
| Тип увлажнителя | ультразвуковой |
| Назначение прибора | увлажнение/ароматизация |
| Расход воды | 350 мл/ч |
| Управление | электронное |
| Регулировка скорости вентилятора/интенсивности испарения | есть |
| Регулировка направления увлажнения | есть |
| Обслуживаемая площадь | до 25 м2 |
| Индикатор низкого уровня воды | есть |
| Деминерализующий картридж | есть |
| Гигростат | есть |
| Таймер | есть |
| Дисплей | есть |
| Подсветка корпуса | есть |
| Пульт ДУ | есть |
| Индикатор включения | есть |
| Максимальный воздухообмен | 350 м3/ч |
| Потребляемая мощность | 40 вт |
| Источник питания | сеть |
| Вес | 2,4 |
| Дополнительно | Функция «Теплый пар» |
| Емкость резервуара для воды | 4,5 л |
показать все характеристики
Ультразвуковой увлажнитель воздуха VITEK VT-2331 BK оснащен резервуаром для воды объемом 4,5 л, индикатором уровня жидкости и функцией «теплый пар». Рассчитан для работы в помещении площадью до 25 м2. Вы легко установите на ЖК-дисплее таймер и настроите прибор с помощью пульта дистанционного управления.
Airo2
13
18
23
VT-2331 BK
Humidifier
Увлажнитель
3
7
1
IM VT-2331.indd 1 07.04.2017 11:06:45
IM VT-2331.indd 2 07.04.2017 11:06:46

HUMIDIFIER VT-2331 BK
Insufficient room humidity negatively affects
humans’ and pets’ health as well as plants and furniture. The recommended comfortable room humidity level is from 40% to 60%.
The VT-2331 BK humidifier allows you to improve the
air quality in the room.
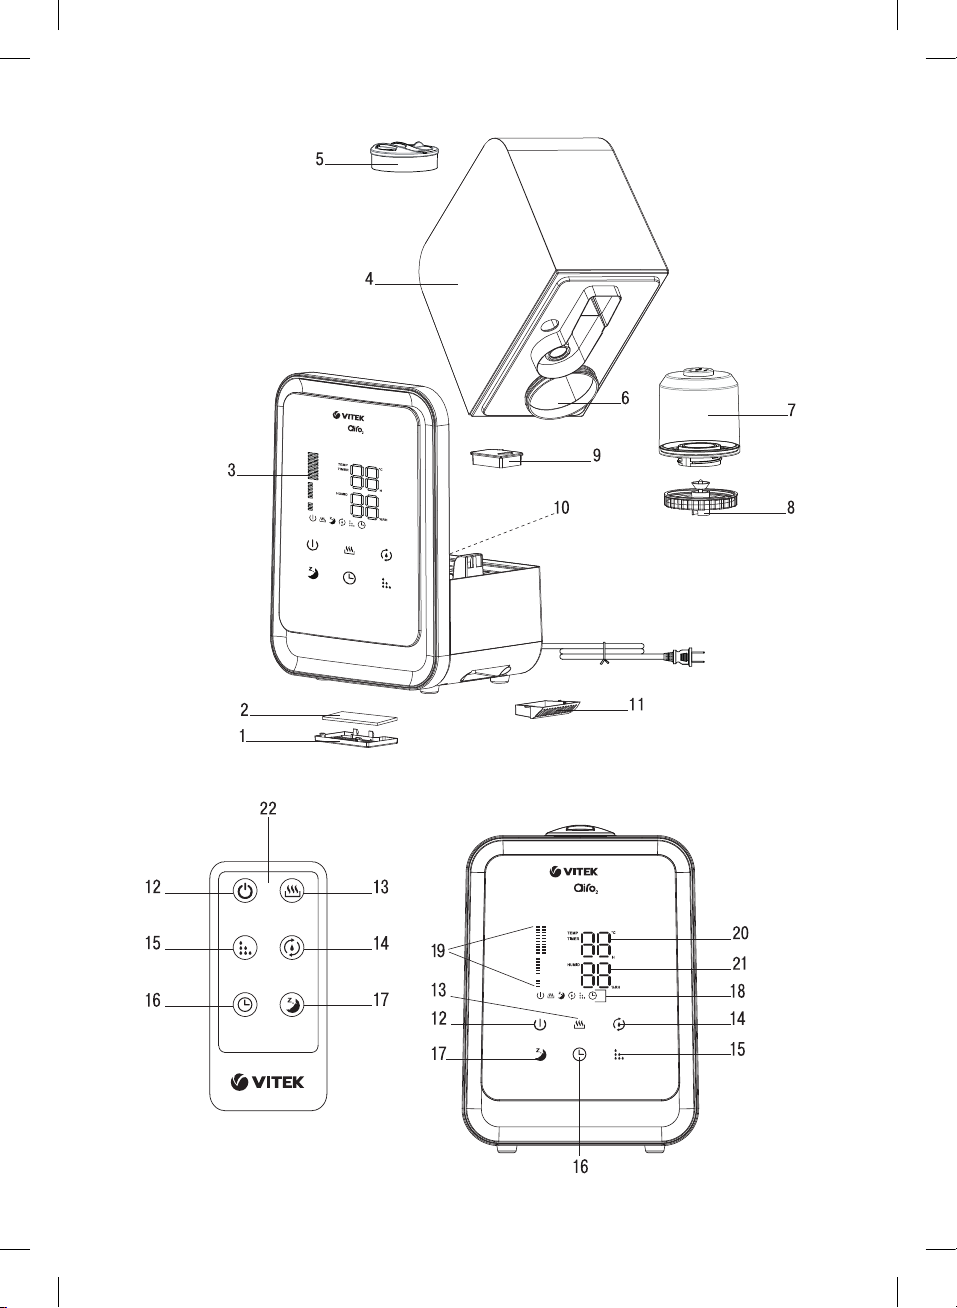
DESCRIPTION
1.
Air inlet grid
2.
Air filter
3.
Control panel
4.
Water tank with a carrying handle
5.
Mist release double nozzle
6.
Water inlet
7.
Mineral filter
8.
Water tank lid
9.
Heating element protective lid
10.
Process chamber with sprayer
and water tank lighting
11.
Aromatic oil container
Control panel (3) and remote control (22)
buttons
12.
ON/OFF button
13.
Water heating mode on/off button
14.
Room relative humidity setting button
15.
Mist release intensity setting button
16.
Timer setting button
17.
«Night» mode on/off button
Display indications
18.
Operation mode icons
19.
Mist release intensity icons
20.
Temperature/timer operation time icons
21.
Room relative humidity icons
22.
Remote control
ATTENTION!
For additional protection it is reasonable to install a
residual current device (RCD) with nominal operation current not exceeding 30 mA. To install RCD,
contact a specialist.
SAFETY MEASURES
Before using the electrical unit, read this instruction
manual carefully and keep it for future reference.
Use the unit for its intended purpose only, as specified in this manual. Mishandling of the unit may lead
to its breakage and cause harm to the user or damage to his/her property.
•
Before switching the unit on, make sure that voltage of the mains corresponds to unit operating
voltage.
•
Place the unit on a flat, moisture-resistant surface. The distance to the walls, other furniture
and interior objects should be at least 30 cm.
•
Do not place the unit on carpet surfaces with
high pile.
•
Do not place the air humidifier in places exposed
to direct sunlight, high temperatures, near computers or other sensitive electronic appliances.
•
Do not use the unit outdoors.
•
Use the supplied removable parts only.
•
Do not operate the unit without water; switch the
unit off when the water tank is empty.
•
Do not use soda or dirty water or any perfume
additives.
•
Water temperature should not exceed +40°С.
•
Do not switch the unit on if the water tank is not
installed.
•
Unplug the unit before removing the water tank.
•
Do not cover the unit.
•
Do not cover the openings on the unit body and
avoid getting of foreign objects inside them.
•
Do not immerse the unit body, the power plug or
the power cord into water or any other liquids.
•
Do not move or tilt the unit during the operation
and do not remove the water tank.
•
Always unplug the unit and pour out water from
the water tank and the process chamber before
cleaning or if you do not use the air humidifier.
•
Before moving the unit to another place, unplug
it and pour out water from the water tank and the
process chamber. When carrying the unit, hold it
by the body with both hands.
•
Do not touch the power plug with wet hands.
•
Clean the unit regularly.
•
If you are not planning to use the remote control
for a long time, remove the battery from the battery compartment.
•
Strictly follow the polarity according to the markings when installing the battery.
•
Replace the batteries in time.
•
Do not allow children to touch the unit body and
the power cord during operation.
•
This unit is not intended for usage by children.
•
The unit is not intended for usage by physically
or mentally disabled persons (including children)
or by persons lacking experience or knowledge
if they are not under supervision of a person who
is responsible for their safety or if they are not
instructed by this person on the usage of the unit.
•
Do not leave children unattended to prevent
using the unit as a toy.
•
For children safety reasons do not leave polyethylene bags, used as packaging, unattended.
Attention! Do not allow children to play with polyethylene bags or packaging film. Danger of suf-
focation!
•
Never pull the power cord when disconnecting
the unit from the mains; take the power plug and
carefully pull it out of the mains socket.
3
IM VT-2331.indd 3 07.04.2017 11:06:46

•
Never use the unit if the power cord or the power
plug is damaged, if the unit works improperly or
after it was dropped.
•
Do not attempt to repair the unit. Do not disassemble the unit by yourself, if any malfunction is
detected or after it was dropped, unplug the unit
and apply to any authorized service center from
the contact address list given in the warranty certificate and on the website www.vitek.ru.
•
Transport the unit in the original package only.
•
For environment protection do not discard the
unit with usual household waste after its service
life expiration; apply to a specialized center for
further recycling.
•
Keep the unit out of reach of children and disabled persons.
THE UNIT IS INTENDED FOR HOUSEHOLD USAGE
ONLY
BEFORE THE FIRST USE
After unit transportation or storage under cold
(winter) conditions, it is necessary to keep it for
at least three hours at room temperature.
There may be water spots in the air humidifier,
this is normal, as the unit has undergone factory
quality control.
–
Unpack the unit, remove any stickers and package materials that can prevent unit operation.
Check the unit for damages. In case of damages
do not switch the unit on.
–
Before plugging the unit in make sure that your
home mains voltage corresponds to the unit
operating voltage.
Notes:
Use the air humidifier at the room temperature from
+10° С to +40°С, and relative humidity less than 80%.
Water temperature should not exceed +40°С.
Installing batteries in the remote control (RC)
•
Open the RC battery compartment lid and insert
a CR2025 battery, strictly following the polarity.
•
Install the battery compartment lid back to its place.
Note: The unit can be supplied with the battery
installed in the RC battery compartment. In this case
if there is an isolation insert in the RC battery compartment, remove the insert.
Battery replacement
•
Open the battery compartment lid, replace the old
battery with a new one, strictly following the polarity, then close the battery compartment lid.
USING THE AIR HUMIDIFIER
–
Remove the nozzle (5).
–
Take the water tank (4) and remove it from the
unit body.
–
Turn over the tank (4), open the lid (8) rotating it
counterclockwise.
Notes:
–
before the first use it is recommended to put the
mineral filter (7) into a container filled with water
of room temperature for several minutes.
–
remove the filter (7) from the lid (8) turning it
counterclockwise, put the filter (7) into water for
several minutes, take the filter out and drain the
remaining water, then install it back on the lid (8),
turning it clockwise until bumping.
–
Fill the tank (4) with necessary amount of water,
insert the lid (8) into the water inlet (6) and screw
it rotating it clockwise.
–
First place the filled water tank (4) back to its
place and then install the nozzle (1).
–
Wait till the process chamber (10) is filled with
water.
–
If you want to use the aromatization function,
remove the aromatic oil container (11). Add some
drops of water-soluble aromatic oil on the sponge
and install the container (11) back to its place.
Notes:
–
use water-soluble aromatic oils only.
–
if you are not going to use the aromatization
function, remove the sponge from the container (11), wash it and install back to its place.
–
Insert the plug into the socket; you will hear a
sound signal, the connection icon will appear in
the operation mode icons (18) row.
–
Switch the unit on by touching the button (12).
There will be a sound signal, and the following
icons will appear on the display: operation mode
icons (18), mist release intensity icons (19),
room temperature icons (20), relative humidity icons (21), and the water tank (4) lighting will
light up blue. The air humidifier will operate at the
maximal mist release intensity.
–
You can adjust the mist release direction by turning the nozzle (5) in various directions.
–
To finish the unit’s operation touch the button (12) again, the icons on the display will go
out except the connection icon in the operation
mode icons (18) row.
–
Unplug the unit.
Notes:
–
the operation mode buttons on the control
panel (3) are sensory, you just need to touch the
button to switch the necessary operation mode on.
–
the humidity level indications shown on the display (8) may be slightly different from the readings of another hygrometer.
–
the humidity level indications depend on the
room temperature.
–
draughts or other air flows may significantly
affect the air humidity and temperature indications in the room.
4
IM VT-2331.indd 4 07.04.2017 11:06:46

Control panel (3) and remote control (22) buttons
ON/OFF button (12)
–
Press/touch the button (12) (on the remote con-
trol) to switch the unit on and press/touch it again
to switch the unit off.
Water heating mode on/off button (13)
–
Press/touch the button (13) to switch the water
heating mode on, the corresponding icon will
light up in the operation mode icons (18) row on
the display. To switch the water heating mode
off press/touch the button (13) again, the water
heating icon in the operation mode icons (18)
row will go out.
–
To switch the water tank (4) illumination on or off
press/touch and hold the button (13).
Room relative humidity setting button (14)
–
Consequently press/touch this button to set the
desired level of relative humidity in the room
within the range from 40% to 80% which will be
shown on the display with the icons (21), the
humidity icon will light up on the display in the
operation mode icons (18) row.
–
When the desired humidity level is reached,
the unit will be switched off, when the relative
humidity level decreases, the unit will switch
on.
–
To switch the selected humidity maintenance
mode off press/touch the button (14) until the
flashing symbols «- -» (21) appear on the display.
Mist release intensity button (15)
–
Consequently press/touch this button to select
the mist release intensity, the mist release intensity will be shown on the display as the icons (19)
in the following order:
–
medium intensity
–
low intensity,
–
high intensity.
–
medium intensity
Timer setting button (16)
–
Consequently press/touch this button to set up
the timer within the range from 1 to 12 hours with
1 hour step which will be shown on the display
with the icons (20) and an icon in the operation
mode icons (18) row.
–
When the set time is reached the unit will be
switched off.
–
To switch the timer off press/touch the button (16) until the temperature icons (20) appear
on the display.
–
To switch the digital display on or off press/touch
and hold the button (16).
«Night» mode on/off button (17)
–
After pressing/touching this button the unit will
switch to the «night» mode: the icons (19, 20,
21) on the display will go out, and the connection
icon and the night mode icon will be shown in the
operation mode icons (18) row.
–
To switch the display on press/touch the button (17) again.
Low water level indication
For normal operating mode:
–
When the water tank (4) is empty, the unit will be
switched off, the connection icon will be flashing in the operation mode icons (18) row (if the
unit is not in the «night» mode). If the unit is in the
«night» mode, the unit will be switched off when
the water tank (4) is empty.
–
Switch the unit off with the button (12), remove
the nozzle (5) and the water tank (4). Fill
the tank (4) with water (see the chapter «Using
the air humidifier»). Place the filled water
tank (4) back to its place and then install the
nozzle (5).
–
Switch the unit on for further operation.
For night mode:
–
When the water tank (4) is empty, the unit will
be switched off, the display will not show any
icons.
–
Remove the nozzle (5) and the water tank (4).
Fill the tank (4) with water (see the chapter
«Using the air humidifier»). Place the filled water
tank (4) back to its place and then install the
nozzle (5). The unit will start operating automatically.
CLEANING AND CARE
WARNING! Always switch the unit off
and unplug it before cleaning.
Hard water causes appearance of mineral scale
in the process chamber (10) and in the water
tank (4) that leads to improper operation of the
unit. To avoid it:
–
use filtered, boiled and settled water. If tap water
is hard, it is recommended to mix tap water with
distilled water in proportion 1:1. If tap water is too
hard, mix it with distilled water in proportion 1:2
or use distilled water only.
–
Change water in the water tank (4) twice
a week.
–
Thoroughly wash the process chamber (10) and
the water tank (4) with neutral detergent solution
twice a week.
–
Before cleaning the process chamber (10)
remove the heating element protective lid (9).
–
To clean the sprayer add 5-10 drops of detergent
on it and wait for approximately 10-15 minutes.
5
IM VT-2331.indd 5 07.04.2017 11:06:46
Remove the scale from the sprayer surface with
a soft brush, and then wash the process chamber
(10) with neutral detergent solution.
–
Rinse the process chamber (10) and the water
tank (4) several times. Wipe the process chamber (9) with a soft cloth.
–
Clean the air humidifier body with a soft, slightly
damp cloth, and then wipe it dry.
–
Remove and clean the air inlet grid (1) and the air
filter (2) as it becomes dirty.
Notes:
Do not immerse the unit body into water or any other
liquids.
Do not use abrasives for cleaning the “sprayer”.
Cleaning the mineral filter
–
The mineral filter (7) is intended for approximately 500 hours of the humidifier operation.
Nevertheless it is recommended to wash and
clean the filter (7) from time to time, especially if
using «hard water».
–
Remove the water tank (4), unscrew the lid (8)
and remove it, remove the mineral filter (7), turning it counterclockwise.
–
Put the mineral filter (7) into a container with vinegar for approximately 10 minutes, then take the
mineral filter (7) out and rinse it with running water.
–
Install the mineral filter (7) back on the lid (8),
turning it clockwise.
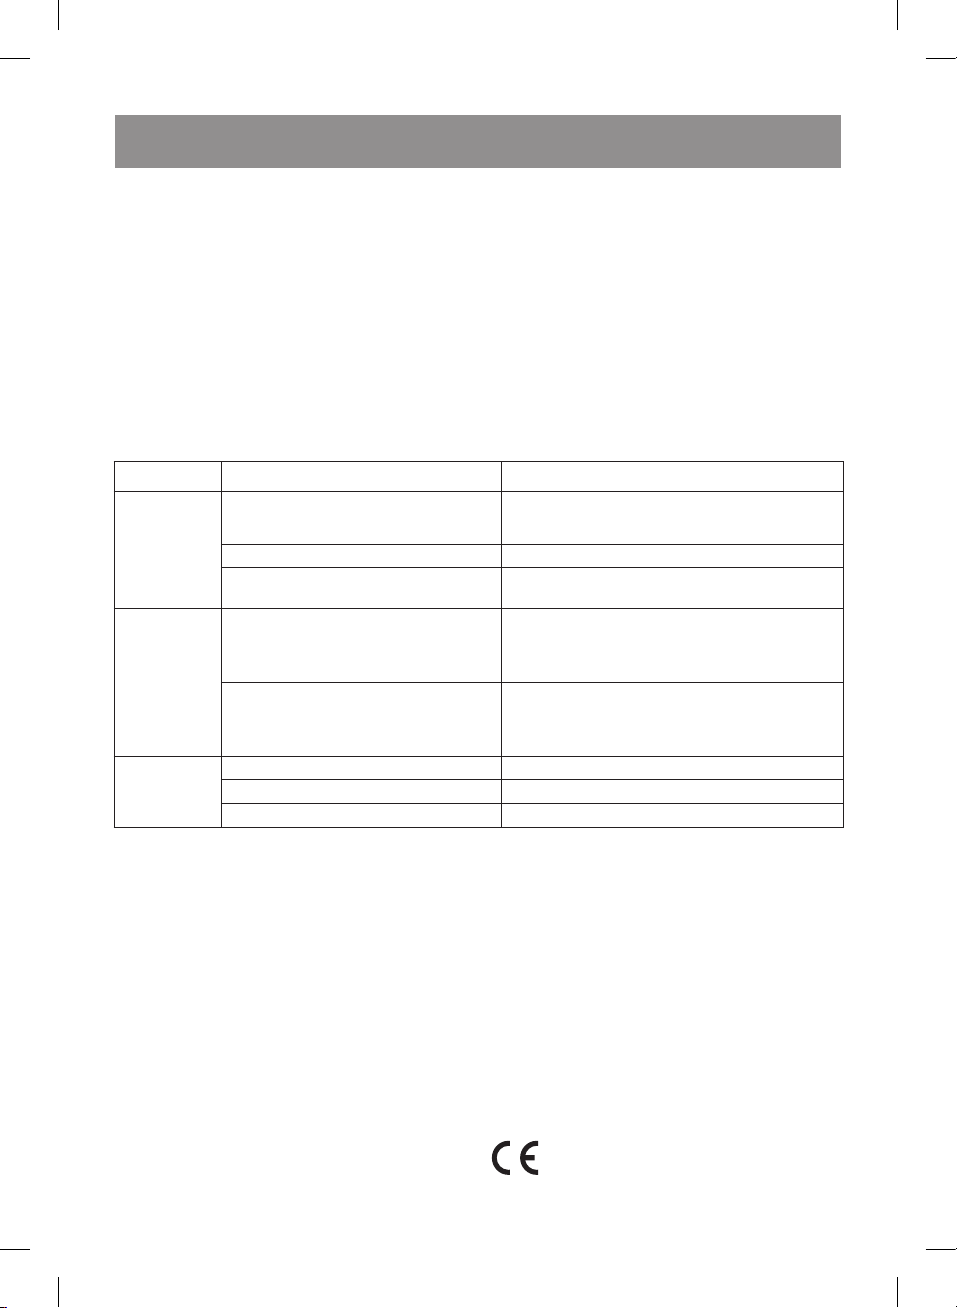
TROUBLESHOOTING
Malfunction Possible causes Troubleshooting
No “mist” The unit is connected improperly Check if the power plug is inserted into the
mains socket.
The unit is off Switch the unit on by pressing the button (12).
Water tank is empty or there isn’t
Fill the water tank with enough water.
enough water in the tank.
Foreign smell
appears
during the
operation
First use Disconnect the unit from the mains. Remove
the water tank, unscrew the lid (8) and pour the
water out of the water tank, then leave the water
tank in a dry cool place for 12 hours.
Dirty or stale water Unplug the unit, remove the water tank, unscrew
the lid (8), pour the water out of the water tank
and clean the tank (as described in the chapter
“Cleaning and care”), then fill it with clean water.
Foreign noise The water tank is installed improperly. Make sure that the water tank is installed properly.
Not enough water in the tank Fill the water tank with enough water.
The unit is placed on an uneven surface. Place the unit on a flat steady surface.
STORAGE
–
Pour the water out of the tank and make sure that
the process chamber and the «sprayer» are dry
Water tank capacity: 4.5 l
Water flow: ≤ 350 ml/h
Humidified area: up to 25 m
2
before taking the unit away for storage.
–
Do not keep the unit with water inside the tank or
the process chamber.
–
Before taking the mineral filter (7) away for storage clean and dry the filter. Keep the filter in a
The manufacturer reserves the right to change the
unit specifications without a preliminary notification
Unit operating life is 3 years
cool darkened place.
–
Keep the air humidifier away from children in a
dry cool place.
Guarantee
Details regarding guarantee conditions can be obtained from the dealer from whom the appliance
DELIVERY SET
Air humidifier – 1 pc.
Remote control – 1 pc.
Instruction manual – 1 pc.
TECHNICAL SPECIFICATIONS
Supply voltage: 220-240 V ~ 50 Hz
Power consumption: 40 W
was purchased. The bill of sale or receipt must be
produced when making any claim under the terms
of this guarantee.
This product conforms to the EMCRequirements as laid down by the Council
Directive 2004/108/ЕС and to the Low
Voltage Regulation (2006/95/ЕС)
6
IM VT-2331.indd 6 07.04.2017 11:06:46

УВЛАЖНИТЕЛЬ VT-2331 BK
Недостаточная влажность в помещении
негативно сказывается на здоровье человека, домашних животных, растениях и
предметах мебели. Рекомендуемый комфортный уровень относительной влажности
воздуха в помещениях составляет от 40%
до 60%.
Увлажнитель VT-2331 BK позволит улучшить
качество воздуха в помещении.
ОПИСАНИЕ
1. Решётка воздухозаборника
2. Воздушный фильтр
3. Панель управления
4. Резервуар для воды с ручкой для
переноски
5. Двойное сопло выхода «пара»
6. Отверстие для заливки воды
7. Минеральный фильтр
8. Крышка резервуара для воды
9. Защитная крышка нагревательного
элемента
10. Рабочая камера с «распылителем»
и подсветкой резервуара
11. Контейнер для ароматических масел.
Кнопки панели управления (3)
и пульта управления (22)
12. Кнопка включения/выключения
13. Кнопка включения/выключения
режима подогрева воды
14. Кнопка установки относительной
влажности в помещении
15. Кнопка установки интенсивности
выхода «пара»
16. Кнопка установки времени работы
таймера
17. Кнопка включения/выключения
«ночного» режима
Обозначения на дисплее
18. Символы режимов работы
19. Символы интенсивности выхода «пара»
20. Символы температуры/времени работы
таймера
21. Символы относительной влажности
в помещении
22. Пульт дистанционного управления
ВНИМАНИЕ!
Для дополнительной защиты целесообразно
установить в цепи питания устройство
защитного отключения (УЗО) с номинальным током срабатывания, не превышающим
30 мА, для установки УЗО обратитесь к специалисту.
МЕРЫ БЕЗОПАСНОСТИ
Перед началом эксплуатации электроприбора внимательно прочитайте настоящее
руководство по эксплуатации и сохраните
его для использования в качестве справочного материала.
Используйте устройство только по его прямому назначению, как изложено в данном
руководстве. Неправильное обращение с
устройством может привести к его поломке,
причинению вреда пользователю или его
имуществу.
• Перед включением убедитесь, что напря-
жение электрической сети соответствует
рабочему напряжению устройства.
• Устанавливайте устройство на ровной
влагостойкой поверхности. Расстояние
до стен, других предметов мебели и интерьера должно быть не менее 30 см.
• Запрещается устанавливать устройст-
во на напольные покрытия с длинным
ворсом.
• Не размещайте увлажнитель в местах,
подверженных воздействию прямых
солнечных лучей, высоких температур,
вблизи компьютеров или чувствительной
электронной техники.
• Запрещается использовать устройство
вне помещений.
• Используйте только те съёмные детали,
которые входят в комплект поставки.
• Не включайте устройство без воды и
отключайте его, как только в резервуаре
закончится вода.
• Не используйте газированную или загряз-
нённую воду, а также парфюмерные
добавки.
• Температура используемой воды не
должна превышать +40°С.
• Не включайте устройство без установлен-
ного резервуара для воды.
7
IM VT-2331.indd 7 07.04.2017 11:06:46

• Отключайте устройство от электросети
перед снятием резервуара для воды.
• Не накрывайте устройство.
• Не закрывайте имеющиеся отверстия на
корпусе устройства и не допускайте попадания в них посторонних предметов.
• Не погружайте корпус устройства, сете-
вой шнур либо вилку сетевого шнура в
воду или другие жидкости.
• Во время работы устройства не переме-
щайте и не наклоняйте его, а также не
снимайте резервуар для воды.
• Обязательно отключайте устройство
от сети и выливайте воду из резервуара
и рабочей камеры во время чистки или
если вы не пользуетесь увлажнителем.
• Прежде чем перенести устройство в
другое место, отключите его от электросети и слейте воду из резервуара
для воды и рабочей камеры. При переноске устройства держите его обеими
руками за корпус.
• Не прикасайтесь к вилке сетевого шнура
мокрыми руками.
• Регулярно проводите чистку устройства.
• Если вы не будете пользоваться пультом
дистанционного управления в течение
длительного периода времени, необходимо извлечь элемент питания из батарейного отсека.
• При установке элемента питания строго
соблюдайте полярность в соответствии с
обозначениями.
• Своевременно заменяйте элемент пи-
тания.
• Не разрешайте детям прикасаться к кор-
пусу устройства и к сетевому шнуру во
время работы устройства.
• Данное устройство не предназначено для
использования детьми.
• Прибор не предназначен для использо-
вания лицами (включая детей) с пониженными физическими, психическими
и умственными способностями или при
отсутствии у них опыта или знаний, если
они не находятся под контролем или не
проинструктированы об использовании
прибора лицом, ответственным за их безопасность.
• Осуществляйте надзор за детьми, чтобы
не допустить использования устройства
в качестве игрушки.
• Из соображений безопасности детей
не оставляйте полиэтиленовые пакеты,
используемые в качестве упаковки, без
присмотра.
Внимание! Не разрешайте детям играть с
полиэтиленовыми пакетами или упаковочной плёнкой. Опасность удушья!
• Отключая устройство от электросети,
никогда не дёргайте за сетевой шнур,
возьмитесь за сетевую вилку и аккуратно
извлеките её из электрической розетки.
• Не используйте устройство, если име-
ются повреждения сетевого шнура или
вилки сетевого шнура, если устройство
работает с перебоями, а также после его
падения.
• Запрещается самостоятельно ремон-
тировать прибор. Не разбирайте прибор самостоятельно, при возникновении
любых неисправностей, а также после
падения устройства выключите его
из электрической розетки и обратитесь в любой авторизованный (уполномоченный) сервисный центр по
контактным адресам, указанным в гарантийном талоне и на сайте www.vitek.ru.
• Перевозите устройство только в завод-
ской упаковке.
• В целях защиты окружающей среды,
после окончания срока службы прибора
не выбрасывайте его вместе с бытовыми
отходами, передайте прибор в специализированный пункт для дальнейшей утилизации.
• Храните устройство в местах, недоступ-
ных для детей и людей с ограниченными
возможностями.
УСТРОЙСТВО ПРЕДНАЗНАЧЕНО ТОЛЬКО
ДЛЯ БЫТОВОГО ИСПОЛЬЗОВАНИЯ
ПЕРЕД ПЕРВЫМ ИСПОЛЬЗОВАНИЕМ
После транспортировки или хранения
устройства в холодных (зимних) условиях необходимо выдержать его при комнатной температуре не менее трёх часов.
8
IM VT-2331.indd 8 07.04.2017 11:06:46

Внутри увлажнителя могут находиться
следы от воды – это нормальное явление, так как устройство проходило контроль качества.
– Распакуйте прибор и удалите упаковоч-
ные материалы и любые наклейки, мешающие работе устройства. Осмотрите
прибор на предмет повреждений.
При наличии повреждений не включайте
прибор.
– Перед включением в сеть убедитесь, что
напряжение электрической сети соответствует рабочему напряжению прибора.
Примечания:
Используйте увлажнитель при температуре
в помещении от +10°C до +40°C и относительной влажности менее 80%.
Температура используемой воды не должна
быть выше +40°С.
Установка элементов питания в пульт
дистанционного управления (ПДУ)
• Откройте крышку батарейного отсека ПДУ
и установите элемент питания CR2025,
строго соблюдая полярность.
• Установите крышку батарейного отсека
на место.
Примечание: Прибор может поставляться
с установленным элементом питания в ПДУ.
В этом случае, при наличии изолирующей
прокладки в батарейном отсеке ПДУ, извлеките прокладку.
Замена элемента питания
• Откройте крышку батарейного отсека,
извлеките элемент питания, установите
новый элемент питания, строго соблюдая
полярность, затем закройте крышку батарейного отсека.
ИСПОЛЬЗОВАНИЕ УВЛАЖНИТЕЛЯ
ВОЗДУХА
– Снимите сопло (5).
– Возьмитесь за ручку резервуара для
воды (4) и снимите его с корпуса.
– Переверните резервуар (4), открутите
крышку (8), поворачивая её против часовой стрелки.
Примечание:
– перед первым использованием реко—
мендуется на несколько минут поместить минеральный фильтр (7) в ёмкость
с водой комнатной температуры.
– снимите фильтр (7) с крышки (8), пово-
рачивая его против часовой стрелки, опустите фильтр (7) на несколько минут в
ёмкость с водой, выньте фильтр из воды,
дайте стечь остаткам воды и накрутите
его на крышку (8), поворачивая по часовой стрелке до упора.
– Наполните резервуар (4) необходимым
количеством воды, вставьте крышку (8) в
заливочное отверстие (6) и закрутите её,
поворачивая по часовой стрелке.
– Установите на место сначала наполнен-
ный резервуар (4), а затем – сопло (1).
– Подождите некоторое время, пока рабо-
чая камера (10) заполнится водой.
– Если вы хотите использовать функцию
ароматизации, извлеките контейнер для
ароматических масел (11). Капните на
губку несколько капель водорастворимого ароматического масла и установите
контейнер (11) на место.
Примечания:
– используйте только водорастворимые
ароматические масла.
– если вы не планируете использовать
функцию ароматизации, извлеките губку
из контейнера (11), промойте её и установите на место.
– Вставьте вилку сетевого шнура в электри-
ческую розетку, прозвучит звуковой сигнал,
в строке символов режимов работы (18)
отобразится символ включения в сеть.
– Включите устройство, коснувшись кноп-
ки (12). Прозвучит звуковой сигнал, на дисплее отобразятся следующие символы:
символы в строке режимов работы (18),
символы интенсивности выхода «пара» (19), показания температуры в помещении (20), показания относительной
влажности (21) и загорится подсветка
резервуара для воды (4) голубого цвета.
Увлажнитель начнёт работать на максимальной интенсивности выхода «пара».
9
IM VT-2331.indd 9 07.04.2017 11:06:47
Loading…
Код: 98763
Извините, товара сейчас нет в наличии
Бесплатная доставка
по Красноярску
Извините, товара сейчас нет в наличии
Новости интернет-магазина «Лаукар»:
Дополнительная информация в категории Увлажнитель воздуха:
В интернет-магазине бытовой техники «Лаукар» Вы можете скачать инструкцию к товару Увлажнитель воздуха Vitek VT-2331 BK совершенно бесплатно.
Все инструкции, представленные на сайте интернет-магазина бытовой техники «Лаукар», предоставляются производителем товара.
Перед началом использования товара рекомендуем Вам ознакомиться с инструкцией по применению.
Для того чтобы скачать инструкцию, Вам необходимо нажать на ссылку «скачать инструкцию», расположенную ниже, а в случае, если ссылки нет,
Вы можете попробовать обратиться к данной странице позднее,
возможно специалисты интернет-магазина бытовой техники «Лаукар» еще не успели загрузить для скачивания инструкцию к товару:
Увлажнитель воздуха Vitek VT-2331 BK.

Фирма-производитель оставляет за собой право на внесение изменений в конструкцию, дизайн и комплектацию товара: Увлажнитель воздуха Vitek VT-2331 BK. Пожалуйста, сверяйте информацию о товаре с информацией на
официальном сайте компании производителя.
Перейти к контенту
Увлажнители воздуха Vitek
- Размер инструкции: 1.11 Мб
- Формат файла: pdf
Если вы потеряли инструкцию от увлажнителя воздуха Vitek VT-2331 BK, можете скачать файл для просмотра на компьютере или печати.
Инструкция для увлажнителя воздуха Vitek VT-2331 BK на русском языке. В руководстве описаны возможности и полезные функции, а также правила эксплуатации. Перед использованием внимательно ознакомьтесь с инструкцией.
Чтобы не читать всю инструкцию вы можете выполнить поиск по содержимому внутри инструкции и быстро найти необходимую информацию. Рекомендации по использованию помогут увеличить срок службы увлажнителя воздуха Vitek VT-2331 BK. Если у вас появилась проблема, то найдите раздел с описанием неисправностей и способами их решения. В нем указаны типичные поломки и способы их решения.
Vitek VT-2331 BK Manual instruction
- Vitek
- Humidifier
- Manual instruction
- vitek-vt-2331-bk-manual-instruction-28-1675918.pdf
- 28
Download Vitek VT-2331 BK PDF Manual
Vitek VT-2331 BK Manuals come in various types, each serving a specific purpose to help users effectively operate and maintain their devices. Each type of Vitek VT-2331 BK instruction is designed to address specific needs, ensuring users have the necessary information to use, maintain, and repair their devices effectively.
Related Instructions for Vitek VT-2331 BK:
VT-1770 W, VT-1768 BK, VT-2334 W, VT-2341, VT-2355
- Vitek VT-1770 W
- Vitek VT-1768 BK
- Vitek VT-2334 W
- Vitek VT-2341
- Vitek VT-2355
- Vitek VT-2335 BK
- Vitek VT-1764 BK
- Vitek VT-2346
- Vitek VT-2332 W
- Vitek VT-1762
- Vitek VT-2354 BK
- Vitek VT-1760
Humidifier Devices by Other Brands:
| Brand | Device Model | Type of Document | Pages | Size | Views | Downloads | Updated |
|---|---|---|---|---|---|---|---|
| Transcend |
Heated Humidifier |
Transcend Heated Humidifier Manual |
56 | 1203 | 193 | 02-10-2024 | |
| Scarlett |
SC-AH986E03 |
Scarlett SC-AH986E03 Instruction manual |
27 | 450 | 108 | 05-11-2024 | |
| Honeywell |
HE360A — Whole House Powered Humidifier |
Honeywell HE360A — Whole House Powered Humidifier Owner’s manual |
8 | 0.23 Mb | 879 | 220 | 05-12-2024 |
| ALPATEC |
HU 60 G |
ALPATEC HU 60 G Operation & user’s manual |
6 | 347 | 80 | 29-10-2024 | |
| Philips |
DreamStation |
Philips DreamStation Welcome manual |
8 | 256 | 39 | 27-11-2024 |
Categories:
Car Stereo System
Speaker System
Portable Stereo System
Cooktop
Clock
Hot Tub