
Если нет к нему инструкции (Вы об этом пишите) значит это б/у увлажнитель.
Конечно инструкцию проще найти в интернете (10-и сайтов с инструкцией по эксплуатации, подробная инструкция это 6-ь страниц мелким почерком), но если нет, то можно и самостоятельно освоиться.
В первую очередь убедитесь что напряжение в Вашей электросети соответствует рабочему напряжению самого увлажнителя.
Установите свой прибор на ровную поверхность, будьте внимательны увлажнитель нельзя прижимать к стенам.
Снимите специальный резервуар в который заливается вода (находится сверху прибора).
На резервуаре крышка откручивается против часовой стрелки, открутили крышку, залили воду, закрутили обратно.
Резервуар с водой вставляем в корпус, ждём минуты две и включаем увлажнитель в сеть.
Ручка с индикатором, включения прибора находится на передней панели, устанавливаем в положение «Вкл».
Если надо что бы прибор работал в режиме ионизации воздуха, есть кнопка включающая этот режим (находится чуть левее ручки управления), при нажатии индикатор загорится зелёным светом, если надо отключить этот режим нажимаем на эту же кнопку ещё раз.
В общем-то всё, особых сложностей нет, на панели управления вся информация на русском языке.

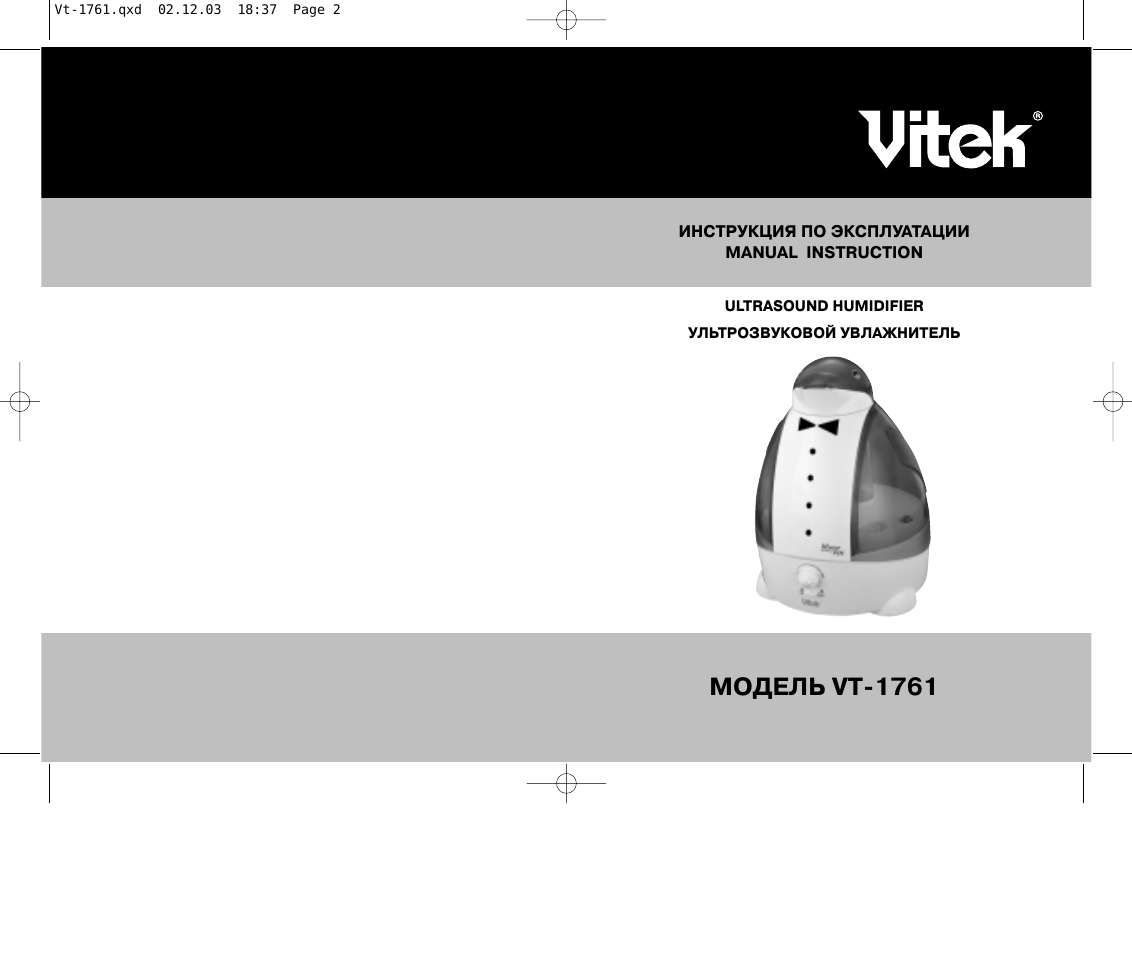
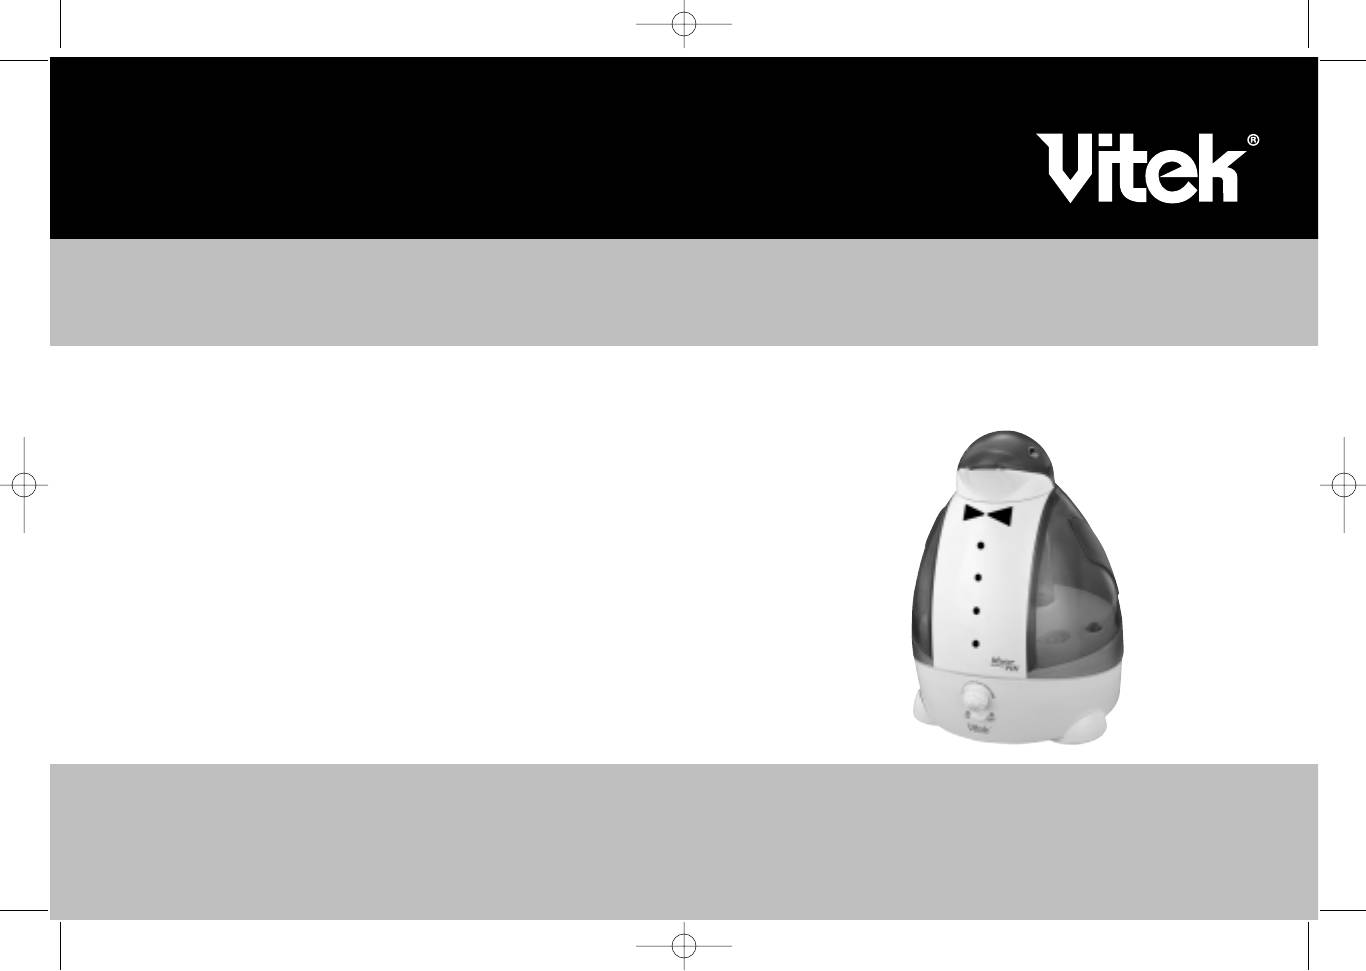
ИНСТРУКЦИЯ ПО ЭКСПЛУАТАЦИИ
MANUAL INSTRUCTION
МОДЕЛЬ VT 1761
ULTRASOUND HUMIDIFIER
УЛЬТРОЗВУКОВОЙ УВЛАЖНИТЕЛЬ
Vt-1761.qxd 02.12.03 18:37 Page 2
3. Перед укладкой в коробку для хранения все детали увлажнителя
следует очистить и вытереть насухо.
4. Во время каждой замены воды рекомендуется удалить пыль и
известковые отложения с преобразователя.
5. Не помещайте преобразователь под струю воды из крана.
В случае попадания воды в преобразователь, не пользуйтесь прибором
и обратитесь в сервисный центр.
УСТРАНЕНИЕ НЕПОЛАДОК
Во избежание поражения электротоком не пытайтесь открыть прибор.
Прибор не работает:
•
Проверьте подключение к сети электроснабжения.
•
Убедитесь в том, что выключатель находится в положении ON
(«Вкл.»).
Сигнальная лампочка горит, но пар не поступает:
•
Проверьте наличие воды в емкости.
•
Проверьте наличие известковых отложений на поплавке или
преобразователе.
•
Установите регулятор потока в открытом положении.
Посторонние запахи:
•
Очистите емкость с помощью воды и уксуса. Промойте чистой водой.
•
Оставьте открытую емкость в прохладном месте на некоторое время.
ПРИМЕЧАНИЯ
•
Ультразвуковые увлажнители воздуха образуют мельчайшие
частички воды, которые легко попадают в нижние дыхательные пути.
Поэтому данный прибор можно использовать для лечения простуды
(кроме людей, страдающих бронхиальной астмой или аллергией).
•
Увлажнители идеально подходят для поддержания влажности
воздуха в доме на уровне 40% 60%, что максимально снижает риск
возникновения респираторных инфекций.
СПЕЦИФИКАЦИЯ
Питание
230 В ~ 50 Гц
Потребляемая мощность
35 Вт
СРОК СЛУЖБЫ УВЛАЖНИТЕЛЯ НЕ МЕНЕЕ 3 Х ЛЕТ
11
RECOMMENDATIONS
•
Please read the instructions carefully before first use and keep then future
consultation.
•
Keep the apparatus and packaging out of the reach of children.
•
Before use, ensure that the voltage in your home is the same as than the
specifications plate.
•
Always use in the vertical position.
•
Do not cover while in use.
•
Place on a flat, firm shelf about 0.5 m or 1 m from the floor. Never use the
floor. Never tip.
•
Use only for the purposes indicated. The manufacturer is not liable dam
age caused by unsuitable or incorrect use of the humidifier.
•
If the apparatus does not work, unplug it: do not tamper with it. If reps are
necessary, please contact the Technical Assistance Service.
•
Do not use if the connection cable is damaged.
Some operations, such as replacement of the power cable, must be doing
by an authorised service centre: the right tools are required.
•
If not to be used, unplug.
•
The unit must be unplugged for assembly, cleaning, removal or filling
water.
•
Do not leave in operation without water: the system may be damaged.
•
Always fill the tank with clean water Do not add detergent, freshener
essence. NEVER PLACE THE WATER IN THE VAPORISATION CHABER.
•
When in use, do not remove the vapour output cover from the vaporisation
tank, or from the water tank.
•
Do not expose to direct sunlight or place near heat sources.
•
Do not place the vapour outlet near furnishings, walls or television sets.
•
Ensure that the water tank cover is completely closed.
•
Ensure that the apparatus is unplugged before removing the water tank.
•
Do not touch the ultrasound transmitter with the hands or with tools.
•
Do not use the humidifier when barefoot.
•
When unplugging, do not pull on the power cable or the apparatus.
•
Do not leave exposed to atmospheric elements.
•
Do not touch with wet hands when in operation. Do not fill with hot water.
2
РУССКИЙ
ENGLISH
Vt-1761.qxd 02.12.03 18:37 Page 4

•
Отрегулировать интенсивность потока пара (см. Рис. 1 поз. 7).
УХОД И ЧИСТКА
Перед тем, как приступить к чистке, прибор следует выключить и вынуть
вилку из розетки.
1. В преобразователе могут появиться известковые отложения
(особенно в местности, где используется жесткая вода). Известковые
отложения следует удалять хотя бы один раз в неделю с помощью
мягкой тряпочки, уксуса и воды:
(а) Смочить тряпочку в уксусе и осторожно протереть преобразователь
до полного устранения известковых отложений.
(б) Вытереть досуха.
(в) Не трите преобразователь твердыми предметами.
(г) Не пользуйтесь химикатами.
2. Внутреннюю поверхность емкости для воды следует чистить хотя бы
один раз в неделю:
(а) Наполнить емкость чистой водой и добавить несколько капель
отбеливающего средства. Плотно закрыть крышку емкости.
(б) Тщательно промыть.
(в) При обнаружении известковых отложений в емкости очистить с
помощью уксуса и вытереть насухо мягкой тряпочкой. Промыть чистой
водой. Если поплавок в корпусе прибора поднялся под действием
известковых отложений, его следует протереть дочиста мягкой
тряпочкой.
Примечание: Долгое пользование воды может привести к
образованию плесени (грибка).
РУССКИЙ
10
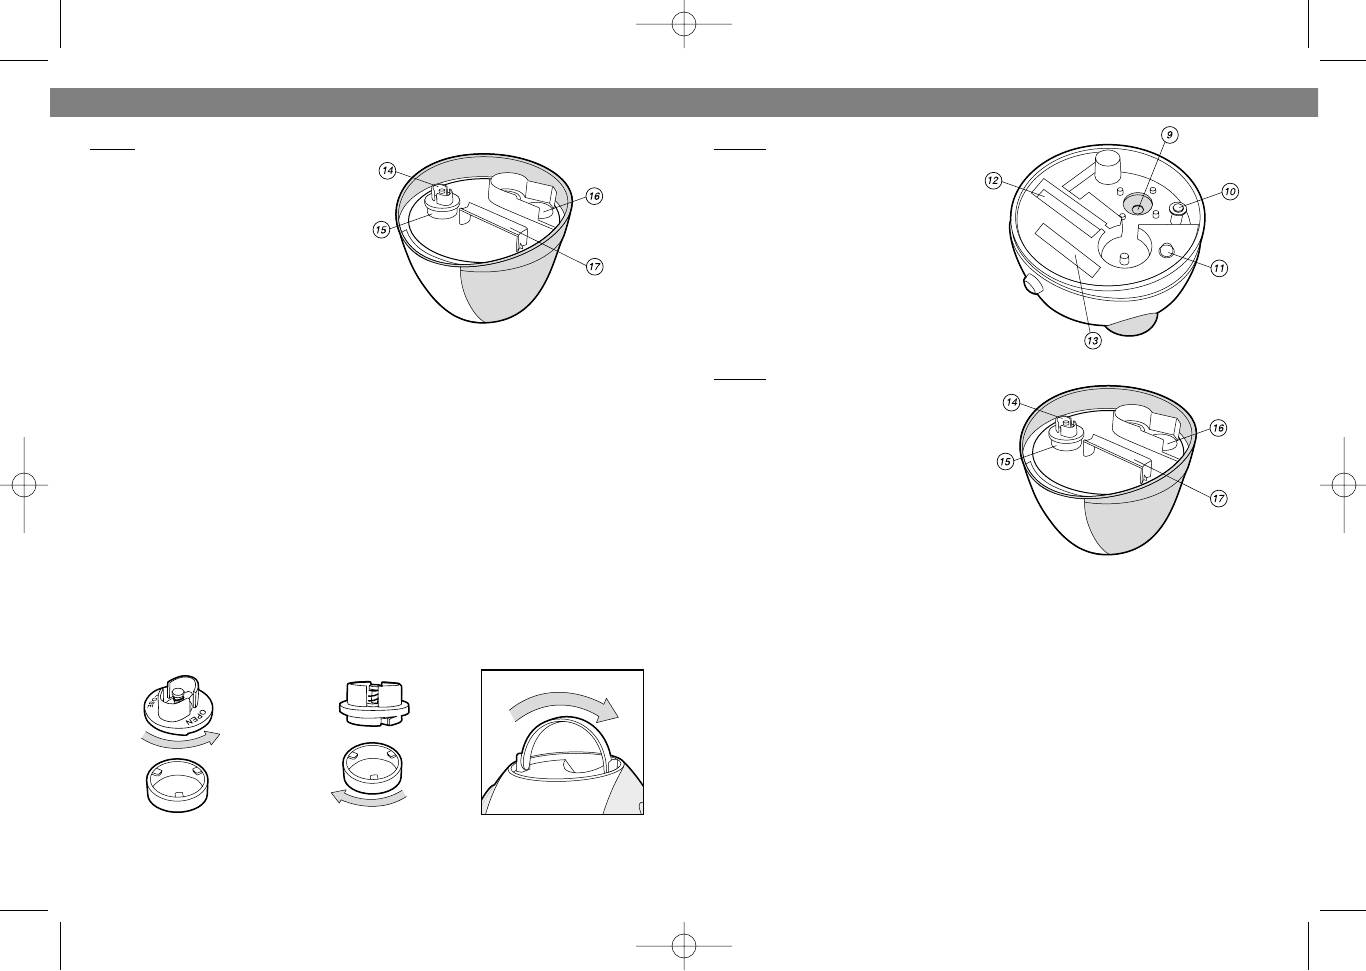
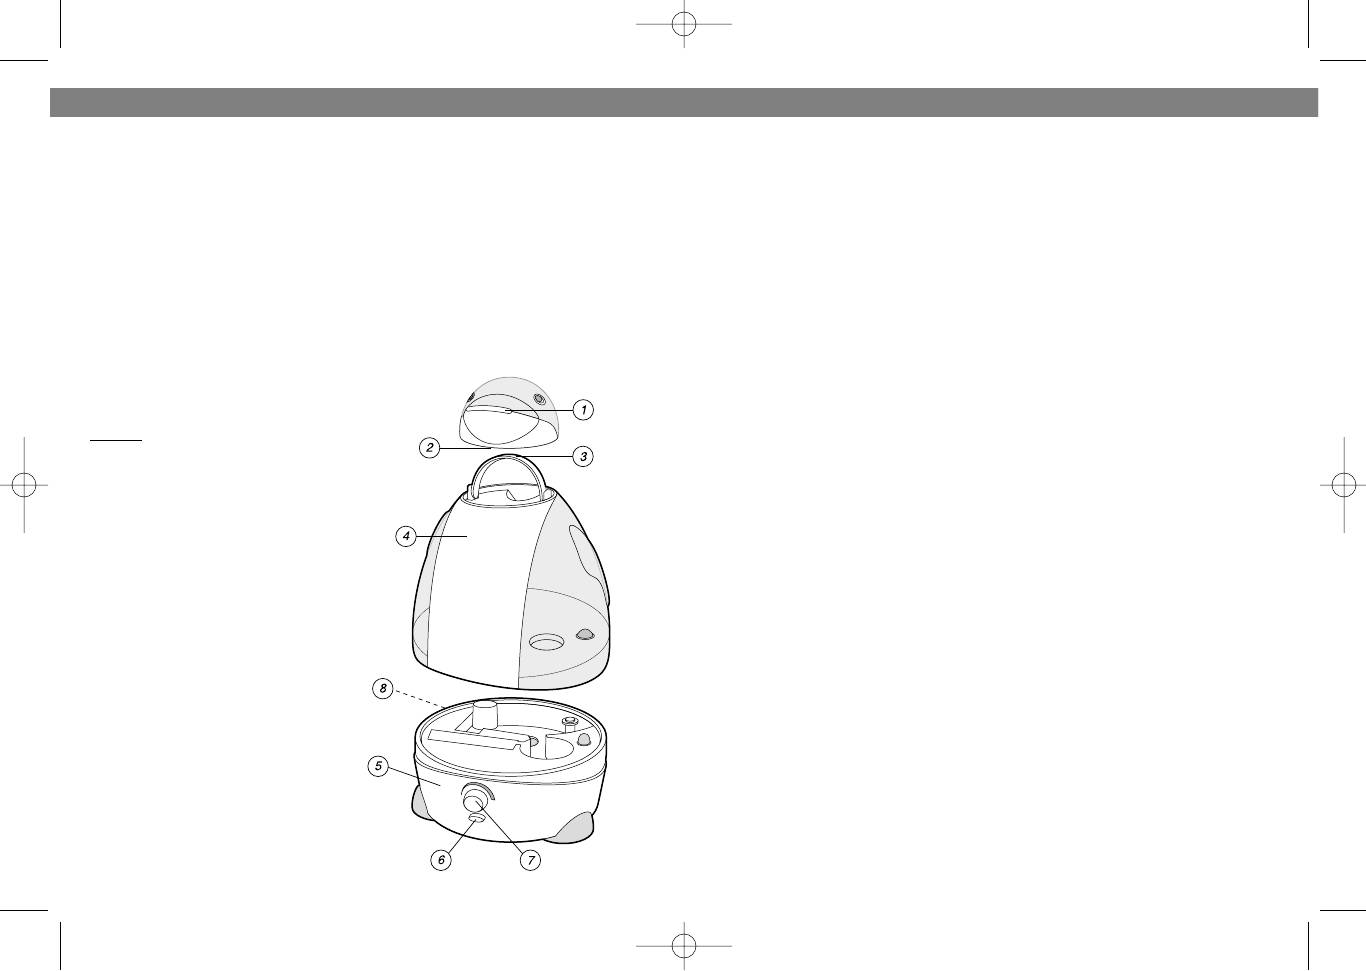
MAIN COMPONENTS
Fig. 1
1. Vapour output nozzle
2. Rotary head
3. Top carry handle
4. Water tank
5. Central body
6. On/off button
7. Flow regulator control
8. Power cable
Fig. 2
9. Transducer
10. Water level float
11. Pilot light on
12. Vaporisation chamber
13. Cleaning brush
3
ENGLISH
Рис. 4
Рис. 5
Рис. 6
Vt-1761.qxd 02.12.03 18:37 Page 6

Рис. 2
9. Преобразователь.
10. Поплавок уровнемера
(показывает уровень воды).
11. Сигнальная лампочка
(горит в состоянии «Вкл».)
12. Камера испарения.
13. Щетка для очистки.
Рис. 3
14. Задвижка (подача воды).
15. Крышка.
16. Канал, по которому
выходит пар.
17. Ручка нижней емкости.
ЭКСПЛУАТАЦИЯ
•
Отделить емкость для воды от основного корпуса, перевернуть,
поворотом против часовой стрелки снять крышку в нижней части
емкости (см. Рис. 4). Залить холодной водой (не заливайте под
завязку).
•
Установить крышку в прорези на емкости и повернуть по часовой
стрелке (см. Рис. 5).
•
Перевернуть емкость в исходное положение, удерживая за ручку, и
аккуратно установить в основной корпус. Повернуть верхнюю ручку
вперед и установить насадку «пингвин» (см. Рис. 6).
•
Подсоединить к розетке и включить прибор (см. Рис. 1 поз. 5). На
корпусе увлажнителя воздуха должна загореться сигнальная
лампочка. В течение несколько секунд через отверстие начнет
поступать пар.
9
Fig. 3
14. Water opening valve
15. Water cap
16. Vapour outlet channel
17. Bottom tank handle
OPERATION AND USE
•
Separate the water tank and central body, turn over and remove the CAP
from the bottom, turning it anticlockwise Fig. 4. Fill with cold water, do not
fill completely.
•
Replace the plug, aligning the notches on the tank with the grooves on the
cap, and turn it clockwise. Fig. 5
•
Turn the tank over, holding it by the top handle, and place it on the central
body, making sure it fits perfectly. Before replacing the penguin head, turn
the top handle forward. Fig. 6
•
Plug in and turn on Fig. 1 (5); the light signal inside the humidifier body
comes on. In a few seconds, vapour will start to come from the opening.
•
Use the flow regulator control to adjust the intensity of the vapour output
Fig 1 (7).
ENGLISH
4
РУССКИЙ
Fig. 4
Fig. 5
Fig. 6
Vt-1761.qxd 02.12.03 18:37 Page 8

•
Крышка емкости для воды должна быть плотно закрыта.
•
Перед тем, как приступить к сливу воды из емкости, прибор следует
отключить от сети электроснабжения.
•
Не
прикасайтесь
к
излучателю
ультразвука
руками
или
инструментами.
•
Не ходите босиком во время работы увлажнителя.
•
Во время отключения от сети электроснабжения не тянуть за шнур
или за прибор.
•
Беречь от атмосферных осадков.
•
Не касайтесь работающего прибора мокрыми руками. Не заливайте
горячей водой!
ОСНОВНЫЕ ДЕТАЛИ
Рис. 1
1. Насадка для выпуска пара.
2. Вращающаяся головка.
3. Переносная ручка.
4. Емкость для воды.
5. Основной корпус.
6. Кнопка «Вкл./Выкл».
7. Регулятор потока.
8. Шнур электроснабжения.
РУССКИЙ
8
MAINTENANCE AND CLEANING
Before any cleaning operation, switch the apparatus off and unplug it.
1. There may be some lime deposits in the transducer, particular in areas with
hard water. Overcome this drawback by cleaning the transducer with water
and vinegar on a soft cloth at least once a week, as follows:
a) Dampen a cloth with vinegar and wipe the transducer gently, until
the lime deposits disappear completely.
b) Rub down with a dry cloth and remove remains of humidity.
c) Do not rub the transducer with solid objects.
d) Do not clean with chemical products.
2. Clean the inside of the water tank at least once a week, as follows:
a) Fill the tank with clean water adding a few drops of bleach. Close the
tank completely with its cap and forcibly.
b) Rinse thoroughly.
c) If lime deposits are noted in the tank, dean with vinegar and v and rub
down with a clean soft clothe. Then rinse with clean water the lime deposit
has affected the water level float in the central clean it with a soft cloth.
Note: Water accumulated over long periods may create bacteria mildew (fun
gus).
3. Clean all the humidifier parts and then dry them well before storing appa
ratus in its box.
4. With each change of water the use is recommended of the included, to
remove dust and any lime remains on the transducer.
5. Do not place the transducer directly under the tap.
Water must not get into the apparatus; should that happen, take it the autho
rised assistance centre before using it again.
TROUBLESHOOTING
Do not try to open the apparatus: there is a risk of electrocution.
ENGLISH
5
Vt-1761.qxd 02.12.03 18:37 Page 10

РЕКОМЕНДАЦИИ
•
Внимательно ознакомьтесь с инструкцией перед тем, как приступить
к работе. При необходимости, обращайтесь к данной инструкции и в
дальнейшем.
•
Прибор и его упаковку следует беречь от детей.
•
Прежде чем приступить к эксплуатации, убедитесь в том, что
напряжение в сети соответствует указанному на информационной
панели прибора.
•
Эксплуатация прибора допускается только в вертикальном
положении.
•
Не накрывать прибор во время работы.
•
Прибор должен быть установлен на прочной и ровной основе в 0,5 1
м от пола. Не ставьте прибор на пол! Не наклонять!
•
Используйте прибор исключительно в целях, для которых он
предназначен. Производитель не несет ответственности за
неправильное использование увлажнителя.
•
Если прибор не работает, выньте вилку из розетки. Не пытайтесь
самостоятельно ремонтировать прибор. Обратитесь в службу
технической помощи.
•
Не использовать прибор, если поврежден шнур электроснабжения.
•
Некоторые операции (например, замена шнура электроснабжения),
для которых требуются специальные инструменты, производятся
только соответствующим сервисным центром.
•
Если прибор не используется, выньте вилку из розетки.
•
Сборка, чистка, слив и заполнение водой производятся только тогда,
когда прибор отключен от сети электроснабжения.
•
Следите за тем, чтобы в работающем приборе была вода, иначе
можно повредить систему.
•
Емкость следует заполнять чистой водой. Не добавляйте в воду
стиральный порошок или экстракт освежителя воздуха. НИ В КОЕМ
СЛУЧАЕ НЕ ЗАЛИВАЙТЕ ВОДУ В КАМЕРУ ИСПАРЕНИЯ!
•
Во время работы прибора не снимайте крышку с емкости испарителя
или емкости с водой.
•
Беречь от прямых солнечных лучей и нагревательных приборов.
•
Отверстия, через которое выпускается пар, должно находиться
вдали от мебели, стен или телевизора.
7
If it does not work:
• Ensure it is properly plugged in.
• Check that the switch is in the ON position.
If the operating light signal is on but instead or vapour, the apparatus
emits:
• Check that there is water in the tank.
• Check for possible lime deposits on the water level float or the transducer.
• Check that the flow regulator is open.
Strange odour:
• Clean the tank with water and Vinegar and rinse with clean water.
• Leave the tank open for some time without the cap, in a cool place.
OBSERVATIONS
•
Ultrasound humidifiers produce smaller water particles, which may easily
reach the lower respiratory tracts. This type of humidifier is the fore suit
able for the treatment of symptoms of the common cold. There use is not
however recommended for persons with bronchi asthma and allergies.
•
Domestic humidifiers are ideal for obtaining a comfortable humidity
between 40% and 60%, the range in which the risk of respiratory infection
is minimised.
SPECIFICATION
Power requirement
230 V ~ 50 Hz
Power consumption
35 W
SERVICE LIFE OF THE HUMIDIFIER NOT LESS THAN 3 YEARS
ENGLISH
6
РУССКИЙ
Vt-1761.qxd 02.12.03 18:37 Page 12

19:59
Ремонт увлажнителя воздуха VITEK VT-1765W
03:00
Увлажнитель воздуха VITEK VT 1761
05:12
Увлажнитель воздуха VITEK VT-1761 ВК, как работает, какой звук и вид ночью, как почистить.
01:04
Увлажнитель воздуха Vitek VT-1761
02:44
Увлажнитель VITEK VT 1761
08:29
Новый ведущий. Обзор увлажнителя Vitek с Tmall
Нажмите на кнопку для помощи

1761.indd 11761.indd 1 04.06.2010 10:20:4204.06.2010 10:20:42

2
1761.indd 21761.indd 2 04.06.2010 10:20:4504.06.2010 10:20:45

ENGLISH
AIR HUMIDIFIER
DESCRIPTION
1. Indoor moisture regulator
«Humidistat»
2. Power switch, steam-out intensity
regulator
3. Ionization switch «Ion»
4. Ionization indicator «Ion»
5. Switch / refill indicator «Humidify/
Refill»
6. Front panel
7. Vented cap for steam-out
8. Vents for steam-out
9. Handle for removing water tank from
the body
10. Water tank
11. Water pouring hole
12. Handle for convenience when refilling/carrying water tank
13. Filter-cartridge
14. Water tank cap
15. «Nebulizer»
16. Humidifier body
17. Water tank spot lighting
18. Cleaning scrub for «nebulizer»
SAFETY INSTRUCTIONS
Before starting using the device read
carefully these instructions and keep
them, use them as reference material.
• Ensure that operating voltage of the
device corresponds to the circuit voltage.
• Place the device on a flat damp-proof
surface. Distance from walls should be
no less than 15 cm.
• Do not point the mist nozzle at wood
furniture, electric appliances, books
and surfaces that could be damaged
by water.
• Do not place humidifier in direct sun-
light, high-temperature areas, near
computers or sensitive electronic
equipment.
• Do not leave the device unattended in
a closed room, since air could become
saturated and leave condensation on
walls or furniture, that is why it is recommended that you leave the door to
the room with humidifier slightly open.
• Do not use the device outdoors.
• Use only those removal parts that are
included into delivery package.
• Do not allow children to use the device
as a toy.
• Be careful, when the device is used by
children or by handicapped people.
• This device should not be used by
children or by handicapped people,
unless they are provided with relevant
and legible safety instructions and are
aware of hazards arising from misuse
of the device by a responsible person.
• Do not operate the device without water; turn it off, when water tank is empty.
• Do not use carbonated water and perfume additives.
• Unplug the device before removing
water tank.
• Do not cover steam-out vents and keep
from falling any objects into them.
• Do not immerse the body into water or
other liquids.
• Do not move or bend the device while it
is operating.
• Always unplug the device and empty
it when cleaning or when not in operation. If you want to move the device to
another place, first of all unplug it.
• Do not touch the plug of the power
cord with wet hands.
• Before using the device inspect the
power cord and ensure that it is not
damaged. Do not use the device when
its power cord is damaged.
3
3
1761.indd 31761.indd 3 04.06.2010 10:20:4504.06.2010 10:20:45

ENGLISH
• Do not dismantle the device on your
own, in case of disorder refer to the
nearest authorized service center.
• Clean the device regularly, keep from
scratch appearance on a nebulizer.
• Store the device in places out of reach
of children.
FOR HOME USE ONLY
USE OF HUMIDIFIER
Unpack the device and remove all packing materials. Inspect the device for
damage. If there is any damage do not
turn on the device.
Note:
— if the humidifier was exposed to
negative temperatures, then before the first time use it is recommended that you keep it at room
temperature during 30 minutes.
— use the humidifier at indoor temperature from +5 to +40°С, and relative humidity no less than 80%.
— the temperature of utilized water
should not exceed +40°С.
Before plugging in ensure that the power
network voltage corresponds to the operating voltage of the device.
1. Take the handle (9) and remove water
tank (10) from the body (16).
2. Turn over water tank (10), remove the
top cover (14), by turning it counterclockwise. Fill the water tank (10) with
the necessary quantity of water and
secure the top cover (14), by turning it
clockwise.
3. Fix the filled water tank (10) to the body
of the device (16). Wait till the working
compartment is filled with water.
4. Plug in the humidifier.
5. Turn on the humidifier, by turning the
handle (2) clockwise, indicator (5) will
turn green, the spot lighting of regulators (1) and (2) and of water tank (17)
will turn on.
6. Establish steam-out intensity by turning the handle (2).
7. By a regulator of maintaining relative
indoor humidity (1) «Humidistat», establish the boundary value of maintaining indoor humidity from «Min» to
«Max».
«Min» — from 20 % to 30 %;
«Mid» — from 50 % to 60 %;
«Max» — up to 90 %.
Note:
— if humidity in a room is higher than
a set one on the control knob(1),
the moisturizer cannot be turned
on in a steam-out mode .
8. To turn on ionization mode push the
button (3) «ION», in the process the
LED light (4) comes on. To turn off
ionization mode push the button (3)
one more time, the light (4) goes out.
9. On completion of work turn off the device by setting the control (2) in «OFF»
position, in the process the LED light
(5) goes out, the booster light of the
control knobs (1) and (2) shuts down.
Note:
— (17)the booster light lamp helps
you to estimate the quantity of water in the reservoir.
— if the water in the reservoir (10)
is over, the red LED light (5)
«Humidify/Refill» is on, remove the
reservoir and fill it with water.
4
4
1761.indd 41761.indd 4 04.06.2010 10:20:4504.06.2010 10:20:45

ENGLISH
MAINTENANCE AND CLEANING
Warning! Always turn off and unplug
the device before cleaning.
Hard water causes scale formation on
the «sprayer», inner parts of the body
and water reservoir. This leads to the deterioration of operation of the moisturizer
and to the onset of white thin coat on the
objects of interior. In order to avoid this, it
is necessary to clean the sprayer weekly, to change water as often as possible
and to make cleaning of a filter-cartridge
(13).
In case you are not going to use the
moisturizer for a long time: — pour the
water out of reservoir and operational
compartment of the «sprayer», wash
the reservoir, wash and clean the operational compartment of the «sprayer» and
«sprayer» itself, dry carefully and store
the device.
Weekly maintenance
• Once a week wash carefully the water
reservoir (10) and operational compartment under the reservoir (10) with
the neutral detergent solution. Then
rinse them carefully out with water.
• Drip 5-10 drops of detergent to the
«sprayer» (15); wait about 2-5 minutes.
Using a brush (18), remove the thin
coat from the surface of the «sprayer»
(15).
Cleaning of filter
• Clean filter (13) after going through it
of about 1000 l of water. In case of hard
water or onset of «white thin coat» on
furniture, clean it more often.
• Take the control handle(9) and remove
the water reservoir (10) from the body
(16).
• Turn the reservoir over (10), turn off
the cover (14) turning it counter-clockwise, turn off the filter-cartridge (13)
turning it counter-clockwise.
• Place the filter-cartridge (13) for 10
min into the vessel with the vinegar, remove the filter-cartridge (13) and rinse
it off under the running water.
• Place the filter-cartridge (13) back on
the cover (14) turning it clockwise.
Storage
— If you are not going to use the device
for a long time and you want to put it
away, make sure of all its parts to be
dry, including the operational compartment of the «sprayer».
— Do not store the device with the water
in reservoir or in the operational compartment of the «sprayer».
— Before to take the filter-cartridge away
for storage, clean it and dry, keep the
filter-cartridge in a cool dark place.
Store the moisturizer in a dry cool
place, unavailable for children.
Note:
— it is possible to use antisludge agent
as a detergent for «sprayer»
• Do not dip the body of the device into
the water or any other liquids.
5
1761.indd 51761.indd 5 04.06.2010 10:20:4504.06.2010 10:20:45

ENGLISH
TROUBLESHOOTING
Before refer to the service center, look through the following troubles:
Trouble Probable reason Troubleshooting
The device is unplugged Plug the device in
Moisturizer doesn’t operate
«Steam» has an unpleasant
smell
Low intensity of the steamout
Note:
— If the rules of the device cleaning aren’t kept, the efficiency of the device
operation can descent. In this case clean the device and henceforth use filtered or distilled water.
Specification:
Power supply: 220-230 V ~ 50 Hz
Power consumption: 40 W
Emission of ions: 2.000.000 ~ 3.000.000 Ion /cm
Emission of ozone: 0.05 PPM
Vessel for water: 5 l
Expenditure of water: 400 ml/h
Area of moistening: to 40 m
There is no water in the reservoir, light (5) is red
It’s normal effect for a new
device
There is dirty water in the
reservoir
The «sprayer» is foul Clean the part of the sprayer
2
2
Fill the reservoir with water
Turn off the cover of the water reservoir and leave it in
a dark cool room for some
hours
Clean the reservoir and fill it
with the clean water
Specifications subject to change without prior notice.
Service life of appliance — 3 years
GUARANTEE
Details regarding guarantee conditions can be obtained from the dealer from whom
the appliance was purchased. The bill of sale or receipt must be produced when making any claim under the terms of this guarantee.
This product conforms to the EMC-Requirements as laid down by the
Council Directive 89/336/EEC and to the Law Voltage Regulation (73/23
EEC)
6
1761.indd 61761.indd 6 04.06.2010 10:20:4504.06.2010 10:20:45

DEUTSCH
LUFTBEFEUCHTER
BESCHREIBUNG
1. Regler für Feuchtigkeitsunterhaltung im
Raum «Humidistat»
2. EIN/AUSTaste, Regler für den Ausgang
der „Dampf“Intensität
3. EIN/AUSTaste für den
Ionisierungsmodus «Ion»
4. Anzeiger des Ionisierungsmodus «Ion»
5. Anzeiger des Einschaltens / des notwendigen Wassernachfüllen «Humidify/Refi ll»
6. Frontplatte
7. Deckel mit den Löchern für den
„Dampf“Ausgang
8. Löcher für den „Dampf“Ausgang
9. Griff für Entfernung des Behälters vom
Gehäuse
10. Wasserbehälter
11. Loch für Wasserfüllen
12. KomfortGriff für Füllen/Hinübertragen
des Behälters
13. FilterCartridge
14. Deckel des Wasserbehälters
15. «Sprühgerät»
16. Gehäuse des Befeuchters
17. Beleuchtung des Wasserbehälters
18. Bürste für die Reinigung des
«Sprühgerätes»
VORSICHTSMASSNAHMEN
Vor dem Betriebsanfang des Gerätes lesen
Sie aufmerksam diese Betriebsanleitung und
behalten Sie sie, verwenden Sie sie in der
Zukunft zum Nachschlagen.
• Vergewissern Sie sich, dass die
Betriebsspannung des Gerätes mit der
Netzspannung übereinstimmt.
• Stellen Sie das Gerät auf eine glatte, feuch-
tigkeitsfesten Oberfl äche. Der Abstand bis
zu den Wänden muss mindestens 15 cm
betragen.
• Richten Sie die Düse des Befeuchters nicht
auf Holzmöbel, Elektrogeräte, Bücher und
Gegenstände, die durch Feuchtigkeit können beschädigt werden.
• Unterbringen Sie den Befeuchter in
den Stellen nicht, die von den direkten
Sonnenstrahlen, hohen Temperaturen be-
einfl usst werden, sowie neben PCs und feiner elektronischer Technik.
• Lassen Sie das Gerät ohne Aufsicht in
einem geschlossenen Raum nicht, im gegenfall kann sich auf/an dem Möbel und an
den Wänden Kondensat bilden, deswegen
wird es empfohlen, die Tür in den Raum mit
dem funktionierenden Befeuchter ein wenig geöffnet halten.
• Es wird nicht gestattet, dieses Gerät außerhalb der Räumlichkeiten zu betreiben.
• Verwenden Sie nur die mitgelieferten abnehmbaren Teile.
• Lassen Sie Kinder mit dem Gerät nicht spielen.
• Seien Sie besonders aufmerksam, wenn
das Gerät von den Kindern oder behinderten Personen verwendet wird.
• Dieses Gerät ist nicht für den Gebrauch
von Kindern oder behinderten Personen
bestimmt, es sei denn, dass sie von der
für ihre Sicherheit zuständigen Person
entsprechend und verständlich über den
Gebrauch des Gerätes sowie über die
möglichen Gefahren wegen der unrichtigen
Benutzung angewiesen wurden.
• Schalten Sie das Gerät ohne Wasser nicht
ein, und schalten Sie es sofort aus, sobald
das Wasser im Behälter zu Ende ist.
• Verwenden Sie kein kohlensäurehaltiges
Wasser und Parfümzusatzstoffe.
• Trennen Sie das Gerät vom Stromnetz vor
der Entfernung des Wasserbehälters.
• Machen Sie die Löcher für den
«Damf»Ausgang nicht zu und lassen sie
fremde Gegenstände dorthin nicht geraten.
• Tauchen Sie das Gehäuse des Gerätes ins
Wasser oder andere Flüssigkeiten nicht
ein.
• Stellen Sie das Gerät während des Betriebes
nicht um, sowie kippen Sie es nicht.
• Immer trennen Sie das Gerät vom Netz
und entfernen Sie das Wasser aus dem
Behälter während der Reinigung, wenn Sie
den Befeuchter nicht benutzen. Wenn Sie
das Gerät zu einem anderen Ort übertragen möchten, trennen Sie es zuerst vom
Stromnetz.
7
7
1761.indd 71761.indd 7 04.06.2010 10:20:4504.06.2010 10:20:45

DEUTSCH
• Greifen Sie den Stecker des Netzkabels mit
den nassen Händen nicht.
• Vor dem Gebrauch des Gerätes untersuchen Sie aufmerksam das Netzkabel und
vergewissern Sie sich, dass es nicht beschädigt ist. Verwenden Sie das Gerät mit
dem beschädigten Netzkabel nicht.
• Bauen Sie das Gerät selbstständig nicht
aus, falls eine Störung festgestellt wird,
wenden Sie sich an das nächste autorisierte ServiceZentrum.
• Reinigen Sie das Gerät regelmäßig, vermeiden Sie Risse auf dem Sprühgerät.
• Bewahren Sie das Gerät in einer für die
Kinder unzugänglichen Stelle.
NUR FÜR DEN HAUSHALTSGEBRAUCH
BENUTZUNG DES LUFTBEFEUCHTERS
Packen Sie das Gerät aus und entfernen Sie
die Verpackung. Untersuchen Sie das Gerät
auf das Vorhandensein von Beschädigungen.
Falls Beschädigungen vorhanden sind, schalten Sie das Gerät nicht ein.
Anmerkung:
Falls das Gerät von den negativen
Temperaturen beeinfl usst wurde, wird es
empfohlen, es vor dem Einschalten im Laufe
von 30 Minuten in der Raumtemperatur
stehen lassen.
Verwenden Sie den Luftbefeuchter im
Raum mit dem Temperatur von +5 bis
+40°C und mit der relativen Feuchtigkeit
von höchstens 80%.
Die Temperatur des Nutzwassers muss
+40°C nicht übersteigen.
• Bevor Sie das Gerät einschalten, vergewissern Sie sich, dass die Netzspannung mit
seinem Betriebsspannung übereinstimmt.
1. Nehmen Sie den Griff (9) in die Hand und
entfernen Sie den Wasserbehälter (10)
vom Gehäuse (16).
2. Kippen Sie den Behälter (10) um, schrau-
ben Sie den Deckel (14)ab, drehen Sie ihn
dafür entgegen dem Uhrzeigersinn. Füllen
Sie den Behälter (10) mit der notwen-
digen Wassermenge und verdrehen Sie
den Deckel (14), drehen Sie ihn dafür im
Uhrzeigersinn.
3. Bauen Sie den gefüllten Behälter (10) auf
dem Gehäuse des Gerätes (16) an. Warten
Sie eine Weile, bis die Betriebssektion mit
dem Wasser gefüllt wird.
4. Schalten Sie den Luftbefeuchter zum Netz
an.
5. Schalten Sie den Luftbefeuchter ein, indem
Sie den Griff (2) im Uhrzeigersinn drehen,
dabei leuchtet der Anzeiger (5) grün, die
Beleuchtung der Regler (1) und (2) wird
eingeschaltet, sowie wird die Beleuchtung
des Wasserbehälters (17) eingeschaltet.
6. Stellen Sie die Intensität des
„Dampf“Ausgangs durch das Drehen des
Griffs (2) ein.
7. Durch den Regler für die Unterhaltung
der relativen Feuchtigkeit im Raum (1)
«Humidistat» stellen Sie die Grenze für die
Unterhaltung der Feuchtigkeit im Raum
von «Min» bis «Max» ein.
«Min» von 20 % bis 30 %;
«Mid» von 50 % bis 60 %;
«Max» bis 90 %.
Anmerkung:
Wenn die Feuchtigkeit im Raum höher sein
wird, als das durch den Regler (1) eingestellt wurde, wird der Luftbefeuchter in
den Modus des «Dampf»Ausgangs nicht
eingeschaltet.
8. Um den Ionisierungsmodus einzuschalten, drücken Sie die Taste (3) «ION», dabei leuchtet der Anzeiger (4). Um den
Ionisierungsmodus auszuschalten, drücken Sie wiederholt die Taste(3), der
Anzeiger (4) erlöscht
9. Nach dem Betrieb schalten Sie das Gerät
aus, indem Sie den Griff (2) in die Position
«OFF» bringen, dabei erlöscht der Anzeiger
(5), die Beleuchtung der Regler (1) und (2)
wird ausgeschaltet.
8
1761.indd 81761.indd 8 04.06.2010 10:20:4504.06.2010 10:20:45

DEUTSCH
Anmerkung:
Sie können den Wasserstand im Behälter
mit Hilfe der Beleuchtungslampe (17) einschätzen.
Wenn das Wasser im Behälter (10) zu Ende
ist, leuchtet der Anzeiger (5) «Humidify/
Refi ll» rot, dann nehmen Sie den Behälter
ab und füllen Sie ihn mit Wasser.
REINIGUNG UND WARTUNG
Warnung! Vor Reinigung immer schalten Sie
das Gerät aus und trennen Sie es vom Netz.
Hartwasser verursacht Entstehung von
Mineralablagerungen auf dem „Sprühgerät“,
den innerlichen Teilen des Gehäuses
und auf dem Wasserbehälter, was die
Verschlechterung des Funktionierens des
Luftbefeuchters und die Entstehung des weißen Ansatzes auf den InterieurGegenständen
als Folge hat. Um das zu vermeiden, ist es
notwendig, das Sprühgerät wöchentlich zu
reinigen und je öfter desto besser das Wasser
zu ersetzen, sowie den CartridgeFilter (13)
zu reinigen.
Falls Sie vorhaben den Luftbefeuchter für
eine längere Zeit nicht zu gebrauchen: gießen Sie das Wasser aus dem Behälter und
aus der Betriebssektion des «Sprühgerätes»
ab, spülen Sie den Behälter durch, waschen
und reinigen Sie die Betriebssektion des
«Sprühgerätes» und das «Sprühgerät» selbst,
trocknen Sie das Gerät sorgfältig aus und räumen Sie es für Aufbewahrung ab.
Wöchentliche Wartung
• Einmal pro Woche spülen Sie gründlich den
Wasserbehälter (10) und die Betriebssektion
unter dem Behälter (10) mit einer Lösung
des neutralen Waschmittels durch. Danach
spülen Sie die sorgfältig mit dem Wasser.
• Tröpfeln Sie 510 Tropfen des
Reinigungsmittels auf das «Sprühgerät»
(15), und warten Sie ca. 25 Minuten. Mit
der Bürste(18)entfernen Sie den Ansatz
von der Oberfl äche des «Sprühgerätes»
(15).
Anmerkung:
als Reinigungsmittel für das «Sprühgerät»
kann man Mittel für die Belagentfernung in
den Teekesseln.
• Tauchen Sie das Gehäuse des Gerätes ins
Wasser oder andere Flüssigkeiten nicht
ein.
Filterreinigung
• Reinigen Sie den Filter (13) nachdem dadurch ca.1000 l Wasser durchgehen, wenn
Hartwasser benutzt wird oder der weiße
Ansatz auf den Möbelgegenständen erscheint, reinigen Sie ihn öfter.
• Nehmen Sie den Griff (9) in die Hand und
entfernen Sie den Wasserbehälter (10) vom
Gehäuse (16).
• Kippen Sie den Behälter (10)um, drehen
Sie den Deckel (14)ab, indem Sie ihn entgegen dem Uhrzeigersinn drehen, drehen
Sie den CartridgeFilter (13) ab, indem Sie
ihn entgegen dem Uhrzeigersinn drehen.
• Legen Sie den CartridgeFilter (13)
für 10 Minuten in den Behälter mit
dem Speiseessig, nehmen Sie den
CartridgeFilter (13) heraus und spülen Sie
ihn unter dem fl ießenden Wasser.
• Bauen Sie den CartridgeFilter (13) wieder
auf den Deckel (14) an, indem Sie ihn im
Uhrzeigersinn drehen.
Aufbewahrung
Wenn Sie vorhaben, das Gerät für längere
Zeit nicht zu benutzen und es abräumen
wollen, vergewissern Sie sich, dass alle
seine Teile trocken sind, einschließlich der
Betriebssektion des «Sprühgerätes».
Bewahren Sie das Gerät mit dem Wasser
im Behälter und in der Betriebssektion des
«Sprühgerätes» nicht.
Bevor Sie den CartridgeFilter für die
Aufbewahrung abräumen, überprüfen Sie
seine Reinigung und trocknen Sie ihn, bewahren Sie den CartridgeFilter in einem
kühlen dunklen Ort auf.
• Bewahren Sie den Luftbefeuchter in einer
trockenen und für die Kinder unzugänglichen Stelle.
9
1761.indd 91761.indd 9 04.06.2010 10:20:4504.06.2010 10:20:45
DEUTSCH
STPRUNGEN UND IHRE BESEITIGUNG
Bevor Sie sich an das ServiceZentrum wenden, machen Sie sich mit folgenden Störungen
bekannt:
Störung Mögliche Ursache Beseitigung
Das Gerät ist ans Stromnetz
Luftbefeuchter funktioniert
nicht
„Dampf“ hat einen unangenehmen Geruch
Kleine Intensität des
„Dampf“Ausgangs
nicht angeschlossen
Lein Wasser im Behälter, der
Anzeiger (5) leuchtet rot
Für ein neues Gerät ist das
eine normale Erscheinung
Das Wasser im Behälter ist
verschmutzt
„Das Sprühgerät“ ist verschmutzt
Anmerkung:
Wenn die Regeln für die Reinigung des Gerätes von den durch die Verwendung des
Hartwassers verursachten Mineralablagerungen nicht eingehalten werden, kann sich die
Funktionseffi zienz des Gerätes vermindern. In diesem Fall reinigen Sie das Gerät und verwenden Sie in der Zukunft fi ltriertes oder destillatives Wasser.
Schließen Sie das Gerät an das
Stromnetz an
Füllen Sie den Behälter mit
Wasser
Drehen Sie den Deckel des
Wasserbehälters ab und lassen Sie ihn für einige Stunden
in einer dunklen kühlen Stelle
stehen
Reinigen Sie den Behälter
und füllen Sie ihn mit frischem
Wasser
Reinigen Sie das Element des
Sprühgerätes
Technische Eigenschaften:
Stromversorgung: 220240 V ~ 50 Hz
gespeiste Leistung: 40 W
Ionenausgang: 2.000.000 ~ 3.000.000 Ion /cm
2
Ozonausgang: 0.05 PPM
Wasserbehälter: 5 l
Wasserverbrauch: 400 ml/h
Befeuchtungsfl äche: bis 40 m
2
Der Hersteller behält sich das Recht vor die Charakteristiken des Gerätes ohne Vorbescheid
zu ändern.
Betriebslebensdauer des Geräts – 3 Jahre
Gewährleistung
Ausführliche Bedingungen der Gewährleistung kann man beim Dealer, der diese Geräte verkauft hat, bekommen. Bei beliebiger Anspruchserhebung soll man während der Laufzeit der
vorliegenden Gewährleistung den Check oder die Quittung über den Ankauf vorzulegen.
Das vorliegende Produkt entspricht den Forderungen der elektromagnetischen
Verträglichkeit, die in 89/336/EWG -Richtlinie des Rates und den Vorschriften
73/23/EWG über die Niederspannungsgeräte vorgesehen sind.
10
1761.indd 101761.indd 10 04.06.2010 10:20:4504.06.2010 10:20:45

РУССКИЙ
УВЛАЖНИТЕЛЬ ВОЗДУХА
ОПИСАНИЕ
1. Регулятор поддержания влажности в
помещении «Humidistat»
2. Ручка вкл./выкл., регулятор интенсивности выхода «пара»
3. Кнопка включения/выключения режима ионизации «Ion»
4. Индикатор режима ионизации «Ion»
5. Индикатор включения/необходимости долива воды «Humidify/Refill»
6. Передняя панель
7. Крышка с отверстиями для выхода
«пара»
8. Отверстия выхода «пара»
9. Ручка для снятия резервуара с корпуса
10. Резервуар для воды
11. Отверстие для заливки воды
12. Ручка для удобства при наполнении/
переноске резервуара
13. Фильтр-картридж
14. Крышка резервуара для воды
15. «Распылитель»
16. Корпус увлажнителя
17. Подсветка резервуара для воды
18. Щеточка для чистки «распылителя»
МЕРЫ БЕЗОПАСНОСТИ
Перед началом эксплуатации прибора
внимательно прочитайте настоящую инструкцию и сохраните ее, используйте ее
в дальнейшем в качестве справочного
материала.
• Убедитесь, что рабочее напряжение
прибора соответствует напряжению
сети.
• Устанавливайте прибор на ровной, вла-
гостойкой поверхности. Расстояние до
стен должно быть не менее 15 см.
• Не направляйте сопло увлажнителя на
деревянную мебель, электроприборы,
книги и на предметы, которые могут
быть повреждены влагой.
• Не располагайте увлажнитель в местах,
подверженных воздействию прямых
солнечных лучей, высоких температур,
вблизи компьютеров или чувствительной электронной техники.
• Не оставляйте прибор без присмотра
в закрытом помещении, в противном
случае на мебели и стенах может образоваться конденсат, поэтому дверь в
помещение, где работает увлажнитель,
рекомендуется держать приоткрытой.
• Запрещается использовать прибор вне
помещений.
• Используйте только съемные детали,
входящие в комплект поставки.
• Не разрешайте детям использовать
прибор в качестве игрушки.
• Будьте особенно внимательными, если
прибор используется детьми или людьми с ограниченными возможностями.
• Данное устройство не предназначено
для использования детьми и людьми с
ограниченными возможностями, если
только лицом, отвечающим за их безопасность, им не даны соответствующие и понятные им инструкции о безопасном пользовании устройством и тех
опасностях, которые могут возникать
при его неправильном пользовании.
• Не включайте прибор без воды; отключайте его, как только в резервуаре закончится вода.
• Не используйте газированную воду и
парфюмерные добавки.
• Отключайте прибор от сети перед снятием резервуара для воды.
• Не закрывайте отверстия выхода
«пара» и не допускайте попадания в
них посторонних предметов.
• Не погружайте корпус прибора в воду
или другие жидкости.
• Не перемещайте и не наклоняйте прибор во время работы.
• Всегда отключайте прибор от сети и
выливайте воду из резервуара во время чистки, или если вы не пользуетесь
увлажнителем. Если вы хотите перенести прибор в другое место, сначала
отключите его от сети.
11
11
1761.indd 111761.indd 11 04.06.2010 10:20:4504.06.2010 10:20:45

РУССКИЙ
• Не прикасайтесь к вилке сетевого шнура мокрыми руками.
• Перед использованием прибора внимательно осмотрите сетевой шнур и
убедитесь, что он не поврежден. Не используйте прибор при поврежденном
сетевом шнуре.
• Не разбирайте прибор самостоятельно. В случае обнаружения неисправности обратитесь в ближайший авторизованный сервисный центр.
• Регулярно проводите чистку прибора,
не допускайте появления царапин на
распылителе.
• Храните прибор в недоступных для детей местах.
ТОЛЬКО ДЛЯ ДОМАШНЕГО
ИСПОЛЬЗОВАНИЯ
ИСПОЛЬЗОВАНИЕ УВЛАЖНИТЕЛЯ
Распакуйте прибор и удалите упаковочные материалы. Осмотрите прибор на
предмет повреждений. При наличии повреждений не включайте прибор.
Примечание:
— если увлажнитель был подвержен
отрицательным температурам, то
перед первым включением рекомендуется выдержать его в течение
30 минут при комнатной температуре.
— используйте увлажнитель при температуре в помещении от +5 до
+40°С и относительной влажности
менее 80%.
— температура используемой воды не
должна быть выше +40°С.
Перед включением в сеть убедитесь, что
напряжение электрической сети соответствует рабочему напряжению прибора.
1. Возьмитесь за ручку (9) и снимите ре-
зервуар для воды (10) с корпуса (16).
2. Переверните резервуар (10), открутите крышку (14), поворачивая ее против
часовой стрелки. Наполните резервуар (10) необходимым количеством
воды и закрутите крышку (14), поворачивая ее по часовой стрелке.
3. Установите наполненный резервуар
(10) на корпус прибора (16). Подождите
некоторое время, необходимое для
заполнения рабочего отсека водой.
4. Подключите увлажнитель к сети.
5. Включите увлажнитель, повернув ручку
(2) по часовой стрелке, при этом индикатор (5) загорится зеленым светом,
включится подсветка регуляторов (1)
и (2) и загорится подсветка резервуара для воды (17).
6. Установите интенсивность выхода
«пара» поворотом ручки (2).
7. Регулятором поддержания относительной влажности в помещении (1)
«Humidistat» установите предел поддержания влажности в помещении от
«Min» до «Max».
«Min» — от 20 % до 30 %;
«Mid» — от 50 % до 60 %;
«Max» — до 90 %.
Примечание:
— если влажность в помещении окажется больше, чем это задано регулятором (1), то увлажнитель не
включится в режим выхода «пара».
8. Для включения режима ионизации нажмите кнопку (3) «ION», при этом загорится индикатор (4). Для выключения
режима ионизации нажмите кнопку (3)
еще раз, индикатор (4) погаснет.
9. По окончании работы выключите прибор, установив ручку (2) в положение
«OFF», при этом индикатор (5) погаснет, подсветка регуляторов (1) и (2)
выключится.
12
1761.indd 121761.indd 12 04.06.2010 10:20:4504.06.2010 10:20:45
Loading…
ИНСТРУКЦИЯ ПО ЭКСПЛУАТАЦИИ
MANUAL INSTRUCTION
ULTRASOUND HUMIDIFIER
УЛЬТРОЗВУКОВОЙ УВЛАЖНИТЕЛЬ
МОДЕЛЬ VT1761
Vt-1761.qxd 02.12.03 18:37 Page 2

РУССКИЙENGLISH
RECOMMENDATIONS
3. Перед укладкой в коробку для хранения все детали увлажнителя
• Please read the instructions carefully before first use and keep then future
следует очистить и вытереть насухо.
consultation.
4. Во время каждой замены воды рекомендуется удалить пыль и
известковые отложения с преобразователя.
• Keep the apparatus and packaging out of the reach of children.
5. Не помещайте преобразователь под струю воды из крана.
• Before use, ensure that the voltage in your home is the same as than the
В случае попадания воды в преобразователь, не пользуйтесь прибором
specifications plate.
и обратитесь в сервисный центр.
• Always use in the vertical position.
• Do not cover while in use.
УСТРАНЕНИЕ НЕПОЛАДОК
• Place on a flat, firm shelf about 0.5 m or 1 m from the floor. Never use the
Во избежание поражения электротоком не пытайтесь открыть прибор.
floor. Never tip.
Прибор не работает:
• Use only for the purposes indicated. The manufacturer is not liable dam
• Проверьте подключение к сети электроснабжения.
age caused by unsuitable or incorrect use of the humidifier.
• Убедитесь в том, что выключатель находится в положении ON
• If the apparatus does not work, unplug it: do not tamper with it. If reps are
(«Вкл.»).
necessary, please contact the Technical Assistance Service.
Сигнальная лампочка горит, но пар не поступает:
• Do not use if the connection cable is damaged.
• Проверьте наличие воды в емкости.
Some operations, such as replacement of the power cable, must be doing
• Проверьте наличие известковых отложений на поплавке или
by an authorised service centre: the right tools are required.
преобразователе.
• If not to be used, unplug.
• Установите регулятор потока в открытом положении.
• The unit must be unplugged for assembly, cleaning, removal or filling
Посторонние запахи:
water.
• Очистите емкость с помощью воды и уксуса. Промойте чистой водой.
• Do not leave in operation without water: the system may be damaged.
• Оставьте открытую емкость в прохладном месте на некоторое время.
• Always fill the tank with clean water Do not add detergent, freshener
essence. NEVER PLACE THE WATER IN THE VAPORISATION CHABER.
ПРИМЕЧАНИЯ
• When in use, do not remove the vapour output cover from the vaporisation
• Ультразвуковые увлажнители воздуха образуют мельчайшие
tank, or from the water tank.
частички воды, которые легко попадают в нижние дыхательные пути.
Поэтому данный прибор можно использовать для лечения простуды
• Do not expose to direct sunlight or place near heat sources.
(кроме людей, страдающих бронхиальной астмой или аллергией).
• Do not place the vapour outlet near furnishings, walls or television sets.
• Увлажнители идеально подходят для поддержания влажности
• Ensure that the water tank cover is completely closed.
воздуха в доме на уровне 40% 60%, что максимально снижает риск
• Ensure that the apparatus is unplugged before removing the water tank.
возникновения респираторных инфекций.
• Do not touch the ultrasound transmitter with the hands or with tools.
• Do not use the humidifier when barefoot.
СПЕЦИФИКАЦИЯ
• When unplugging, do not pull on the power cable or the apparatus.
Питание 230 В ~ 50 Гц
Потребляемая мощность 35 Вт
• Do not leave exposed to atmospheric elements.
• Do not touch with wet hands when in operation. Do not fill with hot water.
СРОК СЛУЖБЫ УВЛАЖНИТЕЛЯ НЕ МЕНЕЕ 3+Х ЛЕТ
2
11
Vt-1761.qxd 02.12.03 18:37 Page 4

РУССКИЙ
ENGLISH
• Отрегулировать интенсивность потока пара (см. Рис. 1 поз. 7).
MAIN COMPONENTS
Fig. 1
1. Vapour output nozzle
2. Rotary head
3. Top carry handle
4. Water tank
5. Central body
6. On/off button
Рис. 4
Рис. 5 Рис. 6
7. Flow regulator control
8. Power cable
УХОД И ЧИСТКА
Перед тем, как приступить к чистке, прибор следует выключить и вынуть
вилку из розетки.
1. В преобразователе могут появиться известковые отложения
(особенно в местности, где используется жесткая вода). Известковые
отложения следует удалять хотя бы один раз в неделю с помощью
мягкой тряпочки, уксуса и воды:
(а) Смочить тряпочку в уксусе и осторожно протереть преобразователь
до полного устранения известковых отложений.
(б) Вытереть досуха.
(в) Не трите преобразователь твердыми предметами.
(г) Не пользуйтесь химикатами.
2. Внутреннюю поверхность емкости для воды следует чистить хотя бы
один раз в неделю:
(а) Наполнить емкость чистой водой и добавить несколько капель
Fig. 2
отбеливающего средства. Плотно закрыть крышку емкости.
9. Transducer
(б) Тщательно промыть.
10. Water level float
(в) При обнаружении известковых отложений в емкости очистить с
11. Pilot light on
помощью уксуса и вытереть насухо мягкой тряпочкой. Промыть чистой
12. Vaporisation chamber
водой. Если поплавок в корпусе прибора поднялся под действием
13. Cleaning brush
известковых отложений, его следует протереть дочиста мягкой
тряпочкой.
Примечание: Долгое пользование воды может привести к
образованию плесени (грибка).
10
3
Vt-1761.qxd 02.12.03 18:37 Page 6
ENGLISH
РУССКИЙ
Fig. 3
Рис. 2
14. Water opening valve
9. Преобразователь.
15. Water cap
10. Поплавок уровнемера
(показывает уровень воды).
16. Vapour outlet channel
11. Сигнальная лампочка
17. Bottom tank handle
(горит в состоянии «Вкл».)
12. Камера испарения.
13. Щетка для очистки.
Рис. 3
OPERATION AND USE
14. Задвижка (подача воды).
• Separate the water tank and central body, turn over and remove the CAP
15. Крышка.
from the bottom, turning it anticlockwise Fig. 4. Fill with cold water, do not
16. Канал, по которому
fill completely.
выходит пар.
• Replace the plug, aligning the notches on the tank with the grooves on the
17. Ручка нижней емкости.
cap, and turn it clockwise. Fig. 5
• Turn the tank over, holding it by the top handle, and place it on the central
body, making sure it fits perfectly. Before replacing the penguin head, turn
the top handle forward. Fig. 6
• Plug in and turn on Fig. 1 (5); the light signal inside the humidifier body
comes on. In a few seconds, vapour will start to come from the opening.
• Use the flow regulator control to adjust the intensity of the vapour output
ЭКСПЛУАТАЦИЯ
Fig 1 (7).
• Отделить емкость для воды от основного корпуса, перевернуть,
поворотом против часовой стрелки снять крышку в нижней части
емкости (см. Рис. 4). Залить холодной водой (не заливайте под
завязку).
• Установить крышку в прорези на емкости и повернуть по часовой
стрелке (см. Рис. 5).
• Перевернуть емкость в исходное положение, удерживая за ручку, и
аккуратно установить в основной корпус. Повернуть верхнюю ручку
вперед и установить насадку «пингвин» (см. Рис. 6).
• Подсоединить к розетке и включить прибор (см. Рис. 1 поз. 5). На
корпусе увлажнителя воздуха должна загореться сигнальная
Fig. 4
Fig. 5 Fig. 6
лампочка. В течение несколько секунд через отверстие начнет
поступать пар.
4
9
Vt-1761.qxd 02.12.03 18:37 Page 8
РУССКИЙ
ENGLISH
• Крышка емкости для воды должна быть плотно закрыта.
MAINTENANCE AND CLEANING
• Перед тем, как приступить к сливу воды из емкости, прибор следует
Before any cleaning operation, switch the apparatus off and unplug it.
отключить от сети электроснабжения.
• Не прикасайтесь к излучателю ультразвука руками или
1. There may be some lime deposits in the transducer, particular in areas with
инструментами.
hard water. Overcome this drawback by cleaning the transducer with water
• Не ходите босиком во время работы увлажнителя.
and vinegar on a soft cloth at least once a week, as follows:
• Во время отключения от сети электроснабжения не тянуть за шнур
a) Dampen a cloth with vinegar and wipe the transducer gently, until
или за прибор.
the lime deposits disappear completely.
• Беречь от атмосферных осадков.
b) Rub down with a dry cloth and remove remains of humidity.
• Не касайтесь работающего прибора мокрыми руками. Не заливайте
c) Do not rub the transducer with solid objects.
горячей водой!
d) Do not clean with chemical products.
2. Clean the inside of the water tank at least once a week, as follows:
ОСНОВНЫЕ ДЕТАЛИ
a) Fill the tank with clean water adding a few drops of bleach. Close the
tank completely with its cap and forcibly.
Рис. 1
b) Rinse thoroughly.
1. Насадка для выпуска пара.
c) If lime deposits are noted in the tank, dean with vinegar and v and rub
2. Вращающаяся головка.
down with a clean soft clothe. Then rinse with clean water the lime deposit
3. Переносная ручка.
has affected the water level float in the central clean it with a soft cloth.
4. Емкость для воды.
5. Основной корпус.
Note: Water accumulated over long periods may create bacteria mildew (fun0
6. Кнопка «Вкл./Выкл».
gus).
7. Регулятор потока.
8. Шнур электроснабжения.
3. Clean all the humidifier parts and then dry them well before storing appa
ratus in its box.
4. With each change of water the use is recommended of the included, to
remove dust and any lime remains on the transducer.
5. Do not place the transducer directly under the tap.
Water must not get into the apparatus; should that happen, take it the autho
rised assistance centre before using it again.
TROUBLESHOOTING
Do not try to open the apparatus: there is a risk of electrocution.
8
5
Vt-1761.qxd 02.12.03 18:37 Page 10
ENGLISH
РУССКИЙ
If it does not work:
РЕКОМЕНДАЦИИ
• Ensure it is properly plugged in.
• Внимательно ознакомьтесь с инструкцией перед тем, как приступить
• Check that the switch is in the ON position.
к работе. При необходимости, обращайтесь к данной инструкции и в
дальнейшем.
• Прибор и его упаковку следует беречь от детей.
If the operating light signal is on but instead or vapour, the apparatus
emits:
• Прежде чем приступить к эксплуатации, убедитесь в том, что
напряжение в сети соответствует указанному на информационной
• Check that there is water in the tank.
панели прибора.
• Check for possible lime deposits on the water level float or the transducer.
• Эксплуатация прибора допускается только в вертикальном
• Check that the flow regulator is open.
положении.
• Не накрывать прибор во время работы.
Strange odour:
• Прибор должен быть установлен на прочной и ровной основе в 0,5 1
• Clean the tank with water and Vinegar and rinse with clean water.
м от пола. Не ставьте прибор на пол! Не наклонять!
• Leave the tank open for some time without the cap, in a cool place.
• Используйте прибор исключительно в целях, для которых он
предназначен. Производитель не несет ответственности за
OBSERVATIONS
неправильное использование увлажнителя.
• Ultrasound humidifiers produce smaller water particles, which may easily
• Если прибор не работает, выньте вилку из розетки. Не пытайтесь
reach the lower respiratory tracts. This type of humidifier is the fore suit
самостоятельно ремонтировать прибор. Обратитесь в службу
able for the treatment of symptoms of the common cold. There use is not
технической помощи.
however recommended for persons with bronchi asthma and allergies.
• Не использовать прибор, если поврежден шнур электроснабжения.
• Domestic humidifiers are ideal for obtaining a comfortable humidity
• Некоторые операции (например, замена шнура электроснабжения),
between 40% and 60%, the range in which the risk of respiratory infection
для которых требуются специальные инструменты, производятся
is minimised.
только соответствующим сервисным центром.
• Если прибор не используется, выньте вилку из розетки.
SPECIFICATION
• Сборка, чистка, слив и заполнение водой производятся только тогда,
Power requirement 230 V ~ 50 Hz
когда прибор отключен от сети электроснабжения.
Power consumption 35 W
• Следите за тем, чтобы в работающем приборе была вода, иначе
можно повредить систему.
SERVICE LIFE OF THE HUMIDIFIER NOT LESS THAN 3 YEARS
• Емкость следует заполнять чистой водой. Не добавляйте в воду
стиральный порошок или экстракт освежителя воздуха. НИ В КОЕМ
СЛУЧАЕ НЕ ЗАЛИВАЙТЕ ВОДУ В КАМЕРУ ИСПАРЕНИЯ!
• Во время работы прибора не снимайте крышку с емкости испарителя
или емкости с водой.
• Беречь от прямых солнечных лучей и нагревательных приборов.
• Отверстия, через которое выпускается пар, должно находиться
вдали от мебели, стен или телевизора.
6
7
Vt-1761.qxd 02.12.03 18:37 Page 12

11
РУССКИЙ
11
УВЛАЖНИТЕЛЬ ВОЗДУХА
ОПИСАНИЕ
1. Регулятор поддержания влажности в
помещении «Humidistat»
2. Ручка вкл./выкл., регулятор интенсив-
ности выхода «пара»
3. Кнопка включения/выключения режи-
ма ионизации «Ion»
4. Индикатор режима ионизации «Ion»
5. Индикатор включения/необходимос-
ти долива воды «Humidify/Refill»
6. Передняя панель
7. Крышка с отверстиями для выхода
«пара»
8. Отверстия выхода «пара»
9. Ручка для снятия резервуара с корпу-
са
10. Резервуар для воды
11. Отверстие для заливки воды
12. Ручка для удобства при наполнении/
переноске резервуара
13. Фильтр-картридж
14. Крышка резервуара для воды
15. «Распылитель»
16. Корпус увлажнителя
17. Подсветка резервуара для воды
18. Щеточка для чистки «распылителя»
МЕРЫ БЕЗОПАСНОСТИ
Перед началом эксплуатации прибора
внимательно прочитайте настоящую инс-
трукцию и сохраните ее, используйте ее
в дальнейшем в качестве справочного
материала.
• Убедитесь, что рабочее напряжение
прибора соответствует напряжению
сети.
• Устанавливайте прибор на ровной, вла-
гостойкой поверхности. Расстояние до
стен должно быть не менее 15 см.
• Не направляйте сопло увлажнителя на
деревянную мебель, электроприборы,
книги и на предметы, которые могут
быть повреждены влагой.
• Не располагайте увлажнитель в местах,
подверженных воздействию прямых
солнечных лучей, высоких температур,
вблизи компьютеров или чувствитель-
ной электронной техники.
• Не оставляйте прибор без присмотра
в закрытом помещении, в противном
случае на мебели и стенах может об-
разоваться конденсат, поэтому дверь в
помещение, где работает увлажнитель,
рекомендуется держать приоткрытой.
• Запрещается использовать прибор вне
помещений.
• Используйте только съемные детали,
входящие в комплект поставки.
•
Не разрешайте детям использовать
прибор в качестве игрушки.
• Будьте особенно внимательными, если
прибор используется детьми или людь-
ми с ограниченными возможностями.
• Данное устройство не предназначено
для использования детьми и людьми с
ограниченными возможностями, если
только лицом, отвечающим за их бе-
зопасность, им не даны соответствую-
щие и понятные им инструкции о безо-
пасном пользовании устройством и тех
опасностях, которые могут возникать
при его неправильном пользовании.
• Не включайте прибор без воды; отклю-
чайте его, как только в резервуаре за-
кончится вода.
• Не используйте газированную воду и
парфюмерные добавки.
• Отключайте прибор от сети перед сня-
тием резервуара для воды.
•
Не закрывайте отверстия выхода
«пара» и не допускайте попадания в
них посторонних предметов.
• Не погружайте корпус прибора в воду
или другие жидкости.
• Не перемещайте и не наклоняйте при-
бор во время работы.
• Всегда отключайте прибор от сети и
выливайте воду из резервуара во вре-
мя чистки, или если вы не пользуетесь
увлажнителем. Если вы хотите пере-
нести прибор в другое место, сначала
отключите его от сети.
1761.indd 11
1761.indd 11
04.06.2010 10:20:45
04.06.2010 10:20:45