
Раздел: Бытовая, кухонная техника, электроника и оборудование
Тип: Утюг
Характеристики, спецификации
Потребляемая мощность:
2400 Вт
Мощность подачи пара:
до 40 г/мин
Вертикальное отпаривание:
Да
Противокапельная система:
Да
Авт.отключ. гориз./вертик.:
30 сек/8 мин
Насадка для деликатных тканей:
Нет
Шаровое крепление шнура:
Да
Инструкция к Утюгу Philips GC 4330

Azur
GC4340, GC4330, GC4325, GC4320, GC4310
2
ENGLISH 4
POLSKI 13
ROMÂNĂ 23
РУССКИЙ 33
ČEŠTINA 43
MAGYAR 52
SLOVENSKY 62
LIETUVIŠKAI 72
GC4340, GC4330, GC4325, GC4320, GC4310

ENGLISH4
Important
Read these instructions for use carefully before using the appliance and
save them for future reference.
◗ Check if the voltage indicated on the type plate corresponds to
the local mains voltage before you connect the appliance.
◗ Only connect the appliance to an earthed wall socket.
◗ Do not use the appliance if the plug, the cord or the appliance
itself shows visible damage, or if the appliance has been dropped
or is leaking.
◗ Check the cord regularly for possible damage.
◗ If the mains cord is damaged, it must be replaced by Philips, a
service centre authorised by Philips or similarly qualified persons
in order to avoid a hazard.
◗ Never leave the appliance unattended when it is connected to the
mains.
◗ Never immerse the iron and the stand, if provided, in water.
◗ Keep the appliance out of the reach of children.
◗ The soleplate of the iron can become extremely hot and may
cause burns if touched.
◗ Do not allow the cord to come into contact with the soleplate
when it is hot.
◗ When you have finished ironing, when you clean the appliance,
when you fill or empty the water tank and also when you leave
the iron even for a short while: set the steam control to position
0, put the iron on its heel and remove the mains plug from the
wall socket.
◗ Always place and use the iron and the stand, if provided, on a
stable, level and horizontal surface.
◗ Do not put perfume, vinegar, starch, descaling agents, ironing aids
or other chemicals in the water tank.
◗ This appliance is intended for household use only.
Before first use
1 Remove the heat-resistant protective cover from the soleplate
C
(GC4340 only). Remove any sticker or protective foil from the
soleplate.
B
The iron may give off some smoke when you use it for the first time.This
will cease after a short while.
ENGLISH 5
Preparing for use
Filling the water tank
Never immerse the iron in water.
1 Make sure the appliance is unplugged.
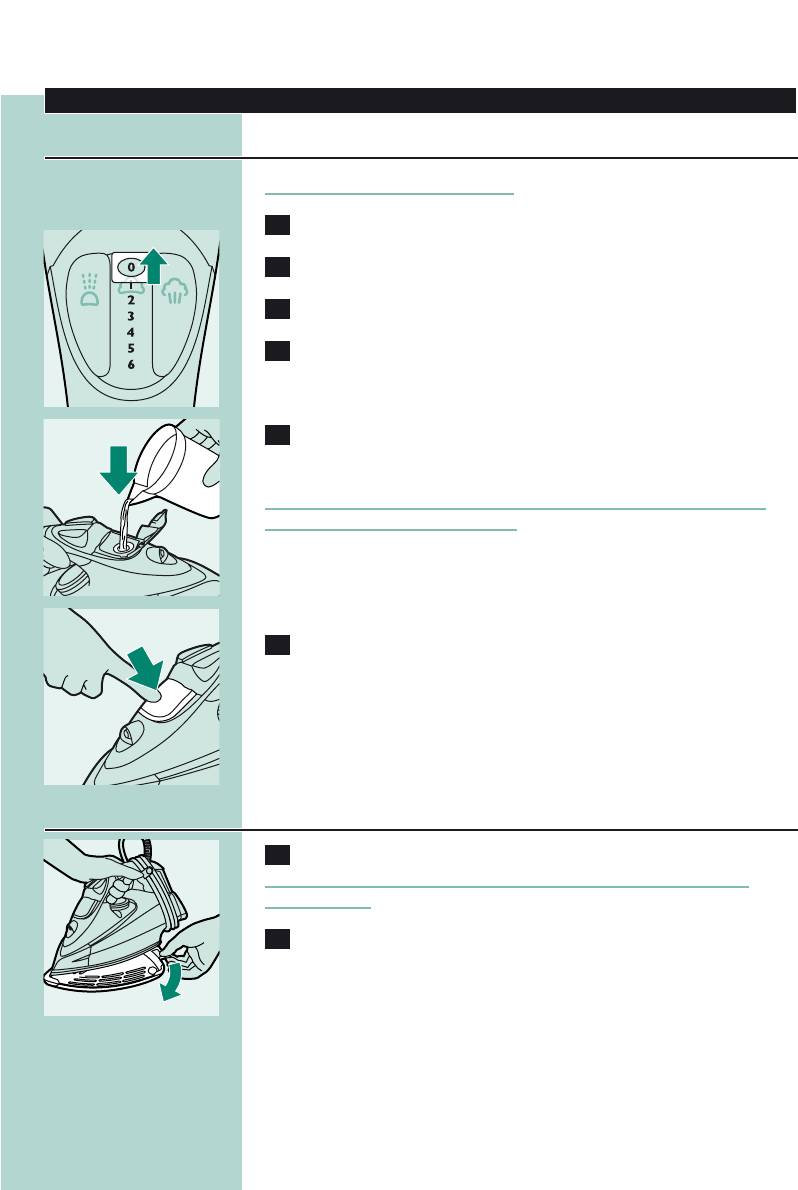
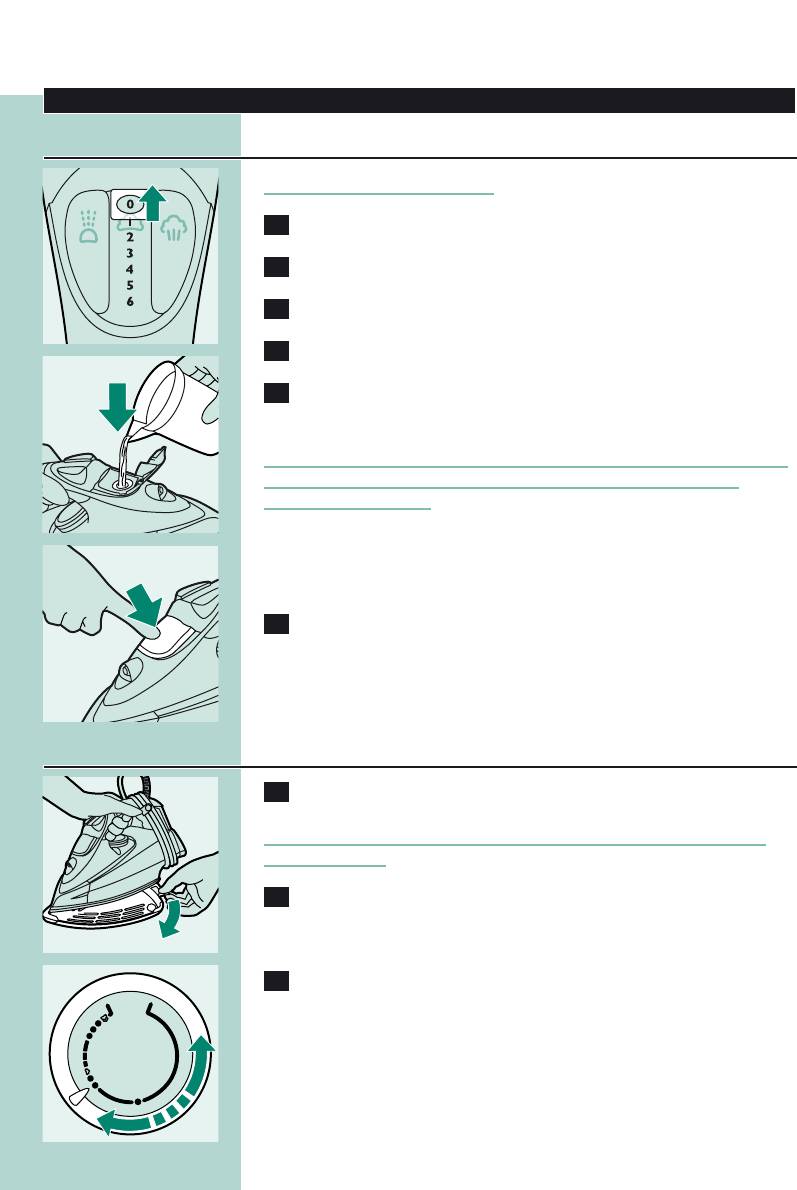
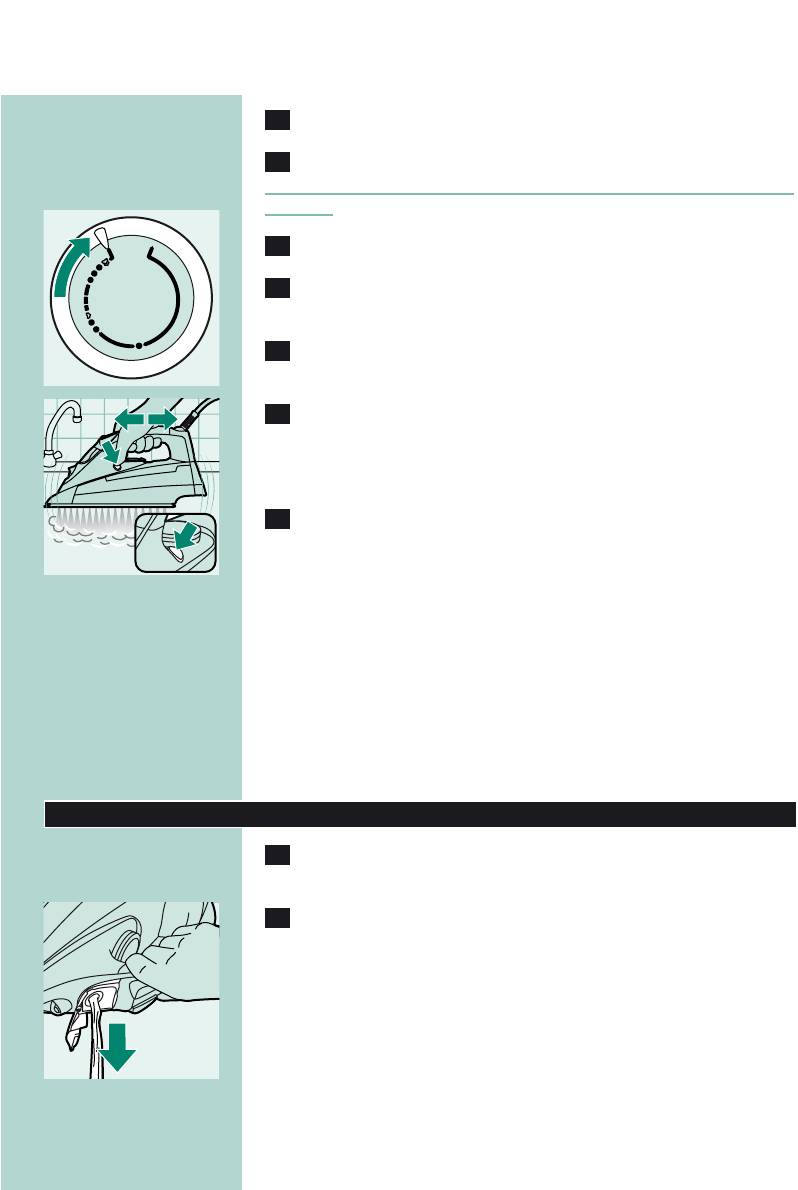
2 Set the steam control to position 0 (= no steam).
C
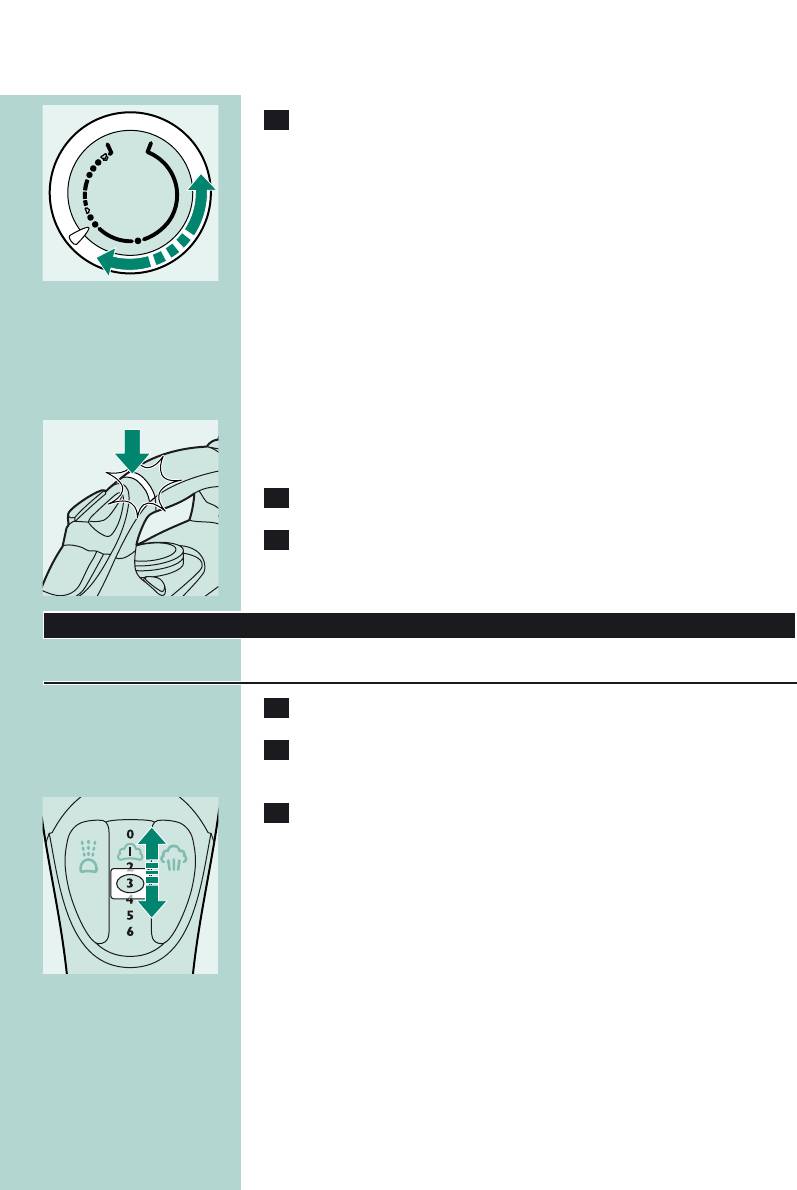
3 Open the cap of the filling opening.
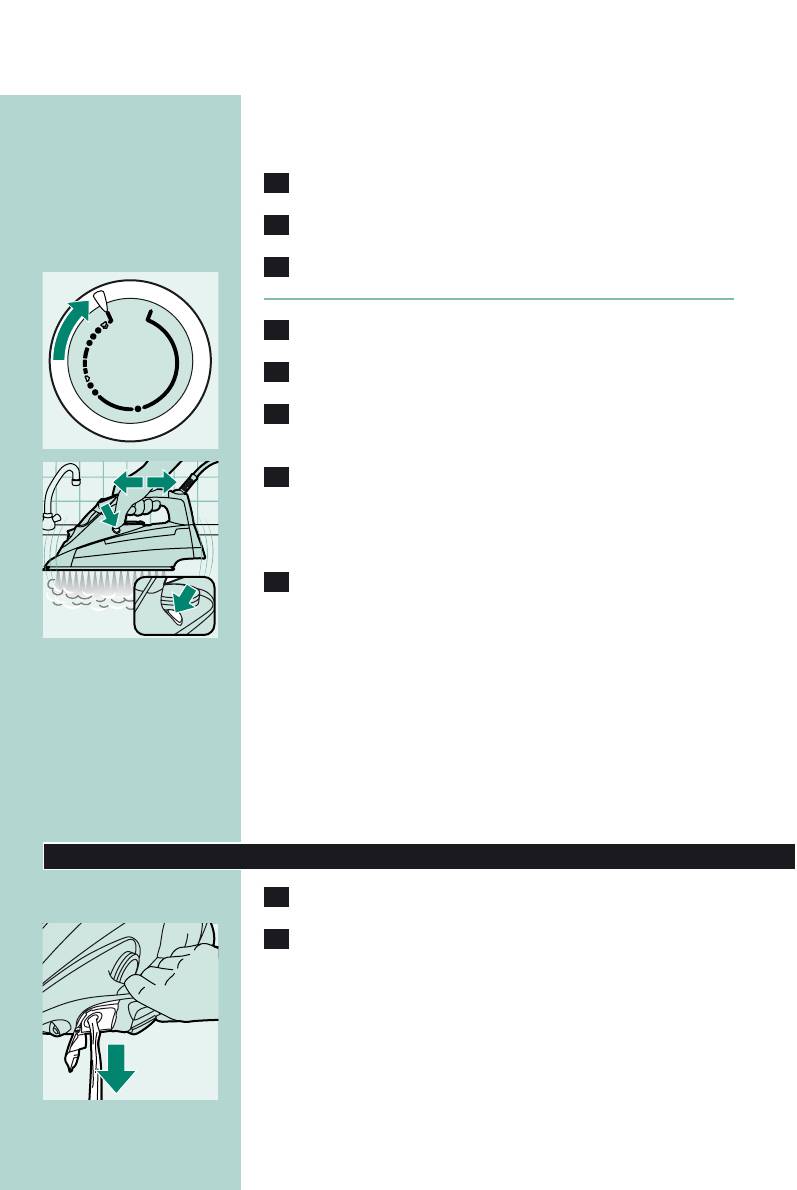
4 Tilt the iron backwards.
5 Fill the water tank with tap water up to the maximum level by
C
means of the filling cup.
Do not fill the tank beyond the MAX indication.
Do not put perfume, vinegar, starch, descaling agents, ironing aids or
other chemicals in the water tank.
◗ If the tap water in your area is very hard, we advise you to mix it
with an equal portion of distilled water, or to use distilled water
only.
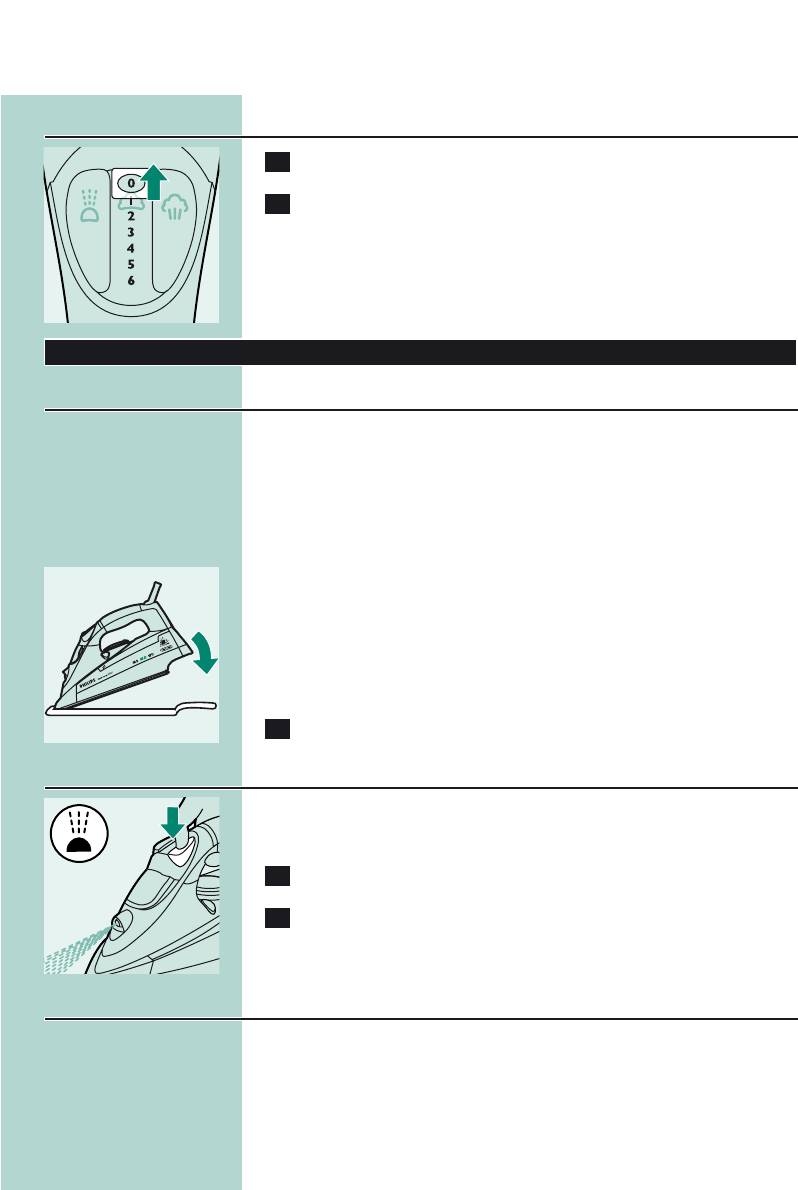
6 Close the cap of the filling opening (‘click’).
C
Setting the temperature
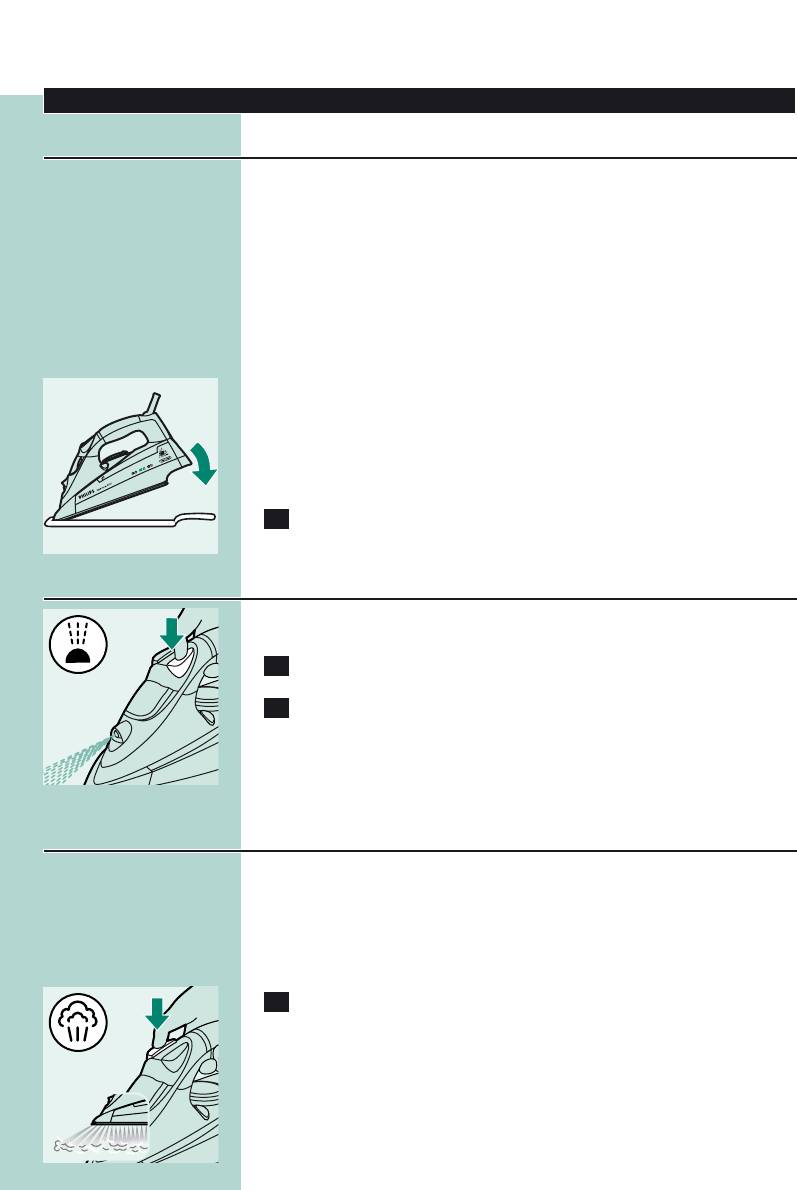
1 Type GC4340 only: remove the heat-resistant protective cover.
C
Do not leave the heat-resistant protective cover on the soleplate
during ironing.
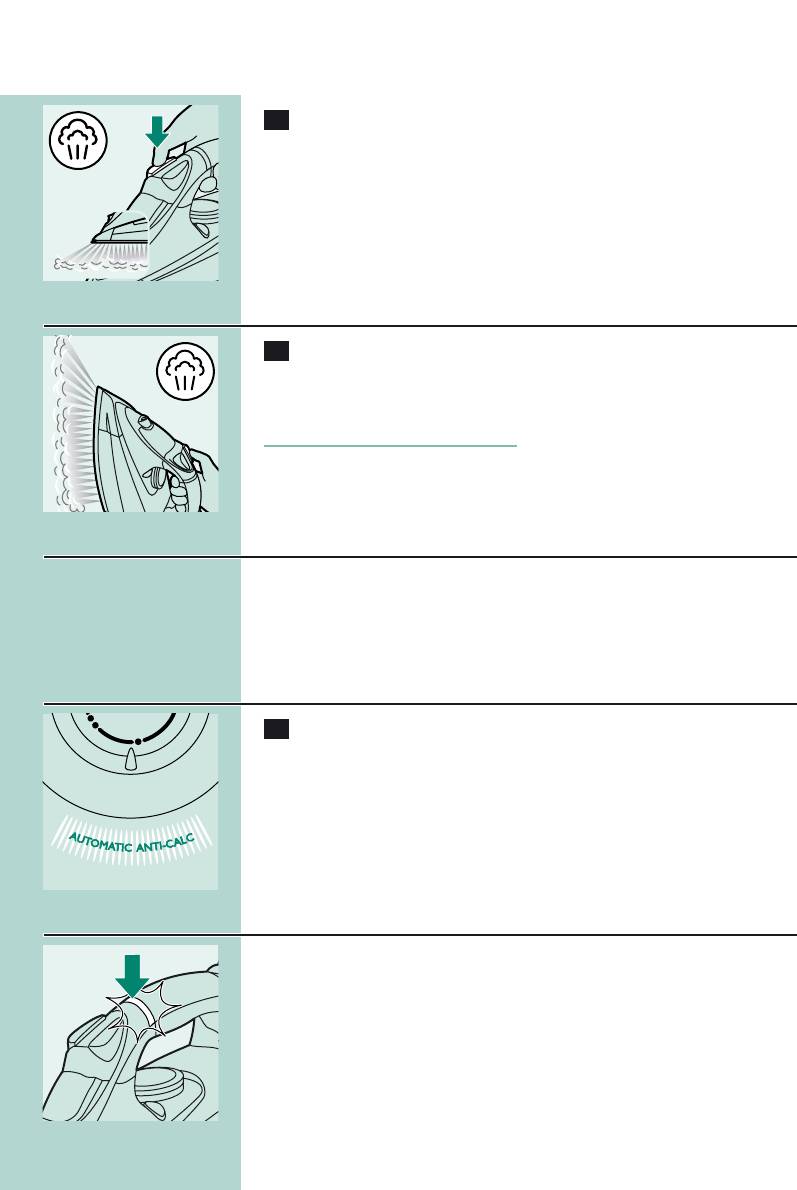
2 Put the iron on its heel.
ENGLISH6
3 Set the required ironing temperature by turning the
C
temperature dial to the appropriate position.
Check the laundry care label for the required ironing temperature:
— 1 Synthetic fabrics (e.g. acrylic, nylon, polyamide, polyester)
— 1 Silk
— 2 Wool
— 3 Cotton, linen
If you do not know what kind or kinds of fabric an article is made of,
determine the right ironing temperature by ironing a part that will not
be visible when you wear or use the article.
Silk, woollen and synthetic materials: iron the reverse side of the fabric
to prevent shiny patches. Avoid using the spray function to prevent
stains.
Start ironing the articles that require the lowest ironing temperature,
such as those made of synthetic fibres.
4 Put the mains plug in an earthed wall socket.
5 When the amber temperature light has gone out, wait a while
C
before you start ironing.
The temperature light will go on from time to time during ironing.
Using the appliance
Steam ironing
1 Make sure that there is enough water in the water tank.
2 Select the recommended ironing temperature (see chapter
‘Preparing for use’, section ‘Setting the temperature’).
3 Select the appropriate steam setting. Make sure that the steam
C
setting you select is suitable for the ironing temperature
selected:
— 1 — 3 for moderate steam (temperature settings 2 to 3)
— 4 — 6 for strong steam (temperature settings 3 to MAX)
B
The iron will start steaming as soon as the set temperature has been
reached.
MAX
MIN
LINEN
COTTON
WOOL
NYLON
SILK
ENGLISH 7
Ironing without steam
1 Set the steam control to position 0 (= no steam).
C
2 Select the recommended ironing temperature (see chapter
‘Preparing for use’, section ‘Setting the temperature’).
Features
Delicate fabric protector (GC4325 only)
The delicate fabric protector protects delicate fabrics from heat
damage and shiny patches.
With the delicate fabric protector you can iron delicate fabrics (silk,
wool and nylon) at temperature settings 3 to MAX in combination
with all steam functions available on the iron.
The delicate fabric protector reduces the soleplate temperature
instantly, thus allowing you to iron delicate fabrics safely.
If you do not know what kind or kinds of fabric an article is made of,
determine the right ironing temperature by ironing a part that will not
be visible when you wear or use the article.
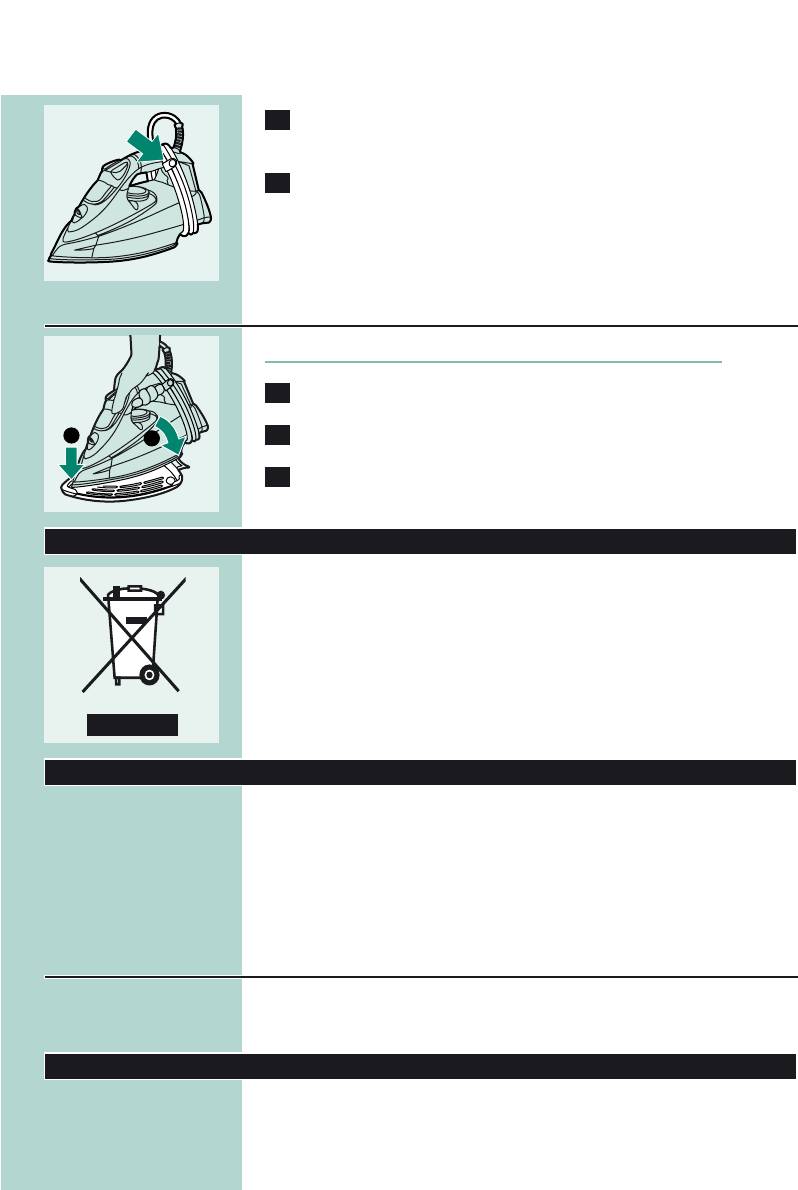
1 Put the iron on the delicate fabric protector (‘click’).
C
Spray function
You can use the spray function to remove stubborn creases at any
temperature.
1 Make sure that there is enough water in the water tank.
2 Press the spray button several times to moisten the article to
C
be ironed.
Concentrated shot of steam from the special Steam Tip
A powerful shot of concentrated steam helps remove stubborn
creases.The forward-directed concentrated shot of steam enhances
the distribution of steam into every part of your garment.
The shot-of-steam function can only be used at temperature settings
between 2 and MAX.
ENGLISH8
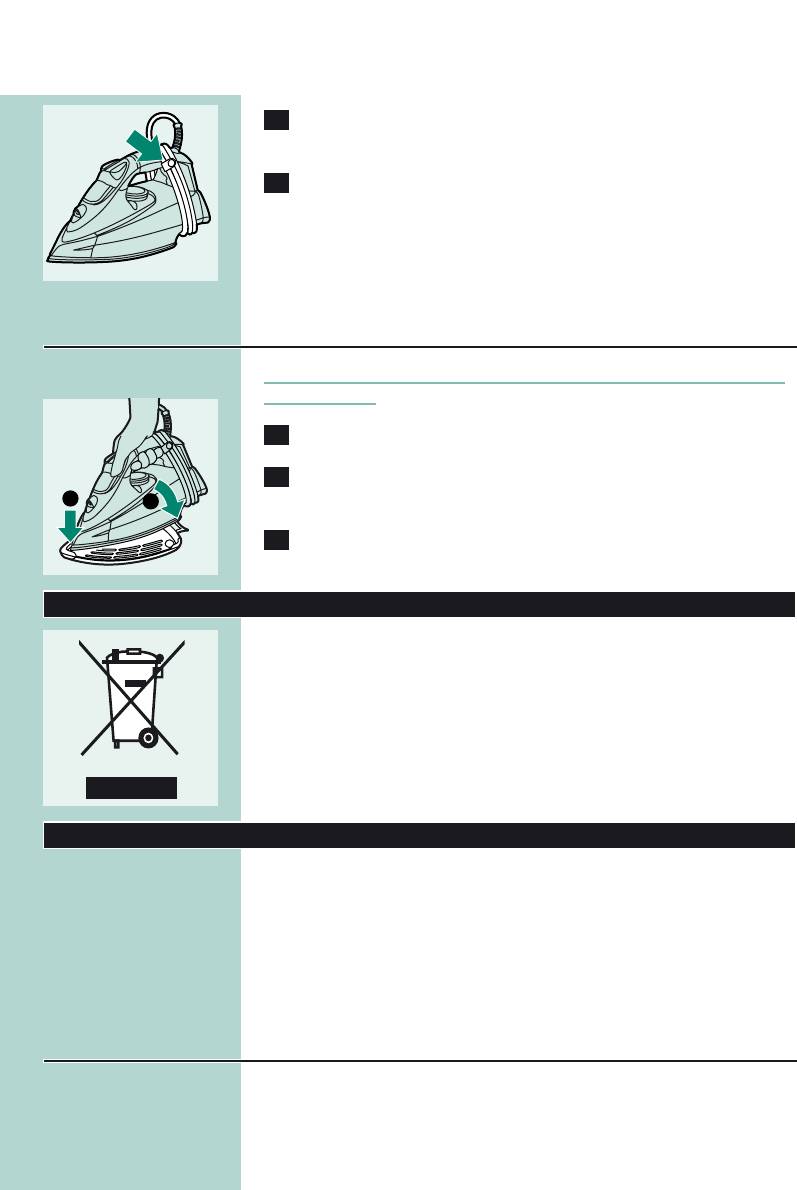
1 Press and release the shot-of-steam button.
C
Vertical shot of steam
1 The shot-of-steam function can also be used when you hold
C
the iron in vertical position.
This is useful for removing creases from hanging clothes, curtains etc.
Never direct the steam at people.
Drip stop
This iron is equipped with a drip-stop function: the iron automatically
stops producing steam when the temperature is too low, to prevent
water from dripping out of the soleplate.When this happens you may
hear a sound.
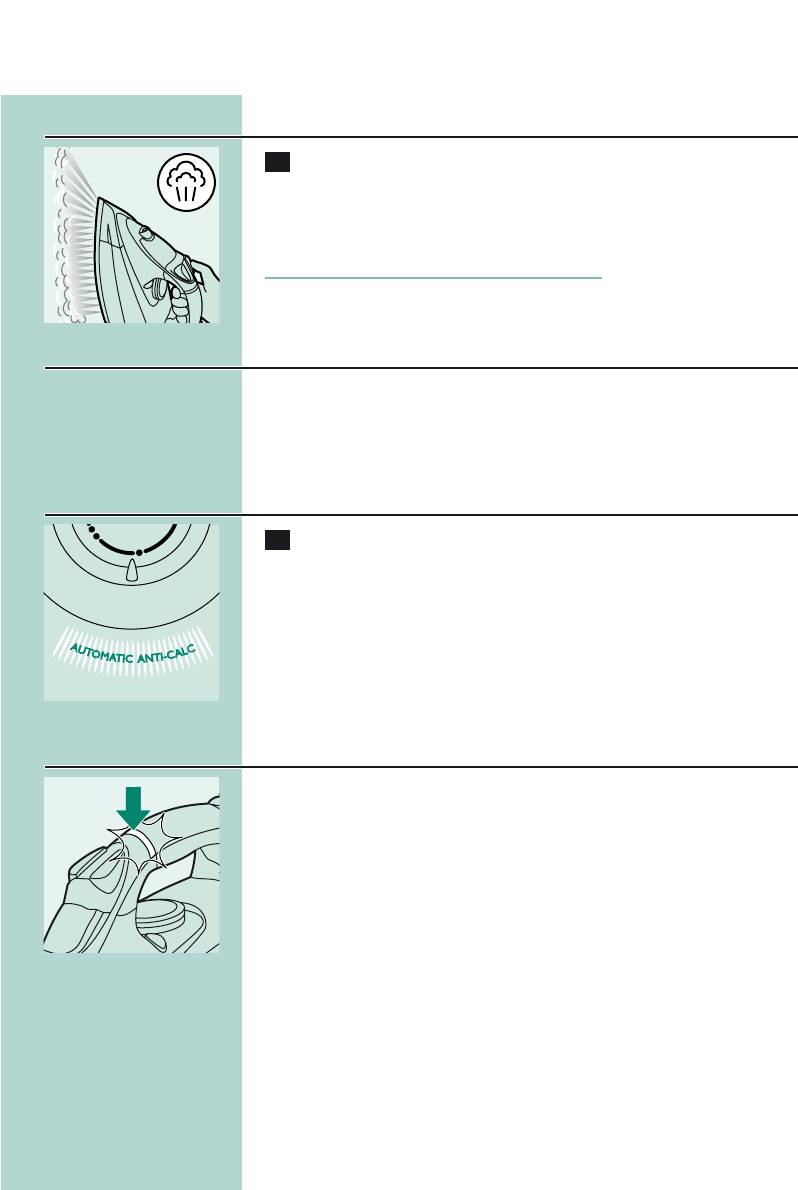
Automatic anti-calc system
1 The built-in anti-calc system reduces the build-up of scale and
C
guarantees a longer life for the iron.
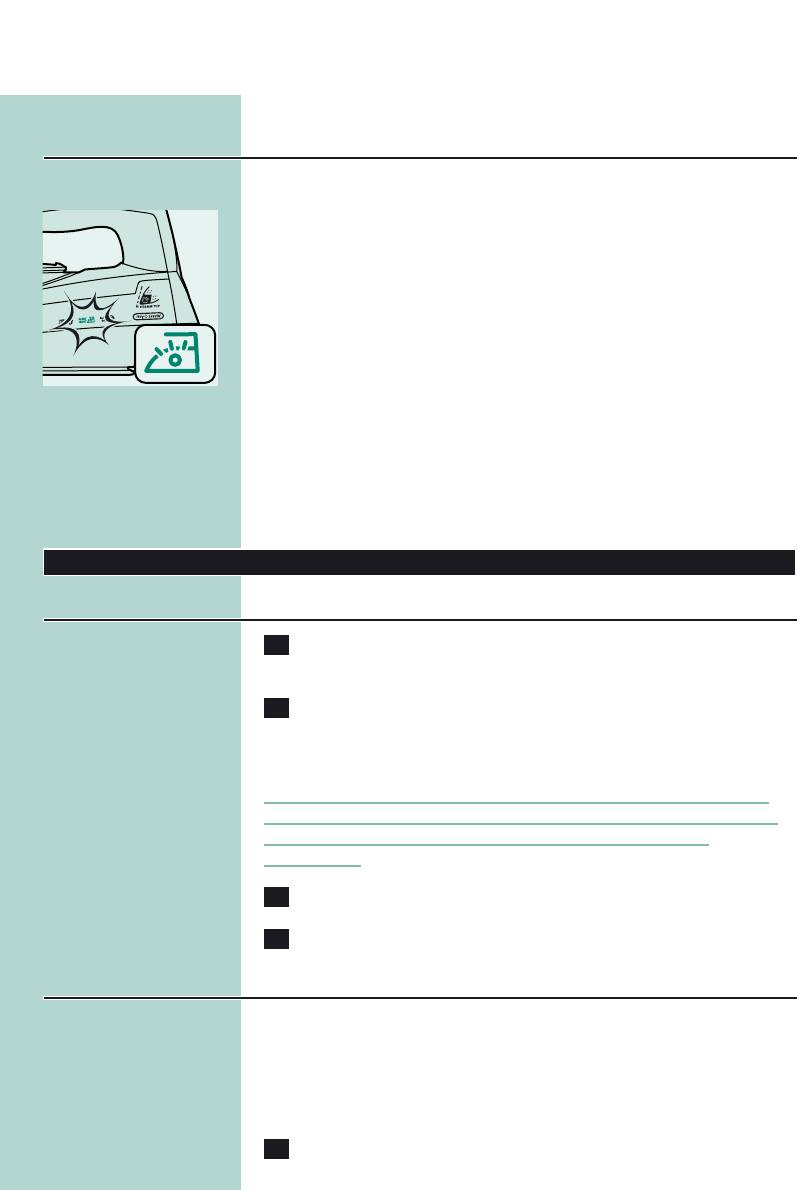
Electronic safety shut-off function (GC4325/4320 only)
◗ The electronic safety shut-off function automatically switches off
C
the iron if it has not been moved for a while.
◗ The red auto-off light starts blinking to indicate that the iron has
been switched off by the safety shut-off function.
To let the iron heat up again:
— Pick up the iron or move it slightly.
— The red auto-off light goes out. If the temperature of the soleplate
has dropped below the set ironing temperature, the amber
temperature light goes on.
ENGLISH 9
— If the temperature light goes on after you have moved the iron, wait
for it to go out before you start ironing.
— If the temperature light does not go on after you move the iron, the
soleplate still has the right temperature and the iron is ready for use.
Alert light and electronic safety shut-off function (GC4340
and GC4330)
The iron is equipped with a blue alert light.
◗ The blue alert light burns as long as the iron is plugged in.
C
◗ The blue alert light starts blinking to indicate that the iron has
been switched off by the safety shut-off function.
To let the iron heat up again:
— Pick up the iron or move it slightly.
— The blue alert light stops blinking. If the temperature of the soleplate
has dropped below the set ironing temperature, the amber
temperature light goes on.
— If the temperature light goes on after you have moved the iron, wait
for it to go out before you start ironing.
— If the temperature light does not go on after you move the iron, the
soleplate still has the right temperature and the iron is ready for use.
Cleaning and maintenance
After ironing
1 Remove the mains plug from the wall socket and let the iron
cool down.
2 Wipe flakes and any other deposits off the soleplate with a
damp cloth and a non-abrasive (liquid) cleaning agent.
To keep the soleplate smooth, you should avoid hard contact with
metal objects. Never use a scouring pad, vinegar or other chemicals to
clean the soleplate.
3 Clean the upper part of the iron with a damp cloth.
4 Regularly rinse the water tank with water. Empty the water
tank after cleaning.
Calc-clean function
You can use the calc-clean function to remove scale and impurities.
◗ Use the calc-clean function once every two weeks. If the water in
your area is very hard (i.e. when flakes come out of the soleplate
ENGLISH10
during ironing), the calc-clean function should be used more
frequently.
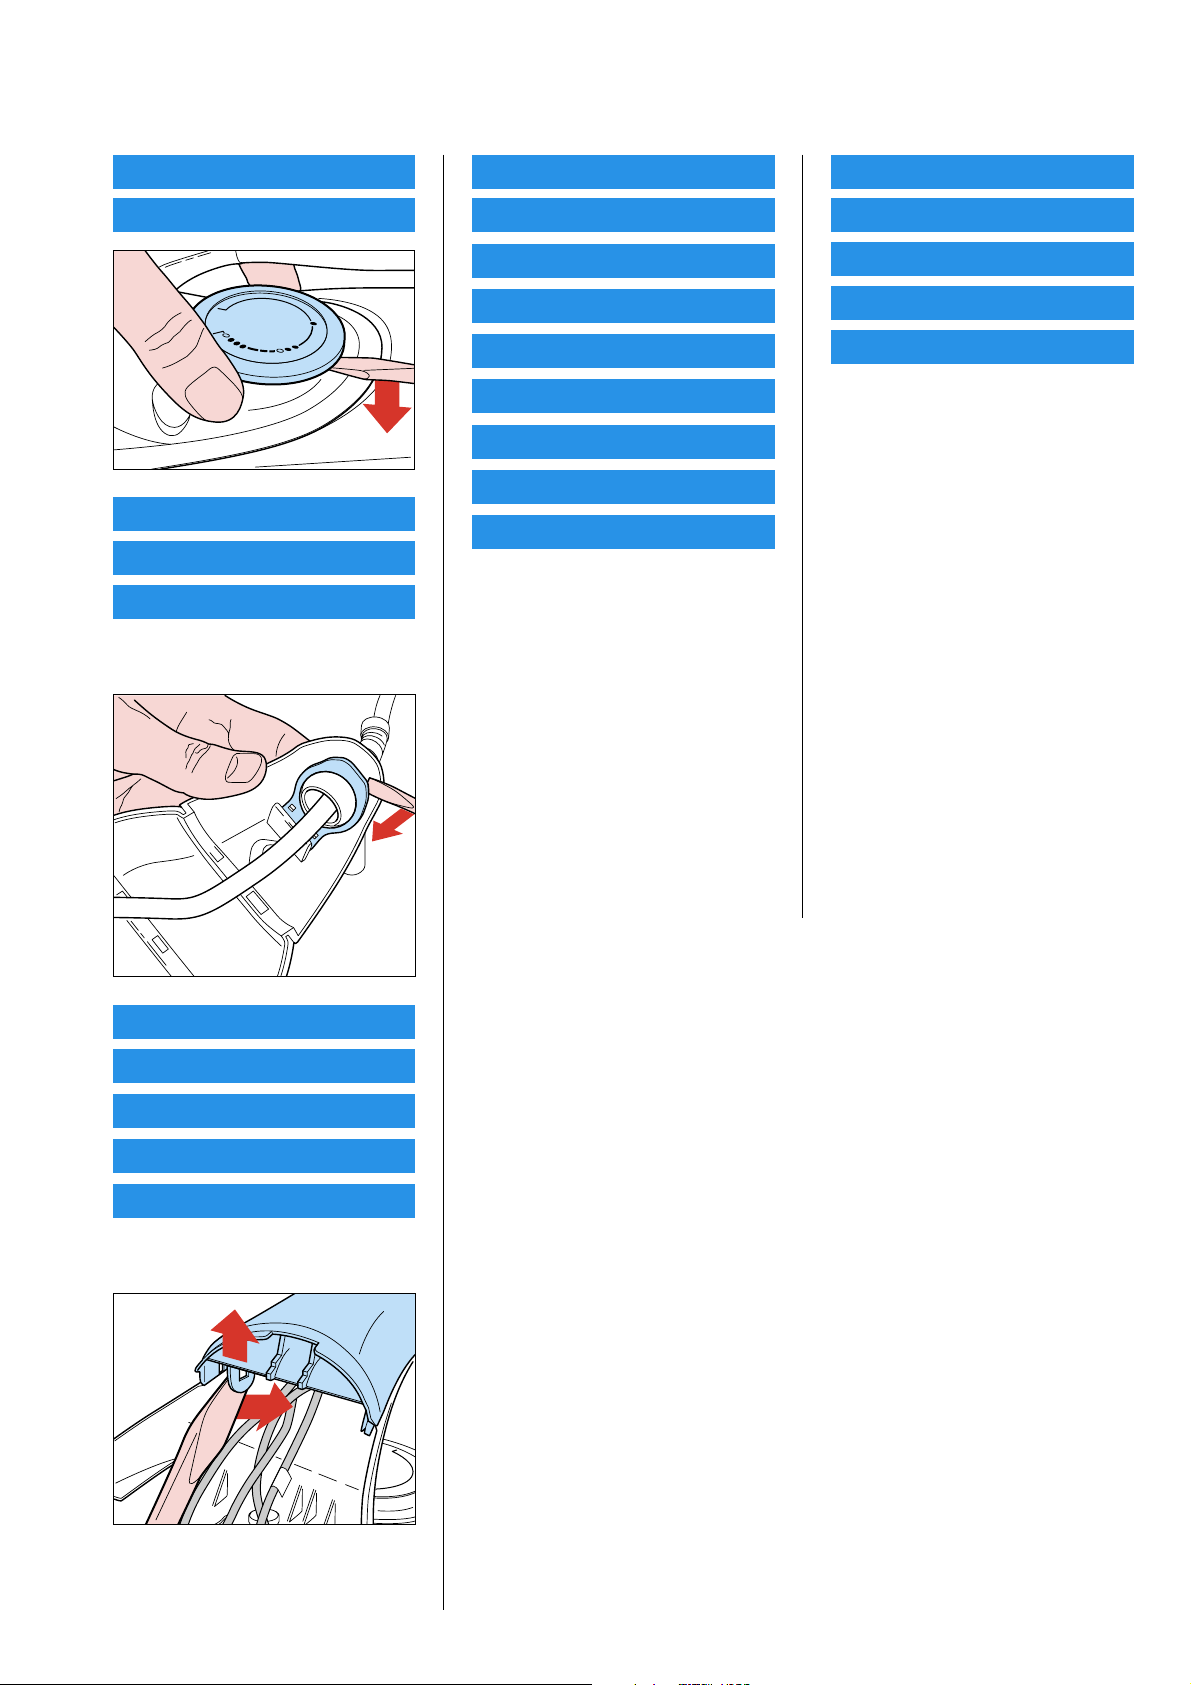
1 Make sure the appliance is unplugged.
2 Set the steam control to position 0.
3 Fill the water tank to the maximum level.
Do not put vinegar or other descaling agents in the water tank.
4 Select the maximum ironing temperature.
C
5 Put the plug in an earthed wall socket.
6 Unplug the iron when the amber temperature light has gone
out.
7 Hold the iron over the sink, press and hold the calc-clean
C
button and gently shake the iron to and fro.
Steam and boiling water will come out of the soleplate. Impurities and
flakes (if any) will be flushed out.
8 Release the calc-clean button as soon as all the water in the
tank has been used up.
Repeat the calc-clean process if the iron still contains a lot of impurities.
After the calc-clean process
— Put the plug in the wall socket and let the iron heat up to allow the
soleplate to dry.
— Unplug the iron when it has reached the set ironing temperature.
— Move the hot iron gently over a piece of used cloth to remove any
water stains that may have formed on the soleplate.
— Let the iron cool down before you store it.
Storage
1 Unplug the iron and set the steam control to position 0.
2 Empty the water tank.
C
MAX
MIN
LINEN
COTTON
WOOL
NYLON
SILK
ENGLISH 11
3 Let the iron cool down.Wind the mains cord round the cord
C
storage facility and fix it with the cord clip.
4 Always store the emptied iron horizontally on a stable surface
and use a cloth to protect the soleplate.
Heat-resistant protective cover (GC4340 only)
Do not use the heat-resistant protective cover during ironing.
1 Wind the mains cord round the cord storage facility.
2 Put the iron on the heat-resistant protective cover.
C
3 Store the iron with the heat-resistant protective cover
horizontally on a stable surface.
Environment
◗ Do not throw the appliance away with the normal household
C
waste at the end of its life, but hand it in at an official collection
point for recycling. By doing this you will help to preserve the
environment.
Guarantee & service
If you need information or if you have a problem, please visit the Philips
website at www.philips.com or contact the Philips Customer Care
Centre in your country (you will find its phone number in the
worldwide guarantee leaflet). If there is no Customer Care Centre in
your country, turn to your local Philips dealer or contact the Service
Department of Philips Domestic Appliances and Personal Care BV.
Guarantee restrictions
The delicate fabric protector is not covered by the terms of the
international guarantee.
Troubleshooting
This chapter summarises the most common problems you could
encounter with your iron. If you are unable to solve the problem,
contact the Customer Care Centre in your country.
1
2

ENGLISH12
Problem
Possible cause
Solution
The iron is plugged in but the soleplate
There is a connection problem.
Check the mains cord, the plug and
is cold.
the wall socket.
The temperature dial has been set to
Set the temperature dial to the
MIN.
required position.
No steam.
There is not enough water in the
Fill the water tank (see chapter
water tank.
‘Preparing for use’).
The steam control has been set to
Set the steam control to a position
position 0.
between 1 and 6 (see chapter ‘Using
the appliance’).
The iron is not hot enough and/or the
Select an ironing temperature that is
drip-stop function has been activated.
suitable for steam ironing (2 to
MAX). Put the iron on its heel and
wait until the amber temperature light
has gone out before you start ironing.
No shot of steam or no vertical shot of
The shot-of-steam function has been
Continue ironing in horizontal position
steam.
used too often within a very short
and wait a while before using the
period.
shot-of-steam function again.
The iron is not hot enough.
Select an ironing temperature that is
suitable for steam ironing (2 to
MAX). Put the iron on its heel and
wait until the amber temperature light
has gone out before you start ironing.
Water droplets drip onto the fabric.
The cap of the filling opening has not
Press the cap until you hear a click.
been closed properly.
An additive has been poured into the
Rinse the water tank and do not put
water tank.
any additive in the water tank.
Flakes and impurities come out of the
Hard water forms flakes inside the
Use the calc-clean function a few
soleplate during ironing.
soleplate.
times (see chapter ‘Cleaning and
maintenance’).
The red auto-off light blinks
The safety shut-off function has
Move the iron slightly to deactivate
(GC4325/4320 only).
switched the iron off (see chapter
the safety shut-off function.The auto-
‘Features’).
off light goes out.
The blue alert light blinks (GC4340 and
The safety shut-off function has
Move the iron slightly to deactivate
GC4330).
switched the iron off (see chapter
the safety shut-off function.The blue
‘Features’).
alert light stops blinking.
The iron is plugged in but the blue alert
There is a connection problem.
Check the mains cord, the plug and
light is out (GC4340 and GC4330).
the wall socket.
POLSKI 13
Ważne
Przed pierwszym użyciem urządzenia zapoznaj się dokładnie z jego
instrukcją obsługi i zachowaj ją na wypadek konieczności użycia w
przyszłości.
◗ Przed podłączeniem urządzenia upewnij się, czy napięcie podane
na tabliczce znamionowej jest zgodne z napięciem w sieci
elektrycznej.
◗ Podłączaj urządzenie wyłącznie do uziemionego gniazdka
elektrycznego.
◗ Nie korzystaj z urządzenia, jeśli uszkodzona jest wtyczka, przewód
sieciowy lub samo urządzenie, albo jeśli urządzenie zostało
upuszczone bądź przecieka.
◗ Regularnie sprawdzaj, czy przewód sieciowy nie jest uszkodzony.
◗ Ze względów bezpieczeństwa wymianę uszkodzonego przewodu
zleć autoryzowanemu centrum serwisowemu firmy Philips lub
odpowiednio wykwalifikowanej osobie.
◗ Nie zostawiaj urządzenia bez nadzoru, gdy jest ono podłączone do
sieci elektrycznej.
◗ Nie zanurzaj w wodzie żelazka ani podstawki (jeśli jest dołączona).
◗ Przechowuj urządzenie w miejscu niedostępnym dla dzieci.
◗ Stopa żelazka może być bardzo rozgrzana i dotknięcie jej może
spowodować poparzenia.
◗ Nie dopuszczaj do kontaktu przewodu z rozgrzaną stopą żelazka.
◗ Po zakończeniu prasowania ustaw regulator pary w położeniu „0”,
postaw żelazko na piętce i wyjmij wtyczkę przewodu sieciowego z
gniazdka w przypadku: czyszczenia urządzenia, napełniania lub
opróżniania zbiorniczka wody, odstawienia żelazka nawet na
krótką chwilę.
◗ Zawsze korzystaj z żelazka i podstawki (jeśli jest dołączona)
umieszczonej na stabilnej i równej powierzchni poziomej.
◗ Nie wlewaj do zbiorniczka wody perfum, octu, krochmalu,
środków do usuwania kamienia, ułatwiających prasowanie ani
żadnych innych środków chemicznych.
◗ Urządzenie to jest przeznaczone wyłącznie do użytku domowego.
Przed pierwszym użyciem
1 Usuń ze stopy żelazka osłonę zabezpieczającą, odporną na
C
wysokie temperatury (tylko w modelu GC4340). Zdejmij ze
stopy żelazka wszelkie nalepki i folię ochronną.
B
Podczas pierwszego użycia z żelazka może wydostawać się dym.
Zjawisko to ustanie po krótkiej chwili.
POLSKI14
Przygotowanie do użycia
Napełnianie zbiorniczka na wodę.
Nie zanurzaj żelazka w wodzie.
1 Upewnij się, że urządzenie jest odłączone od sieci elektrycznej.
2 Ustaw regulator pary w położeniu „0” (brak pary).
C
3 Zdejmij nasadkę z otworu wlewowego wody.
4 Przechyl żelazko do tyłu.
5 Nalej wody z kranu do zbiorniczka do górnego oznaczenia
C
poziomu, używając do tego celu specjalnego pojemniczka.
Nie napełniaj zbiorniczka powyżej wskaźnika „MAX”.
Nie wlewaj do zbiorniczka wody perfum, octu, krochmalu, środków do
usuwania kamienia, ułatwiających prasowanie ani żadnych innych
środków chemicznych.
◗ Jeśli woda kranowa w Twojej okolicy jest bardzo twarda, zaleca się
wymieszanie jej w równych proporcjach z wodą destylowaną lub
stosowanie samej wody destylowanej.
6 Załóż nasadkę na otwór wlewowy wody (usłyszysz
C
„kliknięcie”).
Ustawianie temperatury
1 Tylko model GC4340: Zdejmij osłonę zabezpieczającą, odporną
C
na wysokie temperatury.
Nie zostawiaj osłony zabezpieczającej założonej na stopę żelazka na
czas prasowania.
2 Postaw żelazko na piętce.
3 Ustaw żądaną temperaturę prasowania, obracając pokrętło
C
regulatora temperatury w odpowiednie położenie.
Sprawdź zaznaczoną na metce wymaganą temperaturę prasowania.
— 1 Tkaniny sztuczne (np. akryl, nylon, poliamid, poliester)
— 1 Jedwab
— 2 Wełna
— 3 Bawełna, len
Jeśli nie znasz rodzaju tkaniny, z którego wykonany jest prasowany
MAX
MIN
LINEN
COTTON
WOOL
NYLON
SILK

POLSKI 15
produkt, właściwą temperaturę prasowania należy ustalić przez
wyprasowanie takiej jego części, która będzie niewidoczna podczas
noszenia czy używania.
Jedwab, wełna i tkaniny sztuczne:Aby nie dopuścić do powstawania
lśniących plam, prasuj tkaniny na lewej stronie. Nie używaj funkcji
spryskiwacza, aby uniknąć powstawania plam przy prasowaniu.
Zacznij od prasowania produktów, wymagających najniższej
temperatury prasowania, np. wykonanych z tkanin sztucznych.
4 Podłącz wtyczkę przewodu sieciowego do uziemionego
gniazdka elektrycznego.
5 Gdy zgaśnie pomarańczowy wskaźnik temperatury, odczekaj
C
chwilę przed rozpoczęciem prasowania.
Podczas prasowania wskaźnik temperatury będzie zapalał się od czasu
do czasu.
Zasady używania
Prasowanie parowe
1 Sprawdź, czy w zbiorniczku jest wystarczająca ilość wody.
2 Wybierz zalecaną temperaturę prasowania (patrz rozdział
„Przygotowanie do użycia”, część „Ustawianie temperatury”).
3 Wybierz odpowiednie ustawienie pary. Sprawdź, czy wybrane
C
ustawienie pary jest odpowiednie dla wybranej temperatury
prasowania:
— 1–3 dla umiarkowanej ilości pary (ustawienia temperatury od 2 do
3)
— 4–6 dla maksymalnej ilości pary (ustawienia temperatury od 3
do „MAX”)
B
Z chwilą osiągnięcia zadanej temperatury żelazko zacznie wytwarzać
parę.
Prasowanie bez pary
1 Ustaw regulator pary w położeniu „0” (brak pary).
C
2 Wybierz zalecaną temperaturę prasowania (patrz rozdział
„Przygotowanie do użycia”, część „Ustawianie temperatury”).
POLSKI16
Funkcje
Osłona do delikatnych tkanin (tylko model GC4325)
Osłona chroni delikatne tkaniny przed zniszczeniem w wyniku działania
zbyt wysokich temperatur oraz przez powstawaniem lśniących plam.
Dzięki niej można prasować delikatne tkaniny (tj. jedwab, wełna i nylon)
przy ustawieniach temperatury od 3 do „MAX” i korzystać
jednocześnie ze wszystkich funkcji wytwarzania pary dostępnych w
żelazku.
Osłona do delikatnych tkanin błyskawicznie obniża temperaturę stopy,
umożliwiając bezpieczne prasowanie delikatnych tkanin.
Jeśli nie znasz rodzaju tkaniny, z którego wykonany jest prasowany
produkt, właściwą temperaturę prasowania należy ustalić przez
wyprasowanie takiej jego części, która będzie niewidoczna podczas
noszenia czy używania.
1 Umieść żelazko na osłonie do delikatnych tkanin (usłyszysz
C
„kliknięcie”).
Funkcja spryskiwacza
Funkcji spryskiwacza można użyć w celu usunięcia opornych zagnieceń.
1 Sprawdź, czy w zbiorniczku jest wystarczająca ilość wody.
2 Aby zwilżyć prasowaną tkaninę, kilkakrotnie wciśnij przycisk
C
spryskiwacza.
Skoncentrowane uderzenie pary ze specjalnej końcówki Steam
Tip
Uderzenie skoncentrowanej pary pozwala usunąć najbardziej oporne
zagniecenia. Skierowany do przodu strumień skoncentrowanej pary
zwiększa ilość pary trafiającej do każdej części prasowanej tkaniny.
Funkcję uderzenia pary można użyć wyłącznie dla ustawień
temperatury od 2 do „MAX”.
1 Wciśnij i zwolnij przycisk uderzenia pary.
C
POLSKI 17
Pionowe uderzenie pary
1 Funkcję uderzenia pary można także używać w pozycji
C
pionowej.
Jest ona użyteczna w przypadku usuwania zagnieceń na wiszących
ubraniach, zasłonach itd.
Nie wolno kierować strumienia pary na ludzi.
Blokada kapania
To żelazko wyposażone jest w funkcję blokady kapania: żelazko
automatycznie przestaje wytwarzać parę, gdy temperatura jest zbyt
niska, co zapobiega kapaniu wody ze stopy.Włączenie blokady jest
sygnalizowane dźwiękiem.
System antywapienny Anti-Calc
1 Wbudowany system Anti-Calc zmniejsza wytwarzanie się
C
kamienia i gwarantuje dłuższy czas eksploatacji żelazka.
Elektroniczny wyłącznik bezpieczeństwa (tylko model
GC4325/4320)
◗ Funkcja elektronicznego wyłącznika bezpieczeństwa powoduje
C
automatyczne wyłączenie żelazka, gdy nie jest ono używane przez
dłuższy czas.
◗ W przypadku wyłączenia żelazka przez wyłącznik bezpieczeństwa
wskaźnik automatycznego wyłączenia zaczyna migać na czerwono.
Aby żelazko rozgrzało się ponownie:
— Chwyć żelazko lub porusz nim delikatnie.
— Czerwony wskaźnik automatycznego wyłączenia zgaśnie. Jeśli
temperatura stopy żelazka spadnie poniżej ustawionej temperatury
prasowania, wówczas zapali się pomarańczowy wskaźnik
temperatury.
— Jeśli po poruszeniu żelazkiem zaświeci się wskaźnik temperatury,
zaczekaj aż zgaśnie i dopiero wtedy zacznij prasować.
— Jeśli po poruszeniu żelazkiem wskaźnik temperatury nie zaświeci się,
oznacza to, że temperatura stopy żelazka jest odpowiednia i żelazko
jest gotowe do prasowania.
POLSKI18
Wskaźnik ostrzegawczy i funkcja elektronicznego wyłącznik
bezpieczeństwa (model GC4340 i GC4330)
Żelazko wyposażone jest w niebieski wskaźnik ostrzegawczy.
◗ Niebieski wskaźnik ostrzegawczy świeci się, gdy żelazko
C
podłączone jest do zasilania.
◗ W przypadku wyłączenia żelazka przez wyłącznik bezpieczeństwa
wskaźnik ostrzegawczy zaczyna migać na czerwono.
Aby żelazko rozgrzało się ponownie:
— Chwyć żelazko lub porusz nim delikatnie.
— Niebieski wskaźnik ostrzegawczy przestanie migać. Jeśli temperatura
stopy żelazka spadnie poniżej ustawionej temperatury prasowania,
wówczas zapali się pomarańczowy wskaźnik temperatury.
— Jeśli po poruszeniu żelazkiem zaświeci się wskaźnik temperatury,
zaczekaj aż zgaśnie i dopiero wtedy zacznij prasować.
— Jeśli po poruszeniu żelazkiem wskaźnik temperatury nie zaświeci się,
oznacza to, że temperatura stopy żelazka jest odpowiednia i żelazko
jest gotowe do prasowania.
Czyszczenie i konserwacja
Po zakończeniu prasowania
1 Wyjmij wtyczkę przewodu sieciowego z gniazdka
elektrycznego i poczekaj, aż żelazko ostygnie.
2 Zetrzyj ze stopy żelazka płytki kamienia i inne osady za pomocą
wilgotnej szmatki i (płynnego) środka czyszczącego nie
zawierającego środków ściernych.
Aby powierzchnia stopy pozostała niezarysowana, żelazka nie należy
stawiać w pobliżu żadnych metalowych przedmiotów. Do czyszczenia
stopy nie wolno używać czyścików, octu ani innych środków
chemicznych.
3 Przetrzyj górną część żelazka wilgotną szmatką.
4 Wypłucz zbiorniczek wody. Po umyciu opróżnij go.
Funkcja Calc-Clean
Funkcja Calc-Clean służy do usuwania kamienia i innych zanieczyszczeń.
◗ Korzystaj z tej funkcji raz na dwa tygodnie. Jeśli woda kranowa w
Twojej okolicy jest bardzo twarda (tzn. gdy podczas prasowania ze
stopy spadają płytki kamienia), z funkcji należy korzystać częściej.
1 Upewnij się, że urządzenie jest odłączone od sieci elektrycznej.
POLSKI 19
2 Ustaw regulator pary w położeniu „0”.
3 Napełnij zbiorniczek wodą do wskaźnika „MAX”.
Nie wlewaj do zbiorniczka wody octu ani innych środków do usuwania
kamienia.
4 Wybierz maksymalną temperaturę prasowania.
C
5 Podłącz wtyczkę przewodu sieciowego do uziemionego
gniazdka elektrycznego.
6 Gdy zgaśnie pomarańczowy wskaźnik temperatury, wyjmij
wtyczkę przewodu z gniazdka elektrycznego.
7 Trzymając żelazko nad zlewem, wciśnij i przytrzymaj przycisk
C
Calc-Clean, po czym delikatnie potrząśnij żelazkiem.
Ze stopy żelazka zacznie wydostawać się para i gorąca woda.
Wypłukane zostaną zanieczyszczenia i płytki kamienia.
8 Po opróżnieniu zbiorniczka wody zwolnij przycisk Calc-Clean.
Czynność należy powtórzyć, jeśli w żelazku nadal znajduje się dużo
zanieczyszczeń.
Po czyszczeniu przy użyciu funkcji Calc-Clean
— Podłącz wtyczkę przewodu sieciowego do gniazdka elektrycznego i
poczekaj, aż żelazko rozgrzeje się, a jego stopa wyschnie.
— Odłącz żelazko od zasilania, gdy osiągnie ono ustawioną temperaturę
prasowania.
— Przeciągnij żelazko po kawałku niepotrzebnego materiału, aby usunąć
zacieki wodne, jakie mogły powstać na stopie żelazka.
— Przed odstawieniem żelazka odczekaj, aż zupełnie ostygnie.
Przechowywanie
1 Odłącz żelazko od zasilania i ustaw regulator pary w pozycji
„0”.
2 Opróżnij zbiorniczek wody.
C
MAX
MIN
LINEN
COTTON
WOOL
NYLON
SILK
POLSKI20
3 Odczekaj, aż żelazko ostygnie. Nawiń przewód zasilający na
C
żelazko i zapnij go za pomocą zacisku.
4 Puste żelazko przechowuj w pozycji poziomej, na stabilnej
powierzchni, a pod stopę podłóż szmatkę.
Osłona zabezpieczająca odporna na wysokie temperatury
(tylko model GC4340)
Nie używaj osłony zabezpieczającej odpornej na wysokie temperatury
do prasowania.
1 Nawiń przewód zasilający na żelazko.
2 Ustaw żelazko na osłonie zabezpieczającej odpornej na wysokie
C
temperatury.
3 Przechowuj żelazko z założoną osłoną zabezpieczającą w
pozycji poziomej, na stabilnej powierzchni.
Ochrona środowiska
◗ Zużytego urządzenia nie należy wyrzucać wraz z normalnymi
C
odpadami gospodarstwa domowego — należy oddać je do punktu
zbiórki surowców wtórnych w celu utylizacji. Stosowanie się do
tego zalecenia pomaga w ochronie środowiska.
Gwarancja i serwis
W razie jakichkolwiek pytań lub problemów prosimy odwiedzić naszą
stronę internetową www.philips.com lub skontaktować się z Centrum
Obsługi Klienta firmy Philips (numer telefonu znajduje się w ulotce
gwarancyjnej). Jeśli w kraju zamieszkania nie ma takiego Centrum, o
pomoc należy zwrócić się do sprzedawcy produktów firmy Philips lub
do Działu Obsługi Klienta firmy Philips Domestic Appliances and
Personal Care BV.
Ograniczenia gwarancji
Osłona do delikatnych tkanin nie jest objęta warunkami
międzynarodowej gwarancji.
1
2
Аннотация для Утюга Philips GC 4330 в формате PDF
Топ 10 инструкций
Другие инструкции
-
Page 1
Azur GC4340, GC4330, GC4325, GC4320, GC4310[…]
-
Page 2
2[…]
-
Page 3
ENGLISH 4 ESP AÑOL 13 IT ALIANO 23 POR TUGUÊS 32 42 TÜRKÇE 52 GC4340, GC4330, GC4325, GC4320, GC4310[…]
-
Page 4
Important Read these instr uctions for use carefully bef ore using the appliance and sav e them for future reference . ◗ Check if the voltage indicated on the type plate cor responds to the local mains voltage bef ore y ou connect the appliance . ◗ Only connect the appliance to an earthed wall sock et. ◗ Do not use the appliance if the plug, […]
-
Page 5
Preparing f or use Filling the water tank Never immerse the iron in water . 1 Mak e sure the a ppliance is unplugged. C 2 Set the steam control to position 0 (= no steam). 3 Open the cap of the filling opening. 4 Tilt the iron backwar ds. C 5 Fill the water tank with tap water up to the maximum le vel b y means of the filling cup . Do not fill the […]
-
Page 6
C 3 Set the requir ed ironing temperature b y turning the temperature dial to the a ppropriate position. Check the laundr y care label for the required ironing temperature: — 1 Synthetic fabrics (e .g. acr ylic, nylon, polyamide, poly ester) — 1 Silk — 2 W ool — 3 Cotton, linen If you do not kno w what kind or kinds of fabric an ar ticle is made of[…]
-
Page 7
Ir oning without steam C 1 Set the steam control to position 0 (= no steam). 2 Select the recommended ir oning temperature (see chapter ‘Preparing f or use’, section ‘Setting the temperature’). F eatures Delicate fabric pr otector (GC4325 only) The delicate fabric protector protects delicate fabr ics from heat damage and shiny p[…]
-
Page 8
C 1 Press and r elease the shot-of-steam button. V er tical shot of steam C 1 The shot-of-steam function can also be used when you hold the iron in v er tical position. This is useful for remo ving creases from hanging clothes, cur tains etc . Never direct the steam at people. Drip stop This iron is equipped with a drip-stop function: the iron auto[…]
-
Page 9
— If the temperature light goes on after you hav e mov ed the iron, wait for it to go out before y ou star t ironing. — If the temperature light does not go on after you mov e the iron, the soleplate still has the right temper ature and the iron is ready for use . Alert light and electronic safety shut-off function (GC4340 and GC4330) The iron is e[…]
-
Page 10
during ironing), the calc-clean function should be used more frequentl y . 1 Mak e sure the a ppliance is unplugged. 2 Set the steam control to position 0. 3 Fill the water tank to the maximum lev el. Do not put vinegar or other descaling agents in the water tank. C 4 Select the maximum ir oning temperature. 5 Put the plug in an earthed wall socket[…]
-
Page 11
C 3 Let the iron cool do wn. Wind the mains cord r ound the cord storage facility and fix it with the cord clip . 4 Alwa ys store the emptied ir on horizontally on a stable surface and use a cloth to protect the soleplate. Heat-resistant pr otective cov er (GC4340 only) Do not use the heat-resistant protective co ver during ironing. 1 Wind the main[…]
-
Page 12
Solution Check the mains cord, the plug and the wall socket. Set the temperature dial to the required position. Fill the water tank (see chapter ‘Preparing for use’). Set the steam control to a position between 1 and 6 (see chapter ‘Using the appliance’). Select an ironing temperature that is suitable for steam ironing ( 2 to MA[…]
-
Page 13
Importante Antes de usar el aparato, lea atentamente estas instr ucciones de uso y consér v elas por si necesitara consultar las en el futuro. ◗ Antes de encender la plancha, compruebe si el voltaje indicado en la placa de modelo se corr esponde con el voltaje de r ed local. ◗ Enchufe el aparato sólo a un enchuf e con toma de tierra. ◗ No u[…]
-
Page 14
Preparación para su uso Llenado del depósito de agua No sumerja nunca la plancha en agua. 1 Asegúrese de que el a parato está desenchufado . C 2 Ajuste el control de va por a la posición 0 (= sin vapor). 3 Abra la tapa de la abertura de llenado. 4 Incline la plancha hacia atrás. C 5 Llene el depósito con agua del grifo hasta la indicación d[…]
-
Page 15
C 3 Fije la temperatura de planchado adecuada girando el control de temperatura hasta la posición corr espondiente. Compr uebe en la etiqueta de la prenda la temperatur a de planchado apropiada: — 1 Fibras sintéticas (por ejemplo, acrílico , n ylon, poliamida, poliéster) — 1 Seda — 2 Lana — 3 Algodón, lino Si no sabe de qué tipos de tejido es[…]
-
Page 16
Planchado sin vapor C 1 Ponga el contr ol de vapor en la posición 0 (= sin vapor). 2 Seleccione la posición de temperatura de planchado recomendada (consulte el ca pítulo «Preparación para su uso», apartado «Ajuste de la temperatura»). Características Pr otector de tejidos delicados (sólo modelo GC4325) El protector de tej[…]
-
Page 17
La función de golpe de vapor sólo se puede usar a temperatur as de planchado entre 2 y MAX. C 1 Presione y suelte el botón de g olpe de vapor . Golpe de vapor v ertical C 1 La función de golpe de vapor también se puede utilizar con la plancha en posición vertical. Es muy útil para eliminar las ar r ugas de prendas colgadas, cor tinas, etc . […]
-
Page 18
— El piloto rojo de apagado automático se apagará. Si la temperatur a de la suela es inferior a la temper atura de planchado seleccionada, el piloto ámbar de temperatur a se encenderá. — Si el piloto de temperatur a se ilumina después de haber movido la plancha, espere a que se apague antes de empezar a planchar . — Si el piloto de temperatur […]
-
Page 19
Función Calc-Clean (autolimpieza) Puede utilizar la función Calc-Clean para eliminar las par tículas de cal y las impurezas. ◗ Use la función Calc-Clean una vez cada dos semanas. Si el agua de su zona es muy dura (es decir , si durante el planchado salen partículas de cal por la suela), debe utilizar la función Calc-Clean más a menudo . 1 […]
-
Page 20
Almacenamiento 1 Desenchufe la plancha y ajuste el contr ol de vapor a la posición 0. C 2 V acíe el depósito de agua. C 3 Deje que la plancha se enfríe. Enr olle el cable de red alrededor del recogecable y sujételo con el clip . 4 Guarde siempr e la plancha vacía en posición horizontal y sobre una superficie estable, y utilice un tra po para[…]
-
Page 21
de Philips en su país, diríjase a su distribuidor local Philips o póngase en contacto con el Ser vice Depar tment de Philips Domestic Appliances and P er sonal Care BV . Restricciones de la garantía El protector de tejidos delicados no está cubier to por las condiciones de la garantía inter nacional. Guía de resolución de pr oblemas En este[…]
-
Page 22
Solución Compr uebe el cable de red, la clavija y el enchufe. Coloque el control de temperatur a en la posición adecuada. Llene el depósito de agua (consulte el capítulo «Preparación par a su uso»). Ajuste el control del vapor a una posición entre 1 y 6 (consulte el capítulo «Uso del aparato»). Seleccione una temperatur a[…]
-
Page 23
Importante Prima di utilizzare l’apparecchio, leggete attentamente le istr uzioni e conser vatele per ev entuali rifer imenti futuri. ◗ Prima di collegare l’a pparecchio , controllate che la tensione indicata sulla placchetta corrisponda a quella della r ete locale. ◗ Collegate l’appar ecchio esclusivamente a una presa di messa a[…]
-
Page 24
Come preparar e l’apparecchio per l’uso Come riempire il serbatoio Non immergete mai il fer ro nell’acqua. 1 V erificate che l’apparecchio sia scollegato dalla pr esa di corr ente. C 2 Impostate il reg olatore di va pore in posizione 0 (= assenza di vapor e). 3 Aprite il tappo del for o di riempimento. 4 Inclinate il ferr o all&[…]
-
Page 25
Se non conoscete la composizione di un tessuto e volete stabilire la temperatur a giusta, fate una pro va su un angolo del capo non visibile quando viene indossato o usato. Seta, lana e materiali sintetici: stirate il capo al rovescio per evitare tracce di lucido. Evitate anche l’uso dello spray per non macchiare i tessuti. Iniziate a stirare […]
-
Page 26
Caratteristiche Pr otezione per tessuti delicati (solo per GC4325) Questo sistema consente di proteggere i tessuti delicati dal calore e dalle tracce di lucido. La protezione per tessuti delicati consente di stirare tessuti (seta, lana, nylon) a una temperatur a compresa tra 3 e MAX in combinazione con tutte le opzioni di vapore disponibili. La pro[…]
-
Page 27
Getto di vapor e verticale C 1 La funzione getto di vapor e può essere utilizzata anche tenendo il ferr o in posizione verticale Questo getto di vapore è utile per eliminare le pieghe da vestiti appesi, tende , ecc . Non puntate mai il getto di vapore verso le per sone . Dispositivo antig occia Il ferro è provvisto di un dispositivo antigoccia c[…]
-
Page 28
Spia allarme e funzione elettr onica di spegnimento di sicurezza (solo per GC4340 e GC4330) Il ferro è provvisto di una spia allarme di colore blu C ◗ La spia blu rimane accesa mentre il f err o viene collegato alla presa di corr ente. ◗ La spia blu inizia a lampeggiare per indicar e che il ferro è stato?spento dalla funzione di spegnimento d[…]
-
Page 29
2 Mettete il reg olatore di va pore in posizione O . 3 Riempite il serbatoio fino al livello MAX. Non versate aceto o altr i agenti disincrostanti nel serbatoio dell’acqua. C 4 Selezionate la temperatura massima di stiratura. 5 Inserite la spina nella presa di cor rente. 6 Scollegate l’appar ecchio dalla presa di cor rente non a ppena la […]
-
Page 30
Coper chio di protezione termor esistente (solo per GC4340) Non utilizzate il coperchio di protezione termoresistente dur ante la stiratur a. 1 Avv olgete il cav o attorno all’apposito supporto. C 2 Mettete il ferr o sul coperchio di pr otezione termoresistente. 3 Riponete il ferr o con il coperchio di pr otezione termoresistente in posizione […]
-
Page 31
Soluzione Controllate il cav o, la presa e la spina a?muro . Impostate il termostato sulla posizione richiesta. Riempite il serbatoio dell’acqua (vedere il capitolo «Come preparare il ferro per l’uso») Impostate il regolatore di vapore in una posizione compresa fra 1 e 6(vedere il capitolo «Come usare?l’apparecchio&quo[…]
-
Page 32
Importante Leia estas instr uções com atenção antes de utilizar o aparelho e guarde-as para uma eventual consulta futur a. ◗ V erifique se a voltagem indicada na sinalética corr esponde à voltagem eléctrica local, antes de ligar o aparelho . ◗ Ligue sempre o a parelho a uma tomada com ter ra. ◗ Não utilize o apar elho se a ficha, o fi[…]
-
Page 33
Preparação Encher o reservatório da água Nunca mergulhe o fer ro dentro de água. 1 Certifique-se de que o aparelho está desligado da tomada. C 2 Regule o controlo do va por para a posição 0 (= sem vapor). 3 Abra a tampa da abertura de enchimento. 4 Incline o ferr o para trás. C 5 Encha o reservatório com água da torneira até ao nível m[…]
-
Page 34
C 3 Regule o ferr o para a temperatura pretendida rodando o botão da temperatura para a posição apr opriada. V erifique a etiqueta da peça de roupa para saber qual a temper atur a que deve seleccionar : — 1 T ecidos sintéticos (p. ex.: acrílico, nylon, poliamida, poliéster) — 1 Seda — 2 Lã — 3 Algodão, linho Se desconhecer o tipo ou os tip[…]
-
Page 35
Passar sem vapor C 1 Regule o controlo do va por para a posição 0 (= sem vapor). 2 Seleccione a temperatura recomendada (consulte o ca pítulo ‘Preparação’, secção ‘Selecção da temperatura’). Características Pr otector de tecidos delicados (apenas GC4325) O protector de tecidos delicados protege este tipo de tecidos dos[…]
-
Page 36
C 1 Prima e solte o botão do jacto de vapor . Jacto de vapor v ertical C 1 A função ‘jacto de vapor’ também pode ser utilizada segurando o ferr o na posição vertical. Este procedimento é útil para a remoção de vincos quando a roupa está pendurada nos cabides, par a cor tinas, etc . Nunca direccione o jacto para as pessoas. Sist[…]
-
Page 37
— A luz vermelha ‘auto-off’ apaga-se . Se a temperatur a da base do ferro descer abaixo da temper atura seleccionada par a passar a roupa, a luz âmbar da temperatur a acende-se. — Se a luz da temperatur a se acender depois de movimentar o ferro, aguarde que ela se apague antes de começar a passar . — Se a luz da temperatur a não se ace[…]
-
Page 38
Função Calc-clean (limpeza do calcário) P ode utilizar a função Calc-clean par a remov er o calcár io e as impurezas. ◗ Utilize a função Calc-clean uma vez a cada duas semanas. Se a água da sua zona de residência f or muito dura (p . ex., se saírem resíduos de calcário da base quando estiv er a passar), a função Calc-clean dev e se[…]
-
Page 39
Arrumação 1 Desligue o ferr o e regule o controlo de va por para a posição 0. C 2 Esvazie o reservatório da água. C 3 Deix e o ferr o arrefecer . Enrole o fio do f err o no compartimento respectivo e fix e-o com a mola. 4 Guarde sempr e o ferr o vazio na posição horizontal, sobre uma superfície estável, e utilize um pano para proteger a b[…]
-
Page 40
o Depar tamento de Assistência da Philips Domestic Appliances and P er sonal Care BV . Restrições à garantia O protector de tecidos delicados não está abrangido pelos ter mos da garantia inter nacional. Resolução de pr oblemas Este capítulo resume alguns dos problemas mais com uns que pode encontrar no seu fer ro. Se não conseguir resolve[…]
-
Page 41
Solução V erifique o fio, a ficha e a tomada eléctrica. Regule a temperatur a para a posição pretendida. Encha o reser vatór io com água (consulte o capítulo ‘Preparação’). Regule o controlo do vapor para uma posição entre 1 e 6 (consulte o capítulo ‘Utilização do aparelho’). Seleccione uma temperatur a que seja a[…]
-
Page 42
. ◗ ?[…]
-
Page 43
. 1 […]
-
Page 44
, , ?[…]
-
Page 45
C 1 0 (= ). 2 ( ?[…]
-
Page 46
[…]
-
Page 47
( GC4325/4320) C ◗ […]
-
Page 48
! 1 . 2 ?[…]
-
Page 49
C 7 , ?[…]
-
Page 50
C 2 . 3 ?[…]
-
Page 51
, . . (?[…]
-
Page 52
Önemli Lütfen cihazı kullanmadan önce v erilen talimatları okuyun. İler ide başvurmak için bu talimatları saklayın. ◗ Cihazı bağlamadan önce, model plakasında belirtilen voltajın ana şebek e voltajıyla a ynı olduğunu k ontrol edin. ◗ Bu cihazı sadece toprak hatlı bir prize takılı kullanın. ◗ Priz, kablo veya cihazın k[…]
-
Page 53
TÜRKÇE 53 C 2 Buhar k ontrolünü 0 k onumuna getirin (= buharsız). 3 Doldurma deliğinin kapağını açın. 4 Ütüyü arka ya doğru yatırın. C 5 Su haznesini doldurma kabının yardımıyla maksimum se viyey e kadar musluk suyuyla doldurun. Hazneyi MAX (MAKS) göstergesinin üzer inde bir seviyede doldurmayın. Su haznesine parfüm, sirke […]
-
Page 54
TÜRKÇE 54 İpek, yünlü v e sentetik malzemeler : par lak lekeler oluşmasını engellemek için, kumaşın ters yüzünü ütüleyin. Leke oluşumun u engellemek için sprey özelliğini kullanmaktan kaçının. Ütüleme işlemine , sentetik ürünler gibi en az ütüleme sıcaklığı isteyen elbiseleri ütüleyerek başlayın. 4 Cihazın fi?[…]
-
Page 55
TÜRKÇE 55 Hassas kumaş kor uyucu, ütü tabanı sıcaklığını anlık olar ak azaltır ve hassas kumaşları güvenle ütülemenizi sağlar . Elbisenin ne tür kumaştan yapıldığını bilmiy or sanız, elbiseyi giydiğinizde görünmeyen bir bölümünü ütüley erek doğr u ütüleme sıcaklığını belir leyin. C 1 Ütüde hassas kumaş[…]
-
Page 56
TÜRKÇE 56 Otomatik anti-calc sistemi C 1 Dahili anti-calc sistemi kireç oluşum unu azaltır v e ütünün daha uzun ömürlü olmasını sağlar . Elektr onik emniyetli ka panma özelliği (sadece GC4325/4320 için) C ◗ Elektronik emniy etli kapanma özelliği, ütü bir süre boyunca harek etsiz kaldıysa cihazı otomatik olarak kapatır . ?[…]
-
Page 57
T emizlik ve bakım Ütülemeden sonra 1 Elektrik fişini prizden çıkarın ve ütüyü soğuma ya bırakın. 2 T ortuları ve tabandan çıkan diğer artıkları nemli bir bez ve aşındırıcı olma yan (sıvı) bir temizlik maddesiyle silin. Ütü tabanının düzlüğünü kor uması için, metal cisimler le ser t temasından kaçının. Ütü[…]
-
Page 58
TÜRKÇE 58 Calc-clean işleminden sonra — Fişi prize takın ve ütü tabanının kur uması için ütünün ısınmasını sağlayın. — A yar lanan ütüleme sıcaklığına ulaştığında, ütüyü pr izden çekin. — Ütünüzü ya vaşça eski bir bez üzerinde gezdir in. Kalan su lekeler i ütü tabanından çıkar . — Saklamadan önce , üt[…]
-
Page 59
Garanti ve Servis Eğer daha fazla bilgiye ihtiy aç duyar sanız vey a bir problem y aşar sanız, lütfen Philips W eb sitesini www .philips.com.tr adresinden ziyaret ediniz veya ülk enizde bulunan Philips Müşteri Danışma Mer kezi ile iletişime geçiniz (dünya genelindeki telef on numaraları verilen gar anti belgeler i içerisinde bulabil[…]
-
Page 60
TÜRKÇE 60 Çözüm Cihazın fişini, elektr ik kablosun u ve prizi kontrol ediniz. Sıcaklık kadranını istenilen konuma getirin. Su haznesini doldur un (bkz. «Kullanıma hazır lama» bölümü) Buhar ayar düğmesini 1 ila 6 arasında bir konuma getirin (bkz. ‘Cihazı kullanma’ bölümü). Buhar lı ütüleme için uygun ol[…]
-
Page 61
61[…]
-
Page 62
62[…]
-
Page 63
63[…]
-
Page 64
www .philips.com 4239 000 56935 u[…]
-
Page 1: Philips Azur Precise GC4330
Azur GC4340, GC4330, GC4325, GC4320, GC4310[…]
-
Page 2: Philips Azur Precise GC4330
2[…]
-
Page 3: Philips Azur Precise GC4330
ENGLISH 4 ESP AÑOL 13 IT ALIANO 23 POR TUGUÊS 32 42 TÜRKÇE 52 GC4340, GC4330, GC4325, GC4320, GC4310[…]
-
Page 4: Philips Azur Precise GC4330
Important Read these instr uctions for use carefully bef ore using the appliance and sav e them for future reference . ◗ Check if the voltage indicated on the type plate cor responds to the local mains voltage bef ore y ou connect the appliance . ◗ Only connect the appliance to an earthed wall sock et. ◗ Do not use the appliance if the plug, […]
-
Page 5: Philips Azur Precise GC4330
Preparing f or use Filling the water tank Never immerse the iron in water . 1 Mak e sure the a ppliance is unplugged. C 2 Set the steam control to position 0 (= no steam). 3 Open the cap of the filling opening. 4 Tilt the iron backwar ds. C 5 Fill the water tank with tap water up to the maximum le vel b y means of the filling cup . Do not fill the […]
-
Page 6: Philips Azur Precise GC4330
C 3 Set the requir ed ironing temperature b y turning the temperature dial to the a ppropriate position. Check the laundr y care label for the required ironing temperature: — 1 Synthetic fabrics (e .g. acr ylic, nylon, polyamide, poly ester) — 1 Silk — 2 W ool — 3 Cotton, linen If you do not kno w what kind or kinds of fabric an ar ticle is made of[…]
-
Page 7: Philips Azur Precise GC4330
Ir oning without steam C 1 Set the steam control to position 0 (= no steam). 2 Select the recommended ir oning temperature (see chapter ‘Preparing f or use’, section ‘Setting the temperature’). F eatures Delicate fabric pr otector (GC4325 only) The delicate fabric protector protects delicate fabr ics from heat damage and shiny p[…]
-
Page 8: Philips Azur Precise GC4330
C 1 Press and r elease the shot-of-steam button. V er tical shot of steam C 1 The shot-of-steam function can also be used when you hold the iron in v er tical position. This is useful for remo ving creases from hanging clothes, cur tains etc . Never direct the steam at people. Drip stop This iron is equipped with a drip-stop function: the iron auto[…]
-
Page 9: Philips Azur Precise GC4330
— If the temperature light goes on after you hav e mov ed the iron, wait for it to go out before y ou star t ironing. — If the temperature light does not go on after you mov e the iron, the soleplate still has the right temper ature and the iron is ready for use . Alert light and electronic safety shut-off function (GC4340 and GC4330) The iron is e[…]
-
Page 10: Philips Azur Precise GC4330
during ironing), the calc-clean function should be used more frequentl y . 1 Mak e sure the a ppliance is unplugged. 2 Set the steam control to position 0. 3 Fill the water tank to the maximum lev el. Do not put vinegar or other descaling agents in the water tank. C 4 Select the maximum ir oning temperature. 5 Put the plug in an earthed wall socket[…]
-
Page 11: Philips Azur Precise GC4330
C 3 Let the iron cool do wn. Wind the mains cord r ound the cord storage facility and fix it with the cord clip . 4 Alwa ys store the emptied ir on horizontally on a stable surface and use a cloth to protect the soleplate. Heat-resistant pr otective cov er (GC4340 only) Do not use the heat-resistant protective co ver during ironing. 1 Wind the main[…]
-
Page 12: Philips Azur Precise GC4330
Solution Check the mains cord, the plug and the wall socket. Set the temperature dial to the required position. Fill the water tank (see chapter ‘Preparing for use’). Set the steam control to a position between 1 and 6 (see chapter ‘Using the appliance’). Select an ironing temperature that is suitable for steam ironing ( 2 to MA[…]
-
Page 13: Philips Azur Precise GC4330
Importante Antes de usar el aparato, lea atentamente estas instr ucciones de uso y consér v elas por si necesitara consultar las en el futuro. ◗ Antes de encender la plancha, compruebe si el voltaje indicado en la placa de modelo se corr esponde con el voltaje de r ed local. ◗ Enchufe el aparato sólo a un enchuf e con toma de tierra. ◗ No u[…]
-
Page 14: Philips Azur Precise GC4330
Preparación para su uso Llenado del depósito de agua No sumerja nunca la plancha en agua. 1 Asegúrese de que el a parato está desenchufado . C 2 Ajuste el control de va por a la posición 0 (= sin vapor). 3 Abra la tapa de la abertura de llenado. 4 Incline la plancha hacia atrás. C 5 Llene el depósito con agua del grifo hasta la indicación d[…]
-
Page 15: Philips Azur Precise GC4330
C 3 Fije la temperatura de planchado adecuada girando el control de temperatura hasta la posición corr espondiente. Compr uebe en la etiqueta de la prenda la temperatur a de planchado apropiada: — 1 Fibras sintéticas (por ejemplo, acrílico , n ylon, poliamida, poliéster) — 1 Seda — 2 Lana — 3 Algodón, lino Si no sabe de qué tipos de tejido es[…]
-
Page 16: Philips Azur Precise GC4330
Planchado sin vapor C 1 Ponga el contr ol de vapor en la posición 0 (= sin vapor). 2 Seleccione la posición de temperatura de planchado recomendada (consulte el ca pítulo «Preparación para su uso», apartado «Ajuste de la temperatura»). Características Pr otector de tejidos delicados (sólo modelo GC4325) El protector de tej[…]
-
Page 17: Philips Azur Precise GC4330
La función de golpe de vapor sólo se puede usar a temperatur as de planchado entre 2 y MAX. C 1 Presione y suelte el botón de g olpe de vapor . Golpe de vapor v ertical C 1 La función de golpe de vapor también se puede utilizar con la plancha en posición vertical. Es muy útil para eliminar las ar r ugas de prendas colgadas, cor tinas, etc . […]
-
Page 18: Philips Azur Precise GC4330
— El piloto rojo de apagado automático se apagará. Si la temperatur a de la suela es inferior a la temper atura de planchado seleccionada, el piloto ámbar de temperatur a se encenderá. — Si el piloto de temperatur a se ilumina después de haber movido la plancha, espere a que se apague antes de empezar a planchar . — Si el piloto de temperatur […]
-
Page 19: Philips Azur Precise GC4330
Función Calc-Clean (autolimpieza) Puede utilizar la función Calc-Clean para eliminar las par tículas de cal y las impurezas. ◗ Use la función Calc-Clean una vez cada dos semanas. Si el agua de su zona es muy dura (es decir , si durante el planchado salen partículas de cal por la suela), debe utilizar la función Calc-Clean más a menudo . 1 […]
-
Page 20: Philips Azur Precise GC4330
Almacenamiento 1 Desenchufe la plancha y ajuste el contr ol de vapor a la posición 0. C 2 V acíe el depósito de agua. C 3 Deje que la plancha se enfríe. Enr olle el cable de red alrededor del recogecable y sujételo con el clip . 4 Guarde siempr e la plancha vacía en posición horizontal y sobre una superficie estable, y utilice un tra po para[…]
-
Page 21: Philips Azur Precise GC4330
de Philips en su país, diríjase a su distribuidor local Philips o póngase en contacto con el Ser vice Depar tment de Philips Domestic Appliances and P er sonal Care BV . Restricciones de la garantía El protector de tejidos delicados no está cubier to por las condiciones de la garantía inter nacional. Guía de resolución de pr oblemas En este[…]
-
Page 22: Philips Azur Precise GC4330
Solución Compr uebe el cable de red, la clavija y el enchufe. Coloque el control de temperatur a en la posición adecuada. Llene el depósito de agua (consulte el capítulo «Preparación par a su uso»). Ajuste el control del vapor a una posición entre 1 y 6 (consulte el capítulo «Uso del aparato»). Seleccione una temperatur a[…]
-
Page 23: Philips Azur Precise GC4330
Importante Prima di utilizzare l’apparecchio, leggete attentamente le istr uzioni e conser vatele per ev entuali rifer imenti futuri. ◗ Prima di collegare l’a pparecchio , controllate che la tensione indicata sulla placchetta corrisponda a quella della r ete locale. ◗ Collegate l’appar ecchio esclusivamente a una presa di messa a[…]
-
Page 24: Philips Azur Precise GC4330
Come preparar e l’apparecchio per l’uso Come riempire il serbatoio Non immergete mai il fer ro nell’acqua. 1 V erificate che l’apparecchio sia scollegato dalla pr esa di corr ente. C 2 Impostate il reg olatore di va pore in posizione 0 (= assenza di vapor e). 3 Aprite il tappo del for o di riempimento. 4 Inclinate il ferr o all&[…]
-
Page 25: Philips Azur Precise GC4330
Se non conoscete la composizione di un tessuto e volete stabilire la temperatur a giusta, fate una pro va su un angolo del capo non visibile quando viene indossato o usato. Seta, lana e materiali sintetici: stirate il capo al rovescio per evitare tracce di lucido. Evitate anche l’uso dello spray per non macchiare i tessuti. Iniziate a stirare […]
-
Page 26: Philips Azur Precise GC4330
Caratteristiche Pr otezione per tessuti delicati (solo per GC4325) Questo sistema consente di proteggere i tessuti delicati dal calore e dalle tracce di lucido. La protezione per tessuti delicati consente di stirare tessuti (seta, lana, nylon) a una temperatur a compresa tra 3 e MAX in combinazione con tutte le opzioni di vapore disponibili. La pro[…]
-
Page 27: Philips Azur Precise GC4330
Getto di vapor e verticale C 1 La funzione getto di vapor e può essere utilizzata anche tenendo il ferr o in posizione verticale Questo getto di vapore è utile per eliminare le pieghe da vestiti appesi, tende , ecc . Non puntate mai il getto di vapore verso le per sone . Dispositivo antig occia Il ferro è provvisto di un dispositivo antigoccia c[…]
-
Page 28: Philips Azur Precise GC4330
Spia allarme e funzione elettr onica di spegnimento di sicurezza (solo per GC4340 e GC4330) Il ferro è provvisto di una spia allarme di colore blu C ◗ La spia blu rimane accesa mentre il f err o viene collegato alla presa di corr ente. ◗ La spia blu inizia a lampeggiare per indicar e che il ferro è stato?spento dalla funzione di spegnimento d[…]
-
Page 29: Philips Azur Precise GC4330
2 Mettete il reg olatore di va pore in posizione O . 3 Riempite il serbatoio fino al livello MAX. Non versate aceto o altr i agenti disincrostanti nel serbatoio dell’acqua. C 4 Selezionate la temperatura massima di stiratura. 5 Inserite la spina nella presa di cor rente. 6 Scollegate l’appar ecchio dalla presa di cor rente non a ppena la […]
-
Page 30: Philips Azur Precise GC4330
Coper chio di protezione termor esistente (solo per GC4340) Non utilizzate il coperchio di protezione termoresistente dur ante la stiratur a. 1 Avv olgete il cav o attorno all’apposito supporto. C 2 Mettete il ferr o sul coperchio di pr otezione termoresistente. 3 Riponete il ferr o con il coperchio di pr otezione termoresistente in posizione […]
-
Page 31: Philips Azur Precise GC4330
Soluzione Controllate il cav o, la presa e la spina a?muro . Impostate il termostato sulla posizione richiesta. Riempite il serbatoio dell’acqua (vedere il capitolo «Come preparare il ferro per l’uso») Impostate il regolatore di vapore in una posizione compresa fra 1 e 6(vedere il capitolo «Come usare?l’apparecchio&quo[…]
-
Page 32: Philips Azur Precise GC4330
Importante Leia estas instr uções com atenção antes de utilizar o aparelho e guarde-as para uma eventual consulta futur a. ◗ V erifique se a voltagem indicada na sinalética corr esponde à voltagem eléctrica local, antes de ligar o aparelho . ◗ Ligue sempre o a parelho a uma tomada com ter ra. ◗ Não utilize o apar elho se a ficha, o fi[…]
-
Page 33: Philips Azur Precise GC4330
Preparação Encher o reservatório da água Nunca mergulhe o fer ro dentro de água. 1 Certifique-se de que o aparelho está desligado da tomada. C 2 Regule o controlo do va por para a posição 0 (= sem vapor). 3 Abra a tampa da abertura de enchimento. 4 Incline o ferr o para trás. C 5 Encha o reservatório com água da torneira até ao nível m[…]
-
Page 34: Philips Azur Precise GC4330
C 3 Regule o ferr o para a temperatura pretendida rodando o botão da temperatura para a posição apr opriada. V erifique a etiqueta da peça de roupa para saber qual a temper atur a que deve seleccionar : — 1 T ecidos sintéticos (p. ex.: acrílico, nylon, poliamida, poliéster) — 1 Seda — 2 Lã — 3 Algodão, linho Se desconhecer o tipo ou os tip[…]
-
Page 35: Philips Azur Precise GC4330
Passar sem vapor C 1 Regule o controlo do va por para a posição 0 (= sem vapor). 2 Seleccione a temperatura recomendada (consulte o ca pítulo ‘Preparação’, secção ‘Selecção da temperatura’). Características Pr otector de tecidos delicados (apenas GC4325) O protector de tecidos delicados protege este tipo de tecidos dos[…]
-
Page 36: Philips Azur Precise GC4330
C 1 Prima e solte o botão do jacto de vapor . Jacto de vapor v ertical C 1 A função ‘jacto de vapor’ também pode ser utilizada segurando o ferr o na posição vertical. Este procedimento é útil para a remoção de vincos quando a roupa está pendurada nos cabides, par a cor tinas, etc . Nunca direccione o jacto para as pessoas. Sist[…]
-
Page 37: Philips Azur Precise GC4330
— A luz vermelha ‘auto-off’ apaga-se . Se a temperatur a da base do ferro descer abaixo da temper atura seleccionada par a passar a roupa, a luz âmbar da temperatur a acende-se. — Se a luz da temperatur a se acender depois de movimentar o ferro, aguarde que ela se apague antes de começar a passar . — Se a luz da temperatur a não se ace[…]
-
Page 38: Philips Azur Precise GC4330
Função Calc-clean (limpeza do calcário) P ode utilizar a função Calc-clean par a remov er o calcár io e as impurezas. ◗ Utilize a função Calc-clean uma vez a cada duas semanas. Se a água da sua zona de residência f or muito dura (p . ex., se saírem resíduos de calcário da base quando estiv er a passar), a função Calc-clean dev e se[…]
-
Page 39: Philips Azur Precise GC4330
Arrumação 1 Desligue o ferr o e regule o controlo de va por para a posição 0. C 2 Esvazie o reservatório da água. C 3 Deix e o ferr o arrefecer . Enrole o fio do f err o no compartimento respectivo e fix e-o com a mola. 4 Guarde sempr e o ferr o vazio na posição horizontal, sobre uma superfície estável, e utilize um pano para proteger a b[…]
-
Page 40: Philips Azur Precise GC4330
o Depar tamento de Assistência da Philips Domestic Appliances and P er sonal Care BV . Restrições à garantia O protector de tecidos delicados não está abrangido pelos ter mos da garantia inter nacional. Resolução de pr oblemas Este capítulo resume alguns dos problemas mais com uns que pode encontrar no seu fer ro. Se não conseguir resolve[…]
-
Page 41: Philips Azur Precise GC4330
Solução V erifique o fio, a ficha e a tomada eléctrica. Regule a temperatur a para a posição pretendida. Encha o reser vatór io com água (consulte o capítulo ‘Preparação’). Regule o controlo do vapor para uma posição entre 1 e 6 (consulte o capítulo ‘Utilização do aparelho’). Seleccione uma temperatur a que seja a[…]
-
Page 42: Philips Azur Precise GC4330
. ◗ ?[…]
-
Page 43: Philips Azur Precise GC4330
. 1 […]
-
Page 44: Philips Azur Precise GC4330
, , ?[…]
-
Page 45: Philips Azur Precise GC4330
C 1 0 (= ). 2 ( ?[…]
-
Page 46: Philips Azur Precise GC4330
[…]
-
Page 47: Philips Azur Precise GC4330
( GC4325/4320) C ◗ […]
-
Page 48: Philips Azur Precise GC4330
! 1 . 2 ?[…]
-
Page 49: Philips Azur Precise GC4330
C 7 , ?[…]
-
Page 50: Philips Azur Precise GC4330
C 2 . 3 ?[…]
-
Page 51: Philips Azur Precise GC4330
, . . (?[…]
-
Page 52: Philips Azur Precise GC4330
Önemli Lütfen cihazı kullanmadan önce v erilen talimatları okuyun. İler ide başvurmak için bu talimatları saklayın. ◗ Cihazı bağlamadan önce, model plakasında belirtilen voltajın ana şebek e voltajıyla a ynı olduğunu k ontrol edin. ◗ Bu cihazı sadece toprak hatlı bir prize takılı kullanın. ◗ Priz, kablo veya cihazın k[…]
-
Page 53: Philips Azur Precise GC4330
TÜRKÇE 53 C 2 Buhar k ontrolünü 0 k onumuna getirin (= buharsız). 3 Doldurma deliğinin kapağını açın. 4 Ütüyü arka ya doğru yatırın. C 5 Su haznesini doldurma kabının yardımıyla maksimum se viyey e kadar musluk suyuyla doldurun. Hazneyi MAX (MAKS) göstergesinin üzer inde bir seviyede doldurmayın. Su haznesine parfüm, sirke […]
-
Page 54: Philips Azur Precise GC4330
TÜRKÇE 54 İpek, yünlü v e sentetik malzemeler : par lak lekeler oluşmasını engellemek için, kumaşın ters yüzünü ütüleyin. Leke oluşumun u engellemek için sprey özelliğini kullanmaktan kaçının. Ütüleme işlemine , sentetik ürünler gibi en az ütüleme sıcaklığı isteyen elbiseleri ütüleyerek başlayın. 4 Cihazın fi?[…]
-
Page 55: Philips Azur Precise GC4330
TÜRKÇE 55 Hassas kumaş kor uyucu, ütü tabanı sıcaklığını anlık olar ak azaltır ve hassas kumaşları güvenle ütülemenizi sağlar . Elbisenin ne tür kumaştan yapıldığını bilmiy or sanız, elbiseyi giydiğinizde görünmeyen bir bölümünü ütüley erek doğr u ütüleme sıcaklığını belir leyin. C 1 Ütüde hassas kumaş[…]
-
Page 56: Philips Azur Precise GC4330
TÜRKÇE 56 Otomatik anti-calc sistemi C 1 Dahili anti-calc sistemi kireç oluşum unu azaltır v e ütünün daha uzun ömürlü olmasını sağlar . Elektr onik emniyetli ka panma özelliği (sadece GC4325/4320 için) C ◗ Elektronik emniy etli kapanma özelliği, ütü bir süre boyunca harek etsiz kaldıysa cihazı otomatik olarak kapatır . ?[…]
-
Page 57: Philips Azur Precise GC4330
T emizlik ve bakım Ütülemeden sonra 1 Elektrik fişini prizden çıkarın ve ütüyü soğuma ya bırakın. 2 T ortuları ve tabandan çıkan diğer artıkları nemli bir bez ve aşındırıcı olma yan (sıvı) bir temizlik maddesiyle silin. Ütü tabanının düzlüğünü kor uması için, metal cisimler le ser t temasından kaçının. Ütü[…]
-
Page 58: Philips Azur Precise GC4330
TÜRKÇE 58 Calc-clean işleminden sonra — Fişi prize takın ve ütü tabanının kur uması için ütünün ısınmasını sağlayın. — A yar lanan ütüleme sıcaklığına ulaştığında, ütüyü pr izden çekin. — Ütünüzü ya vaşça eski bir bez üzerinde gezdir in. Kalan su lekeler i ütü tabanından çıkar . — Saklamadan önce , üt[…]
-
Page 59: Philips Azur Precise GC4330
Garanti ve Servis Eğer daha fazla bilgiye ihtiy aç duyar sanız vey a bir problem y aşar sanız, lütfen Philips W eb sitesini www .philips.com.tr adresinden ziyaret ediniz veya ülk enizde bulunan Philips Müşteri Danışma Mer kezi ile iletişime geçiniz (dünya genelindeki telef on numaraları verilen gar anti belgeler i içerisinde bulabil[…]
-
Page 60: Philips Azur Precise GC4330
TÜRKÇE 60 Çözüm Cihazın fişini, elektr ik kablosun u ve prizi kontrol ediniz. Sıcaklık kadranını istenilen konuma getirin. Su haznesini doldur un (bkz. «Kullanıma hazır lama» bölümü) Buhar ayar düğmesini 1 ila 6 arasında bir konuma getirin (bkz. ‘Cihazı kullanma’ bölümü). Buhar lı ütüleme için uygun ol[…]
-
Page 61: Philips Azur Precise GC4330
61[…]
-
Page 62: Philips Azur Precise GC4330
62[…]
-
Page 63: Philips Azur Precise GC4330
63[…]
-
Page 64: Philips Azur Precise GC4330
www .philips.com 4239 000 56935 u[…]

Steam Iron Azur Precise
GC4330
Philips Domestic Appliances and Personal Care
Service Manual
PRODUCT INFORMATION
Features
— Color : Sea Green
— Careeza soleplate
— Steam output (40 gram/min)
— Shot Of Steam, SOS (100 gram/min)
— Vertical SOS (100 gram/min)
— Spray feature
— Tank capacity (350 ml)
— Cord winder
— Cord length (3 m)
— Drip stop feature
— Anti-calc feature
— Self clean feature
— Steam tip
— Auto Shut Off
— Alert Light
Safety Information
— This product meets the requirements regarding
interference suppression on radio and TV.
— After the product has been repaired, it should function
properly and has to meet the safety requirements and legal
regulations as officially laid down at this moment.
Water Advice
Suitable for tap water use. Advice to mix with equal portion
of distilled water or use only distilled water if the tap water is
very hard.
Self Clean
When the self clean button is pressed, a sudden release of
water into the soleplate loosen scale particles by thermal
shock. These particles are then fl ushed out through the steam
vents by the water.
Careeza Soleplate
Careeza is a multi-layer chemical substance that gives an
excellent gliding effect and better care for the garment.
Vertical Steam
When the iron is kept in a vertical position, the SOS button
can be used to iron hanging fabrics such as curtains.
Anti Drip
Water is only released into steam chamber via the tank
valve when the soleplate temperature is high enough. If the
temperature is too low, the tank valve is closed by means of a
bi-metal disc.
Steam Tip
Concentrated steam delivered in the hard to reach places by
pointed shape and the elongated steam slots.
TECHNICAL INFORMATION
Voltage : 100 — 240 V
Frequency : 50 — 60 Hz
Power : 2000 — 2400 W
Dimension (F-box) : 335 (L) x 144 (W) x 182 (H) mm
Weight : 1.58 kg
Published by Philips Domestic Appliances and Personal Care Printed in the Netherlands © Copyright reserved Subject to modification
Auto Shut Off
The irons shuts off automatically after 30 sec. in horizontal
position & after 8 min. in vertical position.
Alert Light
A bright LED is positioned in the iron, which lets you know
the iron is plugged in. The alert light will blink when the iron
goes into auto shut off.
04/07
DISASSEMBLY ADVICE
GC4330
THERMOSTAT DIAL ASSY 1
RATTLE SPRING 2
NYLON
NYLON
E
E
ID
B.WOLLE
BOMULE
E
S
SILK
OLLE
YLLE
W
LEINEN
LINNE
BACKPLATE ASSY 3
CORDSET 4
BALL SWIVEL 5
Remove Screw A
Remove Screws B1, B2
STEAM SLIDER 9
DOSING ASSY 10
TANK SEAL 14
HOUSING 15
AESTHETICS RING 16
SPRAY NOZZLE ASSY 18
PUMP ASSY 19
THERMOSTAT BUSH 20
WATER TANK ASSY 21
Remove Screw A
Remove Backplate assy 3
Remove Inlay 7
Remove SOS knob 11
Remove Spray knob 12
Remove Screws C1, C2
Remove Dosing assy 10
Remove Thermostat dial assy 1
Remove Screws D1, D2
Remove Screws E1, E2
Remove Housing 15
Remove Screws F1, F2
Remove Water tank assy 21
COVER 22
RYTON RING 23
SOS SEAL 24
DOSING SEAL 25
SOLEPLATE ASSY 26
Remove Screw A
Remove Backplate assy 3
Remove Inlay 7
Remove SOS knob 11
Remove Spray knob 12
Remove Screws E1, F1, F2
Remove Water tank assy 21
Remove Screws G1, G2, G3
Remove Heat shield
Remove Cover 22
FILLING DOOR 6
INLAY 7
SOS KNOB 11
SPRAY KNOB 12
ASO ASSY 13
Remove Screw A
Remove Backplate assy 3
REPAIR INSTRUCTIONS
— Due to the high voltage of the iron, ONLY the specified cordsets must be used.
— Thermostat (Pos 101) fitted to the soleplate (Pos 26) was pre-adjusted by the
suppliers and secured by glue. To avoid mal-function of the iron, NEVER adjust
the thermostat.
— No information about the type number and voltage is stamped onto the typeplate.
When replacing the back plate (typeplate is at the bottom), engrave at least the type
number & voltage on the typeplate with a sharp object.
— Parts with numbers from 100 and higher cannot be ordered separately.
OPTIONAL (accessories)
— No specific issues
2-4
- Изображения
Мощность и точность
Паровой утюг с уникальным паровым носиком для отпаривания самых мелких деталей одежды. Очень высокая постоянная подача пара (40 г), сверхмощный паровой удар (100 г), удлиненные отверстия для пара и специальные функции безопасности.
К сожалению, этот продукт больше не доступен
На этот продукт распространяется льгота по НДС
Если вы имеете право на льготы по НДС для медицинских устройств, вы можете воспользоваться ими при покупке этого продукта. НДС будет вычтен из цены, указанной выше. Подробную информацию см. в корзине.
Паровой утюг
Мощность и точность
Паровой носик для труднодоступных мест
Постоянная подача пара до 40 г/мин
Паровой утюг Philips обеспечивает постоянную подачу пара до 40 г/мин, обеспечивая оптимальное количество пара для разглаживания складок.
Электронная функция отключения выключает оставленный без присмотра утюг
Электронная функция отключения питания автоматически отключает оставленный без присмотра или перевернувшийся утюг.
Система «капля-стоп» предотвращает протекание воды на одежду
Этот паровой утюг Philips оснащен системой «капля-стоп», поэтому вы сможете гладить даже деликатные ткани при низкой температуре, не беспокоясь о появлении пятен воды на одежды.
Резервуар увеличенного объема (350 мл) позволяет реже доливать воду
Резервуар увеличенного объема (350 мл) позволяет реже доливать воду. Вы сможете погладить больше одежды за один раз.
Удлиненный шнур (3 м) для максимальной мобильности
Удлиненный шнур (3 м) утюга Philips позволяет легко дотянуться до любого края гладильной доски!
Паровой носик позволяет гладить в труднодоступных местах
Уникальный паровой носик со специальными отверстиями для пара на кончике позволяет пару проникать к самым мелким и труднодоступным деталям одежды.
Система автоматического удаления накипи Anti-Calc
Система автоматического удаления накипи Anti-Calc.
Мягкая ручка для комфорта при длительном глажении
Мягкая ручка утюга Philips обеспечивает удобство использования даже при длительном глажении.
-
Технические характеристики
- Мощность
-
2400
- Частота
-
50–60
- Напряжение
-
220–240
-
Вес и размеры
- Масса продукта
-
1,70
- Размеры продукта
-
303 x 120 x 152 мм
-
Простота использования
- Быстрый нагрев
-
Да
-
Гладкое скольжение
- Подошва
-
Подошва Careeza
-
Комфортный процесс глаженья
- Длина шнура
-
3
m
- Дополнительный комфорт
-
-
Свободный поворот шнура на 360 градусов
-
Мягкая ручка
-
- Управляемая очистка от накипи
-
Двойная система очистки от накипи
- Никаких протечек
-
Система «капля-стоп»
- Безопасен в использовании
-
-
Электронная функция отключения выключает оставленный без присмотра утюг
-
Превышает международные стандарты перепада напряжения
-
- Можно использовать водопроводную воду
-
Да
- Объем резервуара для воды
-
350
ml
-
Разглаживание складок
- Вертикальное отпаривание
-
Да
- Постоянная подача пара
-
До 40 г/мин
- Распылитель
-
Да
- Эффективное глажение труднодоступных мест
-
Паровой носик
- Паровой удар
-
До 100 г/мин