

Хотите научиться скретчингу, но не знаете с чего начать? В TRAKTOR KONTROL S4 скретчинг на джогах очень похож на игру с винилом. Контроллер оборудован прочными и надежными элементами управления, с которыми диджею будет очень удобно исполнять комбо. Перед вами руководство по скретчингу на TRAKTOR KONTROL S4.
Содержание:
- Инструментарий
- Выбор семплов и битов для скретчинга
- Настройка
- Постановка рук
- Как установить cue в Traktor и S4
- Режимы и тактильный отклик
- Приемы скретчинга
Инструментарий
Для начала работы Вам понадобится TRAKTOR KONTROL S4, ноутбук, USB-кабель для подключения контроллера, библиотека битов и лупов для скретчинга, а также коллекция цифровых семплов скретчей. Помимо этих инструментов, рекомендуем найти человека, который может выступить учителем, и нескольких диджеев, у которых вы будете заимствовать приемы.
Выбор семплов и битов для скретчинга
Прежде всего нужно освоить работу со скретч-семплами. Скретч-семплы — это слова и фразы, которые можно использовать в качестве перкуссии. На классических скретч-семплах можно услышать что-нибудь наподобие «ahhh», «scratch» и «fresh». Если у вас есть коллекция винила, запишите и оцифруйте скретч-семплы из своей баттл-библиотеки. Если вы начинаете с нуля, то можете поискать семплы эффектов в библиотеке вроде Sounds.com (можно найти множество звуков и эффектов специально для скретчинга).
Далее, нам нужно поискать биты для скретчинга. Для скретча отлично подходит инструментальный хип-хоп, трэп, электро, хотя на самом деле скретчить можно с любым битом. Лучше начинать с медленных битов (скажем, 70-95 bpm) и постепенно увеличивать темп. На Sounds.com можно найти множество хороших битов, а если вам интересен продакшн, то вы можете создать собственные лупы на основе семпл-пака. Биты не должны быть длинными; для использования в TRAKTOR подойдут фразы от 8 до 16 тактов.
Настройка
Далее нам понадобится расставить точки cue с помощью TRAKTOR и контроллера S4. Определитесь, какой рукой вы будете скретчить, а какой управлять кроссфейдером. Как правило, на джоге стоит использовать ту руку, которой вы пишете, поскольку так можно добиться лучшего контроля над исполнением. Однако, если вам удобнее, можете играть и наоборот. Если вы собираетесь использовать левый джог для скретчинга, загрузите скретч-семплы в деку A в TRAKTOR, а бит в деку B. Если будете играть как правша, бит нужно будет загрузить в деку А, а семплы в деку В. Существует стиль скретчинга под названием hamster, где ход кроссфейдера идет слева направо, но пока что мы не будем затрагивать этот способ.

Постановка рук
Чтобы понимать, где находится семпл в соответствии с позицией джога, стоит представить джог как циферблат. Положите руку на джог между шестью и девятью часами. Поставьте на джог указательный и средний, либо средний и безымянный палец. Расположите ладонь ближе к джогу; чем она ближе, тем лучше будет контроль над звуками. Другой рукой мы будем управлять кроссфейдером. Ваше запястье должно быть расслаблено, а кроссфейдер должен свободно удерживаться между большим и указательным пальцами.
Как установить cue в Traktor и S4
Отметка cue позволяет ди-джеям мгновенно перемещаться в определенный момент трека. Отметки Cue нужны, чтобы быстро переходить к семплам. Лучше всего разместить cue-отметки в начале каждого семпла или каждых нескольких семплов. Чтобы разместить отметку, положите руку на джог и ориентируйтесь на слух и дисплей с TRAKTOR. На деке, в которую вы загрузили семпл, мотайте джог вперед и назад, пока не услышите первый семпл. Чтобы найти самое начало семпла, приблизьте отображаемую форму волны в TRAKTOR с помощью клавиши +. Перед семплом вы увидите пустое пространство и услышите тишину. Начало семпла будет иметь цветную форму волны, и вы услышите звук при перемещении джога к семплу. Нажмите Cue 1 на S4, чтобы сделать отметку cue. Чтобы удалить отметку cue, нажмите клавишу Shift, а затем нажмите на отметку, которую нужно удалить. Повторите действие на каждой отметке, которую нужно выделить.
На дорожке, загруженной в деку B, найдите первый такт записи, используя джог, чтобы перемотать дорожку, пока не услышите звук. Первую долю в музыке также называют даунбитом; это, как правило, первый звук, который вы услышите в треке, но лучше проверить лишний раз, что бит начинается с бочки. Если это не так, медленно вращайте джог, пока не найдете первую бочку. Отметьте cue на первой доле, нажав Cue 1 на S4. Так нам нужно закольцевать биты, нажмите Loop из выпадающего меню ниже Cue и выберите Loop. Выберите количество тактов, которое вы хотите закольцевать. Луп будет воспроизводиться при нажатии клавиши Cue Button 1.
Режимы и тактильный отклик
S4 имеет три разных режима; Turntable Mode, Jog Mode и Beatgrid Adjust Mode. Выберите Turntable Mode, чтобы включить имитацию винила. Этот режим позволяет ди-джеям вращать джог, а также использовать край контроллера для замедления треков во время сета, как на виниле. Также можно отрегулировать инерционный момент джогов, как на виниле. С помощью опции Enable Haptic Hotcues во вкладке Preferences вы можете включить тактильный отклик джога при установке Cue-отметок и Loop-маркеров. Джоги Haptic Drive щелкают, когда вы мотаете через cue-отметки и лупы; вы также можете быстро промотать джог до следующей cue-отметки. С помощью опции Enable Haptic Hotcues во вкладке Preferences вы можете включить тактильный отклик джога при установке Cue-отметок и Loop-маркеров. Джоги Haptic Drive щелкают, когда вы проматываете через cue-отметки и лупы; вы также можете быстро промотать джог до следующей cue-отметки.
Приемы скретчинга
Baby Scratch
Это самый простой прием из всех. Загрузите длинный семпл и начните с начала семпла. Держите кроссфейдер на середине, сдвиньте джог вперед, а затем назад. Играйте так вместе с музыкой, сдвигая джог вперед на первую долю, а назад — на вторую. Как только вы овладеете приемом, попробуйте делать его дабл-тайм (в два раза быстрее). Сначала попробуйте скретчить без музыки, но как только вы освоите движение, начните играть поверх бита и старайтесь скретчить в сетке.
Forwards (Cutting)
Форвард или кат, это когда кроссфейдер закрывается во время обратного движения пластинки. Лучше всего использовать семплы короткой и средней длины, типа «fresh» или «aww yeah». Чтобы исполнить прием, начните с Cue 1 в начале семпла и откройте кроссфейдер. Пусть семпл начнет проигрываться; поставьте руку на джог и остановите воспроизведение. Закройте кроссфейдер, сдвинув его на противоположную сторону (чтобы семпл не было слышно) и аккуратно перемотайте запись до начала семпла. Например, если у вас есть скретч-семпл, загруженный в деку A, сместите кроссфейдер до упора вправо, чтобы семпл не было слышно во время перемотки назад.
Drag
Дрег — это прием без использования кроссфейдера, то есть на всем протяжении скретча он остается открытым (в среднем положении). Этот прием выполняется медленно, плавным перемещением джога; таким образом семпл проигрывается с понижением тона. Чтобы выполнить дрег, оставьте кроссфейдер открытым и начните с семпла с отметкой cue. Семпл должен быть достаточно длинным, наподобие белого шума или звука «ahhh». Медленно перемотайте семпл под музыку, а затем потяните джог назад.
Tears
Еще один прием скретча без использования фейдера, когда два звука создаются из одного длинного звука с помощью паузы между движением вперед и движением назад на джоге. Чтобы выполнить прием, начните с отметки cue на семпле и перемотайте джог вперед. Сделайте паузу, затем снова потяните джог вперед. Завершите прием движением джога обратно, чтобы переместить проигрывание семпла в самое начало. Чем ниже над джогом находится рука, тем лучше вы будете контролировать звук. Чтобы сделать обратную версию приема, начните с конца семпла, потяните джог назад, сделайте паузу, а затем снова потяните колесо назад. Завершите прием перемоткой семпла вперед. Вы также можете делать различные комбинации приемов, например два прямых и два обратных.
Хорошее руководство по эксплуатации
Законодательство обязывает продавца передать покупателю, вместе с товаром, руководство по эксплуатации Native Traktor Kontrol S4 MK2. Отсутствие инструкции либо неправильная информация, переданная потребителю, составляют основание для рекламации в связи с несоответствием устройства с договором. В законодательстве допускается предоставлении руководства в другой, чем бумажная форме, что, в последнее время, часто используется, предоставляя графическую или электронную форму инструкции Native Traktor Kontrol S4 MK2 или обучающее видео для пользователей. Условием остается четкая и понятная форма.
Что такое руководство?
Слово происходит от латинского «instructio», тоесть привести в порядок. Следовательно в инструкции Native Traktor Kontrol S4 MK2 можно найти описание этапов поведения. Цель инструкции заключается в облегчении запуска, использования оборудования либо выполнения определенной деятельности. Инструкция является набором информации о предмете/услуге, подсказкой.
К сожалению немного пользователей находит время для чтения инструкций Native Traktor Kontrol S4 MK2, и хорошая инструкция позволяет не только узнать ряд дополнительных функций приобретенного устройства, но и позволяет избежать возникновения большинства поломок.
Из чего должно состоять идеальное руководство по эксплуатации?
Прежде всего в инструкции Native Traktor Kontrol S4 MK2 должна находится:
— информация относительно технических данных устройства Native Traktor Kontrol S4 MK2
— название производителя и год производства оборудования Native Traktor Kontrol S4 MK2
— правила обслуживания, настройки и ухода за оборудованием Native Traktor Kontrol S4 MK2
— знаки безопасности и сертификаты, подтверждающие соответствие стандартам
Почему мы не читаем инструкций?
Как правило из-за нехватки времени и уверенности в отдельных функциональностях приобретенных устройств. К сожалению само подсоединение и запуск Native Traktor Kontrol S4 MK2 это слишком мало. Инструкция заключает ряд отдельных указаний, касающихся функциональности, принципов безопасности, способов ухода (даже то, какие средства стоит использовать), возможных поломок Native Traktor Kontrol S4 MK2 и способов решения проблем, возникающих во время использования. И наконец то, в инструкции можно найти адресные данные сайта Native, в случае отсутствия эффективности предлагаемых решений. Сейчас очень большой популярностью пользуются инструкции в форме интересных анимаций или видео материалов, которое лучше, чем брошюра воспринимаются пользователем. Такой вид инструкции позволяет пользователю просмотреть весь фильм, не пропуская спецификацию и сложные технические описания Native Traktor Kontrol S4 MK2, как это часто бывает в случае бумажной версии.
Почему стоит читать инструкции?
Прежде всего здесь мы найдем ответы касательно конструкции, возможностей устройства Native Traktor Kontrol S4 MK2, использования отдельных аксессуаров и ряд информации, позволяющей вполне использовать все функции и упрощения.
После удачной покупки оборудования/устройства стоит посвятить несколько минут для ознакомления с каждой частью инструкции Native Traktor Kontrol S4 MK2. Сейчас их старательно готовят или переводят, чтобы они были не только понятными для пользователя, но и чтобы выполняли свою основную информационно-поддерживающую функцию.
Warning
You’re reading the manual for Mixxx 2.4.
If you’re using another version, please select it in the sidebar.
The latest Mixxx release is version 2.5.
The Kontrol S4 MK2 is a 4 deck all-in-one controller with a sturdy build quality and integrated sound card.
The MK2 has substantial improvements over the S4 MK1, including large multicolor buttons.
The MK1 is not supported and cannot be supported because it uses a proprietary communication protocol exclusive to Traktor.
The MK2 uses the standard HID protocol (also used by keyboards & mice) to send and receive signals from a computer, so it can work with Mixxx.
The easiest way to tell the MK1 apart from the MK2 is the appearance of the jog wheel.
On the MK1, the top of the jog wheel is black plastic; on the MK2, the top of the jog wheel is shiny aluminum.
The Kontrol S4 Mk2 can run from USB power.
Using the separate power supply increases the brightness of the LEDs, which is helpful for using it in daylight, and increases the volume of the headphone output.
-
Manufacturer’s product page
Добавлено в версии 2.1.
Compatibility
Controller
The Kontrol S4 MK2 is a USB class compliant audio, HID and MIDI device, so it is compatible with Mixxx without any proprietary drivers on GNU/Linux and MacOS.
On Windows, it is recommended to install the driver from Native Instruments and select the ASIO sound API in the preferences.
With the S4 plugged in, a MIDI device is listed as an available controller in Mixxx’s Preferences.
That is the MIDI input/output ports on the back of the S4 for connecting external MIDI gear; no mapping for the S4 will appear in the menu for the MIDI device.
The controller uses HID for the knobs, buttons, and other components on the device, so the mapping can only be loaded when you select the HID device on the left side of Mixxx’s Preferences.
Timecode vinyl
The phono inputs on the S4 can be used with turntables for timecode vinyl control of Mixxx.
Mapping Description
Push and hold the SYNC button to “lock” sync on for all decks you want to remain in sync.
Push SHIFT + SYNC to enable Sync Lock for details.
Mixxx does not have remix decks, so the four remix slot buttons control the samplers.
There are some more bonus actions that can be accessed by holding SHIFT and pressing certain buttons.
Mixer
|
Control |
Description |
|---|---|
|
FILTER knob |
Controls QuickEffect superknob. This controls the Filter effect by default, but a different effect can be chosen in the Equalizer section of Mixxs’s Preferences. |
|
SNAP |
Toggles library fullscreen |
|
LOOP RECORD |
Toggles recording |
|
LOOP RECORDER PLAY |
Hold down and press FLUX button on a deck to enable autoslip mode on that deck. |
|
SHIFT + Gain |
Up/down will move the beatgrid |
|
LOOP RECORDER PLAY + GAIN |
Increase / decrease the BPM of the track by 0.5. Press the encoder to round the track the nearest whole BPM. Best done to fix tracks with the wrong BPM with the pitch fader at 0. |
|
BROWSE encoder |
Up/down will browse in the focused library pane. Pressing acts like a double click on the mouse. |
GAIN, effects routing, equalizer high/mid/low, and CUE (headphones) behave as labeled.
The Master Volume knob on the S4 controls the volume of the S4’s main output in hardware, so it does not affect the software main gain knob in Mixxx.
Peak display is only generated from software, however.
So if you see or hear clipping, lower the gain of the playing decks; adjusting the main volume knob on the S4 will not help.
Decks
|
Control |
Description |
|---|---|
|
LOAD |
Load track selected in library to the deck. |
|
SHIFT + LOAD |
Eject track |
|
Small buttons with preview icons |
Play a sampler from its cue point. If no track is loaded in the sampler, the track selected in the library will be loaded. |
|
SHIFT + small buttons with preview icons |
If sampler is playing, stop it. If sampler is not playing, the loaded track is ejected from the sampler. |
|
1-4 numbered buttons |
Set/activate hotcue |
|
SHIFT + 1-4 numbered buttons |
Clear hotcue |
|
SHIFT + Wheel nudge |
Fast search through track when not playing |
|
FLUX button |
Enable slip mode (if shift is held down this decreases the range of the BPM slider, if LOOP RECORDER PLAY is held down enter autoslip mode) |
|
RESET button |
Reset key (if shift is held down increase the range of the BPM slider |
Looping
|
Control |
Description |
|---|---|
|
Right Encoder (turn) |
Double/halve loop size. The loop size is shown on the controller. A dot on the right indicates a fractional loop size. Two dots indicates a loop size larger than 99 beats. |
|
Right Encoder (press) |
Activate loop of set size from current position |
|
SHIFT + Right Encoder (turn) |
Adjust key |
|
SHIFT + Right Encoder (press) |
Reset key |
|
Left Encoder (turn) |
Beatjump forward/backward by beatjump size (shown on screen but not on controller), or move the loop by beatjump size if there is a loop enabled |
|
Left Encoder (press) |
Re-enable a loop that has been set previously. Pressing this before a loop will keep playing until the loop is entered. |
|
SHIFT + Left Encoder (turn) |
Adjust beatjump size |
|
SHIFT + Left Encoder (press) |
Jump to loop in point, activate loop, and stop playback. This is helpful for preparing to mix a track in with a loop. |
|
IN button |
Set loop in point manually. Hold pressed while moving the jog wheel to finely adjust the loop in point. |
|
OUT button |
Set loop out point manually. Hold pressed while moving the jog wheel to finely adjust the loop out point. |
Effects
The knob on the left of each effect unit controls the mix (dry/wet) knob for all 3 effects in the unit.
The other knobs control the metaknobs of the effects.
The buttons below the metaknobs control the effect enable buttons.
When pressed with shift, they cycle through the available effects.
The button below the mix knob toggles whether the effect parameters are showing on screen.
This will be expanded in a future update to implement the Standard Effects Mapping.
The buttons at the top of each mixer column control which decks are routed to which effects units.
Mapping options
If you choose, you can edit the controller script and change the Remix Slot buttons to perform loop rolls instead.
Also by default, SHIFT + CUE rewinds the track to the beginning but you can change this to a Reverse Roll (or “Censor”) effect instead.
Making these changes is still a little awkward and we will be making controller preferences easier to change in the future.
For now you’ll have to make a small change to the mapping script file. Don’t worry, the actual edit only involves replacing a single word in a text file.
-
Open Mixxx Preferences and select the Kontrol S4 in the side list.
-
Select
Traktor-Kontrol-S4-MK2-hid-scripts.js. -
Click Open Selected File.
-
Either the file should open in an editor, or you should see a file browser window with that file selected. If you see a file browser, right click the file and select an option to edit it.
-
At the top of the file will be short instructions explaining what to do.
Setup Guide

The information in this document is subject to change without notice and does not represent a
commitment on the part of Native Instruments GmbH. The software described by this document is subject to a License Agreement and may not be copied to other media. No part of this
publication may be copied, reproduced or otherwise transmitted or recorded, for any purpose,
without prior written permission by Native Instruments GmbH, hereinafter referred to as Native Instruments.
“Native Instruments”, “NI” and associated logos are (registered) trademarks of Native Instruments GmbH.
Mac, Mac OS, GarageBand, Logic, iTunes, iPod, iPad, OSX, are registered trademarks of Apple
Inc, registered in the U.S. and other countries. iOS is a trademark or registered trademark of
Cisco in the U.S. and other countries, where it is used under license.
Windows, Windows Vista and DirectSound are registered trademarks of Microsoft Corporation
in the United States and/or other countries.
All other trade marks are the property of their respective owners and use of them does not imply any affiliation with or endorsement by them.
Document authored by: Native Instruments GmbH
Disclaimer
Software version: 2.6.4 (09/2013)
Special thanks to the Beta Test Team, who were invaluable not just in tracking down bugs, but
in making this a better product.

Germany
Native Instruments GmbH
Schlesische Str. 29-30
D-10997 Berlin
Germany
www.native-instruments.de
USA
Native Instruments North America, Inc.
6725 Sunset Boulevard
5th Floor
Los Angeles, CA 90028
USA
www.native-instruments.com
Japan
Native Instruments KK
YO Building 3F
Jingumae 6-7-15, Shibuya-ku,
Tokyo 150-0001
Japan
www.native-instruments.co.jp
Contact
© Native Instruments GmbH, 2013. All rights reserved.

Table of Contents
Table of Contents
1 Welcome to the TRAKTOR KONTROL S4 Setup Guide …………………………………………….
1.1 What Is Included in the Box? ………………………………………………………………………………………… 7
1.2 Document Conventions ………………………………………………………………………………………………… 8
2 Software Installation …………………………………………………………………………………….
2.1 Read Before Installing …………………………………………………………………………………………………. 9
2.2 Installation on Mac OS X ……………………………………………………………………………………………… 9
2.3 Installation on Windows ………………………………………………………………………………………………. 13
2.2.1 Locate and Start the Installation Program ……………………………………………………….. 9
2.2.2 Select the Components to Install …………………………………………………………………… 10
2.2.3 Enter Your Password …………………………………………………………………………………….. 12
2.2.4 Complete the Installation ……………………………………………………………………………… 12
2.3.1 Locate and Start the Installation Program ……………………………………………………….. 14
2.3.2 Confirm the Features to Install ………………………………………………………………………. 14
2.3.3 Confirm the Application Installation Path ……………………………………………………….. 15
2.3.4 Select Your Hardware Drivers ………………………………………………………………………… 16
2.3.5 Complete the Software Installation ………………………………………………………………… 17
3 Product Activation with Service Center ……………………………………………………………..
3.1 Activating Your Product Online ……………………………………………………………………………………… 18
3.2 Updating Your Product ………………………………………………………………………………………………… 22
3.1.1 Start Service Center ……………………………………………………………………………………… 18
3.1.2 Log In Into Your User Account ………………………………………………………………………… 19
3.1.3 Activate the Product …………………………………………………………………………………….. 20
3.1.4 Finish the Online Activation …………………………………………………………………………… 21
3.2.1 Select Updates ……………………………………………………………………………………………. 22
3.2.2 Download the Updates ………………………………………………………………………………….. 23
3.2.3 Open Your Download Folder …………………………………………………………………………… 24
7
9
18
Traktor Kontrol S4 — Setup Guide — 4

Table of Contents
3.3 Activating Your Product Offline …………………………………………………………………………………….. 25
3.4 Further Information …………………………………………………………………………………………………….. 32
3.2.4 Install the Updates ………………………………………………………………………………………. 25
3.3.1 Start the Offline Activation ……………………………………………………………………………. 26
3.3.2 Create the Activation Request File ………………………………………………………………….. 27
3.3.3 Enter the Serial Number ……………………………………………………………………………….. 28
3.3.4 Transfer the Activation Request File ……………………………………………………………….. 29
3.3.5 Open the Activation Return File ……………………………………………………………………… 30
3.3.6 Finish the Offline Activation ………………………………………………………………………….. 31
4 Using the S4 with Your Computer ……………………………………………………………………
4.1 Connecting the S4 to Your Computer ……………………………………………………………………………… 33
4.2 Turning on the Device ………………………………………………………………………………………………….. 34
4.3 Connecting Headphones ………………………………………………………………………………………………. 35
4.4 Connecting an Amplification System ……………………………………………………………………………… 36
4.5 Final Preparations ……………………………………………………………………………………………………… 37
4.6 Starting the TRAKTOR Software on Your Computer …………………………………………………………… 38
5 Using the S4 with Your iOS Device …………………………………………………………………..
5.1 Connecting the S4 to Your iOS Device …………………………………………………………………………….. 40
5.2 Connecting the Power Supply ……………………………………………………………………………………….. 40
5.3 Connecting Headphones ………………………………………………………………………………………………. 42
5.4 Connecting an Amplification System ……………………………………………………………………………… 42
5.5 Final Preparations ……………………………………………………………………………………………………… 43
5.6 Launching the TRAKTOR DJ App …………………………………………………………………………………….. 44
6 What’s Next? ……………………………………………………………………………………………….
7 Troubleshooting and FAQ ……………………………………………………………………………….
7.1 Installation Folder Not Found by an Update Installer ………………………………………………………… 46
7.2 Audio Clicks and Drop-outs When Playing Tracks …………………………………………………………….. 46
7.3 More Troubleshooting Resources …………………………………………………………………………………… 46
33
39
45
46
Traktor Kontrol S4 — Setup Guide — 5

Table of Contents
8 Support ………………………………………………………………………………………………………
8.1 Knowledge Base / Online Support / Readme ……………………………………………………………………. 47
8.2 Forum ……………………………………………………………………………………………………………………….. 48
8.3 Updates …………………………………………………………………………………………………………………….. 48
9 Product Returns …………………………………………………………………………………………..
47
49
Traktor Kontrol S4 — Setup Guide — 6

Welcome to the TRAKTOR KONTROL S4 Setup Guide
What Is Included in the Box?
1 Welcome to the TRAKTOR KONTROL S4 Setup Guide
Thank you for purchasing the TRAKTOR KONTROL S4. On behalf of the entire Native Instruments team, we hope you are truly inspired by this product. This Setup Guide covers the following topics:
▪ How to install the TRAKTOR software on your computer
▪ How to activate your TRAKTOR version using the Service Center application
▪ How to connect the devices and get your TRAKTOR KONTROL S4 system up and running
▪ How to make use of your iOS device with the TRAKTOR KONTROL S4
▪ How to proceed once your TRAKTOR KONTROL S4 system is up and running
▪ How to solve common problems, and where to find further product support
1.1 What Is Included in the Box?
The TRAKTOR KONTROL S4 box contains the following items:
▪ The TRAKTOR KONTROL S4
▪ A power supply
▪ A USB cable
▪ A Native Instruments iOS cable
▪ A registration flyer with your TRAKTOR PRO 2 software serial number, your TRAKTOR
KONTROL S4 hardware serial number, and a link to the hardware registration page, where
you can register your hardware and download the TRAKTOR software
▪ A safety instructions flyer
Traktor Kontrol S4 — Setup Guide — 7

Welcome to the TRAKTOR KONTROL S4 Setup Guide
Document Conventions
1.2 Document Conventions
This document uses particular formatting to point out special facts and to warn you of potential issues. The icons introducing the following notes let you see what kind of information can
be expected:
Whenever this exclamation mark icon appears, you should read the corresponding note
carefully and follow the instructions and hints given there if applicable.
This light bulb icon indicates that a note contains useful extra information. This information may often help you to solve a task more efficiently, but does not necessarily apply to
the setup or operating systems you are using; however, it’s always worth a look.
Furthermore, the following formatting is used:
▪ Text appearing in (drop-down) menus (such as Open…, Save as…) and paths to locations
on your hard drive or other storage devices is printed in italics.
▪ Text referring to elements appearing on the screen (labels of buttons, controls, text next
to checkboxes, etc.) is printed in light blue. Whenever you see this formatting applied,
you will find the same text appearing on your computer screen.
▪ Text referring to elements printed on hardware is formatted orange. Whenever you see this
formatting applied, you will find the same text appearing on the hardware.
▪ Important names and concepts are printed in bold.
Single instructions are introduced by this play button type arrow.
►
Results of actions are introduced by this smaller arrow.
→
Traktor Kontrol S4 — Setup Guide — 8

Software Installation
Read Before Installing
2 Software Installation
2.1 Read Before Installing
Before starting the TRAKTOR software installer, here are some points to be aware of:
▪ Make sure you have downloaded the TRAKTOR software to your computer by following the in-
structions on the registration page:
http://www.native-instruments.com/go-s4
If you have already registered your device but need to download the installer again, you
can find the relevant downloads in the «My Account» section of the NI website:
https://www.native-instruments.com/en/my-account/my-products-serials
▪ Please carefully review the installer screens and the suggested installation paths in order to
avoid that any unwanted folders are created on your hard disk.
▪ Moving any folders related to Native Instruments software after installation is not recom-
mended. Future software updates rely on the directory locations set during initial installa-
tion.
2.2 Installation on Mac OS X
At the end of the installation process, you will need to restart your computer. Please save your
work and close all applications before proceeding.
2.2.1 Locate and Start the Installation Program
1. Locate and unpack the downloaded installer package file on your computer.
2. Double-click the Traktor 2 Installer.mpkg file to start the installation procedure.
3. Follow the on-screen instructions.
Traktor Kontrol S4 — Setup Guide — 9
Software Installation
Installation on Mac OS X
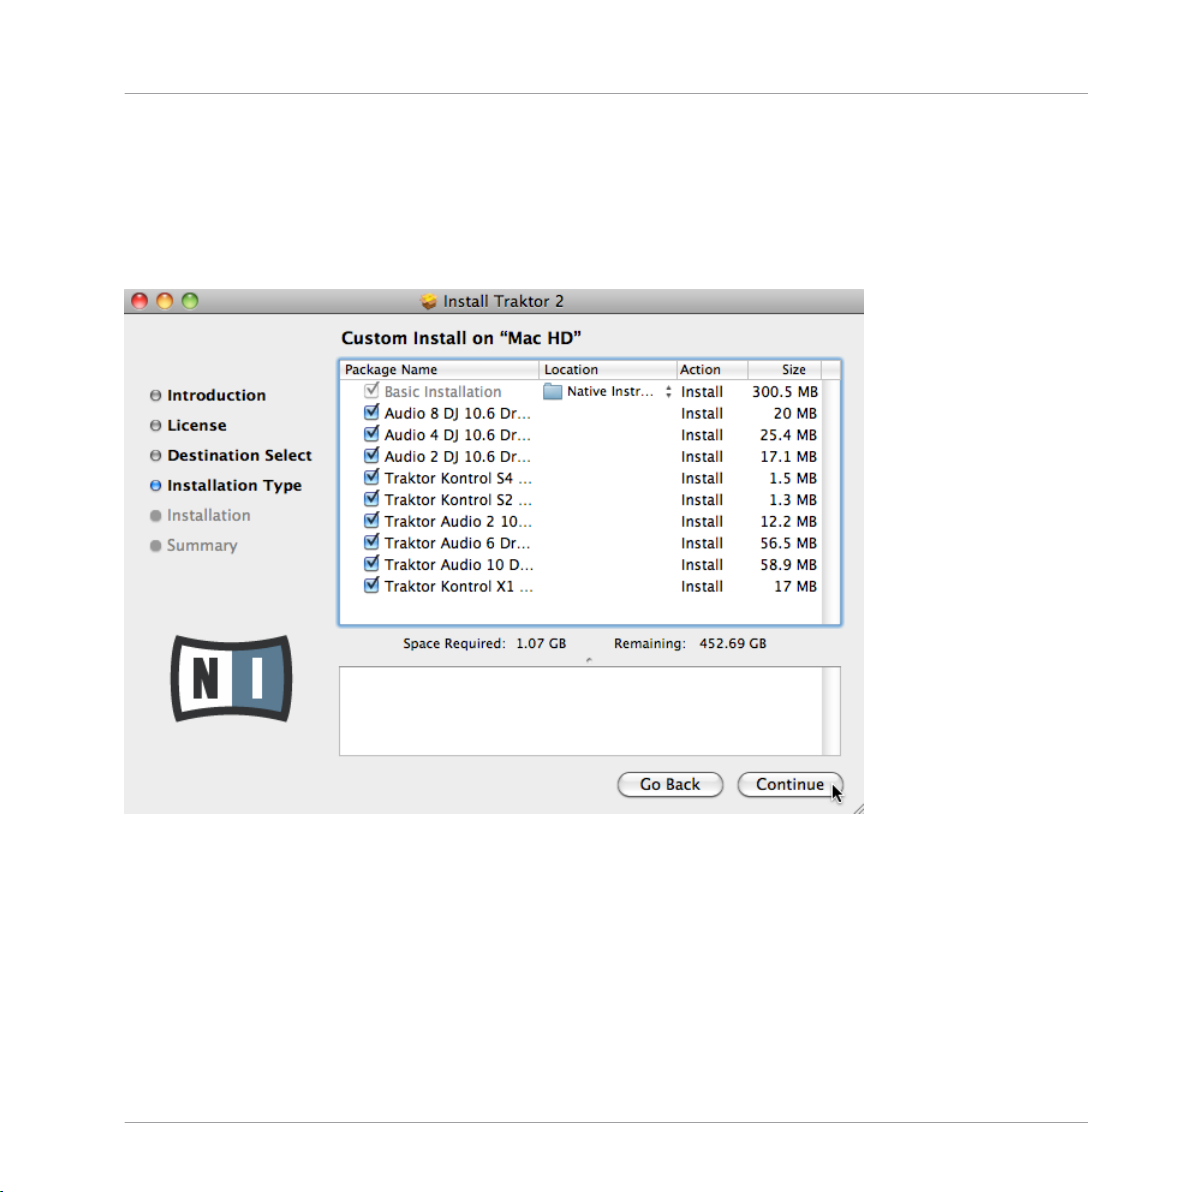
2.2.2 Select the Components to Install
After you have accepted the software license agreement, the installer window displays the
components available for installation. This installer screen also contains information about how
much disk space the individual components will use.
The components selection screen of the installation program.
Basic Installation: This installs the TRAKTOR software along with its documentation. This component cannot be deselected. It also installs the Service Center application (required for activation of your product) and the Controller Editor application, which allows you to configure the
controllerʼs MIDI assignments for using the controller with other applications than TRAKTOR.
Audio 8/4/2 DJ Drivers: This installs drivers for the AUDIO 8 DJ, AUDIO 4 DJ and AUDIO 2 DJ
audio interfaces by Native Instruments. If you do not intend to use any of these audio interfaces, you can deactivate the checkboxes.
Traktor Kontrol S4 — Setup Guide — 10

Software Installation
Installation on Mac OS X
Traktor Kontrol S4: This installs the driver for the TRAKTOR KONTROL S4 controller. If you do
not intend to use a TRAKTOR KONTROL S4 controller on your computer, you can deactivate
the checkbox.
Traktor Kontrol S2: This installs the driver for your TRAKTOR KONTROL S2 controller. If you do
not intend to use a TRAKTOR KONTROL S2 controller on your computer, you can deactivate
the checkbox.
Traktor Audio 2/6/10 Drivers: This installs the drivers for the TRAKTOR AUDIO 2, TRAKTOR
AUDIO 6 and TRAKTOR AUDIO 10 audio interfaces by Native Instruments. If you do not intend to use any of these audio interfaces, you can deactivate the checkboxes.
Traktor Kontrol X1: This installs the driver for the TRAKTOR KONTROL X1 controller. If you do
not intend to use a TRAKTOR KONTROL X1 controller on your computer, you can deactivate
the checkbox.
Background Components
These components are not displayed in the installer window, but are installed depending on
your system configuration:
Controller Editor: The Controller Editor application allows you to configure your controller for
use as a MIDI controller with applications other than the TRAKTOR software. This component
will automatically be installed unless a newer version of Controller Editor already exists on your
computer.
Service Center: The Service Center application is required for activation of the TRAKTOR software. It will be installed independent of the selected drivers (unless a newer version of Service
Center already exists on your computer).
It is strongly recommended to install the TRAKTOR software to the default location. If you still
need to change the install location, click on the folder icon in the Location column and select
the desired folder.
After you have customized the installation as required, click Continue and then follow the
►
on-screen instructions.
Traktor Kontrol S4 — Setup Guide — 11
Software Installation
Installation on Mac OS X
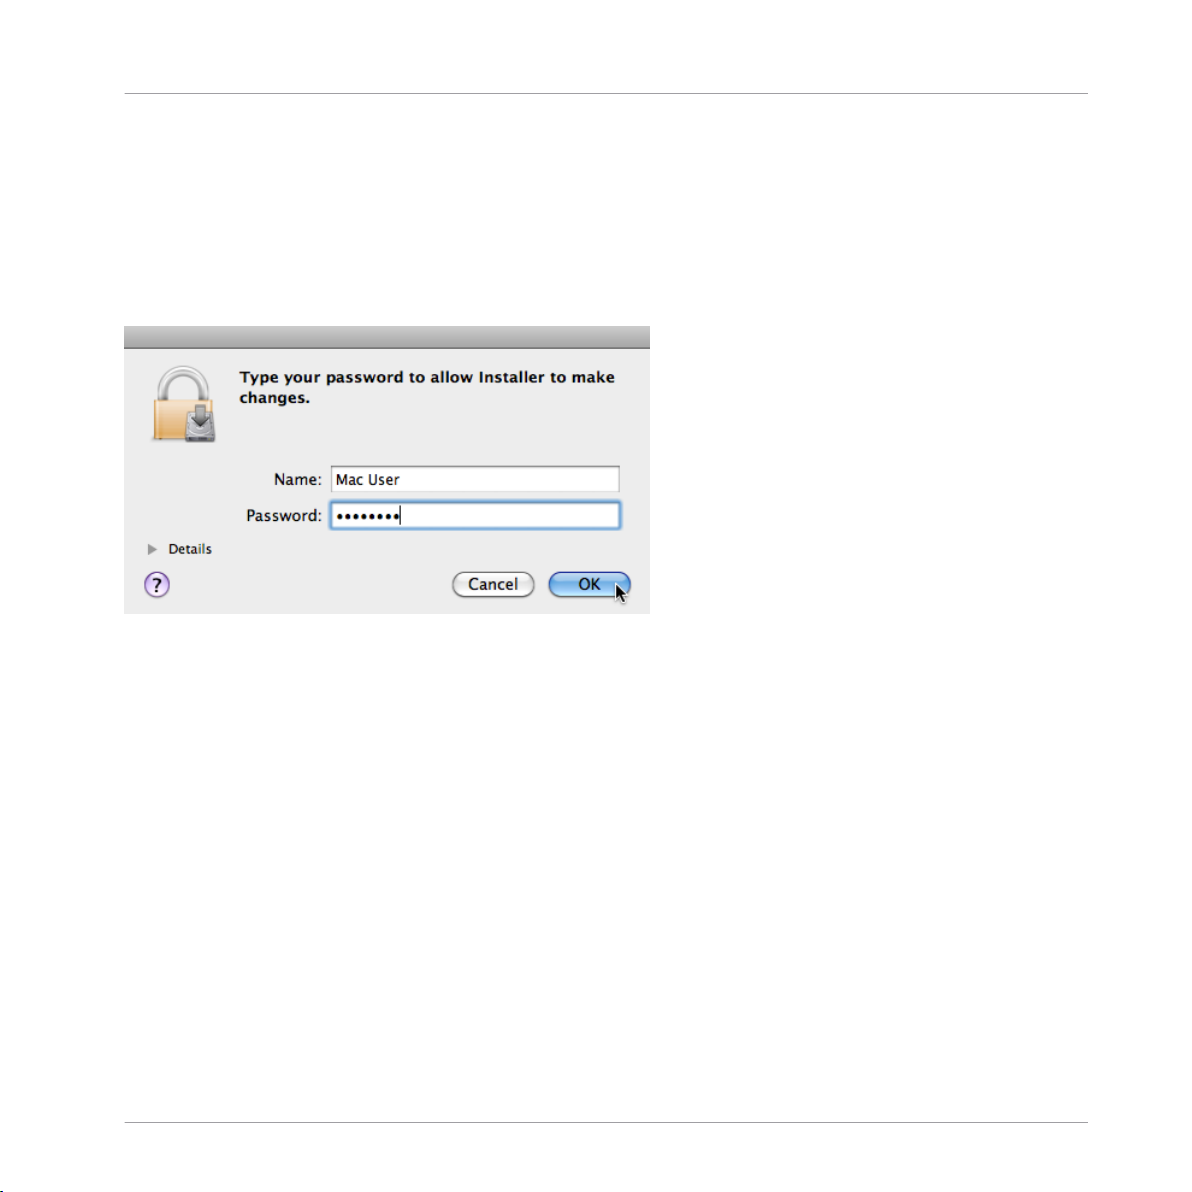
2.2.3 Enter Your Password
Before installing the selected components, the installer will prompt you to enter your Mac OS X
password. This is a standard behavior on Mac OS X that makes sure you are aware of the
changes the installer is about to make.
The Mac OS X user account you are using needs to have Administrator privileges.
The Mac OS X password prompt.
To proceed, enter your password and click OK.
►
The selected components will be installed.
→
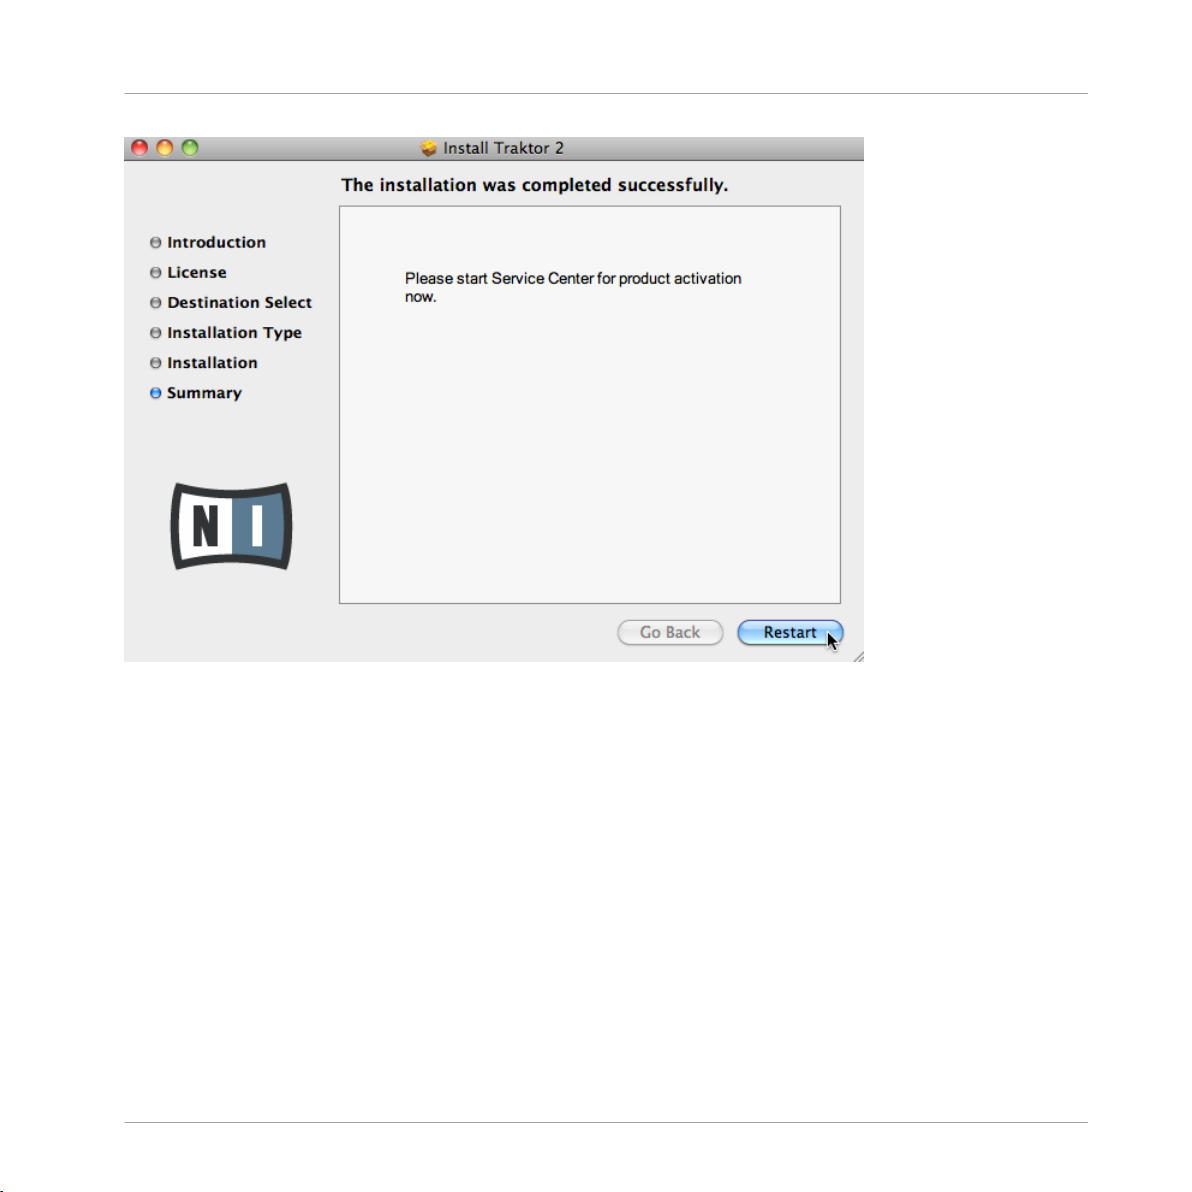
2.2.4 Complete the Installation
After the components have been installed, you need to restart your computer.
Traktor Kontrol S4 — Setup Guide — 12
Software Installation
Installation on Windows
The final screen of the installation program.
On the last screen of the installation program, click Restart to restart your computer and
►
complete the software installation.
Your computer will immediately restart.
→
After your computer has restarted, continue reading in chapter ↑3, Product Activation
►
with Service Center of this Setup Guide for information about product activation.
2.3 Installation on Windows
This section describes the process of installing the TRAKTOR software on Windows.
Traktor Kontrol S4 — Setup Guide — 13

Software Installation
Installation on Windows
It may be necessary to disable your anti-virus software during installation, please refer to
the software’s own documentation for further information.
2.3.1 Locate and Start the Installation Program
1. Locate and unpack the downloaded installer package file on your computer.
2. Double-click the Traktor 2 Setup.exe file to start the installation procedure.
3. Follow the on-screen instructions.
2.3.2 Confirm the Features to Install
After you have accepted the software license agreement, the installer window displays the features available for installation.
The components selection screen of the installation program.
Basic Installation: This installs the TRAKTOR software along with its documentation. This component cannot be deselected.
Traktor Kontrol S4 — Setup Guide — 14
Software Installation
Installation on Windows
Background Components
These components are not displayed in the installer window, but are installed depending on
your system configuration:
Controller Editor: The Controller Editor application allows you to configure your controller for
use as a MIDI controller with applications other than the TRAKTOR software. This component
will automatically be installed unless a newer version of Controller Editor already exists on your
computer.
Service Center: The Service Center application is required for activation of the TRAKTOR software. It will be installed independent of the selected drivers (unless a newer version of Service
Center already exists on your computer).
Click Continue and then follow the on-screen instructions.
►
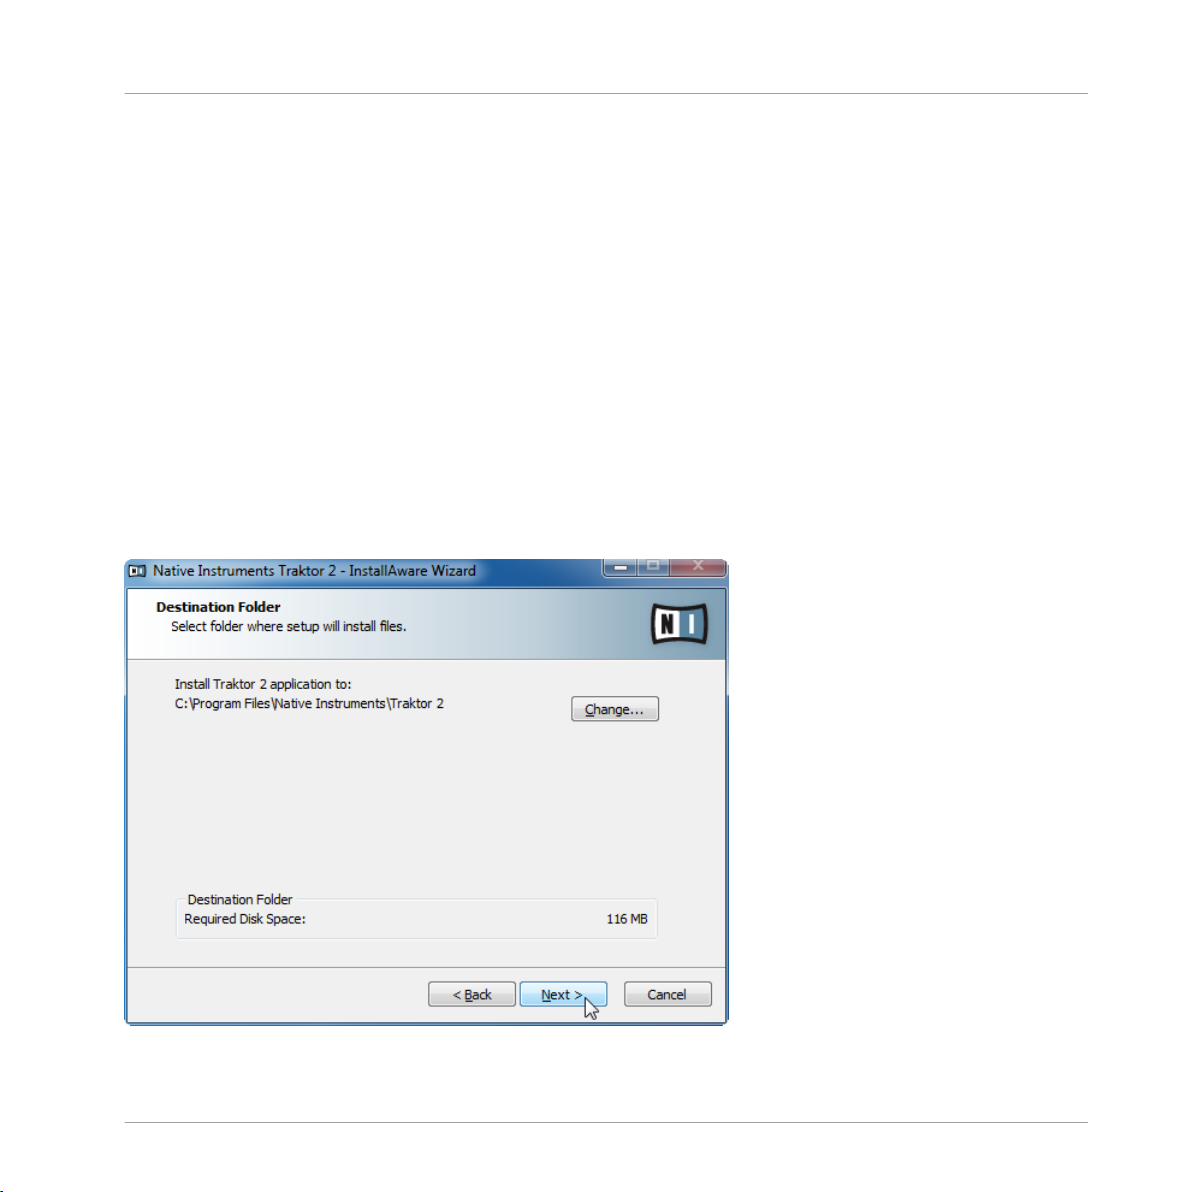
2.3.3 Confirm the Application Installation Path
The software installation path screen of the installation program.
Traktor Kontrol S4 — Setup Guide — 15
Loading…
- Инструкции и руководства
- Бренды
- Native Instruments
- Traktor Kontrol S4 MK2
- Техническая Спецификация