
Тонометры OMRON, инструкции
-
OMRON 108M, механический тонометр (3 Mb)
pdf
-
OMRON 705IT, автоматический тонометр на плечо (377 Kb)
pdf
-
OMRON 711, инструкция (5 Mb)
pdf
-
OMRON 717, инструкция (5 Mb)
pdf
-
OMRON 773, автоматический тонометр на плечо (382 Kb)
pdf
-
OMRON 907, профессиональный тонометр (759 Kb)
pdf
-
OMRON CL, манжета большая для руки с окружностью 32-42 см (209 Kb)
pdf
-
OMRON CM, манжета стандартная (151 Kb)
pdf
-
OMRON CW, универсальная манжета (22-42 см) (3 Mb)
pdf
-
OMRON HBP-1100, профессиональный тонометр (24 Mb)
pdf
-
OMRON HBP-1300, профессиональный тонометр (23 Mb)
pdf
-
OMRON HEM-18, механический тонометр (163 Kb)
pdf
-
OMRON i-C10, автоматический тонометр на плечо с СУПЕР манжетой (22-42 см) (13 Mb)
pdf
-
OMRON M1 Classic, полуавтоматический тонометр на плечо (364 Kb)
pdf
-
OMRON M1 Compact, полуавтоматический тонометр на плечо (3 Mb)
pdf
-
OMRON M1 Eco, полуавтоматический тонометр на плечо (4 Mb)
pdf
-
OMRON M1 Plus, полуавтоматический тонометр на плечо (15 Mb)
pdf
-
OMRON M1/MX, полуавтоматический тонометр на плечо (206 Kb)
pdf
-
OMRON M10-IT, автоматический тонометр на плечо с СУПЕР манжетой (22-42 см) (13 Mb)
pdf
-
OMRON M2 Basic (HEM-7121-RU), автоматический тонометр на плечо (манжета для руки 22-32 см) (515 Kb)
pdf
-
OMRON M2 Basic с адаптером, автоматический тонометр на плечо (манжета 22-32 см) (6 Mb)
pdf
-
OMRON M2 Basic, автоматический тонометр на плечо (манжета для руки 22-32 см) (1 Mb)
pdf
-
OMRON M2 Basic, автоматический тонометр на плечо с универсальной манжетой (22-42 см) (513 Kb)
pdf
-
OMRON M2 Basic, автоматический тонометр на плечо с универсальной манжетой (22-42 см) и адаптером (535 Kb)
pdf
-
OMRON M2 Classic с адаптером (523 Kb)
pdf
-
OMRON M2 Classic, автоматический тонометр на плечо (1 Mb)
pdf
-
OMRON M2 Classic, автоматический тонометр на плечо с универсальной манжетой (22-42 см) (580 Kb)
pdf
-
OMRON M2 Compact, автоматический тонометр на плечо (1 Mb)
pdf
-
OMRON M2 Eco, автоматический тонометр на плечо (3 Mb)
pdf
-
OMRON M2 Plus (593 Kb)
pdf
-
OMRON M3 Comfort, автоматический тонометр на плечо (6 Mb)
pdf
-
OMRON M3 Expert (HEM-7132-ALRU), автоматический тонометр на плечо (635 Kb)
pdf
-
OMRON M3 Expert, автоматический тонометр на плечо с универсальной манжетой (22-42 см) и адаптером в комплекте (1 Mb)
pdf
-
OMRON M3 Family, автоматический тонометр на плечо с универсальной манжетой (22-42 см) и адаптером (1 Mb)
pdf
-
OMRON M3 Intellisense, автоматический тонометр на плечо (11 Mb)
pdf
-
OMRON M4-I, автоматический тонометр на плечо (322 Kb)
pdf
-
OMRON M5 Comfort, автоматический тонометр на плечо с СУПЕР манжетой (22-42 см) и адаптером (920 Kb)
pdf
-
OMRON M5-I, автоматический тонометр на плечо (261 Kb)
pdf
-
OMRON M5, автоматический тонометр на плечо с универсальной манжетой (22-42 см) и адаптером (881 Kb)
pdf
-
OMRON M6 Comfort, автоматический тонометр на плечо с СУПЕР манжетой и адаптером (951 Kb)
pdf
-
OMRON M6, автоматический тонометр на плечо с универсальной манжетой (22-42 см) и адаптером (920 Kb)
pdf
-
OMRON M7, автоматический тонометр на плечо (847 Kb)
pdf
-
OMRON MIT Elite Plus, автоматический тонометр на плечо с веерообразной манжетой (22-32 см) (11 Mb)
pdf
-
OMRON MIT Elite, автоматический тонометр на плечо с веерообразной манжетой (22-32 см) (10 Mb)
pdf
-
OMRON MIT, автоматический тонометр на плечо (222 Kb)
pdf
-
OMRON MX2 Basic, автоматический тонометр на плечо (513 Kb)
pdf
-
OMRON MX3 Plus, автоматический тонометр на плечо (784 Kb)
pdf
-
OMRON MX3/M4/711, автоматический тонометр на плечо (158 Kb)
pdf
-
OMRON R1, автоматический тонометр на запястье (1 Mb)
pdf
-
OMRON R1/R3/RX, тонометр на запястье (128 Kb)
pdf
-
OMRON R2, автоматический тонометр на запястье (1 Mb)
pdf
-
OMRON R3 Intellisense, тонометр на запястье (661 Kb)
pdf
-
OMRON R3 Opti, автоматический тонометр на запястье (2 Mb)
pdf
-
OMRON R3-I Plus, тонометр на запястье (2 Mb)
pdf
-
OMRON R4, тонометр на запястье (211 Kb)
pdf
-
OMRON R5 Prestige, автоматический тонометр на запястье (3 Mb)
pdf
-
OMRON R5-I, тонометр на запястье (285 Kb)
pdf
-
OMRON R6, тонометр на запястье (881 Kb)
pdf
-
OMRON R7, автоматический тонометр на запястье (588 Kb)
pdf
-
OMRON RS1, инструкция (4 Mb)
pdf
-
OMRON RS2, инструкция (4 Mb)
pdf
-
OMRON RS3, инструкция (7 Mb)
pdf
-
OMRON RX-I, тонометр на запястье (286 Kb)
pdf
-
OMRON RX2, тонометр на запястье (263 Kb)
pdf
-
OMRON RX3 Plus, тонометр на запястье (525 Kb)
pdf
-
OMRON RX3, тонометр на запястье (429 Kb)
pdf
-
OMRON S1, полуавтоматический тонометр на плечо (1 Mb)
pdf
-
OMRON SpotArm i-Q132, автоматический тонометр на плечо подходит для руки с окружностью 17-32 см (13 Mb)
pdf
-
OMRON SpotArm i-Q142, автоматический тонометр на плечо подходит для руки с окружностью 22-42 см (12 Mb)
pdf
-
Манжета OMRON GS CUFF2 для HBP-1120/1320, SS, S, M, L, XL (1 Mb)
pdf
-
Мини-адаптер OMRON S, инструкция (516 Kb)
pdf
-
Преобразователь (адаптер) OMRON HHP-CM01, инструкция (4 Mb)
pdf
-
Принтер OMRON (5 Mb)
pdf
-
Тонометр M2 Basic (HEM-7121-ALRU) с адаптером и универсальной веерообразной манжетой, инструкция (5 Mb)
pdf
-
Тонометр M2 Basic (HEM-7121-RU), инструкция (5 Mb)
pdf
-
Тонометр M2 Basic с адаптером (HEM-7121-ARU), инструкция (5 Mb)
pdf
-
Тонометр M2 Plus ALRU, инструкция (5 Mb)
pdf
-
Тонометр OMRON HBP-1120, инструкция (867 Kb)
pdf
-
Тонометр OMRON EVOLV, инструкция (6 Mb)
pdf
-
Тонометр OMRON EVOLV, инструкция (6 Mb)
pdf
-
Тонометр OMRON HBP-1320, инструкция (978 Kb)
pdf
-
Тонометр OMRON M1 Basic (ARU), инструкция (4 Mb)
pdf
-
Тонометр OMRON M1 Basic (RU), инструкция (4 Mb)
pdf
-
Тонометр OMRON M2 Basic (ALRU), инструкция (5 Mb)
pdf
-
Тонометр OMRON M2 Basic (ARU), инструкция (5 Mb)
pdf
-
Тонометр OMRON M2 Basic (RU), инструкция (5 Mb)
pdf
-
Тонометр OMRON M2 Classic (HEM-7122-ALRU) с универсальной манжетой и адаптером, инструкция (6 Mb)
PDF
-
Тонометр OMRON M2 Classic, инструкция (6 Mb)
pdf
-
Тонометр OMRON M2 Comfort ALRU, инструкция (6 Mb)
pdf
-
Тонометр OMRON M2 Eco (ARU), инструкция (6 Mb)
pdf
-
Тонометр OMRON M2 Eco (RU), инструкция (5 Mb)
pdf
-
Тонометр OMRON M2 Plus, инструкция (6 Mb)
pdf
-
Тонометр OMRON M3 Comfort ALRU (HEM-7155-ALRU), инструкция (15 Mb)
pdf
-
Тонометр OMRON M3 Expert (ALRU), инструкция (15 Mb)
pdf
-
Тонометр OMRON M3 Expert, инструкция (6 Mb)
pdf
-
Тонометр OMRON M4 Intelli IT ALRU (HEM-7155T-ALRU), инструкция (17 Mb)
pdf
-
Тонометр OMRON M7 Intelli IT ALRU (HEM-7361T-ALRU), инструкция (28 Mb)
pdf
-
Тонометр OMRON M7 Intelli IT, инструкция (68 Mb)
pdf
-
Тонометр OMRON RS1, инструкция (8 Mb)
pdf
-
Тонометр OMRON RS1, инструкция (4 Mb)
pdf
-
Тонометр OMRON RS2 Intelli IT, инструкция (4 Mb)
pdf
-
Тонометр OMRON RS2, инструкция (8 Mb)
pdf
-
Тонометр OMRON RS2, инструкция (4 Mb)
pdf
-
Тонометр OMRON RS3, инструкция (11 Mb)
pdf
-
Тонометр OMRON RS3, инструкция (7 Mb)
pdf
-
Тонометр OMRON RS7 Intelli IT, инструкция (7 Mb)
pdf
-
Тонометр OMRON RS7 Intelli IT, инструкция (7 Mb)
pdf
-
Тонометр OMRON S1, инструкция (3 Mb)
pdf
Наша миссия
сделать более доступной высокотехнологичную
и современную медицинскую технику
для каждого жителя России
Наша команда
это более 675 сотрудников по всей России.
Мы уверены, что здоровье — это главная
ценность человека
Мы профессионалы
и создаем основу для успешного
взаимовыгодного сотрудничества с нашими
клиентами

HEM-7301-ITKE_main.book 1 ページ 2011年11月14日 月曜日 午後2時24分
Digital Automatic Blood Pressure Monitor
Model MIT Elite Plus
• Instruction Manual
• Mode d’emploi
• Gebrauchsanweisung
• Manuale di istruzioni
• Manual de instrucciones
• Gebruiksaanwijzing
• РУКОВОДСТВО ПО ЭКСПЛУАТАЦИИ
IM-HEM-7301-ITKE7-02-10/2011
5329378-0D
EN
FR
DE
IT
ES
NL
RU
AR
HEM-7301-ITKE_main.book 2 ページ 2011年11月14日 月曜日 午後2時24分
Contents
Before using the unit
Introduction ……………………………………………………………………..3
Important Safety Information ……………………………………………. 4
1. Overview ……………………………………………………………………. 6
2. Preparation ………………………………………………………………. 10
2.1 Installing/Replacing the Batteries……………………………… 10
2.2 Setting the Date and Time ………………………………………. 12
Operating instructions
3. Using the Unit…………………………………………………………… 15
3.1 How to Sit Correctly When Taking a Measurement ……..15
3.2 Applying the Arm Cuff …………………………………………….. 17
3.3 Taking a Reading……………………………………………………20
3.4 Using the Memory Function …………………………………….. 25
4. Quick Reference Guide ……………………………………………..29
5. Using the Software ……………………………………………………30
Care and maintenance
6. Handling Errors and Problems ………………………………….. 32
6.1 Error Messages………………………………………………………32
6.2 Troubleshooting …………………………………………………….. 34
7. Maintenance and Storage …………………………………………. 36
8. Optional Parts ………………………………………………………….. 38
9. Technical Data…………………………………………………………..39
10. Some Useful Information about Blood Pressure …………41
2
HEM-7301-ITKE_main.book 3 ページ 2011年11月14日 月曜日 午後2時24分
Before using the unit
Introduction
Thank you for purchasing the OMRON MIT Elite Plus Upper Arm Blood
Pressure Monitor.
The OMRON MIT Elite Plus is a fully automatic blood pressure
monitor, operating on the oscillometric principle. It measures your
blood pressure and pulse rate simply and quickly. For comfortable
controlled inflation without the need for pressure pre-setting or reinflation the device uses its advanced “IntelliSense” technology.
The unit also stores up to 90 measurements in memory and calculates
an average reading based on the three most recent measurements
taken within 10 minutes of the last reading.
Omron’s blood pressure management software included with this unit
allows you to view, manage and print data about blood pressure
measured by the OMRON MIT Elite Plus. Included software is in
English only.
Please read this instruction manual thoroughly before
using the unit. For specific information about your own
blood pressure, CONSULT YOUR DOCTOR.
EN
3

HEM-7301-ITKE_main.book 4 ページ 2011年11月14日 月曜日 午後2時24分
Important Safety Information
Important Safety Information
Consult your doctor during pregnancy, arrhythmia and arteriosclerosis. Please
read this section carefully before using the unit.
Warning:
Indicates a potentially hazardous situation which, if not avoided, could result in
death or serious injury.
(General Usage)
• Always consult your doctor. Self-diagnosis of measurement results and selftreatment are dangerous.
• People with severe blood flow problems, or blood disorders, should consult a
doctor before using the unit. Cuff inflation can cause internal bleeding.
(Battery Usage)
• If battery fluid should get in your eyes, immediately rinse with plenty of clean
water. Consult a doctor immediately.
(Optional AC Adapter Usage)
• Never plug in or unplug the power cord from the electric outlet with wet
hands.
Caution:
Indicates a potentially hazardous situation which, if not avoided, may result in
minor or moderate injury to the user or patient or damage to the equipment or
other property.
(General Usage)
• Do not leave the unit unattended with infants or persons who cannot express
their consent.
• Do not use the unit for any purpose other than measuring blood pressure.
• Do not disassemble the unit or arm cuff.
• Do not inflate the arm cuff over 299 mmHg.
• Do not use a mobile phone, or other devices that emit electromagnetic fields,
near the unit. This may result in incorrect operation of the unit.
• Do not operate unit in a moving vehicle (car, airplane).
• Do not play the CD-ROM disc included with this monitor on general audio
players, DVD players or personal game devices. It may damage the speaker
of the device and may harm your hearing ability.
4
HEM-7301-ITKE_main.book 5 ページ 2011年11月14日 月曜日 午後2時24分
Important Safety Information
(Optional AC Adapter Usage)
• Use only the original AC adapter designed for this unit. Use of unsupported
adapters may damage and/or may be hazardous to the unit.
• Plug the AC adapter into the appropriate voltage outlet.
• Do not use the AC adapter if the unit or the power cord is damaged. Turn off
the power and unplug the power cord immediately.
(Battery Usage)
• If battery fluid should get on your skin or clothing, immediately rinse with
plenty of clean water.
• Use only four “AAA” alkaline batteries with this unit. Do not use other types of
batteries.
• Do not insert the batteries with their polarities incorrectly aligned.
• Replace old batteries with new ones immediately. Replace all four batteries at
the same time.
• Remove the batteries if the unit will not be used for three months or more.
• When the batteries are replaced, you may need to reset the date and time. If
the year is flashing on the display screen, refer to “2.2 Setting the Date and
Time”.
• Do not use new and used batteries together.
General Safety Precautions
• Do not inflate the arm cuff when it is not wrapped around your arm.
• Do not apply strong shocks and vibrations to or drop the unit.
• Do not take measurements after bathing, drinking alcohol, smoking,
exercising or eating.
• Do not wash the arm cuff or immerse it in water.
• Read and follow the “Important information regarding Electro Magnetic
Compatibility (EMC)” in the Technical Data Section.
• Read and follow the “Correct Disposal of This Product” in the Technical Data
Section when disposing of the device and any used accessories or optional
parts.
Save these instructions for future reference.
EN
5
HEM-7301-ITKE_main.book 6 ページ 2011年11月14日 月曜日 午後2時24分
1.Overview
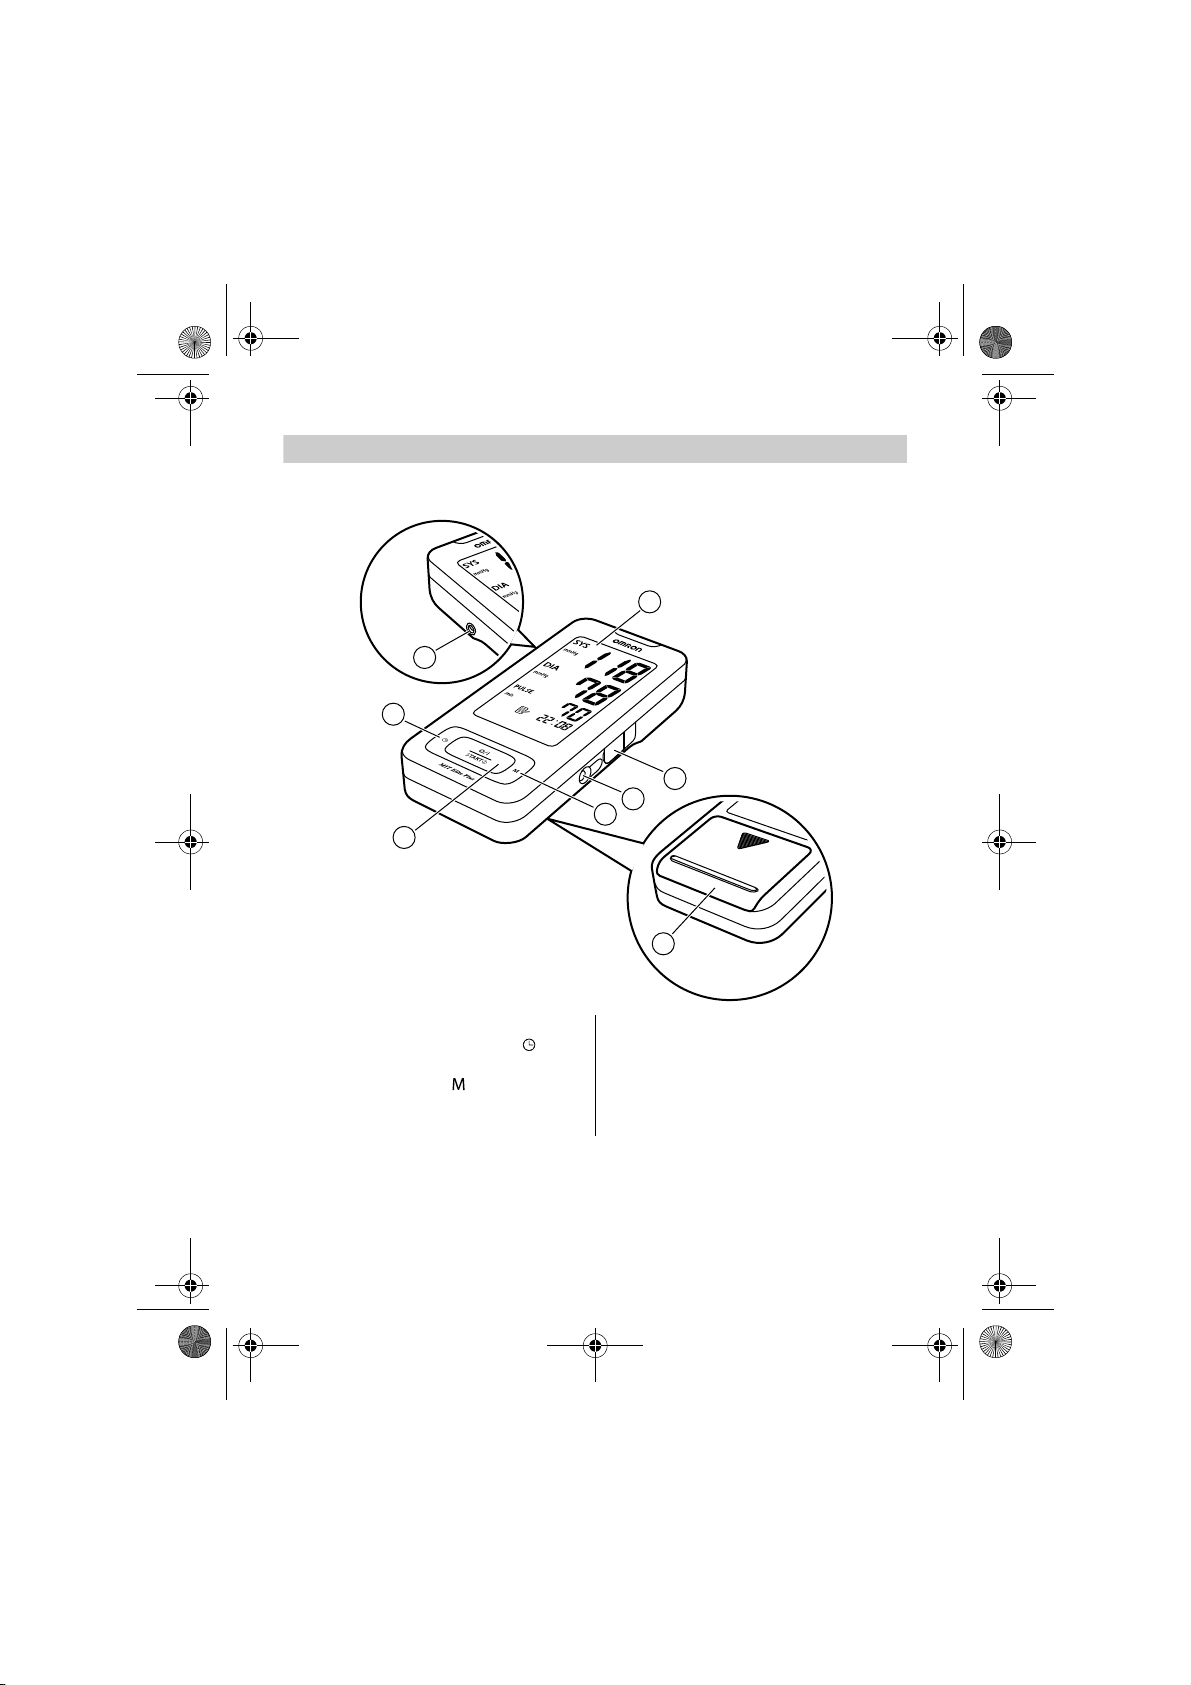
1. Overview
Main unit
A. Air jack
B. Date/time setting button ( )
C. O/I START button
D. Memory button ( )
E. AC adapter jack (for optional AC
adapter)
6
F. USB port
G. Display
H. Battery compartment
HEM-7301-ITKE_main.book 7 ページ 2011年11月14日 月曜日 午後2時24分
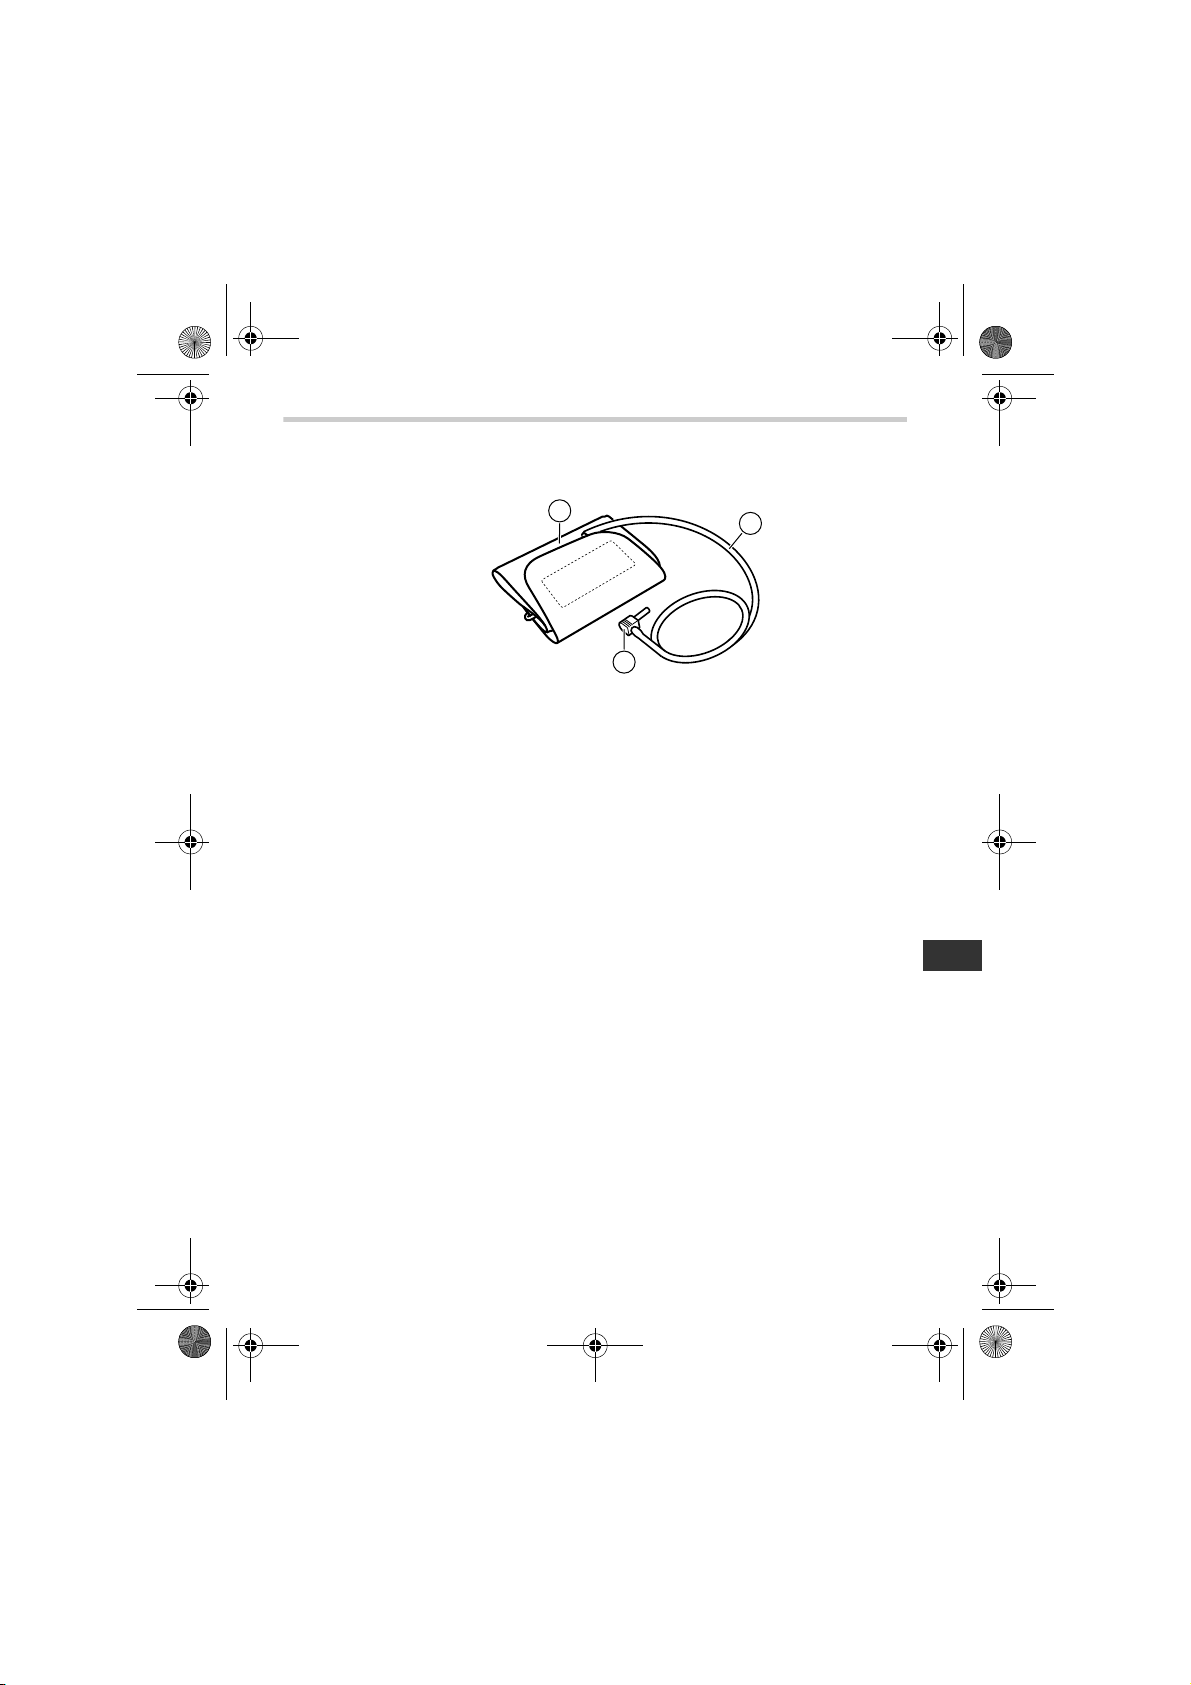
Arm Cuff
I. Arm cuff
(Medium cuff: arm circumference 22-32 cm)
J. Air tube
K. Air plug
1.Overview
EN
7

HEM-7301-ITKE_main.book 8 ページ 2011年11月14日 月曜日 午後2時24分
1.Overview
Display
L. Systolic blood pressure
M. Diastolic blood pressure
N. Heartbeat symbol
1.
Flashes during measurement
2.
If flashing after measurement
complete indicates blood
pressure out of recommended
range
O. Deflation symbol
P. Memory symbol
Displayed when viewing values
stored in memory
Q. Average value symbol
Displayed when viewing value for
the last three measurements
R. Battery low symbol
S. Movement error symbol
Displayed if you move your body
during the measurement
T. Pulse display
U. Date/Time display
V. Irregular heartbeat symbol
W. Guest symbol
Note: The backlight turns on when setting the date and time, when
taking measurement, and displaying measurement values.
8
HEM-7301-ITKE_main.book 9 ページ 2011年11月14日 月曜日 午後2時24分
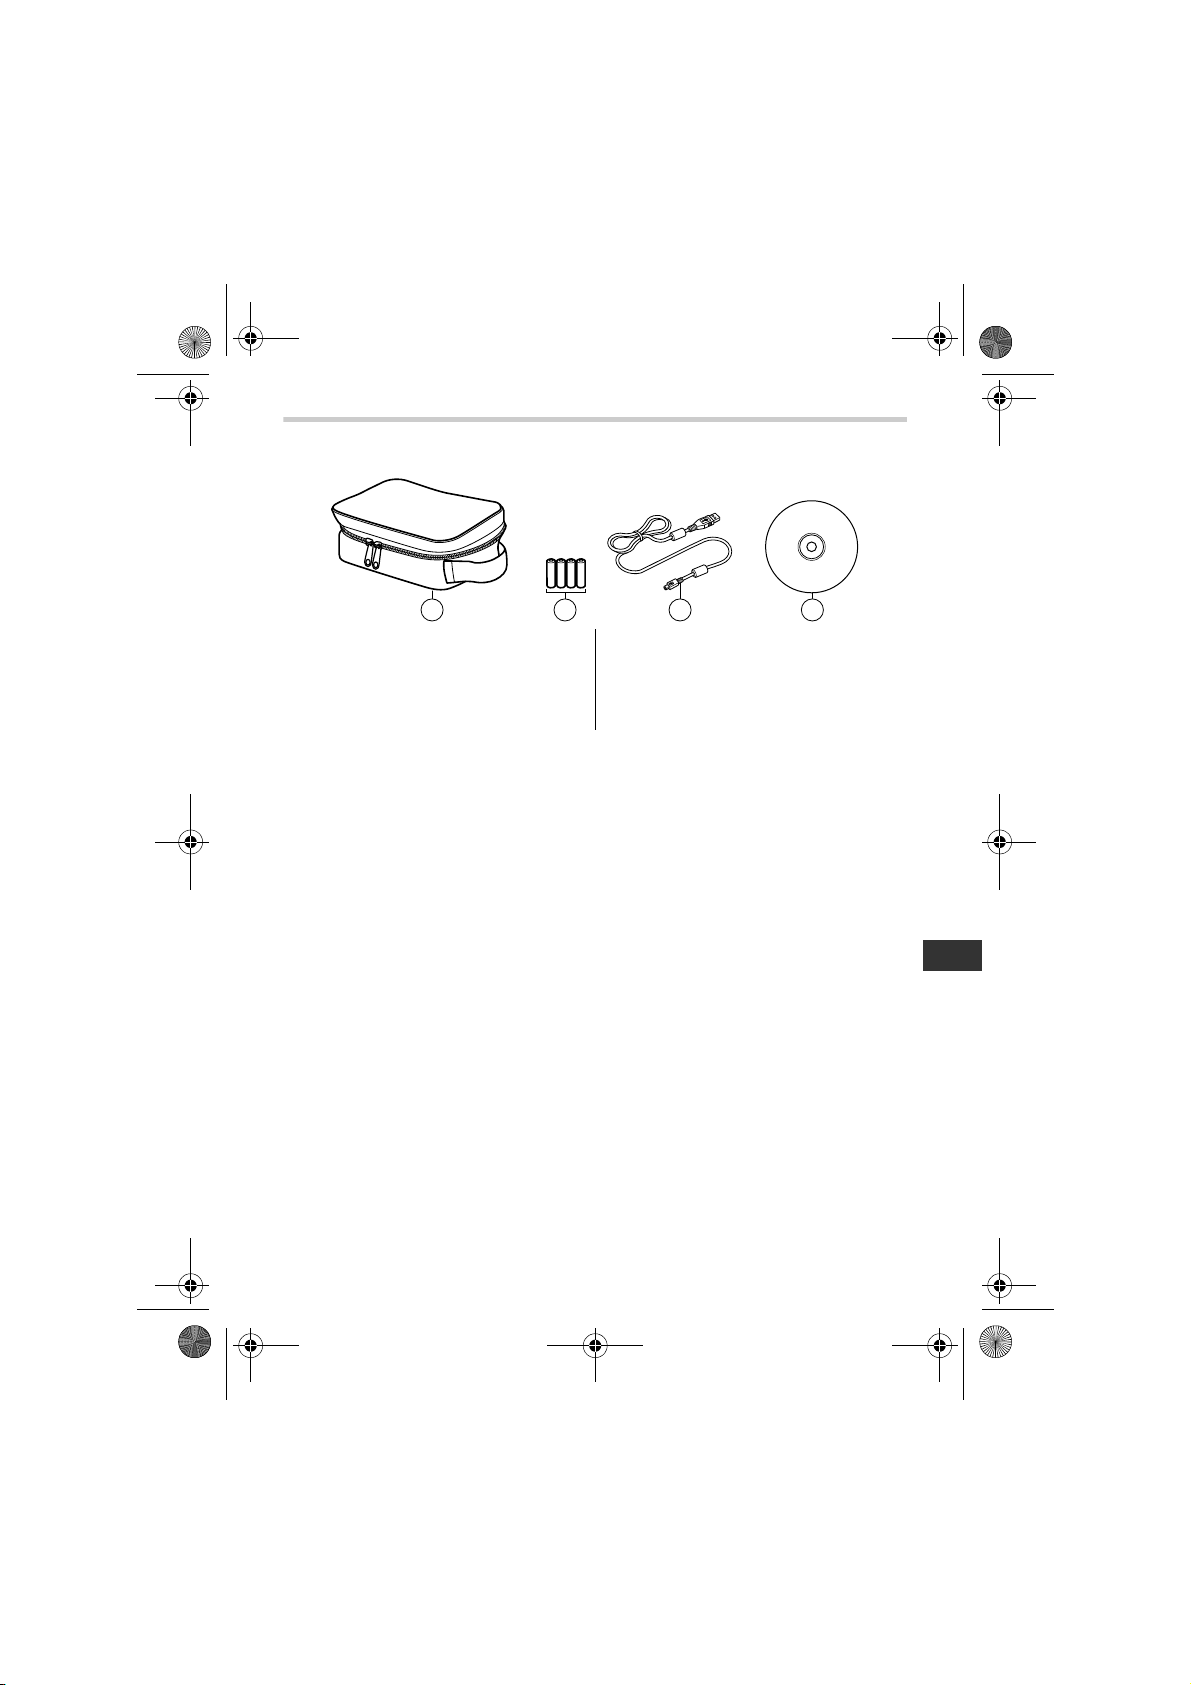
Package contents
1.Overview
X. Storage case
Y. Four “AAA” alkaline (LR03)
batteries
Z. USB cable
AA.CD-ROM
• Instruction manual
• Guarantee card
• Blood pressure pass
• Software Installation Guide
EN
9
HEM-7301-ITKE_main.book 10 ページ 2011年11月14日 月曜日 午後2時24分
2.Preparation
2. Preparation
2.1 Installing/Replacing the Batteries
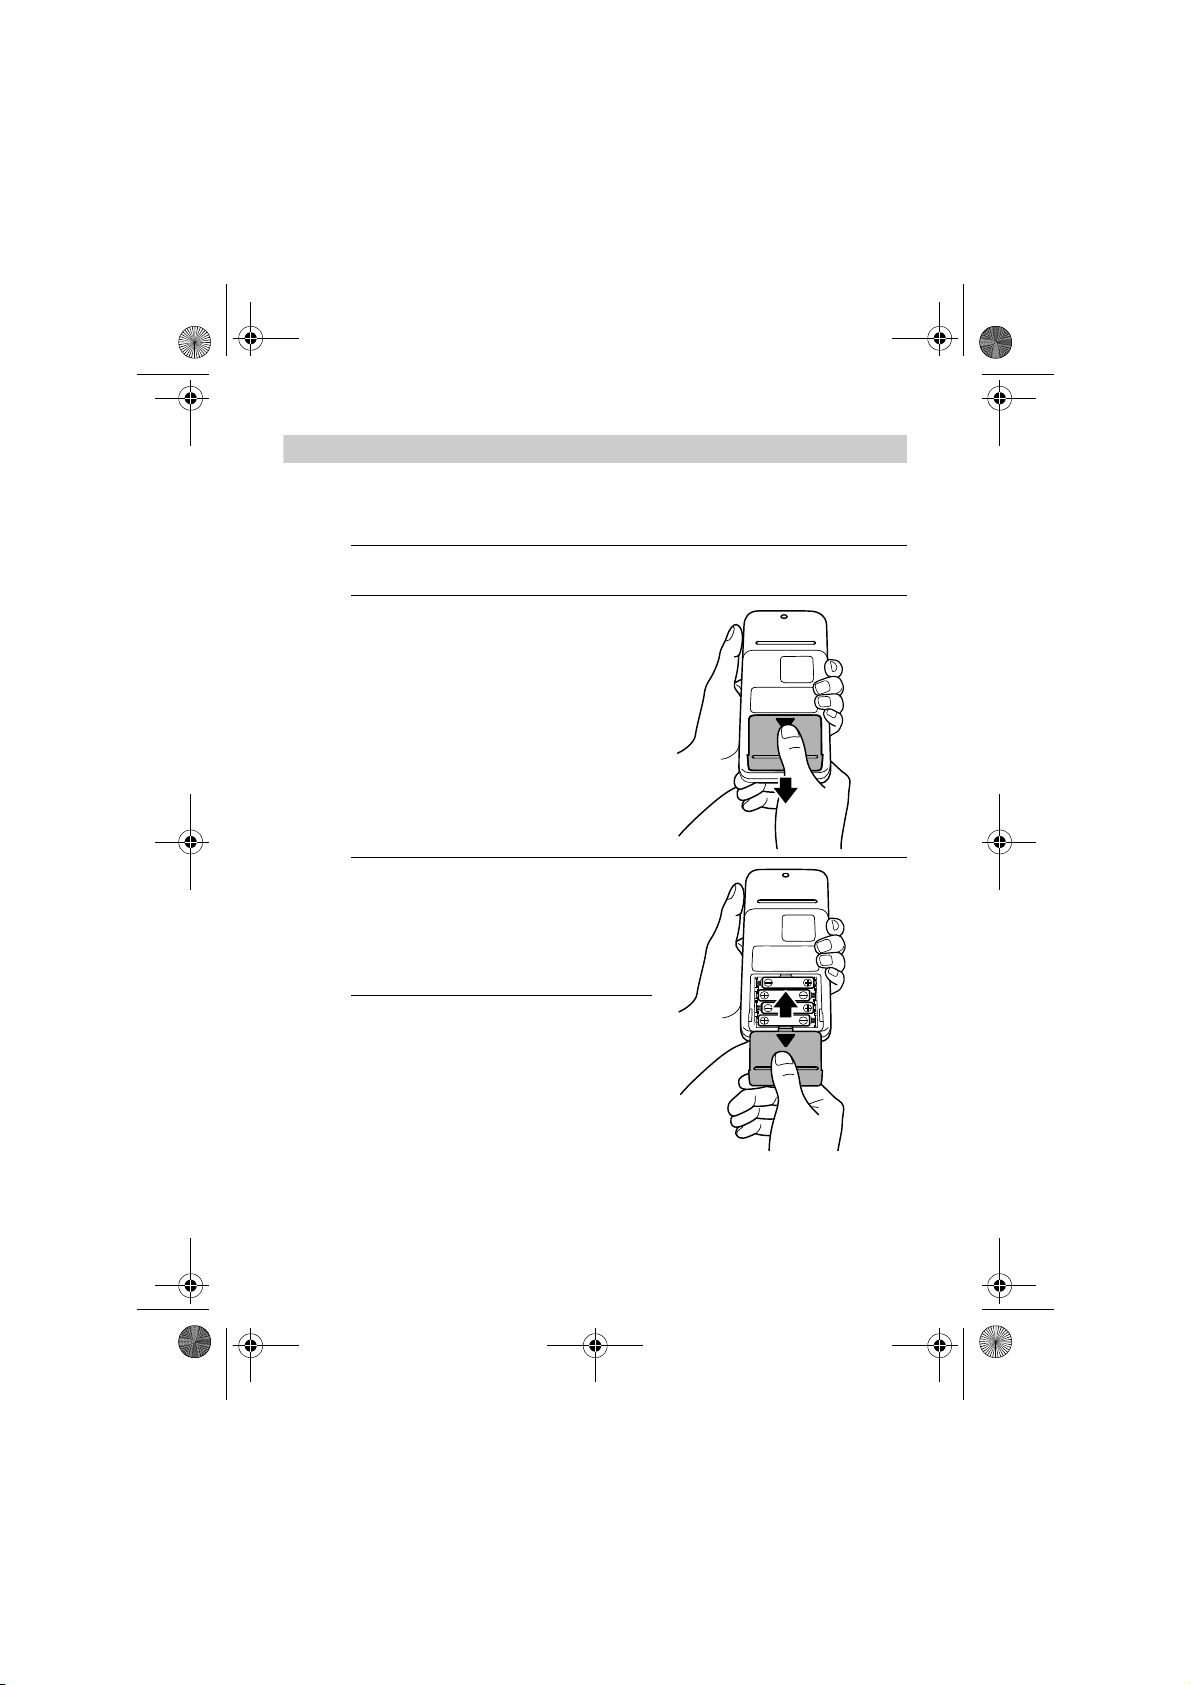
1. Turn the main unit upside down.
2. Slide the battery cover in the
direction of the arrow while
pressing the ribbed part of the
cover.
3. Install or replace four “AAA” size
batteries so that the + (positive)
and — (negative) polarities match
the polarities indicated on the
battery compartment.
4. Put the battery cover back in
place.
Slide the battery cover as
indicated, until it clicks into
place.
Note: The measurement values continue to be stored in
memory even after the batteries are replaced.
10
HEM-7301-ITKE_main.book 11 ページ 2011年11月14日 月曜日 午後2時24分
2.Preparation
Battery Life & Replacement
If the battery low symbol ( ) appears on the display, replace all four
batteries at the same time.
— When the battery low symbol ( ) starts to blink, you will still be
able to use the unit for a short while. You should replace the
batteries with new ones ahead of time.
— When the symbol ( ) remains lit, the batteries are exhausted. You
should replace the batteries with new ones at once. Turn the unit off
before replacing the batteries.
• Remove the batteries if the unit will not be used for three months or
more.
• If the batteries have been removed for more than 30 seconds, the
Date/Time setting will need to be reset. See “2.2 Setting the Date and
Time” for details.
• Dispose of batteries according to applicable local regulations.
Four new
“AAA” alkaline batteries will last for approximately 300
measurements, when used to take three measurements a day.
Since the supplied batteries are for monitoring use only, they may have
a shorter life and not last for 300 measurements.
EN
11
HEM-7301-ITKE_main.book 12 ページ 2011年11月14日 月曜日 午後2時24分
2.Preparation
2.2 Setting the Date and Time
Your blood pressure monitor automatically stores up to 90
measurements values with the date and time. To make use of the
memory and average values functions:
• Set the unit to the correct date and time before taking a measurement
for the first time.
• If the batteries have been removed for more than 30 seconds, the
Date/Time setting will need to be set.
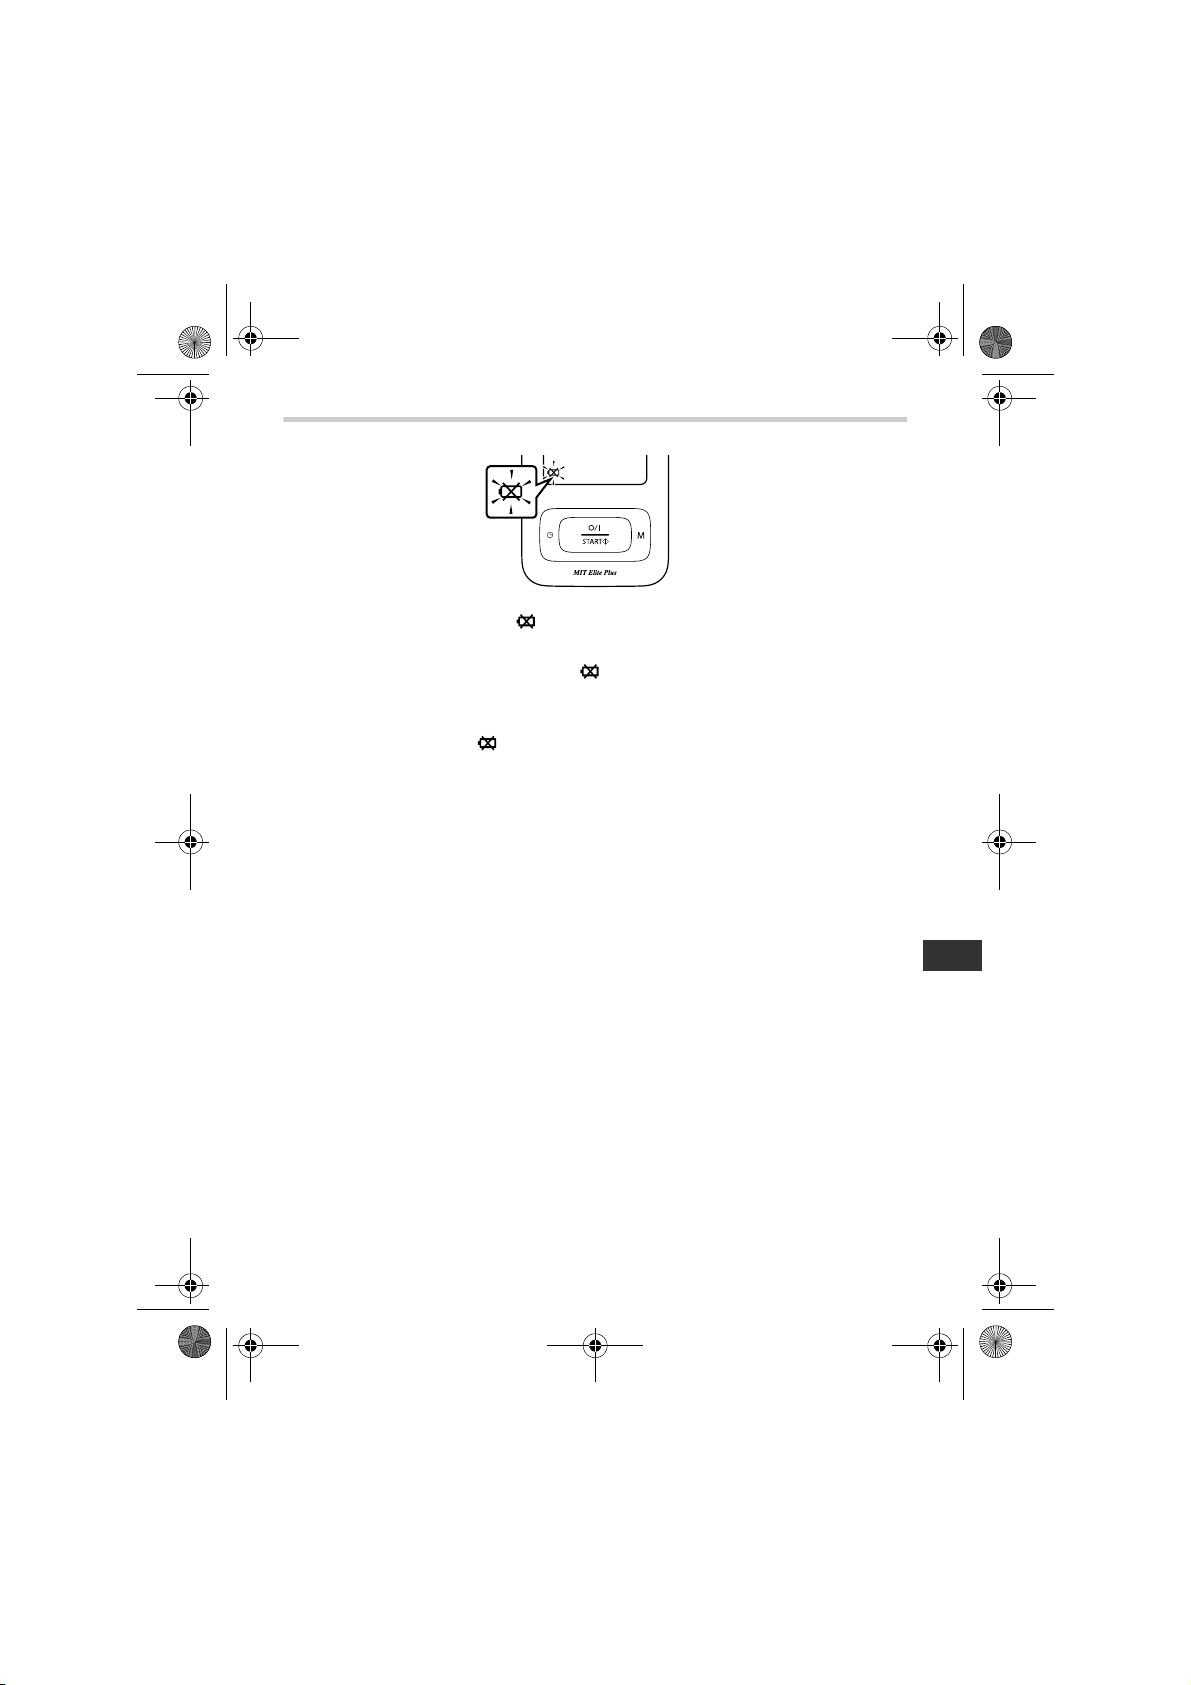
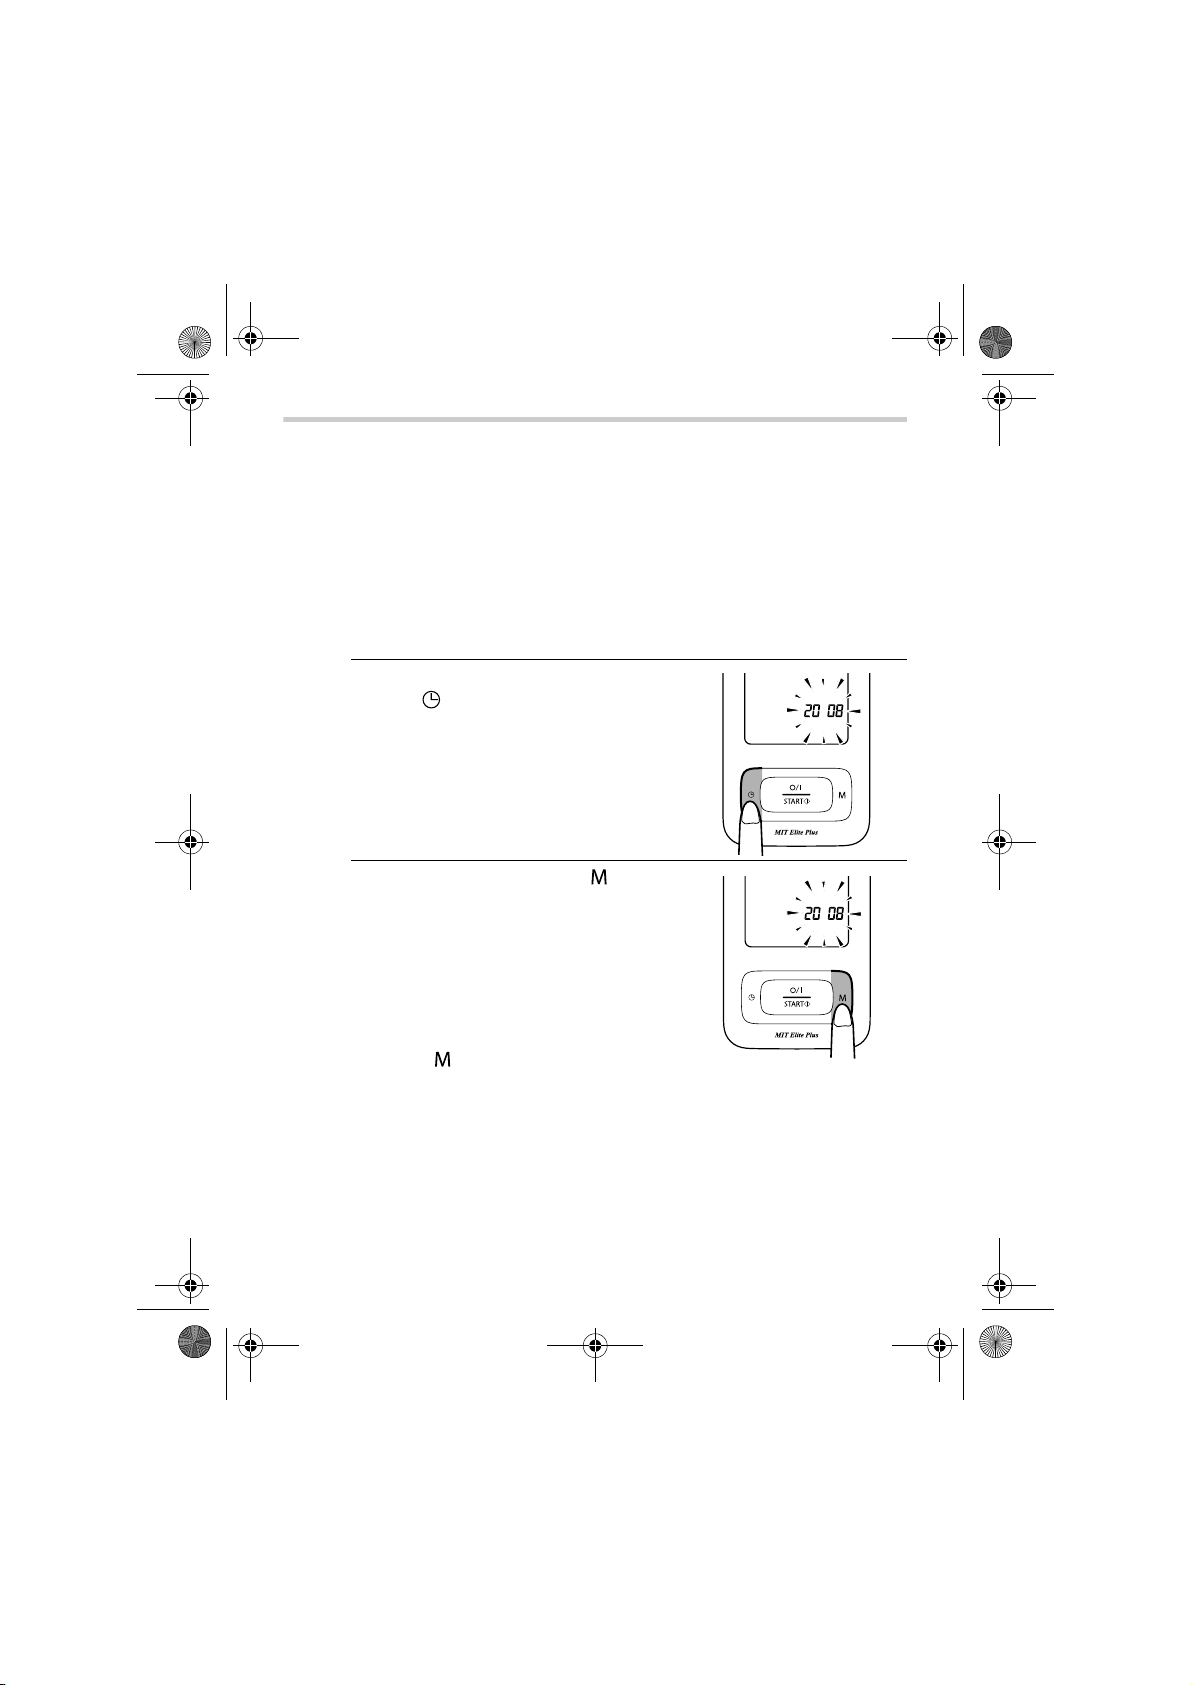
1. Press and hold the Date/time setting
button ( ) to adjust the date and
time. The year digits (2008) will flash
on the display.
2. Press the Memory button ( ) to
advance the digits one at a time.
12
Notes:
• The range for the year setting is
2008 to 2030. If the year reaches
2030, it will return to 2008.
• If you hold down the Memory
button ( ), the digits will advance
rapidly.
HEM-7301-ITKE_main.book 13 ページ 2011年11月14日 月曜日 午後2時24分
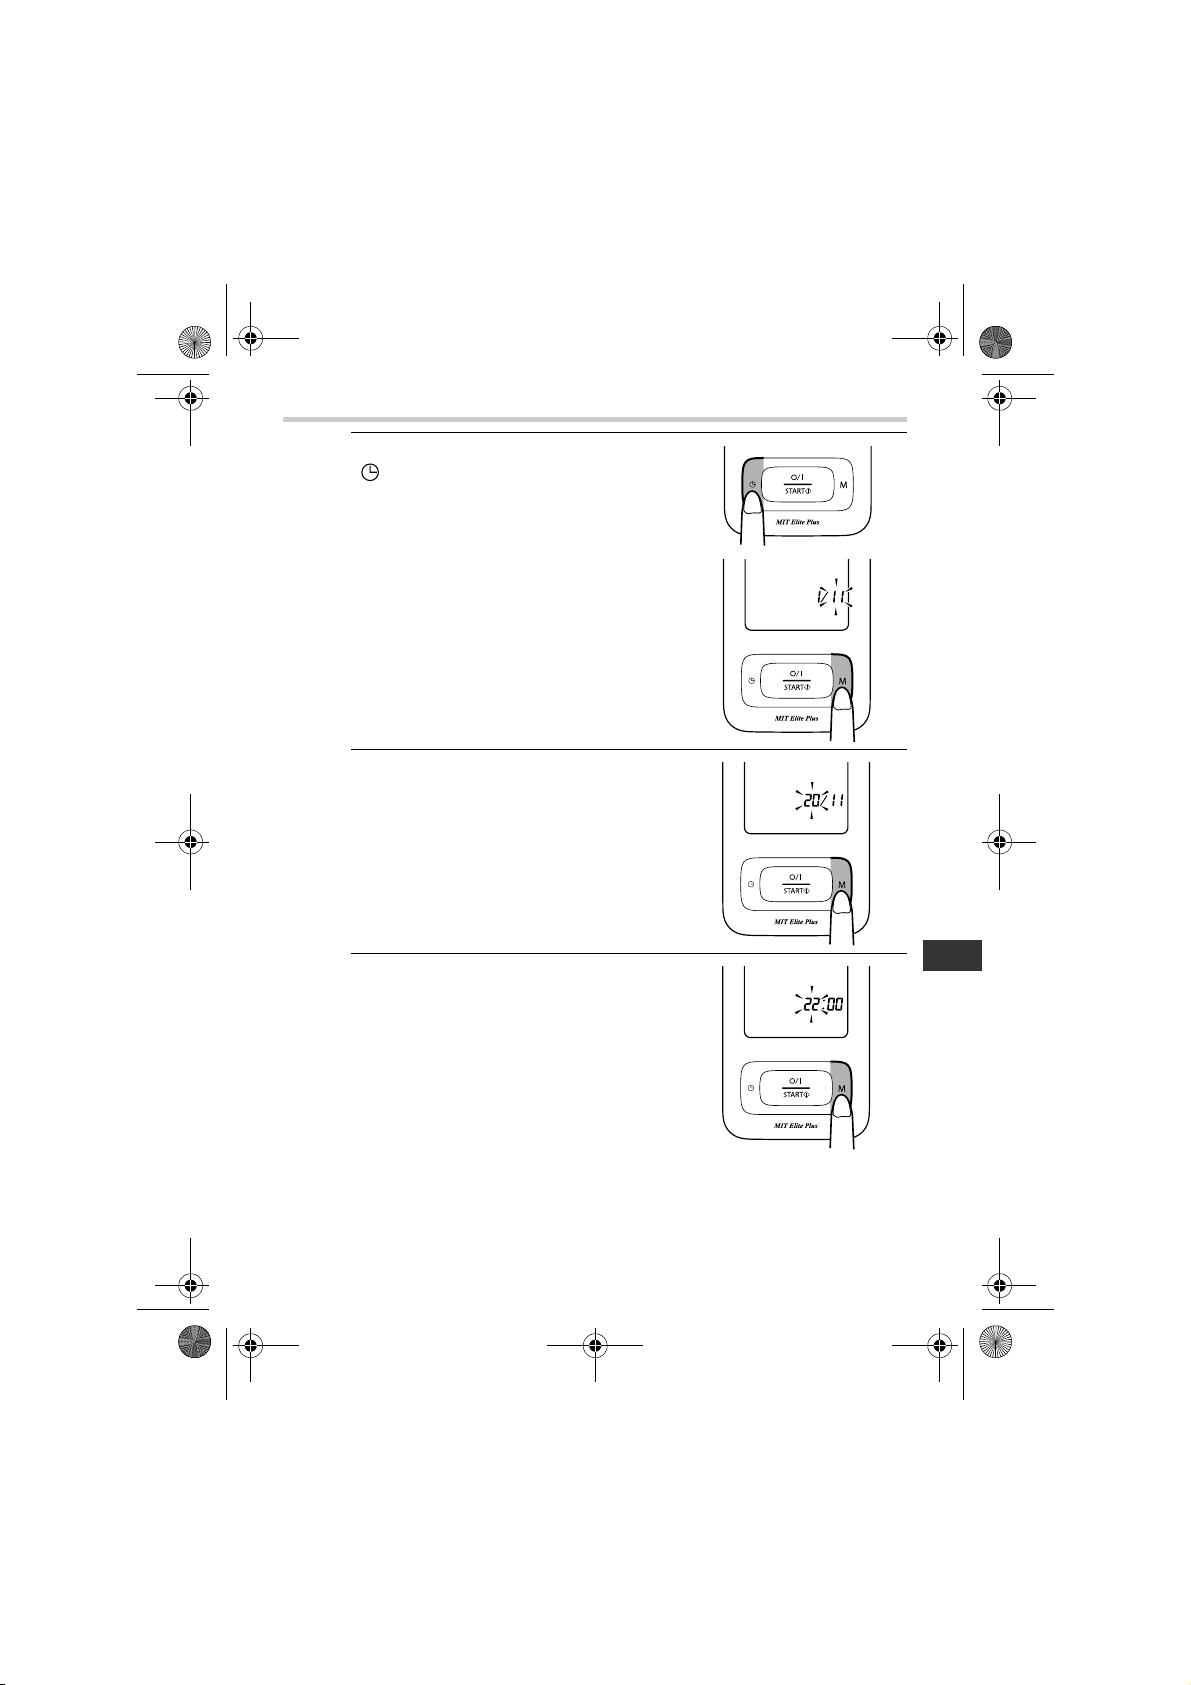
2.Preparation
3. Press the Date/time setting button
( ) to confirm the setting when the
desired number appears on the
display.
The year is set and the month digits
flash on the display.
4. Repeat steps 2 and 3 to set the
month.
The month is set and the day digits
flash on the display.
5. Repeat steps 2 and 3 to set the day.
The day is set and the hour digits
flash on the display.
EN
13
HEM-7301-ITKE_main.book 14 ページ 2011年11月14日 月曜日 午後2時24分
2.Preparation
6. Repeat steps 2 and 3 to set the
hour.
The hour is set and the minutes
digits flash on the display.
7. Repeat steps 2 and 3 to set the minutes.
The minutes settings is set.
Press the Date/time setting button
( ) to turn the monitor off.
When adjusting the date and time,
press the Date/time setting button
( ) to turn the monitor on, follow
the steps above, and press the O/I START button to turn the
monitor off.
14
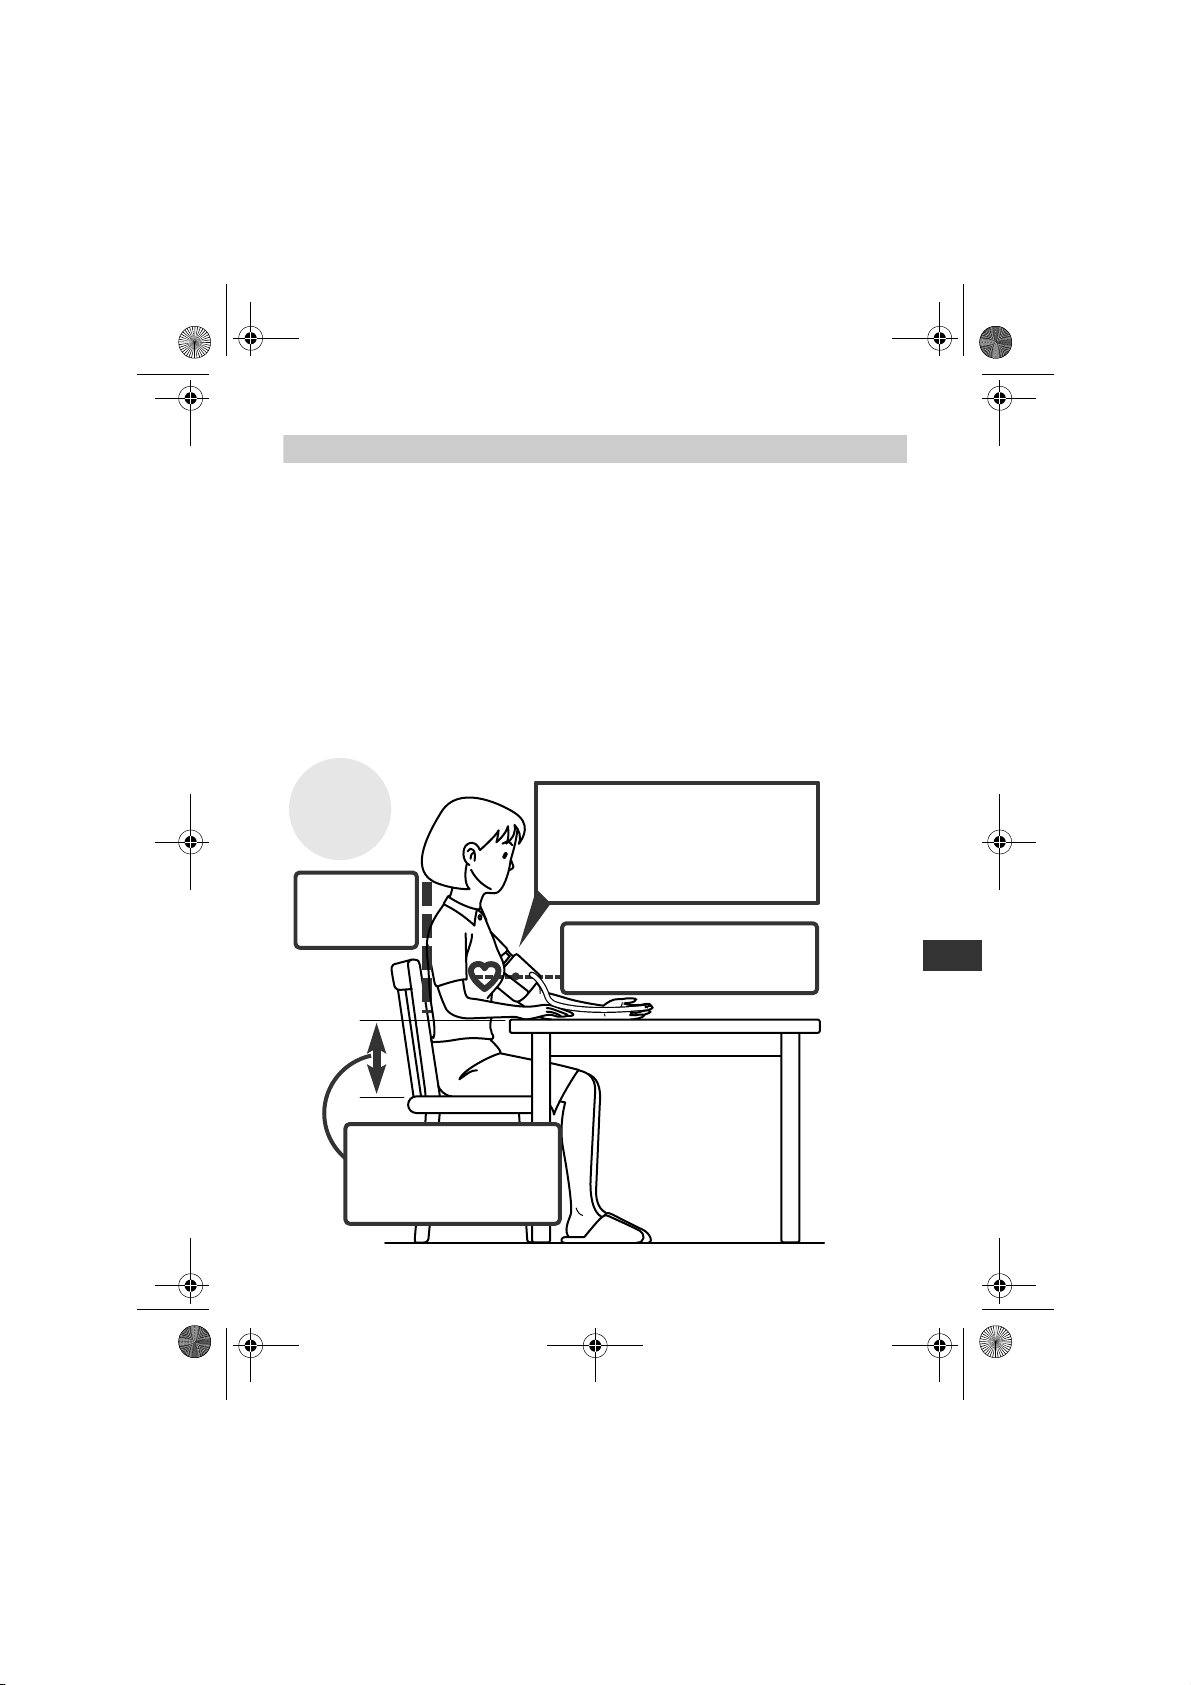
Correct
Posture
Remove tight fitting clothing from
your upper arm, and any thick
clothing such as a sweater.
Do not place the cuff over thick
clothes and do not roll up your sleeve
if it is too tight.
Sit upright
with your
back straight.
Place your arm on a table so
that the cuff will be at the same
level as your heart.
The gap between the
chair and the top of the
table should be between
25cm to 30cm.
HEM-7301-ITKE_main.book 15 ページ 2011年11月14日 月曜日 午後2時24分
Operating instructions
3. Using the Unit
3.Using the Unit
3.1
How to Sit Correctly When Taking a Measurement
You can take a measurement on either your left or right arm.
Notes:
• Measurements should be taken in a quiet place and you should be in
a relaxed, seated position. Make sure that the room is not too hot or
cold.
• Avoid eating, drinking alcohol, smoking, or exercising for at least 30
minutes before taking a measurement.
• Do not move or talk during measurement.
EN
15
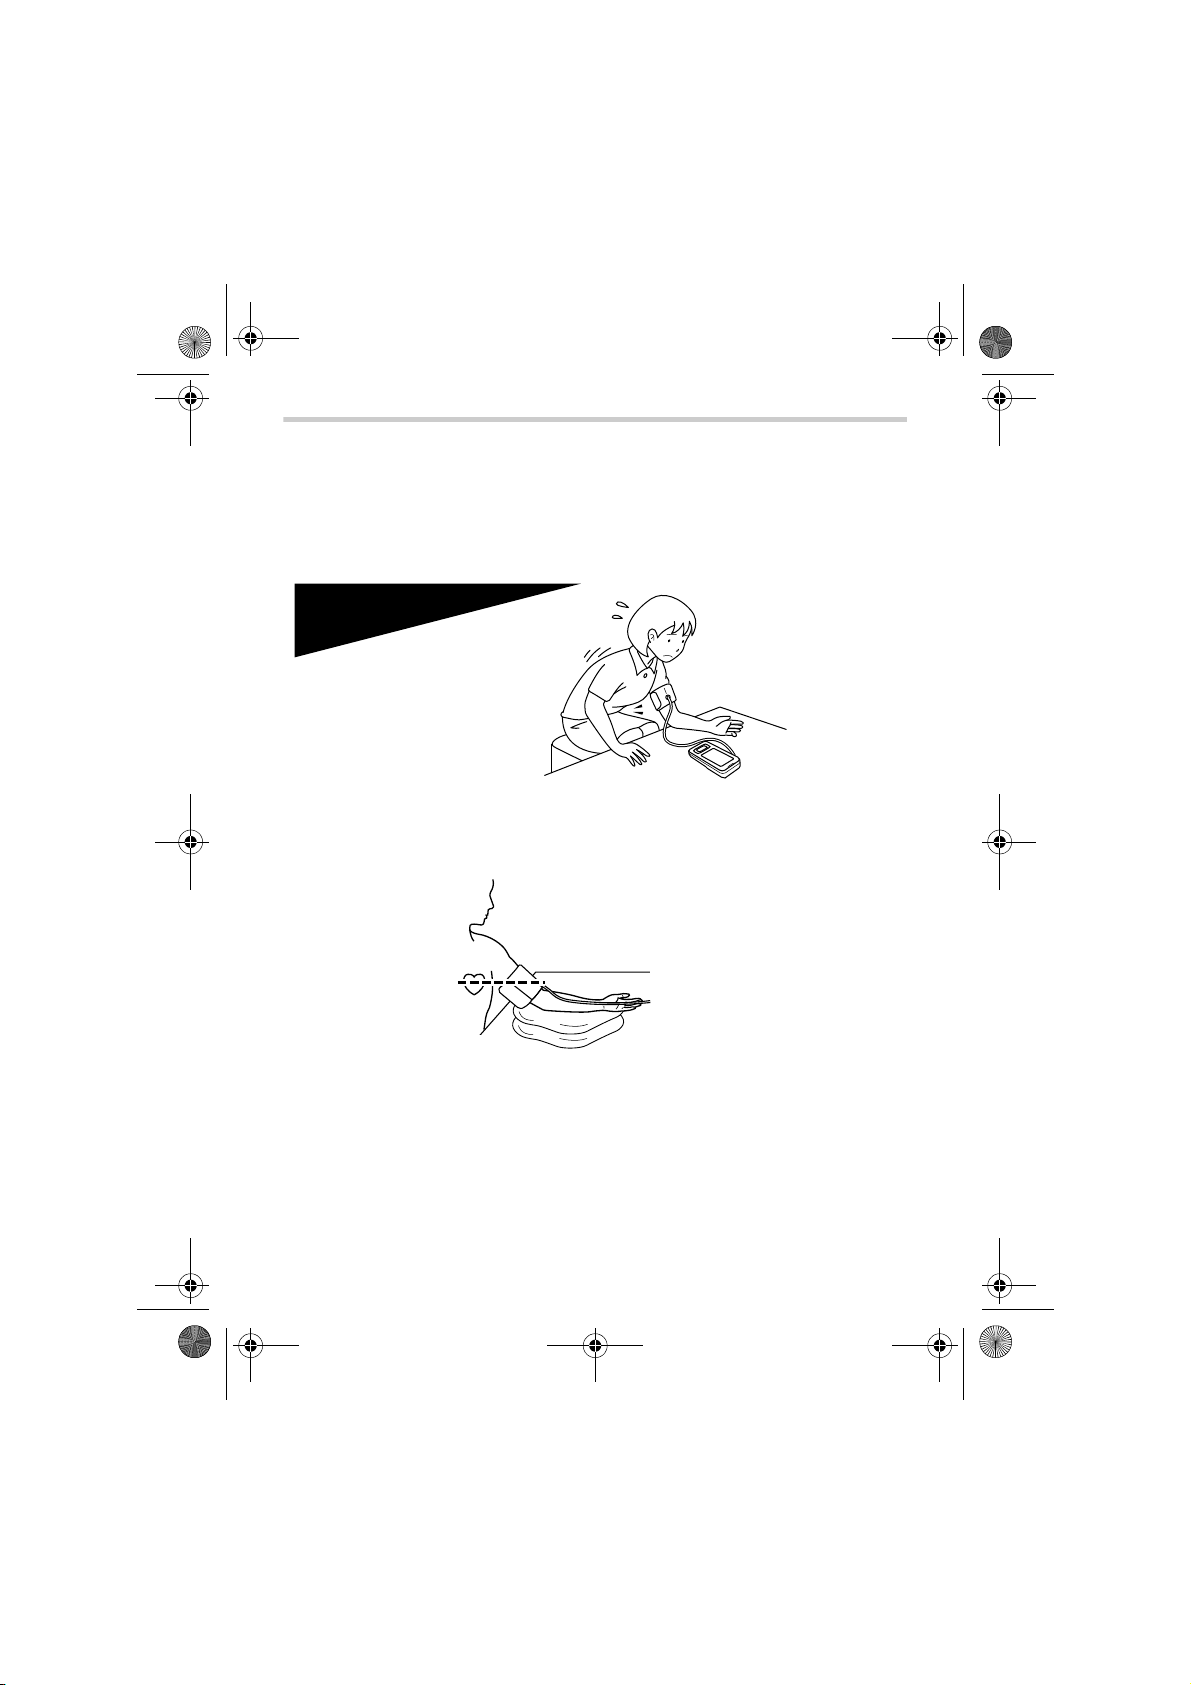
Incorrect Posture
These situations could lead to higher blood pressure values due to
strain or the arm cuff being lower than the heart.
If the arm cuff is at a lower position than your heart use cushions
etc., to adjust the height of your arm.
• Arched back (leaning
forwards)
• Sitting cross-legged
• Sitting on a sofa or at a low
table so that you tend to lean
forward
HEM-7301-ITKE_main.book 16 ページ 2011年11月14日 月曜日 午後2時24分
3.Using the Unit
Notes:
• Correct posture during measurement is necessary to get accurate
results.
• You should also try to measure your blood pressure at the same time
each day. (Within 1 hour after waking up is recommended.)
16
HEM-7301-ITKE_main.book 17 ページ 2011年11月14日 月曜日 午後2時24分
3.Using the Unit
3.2 Applying the Arm Cuff
Notes:
• Be sure to wrap the arm cuff correctly so that you get accurate
results.
• Measurements can be taken in light clothing. However, please
remove thick clothes, such as sweaters, before taking a reading.
• You can take a measurement on either your left or right arm. The
blood pressure can differ between the right arm and the left arm and
therefore also the measured blood pressure values can be different.
Omron recommends to always use the same arm for measurement. If
the values between the two arms differ substantially, please check
with your doctor which arm to use for your measurement.
Taking measurements on the left arm
1. Insert the air plug into the air
jack on the left side of the main
unit.
17
EN
HEM-7301-ITKE_main.book 18 ページ 2011年11月14日 月曜日 午後2時24分
3.Using the Unit
2. Put your left arm through the cuff
loop.
Note: If the cuff is not assembled,
pass the end of the cuff
furthest from the tubing
through the metal D-ring to
form a loop. The smooth cloth
should be on the inside of the
cuff loop.
18
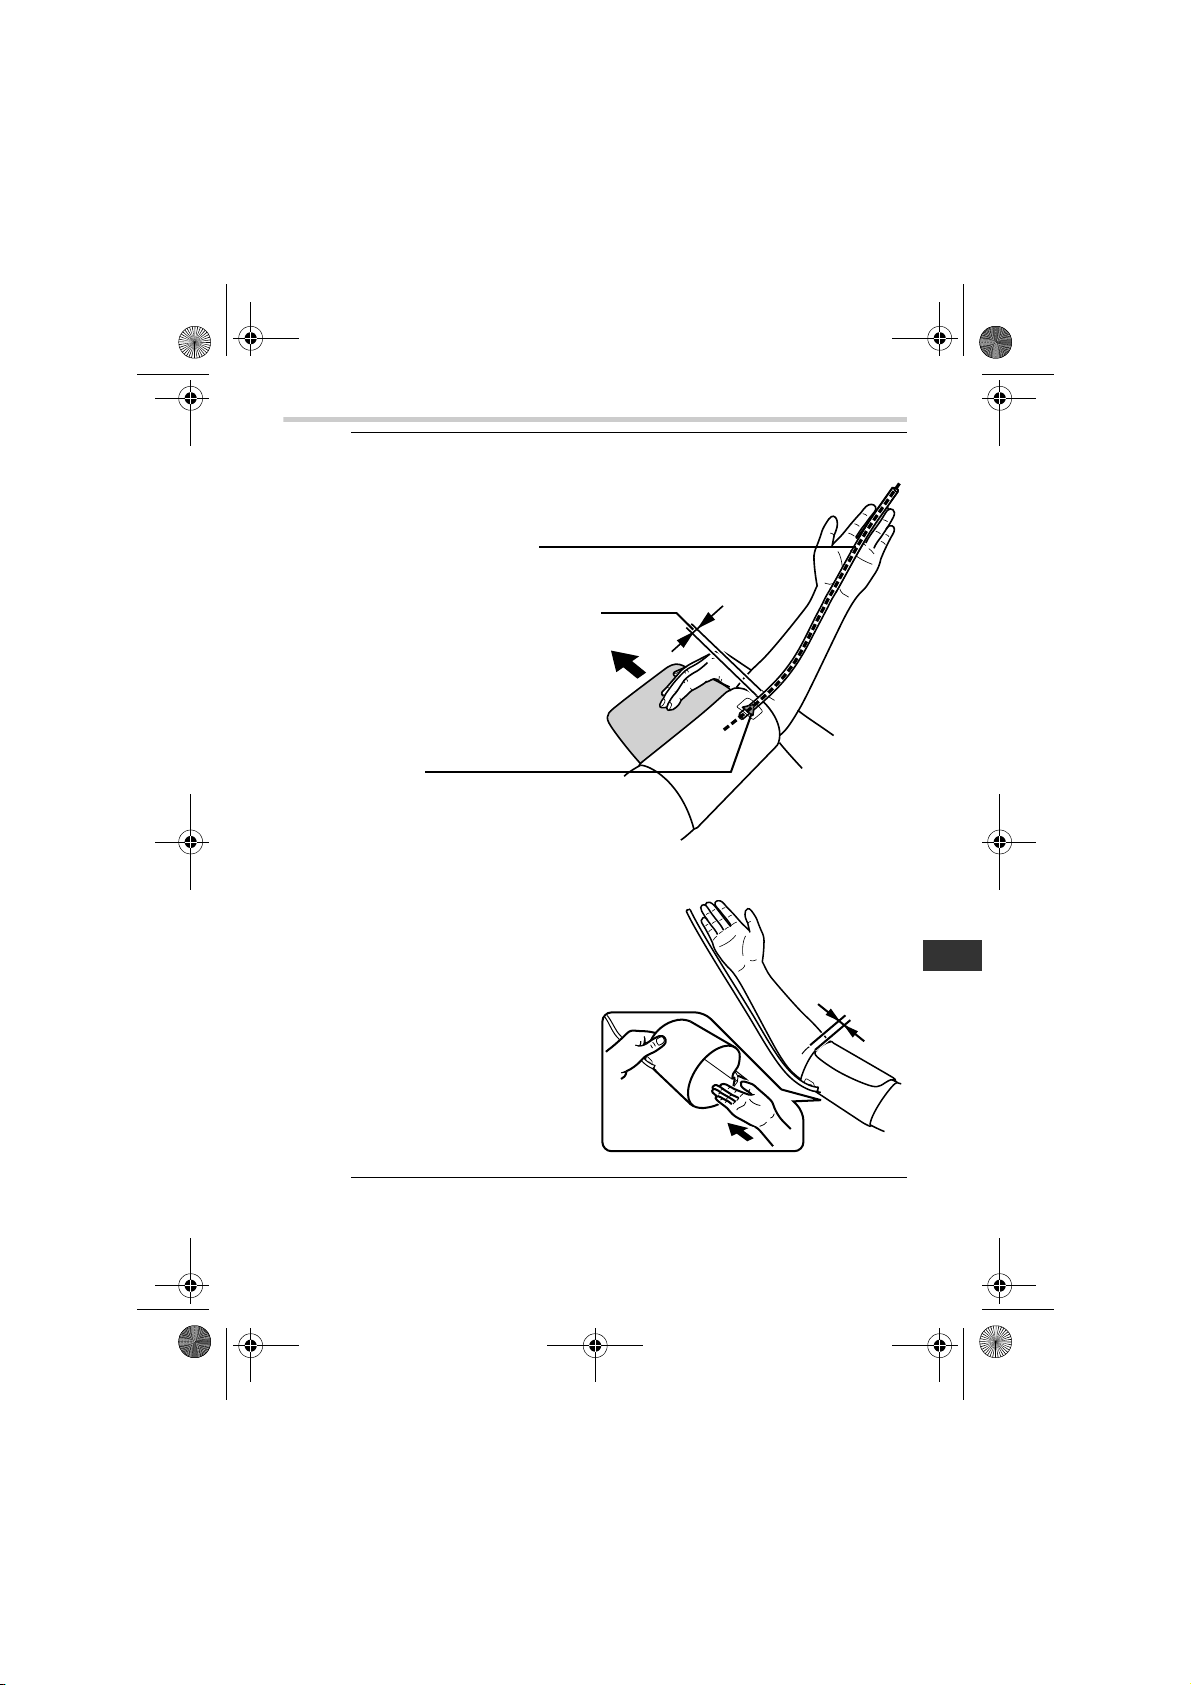
1) The air tube should run
down the inside of your
forearm and be in line with
your middle finger.
2) The bottom of the cuff
should be approximately 1
to 2 cm above your elbow.
3) Apply the cuff to your
upper arm so that the
coloured marker (blue
arrow under tube) is
centred on the middle of
your inner arm and points
down the inside of the
arm.
HEM-7301-ITKE_main.book 19 ページ 2011年11月14日 月曜日 午後2時24分
3.Using the Unit
3. Position the arm correctly.
Taking measurements on the right arm
Apply the cuff so that the
air tube is at the side of
your elbow.
• Be careful not to rest
your arm on the air tube,
or otherwise restrict the
flow of air to the cuff.
• The cuff should be 1 to 2
cm above the elbow.
EN
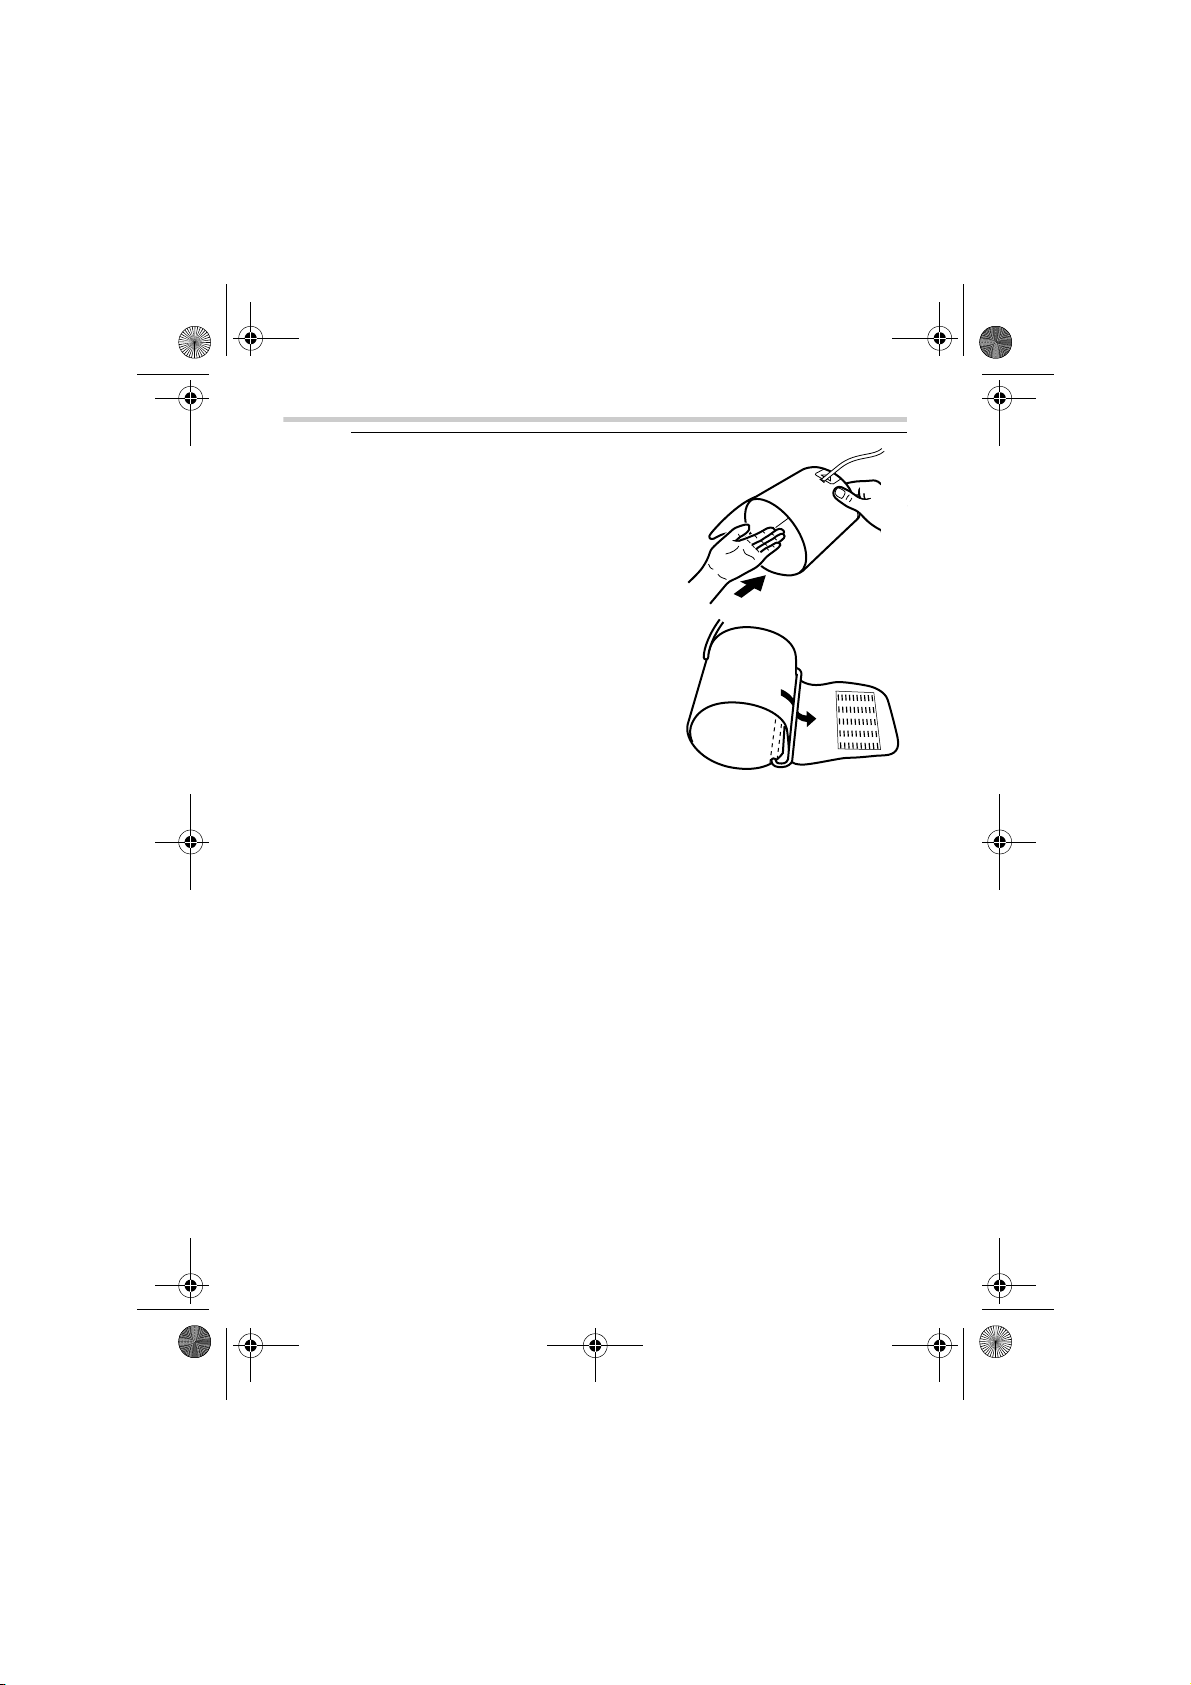
4. When the cuff is positioned correctly, close the fabric fastener
FIRMLY.
19
HEM-7301-ITKE_main.book 20 ページ 2011年11月14日 月曜日 午後2時24分
3.Using the Unit
3.3 Taking a Reading
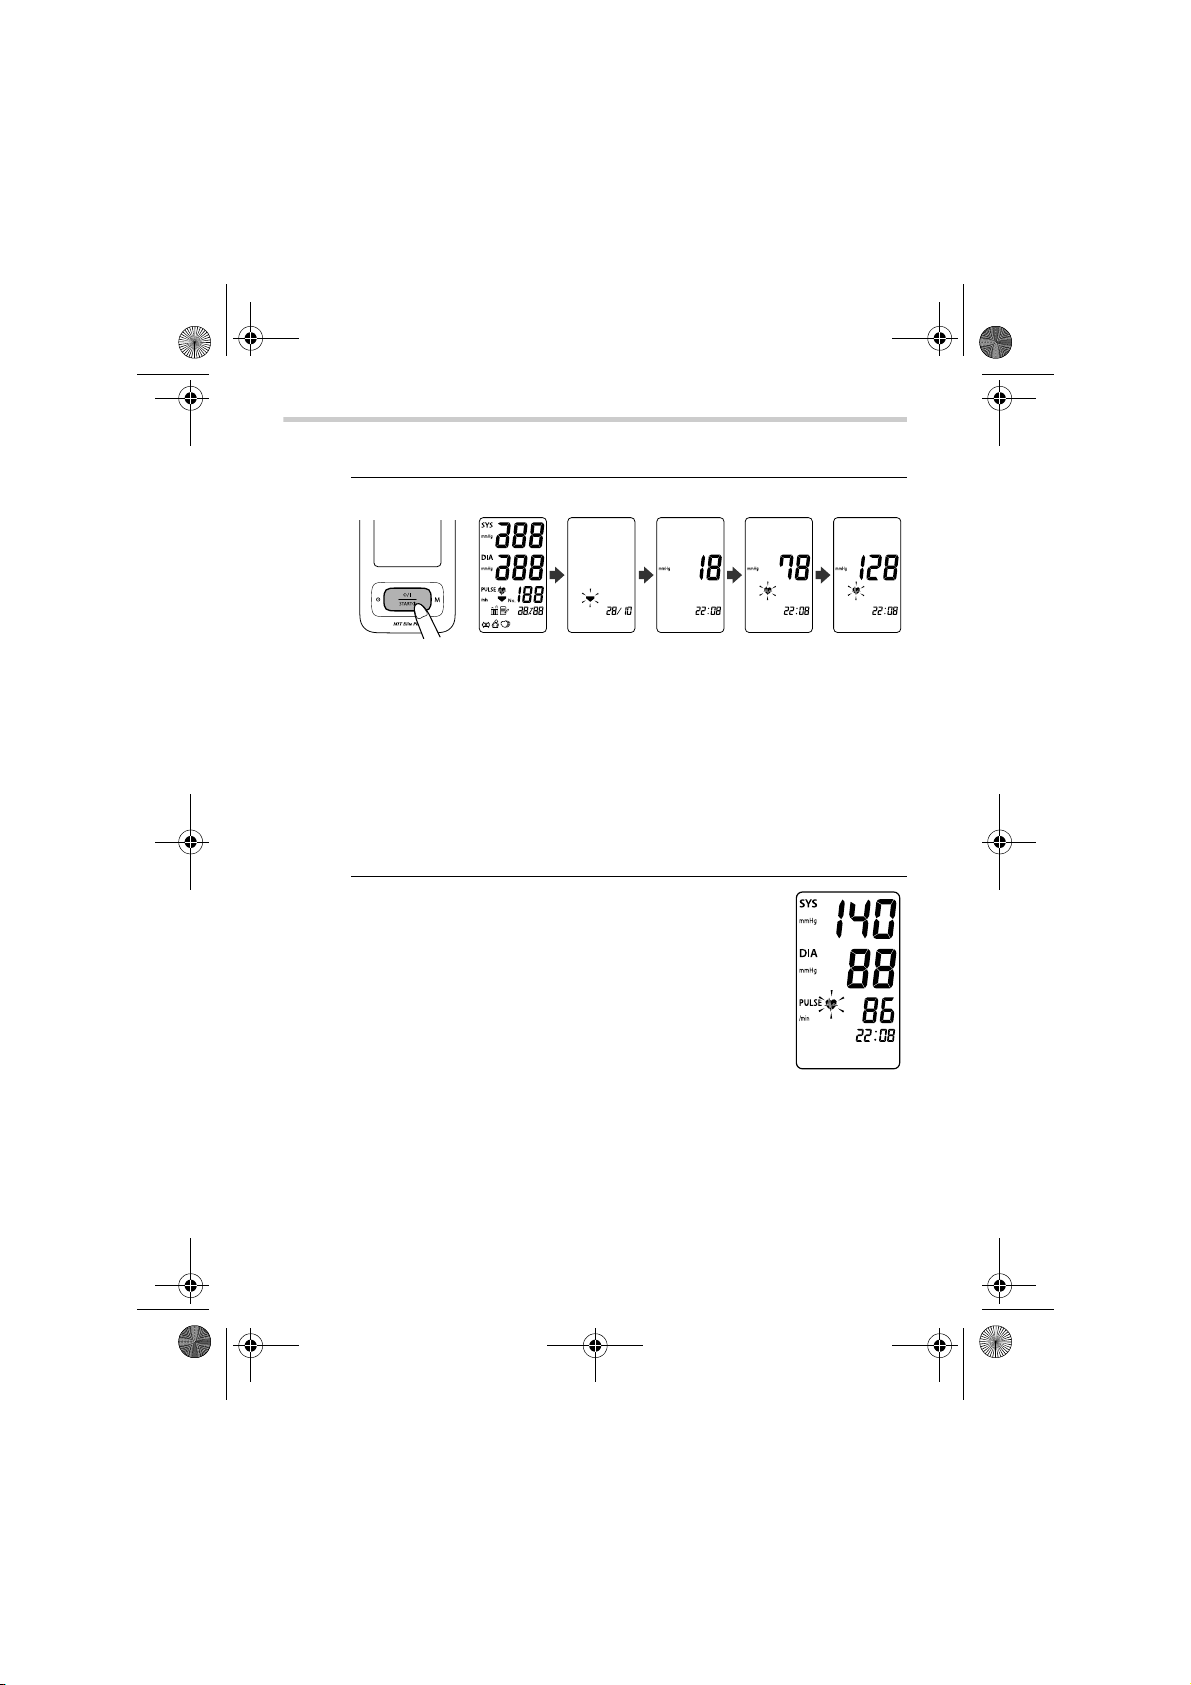
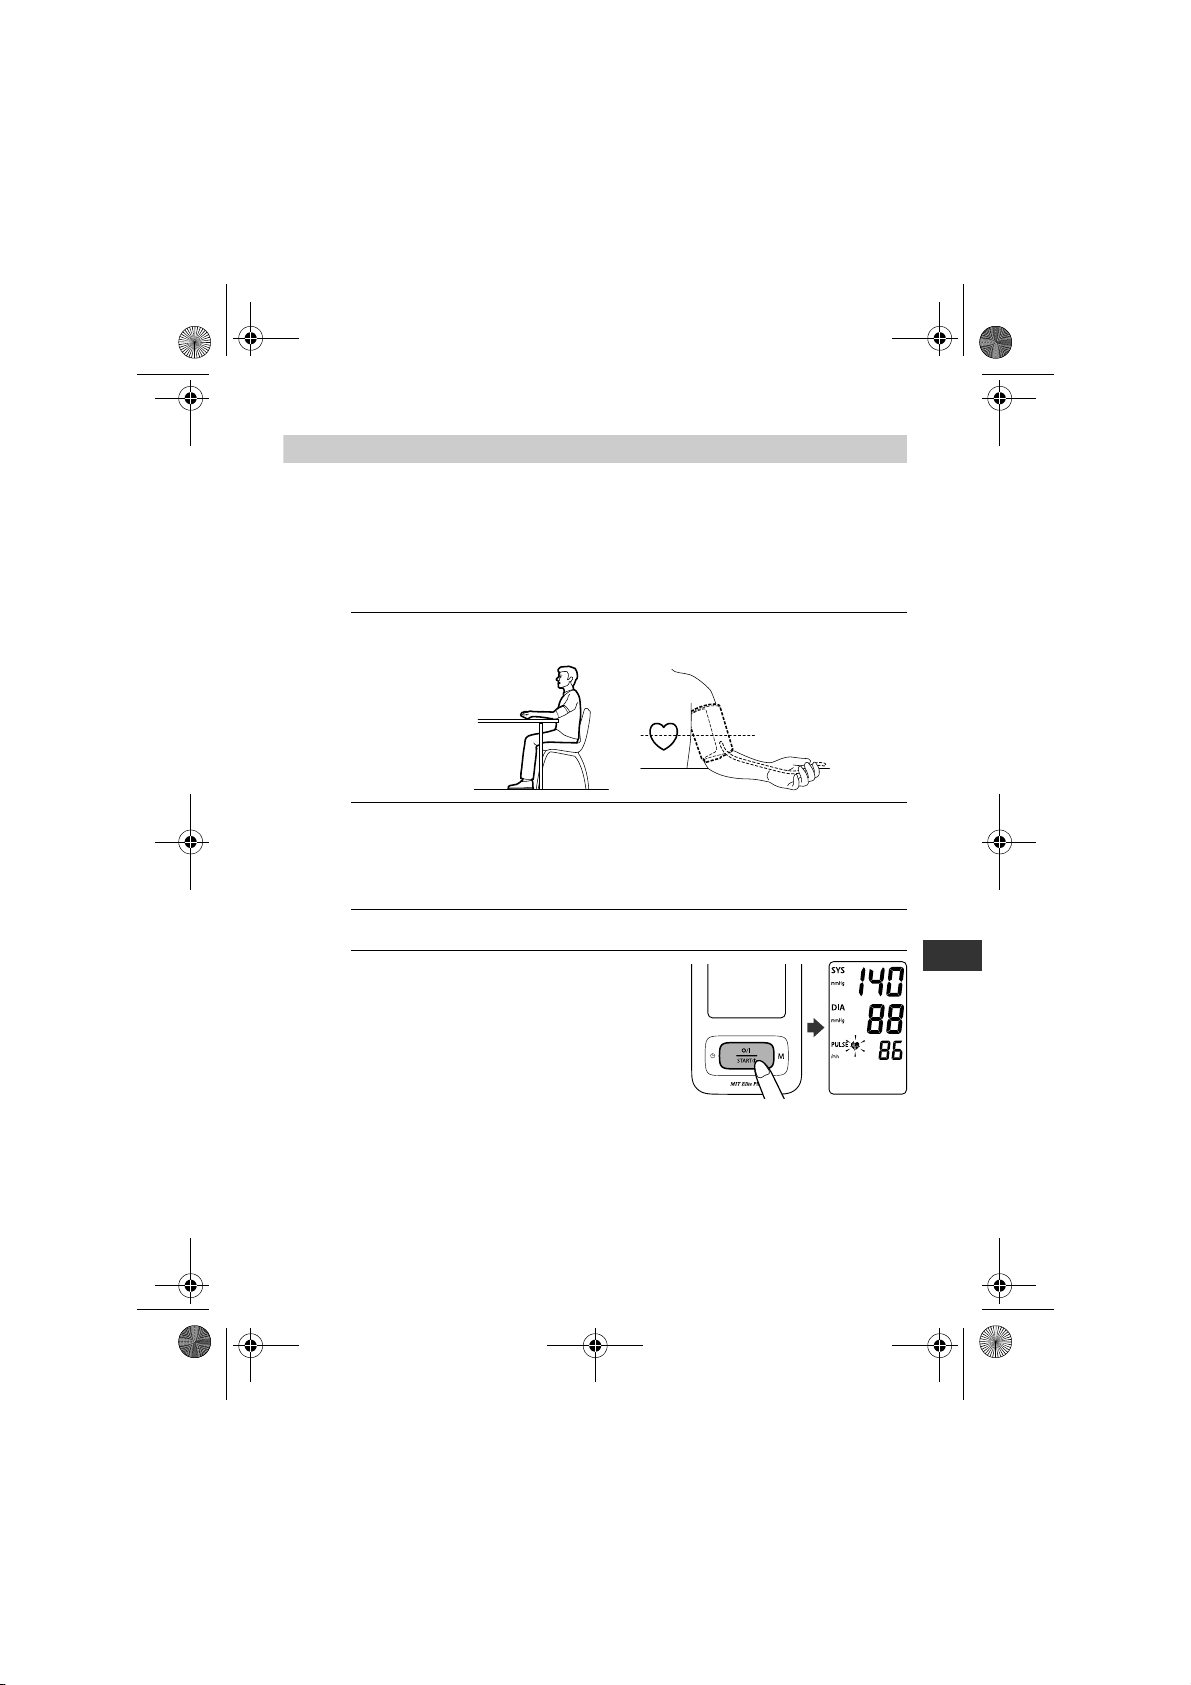
1. Press the O/I START button to turn on the unit.
All symbols appear on the display.
The cuff starts to inflate automatically. As the cuff inflates, the
unit automatically determines your ideal inflation level. This unit
detects the pulse during inflation. Do not move your arm and
remain still until the entire measurement process is completed.
Note: To stop the inflation or measurement, press and release
the O/I START button. The unit will stop inflating, start
deflation and will turn off.
2. When the measurement is complete, the arm
cuff completely deflates. Your blood pressure
and pulse rate are displayed.
20
HEM-7301-ITKE_main.book 21 ページ 2011年11月14日 月曜日 午後2時24分
3.Using the Unit
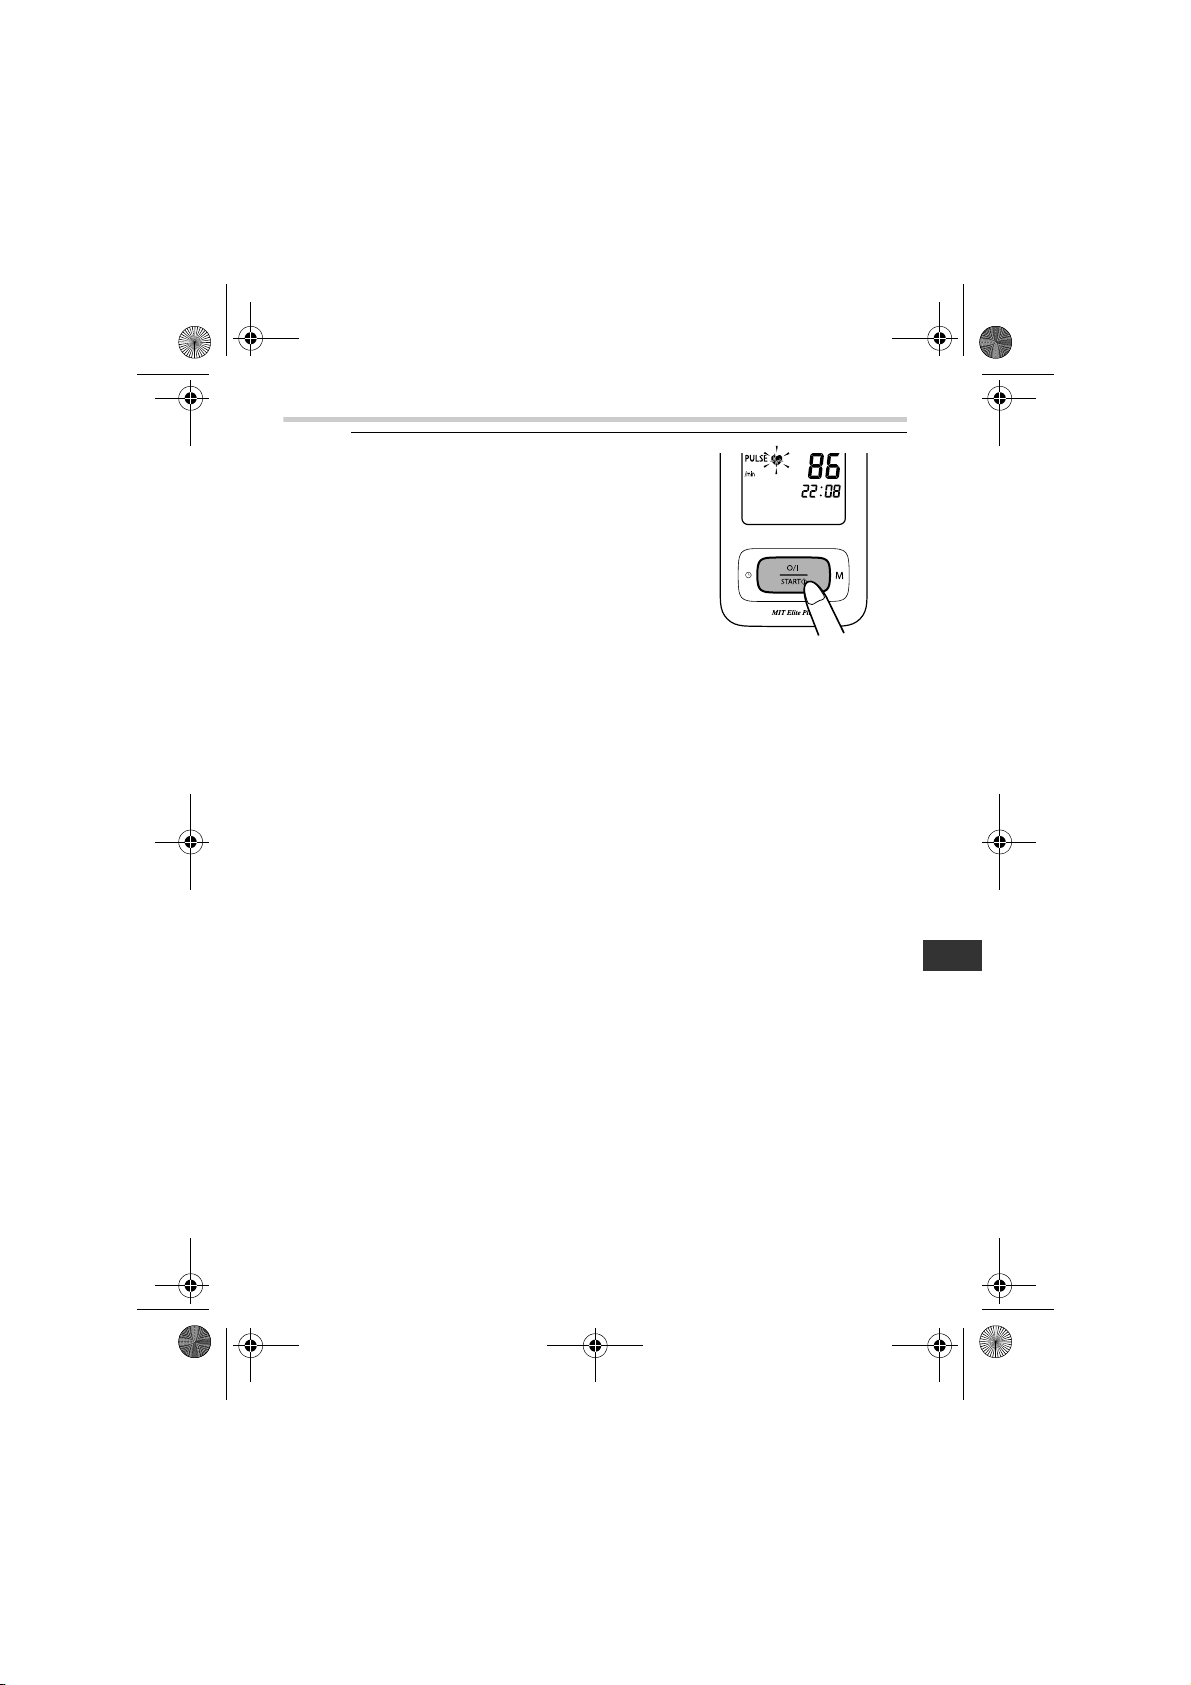
3. Press the O/I START button to turn
the unit off.
Note: If you forget to turn the
monitor off, it will
automatically turn off after
two minutes.
Notes:
• Self-diagnosis of measured results and treatment are dangerous.
Please follow the instructions of your doctor.
• Wait 2-3 minutes before taking another blood pressure measurement.
Waiting between readings allows the arteries to return to the condition
prior to taking the blood pressure measurement.
21
EN
HEM-7301-ITKE_main.book 22 ページ 2011年11月14日 月曜日 午後2時24分
3.Using the Unit
Using the Guest Mode
The monitor stores measurement values for one user in the memory.
The guest mode can be used to take a single measurement for another
user.
No measurement values are stored in the memory when the guest
mode is selected.
1. Press and hold the O/I START button for 3 seconds.
The Guest symbol ( ) appears on
the display.
2. Release the O/I START button.
The cuff starts to inflate automatically.
Note: To stop the inflation, press the O/I START button. The
monitor will stop inflating, start deflating and turn off.
3. Inflation stops and the measurement is started. When the
measurement is completed, your blood pressure and pulse rate
appear on the display.
22
HEM-7301-ITKE_main.book 23 ページ 2011年11月14日 月曜日 午後2時24分
3.Using the Unit
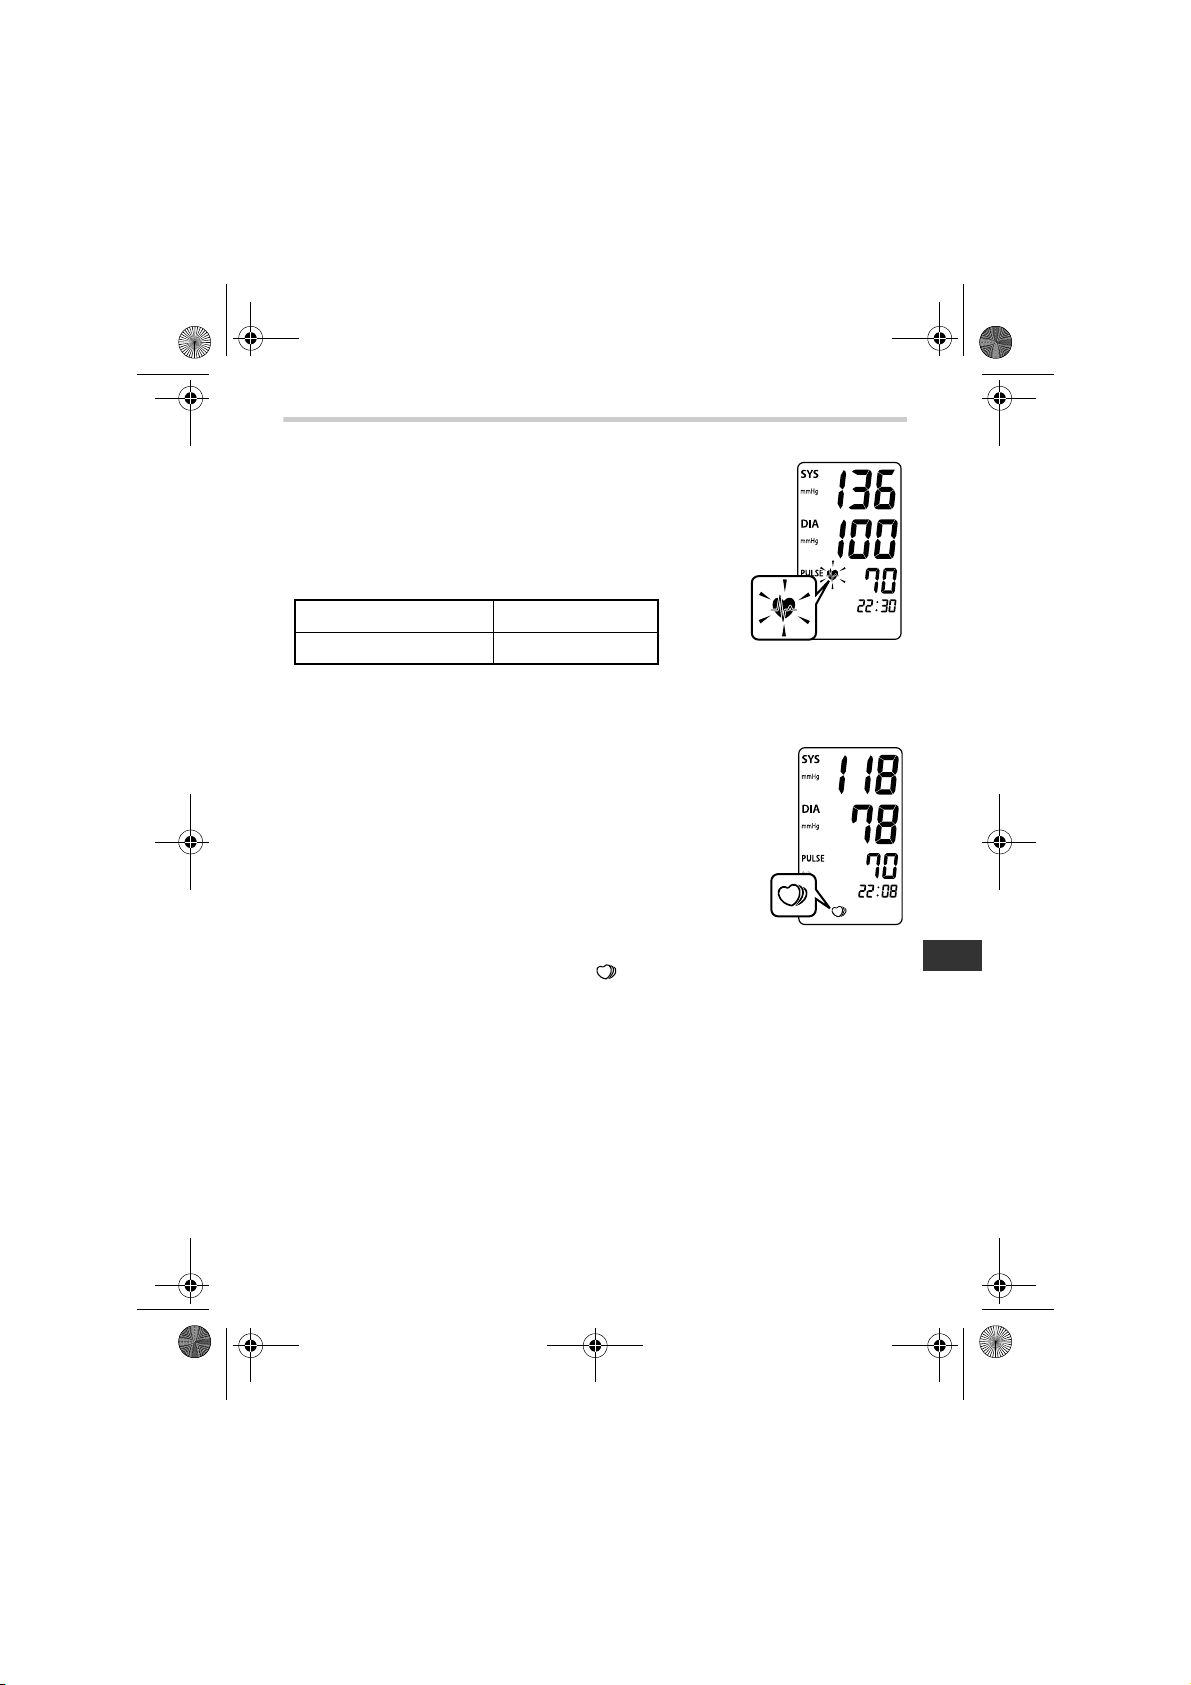
Important:
• If your systolic or diastolic pressure is outside the
standard range, the heartbeat symbol will blink
when the measurement result is displayed.
Recent research suggests that the following
values can be used as a guide to high blood
pressure for measurements taken at home.
Systolic Blood Pressure Above 135 mmHg
Diastolic Blood Pressure Above 85 mmHg
This criteria is for home blood pressure measurement.
For professional office blood pressure measurement criteria, please
refer to Chapter 10 “Some Useful Information about Blood Pressure”.
• Your blood pressure monitor includes an irregular
heartbeat feature. Irregular heartbeats can
influence the results of the measurement. The
irregular heartbeat algorithm automatically
determines if the measurement is usable or
needs to be repeated. If the measurement results
are affected by irregular heartbeats but the result
is valid, the result is shown together with the
irregular heartbeat symbol. If the irregular
heartbeats cause the measurement to be invalid, no result is shown.
If the irregular heartbeat symbol ( ) is shown after you have taken
a measurement, repeat the measurement. If the irregular heartbeat
symbol is shown frequently, please make your doctor aware of it.
EN
23
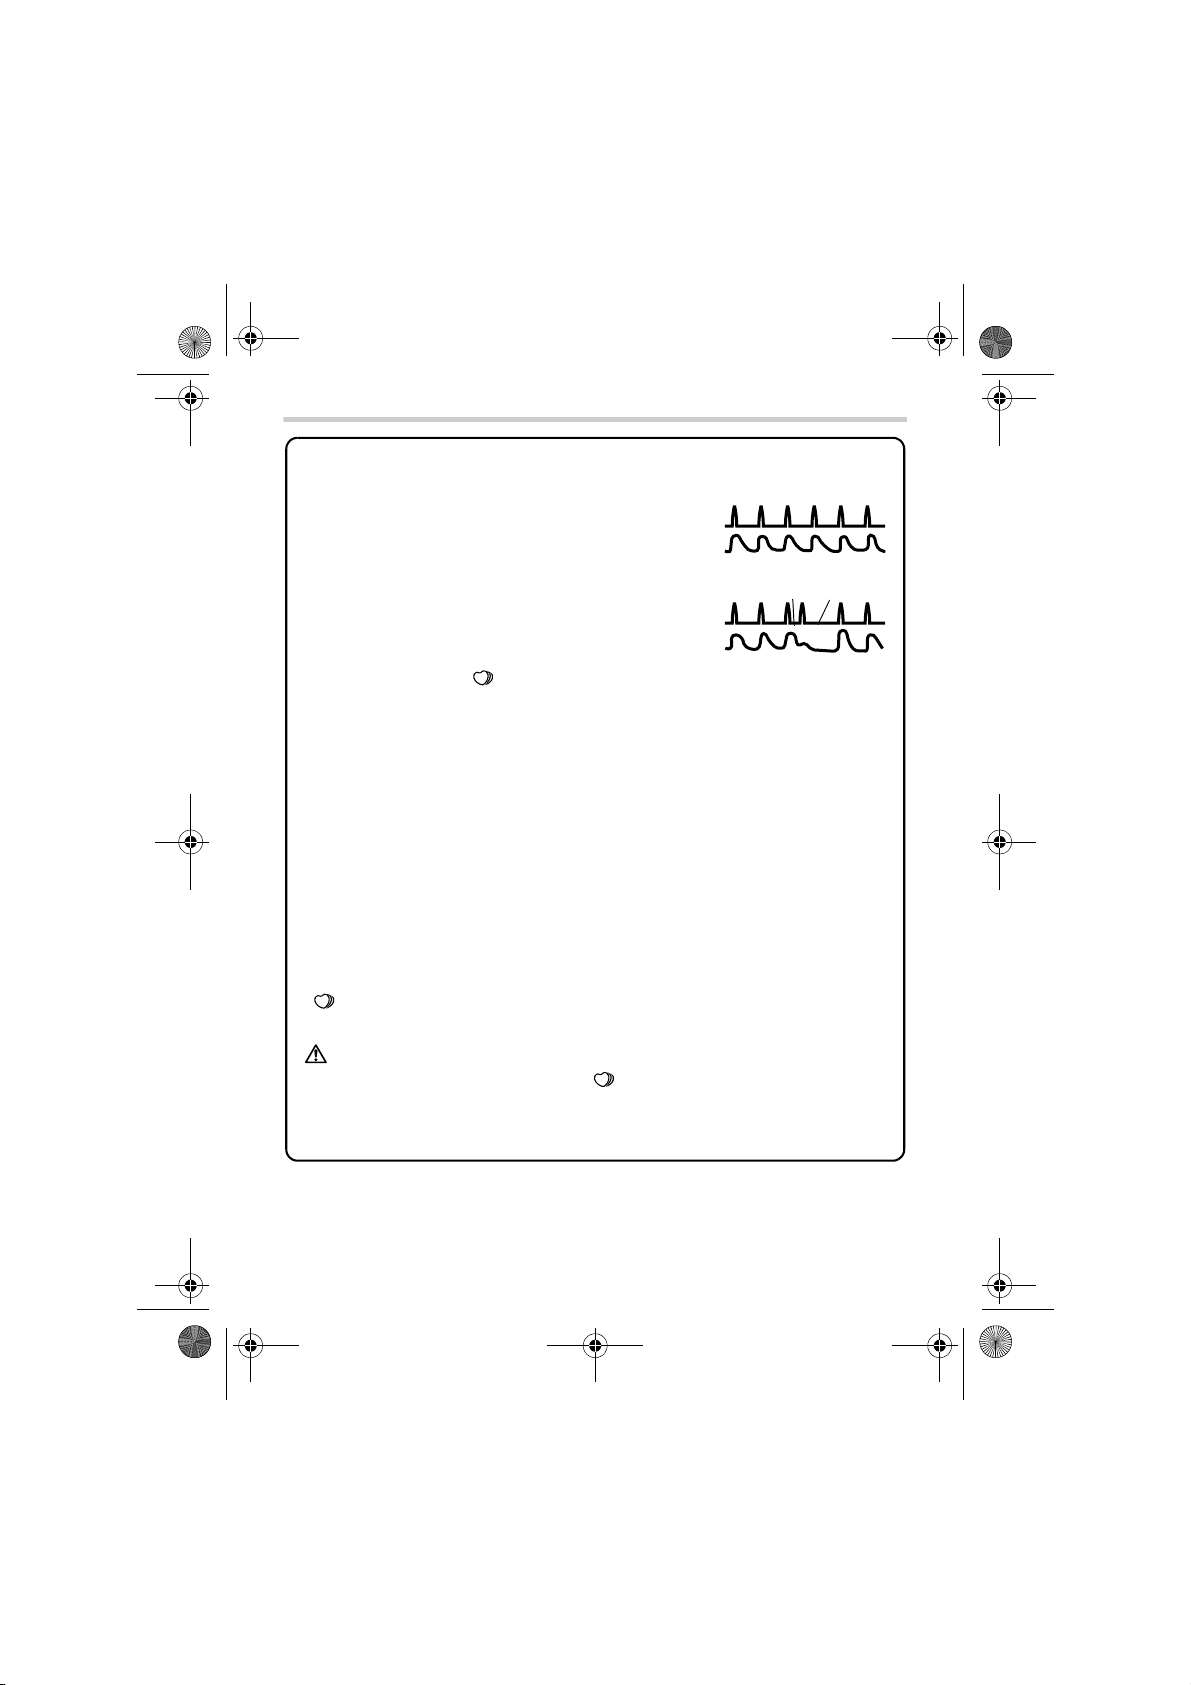
What is Irregular Heartbeat?
An irregular heartbeat is a
heartbeat rhythm that varies by
more than 25% from the average
heartbeat rhythm detected while
the unit is measuring the systolic
and diastolic blood pressure.
If such an irregular rhythm is
detected more than twice during
measurement, the irregular
heartbeat symbol ( ) appears on the symbol when the
measurement results are displayed.
What is Arrhythmia?
A heartbeat is stimulated by electrical signals that cause the heart
to contract.
Arrhythmia is a condition where the heartbeat rhythm is abnormal
due to flaws in the bio-electrical system that drives the heartbeat.
Typical symptoms are skipped heartbeats, premature contraction,
an abnormally rapid (tachycardia) or slow (bradycardia) pulse. This
can be caused by heart disease, aging, physical predisposition,
stress, lack of sleep, fatigue etc. Arrhythmia can only be diagnosed
by a doctor through a special examination.
Whether the appearance of the irregular heartbeat symbol
( ) in the results indicates arrhythmia or not can only be
determined by an examination and diagnosis by your doctor.
Warning:
If the Irregular heartbeat symbol
( ) is shown frequently, please
make your doctor aware of it. Conducting self-diagnosis and
treatment based on measurement results are dangerous. Be sure to
follow the instructions of your doctor.
Normal Heartbeat
Irregular Heartbeat
Pulse
Blood pressure
Blood pressure
Short
Long
Pulse
HEM-7301-ITKE_main.book 24 ページ 2011年11月14日 月曜日 午後2時24分
3.Using the Unit
24
HEM-7301-ITKE_main.book 25 ページ 2011年11月14日 月曜日 午後2時24分
3.Using the Unit
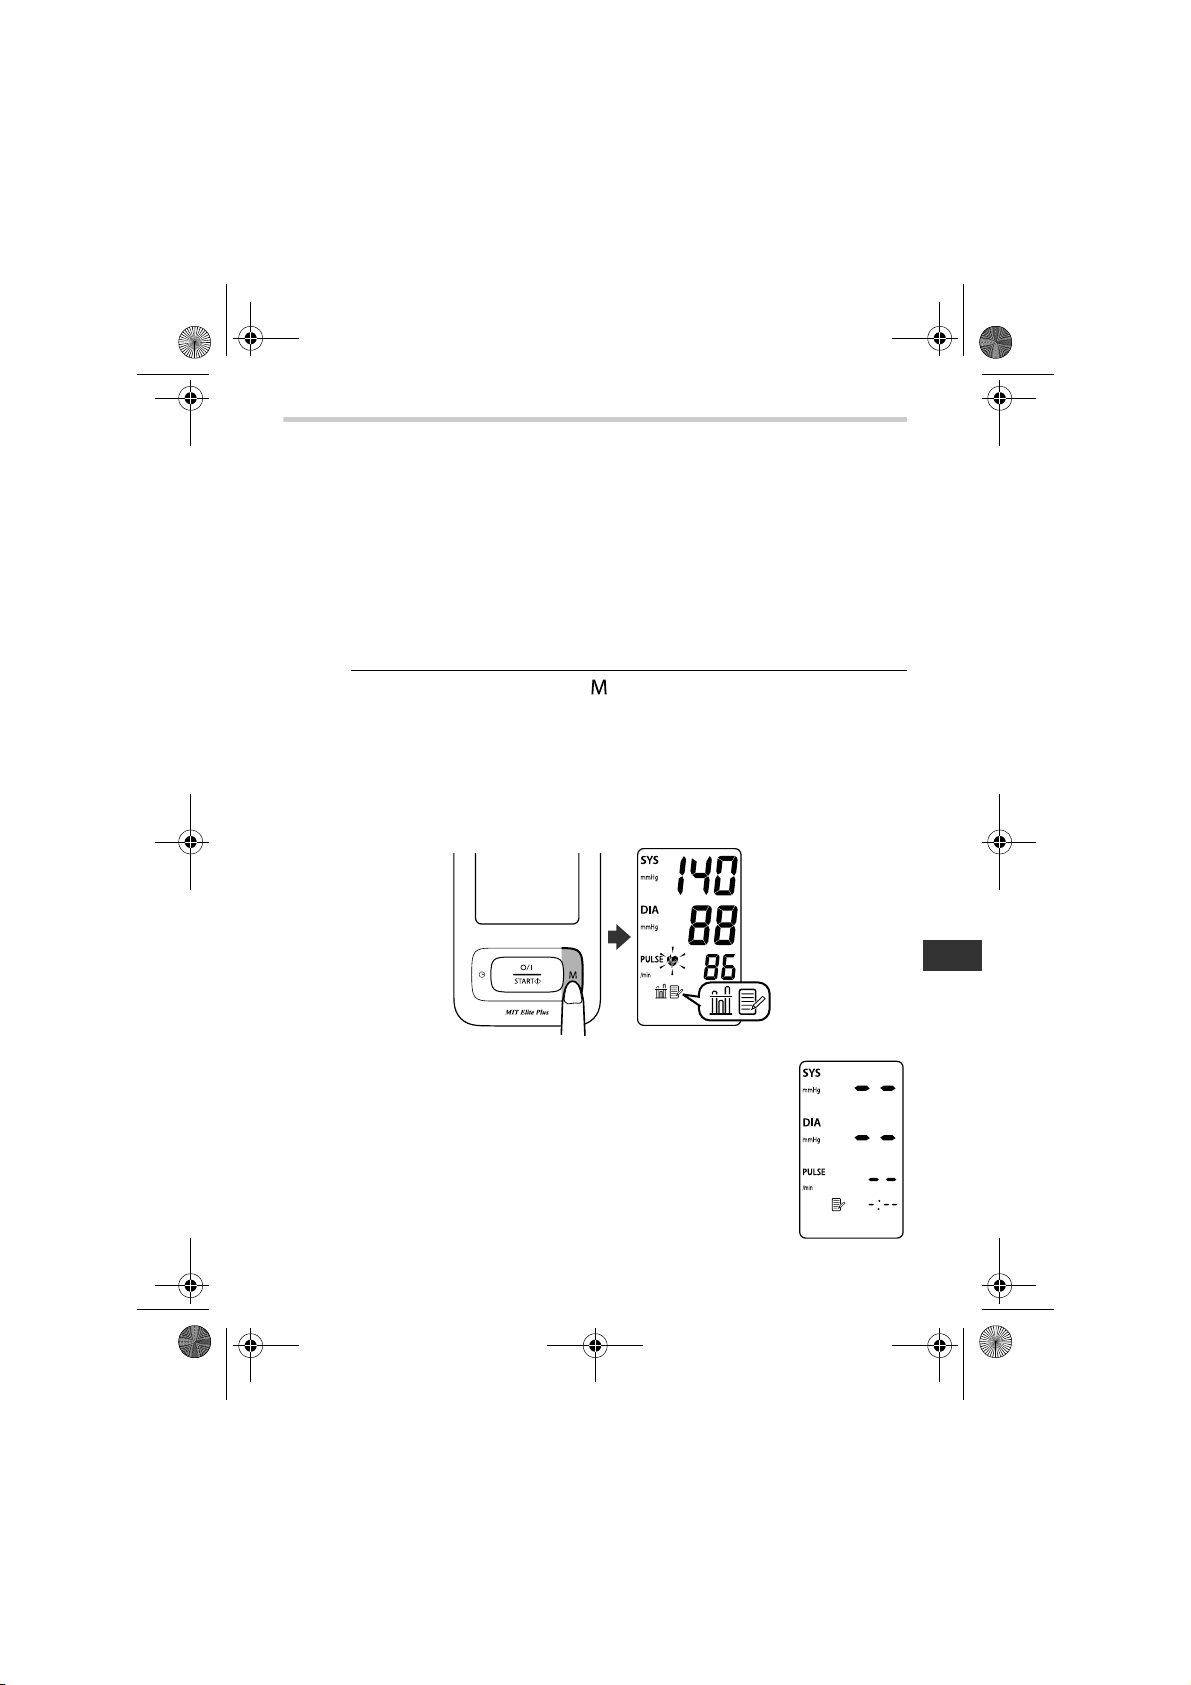
3.4 Using the Memory Function
This unit has a memory capable of storing 90 sets of readings. Every
time you complete the measurement, the unit automatically stores the
blood pressure and pulse rate.
If there are three readings within 10 minutes of the last reading, the
average of the three readings is displayed.
Note: When 90 sets of readings are stored in memory, the oldest set
will be deleted to store a new set.
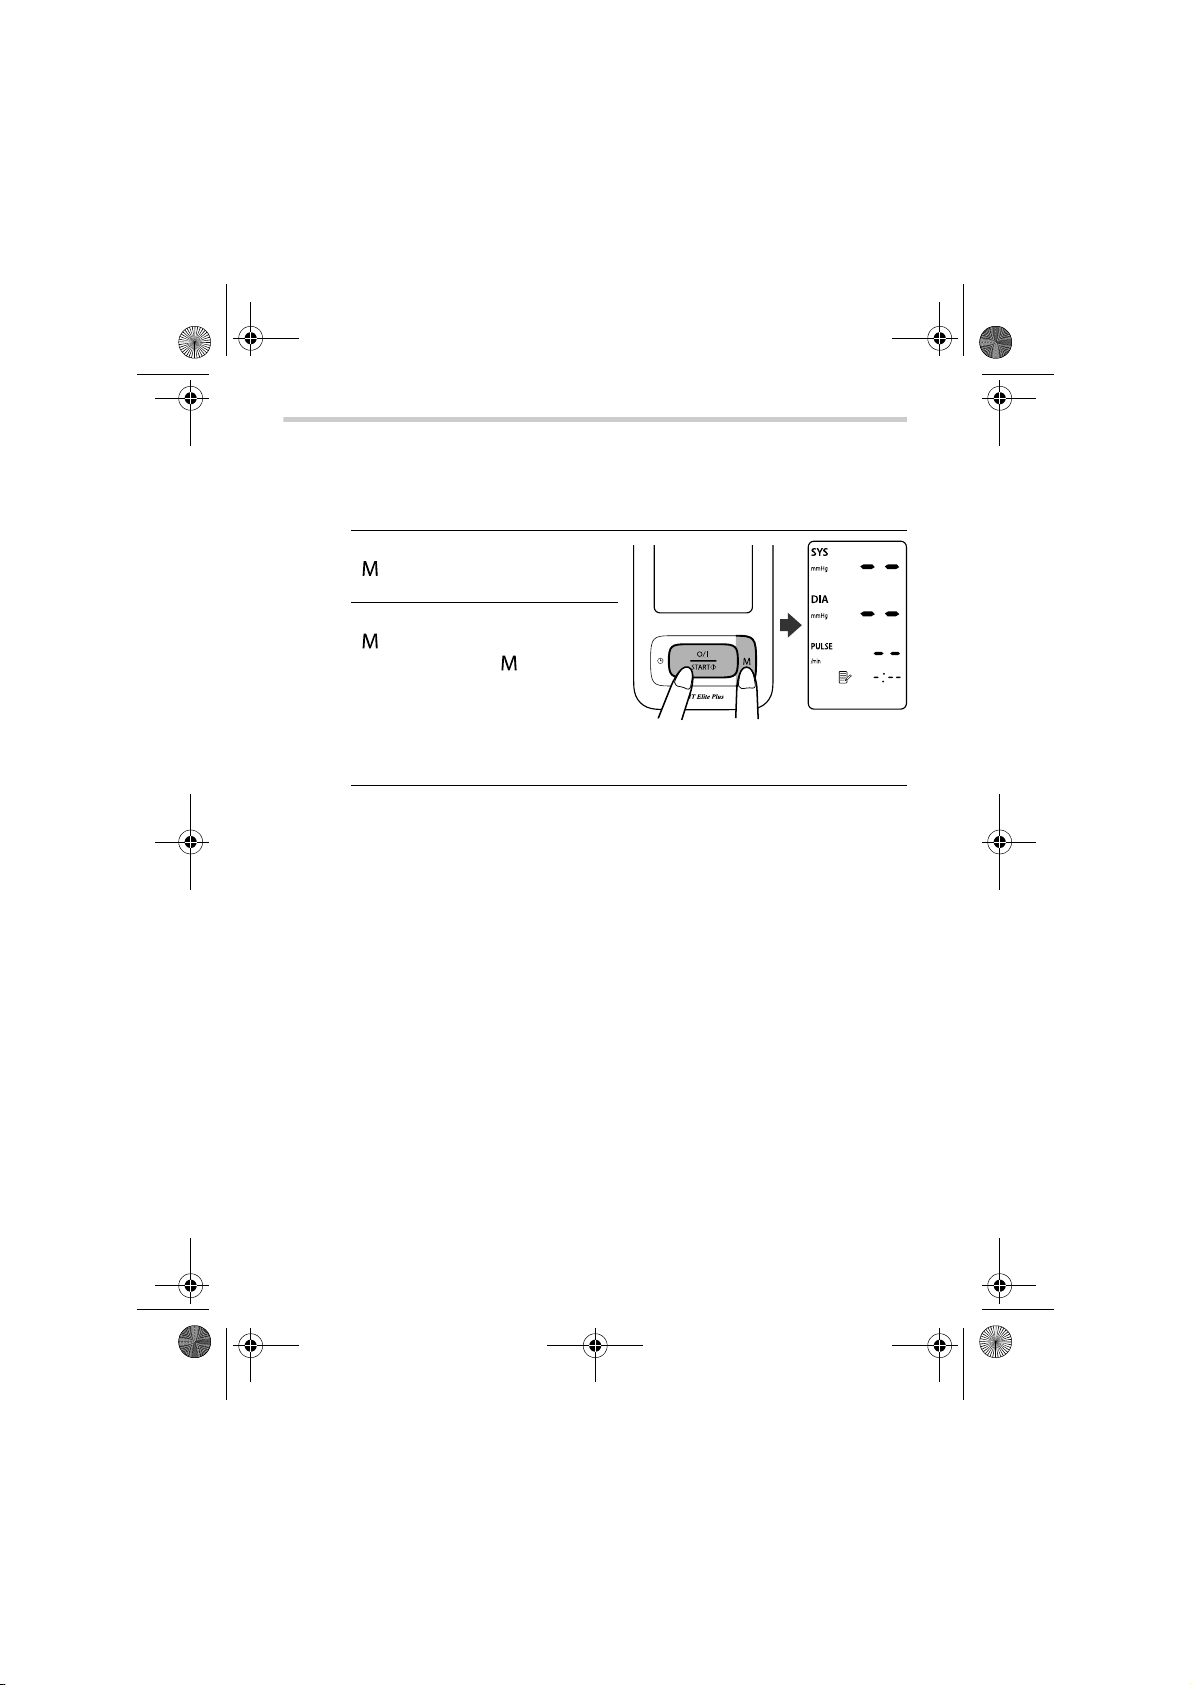
1. Press the Memory button ( ).
If there are three readings stored in memory that were taken
within 10 minutes of the last reading, an average value for
those reading is displayed. (If there are only two readings in
memory for that period, the average will be based on two
readings. If there is only one reading in memory for that period,
that reading will be displayed as the average value.)
Note: If there are no measurements
results stored in memory, the screen
to the right is displayed.
EN
25
HEM-7301-ITKE_main.book 26 ページ 2011年11月14日 月曜日 午後2時24分
3.Using the Unit
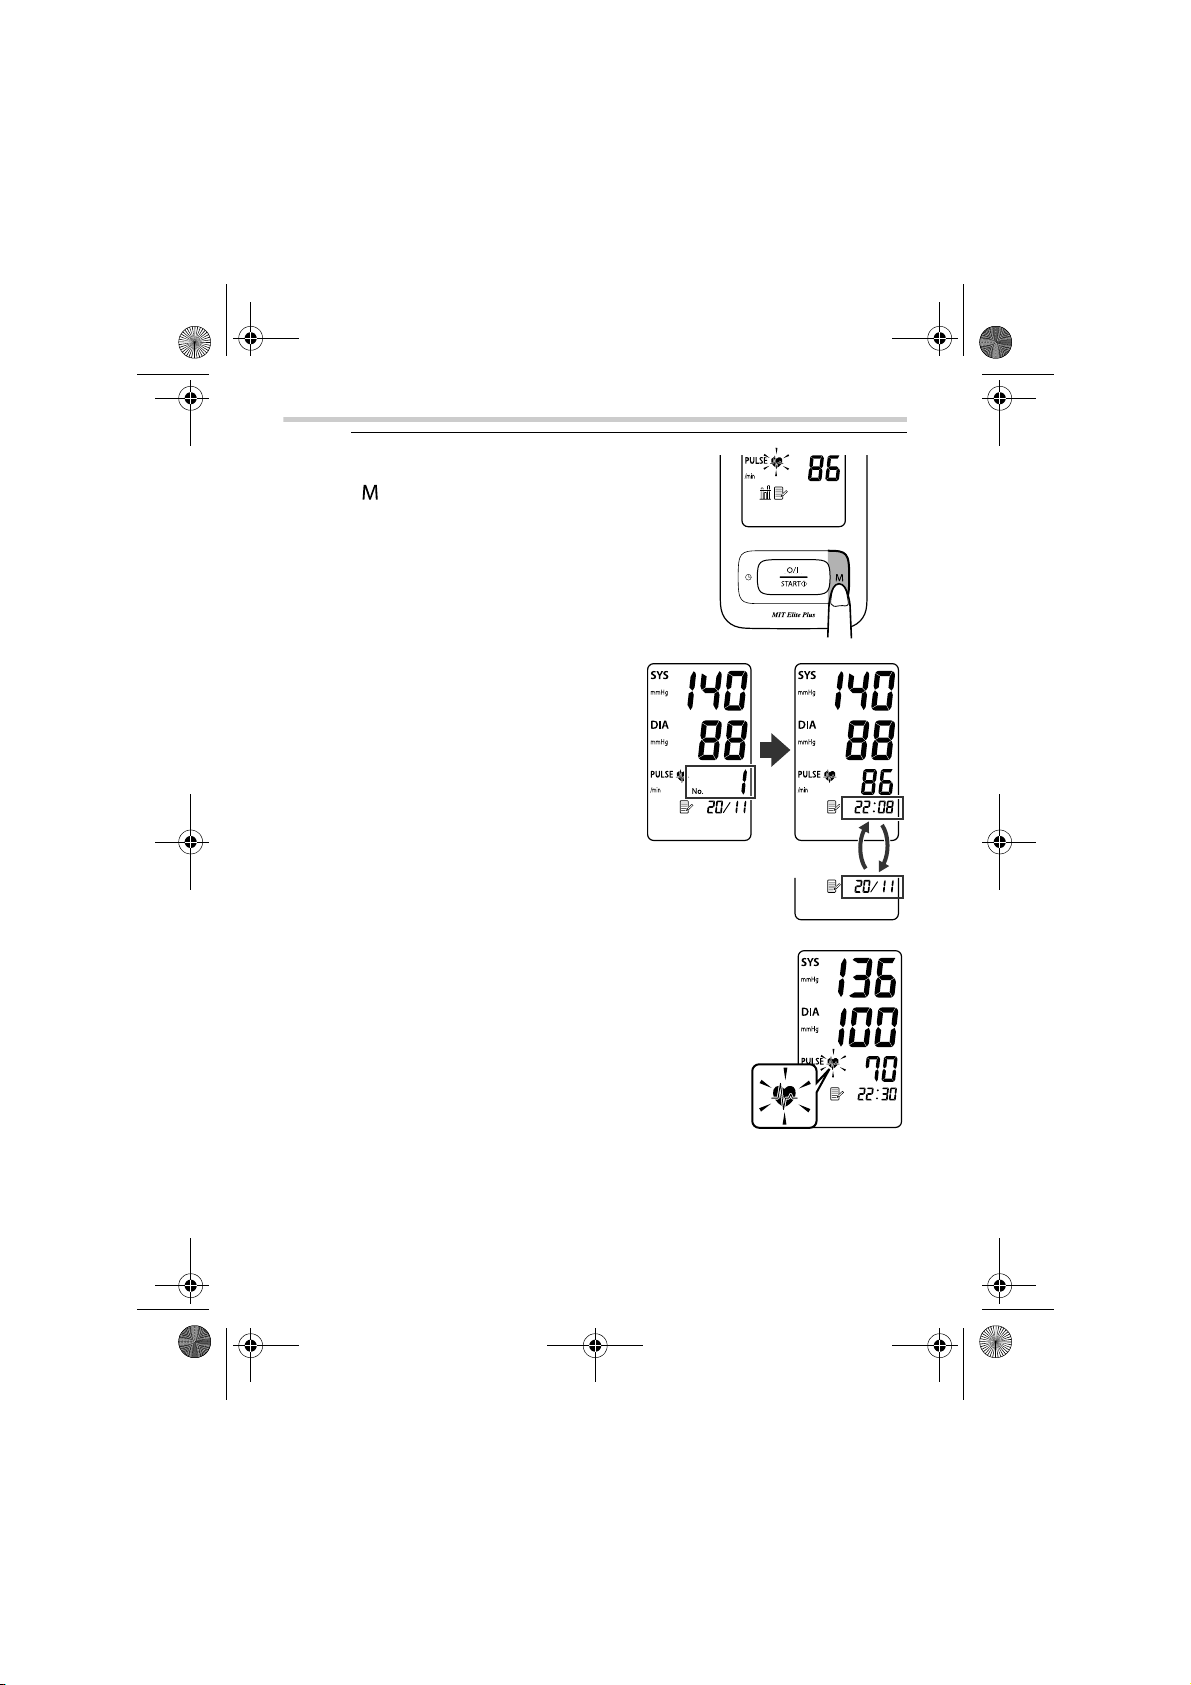
2. While the average value is
displayed, press the Memory button
( ) again.
The result from the most recent
measurement is displayed.
The date and time are
alternately displayed.
26
Note: If your systolic or diastolic
pressure is outside the standard
range, the heartbeat symbol will
blink when the measurement result
is displayed. Refer to section 3.3.
HEM-7301-ITKE_main.book 27 ページ 2011年11月14日 月曜日 午後2時24分
3.Using the Unit
3. Press the Memory button ( )
repeatedly to cycle through the
previous measurement results.
Keep the button pressed down to
cycle rapidly through the previous
results.
If the irregular heartbeat symbol was
displayed at the time of a
measurement, this is displayed when that result is displayed.
4. Press the O/I START button to turn the unit off.
If you forget to turn the unit off, it will automatically shut itself off
after two minutes.
27
EN
HEM-7301-ITKE_main.book 28 ページ 2011年11月14日 月曜日 午後2時24分
3.Using the Unit
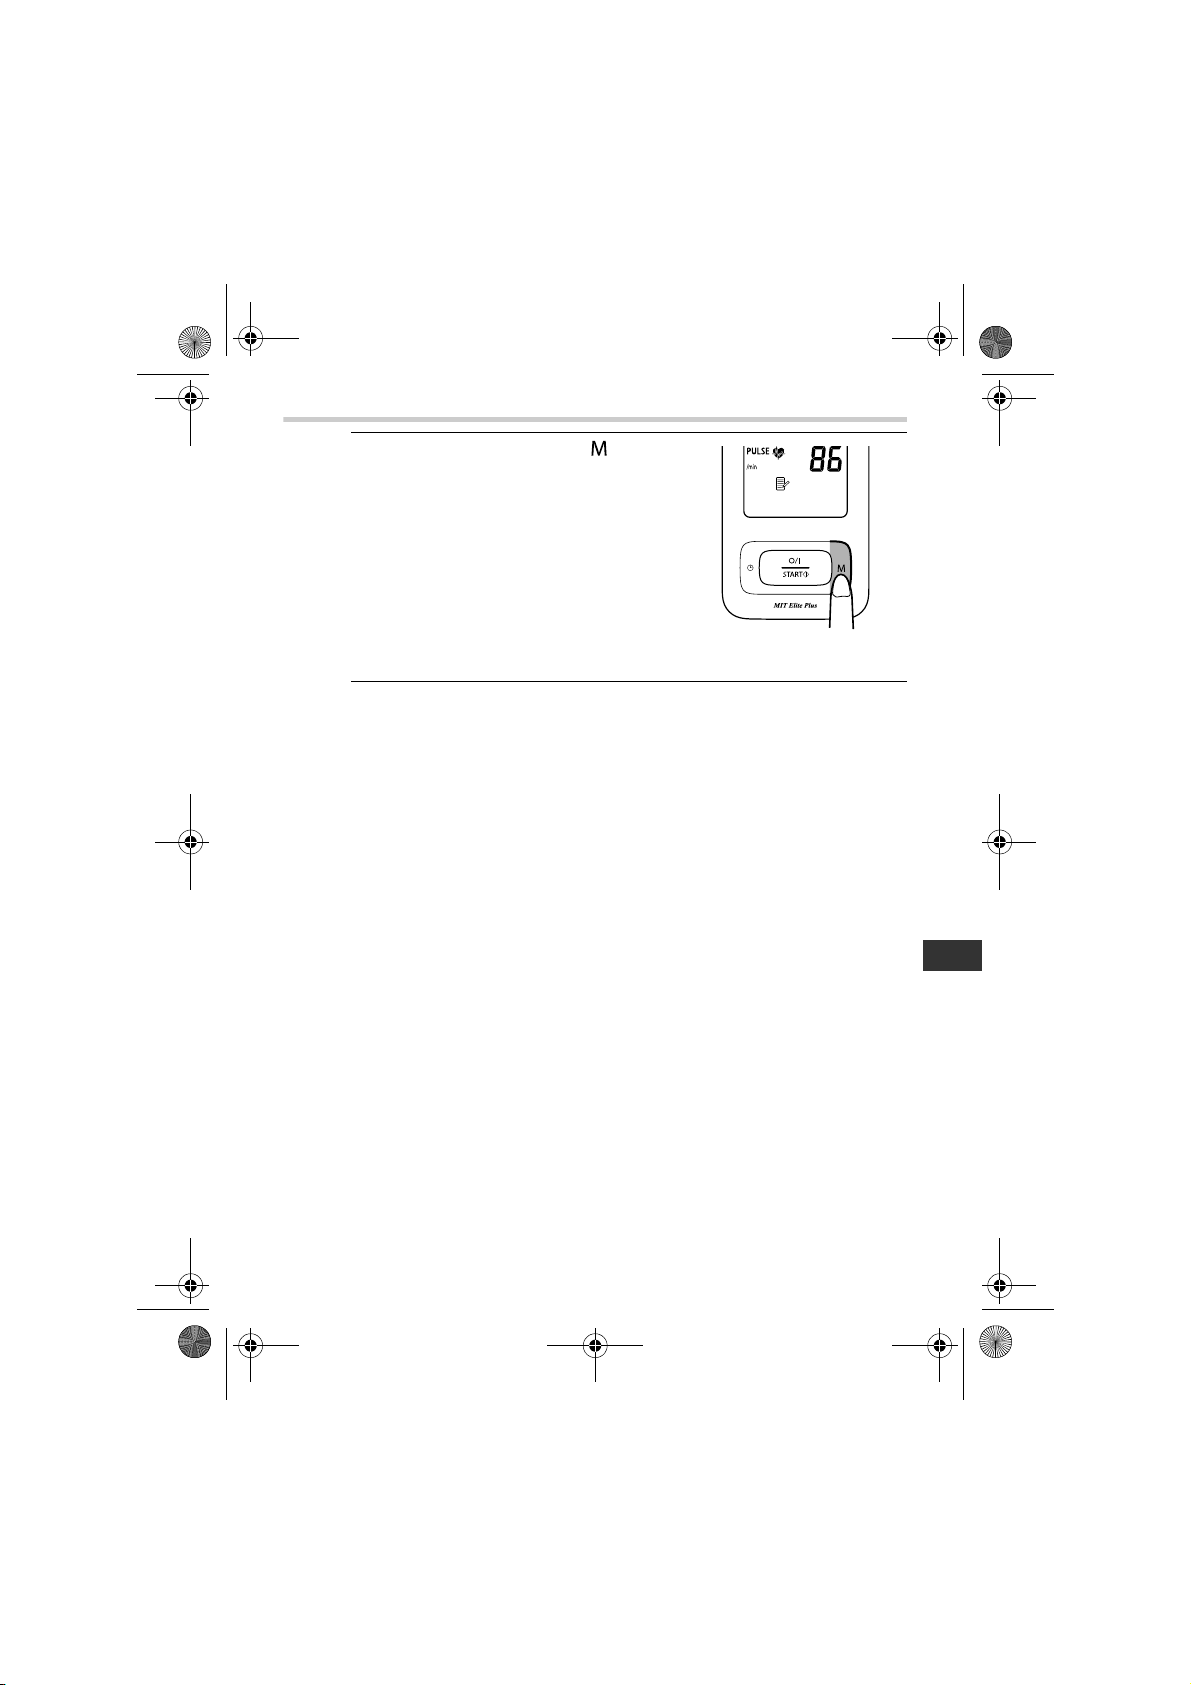
To Delete All the Values Stored in Memory
You cannot delete individual stored readings, all the readings in the
unit will be deleted.
1. Press the Memory button
( ) to turn the monitor on.
2. Press the Memory button
( ) again. While holding the
Memory button ( ), press
the O/I Start button down for
approximately 5 seconds
until the digital display
appears as it does in the illustration to the right.
3. Press the O/I START button to turn the unit off.
If you forget to turn the unit off, it will automatically shut itself off
after two minutes.
Note: If the date and time are reset to a time before the most
recent measurement, the average value will be based on
any measurements taken after the date and time were
reset. However, you can still view the readings stored in
memory.
28
HEM-7301-ITKE_main.book 29 ページ 2011年11月14日 月曜日 午後2時24分
4.Quick Reference Guide
4. Quick Reference Guide
If you are using this device for the first time, please read carefully
chapter 3 of this instruction manual. To help ensure a reliable reading,
avoid eating, drinking alcohol, smoking, or exercising for at least 30
minutes before taking a measurement.
Note: Remove any tight-fitting clothing from your upper arm.
1.
Sit on a chair with your feet flat on the floor and place your arm on
a table so that the arm cuff will be at the same level as your heart.
2. Apply the arm cuff to your upper arm. The coloured marker
should be centred on the inside of your arm and point down the
inside of the arm, so that the air tube runs down the inside of
your forearm and is in line with your middle finger.
3. Secure the cuff around your arm using the fabric fastener strip.
4. Press the O/I START button.
When measurement is complete,
the monitor displays your blood
pressure and pulse rate, and
automatically deflates the cuff.
Notes:
• Always wait at least 2-3 minutes before taking another blood
pressure measurement.
• Please note that all measurements are stored in the memory.
If different people measure with the same device make sure
that you are aware of this fact.
29
EN

HEM-7301-ITKE_main.book 30 ページ 2011年11月14日 月曜日 午後2時24分
5.Using the Software
5. Using the Software
OMRON HEALTH MANAGEMENT SOFTWARE
Omron Health Management Software allows you to view, track and
print data about blood pressure measured by Omron blood pressure
monitors and steps measured by OMRON step counters with a PC
download.
Caution:
This is a CD-ROM disc. Do not play this disc on general audio players,
DVD players or personal game devices. It may damage the speaker of
the device and may harm your hearing ability.
Refer to the enclosed Software Installation Guide for details on
installing and using the software.
Use only the authorized Omron USB cable included with this unit.
Caution:
Use only Omron authorized parts and accessories. Parts and
accessories not approved for use with the device may damage the
unit.
1. Open the USB Port cover.
Note: Do not allow objects to come
into contact with the USB
Port.
30
Loading…
View the manual for the Omron MIT Elite Plus here, for free. This manual comes under the category sphygmomanometer and has been rated by 9 people with an average of a 8.9. This manual is available in the following languages: English. Do you have a question about the Omron MIT Elite Plus or do you need help?
Ask your question here
Frequently Asked Questions
Can’t find the answer to your question in the manual? You may find the answer to your question in the FAQs about the Omron MIT Elite Plus below.
What does systolic pressure mean?
Systolic pressure is the top number that the blood pressure monitor will indicate. Systolic pressure refers to the amount of pressure in your arteries during the contraction of your heart muscle.
What is a normal blood pressure?
A normal blood pressure is about 120/80.
What does diastolilc pressure mean?
Diastolic pressure is the lowest number that the blood pressure monitor will indicate. The bottom number refers to your blood pressure when your heart muscle is between beats.
Is the manual of the Omron MIT Elite Plus available in English?
Yes, the manual of the Omron MIT Elite Plus is available in English .
Is your question not listed? Ask your question here
Report abuse
Libble takes abuse of its services very seriously. We’re committed to dealing with such abuse according to the laws in your country of residence. When you submit a report, we’ll investigate it and take the appropriate action. We’ll get back to you only if we require additional details or have more information to share.
Product:
Get your user manual by e-mail
Enter your email address to receive the manual of Omron HEM-7301 — MIT Elite Plus in the language / languages: English as an attachment in your email.
The manual is 0,59 mb in size.
You will receive the manual in your email within minutes. If you have not received an email, then probably have entered the wrong email address or your mailbox is too full. In addition, it may be that your ISP may have a maximum size for emails to receive.
The manual is sent by email. Check your email
If you have not received an email with the manual within fifteen minutes, it may be that you have a entered a wrong email address or that your ISP has set a maximum size to receive email that is smaller than the size of the manual.