
-
Consumer services
>
-
User manual, instruction for use
>
-
Linen Care
>
-
Garment steamer
>
User manual and frequently asked questions PRO STYLE CARE IT8460
Super powerful for great results
With the Tefal Pro Style Care Garment Steamer, experience smooth and wrinkle-free clothing with all the convenience and ease of home garment care. The exclusive patented Steam & Press vertical support system provides double-action steaming, for professional results with easy and comfortable one-handed steaming. With a variety of convenient features, Pro Style Care is perfect for everyday use on any fabric, even the most delicate.
Reference : IT8460G0
Frequent questions
• Untreated tap water:
Your appliance has been designed to use untreated tap water.
If your water is very hard, mix 50% untreated tap water and 50% distilled water.
• Types of water not to use:
Heat concentrates the elements contained in water during evaporation. The types of water listed below may contain organic waste, mineral or chemical elements that can cause spitting, brown staining or premature wear of the appliance:
— water from clothes dryers
— scented or softened water
— water from refrigerators, batteries, air conditioners
— rain water
— boiled, filtered or bottled water
In order to ensure the best performance from your iron, these types of water should not be used for ironing.
Your product is not plugged in or is not switched on ==> Check that your product is properly connected to a power socket and that the switch is on «I».
The water level in the tank is too low ==> Unplug the appliance and fill the tank.
The pump is unprimed ==>Press and hold the steam button for a few seconds to prime the pump.
The removable tank is not installed correctly ==> Check the correct positioning of the tank on the product.
The product is in «Stand-by» mode ==> Press the «On-Off» button and wait until it stops flashing.
Your product is not plugged in or is not switched on ==> Check that your product is properly connected to a power socket and that the switch is on «I».
The product is in «Stand-by» mode ==> Press the «On-Off» button and wait until it stops flashing.
The water tank is not installed correctly or its locking valve is not closed properly ==> Check that the valve is closed and that the tank is installed correctly on the product.
Your appliance has limescale, consult the «Descaling» section in the instructions.
The «Steam» button is in Continuous Steam position. Unlock it by pressing it once.
You have used descaling chemicals or additives in the water.
Never add such products to the water tank. These contain organic waste or minerals that condense under the influence of heat and cause spitting, brown dripping or premature aging of your appliance.
You have used descaling chemicals or additives in the water.
Never add such products to the water tank. These contain organic waste or minerals that condense under the influence of heat and cause spitting, brown dripping or premature aging of your appliance.
After following the instructions in the user manual for starting the appliance, make sure that your electrical socket is working by plugging another appliance. If it still does not work, do not try to dismantle or repair the appliance yourself, instead, take it to an approved repair centre
Do not use your appliance. To avoid any danger, have it replaced by an approved repair centre.
Your appliance contains valuable materials which can be recovered or recycled. Leave it at a local civic waste collection point.
Please go to the “Accessories” section of the website to easily find whatever you need for your product.
Find more detailed information in the Guarantee section of this website.
If you believe that one part is missing, please call Consumer Services Center and we will help you find a suitable solution.
EN
FR
ZH
MS
AR
FA
IT84XX
www.tefal.com

1
2*
4
12*
13*
14*
3
10
11
17*
15*
16*
5
7*
9
* EN Depending on model / FR Selon le modèle / ZH 好ḵ❲噆/ MS Bergantung pada model / AR ﻞﻳدﻮﳌا ﺐﺴﺣ
/ FA
لﺪﻣ ﻪﺑ ﻪﺘﺴﺑ
6
8

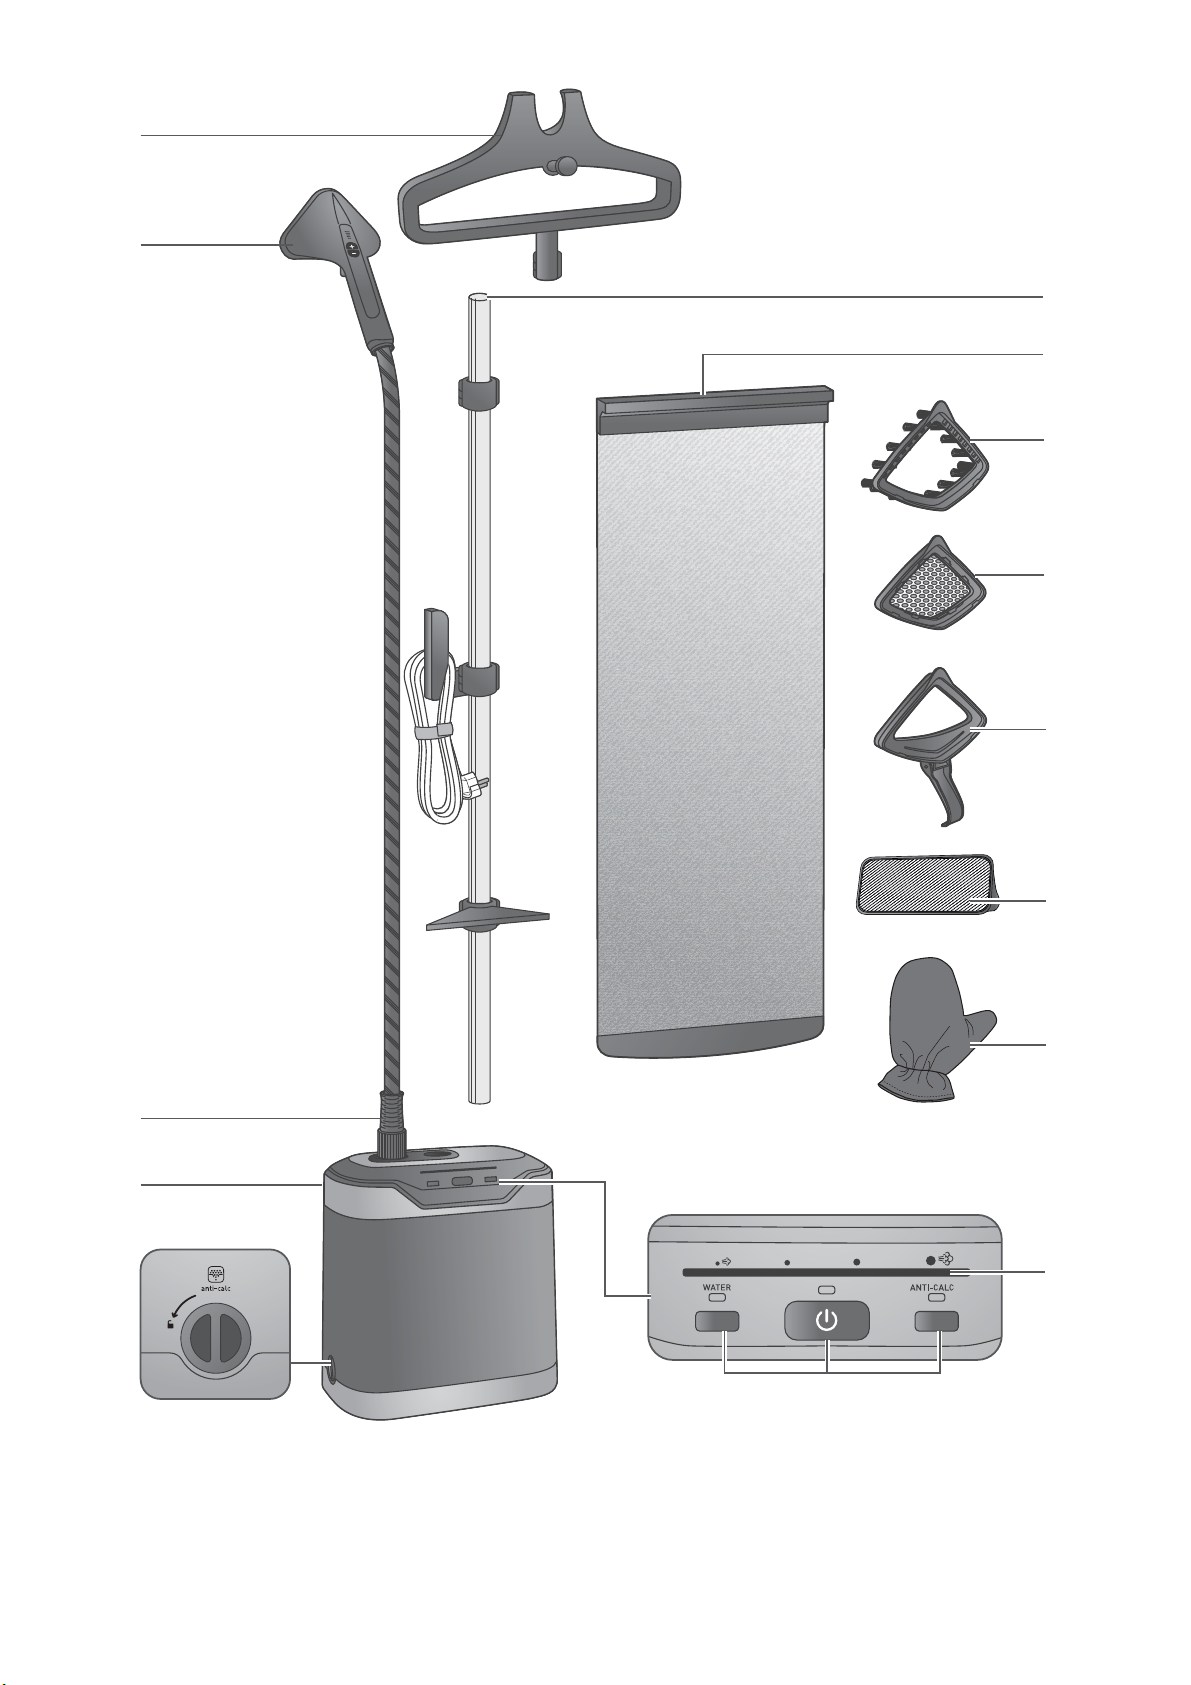
PRODUCT DESCRIPTION / DESCRIPTION DU PRODUIT
1. EN Hanger + hanger hook
FR Cintre + crochet
2. EN Steam Head*
FR Tête vapeur*
3. EN Steam Hose
FR Cordon vapeur
4. EN Adjustable pole +
adjustable vertical support
hook* + Power cord hook
FR Pole ajustable + crochet
ajustable du support
vertical* + crochet du
cordon d’alimentation
9. EN Water tank button
FR Bouton réservoir
10. EN Removable Water tank
FR Réservoir amovible
11. EN Draining Cap
FR Ouverture anti-calc
12. EN Removable vertical
support*
FR Support vertical amovible*
13. EN Fabric Brush *
FR Brosse pour tissu *
5. EN Control pannel
FR Panneau de contrôle
6. EN ON/OFF button
FR Bouton ON/OFF
7. EN Steam level led*
FR Led niveau de vapeur*
8. EN Anti-calc button
FR Bouton anti-calc
14. EN Steam bonnet*
FR Protège-tissu*
15. EN Lint pad*
FR Brosse anti-peluches*
16. EN Glove*
FR Gant*
17. EN Crease attachement*
FR Pince à pli*
* EN Depending on model / FR Selon le modèle
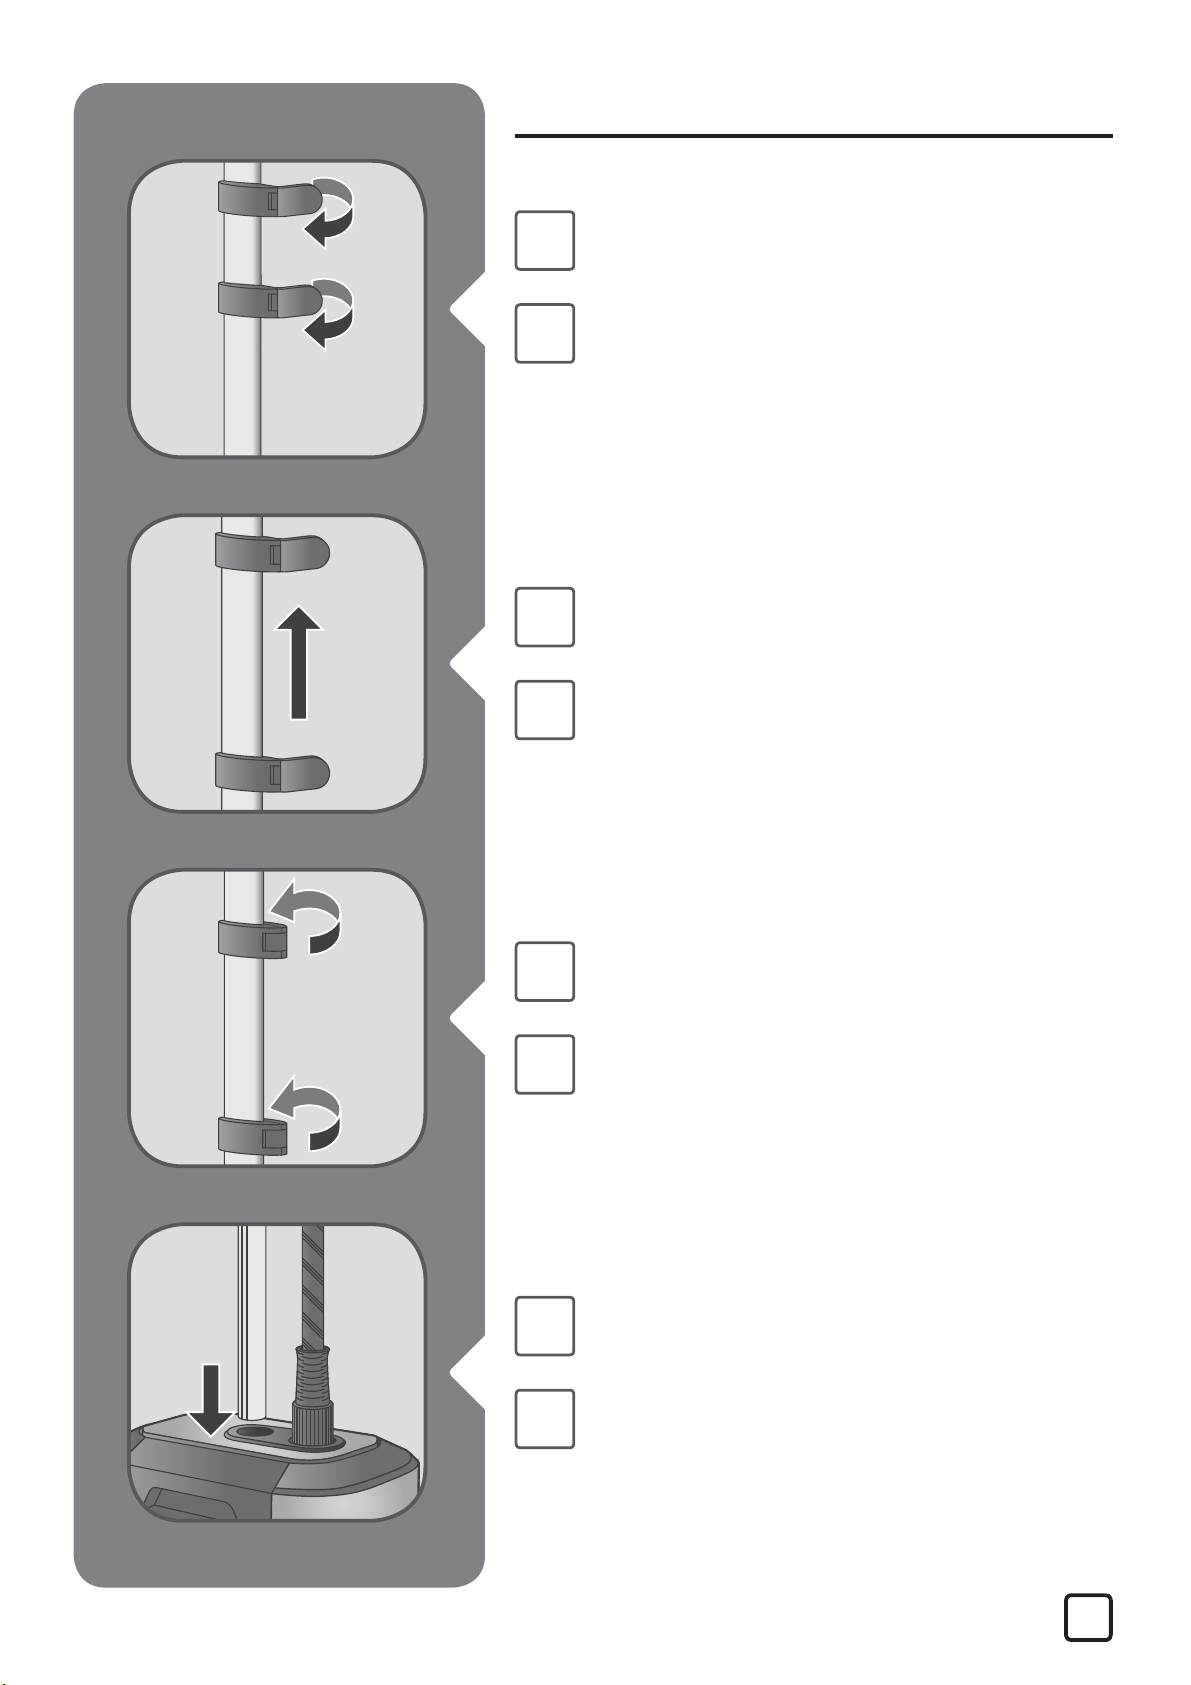
1. ASSEMBLY / ASSEMBLAGE
EN
FR
EN
FR
Open the two pole locks.
Ouvrez les deux verrous du tube.
Extend the pole fully.
Étirez entièrement le tube.
EN
FR
EN
FR
Close the two locks.
Fermez les deux verrous du tube.
Insert the pole in the housing untill
you hear a «click».
Insérez le tube dans le boîtier jusqu’à
ce que vous entendiez un clic.
5
EN
FR
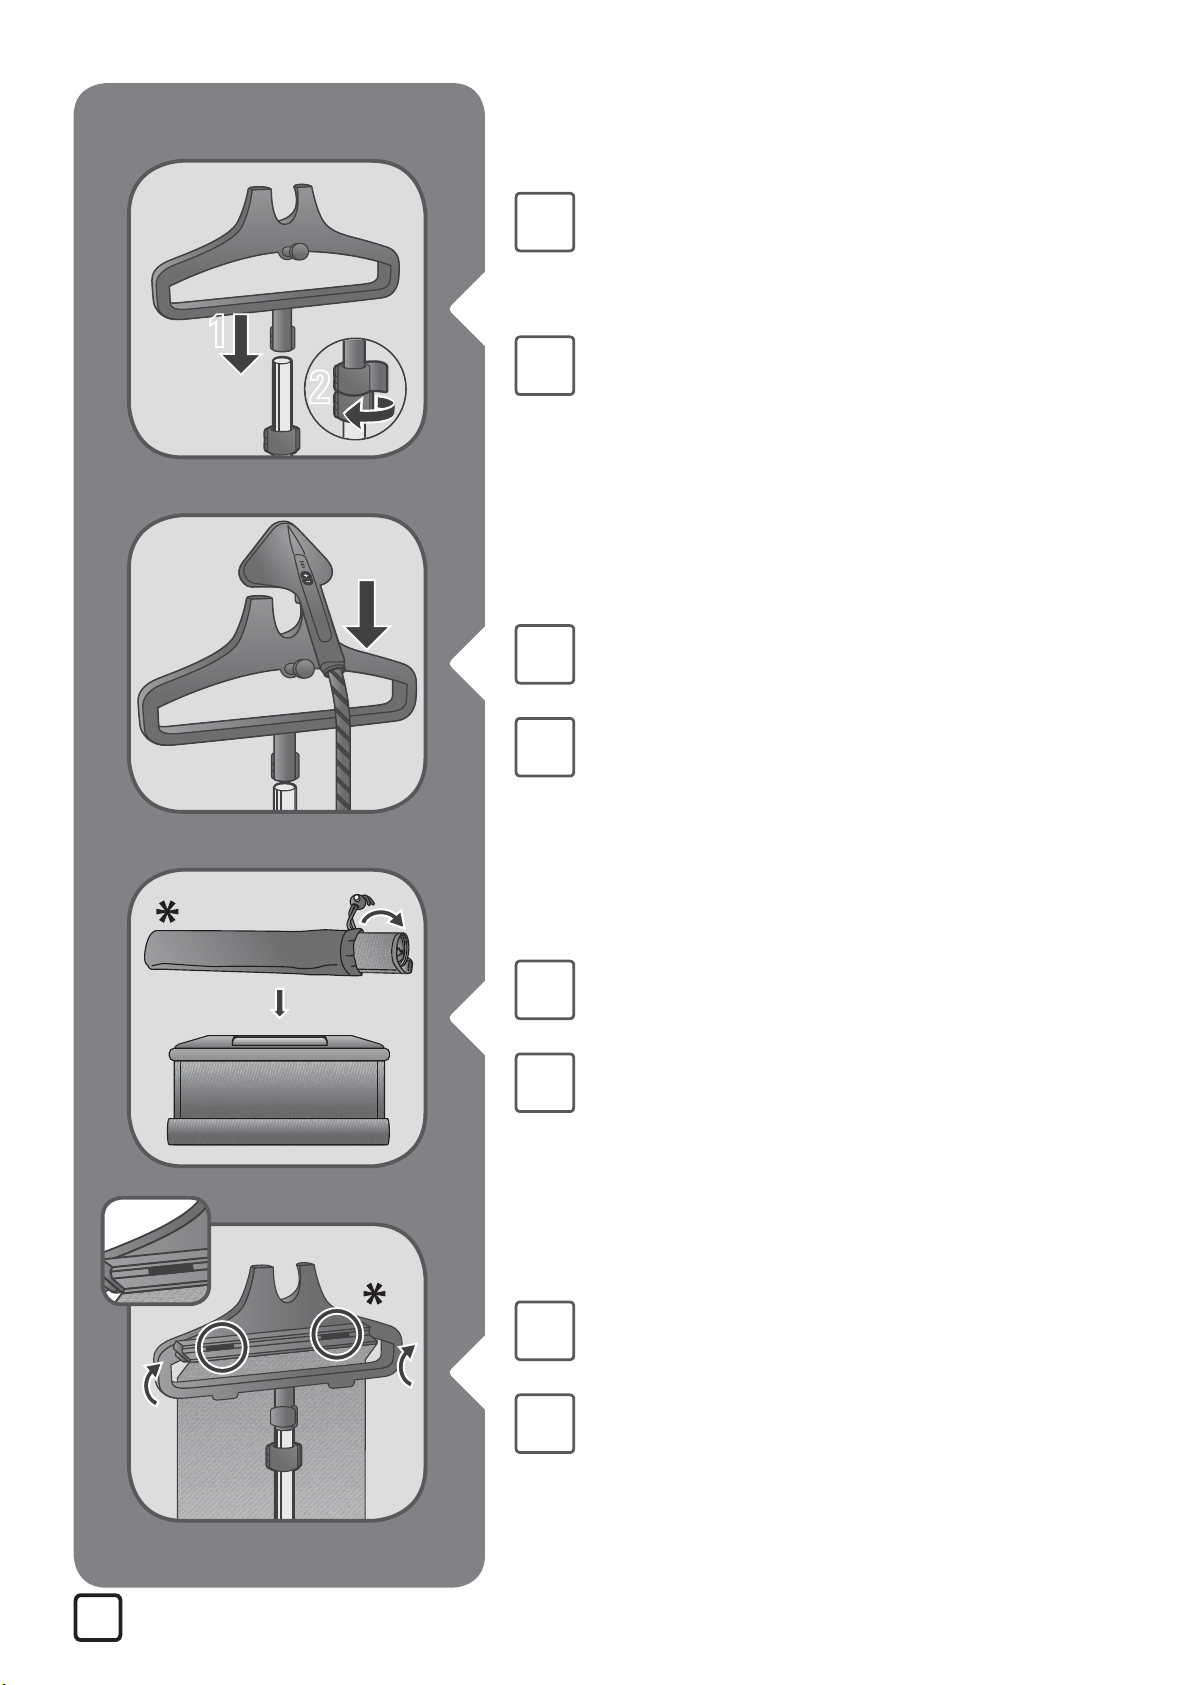
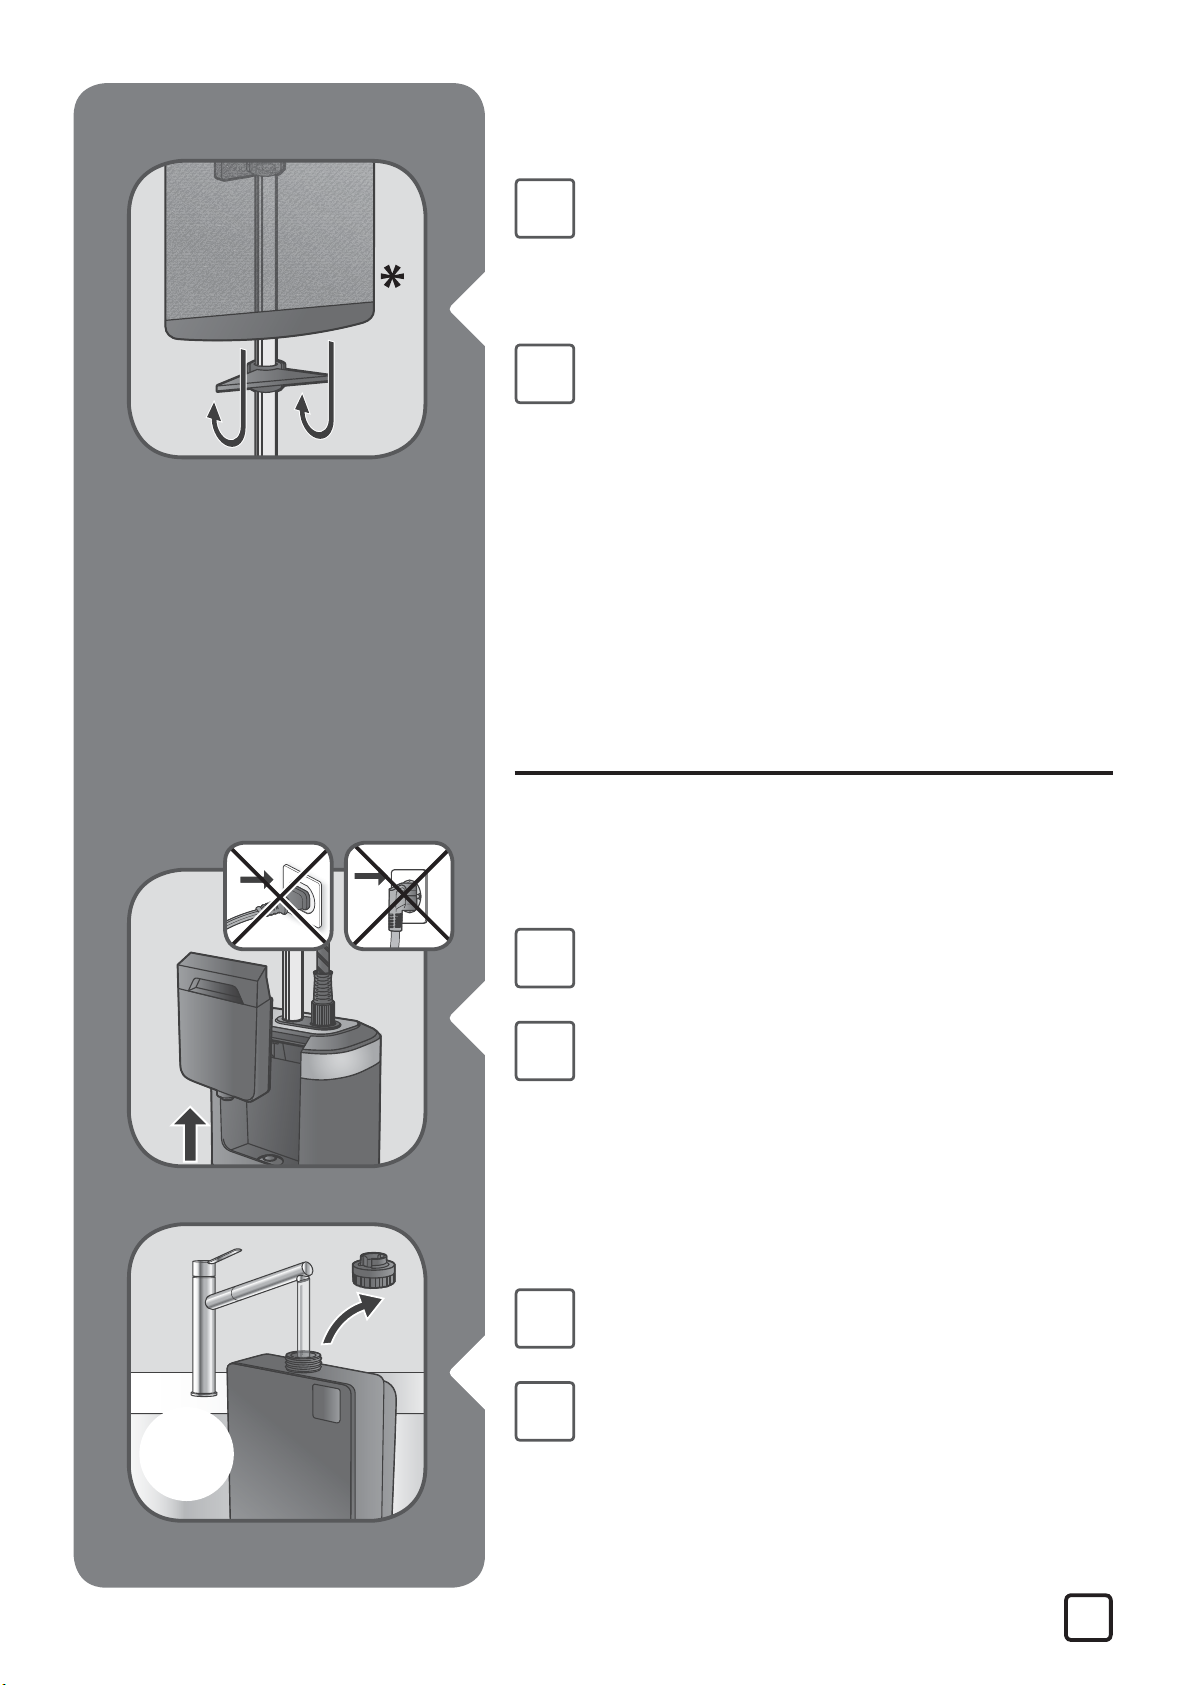
Unlock the hanger and fully insert it
vertically on top of the pole and lock
it.
Déverrouillez le cintre, puis insérez
complètement le cintre verticalement
en haut du tube et verrouillez le.
EN
FR
EN
FR
Position the steam head on its craddle.
Positionnez la tête vapeur sur son
support.
Take out the vertical support* from its
bag and unroll it.
Sortez le support vertical* de son sac
et déroulez-le complètement.
Hook the upper part of the vertical
EN
FR
6
support* on rear hanger.
Accrochez la partie supérieure du
support vertical* à l’arrière du cintre.
* EN Depending on model / FR Selon le modèle
Unwind the support and insert it in
EN
FR
the adjustable hook, by adjusting the
tension with the dedicated hook and
lock it.
Déroulez le support et attachez-le,
en réglant la tension avec l’accroche
prévue à cet eet. Puis verrouillez.
2. BEFORE USE / AVANT L’UTILISATION
EN
FR
EN
FR
Remove the water tank.
Retirez le réservoir d’eau.
Remove the cap and ll in the water
tank.
Retirez le bouchon puis remplissez le
réservoir d’eau.
* EN Depending on model / FR Selon le modèle
7
EN
FR
EN
FR
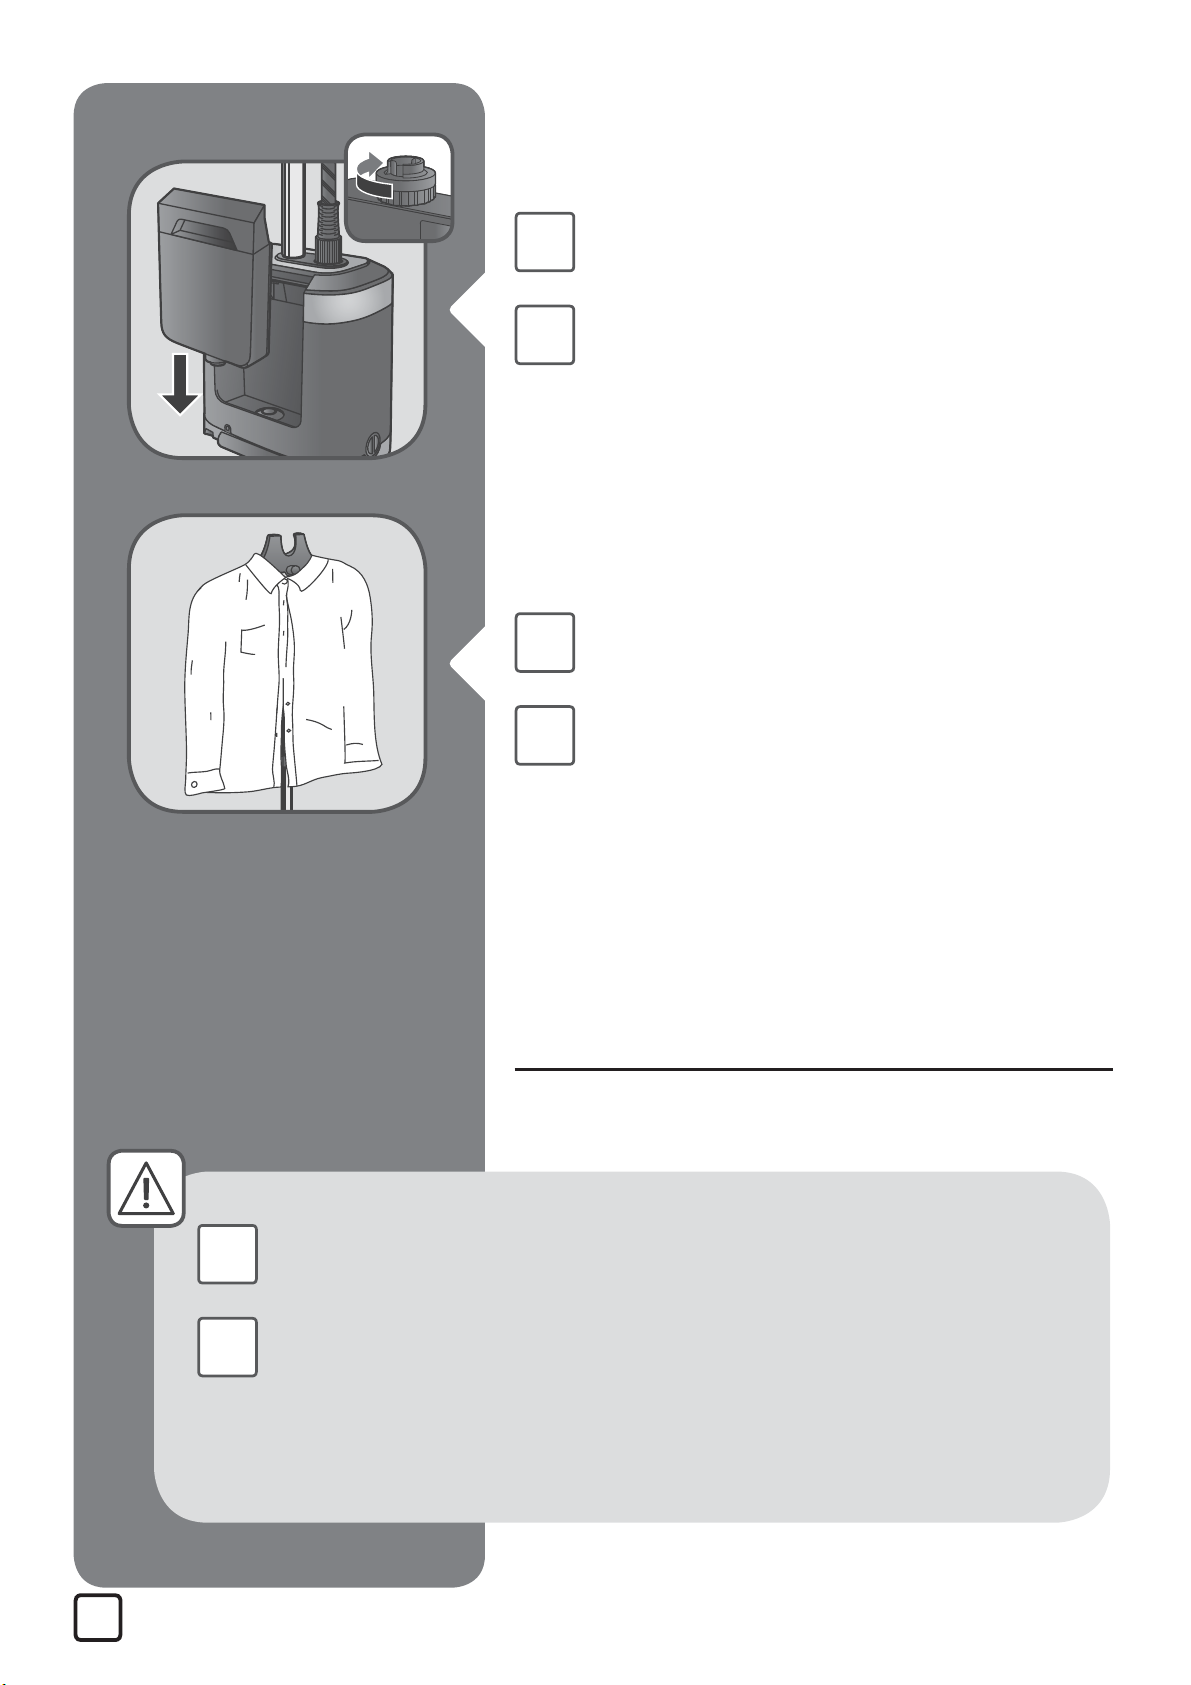
Fully screw the water tank cap and
insert tank back in appliance.
Vissez complètement le bouchon du
réservoir d’eau et replacez le réservoir
dans l’appareil.
Add the clothe of your choice on the
hanger.
Ajoutez le vêtement de votre choix sur
le cintre.
3. ACCESSORIES / ACCESSOIRES
Accessories must be settled when appliance is cold and not
EN
FR
8
running.
Les accessoires doivent être installés lorsque l’appareil est
froid et n’est pas en fonctionnement.
* EN Depending on model / FR Selon le modèle
*
*
EN
FR
EN
FR
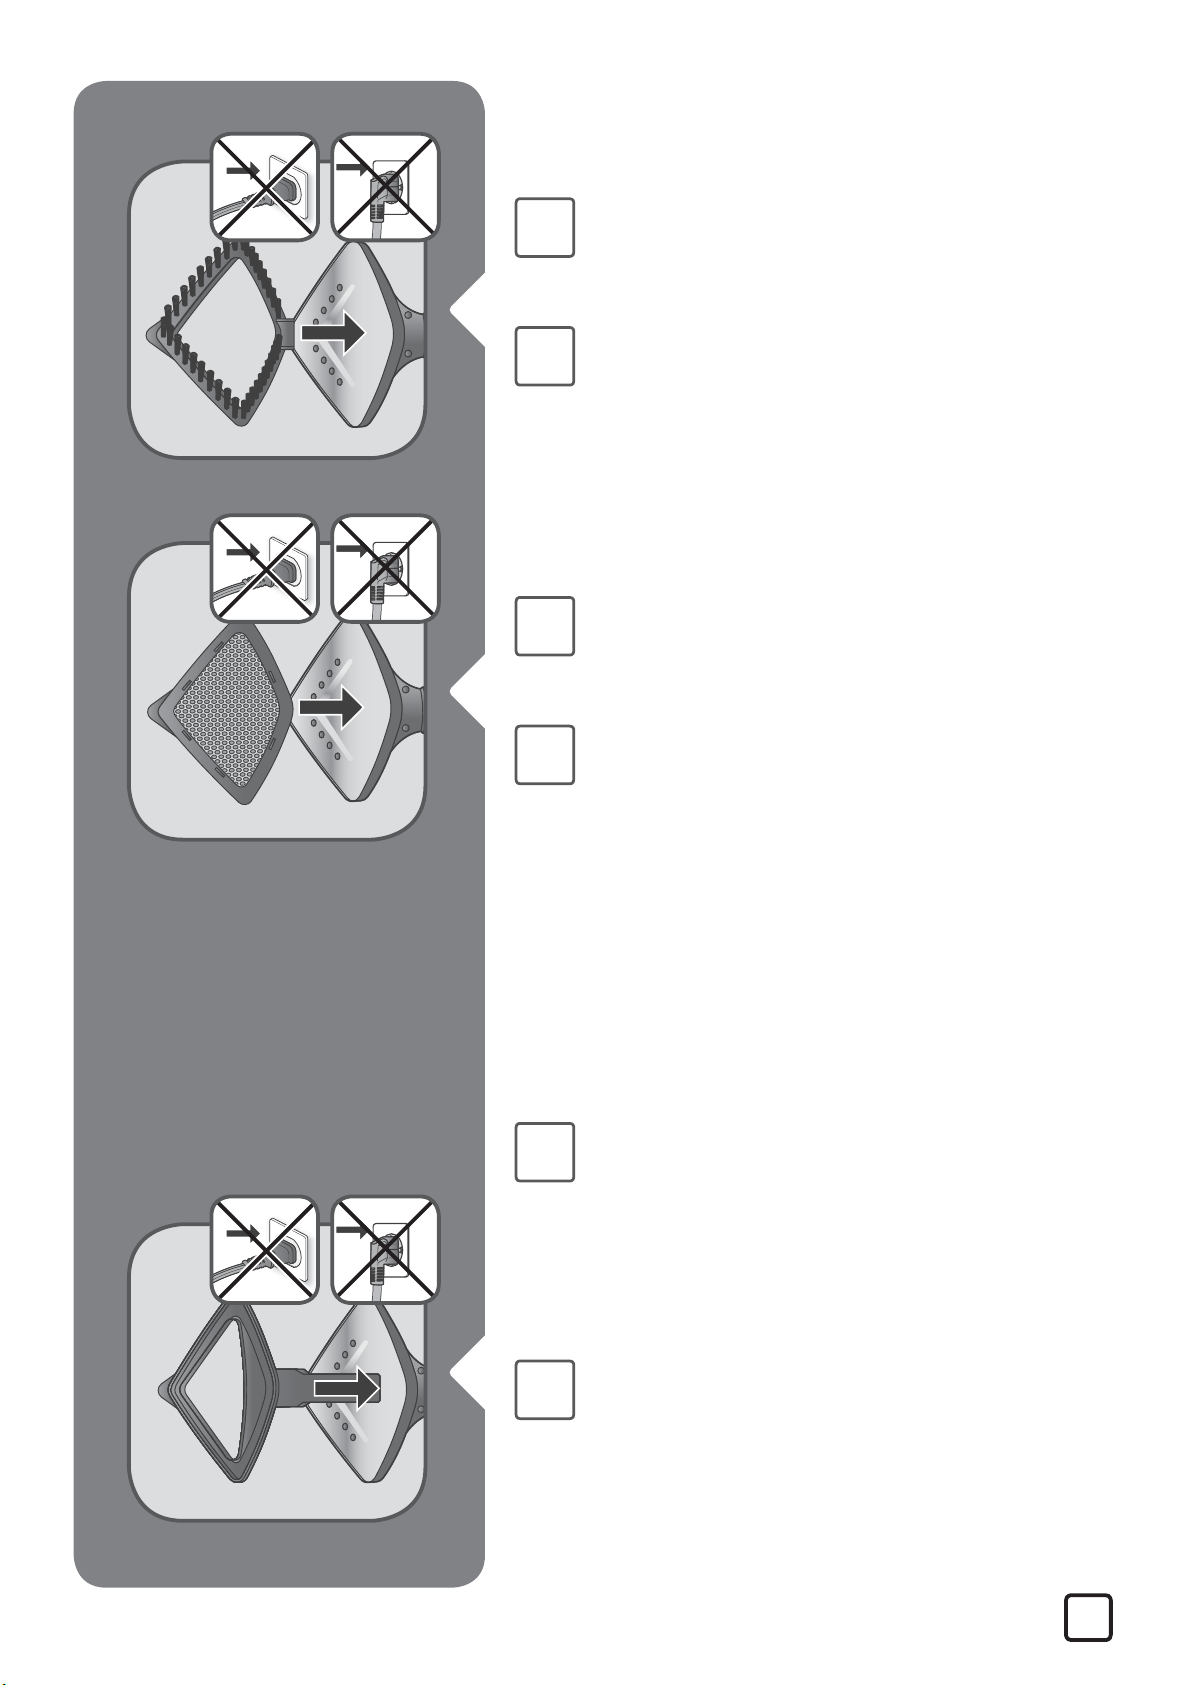
The fabric brush opens the weaves
of the fabrics for better steam
penetration.
La brosse à tissu ouvre le tissage des
tissus pour une meilleure pénétration
de la vapeur.
The steam bonnet lters water
impurities and protects fabrics from
water drips.
Le protège-tissu ltre les impuretés de
l’eau et protège le textile des gouttes
*
EN
d’eau.
The crease attachment is used to make
pant creases easily or to remove stubborn
wrinkles. Put your fabric in the space
between the two accessory parts. Move
the crease attachment in a downwards
motion starting from the top.
* EN Depending on model / FR Selon le modèle
FR
La pince à pli est utilisée pour faire les plis
des pantalons ou enlever plus facilement
les plis persistants. Mettez votre textile
entre les deux parties de l’accessoire et
faite un geste de haut en bas.
9
4. USE / UTILISATION
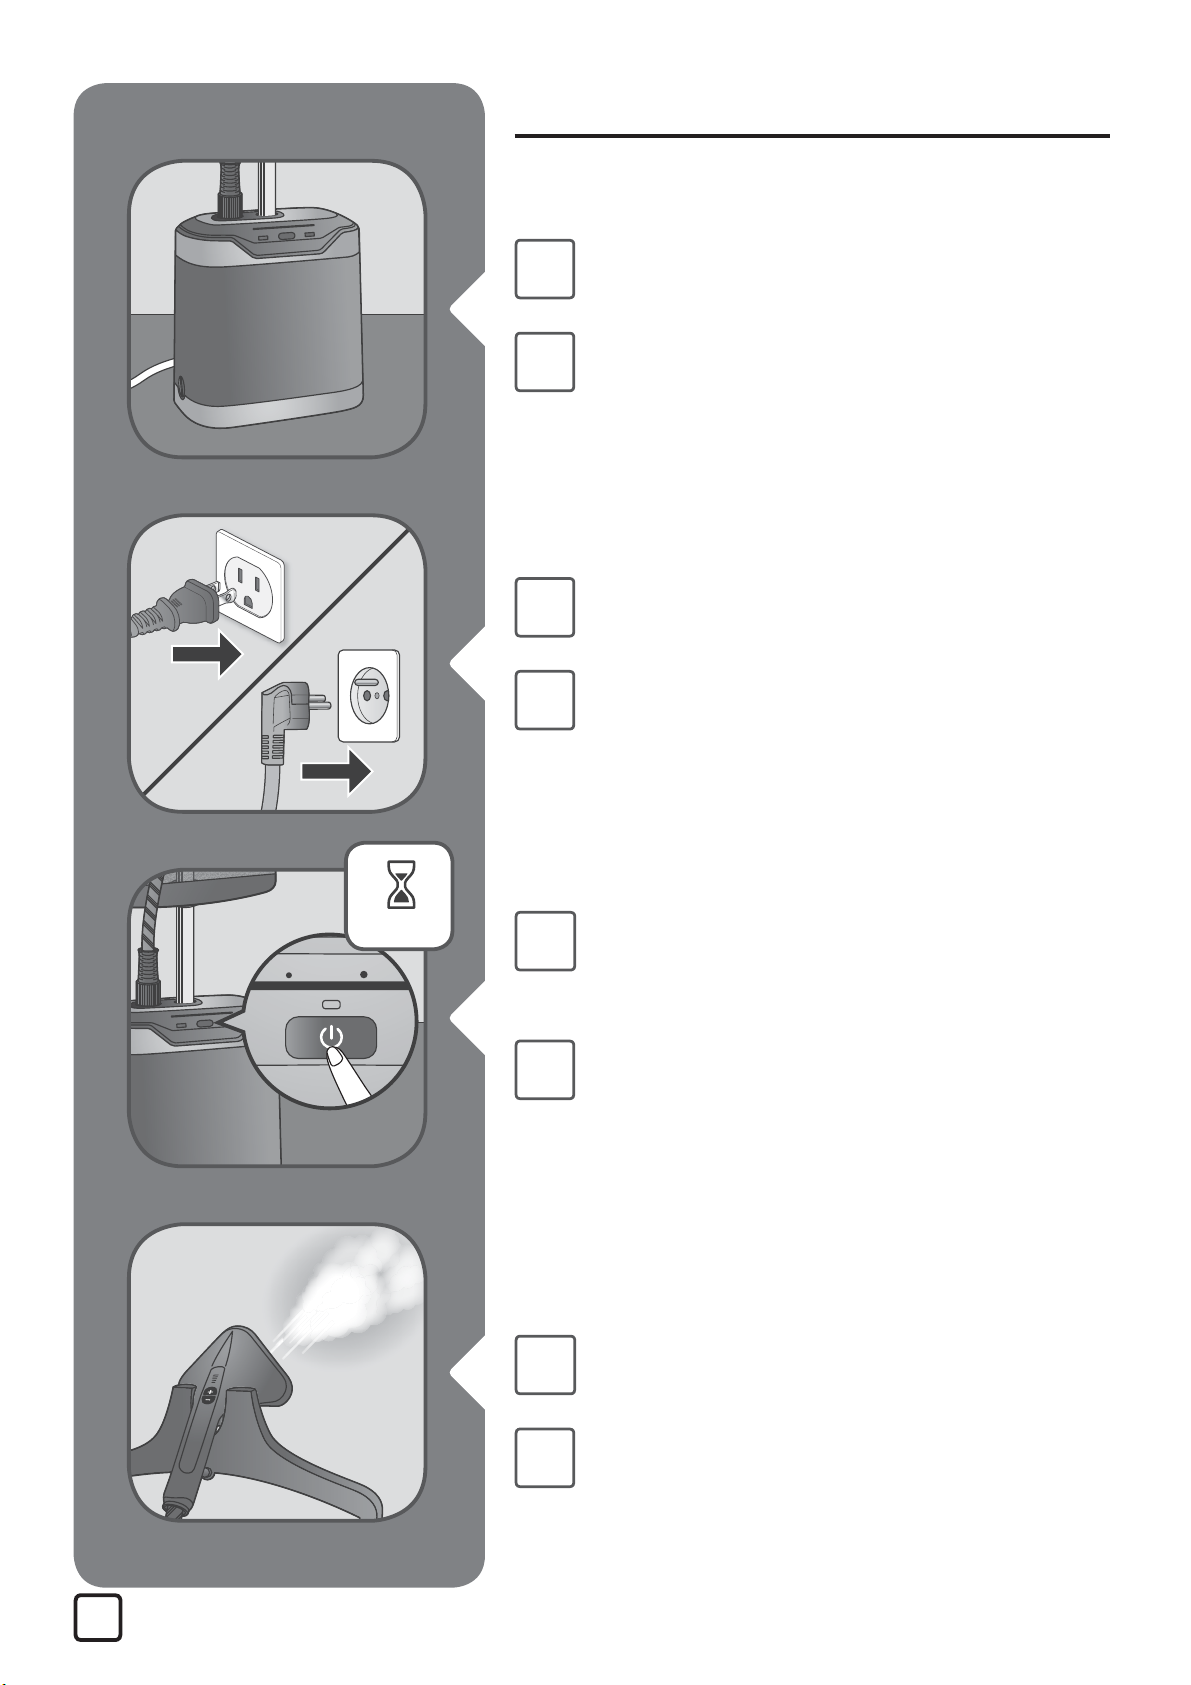
The appliance must remain in a
EN
FR
EN
FR
horizontal position on the oor.
L’appareil doit rester posé
horizontalement sur le sol.
Totally unroll the cord and plug the
appliance.
Déroulez totalement le câble
d’alimentation et branchez l’appareil.
EN
FR
EN
FR
Push the ON/OFF button, in order to
switch on the appliance. The leds will
ash for approx 45 seconds.
Tournez le bouton ON/OFF an
d’allumer l’appareil. Les leds vont
clignoter pendant environ 45 secondes.
After 45 seconds approximately, steam
will come out.
Après environ 45 secondes, la vapeur
sera émise.
10
*
*
EN
FR
EN
FR
Adjust steam output by pushing the
buttons + and — on the steam head.
Ajustez le niveau de vapeur en
appuyant sur les commandes + et — sur
la tête vapeur.
Level max = all leds are bright = steam
max
Niveau max = toutes les leds sont
allumées = niveau maximal de vapeur
*
*
EN
FR
EN
FR
level 2 = 2 led bright = steam low
Niveau 2 = 2 leds sont brillantes =
vapeur faible
level 0 = no led bright = no steam
Niveau 0 = aucune led allumée = pas
de vapeur
* EN Depending on model / FR Selon le modèle
11
EN
FR
For optimal use, press the steam jets
on your garment from top to bottom.
Pour une utilisation optimale, passez
les jets de vapeur sur votre vêtement
de haut en bas.
EN
FR
Never steam directly on people.
Ne dirigez jamais la vapeur
directement vers des personnes.
5. DURING USE / DURANT
L’UTILISATION
12
EN
FR
If «WATER» button is ashing, the level
of water in the water tank is low and
must be lled.
Si le bouton «Water» s’allume, le niveau
d’eau dans le réservoir est faible et
doit être rempli.
EN
FR
The appliance must be switched o,
push the ON/OFF button in order to
switch it o.
L’appareil doit être éteint, appuyez
sur le bouton ON/OFF an d’éteindre
l’appareil.
EN
FR
EN
FR
Unplug, then remove the water tank.
Débranchez l’appareil, et retirez le
réservoir d’eau.
Remove the cap then ll in the water
tank.
Retirez le bouchon puis remplissez le
réservoir d’eau.
EN
FR
Fully screw the water tank cap and
insert tank back in appliance.
Vissez complètement le bouchon du
réservoir d’eau et replacez le réservoir
dans l’appareil.
13
EN
Plug on the appliance.
FR
EN
FR
Branchez l’appareil.
Push the ON/OFF button in order to
switch on the appliance.The steam
level will ash on maximum level for
45 secondes.
Appuyez sur le bouton ON/OFF
an d’allumer l’appareil. Les leds
vont clignoter pendant environ 45
secondes.
14
6. AFTER USE / APRÈS L’UTILISATION
Long push the ON/OFF button in order
EN
FR
to switch o the appliance.
Appuyez longtemps sur le bouton ON/
OFF an d’éteindre l’appareil.
EN
Unplug the appliance.
FR
EN
FR
Débranchez l’appareil.
Remove the water tank.
Retirez le réservoir d’eau.
EN
FR
EN
FR
Unscrew the cap and then empty the
water tank completely in a sink.
Dévissez le bouchon puis videz
complètement le réservoir d’eau dans
un évier.
Screw back the cap and place the
water tank back to its appliance.
Revissez le bouchon du réservoir et
replacez le réservoir dans l’appareil.
15
EN
FR
EN
FR
Roll up the power cord and place it on
its power cord hook.
Enroulez le câble d’alimentation et
placez-le sur son crochet.
Wait for an hour for your appliance to
cool before storing.
Attendez une heure pour que votre
appareil refroidisse avant de le ranger.
Make sure the water tank is empty
EN
before moving the appliance on its
wheel.
Assurez-vous que le réservoir d’eau est
FR
vide avant de déplacer l’appareil sur
sa roue.
7. DESCALING PROCEDURE /
PROCÉDURE DE DÉTARTRAGE
To apply when the «anti-calc» button
EN
is ashing.
16
FR
A faire dès que le bouton «Anti-calc»
clignote.
EN
FR
EN
FR
WARNING! Wait for an hour that
appliance completely cools down.
AVERTISSEMENT ! Attendez une
heure an que l’appareil refroidisse
complètement.
Unlock and half collapse the pole,
lock it.
Retirez la tête vapeur du support,
débloquez et retractez de moitié le pole.
EN
FR
EN
FR
Remove the water tank.
Retirez le réservoir d’eau.
Fill in 0.5L(litre) of water in the
appliance tank inlet.
Versez 0,5 L(litre) d’eau dans l’orice
du réservoir de l’appareil.
17
EN
FR
EN
FR
Shake gently the appliance to remove
the main particles.
Secouez doucement l’appareil pour
retirer les particules principales.
Place the appliance over a sink &
unscrew the «Anti calc» cap by turning
it anti clockwise.
Placez l’appareil au-dessus d’un lavabo
et dévissez le bouchon «anti calcaire»
en le tournant dans le sens antihoraire.
18
EN
FR
Be careful , water might be hot.
Never unscrew the cap when the appliance is in use.
Wait for full cool down.
Ne jamais dévisser le bouton pendant que l’appareil est en
utilisation. Attendez qu’il soit complètement froid.
Loading…
View the manual for the Tefal Pro Style Care IT8460 here, for free. This user manual comes under the category steam cleaners and has been rated by 1 people with an average of a 7.7. This manual is available in the following languages: English. Do you have a question about the Tefal Pro Style Care IT8460?
Ask your question here
Tefal Pro Style Care IT8460 specifications
Below you will find the product specifications and the manual specifications of the Tefal Pro Style Care IT8460.
The Tefal Pro Style Care IT8460 is an upright garment steam cleaner with a 1.3-liter water tank capacity and a 0.75-minute heating time. It boasts five different settings and a vertical steam function, making it suitable for most fabrics. Equipped with a built-in hanger and an automatic anti-calc feature, this steam cleaner is easy to operate and maintain. The continuous steam performance of 35 grams per minute ensures that clothes are refreshed and wrinkle-free in no time. Additionally, the removable water tank and empty tank detector make it convenient and safe to use. This steam cleaner comes with castor wheels, which add to its portability and stability when used on different surfaces. Safe for all fabrics, the Tefal Pro Style Care IT8460 ensures that clothes are not damaged during the cleaning process. The hand switch on/off switch allows for easy operation, and the premium materials used in construction ensure durability and reliability over time. It’s an ideal option for those looking for a convenient, reliable, and effective garment steamer.
Device type
Upright garment steamer
Garment hanger included
Yes
General
| Brand | Tefal |
| Model | Pro Style Care IT8460 | IT8460E0 |
| Product | steam cleaner |
| EAN | 3121040071564 |
| Language | English |
| Filetype | User manual (PDF) |
Features
| Device type | Upright garment steamer |
| Number of settings | 5 |
| Water tank capacity | 1.3 L |
| Heating time | 0.75 min |
| Vertical steam function | Yes |
| Product colour | Black |
| Built-in hanger | Yes |
| On/off switch | Yes |
| On/off switch type | Hand switch |
| Automatic anti-calc | Yes |
| Empty tank detector | Yes |
| Continuous steam performance | 35 g/min |
| Removable water tank | Yes |
| Safe for all fabrics | Yes |
| Castor wheels | Yes |
Power
Packaging content
| Garment hanger included | Yes |
| Manual | Yes |
show more
Frequently asked questions
Can’t find the answer to your question in the manual? You may find the answer to your question in the FAQs about the Tefal Pro Style Care IT8460 below.
Is the manual of the Tefal Pro Style Care IT8460 available in English?
Yes, the manual of the Tefal Pro Style Care IT8460 is available in English .
Is your question not listed? Ask your question here
TEFAL Pro Style Care IT8460: A Versatile and Efficient Hair Styling Tool
The TEFAL Pro Style Care IT8460 is a highly versatile hair styling tool that offers a wide range of features to cater to your hair care needs. As a proud owner of this product, I can confidently say that it has become an indispensable part of my daily grooming routine.
One of the standout features of the TEFAL Pro Style Care IT8460 is its impressive range of temperature settings. With a temperature range of up to 210°C, this styling tool can effortlessly handle even the most stubborn and unruly hair types. Whether you’re looking to create sleek, straight styles or voluminous, bouncy curls, the TEFAL Pro Style Care IT8460 has got you covered.
The device’s ionic technology is another noteworthy feature that sets it apart from other hair styling tools on the market. By releasing negative ions, the TEFAL Pro Style Care IT8460 helps to reduce frizz and static, leaving your hair smooth, shiny, and manageable. This is particularly beneficial for those with thick, coarse, or unruly hair, as it helps to tame flyaways and create a polished, salon-like finish.
In terms of design, the TEFAL Pro Style Care IT8460 is both sleek and ergonomic. The ceramic-coated barrel and plates provide an even heat distribution, ensuring that your hair is styled quickly and efficiently without the risk of damage. The cool tip feature also allows for easy and safe handling, making the device easy to use, even for those with limited dexterity.
One of the things I appreciate most about the TEFAL Pro Style Care IT8460 is its versatility. The device comes with a range of attachments, including a professional-grade nozzle, a concentrator, and a diffuser, allowing you to create a variety of hairstyles with ease. Whether you’re looking to add volume, enhance curls, or smooth out your locks, the TEFAL Pro Style Care IT8460 has the tools to help you achieve your desired look.
Another standout feature of this hair styling tool is its rapid heat-up time. Within just 30 seconds, the TEFAL Pro Style Care IT8460 is ready to use, allowing you to get started on your hair styling routine without any unnecessary delays. This is particularly useful for those with busy mornings or who are always on the go.
In terms of safety, the TEFAL Pro Style Care IT8460 is equipped with a range of features to ensure that it is used safely and responsibly. The automatic shut-off function, for instance, will turn the device off after 60 minutes of inactivity, helping to prevent accidental fires or overheating. The cool touch feature also ensures that the device remains safe to handle, even when in use.
Overall, the TEFAL Pro Style Care IT8460 is an excellent hair styling tool that offers a winning combination of performance, versatility, and safety. Whether you’re looking to create a polished, salon-quality look or simply maintain your hair’s health and shine, this device is sure to exceed your expectations. Highly recommended for anyone in the market for a reliable and efficient hair styling tool.
- Key Features:
- Temperature range up to 210°C for versatile styling
- Ionic technology to reduce frizz and static
- Ceramic-coated barrel and plates for even heat distribution
- Cool tip for safe handling
- Includes a range of attachments for diverse hairstyles
- Rapid 30-second heat-up time
- Automatic shut-off function for safety
Related Pro Style Care IT8460 products
Related Pro Style Care IT8460 Manuals and Guides
Type: Owner’s manual
Pages: 20
Type: Operation & user’s manual
Pages: 20
Type: Instruction manual
Pages: 36
Type: Operation & user’s manual
Pages: 11
Type: Assembly, operating and safety instructions
Pages: 60
Type: Operation & user’s manual
Pages: 44
Type: Operating instructions manual
Pages: 56
Type: Important safety instructions manual
Pages: 34
IMPORTANT SAFETY INSTRUCTIONS
When using your appliance, basic precautions should always be followed, including the following:
Read all instructions before using this appliance. This appliance has been designed for indoor, domestic
use only. Any commercial use, inappropriate use or failure to comply with the instructions, the manufacturer accepts no responsibility and the guarantee will not apply.
Always plug your appliance: — into a mains circuit with voltage between 220 V and 240 V. — into an earthed electrical socket.
Connecting to the wrong voltage may cause irreparable damage to the appliance and will invalidate your guarantee. Do not use an extension lead. If you accept liability for doing so, only use an extension lead which is in good condition, has a plug with an earth connection and is suited to the power rating of the appliance.
Completely unwind the power cord before plugging into an earthed socket.
Use appliance for its intended use only. To reduce the risk of contact with hot water emitting from
steam vents, check appliance before each use by holding it away from body and operating steam button.
2
This appliance can be used by children aged from 8 years and above and persons with reduced physical, sensory or mental capabilities or lack of experience and knowledge if they have been given supervision or instruction concerning use of the appliance in a safe way and understand the hazards involved. Children shall not play with the appliance. Cleaning and user maintenance shall not be made by children without supervision.
Never unplug the appliance by pulling on the power cord; instead, grasp plug and pull away from the socket to unplug the appliance.
Do not allow the power cord to touch hot surfaces or come into contact with rough or sharp edges. Let the appliance cool completely down before putting away. Loop cord loosely around appliance when storing.
Before filling or emptying the water tank, cleaning, or removing or re»tting accessories, ensure that the appliance is unplugged an completely cool.
Care should be taken when using the appliance due to the emission of steam.
The appliance must not be used if it has been dropped, if it has any visible damage, if it leaks, or if it functions abnormally in any way. Do not attempt to dismantle your appliance: have it examined at an Approved Service Centre to avoid any danger.
Close supervision is necessary for any appliance being used by or near children.
3
Never leave the appliance unattended when it is connected to the mains. Before storing the appliance, once it is unplugged, please wait until it has cooled down (around 1 hour).
Burns could occur from touching hot metal or plastic parts, hot water or steam. Use care when you empty a steam appliance. There may be hot water in the reservoir.
Do not use an extension lead. If you accept liability for doing so, only use an extension lead which is in good condition, has a plug with an earth connection and is suited to the power rating of the appliance.
Never immerse your appliance in water or any other liquid. Never place it under a running tap.
Do not direct steam at people, animals or clothes while they are being worn.
This appliance is not intended for use by persons (including children) with reduced physical, sensory or mental capabilities, or lack of experience and knowledge, unless they have been given supervision or instruction concerning use of the appliance by a person responsible for their safety. Children should be supervised to ensure that they do not play with the appliance.
The use of accessory attachments other than those provided by the manufacturer is not recommended and may result in «re, electric shock or personal injury.
4
The appliance must be used and placed on a $at, stable, heat-resistant surface. When you place the appliance on its stand, ensure that the surface on which the stand is placed is stable.
The appliance must not be used if it has been dropped, if there are visible signs of damage or if it is leaking.
Check the electrical power cord and steam cords for signs of wear or damage prior to use. If the electrical power cord or the steam cord is damaged, it must be replaced by an Approved Service Centre to avoid any danger.
Do not use other descaling products than the one cited in the IFU.
Do not obstruct the appliance airways. Before !rst use When you «rst use the appliance, some smoke or a harmless odour may be produced or there may be a small discharge of particles. This will not a%ect the use of the appliance and will disappear quickly.
What water to use? Your appliance has been designed to use untreated tap water. Do not use pure demineralised or pure distilled water, water from clothes dryers, scented or softened water, rain water, «ltered, bottled or boiled water, water from refrigerators, batteries or air conditioners as these may damage the appliance. These types of water contain organic waste, mineral elements that become concentrated when heated and cause spitting, brown staining, leaking or premature wear on your appliance. If your water is very hard, mix 50% untreated tap water with 50% distilled water (available in hardware stores).
SAVE THESE INSTRUCTIONS
5
TROUBLESHOOTING
ENVIRONMENTAL PROTECTION FIRST !
Your appliance contains valuable materials which can be recovered or recycled.
Leave it at a local civic waste collection point.
Problems Possible causes Solutions
There is no steam. The appliance has not been turned on.
Check that the appliance has been plugged in correctly. Next press the On/O% pedal, the power indicator light located at the front of the appliance will come on.
The hose has been obstructed.
Check that the hose is not bent or twisted.
There is no water left in the water tank.
Unplug the appliance and «ll the water tank.
The steam is not ready yet. The appliance will produce steam about 45 seconds after it has been switched on.
The steam $ow is low.
Your steamer has a build-up of scale because it has not been rinsed out regularly.
See descaling process (Descaling procedure paragraph).
The hose has been obstructed.
Check that the hose is not bent or twisted. Always extend fully the pole.
There is no water left in the water tank.
Unplug the appliance and «ll the water tank.
Water runs through the holes of the steam head.
There is condensation in the hose.
Never use a steamer in the horizontal position. Hold the hose vertically outstretched and wait for the condensed water to return to the steamer. Always extend fully the pole.
The steamer takes a long time to heat and/or ejects white particles.
Your steamer has a build-up of scale because it has not been descaled regularly.
See descaling process (Descaling procedure paragraph).
6
* EN Depending on model
2*
3
1
10
11
5
9 6 8
13*
14*
17*
15*
16*
4
12*
7*
PRODUCT DESCRIPTION
1. EN Hanger + hanger hook
2. EN Steam Head*
3. EN Steam Hose
4. EN Adjustable pole + adjustable vertical support hook* + Power cord hook
5. EN Control panel
6. EN ON/OFF button
7. EN Steam level led*
8. EN Anti-calc button
9. EN Water tank button
10. EN Removable Water tank
11. EN Draining Cap
12. EN Removablevertical support*
13. EN Fabric Brush *
14. EN Steam bonnet*
15. EN Lint pad*
16. EN Glove*
17. EN Crease attachment*
* EN Depending on model
9
1. ASSEMBLY
Open the two pole locks.EN
Extend the pole fully.EN
Insert the pole in the housing until you
hear a «click».EN
Close the two locks.EN
10
1
2
Unlock the hanger and fully insert it
vertically on top of the pole and lock it.EN
Position the steam head on its craddle.EN
Take out the vertical support* from its
bag and unroll it.EN
Hook the upper part of the vertical
support* on rear hanger.EN
* EN Depending on model
11
2. BEFORE USE
1.3L
44OZ
MAX
Unwind the support and insert it in
the adjustable hook, by adjusting the
tension with the dedicated hook and
lock it.
EN
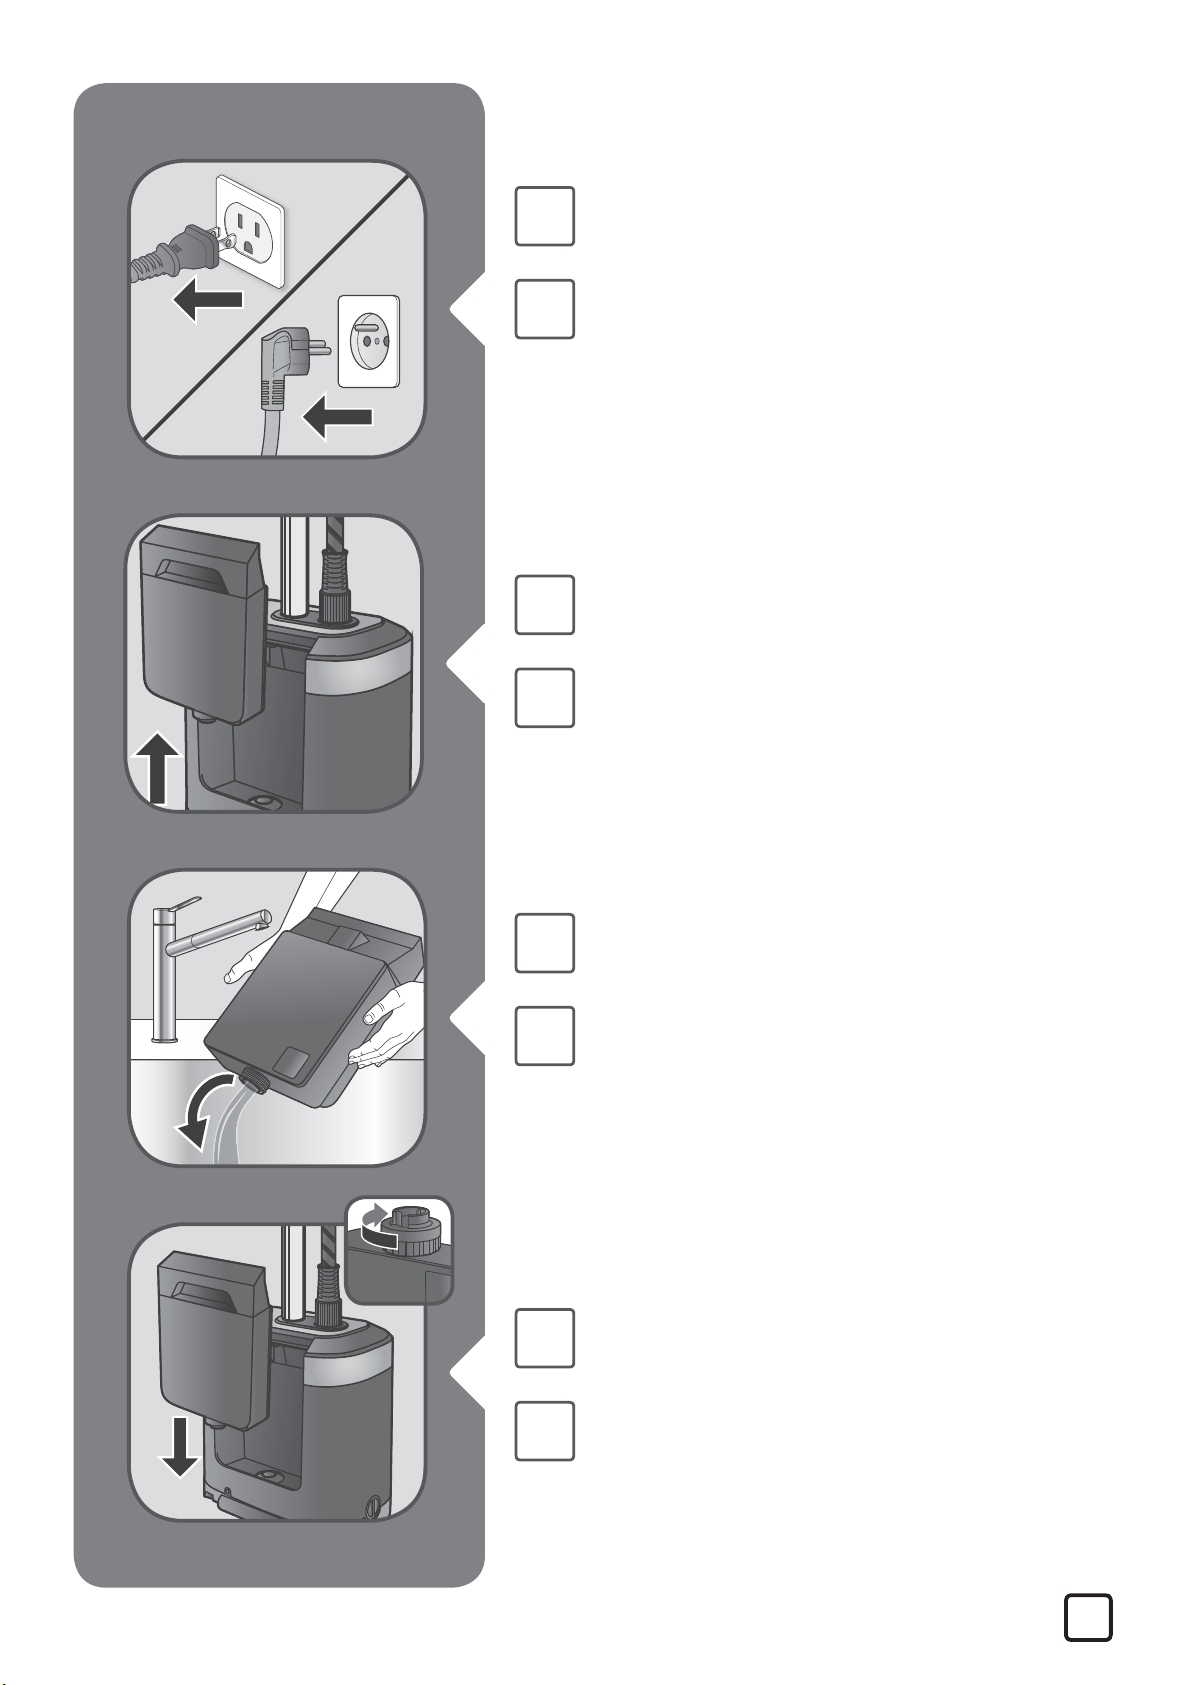
Remove the water tank.EN
Remove the cap and «ll the water tank.EN
* EN Depending on model
12
3. ACCESSORIES
Ensure the appliance is unplugged and completely cool
when adjusting or removing accessories. EN
Fully screw the water tank cap and
insert tank back in appliance.EN
Add the garment of your choice on the
hanger.EN
* EN Depending on model
13
The fabric brush opens the weaves
of the fabrics for better steam
penetration.
EN
The steam bonnet «lters water
impurities and protects fabrics from
water drips.
EN
The crease attachment is used to make
pant creases easily or to remove stubborn
wrinkles. Put your fabric in the space
between the two accessory parts. Move
the crease attachment in a downwards
motion starting from the top.
EN
*
*
*
* EN Depending on model
14
4. USE
45s
The appliance must remain in a
horizontal position on the $oor.EN
Totally unroll the cord and plug the
appliance.EN
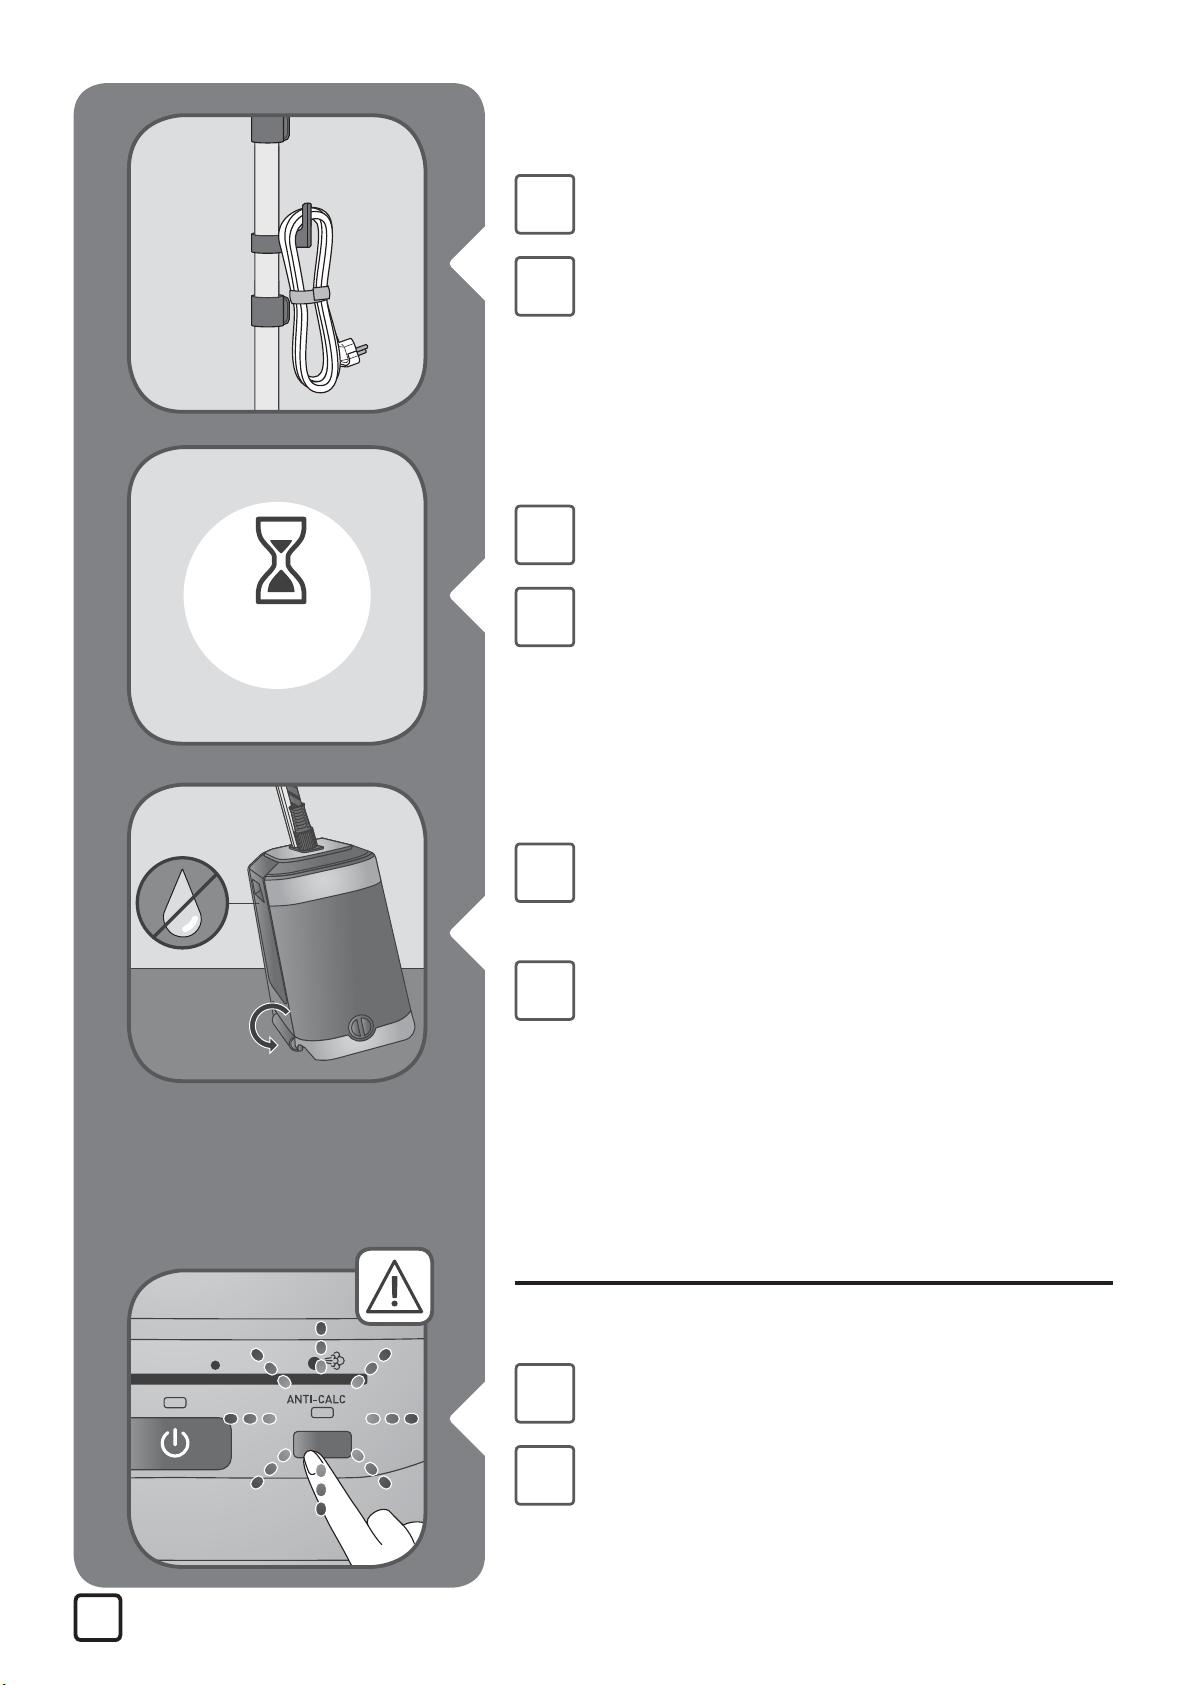
Push the ON/OFF button, in order to
switch on the appliance. The leds will
$ash for approx 45 seconds. EN
After 45 seconds approximately, steam
will come out.EN
15
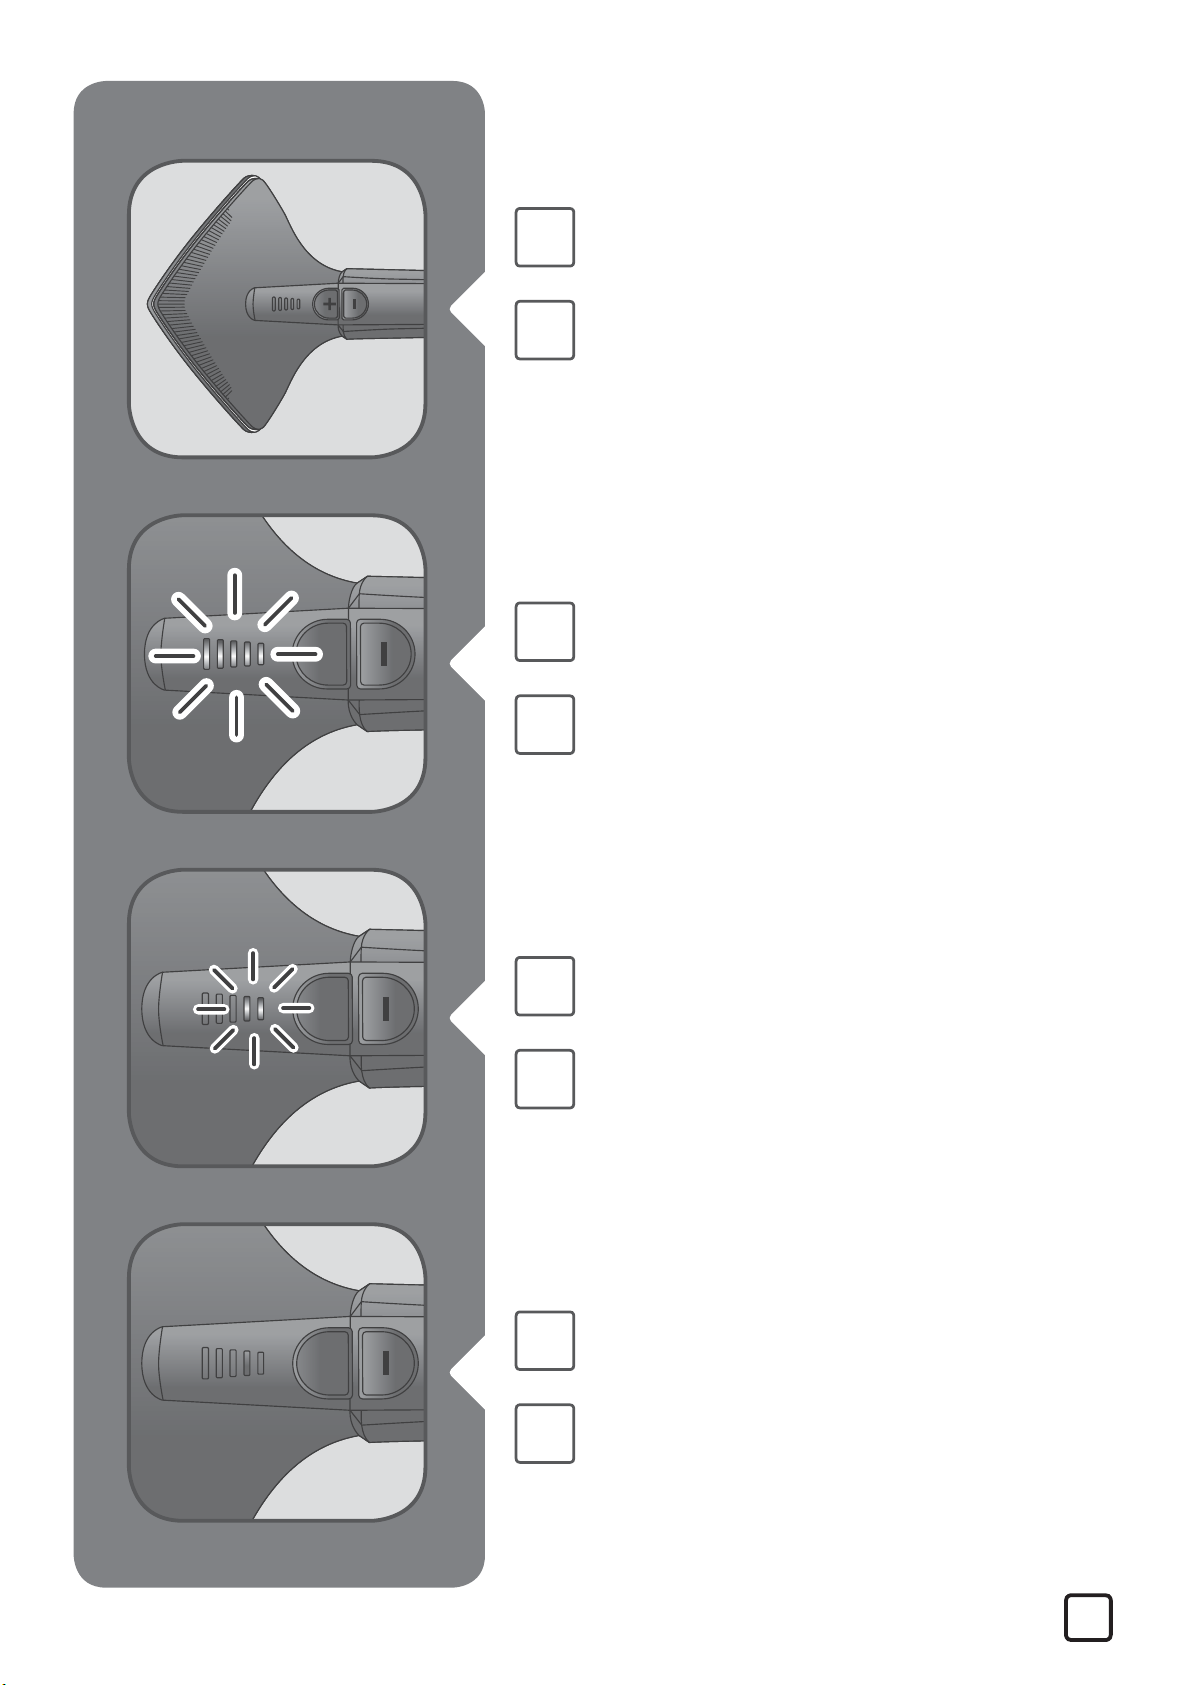
Level max = all leds are bright = steam
maxEN
level 2 = 2 led bright = steam lowEN
level 0 = no led bright = no steamEN
*
*
*
*
Adjust steam output by pushing the
buttons + and — on the steam head.EN
* EN Depending on model
16
5. DURING USE
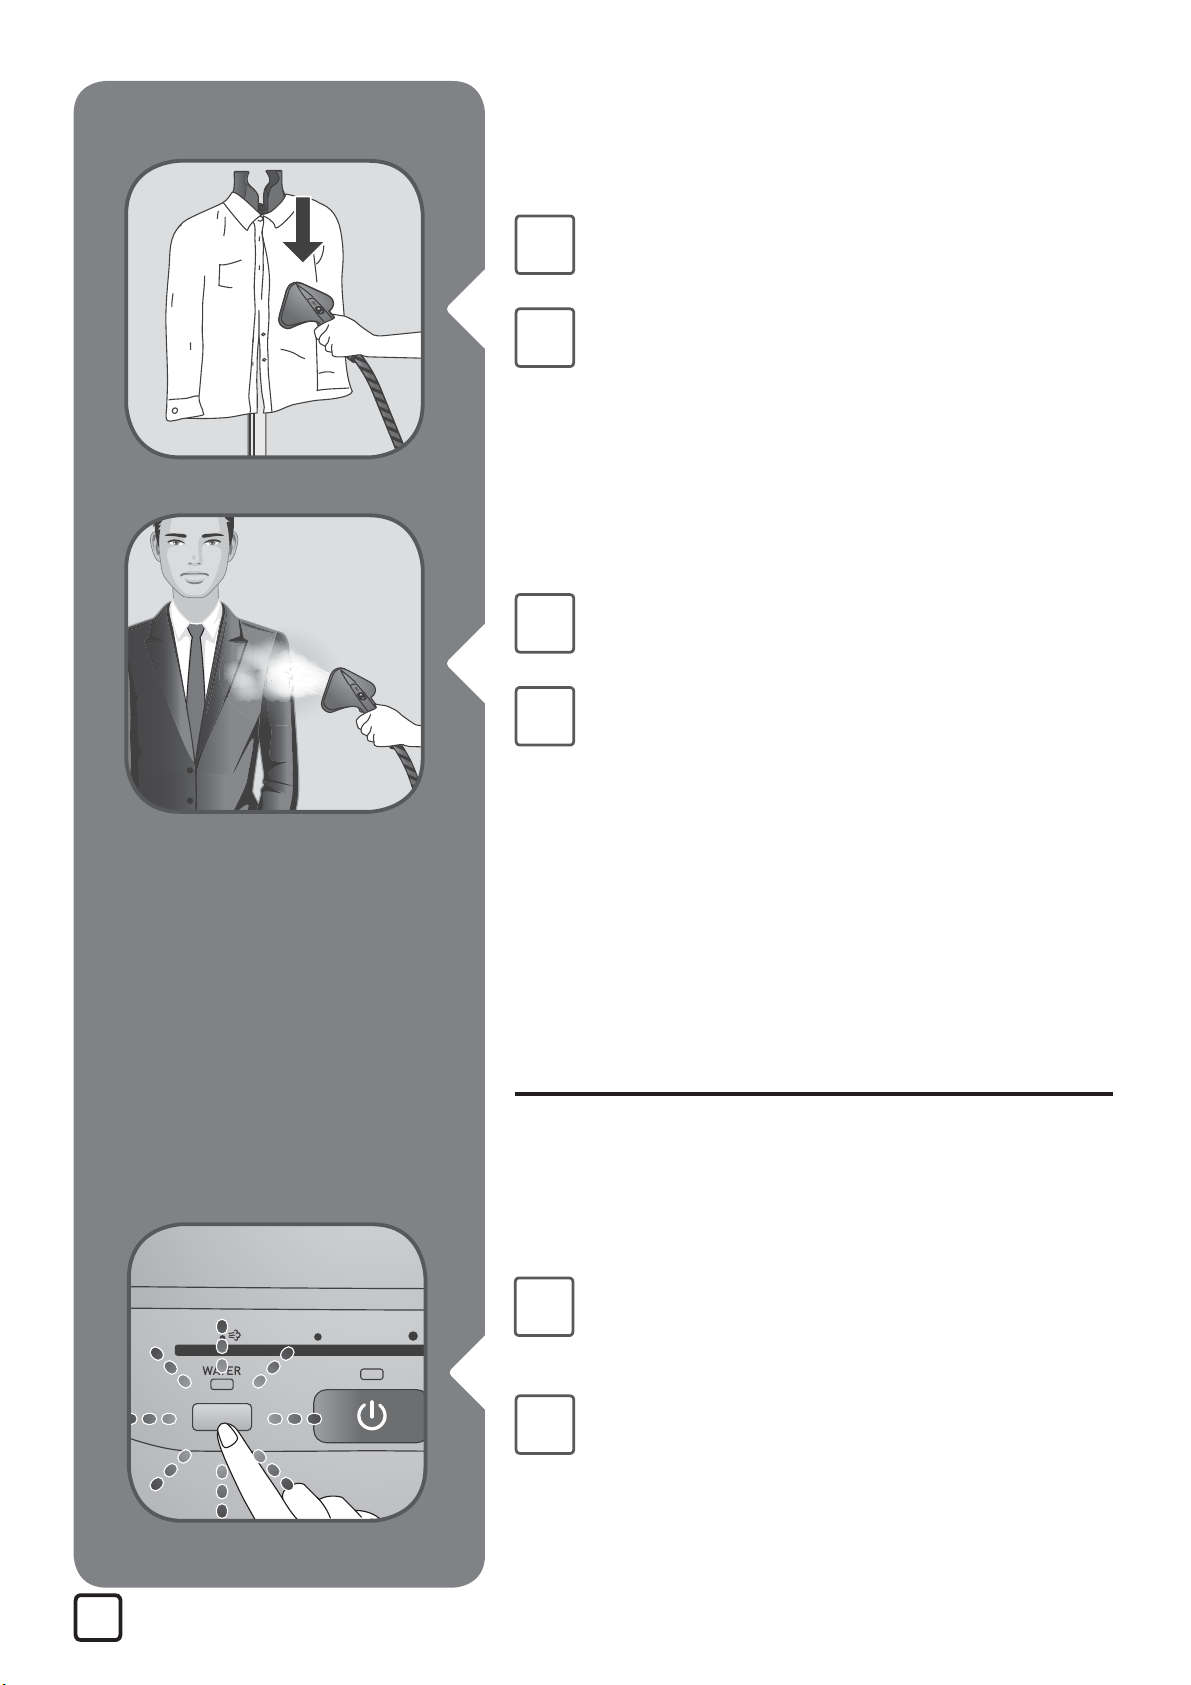
Never steam a garment while it is
being worn. Always hang on the stand
or on a hanger.
EN
For optimal use, press the steam jets
on your garment from top to bottom.EN
If «WATER» button is $ashing, the level
of water in the water tank is low and
must be «lled.
EN
17
1.3L
44OZ
MAX
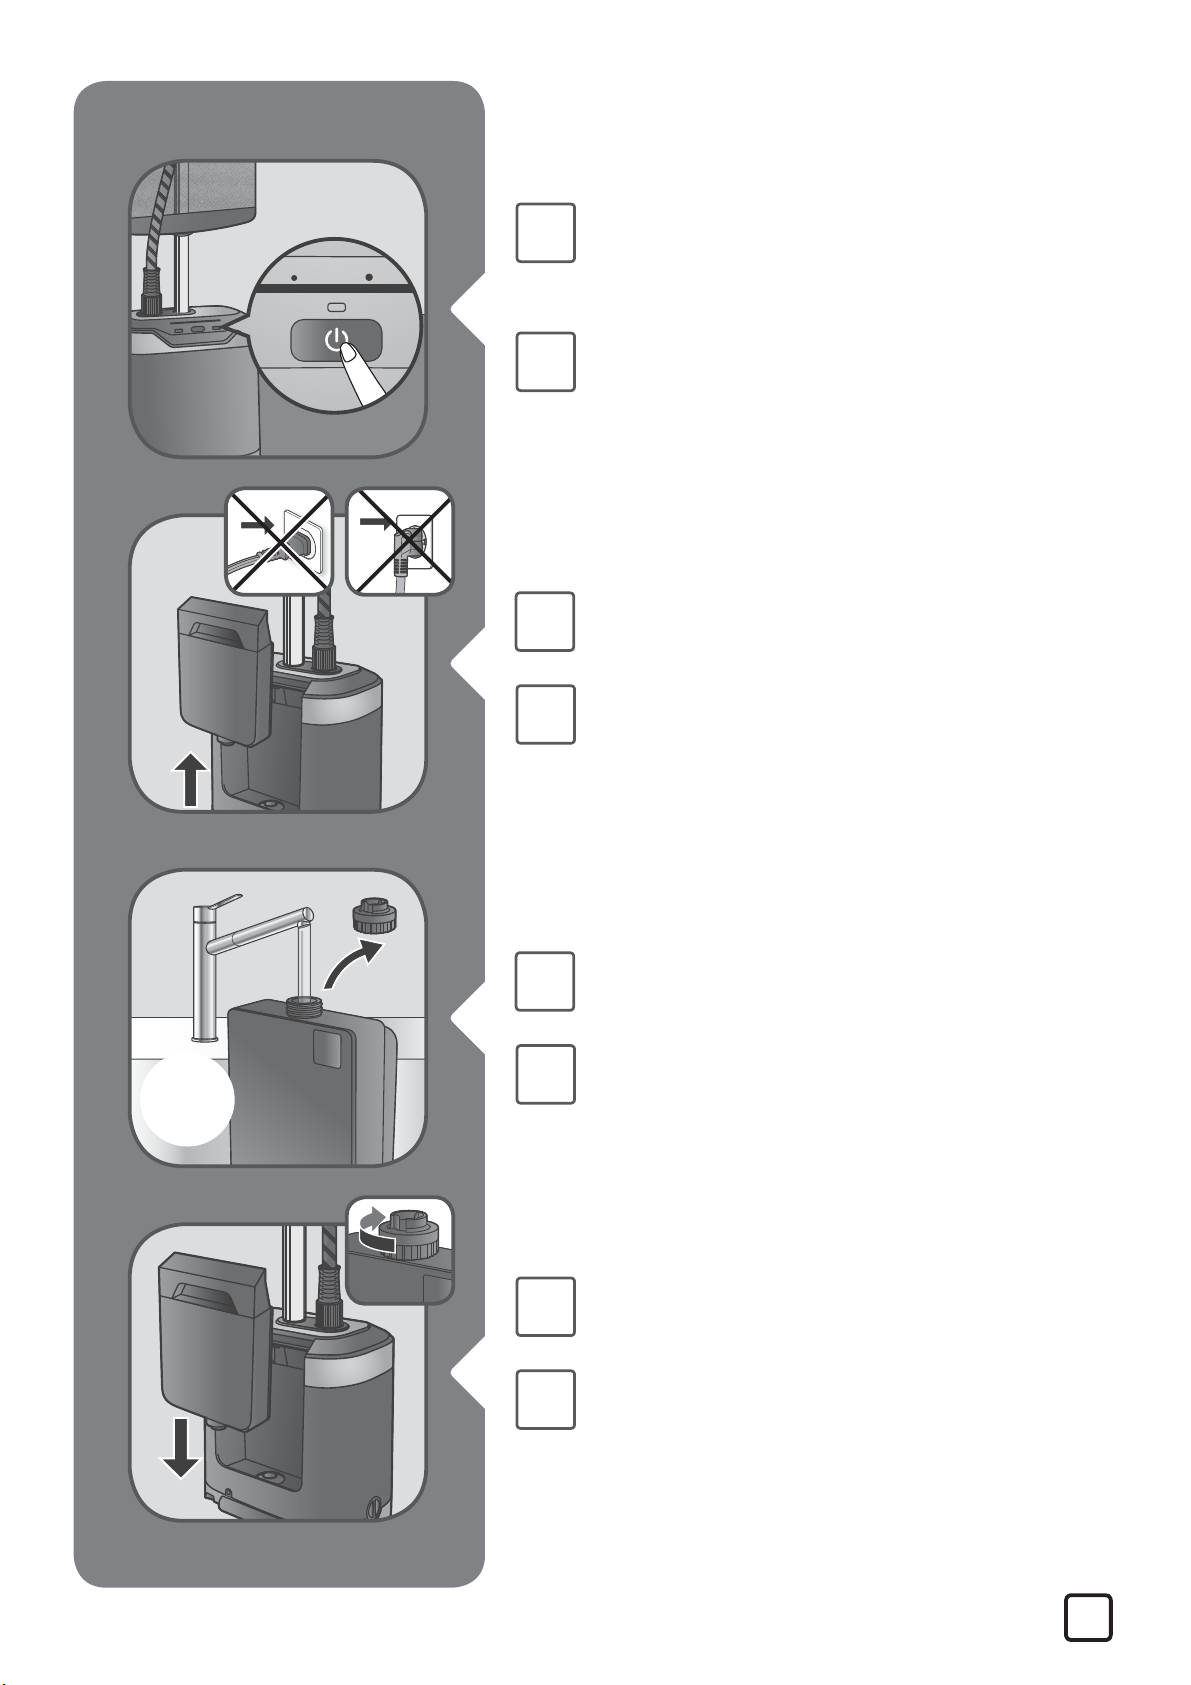
The appliance must be switched o%,
push the ON/OFF button in order to
switch it o%. EN
Unplug, then remove the water tank.EN
Remove the cap then «ll in the water
tank.EN
Fully screw the water tank cap and
insert tank back in appliance.EN
18
6. AFTER USE
45s
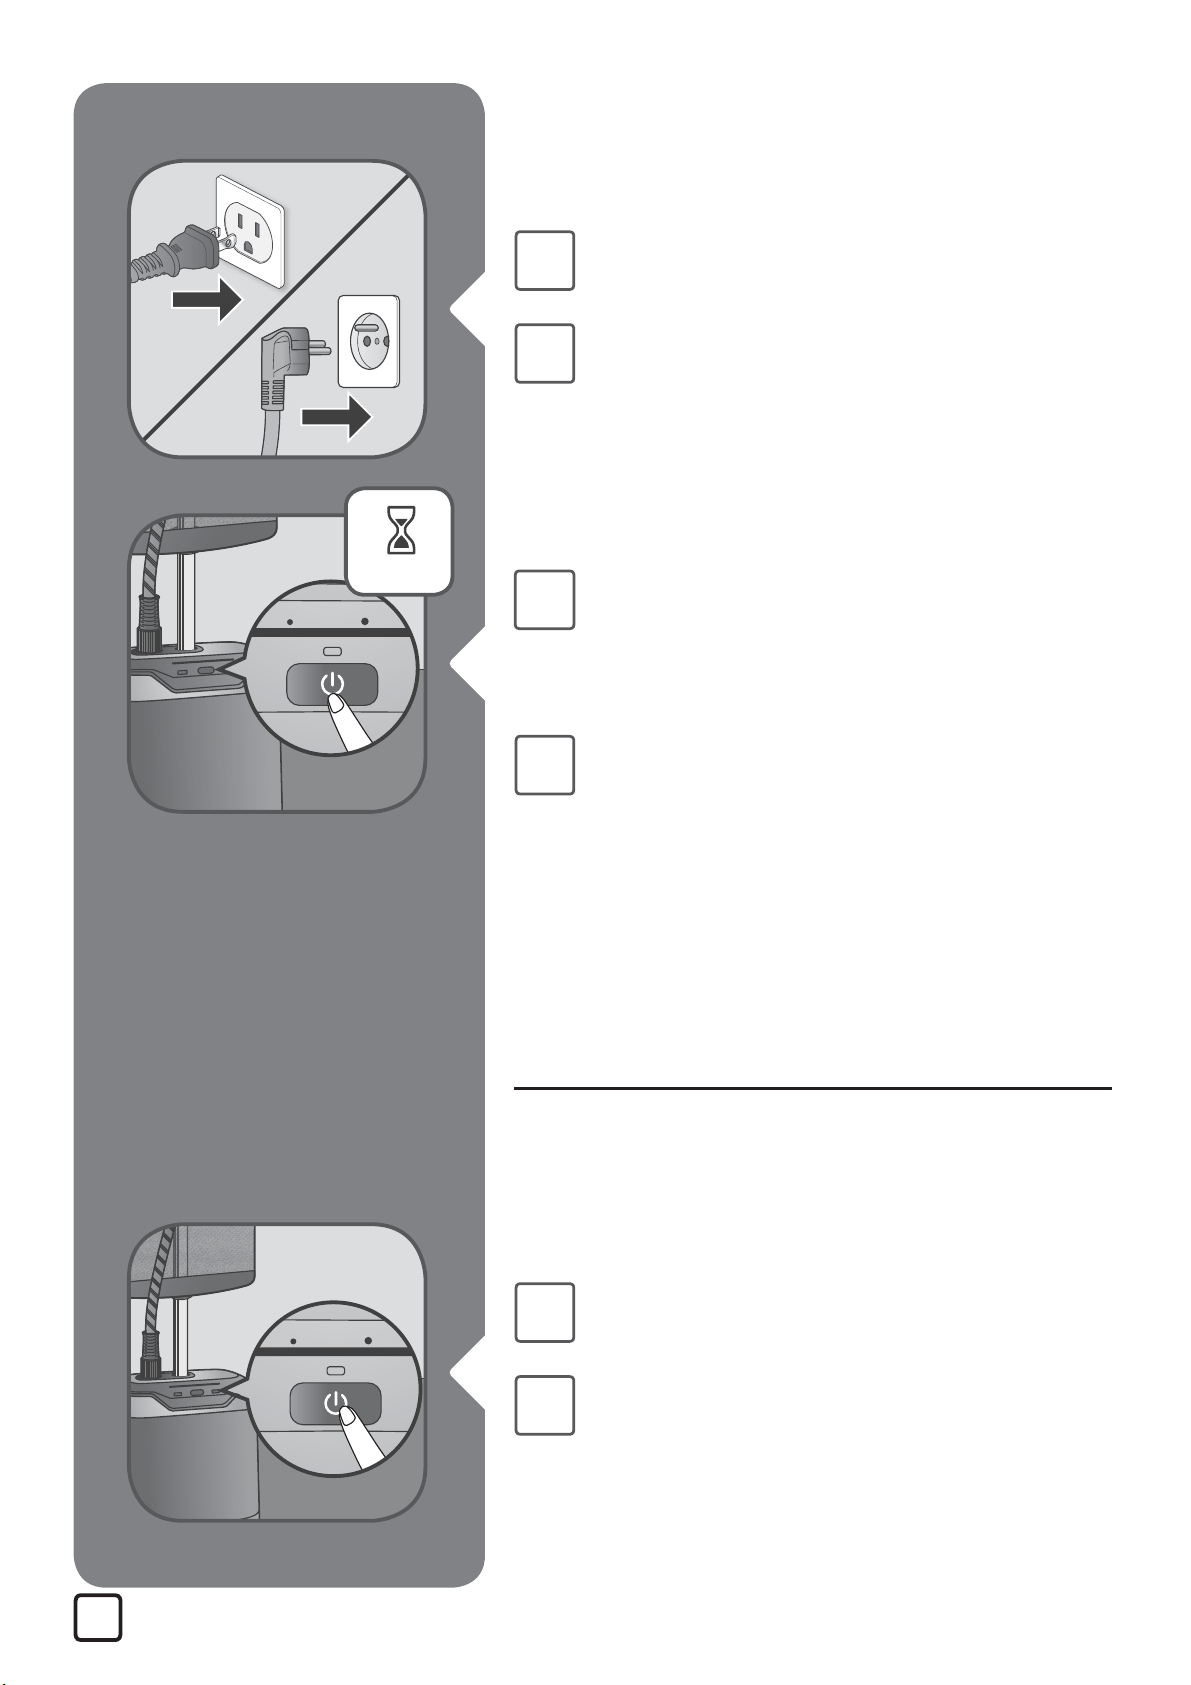
Plug in the appliance.EN
Push the ON/OFF button in order to
switch on the appliance.The steam
level will $ash on maximum level for
45 seconds.
EN
Long push the ON/OFF button in order
to switch o% the appliance.EN
19
Unplug the appliance.EN
Remove the water tank.EN
Unscrew the cap and then empty the
water tank completely in a sink.EN
Screw back the cap and place the
water tank back in the appliance.EN
20
1h
7. DESCALING PROCEDURE
Roll up the power cord and place it on
its power cord hook.EN
Wait for an hour for your appliance to
cool before storing.EN
Make sure the water tank is empty
before moving the appliance on its
wheel.
EN
To apply when the «anti-calc» button is
$ashing. Reset by pressing the button.EN
21
Water
0.5 L
17OZ
1h
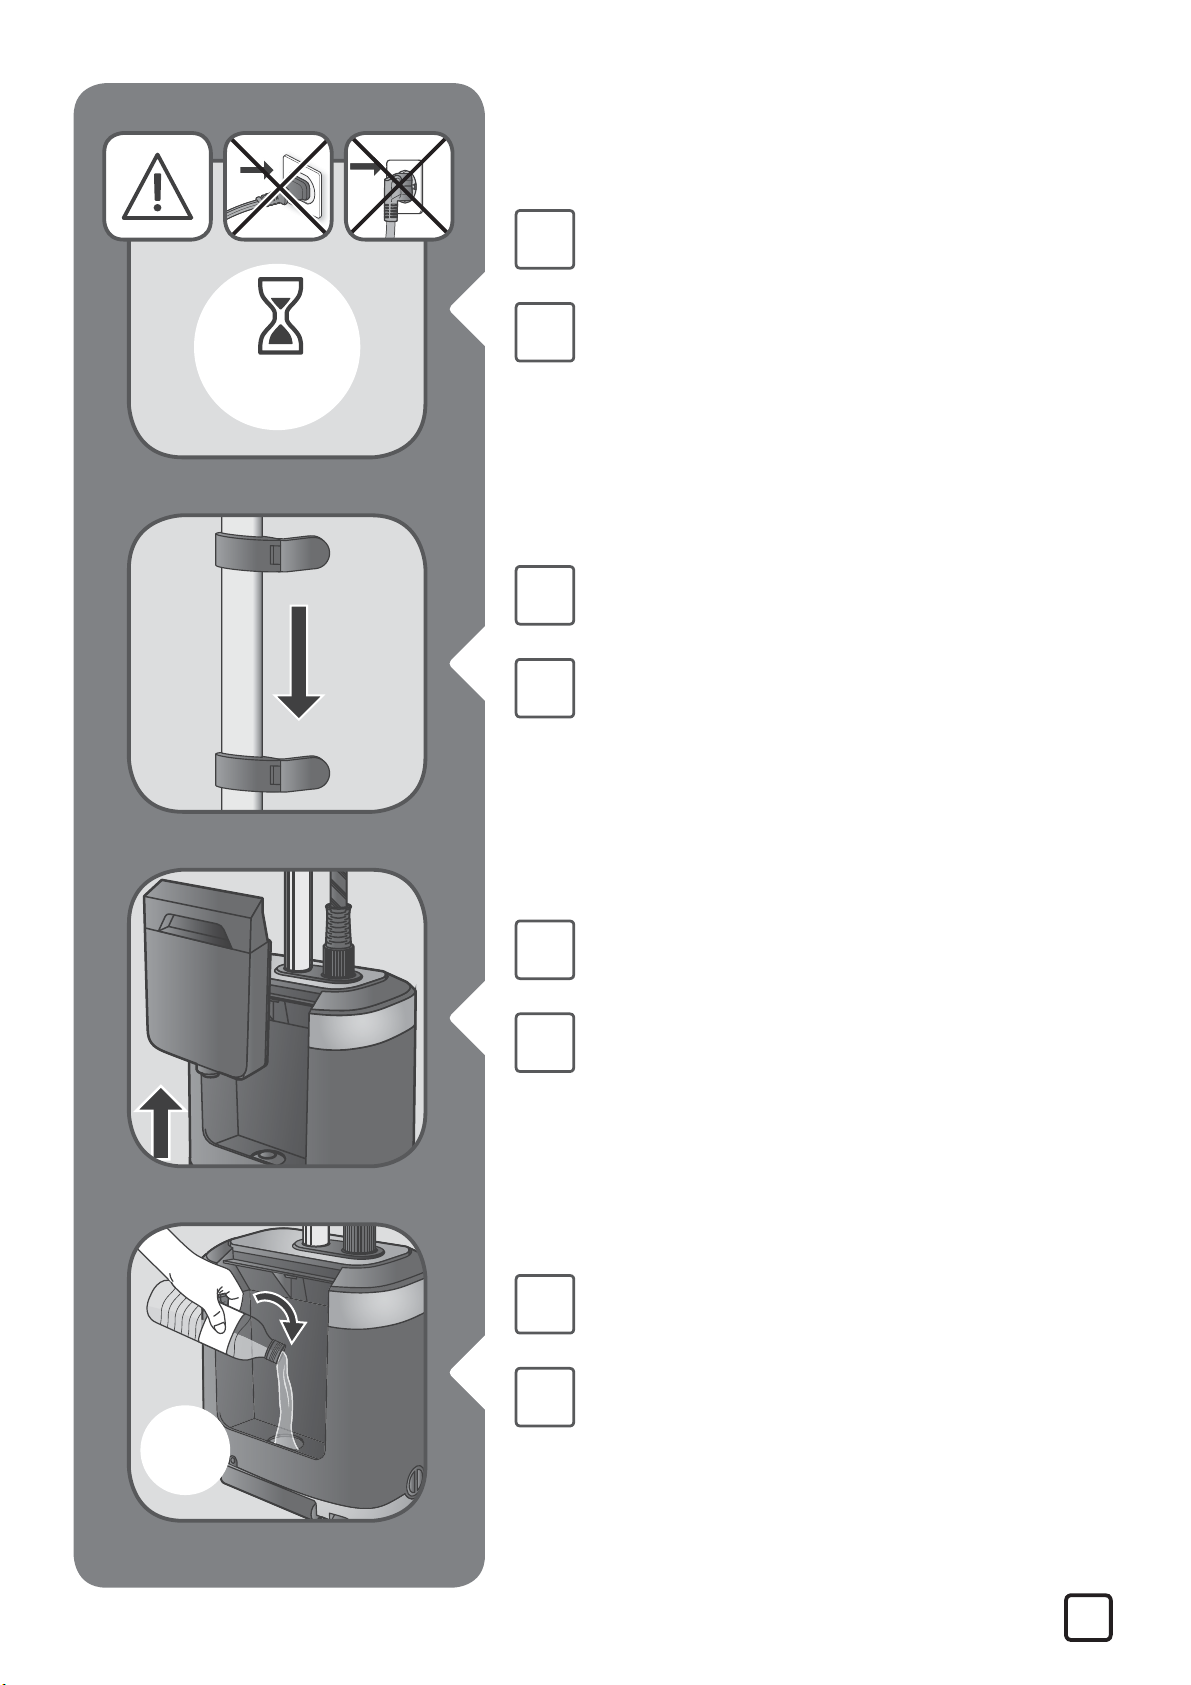
Unlock and half collapse the pole,
lock it.EN
Remove the water tank.EN
Fill in 0.5L(litre) of water in the
appliance tank inlet.EN
WARNING! Wait for an hour for the
appliance to completely cool down. EN
22
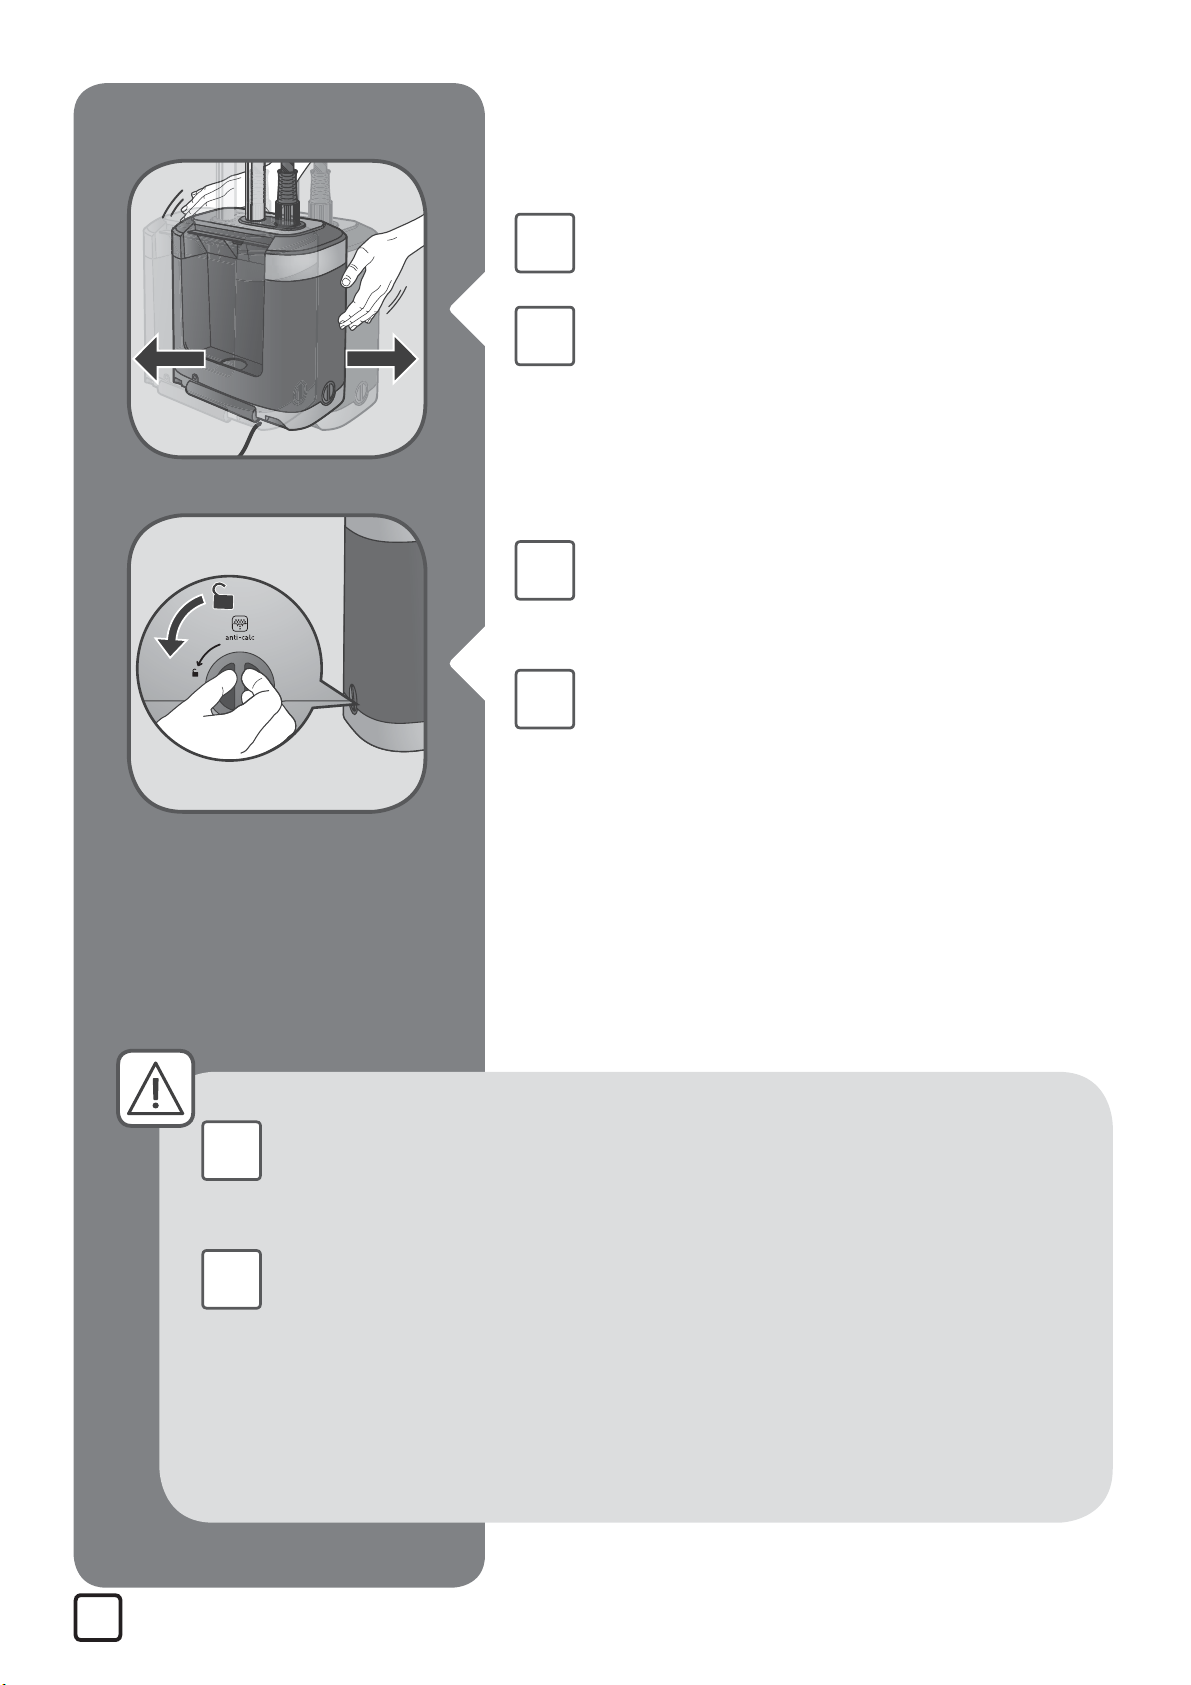
Shake gently the appliance to remove
the main particles.EN
Place the appliance over a sink &
unscrew the Anti calc cap by turning
it anti clockwise. EN
Be careful , water might be hot.
Never unscrew the cap when the appliance is in use.
Wait for full cool down.
EN
23
Tilt the appliance to empty water in
a sink.EN
Set back the draining cap, fully screw
it until complete locking and check
there is no leakage.
EN
Unlock the pole , extend fully, lock.EN
Place the steam head on its craddle.EN
24
1.3L
44OZ
MAX
Remove the cap then «ll the water
tank.EN
Plug in and switch on the appliance.EN
Let the appliance run until water tank
is emptied completely.EN
Fully screw the water tank cap and
insert tank back in appliance.EN
25
8. CLEANING
1h
Wait an hour for complete cool down.EN
Only use a sponge with water to clean
the base. Never put water on control
panel. EN
Only use a sponge with water to clean
the steam head. Never put water on
+/- buttons and leds
EN
EN Never use detergents when cleaning
your appliance.