
-
Consumer services
>
-
User manual, instruction for use
>
-
Floor care
>
-
Robot vacuum cleaner
>
User manual and frequently asked questions ROBOT EXPLORER SERIE 60
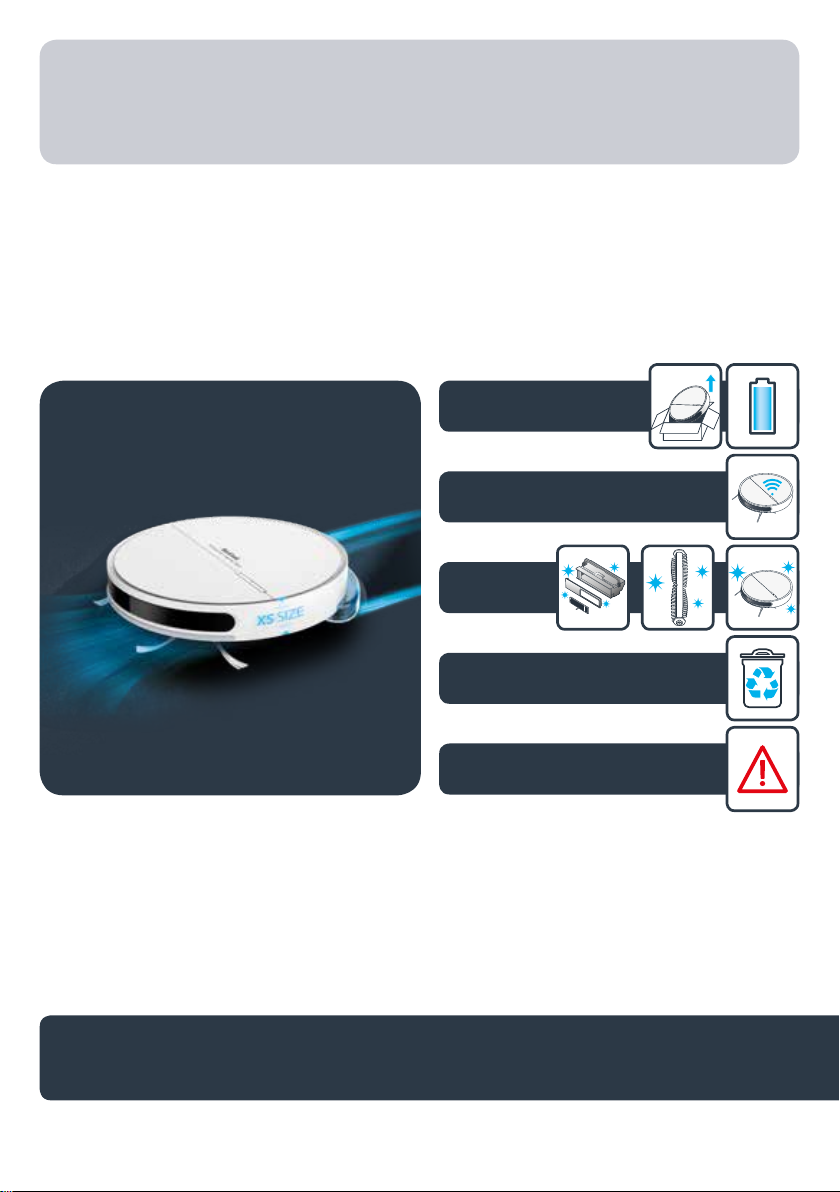
The thinnest 4-in-1 robot*
With the Tefal Explorer Serie 60 robot vacuum cleaner, clean your home and tackle pet hair without lifting a finger! Its two lateral brushes reach all corners and optimize surface coverage. Its high-efficiency Animal Turbo Brush vacuums pet hair and large dust with ease, and offers streamlined maintenance. Plus, its Aqua Force system mops your floor while vacuuming that ensures visibly perfect results! The thinnest 4-in-1 robot* vacuum on the market at only 6 cm high, it even passes under low furniture. Its methodical navigation system, Smart Exploration 4.0, covers your whole home with outstanding accuracy. It’s also highly intuitive and easy to use: simply connect to the app and command your robot from anywhere, at any time.
Reference : RG7455WH
Frequent questions
The robot app is exclusively for smartphones.
Our products are compatible with all operators and the majority of the boxes on the market.
You can connect your product to any WPA and WPA2 type Wi-Fi on the 2.4GHz frequency band.
If your Wi-Fi network is not visible on the product, it is possible that 2.4GHz Wi-Fi is not enabled on your box.
Most boxes allow you to activate it. Consult your operator’s FAQ to find out how to do this.
Warning:
Your product cannot connect to a 5GHz Wi-Fi.
Wi-Fi with a password containing special characters will not work as well as open Wi-Fi (not requiring a password).
If your network isn’t visible in the list of available networks, please move your device closer to the internet box.
If the network still isn’t visible, it may not be compatible with your device. In particular, 5GHz networks are not supported. Please consult the compatibility list.
In «Settings» on the right side of your home screen, you must choose the «WiFi settings» and «activate WiFi».
Then select your WiFi network and enter your password.
Here is the list of the most common problems and solutions by the frequency order.
- Pairing succeeded but the appliance isn’t connected: if you see in the app that your appliance isn’t connected, close and reopen the app.
If you still don’t see the appliance after this action,
— Explorer Serie 40 products: put the robot out of its docking station and press the button 3 seconds. If you want to make another association with another phone, you may have to press the button several times to make it blink in orange.
— Explorer Serie 60 products: restart the robot by using the switch next to the dust bin.
— Explorer Serie 80 products: restart the robot by using the switch below the robot. - Wi-Fi connection: check the Wi-Fi password and type carefully.
- Keep your smartphone close to the appliance and the modem until the end of the pairing process.
- Access Point Android: make sure that you keep the connection to the appliance if you see a confirmation message. This message can appear twice during the pairing process.
- Access Point iOS: after several attempts, restart your smartphone.
- Access Point iOS: during the connection to the appliance, a popup will appear to ask you to connect to the «SEB_ACCESS_POINT» network. Press «Join«.
- Access Point: when you activated the access point,
— Explorer Serie 40 products: does the LED flash orange + double beep?
— Explorer Serie 60 products: does the Wi-Fi light flash quickly + beep?
— Explorer Serie 80 products: is the Wi-Fi light flashing?If not, try again.
- Access Point Android: after several attempts, remove the network «SEB_AccessPoint» from your smartphone setting if you see it.
- Access Point Android: some smartphones have an option in the Wi-Fi settings to avoid the connection to a Wi-Fi which has no internet connection.
For the pairing, please deactivate this option so that the smartphone allows the connection to the appliance. This option is identified in Xiaomi smartphones such as Pocophone F1 and Redmi note 8.
- Internet connection: be sure that the appliance that you are about to pair does not need a proxy.
- Android: you must allow the geolocation.
- Internet connection: check that you select a 2,4 GHz network in your Wi-Fi setting, not 5 GHz to connect your appliance.
- Connection to the cloud: check if the automatic reconnection to your home Wi-Fi is correct.
- Connection to the cloud: activate the mobile data of your smartphone.
- After several attempts: restart the Wi-Fi modem.
- After several attempts: unplug, wait for 20 seconds, and re-plug the appliance.
If the problem is still present, reset the appliance (hard reset).
If you still encounter an error after several unsuccessful attempts:
Press the appliance’s «Home» button for 5 seconds and check that the Wi-Fi light is flashing.
If not, turn the appliance off and on again using the switch next to the dustbin.
If the error persists, it may be due to improper use of the phone:
Android phone:
During the connection process, the app will automatically connect you to the robot. It’s important to stay connected to this new network.
Depending on your phone, different pop-ups may appear during connection:
• If the pop-up tells you that you are going to change network because the one you are connected to does not have internet, refuse.
• If the pop-up asks you if you would like to stay connected to the network without internet, accept.
• If the pop-up tells you that the network does not have internet but does not suggest changing networks, don’t do anything.
iPhone:
When connecting to the appliance, a pop-up will appear and ask you to connect to the «SEB_ACCESS_POINT» network. Accept by clicking «Join».
If you fail this step several times, restart your phone and try again.
After typing in your password, you encounter an error connecting to the cloud.
• When connecting to the cloud, an internet connection is required to successfully pair the devices. To do so, you can activate your mobile data or automatically reconnect to your home network.
• Ensure that the date and time on your phone are correct. Any difference will prevent the connection.
After several unsuccessful attempts:
• Restart your Wi-Fi box.
• Turn the device off and on again using the switch next to the dustbin.
After multiple unsuccessful attempts, you can reset your device:
Press the «Home» and start buttons at the same time for 5 seconds. The start button will flash several times to confirm the activation.
Important: turn the device off and then on again using the switch next to the dustbin.
After typing in your password, you encounter an error related to connecting to the Wi-Fi network.
1. Check the Wi-Fi password and carefully re-enter it.
2. Keep your smartphone near the device and internet modem until the connection process is complete.
3. The device can’t connect to public networks such as those available in hotels.
4. Android phone: When connecting to the device, a pop-up may appear. During the connection process, the app will automatically connect you to the robot. It’s important to stay connected to this new network.
Depending on your phone, here are some examples of problems you may encounter:
• If the pop-up tells you that you are going to change network because the one you are connected to does not have internet, refuse.
• If the pop-up asks you if you would like to stay connected to the network without internet, accept.
• If the pop-up tells you that the network does not have internet but does not suggest changing networks, don’t do anything.
After several unsuccessful attempts:
• Restart your Wi-Fi box.
• Turn the device off and on again using the switch next to the dustbin.
Some Xiaomi phones may experience problems when connecting. An unusually high number of pop-ups may appear.
The phones affected are those with MIUI system (such as Redmi and Pocophone models).
In this case, please try the following steps:
• Settings > Applications > Manage applications > Rowenta Robots > Other permissions. On this page, accept the permission to «Change Wi-Fi connectivity».
• Settings > Wi-Fi > Additional settings > Wi-Fi Assistant. On this page, deactivate the available options.
You can go to the setting of your smartphone and check that your smartphone is connected to your home WiFi. Your home WiFi must have an internet connection.
Several possible reasons exist:
• You didn’t enter the correct email address for the account. Please verify.
• You didn’t enter the correct password. To reset, request a temporary password by email and then change the password in the app’s Menu.
This is not mandatory at all but a user preference.
This is a Gyro map, a non-permanent map that allows you to have a live visual tracking of your cleaning session. This map has a reporting purpose only and is not cuztomizable. A new map will be created for each new cleaning session.
The Gyro map quality may be impacted if the robot encounters too many obstacles while cleaning. Before running the robot vacuum cleaner, ensure to remove obstacles, power cords, clothing, or other potentially obstacles which might cause robot difficulties.
The Gyro map quality may also be impacted if the robot had difficulties to climb on a carpet, a door threshold, a chair leg…
The Gyro map has a maximum surface coverage of 19x19m (360m²), so please make sure to install your docking station accordingly.
Do not vacuum wet surfaces, any type of liquids, hot substances (embers, cigarettes), super fine substances (plaster, cement, ash, etc.), large sharp waste (glass), harmful products (solvents, abrasives, etc.), aggressive products (acids, cleaning products, etc.), inflammable and explosive products (oil or alcohol based).
Place the charging base station against a wall, on a flat surface and where the robot vacuum cleaner can easily find it.
This location must be free of any obstacles (including rugs). Leave at least 1,5 metre of space free to the left and the right, and 2 metres at the front of the base station. If the station is placed in a corner or difficult to find, the robot vacuum cleaner will not be able to reach it.
Place the base station’s power cable along the wall.
For more information, refer to the instructions in your user manual.
Leave the charging base station plugged in permanently (the automatic recharge function will not be available if the charging station is not activated).
Yes, your robot vacuum cleaner is equipped with drop sensors that detect stairs and gaps.
However, in some situations, the sensors are not as efficient. For example, curved staircase edges, rugs next to stairs, slippery surfaces and obstructions might affect the sensors’ performance.
Before running the robot vacuum cleaner ensure space has no obstacles, power cords, clothing, or other potentially dangerous objects which might cause the appliance breakdown or other accidents.
Yes, the robot can be charged on the charging station, even when the robot’s main power switch is turned off.
Check that the switch underneath the robot is correctly in the ‘ON’ position.
The robot vacuum cleaner has 3 cleaning modes:
• «Methodic» (to clean all the accessible areas)
• «Wall follow» (to clean along the walls and in the corners)
• «Spot» (to clean a localised area)
To choose the «Methodic» mode, press once the power button on the robot.
To choose the «Spot» mode, press twice the power button on the robot.
To choose the «Wall follow» mode, press thrice the power button on the robot.
You also can activate different cleaning modes in the mobile application.
To pause the cleaning session press the power button on the robot.
To resume the cleaning session press the power button once again.
To send the robot back to its docking station press the recharge button on the robot. The recharge button will be lit up in red.
When the robot is charging, the charging base’s light indicator flashes blue.
When the robot is fully charged, the indicator stops flashing and stays on blue.
Always keep the robot vacuum cleaner on the docking station, while you are not using it.
If you plan not to use the robot for a long time, fully charge and then take the battery out of the robot (make sure the robot is switched off when you take the battery out). Store them in a cool dry place. Recharge the battery every 3 months.
It’s not recommended to use the mop with water on sensitive floors such as parquets or carpets and rugs.
No, the water tank and the humidified mop have to be installed just before the cleaning and removed right after the cleaning.
Turn off your robot vacuum cleaner immediately.
Remove the dust box, filter and main brush.
Let them dry completely before reinstalling.
Empty the dust container into a bin after each use. Clean the dust compartment seals with a cloth.
It is recommended to clean the central brush once a week.
For more details, please refer to the User Manual.
It is recommended to clean the filters at least once a week.
For more details, please refer to the User Manual.
It is necessary to clean left, right and front wheels regularly to remove entangled hair and threads.
It is recommended to wipe sensors and charging terminals (of the robot and charging base) with a clean dry cloth once a week.
Turn off the robot before cleaning the sensors and charging terminals.
Do not use any cleaning products to clean the robot vacuum cleaner.
For some parts you can use the water, for the others you can use the dry cloth only. For more details, refer to the instruction manual.
It is recommended to replace the fine dust and foam filter every 6 months.
The side brushes should be replaced by new every 6 months.
Do not use your appliance. In order to avoid any danger, you must have them replaced by an approved vacuum repair company.
Do not use your appliance. To avoid any danger, do not touch the terminals. You must unplug the charging station and have it replaced by an approved vacuum repair company.
Check:
• If the dust container is full.
• The cleanliness of the filters.
• If there is an object or rubbish which may be obstructing the suction hole underneath the robot.
Several possible reasons exist:
• If the robot did not start from its docking station, it will not return to it. In this case, the robot will return to its starting point.
• If the robot vacuumed in Spot mode, the robot will return to its starting point.
• If the robot is lifted up and put back down on the floor, it will try to relocate itself. If it can’t, it will return to its starting point.
Check the following:
• The charging station must not be installed on a rug.
• The charging station must not be exposed to sunlight or near a heat source.
• The free space to the side and the front of the charging station adheres to the instructions in the user manual.
• The plug is correctly connected to the charging station.
• The charger cable is connected to the power supply.
• There are no obstructing objects around the charging base.
• There are no objects near the charging station terminals.
• The charging station is activated (LED indicator is green).
If after checking these elements, the robot still cannot find the base station, contact an approved vacuum repair company.
You can perform the following actions:
• Turn off and then turn on the main power switch.
• Unplug the cable and plug it again into the charging station.
• Make sure that the charging terminals and the sensor windows are not clogged up, then wipe the main body and the charging station with a dry cloth. Do not forget to switch off the main power switch and to turn off the robot before drying carefully.
• Check if there is no obstacle such as a reflective object, a chair, etc. near the charging station.
If after these steps, the automatic charging still does not work well, contact an approved vacuum repair company.
This is a regular case. The vacuum cleaner can remain connected to the docking station without any risk.
Caution: use only designated charger.
Check the following:
• If the switch underneath the robot is correctly in the ‘ON’ position.
• If the display is lit up. If not, charge up the robot on the base station.
Check the following:
• There are no obstucting objects under the wheels.
• The robot is not blocked due to differences in the floor level.
• There is no error message displayed. (see the troubleshooting and error codes section in your user manual)
You can perform the following actions:
• Make sure there are no obstructing objects within 10 cm of the staircases/gaps.
• Wipe up the sensor windows with a dry cloth.
If after these steps, the problem persists, please contact an approved vacuum repair company.
Make sure that the brush is not obstructed. Clean the brush from entangled hair and threads.
If the brush is damaged, replace it with a new one.
Flashing light and sound signal indicates an error.
For more details about the error description and solution, refer to User Manual.
You can perform the following actions:
• Check if the intake channel is not obstructed.
• Check if the dust bin is well fitted.
• Empty the dust bin if it is full.
• Remove the central brush and clean it.
• Check if the filter is not saturated.
If after these steps, the problem persists, please contact an approved vacuum repair company.
The power-brush safety feature is activated when the robot identifies a risk.
Two situations may occur:
• The power-brush gets stuck: the robot attempts to free it and stops the vacuuming and the power-brush.
• The robot will try to free the brush: if it can’t, it will turn off and you will have to clear it manually.
If the power-brush gets stuck in thick carpeting due to its long and/or thick fibers, or the robot has vacuumed the carpet for a long time, the power-brush will stop turning and the robot will continue vacuuming without it.
The robot may experience certain problems represented by error codes.
For more details about the error codes description and solution, refer to User Manual.
The filter may be inserted incorrectly. Try positioning the filter correctly into the slot on its holder.
After following the instructions in the user manual for starting the appliance, make sure that your electrical socket is working by plugging another appliance. If it still does not work, do not try to dismantle or repair the appliance yourself, instead, take it to an approved repair centre
The robot can be reset by pressing both the home button and the start button during 5 seconds. A beep is heard and the start button blinks when the procedure is successful.
This is normal, because you are connected to the product, which has no internet connection.
For certain smartphones, after it is connected to the product Wi-Fi, you may see a message asking you to confirm that you want to stay on this network which has no internet connection. You have to answer that you want to connect to this network anyway for the association to be successful.
First, check if the robot is connected. If the Wi-Fi LED is blinking, the robot is trying to connect to the Wi-Fi network.
The LED is off: The robot is not connected. First, check your internet box.
The LED is blinking: The robot is trying to connect. Wait a few moments.
If the robot is in this state for several minutes, restart the robot by putting it off its base and using the switch located near the dust bin.
The LED is lit and stable: The robot is connected.
In this case, restart the robot by putting it off its base and using the switch located near the dust bin. If this does not work, use the reset procedure.
Restart the robot by using the switch next to the dustbin.
If the recharge indicator (5) blinks blue 3 times and then, after a beep, starts blinking red, change the battery or take your robot vacuum cleaner to an approved service centre.
No, the appliance is designed for indoor use only.
Yes, the robot vacuum cleaner’s sensors do not require the light to process the cleaning session.
The robot vacuum cleaner is efficient on the hard floor surfaces, including tile, parquet, laminate, vinyl, and carpets not thicker than 1,5cm.
Yes, it is recommended to use the robot vacuum cleaner to maintain the cleanliness, but there are still surfaces where the robot does not perform as efficient as non-robotic vacuum cleaners.
Yes, you can schedule a single cleaning session or set up a daily cleaning function through the mobile application.
The robot is limited to one program per day in order to ensure optimum cleaning of all accessible rooms.
Yes. The robot will switch to sleep mode when it is fully recharged.
Yes, the robot will automatically return to the charging base when the battery is low during cleaning.
Once charging is complete, the vacuum cleaner will restart the cleaning process.
This is because the robot didn’t start from its docking station: since the robot returns to its starting point, it will go back to where it began vacuuming in Spot mode.
Your appliance contains valuable materials which can be recovered or recycled. Leave it at a local civic waste collection point.
Please go to the “Accessories” section of the website to easily find whatever you need for your product.
Find more detailed information in the Guarantee section of this website.
If you believe that one part is missing, please call Consumer Services Center and we will help you find a suitable solution.
The robot vacuum cleaner has 3 power modes: Silent, Normal and Boost.
You also can activate different power modes in the mobile application.
Yes, the robot sensors allow identifying a rug surface, and the robot automatically switches to the Boost mode.
It will take 4-5 hours to charge an empty battery.
The robot can run up to 90 min before its battery is low.
You can share your robot by having each person download the Rowenta robot app and follow the connection instructions.
In order for your smartphone to detect your Wi-Fi around you, the application needs the location permission as required by Google.
If you don’t allow this permission, your smartphone won’t be able to find your product, and not be able to continue the pairing.
This information will not be used or stored.
If you want to sell your robot, think about deleting your data:
• Press the «Power» and «Home» buttons for 20 seconds.
• Open the Robots app.
• Click on settings.
• Click on the name of your robot and «Delete the product».
-
Warranty
View the product warranty conditions
-
Contact
Our advisors are at your service.
12 13 1411
RU Откройте емкость для
воды на насадке для
влажной уборки и
залейте в нее 110 мл.
PL Otwórz pojemnik
na wodę podstawy
mopa i napełnij go 110
ml wody.
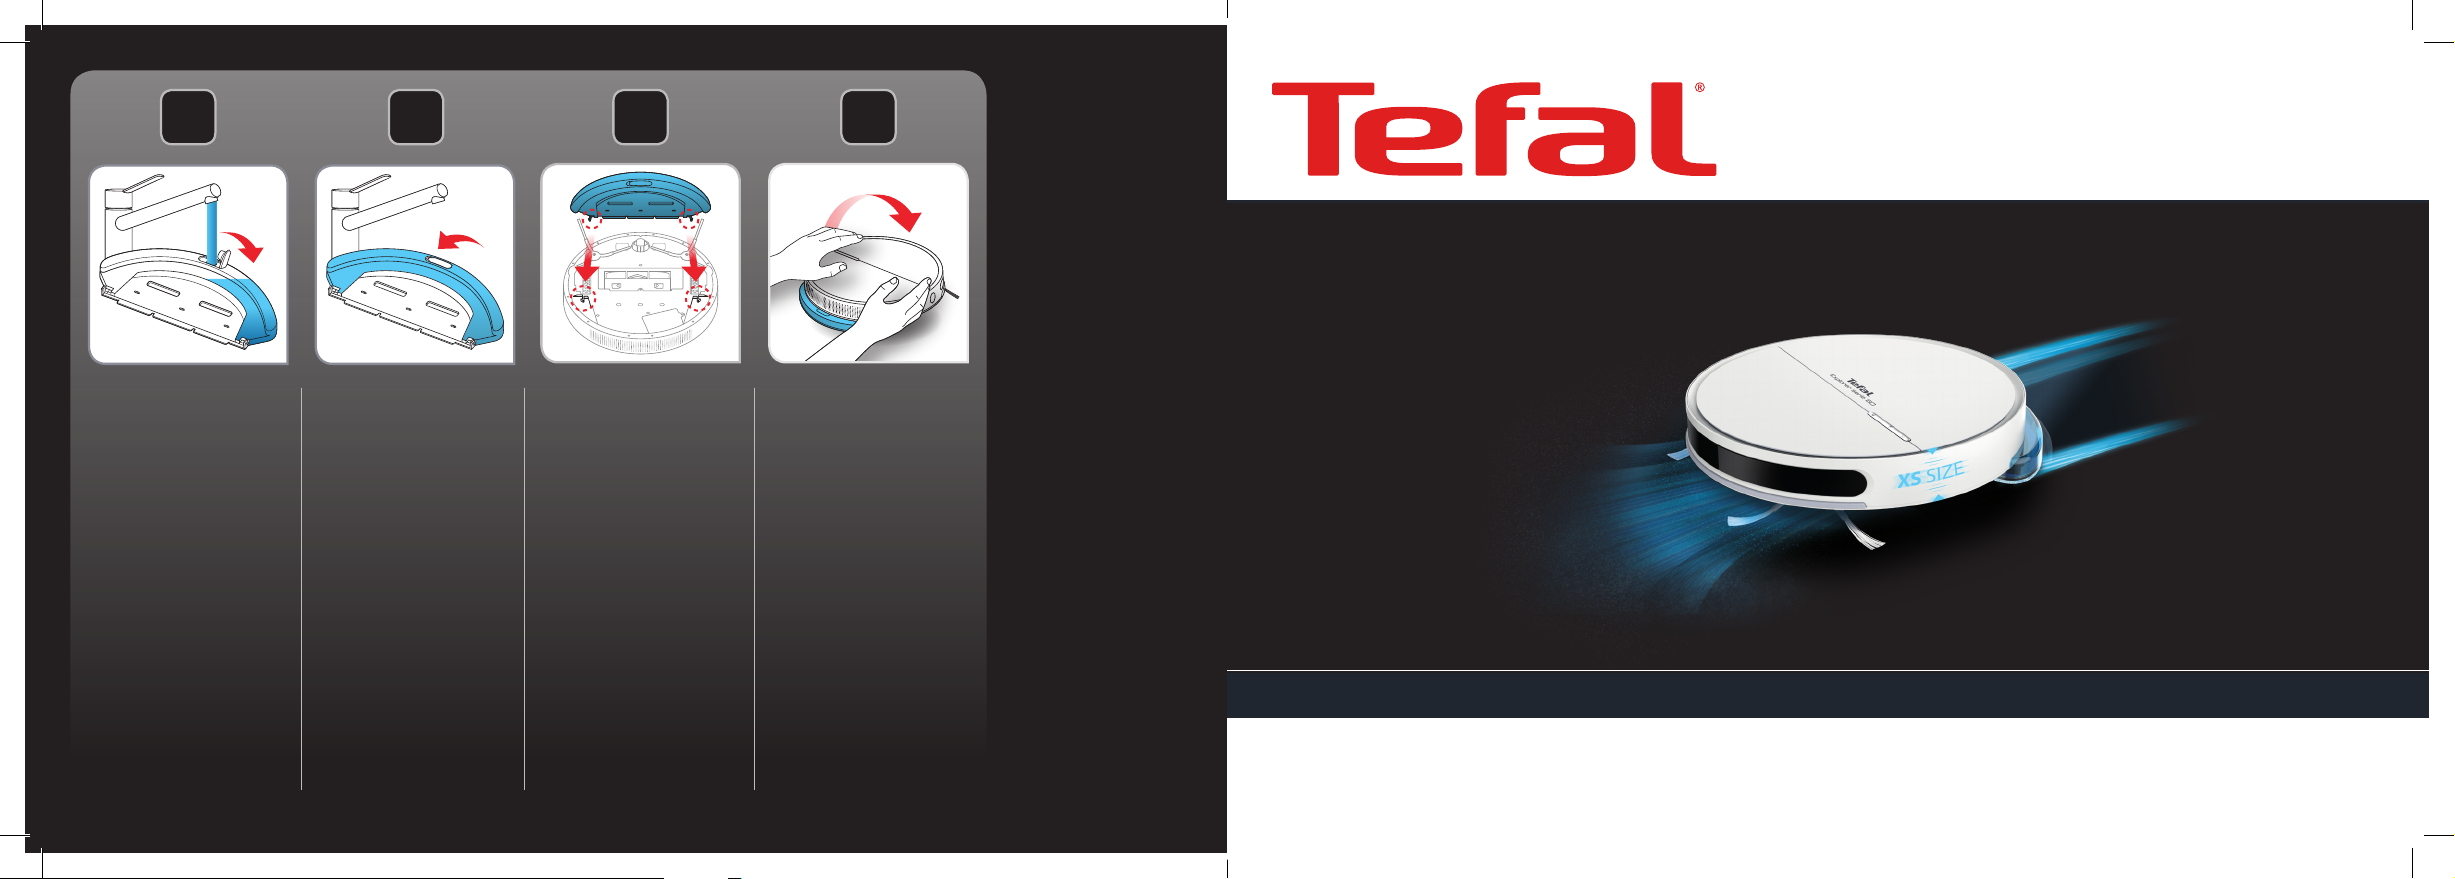
EN Open the water tank of
the mop support and ll
it with 110ml of water.
RU Закройте емкость.
PL Zamknij zbiornik
na wodę.
EN Close the water tank.
RU Закрепите насадку для
влажной уборки на
пылесосе с помощью
двух специальных
отверстий.
PL Przymocuj podstawę
mopa do dwóch
otworów do tego
służących.
EN Clip the mop support in
the two holes provided
for this purpose.
RU Переверните робот-
пылесос.
PL Obróć robot.
EN Turn back your robot.
EXPLORER SERIE 60 QUICK START GUIDE
2220003275/02 — 43/19
www.tefal.com
1 3 5
2
4 87
6
109
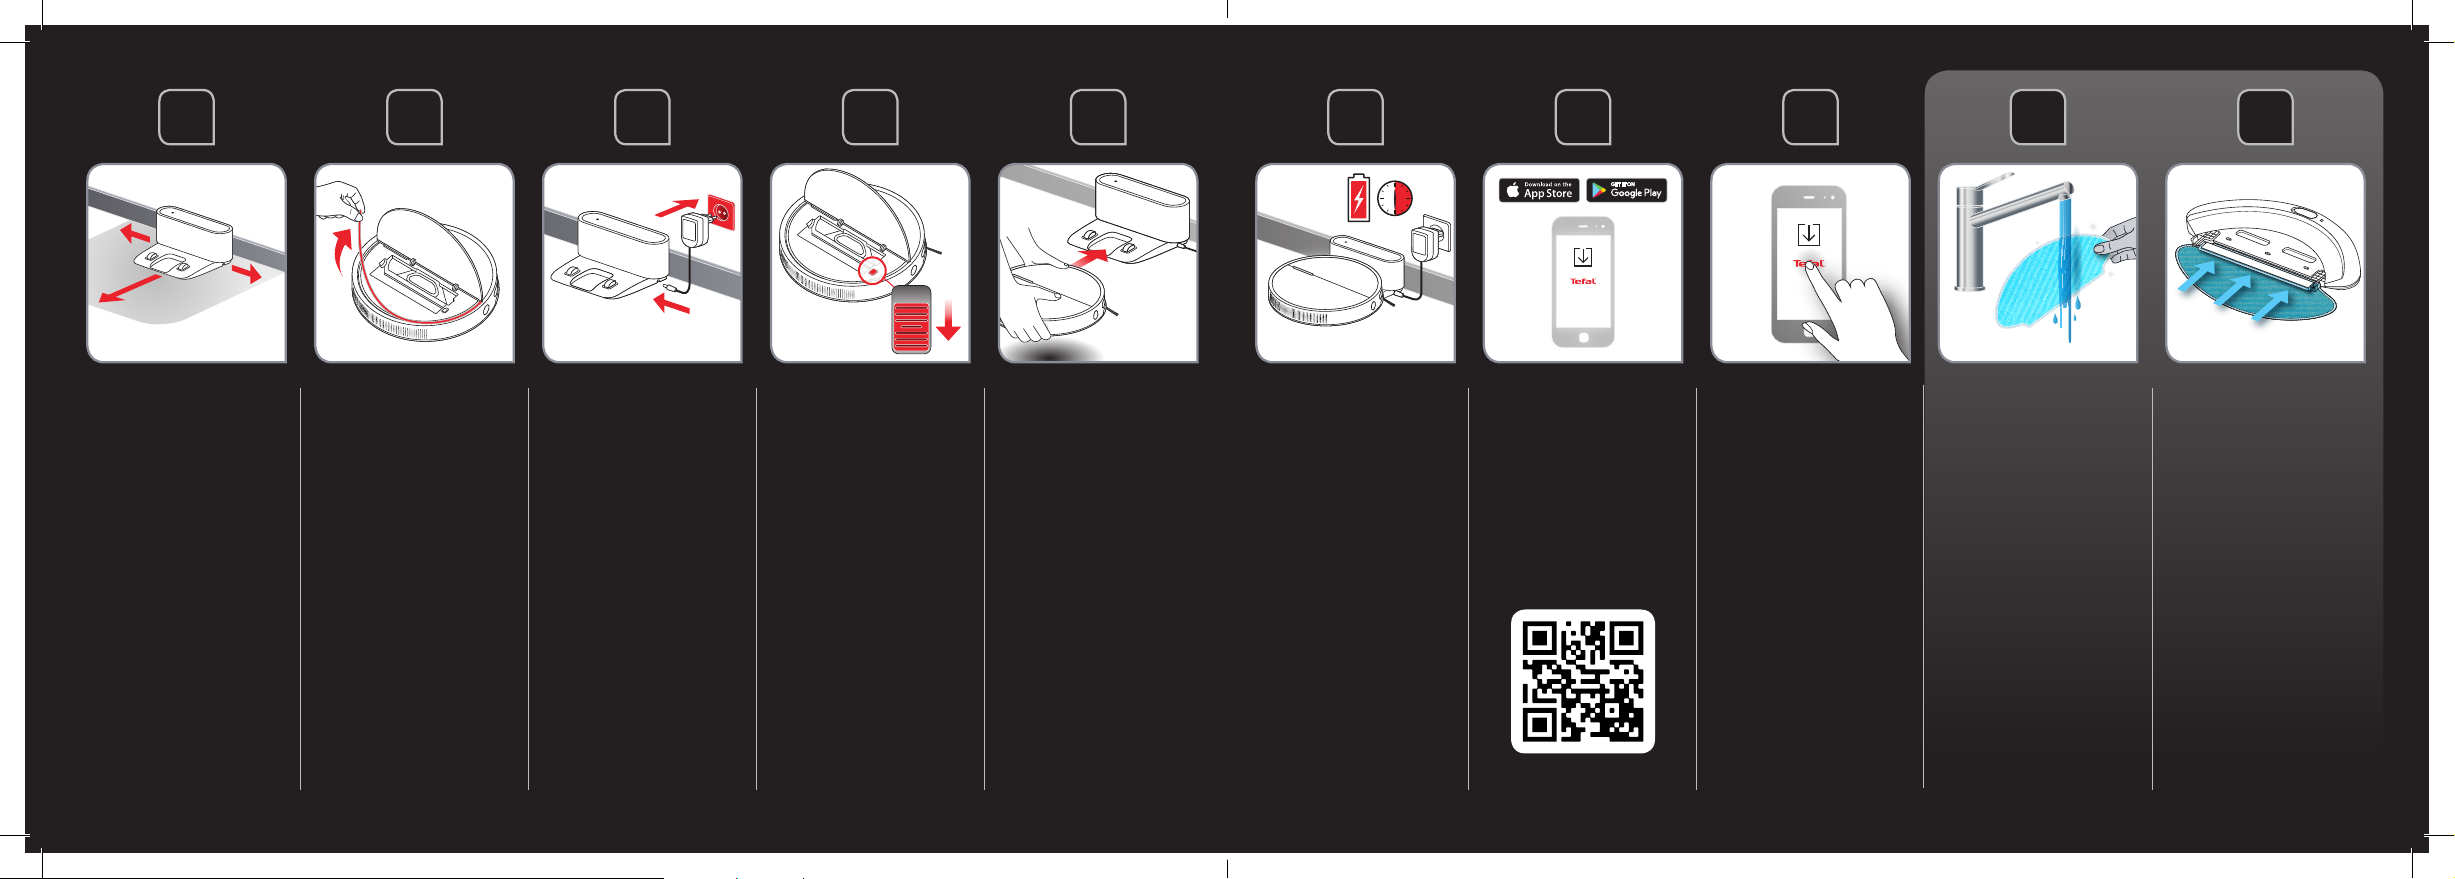
RU Выберите место для
зарядной станции.
PL Wybierz położenie
stacji dokującej.
EN Choose the location
of your docking station.
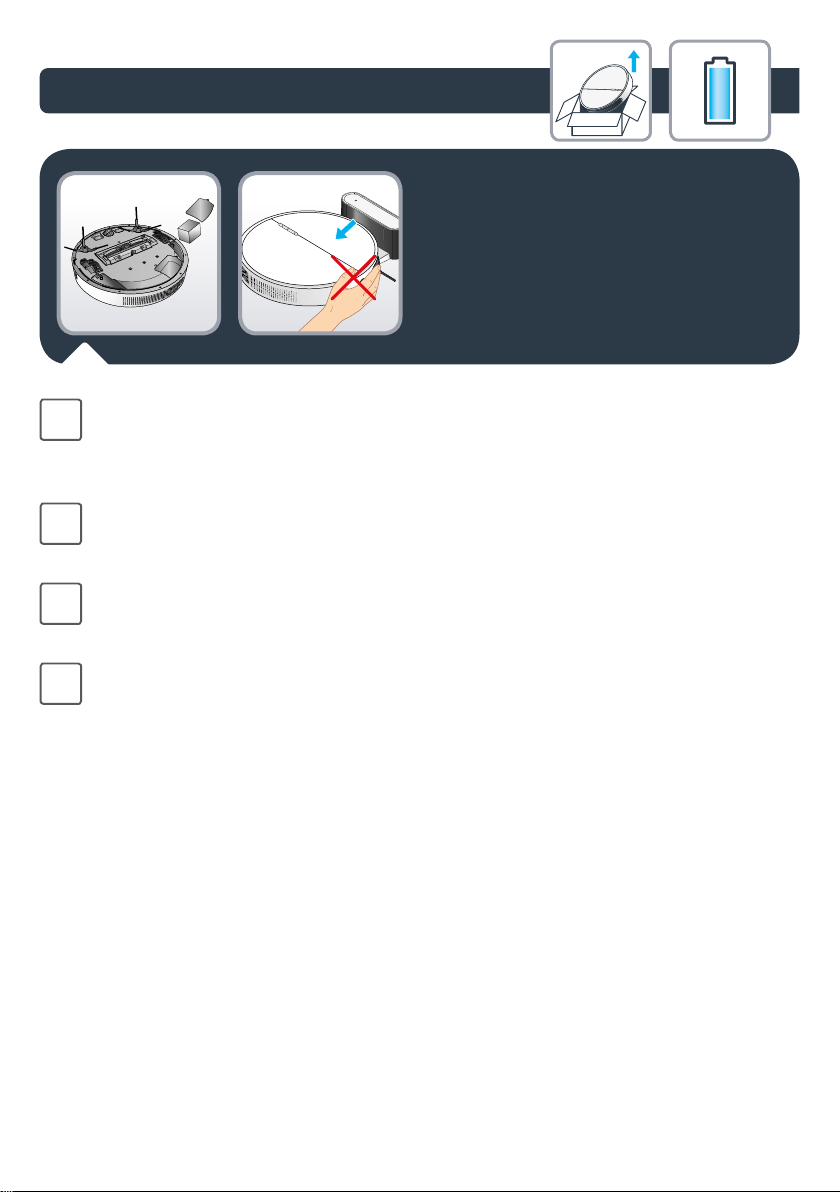
RU Снимите защитную
ленту с бампера
пылесоса.
PL Zdejmij taśmę
ochronną ze zderzaka.
EN Remove the protective
strip from the bumper.
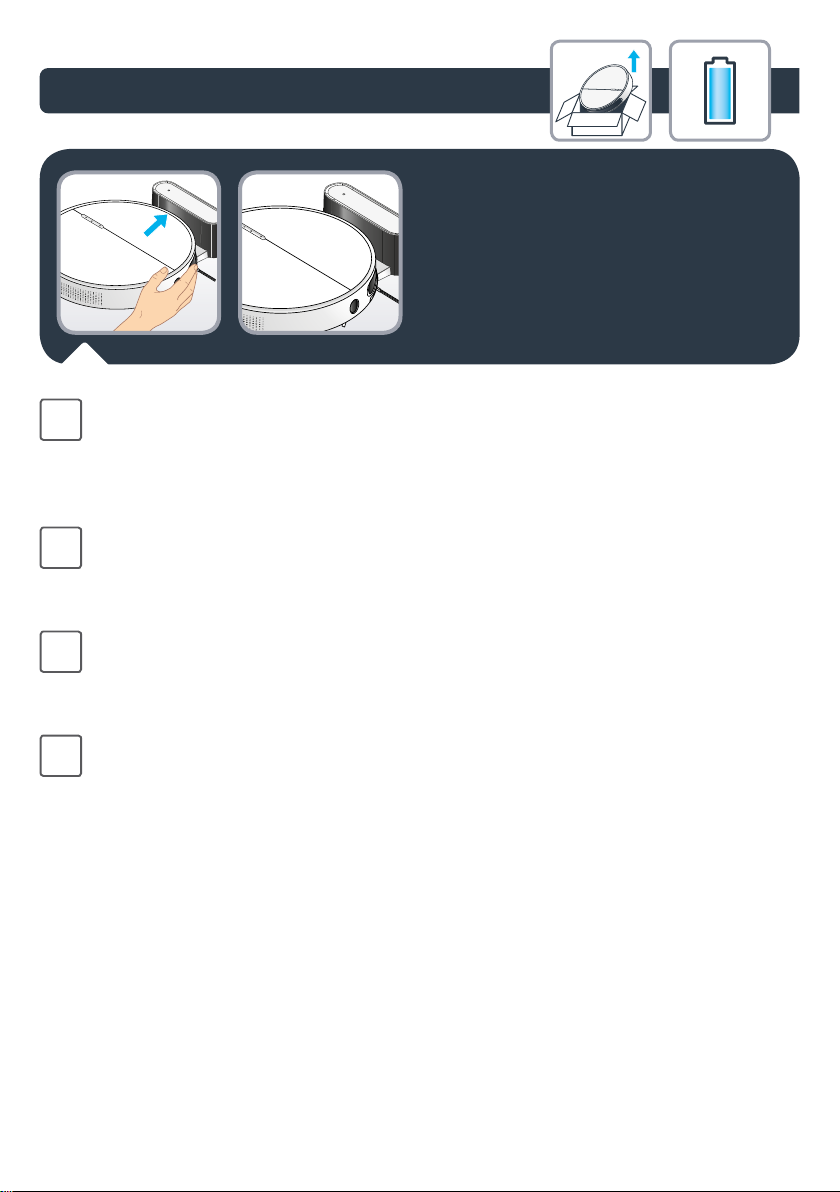
RU Подключите
зарядную станцию к
электросети.
PL Podłącz stację
dokującą.
EN Plug your docking
station.
RU Установите
выключатель
пылесоса во
включенное
положение (On).
PL Przesunąć przełącznik
on/o w pozycję „on”.
EN Toggle the on/o
switch to “on”.
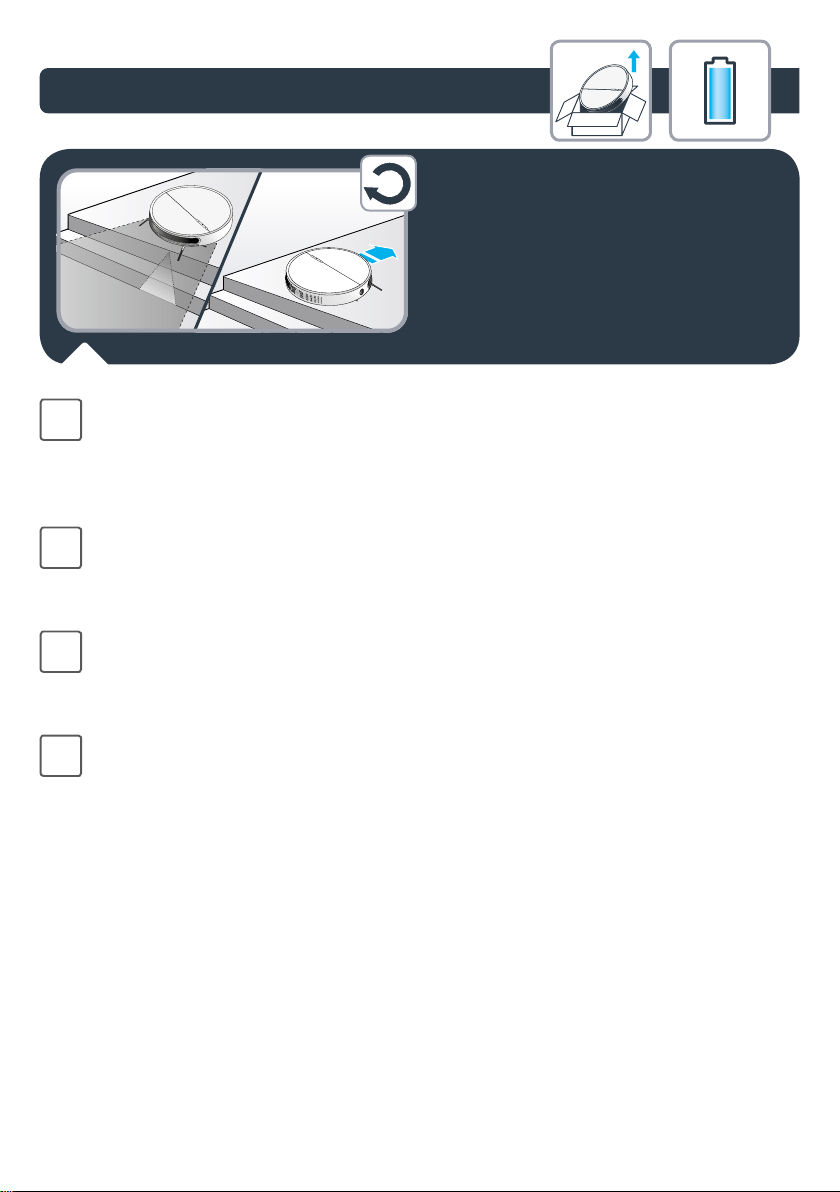
RU Поместите пылесос на
зарядную станцию.
PL Ustaw robot na stacji
dokującej.
EN Position your robot
on its docking station.
RU Дождитесь полной
зарядки пылесоса (6
часов).
PL Odczekaj 6 godzin, by
robot całkowicie się
naładował.
EN Wait 6 hours for the
robot to be fully
charged.
RU Загрузите бесплатное
приложение
(используйте QR-код
ниже).
PL Pobierz bezpłatną
aplikację (zob. kod QR).
EN Download the free app
(cf. QR code).
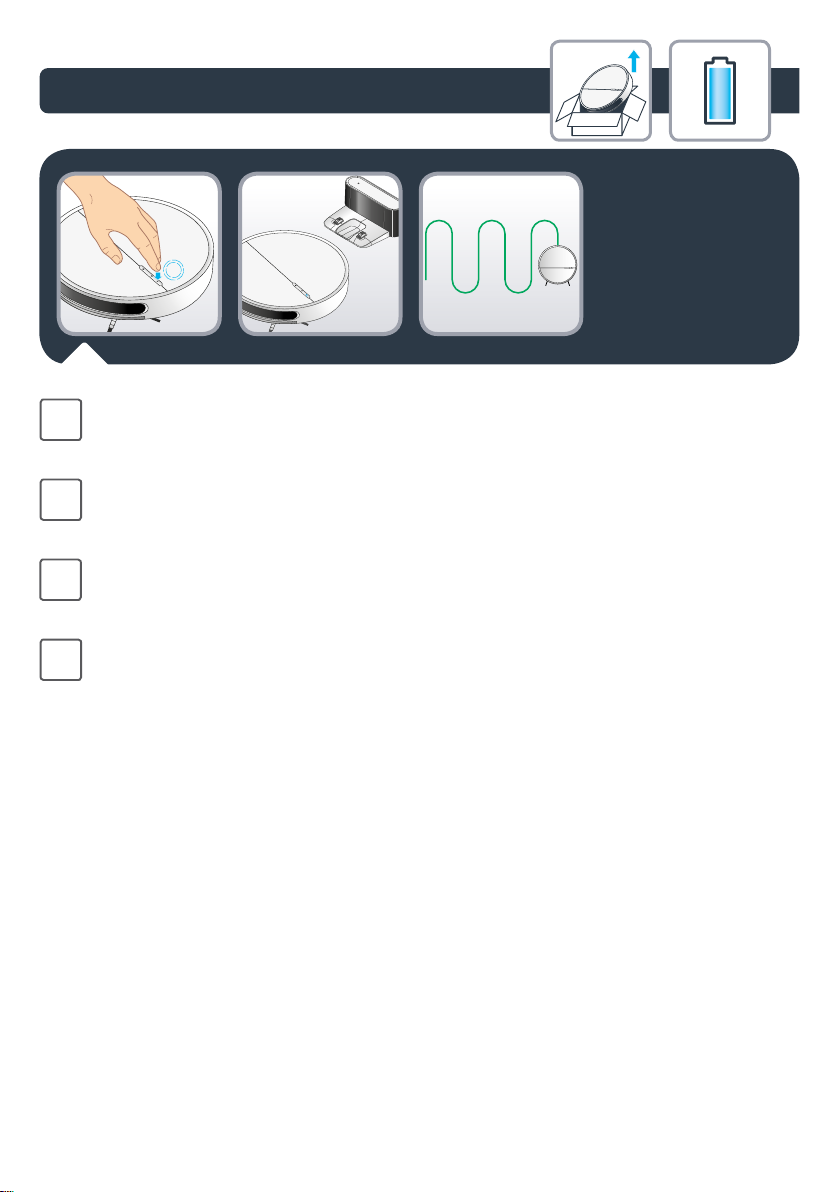
RU Пользуйтесь
роботом-пылесосом
в свое удовольствие
в соответствии с
инструкциями в
приложении.
PL Aby jak najlepiej
korzystać z robota,
postępuj po prostu
zgodnie z instrukcjami
w aplikacji!
EN To enjoy your robot,
simply just follow the
instructions in the app!
RU Намочите
микроволоконную
салфетку водой перед
использованием.
PL Namocz mop wodą
przed użyciem.
EN Moisten the mop with
water before use.
RU Прикрепите
микроволоконную
салфетку на насадку
для влажной уборки.
PL Przyczep mop do
pojemnika z wodą.
EN Attach the mop to the
water tank.
RU Руководство пользователя
PL Instrukcja obsługi
EN User’s guide
KO 사용설명서
1.
2.
3.
Explorer Serie 60
4.
5.

2

RU Перед первым использованием внимательно прочитайте инструкцию «Меры безопасности и правила
использования». / PL Przed pierwszym użyciem proszę uważnie przeczytać broszurę „Zalecenia dotyczące
bezpieczeństwa i użytkowania” / EN Please read carefully the “Safety and use instructions” booklet before first use /
KO 제품을 처음 사용하기 전에 본 사용설명서를 주의 깊게 읽으십시오
RU Для получения дополнительной информации / PL Więcej informacji można znaleźć / EN For more information
/ KO 제품정보
www.tefal.com
3
456


stool
books
bowl
liquid
bag
obstructions
on staircases.
ex. shoes
RU На коврах робот может столкнуться с определенными трудностями: бахрома, большая толщина, длинный ворс, малый вес (например, коврики для ванной) / PL Twój robot może
napotkać trudności na dywanach z frędzelkami, zbyt grubych, z długim włosiem, zbyt le (np. dywaniki łazienkowe) / EN Your robot may encounter some difficulties on carpets: with fringes, too
thick, with long piles, too light (ex: bathroom carpet) / KO 로봇 청소기는 두꺼운 술 장식이나 너무 가볍고 긴 털 때문에 사용이 잘 안될 수 있습니다.(예: 욕실 카펫)
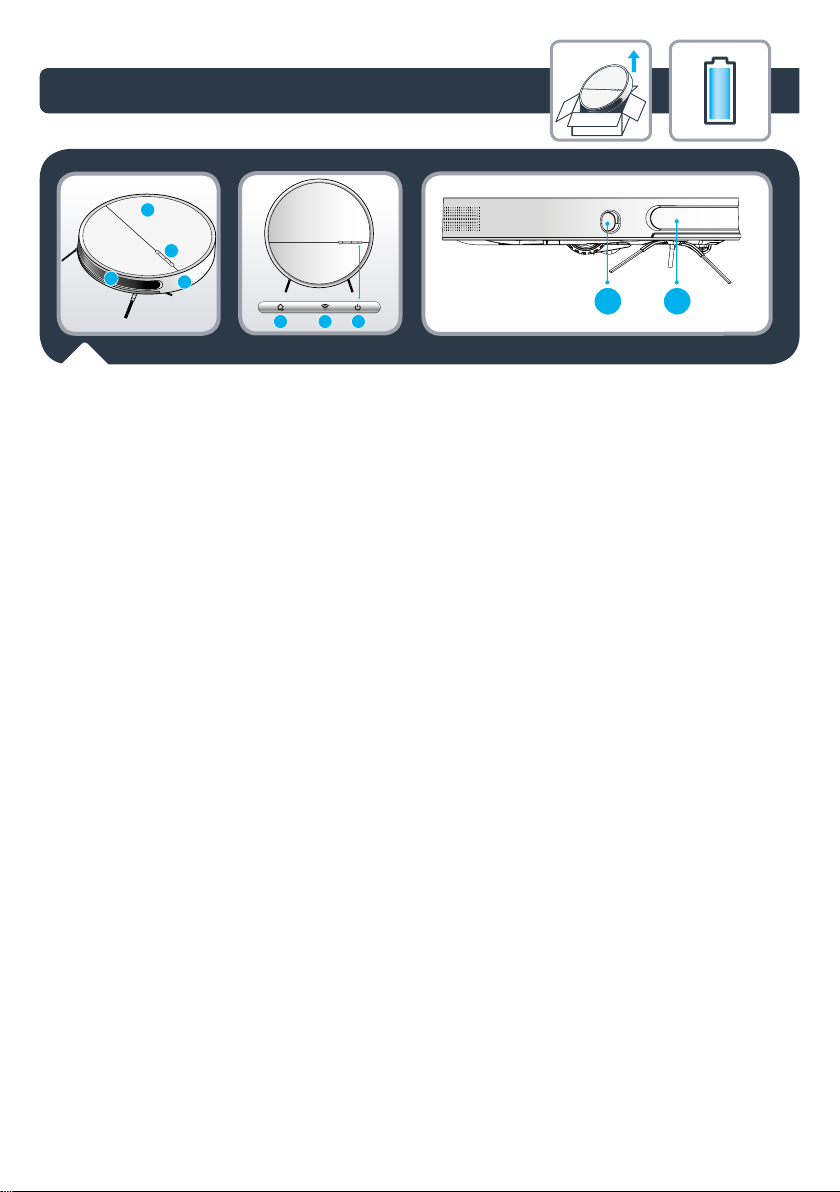
1.
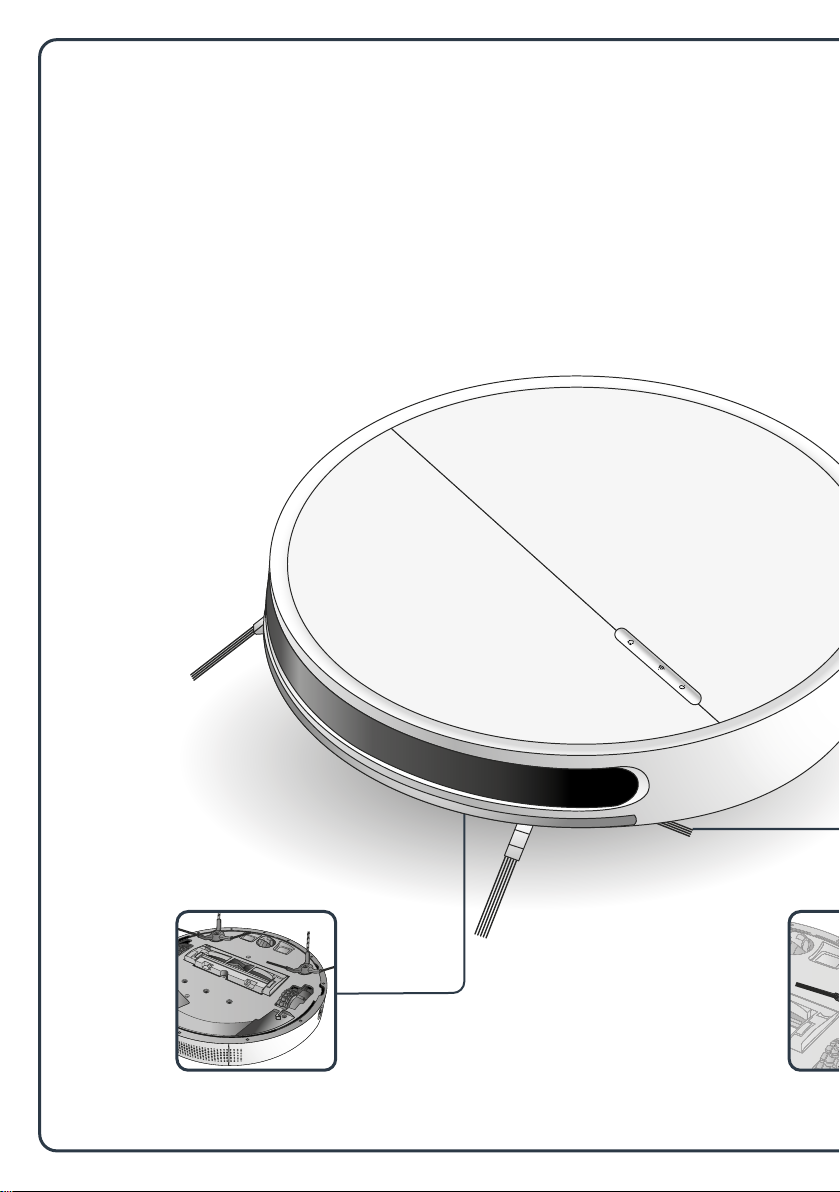
RU :
1. Откидывающаяся
крышка
2. Стекло
3. Кнопка управления
4. Передний бампер
5. Кнопка отправки на
зарядку
6. Индикатор Wi-Fi
7. Кнопка Старт/Пауза
8. Датчик стен TOF
9. Инфракрасный датчик и
датчик подзарядки
PL :
1. Pokrywa
2. Przezroczyste okno
3. Pokrętło sterujące
4. Przedni zderzak
5. Przycisk ładowania
6. Lampka wskazująca WIFI
7. Przycisk Start/Pauza
8. Czujnik ścian TOF
9. Czujnik na podczerwień i
czujnik doładowania
EN :
1. Flip cover
2. Transparent window
3. Control button
4. Front bumper
5. Recharge button
6. WIFI indicator light
7. Start / Pause button
8. TOF wall sensor
9. Infrared sensor &
recharge sensor
KO :
1. 플립 커버
2. 투명창
3. 제어 버튼
4. 앞 범퍼
5. 충전 버튼
6. WIFI 표시등
7. 시작/일시중지 버튼
8. TOF 벽 센서
9. 적외선 센서와 충전 센서
7
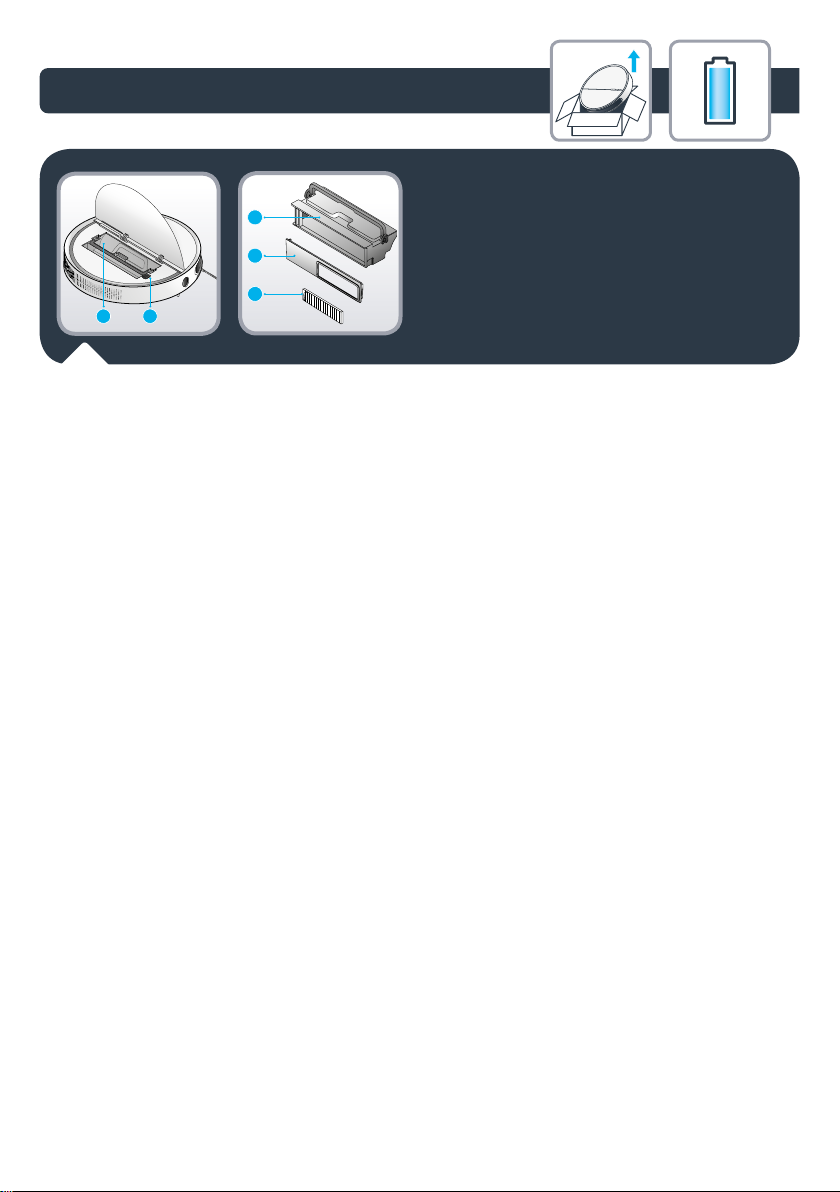
1.
RU :
1. Мусоросборник
2. Выключатель
3. Контейнер для мусора
4. Крышка контейнера для
мусора
5. Сетчатый фильтр
PL :
1. Pojemnik na kurz
2. Przełącznik Włączone/
Wyłączone
3. Pojemnik na kurz
4. Pokrywa ;pojemnika na
kurz
5. Wkład ltra
EN :
1. Dust box
2. ON OFF button
3. Dust bin
4. Dust box cover
5. Filter screen
KO :
1. 먼지함
2. 전원 버튼
3. 먼지통
4. 먼지함 커버
5. 필터 화면
8
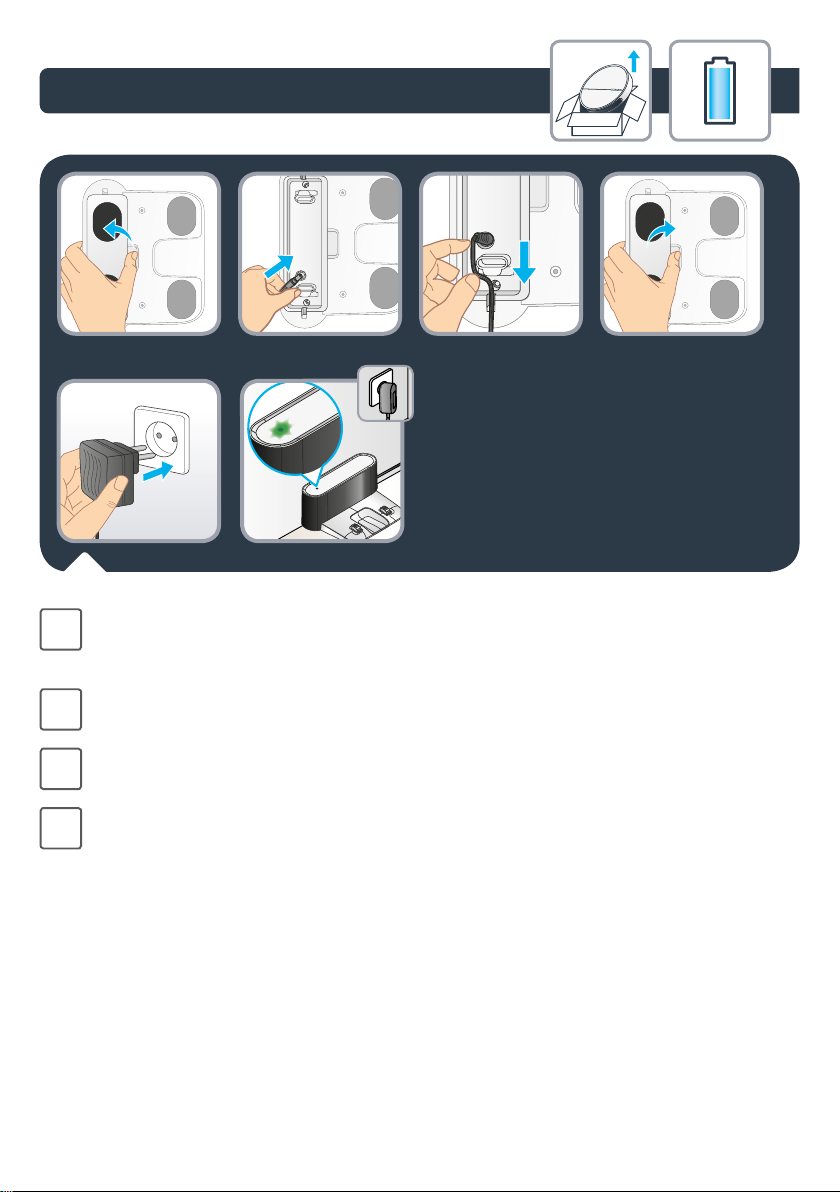
1.
Подключите блок питания к зарядной станции и сети питания. Разместите шнур
RU
блока питания таким образом, чтобы пылесос не запутался в нем во время
работы.
Podłączyć zasil;acz do stacji ładującej i sieci. Upewnić się, że przewód zasilacza nie
PL
zaplątał się podczas działania.
Connect the power adapter to the charging dock and power supply. Be sure to arrange
EN
the adapter cable, so that the vacuum cleaner will not be entangled during operation
전원 어댑터를 충전 도크 및 전원 공급 장치에 연결하십시오. 작동 중에 진공 청소기가
KO
걸리지 않도록 어댑터 케이블을 정돈하십시오.
9
1.
Устанавливая зарядную станцию, убедитесь, что с каждой стороны пустое
RU
пространство составляет 1,5 м и 2 м перед ней. Не устанавливайте зарядную
станцию рядом с лестницей.
Убедитесь, что кабель плотно вставлен в соответствующий разъем.
Зарядная станция должна быть размещена на твердой поверхности. Не
размещайте зарядную станцию на ковровых покрытиях.
Aby ustawić stację dokującą, upewnić się, że z każdej strony jest pusty obszar 1,5 m
PL
oraz 2 m z przodu. Nie instalować stacji dokującej w pobliżu schodów. Przewód musi
być napięty. Zawsze umieszczać stację dokującą na twardej podłodze. Nie instalować
stacji dokującej na dywanie.
To place the docking station, make sure there is an empty area of 1.5m on each side
EN
and 2m in front of the docking station. Do not install the docking station near stairs.
The cable must be tight. Always place the docking station on hard oor. Donot place
the docking station on carpet.
충전대 설치하는 곳은 양옆 1.5미터와 충전대 앞 2미터가 비어 있도록 하십시오.
KO
충전대를 계단 근처에 설치하지 마십시오. 전선은 늘어지지 말아야 합니다. 충전대는
단단한 바닥에 설치하십시오. 충전대를 카펫 위에 놓지 마십시오.
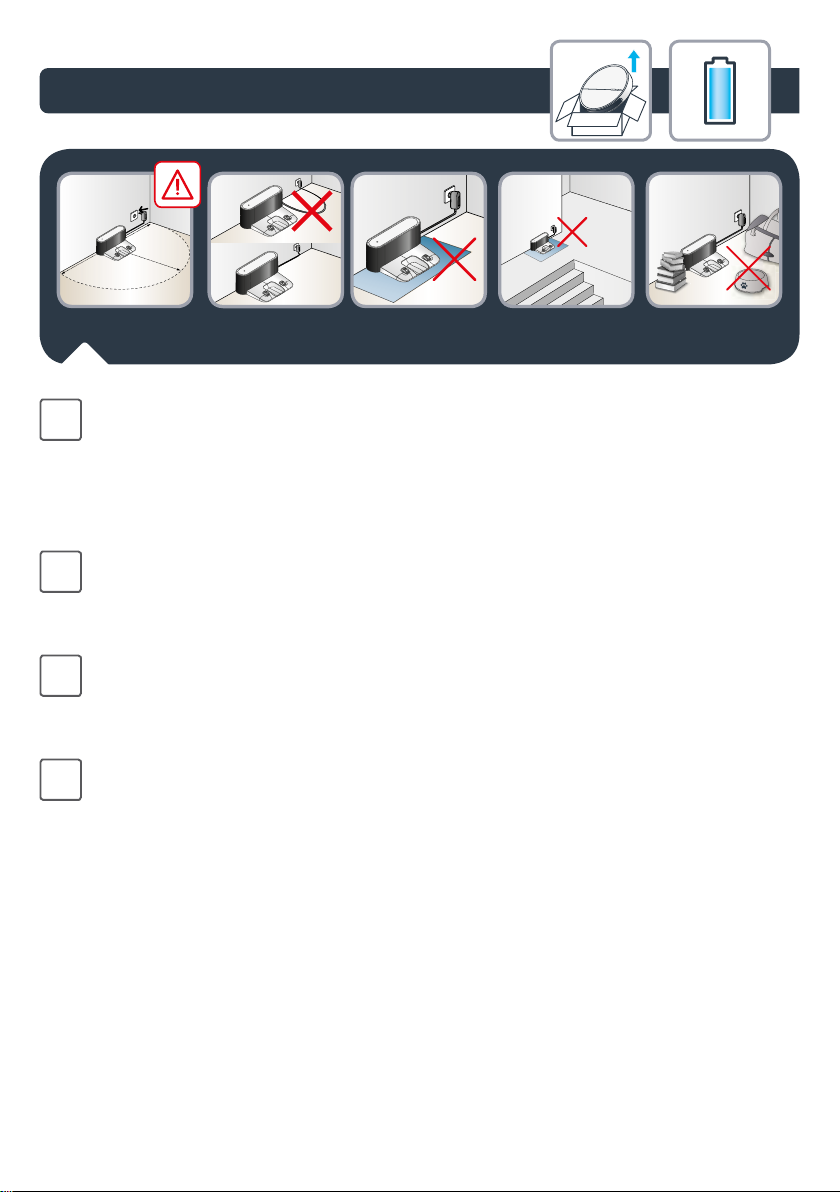
10
1.
Если пылесос не предполагается использовать длительное время, полностью
RU
зарядите аккумулятор, извлеките его и храните в сухом прохладном месте.
Удаление зарядной станции во время работы прибора повлияет на его
подзарядку.
Jeśli odkurzacz nie będzie używany przez dłuższy czas, naładować całkowicie baterie,
PL
wyjąć je i przechowywać w chłodnym i suchym pomieszczeniu. Gdy produkt działa,
wyjęcie stacji dokującej może wpłynąć na ładowanie urządzenia.
When not using the vacuum cleaner for a long time, please fully charge the battery,
EN
then remove it and store it in a cool dry place. When the product is working, removal
of the docking station will aect the recharging of the machine.
진공청소기를 장시간 사용하지 않을 때는 배터리를 완전히 충전한 후 분리하여
KO
서늘하고 건조한 곳에 보관하십시오. 제품이 작동 중일 때 도킹 스테이션을 제거하면
충전에 영향을 미칩니다.
11
1.
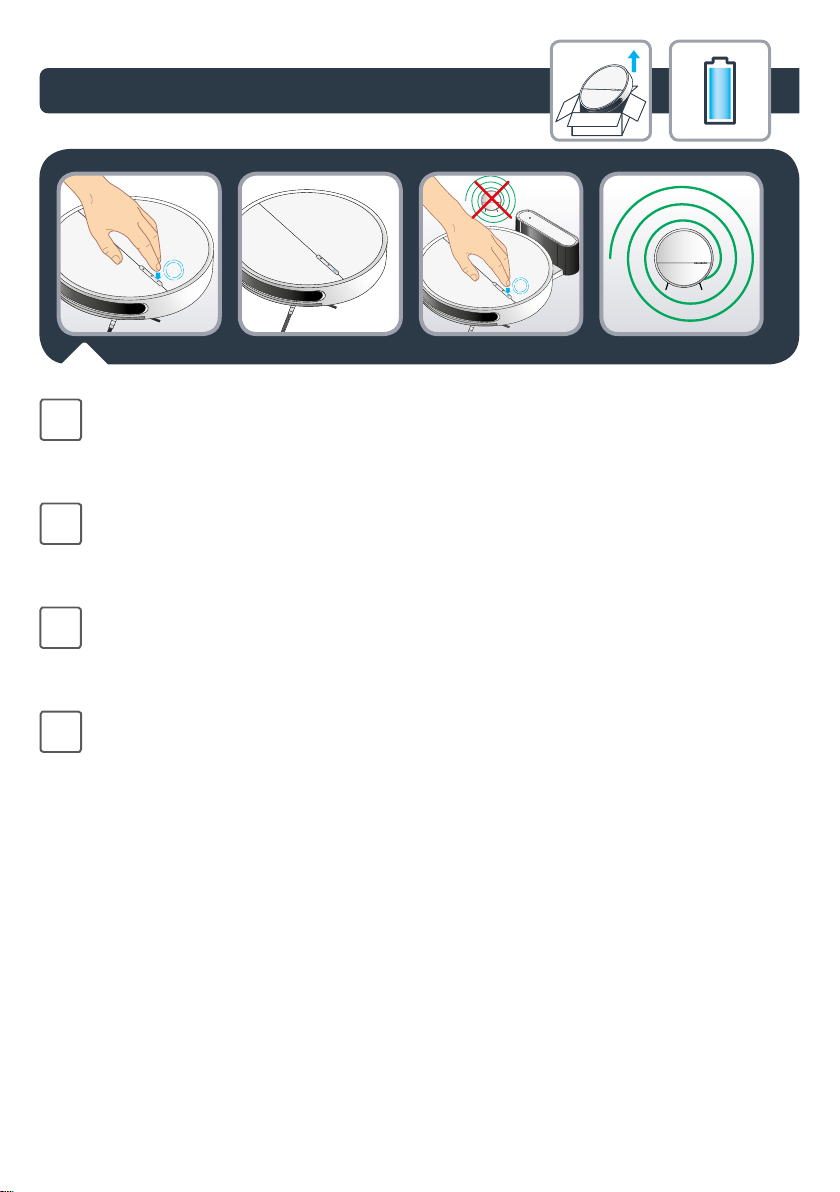
Чтобы зарядить робот, нажмите и удерживайте кнопку включения в течение
RU
3 секунд. Поместите робот на зарядную станцию так, чтобы его контактные
пластины касались клемм на зарядной станции.
Возвращайте робот на зарядную станцию каждый раз после завершения
использования.
Aby ładować robota, ustawić robot na stacji dokującej: płyty ładujące na robocie
PL
muszą dotykać płyt na stacji. Podczas ładowania robota, światełko ładowania miga
na niebiesko; po całkowitym naładowaniu robota, światełko świeci światłem stałym
na niebiesko.
To charge the robot, place the robot on the docking station: the charging plates on
EN
the robot must touch those of the docking station. When the robot is being charged,
the machine’s recharge light ashes in blue; when the robot is fully charged, it will
fully set in blue.
로봇을 충전하려면 로봇을 도킹 스테이션에 올려 놓습니다. 이 때, 로봇과 도킹
KO
스테이션의 충전부에 서로 닿아야 합니다. 로봇이 충전되기 시작하면 충전등이
파란색으로 깜박이고, 완전히 충전되면 불빛이 파란색으로 고정됩니다.
12
1.
Робот оснащен датчиками падения для распознавания лестниц и обрывов. Чтобы
RU
робот правильно распознавал неровности уровня пола, убедитесь, что на полу
рядом с лестницами, ступенями или обрывами отсутствуют какие-либо предметы
(сумки, обувь и т. д.). Лестницы, ступени и обрывы корректно распознаются
датчиками на расстоянии не менее 10 см.
Robot jest wyposażony w czujniki upadku, by wykrywać schody i szczeliny. Po
PL
wykryciu schodów lub szczeliny, robot zmieni kierunek. Aby poprawnie wykryć
różnicę poziomu podłogi, upewnić się, że nie ma na niej żadnych przedmiotów (toreb,
butów…) w pobliżu szczelin, schodów lub na stopniach schodów.
The robot has drop sensors to detect stairs and gaps. The robot will change direction
EN
when detecting them. In order to correctly detect the oor level dierence, make sure
there are no objects (bags, shoes…) on the oor next to gaps, stairs or on the stairs’
steps.
로봇 청소기에는 계단과 추락 공간까지의 간격을 측정하는 낙하방지 센서가 있습니다.
KO
로봇청소기는 이를 감지하면 방향을 바꿉니다. 바닥 높낮이를 제대로 감지하려면,
턱이나 계단 옆 또는 계단 위에 물체(가방, 구두 등)을 놓지 않도록 하십시오.
13
1.
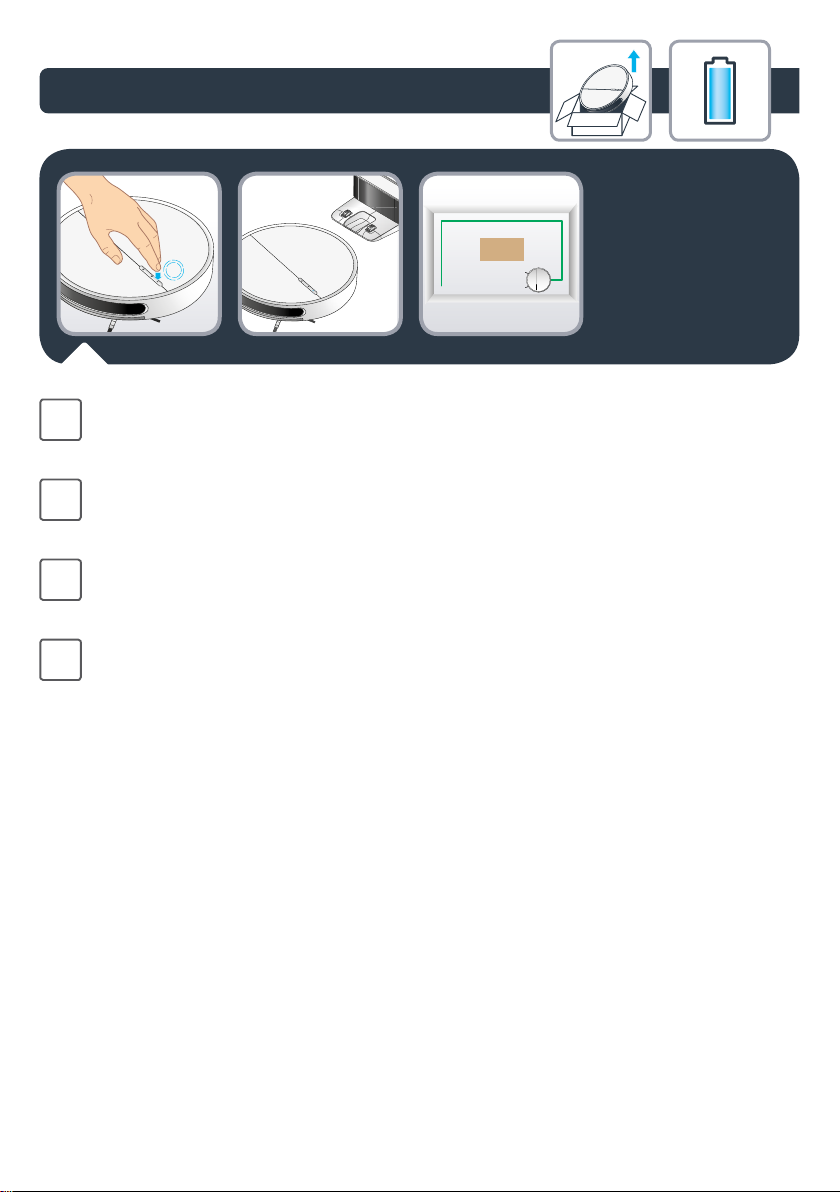
Чтобы очистить все доступные участки в доме, используйте режим
RU
«Систематическая уборка». Нажмите один раз на кнопку питания — робот начнет
уборку, а кнопка питания будет гореть синим цветом.
Aby wyczyścić wszystkie dostępne obszary domu, użyć trybu „Methodic”. Wcisnąć raz
PL
przycisk zasilania, robot rozpocznie czyszczenie a przycisk zasilania będzie świecił na
niebiesko.
To clean all the accessible areas of your home, use the «Methodic» mode. Press once
EN
the Power button, the robot will start cleaning and the Power button will be fully set
in blue.
집 안에서 접근 가능한 영역을 모두 청소하려면 «Methodic » 모드를 사용하십시오.
KO
전원 버튼을 누르면 로봇이 청소를 시작하고 전원 버튼의 불빛이 파란색으로
고정됩니다.
14
1.
Чтобы очистить определенный участок в доме, используйте режим «Локальная
RU
уборка». Нажмите два раза на кнопку питания — робот начнет уборку, а кнопка
питания будет гореть синим цветом. Обратите внимание, что режим «Локальная
уборка» недоступен, когда робот находится на зарядной станции.
Aby wyczyścić wszystkie konkretny obszar domu, użyć trybu „Spot”. Wcisnąć
PL
dwukrotnie przycisk zasilania, robot rozpocznie czyszczenie a przycisk zasilania
będzie świecił na niebiesko. Pamiętaj, że tryb „Spot” nie jest dostępny, gdy robot
znajduje się na stacji dokującej.
To clean a localized area of your home, use the «Spot» mode. Press twice the Power
EN
button, the robot will start cleaning and the Power button will be fully set in blue.
Please note that the «Spot» mode is not available when the robot is on the docking
station.
부분적인 영역을 청소하려면 «Spot» 모드를 사용하십시오. 전원 버튼을 두 번
KO
누르면 로봇이 청소를 시작하며 전원 버튼의 불빛이 파란색으로 고정됩니다. 단,
«Spot» 모드는 로봇이 도킹 스테이션에 있으면 사용할 수 없습니다.
15
1.
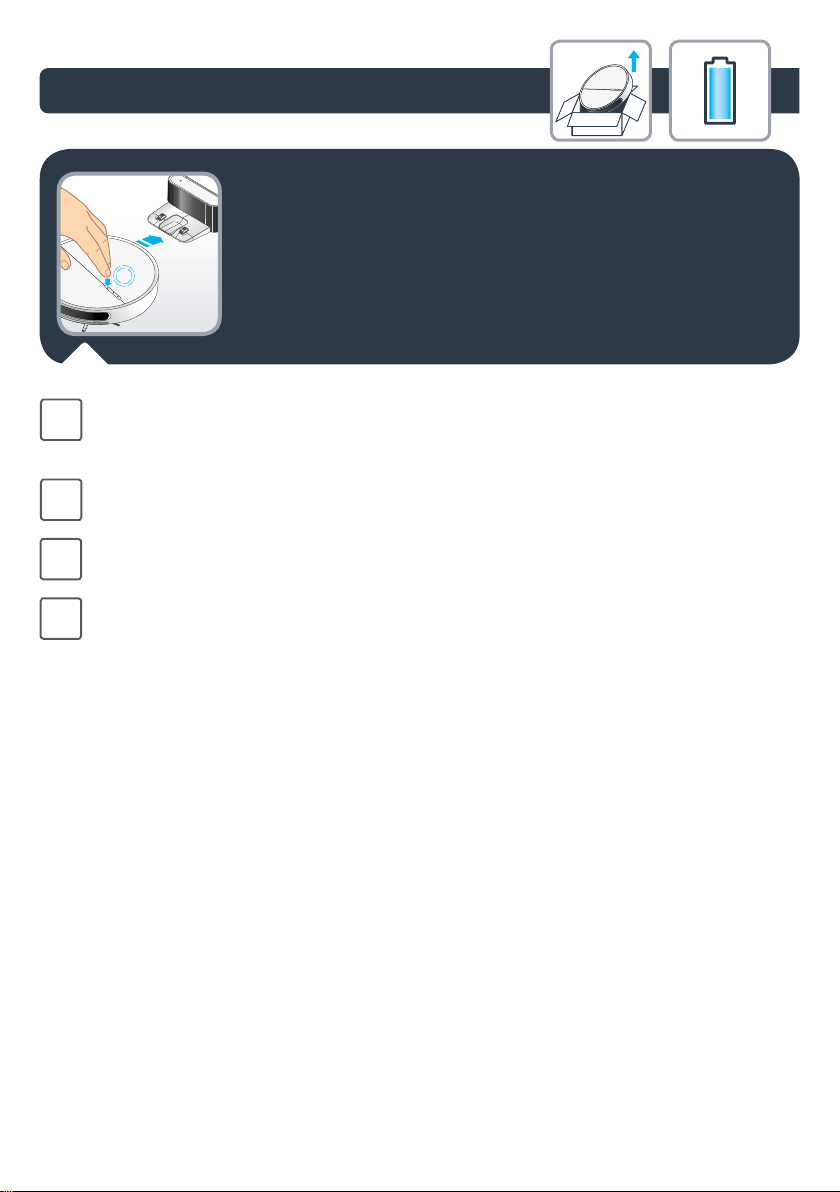
Для уборки вдоль стен и в углах воспользуйтесь режимом «Вдоль стен». Нажмите
RU
три раза на кнопку питания — робот начнет уборку, а кнопка питания будет
гореть синим цветом.
Aby czyścić wzdłuż ścian i w rogach, użyć trybu „Wall follow” (Wzdłuż ścian). Wcisnąć
PL
trzy razy przycisk zasilania, robot rozpocznie czyszczenie a przycisk zasilania będzie
świecił na niebiesko.
To clean along the walls and in the corners, use the «Wall follow» mode. Press three
EN
times the Power button, the robot will start cleaning and the Power button will be
fully set in blue.
벽과 모서리를 따라 청소하려면 «Wall follow » 모드를 사용하십시오. 전원 버튼을
KO
세 번 누르면 로봇이 청소를 시작하며 전원 버튼의 불빛이 파란색으로 고정됩니다.
16
1.
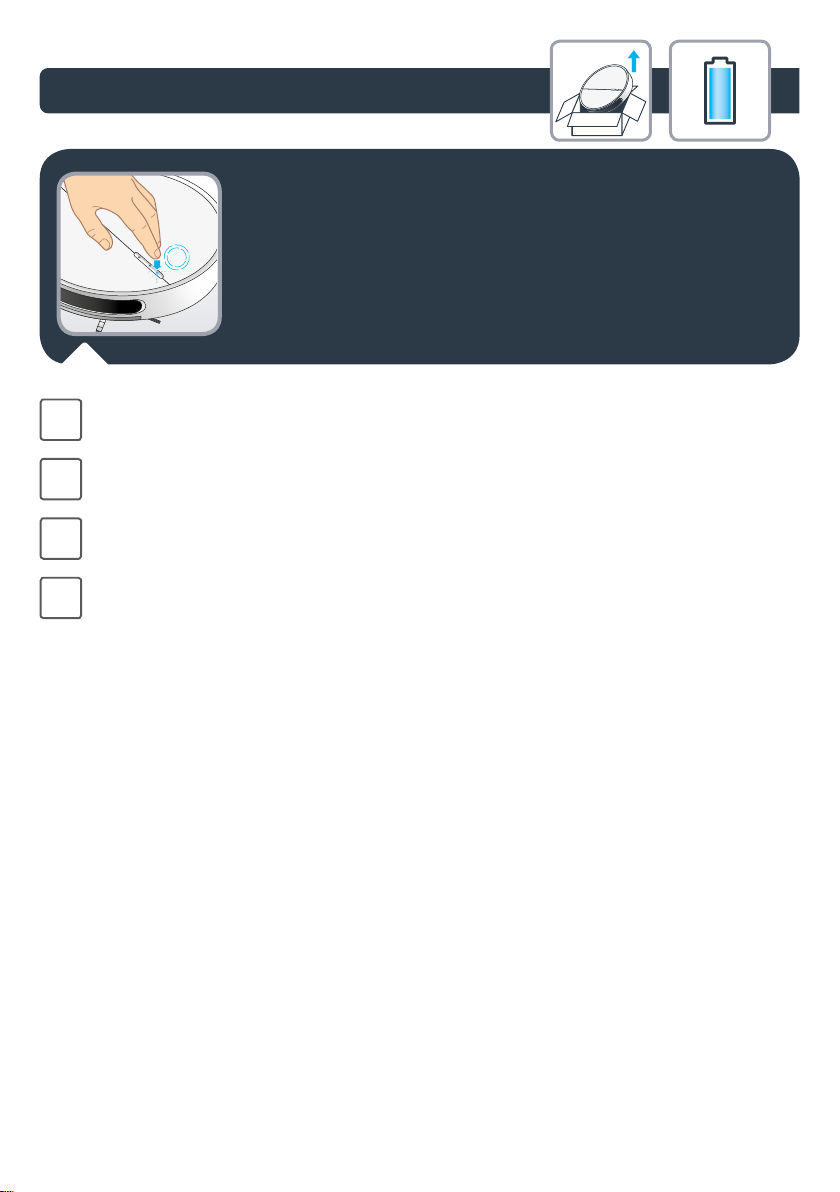
Чтобы поставить робот на паузу во время уборки, нажмите кнопку питания.
RU
Работа робота приостановится, а кнопка питания будет мигать синим цветом.
Aby zatrzymać robota na chwilę podczas czyszczenia, wcisnąć przycisk zasilania;
PL
robot zatrzyma się a przycisk zasilania miga na niebiesko.
To pause the robot when it is cleaning, press the Power button; the robot will pause
EN
and the Power button will ash in blue
청소를 일시 중지하려면 전원 버튼을 누르십시오. 로봇이 청소를 멈추며 전원 버튼의
KO
불빛이 파란색으로 깜박입니다.
17
1.
Чтобы вернуть робота на зарядную станцию, нажмите кнопку отправки на
RU
зарядку — робот вернется для подзарядки, а кнопка подзарядки будет гореть
красным цветом.
Aby robot powrócił do stacji dokującej i naładował się, wcisnąć przycisk Naładuj; robot
PL
powróci do stacji, by się naładować a przycisk Naładuj będzie świecił na czerwono.
To ask the robot to go back to its docking station and charge, press the Recharge
EN
button; the robot will go to charge while the Recharge button will be fully set in red.
로봇에게 도킹 스테이션으로 돌아가 충전하라고 말하고 충전 버튼을 누르십시오.
KO
그러면 로봇이 충전을 시작하며, 충전 버튼의 불빛이 빨간색으로 고정됩니다.
18
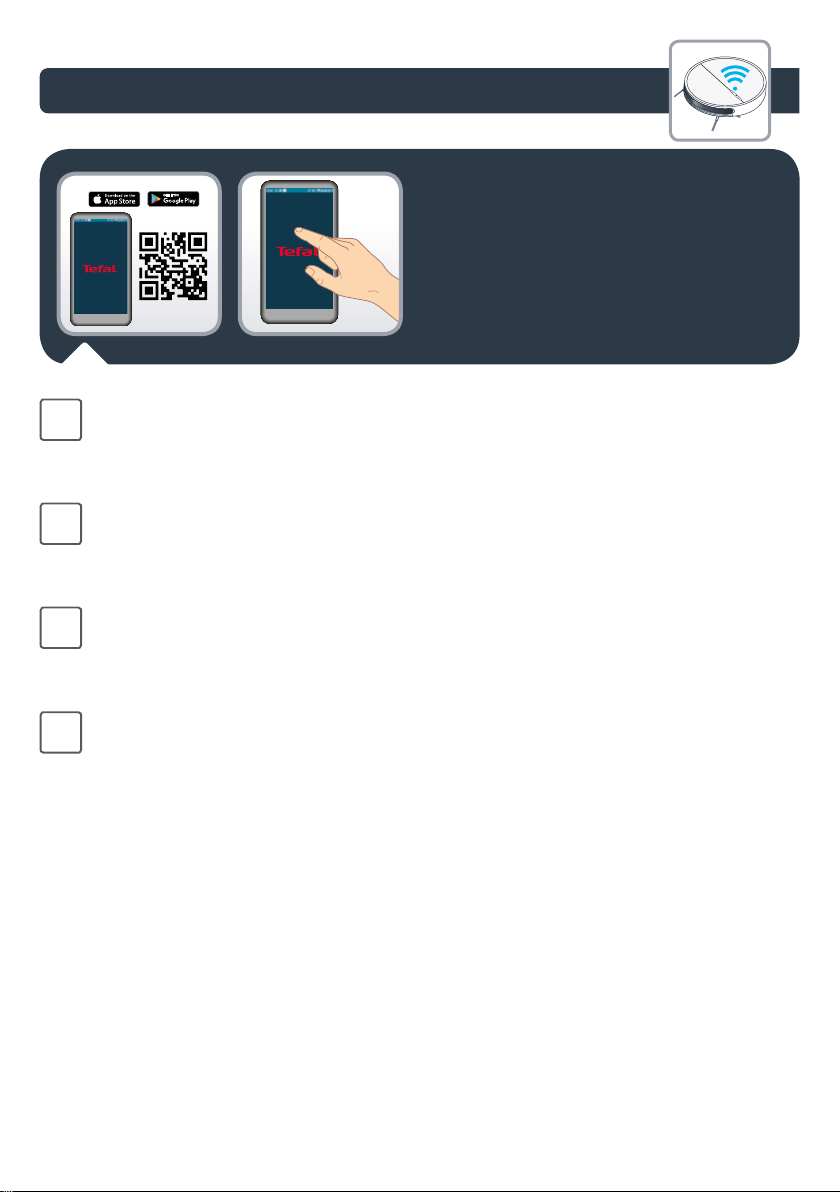
2.
Чтобы пользоваться всеми функциями робота, загрузите на свой смартфон
RU
бесплатное приложение «Tefal Robots» (можно воспользоваться QR-кодом для
поиска приложения в App Store или Google Play). Просто следуйте указаниям в
приложении и наслаждайтесь работой робота!
Aby w pełni korzystać ze wszystkich możliwości robota, pobierz bezpłatną aplikację
PL
„Tefal Robots” (możesz użyć kodu QR powyżej, by znaleźć go w app store lub Google
play) na telefonie. Aby cieszyć się robotem, zapoznaj się z instrukcjami w aplikacji!
To fully benet all the possibilities brought by your robot, download the free app
EN
«Tefal Robots» (you can use the QR code above to nd it on app store or Google play)
on your smartphone. Just let you guided by the instructions in the app to enjoy the
robot!
제품이 제공하는 모든 기능을 최대로 이용하려면 스마트폰에서 무료 앱 «Tefal
KO
Robots»을 다운로드하십시오(위의 QR 코드를 사용하여 앱 스토어 또는 구글
플레이에서 찾아주세요). 앱 안내에 따라 간단하게 실행하여 로봇 청소기와 함께
청소를 즐기시기 바랍니다!
19
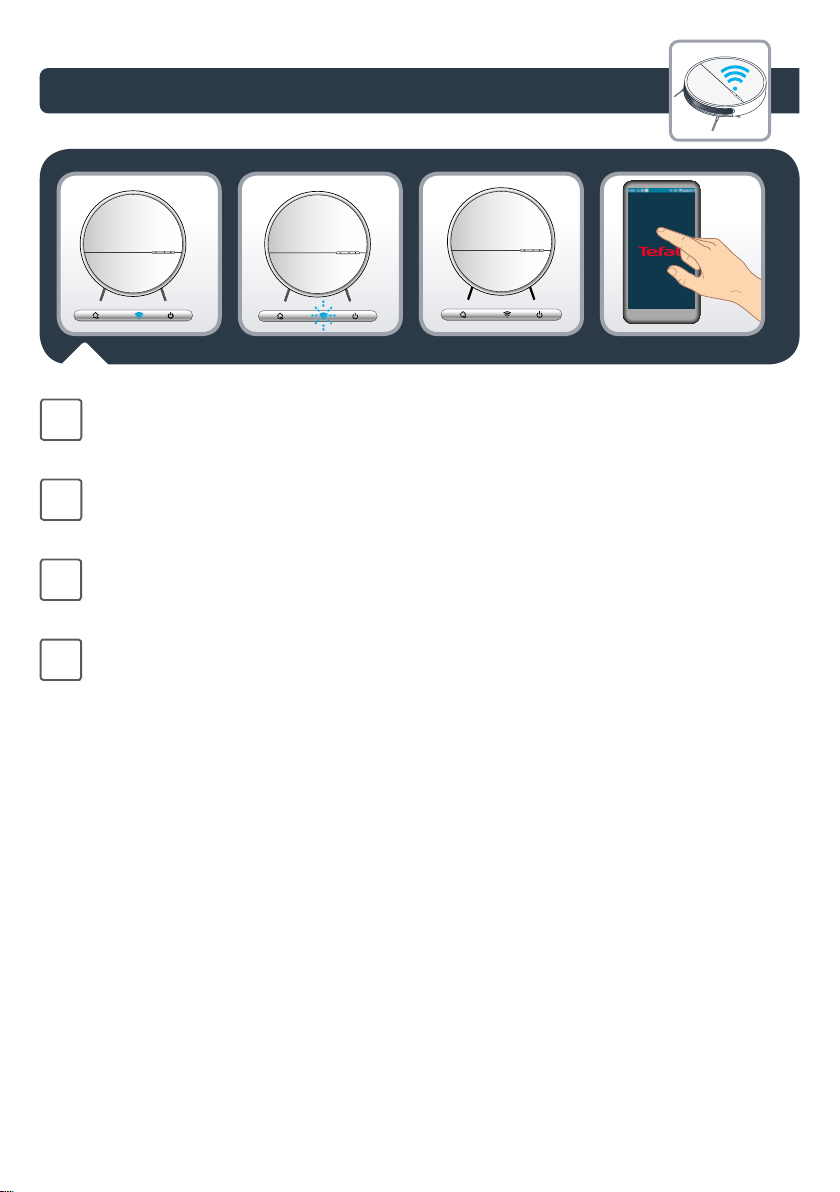
2.
Светодиодный индикатор Wi-Fi показывает состояние подключения: индикатор
RU
горит синим цветом — робот подключен, мигает синим — робот пытается
подключиться, не горит — робот отключен.
Wskaźnik LED WiFi wskazuje stan połączenia: gdy jest niebiesko, root jest podłączony;
PL
gdy miga na niebiesko, robot próbuje się podłączyć, gdy jest wyłączony, robot nie jest
podłączony.
The WIFI indicator LED points out your connection status: when fully set in blue, the
EN
robot is connected; when ashing blue, the robot is trying to connect; when o the
robot is not connected.
WIFI 표시등 LED는 로봇의 연결 상태를 알려줍니다. 불빛이 파란색으로 고정돼
KO
있으면 ‘연결됨’, 파란 불빛이 깜박이면 ‘연결 시도 중’, 불빛이 꺼졌으면 ‘연결되지
않음’을 뜻합니다.
20
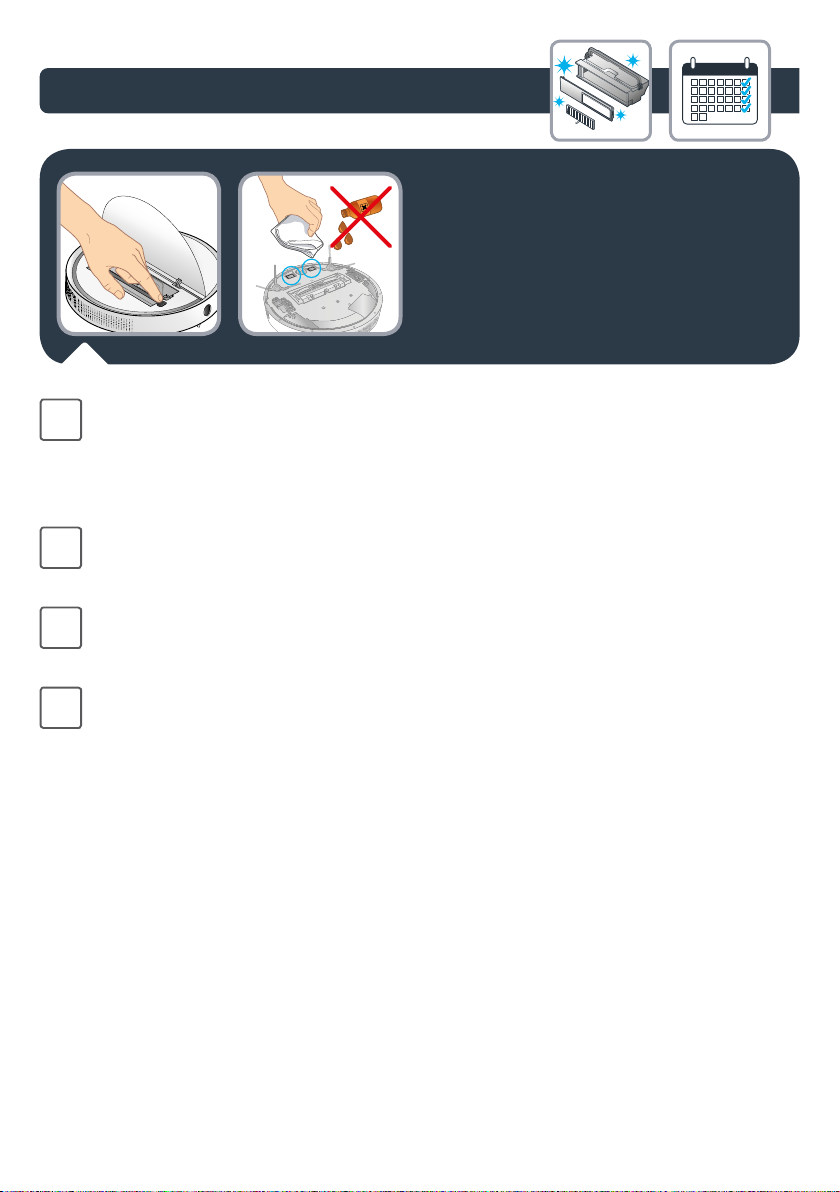
3.
Чтобы очистить контактные пластины, откройте откидывающуюся крышку
RU
и отключите робот с помощью выключателя (или отключите шнур питания).
Протрите пластины сухой тканью. Не протирайте пластины веществами,
имеющими в своем составе масло. Очищайте контактные пластины один раз в
месяц.
Aby wyczyścić styk do ładowania. otworzyć pokr ywkę obrotową i wyłączyć przełącznik
PL
zasilania (lub odłącz przewód zasilający z sieci). Następnie wytrzeć styk zapomocą
suchej szmatki. Nie czyścić olejem. Czyścić styk do ładowania raz w miesiącu.
To clean the charging contact, open the ip cover and turn o the power switch (or
EN
unplug the power cord) rst. Then use a dry cloth to wipe them. Do not scrub with oil.
Clean the charging contact once a month.
충전부를 청소하려면 먼저 플립 커버를 열고 전원을 끄거나 전원 코드를 뽑으십시오.
KO
그런 다음 마른 헝겊으로 닦아주십시오. 오일을 사용하지 마십시오. 한 달에 한 번
관리해줍니다.
21
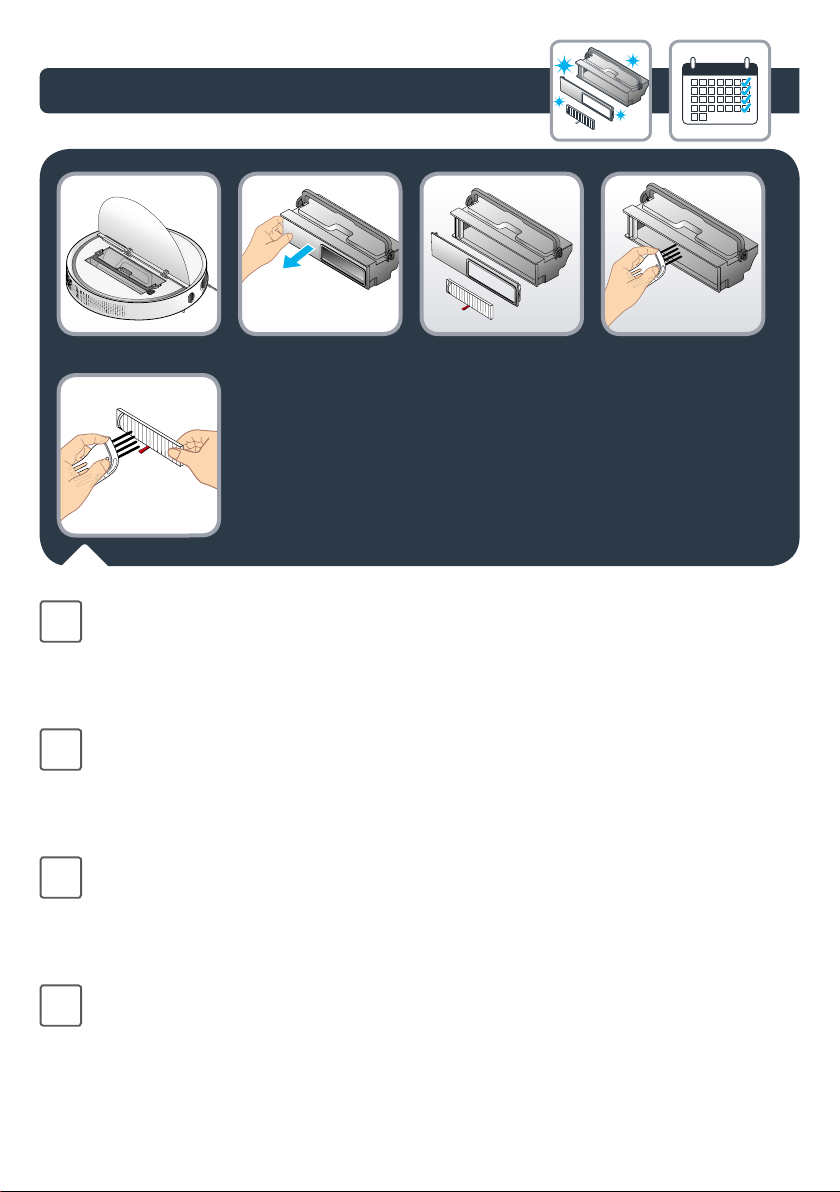
3.
Чтобы очистить мусоросборник, откройте откидывающуюся крышку и вытащите
RU
контейнер за ручку. Снимите крышку с левой стороны контейнера, поднимите
ленту сетчатого фильтра и извлеките фильтр. Выбросьте мусор, очистите
мусоросборник специальной щеткой и прополощите под струей воды. Очистите
фильтр с помощью щетки. Очищайте контейнер для пыли один раз в месяц.
Aby wyczyścić pojemnik na kurz, otworzyć pokrywkę, podnieść uchwyt pojemnika
PL
na kurz i wyjąć pojemnik. Zdjąć pokrywkę z lewej strony pojemnika, podnieść
pasek wkładu ltra i wyjąć wkład. Usunąć kurz z pojemnika za pomocą szczotki
do czyszczenia wyczyścić pojemnika na kurz i opłukać wnętrze pod bieżącą wodą.
Do czyszczenia ltra użyć szczotki Czyścić pojemnik na kurz raz w tygodniu.
To clean the dust box, open the ip cover, lift the dust box handle and take out the
EN
dust box. Remove the dust cover from the left side of the box, lift the lter screen
belt and take out the lter screen. Pour out the dust from the dust bin, use a cleaning
brush to clean the dust bin, and rinse the inside under running water. Use a cleaning
brush to clean the lter. Clean the dust box once a week.
먼지함을 청소하려면 플립 커버를 열고 먼지함 손잡이를 올려 먼지함을 꺼냅니다.
KO
먼지함 왼쪽에서 먼지 커버를 제거하고 필터 화면 벨트를 올려 필터 화면을 뺍니다.
먼지통을 비운 후 청소용 솔로 청소하고 흐르는 물로 내부를 씻어냅니다. 필터는
청소용 솔로 털어냅니다. 먼지함은 일주일에 한 번 청소합니다.
22
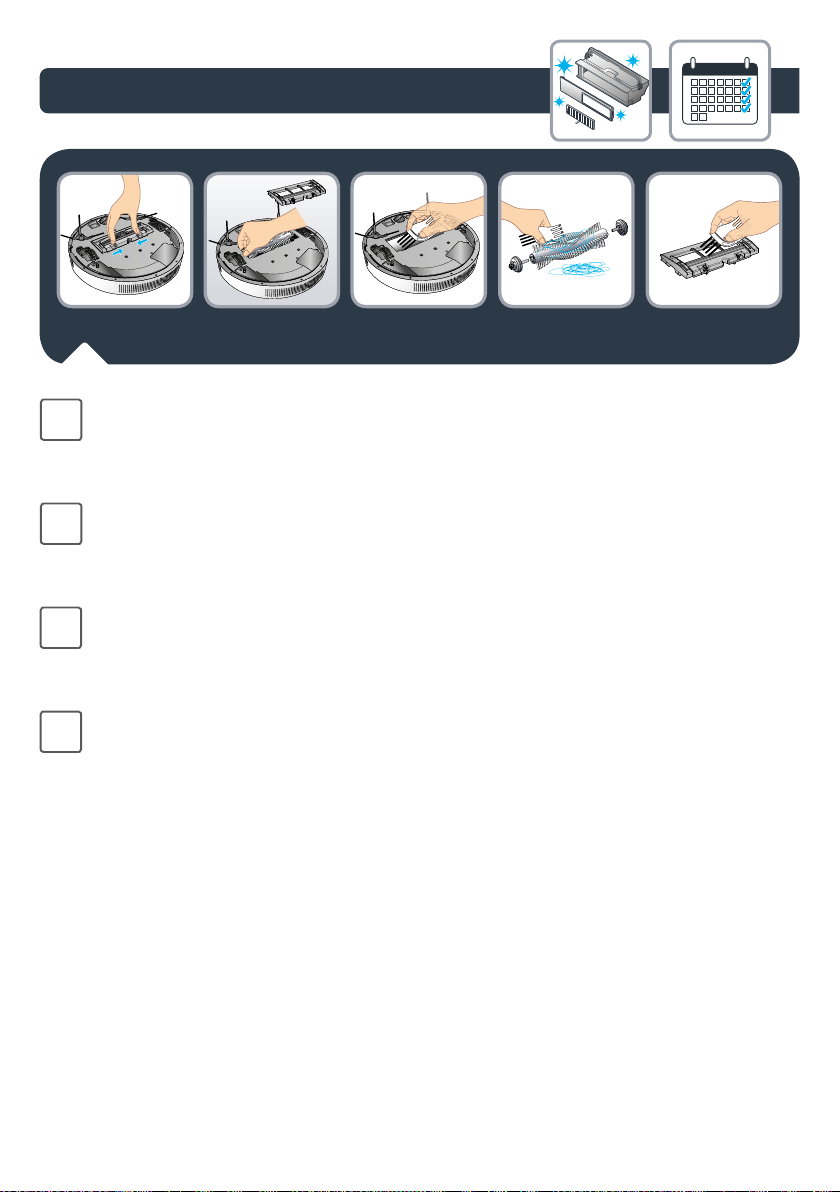
3.
Чтобы очистить центральную щетку, сдвиньте защелки в сторону центра и
RU
поднимите крышку. Возьмитесь за центральную щетку и извлеките ее. Очистите
компоненты с помощью специальной щетки. Регулярно удаляйте с центральной
щетки волосы и другие запутавшиеся предметы.
Aby wyczyścić środkową miotełkę. popchnąć dźwignię blokady do środka i podnieść
PL
ją, by wyjąć środkową miotełkę. Chwycić środkową szczotkę do zamiatania i podnieść
ją, by wyjąć środkową miotełkę. Do czyszczenia części użyć szczotki do czyszczenia
iregularnie usuwać włosy i plątania ze szczotki do zamiatania.
To clean the middle sweeper, push the lock lever to the middle and lift it up to remove
EN
the middle sweeping scraper. Grab the middle sweeping brush and lift it up to remove
the middle sweeper. Use a cleaning brush to clean to clean the elements, and clean
the hair and other entanglements on the sweeping brush regularly.
가운데 청소솔을 관리하려면, 먼저 잠금 버튼을 중앙으로 밀고 위로 올려 가운데
KO
청소솔 끍개를 뺍니다. 그런 다음 가운데 청소솔을 잡고 위로 들어 올려 꺼냅니다.
정기적으로 청소용 솔로 구석구석을 청소해주고 머리카락이나 끼어 있는 이물질이
있으면 제거합니다.
23
Loading…

В последние годы робот-пылесосы стали неотъемлемой частью нашего дома. Среди популярных моделей можно выделить Tefal 60 (Робот-пылесос Tefal X-plorer Serie 60 RG7447WH). В этом руководстве мы пошагово объясним, как подключить робот-пылесос Тефаль 60 к приложению, какие действия нужно предпринять и на какие моменты стоит обратить внимание в процессе настройки.
1. Подготовка к подключению робота к приложению
Перед подключением робота-пылесоса Tefal 60 к приложению, убедитесь, что ваше устройство готово к процессу настройки.
В первую очередь проверьте уровень зарядки вашего пылесоса. К настройке можно приступать только при показателях заряда от 50%. Это обезопасит вас от внезапных отключений во время настройки.
Установите на свой смартфон приложение Tefal Robots удобным для вас способом. Откройте приложение и пройдите простую процедуру регистрации, следуя инструкции на экране.
2. Подключение робота-пылесоса Tefal 60 к Wi-Fi
- Активируйте устройство и запустите стадию настройки. Для этого удерживайте кнопку включения на роботе около 5 секунд до появления мигающего индикатора на устройстве.
- Откройте приложение Tefal Robots на своем смартфоне.
- В приложении выберите опцию «Добавить новый робот» или «Подключить устройство». Следуйте инструкции по подключению на экране.
- Введите имя вашей сети Wi-Fi (SSID) и пароль. Проверьте, работает ли ваша беспроводная сеть на частоте 2,4 GHz — это обязательное условие для правильного подключения.
- Установите соединение с пылесосом. Приложение должно автоматически обнаружить ваш робот-пылесос и начать процесс синхронизации.
3. Завершение настройки и использование робота
После того как робот успешно подключен к сети, вы можете настроить его в приложении, используя все доступные функции:
- Настройка уборки. В приложении можно выбрать режим уборки, создать расписание, а также настроить зоны уборки.
- Мониторинг работы. Приложение позволяет отслеживать состояние робота, его уровень заряда и время уборки.
- Удалённое управление. Вы можете управлять роботом в любое время, даже если вы не дома.
Решение возможных проблем при подключении
Иногда возникают ситуации, когда подключить робот-пылесос Tefal 60 к приложению получается не с первой попытки. Рассмотрим самые часто возникающие проблемы:
- Проблемы с Wi-Fi. Убедитесь, что ваш роутер поддерживает частоту 2,4 GHz, так как роботы Tefal не работают с 5 GHz.
- Неверный пароль. Если приложение не может подключиться, проверьте правильность введённого пароля от вашей сети.
- Робот не в режиме настройки. Если световой сигнал на роботе не активируется, попробуйте перезагрузить устройство и повторить процесс.
Теперь, когда ваш робот успешно подключен и готов к уборке, вы можете приступить к уборке.
Не забывайте, что для долгосрочной эксплуатации вашего устройства, важно использовать качественные аксессуары и запчасти. Filterix предлагает широкий ассортимент оригинальных аксессуаров и запчастей для роботов-пылесосов, а также для вертикальных и строительных пылесосов. Мы продаём только проверенные и качественные запчасти — как оригинальные, так и лучшие аналоги на рынке, которые прошли тщательную проверку. Наши специалисты всегда готовы помочь вам с выбором и подобрать нужные аксессуары для вашего устройства. Вы всегда можете обратиться в наш чат поддержки в Telegram.
Аксессуары для
вашего пылесоса!
Кликните по промокоду,
чтобы применить!
Перейти к контенту
Русские электронные инструкции по эксплуатации
Постоянно обновляемый большой каталог документации по эксплуатации и использованию современных устройств и оборудования на русском языке. Бесплатное скачивание файлов.
Поиск:
Главная
♥ В закладки
Просмотр инструкции в pdf
Инструкция по эксплуатации робота-пылесоса Tefal X-PLORER SERIE 60 RG7455WH.
Скачать инструкцию к роботу-пылесосу Tefal X-PLORER SERIE 60 RG7455WH (15,24 МБ)
Инструкции по эксплуатации роботов-пылесосов Tefal
« Инструкция к роботу-пылесосу Garlyn SR-800 Max
» Инструкция к роботу-пылесосу Accesstyle VR30R01DW
Вам также может быть интересно

Инструкция к воздухоочистителю Tefal Pure Air Genius PT3080F0

Инструкция к тостеру Tefal Express TT410D38

Инструкция к пылесосу Tefal X-TREM Power TW6861EA

Инструкция к роботу-пылесосу Tefal X-Plorer Serie 40 RG7267WH

Инструкция к электрогрилю Tefal Optigrill+ GC712D34

Инструкция к пылесосу Tefal X-TREM Power Cyclonic TW7232EA
Инструкция к обогревателю Tefal Intense Comfort Hot SE9420F0

Инструкция к мультиварке Tefal RK901F32
Добавить комментарий
Имя *
Email *
Сайт
Комментарий
Сохранить моё имя, email и адрес сайта в этом браузере для последующих моих комментариев.
- Добавить инструкцию
- Заказать инструкцию
- Политика конфиденциальности
Tefal Explorer Serie 60 RG7455
X-plorer Serie 60
1.
2.
3.
4.
5.
RU Руководство пользователя
PL Instrukcja obsługi
EN User’s guide
KO 사용설명서
TR Kullanım kılavuzu
ET Kasutusjuhend
LV Lietotāja rokasgrāmata
LT Naudotojo vadovas
View the manual for the Tefal Explorer Serie 60 RG7455 here, for free. This manual comes under the category robot vacuum cleaners and has been rated by 1 people with an average of a 8.5.
This manual is available in the following languages: English. Do you have a question about the Tefal Explorer Serie 60 RG7455 or do you need help?
Ask your question here
Product Images (2)

Tefal Explorer Serie 60 RG7455 specifications
Below you will find the product specifications and the manual specifications of the Tefal Explorer Serie 60 RG7455.
The Tefal Explorer Serie 60 RG7455 is a robot vacuum cleaner designed to efficiently clean floors with minimal effort. It is equipped with advanced features that enhance its performance.
One notable feature of the Tefal Explorer Serie 60 RG7455 is its powerful suction, which effectively removes dust, dirt, and pet hair from various floor types. It also has an intelligent navigation system that allows it to map and navigate your home efficiently, avoiding obstacles and cleaning hard-to-reach areas.
The robot vacuum cleaner is equipped with a high-capacity dustbin, reducing the frequency of emptying it, and a long-lasting battery, ensuring uninterrupted cleaning sessions. With its automatic charging feature, it can return to its docking station when the battery is low.
To enhance user convenience, the Tefal Explorer Serie 60 RG7455 offers multiple cleaning modes, allowing you to choose the most suitable one for your needs. It also has a scheduling feature, enabling you to set cleaning times according to your preferences.
Additionally, the robot vacuum cleaner is designed with a compact and sleek body, allowing it to maneuver effortlessly under furniture and in tight spaces. It also comes with a range of accessories, such as brushes and filters, to maintain its cleaning efficiency.
In conclusion, the Tefal Explorer Serie 60 RG7455 is a highly capable and efficient robot vacuum cleaner that offers powerful suction, intelligent navigation, convenient features, and a compact design. It is a reliable and durable cleaning solution for maintaining clean floors in your home.
General
| Brand | Tefal |
| Model | Explorer Serie 60 RG7455 |
| Product | robot vacuum cleaner |
| Language | English |
| Filetype | User manual (PDF), Instructions / Assembly (PDF), Quickstart Guide (PDF) |
Frequently Asked Questions
Can’t find the answer to your question in the manual? You may find the answer to your question in the FAQs about the Tefal Explorer Serie 60 RG7455 below.
How can I set up the Tefal Explorer Serie 60 RG7455 robot vacuum cleaner?
Before initial use, make sure the charging dock is connected to a power source and place the robot vacuum on the dock for about 24 hours to fully charge. Turn on the vacuum using the power button located on the device.
Can I control the cleaning schedule of the robot vacuum?
Yes, you can conveniently set up a cleaning schedule through the control panel on the robot vacuum. Simply access the settings menu and program the desired cleaning days and times to fit your needs.
How can I maintain optimal cleaning performance?
To ensure optimal cleaning performance, it is important to regularly check and clean the brushes, filters, and sensors of the robot vacuum. Remove any debris or tangled hair from the brushes, clean or replace the filters as needed, and keep the sensors free from obstruction.
What should I do if the robot vacuum gets stuck or encounters obstacles?
If the robot vacuum gets stuck or encounters obstacles, it is equipped with sensors to detect such situations. The best approach is to clear the obstruction or move any obstacles out of its way. If the vacuum is consistently getting stuck, it might be necessary to rearrange furniture or adjust any loose carpeting to allow for smoother navigation.
How do I contact customer support for further assistance?
If you encounter any issues or require further assistance with your Tefal Explorer Serie 60 RG7455 robot vacuum cleaner, you can reach out to Tefal customer support through their official website or contact their support hotline. They will be able to provide you with detailed guidance and solve any arising problems.
How often should I vacuum my house?
For allergy sufferers, vacuuming the house at least twice a week is recommended.
Is the manual of the Tefal Explorer Serie 60 RG7455 available in English?
Yes, the manual of the Tefal Explorer Serie 60 RG7455 is available in English .
Is your question not listed? Ask your question here