
- Описание
- Характеристики
- О бренде TASCAM
Портативный рекордер для DSLR камер Tascam DR-60D MK2.
Обновлённая модель DR-60D mkII практически целиком идентична своему предшественнику и имеет те же возможности, в том числе одновременную запись четырёх каналов с раздельной регулировкой уровня на входах 1-2 и 3-4. Сохранилась и функция Dual Recording, позволяющая писать параллельно два файла с разными уровнями записи для защиты от перегрузки. Также у обоих рекордеров полностью совпадает конфигурация разъёмов и органов управления. А главным отличием новинки стало использование улучшенных микрофонных/линейных предусилителей HDDA. Они обеспечивают усиление до 64 дБ, при этом уровень шумов и искажений остаётся предельно низким.
Технические характеристики:
- Стандартное крепление на штатив.
- Крепление для установки камеры над рекордером
- Возможность крепления на ремень.
- Одновременная запись до 4 дорожек.
- Формат записи звука:
- WAV 44.1/48/96kHz, 16/24bit.
- BWF 44.1/48/96kHz, 16/24bit.
- Высококачественные преобразователи с динамическим диапазоном 120 дБ.
- Запись на карты памяти SD/SDHC до 32 Гб.
- Удобный LCD дисплей 128 x 64 точек.
- Двы микрофонных входа на разъёмах XLR с фантомным питанием +48В.
- Интерфейс USB2.0 lzk передачи данных в компьютер.
- Питание от 4-х батарей AA? от адаптора (продаётся отдельно) или от USB.
- Встроенный микшер с кетролем уровня и панорамы.
- Обрезной фильтр НЧ с переключением частоты среза 40/80/120 Гц.
- Отключаемый лимитер.
- Буфер предзаписи 2 секунды.
- Функция автовключения записи от установленного уровня сигнала.
- Выход на камеру со звуковым генератором «хлопушкой».
- Размеры: 133 x 93.2 x 78 мм.
- Вес: 510 г.
Технические характеристики TASCAM DR-60D MK2 Портативный PCM стерео рекордер
| Производитель: | TASCAM |
| Единица измерения | шт |
Уже более 30 лет под брендом TASCAM создаются продукты для всех сегментов звуковой и музыкальной индустрии. Среди пользователей TASCAM как профессионалы, работающие только с аппаратурой высокого класса, так и любители, занимающиеся музыкой в домашних условиях. TASCAM дает клиентам возможность находить такие творческие решения при работе с аудио и видео, которые становятся настоящим прорывом в этой области, а работа со звуком становится простой и в то же время интересной. TASCAM создает продукты, воплощающие в жизнь творческий потенциал своих клиентов.
Создав в начале 1970-х годов устройство для домашней звукозаписи, TASCAM продолжили завоевывать признание и в сфере профессиональной звукозаписи. Результатом стали многие инновационные приборы, до их появления не имевшие аналогов в мире, среди которых:
первый в мире 4-дорожечный кассетный магнитофон с шириной пленки ½«;
первый в мире 8-дорожечный катушечный магнитофон со встроенным микшером;
первый в мире цифровой магнитофон R-DAT;
первый в мире цифрой многоканальный минидиск-плеер и CD-скретчер.
Престижные награды и признание профессионалов свидетельствуют о том, что продукция TASCAM является единственной в своем роде. В 2001 году цифровой аудио даббер MMR-8 для дублирования художественных фильмов получил премию Оскар Академии кинематографических искусств и наук в номинации за научно-технические достижения. Оскар был присужден за вклад MMR-8 в работу по окончательному сведению звуковой дорожки фильма «Властелин колец» в формате Dolby Surround EX. Среди наград, полученных компанией TASCAM, также можно назвать премию Эмми в 1995 году в номинации «За выдающиеся достижения в области инженерных разработок» за цифровой многоканальный рекордер TASCAM DA-88 и в 2000 году в той же номинации за MMR-8 и ММР-16.
TASCAM — одно из четырех подразделений корпорации TEAC. Со времени своего основания в 1953 году все компании-подразделения TEAC стали ведущими производителями высокотехнологичной продукции, такой, как устройства для хранения информации, бытовая электроника, промышленное оборудование, но TASCAM остались верны производству инновационной продукции для творческой работы в области записи музыки и аудио.
В период формирования, в начале 70-х годов, музыкальная индустрия находилась в стадии расцвета. Музыканты, которые хотели в выгодном свете представить звукозаписывающим компаниям свои таланты и умения, нуждались в эффективных средствах записи музыки по разумной цене. Тем не менее, большинство музыкантов не могли себе позволить ни дорогой записи на профессиональной студии, ни профессиональной звукозаписывающей аппаратуры по заоблачным ценам. Осознав потребности этой части музыкантов, компания TASCAM начала развивать концепцию производства звукозаписывающей аппаратуры, которая имеет бескомпромиссное качество и надежность профессионального студийного оборудования, оставаясь при этом доступной по цене массовому потребителю.
Открывая четвертое десятилетие своей работы на музыкальном рынке, компания TASCAM видит будущее как отображение своей истории. Речь идет о преданности принципам. Цель TASCAM создавать инновационные продукты, которые будут интересны давним клиентам и заслужат доверие нового поколения музыкантов. Таков путь TASCAM.
Другие товары бренда TASCAM
Sale
~10%
Sale
~10%
Sale
~9%
Sale
~10%
Обновленная модель портативного 4-канального рекордера DR-60D,который был создан для работы совместно с такими цифровыми видеокамерами, как DSLM и DSLR. Модернизированное устройство теперь именуется DR-60DmkII, оно оснащено невесомым, но крайне прочным корпусом. Рекордер может крепиться непосредственно к камере или быть установленным на штатив. Благодаря данному девайсу будет улучшено качество звука при записи на карты памяти SD/SDHC с форматом BWF или же WAV, разрешение при этом может достигать 24 бит 96 кГц.
TASCAM DR-60DMK2 имеет сходства со своим предшественником и оснащена такими же характеристиками, так, оно может записывать одновременно с 4 каналов при отдельной регулировке уровней на входах 1-2 и 3-4. Кроме этого, осталась неизменной и возможность DualRecording,при помощи которой можно производить запись двух файлов с разными уровнями без перегрузки устройства. Вдобавок две модели рекордеров имеют одинаковые органы управления и разъемы. Тем не менее, между ними есть одно главное отличие, а именно то, что новинка оснащена лучшими линейными и микрофонными усилителями HDDA, благодаря которым можно получить усиление до 64 дБ безо всяких искажений или шумов.
Manual
View the manual for the Tascam DR-60D MKII here, for free. This manual comes under the category voice recorders and has been rated by 1 people with an average of a 7.5.
This manual is available in the following languages: English. Do you have a question about the Tascam DR-60D MKII or do you need help?
Ask your question here
Frequently Asked Questions
Can’t find the answer to your question in the manual? You may find the answer to your question in the FAQs about the Tascam DR-60D MKII below.
Is the manual of the Tascam DR-60D MKII available in English?
Yes, the manual of the Tascam DR-60D MKII is available in English .
Is your question not listed? Ask your question here
Tascam DR-60D MKII – Профессиональный, портативный рекордер, специально разработанный для работы на съемочных площадках и работы в паре с видеокамерой.
Позволяет легко сделать запись звука концерта, свадьбы, лекции с высоким битрейтом, для дальнейшей редакции на студии. Вы можете подключить внешние микрофоны, микшеры, сигнал с вашей камеры. В DR-60DMK2 много технологичных функций необходимых современному звукооператору:
- TRIM MAX – цифровое усиление линейного сигнала до +64 Дб;
- автоматическая и ручная (микшер) настройка записи;
- контрольная запись – функция делает дублирующий трек (-12 Дб), даже если ваша запись испорчена слишком мощным сигналом, у вас есть дубль тише на 12 Дб;
- автоматическое подавление пиков – каждый пик, который присутствует в вашем треке будет автоматически откорректирован.
- крепление для штатива и специальный винт для закрепления фотоаппарата;
- Проводной пульт управления — поддерживает как footswitcRC-3F, так и расширенный пульт RC-10.
Также есть и стандартные функции, характерные для аналогичных устройств – воспроизведение записанных треков, блокировка кнопок;
Основные особенности:
- AD/DA 24 бит, 96 кГц;
- форматы записи аудио WAV/BWF;
- интуитивно понятное управление;
- высокое качество записи;
- автоматизированные пресеты для настройки качества записи;
- аудио вход — 2 — XLR/TRS ¼ и 2-TRS ¼;
- аудио выход 2-TRS ¼;
- вход для наушников TRS 1/8 стерео;
- поддержка SD/SDHC до 32 Гб;
- передача данных USB 2,0:
- фантомное питание;
- дисплей;
- крепление к штативу резьба 1/4 дюйма;
- крепление для фотоаппарата;
- питание от 4-х батареек АА или по USB.
Технические характеристики DR-60DMK2
| Тип | портативный рекордер |
| AD/DA | 24 бит, 96, 48, 44,1 кГц |
| Предусилетель | HDDA |
| Аудиокодек | Cirrus Logic CS42L52 |
| Форматы записи аудио: | максимально 4 трека одновременно (2 стерео) |
| — WAV, BWF | 96, 48, 44,1 кГц, 24, 16 бит |
| Overdub | мульти-трековая запись (наложение на записанный трек) |
| Встроенный микрофон | два конденсаторных (стерео), два положения X/Y и A/B |
| Частотные характеристики | 20-20000 Гц |
| Линейный вход | 2-XLR/TRS 1/4, 2-TRS 1/8 стерео |
| TRIM MAX для XLR/TRS входа | +4 дБ, + 11 дБ,+ 36 дБ, + 52 дБ, + 64 дБ |
| TRIM MAX для TRS входа | +3 дБ, +26 дБ, +38 дБ |
| Аналоговый выход | 2-TRS 1/8 стерео |
| Вход для наушников | TRS 1/8 стерео |
| Дистанционное управление | RC-3F, RC-10 |
| Память | SD/SDHC до 32 Гб |
| Разъем | mini USB 2,0 |
| Дисплей | есть |
| Крепление к штативу | резьба 1/4 дюйма |
| Крепление для фотоаппарата | резьба 1/4 дюйма |
| Фантомное питание | есть |
| Питание | 4 батарейки АА или через USB |
| Размеры | 133x94x78 мм |
| Вес | 510 г |
Характеристики
Количество каналов записи
4
Количество разъемов USB
1
Максимальная частота, Гц
20000
Минимальная частота, Гц
20
Носители информации
SD/SDHC до 32 Гб
Особенности
Питание: от 4-х батарей AA, от адаптора (продаётся отдельно) или от USB
Параметры WAV
44.1/48/96 кГц, 16/24 бит
Соотношение сигнал/шум, дБ
92
Страна (главный офис)
США

D01231320A
DR-60D
Linear PCM Recorder
REFERENCE MANUAL
)
«

Contents
1 – Introduction ……………………………………………………….. 5
Features……………………………………………………………………………………………. 5
Conventions used in this manual ………………………………………………… 6
2 – Names and functions of parts ……………………………… 7
Front panel ……………………………………………………………………………………….7
Left side panel ………………………………………………………………………………. 10
Right side panel ……………………………………………………………………………. 11
Rear panel ………………………………………………………………………………………12
Top panel ……………………………………………………………………………………….. 13
Bottom Panel ………………………………………………………………………………… 13
Home Screen …………………………………………………………………………………. 14
Recording Screen …………………………………………………………………………. 16
Menu item list ……………………………………………………………………………….. 18
Using menus …………………………………………………………………………………. 19
Basic operation………………………………………………………………………………20
3 – Preparation ……………………………………………………….22
Powering the unit………………………………………………………………………….22
Power sources ………………………………………………………………………..22
Using AA batteries …………………………………………………………………22
Using an AC adaptor (sold separately) ……………………………… 23
Using an external battery pack (sold separately) …………….23
Using USB bus power …………………………………………………………… 24
Turning the power on and off (putting it in standby) …………….25
Starting up the unit ……………………………………………………………….25
Shutting down (putting the unit in standby) …………………..25
Resume function …………………………………………………………………… 26
Setting the date and time …………………………………………………………… 26
Inserting and removing SD cards……………………………………………….27
Inserting the SD card ……………………………………………………………. 27
TASCAM DR-60DMKII
2
Removing the card ……………………………………………………………….. 27
SD card write protection switches …………………………………….. 28
Preparing an SD card for use ……………………………………………………… 29
Camera connection and attachment ………………………………………..29
Connecting monitors and headphones ……………………………………30
Monitoring ……………………………………………………………………………………..30
Enabling monitoring …………………………………………………………….30
Selecting the monitored signal ………………………………………….. 31
4 – Recording …………………………………………………………. 32
Selecting file format, sampling frequency,
and maximum file size …….. 32
Preparing the recording inputs …………………………………………………. 33
Connecting microphones …………………………………………………… 33
Recording an external device (LINE IN) ……………………………. 34
Setting the input types ………………………………………………………..34
Using phantom power ………………………………………………………….35
Using plug-in power …………………………………………………………….. 36
Adjusting the input level/Muting ……………………………………………… 36
Using the limiter ……………………………………………………………………………38
Using the low-cut filter ……………………………………………………………….. 39
Set where to save the file ……………………………………………………………. 39
Overview of recording modes …………………………………………………… 39
Recording (MONO/STEREO recording) ……………………………………..40
Make recording settings ……………………………………………………… 40
Starting the recording …………………………………………………………. 41
File names when recording in MONO/STEREO ……………….. 41
Simultaneously recording two files at different input levels
(DUAL REC) …………………………………………………………………………………….. 42
Enabling dual recording……………………………………………………….42

Contents
Starting dual recording ……………………………………………………….. 43
Dual recording file names ……………………………………………………44
Recording 4 channels …………………………………………………………………..44
Making 4-channel recording settings ……………………………….44
Starting 4-channel recording………………………………………………45
File names when recording in 4-channel …………………………. 46
Recording automatically (AUTO REC) ………………………………………..46
Creating and changeover to a new file during continued
recording (Track increment)………………………………………………………..48
Manual track increment during recording ……………………….48
Automatic track increment by file size ………………………………48
Mark function ………………………………………………………………………………..49
Adding marks manually to a recording……………………………..49
Adding marks automatically to a recording…………………….. 49
Moving to a mark position ………………………………………………….. 49
Recording the moment before pushing RECORD (PRE REC) … 50
Delaying the start of recording (REC DELAY) ………………………….50
Self-timer function ………………………………………………………………………..51
Using the auto tone function …………………………………………………….. 51
Setting the auto tone function…………………………………………… 51
Setting auto tone length …………………………………………………….. 52
Adjusting the volume of the auto tone and the slate tone …… 52
Adding slate tones ……………………………………………………………………….. 52
Recording duration ……………………………………………………………………… 53
5 – Working with Files and Folders (BROWSE screen) …54
Screen navigation …………………………………………………………………………54
Icons on the BROWSE screen ……………………………………………………… 55
File operations ……………………………………………………………………………….55
Folder operations ………………………………………………………………………….56
Creating a new folder …………………………………………………………………..57
6 – Playback …………………………………………………………… 58
Adjusting playback volume ………………………………………………………..58
Setting the playback area (AREA) ………………………………………………58
Selecting a folder for the playback area (1) ……………………………… 59
Selecting a folder for the playback area (2)………………………………60
Selecting files for playback (skip) ……………………………………………….60
Playback ………………………………………………………………………………………….61
Pausing …………………………………………………………………………………… 61
Stopping ………………………………………………………………………………….61
Rewinding and fast-forwarding (search) …………………………. 61
Changing the playback position ………………………………………… 61
Repeat playback (REPEAT) ………………………………………………………….. 61
Moving back a few seconds for replay (jump-back playback) …62
Playback of files recorded using dual recording …………………….. 62
7 – QUICK button operations ………………………………….. 63
Features of the QUICK button ……………………………………………………. 63
Opening the quick menu …………………………………………………………….64
Closing the quick menu ……………………………………………………….65
Deleting the selected file (Quick Delete) ………………………………….65
Dividing the selected file (DIVIDE) ……………………………………………. 65
Increasing the perceived overall sound pressure to enhance
listenability (Level Alignment) …………………………………………………… 67
Using the playback equalizer …………………………………………………….. 68
Setting mic input gain with the quick menu …………………………… 68
8 – Mixer ………………………………………………………………… 69
Making mixer settings …………………………………………………………………. 69
Using the MS decoder …………………………………………………………………. 70
Decoding the input sound as you record ………………………… 70
TASCAM DR-60DMKII
3

Contents
Decoding the playback sound ……………………………………………71
MS decoder settings …………………………………………………………….. 71
9 – Connecting with a computer ………………………………72
Transferring files to a computer ………………………………………………… 73
Transferring files from a computer …………………………………………….73
Disconnecting from a computer ………………………………………………..73
10 – Settings and Information ………………………………… 74
Viewing Information (INFORMATION) ……………………………………….74
File information page ……………………………………………………………74
Card information page …………………………………………………………75
System information page …………………………………………………….75
System Settings and Formatting (SYSTEM) …………………………….. 76
Setting the automatic power saving function ………………… 76
Setting the backlight ……………………………………………………………. 76
Adjusting the display contrast ……………………………………………. 76
Setting the type of AA batteries ………………………………………… 76
Setting the phantom power voltage ………………………………… 76
Restoring the factory settings …………………………………………….77
Using QUICK FORMAT …………………………………………………………..77
Using FULL FORMAT ……………………………………………………………..77
Setting the format of file names ……………………………………………….. 78
File name format ………………………………………………………………….. 78
Setting the WORD item ……………………………………………………….. 78
Resetting the number (COUNT) ………………………………………….78
11 – Using the REMOTE jack ……………………………………. 79
Footswitch (TASCAM RC-3F) ……………………………………………………….79
Setting footswitch operation ………………………………………………79
Using the footswitch …………………………………………………………….80
Remote control (TASCAM RC-10) ………………………………………………..80
TASCAM DR-60DMKII
4
Setting the wired remote control ………………………………………80
Using the wired remote control ………………………………………… 80
Overview of mode functions ………………………………………………80
12 – Messages ………………………………………………………… 81
13 – Troubleshooting ………………………………………………84
14 – Specifications …………………………………………………. 86
Ratings …………………………………………………………………………………………….86
Inputs and outputs ……………………………………………………………………….86
Analog audio input and output ………………………………………….86
Control input and output ……………………………………………………. 87
Audio performance ………………………………………………………………………87
Computer compatibility ……………………………………………………………… 87
Other specifications ……………………………………………………………………..88
Dimensional drawings …………………………………………………………………89

1 – Introduction
Thank you very much for purchasing the TASCAM DR-60DMKII
Linear PCM Recoder. Please read this Owner’s Manual carefully in
order to maximize your use of all the unit’s features. We hope that
you will enjoy using this recorder for many years to come.
After you have finished reading this manual, please keep it in a safe
place for future reference.
You can also download the Owner’s Manual from the TEAC Global
Site (http://teac-global.com/).
Features
This recorder includes audio inputs and outputs that are suitable
for use with digital single-lens reflex (DSLR) cameras, enabling the
recording of high-quality audio with DSLR video.
•
Compact audio recorder that uses SD/SDHC cards as recording
media
•
TASCAM original High Definition Discrete Architecture (HDDA)
microphone preamps provide high-quality recording inputs
•
In addition to ordinary stereo recording, simultaneous recording
of up to four channels is possible
•
Four channels can be mixed down to two for stereo output
•
Recording levels can be adjusted independently for the 1/L, 2/R
and 3-4 inputs
•
Dual recording function allows two files to be recorded
simultaneously at different levels
•
44.1/48/96 kHz, 16/24-bit, linear PCM (WAV format) recording
possible
•
Broadcast Wave Format (BWF) supported as WAV recording
format
•
XLR mic/line inputs can provide phantom power (+24V/+48V)
TRS mic/line inputs (1/L and 2/R) support +24dBU input when
set to LINE
•
Stereo mini jack input supports mics that require plug-in power,
allowing the input of video mics and other high-output mics
(+10dBV maximum input level)
•
Slate tone functions (automatic/manual) simplify synchronization
of video files when editing
•
CAMERA OUT connector allows the high-quality audio from this
unit to be output to a DSLR camera for recording
•
CAMERA IN connector enables convenient monitoring of audio
from a DSLR camera
•
Auto-record function starts recording automatically when a set
sound input level is detected
•
Mid-side decoding function can be used with MS mics
•
Auto-record function can automatically start and stop recording
at set levels
•
Can start recording a new file automatically when a maximum
file size set in advance is reached without interrupting recording
•
A QUICK button is available for easy access to various functions
•
Track incrementing function allows a recording to be split by
creating a new file when desired
•
Pre-recording (PRE REC) function allows the unit to record the 2
seconds of sound before recording is activated
•
Limitter function is available to reduce the level automatically in
case of excessively large input.
•
Low cut filter conveniently reduces low-frequency noise
•
Self-timer function to start recording after a set period of time.
•
Jump back and play function allows the last several seconds of
the currently played file to be replayed again by simply pressing
a button
TASCAM DR-60DMKII
5

1 – Introduction
•
Delay function that eliminates time lags caused by differences in
the distances of two sets of inputs from the sound source
•
DIVIDE function allows files to be split where desired
•
MARK function convenient for moving to specific locations
•
Equalizers function for playback, and level alignment function to
enhance the perceived overall sound pressure
•
File name format can be set to use a user-defined word or the
date
•
Resume function to memorize the playback position before the
unit is turned off (enter standby).
•
3.5 mm (1/8”) line/headphones output jack
•
128 x 64 pixel LCD with backlight
•
Mini-B type USB 2.0 port
•
Operates on 4 AA batteries, an AC adaptor (sold separately:
TASCAM PS-P515U), external battery pack (sold separately:
TASCAM BP-6AA)or USB bus power
•
Tripod mounting threads (bottom) and DSLR screw attachment
that allows attachment and removal with a coin (top)
•
Dedicated remote control jack (for use with RC-10 and RC-3F (sold
separately) )
•
HOLD switch to prevent accidental operation
•
Handles on the front left and right sides protect the screen and
can be used to attach a shoulder belt
Conventions used in this manual
In this manual, we use the following conventions:
•
When we refer to buttons, connectors and other parts of this unit
and other equipment, we use a bold font like this: MENU button.
•
When we show messages, for example, that appears on the unit’s
display, the typeface looks like this:
•
SD memory cards are called “SD cards”.
•
We refer to digital single-lens reflex cameras as “DSLR cameras”
or “DSLRs”.
•
Words that appear on the computer display are shown in
quotation marks like this: “DR-60DMKII”
•
Additional information is provided as necessary as tips, notes
and cautions.
TIP
These are tips about how to use the unit.
NOTE
These provide additional explanations and describe special
cases.
CAUTION
Failure to follow these instructions could result in injury, damage
to equipment or lost recording data, for example.
REPEAT
.
TASCAM DR-60DMKII
6
2 – Names and functions of parts
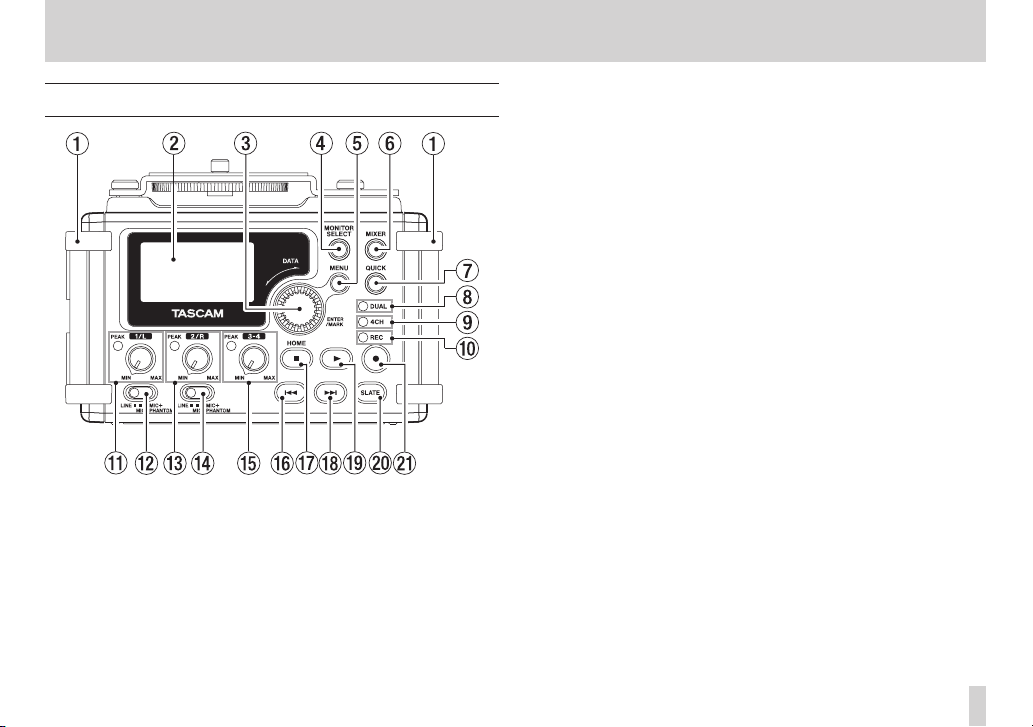
Front panel
1 Handles
Attach a strap, for example, here.
2 Display
Shows a variety of information.
3 DATA dial (ENTER/MARK)
Turn to select items and change values on setting screens.
Use also to change the playback position in a file.
Push to confirm selections on setting screens and to answer “YES”
to confirmation pop-up messages.
Press during recording to add a mark manually. (See “Adding
marks manually to a recording” on page 49.)
Press the . or / button while pressing and holding this
dial to move to the previous or next mark, respectively. (See
“Moving to a mark position” on page 49.)
4 MONITOR SELECT button
When not playing back, press to open the monitoring source
selection pop-up menu.
When playing back dual-recorded files, press to switch between
files.
5 MENU button
When the Home Screen or
the
MENU
Screen.
When a setting screen is open, press to move up one level in
the menu. When the
Home Screen.
6 MIXER button
Press this button to open the
When the
the Home Screen.
MIXE R
screen is open, press this button to return to
MIXE R
screen is open, press to open
MENU
Screen is open, press to return to the
MIXE R
screen.
TASCAM DR-60DMKII
7

2 – Names and functions of parts
7 QUICK button
Press when the Home Screen,
open to show the quick menu pop-up.
The function to be shown depends on the state of the unit when
the button is pressed.
Recorder status Functions shown
Stopped
Playing back Level align and playback EQ functions
Recording
standby
Recording
MIXE R
screen
open
BROWSE
screen
open
8 DUAL indicator
This lights orange when recording in dual recording mode.
9 4CH indicator
This lights orange when recording in 4-channel recording mode.
0 REC indicator
This blinks when in recording standby and lights red when
recording.
BROWSE
screen or
Delete/divide current playback file, level
align, playback EQ and mic input gain
setting functions
Mic input gain setting function
Mic input gain setting function
File/folder operations
MIXE R
screen is
q 1/L knob and PEAK indicator
Use this knob to adjust the input level from the 1/L connector on
the left side of the unit.
The 1/L PEAK indicator lights when the 1/L input level is about
to cause distortion. This also lights if distortion occurs in the
analog circuitry during mic input, but this does not light if
distortion occurs in the analog circuitry during line level input.
(See “Adjusting the input level/Muting” on page 36.)
w Input switch (1/L)
Set the input type for the 1/L connector and whether phantom
power is on or off.
e 2/R knob and PEAK indicator
Use this knob to adjust the input level from the 2/R connector
on the left side of the unit.
The 2/R PEAK indicator lights when the 2/R input level is about
to cause distortion. This also lights if distortion occurs in the
analog circuitry during mic input, but this does not light if
distortion occurs in the analog circuitry during line level input.
(See “Adjusting the input level/Muting” on page 36.)
r Input switch (2/R)
Set the input type for the 2/R connector and whether phantom
power is on or off.
t 3-4 knob and PEAK indicator
Use to adjust the input level from the 3/4 connector on the left
side of the unit.
The 3-4 PEAK indicator lights when the 3-4 input level is about
to cause distortion.
TASCAM DR-60DMKII
8

2 – Names and functions of parts
y . button
During playback or when stopped in the middle of a file, press to
return to the beginning of the file.
When stopped at the beginning of a file, press to skip to the
beginning of the previous file.
Press and hold to search backward.
Press this button while pressing and holding the DATA dial to
return to the previous mark.
On the setting screens, use this button to move the cursor left.
On the
BROWSE
Screen, press this button to move up a level.
u Stop(8) [HOME] button
Press this button during playback to cause the playback to pause
at the current position. Press this button during pause time to
return to the beginning of the playback file.
Press this button during recording or recording standby to cause
the recording to stop.
When any other screen is open, press this button to return to the
Home Screen. Use this button to answer “NO” to a confirmation
message.
i / button
When stopped or playing back, press to skip to the next file.
Press and hold to search forward.
On the setting screens, use this button to move the cursor right.
Press this button while pressing and holding the DATA dial to
move to the next mark.
On the
BROWSE
If a file is selected, the file is loaded and the unit returns to the
Home Screen and stops.
Screen, press this button to move down a level.
o 7 (playback) button
When the Home Screen is displayed and playback is stopped,
press this button to start playback.
During playback, press this button to start jump-back playback.
(See “Moving back a few seconds for replay (jump-back
playback)” on page 62.)
When a file or folder is selected in the
button to return to the Home Screen and play the file or the first
file in the folder from the beginning.
p SLATE button
Press and hold during playback to record a slate stone. (See
“Adding slate tones” on page 52.)
a 0 (record) button
Press when stopped to start recording standby
Press when recording to pause recording (resume recording
standby).
BROWSE
screen, press this
TASCAM DR-60DMKII
9
2 – Names and functions of parts
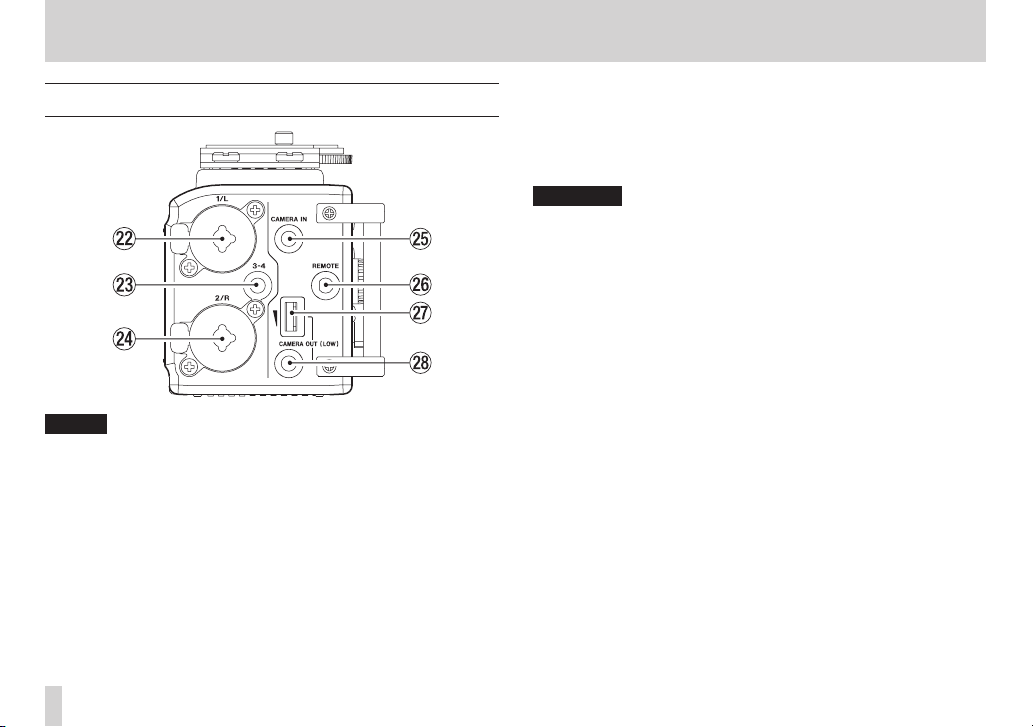
Left side panel
NOTE
Do not apply excessive force when plugging in external devices to
connect them to this unit or during use. In particular, be careful
when using a standard-to-mini plug adapter, because the application of unintended force could result in damage to the device.
s 1/L connector (XLR/TRS)
These are balanced analog XLR/TRS combo jacks for microphone
and line level inputs.
XLR (1: GND, 2: HOT, 3: COLD)
TRS (Tip: HOT, Ring: COLD, Sleeve: GND)
d 3-4 connector (3.5mm stereo mini jack)
This TRS analog input jack can provide plug-in power.
TRS (Tip: HOT, Ring: COLD, Sleeve: GND)
TASCAM DR-60DMKII
10
f 2/R connector (XLR/TRS)
These are balanced analog XLR/TRS combo jacks for microphone
and line level inputs.
XLR (1: GND, 2: HOT, 3: COLD)
TRS (Tip: HOT, Ring: COLD, Sleeve: GND)
CAUTION
•
Confirm that phantom power is OFF before connecting a line
level device to a 1/L connector or 2/R connector. If you connect
a line level device while phantom power is being supplied, that
device and this unit could be damaged.
•
When using a condenser microphone, before connecting to and
disconnecting from a 1/L connector or 2/R connector, confirm
that the phantom power for that jack is OFF. If you connect or
disconnect a mic while phantom power is being supplied, that
mic and this unit could be damaged.
•
Do not connect an unbalanced dynamic mic to an XLR connector
when phantom power is being supplied. Doing so could damage
that mic and this unit.
g CAMERA IN connector (3.5mm stereo mini jack)
Connect to the audio output of a camera.
Refer to the camera’s operation manual to identify this connector
on the camera. (See “Camera connection and attachment” on
page 29.)
h REMOTE connector (2.5mm TRS jack)
Connect a TASCAM RC-3F footswitch or TASCAM RC-10 wired
remote control (both sold separately) here to enable remote
starting and stopping of playback and other functions. (See “11 –
Using the REMOTE jack” on page 79.)

2 – Names and functions of parts
j CAMERA OUT (LOW) volume control
Use to adjust the volume output from the CAMERA OUT (LOW)
connector.
k CAMERA OUT (LOW) connector (3.5mm stereo mini jack)
Connect a camera external mic connector.
Refer to the camera’s operation manual to identify this connector
on the camera. (See “Camera connection and attachment” on
page 29.)
Right side panel
NOTE
Do not apply excessive force when plugging in headphones
and external devices to connect them to this unit or during use.
In particular, be careful when using a standard-to-mini plug
adapter, because the application of unintended force could result
in damage to the device.
l SD card slot
Insert an SD card here.
; button
Press and hold this button to turn the unit’s power ON or
OFF(Standby). (See “Turning the power on and off (putting it in
standby)” on page 25)
TASCAM DR-60DMKII
11
2 – Names and functions of parts
z HOLD switch
Shift to the top end (in the direction of the arrow) to engage the
hold function.
All buttons are inoperative when hold is ON.
x USB port
Use the included USB cable to connect with a computer USB
port. (See “9 – Connecting with a computer” on page 72.)
Power can be supplied through the USB cable provided with the
unit or an AC adaptor (sold separately: TASCAM PS-P515U).
CAUTION
Always connect the recorder directly to a computer. Do not use a
USB hub.
c PHONES volume control
Use to adjust the volume output from the PHONES jack.
v PHONES jack (3.5mm stereo mini jack)
Connect stereo headphones to this stereo mini jack.
Use the PHONES control to adjust the volume.
CAUTION
Before connecting headphones, lower the PHONES volume to
the minimum level. Failure to do so could result in a sudden loud
noise that could harm hearing, for example.
b CAMERA OUT (HIGH)/LINE OUT volume control
Use to adjust the volume output from the CAMERA OUT (HIGH)/
LINE OUT jack.
n CAMERA OUT (HIGH)/LINE OUT jack (3.5mm stereo mini jack)
Use this to connect with the line input jack of an amp or other
equipment.
Use the CAMERA OUT (HIGH)/LINE OUT control to adjust the
volume.
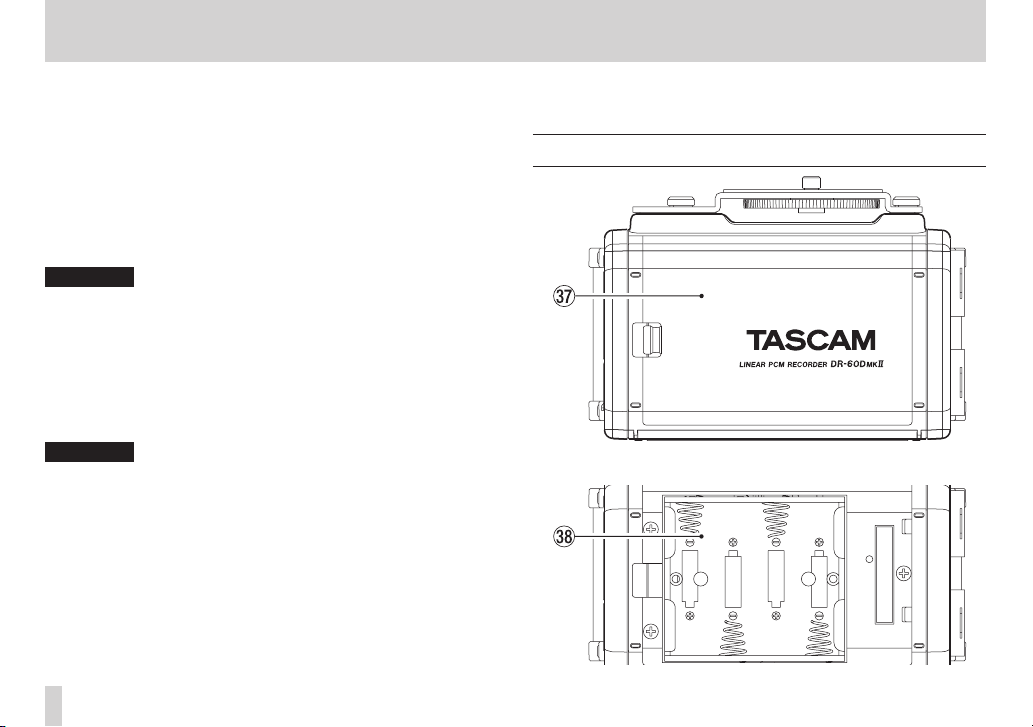
Rear panel
m Battery compartment cover
TASCAM DR-60DMKII
12
2 – Names and functions of parts
, Battery compartment
Install batteries (4 AA batteries) in this compartment to power
the unit. (See “Using AA batteries” on page 22.)
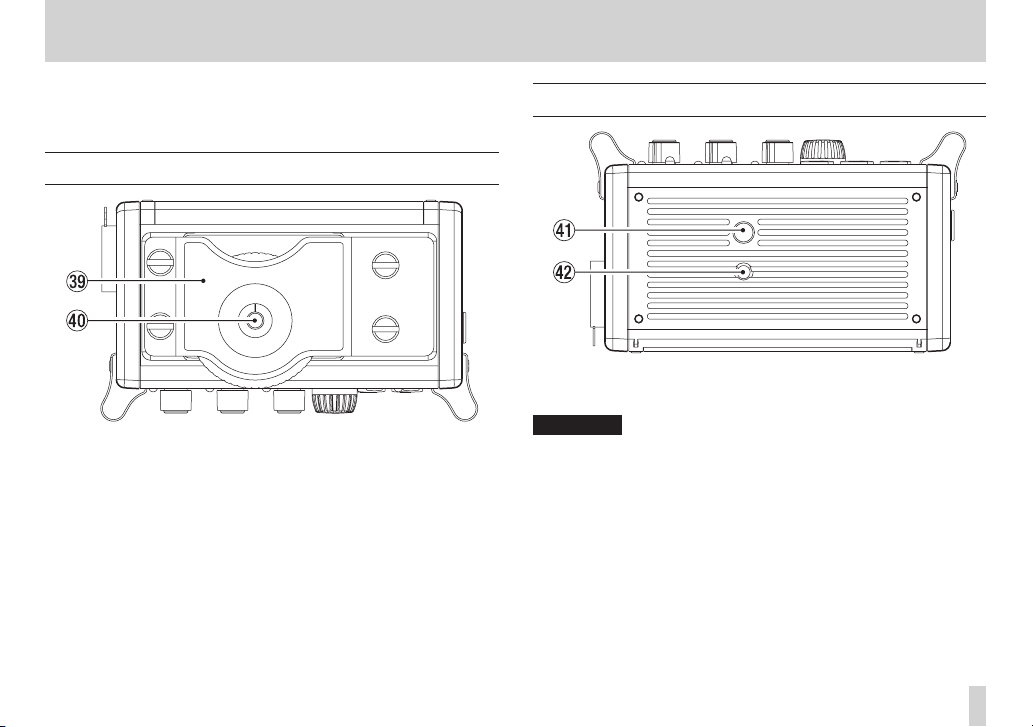
Top panel
. DSLR attachment bracket
Use this bracket, which is preinstalled on the unit, with the DSLR
mounting screw.
If you do not want to use this bracket, use a coin or other tool to
remove the four attachment screws.
/ DSLR mounting screw (1/4-inch)
Use to attach this unit to the bottom of a camera or a rack that
supports camera mounting screws, for example.
Bottom Panel
! Tripod mounting threads (1/4-inch)
Use to attach this unit to a tripod.
CAUTION
•
Tighten the unit securely to the tripod or microphone stand to
prevent it from falling off.
•
Place the tripod or microphone stand on a level surface when
using it with this unit.
•
Some tripods have different screw specifications that make direct
connection impossible. Use a commercially-available adapter
with such tripods.
@ Video camera pin hole
When using a tripod with a pin for video cameras, align this hole
with the pin when attaching the unit to the tripod.
TASCAM DR-60DMKII
13
2 – Names and functions of parts
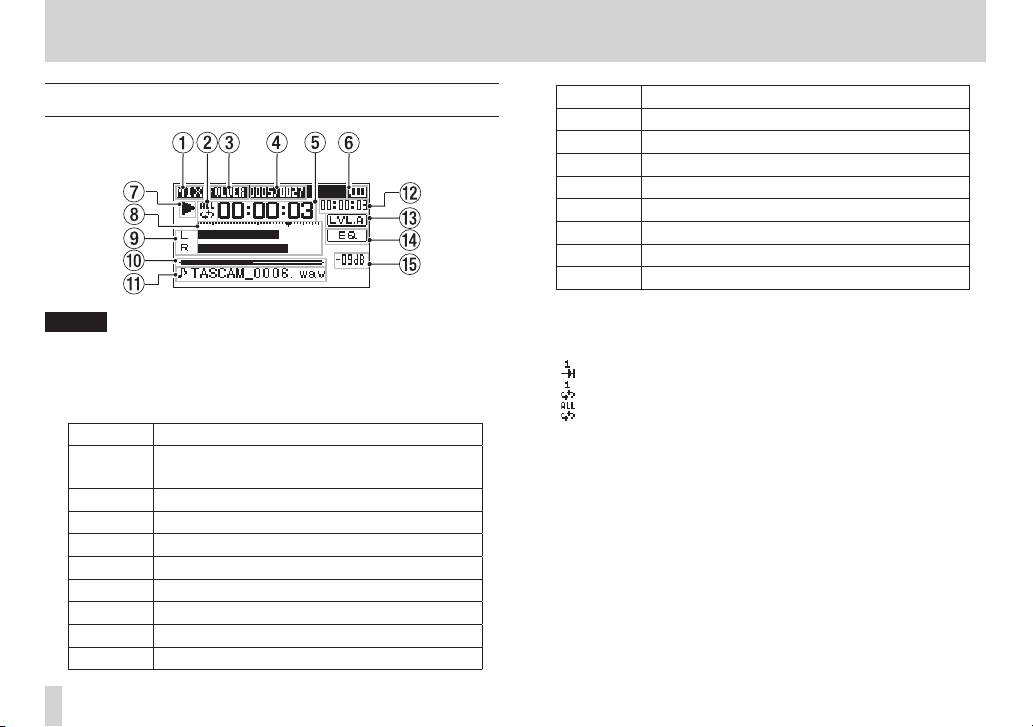
Home Screen
NOTE
When monitoring, some meters, icons and other items will
change to recording screen appearance.
1 Monitoring mode
This shows what audio is now being monitored.
Indicator Meaning
MIX
SUB Dual recording mode sub file
1+2 Mix of channels 1-2
3+4 Mix of channels 3-4
CAM CAMERA IN jack sound input
CH1 Channel 1 sound input
1-M Left channel of dual recording mode main file
1-S Left channel of dual recording mode sub file
CH2 Channel 2 sound input
Mix of channels 1-4,
or dual recording mode main file
Indicator Meaning
2-M Right channel of dual recording mode main file
2-S Right channel of dual recording mode sub file
CH3 Channel 3 sound input
3-M Left channel of dual recording mode main file
3-S Left channel of dual recording mode sub file
CH4 Channel 4 sound input
4-M Right channel of dual recording mode main file
4-S Right channel of dual recording mode sub file
2 Repeat playback setting
One of the following icons appears according to the current
setting.
Single file playback
Single file repeat playback
All file repeat playback
3 Playback area
This shows the current playback file area.
ALL
All files in the MUSIC folder
FOLDER
All files in the selected folder
4 Current playback file number/total number of files
This shows the current file number and total number of files in
the current playback area.
5 Elapsed time
This shows the elapsed time (hours: minutes: seconds) of the
current file.
TASCAM DR-60DMKII
14
2 – Names and functions of parts
6 Power supply status
When a battery is being used, a battery icon shows the amount
of power remaining in bars (“ ”, “ ”, “ ”).
The battery is almost dead and the power will soon turn off
(standby) if the icon has no bars “ ”.
When using the PS-P515U AC adaptor (sold separately) or USB
bus power, “ ” appears.
NOTE
Sometimes a
or conducting other demanding operations even when battery
power remains.
7 Recorder operation status
This icon shows the recorder operation status.
Indicator Meaning
8
9
7
,
m
/
.
8 Level meter
These show the levels of the input playback signals.
Battery Low
Stopped
Paused
Playing back
Fast-forwarding
Fast-rewinding
Skipping forward
Skipping backward
warning appears when recording
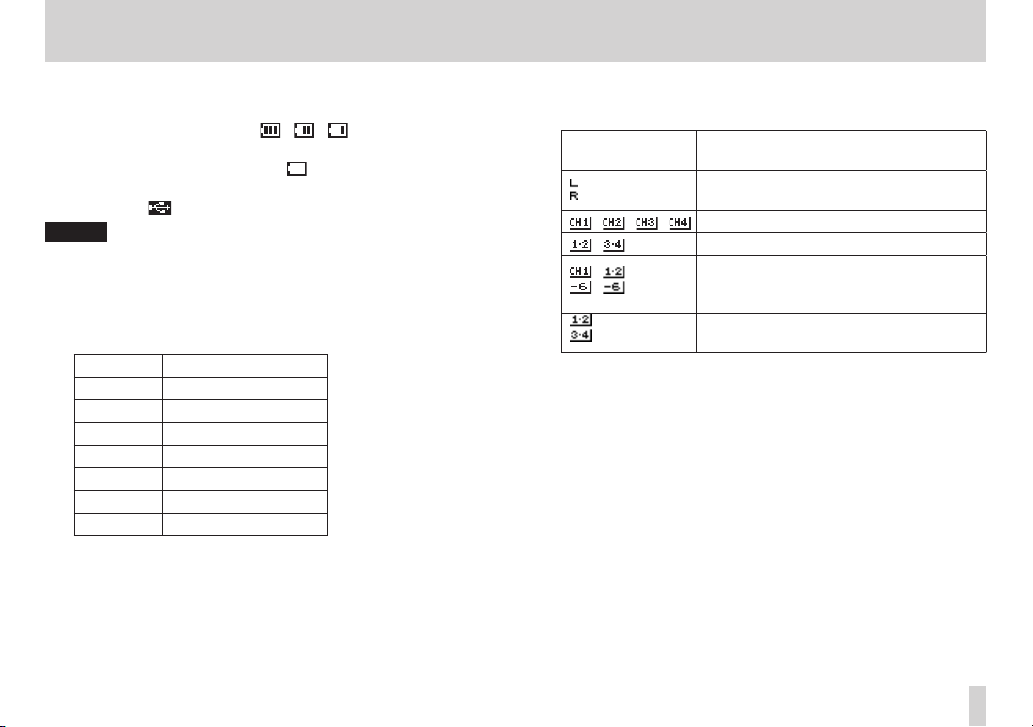
9 Track status display
This icon changes according to the recording mode.
Indicators
(examples)
/ / / Monitoring in MONO mode
/ Monitoring in STEREO mode
/
0 Playback position display
The current playback position is shown by a bar. As playback
progresses, the bar extends to the right.
q File name
This shows the name of the file playing back unless there are
multiple files recorded in 4-channel recording mode or dual
recording mode. In these cases, it shows the project name.
w Remaining time
This shows the remaining time (hours: minutes: seconds) of the
current file.
Meaning
Playing a file recorded in MONO or
STEREO mode
Playing a file recorded in DUAL MONO
or DUAL ST mode or monitoring in these
modes
Playing a file recorded in 4CH mode or
monitoring in this mode
TASCAM DR-60DMKII
15
2 – Names and functions of parts
e Level align status
This icon shows whether the level align function is on or off. (See
“Increasing the perceived overall sound pressure to enhance
listenability (Level Alignment)” on page 67.)
Level align function off
Level align function on
r Playback equalizer status
This icon shows whether the playback equalizer is on or off. (See
“Using the playback equalizer” on page 68.)
Playback equalizer off
Playback equalizer on
t Peak value in decibels (dB)
The maximum level that occurs in a fixed period of time is
displayed digitally.
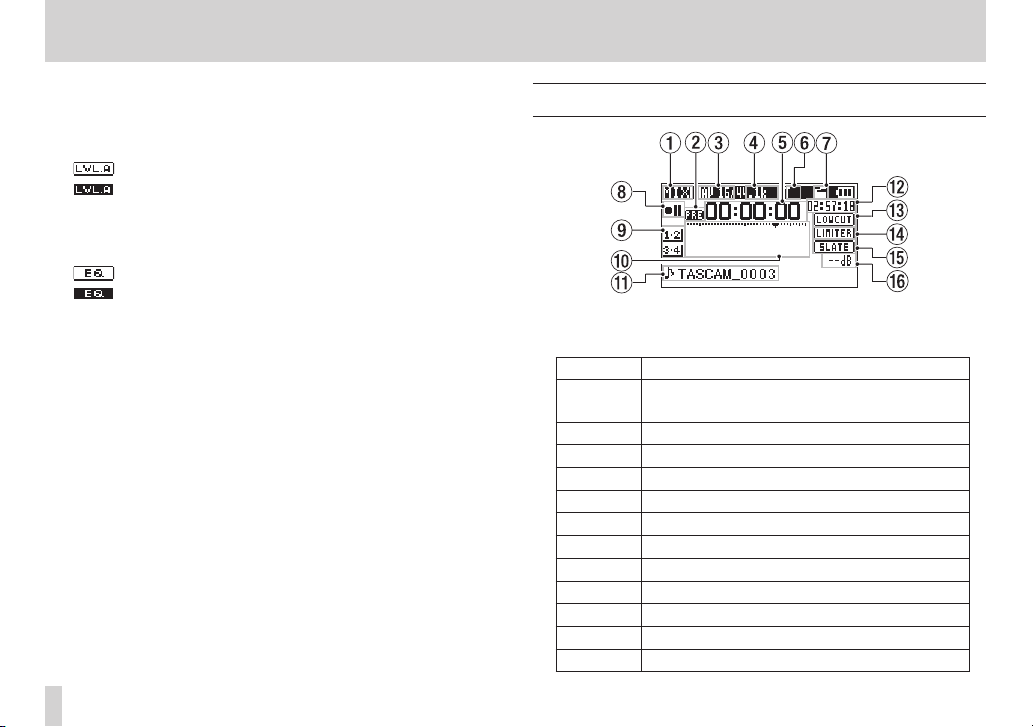
Recording Screen
1 Monitoring mode
This shows what audio is being monitored now.
Indicator Meaning
MIX
SUB Dual recording mode sub file
1+2 Mix of channels 1-2
3+4 Mix of channels 3-4
CAM CAMERA IN jack sound input
CH1 Channel 1 sound input
1-M Left channel of dual recording mode main file
1-S Left channel of dual recording mode sub file
CH2 Channel 2 sound input
2-M Right channel of dual recording mode main file
2-S Right channel of dual recording mode sub file
CH3 Channel 3 sound input
Mix of channels 1-4,
or dual recording mode main file
TASCAM DR-60DMKII
16
2 – Names and functions of parts
Indicator Meaning
3-M Left channel of dual recording mode main file
3-S Left channel of dual recording mode sub file
CH4 Channel 4 sound input
4-M Right channel of dual recording mode main file
4-S Right channel of dual recording mode sub file
2 Prerecording or Auto recording function status
“ ” appears when the prerecording function is ON, and in
recording standby.
“ ” appears when the auto recording function is ON, and
recording.
3 Recording format
This shows the file recording format.
WAV16, WAV24, BWF16 or BWF24
4 Recording sampling frequency
This shows the file recording sampling frequency.
44.1kHz, 48kHz or 96kHz
5 Elapsed recording time
The elapsed recording time of the file appears as hours: minutes:
seconds.
6 Number of recording channels
This shows the number of recording channels in the file.
ST or MONO
7 Auto tone function status
This icon shows whether the auto tone function is on or off. (See
“Using the auto tone function” on page 51.)
No icon Auto tone off
Auto tone on
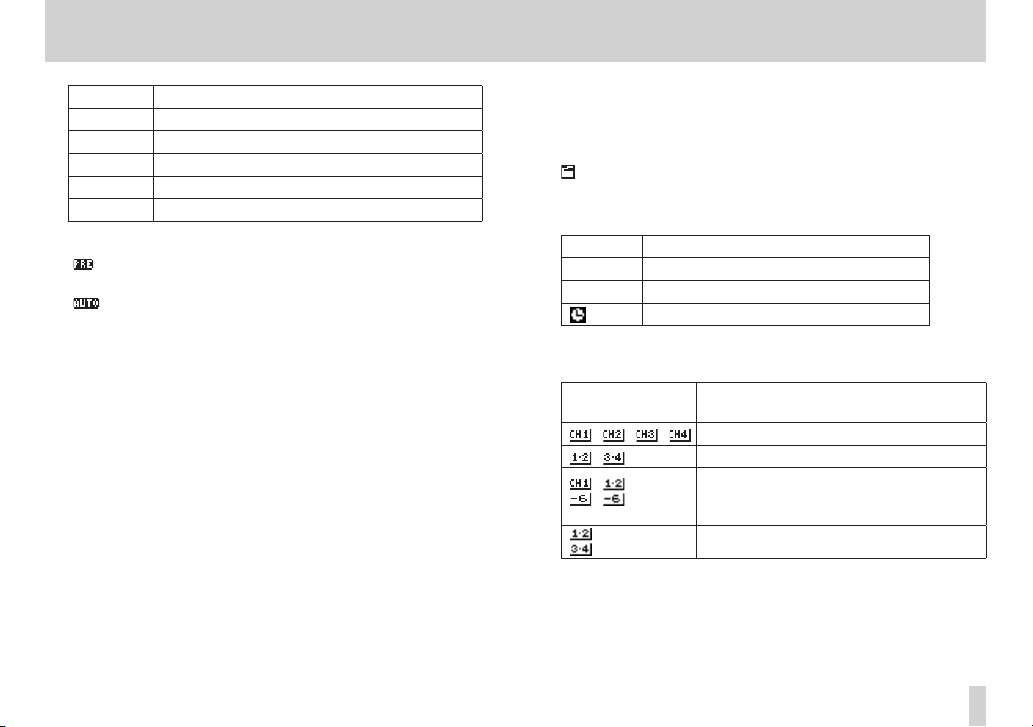
8 Recorder operation status
This icon shows the recorder operation status.
Indicator Meaning
09
0
9 Input source
This icon shows the input source.
Indicators
(examples)
0 Recording level meters
These show the levels of the input audio.
The b mark at the –12dB position provides a guide when
adjusting the input levels.
Recording standby or Recording paused
Recording
Self-timer recording activated
Meaning
/ / / Mono recording mode input source
/ Stereo recording mode input source
Dual recording mode input source and
/
gain setting for the second recording (0
to –12)
4-channel recording mode input source
TASCAM DR-60DMKII
17
2 – Names and functions of parts
q File name
This shows the file name that is automatically assigned to a
recording file.
This shows the project name when there are multiple files
recorded in 4-channel recording mode or dual recording mode.
w Remaining recording time
The remaining recording time on the SD card is shown in hours:
minutes: seconds according to the recording mode, sampling
frequency and recording format settings.
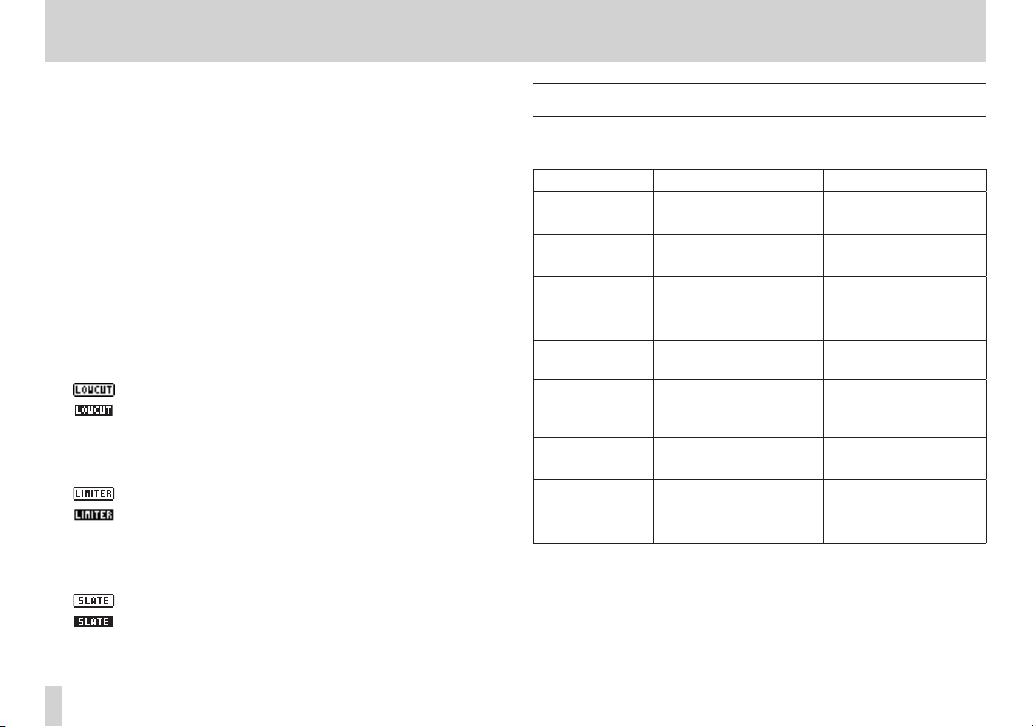
e Low cut filter status
This shows whether the low cut filter is ON/OFF. (See “Using the
low-cut filter” on page 39.)
This icon is shown as light letters on a dark background if the
low-cut filter is set to 40Hz, 80Hz or
2 or channels 3/4.
: Low cut filter off
: Low cut filter on
r Limiter function status
An icon appears if the limiter function setting for channel 1, 2 or
3/4 is set to
: Limiter off
: Limiter on
t SLATE button setting
This shows the SLATE button setting (enable/disabled).
(See “Adding slate tones” on page 52.)
: SLATE button disabled
: SLATE button enabled
y Peak value in decibels (dB)
Peak input level values are shown digitally.
18
MONO
or
TASCAM DR-60DMKII
LINK
. (See “Using the limiter” on page 38.)
120
Hz for channel 1, channel
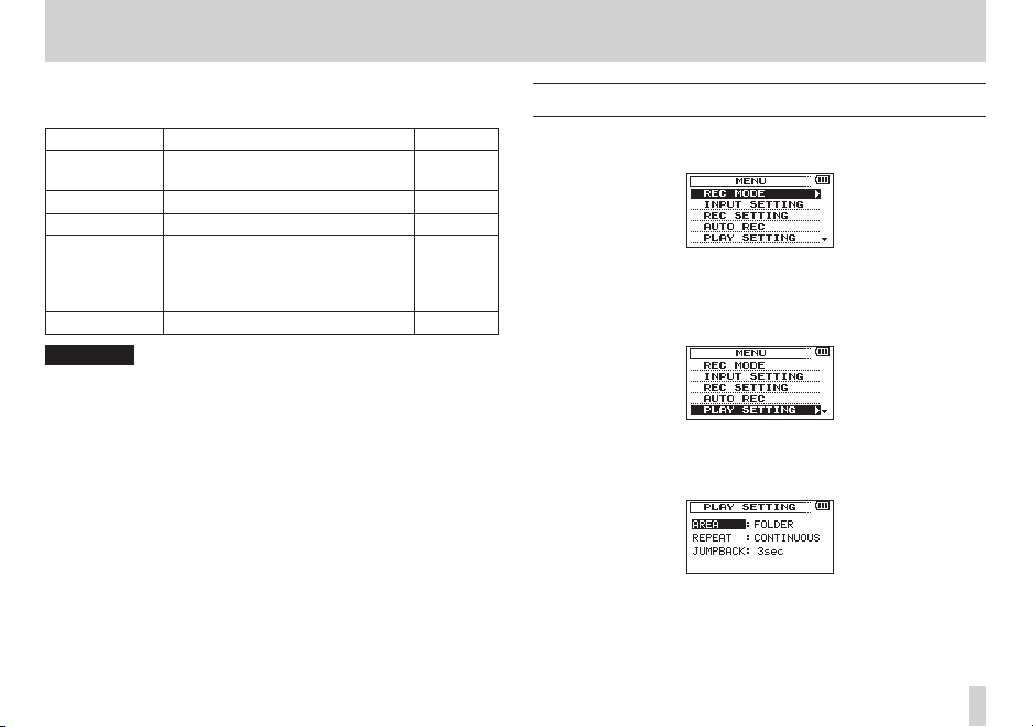
Menu item list
Press the MENU button to open the
menu are as follows.
Menu item Function Pages
REC MODE
INPUT SETTING Make input settings.
REC SETTING
AUTO REC
PLAY SETTING
BROWSE
OTHERS Show submenu items.
Set the recording
source.
Make recording
settings
Make auto recording
settings.
Make play area,
repeat playback and
jump-back settings.
SD card file and folder
operations
MENU
screen. The items in this
page 39, page 40,
page 42, page 44
page 36, page 38,
page 39
page 30, page 32,
page 48, page 50,
page 51, page 52
page 46, page 49
page 58, page 61
page 54, page 59
page 60
page 26, page 36,
page 74, page 78,
page 79
The
OTHERS
MENU
Submenu item Function Pages
INFORMATION
FILE NAME File name settings page 78
DATE/TIME Date and time settings page 26
REMOTE
SYSTEM Various system settings page 76
CAUTION
•
When in recording standby or recording, only the
SETTING
•
When recording, the
submenu appears when
screen. The menu items contained are as follows.
Information about the file, SD card,
and system
Settings for the TASCAM RC-3F
footswitch and TASCAM RC-10
wired remote control (both sold
separately)
and
AUTO REC
screens are shown.
AUTO REC
OTHERS
is selected in the
setting cannot be changed.
page 74
page 79,
page 80
INPUT
2 – Names and functions of parts
Using menus
Use the
MENU
screen to make various settings.
1. Press the MENU button to open the
2. Turn the DATA dial to select a menu item (highlighted), and
press the DATA dial or / button to move to various settings
screens.
Example: PLAY SETTING screen
3. Turn the DATA dial to select a menu item (highlighted) to be
set.
Example: AREA is selected.
MENU
screen.
TASCAM DR-60DMKII
19
2 – Names and functions of parts
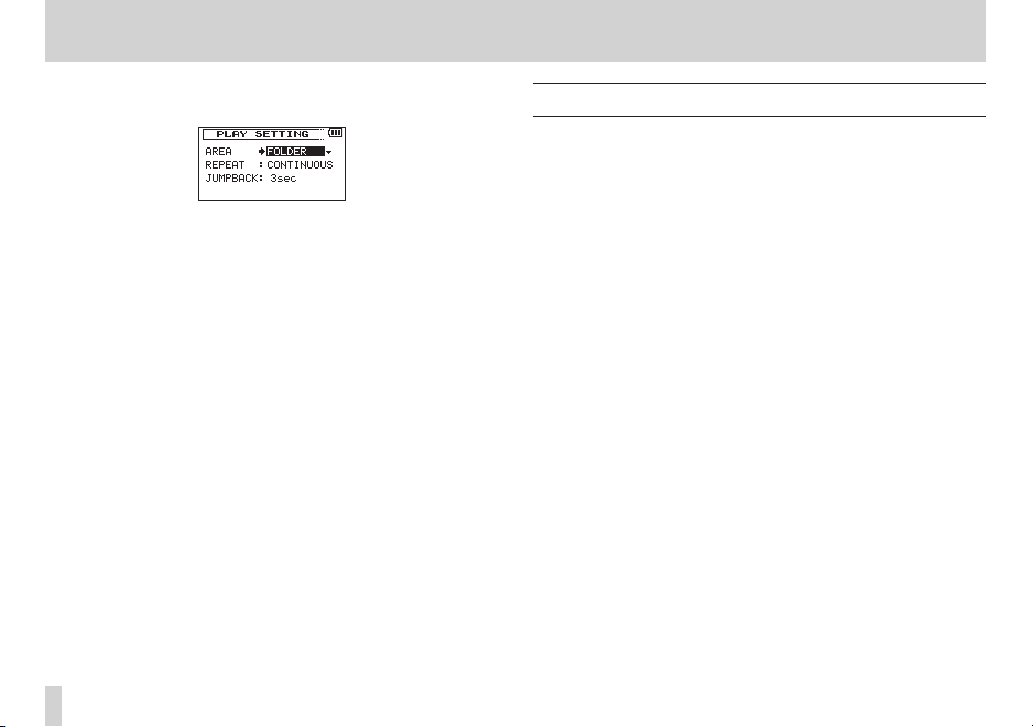
4. Press the DATA dial or / button to move the cursor to
highlight the value of the setting.
5. Turn the DATA dial to change the setting.
6. Press the DATA dial or . button to set a different item in the
same menu.
This enables you to select a new item. Turn the D ATA dial again
to select an item to be set.
7. Repeat step 3 to 6 as necessary to set each item.
8. To open the
the MENU button.
To return to the Home Screen, press the Stop (8) [HOME]
button.
MENU
screen (or
OTHERS
submenu screen), press
Basic operation
Use the following buttons to operate the various screens.
MENU button:
Opens the
Stop (  [HOME] button:
When any other screen is open, press this to return to the Home
Screen. Use this to answer “NO” to a confirmation message.
DATA dial:
Turn the DATA dial to select items and change values on setting
screens. You can also turn the DATA dial to change the file
playback position.
Press the DATA dial to confirm items selected on setting screens
and to answer “Yes” to confirmation pop-up messages.
Press the DATA dial during recording to add a mark manually.
(See“Adding marks manually to a recording” on page 49.)
While pressing and holding the DATA dial, press the . button
to jump to the previous mark or press the / button to jump
to the next mark. (See “Moving to a mark position” on page 49.)
/ button:
Use this to move the cursor (the highlighted area) to the right on
the screen, and to open folders on the
. button:
Use this to move the cursor (the highlighted area) to the left on
the screen, and to close folders on the
MENU
screen.
BROWSE
BROWSE
screen.
screen.
TASCAM DR-60DMKII
20

QUICK button:
This opens the quick menu pop-up.
• When stopped: Delete/divide current playback file, level align,
playback EQ and mic input gain setting functions
• During playback: Level align and playback EQ functions
• In recording standby: Mic input gain setting function
• When recording: Mic input gain setting function
• When the
• When the
function
BROWSE
screen is open: File/folder operations
MIXE R
screen is open: Mic input gain setting
Record (0) button
Opens the
When the
REC MODE
REC MODE
screen.
screen is open, returns to the Home Screen.
MIXER button
Opens the
When the
MIXE R
screen.
MIXE R
screen is open, returns to the Home Screen.
2 – Names and functions of parts
TASCAM DR-60DMKII
21
3 – Preparation
Powering the unit
Power sources
DR-60DMKII can operate on four AA batteries, TASCAM PS-P515U AC
adaptor (sold separately) or USB cable provided with the unit (USB
bus power).
Alkaline or Ni-MH batteries can be used.
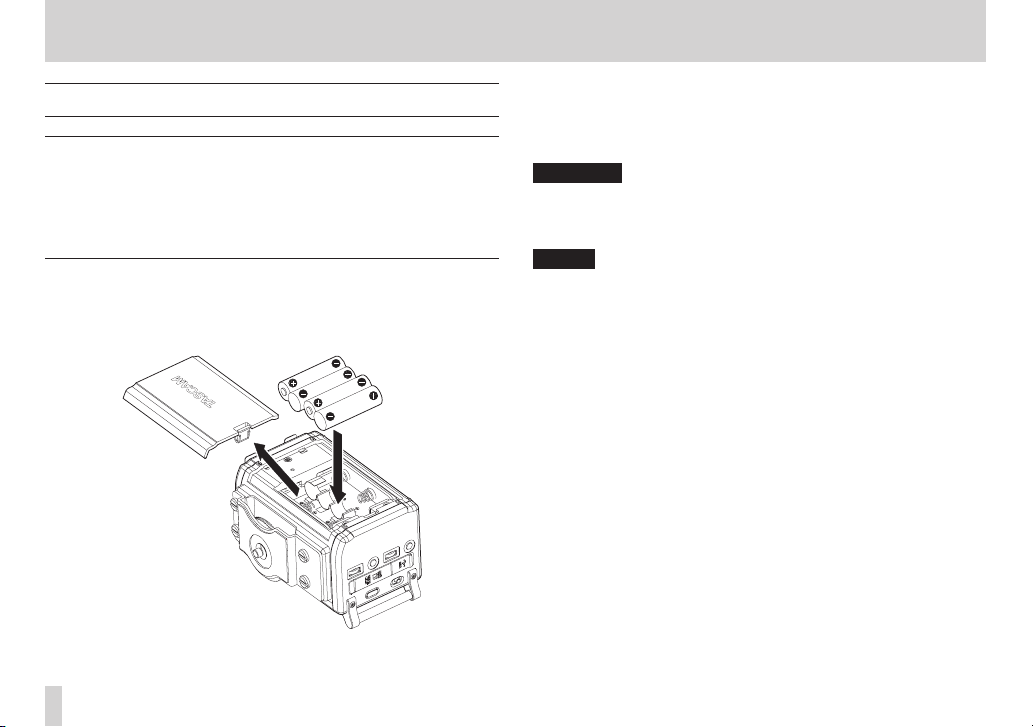
Using AA batteries
Remove the battery compartment cover on the back of the unit.
Install 4 AA batteries in the compartment with the ¥ and ^ marks
as shown. Then, close the battery compartment cover.
When using AA batteries, set the type of battery in order to
accurately show the amount of power remaining and allow the
unit to accurately determine whether power is available for proper
operation. (See “Setting the type of AA batteries” on page 76.)
CAUTION
•
Manganese dry cell batteries (R6) cannot be used with this unit.
•
This unit cannot recharge Ni-MH batteries. Use a commercially
available recharger.
NOTE
A great amount of power is required to provide phantom power
to a condenser microphone. If you use a condenser microphone
while running the unit on AA batteries (NiMH rechargeable or
alkaline), the operation time will be shortened.
If you need to operate the unit for a long time, use a TASCAM
PS-P515U AC adaptor or TASCAM BP-6AA external battery box
(both sold separately) to power the unit.
TASCAM DR-60DMKII
22

3 – Preparation
Using an AC adaptor (sold separately)
Connect the TASCAM PS-P515U AC adaptor (sold separately) and the
USB cable to the USB port of the unit as shown in the illustration.
AC outlet
TASCAM
PS-P151U
(sold separately)
Mini-B USB plug
NOTE
When both batteries are installed and the AC adaptor is
connected, power will be supplied from the AC adaptor.
CAUTION
•
Never use any adaptor other than the designated TASCAM
PS-P515U AC adaptor (sold separately). Use of a different adaptor
could cause malfunction, fire or electric shock.
•
Noise may occur when recording with a microphone if the unit
is too close to the AC adaptor. In such a case, keep sufficient
distance between the AC adaptor and the unit.
Using an external battery pack (sold separately)
Connect a TASCAM BP-6AA external battery pack (designed for use
with this unit and sold separately) to the recorder with the included
USB cable as shown in the illustration. For details, see the BP-6AA
Owner’s Manual.
TASCAM BP-6AA
(sold separately)
Mini-B USB plug
CAUTION
The DR-60DMKII cannot detect the remaining battery charge of a
BP-6AA. If you use a BP-6AA to operate the DR-60DMKII without
batteries in the recorder itself, the unit might stop operating
suddenly if the battery pack runs out of charge. In order to avoid
problems, put batteries with sufficient charge into the DR-60DMKII
before connecting and using a BP-6AA.
TASCAM DR-60DMKII
23
3 – Preparation
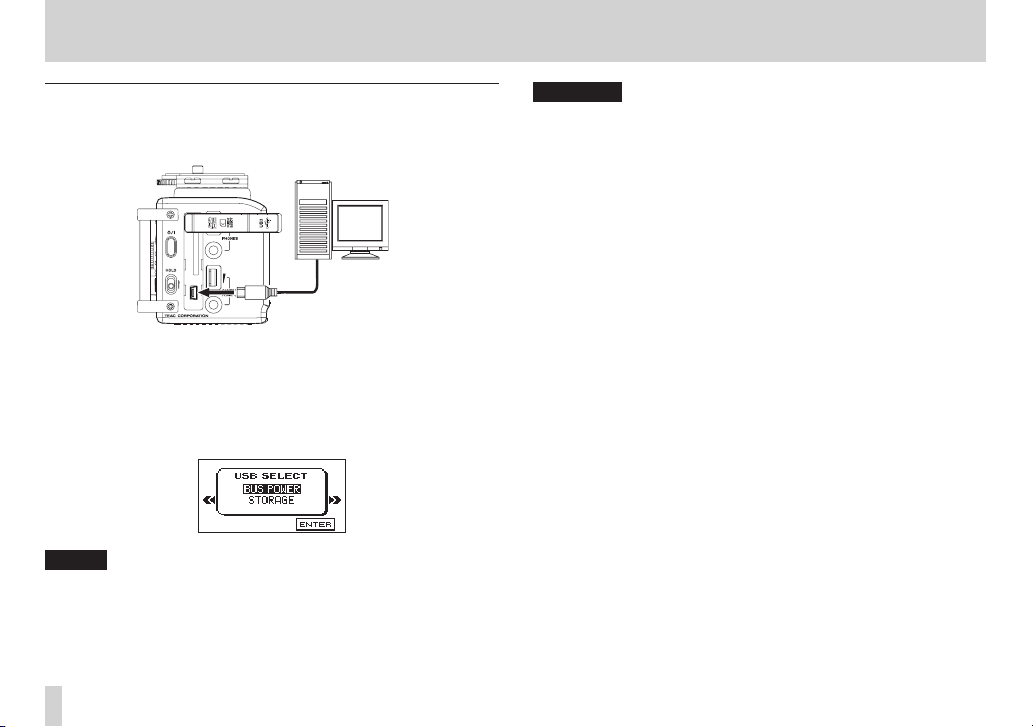
Using USB bus power
Connect the unit to a PC using the attached USB cable as shown in
the illustration.
Computer
USB
Mini-B USB plug
The
USB SELECT
power for power supply or connection with a PC through the USB
cable when USB cable is connected after the unit is turned on or
when the unit is turned on after connecting the USB cable. Turn the
DATA dial to select
power supply from the USB port. The Home Screen will appear.
NOTE
Power is supplied from the USB port if the USB cable is connected
to the unit that contains batteries (USB bus power prioritized).
screen appears to choose between USB bus
BUS POWER
and press the DATA dial to select
CAUTION
•
Depending on the USB bus power specifications of the computer,
this unit might not function when connected to the computer by
USB cable. In this case, use a TASCAM PS-P515U AC adaptor (sold
separately) or batteries.
•
This unit does not support computer power conservation and
sleep functions. When powering the unit using the USB bus power
of a computer, always turn such functions off.
TASCAM DR-60DMKII
24
3 – Preparation
Turning the power on and off (putting it in
standby)
CAUTION
•
The unit goes in standby mode if shut down when the unit is
operating on AC power supplied through the TASCAM PS-P515U
AC adaptor (sold separately), or bus power supplied from a USB
port of a PC.
•
Turn down the volume of the sound system connected to the unit
before starting up or shutting down (standby) the unit.
•
Do not use headphones when starting up or shutting down
(standby) the unit. Otherwise, a large noise would cause damage
to headphones or your ears.
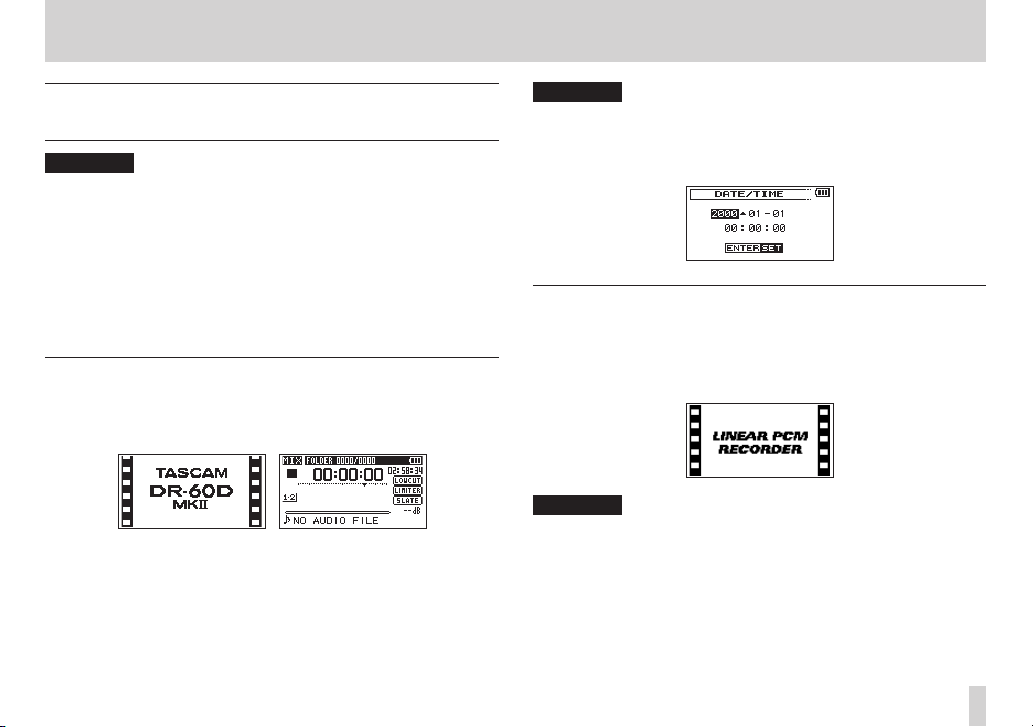
Starting up the unit
To start up the unit from the stopped state, press and hold the ¤
button until
the display. The Home Screen appears when the unit starts up.
TASCAM DR-60DMKII
Start -Up Screen Home Screen
(start-up screen) is displayed on
CAUTION
When the unit is started up for the first time (or when the built-in
clock is reset after being left unused without batteries), the
DA TE/TIME
the date and time. (See “Setting the date and time” on page 26.)
screen appears before the start-up screen to adjust
Shutting down (putting the unit in standby)
Press and hold the ¤ button until
appears on the display.
The power turns off after the unit completes its shutdown (standby)
process.
CAUTION
Always use the ¤ button to shutdown (standby) the unit.
Do not remove the batteries or disconnect the power cable (AC
adaptor TASCAM PS-P515U or USB cable) accidently while the
unit is operating. If you do so, the unit cannot shut down properly
and all recordings, settings and other data will be lost. Lost data
cannot be restored.
LINEAR PCM RECORDER
TASCAM DR-60DMKII
25
3 – Preparation
Resume function
The unit has resume function. When started up, the unit is located to
the position (time) where it left off when shut down previously.
If the Playback (7) button is pressed after start-up, the file the
unit was playing when shut down (standby) previously starts to be
played from the position (time) where the unit left off when shut
down.
NOTE
The required data are stored in the SD card. The resume function
does not work if the card is exchanged or formatted.
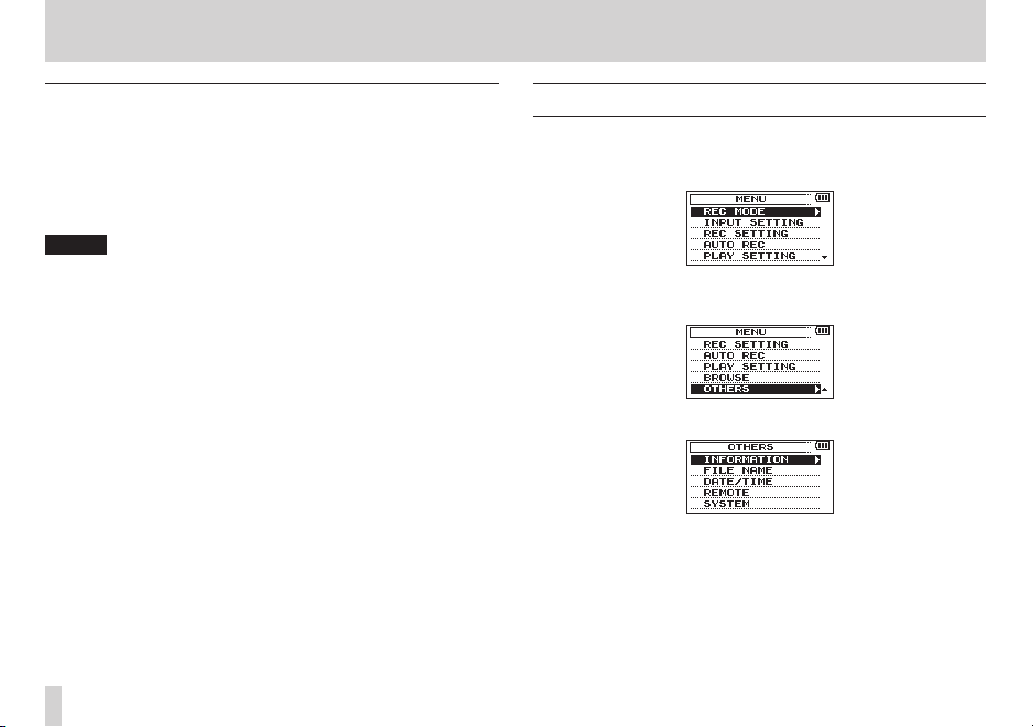
Setting the date and time
Using its internal clock, this unit remembers the date and time when
a file is recorded.
1. Press the MENU button to open the
2. Turn the DATA dial to select
/ button to open the
The
OTHERS
screen opens.
OTHERS
MENU
screen.
OTHERS
, and press the DATA dial or
screen.
TASCAM DR-60DMKII
26
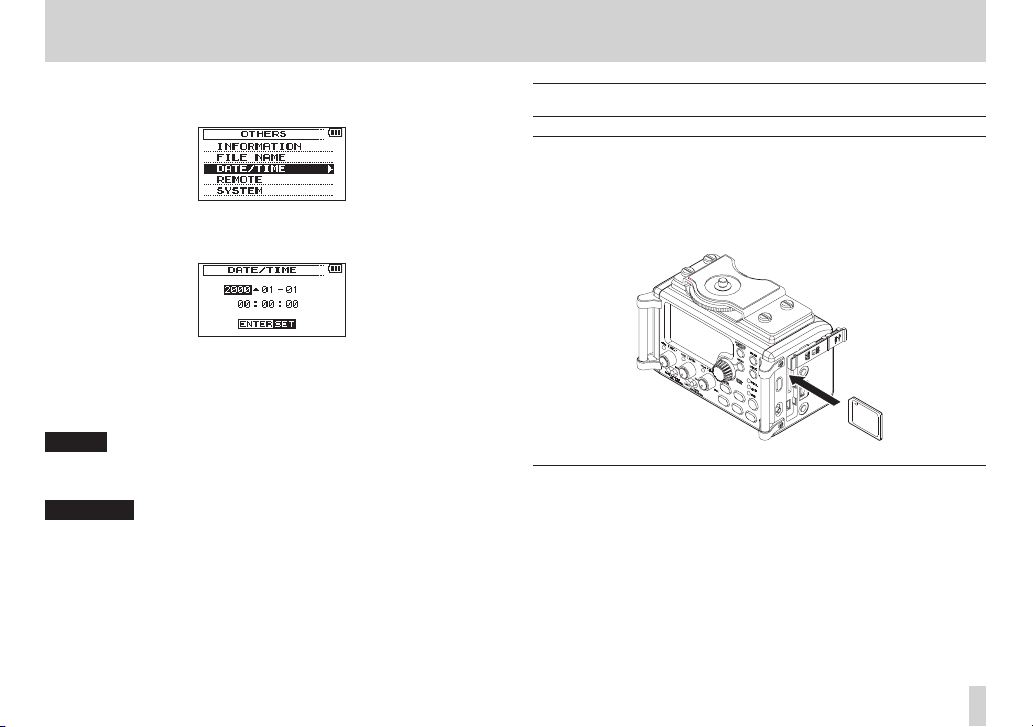
3 – Preparation
3. Turn the DATA dial to select
dial or / button.
The
DA TE/TIME
4. Press the DATA dial or the . and / buttons to move the
cursor, and turn the DATA dial to change the value.
5. Press the MENU button or . button to confirm the change
and return to the
NOTE
You can set the unit to automatically add the date to file names.
(See “Setting the format of file names” on page 78.)
CAUTION
•
The date and time setting can only be maintained for a few
minutes if the battery power becomes low and the unit is not
powered by a TASCAM PS-P515U AC adaptor (sold separately)
or USB cable. When using batteries, replace them before they
completely lose power.
screen opens.
OTHERS
DA TE/TIME
screen.
, and press the DATA
Inserting and removing SD cards
Inserting the SD card
1. Open the SD card slot/USB port cover on the right side of the
unit.
2. Insert the SD Card into the slot as shown in the following illustration until it clicks into place.
Removing the card
1. Open the SD card slot/USB port cover on the right side of the
unit.
TASCAM DR-60DMKII
27
Loading…