

COMPUTER SEWING MACHINE
MACHINE ELECTRONIQUE
MÁQUINA DE COSER ELECTRÓNICA
ШВЕЙНАЯ МАШИНА С ЭЛЕКТРОННЫМ УПРАВЛЕНИЕМ
HZL-G series
INSTRUCTION MANUAL
MANUEL D’INSTRUCTIONS
MANUAL DE INSTRUCCIONES
РУКОВОДСТВО ПО ЭКСПЛУАТАЦИИ
Attention
Attention
Atención
ВНИМАНИЕ
Please read this instruction manual before using
the machine as it contains important operational
and safety information.
Keep this manual accessible so that you may refer
to it at anytime while operating the machine.
Avant de mettre la machine en marche, lire
attentivement et assimiler les règles de securité
de ce manuel.
Conserver le manuel an de pouvoir le consulter
ultérieurement.
Lea este manual de instrucciones antes de utilizar
la máquina, porque contiene información de
operación y seguridad importante.
Mantenga este manual accesible para poder
consultarlo en cualquier momento cuando utilice
la máquina.
Перед началом работы внимательно
прочитайте эту инструкцию по эксплуатации,
так как она содержит важную информацию
по работе с машиной а также по технике
безопасности.

IMPORTANT SAFETY INSTRUCTIONS
When using an electrical appliance, basic safety precautions should always be followed, including the following:
Read all instructions before using this sewing machine.
DANGER
1. An appliance should never be left unattended when plugged in.
2. Always unplug this appliance from the electric outlet immediately after using and before cleaning.
WARNING
1. Do not allow this appliance to be used as a toy. Close attention is necessary when this appliance is used by or near
children.
2. Use this appliance only for its intended use as described in this manual. Use only attachments recommended by the
manufacturer as contained in this manual.
3. Never operate this appliance if it has a damaged cord or plug, if it is not working properly, if it has been dropped or
damaged, or dropped into water. Return the appliance to the nearest authorized dealer or service center for examination,
repair, electrical or mechanical adjustment.
4. Never operate the appliance with any air openings blocked. Keep ventilation openings of the sewing machine and foot
controller free from the accumulation of lint, dust and loose cloth.
5. Keep ngers away from all moving parts. Special care is required around the sewing machine needl
6. Always use the proper throat plate.
7. Do not use bent needles.
8. Do not pull or push fabric while stitching. It may deect the needle causing it to break.
9. Switch the sewing machine off (“O”) when making any adjustments in the needle area, such as threading needle,
changing needle, threading bobbin, or changing presser foot and the like.
10. Always unplug sewing machine from the electrical outlet when removing covers, lubricating, or when making any other
user servicing adjustments mentioned in the instruction manual.
11. Never drop or insert any object into any opening.
12. Do not use outdoors.
13. Do not operate where aerosol (spray) products are being used or when oxygen is being administered.
14. To disconnect, turn all controls to the off (“O”) position, then remove plug from outlet.
15. Do not unplug by pulling on cord. To unplug, grasp the plug, not the cord.
-To reduce the risk of electric shock:
-To reduce the risk of burns, re, electric shock, or inquiry to persons:
e.
The wrong plate can cause the needle to break.
SAVE THESE INSTRUCTIONS
This sewing machine is intended for household use only.
Foot controller: Model JC-001
Foot controller can be used on sewing machine model HZL-G210 or HZL-G110.
The working temperature of sewing machine is from 5 to 40 degree Celsius. Do not use sewing machine under direct
sunlight, near a heat source such as stove, iron, candle or any hot objects and in the place where temperature is high.
Otherwise temperature inside sewing machine becomes high and/or vinyl of the power cord may be damaged, resulting in
re or an electric shock.
Always check a combination of material, thread and needle size. (Refer to page 43.) If the combination is not right, for example, sewing thick material such as denim with thin needle like size 11 and smaller, needle may break and it will cause injury to
your body.
1
Thank you for purchasing our products.
To safely and properly use this product, please read the instruction manual carefully and understand
the properties of this computer sewing machine. This machine is composed of well-chosen brand-name parts
and is well quality controlled. Please try a variety of different sewing methods and have fun.
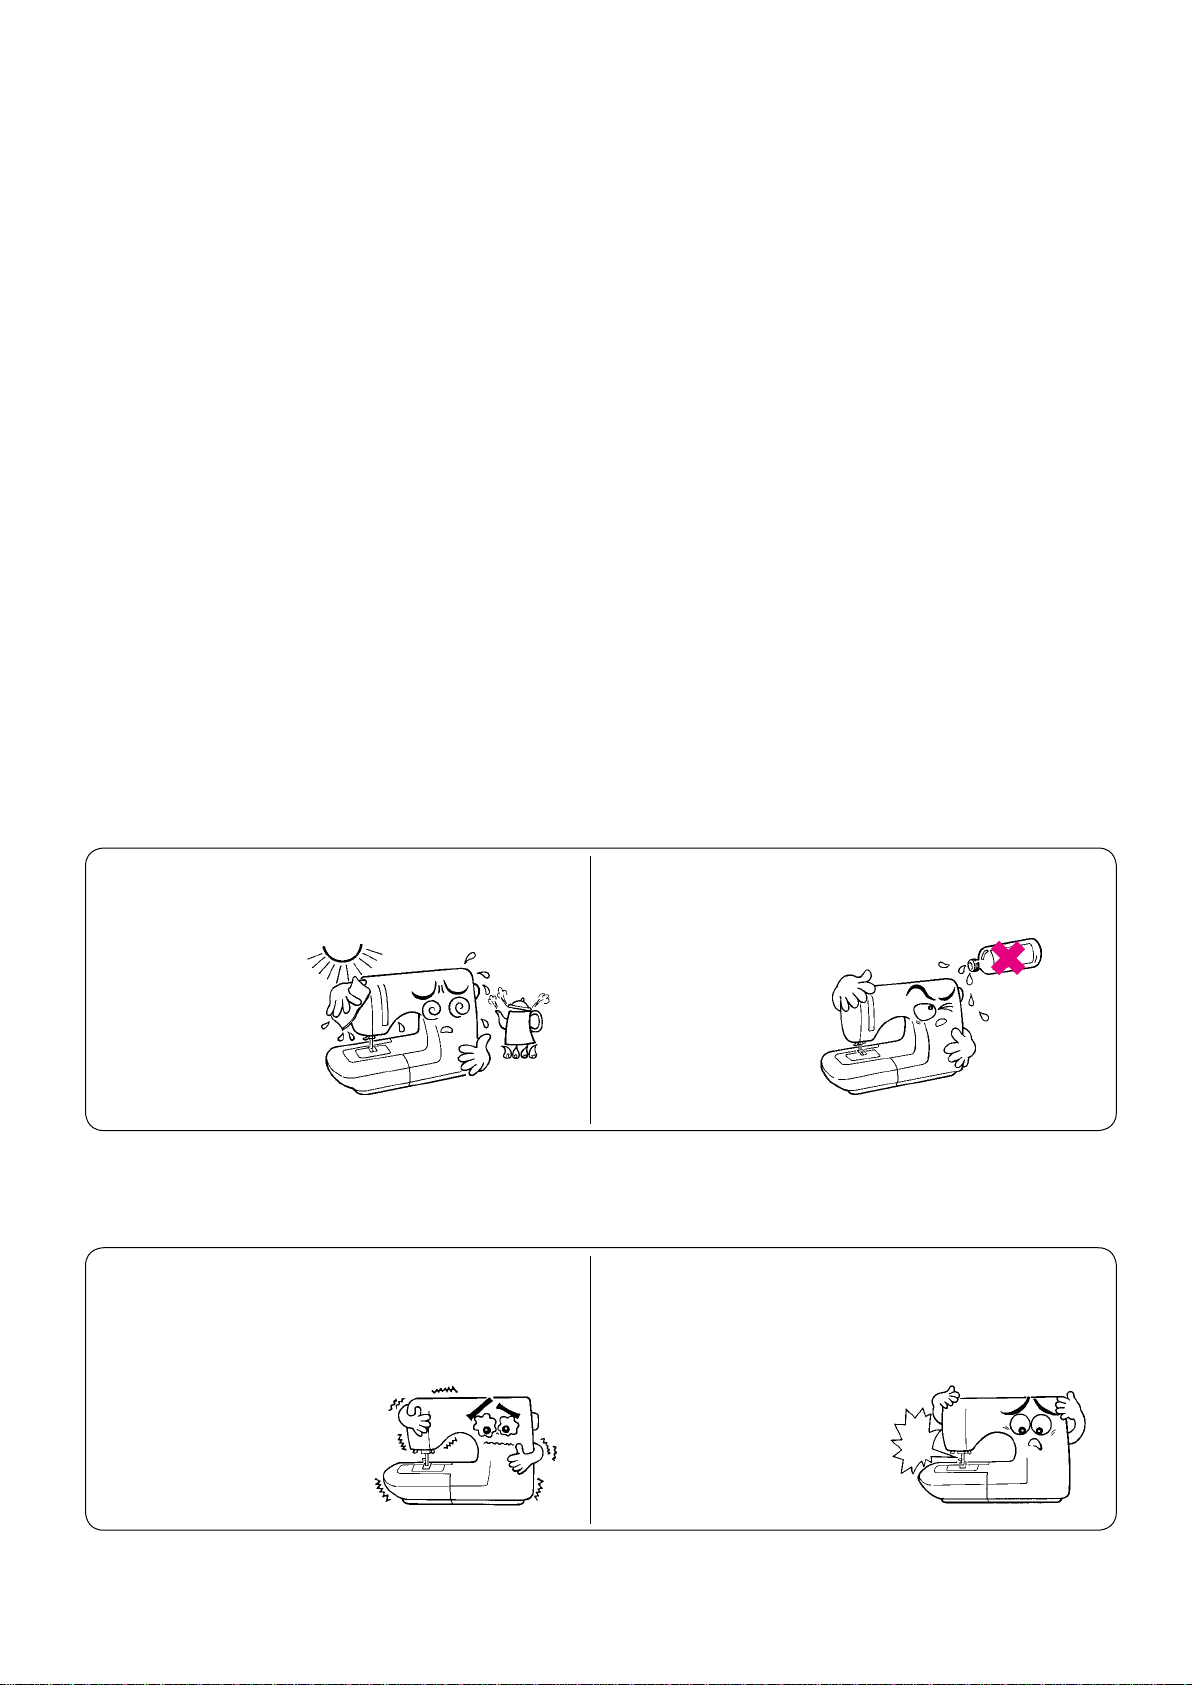
● Do not expose machine to direct sunlight or humid
atmosphere.
As the microcomputer(s), semi-conductor(s) and precise wiring board(s) is built in this sewing machine,
please pay attention that the following condition(s) may occur.
● Use this product in a temperature between 5 and 40
degree Celsius. If temperature is extremely low, this
sewing machine may not work properly.
● Do not use thinner or other similar solvents to clean
machine.
● This sewing machine will stop due to safety mechanism
to prevent the machine from overheating, when it sews
slowly and for a long time. In this event, Start and Stop
button will not light.
The sewing machine will
return to working condition
after about 10 minutes.
Stop!
2

NOTES DE SECURITE IMPORTANTES
Lorsque vous utilisez un appareil électrique, des précautions élémentaires doivent toujours être suivies, comme celles-ci.
Lisez attentivement ces instructions avant d’utiliser cette machine à coudre.
DANGER
1. Un appareil ne doit jamais être laissé sans surveillance lorsqu’il est branché.
2. Toujours débrancher cet appareil du secteur immédiatement après utilisation et avant de le nettoyer.
ATTENTION
1. Ne pas utiliser cet appareil comme un jouet. Porter une attention particulière lorsque cet appareil est utilisé par des
enfants.
2. N’utiliser cet appareil que dans le cadre de ses fonctions, mentionnées
N’utiliser que les piéces fournies ou recommandées par le fabricant dans ce manuel.
3. Ne pas utiliser cet appareil si une de ses prises ou cordons est endommagée, ou s’il ne fonctionne pas correctement.
S’il est tombé, a été endommagé, tombé dans l’eau, retournez l’appareil auprès de votre revendeur
une réparation, ou une vérication technique ou électrique.
4. Ne jamais utiliser cet appareil dans un lieu dépourvu d’aération. Maintenez une ventilation sufsante autours de la
machine et du rhéostat et éviter la poussière et les chutes de tissus aux alentours des sources d’aération de la machine.
5. Eloigner vos doigts des pièces mobiles de la machine. Faites particulièrement attention aux mouvement
oujours utiliser la plaque aiguille appropriée. Un plaque non appropriée peut faire casser l’aiguille.
6. T
7. Ne pas utiliser d’aiguilles courbes.
8. Ne pas tirer ou pousser le tissu lorsque vous cousez., cela pourrait abîmer
9. Mettre l’interrupteur de la machine en position(“O”) lorsque vous manipulez l’aiguille, ou l’enlez. De même,lorsque vous
changez le pied presseur ou la canette. such as threading.
10. Débranchez toujours votre machine lorsque vous ôtez le capot, lorsque vous la nettoyez, ou pour tout autre manipulation
mentionnée dans le manuel d’instruction.
11. Ne jamais laisser d’objet entrer dans les ouvertures de la machi
12. Ne pas utiliser à l’extérieur.
13. Ne pas utiliser lorsqu’un aérosol a été pulvérisé, ou lorsque de l’oxygène
vant de débrancher la machine, mettre l’interrupteur en position éteint (“O”).
14. A
15. Ne pas débrancher en tirant sur le cordon. Pour débrancher, tenir la prise, pas le cordon.
-Pour réduire le risque d’électrocution
-Pour les risques de brûlure, électrocutions et de blessures
dans le présent manuel.
le plus proche pour
s de l’aiguille.
, voire casser l’aiguille.
ne.
a été administré.
RETENEZ CES INSTRUCTIONS
Cette machine à coudre est destinée à une utilisation domestique uniquement.
Utilisez uniquement la pédale JC-001 avec votre machine HZL-G210 ou HZL-G110.
L’utilisation de la machine doit se faire dans une température comprise entre 5 et 40 degrés Celsius. Ne pas utiliser la
machine sous les rayons directs du soleil, près d’une source de chaleur comme un fer à repasser
bien tout objet dégageant une forte chaleur
le pourrait être endommager et provoquer une électrocution ou un feu.
Toujours controler la combinaison matière/ls/diamètre de l’aiguille. (voir page 43.) Si cette combinaison n’est pas correcte,
par exemple, coudre du Jean avec une aiguille de diamètre 11 ou inférieur, cela pourra avoir pour conséquence de casser
l’aiguille et éventuellement projeter ces morceaux d’aiguilles au visage ou toute autre partie du corps.
. Sinon la température intérieure de la machine pourra fortement augmenter et/ou
3
une bougie, un four ou

Merci d’avoir acheté nos produits.
An d’utiliser correctement cette machine, veuillez lire avec attention ce manuel d’instruction an de connaitre
et de comprendre toutes les propriétés de cette machine électro
grandes marques et dont la qualité a été hautement contrôlée. Essayez les différentes méthodes de couture et amusez vous.
nique. Cette machine est élaborée avec des composants de
● Ne pas exposer la machine directement au soleil ou
dans une atmosphère humide.
Parce qu’il y a des composants électronique et électrique dans la machine, il convient donc de bien suivre ces
recommandations an d’éviter toute détérioration de votre machine.
● Utilisez ce produit dans une température comprise
entre 5 et 40° degrés Celsius.
Si la température est extrêmement basse, la machine
peut ne pas fonctionner correctement.
● Ne pas utiliser de détergents ou alcool pour nettoyer la
machine.
● La machine peut s’arrêter et se mettre en sécurité en
cas de surchauffe lorsque la machine coud lentement et
depuis longtemps.
Au bout de 10 minutes la
machine sera de nouveau
opérationnelle.
Stop!
4

INSTRUCCIONES DE SEGURIDAD IMPORTANTES
Cuando utilice un aparato eléctrico, deben seguirse las precauciones de seguridad básicas, incluidas las siguientes:
Lea todas las instrucciones antes de utilizar esta máquina de coser.
PELIGRO
1. Nunca debe deje desatendida la máquina cuando esté enchufada.
2. Desenchufe siempre esta máquina de la toma de corriente inmediatamente después de utilizarla y antes de limpiarla.
ADVERTENCIA
-Para reducir el riesgo de descarga eléctrica:
-Para reducir el riesgo de quemaduras, incendio, descarga eléctrico o
cualquier otro daño a personas:
1. No permita que se utilice esta máquina como un juguete. Tenga mucho cuidado cuando se la utilicen niños o cuando
estén cerca de ellos.
2. Use esta máquina para los nes correctos descritos en esta guía. Utilice sólo los accesorios recomendados por el
fabricante y contenidos en este manual.
3. Nunca utilice esta máquina si el cable o el enchufe están dañados, si no funciona correctamente, si se ha caído, está
dañada o si se ha mojado. Devuelva la máquina al distribuidor o servicio técnico autorizado más cercano para su
inspección, reparación y ajuste eléctrico o mecánico.
4. Nunca utilice la máquina con las aberturas de ventilación bloqueadas.
máquina de coser y el pedal libre de acumulaciones de bra, polvo y retales.
5. No acerque los dedos a las partes móviles. Preste especial atención a la aguj
6. Utilice siempre la placa aguja adecuada. Una placa aguja no adecuada puede romper la aguja.
7. No utilice agujas torcidas.
8. No tire de la ropa ni la empuje cuando esté cosiendo. Puede deformar la aguj
Apague la máquina (“O”) cuando realice ajustes en el área de la aguja, como al enhebrar y cambiar la aguja, al enhebrar
9.
la canilla, al cambiar el prensatelas, etc.
10. Desenchufe siempre la máquina de coser de la toma de corriente cuando retire cubiertas, la lubrique o realice cualquier
otro ajuste de servicio mencionado en el manual de instrucciones.
11. No introduzca ningún objeto en ninguna abertura.
12. No utilice la máquina en exteriores.
13. No utilice la máquina si se utilizan productos en aerosol (spray) o si se administra oxígeno.
14. Para desconectar la máquina, establezca todos los controles en posición apagada (“O”), y desenchúfela de la toma de
corriente.
15. No desenchufe la máquina tirando del cable. Para desenchufarla, sujete el enchufe, no el cable.
Mantenga las aberturas de ventilación de la
a de la máquina de coser.
a y acabar por romperla.
CONSERVE ESTAS INSTRUCCIONES
Esta máquina de coser esta diseñada para su uso doméstico.
Utilice sólo el pedal JC-001 con los modelos HZL-G210 o HZL-G110.
La temperatura de operación de la máquina de coser es de 5 a 40 ºC. No utilice la máquina de coser bajo luz directa el sol,
cerca de una fuente de calor como un horno, una plancha, una vela o cualquier otro objeto caliente, ni en un lugar en el que
la temperatura sea alta. De lo contrario, la temperatura en el interior de la máqui
de alimentación puede resultar dañado, lo que dará como resultado un incendi
Compruebe siempre la combinación de material, hilo y tamaño de la aguja (consulte la página 44). Si la combinación no es
correcta, por ejemplo, si cose material grueso como tela de tejano con un tamaño de aguj
que se rompa la aguja y causar lesiones personales.
5
na de coser aumentará y el vinilo del cable
o o una descarga eléctrica.
a del 11 o inferior
, puede provocar

Gracias por adquirir nuestros productos.
Para utilizar este producto de forma correcta y segura, lea el manual de instrucciones detenidamente y comprenda las
propiedades de esta máquina de coser electrónica. Esta máquina se compone de piezas de marcas reconocidas y
debidamente seleccionadas y se ha sometido a un estricto control de calidad. Pruebe los diferentes métodos de costura y
diviértase.
● No utilice disolventes para limpiar la máquina.● No exponga la máquina a la luz del sol directa ni a
ambientes húmedos.
Puesto que esta máquina de coser incorpora microordenadores, semiconductores y placas de circuito precisas,
preste atención a las situaciones siguientes.
● Utilice este producto a una temperatura entre
5 y 40 ºC. Si la temperatura es demasiado baja,
es posible que esta máquina coser no funcione
correctamente.
● El mecanismo de seguridad detendrá esta máquina
de coser para que evitar que se recaliente cuando cosa
lentamente durante mucho tiempo. En este caso,
el botón de arranque y parada no estará iluminado.
La máquina de coser volverá
a condiciones operativas
tras unos 10 minutos.
Stop
6

ОСНОВНЫЕ ИНСТРУКЦИИ ПО ТЕХНИКЕ БЕЗОПАСНОСТИ
При пользовании электроприбором всегда соблюдайте основные правила техники безопасности,
включая следующее правило: «Перед началом эксплуатации прочтите все инструкции».
ОПАСНО
1. Никогда не оставляйте включённую в электросеть машину без присмотра.
2. По окончании работы и перед чисткой отключайте машину от электросети.
ПРЕДУПРЕЖДЕНИЕ
— для снижения риска поражения электрическим током:
— для снижения риска ожога, пожара, поражения током или
травм:
1. Не разрешайте пользоваться машиной в качестве игрушки. Необходимо тщательно следить за машиной, когда на
дети работают на ней или находятся рядом.
2. Используйте машину только для целей, описанных в данном Руководстве. Пользуйтесь только теми
принадлежностями, которые рекомендованы производителем и описаны в данном руководстве.
3. Никогда не пользуйтесь машиной с повреждённым электрошнуром или штепселем, если она работает
ненормально, если её уронили или повредили, а также если она побывала в воде. Верните машину ближайшему
уполномоченному дилеру или в центр обслуживания для осмотра, ремонта, регулировки электрической или
механической частей.
4. Не эксплуатируйте машину при закрытых вентиляционных отверстиях. Не допускайте накапливания пыли, пуха,
очесов в вентиляционных отверстиях швейной машины и в ножной педали.
5. Следите за тем, чтобы пальцы рук не находились вблизи движущихся деталей машины — особенно иглы.
6. Всегда используйте соответствующую игольную пластину. Неподходящая игольная пластина может сломать иглу.
7. Не пользуйтесь гнутыми иглами.
8. При работе на машине не тяните и не толкайте ткань – это может привести к поломке иглы.
9. Выключайте машину («0») перед регулировкой в зоне действия иглы, а также перед такими операциями, как
заправка нитки, замена иглы, намотка шпульки, замена нажимной лапки и т.п.
10. Всегда отключайте швейную машину от электросети перед снятием крышек, смазкой или любыми описанными в
Руководстве операциями по техническому обслуживанию.
11. Нельзя ронять или вставлять какие-либо предметы в отверстия машины.
12. Не эксплуатируйте машину на открытом воздухе.
13. Не работайте на машине там, где применяются аэрозоли или подводится кислород.
14. Чтобы отсоединить машину от сети, поставьте все ручки управления на («0»), затем извлеките вилку из розетки.
15. Не извлекайте вилку из розетки, держась за шнур. Беритесь за вилку, а не за шнур.
СОХРАНИТЕ ЭТИ ИНСТРУКЦИИ
Машина предназначена только для пользования в быту.
Для работы на швейных машинах HZL G210, HZL G110 используйте ножную педаль только JC001.
Диапазон рабочих температур швейной машины 5ºC – 40 ºC. Не подвергайте машину воздействию прямых солнечных
лучей, не размещайте ее рядом с источниками тепла, такими как плита, утюг, свеча и другие горячие предметы, а
также в сильно нагретых местах. В противном случае температура внутри швейной машины может повыситься, в
результате чего может повредиться виниловая изоляция шнура питания, что, в свою очередь, привести к пожару или
короткому замыканию.
Всегда проверяйте сочетаемость ткани, нити и размера иглы (см. стр. 44). Если, например, такая плотная ткань как
деним используется с иглой размера 11 или меньше, игла может сломаться и, возможно, стать причиной травмы
швеи.
7
Спасибо за покупку швейной машины!
Для надежной и безопасной работы машины, пожалуйста, внимательно прочтите это руководство по эксплуатации
к машине и изучите ее свойства. Машина собрана из прошедших тщательный отбор фирменных запасных частей,
качество которых проверено. Попробуйте различные типы строчек и получайте удовольствие от шитья!
● Не подвергайте машину воздействию прямых
солнечных лучей или влажного воздуха.
Так как микрокомпьютер(ы), полупроводник(и) и точная(ые) наборная(ые) панель(и) встроены в эту
швейную машину, обращайте, пожалуйста, внимание на выполнение следующих условий.
● Эксплуатируйте машину при температуре 5ºC 40 ºC.
Если температура крайне низкая, швейная
машина может работать некорректно.
● Не пользуйтесь жидкими средствами или
растворителями для чистки машины.
● Для предотвращения перегрева, когда машина
работала в медленном режиме длительное время,
срабатывает предохранительный механизм, и
машина останавливается. В этом случае кнопка
Start (Пуск)/Stop (Останов) не
подсвечена.
Швейная машина вернется
к рабочему режиму примерно
через 10 минут.
Cтои!
8

Contents
Important safety instructions
Principal parts
Accessories
……………………………………………………
……………………………………………………………
…………………………………
13, 14
1,2
15
Basic operations
Function of operational buttons
Connecting to the power supply
Name and function of other operational buttons
Speed control
Presser foot lifting lever
…………………………………………………………
……………………………………………
Changing the presser foot
Bobbin thread preparation
Needle thread preparation
Threading the needle thread
Automatic needle threader
Pulling up the bobbin thread
Attaching the needle
…………………………………………
Fabric, thread and needle table
How to adjust thread tension
How to lower feed dog
……………………………………………
How to select a stitch pattern
………………………………
…………………………
…
…………………………………
…………………………………
………………………………
………………………………
………………………………
………………………………
16
17, 18
19, 20
27
28
29~32
33~35
36~40
41, 42
43
45, 46
47
48~50
Practical sewing
Straight stitch
How to use seam guide line on the throat plate
How to change needle positions
How to change the stitch length
Automatic lock stitch and programmed thread trimming
Other straight stitch patterns
Zigzag stitch
Overcasting stitch
Buttonhole stitches
Standard buttonholing
Keyhole buttonholing
Buttonhole with gimp
When changing the width of the buttonhole
When changing the density of the seam
Bartacking
Shirring and gathering
Pintucking
Welt seam
Decorative stitches and one point pattern
Scallop stitches
……………………………………………………
……………………………………………………………
………………………………………………
……………………………………………
…………………………………………………………
………………………………………
………………………………………………………………
………………………………………………………………
…………………
………………………………………………………
51~52
59, 60
61~68
69, 70
71, 72
58
73
74
75
76
Patchwork quilt
Applique
Quilt
……………………………………………………………
………………………………………………………………………
Decorative stitches
Sewing letters and one point pattern
Preparation before stitching
Test sewing
…………………………………………………………
How to select patterns (letters)
How to stitch a pattern (letters)
Disposing thread ends of jump stitches
…………………
………………………………
……………………
…………………………
Optional accessory parts
Introduction of optional accessory parts
How to install wide table
Blind stitch
Inserting zippers
…………………………………………………………
………………………………………………
…………………………………………
Side zipper attachment
Butted zipper attachment
How to use quilt guide
Stitch in ditch quilting
Quilting (straight stitch)
Quilting (free motion)
List of stitch patterns
Machine maintenance
Performance check list
Specications
………………………………………………
…………………………………………
……………………………………
……………………………………
………………………………………………
……………………………………
……………………………………
……………………………………………
………………
77, 78
79~83
81, 82
……………
84~87
89~91
92~95
97, 98
99, 100
101~103
105, 106
107, 108
back cover
79
80
83
83
78
88
96
104
9

TABLES DES MATIERES
Notes de sécurité importantes
Principaux éléments
Accessories
……………………………………………………………
…………………………………………
………………………………
13, 14
Opérations simples
Fonction des différents boutons
Branchement
……………………………………………………
Nom et fonction des autres boutons de
commande
Variateur de vitesse
Levier relève pied presseur
…………………………………………………………
…………………………………………………
………………………………………
Changement du pied presseur
Préparattion du l de la canette
Préparation du l de l’aiguille
Enllage du l de l’aiguille
Enllage automatique du l de l’aiguille
Tirez le l de la canette
Installation de l’aiguille
………………………………………
Tableau des tissus, ls et aiguilles
Comment régler la tension du l
Comment abaisser la griffe
Sélectionner un programme
………………………………………
………………………………
…………………………
……………………………
…………………………
………………………………
……………………………
…………………………
17, 18
21, 22
29~32
33~35
36~40
41, 42
45, 46
48~50
Programmes usuels
Point droit
Comment utiliser les lignes de guidage sur la plaque
Comment changer la position de l’aiguille
Comment changer la longueur du point
Point de sécurité automatique et coupel
Autres programmes point droit
Point zigzag
Surlage
Boutonnières
Boutonnière standard
Boutonnière à oeillet
Boutonnière avec l cordonnet
Changement de la largeur de la boutonnière
Changement de la densité du point
Point d’arrêt
Fronçage et bouillonné
Pintucking
Bordage
Points décoratif et programme un-point
Point feston
…………………………………………………………
……………………………………………………………
……………………………………………………………
……………………………………………………
………………………………………………………
………………………………………
………………………………………………………………
…………………………………………………………………
……………………
……………………………………………………………
51~57
59, 60
61~68
69, 70
71, 72
3, 4
15
16
27
28
43
47
58
73
74
75
76
Patchwork matelassage
Motifs Appliqués
………………………………………………………………………
Quilt
…………………………………………………
Points décoratifs
Lettres et programmes un-point
Préparation avant la couture
Test de couture
……………………………………………………
Sélectionner un programme (lettres)
Exécuter un programme (lettres)
Fils superux
………………………………………………………
…………………………
……………………………
………………………
Accessoire en option
Accessoires en option
Installation de la rallonge de table
Point invisible
……………………………………………………
Insertion fermeture à glissière
Insertion latérale
Insertion bord à bord
Guide matelassage
Quilting avec effet relief
Quilting (point droit)
Quilting (libre)
………………………………………………
Programmes pour
Entretien de la machine
Problèmes éventuels et remèdes simples
Caractéristiques
………………………………………
……………………………
……………………………
…………………………………………………
………………………………………
…………………………………………
…………………………………………………
…………………………………
……………………………………
77, 78
79~83
79
80
…………
81, 82
83
83
84~87
89~91
92~95
97, 98
99, 100
101~103
105, 106
………
109, 110
dernière page
78
88
96
104
10

Contenido
Instrucciones de seguridad importantes
Componentes principales
Accesorios
………………………………………………………………
…………………………………
…………………
13, 14
5, 6
15
Operaciones básicas
Función de los botones de operación
Conexión a la toma de alimentación
Nombre y función de otros botones de operación … 23, 24
Control de la velocidad
……………………………………………
Palanca de elevación del prensatelas
Sustitución del prensatelas
Preparación de la canilla
………………………………
……………………………………
Preparación del hilo de la aguja
Enhebrado del hilo de la aguja
Enhebrado automático de la aguja
Subir el hilo de la canilla
Colocación de la aguja
Tabla de tejido, hilo y aguja
………………………………………
………………………………………
Cómo ajustar la tensión del hilo
Descenso de los dientes
…………………………………………
Seleccionar un patrón de costura
………………………
……………………
………………………
…………………………
…………………………
………………………
16
17, 18
27
28
29~32
33~35
36~40
41, 42
44
45, 46
47
48~50
Costura práctica
Pespunte recto
Cómo utilizar una guía de costura en la placa aguja
Cambiar posiciones de la aguja
Cambiar la longitud de la puntada
Puntada de seguridad automática y corte programado
del hilo
Otros patrones de pespunte recto
Puntada en zig zag
Sobrehilado
Puntada para ojales
Ojales normales
Ojales especiales
Ojal con refuerzo
Cambiar la anchura del ojal
Cambiar la densidad de la puntada
Presellado
Fruncido y fruncido elástico
Lorzas
……………………………………………………………………
Costura de refuerzo
Puntadas decorativas y una puntada de punto
Puntadas con festones
…………………………………………………
…………………………………………………
………………………………………………………
…………………………………………
…………………………………………………………
………………………………
…………………………………………………
…………
……………………………………………
51~57
58
59, 60
61~68
69, 70
71, 72
73
74
75
76
Colchas de patchwork
Aplicación
Acolchado
…………………………………………………………
………………………………………………………………
Puntadas decorativas
Cosiendo letras y un punto
Preparación antes de coser
Puntada de prueba
Selección de patrones (letras)
Coser un patrón (letras)
Desechado del hilo sobrante en
puntadas salteadas
…………………………………
………………………………
……………………………………………
……………………
……………………………………
……………………………………………
Accesorios opcionales
Introducción de accesorios opcionales
Instalación de la mesa de expansión
Puntada invisible
Colocación de cremalleras
Colocación lateral de cremalleras
Colocación inferior de cremalleras
Uso de la guía de acolchar
Puntada con guía central
Acolchado (pespunte recto)
Acolchado libre
Lista de patrones de costura
Mantenimiento de la máquina
Resolución de problemas
Especificaciones
………………………………………………
…………………………………
………………………………………
……………………………………
………………………………
………………………………………………
…………………………………
…………………………
………………………………
…………………………………
77, 78
79~83
79
80
81, 82
83
83
………………
………………………
84~87
89~91
92~95
97, 98
99, 100
101~103
105, 106
111, 112
Contraportada
78
88
96
104
11

Содержание
Основные инструкции по технике безопасности … 7, 8
Главные детали
Принадлежност
………………………………………………
……………………………………………………
13, 14
15
ОСНОВНЫЕ ОПЕРАЦИИ
Функции кнопок управления
Подключение к электросети
Наименование и функции других кнопок
управления
Контроль скорости
………………………………………………………
…………………………………………………
Рычаг для подъема прижимной лапки
Демонтаж и установка прижимной лапки
Извлечение шпульки
Подготовка верхней нити
Заправка верхней нити в машину
Устройство для автоматической заправки нити в иглу
Извлечение нижней нити
Установка иглы
…………………………………………………
Таблица сочетаемости тканей, нитей и игл
Как отрегулировать натяжение нити
Как уменьшить скорость подачи
Как выбрать образец строчки
…………………………………
……………………………
…………………
…………
………………………………………
…………………………………
……………
………………
……………………………
…………………………
16
17, 18
25, 26
27
28
29~32
33~35
36~40
41, 42
44
45, 46
47
48~50
ШВЕЙНАЯ ПРАКТИКА
Прямая строчка
Как использовать направляющую линию края ткани
на игольной пластинке
Как изменить положение иглы
Как изменить длину стежка
Автоматическое закрепление строчки и обрыв нитей
Другие образцы прямых строчек
Строчка зигзаг
Краеобметочный стежок
Строчки для обметывания пуговичных петель
Стандартная пуговичная петля
Пуговичная петля в форме замочной скважины
Пуговичная петля с каркасной нитью
Изменение ширины пуговичной петли
Изменение плотности шва
Выполнение закрепки
Сборки и буфы
Защипы
…………………………………………………………………
Обтачка каймой
Декоративные стежки и точечные рисунки
Фестоны
…………………………………………………………………
………………………………………………
………………………………………………………
…………………………………
………………………………………
…………………………………………………
……………………………………………………
51~57
59, 60
…
61~68
69, 70
71, 72
……………
58
73
74
75
76
ПЭЧВОРК
Аппликация
Выход
………………………………………………………
……………………………………………………………………
ДЕКОРАТИВНЫЕ СТРОЧКИ
Буквы для вышивки и точечные рисунки
Подготовка перед началом строчки
Тестовая строчка
Как выбрать образцы (буквы)
Как вышить образец (буквы)
………………………………………………
……………………
……………………………
Расположение концов нити при переходе от
одного элемента вышивки к другому
…………
………………
81, 82
……………
Дополнительные аксессуары
Описание дополнительных вспомогательных
компонентов
Как установить широкий стол
Потайной шов
Вшивание застежки-молнии
Втачивание застежки-молнии внахлест
Втачивание застежки-молнии встык
Как использовать направляющую для квилтинга
Объемный квилтинг
Квилтинг (прямая строчка)
Квилтинг (свободное движение)
Перечень образцов строчки
Техническое обслуживание машины
Лист выполнения проверок
Спецификация
……………………………………………………
…………………………………
…………………………………………………
……………………………
…………………………………………
……………………………
…………………
…………………………………
……………
…………………………
……………………………………………
101~103
105, 106
113, 114
обложка
99, 100
77, 78
78
79~83
79
80
83
83
84~87
88
89~91
92~95
…
96
97, 98
104
12
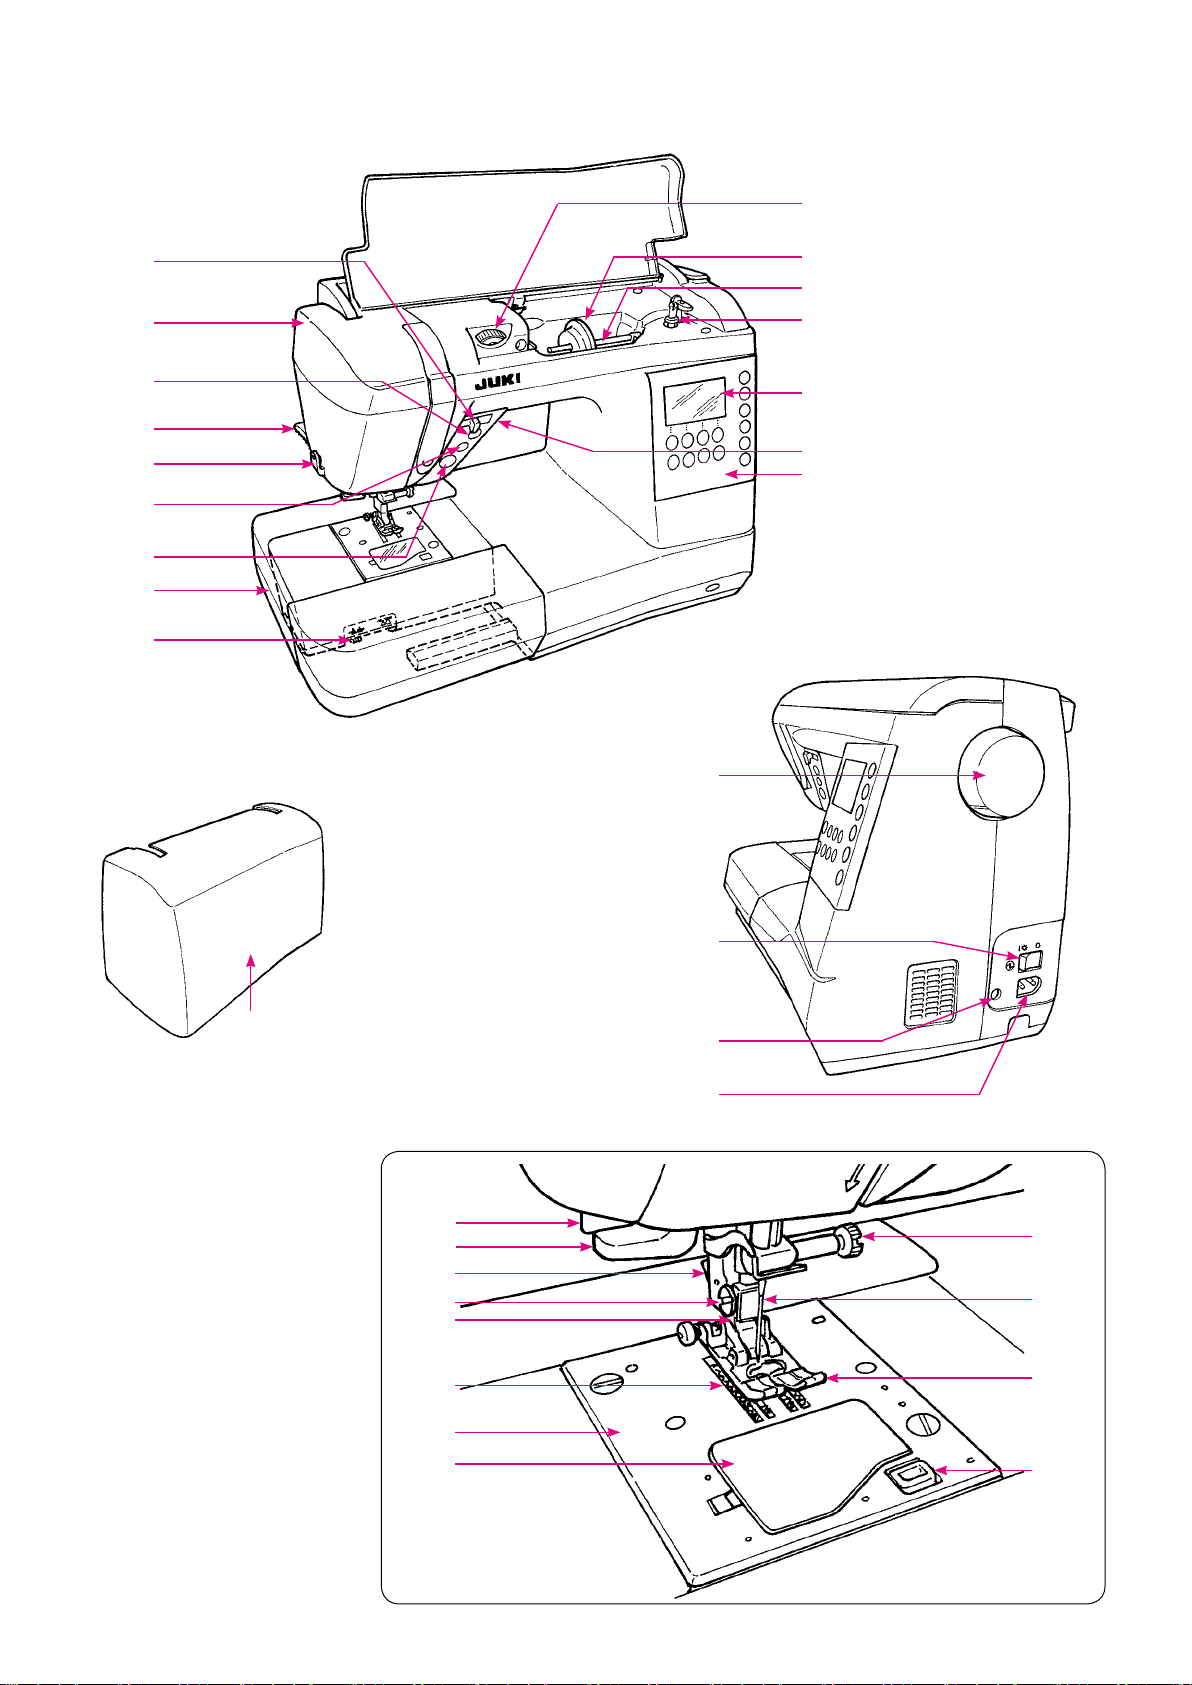
Principal parts / Principaux éléments
Componentes principales / Главные детали
10
1
2
3
4
5
6
7
8
9
17
11
12
13
14
15
16
21
* Do not put heavy objects onto hard case
and wide table.
* Ne mettre aucun objet lourd sur la boite
et sur la rallonge de table.
* No coloque objetos pesados en la
maleta rígida y la mesa extensible.
* Не размещайте тяжелые предметы
на твердом ящике и широком столе.
22
23
24
25
26
27
28
29
18
19
20
30
31
32
33
13

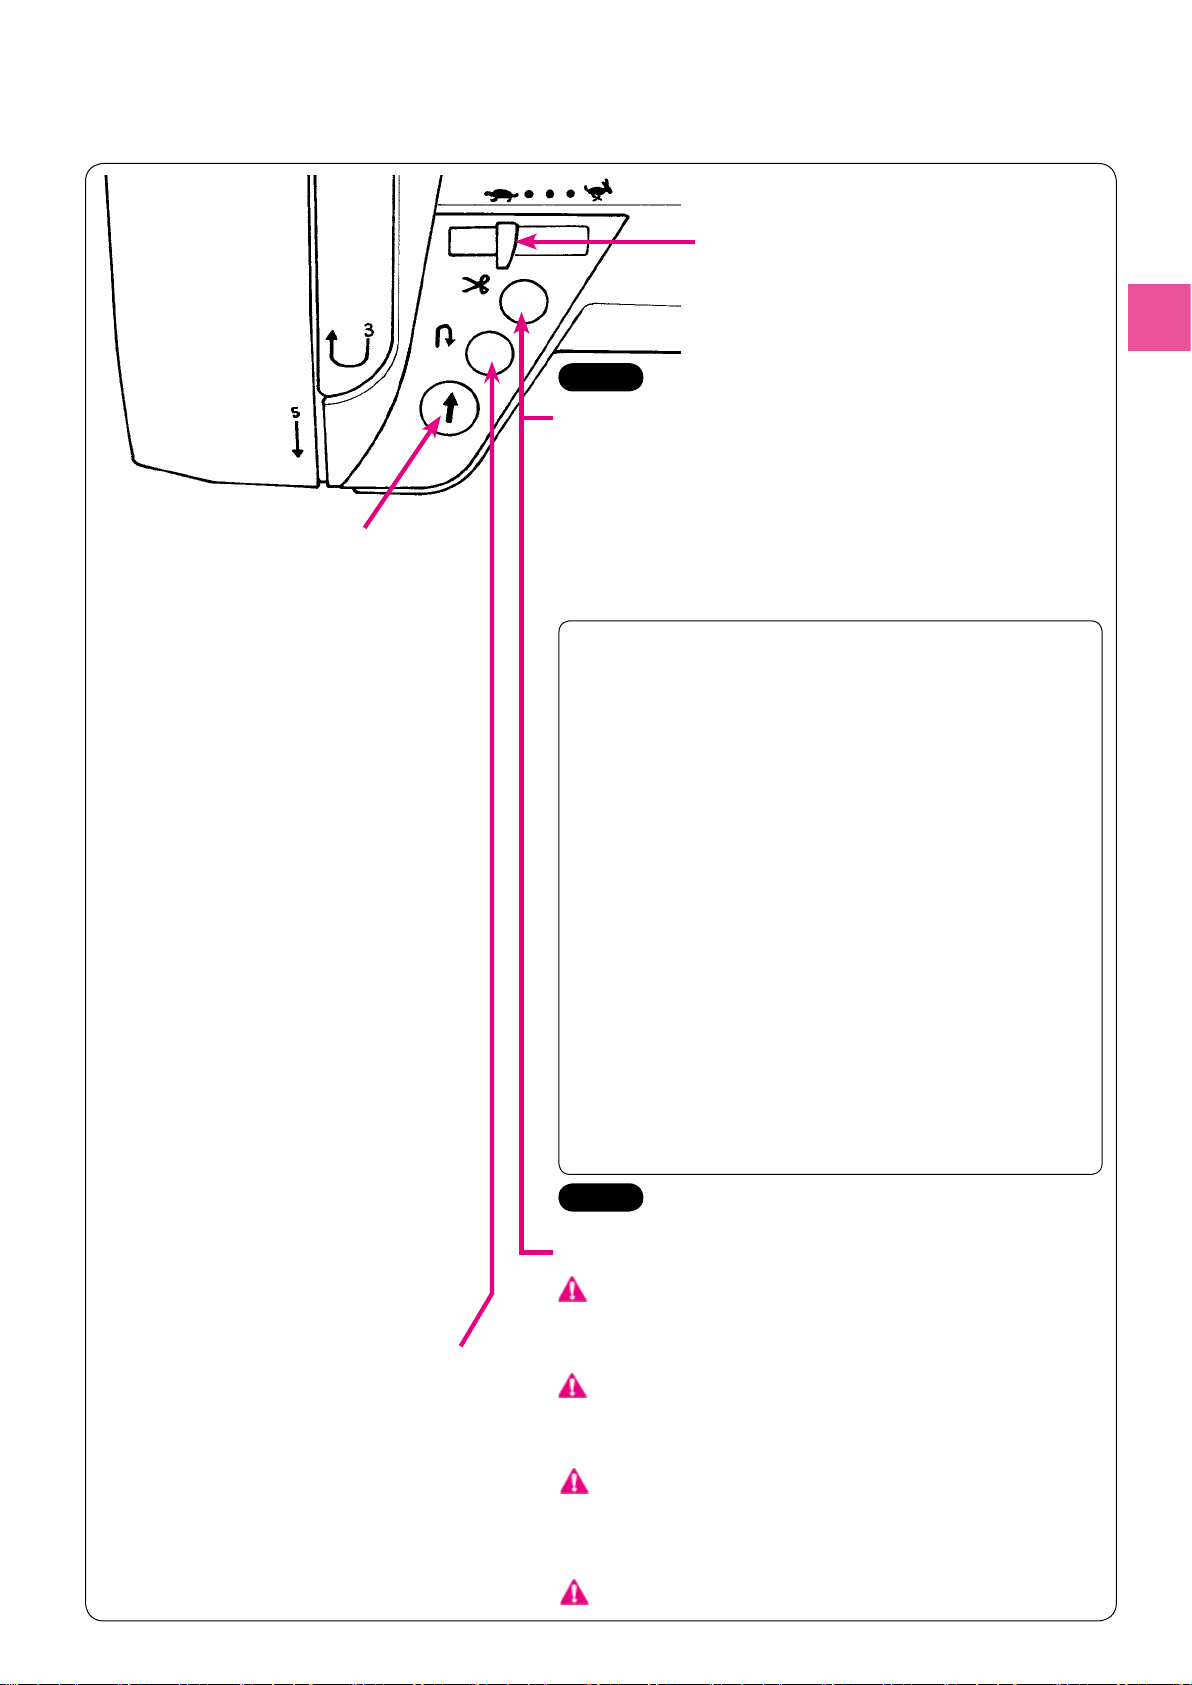
1. Speed controller
2. Face plate cover
3. Needle up/down button
4. Presser foot lifting lever
5. Thread cutter
6. Thread trimming button
7. Start/stop button
8. Auxiliary bed (accessory case)
9. Drop feed knob
10. Thread tension adjustment dial
11. Spool cap (large)
12. Spool pin
13. Bobbin winding shaft
14. LCD Screen
15. Reverse stitch button
16. Operational buttons
17. Hand wheel (pulley)
18. Power switch
19. Foot-controller-jack
20. Machine-socket-inlet
21. Hard case
22. Buttonholing lever
23. Threading lever
24. Presser foot releasing button
25. Presser foot holder setscrew
26. Presser foot holder
27. Feed dog
28. Throat plate
29. Hook cover
30. Needle setscrew
31. Needle
32. Presser foot
33. Hook cover release button
1. Variateur de vitesse
2. Carter avant
3. Position de l’aiguille
4. Levier relevage pied
5. Coupe l
6. Bouton coupe l
7. Bouton Marche/Arrêt
8. Bras libre (Boite accessoires)
9. Escamotage griffe
10. Touche réglage de tension du l
11. Coiffe de la bobine (grande)
12. Porte bobine de l
13. Dévidoir de canette
14. Ecran LCD
15. Bouton marche arrière
16. Panneau de sélection du point
17. Volant manuel
18. Interrupteur
19. Prise du rhéostat
20. Prise du cordon d’alimentation
21. Boite rigide
22. Prise pour la cellule de la boutonnière
23. Levier enlage
24. Bouton pour déclipser le pied pied
presseur
25. Vis xation pied presseur
26. Support du pied presseur
27. Griffe
28. Plaque aiguille
29. Capot du crochet
30. Vis d’aiguille
31. Aiguille
32. Pied presseur
33. Bouton d’ouverture du capot du crochet
1. Controlador de velocidad
2. Cubierta frontal
3. Botón de subir/bajar aguja
4. Palanca de elevación del prensatelas
5. Cortahilos
6. Botón para cortar hilos
7. Botón de arranque/parada
8. Base auxiliar (caja de accesorios)
9. Selector de arrastre arriba/abajo
10. Selector de ajuste de tensión del hilo
11. Tapa de bobina (grande)
12. Pivote de la bobina
13. Eje de enrollado de la canilla
14. Pantalla LCD
15. Botón de puntada de remate
16. Botones de operación
17. Volante (polea)
18. Interruptor de alimentación
19. Enchufe para el pedal
20. Enchufe para el cable
21. Maleta rígida
22. Oricio delsensor para ojales
23. Palanca de enhebrado
24. Botón de liberación del prensatelas
25. Tornillo de sujeción del prensatelas
26. Soporte del prensatelas
27. Dientes
28. Placa aguja
29. Tapa del garo
30. Tornillo de ajuste de la aguja
31. Aguja
32. Prensatelas
33. Botón de liberación de la tapa del
garo
1. Регулятор скорости
2. Крышка лицевой панели
3. Кнопка для подъема/опускания иглы
4. Рычаг для подъема прижимной лапки
5. Нитеобрезатель
6. Кнопка для обрезания нити
7. Кнопка пуск/останов
8. Выдвижной столик
(коробка для принадлежностей)
9. Ручка управления зубчатой рейкой
10. Диск регулятора натяжения нити
11. Колпачок катушки (большой)
12. Катушечный стержень
13. Стержень моталки
14. ЖК экран
15. Кнопка реверса строчки
16. Кнопки управления
17. Маховик (шкив)
18. Выключатель питания
19. Штепсельное гнездо контроллера
20. Штепсельная розетка машины
21. Твердый ящик
22. Датчик для петель
23. Рычаг заправки нити
24. Кнопка фиксатора прижимной лапки
25. Винт держателя прижимной лапки
26. Держатель прижимной лапки
27. Транспортер
28. Игольная пластинка
29. Крышка с крючком
30. Винт иглодержателя
31. Игла
32. Прижимная лапка
33. Кнопка для открывания крышки с крючком
14
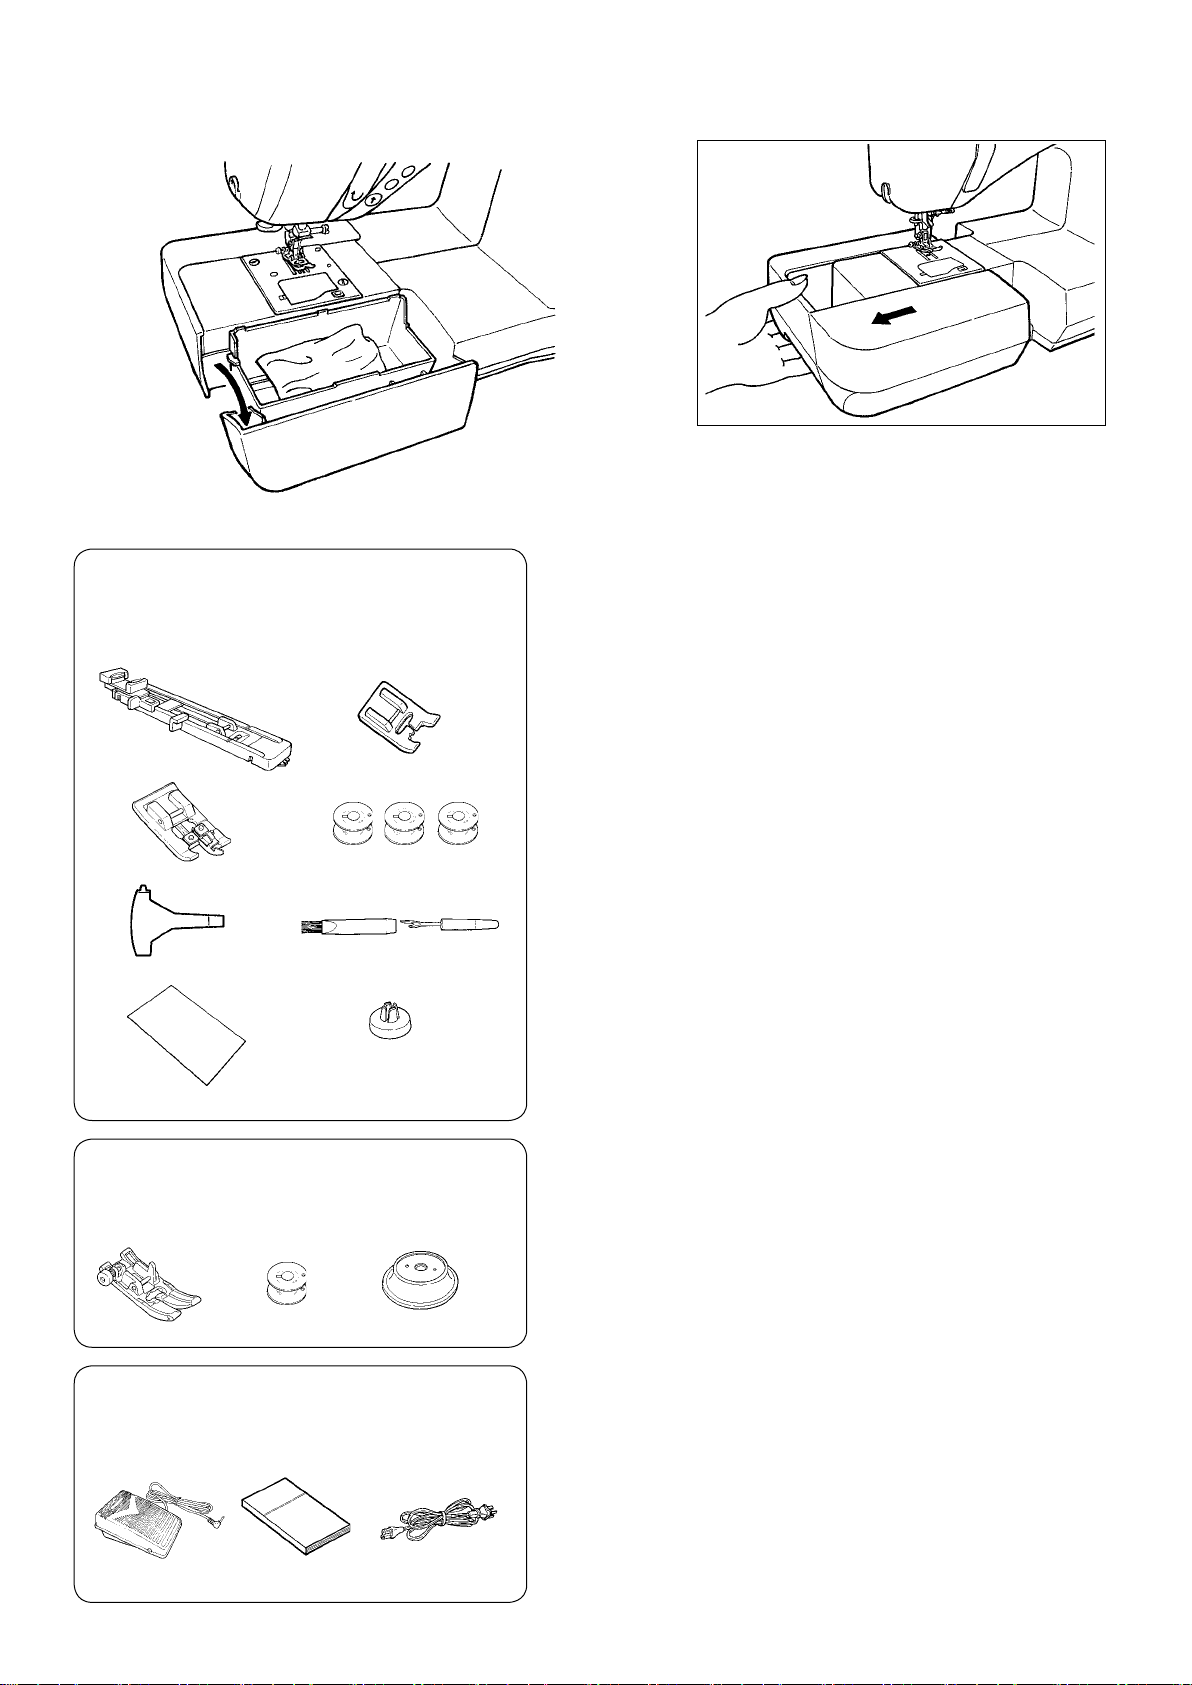
Accessories / Accessoires / Accesorios / Принадлежности
Draw the auxiliary bed out to the left.
Pour ôter le plateau de travail, tirez vers la gauche.
Tire de la base auxiliar hacia la izquierda.
Отодвиньте выдвижной столик влево.
● Inside the auxiliary bed.
● A l’intérieur de la boite d’accessoires.
● Interior de la base auxiliar.
● Bнутри выдвижного столика
1
2
3
4
● Supplied with the machine
● Sur la machine
● Suministrado con la máquina
● Поcтавляeтcя в комплeктe c машиной
9
● Placed at styrofoam
● Placé au polystyrène
● Colocada en la espuma de poliestireno
● Основана на пеностироле
12
10 11
13
5
6
7
8
14
1. Buttonhole presser foot (E)
2. Overcasting presser foot (C)
3. T-shape screwdriver
4. Needle set
HA X 1 # 11 (1)
# 14 (1)
# 16 (1)
for knit # 11 (1)
5. Manual buttonhole presser
foot (I)
6. Bobbin (3)
7. Ripper / Cleaning brush
8. Spool cap (Small)
9. Standard presser foot (A)
10. Bobbin (1)
11. Spool cap (large)
12. Foot Controller
(model name; JC-001)
13. Instruction manual
(This manual)
14. Power cord
1. Pied presseur pour boutonnière
(E)
2. Pied presseur pour surler (C)
3. Tournevis en T
4. Kit d’aiguilles
HA X 1 # 11 (1)
# 14 (1)
# 16 (1)
for knit # 11 (1)
5. Pied pour boutonnière
manuelle (I)
6. Canette (3)
7. Découseur / Brosse de néttoy
age
8. Coiffe (Petite)
9. Pied presseur standard (A)
10. Canette (1)
11. Coiffe (grande)
12. Rhéostat
(référence; JC-001)
13. Manuel d’instruction
(Ce manuel)
14. Cordon d’alimentation
1. Prensatelas para ojales (E)
2. Prensatelas de sobrehilar (C)
3. Destornillador en forma de T
4. Juego de agujas
HA X 1 nº 11 (1)
nº 14 (1)
nº 16 (1)
para punto nº 11 (1)
5. Prensatelas para ojales
manuales (I)
6. Canilla (3)
7. Descosedor / Cepillo de
limpieza
8. Tapa para bobina de hilo
(pequeña)
9. Prensatelas estándar (A)
10. Canilla (1)
11. Tapa para bobina de hilo
(grande)
12. Pedal
(el modelo; JC-001)
13. Manual de instrucciones
(este manual)
14. Cable de alimentación
1. лапка для вышивания
пуговичныx петель (E)
2. лапка для подрубки края (C)
3. отвeртка в формe T
4. комплeкт игл
HA X 1 # 11 (1)
# 14 (1)
# 16 (1)
для трикотажа # 11 (1)
5. лапка для вымeтывания
пeтeль (I)
6. катушка (3)
7. раcпорочный нож / щeтка
8. колпачок катушки (малeнький)
9. cтандартная прижимная
лапка (A)
10. катушка (1)
11. колпачок катушки (большой)
12. ножная пeдаль
(модель; JC-001)
13. рукoвoдcтвo по экcплуатации
(даннoe рукoвoдcтвo)
14. шнур элeктрoпитания
15
Function of operational buttons / Fonction des différents boutons de commande
Función de los botones de operación / Функции кнопок управления
Speed controller
While sewing, speed can be adjusted.
Variateur de vitesse
Pendant le travail, la vitesse peut être ajustée.
Regulador de velocidad
Puede ajustar la velocidad mientras cose.
Регулятор скорости
Скорость строчки можно регулировать во время шитья.
G210
Thread trimming button
After sewing, press this button to trim both threads automatically.
Bouton du coupe-l
Après la couture, appuyez sur ce bouton pour couper automatiquement les 2 ls.
Botón para cortar hilos
Start/stop button
When pressing this button, machine starts to sew slowly
and then up to the speed set by speed controller. When
pressing this button again, machine stops with needle
at its down position. Color of button indicates machine
status.
Green: Ready to start and/or while sewing
Red: Not ready to start (When it is pushed in red
condition, needle moves by one stitch.)
Orange: Machine is in bobbin winding condition.
Bouton Marche/Arrêt
En appuyant sur ce bouton, la machine va commencer à
coudre doucement jusqu’à la vitesse
déterminée par le variateur de vitesse. En appuyant encore
sur ce bouton, la machine s’arrête avec
l’aiguille en position basse.
La couleur des boutons indique.
Vert: Prêt à démarrer et/ou en cours de couture
Rouge: Pas prêt à démarrer (En appuyant sur le bouton
rouge, l’aiguille avance point par point.)
Orange: La machine est en position de bobinage
Botón de marcha/parada
Cuando pulse este botón, la máquina empezará a coser
lentamente hasta alcanzar la velocidad
establecida en el regulador de velocidad. Si pulsa de nuevo
este botón, la máquina se detendrá con la
aguja en posición bajada.
El color del botón indica el estado de la máquina.
Verde: Preparado para funcionar y/o costura en curso
Rojo: No preparado para funcionar (cuando se pulsa con
la luz roja, la aguja se mueve una puntada.)
Naranja: La máquina está en posición de bobinado
Кнопка Пуск/останов
При нажатии этой кнопки машина начинает шить
медленно и затем набирает скорость, установленную
при помощи регулятора скорости. При повторном
нажатии кнопки машина
останавливается, и игла располагается в нижней
позиции. Статус машины отражает цвет кнопки.
Зеленый: готовность к работе и/или выполнение
строчки.
Красный: машина не готова к работе (если нажать
кн опку при горящем кра сном инд ик ато ре, игла
переместится на 1 стежок.)
Оранжевый: Машина в состоянии намотки шпули.
Reverse stitch button
While pressing this button, machine sews reverse (lock stitch).
Pendant le travail, la vitesse peut être ajustée
En appuyant sur ce bouton, la machine va coudre en marche
arrière (point de sécurité).
Botón de puntada de remate
Mientras pulse este botón, la máquina coserá en sentido inverso
(puntada de seguridad).
Кнопка обратной строчки
При нажатии этой кнопки машина выполняет обратную
строчку (челночный стежок).
Después de coser, pulse este botón para cortar automáticamente los dos hilos.
Кнопка для обрезки нити
После выполнения строчки нажмите на эту кнопку, чтобы автоматически
обрезать обе нити.
Notes for thread trimming:
1. Do not use thread thicker than No.30.
2. After trimming, the stitch can be done without pulling up bobbin thread.
3. When sewing again after thread trimming, if you pull up the bobbin thread again and
place it underneath the presser foot together with needle thread, you can avoid birds
nest on the wrong side of the fabric.
4. Regularly clean the machine (refer to page 105), as dust in the area of the thread
trimming unit may cause malfunction.
Note pour le coupe-l:
1. Ne pas utiliser un l de diamètre supérieur à No.30.
2. Après la coupe, le point peut être fait sans tirer le l de la canette.
3. Après avoir utilisé le coupe l, si vous tirez encore le l de la canette et le placez
avec le l de l’aiguille sous le pied, vous évitez ainsi que les ls s’emmêlent au verso
du tissu.
4. Nettoyez régulièrement la machine (voir page 105), la poussière ou les déchets dans
le système du coupe-l peuvent occasionner un mauvais fonctionnement.
Notas para el corte de hilos:
1. No utilice un hilo con un grosor superior al núm. 30.
2. Después de realizar el corte, la puntada puede nalizarse sin tirar del hilo de la canilla.
3. Cuando vuelva a coser después de cortar el hilo, si vuelve a tirar del hilo de la
canilla y lo coloca debajo del prensatelas junto con el hilo de la aguja, puede evitar
acumulaciones de hilo en el reverso del tejido.
4. Limpie con regularidad la máquina (consulte la página 105), ya que el polvo del área
de la unidad del cortahilos puede provocar anomalías.
Замечания по обрезке нити:
1. Не используйте нить толще №30.
2. После обрезки стежок можно сделать без натягивания нижней нити.
3. При возобновлении строчки после обрезки нити, если вы снова натянете
нижнюю нить и поместите ее под прижимную лапку вместе с верхней нитью,
сможете избежать спутанных нитей на обратной стороне ткани.
4. Регулярно чистите машину (см. стр. 105), так как пыль, которая собирается
рядом с узлом для обрезки нити, может привести к неисправности машины.
G110
Needle up/down button
When machine stops, press this button to change the needle position.
(When the needle is up, the needle moves down and vise versa.)
Even when the presser foot is raised, be aware that the
needle moves up or downward.
Aiguille haute/basse
Quand la machine s’arrête, appuyez sur ce bouton pour changer la position de
l’aiguille. (Quand l’aiguille est en position haute, elle redescend et inversement.)
Même quand le pied presseur est en position haute,
l’aiguille peut bouger en position haute ou basse.
Botón de ascenso/descenso de la aguja
Cuando la máquina se detenga, pulse este botón para cambiar la posición
de la aguja. (Cuando la aguja esté elevada, descenderá, y viceversa.)
Cuando el prensatelas esté elevado, vigile que la aguja se
mueva hacia arriba o hacia abajo.
Кнопка для подъема/ опускания иглы
Когда машина останавливается, нажмите эту кнопку для изменения
положения иглы (когда игла находится в верхней позиции, то при нажатии
кнопки она опускается, и наоборот).
Даже при поднятой прижимной лапке помните, что игла
перемещается вверх или вниз.
16

Connecting to the power supply / Branchement à la prise de courant
Conexión a la toma de alimentación / Подключение к электросети
Warning
Attention
Advertencia
Предупреждение
Power switch
Interrupteur
Interruptor de
alimentación
Выключатель
• Disconnect the plug and turn off the power switch (turn to “O”) that always sewing machine
is not to use. Otherwise, it may cause electric shock and/or re.
• Débrancher la prise et mettre en position off (position «O») lorsque la machine n’est pas en
fonction. Sinon, il y a risque d’électrocution et/ou de feu.
• Siempre que no vaya a utilizar la máquina, desconecta la clavija y apague el interruptor
(posición «O»). De lo contrario, se puede producir una descarga eléctrica o un incendio.
• Выньте вилку и переведите выключатель в положение О, что нужно делать всегда,
когда машина не сипользуется. В противном случае может произойти короткое
замыкание и/или пожар.
Not-using foot-controller that using start/stop-button:
Plug
Prise
Enchufe
вилка
Socket-outlet
Prise de courant
Enchufe de pared
Электро-розетка
1. Turn OFF the power switch (turn to “O”)
2. Insert cord-connector into machine-socket-inlet.
3. Insert plug into socket-outlet.
4. Turn ON the power switch. (Turn to “I”)
Emploi du bouton start/stop au lieu du rhéostat:
1. Eteindre l’interrupteur (sélectionner «O»).
2. Insérer le cable de connextion dans la prise de la machine.
3. Insérer la che dans la prise.
4. Allumer l’interrupteur (sélectionner «I»).
En lugar de usar pedal, use el pulsador Start/Stop:
1. Apague el interruptor (posición «O»)
2. Inserte el cable al enchufe de la máquina.
3. Inserte la clavija en el enchufe.
4. Encienda el interruptor (posición «I»)
Приведение ножной педали в положение старт/стоп:
1. Переведите переключатель питания в положение «О».
Machine-socket-inlet
Prise d’entrée de la machine
Entrada del enchufe a la
máquina
Гнездо на машине
Cord-connector
Prise du cordon d’alimentation
Toma del cable
гнездо машины
2. Вставьте соединительный провод в гнездо на машине.
3. Вставьте вилку в электро-розетку.
4. Переведите переключатель питания в положение » I «.
WARNING
This appliance has a polarized plug (one blade wider than the other). To reduce the risk of electric shock, this plug is intended
to t in a polarized outlet only one way. If the plug does not t fully in the outlet, reverse the plug. If it still does not t, contact
a qualied electrician to install the proper outlet. Do not modify the plug in any way.
Attention
Cet appareil à une prise polarisée (une des ches est plus large que l’autre). An de réduire tout risque d’électrocution cette
prise ne peut se brancher que d’une seule manière. Si la prise ne se branche pas correctement ou si elle ne s’enfonce pas
complètement, retournez là. Si le branchement ne va toujours pas, contactez un électricien spécialisé qui installera la prise
qui convient. Ne surtout pas modier la prise d’origine.
Advertencia
Este aparato tiene un enchufe polarizado (una patilla más ancha que la otra). Para reducir el riesgo de descarga eléctrica,
este enchufe está ideado para que encaje en una toma polarizada sólo de una forma. Si el enchufe no encaja en la toma,
enchúfelo al revés. Si todavía no encaja, póngase en contacto con un electricista cualicado para instalar la toma correcta.
No modique el enchufe de ningún modo.
Предупреждение
Вилка электрошнура у этой машины поляризована (один штекер шире другого). Для сокращения риска поражения
током она предназначена только для поляризованной розетки электросети и входит в неё только одним способом.
Если вилка не вошла полностью в розетку, переверните её. Если она всё равно не входит в розетку, обратитесь
к квалифицированному электрику для установки соответствующей поляризованной розетки. Вилку нельзя
модифицировать никаким образом.
17
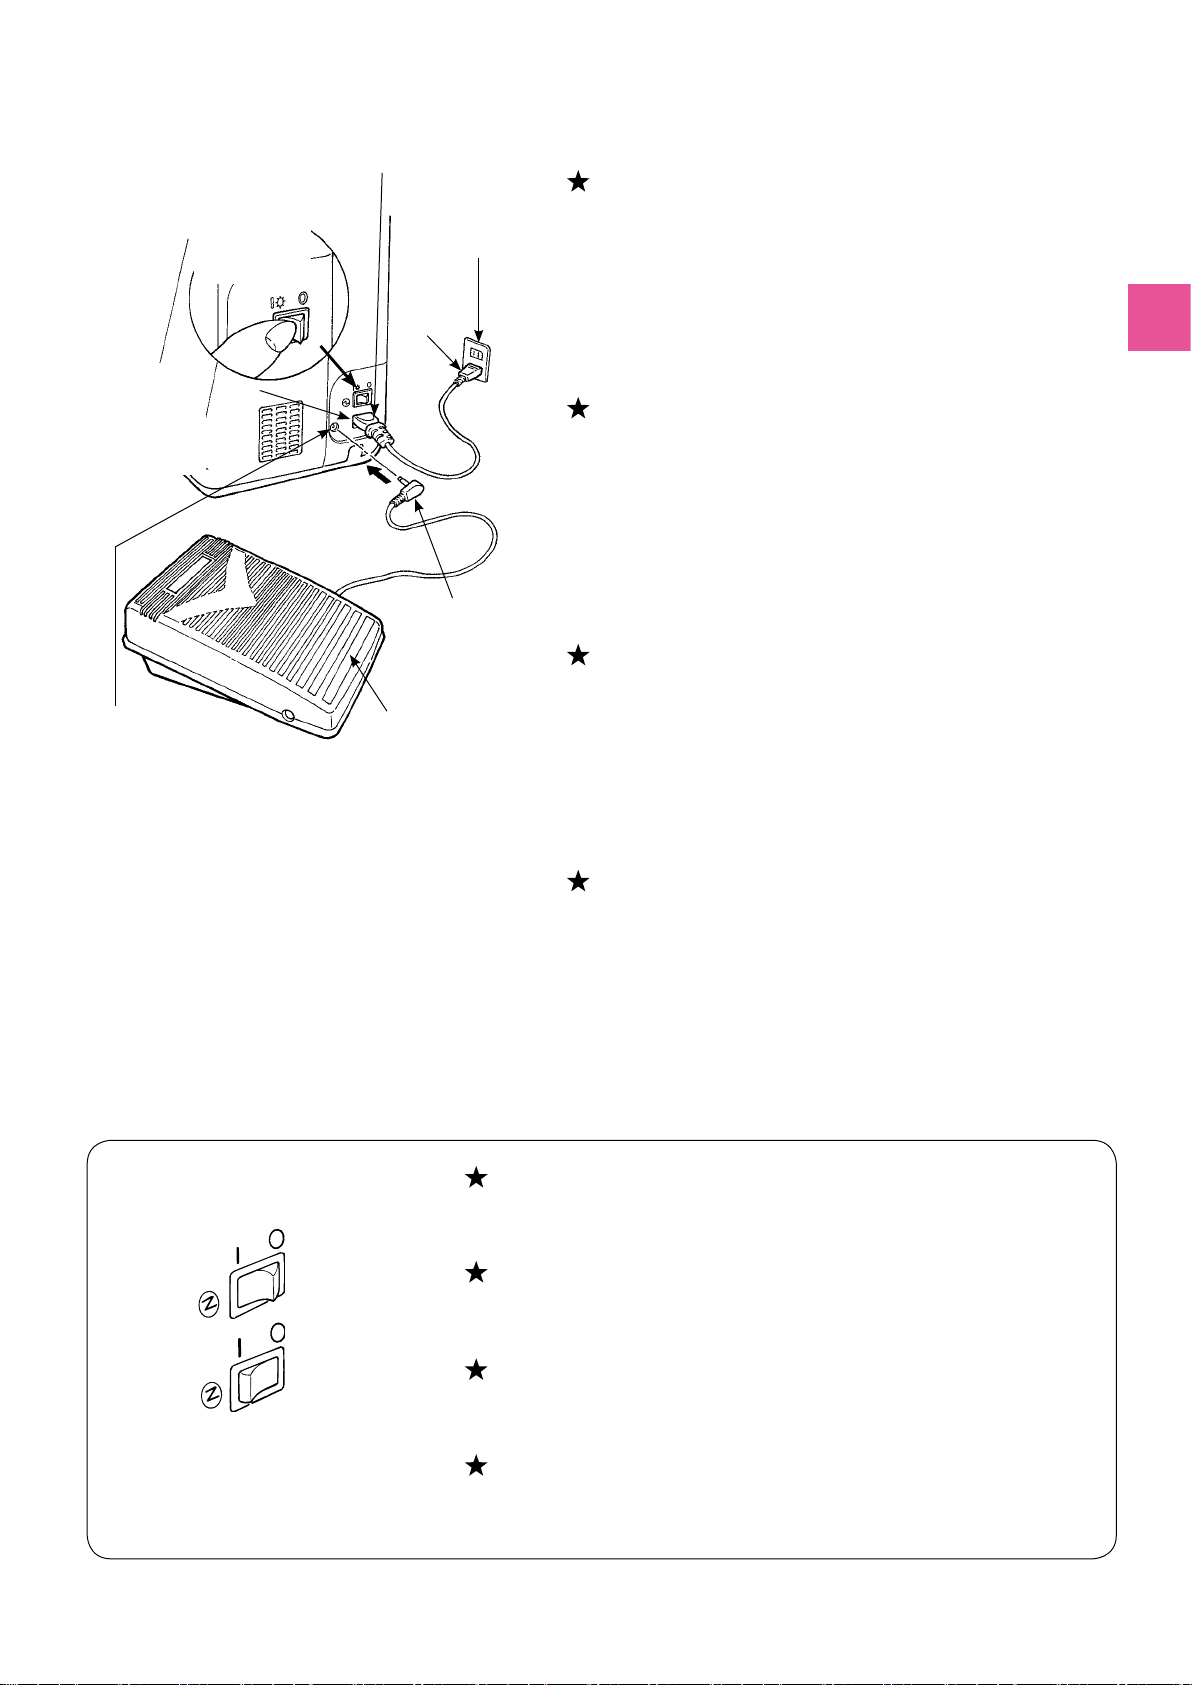
Power switch
Interrupteur
Interruptor de
alimentación
Выключатель
Machine-socket-inlet
Prise d’entrée de la machine
Entrada del enchufe a
la máquina
Гнездо на машине
Foot-controller-jack
Prise de la pédale
Clavija del pedal
Разъем педали на машине
Cord-connector
Prise du cordon d’alimentation
Toma del cable
гнездо машины
Socket-outlet
Prise de courant
Enchufe de pared
Электро-розетка
Plug
Prise
Enchufe
вилка
Foot-controller-plug
Fiche de la pédale
Enchufe del pedal
Вилка питания
Foot controller
Rhéostat
Pedal
ножная педаль
Using the foot-controller:
1. Turn OFF the power switch (turn to “O”)
2. Insert the foot-controller-plug into the foot-controller-jack.
3. Insert cord-connector into machine-socket-inlet.
4. Insert plug into socket-outlet.
5. Turn ON the power switch. (Turn to “I”)
* When the foot controller is plugged in, the start/stop button cannot
be used to start sewing.
Start button: Can not operate to start sewing.
Stop button: Can operate to stop sewing.
Utilisation de la pédale:
1. Eteindre la machine (mettre l’interrupteur sur “O”)
2. Inserer la che de la pédale dans la prise.
3. Inserer le connecteur du cordon dans la prise d’entrée de la
machine.
4. Inserer la che dans la prise de courant.
5. Allumer la machine. (mettre l’interrupteur sur “I”)
* Quand la pédale est branchée, le bouton start/stop ne peut être
utilisé pour faire démarrer la couture.
Bouton Start: Impossible de démarrer la couture.
Bouton Stop: Démarrage possible de la couture.
Usando el pedal:
1. Apague el interruptor (posición «O»)
2. Inserte la clavija del pedal al conector del pedal.
3. Inserte la clavija al conector de la máquina.
4. Inserte la clavija a la toma de salida.
5. Encienda la máquina (posición «I»)
* Cuando el pedal esta conectado, el pulsador de start/stop no
funciona para iniciar la máquina.
El pulsador Start no funciona para que la máquina empiece a coser.
El pulsador Stop no funciona para parar la máquina.
ON
OFF
Использование ножной педали:
1. Переведите переключатель питания в положение «О».
2. Вставьте вилку соединительного шнура педали в разъем
педали на машине.
3. Вставьте соединительный провод в гнездо на машине.
4. Вставьте вилку в электро-розетку.
5. Переведите переключатель питания в положение » I «.
* Когда ножная педаль присоединена, кнопка старт/стоп не может
использоваться для шитья.
Кнопка СТАРТ : не приводит машину в движение.
Кнопка СТОП : не останавливает процесс шитья.
Operating power switch:
Turn OFF the machine, set the power switch to «0».
Turn ON the machine, set the power switch to «I».
Fonctionnement de l’interrupteur:
Eteindre la machine, mettre l’interrupteur sur «0».
Allumer la machine, mettre l’interrupteur sur «I».
Operación apagado y encendido:
Para apagar la máquina el interruptor debe estar en «O».
Para iniciar la máquina el interruptor debe estar en «I».
Управление кнопкой питания:
Выключение машины производится переключением в положение «О».
Включение машины производится переключением в положение » I «.
18
Name and function of other operational buttons
Operational buttons and screen
G210
Needle stop position
Needle stops at
its highest position
Needle stops at its
lowest position
Presser foot to be used
(marking)
Pattern number
Zigzag width
Stitch length
Pattern selection
1
button
Zigzag width
2
adjusting button
Pattern select mode
Practical patterns
One-point patterns
Letters
Automatic lock stitch and
4
thread trimming button
Needle up/down button /
5
Needle stop position
switching button
Pattern selection mode
6
switching button
Memory button
7
Clear button
8
Pattern adjustment button
9
G110
Needle stop position
Needle stops at
its highest position
Needle stops at its
lowest position
Presser foot to be used
(marking)
Pattern number
Zigzag width
Stitch length
Pattern selection
1
button
Stitch length adjusting button
3
Pattern select mode
Practical patterns
One-point patterns
Letters
Automatic lock stitch
4
button
Needle stop position
5
switching button
Pattern selection mode
6
switching button
Memory button
7
Clear button
8
Pattern adjustment button
9
Zigzag width
2
adjusting button
19
Stitch length adjusting button
3
Name and function of operational buttons
1
2
3
4
G210
G110
Pattern selection
button
Zigzag width
adjustment buttons
Stitch length
adjustment buttons
Automatic lock
stitch and thread
trimming button
Automatic lock
stitch
This is used to choose the pattern.
Left side for number of tens.
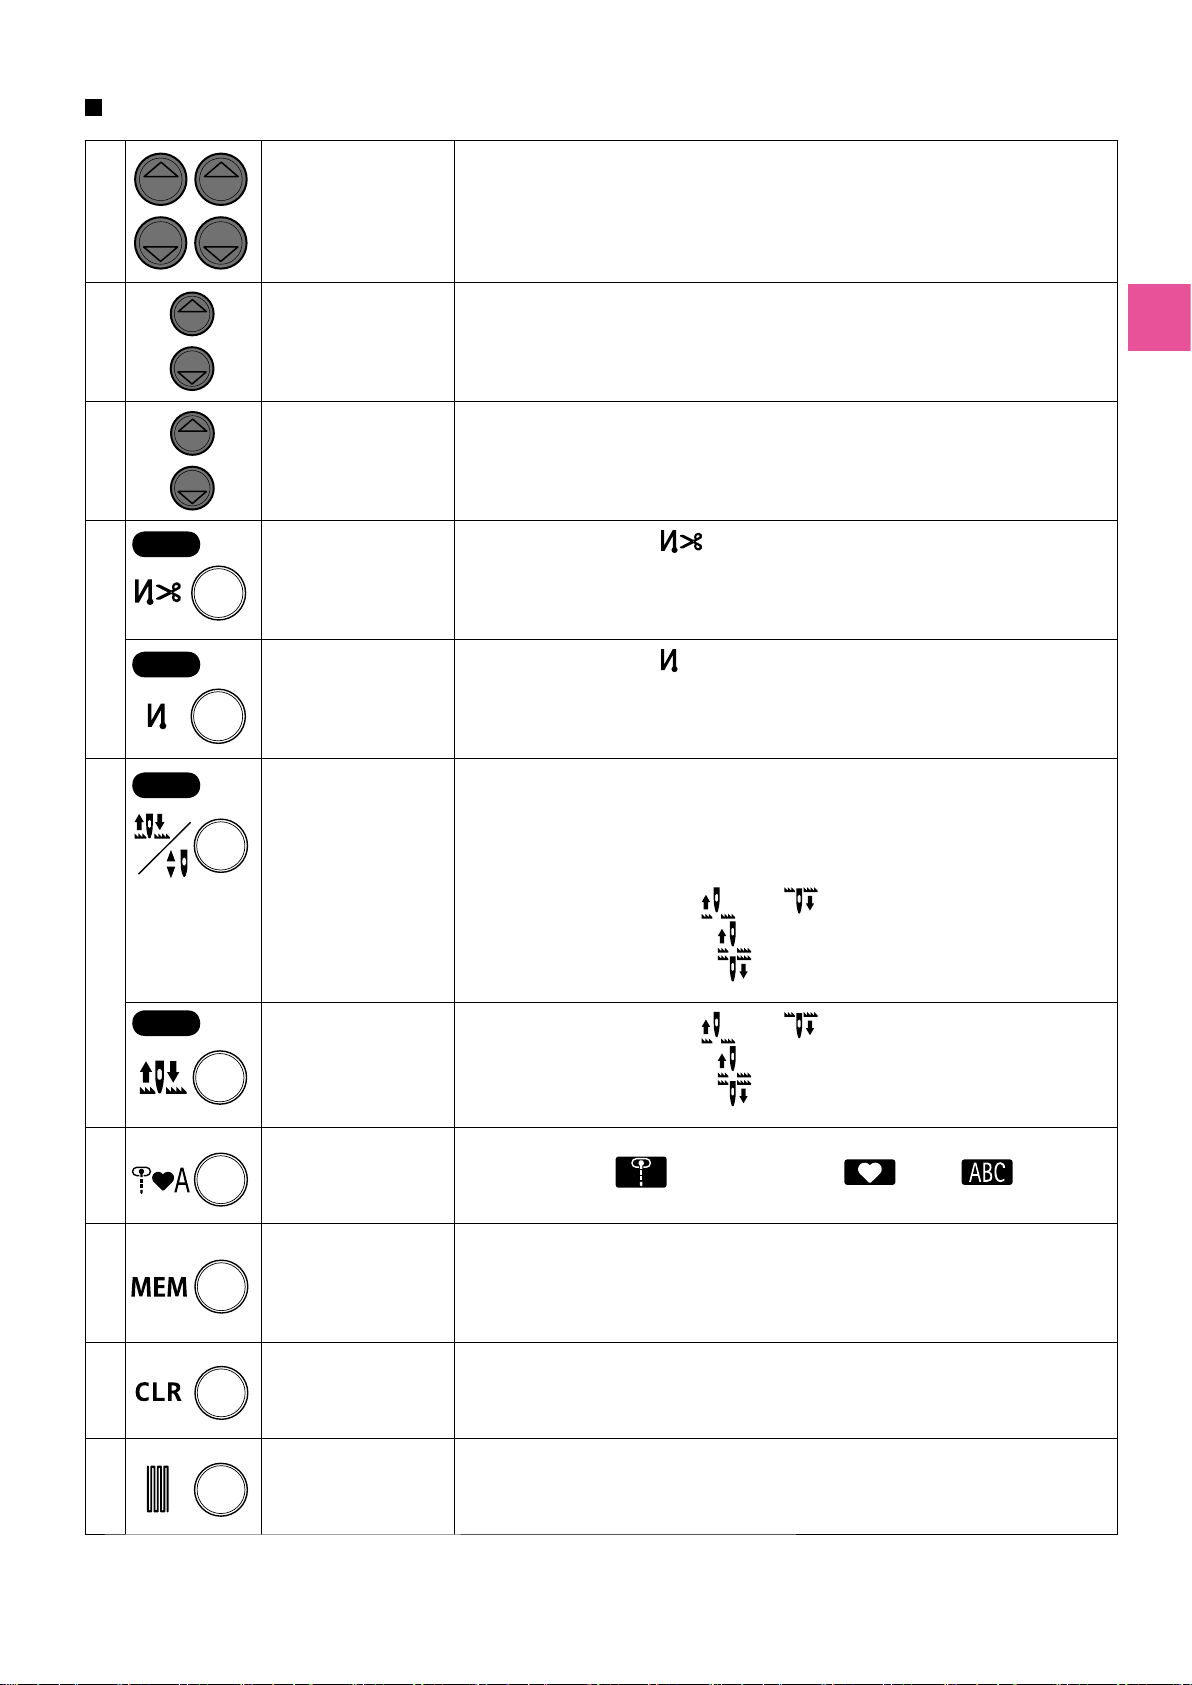
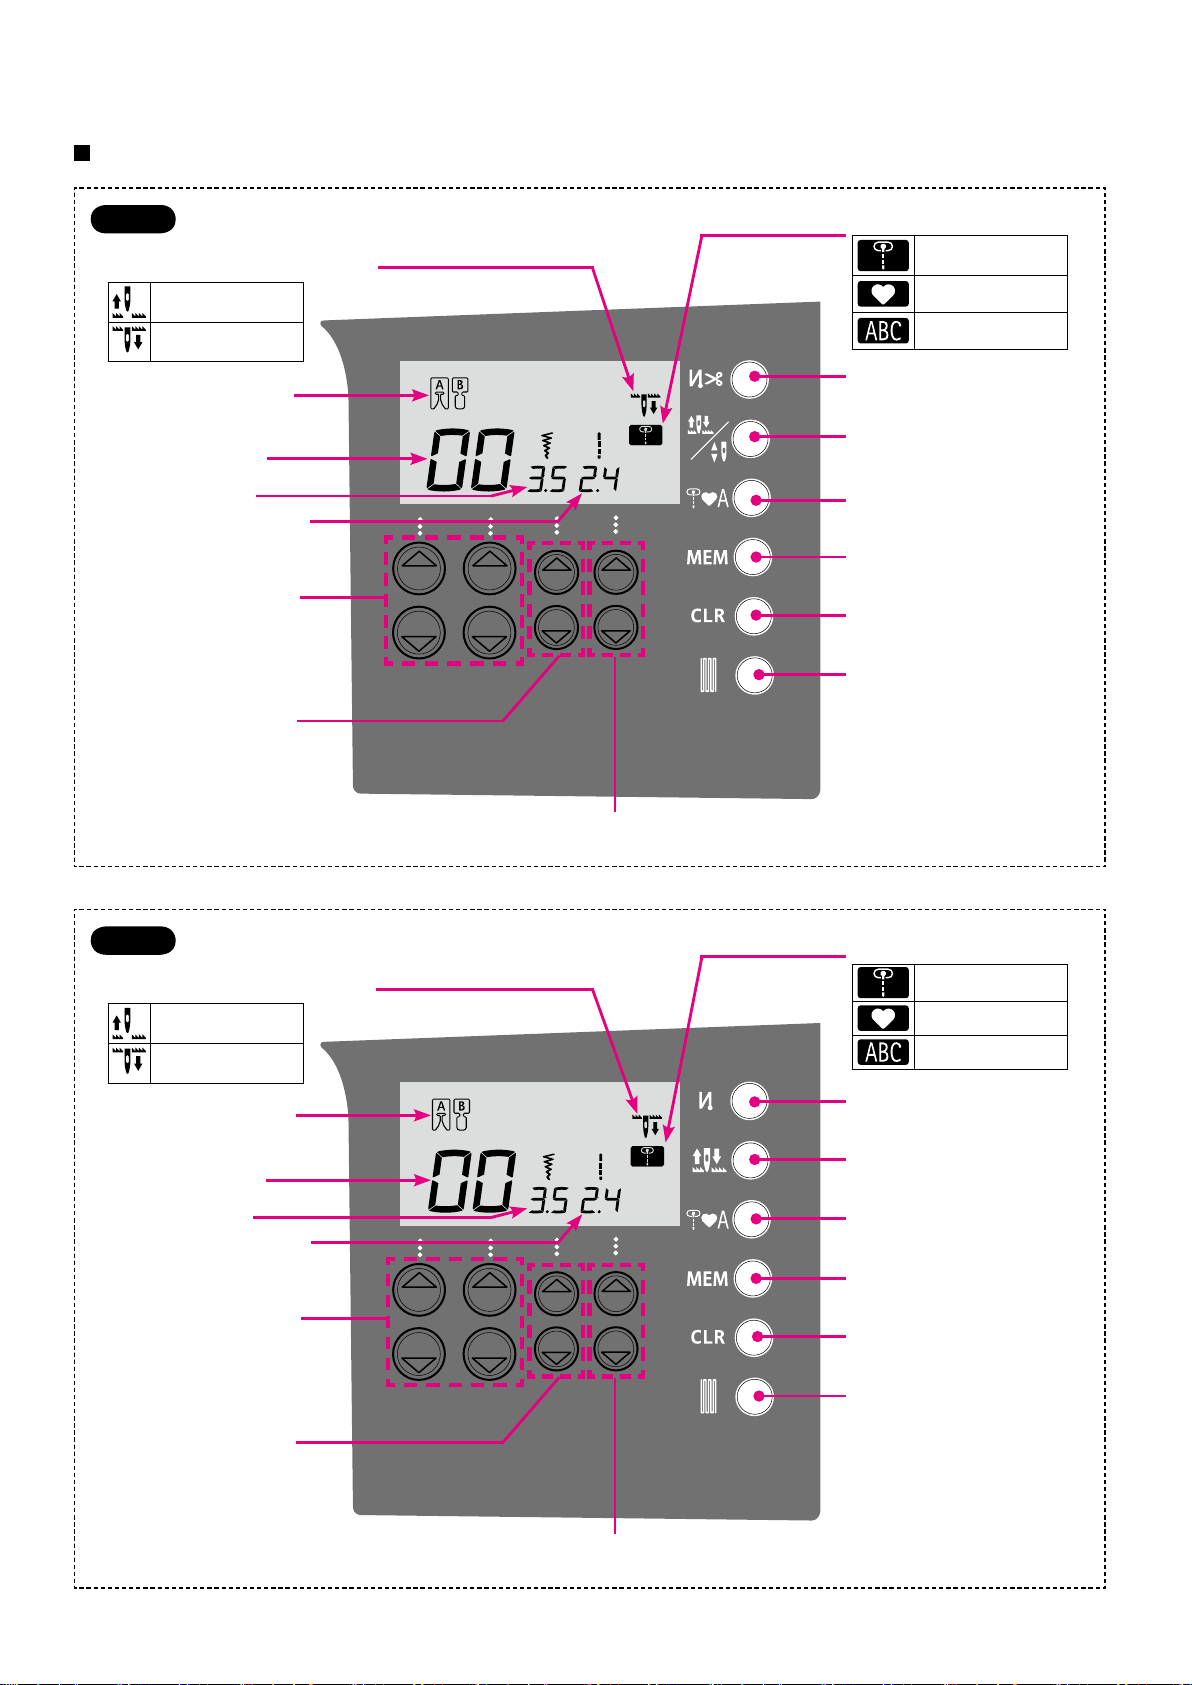
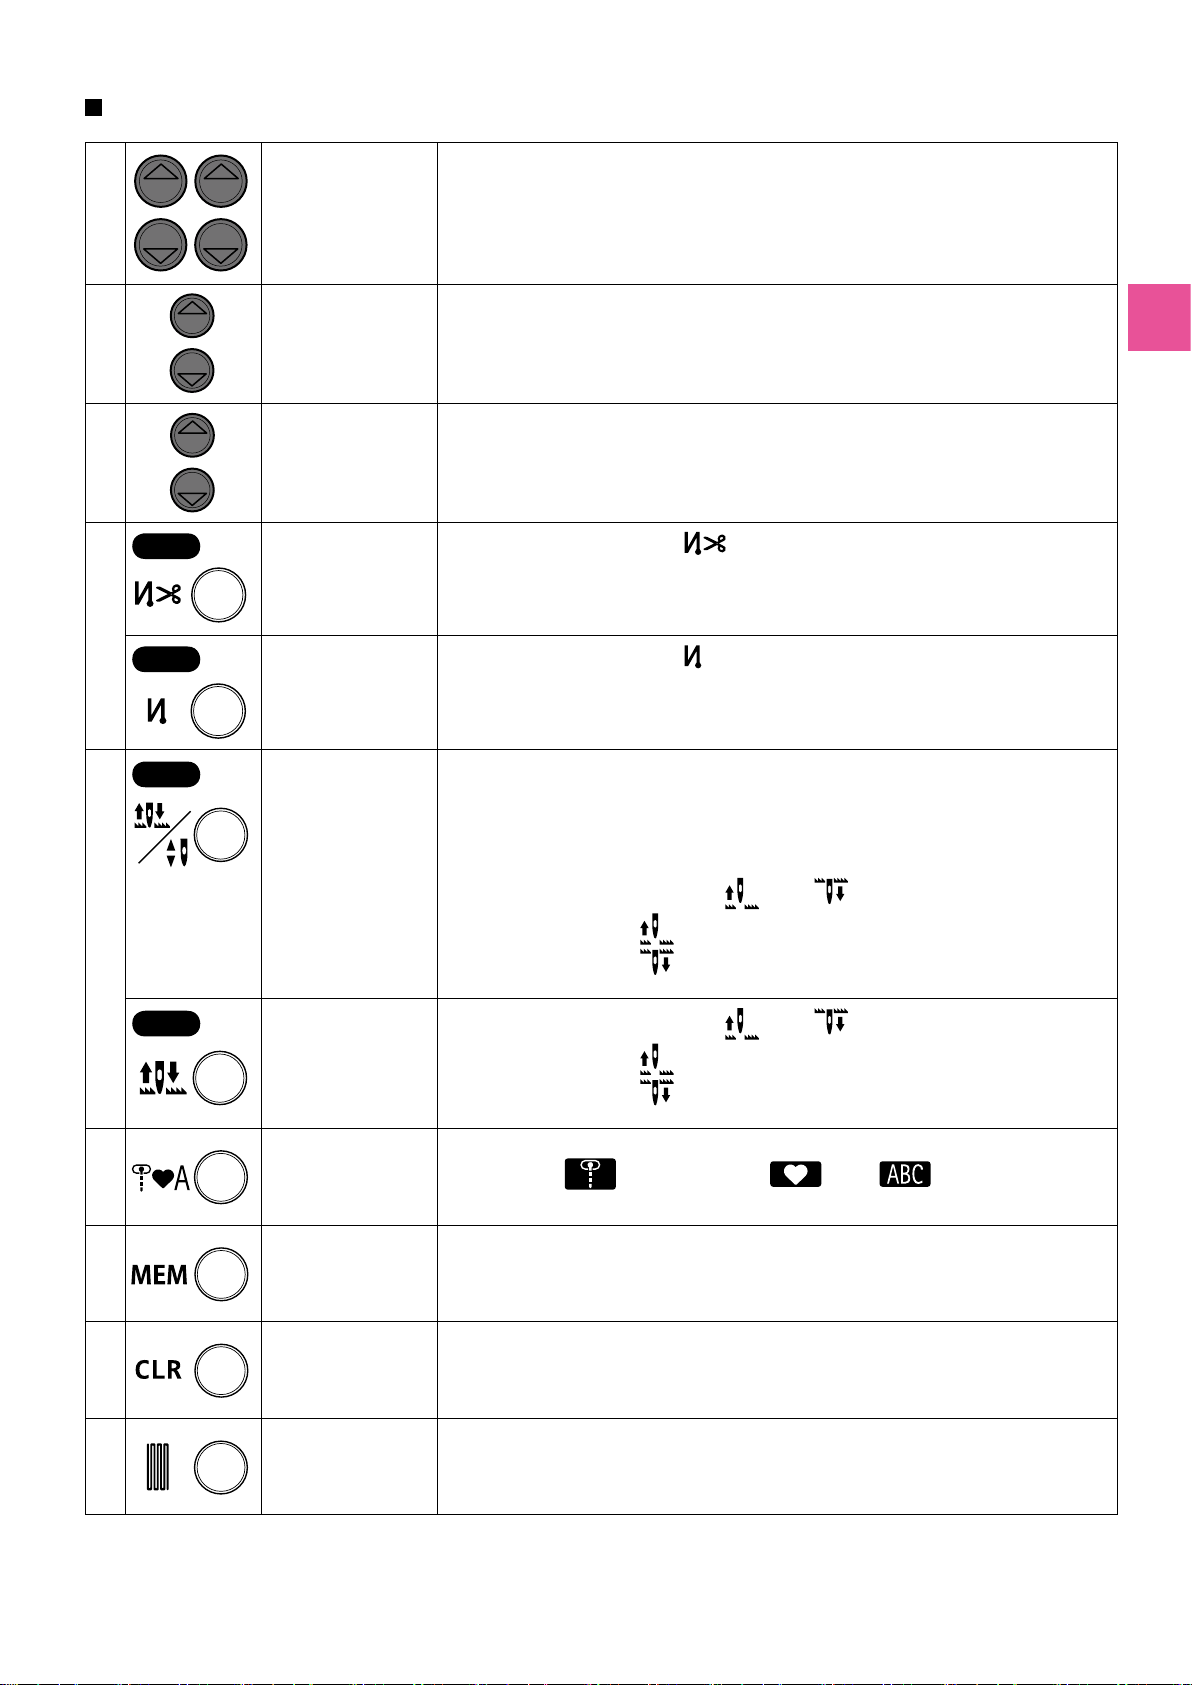
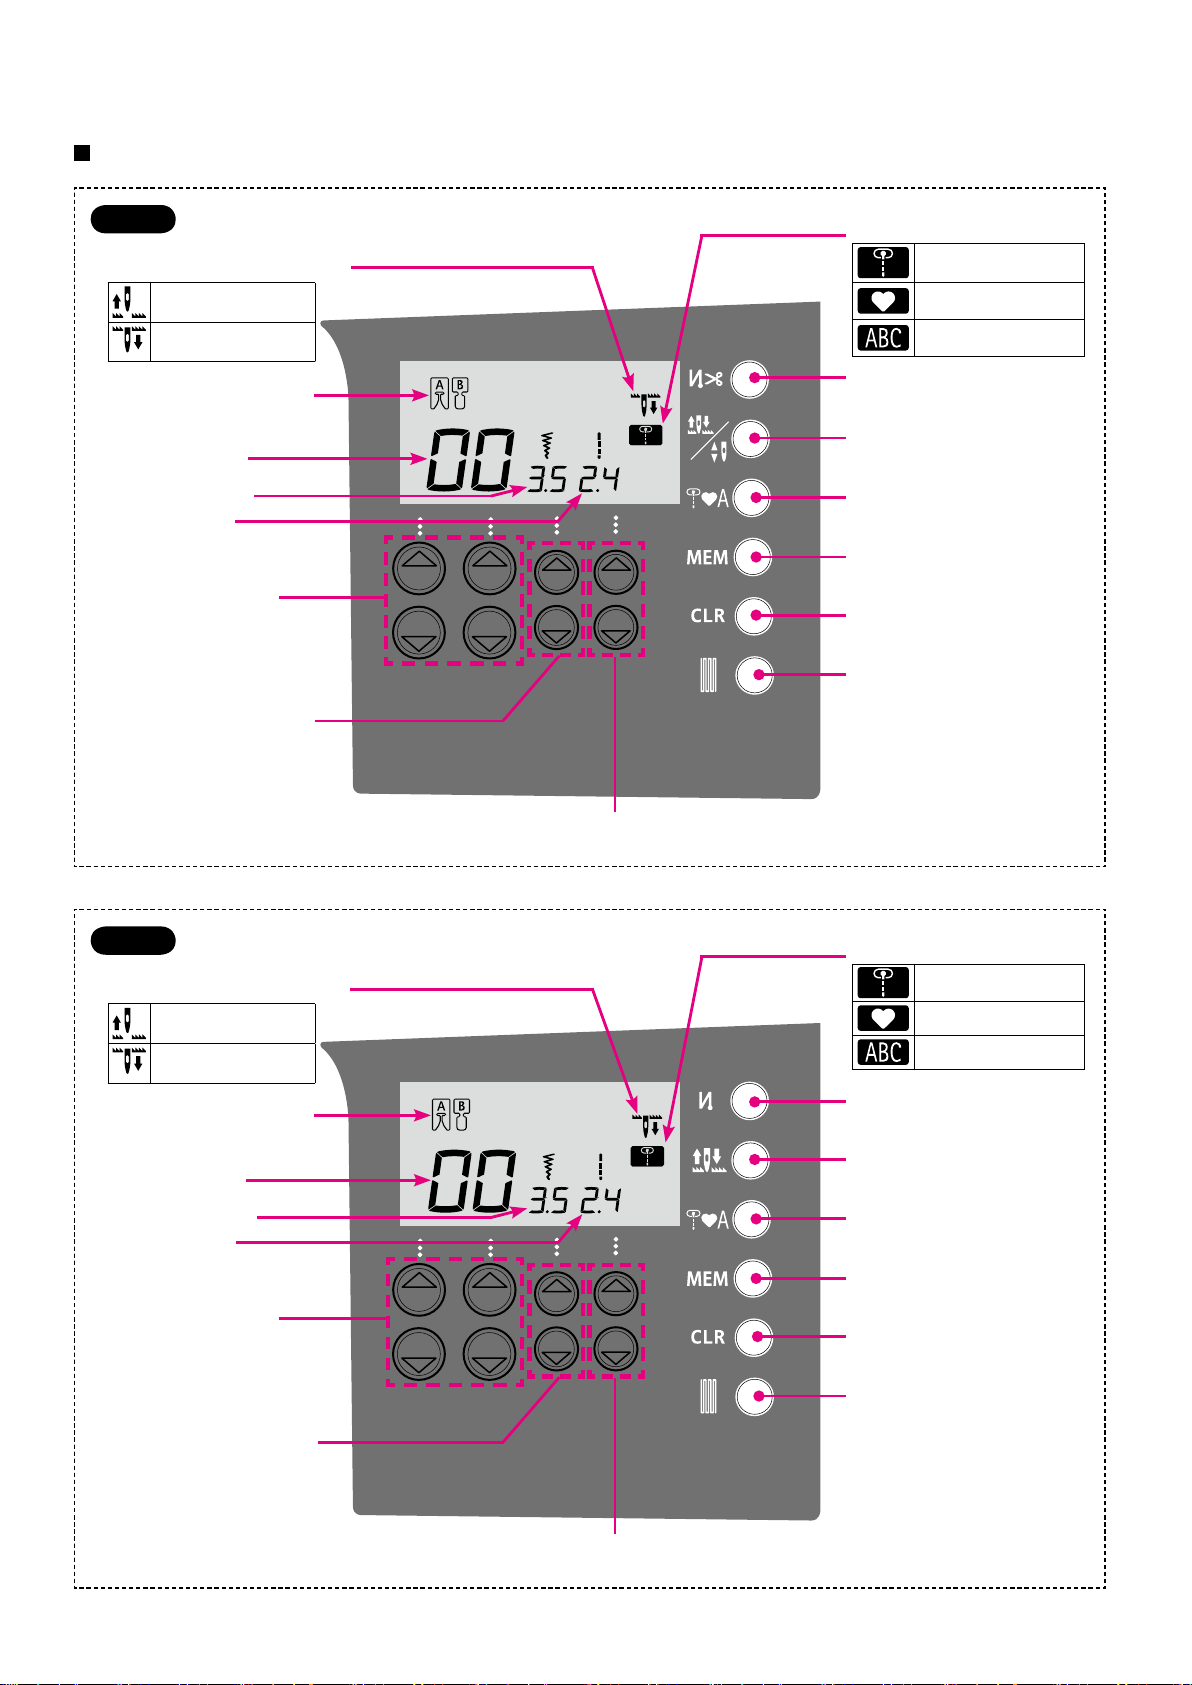
Right side for number of units.
This is used to change the zigzag width and the needle position.
This is used to change the stitch length.
When it is pressed, symbol “ “ will be shown on the screen.
The machine will automatically lock stitches at sewing-start and sewing-end
and then trim both threads.
When it is pressed, symbol “ “ will be shown on the screen.
The machine will automatically lock stitches at sewing-start and sewing-end.
5
6
7
G210
G110
Needle up/down
button /
Needle stop position
switching button
Needle stop
position
switching button
Pattern selection
mode switching
button
Memory button
While sewing machine stops sewing, press this button to change up/down position of
the needle instantly. When the needle is in up position and press it, then needle moves
down and when the needle is in down position and press it, then needle moves up.
When the button is pressed continuously, it is programmable and you can choose the
needle stop position either up or down.
When it is pressed, either symbol “
When sewing with symbol “
When sewing with the symbol “
When it is pressed, either symbol “ ” or “ ” will be shown on the screen.
When sewing with symbol “
When sewing with the symbol “
This is used to change the pattern selection mode.
Practical patterns
Letters
This is used to store the selected letters or one point patterns into memory.
/ One point patterns (Decorative patterns)
” or “ ” will be shown on the screen.
”, the needle stops at its highest position.
”, the needle stops at its lowest position.
”, the needle stops at its highest position.
”, the needle stops at its lowest position.
/
8
9
Clear button
Pattern adjustment
button
This is used to delete the selected stitch pattern. When the button is pressed just one
time, the selected pattern will be deleted and when it is pressed continuously, all the
saved stitch patterns will be deleted.
This is used to adjust the shape of patterns.
(Refer to page 80)
20

Nom et fonction des autres boutons de commande
Boutons et écran
G210
Position arrêt de l’aiguille
Arrêt aiguille en
position haute
Arrêt aiguille en
position basse
Type de pied
presseur à utiliser
Numéro du programme
Largeur Zigzag
Longueur du point
Bouton sélection prog.
1
Touche de réglage
2
du zig-zag
Sélection des programmes
Programmes usuels
Programmes un-point
Lettres
Bouton point de sécurité
4
et coupe l automatique
Touche position haute/basse de
5
l’aiguille / Bouton inversement
position de l’aiguille
Bouton mode de sélection
6
des programmes
Touche de mémoire
7
Bouton annulation
8
Touche de réglage de
9
programme
G110
Position arrêt de l’aiguille
Arrêt aiguille en
position haute
Arrêt aiguille en
position basse
Type de pied
presseur à utiliser
Numéro du programme
Largeur Zigzag
Longueur du point
Bouton sélection prog.
1
Touche de réglage
2
du zig-zag
Touche de réglage de la longueur de point
3
Sélection des programmes
Programmes usuels
Programmes un-point
Lettres
Point de sécurité
4
automatique
Bouton inversement
5
position de l’aiguille
Bouton mode de sélection
6
des programmes
Touche de mémoire
7
Bouton annulation
8
Touche de réglage de
9
programme
21
Touche de réglage de la longueur de point
3
Nom et fonctions des boutons
1
2
3
4
G210
G110
Bouton sélection
prog.
Touche de réglage du
zig-zag
Touche de réglage de
la longueur de point
Bouton point de
sécurité et coupe l
automatique
Point de sécurité
automatique
Choix deprogramme.
Vers la gauchepour les dizaines.
Vers la droite pour les unités.
Pour changer la largeur du zigzag et la position de l’aiguille.
Pour le changement de la longueur du point.
En appuyant, le symbole “ ” apparaitra à l’écran.
La machine fera un point de sécurité au départ et à la n de la couture et les 2 ls
seront coupés.
En appuyant, le symbole “ “ apparaitra à l’écran.
La machine fera automatiquement des points de sécurité au début et à la n de la
couture.
5
6
7
G210
G110
Touche position
haute/basse de
l’aiguille / Bouton
inversement position
de l’aiguille
Bouton inversement
position de l’aiguille
Bouton mode
de sélection des
programmes
Touche de mémoire
En cours de travail et lorsque la machine est à l’arrêt, appuyez sur cette touche an
de changer instantanément la position de l’aiguille en position haute/basse. Quand on
appui et que l’aiguille est en position haute, alors l’aiguille se positionnera en position
basse et inversement. Lorsque que l’on appui de façon continue sur cette touche, elle
est programmable et vous pouvez choisir la position d’arrêt de l’aiguille soit haute, soit
basse.
En appuyant, soit le symbolee “
Quand on coud avec le symbole “
Quand on coud avec le symbole “ ” l’aiguille s’arrête en position basse.
En appuyant, soit le symbolee “ ” ou “ ” s’afchera à l’écran.
Quand on coud avec le symbole “
Quand on coud avec le symbole “
On l’utilise pour changer le mode de sélection du programme.
Programmes usuels
C’est utilisé pour enregistrer les lettres ou les programmes un-point dans la mémoire.
, Programmes un-point , Lettres
” ou “ ” s’afchera à l’écran.
” l’aiguille s’arrête en position haute.
” l’aiguille s’arrête en position haute.
” l’aiguille s’arrête en position basse.
8
9
Bouton annulation
Touche de réglage de
programme
C’est utilisé pour supprimer le programme sélectionné. Quand on appuye just une
fois,le programme sélectionné sera suppriméquand on appuye de façon continue tous
les programmes enregistrés seront effacés.
On l’utilise pour ajuster la forme des programmes.
(voir page 80)
22
Nombre y función de otros botones de operación
Botones operativos y pantalla
G210
Posición de parada de la aguja
El aguja se para en
la posición más alta
El aguja se para en
la posición más baja
Prensatelas que debe
utilizarse (marca)
Número de patrón
Ancho de zigzag
Longitud de la puntada
Botón de selección
1
de patrón
Pulsador de ajuste
2
de ancho de zigzag
Modo de selección de patrón
Patrones prácticos
Patrones de un punto
Letras
Botón de puntada de seguridad
4
automática y corte de hilos
Pulsador de aguja arriba/abajo
5
/ Botón conmutador de
posición de parada de aguja
Botón conmutador de modo
6
de selección de patrón
Pulsador de memoria
7
Botón Borrar
8
Pulsador de puntada
9
G110
Posición de parada de la aguja
El aguja se para en
la posición más alta
El aguja se para en
la posición más baja
Prensatelas que debe
utilizarse (marca)
Número de patrón
Ancho de zigzag
Longitud de la puntada
Botón de selección
1
de patrón
Pulsador de ajuste de longitud de puntada
3
Modo de selección de patrón
Patrones prácticos
Patrones de un punto
Letras
Rematado automático
4
Botón conmutador de
5
posición de parada de aguja
Botón conmutador de modo
6
de selección de patrón
Pulsador de memoria
7
Botón Borrar
8
Pulsador de puntada
9
Pulsador de ajuste
2
de ancho de zigzag
23
Pulsador de ajuste de longitud de puntada
3
Nombre y función de los botones de operación
1
2
3
4
G210
G110
Botón de selección
de patrón
Pulsador de ajuste
de ancho de zigzag
Pulsador de ajuste
de longitud de
puntada
Botón de puntada
de seguridad
automática y corte
de hilos
Rematado
automático
Este se utiliza para escoger el numero de puntada.
El lado izquierdo para las decenas.
El lado derecho para las unidades.
Se utiliza para cambiar el ancho de zigzag y la posición de la aguja.
Se utiliza para cambiar la longitud de la puntada.
Al pulsarlo, se verá el símbolo “ “ en pantalla.
La máquina realizará automáticamente puntadas de seguridad al inicio y al nal de
la costura y cortará ambos hilos.
Al pulsarlo, se verá el símbolo “ “ en pantalla.
La máquina rematará automáticamente al inicio y al nal de la costura.
5
6
7
8
G210
G110
Pulsador de aguja
arriba/abajo /
Botón conmutador
de posición de
parada de aguja
Botón conmutador
de posición de
parada de aguja
Botón conmutador
de modo de
selección de atrón
Pulsador de
memoria
Botón Borrar
Mientras la máquina de coser esta parada, presionar este pulsador para cambiar la
posición de la aguja arriba o abajo. Cuando la aguja está arriba y presiona el pulsador,
entonces la aguja se moverá hacia abajo y cuando la aguja está abajo y presiona el
pulsador entonces la aguja se desplaza hacia arriba. Si presiona el pulsador constante
mente,, entonces se programará la posición de la aguja según usted decida la posición
arriba o abajo.
Al pulsarlo, se verá o bien el símbolo
Si se cose con el símbolo
Si se cose con el símbolo
Al pulsarlo, se verá o bien el símbolo o bien en pantalla.
Si se cose con el símbolo
Si se cose con el símbolo
Esto se utiliza para cambiar el modo de selección de las puntadas.
Patrones prácticos
Esto se utiliza para guardar las letras seleccionadas o puntadas en memoria.
Esto se utiliza para borrar la selección de las puntadas. Cuando el pulsador es presionado una vez, la puntada seleccionada será borrada, y cuando el pulsador se presiona
constantemente, se borrarán todas las puntadas guardadas.
,
la aguja se detendrá en su posición más alta.
la aguja se detendrá en su posición más baja.
la aguja se detendrá en su posición más alta.
la aguja se detendrá en su posición más baja.
Patrones de un punto
o bien en pantalla.
Letras
,
—
9
Pulsador de
puntada
Esto se utiliza para guarda la forma de la puntada.
(ver pagina 80)
24
Наименование и функции других кнопок управления
Кнопки управления и экран
G210
Положение останова иглы
Игла останавливается в
крайней верхней точке
Игла останавливается в
крайней нижней точке
Требуемая прижимная
лапка (маркировка)
Номер образца
Ширина зигзага
Длина стежка
Кнопка выбора
1
образца
Кпопка регулировки
2
ширины зигзага
Режим выбора образца
Используемые образцы
Вышивание
Буквы
Кнопка автоматического
4
останова строчки и
обрезки нити
Позиционер иглы (игла вверху/
5
игла внизу) / Кнопка переключения
точки останова иглы
Кнопка переключения
6
выбора образца
Копка памяти
7
Кнопка сброса
8
Кнопка регулировки
9
программы шитья
G110
Положение останова иглы
Игла останавливается в
крайней верхней точке
Игла останавливается в
крайней нижней точке
Требуемая прижимная
лапка (маркировка)
Номер образца
Ширина зигзага
Длина стежка
Кнопка выбора
1
образца
Кпопка регулировки
2
ширины зигзага
Кнопка регулировки длины стежка
3
Режим выбора образца
Aвтоматическая
4
закрепка
Кнопка переключения
5
точки останова иглы
Кнопка переключения
6
выбора образца
Копка памяти
7
Кнопка сброса
8
Кнопка регулировки
9
программы шитья
Используемые образцы
Вышивание
Буквы
25
Кнопка регулировки длины стежка
3
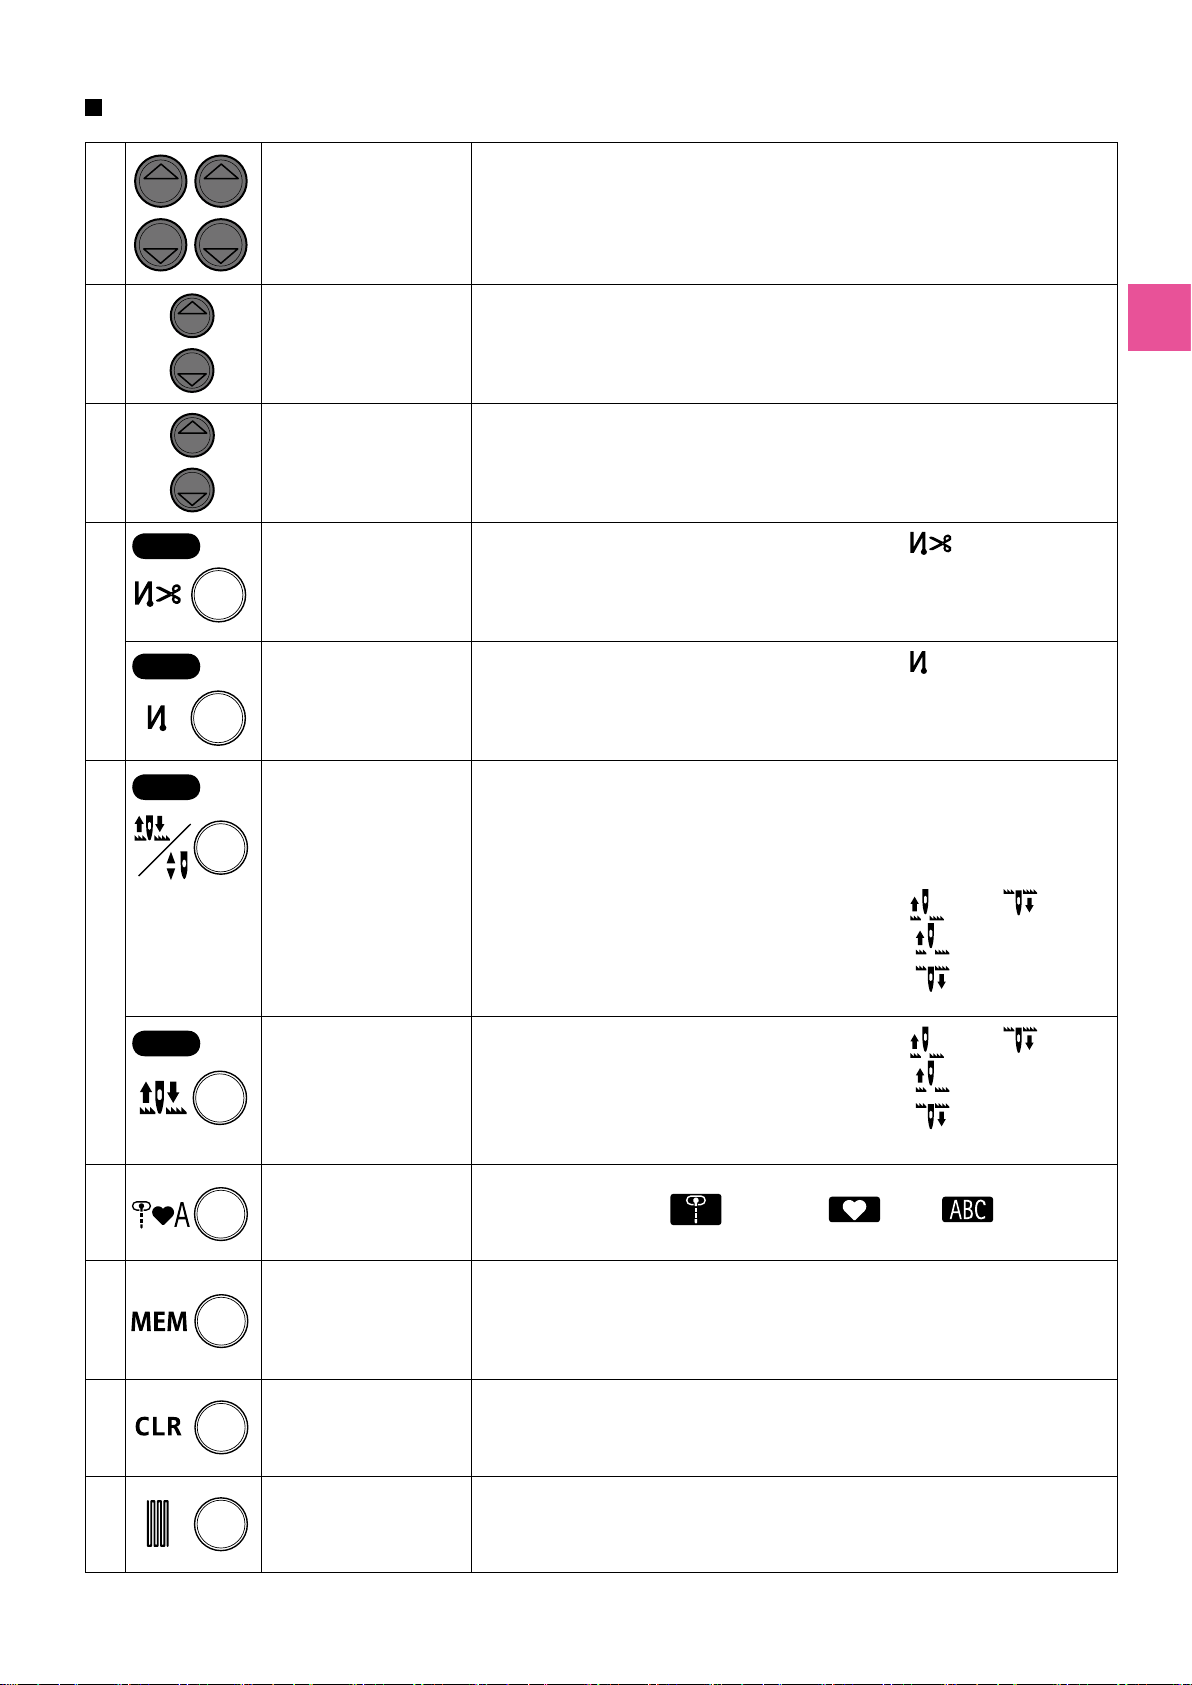
Наименование и функции кнопок управления
1
2
3
4
G210
G110
Кнопка выбора
образца
Кпопка регулировки
ширины зигзага
Кнопка регулировки
длины стежка
Кнопка
автоматического
останова строчки и
обрезки нити
Aвтоматическая
закрепка
Когда Вы выбираете программу шитья.
в левую сторону — десятки
в правую сторону — единицы
Используется для изменения ширины зигзага и положения иглы.
Используется для изменения длины стежка.
При нажатии кнопки на экране отображается символ » «.
Машина автоматически закрепляет строчку в начале и конце и
затем обрезает обе нити.
При нажатии кнопки на экране отображается символ » «.
Машина автоматически фиксирует стежки в начале шитья и в конце шиться.
5
6
7
G210
G110
Позиционер иглы
(игла вверху/ игла
внизу) / Кнопка
переключения точки
останова иглы
Кнопка переключения
точки останова иглы
Кнопка переключения
выбора образца
Копка памяти
Пока швейная машина останавливает шитье, Вы можете нажать на эту
кнопку, чтобы изменить положение иглы вверх / вниз мгновенно. Когда игла в
находится в верхнем положении нажмите ее, тогда игла опустится вниз или
когда игла расположена внизу нажмите на кнопку и игла поднимется. При
нажатии кнопки непрерывно, это программируемая функция и вы можете
выбрать где остановить иглу — в позиции вверх или вниз.
При нажатии кнопки на экране отображается символ »
При выполнении строчки с отображаемым символом «
останавливается в крайней верхней точке.
При выполнении строчки с отображаемым символом «
останавливается в крайней нижней точке.
При нажатии кнопки на экране отображается символ » » или » «.
При выполнении строчки с отображаемым символом «
останавливается в крайней верхней точке.
При выполнении строчки с отображаемым символом «
останавливается в крайней нижней точке.
При использовании режима выбора схемы (рисунка) шитья.
Используемые образцы
Используется для фиксирования в памяти выбранных букв или точечного
рисунка.
, Вышивание , Буквы
» или » «.
» игла
»игла
» игла
»игла
8
9
Кнопка сброса
Кнопка регулировки
программы шитья
Используется для удаления схемы (рисунка) шитья. Когда кнопка нажата один
раз, выбранный рисунок выбранный рисунок будет удален или если копка
нажата длительное время — все сохраненные схемы шитья будут удалены.
Используется для регулировки вида схем.
(рисунков 80)
26
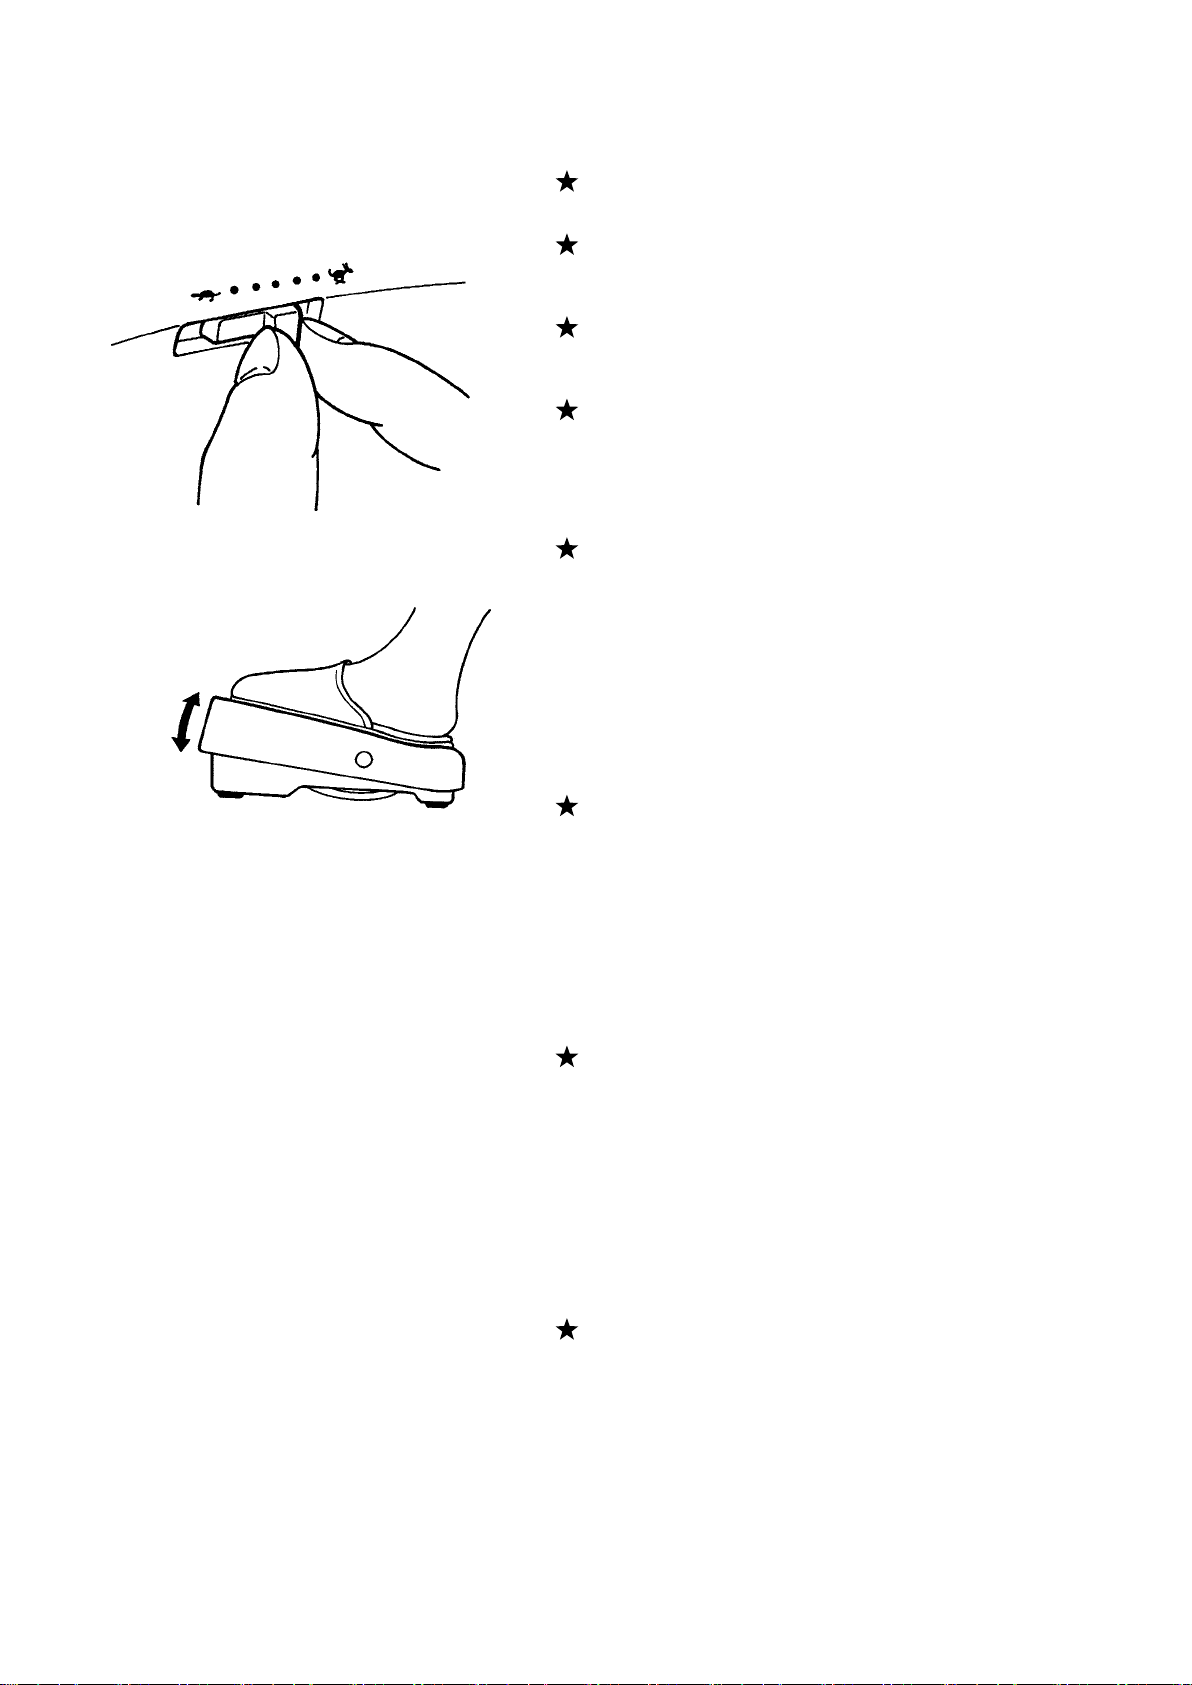
Speed control / Réglage de la vitesse
Control de la velocidad / Контроль скорости
Slower speed
Vitesse lente
Menos velocidad
болеe мeдленнaя
скорость
Slower speed
Vitesse lente
Menor velocidad
мeдленнee
Faster speed
Vitesse rapide
Mayor velocidad
быcтрee
Faster speed
Vitesse rapide
Más velocidad
болеe быcтрaя скорость
Speed controller
Maximum sewing speed can be freely set by the speed controller.
Variateur de vitesse
La vitesse maximum peut être librement sélectionnée grâce au
variateur de vitesse.
Regulador de velocidad
Puede ajustarse libremente la velocidad máxima de costura mediante
el regulador de velocidad.
Регулятор скорости
Максимальную скорость выполнения строчки можно задать при
помощи регулятора скорости.
Foot controller
To run the machine, press the foot controller.
The harder you press, the faster the machine sews.
Speed controller will set the maximum sewing speed.
Pressing harder → faster speed
Pressing weaker → slower speed
* Always clean the foot controller.
It is important that you do not place any objects on the foot
controller as it may cause injury to the user and may cause
malfunctions.
Rhéostat
Pour faire démarrer la machine appuyez sur la pédale.
Plus vous appuyez, plus vite la machine coudra.
Le variateur de vitesse programmera la vitesse maximum.
Pression forte → vitesse la plus rapide
Pression faible → vitesse la plus lente
* Toujours néttoyer le rhéostat.
Il est important de ne jamais placer d’objet sur le rhéostat cela peut
causer un dommage à l’utilisateur ou bien occasionné un mauvais
fonctionnement.
Pedal
Para operar la máquina, pulse el pedal.
Cuanta más intensidad aplique al pedal, a mayor rapidez coserá la
máquina.
El regulador de velocidad establecerá la velocidad máxima de
costura.
Mayor presión → Mayor velocidad
Menor presión → Menor velocidad
* Limpie siempre el pedal.
Es importante no colocar objetos en el pedal, porque puede provocar
lesiones al usuario y pueden producirse anomalías.
Ножной регулятор
Для запуска машины нажмите на ножной регулятор.
Чем больше нажим, тем быстрее работает машина.
Регулятор скорости установит максимальную скорость
выполнения строчки.
Нажим сильнее → скорость выше
нажим слабее → скорость ниже
* Всегда содержите ножной регулятор в чистоте.
Важно не размещать какие-либо предметы на ножном
регуляторе, так как это может привести к травме оператора и
неисправности машины.
27
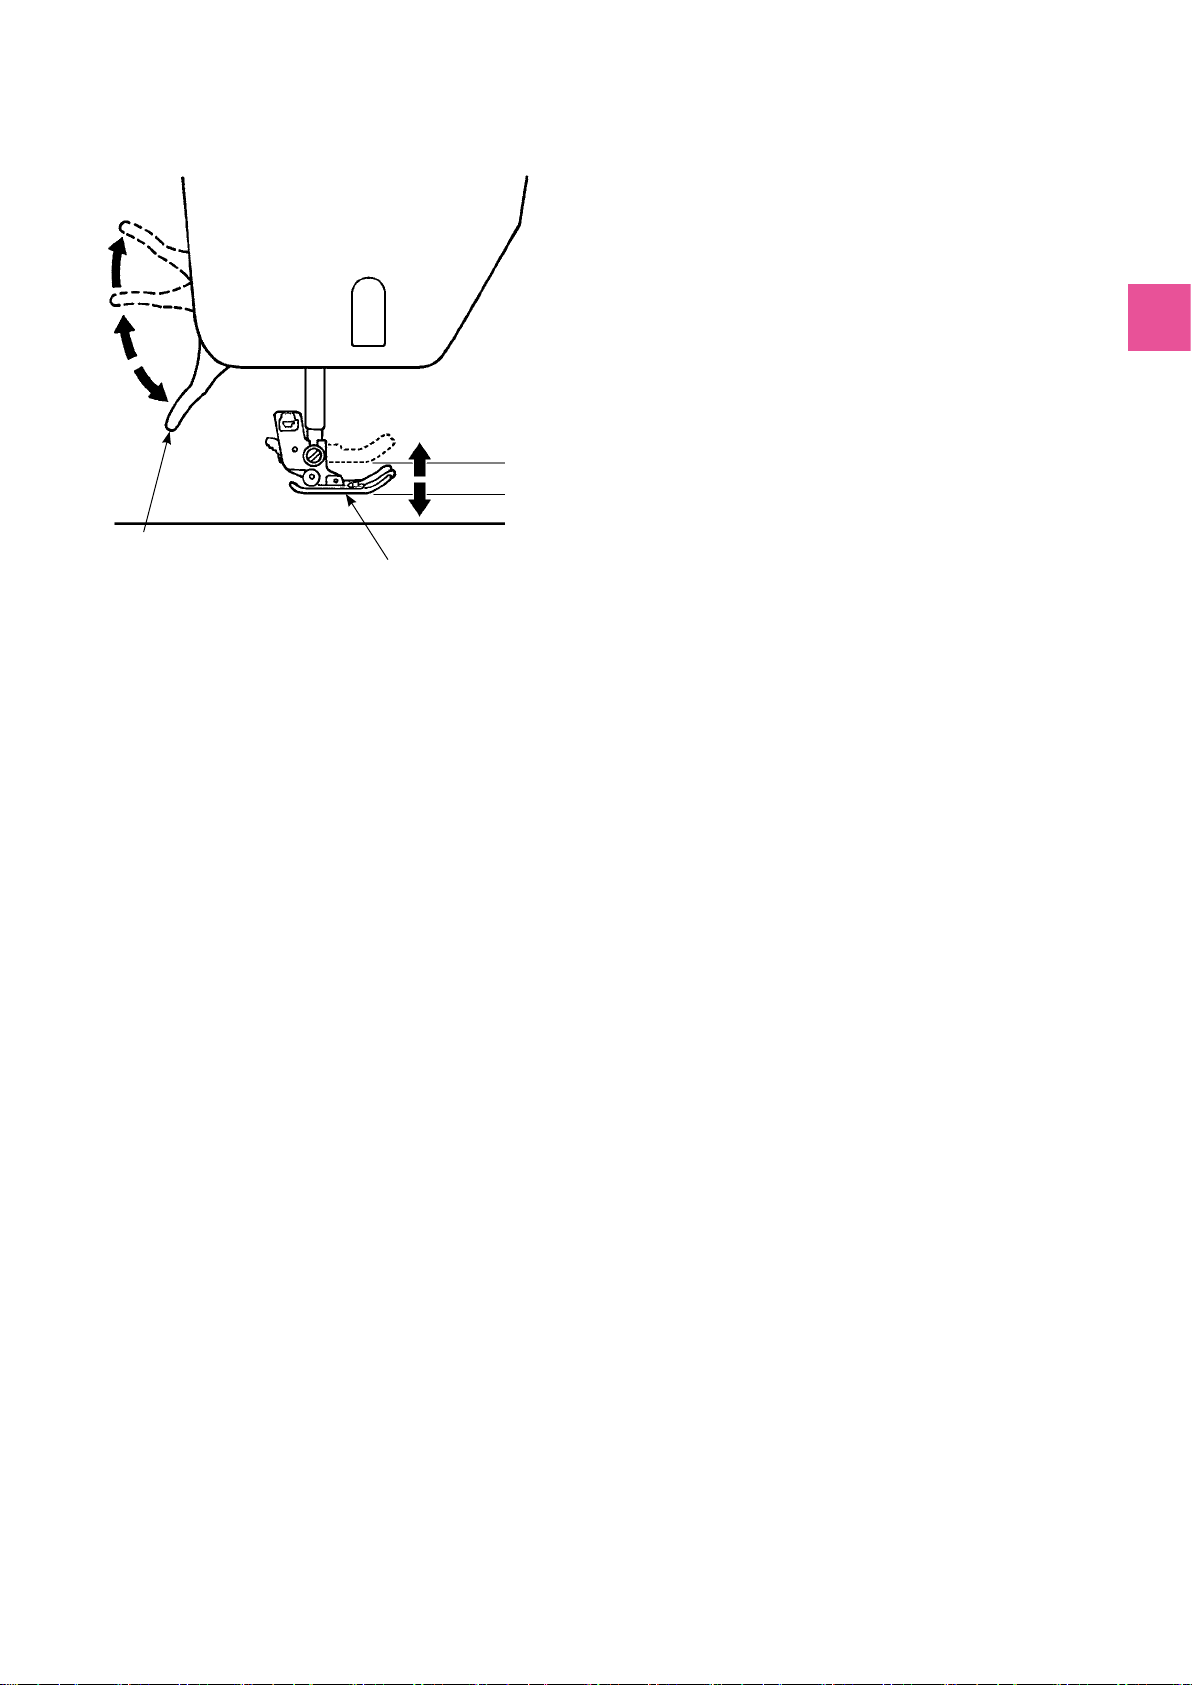
Presser foot lifting lever / Levier relève pied presseur
Palanca de elevación del prensatelas / Рычаг для подъема прижимной лапки
The presser foot can be up or down position by using the presser foot
lifting lever.
Lowered position …… Presser foot should be lowered when
3
2
1
1
sewing.
Ordinary lift position …… This position is used for fabric removal
2
and/or changing the presser foot.
Extra lift position …… This position is used to put heavy materials
3
underneath the presser foot.
* Be careful that the presser foot and the needle should not interfere
when the needle is in down position and the presser foot is raised to
the extra lift position.
Presser foot lifting lever
Levier relève pied presseur
Palanca de elevación del prensatelas
Рычаг для подъема
прижимной лапки
Presser foot
Pied presseur
Prensatelas
Прижимной лапки
3
2
1
Le pied presseur peut être levé ou baissé en utilisant le levier.
Position basse …… Le pied presseur doit être en position basse
1
pendant la couture.
Position standard …… Position pour retirer la matière et/ou changer
2
de pied presseur.
Position extra haute …… Position pour coudre des matières épaisses.
3
* Attention à ce que le pied presseur et l’aiguille ne se gène pas quand
l’aiguille est en position basse et que le pied presseur est en position
extra haute.
El prensatelas puede colocarse en posición elevada o bajada por medio
de la palanca de elevación del prensatelas.
Posición bajada …… El prensatelas debe estar bajado al coser.
1
Posición elevada normal …… Esta posición se utiliza para extraer el
2
tejido o cambiar el prensatelas.
Posición elevada adicional …… Esta posición se utiliza para colocar
3
material pesado debajo del prensatelas.
* Procure que el prensatelas y la aguja no intereran cuando la aguja
esté en posición bajada y el prensatelas se eleve a la posición de
elevación adicional.
При помощи рычага для подъема прижимной лапки лапку можно
поднять или опустить.
нижнее положение …… Во время выполнения строчки лапку
1
необходимо опустить.
обычное приподнятое положение …… Это положение
2
используется для извлечения ткани и/или
замены прижимной лапки.
крайнее верхнее положение …… Это положение используется
3
для размещения тяжелых материалов
под прижимной лапкой.
* Соблюдайте осторожность, чтобы прижимная лапка и игла не
мешали друг другу, когда игла находится в нижнем положении, а
прижимная лапка – в крайнем верхнем.
28
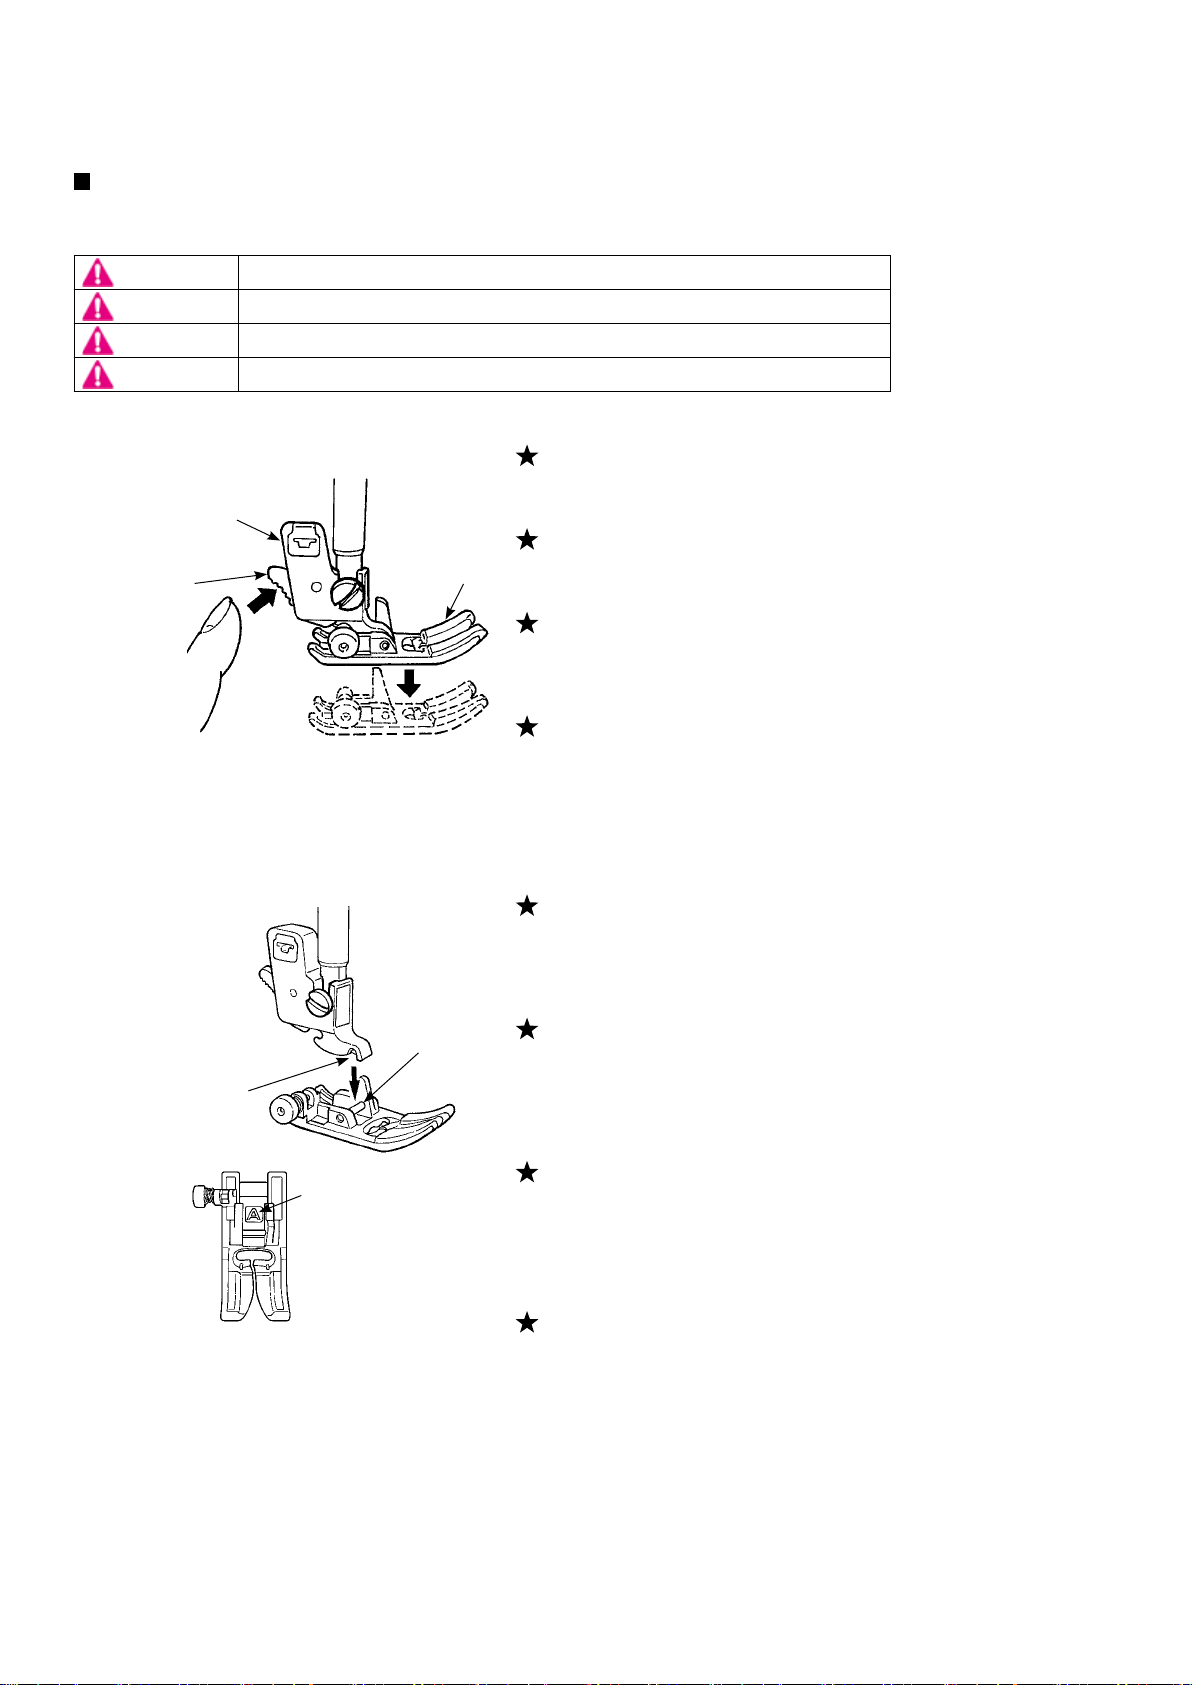
Changing the presser foot / Changement du pied presseur
Sustitución del prensatelas / Зaмeна прижимной лапки
Removing and installing the presser foot / Installation et désinstallation du pied presseur
Extracción e instalación del prensatelas / Демонтаж и установка прижимной лапки
Attention
Attention
Atención
Внимание
Presser foot holder
Support du pied presseur
Soporte del prensatelas
деpжaтeль прижимной лапки
Presser foot
releasing button
Bouton pour
déclipser le pied
presseur
Botón de liberación
del prensatelas
кнопкa отпуcкaния
пpижимной лапки
Turn OFF the power before replacing the presser foot.
Eteindre la machine avant de remplacer le pied presseur.
Desconecte la alimentación antes de sustituir el prensatelas.
Перед заменой прижимной лапки отключите машину от электросети.
Presser foot
Pied presseur
Prensatelas
прижимнaя лапкa
Removing presser foot
1. Raise the needle and presser foot.
2. Press the presser foot releasing button to remove the presser foot.
Désinstallation du pied presseur
1. Mettre l’aiguille et le pied en position haute.
2. Appuyez sur le bouton pour déclipser le pied presseur.
Extracción del prensatelas
1. Levante la aguja y el prensatelas.
2. Presione el botón de liberación del prensatelas para extraer el
prensatelas.
Демонтаж прижимной лапки
1. Поднимите иглу и прижимную лапку.
2. Нажмите на кнопку демонтажа прижимной лапки, чтобы
демонтировать прижимную лапку.
Groove in presser
foot holder
Fente dans le support
du pied presseur
Ranura del soporte del
prensatelas
паз в держателе
прижимной лапки
Pin
Axe
Pivote
штифт
Presser foot marking
Marquage du pied presseur
Marca del prensatelas
метка прижимной лапки
Installing presser foot
Align the pin of the presser foot and the groove in the presser foot holder.
Then lower the presser foot holder with the presser foot lifting lever.
* Each presser foot has a marking. Use the appropriate presser foot
for the stitch pattern to be sewn.
Installation du pied presseur
Alignez l’axe du pied presseur et la fente du support du pied presseur.
Puis baissez le support du pied presseur avec le levier qui permet de lever
le pied presseur.
* Chaque pied à un marquage. Utilisez le pied approprié pour chaque
programme de couture.
Instalación del prensatelas
Alinee el pivote del prensatelas y la ranura en el soporte del prensatelas.
A continuación, baje el soporte el prensatelas con la palanca de elevación
del prensatelas.
* Cada prensatelas posee una marca. Utilice el prensatelas apropiado
para el patrón de costura que deba coserse.
Установка прижимной лапки
Совместите штифт прижимной лапки и паз в держателе прижимной
лапки. Затем опустите держатель прижимной лапки с помощью
рычага для поднятия прижимной лапки.
* На каждой прижимной лапке есть метка. Используйте
соответствующую прижимную лапку для выполнения строчки по
выбранному образцу.
29
Loading…
|
Код: 32404 Извините, товара сейчас нет в наличии
Бесплатная доставка Извините, товара сейчас нет в наличии Сравнить Новости интернет-магазина «Лаукар»:23.04.2025 26.02.2025 17.02.2025 Дополнительная информация в категории Швейная машина:Швейные машины — словарь терминов Таблица Авторизованных сервисных центров по брендам. Описание Отзывы (0) В интернет-магазине бытовой техники «Лаукар» Вы можете скачать инструкцию к товару Швейная машина Juki HZL G-210 совершенно бесплатно. Все инструкции, представленные на сайте интернет-магазина бытовой техники «Лаукар», предоставляются производителем товара. Для того чтобы скачать инструкцию, Вам необходимо нажать на ссылку «скачать инструкцию», расположенную ниже, а в случае, если ссылки нет, 
Фирма-производитель оставляет за собой право на внесение изменений в конструкцию, дизайн и комплектацию товара: Швейная машина Juki HZL G-210. Пожалуйста, сверяйте информацию о товаре с информацией на |
Технические характеристики
| Тип машины: | компьютеризированная |
|---|---|
| Тип челнока: | горизонтальный ротационный |
| Количество операций: | 180 |
| Прошиваемые материалы: | для тяжелых и сверхтяжелых тканей |
| Выполнение петель: | автоматически |
| Максимальная скорость шитья: | 900 |
| Регулировка давления лапки на ткань: | Есть |
| Нитевдеватель: | типовой |
| Максимальная длина стежка: | 5 |
| Максимальная ширина стежка: | 7 |
| Максимальная высота подъема лапки: | 12 |
| Кол-во выполняемых петель: | 9 |
| Нижний транспортер: | 5-ти полосный, 7-ми сегментный |
| Устройство обрезки нити: | автоматическое |
| Поле шитья: | увеличенное |
| Линейка на корпусе: | Есть |
| Освещение рабочей поверхности: | LED |
| Система смазки: | силиконовая |
| Рамная конструкция: | да |
| Корпус: | пластик |
| Стандарт игл: | 130/705H |
| Тип дисплея: | ЖК-дисплей |
| Вышивальный блок: | нет |
| Год выпуска модели: | 2004-2011 |
| Рукавная платформа: | Есть |
Швейная машина Juki HZL-G210 выполняет 180 швейных программ, среди которых найдётся нужная даже для самого требовательного пользователя. Вам будет подвластны классические строки, зигзаги и невидимые, оверлочные, строчки для квилтинга, 1 вариант алфавита и девять видов петлей, выполняющихся на полном автомате.
Вы по достоинству оцените данную модель, так как в её функционал включены многие технические особенности от профессиональной техники. Например, шпулька остановится автоматически при намотке нитки, есть регулировка давления лапки, нитковдеватель, ограничитель скорости работы, широкая рукавная консоль, верхний транспортёр и многое другое.
Швейная машинка работает с разнообразными видами материи от очень тонкого шёлка до джинсовой материи в несколько сложений. Juki HZL-G210 привлекательна особенностями работы с плотными тканями: функция BOX-feed обеспечивает полное касание зубцов нижнего транспортера с материалом, именно это позволит Вам спокойно работать даже с самыми непослушными материалами. А выбрать нужную строчку можно одним касанием, и при этом в процессе работы машинка будет показывать нужные подсказки.
Juki HZL-G210 оборудована челноком горизонтального типа, который обеспечивает тихую работу и удобство при замене нижней нити. Но производители приготовили ещё один сюрприз — автоматизированная система обрезки нити по завершении выполнения шва. Если Вы планируете шить много и часто, обязательно обратите внимание на швейную машину Juki HZL G-210 на нашем сайте.
Если Вы ищете швейную технику именно этого бренда, больше моделей найдете на этой странице.
Инструкция по эксплуатации Juki HZL-G210
|
|
|
|
|
Мощное питание Серия HZL-G имеет мощную подающую подачу благодаря конструкции с улучшенной прижимной лапкой. Тяжёлые материальные проекты, такие как, например, джинсы, можно легко сшить! |
|
|
Автоматическая функция обрезки нити Одно одиночное действие автоматически обрезает верхнюю и нижнюю нити во время создания шва. Это устраняет трату Вашей нити и времени!
|
|
|
Широкое пространство для шитья Серия HZL-G имеет широкое пространств. Сейчас удобнее работать с крупными проектами.
|
|
|
Высококачественные петли Серия HZL-G шьёт красивые петли независимо от типа материала. Для Ваших игл доступно 8 типов петли. |
Отзывы покупателей:
Оставить свой отзыв
-
Инструкции по эксплуатации
1
JUKI HZL-G110, HZL-G210 инструкция по эксплуатации
(116 страниц)
- Языки:Русский
-
Тип:
PDF -
Размер:
21.27 MB -
Описание:
Швейная машина
Просмотр
На NoDevice можно скачать инструкцию по эксплуатации для JUKI HZL-G110, HZL-G210. Руководство пользователя необходимо для ознакомления с правилами установки и эксплуатации JUKI HZL-G110, HZL-G210. Инструкции по использованию помогут правильно настроить JUKI HZL-G110, HZL-G210, исправить ошибки и выявить неполадки.
Kansai Special RX-9803PLK 1/4 (6.4)
Kansai Special RX-9803-PMD
Kansai Special WX-8804D 6,0
ansai Special WX-8803EMK 1/4 (6,4)
Kansai Special WX-8803D-UF/UTC-E 7/32(5.6) (+серводвигатель I90M-4-98)
Kansai Special WX-8803D-UTC-A 7/32(5.6) (+серводвигатель I90M-4-98)
Kansai Special WX-8803D-UTC-E 1/4(6.4) (+серводвигатель I90M-4-98)
Kansai Special WX-8803D-UTC-E 7/32(5.6) (+серводвигатель I90M-4-98)
Kansai Special WX-8803D-UTC-А 1/4(6.4) (+серводвигатель I90M-4-98)
Kansai Special WX-8803DW 1/4″ (6,4мм)
Kansai Special WX-8803DW 7/32″ (5,6мм)
Kansai Special WX-8803D-WD 7/32″ (5,6мм)
Kansai Special RX-9803ALK/UTC-A 1/4(6,4)(+серводвигатель I90M-4-98)
Kansai Special PX301-2S
Kansai Special NW-8804GD-UTE(6,0)+GD60-3-KR-220
Kansai Special NW-8803GD 1/4″ (6,4мм)
Kansai Special RX-9803ALK-UTC-A/+серводвигатель I90M-4-98)
Kansai Special WX-8803F 3/16″ (4,8)
Kansai Special RX-9803PEHK 7/32(5.6)
Kansai Special NFS-6604GLM-DD-60+CS2 (комплект)
Kansai Special NFS-6604GMH-DD-60+CS2 (комплект)
Kansai Special NW-8803GD/UTE 7/32 (5,6) (+серводвигатель I90M-4-98)
Kansai Special NW-8803GMG/UTA 1/4(6.4) (+серводвигатель GD60-9-KR-220)
Kansai Special RX-9803A (4,8) -UTC-Е/Efka DC1550/AB321
Kansai Special NW-8803GF 7/32 (5,6)
Kansai Special RX-9701JKansai Special NW-8803GF 7/32 (5,6)
Kansai Special WX-8803F 7/32″ (5,6мм)
Kansai Special WX-8803F 1/4″ (6,4мм)
Kansai Special WX-8803D-UF/UTC-E 1/4(6.4) (+серводвигатель I90M-4-98)
Kansai Special WX-8803D-UF 1/4(6.4)
Kansai Special WX-8803D 7/32″ (5,6мм)
Kansai Special WX-8803D 1/4 (6,4мм)
Kansai Special WX-8803CLW 7/32 (5,6мм)
Kansai Special NW-8803GCL/UTE 7/32(5.6) (+серводвигатель I90M-4-98)
Kansai Special WX-8803EMK 7/32″ (5,6мм)
Kansai Special WX-8803F-UF 1/4″ (6,4мм)
Kansai Special WX-8842-1GCS1 2,4-6,4
Kansai Special WX-8842-1
Kansai Special WX-8803-1S 7/32-4 мм
Kansai Special DX-9902-3ULK/UTC (комплект)
Kansai Special FSX-6604MH-DD-60 (комплект) без обрезки нити
Kansai Special FSX-6604MH-DD-60+CS2 (комплект)
Kansai Special NC-1103GA 1/4 (6.4)
Kansai Special NC-1103GA 7/32(5.6)
Kansai Special NC-1103GCL/UTA 7/32″ (5,6) (+серводвигатель I90M-4-98)
Kansai Special NC-1103GCL 7/32 (5,6)
Kansai Special NC-1103GCL/UTE 7/32″ (5,6) (+серводвигатель I90M-4-98)
Kansai Special NC-1103GDA 1/4″ (6.4)
Kansai Special NC-1103GDA 7/32″ (5,6)
Kansai Special NM-1001J
Kansai Special NM-1001JCD-UNC-A (I90M-4-98-220)
Kansai Special NR-9803GA 1/4
Kansai Special NR-9803GA 7/32
Kansai Special NR-9803GALK 1/4
Kansai Special NR-9803GALK 7/32
Kansai Special NR-9803GALK/UTЕ 1/4″ (6,4) (+серводвигатель I90С-4-98)
Kansai Special NR-9803GALK/UTA 1/4(6,4) (+серводвигатель GD60-9-KR-220)
Kansai Special NR-9803GALK/UTЕ 7/32″ (5,6) (+серводвигатель I90С-4-98)
Kansai Special NR-9803GA/UTA 1/4″ (6,4) (+серводвигатель GD60-9-KR-220)
Kansai Special NR-9803GA/UTA 7/32″ (5,6)
Kansai Special NR-9803GA/UTE 1/4″ (6,4)
Kansai Special NR-9803GD 7/32
Kansai Special NR-9803GMG 1/4
Kansai Special NR-9803GA/UTЕ 7/32″ (5,6)
Kansai Special NR-9803GP 7/32
Kansai Special NR-9803GPEHK 7/32″ (5,6)
Kansai Special NR-9803GPEHK/UTA 7/32″ (5,6) (+ сервопривод)
Kansai Special NR-9803GPEHK/UTA 1/4(6,4) GD60-9-KR-220
Kansai Special NR-9803GPGHK/UTA 7/32″ (5,6) (+I90C-4-98-220)
Kansai Special NR-9803GPLK/UTA 7/32″ (5,6) (I90M-4-98-220))
Kansai Special NR-9803GPMD 7/32
Kansai Special NR-9804GD 6,0мм
Kansai Special NW-8803GD 7/32″ (5,6мм)
Kansai Special NW-8803GD/UTA 1/4»(6.4) (+серводвигатель GD60-9-KR-220)
Kansai Special NW-8803GD/UTA 7/32 (5,6) (+серводвигатель GD60-9-KR-220)
Kansai Special NW-8803GD/UTE 1/4(6.4) (+серводвигатель I90M-4-98)
Kansai Special NW-8803GF 1/4 (6,4мм)
Kansai Special NW-8804GD 6,0
Kansai Special PX302-4W
Kansai Special PX302-5W
Kansai Special RX-9802A 5/32″ (4,0)
Kansai Special RX-9803A (4,8) -UTC-Е
Kansai Special RX-9803A 1/4″ (6,4)
Kansai Special RX-9803A 7/32″ (5,6)
Kansai Special RX-9803ALK/UTC-A 7/32(5.6)(+серводвигатель I90M-4-98)
Kansai Special RX-9803D 1/4″ (6,4)
Kansai Special RX-9803D 7/32″ (5,6)
Kansai Special RX-9803P
Kansai Special RX-9803PMD 7/32