
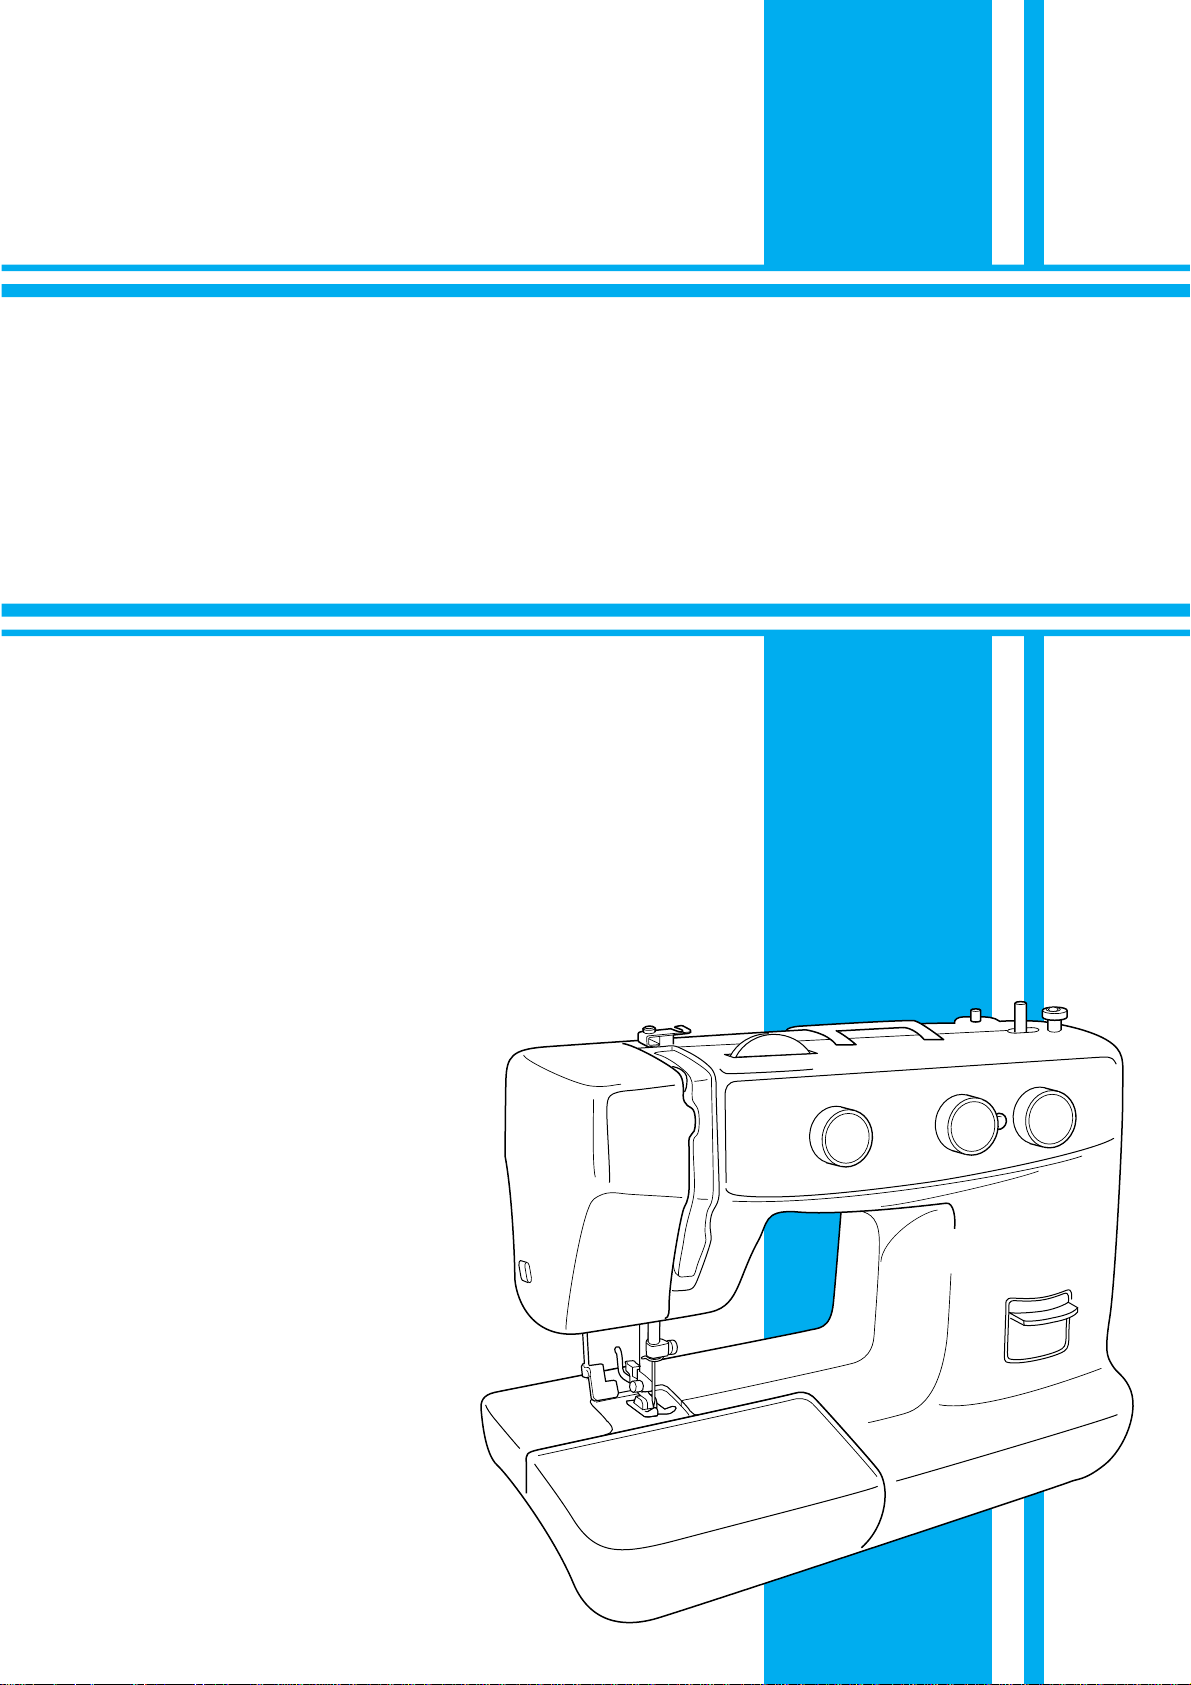
Brother XL-5130 Instruction Manual
Brother XL-5130 Specification
The Brother XL-5130 Sewing Machine is a versatile and user-friendly device designed for both beginners and experienced sewers. It features a robust motor that provides consistent stitching performance across a variety of fabric types, ensuring precision and reliability. The machine offers multiple stitch functions, including straight, zigzag, and decorative stitches, providing ample creative possibilities for garment construction and embellishment. Equipped with a convenient dial control system, the XL-5130 allows for easy stitch selection and adjustment, enhancing the user’s ability to customize their sewing projects. The built-in free arm capability facilitates effortless sewing of cylindrical items such as sleeves and pant legs, while the automatic bobbin winding system streamlines setup and operation. The machine includes a built-in needle threader which simplifies the threading process, reducing eye strain and saving time. Its sturdy metal frame construction ensures durability and stability, maintaining machine balance even during high-speed sewing. With a compact and lightweight design, the Brother XL-5130 is portable and easy to store, making it an ideal choice for small spaces and on-the-go sewing needs. The included accessories, such as various presser feet and a storage compartment, enhance the machine’s functionality and convenience. Overall, the Brother XL-5130 Sewing Machine combines user-friendly features with reliable performance, making it a practical and efficient tool for a wide range of sewing projects.
To thread the Brother XL-5130, first raise the presser foot and turn the handwheel to raise the needle. Place the spool on the spool pin and draw the thread through the top thread guide. Then, guide the thread down and around the tension discs, through the take-up lever, and finally thread the needle from front to back.
Ensure the feed dogs are raised. Check that the presser foot is down and that you are using the correct presser foot for your fabric type. Adjust the stitch length setting if necessary. Clean the feed dogs and surrounding area to remove any lint or debris.
First, re-thread the machine, making sure the thread is correctly seated in the tension discs. Adjust the upper tension dial gradually to see if it improves the stitch quality. Check that the bobbin is wound correctly and is inserted properly. Clean the tension discs and bobbin area for any lint or thread build-up.
Regularly clean the machine by removing lint and dust from the feed dogs, bobbin case, and needle plate using a small brush. Oil the machine as per the user manual recommendations. Always unplug the machine before cleaning. Replace needles frequently and store the machine in a dust-free environment when not in use.
For lightweight fabrics like silk, use a size 9/70 or 11/75 needle. Medium-weight fabrics like cotton typically require a size 14/90 needle. For heavy fabrics like denim or canvas, use a size 16/100 or 18/110 needle. Always match the needle type to the fabric and thread type.
To replace the needle, first turn off the machine. Loosen the needle clamp screw and remove the old needle. Insert the new needle with the flat side facing the back, push it up as far as it will go, and tighten the needle clamp screw securely.
A loud noise may be due to incorrect threading, a bent needle, or a buildup of lint in the bobbin area. Check the threading, replace the needle if necessary, and clean the bobbin area. Ensure that the machine is properly oiled.
Ensure the needle is not bent or dull and is the correct type for the fabric. Re-thread the machine, both top and bobbin threads. Also, check the tension settings and adjust if necessary. Make sure the fabric is not being pulled too hard while sewing.
Adjust the stitch length by turning the stitch length dial located on the front of the machine. The dial ranges from 0 (for no movement) to 4 (for longer stitches). Set the dial to the desired stitch length according to your fabric and sewing needs.
Ensure the bobbin is wound evenly and is placed correctly in the bobbin case. Re-thread the bobbin, making sure the thread is following the correct path. Check the upper thread tension and adjust if necessary. Clean any lint from the bobbin area.
Instruction Manual
Manual de instrucciones
Manuel d’instructions

“IMPORTANT SAFETY INSTRUCTIONS”
When using the sewing machine, basic safety precautions should always be followed, including the following:
“Read all instructions before using.”
D ANGER – To reduce the risk of electric shock:
1. The sewing machine should never be left unattended when plugged in. Always unplug this sewing machine from the electr ical outlet
immediately after using and before cleaning.
2. Always unplug before changing the light bulb. Replace bulb with same type rated 15 watts.
WARNING – To reduce the risk of burns, fire, electric shock, or injury to persons:
1. Do not allow this machine to be used as a toy. Close attention is necessary when the sewing machine is used by or near children.
2. Use this sewing machine only for its intended use as described in this manual. Use only accessories recommended by the manuf acturer as contained in this manual.
3. Never operate this se wing machine if it has a damaged cord or plug, if it is not working properly, if it has been dropped or damaged,
or dropped into water. Return the sewing machine to the nearest authorized dealer or service center for examination, repair , electrical or mechanical adjustment.
4. Never operate the sewing machine with any of the air openings blocked. Keep the ventilation openings of the sewing machine and
foot controller free from the accumulation of lint, dust and loose cloth.
5. Never drop or insert any object into any openings.
6. Do not use this machine outdoors.
7. Do not operate this machine where aerosol (spray) products are being used or where oxygen is being administered.
8. To disconnect, turn the main switch to the symbol “O” position which represents off, then remove plug from outlet.
9. Do not unplug by pulling on the cord. To unplug, grasp the plug and pull, not the cord.
10. Keep fingers away from all moving parts. Special care is required around the sewing machine needle.
11. Always use the proper needle plate. The wrong plate can cause the needle to break.
12. Do not use a bent needle.
13. Do not pull or push the fabric while stitching. It may deflect the needle causing it to break.
14. Switch the sewing machine to the off, symbol “O” position when making any adjustments in the needle area, such as threading the
needle, changing the needle, threading the bobbin, or changing the presser foot.
15. Always unplug the sewing machine from the electrical outlet when removing covers, lubricating, or when making any other user
service adjustments mentioned in this instruction manual.
16. This sewing machine is not intended for use by young children or infirm persons without supervision.
17. Young children should be supervised to ensure that they do not play with this sewing machine.
“SA VE THESE INSTRUCTIONS”
“This sewing machine is intended for household use.”

“IMPORTANTES INSTRUCCIONES DE
SEGURIDAD”
Cuando se usa una máquina de coser, debe seguirse unas precauciones básicas y que se detallan a continuación.
“Leer todas las instrucciones antes de usarla”
PELIGRO – Para reducir el riesgo de una descarga eléctrica.
1. La máquina no debe dejarse nunca desatendida mientras esté conectada. Desconectar la máquina de la red cuando se termine de
usar y antes de limpiarla.
2. Desconectar la máquina de la red antes de cambiar la bombilla. Colocar una bombilla del mismo tipo con una potencia de 15 v atios.
CUIDADO – Para reducir el riesgo de quemaduras, fuego, descargas eléctricas o causar daño a las personas.
1. No usar la máquina como un juguete.
Hay que prestar atención si la máquina la usan los niños o se trabaja cerca de ellos.
2. Usar la máquina de coser solamente como se describe en este manual.
Usar únicamente los accesorios recomendados por el fabricante y que vienen especificados en este manual.
3. Nunca haga funcionar la máquina de coser si el cordón de alimentación o la clavija están deteriorados, si no funciona correctamente, si se ha caído o si se ha mojada. Entregar la máquina de coser al centro de servicio autorizado más cercano para que la
examinen, la reparen o hagan los ajustes eléctricos o mecánicos que correspondan.
4. No usar la máquina con los orificios de ventilación bloqueados. Mantener los orificios de ventilación de la máquina de coser y el
pedal sin acumulacíon de polvo. Suciedad y restos de tejido.
5. No introducir ni insertar objetos en los orificios de ventilación.
6. No usar al, aire libre.
7. No trabajar con la máquina si se estén utilizando productos aerosoles (spray) o en lugares donde se esté administrando oxígeno.
8. Para desconectar, girar el interruptor hasta la posición del símbolo “O” que representa off , luego desconectar el enchufe de la red.
9. No desconectar el enchufe tirando del cable. Para desconectar, tirar de la clavija, no del cable.
10. Mantener los dedos alejados de todas las partes movibles de la máquina. Tener un cuidado especial con la aguja.
11. Usar siempre la placa de agujas apropiada. Una placa de agujas impropia puede producir la rotura de la aguja.
12. No usar agujas despuntadas.
13. No presionar ni tirar del tejido mientras se está cosiendo. Esto podría doblar la aguja y romperla.
14. Situar el interruptor principal de la máquina en posición “O” cuando se realice algún ajuste en el área de la aguja como enhebrara,
cambiar la aguja, cambiar la canilla, cambiar la pata prensatelas y similares.
15. Desconectar siempre la máquina de la red eléctrica cuando se retiren las tapas, para lubricar, o cuando se realice algún otro tipo de
ajuste mecánico mencionado en el manual de instrucciones.
“CONSERVE ESTE MANUAL DE
INSTRUCCIONES”
“Esta máquina de coser es para uso
doméstico”

“IMPORTANTES CONSIGNES DE SECURITE”
Lors de l’utilisation de la machine à coudre, il convient de toujours suivre les consignes de sécurité essentielles et de prendre
notamment les précautions suivantes:
“Lire toutes les instructions avant d’utiliser la machine.”
DANGER – Pour réduire le risque de décharge électrique:
1. Ne jamais laisser la machine sans surveillance lorsqu’elle est branchée. Toujours débrancher la machine à coudre après son
utilisation et avant de procéder au nettoyage.
2. T oujours débrancher la machine a vant de changer l’ampoule de la lampe. Remplacer l’ampoule par une du même type , de 15
watts.
AVERTISSEMENT – Pour réduire le risque de brûlures, d’incendie, de choc électrique ou de
blessures:
1. Ne pas utiliser cette machine comme un jouet. Il convient de faire particulièrement attention lorsqu’elle est utilisée par des
enfants ou dans leur entourage.
2. Ne jamais utiliser cette machine à d’autres fins que celles pour lesquelles elle a été conçue, telles que décrites dans le
présent manuel. Utiliser uniquement les accessoires recommandés par le fabricant tels que repris dans le manuel.
3. Ne jamais faire fonctionner la machine si le cordon d’alimentation ou la fiche ont été endommagés, s’il y a un problème de
fonctionnement, si elle est tombée ou a été abîmée, ou si elle a été plongée dans du liquide. Retourner la machine à coudre
auprès du revendeur autorisé ou du service technique le plus proche afin qu’il puisse l’examiner, la réparer ou effectuer
certains réglages électriques ou mécaniques.
4. Ne jamais faire fonctionner la machine si l’un des orifices de ventilation est obstrué. Veiller à ce que ces orifices et la commande au pied ne soient jamais encombrés de peluches, poussières et morceaux de tissus.
5. Ne jamais laisser tomber ou insérer des objets dans ces ouvertures.
6. Ne pas utiliser la machine à l’extérieur.
7. Ne pas faire fonctionner la machine en cas d’utilisation de produits aérosols (vaporisateurs) ou d’administration d’oxygène.
8. Pour l’éteindre, mettre l’interrupteur principal sur le symbole “O” pour “Off”, puis retirer la fiche de la prise.
9. Ne jamais débrancher en tirant sur le cordon d’alimentation. Pour débrancher, saisir la fiche (et non le cordon) et tirer.
10. Tenir ses doigts à l’écart de toute pièce mobile. Faire tout spécialement attention a proximité de l’aiguille.
11. Toujours utiliser la plaque à aiguille adéquate. Une mauvaise plaque peut casser l’aiguille.
12. Ne jamais utiliser une aiguille tordue.
13. Ne pas tirer ou pousser le tissu en cousant. Cela peut entraver le fonctionnement de l’aiguille et causer sa rupture.
14. Eteindre la machine (mettre sur “O”) lors des réglages dans la zone de l’aiguille, tels que l’enfilage , le changement d’aiguille,
la mise en place de la canette ou le changement de pied-de-biche.
15. T oujours débr ancher la machine à coudre a v ant de retirer les plaques de protection, de la graisser ou a v ant d’eff ectuer toute
modification accessible à l’utilisateur telles qu’elles sont reprises dans le présent manuel d’utilisation.
“CONSERVER CES INSTRUCTIONS”
“Cette machine à coudre est prévue pour un
usage domestique.”

FOR USERS IN THE UK, EIRE, MALTA AND CYPRUS ONLY.
If your sewing machine is fitted with a 3 pin non-rewireable BS plug then please read the following.
IMPORTANT
If the available socket outlet is not suitable for the plug
supplied with this equipment, it should be cut off and
an appropriate three pin plug fitted. With alternative
plugs an approved fuse must be fitted in the plug.
NOTE: The plug severed from the main leads must
be destroyed as a plug with bared flexible cords is
hazardous if engaged in a live socket outlet. In the
event of replacing the plug fuse, use a fuse approved
by ASTA to BS 1362, i.e. carrying the
rating as marked on plug.
Always replace the fuse cover. Never use plugs with
the fuse cover removed.
WARNING: DO NOT CONNECT EITHER WIRE TO
THE EARTH TERMINAL WHICH IS MARKED WITH
THE LETTER ‘E’, BY THE EARTH SYMBOL
COLOURED GREEN OR YELLOW.
ASA
mark,
OR
The wires in these main leads are coloured in accordance with the following code:
Blue Neutral
Brown Live
As the colours of the wiring in the main lead of this
appliance may not correspond with the coloured
markings identifying the terminals in your plug, proceed as follows:
The wire which is coloured blue must be connected
to the terminal which is marked with the letter ‘N’ or
coloured black or blue.
The wire which is coloured brown must be connected
to the terminal which is marked with the letter ‘L’ or
coloured red or brown.
Connecting Plugs and Main Power / Sewing Light Switch
1. Connect the three-prong plug into the machine.
2. Connect the electrical supply plug into a wall
outlet.
— When leaving the sewing machine unattended,
the main switch of the machine must be switched
off or the plug must be removed from the socket
outlet.
1
2
Turn on or off the switch for the main power and sewlight.
1 Turn on
2 Turn off
— When servicing the sewing machine, or when
removing covers or changing lamps, the machine or the electrical set must be disconnected
from the supply by removing the plug from the
socket outlet.

CONTENTS
CONTENTS
KNOWING YOUR SEWING MACHINE
PRINCIPAL PARTS …………………………………………………1
ACCESSORIES……………………………………………………….3
OPERATING YOUR SEWING
MACHINE…………………………………………………………….5
Connecting Plugs…………………………………………..5
Main Power and Sewing Light Switches ……………6
Foot Controller ……………………………………………..6
Inserting the Needle ………………………………………7
Checking the Needle……………………………………..7
Changing the Presser Foot ………………………………8
Converting to Free-Arm Style…………………………..9
Steadying the Machine …………………………………..9
VARIOUS CONTROLS…………………………………………. 10
Pattern Selection Dial…………………………………..10
RECOMMENDED WIDTHS AND
LENGTHS FOR STITCHES…………………………………….. 11
Stitch Length Dial ………………………………………..14
Stretch Stitching…………………………………………..15
Stitch Width Dial………………………………………… 16
Reverse Sewing Lever …………………………………..17
THREADING THE MACHINE ………………………………..18
Winding the Bobbin …………………………………….18
Lower Threading …………………………………………19
Upper (Needle) Threading …………………………….20
Using the Needle Threader
(when the machine is equipped with a needle threader) ..
22
Quick Thread-setting System
FAST START BOBBIN
(when the machine is equipped with a quick
thread-setting system) …………………………………..24
Drawing Up Lower Thread ……………………………25
Twin-Needle Sewing…………………………………….26
Thread Tension……………………………………………27
CHART OF SEWING FABRICS, NEEDLES AND
THREAD COMBINATIONS …………………………..29
BUTTONHOLE AND BUTTON SEWING
Making a Buttonhole
(1 Step Automatic Buttonhole) ……………………….42
Making a Buttonhole
(4 Step Buttonhole) ………………………………………44
Buttonhole Fine Adjustment …………………………. 47
Button Sewing …………………………………………….49
USING ATTACHMENTS AND APPLICATIONS
Zipper Inserting …………………………………………..51
Gathering …………………………………………………..51
Darning ……………………………………………………..53
Appliques …………………………………………………..54
Monogramming and Embroidering …………………55
MAINTENANCE
Changing the Bulb……………………………………….57
Oiling………………………………………………………..58
Cleaning…………………………………………………….59
Performance Checklist………………………………….60
Repacking the Machine ……………………………….. 66
INDEX
SEWING MACHINE
KNOWING Y OUR
ZIGZAG STITCHING
STRAIGHT AND
BUILT-IN STITCHES
BUTTONHOLE AND
BUTTON SEWING
USING ATTACHMENTS
AND APPLICATIONS
STRAIGHT AND ZIGZAG STITCHING
Straight Stitching………………………………………….31
Zigzag Stitching…………………………………………..34
BUILT-IN STITCHES
Blindhem Stitching ………………………………………35
Shell Tuck Stitching ……………………………………..36
Elastic Stitching …………………………………………..37
Scallop Stitching………………………………………….38
Universal Stitching ………………………………………38
Overedge Stitching ………………………………………39
Feather Stitching………………………………………….40
Triple Zigzag Stretch Stitching………………………..41
Decorative Stitching …………………………………….41
MAINTENANCE INDEX
ÍNDICE DEL CONTENIDO
CONOZCA SU MÁQUINA DE COSER
ELEMENTOS PRINCIPALES …………………………………2
ACCESORIOS ……………………………………………………..3
FUNCIONAMIENTO DE LA MÁQUINA DE COSER….5
Conexión de los enchufes ……………………………..5
Interruptor principal y de luz …………………………..6
Pedal ………………………………………………………….6
Inserción de la aguja …………………………………….7
Comprobación de la aguja……………………………..7
Cambio del prensatelas…………………………………8
Conversión en modalidad de brazo libre ………….9
Para estabilizar la máquina ……………………………9
DISTINTOS MANDOS ………………………………………… 10
Selector de puntadas ………………………………….10
ANCHOS Y LARGOS DE PUNTADAS
RECOMENDADOS …………………………………….12
Selector de largo de puntada ……………………….14
Puntada elástica ………………………………………… 15
Selector del ancho de puntada…………………….. 16
Palanca de retroceso…………………………………..17
ENHEBRADO DE LA MÁQUINA …………………………. 18
Bobinado de la canilla …………………………………18
Enhebrado inferior ………………………………………19
Enhebrado superior (de la aguja) …………………. 21
Uso del enhebrador
(cuando la máquina está equipada con una
enhebradora de hilo) ………………………………….23
Sistema rápido de colocación del hilo
BOBINA DE INICIO RÁPIDO
(cuando la máquina está equipada con un sistema
rápido de colocación del hilo) ……………………… 24
Para sacar el hilo de la canilla………………………25
Costura con aguja doble………………………………26
Tensión de los hilos …………………………………….28
TABLA DE COMBINACIONES ENTRE TEJIDOS,
AGUJAS Y HILOS ………………………………………29
OJALES Y COSTURA DE BOTONES
Para coser ojales
(Cosido automático de ojales con una sola
operación)………………………………………………….43
Para coser ojales
(Cosido de ojales con 4 operaciones)) ………….. 44
Ajuste fino de los ojales……………………………….48
Costura de botones …………………………………….50
USO DE ACCESORIOS Y APLICACIONES
Inserción de cremalleras …………………………….. 52
Fruncido…………………………………………………….52
Zurcido………………………………………………………53
Aplicaciones ………………………………………………54
Monogramas y bordados…………………………….. 55
MANTENIMIENTO
Cambio de la bombilla ………………………………… 57
Engrasado …………………………………………………58
Limpieza ……………………………………………………59
Listado de posibles incidencias ……………………. 62
Embalaje de la máquina……………………………… 66
ÍNDICE
PUNTADAS RECTAS Y ZIGZAG
Puntadas rectas………………………………………….31
Puntadas zigzag …………………………………………34
PUNTADAS INCORPORADAS
Puntadas invisibles……………………………………..35
Puntada alforza derefuerzo ………………………….36
Puntada elástica ………………………………………… 37
Puntada festón …………………………………………..38
Puntada universal………………………………………. 38
Puntada por encima de la orilla ……………………. 39
Puntada pluma …………………………………………..40
Puntada triple zigzag elástica……………………….41
Puntada decorativa……………………………………..41

TABLE DES MATIÈRES
CONNAÎTRE SA MACHINE À COUDRE
PIÈCES PRINCIPALES ……………………………………………..2
ACCESSOIRES …………………………………………………………. 3
FONCTIONNEMENT DE LA MACHINE A COUDRE 5
Raccordement ……………………………………………………..5
Interrupteur principal et de la lampe……………………….6
Pédale…………………………………………………………………6
Pour mettre l’aiguille en place ………………………………. 7
Vérification de l’aiguille ……………………………………….7
Changement de pied-de-biche ………………………………. 8
Modèle bras libre …………………………………………………9
Pour stabiliser la machine …………………………………….. 9
DESCRIPTIF DES DIFFERENTES COMMANDES …10
Sélecteur de modèle de point ………………………………. 10
LONGUEURS ET LARGEURS DE POINT
RECOMMANDÉES …………………………………………..13
Sélecteur de longueur de point……………………………..14
Couture en points élastiques ………………………………..15
Sélecteur de largeur de point ………………………………. 16
Levier de couture en marche arrière ……………………..17
ENFILAGE DE LA MACHINE …………………………………18
Remplissage de la canette …………………………………… 18
Mise en place du fil inférieur ……………………………….19
Mise en place du fil supérieur (fil de l’aiguille) ……..21
Utilisation de l’enfileur d’aiguille
(lorsque la machine est équipée d’un enfileur) ……….23
SYSTÈME RAPIDE
(lorsque la machine est équipée d’un système
d’enfilage rapide) ………………………………………………24
Remontée du fil inférieur …………………………………….25
Couture avec l’aiguille jumelée ……………………………26
Tension des fils ………………………………………………….28
TABLEAU DES COMBINAISONS TISSU/
AIGUILLE/FIL…………………………………………………. 30
COUTURE DE BOUTONNIÈRES ET DE BOUTONS
Pour coudre une boutonnière
(Boutonnière automatique 1 pas) ………………………….43
Pour faire une boutonnière
(Boutonnière automatique 4 pas) ………………………….44
Equilibrage des boutonnières……………………………….48
Pour coudre un bouton ………………………………………..50
UTILISA TION DES A CCESSOIRES ET LEURS APPLICA
Insertion de fermeture à glissière………………………….52
Pour froncer un tissu ………………………………………….. 52
Reprisage …………………………………………………………. 53
Appliques …………………………………………………………. 54
Monogrammes et broderies ………………………………… 55
ENTRETIEN
Remplacement de l’ampoule ………………………………. 57
Graissage………………………………………………………….. 58
Nettoyage …………………………………………………………. 59
Liste de vérification en cas de défaillances…………….64
Emballage de la machine …………………………………….66
INDEX
TIONS
POINTS DROITS ET POINTS ZIGZAG
Point droit ………………………………………………………… 31
Point zigzag ………………………………………………………34
POINTS INCLUS
Ourlet invisible de lingerie………………………………….. 35
Point à coquilles…………………………………………………36
Point élastique……………………………………………………37
Point feston ……………………………………………………….38
Point universel …………………………………………………..38
Points sur le bord ……………………………………………….39
Point plume ………………………………………………………. 40
Triple point zigzag élastique………………………………..41
Point decoratif……………………………………………………41

5
B
3
4
6
2
1
A
9
8
7
0
○○○○○○○○○○○○○○○○○○○○○○○○○○○○○○○○○○○○○○○○○○○○○○○○○○○○○○○○○○○○○○○○○○○○○○○○○○○○○○○○○○○○○○○○○○○○○○○○
PRINCIPAL PARTS
1 Bobbin winding assembly
Winds the thread onto the bobbin to be used for the lower thread.
2 Spool pin
Holds the spool of thread.
3 Bobbin winding tension disc and thread guide
4 Thread take-up lever
5 Thread cutter
6 Upper tension control dial
Controls the tension of the upper thread.
7 Stitch width dial
Controls the stitch width.
8 Pattern selection dial
Turn in either direction to select the desired stitch.
9 Stitch length dial
Controls the length of the stitches.
0 Reverse sewing lever
Push for stitching in the reverse direction.
A Buttonhole fine-adjustment screw
B Buttonhole lever (1 Step automatic buttonhole)
C Handle
D Balance wheel
T urn toward you (counter clockwise) to raise and lower the needle.
E Main power/sewing light switch
Turns the main power and sewing light on and off.
F Foot controller receptacle
Insert the foot controller plug for operation.
G Presser foot lever
Raises and lowers the presser foot.
H Foot controller
Used to control sewing speed start and stop.
CONTENTS
SEWING MACHINE
KNOWING Y OUR
ZIGZAG STITCHING
STRAIGHT AND
BUILT-IN STITCHES
BUTTONHOLE AND
BUTTON SEWING
H
D
E
F
G
C
USING ATTACHMENTS
AND APPLICATIONS
MAINTENANCE
INDEX
1

ELEMENTOS PRINCIPALES
1 Porta bobinas
Hace bobina para la canilla que va a ser utilizada como hilo inferior.
2 Porta carretes
Soporta el carrete del hilo
3 Guía de hilos y disco de tensión de bobinado de la canilla
4 Palanca tirahilos
5 Cortador de hilo
6 Disco de control de la tensión superior
Controla la tensión del hilo superior.
7 Selector del ancho de puntada
Controla el ancho de las puntadas.
8 Selector de puntadas
Gírelo en cualquier dirección para seleccionar la puntada deseada.
9 Selector de largo de puntada
Controla el largo de las puntadas.
: Palanca de retroceso
Presione la palanca para que la puntada se realice en la dirección contraria.
A Tornillo de ajuste fino de los ojales
B Palanca del ojal (Cosido automático de ojales con una sola
operación)
C Asa
D Ruedecilla
Gírela hacia usted (en el sentido contrario de las manecillas de
un reloj) para levantar y bajar la aguja.
E Interruptor principal y de luz
Apaga y enciende la alimentación principal así como la luz de
costura.
F Conectar el pedal
Insertar la clavija del pedal para conectarlo.
G Palanca de elevación del prensatelas
Levanta y baja el prensatelas.
H Pedal
Sirve para controlar la velocidad de costura, el arranque y la parada.
○○○○○○○○○○○○○○○○○○○○○○○○○○○○○○○○○○○○○○○○○○○○○○○○○○○○○○○○○○○○○○○○○○○○○○○○○○○○○○○○○○○○○○○○○○○○○○○○
PIÈCES PRINCIPALES
1 Dévidoir
Enroule le fil inférieur sur la canette.
2 Porte-bobine
Sert à tenir la bobine de fil à coudre.
3 Disque de tension pour le remplissage de la canette et guide-fil
4 Levier de remontée du fil
5 Coupe-fils
6 Sélecteur de tension supérieure
Contrôle la tension du fil supérieur.
7 Sélecteur de largeur de point
Permet de régler la largeur des points.
8 Sélecteur de modèle de point
Tourner dans l’une ou l’autre direction pour sélectionner le point souhaité.
9 Sélecteur de longueur de point
Contrôle la longueur des points.
< Bouton de couture en marche arrière
Pousser sur le bouton pour coudre en marche arrière.
A Vis d’équilibrage des boutonnières
B Levier pour boutonnières (Boutonnière automatique 1 pas)
C Poignée
D Volant à main
T ourner vers soi (dans le sens opposé aux aiguilles d’une montre) pour
lever ou abaisser l’aiguille.
E Interrupteur principal / de la lampe
Met la machine sous ou hors tension et éteint ou allume la lampe de
couture.
F Logement de la prise de la pédale
Pour faire fonctionner la pédale, insérér la prise dans le logement prévu.
G Levier du pied-de-biche
Lève et abaisse le pied-de-biche.
H Pédale du rhéostat
Sert à contrôler la vitesse de couture, la mise en marche et l’arrêt.
CONTENTS
SEWING MACHINE
KNOWING Y OUR
ZIGZAG STITCHING
STRAIGHT AND
BUILT-IN STITCHES
BUTTONHOLE AND
BUTTON SEWING
USING ATTACHMENTS
AND APPLICATIONS
MAINTENANCE
INDEX
2

1 XA4911151 2 X59370-051
4 129583-001 5 X57521-001
7 X55467-051
3 X59375-051
6 X52800-050
8 130920-051
○○○○○○○○○○○○○○○○○○○○○○○○○○○○○○○○○○○○○○○○○○○○○○○○○○○○○○○○○○○○○○○○○○○○○○○○○○○○○○○○○○○○○○○○○○○○○○○○
ACCESSORIES
XL5340/XL5232/XR42/XR34
(1 STEP AUTOMATIC BUTTONHOLE)
1 Buttonhole foot (1 pc.)
2 Zipper foot (1 pc.)
3 Button sewing foot (1 pc.)
4 Needle pack (regular single needle HA × 130) (3 pcs.)
5 Twin needle (1 pc.)
6 Bobbins (3 pcs.)
7 Screwdriver (1 pc.)
8 Extra spool pin (1 pc.)
9 1/4 Quilting foot (1 pc.)
0 Darning plate (1pc.) (When the machine is not equipped with a
Drop Feed.)
Parts code for zigzag presser foot: 138135-152
Foot controller: X57319-051 (110/120V areas)
XA6422-021 (220/240V areas)
XA6412-021 (U.K.)
XA6414-021 (Australia, New Zealand)
The above accessories are stored in the accessory bag inside the extension table. These accessories have been designed to help complete
most sewing tasks.
CONTENTS
SEWING MACHINE
KNOWING Y OUR
ZIGZAG STITCHING
STRAIGHT AND
9 SA125
○○○○○○○○○○○○○○○○○○○○○○○○○○○○○○○○○○○○○○○○○○○○○○○○○○○○○○○○○○○○○○○
ACCESORIOS
XL5340/XL5232/XR42/XR34
(Cosido automático de ojales con una sola operación)
1 Prensatelas para ojales (1 pza.)
2 Prensatelas cremalleras (1 pza.)
3 Prensatelas para costura de botones (1 pza.)
4 Paquete de agujas (agujas simples normales HA × 130) (3 pzas.)
5 Aguja doble (1 pza.)
6 Canilla (3 pzas.)
7 Destornillador (1 pza.)
8 Porta carretes extra (1 pza.)
9 Prensatelas para pespunte de 1/4 (1 pza.)
< Placa de zurcido (1 pza.) (cuando la máquina no está equipada
con alimentación de bajada)
Código del prensatelas para la puntada en zigzag: 138135-152
Pedal: X57319-051 (zona con 110/120 V)
XA6422-021 (zona con 220/240 V)
XA6412-021 (Reino Unido)
XA6414-021 (Australia, Nueva Zelanda)
Los accesorios mencionados arriba se encuentran en la bolsa de
accesorios, dentro del soporte de accesorios. Han sido concebidos
para poder realizar la mayoría de las operaciones de costura.
0 XA3442-151
ACCESSOIRES
XL5340/XL5232/XR42/XR34
(Boutonnière automatique 1 pas)
1 Pied pour boutonnières (1 pc.)
2 Pied pour fermeture à glissière (1 pc.)
3 Pied pour boutons (1 pc.)
4 Jeu d’aiguilles (aiguille normale HA × 130) (3 pcs.)
5 Aiguille jumelée (1 pc.)
6 Canettes (3 pcs.)
7 Tournevis (1 pc.)
8 Porte-bobine supplémentaire (1 pc.)
9 Pied pour ouatinage/matelassage 1/4 (1 pc.)
< Plaque à repriser (1 pc.) (Lorsque la machine n’est pas équipée d’un
levier d’abaissement des griffes d’entraînement).
Code des éléments pour le pied Zigzag: 138135-152
Pédale du rhéostat: X57319-051 (Zones 110/120 V)
XA6422-021 (Zones 220/240V)
XA6412-021 (R.U.)
XA6414-021 (Australie, Nouvelle Zélande)
Les accessoires mentionnés ci-dessus se trouvent dans un sac, à l’intérieur
de la table d’extension. Ils ont été conçus pour vous permettre de réaliser la
plupart des tâches de couture. Pour de plus amples renseignements les concernant, veuillez vous reporter aux pages indiquées.
BUILT-IN STITCHES
BUTTONHOLE AND
BUTTON SEWING
USING ATTACHMENTS
AND APPLICATIONS
MAINTENANCE
INDEX
3

1 X59369-251 2 X59370-051 3 X59375-051
4 129583-001 6 X52800-150
7 X55467-051
5 X57521-001
8 130920-051
○○○○○○○○○○○○○○○○○○○○○○○○○○○○○○○○○○○○○○○○○○○○○○○○○○○○○○○○○○○○○○○○○○○○○○○○○○○○○○○○○○○○○○○○○○○○○○○○
XL5130/XR32
(4 STEP BUTTONHOLE)
1 Buttonhole foot (1 pc.)
2 Zipper foot (1 pc.)
3 Button sewing foot (1 pc.)
4 Needle pack (regular single needle HA × 130) (3 pcs.)
5 Twin needle (1pc.)
6 Bobbins (3 pcs.)
7 Screwdriver (1 pc.)
8 Extra spool pin (1pc.)
9 Darning plate (1pc.) (When the machine is not equipped with a
Drop Feed.)
Parts code for zigzag presser foot: 138135-152
Foot controller: X57319-051 (110/120V areas)
The above accessories are stored in the accessory bag inside the extension table. These accessories have been designed to help complete
most sewing tasks.
XA6422-021 (220/240V areas)
XA6412-021 (U.K.)
XA6414-021 (Australia, New Zealand)
CONTENTS
SEWING MACHINE
KNOWING Y OUR
ZIGZAG STITCHING
STRAIGHT AND
9 XA3442-151
○○○○○○○○○○○○○○○○○○○○○○○○○○○○○○○○○○○○○○○○○○○○○○○○○○○○○○○○○○○○○○○
XL5130/XR32
(Cosido de ojales con 4 operaciones)
1 Prensatelas para ojales (1 pza.)
2 Prensatelas cremalleras (1 pza.)
3 Prensatelas para costura de botones (1 pza.)
4 Paquete de agujas (agujas simples normales HA × 130) (3 pzas.)
5 Aguja doble (1 pza.)
6 Canilla (3 pzas.)
7 Destornillador (1 pza.)
8 Porta carretes extra (1 pza.)
9 Placa de zurcido (1 pza.) (cuando la máquina no está equipada
con alimentación de bajada)
Código del prensatelas para la puntada en zigzag: 138135-152
Pedal: X57319-051 (zona con 110/120 V)
XA6422-021 (zona con 220/240 V)
XA6412-021 (Reino Unido)
XA6414-021 (Australia, Nueva Zelanda)
Los accesorios mencionados arriba se encuentran en la bolsa de
accesorios, dentro del soporte de accesorios. Han sido concebidos
para poder realizar la mayoría de las operaciones de costura.
XL5130/XR32
(Boutonnière automatique 4 pas)
1 Pied pour boutonnières (1 pc.)
2 Pied pour fermeture à glissière (1 pc.)
3 Pied pour boutons (1 pc.)
4 Jeu d’aiguilles (aiguille normale HA × 130) (3 pcs.)
5 Aiguille jumelée (1 pc.)
6 Canettes (3 pcs.)
7 Tournevis (1 pc.)
8 Porte-bobine supplémentaire (1 pc.)
9 Plaque à repriser (1 pc.) (Lorsque la machine n’est pas équipée d’un
levier d’abaissement des griffes d’entraînement).
Code des éléments pour le pied Zigzag: 138135-152
Pédale du rhéostat: X57319-051 (Zones 110/120 V)
XA6422-021 (Zones 220/240V)
XA6412-021 (R.U.)
XA6414-021 (Australie, Nouvelle Zélande)
Les accessoires mentionnés ci-dessus se trouvent dans un sac, à l’intérieur
de la table d’extension. Ils ont été conçus pour vous permettre de réaliser la
plupart des tâches de couture. Pour de plus amples renseignements les concernant, veuillez vous reporter aux pages indiquées.
BUILT-IN STITCHES
BUTTONHOLE AND
BUTTON SEWING
USING ATTACHMENTS
AND APPLICATIONS
MAINTENANCE
4
INDEX

○○○○○○○○○○○○○○○○○○○○○○○○○○○○○○○○○○○○○○○○○○○○○○○○○○○○○○○○○○○○○○○○○○○○○○○○○○○○○○○○○○○○○○○○○○○○○○○○
OPERATING YOUR SEWING
MACHINE
Connecting Plugs
1. Connect the power cord plug into the machine.
2. Connect the power supply plug into a wall outlet.
CAUTION:
1. When changing the needle, bobbin or light bulb or when the sewing machine is not in use, it is recommended that the power supply plug be disconnected from the wall socket to avoid electrical
hazards.
2. For U.S.A. only
This appliance has a polarized plug (one blade wider than the
other). To reduce the risk of electric shock, this plug is intended to
fit in a polarized outlet only one way . If the plug does not fit fully
in the outlet, reverse the plug.
If it still does not fit, contact a qualified electrician to install the
proper outlet. Do not modify the plug in any way.
CONTENTS
SEWING MACHINE
KNOWING Y OUR
ZIGZAG STITCHING
STRAIGHT AND
○○○○○○○○○○○○○○○○○○○○○○○○○○○○○○○○○○○○○○○○○○○○○○○○○○○○○○○○○○○○○○○
FUNCIONAMIENTO DE LA
MÁQUINA DE COSER
Conexión de los enchufes
1. Conecte el enchufe a la máquina, el cordón, se encuentra situado entre el pedal y el enchufe destinado a la alimentación de
corriente.
2. Conecte el enchufe de alimentación a una toma de corriente.
ATENCIÓN:
1. Cuando se cambia una aguja, la canilla o la bombilla de luz,
o cuando se deja la máquina sin funcionar, se recomienda
siempre retirar el enchufe de la toma de corriente para evitar
choques eléctricos.
FONCTIONNEMENT DE LA
MA CHINE A COUDRE
Raccordement
1. Brancher la fiche qui se trouve sur le cordon d’alimentation entre la
pédale et la fiche d’alimentation dans la machine.
2. Brancher la fiche d’alimentation à une prise secteur.
PRÉCAUTION:
1. Lors du remplacement de l’ampoule, de la canette, de l’aiguille ou
lorsque la machine n’est pas utilisée, il est recommandé de la débrancher de la prise secteur pour éviter toute décharge électrique.
BUILT-IN STITCHES
BUTTONHOLE AND
BUTTON SEWING
USING ATTACHMENTS
AND APPLICATIONS
MAINTENANCE
5
INDEX

A
1
2
○○○○○○○○○○○○○○○○○○○○○○○○○○○○○○○○○○○○○○○○○○○○○○○○○○○○○○○○○○○○○○○○○○○○○○○○○○○○○○○○○○○○○○○○○○○○○○○○
Main Power and Sewing Light Switches
This switch turns the main power and sewing light on or off. (See fig.
A.)
1 Turn on (toward the “I” mark)
2 Turn off (toward the “O” mark)
Foot Controller
When the foot controller is depressed lightly, the machine will run at a
low speed. When the pressure on the foot controller is increased, the
machine’s speed will increase. When pressure on the foot controller is
released, the machine will stop. Care should be taken that nothing is
placed on the foot controller when the machine is not in use. (See fig.
B.)
CONTENTS
SEWING MACHINE
KNOWING Y OUR
Note (For U.S.A. only)
Foot controller: Model N
This foot controller can be used for this machine model XL5340/XL5232/
B
○○○○○○○○○○○○○○○○○○○○○○○○○○○○○○○○○○○○○○○○○○○○○○○○○○○○○○○○○○○○○○○
Interruptor principal y de luz
Este interruptor permite apagar y encender la máquina y la luz. (Ver
fig. A.)
1 Encender (hacia la marca “I”)
2 Apagar (hacia la marca “O”)
Pedal
XL5130/XR42/XR34/XR32.
Interrupteur principal et de la lampe
Cet interrupteur permet d’allumer et d’éteindre la machine ainsi que la lampe
de couture. (Voir fig. A.)
1 Allumer (pousser vers la marque “I”)
2 Eteindre (pousser vers la marque “O”)
Pédale
ZIGZAG STITCHING
STRAIGHT AND
BUILT-IN STITCHES
BUTTONHOLE AND
BUTTON SEWING
USING ATTACHMENTS
AND APPLICATIONS
Al presionar ligeramente el pedal, la máquina funcionará a baja velocidad. Al aumentar la presión, se incrementa también la v elocidad
de la máquina. Al soltar el pedal, la máquina se para. Asegúrese
siempre de no poner ningún objeto sobre el pedal cuando la máquina no se utilire. (Ver fig. B.)
Lorsque l’on appuie légèrement sur la pédale, la machine va fonctionner à
faible vitesse. Si l’on augmente la pression, la vitesse de couture de la machine va augmenter également. La machine s’arrête lorsque la pression sur
la pédale est relâchée. Il faut donc veiller à ne rien placer sur la pédale
lorsque la machine n’est pas utilisée. (Voir fig. B.)
MAINTENANCE
INDEX
6

A
1 1
○○○○○○○○○○○○○○○○○○○○○○○○○○○○○○○○○○○○○○○○○○○○○○○○○○○○○○○○○○○○○○○○○○○○○○○○○○○○○○○○○○○○○○○○○○○○○○○○
Inserting the Needle
Turn power switch to “O”.
1. Remove the power supply plug from the electrical outlet.
2. Raise the needle bar to its highest position.
3. Lower the presser foot.
4. If a needle is already installed, remove it by loosening the needle
clamp with a coin and pulling the needle down. (See fig. A.)
5. With the flat side toward the back, insert the new needle as far as
possible up against the needle stopper.
6. Tighten the needle clamp.
1 Coin
CONTENTS
SEWING MACHINE
KNOWING Y OUR
Checking the Needle
B
○○○○○○○○○○○○○○○○○○○○○○○○○○○○○○○○○○○○○○○○○○○○○○○○○○○○○○○○○○○○○○○
Inserción de la aguja
Desenchufar la máquina, interruptor principale a “O”.
1. Retire el enchufe de alimentación de la toma de corriente.
2. Levante la barra de la aguja a su posición más alta.
3. Baje el prensatelas.
4. En caso de que ya esté una aguja instalada, retírela aflojando el
tornillo con una moneda y tirando hacia abajo. (Ver fig. A.)
5. Introduzca una nueva aguja con la parte plana hacia atrás, lo
más adentro posible hasta que llegue a su tope.
6. Vuelva a apretar el tornillo de la aguja.
1 Moneda
1. The sewing needle must always be straight and sharp for smooth
sewing.
2. To check if the needle is bent, place the flat side of the needle
down as shown in the illustration. (See fig. B.)
3. Replace the needle if it is bent or dull.
Pour mettre l’aiguille en place
Mettre l’interrupteur principal sur “O”.
1. Retirer la fiche de la prise de courant.
2. Remonter complètement l’aiguille.
3. Abaisser le pied-de-biche.
4. Retirer l’aiguille éventuellement présente en dévissant la fixation avec
une pièce de monnaie et en tirant l’aiguille vers le bas. (Voir fig. A.)
5. Introduire une autre aiguille côté plat vers l’arrière, en l’enfonçant au
maximum jusqu’à ce qu’elle vienne heurter le butoir.
6. Resserrer la fixation.
1 Pièce de monnaie
ZIGZAG STITCHING
STRAIGHT AND
BUILT-IN STITCHES
BUTTONHOLE AND
BUTTON SEWING
USING ATTACHMENTS
AND APPLICATIONS
Comprobación de la aguja
1. La aguja siempre ha de estar bien recta y afilada para un perfecto cosido.
2. Para comprobar que la aguja no está doblada, coloque la parte
plana de la aguja hacia abajo como se muestra en el dibujo . (V er
fig. B.)
3. Cambie la aguja si está doblada o gastada.
7
MAINTENANCE
Vérification de l’aiguille
1. L’aiguille doit toujours être droite et pointue pour piquer correctement.
2. Pour vérifier si l’aiguille n’est pas tordue, placer le côté plat de l’aiguille
vers le bas, comme le montre l’illustration. (Voir fig. B.)
3. Remplacer l’aiguille si elle est tordue ou usée.
INDEX

○○○○○○○○○○○○○○○○○○○○○○○○○○○○○○○○○○○○○○○○○○○○○○○○○○○○○○○○○○○○○○○○○○○○○○○○○○○○○○○○○○○○○○○○○○○○○○○○
Changing the Presser Foot
It may be necessary to change the presser foot according to your sewing needs.
SNAP-ON TYPE
Turn power switch to “O”.
1. Raise the needle to its highest position by turning the balance wheel
toward you (counterclockwise) and raise the presser foot lever.
2. Release the foot by raising the lever located at the back of the presser
foot holder assembly.
3. Place a different presser foot on the needle plate so that the bar on
the presser foot is in line with the slot in the presser foot holder.
4. Lower the presser foot lifter and fix the presser foot onto the holder.
If the presser foot is in the correct location, the bar should snap into
place.
CONTENTS
SEWING MACHINE
KNOWING Y OUR
ZIGZAG STITCHING
STRAIGHT AND
○○○○○○○○○○○○○○○○○○○○○○○○○○○○○○○○○○○○○○○○○○○○○○○○○○○○○○○○○○○○○○○
Cambio del prensatelas
Según sus necesidades de costura, puede ser necesario cambiar el
prensatelas.
Modelo a presión
Desenchufar la máquina, interruptor principale a “O”.
1. Levante la aguja a su posición más alta, girando la ruedecilla
hacia usted (en el sentido contrario al de las manecillas de un
reloj) y levante la palanca del prensatelas.
2. Suelte el prensatelas levantando la palanca que hay en la parte
trasera del soporte.
3. Coloque otro prensatelas en la placa de agujas de tal forma que
la barra del prensatelas quede alineada con la ranura del soporte
del prensatelas.
4. Baje la palanca del prensatelas y fije el prensatelas en el soporte. Si el prensatelas está bien colocado, la barra debe engancharse en su lugar correspondiente.
En fonction des besoins, il peut s’avérer nécessaire de changer le pied-debiche.
MODELE A CLIQUET
Mettre l’interrupteur principal sur “O”.
1. Remonter complètement l’aiguille en tournant le volant vers soi (dans
2. Libérer le pied en levant le levier situé à l’arrière du support.
3. Placer un pied différent sur la plaque à aiguille de sorte que la tige du
4. Abaisser le levier du pied-de-biche et fixer le pied sur l’axe. Si le pied-
Changement de pied-de-biche
le sens opposé aux aiguilles d’une montre) et remonter le levier du piedde-biche.
pied-de-biche s’aligne avec la fente située dans l’axe du pied-de-biche.
de-biche est correctement installé, la tige devrait se mettre en place avec
un déclic.
BUILT-IN STITCHES
BUTTONHOLE AND
BUTTON SEWING
USING ATTACHMENTS
AND APPLICATIONS
MAINTENANCE
8
INDEX
A
1
B
○○○○○○○○○○○○○○○○○○○○○○○○○○○○○○○○○○○○○○○○○○○○○○○○○○○○○○○○○○○○○○○○○○○○○○○○○○○○○○○○○○○○○○○○○○○○○○○○
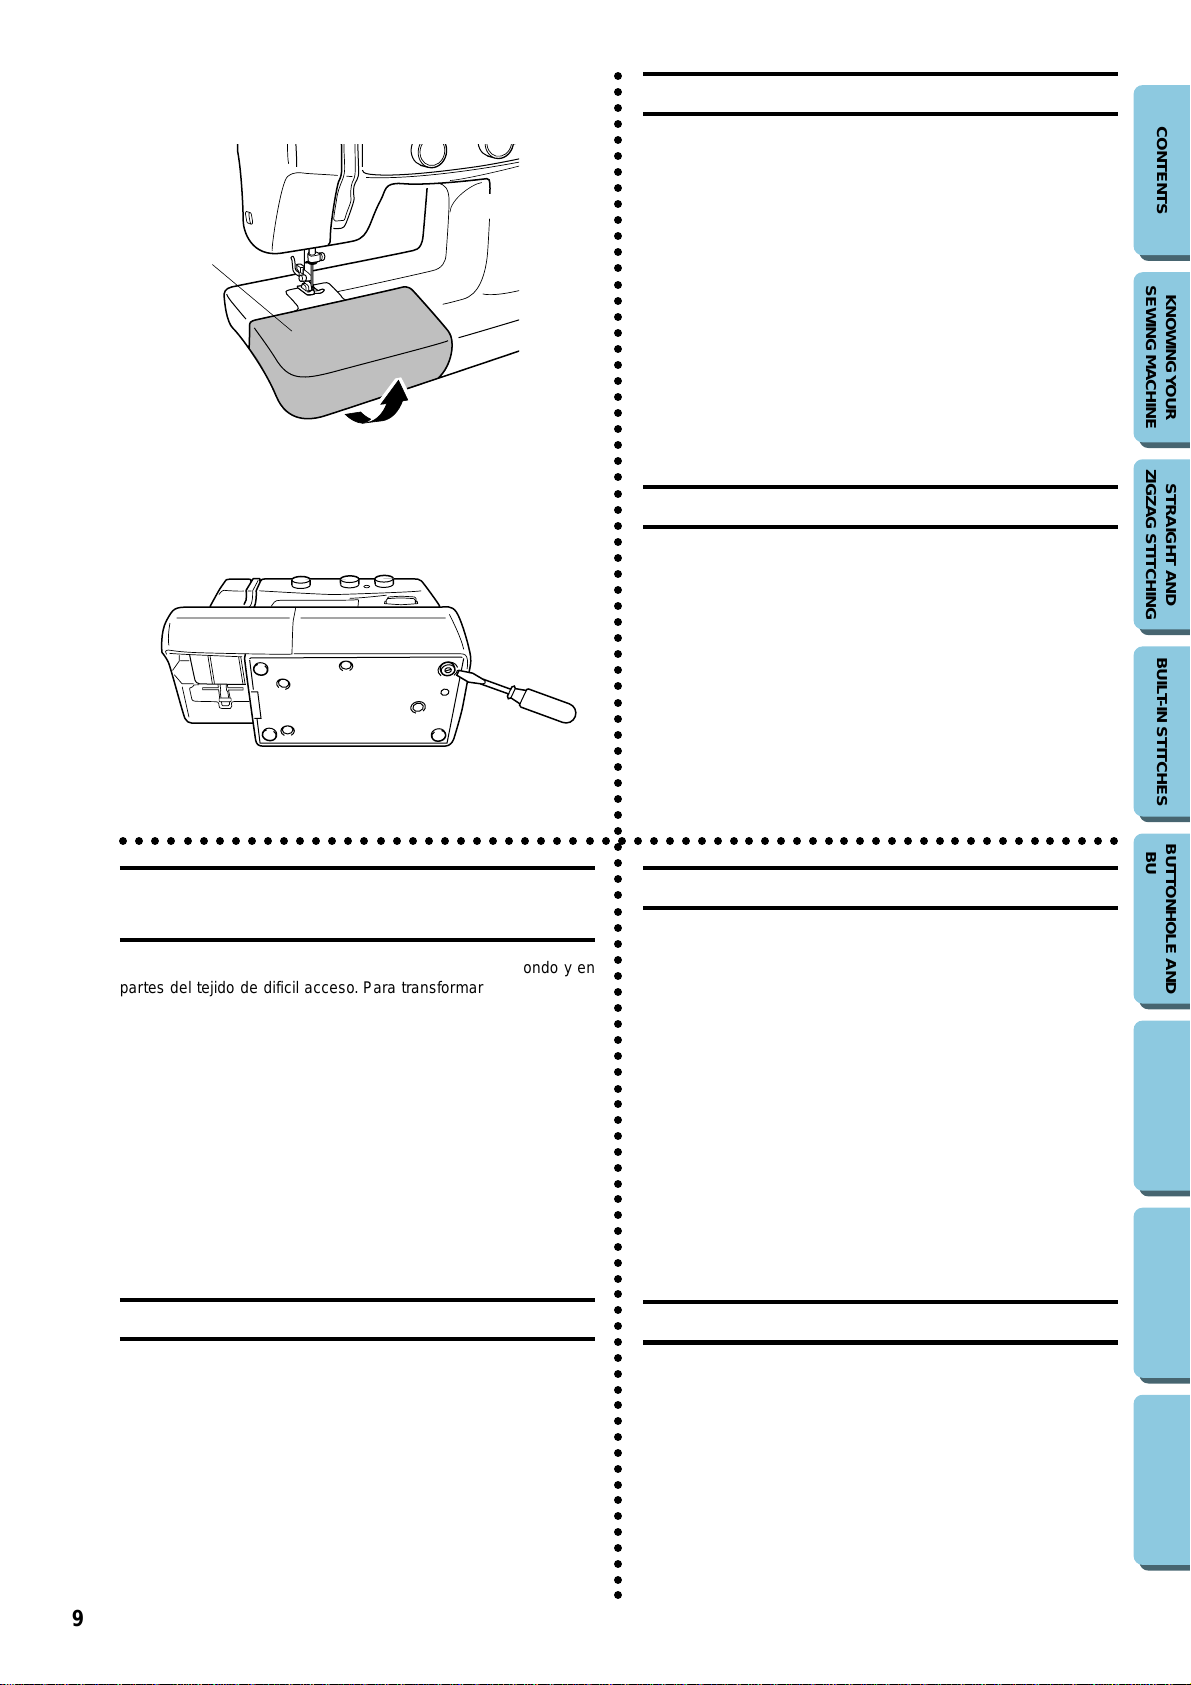
Converting to Free-Arm Style
Free-arm sewing is convenient for sewing tubular and hard-to-reach
areas on garments. To change your machine to the free-arm style, lift
up on the extension table and pull it out. (See fig. A.)
1 Lift the bottom of the extension table up toward you.
2 Pull the extension table out to remove it.
1 Extension table
Steadying the Machine
When the sewing machine is placed on an uneven surface, turn the
rubber cushion on the front right-hand side of the base plate to adjust
its height until the sewing machine is stable. (See fig. B.)
CONTENTS
SEWING MACHINE
KNOWING Y OUR
ZIGZAG STITCHING
STRAIGHT AND
○○○○○○○○○○○○○○○○○○○○○○○○○○○○○○○○○○○○○○○○○○○○○○○○○○○○○○○○○○○○○○○
Conversión en modalidad de brazo
libre
La costura con brazo libre es práctica para coser en redondo y en
partes del tejido de dificil acceso. Para transformar su máquina en
esa modalidad, sólo hace falta lev antar el soporte de los accesorios
y sacarlo tirando de él. (Ver fig. A.)
1 Levante la parte inferior del soporte de accesorios hacia usted.
2 Tíre hacia afuera para sacarlo.
1 Soporte de accesorios
La couture à bras libre s’impose pour des coutures tubulaires ou pour des
endroits difficiles à atteindre sur des vêtements. Pour obtenir la configuration à bras libre, il suffit de soulev er et de retirer la table d’extension. (Voir
fig. A.)
1 Soulever le bas de la table d’extension vers soi.
2 Tirer la table d’extension vers l’extérieur pour l’enlever.
Modèle bras libre
1 Table d’extension
BUILT-IN STITCHES
BUTTONHOLE AND
BUTTON SEWING
USING ATTACHMENTS
AND APPLICATIONS
MAINTENANCE
Para estabilizar la máquina
Si se instala la máquina de coser en una superficie desigual, puede
ajustar su altura girando el cojinete de goma que se encuentra en la
parte anterior izquierda de la placa de base hasta que la máquina
quede estable. (Ver fig. B.)
9
Pour stabiliser la machine
Lorsque la machine à coudre est installée sur une surface inégale, tourner le
coussin en caoutchouc sur le côté avant gauche de la plaque de base de la
machine pour régler sa hauteur jusqu’à ce qu’elle soit stable. (Voir fig. B.)
INDEX

○○○○○○○○○○○○○○○○○○○○○○○○○○○○○○○○○○○○○○○○○○○○○○○○○○○○○○○○○○○○○○○○○○○○○○○○○○○○○○○○○○○○○○○○○○○○○○○○
1
VARIOUS CONTROLS
Pattern Selection Dial
To select a stitch, simply turn the pattern selection dial in either direction. Stitch widths and lengths are shown on the following pages.
1 Pattern selection dial
NOTE:
Since the Pattern Selection Dial is not a continuous dial, it cannot be
turned directly from the last stitch to the first one or from the first stitch
to the last one. T o select the first stitch when the last one is displayed or
to select the last stitch when the first one is displayed, turn the Pattern
Selection Dial in the opposite direction until the desired stitch is displayed.
○○○○○○○○○○○○○○○○○○○○○○○○○○○○○○○○○○○○○○○○○○○○○○○○○○○○○○○○○○○○○○○
CONTENTS
SEWING MACHINE
KNOWING Y OUR
DISTINTOS MANDOS
Selector de puntadas
Para seleccionar una puntada, sólo hace falta gir ar el disco en cualquier dirección. En las siguientes páginas, encontrará los largos y
anchos de puntadas.
1 Selector de puntadas
NOTA:
Como el selector de puntada no es continuo, no se puede cambiar
directamente de la última puntada a la primera ni de la primera a la
última. Para seleccionar la primera puntada cuando esté mostrada
la última, o para seleccionar la última cuando esté mostrada la primera, gire el selector de puntada en la dirección opuesta hasta que
se visualice la puntada deseada.
XL5340/XR42
1
2 3 4 5 6 7 8 9 10 11 12 13 14 15 16 17 18 19 20 21
DESCRIPTIF DES DIFFERENTES
COMMANDES
Sélecteur de modèle de point
Pour sélectionner un modèle de point, tourner le sélecteur de modèle dans
l’un ou l’autre sens. Sur les pages suivantes, vous trouverez une liste avec
les longueurs et les largeurs de points en fonction du modèle choisi.
1 Sélecteur de modèle de point
REMARQUE :
Comme le sélecteur de modèle n’est pas de type continu, il n’est pas possible de continuer de tourner du dernier point pour passer au premier point ou
du premier point pour passer au dernier point. Pour sélectionner le premier
point lorsque le dernier point est affiché ou pour sélectionner le dernier
point lorsque le premier point est affiché, tournez le sélecteur de modèle
dans le sens opposé jusqu’à ce que le point désiré soit affiché.
ZIGZAG STITCHING
STRAIGHT AND
BUILT-IN STITCHES
BUTTONHOLE AND
BUTTON SEWING
USING ATTACHMENTS
AND APPLICATIONS
XL5232/XR34
1
2 3 4 5 6 7 8 9 10 11 12 13 14 15 16 17
XL5130/XR32
B
A/C1D23456789101112131415
C
A
MAINTENANCE
INDEX
10

○○○○○○○○○○○○○○○○○○○○○○○○○○○○○○○○○○○○○○○○○○○○○○○○○○○○○○○○○○○○○○○○○○○○○○○○○○○○○○○○○○○○○○○○○○○○○○○○
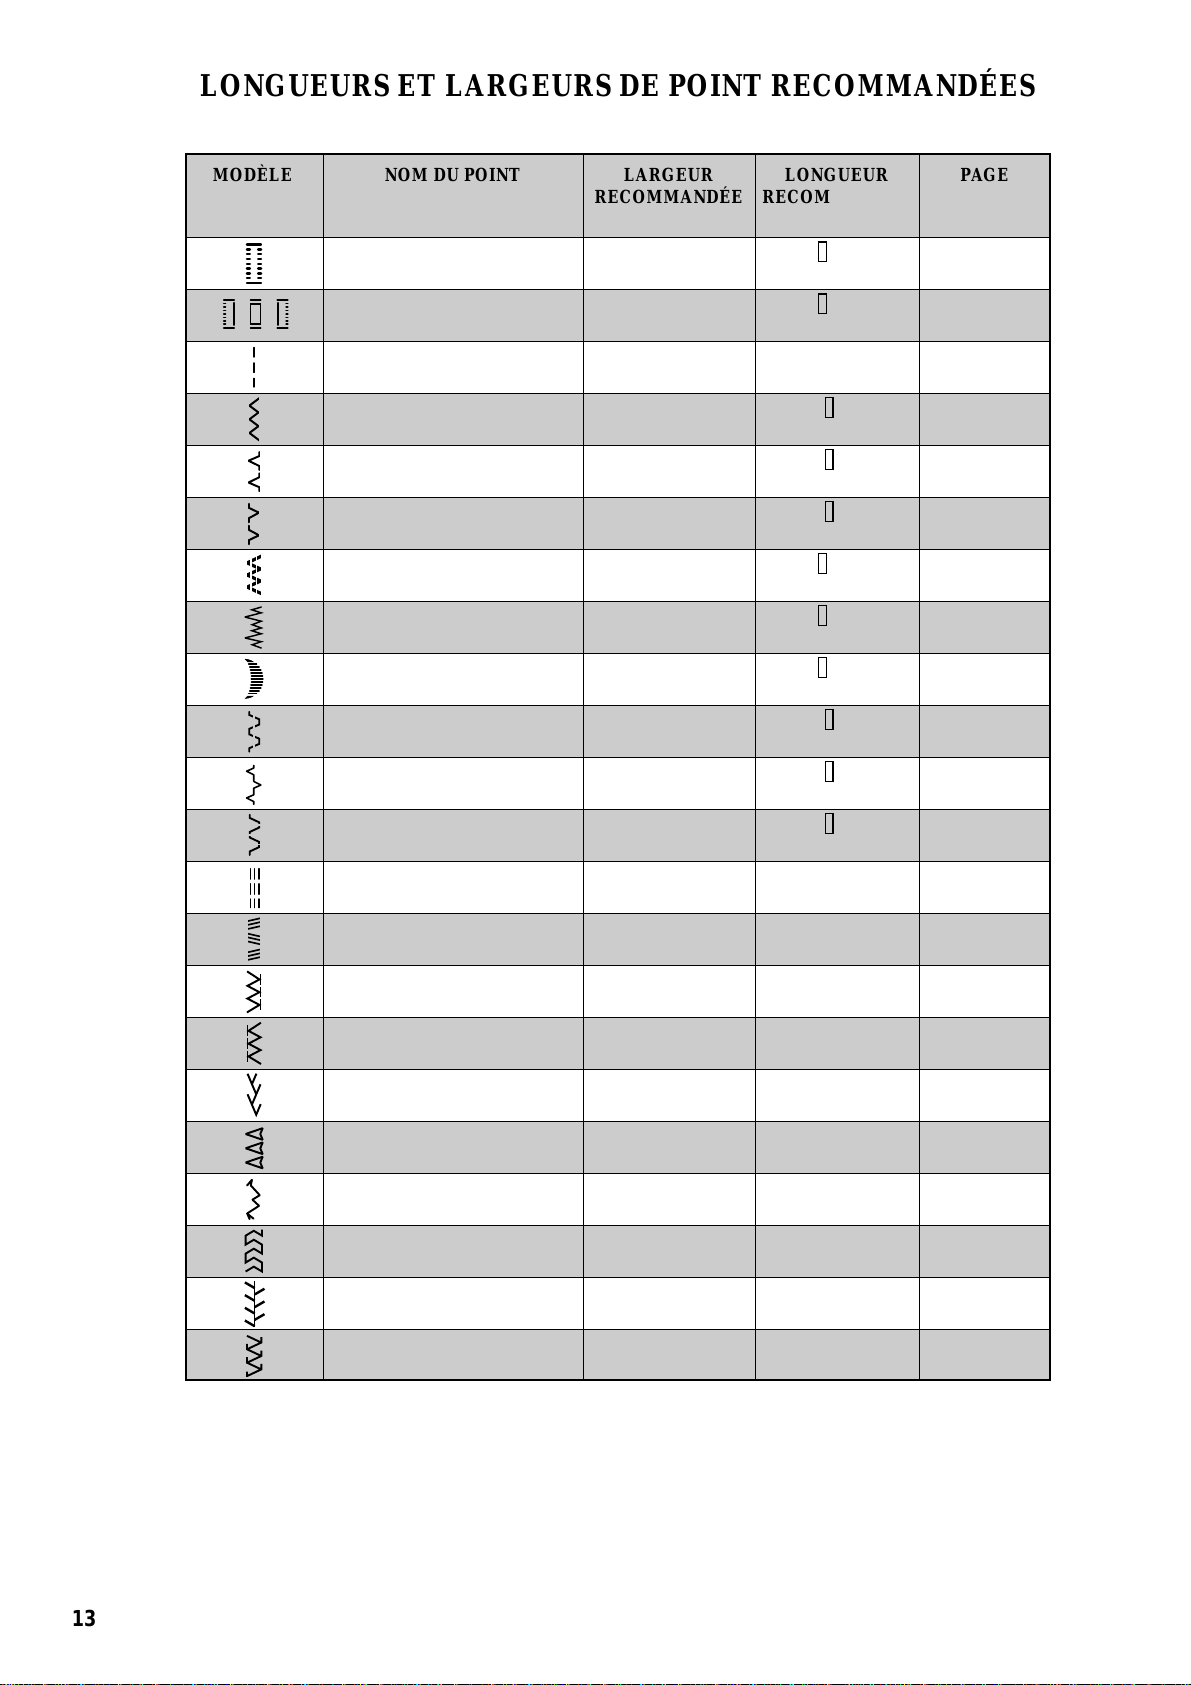
RECOMMENDED WIDTHS AND LENGTHS FOR STITCHES
PATTERN STITCH NAME RECOMMENDED RECOMMENDED PAGE IN
WIDTH LENGTH INSTRUCTIONS
[mm (inch)] [mm (inch)]
1 STEP AUTOMATIC 3-5 -1.5 42
C
A
TRIPLE ZIGZAG STRETCH STITCH
BUTTONHOLE (1/8-13/64) (1/64-1/16)
4 STEP BUTTONHOLE 3-5
-1.5 44
(1/8-13/64) (1/64-1/16)
STRAIGHT STITCH 0-5 1-4 31
(Needle position change)
ZIGZAG STITCH 0-5
(3/64-5/32)
-2 34
(0-13/64) (1/64-5/64)
BLINDHEM STITCH 3-5
-2 35
(1/8-13/64) (1/64-5/64)
SHELL TUCK STITCH 3-5 -3 36
(1/8-13/64) (1/64-1/8)
ELASTIC STITCH 3-5
-2.5 37
(1/8-13/64) (1/64-3/32)
STRETCH BLINDHEM STITCH 3-5
-1.5 35
(1/8-13/64) (1/64-1/16)
SCALLOP STITCH 3-5
-1.5 38
(1/8-13/64) (1/64-1/16)
UNIVERSAL STITCH 3-5
-3 38
(1/8-13/64) (1/64-1/8)
BRIDGING STITCH 3-5
-3 –
(1/8-13/64) (1/64-1/8)
RAMPART STITCH 3-5
-3 –
(1/8-13/64) (1/64-1/8)
TRIPLE STRETCH STITCH 0-5 Fixed 31
(Needle position change)
2.5 (3/32)
3-5 Fixed 41
(1/8-13/64) 2.5 (3/32)
STRETCH OVERLOCK STITCH 3-5 Fixed 39
(1/8-13/64) 2.5 (3/32)
ELASTIC OVERLOCK STITCH 3-5 Fixed 39
(1/8-13/64) 2.5 (3/32)
FEATHER STITCH 3-5 Fixed 40
(1/8-13/64) 2.5 (3/32)
ARROW HEAD STITCH 3-5 Fixed 39
(1/8-13/64) 2.5 (3/32)
DECORATIVE STITCH 3-5 Fixed 41
(1/8-13/64) 2.5 (3/32)
LEAF STITCH 3-5 Fixed –
(1/8-13/64) 2.5 (3/32)
TREE STITCH 3-5 Fixed –
(1/8-13/64) 2.5 (3/32)
LEGS STITCH 3-5 Fixed –
(1/8-13/64) 2.5 (3/32)
CONTENTS
SEWING MACHINE
KNOWING Y OUR
ZIGZAG STITCHING
STRAIGHT AND
BUILT-IN STITCHES
BUTTONHOLE AND
BUTTON SEWING
USING ATTACHMENTS
AND APPLICATIONS
MAINTENANCE
11
INDEX

○○○○○○○○○○○○○○○○○○○○○○○○○○○○○○○○○○○○○○○○○○○○○○○○○○○○○○○○○○○○○○○○○○○○○○○○○○○○○○○○○○○○○○○○○○○○○○○○
ANCHOS Y LARGOS DE PUNTADAS RECOMENDADOS
PUNTADA NOMBRE ANCHO LARGO PÁGINA DEL
RECOMENDADO RECOMENDADO MANUAL
[mm (pulgadas)] [mm (pulgadas)]
COSIDO AUTOMÁTICO DE
OJALES CON UNA SOLA OPERACIÓN
C
A
COSIDO DE OJALES CON 4 3-5 -1,5 44
OPERACIONES (1/8-13/64) (1/64-1/16)
PUNTADA RECTA 0-5 1-4 31
(Cambio de posición de la aguja)
PUNTADA ZIGZAG 0-5
PUNTADA INVISIBLE 3-5
PUNTADA DE LENCERIA 3-5 -3 36
PUNTADA PARA 3-5 -2,5 37
COSER ELÁSTICOS (1/8-13/64) (1/64-3/32)
BASTA INVISIBLE STRETCH 3-5 -1,5 35
PUNTADA FESTÓN 3-5
ONDULADO (1/8-13/64) (1/64-1/16)
PUNTADA DE ACOLCHADO 3-5 -3 38
PUNTADA DE PUENTE 3-5 -3 –
PUNTADA DE MURALLA 3-5 -3 –
PUNT AD A TRIPLE ELÁSTICA 0-5 Fija 31
(Cambio de posición de la aguja)
PUNTADA ZIGZAG 3-5 Fija 41
ELÁSTICA TRIPLE (1/8-13/64) 2,5 (3/32)
PUNTADA OVERLOCK 3-5 Fija 39
IMITACIÓN OVERLOCK 3-5 Fija 39
PUNTADA DE ESPINA 3-5 Fija 40
PUNTADA PUNTA DE FLECHA 3-5 Fija 39
PUNTADA DECORATIVA 3-5 Fija 41
PUNTADA DE HOJA 3-5 Fija –
PUNTADA
PUNTADA DE PIE 3-5 Fija –
DE ÁRBOL 3-5 Fija –
3-5 -1,5 43
(1/8-13/64) (1/64-1/16)
(3/64-5/32)
-2 34
(0-13/64) (1/64-5/64)
-2 35
(1/8-13/64) (1/64-5/64)
(1/8-13/64) (1/64-1/8)
(1/8-13/64) (1/64-1/16)
-1,5 38
(1/8-13/64) (1/64-1/8)
(1/8-13/64) (1/64-1/8)
(1/8-13/64) (1/64-1/8)
2,5 (3/32)
(1/8-13/64) 2,5 (3/32)
(1/8-13/64) 2,5 (3/32)
(1/8-13/64) 2,5 (3/32)
(1/8-13/64) 2,5 (3/32)
(1/8-13/64) 2,5 (3/32)
(1/8-13/64) 2,5 (3/32)
(1/8-13/64) 2,5 (3/32)
(1/8-13/64) 2,5 (3/32)
CONTENTS
SEWING MACHINE
KNOWING Y OUR
ZIGZAG STITCHING
STRAIGHT AND
BUILT-IN STITCHES
BUTTONHOLE AND
BUTTON SEWING
USING ATTACHMENTS
AND APPLICATIONS
MAINTENANCE
12
INDEX
○○○○○○○○○○○○○○○○○○○○○○○○○○○○○○○○○○○○○○○○○○○○○○○○○○○○○○○○○○○○○○○○○○○○○○○○○○○○○○○○○○○○○○○○○○○○○○○○
LONGUEURS ET LARGEURS DE POINT RECOMMANDÉES
MODÈLE NOM DU POINT LARGEUR LONGUEUR PAGE
RECOMMANDÉE RECOMMANDÉE DU
(en mm) (en mm) MANUEL
BOUTONNIÈRE 3-5
AUTOMATIQUE 1 PAS
C
A
BOUTONNIÈRE 3-5
AUTOMATIQUE 4 PAS
POINT DROIT 0-5 1-4 31
(Changement de position de l’aiguille)
POINT ZIGZAG 0-5 -2 34
-1,5 43
-1,5 44
CONTENTS
SEWING MACHINE
KNOWING Y OUR
OURLET INVISIBLE DE 3-5 -2 35
LINGERIE
POINT À COQUILLES 3-5
-3 36
POINT ÉLASTIQUE 3-5 -2,5 37
OURLET INVISIBLE 3-5 -1,5 35
ÉLASTIQUE
POINT FESTON 3-5
-1,5 38
POINT UNIVERSEL 3-5 -3 38
POINT DE FRONCES 3-5 -3 –
POINT REMBLAI 3-5 -3 –
TRIPLE POINT ÉLASTIQUE 0-5 Fixe 31
(Changement de position de l’aiguille)
2,5
TRIPLE POINT ZIGZAG 3-5 Fixe 41
ÉLASTIQUE 2,5
POINT OVERLOCK STRETCH
3-5 Fixe 39
2,5
POINT OVERLOCK ÉLASTIQUE
3-5 Fixe 39
2,5
POINT PLUME 3-5 Fixe 40
2,5
POINT FLÈCHE 3-5 Fixe 39
2,5
POINT DECORATIF 3-5 Fixe 41
2,5
POINT FEUILLE-CHEVRON 3-5 Fixe –
2,5
POINT D’ÉPINE 3-5 Fixe –
2,5
POINT DE DÉCORATION 3-5 Fixe –
2,5
ZIGZAG STITCHING
STRAIGHT AND
BUILT-IN STITCHES
BUTTONHOLE AND
BUTTON SEWING
USING ATTACHMENTS
AND APPLICATIONS
MAINTENANCE
13
INDEX

1
23
0
1
2
–
SS
3
4
+
•
•
•
•
○○○○○○○○○○○○○○○○○○○○○○○○○○○○○○○○○○○○○○○○○○○○○○○○○○○○○○○○○○○○○○○○○○○○○○○○○○○○○○○○○○○○○○○○○○○○○○○○
Stitch Length Dial
Depending on your selected stitch, you may need to adjust the stitch
length for best results.
The numbers marked on the stitch length dial represent the length of
the stitch in millimeters (mm) (1/25″).
THE HIGHER THE NUMBER, THE LONGER THE STITCH.
The “0” setting does not feed the material. This is used for sewing on
a button.
The “ ” area is used for making a Satin Stitch (a close zigzag stitch)
which can be used in making buttonholes and decorative stitches. The
position needed for making the Satin Stitch varies according to the
material and thread being used. To determine the exact dial position,
you should first test the stitch and length settings on a scrap of fabric to
observe the feeding of the material.
1 Stitch length
2 Shorter
3 Longer
CONTENTS
SEWING MACHINE
KNOWING Y OUR
ZIGZAG STITCHING
STRAIGHT AND
○○○○○○○○○○○○○○○○○○○○○○○○○○○○○○○○○○○○○○○○○○○○○○○○○○○○○○○○○○○○○○○
Selector de largo de puntada
Según la puntada seleccionada, puede ser necesario ajustar su largo para lograr mejores resultados.
Los números indicados en el selector representan el largo de las
puntadas en milímetros (1/25″).
CUANTO MAYOR EL NÚMERO, MÁS LARGA LA PUNTADA.
El ajuste “0” no alimenta el tejido. Sirve para coser un botón.
La zona “ ” se usa para realizar puntadas de realce (una puntada
zigzag muy cerrada) que pueden servir para ojales o decoración. La
posición necesaria para realizar puntadas de realce varía dependiendo del tejido o hilo utilizados. P ar a determinar la posición exacta
del selector, conviene primero probar la puntada y los ajustes de
largo en un pedazo de tejido para ver cómo se alimenta el material.
1 Largo de puntada
2 Más corto
3 Más largo
En fonction du point sélectionné, il est possible de régler la longueur de
point pour obtenir les meilleurs résultats.
Les chiffres inscrits sur le sélecteur de longueur de point représentent la
longueur du point en millimètres (mm).
PLUS LE CHIFFRE EST ÉLEVÉ, PLUS LE POINT SERA LONG.
Le réglage “0” n’entraînera pas le tissu à coudre. Il sert à coudre les boutons.
La zone “ ” sert à réaliser un point de bourdon (un point zigzag serré) qui
peut servir à faire des boutonnières ou comme point fantaisie décoratif. La
position idéale pour le point de bourdon variera en fonction du tissu et du fil
utilisés. Pour déterminer la position exacte, il est préférable de tester d’abord
les réglages de point et de longueur sur un bout de tissu pour observer son
entraînement.
Sélecteur de longueur de point
1 Longueur de point
2 Plus court
3 Plus long
BUILT-IN STITCHES
BUTTONHOLE AND
BUTTON SEWING
USING ATTACHMENTS
AND APPLICATIONS
MAINTENANCE
14
INDEX

B
A
0
–
SS
1
+
2
SS
3
–
+
•
•
•
•
4
3
•
•
4
○○○○○○○○○○○○○○○○○○○○○○○○○○○○○○○○○○○○○○○○○○○○○○○○○○○○○○○○○○○○○○○○○○○○○○○○○○○○○○○○○○○○○○○○○○○○○○○○
Stretch Stitching
CONTENTS
Selecting a stretch stitch
Setting the stitch length dial to “SS” changes the selected pattern to a
stretch stitch. (See fig. A.)
Adjusting the stretch stitching
The sewing machine is adjusted during its production so that the stretch
stitching can be sewn at the standard position “SS”.
If different types of fabric or thread are used or the pattern does not
have the correct shape, turn the dial toward either “+” or “–” to adjust
the stitch. (See fig. B.)
•
•
1 Makes fine stitches
2 Standard position
3 Makes rough stitches
NOTE:
The dial cannot be turned past “· · · · + SS –”. Do not forcefully turn
the stitch length dial out of the allowable range.
1
2
3
SEWING MACHINE
KNOWING Y OUR
ZIGZAG STITCHING
STRAIGHT AND
BUILT-IN STITCHES
○○○○○○○○○○○○○○○○○○○○○○○○○○○○○○○○○○○○○○○○○○○○○○○○○○○○○○○○○○○○○○○
Puntada elástica
Selección de la puntada elástica
Al establecer el selector del largo de puntada en la posición “SS”, la
puntada actualmente seleccionada cambia a la puntada elástica. (V er
fig. A.)
Ajuste de la puntada elástica
La máquina de coser se ajusta durante su producción de tal forma
que puede coser la puntada elástica en la posición estándar “SS”.
Si utiliza un tipo de hilo diferente al de fábrica o la puntada realizada
no tiene la forma correcta, gire el disco hacia la posición “+” o hacia
la posición “–” par a ajustar la puntada. (Ver fig. B.)
1 Realiza puntadas correctas
2 Posición estándar
3 Realiza puntadas defectuosas
NOTA:
No puede girar el disco después de la posición “· · · · + SS –”. No
Sélection d’un point élastique
Régler le sélecteur de longueur de point sur “SS” pour que le modèle
sélectionné devienne un point élastique. (Voir fig. A.)
Réglage de la couture en points élastiques
A la sortie d’usine, la machine à coudre est réglée de sorte que la piqûre en
points élastiques se fasse à la position normale “SS”.
Si vous utilisez des tissus ou des fils différents ou si le modèle de point n’a
pas la forme voulue, tourner le sélecteur vers “+” ou “–” pour régler le
point (Voir fig. B.)
REMARQUE:
Le sélecteur ne peut dépasser “. . . . + SS –”. Ne pas forcer le sélecteur en
tentant de le tourner au deçà de la plage de réglages autorisée.
Couture en points élastiques
1 Points fins
2 Position normale
3 Points grossiers
intente forzar el selector del largo de puntada fuera del rango permitido.
BUTTONHOLE AND
BUTTON SEWING
USING ATTACHMENTS
AND APPLICATIONS
MAINTENANCE
15
INDEX

○○○○○○○○○○○○○○○○○○○○○○○○○○○○○○○○○○○○○○○○○○○○○○○○○○○○○○○○○○○○○○○○○○○○○○○○○○○○○○○○○○○○○○○○○○○○○○○○
Stitch Width Dial
CONTENTS
1
0
1
2
R
3
M
4
L
5
2
3
1
4
0
M
R
5
L
5
4
3
L
2
M
1
R
0
Depending on the stitch selected, you may need to adjust the stitch
width.
The numbers marked on the dial represent the stitch width.
THE HIGHER THE NUMBER, THE WIDER THE STITCH.
1 Stitch width dial
NOTE:
When you choose the Straight Stitch or the Triple Straight, you can
change the needle position from left to right.
NOTE:
If the Straight Stitch or the T riple Straight is chosen, the needle position
can be changed by adjusting the stitch width dial.
SEWING MACHINE
KNOWING Y OUR
ZIGZAG STITCHING
STRAIGHT AND
○○○○○○○○○○○○○○○○○○○○○○○○○○○○○○○○○○○○○○○○○○○○○○○○○○○○○○○○○○○○○○○
Selector del ancho de puntada
Es probable que tenga que ajustar el ancho de la puntada en función del tipo de puntada seleccionada.
Los números marcados en el disco representan el ancho de puntada.
CUANTO MAYOR EL NÚMERO, MÁS ANCHA LA PUNTADA.
1 Selector del ancho de puntada
NOTA:
Cuando selecciona la puntada recta o la triple recta, puede cambiar
la posición de la aguja de la izquierda a la derecha.
NOTA:
Si ha seleccionado la puntada recta o la triple recta, la posición de la
aguja puede cambiarse mediante el ajuste del selector de ancho de
En fonction du modèle de point choisi, il peut être nécessaire de régler également la largeur du point.
Les numéros indiqués sur le sélecteur représentent la largeur du point en
mm.
PLUS LE CHIFFRE EST ÉLEVÉ, PLUS LE POINT SERA LARGE.
REMARQUE:
Lorsque l’on sélectionne le point droit ou le triple point droit, il est possible
de changer la position de l’aiguille de gauche à droite.
REMARQUE:
Lorsque l’on sélectionne le point droit ou le triple point droit, il est possible
de changer la position de l’aiguille à l’aide du sélecteur de largeur de point.
Sélecteur de largeur de point
1 Sélecteur de largeur de point
puntada.
BUILT-IN STITCHES
BUTTONHOLE AND
BUTTON SEWING
USING ATTACHMENTS
AND APPLICATIONS
MAINTENANCE
16
INDEX
Loading…
- Addeddate
- 2021-07-04 06:54:23
- Identifier
- manualzilla-id-7373983
- Identifier-ark
- ark:/13960/t1ph3hb46
- Ocr
- tesseract 5.0.0-alpha-20201231-10-g1236
- Ocr_autonomous
- true
- Ocr_detected_lang
- fr
- Ocr_detected_lang_conf
- 1.0000
- Ocr_detected_script
- Latin
- Ocr_detected_script_conf
- 0.9946
- Ocr_module_version
- 0.0.13
- Ocr_parameters
- -l fra+cat+lat+spa+bre+eng+fil+Latin
- Page_number_confidence
- 89.47
comment
Reviews
There are no reviews yet. Be the first one to
write a review.
56
Views
DOWNLOAD OPTIONS
Temporarily Unavailable
DAISY
For users with print-disabilities
Temporarily Unavailable
EPUB
Uploaded by
chris85
on
Перейти к контенту
Instruction Manual
Manual de instrucciones
Manuel d’instructions
На этой странице вы можете совершенно бесплатно скачать Руководство по эксплуатации Brother XL-5130.
У документа PDF Руководство по эксплуатации 280 страниц, а его размер составляет 20.36 Mb.
Читать онлайн Принтеры Brother XL-5130 Руководство по эксплуатации
Скачать файл PDF «Brother XL-5130 Руководство по эксплуатации» (20.36 Mb)
Популярность:
1662 просмотры
Подсчет страниц:
280 страницы
Тип файла:
Размер файла:
20.36 Mb
-
Brother XL-5130 Мануал
Популярность:
1480 просмотры
Подсчет страниц:
77 страницы
Тип файла:
PDF
Размер файла:
936 Kb
Прочие инструкции Brother Принтеры
Прочие инструкции Brother
Руководство по эксплуатации (руководство пользователя) на русском швейной машинки Brother XL-5130 — XL-5700
| ОтветитьНовая тема |
1 сообщение • Страница 1 из 1 |
Швейная машинка Brother XL-5130. Руководство по эксплуатации
Admin » 11.03.2017, 14:15 » Сообщение: #1
Руководство по эксплуатации (руководство пользователя) на русском швейной машинки Brother XL-5130/5232/5340/5700
Производитель: Brother
Размер: 1,69 МБ
☑ Скачать бесплатно Швейная машинка Brother XL-5130. Руководство по эксплуатации на русском.pdf.rar
Ответить с цитатой
| ОтветитьНовая тема |
1 сообщение • Страница 1 из 1 |
|
Вернуться в Прочее, не сортированное |
Версия для печати | Пред. тема | След. тема |
| Похожие темы | Комментарии | Просмотры | Последнее сообщение |
Pioneer BDP-3220. Инструкция по эксплуатацииAdmin в форуме Прочее, не сортированное |
0 | 775 | Pioneer BDP-3220. Инструкция по эксплуатации 24.01.2017, 20:09 от: Admin |
Yamaha RX-V477. Инструкция по эксплуатацииAdmin в форуме Прочее, не сортированное |
0 | 797 | Yamaha RX-V477. Инструкция по эксплуатации 25.01.2017, 20:50 от: Admin |
Руководство по синтаксису шаблонов phpBBAdmin в форуме Установка и настройка phpBB. Инструкции |
0 | 4243 | Руководство по синтаксису шаблонов phpBB 19.12.2014, 04:38 от: Admin |
Кто сейчас на форуме
Сейчас этот форум просматривают: нет зарегистрированных пользователей
Как пользоваться швейной машиной Brother Xl-5130?
Автор:
John Pratt
Дата создания:
15 Январь 2021
Дата обновления:
3 Сентябрь 2023

Содержание
- Совет
- Предупреждение
Швейная машина Brother XL-5130 соответствует стандартной схеме для большинства швейных машин, позволяя продевать ее сверху справа от машины и в иглу слева внизу через различные шестерни и компоненты, используемые для поддержания нужного количества. натяжение нити.
Важно не допустить, чтобы нить двигалась слишком свободно, чтобы стежки крепко держались, но не настолько сильно, чтобы нить часто ломалась.
Не забудьте положить шпульку с нитью, которая соответствует или дополняет катушку на верхней части машины.
Пропустите нить от катушки вокруг натяжного диска шпульки к шпульке.
Поместите шпульку на намоточный вал шпульки и сдвиньте ее вправо.
Нажмите педаль, чтобы запустить машину и заполнить шпульку. Машина автоматически останавливается, когда шпулька заполнена.
Снимите крышку челнока на передней части машины, рядом с иглой.
Выньте шпульный колпачок и поместите в него шпульный колпачок. Замените корпус, удерживая его за защелку.
Пропустите нить из катушки через нитенаправитель и натяжные диски в рычаг натяжения и опустите в иглу.
Поместите ткань под лапку, чуть ниже иглы, и опустите лапку, нажав на рычаг позади и чуть выше иглы.
Нажмите педаль, чтобы начать делать швы.
Совет
Вы можете изменить тип стежка, величину натяжения и направление, в котором вы шьете, используя различные органы управления, расположенные на передней части машины.
Используйте клочки материала, чтобы проверить свои швы. Легче бросать отходы, чем разрывать швы.
Предупреждение
Держите ногу подальше от педали, пока вы заправляете иглу, чтобы избежать случайного удара пальцем.
Руководства Brother XL-5130 Размер файлов: 5200 KB, Язык: English, Формат: pdf, Платформа: Windows/Linux, Дата: 2017-03-07
На данной странице вы можете скачать руководства Brother XL-5130. Мы предлагаем вам ознакомиться с руководством пользователя, инструкцией по сервисному обслуживанию и ремонту.
Также здесь вы найдете список заказных номеров на комплектующие Brother XL-5130.
Все файлы предоставляются исключительно в ознакомительных целях. И не являютя руководством по ремонту, а направлены лишь на то чтобы помочь вам более детально ознакомиться с принципом построения устройства.
Содержимое представленных здесь руководств требуют от вас знания технического английского языка.
Если вы собираетесь скачать руководство по сервисному обслуживанию Brother XL-5130, иными словами сервис мануал, вы дожны обладать хотя бы минимальными познаниями в области электроники и пониманием базовых принципов работы электромеханических устройств.
Для просмотра руководств вам понадобится Adobe Acrobat Reader версии 9 и выше либо другая программа для просмотра pdf файлов.
В связи с популярностью информации представленной на сайте и ее бесплатного предоставления конечному пользователю, убедительная просьба использовать специальные программные продукты для многопотокового скачивания файлов.
Руководства для Brother XL-5130
- Руководство пользователя (User manual)
- Руководство по сервисному обслуживанию (Service manual)
- Руководство по ремонту (Repair manual)
- Перечень комплектующих (PartList)
Это тоже интересно:

Instruction Manual
Manual de instrucciones
Manuel d’instructions