
Перейти к контенту
МФУ (многофункциональные устройства) Samsung
- Размер инструкции: 6.83 Мб
- Формат файла: pdf
Если вы потеряли инструкцию от МФУ (многофункционального устройства) Samsung SCX-3200, можете скачать файл для просмотра на компьютере или печати.
Инструкция для МФУ (многофункционального устройства) Samsung SCX-3200 на русском языке. В руководстве описаны возможности и полезные функции, а также правила эксплуатации. Перед использованием внимательно ознакомьтесь с инструкцией.
Чтобы не читать всю инструкцию вы можете выполнить поиск по содержимому внутри инструкции и быстро найти необходимую информацию. Рекомендации по использованию помогут увеличить срок службы МФУ (многофункционального устройства) Samsung SCX-3200. Если у вас появилась проблема, то найдите раздел с описанием неисправностей и способами их решения. В нем указаны типичные поломки и способы их решения.
Samsung Universal Print
Driver
Руководство пользователя
представьте
возможности
Авторское право_ 2
Авторское право
© 2009 Samsung Electronics Co., Ltd. Все права защищены.
Данное руководство администратора предназначено только для ознакомления. Любая информация,
содержащаяся в нем, может быть изменена без предупреждения.
Корпорация Samsung Electronics не несет ответственности за какие бы то ни было убытки, прямые или косвенные,
вызванные использованием данного руководства или связанные с ним.
•
Samsung Universal Print Driver является товарным знаком компании Samsung Electronics Co., Ltd.
•
Samsung и эмблема Samsung являются товарными знаками компании Samsung Electronics Co., Ltd.
•
Microsoft, Windows, Internet Explorer и Windows Vista являются охраняемыми товарными знаками корпорации
Microsoft в США и других странах.
•
Прочие торговые знаки, названия товаров и компаний, упомянутые в документе, могут быть товарными
знаками соответствующих владельцев.
ВЕРСИЯ 1.01

Введение_ 4
1.
Введение
Драйвер Samsung Universal Print Driver поддерживает различные модели принтеров. Он
позволяет пользоваться не только устройствами печати Samsung, но и принтерами на базе
PDL других компаний, не загружая отдельные драйверы.
•
PDL означает PCL и PS.
•
Компания Samsung не гарантирует качество печати принтеров других производителей и
неподдерживаемых моделей Samsung (чтобы просмотреть список поддерживаемых устройств Samsung,
щелкните ).
Для неподдерживаемых моделей Samsung драйвер автоматически переключается в
режим PDL, заданный по умолчанию.
Samsung Universal Print Driver и драйверы для конкретных моделей
В таблице ниже показаны различия между драйвером Samsung Universal Print Driver и драйверами для отдельных
продуктов.
Требования к системе
Ниже приведены минимальные требования к системе для драйвера Samsung Universal Print Driver.
SAMSUNG UNIVERSAL PRINT DRIVER
ДРАЙВЕРЫ ДЛЯ КОНКРЕТНЫХ
МОДЕЛЕЙ
Интерфейс
пользователя
Единый интерфейс пользователя.
Различные интерфейсы пользователя.
Установка
•
Наличие файла установщика, который
загружается вместе в драйвером
Samsung Universal Print Driver.
•
Установка с помощью файла
установщика.
•
Поиск, загрузка и установка драйверов
для каждого устройства.
•
Установка при автоматическом
запуске компакт-диска или с помощью
мастера установки принтеров.
Поиск устройств
Простой поиск предложенных устройств
из числа принтеров Samsung.
Поиск устройств вручную.
Доступность
Предлагается на веб-сайте Samsung.
Предлагается на компакт-диске, который
входит в комплект поставки;
предоставляется отдельно для каждого
продукта.
ОПЕРАЦИОННАЯ
СИСТЕМА
ТРЕБОВАНИЯ
(РЕКОМЕНДУЕМЫЕ)
ЦП
ОЗУ
СВОБОДНОЕ МЕСТО
НА ЖЕСТКОМ ДИСКЕ
Windows Vista
Pentium IV 3 ГГц
512 Мб (1 Гб)
15 Гб
Windows XP
Pentium III, 933 МГц (Pentium IV, 1 ГГц)
128 Мб (256 Мб)
1,5 Гб или больше
Windows 2000
Pentium II, 400 МГц (Pentium III, 933 МГц)
64 Мб (128 Мб)
600 Мб
Windows 7
32- или 64-разрядный процессор
Pentium IV, 1 ГГц или более мощный
1 Гб (2 Гб)
16 Гб
•
Графическая карта с объемом памяти 128 Мб и поддержкой DirectX 9
(для темы Aero).
•
Дисковод DVD-R/W.
Windows Server 2003
Pentium III, 933 МГц (Pentium IV, 1 ГГц)
128 Мб (512 Мб)
1,25−2 Гб
Windows Server 2008
Pentium IV, 1 ГГц (Pentium IV, 2 ГГц)
512 Мб (2 Гб)
10 Гб
Windows Server 2008
(R2)
Pentium IV, 1 ГГц (x86) или 1,4 ГГц (x64)
(2 ГГц или выше)
512 Мб (2 Гб)
10 Гб

Установка и удаление драйвера Samsung Universal Print Driver_ 5
2.
Установка и удаление драйвера Samsung
Universal Print Driver
В этой главе приведены пошаговые инструкции по установке и удалению драйвера
Samsung Universal Print Driver.
Ниже описаны окна для драйвера PCL в Windows XP. Окна для драйвера PS могут отличаться от
представленных ниже, но порядок действий для этих драйверов совпадает.
Установка Samsung Universal Print Driver
Перед установкой драйвера проверьте соответствие рекомендуемым минимальным требованиям к системе (см.
раздел «Требования к системе» на стр. 4).
1. Запустите веб-браузер и откройте страницу www.samsung.com.
2. Выполните поиск установочного файла Samsung Universal Print Driver.
3. Запустите установочный файл.
Появится мастер установки Samsung Universal Print Driver.
4. Нажмите кнопку Далее. При необходимости выберите нужный язык из раскрывающегося списка.
После появления окна установки дождитесь ее завершения.
5. После окончания установки нажмите кнопку Готово.
Для того чтобы зарегистрироваться как пользователь принтера Samsung, установите соответствующий
флажок и нажмите кнопку Готово. Регистрация позволит получать информацию от компании Samsung.
Если драйвер установлен правильно, в папку Принтеры и факсы будет добавлен элемент Samsung Universal
Print Driver.

Установка и удаление драйвера Samsung Universal Print Driver_ 6
Удаление Samsung Universal Print Driver
Чтобы удалить Samsung Universal Print Driver, выполните указанные ниже действия.
1. В меню «Пуск» Windows выберите пункты Все программы > Samsung Universal Print Driver >
Обслуживание.
Появится мастер установки Samsung Universal Print Driver.
2. Выберите пункт Удалить и нажмите кнопку Далее.
3. Выберите компоненты, которые необходимо удалить, и нажмите кнопку Далее.
4. В окне подтверждения нажмите кнопку Да.
5. После завершения удаления нажмите кнопку Готово.

Использование драйвера Samsung Universal Print Driver_ 7
3.
Использование драйвера Samsung
Universal Print Driver
Основная задача драйвера Samsung Universal Print Driver заключается в том, чтобы можно
было установить один драйвер (Samsung Universal Print Driver) и использовать его для
различных устройств печати. Тем не менее Samsung Universal Print Driver поддерживает и
другие возможности, например поиск устройств печати, создание папки избранного и
проверку состояния устройства.
Доступ к драйверу Samsung Universal Print Driver
1. В меню Пуск Windows выберите пункт Принтеры и факсы.
2. Щелкните правой кнопкой мыши Samsung Universal Print Driver.
3. Выберите команду Настройка печати или Свойства.
Появится окно Samsung Universal Print Driver.
Если принтеры давно не использовались, появится всплывающее окно с запросом на поиск принтеров. Для
поиска подключенных принтеров нажмите кнопку ОК.

Использование драйвера Samsung Universal Print Driver_ 8
Внешний вид окна драйвера
1
Панель макета
Включает параметры отображения.
•
: Выберите макет окна Samsung Universal Print Driver. Если
выбрать макет Рисунок2 и установить программу Samsung Smart Panel,
будет доступно окно состояния (4).
•
: Обновление сведений о принтерах в списке.
•
: Выбор представления для списка принтеров. При выборе
значения Вид — таблица выводятся сведения о принтерах, такие как
Адрес, Размещение, Статус и Системное имя. При выборе значения Вид
— изображение кроме этого выводится крупное изображение принтера.
Этот параметр поддерживается только в Windows XP и более поздних
версиях.
•
: Вывод групп принтеров. Чтобы систематизировать принтеры,
распределив их по группам, нажмите эту кнопку. Этот параметр
поддерживается только в Windows XP и более поздних версиях.
•
: Поиск принтера в списке по ключевому слову (например, по
названию модели).
•
: Вызов окна справки.
•
: Вывод сведений о драйвере Samsung Universal Print Driver.

Использование драйвера Samsung Universal Print Driver_ 9
2
Основные меню
•
Недавние
—
Недавно использ. принтеры: вывод списка недавно использованных
принтеров. Последний использованный принтер указывается вверху
списка.
—
Недавно найденные принтеры: вывод списка недавно найденных
принтеров. Последний найденный принтер указывается вверху списка.
•
Поиск
—
Начать поиск: поиск принтеров, подключенных через USB-порт или по
сети.
—
Поиск по адресу: поиск принтера по его IP-адресу.
•
Мой принтер
—
Создать папку избранного: создание папки для часто используемых
принтеров.
•
Параметры: параметры поиска и всплывающих окон.
3
Список принтеров
Вывод списка принтеров. Если нажата кнопка
на панели макета, принтеры
можно распределить по группам. Щелкните список принтеров правой кнопкой
мыши. Выберите вариант распределения принтеров по группам.
•
Подключен/неизвестно: распределение принтеров в соответствии с
текущим состоянием каждого из них.
•
Дата: распределение по дате последнего использования, например
сегодня, вчера, на этой неделе, в этом месяце и т. д.
•
Цветная/черно-белая печать: распределение принтеров по типу:
(цветной или монохромный).
•
Односторонняя/двусторонняя печать: распределение в зависимости от
наличия функции двусторонней печати.
4
Окно состояния
Выводит сведения о состоянии принтера, выбранного в списке. Для
отображения этого окна необходимо выбрать макет Рисунок2 и установить
программу Samsung Smart Panel.
•
Начать обновление: обновление сведений о выбранном принтере.
•
Расходные материалы: открытие веб-сайта для приобретения расходных
материалов.
•
Рук. по устр. неполадок: вызов главы руководства пользователя,
посвященной устранению неполадок. Для просмотра руководства
требуется установить программу Smart Panel для используемой модели.
•
Параметры принтера: запуск службы SyncThru Web Service,
предназначенной для настройки принтера и управления им. Этот параметр
поддерживается только сетевыми принтерами.

Использование драйвера Samsung Universal Print Driver_ 10
Изменение параметров Samsung Universal Print Driver
Настройка всплывающего окна
Можно настроить вывод окна Samsung Universal Print Driver при печати. Доступно четыре варианта вывода
всплывающего окна.
1. Нажмите кнопку Параметры в нижнем левом углу.
2. В открывшемся окне имеется переключатель Всплывающее окно.
•
Только когда последний использованный принтер недоступен: окно Samsung Universal Print Driver
выводится только в том случае, если принтер, использовавшийся последним, недоступен.
•
При появлении интерфейсного сообщения драйвера: окно Samsung Universal Print Driver выводится
при открытии окна Настройки печати (Свойства).
•
При каждой печати: окно Samsung Universal Print Driver выводится каждый раз при печати.
•
Только при первой печати: окно Samsung Universal Print Driver выводится только при первом выборе
драйвера Samsung Universal Print Driver из приложения.
3. Нажмите кнопку ОК.

Данное руководство также подходит к другим моделям:
- Samsung CLX-3185
- Samsung CLX-3185W
- Samsung CLP-320
- Samsung ML-1660
- Samsung ML-1661
- Samsung ML-1665
- Samsung ML-1667
- Samsung ML-1910
- Samsung ML-2525
- Samsung ML-2580N
- Samsung SCX-3205
- Samsung SCX-3205W
- Samsung SCX-3207
- Samsung SCX-4600
- Samsung SCX-4623F
- Samsung SCX-4623FN
- Samsung CLX-3185FN
- Samsung CLX-3185N
- Samsung CLP-320N
- Samsung CLP-325
- Samsung CLP-325W
- Samsung CLP-620ND
- Samsung CLP-670N
- Samsung CLP-770ND
- Samsung CLX-6220FX
- Samsung CLX-6250FX
- Samsung ML-1915
- Samsung ML-2855ND
- Samsung SCX-5635FN
- Samsung SCX-5835FN
- Samsung CLP-670ND
09:19
SCX-3200 Захватывает несколько листов. Замятие бумаги
09:56
Заправка картриджа Samsung D104S/3200/1660/1665/1860/1865/3205
03:07
Прошивка принтера samsung scx 3200
05:01
Samsung SCX-3200 — забирает два листа бумаги, щелкает лотком
03:08
Samsung SCX-3200 не захватывает бумагу
01:57
SAMSUNG SCX-3205 разблокировка,сброс
02:14
The Samsung scx-3200 is a red light mistake. How to reset the Samsung scx-3200. Samsung toner refill
26:10
Samsung SCX-3200 • Riparazione Sistema di Pick-up Carta
Нажмите на кнопку для помощи
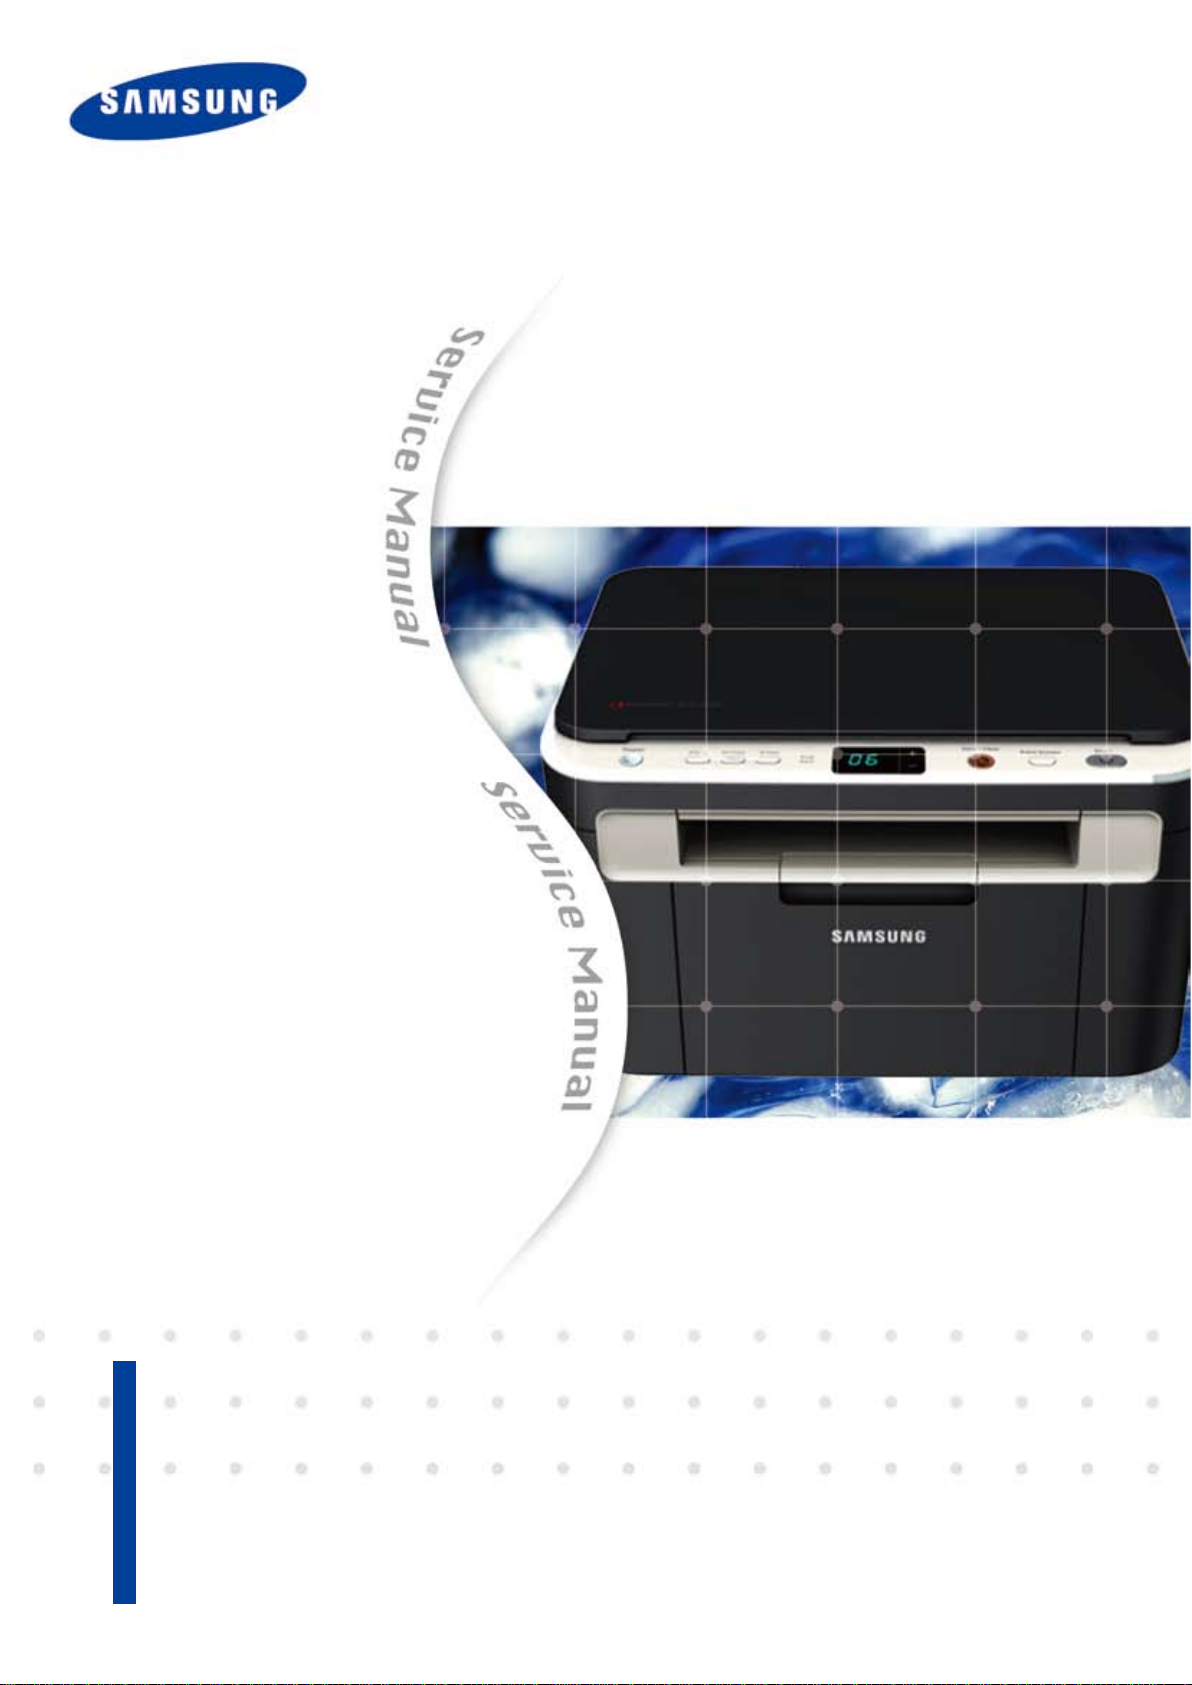
Service Manual
1. Print / Copy Speed
• 17 ppm in letter
2. Processor
• Jupiter5 375 Mhz
3. Printer Language Emulations
• SPL, PCL5e
4. Memory
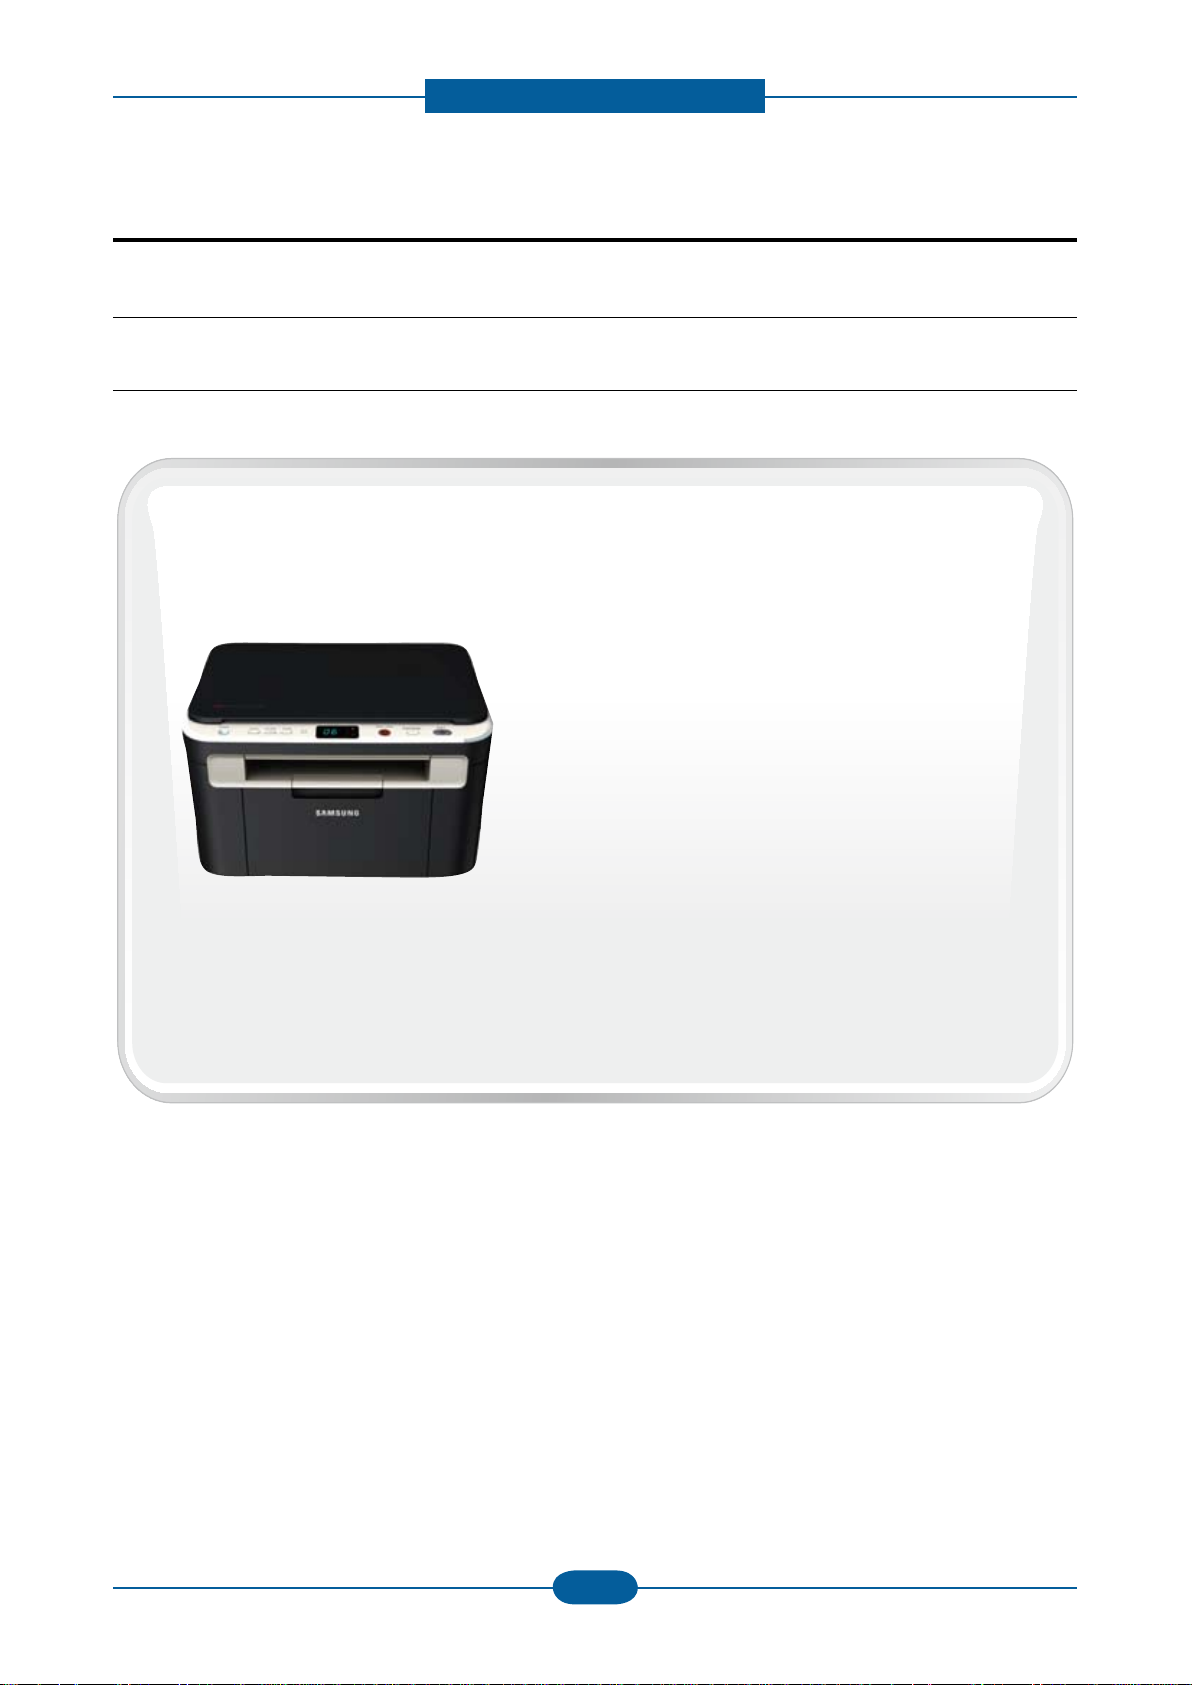
The keynote of Product
• 32 MB (SCX-3200/3205)
• 128 MB (SCX-3205W)
Mono Laser MFP
SCX-3200/3205
SCX-3205W
5. Interfaces
• One USB port
• One 10/100 Base TX network connector (SCX-3205W)
• One 802.11b/g/n wireless module (SCX-3205W)
6. Toner cartridge
• Initial : 700 pages
• Sales : 1,500 pages
7. Machine life
• 30,000 sheets or 3 years (whichever comes rst)
GSPN (Global Service Partner Network)
North America : service.samsungportal.com
Latin America : latin.samsungportal.com
CIS : cis.samsungportal.com
Europe : europe.samsungportal.com
China : china.samsungportal.com
Asia : asia.samsungportal.com
Mideast & Africa : mea.samsungportal.com

chapter 1 Precautions
1.1 Safety Warning …………………………………………………… 1-1
1.2 Caution for safety ………………………………………………… 1-2
1.2.1 Toxic material ………………………………………………… 1-2
1.2.2 Electric Shock and Fire Safety Precautions ……………… 1-2
1.2.3 Handling Precautions ……………………………………… 1-3
1.2.4 Assembly / Disassembly Precautions …………………… 1-3
1.2.5 Disregarding this warning may cause bodily injury ……… 1-4
1.3 ESD Precautions ………………………………………………… 1-5
Contents
chapter 2 Product Overview
2.1 Product Specications …………………………………………… 2-1
2.1.1 Product Overview …………………………………………… 2-1
2.1.2 Specications ………………………………………………… 2-2
2.1.3 Model Comparison Table …………………………………… 2-11
2.2 System Overview ………………………………………………… 2-12
2.2.1 Front View …………………………………………………… 2-12
2.2.2 Rear View …………………………………………………… 2-13
2.2.3 System Layout ……………………………………………… 2-14
2.2.4 Engine H/W Specications ………………………………… 2-21
2.2.5 Engine F/W Contol Algorithm ……………………………… 2-27
2.2.6 S/W Descriptions …………………………………………… 2-29
chapter 3 Maintenance and Disassembly
3.1 Precautions when replacing parts ……………………………… 3-1
3.1.1 Precautions when assembling and disassembling ……… 3-1
3.1.2 Preautions when handling PBA …………………………… 3-1
3.1.3 Releasing Plastic Latches ………………………………… 3-1

Contents
3.2 Screws used in the printer ……………………………………… 3-2
3.3 Left / Right cover ………………………………………………… 3-3
3.4 Scanner unit ……………………………………………………… 3-4
3.4.1 OPE unit ……………………………………………………… 3-5
3.4.2 CIS unit ……………………………………………………… 3-6
3.4.3 Scan motor …………………………………………………… 3-7
3.5 Middle cover and COVER-OPEN ……………………………… 3-9
3.6 Front and Rear cover …………………………………………… 3-10
3.7 Main PBA ………………………………………………………… 3-10
3.8 SMPS / HVPS board …………………………………………… 3-11
3.9 Fuser unit ………………………………………………………… 3-12
3.10 LSU ……………………………………………………………… 3-13
3.11 Drive unit ………………………………………………………… 3-14
3.12 Step motor ……………………………………………………… 3-15
3.13 Pick up roller …………………………………………………… 3-16
3.14 Transfer roller …………………………………………………… 3-17
chapter 4 Alignment and Troubleshooting
4.1 Alignment and Adjustments ……………………………………… 4-1
4.1.1 Control Panel ………………………………………………… 4-1
4.1.2 Understanding the status LED …………………………… 4-2
4.1.3 JAM Removal ……………………………………………… 4-3
4.1.4 EDC mode …………………………………………………… 4-6
4.1.5 Tech mode …………………………………………………… 4-9
4.1.6 Upgrade Firmware ………………………………………… 4-17
4.1.7 Periodic Defective Image …………………………………… 4-21
4.2 Troubleshooting…………………………………………………… 4-22
4.2.1 Procedure of Checking the Symptoms …………………… 4-22
4.2.2 Error code and troubleshooting …………………………… 4-23
4.2.3 Printing quality problems …………………………………… 4-44
4.2.4 Copy Problems ……………………………………………… 4-58
4.2.5 Scan problems ……………………………………………… 4-62
4.2.6 Other errors ………………………………………………… 4-64

chapter 5 System Diagram
5.1 Block Diagram …………………………………………………… 5-1
5.2 Connection Diagram……………………………………………… 5-2
chapter 6 Reference Information
6.1 Tool for Troubleshooting ………………………………………… 6-1
6.2 Acronyms and Abbreviations …………………………………… 6-2
6.2.1 Acronyms …………………………………………………… 6-2
6.2.2 Service Parts ………………………………………………… 6-4
Contents
6.3 A4 ISO 19798 Standard Pattern ………………………………… 6-8
6.3.1 A4 ISO 19752 Standard Pattern …………………………… 6-8
6.4 Selecting a location ……………………………………………… 6-9
attached Exploded Views & Parts List
Precautions
1. Precautions
In order to prevent accidents and damages to the equipment please read the precautions listed below
carefully before servicing the product and follow them closely.
1.1 Safety warning
(1) Only to be serviced by a factory trained service technician.
High voltages and lasers inside this product are dangerous. This product should only be serviced by a
factory trained service technician.
(2) Use only Samsung replacement parts.
There are no user serviceable parts inside the product. Do not make any unauthorized changes or
additions to the product as these could cause the product to malfunctions and create an electric shocks
or re hazards.
(3) Laser Safety Statement
The product is certied in the U.S. to conform to the requirements of DHHS 21 CFR, chapter 1
Subchapter J for Class 1(1) laser products, and elsewhere, it is certied as a Class I laser product conforming to the requirements of IEC 825. Class I laser products are not considered to be hazardous. The
laser system and product are designed so there is never any human access to laser radiation above a
Class I level during normal operation, user maintenance, or prescribed service condition.
Warning >> Never operate or service the product with the protective cover removed from Laser/Scanner
assembly. The reected beam, although invisible, can damage your eyes.
When using this product, these basic safety pre-cautions should always be followed to reduce
risk of re, electric shock, and personal injury.
Service Manual
1-1
Samsung Electronics

Precautions
Service Manual
1-2
Samsung Electronics
1.2 Caution for safety
1.2.1 Toxic material
This product contains toxic materials that could cause illness if ingested.
(1) If the LCD control panel is damaged, it is possible for the liquid inside to leak. This liquid is toxic.
Contact with the skin should be avoided. Wash any splashes from eyes or skin immediately and contact
your doctor. If the liquid gets into the mouth or is swallowed, see a doctor immediately.
(2) Please keep imaging unit and toner cartridge away from children. The toner powder contained in the
imaging unit and toner cartridge may be harmful, and if swallowed, you should contact a doctor.
1.2.2 Electric shock and re safety precautions
Failure to follow the following instructions could cause electric shock or potentially cause a re.
(1) Use only the correct voltage, failure to do so could damage the product and potentially cause a re or
electric shock.
(2) Use only the power cable supplied with the product. Use of an incorrectly specied cable could cause the
cable to overheat and potentially cause a re.
(3) Do not overload the power socket, this could lead to overheating of the cables inside the wall and could
lead to a re, and/or cause your ceiling or lamp lights to icker.
(4) Do not allow water or other liquids to spill into the product, this can cause electric shock. Do not allow
paper clips, pins or other foreign objects to fall into the product, these could cause a short circuit leading
to an electric shock or re hazard.
(5) Never touch the plugs on either end of the power cable with wet hands, this can cause electric shock.
When servicing the product, remove the power plug from the wall socket.
(6) Use caution when inserting or removing the power connector. When removing the power connector, grip it
rmly and pull. The power connector must be inserted completely, otherwise a poor contact could cause
overheating possibly leading to a re.
(7) Take care of the power cable. Do not allow it to become twisted, bent sharply around corners or wise
damaged. Do not place objects on top of the power cable. If the power cable is damaged it could overheat
and cause a re. Exposed cables could cause an electric shock. Replace the damaged power cable
immediately, do not reuse or repair the damaged cable. Some chemicals can attack the coating on the
power cable, weakening the cover or exposing cables causing re and shock risks.
(8) Ensure that the power sockets and plugs are not cracked or broken in any way. Any such defects should
be repaired immediately. Take care not to cut or damage the power cable or plugs when moving the
machine.
(9) Use caution during thunder or lightning storms. Samsung recommends that this machine be disconnected
from the power source when such weather conditions are expected. Do not touch the machine or the
power cord if it is still connected to the wall socket in these weather conditions.
(10) Avoid damp or dusty areas, install the product in a clean well ventilated location. Do not position the
machine near a humidier or in front of an air conditioner. Moisture and dust built up inside the machine
can lead to overheating and cause a re or cause parts to rust.
(11) Do not position the product in direct sunlight. This will cause the temperature inside the product to rise
possibly leading to the product failing to work properly and in extreme conditions could lead to a re.
(12) Do not insert any metal objects into the machine through the ventilator fan or other part of the casing, it
could make contact with a high voltage conductor inside the machine and cause an electric shock.

Precautions
Service Manual
1-3
Samsung Electronics
1.2.3 Handling precautions
The following instructions are for your own personal safety to avoid injury and so as not to damage the
product.
(1) Ensure the product is installed on a level surface, capable of supporting its weight. Failure to do so could
cause copy quality problems, and/or the product to tip or fall.
(2) The product contains many rollers, gears and fans. Take great care to ensure that you do not catch your
ngers, hair or clothing in any of these rotating devices.
(3) Do not place any small metal objects, containers of water, chemicals or other liquids close to the product
which if spilled could get into the machine and cause damage or a shock or re hazard.
(4) Do not install the machine in areas with high dust or moisture levels, beside on open window or close to a
humidier or heater. Damage could be caused to the product in such areas.
(5) Do not place candles, burning cigarettes, etc on the product, These could cause a re.
1.2.4 Assembly / Disassembly precautions
Replace parts carefully and always use Samsung parts. Take care to note the exact location of parts and also
cable routing before dismantling any part of the machine. Ensure all parts and cables are replaced correctly.
Please carry out the following procedures before dismantling the product or replacing any parts.
(1) Check the contents of the machine memory and make a note of any user settings. These will be erased if
the main board or network card is replaced.
(2) Ensure that power is disconnected before servicing or replacing any electrical parts.
(3) Disconnect interface cables and power cables.
(4) Only use approved spare parts. Ensure that part number, product name, any voltage, current or
temperature rating are correct.
(5) When removing or re-tting any parts do not use excessive force, especially when tting screws into
plastic.
(6) Take care not to drop any small parts into the machine.
(7) Handling of the OPC Drum
— The OPC Drum can be irreparably damaged if it exposed to light.
Take care not to expose the OPC Drum either to direct sunlight or to uorescent or incandescent room
lighting. Exposure for as little as 5 minutes can damage the surface of the photoconductive properties
and will result in print quality degradation. Take extra care when servicing the product. Remove the OPC
Drum and store it in a black bag or other lightproof container. Take care when working with the Covers
(especially the top cover) open as light is admitted to the OPC area and can damage the OPC Drum.
— Take care not to scratch the green surface of OPC Drum Unit.
If the green surface of the Drum Cartridge is scratched or touched the print quality will be compromised.

Precautions
Service Manual
1-4
Samsung Electronics
1.2.5 Disregarding this warning may cause bodily injury
(1) Be careful with the high temperature part.
The fuser unit works at a high temperature. Use caution when working on the printer. Wait for the fuser to
cool down before disassembly.
(2) Do not put nger or hair into the rotating parts.
When operating a printer, do not put hand or hair into the rotating parts (Paper feeding entrance, motor,
fan, etc.). If done, you can get harmed.
(3) When you move the printer.
This printer weighs 4.72kg (10.41 lbs) including toner cartridge and cassette. Use safe lifting and handling
techniques. Use the lifting handles located on each side of the machine. Back injury could be caused if
you do not lift carefully.
(4) Ensure the printer is installed safely.
The printer weighs 4.72kg (10.41 lbs), ensure the printer is installed on a level surface, capable of
supporting its weight. Failure to do so could cause the printer to tip or fall possibly causing personal injury
or damaging the printer.
(5) Do not install the printer on a sloping or unstable surface. After installation, double check that the printer
is stable.

Precautions
Service Manual
1-5
Samsung Electronics
1.3 ESD precautions
Certain semiconductor devices can be easily damaged by static electricity. Such components are commonly
called “Electrostatically Sensitive (ES) Devices” or ESDs. Examples of typical ESDs are: integrated
circuits,some eld effect transistors, and semiconductor “chip” components.
The techniques outlined below should be followed to help reduce the incidence of component damage
caused by static electricity.
Caution >>Be sure no power is applied to the chassis or circuit, and observe all other safety precautions.
1. Immediately before handling a semiconductor component or semiconductor-equipped assembly, drain
off any electrostatic charge on your body by touching a known earth ground. Alternatively, employ a
commercially available wrist strap device, which should be removed for your personal safety reasons prior
to applying power to the unit under test.
2. After removing an electrical assembly equipped with ESDs, place the assembly on a conductive surface,
such as aluminum or copper foil, or conductive foam, to prevent electrostatic charge buildup in the vicinity
of the assembly.
3. Use only a grounded tip soldering iron to solder or desolder ESDs.
4. Use only an “anti-static” solder removal device. Some solder removal devices not classied as “anti-static”
can generate electrical charges sufcient to damage ESDs.
5. Do not use Freon-propelled chemicals. When sprayed, these can generate electrical charges sufcient to
damage ESDs.
6. Do not remove a replacement ESD from its protective packaging until immediately before installing it.
Most replacement ESDs are packaged with all leads shorted together by conductive foam, aluminum foil,
or a comparable conductive material.
7. Immediately before removing the protective shorting material from the leads of a replacement ESD, touch
the protective material to the chassis or circuit assembly into which the device will be installed.
8. Maintain continuous electrical contact between the ESD and the assembly into which it will be installed,
until completely plugged or soldered into the circuit.
9. Minimize bodily motions when handling unpackaged replacement ESDs. Normal motions, such as
the brushing together of clothing fabric and lifting one’s foot from a carpeted oor, can generate static
electricity sufcient to damage an ESD.
Product spec and feature
2. Product spec and feature
2.1 Product Specications
2.1.1 Product Overview
1. Print / Copy Speed
• 17 ppm in letter
2. Processor
• Jupiter5 375 Mhz
3. Printer Language Emulations
• SPL, PCL5e
SCX-3200/3205
SCX-3205W
4. Memory
• 32 MB (SCX-3200/3205)
• 128 MB (SCX-3205W)
5. Interfaces
• One USB port
• One 10/100 Base TX network connector (SCX-3205W)
• One 802.11b/g/n wireless module (SCX-3205W)
6. Toner cartridge
• Initial : 700 pages
• Sales : 1,500 pages
7. Machine life
• 30,000 sheets or 3 years (whichever comes rst)
Service Manual
2-1
Samsung Electronics
Product spec and feature
Service Manual
2-2
Samsung Electronics
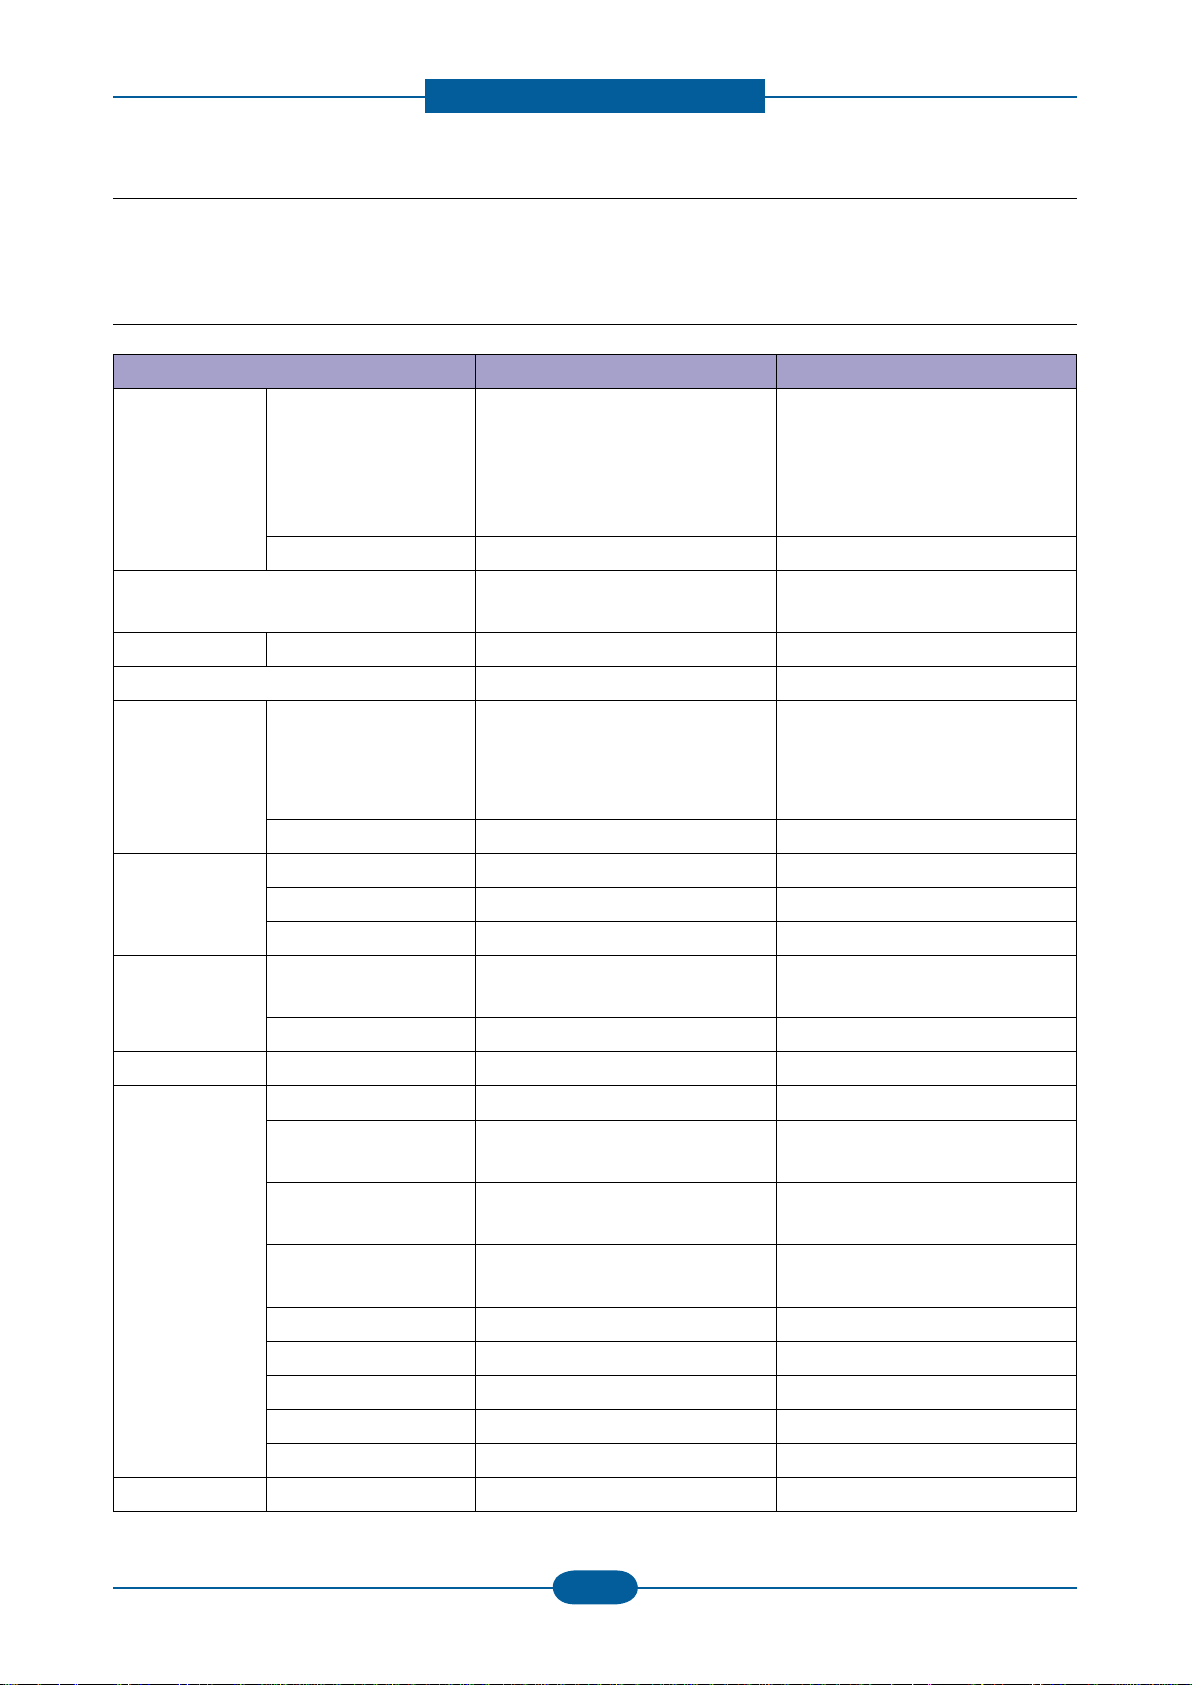
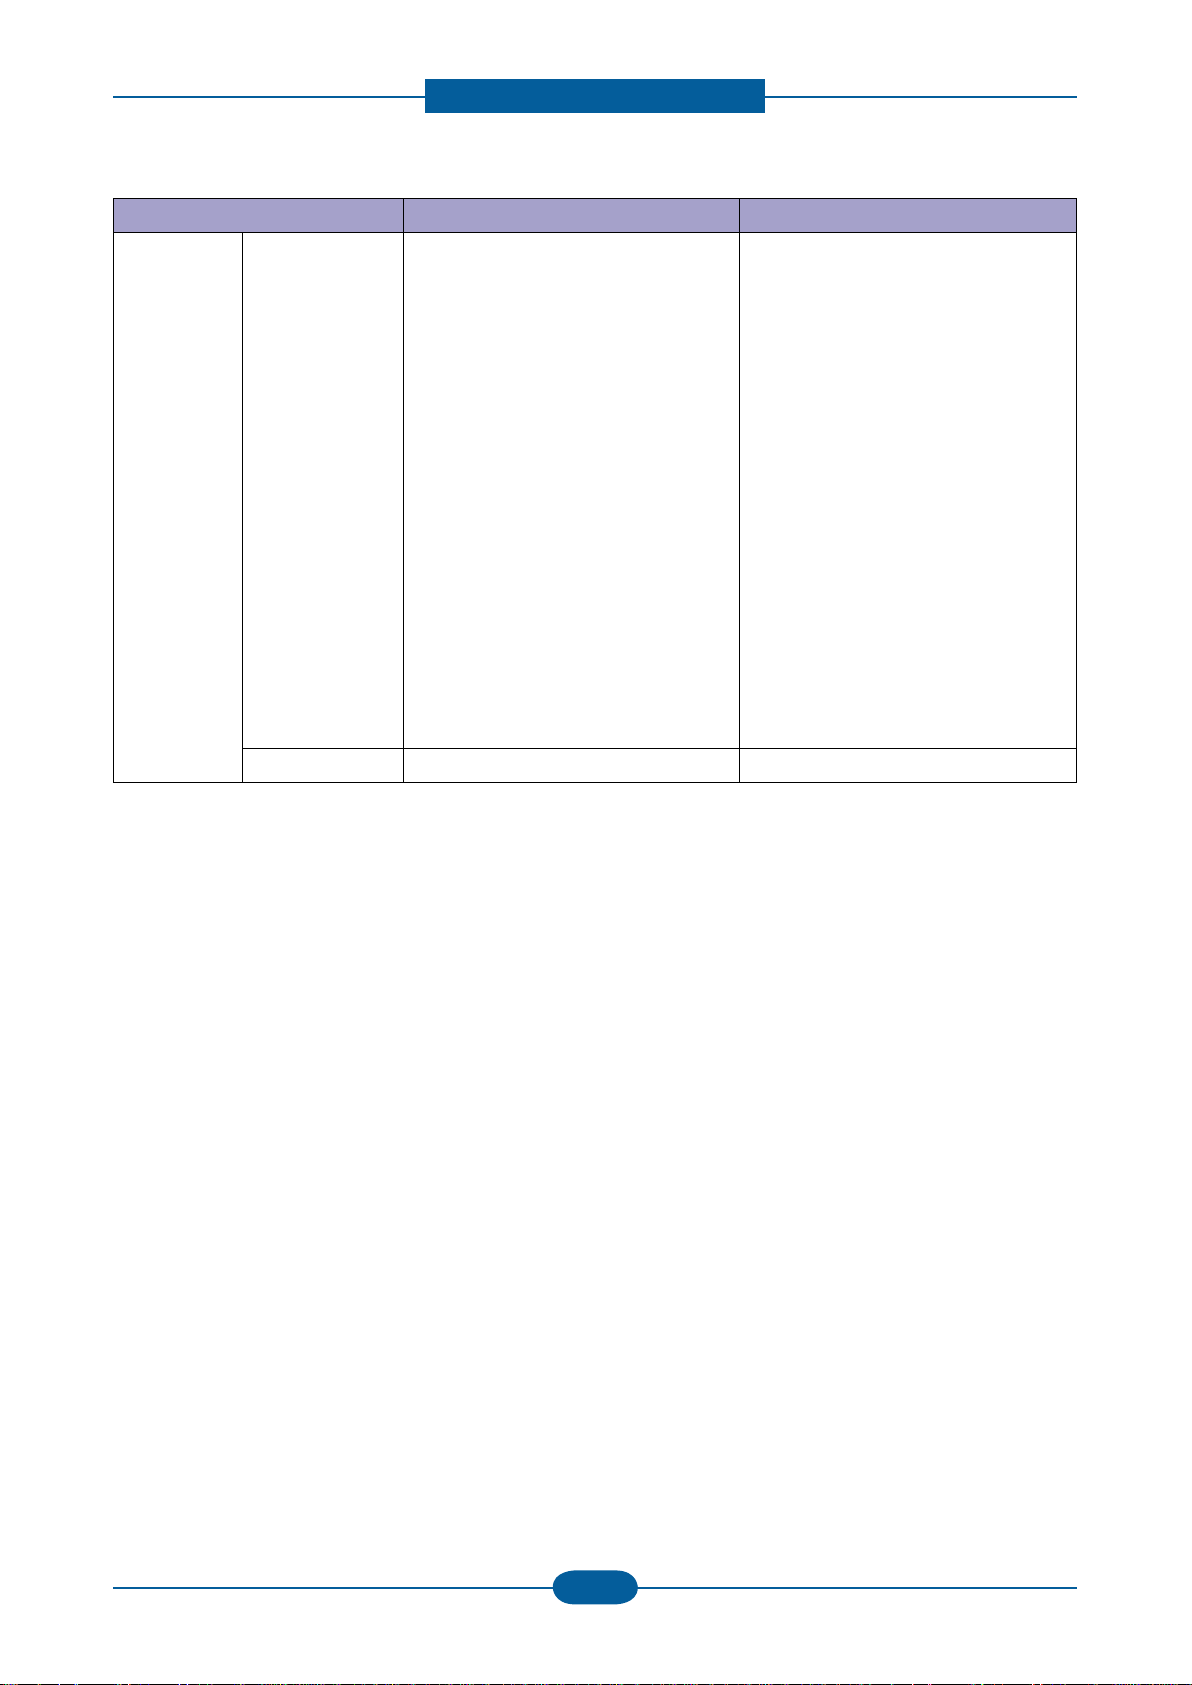
2.1.2 Specications
• Product Specications are subject to change without notice. See below for product specications.
2.1.2.1 General Specication
Items SCX-3200/3205 SCX-3205W
Major Functions Standard — Copy
— Scan
Option — —
— Copy
— Print & N/W Print
— Scan
— Wireless LAN
— DLNA
Dimension (WxDxH) 15.28 x 11.77 x 9.21 inches
(388 x 299 x 234 mm)
Weight with Package 7.5 Kg (16.63 lbs) 7.5 Kg (16.63 lbs)
LCD 7-Segment(2-Digit) 7-Segment(2-Digit)
I/O Interface Standard Hi-Speed USB 2.0 Hi-Speed USB 2.0,
Option — —
Power
Consumption
Noise (Sound
Pressure)
Warm Up Time from Sleep Start Less than 15 sec Less than 15 sec
Machine Life Monthly Duty Cycle 5,000 pages 5,000 pages
Avg operation Less than 270 W Less than 270 W
Sleep Mode Less than 3.8 W Less than 5.6 W
Standby Mode Less than 36 W Less than 36 W
Operating Printing : 49dBA
Copying : 49dBA
Standby Less than 26 dBA Less than 26 dBA
Average Monthly Print
Volume
101 pages 101 pages
15.28 x 11.77 x 9.21 inches
(388 x 299 x 234 mm)
Ethernet 10/100 Base TX
(Embedded type)
Wireless LAN 802.11 b/g/n
Printing : 49dBA
Copying : 49dBA
Average Monthly Scan
Volume
Machine Life Engine :30,000 sheets or 3 years
ADF Feed Roller — ADF Rubber Pad — —
Pick-up Roller 30,000 pages 30,000 pages
Transfer Roller 30,000 pages 30,000 pages
Fuser Unit 30,000 pages 30,000 pages
CPU 375 MHz 375 MHz
— —
(whichever comes rst)
Engine :30,000 sheets or 3 years
(whichever comes rst)
Product spec and feature
Service Manual
2-3
Samsung Electronics
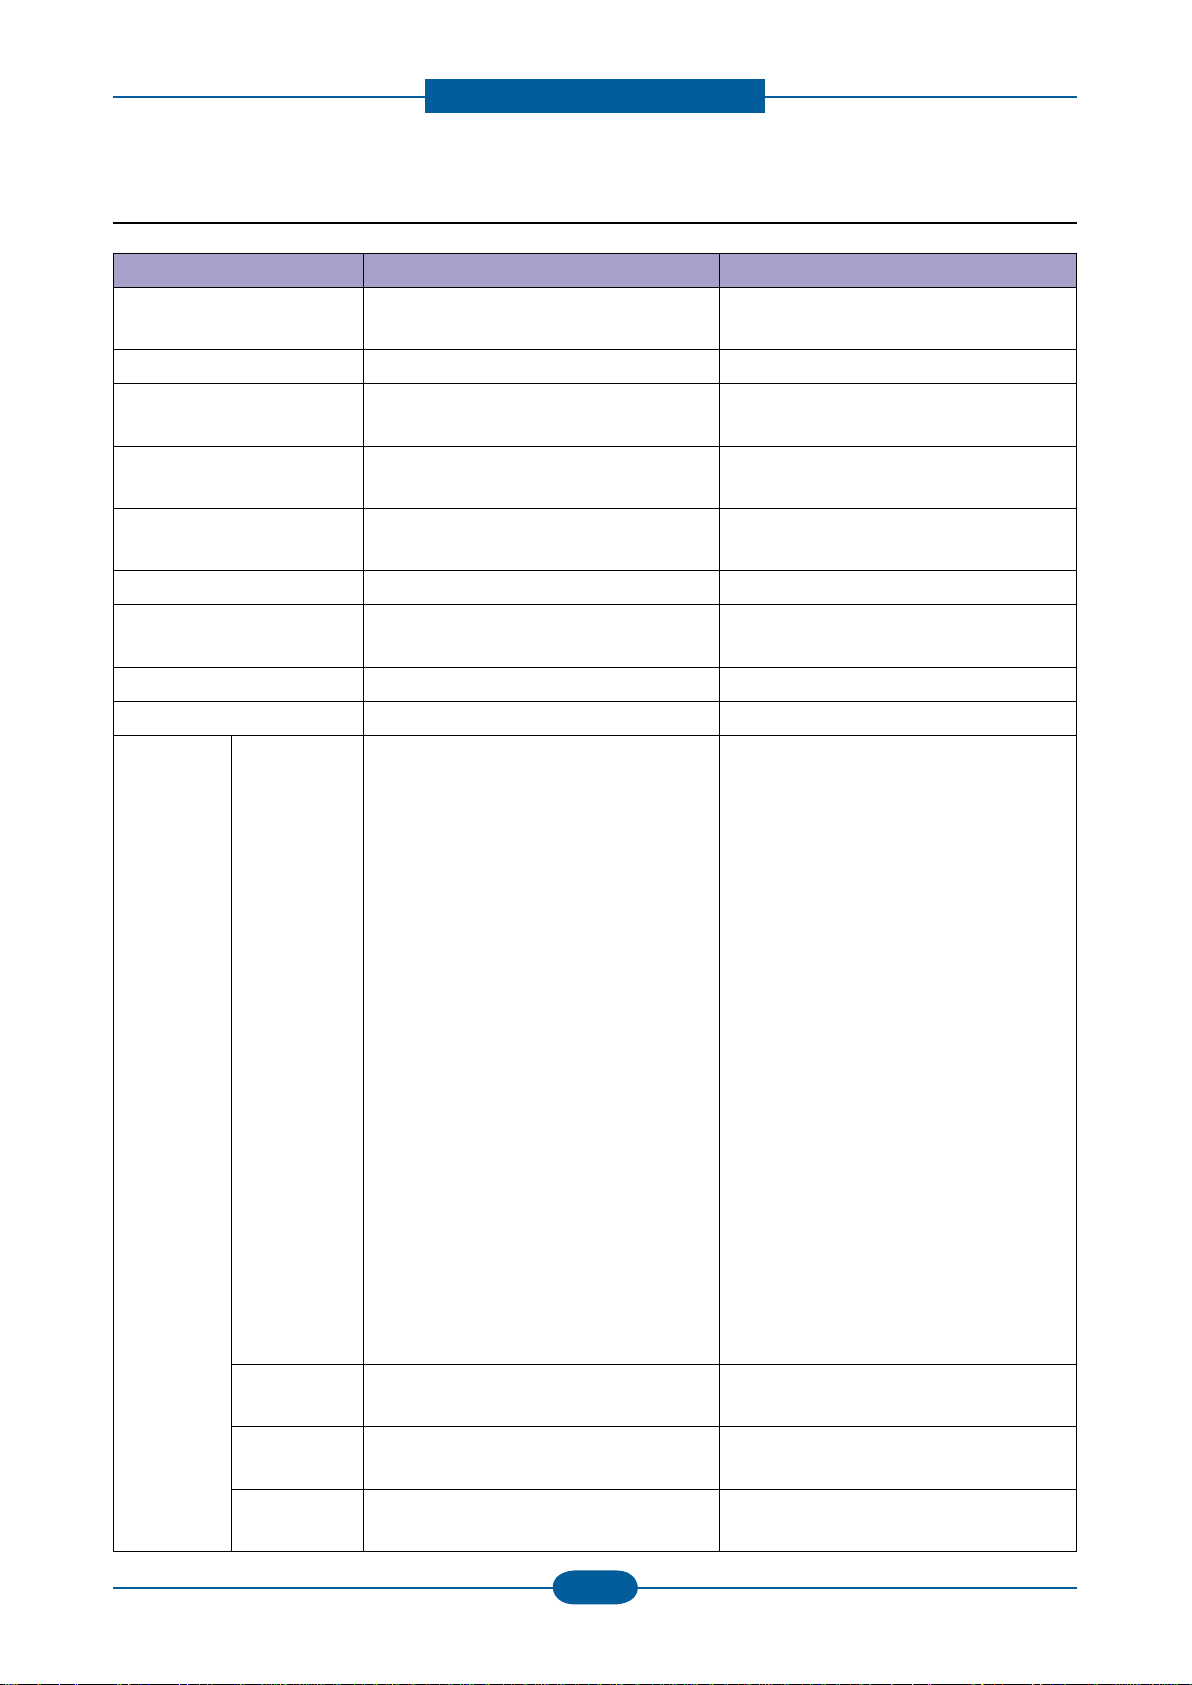
2.1.2.2 Print Specication
Items SCX-3200/3205 SCX-3205W
Print Speed Up to 16 ppm in A4
Up to 16 ppm in A4 (17 ppm in Letter)
(17 ppm in Letter)
Print Language (Emulation) SPL, PCL5e SPL, PCL5e
Power Save Yes (1, 5, 10, 15, 20, 30, 45, 60, 120
minutes)
Power rating 110 ~ 127 VAC(-10%-6%), 50/60Hz, 4.0A
220 ~ 240 VAC(-10%-6%), 50/60Hz, 2.0A
Resolution Up to 1200 dpi Effective Output
(Addressable 1200 x 1200 dpi)
Yes (1, 5, 10, 15, 20, 30, 45, 60, 120
minutes)
110 ~ 127 VAC(-10%-6%), 50/60Hz, 4.0A
220 ~ 240 VAC(-10%-6%), 50/60Hz, 2.0A
Up to 1200 dpi Effective Output
(Addressable 1200 x 1200 dpi)
Memory 32 MB 128 MB
FPOT Less than 10 sec (from Ready mode)
Less than 30 sec (from Sleep mode)
Less than 10 sec (from Ready mode)
Less than 30sec (from Sleep mode)
Duplex Print
Halftone(Gray Scale) 256 Levels 256 Levels
N/W Print Compatibility — Windows 2000/
XP(32/64bit)/2003(32/64bit)/
Vista(32/64bit)/2008(32/64bit)/
in7(32/64bit)/
2008R2(64bit)
Various Linux OS:
— RedHat Enterprise Linux WS 4, 5
(32/64bit)
— Fedora Core 2~9 (32/64bit)
— Mandriva 2005, 2006, 2007,
2008(32/64bit)
— openSuSE 9.1, 9.2, 9.3, 10.0, 10.1,
10.2, 10.3, 11.0 (32bit)
— SuSE Linux Enterprise Desktop 9, 10
(32/64bit)
— Ubuntu 6.04, 6.10, 7.04, 7.10, 8.04
(32/64bit)
— Debian 3.1, 4.0 (32/64bit)
Mac OS 10.3~10.6
Unix AT&T system V(Rel 4.2), BSD4.3,
HP-UX (Rel 9.x & Rel 10.x), SCO 5.x,
SUNOS 5.5, Sparc or Solaris 2.5
Printing
Protocols
Novell N/W
Print Service
Device
Discovery
— TCP/IPv4/IPv6, HTTP, SNMPv1/v2c/v3,
LDAP, SMTP, Ethertalk
— Netware 5.x, 6.x (TCP/IP Only)
— Rendezvous(Bonjour), SLP, UPnP

Product spec and feature
Service Manual
2-4
Samsung Electronics
2.1.2.3 Scan Specication
Items SCX-3200/3205 SCX-3205W
Scan Method Color CIS Color CIS
Scan Speed Linearity,
Halftone
Gray 25 sec (at Pc scan : P4-2.4GHz,
Color 40 sec (at Pc scan : P4-2.4GHz,
Resolution Optical 1200 x 1200 dpi (Color@Platen), 600
15 sec (at Pc scan : P4-2.4GHz,
512MB, USB2.0, 300dpi, Letter)
512MB, USB2.0, 300dpi, Letter)
512MB, USB2.0, 300dpi, Letter)
x 600 dpi (B/W@Platen)
15 sec (at Pc scan : P4-2.4GHz,
512MB, USB2.0, 300dpi, Letter)
25 sec (at Pc scan : P4-2.4GHz,
512MB, USB2.0, 300dpi, Letter)
40 sec (at Pc scan : P4-2.4GHz,
512MB, USB2.0, 300dpi, Letter)
1200 x 1200 dpi (Color@Platen), 600
x 600 dpi (B/W@Platen)
Enhanced 4800 x 4800 dpi 4800 x 4800 dpi
Halftone 256 levels 256 levels
Scan Size Max. Document
Max. 216 mm (8.5”) Max. 216 mm (8.5”)
Width
Efective Scan
Max. 208 mm (8.2”) Max. 208 mm (8.2”)
Width
Scan Depth Color Internal: 30 bit, External : 24 bit Internal: 30 bit, External : 24 bit
Mono — 1bit for Lineart & Halftone
— 8bits for Gray scale
— 1bit for Lineart & Halftone
— 8bits for Gray scale
Scan to Application Yes Yes
USB No No
Email No No
SMB No No
FTP No No
HTTP(S) No No
Scan Manager Yes Yes
Network Scan No Yes
Product spec and feature
Service Manual
2-5
Samsung Electronics
Items SCX-3200/3205 SCX-3205W
Compatibility PC Scan Windows 2000/
XP(32/64bit)/2003(32/64bit)/
Vista(32/64bit)/2008(32/64bit)/
Win7(32/64bit)/2008R2(64bit)
Various Linux OS:
— RedHat Enterprise Linux WS 4, 5
(32/64bit)
— Fedora Core 2~9 (32/64bit)
— Mandriva 2005, 2006, 2007,
2008(32/64bit)
— openSuSE 9.1, 9.2, 9.3, 10.0, 10.1,
10.2, 10.3, 11.0 (32bit)
— SuSE Linux Enterprise Desktop
9, 10 (32/64bit)
— Ubuntu 6.04, 6.10, 7.04, 7.10, 8.04
(32/64bit)
— Debian 3.1, 4.0 (32/64bit)
Mac OS 10.3~10.6
Network Scan None None
Windows 2000/
XP(32/64bit)/2003(32/64bit)/
Vista(32/64bit)/2008(32/64bit)/
Win7(32/64bit)/2008R2(64bit)
Various Linux OS:
— RedHat Enterprise Linux WS 4, 5
(32/64bit)
— Fedora Core 2~9 (32/64bit)
— Mandriva 2005, 2006, 2007,
2008(32/64bit)
— openSuSE 9.1, 9.2, 9.3, 10.0, 10.1,
10.2, 10.3, 11.0 (32bit)
— SuSE Linux Enterprise Desktop
9, 10 (32/64bit)
— Ubuntu 6.04, 6.10, 7.04, 7.10, 8.04
(32/64bit)
— Debian 3.1, 4.0 (32/64bit)
Mac OS 10.3~10.6

Product spec and feature
Service Manual
2-6
Samsung Electronics
2.1.2.4 Copy Specication
Items SCX-3200/3205 SCX-3205W
Copy Speed Simplex Copy
Speed
@SDMP, Text: Up to 16 cpm (A4) /
17ppm (Ltr)
Up to 12 cpm (A4)
(For Austria, Belgium, Germany, Spain)
FCOT Less than 15 seconds Less than 15 seconds
Multi Copy 1~99 1~99
Duplex N/A N/A
@SDMP, Text: Up to 16 cpm (A4) /
17ppm (Ltr)
Up to 12 cpm (A4)
(For Austria, Belgium, Germany, Spain)
Original Type Text Scan: 600x600dpi(Optical 600x300dpi),
Printing : 600x600dpi
Text/Photo Scan: 600x600dpi(Optical 600x300dpi),
Printing : 600x600dpi
Photo Scan: 1200x1200dpi(Optical
600x600dpi), Printing : 1200x1200dpi
Automatic Background
Off, Auto Off, Auto
Scan: 600x600dpi(Optical 600x300dpi),
Printing : 600x600dpi
Scan: 600x600dpi(Optical 600x300dpi),
Printing : 600x600dpi
Scan: 1200x1200dpi(Optical
600x600dpi), Printing : 1200x1200dpi
Suppression
Darkness Control 5 Level 5 Level
Collation Copy No No
Special Copy ID Card Copy Yes Yes
Margin Shift No No
Book Copy No No
Covers No No
Transparencies No No
Create Booklet No No
N-up copy No No
Clone No No
Poster No No
Product spec and feature
Service Manual
2-7
Samsung Electronics
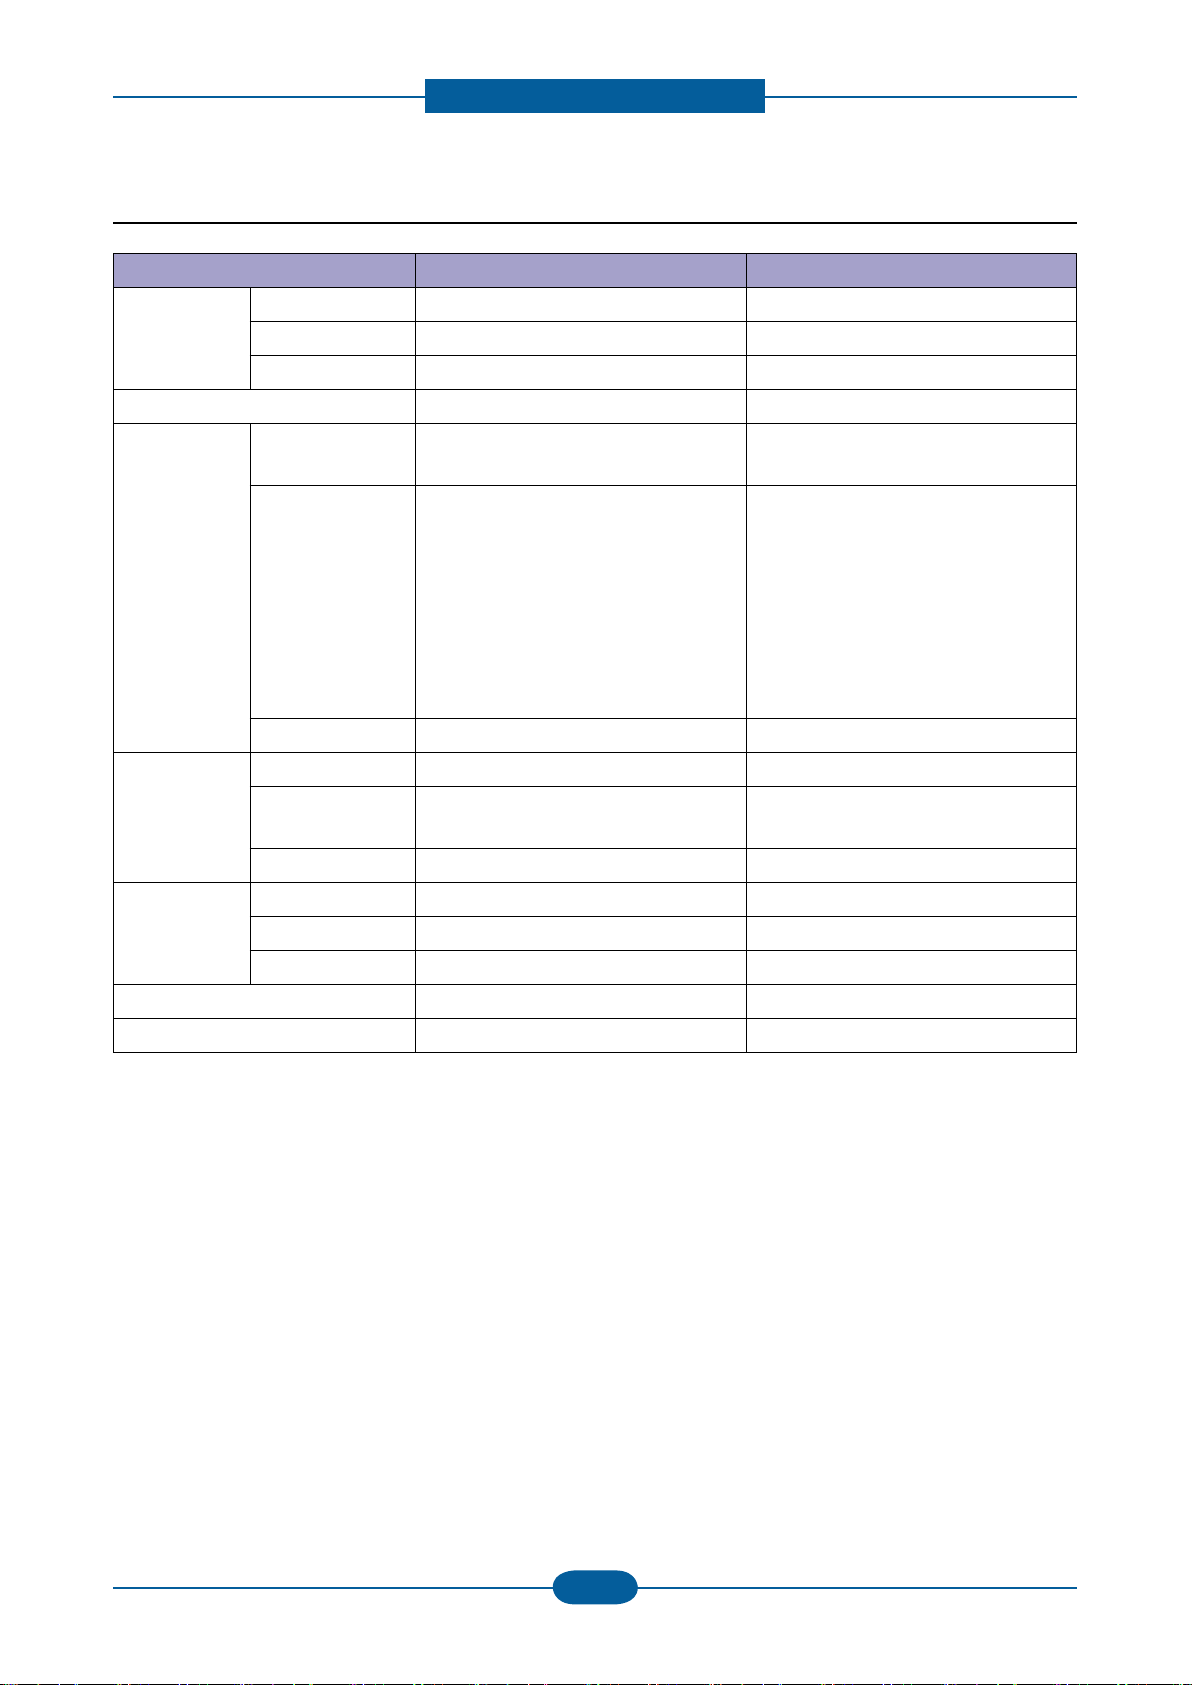
2.1.2.5 Paper Handling
Items SCX-3200/3205 SCX-3205W
Input Capacity Main Tray 150-sheet Cassette @ 80g/㎡ 150-sheet Cassette @ 80g/㎡
Manual Tray 1 sheet @ 80g/㎡ 1 sheet @ 80g/㎡
Optional Cassette No No
Output Capacity 50 sheets @ 80g/㎡ face down 50 sheets @ 80g/㎡ face down
Media Size Main Tray A4, A5, Letter, Legal, Executive,
Folio,ISO B5, JIS B5, Custom
Manual Tray A4, A5, Letter, Legal, Executive,
Ofcio, Folio, ISO B5, JIS B5
Envelope Monarch, No.9, No.10, DL,
C5
Minimum Size (Custom) : 76x183mm
(3×7.2inch)
Maximum Size (Custom): 216x356mm
(8.5x14inch)
A4, A5, Letter, Legal, Executive,
Folio,ISO B5, JIS B5, Custom
A4, A5, Letter, Legal, Executive,
Ofcio, Folio, ISO B5, JIS B5
Envelope Monarch, No.9, No.10, DL,
C5
Minimum Size (Custom) : 76x183mm
(3×7.2inch)
Maximum Size (Custom): 216x356mm
(8.5x14inch)
Duplex NA NA
Media Type Main Tray Plain ,Thick, Thin, Recycled, Archive Plain ,Thick, Thin, Recycled, Archive
Manual Tray Plain Paper, Transparency, Envelope,
Labels, Card stock
Plain Paper, Transparency, Envelope,
Labels, Card stock
Duplex NA NA
Media Weight Main Tray 16~32lb (60 to 120g/㎡) 16~32lb (60 to 120g/㎡)
Manual Tray 16~43 lb (60 to 163g/㎡) 16~43 lb (60 to 163g/㎡)
Duplex NA NA
ADF Capacity — ADF Document Size — —
Product spec and feature
Service Manual
2-8
Samsung Electronics
2.1.2.6 Software
Items SCX-3200/3205 SCX-3205W
OS Windows 2000/XP(32/64bit)/
2003(32/64bit)/
Vista(32/64bit)/2008(32/64bit)/
Win7(32/64bit)/2008R2(64bit)
Various Linux OS:
— RedHat Enterprise Linux WS 4, 5
(32/64bit)
— Fedora 4, 5, 6, 7, 8, 9, 10, 11, 12
(32/64bit)
— SuSE Linux 10.0, 10.1 (32bit)
— OpenSuSE 10.2, 10.3, 11.0, 11.1,
11.2 (32/64bit)
— Mandriva 2005, 2006, 2007, 2008,
2009, 2009.1 (32/64bit)
— Ubuntu 5.04, 5.10, 6.06, 6.10, 7.04,
7.10, 8.04, 8.10, 9.04, 9.10 (32/64bit)
— SuSE Linux Enterprise Desktop 10,
11 (32/64bit)
— Debian 4.0, 5.0 (32/64bit)
Driver Printer SPL, PCL5e SPL, PCL5e
Windows 2000/XP(32/64bit)/
2003(32/64bit)/
Vista(32/64bit)/2008(32/64bit)/
Win7(32/64bit)/2008R2(64bit)
Various Linux OS:
— RedHat Enterprise Linux WS 4, 5
(32/64bit)
— Fedora 4, 5, 6, 7, 8, 9, 10, 11, 12
(32/64bit)
— SuSE Linux 10.0, 10.1 (32bit)
— OpenSuSE 10.2, 10.3, 11.0, 11.1,
11.2 (32/64bit)
— Mandriva 2005, 2006, 2007, 2008,
2009, 2009.1 (32/64bit)
— Ubuntu 5.04, 5.10, 6.06, 6.10, 7.04,
7.10, 8.04, 8.10, 9.04, 9.10 (32/64bit)
— SuSE Linux Enterprise Desktop 10,
11 (32/64bit)
— Debian 4.0, 5.0 (32/64bit)
TWAIN Yes Yes
WIA Yes Yes
ICDM Yes Yes
WHQL Windows XP, 2003, Vista, 2008,
Win7, 2008R2
Application
S/W
SmarThru SmarThru 4 SmarThru 4
Smart Panel Yes (Windows, Mac, Linux) Yes (Windows, Mac, Linux)
Printer Settings Utility Yes (Windows, Mac, Linux) Yes (Windows, Mac, Linux)
Network Scan No Yes
Scan Manager Yes (Windows, Mac) Yes (Windows, Mac)
PC-FAX — Direct Printing Utility No No
Network
SWAS No SyncThru Web Admin Service 5.0
Application
SetIP No Yes
Windows XP, 2003, Vista, 2008,
Win7, 2008R2
(Windows)
Product spec and feature
Service Manual
2-9
Samsung Electronics
Items SCX-3200/3205 SCX-3205W
Accessory Quick Install Guide Yes Yes
S/W CD ROM 1 CD for all driver & application 1 CD for all driver & application
Toner Cartridge 1 EA 1 EA
Power Cable 1 EA 1 EA
Telephone Jack No No
Wireless Install Guide
No Yes
Printer Cable[USB]
Only XBH/ETS/XIP/STS/XEV/XSS
model
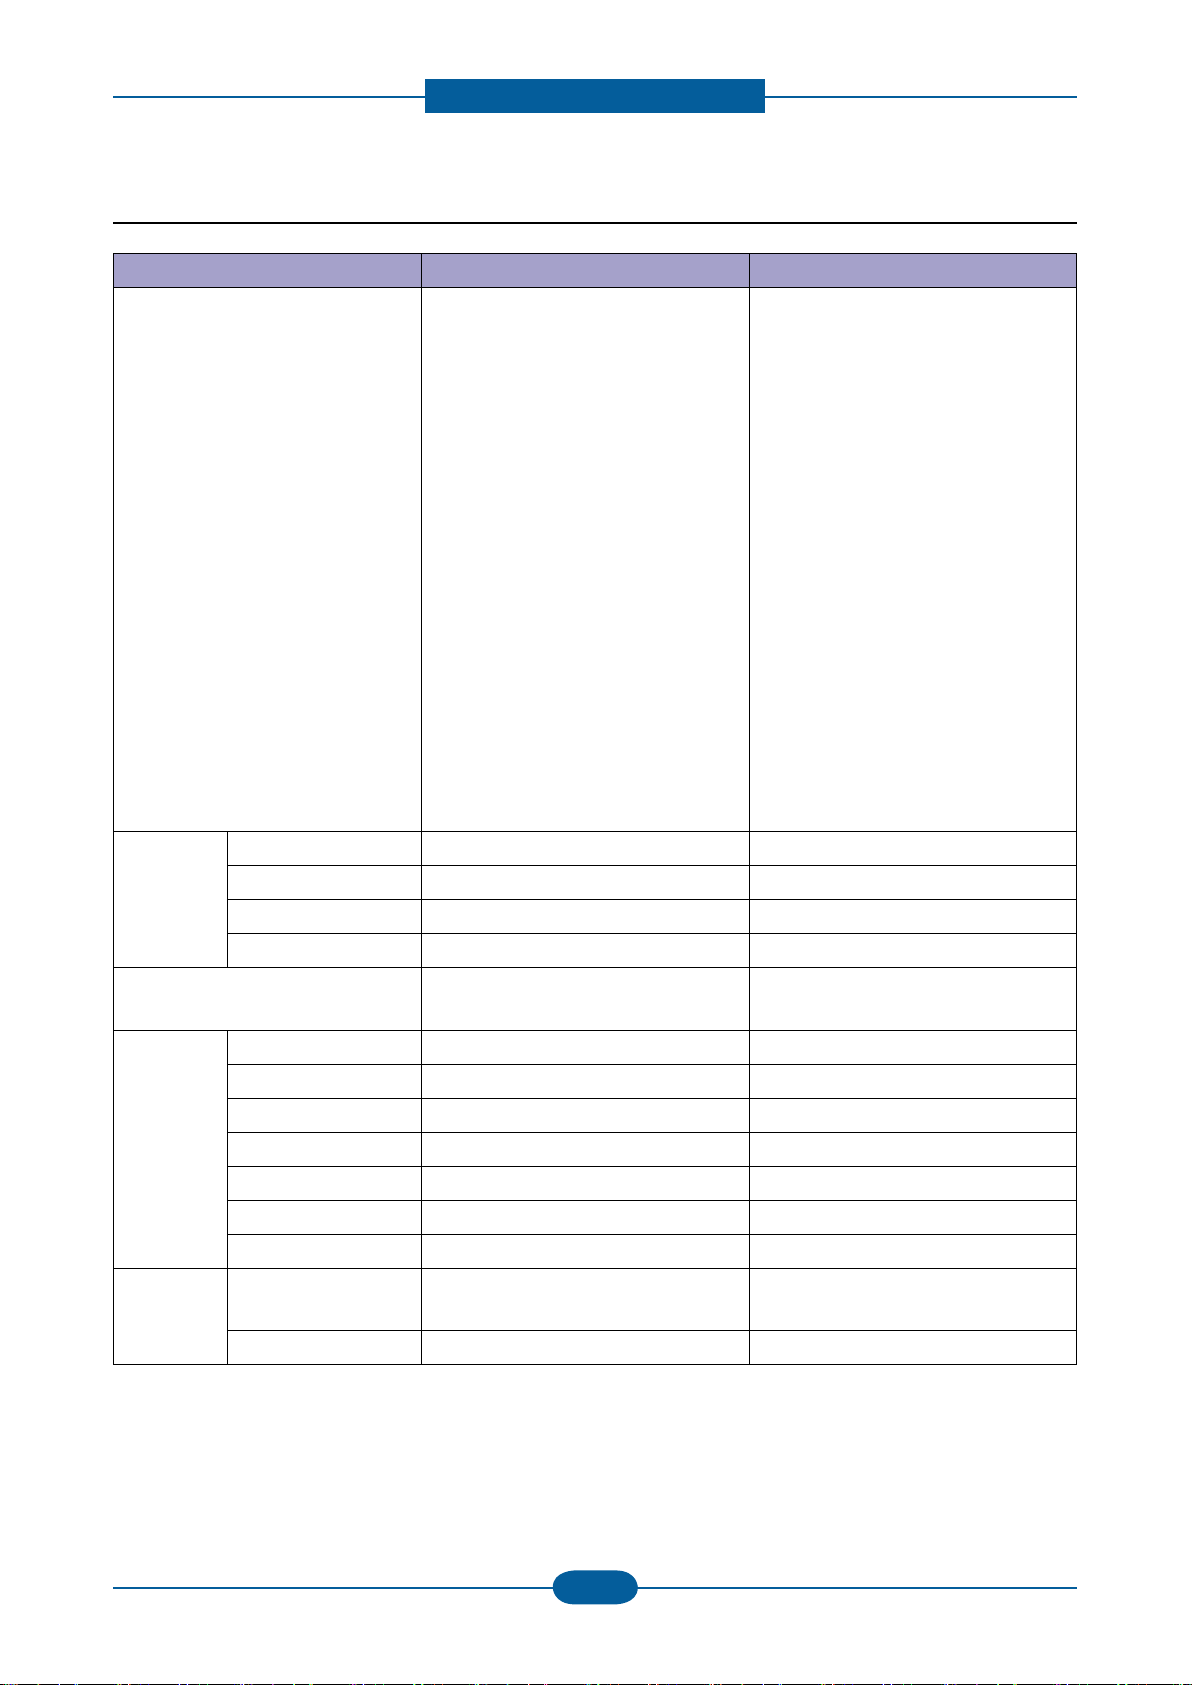
2.1.2.7 Options
Items SCX-3200/3205 SCX-3205W
Options No No
Memory No No
Paper Cassette No No
PS No No
Mechanical Counter No No
FDI No No
Downloadable Font ROM No No
2nd Fax Modem No No
Desk No No
Only XBH/ETS/XIP/STS/XEV/XSS
model
2.1.2.8 Consumables
Items SCX-3200/3205 SCX-3205W
Type 1 piece 1 piece
Model Code Toner MLT-D104S, MLT-D104L MLT-D104S, MLT-D104L
Toner Life Standard : Average Cartridge Yield
1,500 standard pages
(Ships with 700 pages Starter Toner
Cartridge)
Declared cartridge yield in
accordance with ISO/IEC 19752
Level Sensor No No
Toner Count Yes (CRUM) Yes (CRUM)
Standard : Average Cartridge Yield
1,500 standard pages
(Ships with 700 pages Starter Toner
Cartridge)
Declared cartridge yield in
accordance with ISO/IEC 19752

Product spec and feature
Service Manual
2-10
Samsung Electronics
2.1.2.9 Options
Items Specication
Memory N/A
Second Cassette N/A
Wired Network N/A
Wireless Network N/A
Hard Disk N/A
Duplex Unit N/A
Product spec and feature
Service Manual
2-11
Samsung Electronics
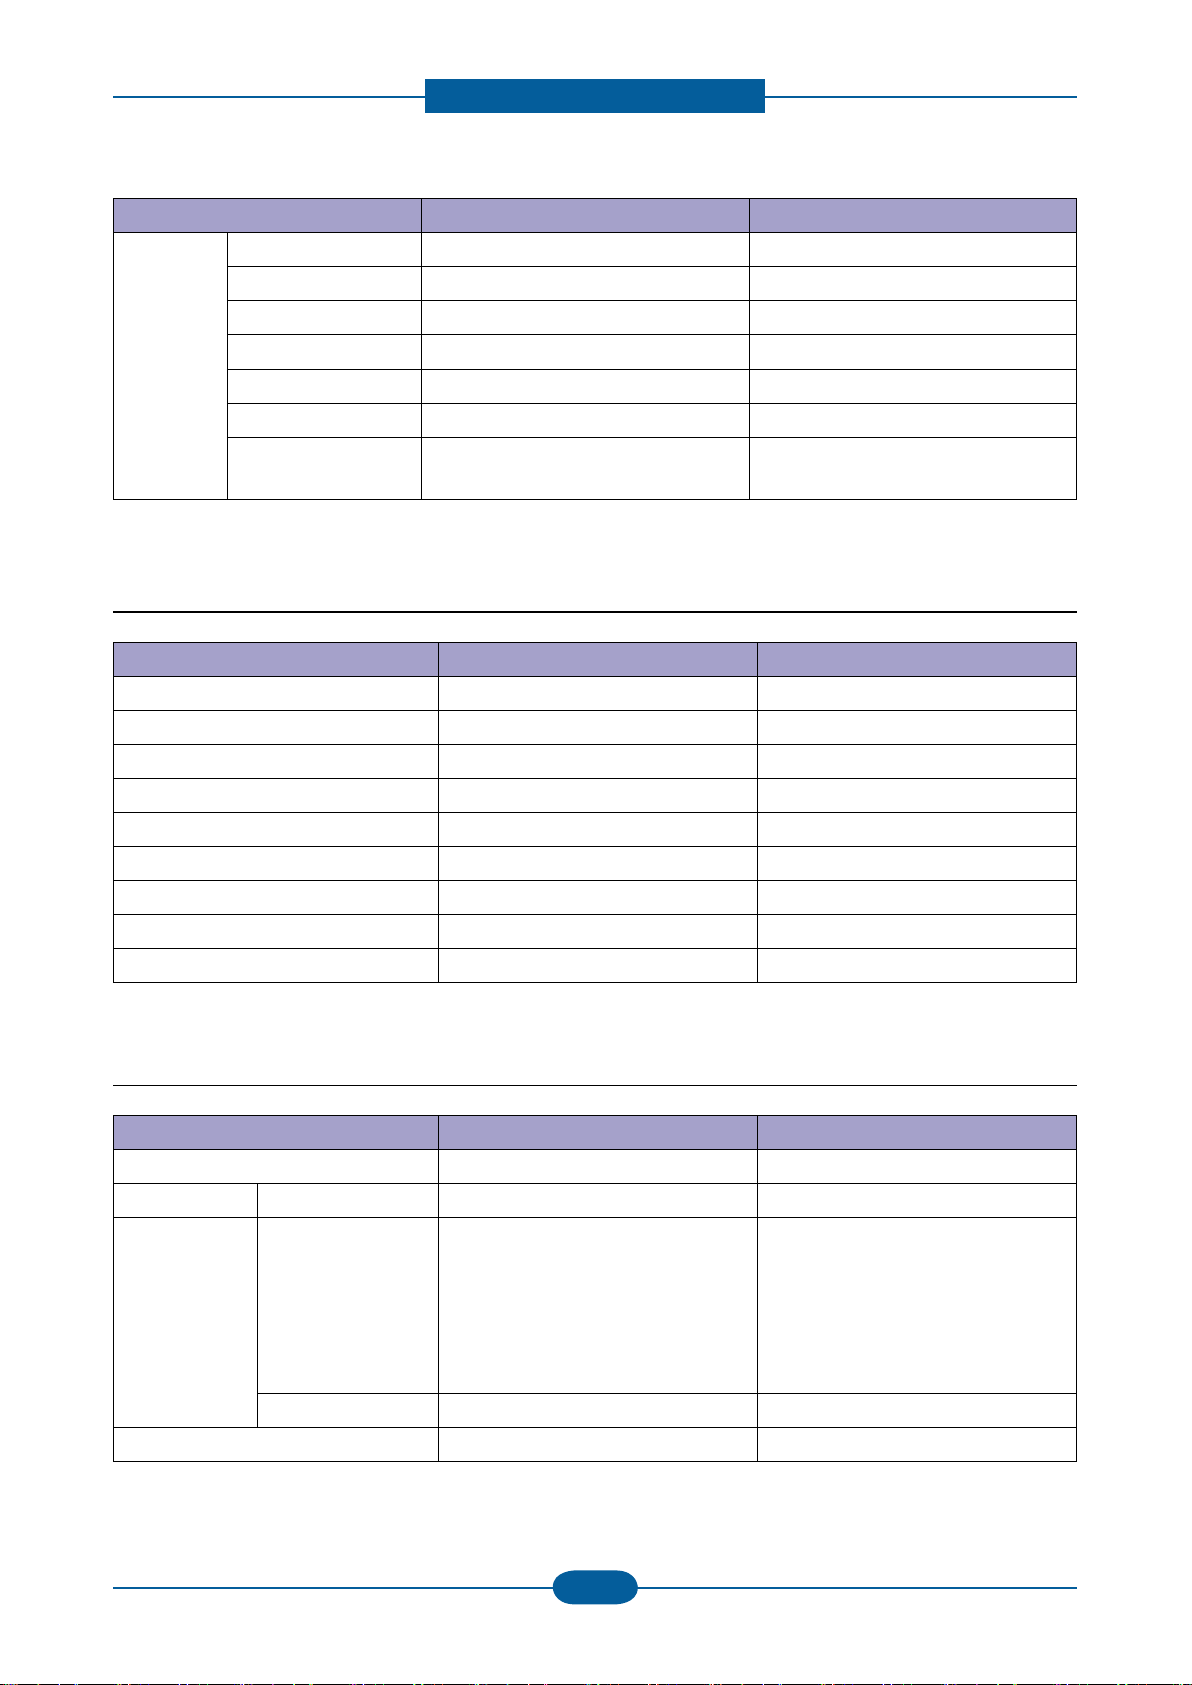
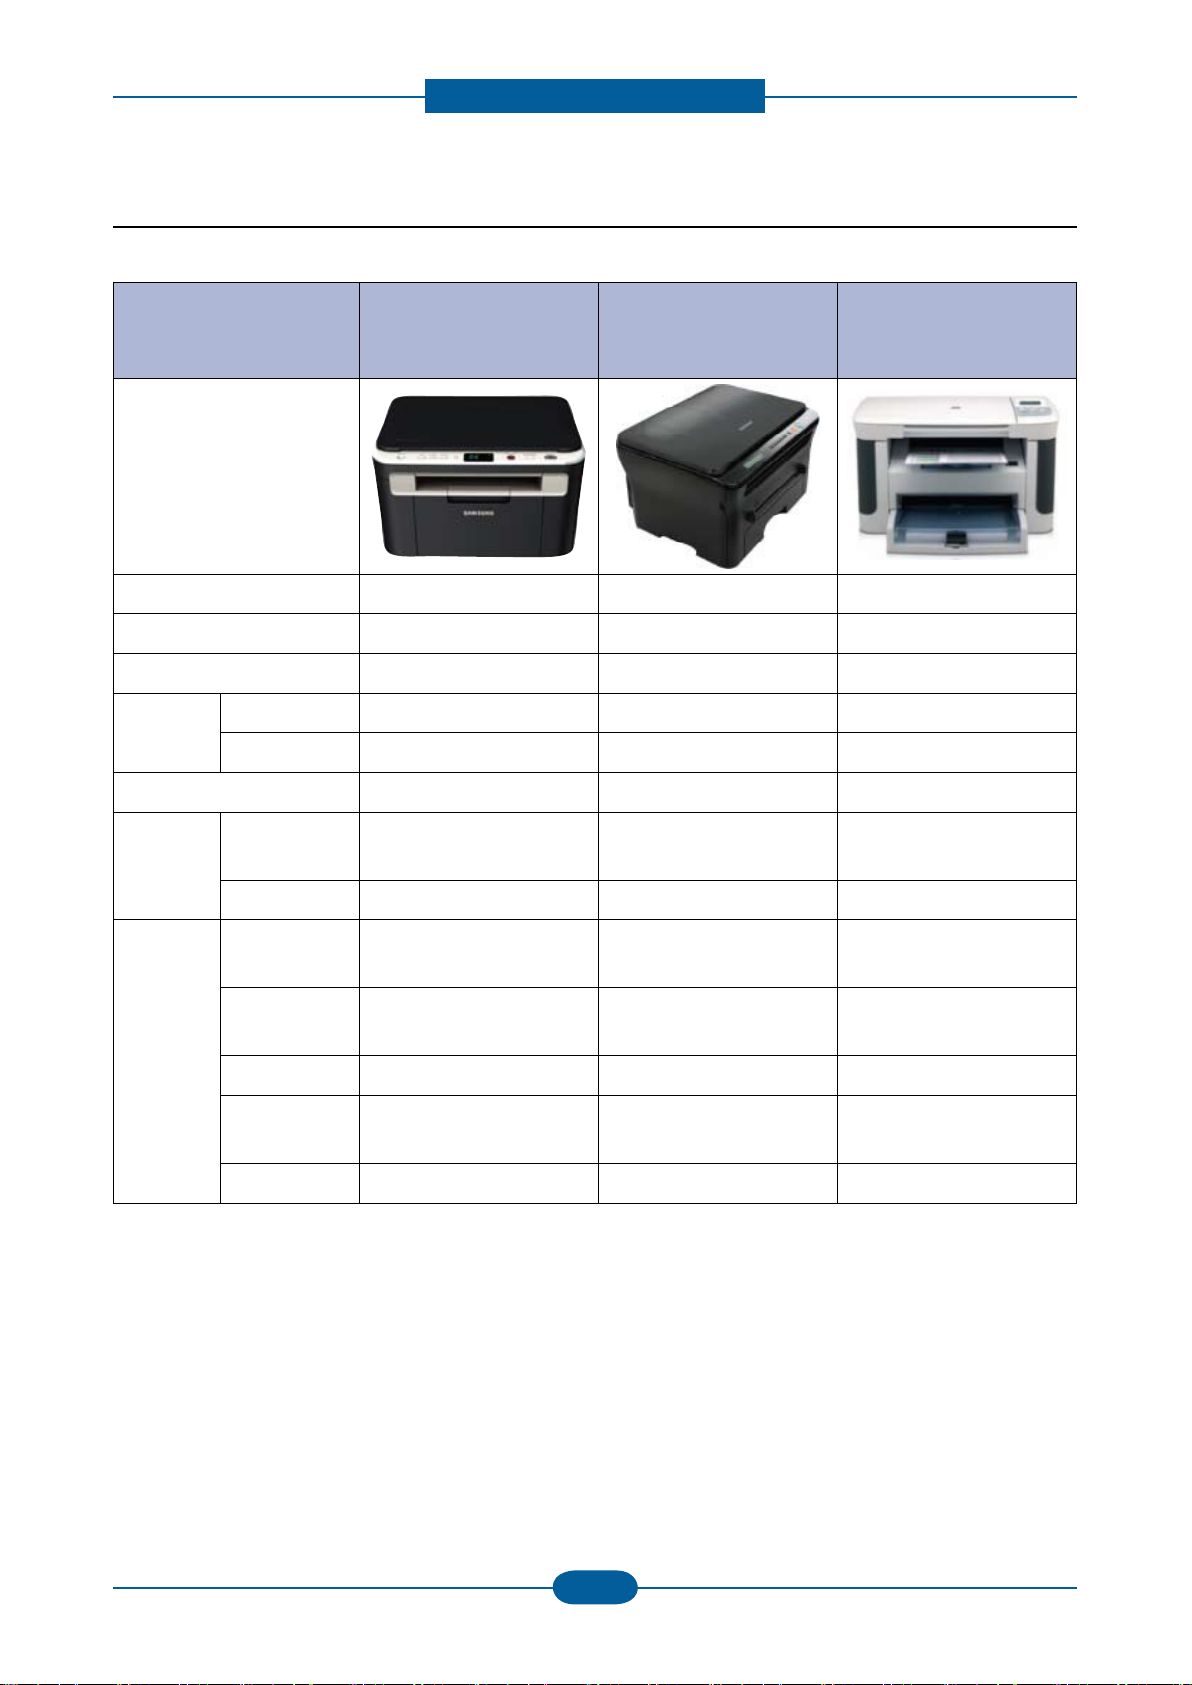
2.1.3 Model Comparison Table
Samsung
SCX-3200/3205
SCX-3205W
Image
Print speed (A4/Ltr.) 16/17ppm 18/19ppm 18/19ppm
FPOT (From ready) 10 sec 40 sec 7 sec
Resolution (Print) Up to 1,200 x 1,200 dpi Up to 600 x 600 dpi Up to 600 x 600 dpi
Resolution
(Scan)
Emulation PCL5e, SPL SPL-C GDI
Paper
Handling
Optical Up to 1,200 x 1,200 dpi Up to 600 x 2,400 dpi Up to 1200 dpi
Enhanced 4,800 x 4,800 dpi 4,800 x 4,800 dpi Up to 19,200 dpi
Input 150 sh. Bin
Output 50 sh. 50 sh. 100 sh.
Samsung
SCX-4300
250 sh. Cassette
1 MP
HP
M1120
250 sh. Bin
10 sh. MP
General
Memory
Interface
Noise level 49 dBA 48 dBA 52 dBA
Dimension
WxDxH
(
Consumables 1.5K 2K(1K) 2.0K
32 MB (SCX-3200/3205)
128 MB (SCX-3205W)
Hi-Speed USB 2.0
Wireless (SCX-3205W)
)
15.9” x 11.7” x 9.2” 16.1” x 16.8” x 9.1” 18.00” x 14.5” x 12.7”
8 MB 32 MB
Hi-Speed USB 2.0 High speed USB 2.0
Product spec and feature
Service Manual
2-12
Samsung Electronics
2
1
8
9
10
11
12
3
4
7
5
6
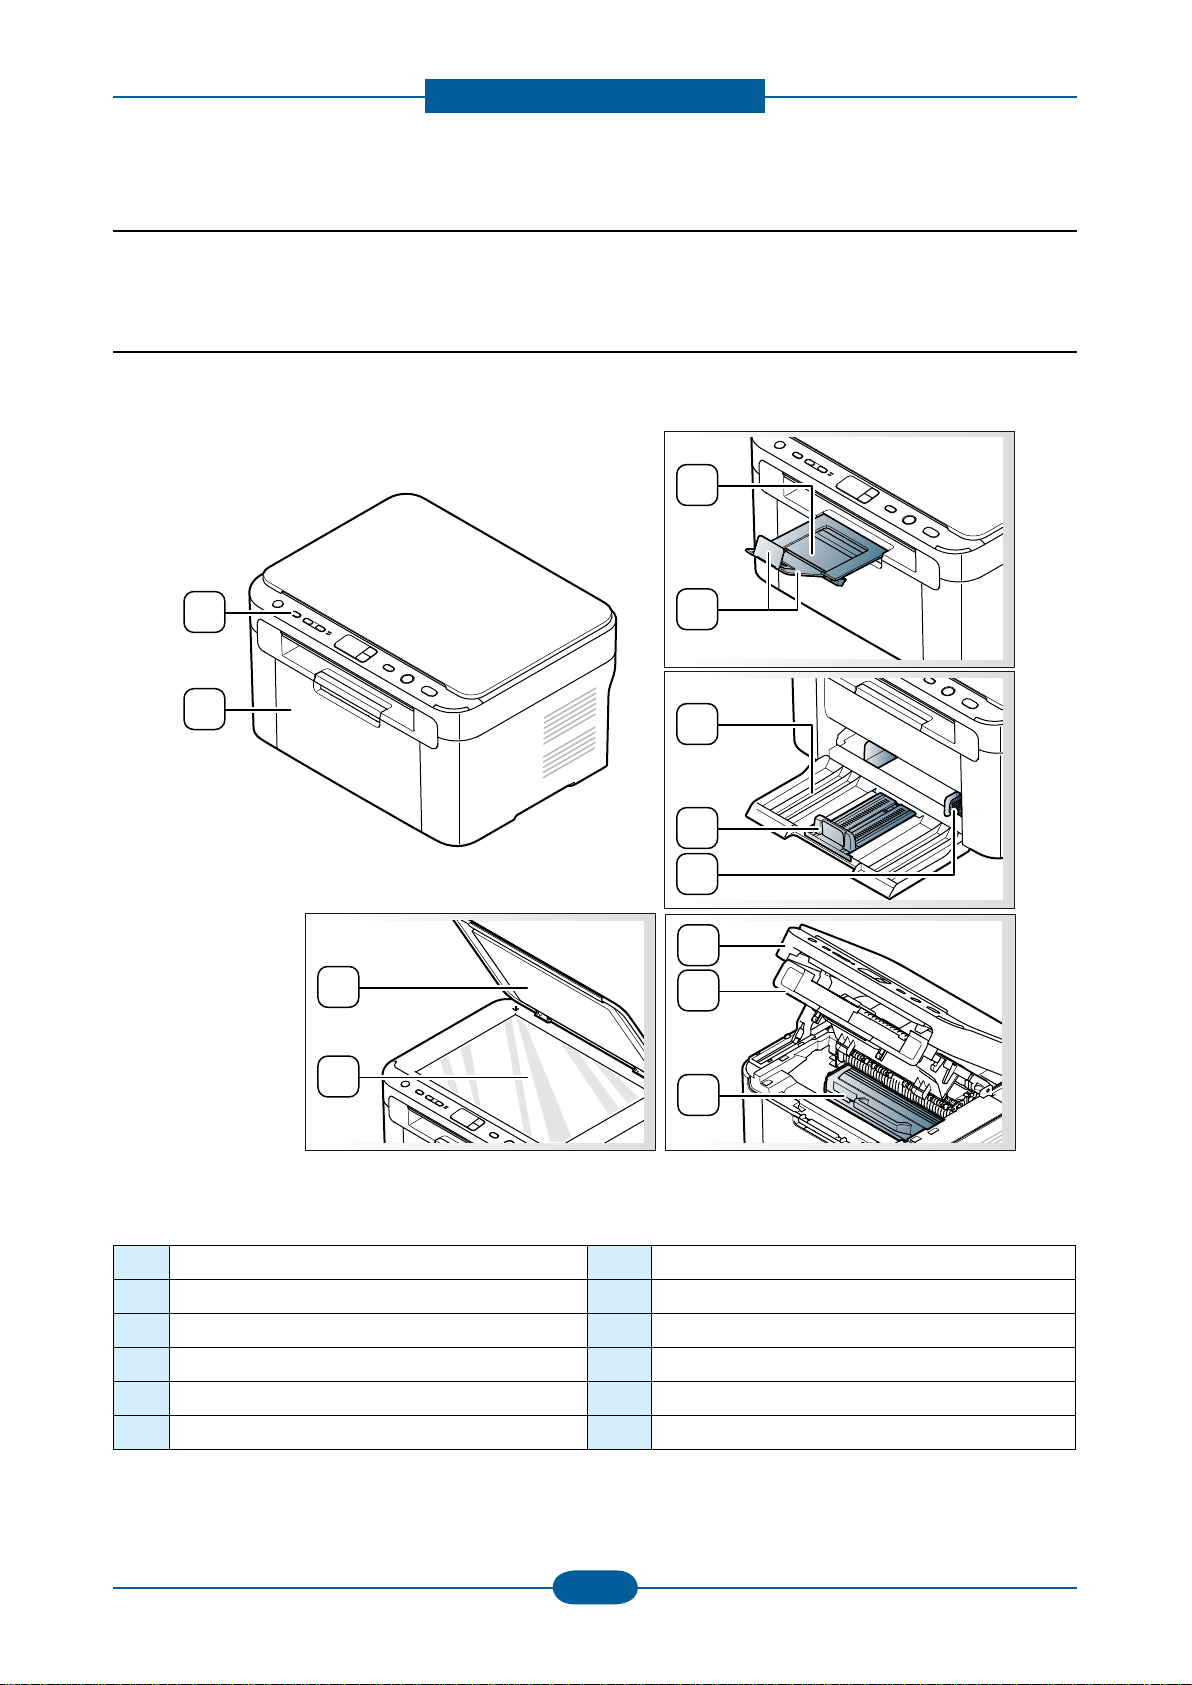
2.2 System Overview
This chapter describes the functions and operating principal of the main component.
2.2.1 Front View
This illustration may differ from your machine depending on its model.
1 Front door 7 Paper width guides
2 Control panel 8 Scanner lid
3 Output tray (face down) 9 Scanner glass
4 Output support 10 Scan unit
5 Tray 11 Inner cover
6 Paper length guide 12 Toner cartridge
Product spec and feature
Service Manual
2-13
Samsung Electronics
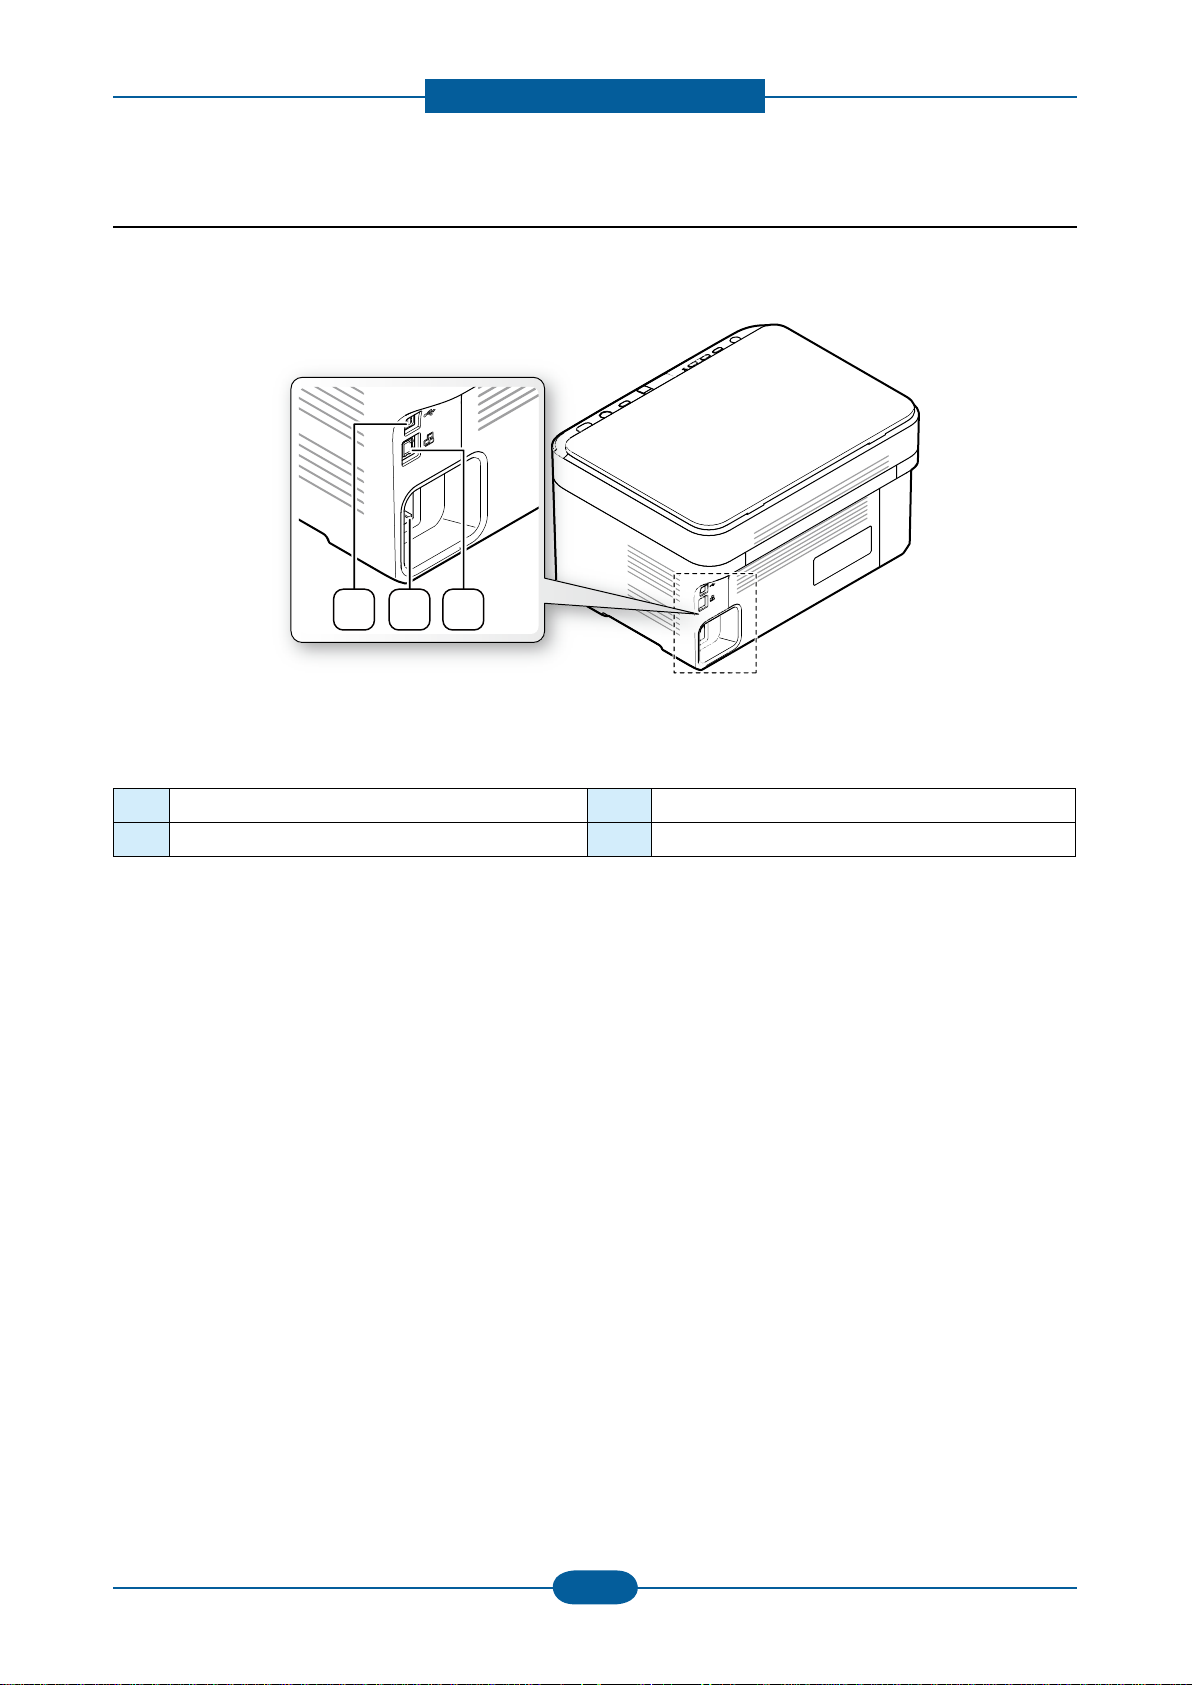
2.2.2 Rear View
This illustration may differ from your machine depending on its model.
1 USB port 3 Network port
2 Power cord receptacle
a. SCX-3205W(K) only
a
Product spec and feature
Service Manual
2-14
Samsung Electronics
13
5
12
7
1
2
9
14
10
3
11
6
4
8
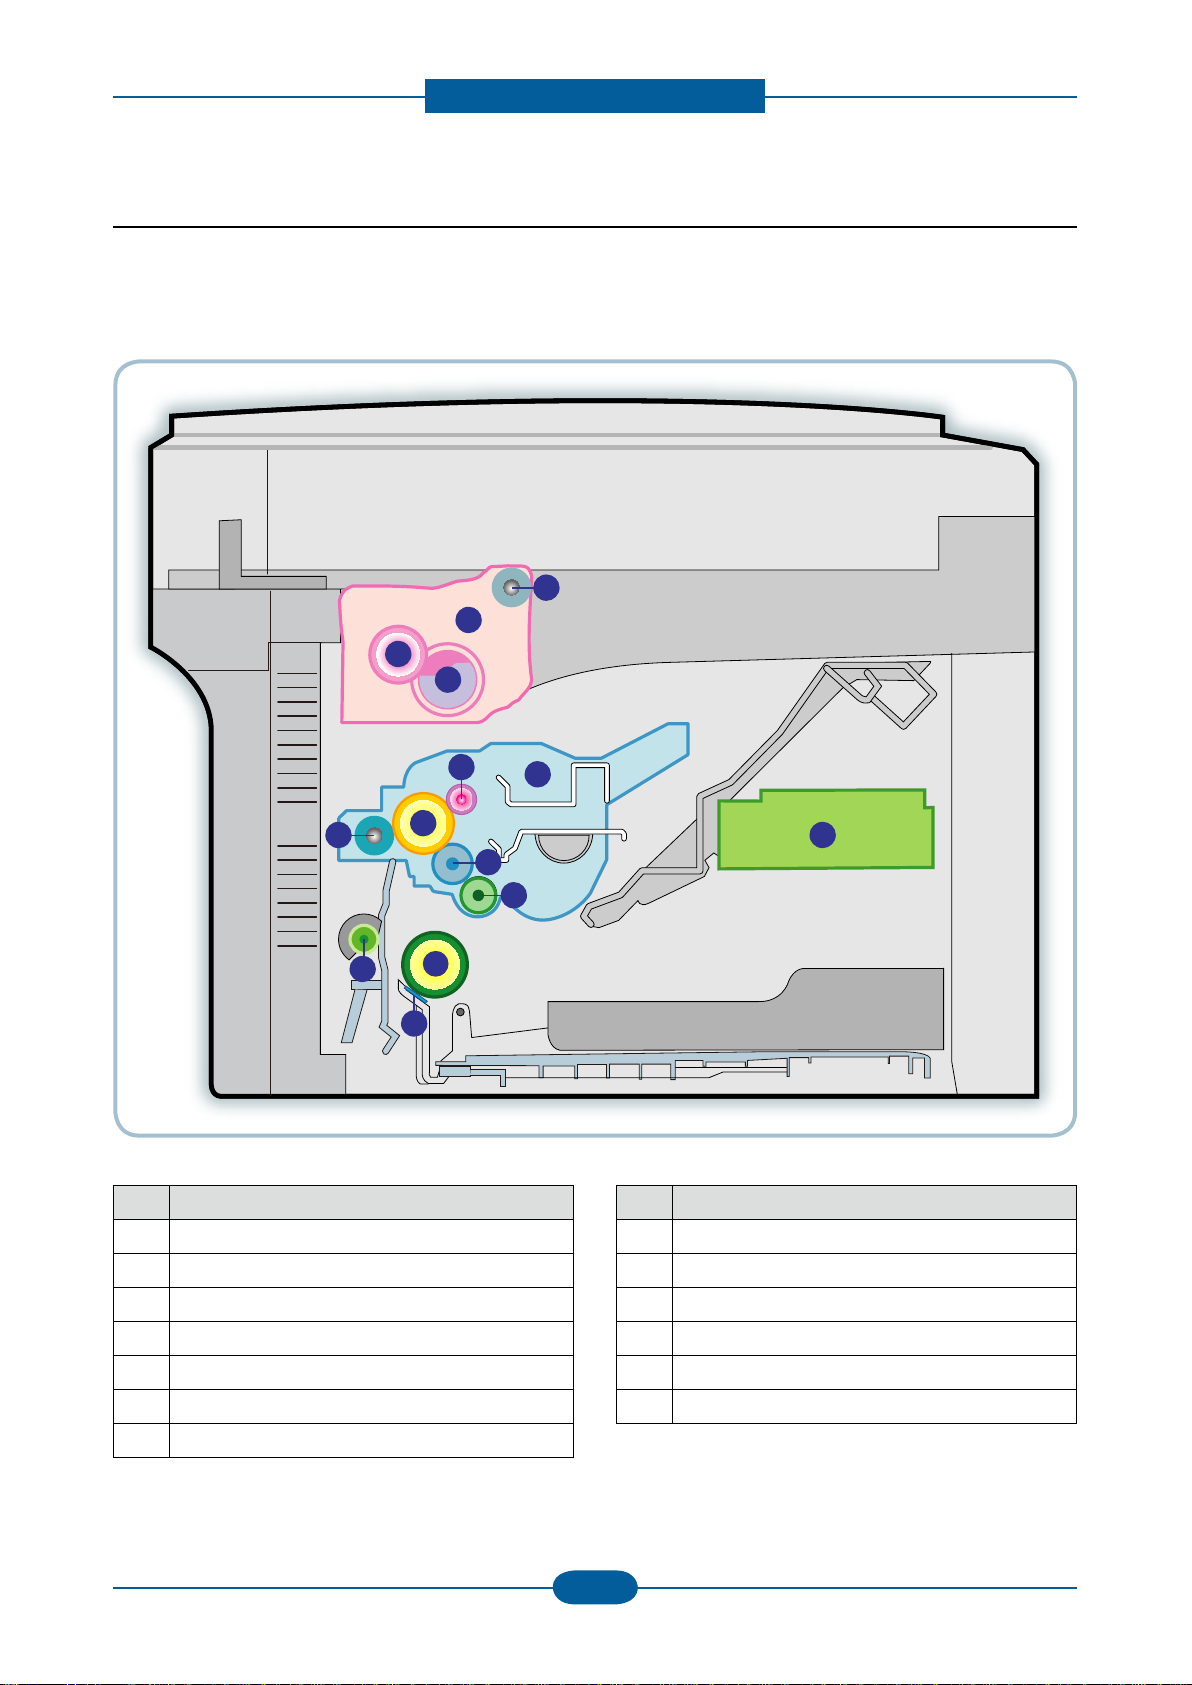
2.2.3 System Layout
This model consists of the Engine parts and F/W, and said engine parts consists of the mechanical
parts comprising the Frame, Feeding, Developing, Driving, Transferring, Fusing, Cabinet and H/W. The
electrical systems are comprised of the main control board, power board, operation panel, PC Interface.
NO. NAME
1 Pressure roller
2 Heat roller
3 Exit roller
4 Toner Cartridge
5 LSU
6 Charge roller
7 OPC
NO. NAME
8 Transfer roller
9 Deve roller
10 Supply roller
11 Feed roller
12 Friction pad
13 Pickup roller
Product spec and feature
Service Manual
2-15
Samsung Electronics
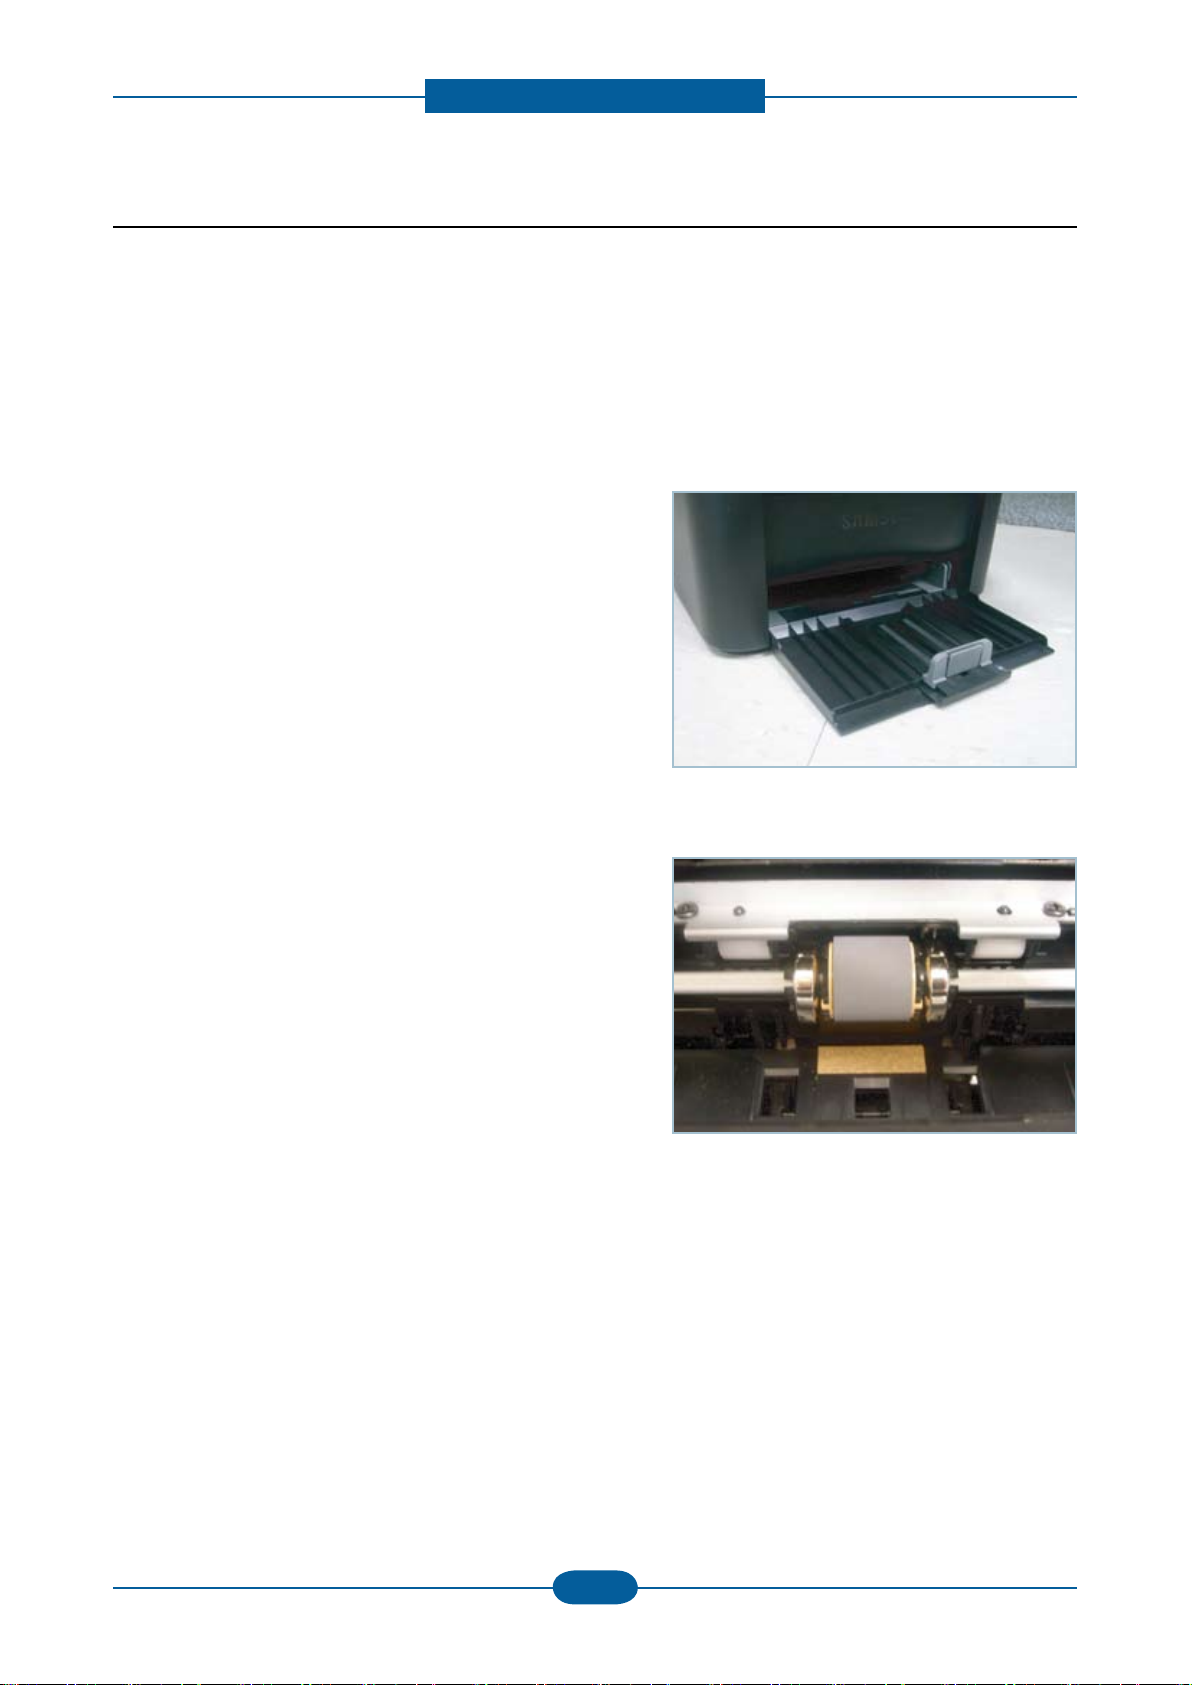
2.2.3.1 Feeding Part
It is consists of a basic cassette, an MP tray for printing on special media (envelope, label, special paper).
1) Separation method
Paper is separated by the friction pad mounted to the center of the cassette.
2) Input tray
This model uses a bin-type tray to hold the paper.
It takes a center loading method and applies ‘friction pad
separating method.
Both the side guide and the rear guide can be adjusted for
various types of papers from A6 to legal size paper.
The input tray uses a Paper Empty Sensor for paper
detection.
(Capacity: 150 sheets (80g/㎡ paper standard), paper
arranging function, various size papers accepting function.
In the front side, there is a paper level indicator.
3) Pick- up roller
The paper feed system is comprised of a paper pickup,
driving, control function, paper feeding, and static removal
function. The Pick up roller is driven by a solenoid.
Product spec and feature
Service Manual
2-16
Samsung Electronics
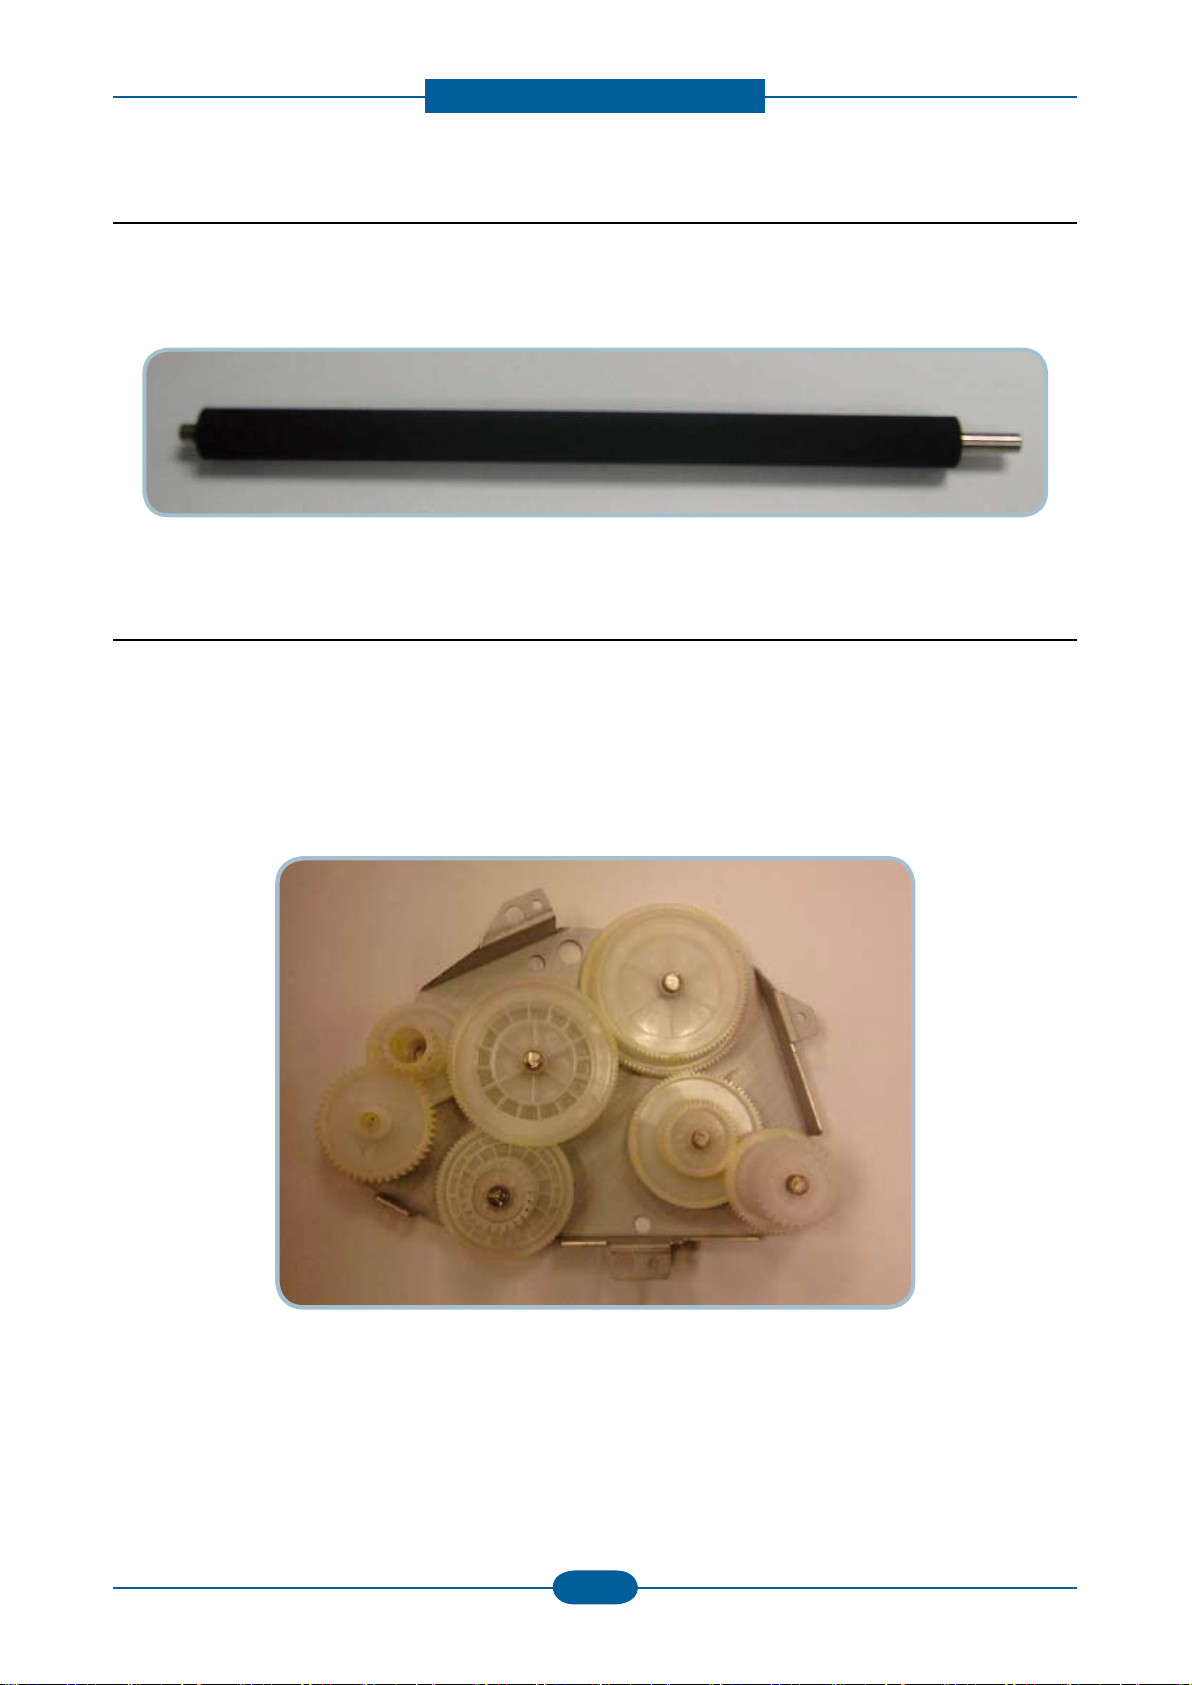
2.2.3.2 Transfer Roller
— The transfer roller delivers the toner from the OPC drum to the paper.
— There is no PTL Ass’y.
— Life Span : Print over 30,000 sheets (in15~30℃)
2.2.3.3 Driver Assy
— The SCX-3200/3205 Series drive system is comprised of an OPC, Pick- up, Feed, Fuser, Gear- Train all
xed to as mounting bracket. A step motor is used for driving the assembly; it mounted to the left frame.
• Driving Frequency: Step Motor 840 PPS (1050rpm)
• Drive system is comprised of: Stepping Motor → Pick-up/Feeder/Transfer/Fuser/Exit
Product spec and feature
Service Manual
2-17
Samsung Electronics
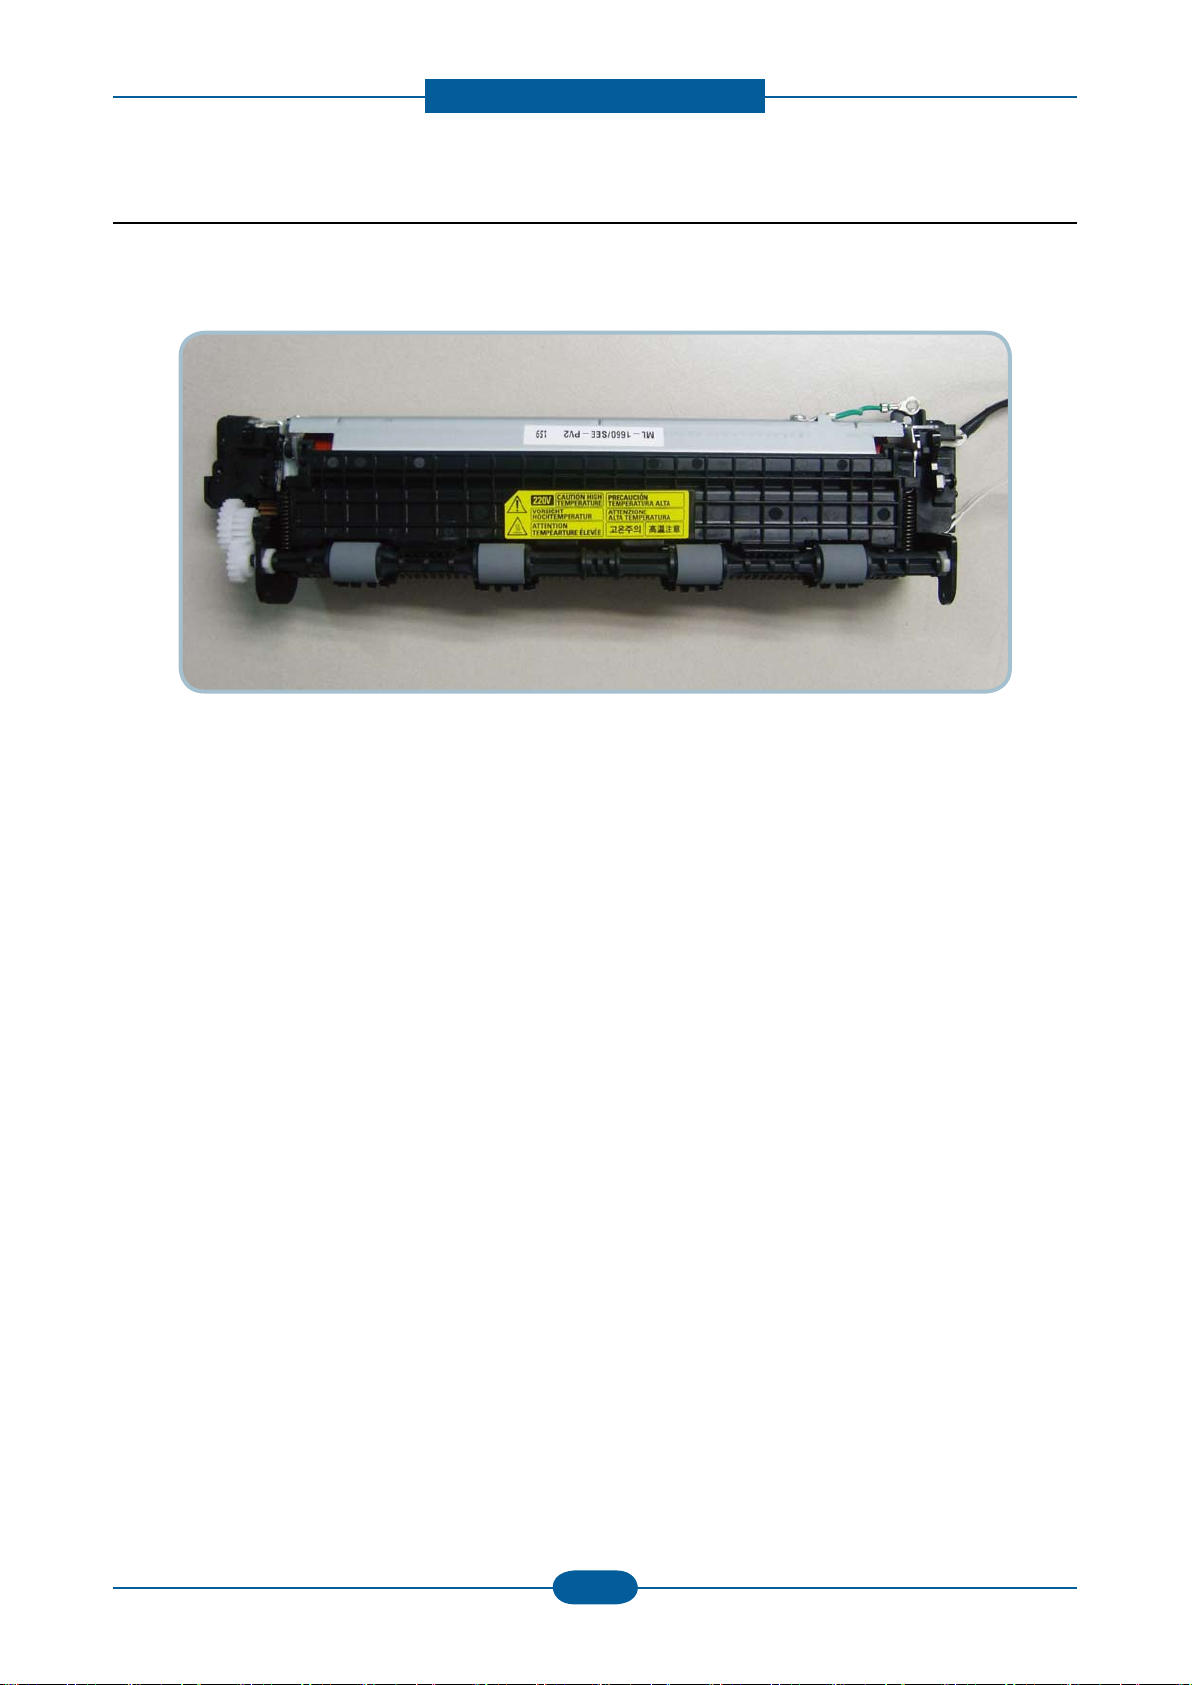
2.2.3.4 Fuser
The Fuser Unit consisted of a halogen lamp, heat roller, pressure roller, thermistor and thermostat. It fuses
the toner on a paper by a combination of heat and pressure to complete the printing job.
1) Thermostat
When a heat lamp is overheated, a Thermostat cuts off the main power to prevent over- heating.
— Thermostat Type : Non- Contact type dual THERMOSTAT
— Control Temperature : 195℃ ± 5 ℃
2) Thermistor
It is a temperatrue detecting sensor.
— Temperature Resistance : 7 ㏀ (180 ℃)
Provide spec cold at rook temp
Example: 375K ohms
3) Heat roller
The heat roller transfers the heat from the lamp to apply a heat on the paper.
The surface of a heat roller is coated with Teon, so toner does not stick to the surface.
4) Pressure roller
A pressure roller mounted under a heat roller is made of a silicon resin, and the surface also is coated with
Teon. When a paper passes between a heat roller and a pressure roller, toner adheres to the surface of a
paper permanently.
5) Halogen Lamp
— Voltage 120 V : 115 ± 5 %
220 V : 230 ± 5 %
— Capacity : 600 Watt ± 25 W

Product spec and feature
Service Manual
2-18
Samsung Electronics
6) Items for safety
Protecting device for overheating
— 1st protection device: Hardware cuts off when overheated
— 2nd protection device: Software cuts off when overheated
— 3rd protection device: Thermostat cuts off main power.
Safety device
— The fuser power is cut off when a front cover is opened
— A caution label has been added to the Fuser Unit to warn the customer of the “Hot Area”, so they can
use care when in that area. It can be easily seen when customer opens the rear cover.
Product spec and feature
Service Manual
2-19
Samsung Electronics
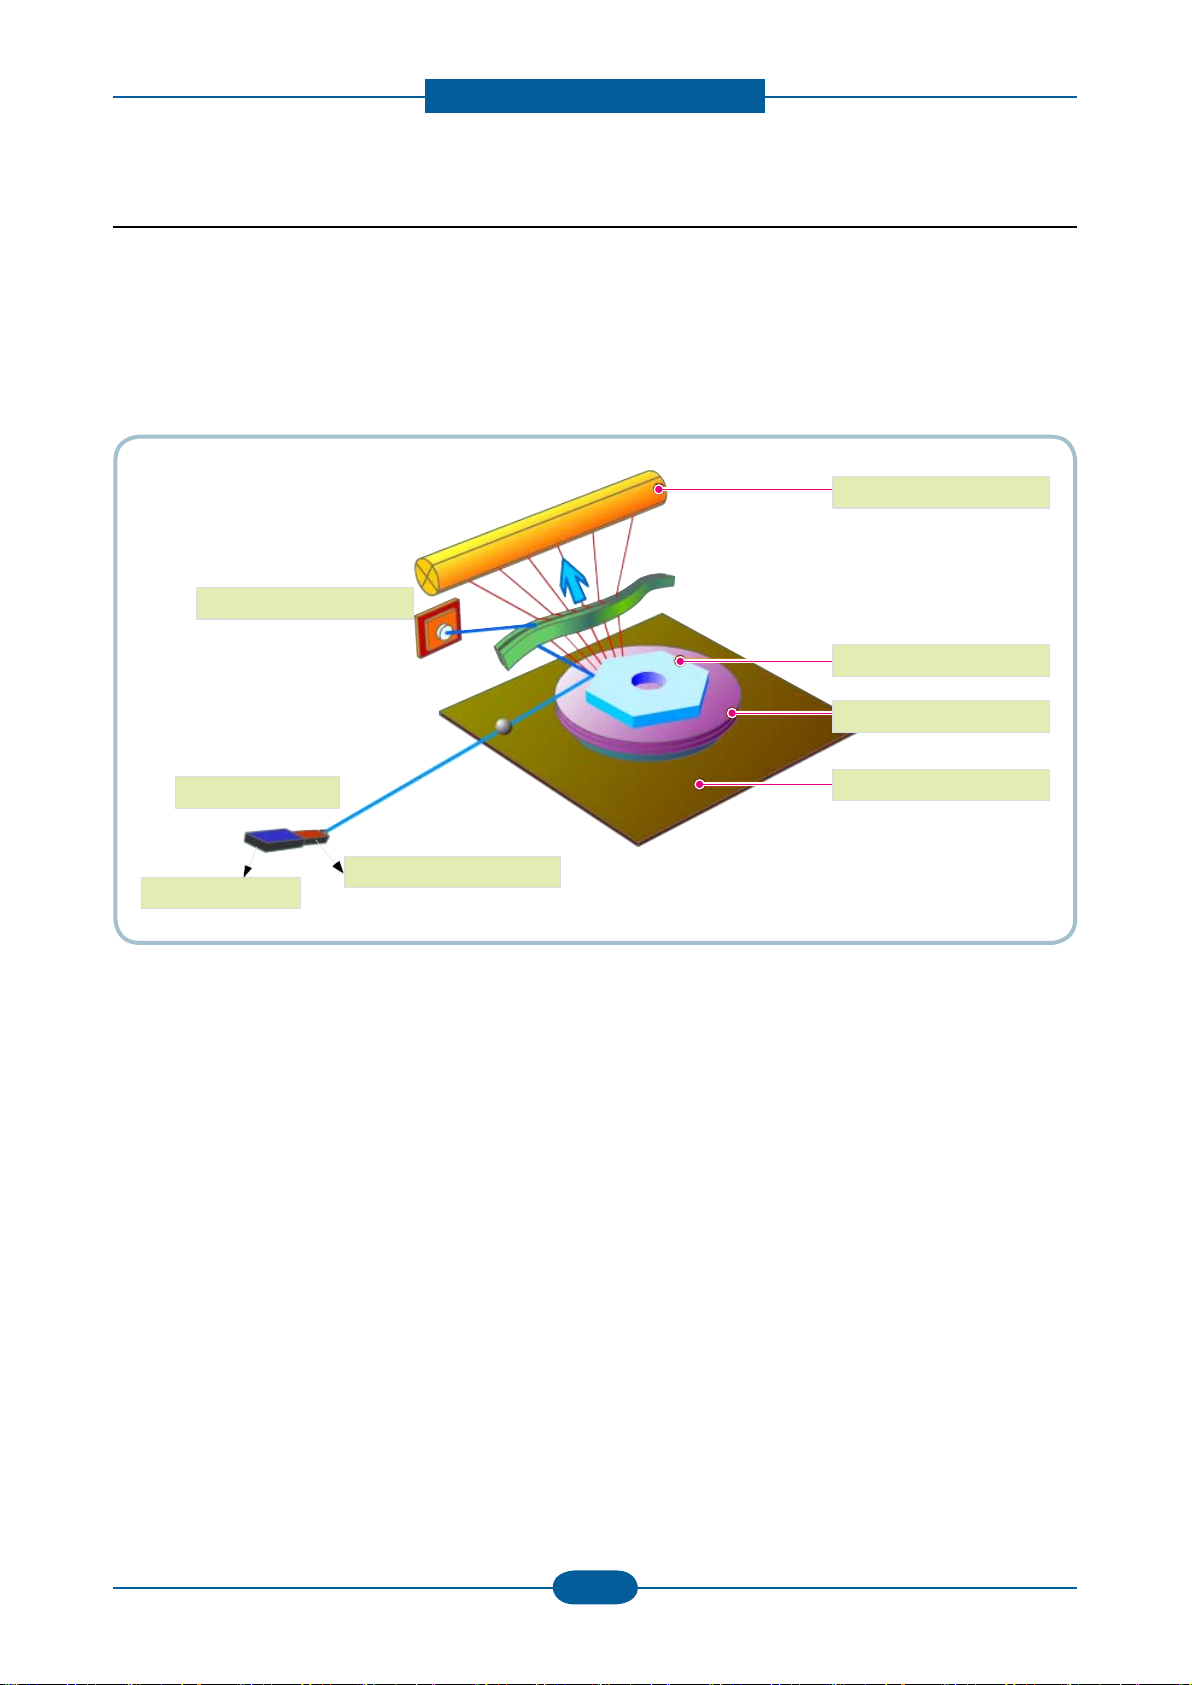
OPC Drum
Photo Diode
LD Driver circit
Protector panel
LD(Laser Diode)
Polygon Mirror
Polygon Motor
Motor Driver
2.2.3.5 LSU (Laser Scanner Unit)
It is the core part of the LBP which switches from the video data received to the controller to the electrostatic
latent image on the OPC drum by controlling laser beam, exposing OPC drum, by use of a polygon mirror.
The OPC drum is synchronized with the paper feeding speed. The /HSYNC signal is created when the laser
beam from LSU reaches the end of the polygon mirror, and the signal is sent to the controller.
The controller detects the /HSYNC signal to adjust the vertical line of the image on paper. The /HSYNC
signal is used to synchronize the image data with the left margin of the paper.
Product spec and feature
Service Manual
2-20
Samsung Electronics
Cleaning Roller
Cleaning Blade
-720V
-350V
-550V
0.20mW
Max -1.4KV
-100V
1
2
3
4
5
6
7
8
+3.5kV
-150V↓
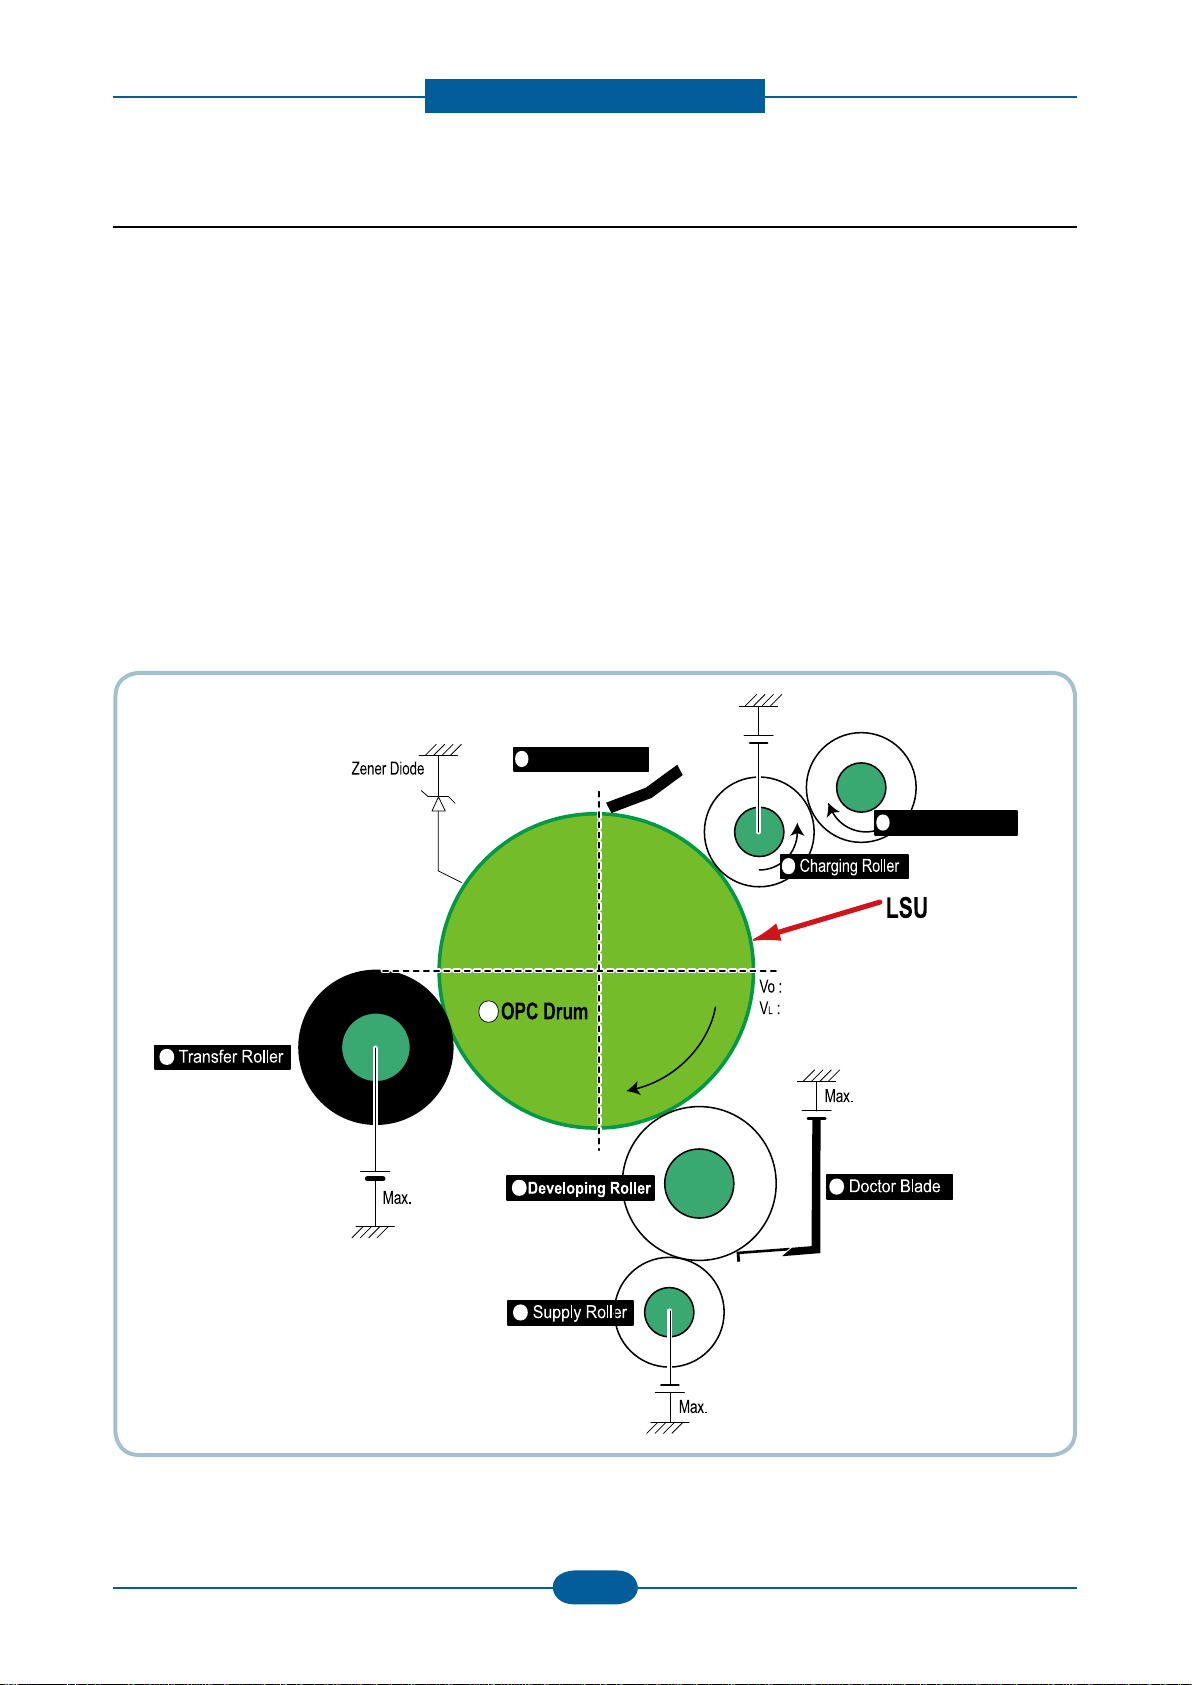
2.2.3.6 Toner Cartridge
By using the electronic photo process, it creates a visual image. In the toner cartridge, the OPC unit and the
developing unit are contained in one assembly. The OPC unit houses the OPC drum and charging roller, the
toner cartridge unit houses the toner, supply roller, developing roller, and blade (Doctor blade)
• Developing Method : Non magnetic 1 element contacting method
• Toner : Non magnetic 1 element shatter type toner
• Charging capacity : — 39.1 ± 3 μC/g
• Average OD : 8.0 ± 0.5㎛ (Toner)
• The life span of toner (ISO 19752 pattern / Letter standard)
→ Initial toner : 0.7K
→ Sales toner : 1.5K
• Toner Residual Sensor : Dot count with CRUM(CRU Monitor)
• OPC Cleaning : Collect the toner by using cleaning blade
• Handling of wasted toner : Waste [residual] toner is cleaned off the drum by means of a cleaning blade.
• OPC Drum Protecting Shutter : None
• Classifying device for toner cartridge: ID is classied by CRUM.
Loading…
-
Драйверы
6
-
Руководства по ремонту
2
-
Инструкции по эксплуатации
1
Samsung SCX-3200 инструкция по эксплуатации
(100 страниц)
- Языки:Русский
-
Тип:
PDF -
Размер:
19.61 MB -
Описание:
Монохромное многофункциональное устройство (МФУ)
Просмотр
На NoDevice можно скачать инструкцию по эксплуатации для Samsung SCX-3200. Руководство пользователя необходимо для ознакомления с правилами установки и эксплуатации Samsung SCX-3200. Инструкции по использованию помогут правильно настроить Samsung SCX-3200, исправить ошибки и выявить неполадки.