
В настоящий момент товары недоступны для заказа на samsung.com/ru
В настоящий момент товары недоступны для заказа на samsung.com/ru
Выберите свое местоположение и язык.
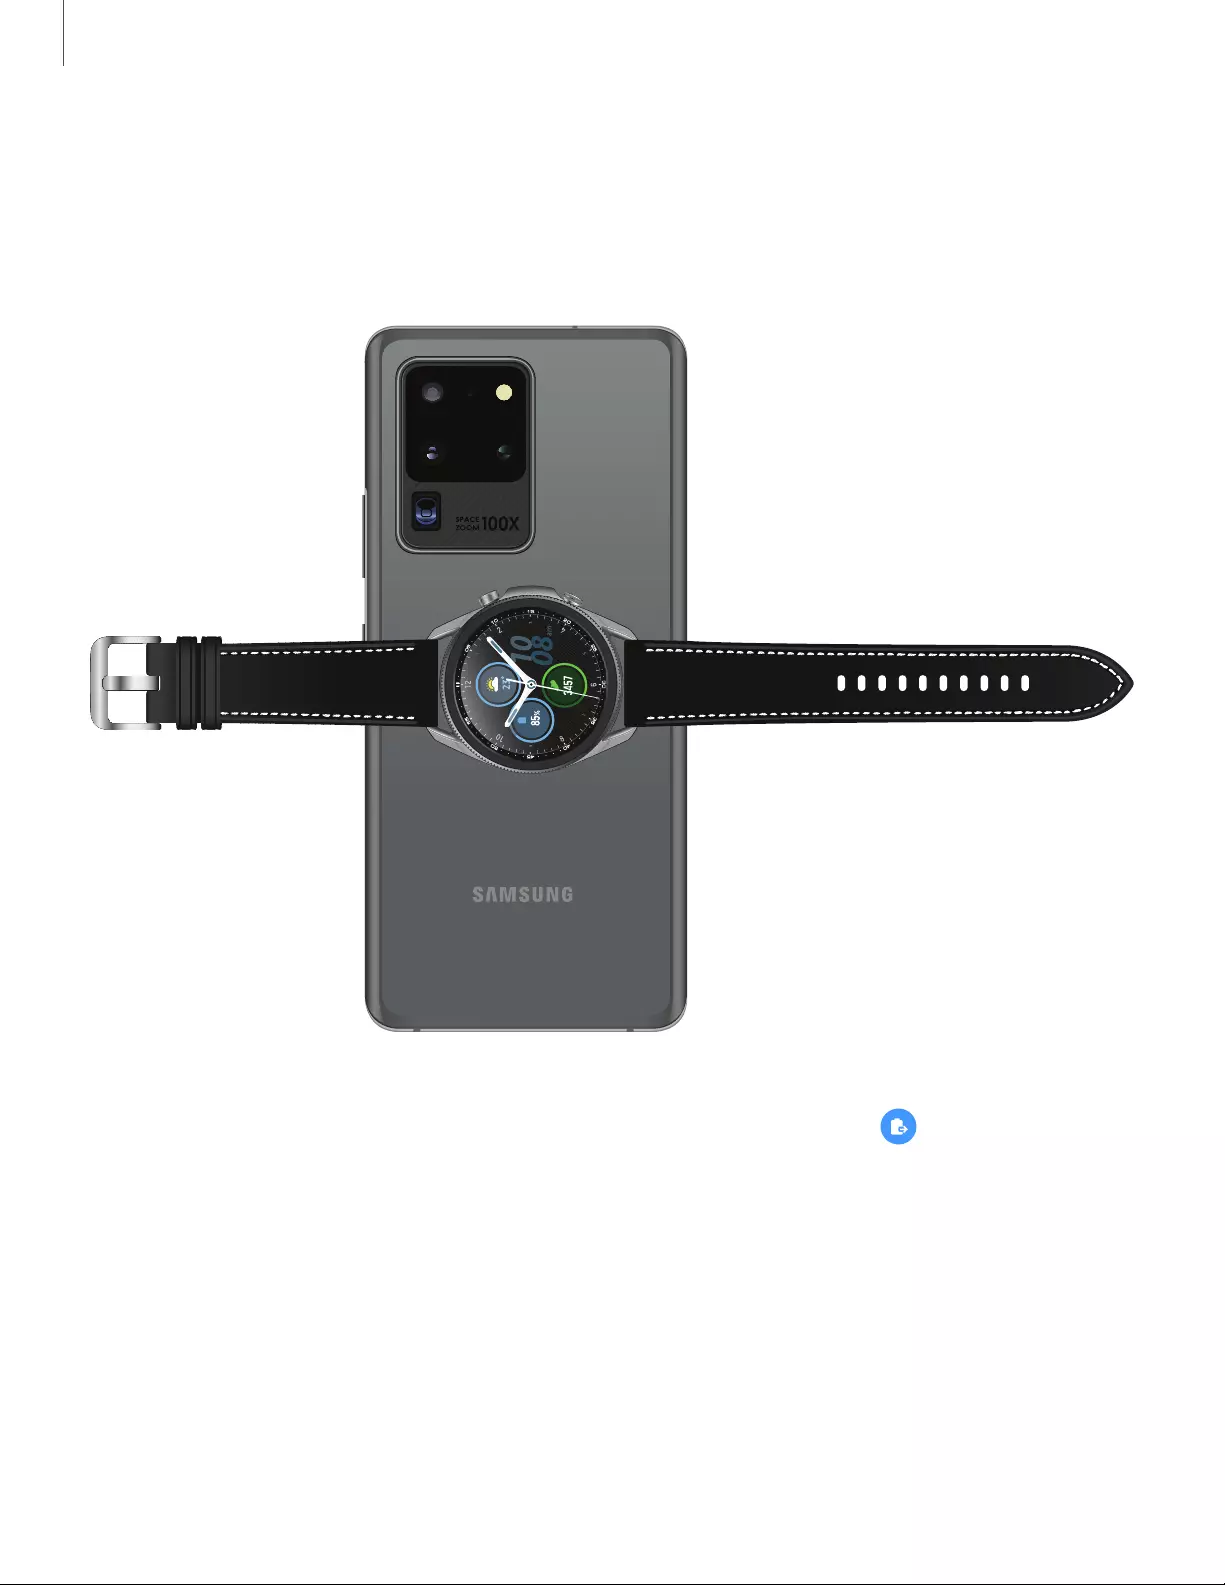
Galaxy Watch3 45мм
SM-R840
-
Настройка
Как узнать дату изготовления (производства) техники SamsungХотите узнать дату производства вашей техники Samsung? Ответ в этой статье.
-
Samsung Pay: как использовать, обзор, список банков, смартфонов, часовСамая свежая информация о сервисе Samsung Pay для РФ и РБ. Список банков, платежных систем, смартфонов и часов. Инструкции по регистрации и добавлению карт
-
Список банков, которые работают с Samsung Pay в БеларусиСписок банков для Беларуси в этой статье. Информация обновляется.
-
Как начать пользоваться Samsung Pay на носимых устройствахУзнайте подробнее о ‘Как начать пользоваться Samsung Pay на носимых устройствах’ с помощью службы поддержки Samsung. Часто задаваемые вопросы о Samsung Pay.
-
Bluetooth
Сопряжение Galaxy Buds+ с мобильным устройствомУзнайте подробнее о ‘Сопряжение Galaxy Buds+ с мобильным устройством’ с помощью службы поддержки Samsung. Часто задаваемые вопросы о мобильных устройствах Samsung Galaxy
-
Bluetooth
Что делать, если наушники Galaxy Buds+ не подключаются к смартфону Samsung GalaxyЧасто задаваемые вопросы о мобильных устройствах Samsung. Узнайте подробнее о ‘Что делать, если наушники Galaxy Buds+ не подключаются к смартфону Galaxy’ с помощью службы поддержки Samsung.
-
Питание / Зарядка
Samsung Galaxy Buds+ не заряжаютсяУзнайте подробнее о ‘Samsung Galaxy Buds+ не заряжаются’ с помощью службы поддержки Samsung. Часто задаваемые вопросы о мобильных устройствах Samsung Galaxy.
-
Звук / Динамик / Микрофон
Как управлять звонками на Samsung Galaxy Buds +Узнайте подробнее о ‘Как управлять звонками на Samsung Galaxy Buds +’ с помощью службы поддержки Samsung. Часто задаваемые вопросы о мобильных устройствах Samsung.
-
Использование
Какой уровень водонепроницаемости в Galaxy Buds Pro?Часто задаваемые вопросы о бытовой технике Samsung. Узнайте подробнее о ‘Какой уровень водонепроницаемости в Galaxy Buds Pro’ с помощью службы поддержки Samsung.
-
Использование
Как работает умное шумоподавление в наушниках Galaxy Buds Pro и Galaxy Buds2 ProУзнайте подробнее о ‘Как работает умное шумоподавление в наушниках Galaxy Buds Pro и Galaxy Buds2 Pro’ с помощью службы поддержки Samsung. Часто задаваемые вопросы о мобильных устройствах Samsung.
-
Обновление
Как обновить прошивку на носимых устройствах Samsung Galaxy (Watch, Buds, Fit)Часто задаваемые вопросы о технике Мобильные устройства Samsung. Узнайте подробнее о ‘Как обновить прошивку на носимых устройствах Samsung Galaxy (Watch, Buds, Fit)’ с помощью службы поддержки Samsung.
-
Использование
Как синхронизировать левый и правый наушники Samsung Galaxy между собойУзнайте подробнее о ‘Как синхронизировать левый и правый наушники Samsung Galaxy между собой’ с помощью службы поддержки Samsung. Часто задаваемые вопросы о мобильных устройствах Samsung.
-
Звук / Динамик / Микрофон
Что делать, если звук в одном наушнике Galaxy Buds тише, чем во второмУзнайте подробнее ‘Что делать, если звук в одном наушнике Galaxy Buds тише, чем во втором’ с помощью службы поддержки Samsung. Часто задаваемые вопросы о технике Мобильные устройства Samsung.
-
Использование
Как очистить наушники Galaxy BudsУзнайте подробнее о ‘Как прочистить наушники Galaxy Buds’ с помощью службы поддержки Samsung. Часто задаваемые вопросы о технике Мобильные устройства Samsung.
-
Настройка
Что делать, если перестали поступать уведомления на Samsung Galaxy Watch?Узнайте подробнее о ‘Что делать, если перестали поступать уведомления на Samsung Galaxy Watch?’ с помощью службы поддержки Samsung. Часто задаваемые вопросы о технике Samsung Galaxy Watch.
-
Использование
Как подключить и отключить беспроводную метку SmartTagЧасто задаваемые вопросы о технике Мобильные устройства Samsung. Узнайте подробнее о ‘Как подключить и отключить беспроводную метку SmartTag’ с помощью службы поддержки Samsung.
-
Использование
Как найти Galaxy Watch, если они потерялисьУзнайте подробнее о ‘Как найти Galaxy Watch, если они потерялись’ с помощью службы поддержки Samsung. Часто задаваемые вопросы о технике Мобильные устройства Samsung.
-
Использование
Что делать, если не работает один наушник Samsung Galaxy BudsУзнайте подробнее о ‘Что делать, если не работает один наушник Samsung Galaxy Buds’ с помощью службы поддержки Samsung. Часто задаваемые вопросы о технике Мобильные устройства Samsung.
-
Использование
Как установить соединение Galaxy Watch со смартфономУзнайте подробнее ‘Как установить соединение Galaxy Watch со смартфоном’ с помощью службы поддержки Samsung. Часто задаваемые вопросы о мобильных устройствах Samsung Galaxy
-
Использование
Как подключить Galaxy Buds к другим устройствамУзнайте, как выполнить сопряжение наушников Galaxy Buds с другими устройствами.
-
Использование
Как зарядить наушники Galaxy BudsЧасто задаваемые вопросы о Мобильных Устройствах. Узнайте больше о том, Как зарядить наушники Galaxy Buds, с помощью справочной системы Samsung Support.
-
Использование
Как изменить циферблат на Galaxy WatchЧасто задаваемые вопросы о мобильных устройствах Samsung. Узнайте подробнее о ‘Как изменить циферблат на Galaxy Watch’ с помощью службы поддержки Samsung.
-
Использование
Как пользоваться часами Galaxy WatchЧасто задаваемые вопросы о Мобильных Устройствах. Узнайте больше о том, Как пользоваться часами Galaxy Watch, с помощью справочной системы Samsung Support.
-
Использование
Как обновить программное обеспечение наушников Galaxy Buds, Galaxy Buds2, Galaxy Buds Live и Galaxy Buds ProЧасто задаваемые вопросы о Мобильных Устройствах. Узнайте больше о том, Как обновить программное обеспечение наушников Galaxy Buds, с помощью справочной системы Samsung Support.
-
Samsung Pay
Как совершить оплату с помощью Galaxy Watch?FAQ по использованию на мобильных устройствах. Узнайте подробнее, как совершить оплату с помощью Galaxy Watch, в Samsung Support.
-
Использование
Как найти Galaxy Watch и наушники Galaxy Buds с помощью SmartThings FindЧасто задаваемые вопросы о мобильных устройствах Samsung. Узнайте подробнее о ‘Как найти Galaxy Watch и наушники Galaxy Buds с помощью SmartThings Find’ с помощью службы поддержки Samsung.
-
Использование
Как управлять камерой смартфона Samsung Galaxy с носимых устройствЧасто задаваемые вопросы о мобильных устройствах Samsung. Узнайте подробнее о ‘Как управлять камерой смартфона Samsung Galaxy с носимых устройств’ с помощью службы поддержки Samsung.
-
Использование
Как носить наушники SamsungЧасто задаваемые вопросы о мобильных устройствах Samsung. Из этого раздела вы узнаете, как носить наушники Samsung.
-
Использование
Что делать, если микрофон наушников Galaxy Buds не работаетЧасто задаваемые вопросы о мобильных устройствах Samsung Mobile. В этом разделе справки и поддержки Samsung вы узнаете, что делать, если на наушниках Galaxy Buds не работает микрофон.
-
Использование
Как подключить ваше устройство Galaxy к другим устройствам с помощью приложения Подключенные устройстваFAQ для мобильных устройств. Узнайте подробнее, Как подключить ваше устройство Galaxy к другим устройствам с помощью приложения Подключенные устройства, в Samsung Support.
-
Использование
Низкое или плохое качество звука в наушниках SamsungЧасто задаваемые вопросы о Samsung Mobile. В этом разделе справки и поддержки Samsung вы узнаете о причинах низкого уровня громкости или недостаточного качества звука в наушниках.
-
Использование
Как использовать сенсорную команду наушников Samsung Galaxy BudsУзнайте, как настраивать и использовать сенсорные команды на серии Samsung Galaxy Buds2.
-
Использование
Влагозащита Galaxy WatchFAQ для мобильных устройств. Узнайте подробнее о Влагозащита Galaxy Watch, в Samsung Support.
-
Использование
Как использовать виртуальную SIM-карту (eSIM) на часах Galaxy WatchУзнайте подробнее о ‘Как использовать виртуальную SIM-карту (eSIM) на часах Galaxy Watch’ с помощью службы поддержки Samsung. Часто задаваемые вопросы о мобильных устройствах Samsung.
-
Использование
Измерьте состав своего тела с помощью серии Galaxy WatchВы можете измерить состав своего тела с помощью датчика BIA на Galaxy Watch.
-
Использование
Как измерить ЭКГ с помощью Galaxy WatchИзмерение ЭКГ с помощью Galaxy Watch позволяет следить за состоянием вашего сердца.
-
Использование
Что делать, если Galaxy Watch не подключаются к смартфону SamsungУзнайте подробнее о ‘Что делать, если Galaxy Watch не подключаются к смартфону Samsung’ с помощью службы поддержки Samsung. Часто задаваемые вопросы о мобильных устройствах Samsung.
-
Использование
Что делать, если Bluetooth-гарнитура не подключается к Samsung GalaxyЧасто задаваемые вопросы о мобильных устройствах Samsung. Узнайте подробнее о ‘Что делать, если Bluetooth-гарнитура не подключается к Samsung Galaxy’ с помощью службы поддержки Samsung.
-
Samsung Apps
Используйте приложение Samsung Find, чтобы поделиться своим местоположением с друзьями, ребенком, семьей и другими контактамиУзнайте, как использовать приложение Samsung Find, чтобы делиться своим местоположением с друзьями, семьей и другими контактами.
-
Использование
Что делать, если время на Galaxy Watch отображается неправильноУзнайте подробнее о ‘Что делать, если время на Galaxy Watch отображается неправильно’ с помощью службы поддержки Samsung. Часто задаваемые вопросы о мобильных устройствах Samsung.
-
Батарея
Беспроводная и обратная беспроводная зарядка Galaxy Watch Ultra и Watch7Узнайте, как изменения в дизайне у Galaxy Watch Ultra и Watch7 влияют на возможность беспроводной зарядки устройства.
-
Использование
Как заменить амбушюры на Galaxy Buds3 ProУзнайте подробнее о ‘Как заменить амбушюры на Galaxy Buds3 Pro’ с помощью службы поддержки Samsung. Часто задаваемые вопросы о мобильных устройствах Samsung.
-
Использование
Чем отличаются Galaxy Bugs3/Buds3Pro и другие модели наушников SamsungУзнайте подробнее о ‘Чем отличаются Galaxy Bugs3/Buds3Pro и другие модели наушников Samsung’ с помощью службы поддержки Samsung. Часто задаваемые вопросы о мобильных устройствах Samsung.
-
Использование
Чем Galaxy Watch7 отличаются от предыдущих моделейУзнайте подробнее о ‘Чем Galaxy Watch7 отличаются от предыдущих моделей’ с помощью службы поддержки Samsung. Часто задаваемые вопросы о мобильных устройствах Samsung.
-
Использование
Используйте мониторинг сна Samsung Health на своих Samsung Galaxy Watch и FitУзнайте, как использовать функцию мониторинга сна в приложении Samsung Health и улучшить ночной сон.
-
Звук / Динамик / Микрофон
Что делать, если вы слышите статический шум при использовании наушников Samsung Galaxy BudsУзнайте, что делать, если в наушниках Galaxy Buds слышен статический шум.
-
Использование
Как использовать функцию обнаружения риска апноэ во сне на Samsung Galaxy WatchУзнайте, как включить и использовать функцию апноэ во сне на Galaxy Watch.
-
Использование
Что делать, если сенсорный экран Galaxy Watch не работаетВоспользуйтесь данным руководством, чтобы устранить неисправности сенсорного экрана, восстановить реагирование экрана или сбросить настройки часов Galaxy Watch.
-
Батарея
Как зарядить Samsung Galaxy Watch с зарядным устройством или без негоУзнайте о различных методах зарядки и функциях экономии заряда батареи, доступных на ваших часах Galaxy Watch.
-
Питание / Зарядка
Как использовать функцию беспрозодная обратная зарядка на вашем устройстве GalaxyУзнайте, как использовать функцию беспрозодная обратная зарядка для зарядки телефона Galaxy и других устройств.
-
Звук / Динамик / Микрофон
Galaxy Buds: можно ли использовать только один наушникМожно ли использовать только один наушник Galaxy Buds? Читайте рекомендации от производителя в этой статье.
-
Звук / Динамик / Микрофон
Galaxy Buds: какие улучшения у Galaxy Buds по сравнению с IconX 2018Узнайте подробнее ‘Galaxy Buds: какие улучшения у Galaxy Buds по сравнению с IconX 2018’ с помощью службы поддержки Samsung. Часто задаваемые вопросы о мобильных устройствах Samsung Galaxy
-
Что делать, если забыт PIN-код от Samsung Pay. Как восстановить?Забыли PIN-код от Samsung Pay? Информация от производителя в этой статье
-
Как добавить банковскую карту в Samsung PayУзнайте подробнее о ‘Как добавить банковскую карту в Samsung Pay’ с помощью службы поддержки Samsung. Часто задаваемые вопросы о Samsung Pay.
-
Приложения
Как обновить ПО и приложения на вашем Samsung Galaxy Watch Active2Часто задаваемые вопросы о мобильных устройствах Samsung. Узнайте подробнее о ‘Как обновить ПО и приложения на вашем Samsung Galaxy Watch Active2’ с помощью службы поддержки Samsung.
-
Bluetooth
Как подключить Bluetooth наушники к Galaxy Watch Active 2Узнайте подробнее ‘Как подключить Bluetooth наушники к Galaxy Watch Active 2’ с помощью службы поддержки Samsung. Часто задаваемые вопросы о мобильных устройствах Samsung Galaxy
-
Приложения
Как настроить приложения на вашем Samsung Galaxy Watch Active2Как настроить приложения на вашем Samsung Galaxy Watch Active2
-
Мультимедийный контент
Как слушать музыку на Galaxy BudsУзнайте подробнее о ‘Как слушать музыку на Galaxy Buds’ с помощью службы поддержки Samsung. Часто задаваемые вопросы о технике Мобильные устройства Samsung.
-
Спецификации / Функции
Что делать, если GPS не работает должным образом на Samsung Galaxy Watch Active2Узнайте подробнее ‘Что делать, если GPS не работает должным образом на Samsung Galaxy Watch Active2’ с помощью службы поддержки Samsung. Часто задаваемые вопросы о мобильных устройствах Samsung Galaxy
-
Звук / Динамик / Микрофон
Что делать, если при использовании наушников с Galaxy Watch Active 2 низкое качество звукаУзнайте подробнее ‘Что делать, если при использовании наушников с Galaxy Watch Active 2 низкое качество звука’ с помощью службы поддержки Samsung. Часто задаваемые вопросы о мобильных устройствах Samsung Galaxy
-
Звук / Динамик / Микрофон
Как избежать задержки звука на Galaxy Buds+Узнайте подробнее ‘Как избежать задержки звука на Galaxy Buds+’ с помощью службы поддержки Samsung. Часто задаваемые вопросы о мобильных устройствах Samsung Galaxy
-
Настройка
Функция 360 Audio на Galaxy Buds ProУзнайте подробнее о ‘Функция 360 Audio на Galaxy Buds Pro’ с помощью службы поддержки Samsung. Часто задаваемые вопросы о технике Мобильные устройства Samsung.
-
Использование
Что такое мобильная экосистема Samsung GalaxyЧасто задаваемые вопросы о Мобильных устройствах Samsung. Узнайте подробнее о ‘Что такое мобильная экосистема Samsung Galaxy’ с помощью службы поддержки Samsung.
-
Использование
Советы по использованию Galaxy Buds ProЧасто задаваемые вопросы о технике Мобильные устройства Samsung. Узнайте подробнее о ‘Советы по использованию Galaxy Buds Pro’ с помощью службы поддержки Samsung.
-
Использование
Как пользоваться виджетами для Samsung Galaxy Buds ProЧасто задаваемые вопросы о технике Мобильные устройства Samsung. Узнайте подробнее о ‘Как пользоваться виджетами для Samsung Galaxy Buds Pro’ с помощью службы поддержки Samsung.
-
Звук / Динамик / Микрофон
Что делать, если в наушниках Galaxy Buds Pro разная громкость?Часто задаваемые вопросы о технике Samsung Galaxy Watch. Узнайте подробнее о ‘Что делать, если в наушниках Galaxy Buds Pro разная громкость ?’ с помощью службы поддержки Samsung
-
Звук / Динамик / Микрофон
Советы по правильному ношению Samsung Galaxy Buds2Часто задаваемые вопросы о технике Мобильные устройства Samsung. Узнайте подробнее о ‘Советы по правильному ношению Samsung Galaxy Buds2’ с помощью службы поддержки Samsung.
-
Настройка
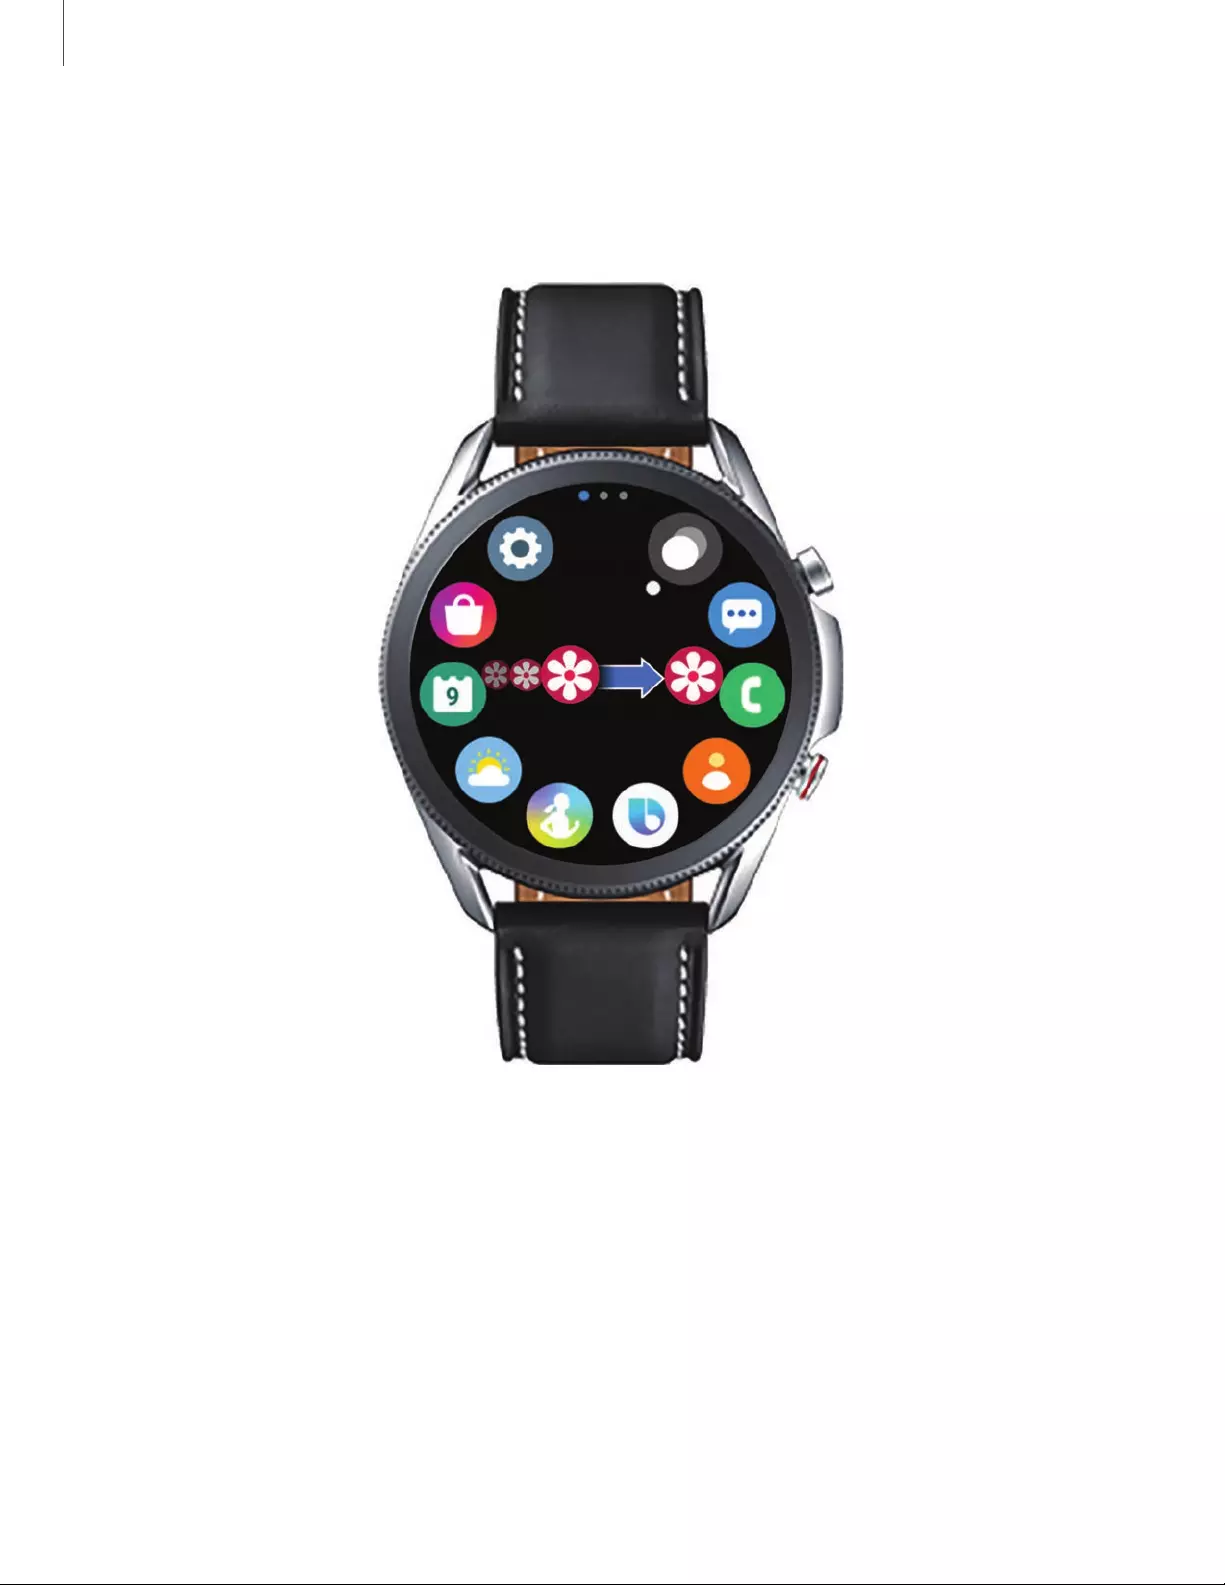
Как настроить быстрые ответы на Galaxy WatchЧасто задаваемые вопросы о технике Samsung Galaxy. Узнайте подробнее о ‘Как настроить быстрые ответы на Galaxy Watch?’ с помощью службы поддержки Samsung
-
Использование
Как измерить состав тела с Galaxy Watch4Узнайте подробнее о ‘Как измерить состав тела с Galaxy Watch4’ с помощью службы поддержки Samsung. Часто задаваемые вопросы о технике Мобильные устройства Samsung.
-
Использование
Как перенести звукозапись с Galaxy Watch на смартфон Samsung GalaxyУзнайте подробнее о ‘Как перенести звукозапись с Galaxy Watch на смартфон Samsung Galaxy’ с помощью службы поддержки Samsung. Часто задаваемые вопросы о технике Мобильные устройства Samsung.
-
Использование
Что представляет собой функция Galaxy Buds «Аудио 360»?FAQ для мобильных устройств. Узнайте подробнее, Что представляет собой функция Galaxy Buds «Аудио 360», в разделе поддержки Samsung.
-
Использование
Как управлять виджетами и карточками на Galaxy WatchЧасто задаваемые вопросы о мобильных устройствах Samsung. Узнайте подробнее о ‘Как управлять виджетами и карточками на Galaxy Watch’ с помощью службы поддержки Samsung.
-
Использование
Как сделать снимок экрана на часах Galaxy Watch?Часто задаваемые вопросы о Мобильных Устройствах. Узнайте больше о том, Как сделать снимок экрана на часах Galaxy Watch, с помощью справочной системы Samsung Support.
-
Использование
Как изменить отображаемое имя наушников Galaxy Buds?Часто задаваемые вопросы о Мобильных Устройствах. Узнайте больше о том, Как изменить отображаемое имя наушников Galaxy Buds, с помощью справочной системы Samsung Support.
-
Использование
Чем отличаются Galaxy Buds2, Buds Live и Buds Pro?FAQ для мобильных устройств. Узнайте подробнее, чем отличаются Galaxy Buds2, Buds Live и Buds Pro, в Samsung Support.
-
Использование
Что делать, если возникла проблема со звуком на Galaxy WatchЧасто задаваемые вопросы о мобильных устройствах Samsung. Узнайте подробнее о ‘Что делать, если возникла проблема со звуком на Galaxy Watch’ с помощью службы поддержки Samsung.
-
Камера
Что делать, если не работает функция управления камерой телефона с часов Galaxy WatchУзнайте подробнее о ‘Что делать, если не работает функция управления камерой телефона с часов Galaxy Watch’ с помощью службы поддержки Samsung. Часто задаваемые вопросы о мобильной технике Samsung.
-
Использование
Техника безопасности при эксплуатации устройства GalaxyFAQ для мобильных устройств. Узнайте подробнее, как обеспечивается Техника безопасности при эксплуатации устройства Galaxy в Samsung Support.
-
Обновление
Обновление программного обеспечения для наушников SamsungЧасто задаваемые вопросы о мобильных устройствах Samsung. Из этого раздела вы узнаете о том, как выполнять обновление программного обеспечения для наушников Samsung.
-
Использование
Как настроить клавишу «Домой» на часах Samsung Galaxy WatchЧасто задаваемые вопросы о Samsung Mobile. В этом разделе справки и поддержки Samsung вы узнаете, как настроить клавишу «Домой» на часах Samsung Galaxy Watch.
-
Использование
Самодиагностика портативных устройств GalaxyЧасто задаваемые вопросы по работе на мобильных устройствах. Узнайте больше о Самодиагностике портативных устройств Galaxy, в Samsung Support.
-
Спецификации / Функции
Советы и методы использования спортивного ремешка D-Buckle для серии Galaxy WatchРаскройте весь потенциал ремешка D-Buckle Sport серии Galaxy Watch с советами и рекомендациями экспертов. Узнайте, как регулировать, обслуживать и настраивать ремешок для часов, чтобы сделать его индивидуальным и стильным. Улучшите свои часы Galaxy Watch с помощью этого универсального аксессуара, который дополнит ваш образ и сделает вашу игру на умных часах еще лучше.
-
Использование
Как настроить порядок упражнений на Galaxy WatchУзнайте подробнее о ‘Как настроить порядок упражнений на Galaxy Watch’ с помощью службы поддержки Samsung. Часто задаваемые вопросы о мобильных устройствах Samsung.
-
Использование
Руководство пользователя приложения «Компас» для Galaxy WatchЗнание того, как использовать компас вашего Galaxy Watch, поможет вам добраться туда, куда вам нужно, когда вы не совсем уверены, куда повернуть.
-
Использование
Как сделать резервную копию данных на Samsung Galaxy WatchЧасто задаваемые вопросы о мобильных устройствах Samsung. Узнайте подробнее о ‘Как сделать резервную копию данных на Samsung Galaxy Watch’ с помощью службы поддержки Samsung.
-
Использование
Как включить режим «Сон» или «Театр» на Galaxy WatchУзнайте подробнее о ‘Как включить режим «Сон» или «Театре» на Galaxy Watch’ с помощью службы поддержки Samsung. Часто задаваемые вопросы о мобильных устройствах Samsung.
-
Использование
Как почистить ваше устройство Samsung GalaxyУчитывая, как грязь и микробы скапливаются на устройствах, которыми мы пользуемся каждый день, разумно научиться чистить устройство Samsung Galaxy.
-
Использование
Как правильно носить и ухаживать за Galaxy Watch/FitСледуя этому руководству по правильному ношению и обслуживанию устройства, убедитесь, что ваше устройство Galaxy Watch/Fit находится в хорошем состоянии.
-
Использование
Как поменять амбушюры у наушников GalaxyУзнайте, как легко заменить насадки для наушников Galaxy, с помощью нашего подробного руководства.
-
Samsung Apps
Используйте приложение Samsung Find, чтобы найти потерянное устройствоУзнайте, как использовать приложение Samsung Find для поиска утерянных устройств и отслеживания Samsung SmartTags.
-
Samsung Apps
Возможности приложения Samsung FindОткройте для себя различные функции приложения Samsung Find.
-
Настройка
Используйте беззвучные режимы на своих Samsung Galaxy WatchУзнайте, как использовать различные беззвучные режимы на часах Galaxy.
-
Samsung Apps
Просмотр количества шагов в Samsung HealthНаучитесь использовать устройства Galaxy для отслеживания количества шагов в приложении Samsung Health.
-
Обновление
Как обновить программное обеспечение и приложения на Samsung Galaxy WatchУзнайте, как обновить программное обеспечение и приложения ваших часов Samsung Galaxy.
-
Использование
Что делать, если приложение Samsung Galaxy Watch выходит из строя, зависает или не отвечаетУзнайте, что делать, если приложение на ваших часах Samsung Watch выходит из строя, зависает или не отвечает.
-
Использование
Как подключить часы Galaxy Watch к устройству Samsung GalaxyУзнайте, как подключить Galaxy Watch к устройству Samsung Galaxy, с помощью этого пошагового руководства.
-
Настройка
Как использовать телефон или часы Samsung Galaxy для управления уведомлениями на носимом устройствеУзнайте, как использовать телефон Galaxy и Galaxy Watch для включения и отключения уведомлений на носимом устройстве.
-
Питание / Зарядка
Что делать, если наушники Samsung Galaxy не включаются и не заряжаютсяУзнайте, что делать, если наушники Samsung Galaxy не включаются и не заряжаются.
-
Использование
Как установить или обновить приложение на устройстве с операционной системой Wear OSУзнай подробнее Как установить или обновить приложение на устройстве с операционной системой Wear OS с помощью службы поддержки Samsung. Часто задаваемые вопросы о мобильных устройствах Samsung Galaxy.
-
Обновление
Что делать, если на экране Galaxy Fit появляется восклицательный знак?Что делать, если на экране Galaxy Fit появляется восклицательный знак?
-
{{file.description}}
- Версия {{file.fileVersion}}
- {{file.fileSize}} MB
- {{file.fileModifiedDate}}
- {{file.osNames}}
Полезные ссылки
Другие программные инструменты и сервисы
Kies
Программа для создания резервных копий. Подойдет для всех смартфонов и планшетов Galaxy на Android от 2.3 до 4.3 и смартфонов Wave (Bada)
Читать дальше
Smart View
Приложение для просмотра мультимедийного контента с мобильного устройства или компьютера на телевизоре Samsung Smart TV
Читать дальше
Smart Switch
Программа для обновления прошивки и создания резервных копий. Подойдет для всех смартфонов и планшетов Galaxy на Android 4.3 и новее
Читать дальше
ДОПОЛНИТЕЛЬНАЯ ИНФОРМАЦИЯ
Информация о гарантии
Узнайте, что входит в гарантийные обязательства
Индивидуальная поддержка
Получите помощь от официальных центров поддержки
Новости и уведомления
Обьявления о важных продуктах и услугах

User manual

Contents
Getting started
Device Layout: LTE model| Bluetooth model
Set up your device: Charge the battery| Wireless PowerShare
Start using your device: Turn on your device| Activation| Galaxy Wearable app| Lock or
unlock your device| Home key settings| Navigation| Change the watch face| Quick panel|
Notifications| Water lock mode| Do not disturb| Goodnight mode | Theater mode| Daily
briefing | Enter text
Apps
Navigate the apps screen| Messages| Phone| Contacts| Bixby| Samsung Health|
Weather| Calendar| Galaxy Store| Samsung Pay| Reminder| Microsoft Outlook| Music|
Gallery| Find My Phone| Alarm| World clock| Timer| Stopwatch| Spotify| PPT Controller|
Voice Recorder | Samsung Health Monitor
Settings
Connections: Bluetooth| Mobile networks| Wi-Fi| NFC| Disconnection alerts| Airplane
mode | Connect to a new phone
Sound and vibration: Sound mode| Ringtone | Notification sound | Volume | Ringtone
vibration | Notification vibration| Vibration intensity| Long vibration| System sounds |
Vibration feedback
Display: Adjust screen brightness| Set the screen timeout| Show last app| Background
style| Font style | Show charging info
Device maintenance: Date and time| Power saving mode| Watch only mode| Optimize
battery | Related settings | Reset the Watch | Location
Lockscreen and security: Set a screen lock | Permission manager
2WEA_R84X_R85X_EN_UM_TN_TH1_100520_FINAL

Accessibility: Screen Reader| Visibility enhancements| Hearing enhancements| Advanced
settings | Text to speech
Other: Screen wake—up|Touch sensitivity| Watch status | Watch info
Learn More
Samsung Care | Samsung Care | Samsung Care | Samsung Care
Legal information
Samsung Knox | Maintaining water and dust resistance | Military Specification | Restricting
children’s access to your mobile device
Contents
3

Getting started
LTE model
Bluetooth model
Set up your device
Start using your device
4

LTE model
Atmospheric
pressure sensor
GPS antenna
Light sensor
Touchscreen Home key
Back key
Microphone
Band
Heart rate
sensor
Pressure vent
Speaker
Getting started
5
Devices and software are constantly evolving — the illustrations you see here are for reference only.

Bluetooth model
Atmospheric
pressure sensor
GPS antenna
Light sensor
Touchscreen Home key
Back key
Microphone
Band
Heart rate
sensor
Pressure vent
Speaker
Getting started
6
Devices and software are constantly evolving — the illustrations you see here are for reference only.

Set up your device
Charge the battery| Wireless PowerShare
Learn more about your device hardware, assembling and charging, and how to get
started using your new device.
CAUTION Do not insert sharp objects into the atmospheric pressure sensor, the
pressure vent, speaker, or the microphone. Inner components of the watch may
be damaged along with the water-resistance feature.
Charge the battery
Your device is powered by a rechargeable battery.
1. Connect the wireless charger to a USBcharging port.
2. Place the watch onto the wireless charger, aligning the center of your watch
with the center of the wireless charger.
3. After fully charging, disconnect the watch from the wireless charger.
Getting started
7
Devices and software are constantly evolving — the illustrations you see here are for reference only.

CAUTIONThe charging head for plugging the USB cable into a wall outlet is not
included. Use only Samsung charging devices rated with an output voltage of 5v
and an output current of over 150mA (sold separately). Samsung accessories are
designed for your device to maximize battery life. Using other accessories may
void your warranty and may cause damage.
NOTEPrevent the USB charger port and the small end of the charger cable from
coming into contact with conductive materials, such as liquids, dust, metal
powders, and pencil leads.
While charging, the device and the charger may become hot. This does not affect the
device’s lifespan or performance and is in the device’s normal range of operation.
Remove the device from the charger and wait for the device to cool down. For more
information, visit https://www.samsung.com/us/support/answer/ANS00076952.
NOTEDo not disassemble, modify, or repair your device. Placing objects, such as
magnetic stripe cards, including credit cards, phone cards, passbooks, and
boarding passes, next to the device or charger may cause damage from the
charger or device’s magnetic field.
8
Getting started
Wireless PowerShare
Wirelessly charge your device using a supported Samsung smartphone. Some features
are not available while sharing power.
1. From the smartphone, open the Notification panel and, tap Wireless
PowerShare to enable this feature.
2. With the smartphone face down, place the device on the back of the smartphone
to charge. A notification sound or vibration occurs when charging begins.
Getting started
9
Devices and software are constantly evolving — the illustrations you see here are for reference only.

NOTEWireless PowerShare works with most Qi—Certified devices. Requires
minimum 30% battery to share. Speed and power efficiency of charge varies by
device. May not work with some accessories, covers, or other manufacturer’s
devices. If you have trouble connecting or charging is slow, remove any cover
from each device. May affect call reception or data services, depending on your
network environment.
For best results when using Wireless PowerShare, please note:
•Remove any accessories or cover before using the feature. Depending on the
type of accessory or cover, Wireless PowerShare may not work properly.
•The location of the wireless charging coil may vary by device, so you may need to
adjust the placement to make a connection. When charging starts, a notification
or vibration will occur, so the notification will help you know you‘ve made a
connection.
•Call reception or data services may be affected, depending on your network
environment.
•Charging speed or efficiency can vary depending on device condition or
surrounding environment.
•Do not use headphones.
10
Getting started

Wear the Watch
Wrap the watch firmly around your lower arm just above your wrist as shown below.
Do not fasten the watch too tightly.
WARNINGWear the device correctly. If you feel discomfort while using the
device, stop using it. If your device becomes hot, please remove it until it cools.
1. Open the buckle and place the strap around yourwrist.
2. Fit the strap to your wrist, insert the pin into an adjustment hole, and then
secure the buckle to close it.
Strap tips and precautions
lSome people may experience discomfort when wearing the watch for prolonged
periods.
lIf you have sensitive skin or fasten the watch too tightly, you may feel some
discomfort.
lDo not expose the straps to very wet conditions. Wet straps can cause skin
irritations. Dry the straps first. If you experience skin irritation when wearing the
watch, stop wearing it and consult a physician.
Getting started
11
Devices and software are constantly evolving — the illustrations you see here are for reference only.
Replace the strap
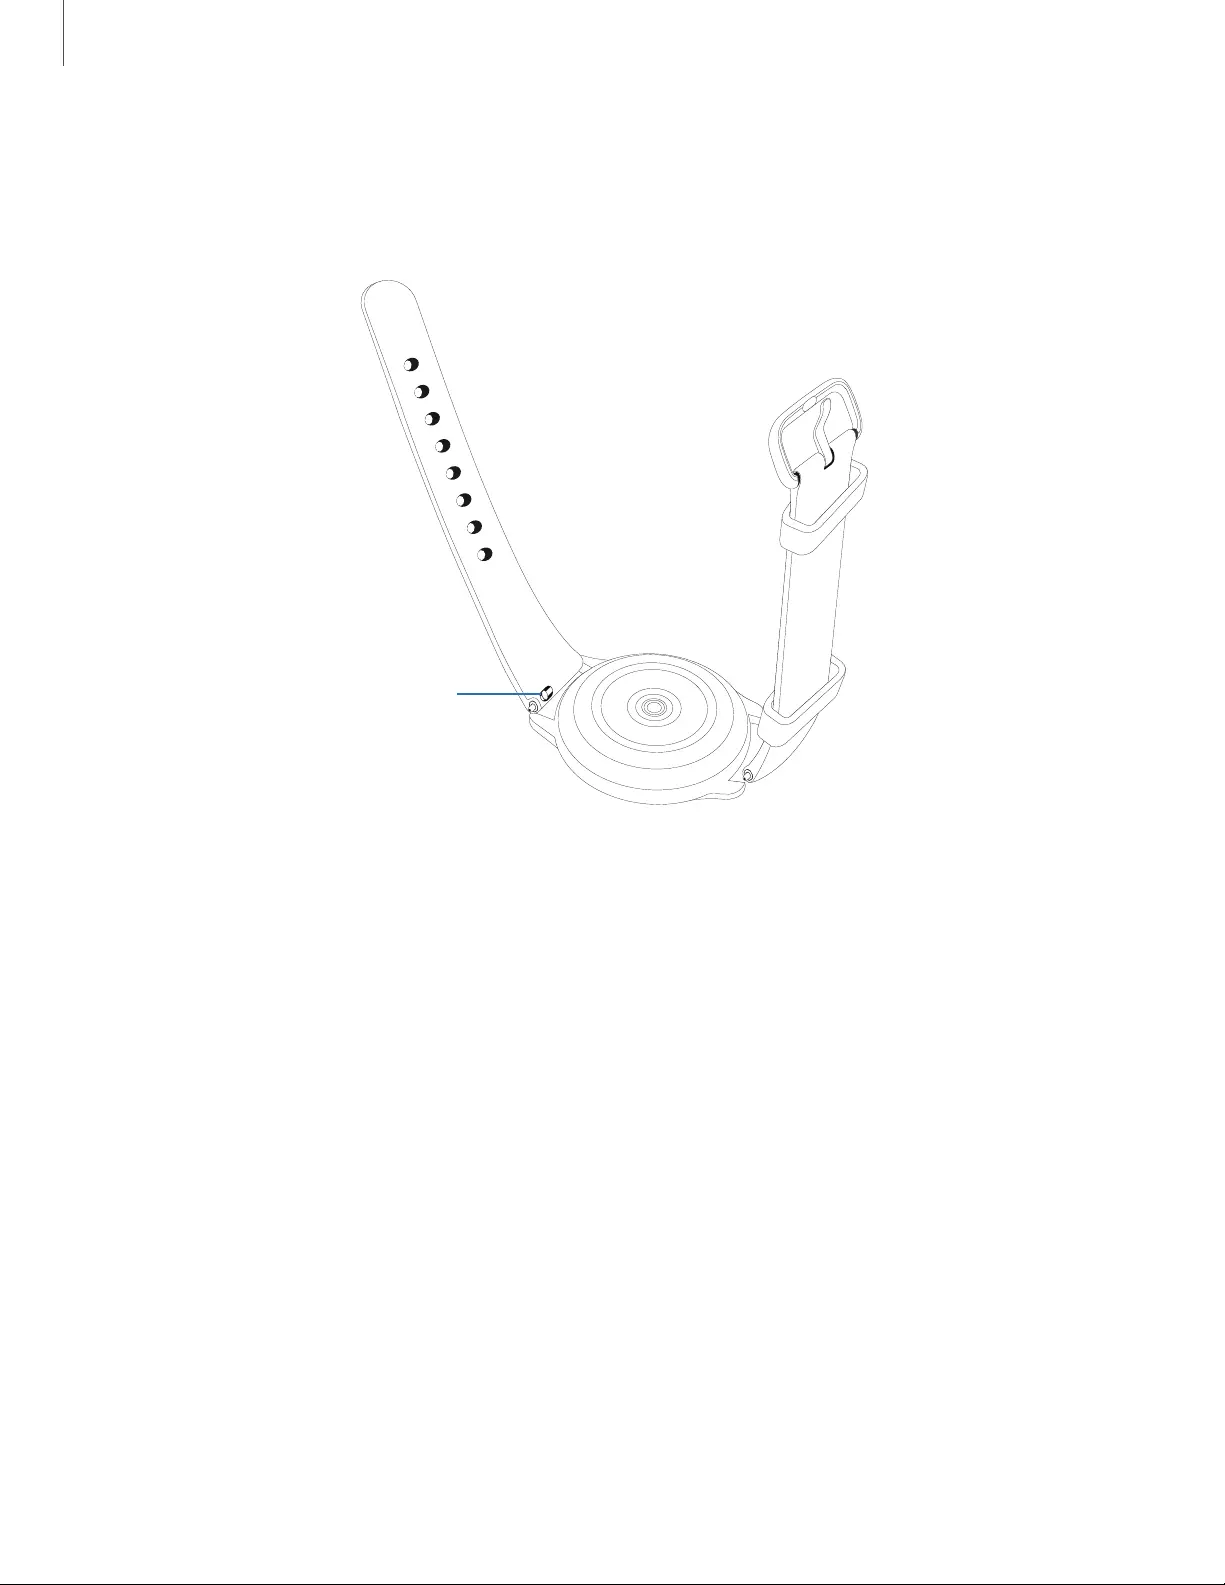
Detach the strap from the watch to replace it with anewone.
To remove the strap:
◌Slide the strap’s spring bar inward and pull the strap away from the watch.
To replace the strap:
1. Insert one end of the spring bar into the hole on the side of the watch.
2. Slide the other spring bar inward, and release it once the strap is in place.
Getting started
12
Devices and software are constantly evolving — the illustrations you see here are for reference only.
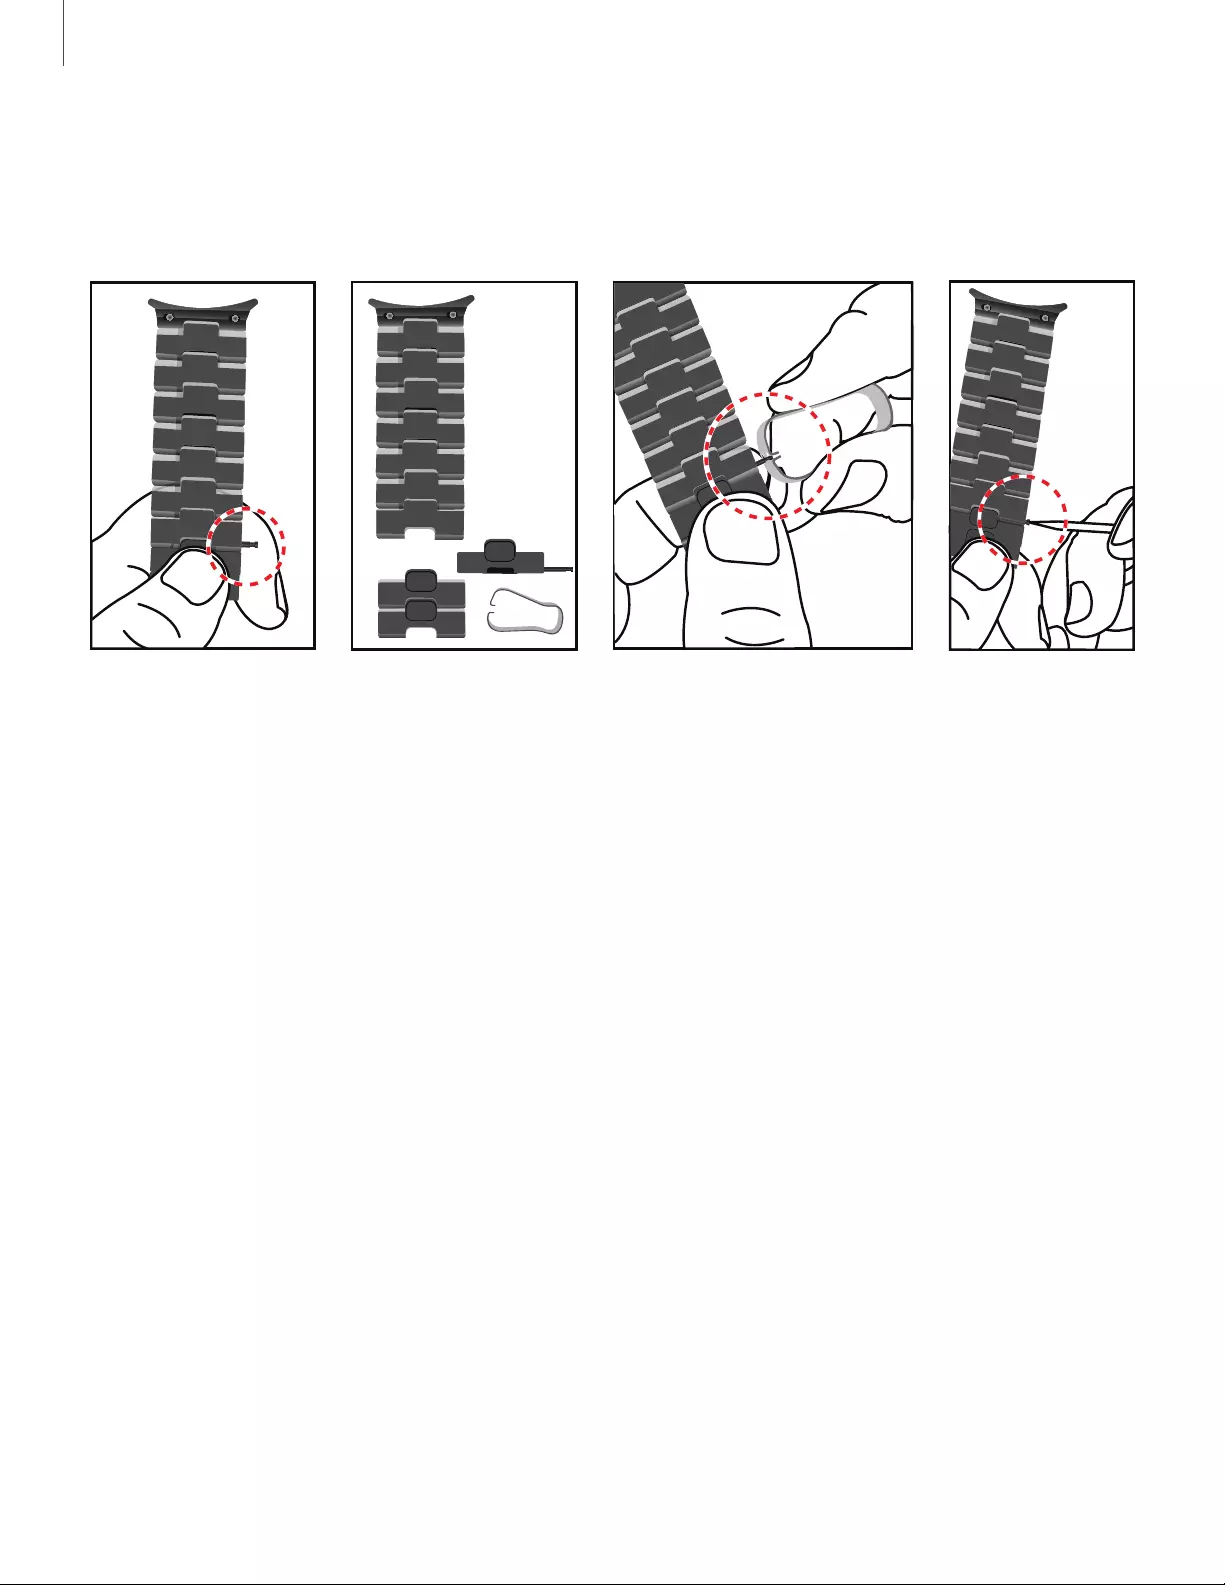
Adjust the titanium strap
You can make the titanium strap longer or shorter for a better fit.
1. Press the button on the strap. The pin will pop out.
2. Use the provided tool to remove the pin.
3. Remove or add links to adjust the strap to your desired length.
4. Replace the pin using a small pointed object.
Getting started
13
Devices and software are constantly evolving — the illustrations you see here are for reference only.

Start using your device
Turn on your device| Activation| Galaxy Wearable app| Lock or unlock your device| Home
key settings| Navigation| Change the watch face| Quick panel| Notifications| Water lock
mode| Do not disturb| Goodnight mode | Theater mode| Daily briefing | Enter text
Turn on your device
Use the Home key to turn your watch on or off.
◌Press and hold the Home key.
•To turn the watch off, swipe down from the top of the watch screen to open
the Quick panel, and tap > Power off.
TIPTo restart the watch, press and hold the Home and Back keys for more than
seven seconds.
Activation
The Galaxy Watch3 (R845U and R855U) are 4G LTE-enabled. Get texts, alerts, and
make and receive calls, even when you leave your phone behind.
Consult your service provider for more information about activation.
Galaxy Wearable app
To connect your watch to a smartphone, install the Galaxy Wearable app on the
smartphone. You can download the app from the GalaxyStore or the Google Play™
store.
Galaxy Wearable is compatible with select devices using Android 5.0 and later with at
least 1.5 GB RAM. Supported devices may vary by carrier and device. Some features
may not be available. For best results, connect with compatible Samsung Galaxy
devices. Visit samsung.com/us/support/owners/app/galaxy—wearable—watch for a list
of compatible smartphones.
14
Getting started

Connect the watch to a smartphone
Turn on the watch before connecting to your phone.
1. From the Apps screen of the smartphone, tap Galaxy Wearable. If necessary,
update the app to the latest version.
2. Tap Get started and select your device.
3. When the Bluetooth® pairing request window is displayed, confirm the passkeys
displayed on your watch and smartphone match, and then tap OK.
4. Follow the prompts to complete the connection.
When the devices are connected, a tutorial is displayed on the watch’s screen. Follow
the prompts to the learn basic controls.
Back up data
The watch can only be connected to one smartphone at a time. When you connect the
watch to a new smartphone, the watch automatically resets and all data is removed
from its memory. Make sure you back up any important data stored on yourwatch.
1. From Galaxy Wearable, tap the Home tab.
2. Tap Account and backup > Back up data.
Remote connection
Set the watch to remotely connect to the smartphone when a Bluetooth connection
between the devices is not available. With this connection, you can still receive
notifications from your smartphone. The watch and smartphone must be connected to
the same Wi-Fi® network in order to receive notifications and calls.
To enable or disable this feature:
1. From Galaxy Wearable, tap the Home tab.
2. Tap Account and backup > Remote connection.
Disconnect
1. From Galaxy Wearable, tap the Home tab.
2. Tap Menu > Disconnect.
15
Getting started

Lock or unlock your device
By default your screen is not locked. You can use the screen lock feature to secure
your device. See Set a screen lock.
When enabled, your watch locks when you remove it from your wrist or when the
screen times out while you are wearingit.
To lock the watch:
◌Cover the screen with your palm.
To unlock the watch:
◌Press any key to turn on the watch screen.
•If you have a lock screen enabled, press any key to enter your pattern or pin
and unlock the watch.
Home key settings
You can customize the shortcuts assigned to the Home key.
Double press
Choose which feature is launched when the Home key is pressed twice. By default this
option is set to open the Recent apps list.
1. From Settings, tap Advanced > Home key.
2. Tap Double press, and choose a shortcut to enable it.
Press and hold
Choose which feature is launched when you press and hold the Home key. By default
this option is set to wake Bixby.
1. From Settings, tap Advanced > Home key.
2. Tap Press and hold, and choose a shortcut to enable it.
16
Getting started
Navigation
The touchscreen responds best to a light touch from the pad of your finger. Using
excessive force or a metallic object on the touchscreen may damage the tempered
glass surface and void the warranty.
Tap
Lightly tap the screen to launch an app or select a menu item.
Getting started
17
Devices and software are constantly evolving — the illustrations you see here are for reference only.

Swipe
Lightly drag your finger vertically or horizontally across the screen to view panels.
Getting started
18
Devices and software are constantly evolving — the illustrations you see here are for reference only.
Drag
Touch and hold an item, and then move it to a new location.
Getting started
19
Devices and software are constantly evolving — the illustrations you see here are for reference only.

Rotate
Lightly press and drag your finger clockwise or counterclockwise using the digital
bezel on the edge of the screen to move through a list.
Getting started
20
Devices and software are constantly evolving — the illustrations you see here are for reference only.

Change the watch face
From the smartphone:
1. From Galaxy Wearable, tap the Watch faces tab.
2. Tap a watch face.
3. Tap Customize to select a background and items to display on the watch face.
From the watch:
◌Touch and hold the watch face. Swipe left or right to choose a new style.
Watch face settings
Customize the watch face style, order, and notifications.
◌From Settings, tap Watch faces. The following options are available:
•Select watch face: Select a watch face type.
•Watch always on: Set the watch to display the time when the screen is
turned off.
•Watch face order: Display the most recent watch face or create a custom
order.
•Notification indicator: Enable or disable the notification indicator.
•Show status: Indicators are icons that show the current status of your watch
on the watch face.
•Ongoing icons: Show icons for ongoing events such as a workout or voice
memo.
21
Getting started

Widgets
You can instantly check your health and activity information and view app
information, such as weather and schedules, for some connected mobile devices.
Add Widgets
To add more widgets on the Home screen:
1. Swipe to the end of the Widget screens, and tap Add widget.
2. Select a widget.
The selected widget is displayed in a new panel.
Move Widgets
◌Touch and hold a widget and then drag it to the desired location.
Remove Widgets
◌Touch and hold a widget, and then tap Remove.
22
Getting started

Quick panel
Instead of navigating through the Settings menu, you can access commonly used
settings through the Quick panel, where you can also view the Status bar.
◌Swipe down from the top of the watch screen to open the Quick panel.
•Tap a quick setting to open it.
•Touch and hold a quick setting to edit the placement, remove a setting, or
add a new setting.
Getting started
23
Devices and software are constantly evolving — the illustrations you see here are for reference only.

Status bar
Indicator icons display at the top of the screen in the Status bar. Swipe down from the
top of the watch screen to view the Status bar.
Indicator icons
Battery full
Bluetooth connected
Bluetooth enabled, but not connected
Wi-Fi connected
LTEnetwork connected (LTE model only)
Signal strength (LTEmodel only)
24
Getting started

Notifications
Stay up to date with events, notifications, and messages from your smartphone. When
you receive a notification, information about the notification, such as its type, is
displayed on the screen while the watch is vibrating.
◌From the watch screen, swipe right and tap a notification to view details.
Getting started
25
Devices and software are constantly evolving — the illustrations you see here are for reference only.

View a list of notifications for each app
You can view a list of notifications from the same app.
1. From the watch screen, swipe right to view notifications.
2. Tap the number at the bottom of the notification.
Clear all notifications
Instead of individually clearing notifications, you can clear all notifications at once.
1. From the watch screen, swipe right to view notifications.
2. Swipe right until you reach the end of the notifications screens, and then tap
Clearall.
Block notifications
You can choose to block notifications from some apps. Not all apps support Block
notifications.
1. From the watch screen, swipe right to view notifications.
2. Tap a notification from the app that you want to block, and tap again to view the
details.
3. Tap More options > Block notifications.
Notification settings
Change settings for the notification feature.
1. From the Apps screen of the smartphone, tap Galaxy Wearable > Home tab >
Notifications.
2. Tap to activate it, and then tap to select items:
•Show only while wearing: Show notifications on your watch only while it is
beingworn.
•Show while using phone: Show notifications from your phone on your watch
while you are using your phone.
•Turn on for new apps: Automatically turn on notifications for newly installed
apps.
26
Getting started

Water lock mode
You can use Water lock mode to exercise in the water. While in Water lock mode,
touchscreen, wake—up gestures, and watch always on will be disabled.
1. Swipe down from the top of the watch to open the Quick settings panel.
2. Tap to put the watch in Water lock mode.
TIP You can also enable Water lock mode from the Setting menu. From
Advanced, tap Water lock. Tap to enable.
Exit water lock mode
1. Press and hold the Home key for two seconds to turn off the mode. The watch
will make sounds to eject water from the speaker.
2. Press the Home key to stop the sound.
3. Shake the watch to remove any water from the pressure sensor.
Eject water
You can use the eject water feature to help clear out water from your watch. The
watch will make sounds to help eject water from the speaker.
1. From Settings, tap Advanced > Water lock.
2. Tap Eject water with sound > Play sound.
Do not disturb
Use these options to determine block out time where notifications are turned off, and
during which time periods you want to enter this mode.
◌From Settings, tap Advanced > Do not disturb, and tap to enable an
option:
•Turn on now: Enable this option and set the time period.
•Sync Do not disturb: Match Do not disturb settings on your phone and watch.
TIP You can also access Do not disturb from Quick settings. Swipe down from the
top of the watch, and tap Do not disturb.
27
Getting started

Goodnight mode
Goodnight mutes all alerts, except for alarms and notifications. This keeps the screen
off and mutes most sounds while you sleep.
1. Swipe down from the top of the watch to open the Quick settings panel.
2. Tap to put the watch in Goodnight mode.
TIP You can also access Goodnight mode from the Settings menu. From
Advanced, tap Goodnight mode. Tap to enable.
Theater mode
Theater mode keeps the screen turned off and silences all sounds.
1. Swipe down from the top of the watch to open the Quick settings panel.
2. Tap to put the watch in Theater mode.
TIP You can also access Theater mode from the Settings, tap Advanced >
Theater mode, and tap to enable this feature.
Daily briefing
Receive morning and evening summaries of your schedule, health information, and
reminders.
◌From Settings, tap Advanced > Daily briefing, and tap an option:
•Set briefing times: Manually set up when you will receive briefings.
•Help: Tap to view help information on this feature.
28
Getting started
Enter text
Text can be entered by speaking or by using a keyboard.
Keyboard
Emojis
Voice input
Default keyboard
Select a default keyboard type for text input.
◌From Settings, tap General > Input > Defaultkeyboard and select your default
keyboard.
Getting started
29
Devices and software are constantly evolving — the illustrations you see here are for reference only.

Voice input
Instead of typing your text, you can speak it.
◌Tap Voice input and speak the message you want to enter. Tap Send when
you are finished.
•Tap More options > Input languages to change the language. Voice input is
not supported in some languages.
Emojis
You can add emojis to your message.
◌Tap Emojis, and choose an emoji.
•To insert stickers and bitmojis, tap Stickers.
Keyboard
Use the keyboard to enter your message.
◌Tap Keyboard, and then use your finger to write text, or swipe right to view
the keyboard mode options.
Keyboard settings
Change the Samsung keyboard settings.
◌From Settings, tap General > Input > Keyboard settings, and tap options to
customize:
•Input languages: Select languages for text input.
•Handwriting: Enable handwriting mode.
•Smart typing: Customize features like predictive text, auto capitalize, and
auto punctuate.
•Key-tap feedback: Set the watch to vibrate when you tap a key on the
keyboard.
•Reset keyboard settings: Return your keyboard to the default settings.
•Clear personalized data: Remove word predictions and other personalized
data.
30
Getting started
Apps
Navigate the apps screen
Messages
Phone
Contacts
Bixby
Samsung Health
Samsung Health Monitor
Weather
Calendar
Galaxy Store
Samsung Pay
Reminder
Microsoft Outlook
Music
Spotify
Gallery
Find My Phone
Alarm
World clock
Timer
Stopwatch
PPT Controller
Voice Recorder

Navigate the apps screen
Hide apps| Uninstall apps| Apps Settings
The Apps list displays all preloaded and downloaded apps. Apps can be downloaded
from the Galaxy Store.
◌From the watch screen, press the Home key to open the Apps screen.
•To scroll through the list of apps, rotate the bezel.
•To view other panels, swipe the screen to the left or right.
•To view recently opened apps, tap Recent apps.
Hide apps
You can hide apps that you do not want to see on your watch.
1. From Galaxy Wearable on your phone, tap the Home tab > Apps > Manage
apps.
2. Tap Hide next to the apps you do not want to see on your watch, then tap
Save.
Uninstall apps
Uninstall apps you have download.
1. From Apps on your watch, touch and hold an app.
2. Tap Uninstall. This option is not available for all apps.
Apps Settings
Customize how apps are displayed on the Apps screen.
App layout
Choose how to view your apps.
◌From Settings, tap Apps > Layout, and choose an option:
lRotary view: Use the digital rotating bezel to quickly browse apps by rotating.
lList view: Arrange the apps in a list.
32
Apps

Auto open apps
Set an app to launch without tapping the app. When the indicator icon hovers over an
app, the app will be launched automatically.
◌From Settings, tap Apps > Auto open apps to enable this feature.
Sort apps
Choose how to arrange the apps on the Apps screen.
◌From Settings, tap Apps > App order, and choose an option:
•Most recent first: Recently used apps to appear first.
•Custom: Arrange the apps to your preference.
– From the Apps screen, touch and hold anapp, and then drag it to the
desired location.
App permissions
Configure permissions for each installed app.
1. From Apps, tap Settings.
2. Tap Apps > Permissions.
3. Tap each feature to enable or disable permission to access or use the feature.
33
Apps
Messages
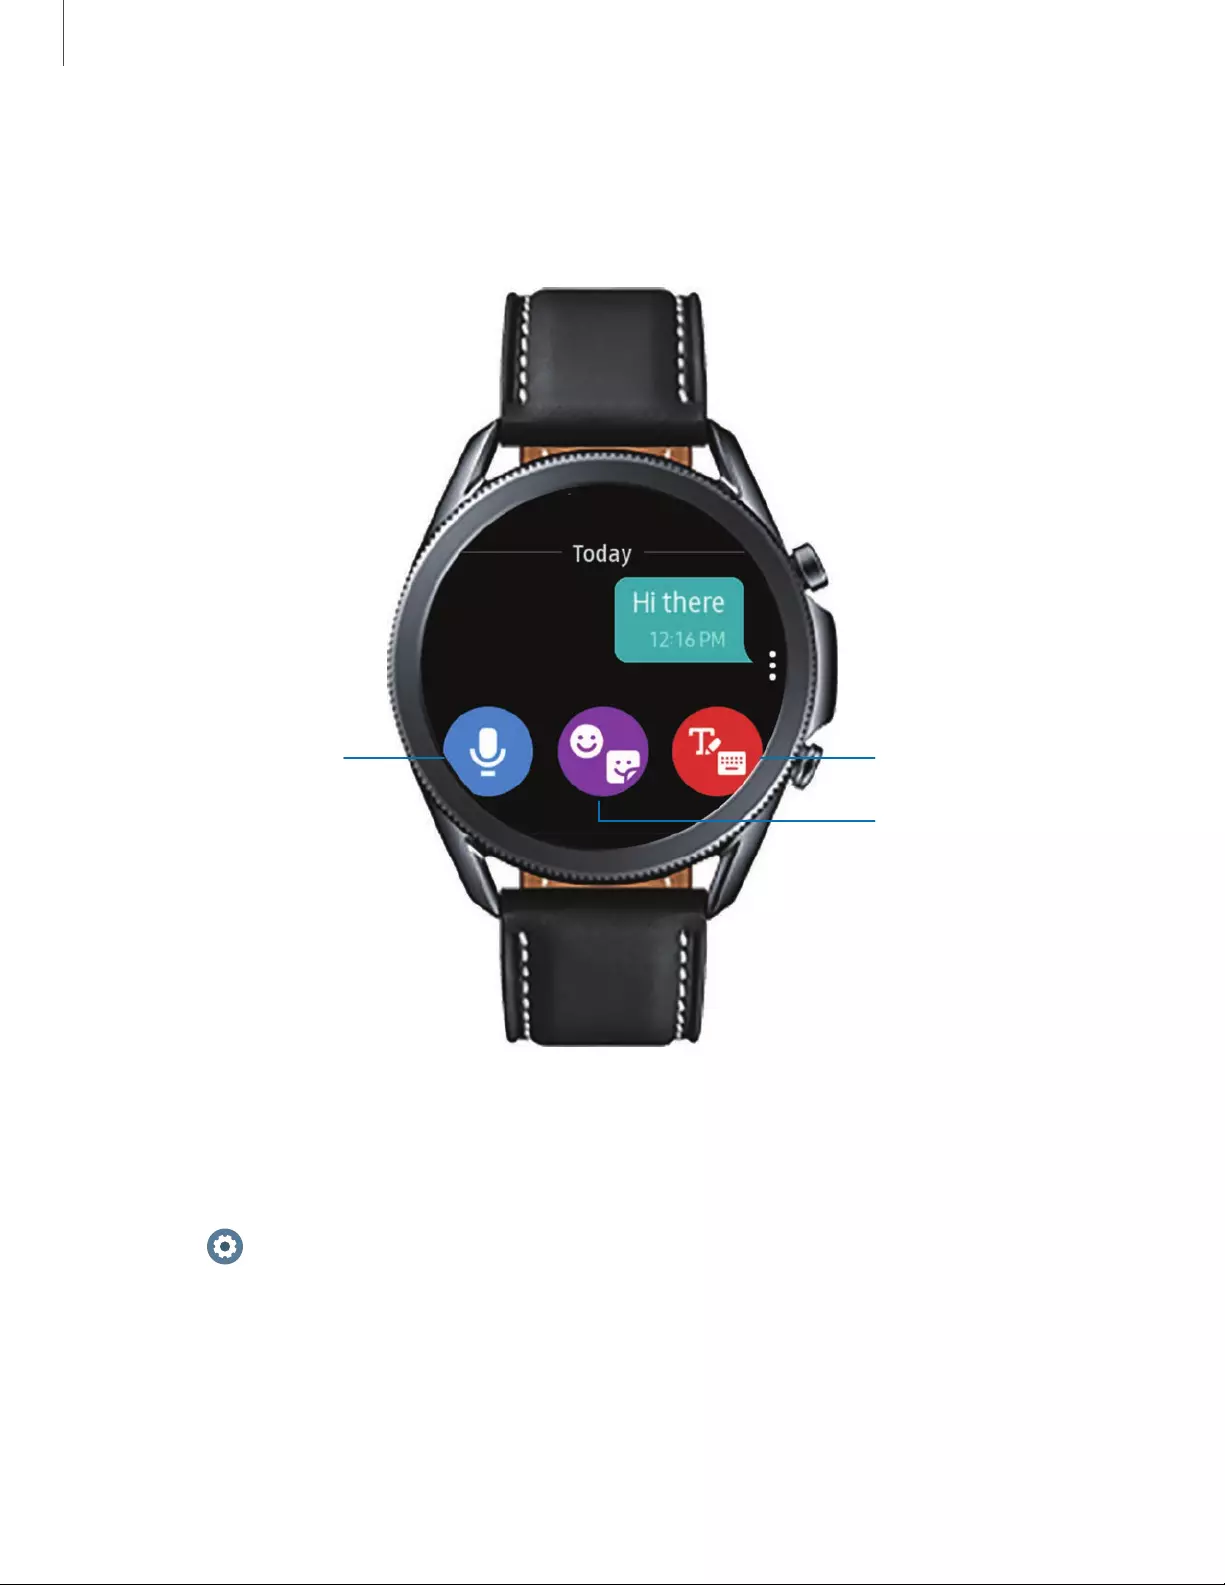
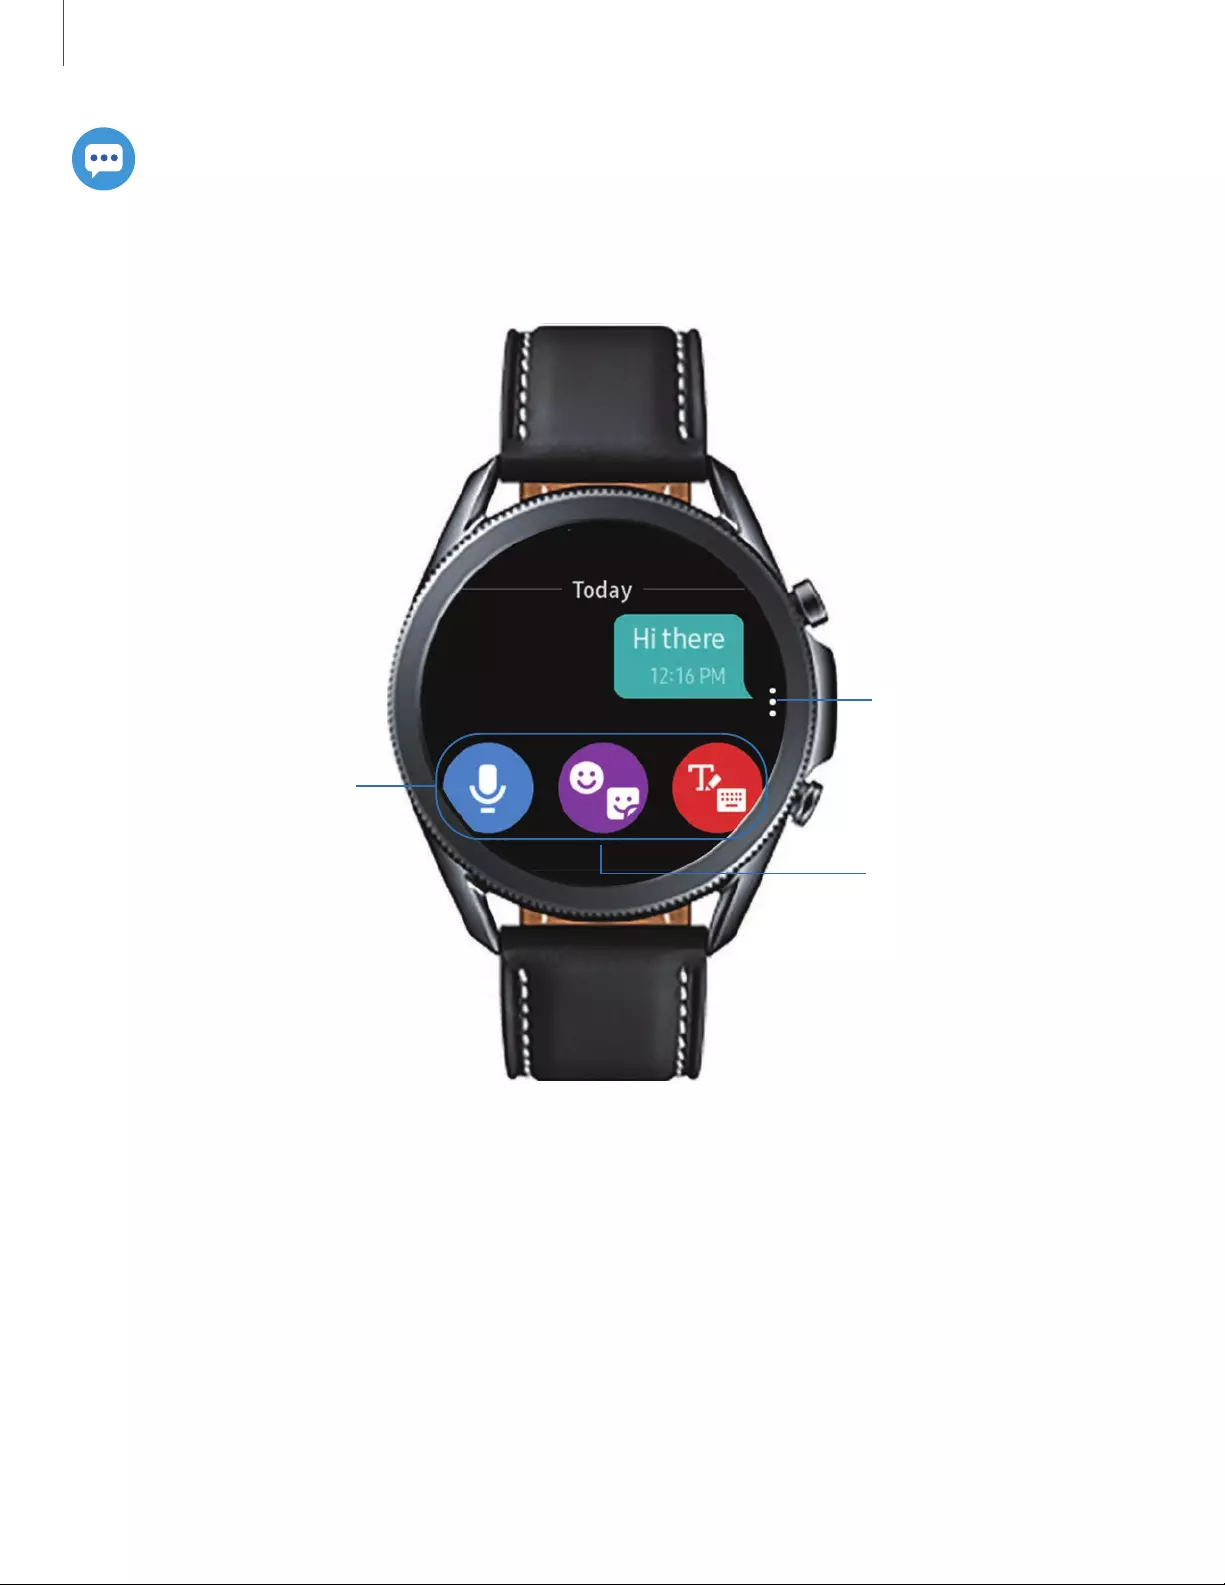
View messages and reply to or call the sender using the watch.
More options
Tap a keyboard to
compose a reply
Swipe down to
select a quick reply
Apps
34
Devices and software are constantly evolving — the illustrations you see here are for reference only.

Send messages
Create and send messages from your watch.
1. From Apps, tap Messages > Compose.
2. Tap Recipient to enter a phone number, or Contacts to add a number you
have saved.
3. Choose a keyboard or quick message to compose your message. Quick messages
and emojis send automatically.
4. Tap Send.
Edit Quick messages
Edit or add templates used for replying to messages.
1. From Galaxy Wearable, tap the Home tab > Apps.
2. Tap Settings next to Messages.
•To edit a message, select it and edit the text.
•To create additional templates, tap Add.
•To delete or rearrange messages, tap Edit.
Delete messages
Delete messages from your watch.
◌Swipe to the right on the watch screen to open a message, then drag the
message up to Delete.
SOS messages
Send a message with your location to designated contacts when you are in an
emergency situation.
35
Apps

Set up SOS messages:
◌From Galaxy Wearable, tap the Home tab > SOS.
•Emergency contacts: Designate an emergency contact.
•Make SOScalls to: Call you emergency contact in an emergency.
•Send SOSes: Press the Home key quickly 3 times to send an SOS message.
•Detect falls: Makes an SOS call and send an SOS message when a hard fall is
detected.
TIP After you have set up SOS messages in the Galaxy Wearable app, you can
enable SOS messages and Detect falls from the Settings menu on the watch.
From Settings, tap Advanced > SOS to customize.
Send SOS messages:
◌Press the Home key quickly three times to send an SOS message.
Message settings
Customize the Messages app.
1. From Apps, tap Messages.
2. Tap More options > Settings, and tap an option to customize:
lSend as audio: Enable to send recordings instead of texts.
lBlocked numbers and messages: View your blocked numbers and messages.
lEmergency alerts: Enable and customize emergency alerts.
36
Apps

Phone
Make and answer calls on your phone from your watch.
More options
End call
Speaker
Transfer to the phone Mute
Make a call
Make a call from your watch.
1. From Apps, tap Phone.
2. Tap Keypad and enter a number or tap Contacts and select a contact to
call.
3. Tap Call.
37
Apps

Answer a call
Answer incoming calls.
◌On the incoming call screen, drag Answer to the right to answer the call on
your phone.
Reject a call
Reject incoming calls.
◌Tap Decline and drag it to the left to reject a call and send it to your
voicemail.
End a call
End a call from your watch.
◌Tap End when you are ready to end your call.
Contacts
View your smartphone’s contact list.
Create a contact
You can search for a contact or scroll through the list to find one by name.
1. From the Apps screen, tap Contacts.
2. Tap Add, and then enter the contact information.
3. Tap Save.
Find a contact
You can search for a contact or scroll through the list to find one by name.
◌From Contacts, tap Search, and then enter characters to find contacts
that match.
38
Apps
Call or message a contact
You can send a message or make a phone call from Contacts.
◌From Contacts, tap the contact you want to connect with, and tap an option:
• Call: Begin a phone call with the contact.
• Message: Type a message to the contact.
Bixby
Bixby is a voice service that helps you use your watch more conveniently. You can talk
to Bixby to launch a function or provide you with information. To use Bixby, your
mobile device must be connected to a Wi-Fi or mobile network, and you must sign in
to your Samsung account.
1. From Apps, tap Bixby.
2. Follow the prompts to set up Bixby.
Use Bixby
To launch Bixby for voice commands:
◌Quickly press the Home key twice, or say «Hi Bixby.«
Enable voice launch
You can launch Bixby using your own voice command. You can only use this feature
when the watch screen is turned on.
◌From Bixby, tap More options > Voice wake—up to enable this feature.
Change the language
Change the speech recognition language.
◌From Bixby, tap More options > Language, and then choose a language.
39
Apps

Samsung Health
When synced with a compatible smartwatch, the Samsung Health application is a
great companion to your routine. You can set goals, record and manage health—
related data, check your progress and receive useful information. Recent info is stored
on your smartwatch for quick access, and you can view historical info in the app on
the synced smartphone.
◌From the Apps screen, tap Samsung Health.
CAUTIONThe ECG app is not intended for users with known arrhythmias other
than atrial fibrillation or users under 22 years old. Users should not interpret or
take clinical action based on the device output without consultation of a
qualified healthcare professional. The ECG app is not intended to replace
traditional methods of diagnosis or treatment.
The SpO2 measurement, VO2 Max, heart rate, and trip detection software functions
are not intended to diagnose disease or other conditions, or to cure, mitigate, treat, or
prevent disease.
The accuracy of the information and data provided by a device and its related
software, including heart rate readings, may be affected by factors such as
environmental conditions, skin condition, specific activity performed while
using/wearing the device, settings of the device, user configuration/user-provided
information, placement of the sensor on the body, and other end-user interactions.
For more information on proper wear and use, visit samsung.com/us/heartratesensor.
Before you start exercising
While moderate physical activity, such as brisk walking, is safe for most people,
health experts suggest that you talk with a qualified healthcare professional before
starting a new exercise routine, especially if you are unsure of your health status, or if
you have any of the following conditions or symptoms:
lPregnancy
lHeart disease; Asthma or lung disease; Diabetes, or liver or kidney disease; and
Arthritis
40
Apps

lSymptoms suggestive of heart, lung, or other serious disease, such as:
lPain or discomfort in your chest, neck, jaw, or arms during physical activity;
lDizziness or loss of consciousness;
lShortness of breath with mild exertion or at rest, or when lying down or going to
bed;
lAnkle swelling, especially at night;
lA heart murmur or a rapid or pronounced heartbeat; or
lMuscle pain when walking upstairs or up a hill that goes away when you rest.
Steps
Your watch counts the number of steps you have taken and measures the distance
traveled.
◌From Samsung Health, tap Steps to view a graph of your step count records.
To set your steps target:
1. From Samsung Health, tap Steps.
2. Swipe up, tap Settings, and then tap Step target.
3. Swipe up or down to set the target.
4. Tap Done.
Exercise
Record your exercise information using Samsung Health’s exercise feature.
1. From Samsung Health, tap Exercise.
2. Tap Work out and swipe to an activity type.
•If available, tap to enter the exercise information.
3. Tap the activity to start monitoring your exercise. Your heart rate measurement
will be displayed after you begin your exercise.
•When you swipe right or left you can view exercise information, such as
calories burned and current speed.
4. Press the Back key to pause the workout.
•Press the Back key again to resume the workout.
41
Apps

•Tap Finish to complete your workout and view your workout summary.
5. Swipe to and tap View log to see your workout log.
NOTEMeasured distance may differ from the actual distance due to uneven
strides, walking in place, and pacing around.
Auto workout tracking
The watch automatically recognizes workouts after 10 minutes of exercise and begins
recording exercise information. If you stop exercise for more than one minute, then
the auto workout tracking feature deactivates. You can view and enable or disable the
exercises supported by the auto workout tracking feature.
1. From Samsung Health, tap Settings.
2. Tap Workout detection > Activities to detect.
3. Tap an activity type to enable or disable auto workout tracking.
Running coach
Set your watch to receive coaching messages for proper pacing while running.
1. From Samsung Health, tap Exercise.
2. Tap Work out >Running coach to begin workout.
•Tap to adjust exercise information.
Calories
View your record of calories burned during activities over the week.
1. From Samsung Health, tap Calories.
2. Swipe up to view your calorie data.
Sleep
Automatically track your sleep patterns.
1. From Samsung Health, tap Sleep.
2. Swipe up to view your sleep data.
42
Apps

Heart rate
Measure and record your heart rate. Take heart rate measurements when you are
seated and relaxed.
1. From Samsung Health, tap Heart rate.
2. Tap Measure to begin measuring your heartrate.
•After a moment, your current heart rate is displayed on the screen.
3. Tap Tag to select a status tag for your measured heart rate.
•The watch displays information about your heart rate in relation to your
selected tag.
Track your heart rate and stress
The watch can be configured to automatically measure and track your heart rate and
stress.
1. From Samsung Health, tap Heart rate.
2. Swipe up, tap HR and stress measurement, and select a measuring interval.
•Measure continuously: The watch measures your heart rate and stress
continuously, regardless of your movement.
•Every 10 mins while still: The watch measures your heart rate every ten
minutes when you are relaxed.
•Manual measurement only: The watch measures your heart rate or stress only
when you check it manually.
3. Tap Help to view help information for using the HR and stress measurement
feature.
Stress
Keep track of your stress. Breathing exercises are also available to help reduce stress.
1. From Samsung Health, tap Stress.
2. Tap Measure to measure your current stress level.
43
Apps

Breathing exercise
Use the Breathe feature to help reduce stress.
1. From Samsung Health, tap Stress.
2. After taking a stress measurement, the Breathe feature is available. Tap Breathe
for the following options:
•Start: Begin the breathing exercise.
•Settings:Configure the following options:
–Target: Adjust the target cycles per minute.
–Inhale/Exhale: Adjust the time for inhaling and exhaling.
–Vibration:Enable or disable vibration between inhale and exhale
prompts.
–Sound: Enable or disable sound for the breathing exercise.
Oxygen level
Keep track of your oxygen level, also known as saturation of percutaneous oxygen
(SpO2).
1. From Samsung Health, tap SpO2.
2. Place you hand flat on a table near your heart.
3. Tap Measure to measure your current oxygen level.
•After a moment, your current oxygen level is displayed on the screen.
4. Tap Tag to select a status tag for your measured oxygen level.
Food
Keep track of your calorie intake from food.
1. From Samsung Health, tap Food.
2. Tap Add when you eat something to enter the following information:
•Meal type:Enter the type of meal you had.
•Cal:Swipe up or down to select the calories consumed.
44
Apps

To set your daily calorie target:
1. From Samsung Health, tap Food.
2. Swipe down and tap Set target.
3. Set the daily calorie number.
4. Tap Done.
Weight management
View your progress in reaching your target weight. Weight management needs to be
enabled and a target weight set through the Samsung Health app on your phone.
1. From Samsung Health, tap Weight management.
2. Swipe up on the screen to see your calorie intake and weight status records.
3. Tap Info for more detailed descriptions of status icons.
Water
Record and track how many glasses of water you drink each day.
1. From Samsung Health, tap Water.
2. Tap Add when you drink a glass of water.
•To decrease the count, tap Remove.
To set your daily water target:
1. From Samsung Health, tap Water.
2. Swipe down and tap Set target.
3. Tap to enable water tracking.
4. Tap Daily target and set the number.
5. Tap Done.
45
Apps

Caffeine
Record and track how many cups of caffeinated beverages you drink each day.
1. From Samsung Health, tap Caffeine.
2. Tap Add when you drink a caffeinated beverage.
•To decrease the count, tap Remove.
To set your daily caffeine target:
1. From Samsung Health, tap Caffeine.
2. Swipe down and tap Set target.
3. Tap to enable caffeine tracking.
4. Tap Daily target, and set the number.
5. Tap Done.
Together
Compete with other Samsung Health users.
Steps leaderboard
Add challenges through Samsung Health on your smartphone.
◌From Apps, tap Samsung Health > Together. Here you can add friends and
challenges.
View challenges on your Watch
View your challenges and rank on the Steps leaderboard.
1. From Samsung Health, tap Together.
2. Tap a list to see your challenges.
46
Apps

Women‘s health
Record and track your menstrual cycle.
◌From Samsung Health, tap Women‘s health.
•Tap Enter period to record your menstrual cycle.
•Swipe up on the screen to view your ovulation and predicted period
information.
•Tap Add log to record your symptoms.
Settings
Customize your Samsung Health settings.
1. From Samsung Health, tap Settings.
2. Tap an item to customize:
•Profile: Update your personal profile.
•Units:Change units for distance, temperature, and volume.
•Workout detection: Set the watch to recognize and encourage you when it
detects that you are exercising.
•Inactive time alerts: Set the watch to alert you if you have been still for
almost an hour.
•HRand stress measurement: Configure automatic heart rate and stress
measurements.
•Data permissions: Configure access permissions to your health data.
3. Tap Help for a description of Samsung Health.
47
Apps

Samsung Health Monitor
Use the Samsung Health Monitor app to track and record electrocardiogram (ECG)
measurements, analyze them quickly, and share the results with experts.
To view detailed reports of your ECG readings on your smartphone, install the
Samsung Health Monitor app. You can download the app from the GalaxyStore or the
Google Play™ store.
1. From your smartphone, tap Samsung Health Monitor. If necessary, update the
app to the latest version.
2. Tap Continue and create your profile.
Measure ECG
Use your Galaxy watch to record ECG for 30 seconds similar to a standard single-lead
ECG. The ECG Monitor app will also check the recording for signs of Atrial Fibrillation—
a common form of irregular heart rhythm.
Requires Samsung Galaxy smartphone with Android 7 or later, and Samsung Health
Monitor app (available only at the Samsung Galaxy app store).
CAUTIONThe ECG app is not intended for users with known arrhythmias other
than atrial fibrillation or users under 22 years old. Users should not interpret or
take clinical action based on the device output without consultation of a
qualified healthcare professional. The ECG app is not intended to replace
traditional methods of diagnosis or treatment.
1. From Samsung Health Monitor, tap ECG.
2. Rest your finger lightly on the Back key to begin the ECG.
•After a moment, your ECG is displayed on the screen.
3. Tap Add to add any symptoms you are experiencing.
4. Tap Done when you are finished.
48
Apps

Share your report
You can view your ECG readings as daily, weekly, and monthly charts, or view detailed
reports for each measurement. You can share the PDF report of your ECG recording
with your healthcare provider using Samsung Health Monitor app on your compatible
Galaxy phone.
1. From your smartphone, tap Samsung Health Monitor.
2. Tap See details to view the latest report or View history to see all available
reports.
3. Tap Share this report and choose a sharing method to send a PDF.
Weather
View weather information on the watch for locations set on the smartphone when
the devices are connected.
◌From Apps, tap Weather. Swipe through the screens to view the weather
information.
•To add a city, rotate the bezel to the last screen and tap Add location.
Calendar
View events scheduled on the smartphone.
1. From Apps, tap Calendar.
2. Swipe right or left to view different months.
Add events
1. From Calendar, tap a day.
2. Tap Add an event.
3. Enter the event information, and tap Save.
49
Apps

Galaxy Store
Samsung Galaxy Store provides a quick and easy way to find and download free
premium apps that are compatible with your Galaxy device. A Samsung account is
required to purchase and download apps.
◌From Apps, tap Galaxy Store.
Samsung Pay
Pay almost anywhere that accepts a debit, credit, or gift card. Samsung Pay supports
Near Field Communication (NFC) to allow quick and secure payment through standard
credit card readers. For more information, see samsung.com/us/samsung-pay.
Set up Samsung Pay
1. From Apps, tap Samsung Pay.
2. Follow the prompts to complete the setup.
Make a payment
1. From any screen, press and hold the Back key to launch Samsung Pay.
2. Enter your four-digit PIN.
3. Select a card, tap Pay, and then hold the watch near the terminal.
NOTEYou can use Samsung Pay for up to 5 transactions without the
smartphone. This may vary depending on the bank/institution issuing the
account.
50
Apps

Reminder
Add reminders for events and set alarms outside of the Calendar app.
Create a reminder
Set up and track reminders on your watch:
1. From Apps, tap Reminder.
2. Tap Add a reminder, and then speak to record your reminder.
•Tap Write memo to type the reminder.
3. Tap Set time to schedule the reminder.
4. Tap Save when finished.
Complete a reminder
To mark reminders complete:
1. From Reminder, tap the reminder you want to complete.
2. Tap the circle to mark it as complete with a check mark.
Microsoft Outlook
View emails and reply tothem.
Read emails
View emails on your watch.
1. From Apps, tap Microsoft Outlook.
2. Tap a message to view its content.
3. Tap Moreoptions for additional options:
•Star: Mark the email as important.
•Show on phone: View the email on your smartphone.
•Delete: Delete the email.
51
Apps

Reply to emails
Compose and send email messages on your watch.
1. From Microsoft Outlook, tap an email to open the email screen.
2. Tap an icon or a quick reply to compose and send your message.
Delete emails
Delete emails on your watch.
1. From Microsoft Outlook, scroll through the inbox to the email you want to
delete.
2. Tap Moreoptions > Delete.
3. Select the email again, and then tap Delete.
52
Apps

Music
Play music from your watch.
Volume
Fast-forward
Rewind
Output
Play/Pause
Apps
53
Devices and software are constantly evolving — the illustrations you see here are for reference only.

Play music from the watch
You can play music from the watch through Bluetooth headphones (not included).
1. From Apps, tap Music.
2. Tap the output until the Watch icon is displayed.
3. Tap More options for the following options:
•Shuffle: Enable or disable shuffle.
•Repeat: Tap to repeat all songs, tap again to repeat once, and tap again to
turn off repeat.
•Add to Favorites: Add a track to your favorites.
•Listen using:Select which audio output type to use for playback.
•Set as ringtone: Set the current track as your ringtone.
•Delete:Remove the current track.
4. Tap Play music to play music.
5. Swipe up from the bottom of the screen to open the library screen, where you
can view the current song, playlist, and queue music.
Play music on your smartphone
When you select a smartphone to play music from, you can control playback of the
music with your watch. The music plays on your smartphone.
1. From Music, tap the output until the Phone icon is displayed.
2. Tap Play music to play music on your smartphone.
3. The music plays on your smartphone and the watch displays the music controller
screen.
Import music
Import music saved on your smartphone to your watch.
1. From Galaxy Wearable, tap the Home tab.
2. Tap Add content to your watch > Add tracks.
3. Select files and tap Done.
54
Apps

To sync recently added music on your smartphone with your watch:
1. From Galaxy Wearable, tap the Home tab.
2. Tap Add content to your watch.
3. Tap Add tracks or tap Auto sync, music will be synced while the watch’s battery
power is at least fifteen percent.
Spotify
Access music and podcasts on your device. You can listen to artists and albums, or
create your own playlist of your favorite songs.
◌From Apps, tap Spotify.
Gallery
View and manage images stored on the watch.
View images
1. From Apps, tap Gallery.
2. Swipe through the image list and then tap an image to view it.
•To zoom in or out, double tap the image.
•To delete an image, tap More options > Delete, and then tap Ok to
confirm.
55
Apps

Import and export images
Images can be exchanged between your watch and smartphone.
Import images from your smartphone
Send images or entire albums from your smartphone to your watch.
1. From Galaxy Wearable, tap the Home tab.
2. Tap Add content to your watch > Copy images to watch.
3. Select files or albums and tap Done.
To automatically sync images on your smartphone with your watch:
1. From Galaxy Wearable, tap the Home tab.
2. Tap Add content to your watch > Auto sync to enable. Images will be synced
while the watch battery power is at least 15 percent.
•Image limit:Set a limit to the number of images that can be synced to your
watch.
•Albums to sync:Select which Gallery albums to sync to your watch.
Export images to your smartphone
1. From Gallery, tap the image you want to send to the smartphone.
2. Tap More options > Copy to phone.
Take a screenshot
Capture an image of your screen. It is automatically saved to the Gallery app.
◌From any screen, press the Home and Back keys at the same time.
56
Apps

Find My Phone
If you misplace your smartphone, your watch can help you find it.
1. From Apps, tap Find My Phone.
2. Tap Start.
•The Phone vibrates and the screen turns on.
3. Tap Dismiss on your smartphone or drag Stop to the right on the watch.
Find your Watch
You can also locate your watch by making it light up and make sounds from the
Galaxy Wearable app.
1. From Galaxy Wearable, tap the Home tab > Find My Watch.
2. Tap Start.
3. Drag Stop to the right on the watch or tap Stop on the smartphone.
Alarm
Set an alarm to ring at a specific time.
Create an alarm
Create an alarm event. You can set one-time or recurring alarms.
1. From Apps, tap Alarm.
2. Tap Add and enter the time.
3. Tap Next, and select the days to repeat the alarm.
4. Tap Save when finished.
Stop or snooze an alarm
◌Drag Cancel to the right to stop an alarm or drag Snooze to the left to
snooze.
57
Apps

Delete an alarm
You can delete an alarm that you created.
◌From Alarm, tap and hold an alarm, and then tap Delete.
World clock
Keep track of the current time in multiple cities around the globe.
Add cities
Keep track of the time in multiple cities:
1. From Apps, tap Worldclock.
2. Tap Add to add a city to your World clock.
3. Tap a location on the map, or tap All cities to search for the city you want to add.
4. Tap the city to add it to your World clock.
•To add more cities, tap Add.
Remove cities
To remove a City:
1. From Worldclock, tap More options by the city you want to remove.
2. Tap Delete, and select the city again.
3. Tap Delete to confirm.
58
Apps

Timer
Set a countdown timer for up to 99hours, 59minutes, and 59 seconds.
Set a timer
Create an alarm event. You can set one-time or recurring alarms.
1. From Apps, tap Timer.
2. Tap a time or Custom to set the Timer.
3. Tap Start.
Stop the timer
◌Drag Cancel to the right when the timer goes off.
Stopwatch
The Stopwatch lets you time events down to a hundredth of a second.
1. From Apps, tap Stopwatch.
2. Tap Start to begin timing.
•To keep track of lap times, tap Lap.
3. Tap Stop to end timing.
•To continue timing after stopping the clock, tap Resume.
•To reset the Stopwatch to zero, tap Reset.
59
Apps

PPT Controller
You can use PPT Controller to connect to a computer, phone, or tablet using
Bluetooth and control PowerPoint presentations with your watch.
To connect:
1. From Apps, tap PPTController.
2. Tap a device in the list to connect your watch.
3. Select your watch from the Bluetooth list on the device.
4. Follow the on—screen instructions to complete the connection. The watch and
device will be connected by Bluetooth.
To disconnect:
◌From PPTController, tap Moreoptions > Connect new device.
Control PPT slides with the watch
You can remotely control the PowerPoint slides with your watch.
1. Open the PowerPoint presentation on your connected device.
2. From PPTController, tap Play to start the slideshow on your device.
•Tap Next or rotate the bezel to the right to move to the next slide.
•Swipe up from the bottom of the watch screen, and tap Previous or rotate
the bezel to the left to move to the previous slide.
•Swipe up from the bottom of the watch screen, and tap Touchpad to move
the cursor on the device by swiping on the watch screen.
3. Swipe up from the bottom of the watch screen, and tap Stop to finish
controlling slides with your watch.
60
Apps

Presentation alerts
You can set alerts on your watch to warn you when you are close to the end of your
presentation time, or at various intervals during your presentation.
Wrap-up alerts
Receive a notification after a set time.
1. From PPTController, tap Moreoptions > Wrap-up alert.
2. Tap to enable this feature.
3. Tap Set alert for, and enter the time that your presentation needs to be finished.
Interval alerts
Receive a notification at set intervals during your presentation to help keep you on
track.
1. From PPTController, tap Moreoptions > Interval alerts.
2. Tap to enable this feature.
3. Tap Interval type, and choose to base intervals on time or slides.
4. Tap Set interval, and enter the interval that you want to receive notifications.
Voice Recorder
Use your voice to record memos.
1. From Apps, tap Voice Recorder.
2. Tap Record or Speech-to—text and begin recording your message.
•To stop recording and delete the memo, tap .
•To pause the recording, tap Pause.
3. Tap Stop when you are finished.
61
Apps

Settings
Access Settings
Display
Sound and vibration
Connections
Device maintenance
Accessibility
Security and privacy
Other settings
62

Access Settings
You can personalize your device by configuring various setting options.
◌From Apps, tap Settings, or swipe down from the top of the screen to open
the status panel and tap Settings.
Display
Adjust screen brightness| Set the screen timeout| Show last app| Background style| Font
style | Show charging info
You can configure the screen brightness, timeout delay, font size, and many other
display settings.
Adjust screen brightness
Manually adjust the brightness of the display.
◌From Settings, tap Display and select an option:
•Brightness: Manually adjust the brightness of the display.
•Auto low brightness: Set the watch to automatically adjust the brightness
depending on ambient light conditions.
Set the screen timeout
Set the length of time the watch waits before turning off the display’s backlight.
◌From Settings, tap Display > Screen timeout, and select a timeout value.
Show last app
Set the length of time the watch shows displays last app used when you turn the
screen on.
◌From Settings, tap Display > Show last app, and select a timeout value.
63
Settings

Background style
Select a background for the watch screens. This will be applied to every screen except
your main watch screen.
◌From Settings, tap Display > Background style and select a background.
Font style
Customize the font style and size on your watch.
◌From Settings, tap Display > Font and choose an option to customize:
•Font style: View and select a font.
•Font size: Choose from small, medium, and large.
Show charging info
Display the battery level until full.
1. From Settings, tap Display > Show charging info.
2. Tap to enable the feature.
Sound and vibration
Sound mode| Ringtone | Notification sound | Volume | Ringtone vibration | Notification
vibration| Vibration intensity| Long vibration| System sounds | Vibration feedback
Configure the vibrations used to indicate notifications, screen touches, and other
interactions.
64
Settings

Sound mode
Switch between sound modes, while preserving the individual sound settings you have
made.
1. From Settings, tap Sound and vibration.
2. Tap Soundmode, and then select a mode:
•Sound: Enable sounds for notifications and alerts.
•Vibrate: Use vibration only for notifications and alerts.
•Mute: Set your device to make no sounds.
Ringtone
Choose from preset ringtones or add your own.
1. From Settings, tap Sound and vibration.
2. Tap Ringtone.
3. Tap a ringtone to hear a preview, or tap Add from watch to use an audio file as a
ringtone.
4. Tap OK to select it.
Notification sound
Choose from preset notification sounds.
1. From Settings, tap Sound and vibration > Notification sound.
2. Tap a notification sound to hear a preview, and tap OK to select it.
Volume
Set volume levels.
1. From Settings, tap Sound and vibration > Volume.
2. Swipe the screen from right to left to adjust the volume levels for different
modes.
65
Settings

Ringtone vibration
Vibrate for calls.
1. From Settings, tap Sound and vibration.
2. Tap Ringtone vibration and select a vibration pattern.
3. Tap OK to confirm.
Notification vibration
Choose a vibration pattern for new notifications.
◌From Settings, tap Sound and vibration > Notification vibration and select a
vibration pattern. Tap OK to confirm.
Vibration intensity
Configure the vibration intensity.
◌From Settings, tap Sound and vibration > Vibration intensity, and select your
preferred intensity level. Tap OK to confirm.
Long vibration
Increase the duration of the vibration for calls and notifications.
◌From Settings, tap Sound and vibration > Long vibration to enable this
feature.
66
Settings

System sounds
Enable sounds for actions like tapping the screen and charging the watch.
1. From Settings, tap Sound and vibration.
2. Tap System sounds, and then an option to enable it:
•Touch sounds: Play tones when you touch or tap the screen to make
selections.
•Ticking sound: Hear a ticking sound similar to a mechanical watch every
second.
•Hourly chime: Hear a sound and feel a vibration at the start of each hour.
•Unlock sound: Play a sound when you lock or unlock the screen.
•Charging sound: Play a sound when a charger is connected.
•Dialing keypad: Play a tone when dialing numbers on the Phone keypad.
Vibration feedback
Enable vibrations when the watch screen is tapped.
◌From Settings, tap Sound and vibration > Vibration feedback, and tap to
enable.
Connections
Bluetooth| Mobile networks| Wi—Fi| NFC| Disconnection alerts| Airplane mode | Connect
to a new phone
Manage connections between your device and a variety of networks and other
devices.
67
Settings

Bluetooth
Use Bluetooth to connect the watch to a smartphone or an optional headset for
playing music (headset not included).
1. From Settings, tap Connections > Bluetooth.
2. Tap to turn on the feature.
•Tap Bluetooth audio to connect a Bluetooth audio device to the watch.
Mobile networks
Customize your mobile networks. This feature is only available on the LTEmodel.
1. From Settings, tap Connections.
2. Tap Mobile networks, and tap an option to customize:
•Mobile networks: Enable or disable using mobile data.
•Mobile data: Enable mobile data.
•Data roaming: Enable data roaming.
•Network mode: Select a network mode.
•Network operators: Choose a network operator.
•Access Point Names: Select and APN.
Wi-Fi
Activate the Wi-Fi feature to connect to a Wi-Fi network.
1. From Settings, tap Connections > Wi-Fi.
2. Tap Auto, Always on, or Always off.
68
Settings

Connect to a Wi-Fi network
This feature is available when the watch is not connected to the smartphone through
Bluetooth.
1. From Settings, tap Connections > Wi-Fi.
2. Tap Wi-Fi networks > Scan, and select a network from the list.
•Networks that require a password display a lockicon.
3. Enter the password if required, and tap Connect.
NOTEOnce the watch connects to a Wi-Fi network, the watch reconnects to that
network each time it is available without requiring a password. To prevent the
watch connecting to the network automatically, select the network, and then
tap Forget.
Sync Wi-Fi profiles
Set the device to sync the list of saved Wi-Fi networks with your watch.
1. From Galaxy Wearable, tap the Home tab.
2. Tap Sync phone settings > Sync Wi-Fi networks.
NFC
Near Field Communication (NFC) allows you to communicate with another device
without connecting to a network. Make payments and buy tickets for transportation
or events after downloading and configuring the requiredapps.
1. From Settings, tap Connections > NFC.
2. Tap to enable the feature, and tap Tap and pay to set the default payment
app for mobile payments.
69
Settings

Make payments with the NFC feature
Before you can use the NFC feature to make payments, you must register for the
mobile payment service. Toregister or get more information about the service,
contact your service provider.
1. From Settings, tap Connections > NFC.
2. Touch the top of the watch’s touchscreen to the credit card reader.
NOTEThe payment services list may not include all available payment apps.
Open with NFC
You can select supported apps to open with NFC.
1. From Settings, tap Connections > NFC.
2. Tap Open with NFC, and select an app.
Disconnection alerts
Receive alerts when disconnected from Bluetooth.
1. From Settings, tap Connections > Disconnection alerts to enable this feature.
2. Tap Type to choose an alert style.
Airplane mode
Airplane mode disconnects your device from all networks and turns off connectivity
features, such as phone calls and Wi-Fi.
◌From Settings, tap Connections > Airplane mode to enable this option.
TIP You can also access Airplane mode from Quick settings. Swipe down from
the top of the watch, and tap .
70
Settings

Connect to a new phone
Connect your watch to a new mobile device. This feature is available when the watch
is connected to a smartphone. Otherwise, Connect to phone is displayed. For more
information, see Back up data.
◌From Settings, tap Connect to new phone and follow the prompts.
Device maintenance
Date and time| Power saving mode| Watch only mode| Optimize battery | Related settings
| Reset the Watch | Location
View the status of your device’s battery, storage, and memory. You can also
automatically optimize your device’s system resources.
Date and time
You can set the date and time manually. These options are only available when your
watch is not connected to your mobile device.
◌From Settings, tap General > Date and time.
•Automatic: Use the network to set date and time.
•Set date: Set the date manually.
•Set time: Set the time manually.
•Select time zone: Select the time zone manually.
•Use 24-hour format: Set the format for displaying time.
71
Settings

Power saving mode
Activate Power saving mode to save battery power by limiting the watch’s functions,
such as:
lUse a grayscale Home screen.
lTurn off all functions except calls, messages, and notifications.
lTurn off Wi-Fi and mobile networks (if applicable).
lLimit performance.
1. From Settings, tap Battery > Power mode.
2. Tap Power saving, and then tap OK.
To disable Power saving mode:
◌From the Home screen, tap OFF, and then tap OK.
Watch only mode
Activate Watch only mode to save battery power by limiting the watch’s functions to
only showing the time.
1. From Settings, tap Battery > Power mode.
2. Tap Watch only, and then tap OK.
To disable watch only mode:
◌Press and hold the Home key for three seconds.
Optimize battery
You can automatically optimize your watch system resources to save your battery.
1. From Settings, tap Battery > Optimize battery.
2. View the list of features that can be modified to improve the watch battery life.
3. Tap Optimize.
72
Settings

Related settings
View system resources that typically drain battery life in one list to quickly modify
and optimize settings.
1. From Settings, tap Battery > Related settings.
2. View the list of features that can be modified to improve the watch battery life
and tap an option to change the settings for that feature.
Reset the Watch
Reset settings to their factory default values and delete all data.
1. From Settings, tap General > Reset.
2. Tap Reset again to confirm.
Location
Some apps may require location services to be turned on for full functionality.
1. From Settings, tap Location.
2. Tap to enable this feature, and select a mode.
•GPS, Wi-Fi, and mobile networks: Use GPS, Wi-Fi, and mobile networks.
•Wi-Fi and mobile networks: Use Wi-Fi and mobile networks only.
•GPS: Use GPS only.
3. Tap Permissions to view apps and features that have permission to access your
location information.
73
Settings

Accessibility
Screen Reader| Visibility enhancements| Hearing enhancements| Advanced settings | Text
to speech
Accessibility services are special features that make using the device easier for those
with certain physical disabilities.
For more information about Accessibility for Samsungproducts, please contact us at
accessibility@sea.samsung.com.
Screen Reader
Use special controls and settings that let you navigate without needing to see the
screen.
◌From Settings,tap Accessibility > Screen reader for the following options:
•Voice Assistant: Receive spoken feedback when using your device, such as
what you touch, select, or activate.
•Tutorial: Learn how to use Voice assistant.
•Settings: Configure Voice assistant to better assist you.
Visibility enhancements
You can configure Accessibility features to assist with visual aspects of your device.
◌From Settings,tap Accessibility > Visibility enhancements for the following
options:
•Triple tap magnify: Triple tap to zoom in and out. After zooming out, drag
two fingers apart or together to adjust the zoom level.
•Grayscale: Remove all colors from the display, and use shades of gray.
•Negative colors: Reverse the display of colors from white text on a black
background to black text on a white background.
•Color lens: Adjust the screen colors if you have difficulty reading the text.
74
Settings

Hearing enhancements
You can configure Accessibility features to assist with audial aspects of the device.
◌From Settings, tap Accessibility > Hearing enhancements and tap an option:
•Mute all sounds: Turn off all notifications and audio for privacy.
•Mono audio: Switch audio from stereo to mono when using one earphone.
Advanced settings
You can configure Accessibility features.
◌From Settings,tap Accessibility > Advanced settings for the following
options:
•Vibration watch: The watch will use vibrations to communicate the time.
•Notification reminder: Enable and customize notification reminders.
•Two finger triple tap: Use two fingers when using the gesture triple tap.
Text to speech
To set accessibility settings related to Text to speech:
◌From Settings, tap General > Text-to-speech and select a mode:
•Language: Choose the language for spoken text.
•Speech rate: Set the speed at which the text is spoken.
•Read notifications aloud: Set the watch to read out notifications received on
your watch.
•Install voice data: Install voice data for use with text-to-speech.
75
Settings

Security and privacy
Set a screen lock | Permission manager
You can secure your device and protect your data by setting a screen lock.
Set a screen lock
It is recommended that you secure your device using a screen lock.
1. From Settings,tap Security and privacy > Lock.
2. Tap Type to select a screen lock type:
•Pattern: Create a pattern that you draw on the screen to unlock your device.
•PIN: Set a PIN to use for unlocking the device when it is removed from your
wrist and the screen is turned off.
•None: Do not lock the screen.
3. Tap Use for to select when your lock screen will be used.
TIP View helpful information about using the screen lock feature from
Settings > Security and privacy > Lock, tap Help.
Permission manager
Apps might access features of your watch that you permit them to (like the sensors,
microphone, or location) when they are running in the background, not just when you
are using the app. You can set your watch to notify you when this happens.
1. From Settings, tap Security and privacy > Permission manager.
2. Tap a category, then tap an app to select which permissions you want to be
notified about by tapping .
76
Settings

Other settings
Screen wake-up|Touch sensitivity| Watch status | Watch info
Configure features on your device that make it easier to use.
Screen wake-up
Use a gesture to turn on the watch screen.
◌From Settings, tap Advanced > Screen wake—up, and tap an option to enable:
•Wake-up gesture: Lift your wrist to turn on the watch screen.
•Touch wake-up: Touch the watch screen to turn it on.
•Bezel wake—up: Rotate the bezel to turn on the watch screen.
Touch sensitivity
Set the watch to allow use of the touch screen with gloves on.
1. From Settings, tap Advanced > Touch sensitivity.
2. Tap to enable this feature.
TIPYou can also enable touch sensitivity by holding down the Home key and
tapping Touch sensitivity.
77
Settings

Watch status
Access information about the watch.
1. From Galaxy Wearable, tap the Home tab > About watch.
2. Tap an option below:
•Battery: View battery life, usage information, and change your watch’s power
mode.
•Storage: View storage information and free up space.
•Memory: Enhance performance of your watch and manage background apps.
•Device: See device identification codes for your watch.
•Legal information: View the legal information for the watch.
•Software information: See the current software and Knox versions and
available updates.
•Battery information: View the capacity and rating of your watch’s battery.
•Install unknown apps: Set the watch to allow the installation of apps from
unknown sources.
Watch info
View information about the watch.
◌From Settings, tap About watch to view information about your watch:
•Watch phone number: View the phone number assigned to your watch
(LTEmodel only).
•Model number: Check your watch’s model number.
•Serial number:View your watch’s serial number.
•IMEI: View your watch’s IMEI number.
•Storage: Check the available storage space.
•Device: Access device information about thewatch.
•Legal info: Access legal information related to the watch.
•Software: Check your watch’s software version and security status.
•Battery: Check the watch’s battery voltage and capacity.
78
Settings

•Debugging: Activate or deactivate USB debugging mode when developing
apps for thewatch.
TIP To view the user manual from the Galaxy Wearable app on your
smartphone, tap the Home tab > Tips and user manual.
79
Settings

Learn more
Videos
youtube.com/samsungcare
Tips
samsung.com/us/support/tips
Samsung Care
samsung.com/us/support
Talk to an agent
Contact us on Facebook Messenger
Find us on Facebook
Follow us on Twitter
80

Legal information
READ THIS INFORMATION BEFORE USING YOUR MOBILE DEVICE.
Arbitration Agreement — This Product is subject to a binding arbitration agreement
between you and SAMSUNG ELECTRONICS AMERICA, INC. (“Samsung”). You can opt
out of the agreement within 30 calendar days of the first consumer purchase by
emailing optout@sea.samsung.com or calling 1-800—SAMSUNG (726-7864) and
providing the applicable information.
The full Arbitration Agreement, Standard One-year Limited Warranty, End User
License Agreement (EULA), and Health & Safety Information for your device are
available online at https://www.samsung.com/us/Legal/Gear-HSGuide.
If your device required Federal Communications Commission (FCC) approval, you can
view the FCC certification on the watch by opening Settings > About watch > Device.
Samsung Knox
Samsung Knox is Samsung’s security platform and is a mark for a Samsung device
tested for security with enterprise use in mind. Additional licensing fee may be
required. For more information about Knox, please refer to: samsung.com/us/knox.
Maintaining water and dust resistance
CAUTIONTo avoid electric shock and damage to your device, do not charge
device while it is wet or in an area where it could get wet. Do not handle device,
charger or cords with wet hands while charging.
The device is not impervious to dust and water damage in any situation. It is important
that all compartments are closed tightly.
Follow these tips carefully to prevent damage to the device and maintain dust and
water resistance performance:
81

Water resistant based on 5ATM rating, which means submersion up to 50 meters per
ISO standard 22810:2010. Not intended for scuba diving. Avoid excessive, sudden
temperature changes, and high velocity activities. Falls and shocks may breach
integrity.
After use in sea water, rinse in fresh water and dry device. Despite this classification,
your device is not impervious to water damage in any situation. It is important that all
compartments are closed tightly.
Follow these tips carefully to prevent damage to the device.
Whenever your device gets wet, dry it thoroughly with a clean, soft cloth. Failure to
rinse the device in fresh water and dry it as instructed may cause the device to
suffer from operability or cosmetic issues.
Do not expose the device to water at high pressure.
If the device is dropped or receives an impact, the water and dust resistant features
of the device may be damaged.
Military Specification
This device passed military specification (MIL-STD-810G) testing against specific
conditions, including drops from 3.2 feet, extreme temperatures, dust, shock/vibration,
and low pressure/high altitude. Device may not perform as described in all extreme
conditions.
Restricting children’s access to your
mobile device
Your device is not a toy. Do not allow children to play with it because they could hurt
themselves and others, or damage the device. Keep the device and all its parts and
accessories out of the reach of small children.
Legal information
82

Samsung Electronics America, Inc.
Address:
85 Challenger Road
Ridgefield Park
New Jersey 07660
Phone: 1-800-SAMSUNG (726-7864)
Internet: samsung.com
©2020 Samsung Electronics America, Inc. Samsung, Samsung Galaxy, Samsung
Health and Samsung Galaxy Watch are all trademarks of Samsung Electronics Co.,
Ltd.
Other marks are the property of their respective owners.
Some multimedia (audio/video) files contain Digital Rights Management (DRM)
technology to verify you have the right to use the files. Preloaded apps on your
device may not be compatible with DRM-protected files.
Screen images are simulated. Appearance of device may vary.
The actual available capacity of the internal memory is less than the specified
capacity because the operating system and default applications occupy part of the
memory. The available capacity may change when you upgrade the device.
Please check with your service provider to verify qualifying services/features.
Legal information
83
РУКОВОДСТВО
ПОЛЬЗОВАТЕЛЯ
SM-R840
SM-R850
www.samsung.comRussian. 08/2020. Rev.1.0

Содержание
Начало работы
5 Об устройстве Galaxy Watch3
5 Прочтите перед использованием
10 Внешний вид устройства
10 Комплект поставки
11 Galaxy Watch3
13 Беспроводное зарядное устройство
14 Аккумулятор
14 Зарядка аккумулятора
17 Зарядка аккумулятора с помощью
функции Wireless PowerShare
18 Режим энергосбережения
19 Ношение устройства Galaxy Watch3
19 Надевание устройства Galaxy Watch3
19 Советы и меры предосторожности
при использовании ремешка
20 Присоединение или замена ремешка
22 Правильное ношение устройства
Galaxy Watch3
24 Включение и выключение
устройства Galaxy Watch3
25 Подключение Galaxy Watch3 к
мобильному устройству
25 Установка приложения Galaxy
Wearable
25 Подключение Galaxy Watch3 к
мобильному устройству по Bluetooth
27 Управление экраном
27 Безель
29 Сенсорный экран
31 Структура экрана
31 Включение и выключение экрана
32 Переключение между экранами
34 Экран блокировки
35 Часы
35 Экран часов
35 Изменение вида часов
36 Включение функции постоянного
отображения часов
36 Режим «Только часы»
37 Уведомления
37 Панель уведомлений
37 Просмотр входящих уведомлений
38 Выбор приложений, от которых
поступают уведомления
39 Панель быстрого доступа
46 Ввод текста
46 Введение
46 Использование функции голосового
ввода
47 Смайлики и стикеры
47 Использование режима рукописного
ввода или клавиатуры
48 Изменение режима ввода
27 Удаленное подключение
2

Содержание
Приложения и функции
49 Сообщ.
51 Телефон
51 Введение
51 Входящие вызовы
52 Выполнение вызовов
52 Возможности во время вызовов
53 Контакты
55 Samsung Pay
56 Samsung Health
56 Введение
57 Активность
58 Шаги
60 Упражнение
67 Калории
79 Воспроизведение музыки с помощью
устройства Galaxy Watch3
80 Воспроизведение музыки с
мобильного устройства
80 Напоминания
82 Календарь
82 Bixby
82 Введение
83 Начало работы с Bixby
84 Использование Bixby
85 Погода
85 Будильник
86 Мировое время
87 Таймер
87 Секундомер
67 Сон
69 Пульс
71 Стресс
72 Пища
73 Контроль веса
74 Вода
75 Кофеин
76 Together
76 Жен. здоровье
77 Настройки
78 GPS
78 Музыка
78 Введение
78 Прослушивание музыки
79 Импорт музыкальных файлов
88 Галерея
88 Импорт и экспорт изображений
89 Просмотр изображений
89 Удаление изображений
90 Найти телефон
90 Найти часы
91 Отправка экстренного сообщения
91 Введение
91 Регистрация контактов для
экстренной связи
92 Запрос экстренной помощи
93 Запрос экстренной помощи в случае
травмы при падении
93 Управление PPT
93 Введение
93 Подключение Galaxy Watch3 к
устройству по Bluetooth
95 Настройка функций сигнала
3

Содержание
96 Диктофон
96 Введение
96 Создание записей голоса
97 Изменение режима записи
97 GALAXY Store
98 Настройки
98 Введение
98 Циферблаты часов
98 Приложения
100 Звук и вибрация
101 Экран
102 Дополнительные
103 Подключения
106 Общие
107 Спец. возможн.
107 Защита данных
117 Добавление содержимого на часы
118 Помощь
118 Найти часы
119 Общие
120 Спец. возможн.
120 Bixby
120 Samsung Pay
120 Учетная запись и рез. копир.
122 Синхрониз. параметров телефона
123 Обновление ПО для часов
123 Советы и пособие
123 О часах
124 Циферблаты часов
125 Поиск
108 Местоположение
108 Учетная запись
109 Аккумулятор
110 О часах
110 Подкл. к новому телефону
Приложение Galaxy
Wearable
111 Введение
113 Главная
113 Введение
113 Уведомления
113 Приложения
115 Виджеты
Приложение
126 Устранение неполадок
115 Звук и вибрация
116 Экран
116 Дополнительные
4

Начало работы
Об устройстве Galaxy Watch3
Galaxy Watch3 — это носимое устройство, способное анализировать характер ваших тренировок,
позволяющее следить за здоровьем, а также использовать другие разнообразные и удобные
приложения для совершения телефонных вызовов и прослушивания музыки. Можно легко
переходить между различными функциями, поворачивая безель, или запускать функции касанием
экрана, а также изменять вид циферблата часов по вашему вкусу.
Подключите Galaxy Watch3 к мобильному устройству.
Прочтите перед использованием
В целях правильного и безопасного использования устройства, прежде чем приступать к работе с
ним, изучите это руководство.
•
Приведенные ниже описания основаны на настройках устройства по умолчанию.
•
Приведенные сведения могут частично не соответствовать функциям данного устройства. Это
зависит от региона, характеристик устройства, программного обеспечения или поставщика
услуг.
•
Контент (высококачественный контент) с высоким потреблением ресурсов ЦП и ОЗУ влияет
на общую производительность устройства. Приложения, использующие такой контент, могут
работать некорректно в зависимости от характеристик устройства и среды, в которой оно
используется.
•
Компания Samsung не несет ответственности за нарушения производительности, вызванные
приложениями, выпущенными не компанией Samsung.
•
Компания Samsung не несет ответственности за нарушения производительности или
совместимости, возникшие вследствие редактирования настроек реестра или внесения
изменений в операционную систему. Попытки изменить настройки операционной системы
могут привести к неправильной работе устройства Galaxy Watch3 или установленных
приложений.
•
ПО, звуковые файлы, обои, изображения и прочее содержимое, предустановленное на этом
устройстве Galaxy Watch3, лицензированы для ограниченного использования. Копирование
и использование этих материалов в коммерческих или иных целях является нарушением
авторского права. Пользователи несут полную ответственность за незаконное использование
мультимедийного содержимого.
5

Начало работы
•
Предустановленные на устройстве Galaxy Watch3 приложения могут обновляться. В
дальнейшем их поддержка может быть прекращена без предварительного уведомления.
В случае возникновения вопросов относительно предустановленных на устройство Galaxy
Watch3 приложений обратитесь в сервисный центр Samsung. По вопросам, касающимся
установленных вами приложений, обращайтесь к вашему поставщику услуг.
•
Изменение настроек операционной системы устройства Galaxy Watch3 и установка
приложений, полученных из неофициальных источников, может вызвать сбои в работе
устройства Galaxy Watch3 и повреждение или утерю данных. Такие действия являются
нарушением условий лицензионного соглашения Samsung и ведут к прекращению действия
гарантии.
•
Некоторые функции могут не работать в соответствии с описанием в данном руководстве. Это
зависит от производителя и модели подключенного к Galaxy Watch3 мобильного устройства.
•
Благодаря автоматической регулировке контраста в зависимости от окружающей среды
сенсорный экран может быть четко виден даже при сильном солнечном освещении
вне помещения. Принимая во внимание свойства Galaxy Watch3, если в течение
продолжительного времени на экране устройства отображаются неподвижные изображения,
на экране могут появляться шлейфы от изображения (эффект выгорания экрана) и артефакты.
–
Рекомендуется не использовать неподвижные изображения на всем сенсорном экране или
его части в течение продолжительного времени или выключать сенсорный экран, когда
устройство Galaxy Watch3 не используется.
–
Сенсорный экран можно настроить на выключение в случае неактивности. На экране
приложений Galaxy Watch3 коснитесь значка (
Тайм-аут экрана
выключаться.
–
Чтобы настроить сенсорный экран на автоматическую регулировку яркости в зависимости
от окружающей среды, на экране приложений Galaxy Watch3 коснитесь значка
(
Настройки
переключателя, чтобы включить соответствующую функцию.
•
В зависимости от модели или региона некоторым устройствам требуется утверждение
Федерального агентства по связи (FCC).
Если ваше устройство одобрено FCC, можно посмотреть идентификатор FCC для вашего
устройства Galaxy Watch3. Чтобы просмотреть идентификатор FCC, нажмите кнопку
(
Настройки
Устройство
одобрено к продаже на территории США и его ввоз в США возможен только для личного
пользования владельцем.
) на экране приложений устройства Galaxy Watch3 и выберите пункт
. Если у вашего устройства нет идентификатора FCC, это означает, что оно не было
, а затем выберите время, по истечении которого сенсорный экран будет
), выберите пункт
Экран
→
Автонастройка яркости
Настройки
), выберите пункт
, а затем коснитесь
О часах
Экран
→
→
6

Начало работы
Влаго- и пылезащита
Устройство оснащено влаго- и пылезащитой. Следуйте советам ниже для обеспечения влаго- и
пылезащиты устройства. Их несоблюдение может привести к повреждению устройства.
•
Избегайте контакта устройства с водой под напором. Не подвергайте устройство внезапному
давлению воды, например, во время ныряния.
•
Не пользуйтесь устройством во время ныряния в воду, занятия водными видами спорта
и плавания в быстротекущей воде. Оно предназначено для обычного пользования в
нормальных условиях плавания, например, в бассейнах или на пляже.
•
Тщательно вытрите намокшее устройство или мокрые руки перед использованием
устройства.
•
После погружения устройства в пресную воду тщательно протрите его чистой мягкой
тканью. Если устройство подвергается воздействию других жидкостей, таких как соленая,
мыльная вода, вода из бассейна, масло, духи, солнцезащитный крем, очиститель для рук, или
воздействию химических веществ, таких как косметические средства, промойте его в пресной
воде и тщательно протрите чистой мягкой тканью. Несоблюдение этих инструкций может
повлиять на работу и внешний вид устройства.
•
Не разбирайте устройство. Водо- и пыленепроницаемые качества устройства могут быть
нарушены.
•
Не подвергайте устройство воздействию резких перепадов температуры воды или воздуха.
•
Не сушите устройство с помощью нагревательного прибора, такого как фен для волос.
•
Водонепроницаемость устройства может нарушиться в сауне.
•
Если устройство было погружено в воду либо его микрофон или внешний динамик
намочены, качество звука во время вызова может ухудшиться. После протирки устройства
сухой тканью тщательно высушите его перед использованием.
•
Сенсорный экран и другие функции могут не работать должным образом, если устройство
используется в воде.
•
Устройство прошло испытания в контролируемой среде и признано устойчивым к
воздействию воды и пыли в определенных условиях и ситуациях. (Устройство признано
влагозащищенным, будучи погруженным в воду на глубину 50 м, в соответствии с
международным стандартом ISO 22810:2010, и может использоваться в мелкой воде.
Отвечает требованиям к пылезащищенности в соответствии с классификацией стандарта
IEC 60529 IP6X.)
7
Начало работы
Предостережения о перегреве
Если при использовании устройства вы ощущаете дискомфорт по причине перегрева, немедленно
прекратите им пользоваться и снимите его с запястья.
Во избежание таких проблем, как поломка устройства, дискомфорт или повреждение кожи, а
также преждевременная разрядка аккумулятора, при нагреве до определенной температуры
устройство выдает предупреждение. Как только появится первое предупреждение, функции
устройства будут отключены до тех пор, пока его температура не снизится до заданного уровня.
Если температура устройства продолжает повышаться, появляется второе предупреждение. На
этот раз устройство отключится. Не пользуйтесь устройством до тех пор, пока его температура не
снизится до заданного уровня.
Очистка устройства Galaxy Watch3 и уход за ним
Следуйте приведенным ниже указаниям— их соблюдение гарантирует правильность работы
устройства Galaxy Watch3 и сохранение его внешнего вида. Несоблюдение этих указаний может
стать причиной повреждения устройства Galaxy Watch3 и появления раздражения кожи.
Входящий в комплект поставки ремешок может отличаться в зависимости от региона
или модели. Обеспечьте надлежащую очистку и поддержание состояния ремешка
соответственно.
•
Выключите Galaxy Watch3 и снимите ремешок перед его очисткой.
•
Оберегайте устройство от воздействия пыли, пота, чернил, жирных веществ и химических
продуктов, таких как косметика, антибактериальные спреи, антисептики для рук, моющие
средства и инсектициды. Это может привести к порче внешних или внутренних частей
устройства Galaxy Watch3 или ненадлежащей его работе. Если на устройство Galaxy Watch3
попала любая из вышеупомянутых жидкостей, используйте для его очистки мягкую ткань без
ворсы.
•
Для очистки устройства Galaxy Watch3 не следует использовать мыло, чистящие вещества,
абразивные материалы и сжатый воздух, а также запрещается применять ультразвуковые
волны или внешние источники тепла. Это может повредить устройство Galaxy Watch3. Остатки
мыла, моющих и дезинфицирующих средств или чистящих веществ на устройстве Galaxy
Watch3 могут вызвать раздражение кожи.
•
Для удаления солнцезащитного крема, лосьона или масла используйте не содержащее мыло
моющее средство, после чего прополощите и тщательно высушите устройство Galaxy Watch3.
8

Начало работы
•
Кожаный ремешок не является водостойким. Не плавайте и не принимайте душ с кожаным
ремешком.
•
Ввиду природных свойств кожи на кожаном ремешке могут появиться пятна от масла или
косметики. Будьте осторожны и не подвергайте кожаный ремешок воздействию этих веществ.
•
Не подвергайте кожаный ремешок Galaxy Watch3 воздействию прямых солнечных лучей,
горячей или влажной среды или воды. В противном случае, цвет и форма кожаного ремешка
могут измениться. Если кожаный ремешок намокнет, немедленно протрите его мягкой
безворсовой тканью и высушите в хорошо проветриваемом и укрытом от солнечных лучей
месте.
•
Если кожаный ремешок испачкается, протрите его мягкой безворсовой тканью. При
необходимости слегка смочите ткань пресной водой.
Предостережения касательно аллергии на материалы устройства Galaxy
Watch3
•
Компания Samsung протестировала вредные материалы, содержащиеся в устройстве Galaxy
Watch3, с привлечением внутренних и внешних организаций по сертификации, в том числе
были проведены тесты всех материалов, которые контактируют с кожей, тест на кожную
токсичность и тест на ношение устройства Galaxy Watch3.
•
В устройстве Galaxy Watch3 присутствует никель. Соблюдайте надлежащие меры
предосторожности в случае гиперчувствительности кожи или при наличии аллергии на
какие-либо материалы устройства Galaxy Watch3.
–
Никель: в устройстве Galaxy Watch3 содержится никель, количество которого
незначительно и меньше порога, определенного регламентом Европейского союза REACH.
Пользователь не подвергается воздействию никеля, находящегося внутри устройства
Galaxy Watch3 и устройство Galaxy Watch3 прошло международную сертификацию. Однако
следует проявлять осторожность при использовании устройства Galaxy Watch3 в случае
гиперчувствительности к никелю.
•
В производстве устройства Galaxy Watch3 применялись только материалы, отвечающие
требованиям стандартов Комиссии США по безопасности потребительских товаров (CPSC),
регламентов стран Европейского союза и других международных стандартов.
•
Дополнительную информацию о порядке обращения компании Samsung
с химическими веществами можно получить на веб-сайте Samsung
(https://www.samsung.com/uk/aboutsamsung/sustainability/environment/).
9

Начало работы
Обозначения, используемые в данном руководстве
Предупреждение — ситуации, которые могут привести к получению травмы вами или
кем-либо из окружающих.
Внимание — ситуации, которые могут привести к повреждению устройства или другого
оборудования.
Примечание — примечания, советы или дополнительные сведения.
Внешний вид устройства
Комплект поставки
Комплект поставки описан в кратком руководстве.
•
Комплект поставки устройства Galaxy Watch3 и набор доступных аксессуаров могут
различаться в разных регионах и определяются поставщиком услуг.
•
Поставляемые аксессуары предназначены исключительно для данного устройства
Galaxy Watch3 и могут быть несовместимы с другими устройствами.
•
Внешний вид изделий и технические характеристики могут быть изменены без
предварительного уведомления.
•
Дополнительные аксессуары можно приобрести у местных дилеров компании
Samsung. Перед покупкой убедитесь, что они совместимы с вашим устройством Galaxy
Watch3.
•
В отличие от устройства Galaxy Watch3 некоторые поставляемые в комплекте предметы
и аксессуары могут не обладать такой же водо- и пыленепроницаемостью.
•
Применяйте только аксессуары, рекомендованные компанией Samsung.
Использование нерекомендованных аксессуаров может привести к проблемам в
работе и сбоям, на которые не распространяется гарантия.
•
Доступность любых аксессуаров целиком и полностью зависит от производителя.
Дополнительные сведения о доступных аксессуарах см. на веб-сайте Samsung.
10
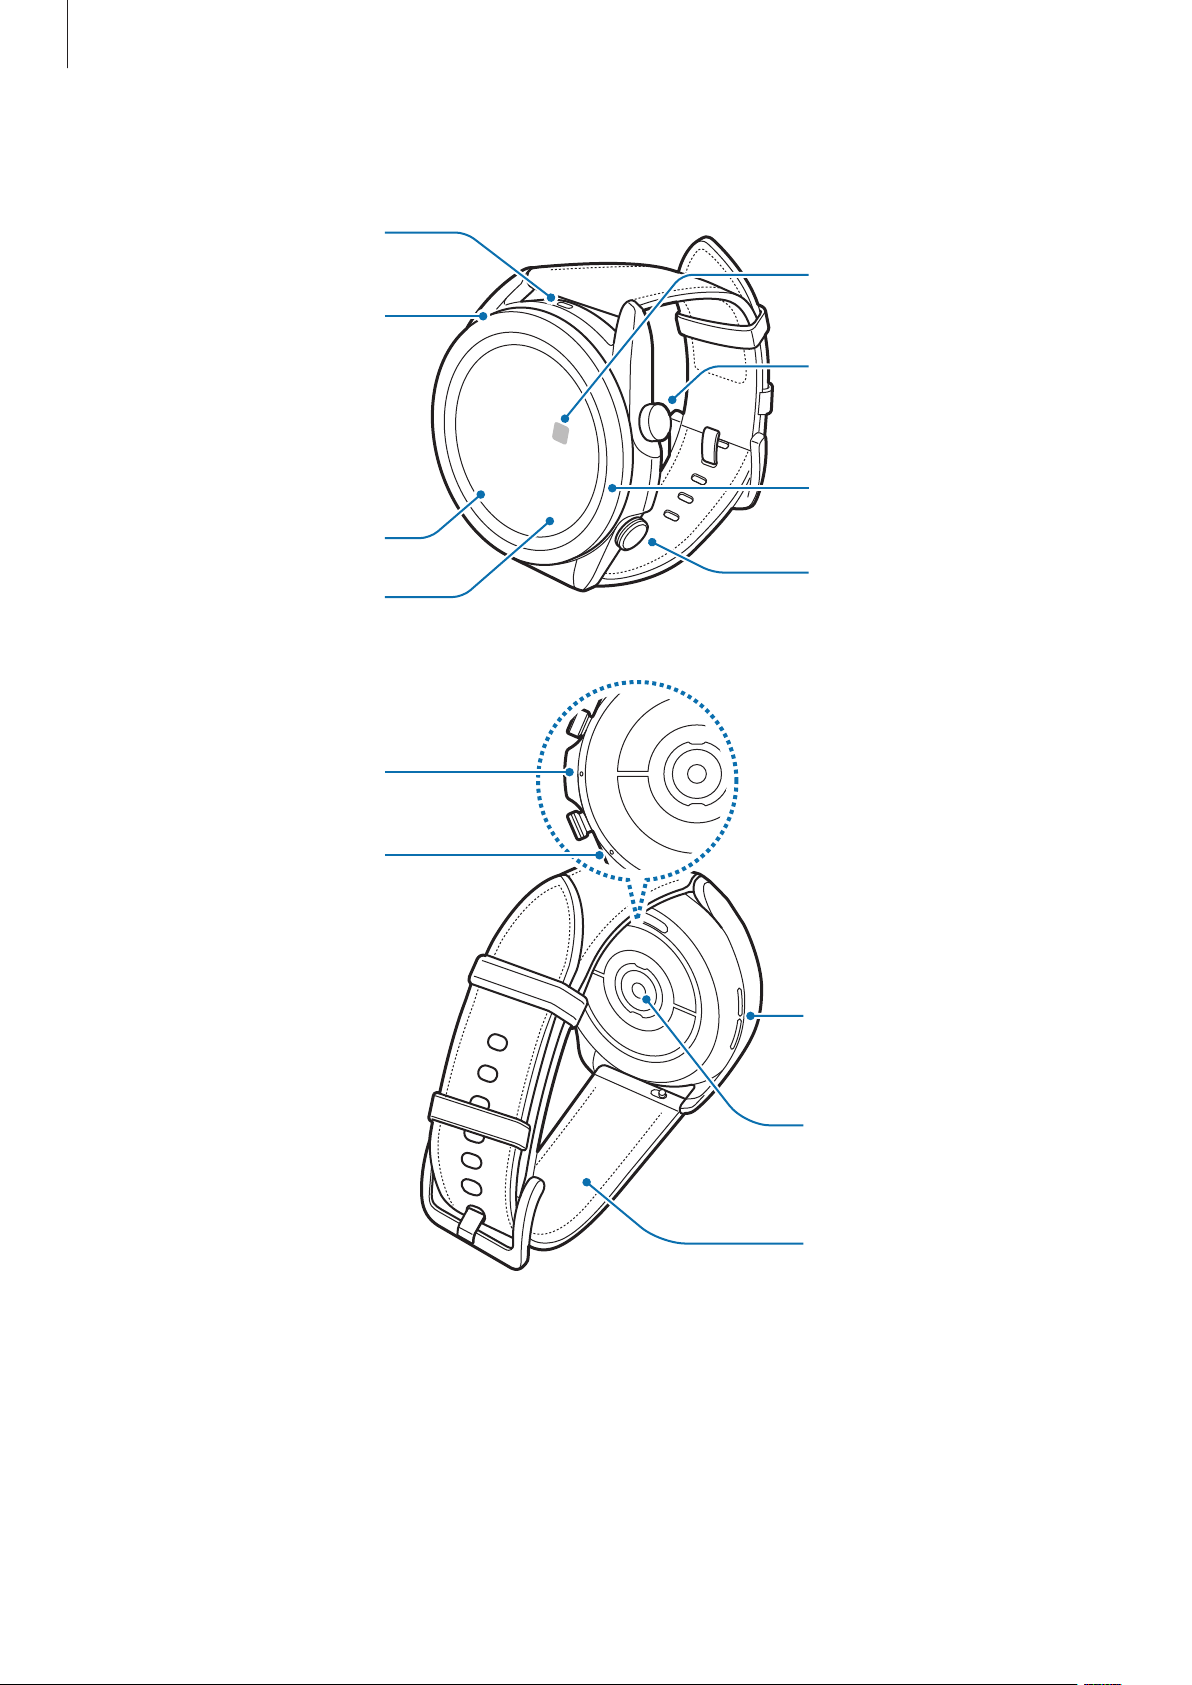
Начало работы
Galaxy Watch3
атмосферного
давления
GPS антенна
Сенсорный экран
Датчик
Антенна NFC
Клавиша «Назад»
Безель
Клавиша «Главный
экран» (клавиша
Микрофон
Клапан сброса
давления
Внешний динамик
Оптический датчик
пульсометра
Ремешок
11

Начало работы
•
Устройство содержит магниты, которые могут воздействовать на работу
медицинских устройств, таких как кардиостимуляторы или имплантируемые
кардиовертеры-дефибрилляторы. Если вы используете подобные медицинские
устройства, держите устройство на безопасном расстоянии от них и
проконсультируйтесь с врачом, прежде чем пользоваться устройством.
•
Сохраняйте безопасное расстояние между устройством и объектами, на которые
воздействуют магниты. Находящиеся в устройстве магниты могут повредить или
привести в негодность предметы, такие как кредитные карты, сберегательные книжки,
карты доступа, посадочные или парковочные талоны.
•
При работе динамиков, например, при воспроизведении мультимедийных файлов или
во время вызовов, не держите устройство Galaxy Watch3 вблизи ушей.
•
Убедитесь, что ремешок устройства чист. При контакте ремешка с загрязняющими
частицами, такими как пыль или краска, на нем могут появляться трудноудаляемые
пятна.
•
Запрещается вставлять острые предметы в датчик атмосферного давления, динамик,
клапан сброса давления или микрофон. Возможно повреждение внутренних
компонентов устройства Galaxy Watch3 и нарушение влагонепроницаемости.
•
Использование устройства Galaxy Watch3 с поврежденным акриловым корпусом
может быть травмоопасным. Снова пользоваться устройством можно только после его
ремонта в сервисном центре Samsung.
•
Не накрывайте датчик освещенности аксессуарами для экрана, такими как защитная
пленка для экрана или наклейки. В противном случае это может привести к поломке
датчика.
•
Убедитесь, что во время разговора микрофон Galaxy Watch3 ничем не закрыт.
•
Клапан сброса давления обеспечивает правильность работы внутренних компонентов
и датчиков Galaxy Watch3 в случае использования Galaxy Watch3 в среде с перепадами
атмосферного давления.
•
Кожаный ремешок изготовлен из натуральной кожи с минимальной обработкой.
Неоднородность фактуры, структуры кожи ремешка, наличие на коже пор, вмятин, а
также изменение ее натурального цвета, в том числе метахроматической окраски во
время использования являются естественными особенностями кожи и не считаются
дефектами изделия.
•
На изображениях в настоящем руководстве на устройстве Galaxy Watch3 закреплен
кожаный ремешок.
12
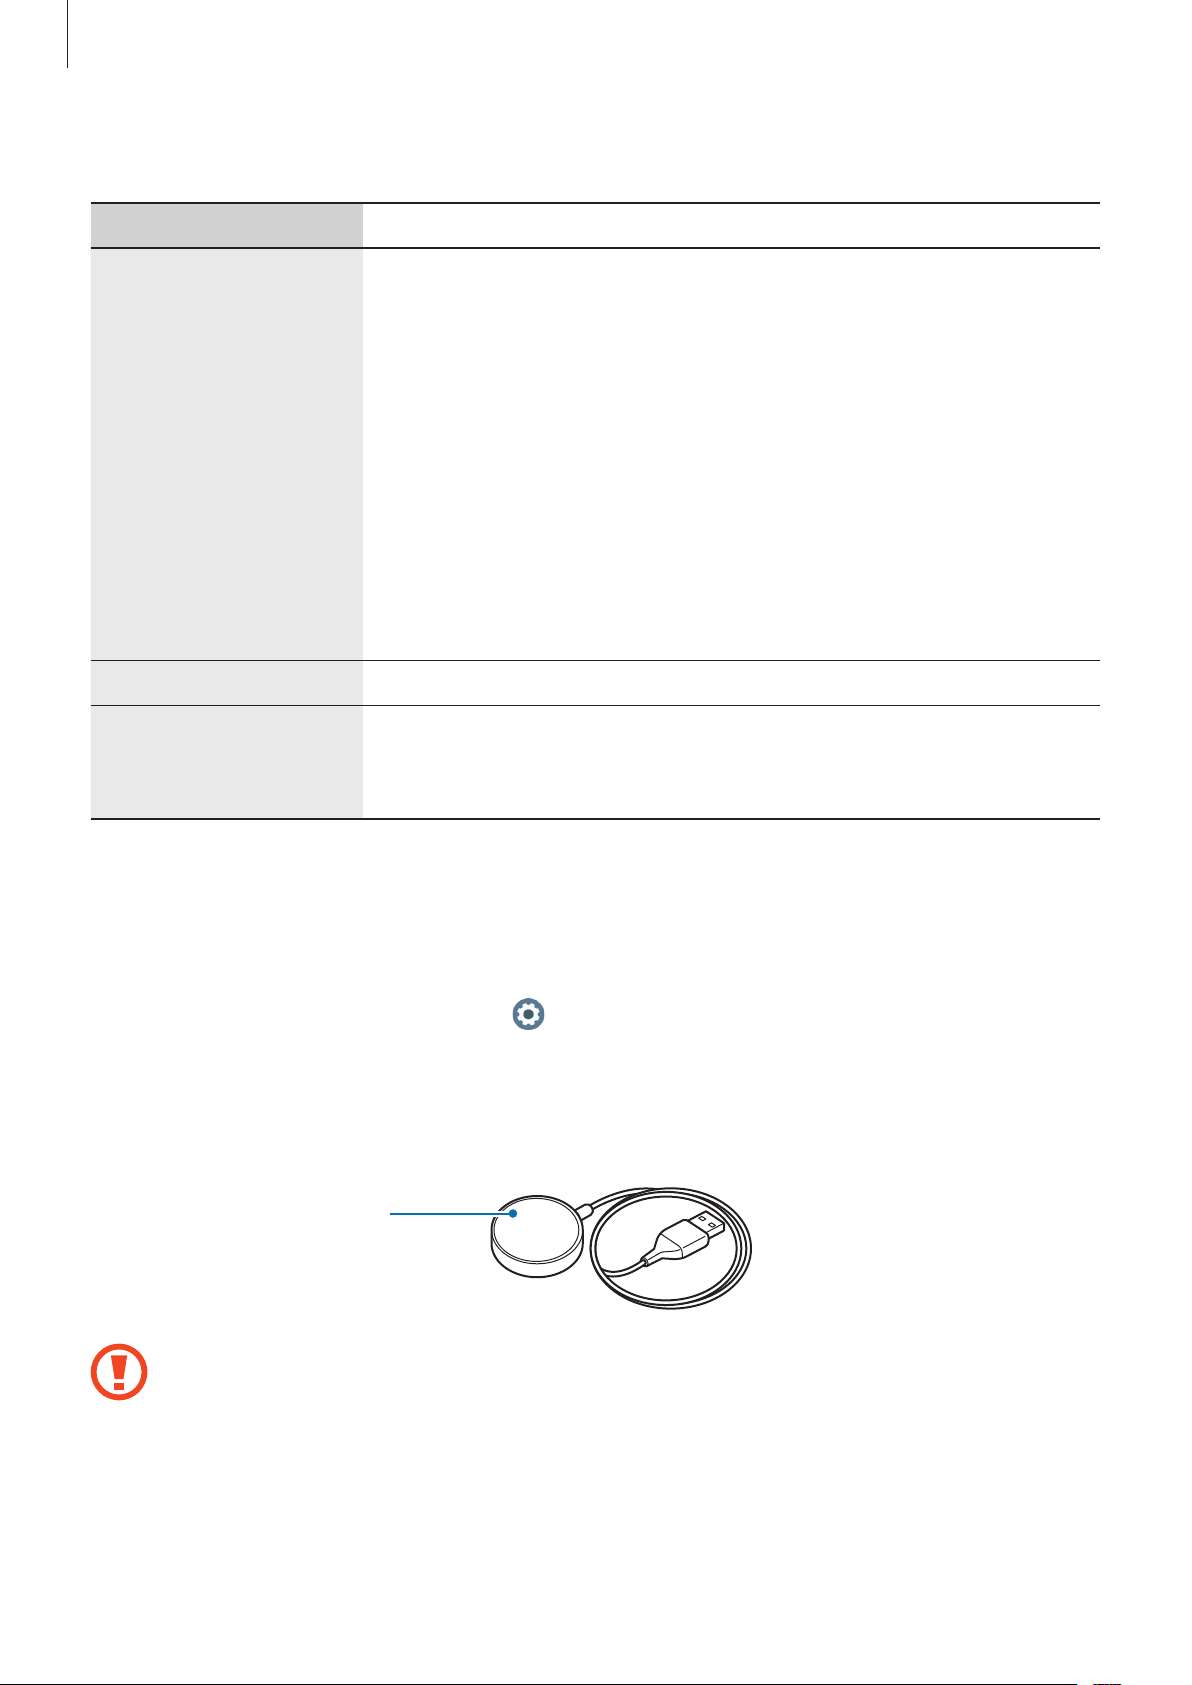
Начало работы
Клавиши
Клавиша Функция
•
Когда устройство Galaxy Watch3 выключено, нажмите и
удерживайте клавишу, чтобы включить устройство.
•
Нажмите, чтобы включить экран.
•
Нажмите и удерживайте, чтобы начать беседу с Bixby.
Дополнительные сведения см. в разделе Использование Bixby.
Клавиша «Главный
экран»
•
Нажмите два раза или нажмите и удерживайте, чтобы запустить
выбранное приложение или функцию.
•
Если открыт экран часов, нажмите, чтобы перейти на экран
приложений.
•
Если открыт какой-либо другой экран, нажмите, чтобы перейти на
экран часов.
Клавиша «Назад»
Клавиша «Главный
экран» + клавиша
«Назад»
•
Нажмите для возврата на предыдущий экран.
•
Нажмите одновременно, чтобы сделать снимок экрана.
•
Нажмите одновременно и удерживайте, чтобы выключить
устройство Galaxy Watch3.
Настройка клавиши «Главный экран»
Выберите программу или функцию, которая будет запускаться двойным нажатием или нажатием и
удержанием клавиша «Главный экран».
На экране приложений коснитесь значка
“Домой”
→
Двойное нажатие
или
Нажатие и удерж.
(
Настройки
) →
Дополнительные
, а затем выберите нужный параметр.
→
Клавиша
Беспроводное зарядное устройство
Поверхность для
беспроводной
зарядки
Не допускайте попадания воды на беспроводное зарядное устройство, так как оно не
обладает водонепроницаемостью в отличие от устройства Galaxy Watch3.
13
Начало работы
Аккумулятор
Зарядка аккумулятора
Перед первым использованием устройства или после продолжительного периода, в течение
которого устройство не использовалось, необходимо зарядить аккумулятор.
Используйте только одобренный компанией Samsung аккумулятор, зарядное устройство
и кабель, предназначенные специально для вашего Galaxy Watch3. Несовместимый
аккумулятор, зарядное устройство и кабель могут привести к серьезным травмам или
повреждению Galaxy Watch3.
•
Неправильное подключение зарядного устройства может привести к серьезному
повреждению вашего устройства. Гарантия не распространяется на любые
повреждения, возникшие в результате неправильного использования устройства и
аксессуаров.
•
Используйте только беспроводное зарядное устройство, прилагаемое к устройству. В
случае использования сторонних беспроводных зарядных устройств устройство Galaxy
Watch3 может не заряжаться должным образом.
•
В целях экономии электроэнергии отключайте зарядное устройство, если оно не
используется. Зарядное устройство не оснащено переключателем питания, поэтому
его нужно отключать от электрической розетки, чтобы прервать процесс зарядки и
сэкономить электроэнергию. При использовании зарядное устройство должно плотно
прилегать к электрической розетке и находиться в легкодоступном месте.
•
Устройство Galaxy Watch3 оснащено встроенной катушкой для беспроводной
зарядки. Для зарядки аккумулятора можно использовать специальный коврик для
беспроводной зарядки. Коврик для беспроводной зарядки продается отдельно.
Дополнительные сведения о доступных ковриках для беспроводной зарядки см. на
веб-сайте Samsung.
Подключите беспроводное зарядное устройство к обычному зарядному устройству, а затем
1
последнее подключите к электрической розетке.
14
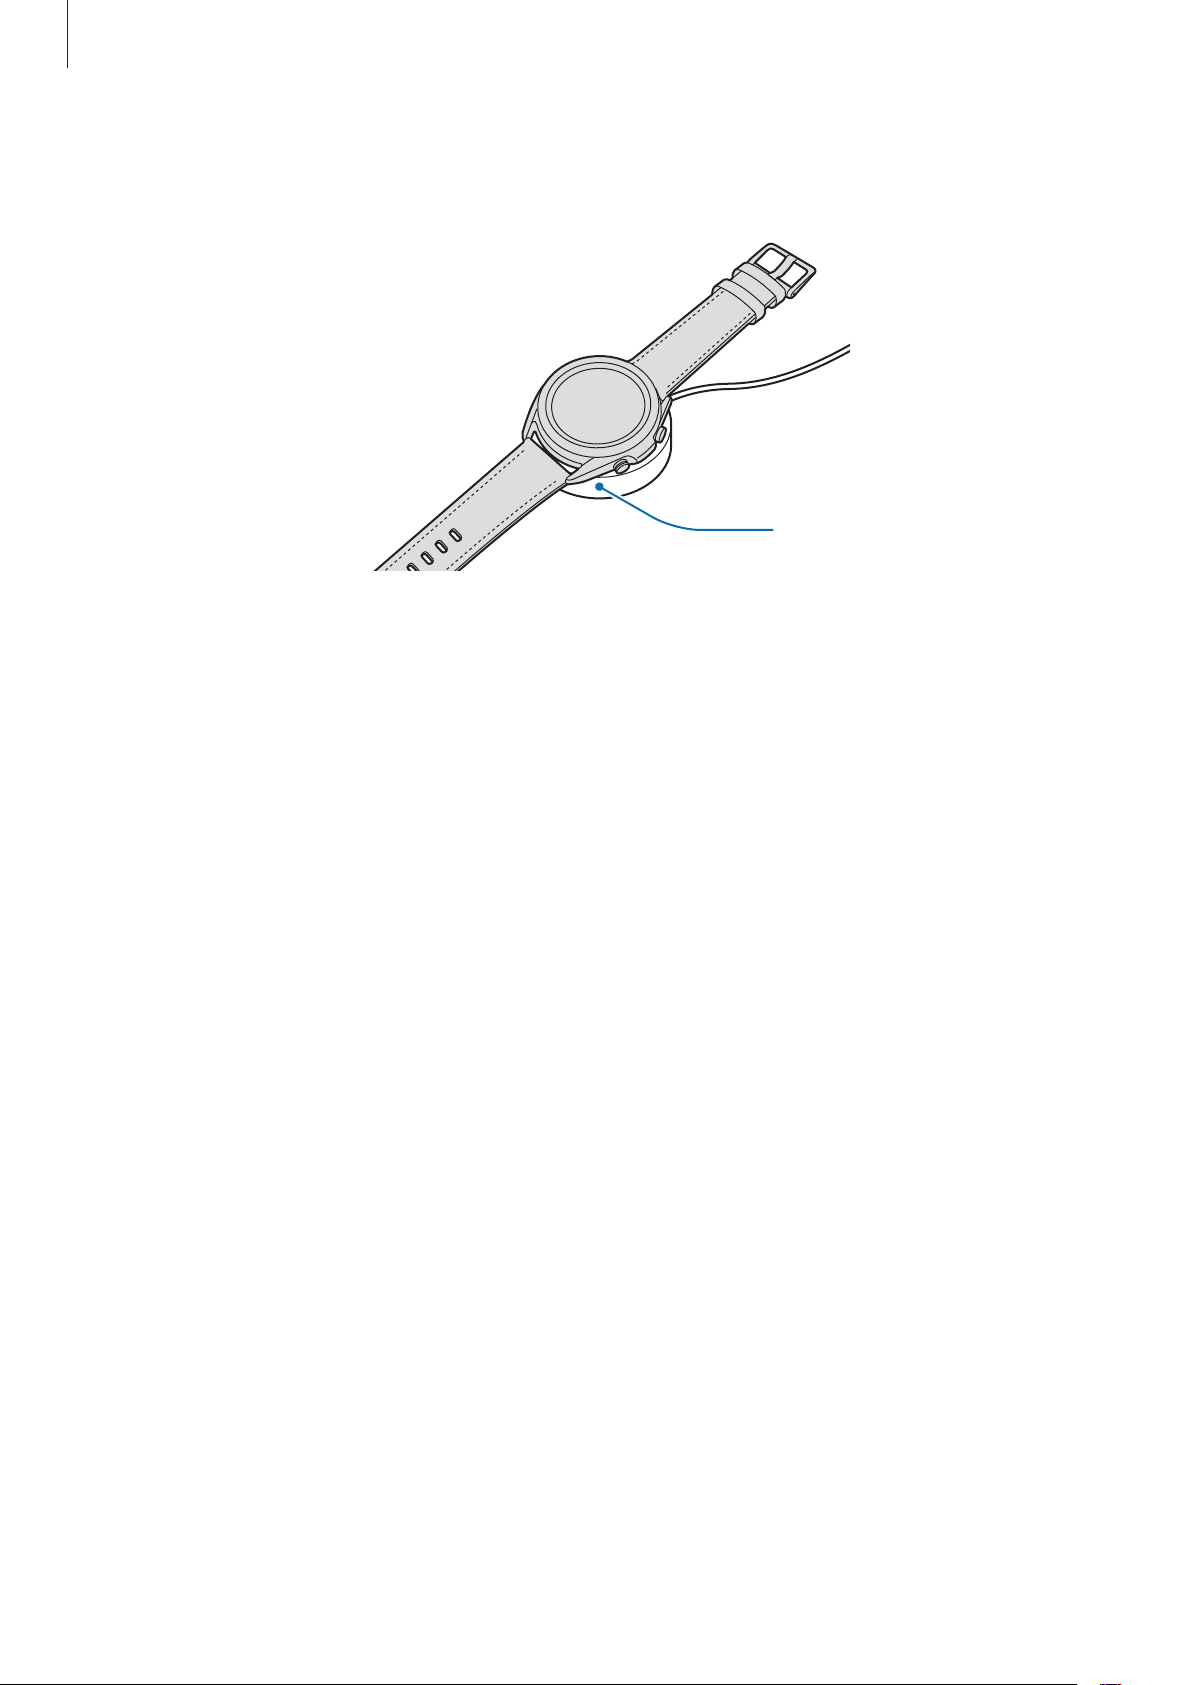
Начало работы
Поместите устройство Galaxy Watch3 на беспроводное зарядное устройство, совместив центр
2
задней стенки устройства Galaxy Watch3 с центром беспроводного зарядного устройства.
Беспроводное
зарядное устройство
После полной зарядки уберите устройство Galaxy Watch3 с беспроводного зарядного
3
устройства. Затем отсоедините беспроводное зарядное устройство от обычного зарядного
устройства, а затем — от электрической розетки.
Проверка состояния заряда аккумулятора
Проверьте состояние зарядки устройства Galaxy Watch3, которое находится на беспроводном
зарядном устройстве. Расчетное время полной зарядки устройства Galaxy Watch3 будет показано
на экране после двойного касания.
При зарядке аккумулятора выключенного устройства Galaxy Watch3 нажмите любую клавишу,
чтобы просмотреть состояние зарядки на экране.
Советы и меры предосторожности во время зарядки аккумулятора
•
При наличии посторонних предметов или веществ между беспроводным зарядным
устройством и устройством Galaxy Watch3, последнее может не заряжаться должным образом.
Не допускайте попадания на устройство Galaxy Watch3 и беспроводное зарядное устройство
пота, жидкостей или пыли.
•
Когда заряд аккумулятора подходит к концу, появляется значок пустого аккумулятора.
•
При полной разрядке аккумулятора включить устройство Galaxy Watch3 сразу после
подключения к беспроводному зарядному устройству невозможно. Чтобы включить
устройство Galaxy Watch3, следует подождать несколько минут, пока аккумулятор немного
зарядится.
•
При одновременном использовании нескольких приложений, а также приложений,
требующих соединения с другими устройствами, аккумулятор разряжается быстрее. Чтобы
избежать разрядки аккумулятора во время передачи данных, эти приложения следует всегда
запускать при полностью заряженном аккумуляторе.
15

Начало работы
•
Если для зарядки используется не зарядное устройство, а, например, ПК, на зарядку
аккумулятора может потребоваться больше времени из-за меньшей силы электрического
тока.
•
Если устройство Galaxy Watch3 заряжается одновременно с другими устройствами с
помощью зарядного устройства для зарядки нескольких устройств, на полную зарядку может
потребоваться больше времени.
•
Во время зарядки аккумулятора можно пользоваться устройством Galaxy Watch3, но в этом
случае на зарядку его аккумулятора потребуется больше времени.
•
Если устройство Galaxy Watch3 получает нестабильное питание во время зарядки, сенсорный
экран может не реагировать на прикосновения. В этом случае уберите устройство Galaxy
Watch3 с беспроводного зарядного устройства.
•
Во время зарядки устройство Galaxy Watch3 может нагреваться. Это нормальное явление, не
влияющее на производительность и срок службы устройства Galaxy Watch3. Если аккумулятор
нагреется больше обычного, зарядное устройство может прекратить свою работу по
соображениям безопасности. Если это произойдет, уберите устройство Galaxy Watch3 с
беспроводного зарядного устройства, дайте ему остыть, и только затем продолжите его
зарядку.
•
Зарядка устройства Galaxy Watch3 на влажном беспроводном зарядном устройстве может
привести к повреждению Galaxy Watch3. Тщательно высушите беспроводное зарядное
устройство перед зарядкой Galaxy Watch3.
•
Если устройство Galaxy Watch3 не заряжается должным образом, обратитесь с ним в
сервисный центр Samsung.
•
Не используйте изогнутый или поврежденный кабель беспроводного зарядного устройства.
Если кабель беспроводного зарядного устройства поврежден, воздержитесь от его
использования.
16
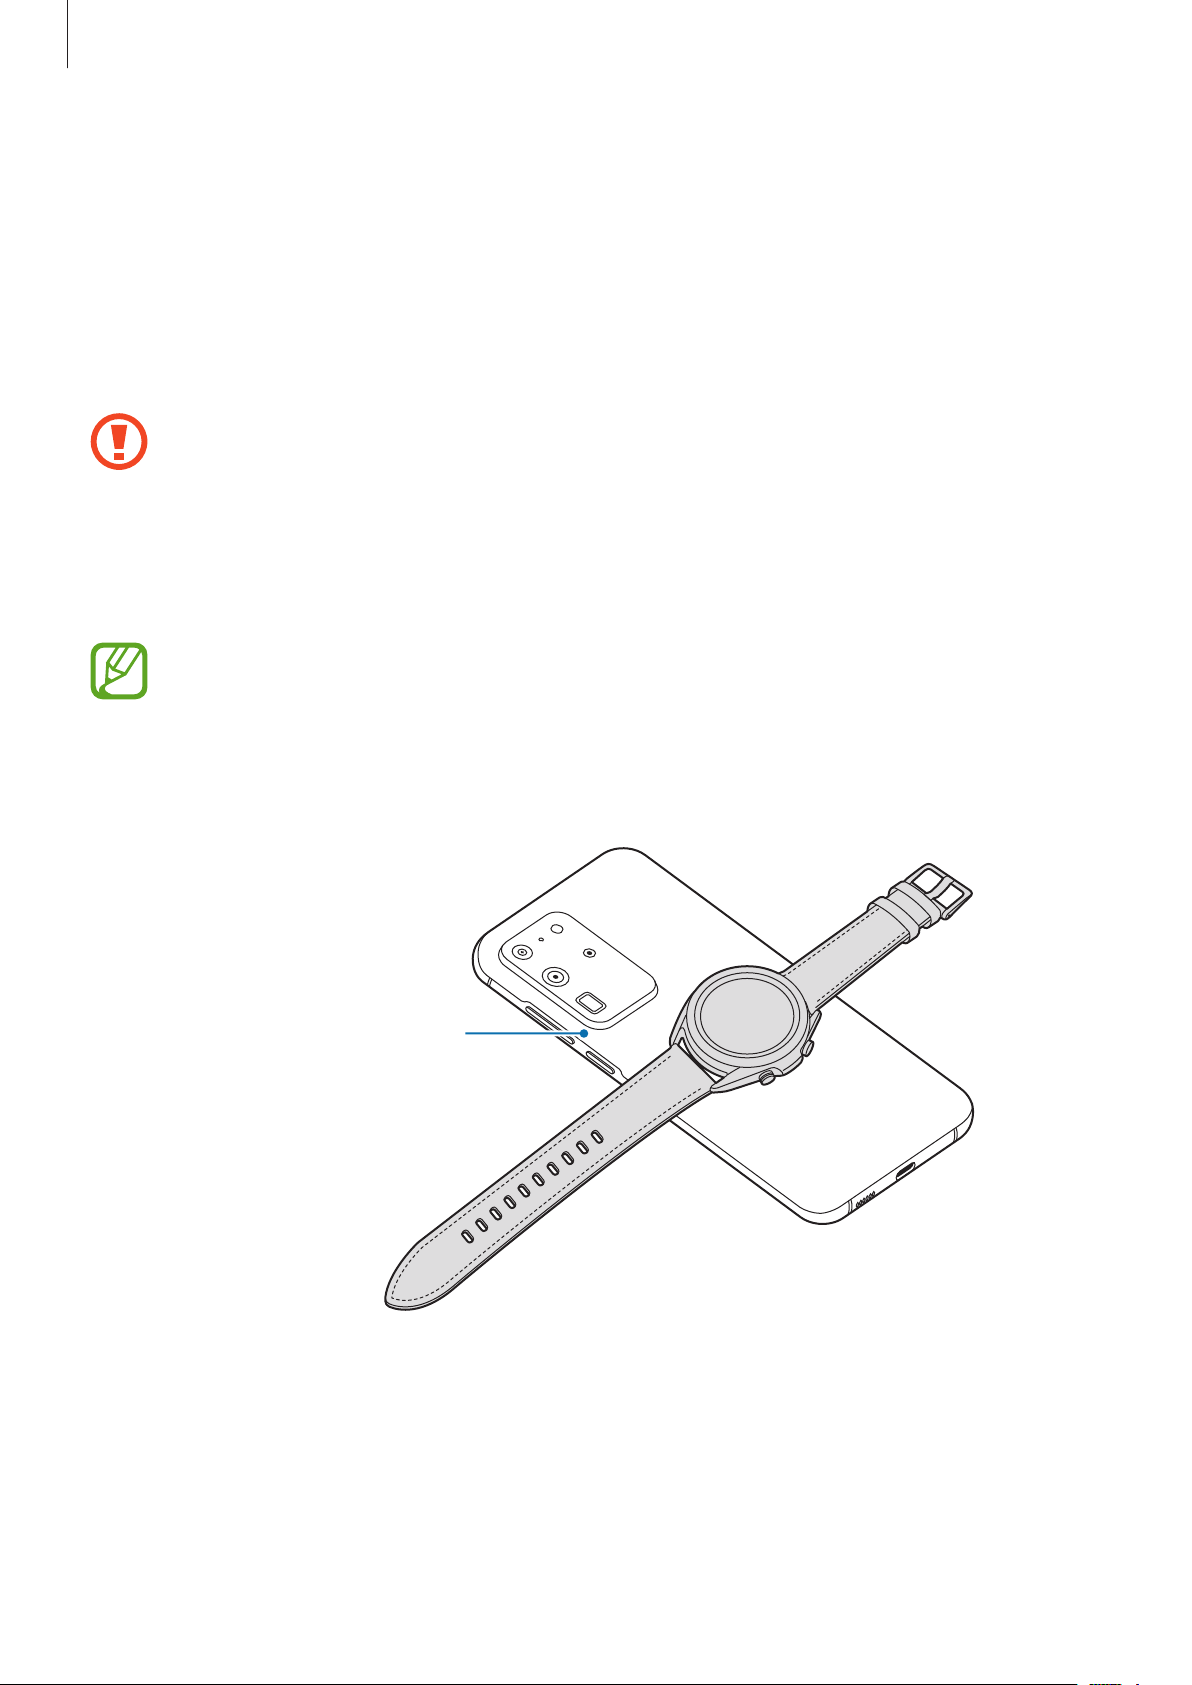
Начало работы
Зарядка аккумулятора с помощью функции Wireless PowerShare
Galaxy Watch3 можно заряжать от аккумулятора устройства, которое функционирует как
коврик для беспроводной зарядки. Galaxy Watch3 можно заряжать даже во время зарядки
устройства, которое функционирует как коврик для беспроводной зарядки. Функция Wireless
PowerShare может работать неправильно с некоторыми чехлами. Перед использованием этой
функции рекомендуется снять все чехлы с устройства, которые выполняет функцию коврика для
беспроводной зарядки.
Не используйте наушники или гарнитуру Bluetooth, заряжая другое устройство с помощью
своего. Это может повредить задействованные устройства.
Включите функцию Wireless PowerShare на устройстве, функционирующем как коврик для
1
беспроводной зарядки и поместите центр Galaxy Watch3 на устройство, функционирующее
как коврик для беспроводной зарядки.
•
Расположение катушки для беспроводной зарядки зависит от модели устройства.
Отрегулируйте устройство или Galaxy Watch3 для правильного соединения устройств
друг к другом.
•
Некоторые функции, работающие во время ношения Galaxy Watch3, при передаче
заряда на другое устройство недоступны.
Устройство, функционирую-
щее как коврик для
беспроводной зарядки
17

Начало работы
После полной зарядки отсоедините Galaxy Watch3 от устройства, функционирующего как
2
коврик для беспроводной зарядки.
•
Для надлежащей зарядки не перемещайте и не используйте устройство,
функционирующее как коврик для беспроводной зарядки, или Galaxy Watch3 во время
зарядки.
•
Питание, поступающее на устройство Galaxy Watch3, может быть меньше, чем
питание, которое поступает с другого устройства, функционирующего как коврик для
беспроводной зарядки.
•
Если устройство Galaxy Watch3 заряжается во время того, как заряжается устройство,
функционирующее как коврик для беспроводной зарядки, то в зависимости от типа
зарядного устройства скорость зарядки Galaxy Watch3 может уменьшится либо
устройство может не зарядиться должным образом.
•
Скорость или эффективность зарядки могут варьироваться в зависимости от состояния
устройства, которое выполняет функцию коврика для беспроводной зарядки, или
окружающей среды.
•
Если доступный заряд аккумулятора устройства, функционирующего как коврик
для беспроводной зарядки, станет ниже определенного уровня, зарядка другого
устройства прекратится.
•
Дополнительные сведения о доступных устройствах, функционирующих как коврики
для беспроводной зарядки, см. на веб-сайте Samsung.
Режим энергосбережения
Для продления времени работы от аккумулятора включите режим энергосбережения.
•
Функция Wi-Fi отключена.
•
Все функции, за исключением вызовов, сообщение и уведомлений, ограничиваются.
•
Производительность процессора Galaxy Watch3 ограничивается.
На экране приложений нажмите кнопку
производительности
Для отключения этого режима выберите пункт
коснитесь кнопки
→
Экономия энергии
.
(
Настройки
→ .
ВЫКЛ.
) →
Аккумулятор
внизу экрана режима энергосбережения и
→
Режим
18

Начало работы
Ношение устройства Galaxy Watch3
Надевание устройства Galaxy Watch3
Откройте замок браслета и наденьте Galaxy Watch3 на запястье. Затяните ремешок, вставьте
язычок в нужное регулировочное отверстие и зафиксируйте замок браслета, чтобы закрыть
его. Если ремешок слишком тугой на запястье, используйте предыдущее отверстие для более
комфортного использования часов.
Не сгибайте ремешок слишком сильно. Это может повредить устройство Galaxy Watch3.
•
Для более точного измерения пульса с помощью устройства Galaxy Watch3 носите его
так, чтобы оно плотно прилегало к нижней части руки над запястьем. Дополнительные
сведения см. в разделе Правильное ношение устройства Galaxy Watch3.
•
В случае контакта определенных материалов с обратной стороной устройства Galaxy
Watch3, устройство Galaxy Watch3 может распознавать ношение на запястье.
•
В случае отсутствия контакта между датчиком Galaxy Watch3 и запястьем в течение
10 минут, устройство Galaxy Watch3 может определить, что не находится на запястье.
Советы и меры предосторожности при использовании ремешка
•
При продолжительном ношении или выполнении высокоинтенсивных упражнений во время
ношения Galaxy Watch3 возможно раздражение кожи по причине трения и давления. После
ношения устройства Galaxy Watch3 в течение продолжительного времени снимите его с
запястья и не надевайте в течение нескольких часов.
•
Раздражение кожи может возникать по причине аллергии, факторов внешней среды, прочих
факторов, а также при длительном контакте с мылом или потом. В этом случае прекратите
пользоваться устройством Galaxy Watch3 и подождите 2 или 3 дня до тех пор, пока симптомы
не ослабнут. Если симптомы не проходят или усугубляются, немедленно обратитесь к врачу.
•
Перед надеванием устройства Galaxy Watch3 кожа должна быть сухой. При длительном
ношении влажного устройства Galaxy Watch3 возможно воздействие на кожу.
•
Если устройство Galaxy Watch3 используется в воде, уберите посторонние материалы с кожи и
устройства Galaxy Watch3 и тщательно высушите их во избежание раздражения кожи.
•
Не используйте в воде никакие аксессуары помимо устройства Galaxy Watch3.
19

Начало работы
Присоединение или замена ремешка
Присоедините ремешок перед использованием Galaxy Watch3. Можно отсоединить ремешок от
устройства Galaxy Watch3 и заменить его новым.
•
Входящий в комплект поставки ремешок может отличаться в зависимости от региона
или модели.
•
Размер входящего в комплект поставки ремешка может отличаться в зависимости от
модели. Используйте ремешки соответствующего размера для вашей модели.
Присоединение ремешка
Вставьте один конец пружинного стержня ремешка в проушину устройства Galaxy Watch3.
1
Задвиньте пружинный стержень внутрь и подсоедините ремешок.
2
2
20
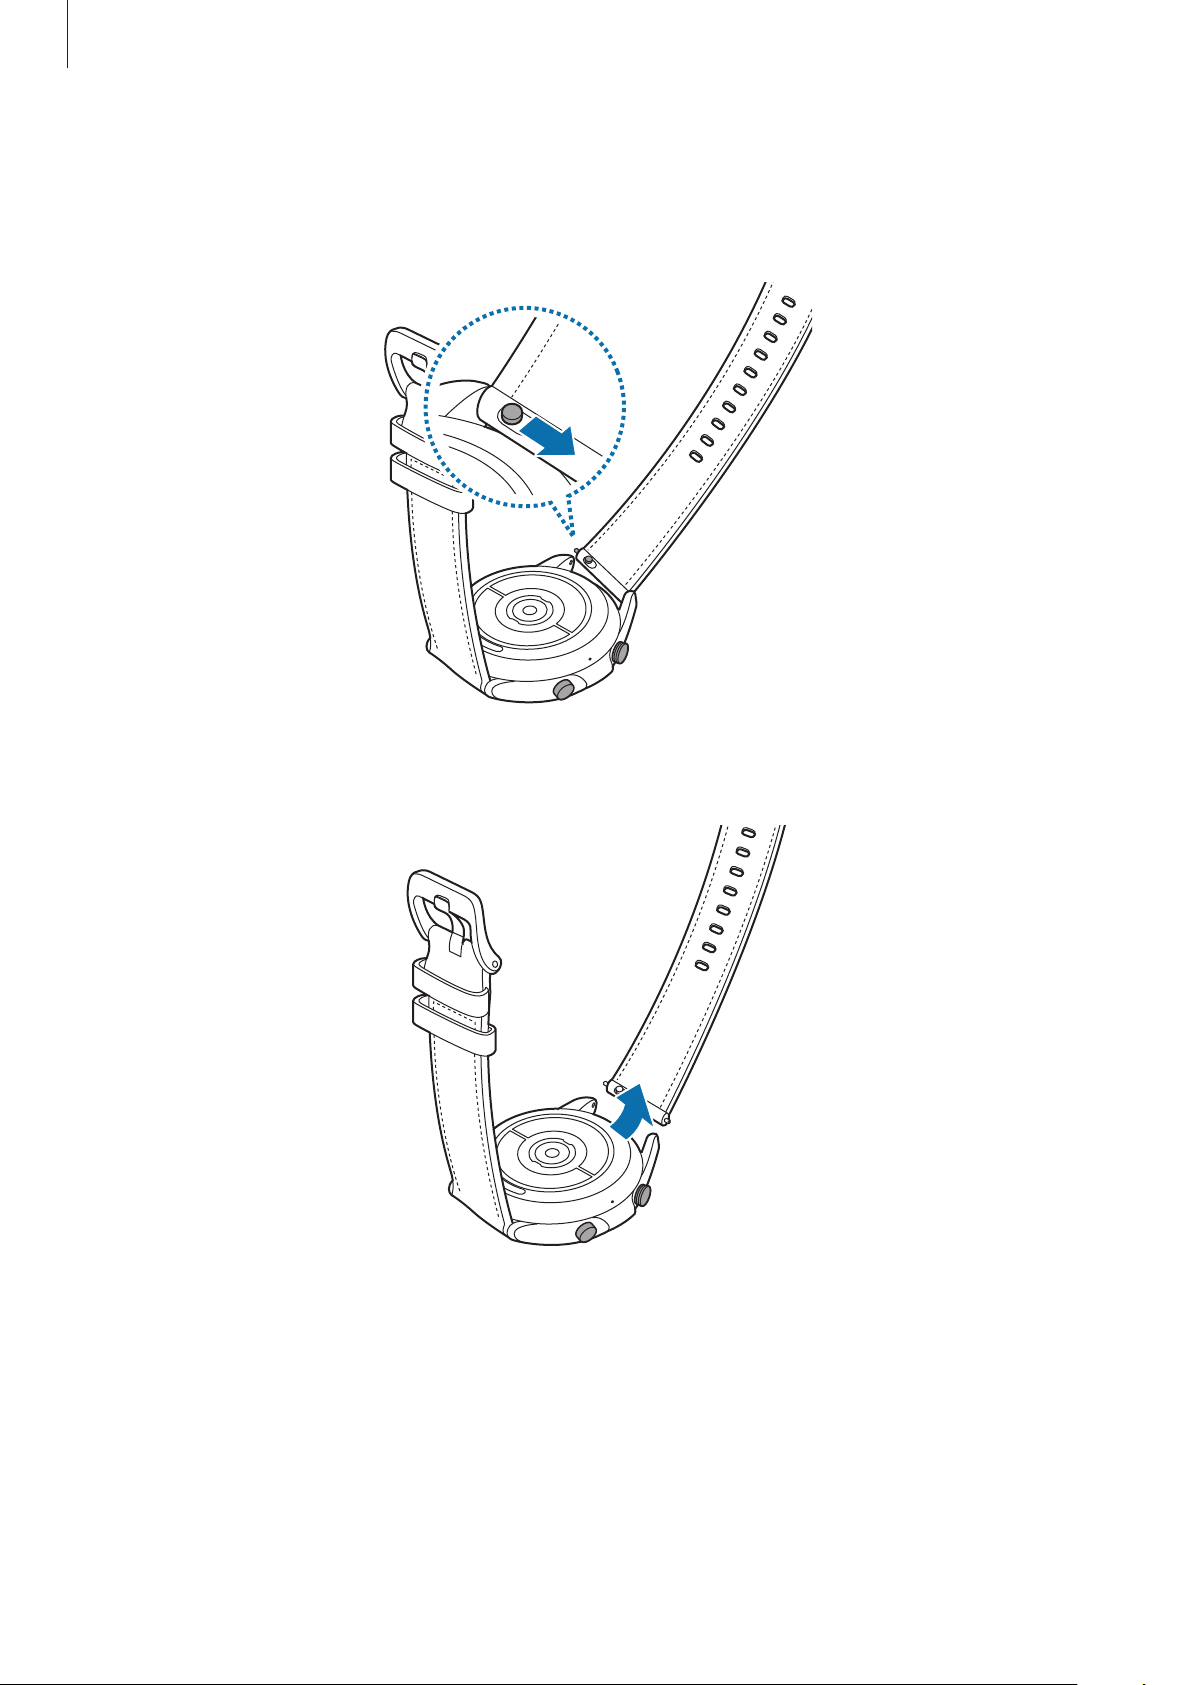
Начало работы
Замена ремешка
Передвиньте пружинный стержень ремешка внутрь.
1
Отсоедините ремешок от корпуса устройства Galaxy Watch3.
2
Присоедините новый ремешок к устройству Galaxy Watch3.
3
21
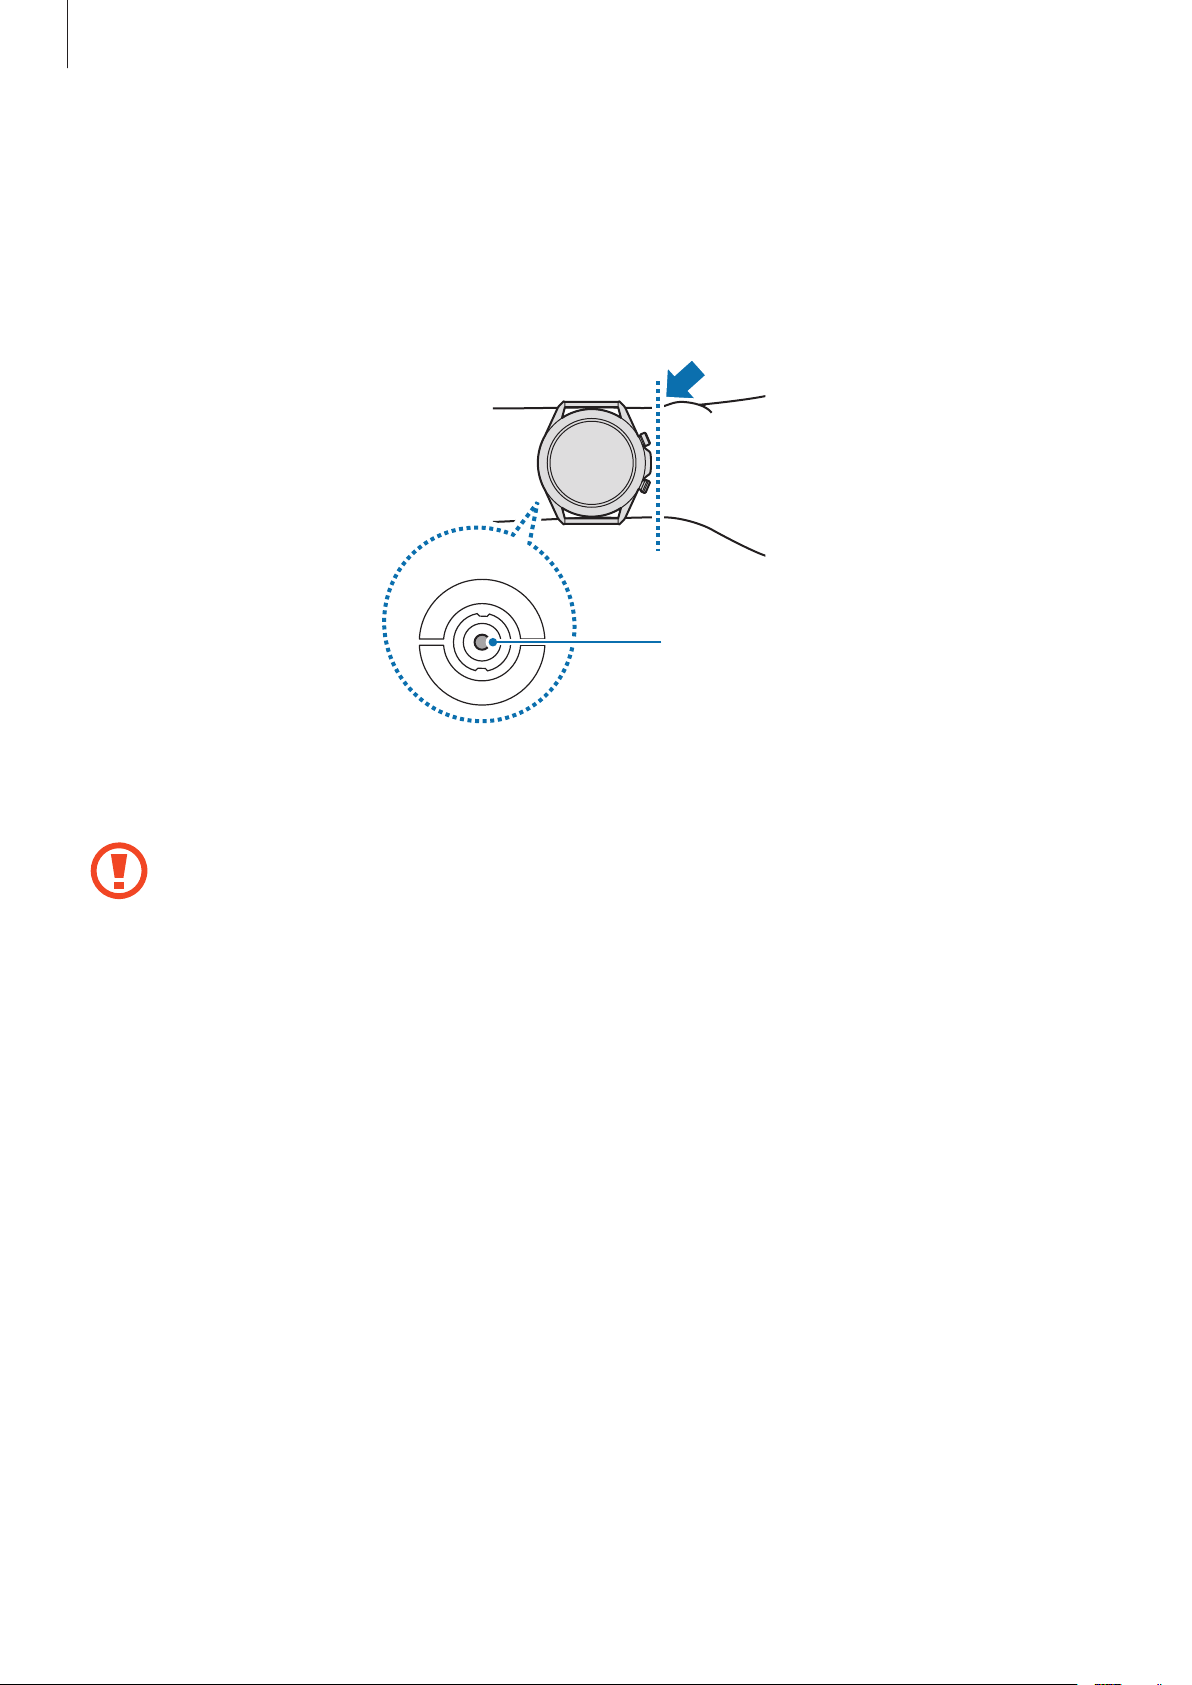
Начало работы
Правильное ношение устройства Galaxy Watch3
•
После включения функции автоматического измерения пульса или при начале использования
функций упражнений измерение пульса запустится на устройстве Galaxy Watch3
автоматически. При измерении пульса наденьте устройство Galaxy Watch3 на руку выше
запястья, чтобы оно плотно прилегало к ней, как показано на рисунке ниже.
<Вид сзади>
Оптический датчик пульсометра
•
Если устройство Galaxy Watch3 закреплено слишком туго, может возникнуть раздражение
кожи, а если слишком слабо— может образовываться трение.
•
Не смотрите на оптический датчик пульсометра без применения защитных средств
для глаз. Это может привести к нарушению зрения. Не позволяйте детям смотреть
непосредственно на датчик пульсометра.
•
Если Galaxy Watch3 нагревается, снимите его, чтобы оно остыло. Длительное ношение
устройства Galaxy Watch3 с нагретой поверхностью на руке может привести к ожогу.
22
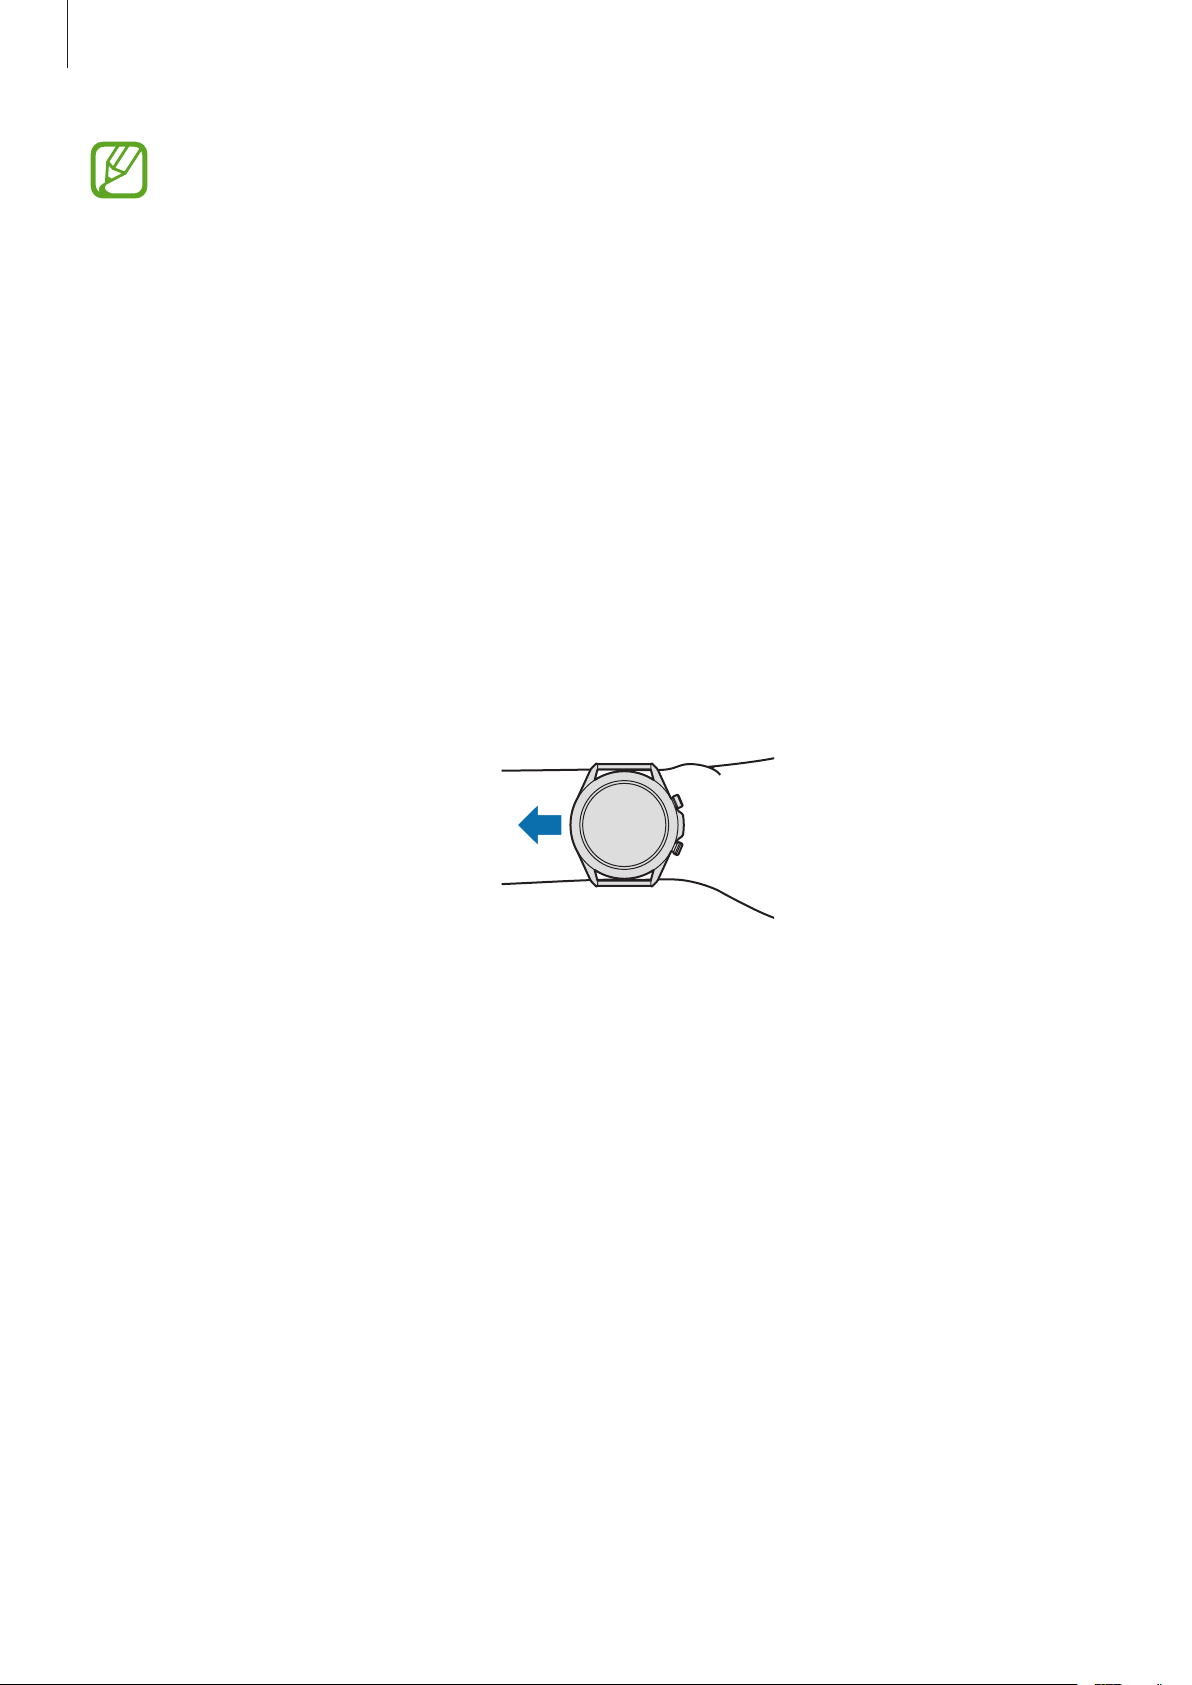
Начало работы
•
Точность измерений оптическим датчиком пульсометра зависит от условий измерения
и окружающих условий.
•
Используйте функцию пульсометра только для измерения пульса.
•
Низкая температура окружающей среды может влиять на результаты измерений. В
холодное время года необходимо согреться перед осуществлением замера.
•
Курение и употребление алкоголя перед замерами могут повлиять на их результаты.
•
Не разговаривайте, не зевайте и не дышите глубоко во время измерения пульса. Это
может привести к неточному измерению пульса.
•
На сигнал может влиять оттенок кожи, циркуляция крови, а также чистота в области
датчика. Кроме того, если пульс сильно повышен или понижен, результаты измерения
могут быть неточными.
•
Пользователи с тонким запястьем могут получить неточные результаты измерений
пульса из-за того, что устройство может неплотно прилегать, вследствие чего свет
отражается неравномерно. При ненадлежащем измерении пульса сдвиньте оптический
датчик пульсометра вправо, влево, вверх или вниз на запястье, или носите устройство
на внутренней стороне запястья, чтобы обеспечить контакт датчика с кожей.
•
При загрязнении оптического датчика пульсометра вытрите его и повторите попытку.
К неравномерному отражению света датчика могут привести препятствия между
ремешком устройства и запястьем, такие как грязь или посторонние частицы.
Убедитесь, что ремешок прилегает плотно, прежде чем начать использование
устройства.
•
Для более точного измерения пульса с помощью устройства Galaxy Watch3 используйте
спортивный ремешок Ridge. Спортивный ремешок Ridge продается отдельно.
23
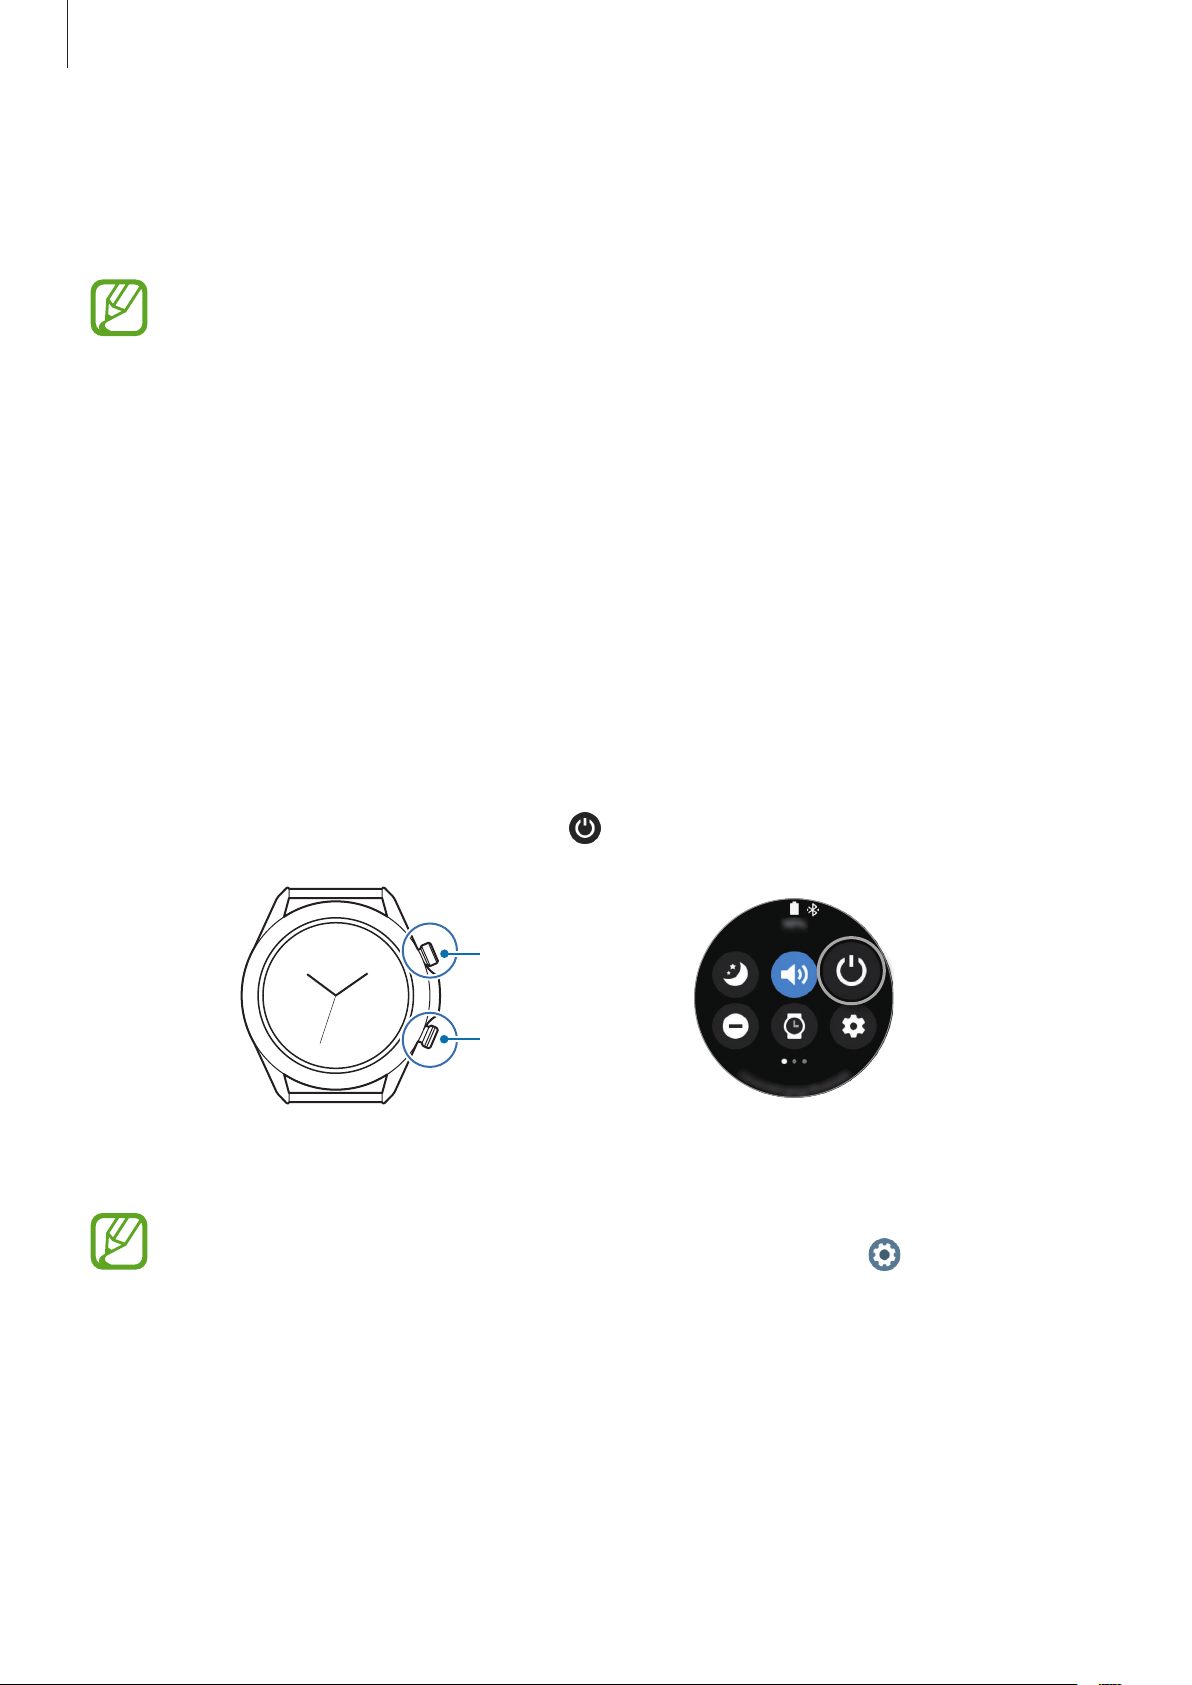
Начало работы
Включение и выключение устройства Galaxy
Watch3
В местах, где использование беспроводных устройств запрещено, например в самолетах
или больницах, следуйте требованиям предупреждающих табличек и указаниям
персонала.
Включение устройства Galaxy Watch3
Чтобы включить устройство Galaxy Watch3, нажмите и удерживайте клавишу «Главный экран» в
течение нескольких секунд.
При первом включении устройства Galaxy Watch3 или после его сброса на экране появляются
инструкции по загрузке и установке приложения Galaxy Wearable на мобильном устройстве.
Дополнительные сведения см. в разделе Подключение Galaxy Watch3 к мобильному устройству.
Выключение устройства Galaxy Watch3
Для выключения устройства Galaxy Watch3 нажмите и удерживайте клавишу «Главный экран»
1
и клавишу «Назад» одновременно. Можно также открыть панель быстрого доступа, проведя
по экрану сверху вниз, и коснуться значка .
Клавиша «Назад»
Клавиша
«Главный экран»
Выберите пункт
2
Устройство Galaxy Watch3 можно настроить на отключение при нажатии и удерживании
клавиши «Главный экран». На экране приложений коснитесь значка (
Дополнительные
выключения
Выключение
→
Клавиша “Домой”
.
.
Настройки
→
Нажатие и удерж.
и выберите пункт
) →
Меню
Принудительная перезагрузка
Если устройство Galaxy Watch3 не реагирует на выполняемые действия, для его перезагрузки
одновременно нажмите и удерживайте клавишу «Главный экран» и клавишу «Назад» в течение
более 7 секунд.
24
Начало работы
Подключение Galaxy Watch3 к мобильному
устройству
Установка приложения Galaxy Wearable
После подключения устройства Galaxy Watch3 к мобильному устройству можно использовать
прочие различные функции. Чтобы подключить устройство Galaxy Watch3 к мобильному
устройству, установите на мобильном устройстве приложение Galaxy Wearable.
В зависимости от смартфона приложение Galaxy Wearable можно загрузить из следующих
источников:
•
Устройства на базе Android компании Samsung:
•
Другие устройства Android:
Play Маркет
Galaxy Store, Play Маркет
•
Приложение Galaxy Wearable невозможно установить на мобильные устройства,
которые не поддерживают синхронизацию с Galaxy Watch3. Убедитесь, что ваше
мобильное устройство совместимо с устройством Galaxy Watch3.
•
Если используется мобильное устройство iOS, откройте приложение
iPhone 5 или более новой версии, или устройстве, которое поддерживает iOS 9 или
новее, и установите приложение Galaxy Wearable, чтобы подключиться к Galaxy Watch3.
Некоторые функции могут отсутствовать.
App Store
Подключение Galaxy Watch3 к мобильному устройству по
Bluetooth
Включите устройство Galaxy Watch3 и проведите от нижнего края экрана вверх.
1
Появится экран с информацией о загрузке и установке приложения Galaxy Wearable.
Нажмите кнопку , чтобы выбрать используемый язык, и следуйте инструкциям на экране.
2
на
Экран первоначальной настройки может отличаться в зависимости от региона.
Откройте приложение
3
При необходимости обновите приложение Galaxy Wearable до последней версии.
Galaxy Wearable
на мобильном устройстве.
25
Начало работы
Выберите пункт
4
Выберите устройство на экране.
5
Если нужное устройство отсутствует, выберите пункт
Для установки подключения следуйте инструкциям на экране.
6
При установлении подключения на экране Galaxy Watch3 откроется экранное учебное
руководство. Следуйте инструкциям на экране, чтобы ознакомиться с базовыми функциями
устройства Galaxy Watch3.
•
Способы подключения могут отличаться в зависимости от используемого смартфона и
версии программного обеспечения.
•
При первом подключении устройства Galaxy Watch3 к мобильному устройству после
сброса заряд аккумулятора Galaxy Watch3 может расходоваться быстрее во время
синхронизации данных, например, контактов.
•
Поддерживаемые мобильные устройства и функции могут отличаться в зависимости от
страны, поставщика услуг и производителя устройства.
Начать
.
Моего устройства нет
.
Подключение Galaxy Watch3 к новому мобильному устройству
При подключении Galaxy Watch3 к новому мобильному устройству все данные Galaxy Watch3,
кроме мультимедийных файлов и настроек, будут сброшены. Когда появится запрос перед
подключением устройства Galaxy Watch3 к новому мобильному устройству, выберите пункт
Резервное копирование
данных. Для получения дополнительной информации о резервном копировании данных
устройства Galaxy Watch3 см. раздел Управление данными устройства Galaxy Watch3.
На экране приложений нажмите кнопку (
1
Продолжить
Устройство Galaxy Watch3 будет отключено от мобильного устройства. После этого оно
автоматически переключится в режим сопряжения по Bluetooth.
.
, чтобы безопасно выполнить резервное копирование сохраненных
Настройки
) →
Подкл. к новому телефону
→
26
Начало работы
На новом мобильном устройстве откройте приложение
2
подключение к устройству Galaxy Watch3.
Если нужное мобильное устройство уже подключено к другому устройству, откройте
приложение
Добавить новое устройство
Galaxy Wearable
на мобильном устройстве и коснитесь значка →
, чтобы выполнить подключение к новому устройству.
Galaxy Wearable
, чтобы установить
Удаленное подключение
Мобильное устройство и устройство Galaxy Watch3 будут подключены с помощью функции
Bluetooth. Если подключение по Bluetooth недоступно, устройство Galaxy Watch3 можно удаленно
подключить к мобильному устройству с помощью учетной записи Samsung по сети Wi-Fi. Таким
образом, можно будет и далее получать уведомления от мобильного устройства.
Если эта функция выключена, откройте приложение
выберите пункт
Удаленное подключение
Главная
→
Учетная запись и рез. копир.
, чтобы включить соответствующую функцию.
Galaxy Wearable
, а затем коснитесь переключателя
на мобильном устройстве,
Управление экраном
Безель
Устройство Galaxy Watch3 оснащено безелем. Поверните безель по часовой стрелке или против
часовой стрелки, чтобы легко управлять различными функциями Galaxy Watch3.
•
Убедитесь, что в области безеля нет посторонних веществ, таких как пыль или песок.
•
Не используйте безель возле магнитных полей, так как они могут вносить помехи в
работу внутренних магнитов безеля и привести к их неисправности.
Если безель не поворачивается, обратитесь в сервисный центр Samsung, не пытаясь
разобрать устройство Galaxy Watch3.
27

Начало работы
Перемещение между экранами
Поверните безель, чтобы просмотреть содержимое других экранов. При открытом экране Часы
поверните безель против часовой стрелки, чтобы просмотреть уведомления.
Выбор объекта
Для перемещения по элементам поворачивайте безель. С поворотом безеля индикатор выделения
перемещается в направлении вращения и выделяется элемент.
Настройка значений ввода
Поверните безель для настройки уровня громкости или яркости. Настраивая яркость, поверните
безель по часовой стрелке, чтобы сделать экран ярче.
28
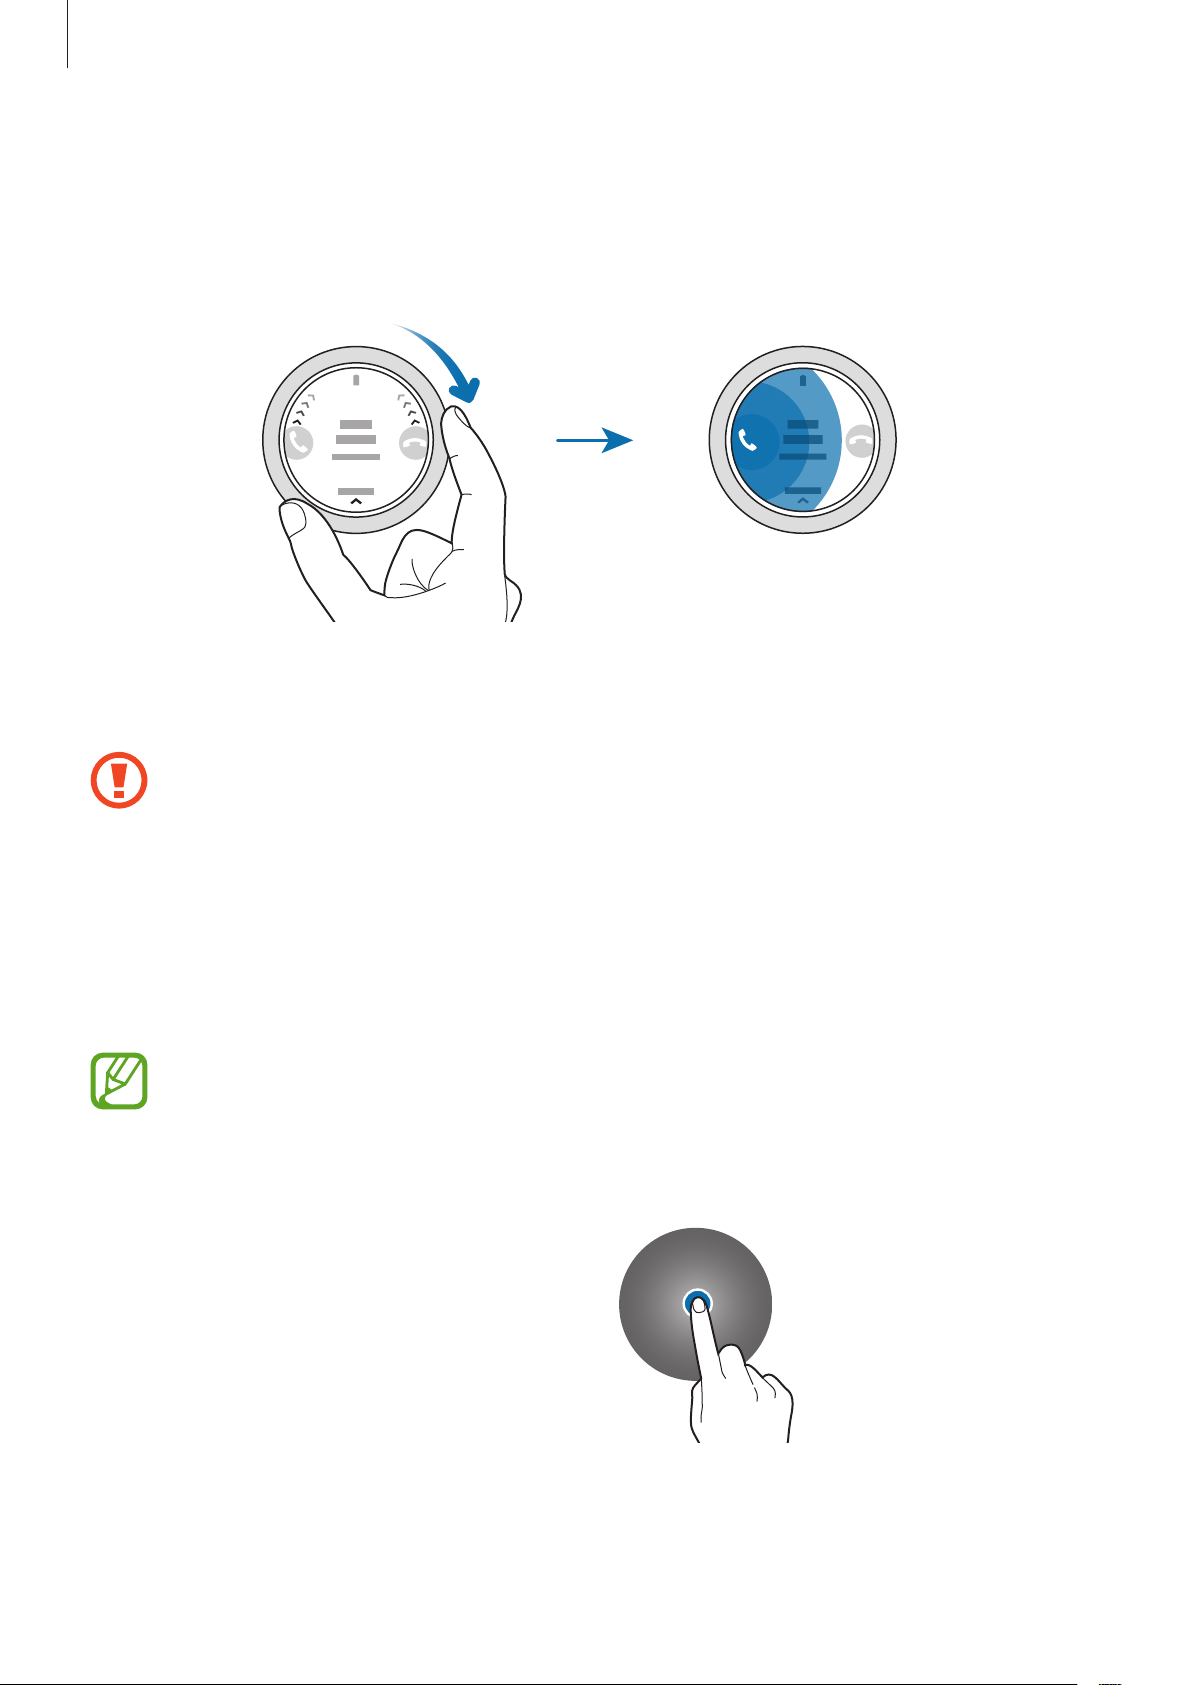
Начало работы
Использование функции телефона или будильника
Чтобы ответить на входящий вызов или выключить сигнал оповещения, поверните безель
по часовой стрелке. Чтобы отклонить входящий вызов или отложить срабатывание сигнала
оповещения, поверните безель против часовой стрелки.
Сенсорный экран
•
Следите за тем, чтобы сенсорный экран не соприкасался с электронными устройствами.
Возникающие при этом электростатические разряды могут привести к неправильной
работе сенсорного экрана или выходу его из строя.
•
Во избежание повреждений сенсорного экрана не касайтесь его острыми предметами
и не нажимайте на него слишком сильно пальцами.
•
Рекомендуется не использовать неподвижные изображения на всем сенсорном экране
или его части в течение продолжительного времени. В противном случае на экране
могут появляться шлейфы от изображения (эффект выгорания экрана) и артефакты.
•
Устройство Galaxy Watch3 может не распознать касания близко к краям экрана,
поскольку они находятся за пределами сенсорной области.
•
Рекомендуется пользоваться сенсорным экраном с помощью пальцев.
•
При включенном режиме блокировки в воде сенсорный экран не будет действовать.
Касание
Чтобы открыть приложение, выбрать
пункт меню или нажать экранную кнопку,
коснитесь нужного объекта пальцем.
29
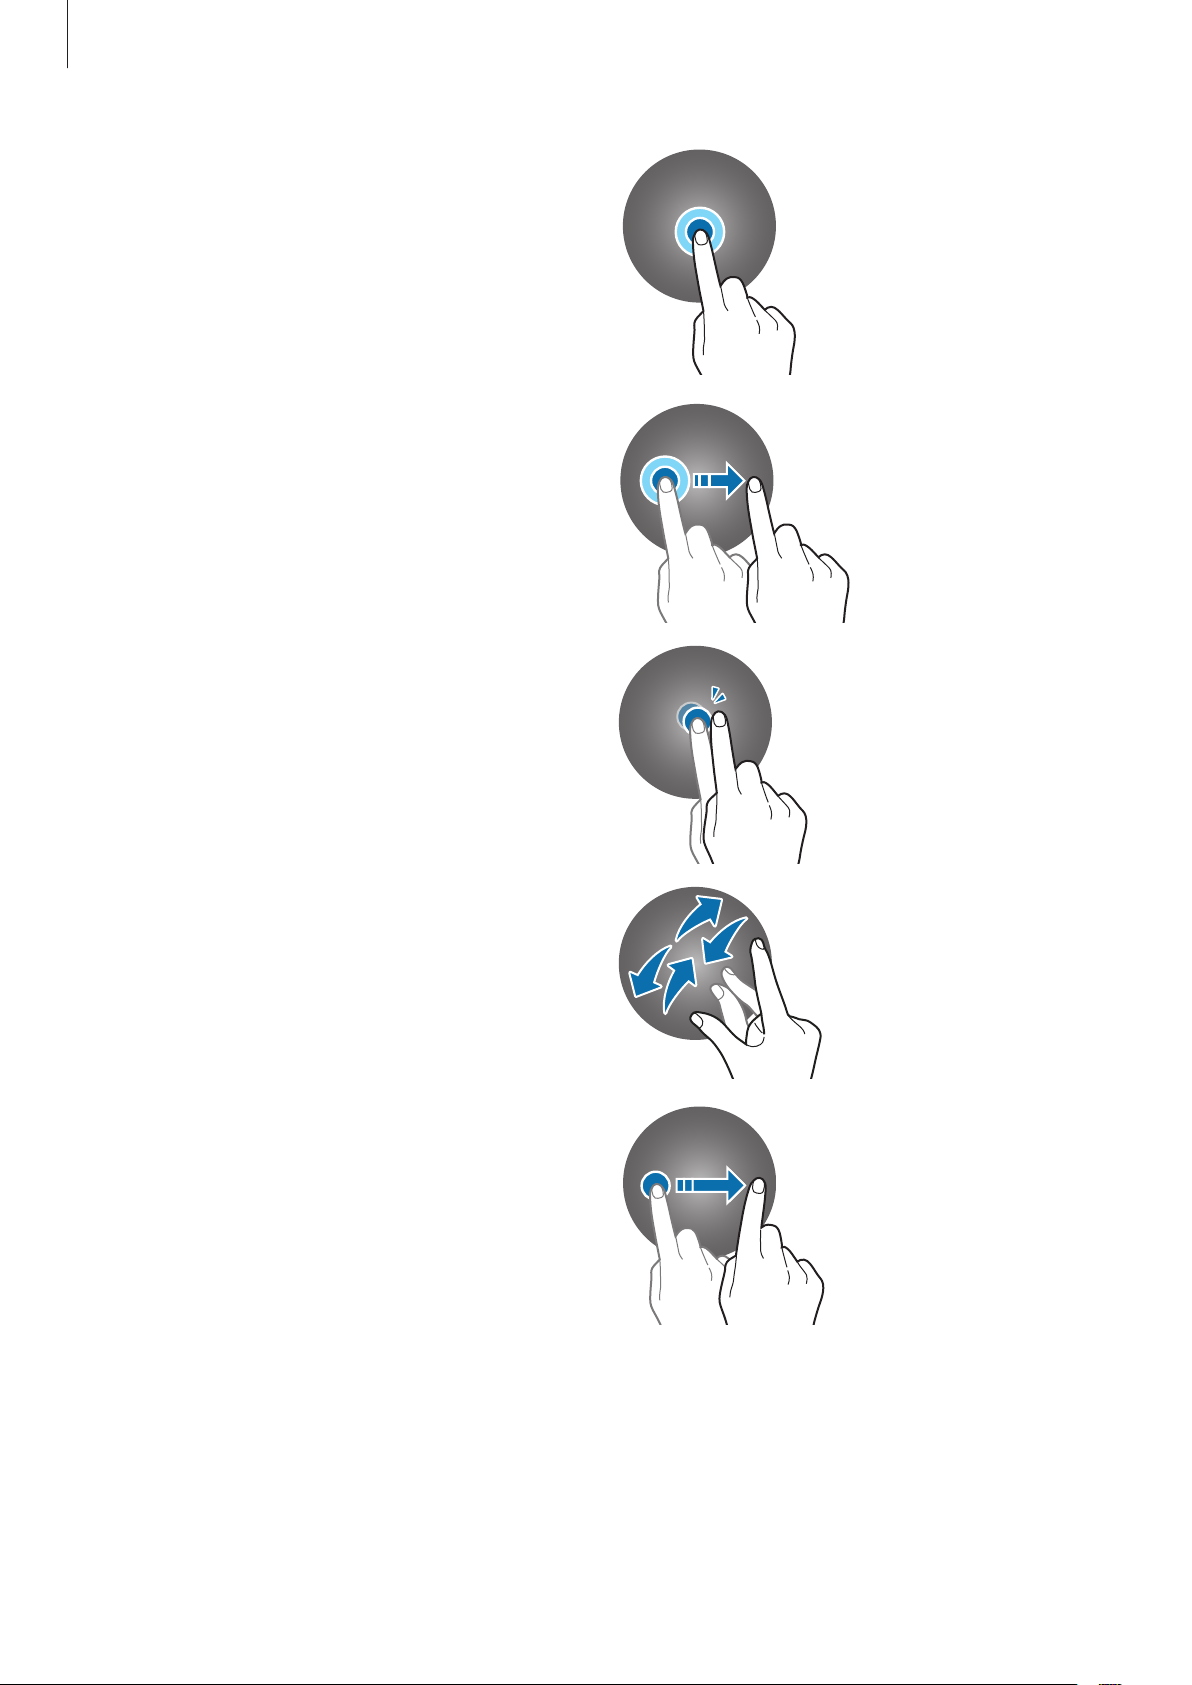
Начало работы
Нажатие и удерживание
Нажмите и удерживайте экран в течение не
менее двух секунд, чтобы перейти в режим
редактирования или просмотреть доступные
параметры.
Перемещение
Чтобы переместить элемент, коснитесь его и,
удерживая, перетащите в нужное место.
Двойное касание
Дважды коснитесь изображения, чтобы
увеличить или уменьшить масштаб.
Разведение и сведение пальцев
Разведите или сведите два пальца на
изображении, чтобы увеличить или
уменьшить масштаб.
Прокрутка
Проведите влево или вправо, чтобы
просмотреть другую панель.
30
Loading…
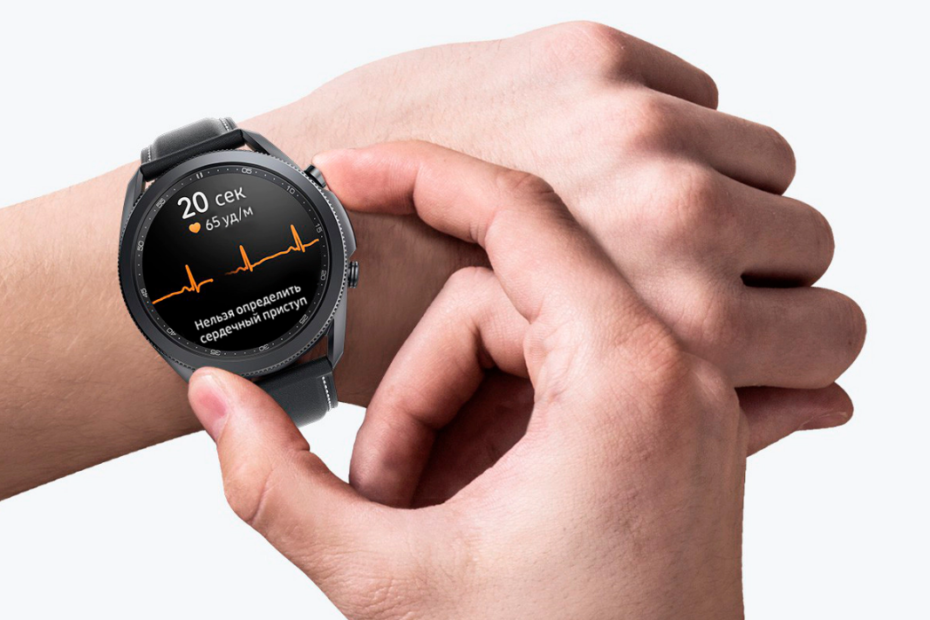
КЛАССИКА И ЭЛЕГАНТНОСТЬ — Смарт-часы Samsung Galaxy Watch3
Загрузить Руководство Пользователя: Galaxy-Watch3-rukovodstvo
Поворотный безель для простоты навигации
Циферблат, который невозможно забыть: выберите любой из двух размеров – 45 мм или 41 мм. Носимое устройство предлагается в трех цветах: Черный, Серебро и Бронза. Элегантный дизайн подчеркивается уникальным вращающимся безелем.
Экран больше, вес и толщина меньше
Теперь экран стал больше, и самое важное стало еще заметнее. Новые Galaxy Watch3 стали элегантнее – теперь они тоньше и легче предыдущей модели и особенно комфортно ощущаются на запястье.
Гармония красоты и функциональности
Вы сможете выбрать любой из многочисленных вариантов циферблатов Galaxy Watch3, дизайн которых прекрасно сочетается с элегантным внешним видом устройства. Составьте свою собственную информацию, которая будет отображаться на циферблате. Выбор из 40 элементов позволит всегда получать нужные данные с одного взгляда, а также получить быстрый доступ к вашим любимым приложениям.
Характеристики
-
Функция NFC Да
-
Версия Bluetooth Bluetooth v5.0
-
Размер экрана 1.4″ (34.5 мм)
-
Процессор 1.15 ГГц
-
Встроенная память (ГБ) 8 ГБ
-
Датчики Акселерометр, Барометр, Гироскопический датчик, Датчик освещенности, Оптический датчик сердечного ритма
Подробные технические характеристики
Сеть
- Стандарт связи Bluetooth, Wi-Fi
Подключения
- ANT+ Нет
- Система навигации GPS, ГЛОНАСС, Beidou, Galileo
- Wi-Fi 802.11 b/g/n 2.4 ГГц
- Функция NFC Да
- Версия Bluetooth Bluetooth v5.0
- Профили Bluetooth A2DP,AVRCP,HFP,HSP
Операционная система
- Tizen
Экран
- Тип экрана Super AMOLED
- Размер экрана 1.4″ (34.5 мм)
- Разрешение экрана 360 x 360 мм
- Глубина цвета экрана 16 млн.
Процессор
- Частота процессора 1.15 ГГц
- Тип процессора Двухъядерный
Память
- Объем ОЗУ (ГБ) 1 ГБ
- Встроенная память (ГБ) 8 ГБ
- Доступная память* (ГБ) 4,3 ГБ
Датчики
- Акселерометр, Барометр, Гироскопический датчик, Датчик освещенности, Оптический датчик сердечного ритма
Физические характеристики
- Размеры (ВxШxГ) 46.2 x 45.0 x 11.1 мм
- Вес (г.) 53.8 г
Аккумулятор
- Емкость аккумулятора (мАч, типичное значение) 340 мАч
- Съемный аккумулятор Нет
- Среднее время автономной работы при стандартном режиме использования Более 56 часов
- Максимальное время использования До 151 час.
Аудио и Видео
- Форматы аудио MP3,M4A,3GA,AAC,OGG,OGA,WAV,WMA,AMR,AWB
Оформить заявку на ремонт