
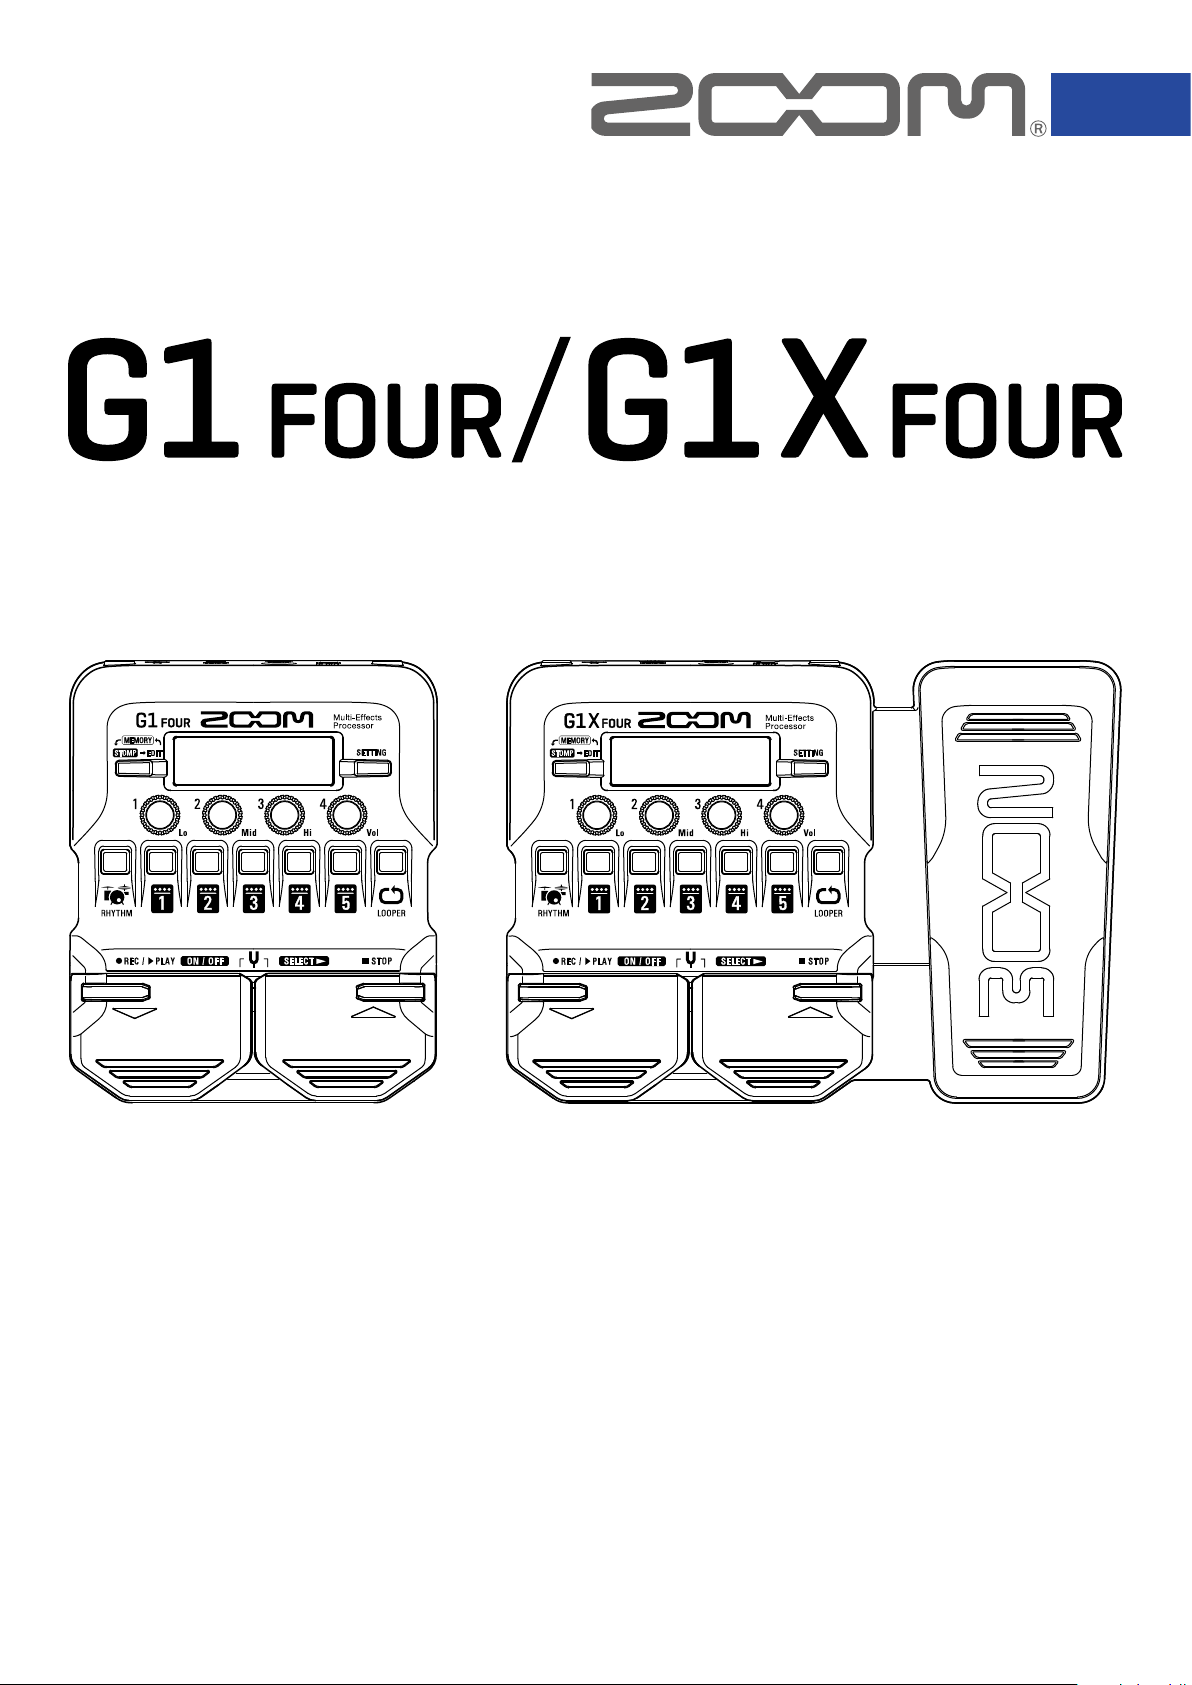
Multi-Effects Processor
Operation Manual
You must read the Usage and Safety Precautions before use.
© 2018 ZOOM CORPORATION
Copying or reprinting this manual in part or in whole without permission is prohibited.
Product names, registered trademarks and company names in this document are the property of their respective companies. All trademarks and regis-
tered trademarks in this document are for identification purposes only and are not intended to infringe on the copyrights of their respective owners.
Introduction
This Multi-Effects Processor starts with numerous effects that can be combined for use together. Effect
combinations and parameter settings can be saved as patches to be used whenever you like. By simply
switching between preset patches, you can achieve dramatic changes in sound.
This processor includes a wide variety of effects, including distortion, chorus and reverb effects. Understanding the features of each effect is important for designing your own sounds. By turning off the effects
in a preset one at time, you should be able to learn their individual roles. If understanding how a sound
is being changed is difcult, try turning off all but one of the effects and adjusting its parameters as you
play. The order of the effects also impacts the sound. Experimenting with the effect order could bring you
closer to your desired sound.
This Multi-Effects Processor allows you to easily enjoy a variety of sounds.
We hope you will enjoy using it for many years.
Main features of the
Realistic amp and effect sounds
The rich collection of effects from the latest G Series content includes boutique pedals and realistic amp
and cabinet models that faithfully emulate the originals.
Using the free Guitar Lab effect management application on a computer (Mac/Windows), you can add effects that are distributed online as well as edit and back up patches, for example.
Craft sounds intuitively with easy operations
With 5 buttons and 4 knobs, you can create sounds intuitively like working with a compact effect or
stompbox.
Rhythm patterns and looper
The looper can record up to 30 seconds and be synchronized with rhythm patterns.
Equalization (EQ) can be quickly adjusted to suit performance conditions
In MEMORY and STOMP modes, 3 EQ (Lo/Mid/Hi) knobs and a volume (Vol) knob can be used to adjust the output. These enable you to make quick adjustments whether at home, in a rehearsal studio, on
stage or elsewhere.
Long operation on batteries
Continuous operation for about 18 hours is possible using 4 AA batteries (when the LCD backlight is off).
2

Terms used in this manual
Patch
A “patch” stores effect ON/OFF states and parameter setting values. Effects are saved and recalled in units
of patches. Five effects can be added to one patch, and the can store up to 50 patches.
Bank
One group of 10 patches is a “bank”. Patches can be quickly recalled by switching banks. The
has 5 banks.
Effect type
The available effect types include various guitar effects and amp/cabinet simulation models. Effects can
be selected from these types to be added to patches.
MEMORY mode
This mode allows you to select patches with the footswitches.
STOMP mode
Use this mode to turn effects in a patch ON/OFF with the footswitches.
EDIT mode
In this mode, edit the types and parameters and effects used in a patch.
PRESELECT
This function allows you to switch to a patch at any location while continuing to use the tone of the currently selected patch.
BANK HOLD
This function allows patch switching to be limited to the current bank.
AUTO SAVE
This function automatically saves changes to patch and effect settings.
ECO mode
This function will automatically turn the power off 10 hours after the last operation.
3

Contents
Introduction ����������������� 2
Terms used in this manual ���������� 3
Contents ������������������ 4
structure ���������� 5
Names of parts ��������������� 7
Loading batteries �������������� 9
Connecting ���������������� 10
Adjusting the overall audio character and output
level ������������������� 11
Using patches (MEMORY mode) ������ 12
Switching to MEMORY mode. ������ 12
Selecting patches and banks ������� 13
Changing individual patch settings ���� 14
Turning effects ON/OFF with footswitches (STOMP
mode) ������������������ 16
Activating STOMP mode ��������� 16
Turning effects ON/OFF with footswitches � 17
Editing effects (EDIT mode) ��������� 18
Activating EDIT mode ���������� 18
Selecting effects ������������� 19
Turning effects ON/OFF ���������� 19
Changing effect types ���������� 20
Adjusting effect parameters ������� 21
Changing the effect order �������� 22
Using the tuner �������������� 39
Activating the tuner ����������� 39
Tuning a guitar ������������� 39
Changing tuner settings ��������� 41
Using rhythms ��������������� 43
Activating the rhythm function ������ 43
Setting the rhythm ������������ 44
Starting/stopping rhythm playback ���� 45
Rhythm patterns ������������� 46
Using the looper �������������� 47
Activating the looper ����������� 47
Setting the looper ������������ 48
Recording and playing loops ������� 50
Overdubbing loops ����������� 51
Clearing the loop ������������ 52
Using the expression pedal (
Setting pedal effects ����������� 53
Adjusting the pedal ����������� 54
Managing the rmware ���������� 56
Checking the rmware versions ������ 56
Updating the rmware ���������� 57
Restoring factory default settings ����� 58
Troubleshooting �������������� 59
Specications ��������������� 60
only) � 53
Managing patches ������������� 23
Saving patches ������������� 23
Swapping patches ������������ 25
Adjusting the master tempo ������� 27
Setting the AUTO SAVE function ����� 28
Setting the PRESELECT function ����� 31
Setting the BANK HOLD function ����� 34
Making power and display settings ����� 35
Setting the type of batteries used ����� 35
Setting the ECO mode ���������� 36
Setting the backlight time �������� 37
Adjusting the display contrast ������ 38
4
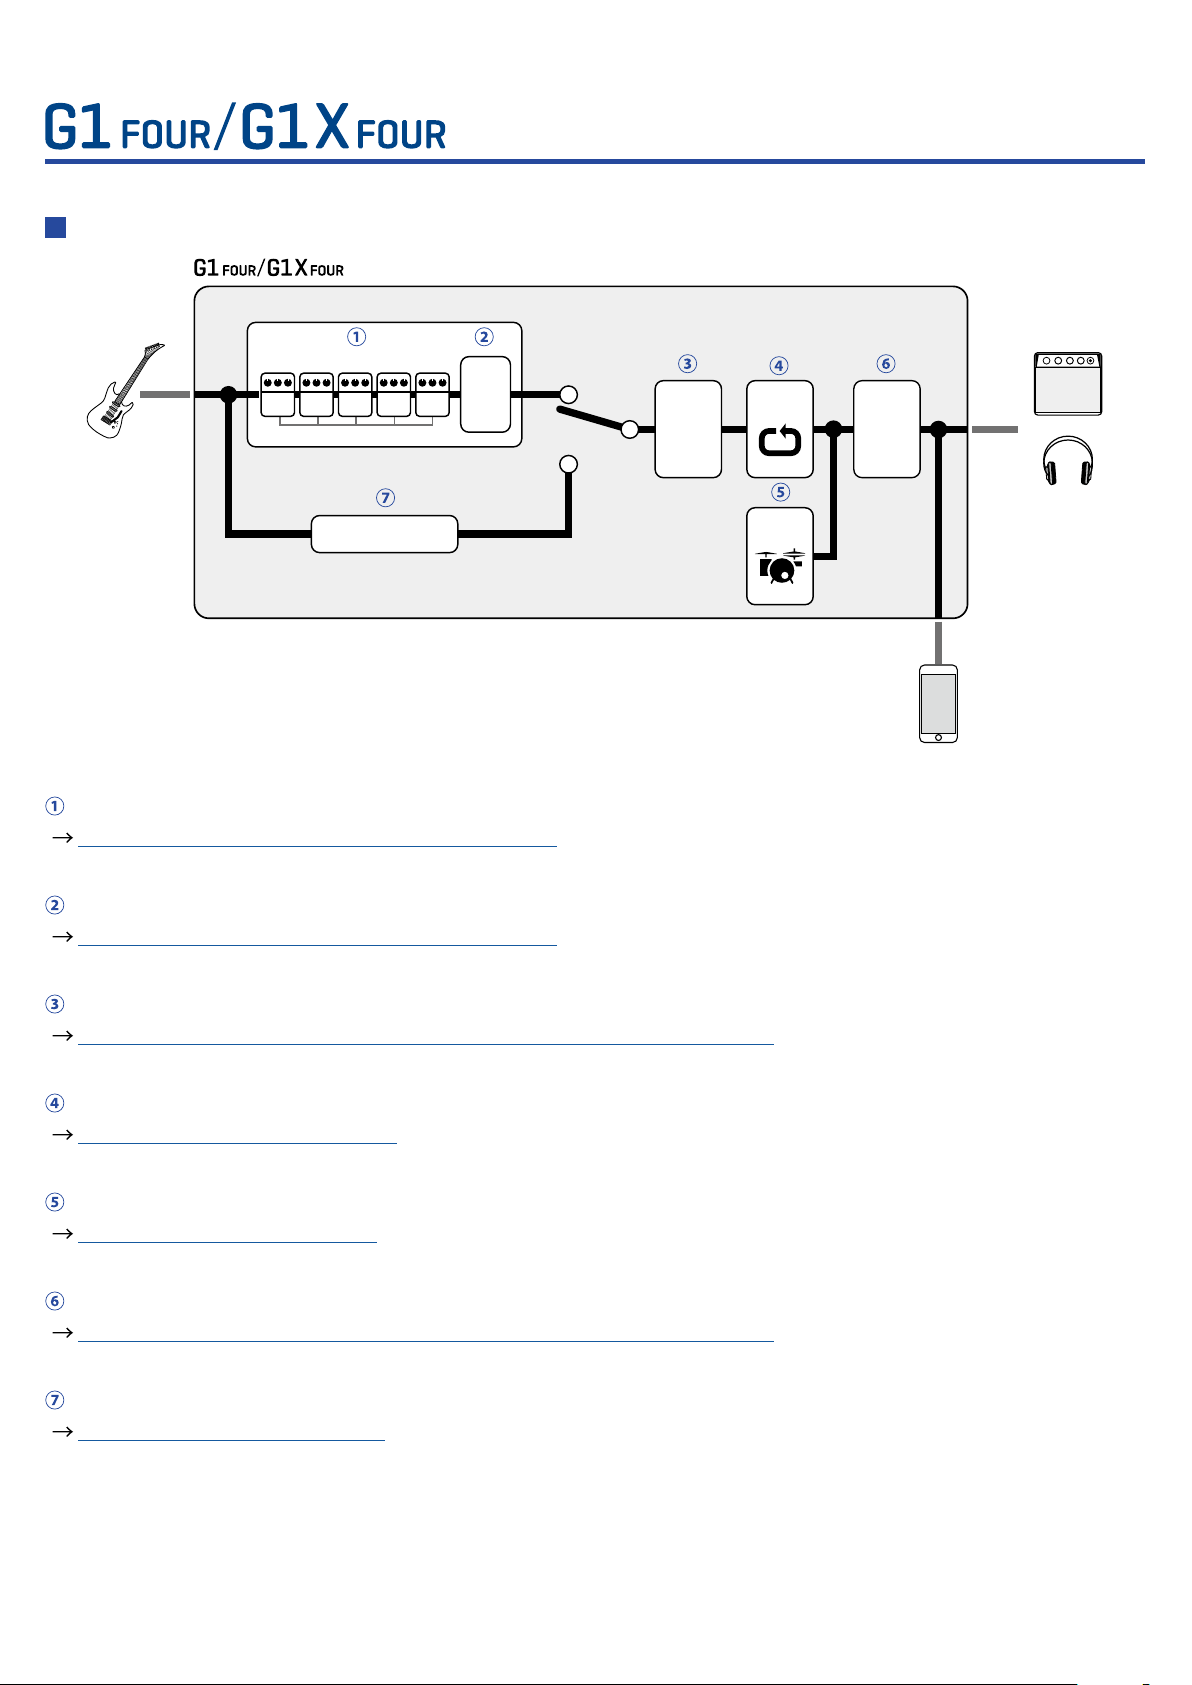
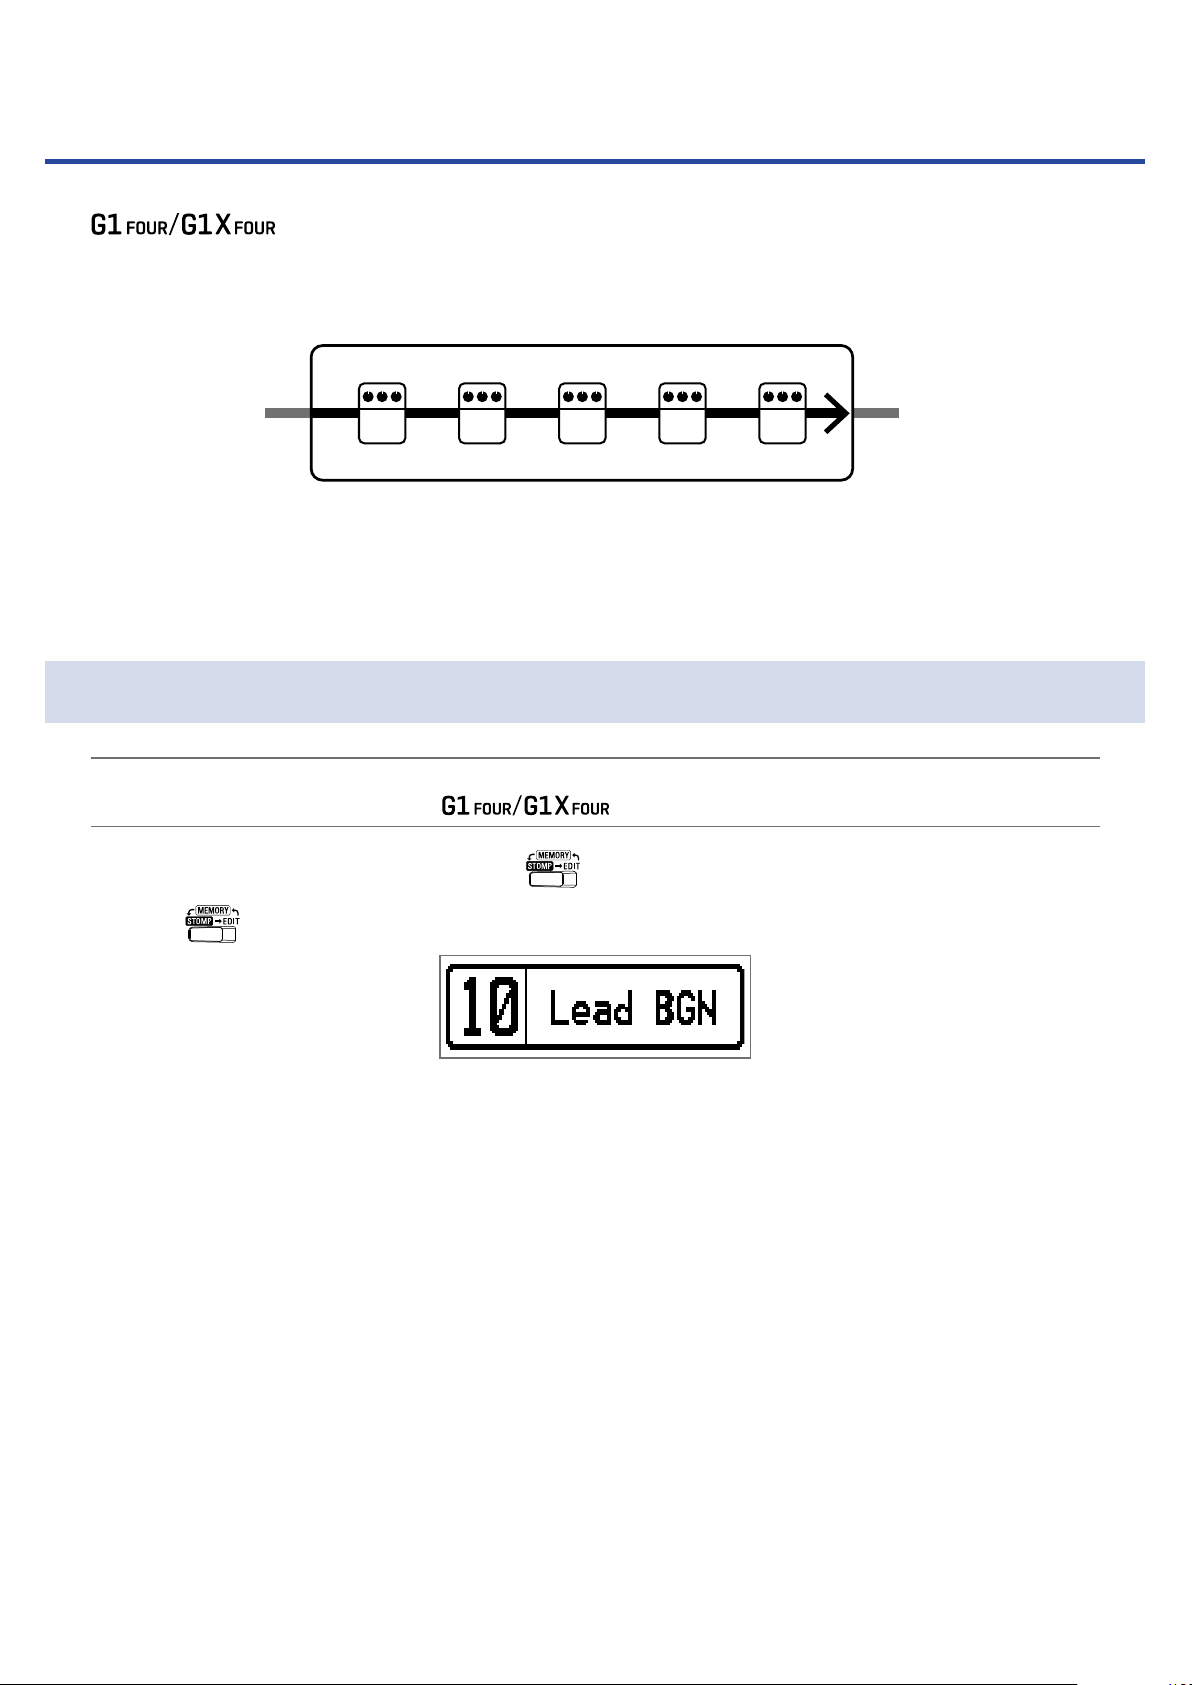
G1 FOUR/G1X FOUR
structure
Signal ow
Patch
Patch
INPUT
1 2 3 4 5
1
Effect
level
Output
EQ
Looper
Output
volume
OUTPUT
Tuner
Rhythm
AUX IN
The input guitar sound passes through effects 1 – 5 in order.
( “Using patches (MEMORY mode)” on page 12)
The patch level is adjusted.
( “Using patches (MEMORY mode)” on page 12)
The overall sound is adjusted. This setting is retained even when the patch is changed.
( “Adjusting the overall audio character and output level” on page 11 )
Recorded phrases can be played back in a loop.
( “Using the looper” on page 47)
Drum sounds can be played back using built-in rhythm patterns.
( “Using rhythms” on page 43)
The overall level is adjusted.
( “Adjusting the overall audio character and output level” on page 11 )
This function enables tuning the connected guitar.
( “Using the tuner” on page 39)
5
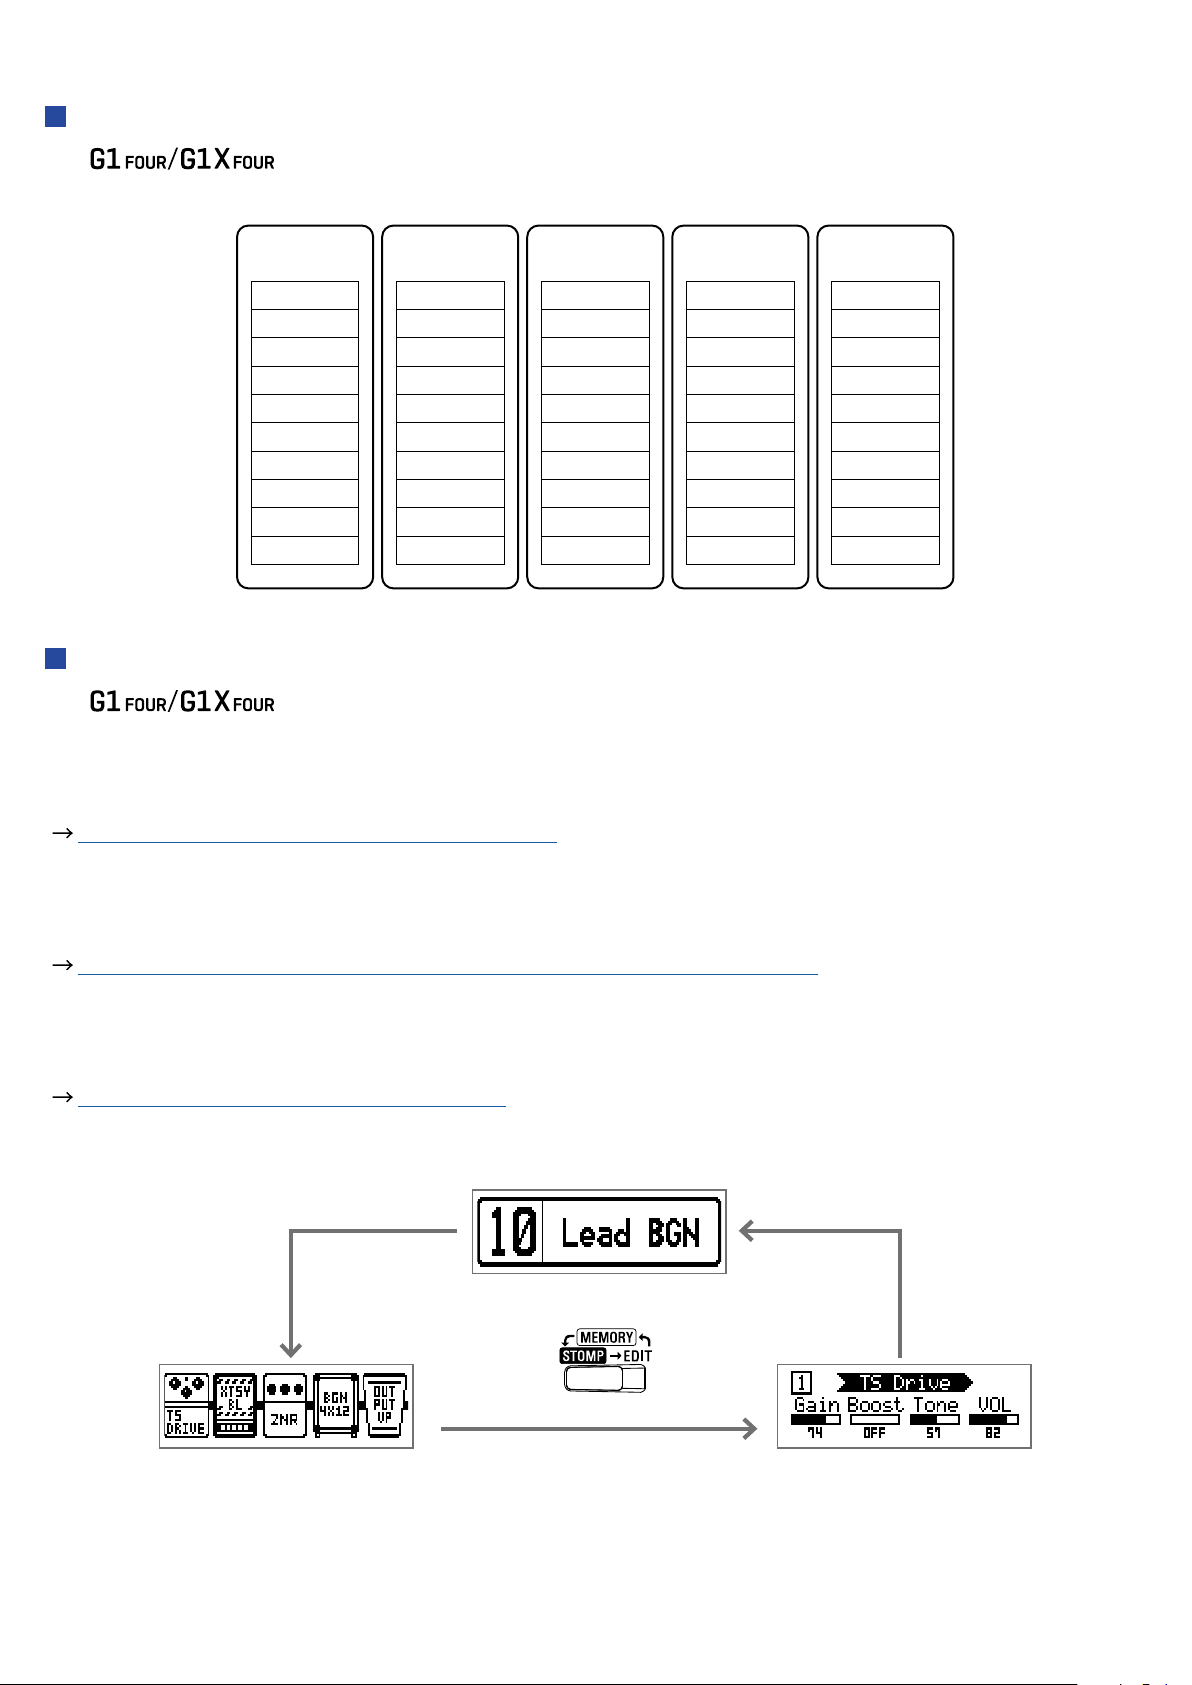
Memory overview (patches/banks)
The can save up to 50 patches.
Patches are managed in banks of 10.
Bank 1
Patch 10
Patch 11
Patch 12
Patch 13
Patch 14
Patch 15
Patch 16
Patch 17
Patch 18
Patch 19
Bank 2
Patch 20
Patch 21
Patch 22
Patch 23
Patch 24
Patch 25
Patch 26
Patch 27
Patch 28
Patch 29
Bank 3
Patch 30
Patch 31
Patch 32
Patch 33
Patch 34
Patch 35
Patch 36
Patch 37
Patch 38
Patch 39
Bank 4
Patch 40
Patch 41
Patch 42
Patch 43
Patch 44
Patch 45
Patch 46
Patch 47
Patch 48
Patch 49
Bank 5
Patch 50
Patch 51
Patch 52
Patch 53
Patch 54
Patch 55
Patch 56
Patch 57
Patch 58
Patch 59
Operation modes
The has three operation modes that can be used as needed while performing.
• MEMORY mode
Use to select patches for performance.
( “Using patches (MEMORY mode)” on page 12)
• STOMP mode
Use this to turn effects in a patch ON/OFF with the footswitches.
( “Turning effects ON/OFF with footswitches (STOMP mode)” on page 16)
• EDIT mode
Use this to change the effects used in a patch and to edit effect parameters.
( “Editing effects (EDIT mode)” on page 18)
MEMORY mode
EDIT modeSTOMP mode
6
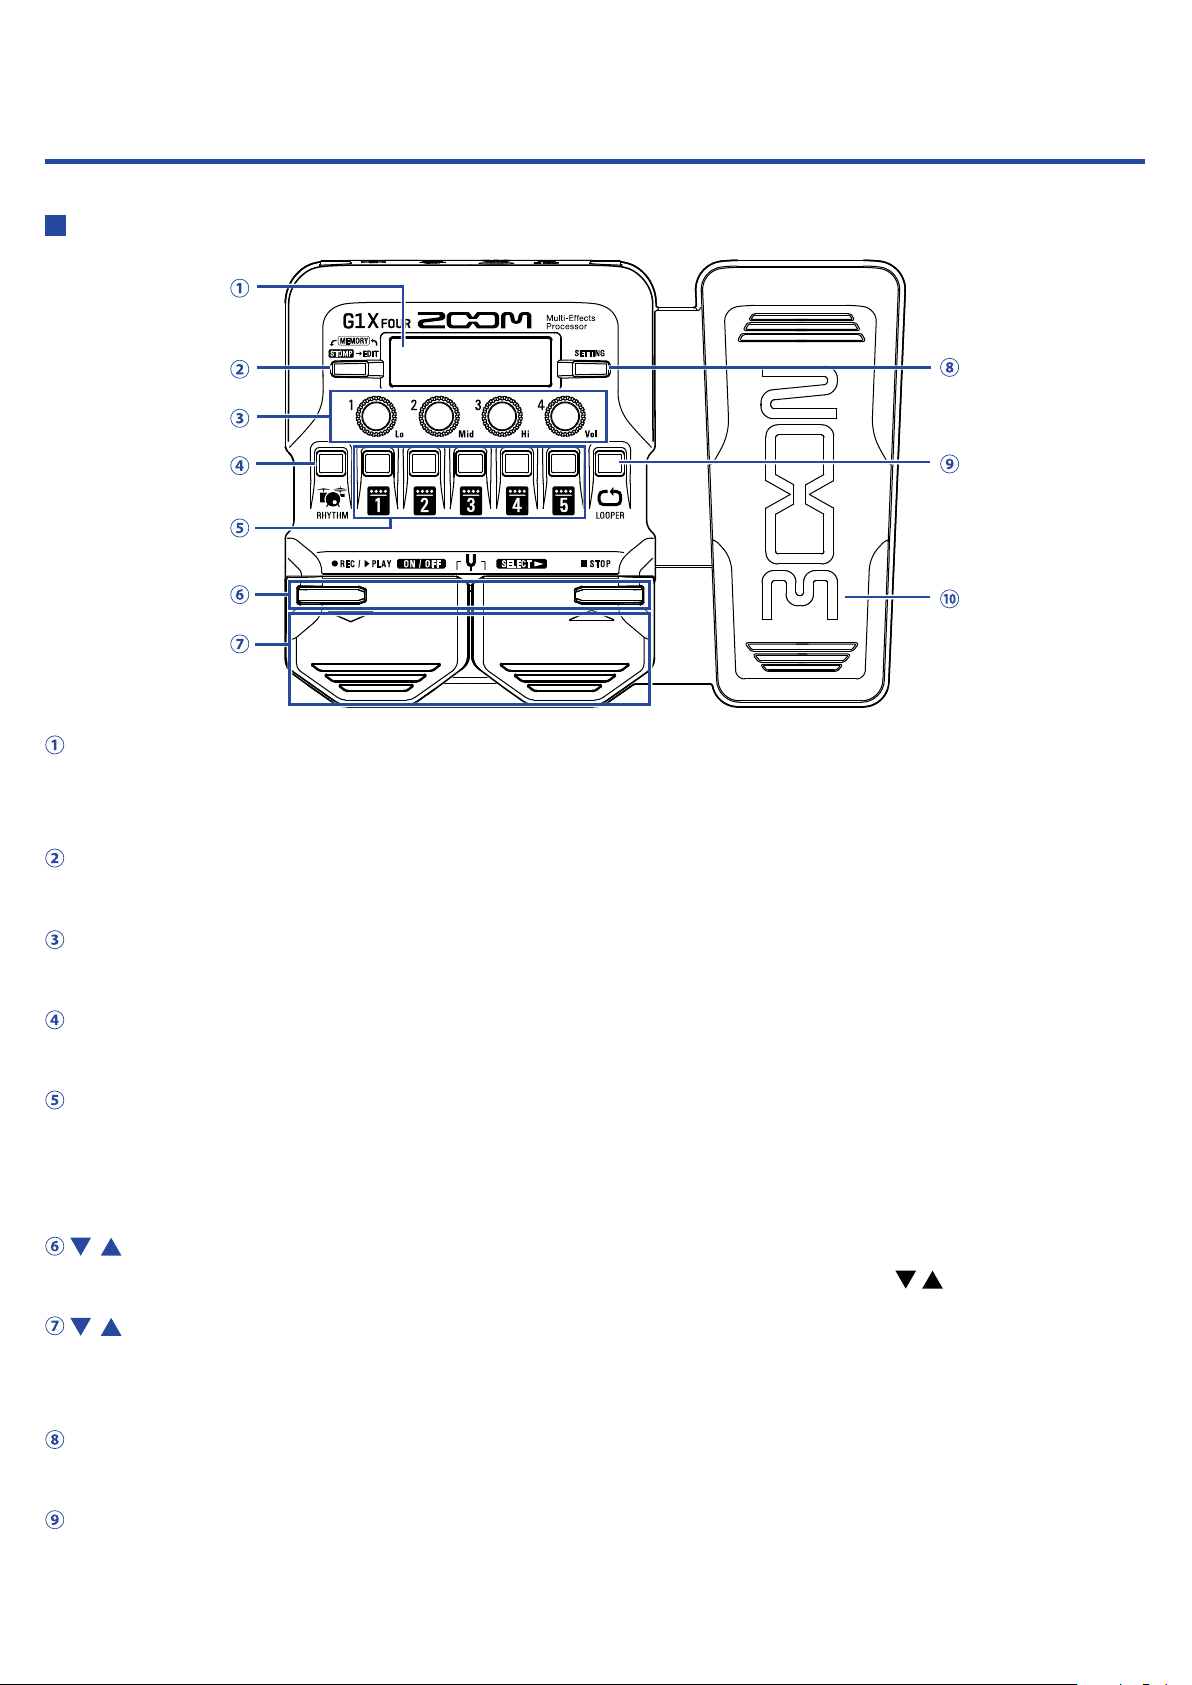
Names of parts
Front Panel
Display
This shows information, including the names of the selected patch and its effects and their parameter
values.
Mode switch
Press this to cycle through the MEMORY, STOMP and EDIT modes.
Parameter knobs
Use these to adjust effect parameters and to make various settings.
RHYTHM button
Press to activate the rhythm.
Effect/bank buttons
In MEMORY mode, these change banks.
In STOMP mode, these turn effects ON/OFF.
In EDIT mode, these select effects and turn them ON/OFF.
/ buttons
Use these to switch effects in EDIT mode. These have the same functions as the / footswitches.
/ footswitches
In MEMORY mode, use these to switch patches. In STOMP mode, use these to select effects and turn
them ON/OFF, for example.
SETTING button
This opens the SETTING screen.
LOOPER button
Press to activate the looper.
7
Expression pedal ( only)
When an effect in the PEDAL category is selected, this adjusts the amount of that effect. ( “Setting
pedal effects” on page 53)
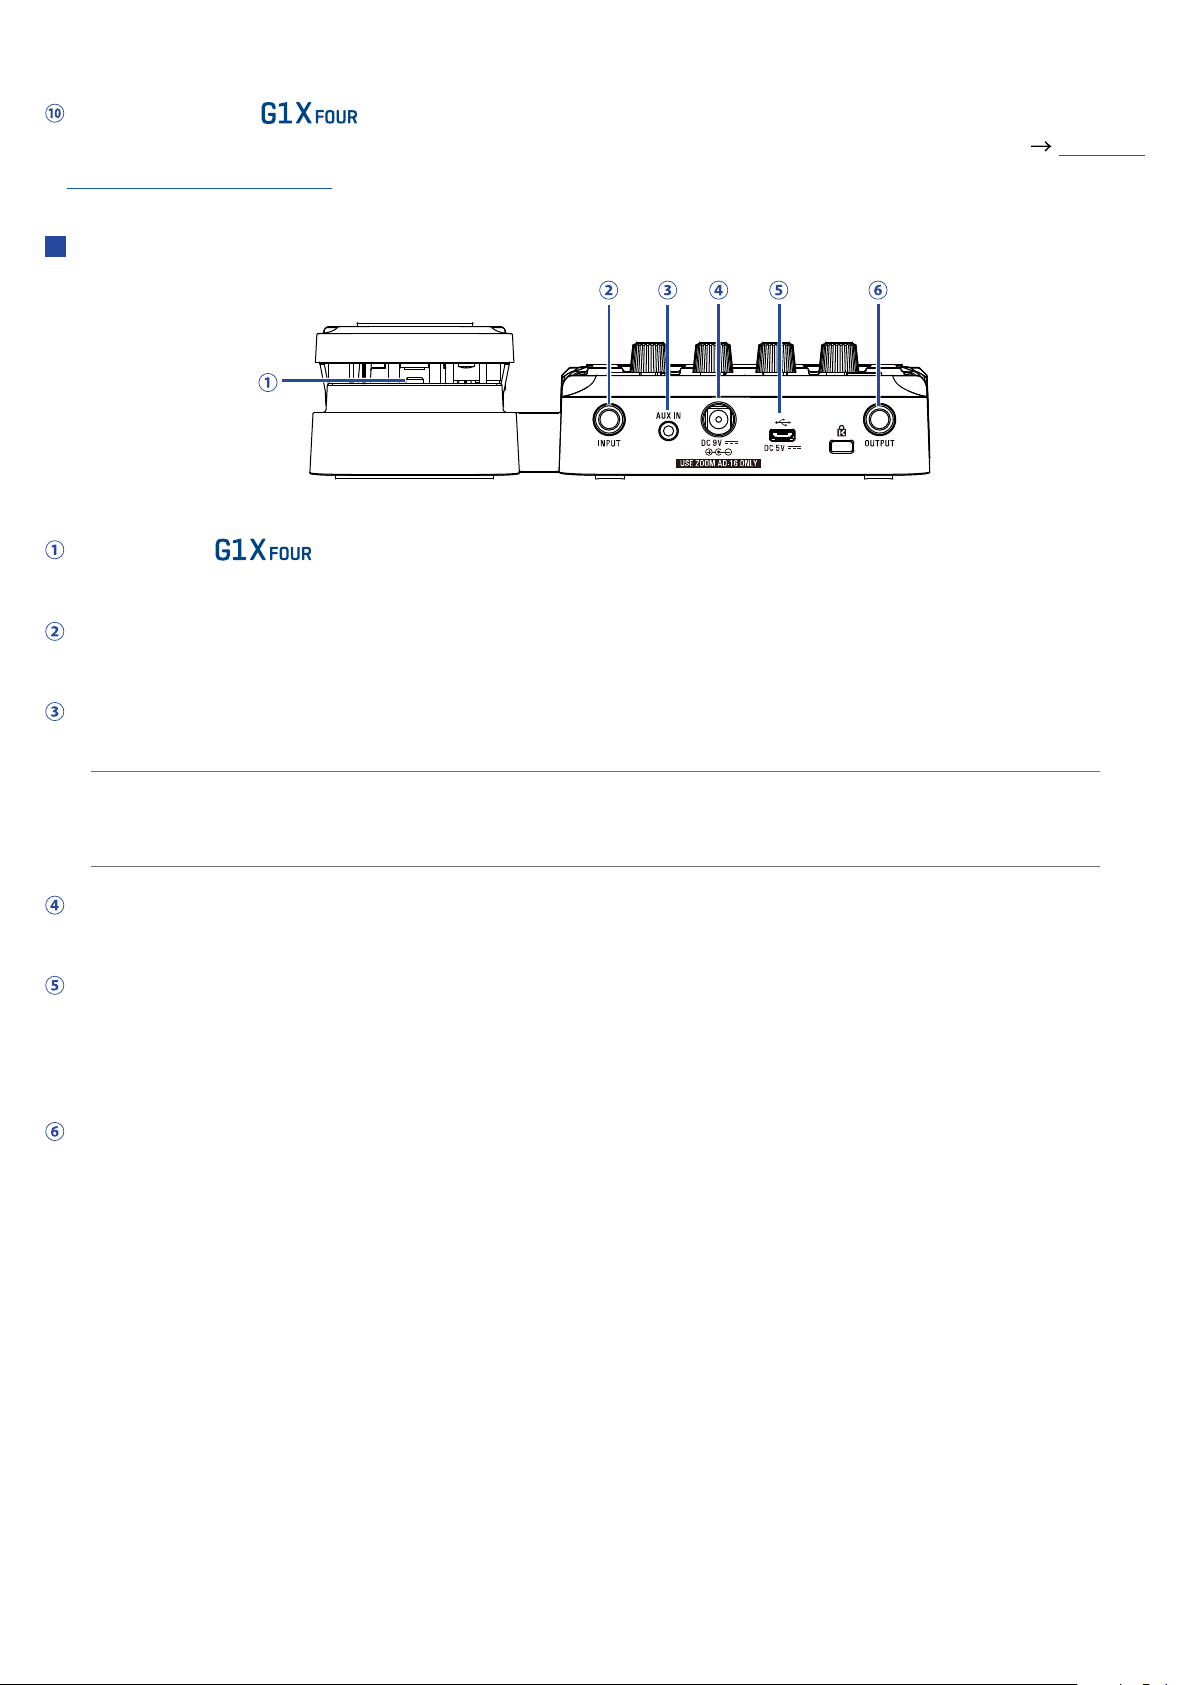
Rear Panel
Pedal switch ( only)
When an effect in the PEDAL category is in use, this turns that effect ON/OFF.
Input jack
Connect a guitar here.
AUX IN jack
Connect an audio device or other external sound source here.
HINT
Signals input through the AUX IN jack will be sent to the OUTPUT jack directly without passing through
the built-in effects.
AC adapter connector
Connect the dedicated AC adapter (ZOOM AD-16) here.
USB port
Connect a computer other external device here. By using Guitar Lab, you can manage patches and edit
and add effects, for example from a computer.
You can also connect a mobile battery, for example, to provide power.
OUTPUT jack
Connect a guitar amp or headphones here.
8
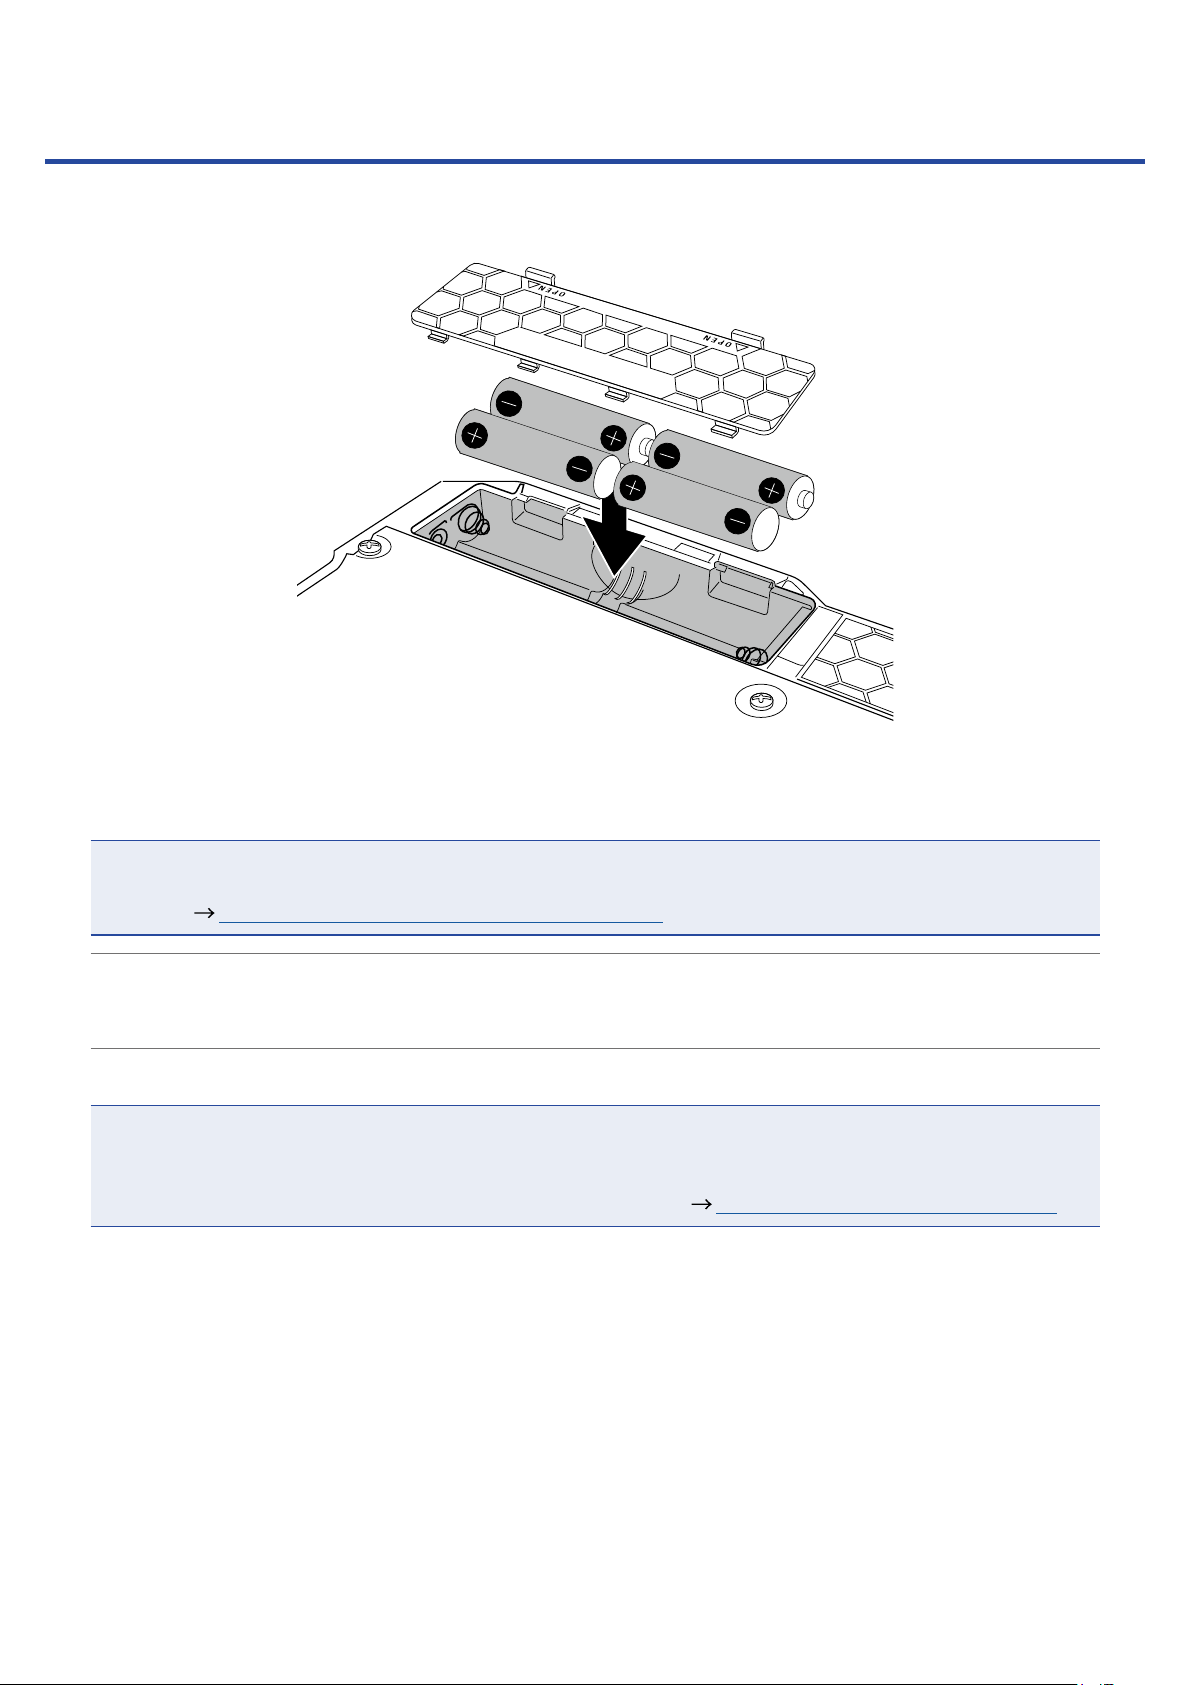
Loading batteries
Open the battery compartment cover on the bottom of the product and insert 4 AA batteries.
1.
Close the battery compartment cover.
2.
NOTE
Set the type of battery used correctly so that the amount of remaining battery charge can be shown accurately. (
HINT
• If a dedicated AC adapter (ZOOM AD-16) is connected, it can run on AC power.
• Power for operation can also be supplied through the USB port.
ECO mode overview
• By default, ECO mode setting is ON, so the power will automatically turn off if no use occurs for 10
hours.
ECO mode can also be set to “OFF” on the SETTING screen. (
•
“Setting the type of batteries used” on page 35)
“Setting the ECO mode” on page 36)
9
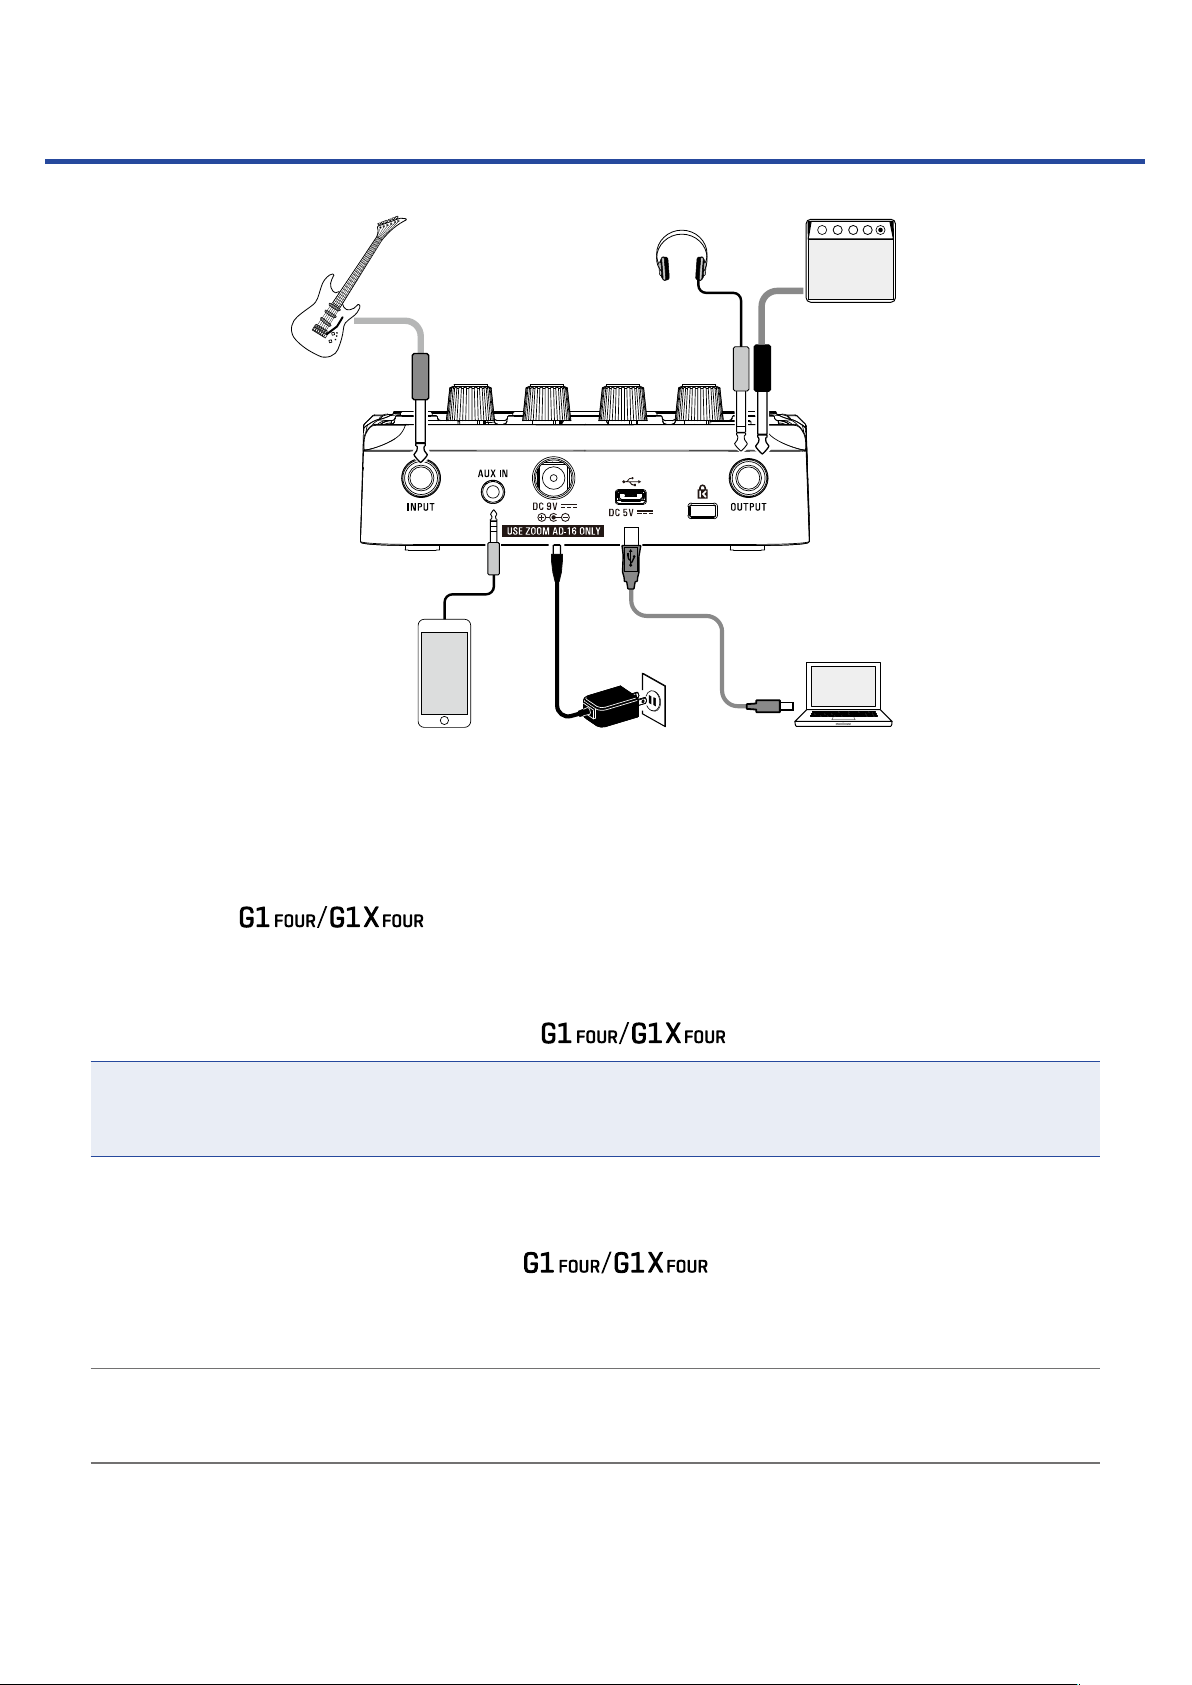
Connecting
1, 7
4
6
25 3
Minimize the volume of the guitar amp.
1.
To use AC power supply, connect to the dedicated AC adapter (ZOOM AD-16) to the AC adapter jack
2.
and an outlet.
This turns the
power ON.
To use a computer, connect a USB cable (not included) to the USB port and the computer.
3.
When using USB bus power to operate the
Guitar Lab
By using Guitar Lab, you can manage patches and edit and add effects, for example from a computer.
Download Guitar Lab from the ZOOM website (https://www.zoom.co.jp).
Connect a guitar to the INPUT jack.
4.
When using battery power to operate the
To use external input, connect a portable audio player or other device to the AUX IN jack.
5.
HINT
Signals input through the AUX IN jack will be sent to the OUTPUT jack directly without passing through
the built-in effects.
Connect a guitar amp or headphones to the OUTPUT jack.
6.
, connecting this cable will turn it ON.
, connecting to this will turn it ON.
Raise the guitar amp volume.
7.
10
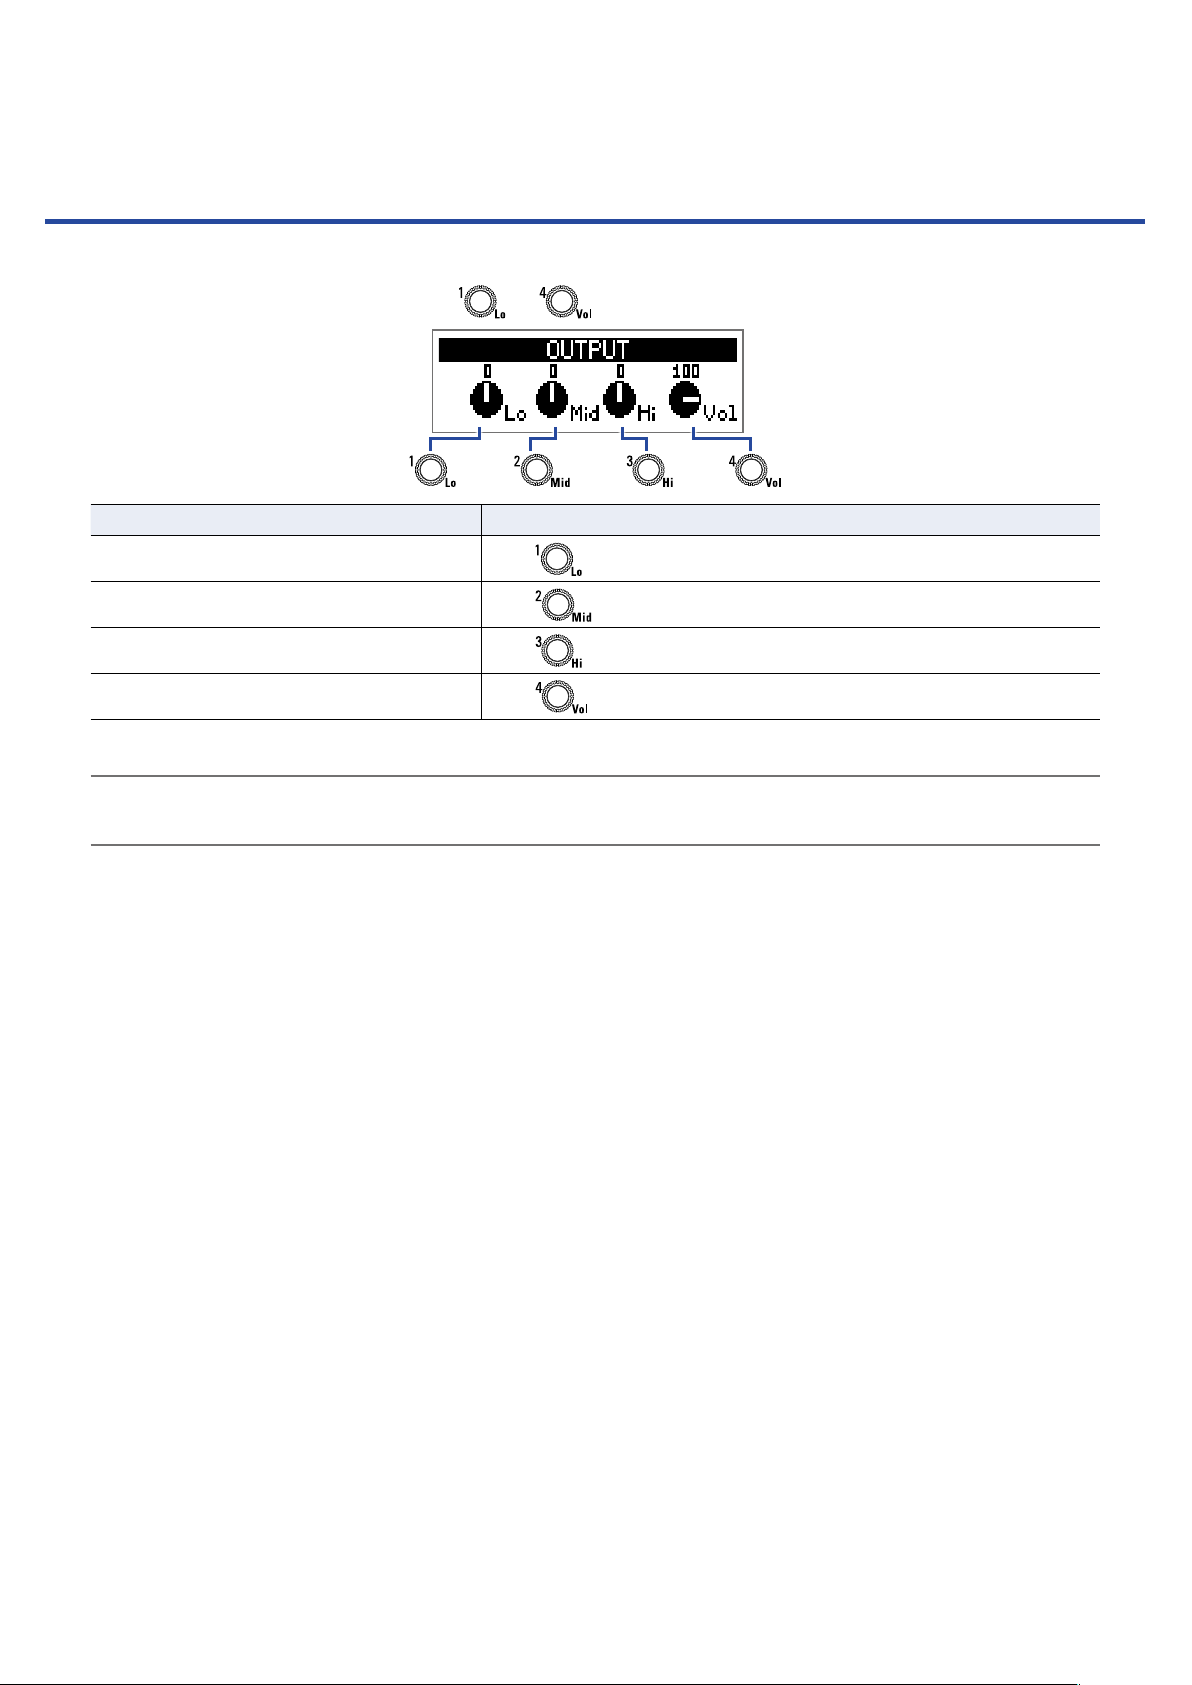
Adjusting the overall audio character and output level
In MEMORY or STOMP mode, turn – .
1.
Function Operation
Adjust the level of low frequencies
Adjust the level of middle frequencies
Adjust the level of high frequencies
Adjust the overall level
HINT
These adjustments are retained even when the patch is changed.
Turn
Turn
Turn
Turn
11
Using patches (MEMORY mode)
The manages effects in patches. A patch can have up to ve effects and save their ON/
OFF states and parameter settings.
Patch
IN OUT
Up to 50 patches can be created. Groups of 10 patches are organized into banks, so effects can be quickly
recalled by switching banks.
Select patches to use in MEMORY mode.
1 2 3 4 5
Effect
Switching to MEMORY mode.
HINT
MEMORY mode is shown when the starts up.
When using STOMP or EDIT mode, press .
1.
Pressing
repeatedly, cycles through the MEMORY, STOMP and EDIT modes in order.
12
Selecting patches and banks
Switching patches
Press or .
1.
This changes the patch.
Function Operation
Switch to lower-numbered patch
Switch to higher-numbered patch
HINT
• By continuing to press
• By using the PRESELECT function, you can switch to a patch at any location while continuing to use the
tone of the currently selected patch. (
When using the BANK HOLD function, switching is limited to patches in the same bank. ( “Setting the
•
BANK HOLD function” on page 34)
or , you can continuously switch patches.
Press
Press
“Setting the PRESELECT function” on page 31)
Switching banks
Press – .
1.
This changes the bank. The LED for the selected bank lights.
Function Operation
Switch to patch numbers 10 – 19
Switch to patch numbers 20 – 29
Switch to patch numbers 30 – 39
Switch to patch numbers 40 – 49
Switch to patch numbers 50 – 59
Press
Press
Press
Press
Press
13
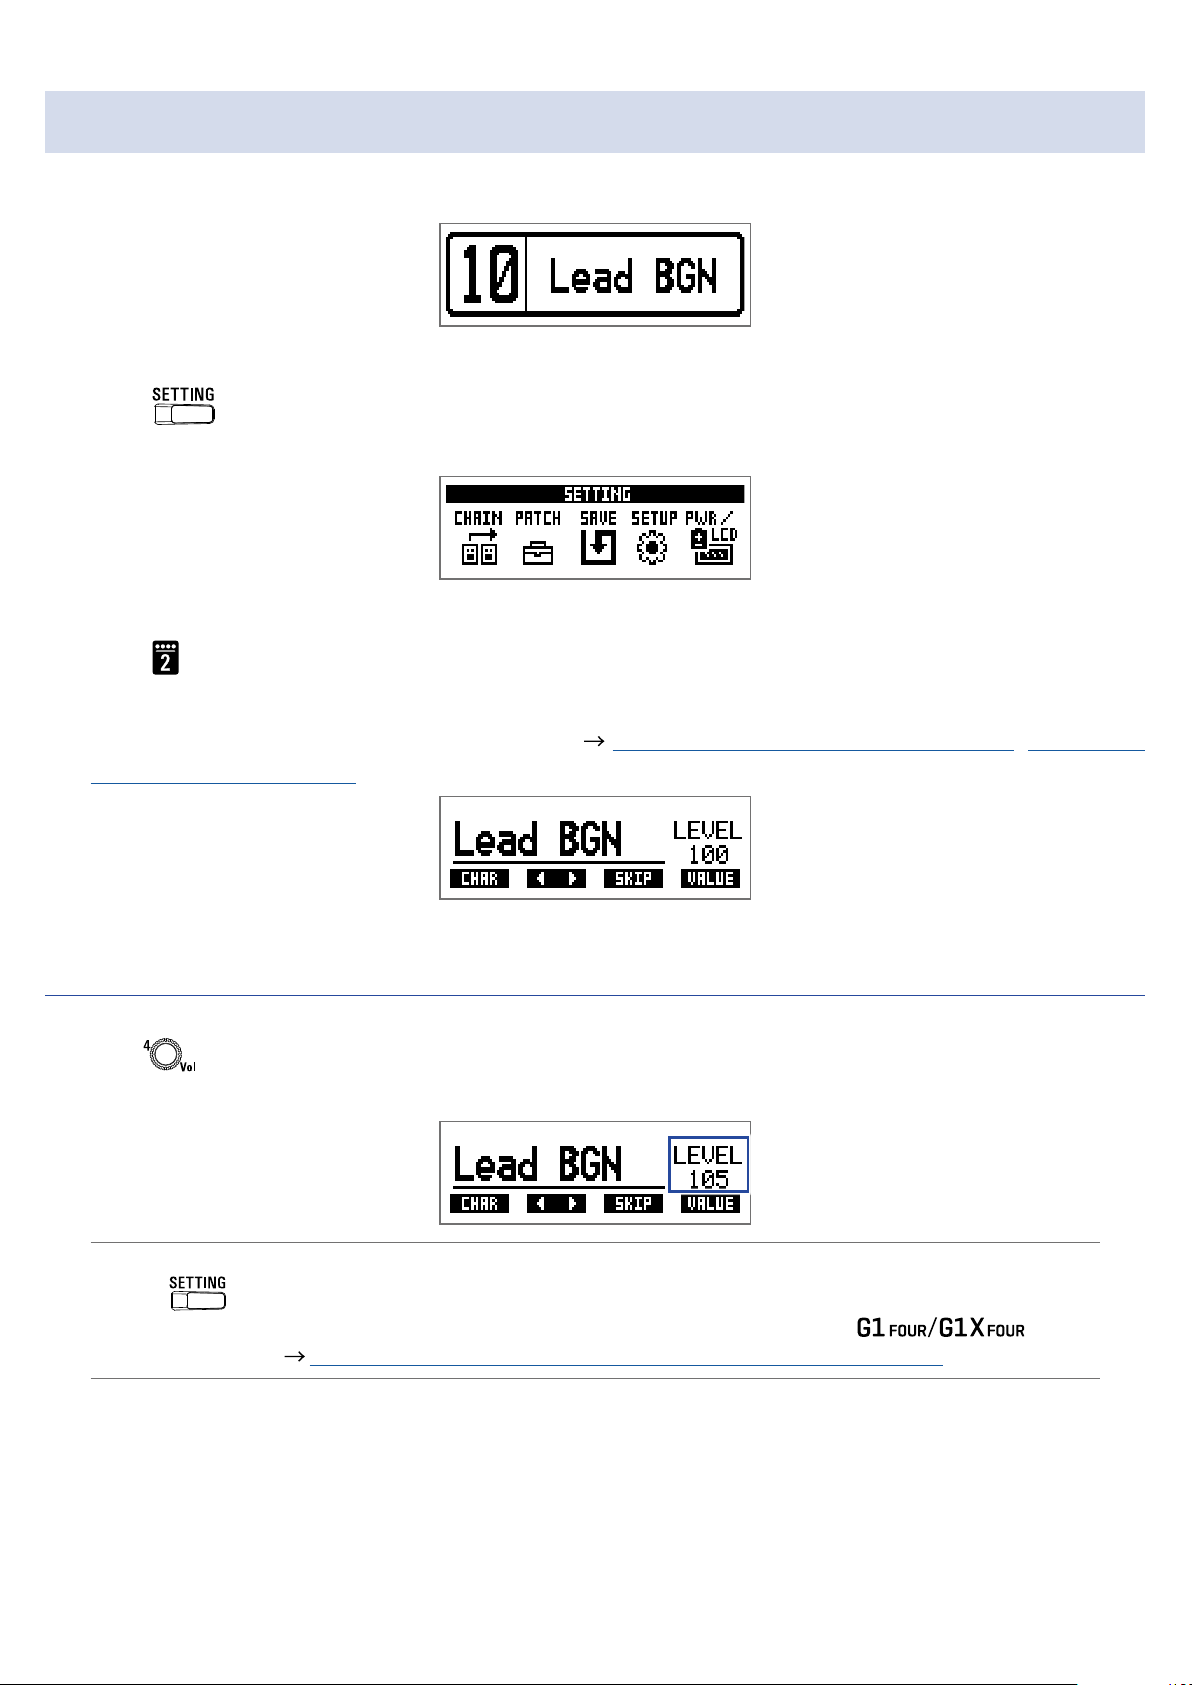
Changing individual patch settings
Select the patch with settings you want to change.
1.
Press .
2.
This opens the SETTING screen.
Press .
3.
This opens the patch setting screen.
The patch level and name can be changed. (
patch names” on page 15)
“Changing patch levels” on page 14, “Changing
Changing patch levels
Turn .
1.
This changes the patch level.
HINT
• Press
• In addition to settings for individual patches, the overall volume and EQ of the
also be changed. (
to end patch setting and return to the original screen.
“Adjusting the overall audio character and output level” on page 11)
can
14
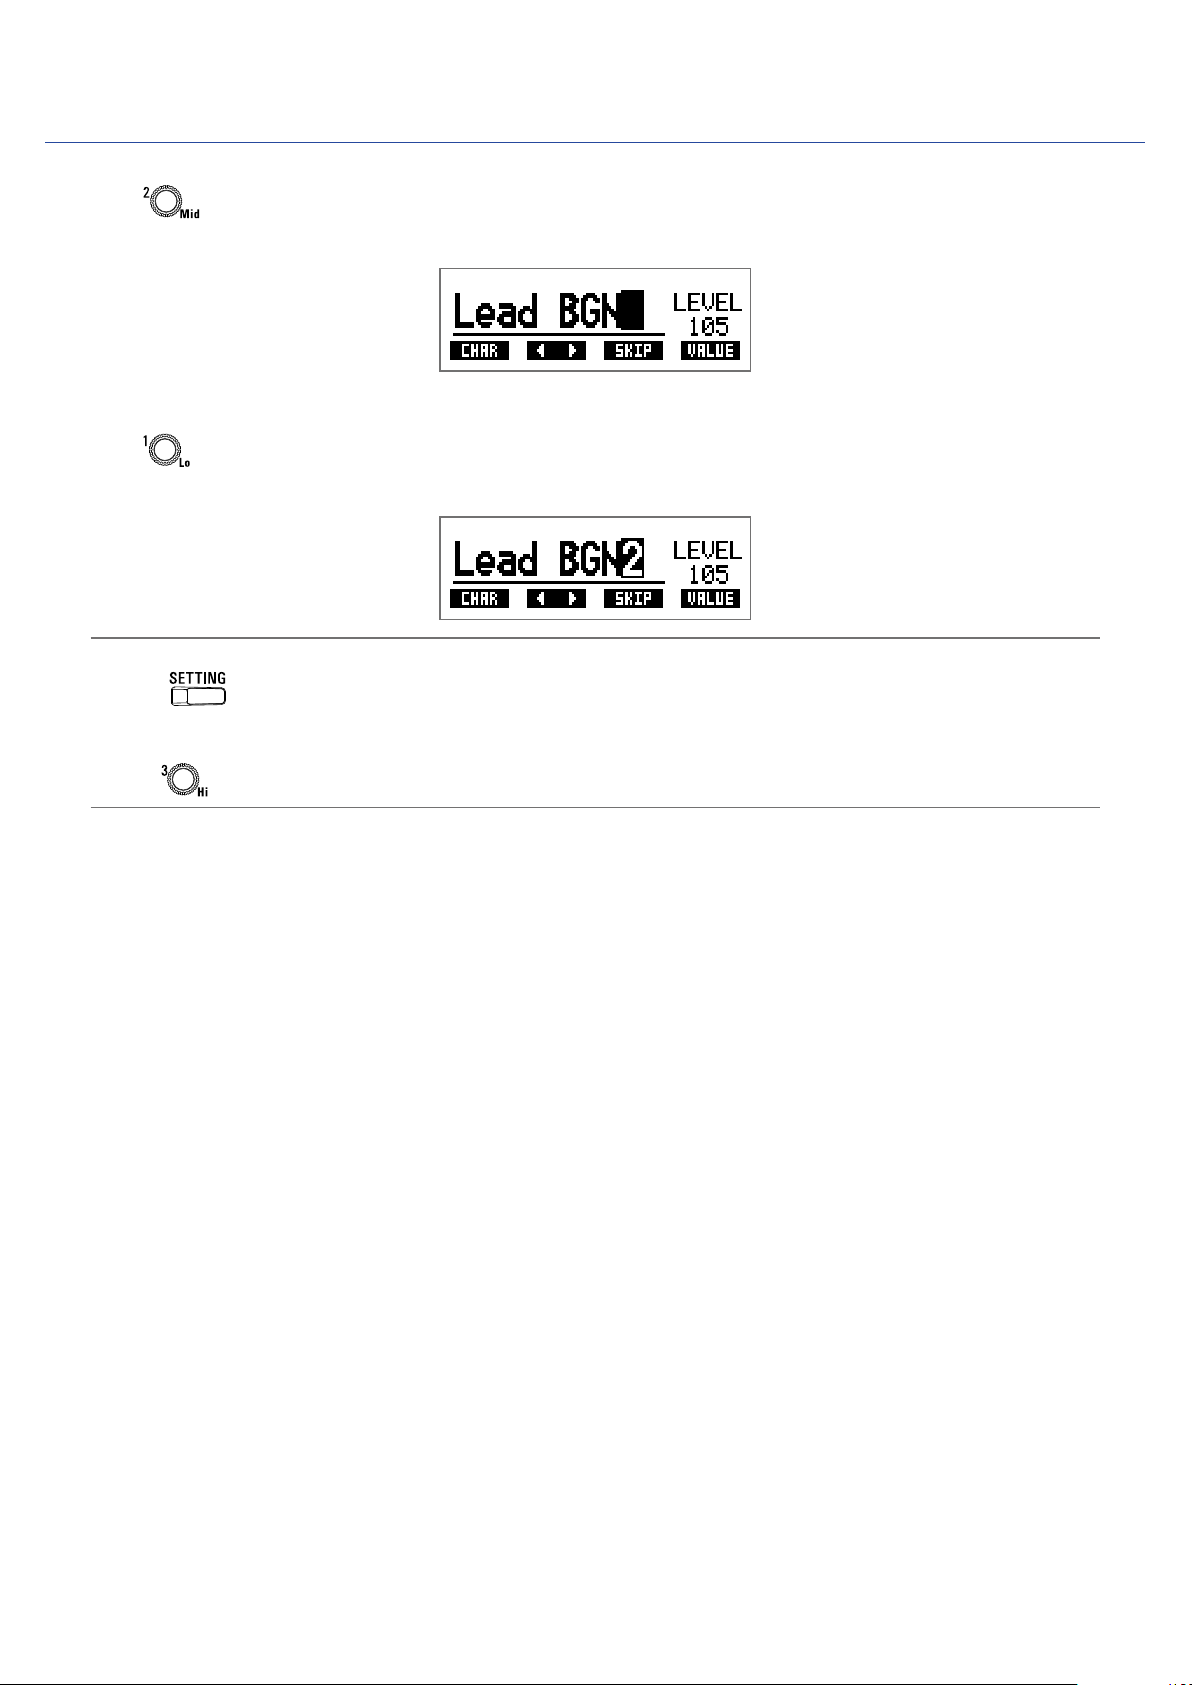
Changing patch names
Turn .
1.
This moves the cursor.
Turn .
2.
This changes the character at the cursor position.
HINT
• Press
• The characters and symbols that can be used are as follows.
A–Z, a–z, 0–9, ! # $ % & ‘ () +, -. ; = @ [] ^ _ ` { } ~ (space)
• Turn
to end patch setting and return to the original screen.
to change the character type.
15
Turning effects ON/OFF with footswitches
(STOMP mode)
In STOMP mode, you can turn effects ON/OFF with footswitches.
Activating STOMP mode
When using MEMORY or EDIT mode, press .
1.
Pressing
repeatedly, cycles through the MEMORY, STOMP and EDIT modes in order.
16

Turning effects ON/OFF with footswitches
Press .
1.
Select the effect to control.
The selected effect is shown with light and dark inverted.
Press repeatedly to move the selection to the right.
Press .
2.
This turns the effect ON/OFF.
ON
To turn an effect ON/OFF by hand, press the – button that corresponds to the effect position.
OFF
17
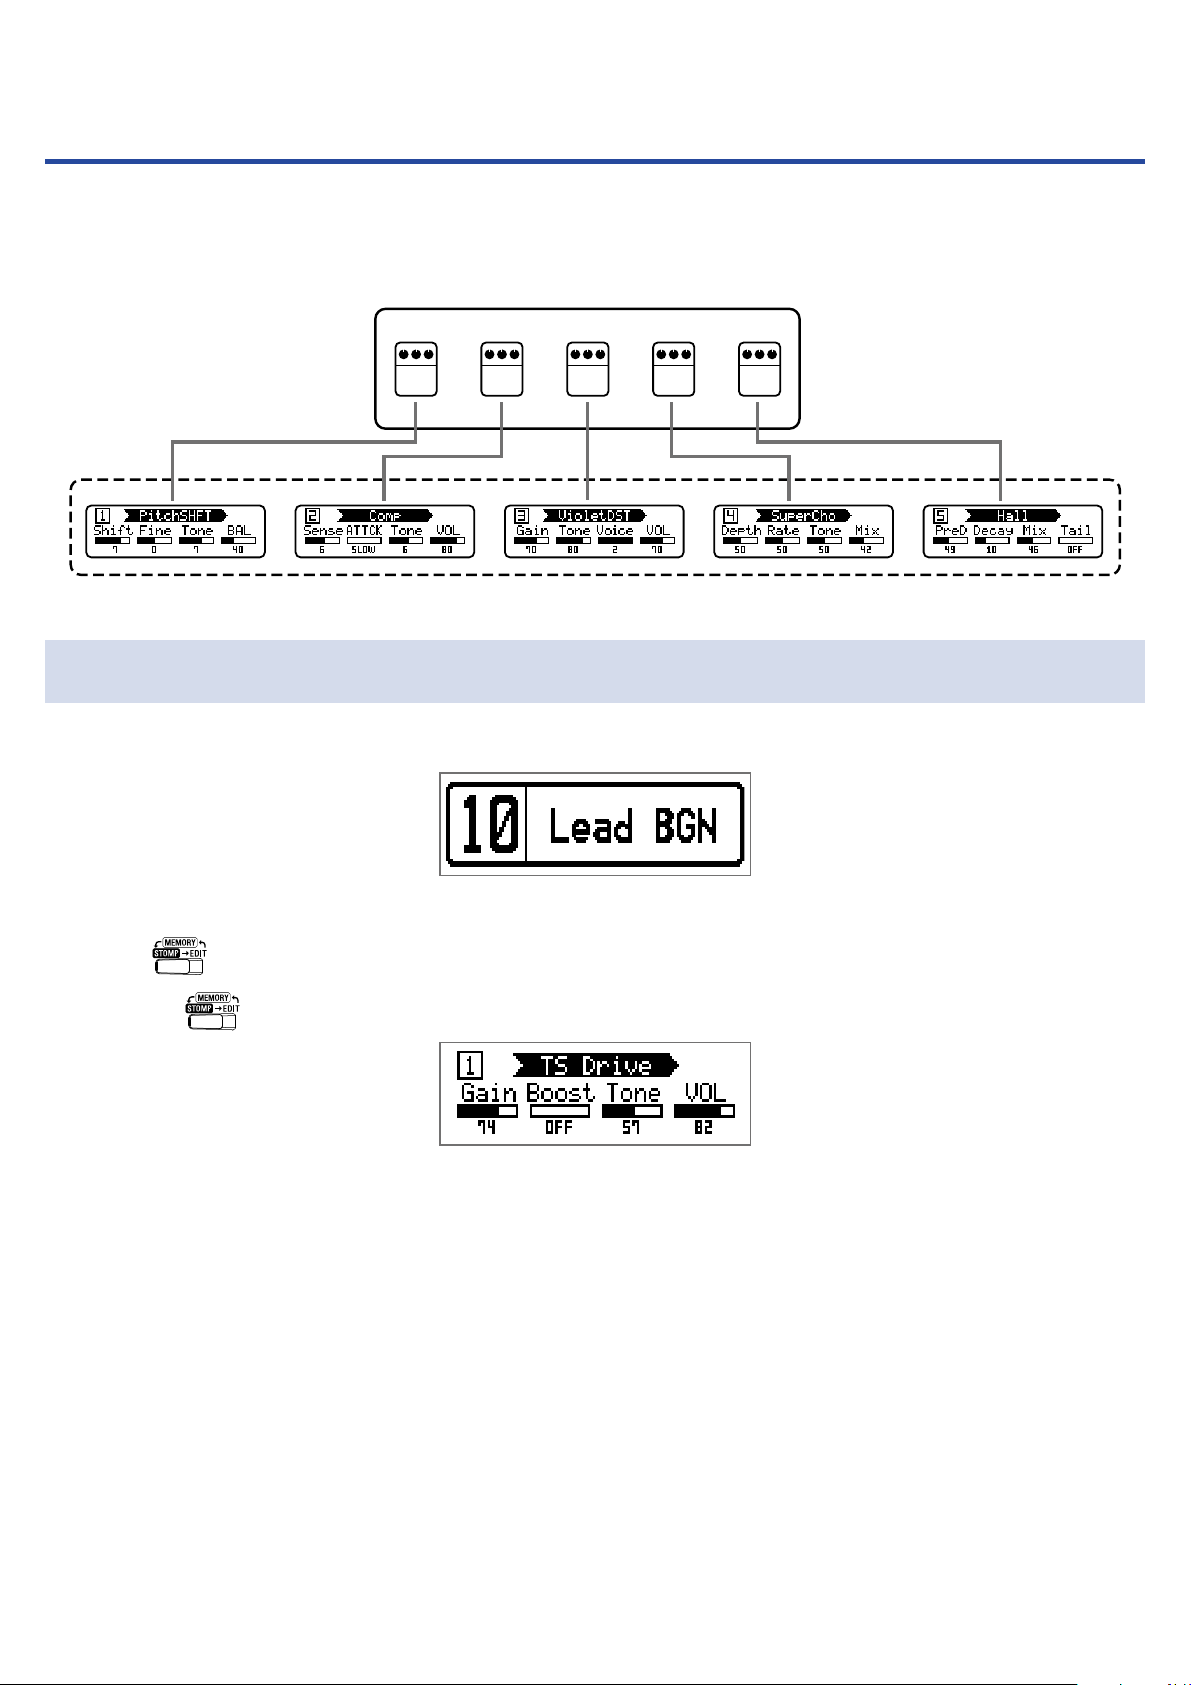
Editing effects (EDIT mode)
In EDIT mode, you can change the effects used in a patch and adjust their parameters.
Patch
Effect
1 2 3 4 5
EDIT mode screen
Activating EDIT mode
Select a patch in MEMORY mode.
1.
Press .
2.
Pressing
repeatedly, cycles through the MEMORY, STOMP and EDIT modes in order.
18

Selecting effects
Press – for the effect you want to edit.
1.
This switches the effect.
The LED for the selected effect lights.
HINT
The effect unit number is its position in the patch order.
Turning effects ON/OFF
Effect nameUnit number
Parameters
Press – for the selected effect again.
1.
Pressing
– toggles it ON/OFF.
OFF
ON
19
Loading…
Zoom G1 Four
You must read the Usage and Safety Precautions before use.
Operation Manual
Multi-Effects Processor
© 2018 ZOOM CORPORATION
Copying or reprinting this manual in part or in whole without permission is prohibited.
Product names, registered trademarks and company names in this document are the property of their respective companies. All trademarks and regis—
tered trademarks in this document are for identification purposes only and are not intended to infringe on the copyrights of their respective owners.
View the manual for the Zoom G1 Four here, for free. This manual comes under the category effects pedals and has been rated by 9 people with an average of a 8.9.
This manual is available in the following languages: English. Do you have a question about the Zoom G1 Four or do you need help?
Ask your question here
Index
- Introduction
- Terms used in this manual
- Contents
- G1 FOUR/G1X FOUR structure
- Names of parts
- Loading batteries
- Connecting
- Adjusting the overall audio character and output level
- Using patches (MEMORY mode)
- Turning effects ON/OFF with footswitches (STOMP mode)
- Editing effects (EDIT mode)
- Managing patches
- Making power and display settings
- Using the tuner
- Using rhythms
- Using the looper
- Using the expression pedal (G1X FOUR only)
- Managing the firmware
- Troubleshooting
- Specifications
Product Images (6)

Zoom G1 Four specifications
Below you will find the product specifications and the manual specifications of the Zoom G1 Four.
The not categorized Zoom G1 Four is an expression pedal designed for use with guitars. It can be powered by either AC or battery, with support for up to four batteries. It has a compact design, with a width of 130 millimeters, a depth of 156 millimeters, and a height of 42 millimeters. The pedal weighs in at 340 grams.
The Zoom G1 Four features a DC-in jack for connecting to a power source, and has a power consumption of 500 milliamps. The product is not categorized as it does not fit into any specific product category.
Overall, the Zoom G1 Four is a simple and lightweight pedal designed for use with guitars. With its compact design, it can be easily transported and used in a variety of settings. Its support for multiple power sources makes it a versatile accessory for musicians on the go.
Power source type
AC, Battery
General
| Brand | Zoom |
| Model | G1 Four | ZOOM G1 FOUR |
| Product | effects pedal |
| EAN | 4515260020188 |
| Language | English |
| Filetype | User manual (PDF) |
Features
| Product color | Black |
| Product type | Expression pedal |
| Best uses | Guitar |
Power
| Power source type | AC, Battery |
| Number of batteries supported | 4 |
| Power consumption | 500 mA |
Weight & dimensions
| Width | 130 mm |
| Depth | 156 mm |
| Height | 42 mm |
| Weight | 340 g |
Ports & interfaces
show more
Frequently Asked Questions
Can’t find the answer to your question in the manual? You may find the answer to your question in the FAQs about the Zoom G1 Four below.
How can I change the amp model on the Zoom G1 Four?
To change the amp model, press the «Amp» button on the pedal, then use the navigation buttons to scroll through the available options until you find the desired model.
How do I adjust the gain on the Zoom G1 Four?
To adjust the gain, first select the desired amp model. Then, use the «Value» knob to increase or decrease the gain level according to your preference.
Can I use the Zoom G1 Four as an audio interface?
Yes, the Zoom G1 Four can be used as an audio interface. Connect the G1 Four to your computer via USB, and ensure that the proper drivers are installed. You can then use recording software on your computer to capture the audio from the G1 Four.
How do I save a custom patch on the Zoom G1 Four?
To save a custom patch, modify the settings on the pedal including amp model, effects, and parameters. Press and hold the footswitch of the desired patch location until the display flashes. This will save your custom patch to that location for easy recall.
How can I connect an external expression pedal to the Zoom G1 Four?
To connect an external expression pedal, use a TRS cable to connect the expression pedal to the dedicated «CTL/EXP» input on the G1 Four. Once connected, you can assign various parameters such as volume or wah-wah to the expression pedal for additional control during your performance.
Is the Zoom G1 Four a product with an expression pedal?
Yes, the Zoom G1 Four is a product with an expression pedal. This feature allows users to control and manipulate various parameters in real-time, adding expressive possibilities to their guitar playing.
Is the Zoom G1 Four specifically designed for guitar use?
Yes, the Zoom G1 Four is specifically designed for guitar use. Its features and effects are tailored to enhance the guitar playing experience, making it a suitable choice for guitarists of all skill levels.
Can I power the Zoom G1 Four using both AC and batteries?
Yes, the Zoom G1 Four can be powered using either AC or batteries. This versatility allows users to conveniently use the product in various settings, whether they have access to an outlet or need to rely on batteries.
How many batteries does the Zoom G1 Four support?
The Zoom G1 Four supports up to 4 batteries. This ensures a longer operating time and greater flexibility for users who prefer a portable setup or perform in locations without easy access to power outlets.
What is the power consumption of the Zoom G1 Four?
The power consumption of the Zoom G1 Four is 500 mA. Compared to comparable products, this consumption rate is relatively moderate, striking a balance between functionality and energy efficiency.
What is the weight of the Zoom G1 Four?
The Zoom G1 Four has a weight of 340 g.
What is the height of the Zoom G1 Four?
The Zoom G1 Four has a height of 42 mm.
What is the width of the Zoom G1 Four?
The Zoom G1 Four has a width of 130 mm.
What is the depth of the Zoom G1 Four?
The Zoom G1 Four has a depth of 156 mm.
Is the manual of the Zoom G1 Four available in English?
Yes, the manual of the Zoom G1 Four is available in English .
Is your question not listed? Ask your question here
- Manuals
- Brands
- ZOOM Manuals
- Music Pedal
- G1 X Four
Manuals and User Guides for ZOOM G1 X Four. We have 5 ZOOM G1 X Four manuals available for free PDF download: Operation Manual, Service Manual, Quick Manual
Zoom G1 X Four Operation Manual (61 pages)
Multi-Effects Processor
Brand: Zoom
|
Category: Music Pedal
|
Size: 12.71 MB
Table of Contents
-
Terms Used in this Manual
3
-
Adjusting the Overall Audio Character and Output Level
11
-
Level �������������������
12
-
Using Patches (MEMORY Mode)
12
-
Switching to MEMORY Mode
12
-
Selecting Patches and Banks
13
-
Changing Individual Patch Settings
14
-
-
Mode) ������������������
16
-
Turning Effects ON/OFF with Footswitches (STOMP Mode)
16
-
Turning Effects ON/OFF with Footswitches
17
-
Editing Effects (EDIT Mode)
18
-
Turning Effects ON/OFF
19
-
Adjusting Effect Parameters
21
-
Changing the Effect Order
22
-
-
Adjusting the Master Tempo
27
-
Setting the AUTO SAVE Function
28
-
Setting the PRESELECT Function
31
-
Setting the BANK HOLD Function
34
-
Making Power and Display Settings
35
-
Setting the Type of Batteries Used
35
-
Setting the Backlight Time
37
-
Adjusting the Display Contrast
38
-
-
-
Changing Tuner Settings
41
-
-
Activating the Rhythm Function
43
-
Starting/Stopping Rhythm Playback
45
-
-
-
Recording and Playing Loops
50
-
Using the Expression Pedal ( Only)
53
-
-
Checking the Firmware Versions
56
-
Restoring Factory Default Settings
58
-
ZOOM G1 X Four Operation Manual (16 pages)
Guitar Effects Pedal
Brand: ZOOM
|
Category: Music Pedal
|
Size: 1.58 MB
Table of Contents
-
SAFETY PRECAUTIONS / Usage Precautions
2
-
Terms Used in this Manual
2
-
Controls and Functions / Connections
3
-
Using the Rhythm Function
6
-
Storing/Copying Patches
8
-
Changing the Way Patches Are Called up
9
-
Using a Foot Switch or Pedal
9
-
Using the Foot Switch (FS01) (G1 Only)
9
-
Using the Expression Pedal
9
-
-
Effect Types and Parameters
10
-
Explanation of Symbols
10
-
COMP/EFX (Compressor/Efx)
10
-
ZNR/AMP (Znr/Amp Simulator) Module
11
-
Restoring Factory Defaults
13
-
Special Features of G1X
14
-
[PEDAL ASSIGN] Key Operation
14
-
Adjusting the Expression Pedal
14
-
Zoom G1 X Four Service Manual (33 pages)
Brand: Zoom
|
Category: Music Pedal
|
Size: 5.8 MB
Table of Contents
-
Recovering the Factory Default
11
-
Special Function Start up
12
-
Circuit Check Specifications
15
-
PCB Parts Layout and Pattern
16
-
Spare Parts Order List
28
-
Spare Parts Order Sheet
30
-
Supplement: Identification of Main PCB
31
-
Supplement: the Major Difference between before No.022150 and after No.022151
32
Zoom G1 X Four Quick Manual (13 pages)
Multi-Effects Processor
Brand: Zoom
|
Category: Music Pedal
|
Size: 2.03 MB
Table of Contents
-
Editing Effects (EDIT Mode)
5
Zoom G1 X Four Quick Manual (13 pages)
Multi-Effects Processor
Brand: Zoom
|
Category: Recording Equipment
|
Size: 2.39 MB
Table of Contents
Advertisement
Related Products
-
Zoom G1U
-
Zoom G1N
-
Zoom G1XN
-
ZOOM G1 Four
-
Zoom G1N EXT
-
Zoom G1XN EXT
-
Zoom G1on
-
Zoom G1Xon
-
ZOOM G2.1u
-
Zoom G2Nu
ZOOM Categories
Recording Equipment
Modem
Music Pedal
Network Router
Measuring Instruments
More ZOOM Manuals
Zoom G1X FOUR
Гитарный процессор мультиэффектов с педалью

Гитарный процессор мультиэффектов с педалью
Купить на маркетплейсах
- Описание
- Характеристики
- Галерея
- Поддержка
Две педали, неограниченные возможности
Гитарный процессор мультиэффектов G1X FOUR
Zoom G1X FOUR включает в себя 70 эффектов и моделей усилителей, функции лупера и драм-машины. Кроме того, вы можете подключиться к постоянно пополняемой библиотеке ZOOM Guitar Lab, чтобы скачать новые эффекты и патчи.
Свобода самовыражения
Модель G1X FOUR оснащена педалью экспрессии ZOOM, с помощью которой вы сможете управлять такими эффектами, как громкость, wah-wah, задержка и питч.

Вдохновляющее звучание
На борту G1X FOUR 70 традиционных и бутиковых эффектов, включая кольцевой модулятор, питч-шифтер, дилэй и даже эмулятор ситара (Скачать список предустановленных эффектов G1 FOUR).

Ваши любимые усилители и кабинеты
G1X FOUR включает в себя эмуляторы 13 классических усилителей и кабинетов, включая Fender, Orange и другие*. Этого набора будет с лихвой достаточно для выхода на любую сцену.

* 13 эмуляторов усилителей были созданы на основе следующих моделей:
1. Marshall JCM800 2203
2. Marshall 1959 SUPER LEAD 100
3. Fender ’65 Twin Reverb
4. Fender ’59 Bassman
5. Fender ’65 Deluxe Reverb
6. Class A British combo amp
7. Mesa Boogie Mark I combo amp
8. Bogner Ecstasy Blue channel
9. Hiwatt Custom 100
10. Mesa Boogie Dual Rectifier Orange Channel
11. Orange Graphic120
12. Diezel Herbert Channel2
13. Matchless DC-30.
Примечание: Названия производителей и продуктов являются торговыми марками или зарегистрированными товарными знаками и принадлежат соответствующим владельцам. Эти названия используются для описания звуковых характеристик и не указывают их связь с корпорацией Zoom.
Бесплатное приложение Guitar Lab
С нашим приложением ZOOM Guitar Lab перед вами откроется бескрайний мир дополнительного контента для вашего процессора. Guitar Lab – это постоянно пополняемая библиотека авторских патчей, эффектов и других обновлений. Кроме того, благодаря его функции управления и автоматического сохранения ваших патчей, вы сможете свободно экспериментировать, создавая бесконечные комбинации различных параметров и эффектов.

Ударные в комплекте!
В вашем распоряжении 68 качественных ритмических рисунков, доступных в различных размерах, включая 4/4, 3/4 и другие.

Зациклитесь на хорошем
Встроенный лупер продолжительностью до 30 секунд позволит вам создавать динамичные многопартийные аранжировки.

Автосохранение патчей
Включите функцию автосохранения и любые изменения, внесенные в патчи, будут мгновенно сохраняться, минимизируя риск случайной утери проделанной работы.

Живые выступления
Два режима для выступлений значительно облегчат вам работу на сцене.
Режим PRESELECT позволяет вам переключаться между патчами, никак не влияя на тот патч, с которым вы играете в данный момент.
В режиме STOMP вы можете включать и выключать отдельные эффекты одним нажатием на футсвич.

Ручное управление
Панель управления G1X FOUR также оптимизирована для ручного, настольного применения. Абсолютный контроль над всеми параметрами устройства станет важным фактором в ваших поисках идеального звучания.
Питание
G1X FOUR может питаться от четырех батареек AA. Кроме того, вы можете подключить его к электросети с помощью опционального адаптера AD-16 или использовать для питания шину USB.

Функции и особенности
- Более 70 встроенных эффектов;
- 13 моделей усилителей для эмуляции классического звука;
- До 5 эффектов, объединенных в цепочку в любой последовательности, могут быть использованы одновременно;
- Лупер продолжительностью до 30 секунд / 64 тактовые доли аудио в CD-качестве с бесшовными переходами в начале и в конце;
- Приложение ZOOM Guitar Lab для создания, редактирования и управления эффектами и патчами для G1X FOUR;
- 50 банков памяти для сохранения пользовательских патчей;
- Функция Auto Save для автоматического сохранения всех параметров в патче;
- Встроенный хроматический тюнер с поддержкой всех стандартных гитарных строев, включая открытые и дроп-строи;
- Входы совместимы со стандартным монофоническим гитарным кабелем (поддержка как активных, так и пассивных инструментов);
- Вспомогательный вход для подключения внешних музыкальных проигрывателей;
- Выход для подключения к усилителю или наушникам;
- Питается от 4 батареек АА, продолжительность работы с алкалиновыми батарейками до 18 часов;
- USB-порт для обновления прошивки, питания и подключения к приложению ZOOM Guitar Lab.
Комплект поставки
|
Мультимедиа
Аудио
Технические характеристики
| Количество эффектов одновременно | 5 |
| Пользовательских патчей | 50 |
| Частота дискретизации | 44,1кГц |
| A/D преобразование | 24 бит, 128-кратный оверсемплинг |
| D/A преобразование | 24 бит, 128-кратный оверсемплинг |
| Обработка сигнала | 32 бита |
| Частотные характеристики | 20Гц – 20 кГц +1 дБ, -6 дБ (при нагрузке 10 кОм) |
| Дисплей | Матричный индикатор 128×32 точек |
| Входы | |
|---|---|
| Вход (Input) |
Стандартный монофонический джек Номинальный входной уровень: -20 dBu Входное сопротивление (Line): 470 кОм |
| Aux In |
Стерео мини-джек Номинальный входной уровень: -10 dBu Входное сопротивление (Line): 10 кОм |
| Выходы | |
| Выход (OUTPUT) |
Стандартный стерео джек (линейный/для наушников) Максимальный выходной уровень: +2 dBu Сопротивление на выходе: 10 кОм или более Наушники 17 мВт + 17 мВт (32 Ом нагрузки) |
| Соотношение сигнал/шум | 120 дБ |
| Шумовой порог (остаточный шум) | -97 dBu |
| Питание |
Сетевой адаптер DC 9В (минус в центре), 500 мА (Zoom AD-16) 4 батарейки AA (~18 часов работы с использованием алкалиновых батареек при выключенной подсветке дисплея) |
| USB |
USB MIDI, USB Micro-B Питание от шины USB При использовании кабеля, предназначенного только для питания, другие функции USB недоступны. |
| Габариты | 156 (Д) × 216 (Ш) × 52 (В) мм |
| Вес | 610 г (без батареек) |
| * Примечание: 0 dBu = 0,775 В |
* Компания — производитель имеет право изменять комплектацию товара без дополнительного уведомления!
Руководства Zoom G1x Размер файлов: 1405 KB, Язык: English, Формат: pdf, Платформа: Windows/Linux, Дата: 2016-08-13
На данной странице вы можете скачать руководства Zoom G1x. Мы предлагаем вам ознакомиться с руководством пользователя, инструкцией по сервисному обслуживанию и ремонту.
Также здесь вы найдете список заказных номеров на комплектующие Zoom G1x.
Все файлы предоставляются исключительно в ознакомительных целях. И не являютя руководством по ремонту, а направлены лишь на то чтобы помочь вам более детально ознакомиться с принципом построения устройства.
Содержимое представленных здесь руководств требуют от вас знания технического английского языка.
Если вы собираетесь скачать руководство по сервисному обслуживанию Zoom G1x, иными словами сервис мануал, вы дожны обладать хотя бы минимальными познаниями в области электроники и пониманием базовых принципов работы электромеханических устройств.
Для просмотра руководств вам понадобится Adobe Acrobat Reader версии 9 и выше либо другая программа для просмотра pdf файлов.
В связи с популярностью информации представленной на сайте и ее бесплатного предоставления конечному пользователю, убедительная просьба использовать специальные программные продукты для многопотокового скачивания файлов.
Руководства для Zoom G1x
- Руководство пользователя (User manual)
- Руководство по сервисному обслуживанию (Service manual)
- Руководство по ремонту (Repair manual)
- Перечень комплектующих (PartList)
Главная » Zoom » Zoom G1X Four Multi-Effect Processor Руководство по эксплуатации
16 мая 2023
Содержание скрывать
1
Zoom G1X Four Multi-Effect Processor Руководство по эксплуатации
2
Похожие сообщения
Zoom G1X Four Multi-Effect Processor Руководство по эксплуатации
View Fullscreen
Похожие сообщения
-
Руководство пользователя NUX MG-400 Педаль мультиэффектов
MG-400 Modeling Guitar & Bass Processor Руководство пользователя Версия 1.0 Педаль мультиэффектов MG-400 Copyright Copyright 2020 Cherub Technology…
-
LEKATO PA-1 Гитара для наушников с мультиэффектами Ampруководство пользователя lifier
LEKATO PA-1 Гитара для наушников с мультиэффектами Amplifier Руководство пользователя I, ссылка на модуль эффектов PA-1 II, функциональная схема панели PA-1…
-
Руководство по многоспутниковой антенне
Руководство по многоспутниковой антенне Есть вопросы о вашей многоспутниковой антенне? Напишите в комментариях! Загрузить руководство по многоспутниковой антенне [PDF]
-
Zoom H6 Handy Recorder Руководство по эксплуатации
Zoom H6 Handy Recorder Operation Manual — Скачать
Оставить комментарий
Ваш электронный адрес не будет опубликован. Обязательные поля помечены * *
КОММЕНТАРИЙ *
Имя и фамилия
Эл. адрес
Cайт
Сохраните мое имя, адрес электронной почты и веб-сайт в этом браузере для следующего комментария.
Это тоже интересно:
В современном мире цифровая музыка и звукозапись играют важную роль в творчестве многих музыкантов. Устройства, такие как Zoom G1 Four, предоставляют широкие возможности для обработки звука и создания уникальных музыкальных произведений. Для эффективного использования этого многофункционального музыкального процессора важно иметь доступ к подробной инструкции, которая поможет разобраться в его функциях.
В данной статье мы предоставим подробную инструкцию по работе с Zoom G1 Four на русском языке. Вы сможете узнать о всех основных функциях устройства, а также о его настройках и способах использования в различных музыкальных жанрах. Эта информация будет полезна как новичкам, так и опытным музыкантам, желающим улучшить свои навыки записи и обработки звука.
С помощью нашей инструкции вы сможете легко освоить все возможности Zoom G1 Four и добиться качественного звучания ваших музыкальных произведений. Погрузитесь в мир звука и творчества вместе с нашим руководством!
Следующие разделы инструкции помогут вам освоить основные аспекты работы с Zoom G1 Four:
Основные функции устройства
- Эффекты: множество эффектов, включая искажения, реверберацию и хорус.
- Программирование: возможность создания персонализированных звуковых пресетов.
- Тюнер: встроенный тюнер для точной настройки гитары.
- Метроном: полезная функция для практики и записи.
Для начала работы с Zoom G1 Four вам потребуется:
- Подключить устройство к усилителю или наушникам.
- Выбрать один из предустановленных эффектов или создать собственный.
- Настроить уровень громкости и баланс эффектов по вашему желанию.
Следуйте инструкции по использованию, чтобы максимально эффективно использовать все возможности вашего Zoom G1 Four!
Обзор ключевых функций Zoom G1 Four
Одним из главных достоинств Zoom G1 Four является его портативность и компактный размер, что делает его идеальным выбором для гастролирующих музыкантов. Давайте рассмотрим ключевые функции этого устройства более подробно:
Ключевые функции Zoom G1 Four
- Широкий выбор эффектов: Более 70 эффектов, включая модуляцию, риверберацию и дисторшн.
- Имитация усилителей: Поддержка различных моделей усилителей для создания нужного звучания.
- Мультиэффект: Одновременное использование до 5 эффектов за раз.
- Цифровой тюнер: Встроенный тюнер для быстрой настройки инструмента.
- Подключение к компьютеру: USB-интерфейс для записи и редактирования звука на ПК.
Zoom G1 Four – это не просто процессор эффектов, но и мощный инструмент для творчества, позволяющий музыкантам раскрыть свои способности и экспериментировать с различными звуками.
Pошаговая настройка устройства для первых звуковых экспериментов
Настройка устройства Zoom G1 Four может показаться сложной задачей, особенно для начинающих пользователей. Однако, следуя простым шагам, вы сможете использовать его для создания и записи уникальных звуковых эффектов.
В этом руководстве мы рассмотрим основные этапы настройки устройства, а также дадим советы по его использованию. Вы сможете быстро разобраться с функционалом и начать свои эксперименты в музыкальном творчестве.
Шаги по настройке Zoom G1 Four
- Подключение устройства: Убедитесь, что ваш Zoom G1 Four подключен к электросети и к источнику звука, таким как гитара или микрофон.
- Включение устройства: Нажмите кнопку питания и дождитесь загрузки устройства.
- Настройка звучания: Используйте ручки и педали для выбора и настройки желаемого звукового эффекта.
- Запись: Чтобы записать звук, нажмите соответствующую кнопку и выполните необходимые действия.
- Сохранение настроек: Не забудьте сохранить свои настройки, чтобы в дальнейшем быстро к ним вернуться.
С помощью этой инструкции вы сможете с легкостью начать свои первые звуковые эксперименты с Zoom G1 Four. Удачи!
Использование пресетов: как выбрать лучший звук для вашей гитары
В мире музыкального творчества звук играет ключевую роль, особенно когда речь идет о гитаре. Использование пресетов в процессах записи и при исполнении музыки может существенно упростить задачу выбора нужного звучания. На современных процессорах эффектов, таких как Zoom G1 Four, существует множество предустановленных пресетов, которые помогут вам легко адаптировать звук под конкретный музыкальный стиль.
При выборе лучшего пресета для вашей гитары стоит учитывать несколько факторов. Во-первых, необходимо понимать, какой стиль музыки вы собираетесь исполнять. Во-вторых, важно экспериментировать с различными параметрами и эффектами, чтобы найти идеальное звучание. Ниже представлены некоторые рекомендации по выбору звучания:
Рекомендации по выбору пресетов
- Определите ваш музыкальный стиль: различные жанры требуют разных подходов к звуку.
- Используйте предустановленные пресеты: часто они уже оптимизированы для обработки гитарного звука.
- Экспериментируйте: не бойтесь комбинировать эффекты и настраивать их под себя.
- Записывайте свои настройки: так будет проще воспроизводить понравившиеся звуки.
Следуя этим простым советам, вы сможете выбрать идеальный пресет для вашей гитары и добиться нужного звучания в своих музыкальных проектах.
Подключение Zoom G1 Four к компьютеру: драйвера и программное обеспечение
При подключении устройства Zoom G1 Four к компьютеру важно обеспечить правильную установку драйверов и программного обеспечения. Это позволит использовать все функции устройства без каких-либо проблем. Перед началом процесса подключения рекомендуется ознакомиться с инструкцией и подготовить необходимые ресурсы.
Существует несколько этапов, которые необходимо пройти для успешного подключения:
- Скачивание и установка драйверов для Zoom G1 Four.
- Подключение устройства к компьютеру с использованием USB-кабеля.
- Настройка программного обеспечения для правильной работы устройства.
Установка драйверов: Для начала загрузите последние версии драйверов с официального сайта Zoom. Убедитесь, что вы выбрали драйверы, соответствующие вашей операционной системе.
Подключение устройства: Используйте качественный USB-кабель, чтобы подключить Zoom G1 Four к USB-порту вашего компьютера. После подключения устройство должно быть автоматически распознано.
Настройка программного обеспечения: После установки драйверов откройте программное обеспечение, предназначенное для управления Zoom G1 Four, и выполните необходимые настройки.
Создание собственных эффектов: подробная инструкция
Создание собственных эффектов для Zoom G1 Four может значительно расширить ваши возможности в звучании и добавить индивидуальности вашему музыкальному стилю. В данном руководстве мы подробно рассмотрим, как создать уникальные эффекты, которые подчеркнут вашу игру.
Следуя этой инструкции, вы сможете научиться использовать встроенные возможности устройства для создания эффектов, которые идеально подойдут для вашей музыки. Начнем с основ.
Основные шаги для создания эффектов
- Выбор базового эффекта: Начните с выбора базового эффекта из меню.
- Настройка параметров: Изменяйте различные параметры, такие как уровень эффекта, время задержки, частота и другие.
- Сохранение настроек: После настройки не забудьте сохранить созданный эффект в памяти устройства.
- Тестирование: Проверьте созданный эффект в боевых условиях, играя на инструменте.
Создание собственных эффектов — это не только процесс настройки, но и возможность саморазвития и поиска своего уникального звучания.
| Этап | Описание |
|---|---|
| 1 | Выбор эффекта |
| 2 | Настройка параметров |
| 3 | Сохранение |
| 4 | Тестирование |
Следуя этой инструкции, вы сможете гибко подходить к процессу создания звуков, что позволит вам создать поистине уникальные эффекты для вашей музыки.
Как работать с MIDI-управлением на Zoom G1 Four
В данной инструкции мы рассмотрим, как эффективно использовать MIDI-управление на проигрывателе Zoom G1 Four. MIDI (Musical Instrument Digital Interface) позволяет вам управлять вашим оборудованием с помощью специального контроллера или программы, что открывает новые горизонты в создании и исполнении музыки.
Zoom G1 Four предоставляет множество возможностей для настройки и управления эффектами через MIDI. Это позволяет вам не только изменять параметры звука в реальном времени, но и интегрировать другие устройства в ваш музыкальный процесс.
Основные шаги по настройке MIDI на Zoom G1 Four
- Подключите устройство: Используйте подходящий MIDI-кабель для подключения вашего контроллера к входу MIDI на Zoom G1 Four.
- Настройка параметров: Войдите в меню настроек Zoom G1 Four и выберите раздел, посвященный MIDI-управлению.
- Калибровка: Проверьте работоспособность соединения, отправив тестовые сигналы с вашего контроллера.
- Сохранение настроек: После завершения настройки не забудьте сохранить изменения, чтобы они применялись при следующем использовании.
С помощью этих шагов вы сможете значительно расширить функциональность вашего устройства и улучшить процесс исполнения музыки. Удачи в освоении MIDI-управления на Zoom G1 Four!
Ремонт и обслуживание Zoom G1 Four
При длительной эксплуатации устройства Zoom G1 Four важно учитывать несколько ключевых аспектов, которые помогут обеспечить его надежную работу и длительный срок службы. Правильное обслуживание включает в себя как регулярную чистку, так и периодическую проверку функциональности всех компонентов.
Немаловажным аспектом является также понимание того, когда и как проводить ремонт. Это позволит избежать серьезных поломок и снизит риски выхода устройства из строя в ответственный момент.
Что нужно знать о длительной эксплуатации устройства
- Регулярная чистка: Пыль и грязь могут негативно сказаться на работе устройства. Рекомендуется регулярно протирать корпус и клавиши.
- Замена батарей: Если вы используете устройство на батарейках, следите за уровнем заряда и вовремя заменяйте их.
- Обновления прошивки: Проверяйте наличие обновлений для вашего устройства, так как они могут содержать важные исправления и новые функции.
- Хранение: Убедитесь, что ваше устройство хранится в сухом и защищенном от повреждений месте.
Следование этим рекомендациям поможет вам максимально эффективно использовать Zoom G1 Four и продлить срок его службы. Не забывайте также об обращении к специалистам в случае обнаружения серьезных неполадок.
Советы по записи: от настройки оборудования до обработки звука
В этой статье мы разобрали ключевые аспекты, которые помогут вам добиться наилучшего звукового качества. Ознакомьтесь с нашими советами и примените их на практике, чтобы ваши записи звучали профессионально.
Основные рекомендации
- Настройка оборудования: Убедитесь, что микрофон и интерфейс правильно подключены и настроены для минимизации шумов.
- Выбор помещения: Записывайтесь в тихих и хорошо звукоизолированных местах, чтобы избежать посторонних звуков.
- Проверка уровня сигнала: Следите за уровнями записи, чтобы избежать искажений и перегрузок.
- Использование поп-фильтров: Они помогут уменьшить нежелательные звуки, такие как «поп» при произнесении определенных звуков.
- Обработка звука: Используйте программное обеспечение для редактирования и обработки записей, чтобы улучшить качество звука.
Следуя этим рекомендациям, вы сможете создать качественные звуковые записи, которые будут приятно слушать. Помните, что практика – ключ к совершенству. Не стесняйтесь экспериментировать с настройками и методами, чтобы найти лучший подход для вашего стиля работы.