
КРАТКОЕ СПРАВОЧНОЕ
РУКОВОДСТВО
RU
БЛАГОДАРИМ ВАС ЗА ПРИОБРЕТЕНИЕ ИЗДЕЛИЯ
МАРКИ HOTPOINT-ARISTON. Для получения более
полной технической поддержки зарегистрируйте ваш
прибор на: www.hotpoint.eu/register
Перед началом использования прибора внимательно прочтите руководство
“Здоровье и безопасность”.
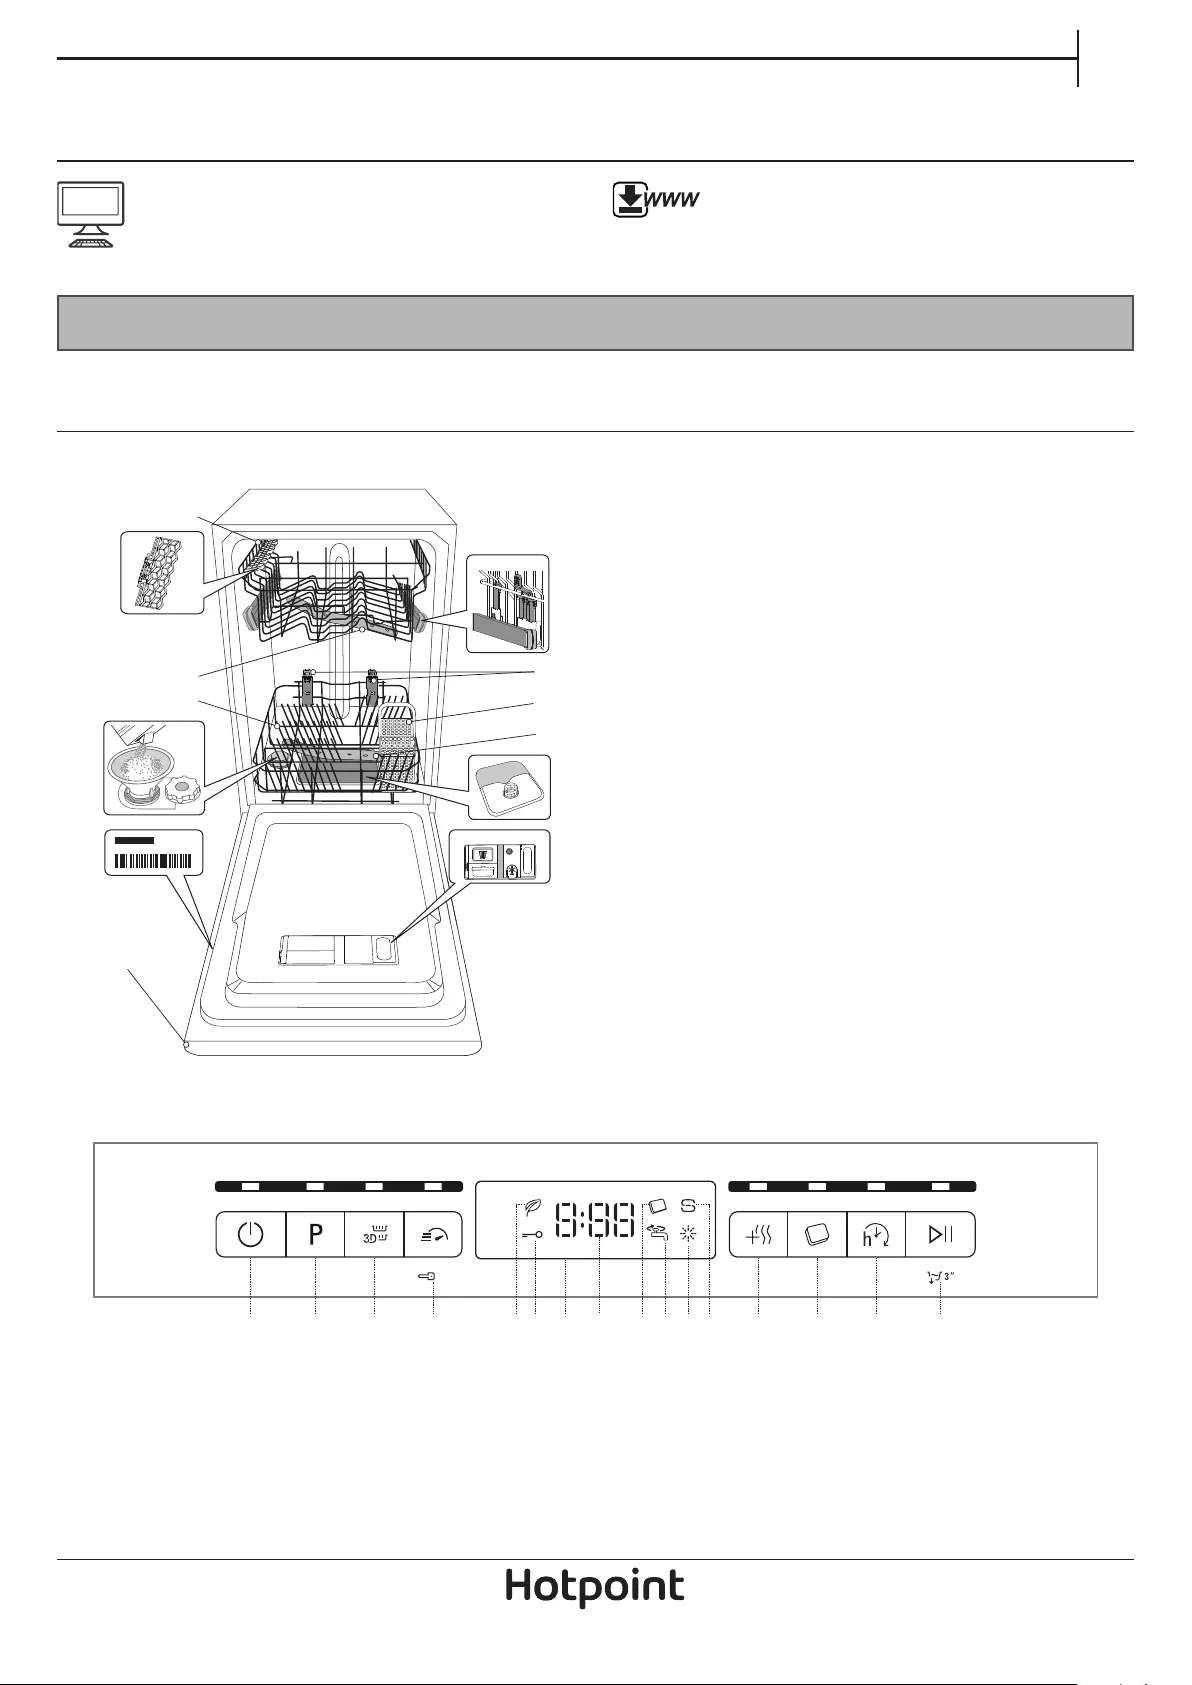
ОПИСАНИЕ ИЗДЕЛИЯ
ПРИБОР
1
2
4
5
10
Service:
0000 000 00000
Вы также можете загрузить инструкцию по
безопасности и руководство “Использование и
уход” с нашего сайта docs.hotpoint.eu следуя
инструкциям, приведенным на обратной стороне
этого буклета.
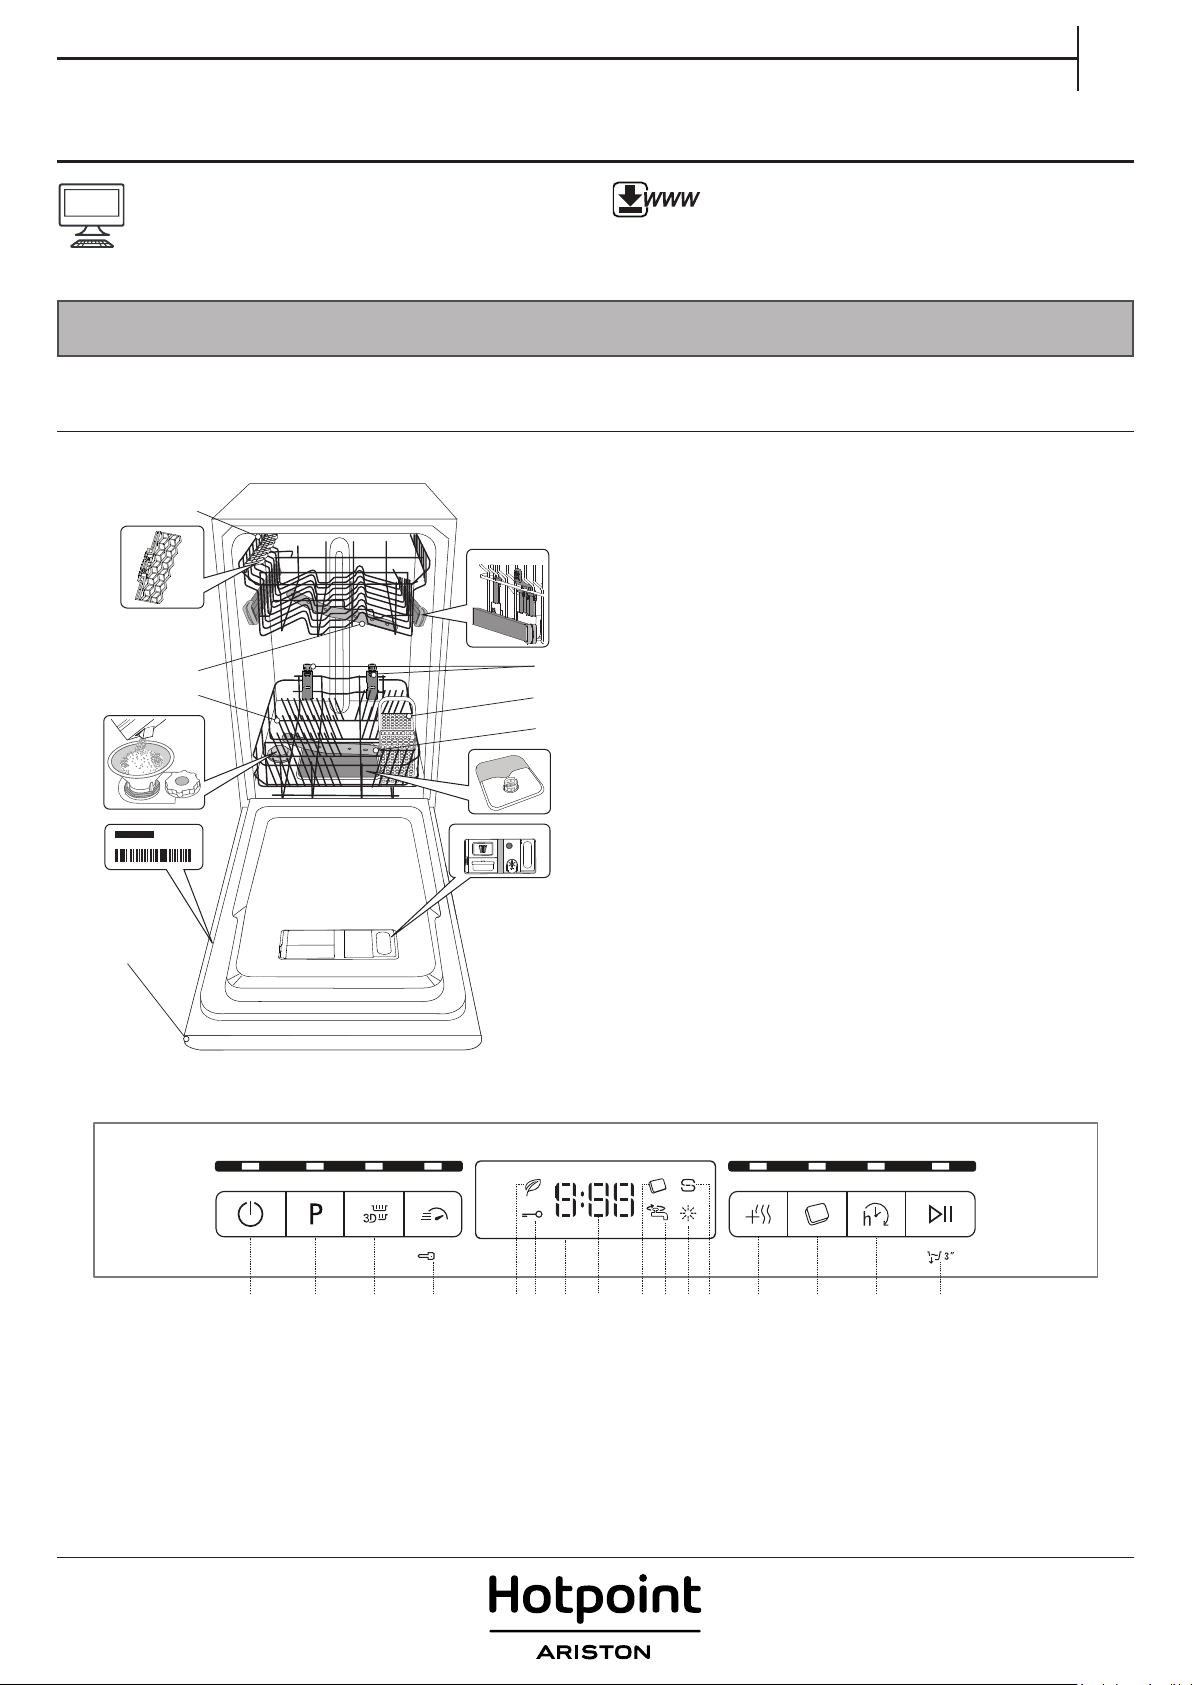
1. Верхняя корзина
2. Откидные полочки
3
3. Регулятор высоты верхней корзины
4. Верхний разбрызгиватель
5. Нижняя корзина
6. Корзина для столовых приборов
6
7
8
9
7. Открытая Зона
8. Нижний разбрызгиватель
9. Фильтрующий узел
10. Бачок для соли
11. Дозаторы моющего средства и ополаскивателя
1112
12. Паспортная табличка
13. Панель управления
13
ПАНЕЛЬ УПРАВЛЕНИЯ
3 ’’
1
1. Кнопка “Вкл.-Выкл./Сброс” с индикатором
2. Кнопка выбора программы с индикатором
3. Кнопка “3D Zone Wash” с индикатором
4. Кнопка “Short Time” (Короткий цикл) с индикатором /
Блокировка кнопок
5. Индикатор программы “Эко”
6. Индикатор блокировки кнопок
7. Дисплей
8. Индикатор номера программы и остающегося времени
3
2
4
65 7 8 11 12 1310
9 16
14
15
9. Индикатор “Таблетка”
10. Индикатор “Кран закрыт”
11. Индикатор “Отсутствие ополаскивателя”
12. Индикатор “Отсутствие соли”
13. Кнопка “Экстра Сушка” с индикатором
14. Кнопка “Таблетка” с индикатором
15. Кнопка “Отложенный старт” с индикатором
16. Кнопка “Старт/Пауза” с индикатором / Слив
1
ПЕРВОЕ ИСПОЛЬЗОВАНИЕ
СОЛЬ, ОПОЛАСКИВАТЕЛЬ И МОЮЩЕЕ СРЕДСТВО
ПЕРЕД ПЕРВЫМ ИСПОЛЬЗОВАНИЕМ
После установки удалите фиксаторы с корзин и удерживающие
эластичные элементы с верхней корзины.
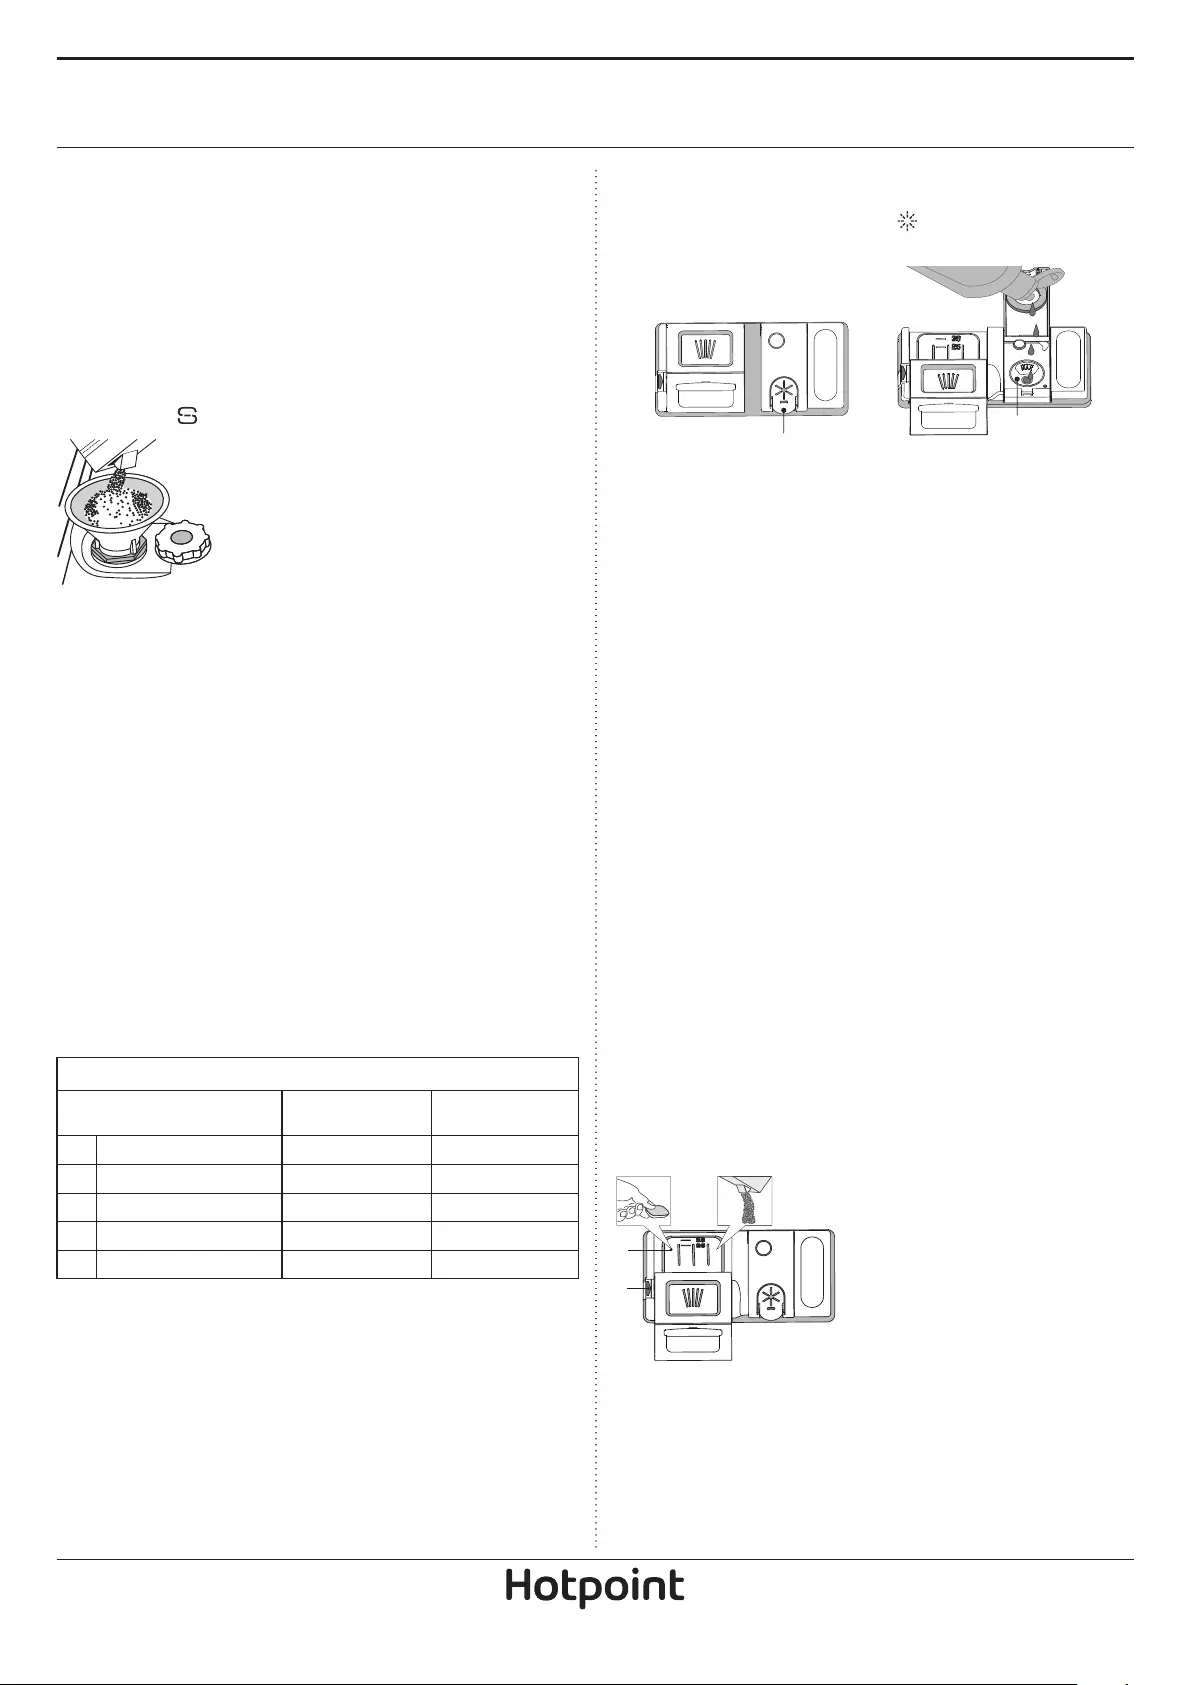
ЗАГРУЗКА РЕГЕНЕРИРУЮЩЕЙ СОЛИ
Использование соли предотвращает образование ИЗВЕСТКОВОГО
НАЛЕТА на посуде и функциональных компонентах пос удомоечной
машины.
• Бачок для соли не должен оставаться пустым.
• Обязательно установите уровень жесткости.
Бачок для соли расположен в нижней части посудомоечной машины
(см. ОПИСАНИЕ ПРОГРАММ). Его необходимо заполнять, когда на
панели управления загорается индикатор ОТСУТСТВИЕ СОЛИ .
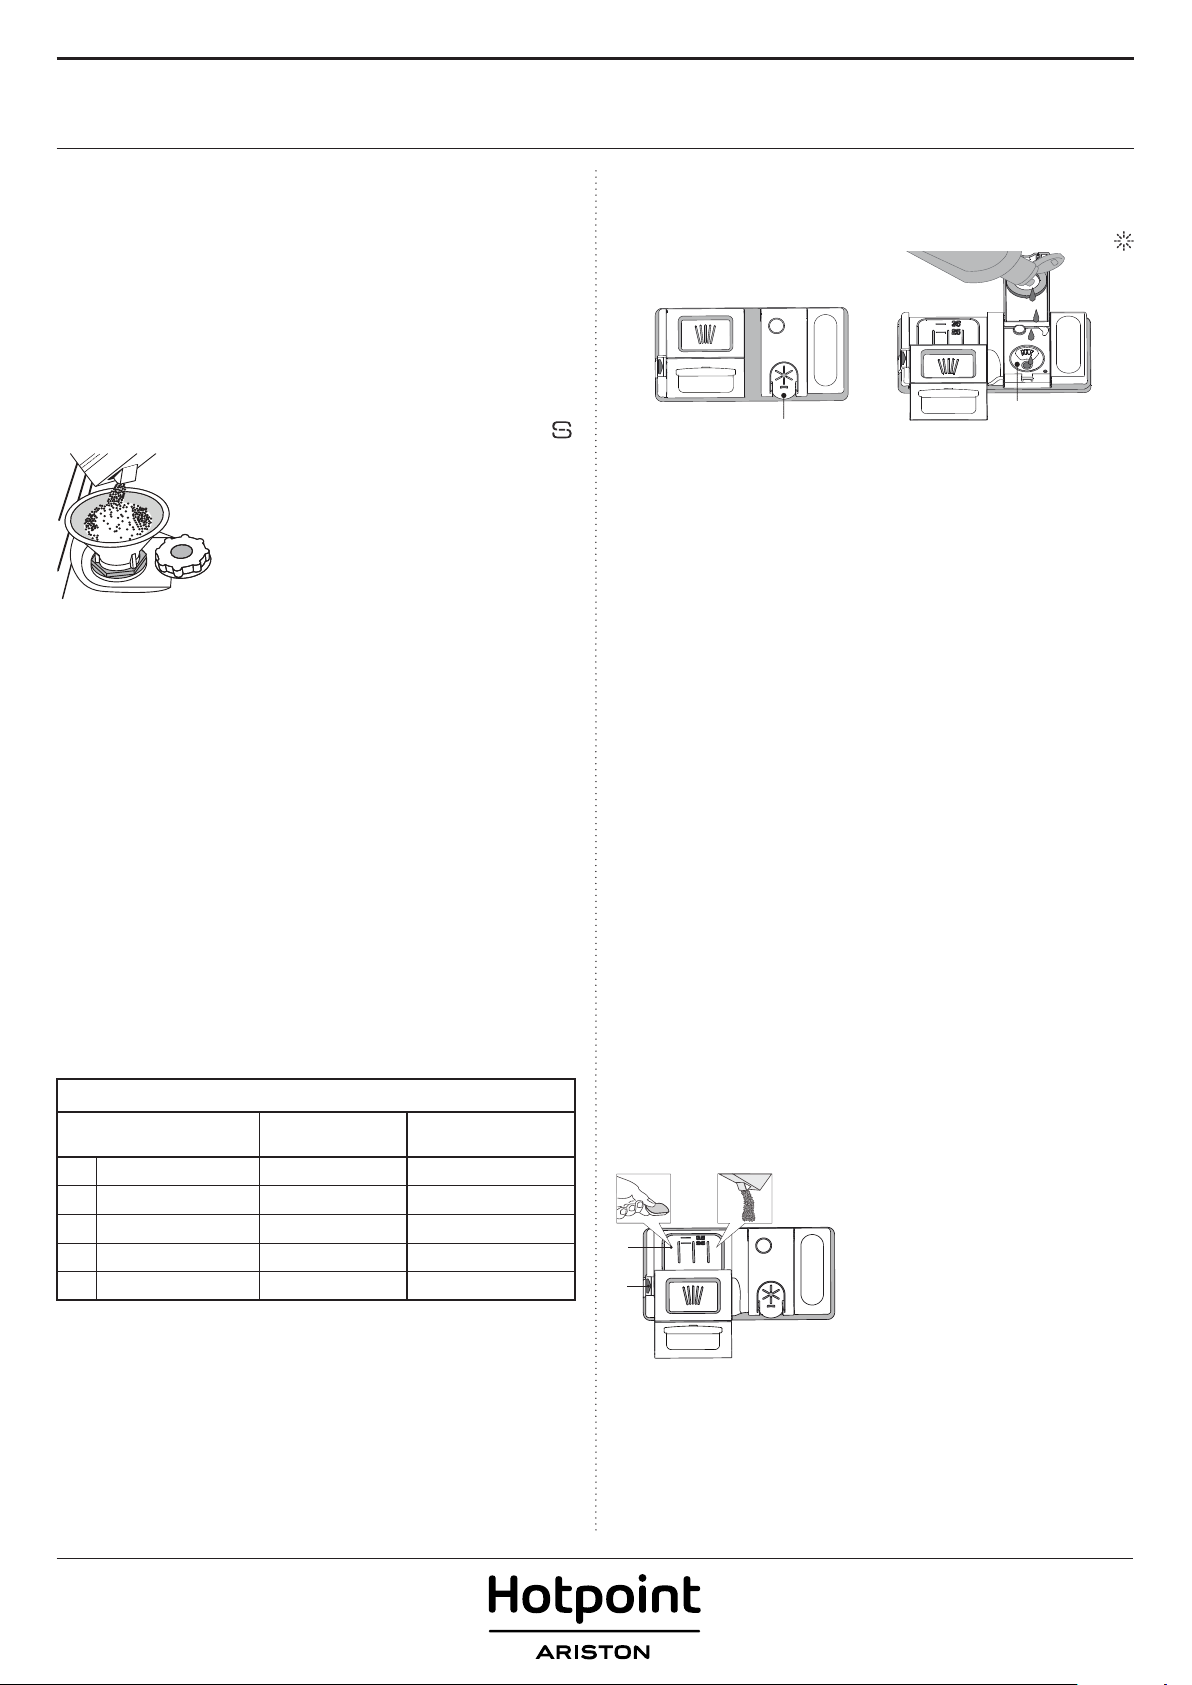
1. Выньте нижнюю корзину и отвинтите
крышку бачка (против часовой стрелки).
2. Выполняется только при первом
использовании: залейте воду в бачок для соли.
3. Вставьте воронку (см. рисунок) и заполните
бачок солью до краев (примерно 1 кг). При
этом из бачка может вытечь небольшое
количество воды.
4. Выньте воронку и протрите участок вокруг
отверстия от остатков соли.
Плотно завинтите крышку, чтобы во время мойки в емкость не попадало
моющее средство (иначе умягчитель воды может выйти из строя).
Если нужно добавить соль, необходимо завершить процедуру
до начала цикла мойки.
УСТАНОВКА ЖЕСТКОСТИ ВОДЫ
Для обеспечения правильной работы умягчителя параметр
жесткости воды должен соответствовать фактической жесткости
воды в вашем доме. Соответствующую информацию можно
получить в местной водоснабжающей организации.
Заводская настройка соответствует средней степени жесткости (3).
• Включите прибор нажатием кнопки ВКЛ./ВЫКЛ.
• Выключите прибор нажатием кнопки ВКЛ./ВЫКЛ.
• Удерживайте нажатой кнопку СТАРТ/ПАУЗА в течение 5 секунд,
пока не раздастся звуковой сигнал.
• Включите прибор нажатием кнопки ВКЛ./ВЫКЛ.
• На панели управления мигает индикатор, соответствующий
текущему уровню, и индикатор соли.
• Нажмите кнопку P, чтобы выбрать нужный уровень жесткости
(см. Таблицу жесткости воды).
Таблица жесткости воды
Уровень
1 Мягкая 0 — 6 0 — 10
2 Средняя 7 — 11 11 — 20
3 Средняя 12 — 17 21 — 30
4 Жесткая 17 — 34 31 — 60
5 Очень жесткая 35 — 50 61 — 90
• Выключите прибор нажатием кнопки ВКЛ./ВЫКЛ.
Настройка завершена!
После завершения данного действия запустите программу, не
загружая посуду.
Используйте только специальную соль для посудомоечных машин.
После загрузки соли индикатор ОТСУТСТВИЕ СОЛИ гаснет.
Отсутствие соли в бачке может привести к повреждению
умягчителя воды и нагревательного элемента.
°dH
Немецкие градусы
Французские градусы
°fH
ЗАЛИВКА ОПОЛАСКИВАТЕЛЯ
Ополаскиватель способствует СУШКЕ посуды. Дозатор
ополаскивателя A необходимо заполнить, если на панели
управления горит индикатор ОТСУТСТВИЕ ОПОЛАСКИВАТЕЛЯ
A
B
1. Откройте дозатор B, нажав и потянув вверх язычок крышки.
2. Осторожно залейте ополаскиватель до максимальной
отметки (110 мл). Если вы случайно пролили ополаскиватель,
немедленно вытрите его сухой тряпкой
3. Закройте крышку, нажав на нее до щелчка.
НИКОГДА не заливайте ополаскиватель непосредственно в
моечную камеру.
РЕГУЛИРОВКА ДОЗЫ ОПОЛАСКИВАТЕЛЯ
Если вас не удовлетворяет качество сушки, можно отрегулировать
дозировку ополаскивателя
• Включите посудомоечную машину нажатием кнопки ВКЛ./ВЫКЛ.
• Выключите прибор нажатием кнопки ВКЛ./ВЫКЛ.
• Нажмите три раза кнопку СТАРТ/ПАУЗА: раздастся звуковой сигнал.
• Включите прибор нажатием кнопки ВКЛ./ВЫКЛ.
• На панели управления мигает индикатор ополаскивателя.
• Нажимая кнопку P, выберите уровень подачи ополаскивателя.
• Выключите прибор нажатием кнопки ВКЛ./ВЫКЛ.
Настройка завершена!
Уровень ополаскивателя можно установить на 1 (ЭКО), В этом случае
ополаскиватель не используется, причем индикатор ОТСУТСТВИЕ
ОПОЛАСКИВАТЕЛЯ не загорается, даже если дозатор пуст.
В зависимости от модели посудомоечной машины доступно до
4 уровней настройки. Заводские настройки указаны для модели,
чтобы узнать настройки для своей машины, следуйте приведенной
выше инструкции.
• Если на посуде остаются синеватые разводы, установите
меньшее значение (2-3).
• Если на посуде остаются капли воды или пятна накипи,
установите более высокое значение (4-5).
ЗАГРУЗКА МОЮЩЕГО СРЕДСТВА
Для открытия дозатора моющего средства используйте
фиксатор A. Загрузите моющее средство только в сухой
дозатор B. Моющее средство для предварительной мойки
поместите непосредственно в моечную камеру.
1. Для определения требуемого
количества моющего средства
см. указания выше. С внутренней
стороны лотка B нанесены мерные
отметки, позволяющие правильно
дозировать моющее средство.
2. Удалите остатки моющего
средства с краев дозатора и
закройте крышку со щелчком.
3. Закройте крышку дозатора
моющего средства, потянув ее вверх
до возврата на место фиксатора.
Дозатор моющего средства открывается автоматически в нужный
момент времени согласно выбранной программе.
При использовании моющих средств “все в одном” рекомендуется
нажать кнопку ТАБЛЕТКА: данная функция адаптирует программу
для повышения качества мойки и сушки.
2
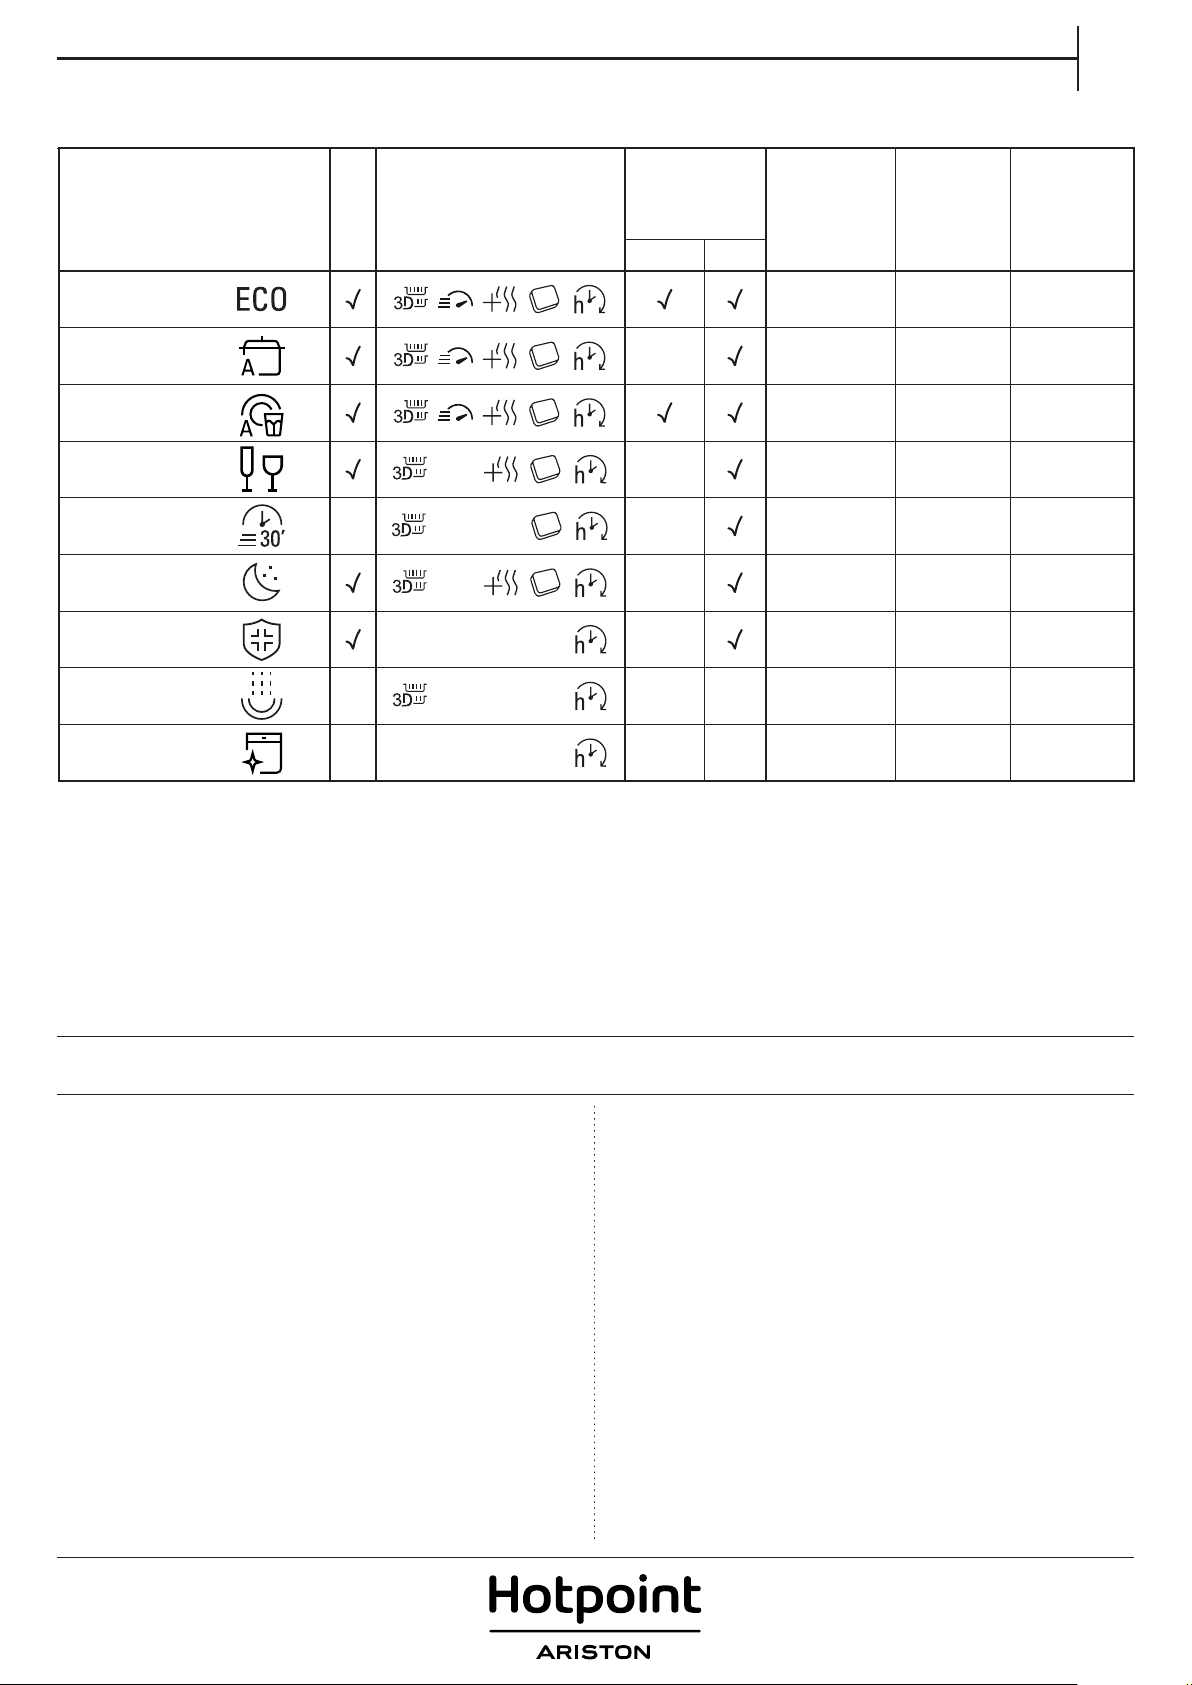
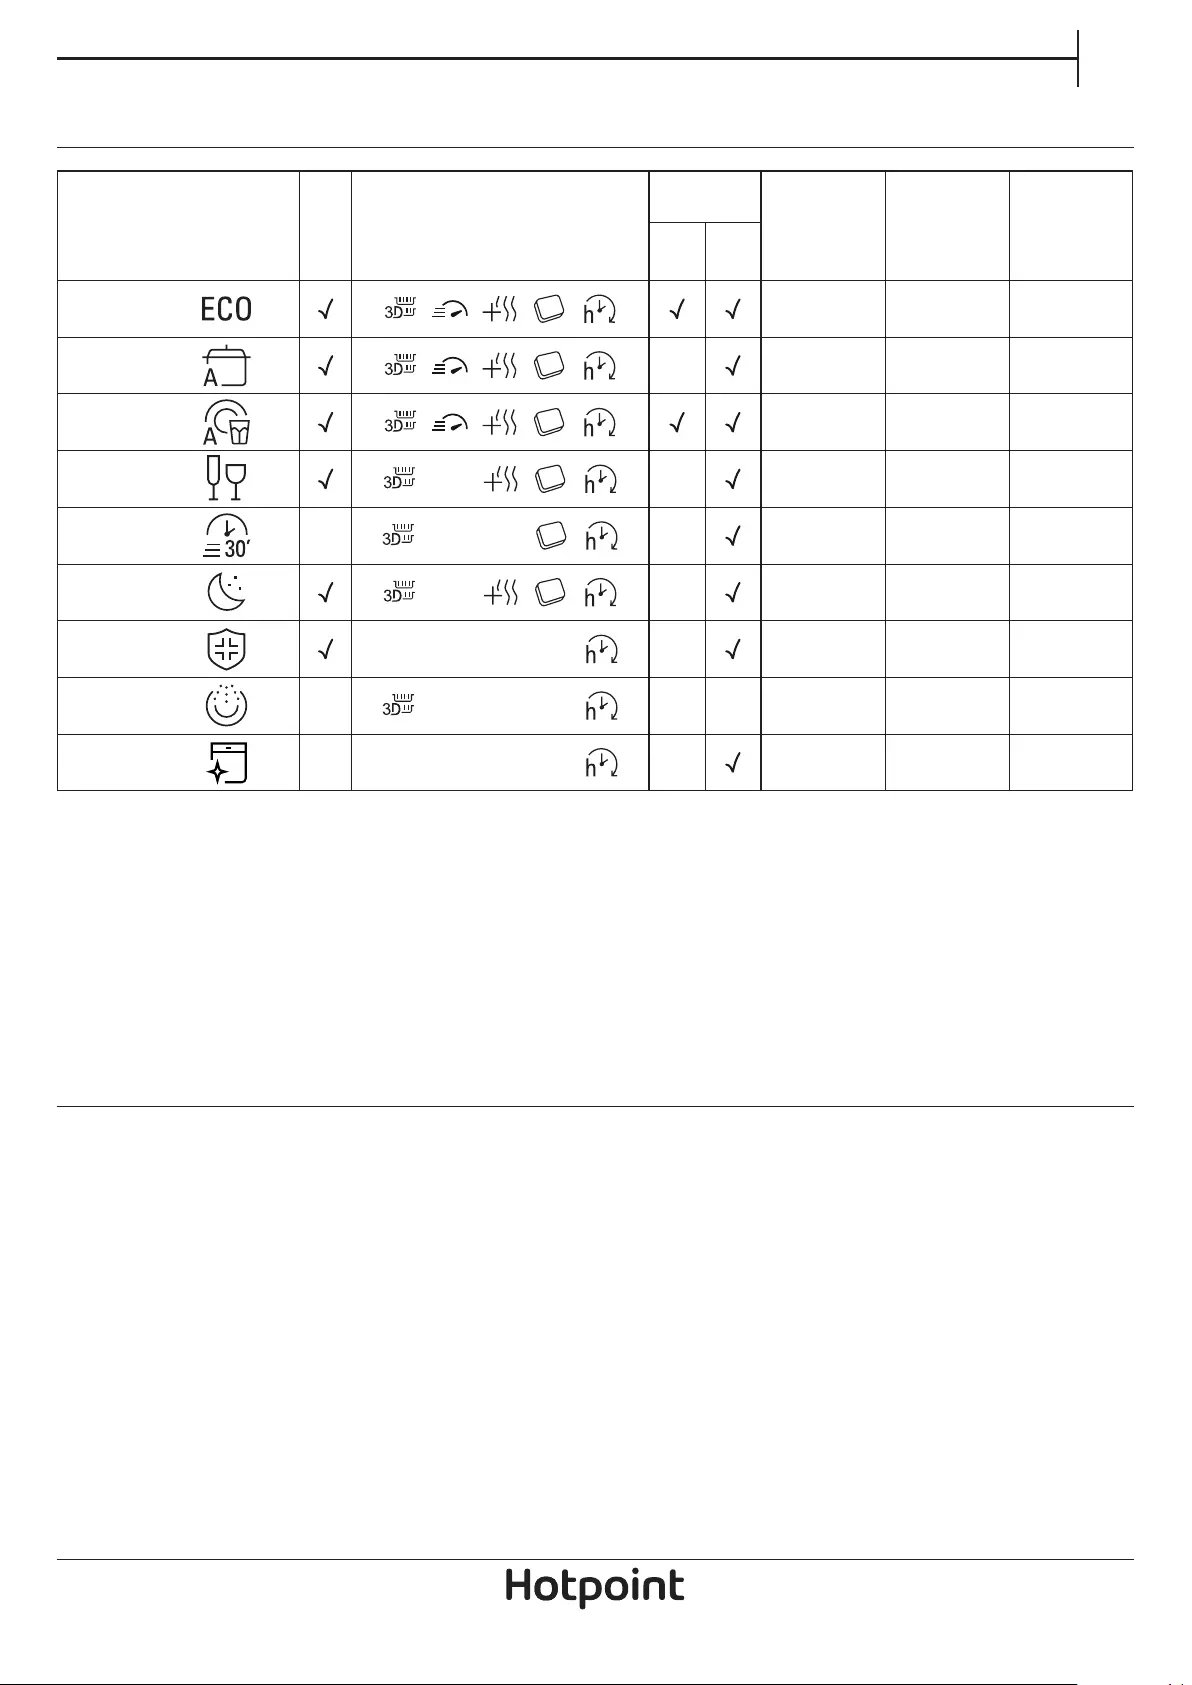
ТАБЛИЦА ПРОГРАММ
RU
Программа
1
Эко 50°
Автоматическая
2
интенсивная
Автоматическая
3
стандартная
Хрупкая
4
посуда
Экспресс
5
30 мин.
Спокойной
6
ночи!
7
Дезинфекция
8
Вымачивание
65°
55°
45°
50°
50°
70°
— —
Сушка
—
Доступные опции
стадия
Контейнер
*)
для
моющего
средства
Камера
— 2:20 — 3:00 16.0 — 18.0 1.20 — 1.40
— 1:40 12.0 1.00
— 0:30 9.0 0.50
— 3:35 16.5 1.00
—
—
Длитель-
ность про-
граммы
B
(ч:мин)
2:10 — 2:50 14.5 — 16.0 1.05 — 1.25
—
**)
4:00 9.0 0.74
1:40 12.0 1.30
0:10 4.5 0.01
Расход
воды
(л/цикл)
Расход
энергии
(кВтч/цикл)
9
Самоочистка 65°
Показатели программы ЭКО были измерены в лабораторных условиях в соответствии с европейским стандартом EN 50242.
Примечание для Испытательных Лабораторий: для получения более подробной информации об условиях сравнительного испытания EN
пошлите запрос на адрес: assistenza_en_lvs@indesitcompany.com
Ни одна программа не предусматривает предварительную обработку посуды.
*) Не все опции могут использоваться одновременно.
**) Длительность программы, отображаемая на дисплее или указанная в инструкции, представляет собой оценочное значение,
рассчитанное для стандартных условий. Фактическое время может варьироваться в зависимости от многих факторов, таких как
температура и давление подаваемой воды, температура в помещении, количество моющего средства, объем и тип загрузки, баланс
загрузки, выбор дополнительных опций и калибровка датчиков. Калибровка датчиков может увеличивать длительность программы на
время до 20 мин. Потребление в режиме “ожидание”: Потребление в режиме “остановлено”: 5 Вт — Потребление в режиме “выключено”: 0.5 Вт
—
—
—
0:50 9.5 0.7
ОПИСАНИЕ ПРОГРАММ
Указания по выбору программ мойки.
1 ЭКО
Нормально загрязненная посуда. Стандартная программа мойки,
наиболее эффективная по совокупному потреблению воды и
электроэнергии.
2 АВТОМАТИЧЕСКАЯ ИНТЕНСИВНАЯ
Автоматическая программа для сильно загрязненных тарелок и кастрюль (не использовать для легко повреждаемой посуды).
3 АВТОМАТИЧЕСКАЯ СТАНДАРТНАЯ
Автоматическая программа для нормально загрязненных сковород и столовой посуды.
4 ХРУПКАЯ ПОСУДА
Программа для легко повреждаемой посуды, чувствительной к высокой температуре (стекло, чашки и т. п.).
5 ЭКCПРЕCC 30 МИН.
Программа для легко загрязненной посуды без засохших
остатков пищи.
6 СПОКОЙНОЙ НОЧИ!
Подходит для использования в ночное время. Обеспечивает оптимальную эффективность очистки и высушивания при низком
уровне шума.
7 ДЕЗИНФЕКЦИЯ
Программа для нормально или сильно загрязненной посуды с дополнительным антибактериальным ополаскиванием. Может быть
использована для обслуживания посудомоечной машины.
8 ВЫМАЧИВАНИЕ
Используется для замачивания посуды, которая будет вымыта
позднее. Эта программа не использует моющее средство.
9 САМООЧИСТКА
Программа для выполнения обслуживания посудомоечной машины.
Выполняет очистку внутренних элементов прибора горячей водой.
Примечания:
Обратите внимание, что быстрые циклы лучше всего подходят для не
очень грязной посуды (Экспресс).
Для сокращения потребления старайтесь использовать
посудомоечную машину только с полной загрузкой.
3
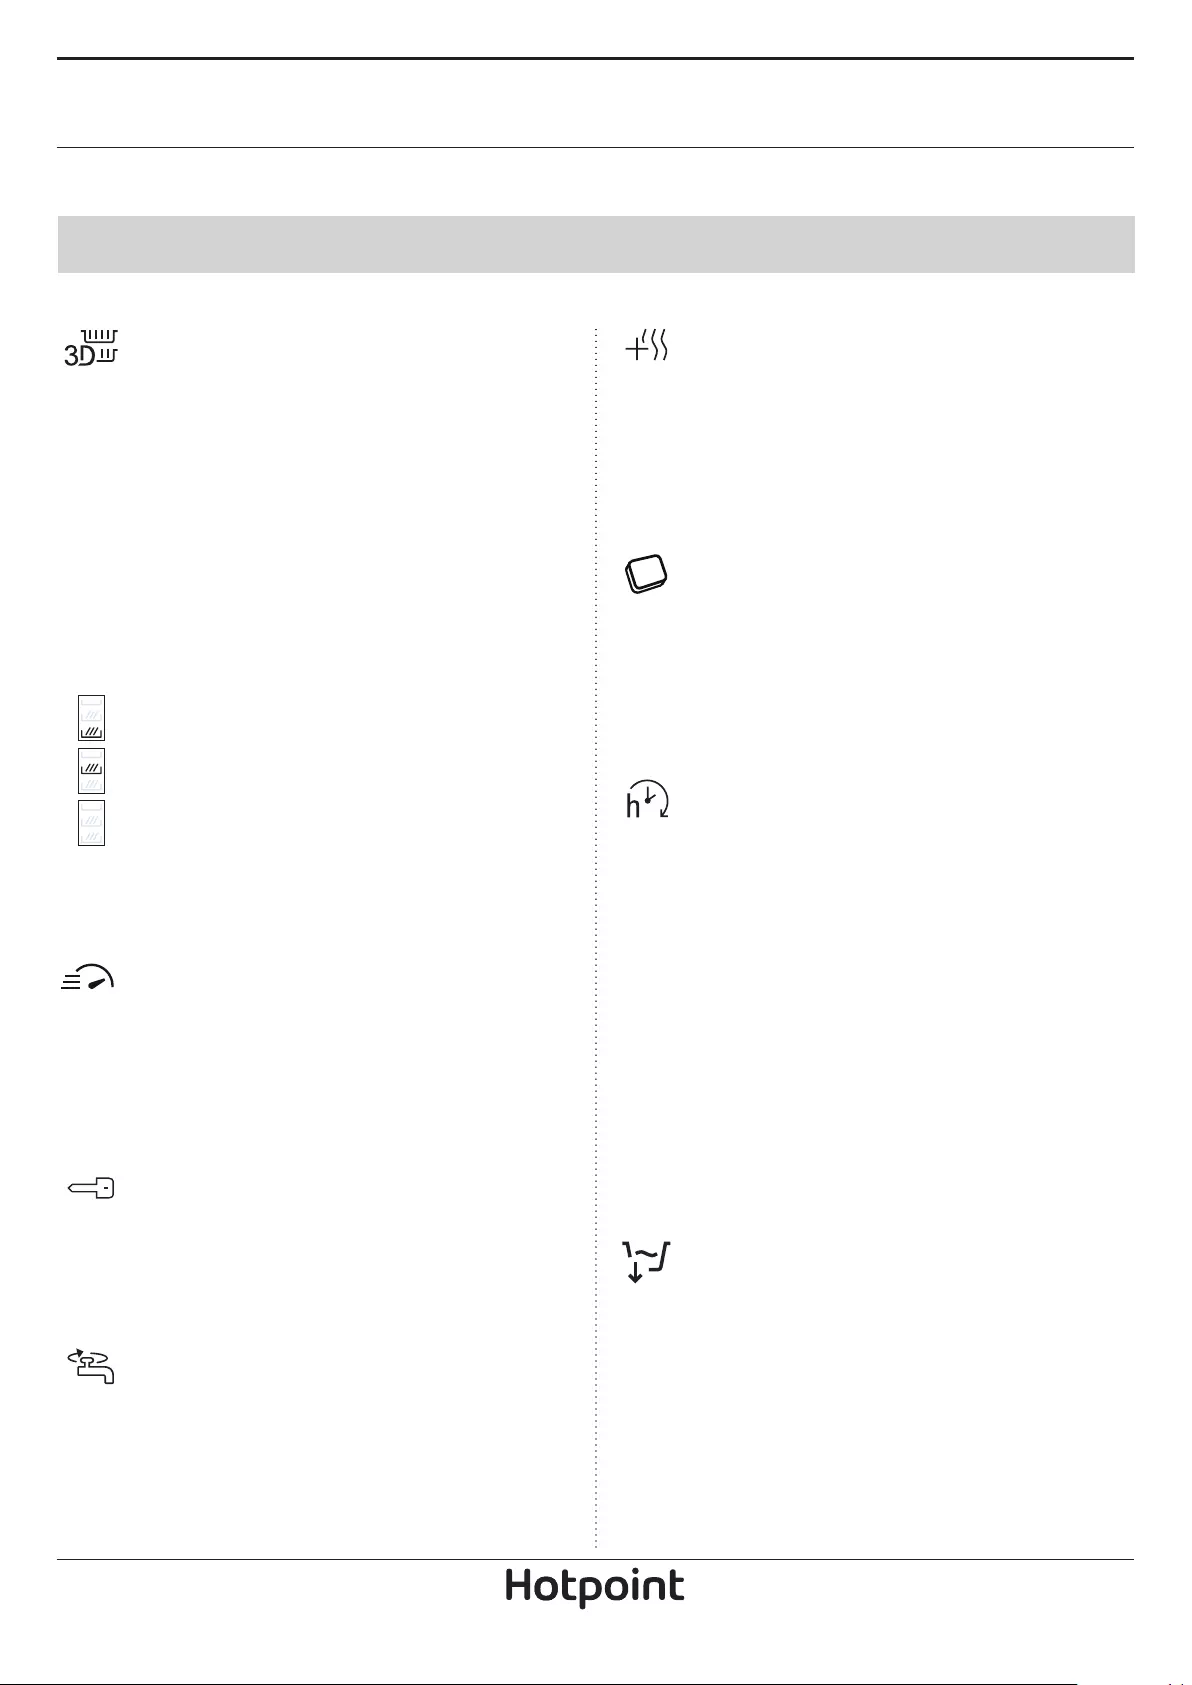
ОПЦИИ И ФУНКЦИИ
ОПЦИИ выбираются непосредственным нажатием соответствующих кнопок (см. ПАНЕЛЬ УПРАВЛЕНИЯ).
Если опция несовместима с выбранной программой (см. ТАБЛИЦА ПРОГРАММ), соответствующий индикатор мигнет 3
раза и раздастся звуковой сигнал. Опция не будет подключена.
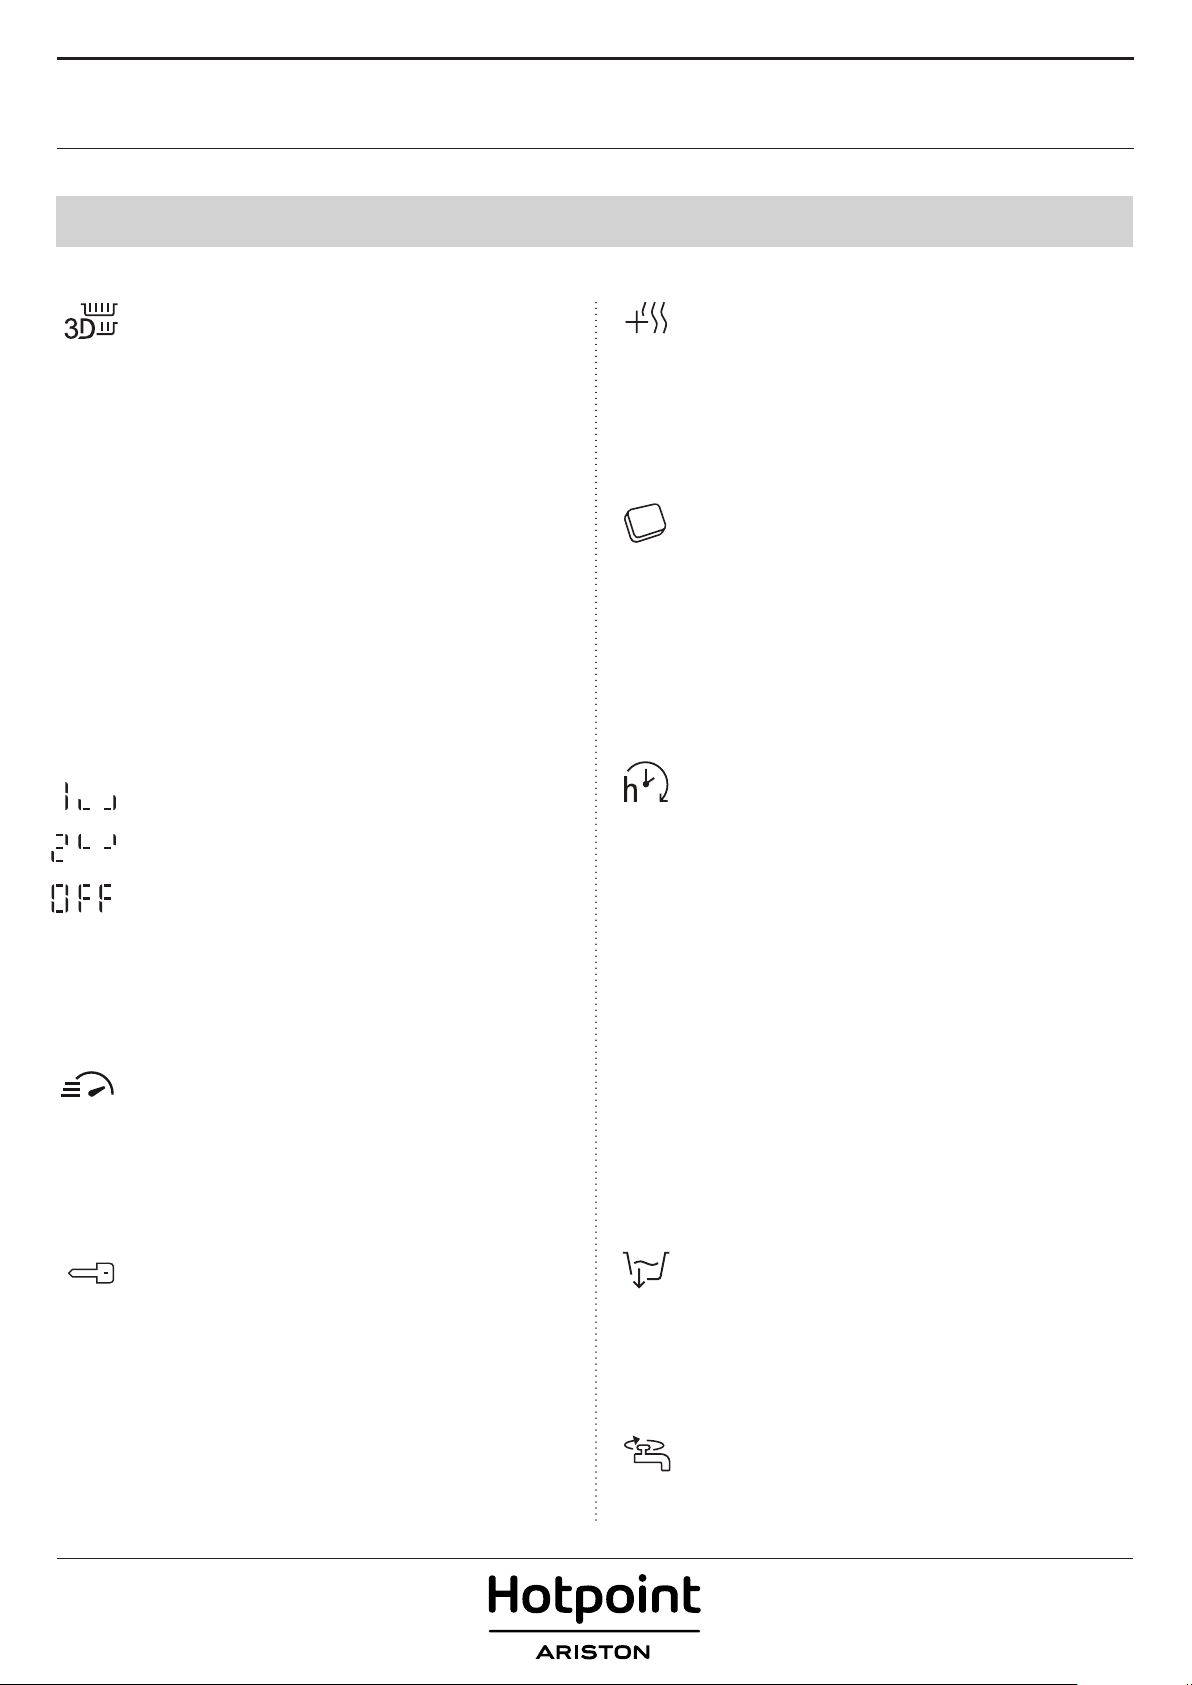
3D ZONE WASH
Функция работает при одной установленной корзине. В
частности, ее рекомендуется использовать в «Нормальном»
и «Интенсивном» режиме. Благодаря дополнительным
объемным струям воды, выходящим со дна камеры, опция
«ZONE WASH 3D» позволяет сэкономить электроэнергию
или повысить эффективность мойки в посудомоечной
машине:
• 3D ZONE WASH + НОРМАЛЬНЫЙ ЦИКЛ: позволяет снизить
энергопотребление (до 40%).
• 3D ZONE WASH + ИНТЕНСИВНЫЙ ЦИКЛ: повышает
эффективность вымывания (до 40%). Идеально подходит
для очень грязной посуды смешанного типа, например,
кастрюль и сотейников, тарелок с засохшими остатками
пищи, трудноочищаемых предметов (терки, овощерезки,
грязные столовые приборы).
Чтобы включить опцию:
1. Выберите совместимый цикл (нормальный или
интенсивный).
2. По умолчанию на дисплее горят значки всех лотков:
нажимайте на кнопку «3D ZONE WASH», пока не загорится
индикатор нужной корзины.
Загружайте посуду только в выбранный лоток:
на дисплее (только нижняя корзина)
на дисплее (только верхняя корзина)
на дисплее (опция выключена, прибор моет посуду во всех
корзинах).
Загружайте только нижнюю или только верхнюю
корзину, соответственно уменьшив количество
моющего средства.
SHORT TIME
Данная опция позволяет сократить длительность основных
программ при сохранении качества мойки и сушки на
исходном уровне.
После выбора программы нажмите кнопку SHORT TIME. На
панели загорится соответствующий индикатор. Для отмены
опции нажмите кнопку еще раз.
ЭКСТРА-ДРАЙ
Чтобы повысить качество сушки посуды, нажмите кнопку
ЭКСТРА-ДРАЙ, предварительно выбрав программу. На
панели загорится соответствующий индикатор.
Удалению влаги способствует более высокая температура
завершающего ополаскивания и более длительная стадия
сушки. Для отмены опции нажмите кнопку еще раз. Опция
ЭКСТРА-ДРАЙ удлиняет цикл мойки.
ТАБЛЕТКА
Эта настройка позволяет оптимизировать действие
программы в соответствии с типом применяемого
моющего средства.
Нажмите кнопку ТАБЛЕТКА (загорится соответствующий
индикатор, загорится соответствующий символ
загорится), если вы используете комбинированные
моющие средства в таблетках (ополаскиватель, соль и
моющее средство в одном продукте).
Если вы пользуетесь порошковым или жидким
моющим средством, не включайте эту опцию.
ОТЛОЖЕННЫЙ СТАРТ
Запуск программы можно отложить на время от 30 минут
до 24 часов.
1. Выберите программу и нужные опции. Установите
время отсрочки последовательным нажатием кнопки
ОТЛОЖЕННЫЙ СТАРТ. Значение меняется в диапазоне
от 30 минут до 24 часов. При каждом нажатии кнопки
отсрочка запуска увеличивается на 30 минут (в
интервале до 4 часов), на 1 час (в интервале до 12
часов) или на 4 часа (в интервале более 12 часов). После
достижения 24 часов последующее нажатие кнопки
отменяет отсрочку запуска.
2. Нажмите кнопку СТАРТ/ПАУЗА: стартует обратный
отсчет таймера.
3. После истечения заданного времени индикатор гаснет
и программа автоматически запускается.
Если в процессе отсчета времени снова нажать кнопку
СТАРТ/ПАУЗА, опция ОТЛОЖЕННЫЙ СТАРТ отменяется и
машина автоматически приступает к выполнению программы.
Функция ОТЛОЖЕННЫЙ СТАРТ недоступна, если
программа уже выполняется.
БЛОКИРОВКА КНОПОК
Длительное нажатие (более 3 секунд) кнопки SHORT TIME
вводит в действие функцию БЛОКИРОВКИ КНОПОК. Функция
БЛОКИРОВКИ КНОПОК блокирует всю панель управления
за исключением кнопки ВКЛ./ВЫКЛ. БЛОКИРОВКА КНОПОК
отменяется повторным длительным нажатием.
4
СЛИВ
Чтобы прервать выполнение текущей программы, можно
использовать функцию “Слив”.
Длительное нажатие кнопки СТАРТ/ПАУЗА вводит в действие
функцию СЛИВ: текущая программа останавливается и
посудомоечная машина сливает воду.
КРАН ПОДАЧИ ВОДЫ ЗАКРЫТ –
Предупреждение
Индикатор мигает, если в машину не поступает вода (закрыт
водопроводный кран).
ЗАГРУЗКА КОРЗИН
RU
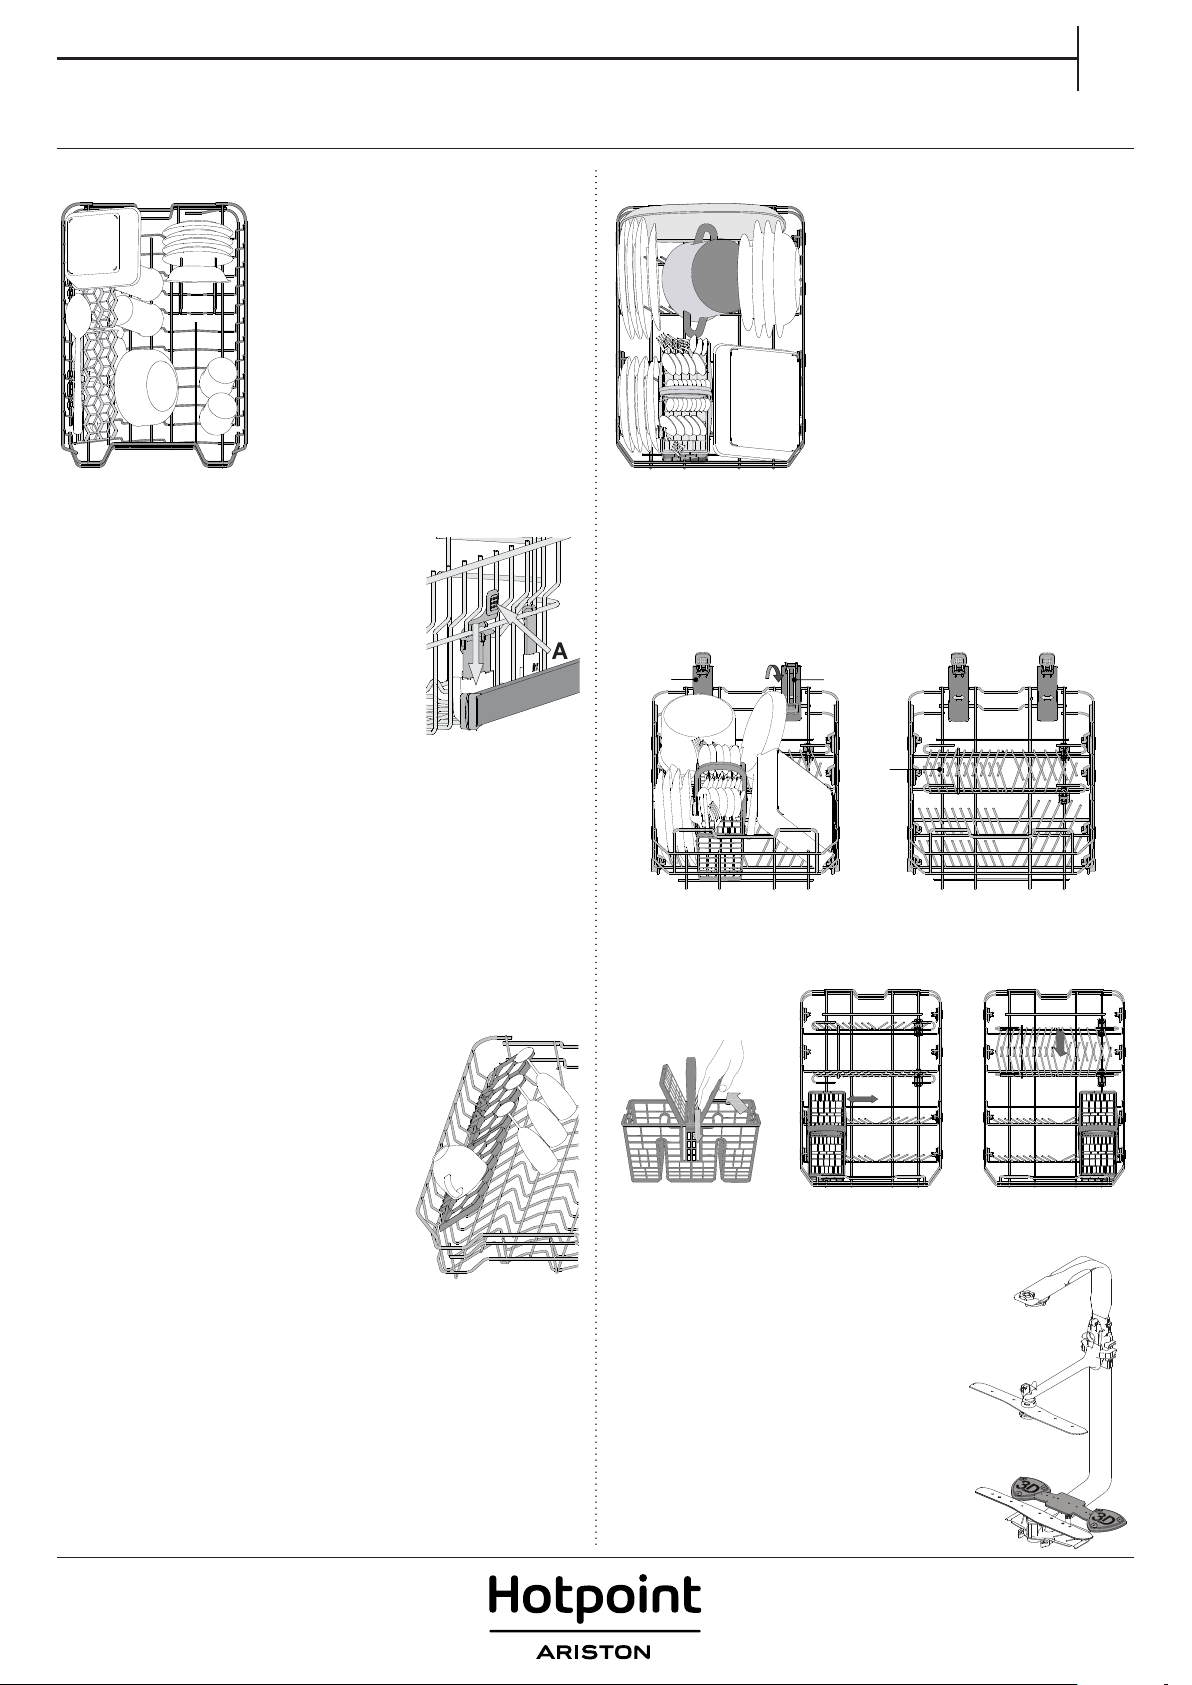
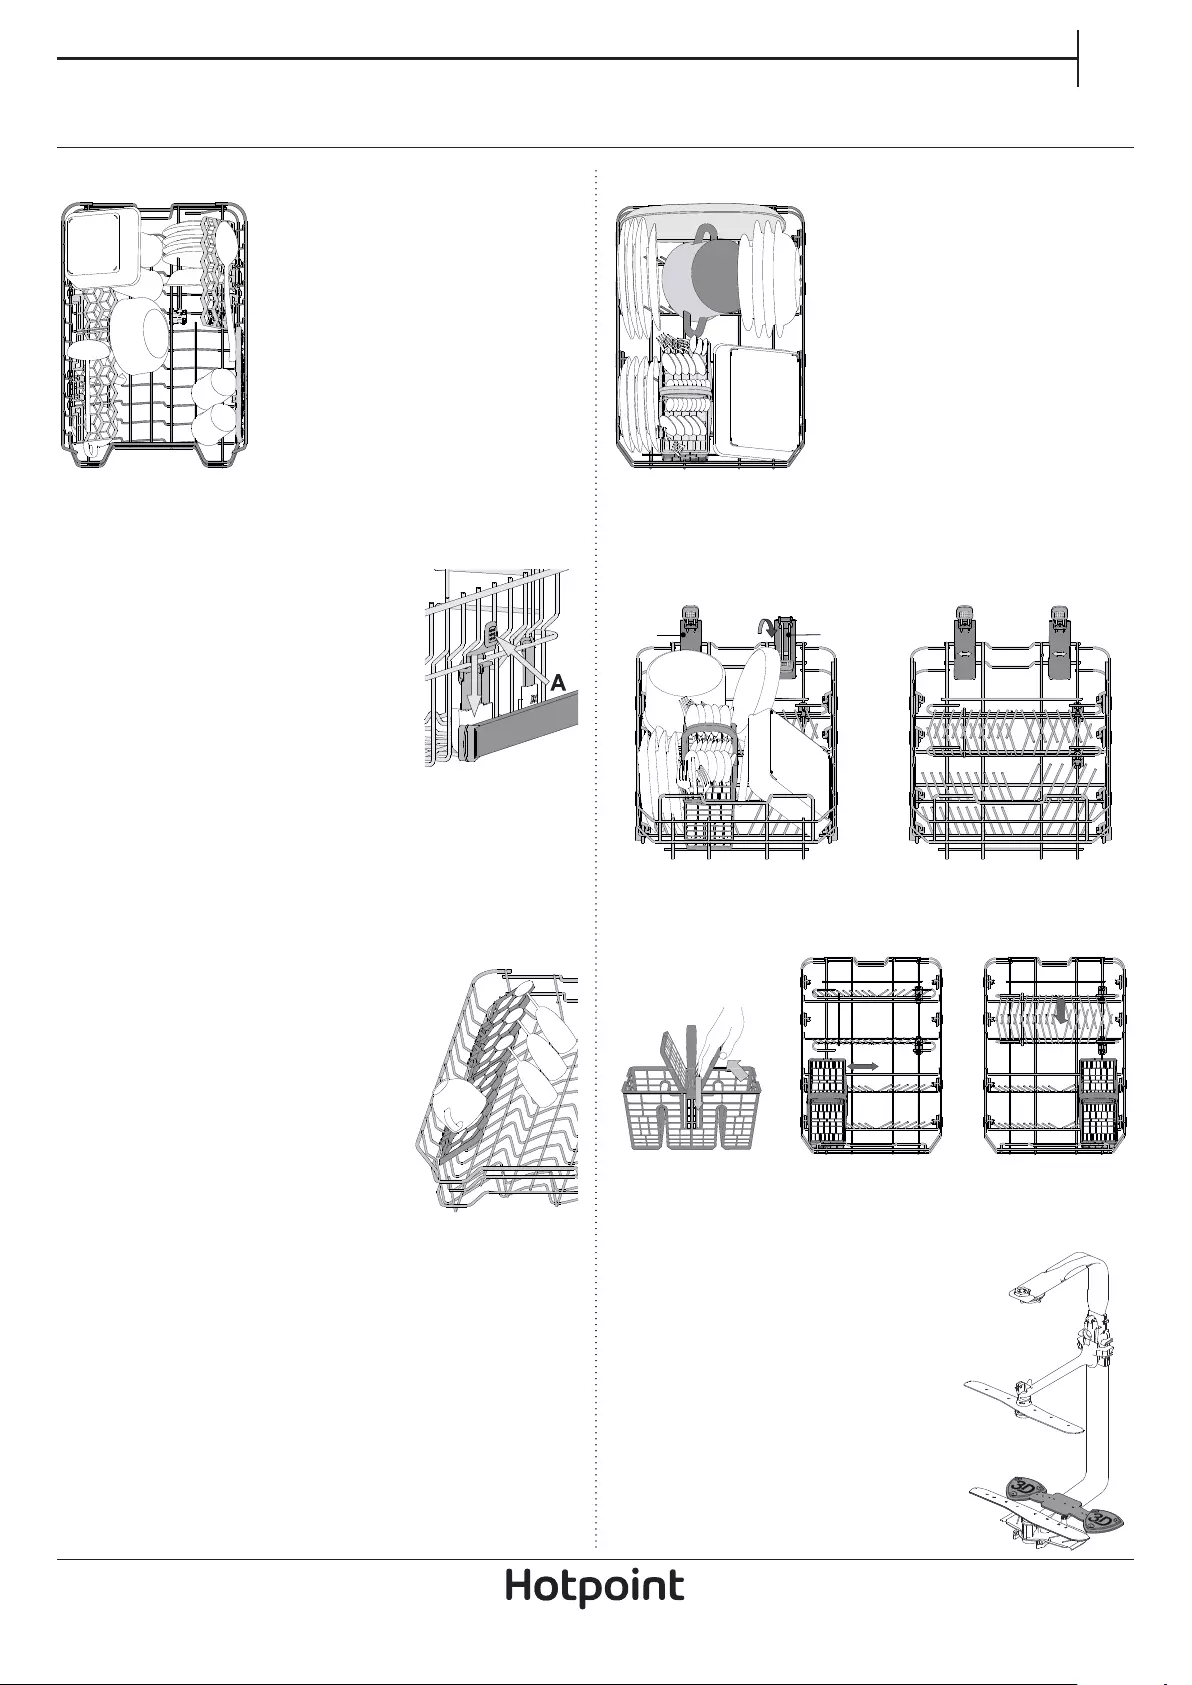
ВЕРХНЯЯ КОРЗИНА
Эта корзина предназначена для легко
повреждаемой и легкой посуды:
стаканы, чашки, блюдца, мелкие
салатницы.
(пример загрузки верхней корзины)
РЕГУЛИРОВКА ВЫСОТЫ ВЕРХНЕЙ КОРЗИНЫ
Высоту верхней корзины можно
регулировать: верхнее положение — для
возможности размещения крупной посуды в
нижней корзине, нижнее положение — для
использования в полной мере откидных
держателей (для увеличения свободного
пространства сверху без создания помех для
посуды, загруженной в нижнюю корзину).
Верхняя корзина снабжена
приспособлением для регулировки
высоты (см. рисунок). Чтобы поднять
верхнюю корзину, просто потяните ее вверх за края, не нажимая
рычаги, пока она не займет устойчивое положение вверху.
Чтобы вернуть корзину в нижнее положение, нажмите рычаги A,
расположенные на ее боковых сторонах, и сместите корзину вниз.
Не регулируйте высоту верхней корзины, когда в нее
загружена посуда.
НИКОГДА не поднимайте и не опускайте корзину, взявшись
за нее только с одной стороны.
НИЖНЯЯ КОРЗИНА
Эта корзина предназначена для
кастрюль, крышек, тарелок, салатниц,
столовых приборов и т.п. Большие
тарелки и крышки лучше размещать по
краям, чтобы они не мешали движению
лопасти-разбрызгивателя.
Нижняя корзина имеет откидные
держатели C, которые можно установить в
вертикальное положение для размещения
тарелок либо в горизонтальное (нижнее)
положение — для удобной загрузки
сковород и салатниц.
(пример загрузки нижней корзины)
В задней части нижней корзины находится Открытая Зона A —
специальная выдвижная подставка, которая может использоваться
для удержания сковород или форм для выпечки в вертикальном
положении так, чтобы они занимали меньше места. Для
использования возьмитесь за цветную рукоятку и потяните ее вверх B,
одновременно поворачивая вперед. Подставки можно перемещать в
поперечном направлении в соответствии с размером посуды.
A
КОРЗИНКА ДЛЯ СТОЛОВЫХ ПРИБОРОВ
Корзинка снабжена верхними решетками для более удобной
укладки столовых приборов.
Ее необходимо размещать в передней части нижней корзины.
B
C
ОТКИДНЫЕ ДЕРЖАТЕЛИ С ИЗМЕНЯЕМЫМ ПОЛОЖЕНИЕМ
Откидные держатели могут быть установлены
на трех разных уровнях для оптимального
размещения посуды в корзине.
Винные бокалы можно надежно закрепить
в откидных держателях, вставив их ножки в
специальные прорези.
Для оптимальной сушки наклоните откидные
держатели сильнее.Чтобы изменить угол
наклона, приподнимите откидной держатель,
слегка сместите и установите его в нужном
положении.
Ножи и другие острые предметы следует укладывать в корзинку
для столовых приборов острыми краями вниз либо класть
горизонтально на откидные секции верхней корзины.
3D-КОМПОНЕНТЫ ЗОНЫ МЫТЬЯ
Опция 3D в зоне мытья предусматривает
применение дополнительных водяных
струй, выходящих из нижней и верхней
частей посудомоечной машины (обозначены
оранжевым цветом) для более интенсивного
отмывания сильных загрязнений благодаря
большему охвату посуды водой. Пример:
загрузите кастрюли и горшочки, развернув
их в сторону нижних 3D-компонентов зоны
мытья и активируйте опцию «3D Zone Wash»
на панели.
5
ЕЖЕДНЕВНОЕ ИСПОЛЬЗОВАНИЕ
1. ПРОВЕРКА ПОДАЧИ ВОДЫ
Убедитесь, что посудомоечная машина подсоединена к
водопроводу и что заливной кран открыт.
2. ВКЛЮЧИТЕ ПОСУДОМОЕЧНУЮ МАШИНУ
Нажмите кнопку ВКЛ./ВЫКЛ.
3. ЗАГРУЗИТЕ КОРЗИНЫ
(см. ЗАГРУЗКА КОРЗИН)
4. ЗАГРУЗКА МОЮЩЕГО СРЕДСТВА
(см. ТАБЛИЦА ПРОГРАММ).
5. ВЫБЕРИТЕ ПРОГРАММУ И ОПЦИИ
Выберите наиболее подходящую программу в соответствии
с типом посуды и степенью ее загрязнения (см. ОПИСАНИЕ
ПРОГРАММ), нажимая кнопку P.
Выберите необходимые опции (см. ОПЦИИ И ФУНКЦИИ).
6. С ТАРТ
Запустите процесс мойки, нажав кнопку СТАРТ/ПАУЗА.
В момент запуска программы раздастся звуковой сигнал.
7. ОКОНЧАНИЕ МОЙКИ
Окончание процесса мойки указывается звуковым сигналом
и сообщением END на дисплее. Откройте дверцу и выключите
прибор нажатием кнопки ВКЛ./ВЫКЛ.
Во избежание ожогов подождите несколько минут, прежде чем
вынимать посуду.
Выгрузите посуду из корзин, начиная с нижней.
СМЕНА ВЫПОЛНЯЕМОЙ ПРОГРАММЫ
Если вы выбрали неверную программу, ее можно сменить, при
условии что с момента ее запуска прошло не так много времени:
выключите машину, нажав и удерживая кнопку ВКЛ./ВЫКЛ.
Снова включите машину кнопкой ВКЛ./ВЫКЛ. и выберите новую
программу и набор опций. Запустите процесс мойки, нажав
кнопку СТАРТ/ПАУЗА.
ДОБАВЛЕНИЕ ПОСУДЫ
Не выключая машины, откройте дверцу (действуйте осторожно,
чтобы не обжечься ГОРЯЧИМ паром!) и поместите посуду
внутрь. Закройте дверцу и нажмите кнопку СТАРТ/ПАУЗА
процесс мойки возобновится с места остановки.
СЛУЧАЙНОЕ ПРЕРЫВАНИЕ
В случае открытия дверцы или исчезновения напряжения в сети
процесс мойки останавливается. После закрытия дверцы или
восстановления электроснабжения нажмите кнопку
СТАРТ/ПАУЗА. Процесс мойки продолжится с места остановки.
Для получения более подробной информации о функциях
запросите или загрузите из интернета руководство
“Использование и уход”, следуя указаниям, представленным на
последней странице.
В целях экономии электроэнергии машина выключается
автоматически после определенного периода бездействия.
Если посуда загрязнена несильно или была предварительно
ополоснута водой, сократите дозу моющего средства.
ПОЛЕЗНЫЕ СОВЕТЫ
СОВЕТЫ
Перед загрузкой корзин удалите с посуды остатки пищи, вылейте
содержимое из стаканов. Ополаскивать посуду водой не
требуется.
При загрузке посуды следите, чтобы она крепко держалась на
месте и не падала. Располагайте емкости дном вверх и так, чтобы
выпуклые/вогнутые части были наклонены: это позволит воде
достигать всех участков посуды и свободно стекать вниз.
Внимание: Убедитесь, что крышки, ручки, подносы и сковороды
не мешают вращению лопастей-разбрызгивателей.
Кладите мелкие предметы в корзинку для столовых приборов.
Сильно загрязненные тарелки и сковороды рекомендуется помещать
в нижнюю корзину, поскольку в этой зоне действуют более мощные
струи воды, обеспечивающие более качественную мойку.
После загрузки прибора убедитесь, что лопасти-разбрызгиватели
могут свободно вращаться.
ГИГИЕНА
Чтобы предотвратить появление запахов и отложений в камере
посудомоечной машины, используйте высокотемпературную
программу мойки не реже чем раз в месяц. Для очистки
прибора добавьте чайную ложку моющего средства и запустите
программу, не загружая посуды.
ПОСУДА, НЕПРИГОДНАЯ ДЛЯ МОЙКИ В
ПОСУДОМОЕЧНОЙ МАШИНЕ
• Деревянная посуда и столовые приборы.
• Хрупкие декорированные бокалы, предметы художественного
ремесла и старинная посуда. Декоративные элементы такой
посуды могут быть повреждены.
• Предметы из синтетических материалов, не стойкие к высоким
температурам.
• Медная и жестяная посуда.
• Посуда, загрязненная золой, воском, техническими смазками
или чернилами.
Декоративные рисунки на стекле и алюминиевые/серебряные
части могут изменить свой цвет или потускнеть в процессе мойки.
Некоторые типы стекла (например, хрусталь) могут помутнеть
после определенного числа циклов мойки.
ПОВРЕЖДЕНИЕ ИЗДЕЛИЙ ИЗ СТЕКЛА И ПОСУДЫ
• Мойте изделия из стекла и фарфора только в том случае, если
их производитель гарантирует, что изделия допускают мойку
в посудомоечной машине.
• Используйте деликатное моющее средство, пригодное для посуды.
• Вынимайте стеклянные изделия и посуду из посудомоечной
машины сразу же после окончания процесса мойки.
6
ЧИСТКА И УХОД
RU
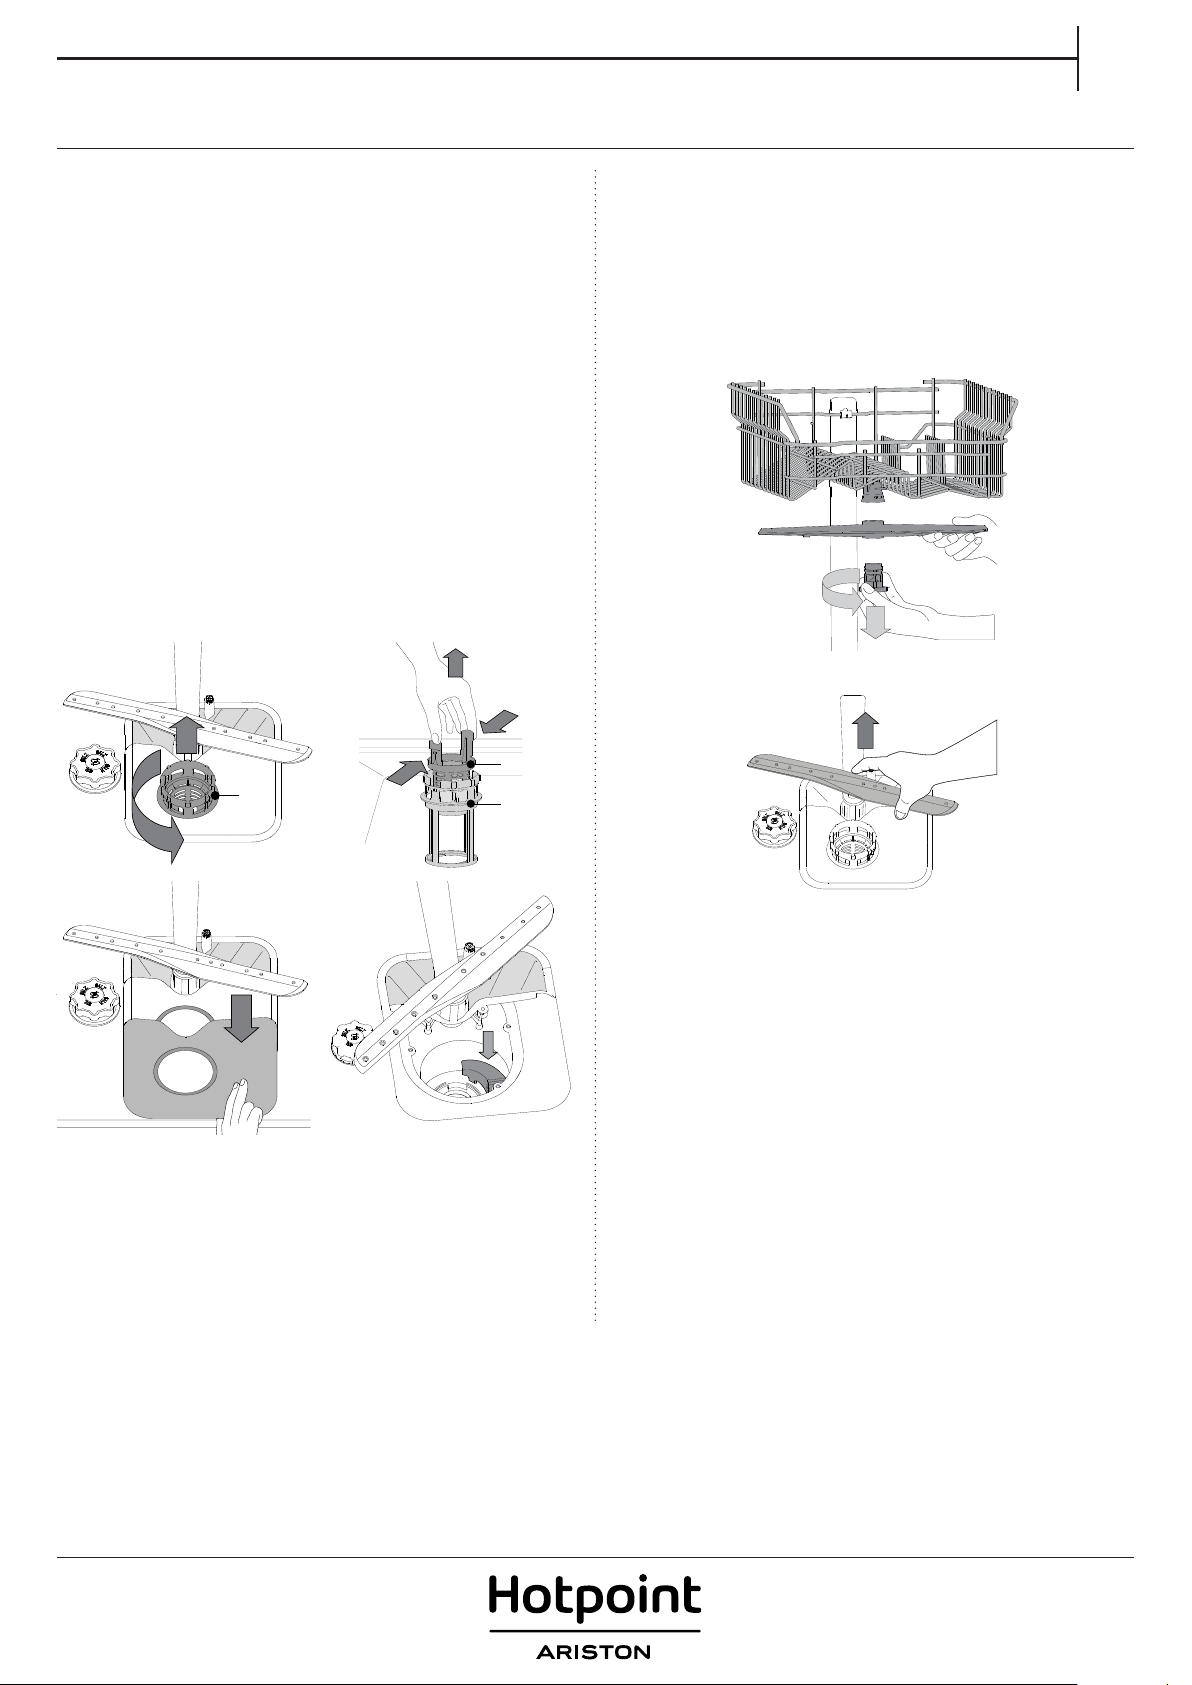
ЧИСТКА ФИЛЬТРУЮЩЕГО УЗЛА
Регулярно очищайте фильтрующий узел, чтобы предотвратить
засорение фильтров и затруднения при отводе воды.
Фильтрующий узел состоит из трех фильтров, которые удаляют
остатки пищи из воды перед ее повторной подачей в моечную
камеру. Для достижения качественных результатов мойки
поддерживайте их в чистоте.
Не используйте посудомоечную машину без фильтров или с
ослабленным креплением фильтров.
После нескольких циклов мойки проверьте фильтрующий узел и
при необходимости тщательно очистите его под проточной водой,
используя неметаллическую щетку. При этом действуйте согласно
следующим инструкциям:
1. Поверните против часовой стрелки цилиндрический фильтр A
и выньте его (Рис. 1).
2. Выньте стакан фильтра B, слегка нажав на боковые язычки (Рис. 2).
3. Выньте плоский фильтр из нержавеющей стали C (Рис. 3).
4. Осмотрите отстойник и удалите из него любые остатки пищи.
НИКОГДА НЕ УДАЛЯЙТЕ защиту рабочего насоса (деталь
черного цвета) (Рис. 4).
1 2
ЧИСТКА РАЗБРЫЗГИВАТЕЛЕЙ
Иногда остатки пищи могут попадать на лопасти-разбрызгиватели
и блокировать отверстия подачи воды. По этой причине
рекомендуется время от времени проверять и очищать лопасти
при помощи маленькой неметаллической щетки
Для снятия верхней лопасти поверните пластмассовое
удерживающее кольцо против часовой стрелки. Устанавливайте
верхнюю лопасть так, чтобы сторона с большим количеством
отверстий была обращена вверх.
Нижнюю лопасть можно снять, потянув ее вверх.
B
A
A
3 4
C
После чистки фильтров установите на место и надежно
закрепите фильтрующий узел: это важно для исправной работы
посудомоечной машины.
ЧИСТКА ЗАЛИВНОГО ШЛАНГА
Если шланги новые или не использовались в течение долгого
времени, промойте их водой от возможных загрязнений перед
подсоединением. Несоблюдение данной меры предосторожности
может привести к засору заливного патрубка и повреждению
посудомоечной машины.
7
ПОИСК И УСТРАНЕНИЕ НЕИСПРАВНОСТЕЙ
В посудомоечной машине могут возникать неполадки.
Прежде чем обращаться в Сервисный центр, попытайтесь устранить проблему самостоятельно, руководствуясь
следующей таблицей.
ПРОБЛЕМЫ ВОЗМОЖНЫЕ ПРИЧИНЫ СПОСОБЫ УСТРАНЕНИЯ
Посудомоечная
машина не
запускается или
не реагирует на
команды.
Посудомоечная
машина не
сливает воду.
Прибор не включен в сеть. Вставьте вилку прибора в розетку.
Перебой в подаче электроэнергии.
Дверца посудомоечной машины не закрыта. Энергично толкните дверцу до “щелчка”.
Прибор не реагирует на команды.
Процесс мойки еще не завершился. Дождитесь завершения процесса мойки.
Сливной шланг заломан.
Засор сливной трубы раковины. Очистите сливную трубу раковины.
Фильтр засорен остатками пищи. Очистите фильтр (см. ЧИСТКА ФИЛЬТРУЮЩЕГО УЗЛА).
Посудомоечная машина возобновит работу автоматически после
восстановления электроснабжения.
Выключите прибор нажатием кнопки ВКЛ./ВЫКЛ. Примерно через
минуту снова включите прибор и выполните повторную настройку
программы.
Проверьте сливной шланг на предмет залома (см. ИНСТРУКЦИЮ ПО
УСТАНОВКЕ).
Шумная работа
посудомоечной
машины.
Посуда остается
грязной.
Тарелки касаются друг друга и дребезжат. Разместите посуду правильным образом (см. ЗАГРУЗКА КОРЗИН).
Образуется слишком много пены.
Посуда расположена в корзинах
неправильно.
Посуда мешает свободному вращению
лопастей разбрызгивателей.
Процесс мойки недостаточно интенсивный. Выберите подходящий режим мойки (см. ТАБЛИЦА ПРОГРАММ).
Образуется слишком много пены.
Крышка ополаскивателя плохо закрыта. Закройте крышку на дозаторе ополаскивателя.
Фильтр засорен. Очистите фильтрующий узел (см. ЧИСТКА И УХОД).
Отсутствует регенерирующая соль. Заполните бачок для соли (см. ЗАГРУЗКА РЕГЕНЕРИРУЮЩЕЙ СОЛИ).
РУКОВОДСТВО ПО УХОДУ И УСТРАНЕНИЮ
НЕИСПРАВНОСТЕЙ
За дополнительной информацией и инструкциями по уходу
и устранению неисправностей обращайтесь к руководству
“Использование и уход”.
Руководство “Использование и уход” можно
• получить в Сервисном центре; телефонный номер указан в
гарантийном буклете.
• загрузить с сайта: docs.hotpoint.eu
• получить по QR-коду
Моющее средство отмерено в неправильном количестве или не
подходит для посудомоечных машин (см. ЗАГРУЗКА МОЮЩЕГО СРЕДСТВА).
Прервите процесс мойки нажатием кнопки СЛИВ (см. ОПЦИИ И ФУНКЦИИ)
и запустите новую программу, не добавляя моющего средства.
Разместите посуду правильным образом (см. ЗАГРУЗКА КОРЗИН).
Разместите посуду правильным образом (см. ЗАГРУЗКА КОРЗИН).
Моющее средство отмерено в неправильном количестве или не
подходит для посудомоечных машин (см. ЗАГРУЗКА МОЮЩЕГО СРЕДСТВА).
ТЕХНИЧЕСКИЙ ПАСПОРТ
Паспорт технических данных с указанием значений
энергоэффективности можно загрузить с сайта:
docs.hotpoint.eu
ОБРАЩЕНИЕ В СЕРВИС
При обращении в Сервис сообщите
коды, содержащиеся на паспортной
табличке, закрепленной слева или
справа на внутренней стороне дверцы
посудомоечной машины. Телефонный
номер можно найти в гарантийном
буклете или на сайте: www.hotpoint.eu
:
IEC 436
400011302520
08/2018 jk — Xerox Fabriano
8
Loading…
|
Код: 108017 Извините, товара сейчас нет в наличии
Бесплатная доставка Извините, товара сейчас нет в наличии Сравнить Услуги:Установка и подключение посудомоечной машины Новости интернет-магазина «Лаукар»:23.04.2025 26.02.2025 17.02.2025 Дополнительная информация в категории Посудомоечная машина:Посудомоечные машины — разбираемся в терминах Таблица Авторизованных сервисных центров по брендам. Описание Инструкция Отзывы (0) В интернет-магазине бытовой техники «Лаукар» Вы можете скачать инструкцию к товару Посудомоечная машина Hotpoint-Ariston HSFO 3T223 W совершенно бесплатно. Все инструкции, представленные на сайте интернет-магазина бытовой техники «Лаукар», предоставляются производителем товара. Для того чтобы скачать инструкцию, Вам необходимо нажать на ссылку «скачать инструкцию», расположенную ниже, а в случае, если ссылки нет, Скачать инструкцию Смотреть инструкцию 
Фирма-производитель оставляет за собой право на внесение изменений в конструкцию, дизайн и комплектацию товара: Посудомоечная машина Hotpoint-Ariston HSFO 3T223 W. Пожалуйста, сверяйте информацию о товаре с информацией на |
[pdf]
Info sheet Hotpoint Ariston HSFO 3T223 WC X Dishwasher Silver prof lv Viss Online Fiche 296539 LV eprel ec europa eu informationsheet |||
Razojuma informcijas lapa KOMISIJAS DELET REGULA ES 2019/2017 attiecb uz sadzves trauku mazgsanas masnu energomarjumu Piegdtja nosaukums vai precu zme: HOTPOINT/ARISTON Piegdtja adrese: EMEA Compliance Team, VIA CARLO PISACANE, 1 20016 PERO MI ITALY Modea identifikators: HSFO 3T223 WC X 2 …
lang:es score:40 filesize: 47.43 K page_count: 1 document date: 2024-01-23
[pdf]
Label
ENERGY LABEL MLS e team 7 0 eteam eu Hotpoint Freestanding Dishwasher HSFO 3T223 W X UK N EU Energy Label MB 869991616240 mmo 120576962 1715355999 3543 1994732 objects icecat biz |||
HOTPOINT HSFO 3T223 W X UK N 76 10 4:00 9,0 43 ABCD …
lang:es score:38 filesize: 36.52 K page_count: 1 document date: 0000-00-00
[pdf]
Decleration of Conformity Label
ENERGY LABEL MLS e team 7 0 eteam eu Freestanding Dishwasher Hotpoint HSFO 3T223 W UK N doc whirlpool cdn thron delivery public document do 84c5a6ca 26a4 4d63 b20f 60a10e5465d9 jsind9 WEB |||
HOTPOINT HSFO 3T223 W UK N 76 10 4:00 9,0 43 ABCD …
lang:es score:38 filesize: 36.34 K page_count: 1 document date: 0000-00-00
[pdf]
Datasheet Dimension Guide
PIS MLS e team 7 0 eteam eu Hotpoint Freestanding Dishwasher HSFO 3T223 W UK N EU data sheet MB 869991616230 mmo 120576942 1715355937 2782 3998356 objects icecat biz |||
Product information sheet — EU 2019/2017 Supplier s name or trade mark: HOTPOINT Supplier s address: VIA CARLO PISACANE, 1 20016 PERO MI ITALY Model identifier: HSFO 3T223 W UK N General product parameters: Parameter Value Parameter Value Height 85 Rated capacity ps 10 Dimensions in c…
lang:en score:38 filesize: 42.08 K page_count: 1 document date: 0000-00-00
[pdf]
Decleration of Conformity Label
ENERGY LABEL MLS e team 7 0 eteam eu Freestanding Dishwasher Hotpoint HSFO 3T223 W X UK N doc whirlpool cdn thron delivery public document do cdc36829 bc0c 4144 ab7f d766e107da39 jsind9 WEB |||
HOTPOINT HSFO 3T223 W X UK N 76 10 4:00 9,0 43 ABCD …
lang:en score:38 filesize: 36.52 K page_count: 1 document date: 0000-00-00
[pdf]
Datasheet Dimension Guide
PIS MLS e team 7 0 eteam eu Hotpoint Freestanding Dishwasher HSFO 3T223 W X UK N EU data sheet MB 869991616240 mmo 120576962 1715355999 7578 1994732 objects icecat biz |||
Product information sheet — EU 2019/2017 Supplier s name or trade mark: HOTPOINT Supplier s address: VIA CARLO PISACANE, 1 20016 PERO MI ITALY Model identifier: HSFO 3T223 W X UK N General product parameters: Parameter Value Parameter Value Height 85 Rated capacity ps 10 Dimensions in…
lang:en score:38 filesize: 42.28 K page_count: 1 document date: 0000-00-00
[pdf]
Dimension Guide Decleration of Conformity
PIS MLS e team 7 0 eteam eu Product detail Freestanding Dishwasher Hotpoint HSFO 3T223 W UK N doc whirlpool cdn thron delivery public document do 09330373 886f 498c ac22 e0cf2f26c4e1 jsind9 WEB |||
Product information sheet — EU 2019/2017 Supplier s name or trade mark: HOTPOINT Supplier s address: VIA CARLO PISACANE, 1 20016 PERO MI ITALY Model identifier: HSFO 3T223 W UK N General product parameters: Parameter Value Parameter Value Height 85 Rated capacity ps 10 Dimensions in c…
lang:en score:37 filesize: 41.35 K page_count: 1 document date: 0000-00-00
[pdf]
Dimension Guide Decleration of Conformity
PIS MLS e team 7 0 eteam eu Product detail Freestanding Dishwasher Hotpoint HSFO 3T223 W X UK N doc whirlpool cdn thron delivery public document do 4e0db7a6 11c9 4744 8237 07135917d5ee jsind9 WEB |||
Product information sheet — EU 2019/2017 Supplier s name or trade mark: HOTPOINT Supplier s address: VIA CARLO PISACANE, 1 20016 PERO MI ITALY Model identifier: HSFO 3T223 W X UK N General product parameters: Parameter Value Parameter Value Height 85 Rated capacity ps 10 Dimensions in…
lang:en score:37 filesize: 41.56 K page_count: 1 document date: 0000-00-00
[pdf]
hotpoint ariston hsfo 3t223 wc x trovaprezzi it manuali |||
Questo manuale d istruzione fornito da trovaprezzi.it. Scopri tutte le offerte per Hotpoint Ariston HSFO 3T223 WC X o cerca il tuo prodotto tra le migliori offerte di Lavastoviglie GUIDA RAPIDA IT ISTRUZIONI D USO GRAZIE PER AVER ACQUISTATO UN PRODOTTO HOTPOINT ARISTON. Per ricevere assistenza …
lang:it score:36 filesize: 7.25 M page_count: 8 document date: 2019-01-03
[pdf]
Datasheet Borchure
Dishwasher Data Sheet 1 5 Hotpoint Freestanding HSFO 3T223 W UK N Product Brochure Datasheet 0 6 MB 869991616230 mmo 120576942 1715355936 3698 3998356 objects icecat biz |||
HSFO 3T223 W UK N 12NC: 869991616230 GTIN EAN code: 5054645616237 MAIN FEATURES Construction type Installation type Type of control Type of control settings Removable work top Main colour of product Electrical connection rating W Current A Voltage V Frequency Hz Length of Electrical Supply…
lang:en score:32 filesize: 573.79 K page_count: 1 document date: 0000-00-00
[pdf]
Decleration of Conformity
HSFO 3T223 W UK N Extended technical drawing Freestanding Dishwasher Hotpoint doc whirlpool cdn thron delivery public document do 1f3e447f 99aa 4fff bafa f367d97338af jsind9 WEB |||
0-0 850-850 450 0 0-0 120 48 572.5 HSFO 3T223 W UK N 12NC/Fx: F161623 DIMENSION OVERALL CABINET 01. Height MIN of the base cabinet Niche, including all required space for installation or ventilation HMIN_B 02. Height MAX of the base cabinet Niche, including all required space for installation…
lang:en score:32 filesize: 97.35 K page_count: 2 document date: 0000-00-00
[pdf]
Datasheet Decleration of Conformity
Dishwasher Data Sheet 1 5 sheet Freestanding Hotpoint HSFO 3T223 W UK N doc whirlpool cdn thron delivery public document do 59b682a8 216c 4691 9285 fe76230705fe jsind9 WEB |||
HSFO 3T223 W UK N 12NC: 869991616230 GTIN EAN code: 5054645616237 MAIN FEATURES Construction type Installation type Type of control Type of control settings Removable work top Main colour of product Electrical connection rating W Current A Voltage V Frequency Hz Length of Electrical Supply…
lang:en score:32 filesize: 706.96 K page_count: 1 document date: 0000-00-00
[pdf]
Datasheet Borchure
Dishwasher Data Sheet 1 5 Hotpoint Freestanding HSFO 3T223 W X UK N Product Brochure Datasheet 0 6 MB 869991616240 mmo 120576962 1715355998 9662 1994732 objects icecat biz |||
HSFO 3T223 W X UK N 12NC: 869991616240 GTIN EAN code: 5054645616244 MAIN FEATURES Construction type Installation type Type of control Type of control settings Removable work top Main colour of product Electrical connection rating W Current A Voltage V Frequency Hz Length of Electrical Supp…
lang:en score:32 filesize: 656.78 K page_count: 1 document date: 0000-00-00
[pdf]
Decleration of Conformity
HSFO 3T223 W X UK N Extended technical drawing Freestanding Dishwasher Hotpoint doc whirlpool cdn thron delivery public document do 952a27f2 28e5 4330 9c25 58c373b3ba60 jsind9 WEB |||
0-0 850-850 450 0 0-0 120 48 572.5 HSFO 3T223 W X UK N 12NC/Fx: F161624 DIMENSION OVERALL CABINET 01. Height MIN of the base cabinet Niche, including all required space for installation or ventilation HMIN_B 02. Height MAX of the base cabinet Niche, including all required space for installati…
lang:en score:32 filesize: 97.44 K page_count: 2 document date: 0000-00-00
[pdf]
Hotpoint Dishwasher Promotion 6 Months Free Fairy *Available on selected dishwashers purchased between 17 October 2021 31 December Claims must be received by 30 January 2022 UPDATED T Cs 2 currys ssl cdn dixons css themes
Hotpoint Dishwasher Promotion — 6 Months Free Fairy Platinum Plus on Selected Hotpoint Dishwasher Ap … In Freestanding Freestanding Built In Built In Freestanding Built In Freestanding HIC 3C26 W UK N HSFO 3T223 W UK N HSFO 3T223 W X UK N HSIO 3T223 WCE UK N HSICIH 4798 BI UK HSFCIH 4798 FS UK HSIC 3…
lang:en score:29 filesize: 79.7 K page_count: 3 document date: 2021-10-19
[pdf]
Microsoft Word Hotpoint Dishwasher Promotion 100 Day Money Back Guarantee T C s docx on Selected Appliances* *Available selected dishwasher 39 dishwashers purchased between 20 02 19 27 09 hot100tandcs19 cdn2 hughes co uk images |||
Hotpoint Dishwasher Promotion — 100 Day Money Back Guarantee on Selected Appliances* *Available on s … LL SIZE FREE STANDING FULL SIZE FREE STANDING FULL SIZE HSFE 1B19 UK HSFE 1B19 S UK HSFE 1B19 B UK HSFO 3T223 W UK HSFO 3T223 W X UK HFC 2B19 UK FDFEX 11011 K HFC 2B19 SV UK HFC 2B 26 C UK HFC 3C26 W…
lang:en score:29 filesize: 47.48 K page_count: 4 document date: 2019-02-05
[pdf]
Label
ENERGY LABEL MLS e team 7 0 eteam eu Mașini spălat vase Hotpoint RO Noua etichet energetic whirlpool cdn thron delivery public document do b8a9458f 2e67 479e 9bbc ffe8b217f317 jsind9 WEB |||
HOTPOINT/ARISTON HSFO 3T223 WC X 2 76 10 4:00 9,0 43 ABCD …
lang:en score:27 filesize: 37.28 K page_count: 1 document date: 0000-00-00
[pdf]
st0 fill 8DB8CD Karta informacyjna produktu Zmywarka HOTPOINT HSFO3T223WCX już za 1 499 00 zł wysyłka w 24h strona sferis pl file C2A7I3L100l0E1n7u1m1Z466E7I4h3C5 |||
Karta informacyjna produktu ROZPORZDZENIE DELEGOWANE KOMISJI UE 2019/2017 w odniesieniu do etykie … dostawcy: EMEA Compliance Team, VIA CARLO PISACANE, 1 20016 PERO MI ITALY Identyfikator modelu: HSFO 3T223 WC X 2 Oglne parametry produktu: Parametr Warto Parametr Warto Pojemno znamionowa…
lang:pl score:27 filesize: 47.99 K page_count: 1 document date: 2021-10-18
[pdf]
PIS MLS e team 7 0 eteam eu Karta informacyjna produktu Zmywarka HOTPOINT ARISTON HSFO3T223WCX sklep internetowy Avans pl 14442220 1 avans products files 16 1613201 |||
Karta informacyjna produktu — UE 2019/2017 Nazwa dostawcy lub znak towarowy: HOTPOINT/ARISTON Adres dostawcy: VIA CARLO PISACANE, 1 20016 PERO MI ITALY Identyfikator modelu: HSFO 3T223 WC X 2 Oglne parametry produktu: Parametr Warto Parametr Warto Wysoko 85 Pojemno znamionowa ps 10 …
lang:pl score:27 filesize: 42.01 K page_count: 1 document date: 0000-00-00
[pdf]
Dimension Guide
PIS MLS e team 7 0 eteam eu Product information sheet EU 2019 2017 Supplier s name or trade mark HOTPOINT address VIA CARLO PISACANE 1 770958 energy fiche 37224 currysprod a bigcontent io v1 static |||
Product information sheet — EU 2019/2017 Supplier s name or trade mark: HOTPOINT Supplier s address: VIA CARLO PISACANE, 1 20016 PERO MI ITALY Model identifier: HSFO 3T223 W UK N General product parameters: Parameter Value Parameter Value Height 85 Rated capacity ps 10 Dimensions in c…
lang:en score:27 filesize: 41.2 K page_count: 1 document date: 0000-00-00
[pdf]
Dimension Guide Label
Product Information Sheet Icecat 2 giorni fa — Supplier s name or trade mark HOTPOINT ARISTON address EMEA Compliance Team VIA CARLO PISACANE 1 20016 PERO MI ITALY mmo 87016532 1673373184 2287 1134 objects icecat biz |||
Product Information Sheet COMMISSION DELEGATED REGULATION EU 2019/2017 with regard to energy labelling of household dishwashers Supplier s name or trade mark: HOTPOINT/ARISTON Supplier s address: EMEA Compliance Team, VIA CARLO PISACANE, 1 20016 PERO MI ITALY Model identifier: HSFO 3T223 WC X…
lang:en score:26 filesize: 45.11 K page_count: 1 document date: 2022-06-28
[pdf]
PIS MLS e team 7 0 eteam eu Gaminio informacijos lapas ES 2019 2017 Tiekėjo pavadinimas arba prekės ženklas HOTPOINT ARISTON adresas VIA C PISF161564lt whirlpool cdn thron delivery public document do cb3c809b 195a 47ec adcf e0b870ddec3a sckne7 WEB |||
Gaminio informacijos lapas — ES 2019/2017 Tiekjo pavadinimas arba preks zenklas: HOTPOINT/ARISTON Tiekjo adresas: VIA CARLO PISACANE, 1 20016 PERO MI ITALY Modelio zymuo: HSFO 3T223 WC X 2 Bendrieji gaminio parametrai: Parametras Vert Parametras Vert Aukstis 85 Vardinis pajgumas ps 1…
lang:it score:26 filesize: 42.9 K page_count: 1 document date: 0000-00-00
[pdf]
Dimension Guide
PIS MLS e team 7 0 eteam eu EU 2019 2017 Supplier s name or trade mark HOTPOINT il y a 23 heures — Energy consumption in kWh per cycle based on the eco pro gramme using cold water fill Ac tual energy will de pend how appliance is mmo 120576962 1730994059 5115 1730787 objects icecat biz |||
Product information sheet — EU 2019/2017 Supplier s name or trade mark: HOTPOINT Supplier s address: BEKO EUROPE MANAGEMENT S.R.L., VIA VARESINA, 204 20156 MILANO ITALY Model identifier: HSFO 3T223 W X UK N General product parameters: Parameter Value Parameter Value Height 85 Rated capacity…
lang:en score:26 filesize: 42.56 K page_count: 1 document date: 0000-00-00
[pdf]
T Cs VIEW CS 100 Day Dishwasher Satisfaction Guarantee 100days tandcs whirlpoolmedia co uk |||
100 Day Money Back Guarantee Promotion — Terms and Conditions 1. The promotion is open to all reside … SHING HSFE 1B19 S UK N DISHWASHING HSFE 1B19 B UK N DISHWASHING HSFCIH 4798 FS UK DISHWASHING HSFO 3T223 W UK N DISHWASHING HSFO 3T223 W X UK N DISHWASHING FREE-STANDING DISHWASHING FREE-STAND…
lang:en score:25 filesize: 59.36 K page_count: 4 document date: 0000-00-00
[pdf]
Label
ENERGY LABEL MLS e team 7 0 eteam eu whirlpool cdn thron static Q4IX0G ELF155287 9KREBM xseo response content disposition inline filename |||
HOTPOINT/ARISTON HSFO 3T223 W 212 2520 ABCDEFG X10 43 2010/1059 …
lang:en score:24 filesize: 132.38 K page_count: 1 document date: 0000-00-00
[pdf]
Label
ENERGY LABEL MLS e team 7 0 eteam eu Energiam rgis whirlpool cdn thron static 1LXGRB ELF161564 DUODSD xseo response content disposition inline filename |||
HOTPOINT/ARISTON HSFO 3T223 WC X 212 2520 ABCDEFG X10 43 2010/1059 …
lang:en score:24 filesize: 132.59 K page_count: 1 document date: 0000-00-00
[pdf]
Label
ENERGY LABEL MLS e team 7 0 eteam eu sp0084901 label 24762 brain images ssl cdn dixons file 26 74 20 00 |||
HOTPOINT HSFO 3T223 W X UK A A A A A A A 212 2520 ABCDEFG X10 43 2010/1059 …
lang:en score:24 filesize: 141.47 K page_count: 1 document date: 0000-00-00
[pdf]
Decleration of Conformity Label
ENERGY LABEL MLS e team 7 0 eteam eu doc whirlpool cdn thron static ADOWZK NELF161623en Y4HELH xseo response content disposition inline filename |||
HOTPOINT HSFO 3T223 W UK N 76 10 4:00 9,0 43 ABCD …
lang:en score:24 filesize: 36.34 K page_count: 1 document date: 0000-00-00
[pdf]
Label
ENERGY LABEL MLS e team 7 0 eteam eu whirlpool cdn thron static MTFN9X ELF155361 ZJNOO3 xseo response content disposition inline filename |||
HOTPOINT/ARISTON HSFO 3T223 WC X 212 2520 ABCDEFG X10 43 2010/1059 …
lang:en score:24 filesize: 132.59 K page_count: 1 document date: 0000-00-00
[pdf]
Label
ENERGY LABEL MLS e team 7 0 eteam eu 770958 energy labels 37225 IE currysprod a bigcontent io v1 static |||
HOTPOINT HSFO 3T223 W UK N 76 10 4:00 9,0 43 ABCD …
lang:en score:24 filesize: 36.66 K page_count: 1 document date: 0000-00-00
[pdf]
Label
ENERGY LABEL MLS e team 7 0 eteam eu Uus energiam rgis whirlpool cdn thron delivery public document do b8a9458f 2e67 479e 9bbc ffe8b217f317 jsind9 WEB |||
HOTPOINT/ARISTON HSFO 3T223 WC X 2 76 10 4:00 9,0 43 ABCD …
lang:en score:24 filesize: 37.28 K page_count: 1 document date: 0000-00-00
[pdf]
Label
ENERGY LABEL MLS e team 7 0 eteam eu sp0106885 label 45018 IE currysprod a bigcontent io v1 static |||
HOTPOINT HSFO 3T223 W X UK N 76 10 4:00 9,0 43 ABCD …
lang:en score:24 filesize: 36.85 K page_count: 1 document date: 0000-00-00
[pdf]
Tooteinfo whirlpool cdn thron static WSMFKC PFF161564et G3MMWC xseo response content disposition inline filename |||
TOOTEKIRJELDUS NUDEPESUMASIN KAUBAMRK MUDELINIMI Nudekomplektide arv Energiathususe klass HOTPOINT/ ARISTON HSFO 3T223 WC X 10 A Energiakulu 212 kWh aastas, vastavalt 280 standardsele pesutsklile, kasutades titmiseks klma vett ja vhese vimsusega seadeid. Tegelik energiakulu sltub seadme kasut…
lang:et score:24 filesize: 53.32 K page_count: 1 document date: 0000-00-00
[pdf]
Decleration of Conformity Label
PFF155399en docs whirlpool eu 80 doc
DISHWASHER PRODUCT FICHE BRAND NAME HOTPOINT COMMERCIAL CODE HSFO 3T223 W X UK NUMBER OF PLACE SETTINGS 10 ENERGY EFFICIENCY CLASS A Energy consumption 212 kWh per year, based on 280 standard cleaning cycles using cold water fill and the consumption of the low power modes. Actual energy c…
lang:en score:24 filesize: 48.54 K page_count: 1 document date: 0000-00-00
[pdf]
Datasheet Label
hsfo3t223wxukn sse media ao com s3 amazonaws en GB energyrating productdatasheet |||
DISHWASHER PRODUCT FICHE BRAND NAME HOTPOINT COMMERCIAL CODE HSFO 3T223 W X UK N NUMBER OF PLACE SETTINGS 10 ENERGY EFFICIENCY CLASS A Energy consumption 212 kWh per year, based on 280 standard cleaning cycles using cold water fill and the consumption of the low power modes. Actual energy…
lang:en score:24 filesize: 48.54 K page_count: 1 document date: 0000-00-00
[pdf]
Datasheet Label
hsfo3t223wuk wh media ao com s3 amazonaws en GB energyrating productdatasheet |||
DISHWASHER PRODUCT FICHE BRAND NAME HOTPOINT COMMERCIAL CODE HSFO 3T223 W UK NUMBER OF PLACE SETTINGS 10 ENERGY EFFICIENCY CLASS A Energy consumption 212 kWh per year, based on 280 standard cleaning cycles using cold water fill and the consumption of the low power modes. Actual energy con…
lang:en score:24 filesize: 51.73 K page_count: 1 document date: 0000-00-00
[pdf]
Datasheet Label
hsfo3t223wxuk ss media ao com s3 amazonaws en GB energyrating productdatasheet |||
DISHWASHER PRODUCT FICHE BRAND NAME HOTPOINT COMMERCIAL CODE HSFO 3T223 W X UK NUMBER OF PLACE SETTINGS 10 ENERGY EFFICIENCY CLASS A Energy consumption 212 kWh per year, based on 280 standard cleaning cycles using cold water fill and the consumption of the low power modes. Actual energy c…
lang:en score:24 filesize: 51.89 K page_count: 1 document date: 0000-00-00
[pdf]
PIS MLS e team 7 0 eteam eu Toote teabeleht EL 2019 2017 Tarnija nimi või kaubamärk 6 days ago — Energiatarbimine kWh tsükli koh ta programmiga „eco kui kasu tatakse külma vett Seadme tege lik energiatarbimine oleneb selle kasutusviisist infoleht whirlpool cdn thron delivery public document do 7ff06f3a 3035 4000 9d9a 3f168159d2ef jsind9 WEB |||
Toote teabeleht — EL 2019/2017 Tarnija nimi vi kaubamrk: HOTPOINT/ARISTON Tarnija aadress: VIA CARLO PISACANE, 1 20016 PERO MI ITALY Mudelithis: HSFO 3T223 WC X 2 Toote ldnitajad: Nitaja Vrtus Nitaja Vrtus Krgus 85 Nimimahutavus ps 10 Mtmed cm Laius 45 Sgavus 59 EEI 55,9 En…
lang:et score:24 filesize: 39.87 K page_count: 1 document date: 0000-00-00
[pdf]
Datasheet Dimension Guide
PIS MLS e team 7 0 eteam eu hsfo3t223wxukn sse newproductfiche media ao com s3 amazonaws en GB energyrating productdatasheet |||
Product information sheet — EU 2019/2017 Supplier s name or trade mark: HOTPOINT Supplier s address: VIA CARLO PISACANE, 1 20016 PERO MI ITALY Model identifier: HSFO 3T223 W X UK N General product parameters: Parameter Value Parameter Value Height 85 Rated capacity ps 10 Dimensions in…
lang:en score:23 filesize: 41.4 K page_count: 1 document date: 0000-00-00
[pdf]
Datasheet Dimension Guide
PIS MLS e team 7 0 eteam eu hsfo3t223wukn wh media ao com s3 amazonaws en GB energyrating productdatasheet |||
Product information sheet — EU 2019/2017 Supplier s name or trade mark: HOTPOINT Supplier s address: VIA CARLO PISACANE, 1 20016 PERO MI ITALY Model identifier: HSFO 3T223 W UK N General product parameters: Parameter Value Parameter Value Height 85 Rated capacity ps 10 Dimensions in c…
lang:en score:23 filesize: 41.22 K page_count: 1 document date: 0000-00-00
[pdf]
Label
Dishwasher 2018 Sharon Welch 256144 as 1 0 06112018 154531 20181107 24741 brain images ssl cdn dixons file 14 74 20 00 |||
Product fiche pursuant to Delegated Regulation EU no. 1059/2010 Dishwasher Supplier s Name or Trade Mark Answer Hotpoint Model HSFO 3T223 W X UK Capacity 10 place settings Energy efficiency class A EU Ecolabel If applicable Annual Energy Consumption — Energy consumption xx kWh per y…
lang:en score:23 filesize: 111.09 K page_count: 1 document date: 2019-11-14
[pdf]
PIS MLS e team 7 0 eteam eu Preces datu lapa Trauku mazgājamās mašīnas kvarcs lv 617bef516620f315454780 storage app public 617 bef 516 |||
Razojuma informcijas lapa — ES 2019/2017 Piegdtja nosaukums vai precu zme: HOTPOINT/ARISTON Piegdtja adrese: VIA CARLO PISACANE, 1 20016 PERO MI ITALY Modea identifikators: HSFO 3T223 WC X 2 Visprjie razojuma parametri: Parametrs Vrtba Parametrs Vrtba Augstums 85 Nominl ietilpba ps 1…
lang:es score:23 filesize: 42.41 K page_count: 1 document date: 0000-00-00
[pdf]
Dimension Guide
PIS MLS e team 7 0 eteam eu PISF161564en sg repo production photos s3 central 1 amazonaws aikido cache 90a8850aa9f35a5f1aa54c616814ebc1 |||
Product information sheet — EU 2019/2017 Supplier s name or trade mark: HOTPOINT/ARISTON Supplier s address: VIA CARLO PISACANE, 1 20016 PERO MI ITALY Model identifier: HSFO 3T223 WC X 2 General product parameters: Parameter Value Parameter Value Height 85 Rated capacity ps 10 Dimen…
lang:en score:23 filesize: 41.31 K page_count: 1 document date: 0000-00-00
[pdf]
PIS MLS e team 7 0 eteam eu HYOSA1 PISF161564et 4NN75J whirlpool cdn thron static |||
Toote teabeleht — EL 2019/2017 Tarnija nimi vi kaubamrk: HOTPOINT/ARISTON Tarnija aadress: VIA CARLO PISACANE, 1 20016 PERO MI ITALY Mudelithis: HSFO 3T223 WC X 2 Toote ldnitajad: Nitaja Vrtus Nitaja Vrtus Krgus 85 Nimimahutavus ps 10 Mtmed cm Laius 45 Sgavus 59 EEI 55,9 En…
lang:et score:23 filesize: 40.58 K page_count: 1 document date: 0000-00-00
[pdf]
Dimension Guide Label
5dd7fd83 45e6 4ba0 868f e027f88a3aa0 cdn cnetcontent 5d d7 |||
Product Information Sheet COMMISSION DELEGATED REGULATION EU 2019/2017 with regard to energy labelling of household dishwashers Supplier s name or trade mark: HOTPOINT Supplier s address: EMEA Compliance Team, VIA CARLO PISACANE, 1 20016 PERO MI ITALY Model identifier: HSFO 3T223 W X UK N Ge…
lang:en score:23 filesize: 45.36 K page_count: 1 document date: 2021-11-12
[pdf]
PIS MLS e team 7 0 eteam eu UE 2019 2017 Nazwa dostawcy lub znak towarowy THRON Sep 8 2022 — Zużycie energii w kWh na cykl podstawie programu eco z wykorzystaniem zimnej wody Rzeczywiste zużycie zależy od sposobu użytkowania Karta produktu whirlpool cdn thron delivery public document do 4462e946 f4a9 405f b70d 446f20b9e2cb l9poht WEB |||
Karta informacyjna produktu — UE 2019/2017 Nazwa dostawcy lub znak towarowy: HOTPOINT/ARISTON Adres dostawcy: VIA CARLO PISACANE, 1 20016 PERO MI ITALY Identyfikator modelu: HSFO 3T223 WC X 2 Oglne parametry produktu: Parametr Warto Parametr Warto Wysoko 85 Pojemno znamionowa ps 10 …
lang:pl score:23 filesize: 42.01 K page_count: 1 document date: 0000-00-00
[pdf]
PIS MLS e team 7 0 eteam eu PISF161564lt whirlpool cdn thron static TIUUZ0 E1PAH1 xseo response content disposition inline filename |||
Gaminio informacijos lapas — ES 2019/2017 Tiekjo pavadinimas arba preks zenklas: HOTPOINT/ARISTON Tiekjo adresas: VIA CARLO PISACANE, 1 20016 PERO MI ITALY Modelio zymuo: HSFO 3T223 WC X 2 Bendrieji gaminio parametrai: Parametras Vert Parametras Vert Aukstis 85 Vardinis pajgumas ps 1…
lang:it score:23 filesize: 44.33 K page_count: 2 document date: 0000-00-00
[pdf]
PIS MLS e team 7 0 eteam eu MOXFOX PISF161564pl LWIYPB whirlpool cdn thron static |||
Karta informacyjna produktu — UE 2019/2017 Nazwa dostawcy lub znak towarowy: HOTPOINT/ARISTON Adres dostawcy: VIA CARLO PISACANE, 1 20016 PERO MI ITALY Identyfikator modelu: HSFO 3T223 WC X 2 Oglne parametry produktu: Parametr Warto Parametr Warto Wysoko 85 Pojemno znamionowa ps 10 …
lang:pl score:23 filesize: 43.25 K page_count: 2 document date: 0000-00-00
[pdf]
Fiche 296539 LV sg repo production photos s3 eu central 1 amazonaws aikido cache 5a458a7c8141ec12056d1e25a7b081d6 |||
Razojuma informcijas lapa KOMISIJAS DELET REGULA ES 2019/2017 attiecb uz sadzves trauku mazgsanas masnu energomarjumu Piegdtja nosaukums vai precu zme: HOTPOINT/ARISTON Piegdtja adrese: EMEA Compliance Team, VIA CARLO PISACANE, 1 20016 PERO MI ITALY Modea identifikators: HSFO 3T223 WC X 2 …
lang:es score:23 filesize: 47.43 K page_count: 1 document date: 2024-04-26
[pdf]
PIS MLS e team 7 0 eteam eu THRSUF PISF161564ro EJ1WBQ whirlpool cdn thron static |||
Fia cu informaii despre produs — UE 2019/2017 Numele furnizorului sau marca comercial: HOTPOINT/ARISTON Adresa furnizorului: VIA CARLO PISACANE, 1 20016 PERO MI ITALY Identificatorul de model: HSFO 3T223 WC X 2 Parametri generali ai produsului: Parametru Valoare Parametru Valoare nlime 8…
lang:it score:23 filesize: 42.14 K page_count: 1 document date: 0000-00-00
Перейти к контенту
Русские электронные инструкции по эксплуатации
Постоянно обновляемый большой каталог документации по эксплуатации и использованию современных устройств и оборудования на русском языке. Бесплатное скачивание файлов.
Поиск:
Главная
♥ В закладки
Просмотр инструкции в pdf
Инструкция по эксплуатации посудомоечной машины Hotpoint-Ariston HSFO 3T223 W.
Скачать инструкцию к посудомоечной машине Hotpoint-Ariston HSFO 3T223 W (12,51 МБ)
Инструкции по эксплуатации посудомоечных машин Hotpoint-Ariston
« Инструкция к стиральной машине Samsung WW80R62LVFX
» Инструкция к посудомоечной машине Hotpoint-Ariston HSFO 3T223 WC X
Вам также может быть интересно

Инструкция к холодильнику Hotpoint-Ariston HFP 7200 XO
Инструкция к стиральной машине Hotpoint-Ariston AQSL 85

Инструкция к посудомоечной машине Hotpoint-Ariston ADLK 70

Инструкция к стиральной машине Hotpoint-Ariston VMSG 501 W

Инструкция к холодильнику Hotpoint-Ariston HF 9201 B RO

Инструкция к стиральной машине Hotpoint-Ariston WMTG 722 H C CIS

Инструкция к стиральной машине Hotpoint-Ariston VML 7023 B

Инструкция к посудомоечной машине Hotpoint-Ariston HFC 3B+26
Добавить комментарий
Имя *
Email *
Сайт
Комментарий
Сохранить моё имя, email и адрес сайта в этом браузере для последующих моих комментариев.
- Добавить инструкцию
- Заказать инструкцию
- Политика конфиденциальности
Displayed below is the user manual for HSFO 3T223 W UK by Hotpoint which is a product in the Dishwashers category.
This manual has pages.
EN
1
Before using the appliance carefully read Health and Safety guide.
APPLIANCE
PRODUCT DESCRIPTION
THANK YOU FOR BUYING A HOTPOINT PRODUCT.
In order to receive a more complete assistance, please
register your appliance on: www.hotpoint.eu/register
You can download the Safety Instructions and the
Use and Care Guide, by visiting our website
docs.hotpoint.eu and following the Instructions on
the back of this booklet.
1. Upper rack
2. Foldable aps
3. Upper rack height adjuster
4. Upper spray arm
5. Lower rack
6. Space Zone
7. Cutlery basket
8. Lower spray arm
9. Filter Assembly
10. Salt reservoir
11. Detergent and Rinse Aid dispensers
12. Rating plate
13. Control panel
1. On-O/Reset button with indicator light
2. Program selection button with indicator light
3. Zone Wash 3D button with indicator light
4. Short Time button with indicator light / Key lock
5. Eco program indicator light
6. Key lock indicator light
7. Display
8. Program number and remaining time indicator
DAILY REFERENCE
GUIDE
CONTROL PANEL
9. Tablet (Tab) indicator light
10. Closed water tap indicator light
11. Rinse Aid rell indicator light
12. Salt rell indicator light
13. Extra Dry button with indicator light
14. Tablet (Tab) button with indicator light
15. Delay button with indicator light
16. Start/Pause button with indicator light / Drain out
1
2
3
4
57
8
10
9
13
0000 000 00000
Service:
1112
6
4
1
3
2
9 16
14 15
65 7 8 11 12 1310
3 ’’
2
FIRST TIME USE
SALT, RINSE AID AND DETERGENT
ADVICE REGARDING THE FIRST TIME USE
After installation, remove the stoppers from the racks and the reta-
ining elastic elements from the upper rack.
FILLING THE SALT RESERVOIR
The use of salt prevents the formation of LIMESCALE on the dishes and
on the machine’s functional components.
• It is important that the salt reservoir be never empty.
• It is important to set the water hardness.
The salt reservoir is located in the lower part of the dishwasher
(see PRODUCT DESCRIPTION) and should be lled when the SALT REFILL
indicator light in the control panel is lit .
1. Remove the lower rack and unscrew the
reservoir cap (anticlockwise).
2. Only the rst time you do this: ll the salt re-
servoir with water.
3. Position the funnel (see gure) and ll the salt
reservoir right up to its edge (approximately
1 kg); it is not unusual for a little water to leak
out.
4. Remove the funnel and wipe any salt residue
away from the opening.
Make sure the cap is screwed on tightly, so that no detergent can get
into the container during the wash program (this could damage the
water softener beyond repair).
Whenever you need to add salt, it is mandatory to complete the
procedure before the beginning of the washing cycle.
SETTING THE WATER HARDNESS
To allow the water softener to work in a perfect way, it is essential that
the water hardness setting is based on the actual water hardness in
your house. This information can be obtained from your local water
supplier.
The factory setting is for average (3) water hardness.
• Switch on the appliance by pressing the ON/OFF button.
• Switch o the appliance by pressing the ON/OFF button.
• Hold down button START/Pause for 5 seconds, until you hear a beep.
• Switch on the appliance by pressing the ON/OFF button.
• The current selection level number and the salt indicator light both ash.
• Press button P to select the desired hardness level (see WATER HARD—
NESS TABLE).
• Switch o the appliance by pressing the ON/OFF button.
Setting is complete!
As soon as this procedure is complete, run a program without loading.
Only use salt that has been specically designed for dishwashers.
After the salt has been poured into the machine, the SALT REFILL indi-
cator light switches o.
If the salt container is not lled, the water softener and the
heating element may be damaged as a result.
Water Hardness Table
Level °dH
German degrees
°fH
French degrees
1 Soft 0 — 6 0 — 10
2 Medium 7 — 11 11 — 20
3 Average 12 — 17 21 — 30
4 Hard 17 — 34 31 — 60
5 Very hard 35 — 50 61 — 90
FILLING THE RINSE AID DISPENSER
Rinse aid makes dish DRYING easier. The rinse aid dispenser A should
be lled when the RINSE AID REFILL indicator light in the control
panel is lit.
1. Open the dispenser B by pressing and pulling up the tab on the lid.
2. Pour in the rinse aid (max.110 ml), making sure it does not overow
from the dispenser. If this happens, clean the spill immediately with
a dry cloth.
3. Press the lid down until you hear a click to close it.
NEVER pour the rinse aid directly into the appliance tub.
ADJUSTING THE DOSAGE OF RINSE AID
If you are not completely satised with the drying results, you can ad—
just the quantity of rinse aid used.
• Switch the dishwasher on using the ON/OFF button.
• Switch it o using the ON/OFF button.
• Press button START/Pause three times — a beep will be heard.
• Switch it on using the ON/OFF button.
• The current selection level number and rinse aid indicator light ash.
• Press button P to select the level of rinse aid quantity to be supplied.
• Switch it o using the ON/OFF button
Setting is complete!
If the rinse aid level is set to 1 (ECO), no rinse aid will be supplied. The
LOW RINSE AID indicator light will not be lit if you run out of rinse aid.
A maximum of 4 levels can be set according to the dishwasher model.
The factory setting is specic to the model, please follow instruction
above to check this for your machine.
• If you see bluish streaks on the dishes, set a low number (2-3).
• If there are drops of water or limescale marks on the dishes, set a
mid-range number (4-5).
FILLING THE DETERGENT DISPENSER
To open the detergent dispenser use the opening device A.
Introduce the detergent into the dry dispenser B only. Place the
amount of detergent for pre-washing directly inside the tub.
1. When measuring out the detergent
refer to the mentioned earlier infor—
mation to add the proper quantity.
Inside the dispenser B there are
indications to help the detergent
dosing.
2. Remove detergent residues from
the edges of the dispenser and clo-
se the cover until it clicks.
3. Close the lid of the detergent
dispenser by pulling it up until the
closing device is secured in place.
The detergent dispenser automatically opens up at the right time
according to the program.
If all-in-one detergents are used, we recommend using the TABLET
button, because it adjusts the program so that the best washing and
drying results are always achieved.
A
EN
3
ECO program data is measured under laboratory conditions according to European Standard EN 50242.
Note for Test Laboratories:
For information on comparative EN testing conditions, please send an email to the following address: assistenza_en_lvs@indesitcompany.com
Pre-treatment of the dishes is not needed before any of the programs.
*) Not all options can be used simultaneously.
**) The duration of the program shown on the display or in the booklet is an estimate calculated on standard conditions. The actual time may vary
depending on many factors such as temperature and pressure of the incoming water, room temperature, amount of detergent, quantity and type of load,
load balancing, additional selected options and sensor calibration. The sensor calibration can increase program duration up to 20 min.
Standby consumption: Left-on mode consumption: 5 W — O mode consumption: 0.5 W
Program
Drying
phase
Available
options *)
Detergent
container Duration
of wash
program
(h:min)**)
Water
consumption
(litres/cycle)
Energy
consumption
(kWh/cycle)
Tub B
1Eco 50° 4:00 9.0 0.74
2Auto
Intensive 65° — 2:20 — 3:00 16.0 — 18.0 1.20 — 1.40
3Auto
Normal 65° 2:10 — 2:50 14.5 — 16.0 1.05 — 1.25
4Delicates
45°
— 1:40 12.0 1.00
5Express 30’ 50° — — 0:30 9.0 0.50
6Good Night 50° — 3:35 16.5 1.00
7Sanitizing 70° — 1:40 12.0 1.30
8Soak — — ——0:10 4.5 0.01
9Self Clean 65° — —0:50 9.5 0.70
PROGRAMS TABLE
PROGRAMS DESCRIPTION
Instructions on wash cycle selection.
1 ECO
Normally soiled crockery. Standard program, the most ecient in
terms of its combined energy and water consumption.
2 AUTO INTENSIVE
Automatic program for heavily soiled dishes and pans (not to be used
for delicate items).
3 AUTO NORMAL
Automatic program for normally soiled pans and dishes.
4 DELICATES
Program for delicate items, which are more sensitive to high tempera—
tures, for example glasses and cups.
5 EXPRESS 30’
Program to be used for lightly-soiled dishes with no dried food
residues.
6 GOOD NIGHT
Suitable for night-time operation of the appliance. Ensures optimal
cleaning and drying performance with the lowest noise emission.
7 SANITIZING
Normally or heavily soiled crockery, with additional antibacterial wash.
Can be used to perform maintenance of the dishwasher.
8 SOAK
Use to refresh crockery planned to be washed later. No detergent to be
used with this program.
9 SELF-CLEAN
Program to be used to perform maintenance of the dishwasher.
It cleans the interior of the appliance using hot water.
Notes:
Please note that cycles like Express or Fast are most eective for lightly so—
iled dishes.
To reduce consumption even further, only run the dishwasher
when it is full.
4
OPTIONS AND FUNCTIONS
OPTIONS can be selected directly by pressing the corresponding button (see CONTROL PANEL).
If an option is not compatible with the selected program see PROGRAMS TABLE, the corresponding LED ashes rapidly 3 times
and beeps will sound. The option will not be enabled.
TABLET (Tab)
This setting allows you to optimize the performance of the
program according to the type of detergent used.
Press the TABLET button (the indicator light will light up / the
corresponding symbol will light up) if you use combined
deter-
gents in tablet form (rinse aid, salt and detergent in 1 dose).
If you use powder or liquid detergent, this option should
be o.
KEYLOCK
A long press (for 3 seconds) of SHORT TIME button, will activate
the KEYLOCK function. The KEYLOCK function will block the
control panel except the ON/OFF button. To deactivate the
KEYLOCK, long press again.
DELAY
The start of the program may be delayed for a period of time
between 0:30 and 24 hours.
1. Select the program and any desired options. Press the
DELAY button (repeatedly) to delay the start of the program.
Adjustable from 0:30 to 24 hours. With each press of the
button, the delay start increases by: 0:30 if selection below
4 hours, 1:00 if selection is below 12 hours, 4 hours if
selection is above 12 hours. If 24 hours reached, and the
button is pressed, the delayed start is deactivated.
2. Press the START/PAUSE button: the timer will begin
counting down;
3. Once this time has elapsed, the indicator light switches o
and the program begins automatically.
If at the time of the countdown the START/PAUSE button is
pressed again the DELAY option is cancelled and the selected
program starts automatically.
The DELAY function cannot be set once a program has
been started.
WATER TAP CLOSED – Alarm
Flashes when there is no inlet water or water tap is closed.
DRAIN OUT
To stop and cancel the active cycle, the Drain Out function
can be used.
A long press of START/PAUSE button, will activate the DRAIN
OUT function. The active program will be stopped and the
water in the dishwasher will be drained out.
ZONE WASH 3D
Option works with one rack at once. In particular, we
recommend to use it with Normal and Intensive cycles — thanks
to the additional 3D water jets placed on the bottom o the
cavity, ZONE WASH 3D option allows to save energy or to
increase the washing performance of the dishwasher:
• ZONE WASH 3D + NORMAL CYCLE: it allows to reduce energy
consumption up to 40%.
• ZONE WASH 3D + INTENSIVE CYCLE: it increases the washing
performances up to 40%. Ideal for very soiled mixed loads,
e.g. pans and saucepans, dishes with heavy encrustation
or dicult-to-clean crockery (grater, vegetable mill, dirty
cutlery).
How to activate the option:
1. Select a compatible cycle
2. By default the appliance washes dishes in all racks. To wash
only the specic rack, press this button repeatedly:
shown on the display (only lower rack)
shown on the display (only upper rack)
shown on the display (option is OFF and the appliance will
wash dishes in all racks).
Remember to load the upper or lower rack only, and to
reduce the amount of detergent accordingly.
SHORT TIME
This option can be used to reduce the duration of the main
programs while maintaining the same washing and drying
performance levels.
After selecting the program, press the SHORT TIME button and
the indicator light will switch on. To deselect the option, press
the same button again.
EXTRA DRY
To improve the drying of the dishes, after selecting the
program, press the EXTRA DRY button and the indicator light
comes on.
A higher temperature during the nal rinse and an extended
drying phase allow for improving drying. To deselect the
option, press the same button again. The EXTRA DRY option
results in the lengthening of the wash cycle.
EN
5
LOADING THE RACKS
LOWER RACK
For pots, lids, plates, salad bowls, cutlery
etc… Large plates and lids should ideally
be placed at the sides to avoid interferen-
ces with the spray arm.
The lower rack has tip-up supports
which can be used in a vertical position
when arranging plates or in a horizontal
position (lower) to load pans and salad
bowls easily.
(loading example for the lower rack)
The lower rack has a Space Zone A, a special pull-out support in the
rear of the rack that can be used to support frying pans or baking
pans in upright position, thus taking up less space.
In order to use it, just get hold of the coloured grip and pull it
upwards B while rotating it forward. The supports can slide right and
left to t the size of the crockery.
CUTLERY BASKET
It is tted with top grids for improved cutlery arrangement.
It must only be positioned at the front of the lower rack.
Knives and other utensils with sharp edges must be placed in the
cutlery basket with the points facing downwards or they must be po—
sitioned horizontally in the tip-up compartments on the upper rack.
ZONE WASH 3D
Zone Wash 3D uses additional water jets
located both: in the lower and upper part of
the dishwasher (marked with orange color)
to wash more intensively heavily soiled items
by increasing water coverage on dishes.
Example: Load pots and casseroles facing
lower part of Zone Wash 3D components
and activate the 3D Zone Wash option on the
panel.
B
A
UPPER RACK
Load delicate and light dishes: glasses,
cups, saucers, low salad bowls.
The upper rack has tip-up supports which
can be used in a vertical position when
arranging tea/ dessert saucers or in a
lower position to load bowls and food
containers.
(loading example for the upper rack)
ADJUSTING THE HEIGHT OF THE UPPER RACK
The height of the upper basket can be adjusted:
high position to place bulky crockery in the
lower basket and low position to make the most
of the tip-up compartments by creating more
space upwards.
The upper rack is equipped with a Upper Rack
height adjuster (see gure), without pressing
the levers, lift it up by simply holding the rack si-
des, as soon as the rack is stable in its upper po-
sition. To restore to the lower position, press the
levers (A) at the sides of the rack and move the basket downwards.
We strongly recommend that you do not adjust the height of the
rack when it is loaded.
NEVER raise or lower the basket on one side only.
FOLDABLE FLAPS WITH ADJUSTABLE POSITION
The side foldable aps can be positioned at
three dierent heights to optimize the arrange—
ment of crockery inside the rack.
Wine glasses can be placed safely in the folda-
ble aps by inserting the stem of each glass
into the corresponding slots.
For optimum drying results incline the foldable
aps more. To change the inclination, pull up
the foldable ap, slide it slightly and position it
as you wish.
6
DAILY USE
1. CHECK WATER CONNECTION
Check that the dishwasher is connected to the water supply and
that the tap is open.
2. SWITCH ON THE DISHWASHER
Press the ON/OFF button.
3. LOAD THE RACKS
(see LOADING THE RACKS).
4. FILLING THE DETERGENT DISPENSER
(see PROGRAMS TABLE).
5. CHOOSE THE PROGRAM AND CUSTOMISE THE CYCLE
Select the most appropriate program in accordance with the type
of crockery and its soiling level (see PROGRAMS DESCRIPTION) by
pressing the P button.
Select the desired options (see OPTIONS AND FUNCTIONS).
6. START
Start the wash cycle by pressing the START/PAUSE button. When
the program starts you hear a beep.
7. END OF WASH CYCLE
The end of the wash cycle is indicated by beeps and the display
shows End. Open the door and switch o the appliance by press-
ing the ON/OFF button.
Wait for a few minutes before removing the crockery — to avoid
burns. Unload the racks, beginning with the lower one.
The machine will switch o automatically during certain extended
periods of inactivity, in order to minimise electricity consumption.
If the crockery is only lightly soiled or if it has been rinsed with
water before being placed in the dishwasher, reduce the amount
of detergent used accordingly.
MODIFYING A RUNNING PROGRAM
If a wrong program was selected, it is possible to change it, provided
that it has only just begun: press and hold the ON/OFF button, the
machine will switch o. Switch the machine back on using the
ON/OFF button and select the new wash cycle and any desired
options; start the cycle by pressing the START/PAUSE button.
ADDING EXTRA CROCKERY
Without switching o the machine, open the door (be ware of HOT
steam!) and place the crockery inside the dishwasher. Close the door
and press the START/PAUSE button the cycle will begin from the
point at which it was interrupted.
ACCIDENTAL INTERRUPTIONS
If the door is opened during the wash cycle, or if there is a power cut,
the cycle stops. Once the door has been closed or the electricity sup-
ply is restored, to start again the cycle from where it was interrupted,
press the START/PAUSE button.
For more information about the functions, you can request or download
from the WEB a Use & Care Guide by following the instructions on the last
page.
ADVICE AND TIPS
TIPS
Before loading the baskets, remove all food residues from the crock-
ery and empty the glasses. You do not need to rinse beforehand
under running water.
Arrange the crockery so that it is held in place rmly and does not tip
over; and arrange the containers with the openings facing down-
wards and the concave/convex parts placed obliquely, thus allowing
the water to reach every surface and ow freely.
Warning: lids, handles, trays and frying pans do not prevent the
sprayer arms from rotating.
Place any small items in the cutlery basket.
Very soiled dishes and pans should be placed in the lower basket be-
cause in this sector the water sprays are stronger and allow a higher
washing performance.
After loading the appliance, make sure that the sprayer arms can
rotate freely.
HYGIENE
To avoid odour and sediment which can be accumulated in the dish-
washer please run a high temperature program at least one a month.
Use a tea spoon of detergent and run it without the loading to clean
your appliance.
UNSUITABLE CROCKERY
• Wooden crockery and cutlery.
• Delicate decorated glasses, artistic handicraft and antique crockery.
Their decorations are not resistant.
• Parts in synthetic material which do not withstand high tempera-
tures.
• Copper and tin crockery.
• Crockery soiled with ash, wax, lubricating grease or ink.
The colours of glass decorations and aluminium/silver pieces can
change and fade during the washing process. Some types of glass
(e.g. crystal objects) can become opaque after a number of wash
cycles too.
DAMAGE TO GLASS AND CROCKERY
• Only use glasses and porcelain guaranteed by the manufacturer as
dishwasher safe.
• Use a delicate detergent suitable for crockery
• Collect glasses and cutlery from the dishwasher as soon as the
wash cycle is over.
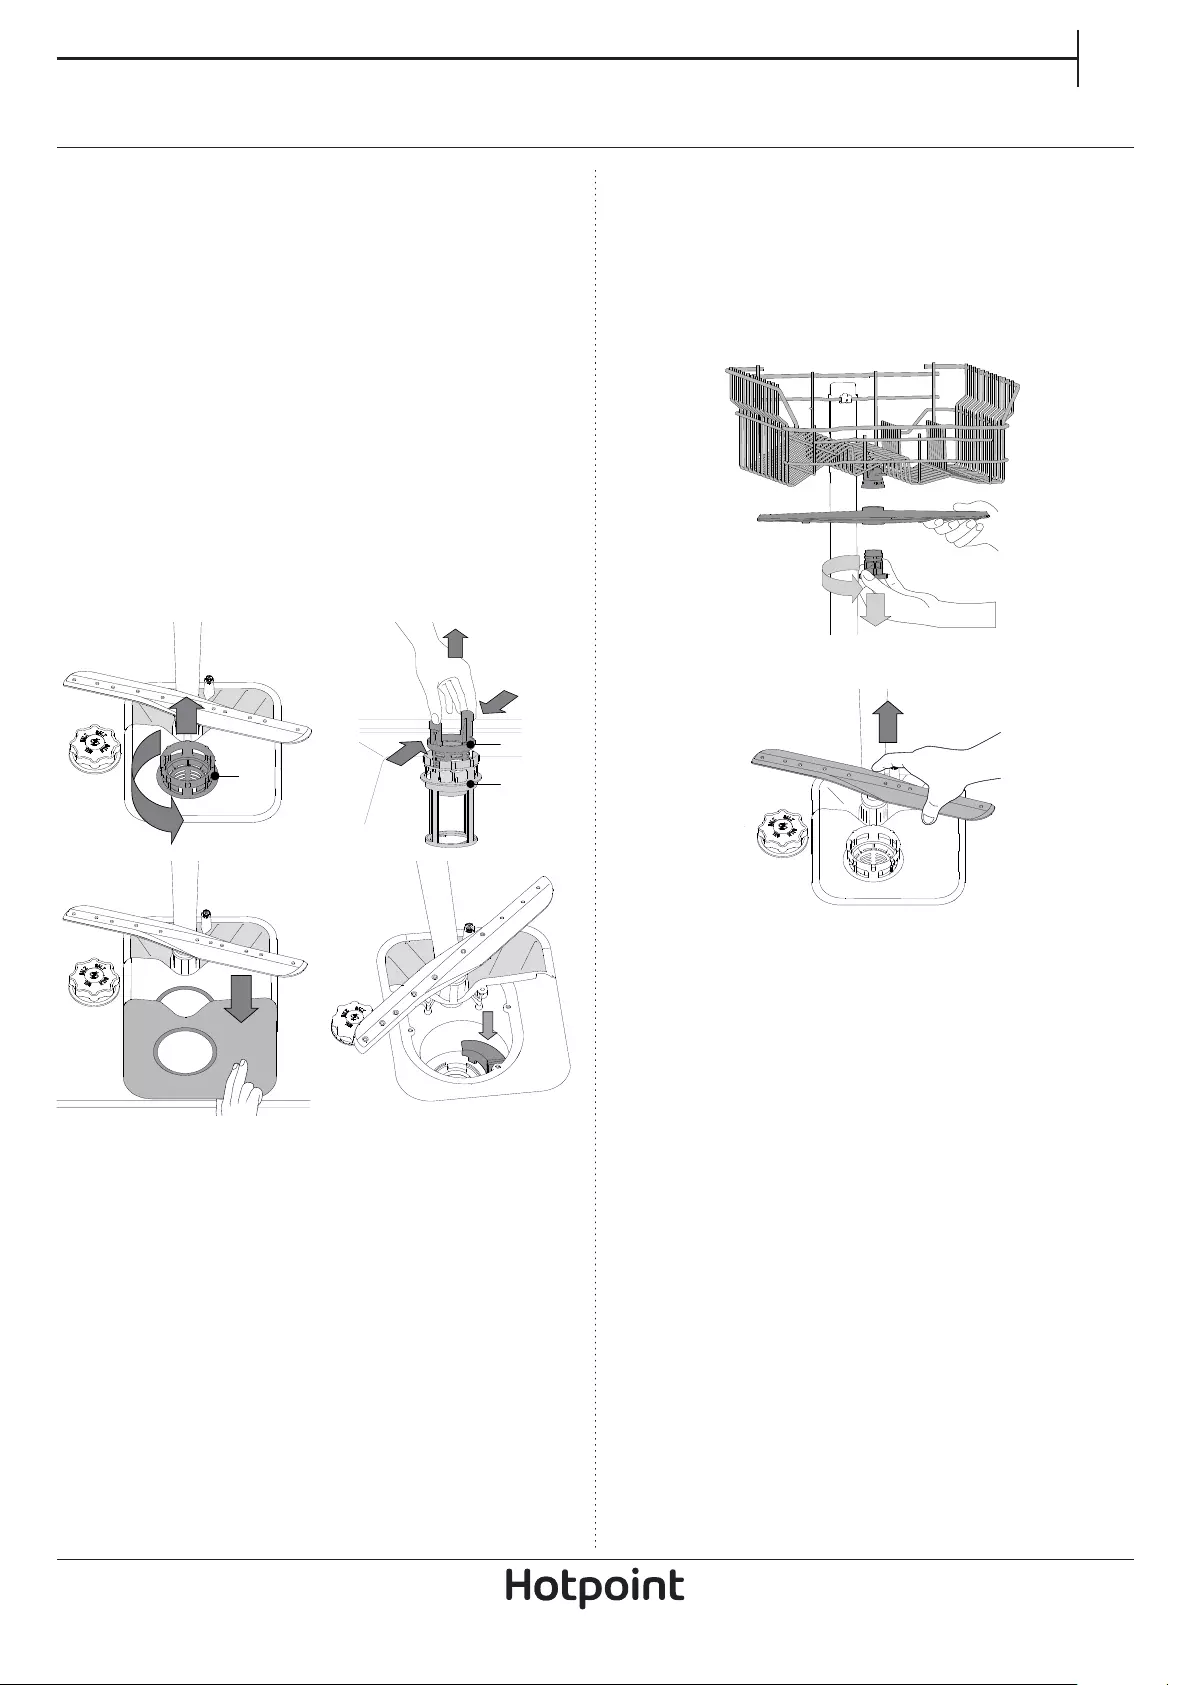
EN
7
CLEANING THE FILTER ASSEMBLY
Regularly clean the lter assembly so that the lters do not clog and
that the waste water ows away correctly.
The lter assembly consists of three lters which remove food residues
from the washing water and then recirculate the water: to obtain the
best washing results, you need to keep them clean.
The dishwasher must not be used without lters or if the lter is
loose.
After several washes, check the lter assembly and if necessary clean it
thoroughly under running water, using a non-metallic brush and follo—
wing the instructions below:
1. Turn the cylindrical lter A in an anti-clockwise direction and pull
it out (Fig 1).
2. Remove the cup lter B by exerting a slight pressure on the side
aps (Fig 2).
3. Slide out the stainless-steel plate lter C (Fig 3).
4. Inspect the trap and remove any food residues. NEVER REMOVE
the wash-cycle pump protection (black detail) (Fig 4).
After cleaning the lters, re-place the lter assembly and x it in
position correctly; this is essential for maintaining the ecient
operation of the dishwasher.
AA
B
C
CLEANING THE SPRAY ARMS
On occasions, food residue may become encrusted onto the spray
arms and block the holes used to spray the water. It is therefore recom-
mended that you check the arms from time to time and clean them
with a small non-metallic brush.
To remove the upper spray arm, turn the plastic locking ring in an
anti-clockwise direction. The upper spray arm should be replaced so
that the side with the greater number of holes is facing upwards.
The lower spray arm may be removed by pulling it upwards.
CLEANING THE WATER INLET HOSE
If the water hoses are new or have not been used for an extended
period of time, let the water run to make sure it is clear and free of
impurities before performing the necessary connections. If this
precaution is not taken, the water inlet could become blocked and da-
mage the dishwasher.
CARE AND MAINTENANCE
1 2
3 4
8
Your dishwasher may not work properly.
Before contacting the Service Centre check if the problem can be solved by going through the following list.
TROUBLESHOOTING
MAINTENANCE AND TROUBLESHOOTING GUIDE
For more information, maintenance procedures and troubleshooting,
see the Use and Care Guide
The Use and Care Guide can be obtained by:
• After-Sales Service; phone number see in warranty booklet.
• download from website: docs.hotpoint.eu
• use QR code
TECHNICAL DATASHEET
The technical data containing the energy consumption data can be
downloaded from the website: docs.hotpoint.eu
CONTACTING AFTER-SALES SERVICE
When you contact the After-Sales Service,
you must provide the codes shown on the
rating plate attached to the left or right side
inside the door of the dishwasher. The pho—
ne number is listed in the warranty booklet
or on the website: www.hotpoint.eu
IEC 436
:
PROBLEMS POSSIBLE CAUSES SOLUTIONS
The dishwasher
won’t start
or does not
respond to com-
mands.
The appliance has not been plugged in
properly. Insert the plug into the socket.
Power outage. The dishwasher starts automatically when the power returns.
The dishwasher door is not closed. Vigorously push the door until you hear the “click”.
It does not respond to commands. Switch o the appliance by pressing the ON/OFF button, switch it back on
after approximately one minute and reset the program.
The dishwasher
won’t drain. The wash cycle has not nished yet. Wait until the wash cycle nishes.
The drain hose is bent. Check that the drain hose is not bent (see INSTALATION INSTRUCTION).
The sink drain pipe is blocked. Clean the sink drain pipe.
The lter is clogged up with food residues. Clean the lter (see CLEANING THE FILTER ASSEMBLY).
The dishwasher
makes
excessive noise.
The dishes are rattling against each Position the crockery correctly (see LOADING THE RACKS).
An excessive amount of foam has been
produced.
The detergent has not been measured out correctly or it is not suitable for
use in dishwashers (see FILLING THE DETERGENT DISPENSER). Reset dishwa-
sher by pressing the DRAIN button (see OPTIONS AND FUNCTIONS) and run
new program without detergent.
The dishes are
not clean.
The crockery has not been arranged
properly. Arrange the crockery correctly (see LOADING THE RACKS).
The spray arms cannot rotate freely, being
hindered by the dishes. Arrange the crockery correctly (see LOADING THE RACKS).
The wash cycle is too gentle. Select an appropriate wash cycle (see PROGRAMS TABLE).
An excessive amount of foam has been
produced.
The detergent has not been measured out correctly or it is not suitable for use
in dishwashers (see FILLING THE DETERGENT DISPENSER).
The cap on the rinse aid compartment has
not been shut correctly. Make sure the cap of the rinse aid dispenser is closed.
The lter is soiled or clogged. Clean the lter assembly (see CARE AND MAINTENANCE).
There is no salt. Fill the salt reservoir (see FILLING THE SALT RESERVOIR).
07/2018 as — Xerox Fabriano