
-
Page 1: Pfaff tipmatic 6150
D C’, 1 C C) C D 3 0) D C 0) og C-) 03 0) .sfl NJ 0 C.) -a 01 0 •0 an ‘1 IT’[…]
-
Page 2: Pfaff tipmatic 6150
For easier understanding of this instruction book please fold this or the last page open when reading it. Safety rules For the United Kingdom only The leads must definitely not be connected to the safety lead terminal I nor to a plug with three pins. The wires in the mains lead are coloured according to the following code: Neutral Live As the colou[…]
-
Page 3: Pfaff tipmatic 6150
MrsJ — — OCD ‘.a owl[…]
-
Page 4: Pfaff tipmatic 6150
Parts of the sewing machine (Models 6230 and 6150) (1) Key for ,,slow sewing” (Model 6230) (2) Key for ,,needle down position” (Model 6230) (3) Key for ,,tacking” (Model 6230) (4) Carrying handle (5) Hand-wheel (6) Hand-wheel release disk (7) Fancy stitch knob (8) Main switch (9) Connection socket ,,mains cord” (Model 6230) Connection socke[…]
-
Page 5: Pfaff tipmatic 6150
Important safety instructions For the United States only This sewing machine is designed and manufactured for HOUSEHOLD use only. When you use an electric appliance, basic safety precautions should always be adhered to as fol lows: Read all instructions before using this sewing machine. DANGER To reduce the risk of electric shock: 1 The sewing mach[…]
-
Page 6: Pfaff tipmatic 6150
Notes on safety Notes on safety for domestic sewing machines according to DIN 57 700, Section 28 or IEC 335, Section 28. 1. The user must exercise adequate caution with regard to the up and down moving of the needle and constantly observe the sewing area during work. 2. When leaving the machine, during maintenance work or when changing mechanical p[…]
-
Page 7: Pfaff tipmatic 6150
Modern, uncomplicated — Sewing by puchbutton control — Congratulations! You have bought a high-quality product that offers unique advantages. Your new sewing machine can take any material in its stride and will sew through thick and thin for you. It features the very latest in design and technology and this instruction book is Just as uncomplic[…]
-
Page 8: Pfaff tipmatic 6150
Contents Accessories and needles . 72 — 81 Accessory compartment 14 Applique 66 Appliqué foot 78 Bias tape binder . . . . 77 Blind stitch 38 Bobbin case. . 18, 19 Bobbin thread tension . . . 19 Bobbin winding . . . 15 — 1 7 Borders . . . . . . 62. 63, 64 Buttonholes . . . . . . . 46, 47 Changing the needle 26 Changing the needle plate . . . 84[…]
-
Page 9: Pfaff tipmatic 6150
Lowering the feed dog Main switch Maintenance and faults Monograms Multi4oot gathering foot. Needle chart Needle position. Needle thread tension Needle threader Nonelastic stitches — Oiling . Open overlock stitch Overlock stitches Pattern length . Pattern width Practical sewing Presser bar litter Puchbutton control Pulling up the bobbin thread Pull[…]
-
Page 10: Pfaff tipmatic 6150
Utility stitch table (elastic stitches) D E F G HI H HD ID IF K < < _: _: ,—‘ c—’ ‘ / I “ “ -‘ ‘- I I — ‘ I ( < ED ED c : “: , With these programs the stitch length can be set as required between 0 and 6 mm with the stitch length knob (11). Program Description Application A/B/C Buttonholes Standard buttonholes e.g. fo[…]
-
Page 11: Pfaff tipmatic 6150
I I I S Utility stitch table (non-elastic stitches) KU KG L LC LU LF LI M ME MF MG Program Description Application KD Elastic edge seam For securing seams of edges that do not fray very much KG Shelledging stitch For decorative hems on light fabrics e.g. for underwear L Fancy elastic stitch For overstitching two buttjoined plies LC Emperor stitch A[…]
-
Page 12: Pfaff tipmatic 6150
Utility stitch table (elastic stitches) D E F G Hi I H HO I HG I ID IF I IG I K I KO I KGI KMI Ill lii ‘i I I I 11/ I l’ ‘, I III I I ii ii I i”i I / —‘I, ‘.. ‘.‘. ‘.‘, I Ill Iii 0 “,ii I “,,ii ‘sit I i”..i ,,, , ,,— II Ih ill I —“i ..—‘ii —II ‘ ,.— — III Hi I iii __.—ii —ii ‘—‘— I i ‘[…]
-
Page 13: Pfaff tipmatic 6150
Utility stitch table (elastic stitches) ‘5’ -ii NJ XI ..i XI /1,’ I I I J’t% I I ‘.ii ,X’ iii • III I I I i “.i. ‘.i I 11/ L LD LF LI I LK LDK LEI LGK LMK f M I MD ME MF I MG ,“ I —I’ I I ll i I •.ii Xi 5 41 I X’ I / I I I 11/ I I -ii I I )<i ‘“i 7” I /1/ II .1i Xi in XI /‘s 11/ Program Descriptio[…]
-
Page 14: Pfaff tipmatic 6150
1IllIII VIIIILilII{ll. ifIIIIIJlIWIL ‘ 11111 PIljjjljjjIIlj 11111111 {fjjjjIIIIjlIl liii II I1IIIUI 1 D II ill II a) 95a) Q) > C) 1 III,IqIIp C lilt ii jliiJlijifi ijlilIIil lj 1 i D _L ‘iii o 111111 liii! ‘liii iii!! iiIh 0 2 a) D C) iIlIIlidlTlIIiIllIiIIiIIIillTlhIlilUIi iilii. D (_ a) — — 1f”ilifJiTI”TN}ill[’’iTjiTHh[’lli[…]
-
Page 15: Pfaff tipmatic 6150
PFAFF I pt onlc 6230 / i!II ——— Operation of the sewing machine I Electrical connection page 1 2, 1 3 I Detachable work support page 1 4 Bobbins pages 15 — 17 Bobbin case pages 1 8, 1 9 Bobbin thread tension page 1 9 J Threading the needle page 20 Needle threader page 21 I Pulling up the bobbin thread page 22 Sewing foot lifter page 22 Thre[…]
-
Page 16: Pfaff tipmatic 6150
Carrying case Place the enclosed mains cord, foot control and instruction book in the compartment of the carrying case. 0’ Programs The programs of the sewing machine are illustrated on the inside of the top cover Top cover Open the folding cover (26) upwards. Electrical connection (Modell 6230) Connect the mains cord with the socket (9) of the s[…]
-
Page 17: Pfaff tipmatic 6150
Connecting the foot control (Model 6230) Connect the plug of the foot control with the connection socket (12) of the sewing machine. The sewing speed is regulated by pressing the pedal. Main switch Connect the plug of the foot control with the connection socket (9) of the sewing machine. The sewing speed is regulated by pressing the pedal. The sewi[…]
-
Page 18: Pfaff tipmatic 6150
A I J 41 41 41 .41 .4 Winding the bobbin from the reel holder Place the sewing thread on the reel holder (24). To obtain free movement of the thread and hold the thread reel firmly, fit an unwind ing disk corresponding to the size of the thread reel. Threading Place the thread into guide A from behind and pull it through opening B to the right. Win[…]
-
Page 19: Pfaff tipmatic 6150
I 3 V Winding from the second reel holder Insert the second reel holder (25) in the hole provided and place a reel of thread on it. Threading Place the thread into guide C and pull it through opening B to the right. Wind the thread clockwise a few times around the bob bin. Switch on the main switch Hold the end of the thread firmly and press the fo[…]
-
Page 20: Pfaff tipmatic 6150
A Hook cover Switch off the main switch Hold the hook cover (28) at the side and open it to the front. Thread tension Lift the latch of the bobbin case and pull out the bobbin case. Release the latch and take out the empty bobbin. To obtain optimum seam appearance and durability make sure the needle and bobbin thread lensions are correctly adjusted[…]
-
Page 21: Pfaff tipmatic 6150
Inserting the bobbin F Insert the full bobbin in the bobbin case. When doing so, pull the thread sideways through slot A, then under tension spring B until it rests in the opening (see arrow). Check: When you pull the thread, the bobbin must turn clockwise. Checking the bobbin thread tension Hold the bobbin case by the thread and move your hand sha[…]
-
Page 22: Pfaff tipmatic 6150
Threading the needle Switch off the main switch. Raise the presser foot lifter (20). Turn the hand wheel until the take-up lever (19) has moved to the top. Place the thread on the reel holder (24) and fit an unwinding disk of the right size. Now, using both hands, pull the thread into guide A and under thread guide hook D. Pa the thread through the[…]
-
Page 23: Pfaff tipmatic 6150
Needle threader (Models 6120. 6150. 6230) The PFAFF needle threader (16) is an aid to make threading the needle easier and quicker. Lower the sewing foot (see next page). Turn the hand wheel until the needle is at its high est point. Piace the needle thread over hook o and hold it taut. Move the threader fully downwards and turn it towards the need[…]
-
Page 24: Pfaff tipmatic 6150
The sewing foot is raised or lowered with the presser bar lifter (20). Drawing up the bobbin thread Raise the sewing foot. Hold the needle thre and turn the hand wheel towards you until needle is at the top again and the bobbin thread has formed a loop. Pull the needle thread to draw up the bobbin thread. —r Bobbin thread Close the hook cover (28[…]
-
Page 25: Pfaff tipmatic 6150
U Removing the sewing foot Turn off the main switch Set the needle at its highest point. Press the sewing foot upwards at the front and down wards at the back at the same time so that it disengages from the sewing toot holder (15). Check: Place the sewing foot under the sewing foot holder (15) that the pins of the foot engage in the sewing foot hol[…]
-
Page 26: Pfaff tipmatic 6150
The built-in dual fabric feed (Models 6120, 6150, 6230) For sewing difficult materials PFAFF offers the ideal solution: built-in dual feed. As on industria sewing machines it feeds the material from the top and bottom at the same time. The fabric is fed accurately. On light or difficult materials such as silk and viscose fabrics the dual fabric fee[…]
-
Page 27: Pfaff tipmatic 6150
Disengaging the top feed Hold the top feed with two fingers at the marked places. Push the top feed (23) down a little and out to the rear, and let it move slowly upwards (see also the illustration on page 24(. Engaging the top feed (Models 6120. 6150. 6230) Raise the sewing foot. Now push the top feed (23) so that it snaps in place Important! For […]
-
Page 28: Pfaff tipmatic 6150
Changing the needle Switch off main switch To remove: Lower the sewing foot and set the needle at its highest point. Now loosen the Fixing screw (22) and pull the needle out downa rds. To insert: The flat side A of the needle must Face to the rear. Lower the sewing foot dnd insert the needle. pushing it up as far as it will go. Hold the needle and […]
-
Page 29: Pfaff tipmatic 6150
Setting the need’e thread tension Set the required amount on the needle thread tension (18) using mark A The normal setting for sewing is 4 to 5 For embroidering. darning and buttonhole sewing between 2 and 3. For certain sewing work, e g. darning, the feed dog has to be dropped. To do this, open the hook cover and press slide B fully to the righ[…]
-
Page 30: Pfaff tipmatic 6150
Reverse sewing The machine sews in reverse as long as the reverse key (21) is kept pressed. Li AA You will find the symbol buttonhole bet ween the figure 0 arid 1. The optimal stitch density for sewing buttonholes is in this range. The stitch becomes more concentrated the farther you turn towards O Stitch length knob You can set the stitch length ([…]
-
Page 31: Pfaff tipmatic 6150
Pushbutton controls Setting utility stitches Under the id (26) you can find the program PFAFF tiptronic 6230 table with all the stitches and stitch combina tions. On model 6230 the most important stitches are additionally illustrated on the lighted display. Each program has been given a letter that you can find on the bushbutton controls. If the ri[…]
-
Page 32: Pfaff tipmatic 6150
Utility and stretch stitch combinations AIAAA By striking two or several keys you can m combinations in the utility stitch range The stitch length knob can either be set in utility sewing range or in the stretch range All the stitch combinations are illustrated the program table in the lid. You can rele keys that are already activated with key B. P[…]
-
Page 33: Pfaff tipmatic 6150
Function keys (Model 6230) The tiptronic has three function keys. 1. Sewing slowly When key (1) slow sewing’ is pressed the green diode lights up. The sewing machine now sews at half speed. If the key is pressed again the green diode is extinguished and the machine sews at full speed again. 2. Needle position up/down Each time sewing is interrupt[…]
-
Page 34: Pfaff tipmatic 6150
Sewing chart General sewing aids Nonelastic stitches Elastic stitches Overlock stitches Covering stitches Buttonhole Hems with twin needle Smocking Gathering Darning Inserting zippers Rollhemming Sewing lace Shelledging page 34 pages 35 pages 36 — 39 pages 40, 45 pages 42, 43 pages 44, 45 pages 46, 47 page 48 page 48 pages 49, 50 pages 51 — 53 […]
-
Page 35: Pfaff tipmatic 6150
Explanation of the sewing chart The following charts show the recom mended settings that you require for the relevant sewing operations. These charts also provide you with further instructions that are necessary when sewing the selected programs: The choice of the sewing foot, the setting of the needle thread tension and whether the sewing is carri[…]
-
Page 36: Pfaff tipmatic 6150
Needle thread tension In order to obtain perfect sewing results the needle and bobbin thread tensions must be correctly adapted to each other. The normal setting for utility stitches is 3 to 5. Check the tension using a wide zigzag stitch. The interlace of the two threads must lie in the middle of the two fabric plies. If the interlace lies on the […]
-
Page 37: Pfaff tipmatic 6150
HLi a Taste3 — — C’ 3 0/1 b — — — — — Basting stitch (Mode) 6230) With key (3) basting you can baste a gar ment before trying it on. When you press the foot control the machine will only make one stitch. For each further stitch you have to press the foot control each time, — Lower the bottom feed and disengage the top feed. — Place th[…]
-
Page 38: Pfaff tipmatic 6150
i I I I prog Z*j L_____ J6j_j35IO3J Zigzag stitch With keys D, E and F you can alter the width of the zigzag stitches from 2 to 6 mm. By combining the keys DIE or E/F you obtain additional widths When serging the edge, always make sure the needle goes into the material and over the edge alternately For serging difficult materials, blind stitch foot[…]
-
Page 39: Pfaff tipmatic 6150
Blind stitch H is best suited for invisible hems; sewing by hand is unnecessary. — Serge the edge of the hem. — Fold the edge inwards by the hem width. — Now unfold the hem again so that the hem edge protrudes by about half an inch. — Now place the fabric under the sewing foot so that the crease line runs along edge guide B. — When the ne[…]
-
Page 40: Pfaff tipmatic 6150
a! E 4 23!— U Sewing on buttons with stems — Insert the sewing foot. — Place a match between the holes of the button and sew it on as described on the left. Sewing on buttons With orogram E you can sew on two and four- hole buttons with no problem at all — Remove the sewing foot and lower the feed dog. — Turn the hand wheel towards you an[…]
-
Page 41: Pfaff tipmatic 6150
1 prog 1” — jJ a DFFSTc 46 • 35 01 D E F StrpcP 4 6 3 5 0 Stretch triple straight stitch This program is used for sewing all seams where great strength is needed, e.g. inside trouser seams. The farther you turn the stitch length knob, the longer the stitch length. Stretch triple zigzag stitch The stretch triple zigzag stitch is a highly elasti[…]
-
Page 42: Pfaff tipmatic 6150
prog 1 I I III I I> III I I prog I I a M 1-2,5 I 6 • 3 5 I 0/1 a M I Stretch I 6 • 3-5 0/1 [ bIMI125161._13-510I bMIStretchI6I_I35I0I Elastic stitch Owing to its high elasticity this stitch is used for sewing on elastic tapes, e.g. on underwear. Cut off the old elastic tape close to the edge. — Gather the fabric with 6 mm long straight sti[…]
-
Page 43: Pfaff tipmatic 6150
N N N N What is an overlock stitch? For knitted and other stretch materials the models with pushbutton controls offer a selection of overlock stitches. These join two plies of fabric and serge them in one opera tion. They have a higher elasticity than usual seams, they are more durable, and you can sew them fast, too. Closed overlock stitch TIP: Wh[…]
-
Page 44: Pfaff tipmatic 6150
— ‘4 ‘ .. _4 •4 .s.•-_’ a- 4 _ ‘_4 4.44?_A I I • I _4_ _4,_•,,,-e 4 • a- , ., I — A — — 4?— %-‘‘ 4? _i I -‘—- “ I •-_‘_ ‘,‘—,.-:—-—- -..-> 3 ‘, —‘-. ,‘- __•4__ ‘, — — I -; — Aa, -* — —4. I > I -‘:.4:%—— Pullover stitch This stitch is suitable for open knit fabrics Fu[…]
-
Page 45: Pfaff tipmatic 6150
prog : L Stretch 6 • 3-5 : L Stretchl 6 — I 1 Fagoting stitch With fagoting stitch you can make very elastic seams with hemstitching effect, eg. on corsetry. — Serge the fabric edges and tack baste over on the inside. — Place the fabric under the sewing foot with the edges about 1/8 of an inch apart. — Sew on the face side, making sure the […]
-
Page 46: Pfaff tipmatic 6150
I,l)IJ I I prog 1 i -.-l progj ‘ I JaLH-2I6j•3-5j1 !aLFIStretchI5I.3-5I1 I IbI L 11-216 HI 0 IbI — I — — — — Fancy elastic stitch Fancy elastic stitch is very useful for materials that need a flat seam, e.g. terry cloth. — Place the two fabric edges so that they overlap by about 3/4 of an inch and over- stitch each edge with fancy elastic sti[…]
-
Page 47: Pfaff tipmatic 6150
PFAFF t i ptron ic 6230 tipmatic 6110, 6120, 6150 PFAFF — ) instruction manual[…]
-
Page 48: Pfaff tipmatic 6150
Buttonholes Sewing buttonholes is very easy with all the models with pushbutton controls since the fabric does not have to be turned. 8uttonholes are generally sewn onto a piece of doubled fabric. However, for some materials, e.g. silk, organza and viscose, it is necessary to use silk paper backing to prevent the material from contracting while sew[…]
-
Page 49: Pfaff tipmatic 6150
I I I I — prog I I I -.. I—I ABC 44,5 3 b A BCI : 3 5 ___________ B Linen buttonholes Insert the buttonhole slide and push it fully to the front. — Press key C and sew the first seam to the required length. Then press key B. Keep it pressed and sew a few stitches for the bartack, while holding the material securely. Then press key A and sew bac[…]
-
Page 50: Pfaff tipmatic 6150
I.! iii ii Il lii rr — — ,, t.* ., Lit i. -jiI’tt’ ‘t, t .t i.r I’’Iv progi I -_-I 23;i Ta G I i — • 3.510/h bIGl3-13-510I Sewing hems with the twin needle With the twin needle you can not only embroider, but also make topstitch seams. Using the twin needle you can add a profes sional touch to hems on stretch materials such as T shir[…]
-
Page 51: Pfaff tipmatic 6150
i 6 6 • 3 5 C) 1 35 01 Gathering with straight stitch With Program G at a stitch length of 6 mm you can gather sleeves, skirts or valances. To obtain a neat and even gather you should sew two or three gathering seams. — Mark the first line on the face side of the fabric and stitch along it. Leave about four or five inches of thread protruding at[…]
-
Page 52: Pfaff tipmatic 6150
a ‘::‘. TIP: The cording foot (special accessory) is Gathering sleeves or waist seams is no pro also ideal for gathering. The grooves in this blem at all with elastic threads. The elastic foot guide the elastic evenly during the sewing thread must not be wound onto the bobbin, operation. — Mark the first gathering seam on the reverse side of […]
-
Page 53: Pfaff tipmatic 6150
prog ‘1’ a G — — 0 23 6 b G — — 23 aEcer Darning with the straight stitch Insert the darning foot: Set the needle at its highest position and push the pin of the darning foot fully into hole C. When you do this, guide fork G places itself around the presser bar. Wire E must be behind fixing screw F. Now tighten screw D. Darning position: Lo[…]
-
Page 54: Pfaff tipmatic 6150
I I! prog I a M 021 6 M 021 6 prog I < I •35011 0 M 15 6 35 0 Darning with elastic stitch Darning with elastic stitch is also a very suitable means of repairing damaged fabric. — Sew over the damaged area with rows of stitches until it is well covered. When doing so, make sure the stitch rows overlap each other. Sewing on patches The best wa[…]
-
Page 55: Pfaff tipmatic 6150
2fl Z — D DO • : V _ 0 Q E’ (0 CDE_ r • 0 — 3 o a DD COO 0 3 00 0 -, ________ 0 — D—43c LD oC 0 . 0 = aoO C) ci, ci, 0 — D-, 00 ci,[…]
-
Page 56: Pfaff tipmatic 6150
progl a G 3 — . 3-5 4 b G 3 — 3-5 4 Sewing in zippers There are different ways to sew in zippers. For skirts we recommend inserting the zipper concealed on both sides, and for men’s or ladies’ slacks concealed on one side. Different types of zippers are available in shops and stores. For tough materials such as denim we recommend metal zipp[…]
-
Page 57: Pfaff tipmatic 6150
— Sew the second half of the zipper parallel at the same distance. Stop shortly before the end of the seam and leave the needle in the material. Raise the sewing foot and open the zipper. — You can now sew to the end of the seam. — Shortly before the end of the seam, open the zipper and finish sewing the seam. — Close the zipper and baste t[…]
-
Page 58: Pfaff tipmatic 6150
Roll hemming With the hemmer you can rollhem blouses, silk fabrics or valances with no problem at all and without having to iron the edges before hand Hemming secures the edges against fraying and produces a tidy and durable edge finish. — Fold the fabric edge over double (about (5/64) 2 mm per fold). — Place the folded fabric edge under the he[…]
-
Page 59: Pfaff tipmatic 6150
Lace inserts You can produce a beautiful effect on christening wear or other children’s clothes with lace inserts, First baste the lace to the face side of the fabric. — Stitch both edges of the lace with a narrow margin. — Cut open the fabric under the lace at the middle and iron it over to the side. — Stitch over both edges of the lace wi[…]
-
Page 60: Pfaff tipmatic 6150
,: 45O Shell edging Shell edging is very effective for thin, soft fabrics such as silk and viscose materials. It is frequently used as an edge finish on under wear, too. The tighter you set the needle thread tension the farther the shell edging is pulled in Serge the raw edge and iron the seam margin over to the left. While sewing, make sure that t[…]
-
Page 61: Pfaff tipmatic 6150
embroidery techniques 4 Sewing table for embroidery Decorative stitches Monograms Appliqué Richelieu Quilting Eyelet embroidery Hemstitching page 60 page 61 — 64 page 65 page 66 page 66 page 67 page 68 page 69 Decorative and traditional I 59[…]
-
Page 62: Pfaff tipmatic 6150
Decorative stitches B To enhance your own home textiles or gar ments the models 6150 and 6230 offer you a S whole host of fancy and decorative stitches to choose from. You can produce even greater embroidery variations by selecting different combinations, colours or sizes. For embroi dery work we recommend using special embroidery threads which are[…]
-
Page 63: Pfaff tipmatic 6150
Changing the pattern length You can vary the pattern length infinitely with the aid of the stitch length knob. The stitch density for embroidery is generally in the but tonhole range. The larger the stitch density you set is, the farther the pattern is stretched apart. Changing the pattern width The machine automatically Sets a stitch width of 6 mm[…]
-
Page 64: Pfaff tipmatic 6150
B S ft B 0 n r t Borders By combining different embroidery programs you can embroider borders of any width. Madeira embroidery threads are very suitable. They are available in many colour shades and different sizes. However, only use one thread size for one piece of embroidery work. — Apply iron-on backing or place silk backing paper under the fa[…]
-
Page 65: Pfaff tipmatic 6150
Borders with a combination of stitches By combining different embroidery keys as desired you can easily achieve other embroi dered effects. This is a simple and pleasing way to embellish tablecloths and garments. — Apply iron-On backing or place silk backing paper under the fabric. — Mark the centre with tailors chalk. — You can now begin wit[…]
-
Page 66: Pfaff tipmatic 6150
Twin neeate You can achieve further embroidery effects by using the twin needle. The illustrations show what beautiful borders can be made with a little imagination. Note: Only use a twin need with a width of 2,5 mm for all embroidery. Threading the twin needle — Insert the twin needle. Fit the second reel holder and place one reel of thread on e[…]
-
Page 67: Pfaff tipmatic 6150
Monograms No matter whether you work on terry cloth or woven fabric, with the darning foot and pro grams D, E or F you can monogram any initi als of your own design. Freehand guiding, however, needs a little practice in the beginning. — Transfer the initials with the magic pen to the part to be embroidered. — Lower the feed dog and insert the d[…]
-
Page 68: Pfaff tipmatic 6150
pl Appliqués are quickly made and always pro duce a beautiful fancy effect. By using diffe rent materials and patterns you can obtain variations galore. You can make a perfect, densely stitched seam with the applique foot (special accessoriesf, because it has a special cutout on its sole for the zigzag seam. — Insert the appliqué foot in the se[…]
-
Page 69: Pfaff tipmatic 6150
Quilting Quilting is a traditional sewing technique. The method that the wives of American settlers developed to make use of material remnants has become an artistic hobby with many enthusiasts in our country, too. A quilt always consists of three layers of material. Lots of geometrically shaped pieces of material are joined together in continually[…]
-
Page 70: Pfaff tipmatic 6150
Traditional eyelet embroidery which long ago had to he made laboriously by hand can be made quite easily with the help of an eyelet plate Ispecial accessory). This is very etfective on blouses, bed or table linen Practically all stitch types are suitable for this utility stitches such as a zigzag stitch, blind stitch, elastic stitch or fancy stitch[…]
-
Page 71: Pfaff tipmatic 6150
Cl, 3CDCD23 C) CD 3 3 CD 0 N CD DC 0 0 DC DC 0 CD DC CD CD Q.3-0 CC * CD < 3 CD DC DC -< 0. 0 CD .CCD DC CD 0. -V DC 0C -n7(9 CDDC C Q 0.3 DC 3 3 CD 0 DC 3- CD 3- CD DC 0 DC C I DC30.3 3- CDCDDCDC Cs, g — C 3-OC—DC<D 3 3 CD 3- DC CC. CD CD C CD Z — 2.3 3 DC _ DC —. p CDDC—.3C)03 3- “ 0 C ‘< 0 CD < DC DC a E E3 DC CD 3 3- C-[…]
-
Page 72: Pfaff tipmatic 6150
Accessories and needles Sewing feet (normal accessories) Special accessory table Felling foot Gathering foot Cording foot Bias binder Multistitch gatherer Cording foot Appliqué foot Fringe foot Needle table pages 72, 73 page 74 page 75 page 75 page 76 page 77 page 77 page 78 page 78 page 79 pages 80, 81 71[…]
-
Page 73: Pfaff tipmatic 6150
Sewing feet (accessories) K. o Normal sewing foot Part No. 98-694 816-00 (Model 6120—6230) Part No. 98-694 847-00 (Modell 6110) Fancy stitch foot for top feed Part No. 98-694 814-00 (Model 6120 — 6230) NO I(O Clearviewfoot L,(Q (Fancy stitch foot not suitable for top feed> Part No. 98-694 864-00 (Model 6110— 6230) LJILc PvT j) q’ çv-9-?[…]
-
Page 74: Pfaff tipmatic 6150
Sewing feet (accessorlesi 5 Buttonhole foot Part No. 98-694882-00 (Model 6110 — 6230) 6 Darning foot Part No. 93-035960-91 (Model 6110 6230) For Model 6110 special accessory 7 Hemmer Part No. 98-694818-00 (Model 6110 — 6230) For Model 6110 special accessory 8 Edge guide Part No. 98-802422-00 (Model 6110 — 6230) Second spool holder 9333vC3 -?[…]
-
Page 75: Pfaff tipmatic 6150
Sewing feet special accessory) Special accessories are intended for special sewing work. They are available at a charge from your dealer. Accessory Part number Sewing work Appliqué foot 93-042941-91 For appliqué work Bias binder 98-053484-91 For binding edges with (remove foot holder( bias tape Cording foot, 5 grooves 93-042950-91 (twin needles w[…]
-
Page 76: Pfaff tipmatic 6150
Lap-feller seams are not only ornamental but strong, too. This makes them very suitable for sportswear and children’s wear, men’s shirts and Jeans. You can make these seams very effective if you use a sewing thread of a con trasting colour. Overlap the raw edge of the lower ply by about 3/8’ to 5/8’. — Now place this overlapping edge over[…]
-
Page 77: Pfaff tipmatic 6150
Cording foot The classic sewing technique of cording can be used without any problems on fabrics such as cotton and light wollens Underclothing and children’s wear can be given a traditional look with cording. — Engage the cording foot. — Replace the needle with a twin needle 11.6 or 2 mml. — Thread up with two needle threads Isee page 64).[…]
-
Page 78: Pfaff tipmatic 6150
Binding with bias tape is a very easy method of giving fabric edges a smooth and neat appearance. For this you need unfolded bias tape about an inch wide. — Remove the foot holder with sewing foot and screw on the binder. — Cut the beginning of the bias tape at a dia gonal. — Push the tape into the scroll of the binder and pull it out to the […]
-
Page 79: Pfaff tipmatic 6150
J,I%I I progl I I c:j — a C O35-lj 1,5 2 3 cording I I b C jO.35.lj 1.5 2 j foot I Cording foot Cording is a technique in which pearl thread or a fine cord is overstitched to produce a purl seam. With this you can obtain an effect similar to braiding. Appliqués can also be made more effective with this seam. -. Mark the required motif on the fabri[…]
-
Page 80: Pfaff tipmatic 6150
Fnnge foot With this special foot for loop embroidery you can produce fantastic effects in no time. This foot is very useful for terry cloth. -. Mark out any pattern you wish with the magic pen. — Use a silk paper underlay and engage the fringe foot. — Embroider the motif, row by row. For circ les you have to work from the outside inward. — F[…]
-
Page 81: Pfaff tipmatic 6150
Needle chart Selection of the right needle guarantees better sewing of the chosen material. Fabric weight Fabric weight Fabric weight light medium heavy needle needle needle 607075 8090 100 110 120 Needle points Type Shape Type of eye Suitable for and point 130/705H Small ball Universal needle for fine synthetic Needle size: point wovens, fine line[…]
-
Page 82: Pfaff tipmatic 6150
Needle Table Description Stitch Stitch Needle suitable for length width distance 130/705 H-ZWI 2,5 mm — 1,6 mm normal cording Size: 80 2.5 mm — 2.0 mm normal cording 130/705 H-ZWI Size: 80 2,5 mm — 2,5 mm wide cording Size: 90 2,5 mm — 3,0 mm extra wide Size: 100 3.0 mm — 4.0 mm cording Fancy pattern with twin needles Before you sew the des[…]
-
Page 83: Pfaff tipmatic 6150
Maintenance and fault-finding I E r Changing the needle plate Cleaning and oiling Changing the sewing lamp Sewing problems and their solution Page 84 Page 84 Page 85 Page 86 83[…]
-
Page 84: Pfaff tipmatic 6150
q It is very important to clean and oil the sewing machine, because it will reward you with a longer service life. The more often you use the machine, the more care it needs. Removal: Switch off the main switch — Raise the sewing foot and remove the detachable work support. — Push the point of a small screwdriver into the opening between needle[…]
-
Page 85: Pfaff tipmatic 6150
— Changing the sewing lamp Switch off the main switch Disconnect the mains plug and the toot control plug from the machine. — Take off the detachable work support. The sewing lamp Ibulb) is located inside the needle head of the sewing machine Removal To make it easier to change the bulb we recommend placing the sewing machine on the hand wheel as […]
-
Page 86: Pfaff tipmatic 6150
Sewing problems and their solutions Problem/cause: 1. The machine Skips stitches Needle is not properly inserted. Wrong needle is in use, Needle is bent or blunt. Machine is not properly threaded. Needle is too small for thread. 2. Needle thread breaks See reasons above Thread tension is too tight. Thread is poor or has slubs in it, or has become d[…]
-
Page 87: Pfaff tipmatic 6150
L9[…]
-
Page 88: Pfaff tipmatic 6150
co[…]
-
Page 89: Pfaff tipmatic 6150
PFAFF G. M. Plaff Aktiengesellschaft Werk Karisruhe-Durlach GritznerstraL,e 11 76227 Karlsruhe Gedrucki in Deutschland Druckerei Gablenz GmbH 76356 Weingarten, Stettiner StraSe 17 Technische Anderungen vorbehaften Nr.: 29629996-65/OOO OG englisch 8/93[…]
-
Pfaff tipmatic 6150 — page 1
D C’, 1 C C) C D 3 0) D C 0) og C-) 03 0) .sfl NJ 0 C.) -a 01 0 •0 an ‘1 IT’ …
-
Pfaff tipmatic 6150 — page 2
For easier understanding of this instruction book please fold this or the last page open when reading it. Safety rules For the United Kingdom only The leads must definitely not be connected to the safety lead terminal I nor to a plug with three pins. The wires in the mains lead are coloured according to the following code: Neutral Live As the colou …
-
Pfaff tipmatic 6150 — page 3
MrsJ — — OCD ‘.a owl …
-
Pfaff tipmatic 6150 — page 4
Parts of the sewing machine (Models 6230 and 6150) (1) Key for ,,slow sewing” (Model 6230) (2) Key for ,,needle down position” (Model 6230) (3) Key for ,,tacking” (Model 6230) (4) Carrying handle (5) Hand-wheel (6) Hand-wheel release disk (7) Fancy stitch knob (8) Main switch (9) Connection socket ,,mains cord” (Model 6230) Connection socke …
-
Pfaff tipmatic 6150 — page 5
Important safety instructions For the United States only This sewing machine is designed and manufactured for HOUSEHOLD use only. When you use an electric appliance, basic safety precautions should always be adhered to as fol lows: Read all instructions before using this sewing machine. DANGER To reduce the risk of electric shock: 1 The sewing mach …
-
Pfaff tipmatic 6150 — page 6
Notes on safety Notes on safety for domestic sewing machines according to DIN 57 700, Section 28 or IEC 335, Section 28. 1. The user must exercise adequate caution with regard to the up and down moving of the needle and constantly observe the sewing area during work. 2. When leaving the machine, during maintenance work or when changing mechanical p …
-
Pfaff tipmatic 6150 — page 7
Modern, uncomplicated — Sewing by puchbutton control — Congratulations! You have bought a high-quality product that offers unique advantages. Your new sewing machine can take any material in its stride and will sew through thick and thin for you. It features the very latest in design and technology and this instruction book is Just as uncomplic …
-
Pfaff tipmatic 6150 — page 8
Contents Accessories and needles . 72 — 81 Accessory compartment 14 Applique 66 Appliqué foot 78 Bias tape binder . . . . 77 Blind stitch 38 Bobbin case. . 18, 19 Bobbin thread tension . . . 19 Bobbin winding . . . 15 — 1 7 Borders . . . . . . 62. 63, 64 Buttonholes . . . . . . . 46, 47 Changing the needle 26 Changing the needle plate . . . 84 …
-
Pfaff tipmatic 6150 — page 9
Lowering the feed dog Main switch Maintenance and faults Monograms Multi4oot gathering foot. Needle chart Needle position. Needle thread tension Needle threader Nonelastic stitches — Oiling . Open overlock stitch Overlock stitches Pattern length . Pattern width Practical sewing Presser bar litter Puchbutton control Pulling up the bobbin thread Pull …
-
Pfaff tipmatic 6150 — page 10
Utility stitch table (elastic stitches) D E F G HI H HD ID IF K < < _: _: ,—‘ c—’ ‘ / I “ “ -‘ ‘- I I — ‘ I ( < ED ED c : “: , With these programs the stitch length can be set as required between 0 and 6 mm with the stitch length knob (11). Program Description Application A/B/C Buttonholes Standard buttonholes e.g. fo …
-
Pfaff tipmatic 6150 — page 11
I I I S Utility stitch table (non-elastic stitches) KU KG L LC LU LF LI M ME MF MG Program Description Application KD Elastic edge seam For securing seams of edges that do not fray very much KG Shelledging stitch For decorative hems on light fabrics e.g. for underwear L Fancy elastic stitch For overstitching two buttjoined plies LC Emperor stitch A …
-
Pfaff tipmatic 6150 — page 12
Utility stitch table (elastic stitches) D E F G Hi I H HO I HG I ID IF I IG I K I KO I KGI KMI Ill lii ‘i I I I 11/ I l’ ‘, I III I I ii ii I i”i I / —‘I, ‘.. ‘.‘. ‘.‘, I Ill Iii 0 “,ii I “,,ii ‘sit I i”..i ,,, , ,,— II Ih ill I —“i ..—‘ii —II ‘ ,.— — III Hi I iii __.—ii —ii ‘—‘— I i ‘ …
-
Pfaff tipmatic 6150 — page 13
Utility stitch table (elastic stitches) ‘5’ -ii NJ XI ..i XI /1,’ I I I J’t% I I ‘.ii ,X’ iii • III I I I i “.i. ‘.i I 11/ L LD LF LI I LK LDK LEI LGK LMK f M I MD ME MF I MG ,“ I —I’ I I ll i I •.ii Xi 5 41 I X’ I / I I I 11/ I I -ii I I )<i ‘“i 7” I /1/ II .1i Xi in XI /‘s 11/ Program Descriptio …
-
Pfaff tipmatic 6150 — page 14
1IllIII VIIIILilII{ll. ifIIIIIJlIWIL ‘ 11111 PIljjjljjjIIlj 11111111 {fjjjjIIIIjlIl liii II I1IIIUI 1 D II ill II a) 95a) Q) > C) 1 III,IqIIp C lilt ii jliiJlijifi ijlilIIil lj 1 i D _L ‘iii o 111111 liii! ‘liii iii!! iiIh 0 2 a) D C) iIlIIlidlTlIIiIllIiIIiIIIillTlhIlilUIi iilii. D (_ a) — — 1f”ilifJiTI”TN}ill[’’iTjiTHh[’lli …
-
Pfaff tipmatic 6150 — page 15
PFAFF I pt onlc 6230 / i!II ——— Operation of the sewing machine I Electrical connection page 1 2, 1 3 I Detachable work support page 1 4 Bobbins pages 15 — 17 Bobbin case pages 1 8, 1 9 Bobbin thread tension page 1 9 J Threading the needle page 20 Needle threader page 21 I Pulling up the bobbin thread page 22 Sewing foot lifter page 22 Thre …
-
Pfaff tipmatic 6150 — page 16
Carrying case Place the enclosed mains cord, foot control and instruction book in the compartment of the carrying case. 0’ Programs The programs of the sewing machine are illustrated on the inside of the top cover Top cover Open the folding cover (26) upwards. Electrical connection (Modell 6230) Connect the mains cord with the socket (9) of the s …
-
Pfaff tipmatic 6150 — page 17
Connecting the foot control (Model 6230) Connect the plug of the foot control with the connection socket (12) of the sewing machine. The sewing speed is regulated by pressing the pedal. Main switch Connect the plug of the foot control with the connection socket (9) of the sewing machine. The sewing speed is regulated by pressing the pedal. The sewi …
-
Pfaff tipmatic 6150 — page 18
A I J 41 41 41 .41 .4 Winding the bobbin from the reel holder Place the sewing thread on the reel holder (24). To obtain free movement of the thread and hold the thread reel firmly, fit an unwind ing disk corresponding to the size of the thread reel. Threading Place the thread into guide A from behind and pull it through opening B to the right. Win …
-
Pfaff tipmatic 6150 — page 19
I 3 V Winding from the second reel holder Insert the second reel holder (25) in the hole provided and place a reel of thread on it. Threading Place the thread into guide C and pull it through opening B to the right. Wind the thread clockwise a few times around the bob bin. Switch on the main switch Hold the end of the thread firmly and press the fo …
-
Pfaff tipmatic 6150 — page 20
A Hook cover Switch off the main switch Hold the hook cover (28) at the side and open it to the front. Thread tension Lift the latch of the bobbin case and pull out the bobbin case. Release the latch and take out the empty bobbin. To obtain optimum seam appearance and durability make sure the needle and bobbin thread lensions are correctly adjusted …
-
Pfaff tipmatic 6150 — page 21
Inserting the bobbin F Insert the full bobbin in the bobbin case. When doing so, pull the thread sideways through slot A, then under tension spring B until it rests in the opening (see arrow). Check: When you pull the thread, the bobbin must turn clockwise. Checking the bobbin thread tension Hold the bobbin case by the thread and move your hand sha …
-
Pfaff tipmatic 6150 — page 22
Threading the needle Switch off the main switch. Raise the presser foot lifter (20). Turn the hand wheel until the take-up lever (19) has moved to the top. Place the thread on the reel holder (24) and fit an unwinding disk of the right size. Now, using both hands, pull the thread into guide A and under thread guide hook D. Pa the thread through the …
-
Pfaff tipmatic 6150 — page 23
Needle threader (Models 6120. 6150. 6230) The PFAFF needle threader (16) is an aid to make threading the needle easier and quicker. Lower the sewing foot (see next page). Turn the hand wheel until the needle is at its high est point. Piace the needle thread over hook o and hold it taut. Move the threader fully downwards and turn it towards the need …
-
Pfaff tipmatic 6150 — page 24
The sewing foot is raised or lowered with the presser bar lifter (20). Drawing up the bobbin thread Raise the sewing foot. Hold the needle thre and turn the hand wheel towards you until needle is at the top again and the bobbin thread has formed a loop. Pull the needle thread to draw up the bobbin thread. —r Bobbin thread Close the hook cover (28 …
-
Pfaff tipmatic 6150 — page 25
U Removing the sewing foot Turn off the main switch Set the needle at its highest point. Press the sewing foot upwards at the front and down wards at the back at the same time so that it disengages from the sewing toot holder (15). Check: Place the sewing foot under the sewing foot holder (15) that the pins of the foot engage in the sewing foot hol …
-
Pfaff tipmatic 6150 — page 26
The built-in dual fabric feed (Models 6120, 6150, 6230) For sewing difficult materials PFAFF offers the ideal solution: built-in dual feed. As on industria sewing machines it feeds the material from the top and bottom at the same time. The fabric is fed accurately. On light or difficult materials such as silk and viscose fabrics the dual fabric fee …
-
Pfaff tipmatic 6150 — page 27
Disengaging the top feed Hold the top feed with two fingers at the marked places. Push the top feed (23) down a little and out to the rear, and let it move slowly upwards (see also the illustration on page 24(. Engaging the top feed (Models 6120. 6150. 6230) Raise the sewing foot. Now push the top feed (23) so that it snaps in place Important! For …
-
Pfaff tipmatic 6150 — page 28
Changing the needle Switch off main switch To remove: Lower the sewing foot and set the needle at its highest point. Now loosen the Fixing screw (22) and pull the needle out downa rds. To insert: The flat side A of the needle must Face to the rear. Lower the sewing foot dnd insert the needle. pushing it up as far as it will go. Hold the needle and …
-
Pfaff tipmatic 6150 — page 29
Setting the need’e thread tension Set the required amount on the needle thread tension (18) using mark A The normal setting for sewing is 4 to 5 For embroidering. darning and buttonhole sewing between 2 and 3. For certain sewing work, e g. darning, the feed dog has to be dropped. To do this, open the hook cover and press slide B fully to the righ …
-
Pfaff tipmatic 6150 — page 30
Reverse sewing The machine sews in reverse as long as the reverse key (21) is kept pressed. Li AA You will find the symbol buttonhole bet ween the figure 0 arid 1. The optimal stitch density for sewing buttonholes is in this range. The stitch becomes more concentrated the farther you turn towards O Stitch length knob You can set the stitch length ( …
-
Pfaff tipmatic 6150 — page 31
Pushbutton controls Setting utility stitches Under the id (26) you can find the program PFAFF tiptronic 6230 table with all the stitches and stitch combina tions. On model 6230 the most important stitches are additionally illustrated on the lighted display. Each program has been given a letter that you can find on the bushbutton controls. If the ri …
-
Pfaff tipmatic 6150 — page 32
Utility and stretch stitch combinations AIAAA By striking two or several keys you can m combinations in the utility stitch range The stitch length knob can either be set in utility sewing range or in the stretch range All the stitch combinations are illustrated the program table in the lid. You can rele keys that are already activated with key B. P …
-
Pfaff tipmatic 6150 — page 33
Function keys (Model 6230) The tiptronic has three function keys. 1. Sewing slowly When key (1) slow sewing’ is pressed the green diode lights up. The sewing machine now sews at half speed. If the key is pressed again the green diode is extinguished and the machine sews at full speed again. 2. Needle position up/down Each time sewing is interrupt …
-
Pfaff tipmatic 6150 — page 34
Sewing chart General sewing aids Nonelastic stitches Elastic stitches Overlock stitches Covering stitches Buttonhole Hems with twin needle Smocking Gathering Darning Inserting zippers Rollhemming Sewing lace Shelledging page 34 pages 35 pages 36 — 39 pages 40, 45 pages 42, 43 pages 44, 45 pages 46, 47 page 48 page 48 pages 49, 50 pages 51 — 53 …
-
Pfaff tipmatic 6150 — page 35
Explanation of the sewing chart The following charts show the recom mended settings that you require for the relevant sewing operations. These charts also provide you with further instructions that are necessary when sewing the selected programs: The choice of the sewing foot, the setting of the needle thread tension and whether the sewing is carri …
-
Pfaff tipmatic 6150 — page 36
Needle thread tension In order to obtain perfect sewing results the needle and bobbin thread tensions must be correctly adapted to each other. The normal setting for utility stitches is 3 to 5. Check the tension using a wide zigzag stitch. The interlace of the two threads must lie in the middle of the two fabric plies. If the interlace lies on the …
-
Pfaff tipmatic 6150 — page 37
HLi a Taste3 — — C’ 3 0/1 b — — — — — Basting stitch (Mode) 6230) With key (3) basting you can baste a gar ment before trying it on. When you press the foot control the machine will only make one stitch. For each further stitch you have to press the foot control each time, — Lower the bottom feed and disengage the top feed. — Place th …
-
Pfaff tipmatic 6150 — page 38
i I I I prog Z*j L_____ J6j_j35IO3J Zigzag stitch With keys D, E and F you can alter the width of the zigzag stitches from 2 to 6 mm. By combining the keys DIE or E/F you obtain additional widths When serging the edge, always make sure the needle goes into the material and over the edge alternately For serging difficult materials, blind stitch foot …
-
Pfaff tipmatic 6150 — page 39
Blind stitch H is best suited for invisible hems; sewing by hand is unnecessary. — Serge the edge of the hem. — Fold the edge inwards by the hem width. — Now unfold the hem again so that the hem edge protrudes by about half an inch. — Now place the fabric under the sewing foot so that the crease line runs along edge guide B. — When the ne …
-
Pfaff tipmatic 6150 — page 40
a! E 4 23!— U Sewing on buttons with stems — Insert the sewing foot. — Place a match between the holes of the button and sew it on as described on the left. Sewing on buttons With orogram E you can sew on two and four- hole buttons with no problem at all — Remove the sewing foot and lower the feed dog. — Turn the hand wheel towards you an …
-
Pfaff tipmatic 6150 — page 41
1 prog 1” — jJ a DFFSTc 46 • 35 01 D E F StrpcP 4 6 3 5 0 Stretch triple straight stitch This program is used for sewing all seams where great strength is needed, e.g. inside trouser seams. The farther you turn the stitch length knob, the longer the stitch length. Stretch triple zigzag stitch The stretch triple zigzag stitch is a highly elasti …
-
Pfaff tipmatic 6150 — page 42
prog 1 I I III I I> III I I prog I I a M 1-2,5 I 6 • 3 5 I 0/1 a M I Stretch I 6 • 3-5 0/1 [ bIMI125161._13-510I bMIStretchI6I_I35I0I Elastic stitch Owing to its high elasticity this stitch is used for sewing on elastic tapes, e.g. on underwear. Cut off the old elastic tape close to the edge. — Gather the fabric with 6 mm long straight sti …
-
Pfaff tipmatic 6150 — page 43
N N N N What is an overlock stitch? For knitted and other stretch materials the models with pushbutton controls offer a selection of overlock stitches. These join two plies of fabric and serge them in one opera tion. They have a higher elasticity than usual seams, they are more durable, and you can sew them fast, too. Closed overlock stitch TIP: Wh …
-
Pfaff tipmatic 6150 — page 44
— ‘4 ‘ .. _4 •4 .s.•-_’ a- 4 _ ‘_4 4.44?_A I I • I _4_ _4,_•,,,-e 4 • a- , ., I — A — — 4?— %-‘‘ 4? _i I -‘—- “ I •-_‘_ ‘,‘—,.-:—-—- -..-> 3 ‘, —‘-. ,‘- __•4__ ‘, — — I -; — Aa, -* — —4. I > I -‘:.4:%—— Pullover stitch This stitch is suitable for open knit fabrics Fu …
-
Pfaff tipmatic 6150 — page 45
prog : L Stretch 6 • 3-5 : L Stretchl 6 — I 1 Fagoting stitch With fagoting stitch you can make very elastic seams with hemstitching effect, eg. on corsetry. — Serge the fabric edges and tack baste over on the inside. — Place the fabric under the sewing foot with the edges about 1/8 of an inch apart. — Sew on the face side, making sure the …
-
Pfaff tipmatic 6150 — page 46
I,l)IJ I I prog 1 i -.-l progj ‘ I JaLH-2I6j•3-5j1 !aLFIStretchI5I.3-5I1 I IbI L 11-216 HI 0 IbI — I — — — — Fancy elastic stitch Fancy elastic stitch is very useful for materials that need a flat seam, e.g. terry cloth. — Place the two fabric edges so that they overlap by about 3/4 of an inch and over- stitch each edge with fancy elastic sti …
-
Pfaff tipmatic 6150 — page 47
PFAFF t i ptron ic 6230 tipmatic 6110, 6120, 6150 PFAFF — ) instruction manual …
-
Pfaff tipmatic 6150 — page 48
Buttonholes Sewing buttonholes is very easy with all the models with pushbutton controls since the fabric does not have to be turned. 8uttonholes are generally sewn onto a piece of doubled fabric. However, for some materials, e.g. silk, organza and viscose, it is necessary to use silk paper backing to prevent the material from contracting while sew …
-
Pfaff tipmatic 6150 — page 49
I I I I — prog I I I -.. I—I ABC 44,5 3 b A BCI : 3 5 ___________ B Linen buttonholes Insert the buttonhole slide and push it fully to the front. — Press key C and sew the first seam to the required length. Then press key B. Keep it pressed and sew a few stitches for the bartack, while holding the material securely. Then press key A and sew bac …
-
Pfaff tipmatic 6150 — page 50
I.! iii ii Il lii rr — — ,, t.* ., Lit i. -jiI’tt’ ‘t, t .t i.r I’’Iv progi I -_-I 23;i Ta G I i — • 3.510/h bIGl3-13-510I Sewing hems with the twin needle With the twin needle you can not only embroider, but also make topstitch seams. Using the twin needle you can add a profes sional touch to hems on stretch materials such as T shir …
-
Pfaff tipmatic 6150 — page 51
i 6 6 • 3 5 C) 1 35 01 Gathering with straight stitch With Program G at a stitch length of 6 mm you can gather sleeves, skirts or valances. To obtain a neat and even gather you should sew two or three gathering seams. — Mark the first line on the face side of the fabric and stitch along it. Leave about four or five inches of thread protruding at …
-
Pfaff tipmatic 6150 — page 52
a ‘::‘. TIP: The cording foot (special accessory) is Gathering sleeves or waist seams is no pro also ideal for gathering. The grooves in this blem at all with elastic threads. The elastic foot guide the elastic evenly during the sewing thread must not be wound onto the bobbin, operation. — Mark the first gathering seam on the reverse side of …
-
Pfaff tipmatic 6150 — page 53
prog ‘1’ a G — — 0 23 6 b G — — 23 aEcer Darning with the straight stitch Insert the darning foot: Set the needle at its highest position and push the pin of the darning foot fully into hole C. When you do this, guide fork G places itself around the presser bar. Wire E must be behind fixing screw F. Now tighten screw D. Darning position: Lo …
-
Pfaff tipmatic 6150 — page 54
I I! prog I a M 021 6 M 021 6 prog I < I •35011 0 M 15 6 35 0 Darning with elastic stitch Darning with elastic stitch is also a very suitable means of repairing damaged fabric. — Sew over the damaged area with rows of stitches until it is well covered. When doing so, make sure the stitch rows overlap each other. Sewing on patches The best wa …
-
Pfaff tipmatic 6150 — page 55
2fl Z — D DO • : V _ 0 Q E’ (0 CDE_ r • 0 — 3 o a DD COO 0 3 00 0 -, ________ 0 — D—43c LD oC 0 . 0 = aoO C) ci, ci, 0 — D-, 00 ci, …
-
Pfaff tipmatic 6150 — page 56
progl a G 3 — . 3-5 4 b G 3 — 3-5 4 Sewing in zippers There are different ways to sew in zippers. For skirts we recommend inserting the zipper concealed on both sides, and for men’s or ladies’ slacks concealed on one side. Different types of zippers are available in shops and stores. For tough materials such as denim we recommend metal zipp …
-
Pfaff tipmatic 6150 — page 57
— Sew the second half of the zipper parallel at the same distance. Stop shortly before the end of the seam and leave the needle in the material. Raise the sewing foot and open the zipper. — You can now sew to the end of the seam. — Shortly before the end of the seam, open the zipper and finish sewing the seam. — Close the zipper and baste t …
-
Pfaff tipmatic 6150 — page 58
Roll hemming With the hemmer you can rollhem blouses, silk fabrics or valances with no problem at all and without having to iron the edges before hand Hemming secures the edges against fraying and produces a tidy and durable edge finish. — Fold the fabric edge over double (about (5/64) 2 mm per fold). — Place the folded fabric edge under the he …
-
Pfaff tipmatic 6150 — page 59
Lace inserts You can produce a beautiful effect on christening wear or other children’s clothes with lace inserts, First baste the lace to the face side of the fabric. — Stitch both edges of the lace with a narrow margin. — Cut open the fabric under the lace at the middle and iron it over to the side. — Stitch over both edges of the lace wi …
-
Pfaff tipmatic 6150 — page 60
,: 45O Shell edging Shell edging is very effective for thin, soft fabrics such as silk and viscose materials. It is frequently used as an edge finish on under wear, too. The tighter you set the needle thread tension the farther the shell edging is pulled in Serge the raw edge and iron the seam margin over to the left. While sewing, make sure that t …
-
Pfaff tipmatic 6150 — page 61
embroidery techniques 4 Sewing table for embroidery Decorative stitches Monograms Appliqué Richelieu Quilting Eyelet embroidery Hemstitching page 60 page 61 — 64 page 65 page 66 page 66 page 67 page 68 page 69 Decorative and traditional I 59 …
-
Pfaff tipmatic 6150 — page 62
Decorative stitches B To enhance your own home textiles or gar ments the models 6150 and 6230 offer you a S whole host of fancy and decorative stitches to choose from. You can produce even greater embroidery variations by selecting different combinations, colours or sizes. For embroi dery work we recommend using special embroidery threads which are …
-
Pfaff tipmatic 6150 — page 63
Changing the pattern length You can vary the pattern length infinitely with the aid of the stitch length knob. The stitch density for embroidery is generally in the but tonhole range. The larger the stitch density you set is, the farther the pattern is stretched apart. Changing the pattern width The machine automatically Sets a stitch width of 6 mm …
-
Pfaff tipmatic 6150 — page 64
B S ft B 0 n r t Borders By combining different embroidery programs you can embroider borders of any width. Madeira embroidery threads are very suitable. They are available in many colour shades and different sizes. However, only use one thread size for one piece of embroidery work. — Apply iron-on backing or place silk backing paper under the fa …
-
Pfaff tipmatic 6150 — page 65
Borders with a combination of stitches By combining different embroidery keys as desired you can easily achieve other embroi dered effects. This is a simple and pleasing way to embellish tablecloths and garments. — Apply iron-On backing or place silk backing paper under the fabric. — Mark the centre with tailors chalk. — You can now begin wit …
-
Pfaff tipmatic 6150 — page 66
Twin neeate You can achieve further embroidery effects by using the twin needle. The illustrations show what beautiful borders can be made with a little imagination. Note: Only use a twin need with a width of 2,5 mm for all embroidery. Threading the twin needle — Insert the twin needle. Fit the second reel holder and place one reel of thread on e …
-
Pfaff tipmatic 6150 — page 67
Monograms No matter whether you work on terry cloth or woven fabric, with the darning foot and pro grams D, E or F you can monogram any initi als of your own design. Freehand guiding, however, needs a little practice in the beginning. — Transfer the initials with the magic pen to the part to be embroidered. — Lower the feed dog and insert the d …
-
Pfaff tipmatic 6150 — page 68
pl Appliqués are quickly made and always pro duce a beautiful fancy effect. By using diffe rent materials and patterns you can obtain variations galore. You can make a perfect, densely stitched seam with the applique foot (special accessoriesf, because it has a special cutout on its sole for the zigzag seam. — Insert the appliqué foot in the se …
-
Pfaff tipmatic 6150 — page 69
Quilting Quilting is a traditional sewing technique. The method that the wives of American settlers developed to make use of material remnants has become an artistic hobby with many enthusiasts in our country, too. A quilt always consists of three layers of material. Lots of geometrically shaped pieces of material are joined together in continually …
-
Pfaff tipmatic 6150 — page 70
Traditional eyelet embroidery which long ago had to he made laboriously by hand can be made quite easily with the help of an eyelet plate Ispecial accessory). This is very etfective on blouses, bed or table linen Practically all stitch types are suitable for this utility stitches such as a zigzag stitch, blind stitch, elastic stitch or fancy stitch …
-
Pfaff tipmatic 6150 — page 71
Cl, 3CDCD23 C) CD 3 3 CD 0 N CD DC 0 0 DC DC 0 CD DC CD CD Q.3-0 CC * CD < 3 CD DC DC -< 0. 0 CD .CCD DC CD 0. -V DC 0C -n7(9 CDDC C Q 0.3 DC 3 3 CD 0 DC 3- CD 3- CD DC 0 DC C I DC30.3 3- CDCDDCDC Cs, g — C 3-OC—DC<D 3 3 CD 3- DC CC. CD CD C CD Z — 2.3 3 DC _ DC —. p CDDC—.3C)03 3- “ 0 C ‘< 0 CD < DC DC a E E3 DC CD 3 3- C- …
-
Pfaff tipmatic 6150 — page 72
Accessories and needles Sewing feet (normal accessories) Special accessory table Felling foot Gathering foot Cording foot Bias binder Multistitch gatherer Cording foot Appliqué foot Fringe foot Needle table pages 72, 73 page 74 page 75 page 75 page 76 page 77 page 77 page 78 page 78 page 79 pages 80, 81 71 …
-
Pfaff tipmatic 6150 — page 73
Sewing feet (accessories) K. o Normal sewing foot Part No. 98-694 816-00 (Model 6120—6230) Part No. 98-694 847-00 (Modell 6110) Fancy stitch foot for top feed Part No. 98-694 814-00 (Model 6120 — 6230) NO I(O Clearviewfoot L,(Q (Fancy stitch foot not suitable for top feed> Part No. 98-694 864-00 (Model 6110— 6230) LJILc PvT j) q’ çv-9-? …
-
Pfaff tipmatic 6150 — page 74
Sewing feet (accessorlesi 5 Buttonhole foot Part No. 98-694882-00 (Model 6110 — 6230) 6 Darning foot Part No. 93-035960-91 (Model 6110 6230) For Model 6110 special accessory 7 Hemmer Part No. 98-694818-00 (Model 6110 — 6230) For Model 6110 special accessory 8 Edge guide Part No. 98-802422-00 (Model 6110 — 6230) Second spool holder 9333vC3 -? …
-
Pfaff tipmatic 6150 — page 75
Sewing feet special accessory) Special accessories are intended for special sewing work. They are available at a charge from your dealer. Accessory Part number Sewing work Appliqué foot 93-042941-91 For appliqué work Bias binder 98-053484-91 For binding edges with (remove foot holder( bias tape Cording foot, 5 grooves 93-042950-91 (twin needles w …
-
Pfaff tipmatic 6150 — page 76
Lap-feller seams are not only ornamental but strong, too. This makes them very suitable for sportswear and children’s wear, men’s shirts and Jeans. You can make these seams very effective if you use a sewing thread of a con trasting colour. Overlap the raw edge of the lower ply by about 3/8’ to 5/8’. — Now place this overlapping edge over …
-
Pfaff tipmatic 6150 — page 77
Cording foot The classic sewing technique of cording can be used without any problems on fabrics such as cotton and light wollens Underclothing and children’s wear can be given a traditional look with cording. — Engage the cording foot. — Replace the needle with a twin needle 11.6 or 2 mml. — Thread up with two needle threads Isee page 64). …
-
Pfaff tipmatic 6150 — page 78
Binding with bias tape is a very easy method of giving fabric edges a smooth and neat appearance. For this you need unfolded bias tape about an inch wide. — Remove the foot holder with sewing foot and screw on the binder. — Cut the beginning of the bias tape at a dia gonal. — Push the tape into the scroll of the binder and pull it out to the …
-
Pfaff tipmatic 6150 — page 79
J,I%I I progl I I c:j — a C O35-lj 1,5 2 3 cording I I b C jO.35.lj 1.5 2 j foot I Cording foot Cording is a technique in which pearl thread or a fine cord is overstitched to produce a purl seam. With this you can obtain an effect similar to braiding. Appliqués can also be made more effective with this seam. -. Mark the required motif on the fabri …
-
Pfaff tipmatic 6150 — page 80
Fnnge foot With this special foot for loop embroidery you can produce fantastic effects in no time. This foot is very useful for terry cloth. -. Mark out any pattern you wish with the magic pen. — Use a silk paper underlay and engage the fringe foot. — Embroider the motif, row by row. For circ les you have to work from the outside inward. — F …
-
Pfaff tipmatic 6150 — page 81
Needle chart Selection of the right needle guarantees better sewing of the chosen material. Fabric weight Fabric weight Fabric weight light medium heavy needle needle needle 607075 8090 100 110 120 Needle points Type Shape Type of eye Suitable for and point 130/705H Small ball Universal needle for fine synthetic Needle size: point wovens, fine line …
-
Pfaff tipmatic 6150 — page 82
Needle Table Description Stitch Stitch Needle suitable for length width distance 130/705 H-ZWI 2,5 mm — 1,6 mm normal cording Size: 80 2.5 mm — 2.0 mm normal cording 130/705 H-ZWI Size: 80 2,5 mm — 2,5 mm wide cording Size: 90 2,5 mm — 3,0 mm extra wide Size: 100 3.0 mm — 4.0 mm cording Fancy pattern with twin needles Before you sew the des …
-
Pfaff tipmatic 6150 — page 83
Maintenance and fault-finding I E r Changing the needle plate Cleaning and oiling Changing the sewing lamp Sewing problems and their solution Page 84 Page 84 Page 85 Page 86 83 …
-
Pfaff tipmatic 6150 — page 84
q It is very important to clean and oil the sewing machine, because it will reward you with a longer service life. The more often you use the machine, the more care it needs. Removal: Switch off the main switch — Raise the sewing foot and remove the detachable work support. — Push the point of a small screwdriver into the opening between needle …
-
Pfaff tipmatic 6150 — page 85
— Changing the sewing lamp Switch off the main switch Disconnect the mains plug and the toot control plug from the machine. — Take off the detachable work support. The sewing lamp Ibulb) is located inside the needle head of the sewing machine Removal To make it easier to change the bulb we recommend placing the sewing machine on the hand wheel as …
-
Pfaff tipmatic 6150 — page 86
Sewing problems and their solutions Problem/cause: 1. The machine Skips stitches Needle is not properly inserted. Wrong needle is in use, Needle is bent or blunt. Machine is not properly threaded. Needle is too small for thread. 2. Needle thread breaks See reasons above Thread tension is too tight. Thread is poor or has slubs in it, or has become d …
-
Pfaff tipmatic 6150 — page 87
L9 …
-
Pfaff tipmatic 6150 — page 88
co …
-
Pfaff tipmatic 6150 — page 89
PFAFF G. M. Plaff Aktiengesellschaft Werk Karisruhe-Durlach GritznerstraL,e 11 76227 Karlsruhe Gedrucki in Deutschland Druckerei Gablenz GmbH 76356 Weingarten, Stettiner StraSe 17 Technische Anderungen vorbehaften Nr.: 29629996-65/OOO OG englisch 8/93 …
Need a manual for your Pfaff tipmatic 6150 Sewing Machine? Below you can view and download the PDF manual for free. There are also frequently asked questions, a product rating and feedback from users to enable you to optimally use your product. If this is not the manual you want, please contact us.
Is your product defective and the manual offers no solution? Go to a Repair Café for free repair services.
Manual
Rating
Let us know what you think about the Pfaff tipmatic 6150 Sewing Machine by leaving a product rating. Want to share your experiences with this product or ask a question? Please leave a comment at the bottom of the page.
Are you satisfied with this Pfaff product?
Yes No
2 votes
Frequently Asked Questions
Our support team searches for useful product information and answers to frequently asked questions. If you find an inaccuracy in our frequently asked questions, please let us know by using our contact form.
What size needle should I use? Verified
The size of the needle depends on the fabric. For a thicker fabric, you will need a thinker needle. The application of the needle of often mentioned on the packaging.
This was helpful (972)
I have checked everything, but my sewing machine thread keeps breaking, what can I do? Verified
If the upper thread of the machine keeps breaking where the needle enters the fabric, it could be that the needleplate or bobbin case have minor damages in the form of scratches and/or sharp edges. These minor damages can cause the thread to break after a few stitches.
This was helpful (843)
How long does a sewing machine neelde last? Verified
This varies between manufacturers, but in general a needle will last about 8 hours. It might take longer for the needle to break, but before that it will have become blunt and might damage the fabric.
This was helpful (438)
My needle keeps breaking, what is causing this? Verified
There can be various reasons for this. The needle may not be the correct one for the selected fabric, the needle may have been set too low, the fabric may not be properly guided or the bobbin case may be placed incorrectly.
This was helpful (412)
Do I need to lubricate my Pfaff sewing machine? Verified
Pfaff sewing machines are generally self-lubiracting and do not need additional lubrication. Exceptions are the ‘select 4.2’ and ‘Smarter by Pfaff C1100 Pro’ models.
This was helpful (310)
Do I need to turn my sewing machine completely off to replace the needle? Verified
You can change the needle after turning off the product with the on/off switch. When cleaning the product you should disconnect it from the power supply.
This was helpful (296)
Посмотреть инструкция для Pfaff tipmatic 6150 бесплатно. Руководство относится к категории швейные машины, 3 человек(а) дали ему среднюю оценку 8.7. Руководство доступно на следующих языках: английский. У вас есть вопрос о Pfaff tipmatic 6150 или вам нужна помощь? Задайте свой вопрос здесь
Не можете найти ответ на свой вопрос в руководстве? Вы можете найти ответ на свой вопрос ниже, в разделе часто задаваемых вопросов о Pfaff tipmatic 6150.
Какой размер иглы лучше всего использовать?
Наиболее подходящий размер иглы зависит от используемой толщины ткани. С плотной тканью следует использовать толстую иглу. Подходящие типы тканей указываются на упаковке с иглами.
Какой срок службы у швейной иглы?
Как правило, срок службы швейной иглы составляет от 7 до 9 часов.
Что может повредить иглу при шитье?
Причин повреждения иглы может быть несколько: — Использование неподходящей иглы для определенного типа ткани — Установка иглы слишком низко — Неправильное расположение ткани — Неправильно установленный шпульный колпачок
Инструкция Pfaff tipmatic 6150 доступно в русский?
К сожалению, у нас нет руководства для Pfaff tipmatic 6150, доступного в русский. Это руководство доступно в английский.
Не нашли свой вопрос? Задайте свой вопрос здесь
-
Страница 1
D C’, 1 C C) C D 3 0) D C 0) og C-) 03 0) .sfl NJ 0 C.) -a 01 0 •0 an ‘1 IT’[…]
-
Страница 2
For easier understanding of this instruction book please fold this or the last page open when reading it. Safety rules For the United Kingdom only The leads must definitely not be connected to the safety lead terminal I nor to a plug with three pins. The wires in the mains lead are coloured according to the following code: Neutral Live As the colou[…]
-
Страница 3
MrsJ — — OCD ‘.a owl[…]
-
Страница 4
Parts of the sewing machine (Models 6230 and 6150) (1) Key for ,,slow sewing” (Model 6230) (2) Key for ,,needle down position” (Model 6230) (3) Key for ,,tacking” (Model 6230) (4) Carrying handle (5) Hand-wheel (6) Hand-wheel release disk (7) Fancy stitch knob (8) Main switch (9) Connection socket ,,mains cord” (Model 6230) Connection socke[…]
-
Страница 5
Important safety instructions For the United States only This sewing machine is designed and manufactured for HOUSEHOLD use only. When you use an electric appliance, basic safety precautions should always be adhered to as fol lows: Read all instructions before using this sewing machine. DANGER To reduce the risk of electric shock: 1 The sewing mach[…]
-
Страница 6
Notes on safety Notes on safety for domestic sewing machines according to DIN 57 700, Section 28 or IEC 335, Section 28. 1. The user must exercise adequate caution with regard to the up and down moving of the needle and constantly observe the sewing area during work. 2. When leaving the machine, during maintenance work or when changing mechanical p[…]
-
Страница 7
Modern, uncomplicated — Sewing by puchbutton control — Congratulations! You have bought a high-quality product that offers unique advantages. Your new sewing machine can take any material in its stride and will sew through thick and thin for you. It features the very latest in design and technology and this instruction book is Just as uncomplic[…]
-
Страница 8
Contents Accessories and needles . 72 — 81 Accessory compartment 14 Applique 66 Appliqué foot 78 Bias tape binder . . . . 77 Blind stitch 38 Bobbin case. . 18, 19 Bobbin thread tension . . . 19 Bobbin winding . . . 15 — 1 7 Borders . . . . . . 62. 63, 64 Buttonholes . . . . . . . 46, 47 Changing the needle 26 Changing the needle plate . . . 84[…]
-
Страница 9
Lowering the feed dog Main switch Maintenance and faults Monograms Multi4oot gathering foot. Needle chart Needle position. Needle thread tension Needle threader Nonelastic stitches — Oiling . Open overlock stitch Overlock stitches Pattern length . Pattern width Practical sewing Presser bar litter Puchbutton control Pulling up the bobbin thread Pull[…]
-
Страница 10
Utility stitch table (elastic stitches) D E F G HI H HD ID IF K < < _: _: ,—‘ c—’ ‘ / I “ “ -‘ ‘- I I — ‘ I ( < ED ED c : “: , With these programs the stitch length can be set as required between 0 and 6 mm with the stitch length knob (11). Program Description Application A/B/C Buttonholes Standard buttonholes e.g. fo[…]
-
Страница 11
I I I S Utility stitch table (non-elastic stitches) KU KG L LC LU LF LI M ME MF MG Program Description Application KD Elastic edge seam For securing seams of edges that do not fray very much KG Shelledging stitch For decorative hems on light fabrics e.g. for underwear L Fancy elastic stitch For overstitching two buttjoined plies LC Emperor stitch A[…]
-
Страница 12
Utility stitch table (elastic stitches) D E F G Hi I H HO I HG I ID IF I IG I K I KO I KGI KMI Ill lii ‘i I I I 11/ I l’ ‘, I III I I ii ii I i”i I / —‘I, ‘.. ‘.‘. ‘.‘, I Ill Iii 0 “,ii I “,,ii ‘sit I i”..i ,,, , ,,— II Ih ill I —“i ..—‘ii —II ‘ ,.— — III Hi I iii __.—ii —ii ‘—‘— I i ‘[…]
-
Страница 13
Utility stitch table (elastic stitches) ‘5’ -ii NJ XI ..i XI /1,’ I I I J’t% I I ‘.ii ,X’ iii • III I I I i “.i. ‘.i I 11/ L LD LF LI I LK LDK LEI LGK LMK f M I MD ME MF I MG ,“ I —I’ I I ll i I •.ii Xi 5 41 I X’ I / I I I 11/ I I -ii I I )<i ‘“i 7” I /1/ II .1i Xi in XI /‘s 11/ Program Descriptio[…]
-
Страница 14
1IllIII VIIIILilII{ll. ifIIIIIJlIWIL ‘ 11111 PIljjjljjjIIlj 11111111 {fjjjjIIIIjlIl liii II I1IIIUI 1 D II ill II a) 95a) Q) > C) 1 III,IqIIp C lilt ii jliiJlijifi ijlilIIil lj 1 i D _L ‘iii o 111111 liii! ‘liii iii!! iiIh 0 2 a) D C) iIlIIlidlTlIIiIllIiIIiIIIillTlhIlilUIi iilii. D (_ a) — — 1f”ilifJiTI”TN}ill[’’iTjiTHh[’lli[…]
-
Страница 15
PFAFF I pt onlc 6230 / i!II ——— Operation of the sewing machine I Electrical connection page 1 2, 1 3 I Detachable work support page 1 4 Bobbins pages 15 — 17 Bobbin case pages 1 8, 1 9 Bobbin thread tension page 1 9 J Threading the needle page 20 Needle threader page 21 I Pulling up the bobbin thread page 22 Sewing foot lifter page 22 Thre[…]
-
Страница 16
Carrying case Place the enclosed mains cord, foot control and instruction book in the compartment of the carrying case. 0’ Programs The programs of the sewing machine are illustrated on the inside of the top cover Top cover Open the folding cover (26) upwards. Electrical connection (Modell 6230) Connect the mains cord with the socket (9) of the s[…]
-
Страница 17
Connecting the foot control (Model 6230) Connect the plug of the foot control with the connection socket (12) of the sewing machine. The sewing speed is regulated by pressing the pedal. Main switch Connect the plug of the foot control with the connection socket (9) of the sewing machine. The sewing speed is regulated by pressing the pedal. The sewi[…]
-
Страница 18
A I J 41 41 41 .41 .4 Winding the bobbin from the reel holder Place the sewing thread on the reel holder (24). To obtain free movement of the thread and hold the thread reel firmly, fit an unwind ing disk corresponding to the size of the thread reel. Threading Place the thread into guide A from behind and pull it through opening B to the right. Win[…]
-
Страница 19
I 3 V Winding from the second reel holder Insert the second reel holder (25) in the hole provided and place a reel of thread on it. Threading Place the thread into guide C and pull it through opening B to the right. Wind the thread clockwise a few times around the bob bin. Switch on the main switch Hold the end of the thread firmly and press the fo[…]
-
Страница 20
A Hook cover Switch off the main switch Hold the hook cover (28) at the side and open it to the front. Thread tension Lift the latch of the bobbin case and pull out the bobbin case. Release the latch and take out the empty bobbin. To obtain optimum seam appearance and durability make sure the needle and bobbin thread lensions are correctly adjusted[…]
-
Страница 21
Inserting the bobbin F Insert the full bobbin in the bobbin case. When doing so, pull the thread sideways through slot A, then under tension spring B until it rests in the opening (see arrow). Check: When you pull the thread, the bobbin must turn clockwise. Checking the bobbin thread tension Hold the bobbin case by the thread and move your hand sha[…]
-
Страница 22
Threading the needle Switch off the main switch. Raise the presser foot lifter (20). Turn the hand wheel until the take-up lever (19) has moved to the top. Place the thread on the reel holder (24) and fit an unwinding disk of the right size. Now, using both hands, pull the thread into guide A and under thread guide hook D. Pa the thread through the[…]
-
Страница 23
Needle threader (Models 6120. 6150. 6230) The PFAFF needle threader (16) is an aid to make threading the needle easier and quicker. Lower the sewing foot (see next page). Turn the hand wheel until the needle is at its high est point. Piace the needle thread over hook o and hold it taut. Move the threader fully downwards and turn it towards the need[…]
-
Страница 24
The sewing foot is raised or lowered with the presser bar lifter (20). Drawing up the bobbin thread Raise the sewing foot. Hold the needle thre and turn the hand wheel towards you until needle is at the top again and the bobbin thread has formed a loop. Pull the needle thread to draw up the bobbin thread. —r Bobbin thread Close the hook cover (28[…]
-
Страница 25
U Removing the sewing foot Turn off the main switch Set the needle at its highest point. Press the sewing foot upwards at the front and down wards at the back at the same time so that it disengages from the sewing toot holder (15). Check: Place the sewing foot under the sewing foot holder (15) that the pins of the foot engage in the sewing foot hol[…]
-
Страница 26
The built-in dual fabric feed (Models 6120, 6150, 6230) For sewing difficult materials PFAFF offers the ideal solution: built-in dual feed. As on industria sewing machines it feeds the material from the top and bottom at the same time. The fabric is fed accurately. On light or difficult materials such as silk and viscose fabrics the dual fabric fee[…]
-
Страница 27
Disengaging the top feed Hold the top feed with two fingers at the marked places. Push the top feed (23) down a little and out to the rear, and let it move slowly upwards (see also the illustration on page 24(. Engaging the top feed (Models 6120. 6150. 6230) Raise the sewing foot. Now push the top feed (23) so that it snaps in place Important! For […]
-
Страница 28
Changing the needle Switch off main switch To remove: Lower the sewing foot and set the needle at its highest point. Now loosen the Fixing screw (22) and pull the needle out downa rds. To insert: The flat side A of the needle must Face to the rear. Lower the sewing foot dnd insert the needle. pushing it up as far as it will go. Hold the needle and […]
-
Страница 29
Setting the need’e thread tension Set the required amount on the needle thread tension (18) using mark A The normal setting for sewing is 4 to 5 For embroidering. darning and buttonhole sewing between 2 and 3. For certain sewing work, e g. darning, the feed dog has to be dropped. To do this, open the hook cover and press slide B fully to the righ[…]
-
Страница 30
Reverse sewing The machine sews in reverse as long as the reverse key (21) is kept pressed. Li AA You will find the symbol buttonhole bet ween the figure 0 arid 1. The optimal stitch density for sewing buttonholes is in this range. The stitch becomes more concentrated the farther you turn towards O Stitch length knob You can set the stitch length ([…]
-
Страница 31
Pushbutton controls Setting utility stitches Under the id (26) you can find the program PFAFF tiptronic 6230 table with all the stitches and stitch combina tions. On model 6230 the most important stitches are additionally illustrated on the lighted display. Each program has been given a letter that you can find on the bushbutton controls. If the ri[…]
-
Страница 32
Utility and stretch stitch combinations AIAAA By striking two or several keys you can m combinations in the utility stitch range The stitch length knob can either be set in utility sewing range or in the stretch range All the stitch combinations are illustrated the program table in the lid. You can rele keys that are already activated with key B. P[…]
-
Страница 33
Function keys (Model 6230) The tiptronic has three function keys. 1. Sewing slowly When key (1) slow sewing’ is pressed the green diode lights up. The sewing machine now sews at half speed. If the key is pressed again the green diode is extinguished and the machine sews at full speed again. 2. Needle position up/down Each time sewing is interrupt[…]
-
Страница 34
Sewing chart General sewing aids Nonelastic stitches Elastic stitches Overlock stitches Covering stitches Buttonhole Hems with twin needle Smocking Gathering Darning Inserting zippers Rollhemming Sewing lace Shelledging page 34 pages 35 pages 36 — 39 pages 40, 45 pages 42, 43 pages 44, 45 pages 46, 47 page 48 page 48 pages 49, 50 pages 51 — 53 […]
-
Страница 35
Explanation of the sewing chart The following charts show the recom mended settings that you require for the relevant sewing operations. These charts also provide you with further instructions that are necessary when sewing the selected programs: The choice of the sewing foot, the setting of the needle thread tension and whether the sewing is carri[…]
-
Страница 36
Needle thread tension In order to obtain perfect sewing results the needle and bobbin thread tensions must be correctly adapted to each other. The normal setting for utility stitches is 3 to 5. Check the tension using a wide zigzag stitch. The interlace of the two threads must lie in the middle of the two fabric plies. If the interlace lies on the […]
-
Страница 37
HLi a Taste3 — — C’ 3 0/1 b — — — — — Basting stitch (Mode) 6230) With key (3) basting you can baste a gar ment before trying it on. When you press the foot control the machine will only make one stitch. For each further stitch you have to press the foot control each time, — Lower the bottom feed and disengage the top feed. — Place th[…]
-
Страница 38
i I I I prog Z*j L_____ J6j_j35IO3J Zigzag stitch With keys D, E and F you can alter the width of the zigzag stitches from 2 to 6 mm. By combining the keys DIE or E/F you obtain additional widths When serging the edge, always make sure the needle goes into the material and over the edge alternately For serging difficult materials, blind stitch foot[…]
-
Страница 39
Blind stitch H is best suited for invisible hems; sewing by hand is unnecessary. — Serge the edge of the hem. — Fold the edge inwards by the hem width. — Now unfold the hem again so that the hem edge protrudes by about half an inch. — Now place the fabric under the sewing foot so that the crease line runs along edge guide B. — When the ne[…]
-
Страница 40
a! E 4 23!— U Sewing on buttons with stems — Insert the sewing foot. — Place a match between the holes of the button and sew it on as described on the left. Sewing on buttons With orogram E you can sew on two and four- hole buttons with no problem at all — Remove the sewing foot and lower the feed dog. — Turn the hand wheel towards you an[…]
-
Страница 41
1 prog 1” — jJ a DFFSTc 46 • 35 01 D E F StrpcP 4 6 3 5 0 Stretch triple straight stitch This program is used for sewing all seams where great strength is needed, e.g. inside trouser seams. The farther you turn the stitch length knob, the longer the stitch length. Stretch triple zigzag stitch The stretch triple zigzag stitch is a highly elasti[…]
-
Страница 42
prog 1 I I III I I> III I I prog I I a M 1-2,5 I 6 • 3 5 I 0/1 a M I Stretch I 6 • 3-5 0/1 [ bIMI125161._13-510I bMIStretchI6I_I35I0I Elastic stitch Owing to its high elasticity this stitch is used for sewing on elastic tapes, e.g. on underwear. Cut off the old elastic tape close to the edge. — Gather the fabric with 6 mm long straight sti[…]
-
Страница 43
N N N N What is an overlock stitch? For knitted and other stretch materials the models with pushbutton controls offer a selection of overlock stitches. These join two plies of fabric and serge them in one opera tion. They have a higher elasticity than usual seams, they are more durable, and you can sew them fast, too. Closed overlock stitch TIP: Wh[…]
-
Страница 44
— ‘4 ‘ .. _4 •4 .s.•-_’ a- 4 _ ‘_4 4.44?_A I I • I _4_ _4,_•,,,-e 4 • a- , ., I — A — — 4?— %-‘‘ 4? _i I -‘—- “ I •-_‘_ ‘,‘—,.-:—-—- -..-> 3 ‘, —‘-. ,‘- __•4__ ‘, — — I -; — Aa, -* — —4. I > I -‘:.4:%—— Pullover stitch This stitch is suitable for open knit fabrics Fu[…]
-
Страница 45
prog : L Stretch 6 • 3-5 : L Stretchl 6 — I 1 Fagoting stitch With fagoting stitch you can make very elastic seams with hemstitching effect, eg. on corsetry. — Serge the fabric edges and tack baste over on the inside. — Place the fabric under the sewing foot with the edges about 1/8 of an inch apart. — Sew on the face side, making sure the […]
-
Страница 46
I,l)IJ I I prog 1 i -.-l progj ‘ I JaLH-2I6j•3-5j1 !aLFIStretchI5I.3-5I1 I IbI L 11-216 HI 0 IbI — I — — — — Fancy elastic stitch Fancy elastic stitch is very useful for materials that need a flat seam, e.g. terry cloth. — Place the two fabric edges so that they overlap by about 3/4 of an inch and over- stitch each edge with fancy elastic sti[…]
-
Страница 47
PFAFF t i ptron ic 6230 tipmatic 6110, 6120, 6150 PFAFF — ) instruction manual[…]
-
Страница 48
Buttonholes Sewing buttonholes is very easy with all the models with pushbutton controls since the fabric does not have to be turned. 8uttonholes are generally sewn onto a piece of doubled fabric. However, for some materials, e.g. silk, organza and viscose, it is necessary to use silk paper backing to prevent the material from contracting while sew[…]
-
Страница 49
I I I I — prog I I I -.. I—I ABC 44,5 3 b A BCI : 3 5 ___________ B Linen buttonholes Insert the buttonhole slide and push it fully to the front. — Press key C and sew the first seam to the required length. Then press key B. Keep it pressed and sew a few stitches for the bartack, while holding the material securely. Then press key A and sew bac[…]
-
Страница 50
I.! iii ii Il lii rr — — ,, t.* ., Lit i. -jiI’tt’ ‘t, t .t i.r I’’Iv progi I -_-I 23;i Ta G I i — • 3.510/h bIGl3-13-510I Sewing hems with the twin needle With the twin needle you can not only embroider, but also make topstitch seams. Using the twin needle you can add a profes sional touch to hems on stretch materials such as T shir[…]
-
Страница 51
i 6 6 • 3 5 C) 1 35 01 Gathering with straight stitch With Program G at a stitch length of 6 mm you can gather sleeves, skirts or valances. To obtain a neat and even gather you should sew two or three gathering seams. — Mark the first line on the face side of the fabric and stitch along it. Leave about four or five inches of thread protruding at[…]
-
Страница 52
a ‘::‘. TIP: The cording foot (special accessory) is Gathering sleeves or waist seams is no pro also ideal for gathering. The grooves in this blem at all with elastic threads. The elastic foot guide the elastic evenly during the sewing thread must not be wound onto the bobbin, operation. — Mark the first gathering seam on the reverse side of […]
-
Страница 53
prog ‘1’ a G — — 0 23 6 b G — — 23 aEcer Darning with the straight stitch Insert the darning foot: Set the needle at its highest position and push the pin of the darning foot fully into hole C. When you do this, guide fork G places itself around the presser bar. Wire E must be behind fixing screw F. Now tighten screw D. Darning position: Lo[…]
-
Страница 54
I I! prog I a M 021 6 M 021 6 prog I < I •35011 0 M 15 6 35 0 Darning with elastic stitch Darning with elastic stitch is also a very suitable means of repairing damaged fabric. — Sew over the damaged area with rows of stitches until it is well covered. When doing so, make sure the stitch rows overlap each other. Sewing on patches The best wa[…]
-
Страница 55
2fl Z — D DO • : V _ 0 Q E’ (0 CDE_ r • 0 — 3 o a DD COO 0 3 00 0 -, ________ 0 — D—43c LD oC 0 . 0 = aoO C) ci, ci, 0 — D-, 00 ci,[…]
-
Страница 56
progl a G 3 — . 3-5 4 b G 3 — 3-5 4 Sewing in zippers There are different ways to sew in zippers. For skirts we recommend inserting the zipper concealed on both sides, and for men’s or ladies’ slacks concealed on one side. Different types of zippers are available in shops and stores. For tough materials such as denim we recommend metal zipp[…]
-
Страница 57
— Sew the second half of the zipper parallel at the same distance. Stop shortly before the end of the seam and leave the needle in the material. Raise the sewing foot and open the zipper. — You can now sew to the end of the seam. — Shortly before the end of the seam, open the zipper and finish sewing the seam. — Close the zipper and baste t[…]
-
Страница 58
Roll hemming With the hemmer you can rollhem blouses, silk fabrics or valances with no problem at all and without having to iron the edges before hand Hemming secures the edges against fraying and produces a tidy and durable edge finish. — Fold the fabric edge over double (about (5/64) 2 mm per fold). — Place the folded fabric edge under the he[…]
-
Страница 59
Lace inserts You can produce a beautiful effect on christening wear or other children’s clothes with lace inserts, First baste the lace to the face side of the fabric. — Stitch both edges of the lace with a narrow margin. — Cut open the fabric under the lace at the middle and iron it over to the side. — Stitch over both edges of the lace wi[…]
-
Страница 60
,: 45O Shell edging Shell edging is very effective for thin, soft fabrics such as silk and viscose materials. It is frequently used as an edge finish on under wear, too. The tighter you set the needle thread tension the farther the shell edging is pulled in Serge the raw edge and iron the seam margin over to the left. While sewing, make sure that t[…]
-
Страница 61
embroidery techniques 4 Sewing table for embroidery Decorative stitches Monograms Appliqué Richelieu Quilting Eyelet embroidery Hemstitching page 60 page 61 — 64 page 65 page 66 page 66 page 67 page 68 page 69 Decorative and traditional I 59[…]
-
Страница 62
Decorative stitches B To enhance your own home textiles or gar ments the models 6150 and 6230 offer you a S whole host of fancy and decorative stitches to choose from. You can produce even greater embroidery variations by selecting different combinations, colours or sizes. For embroi dery work we recommend using special embroidery threads which are[…]
-
Страница 63
Changing the pattern length You can vary the pattern length infinitely with the aid of the stitch length knob. The stitch density for embroidery is generally in the but tonhole range. The larger the stitch density you set is, the farther the pattern is stretched apart. Changing the pattern width The machine automatically Sets a stitch width of 6 mm[…]
-
Страница 64
B S ft B 0 n r t Borders By combining different embroidery programs you can embroider borders of any width. Madeira embroidery threads are very suitable. They are available in many colour shades and different sizes. However, only use one thread size for one piece of embroidery work. — Apply iron-on backing or place silk backing paper under the fa[…]
-
Страница 65
Borders with a combination of stitches By combining different embroidery keys as desired you can easily achieve other embroi dered effects. This is a simple and pleasing way to embellish tablecloths and garments. — Apply iron-On backing or place silk backing paper under the fabric. — Mark the centre with tailors chalk. — You can now begin wit[…]
-
Страница 66
Twin neeate You can achieve further embroidery effects by using the twin needle. The illustrations show what beautiful borders can be made with a little imagination. Note: Only use a twin need with a width of 2,5 mm for all embroidery. Threading the twin needle — Insert the twin needle. Fit the second reel holder and place one reel of thread on e[…]
-
Страница 67
Monograms No matter whether you work on terry cloth or woven fabric, with the darning foot and pro grams D, E or F you can monogram any initi als of your own design. Freehand guiding, however, needs a little practice in the beginning. — Transfer the initials with the magic pen to the part to be embroidered. — Lower the feed dog and insert the d[…]
-
Страница 68
pl Appliqués are quickly made and always pro duce a beautiful fancy effect. By using diffe rent materials and patterns you can obtain variations galore. You can make a perfect, densely stitched seam with the applique foot (special accessoriesf, because it has a special cutout on its sole for the zigzag seam. — Insert the appliqué foot in the se[…]
-
Страница 69
Quilting Quilting is a traditional sewing technique. The method that the wives of American settlers developed to make use of material remnants has become an artistic hobby with many enthusiasts in our country, too. A quilt always consists of three layers of material. Lots of geometrically shaped pieces of material are joined together in continually[…]
-
Страница 70
Traditional eyelet embroidery which long ago had to he made laboriously by hand can be made quite easily with the help of an eyelet plate Ispecial accessory). This is very etfective on blouses, bed or table linen Practically all stitch types are suitable for this utility stitches such as a zigzag stitch, blind stitch, elastic stitch or fancy stitch[…]
-
Страница 71
Cl, 3CDCD23 C) CD 3 3 CD 0 N CD DC 0 0 DC DC 0 CD DC CD CD Q.3-0 CC * CD < 3 CD DC DC -< 0. 0 CD .CCD DC CD 0. -V DC 0C -n7(9 CDDC C Q 0.3 DC 3 3 CD 0 DC 3- CD 3- CD DC 0 DC C I DC30.3 3- CDCDDCDC Cs, g — C 3-OC—DC<D 3 3 CD 3- DC CC. CD CD C CD Z — 2.3 3 DC _ DC —. p CDDC—.3C)03 3- “ 0 C ‘< 0 CD < DC DC a E E3 DC CD 3 3- C-[…]
-
Страница 72
Accessories and needles Sewing feet (normal accessories) Special accessory table Felling foot Gathering foot Cording foot Bias binder Multistitch gatherer Cording foot Appliqué foot Fringe foot Needle table pages 72, 73 page 74 page 75 page 75 page 76 page 77 page 77 page 78 page 78 page 79 pages 80, 81 71[…]
-
Страница 73
Sewing feet (accessories) K. o Normal sewing foot Part No. 98-694 816-00 (Model 6120—6230) Part No. 98-694 847-00 (Modell 6110) Fancy stitch foot for top feed Part No. 98-694 814-00 (Model 6120 — 6230) NO I(O Clearviewfoot L,(Q (Fancy stitch foot not suitable for top feed> Part No. 98-694 864-00 (Model 6110— 6230) LJILc PvT j) q’ çv-9-?[…]
-
Страница 74
Sewing feet (accessorlesi 5 Buttonhole foot Part No. 98-694882-00 (Model 6110 — 6230) 6 Darning foot Part No. 93-035960-91 (Model 6110 6230) For Model 6110 special accessory 7 Hemmer Part No. 98-694818-00 (Model 6110 — 6230) For Model 6110 special accessory 8 Edge guide Part No. 98-802422-00 (Model 6110 — 6230) Second spool holder 9333vC3 -?[…]
-
Страница 75
Sewing feet special accessory) Special accessories are intended for special sewing work. They are available at a charge from your dealer. Accessory Part number Sewing work Appliqué foot 93-042941-91 For appliqué work Bias binder 98-053484-91 For binding edges with (remove foot holder( bias tape Cording foot, 5 grooves 93-042950-91 (twin needles w[…]
-
Страница 76
Lap-feller seams are not only ornamental but strong, too. This makes them very suitable for sportswear and children’s wear, men’s shirts and Jeans. You can make these seams very effective if you use a sewing thread of a con trasting colour. Overlap the raw edge of the lower ply by about 3/8’ to 5/8’. — Now place this overlapping edge over[…]
-
Страница 77
Cording foot The classic sewing technique of cording can be used without any problems on fabrics such as cotton and light wollens Underclothing and children’s wear can be given a traditional look with cording. — Engage the cording foot. — Replace the needle with a twin needle 11.6 or 2 mml. — Thread up with two needle threads Isee page 64).[…]
-
Страница 78
Binding with bias tape is a very easy method of giving fabric edges a smooth and neat appearance. For this you need unfolded bias tape about an inch wide. — Remove the foot holder with sewing foot and screw on the binder. — Cut the beginning of the bias tape at a dia gonal. — Push the tape into the scroll of the binder and pull it out to the […]
-
Страница 79
J,I%I I progl I I c:j — a C O35-lj 1,5 2 3 cording I I b C jO.35.lj 1.5 2 j foot I Cording foot Cording is a technique in which pearl thread or a fine cord is overstitched to produce a purl seam. With this you can obtain an effect similar to braiding. Appliqués can also be made more effective with this seam. -. Mark the required motif on the fabri[…]
-
Страница 80
Fnnge foot With this special foot for loop embroidery you can produce fantastic effects in no time. This foot is very useful for terry cloth. -. Mark out any pattern you wish with the magic pen. — Use a silk paper underlay and engage the fringe foot. — Embroider the motif, row by row. For circ les you have to work from the outside inward. — F[…]
-
Страница 81
Needle chart Selection of the right needle guarantees better sewing of the chosen material. Fabric weight Fabric weight Fabric weight light medium heavy needle needle needle 607075 8090 100 110 120 Needle points Type Shape Type of eye Suitable for and point 130/705H Small ball Universal needle for fine synthetic Needle size: point wovens, fine line[…]
-
Страница 82
Needle Table Description Stitch Stitch Needle suitable for length width distance 130/705 H-ZWI 2,5 mm — 1,6 mm normal cording Size: 80 2.5 mm — 2.0 mm normal cording 130/705 H-ZWI Size: 80 2,5 mm — 2,5 mm wide cording Size: 90 2,5 mm — 3,0 mm extra wide Size: 100 3.0 mm — 4.0 mm cording Fancy pattern with twin needles Before you sew the des[…]
-
Страница 83
Maintenance and fault-finding I E r Changing the needle plate Cleaning and oiling Changing the sewing lamp Sewing problems and their solution Page 84 Page 84 Page 85 Page 86 83[…]
-
Страница 84
q It is very important to clean and oil the sewing machine, because it will reward you with a longer service life. The more often you use the machine, the more care it needs. Removal: Switch off the main switch — Raise the sewing foot and remove the detachable work support. — Push the point of a small screwdriver into the opening between needle[…]
-
Страница 85
— Changing the sewing lamp Switch off the main switch Disconnect the mains plug and the toot control plug from the machine. — Take off the detachable work support. The sewing lamp Ibulb) is located inside the needle head of the sewing machine Removal To make it easier to change the bulb we recommend placing the sewing machine on the hand wheel as […]
-
Страница 86
Sewing problems and their solutions Problem/cause: 1. The machine Skips stitches Needle is not properly inserted. Wrong needle is in use, Needle is bent or blunt. Machine is not properly threaded. Needle is too small for thread. 2. Needle thread breaks See reasons above Thread tension is too tight. Thread is poor or has slubs in it, or has become d[…]
-
Страница 87
L9[…]
-
Страница 88
co[…]
-
Страница 89
PFAFF G. M. Plaff Aktiengesellschaft Werk Karisruhe-Durlach GritznerstraL,e 11 76227 Karlsruhe Gedrucki in Deutschland Druckerei Gablenz GmbH 76356 Weingarten, Stettiner StraSe 17 Technische Anderungen vorbehaften Nr.: 29629996-65/OOO OG englisch 8/93[…]
Смотреть руководство для Pfaff tipmatic 6150 ниже. Все руководства на ManualsCat.com могут просматриваться абсолютно бесплатно. Нажав кнопку «Выбор языка» вы можете изменить язык руководства, которое хотите просмотреть.
MANUALSCAT | RU
Вопросы и ответы
У вас есть вопрос о Pfaff tipmatic 6150, но вы не можете найти ответ в пользовательском руководстве? Возможно, пользователи ManualsCat.com смогут помочь вам и ответят на ваш вопрос. Заполните форму ниже — и ваш вопрос будет отображаться под руководством для Pfaff tipmatic 6150. Пожалуйста, убедитесь, что вы опишите свои трудности с Pfaff tipmatic 6150 как можно более детально. Чем более детальным является ваш вопрос, тем более высоки шансы, что другой пользователь быстро ответит на него. Вам будет автоматически отправлено электронное письмо, чтобы проинформировать вас, когда кто-то из пользователей ответит на ваш вопрос.
не работает рычаг подъма лапки.9166050109
мария2018-11-28
Задать вопрос о Pfaff tipmatic 6150
- Бренд:
- Pfaff
- Продукт:
- швейные машины
- Модель/название:
- tipmatic 6150
- Тип файла:
- Доступные языки:
- английский, немецкий
Сопутствующие товары Pfaff tipmatic 6150
-
Страница 1
D C’, 1 C C) C D 3 0) D C 0) og C-) 03 0) .sfl NJ 0 C.) -a 01 0 •0 an ‘1 IT’[…]
-
Страница 2
For easier understanding of this instruction book please fold this or the last page open when reading it. Safety rules For the United Kingdom only The leads must definitely not be connected to the safety lead terminal I nor to a plug with three pins. The wires in the mains lead are coloured according to the following code: Neutral Live As the colou[…]
-
Страница 3
MrsJ — — OCD ‘.a owl[…]
-
Страница 4
Parts of the sewing machine (Models 6230 and 6150) (1) Key for ,,slow sewing” (Model 6230) (2) Key for ,,needle down position” (Model 6230) (3) Key for ,,tacking” (Model 6230) (4) Carrying handle (5) Hand-wheel (6) Hand-wheel release disk (7) Fancy stitch knob (8) Main switch (9) Connection socket ,,mains cord” (Model 6230) Connection socke[…]
-
Страница 5
Important safety instructions For the United States only This sewing machine is designed and manufactured for HOUSEHOLD use only. When you use an electric appliance, basic safety precautions should always be adhered to as fol lows: Read all instructions before using this sewing machine. DANGER To reduce the risk of electric shock: 1 The sewing mach[…]
-
Страница 6
Notes on safety Notes on safety for domestic sewing machines according to DIN 57 700, Section 28 or IEC 335, Section 28. 1. The user must exercise adequate caution with regard to the up and down moving of the needle and constantly observe the sewing area during work. 2. When leaving the machine, during maintenance work or when changing mechanical p[…]
-
Страница 7
Modern, uncomplicated — Sewing by puchbutton control — Congratulations! You have bought a high-quality product that offers unique advantages. Your new sewing machine can take any material in its stride and will sew through thick and thin for you. It features the very latest in design and technology and this instruction book is Just as uncomplic[…]
-
Страница 8
Contents Accessories and needles . 72 — 81 Accessory compartment 14 Applique 66 Appliqué foot 78 Bias tape binder . . . . 77 Blind stitch 38 Bobbin case. . 18, 19 Bobbin thread tension . . . 19 Bobbin winding . . . 15 — 1 7 Borders . . . . . . 62. 63, 64 Buttonholes . . . . . . . 46, 47 Changing the needle 26 Changing the needle plate . . . 84[…]
-
Страница 9
Lowering the feed dog Main switch Maintenance and faults Monograms Multi4oot gathering foot. Needle chart Needle position. Needle thread tension Needle threader Nonelastic stitches — Oiling . Open overlock stitch Overlock stitches Pattern length . Pattern width Practical sewing Presser bar litter Puchbutton control Pulling up the bobbin thread Pull[…]
-
Страница 10
Utility stitch table (elastic stitches) D E F G HI H HD ID IF K < < _: _: ,—‘ c—’ ‘ / I “ “ -‘ ‘- I I — ‘ I ( < ED ED c : “: , With these programs the stitch length can be set as required between 0 and 6 mm with the stitch length knob (11). Program Description Application A/B/C Buttonholes Standard buttonholes e.g. fo[…]
-
Страница 11
I I I S Utility stitch table (non-elastic stitches) KU KG L LC LU LF LI M ME MF MG Program Description Application KD Elastic edge seam For securing seams of edges that do not fray very much KG Shelledging stitch For decorative hems on light fabrics e.g. for underwear L Fancy elastic stitch For overstitching two buttjoined plies LC Emperor stitch A[…]
-
Страница 12
Utility stitch table (elastic stitches) D E F G Hi I H HO I HG I ID IF I IG I K I KO I KGI KMI Ill lii ‘i I I I 11/ I l’ ‘, I III I I ii ii I i”i I / —‘I, ‘.. ‘.‘. ‘.‘, I Ill Iii 0 “,ii I “,,ii ‘sit I i”..i ,,, , ,,— II Ih ill I —“i ..—‘ii —II ‘ ,.— — III Hi I iii __.—ii —ii ‘—‘— I i ‘[…]
-
Страница 13
Utility stitch table (elastic stitches) ‘5’ -ii NJ XI ..i XI /1,’ I I I J’t% I I ‘.ii ,X’ iii • III I I I i “.i. ‘.i I 11/ L LD LF LI I LK LDK LEI LGK LMK f M I MD ME MF I MG ,“ I —I’ I I ll i I •.ii Xi 5 41 I X’ I / I I I 11/ I I -ii I I )<i ‘“i 7” I /1/ II .1i Xi in XI /‘s 11/ Program Descriptio[…]
-
Страница 14
1IllIII VIIIILilII{ll. ifIIIIIJlIWIL ‘ 11111 PIljjjljjjIIlj 11111111 {fjjjjIIIIjlIl liii II I1IIIUI 1 D II ill II a) 95a) Q) > C) 1 III,IqIIp C lilt ii jliiJlijifi ijlilIIil lj 1 i D _L ‘iii o 111111 liii! ‘liii iii!! iiIh 0 2 a) D C) iIlIIlidlTlIIiIllIiIIiIIIillTlhIlilUIi iilii. D (_ a) — — 1f”ilifJiTI”TN}ill[’’iTjiTHh[’lli[…]
-
Страница 15
PFAFF I pt onlc 6230 / i!II ——— Operation of the sewing machine I Electrical connection page 1 2, 1 3 I Detachable work support page 1 4 Bobbins pages 15 — 17 Bobbin case pages 1 8, 1 9 Bobbin thread tension page 1 9 J Threading the needle page 20 Needle threader page 21 I Pulling up the bobbin thread page 22 Sewing foot lifter page 22 Thre[…]
-
Страница 16
Carrying case Place the enclosed mains cord, foot control and instruction book in the compartment of the carrying case. 0’ Programs The programs of the sewing machine are illustrated on the inside of the top cover Top cover Open the folding cover (26) upwards. Electrical connection (Modell 6230) Connect the mains cord with the socket (9) of the s[…]
-
Страница 17
Connecting the foot control (Model 6230) Connect the plug of the foot control with the connection socket (12) of the sewing machine. The sewing speed is regulated by pressing the pedal. Main switch Connect the plug of the foot control with the connection socket (9) of the sewing machine. The sewing speed is regulated by pressing the pedal. The sewi[…]
-
Страница 18
A I J 41 41 41 .41 .4 Winding the bobbin from the reel holder Place the sewing thread on the reel holder (24). To obtain free movement of the thread and hold the thread reel firmly, fit an unwind ing disk corresponding to the size of the thread reel. Threading Place the thread into guide A from behind and pull it through opening B to the right. Win[…]
-
Страница 19
I 3 V Winding from the second reel holder Insert the second reel holder (25) in the hole provided and place a reel of thread on it. Threading Place the thread into guide C and pull it through opening B to the right. Wind the thread clockwise a few times around the bob bin. Switch on the main switch Hold the end of the thread firmly and press the fo[…]
-
Страница 20
A Hook cover Switch off the main switch Hold the hook cover (28) at the side and open it to the front. Thread tension Lift the latch of the bobbin case and pull out the bobbin case. Release the latch and take out the empty bobbin. To obtain optimum seam appearance and durability make sure the needle and bobbin thread lensions are correctly adjusted[…]
-
Страница 21
Inserting the bobbin F Insert the full bobbin in the bobbin case. When doing so, pull the thread sideways through slot A, then under tension spring B until it rests in the opening (see arrow). Check: When you pull the thread, the bobbin must turn clockwise. Checking the bobbin thread tension Hold the bobbin case by the thread and move your hand sha[…]
-
Страница 22
Threading the needle Switch off the main switch. Raise the presser foot lifter (20). Turn the hand wheel until the take-up lever (19) has moved to the top. Place the thread on the reel holder (24) and fit an unwinding disk of the right size. Now, using both hands, pull the thread into guide A and under thread guide hook D. Pa the thread through the[…]
-
Страница 23
Needle threader (Models 6120. 6150. 6230) The PFAFF needle threader (16) is an aid to make threading the needle easier and quicker. Lower the sewing foot (see next page). Turn the hand wheel until the needle is at its high est point. Piace the needle thread over hook o and hold it taut. Move the threader fully downwards and turn it towards the need[…]
-
Страница 24
The sewing foot is raised or lowered with the presser bar lifter (20). Drawing up the bobbin thread Raise the sewing foot. Hold the needle thre and turn the hand wheel towards you until needle is at the top again and the bobbin thread has formed a loop. Pull the needle thread to draw up the bobbin thread. —r Bobbin thread Close the hook cover (28[…]
-
Страница 25
U Removing the sewing foot Turn off the main switch Set the needle at its highest point. Press the sewing foot upwards at the front and down wards at the back at the same time so that it disengages from the sewing toot holder (15). Check: Place the sewing foot under the sewing foot holder (15) that the pins of the foot engage in the sewing foot hol[…]
-
Страница 26
The built-in dual fabric feed (Models 6120, 6150, 6230) For sewing difficult materials PFAFF offers the ideal solution: built-in dual feed. As on industria sewing machines it feeds the material from the top and bottom at the same time. The fabric is fed accurately. On light or difficult materials such as silk and viscose fabrics the dual fabric fee[…]
-
Страница 27
Disengaging the top feed Hold the top feed with two fingers at the marked places. Push the top feed (23) down a little and out to the rear, and let it move slowly upwards (see also the illustration on page 24(. Engaging the top feed (Models 6120. 6150. 6230) Raise the sewing foot. Now push the top feed (23) so that it snaps in place Important! For […]
-
Страница 28
Changing the needle Switch off main switch To remove: Lower the sewing foot and set the needle at its highest point. Now loosen the Fixing screw (22) and pull the needle out downa rds. To insert: The flat side A of the needle must Face to the rear. Lower the sewing foot dnd insert the needle. pushing it up as far as it will go. Hold the needle and […]
-
Страница 29
Setting the need’e thread tension Set the required amount on the needle thread tension (18) using mark A The normal setting for sewing is 4 to 5 For embroidering. darning and buttonhole sewing between 2 and 3. For certain sewing work, e g. darning, the feed dog has to be dropped. To do this, open the hook cover and press slide B fully to the righ[…]
-
Страница 30
Reverse sewing The machine sews in reverse as long as the reverse key (21) is kept pressed. Li AA You will find the symbol buttonhole bet ween the figure 0 arid 1. The optimal stitch density for sewing buttonholes is in this range. The stitch becomes more concentrated the farther you turn towards O Stitch length knob You can set the stitch length ([…]
-
Страница 31
Pushbutton controls Setting utility stitches Under the id (26) you can find the program PFAFF tiptronic 6230 table with all the stitches and stitch combina tions. On model 6230 the most important stitches are additionally illustrated on the lighted display. Each program has been given a letter that you can find on the bushbutton controls. If the ri[…]
-
Страница 32
Utility and stretch stitch combinations AIAAA By striking two or several keys you can m combinations in the utility stitch range The stitch length knob can either be set in utility sewing range or in the stretch range All the stitch combinations are illustrated the program table in the lid. You can rele keys that are already activated with key B. P[…]
-
Страница 33
Function keys (Model 6230) The tiptronic has three function keys. 1. Sewing slowly When key (1) slow sewing’ is pressed the green diode lights up. The sewing machine now sews at half speed. If the key is pressed again the green diode is extinguished and the machine sews at full speed again. 2. Needle position up/down Each time sewing is interrupt[…]
-
Страница 34
Sewing chart General sewing aids Nonelastic stitches Elastic stitches Overlock stitches Covering stitches Buttonhole Hems with twin needle Smocking Gathering Darning Inserting zippers Rollhemming Sewing lace Shelledging page 34 pages 35 pages 36 — 39 pages 40, 45 pages 42, 43 pages 44, 45 pages 46, 47 page 48 page 48 pages 49, 50 pages 51 — 53 […]
-
Страница 35
Explanation of the sewing chart The following charts show the recom mended settings that you require for the relevant sewing operations. These charts also provide you with further instructions that are necessary when sewing the selected programs: The choice of the sewing foot, the setting of the needle thread tension and whether the sewing is carri[…]
-
Страница 36
Needle thread tension In order to obtain perfect sewing results the needle and bobbin thread tensions must be correctly adapted to each other. The normal setting for utility stitches is 3 to 5. Check the tension using a wide zigzag stitch. The interlace of the two threads must lie in the middle of the two fabric plies. If the interlace lies on the […]
-
Страница 37
HLi a Taste3 — — C’ 3 0/1 b — — — — — Basting stitch (Mode) 6230) With key (3) basting you can baste a gar ment before trying it on. When you press the foot control the machine will only make one stitch. For each further stitch you have to press the foot control each time, — Lower the bottom feed and disengage the top feed. — Place th[…]
-
Страница 38
i I I I prog Z*j L_____ J6j_j35IO3J Zigzag stitch With keys D, E and F you can alter the width of the zigzag stitches from 2 to 6 mm. By combining the keys DIE or E/F you obtain additional widths When serging the edge, always make sure the needle goes into the material and over the edge alternately For serging difficult materials, blind stitch foot[…]
-
Страница 39
Blind stitch H is best suited for invisible hems; sewing by hand is unnecessary. — Serge the edge of the hem. — Fold the edge inwards by the hem width. — Now unfold the hem again so that the hem edge protrudes by about half an inch. — Now place the fabric under the sewing foot so that the crease line runs along edge guide B. — When the ne[…]
-
Страница 40
a! E 4 23!— U Sewing on buttons with stems — Insert the sewing foot. — Place a match between the holes of the button and sew it on as described on the left. Sewing on buttons With orogram E you can sew on two and four- hole buttons with no problem at all — Remove the sewing foot and lower the feed dog. — Turn the hand wheel towards you an[…]
-
Страница 41
1 prog 1” — jJ a DFFSTc 46 • 35 01 D E F StrpcP 4 6 3 5 0 Stretch triple straight stitch This program is used for sewing all seams where great strength is needed, e.g. inside trouser seams. The farther you turn the stitch length knob, the longer the stitch length. Stretch triple zigzag stitch The stretch triple zigzag stitch is a highly elasti[…]
-
Страница 42
prog 1 I I III I I> III I I prog I I a M 1-2,5 I 6 • 3 5 I 0/1 a M I Stretch I 6 • 3-5 0/1 [ bIMI125161._13-510I bMIStretchI6I_I35I0I Elastic stitch Owing to its high elasticity this stitch is used for sewing on elastic tapes, e.g. on underwear. Cut off the old elastic tape close to the edge. — Gather the fabric with 6 mm long straight sti[…]
-
Страница 43
N N N N What is an overlock stitch? For knitted and other stretch materials the models with pushbutton controls offer a selection of overlock stitches. These join two plies of fabric and serge them in one opera tion. They have a higher elasticity than usual seams, they are more durable, and you can sew them fast, too. Closed overlock stitch TIP: Wh[…]
-
Страница 44
— ‘4 ‘ .. _4 •4 .s.•-_’ a- 4 _ ‘_4 4.44?_A I I • I _4_ _4,_•,,,-e 4 • a- , ., I — A — — 4?— %-‘‘ 4? _i I -‘—- “ I •-_‘_ ‘,‘—,.-:—-—- -..-> 3 ‘, —‘-. ,‘- __•4__ ‘, — — I -; — Aa, -* — —4. I > I -‘:.4:%—— Pullover stitch This stitch is suitable for open knit fabrics Fu[…]
-
Страница 45
prog : L Stretch 6 • 3-5 : L Stretchl 6 — I 1 Fagoting stitch With fagoting stitch you can make very elastic seams with hemstitching effect, eg. on corsetry. — Serge the fabric edges and tack baste over on the inside. — Place the fabric under the sewing foot with the edges about 1/8 of an inch apart. — Sew on the face side, making sure the […]
-
Страница 46
I,l)IJ I I prog 1 i -.-l progj ‘ I JaLH-2I6j•3-5j1 !aLFIStretchI5I.3-5I1 I IbI L 11-216 HI 0 IbI — I — — — — Fancy elastic stitch Fancy elastic stitch is very useful for materials that need a flat seam, e.g. terry cloth. — Place the two fabric edges so that they overlap by about 3/4 of an inch and over- stitch each edge with fancy elastic sti[…]
-
Страница 47
PFAFF t i ptron ic 6230 tipmatic 6110, 6120, 6150 PFAFF — ) instruction manual[…]
-
Страница 48
Buttonholes Sewing buttonholes is very easy with all the models with pushbutton controls since the fabric does not have to be turned. 8uttonholes are generally sewn onto a piece of doubled fabric. However, for some materials, e.g. silk, organza and viscose, it is necessary to use silk paper backing to prevent the material from contracting while sew[…]
-
Страница 49
I I I I — prog I I I -.. I—I ABC 44,5 3 b A BCI : 3 5 ___________ B Linen buttonholes Insert the buttonhole slide and push it fully to the front. — Press key C and sew the first seam to the required length. Then press key B. Keep it pressed and sew a few stitches for the bartack, while holding the material securely. Then press key A and sew bac[…]
-
Страница 50
I.! iii ii Il lii rr — — ,, t.* ., Lit i. -jiI’tt’ ‘t, t .t i.r I’’Iv progi I -_-I 23;i Ta G I i — • 3.510/h bIGl3-13-510I Sewing hems with the twin needle With the twin needle you can not only embroider, but also make topstitch seams. Using the twin needle you can add a profes sional touch to hems on stretch materials such as T shir[…]
-
Страница 51
i 6 6 • 3 5 C) 1 35 01 Gathering with straight stitch With Program G at a stitch length of 6 mm you can gather sleeves, skirts or valances. To obtain a neat and even gather you should sew two or three gathering seams. — Mark the first line on the face side of the fabric and stitch along it. Leave about four or five inches of thread protruding at[…]
-
Страница 52
a ‘::‘. TIP: The cording foot (special accessory) is Gathering sleeves or waist seams is no pro also ideal for gathering. The grooves in this blem at all with elastic threads. The elastic foot guide the elastic evenly during the sewing thread must not be wound onto the bobbin, operation. — Mark the first gathering seam on the reverse side of […]
-
Страница 53
prog ‘1’ a G — — 0 23 6 b G — — 23 aEcer Darning with the straight stitch Insert the darning foot: Set the needle at its highest position and push the pin of the darning foot fully into hole C. When you do this, guide fork G places itself around the presser bar. Wire E must be behind fixing screw F. Now tighten screw D. Darning position: Lo[…]
-
Страница 54
I I! prog I a M 021 6 M 021 6 prog I < I •35011 0 M 15 6 35 0 Darning with elastic stitch Darning with elastic stitch is also a very suitable means of repairing damaged fabric. — Sew over the damaged area with rows of stitches until it is well covered. When doing so, make sure the stitch rows overlap each other. Sewing on patches The best wa[…]
-
Страница 55
2fl Z — D DO • : V _ 0 Q E’ (0 CDE_ r • 0 — 3 o a DD COO 0 3 00 0 -, ________ 0 — D—43c LD oC 0 . 0 = aoO C) ci, ci, 0 — D-, 00 ci,[…]
-
Страница 56
progl a G 3 — . 3-5 4 b G 3 — 3-5 4 Sewing in zippers There are different ways to sew in zippers. For skirts we recommend inserting the zipper concealed on both sides, and for men’s or ladies’ slacks concealed on one side. Different types of zippers are available in shops and stores. For tough materials such as denim we recommend metal zipp[…]
-
Страница 57
— Sew the second half of the zipper parallel at the same distance. Stop shortly before the end of the seam and leave the needle in the material. Raise the sewing foot and open the zipper. — You can now sew to the end of the seam. — Shortly before the end of the seam, open the zipper and finish sewing the seam. — Close the zipper and baste t[…]
-
Страница 58
Roll hemming With the hemmer you can rollhem blouses, silk fabrics or valances with no problem at all and without having to iron the edges before hand Hemming secures the edges against fraying and produces a tidy and durable edge finish. — Fold the fabric edge over double (about (5/64) 2 mm per fold). — Place the folded fabric edge under the he[…]
-
Страница 59
Lace inserts You can produce a beautiful effect on christening wear or other children’s clothes with lace inserts, First baste the lace to the face side of the fabric. — Stitch both edges of the lace with a narrow margin. — Cut open the fabric under the lace at the middle and iron it over to the side. — Stitch over both edges of the lace wi[…]
-
Страница 60
,: 45O Shell edging Shell edging is very effective for thin, soft fabrics such as silk and viscose materials. It is frequently used as an edge finish on under wear, too. The tighter you set the needle thread tension the farther the shell edging is pulled in Serge the raw edge and iron the seam margin over to the left. While sewing, make sure that t[…]
-
Страница 61
embroidery techniques 4 Sewing table for embroidery Decorative stitches Monograms Appliqué Richelieu Quilting Eyelet embroidery Hemstitching page 60 page 61 — 64 page 65 page 66 page 66 page 67 page 68 page 69 Decorative and traditional I 59[…]
-
Страница 62
Decorative stitches B To enhance your own home textiles or gar ments the models 6150 and 6230 offer you a S whole host of fancy and decorative stitches to choose from. You can produce even greater embroidery variations by selecting different combinations, colours or sizes. For embroi dery work we recommend using special embroidery threads which are[…]
-
Страница 63
Changing the pattern length You can vary the pattern length infinitely with the aid of the stitch length knob. The stitch density for embroidery is generally in the but tonhole range. The larger the stitch density you set is, the farther the pattern is stretched apart. Changing the pattern width The machine automatically Sets a stitch width of 6 mm[…]
-
Страница 64
B S ft B 0 n r t Borders By combining different embroidery programs you can embroider borders of any width. Madeira embroidery threads are very suitable. They are available in many colour shades and different sizes. However, only use one thread size for one piece of embroidery work. — Apply iron-on backing or place silk backing paper under the fa[…]
-
Страница 65
Borders with a combination of stitches By combining different embroidery keys as desired you can easily achieve other embroi dered effects. This is a simple and pleasing way to embellish tablecloths and garments. — Apply iron-On backing or place silk backing paper under the fabric. — Mark the centre with tailors chalk. — You can now begin wit[…]
-
Страница 66
Twin neeate You can achieve further embroidery effects by using the twin needle. The illustrations show what beautiful borders can be made with a little imagination. Note: Only use a twin need with a width of 2,5 mm for all embroidery. Threading the twin needle — Insert the twin needle. Fit the second reel holder and place one reel of thread on e[…]
-
Страница 67
Monograms No matter whether you work on terry cloth or woven fabric, with the darning foot and pro grams D, E or F you can monogram any initi als of your own design. Freehand guiding, however, needs a little practice in the beginning. — Transfer the initials with the magic pen to the part to be embroidered. — Lower the feed dog and insert the d[…]
-
Страница 68
pl Appliqués are quickly made and always pro duce a beautiful fancy effect. By using diffe rent materials and patterns you can obtain variations galore. You can make a perfect, densely stitched seam with the applique foot (special accessoriesf, because it has a special cutout on its sole for the zigzag seam. — Insert the appliqué foot in the se[…]
-
Страница 69
Quilting Quilting is a traditional sewing technique. The method that the wives of American settlers developed to make use of material remnants has become an artistic hobby with many enthusiasts in our country, too. A quilt always consists of three layers of material. Lots of geometrically shaped pieces of material are joined together in continually[…]
-
Страница 70
Traditional eyelet embroidery which long ago had to he made laboriously by hand can be made quite easily with the help of an eyelet plate Ispecial accessory). This is very etfective on blouses, bed or table linen Practically all stitch types are suitable for this utility stitches such as a zigzag stitch, blind stitch, elastic stitch or fancy stitch[…]
-
Страница 71
Cl, 3CDCD23 C) CD 3 3 CD 0 N CD DC 0 0 DC DC 0 CD DC CD CD Q.3-0 CC * CD < 3 CD DC DC -< 0. 0 CD .CCD DC CD 0. -V DC 0C -n7(9 CDDC C Q 0.3 DC 3 3 CD 0 DC 3- CD 3- CD DC 0 DC C I DC30.3 3- CDCDDCDC Cs, g — C 3-OC—DC<D 3 3 CD 3- DC CC. CD CD C CD Z — 2.3 3 DC _ DC —. p CDDC—.3C)03 3- “ 0 C ‘< 0 CD < DC DC a E E3 DC CD 3 3- C-[…]
-
Страница 72
Accessories and needles Sewing feet (normal accessories) Special accessory table Felling foot Gathering foot Cording foot Bias binder Multistitch gatherer Cording foot Appliqué foot Fringe foot Needle table pages 72, 73 page 74 page 75 page 75 page 76 page 77 page 77 page 78 page 78 page 79 pages 80, 81 71[…]
-
Страница 73
Sewing feet (accessories) K. o Normal sewing foot Part No. 98-694 816-00 (Model 6120—6230) Part No. 98-694 847-00 (Modell 6110) Fancy stitch foot for top feed Part No. 98-694 814-00 (Model 6120 — 6230) NO I(O Clearviewfoot L,(Q (Fancy stitch foot not suitable for top feed> Part No. 98-694 864-00 (Model 6110— 6230) LJILc PvT j) q’ çv-9-?[…]
-
Страница 74
Sewing feet (accessorlesi 5 Buttonhole foot Part No. 98-694882-00 (Model 6110 — 6230) 6 Darning foot Part No. 93-035960-91 (Model 6110 6230) For Model 6110 special accessory 7 Hemmer Part No. 98-694818-00 (Model 6110 — 6230) For Model 6110 special accessory 8 Edge guide Part No. 98-802422-00 (Model 6110 — 6230) Second spool holder 9333vC3 -?[…]
-
Страница 75
Sewing feet special accessory) Special accessories are intended for special sewing work. They are available at a charge from your dealer. Accessory Part number Sewing work Appliqué foot 93-042941-91 For appliqué work Bias binder 98-053484-91 For binding edges with (remove foot holder( bias tape Cording foot, 5 grooves 93-042950-91 (twin needles w[…]
-
Страница 76
Lap-feller seams are not only ornamental but strong, too. This makes them very suitable for sportswear and children’s wear, men’s shirts and Jeans. You can make these seams very effective if you use a sewing thread of a con trasting colour. Overlap the raw edge of the lower ply by about 3/8’ to 5/8’. — Now place this overlapping edge over[…]
-
Страница 77
Cording foot The classic sewing technique of cording can be used without any problems on fabrics such as cotton and light wollens Underclothing and children’s wear can be given a traditional look with cording. — Engage the cording foot. — Replace the needle with a twin needle 11.6 or 2 mml. — Thread up with two needle threads Isee page 64).[…]
-
Страница 78
Binding with bias tape is a very easy method of giving fabric edges a smooth and neat appearance. For this you need unfolded bias tape about an inch wide. — Remove the foot holder with sewing foot and screw on the binder. — Cut the beginning of the bias tape at a dia gonal. — Push the tape into the scroll of the binder and pull it out to the […]
-
Страница 79
J,I%I I progl I I c:j — a C O35-lj 1,5 2 3 cording I I b C jO.35.lj 1.5 2 j foot I Cording foot Cording is a technique in which pearl thread or a fine cord is overstitched to produce a purl seam. With this you can obtain an effect similar to braiding. Appliqués can also be made more effective with this seam. -. Mark the required motif on the fabri[…]
-
Страница 80
Fnnge foot With this special foot for loop embroidery you can produce fantastic effects in no time. This foot is very useful for terry cloth. -. Mark out any pattern you wish with the magic pen. — Use a silk paper underlay and engage the fringe foot. — Embroider the motif, row by row. For circ les you have to work from the outside inward. — F[…]
-
Страница 81
Needle chart Selection of the right needle guarantees better sewing of the chosen material. Fabric weight Fabric weight Fabric weight light medium heavy needle needle needle 607075 8090 100 110 120 Needle points Type Shape Type of eye Suitable for and point 130/705H Small ball Universal needle for fine synthetic Needle size: point wovens, fine line[…]
-
Страница 82
Needle Table Description Stitch Stitch Needle suitable for length width distance 130/705 H-ZWI 2,5 mm — 1,6 mm normal cording Size: 80 2.5 mm — 2.0 mm normal cording 130/705 H-ZWI Size: 80 2,5 mm — 2,5 mm wide cording Size: 90 2,5 mm — 3,0 mm extra wide Size: 100 3.0 mm — 4.0 mm cording Fancy pattern with twin needles Before you sew the des[…]
-
Страница 83
Maintenance and fault-finding I E r Changing the needle plate Cleaning and oiling Changing the sewing lamp Sewing problems and their solution Page 84 Page 84 Page 85 Page 86 83[…]
-
Страница 84
q It is very important to clean and oil the sewing machine, because it will reward you with a longer service life. The more often you use the machine, the more care it needs. Removal: Switch off the main switch — Raise the sewing foot and remove the detachable work support. — Push the point of a small screwdriver into the opening between needle[…]
-
Страница 85
— Changing the sewing lamp Switch off the main switch Disconnect the mains plug and the toot control plug from the machine. — Take off the detachable work support. The sewing lamp Ibulb) is located inside the needle head of the sewing machine Removal To make it easier to change the bulb we recommend placing the sewing machine on the hand wheel as […]
-
Страница 86
Sewing problems and their solutions Problem/cause: 1. The machine Skips stitches Needle is not properly inserted. Wrong needle is in use, Needle is bent or blunt. Machine is not properly threaded. Needle is too small for thread. 2. Needle thread breaks See reasons above Thread tension is too tight. Thread is poor or has slubs in it, or has become d[…]
-
Страница 87
L9[…]
-
Страница 88
co[…]
-
Страница 89
PFAFF G. M. Plaff Aktiengesellschaft Werk Karisruhe-Durlach GritznerstraL,e 11 76227 Karlsruhe Gedrucki in Deutschland Druckerei Gablenz GmbH 76356 Weingarten, Stettiner StraSe 17 Technische Anderungen vorbehaften Nr.: 29629996-65/OOO OG englisch 8/93[…]
-
Page 1: Pfaff tipmatic 6150
D C’, 1 C C) C D 3 0) D C 0) og C-) 03 0) .sfl NJ 0 C.) -a 01 0 •0 an ‘1 IT’[…]
-
Page 2: Pfaff tipmatic 6150
For easier understanding of this instruction book please fold this or the last page open when reading it. Safety rules For the United Kingdom only The leads must definitely not be connected to the safety lead terminal I nor to a plug with three pins. The wires in the mains lead are coloured according to the following code: Neutral Live As the colou[…]
-
Page 3: Pfaff tipmatic 6150
MrsJ — — OCD ‘.a owl[…]
-
Page 4: Pfaff tipmatic 6150
Parts of the sewing machine (Models 6230 and 6150) (1) Key for ,,slow sewing” (Model 6230) (2) Key for ,,needle down position” (Model 6230) (3) Key for ,,tacking” (Model 6230) (4) Carrying handle (5) Hand-wheel (6) Hand-wheel release disk (7) Fancy stitch knob (8) Main switch (9) Connection socket ,,mains cord” (Model 6230) Connection socke[…]
-
Page 5: Pfaff tipmatic 6150
Important safety instructions For the United States only This sewing machine is designed and manufactured for HOUSEHOLD use only. When you use an electric appliance, basic safety precautions should always be adhered to as fol lows: Read all instructions before using this sewing machine. DANGER To reduce the risk of electric shock: 1 The sewing mach[…]
-
Page 6: Pfaff tipmatic 6150
Notes on safety Notes on safety for domestic sewing machines according to DIN 57 700, Section 28 or IEC 335, Section 28. 1. The user must exercise adequate caution with regard to the up and down moving of the needle and constantly observe the sewing area during work. 2. When leaving the machine, during maintenance work or when changing mechanical p[…]
-
Page 7: Pfaff tipmatic 6150
Modern, uncomplicated — Sewing by puchbutton control — Congratulations! You have bought a high-quality product that offers unique advantages. Your new sewing machine can take any material in its stride and will sew through thick and thin for you. It features the very latest in design and technology and this instruction book is Just as uncomplic[…]
-
Page 8: Pfaff tipmatic 6150
Contents Accessories and needles . 72 — 81 Accessory compartment 14 Applique 66 Appliqué foot 78 Bias tape binder . . . . 77 Blind stitch 38 Bobbin case. . 18, 19 Bobbin thread tension . . . 19 Bobbin winding . . . 15 — 1 7 Borders . . . . . . 62. 63, 64 Buttonholes . . . . . . . 46, 47 Changing the needle 26 Changing the needle plate . . . 84[…]
-
Page 9: Pfaff tipmatic 6150
Lowering the feed dog Main switch Maintenance and faults Monograms Multi4oot gathering foot. Needle chart Needle position. Needle thread tension Needle threader Nonelastic stitches — Oiling . Open overlock stitch Overlock stitches Pattern length . Pattern width Practical sewing Presser bar litter Puchbutton control Pulling up the bobbin thread Pull[…]
-
Page 10: Pfaff tipmatic 6150
Utility stitch table (elastic stitches) D E F G HI H HD ID IF K < < _: _: ,—‘ c—’ ‘ / I “ “ -‘ ‘- I I — ‘ I ( < ED ED c : “: , With these programs the stitch length can be set as required between 0 and 6 mm with the stitch length knob (11). Program Description Application A/B/C Buttonholes Standard buttonholes e.g. fo[…]
-
Page 11: Pfaff tipmatic 6150
I I I S Utility stitch table (non-elastic stitches) KU KG L LC LU LF LI M ME MF MG Program Description Application KD Elastic edge seam For securing seams of edges that do not fray very much KG Shelledging stitch For decorative hems on light fabrics e.g. for underwear L Fancy elastic stitch For overstitching two buttjoined plies LC Emperor stitch A[…]
-
Page 12: Pfaff tipmatic 6150
Utility stitch table (elastic stitches) D E F G Hi I H HO I HG I ID IF I IG I K I KO I KGI KMI Ill lii ‘i I I I 11/ I l’ ‘, I III I I ii ii I i”i I / —‘I, ‘.. ‘.‘. ‘.‘, I Ill Iii 0 “,ii I “,,ii ‘sit I i”..i ,,, , ,,— II Ih ill I —“i ..—‘ii —II ‘ ,.— — III Hi I iii __.—ii —ii ‘—‘— I i ‘[…]
-
Page 13: Pfaff tipmatic 6150
Utility stitch table (elastic stitches) ‘5’ -ii NJ XI ..i XI /1,’ I I I J’t% I I ‘.ii ,X’ iii • III I I I i “.i. ‘.i I 11/ L LD LF LI I LK LDK LEI LGK LMK f M I MD ME MF I MG ,“ I —I’ I I ll i I •.ii Xi 5 41 I X’ I / I I I 11/ I I -ii I I )<i ‘“i 7” I /1/ II .1i Xi in XI /‘s 11/ Program Descriptio[…]
-
Page 14: Pfaff tipmatic 6150
1IllIII VIIIILilII{ll. ifIIIIIJlIWIL ‘ 11111 PIljjjljjjIIlj 11111111 {fjjjjIIIIjlIl liii II I1IIIUI 1 D II ill II a) 95a) Q) > C) 1 III,IqIIp C lilt ii jliiJlijifi ijlilIIil lj 1 i D _L ‘iii o 111111 liii! ‘liii iii!! iiIh 0 2 a) D C) iIlIIlidlTlIIiIllIiIIiIIIillTlhIlilUIi iilii. D (_ a) — — 1f”ilifJiTI”TN}ill[’’iTjiTHh[’lli[…]
-
Page 15: Pfaff tipmatic 6150
PFAFF I pt onlc 6230 / i!II ——— Operation of the sewing machine I Electrical connection page 1 2, 1 3 I Detachable work support page 1 4 Bobbins pages 15 — 17 Bobbin case pages 1 8, 1 9 Bobbin thread tension page 1 9 J Threading the needle page 20 Needle threader page 21 I Pulling up the bobbin thread page 22 Sewing foot lifter page 22 Thre[…]
-
Page 16: Pfaff tipmatic 6150
Carrying case Place the enclosed mains cord, foot control and instruction book in the compartment of the carrying case. 0’ Programs The programs of the sewing machine are illustrated on the inside of the top cover Top cover Open the folding cover (26) upwards. Electrical connection (Modell 6230) Connect the mains cord with the socket (9) of the s[…]
-
Page 17: Pfaff tipmatic 6150
Connecting the foot control (Model 6230) Connect the plug of the foot control with the connection socket (12) of the sewing machine. The sewing speed is regulated by pressing the pedal. Main switch Connect the plug of the foot control with the connection socket (9) of the sewing machine. The sewing speed is regulated by pressing the pedal. The sewi[…]
-
Page 18: Pfaff tipmatic 6150
A I J 41 41 41 .41 .4 Winding the bobbin from the reel holder Place the sewing thread on the reel holder (24). To obtain free movement of the thread and hold the thread reel firmly, fit an unwind ing disk corresponding to the size of the thread reel. Threading Place the thread into guide A from behind and pull it through opening B to the right. Win[…]
-
Page 19: Pfaff tipmatic 6150
I 3 V Winding from the second reel holder Insert the second reel holder (25) in the hole provided and place a reel of thread on it. Threading Place the thread into guide C and pull it through opening B to the right. Wind the thread clockwise a few times around the bob bin. Switch on the main switch Hold the end of the thread firmly and press the fo[…]
-
Page 20: Pfaff tipmatic 6150
A Hook cover Switch off the main switch Hold the hook cover (28) at the side and open it to the front. Thread tension Lift the latch of the bobbin case and pull out the bobbin case. Release the latch and take out the empty bobbin. To obtain optimum seam appearance and durability make sure the needle and bobbin thread lensions are correctly adjusted[…]
-
Page 21: Pfaff tipmatic 6150
Inserting the bobbin F Insert the full bobbin in the bobbin case. When doing so, pull the thread sideways through slot A, then under tension spring B until it rests in the opening (see arrow). Check: When you pull the thread, the bobbin must turn clockwise. Checking the bobbin thread tension Hold the bobbin case by the thread and move your hand sha[…]
-
Page 22: Pfaff tipmatic 6150
Threading the needle Switch off the main switch. Raise the presser foot lifter (20). Turn the hand wheel until the take-up lever (19) has moved to the top. Place the thread on the reel holder (24) and fit an unwinding disk of the right size. Now, using both hands, pull the thread into guide A and under thread guide hook D. Pa the thread through the[…]
-
Page 23: Pfaff tipmatic 6150
Needle threader (Models 6120. 6150. 6230) The PFAFF needle threader (16) is an aid to make threading the needle easier and quicker. Lower the sewing foot (see next page). Turn the hand wheel until the needle is at its high est point. Piace the needle thread over hook o and hold it taut. Move the threader fully downwards and turn it towards the need[…]
-
Page 24: Pfaff tipmatic 6150
The sewing foot is raised or lowered with the presser bar lifter (20). Drawing up the bobbin thread Raise the sewing foot. Hold the needle thre and turn the hand wheel towards you until needle is at the top again and the bobbin thread has formed a loop. Pull the needle thread to draw up the bobbin thread. —r Bobbin thread Close the hook cover (28[…]
-
Page 25: Pfaff tipmatic 6150
U Removing the sewing foot Turn off the main switch Set the needle at its highest point. Press the sewing foot upwards at the front and down wards at the back at the same time so that it disengages from the sewing toot holder (15). Check: Place the sewing foot under the sewing foot holder (15) that the pins of the foot engage in the sewing foot hol[…]
-
Page 26: Pfaff tipmatic 6150
The built-in dual fabric feed (Models 6120, 6150, 6230) For sewing difficult materials PFAFF offers the ideal solution: built-in dual feed. As on industria sewing machines it feeds the material from the top and bottom at the same time. The fabric is fed accurately. On light or difficult materials such as silk and viscose fabrics the dual fabric fee[…]
-
Page 27: Pfaff tipmatic 6150
Disengaging the top feed Hold the top feed with two fingers at the marked places. Push the top feed (23) down a little and out to the rear, and let it move slowly upwards (see also the illustration on page 24(. Engaging the top feed (Models 6120. 6150. 6230) Raise the sewing foot. Now push the top feed (23) so that it snaps in place Important! For […]
-
Page 28: Pfaff tipmatic 6150
Changing the needle Switch off main switch To remove: Lower the sewing foot and set the needle at its highest point. Now loosen the Fixing screw (22) and pull the needle out downa rds. To insert: The flat side A of the needle must Face to the rear. Lower the sewing foot dnd insert the needle. pushing it up as far as it will go. Hold the needle and […]
-
Page 29: Pfaff tipmatic 6150
Setting the need’e thread tension Set the required amount on the needle thread tension (18) using mark A The normal setting for sewing is 4 to 5 For embroidering. darning and buttonhole sewing between 2 and 3. For certain sewing work, e g. darning, the feed dog has to be dropped. To do this, open the hook cover and press slide B fully to the righ[…]
-
Page 30: Pfaff tipmatic 6150
Reverse sewing The machine sews in reverse as long as the reverse key (21) is kept pressed. Li AA You will find the symbol buttonhole bet ween the figure 0 arid 1. The optimal stitch density for sewing buttonholes is in this range. The stitch becomes more concentrated the farther you turn towards O Stitch length knob You can set the stitch length ([…]
-
Page 31: Pfaff tipmatic 6150
Pushbutton controls Setting utility stitches Under the id (26) you can find the program PFAFF tiptronic 6230 table with all the stitches and stitch combina tions. On model 6230 the most important stitches are additionally illustrated on the lighted display. Each program has been given a letter that you can find on the bushbutton controls. If the ri[…]
-
Page 32: Pfaff tipmatic 6150
Utility and stretch stitch combinations AIAAA By striking two or several keys you can m combinations in the utility stitch range The stitch length knob can either be set in utility sewing range or in the stretch range All the stitch combinations are illustrated the program table in the lid. You can rele keys that are already activated with key B. P[…]
-
Page 33: Pfaff tipmatic 6150
Function keys (Model 6230) The tiptronic has three function keys. 1. Sewing slowly When key (1) slow sewing’ is pressed the green diode lights up. The sewing machine now sews at half speed. If the key is pressed again the green diode is extinguished and the machine sews at full speed again. 2. Needle position up/down Each time sewing is interrupt[…]
-
Page 34: Pfaff tipmatic 6150
Sewing chart General sewing aids Nonelastic stitches Elastic stitches Overlock stitches Covering stitches Buttonhole Hems with twin needle Smocking Gathering Darning Inserting zippers Rollhemming Sewing lace Shelledging page 34 pages 35 pages 36 — 39 pages 40, 45 pages 42, 43 pages 44, 45 pages 46, 47 page 48 page 48 pages 49, 50 pages 51 — 53 […]
-
Page 35: Pfaff tipmatic 6150
Explanation of the sewing chart The following charts show the recom mended settings that you require for the relevant sewing operations. These charts also provide you with further instructions that are necessary when sewing the selected programs: The choice of the sewing foot, the setting of the needle thread tension and whether the sewing is carri[…]
-
Page 36: Pfaff tipmatic 6150
Needle thread tension In order to obtain perfect sewing results the needle and bobbin thread tensions must be correctly adapted to each other. The normal setting for utility stitches is 3 to 5. Check the tension using a wide zigzag stitch. The interlace of the two threads must lie in the middle of the two fabric plies. If the interlace lies on the […]
-
Page 37: Pfaff tipmatic 6150
HLi a Taste3 — — C’ 3 0/1 b — — — — — Basting stitch (Mode) 6230) With key (3) basting you can baste a gar ment before trying it on. When you press the foot control the machine will only make one stitch. For each further stitch you have to press the foot control each time, — Lower the bottom feed and disengage the top feed. — Place th[…]
-
Page 38: Pfaff tipmatic 6150
i I I I prog Z*j L_____ J6j_j35IO3J Zigzag stitch With keys D, E and F you can alter the width of the zigzag stitches from 2 to 6 mm. By combining the keys DIE or E/F you obtain additional widths When serging the edge, always make sure the needle goes into the material and over the edge alternately For serging difficult materials, blind stitch foot[…]
-
Page 39: Pfaff tipmatic 6150
Blind stitch H is best suited for invisible hems; sewing by hand is unnecessary. — Serge the edge of the hem. — Fold the edge inwards by the hem width. — Now unfold the hem again so that the hem edge protrudes by about half an inch. — Now place the fabric under the sewing foot so that the crease line runs along edge guide B. — When the ne[…]
-
Page 40: Pfaff tipmatic 6150
a! E 4 23!— U Sewing on buttons with stems — Insert the sewing foot. — Place a match between the holes of the button and sew it on as described on the left. Sewing on buttons With orogram E you can sew on two and four- hole buttons with no problem at all — Remove the sewing foot and lower the feed dog. — Turn the hand wheel towards you an[…]
-
Page 41: Pfaff tipmatic 6150
1 prog 1” — jJ a DFFSTc 46 • 35 01 D E F StrpcP 4 6 3 5 0 Stretch triple straight stitch This program is used for sewing all seams where great strength is needed, e.g. inside trouser seams. The farther you turn the stitch length knob, the longer the stitch length. Stretch triple zigzag stitch The stretch triple zigzag stitch is a highly elasti[…]
-
Page 42: Pfaff tipmatic 6150
prog 1 I I III I I> III I I prog I I a M 1-2,5 I 6 • 3 5 I 0/1 a M I Stretch I 6 • 3-5 0/1 [ bIMI125161._13-510I bMIStretchI6I_I35I0I Elastic stitch Owing to its high elasticity this stitch is used for sewing on elastic tapes, e.g. on underwear. Cut off the old elastic tape close to the edge. — Gather the fabric with 6 mm long straight sti[…]
-
Page 43: Pfaff tipmatic 6150
N N N N What is an overlock stitch? For knitted and other stretch materials the models with pushbutton controls offer a selection of overlock stitches. These join two plies of fabric and serge them in one opera tion. They have a higher elasticity than usual seams, they are more durable, and you can sew them fast, too. Closed overlock stitch TIP: Wh[…]
-
Page 44: Pfaff tipmatic 6150
— ‘4 ‘ .. _4 •4 .s.•-_’ a- 4 _ ‘_4 4.44?_A I I • I _4_ _4,_•,,,-e 4 • a- , ., I — A — — 4?— %-‘‘ 4? _i I -‘—- “ I •-_‘_ ‘,‘—,.-:—-—- -..-> 3 ‘, —‘-. ,‘- __•4__ ‘, — — I -; — Aa, -* — —4. I > I -‘:.4:%—— Pullover stitch This stitch is suitable for open knit fabrics Fu[…]
-
Page 45: Pfaff tipmatic 6150
prog : L Stretch 6 • 3-5 : L Stretchl 6 — I 1 Fagoting stitch With fagoting stitch you can make very elastic seams with hemstitching effect, eg. on corsetry. — Serge the fabric edges and tack baste over on the inside. — Place the fabric under the sewing foot with the edges about 1/8 of an inch apart. — Sew on the face side, making sure the […]
-
Page 46: Pfaff tipmatic 6150
I,l)IJ I I prog 1 i -.-l progj ‘ I JaLH-2I6j•3-5j1 !aLFIStretchI5I.3-5I1 I IbI L 11-216 HI 0 IbI — I — — — — Fancy elastic stitch Fancy elastic stitch is very useful for materials that need a flat seam, e.g. terry cloth. — Place the two fabric edges so that they overlap by about 3/4 of an inch and over- stitch each edge with fancy elastic sti[…]
-
Page 47: Pfaff tipmatic 6150
PFAFF t i ptron ic 6230 tipmatic 6110, 6120, 6150 PFAFF — ) instruction manual[…]
-
Page 48: Pfaff tipmatic 6150
Buttonholes Sewing buttonholes is very easy with all the models with pushbutton controls since the fabric does not have to be turned. 8uttonholes are generally sewn onto a piece of doubled fabric. However, for some materials, e.g. silk, organza and viscose, it is necessary to use silk paper backing to prevent the material from contracting while sew[…]
-
Page 49: Pfaff tipmatic 6150
I I I I — prog I I I -.. I—I ABC 44,5 3 b A BCI : 3 5 ___________ B Linen buttonholes Insert the buttonhole slide and push it fully to the front. — Press key C and sew the first seam to the required length. Then press key B. Keep it pressed and sew a few stitches for the bartack, while holding the material securely. Then press key A and sew bac[…]
-
Page 50: Pfaff tipmatic 6150
I.! iii ii Il lii rr — — ,, t.* ., Lit i. -jiI’tt’ ‘t, t .t i.r I’’Iv progi I -_-I 23;i Ta G I i — • 3.510/h bIGl3-13-510I Sewing hems with the twin needle With the twin needle you can not only embroider, but also make topstitch seams. Using the twin needle you can add a profes sional touch to hems on stretch materials such as T shir[…]
-
Page 51: Pfaff tipmatic 6150
i 6 6 • 3 5 C) 1 35 01 Gathering with straight stitch With Program G at a stitch length of 6 mm you can gather sleeves, skirts or valances. To obtain a neat and even gather you should sew two or three gathering seams. — Mark the first line on the face side of the fabric and stitch along it. Leave about four or five inches of thread protruding at[…]
-
Page 52: Pfaff tipmatic 6150
a ‘::‘. TIP: The cording foot (special accessory) is Gathering sleeves or waist seams is no pro also ideal for gathering. The grooves in this blem at all with elastic threads. The elastic foot guide the elastic evenly during the sewing thread must not be wound onto the bobbin, operation. — Mark the first gathering seam on the reverse side of […]
-
Page 53: Pfaff tipmatic 6150
prog ‘1’ a G — — 0 23 6 b G — — 23 aEcer Darning with the straight stitch Insert the darning foot: Set the needle at its highest position and push the pin of the darning foot fully into hole C. When you do this, guide fork G places itself around the presser bar. Wire E must be behind fixing screw F. Now tighten screw D. Darning position: Lo[…]
-
Page 54: Pfaff tipmatic 6150
I I! prog I a M 021 6 M 021 6 prog I < I •35011 0 M 15 6 35 0 Darning with elastic stitch Darning with elastic stitch is also a very suitable means of repairing damaged fabric. — Sew over the damaged area with rows of stitches until it is well covered. When doing so, make sure the stitch rows overlap each other. Sewing on patches The best wa[…]
-
Page 55: Pfaff tipmatic 6150
2fl Z — D DO • : V _ 0 Q E’ (0 CDE_ r • 0 — 3 o a DD COO 0 3 00 0 -, ________ 0 — D—43c LD oC 0 . 0 = aoO C) ci, ci, 0 — D-, 00 ci,[…]
-
Page 56: Pfaff tipmatic 6150
progl a G 3 — . 3-5 4 b G 3 — 3-5 4 Sewing in zippers There are different ways to sew in zippers. For skirts we recommend inserting the zipper concealed on both sides, and for men’s or ladies’ slacks concealed on one side. Different types of zippers are available in shops and stores. For tough materials such as denim we recommend metal zipp[…]
-
Page 57: Pfaff tipmatic 6150
— Sew the second half of the zipper parallel at the same distance. Stop shortly before the end of the seam and leave the needle in the material. Raise the sewing foot and open the zipper. — You can now sew to the end of the seam. — Shortly before the end of the seam, open the zipper and finish sewing the seam. — Close the zipper and baste t[…]
-
Page 58: Pfaff tipmatic 6150
Roll hemming With the hemmer you can rollhem blouses, silk fabrics or valances with no problem at all and without having to iron the edges before hand Hemming secures the edges against fraying and produces a tidy and durable edge finish. — Fold the fabric edge over double (about (5/64) 2 mm per fold). — Place the folded fabric edge under the he[…]
-
Page 59: Pfaff tipmatic 6150
Lace inserts You can produce a beautiful effect on christening wear or other children’s clothes with lace inserts, First baste the lace to the face side of the fabric. — Stitch both edges of the lace with a narrow margin. — Cut open the fabric under the lace at the middle and iron it over to the side. — Stitch over both edges of the lace wi[…]
-
Page 60: Pfaff tipmatic 6150
,: 45O Shell edging Shell edging is very effective for thin, soft fabrics such as silk and viscose materials. It is frequently used as an edge finish on under wear, too. The tighter you set the needle thread tension the farther the shell edging is pulled in Serge the raw edge and iron the seam margin over to the left. While sewing, make sure that t[…]
-
Page 61: Pfaff tipmatic 6150
embroidery techniques 4 Sewing table for embroidery Decorative stitches Monograms Appliqué Richelieu Quilting Eyelet embroidery Hemstitching page 60 page 61 — 64 page 65 page 66 page 66 page 67 page 68 page 69 Decorative and traditional I 59[…]
-
Page 62: Pfaff tipmatic 6150
Decorative stitches B To enhance your own home textiles or gar ments the models 6150 and 6230 offer you a S whole host of fancy and decorative stitches to choose from. You can produce even greater embroidery variations by selecting different combinations, colours or sizes. For embroi dery work we recommend using special embroidery threads which are[…]
-
Page 63: Pfaff tipmatic 6150
Changing the pattern length You can vary the pattern length infinitely with the aid of the stitch length knob. The stitch density for embroidery is generally in the but tonhole range. The larger the stitch density you set is, the farther the pattern is stretched apart. Changing the pattern width The machine automatically Sets a stitch width of 6 mm[…]
-
Page 64: Pfaff tipmatic 6150
B S ft B 0 n r t Borders By combining different embroidery programs you can embroider borders of any width. Madeira embroidery threads are very suitable. They are available in many colour shades and different sizes. However, only use one thread size for one piece of embroidery work. — Apply iron-on backing or place silk backing paper under the fa[…]
-
Page 65: Pfaff tipmatic 6150
Borders with a combination of stitches By combining different embroidery keys as desired you can easily achieve other embroi dered effects. This is a simple and pleasing way to embellish tablecloths and garments. — Apply iron-On backing or place silk backing paper under the fabric. — Mark the centre with tailors chalk. — You can now begin wit[…]
-
Page 66: Pfaff tipmatic 6150
Twin neeate You can achieve further embroidery effects by using the twin needle. The illustrations show what beautiful borders can be made with a little imagination. Note: Only use a twin need with a width of 2,5 mm for all embroidery. Threading the twin needle — Insert the twin needle. Fit the second reel holder and place one reel of thread on e[…]
-
Page 67: Pfaff tipmatic 6150
Monograms No matter whether you work on terry cloth or woven fabric, with the darning foot and pro grams D, E or F you can monogram any initi als of your own design. Freehand guiding, however, needs a little practice in the beginning. — Transfer the initials with the magic pen to the part to be embroidered. — Lower the feed dog and insert the d[…]
-
Page 68: Pfaff tipmatic 6150
pl Appliqués are quickly made and always pro duce a beautiful fancy effect. By using diffe rent materials and patterns you can obtain variations galore. You can make a perfect, densely stitched seam with the applique foot (special accessoriesf, because it has a special cutout on its sole for the zigzag seam. — Insert the appliqué foot in the se[…]
-
Page 69: Pfaff tipmatic 6150
Quilting Quilting is a traditional sewing technique. The method that the wives of American settlers developed to make use of material remnants has become an artistic hobby with many enthusiasts in our country, too. A quilt always consists of three layers of material. Lots of geometrically shaped pieces of material are joined together in continually[…]
-
Page 70: Pfaff tipmatic 6150
Traditional eyelet embroidery which long ago had to he made laboriously by hand can be made quite easily with the help of an eyelet plate Ispecial accessory). This is very etfective on blouses, bed or table linen Practically all stitch types are suitable for this utility stitches such as a zigzag stitch, blind stitch, elastic stitch or fancy stitch[…]
-
Page 71: Pfaff tipmatic 6150
Cl, 3CDCD23 C) CD 3 3 CD 0 N CD DC 0 0 DC DC 0 CD DC CD CD Q.3-0 CC * CD < 3 CD DC DC -< 0. 0 CD .CCD DC CD 0. -V DC 0C -n7(9 CDDC C Q 0.3 DC 3 3 CD 0 DC 3- CD 3- CD DC 0 DC C I DC30.3 3- CDCDDCDC Cs, g — C 3-OC—DC<D 3 3 CD 3- DC CC. CD CD C CD Z — 2.3 3 DC _ DC —. p CDDC—.3C)03 3- “ 0 C ‘< 0 CD < DC DC a E E3 DC CD 3 3- C-[…]
-
Page 72: Pfaff tipmatic 6150
Accessories and needles Sewing feet (normal accessories) Special accessory table Felling foot Gathering foot Cording foot Bias binder Multistitch gatherer Cording foot Appliqué foot Fringe foot Needle table pages 72, 73 page 74 page 75 page 75 page 76 page 77 page 77 page 78 page 78 page 79 pages 80, 81 71[…]
-
Page 73: Pfaff tipmatic 6150
Sewing feet (accessories) K. o Normal sewing foot Part No. 98-694 816-00 (Model 6120—6230) Part No. 98-694 847-00 (Modell 6110) Fancy stitch foot for top feed Part No. 98-694 814-00 (Model 6120 — 6230) NO I(O Clearviewfoot L,(Q (Fancy stitch foot not suitable for top feed> Part No. 98-694 864-00 (Model 6110— 6230) LJILc PvT j) q’ çv-9-?[…]
-
Page 74: Pfaff tipmatic 6150
Sewing feet (accessorlesi 5 Buttonhole foot Part No. 98-694882-00 (Model 6110 — 6230) 6 Darning foot Part No. 93-035960-91 (Model 6110 6230) For Model 6110 special accessory 7 Hemmer Part No. 98-694818-00 (Model 6110 — 6230) For Model 6110 special accessory 8 Edge guide Part No. 98-802422-00 (Model 6110 — 6230) Second spool holder 9333vC3 -?[…]
-
Page 75: Pfaff tipmatic 6150
Sewing feet special accessory) Special accessories are intended for special sewing work. They are available at a charge from your dealer. Accessory Part number Sewing work Appliqué foot 93-042941-91 For appliqué work Bias binder 98-053484-91 For binding edges with (remove foot holder( bias tape Cording foot, 5 grooves 93-042950-91 (twin needles w[…]
-
Page 76: Pfaff tipmatic 6150
Lap-feller seams are not only ornamental but strong, too. This makes them very suitable for sportswear and children’s wear, men’s shirts and Jeans. You can make these seams very effective if you use a sewing thread of a con trasting colour. Overlap the raw edge of the lower ply by about 3/8’ to 5/8’. — Now place this overlapping edge over[…]
-
Page 77: Pfaff tipmatic 6150
Cording foot The classic sewing technique of cording can be used without any problems on fabrics such as cotton and light wollens Underclothing and children’s wear can be given a traditional look with cording. — Engage the cording foot. — Replace the needle with a twin needle 11.6 or 2 mml. — Thread up with two needle threads Isee page 64).[…]
-
Page 78: Pfaff tipmatic 6150
Binding with bias tape is a very easy method of giving fabric edges a smooth and neat appearance. For this you need unfolded bias tape about an inch wide. — Remove the foot holder with sewing foot and screw on the binder. — Cut the beginning of the bias tape at a dia gonal. — Push the tape into the scroll of the binder and pull it out to the […]
-
Page 79: Pfaff tipmatic 6150
J,I%I I progl I I c:j — a C O35-lj 1,5 2 3 cording I I b C jO.35.lj 1.5 2 j foot I Cording foot Cording is a technique in which pearl thread or a fine cord is overstitched to produce a purl seam. With this you can obtain an effect similar to braiding. Appliqués can also be made more effective with this seam. -. Mark the required motif on the fabri[…]
-
Page 80: Pfaff tipmatic 6150
Fnnge foot With this special foot for loop embroidery you can produce fantastic effects in no time. This foot is very useful for terry cloth. -. Mark out any pattern you wish with the magic pen. — Use a silk paper underlay and engage the fringe foot. — Embroider the motif, row by row. For circ les you have to work from the outside inward. — F[…]
-
Page 81: Pfaff tipmatic 6150
Needle chart Selection of the right needle guarantees better sewing of the chosen material. Fabric weight Fabric weight Fabric weight light medium heavy needle needle needle 607075 8090 100 110 120 Needle points Type Shape Type of eye Suitable for and point 130/705H Small ball Universal needle for fine synthetic Needle size: point wovens, fine line[…]
-
Page 82: Pfaff tipmatic 6150
Needle Table Description Stitch Stitch Needle suitable for length width distance 130/705 H-ZWI 2,5 mm — 1,6 mm normal cording Size: 80 2.5 mm — 2.0 mm normal cording 130/705 H-ZWI Size: 80 2,5 mm — 2,5 mm wide cording Size: 90 2,5 mm — 3,0 mm extra wide Size: 100 3.0 mm — 4.0 mm cording Fancy pattern with twin needles Before you sew the des[…]
-
Page 83: Pfaff tipmatic 6150
Maintenance and fault-finding I E r Changing the needle plate Cleaning and oiling Changing the sewing lamp Sewing problems and their solution Page 84 Page 84 Page 85 Page 86 83[…]
-
Page 84: Pfaff tipmatic 6150
q It is very important to clean and oil the sewing machine, because it will reward you with a longer service life. The more often you use the machine, the more care it needs. Removal: Switch off the main switch — Raise the sewing foot and remove the detachable work support. — Push the point of a small screwdriver into the opening between needle[…]
-
Page 85: Pfaff tipmatic 6150
— Changing the sewing lamp Switch off the main switch Disconnect the mains plug and the toot control plug from the machine. — Take off the detachable work support. The sewing lamp Ibulb) is located inside the needle head of the sewing machine Removal To make it easier to change the bulb we recommend placing the sewing machine on the hand wheel as […]
-
Page 86: Pfaff tipmatic 6150
Sewing problems and their solutions Problem/cause: 1. The machine Skips stitches Needle is not properly inserted. Wrong needle is in use, Needle is bent or blunt. Machine is not properly threaded. Needle is too small for thread. 2. Needle thread breaks See reasons above Thread tension is too tight. Thread is poor or has slubs in it, or has become d[…]
-
Page 87: Pfaff tipmatic 6150
L9[…]
-
Page 88: Pfaff tipmatic 6150
co[…]
-
Page 89: Pfaff tipmatic 6150
PFAFF G. M. Plaff Aktiengesellschaft Werk Karisruhe-Durlach GritznerstraL,e 11 76227 Karlsruhe Gedrucki in Deutschland Druckerei Gablenz GmbH 76356 Weingarten, Stettiner StraSe 17 Technische Anderungen vorbehaften Nr.: 29629996-65/OOO OG englisch 8/93[…]
| Модель устройства | Подробности документа |
|---|---|
| Pfaff 100 s |
1.8 mb |
| Pfaff 1014 |
1.72 mb |
| Pfaff 1015 |
1.72 mb |
| Pfaff 1019 |
1.72 mb |
| Pfaff 1035 |
1.72 mb |
| Pfaff 1037 |
1.72 mb |
| Pfaff 1040s |
0.58 mb |
| Pfaff 1060s |
0.46 mb |
| Pfaff 1070S — IAN96742 |
1.99 mb |
| Pfaff 1080S |
6.62 mb |
| Pfaff 1122 |
0.78 mb |
| Pfaff 1122-720/02 |
0.78 mb |
| Pfaff 1122-G |
0.78 mb |
| Pfaff 1122-G-720/02 |
0.78 mb |
| Pfaff 118 |
0 mb |
| Pfaff 1181-D |
1.47 mb |
| Pfaff 1183 |
1.45 mb |
| Pfaff 1183-D |
1.47 mb |
| Pfaff 1196 |
0 mb |
| Pfaff 1197 |
0 mb |
| Pfaff 1199 |
0 mb |
| Pfaff 1209 |
1.37 mb |
| Pfaff 1211 |
0 mb |
| Pfaff 1213 |
0 mb |
| Pfaff 1214 |
0 mb |
| Pfaff 1221 |
0 mb |
| Pfaff 1222 |
0 mb |
| Pfaff 1222 E |
0 mb |
| Pfaff 1222E |
1.56 mb |
| Pfaff 1230 |
11.08 mb |
| Pfaff 1245 |
1.63 mb |
| Pfaff 1245 |
1.17 mb |
| Pfaff 1246 |
1.63 mb |
| Pfaff 1246 |
1.17 mb |
| Pfaff 125 |
0 mb |
| Pfaff 1296 |
1.3 mb |
| Pfaff 130 |
10.89 mb |
| Pfaff 130-6 |
0 mb |
| Pfaff 131 |
0 mb |
| Pfaff 138 |
0 mb |
| Pfaff 139 |
0 mb |
| Pfaff 141 |
5.38 mb |
| Pfaff 142 |
21.37 mb |
| Pfaff 143 |
21.37 mb |
| Pfaff 144 |
21.37 mb |
| Pfaff 145 |
0 mb |
| Pfaff 146 |
21.37 mb |
| Pfaff 148 |
21.37 mb |
| Pfaff 151 |
21.37 mb |
| Pfaff 1527 |
0.21 mb |
| Pfaff 153 |
31.6 mb |
| Pfaff 1540 |
0 mb |
| Pfaff 155 |
31.6 mb |
| Pfaff 16 |
0 mb |
| Pfaff 18 |
0 mb |
| Pfaff 2 |
0.29 mb |
| Pfaff 204 |
0 mb |
| Pfaff 205 |
0 mb |
| Pfaff 2058 |
0.11 mb |
| Pfaff 207 |
0 mb |
| Pfaff 208 |
0 mb |
| Pfaff 209 |
0 mb |
| Pfaff 210 |
0 mb |
| Pfaff 211 |
0 mb |
| Pfaff 212 |
0 mb |
| Pfaff 2124 |
0.95 mb |
| Pfaff 213 |
0 mb |
| Pfaff 2170 |
4.36 mb |
| Pfaff 230 |
7.92 mb |
| Pfaff 245 |
0 mb |
| Pfaff 259 |
0 mb |
| Pfaff 260 |
0 mb |
| Pfaff 261 |
0 mb |
| Pfaff 262 |
3.77 mb |
| Pfaff 28 |
0 mb |
| Pfaff 284 |
0 mb |
| Pfaff 285 |
0 mb |
| Pfaff 294 |
0 mb |
| Pfaff 294-1 |
0 mb |
| Pfaff 295 |
0 mb |
| Pfaff 295-1 |
0 mb |
| Pfaff 296 |
6.9 mb |
| Pfaff 296-1 |
0 mb |
| Pfaff 297-1 |
0 mb |
| Pfaff 3.0 |
2.47 mb |
| Pfaff 30 |
0 mb |
| Pfaff 31 |
1.15 mb |
| Pfaff 332 |
0 mb |
| Pfaff 339 |
0 mb |
| Pfaff 340 |
3.53 mb |
| Pfaff 340.521.541.721.741 |
1.5 mb |
| Pfaff 350P |
1.48 mb |
| Pfaff 360 |
2.96 mb |
| Pfaff 362 |
0 mb |
| Pfaff 4 |
1.24 mb |
| Pfaff 4 |
1.41 mb |
| Pfaff 4.0 |
2.67 mb |
| Pfaff 463 |
0 mb |
| Pfaff 463 AND 463 H |
2.56 mb |
| Pfaff 463H |
2.56 mb |
| Pfaff 481 |
1.97 mb |
| Pfaff 483 |
1.97 mb |
| Pfaff 489 |
0.72 mb |
| Pfaff 51 |
0 mb |
| Pfaff 541 |
31.6 mb |
| Pfaff 542 |
31.6 mb |
| Pfaff 543 |
31.6 mb |
| Pfaff 544 |
31.6 mb |
| Pfaff 545 |
31.6 mb |
| Pfaff 546 |
31.6 mb |
| Pfaff 548 |
31.6 mb |
| Pfaff 5487 |
0.72 mb |
| Pfaff 551 |
31.6 mb |
| Pfaff 553 |
31.6 mb |
| Pfaff 555 |
31.6 mb |
| Pfaff 561 |
0 mb |
| Pfaff 563 |
0 mb |
| Pfaff 574 |
2.41 mb |
| Pfaff 583 |
1.45 mb |
| Pfaff 591 |
2.41 mb |
| Pfaff 6 |
0 mb |
| Pfaff 60 |
0 mb |
| Pfaff 6250 |
0 mb |
| Pfaff 63 |
0 mb |
| Pfaff 71 |
0 mb |
| Pfaff 72 |
0 mb |
| Pfaff 73 |
0 mb |
| Pfaff 74 |
0 mb |
| Pfaff 75 |
0 mb |
| Pfaff 751 |
3.53 mb |
| Pfaff 76 |
0 mb |
| Pfaff 77 |
0 mb |
| Pfaff 78 |
0 mb |
| Pfaff 79 |
0 mb |
| Pfaff 80 |
0 mb |
| Pfaff 84 |
0 mb |
| Pfaff 86 |
0 mb |
| Pfaff 9 |
0 mb |
| Pfaff 90 |
0 mb |
| Pfaff 904-1 |
2.71 mb |
| Pfaff 918 |
0.32 mb |
| Pfaff 919-1 |
2.71 mb |
| Pfaff 92 |
0 mb |
| Pfaff 93 |
0 mb |
| Pfaff 935 |
3.22 mb |
| Pfaff 938 |
1.45 mb |
| Pfaff 94 |
0 mb |
| Pfaff 946-1 |
0 mb |
| Pfaff 946-1 91 |
2.71 mb |
| Pfaff 95 |
0 mb |
| Pfaff 955 |
3.22 mb |
| Pfaff 96 |
5.49 mb |
| Pfaff 97 |
5.49 mb |
| Pfaff ambition |
0 mb |
| Pfaff Ambition 1.0 |
0 mb |
| Pfaff Ambition 1.5 |
0 mb |
| Pfaff Ambition Essential |
0 mb |
| Pfaff automatic 260 |
0 mb |
| Pfaff automatic 261 |
0 mb |
| Pfaff automatic 262 |
0 mb |
| Pfaff automatic 332 |
0 mb |
| Pfaff automatic 362 |
0 mb |
| Pfaff C1100 Pro |
0 mb |
| Pfaff calanda 132 |
0 mb |
| Pfaff Ccreative 2.0 |
2.26 mb |
| Pfaff ClassicStyle 1525 |
0 mb |
| Pfaff ClassicStyle 2025 |
0 mb |
| Pfaff ClassicStyle 2027 |
4.65 mb |
| Pfaff ClassicStyle fashion 2023 |
0 mb |
| Pfaff ClassicStyle home 1529 |
0 mb |
| Pfaff ClassicStyle home 2029 |
0 mb |
| Pfaff ClassicStyle Quilt 1527 |
0 mb |
| Pfaff ClassicStyle Quilt 2027 |
0 mb |
| Pfaff Confidence 7463 |
3.78 mb |
| Pfaff coverlock 3.0 |
0 mb |
| Pfaff coverlock 4.0 |
0 mb |
| Pfaff coverlock 4772 |
0 mb |
| Pfaff coverlock 4852 |
0 mb |
| Pfaff coverlock 4862 |
0 mb |
| Pfaff coverlock 4872 |
0 mb |
| Pfaff Coverstyle |
0.23 mb |
| Pfaff coverstyle 4850 |
0 mb |
| Pfaff Creative 1.5 |
6.23 mb |
| Pfaff creative 1371 |
0 mb |
| Pfaff creative 1467 |
0 mb |
| Pfaff creative 1471 |
0 mb |
| Pfaff creative 1472 |
0 mb |
| Pfaff creative 1473 |
0 mb |
| Pfaff creative 2.0 |
0 mb |
| Pfaff Creative 2.0. |
4.16 mb |
| Pfaff creative 2124 |
0 mb |
| Pfaff Creative 2134 |
0.12 mb |
| Pfaff creative 2144 |
0 mb |
| Pfaff creative 2170 |
0 mb |
| Pfaff creative 3.0 |
0 mb |
| Pfaff creative 4.0 |
0 mb |
| Pfaff creative 4874 |
0 mb |
| Pfaff creative 7510 |
0 mb |
| Pfaff creative 7530 |
0 mb |
| Pfaff creative 7550 |
0 mb |
| Pfaff creative 7560 |
0 mb |
| Pfaff creative 7570 |
0 mb |
| Pfaff creative designer |
0 mb |
| Pfaff creative grand hoop |
0 mb |
| Pfaff creative performance |
0 mb |
| Pfaff creative sensation |
0 mb |
| Pfaff creative vision |
0 mb |
| Pfaff Creative Vision 5.5 |
6.29 mb |
| Pfaff Deluxe |
0.69 mb |
| Pfaff dorina 72 |
0 mb |
| Pfaff dorina 75 |
0 mb |
| Pfaff dorina 77 |
0 mb |
| Pfaff Dualmatic 935 |
7.33 mb |
| Pfaff Dualmatic 955 |
7.33 mb |
| Pfaff Embroidery Machine |
0.46 mb |
| Pfaff Embroidery Machines |
0.36 mb |
| Pfaff Embroidery Mode-Stitch-Out |
0.49 mb |
| Pfaff expression 150 |
0 mb |
| Pfaff expression 2.0 |
0.1 mb |
| Pfaff expression 2014 |
0 mb |
| Pfaff expression 2024 |
0 mb |
| Pfaff expression 2026 |
0 mb |
| Pfaff expression 2028 |
0 mb |
| Pfaff expression 2034 |
0 mb |
| Pfaff expression 2038 |
0 mb |
| Pfaff expression 2044 |
0 mb |
| Pfaff expression 2046 |
0 mb |
| Pfaff expression 2048 |
0 mb |
| Pfaff expression 3.0 |
0 mb |
| Pfaff expression 3.2 |
0 mb |
| Pfaff Expression 3.5 |
2.88 mb |
| Pfaff Expression 4.0 |
3.26 mb |
| Pfaff expression 4.2 |
0 mb |
| Pfaff Freestyle 1527 |
0 mb |
| Pfaff GrandQuilter |
0 mb |
| Pfaff GrandQuilter 18.8 |
0 mb |
| Pfaff GrandQuilter Hobby 1200 |
0.74 mb |
| Pfaff hobby 1010 |
0 mb |
| Pfaff hobby 1016 |
0 mb |
| Pfaff hobby 1022 |
0 mb |
| Pfaff hobby 1032 |
0 mb |
| Pfaff hobby 1042 |
0 mb |
| Pfaff hobby 1122 |
0 mb |
| Pfaff hobby 1132 |
0 mb |
| Pfaff hobby 1142 |
0 mb |
| Pfaff Hobby 301 |
9.6 mb |
| Pfaff hobby 303 |
0 mb |
| Pfaff hobby 307 |
0 mb |
| Pfaff hobby 309 |
0 mb |
| Pfaff Hobby 340 |
3.18 mb |
| Pfaff hobby 350 |
0 mb |
| Pfaff Hobby 350p |
0.3 mb |
| Pfaff hobby 382 |
0 mb |
| Pfaff hobby 422 |
0 mb |
| Pfaff hobby 4240 |
0 mb |
| Pfaff hobby 4250 |
0 mb |
| Pfaff hobby 4260 |
0 mb |
| Pfaff hobby 521 |
0 mb |
| Pfaff Hobby 541 |
3.18 mb |
| Pfaff Hobby 721 |
3.18 mb |
| Pfaff Hobby 741 |
3.18 mb |
| Pfaff Hobby 800 |
2.84 mb |
| Pfaff Hobby 801 |
1.26 mb |
| Pfaff Hobby 802 |
1.26 mb |
| Pfaff Hobby 803 |
1.26 mb |
| Pfaff Hobby 806 |
1.26 mb |
| Pfaff Hobby 807 |
1.26 mb |
| Pfaff hobby serger |
0 mb |
| Pfaff hobbylock 2.0 |
0.71 mb |
| Pfaff Hobbylock 2.5 |
0 mb |
| Pfaff hobbylock 4752 |
0 mb |
| Pfaff hobbylock 4760 |
0 mb |
| Pfaff hobbylock 4762 |
0 mb |
| Pfaff hobbylock 4764 |
0 mb |
| Pfaff hobbylock 4842 |
0 mb |
| Pfaff hobbylock 4860 |
0 mb |
| Pfaff hobbylock 4870 |
0 mb |
| Pfaff hobbylock 603A |
0 mb |
| Pfaff hobbylock 604 |
0 mb |
| Pfaff hobbylock 756 |
0 mb |
| Pfaff hobbylock 774 |
0 mb |
| Pfaff hobbylock 776 |
0 mb |
| Pfaff hobbylock 783 |
0 mb |
| Pfaff hobbylock 784 |
0 mb |
| Pfaff hobbylock 786 |
0 mb |
| Pfaff hobbylock 787 |
0 mb |
| Pfaff hobbylock 788 |
0 mb |
| Pfaff hobbylock 794 |
0 mb |
| Pfaff hobbylock 795 |
0 mb |
| Pfaff hobbylock 796 |
0 mb |
| Pfaff hobbylock 797 |
0 mb |
| Pfaff hobbylock 799 |
0 mb |
| Pfaff hobbylock HL-603A |
0 mb |
| Pfaff hobbymatic 800 |
0 mb |
| Pfaff hobbymatic 801 |
0 mb |
| Pfaff hobbymatic 802 |
0 mb |
| Pfaff hobbymatic 803 |
0 mb |
| Pfaff hobbymatic 806 |
0 mb |
| Pfaff hobbymatic 807 |
0 mb |
| Pfaff hobbymatic 904 |
0 mb |
| Pfaff hobbymatic 919 |
0 mb |
| Pfaff hobbymatic 935 |
0 mb |
| Pfaff hobbymatic 946 |
0 mb |
| Pfaff hobbymatic 947 |
0 mb |
| Pfaff hobbymatic 955 |
0 mb |
| Pfaff kayser 44 |
0 mb |
| Pfaff kayser 46 |
0 mb |
| Pfaff Metal Hoop 180×130 |
1.34 mb |
| Pfaff passport 2.0 |
0 mb |
| Pfaff performance 2054 |
0 mb |
| Pfaff performance 2056 |
0 mb |
| Pfaff performance 2058 |
0 mb |
| Pfaff performance 5.0 |
0 mb |
| Pfaff Quilt Ambition 2.0 |
2.72 mb |
| Pfaff Quilt Expression 4.2 |
2.8 mb |
| Pfaff Select 150 |
6.75 mb |
| Pfaff select 1520 |
0 mb |
| Pfaff select 1528 |
0 mb |
| Pfaff select 1530 |
0 mb |
| Pfaff select 1538 |
0 mb |
| Pfaff select 1540 |
0 mb |
| Pfaff select 1548 |
0 mb |
| Pfaff Select 2.0 |
13.83 mb |
| Pfaff Select 3.0 |
13.83 mb |
| Pfaff Select 3.2 |
6.39 mb |
| Pfaff Select 4.0 |
13.83 mb |
| Pfaff Select-line 2-2 |
6.4 mb |
| Pfaff Select-line 3-2 |
6.4 mb |
| Pfaff Select-line 4-2 |
6.4 mb |
| Pfaff Sewing Machine |
0.38 mb |
| Pfaff smart 100s |
0 mb |
| Pfaff smart 200c |
0 mb |
| Pfaff smart 300e |
0 mb |
| Pfaff Smarter 140S |
2.16 mb |
| Pfaff Smarter 160S |
2.16 mb |
| Pfaff Smarter 260C |
2.44 mb |
| Pfaff synchromatic 1209 |
0 mb |
| Pfaff synchromatic 1215 |
0 mb |
| Pfaff synchromatic 1216 |
0 mb |
| Pfaff synchromatic 1217 |
0 mb |
| Pfaff synchrotronic 1229 |
0 mb |
| Pfaff SZA-645F |
0 mb |
| Pfaff Tipmatic 1011 |
2.13 mb |
| Pfaff tipmatic 1014 |
0 mb |
| Pfaff tipmatic 1015 |
0 mb |
| Pfaff tipmatic 1019 |
0 mb |
| Pfaff tipmatic 1025 |
0 mb |
| Pfaff tipmatic 1027 |
0 mb |
| Pfaff tipmatic 1035 |
0 mb |
| Pfaff tipmatic 1037 |
0 mb |
| Pfaff tipmatic 1045 |
0 mb |
| Pfaff tipmatic 1047 |
0 mb |
| Pfaff tipmatic 1115 |
0 mb |
| Pfaff tipmatic 1119 |
0 mb |
| Pfaff tipmatic 1147 |
0 mb |
| Pfaff tipmatic 1151 |
0 mb |
| Pfaff tipmatic 6110 |
0 mb |
| Pfaff tipmatic 6112 |
0 mb |
| Pfaff tipmatic 6120 |
0 mb |
| Pfaff tipmatic 6122 |
0 mb |
| Pfaff tipmatic 6150 |
0 mb |
| Pfaff tipmatic 6152 |
0 mb |
| Pfaff Tipronic 2010 |
6.78 mb |
| Pfaff Tipronic 2020 |
6.78 mb |
| Pfaff tiptronic 1029 |
0 mb |
| Pfaff tiptronic 1067 |
0 mb |
| Pfaff tiptronic 1069 |
0 mb |
| Pfaff tiptronic 1071 |
0 mb |
| Pfaff tiptronic 1151 |
0 mb |
| Pfaff tiptronic 1171 |
0 mb |
| Pfaff tiptronic 2010 |
0 mb |
| Pfaff tiptronic 2020 |
0 mb |
| Pfaff tiptronic 2030 |
0 mb |
| Pfaff tiptronic 2040 |
0 mb |
| Pfaff Tiptronic 6122 |
3.59 mb |
| Pfaff Tiptronic 6150 |
3.23 mb |
| Pfaff Tiptronic 6152 |
4.18 mb |
| Pfaff tiptronic 6230 |
0 mb |
| Pfaff tiptronic 6232 |
0 mb |
| Pfaff tiptronic 6270 |
0 mb |
| Pfaff varimatic 6086 |
0 mb |
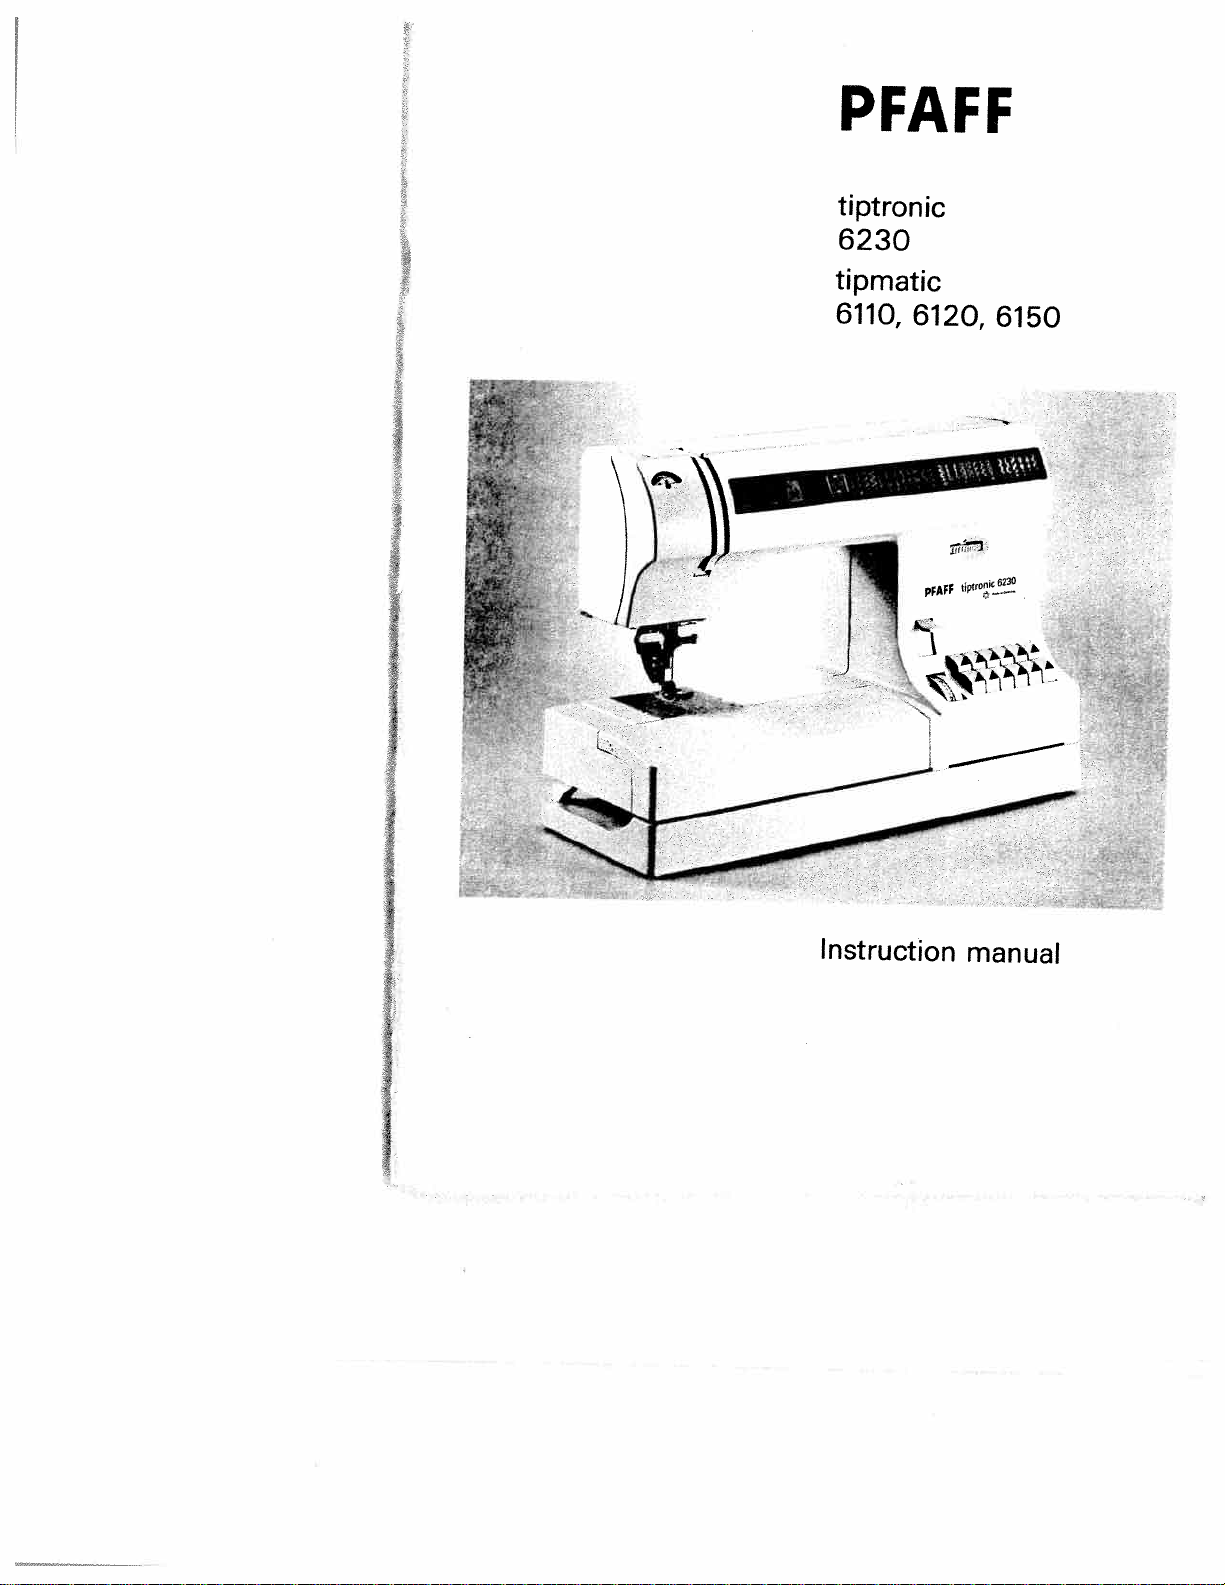
•0
03
an
og
0)
C-)
.sfl
NJ
‘1
0
IT’
C.)
-a
01
0
D
C’,
1
C
C)
D
C
3
0)DC
0)
I
I
I
I
For
please
easier
fold
understanding
this
or
the
of
last
page
Safety
For
The
to
the
with
The
according
As
the
of
this
colour
proceed
The
nected
the
The
connected
with
Cut-off
used,
mains
Only
approved
the
fuse
the
corresponding
The
plug
cover.
electrical
Please
on
page
this
the
leads
three
wires
Blue:
Brown:
colours
appliance
coding
wire
to
lettter
wire
the
mains
but
leads
3
A
Spare
also
2.
instruction
open
rules
United
must
safety
pins.
in
the
to
the
as
follows:
which
the
terminal
N
or
which
to
the
letter
plugs
disposed
must
spare
ASTA
by
cover
must
must
never
fuse
suppliers
observe
when
Kingdom
definitely
lead
mains
following
Neutral
Live
of
the
may
of
the
is
coloured
coloured
is
coloured
terminal
L
or
coloured
of
be
fuses
according
colour
covers
or
the
book
reading
only
terminal
lead
wires
not
correspond
terminals
which
black.
which
are
definitely
immediately.
replaced
must
be
be
marked
code.
be
used
are
the
PFAFF
general
not
be
nor
I
are
coloured
code:
in
the
in
blue
must
is
marked
brown
is
red.
completely.
used
to
BS
3
A
without
available
agencies.
safety
it.
connected
to
mains
your
must
marked
not
to
Defective
as
1362
or
fuse
notes
a
plug
with
plug.
be
with
be
with
from
lead
the
con
be
and
nfinIisfctentnPaZn>
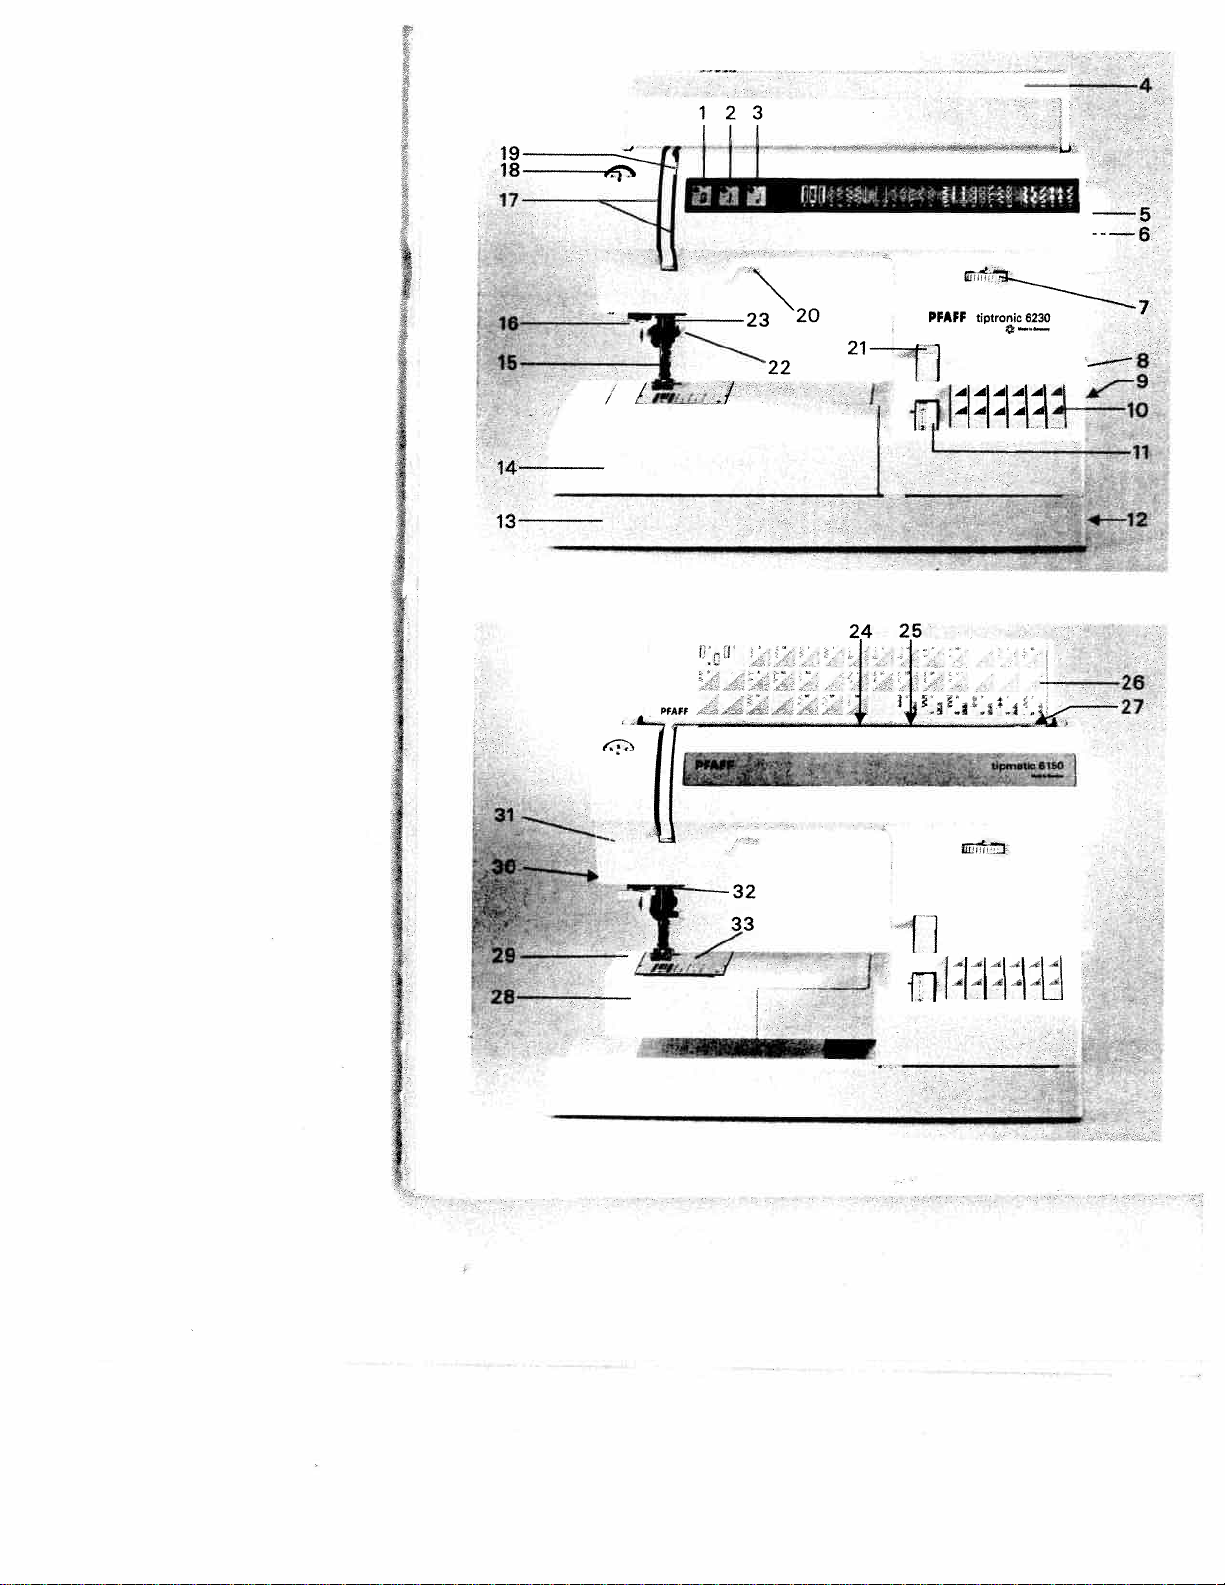
owl
‘.a
OCD
—
—
MrsJ
Parts
(10)
(11)
(1
(13)
(14)
(15)Sewing foot
(16)
(17)
(18)Needle
(19)
(20)
(21)
(22)
(23)
(24)
(25)
(26)
(27)
(28)
(29)
(30)
(31)
(32)
(33)
of
(1)
Key
Key
(2)
(3)
Key
(4)
Carrying
Hand-wheel
(5)
(6)
Hand-wheel
(7)
Fancy
(8)
Main
Connection
(9)
Connection
Touch
Stitch
Connection
2)
Base
Detachable
Needle
Threading
Take-up
Presser
Key
Needle
Dual
Reel
Second spare
Lid
Bobbin
Hook
Free
Thread
Sewing
Thread
Needle
the
for
,,slow
for
,,needle
for
,,tacking”
handle
stitch
switch
controls
length
plate
threader
thread
lever
bar
for ,,reverse
holder
feed
holder
with
program
winder
cover
arm
trimmer
lamp
guide
plate
sewing machine
sewing”
down position”
release
knob
socket
socket
knob
socket
work
holder
slit
tension
lifter
sewing”
with
(top
feed)
with
reel
(max.15watt)
(Model
(Model
disk
,,mains
,,foot
control with
,,foot
control”
support
with
sewing foot
fixing
unwinding
holder
table
6230)
cord”
screw
(Models
6230)
(Model
disk
(Model
mains
(Model
6230
6230)
6230)
6230)
cord”
and
(Model
6150)
6150)
DANGER
1
The
appliance
Always
2.
3.
Do
4
Do
not
To
sewing
not
not
place
reduce
unplug
reach
place
in
machine
from
or
for
or
the
the
before
a
store
drop
risk
should
electric
sewing
a
into
electric
of
never
outlet
relamping.
machine
sewing
water
Important
For
the
United
This
sewing
HOUSEHOLD
basic
safety
lows:
Read
shock:
be
left
immediately
Replace
that
has
machine
or
other
where
liquid.
States
machine
use
precautions
all
instructions
unattended
after
bulb
with
fallen
it
safety
only
is
only.
when
using
same
into
can
fall
instructions
designed
When
you
should
before
plugged
and
before
type
water.
Unplug
or
be
pulled
and
use
always
using
rated
manufactured
an
electric
be
adhered
this
in.
Always
cleaning
15
Watts
immediately.
into
tub
a
sewing
unplug
it.
or
for
appliance,
to
as
machine.
this
sink.
fol
Do
WARNING
I
2.
3
adlustment
4
Never
of
cloth.
5
Never
6
Do
7.
Do
administered.
8.
To
Never
9.
blocked.
10
Do
11
Keep
machine
1
2.
Always
1
3.
Do
14
Do
1
5
Switch
as
1
6.
Always
when
17.
Hold
Please
Do
not
allow
used
by
Use
this
attachments
Never
operate
perly,
if
nearest
operate
the
sewing
drop
not
use
not
operate
disconnect,
operate
not
unplug
fingers
use
not
use
not
pull
the
threading
unplug
making
plug
also
observe
ro
reduce
to
or
near
sewing
recommended
it
has
been
authorized
machine
or
insert
outdoors.
on
by
away
needle.
the
bent
or
push
sewing
needle,
sewing
any
when
the
the
be
used
children
machine
this
sewing
dropped
dealer
the
sewing
where
turn
all
a
soft
pulling
from
proper
or
blunt
fabric
machine
changing
other
rewinding
general
risk
and
any
aerosol
controls
surface
all
needle
machine
user
of
as
a
only
by
machine
or
machine
foot
object
on
cord.
moving
needles.
while
off
servicing
into
safety
burns,
toy.
for
the
or
damaged,
service
control
into
Isprayl
to
such
plate
stitching.
l,.0”(
needle,
from
cord
fire,
Close
ifs
intended
manufacturer
if
it
center
with
free
any
opening.
products
off
(.01
as
a
To
unplug,
parts
The
Use
needles
when
threading
the
adjustments
reel
notes
on
electric
attention
has
a
or
for
any
position,
bed
Special
wrong
It
may
making
electric
Do
page
shock,
is
use
as
as
damaged
dropped
examination,
air
openings
from
the
are
being
then
or
couch
grasp
care
plate
recommended
deflect
any
bobbin,
outlet
mentioned
not
allow
2
or
necessary
described
contained
cord
into
water.
blocked.
accumulation
used
remove
where
the
plug,
is
required
can
cause
the
adjustments
or
changing
when
plug
Injury
in
or
repair,
or
the
not
by
needle,
removing
in
to
whip
SAVE
to
when
in
this
plug,
where
plug
the
the
the
the
this
Return
air
around
persons:
this
sewing
manual.
manual.
if
it
is
the
electrical
Keep
ventilation
lint,
of
oxygen
from
openings
cord
the
needle
manufacturer
causing
in
the
needle
presser
covers,
instruction
when
rewinding.
THESE
machine
Use
only
not
working
appliance
or
mechanical
dust,
outlet.
to
openings
and
loose
is
being
may
be
sewing
break.
only.
it
to
break
ai’ea,
foot,
etc.
lubricating,
manual
INSTRUCTIONS
to
such
is
pro
the
or
Notes
on
safety
Notes
machines
or
28
The
1.
with
of
sewing
When
2.
maintenance
mechanical
always
the
plug.
The
3.
sewing
The
4.
be
The
5.
according
specification
Do
6.
the
Do
7.
—
—
Do
8.
socket
If
9.
pose
rated,
any
To
10.
open
inside
repair.
of
11.
Be
parts.
safety
on
according
Section
335,
IEC
must
user
regard
the
needle
area
leaving
disconnect
by
mains
maximum
lamp
tension
adjusted
machine
to
place
not
machine.
not
use
thereisvisible
its
function
e.g.
wet,
is
it
not
pull
its
by
appliance
this
than
damage
avoid
the
our
sure
intended
will
we
the
machine.
machine
the
This
qualified
to
domestic
for
exercise
the
to
and
during
the
work
parts
pulling
permissible
15
is
the
of
by
a
must
the
plate.
any
sewing
the
is
disturbed,
with
the
mains
cord.
not
caused.
risk
solely
is
only
use
DIN
to
28.
and
up
constantly
work.
machine,
or
accessories,
or
the
Watts.
drive
Pfaff
put
be
indications
objects
damage.
condensation.
is
used
orifit
accept
electric
of
There
which
the
service
original
sewing
57
adequate
down
when
machine
the
out
wattage
belt
mechanic.
into
in
openings
machine
out
plug
for
another
is
any
shock,
are
the
responsibility
staff.
700,
observe
during
changing
mains
must
operation
on
of
wrongly
liability
no
user
PFAFF
Section
caution
moving
from
for
only
the
if:
the
pur
do
paris
can
the
the
on
ope
for
not
Environment
recommended
The
temperature
80%.
sewing
This
nic-mechanical
supervised
rated
dust,
tic
rosive
For
usedona
even.
Treatment
Always
by
Cleaning
Housing:
To
cloth
stubborn
paraffin.
Please
ducts
for
electricity,
ventilation
hitting
clean
not
Do
cleaning
such
in
severe
chemicals
protect
the
which
dirt,
Note!
use
such
10°
machine
appliance;
in
use
a
way
dampness,
heat-producing
purposes
surface,
free
the
or
dropping.
housing,
free
is
use
insecticides
any
petrol
as
the
environment
to
40°
C
is
home.
the
that
liquids.
or
machine
fluff.
of
soft
a
lgasl
housing.
C,
high-quality
a
it
it
direct
the
which
a
use
cloth
Humidity
is
a
should
It
not
is
machine
is
against
dry,
To
with
or
or
thin
Ambient
is:
machine
subjected
sunlight,
objects,
both
clean
remove
alcohol
chemical
chemicals
20%
electro
be
must
firm
damage
and
any
to
for
ope
to:
sta
cor
be
and
soft
or
pro
2
Modern,
—
Sewing
uncomplicated
puchbutton
by
control
Congratulations!
product
sewing
and
It
and
your
If
book
After
the
If
lem!
any
So
enjoyable
that
machine
will
sew
instruction
PFAFF
now
nothing
this
all
have
Your
you
the
take
PFAFF
hours
features
this
you
machine
you
helporadvice
now
any
—
offers
through
very
sewing
time
can
the
is
can
further
can
You
have
unique
can
take
thick
latest
book
machine
enough
wrong
go
only
way
do and
questions,
dealer
you
need.
get started!
creating
of
bought
advantages.
any
material
and
design
in
is
Just
to
to
to
make
will
be
We
your
high-quality
a
for
thin
and
uncomplicated
as
the
study
learn
all
full
use
that
at your
wish
fashion
new
Your
stride
in
its
you.
technology
instruction
things
the
of
them
isnoprob
service
many
you
ideas.
as
with
3
Contents
Accessories
Accessory
Applique
Appliqué
Bias
tape
Blind
stitch
Bobbin
Bobbin
Bobbin
Borders
Buttonholes
Changing
Changing
Changing
Cleaning
Closed
overlock
Detachable
Cording
Cording
Covering
Darning
Darning
Darning
Darning
Decorative
Dual
fabric
Elastic
stitch
Elastic
stitches
Electrical
Eyelet
embroidery
Fancy
elastic
Fancy
elastic
Fancy
stitch
Faults.
Foot
control
Foot
control
Free
arm.
Fringe
foot
Function
Gathering
Gathering
Gathering
General
Hand
wheel
Hem
with
Hemstitching
Honeycomb
Inserting
Inserting
Inserting
work
Lace
Lamp
.
feller
Lap
Left
needle
buttonhole
Linen
Linen
buttonhole
4
compartment
foot
binder
case.
thread
winding
.
.
.
the
the
the
and
work
foot
foot
stitches
.
tears
with
with
stitches
feed
connection
table
. .
.
.
.
keys
foot
with
with
sewing
release
the
stitch
bobbin
patches
zippers
.
position
and
tension
.
needle
needle
sewing
oiling
stitch
.
.
elastic
straight
knob.
stitch
.
.
elastic
straight
aids
twin
.
needles
.
.
.
. .
. .
support
.
.
.
.
.
.
.
.
disk
needle
.
.
.
.
.
with
plate
foot
.
.
.
.
.
stitch
stitch
.
.
.
.
.
thread
.
.
.
.
gimp
.
.
.
.
.
.
.
stitch
.
.
.
.
.
. .
.
.
.
.
.
.
.
.
thread
.
72
—
81
14
66
78
.
.
.
77
38
18,
.
.
.
.
.
.
19
15
—
62.
46, 47
63,
19
1
7
64
26
.
.
84
23
.
.
.
.
84
42
14
. .
.
76
78
.
.
44.
51
45
—
53
53
53
.
.
.
.
.
.
52.
51
61
24,
41
40
12,
68
—
64
25
43
13
30
.
.
.
45
10
86
1
3
13
14
79
31
75
.
.
.
.
.
. .
.
.
.
.
.
—
50
49
35
1
5
48
69
41
.
.
.
.
16
52
54,
57
85
55
75
36
47
.
.
47
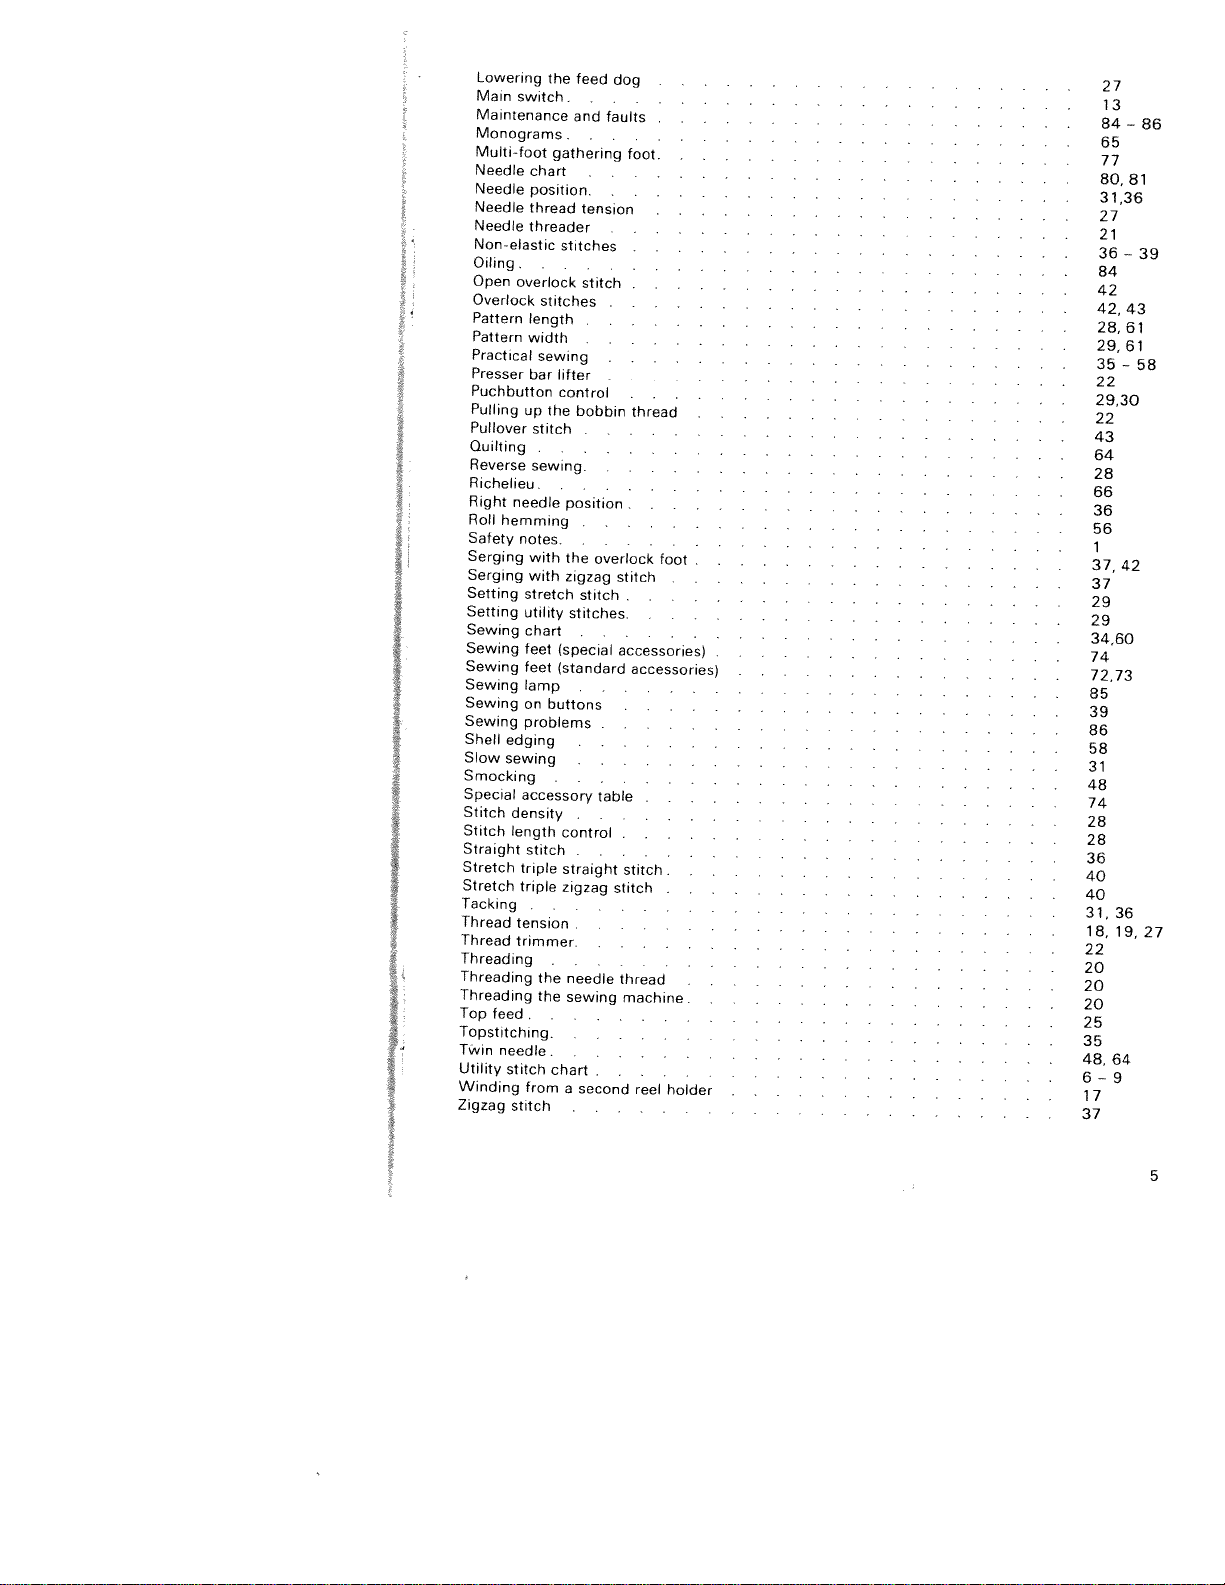
58
65
778428,61
29,61
35—58222228663656
34,60
85
39
28
364020
20
Lowering
Main
Maintenance
Monograms
Multi4oot
Needle
Needle
Needle
Needle
Nonelastic
Oiling
Open
Overlock
Pattern
Pattern
Practical
Presser
Puchbutton
Pulling
Pullover
Quilting
Reverse
the
switch
chart
position.
thread
threader
.
overlock
stitches
length
width
sewing
bar
up
the
stitch
…..
sewing.
feed
and
gathering
tension
stitches
stitch
.
litter
control
bobbin
.
dog
faults
.
foot.
thread
13
84—86
—
.
—
Richelieu………
Right
needle
notes
with
with
stretch
utility
chart
feet
feet
lamp
on
problems
edging
sewing
accessory
density
length
stitch
triple
triple
tension
trimmer
stitch
from
stitch
buttons
.
.
.
the
the
.
chart
position
the
overlock
zigzag
stitch
stitches.
lspecial
(standard
.
control
straight
zigzag
.
needle
sewing
.
.
second
a
stitch
.
accessories(
accessories(
.
.
.
.
table
stitch.
stitch
thread
machine.
.
.
reel
foot
holder
37
74
86
74
28
6—9
17
Roll
hemming
Safety
Serging
Serging
Setting
Setting
Sewing
Sewing
Sewing
Sewing
Sewing
Sewing
Shell
Slow
Smocking
Special
Stitch
Stitch
Straight
j
Stretch
Stretch
Tacking
J
Thread
Thread
Threading
Threading
Threading
Top
feed.
Topstitching.
Twin
needle.
Utility
Winding
Zigzag
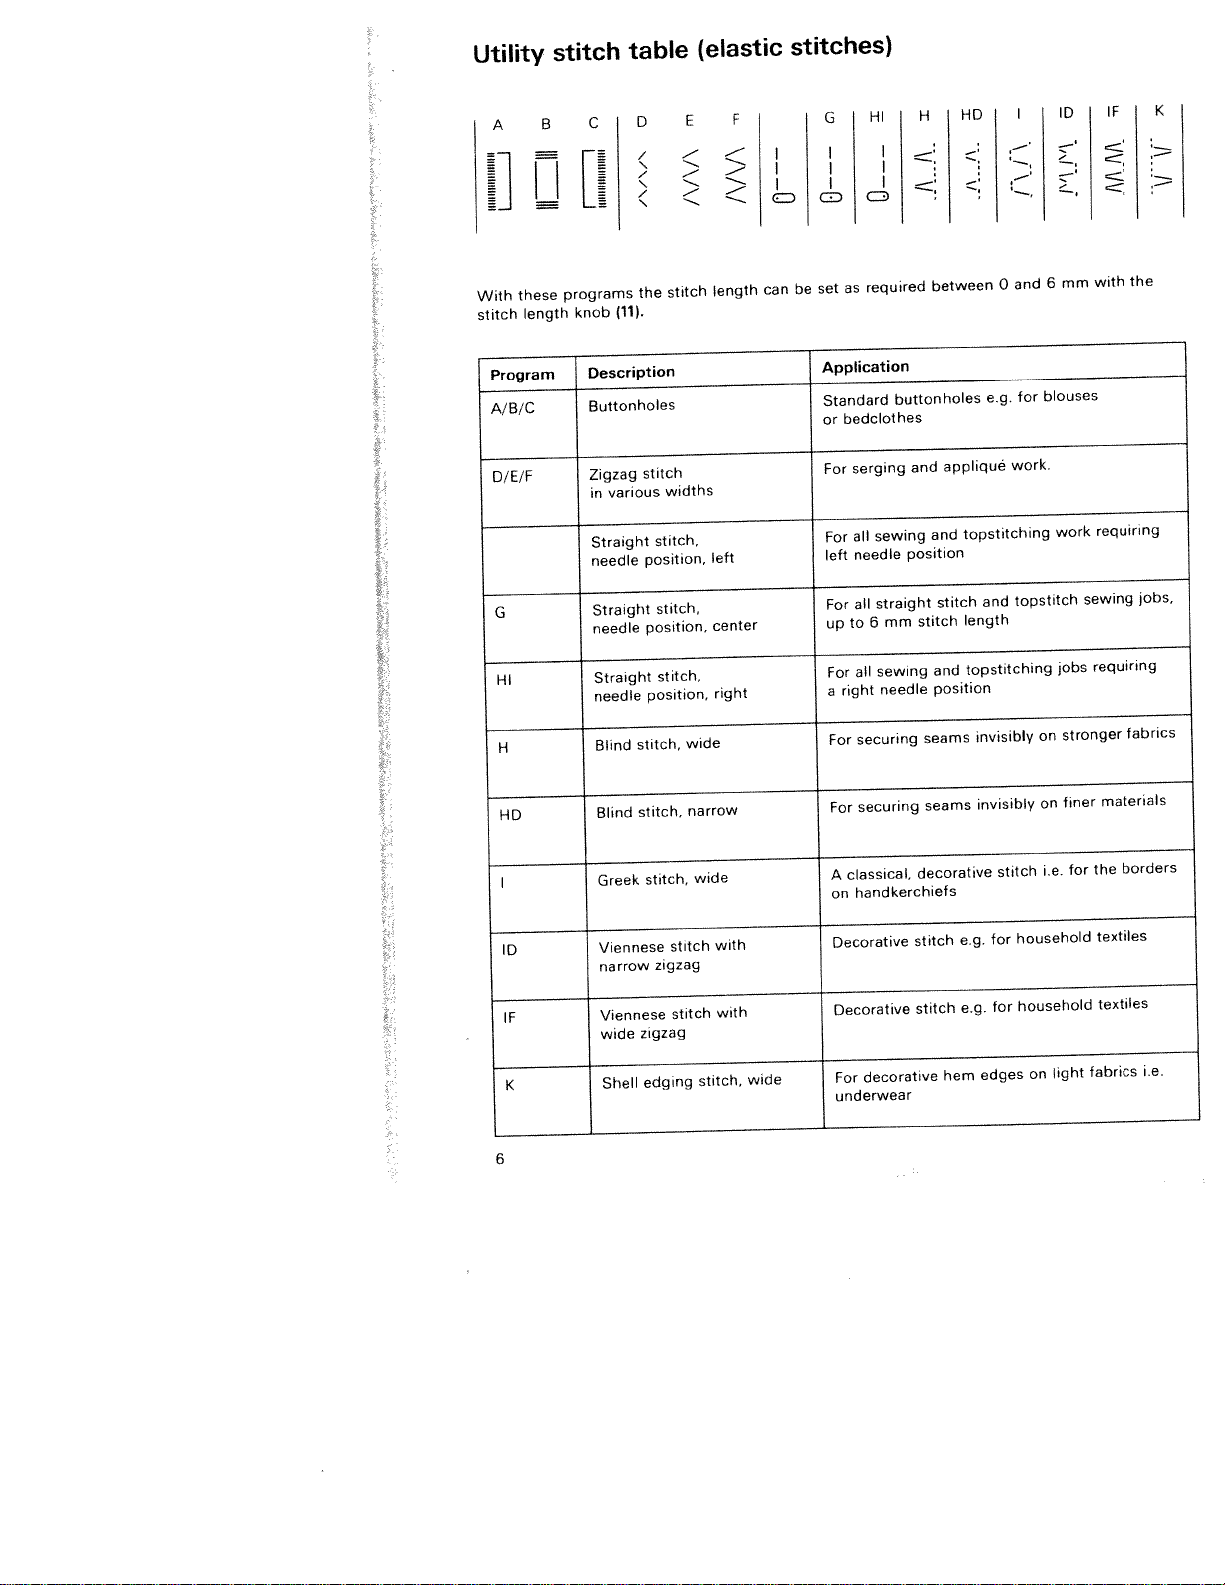
Utility
these
With
stitch
length
stitch
programs
knob
table
D
(11).
<
/
“
(
the
E
<
-‘
<
stitch
(elastic
F
‘-
length
stitches)
I
ED
be
can
ED
set
HD
H
HI
G
_:
_:
I
I
c
required
as
:
between
“:
ID
‘
c—’
,—‘
“
—
mm
6
and
0
with
I
‘
,
the
K
IF
Program
A/B/C
D/E/F
G
HI
H
HD
I
ID
Description
Buttonholes
stitch
Zigzag
various
in
Straight
position,
needle
Straight
position,
needle
Straight
needle
stitch,
Blind
stitch,
Blind
stitch,
Greek
Viennese
narrow
widths
stitch,
stitch,
stitch,
position,
stitch
zigzag
wide
narrow
wide
left
center
right
with
Application
Standard buttonholes
bedclothes
or
appliqué
and
serging
For
and
sewing
For
all
position
needle
left
mm
needle
stitch
stitch
and
position
seams
seams
decorative
stitch
all
For
to
6
up
all
For
right
a
securing
For
For
securing
classical,
A
handkerchiefs
on
Decorative
straight
sewing
e.g.
topstitching
and
length
topstitching
invisibly
invisibly
stitch
for
e.g.
blouses
for
work.
topstitch
on
on
i.e.
household
work
jobs
stronger
finer
for
requiring
sewing
requiring
materials
the
textiles
jobs,
fabrics
borders
light
textiles
fabrics
i.e.
household
for
e.g.
decorative
stitch
hem
edges
on
with
zigzag
edging
stitch
stitch,
wide
IF
Viennese
wide
1<
Shell
Decorative
For
underwear
6
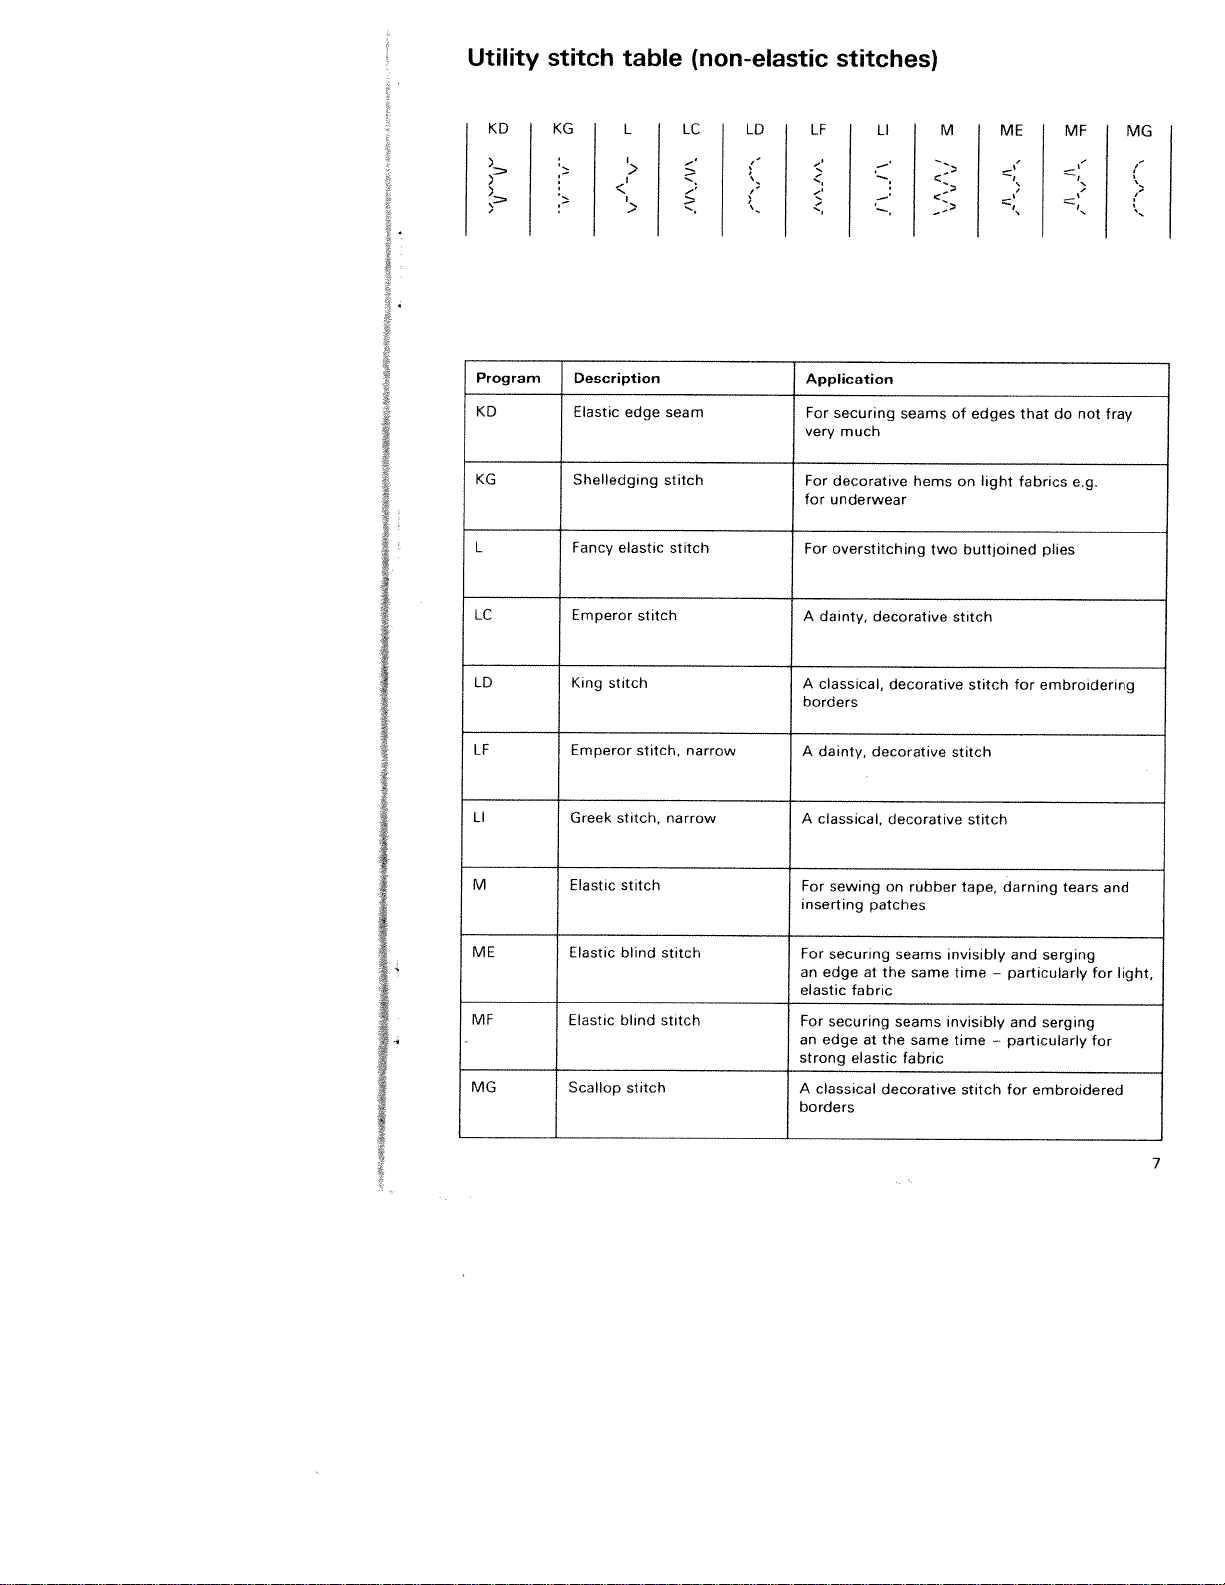
Utility
stitch
table
(non-elastic
stitches)
I
KU
Program Description
KD
KG
L
LC
LU
KG
Elastic
Shelledging
Fancy
Emperor
King
elastic
stitch
L
edge
stitch
seam
stitch
stitch
LC
LU
LF
Application
For
securing
very
much
For
decorative
underwear
for
For
overstitching
A
dainty,
A
classical,
borders
LI
seams
hems
decorative
decorative
two
M
of
on
stitch
ME
edges
light
buttjoined
stitch
that
fabrics
plies
for
embroidering
do
MF
not fray
e.g.
MG
I
I
S
LF
LI
M
ME
MF
MG
Emperor
Greek
Elastic
Elastic
Elastic
Scallop
stitch,
stitch
blind
blind
stitch
stitch,
narrow
stitch
stitch
narrow
A
dainty,
A
classical,
sewing
For
inserting
For
securing
an
edge
elastic
For
securing
an
edge
strong
A
classical
borders
decorative
patches
at
fabric
at
elastic
decorative
on
rubber
seams
the
same
seams
the
same
fabric
decorative
stitch
stitch
tape,
invisibly
time
invisibly
time
stitch
darning
and
—
particularly
and
—
particularly
for
tears
serging
serging
embroidered
and
for light,
for
7
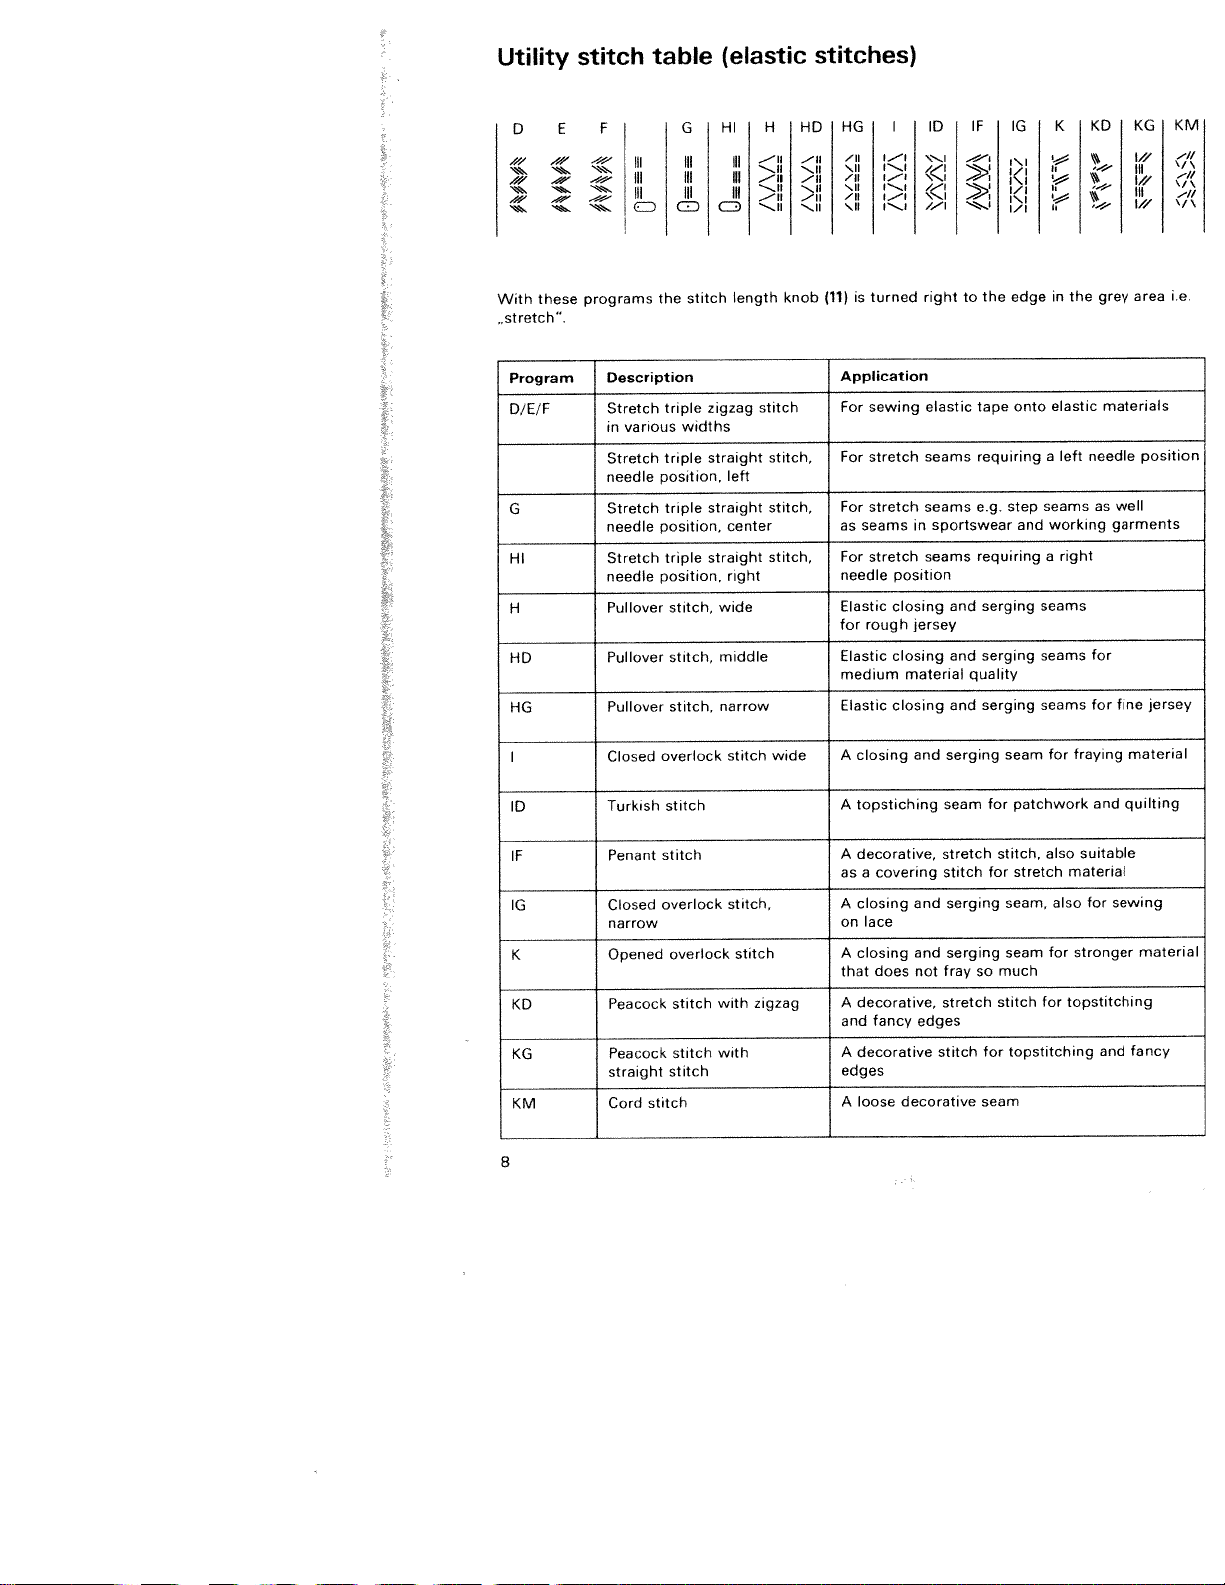
Utility
stitch
table
(elastic
stitches)
D
l’
‘
‘..
,,,
‘,
With
,,stretch”.
Program
D/E/F
G
Hi
H
HD
HG
‘,
,.—
‘.‘.
,
‘.
these
E
F
—
‘.‘,
,,—
‘..
programs
Description
Stretch
in
Stretch
needle
Stretch
needle
Stretch
needle
Pullover
Pullover
Pullover
Ill
III
Ill
I
II
JcD1E1c
various
G
lii
Hi
Iii
Ih
the
stitch
triple
widths
triple
position,
triple
position,
triple
position,
stitch,
stitch,
stitch,
Hi
I
iii
ill
length
zigzag
straight
left
straight
center
straight
right
wide
middle
narrow
I
IG
I
ID
\I
/
right
IF
I
I
the
edge
to
I
HO
H
I
I
‘i
I
ii
__.—ii
0
—ii
“,ii
I
“,,ii
I
—“i
..—‘ii
(11)
knob
HG
\ii
‘sit
is
I
i”i
I
‘—‘—
i”..i
I
i”.,.i1/_”I1”.j
1
turned
KO
K
I
i
the
grey
in
KMI
KGI
I
I
11/
I
I
I
III
—‘I,
—II
1/,’
i.e.
area
Application
materials
stitch
stitch,
stitch,
stitch,
For
sewing
stretch
For
stretch
For
seams
as
stretch
For
needle
Elastic
for
rough
Elastic
medium
Elastic
in
position
closing
jersey
closing
material
closing
elastic
seams
seams
sportswear
seams
and
and
and
tape
requiring
e.g.
requiring
serging
serging
quality
serging
onto
step
and
elastic
left
a
seams
working
a
right
seams
seams
seams
needle
as
for
for
position
well
garments
jersey
fine
material
fraying
for
so
for
seam
for
stitch,
for
much
stitch
seam
patchwork
also
stretch
seam,
also
for
seam
for
topstitching
and
suitable
material
for
sewing
stronger
topstitching
and
quilting
material
fancy
I
ID
IF
lG
K
KO
KG
KM
Closed
Turkish
Penant
Closed
narrow
Opened
Peacock
Peacock
straight
Cord
overlock
stitch
stitch
overlock
overlock
stitch
stitch
stitch
stitch
stitch
with
with
stitch,
stitch
wide
zigzag
A
closing
topstiching
A
A
decorative,
as
a
A
closing
on
lace
A
closing
that
decorative,
A
fancy
and
decorative
A
edges
A
loose
covering
does
decorative
and
and
and
not
edges
serging
seam
stretch
stitch
serging
serging
fray
stretch
stitch
8
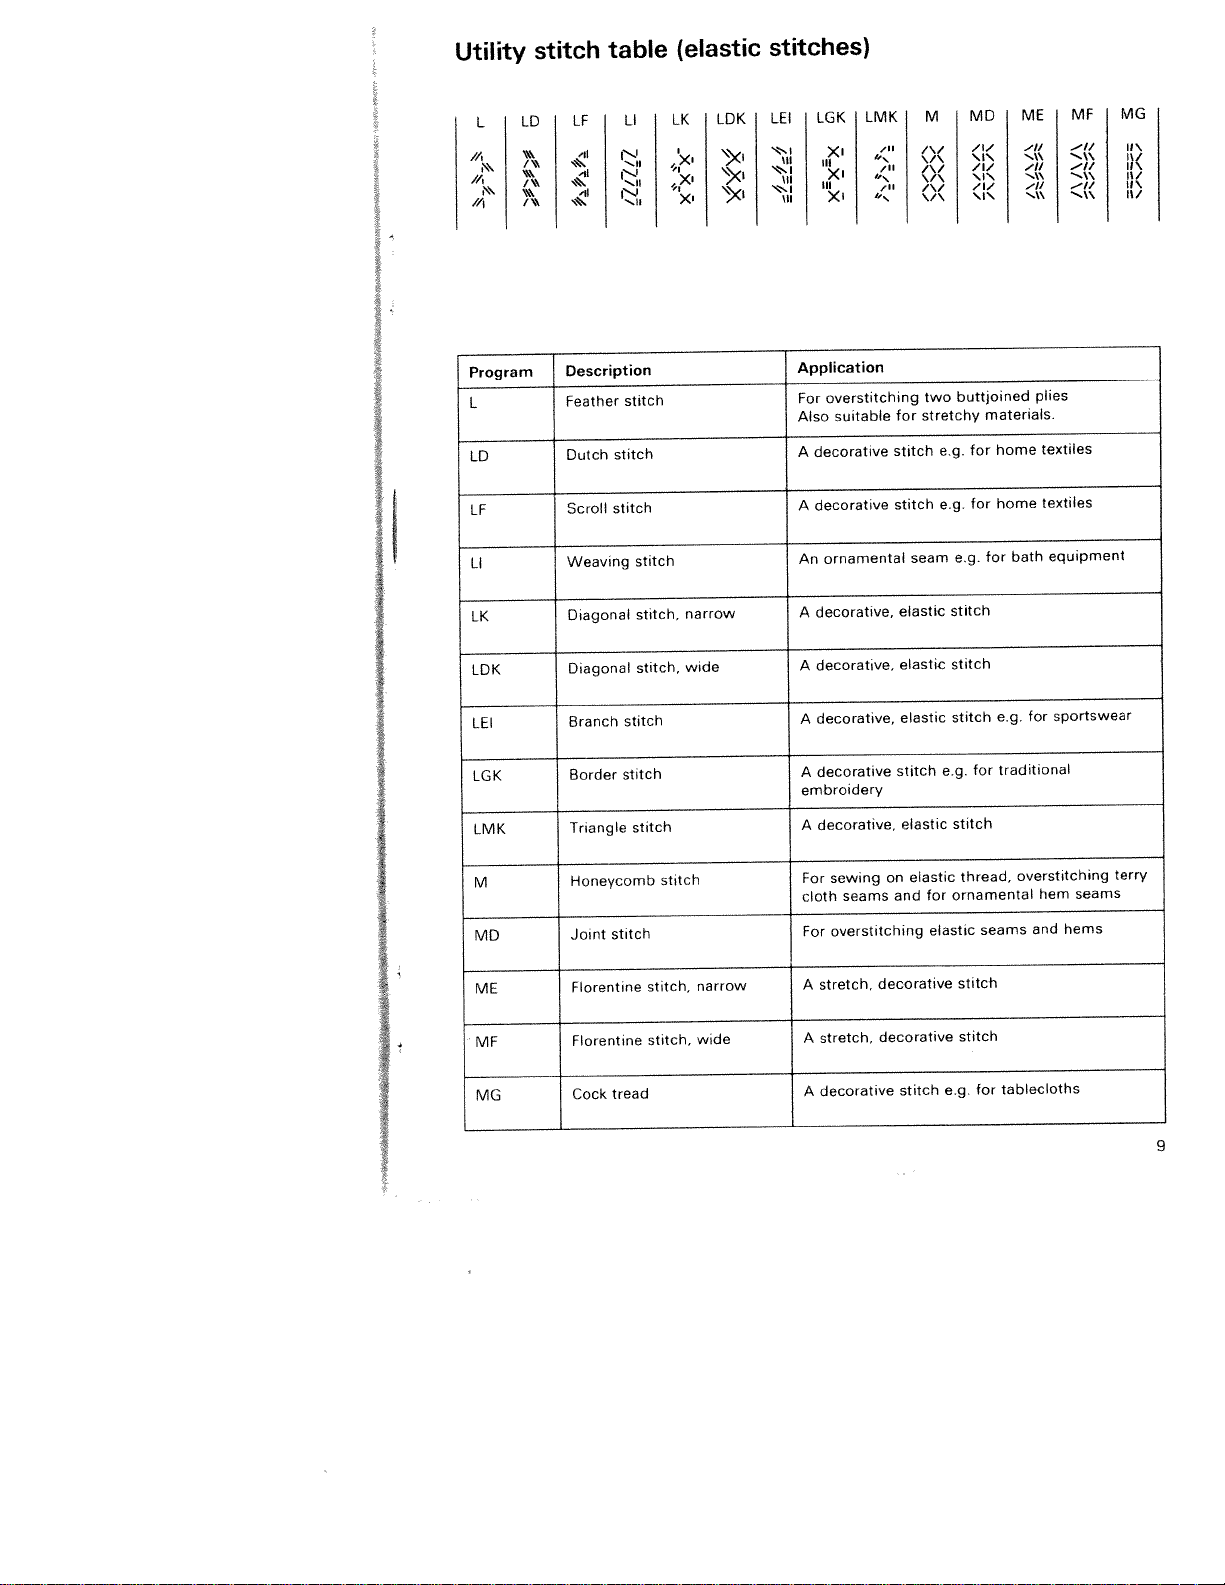
Utility
stitch
table
(elastic
stitches)
L
I
I
Program
L
LD
LF
LI
LK
LDK
LD
‘5’
J’t%
5
LF
-ii
I
41
-ii
Description
Feather
Dutch
Scroll
Weaving
Diagonal
Diagonal
I
I
I
stitch
stitch
LI
NJ
‘.ii
•.ii
.1i
stitch
I
I
I
stitch
stitch,
stitch,
LK
,X’
Xi
Xi
narrow
wide
LDK
\XI
\)<i
LEI
\..i
iii
‘“i
in
Application
For
Also
A
A
An
A
A
LGK
XI
III
•
X’
XI
overstitching
suitable
decorative
decorative
ornamental
decorative,
decorative,
I
I
LMK
,“
7”
f
I
I
for
stitch
stitch
seam
elastic
elastic
M
\/\
\/‘s
two
stretchy
e.g.
e.g.
stitch
stitch
I
MD
/1,’
\i\
I
I
\I
I
/1/
butt;oined
materials.
for
home
home
for
for
e.g.
I
I
bath
ME
“.i.\
—I’
plies
textiles
textiles
MF
‘.i\
I
equipment
I
MG
I
11/
I
i
ll\
I
11/
I
II\
11/
LEI
LGK
LMK
M
MD
ME
MF
MG
stitch
Branch
stitch
Border
Triangle
Honeycomb
stitch
Joint
Florentine
Florentine
tread
Cock
stitch
stitch,
stitch,
stitch
narrow
wide
decorative,
A
A
decorative
embroidery
A
decorative,
sewing
For
seams
cloth
For
overstitching
stretch,
A
stretch,
A
decorative
A
elastic
stitch
elastic
elastic
on
for
and
decorative
decorative
stitch
stitch
e.g.
stitch
ornamental
elastic
stitch
stitch
e.g.
for
thread,
seams
for
for
e.g.
traditional
overstitching
hem
and
tablecloths
sportswear
terry
seams
hems
9
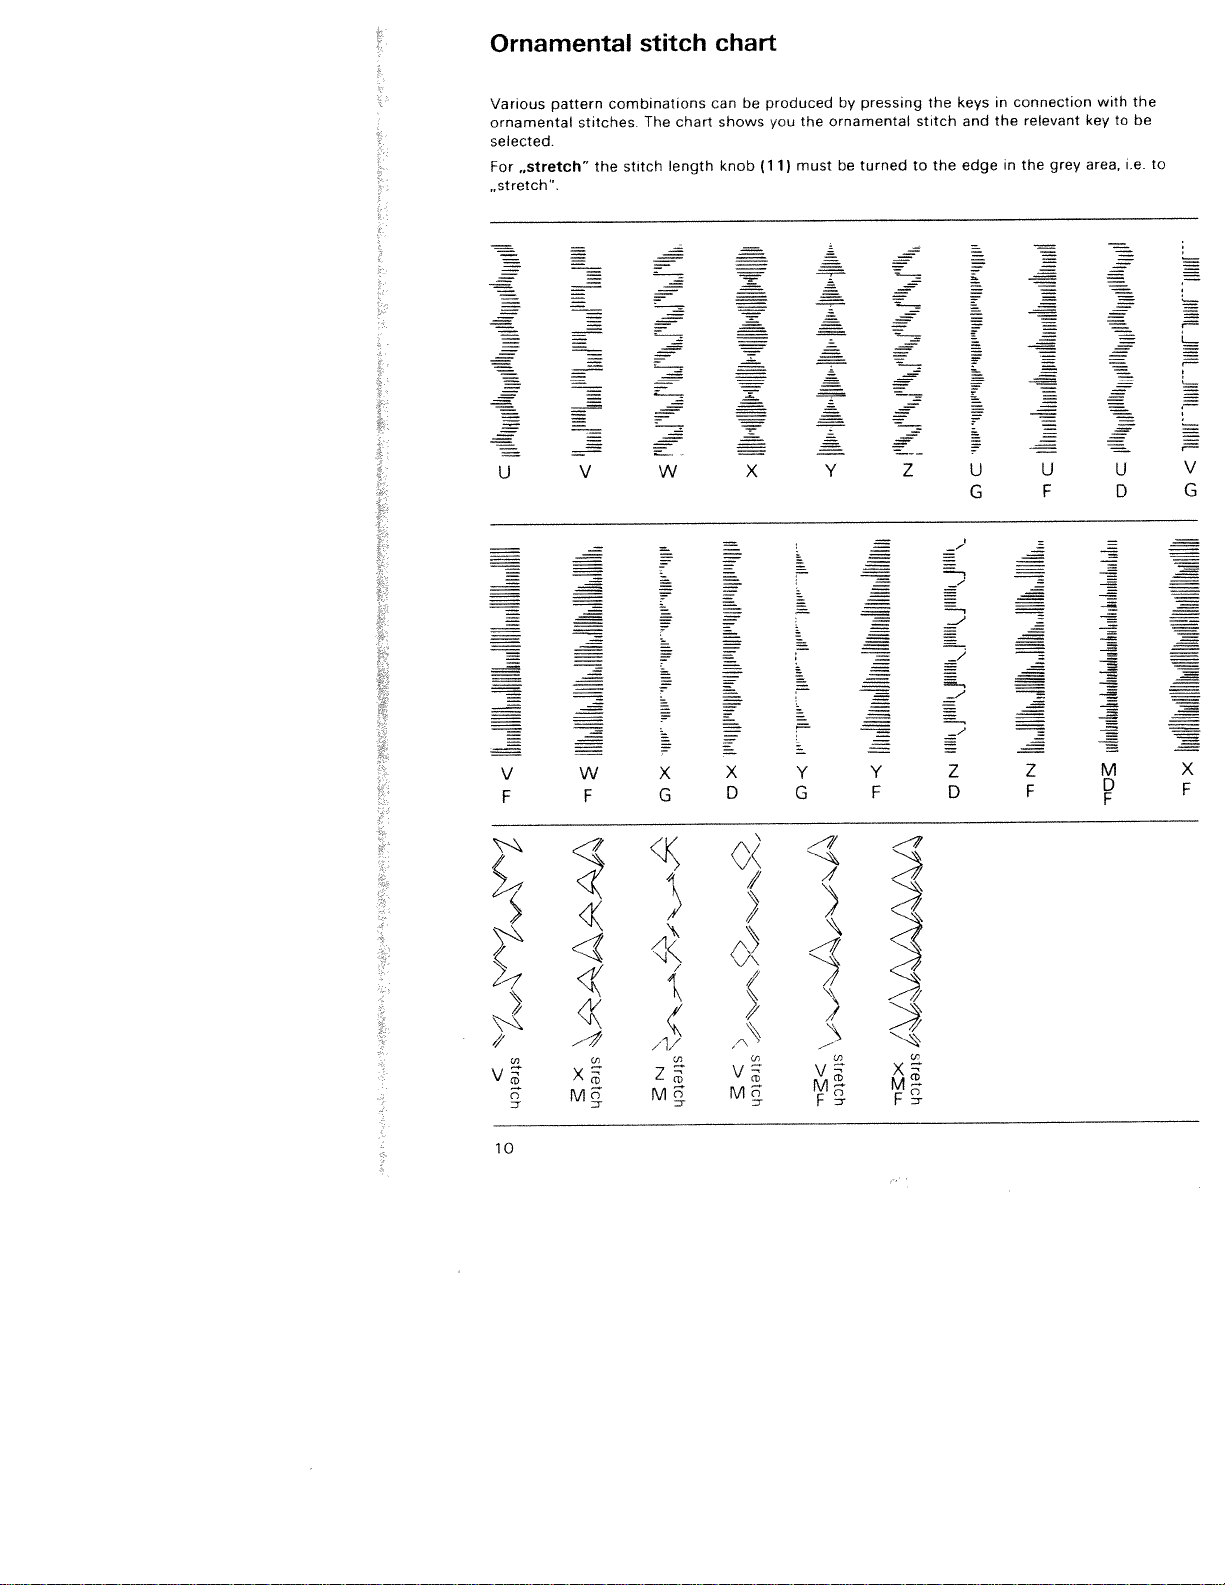
C
E
—
U)
C
.r
t
o
C)
o
>
-C
0
a)
0
_
0
LL
0
_:
.
lIlIlllliiiIliliiIlIilIlllllililIliiiiiiiiiIiIiiilliliiIIIiil
0
oC
2
0
—
C
a)
1111111
Oil)!
Iiiiul
liii))
ililh
liii!
lniil
I)))))!
1111111
111111
D
iIl1IIt!IlII1111lIlIIl11hJIIIIIII1IIIIII111I
ii>
111111
11111
0Ii
liii!
.2
—
C
0
C
a) a)
C
t
f
—
C
I
iihi
Ih
‘iii,i
I
ii
1iIi
I
ih
‘liii
I
ih
iil
I
iiii
I
Ii’
il
IIlilill,dlliitlh,.iili,
C
—
-C
0
C
llIlllhIIIllIIllhIIllIllIIli.ilIlllhlIliIIIliUlIlIlIll
°‘
a)
—
—
—
.0
2
I’
:>(
01
tiiLiitl1
..,iiLiilL..iiilL.i
a)a)
o
c
00
>-
2
a)
ilillflililIiTliIII
I
Oil
Tili
11111111
II
iij
111111
liii
iillIllilillijillIiltIiijIllIlIliliillITllI!IfllIlIlllIliljI
‘lIhi
liii
‘IllIj
91111
111111
liii
it,,
..
x
o
::‘•—
—
a)
0
C)
0
o
—
a)
C
V
—
a)
a)
i’
ii—
‘I
‘I
o
0
2
a)DC)
iIlIIlidlTlIIiIllIiIIiIIIillTlhIlilUIi
i’’
il
il’,
iilii.
D
(_
—\
1f”ilifJiTI”TN}ill[’’iTjiTHh[’lliilTl[
111111
liii!
‘liii
iii!!
iiIh
ijj
r’
ci
‘iii
95a)
Q)
C
>
C)
lilt
1
III,IqIIp
ii
jliiJlijifi
ijlilIIil
lj1i
D
_L
a)
1IllIII
II
VIIIILilII{ll.
ifIIIIIJlIWIL
ill
II
1
D
‘
11111
PIljjjljjjIIlj
11111111
{fjjjjIIIIjlIl
liii
II
I1IIIUI
j
1
stretch
>
C
x
N
stretch
I
stretch
stretch
stretch
stretch
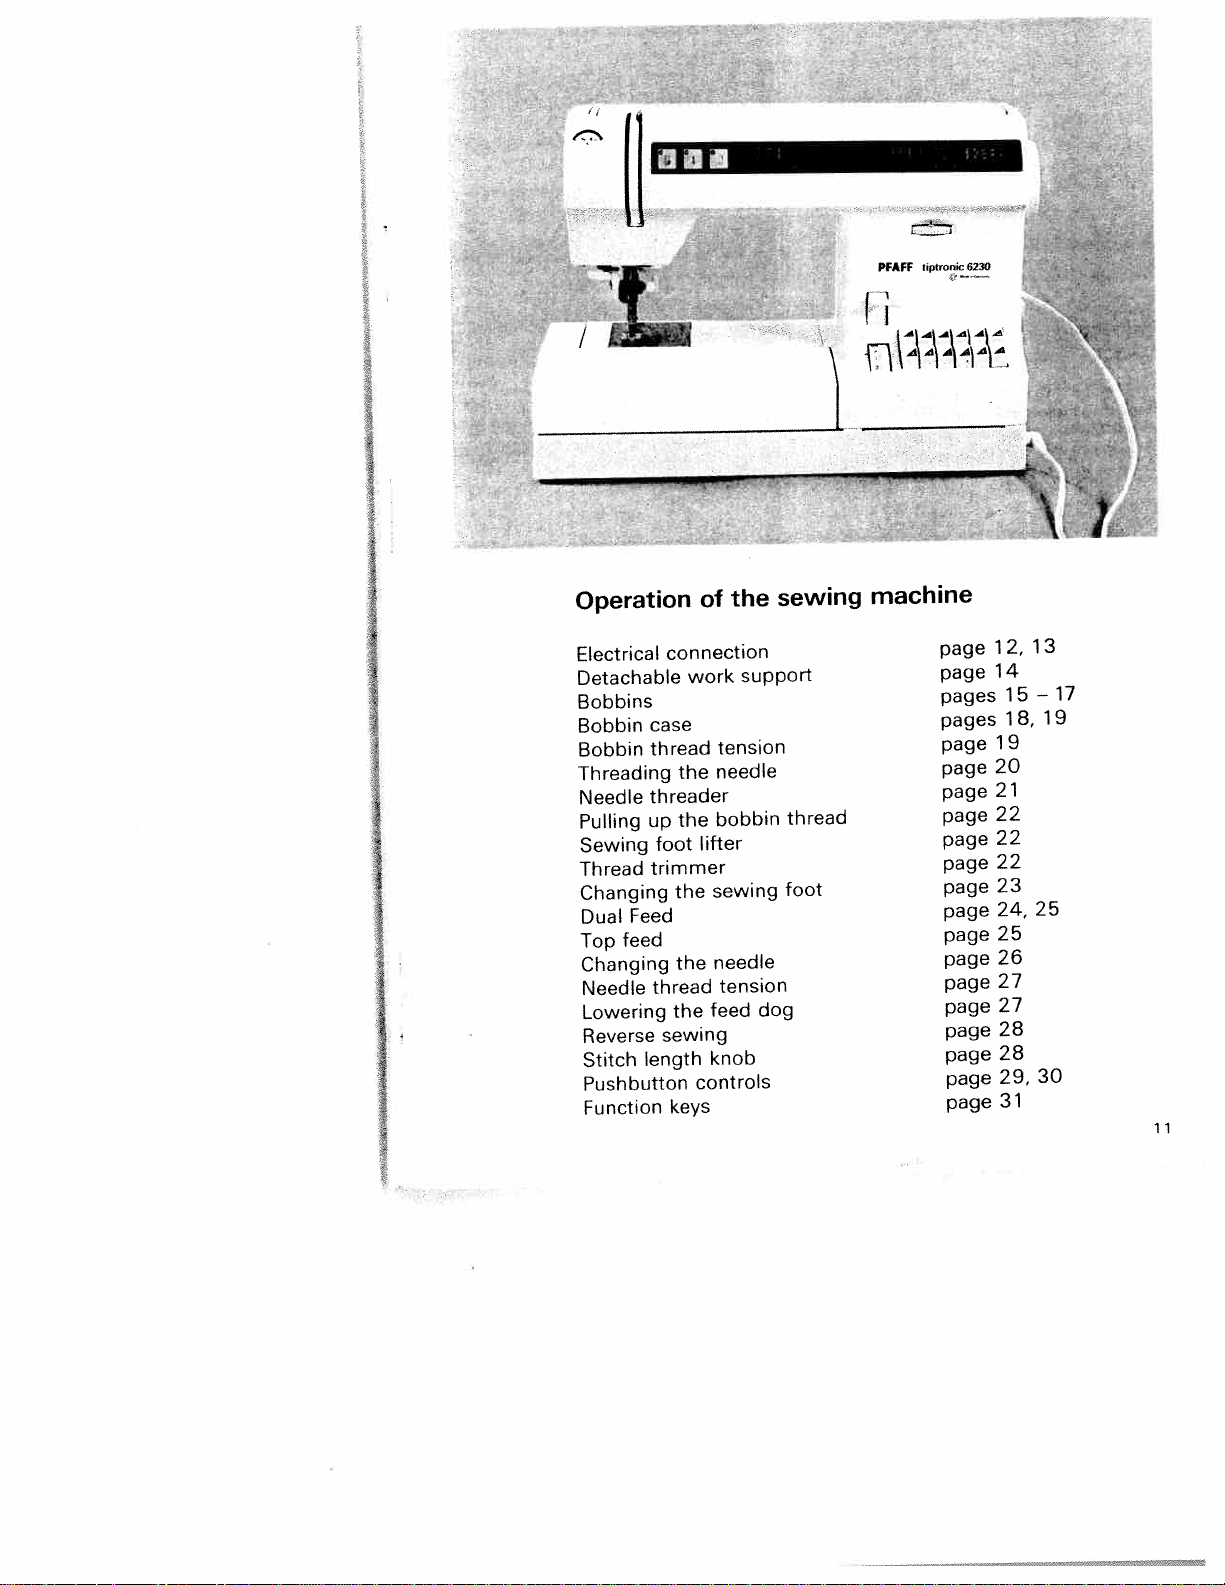
PFAFF
onlc
6230
I
pt
/
———
sewing
the
connection
work
case
thread
the
threader
the
up
foot
trimmer
the
the
thread
the
sewing
length
controls
keys
of
tension
needle
bobbin
lifter
sewing
needle
tension
feed
knob
support
thread
foot
dog
Operation
I
I
J
I
I
-i
I
I
Electrical
Detachable
Bobbins
Bobbin
Bobbin
Threading
Needle
Pulling
Sewing
Thread
Changing
Feed
Dual
feed
Top
Changing
Needle
Lowering
Reverse
Stitch
Pushbutton
Function
machine
page
page
pages
pages
page
page
page
page
page
page
page
page
page
page
page
page
page
page
page
page
1
1
1
20
21
22
22
22
23
24,
25
26
27
27
28
28
29,
31
2,
4
15
1
9
8,
i!II
3
1
17
—
9
1
25
30
11
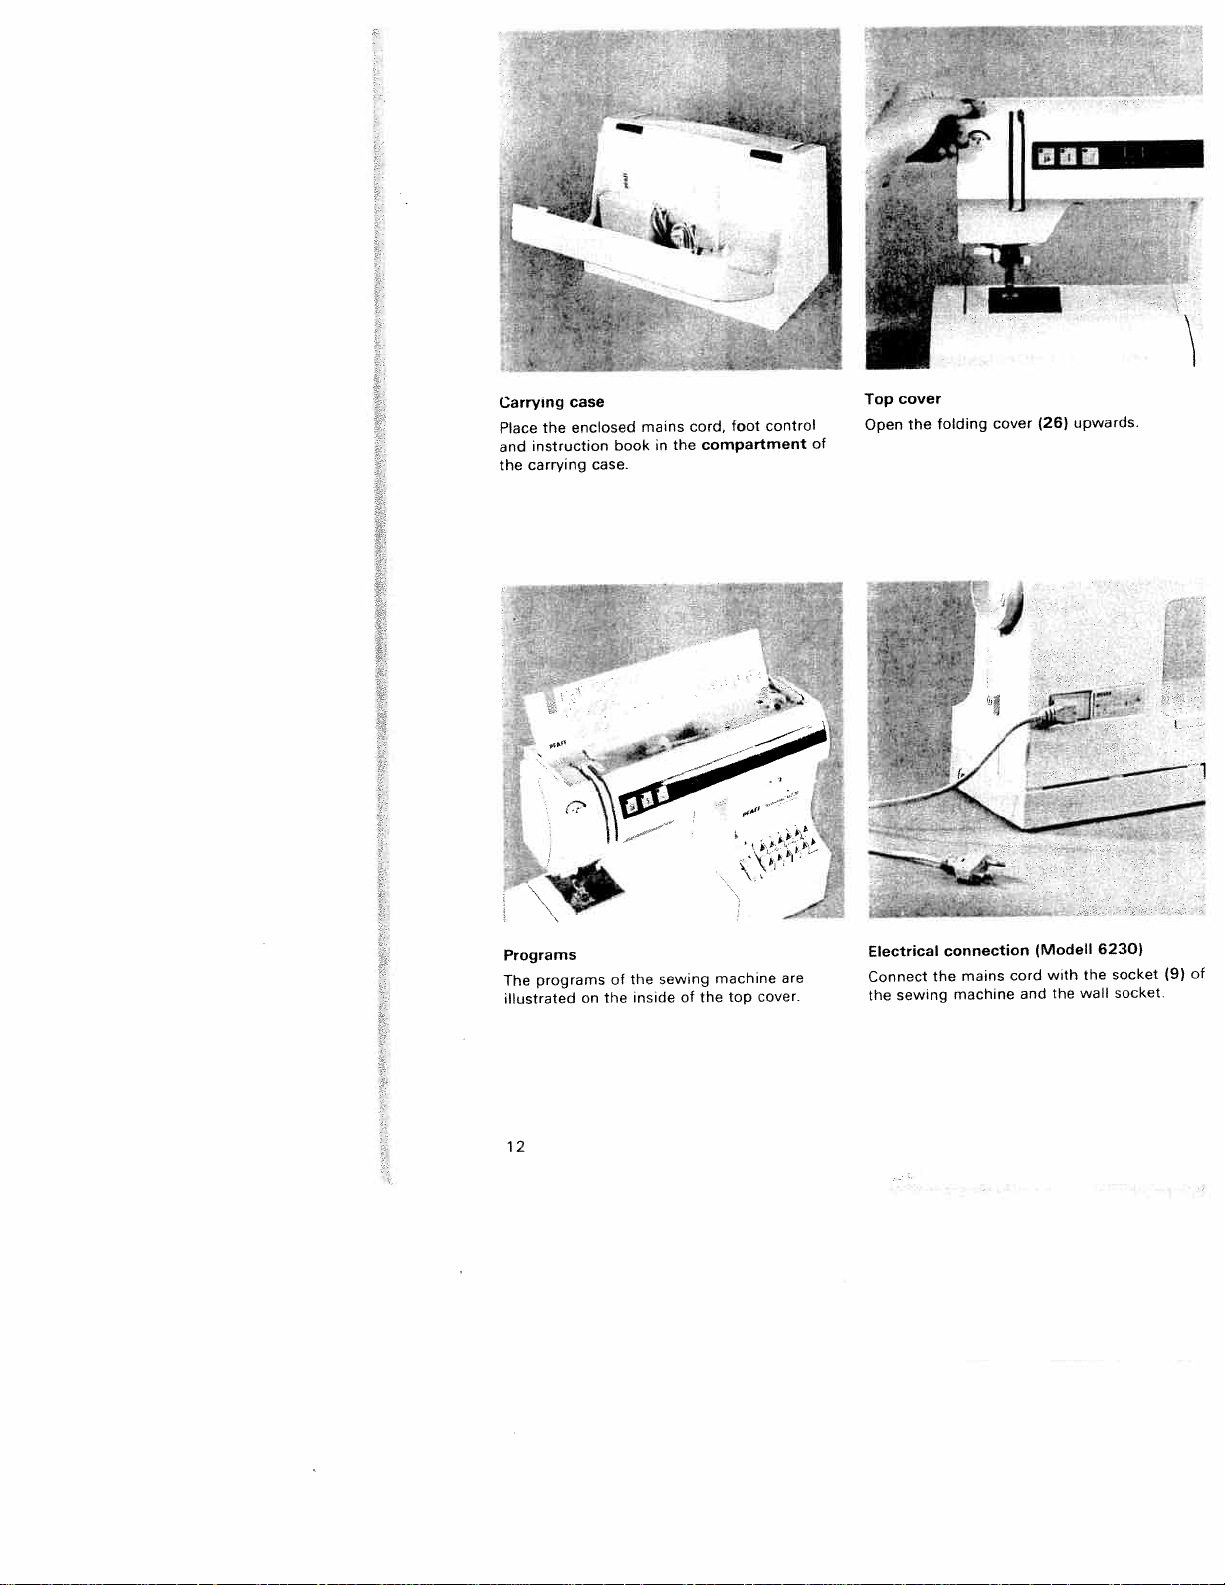
Carrying
Place
instruction
and
carrying
the
the
case
enclosed
case.
book
mains
in
cord,
compartment
the
foot
control
Ii
F.
N
cover
Top
folding
cover
the
Open
of
(26)
upwards.
N’
Programs
programs
The
illustrated
12
]
0’
with
the
the
wall
6230)
socket
socket
(9)
of
(Modell
cord
and
sewing
connection
mains
the
machine
Electrical
Connect
the
top
are
cover
of
inside
the
on
the
of
machine
sewing
the
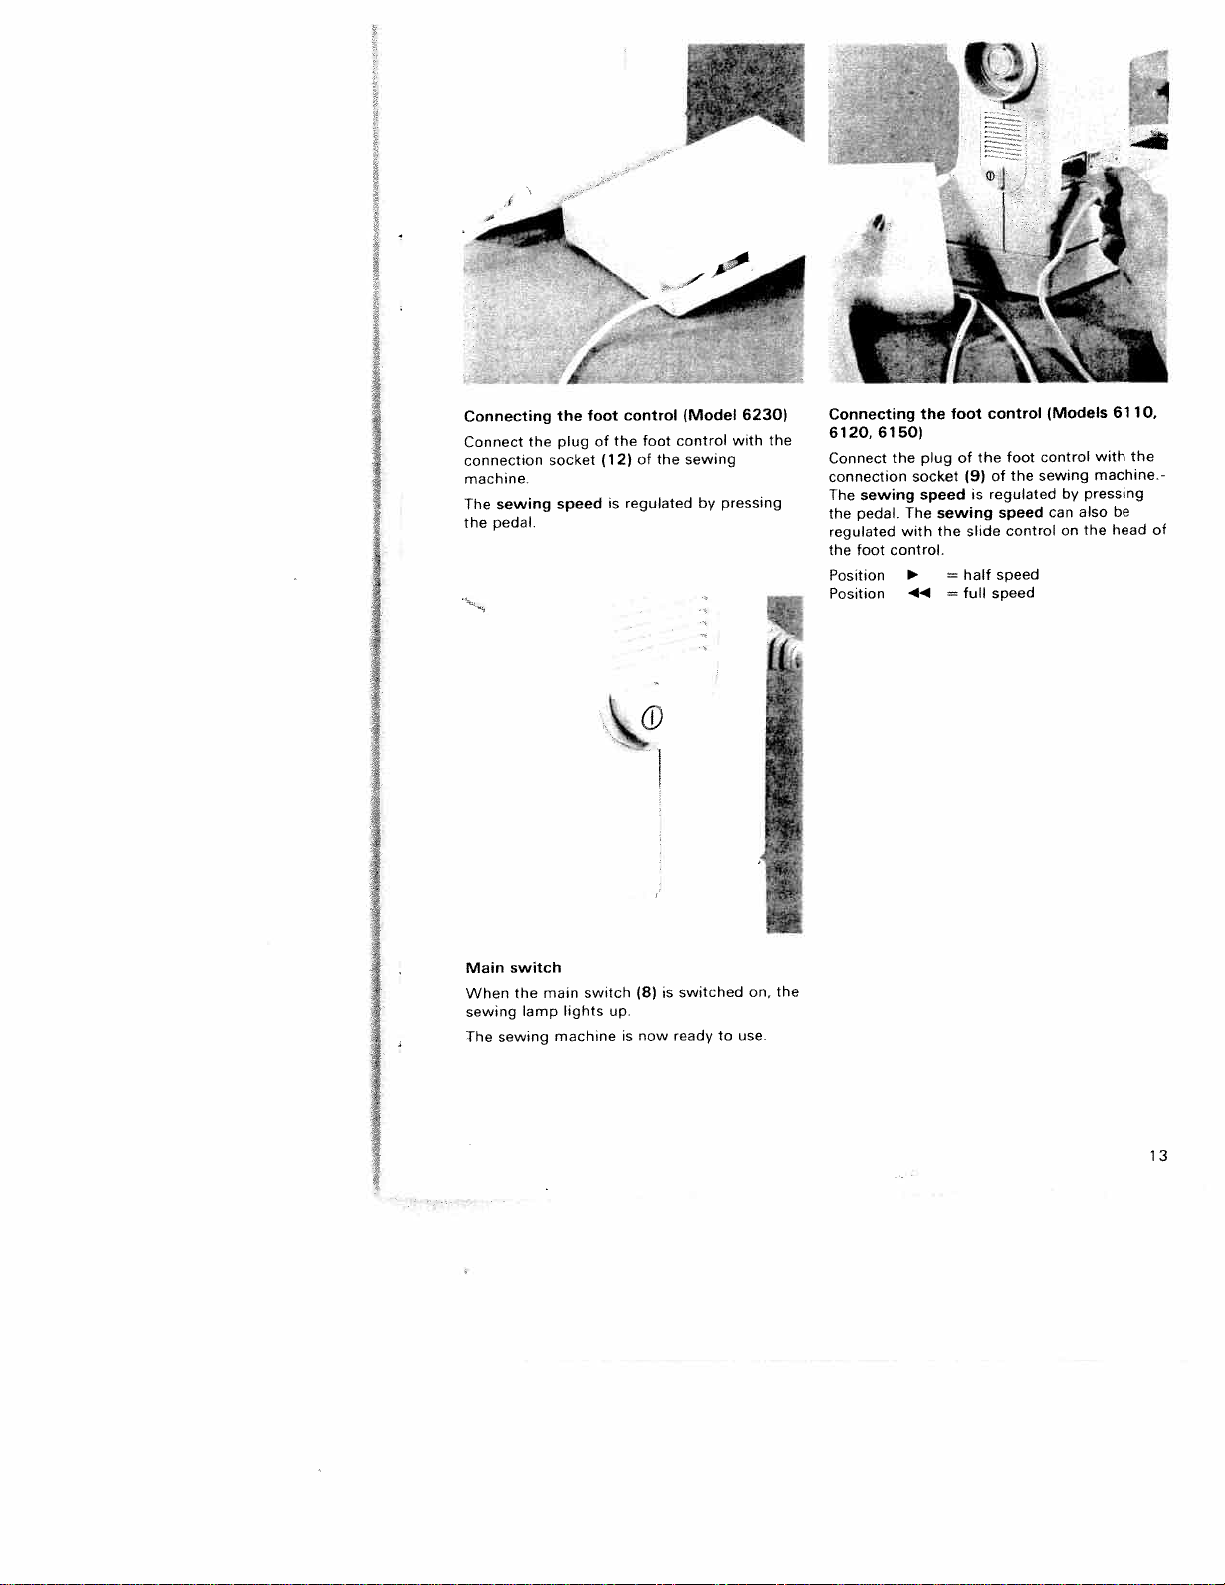
—
—
Connecting
Connect
connection
machine.
The
sewing
the
pedal.
switch
Main
the
When
sewing
The
sewing
the
lamp
the
plug
socket
speed
main
lights
machine
foot
of
(12)
switch
control
the
is
regulated
up.
is
foot
of
(8)
now
the
is
ready
(Model
control
sewing
by
switched
6230)
with
pressing
to
use.
on.
the
the
Connecting
6150)
6120.
Connect
connection
The
sewing
the
pedal.
regulated
foot control.
the
Position
Position
the
socket
The
with
44
foot
the
plug of
speed
sewing
the
=
=
(9)
is
slide
half
full
control
foot
the
of
regulated
speed
control
speed
speed
the
(Models
control
sewing
by
can
on
with
machine.
pressing
also
the
6110.
be
head
the
of
13
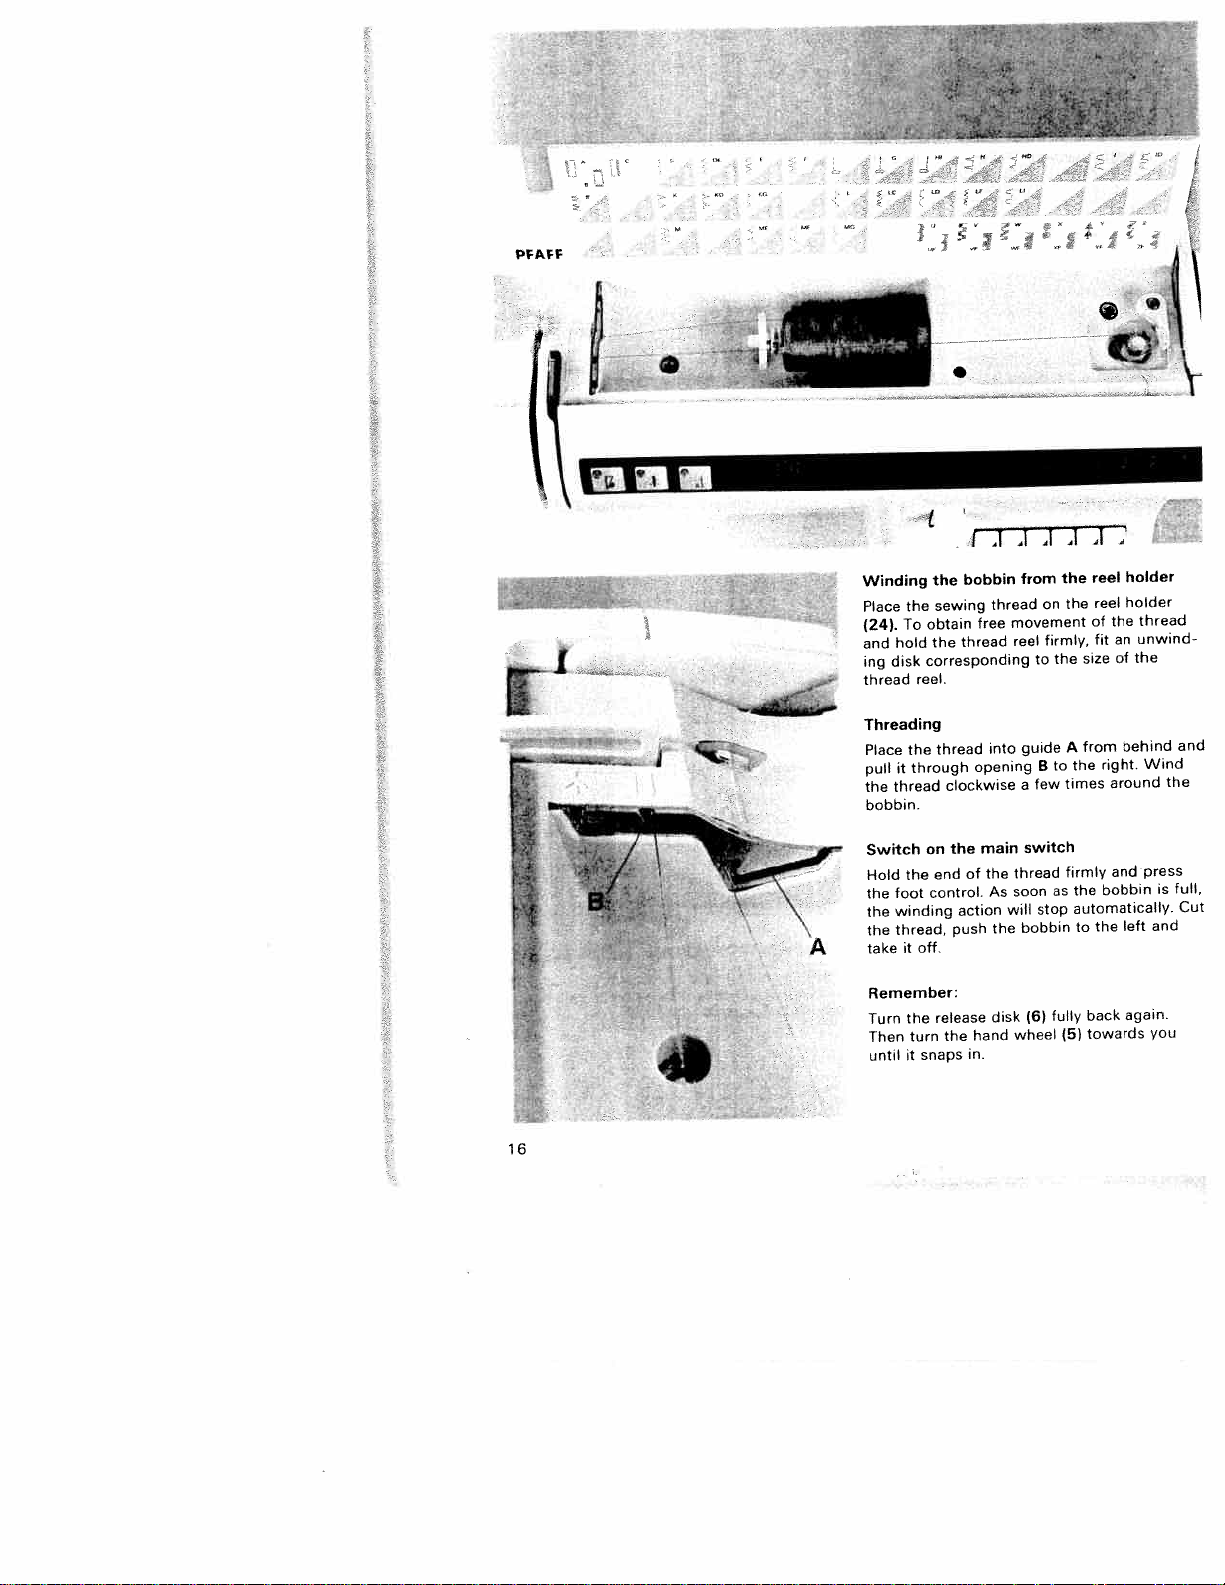
Winding
the
Place
To
(24).
hold
and
disk
ing
thread
Threading
the
Place
it
pull
the
thread
bobbin.
S
bobbin
the
sewing
obtain
thread
the
corresponding
reel.
thread
through
clockwise
I
J
thread
free
into
opening
41
41
from
on
movement
firmly,
reel
the
to
guide
to
B
few
a
41
the
the
A
the
times
A
.41
reel
reel
of
fit
size
from
the
an
of
right.
around
.4
holder
holder
unwind
the
behind
I
thread
and
Wind
the
switch
main
the
on
Switch
press
and
firmly
thread
the
of
end
the
A
Hold
the
the
the
take
foot
winding
thread,
off.
it
control.
push
action
As
the
soon
will
stop
bobbin
the
as
automatically.
the
to
bobbin
left
and
full,
is
Cut
Remember:
Turn
Then
until
the
turn
it
release
snaps
the
disk
hand
in.
(6)
wheel
fully
(5)
towards
you
again.
back
16
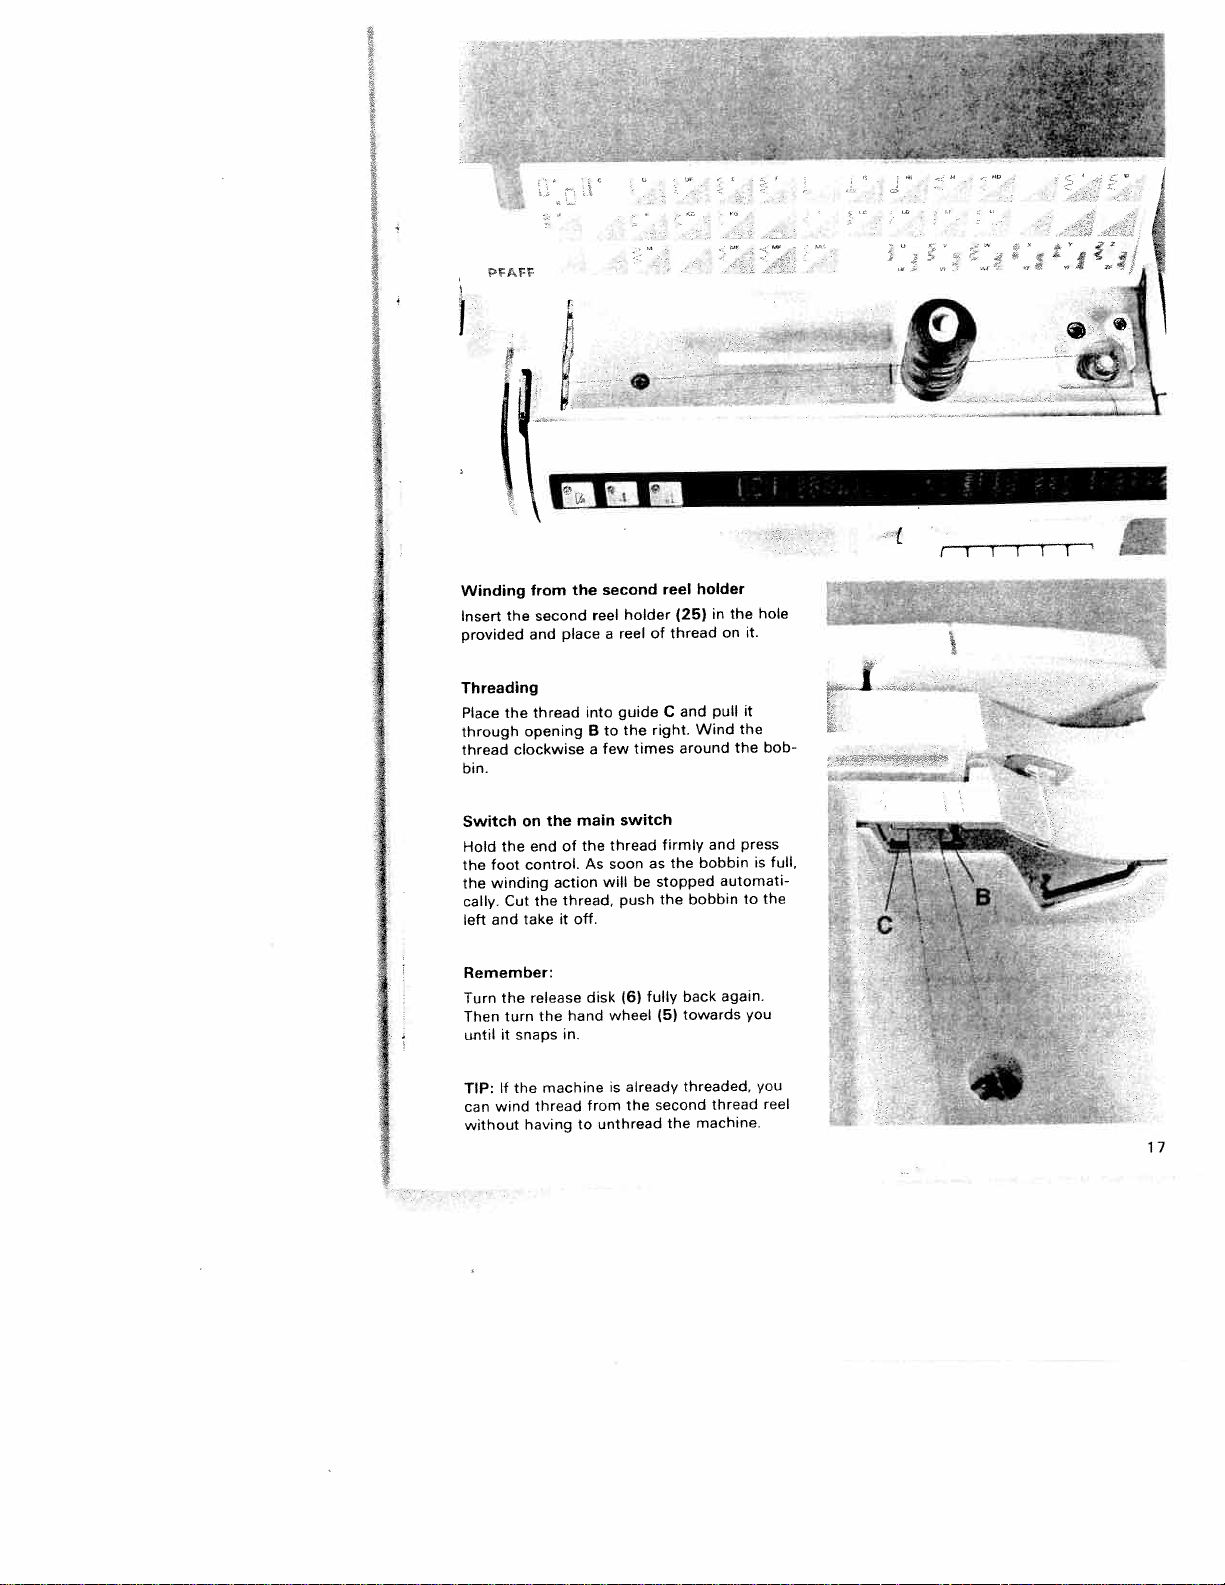
I
I
Winding
Insert
provided
Threading
Place
through
thread
bin.
Switch
Hold
foot
the
winding
the
cally.
and
left
3
V
from
second
the
and
thread
the
opening
clockwise
on
the
end
control.
the
Cut
take
the
action
it
the
place
main
the
of
thread,
off.
reel
into
B
a
As
second
holder
reel
a
guide
the
to
few
switch
thread
soon
will
push
times
as
be
reel
(25)
thread
of
C
right.
firmly
the
stopped
the
holder
and
Wind
around
bobbin
bobbin
the
in
on
pull
and
automati
the
the
press
-4
I
I
I
I
I
hole
it.
it
bob
full,
is
the
to
I
Remember:
the
Turn
turn
Then
snaps
it
until
If
the
TIP:
wind
can
without
release
the
machine
thread
having
hand
in
disk
from
to
(6)
wheel
already
is
the
unthread
fully
(5)
second
back
towards
threaded,
the
again.
thread
machine.
you
you
reel
17
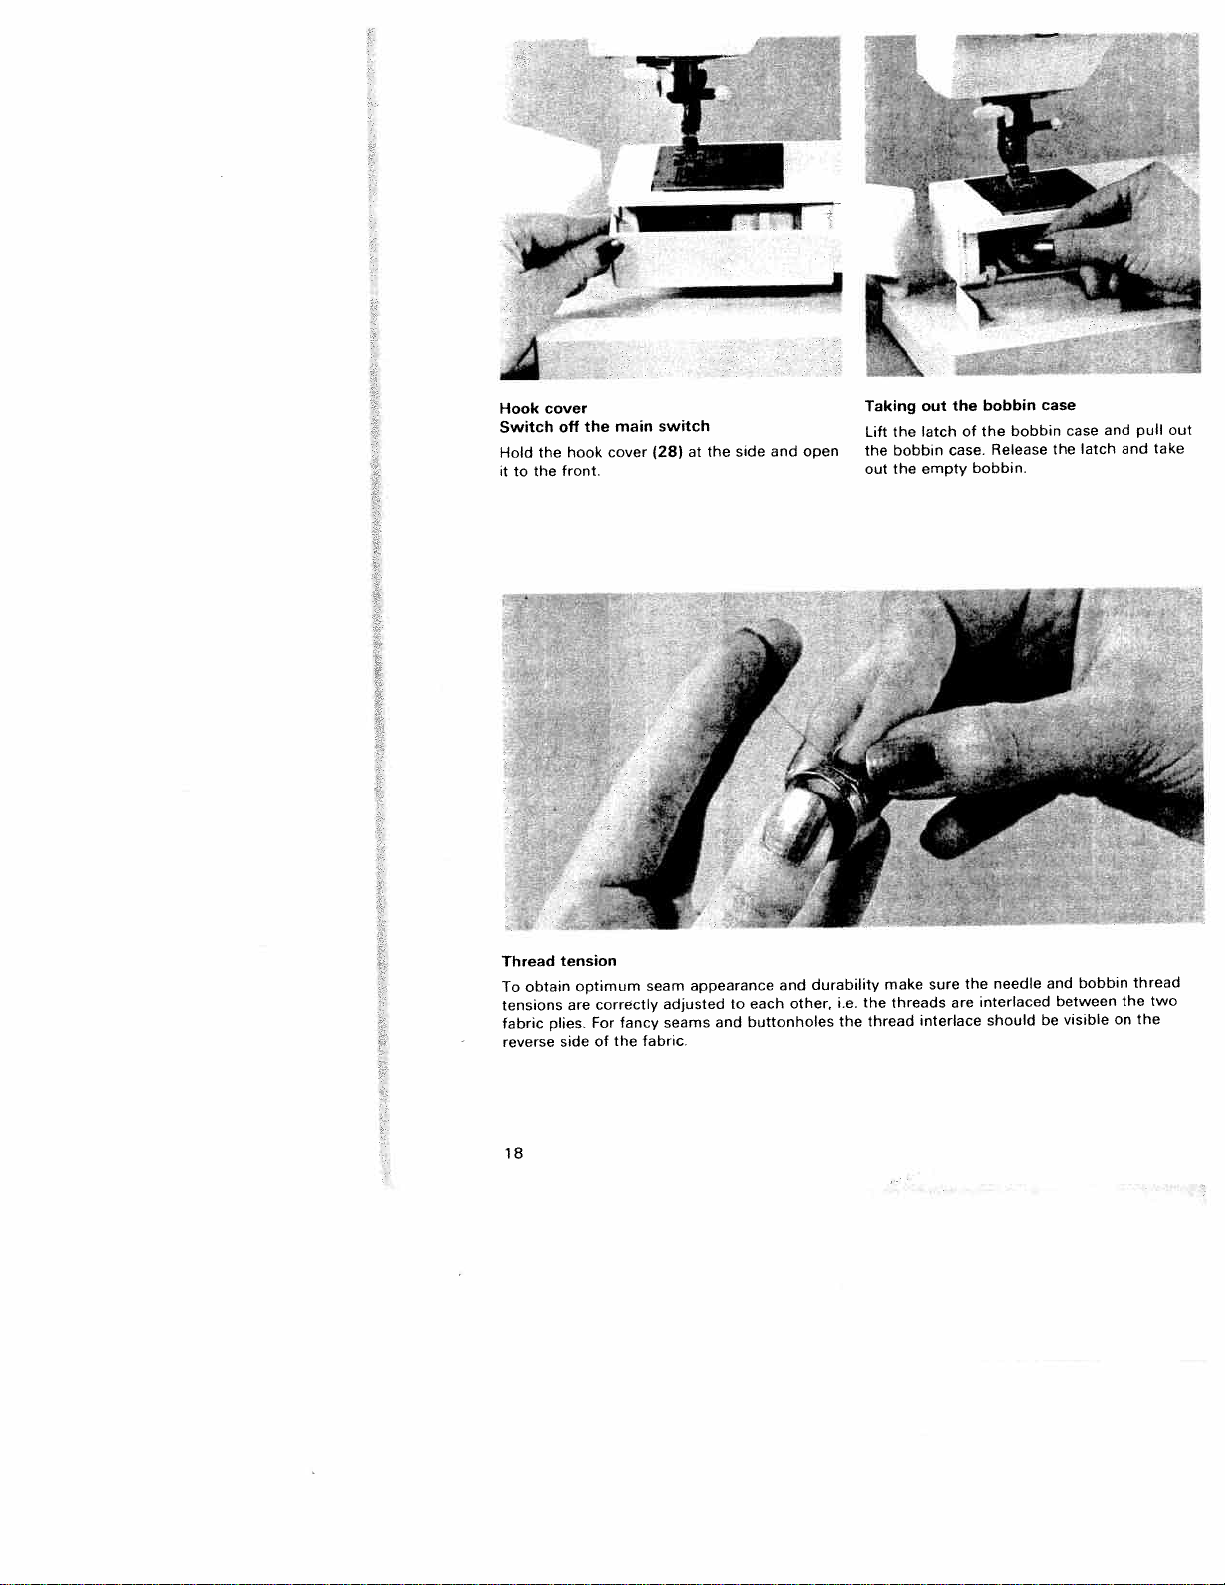
A
Hook
Switch
Hold
it
to
the
cover
the
off
hook
front.
the
main
cover
switch
(28)
bobbin
bobbin
out
latch
empty
the
of
case.
bobbin.
Taking
the
Lift
side
at
the
and
open
the
out
the
the
Release
bobbin
case
the
case
latch
and
and
pull
out
take
Thread
obtain
To
lensions
fabric
reverse
18
tension
plies.
side
optimum
correctly
are
For
of
fancy
the
seam
adjusted
seams
fabric.
appearance
to
and
and
other,
each
buttonholes
durability
i.e.
the
Ihe
thread
make
threads
sure
are
interlace
the
interlaced
should
needle
and
between
be
bobbin
visible
on
the
thread
two
the

the
doing
it
you
the
hand
slip
rests
the
full
slot
pull
the
bobbin
sharply
downwards
Inserting
Insert
When
through
until
Check:
When
turn clockwise.
Checking
Hold
your
must
movement.
bobbin
bobbin
so,
A,
in
bobbin
pull
then
the
the
opening
thread,
case
upwards.
in
the
the thread
under
tension
(see
the
thread
the
by
little
a
bobbin
bobbin
tension
thread
The
with
case.
sideways
spring
arrow).
and
bobbin
each
B
must
move
case
hand
Correcting
Turn
decrease
to
Turn
increase
Inserting
Lift
onto
the
Check:
Pull
case
adjusting
screw
cover
pin
bobbin
the
must
the
the
F
of
0
case
bobbin
not
the
the
C
lust
tension.
and
the
tension:
screw
bobbin
bobbin
push
must
thread
fall
C
a
little
case
the
sewing
face
sharply;
outofthe
just
thread
to
bobbin
hook.
little
a
tension.
the
right
Opening
upwards.
the
hook.
case
to
the
to
bobbin
fully
left
E
of
F
19
/
(/
PFAFF
D
F;
jA
b
Threading
Switch
the
Raise
wheel
hand
moved
reel
holder
right
the
Now,
using
A
guide
the
thread
downwards.
the
nto
the
to
take-up
into
pulled
pass
Then
righthand
F.
guide
Finally
of
one
thread
To
page.
the
off
presser
the
to
size.
and
through
righthand
the
the
threading
pass
two
the
the
the
until
(24)
both
under
the
needle
main
top.
Pull
lever
take-up
thread
thread
thread
needle,
foot
the
and
hands,
the
threading
switch.
(20).
lifter
the
pull
guide
threading
thread
The
lever
downwards
and
from
guides
please
lever
thread
the
around
slot
thread
from
behind
the
refer
take-up
Place
fitanunwinding
thread
the
(19).
slot
(32).
Turn
(19)
thread
hook
slot
and
left
again
side
to
on
disk
stop
upwarc
must
thread
behind
the
the
the
D.
(17)
to
has
into
in
of
Pa
ar
E
b
righ
th
nexi
a
V
/
20
/
Needle
PFAFF
The
threading
make
Lower
hand
the
point.
est
and
o
downwards
the
that
Place
eye.
below.
the
Turn
thread
the
move
thread
the
threader
needle
sewing
the
wheel
Piace
hold
small
the
threader
carefully,
upwards.
through
it
and
taut.
hook
(Models
the
until
the
turn
thread
You
threader
needle
foot
the
needle
Move
it
R
towards
and
can
the
(see
needle
the
towards
goes
into
allow
needle
6120.
easier
next
thread
through
the
the
now
(16)
page).
is
threader
the
hook
rear,
the
pull
eye.
6150.
an
is
and
at
over
needle
threader
the
6230)
aid
quicker.
Turn
high
its
hook
fully
needle
the
from
releasing
end
to
so
to
of
21
Presser
The
presser
sewing
bar
bar
lifter
foot
lifter
is
(20).
raised
I,
or
lowered
with
the
Drawing
Raise
turn
and
needle
thread
thread
the
is
has
to
up
sewing
the
at
formed
draw
the
hand
the
bobbin
foot.
top
up
wheel
again
loop.
a
the
thread
Hold
towards
and
bobbin
Pull
the
the
the
thread.
needle
you
bobbin
needle
thre
until
—r
thread
Bobbin
the
Close
under
the
22
hook
sewing
cover
foot
(28)
to
the
and
left.
pull
the
thread
Thread
Pull
over
the
the
trimmer
threads
thread
from
trimmer
the
back
(30).
front
the
to
U
Removing
off
Turn
the
Set
sewing
at
wards
disengages
Check:
Please
engaged
the
needle
foot
the
check
by
the
main
upwards
back
from
raising
sewing
at
that
its
at
the
switch
highest
at
the
sewing
the
the
foot
the
same
sewing
presser
point.
front
toot
time
foot
and
holder
bar
Press
so
properly
is
lifter.
down
that
the
(15).
foot
the
holder
pins
foot
under
when
the
foot
the
of
the
presser
engage
in
bar
foot
sewing
sewing
the
(15)
sewing
(20)
the
sewing
that
foot
lowered.
is
Engaging
Place
holder
the
lifter
it
23
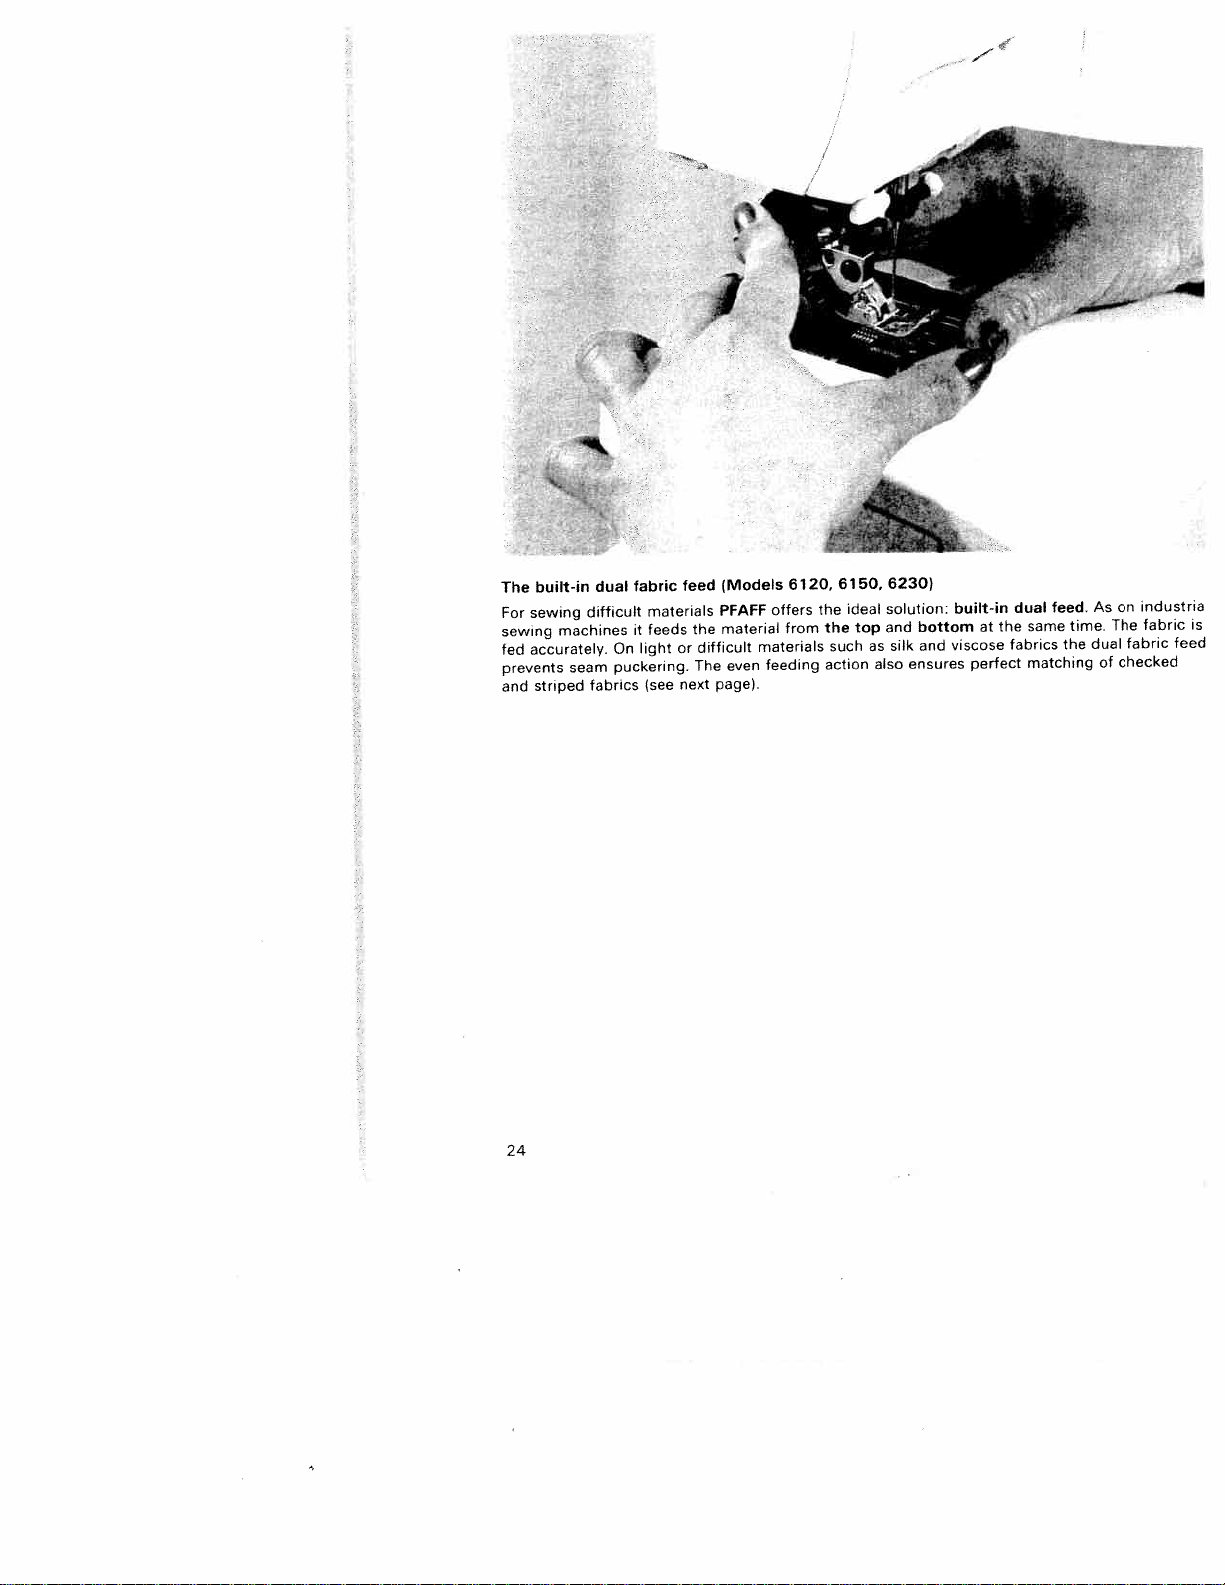
The
For
sewing
sewing
accurately.
fed
prevents
and
24
built-in
machines
striped
seam
dual
difficult
On
puckering.
fabrics
fabric
materials
it
feeds
light
(see
feed
or
next
PFAFF
the
difficult
The
page).
(Models
material
even
6120,
offers
from
materials
feeding
the
the
such
action
6150,
ideal
top
solution:
and
as
also
6230)
silk
bottom
and
ensures
built-in
viscose
perfect
feed.
the
time.
As
dual
of
The
fabric
checked
fabric
is
feed
dual
same
the
at
fabrics
matching
industria
on
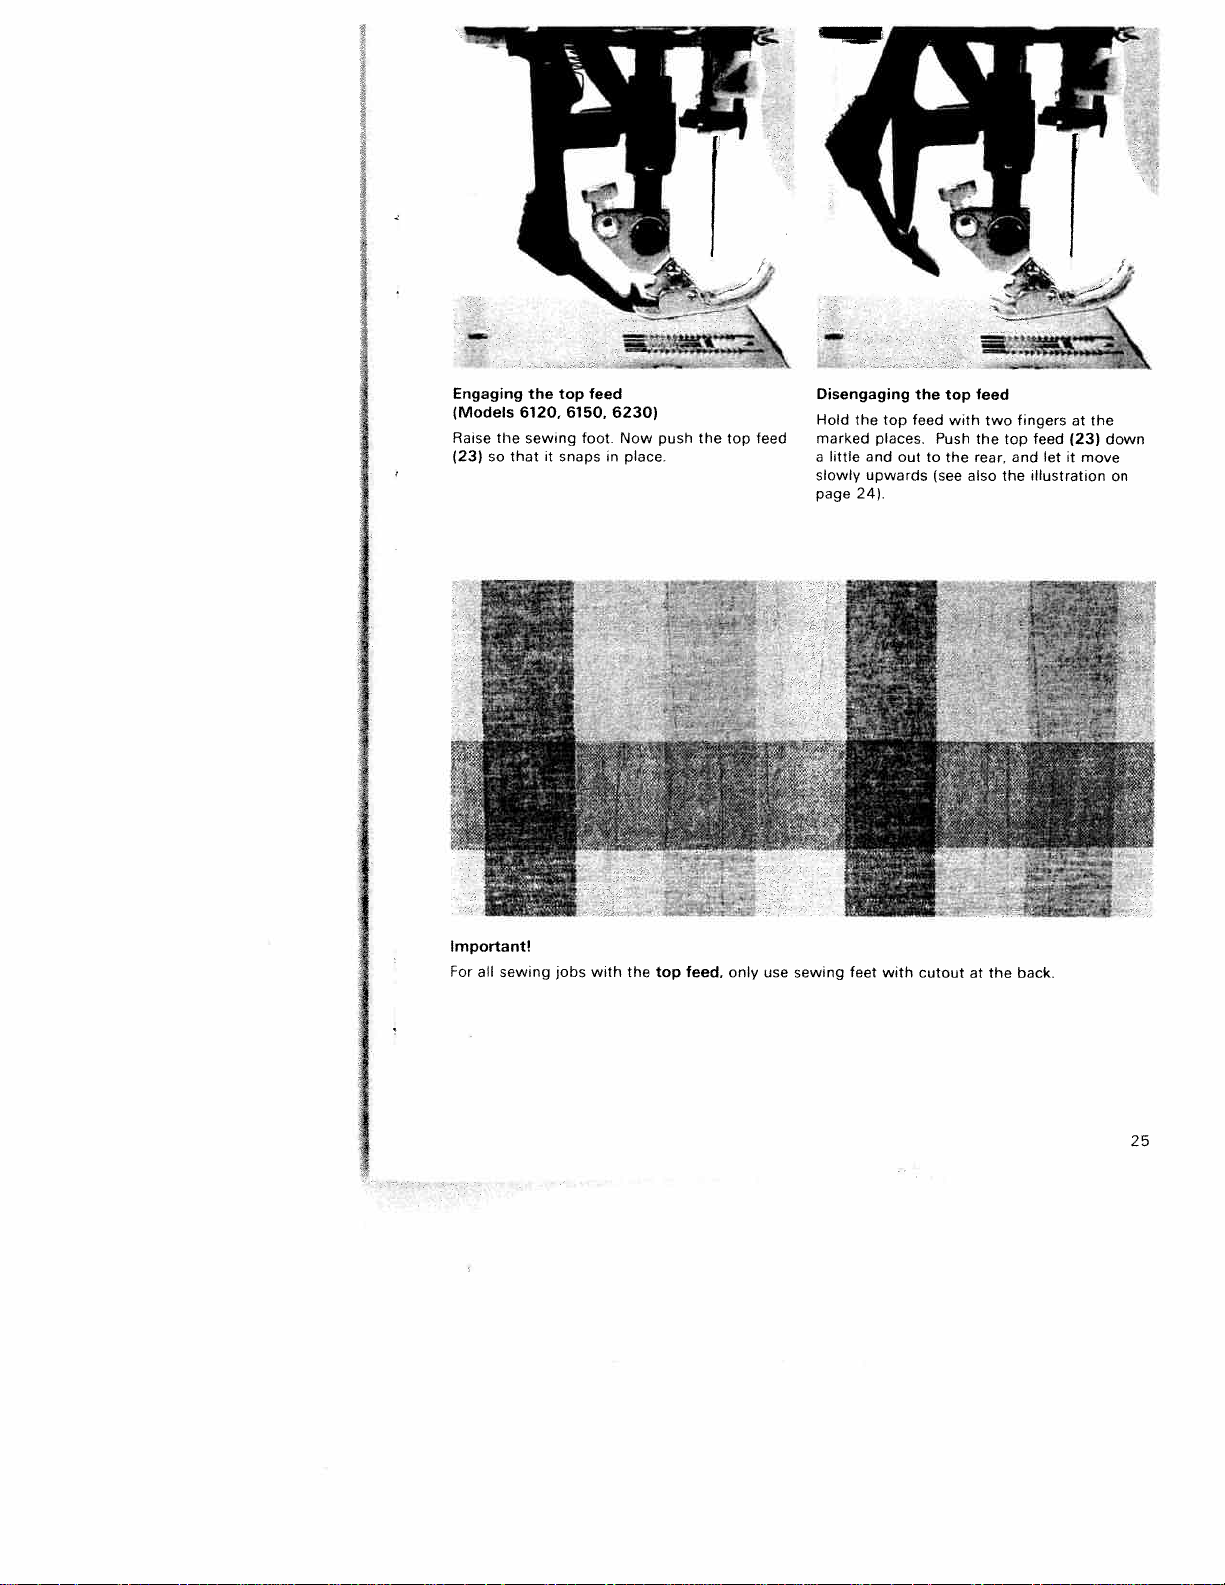
Engaging
(Models
Raise
the
(23) so
Important!
For
all
the
top
6120.
sewing
that
it
snapsinplace
sewing jobs
6150.
foot.
feed
with
6230)
Now
the
push
top
the
feed,
top
only
feed
use
Disengaging
Hold
marked
a
slowly
page
sewing
little
the
and
upwards
24(.
feet
top
places.
out
with
the
feed
to
cutout
Push
(see
top
with
the
feed
the
rear,
also
at
two
the
fingers
top
and
the
back.
at
feed
(23)
let
it
illustration
the
down
move
on
25
Loading…