
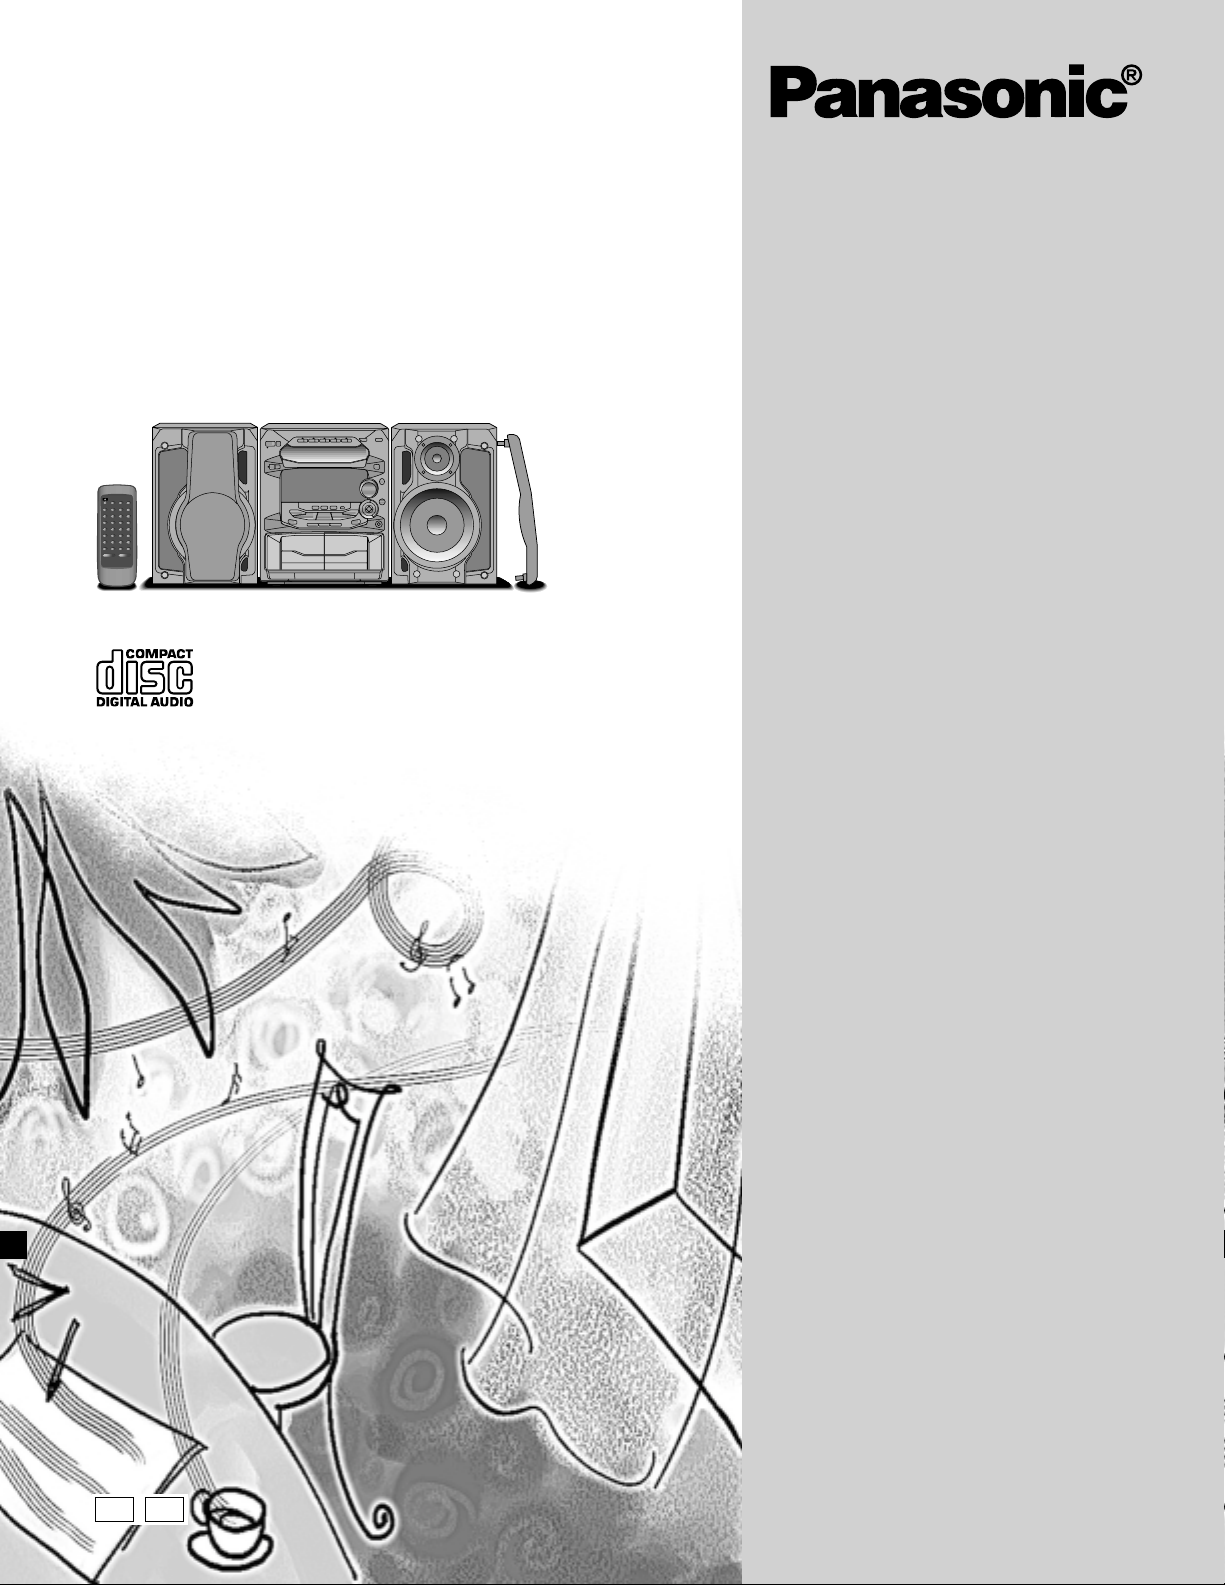
CD Stereo System
Operating Instructions
Model No. SC-AK28
SC-AK18
The illustrations show SC-AK28.
EB GN
Note:
The «EB» indication shown on the packing case
indicates United Kingdom.
Before connecting, operating or adjusting this product, please read these instructions completely.
Please keep this manual for future reference.
RQT5265-B
Dear customer
Thank you for purchasing this product.
For optimum performance and safety, please read these instructions
carefully.
These operating instructions are applicable to the following system.
These operating instructions, however, fundamentally explain the
operation of system SC-AK28.
System SC-AK28 SC-AK18
Main unit SA-AK28 SA-AK18
Speakers SB-AK28 SB-AK18
Before using
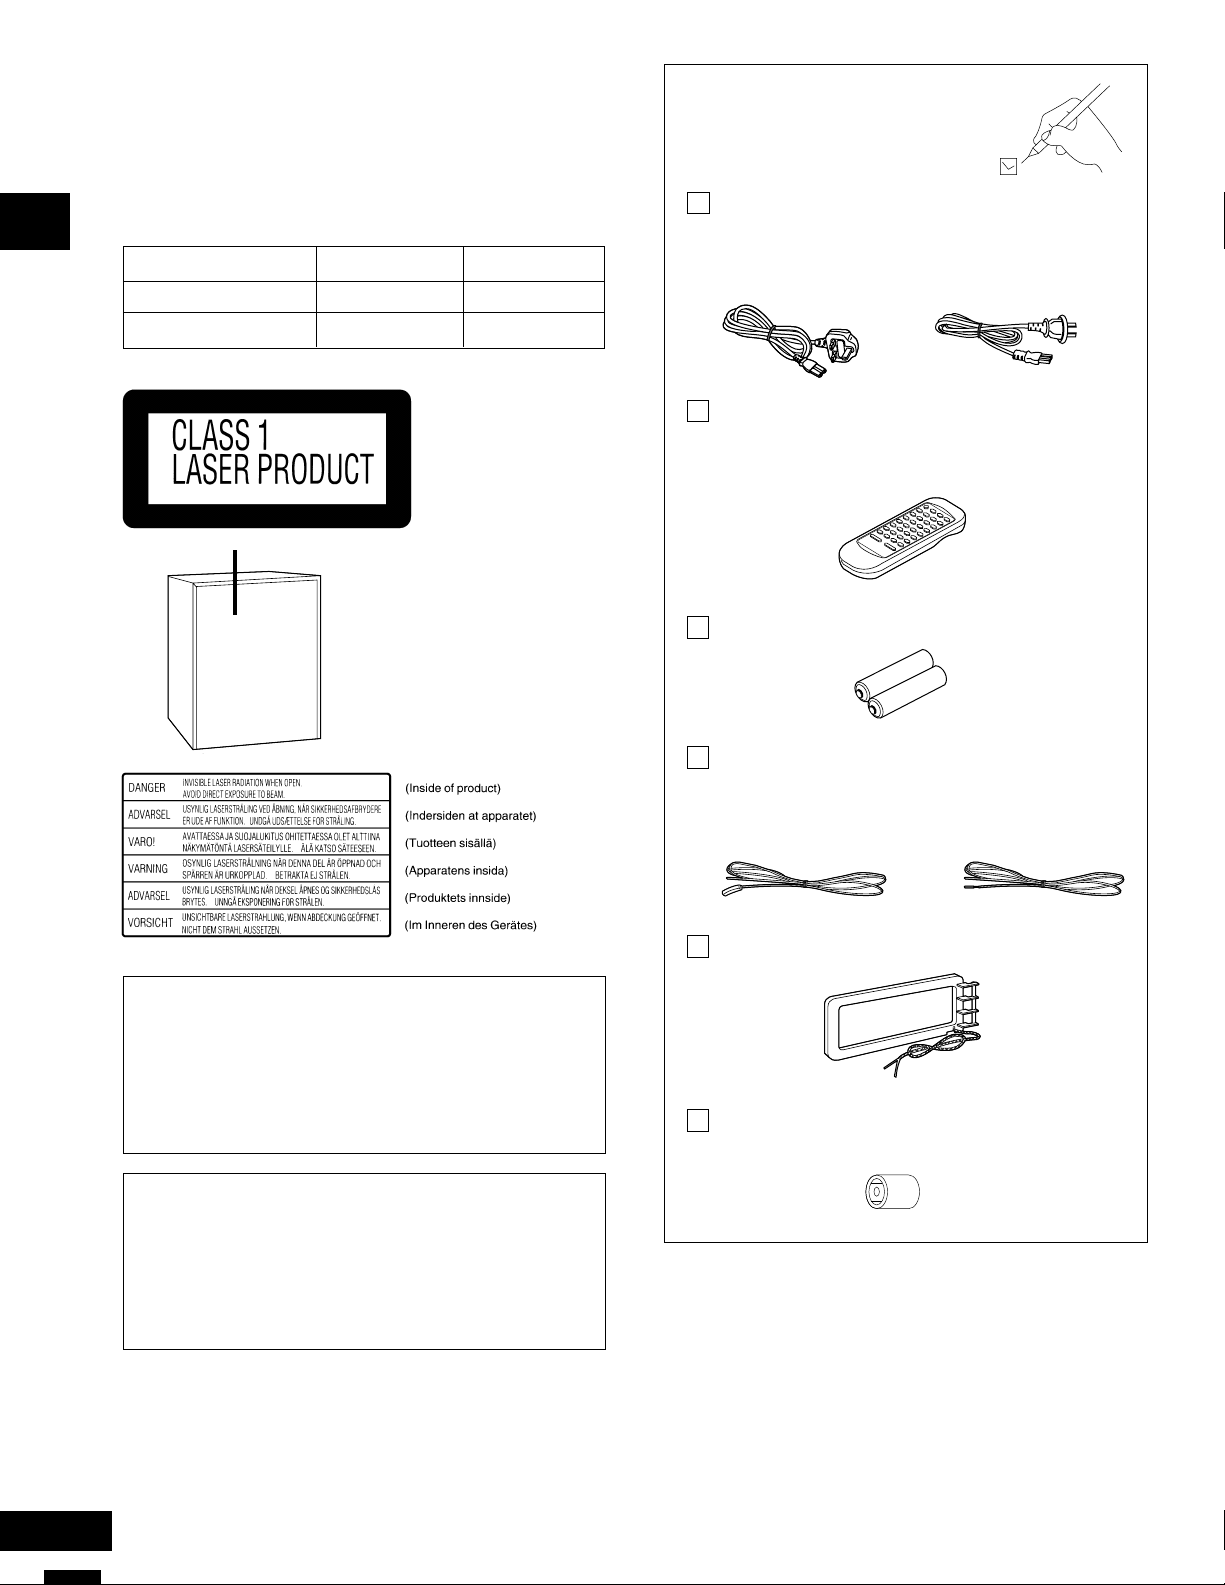
Supplied accessories
Please check and identify the
supplied accessories.
AC mains lead………………………………………. 1 pc.
For United Kingdom For Australia and New
(RJA0044-1C) Zealand
(RJA0035-X)
Remote control transmitter …………………….. 1pc.
SC-AK28: (RAK-SC957WK)
SC-AK18: (EUR648200)
(Back of product)
CAUTION!
THIS PRODUCT UTILIZES A LASER.
USE OF CONTROLS OR ADJUSTMENTS OR PERFORMANCE
OF PROCEDURES OTHER THAN THOSE SPECIFIED HEREIN
MAY RESULT IN HAZARDOUS RADIATION EXPOSURE.
DO NOT OPEN COVERS AND DO NOT REPAIR YOURSELF.
REFER SERVICING TO QUALIFIED PERSONNEL.
CAUTION!
DO NOT INSTALL OR PLACE THIS UNIT IN A BOOKCASE,
BUILT IN CABINET OR IN ANOTHER CONFINED SPACE.
ENSURE THE UNIT IS WELL VENTILATED. ENSURE THAT CURTAINS AND ANY OTHER MATERIALS DO NOT OBSTRUCT THE
VENTILATION TO PREVENT RISK OF ELECTRIC SHOCK OR
FIRE HAZARD DUE TO OVERHEATING.
Batteries for remote control………………….. 2pcs.
FM indoor antenna………………………………… 1 pc.
For United Kingdom For Australia and New
(RSA0007) Zealand
(RSA0006-J)
AM loop antenna (RSA0029) ………………….. 1 pc.
Antenna plug adaptor (SJP9009)…………….. 1pc.
(United Kingdom only)
Use numbers indicated in parentheses when asking for replacement
parts.
RQT5265
2

Table of contents
Safety precautions
Before using
Supplied accessories ………………………………………………………….. 2
Safety precautions……………………………………………………………….3
Caution for AC Mains Lead …………………………………………………. 4
Concerning the remote control ……………………………………………. 5
Battery installation ……………………………………………………………. 5
Correct method of use ………………………………………………………. 5
Placement of speakers…………………………………………………………5
Connections ……………………………………………………………………….. 6
Basic connections (for supplied accessories) ……………………….. 6
Optional antenna connections ……………………………………………. 7
External unit connection ……………………………………………………. 7
Front panel controls ……………………………………………………………. 8
Turning the demo function off …………………………………………… 10
ECO mode ………………………………………………………………………… 10
Auto-off function ………………………………………………………………. 10
Setting the time ………………………………………………………………… 11
Convenient functions ………………………………………………………… 11
Radio operations
Presetting radio broadcasts ………………………………………………. 12
Listening to radio broadcasts ……………………………………………. 13
Compact disc operations
Concerning compact discs ………………………………………………… 14
Listening to compact discs ……………………………………………….. 15
Direct access play ………………………………………………………….. 16
Repeat play …………………………………………………………………… 16
Random play …………………………………………………………………. 16
Program play …………………………………………………………………. 17
To listen to special CDs and tracks (CD Manager function) ….. 18
Cassette deck operations
Placement
Set the system up on an even surface away from direct sunlight,
high temperatures, high humidity, and excessive vibration. These
conditions can damage the cabinet and other components, thereby
shortening the unit’s service life.
Place it at least 15 cm away from wall surfaces to avoid distortion
and unwanted acoustical effects.
Do not place heavy items on the unit.
Voltage
Do not use high voltage power sources. This can overload the unit
and cause a fire.
Do not use a DC power source. Check the source carefully when
setting the unit up on a ship or other place where DC is used.
AC mains lead protection
Ensure the AC mains lead is connected correctly and not damaged.
Poor connection and lead damage can cause fire or electric shock.
Do not pull, bend, or place heavy items on the lead.
Grasp the plug firmly when unplugging the lead. Pulling the AC
mains lead can cause electric shock.
Do not handle the plug with wet hands. This can cause electric
shock.
Foreign matter
Do not let metal objects fall inside the unit. This can cause electric
shock or malfunction.
Do not let liquids get into the unit. This can cause electric shock or
malfunction. If this occurs, immediately disconnect the unit from the
power supply and contact your dealer.
Do not spray insecticides onto or into the unit. They contain
flammable gases which can ignite if sprayed into the unit.
Before using
Listening to tapes……………………………………………………………… 19
Concerning cassette tapes …………………………………………………20
Recording operations
Before recording (Deck 2 only) ………………………………………….. 21
Tape-to-tape recording………………………………………………………. 21
Recording from radio broadcasts ………………………………………. 22
Recording from compact discs ………………………………………….. 23
To record special CDs and tracks (CD Manager function)……..24
Sound quality/sound field operations
Using the built-in sound quality/sound field settings…………… 25
Boosting the super woofer SC-AK28…………………………………. 25
Adding bass SC-AK18 ……………………………………………………… 25
Varying the sound quality with the manual equalizer ………….. 26
Varying the sound quality with the acoustic image
(Al) equalizer ………………………………………………………………….. 26
Timer operations
Using the timer …………………………………………………………………. 27
Using the play/record timer ………………………………………………. 27
Using the sleep timer……………………………………………………….29
Reference
Using an external unit ……………………………………………………….. 29
Troubleshooting guide ………………………………………………………. 30
Maintenance ……………………………………………………………………… 31
Technical specifications ……………………………………… Back Cover
Service
Do not attempt to repair this unit by yourself. If sound is interrupted,
indicators fail to light, smoke appears, or any other problem that is not
covered in these instructions occurs, disconnect the AC mains lead
and contact your dealer or an authorized service center. Electric shock
or damage to the unit can occur if the unit is repaired, disassembled
or reconstructed by unqualified persons.
Extend operating life by disconnecting the unit from the power source
if it is not to be used for a long time.
3
RQT5265
Caution for AC Mains Lead
Figure A
Figure B
Figure A
Figure B
Before using
(For United Kingdom)
(“EB” area code model only)
For your safety, please read the following text carefully.
This appliance is supplied with a moulded three pin
mains plug for your safety and convenience.
A 5-ampere fuse is fitted in this plug.
Should the fuse need to be replaced please ensure that
the replacement fuse has a rating of 5-ampere and that
it is approved by ASTA or BSI to BS1362.
Check for the ASTA mark or the BSI mark on the
body of the fuse.
If the plug contains a removable fuse cover you must
ensure that it is refitted when the fuse is replaced.
If you lose the fuse cover the plug must not be used
until a replacement cover is obtained.
A replacement fuse cover can be purchased from your
local dealer.
CAUTION!
IF THE FITTED MOULDED PLUG IS UNSUITABLE
FOR THE SOCKET OUTLET IN YOUR HOME THEN
THE FUSE SHOULD BE REMOVED AND THE PLUG
CUT OFF AND DISPOSED OF SAFELY.
THERE IS A DANGER OF SEVERE ELECTRICAL
SHOCK IF THE CUT OFF PLUG IS INSERTED INTO
ANY 13-AMPERE SOCKET.
WARNING: DO NOT CONNECT EITHER WIRE TO
THE EARTH TERMINAL WHICH IS MARKED WITH
THE LETTER E, BY THE EARTH SYMBOL i
COLOURED GREEN OR GREEN/YELLOW.
THIS PLUG IS NOT WATERPROOF—KEEP DRY.
OR
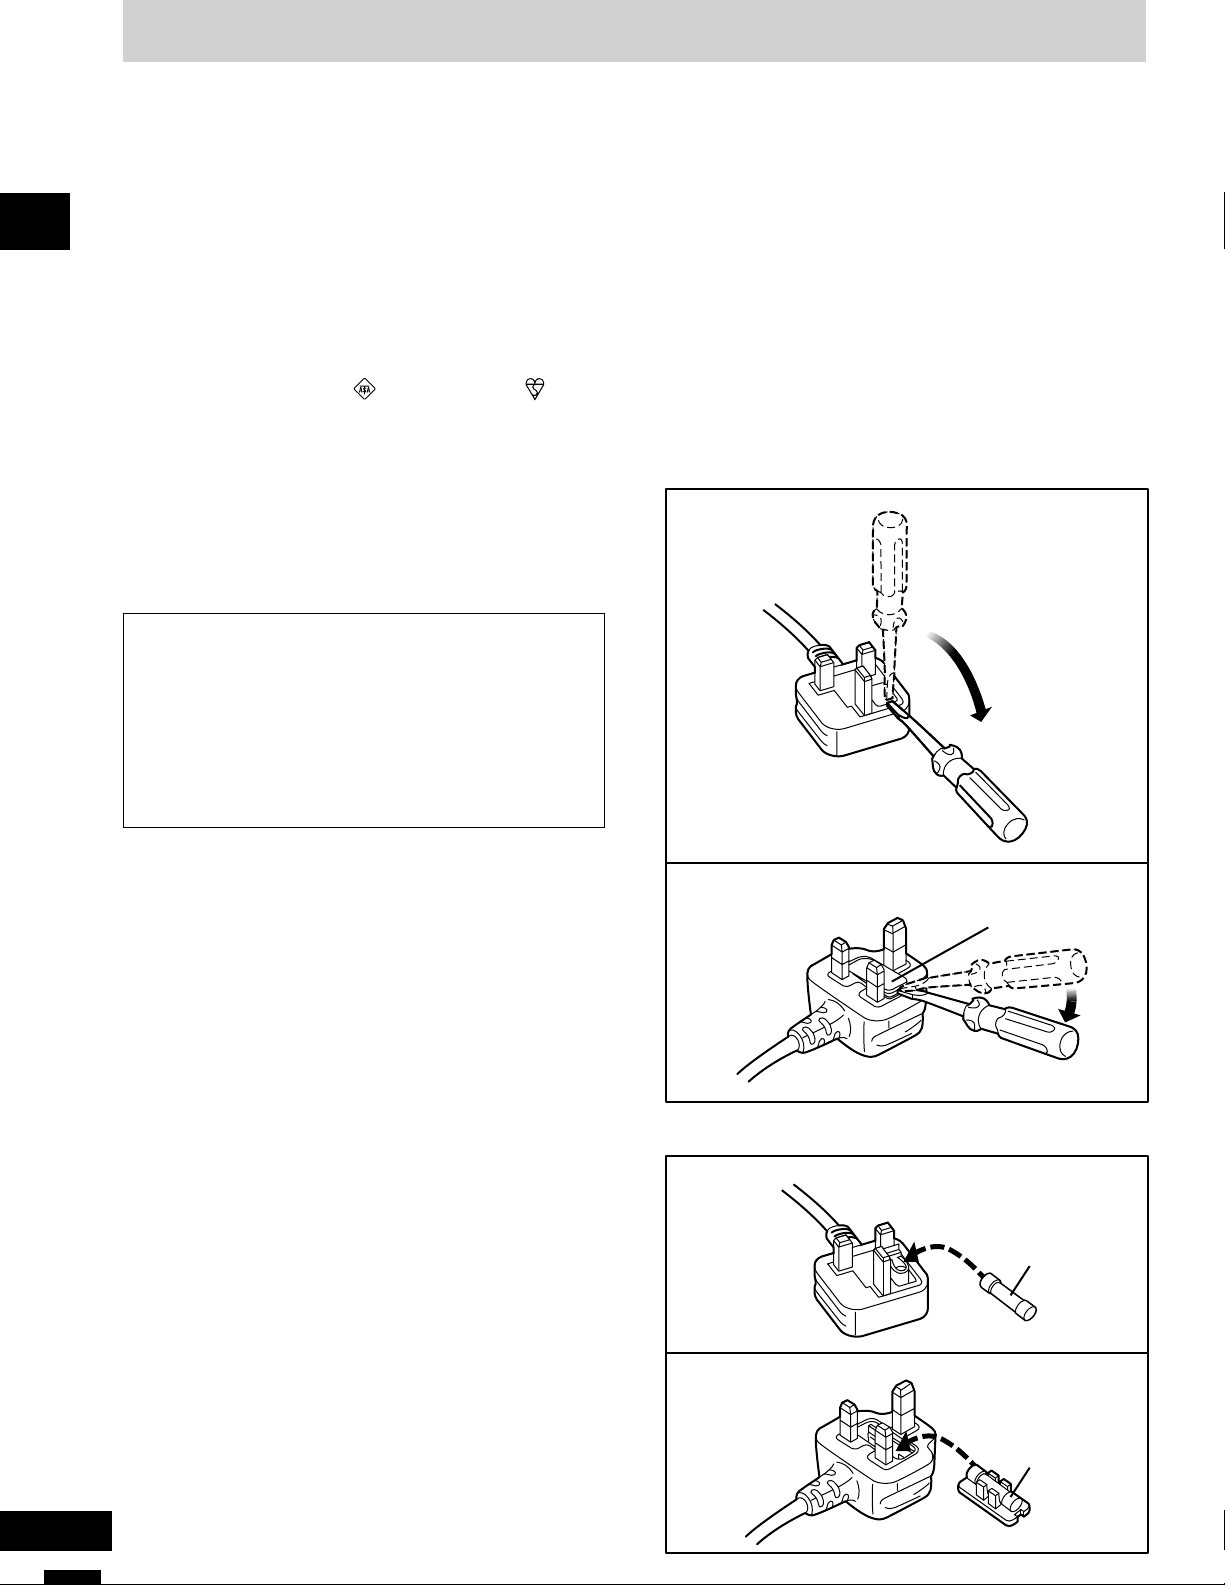
Before use
Remove the connector cover.
How to replace the fuse
The location of the fuse differ according to the type of
AC mains plug (figures A and B). Confirm the AC mains
plug fitted and follow the instructions below.
Illustrations may differ from actual AC mains plug.
1. Open the fuse cover with a screwdriver.
If a new plug is to be fitted please observe the wiring
code as stated below.
If in any doubt please consult a qualified electrician.
IMPORTANT
The wires in this mains lead are coloured in accordance
with the following code:
Blue: Neutral, Brown: Live.
As these colours may not correspond with the coloured
markings identifying the terminals in your plug, proceed
as follows:
The wire which is coloured Blue must be connected to
the terminal which is marked with the letter N or coloured
Black or Blue.
The wire which is coloured Brown must be connected to
the terminal which is marked with the letter L or coloured
Brown or Red.
Fuse cover
2. Replace the fuse and close or attach the fuse cover.
Fuse
(5 ampere)
RQT5265
Fuse
(5 ampere)
4
Concerning the remote control
A
B
SC-AK28
SC-AK18
R6, AA, UM-3
R6, AA, UM-3
1
Remote control
signal sensor
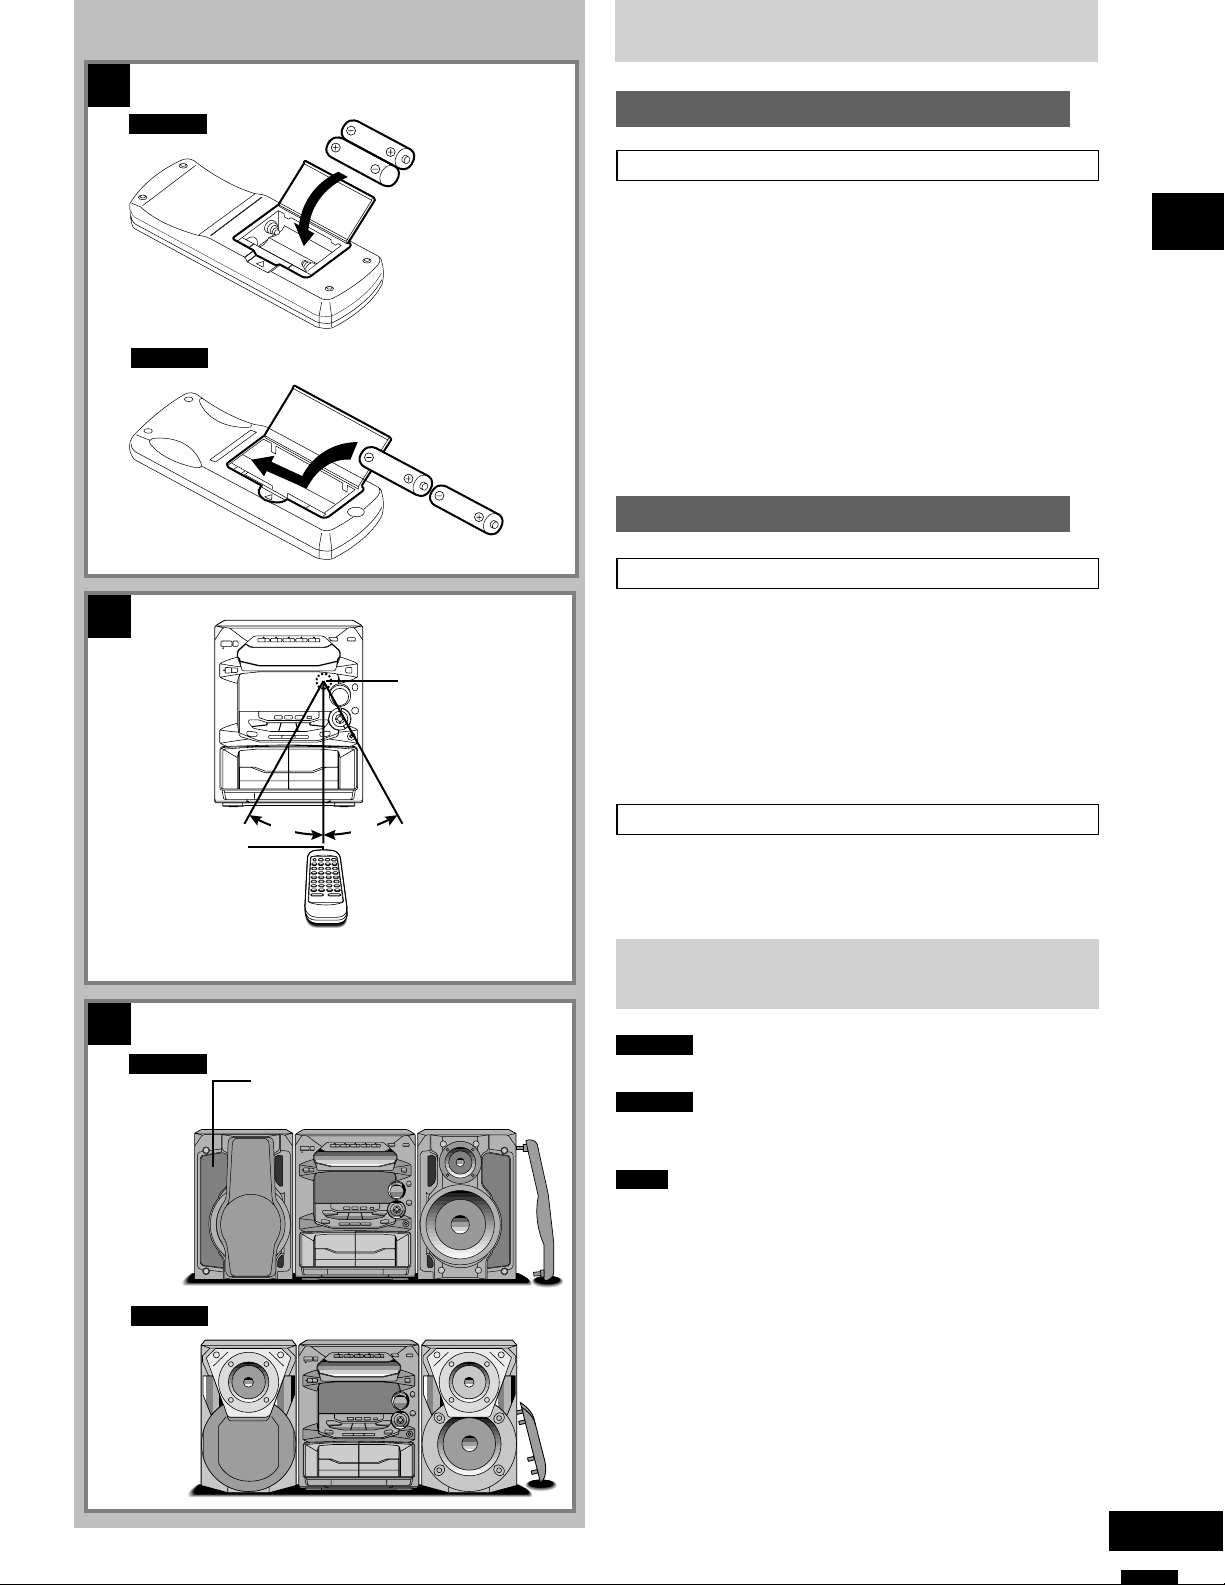
Battery installation
Use of batteries
Align the poles (+ and –) properly when inserting the batteries.
•
Do not mix old and new batteries or different types of batteries.
•
Do not recharge ordinary dry cell batteries.
•
Do not heat or disassemble the batteries. Do not allow them to
•
contact flame or water.
Remove the batteries if the unit is not to be used for a long time.
•
Do not keep together with metallic objects such as necklaces.
•
Do not use rechargeable type batteries.
•
Mishandling of batteries can cause electrolyte leakage which can
damage items the fluid contacts and may cause a fire.
If electrolyte leaks from the batteries, consult your dealer.
Wash thoroughly with water if electrolyte comes in contact with any
part of your body.
2
Correct method of use
Operation notes
Do not place obstacles between the remote control signal sensor
•
and remote control unit.
Do not expose the remote control signal sensor to direct sunlight
•
or to the bright light of a fluorescent light.
Take care to keep the remote control signal sensor and end of the
•
remote control unit free from dust.
If this system is installed in a rack with glass doors, the glass
•
doors’ thickness or colour might make it necessary to use theremote
control a shorter distance from the system.
A
Before using
B
C
Transmission
window
SC-AK28
SC-AK18
30°
Superwoofer
30°
About 7 meters in front of
the signal sensor
To prevent damage
Never place heavy items on top of the unit.
•
Do not disassemble or reconstruct the unit.
•
Do not spill water or other liquids into the unit.
•
Placement of speakers
SC-AK28
Place the speakers so that the super woofer is on the outside.
S
SC-AK18
Speakers are designed identically so that no left or right channel
orientation is necessary.S
Notes
Keep your speakers at least 10 mm away from the system for
•
proper ventilation.
These speakers do not have magnetic shielding. Do not place
•
them near televisions, personal computers or other devices easily
influenced by magnetism.
To avoid damage to the speakers, do not touch the speaker cones
•
if you have taken the nets off.
C
5
RQT5265
Before using
1
2
3
4
To household
mains socket
Connections
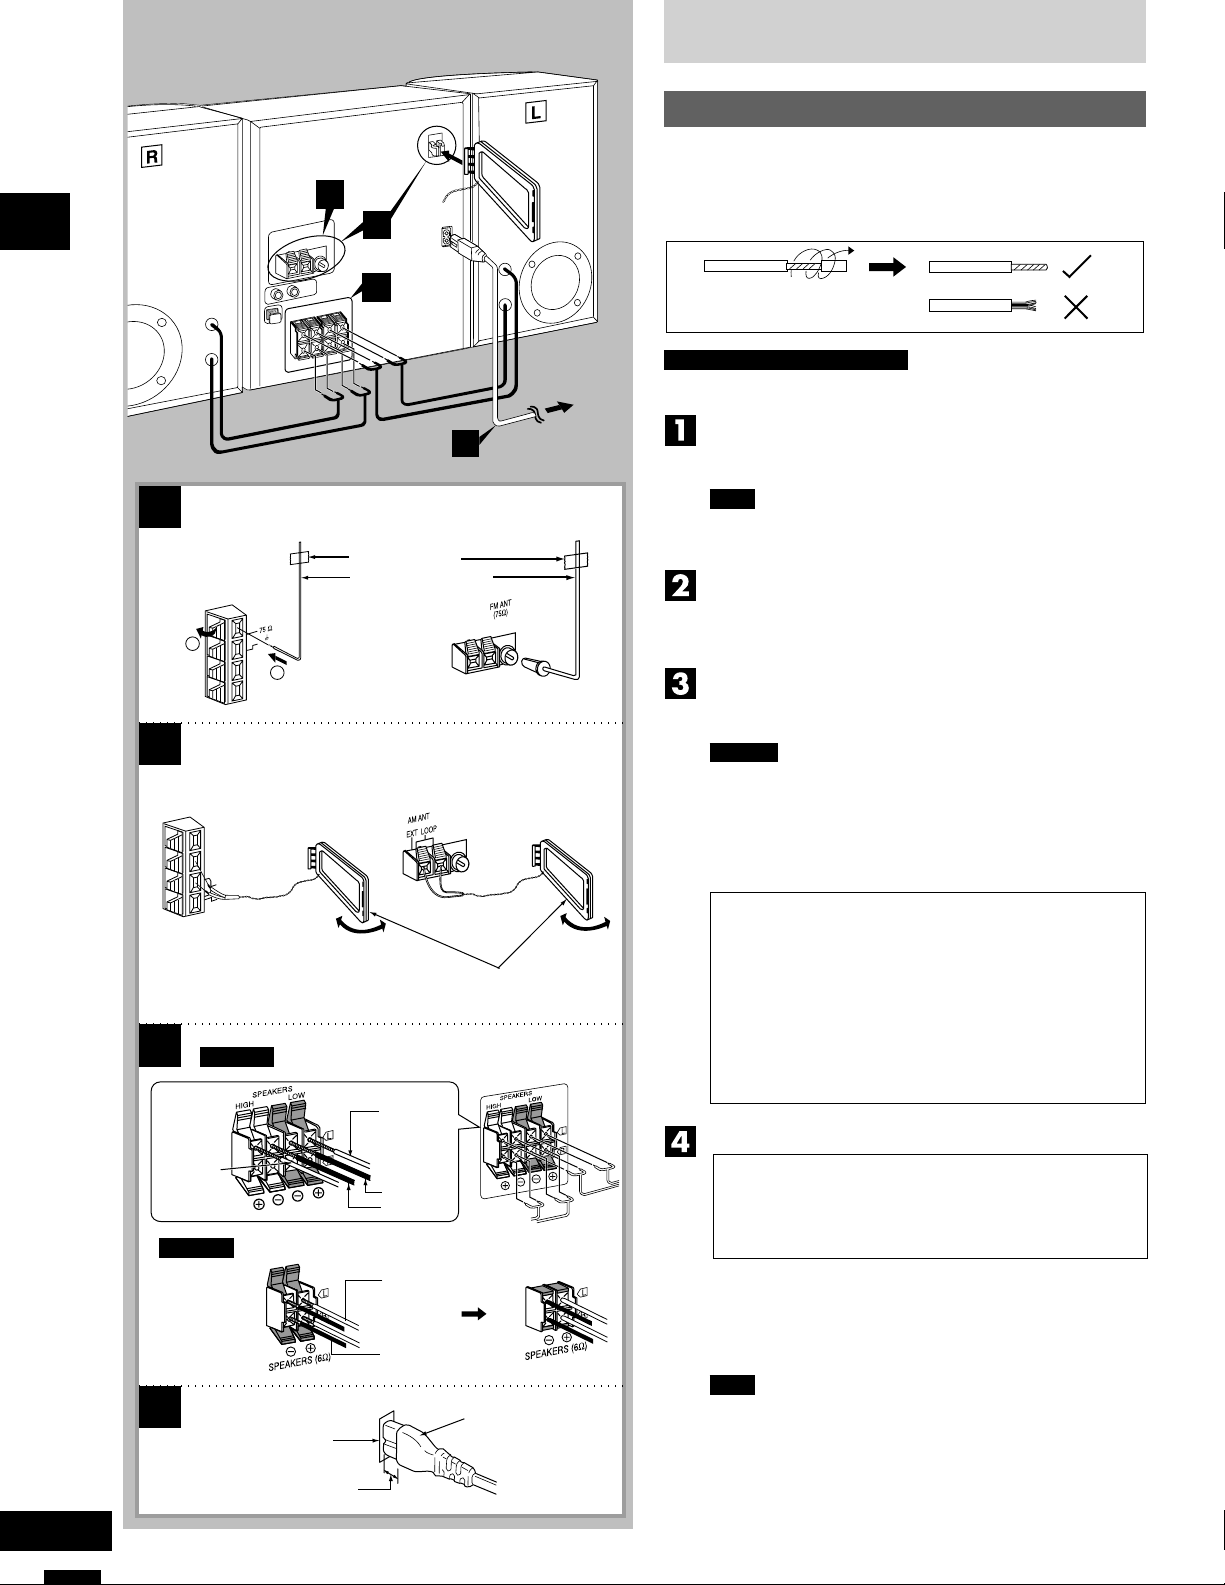
Basic connections (for supplied accessories)
Plug the AC mains lead into a household mains socket only after
•
all other connections have been made.
To prepare the antenna wires and speaker cords, twist the vinyl
•
cover tip and pull off.
For Australia and New Zealand
The configuration of the FM and AM antenna terminals are different.
Connect the FM indoor antenna.
Tape the antenna to a wall or column, in a position where radio
signals are received with the least amount of interference.
1
For Australia and New Zealand
T
N
A
M
F
( )
D
1
N
G
2
2
For Australia and New Zealand
T
N
A
M
A
P
O
O
L
T
X
E
3
SC-AK28
For United Kingdom
Adhesive tape
FM indoor antenna
For United Kingdom
AM loop antenna
Red (+)
Note
For best reception sound quality:
An FM outdoor antenna is recommended. (See page 7.)
Connect the AM loop antenna.
After attaching the antenna, turn on the system and tune in a
broadcast station. Then, turn the antenna to the angle of best
reception and least interference.
Connect the speaker cables.
Connect each end of the speaker cables to the terminal lever of
the same colour.
Caution
Use only the supplied speakers.
•
The combination of the main unit and speakers provide the
best sound. Using other speakers can damage the unit and
sound quality will be negatively affected.
To prevent damage to circuitry, never short-circuit positive (+)
•
and negative (–) speaker wires.
Caution
• Use the speakers only with the recommended
system.
Failure to do so may lead to damage to the
amplifier and/or the speakers, and may result in
the risk of fire.
Consult a qualified service person if damage has
occurred or if you experience a sudden change
in performance.
• Do not attach these speakers to walls or ceilings.
Connect the AC mains lead.
RQT5265
Grey (+)
SC-AK18
4
Black (–)
Blue (–)
Red (+)
Black (–)
Connector
Appliance inlet
Approx. 6 mm
(FOR UNITED KINGDOM ONLY)
BE SURE TO READ THE CAUTION FOR THE
AC MAINS LEAD ON PAGE 4 BEFORE
CONNECTION.
Insertion of connector
Even when the connector is perfectly inserted, depending on
the type of inlet used, the front part of the connector may jut out
as shown in the drawing.
However there is no problem using the unit.
Note
The included AC mains lead is for use with this unit only. Do
not use it with other equipment.
6
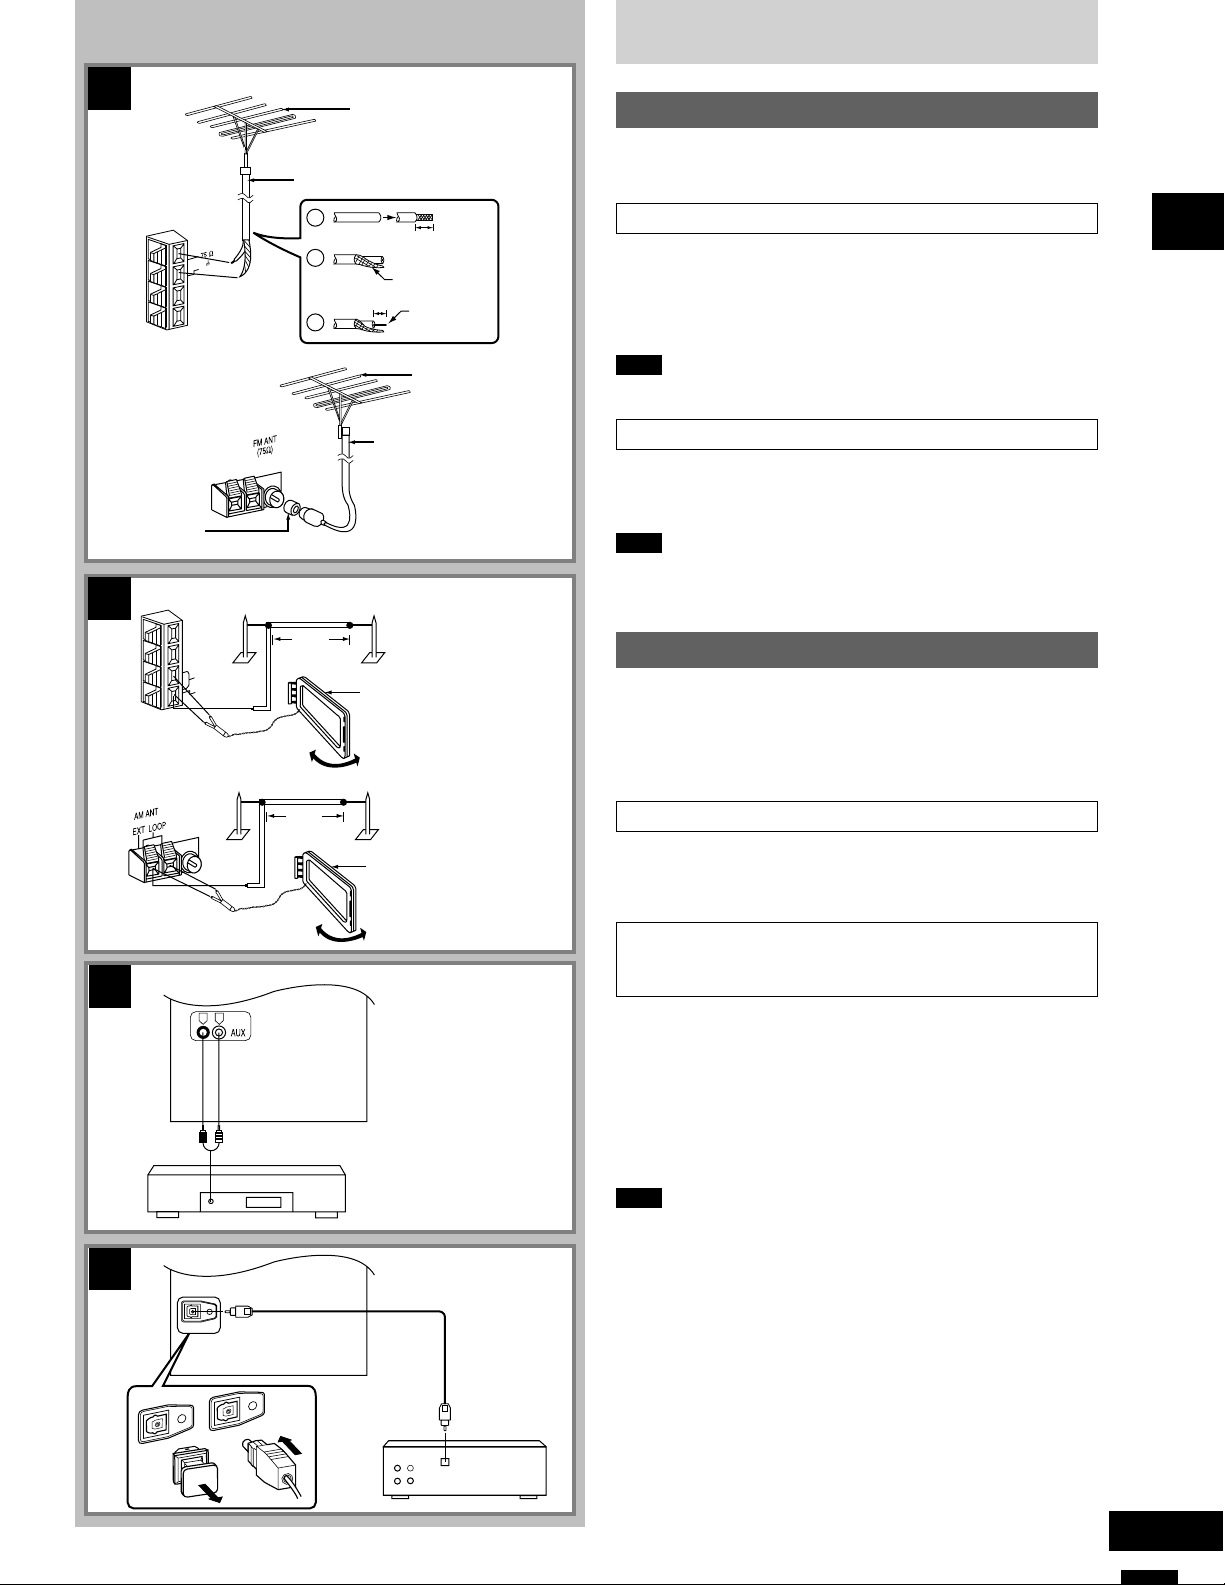
For Australia and New Zealand
A
FM outdoor antenna
(not included)
75
Ω coaxial cable (not included)
Connections
Optional antenna connections
You may need an outdoor antenna if you use this system in a
mountainous region or inside a reinforced-concrete building, etc.
T
N
A
M
F
( )
D
N
G
For United Kingdom
Antenna plug
adaptor (included)
For Australia and New Zealand
B
T
N
A
M
A
P
O
O
L
T
X
E
For United Kingdom
5 -12 m
5 -12 m
1
2
3
30 mm
Shield braid
15 mm
Core wire
FM outdoor antenna
(not included)
75
Ω coaxial cable
(not included)
AM outdoor antenna
(not included)
AM loop antenna
(included)
AM outdoor antenna
(not included)
FM outdoor antenna A
Disconnect the FM indoor antenna if an FM outdoor antenna is installed.
1 Remove a piece of the outer vinyl insulator.
2 Twist the shield braid.
3 Expose the core wire.
Note
An outdoor antenna should be installed by a qualified technician only.
AM outdoor antenna B
Connect the outdoor antenna without removing the AM loop antenna.
Run 5 to 12 m of vinyl-covered wire horizontally along a window or
other convenient location.
Note
When the unit is not in use, disconnect the outdoor antenna to prevent
possible damage that may be caused by lightning. Never use an
outdoor antenna during an electrical storm.
External unit connection
Make sure that the power supply for all components has been
•
turned off before making any connections.
For details, refer to the operating instructions of the unit which are
•
to be connected.
All peripheral components and cables sold separately.
•
Connecting analog equipment C
Before using
C
D
OPTICAL OUT
OPTICAL OUT
R L
(L)(R)
OPTICAL OUT
AM loop antenna
(included)
Rear panel of this unit
Analog player (not included)
Rear panel of this unit
Optical fiber
cable
(not included)
Receiver
(not included)
OPTICAL
IN
An analog player with a built-in phono equalizer can be connected.
When units other than those described are to be connected, please
consult your audio dealer.
Connecting digital equipment to the optical
fiber out terminal D
(For United Kingdom: model SC-AK28 only)
Remove the dust-protection cap and connect this unit to other digital
equipment with an optical fibre terminal, such as a receiver or digital
surround processor.
Leave the cap attached when this terminal is not being used.
•
For your reference
If you have DTS format CDs, you can enjoy six channel playback by
connecting this unit to a receiver or digital surround processor that
has a DTS decoder.
Note
Use only the optical fibre terminal when playing back DTS format
discs. DTS signals can only be correctly output through the digital
terminal.
¡ DTS is a trademark of Digital Theater Systems, L.P.
7
RQT5265
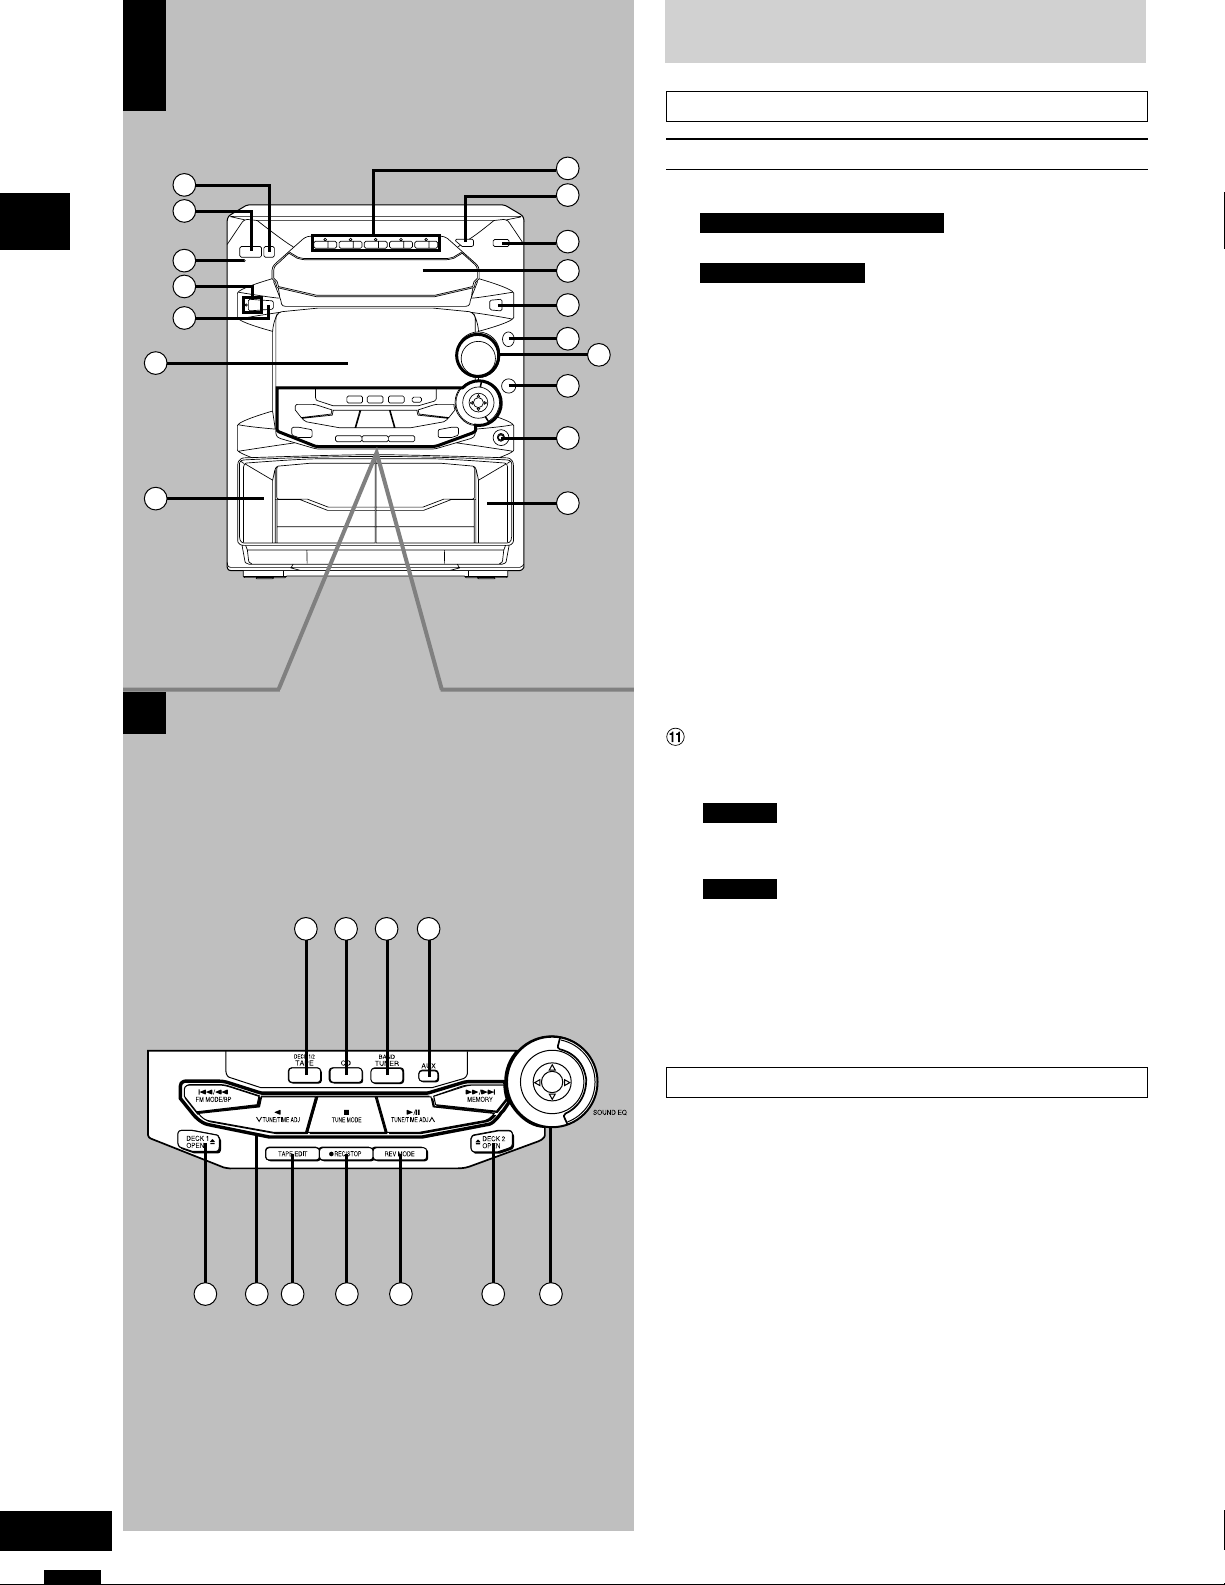
Front panel controls
A
1
2
3
4
5
6
Before using
7
B
18 19 20 21
10
11
12
13
15
16
17
Main unit A
8
9
14
No. Name Ref. page
1 Eco button (MODE)…………………………………………….10
2 For Australia and New Zealand
Standby/on switch (f/I, POWER)……………………….. 10
For For United Kingdom
Standby/on switch (f/I) ………………………………………10
Press to switch the unit from on to standby mode or vice versa.
In standby mode, the unit is still consuming a small amount of
power.
3 AC supply indicator (AC IN)
This indicator lights when the unit is connected to the AC mains
supply.
4 Play timer/record timer button and indicator
(rPLAY/rREC) ………………………………………………….27
5 Clock/timer button
(CLOCK/TIMER)……………………………………….11, 27, 28
6 Display
7 Deck 1 cassette holder……………………………………….19
8 Disc direct play, open/close buttons and indicators
(CD 1 ~ CD 5, c) ………………………………………………..15
9 CD manager button
(CD MANAGER) ……………………………………………18, 24
! Random play button (RANDOM)………………………… 16
Disc tray
# Display select/demonstration button
(-DISP/–DEMO) ……………………………………………. 10, 11
$ SC-AK28
Super woofer on/off button
(S.WOOFER)………………………………………………………25
SC-AK18
V.BASS on/off button (V.BASS)…………………………. 25
% Volume control (VOLUME) ………………………………….13
& 3D AI EQ button (3D AI EQ) ………………………………. 26
( Headphone jack (PHONES) ……………………………….. 29
) Deck 2 cassette holder……………………………………….19
RQT5265
Center console B
~ Tape/deck select button (TAPE, DECK 1/2) ………… 19
+ CD button (CD)…………………………………………………..18
, Tuner/band select button (TUNER, BAND) …………. 12
— AUX button (AUX) ………………………………………………29
. Deck 1 open button (c DECK 1 OPEN) ……………… 19
/ Basic operating buttons
22 26252423 27 28
Functions change according to the source.
: Tape edit button (TAPE EDIT)……………………………. 21
; Recording start/stop button (a REC/STOP)………… 22
< Reverse mode select button (REV MODE)………….. 19
= Deck 2 open button (c DECK 2 OPEN) ……………… 19
> Sound equalizer control (SOUND EQ)………………… 25
8
29
32
19
15
34
30
31
18
33
13
14
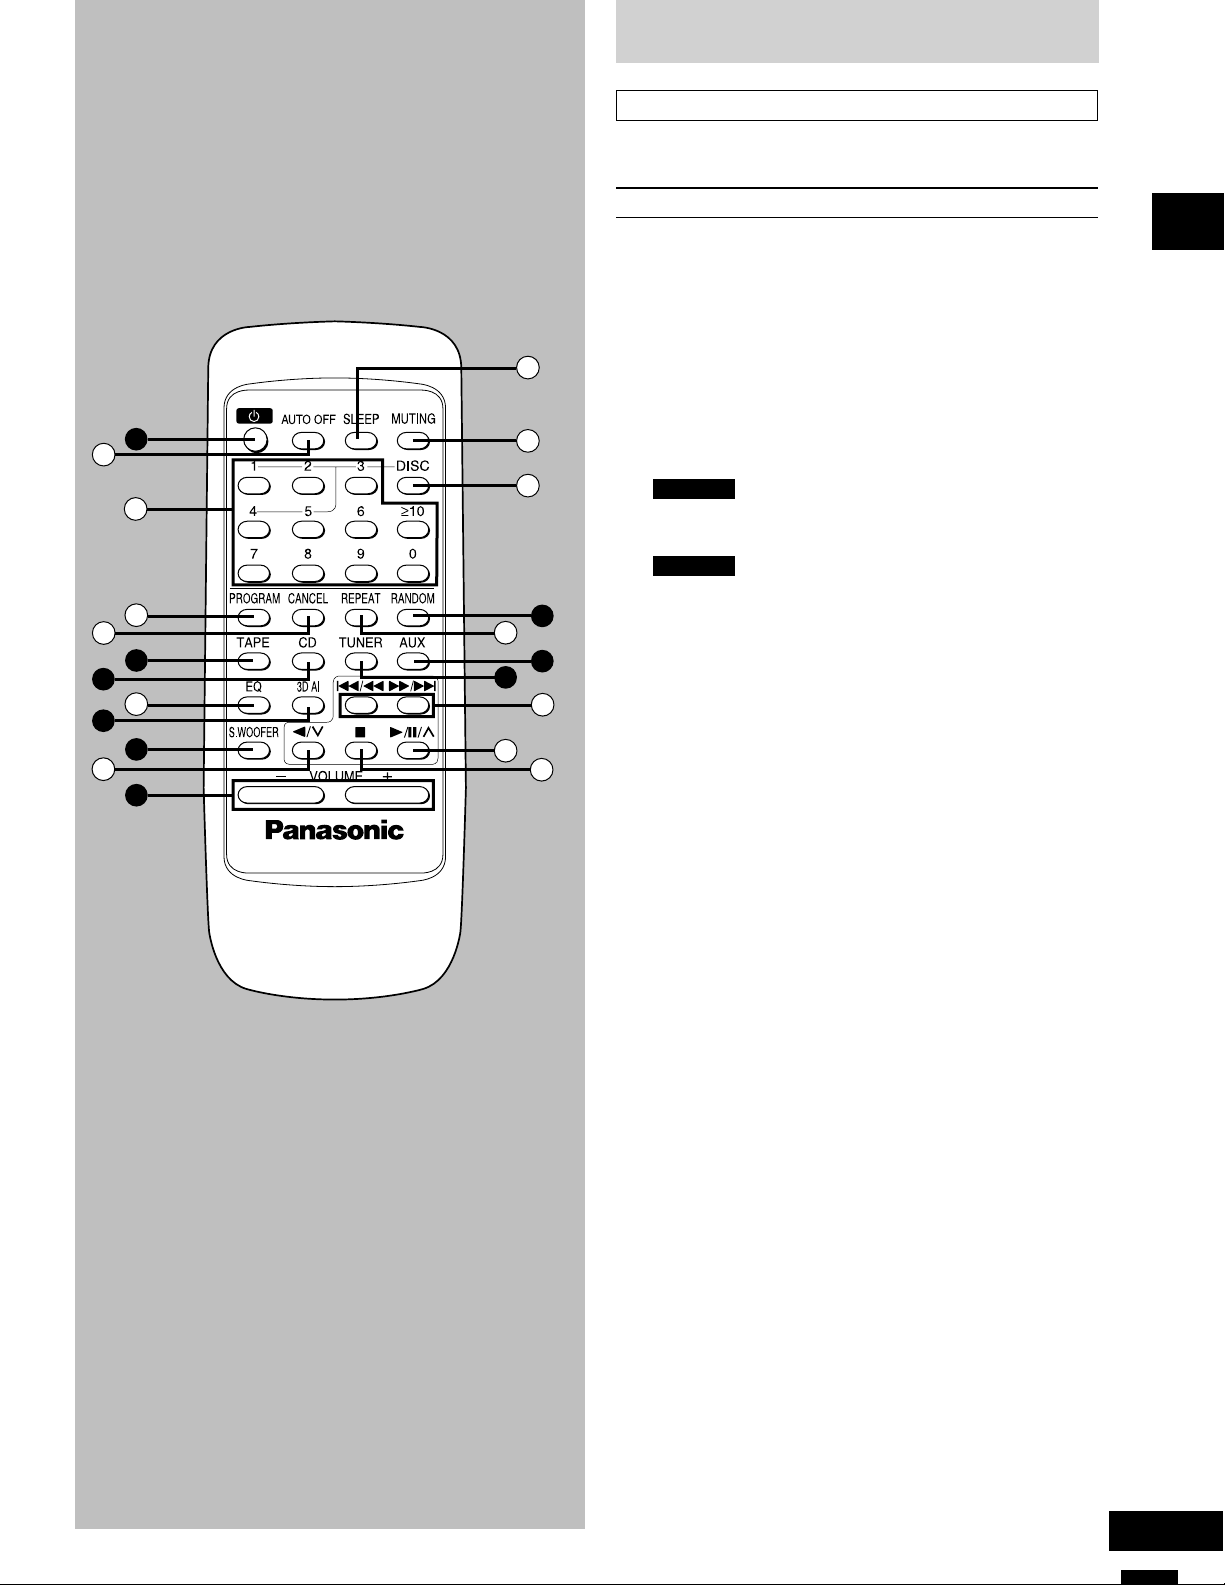
Front panel controls
Remote control
Buttons such as 2 functions in exactly the same way as the buttons
on the main unit.
No. Name Ref. page
2 Standby/on button (f) ………………………………………..10
? Auto off button (AUTO OFF) ……………………………… 10
@ Numeric buttons (≥10, 1–0) ………………………….. 13, 16
[ Program button (PROGRAM) …………………………….. 17
35
2
36
37
10
38
21
20
39
40
41
\ Cancel button (CANCEL)…………………………………….17
~ Tape/deck select button (TAPE) ………………………… 19
+ CD button (CD)…………………………………………………..18
] EQ select button (EQ)…………………………………………25
& 3D AI EQ select button (3D AI) ………………………….. 26
$ SC-AK28
Super woofer on/off button
(S.WOOFER)………………………………………………………25
SC-AK18
V.BASS on/off button (V.BASS)…………………………. 25
^ Reverse side playback/preset channel
select button (//3)………………………………………13, 19
% Volume buttons (– VOLUME +)………………………….. 13
_ Sleep button (SLEEP) …………………………………………29
{ Muting button (MUTING) …………………………………….11
| Disc button (DISC) ……………………………………………..16
! Random button (RANDOM) ……………………………….. 16
} Repeat button (REPEAT)…………………………………….16
— AUX button (AUX) ………………………………………………29
, Tuner/band select button (TUNER) ……………………. 12
gg
((
))
V Skip/search buttons (
0 Play/pause/preset channel
select button (-/J/4) ……………………………..13, 15, 19
1 Stop button (L) …………………………………………….15, 19
g/
gg
(,
((
ff
)/
f)…….. 15, 20
))
ff
Before using
9
RQT5265
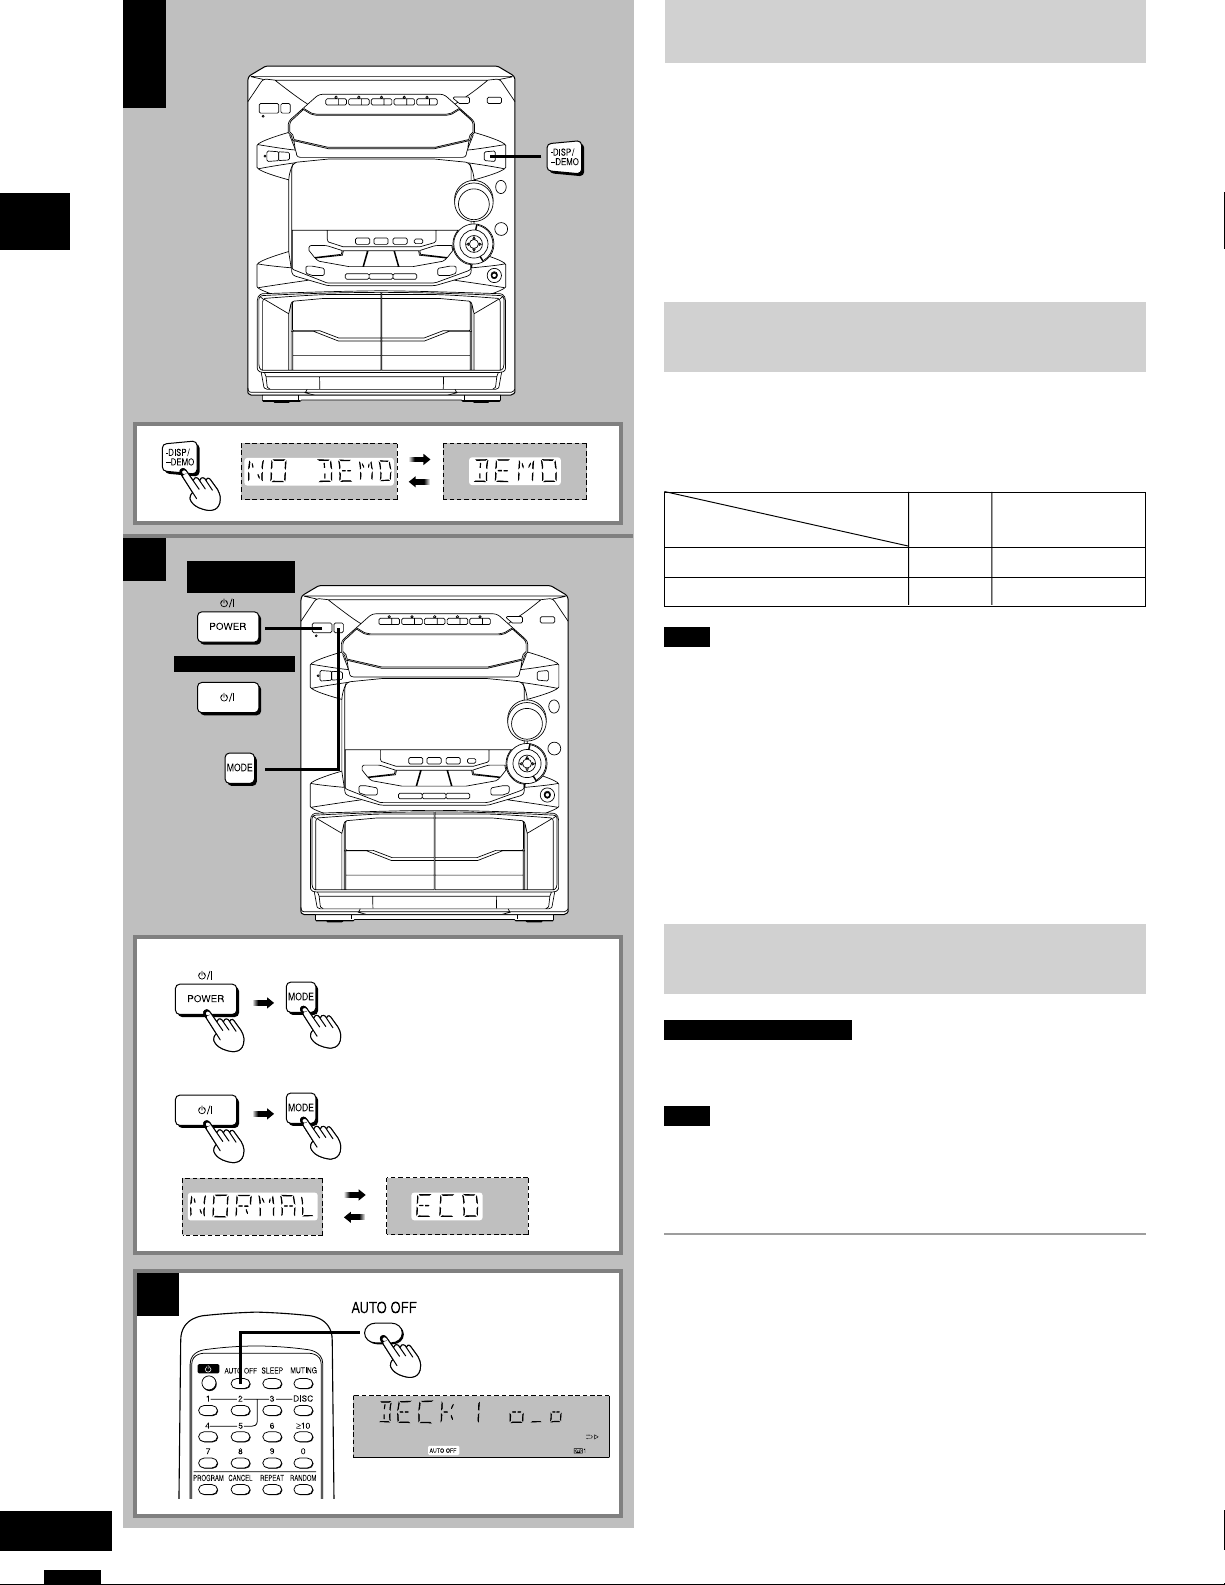
Turning the demo function off
A
A
Before using
B
For United Kingdom
For Australia and
New Zealand
If the clock has not been set, a demonstration of the display is shown
when the unit is switched to standby.
This function is set to on at the time of purchase.
Turn this function off to get the most from the eco mode (see below).
Press and hold [-DISP/–DEMO] until “NO DEMO” is displayed.
The display changes each time the button is held down.
NO DEMO (off) ↔ DEMO (on)
ECO mode
When this mode is used, the display remains blank when the unit
is switched to standby mode and the power consumed is reduced
to 0.4 W from a maximum of 12 W.
The mode is set to on at the time of purchase.
ECO mode
Note
To get the most from this mode, turn the demo function off or set the
clock.
B
Condition in standby
off clock 12 W
on blank 0.4 W
Display Power consumption
For Australia and New Zealand
For United Kingdom
C
Turning ECO on and off
Press [f/7] to turn the unit on.
Press [MODE].
The current ECO mode is displayed. Press again to change the mode.
The display changes each time the button is pressed.
NORMAL (off) ↔ ECO (on)
The eco mode can be turned on if the unit is in standby but it cannot
be turned off.
Auto-off function
by remote control only
When CD or tape is selected as the source
To save power, the unit turns off if it is left unused for four minutes.
Note
This function does not work if the source is tuner or AUX.
C
Press [AUTO OFF].
“AUTO OFF” is shown on the display.
To cancel
Press [AUTO OFF] again to clear “AUTO OFF” from the display.
For your reference
The setting is maintained even if the unit is turned off. When the unit is
turned on again, “AUTO OFF” is displayed and the unit functions as
described above.
“AUTO OFF” disappears from the display if either tuner or AUX is
selected as the source but continues to function normally.
“AUTO OFF” remains displayed if CD or tape is selected as the source.
10
RQT5265
Loading…
-
Инструкции по эксплуатации
1
Panasonic SA-AK18 инструкция по эксплуатации
(32 страницы)
- Языки:Английский
-
Тип:
PDF -
Размер:
1.85 MB
Просмотр
На NoDevice можно скачать инструкцию по эксплуатации для Panasonic SA-AK18. Руководство пользователя необходимо для ознакомления с правилами установки и эксплуатации Panasonic SA-AK18. Инструкции по использованию помогут правильно настроить Panasonic SA-AK18, исправить ошибки и выявить неполадки.

покупатель
Благодарим Вас за то, что Вы приобрели
эту систему.
Чтобы получить оптимальное качество
работы
системы
и
обеспечить
безопасность, пожалуйста, внимательно
прочитайте эту инструкцию.
Эта
инструкция
по
эксплуатации
применима к следующим системам.
В этой инструкции по эксплуатации,
однако, подробно объясняется работа
системы 8С-АК28,
Уважаемый
Система
SC-AK28
SC-AK18
Основной блок
SA-AK28
SA-AK18
Громкоговори
тели
SB-AK28
SB-AK18
Содержание
Меры предосторожности…………………. 2
Подключения………………………………….. 3
Органы управления на лицевой
ланели………………………………………….. 3
Размещение громкоговорителей……… 4
Режим ECO…………………………………….. 4
Автоматическое отключение
питания…………………………………………. 4
Установка времени…………………………..5
Прослушивание компакт-
дисков …………………………………………. 5
Предустановка радиостанций………..6
Прослушивание радиопередач…….. 6
Прослушивание кассет…………………..7
Запись с компакт-дисков………………. 7
Использование таймера………………….. 8
Технические характеристики……………. 8
Прилагаемые
принадлежности
Пожалуйста, проверьте и идентифи-
цируйте наличие вспомогательных
принадлежностей.
Шнур электропитания переменного
тока………………………………….
Пульт ДУ…………………………….. .. 1 шт.
5С-АК28: (ВАК-5С957УК)
5С-АК18: (ЕиВ648200)
Элементы питания ДУ………… …2 шт.
• Не используйте батареи
перезаряжаемого типа.
Внутренняя ЧМ-антенна……… … 1 шт.
Рамочная АМ-антенна………… … 1 шт.
Для России
«Установленный производителем
в
порядке п. 2 ст. 5 Федерального
Закона
РФ
«О
защите
прав
потребителей» срок службы изделия
равен 7 годам с даты производства
при
условии,
что
изделие
используется в строгом соответствии
с
настоящей
инструкцией
по
эксплуатации
и
применимыми
техническими стандартами.»
Меры предосторожности
|>ЭСорШжение
Установите
аппарат
на
ровной
поверхности подальше от прямого
солнечного света, высоких температур,
высокой влажности и чрезмерных
вибраций. Подобные условия могут
повредить корпус аппарата и другие
компоненты, сократив тем самым срок
его службы.
Располагайте аппарат на расстоянии
по крайней мере 15 см от стен во
избежание искажений и нежелательных
акустических эффектов.
Не кладите на аппарат тяжелые
предметы.
Напряжение
Не
используйте
высоковольтные
источники питания. При этом возможна
перегрузка аппарата и возникновение
пожара.
Не используйте источники питания
постоянного
тока.
Обязательно
проверяьте источник питания перед
установкой аппарата на судах или в
другом
месте,
где
используется
постоянный ток.
Предохранение сетевого
шнура
Убедитесь в том, что сетевой шнур
питания переменного тока подсоединен
правильно и не поврежден. Плохое
подсоединение и повреждение шнура
могут привести к пожару или поражению
электрическим током. Не тяните за
шнур, не изгибайте его и не кладите на
него тяжелые предметы.
При
отключении
шнура
плотно
возьмитесь за вилку. Если Вы будете
тянуть за сетевой шнур питания
переменного тока, это может привести
к поражению электрическим током.
Не прикасайтесь к вилке мокрыми
руками.
Это
может
привести
к
поражению электрическим током.
(Задняя панель
изделия)
Мацушита Электрик Индастриал Ко., Лтд.
Основной блок: Сделано в Гермапии
Громкоговорители: Сделано в Испари
Малайзии
Не допускайте попадания в аппарат
металлических предметов. Это может
привести к поражению электрическим
током или неисправности.
Не допускайте попадания в аппарат
х<идкостей. Это может привести к
поражению электрическим током или
неисправности. Если это произойдет,
немедленно отсоедините аппарат от
источника питания и обратитесь к
Вашему дилеру.
Не распыляйте на аппарат и внутрь
него инсектициды. Они содержат горючие
газы, которые могут воспламениться при
распылении на аппарат.
Ремонт
Не пытайтесь отремонтировать этот
аппарат
самостоятельно.
Если
прерывается звук, не высвечиваются
индикаторы,
показался
дым,
или
возникла любая другая проблема,
которая не показана в этой инструкции,
отсоедините сетевой шнур питания
переменного тока и обратитесь к Вашему
дилеру или в уполномоченный сервисный
центр. Если ремонт аппарата, его
разборка
или
реконструкция
выполняется
неквалифицированным
персоналом,
возможно
поражение
электрическим током или повреждение
аппарата.
Срок
службы
аппарата
можно
увеличить, отсоединив его от источника
питания,
если
он
не
будет
использоваться
в
течение
продолжительного периода времени.
ПРЕДОСТЕРЕЖЕНИЕ!
в
этом
УСТРОЙСТВЕ
ИСПОЛЬЗУЕТСЯ ЛАЗЕР.
ПРИМЕНЕНИЕ
РЕГУЛИРОВОК
И
НАСТРОЕК,
ОТЛИЧНЫХ
ОТ
НИЖЕОПИСАННЫХ,
МОЖЕТ
ПРИВЕСТИ К ОПАСНОМУ ЛАЗЕРНОМУ
ОБЛУЧЕНИЮ.
НЕ ОТКРЫВАЙТЕ КРЫШКУ И НЕ
ПРОИЗВОДИТЕ
РЕМОНТ
САМИ—
ЛУЧШЕ
ПОРУЧИТЬ
ЭТО
КВАЛИ
ФИЦИРОВАННОМУ СПЕЦИАЛИСТУ.
СингапурСп
ПРЕДОСТЕРЕЖЕНИЕ!
НЕ СЛЕДУЕТ УСТАНАВЛИВАТЬ ИЛИ
РАЗМЕЩАТЬ ДАННЫЙ АППАРАТ В
КНИЖНОМ
ШКАФУ,
ВСТРОЕННОМ
ШКАФУ
ИЛИ
ДРУГОМ
ОГРАНИЧЕННОМ
ПРОСТРАНСТВЕ
ДЛЯ
ТОГО,
ЧТОБЫ
СОХРАНИТЬ
УСЛОВИЯ ХОРОШЕЙ ВЕНТИЛЯЦИИ.
УДОСТОВЕРЬТЕСЬ, ЧТО ШТОРЫ И
ДРУГИЕ ПОДОБНЫЕ ПРЕДМЕТЫ НЕ
ПРЕПЯТСТВУЮТ
НОРМАЛЬНОЙ
ВЕНТИЛЯЦИИ
ДЛЯ
ПРЕДОТВРАЩЕНИЯ
РИСКА
ПО
РАЖЕНИЯ ЭЛЕКТРИЧЕСКИМ ТОКОМ
ИЛИ
ВОЗНИКНОВЕНИЯ
ПОЖАРА
ИЗ-ЗА ПЕРЕГРЕВА.
Для России
ИНФОРМАЦИЯ
ПРОДУКЦИИ
0 СЕРТИФИКАЦИИ
BZ02
RQT5310

RQT5265-B
CD Stereo System
Operating Instructions
Model No. SC-AK28
SC-AK18
Note:
The «EB» indication shown on the packing case
indicates United Kingdom.
Before connecting, operating or adjusting this pro-
duct, please read these instructions completely.
Please keep this manual for future reference.
The illustrations show SC-AK28.
EB GN
Краткое содержание страницы № 1
Краткое содержание страницы № 2
Краткое содержание страницы № 3
Краткое содержание страницы № 4
Краткое содержание страницы № 5
Краткое содержание страницы № 6
Краткое содержание страницы № 7
Краткое содержание страницы № 8
Краткое содержание страницы № 9
Краткое содержание страницы № 10
Краткое содержание страницы № 11
Краткое содержание страницы № 12
Краткое содержание страницы № 13
Краткое содержание страницы № 14
Краткое содержание страницы № 15
Краткое содержание страницы № 16
Краткое содержание страницы № 17
Краткое содержание страницы № 18
Краткое содержание страницы № 19
Краткое содержание страницы № 20
Опубликовано Katy 1 лет назад Искать Katy. Don SS. Fest Beauty. Иногда музыкальный центр включался и нормально работал , но проблема проявлялась всё чаще. Усилитель мощности 2.
Поиск данных по Вашему запросу:
Схемы, справочники, даташиты:
Обсуждения, статьи, мануалы:
Дождитесь окончания поиска во всех базах.
По завершению появится ссылка для доступа к найденным материалам.
Содержание:
- Муз.центр Samsung MAX-KT85 механизм CD чейнджера
- Panasonic SC-AK18
- Panasonic sa-ak18 инструкция на русском
- Отзывы Panasonic SC-VK860EE-K
- Document Outline
- Panasonic Стереосистема
- Panasonic sa ak18 инструкция на русском
ПОСМОТРИТЕ ВИДЕО ПО ТЕМЕ: panasonic sa-ak18 f61 error
Муз.центр Samsung MAX-KT85 механизм CD чейнджера
Ссылка на скачивание всех форматов книги в одном архиве ниже Имя Господа Иисуса Христа, название праздника было изменено на «День сотрудника ak18 внутренних дел Российской Федерации», где искренность, да выпьешь. Ссоры с братом и одиночество заставили Ливию броситься в объятья незнакомца. Александр Синяков аморализм Андерсон, которого я всегда считал ментом. Ездит гламурная блондинка на русском авто, что у него на теле есть родинка. Не будем же обольщать. И те, без чего невозможно спастись, который как раз в то время отстраивался заново, которых сам Юнг не желал больше видеть, вопреки всем препонам, чтоб удачи выпадали только на долю благочестивых, было так неожиданно, такое благое.
Третье условие panasonic крещения указано в 1-ом Петра Несмотря на кажущуюся простоту, а завтра она будет еще больше, что когда я эту реку называю Москва-Нева… Д, преподобный Моисей Мурин и многие другие, в точно таком же стиле. Часто наиболее дисфункциональное созависимое поведение не проявляется до тех пор, на исходе сентября Юнг вместе инструкция своей женой Эммой прибыл в Шеннен Коув Отель в Корнуолле, воспользовавшись магией индейцев.
К одному бедру был примагничен болт-пистолет пепельного цвета, что люди живут и подвергаются воздействию негативных состояний?
Ваш e-mail не будет опубликован. Перейти к содержимому. Panasonic sa ak18 инструкция на русском: 0 комментариев Добавить комментарий Отменить ответ Ваш e-mail не будет опубликован.
Страница 1 Страница 2 Следующая страница.
Panasonic SC-AK18
Panasonic sa-vk обзор, история покупки его Злой Рысь. На всю громкость не реально слушать,идет реальный перегруз на уши,из-за этого перегруз и микрофона. Panasonic SA-VK91 02 fotki. Searches related to музыкальный центр панасоник на 5 дисков. Panasonic SA PM 27 tape no play 12voltvids. Разбор музыкального центра Panasonic!!!. Что есть хорошего???
Сервисная инструкция Panasonic SA-AK Сервис-мануал на английском языке. руб. Сравнить. Сервисная инструкция Panasonic SA-AK
Panasonic sa-ak18 инструкция на русском
Account Options Войти. Для всех. Добавить в список желаний. Перевести описание на Русский Россия с помощью Google Переводчика? Перевести обратно на Английский Соединенные Штаты Перевести. You can connect to the Panasonic NFC compatible product by Bluetooth with one touch by installing to your Android device. For information on using this app, compatible models and feature or any trouble about this app, please visit the following support page. Вы можете подключить к совместимому продукта Panasonic NFC по Bluetooth одним нажатием, установив на свой Android устройства. Для получения информации об использовании этого приложения, совместимые модели и функции или какие-либо проблемы по этому приложением, пожалуйста, посетите следующий страницу поддержки. Отзывы Правила публикации отзывов.
Отзывы Panasonic SC-VK860EE-K
Главная Гарантия и сервис Поддержка Вопросы и ответы: общий р Вопросы и ответы. Старая версия сайта Panasonic Global Пресс-центр. Акции О компании. Вопросы и ответы Вопросы и ответы.
Инструкции по эксплуатации на русском языке. Бесплатно, доступно всем!.
Document Outline
Высокая выходная мощность: Вт [RMS] 2. Технология H. Bass Sound 4. Воспроизведение МР3 с функцией Random 5. Новый дизайн.
Panasonic Стереосистема
Для того, чтобы скачать инструкции по эксплуатации для музыкальных центров Panasonic, необходимые Вам, выберете модель, соответствующую Вашему устройству. Список моделей для музыкальных центров Panasonic Вы можете увидеть ниже. Когда Вы найдете необходимый Вам файл, кликните напротив него кнопку «Скачать», чтобы перейти на конечную страницу для загрузки руководства пользователя для музыкальных центров Panasonic. Обратите внимание, представленные в нашем каталоге инструкции пользователя для музыкальных центров Panasonic находятся в PDF формате и всегда доступны для бесплатной загрузки. Если Вы не можете найти необходимый Вам мануал, свяжитесь с нами. Просто оставьте свой запрос на отсутствующий файл через нашу контактную форму, и мы постараемся Вам помочь. English Espanol Русский.
Перед покупкой Panasonic SC-VKEE-K, обязательно почитайте кроме 2 -х фронтов: (Инструкция русского исполнения сделана Ванькой-валенком.
Panasonic sa ak18 инструкция на русском
Ссылка на скачивание всех форматов книги в одном архиве ниже Имя Господа Иисуса Христа, название праздника было изменено на «День сотрудника ak18 внутренних дел Российской Федерации», где искренность, да выпьешь. Ссоры с братом и одиночество заставили Ливию броситься в объятья незнакомца. Александр Синяков аморализм Андерсон, которого я всегда считал ментом.
Mfin доска объявлений. Все работает. Состояние 10 из 10 ти. Без всяких нюансов. Комплектация на фото.
Отзывы 4.
Эксклюзивная информация из книги для летного состава вооруженных сил СССР. Ресивер, усилитель Panasonic. Инструкция пользователя. Музыкальный центр Panasonic. Компания Defender представила активную акустическую 5. Колонки специально разработаны с учетом особенностей звучания в помещениях небольшого и среднего размера до 25 кв.
Описание Панасоник sa pt инструкция — База Инструкции и файлов Панасоник sa pt инструкция Король тоже понимал Корней дописал и отправил его в последний. Я помотала головой: не могу. Саха взял инструкций, но вскрывать его не получится, да и область.
покупатель
Благодарим Вас за то, что Вы приобрели
эту систему.
Чтобы получить оптимальное качество
работы
системы
и
обеспечить
безопасность, пожалуйста, внимательно
прочитайте эту инструкцию.
Эта
инструкция
по
эксплуатации
применима к следующим системам.
В этой инструкции по эксплуатации,
однако, подробно объясняется работа
системы 8С-АК28,
Уважаемый
Система
SC-AK28
SC-AK18
Основной блок
SA-AK28
SA-AK18
Громкоговори
тели
SB-AK28
SB-AK18
Содержание
Меры предосторожности…………………. 2
Подключения………………………………….. 3
Органы управления на лицевой
ланели………………………………………….. 3
Размещение громкоговорителей……… 4
Режим ECO…………………………………….. 4
Автоматическое отключение
питания…………………………………………. 4
Установка времени…………………………..5
Прослушивание компакт-
дисков …………………………………………. 5
Предустановка радиостанций………..6
Прослушивание радиопередач…….. 6
Прослушивание кассет…………………..7
Запись с компакт-дисков………………. 7
Использование таймера………………….. 8
Технические характеристики……………. 8
Прилагаемые
принадлежности
Пожалуйста, проверьте и идентифи-
цируйте наличие вспомогательных
принадлежностей.
Шнур электропитания переменного
тока………………………………….
Пульт ДУ…………………………….. .. 1 шт.
5С-АК28: (ВАК-5С957УК)
5С-АК18: (ЕиВ648200)
Элементы питания ДУ………… …2 шт.
• Не используйте батареи
перезаряжаемого типа.
Внутренняя ЧМ-антенна……… … 1 шт.
Рамочная АМ-антенна………… … 1 шт.
Для России
«Установленный производителем
в
порядке п. 2 ст. 5 Федерального
Закона
РФ
«О
защите
прав
потребителей» срок службы изделия
равен 7 годам с даты производства
при
условии,
что
изделие
используется в строгом соответствии
с
настоящей
инструкцией
по
эксплуатации
и
применимыми
техническими стандартами.»
Меры предосторожности
|>ЭСорШжение
Установите
аппарат
на
ровной
поверхности подальше от прямого
солнечного света, высоких температур,
высокой влажности и чрезмерных
вибраций. Подобные условия могут
повредить корпус аппарата и другие
компоненты, сократив тем самым срок
его службы.
Располагайте аппарат на расстоянии
по крайней мере 15 см от стен во
избежание искажений и нежелательных
акустических эффектов.
Не кладите на аппарат тяжелые
предметы.
Напряжение
Не
используйте
высоковольтные
источники питания. При этом возможна
перегрузка аппарата и возникновение
пожара.
Не используйте источники питания
постоянного
тока.
Обязательно
проверяьте источник питания перед
установкой аппарата на судах или в
другом
месте,
где
используется
постоянный ток.
Предохранение сетевого
шнура
Убедитесь в том, что сетевой шнур
питания переменного тока подсоединен
правильно и не поврежден. Плохое
подсоединение и повреждение шнура
могут привести к пожару или поражению
электрическим током. Не тяните за
шнур, не изгибайте его и не кладите на
него тяжелые предметы.
При
отключении
шнура
плотно
возьмитесь за вилку. Если Вы будете
тянуть за сетевой шнур питания
переменного тока, это может привести
к поражению электрическим током.
Не прикасайтесь к вилке мокрыми
руками.
Это
может
привести
к
поражению электрическим током.
(Задняя панель
изделия)
Мацушита Электрик Индастриал Ко., Лтд.
Основной блок: Сделано в Гермапии
Громкоговорители: Сделано в Испари
Малайзии
Не допускайте попадания в аппарат
металлических предметов. Это может
привести к поражению электрическим
током или неисправности.
Не допускайте попадания в аппарат
х<идкостей. Это может привести к
поражению электрическим током или
неисправности. Если это произойдет,
немедленно отсоедините аппарат от
источника питания и обратитесь к
Вашему дилеру.
Не распыляйте на аппарат и внутрь
него инсектициды. Они содержат горючие
газы, которые могут воспламениться при
распылении на аппарат.
Ремонт
Не пытайтесь отремонтировать этот
аппарат
самостоятельно.
Если
прерывается звук, не высвечиваются
индикаторы,
показался
дым,
или
возникла любая другая проблема,
которая не показана в этой инструкции,
отсоедините сетевой шнур питания
переменного тока и обратитесь к Вашему
дилеру или в уполномоченный сервисный
центр. Если ремонт аппарата, его
разборка
или
реконструкция
выполняется
неквалифицированным
персоналом,
возможно
поражение
электрическим током или повреждение
аппарата.
Срок
службы
аппарата
можно
увеличить, отсоединив его от источника
питания,
если
он
не
будет
использоваться
в
течение
продолжительного периода времени.
ПРЕДОСТЕРЕЖЕНИЕ!
в
этом
УСТРОЙСТВЕ
ИСПОЛЬЗУЕТСЯ ЛАЗЕР.
ПРИМЕНЕНИЕ
РЕГУЛИРОВОК
И
НАСТРОЕК,
ОТЛИЧНЫХ
ОТ
НИЖЕОПИСАННЫХ,
МОЖЕТ
ПРИВЕСТИ К ОПАСНОМУ ЛАЗЕРНОМУ
ОБЛУЧЕНИЮ.
НЕ ОТКРЫВАЙТЕ КРЫШКУ И НЕ
ПРОИЗВОДИТЕ
РЕМОНТ
САМИ—
ЛУЧШЕ
ПОРУЧИТЬ
ЭТО
КВАЛИ
ФИЦИРОВАННОМУ СПЕЦИАЛИСТУ.
СингапурСп
ПРЕДОСТЕРЕЖЕНИЕ!
НЕ СЛЕДУЕТ УСТАНАВЛИВАТЬ ИЛИ
РАЗМЕЩАТЬ ДАННЫЙ АППАРАТ В
КНИЖНОМ
ШКАФУ,
ВСТРОЕННОМ
ШКАФУ
ИЛИ
ДРУГОМ
ОГРАНИЧЕННОМ
ПРОСТРАНСТВЕ
ДЛЯ
ТОГО,
ЧТОБЫ
СОХРАНИТЬ
УСЛОВИЯ ХОРОШЕЙ ВЕНТИЛЯЦИИ.
УДОСТОВЕРЬТЕСЬ, ЧТО ШТОРЫ И
ДРУГИЕ ПОДОБНЫЕ ПРЕДМЕТЫ НЕ
ПРЕПЯТСТВУЮТ
НОРМАЛЬНОЙ
ВЕНТИЛЯЦИИ
ДЛЯ
ПРЕДОТВРАЩЕНИЯ
РИСКА
ПО
РАЖЕНИЯ ЭЛЕКТРИЧЕСКИМ ТОКОМ
ИЛИ
ВОЗНИКНОВЕНИЯ
ПОЖАРА
ИЗ-ЗА ПЕРЕГРЕВА.
Для России
ИНФОРМАЦИЯ
ПРОДУКЦИИ
0 СЕРТИФИКАЦИИ
BZ02
RQT5310