
Инструкции
Подключения
1. Подключение кабеля DisplayPort (только при условии использования порта DisplayPort).
А. Выключите монитор и компьютер.
Б. Подключите один конец кабеля DisplayPort к выходному порту DisplayPort компьютера, а другой
конец — к одному из входных портов DisplayPort монитора.
2. Подключение кабеля HDMI (продается отдельно)(только при условии использования порта HDMI).
А. Выключите монитор и компьютер.
Б. Подключите один конец кабеля HDMI к выходному порту HDMI компьютера, а другой конец — к
одному из входных портов HDMI монитора.
3. Подключите гарнитуру или любое внешнее аудиоустройство, совместимое с разъемом 3,5 мм, к
выходному аудиопорту монитора.
4. Подключите шнуры питания компьютера и монитора к розетке.
Примечание. Если шнур питания или кабель DisplayPort поврежден, его необходимо заменить
только оригинальным шнуром или кабелем, приобретенным у изготовителя или в отделе
послепродажного обслуживания.
(продается отдельно)
Примечание. Выходной аудиопорт можно использовать только для выходного звукового сигнала.
DisplayPort (1.4): 3440 × 1440, максимальная частота обновления: 144 Гц
HDMI (2.0): 3440 × 1440, максимальная частота обновления: 100 Гц
32
HDMI 1
HDMI 2
(HDMI 2.0) (HDMI 2.0)
Кабель HDMI
Кабель DisplayPort
DP 1
DP 2
AUDIO
(DP 1.4)
(DP 1.4)
Примечание. Данный
штепсель подходит
только к заземленной
электрической розетке.
AC IN
Шнур питания
переменного тока
*Эта страница была автоматически переведена с английского языка.
Обзор оборудования
1. В: Что такое монитор?
A: Мониторы обычно используются для отображения экрана компьютера. Mi Curved Gaming Monitor 34″ — это экран дисплея 4MS (GTG) с низкой задержкой и частотой 144 Гц с большой кривизной 1500R, широким экраном с соотношением сторон 21:9 и офисными развлечениями.
2. В: Внешний вид Mi Curved Gaming Monitor 34»:
Ответ:
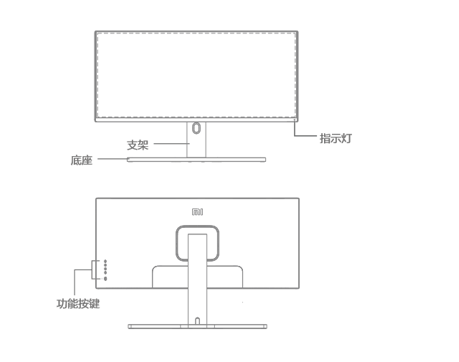
3. В: Какой стандарт Mi Curved Gaming Monitor 34»?
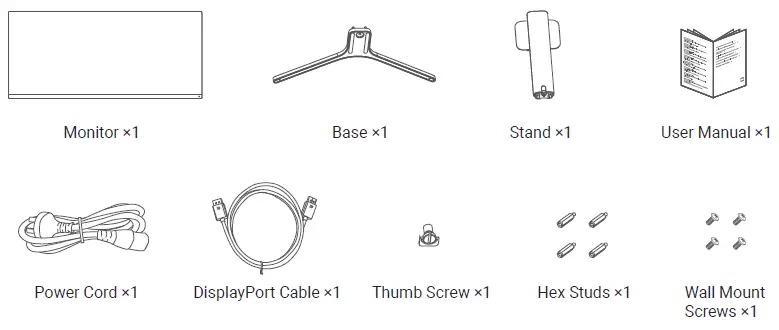
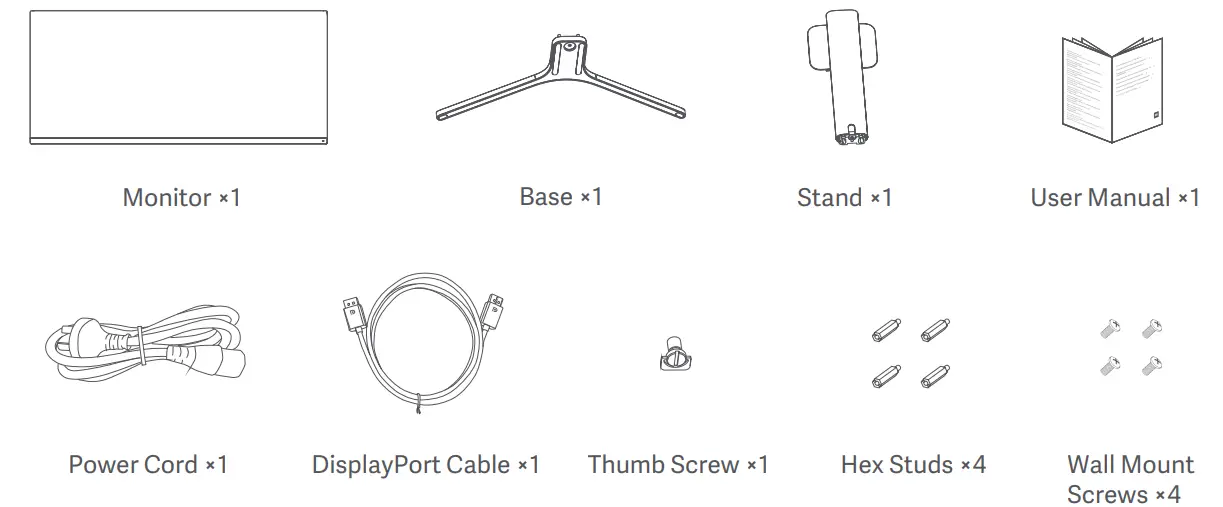
A: Дисплей ×1, кронштейн ×1, основание (включая винты) ×1, сигнальная линия DP ×1, линия питания ×1, ручная ×1, настенная шпилька ×4, настенный винт ×4.
4. В: Как установить Mi Curved Gaming Monitor 34»?
A: Mi Curved Gaming Monitor 34 «не может покинуть пену до установки опорного основания. Конкретный метод установки выглядит следующим образом:
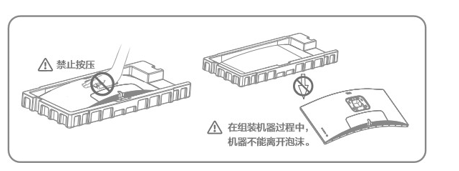
1) Откройте коробку, выньте всю машину с пеной и положите ее на горизонтальный стол;
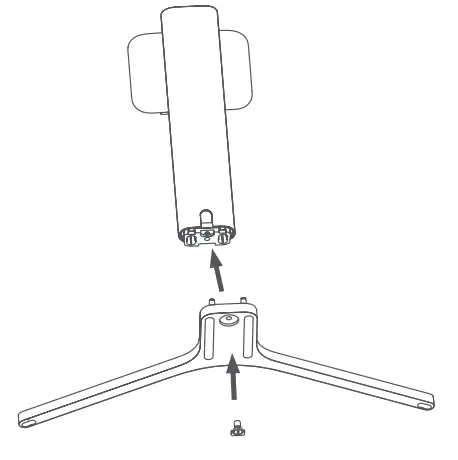
2) Закрепите кронштейн и основание винтом;
3) Снимите верхнюю пену и снимите полиэтиленовый пакет, чтобы обнажить кронштейн на задней части главного двигателя;
4) Закрепите собранный базовый кронштейн в положении зажима на задней части главного двигателя. (Потяните кнопку вверх, чтобы снять опору);
5) Положите собранную машину на плоский стол обеими руками. (Примечание: пожалуйста, не нажимайте на ЖК-экран непосредственно рукой в течение всей машины, чтобы экран не разбился.)
5. В: Какой интерфейс у Mi Curved Gaming Monitor 34«?
A: Mi Curved Gaming Monitor 34 «имеет 2HDMI2.0, 2DP1.4, 1 аудиокабель и 1 интерфейс кабеля питания.
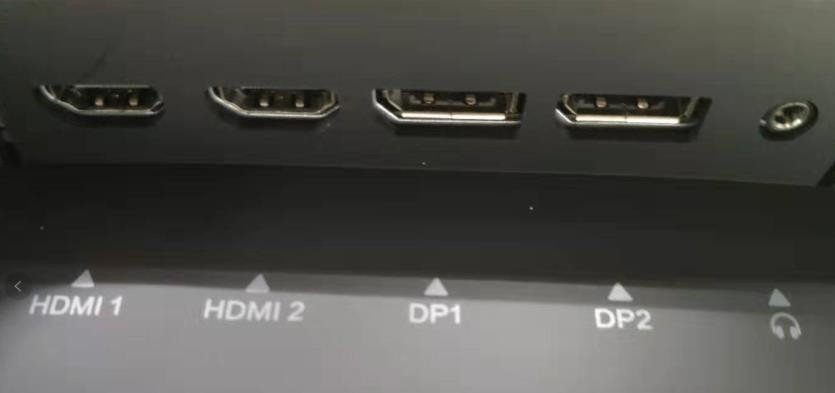
6. В: В чем разница между интерфейсом HDMI1.4 и интерфейсом HDMI 2.0?
A: HDMI 1.4 может поддерживать 4K, однако, ограниченный пропускной способностью, он может достигать только максимального разрешения 3840×2160 и частоты кадров 30 кадров в секунду. HDMI 2.0 расширяет пропускную способность до 18 Гбит/с, поддерживает разрешение 3840×2160 и частоту кадров 50FPS и 60FPS. Другие важные улучшения заключаются в следующем:
1) Одновременная передача двойных видеопотоков нескольким пользователям на одном экране;
2) Несколько аудиопотоков могут быть синхронно переданы максимум четырем пользователям;
3) Поддержка сверхширокоформатного дисплея 21: 9;
4) Динамическая синхронизация видео- и аудиопотоков;
5) Расширение CEC может лучше управлять потребительскими электронными устройствами через единую точку управления;
HDMI 2.0 не определяет новые кабели и разъемы, а это означает, что кабель HDMI 2.0 идентичен по форме текущему HDMI 1.x и остается полностью совместимым с HDMI 1.x вниз. Он также поддерживает до 32 каналов звука и частоту дискретизации до 1536 кГц.
| Глубина цвета | Разъем HDMI 1.4 | Разъем HDMI 2.0 |
| 24 | 4096×2160p 24 Гц | 3840×2160p 60 Гц |
| 30 | 3840×2160p 30 Гц | 3840×2160p 60 Гц |
| 36 | 3840×2160p 25 Гц | 3840×2160p 50 Гц |
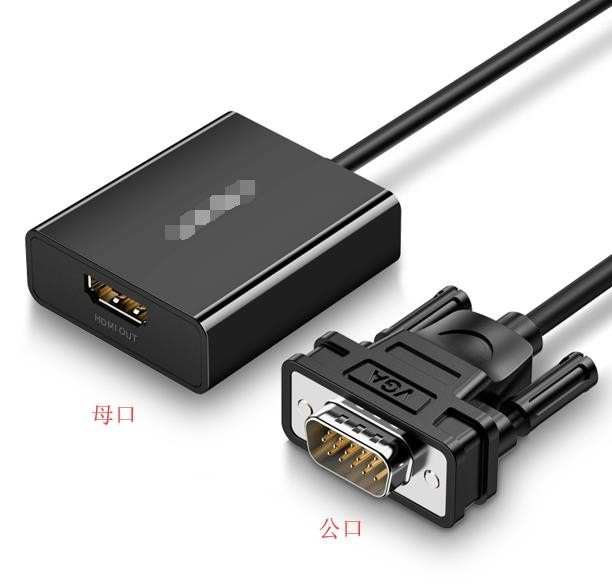
7. В: К какому устройству Mi Curved Gaming Monitor 34 можете подключиться?
A: Он может быть подключен к хосту интерфейса HDMI или DP или ноутбуку, телевизионной приставке, PS4 и другим устройствам вывода. Устройства VGA, отличные от DP, можно приобрести для использования с соответствующей проводкой, такой как VGA-DP (стандартный кабель DP) или адаптер VGA-HDMI для подключения кабеля HDMI.
Примечание: Различные внутренние микросхемы адаптера не могут осуществлять обратную передачу. Порт адаптера необходимо вставить в хост, как показано на рисунке ниже, чтобы преобразовать VGA в HDMI.
8. В: Каков вес нетто Mi Curved Gaming Monitor 34«?
О: 8 кг.
9. В: Какова длина кабеля питания и кабеля DP?
A: Оба они по 1,5 млн.
10. Вопрос: Как заменить, если кабель питания и кабель D P повреждены?
A: Если кабель питания или кабель DP поврежден, его необходимо заменить специальным кабелем или специальным компонентом, приобретенным у производителя или после продажи.
11. В: Как повесить Mi Curved Gaming Monitor 34»?
Ответ:
1) Наберите кнопку быстрого снятия, чтобы снять основание;
2) Зафиксируйте четыре шестиугольные шпильки в положении, показанном выше, а затем зафиксируйте настенный подвесной кронштейн (приобретается отдельно) на шестигранной шпильке машины (отверстие для подвешивания на стене составляет 100×100 мм);
3) Повесьте собранную машину на стену в соответствии с инструкциями настенного подвесного кронштейна. (Не нажимайте на экран непосредственно руками во время подвешивания машины, чтобы экран не сломался.)
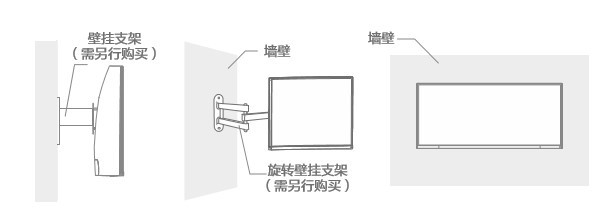
Примечание: Стойка должна быть приобретена с нормальным весом подшипника, превышающим вес товара, а расстояние между отверстиями должно составлять 100 мм × 100 мм.
Дисплей
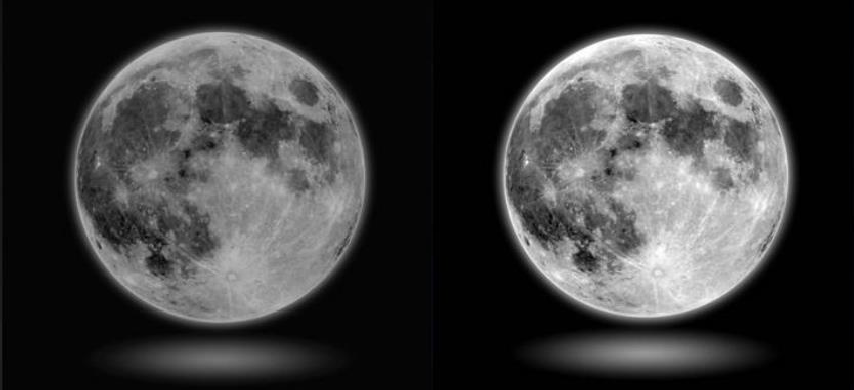
1. В: Что такое динамическая яркость?
A: В процессе изменения изображения динамическая яркость делает белый цвет более белым, а черный — более черным, делая изображение более ярким и ярким, что может уменьшить усталость глаз перед лицом изображения, которое слишком яркое или слишком темное в течение длительного времени.
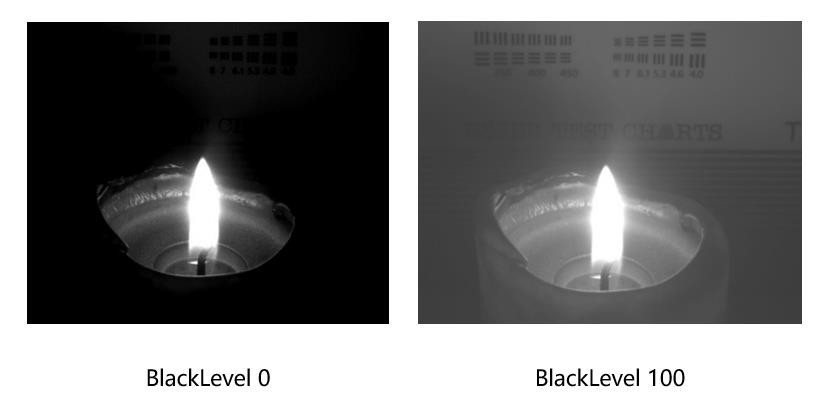
2. В: Что такое BlackLevel?
A: BlackLevel Это может улучшить размытие, которое возникает, когда контраста изображения черной сцены недостаточно, так что изображение черной сцены очень четкое. Если на изображении будет слишком много черного, детали будут потеряны.
3. В: Как отрегулировать цветовую температуру?
A: Он поддерживает стандарт 6500K, холодный цвет 9300K, теплый цвет 5800K пользовательский (красный, зеленый и синий саморегулирующиеся), мы обычно называем более высокую цветовую температуру «холодной» (синий), а более низкую цветовую температуру «теплой» (желтый).
Xiaomi
Loading…
M
- Mi Air 13
- Mi AirDots Pro
- Mi Air Humidifier
- Mi Air Purifier
- Mi Air Purifier 2
- Mi Air Purifier 2H
- Mi Air Purifier 2S4
- Mi Air Purifier 3C2
- Mi Air Purifier 3H3
- Mi Air Purifier 3H EU
- Mi Air Purifier Pro2
- Mi Air Purifier Pro EU
- Mi Air Purifier Pro H
- Mi Band5
- Mi Band 1s
- Mi Band 1 S Pulse
- Mi Band 27
- Mi Band 2 Strap Blue
- Mi Band 37
- Mi Band 3 International
- MI BAND 46
- Mi Band 5
- Mi Band Pulse
- Mi Basic2
- Mi Bedside Lamp Gold
- Mi Bluetooth Audio Receiver2
- Mi Bluetooth Headset Basic
- Mi Bluetooth Headset Mini
- Mi Bluetooth Headset Youth Edition
- Mi Bluetooth Neckband Earphones
- Mi Bluetooth Selfie Stick Gray
- Mi Bluetooth Speaker2
- Mi Bluetooth Speaker Gold
- Mi Body Composition Scale2
- Mi Body Composition Scale 23
- Mi Box3
- Mi Box mini
- Mi Box S2
- Mi BT Headset mini
- Mi Bunny MITU Block Robot
- Mi Bunny Speaker
- Mi Business
- MI CC9 Pro2
- Mi City Dark Blue
- Mi City Dark Grey
- Mi City Light Grey
- Mi City Sling Bag Dark Grey
- Mi City Sling Bag Light Grey
- MI CLOCK2
- Mi Compact Bluetooth Speaker 2
- Mi Curved Gaming Monitor 34
- Mi Dash Cam
- Mi Desktop Monitor 27
- Mi Drone2
- Mi Drone 4K
- Mi Drone Mini3
- Mi Dual Driver Earphones
- Mi Electric Kettle
- Mi Electric Scooter2
- Mi Electric Scooter 2 Black3
- Mi Electric Scooter 2 White3
- Mi Electric Scooter 365
- Mi Electric Scooter Pro
- Mi Electric Scooter Pro 2
- Mi Electric Shaver
- Mi Electric Toothbrush2
- Mi Fidget Cube
- Mi Glass
- Mi Go
- Mi Handheld Vacuum Cleaner2
- Mi Handheld Vacuum Cleaner 1C2
- Mi Headphones Comfort
- Mi Home 1080p
- Mi Home Induction Cooker Youth Edition
- Mi Home Mijia
- Mi Home Security Camera 1080p
- Mi Home Security Camera 3603
- Mi Home Security Camera Basic
- Mi Home Security Camera Basic 1080p
- Mi In-Ear Headphones Pro
- Mi In-Ear Headphones Pro 22
- Mi In-Ear Headphones Pro HD
- Mi Keyboard USB
- Mi Laser Project 150
- Mi LCD Writing Tablet 13.5
- Mi LED Desk Lamp
- Mi LED desk lamp 1s
- Mi LED Smart Bulb3
- Mi LED Smart Bulb E27
- MI LED TV 4 PRO 55
- Mi M365
- MI MAX7
- Mi Max 16 GB
- Mi Max 27
- Mi MAX 2 LTE 64Gb
- Mi Max 38
- Mi Max 32Gb2
- Mi Max 3 4/64Gb
- Mi Max 64 GB
- Mi Mini Robot Builder
Loading…
Loading…
Nothing found
Mi Curved Gaming Monitor 34
User manual
13 pgs46.61 Mb0
Table of contents
Loading…
…
Xiaomi User manual
Specifications and Main Features
Frequently Asked Questions
User Manual


Loading…
+ 9 hidden pages
You need points to download manuals.
1 point = 1 manual.
You can buy points or you can get point for every manual you upload.
Buy points
Upload your manuals

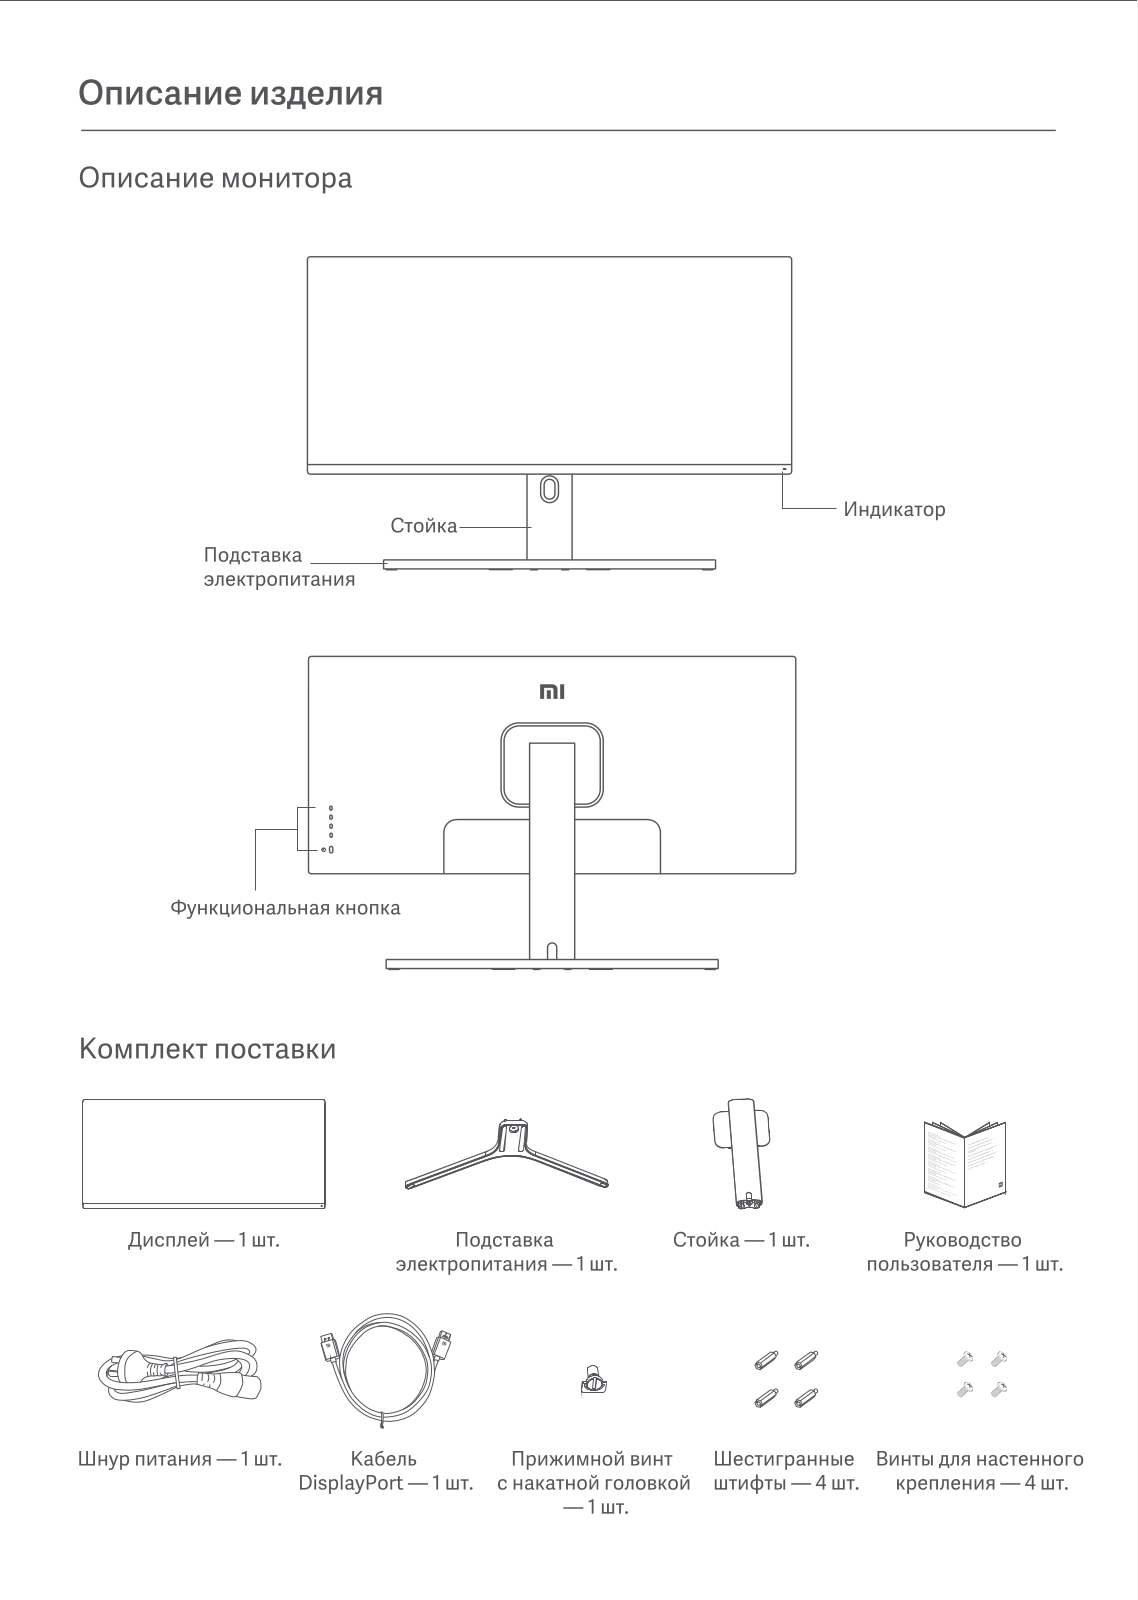
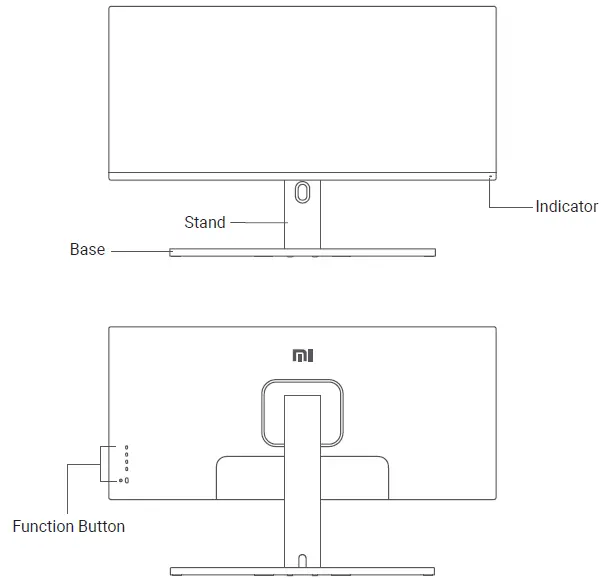
Product Overview
Monitor Overview
Package Contents

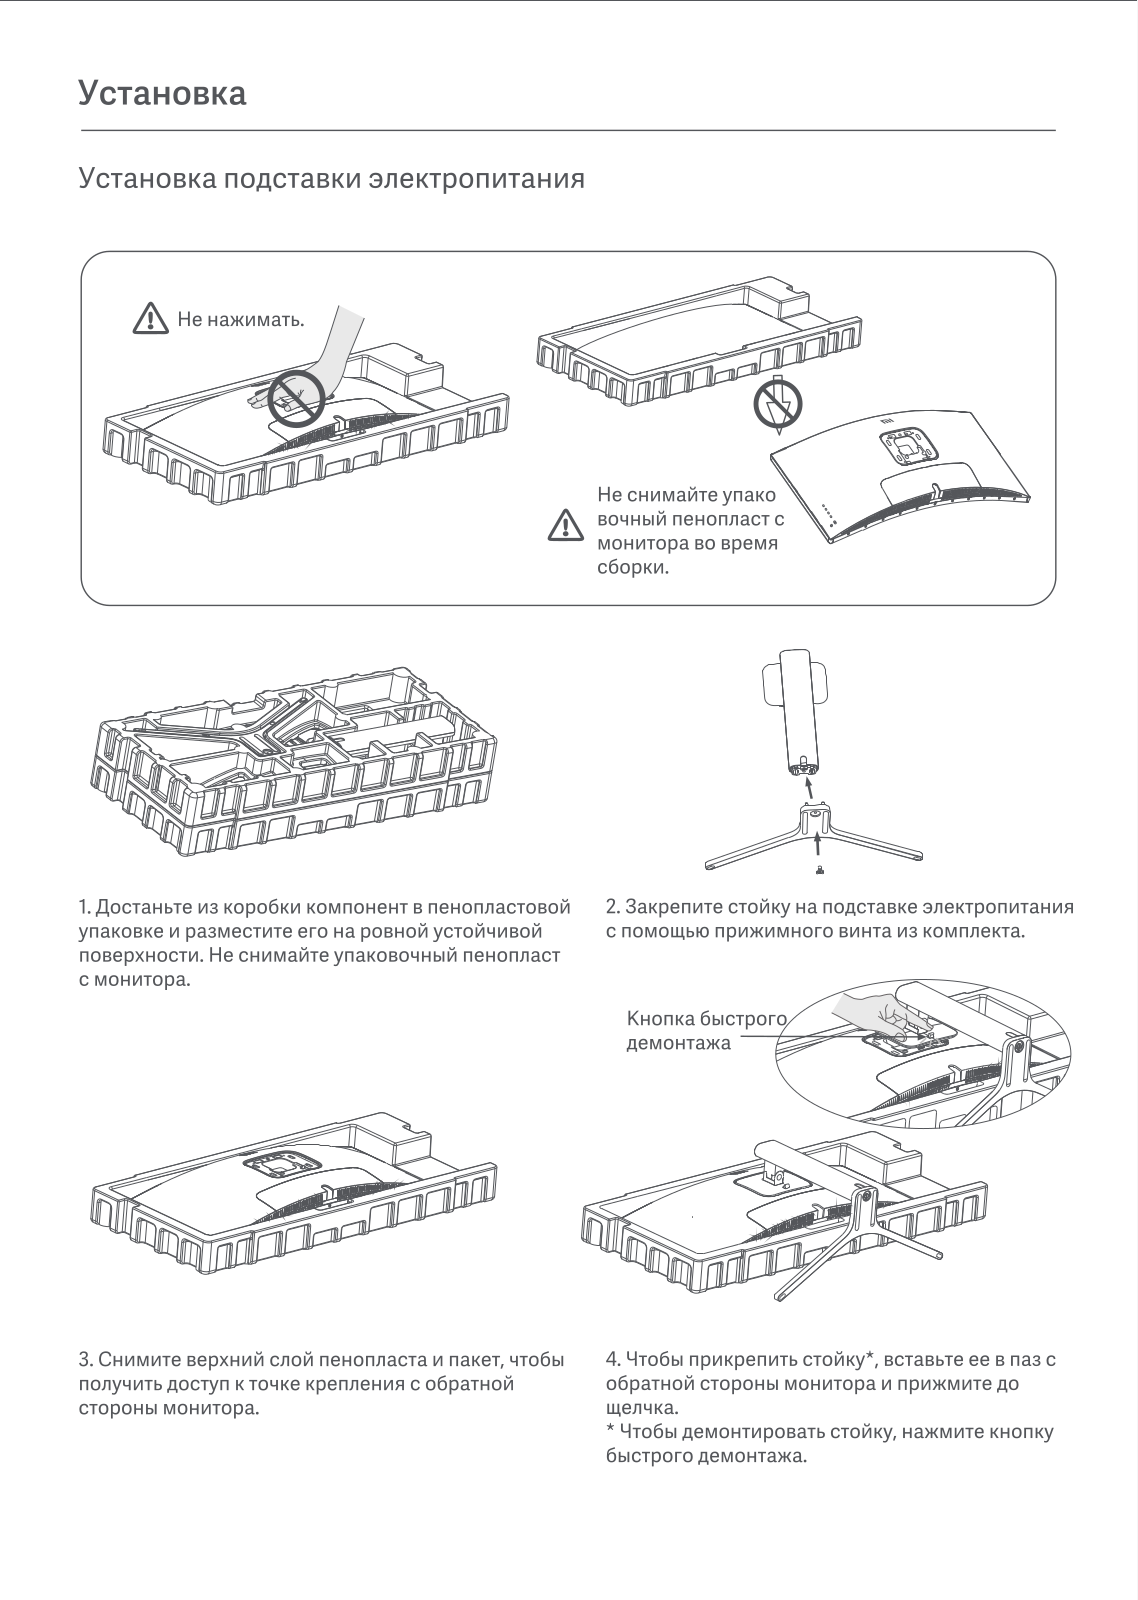
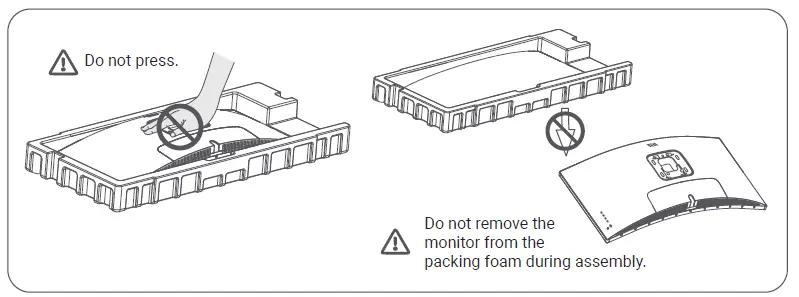
Installation
Installing the Base
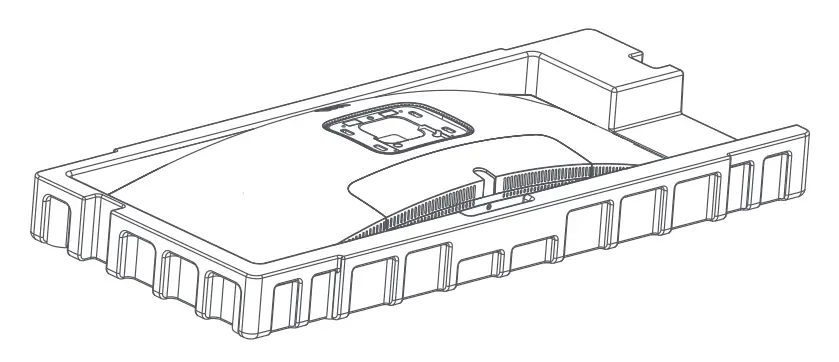
- Remove the foam-encased component from the box and place it on a flat stable surface. Do not remove the monitor from the packing foam.

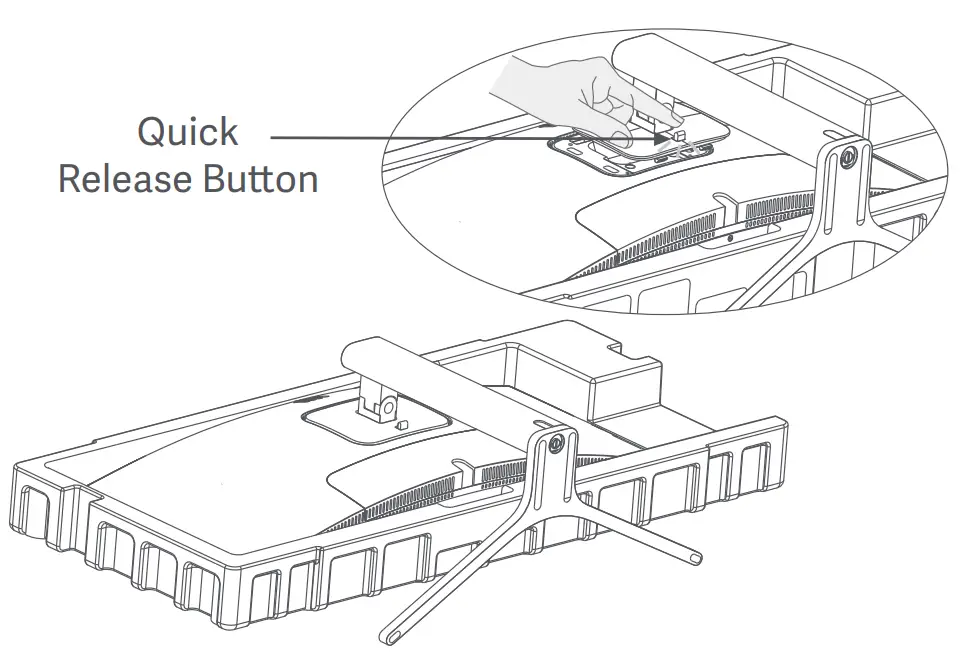
- Fasten the stand to the base using the included thumb screw.
- Remove the top foam layer and the plastic bag to expose the mounting point on the back of the monitor.
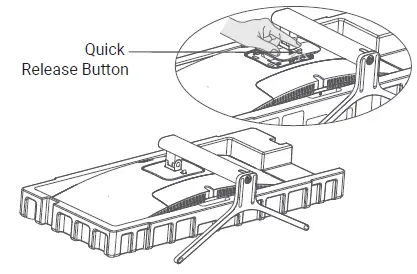
- Attach the stand* by pressing it into the slot on the back of the monitor until it clicks into place.
To remove the stand, press the quick release button. - Use both hands to carefully take out the fully assembled monitor and place it on a flat stable surface.
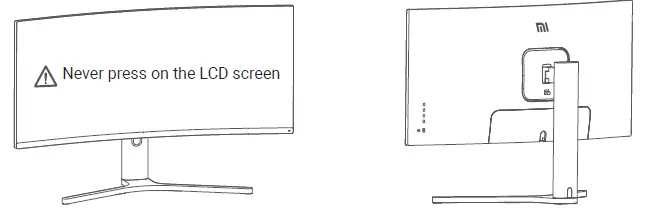
Note: To avoid damaging the screen, be careful not to press on the LCD screen when standing it up.
Cable Management
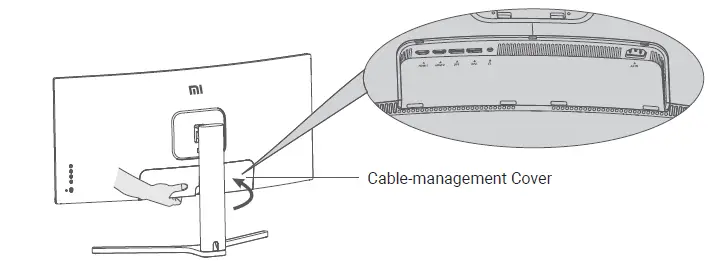
- Remove the monitor‘s cable-management cover and the stand‘s cover.
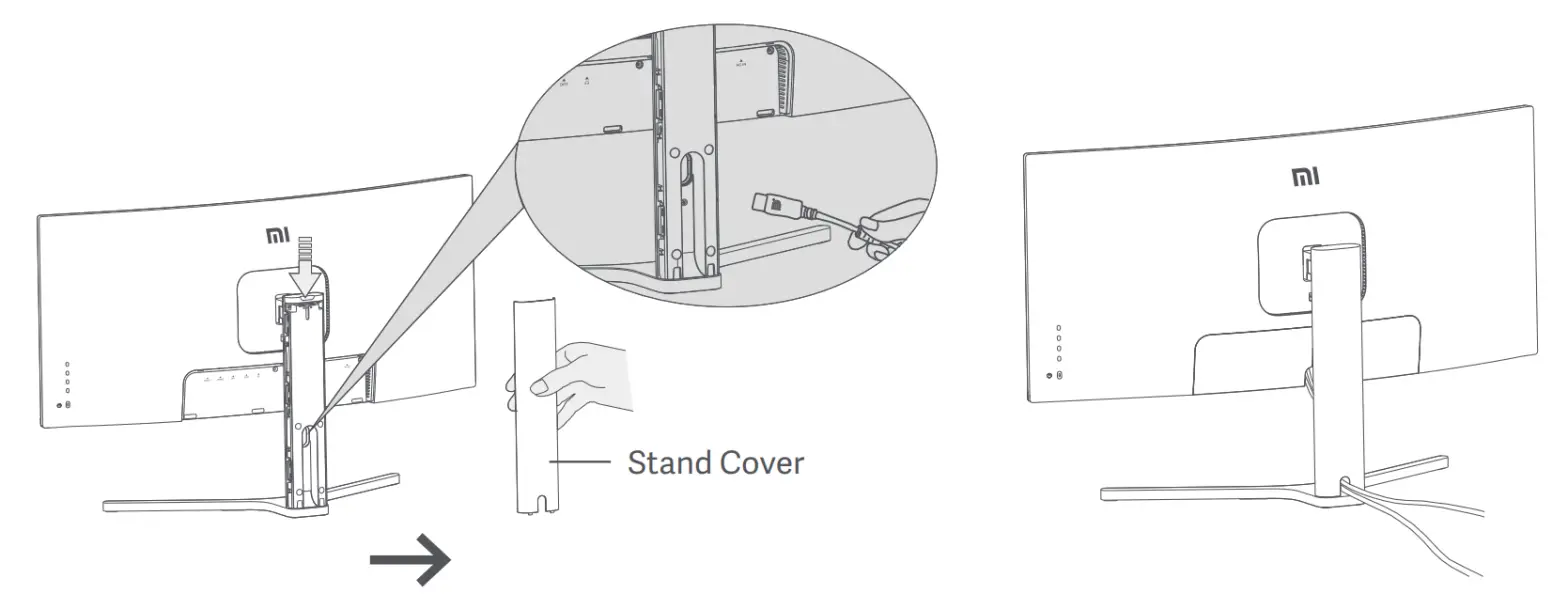
- Feed the power cord and the signal cable through the opening in the stand and connect them to the monitor.
After all cables are in position, install both covers.
Note: The nameplate of this monitor is near the AC IN port, you can find it by removing the cable-management cover.
Wall Mount Installation
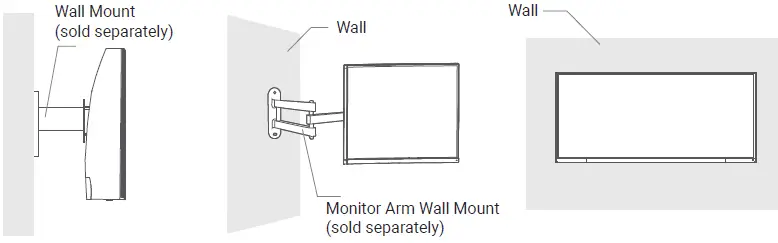
- Press the quick release button to remove the monitor‘s stand.
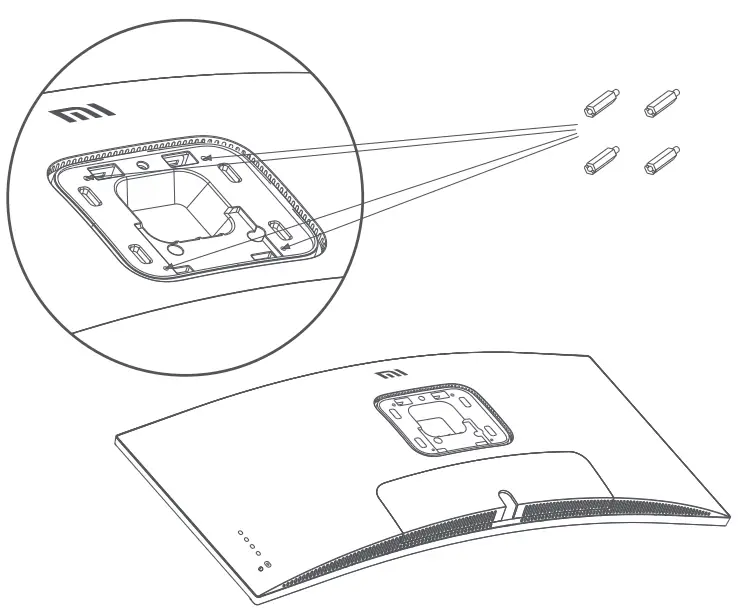
- Fasten the 4 hex studs to the back of the monitor in the positions indicated, then attach the wall mount (sold separately) to the hex studs (mounting holes are spaced 100 × 100 apart).
- Refer to the instructions of the wall mount to mount the monitor.
Note: Do not press on the LCD screen during the mounting process to avoid damaging the screen.
Note: To reduce the risk of falling down, please properly install the wall-mount and take safety protection on the monitor to avoid any injury or damage. Do not place anything on top or hang anything from the wall-mount.
Instructions
Connections
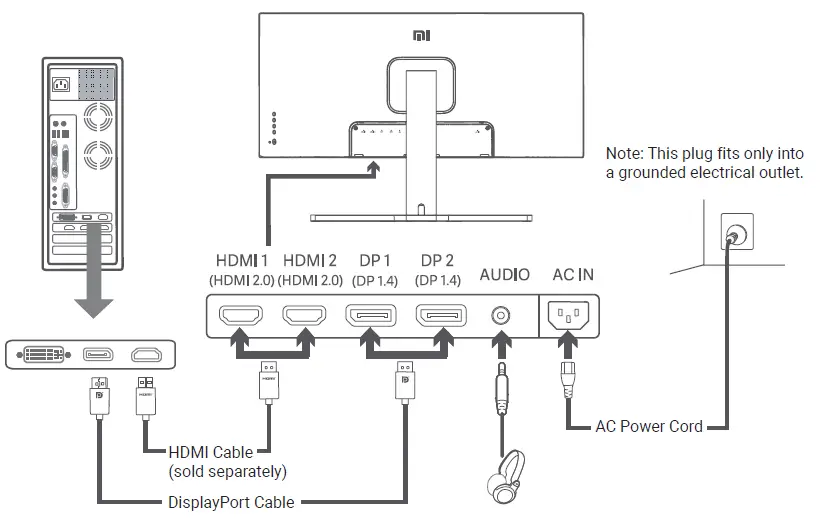
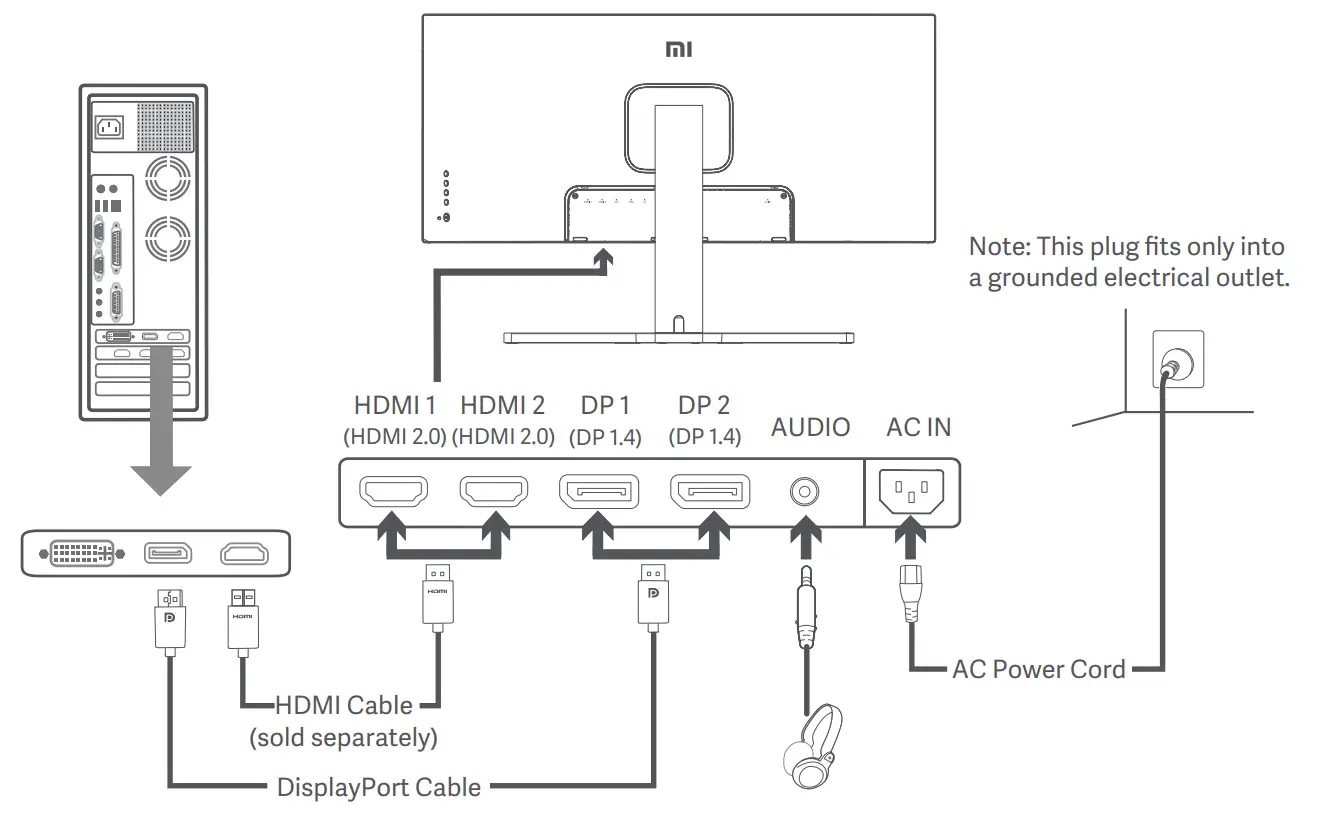
- Connecting the DisplayPort cable (only when using DisplayPort).
Make sure the monitor and the computer are both turned off.
Connect one end of the DisplayPort cable to the computer‘s DisplayPort output port, and the other end to one of the monitor‘s DisplayPort input ports. - Connecting the HDMI cable (sold separately) (only when using HDMI).
Make sure the monitor and the computer are both turned off.
Connect one end of the HDMI cable to the computer‘s HDMI output port, and the other end to one of the monitor‘s HDMI input ports. - Connect a headset or any 3,5 mm compatible external audio device to the monitor‘s audio output port.
- Plug both the power cords of the computer and the monitor into a power outlet.
Note: If the power cord or DisplayPort cable is damaged, it must be replaced with a ganuine power cord or DisplayPort cable purchased from the manufacturer or after-sales service department.
Note: The audio output port can only be used for audio output.
DisplayPort (1.4): 3440 × 1440, max. refresh rate 144 Hz.
HDMI (2.0): 3440 × 1440, max. refresh rate 100 Hz.
Button Description
| Main Menu | Submenu | Description | Adjustable Range | Default |
| Brightness
/ Contrast |
Brightness | Adjust the monitor‘s brightness | 0-100 | 80 |
| Dynamic Brightness | Adjust the monitor‘s dynamic brightness | On / Off | Off | |
| Black Level | Adjust the monitor‘s black level | 0-100 | 50 | |
| Contrast | Adjust the monitor‘s contrast | 0-100 | 75 | |
| DCR | Adjust the monitor‘s dynamic contrast ratio (DCR) | On / Off | Off | |
| Image | Color Temperature | Adjust the monitor‘s color temperature | Standard / Warm / Cool / Custom | Standard |
| Hue | Adjust the monitor‘s hue | 0-100 | 50 | |
| Saturation | Adjust the monitor‘s saturation | 0-100 | 50 | |
| Gamma | Adjust the monitor‘s gamma | 1,8 / 2,0 / 2,2 / 2,4 / 2,6 | 2,2 | |
| Aspect Ratio | Adjust the monitor‘s aspect ratio | Full Screen / 16:9 / 1:1 / Auto | Full Screen | |
| PQ Setting | Sharpness | Adjust the monitor‘s sharpness | 0-100 | 50 |
| Response Time | Adjust the monitor‘s response time | High / Medium / Low / Off | Off | |
| Noise Reduction | Adjust the monitor‘s noise reduction | High / Medium / Low / Off | Off | |
| Motion Response Time | Reduces motion blur at high refresh rates | On / Off | Off |
| Main Menu | Submenu | Description | Adjustable Range | Default |
| Smart Mode | Standard Mode | Set to standard mode | Only one mode can be selected at a time | |
| Eco Mode | Set to eco mode | |||
| Game Mode | Set to game mode | |||
| Movie Mode | Set to movie mode | |||
| Low Blue Light Mode | Set to low blue light mode | |||
| RTS | Set to RTS mode | |||
| Window Settings | Single Window | Only display the main window | Select an input source | |
| Picture-by-Picture (PBP) | Display two video inputs side by side | Window 1 Input Source Window 2 Input Source | ||
| Picture-in-Picture (PIP) | Display the main window and a subwindow | Window 1 Input Source Window 2 Input Source Window 2 Position
Window 2 Size |
||
| Settings | Language | Select the menu language | English | English |
| Audio Input | Select an audio input source | HDMI 1 / HDMI 2
/ DP 1 / DP 2 |
/ | |
| Volume | Adjust the monitor‘s volume | 0-100 | 50 | |
| FreeSync | / | On / Off | Off | |
| Information | Monitor information such as current resolution / input source | / | / | |
| Restore Factory Settings | / | / | / |
Eye Health
To avoid eyestrain, or neck, arm, elbow and shoulder pain caused by using the computer for a long time, please follow the suggestions listed bellow:
- Keep the monitor at a distance of 20–28 inches (approx. 50–70 cm) from your eyes.
- Blink more often to relieve eye fatigue when staring at the monitor.
- Give your eyes a 20-minute break after using the monitor for two hours.
- Take your eyes off the monitor and look at something a certain distance away for at least 20 seconds.
- Stretch your body to help relieve tension on the neck, arms, back, and shoulders.
Low Blue Light Description
In recent years, eye damage caused by blue light has attracted more and more attention. In general, the wavelength of blue light is 400–480 nm, and the wavelength of harmful blue light is 415–455 nm.
This monitor has a function to help reduce your exposure to the blue light emission. You can enable the low blue light mode via the settings menu.
Precautions
- Do not use this monitor in damp or humid environments such as bathrooms, kitchens, basements, or near swimming pools.
- Make sure the monitor is placed on a stable surface. If the monitor falls down or is knocked over, it may cause personal injury or damage to the monitor.
- Store and use the monitor in a cool, dry, ventilated place. Keep the monitor away from radiation and heat sources.
- Do not cover or block the heat dissipation vents on the back of the monitor. Do not place the monitor on a bed, sofa, blanket, etc.
- The monitor‘s operating voltage range is indicated on a label on the back of the monitor. If you are unsure what voltage your power supply is, please contact the monitor‘s distributor or local power company.
- I you do not plan to use the monitor for a long period of time, unplug it from the electrical outlet so as to prevent possible damage from power surges or lightning strikes.
- Do not overload electrical outlets, as this may cause a fire or an electric shock.
- Do not insert any foreign objects into the monitor, as this may cause a short circuit which can lead to a fire or an electric shock.
- Do not attempt to disassemble or repair the monitor yourself to avoid the risk of an electric shock. If the monitor is not functioning properly, please contact our after-sales service department for assistance.
- Do not excessively pull, twist, or bend the power cord.
Troubleshooting
| Issue | Possible causes | Solutions |
| Unable to turn on | No power | • Make sure the power cord is plugged in properly.
• Press the on/off button to turn on the monitor. |
| Image is dark | Brightness / Contrast not adjusted properly | • Adjust the brightness and contrast. |
| Image is jittery or has ripples | Interference | • Keep the monitor away from electronic devices that may cause electrical interference. |
| The indicator is blinking, no image on the screen | No signal, entering sleep mode… | • Turn on the computer.
• Make sure the computer‘s graphics card is working properly. • Make sure the DisplayPort cable is plugged in properly. |
| Monitor displays: Out of range | Resolution is incorrect | • Use the specified recommended resolution settings. |
Specifications
| Name | Mi Curved Gaming Monitor 34“ |
| Model | XMMNTWQ34 |
| Rated Voltage | 100–240 V ~ |
| Rated Frequency | 50 / 60 Hz |
| Rated Current | 2 A |
| Rated Power | 54 W (TYP), 80 W Max. |
| Screen Size | 34“ |
| Viewable Image Size (Diagonal) | 86,36 cm |
| Dot Pitch | 0,07725 (H) × 0,23175 (V) |
| Brightness | 300 cd/m2 (TYP) |
| Contrast | 3000:1 (TYP) |
| Contrast Gamut | 16,7 M |
| Aspect Ratio | 21:9 |
| Response Time | 4 ms (GTG) |
| Maximum Resolution | 3440 × 1440 |
| Recommended Resolution | 3440 × 1440 |
| Refresh Rate | 144 Hz |
| Item Dimensions | 810,39 (L) × 242,53 (W) × 520,61 (H) mm |
| Net Weight | 8 kg |
| Operating Temperature | 0°C to 45°C |
| Operating Humidity | 10–90 % RH |
| Atmospheric Pressure | 86–106 kPa |
Regulatory Compliance Information
WEEE Disposal and Recycling Information
All products bearing this symbol are waste electrical and electronic equipment (WEEE as in directive 2012/19/EU) which should not be mixed with unsorted household waste. Instead, you should protect human health and the environment by handing over your waste equipment to a designated collection point for the recycling of waste electrical and electronic equipment, appointed by the government or local authorities. Correct disposal and recycling will help prevent potential negative consequences to the environment and human health. Please contact the installer or local authorities for more information about the location as well as terms and conditions of such collection points.
EU Declaration of Conformity
We, Xiaomi Communications Co., Ltd., hereby declare that this equipment is in compliace with the applicable Directives and European Norms, and amendments. The full text of the EU declaration of conformity is available at the following internet address: http://www.mi.com/global/service/support/declaration. html
Xiaomi Communications Co., Ltd.
Address: #019, 9th Floor, Building 6, 33 Xi‘erqi Middle Road, Haidan District, Beijing, China, 100085
For further information, please go to www.mi.com
Mi Curved Gaming Monitor 34″ User Manual
Read this manual carefully before use, and retain it for future reference.
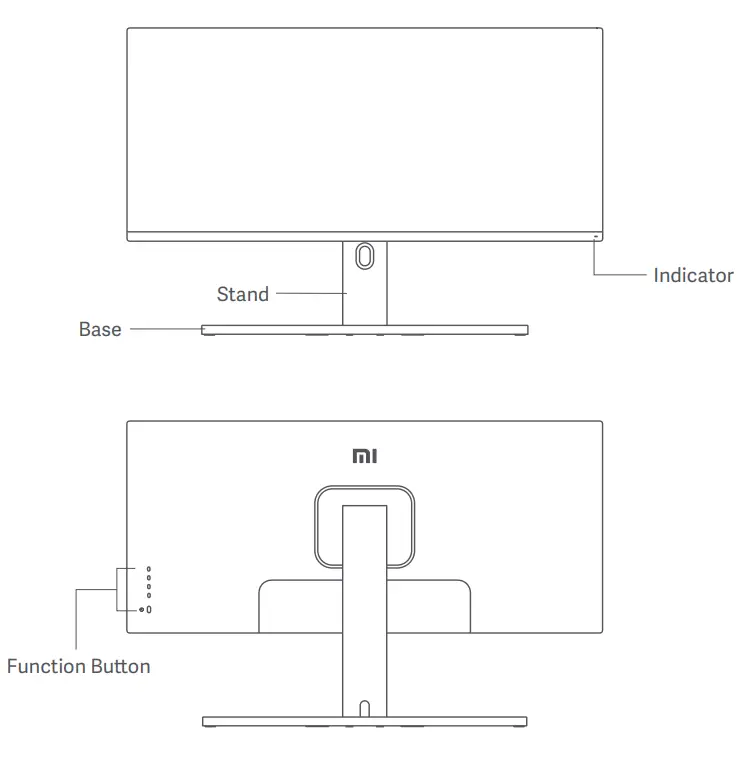
Product Overview
Monitor Overview
Package Contents
Installation
Installing the Base
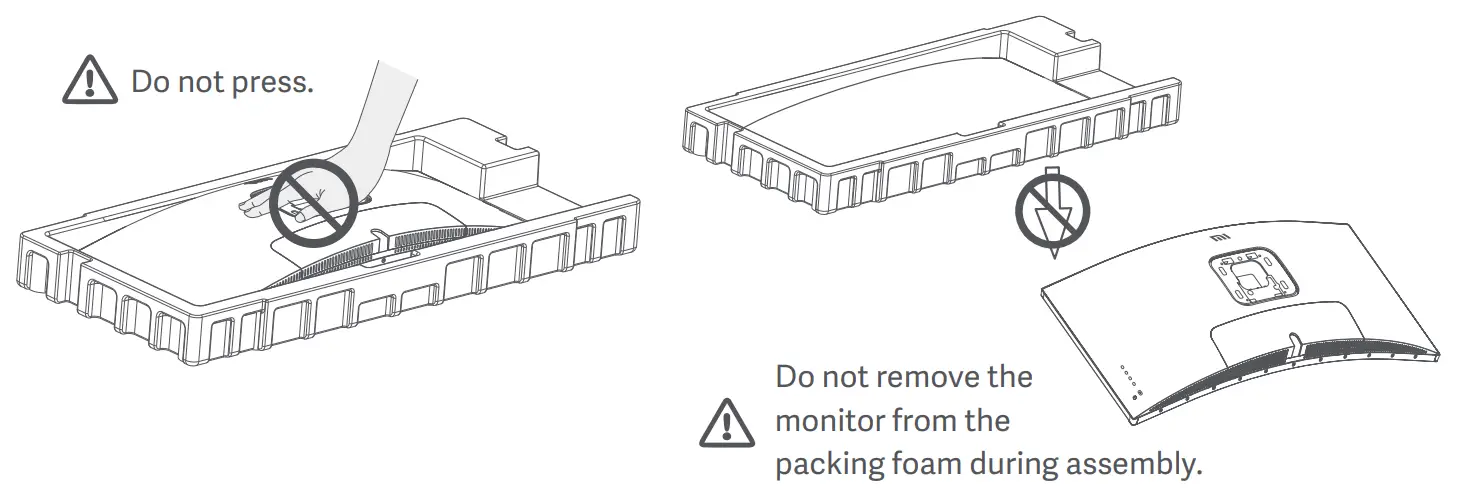
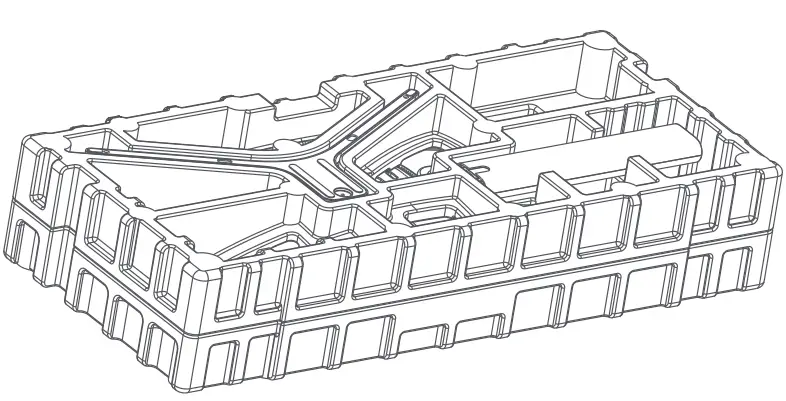
- Remove the foam-encased component from the box and place it on a flat stable surface. Do not remove the monitor from the packing foam.

- Fasten the stand to the base using the included thumbscrew.

- Remove the top foam layer and the plastic bag to expose the mounting point on the back of the monitor.

- Attach the stand* by pressing it into the slot on the back of the monitor until it clicks into place.* To remove the stand, press the quick-release button.
- Use both hands to carefully take out the fully assembled monitor and place it on a flat stable surface.Note: To avoid damaging the screen, be careful not to press on the LCD screen when standing it up.
Cable Management
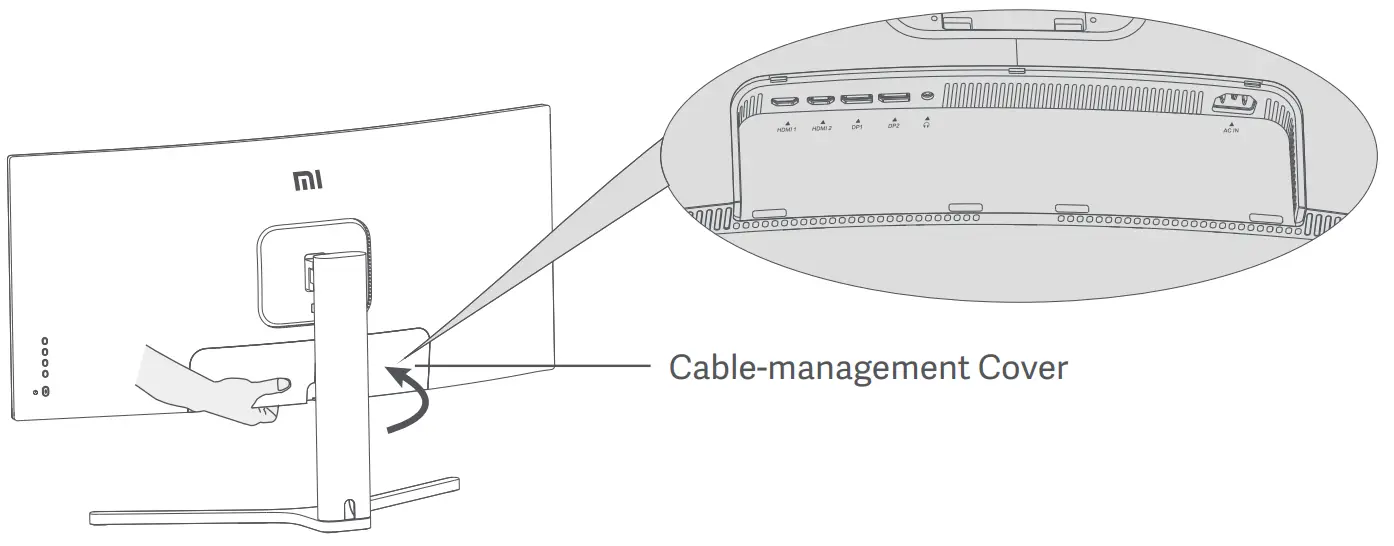
- Remove the monitor’s cable-management cover and the stand’s cover.

- Feed the power cord and the signal cable through the opening in the stand and connect them to the monitor.After all, cables are in position, install both covers.Note: The nameplate of this monitor is near the AC IN port, you can find it by removing the cable-management cover.
Wall Mount Installation
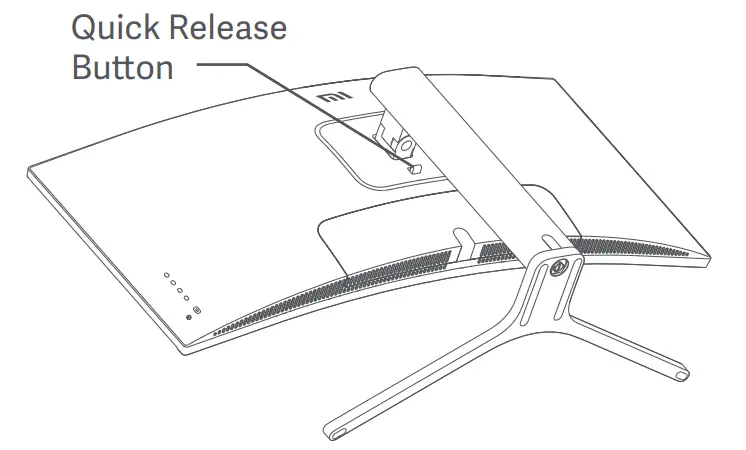
- Press the quick-release button to remove the monitor’s stand.

- Fasten the 4 hex studs to the back of the monitor in the positions indicated, then attach the wall mount (sold separately) to the hex studs (mounting holes are spaced 100 × 100 mm apart).

- Refer to the instructions of the wall mount to mount the monitor.Note: Do not press on the LCD screen during the mounting process to avoid damaging the screen.
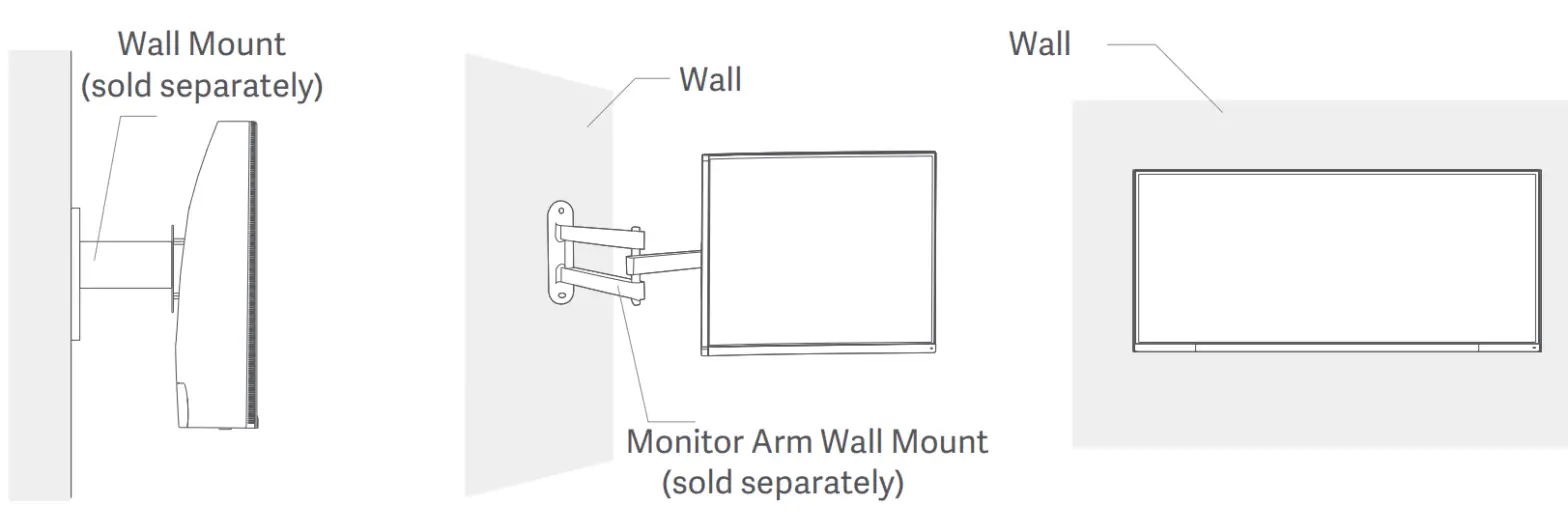
Note: To reduce the risk of falling down, please properly install the wall-mount and take safety protection on the monitor to avoid any injury or damage. Do not place anything on top or hang anything from the wall mount.
Instructions
Connections
- Connecting the DisplayPort cable (only when using DisplayPort).a. Make sure the monitor and the computer are both turned off.b. Connect one end of the DisplayPort cable to the computer’s DisplayPort output port and the other end to one of the monitor’s DisplayPort input ports.
- Connecting the HDMI cable (sold separately) (only when using HDMI).a. Make sure the monitor and the computer are both turned off.b. Connect one end of the HDMI cable to the computer’s HDMI output port and the other end to one of the monitor’s HDMI input ports.
- Connect a headset or any 3.5 mm compatible external audio device to the monitor’s audio output port.
- Plug both the power cords of the computer and the monitor into a power outlet.
Note: If the power cord or DisplayPort cable is damaged, it must be replaced with a genuine power cord or DisplayPort cable purchased from the manufacturer or an after-sales service department.
Note: The audio output port can only be used for audio output.DisplayPort (1.4): 3440 × 1440, max. refresh rate 144 Hz.HDMI (2.0): 3440 × 1440, max. refresh rate 100 Hz.
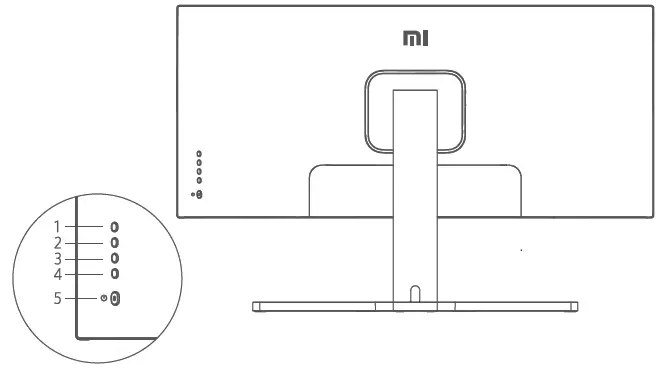
Button Description
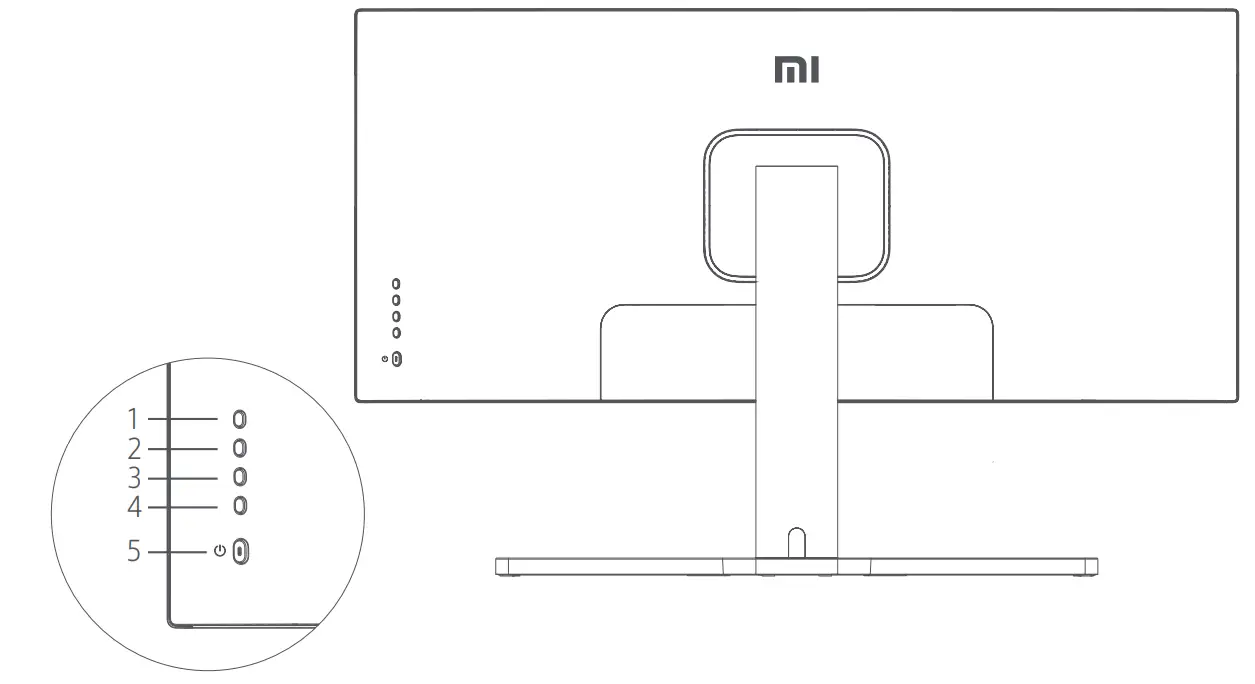
| Button Function | ||
| 1 | M | Menu/Select |
| 2 | Up | |
| 3 | Down | |
| 4 | E | Exit/Go Back |
| 5 | On/Off |
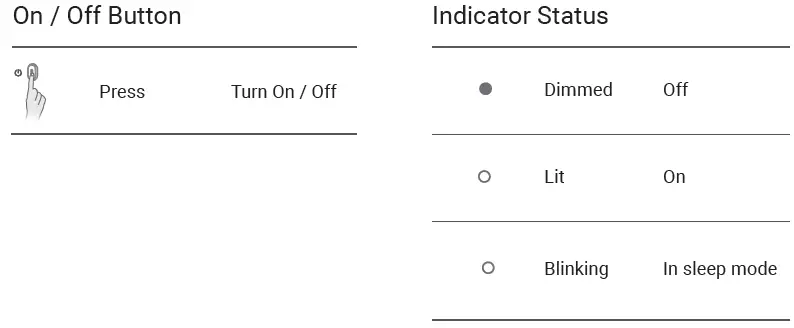
On/Off Button
| Press | Turn On/Off |
Indicator Status
Menu Description
|
Mi Monitor |
Standard Mode Enabled |
|
| Brightness/Contrast | Brightness | |
| Image | Dynamic Brightness | |
| Picture Quality Settings | Black Level | |
| Smart Mode | Contrast | |
| Window Settings | DCR | |
| Settings |
|
Main Menu |
Submenu | Description | Adjustable Range |
Default |
| Brightness /Contrast | Brightness | Adjust the monitor’s brightness | 0-100 | 80 |
| Dynamic Brightness | Adjust the monitor’s dynamic brightness | On/Off | Off | |
| Black Level | Adjust the monitor’s black level | 0-100 | 50 | |
| Contrast | Adjust the monitor’s contrast | 0-100 | 75 | |
| DCR | Adjust the monitor’s dynamic contrast ratio (DCR) | On/Off | Off | |
| Image | Color Temperature | Adjust the monitor’s color temperature | Standard/Warm/ Cool/Custom | Standard |
| Hue | Adjust the monitor’s hue | 0-100 | 50 | |
| Saturation | Adjust the monitor’s saturation | 0-100 | 50 | |
| Gamma | Adjust the monitor’s gamma | 1.8/2.0/2.2/2.4/2.6 | 2.2 | |
| Aspect Ratio | Adjust the monitor’s aspect ratio | Full Screen/16:9/1:1/Auto | Full Screen | |
| PQ Settings | Sharpness | Adjust the monitor’s sharpness | 0-100 | 50 |
| Response Time | Adjust the monitor’s response time | High/Medium/Low/Off | Off | |
| Noise Reduction | Adjust the monitor’s noise reduction | High/Medium/Low/Off | Off | |
| Motion Response Time | Reduces motion blur at high refresh rates | On/Off | Off | |
| Smart Mode | Standard Mode | Set to standard mode | Only one mode can be selected at a time | Standard Mode |
| Eco Mode | Set to eco mode | |||
| Game Mode | Set to game mode | |||
| Movie Mode | Set to movie mode | |||
| Low Blue Light Mode | Set to low blue light mode | |||
| RTS | Set to RTS mode | |||
| Window Settings | Single Window | Only display the main window | Select an input source | Single Window |
| Picture-by-Picture (PBP) | Display two video inputs side by side | Window 1 Input Source Window 2 Input Source | ||
| Picture-in-Picture (PIP) | Display the main window and a subwindow | Window 1 Input Source Window 2 Input Source Window 2 Position
Window 2 Size |
||
| Settings | Language | Select the menu language | English/Espariol/Pycaol/ Francais/Italiano/Deutsch /Polski/IN.1)1 | English |
| Audio Input | Select an audio input source | HDMI 1/HDMI 2/ DP 1/DP 2 | / | |
| Volume | Adjust the monitor’s volume | 0-100 | 50 | |
| FreeSync | / | On/Off | Off | |
| Information | Monitor information such as current resolution/input source | / | / | |
| Restore Factory Settings | / | / | / |
Eye Health
To avoid eyestrain, or neck, arm, elbow, and shoulder pain caused by using the computer for a long time, please follow the suggestions listed below:
- Keep the monitor at a distance of 20–28 inches (approx. 50–70 cm) from your eyes.
- Blink more often to relieve eye fatigue when staring at the monitor.
- Give your eyes a 20-minute break after using the monitor for two hours.
- Take your eyes off the monitor and look at something a certain distance away for at least 20 seconds.
- Stretch your body to help relieve tension on the neck, arms, back, and shoulders.
Low Blue Light DescriptionIn recent years, eye damage caused by blue light has attracted more and more attention. In general, the wavelength of blue light is 400–480 nm, and the wavelength of harmful blue light is 415–455 nm.This monitor has a function to help reduce your exposure to blue light emission. You can enable the low blue light mode via the settings menu.
Precautions
- Do not use this monitor in damp or humid environments such as bathrooms, kitchens, basements, or near swimming pools.
- Make sure the monitor is placed on a stable surface. If the monitor falls down or is knocked over, it may cause personal injury or damage to the monitor.
- Store and use the monitor in a cool, dry, ventilated place. Keep the monitor away from radiation and heat sources.
- Do not cover or block the heat dissipation vents on the back of the monitor. Do not place the monitor on a bed, sofa, blanket, etc.
- The monitor’s operating voltage range is indicated on a label on the back of the monitor. If you are unsure what voltage your power supply is, please contact the monitor’s distributor or local power company.
- If you do not plan to use the monitor for a long period of time, unplug it from the electrical outlet so as to prevent possible damage from power surges or lightning strikes.
- Do not overload electrical outlets, as this may cause a fire or an electric shock.
- Do not insert any foreign objects into the monitor, as this may cause a short circuit which can lead to a fire or an electric shock.
- Do not attempt to disassemble or repair the monitor yourself to avoid the risk of an electric shock. If the monitor is not functioning properly, please contact our after-sales service department for assistance.
- Do not excessively pull, twist, or bend the power cord.
Troubleshooting
|
Issue |
Possible Causes |
Solutions |
| Unable to turn on | No power |
|
| Image is dark | Brightness/ Contrast not adjusted properly |
|
| Image is jittery or has ripples | Interference |
|
| The indicator is blinking, no image on the screen | No signal, entering sleep mode… |
|
| Monitor displays: Out of range | Resolution is incorrect |
|
Specifications
| Name | Mi Curved Gaming Monitor 34″ |
| Model | XMMNTWQ34 |
| Rated Voltage | 100-240 V – |
| Rated Frequency | 50/60 Hz |
| Rated Current | 2 A |
| Rated Power | 54 W (TYP), 80 W Max. |
| Screen Size | 34″ |
| Viewable Image Size (Diagonal) | 86.36 cm |
| Dot Pitch | 0.07725 (H) x 0.23175 (V) |
| Brightness | 300 cd/m2 (TYP) |
| Contrast | 3000:1 (TYP) |
| Color Gamut | 16.7 M |
| Aspect Ratio | 21:9 |
| Response Time | 4 ms (GTG) |
| Maximum Resolution | 3440 • 1440 |
| Recommended Resolution | 3440. 1440 |
| Refresh Rate | 144 Hz |
| Item Dimensions | 810.39 (L) . 242.53 (W) . 520.61 (H) mm |
| Net Weight | 8 kg |
| Operating Temperature | 0°C to 45°C |
| Operating Humidity | 10-90% RH |
| Atmospheric Pressure | 86-106 kPa |
Regulatory Compliance Information
WEEE Disposal and Recycling InformationAll products bearing this symbol are waste electrical and electronic equipment (WEEE as in directive 2012/19/EU) which should not be mixed with unsorted household waste. Instead, you should protect human health and the environment by handing over your waste equipment to a designated collection point for the recycling of waste electrical and electronic equipment, appointed by the government or local authorities. Correct disposal and recycling will help prevent potential negative consequences to the environment and human health. Please contact the installer or local authorities for more information about the location as well as the terms and conditions of such collection points.EU Declaration of ConformityWe, Xiaomi Communications Co., Ltd., hereby, declare that this equipment is in compliance with the applicable Directives and European Norms, and amendments. The full text of the EU declaration of conformity is available at the following internet address:http://www.mi.com/global/service/support/declaration.html
report this ad
For the Product Information Sheet, please scan the QR code below.
https://eprel.ec.europa.eu/qr/373743
Xiaomi Communications Co., Ltd.Address: #019, 9th Floor, Building 6, 33 Xi’erqi Middle Road, Haidian District,Beijing, China, 100085For further information, please go to www.mi.com
References
- Stream TV | Purifier | Earbuds | Power Bank – Xiaomi United States
- Stream TV | Purifier | Earbuds | Power Bank – Xiaomi United States