
Инструкция и руководство для
Panasonic NN-ST342
101 страница подробных инструкций и пользовательских руководств по эксплуатации на русском на английском
Models: NN-ST340W
NN-SM330W
Before operating this oven, please read these instructions completely and keep for future reference.
Перед началом эксплуатации данной микроволновой печи, пожалуйста, ознакомьтесь с инструкцией
и сохраните ее для использования в дальнейшем.
Перед використанням цієї печі, будь ласка, повністю прочитайте ці інструкції і збережіть їх для
подальших довідок.
Operating Instructions and Cookbook
Инструкция по эксплуатации и рецепты приготовления блюд
Інструкція з експлуатації та книга рецептів
Microwave Oven
Микроволновая печь
Мікрохвильова піч
Models No. NN-ST342W/M
NN-SM332W
For home use
Для домашнего использования
Для домашнього використання
Please read these instructions carefully before using this product, and save this manual for future use.
Пожалуйста, перед началом эксплуатации данного продукта внимательно прочитайте инструкцию по эксплуатации
и сохраните ее для использования в дальнейшем.
Будь ласка, перед початком експлуатації цього продукту уважно прочитайте інструкцію з експлуатації й збережіть її
для використання у майбутньому.
English

English
— Eng-1 —
Table of Contents
Before Operating
Installation and Connection……………………………………………………………………………………………………………………………2
Safety Instructions ……………………………………………………………………………………………………………………………………….3
Important Information ……………………………………………………………………………………………………………………………………4
Feature Diagram ………………………………………………………………………………………………………………………………………….5
Control Panel (NN-ST340W) …………………………………………………………………………………………………………………………6
Operation and Hints
For NN-SM330W:
To Cook/Reheat/Defrost by MICRO POWER AND TIME…………………………………………………………………………………..7
For NN-ST340W:
To Set Micro Power and Time………………………………………………………………………………………………………………………..8
To Use Turbo Defrost ……………………………………………………………………………………………………………………………………9
Clock Setting ……………………………………………………………………………………………………………………………………………..10
To Use Child Safety Lock…………………………………………………………………………………………………………………………….10
To Reheat/Cooking Using Auto Cook Pads ……………………………………………………………………………………………….11-13
Timer Setting (Kitchen Timer/Standing Time/Delay Time) ………………………………………………………………………………..14
Quick Guide (NN-ST340W) …………………………………………………………………………………………………………………………18
Maintenance
Before Requesting Service ………………………………………………………………………………………………………………………….15
Care of your Microwave Oven ……………………………………………………………………………………………………………………..16
Technical Specifications ………………………………………………………………………………………………………………………………17
Cooking Guide
Introduction ……………………………………………………………………………………………………………………………………………….19
Cookware and Utensil Guide ……………………………………………………………………………………………………………………….20
Microwave Cooking & Techniques……………………………………………………………………………………………………………21-22
To Reheat by Micro Power and Time…………………………………………………………………………………………………………….23
Defrosting Guidelines/Turbo Defrost……………………………………………………………………………………………………………..24
Defrosting Tips and Techniques……………………………………………………………………………………………………………………25
Microwave Recipe Preparation and Techniques ………………………………………………………………………………………..26-27
Common Queries Answered ………………………………………………………………………………………………………………………..27
Everyday Basics ………………………………………………………………………………………………………………………………………..28
Fish and Shellfish……………………………………………………………………………………………………………………………………….29
Poultry………………………………………………………………………………………………………………………………………………….30-31
Main Fare Meats……………………………………………………………………………………………………………………………………32-33
Vegetable Varieties ………………………………………………………………………………………………………………………………..34-36
Rice, Pasta and Cereal…………………………………………………………………………………………………………………………..37-38
Desserts ……………………………………………………………………………………………………………………………………………………39
342W/M)
342W/M)
332W:
342W/M:
Using Auto Cook Pads ……
English
Installation and connection, English, Examine your microwave oven
Earthing instructions, Operation voltage, Placement of the oven, Warning, Attention Чат поддержки
- Изображение
- Текст
English
— Eng-2 —
Installation and Connection
Examine your microwave oven
Unpack the oven, remove all packing material, and examine
the oven for any damage such as dents, broken door latches
or cracks in the door. If you find any damage, notify your
dealer immediately. Do not install a damaged microwave
oven.
Earthing instructions
IMPORTANT: THIS UNIT HAS TO BE PROPERLY EARTH-
ED FOR PERSONAL SAFETY.
If your AC outlet is not earthed, it is the personal responsibili-
ty of the customer to have it replaced with a properly earthed
wall socket.
Operation voltage
The voltage has to be the same as specified on the label on
the oven. If a higher voltage than specified is used, it may
cause a fire or other damages.
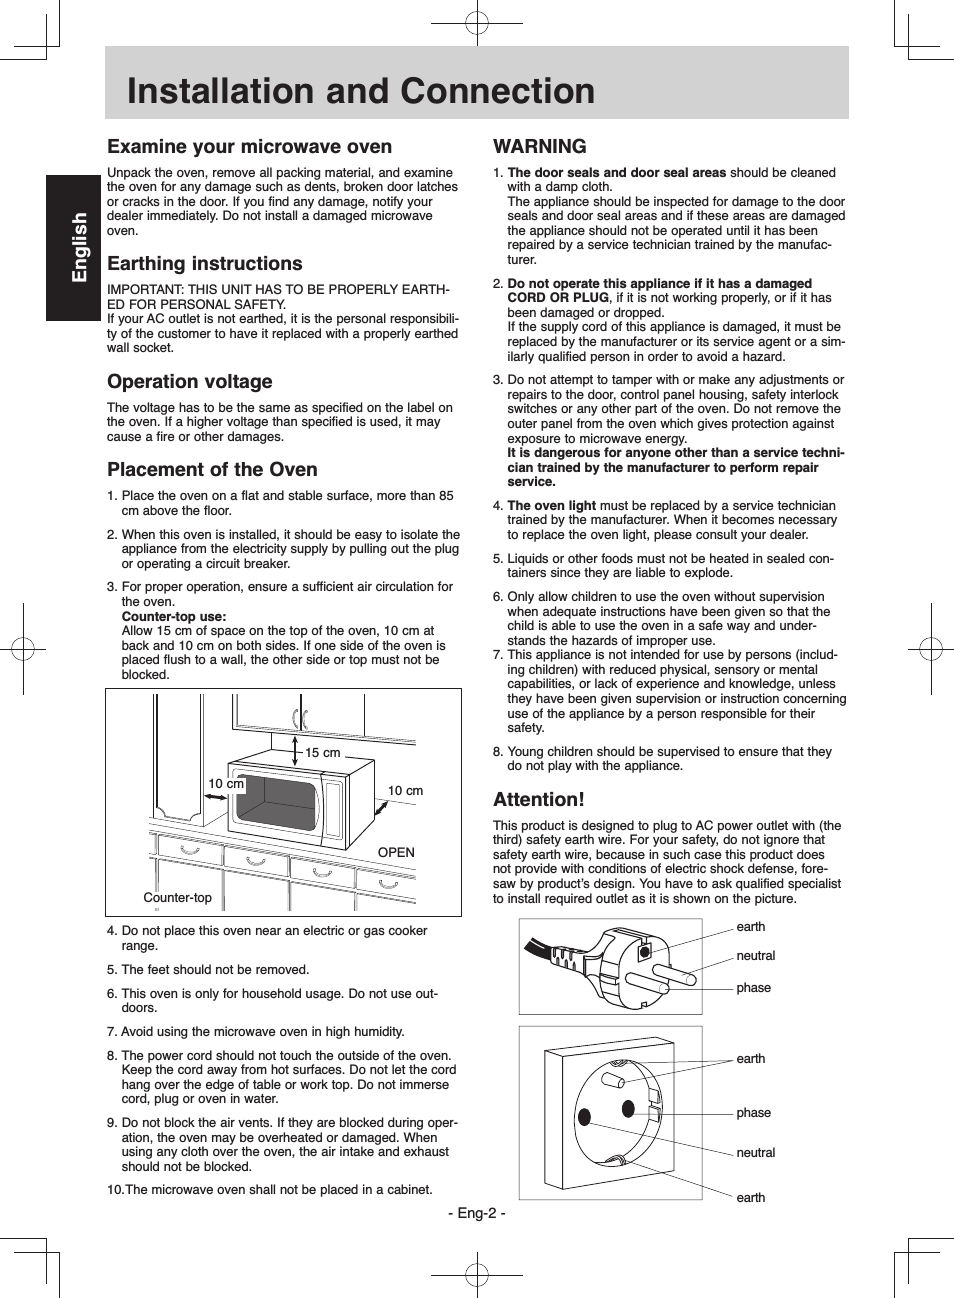
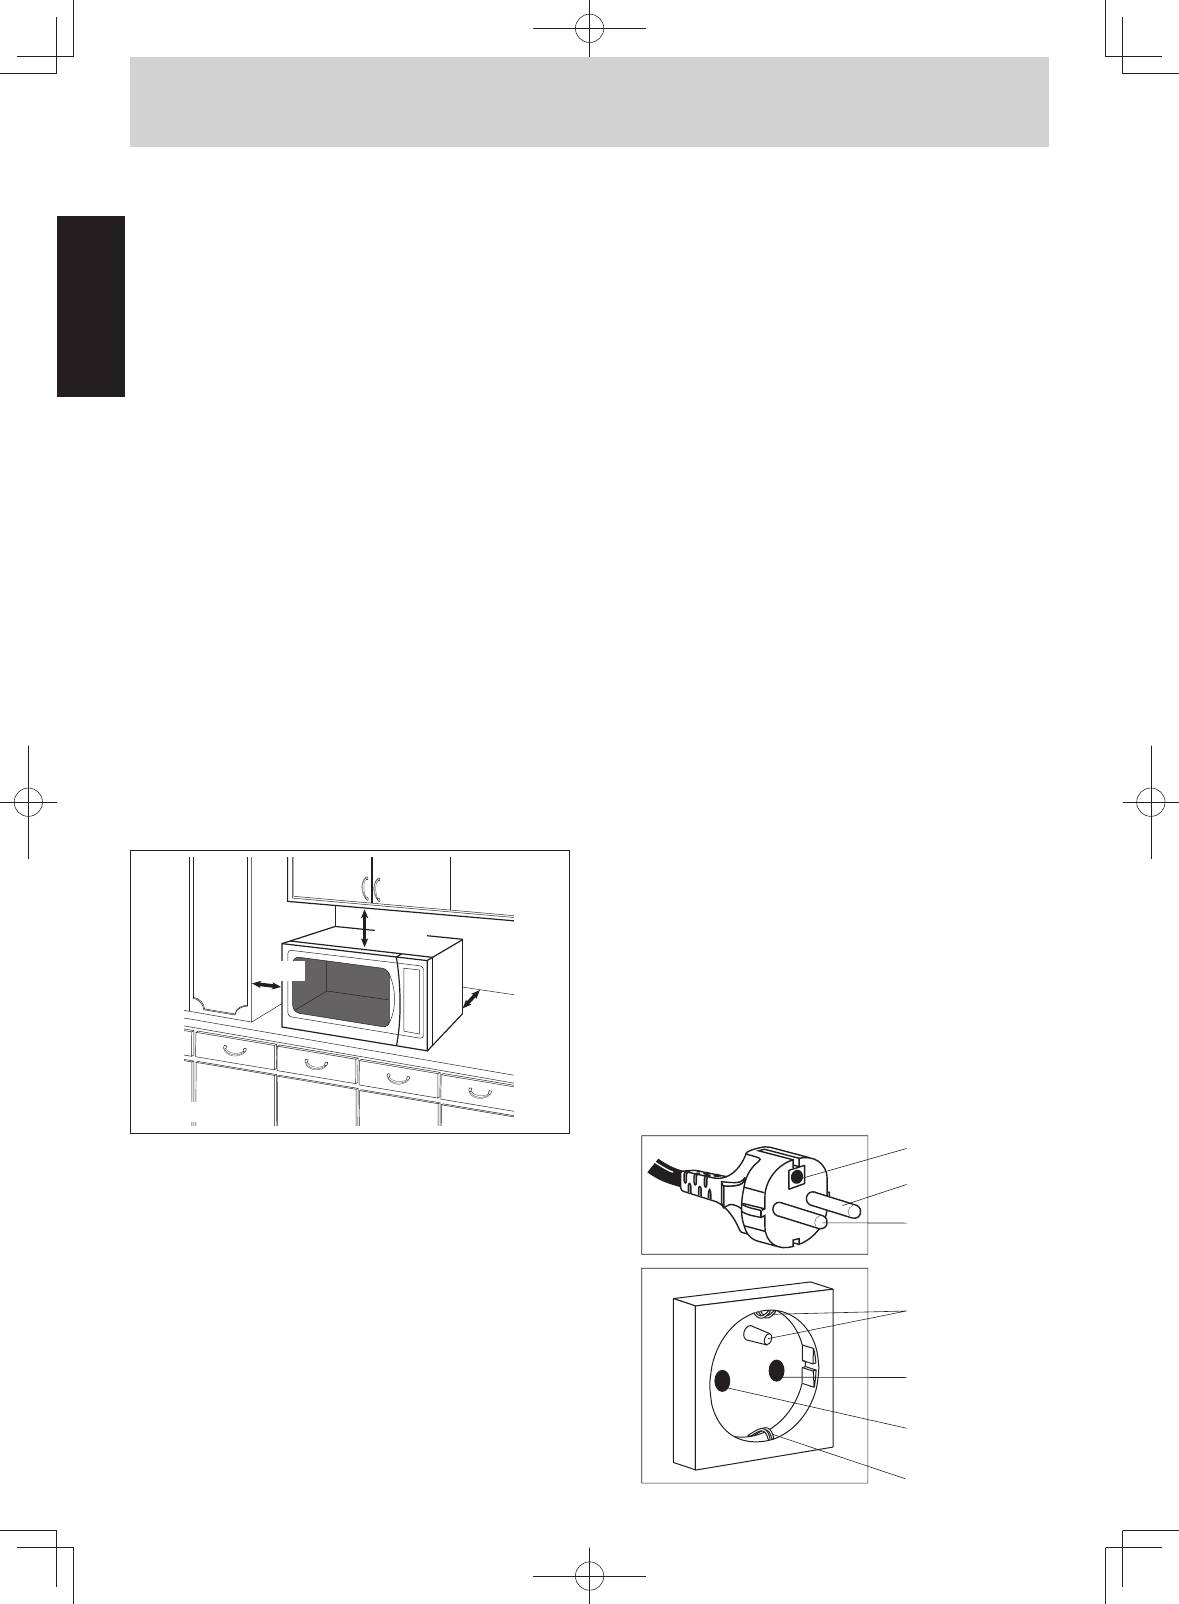
Placement of the Oven
1. Place the oven on a flat and stable surface, more than 85
cm above the floor.
2. When this oven is installed, it should be easy to isolate the
appliance from the electricity supply by pulling out the plug
or operating a circuit breaker.
3. For proper operation, ensure a sufficient air circulation for
the oven.
Counter-top use:
Allow 15 cm of space on the top of the oven, 10 cm at
back and 10 cm on both sides. If one side of the oven is
placed flush to a wall, the other side or top must not be
blocked.
4. Do not place this oven near an electric or gas cooker
range.
5. The feet should not be removed.
6. This oven is only for household usage. Do not use out-
doors.
7. Avoid using the microwave oven in high humidity.
8. The power cord should not touch the outside of the oven.
Keep the cord away from hot surfaces. Do not let the cord
hang over the edge of table or work top. Do not immerse
cord, plug or oven in water.
9. Do not block the air vents. If they are blocked during oper-
ation, the oven may be overheated or damaged. When
using any cloth over the oven, the air intake and exhaust
should not be blocked.
10.The microwave oven shall not be placed in a cabinet.
WARNING
1. The door seals and door seal areas should be cleaned
with a damp cloth.
The appliance should be inspected for damage to the door
seals and door seal areas and if these areas are damaged
the appliance should not be operated until it has been
repaired by a service technician trained by the manufac-
turer.
2. Do not operate this appliance if it has a damaged
CORD OR PLUG, if it is not working properly, or if it has
been damaged or dropped.
If the supply cord of this appliance is damaged, it must be
replaced by the manufacturer or its service agent or a sim-
ilarly qualified person in order to avoid a hazard.
3. Do not attempt to tamper with or make any adjustments or
repairs to the door, control panel housing, safety interlock
switches or any other part of the oven. Do not remove the
outer panel from the oven which gives protection against
exposure to microwave energy.
It is dangerous for anyone other than a service techni-
cian trained by the manufacturer to perform repair
service.
4. The oven light must be replaced by a service technician
trained by the manufacturer. When it becomes necessary
to replace the oven light, please consult your dealer.
5. Liquids or other foods must not be heated in sealed con-
tainers since they are liable to explode.
6. Only allow children to use the oven without supervision
when adequate instructions have been given so that the
child is able to use the oven in a safe way and under-
stands the hazards of improper use.
7. This appliance is not intended for use by persons (includ-
ing children) with reduced physical, sensory or mental
capabilities, or lack of experience and knowledge, unless
they have been given supervision or instruction concerning
use of the appliance by a person responsible for their
safety.
8. Young children should be supervised to ensure that they
do not play with the appliance.
Attention!
This product is designed to plug to AC power outlet with (the
third) safety earth wire. For your safety, do not ignore that
safety earth wire, because in such case this product does
not provide with conditions of electric shock defense, fore-
saw by product’s design. You have to ask qualified specialist
to install required outlet as it is shown on the picture.
15 cm
10 cm
OPEN
10 cm
Counter-top
earth
neutral
phase
earth
earth
neutral
phase
English
English
— Eng-3 —
Safety Instructions
Use of your oven
1. Do not use the oven for any reason other than the prepa-
ration of food. This oven is specifically designed to heat or
cook food. Do not use this oven to heat chemicals or other
non-food products.
2. Before use, check utensils/containers are suitable for use
in microwave ovens.
3. Do not attempt to use this microwave oven to dry newspa-
per, clothing or any other materials.
They may catch on fire.
4. When the oven is not being use, do not store any objects
other than oven accessories inside the oven in case it is
accidentally turned on.
5. The appliance shall not be operated by MICROWAVE
WITHOUT FOOD IN THE OVEN, operation in this manner
may damage the appliance.
6. If smoke is observed, turn the Timer to zero or press
Stop/Reset pad and leave the door closed. Disconnect the
power cord, or shut off power at the fuse or the circuit
breaker panel in order to stifle any flames.
In accordance with para. 2 Cl. 5 of the Russian Federal
Law “On consumer rights protection”, the manufacturer
hereby assigns the use period of the present device to be
7 years from the date of production under the condition
that the present device is used in strict compliance with
the present manual and applicable technical standards.
Accessories
The oven comes equipped with a variety of accessories.
Always follow directions given for use of the accessories.
Glass Tray
1. Do not operate the oven without Roller Ring and Glass
Tray in place.
2. Never use another type of glass tray than the one special-
ly designed for this oven.
3. If Glass Tray is hot, let it to cool before cleaning or placing
in water.
4. Glass Tray can turn in either direction.
5. If the food or cooking vessel on Glass Tray touches the
oven walls and make the turntable stop rotating, the
turntable will automatically rotate in the opposite direction.
This is normal.
6. Do not cook foods directly on Glass Tray.
Roller Ring
1. Roller Ring and the oven floor should be cleaned frequent-
ly to prevent noise and build-up of remaining food.
2. Roller Ring must always be used for cooking together with
Glass Tray.
Maintenance of your oven
1. Service
WHEN YOUR OVEN REQUIRES SERVICING call your
local Panasonic engineer (Customer Support). It is haz-
ardous for anyone other than a competent person to carry
out any service or repair operation which involves the
removal of a cover which gives protection against expo-
sure to microwave energy.
2. Door Seals
Do not attempt to tamper with or make any adjustments or
repairs to door, control panel housing, safety interlock
switches or any other part of the oven. Do not remove
outer panel from oven.
The door seals and door seal areas should always be kept
clean – use a damp cloth.
N.B. The appliance should be inspected for damage to the
door seals and door seal areas. If these areas are dam-
aged the appliance should not be operated until it has
been repaired by a service technician trained by the man-
ufacturer.
3. Oven Light
The oven lamp must be replaced by a service technician
trained by the manufacturer. DO NOT attempt to remove
the outer casing from the oven.
7. Appliances are not intended to be operated by means of an
external timer or separate remote control system.
In accordance with para. 2 Cl. 5 of the Russian Federal
Law “On consumer rights protection”, the manufacturer
hereby assigns the use period of the present device to be
7 years from the date of production under the condition
that the present device is used in strict compliance with
the present manual and applicable technical standards.
Accessories
The oven comes equipped with a variety of accessories.
Always follow directions given for use of the accessories.
Glass Tray
1. Do not operate the oven without Roller Ring and Glass
Tray in place.
2. Never use another type of glass tray than the one special-
ly designed for this oven.
3. If Glass Tray is hot, let it to cool before cleaning or placing
in water.
4. Glass Tray can turn in either direction.
5. If the food or cooking vessel on Glass Tray touches the
oven walls and make the turntable stop rotating, the
turntable will automatically rotate in the opposite direction.
This is normal.
6. Do not cook foods directly on Glass Tray.
Roller Ring
1. Roller Ring and the oven floor should be cleaned frequent-
ly to prevent noise and build-up of remaining food.
2. Roller Ring must always be used for cooking together with
Glass Tray.
English
Important information, English, 1) cooking times
2) small quantities of foods, 3) eggs, 4) piercing skin, 5) meat thermometer, 6) liquids, 7) paper/plastic,  utensils/foil Чат поддержки
- Изображение
- Текст
English
— Eng-4 —
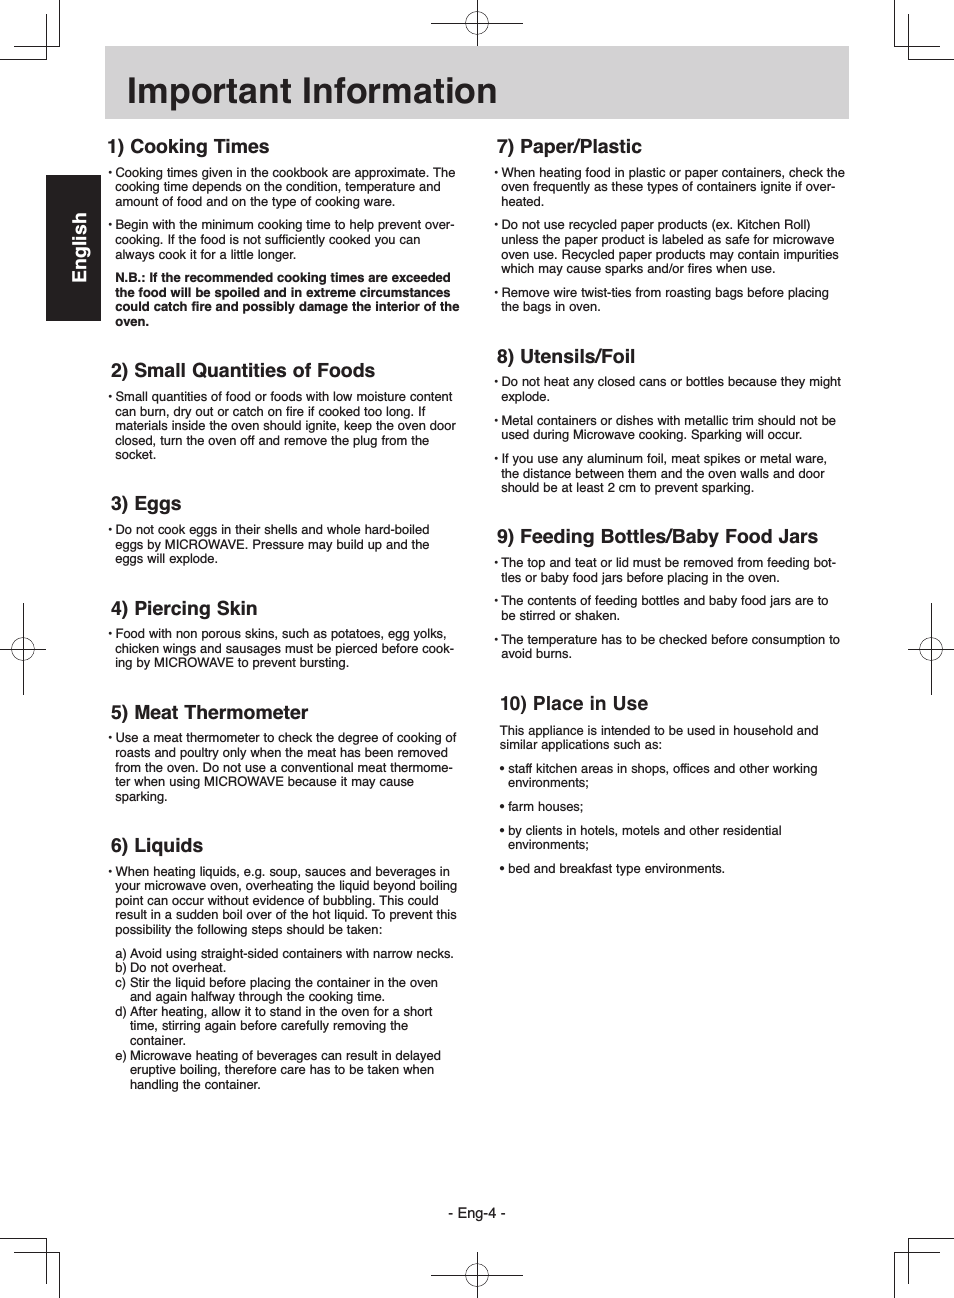
Important Information
1) Cooking Times
• Cooking times given in the cookbook are approximate. The
cooking time depends on the condition, temperature and
amount of food and on the type of cooking ware.
• Begin with the minimum cooking time to help prevent over-
cooking. If the food is not sufficiently cooked you can
always cook it for a little longer.
N.B.: If the recommended cooking times are exceeded
the food will be spoiled and in extreme circumstances
could catch fire and possibly damage the interior of the
oven.
2) Small Quantities of Foods
• Small quantities of food or foods with low moisture content
can burn, dry out or catch on fire if cooked too long. If
materials inside the oven should ignite, keep the oven door
closed, turn the oven off and remove the plug from the
socket.
3) Eggs
• Do not cook eggs in their shells and whole hard-boiled
eggs by MICROWAVE. Pressure may build up and the
eggs will explode.
4) Piercing Skin
• Food with non porous skins, such as potatoes, egg yolks,
chicken wings and sausages must be pierced before cook-
ing by MICROWAVE to prevent bursting.
5) Meat Thermometer
• Use a meat thermometer to check the degree of cooking of
roasts and poultry only when the meat has been removed
from the oven. Do not use a conventional meat thermome-
ter when using MICROWAVE because it may cause
sparking.
6) Liquids
• When heating liquids, e.g. soup, sauces and beverages in
your microwave oven, overheating the liquid beyond boiling
point can occur without evidence of bubbling. This could
result in a sudden boil over of the hot liquid. To prevent this
possibility the following steps should be taken:
a) Avoid using straight-sided containers with narrow necks.
b) Do not overheat.
c) Stir the liquid before placing the container in the oven
and again halfway through the cooking time.
d) After heating, allow it to stand in the oven for a short
time, stirring again before carefully removing the
container.
e) Microwave heating of beverages can result in delayed
eruptive boiling, therefore care has to be taken when
handling the container.
7) Paper/Plastic
• When heating food in plastic or paper containers, check the
oven frequently as these types of containers ignite if over-
heated.
• Do not use recycled paper products (ex. Kitchen Roll)
unless the paper product is labeled as safe for microwave
oven use. Recycled paper products may contain impurities
which may cause sparks and/or fires when use.
• Remove wire twist-ties from roasting bags before placing
the bags in oven.
Utensils/Foil
• Do not heat any closed cans or bottles because they might
explode.
• Metal containers or dishes with metallic trim should not be
used during Microwave cooking. Sparking will occur.
• If you use any aluminum foil, meat spikes or metal ware,
the distance between them and the oven walls and door
should be at least 2 cm to prevent sparking.
9) Feeding Bottles/Baby Food Jars
• The top and teat or lid must be removed from feeding bot-
tles or baby food jars before placing in the oven.
• The contents of feeding bottles and baby food jars are to
be stirred or shaken.
• The temperature has to be checked before consumption to
avoid burns.
1
2
3
4
5
6
7
8
9
0
—
=
~
!
10) Place in Use
This appliance is intended to be used in household and
similar applications such as:
• staff kitchen areas in shops, offices and other working
environments;
• farm houses;
• by clients in hotels, motels and other residential
environments;
• bed and breakfast type environments.
English
English
— Eng-5 —
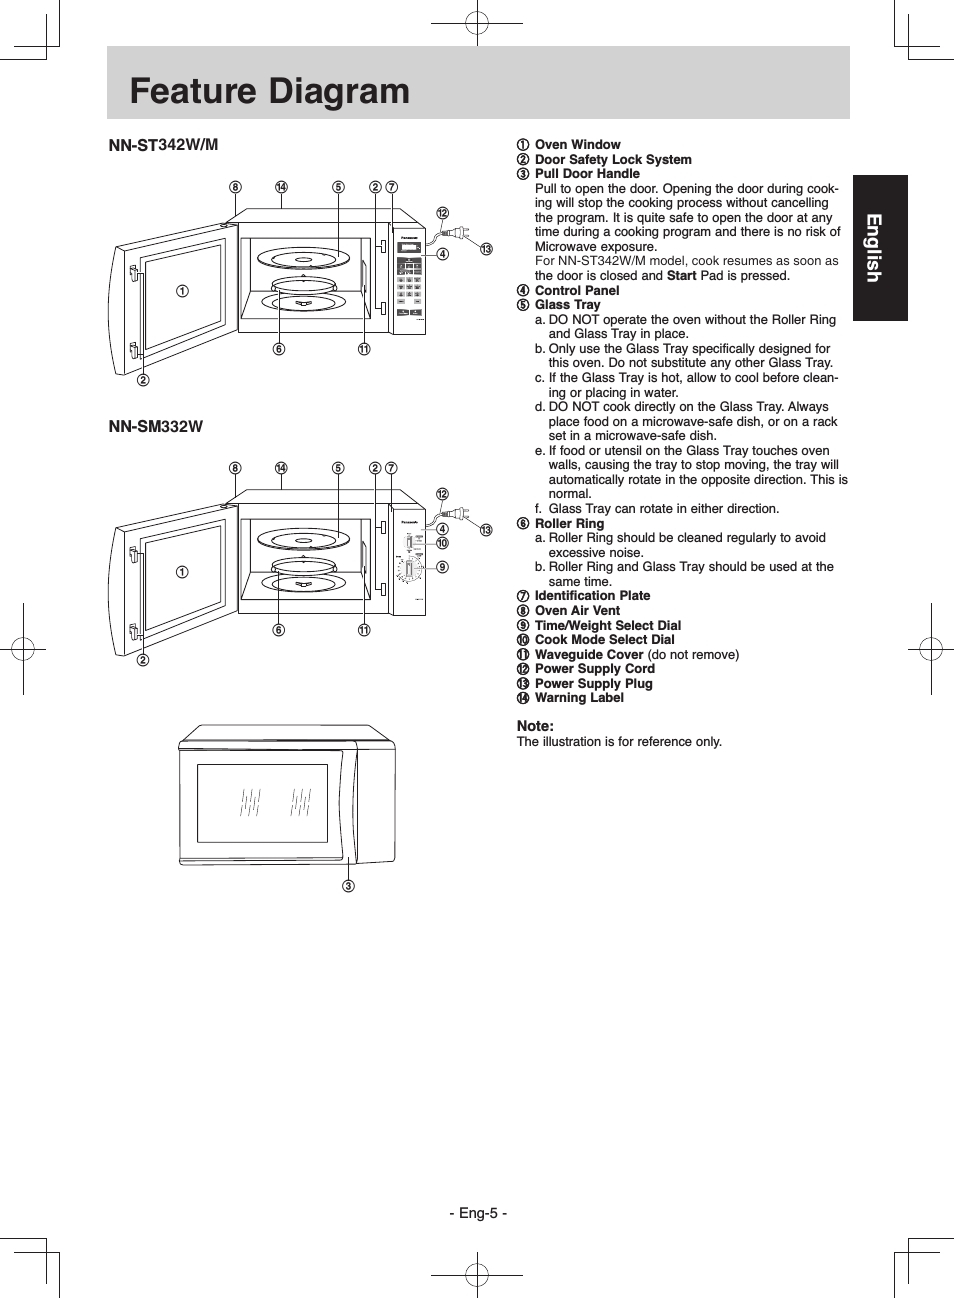
Feature Diagram
1 Oven Window
2 Door Safety Lock System
3 Pull Door Handle
Pull to open the door. Opening the door during cook-
ing will stop the cooking process without cancelling
the program. It is quite safe to open the door at any
time during a cooking program and there is no risk of
Microwave exposure.
For NN-ST340W model, cook resumes as soon as
the door is closed and Start Pad is pressed.
4 Control Panel
5 Glass Tray
a. DO NOT operate the oven without the Roller Ring
and Glass Tray in place.
b. Only use the Glass Tray specifically designed for
this oven. Do not substitute any other Glass Tray.
c. If the Glass Tray is hot, allow to cool before clean-
ing or placing in water.
d. DO NOT cook directly on the Glass Tray. Always
place food on a microwave-safe dish, or on a rack
set in a microwave-safe dish.
e. If food or utensil on the Glass Tray touches oven
walls, causing the tray to stop moving, the tray will
automatically rotate in the opposite direction. This is
normal.
f. Glass Tray can rotate in either direction.
6 Roller Ring
a. Roller Ring should be cleaned regularly to avoid
excessive noise.
b. Roller Ring and Glass Tray should be used at the
same time.
7 Identification Plate
8 Oven Air Vent
9 Time/Weight Select Dial
0 Cook Mode Select Dial
— Waveguide Cover (do not remove)
= Power Supply Cord
~ Power Supply Plug
! Warning Label
Note:
The illustration is for reference only.
NN-ST340W
=
1
2
5
7!
8
2
6
—
4
~
NN-SM330W
=
1
2
5
7!
8
2
6
—
~
9
4
0
3
332W
342W/M
For NN-ST342W/M model, cook resumes as soon as
1
8
7
n
5
6
4
m
l
k
2
2
1
8
7
n
5
6
4
j
9
m
l
k
2
2
3
English
English
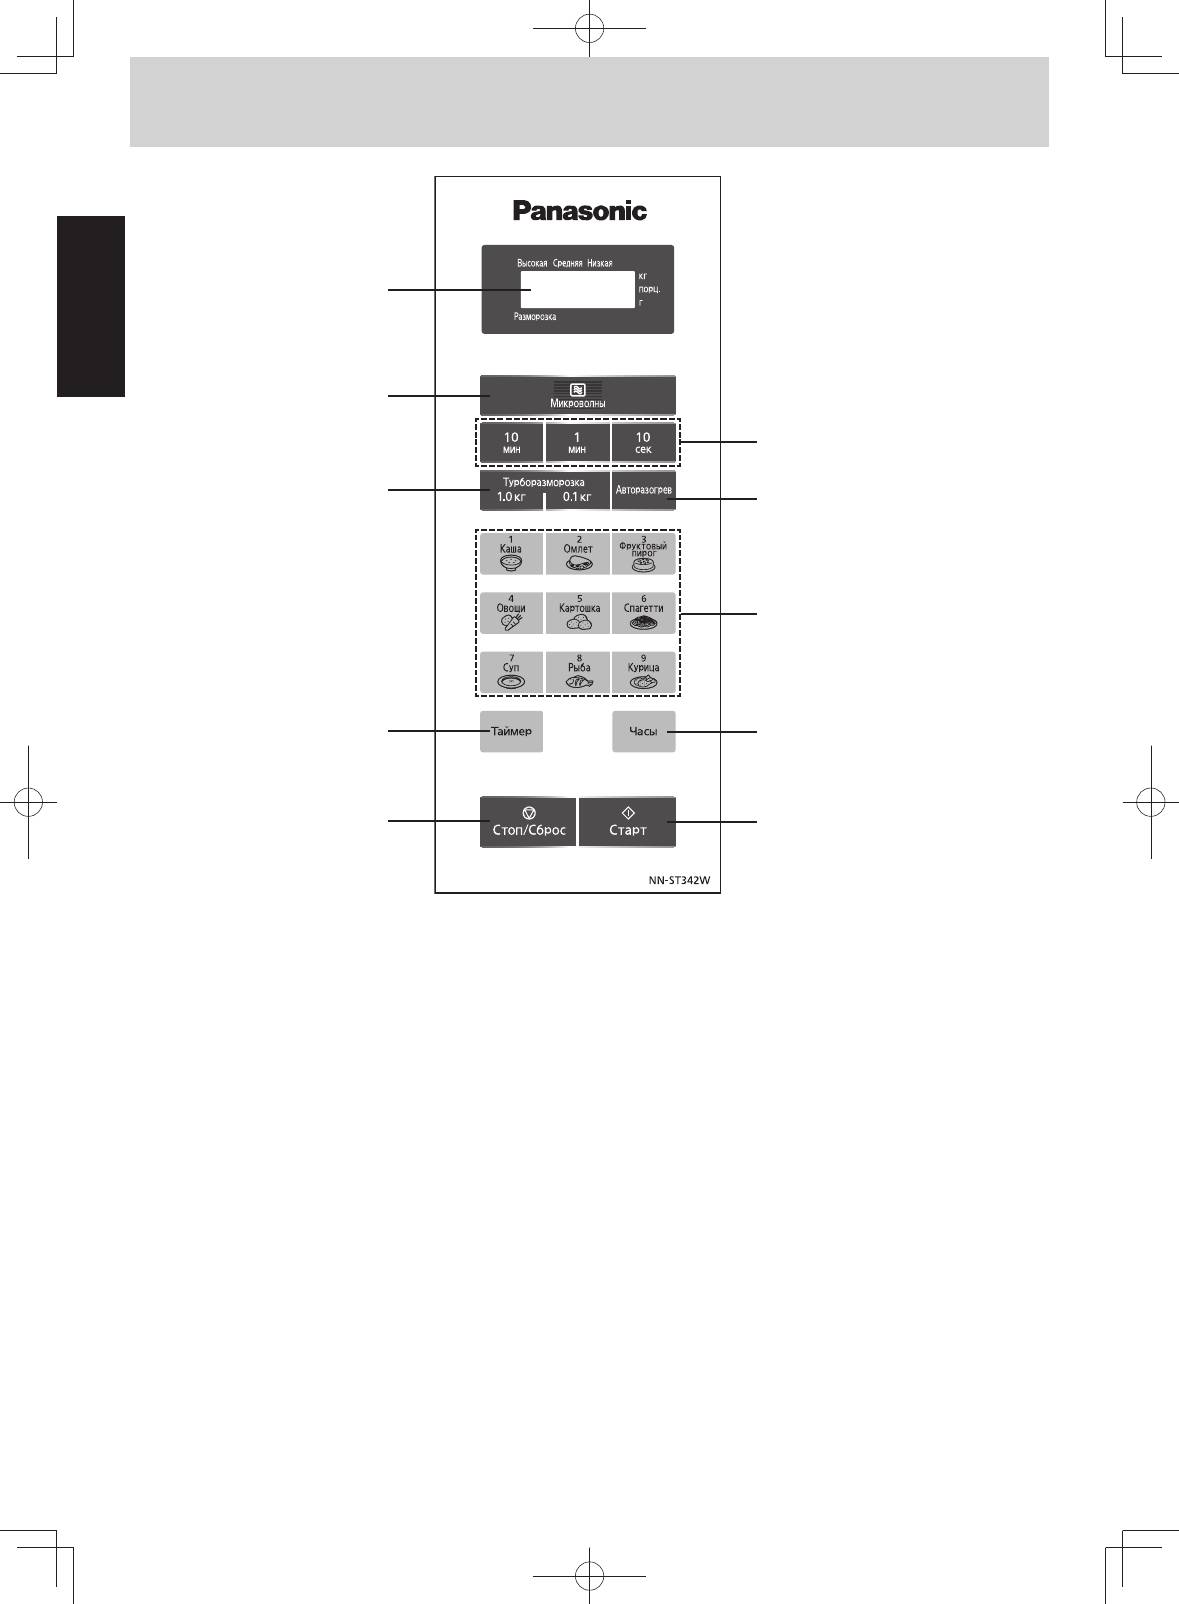
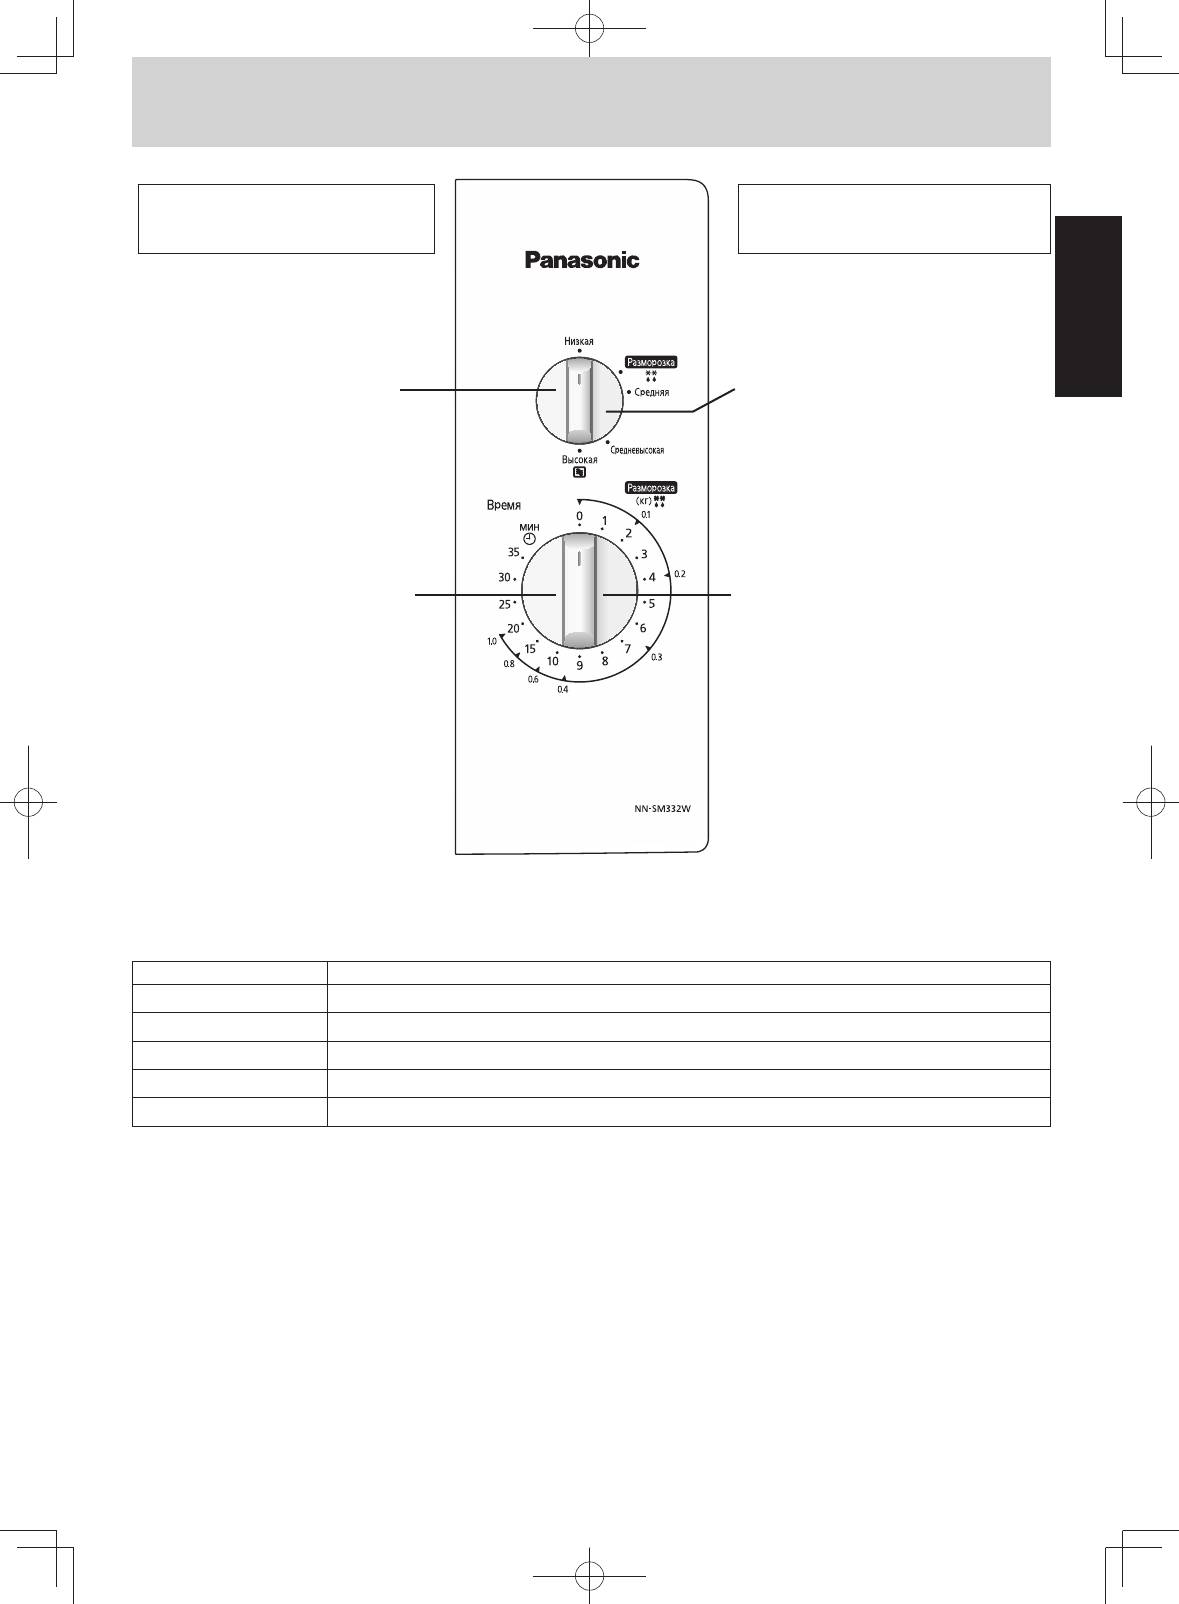
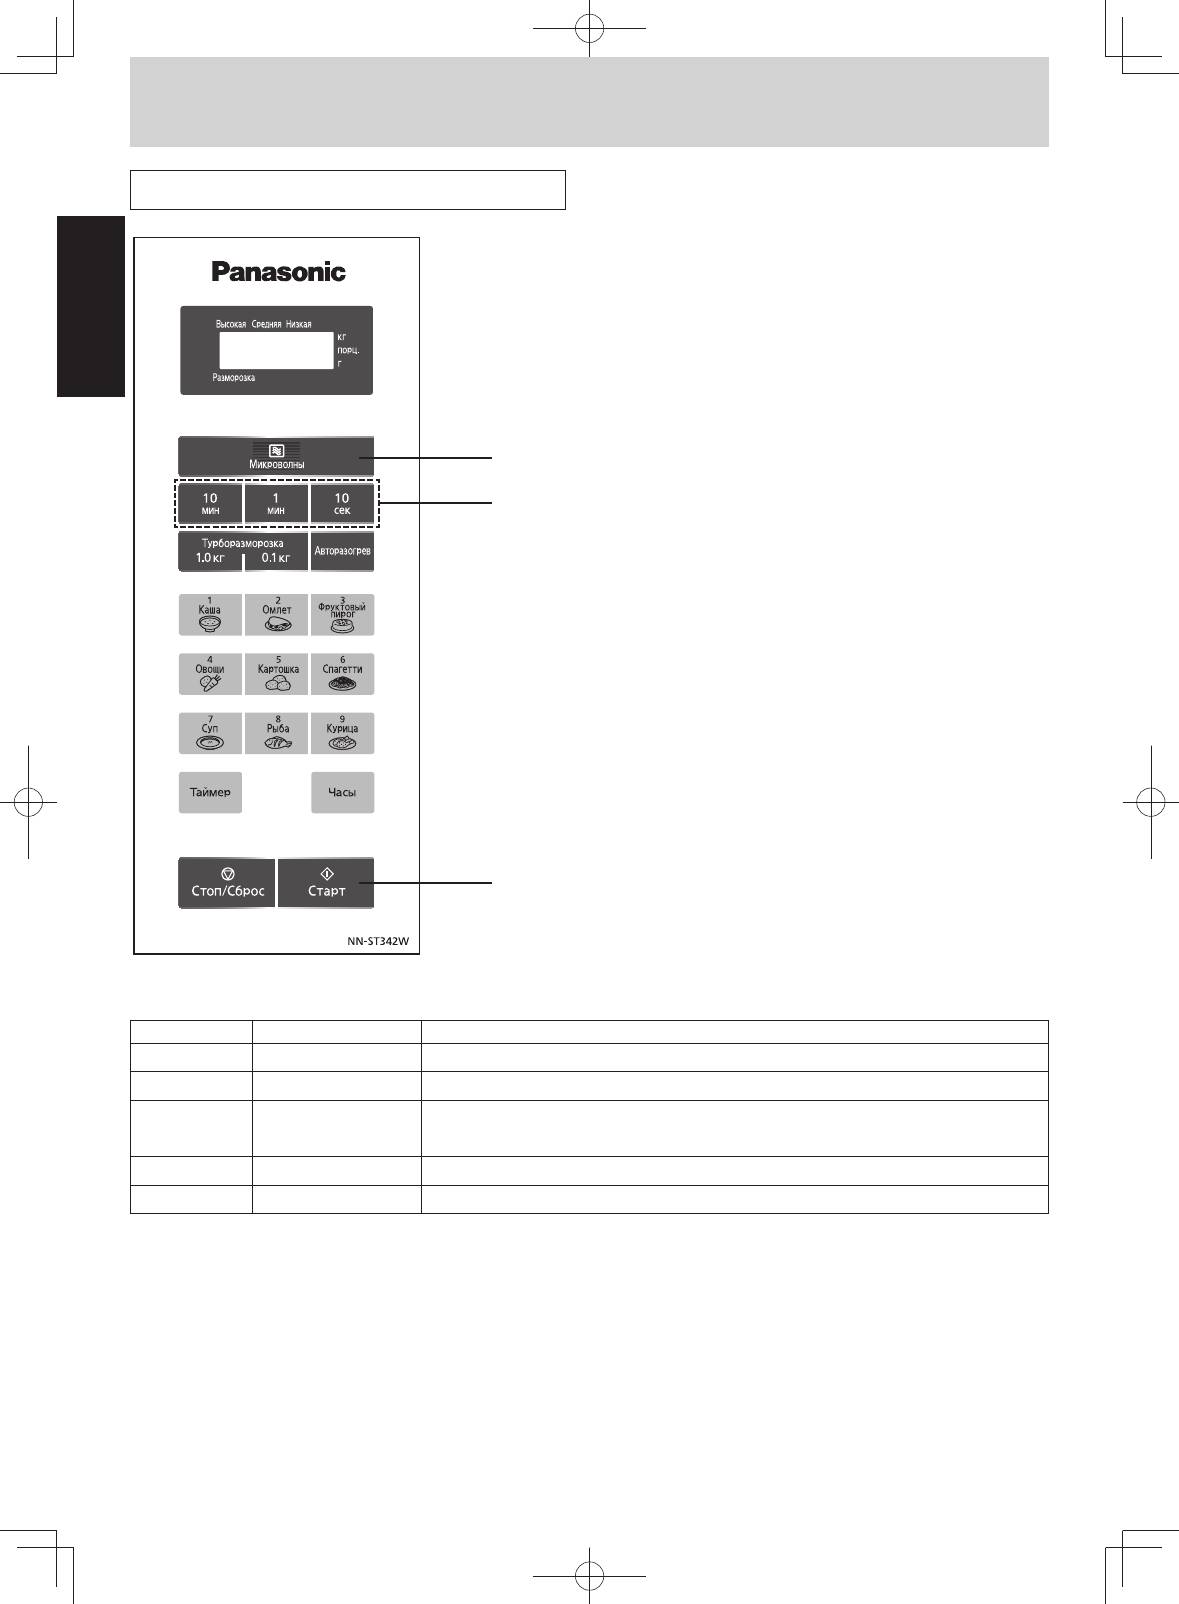
Control Panel
(NN-ST340W)
— Eng-6 —
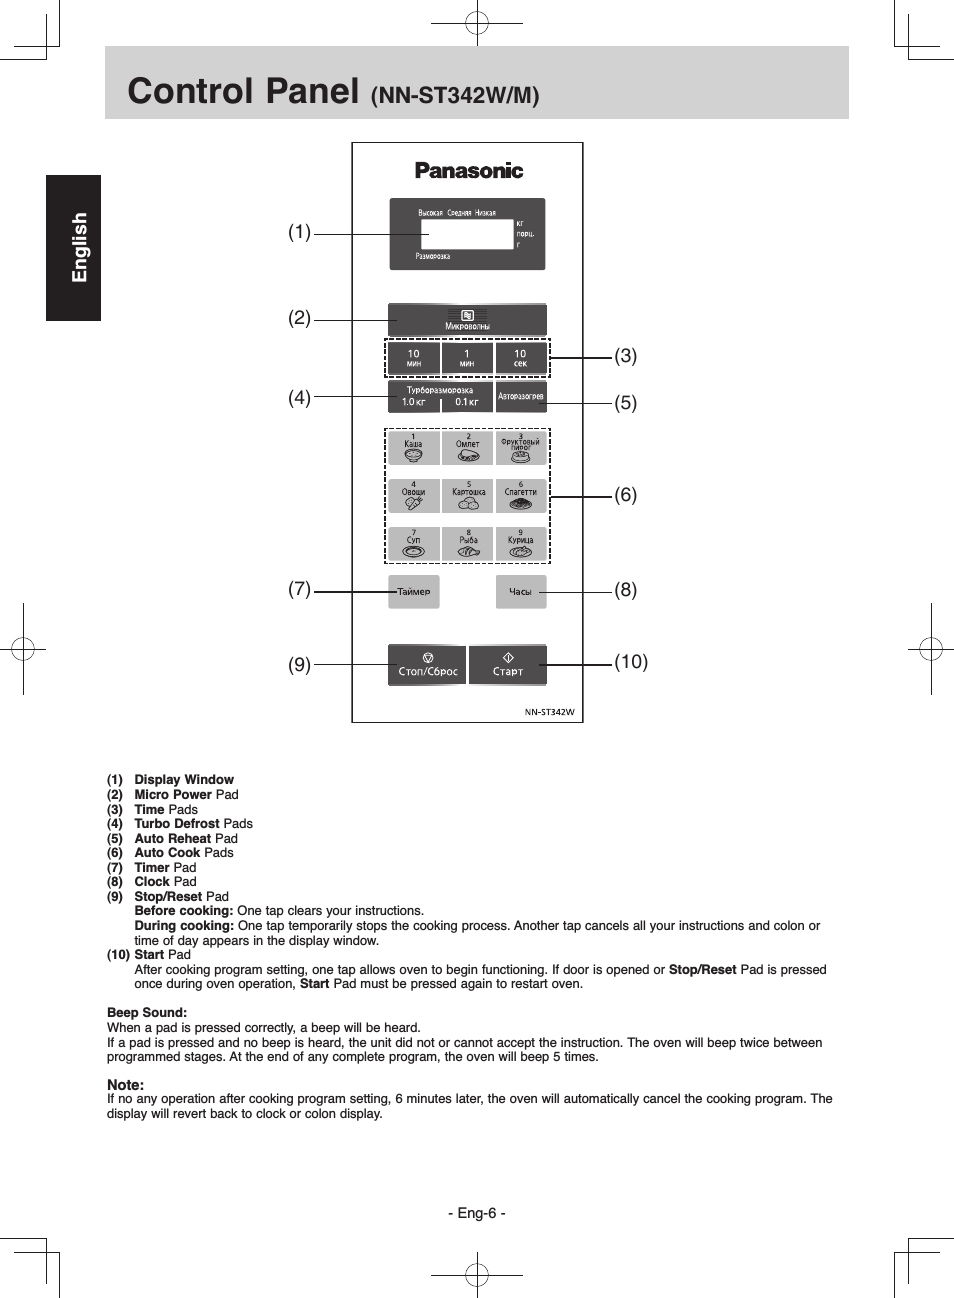
(1) Display Window
(2) Micro Power Pad
(3) Time Pads
(4) Turbo Defrost Pads
(5) Auto Reheat Pad
(6) Auto Cook Pads
(7) Timer Pad
(8) Clock Pad
(9) Stop/Reset Pad
Before cooking: One tap clears your instructions.
During cooking: One tap temporarily stops the cooking process. Another tap cancels all your instructions and colon or
time of day appears in the display window.
(10) Start Pad
After cooking program setting, one tap allows oven to begin functioning. If door is opened or Stop/Reset Pad is pressed
once during oven operation, Start Pad must be pressed again to restart oven.
Beep Sound:
When a pad is pressed correctly, a beep will be heard.
If a pad is pressed and no beep is heard, the unit did not or cannot accept the instruction. The oven will beep twice between
programmed stages. At the end of any complete program, the oven will beep 5 times.
Note:
If no any operation after cooking program setting, 6 minutes later, the oven will automatically cancel the cooking program. The
display will revert back to clock or colon display.
(1)
(2)
(4)
(7)
(3)
(5)
(8)
(9)
(10)
(6)
342W/M)
342W
(1)
(2)
(4)
(7)
(9)
(3)
(5)
(6)
(8)
(10)
English
English
— Eng-7 —
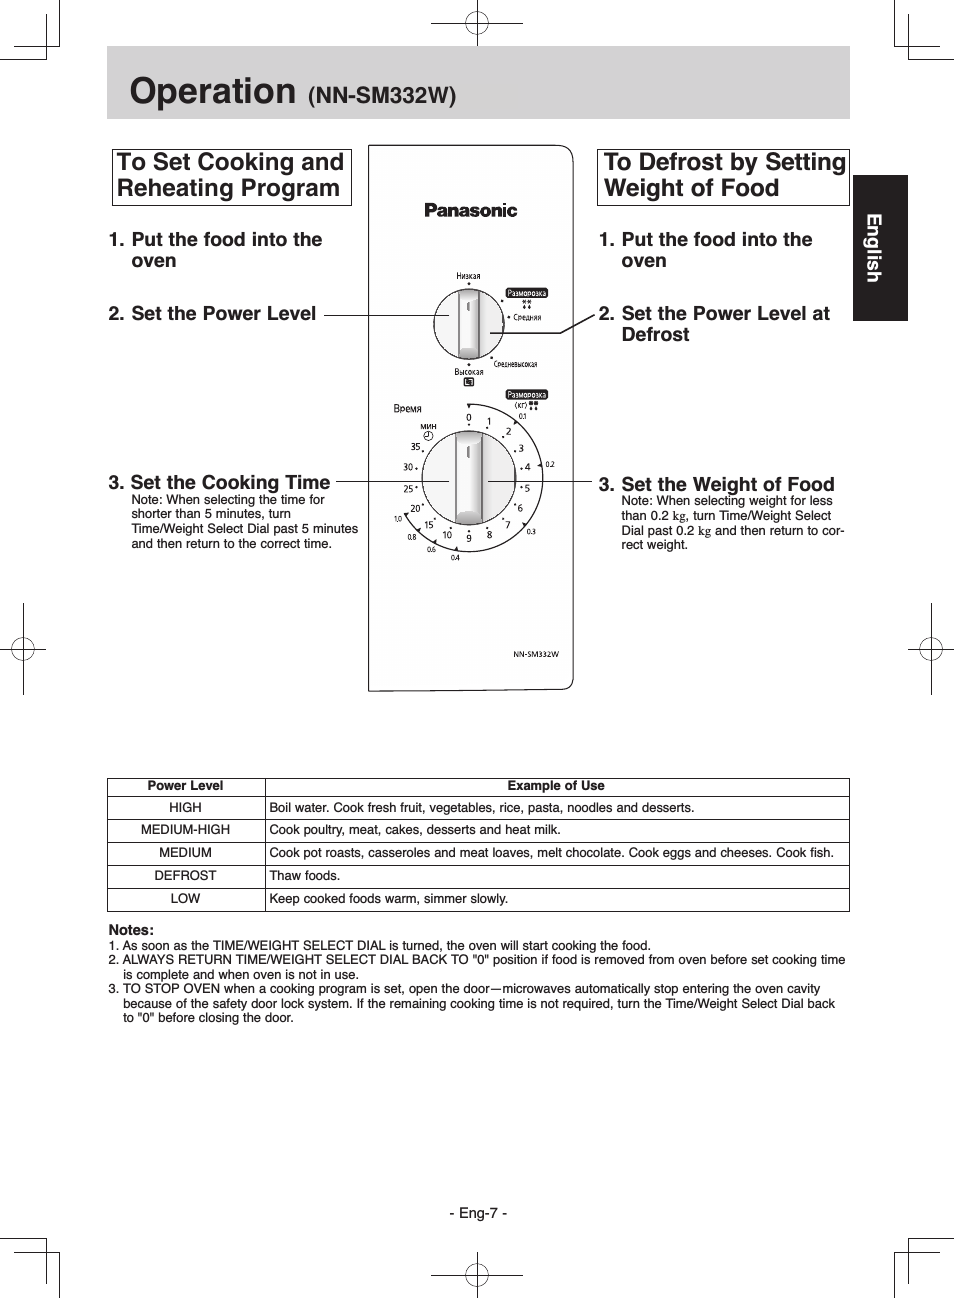
Operation
(NN-SM330W)
3. Set the Cooking Time
Note: When selecting the time for
shorter than 5 minutes, turn
Time/Weight Select Dial past 5 minutes
and then return to the correct time.
2. Set the Power Level
2. Set the Power Level at
Defrost
3. Set the Weight of Food
Note: When selecting weight for less
than 0.2 kg, turn Time/Weight Select
Dial past 0.2 kg and then return to cor-
rect weight.
Notes:
1. As soon as the TIME/WEIGHT SELECT DIAL is turned, the oven will start cooking the food.
2. ALWAYS RETURN TIME/WEIGHT SELECT DIAL BACK TO «0» position if food is removed from oven before set cooking time
is complete and when oven is not in use.
3. TO STOP OVEN when a cooking program is set, open the door—microwaves automatically stop entering the oven cavity
because of the safety door lock system. If the remaining cooking time is not required, turn the Time/Weight Select Dial back
to «0» before closing the door.
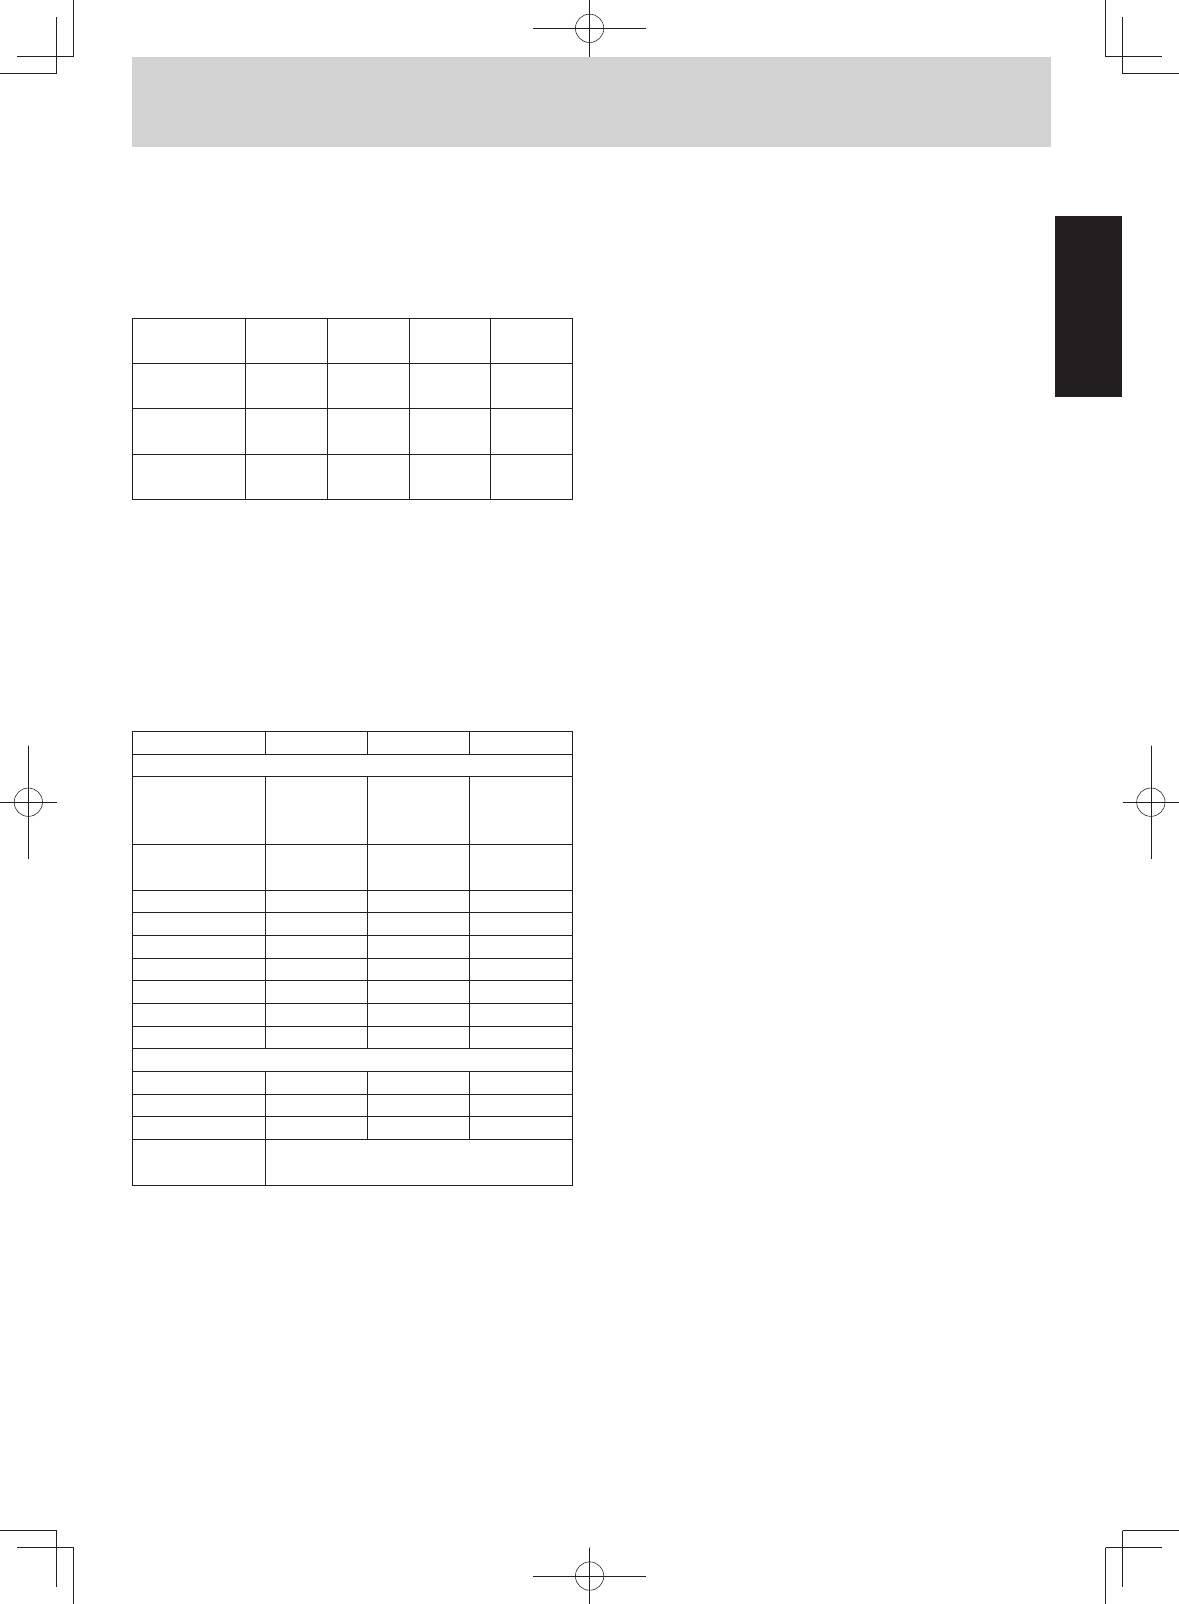
Power Level
Example of Use
HIGH
Boil water. Cook fresh fruit, vegetables, rice, pasta, noodles and desserts.
MEDIUM-HIGH
Cook poultry, meat, cakes, desserts and heat milk.
MEDIUM
Cook pot roasts, casseroles and meat loaves, melt chocolate. Cook eggs and cheeses. Cook fish.
DEFROST
Thaw foods.
LOW
Keep cooked foods warm, simmer slowly.
To Set Cooking
Program
To Defrost by Setting
Weight of Food
1. Put the food into the
oven
1. Put the food into the
oven
332W)
To Set Cooking and
Reheating Program
English
English
— Eng-8 —
Operation
(NN-ST340W)
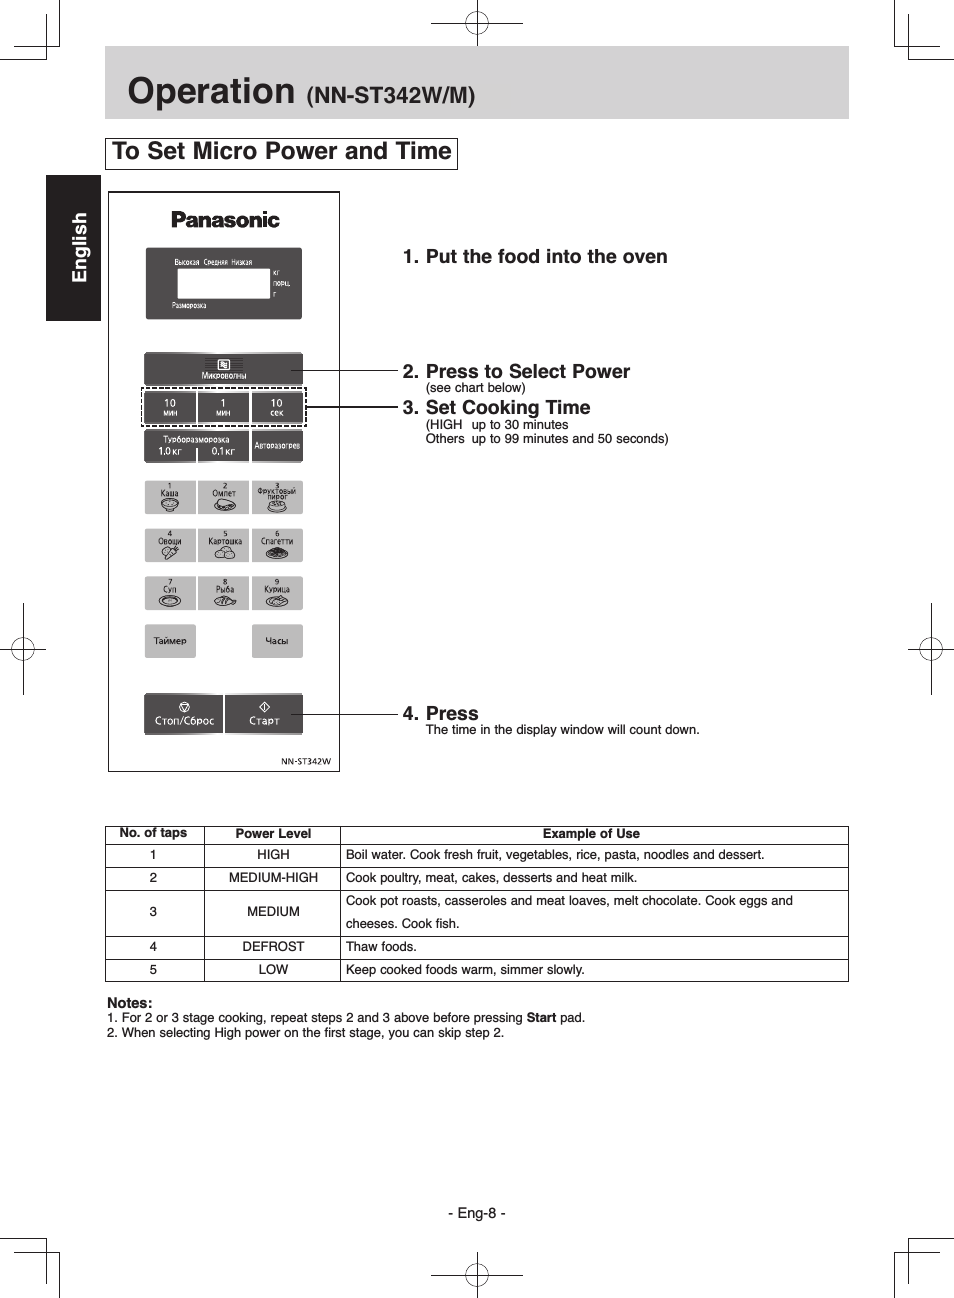
To Set Micro Power and Time
Notes:
1. For 2 or 3 stage cooking, repeat steps 2 and 3 above before pressing Start pad.
2. When selecting High power on the first stage, you can skip step 2.
No. of taps
Power Level
Example of Use
1
HIGH
Boil water. Cook fresh fruit, vegetables, rice, pasta, noodles and dessert.
2
MEDIUM-HIGH
Cook poultry, meat, cakes, desserts and heat milk.
3
MEDIUM
Cook pot roasts, casseroles and meat loaves, melt chocolate. Cook eggs and
cheeses. Cook fish.
4
DEFROST
Thaw foods.
5
LOW
Keep cooked foods warm, simmer slowly.
1. Put the food into the oven
2. Press to Select Power
(see chart below)
3. Set Cooking Time
(HIGH up to 30 minutes
Others up to 99 minutes and 50 seconds)
4. Press
The time in the display window will count down.
342W/M)
342W
3. Set Cooking Time
(HIGH up to 30 minutes
Others up to 99 minutes and 50 seconds)
4. Press
The time in the display window will count down.
2. Press to Select Power
(see chart below)
English
06:27
PANASONIC NN GT 261 — подробная инструкция на микроволновку
04:03
Panasonic NN ST 271 и 251 — подробная инструкция на микроволновки
06:21
Panasonic NN ST 342 — подробная инструкция на микроволновку
04:51
Микроволновая печь Panasonic NN ST25HB
02:19
Panasonic Microwave NNST342W reviewed by a product expert — Appliances Online
13:11
ОНЛАЙН ТРЕЙД.РУ — Микроволновая печь СОЛО Panasonic NN-ST342WZPE, Код товара: 115063
Нажмите на кнопку для помощи
Раздел: Бытовая, кухонная техника, электроника и оборудование
Тип: Микроволновая Печь
Характеристики, спецификации
Расположение:
отдельно стоящая
Размеры (ШxВxГ):
48.5×28.7×40 cм
Внутреннее покрытие камеры:
эмаль
Мощность микроволн:
800 Вт
Тип управления:
электронное
Автоматическое приготовление:
есть, 9 рецептов
Автоматический разогрев:
нет
Автоматическая разморозка:
есть
Возможность внесения своих рецептов в память:
нет
Программирование процесса приготовления:
нет
Автоматическое поддержание заданной температуры:
нет
Дополнительные программы:
функция быстрой разморозки
Инструкция к Микроволновой Печи Panasonic NN ST342M
Operating Instructions and Cookbook
Инструкция по эксплуатации и рецепты приготовления блюд
Інструкція з експлуатації та книга рецептів
Microwave Oven
Микроволновая печь
Мікрохвильова піч
For home use
Для домашнего использования
Для домашнього використання
Models No.
Models: NN-ST340W
NN-ST342 W/M
NN-SM332W
NN-SM330W
Please read these instructions carefully before using this product, and save this manual for future use.
Before operating this oven, please read these instructions completely and keep for future reference.
Перед началом эксплуатации данной микроволновой печи, пожалуйста, ознакомьтесь с инструкцией
Пожалуйста, перед началом эксплуатации данного продукта внимательно прочитайте инструкцию по эксплуатации
и сохраните ее для использования в дальнейшем.
и сохраните ее для использования в дальнейшем.
Перед використанням цієї печі, будь ласка, повністю прочитайте ці інструкції і збережіть їх для
Будь ласка, перед початком експлуатації цього продукту уважно прочитайте інструкцію з експлуатації й збережіть її
подальших довідок.
для використання у майбутньому.

English

Table of Contents
Before Operating
Installation and Connection……………………………………………………………………………………….…………………………………..2
English
English
Safety Instructions ……………………………………………………………………………………………………………………………………….3
Important Information…………………………………………………………………………………………….……………………………………..4
Feature Diagram ………………………………………………………………………………………………….………………………………………5
Control Panel (NN-ST340W) …………………………………………………………………………………………………………………………6
342W/M)
Operation and Hints
For NN-SM330W:
332W:
To Cook/Reheat/Defrost by MICRO POWER AND TIME…………………………………………………………………………………..7
For NN-ST340W:
342W/M:
To Set Micro Power and Time……………………………………………………………………………………….……………………………….8
To Use Turbo Defrost……………………………………………………………………………………………..…………………………………….9
Clock Setting……………………………………………………………………………………………………………………………………………..10
To Use Child Safety Lock………………………………………………………………………………………….…………………………………10
To Reheat/Cooking Using Auto Cook Pads ……………………………………………………………………………..………………..11-13
Using Auto Cook Pads ……
Timer Setting (Kitchen Timer/Standing Time/Delay Time) ……………………………………………………………….……………….14
Quick Guide (NN-ST340W) …………………………………………………………………………………………..…………………………….18
342W/M)
Maintenance
Before Requesting Service ………………………………………………………………………………………………………………………….15
Care of your Microwave Oven ……………………………………………………………………………………….…………………………….16
Technical Specifications………………………………………………………………………………………….…………………………………..17
Cooking Guide
Introduction …………………………………………………………………………………………………….…………………………………………19
Cookware and Utensil Guide ………………………………………………………………………………………..……………………………..20
Microwave Cooking & Techniques…………………………………………………………………………………….……………………..21-22
To Reheat by Micro Power and Time………………………………………………………………………………….…………………………23
Defrosting Guidelines/Turbo Defrost………………………………………………………………………………..……………………………24
Defrosting Tips and Techniques…………………………………………………………………………………….……………………………..25
Microwave Recipe Preparation and Techniques ………………………………………………………………………………………..26-27
Common Queries Answered…………………………………………………………………………………………..……………………………27
Everyday Basics ………………………………………………………………………………………………….…………………………………….28
Fish and Shellfish……………………………………………………………………………………………….………………………………………29
Poultry………………………………………………………………………………………………………………………………………………….30-31
Main Fare Meats………………………………………………………………………………………………….………………………………..32-33
Vegetable Varieties ………………………………………………………………………………………………………………………………..34-36
Rice, Pasta and Cereal…………………………………………………………………………………………………………………………..37-38
Desserts ………………………………………………………………………………………………………..………………………………………….39
— Eng-1 —
Installation and Connection
Examine your microwave oven
WARNING
Unpack the oven, remove all packing material, and examine
1. The door seals and door seal areas should be cleaned
the oven for any damage such as dents, broken door latches
with a damp cloth.
or cracks in the door. If you find any damage, notify your
The appliance should be inspected for damage to the door
dealer immediately. Do not install a damaged microwave
seals and door seal areas and if these areas are damaged
oven.
the appliance should not be operated until it has been
repaired by a service technician trained by the manufac-
turer.
Earthing instructions
English
English
2. Do not operate this appliance if it has a damaged
IMPORTANT: THIS UNIT HAS TO BE PROPERLY EARTH-
CORD OR PLUG, if it is not working properly, or if it has
ED FOR PERSONAL SAFETY.
been damaged or dropped.
If your AC outlet is not earthed, it is the personal responsibili-
If the supply cord of this appliance is damaged, it must be
ty of the customer to have it replaced with a properly earthed
replaced by the manufacturer or its service agent or a sim-
wall socket.
ilarly qualified person in order to avoid a hazard.
Operation voltage
3. Do not attempt to tamper with or make any adjustments or
repairs to the door, control panel housing, safety interlock
The voltage has to be the same as specified on the label on
switches or any other part of the oven. Do not remove the
the oven. If a higher voltage than specified is used, it may
outer panel from the oven which gives protection against
cause a fire or other damages.
exposure to microwave energy.
It is dangerous for anyone other than a service techni-
cian trained by the manufacturer to perform repair
Placement of the Oven
service.
1. Place the oven on a flat and stable surface, more than 85
4. The oven light must be replaced by a service technician
cm above the floor.
trained by the manufacturer. When it becomes necessary
2. When this oven is installed, it should be easy to isolate the
to replace the oven light, please consult your dealer.
appliance from the electricity supply by pulling out the plug
5. Liquids or other foods must not be heated in sealed con-
or operating a circuit breaker.
tainers since they are liable to explode.
3. For proper operation, ensure a sufficient air circulation for
6. Only allow children to use the oven without supervision
the oven.
when adequate instructions have been given so that the
Counter-top use:
child is able to use the oven in a safe way and under-
Allow 15 cm of space on the top of the oven, 10 cm at
stands the hazards of improper use.
back and 10 cm on both sides. If one side of the oven is
7. This appliance is not intended for use by persons (includ-
placed flush to a wall, the other side or top must not be
ing children) with reduced physical, sensory or mental
blocked.
capabilities, or lack of experience and knowledge, unless
they have been given supervision or instruction concerning
use of the appliance by a person responsible for their
safety.
15 cm
8. Young children should be supervised to ensure that they
do not play with the appliance.
10 cm
10 cm
Attention!
This product is designed to plug to AC power outlet with (the
third) safety earth wire. For your safety, do not ignore that
OPEN
safety earth wire, because in such case this product does
not provide with conditions of electric shock defense, fore-
saw by product’s design. You have to ask qualified specialist
Counter-top
to install required outlet as it is shown on the picture.
4. Do not place this oven near an electric or gas cooker
earth
range.
neutral
5. The feet should not be removed.
phase
6. This oven is only for household usage. Do not use out-
doors.
7. Avoid using the microwave oven in high humidity.
8. The power cord should not touch the outside of the oven.
earth
Keep the cord away from hot surfaces. Do not let the cord
hang over the edge of table or work top. Do not immerse
cord, plug or oven in water.
phase
9. Do not block the air vents. If they are blocked during oper-
ation, the oven may be overheated or damaged. When
using any cloth over the oven, the air intake and exhaust
neutral
should not be blocked.
10.The microwave oven shall not be placed in a cabinet.
earth
— Eng-2 —

Safety Instructions
Use of your oven
Maintenance of your oven
1. Do not use the oven for any reason other than the prepa-
1. Service
ration of food. This oven is specifically designed to heat or
WHEN YOUR OVEN REQUIRES SERVICING call your
cook food. Do not use this oven to heat chemicals or other
local Panasonic engineer (Customer Support). It is haz-
English
English
non-food products.
ardous for anyone other than a competent person to carry
out any service or repair operation which involves the
2. Before use, check utensils/containers are suitable for use
removal of a cover which gives protection against expo-
in microwave ovens.
sure to microwave energy.
3. Do not attempt to use this microwave oven to dry newspa-
2. Door Seals
per, clothing or any other materials.
Do not attempt to tamper with or make any adjustments or
They may catch on fire.
repairs to door, control panel housing, safety interlock
4. When the oven is not being use, do not store any objects
switches or any other part of the oven. Do not remove
other than oven accessories inside the oven in case it is
outer panel from oven.
accidentally turned on.
The door seals and door seal areas should always be kept
clean – use a damp cloth.
5. The appliance shall not be operated by MICROWAVE
N.B. The appliance should be inspected for damage to the
WITHOUT FOOD IN THE OVEN, operation in this manner
door seals and door seal areas. If these areas are dam-
may damage the appliance.
aged the appliance should not be operated until it has
been repaired by a service technician trained by the man-
6. If smoke is observed, turn the Timer to zero or press
ufacturer.
Stop/Reset pad and leave the door closed. Disconnect the
power cord, or shut off power at the fuse or the circuit
3. Oven Light
breaker panel in order to stifle any flames.
The oven lamp must be replaced by a service technician
trained by the manufacturer. DO NOT attempt to remove
7. Appliances are not intended to be operated by means of an
the outer casing from the oven.
In accordance with para. 2 Cl. 5 of the Russian Federal
external timer or separate remote control system.
Law “On consumer rights protection”, the manufacturer
hereby assigns the use period of the present device to be
7 years from the date of production under the condition
In accordance with para. 2 Cl. 5 of the Russian Federal
that the present device is used in strict compliance with
Law “On consumer rights protection”, the manufacturer
the present manual and applicable technical standards.
hereby assigns the use period of the present device to be
7 years from the date of production under the condition
that the present device is used in strict compliance with
Accessories
the present manual and applicable technical standards.
The oven comes equipped with a variety of accessories.
Always follow directions given for use of the accessories.
Accessories
The oven comes equipped with a variety of accessories.
Glass Tray
Always follow directions given for use of the accessories.
1. Do not operate the oven without Roller Ring and Glass
Glass Tray
Tray in place.
2. Never use another type of glass tray than the one special-
1. Do not operate the oven without Roller Ring and Glass
ly designed for this oven.
Tray in place.
3. If Glass Tray is hot, let it to cool before cleaning or placing
2. Never use another type of glass tray than the one special-
in water.
ly designed for this oven.
4. Glass Tray can turn in either direction.
3. If Glass Tray is hot, let it to cool before cleaning or placing
in water.
5. If the food or cooking vessel on Glass Tray touches the
4. Glass Tray can turn in either direction.
oven walls and make the turntable stop rotating, the
turntable will automatically rotate in the opposite direction.
5. If the food or cooking vessel on Glass Tray touches the
This is normal.
oven walls and make the turntable stop rotating, the
6. Do not cook foods directly on Glass Tray.
turntable will automatically rotate in the opposite direction.
This is normal.
Roller Ring
6. Do not cook foods directly on Glass Tray.
1. Roller Ring and the oven floor should be cleaned frequent-
Roller Ring
ly to prevent noise and build-up of remaining food.
2. Roller Ring must always be used for cooking together with
1. Roller Ring and the oven floor should be cleaned frequent-
Glass Tray.
ly to prevent noise and build-up of remaining food.
2. Roller Ring must always be used for cooking together with
Glass Tray.
— Eng-3 —

Important Information
1) Cooking Times
7) Paper/Plastic
• Cooking times given in the cookbook are approximate. The
• When heating food in plastic or paper containers, check the
cooking time depends on the condition, temperature and
oven frequently as these types of containers ignite if over-
amount of food and on the type of cooking ware.
heated.
• Begin with the minimum cooking time to help prevent over-
• Do not use recycled paper products (ex. Kitchen Roll)
cooking. If the food is not sufficiently cooked you can
unless the paper product is labeled as safe for microwave
always cook it for a little longer.
oven use. Recycled paper products may contain impurities
which may cause sparks and/or fires when use.
English
N.B.: If the recommended cooking times are exceeded
the food will be spoiled and in extreme circumstances
• Remove wire twist-ties from roasting bags before placing
could catch fire and possibly damage the interior of the
the bags in oven.
oven.
Utensils/Foil
2) Small Quantities of Foods
• Do not heat any closed cans or bottles because they might
• Small quantities of food or foods with low moisture content
explode.
can burn, dry out or catch on fire if cooked too long. If
• Metal containers or dishes with metallic trim should not be
materials inside the oven should ignite, keep the oven door
used during Microwave cooking. Sparking will occur.
closed, turn the oven off and remove the plug from the
socket.
• If you use any aluminum foil, meat spikes or metal ware,
the distance between them and the oven walls and door
should be at least 2 cm to prevent sparking.
3) Eggs
• Do not cook eggs in their shells and whole hard-boiled
9) Feeding Bottles/Baby Food Jars
eggs by MICROWAVE. Pressure may build up and the
eggs will explode.
• The top and teat or lid must be removed from feeding bot-
tles or baby food jars before placing in the oven.
• The contents of feeding bottles and baby food jars are to
4) Piercing Skin
be stirred or shaken.
• Food with non porous skins, such as potatoes, egg yolks,
• The temperature has to be checked before consumption to
chicken wings and sausages must be pierced before cook-
avoid burns.
ing by MICROWAVE to prevent bursting.
5) Meat Thermometer
• Use a meat thermometer to check the degree of cooking of
roasts and poultry only when the meat has been removed
from the oven. Do not use a conventional meat thermome-
ter when using MICROWAVE because it may cause
sparking.
6) Liquids
• When heating liquids, e.g. soup, sauces and beverages in
your microwave oven, overheating the liquid beyond boiling
point can occur without evidence of bubbling. This could
result in a sudden boil over of the hot liquid. To prevent this
possibility the following steps should be taken:
a) Avoid using straight-sided containers with narrow necks.
b) Do not overheat.
c) Stir the liquid before placing the container in the oven
and again halfway through the cooking time.
d) After heating, allow it to stand in the oven for a short
time, stirring again before carefully removing the
container.
e) Microwave heating of beverages can result in delayed
eruptive boiling, therefore care has to be taken when
handling the container.
— Eng-4 —
1
2
3
4
5
6
7
8
9
0
—
=
~
!
English
10) Place in Use
This appliance is intended to be used in household and
similar applications such as:
• staff kitchen areas in shops, offices and other working
environments;
• farm houses;
• by clients in hotels, motels and other residential
environments;
• bed and breakfast type environments.

Feature Diagram
English
— Eng-5 —
1
Oven Window
2
Door Safety Lock System
3
Pull Door Handle
Pull to open the door. Opening the door during cook-
ing will stop the cooking process without cancelling
the program. It is quite safe to open the door at any
time during a cooking program and there is no risk of
Microwave exposure.
For NN-ST340W model, cook resumes as soon as
the door is closed and Start Pad is pressed.
4
Control Panel
5
Glass Tray
a. DO NOT operate the oven without the Roller Ring
and Glass Tray in place.
b. Only use the Glass Tray specifically designed for
this oven. Do not substitute any other Glass Tray.
c. If the Glass Tray is hot, allow to cool before clean-
ing or placing in water.
d. DO NOT cook directly on the Glass Tray. Always
place food on a microwave-safe dish, or on a rack
set in a microwave-safe dish.
e. If food or utensil on the Glass Tray touches oven
walls, causing the tray to stop moving, the tray will
automatically rotate in the opposite direction. This is
normal.
f. Glass Tray can rotate in either direction.
6
Roller Ring
a. Roller Ring should be cleaned regularly to avoid
excessive noise.
b. Roller Ring and Glass Tray should be used at the
same time.
7
Identification Plate
8
Oven Air Vent
9
Time/Weight Select Dial
0
Cook Mode Select Dial
—
Waveguide Cover (do not remove)
=
Power Supply Cord
~
Power Supply Plug
!
NN-ST340W
Warning Label
Note:
The illustration is for reference only.
NN-SM330W
3
342W/M
87n5
2
l
m
4
For NN-ST342W/M model, cook resumes as soon as
1
6
k
2
332W
8
7n5
l
4
m
j
9
1
6
k
2
2
3
English
Control Panel (NN-ST340W)
342W/M)
(1)
(1)
English
English
(2)
(2)
(3)
(3)
(4)
(5)
(4)
(5)
(6)
(6)
(7)
(7)
(8)
(8)
(9) (10)
(9)
(10)
342W
(1) Display Window
(2) Micro Power Pad
(3) Time Pads
(4) Turbo Defrost Pads
(5) Auto Reheat Pad
(6) Auto Cook Pads
(7) Timer Pad
(8) Clock Pad
(9) Stop/Reset Pad
Before cooking: One tap clears your instructions.
During cooking: One tap temporarily stops the cooking process. Another tap cancels all your instructions and colon or
time of day appears in the display window.
(10) Start Pad
After cooking program setting, one tap allows oven to begin functioning. If door is opened or Stop/Reset Pad is pressed
once during oven operation, Start Pad must be pressed again to restart oven.
Beep Sound:
When a pad is pressed correctly, a beep will be heard.
If a pad is pressed and no beep is heard, the unit did not or cannot accept the instruction. The oven will beep twice between
programmed stages. At the end of any complete program, the oven will beep 5 times.
Note:
If no any operation after cooking program setting, 6 minutes later, the oven will automatically cancel the cooking program. The
display will revert back to clock or colon display.
— Eng-6 —
Operation (NN-SM330W)
332W)
To Set Cooking and
To Set Cooking
To Defrost by Setting
Reheating Program
Program
Weight of Food
English
English
1. Put the food into the
1. Put the food into the
oven
oven
2. Set the Power Level 2. Set the Power Level at
Defrost
3. Set the Cooking Time
3. Set the Weight of Food
Note: When selecting the time for
Note: When selecting weight for less
shorter than 5 minutes, turn
than 0.2 kg, turn Time/Weight Select
Time/Weight Select Dial past 5 minutes
Dial past 0.2 kg and then return to cor-
and then return to the correct time.
rect weight.
Power Level Example of Use
HIGH Boil water. Cook fresh fruit, vegetables, rice, pasta, noodles and desserts.
MEDIUM-HIGH Cook poultry, meat, cakes, desserts and heat milk.
MEDIUM Cook pot roasts, casseroles and meat loaves, melt chocolate. Cook eggs and cheeses. Cook fish.
DEFROST Thaw foods.
LOW Keep cooked foods warm, simmer slowly.
Notes:
1. As soon as the TIME/WEIGHT SELECT DIAL is turned, the oven will start cooking the food.
2. ALWAYS RETURN TIME/WEIGHT SELECT DIAL BACK TO «0» position if food is removed from oven before set cooking time
is complete and when oven is not in use.
3. TO STOP OVEN when a cooking program is set, open the door—microwaves automatically stop entering the oven cavity
because of the safety door lock system. If the remaining cooking time is not required, turn the Time/Weight Select Dial back
to «0» before closing the door.
— Eng-7 —
Operation (NN-ST340W)
342W/M)
To Set Micro Power and Time
1. Put the food into the oven
English
2. Press to Select Power
2. Press to Select Power
(see chart below)
3. Set Cooking Time
3. Set Cooking Time
(HIGH up to 30 minutes
(HIGH up to 30 minutes
Others up to 99 minutes and 50 seconds)
Others up to 99 minutes and 50 seconds)
4. Press
The time in the display window will count down.
4. Press
The time in the display window will count down.
342W
No. of taps
Power Level Example of Use
1 HIGH Boil water. Cook fresh fruit, vegetables, rice, pasta, noodles and dessert.
2 MEDIUM-HIGH Cook poultry, meat, cakes, desserts and heat milk.
Cook pot roasts, casseroles and meat loaves, melt chocolate. Cook eggs and
3 MEDIUM
cheeses. Cook fish.
4 DEFROST Thaw foods.
5 LOW Keep cooked foods warm, simmer slowly.
Notes:
1. For 2 or 3 stage cooking, repeat steps 2 and 3 above before pressing Start pad.
2. When selecting High power on the first stage, you can skip step 2.
— Eng-8 —
(
see chart below
)
English

Operation (NN-ST340W)
342W/M)
(Continued)
To Use Turbo Defrost (0.1~2.0 kg):
English
English
1. Put the food into the oven
2. Select the Weight of Food
2. Select the Weight of Food
Example: To defrost 1.5 kg of meat.
Example: To defrost 1.5 kg of meat.
once 5 times
once 5 times
Food Maximum Weight
Food Maximum Weight
Minced meat, Chicken Pieces, Chops 2 kg
Minced meat, Chicken Pieces, Chops 2 kg
Beef roast, lamb, pork, whole chickens 2 kg
Beef roast, lamb, pork, whole chickens 2 kg
Whole fish, scallops, prawns, fish fillets 1 kg
Whole fish, scallops, prawns, fish fillets 1 kg
3. Press
Defrosting time appears in the display window and begings to count
3. Press
down.
Defrosting time appears in the display window and begings to count
down.
342W
Notes:
1. Turbo Defrost can be used to defrost many cuts of meat, poultry and fish by weight. To use, simply program Turbo Defrost
and the weight of the food in kg (1.0) and tenths of a kg (0.1). The oven will determine the defrosting time and power levels.
Once the oven is programmed, the defrosting time will appear in the display. For best results the minimum recommended
weight is 0.2 kg.
2. BONE-IN ROASTS, such as a Beef Rib Roast or Pork Loin Rib Roast have a smaller muscle than a boneless roast of the
same weight. Therefore, for bone-in roasts weighing over 2 kg reduce weight by 0.5 kg. For bone-in roasts weighing less
than 2 kg, reduce weight by 0.25 kg.
0.2 kg.
3. Turn over or remove or shield food when buzzer rings in the middle of cooking.
— Eng-9 —
Operation (NN-ST340W)
342W/M)
(Continued)
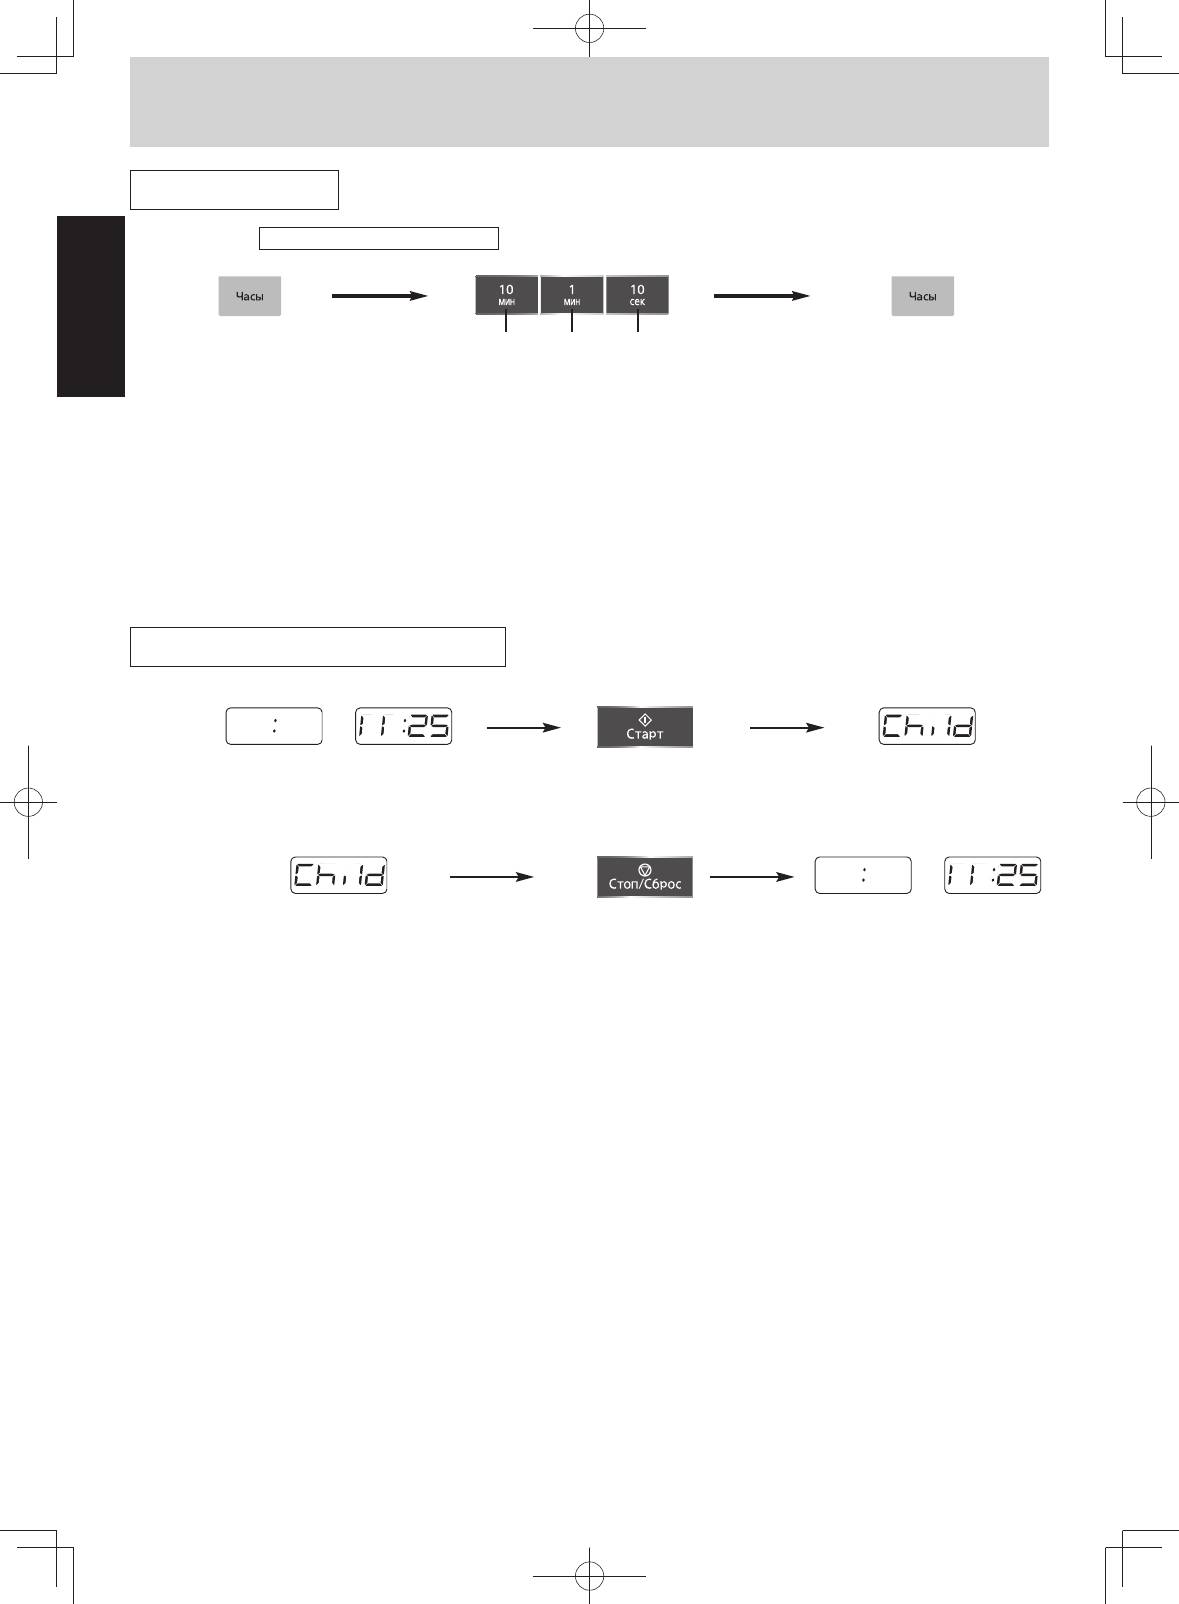
Clock Setting
To Set Clock: Example: To set 11:25 a.m.
English
English
11 times twice 5 times
1. Press.
2. Enter time of day using the number pads.
3. Press once.
Colon will blink in
Time appears in the display window; colon
Colon stops blinking; time of
the display window.
is blinking.
day is entered and locked in
the display window.
Time counts up in minutes.
Notes:
1. To reset time of day, repeat steps 1-3.
2. The clock will keep the time of day as long as oven is plugged in and electricity is supplied.
3. Clock is a 24-hour display.
4. Oven will not operate while colon is blinking.
To Use Child Safety Lock
To set:
or
Colon or time of day is
Press 3 times Display Window
displayed
To cancel:
or
Display Window Press 3 times Colon or time of day is
displayed
Notes:
1. Child Safety Lock can be set when colon or time of day is displayed.
2. This feature allows you to prevent operation of the oven by a young child; however, the door will open.
3. To set or cancel child safety lock, Start pad or Stop/Reset pad must be pressed 3 times within 10 seconds.
— Eng-10 —
Operation (NN-ST340W)
342W/M)
(Continued)
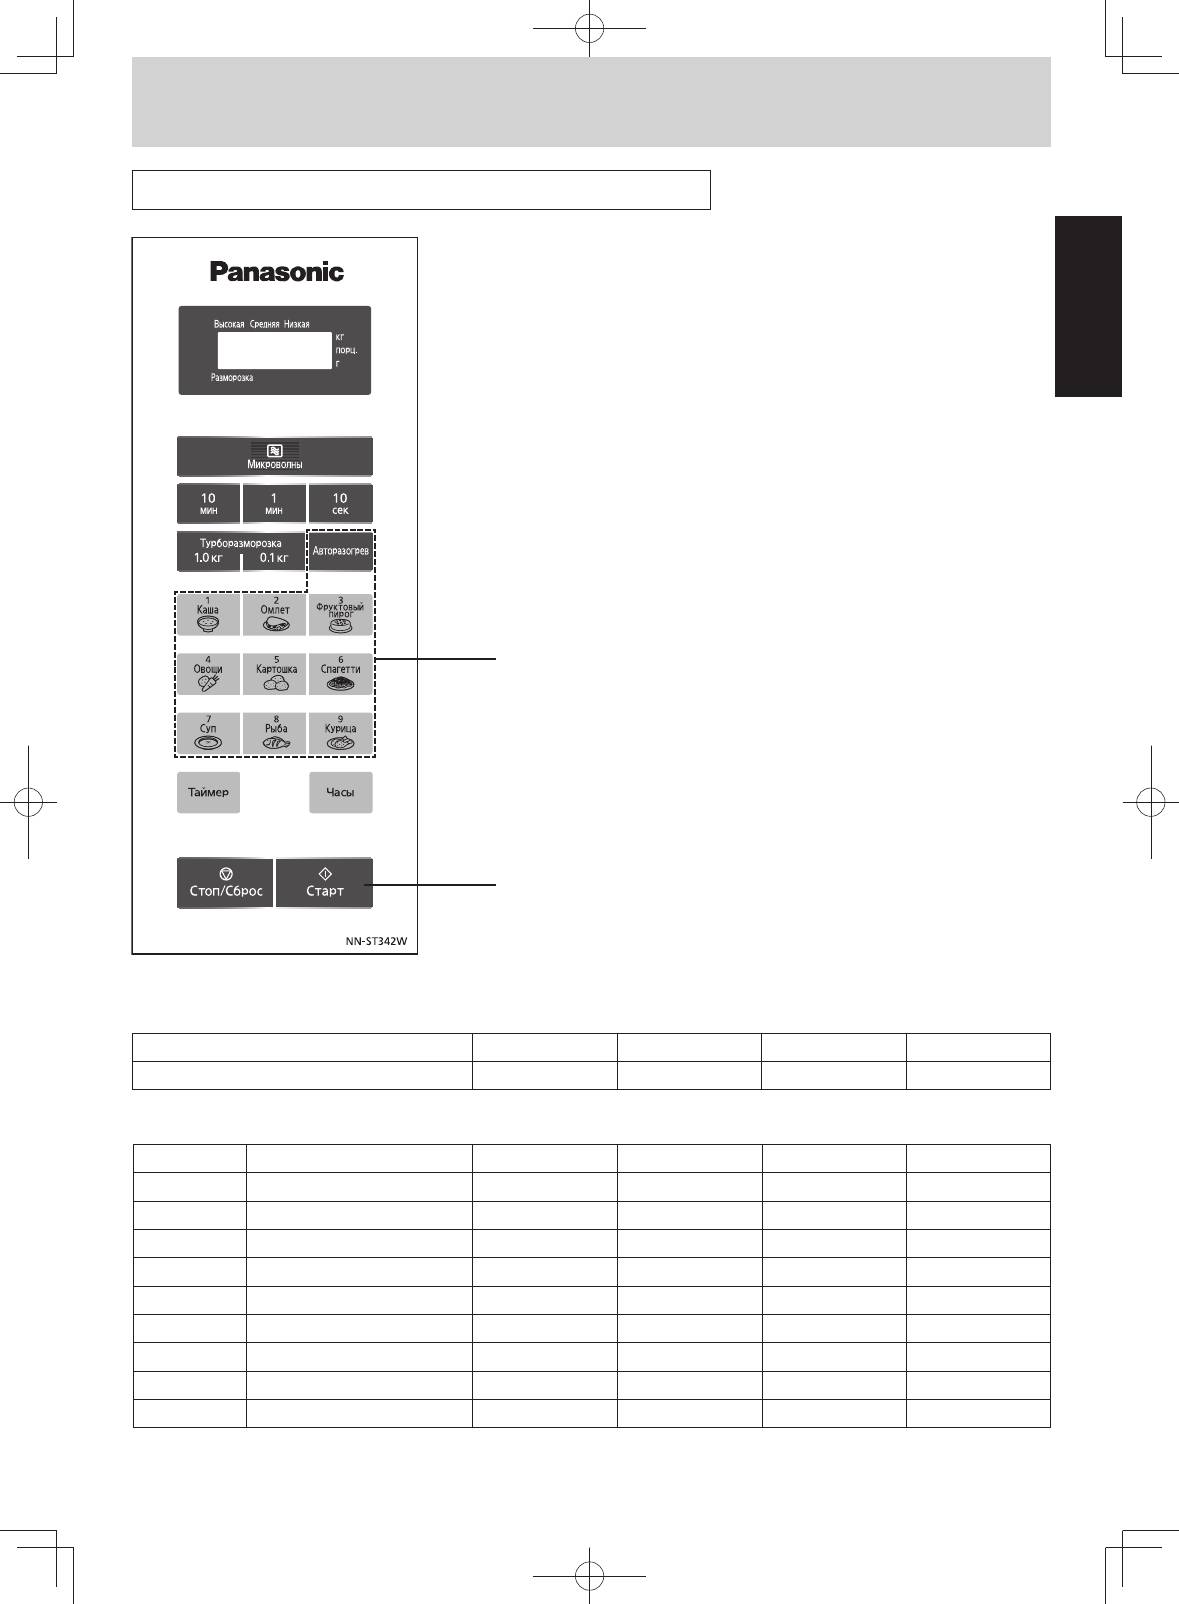
To Reheat/Cook Using Auto Cook Pads
English
English
1. Put the food into the oven
2. Select Pads
Press the desired food category pad until the desired weight appears in
the Display Window.
3. Press
The cooking time appears in the display window and begings to count
3. Press
down.
The cooking time appears in the display window and begings to count
down.
342W
Auto Reheat:
Pad 1 tap 2 taps 3 taps 4 taps
Auto Reheat 200 g 400 g 600 g 800 g
Auto Cook:
Menu No. Pads 1 tap 2 taps 3 taps 4 taps
1 Porridge 2 servs 4 servs — —
2 Omelet 1 serv 2 servs 3 servs 4 servs
3 Pudding 4 servs 8 servs — —
4 Vegetables 120 g 180 g 250 g 370 g
5 Potatoes 200 g 400 g 600 g —
6 Fresh Pasta 150 g 250 g 375 g —
7 Soup 2 servs 4 servs 6 servs —
8 Fish 100 g 200 g 300 g 400 g
9 Chicken 200 g 400 g 600 g 800 g
— Eng-11 —

Operation (NN-ST340W) (Continued)
342W/M)
Auto Reheat
3. Pudding
Pre-cooked foods are reheated automatically by setting the
Suitable for cooking of puddings with berries or fruits. Use
food’s serving. You need not select power level or reheating
the following recipe as a guide:
time. The foods should be at refrigerator or room tempera-
4 servs
8 servs
ture. Use suitable sized dish and cover with a lid or
Ingredients
dish 20 cm
dish 28 cm
microwave safe plastic.
100 g
200 g
Note: When reheating items such as soups, stews, and
Margarine
(
1
/2 pack.)
(1 pack.)
casseroles, it is recommended that they are stirred at half of
75 g
150 g
English
English
reheating time and at completion of reheating.
Sugar
(
1
/4 cup)
(
1
/2 cup)
Egg 1 p. 2 pcs.
1. Porridge
100 g
200 g
Wheat flour
(
2
/3 cup)
(1
1
/3 cup)
cups)
Suitable for cooking different kinds of porridge such as buck-
2 g
4 g
wheat, millet and rice. Place the porridge with water in a suit-
Vanilline powder
(
1
/3 tsp.)
(
1
/2 tsp.)
able size container. Use the following as a guide:
3 g
5 g
Products
Buckwheat
Millet*
Rice
Baked powder
(
1
/2 tsp.)
(1 tsp.)
200 g
130 g
130 g
Frozen berries (cherry,
150 g 300 g
Water
400 ml
rusberry, bilberry etc.)
Milk
450 ml
400 ml
1. Mix up margarine, sugar and eggs for 5 minutes by mixer.
Salt
1
/2 t.sp
1 t.sp
1
/2 t.sp
Stir flour, vanilline powder and baked powder. Pour the
Sugar
2 tb. sp
1 tb. sp
flour into other mixture and make sticky pastry.
2. Add berries into pastry or put them on the bottom of dish.
Then place the container into the oven and press «Porridge»
Place pastry in the dish and make the even surface.
key. Do not forget to stir and remove the cover when «Beep».
3. Place in the oven and select «Pudding». Cooking until
* For Millet, immerse them into warm water for 30 minutes
stopped program. Before serve take out the pudding and
before cooking.
powder with sugar.
2. Omelet
4. Vegetables
This program is suitable for cooking the omelet from eggs.
This program is suitable for cooking fresh vegetables such
Use the casserole dish for cooking. You can cook the omelet
as: potatos, carrots, onions, beetroot, cabbage, cauliflower,
using your recipe or the following as a guide:
pumpkin, marrow, mushroom and etc. and the mixture of
Ingredients
1 serv.
2 serv.
3 serv.
4 serv.
them. Vegetables should be trimmed, prepared and cut into
even sized pieces. Add 2-4 tablespoon to
1
/4 cup of water if
Eggs
2 pcs.
4 pcs.
6 pcs.
8 pcs.
vegetables appear slightly dehydrated or a softer texture is
Milk or cream
125 ml
250 ml
375 ml
500 ml
desired. Place in a suitably sized plate or casserole dish and
cover with plastic wrap or a fitting lid. Stir at the beep. If
Salt, pepper
on taste
desired, butter, herbs, etc. may be added but do not add salt
Butter
for greasing of casserole
until the completion of cooking.
Whisk eggs with milk for 3-5 minutes by mixer, add salt and
5. Potatoes
pepper on taste. Put mixture into greased casserole dish and
place in the oven on glass tray. Select «Omelet» and cook
Potatoes should be trimmed or prepared and cut into evenly
until the cooking time will finish. After cooking, covered, let
sliced pieces. Add 1 to 3 tablespoon of water to potatoes. If
stand for 3 minutes. Serve the hot cooked omelet with melt-
dehydrated or softer texture is desired. Place in a appropri-
ed butter, sauces or grated cheese.
ate size dish and cover with plastic wrap or well fitting lid.
Halfway through the cooking time, stir potatoes. At the end of
the cooking time, stir potatoes and let stand, covered, for 2
to 3 minutes.
— Eng-12 —
Operation (NN-ST340W) (Continued)
342W/M)
6. Fresh Pasta
8. Fish
This program is designed to cook pasta.
Suitable for cooking whole fish and fish fillets. Select fish
Put the macaroni onto a heatproof dish with high brims,
suitable for microwave cooking and place in a single layer in
which is suitable for use in the microwave mode. Fill it up
a shallow dish, with skin-side down. Add butter, spices,
English
English
with the boiling water, add salt, vegetable oil, and select the
herbs, or lemon juice to flavor. Overlap thin edges of fillets to
program for cooking according to recommendations given in
prevent overcooking. If stuffing whole fish with seasoning,
the following chart:
cooking time may need to be extended. Shield the eye and
tail area of whole fish with small amounts of aluminum foil to
Boiling
Vegetable
Program
Pasta
Salt
prevent overcooking. Cover dish securely with plastic wrap
water
oil
or fitted lid. Allow large amounts of fish to stand for 3 to 5
“Pasta” –
150 g
750 ml
1 tb.sp.
To t ast e
minutes after cooking before serving. (thickness of fish
press once
should not be more than 3 cm)
“Pasta” –
250 g 1000 ml 2 tb.sp. To taste
press twice
9. Chicken
“Pasta” –
Suitable for cooking chicken pieces such as wings, drum-
375 g 1250 ml 3 tb.sp. To taste
press 3 times
sticks, thighs, half breasts etc. Chicken pieces should be
thawed completely before cooking. Marinate chicken pieces
(The water level must be 1 — 2 cm higher than pasta).
prior to cooking, add 1 to 5 tablespoon oil, for added flavor
Do not cover the dish.
and color. Place marinated chicken pieces on heat-proof
Stir after the beep.
dish. Cover with plastic wrap or a fitting lid.
After the cooking is completed, pour out the water, add the
butter, stir, and leave for appr. 5 minutes.
7. Soup
This program is suitable for cooking traditional soups, such
as: meat sol’yanka, shchi, rassol’nik. Soups can be cooked
with broth or water. The broth or water should be a room
temperature. Use the following as a guide:
Ingredients
Rassol’nikChshiSolyanka
4 services (1.5 liter)
Smocked meat
products (ham,
——200 g
sausages)
Pickled
3 pcs.—3 pcs.
cucumbers
Onions 1 pcs.1 pcs.2 pcs.
Paprika ——1 pcs.
Tomato sauce 4 tb.sp.4 tb.sp.4 tb.sp.
Potatos 2-3 pcs.2-3 pcs.—
Cabbage —200 g—
Carrots 1 pcs.1 pcs.—
Vegetable oil 2 tb.sp.2 tb.sp.—
Add and press “SOUP”
Broth or water 1000 ml1000 ml1000 ml
Olives ——8-10 pcs.
Lemon
1
/2 pcs.
1
/2 pcs.—
Parsley, salt,
On taste
pepper
It is advisable to use medium size vegetables. Vegetables
should be trimmed. All ingredients should be cut into even
sized pieces. For 1.5L soup you will need 2.5 liter pot.
Place all ingredients from the first part of the table in the pot,
stir well, cover with plastic wrap and cook using the auto
menu «Vegetables». After that add the rest ingredients, stir
well, and cook using the auto menu «Soup». After beep stir
well and go on cooking until finish of the program. Before
serving leave for 10 minutes in the switched off microwave
oven. Serve with sour cream.
— Eng-13 —
Operation (NN-ST340W)
342W/M)
(Continued)
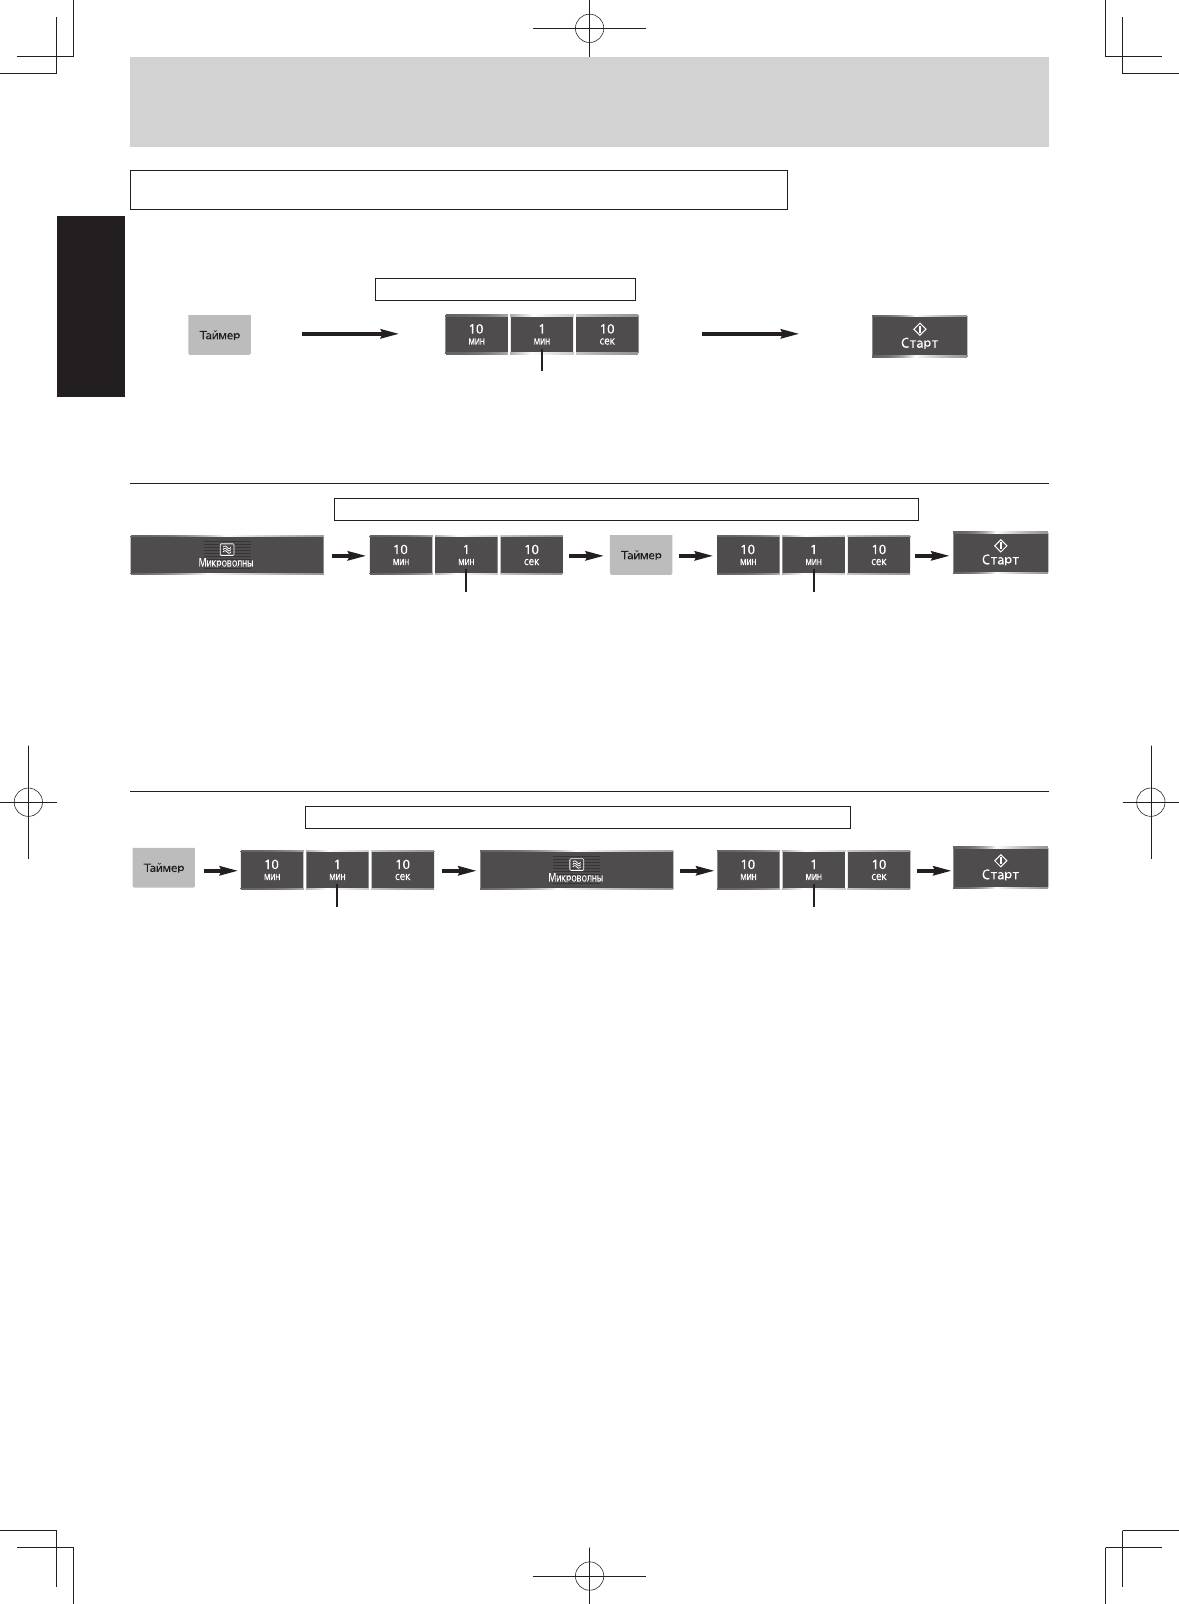
Timer Setting (Kitchen Timer/Standing Time/Delay Time)
This feature allows you to program standing Time after cooking is completed and to program the oven as a minute or 10 sec-
onds timer or program delay start.
To use as a Kitchen Timer: Example: To count 5 minutes
English
English
5 times
1. Press. 3. Press.
2. Set desired amount of time.
(Up to 99 minutes and 50 seconds.)
Time counts down without
operating oven.
To Set Standing Time: Example: To stand for 5 minutes after cooking (3 mins. at Medium)
5 times3 times
1. Press 3 times.
2. Press 3 times. 3. Press. 4. Press 5 times.
5. Press.
Set the desired cook-
Set desired amount
Cooking starts.
ing program. (See
of standing time.
After cooking,
page 8 for directions.)
(Up to 99 minutes
standing time
and 50 seconds.)
will count down
without operat-
ing oven.
To Set Delay Time: Example: To start cooking 5 minutes later (3 mins. at Medium)
5 times 3 times
1. Press.
2. Press 5 times.
3. Press 3 times.
4. Press 3 times.
5. Press.
Set desired amount of
Set the desired cooking
Delayed time
delay time.
program. (See page 8
counts down.
(Up to 99 minutes and
for directions.)
After delay
50 seconds.)
time, the cook-
ing will start.
Notes:
1. If oven door is opened while Standing Time, Delay Time or Kitchen Timer has been set, the time in the display window will
continue to count down.
2. Delay Time and Standing Time can not be programmed before any Auto control function. This is to prevent the standing tem-
perature of the food from rising before defrosting or cooking begins. A change in the starting temperature could cause in
accurate results.
3. When using Standing Time or Delay Time, it’s up to 2 Micro Power stages.
— Eng-14 —
Before Requesting Service
ALL THESE THINGS ARE NORMAL:
The oven causes interference with Some radio and TV interference might occur when you cook with the microwave
my TV. oven. This interference is similar to the interference caused by small appliances
English
English
such as mixers, vacuums, hair dryers, etc. It does not indicate a problem with your
oven.
Steam accumulates on the oven During cooking, steam and warm air are given off from the food. Most of the steam
door and warm air comes from and warm air are removed from the oven by the air which circulates in the oven
the oven vents. cavity. However, some steam will condense on cooler surfaces such as the oven
door. This is normal.
I accidentally operate my Operating the oven empty for a short time will not damage the oven.
microwave oven without any food However, we do not recommend this to be done.
in it.
PROBLEM POSSIBLE CAUSE REMEDY
The oven is not plugged in securely. Remove plug from outlet, wait 10 sec-
onds and re-insert.
Circuit breaker or fuse is tripped or
Contact the specified service center.
Oven will not turn on.
blown.
There is a problem with the outlet. Plug another appliance into the outlet to
check if the outlet is working.
When the oven is turning on,
The roller ring and oven bottom are dirty. Clean these parts according to care of
there is noise coming from
your oven (See next page).
Glass Tray.
Oven will not start cooking.
The door is not closed completely. Close the oven door securely.
For NN-ST340W:
342W/M:
Start Pad was not pressed after pro-
Press Start Pad.
gramming.
Another program has already
Press Stop/Reset Pad to cancel the pre-
been entered into the oven.
vious program and program again.
Oven will not start cooking.
The program has not been entered cor-
Program again according to the
rectly.
Operating Instructions.
Stop/Reset Pad has been pressed acci-
Program oven again.
dentally.
The word «Child» appears in the
The Child Lock was activated by press-
Deactivate Lock by pressing Stop/Reset
Display Window.
ing Start Pad 3 times.
Pad 3 times.
If it seems there is a problem with the oven, contact an authorized Service Centre.
— Eng-15 —

Care of your Microwave Oven
1. The oven should be cleaned regularly and any food
7. It is occasionally necessary to remove the glass tray for
deposits removed.
cleaning. Wash the tray in warm sudsy water or in a dish-
washer.
2. Turn the oven off and remove the power plug from the wall
socket before cleaning.
8. The roller ring and oven cavity floor should be cleaned
regularly to avoid excessive noise. Simply wipe the bottom
3. Keep the inside of the oven clean. When food splatters or
surface of the oven with mild detergent, water or window
spilled liquids adhere to oven walls, wipe with a damp
cleaner and dry. The roller ring may be washed in mild
cloth. Mild detergent may be used if the oven gets very
sudsy water or dish washer. Cooking vapors collect during
English
English
dirty. The use of harsh detergent or abrasives is not rec-
repeated use but in no way affect the bottom surface or
ommended.
roller ring wheels. When removing the roller ring from cavi-
4. The outside oven surfaces should be cleaned with a damp
ty floor for cleaning, be sure to replace in the proper posi-
cloth. To prevent damage to the operating parts inside the
tion.
oven, water should not be allowed to seep into the ventila-
9. When it becomes necessary to replace the oven light,
tion openings.
please consult a dealer to have it replaced.
5. Do not allow the Control Panel to become wet. Clean with
10. Failure to maintain the oven in a clean condition could
a soft, damp cloth. Do not use detergents, abrasives or
lead to deterioration of the surface that could adversely
spray-on cleaners on the Control Panel.
affect the life of the appliance and possibly result in a haz-
When cleaning the Control Panel, leave oven door open to
ardous situation.
prevent oven from accidentally turning on. After cleaning
press Stop/Reset Pad to clear display window or make
sure TIME/WEIGHT SELECT DIAL is set to zero position.
6. If steam accumulates inside or around the outside of the
oven door, wipe with a soft cloth. This may occur when the
microwave oven is operated under high humidity condi-
tions and in no way indicates malfunction of the unit.
— Eng-16 —

Technical Specifications
NN-SM330W NN-ST340W
332W
342W/M
Power Source: 220 V 50 Hz
Power Consumption: 5.3 A, 1,125 W 6.2 A, 1,275 W
5.9 A 1
,
270 W
English
English
Cooking Power: 700 W 800 W
800 W
Outside Dimensions (W x H x D): 488 mm x 279 mm x 405 mm
485 mm x 287 mm x 400 mm
Oven Cavity Dimensions (W x H x D): 315 mm x 206 mm x 353 mm
315 mm x 227 mm x 349 mm
Operating Frequency: 2,450 MHz
Net Weight: Approx. 12.0 kg Approx. 12.5 kg
12.4 12.7
* IEC Test Procedure
Specifications subject to change without notice.
As for the voltage requirement, the production month, country and serial number, please refer to the identification plate on the
microwave oven.
— Eng-17 —

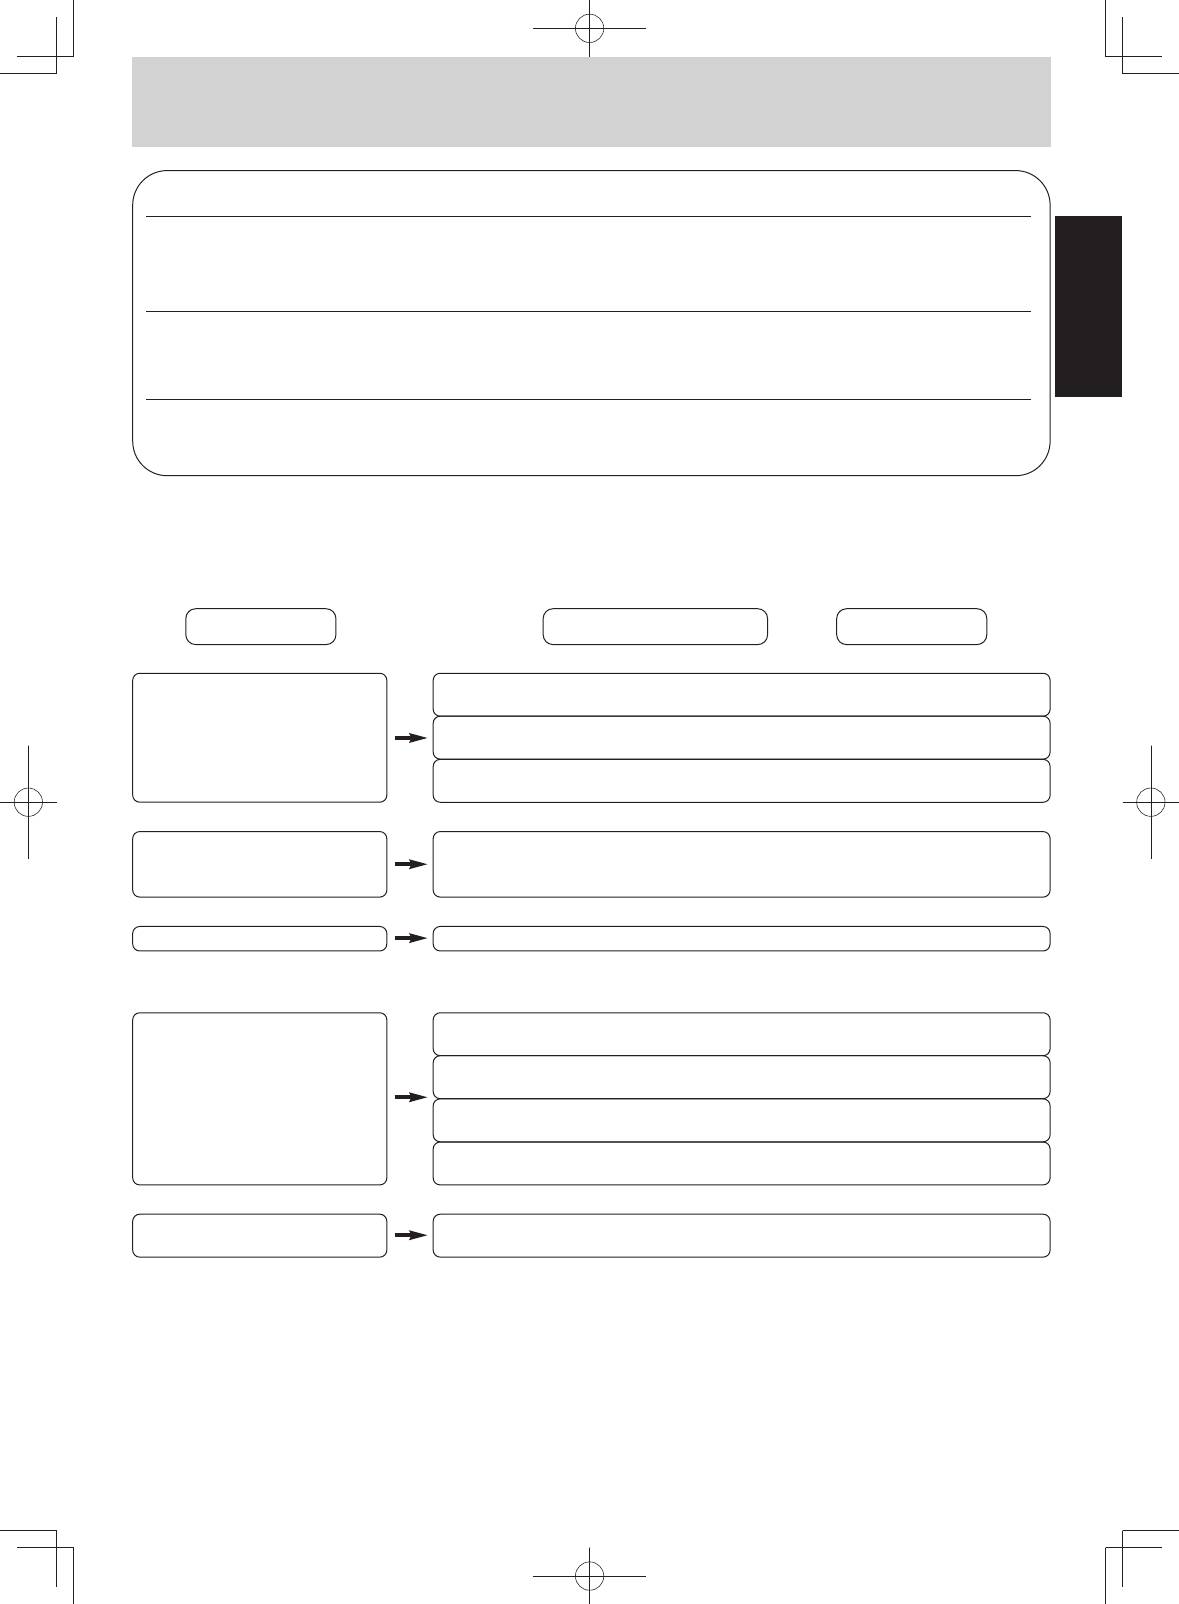
Quick Guide (NN-ST340W)
342W/M)
Feature
How to Operate
To Cook / Reheat /
Defrost by Micro
Power and Time
Setting
English
English
(☞ page
Select power. Set the cooking time. Press.
To Use
Turbo Defrost Pads
(☞ page 9)
Press.Select the weight of food.
To Set Clock
(☞ page 10)
Press. Set time of day. Press.
To Set: Display
To Cancel: Display
To Set / Cancel
Child Safety Lock
or
(☞ page 10)
Press 3 times.
Press 3 times.
To Cook Use
Reheat Use
Auto Reheat Pad
(☞ page 11)
Press.Set weight.
Example:
To Cook Use
Auto Cook Pads
(☞ page 11)
Select the servings. Press.
— Eng-18 —
Оглавление
Аннотации для Микроволновой Печи Panasonic NN ST342M в формате PDF
Топ 10 инструкций
Другие инструкции
-
Panasonic NN-ST342M Operating instruction and cook book (121 pages)
-
Panasonic NN-ST342M Service manual (40 pages)
Panasonic NN-ST342M Manuals come in various types, each serving a specific purpose to help users effectively operate and maintain their devices. Each type of Panasonic NN-ST342M instruction is designed to address specific needs, ensuring users have the necessary information to use, maintain, and repair their devices effectively.
Related Instructions for Panasonic NN-ST342M:
NN-S740WA, NN-K105, NNSD767 — MICROWAVE OVEN 2.0CF, NN-CD87, NNSD297SR
- Panasonic NN-S740WA
- Panasonic NN-K105
- Panasonic NNSD767 — MICROWAVE OVEN 2.0CF
- Panasonic NN-CD87
- Panasonic NNSD297SR
- Panasonic NN-SN667WB
- Panasonic NNS586 — MICROWAVE
- Panasonic NN-CF876S
- Panasonic NN-CF874B
- Panasonic NN-CT577SEPG
- Panasonic NN-S554
- Panasonic NE-2156-2
Microwave Oven Devices by Other Brands:
| Brand | Device Model | Type of Document | Pages | Size | Views | Downloads | Updated |
|---|---|---|---|---|---|---|---|
| GE |
JE1460 |
GE JE1460 Owner’s manual |
36 | 0.46 Mb | 66 | 14 | 02-11-2024 |
| Proline |
GS200S |
Proline GS200S Operating instructions manual |
149 | 1307 | 327 | 22-02-2025 | |
| LG |
MH6342B |
LG MH6342B Owner’s manual |
32 | 781 | 196 | 29-10-2024 | |
| Bosch |
HMT72M450B |
Bosch HMT72M450B Instruction manual |
22 | 1000 | 180 | 16-12-2024 | |
| Viking |
DMOR206SS |
Viking DMOR206SS Service manual |
45 | 776 | 156 | 13-09-2024 |
Categories:
Compact Loader
Transmitters
Blu-ray Drive
Plumbing Product
Multi-function printer
Cordless screwdriver
FEATURES
CONTROL PANEL
(1)
(2)
(3)
(4)
(9)
See-Through oven window
Door C
(5)
(6)
(10)
Oven Front Plate
Glass Tray
Roller Ring
NN- ST342M
(1) Display Window
(2) Micro Power Pad
(3) Time Pads
(4) Turbo Defrost Pads
(5) Auto Reheat Pad
(6) Auto Cook Pads
(7) Serving/Weight Pad
(8) Timer/Clock Pad
(9) Stop/Reset Pad
Before cooking: One tap clears all your instructions.
During cooking: One tap temporarily stops the cooking
process. Another tap cancels all your instructions and
colon or
(10) Start Pad
After cooking program setting, one tap allows oven to begin
functioning. If door is opened or Stop/Reset Pad is pressed
once during oven operation, Start Pad must be pressed again
to restart oven.
Beep Sound:
When a pad is pressed correctly, a beep will be heard.
(7)
If a pad is pressed and no beep is heard, the unit did
not or cannot accept the instruction. The oven will beep
twice between
(8)
complete program, the oven will beep 5 times.
4-1
Control Panel
Safety Door Lock System
(RPM)
time of day appears in the display window.
programmed stages. At the end of any