

MICROWAVE OVENS
USER INSTRUCTIONS
GB
FORNI A MICROONDE
MANUALE DI ISTRUZIONI
HORNOS MICROONDAS
MANUAL DE INSTRUCCIONES
FOURS A MICRO-ONDES
MANUEL D INSTRUCTIONS
,
MIKROWELLENHERD
BEDIENUNGSANWEISUNG
FORNOS MICROONDAS
MANUAL DE INSTRUCOES
IT
ES
FR
DE
PT

Microwave Oven
INSTRUCTION MANUAL
MODEL:
Read these instructions carefully before using your
microwave oven, and keep it carefully.
If you follow the instructions, your oven will provide you with
many years of good service.
SAVE THESE INSTRUCTIONS CAREFULLY
CMG 1773 DW
CMG 1774
DS
1
PRECAUTIONS TO AVOID POSSIBLE EXPOSURE
TO EXCESSIVE MICROWAVE ENERGY
(a) Do not attempt to operate this oven with the door open since this can
result in harmful exposure to microwave energy. It is important not to
break or tamper with the safety interlocks.
(b) Do not place any object between the oven front face and the door or allow
soil or cleaner residue to accumulate on sealing surfaces.
(c) WARNING: If the door or door seals are damaged, the oven must not
be operated until it has been repaired by a competent person.
ADDENDUM
If the apparatus is not maintained in a good state of cleanliness, its surface could
be degraded and affect the lifespan of the apparatus and lead to a dangerous
situation.
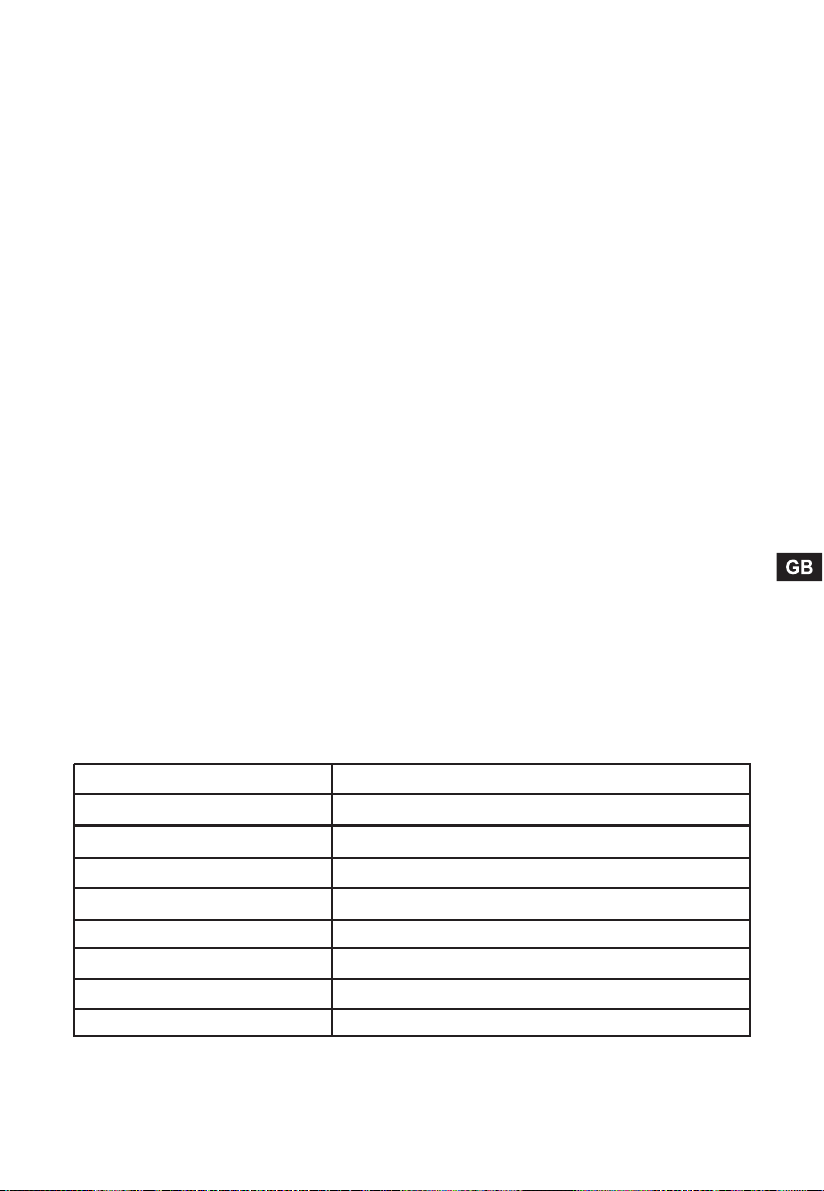
Specifications
Model:
Rated Voltage:
Rated Input Power(Microwave):
Rated Output Power(Microwave):
Rated Input Power(Grill):
Oven Capacity:
Turntable Diameter:
External Dimensions(LxWxH):
Net Weight:
CMG 1773 DW-CMG 1774
230V~50Hz
1150 W
700 W
1000 W
17 L
245 mm
461 x 375 x 280 mm
12.3 kg
2
DS

IMPORTANT SAFETY INSTRUCTIONS
WARNING
To reduce the risk of fire, electric shock, injury to persons
or exposure to excessive microwave oven energy when
using your appliance, follow basic precautions, including
the following:
1. Warning: Liquids and other foods must
not be heated in sealed containers since
they are liable to explode.
2. Warning: It is hazardous for anyone other
than a competent person to remove a
cover which gives protection against
exposure to microwave energy.
3. Warning: Only allow children to use the
oven without supervision when adequate
instructions have been given so that the
child is able to use the oven in a safe way
and understand the hazards of improper
use.
4. Warning: When the appliance is operated
in the combination mode, children should
only use the oven under adult supervision
due to the temperatures generated.
(only for grill series)
5. Only use utensils suitable for use in
microwave ovens.
6. The oven should be cleaned regularly and
any food deposits should be removed.
7. Read and follow the specific:»PRECAU TIONS TO AVOID POSSIBLE EXPOSURE
TO EXCESSIVE MICROWAVE ENERGY».
8. When heating food in plastic or paper
containers, keep an eye on the oven due
to the possibility of ignition.
9. If smoke is observed, switch off or unplug
the appliance and keep the door closed
in order to stifle any flames.
10. Do not overcook food.
11. Do not use the oven cavity for storage
purposes. Do not store items, such as
bread, cookies, etc. inside the oven.
12. Remove wire twist-ties and metal handles
from paper or plastic containers/bags
before placing them in the oven.
13. Install or locate this oven only in
accordance with the installation
instructions provided.
14. Eggs in the shell and whole hard-boiled
eggs should not be heated in microwave
ovens since they may explode, even
after microwave heating has ended.
15. Use this appliance only for its intended
uses as described in manual. Do not
use corrosive chemicals or vapors
in this appliance. This oven is especially
designed to heat. It is not designed for
industrial or laboratory use.
16. If the supply cord is damaged, it must
be replaced by the manufacturer, its
service agent or similarly qualified
persons in order to avoid a hazard.
17. Do not store or use this appliance
outdoors.
18. Do not use this oven near water, in a
wet basement or near a swimming
pool.
19. The temperature of accessible surfaces
may be high when the appliance is
operating. Keep cord away from heated
surface, and do not cover any events
on the oven.
20. Do not let cord hang over edge of table
or counter.
21. Failure to maintain the oven in a clean
condition could lead to deterioration
of the surface that could adversely
affect the life of the appliance and
possibly result in a hazardous situation.
22. The contents of feeding bottles and
baby food jars shall be stirred or shaken
and the temperature checked before
consumption, in order to avoid burns.
23. Microwave heating of beverages can
result in delayed eruptive boiling,
therefore take care when handling the
container.
3

To Reduce the Risk of Injury to Persons
Grounding Installation
DANGER
Electric Shock Hazard
Touching some of the internal
components can cause serious
personal injury or death. Do not
disassemble this appliance.
WARNING
Electric Shock Hazard
Improper use of the grounding
can result in electric shock. Do
not plug into an outlet until
appliance is properly installed
and grounded.
CLEANING
Be sure to disconnect the
oven from the power supply.
1. Clean the inside of the oven after using
with a slightly damp cloth.
2. Clean the accessories in the usual way
in soapy water.
3. The door frame and seal and
neighbouring parts must be cleaned
carefully with a damp cloth when they
are dirty.
Two-round-pin plug
This appliance must be grounded. In the event of
an electrical short circuit, grounding reduces the
risk of electric shock by providing an escape wire
for the electric current. This appliance is equipped
with a cord having a grounding wire with a
grounding plug. The plug must be plugged into an
outlet that is properly installed and grounded.
Consult a qualified electrician or serviceman if the
grounding instructions are not completely
understood or if doubt exists as to whether the
appliance is properly grounded. If it is necessary
to use an extension cord , use only a 3-wire
extension cord that has a 2-pronged plug with a
grounding slot & 2 grounding plates. A 2-slot
receptacle, with a grounding prong or grounding
terminal(s), will accept the plug of the appliance.
1. A short power-supply cord is provided to
reduce the risks resulting from becoming
entangled in or tripping over a longer cord.
2. If a long cord set or extension cord is used:
1)The marked electrical rating of the cord set
or extension cord should be at least as great
as the electrical rating of the appliance.
2)The extension cord must be a grounding type 3-wire cord.
3)The long cord should be arranged so that it
will not drape over the counter top or tabletop
where it can be pulled on by children or tripped
over unintentionally.
4
UTENSILS
CAUTION
Personal Injury Hazard
It is hazardous for anyone
other than a compentent person
to carry out any service or repair
operation that involves the removal
of a cover which gives protection
against exposure to microwave
energy.
See the instructions on «Materials you can use in
microwave oven or to be avoided in microwave oven.»
There may be certain non-metallic utensils that are not
safe to use for microwaving. If in doubt, you can test the
utensil in question following the procedure below.
Utensil Test:
1. Fill a microwave-safe container with 1 cup of cold
water (250ml) along with the utensil in question.
2. Cook on maximum power for 1 minute.
3. Carefully feel the utensil. If the empty utensil is
warm, do not use it for microwave cooking.
4. Do not exceed 1 minute cooking time.
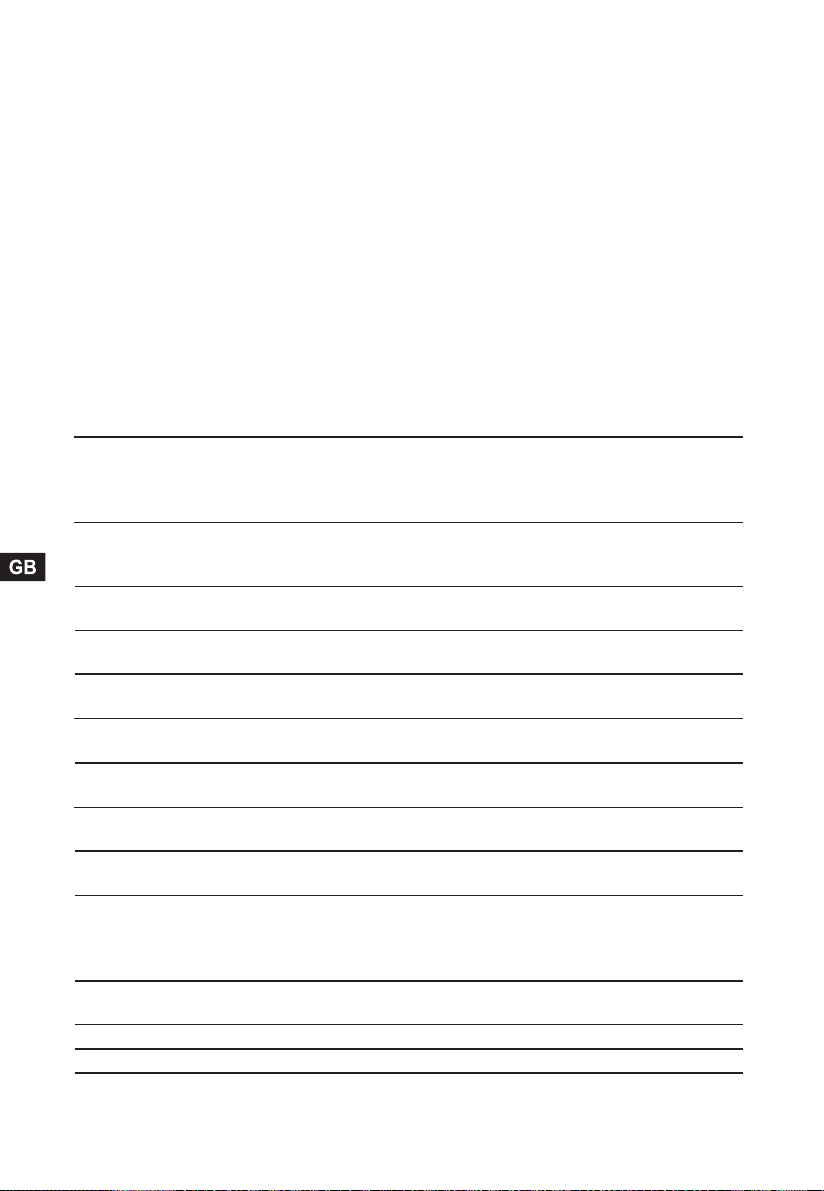
Materials you can use in microwave oven
Utensils Remarks
Aluminum foil Shielding only. Small smooth pieces can be used to cover thin parts of
meat or poultry to prevent overcooking. Arcing can occur if foil is too
close to oven walls. The foil should be at least 1 inch (2.5cm) away from
oven walls.
Browning dish
Dinnerware
Glass jars
Glassware
Oven cooking
bags
Paper plates
and cups
Paper towels
Parchment
paper
Plastic
Plastic wrap
Thermometers Microwave-safe only (meat and candy thermometers).
Wax paper Use as a cover to prevent splattering and retain moisture.
Follow manufacturer’s instructions. The bottom of browning dish must be
at least 3/16 inch (5mm) above the turntable. Incorrect usage may cause
the turntable to break.
Microwave-safe only. Follow manufacturer’s instructions. Do not use
cracked or chipped dishes.
Always remove lid. Use only to heat food until just warm. Most glass jars
are not heat resistant and may break.
Heat-resistant oven glassware only. Make sure there is no metallic trim.
Do not use cracked or chipped dishes.
Follow manufacturer’s instructions. Do not close with metal tie. Make
slits to allow steam to escape.
Use for short–term cooking/warming only. Do not leave oven unattended
while cooking.
Use to cover food for reheating and absorbing fat. Use with supervision
for a short-term cooking only.
Use as a cover to prevent splattering or a wrap for steaming.
Microwave-safe only. Follow the manufacturer’s instructions. Should be
labeled «Microwave Safe». Some plastic containers soften, as the food
inside gets hot. «Boiling bags» and tightly closed plastic bags should be
slit, pierced or vented as directed by package.
Microwave-safe only. Use to cover food during cooking to retain
moisture. Do not allow plastic wrap to touch food.
5

Materials to be avoided in microwave oven
Utensils Remarks
Aluminum tray
Food carton with
metal handle
Metal or metaltrimmed utensils
Metal twist ties
Paper bags
Plastic foam
Wood
May cause arcing. Transfer food into microwave-safe dish.
May cause arcing. Transfer food into microwave-safe dish.
Metal shields the food from microwave energy. Metal trim may
cause arcing.
May cause arcing and could cause a fire in the oven.
May cause a fire in the oven.
Plastic foam may melt or contaminate the liquid inside when exposed
to high temperature.
Wood will dry out when used in the microwave oven and may split
or crack.
SETTING UP YOUR OVEN
Names of Oven Parts and Accessories
Remove the oven and all materials from the carton and oven cavity.
Your oven comes with the following accessories:
Glass tray 1
Turntable ring assembly 1
Instruction Manual 1
F
A
E
D
G
Warning: Do not use grill
rack in microwave mode!
Always take it out when
using the microwave!
Shuts off oven power if the door is opened during operation.
Grill ( Only for Grill series )
A) Control panel
B) Turntable shaft
C) Turntable ring assembly
D) Glass tray
E) Observation window
F) Door assembly
G) Safety interlock system
6
CB

Turntable Installation
Hub (underside)
Glass tray
Turntable shaft
Turntable ring assembly
a. Never place the
tray should never be restricted.
b. Both
always be used during cooking.
c. All food and containers of food are always placed
on the
d. If
glass tray
breaks, contact your nearest authorized service
center.
Countertop Installation
Remove all packing material and accessories.
Examine the oven for any damage such as
dents or broken door. Do not install if oven is
damaged.
Installation
Select a level surface that provide
1.
enough open space for the intake
and/or outlet vents.
12 inch(30cm)
3.0 inch(7.5cm)
3.0 inch(7.5cm)
OPEN
glass tray
glass tray
or
glass tray
and
for cooking.
turntable ring assembly
upside down. The glass
turntable ring assembly
cracks or
Cabinet: Remove any protective film found
on the microwave oven cabinet surface.
Do not remove the light brown Mica cover
that is attached to the oven cavity to
protect the magnetron.
(3) Blocking the intake and/or outlet openings
can damage the oven.
(4) Place the oven as far away from
radios and TV as possible.
Operation of microwave oven may
cause interference to your radio or TV
reception.
2. Plug your oven into a standard household
outlet. Be sure the voltage and the
frequency is the same as the voltage
and the frequency on the rating label.
must
A minimum clearance of 3.0 inches
(7.5cm) is required between the oven and
any adjacent walls. One side must be open.
(1) Leave a minimum clearance of 12
inches (30cm) above the oven.
(2) Do not remove the legs from the
bottom of the oven.
WARNING: Do not install oven over a
range cooktop or other heat-producing
appliance. If installed near or over a heat
source, the oven could be damaged and
the warranty would be void.
The accessible surface
may be hot during
operation.
7
OPERATION INSTRUCTION
This microwave oven uses modern electronic control to adjust cooking parameters
to meet your needs better for cooking.
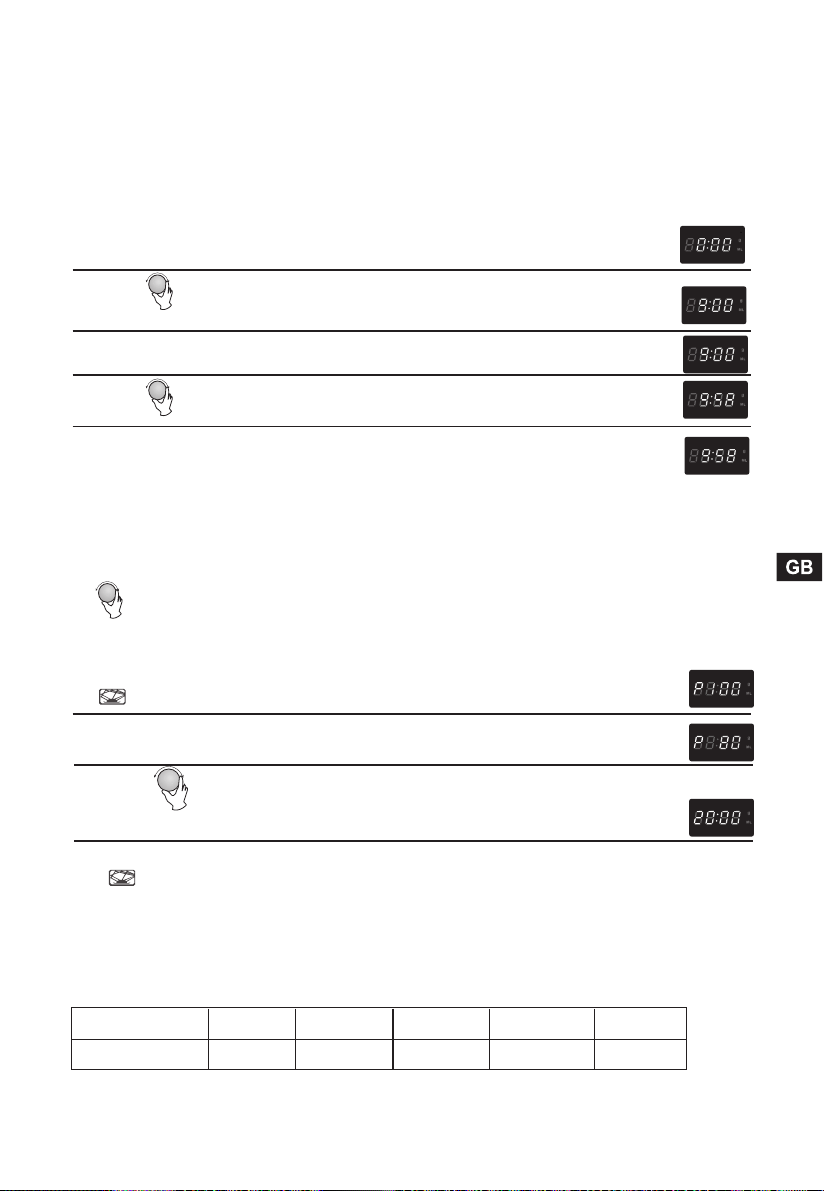
1.Clock Setting
When the microwave oven is electrified,the oven will display «0:00», buzzer will ring
once.
1) Press » Clock/Pre-set «, the hour figures will flah.
2) Turn » » to adjust the hour figures, the input time should be within
0—23.
3) Press » Clock/Pre-set «, the minute figures will flash.
4) Turn » » to adjust the minute figures, the input time should be within
0—59.
5) Press » Clock/Pre-set » to finish clock setting. «:» will flash.
Note: 1) If the clock is not set, it would not function when powered.
2) During the process of clock setting, if you press » Stop/Clear » or no operation
in one minute, the oven will exit the setting.
2. Microwave Cooking
Press » Micro/Grill/ Combi «several times to select the function you want. Turn
» » to adjust the cooking time. Press » Start/ Express» to start cooking.
Example: If you want to use 80% power to cook for 20 minutes, you can
operate the oven as the following steps.
1) Press » Micro/Grill/ Combi » once, the LED will display «P100″,
» » indicator will be lighted.
2) Press » Micro/Grill/ Combi » once again to choose 80% power, the
LED will display «P80».
3) Turn » » to adjust the cooking time until the oven display»20:00″
(The maximum cooking time is 95 minutes.)
4) Press » Start/ Express » to start cooking, «:» will light and the
» » indicator will flash (Buzzer will sound five times after finishing).
NOTE: the step quantities for the adjustment time of the coding switch are as follow:
0—1 min : 5 seconds
1—5 min : 10 seconds
5—10 min : 30 seconds
Microwave Power Chart
Press
Microwave Power
Once Twice Thrice 4 times 5 times
80% 50% 30% 10%100%
10—30 min : 1 minutes
30—95 min : 5 minutes
8

3. Grill Cooking
1) Press the » Micro/Grill/ Combi » key six times , «G » displays and grill
function is selected.
2) Turn » » to adjust the cooking time. The maximum cooking time is 95 minutes.
3) Press the » Start/ Express » key to start cooking. The» » will flash, «:»
will be lighted.
Note: If half the grill time passes, the oven pause and beep twice. This is normal. You can
just press» Start/ Express » to continue cooking. But in order to have a better
effect ofgrilling food,you should turn the food over, close the door, and then press
» Start/ Express » to continue cooking. If there is no operation in 1 minute, the oven
will continue working and beep once.
4. Combination Cooking
1) Press the «Micro/Grill/ Combi» key for times, » C-1 » or «C-2″ display and
combination function is selected. » » and » » will light.
2) Turn » » to adjust the cooking time. (The maximum cooking time is 95 minutes.)
3) Press » Start/ Express » key to start cooking. The cooking indicators will
flash and «:» will light.
Note: Combination instructions
Instructions
LED Display
Microwave Power
Grill Power
1
2
55%
36%
45%
64%
5. Speedy Cooking
When the oven is in the waiting states, press » Start/ Express » key to start cooking
with full microwave power for 30 seconds. The cooking time will add 30 seconds by
every press on » Start/ Express » key,and the maximum setting time is 95 minutes.
Note: Be invalidation under other program during cooking.
6. Defrost by Weight
1) Press «Defrost By Weight » pad once,the LED will display «dEF1».
2) Turn » » to select the weight of food.At the same time, «g» will light.
The weight should be 100-2000g.
3) Press «Start/ Express» key to start defrosting.
» » and » » indicators will flash and «g» indicator will go out.
9

7. Defrost By Time
1) Press » Defrost By Time » key twice, the LED will display «dEF2».
2) Turn » » to select the cooking time. At the same time, » » and
» » will be lighted. The time setting is from 00:05 to 95:00.
The default power level is P30. It is not adjustable.
3) Press » Start/ Express » key to start defrosting.
» » and » » indicators will flash .
8. Auto Menu
1). In waiting states, press «Auto Menu» to choose the menu you need.
«A-1″,»A-2″….»A-8» will display in order.
2). Turn » » to select the weight or portion of the menu.
3) Press «Start/ Express» to start cooking.
When cooking finish, buzzer will sound five times. If the clock has been set before,
the current time will be displayed, otherwise, 0:00 will be displayed.
For example: to cook the pasta of 150g.
1) Press «Auto Menu» for three times, «A-3» displays and pasta menu is selected.
» » and » » indicator will light.
2). Turn » » to select the weight of the menu. Stop turning when «150» displays.
3) Press » Start/ Express » to start cooking.
When cooking finish, buzzer will sound five times. Then turn back to waiting states.
9.Multi-Stage Cooking
Two stages of cooking can be maximumly set. If one stages is defrosting, it will be put in
the first stage automatically. The buzzer will ring once after each stage and the next stage will
begin.
Note: Auto menu cannot be set as one of the multi-stage.
Example: if you want to defrost the food of 500g + 80% microwave power for 5 minutes.
The steps are as following:
1) Press «Defrost By Weight«, «dEF1» displays;
2) Turn » » to adjust the weight of the food. Stop turning when «500» displays;
3) Press»Micro/Grill/ Combi» twice to choose 80% microwave power;
4) Turn » » to adjust the cooking time of 5 minutes;
5) Press «Start/ Express» to start cooking.
Note: When the first stage finish, buzzer sounds once then the second stage
begins.
back to the waiting
When all of them finish, buzzer sounds five times and the unit turn
states.
10

10. Pre-set Function
1) Set the clock first. (Consult the instruction of clock setting.)
2) Input the cooking program. Two stages can be set at most. Defrosting
sholuld not be set here.
3) Press » Clock/Pre-set «. The current clock is displayed. The hour figure flash;
4) Turn » » to adjust the hour figures, the input time should be within
0—23.
5) Press » Clock/Pre-set «, the minute figures will flash.
6) Turn » » to adjust the minute figures, the input time should
be within 0—59.
7) Press » Start/ Express » to finish setting. «:» will light, buzzer will
ring twice when the time arrives, then cooking will start automatically.
Note: 1) Clock must be set first. Otherwise,pre-set function will not work.
2) If the pre-set program has been set without the cooking program,
the whole setting will be used as an alarm clock. That means when
pre-set time arrives, buzzer will sound five times only.
11. Inquiring Function
(1) In cooking state, press » Micro/ Grill/ Combi«, the current microwave power
will be displayed for 3 seconds.
(2) In pre-set state, press » Clock/Pre-set » to inquire the time for delay start cooking.
The pre-set time will flash for 3 seconds, then the oven will turn back to the clock display.
(3) During cooking state, press «Clock/Pre-set» to check the current time. It will be displayed
for 3 seconds.
12. Lock-out Function for Children
Lock: In waiting state, press «Stop/Clear» for 3 seconds, there will be a long «beep» denoting
entering into the children-lock state and LED will display » » and «
Lock quitting: In locked state, press «Stop/Clear» for 3 seconds, there will be a long «beep»
denoting that the lock is released, and LED will turn back to the clock stae, « » will go out.
» will light.
11

13. Protection of Fan
When the microwave or combination cooking works over 5 minutes, it stops working
at the last 15 seconds, only fan runs.
14. Protection Function of Magnetron Control Pipe
When the unit runs for 30 minutes with high power level, it will adjust to 80% microwave power
to protect the magnetron control pipe.
This function works under multi-stage and other states.
15. Automatic Going Out Function
When the door is kept open for 10 minutes, the oven light will be off. Press any key after
opening the door, time will count down again. The oven lamp will light.
16. Specification
(1) The buzzer will sound once when turning the knob at the beginning;
(2) «Start/ Express» must be pressed to continue cooking if the door is opened during cooking;
(3) Once the cooking programme has been set , » Start/ Express » is not pressed
in 1 minutes. The current time will be displayed. The setting will be cancelled.
(4) The buzzer sounds once by efficient press, inefficient press will be no responce.
12
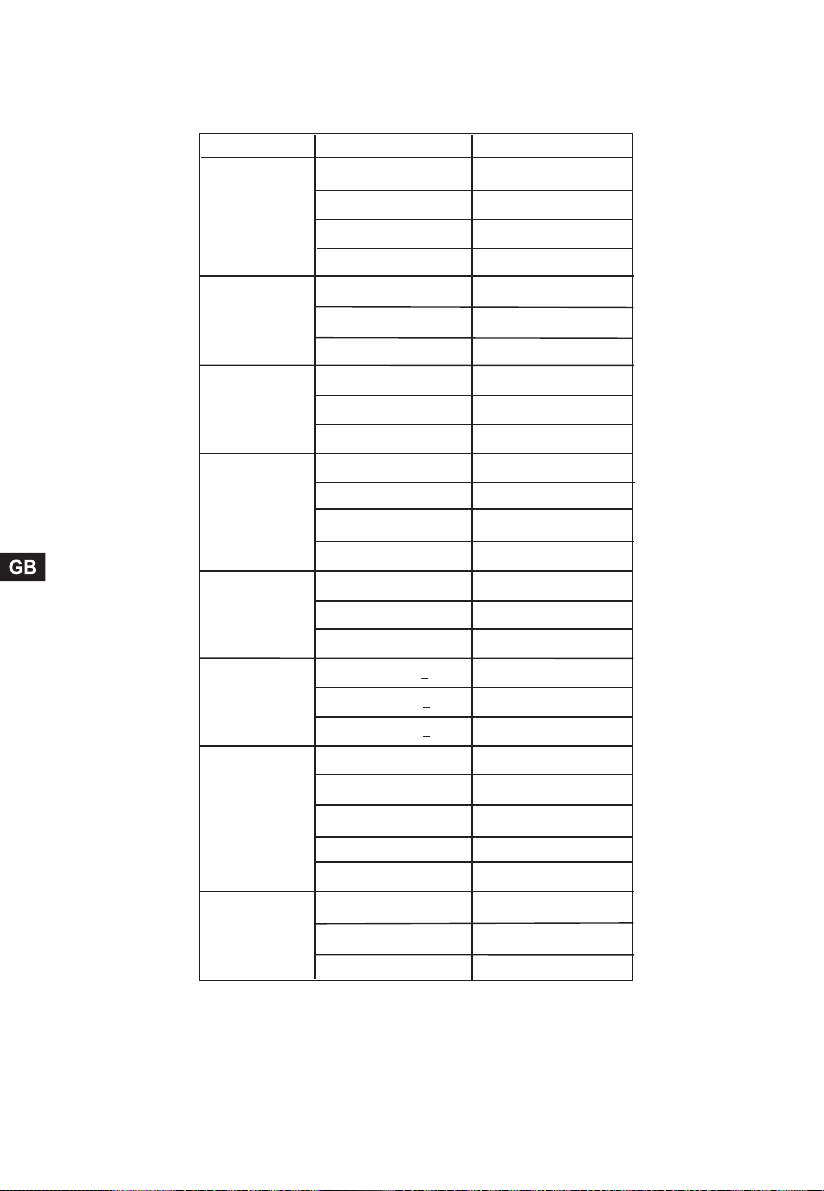
Auto menu Chart
Menu
A-1
AUTO REHEAT
A-2
VEGETABLE
A-3
PASTA
A-4
MEAT
A-5
PIZZA
A-6
POTATO
A-7
FISH
A-8
SOUP
Weight(g)
150
250
350
400
150
350
500
50(with water 450g)
100(with water 800g)
150(with water 1200g)
150
300
450
600
1(About 80g)
2(About 160g)
3(About 250g)
1(About 220 10g)
2(About 440 10g)
3(About 660 10g)
+
+
+
150
250
350
400
450
500
750
1000
Display
150
250
350
400
150
350
500
50
100
150
150
300
450
600
1
2
3
1
2
3
150
250
350
400
450
500
750
1000
13
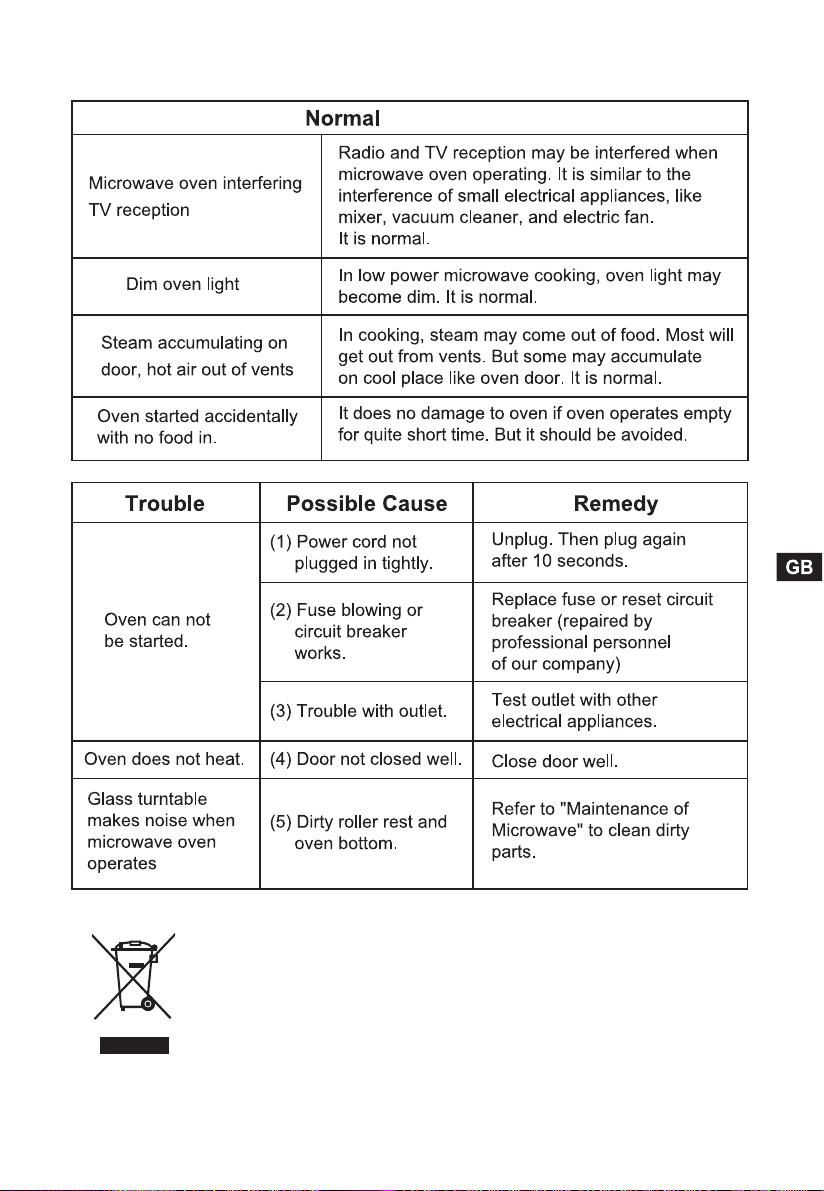
Trouble shooting
According to Waste of Electrical and Electronic Equipment
(WEEE) directive, WEEE should be separately collected and
treated. If at any time in future you need to dispose of this
product please do NOT dispose of this product with household
waste. Please send this product to WEEE collecting points
where available.
14

Cooking Guide
MICROWAVES
Microwave energy actually penetrates food,attracted and absorbed by its water,
fat and sugar content.
The microwaves cause the molecules in the food to move rapidly. The rapid
movement of these molecules creates friction and the resulting heat cooks the
food.
COOKING
Cookware for microwave cooking:
Cookware must allow microwave energy to pass through it for maximum efficiency.
Microwaves can penetrate through ceramic, glass, porcelain and plastic as well
as paper and wood, but they are reflected by metal, such as stainless steel,
aluminium and copper. So food must never be cooked in metal containers.
Foods suitable for microwave cooking:
Many kinds of food are suitable for microwave cooking, including fresh or frozen
vegetables, fruit, pasta, rice, grains, beans, fish, and meat. Sauces, custard,
soups, steamed puddings, preserves, and chutneys can also be cooked in a
microwave oven. Generally speaking, microwave cooking is ideal for any food
that would normally be prepared on a hob.
Covering during cooking
To cover the food during cooking is very important, as the evaporated water rises
as steam and contributes to cooking process. Food can be covered in different
ways: e.g. with a ceramic plate, plastic cover or microwave suitable cling film.
Standing times
After cooking is over food the standing time is important to allow the temperature
to even out within the food.
15

Cooking Guide
Cooking Guide for frozen vegetables
Use a suitable glass pyrex bowl with lid. Cook covered for the minimum time — see
table. Continue cooking to get the result you prefer.
Stir twice during cooking and once after cooking. Add salt, herbs or butter after
cooking. Cover during standing time..
Food Portion Power
Spinach
Broccoli
Peas
Green Beans
Mixed
Vegetables
(carrots/peas/
corn)
Mixed
Vegetables
(Chinese style)
150g P80 5-6 2-3
300g P80 8-9 2-3
300g P80 7-8 2-3
300g P80 7½-8½ 2-3
300g P80 7-8 2-3
300g P80 7½-8½ 2-3
Time
(min. )
Standing
Time (min. )
Instructions
Add 15 ml (1 tablespoon)
cold water.
Add30ml(2tbsp.)cold
water.
Add15ml(1tbsp.)cold
water.
Add30ml(2tbsp.)cold
water.
Add15ml(1tbsp.)cold
water.
Add15ml(1tbsp.)cold
water.
16

Cooking Guide
Cooking Guide for fresh vegetables
Use a suitable glass pyrex bowl with lid. Add 30-45 ml cold water (2-3 tbsp.) for
every 250 g unless another water quantity is recommended — see table. Cook
covered for the minimum time — see table. Continue cooking to get the result you
prefer. Stir once during and once after cooking. Add salt, herbs or butter after
cooking. Cover during a standing time of 3 minutes.
Hint: Cut the fresh vegetables into even sized pieces. The smaller they
All fresh vegetables should be cooked using full microwave power (P100).
Food
Broccoli
Brussels
Sprouts
Carrots
Cauliflower
Courgettes
Egg Plants
Leeks
Mushrooms
Onions
Pepper
Potatoes
Turnip
Cabbage
are cut, the quicker they will cook.
Portion
250g
500g
250g 5-5½ 3
250g 3½-4 3
250g
500g
250g 3-3½ 3
250g 2½-3 3
250g 3-3½ 3
125g
250g
250g 4-4½ 3
250g 3½-4 3
250g
500g
250g
Time
(min. )
3½-4
4-4½
6½-7½
1-1½
2-2½
4½-5
6-7
3-4
6-7
Standing
Time (min. )
3
3
3
3
3
Prepare even sized florets. Arrange
the stems to the centre.
Add 60-75 ml (5-6 tbsp.) water.
Cut carrots into even sized slices.
Prepare even sized florets. Cut big
florets into halves. Arrange stems to
the centre.
Cut courgettes into slices. Add 30 ml
(2 tbsp.) water or a knob of butter.
Cook until just tender.
Cut egg plants into small slices and
sprinkle with 1 tablespoon lemon
juice.
Cut leeks into thick slices.
Prepare small whole or sliced
mushrooms. Do not add any water.
Sprinkle with lemon juice. Spice with
salt and pepper. Drain before
serving.
Cut onions into slices or halves. Add
only 15 ml (1 tbsp.) water.
Cut pepper into small slices.
Weigh the peeled potatoes and cut
them into similar sized halves or
quarters.
Cut turnip cabbage into small cubes.
Instructions
17

Cooking Guide
Cooking Guide for rice and pasta
Rice: Use a large glass pyrex bowl with lid — rice doubles in volume during
Pasta: Usea large glass pyrex bowl. Add boiling water, a pinch of salt and
Food Portion Power
White Rice
(parboiled)
Brown Rice
(parboiled)
Mixed Rice
(rice + wild
rice)
Mixed Corn
(rice + grain)
Pasta
cooking. Cook covered.
After the cooking time is over, stir before standing time and salt or
add herbs and butter.
Remark: the rice may not have absorbed all water after the cooking
time is finished.
stir well. Cook uncovered.
Stir occasionally during and after cooking. Cover during standing
time and drain thoroughly afterwards.
Time
(min. )
250g
P100
375g
250g
P100
375g
250g P100 16-17 5
250g P100 17-18 5
250g P100 10-11 5
15-16
17½-
18½
20-21
22-23
Standing
Time (min. )
5
5
Instructions
Add 500 ml cold water.
Add 750 ml cold water.
Add 500 ml cold water.
Add 750 ml cold water.
Add 500 ml cold water.
Add 400 ml cold water.
Add 1000 ml hot water.
REHEATING
Your microwave oven will reheat food in a fraction of the time that conventional
ovens hobs normally take.
Use the power levels and reheating times in the following chart as a guide. The
times in the chart consider liquids with a room temperature of about +18 to +20°C
or a chilled food with a temperature of about +5 to +7°C.
Arranging and covering
Avoid reheating large items such as joint of meat — they tend to overcook and dry
out before the centre is piping hot. Reheating small pieces will be more
successful.
Power levels and stirring
Some foods can be reheated using maximum powerwhile others should be
reheated using lower power.
Check the tables for guidance. In general, it is better to reheat food using a lower
power level, if the food is delicate, in large quantities, or if it is likely to heat up
very quickly (mince pies, for example).
Stir well or turn food over during reheating for best results. When possible, stir
again before serving.
18

Cooking Guide
Take particular care when heating liquids and baby foods. To prevent eruptive
boiling of liquids and possible scalding , stir before, during and after heating.
Keep them in the microwave oven during standing time. We recommend putting a
plastic spoon or glass stick into the liquids. Avoid overheating (and therefore
spoiling) the food.
It is preferable to underestimate cooking time and add extra heating time, if
necessary.
Heating and standing times
When reheating food for the first time, it is helpful to make a note of the time
taken — for future reference.
Always make sure that the reheated food is piping hot throughout.
Allow food to stand for a short time after reheating — to let the temperature even
out. The recommended standing time after reheating is 2-4 minutes, unless
another time is recommended in the chart..
Take particular care when heating liquids and baby food. See also the chapter
with the safety precautions.
REHEATING LIQUIDS
Always a llow a standing time of at least 20 seconds after the oven has been
switched off to allow the temperature to even out. Stir during heating, if
necessary, and ALWAYS stir after heating. To prevent eruptive boiling and
possible scalding, you should put a spoon or glass stick into the beverages and
stir before, during and after heating.
REHEATING BABY FOOD
BABY FOOD:
Empty into a deep ceramic plate. Cover with plastic lid. Stir well after reheating!
Let stand for 2-3 minutes before serving. Stir again and check the temperature.
Recommended serving temperature: between 30-40°C.
BABY MILK:
Pour milk into a sterilised glass bottle. Reheat uncovered. Never heat a baby’s
bottle with teat on, as the bottle may explode if overheated. Shake well before
standing time and again before serving ! Always carefully check the temperature
of baby milk or food before giving it to the baby. Recommended serving
temperature: ca. 37°C.
REMARK:
Baby food particularly needs to be checked carefully before serving to prevent
burns.
Use the power levels and times in the next table as a guide lines for reheating.
19
Cooking Guide
Reheating Liquids and Food
Use the power levels and times in this table as a guide lines for reheating.
Standing
Food Portion Power
150 ml
Drinks
(coffee,milk,
tea, water
with room
temperature)
Soup
(chilled)
Stew
(chilled)
Pasta with
sauce
(chilled)
Filled pasta
with sauce
(chilled)
Plated Meal
(chilled)
(1cup)
300 ml
(2cups)
450 ml
(3cups)
600 ml
(4cups)
250g
350g
450g
550g
350g P80
350g P80 3½-4½ 3
350g P80
350g
450g
550g
P100
P100
P80
Time
(min. )
1-1½
1½-2
2½-3
3-3½
2-2½
2½-3
3-3½
3½-4
4½-5½ 2-3
4-5 3
4½-5½
5-6
5½-6½
Time
(min. )
1-2
2-3
Instructions
Pour into a ceramic cup and
reheat uncovered. Place 1
cupinthecentre,2
opposite of each other and
3 or 4 in a circle. Stir
carefully before and after
standing time, be careful
while taking them out of
oven.
Pour into a deep ceramic
plate or deep ceramic bowl.
Cover with plastic lid. Stir
well after reheating. Stir
again before serving.
Put stew in a deep ceramic
plate. Cover with plastic
lid.Stir occasionally during
reheating and again before
standing and serving.
Put pasta (e.g. spaghetti or
egg noodles) on a flat
ceramic plate. Cover with
microwave cling film. Stir
before serving.
Put filled pasta (e.g. ravioli,
tortellini) in a deep ceramic
plate. Cover with plastic lid.
Stir occasionally during
reheating and again before
standing and serving.
Plate a meal of 2-3 chilled
components on a ceramic
3
dish. Cover with microwave
cling-film.
20
Cooking Guide
Reheating Baby Food and Milk
Use the power levels and times in this table as guide lines for reheating.
Food Portion Power Time
Baby food
(vegetables
+ meat)
Baby
porridge
(grain +
milk + fruit)
Baby milk
190g P80 30sec. 2-3
190g P80 20sec. 2-3
100ml
P30
200ml
30-40
sec.
1min.
to
1min.
10 sec.
Standing
Time
(min. )
2-3
Instructions
Empty into ceramic deep plate.
Cook covered. Stir after cooking
time. Stand for 2-3 minutes.
Before serving, stir well and
check the tem- perature carefully.
Empty into ceramic deep plate.
Cook covered. Stir after cooking
time. Stand for 2-3 minutes.
Before serving, stir well and
check the tem- perature carefully.
Stir or shake well and pour into a
sterilised glass bottle. Place into
the centre of turntable. Cook
uncovered. Shake well and stand
for at least 3 minutes. Before
serving, shake well and check the
tempera- ture carefully.
21

Cooking Guide
RILL
G
The grill-heating element is located underneath the ceiling of the cavity. It
operates while the door is closed and the turntable is rotating. The turntable’s
rotation makes the food brown more evenly. Preheating the grill for 4 minutes will
make the food brown more quickly.
Cookware for grilling:
Should be flameproof and may include metal. Do not use any type of plastic
cookware, as it can melt.
Food suitable for grilling:
Chops, sausages, steaks, hamburgers, bacon and gammon rashers, thin fish
portions, sandwiches and all kinds of toast with toppings.
IMPORTANT REMARK:
Please remember that food must be placed on the high rack, unless another
instruction is recommended.
MICROWAVE + GRILL
This cooking mode combines the radiant heat that is coming from the grill with the
speed of microwave cooking. It operates only while the door is closed and the
turntable is rotating. Due to the rotation of the turntable, the food browns evenly.
Cookware for cooking with microwave + grill
Please use cookware that microwaves can pass through. Cookware should be
flameproof. Do not use metal cookware with combination mode. Do not use any
type of plastic cookware, as it can melt.
Food suitable for microwave + grill cooking:
Food suitable for combination mode cooking include all kinds of cooked food
which need reheating and browning (e.g. baked pasta), as well as foods which
require a short cooking time to brown the top of the food. Also, this mode can be
used for thick food portions that benefit from a browned and crispy top (e.g.
chicken pieces, turning them over half way through cooking). Please refer to the
grill table for further details.
The food must be turned over, if it is to be browned on both sides.
22
Cooking Guide
Grill Guide for fresh food
Preheat the grill with the grill-function for 4 minutes.
Use the power levels and times in this table as guide lines for grilling.
Fresh Food Portion Power
Toast Slices
Bread Rolls
(already
baked)
Grilled
Tomatoes
TomatoCheese
Toast
Toast
Hawaii
(pineapple,
ham,cheese
slices)
Baked
Potatoes
Gratin
Potatoes/
vegetables
(chilled)
Chicken
Pieces
Roast
Chicken
4pcs
(each25g
2-4
pieces
200g
(2pcs)
400g
(4pcs)
4pcs
(300g)
2pcs
(300g)
4pcs
(600g)
250g
500g
500g C1
450g
(2pcs)
650g
(2-3pcs)
850g
(4pcs)
900g
1100g
Grill
only
)
Grill
only
C2
C2 4-5 —
C1
C1
C2
C1 10-12
1. Side
3½-4½ 3-4
2½-3½ 1½-2½
3½-4½
3½-4½
4½-5½
6½-7½
2. Side
Time
(min)
5-6
6-7
9-11 —
7-8
9-10
11-12
12-14
Time
(min)
Putthe toast slices side by side
on the rack.
Put bread rolls first with the
bottomsideupinacircle
directly on the turntable.
Cut tomatoes into halves. Put
some cheese on top. Arrange
—
in a circle in a flat glass pyrex
dish. Place it on the rack.
Toast the breas slices first. Put
the toast with topping on the
rack. Stand for 2-3 minutes.
Toast the bread slices first. Put
the toast with topping on the
rack. Put 2 toasts opposite
directly on the rack. Stand for
2-3 minutes.
Cut potatoes into halves. Put
theminacircleontherackwith
the cut side to the grill.
Putthefreshgratinintoasmall
glass Grill pyrex dish. Put the
dish on the rack. Aftercooking
stand for 2-3 minutes.
Brush chicken pieces with oil
7-8
and spices. Put them in a circle
with the bones to the middle.
Put one chicken piece not into
8-9
thecentreofthe rack. Standfor
2-3 minutes.
9-10
Brush chicken with oil and
spices. Put chicken first breast
side down, second side breast
9-11
side up directly on turntable.
11-13
Stand for 5 minutes after
grilling.
Instructions
23

Cooking Guide
Grill Guide for fresh food
Fresh Food Portion Power
Lamb Chops
(medium)
Pork Steaks
Roast Fish
Baked
Apples
400g
(4pcs)
250 g
(2pcs)
500 g
(4pcs)
450g
650g
2 apple
(ca.400g)
4 apples
(ca.800g)
Grill
only
MW +
Grill
C2
C2
1. Side
Time
(min)
10-12 8-9
10-12
C2
6-7
8-10
6-7
7-8
6-7
2. Side
Time
(min)
(Grill
only)
Instructions
Brush the lamb chops with oil
and spices. Lay them in a
circle on the rack.After
grilling stand for 2-3 minutes.
Brush the pork steakswith oil
and spices. Lay them in a
circle on the rack. After
5-6
grilling stand for 2-3 minutes.
7-8
Brush skin of whole fish with
oil and herbs and spices. Put
7-8
fish side by side (head to tail)
8-9
on rack.
Core the apples and fill them
with raisins and jam. Put
some almond slices on top.
—
Put apples on a flat glass
pyrex dish. Place the dish
directly on the turntable.
24

Cooking Guide
Grill Guide for frozen food
Use the power levels and times in this table as guide lines for grilling.
Fresh Food Portion Power
Bread Rolls
(each ca. 50 g)
Baguettes/
Garlic Bread
Gratin
(vegetables or
potatoes)
Pasta
(Cannelloni,
Macaroni,
Lasagne)
Fish Gratin 400g C1
2pcs
4pcs
200-250g
(1pc)
400g C1
400g C1 14-16 —
MW+
Grill
MW+
Grill
1. Side
(min)
2. Side
Time
1½-2
2½-3
C1
3½-4
13-15 —
16-18 —
C2
Time
(min)
Grill
only
Grill
only
2-3
Instructions
Arrange rolls in a circle
with the bottom side up
directly o n the turntable.
Grill the second side of
2-3
the rolls up to the crisp
2-3
you prefer. Stand for 2-5
minutes.
Put frozen baguette
diagonally on baking
paper on the rack. After
grilling stand for 2-3
minutes.
Put frozen gratin into a
small glass pyrex dish.
Put the dish on the rack.
After cooking stand for 23 minutes.
Put frozen pasta into a
small flat rectangular
glass pyrex dish. Put the
dish directly on the
turntable. After cooking
stand for 2-3 minutes.
Put frozen fish gratin into
a s mall flat rectangular
glass pyrex dish. Put the
dish directly on the
turntable. After cooking
stand for 2-3 minutes.
25

26
Loading…
| Language | Type | Pages | |
|---|---|---|---|
| English | User Manual | 82 | > Go to the manual |
| German | User Manual | 82 | Go to the manual |
| French | User Manual | 82 | Go to the manual |
| Italian | User Manual | 82 | Go to the manual |
| Portuguese | User Manual | 82 | Go to the manual |
| Spanish | User Manual | 82 | Go to the manual |
364858
Report abuse
Libble takes abuse of its services very seriously. We’re committed to dealing with such abuse according to the laws in your country of residence. When you submit a report, we’ll investigate it and take the appropriate action. We’ll get back to you only if we require additional details or have more information to share.
Product: Candy cmg 1773 dw
Forumrules
To achieve meaningful questions, we apply the following rules:
- First, read the manual;
- Check if your question has been asked previously;
- Try to ask your question as clearly as possible;
- Did you already try to solve the problem? Please mention this;
- Is your problem solved by a visitor then let him/her know in this forum;
- To give a response to a question or answer, do not use this form but click on the button ‘reply to this question’;
- Your question will be posted here and emailed to our subscribers. Therefore, avoid filling in personal details.
Your question has been posted on this page
Would you like to receive an email when new answers and questions are posted? Please enter your email address.
User manual for Candy CMG 1773 DW.
Is this manual useful?
Pagina: /
Need help or do you have a question about the Candy CMG 1773 DW Microwave?
Important specifications
| Brand: | Candy |
| Model/name: | CMG 1773 DW |
| Available languages | English German Italian Spanish French Portuguese |
| Product | Microwave |
| Filetype |
More Microwave manuals of Candy
Didn’t find the correct user manual? Well see here one of our other ones
-
Candy CMG 30 DS
-
Candy CMG 7317 DW
-
Candy CMG 7417 DS
-
Candy CMG 9323 DW
-
Candy CMG 9423 DS
-
Candy CMG 9623 DY
-
Candy CMG 1773 DW
-
Candy CMG 1774 DS
Comments
There are no questions yet. If you need help with Candy, ask others.
Click here to ask.
Frequently asked questions
RU
МИКРОВОЛНОВАЯ ПЕЧЬ
РУКОВОДСТВО ПО ЭКСПЛУАТАЦИИ
МОДЕЛИ CMG 7317 DW
CMG 7417 DS

МИКРОВОЛНОВАЯ ПЕЧЬ
РУКОВОДСТВО ПО ЭКСПЛУАТАЦИИ
МОДЕЛИ
Внимательно прочитайте данную инструкцию перед
использованием микроволновой печи и бережно храните ее. Если вы будете соблюдать содержащиеся здесь инструкции,
ваша печь гарантирует отличную работу на долгие годы.
БЕРЕЖНО ХРАНИТЕ НАСТОЯЩЕЕ РУКОВОДСТВО
CMG 7317 DW
CMG 7417 DS
RU
1

ЧАСЫ/УСТАНОВКА
РАЗМОРОЗКА ПО ВЕСУ
РАЗМОРОЗКА ПО ВРЕМЕНИ
МИКРОВОЛНЫ/ГРИЛЬ/КОМБИ
АВТО МЕНЮ
СТОП/ОЧИСТКА /
БЛОКИРОВКА
ВРЕМЯ /ВЕС
СТАРТ/ЭКСПРЕСС
RU
2

МЕРЫ ПРЕДОСТОРОЖНОСТИ ВО ИЗБЕЖАНИЕ
ОБЛУЧЕНИЯ ЭНЕРГИЕЙ МИКРОВОЛН
(а) Не пытайтесь включать печь с открытой дверцей, поскольку это может
вызвать опасное излучение энергией микроволн. Важно не ломать или не
менять замки безопасности.
(б) Не ставьте никакие предметы между передней частью печи и дверцей, а
также не давайте накапливаться грязи или моющим средствам на
поверхности уплотнителя.
(в) Внимание: Если дверца или уплотнитель повреждены, печь не должна
использоваться, пока не будет починена силами компетентного специалиста.
ПРИЛОЖЕНИЕ
Если прибор не поддерживается в хорошем состоянии чистоты, его
поверхность может быть повреждена, и это может сократить срок службы
прибора и привести к опасным ситуациям.
Технические характеристики
Модели
CM
G
DW — CM
G
DS
Номинальное напряжение 230
В ~ 50 Гц
Номинальная входная мощность
(микроволны)
1150 Вт
Номинальная выходная мощность
(микроволны)
700 Вт
Номинальная входная мощность
(гриль)
1000 Вт
Емкость печи 17
л
Диаметр вращающейся тарелки
ø
245 мм
Внешние габариты
Вес нетто 12,3
кг
461 х 375 х 280 мм
7317
7417
RU
3

ВАЖНЫЕ ПРЕДУПРЕЖДЕНИЯ БЕЗОПАСНОСТИ
ВНИМАНИЕ
Чтобы снизить риск пожара, электрического удара, ущерба людям или
облучения энергией микроволн во время пользования электробытовым
прибором, мы рекомендуем следовать основным мерам предосторожности,
среди которых следующие:
1. Внимание: Жидкости или другие пищевые продукты не должны
разогреваться в наглухо закрытых контейнерах, поскольку могут
взорваться.
2. Внимание: Опасно для всех, кто не является авторизованным техником,
снимать защитную крышку, предназначенную для обеспечения защиты
от облучения энергией микроволн.
3. Внимание:
Разрешайте
пользоваться
микроволновой
печью
несовершеннолетним детям без присмотра только после того, как дадите
соответствующие инструкции, которые позволят несовершеннолетнему
использовать печь безопасным способом, и только, когда он понял
опасности, связанные с ненадлежащим использованием.
4. Внимание: Когда печь используется комбинированным способом,
несовершеннолетние
должны
использовать
печь
только
под
наблюдением взрослого по причине производимой температуры (только
для серии с грилем).
5. Использовать только кухонные принадлежности, пригодные для
использования в микроволновой печи.
6. Печь должна регулярно чиститься, а любые остатки пищи должны
удаляться.
7. Прочитать
и
выполнять
специфические
«МЕРЫ
ПРЕДОСТОРОЖНОСТИ
ЧТОБЫ
ИЗБЕЖАТЬ
ВОЗМОЖНОЕ
ОБЛУЧЕНИЕ ЭНЕРГИЕЙ МИКРОВОЛН».
8. Когда разогревается пища в пластмассовых или бумажных контейнерах,
держать под контролем печь по причине возможного пожара.
9. Если наблюдается дым, выключить или вынуть из розетки печь и
держать закрытой дверцу, чтобы погасить пламя.
10. Не варить чрезмерно пищу.
11. Не использовать полость печи в качестве контейнера. Не оставлять
продукты, такие как хлеб, сухари и проч., внутри печи.
12. Снять замки из металлической проволоки и металлические ручки с
контейнеров/пакетов из бумаги или пластика перед тем, как расположить
их в печи.
13. Установить или расположить печь в соответствии с поставленной
инструкцией по установке.
RU
4

14. Яйца в скорлупе и крутые яйца не должны разогреваться в
микроволновой печи, поскольку могут взорваться даже после того, как
микроволновое разогревание закончено.
15. Использовать этот электробытовой прибор только в порядке, описанном
в настоящем руководстве. Не использовать в этом электробытовом
приборе коррозийные вещества или пары. Эта печь сконструирована
специально, чтобы нагревать. Она не изготовлена для использования в
промышленности или в лаборатории.
16. Если провод, которым оснащена печь, поврежден, он должен быть
заменен изготовителем, его службой технического обслуживания или
аналогично квалифицированным персоналом с целью предотвратить
любую опасную ситуацию.
17. Не складировать или использовать этот электробытовой прибор на улице.
18. Не использовать этот электробытовой прибор вблизи воды, в намоченной
мойке или вблизи бассейна.
19. Температура доступных поверхностей может быть высокой во время
работы электробытового прибора. Держать питающий кабель вдали от
горячих поверхностей и не накрывать печь ни в коем случае.
20. Не оставлять питающий провод висеть на краю стола или рабочей
столешницы.
21. Несоблюдение нормальных условий очистки может вызвать ущерб
поверхностям, и это может вызвать сокращение срока службы
электробытового прибора, помимо того, что вызвать опасные ситуации.
22. Содержимое детских бутылочек и контейнеров с питанием для
новорожденных надо перемешать или потрясти, а температуру
содержащегося в них питания надо проверить, чтобы избежать ожогов.
23. Микроволновое разогревание напитков может вызвать процесс
замедленного кипения, следовательно, обращать внимание, когда
перемещается контейнер.
RU
5

Инструкции чтобы снизить риск ущерба людям
Установка с заземлением
ОПАСНОСТЬ
Опасность электрического удара
Трогать некоторые внутренние компоненты может вызвать серьезный
личный ущерб или смерть. Не разбирать прибор.
ВНИМАНИЕ
Опасность электрического удара
Неправильное использование земли может вызвать электрический удар. Не
подключать к электрической сети, пока электробытовой прибор не будет
правильно установлен и с соответствующим заземлением.
Чтобы снизить риск ущерба людям
Заземление
ОЧИСТКА
Убедитесь, что печь отключена от электрического тока.
1. Очистить внутренние поверхности печи после использования слегка
влажной тряпкой.
2. Очистить посуду привычным способом в мыльной воде.
3. Рамка дверцы, уплотнитель и смежные части должны очищаться по мере
необходимости внимательно влажной тряпкой.
Этот электробытовой прибор должен быть подключен с заземлением. В
случае короткого электрического замыкания земля снижает риск
электрического удара, предоставляя провод для утечки электрического
тока. Этот электробытовой прибор поставляется с проводом, оснащенным
заземлительной жилой и соответствующей заземлительной вилкой. Вилка
должна втыкаться в розетку, корректно установленную и имеющую
заземление. Проконсультируйтесь с квалифицированным электриком или
специалистом по техническому обслуживанию в случае, если инструкции
по заземлению не будут правильно поняты или в случае сомнения
относительно правильности подключения к заземлению электробытового
прибора. В случае, если нужно использовать удлинитель, использовать
только удлинительный трехжильный провод с двухполюсной вилкой с
пазом для заземления и 2 пластинками заземления. Двухполюсная розетка
с
заземлительной
вилкой
или
заземлительным
контактным
выводом/выводами будет пригодна для вилки печи. Провод, поставляемый
с печью, специально короткий, чтобы снизить риск, связанный с
возможностью споткнуться или выдернуть его из розетки, что возможно,
если провод длинный:
RU
6

1) номинальное напряжение, указанное на проводах или на удлинителе,
должно быть хотя бы эквивалентно номинальному напряжению
электробытового прибора.
2) Удлинитель должен состоять из трехжильного провода с заземлением.
3) Длинный провод должен располагаться так, чтобы не свешиваться с
рабочего стола, где он может быть вытянут детьми или об который
можно неожиданно споткнуться.
Розетка типа Schuco
КУХОННАЯ ПОСУДА
ВНИМАНИЕ
Опасность ущерба людям
Нужно считать опасным для всех, кто не имеет специальной компетенции,
выполнять ремонт или техническое обслуживание, которое предусматривает
снятие крышки, которая обеспечивает защиту от облучения энергией
микроволн.
Ссылаться на руководство на параграф «Материалы, которые могут
использоваться в микроволновой печи или которых надо избегать в
микроволновой печи».
Это может быть не металлическая посуда не пригодная для использования в
микроволновой печи. В случае сомнения можно испытать посуду, следуя
следующей процедуре.
Проверка посуды:
1. Наполнить контейнер, пригодный для использования в микроволновой
печи, чашкой холодной воды (250 мл) и исследуемой посудой.
2. Варить на максимальной температуре в течение 1 минуты.
3. Осторожно потрогайте посуду. Если пустая посуда горячая, не
используйте ее для микроволнового приготовления.
4. Не превышать время 1 минуту нагрева.
RU
7

Материалы, которые могут использоваться в микроволновой
печи
Алюминиевая пленка
Только для защиты. Маленькие гладкие кусочки могут
использоваться для закрывания тонких частей мяса или
птицы, чтобы предотвратить чрезмерное варение. Может
произойти дуга, если пленка слишком близко к стенкам
печи. Пленка должна располагаться на минимальном
расстоянии 1 дюйм (2,5 см) от стенок печи.
Терракотовые
контейнеры
Следовать инструкциям изготовителя. Дно терракотового
контейнера должно располагаться хотя бы на 3/16 дюйма
(5 мм) над вращающейся тарелкой. Неправильное
использование может вызвать поломку вращающейся
тарелки.
Столовые тарелки
Только пригодные для использования в микроволновой
печи.
Следовать
инструкциям
изготовителя.
Не
использовать тарелки разбитые или с отбитыми краями.
Стеклянные чаши
Всегда снимать крышку. Использовать только чтобы
разогревать пищу пока не разогреется. Многие
стеклянные чаши не жаропрочные и могут разбиться.
Стеклянные изделия
Использовать только изделия из жаропрочного стекла и
пригодные для использования в микроволновой печи.
Убедитесь, что у них нет металлический краев. Не
использовать тарелки разбитые или с отбитыми краями.
Пакеты для
приготовления в печи
Следовать инструкциям изготовителя. Не закрывать
металлическими замками. Сделать надрезы, чтобы
позволить выходить пару.
Бумажные чашки и
тарелки
Использовать на короткие периоды исключительно для
варения/разогрева. Не оставлять печь без присмотра во
время варения.
Бумажные салфетки
Использовать для закрывания пищи по время разогрева,
чтобы впитывать возможный жир. Использовать,
контролируя, только для непродолжительного варения.
Бумага типа
пергамент
Использовать как закрывание, чтобы предотвратить
брызги, или как закрывание пара.
Пластмасса
Только пригодная для использования в микроволновых
печах. Следовать инструкциям изготовителя. Должна
быть
маркирована
«Пригодно
для
микроволн».
Некоторые пластмассовые контейнеры размягчаются,
когда содержащаяся в них пища разогревается.
Пластмассовые
упаковки
и
пакеты,
закрытые
герметично, должны быть разрезаны или проколоты, как
указано на самой упаковке.
Пластмассовая пленка
Только пригодная для использования в микроволновых
печах. Использовать, чтобы закрывать пищу по время
приготовления, чтобы удерживать влагу. Убедиться, что
пластмассовая пленка не соприкасается с пищей.
Термометры
Только пригодные для использования в микроволновых
печах (термометры для мяса и сладкого).
Парафиновая бумага
Использовать,
чтобы
закрывать
пищу,
чтобы
предотвратить брызги и удержать влагу.
RU
8

Материалы, которых следует избегать в микроволновой печи
Алюминиевые блюда
Может вызвать образование дуги. Переложите
пищу на тарелки, пригодные для использования в
микроволновой печи.
Картонные контейнеры для
пищевых продуктов с
металлическими ручками
Может вызвать образование дуги. Переложите
пищу на тарелки, пригодные для использования в
микроволновой печи.
Металлическая посуда
Металл защищает пищу от действия микроволн.
Металл может вызвать образование дуги.
Металлические замки
Может вызвать образование дуги и может вызвать
возгорание внутри печи.
Бумажные пакеты
Может вызвать возгорание внутри печи.
Контейнеры из полистирена
или полиуретана
Контейнеры могут расплавиться или загрязнить
внутреннюю жидкость , когда подвергаются
действию высокой температуры.
Дерево
Дерево
высыхает,
когда
используется
в
микроволновых печах, и может треснуть или
разломиться.
УСТАНОВКА ВАШЕЙ ПЕЧИ
Наименование компонентов и принадлежностей печи
Извлечь печь и все материалы ил упаковки и из полости печи.
Печь комплектуется следующим оборудованием:
1 вращающееся стеклянное блюдо
1 вращающийся обод в сборе
1 руководство по эксплуатации
A) панель управления
B) ось вращающегося блюда
C) опорный обод
D) стеклянное блюдо
E) смотровое окно
F) дверца
G) система блокировки
Гриль (только для серии с грилем)
Внимание: не используйте металлическую решетку в микроволнах. Всегда
вынимайте ее, когда используете функцию микроволн!
Выключить печь, если дверца остается открытой по время работы.
RU
9

04:59
Candy CMXW 22 DS обзор микроволновки
05:24
Обзор Микроволновая печь Candy CMXG22DS из Rozetka
00:20
Проблема с микроволновой печью Candy CMG 7317 DW
08:12
Распаковка и обзор: Микроволновая печь Candy CMW 2070DW
00:56
СВЧ-печь Candy CMW2070DW распаковка (www.sulpak.kz)
00:58
Candy Countertop Microwave CMXW20DS
03:01
Candy CMW 7117 DW microwave
Нажмите на кнопку для помощи
- Manuals and instructions
- Candy
- Candy CMG 1773 DW
- Back
Manual — a guide for Candy CMG 1773 DW
Instructions for use of Candy CMG 1773 DW will be loaded, after verifying that you’re not a robot. Thank you for your understanding.
Manual will appear after verifying that you‘re not a robot.
Sample of part of the manual for Candy CMG 1773 DW
the size of the manual is 2.67 MB
A sample of part of a manual will soon be completed.