
3-263-513-11 (1)
Operating Instructions
Инструкция по эксплуатации
GB
RU
CDX-R3300EE
For installation and connections, see the supplied installation/connections manual.
Перед установкой и подсоединениями прочитайте прилагаемую инструкцию по
установке и подсоединению.
© 2004 Sony Corporation
FM
/
AM
Compact Disc Player

2
Welcome !
Thank you for purchasing this Sony Compact
Disc Player. You can enjoy its various features
even more with:
• MP3 file playback.
• CD-R/CD-RW which can have a session added
can be played (page 7).
• Discs recorded in Multi Session can be played,
depending on the recording method (page 7).
• CD TEXT information
(displayed when a CD TEXT disc*
1
is played).
• ID3 tag*
2
version 1.0, 1.1, 2.2, 2.3 or 2.4
information (displayed when an MP3 file is
played).
•
Optional controller accessories
Card remote commander RM-X114
Rotary commander RM-X4S
*1
A CD TEXT disc is an audio CD that includes
information such as the disc name, artist name,
and track names. This information is recorded on
the disc.
*2
ID3 tag is an MP3 file that contains information
about album name, artist name, track name, etc.
This label is located on the bottom of the
chassis.


4
Location of controls
Refer to the pages listed for details.
a
Volume +/– button
b
ATT (attenuate) button 16
c
DSPL (display mode change) button
10, 12
d
OPEN/EJECT shutter 11
e
Display window
f
EQ3 button 17, 18
g
OFF (Stop/Power off) button
*
9,
11
h
SEEK +/– button
Radio:
To tune in stations automatically/find a
station manually.
CD (MP3 files):
To skip tracks/fast-forward, reverse a track.
i
(front panel release) button 9
j
SOURCE (Power on/Radio/CD) button
To select the source.
k
MODE button
To change the operation.
l
SEL (select) button
To select items.
m
RESET button
(located on the front side of
the unit, behind the front panel)
9
n
Number buttons 17
Radio:
To store the desired station on each number
button.
MP3 files:
(1):
ALBUM –
11
(2):
ALBUM +
11
CD:
(3):
REP 12
(4):
SHUF 12
o
SENS button 13
p
SCRL (scroll) button 12
q
BTM button 13
r
Receptor for the card remote
commander
*
Warning when installing in a car without
an ACC (accessory) position on the
ignition switch
After turning off the ignition, be sure to press
and hold
(OFF)
on the unit until the display
disappears.
Otherwise, the display does not turn off and this
causes battery drain.
DSPL
EQ3
ATT
OFF
SOURCE
MODE
SEL
SEEK
1
2
3
4
5
6
SENS
REP
– ALBUM +
SHUF
CDX-R3300EE
BTM
SCRL

Selecting an album with the card remote commander, Skipping tracks continuously, Card remote commander rm-x114 (optional)
Страница 5 Чат поддержки
- Изображение
- Текст
5
The corresponding buttons of the card
remote commander control the same
functions as those on this unit.
a
DSPL button
b
MENU button
*
1
c
SOURCE button
d
SEEK (–/+) buttons
e
SOUND button
f
OFF button
g
VOL (+/–) buttons
h
MODE button
i
LIST button
*
1
j
DISC
*
1
(ALBUM)/PRESET (+/–)
buttons
k
ENTER button
*
1
l
ATT button
*1
Not available for this unit
Note
If the display disappears by pressing
(OFF)
, it cannot
be operated with the card remote commander unless
(SOURCE)
on the unit is pressed, or a disc is inserted
to activate the unit first.
Tip
For details on how to replace the battery, see
“Replacing the lithium battery” on page 19.
Selecting an album with the card
remote commander
Album can be skipped using the DISC
(ALBUM) (+/–) buttons on the card remote
commander.
*2
Available only when an MP3 file is played.
Skipping tracks continuously
Press once (SEEK) (+) or (SEEK) (–) on the
card remote commander, then press again within
1 second and hold.
Card remote commander RM-X114
(optional)
DISC
–
ATT
OFF
DSPL
MODE
SOURCE
DISC
+
VOL
+
–
PRESET
+
SEEK
+
SEEK
–
PRESET –
SOUND
ENTER
MENU
LIST
To
Press
Skip albums*
2
– Album selection
+ or – [once for each album]
To continuously skip
albums, press and hold
either button.

6
Precautions
• If your car has been parked in direct sunlight,
allow the unit to cool off before operating it.
• Power aerial will extend automatically while
the unit is operating.
If you have any questions or problems
concerning your unit that are not covered in this
manual, please consult your nearest Sony dealer.
Moisture condensation
On a rainy day or in a very damp area, moisture
condensation may occur inside the lenses and
display of the unit. Should this occur, the unit
will not operate properly. In such a case, remove
the disc and wait for about an hour until the
moisture has evaporated.
To maintain high sound quality
Be careful not to splash juice or other soft drinks
onto the unit or discs.
Notes on discs
• To keep a disc clean, do not touch its surface.
Handle the disc by its edge.
• Keep your discs in their cases or disc
magazines when not in use.
• Do not subject discs to heat/high temperature.
Avoid leaving them in a parked car or on a
dashboard/rear tray.
• Do not attach labels, or use discs with sticky
ink/residue. Such discs may stop spinning
when used, causing a malfunction, or may ruin
the disc.
• Do not use any discs with labels or stickers
attached.
The following malfunctions may result from
using such discs:
– Inability to eject a disc (due to a label or
sticker peeling off and jamming the eject
mechanism).
– Inability to read audio data correctly (e.g.,
playback skipping, or no playback) due to
heat shrinking of a sticker or label causing a
disc to warp.
• Discs with non-standard shapes (e.g., heart,
square, star) cannot be played on this unit.
Attempting to do so may damage the unit. Do
not use such discs.
• You cannot play 8 cm CDs.

7
• Before playing, clean the discs with a
commercially available cleaning cloth. Wipe
each disc from the centre out. Do not use
solvents such as benzine, thinner, commercially
available cleaners, or antistatic spray intended
for analogue discs.
Music discs encoded with copyright
protection
This product is designed to play back discs that
conform to the Compact Disc (CD) standard.
Recently, various music discs encoded with
copyright protection are marketed by some
record companies. Please be aware that among
those discs, there are some that do not conform to
the CD standard and may not be playable by this
product.
Notes on CD-Rs (recordable CDs)/CD-
RWs (rewritable CDs)
This unit can play the following discs:
• Some CD-Rs/CD-RWs (depending on the
equipment used for its recording or the
condition of the disc) may not play on this unit.
• You cannot play a CD-R/CD-RW that is not
finalized*.
• You can play MP3 files recorded on CD-
ROMs, CD-Rs, and CD-RWs.
• A CD-R/CD-RW to which a session can be
added can be played.
*
A process necessary for a recorded CD-R/CD-RW
disc to be played on the audio CD player.
About MP3 files
MP3 (MPEG 1 Audio Layer-3) is a standard
technology and format for compressing a sound
sequence. The file is compressed to about 1/10 of
its original size. Sounds outside the range of
human hearing are compressed while the sounds
we can hear are not compressed.
Notes on discs
You can play MP3 files recorded on CD-ROMs,
CD-Rs, and CD-RWs.
The disc must be in the ISO 9660*
1
level 1 or
level 2 format, or Joliet or Romeo in the
expansion format.
You can use a disc recorded in Multi Session*
2
.
*
1
ISO 9660 Format
The most common international standard for
the logical format of files and folders on a
CD-ROM.
There are several specification levels. In
Level 1, file names must be in the 8.3 format
(no more than 8 characters in the name, no
more than 3 characters in the extension
“.MP3”) and in capital letters. Folder names
can be no longer than 8 characters. There can
be no more than 8 nested folder levels. Level
2 specifications allow file names up to 31
characters long.
Each folder can have up to 8 trees.
For Joliet or Romeo in the expansion format,
make sure of the contents of the writing
software, etc.
*
2
Multi Session
This is a recording method that enables
adding of data using the Track-At-Once
method. Conventional CDs begin at a CD
control area called the Lead-in and end at an
area called Lead-out. A Multi Session CD is a
CD having multiple sessions, with each
segment from Lead-in to Lead-out regarded
as a single session.
CD-Extra: The format which records audio
(audio CD data) as tracks on session 1, and
records data as tracks on session 2.
Mixed CD: In this format, data is recorded as
track 1, and audio (audio CD data) is recorded
as track 2.
Type of discs
Label on the disc
Audio CD
MP3 files
continue to next page
t

8
Notes
• With formats other than ISO 9660 level 1 and level 2,
folder names or file names may not be displayed
correctly.
• When naming, be sure to add the file extension
“.MP3” to the file name.
• If you put the extension “.MP3” to a file other than
MP3, the unit cannot recognize the file properly and
will generate random noise that could damage your
speakers.
• The following discs take a longer time to start
playback.
– a disc recorded with complicated tree structure.
– a disc recorded in Multi Session.
– a disc to which data can be added.
Cautions when playing a disc that is recorded in
Multi Session
• When the first track of the first session is audio CD
data:
Only audio CD data of the first session is played
back.
Any data in subsequent sessions is skipped.
• When the first track of the first session is not audio
CD data:
– If an MP3 file is in the disc, only MP3 file(s) is
played back and other data is skipped. (Audio CD
data is not recognized.)
– If no MP3 file is in the disc, “NO MUSIC” is
displayed and nothing is played back. (Audio CD
data is not recognized.)
The playback order of the MP3 files
The playback order of the folders and files is as
follows:
Notes
• A folder that does not include an MP3 file is skipped.
• When you insert a disc with many trees, it takes a
longer time to start playback. We recommend that
you make only one or two trees for each disc.
• Maximum folder number: 150 (including root folder
and empty folders)
• The maximum number of MP3 files and folders that
can be contained in a disc: 300
When a file/folder name contains many characters,
this number may become less than 300.
Tip
To specify a desired playback order, before the folder
or file name, input the order by number (e.g., “01,”
“02”), then record contents onto a disc. (The order
differs depending on the writing software.)
1
2
6
3
5
7
1
2
6
7
4
8
3
5
8
4
9
Folder (album)
MP3 file (track)
Tree 1
(root)
Tree 2
Tree 4
Tree 5
Tree 3

9
Getting Started
Resetting the unit
Before operating the unit for the first time, or
after replacing the car battery or changing the
connections, you must reset the unit.
Remove the front panel and press the RESET
button with a pointed object, such as a ballpoint
pen.
Note
Pressing the RESET button will erase the clock setting
and some stored contents.
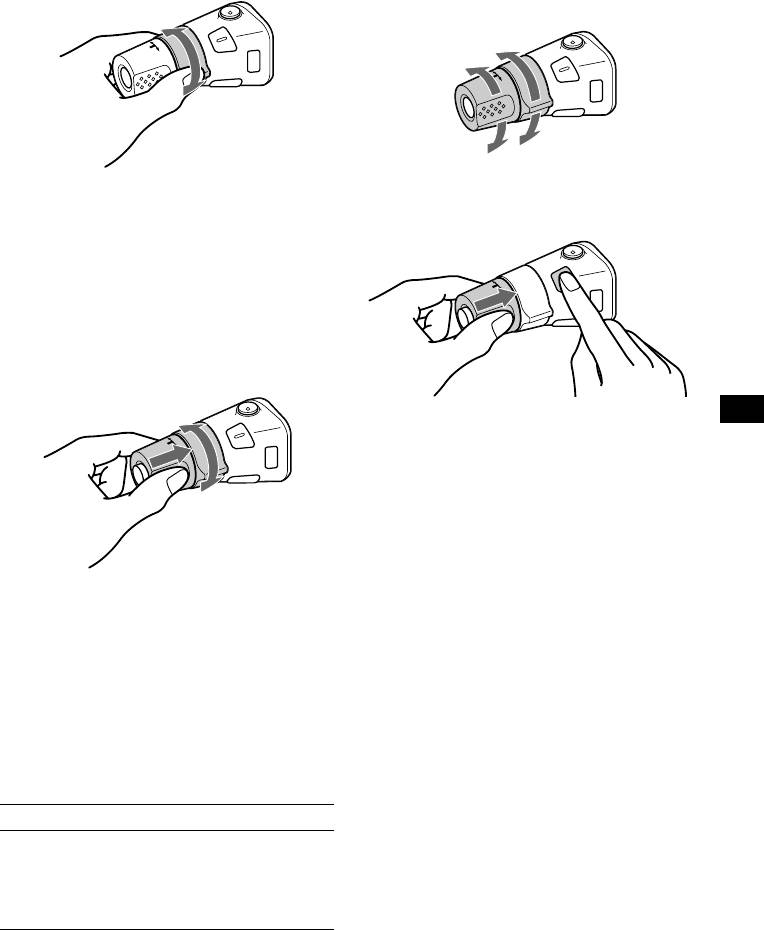
Detaching the front panel
You can detach the front panel of this unit to
protect the unit from being stolen.
Caution alarm
If you turn the ignition switch to the OFF
position without removing the front panel, the
caution alarm will beep for a few seconds.
If you connect an optional amplifier and do not
use the built-in amplifier, the beep sound will be
deactivated.
1
Press
(OFF)*
.
CD playback or radio reception stops (the key
illumination and display remain on).
*
If your car has no ACC (accessory) position on
the ignition switch, be sure to turn the unit off by
pressing
(OFF)
until the display disappears to
avoid car battery drain.
2
Press
, then pull it off towards you.
Notes
• If you detach the panel while the unit is still turned
on, the power will turn off automatically to prevent
the speakers from being damaged.
• Do not drop or put excessive pressure on the front
panel and its display window.
• Do not subject the front panel to heat/high
temperature or moisture. Avoid leaving it in a parked
car or on a dashboard/rear tray.
Tip
When carrying the front panel with you, use the
supplied front panel case.
RESET button
continue to next page
t
OP
EN/
EJE
CT
(OFF)

10
Attaching the front panel
Attach part A of the front panel to part B of the
unit as illustrated and push the left side into
position until it clicks.
Note
Do not put anything on the inner surface of the front
panel.
Setting the clock
The clock uses a 24-hour digital indication.
Example: To set the clock to 10:08
1
Press
(DSPL)
for 2 seconds.
The hour indication flashes.
1
Press the volume +/– button to set
the hour.
2
Press
(SEL)
.
The minute indication flashes.
3
Press the volume +/– button to set
the minute.
2
Press
(DSPL)
.
The clock starts. After the clock setting is
completed, the display returns to normal play
mode.
OP
EN/
EJE
CT

07:20
AUX выход для магнитолы сони на мой Опелёк
00:36
Radio Sony CD/MP3 CDX-R3300 R1
02:42
Sony Xplod Car CD MP3 Player CDX-R3300 50w X 4 Excellent Condition
Нажмите на кнопку для помощи

FM/AM Compact
Disc Player
Руководство по эксплуатации
Для установки и подключения см. руководство
по установке и подключению
cdx-r3300_3300s.qxd 1/15/04 5:44 PM Page 1

Добро пожаловать!
Благодарим вас за приобретение проигрывателя компакт-дисков фирмы Sony.
Это устройство обладает следующими возможностями:
• воспроизведение MP3-файлов;
• воспроизведение CD-R/CD-RW с возможностью добавления сессии (см. стр. 7);
• воспроизведение компакт-дисков, записанных в режиме мультисессии, в зависимости
от способа записи (см. стр. 7);
• информация CD-TEXT (отображается во
время воспроизведения компакт-диска CDTEXT*
1
);
• Информация ID3tag*2(версия 1.0, 1.1, 2.2,
2.3 или 2.4) (отображается во время воспроизведения MP3-файла).
• Дополнительные аксессуары
для управления
Планшетный пульт дистанционного
управления (ДУ) RM-X114
Вращаемый пульт управления RM-X4S
*
1
Диск CD-TEXT — это аудио компакт-диск,
включающий в себя информацию о названии
диска, имени исполнителя и названиях треков.
Эта информация записана на самом компактдиске.
*
2
ID3tag – это MP3-файл, содержащий
информацию о названии альбома, имени
исполнителя, названиях треков и т.д.
Лазерный продукт класса 1
Данная этикетка расположена на нижней
стороне привода устройства.
2
cdx-r3300_3300s.qxd 1/15/04 5:44 PM Page 2

Содержание
Расположение элементов управления . . .4
Меры предосторожности . . . . . . . . . . . . . .6
Примечания по дискам . . . . . . . . . . . . . . .6
О МР3-файлах . . . . . . . . . . . . . . . . . . . . . .7
Подготовка к работе
Перезагрузка устройства . . . . . . . . . . . . . .9
Отсоединение передней панели . . . . . . . .9
Установка часов . . . . . . . . . . . . . . . . . . . .10
Проигрыватель компакт-дисков
Воспроизведение дисков . . . . . . . . . . . . . . . .11
Отображения на дисплее . . . . . . . . . . . . . . . .12
Повторное воспроизведение треков
– Функция Repeat Play . . . . . . . . . . . . . . .12
Воспроизведение треков
в произвольном порядке –
– Функция Shuffle Play . . . . . . . . . . . . . .12
Радио
Автоматическое сохранение радиостанций
– Функция BTM . . . . . . . . . . . . . . . . . . . .13
Прием радиостанций, сохраненных
в памяти устройства . . . . . . . . . . . . . . . . .13
Сохранение в памяти
только нужных радиостанций . . . . . . . . .14
Другие функции
Использование вращающегося
пульта управления . . . . . . . . . . . . . . . . . .14
Настройка характеристик звука . . . . . . .16
Быстрое приглушение звука . . . . . . . . . .16
Изменение установок звука и дисплея
– Меню . . . . . . . . . . . . . . . . . . . . . . . . . . .16
Установки эквалайзера (EQ3) . . . . . . . . .17
Дополнительная информация
Обслуживание . . . . . . . . . . . . . . . . . . . . .18
Извлечение устройства . . . . . . . . . . . . . .19
Технические характеристики . . . . . . . . .21
Устранение неисправностей . . . . . . . . . .22
Отображения при ошибках/
Сообщения . . . . . . . . . . . . . . . . . . . . . . . .23
3
cdx-r3300_3300s.qxd 1/15/04 5:44 PM Page 3

Расположение элементов управления
Подробнее см. указанные страницы.
4
1 Кнопка VOLUME +/- (громкость +/-)
2 Кнопка ATT (приглушение звука) 16
3 Кнопка DSPL (изменение режима
работы дисплея) 10, 12
4 Защитная створка OPEN/EJECT
(открыть) 11
5 Окно дисплея
6 Кнопка EQ3 17, 18
7 Кнопка OFF (остановка
воспроизведения/выключение
питания)* 9, 11
8 Кнопка SEEK +/- (поиск +/-)
Радио:
автоматическая настройка на
радиостанции/ поиск радиостанций
вручную.
СD (МР3-файлы):
пропуск трека/перемотка трека назад и
вперед.
9 Кнопка (разблокирование
передней панели) 9
0 Кнопка SOURCE (включение
питания/радио/CD)
qa Кнопка MODE (режим)
Смена операций.
qs Кнопка SEL (выбор)
Выбор параметра.
qd Кнопка перезагрузки RESET
(расположена на передней стороне корпуса
устройства за передней панелью) 9
qf Номерные кнопки 17
Радио:
сохранение нужных радиостанций
на каждой номерной кнопке.
МР3-файлы:
(1): ALBUM – 11
(2): ALBUM + 11
СD:
(3): REP (повторное воспроизведение) 12
(4): SHUF (воспроизведение
в произвольном порядке) 12
qg Переключатель полосы частот
(расположен на нижней стороне корпуса
устройства)
См. раздел «Переключатель полосы частот»
в руководстве по установке и подключению.
qh Кнопка SENS 13
qj Кнопка SCRL (пролистывание) 12
qk Кнопка ВТМ (сохранение лучшей
настройки) 13
ql Датчик планшетного пульта ДУ
*
Будьте осторожны при установке
в автомобиль, на замке зажигания
которого не предусмотрено положение
ACC (аксессуары).
Выключив зажигание, обязательно нажмите
и удерживайте кнопку
(OFF) данного
устройства до тех пор, пока дисплей
не погаснет.
Иначе дисплей не выключится, что может
привести к разрядке аккумуляторной батареи
автомобиля.
cdx-r3300_3300s.qxd 1/15/04 5:44 PM Page 4

Планшетный пульт ДУ RM-X114
(приобретается отдельно)
Кнопки на пульте ДУ, соответствующие
кнопкам на основном блоке,
выполняют те же функции.
1 Кнопка DSPL (дисплей)
2 Кнопка MENU (меню)*
1
3 Кнопка SOURCE (выбор источника)
4 Кнопка SEEK -/+ (поиск -/+)
5 Кнопка SOUND (звук)
6 Кнопка OFF (остановка
воспроизведения/выключение
питания)
7 Кнопки VOL +/- (громкость +/-)
8 Кнопка MODE (режим)
9 Кнопка LIST*
1
(список)
0 Кнопки DISC*
1
(ALBUM)/PRESET (+/-)
qa Кнопка ENTER*
1
(ввод)
qs Кнопка ATT (приглушение звука)
*
1
Не предусмотрено для данного устройства.
Примечание
Если вы выключили дисплей данного проигрывателя нажатием кнопки
(OFF), то не сможете
управлять проигрывателем с помощью планшетного пульта ДУ, пока не нажмете кнопку
(SOURCE) на корпусе или не активируете
проигрыватель, установив в него компакт-диск.
Совет
Подробности о том, как производить замену
элементов питания, см. раздел «Замена литиевой
батарейки» (стр. 19).
Выбор альбома с помощью
планшетного пульта ДУ
Вы можете пропустить альбом с помощью
кнопок DISC (ALBUM) (+/-) на планшетном
пульте ДУ.
Чтобы Нажмите
Пропускать альбомы
*2+ или – (один раз для
— Выбор альбома каждого альбома).
Чтобы пропустить
несколько альбомов,
нажмите и удерживайте
одну из кнопок.
*
2
Только при воспроизведении МР3-файла.
Пропуск нескольких треков
Нажмите (SEEK) (+) или (SEEK) (-)
на планшетном пульте ДУ, затем в течение
2 сек. нажмите еще раз и удерживайте.
5
cdx-r3300_3300s.qxd 1/15/04 5:44 PM Page 5

Меры предосторожности
•
Если ваш автомобиль был припаркован на
солнце, подождите некоторое время, чтобы
проигрыватель остыл, прежде чем включать его.
• Антенна выдвигается автоматически, когда
проигрыватель включен.
Если у вас возникли вопросы или проблемы, связанные с данным проигрывателем, но не описанные в этом руководстве, обратитесь за консультацией к ближайшему дилеру фирмы Sony.
Конденсация влаги
В дождливый день или при большой влажности
воздуха на линзах звукоснимателя и дисплее
данного проигрывателя может скапливаться
влага. Если это произошло, проигрыватель не
будет функционировать нормально. В таком
случае извлеките из проигрывателя компактдиск и подождите около часа, чтобы влага испарилась.
Поддержание высокого качества
звучания
Будьте внимательны, чтобы не пролить
сок или другие прохладительные напитки
на проигрыватель или диски.
Примечания по дискам
• Чтобы содержать диски в чистоте, не касайтесь
их поверхности. Берите диски за края.
• Храните диски в коробках или в специальных
чехлах, когда вы ими не пользуетесь.
• Берегите диски от воздействия высоких температур. Не оставляйте диски в припаркованных автомобилях или на передней/задней панелях автомобиля.
• Не приклеивайте к дискам наклейки, не используйте диски, надписанные липкими или оставляющими отпечатки чернилами. При использовании такие диски могут прекратить вращаться,
что может стать причиной неисправности или
поломки диска.
•
Не используйте диски с приклеенными наклейками или этикетками. Использование таких дисков может вызвать следующие неисправности:
— Диск будет невозможно извлечь из дисковода
(в результате того, что наклейка или этикетка
отклеится и попадет в механизм, открывающий
дисковод).
— Корректное считывание аудиоданных будет
невозможно (т.е. при воспроизведении могут
быть пропуски, или воспроизведение будет невозможным) в результате того, что под воздействием высокой температуры наклейка или этикетка может сжаться и деформировать диск.
• Диски неправильной формы (например, в виде
сердца, звезды или квадратные диски) не могут
проигрываться на данном проигрывателе. Попытка установить такой диск может повредить
проигрыватель, поэтому не используйте такие
диски.
• Не воспроизводите на данном проигрывателе
компакт-диски диаметром 8 см.
6
cdx-r3300_3300s.qxd 1/15/04 5:44 PM Page 6

•
Прежде чем воспроизводить диск, протрите его специальной чистящей тканью
(имеется в продаже). Протирайте от центра диска
к краям. Не используйте для
чистки дисков растворители, например, бензин или
разбавитель, имеющиеся
в продаже чистящие средства или спрей-антистатик
для аналоговых дисков.
Музыкальные диски с закодированной защитой авторских прав
Данное устройство рассчитано на воспроизведение дисков, которые соответствуют стандартам для компакт-дисков (CD). В последнее время рядом звукозаписывающих компаний выпускаются различные музыкальные диски с кодами защиты авторских прав. Пожалуйста, учтите, что среди подобных дисков могут быть не
соответствующие стандартам CD и они могут
не воспроизводиться на данном устройстве.
Замечания по использованию CD-R
(записываемых компакт-дисков)/
CD-RW (перезаписываемых
компакт-дисков)
Данное устройство может воспроизводить следующие типы дисков.
Тип диска Этикетка на компакт-
диске
Аудио
компакт-диск
MP3-файлы
• Некоторые CD-R/CD-RW (в зависимости от обо-
рудования, использованного для их записи, или от
состояния самого диска) могут не воспроизводиться на данном устройстве.
• Невозможно воспроизвести CD-R/CD-RW, не про-
шедший финализацию*.
•
Возможно воспроизведение MP3-файлов, записанных
на таких носителях, как CD-ROM, CD-R и CD-RW.
• На данном устройстве могут воспроизводиться CD-
R/CD-RW с возможностью добавления сессии.
* Процедура, необходимая для воспроизведения
записанного CD-R/CD-RW на проигрывателе
аудио CD-дисков.
О MP3-файлах
MP3 (MPEG 1 Audio Layer-3) является стандартной технологией и форматом сжатия звукового ряда. Файл сжимается примерно до 1/10
первоначального размера. Звуки, которые недоступны человеческому слуху, сжимаются, в то
время как те звуки, которые мы слышим, остаются несжатыми.
Замечания о дисках
Вы можете воспроизводить MP3-файлы,
записанные на CD-ROM, CD-R, CD-RW.
Компакт-диск должен быть записан в формате
ISO 9660*
1
уровня 1 или 2, либо Joliet или
Romeo в расширенном формате.
Вы также можете воспроизводить диски,
записанные в режиме мультисессии*
2
.
*
1
Формат ISO 9660
Самый распространенный международный
стандарт логического форматирования файлов и папок на CD-ROM.
Существует несколько технических уровней.
На уровне 1 имена файлов должны быть записаны в формате 8.3 (не более 8 знаков в
названии, не более 3 знаков в расширении
«.MP3») и заглавными буквами. Названия
папок не должны быть длиннее 8 знаков. Не
должно существовать более 8 уровней вложения папок. Особенностями уровня 2 дозволяется иметь длину названия файла до 31
знака.
Каждая папка может содержать до 8 подкаталогов.
Для Romeo или Jоliet в расширенном формате проверьте содержимое программного
обеспечения и т.п.
*
2
Мультисессия
Это метод записи, который включает в себя
добавление данных с помощью метода TrackAt-Once. Обычные CD-диски начинаются в
контрольной области Lead-in и заканчиваются в области Lead-out. Мультисессионный
диск содержит множество сессий, при этом
каждый сегмент протяженностью от Lead-in
до Lead-out рассматривается как одна сессия.
CD-Extra – формат, который записывает
звук (аудиоданные CD), как дорожки в сессии 1, а другие данные, как дорожки в сессии 2.
Mixed CD – в данном формате данные записываются, как дорожка 1, а звук (аудиоданные CD) записывается, как дорожка 2.
Продолжение на следующей странице t
7
cdx-r3300_3300s.qxd 1/15/04 5:44 PM Page 7

Примечания
• При использовании форматов, не являющихся
форматом ISO 9660 уровня 1 или ISO 9660
уровня 2, названия папок или файлов могут
отображаться неправильно.
• При присвоении имени, убедитесь в том,
что дали файлу расширение «.MP3».
• Если расширение «.MP3» было дано файлу,
отличному от MP3-файла, устройство не
сможет распознать файл должным образом,
и начнет издавать беспорядочный шум,
который может повредить ваши колонки.
• Перечисленные ниже диски требуют больше
времени для начала воспроизведения:
— диск, записанный с большим количеством
подкаталогов;
— диск, записанный в режиме мультисессии;
— диск, к которому могут быть добавлены
дополнительные данные.
Меры предосторожности во время
воспроизведения дисков, записанных
в мультисессии
• Если первый трек в первой сессии – аудиоданные CD:
Воспроизводятся только аудиоданные CD.
Все данные в последующих сессиях
пропускаются.
• Если первый трек в первой сессии
не является аудиоданными CD:
— Если диск содержит MP3-файлы,
то воспроизводиться будут только MP3-файлы,
а остальные данные будут пропущены
(аудиоданные CD не опознаны).
— Если диск не содержит MP3-файлы,
на дисплее отображается «NO MUSIC»
и воспроизведение не начинается
(аудиоданные CD не опознаны).
Порядок воспроизведения
MP3-файлов
Порядок воспроизведения папок и файлов
выглядит следующим ниже образом.
Дерево1 Дерево2 Дерево3 Дерево4 Дерево5
(исходное)
Примечания
• Папка, которая не содержит MP3-файл, пропускается.
• Если вы устанавливаете диск с большим количеством «деревьев», до начала воспроизведения
проходит больше времени. Рекомендуем вам создавать на каждом диске одно-два «дерева».
• Максимальное количество папок – 150 (включая
исходную и пустые).
• Максимальное количество MP3-файлов и папок,
которые могут содержаться на диске – 300.
Если в имени файла/папки очень много знаков,
это число может уменьшиться.
Совет
Для указания желаемого порядка
воспроизведения, перед именем папки или файла
поставьте номер (например: 01, 02 и т.д.), а затем
запишите содержимое на диск. (Порядок может
меняться в зависимости от записывающего
программного обеспечения.)
8
Папка
(альбом)
МР3-файл
(трек)
cdx-r3300_3300s.qxd 1/15/04 5:44 PM Page 8
Loading…
-
Страница 1
3-263-513- 11 (1) Opera ti ng Inst ru ctions Инструкция по эксплуатац ии GB RU CDX-R3300EE For installation and connections, see the supplied installation/ connections m anual. Перед уст ановкой и подсое динениям и прочитайте прилагаемую инструкцию по уст а?[…]
-
Страница 2
2 Welcome ! Thank you for purch as in g this Sony Com p act Disc P la ye r . Y ou can enj oy i ts v ari ou s featu res e ven more with: • MP3 file playback . • CD- R /C D-R W w h i c h can h a ve a sess ion ad ded can be pl aye d (page 7). • Discs recorded in Multi Sessi on can be pl ayed, dependi n g on the rec ording m et h o d (page 7). ?[…]
-
Страница 3
3 T able of Content s Location of c ontrols . . . . . . . . . . . . . . . . . . . 4 Precautions . . . . . . . . . . . . . . . . . . . . . . . . . . 6 Notes on discs . . . . . . . . . . . . . . . . . . . . . . . . 6 About MP3 fi les . . . . . . . . . . . . . . . . . . . . . . 7 Getting S tarted Resetti ng the unit . . . . . . . . . . . . . . . . . .[…]
-
Страница 4
4 Location of controls Refer t o the pages l isted f or details. a V olume +/– bu tton b A T T (attenuat e) button 16 c DSP L (dis pla y mo de chan ge) b u tt on 10, 12 d OPEN/EJECT shutter 11 e Display window f EQ3 button 17, 1 8 g OFF (Stop/P ower off) butt on * 9, 11 h SEEK +/– button Radio: T o tune in stations automatically/ find a station[…]
-
Страница 5
5 The correspo nding buttons of the card remot e com mande r control the sam e functions as those on this un it. a DSPL button b MENU butt on * 1 c SOURCE button d SEE K (–/+ ) butto n s e SOUND button f OFF button g V OL (+ /–) but ton s h MODE butt on i LIST button * 1 j DISC * 1 (ALBUM)/PRESET (+/–) but to ns k ENTER button * 1 l A TT butt[…]
-
Страница 6
6 Pr ecaut ions • If your car has been pa rked in di re ct sunl ig ht , allo w the unit to cool of f befo re operating it. • Power aeria l will ex tend automaticall y while the unit is operating . If yo u ha ve an y quest i o ns or pr ob lems concern ing your uni t th at are not covered in this manual , pl ea se con sul t you r neares t Sony de[…]
-
Страница 7
7 • Befo re pl ayi n g, clean th e di s cs with a commer cial ly a vaila ble c leani ng cl oth. W ipe each di sc from th e ce ntre ou t. Do not u se solv ents such as ben zine, thinner , co mmercially av ailable cleaners, or antistatic s pray intended for anal ogue dis cs. Music dis cs encode d with copy right pr otection This produ ct is desi gn[…]
-
Страница 8
8 Notes • With forma ts oth er than ISO 9660 le vel 1 and le v el 2, folder names or file nam es may not be disp la y ed correctly . • When namin g, be sure to add th e file extension “.MP3” to the file name. • If you put t he extension “.MP 3” to a file other th an MP3, th e unit canno t recognize the file pro perly and will generate[…]
-
Страница 9
9 Getting St arted Resetting the unit Before operat ing the unit f or the f irst time, or after rep la cing th e ca r batte ry or c hanging the connectio ns, you must reset the u nit. Remo ve t he f ront panel and pr ess t he RESE T butto n with a poi nted object, such as a ballpoin t pen. Note Pressing the RESET button will erase the clock setting[…]
-
Страница 10
10 Attachin g the fron t panel Attach pa rt A of t he front panel to pa rt B of t he unit as illustrate d and push t he left si de into positio n until it cl icks. Note Do not p ut anything on the inner surface of the fr ont panel. Setting t he clock The cloc k uses a 24 -h our digi t al in dication . Examp le : T o s et th e clock to 10: 0 8 1 Pre[…]
-
Страница 11
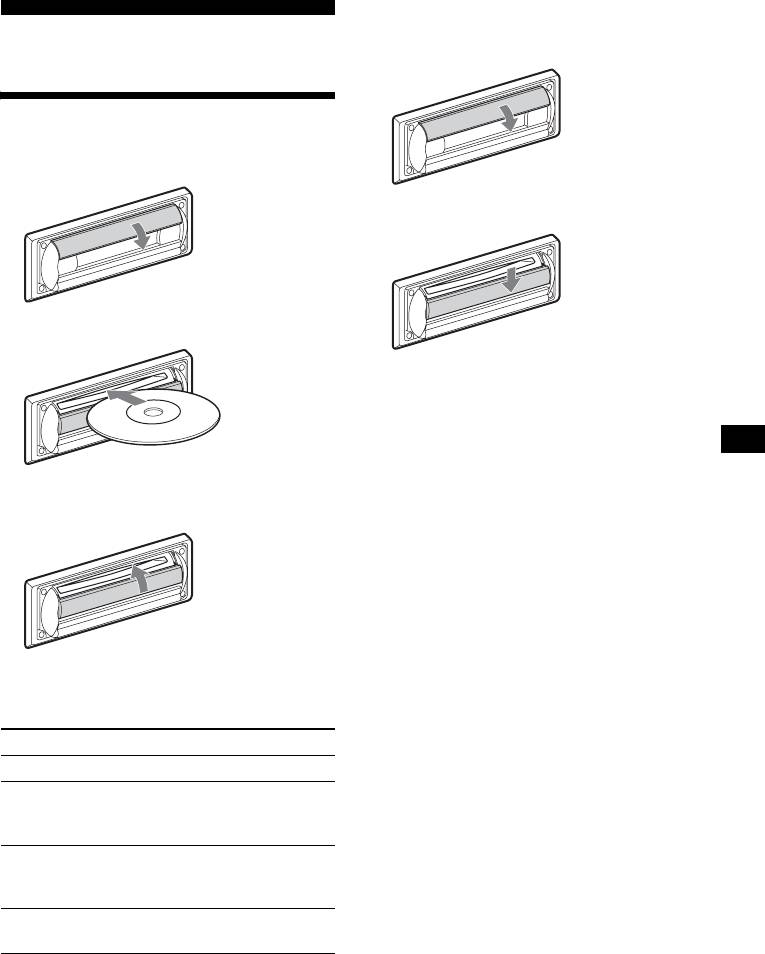
11 CD Player Playing a di sc 1 Open th e sh utter . 2 Insert the disc labelled s ide up. Playback sta rts automatical ly . 3 Close th e shu tter . If a dis c is alread y insert e d, pre ss (S OURC E) repeat edly unt i l “ C D ” a ppears t o s tart play back. * Av ailable only when an MP3 file is played. T o skip tracks continuo usly , press (SE[…]
-
Страница 12
12 Display items When the dis c/album/tr ack changes, a ny prerec orded ti tle* 1 of th e new disc /albu m/tr ack is automatica lly displaye d (if A.SCRL (Auto Scroll) is set to “ON, ” names ex ceeding 8 character s will be scroll ed (page 16)). *1 When p ressing (DSPL) , “NO NAME” in dicates th at there i s no pre recorded name to d isplay[…]
-
Страница 13
13 Radio The un it ca n store up to 6 st at ions pe r ba nd (FM1, FM2, F M3*, AM1 and A M2). Caution When tu ni ng in stations while driving, us e Be st T uning Me mory to pre ven t acci dents . * FM3 tun ing range is 6 5 to 74 M Hz (at 30kH z step). Storing stations automat ically — Be st T uni ng Mem ory (BTM) The un it se lects the stations wi[…]
-
Страница 14
14 Storing on ly the desired station s Y ou can m anually pr eset the de sired s ta t io ns on an y chos en n umber b utton. 1 Press (S OURC E) r epeated ly to sele ct the radio. 2 Press (M ODE ) repe atedly to sel ect the band. 3 Press (S EEK) (+) or (SEEK) (–) to tune in the station that y ou want to store. 4 Press the des ired number button ( […]
-
Страница 15
15 By rota ting the contr ol Rotate and rel ease to: – Skip tracks. T o cont i nuousl y sk ip tracks , rotate on ce and rot at e a g ai n w i th i n 1 second and h old the co nt rol. – T une in stations automatica ll y . Rotate, ho ld, and release to: – F ast-f orwa rd/re verse a tra ck. – Find a stat ion manu ally . By pushing in and r ota[…]
-
Страница 16
16 Adjusting the sound charac teri stics Y ou can adjust th e balanc e, fader , low pass filter and s ubwoo fer v olume. 1 Press (S EL) repeatedly until “B AL, ” “F AD, ” “LPF” or “SUB” appears. Each time you pr ess (SEL) , th e item chan ges as f ollo ws: LO W * 1 t MID * 1 t HI * 1 t B AL (lef t-right) t F AD (front-rear) t LPF (l[…]
-
Страница 17
17 Switching th e REAR/SUB * 1 Press (SEL) and then pr ess the volume + (REAR) or – (SUB) b utton. Afte r 3 s ec onds, th e displ ay return s to norm a l play m ode . Selecting th e desired ite m Press (SEL) and t he desir ed button sim ulta neou sly . (SEL) + (3) : A.SCRL * 2 (SEL) + (4) : DEMO * 1 (SEL) + (6) : BEEP (SEL) + (D SPL) : DIM After […]
-
Страница 18
18 Adjusti ng the equali zer curve Y ou can store an d ad just th e e qualizer settings for dif fer ent ton e rang es. 1 Press (S OURC E) t o sele ct a source (Radio or CD). 2 Press (E Q3) repeat edly to select th e desired equaliz er curve. 3 Adj u st ing the equ al izer curve. 1 Press (SEL) repeate dly to select the desi re d t o ne ran ge. Each […]
-
Страница 19
19 Replac ing the lithium bat tery Under normal conditions, battery will l ast approx imatel y 1 ye ar . (The se rv ice life m a y be short er, depend in g on the condi t io ns of use.) When t he batt ery b ecome s weak , the ra nge of t he card re mote commander b ecomes shor ter . Replace the b attery with a ne w CR 2025 lith ium batte ry . Use o[…]
-
Страница 20
20 2 Remove the unit. 1 Inser t bot h re lease keys to g ether until the y clic k. 2 Pull the release keys to uns eat th e unit. 3 Slide the unit out of the mounting. Face the hook inwards.[…]
-
Страница 21
21 Specificatio ns CD Play er section Signal-t o- nois e ratio 120 dB Frequency response 10 – 20,000 Hz W ow and flutte r Below measu rable li mi t T uner sectio n FM T uning range FM1/FM2: 87.5 – 108 MHz (at 50 kHz st e p) FM3: 65 – 74 MHz (at 30 kHz st e p) Aerial ter minal Exte rn al aerial co n ne ctor Intermedi ate fr eq uen cy 10.7 MHz/[…]
-
Страница 22
22 T r oubles hooting The follo wing checklist will help you remedy proble m s yo u may enc ou nter wit h y our unit. Before go i ng t hr ou gh the che ck list below , c hec k the con nect i o n and oper atin g proced ures . General No sound. • Press the v olume + b utton to adj ust the volu me. • Cancel the A TT functio n. • Set the fader co[…]
-
Страница 23
23 Error displays/Messages If the se sol u tions do not he lp imp rove the situat i on, co nsult y our nea rest Sony dea ler . Radio reception Preset tuning i s not possible. • Store the corr ect frequenc y in the memor y . • The br oa dcast sig nal is too w e ak. The stations cannot be received. The sound is hamp ered by noises. • Connect a […]
-
Страница 24
2 Поздравляем с покупк ой! Благодар им Вас за то , что Вы оста новили свой вы бор на прои грывателе компакт- дисков Son y . Дан ный проиг рыватель имеет ряд н овых ха рактери стик: • Вос произве дени?[…]
-
Страница 25
3 Со дер жание Располож ение ор ганов упра вления . . . 4 Меры предосторожности . . . . . . . . . . . . 6 Прим ечан ия отн осите льно диск ов . . . . 6 О файлах MP3 . . . . . . . . . . . . . . . . . . . . . . 8 Начало работы Переус тан[…]
-
Страница 26
4 Р аспо ло жен ие орг анов упр авления Подроб нее см. на указанны х страниц ах. a Кнопка регу лятора громкости +/– b Кнопка A TT (приг лушение звука) 19 c Кнопка DSPL (изменени е режима дисплея) 11 , 13 d Зас?[…]
-
Страница 27
5 Кнопки на пульт е дистанционного управл ения с таким и же обозначе ниями, что и на устройст ве, управл яют теми же фун кциями. a Кнопка DS PL b Кнопка ME NU * 1 c Кнопка S OURCE d Кнопки SE EK (–/+) e Кнопка S OUND f[…]
-
Страница 28
6 Меры предосторо ж ности • Есл и автомоб иль был пр ипаркова н в солнечн ом месте, не включай те устройс тво до тех по р, пока он о не охла дится. • При рабо те ус тройс тва авто мат ическ и выдвиг[…]
-
Страница 29
7 • Ди ски н естандар тной ф ормы (н априм ер, в фор ме сер дца, квадр ата, звез ды) нел ьзя воспрои звод ить на этом аппарате. В противн ом с лучае э то мож ет при вести к повр еждению аппарат а. Не п?[…]
-
Страница 30
8 О файлах MP3 MP3 ( MPEG 1 A udio La yer -3) – это стандарт ная техно логия и ф ормат для сжатия последо вательно сти зву ков. Фа йл сжимае тся прибл изите льно до 1/10 исходног о размера . Звуки, не восприни мае?[…]
-
Страница 31
9 Порядок восп роизведени я ф айлов MP3 Папки и файлы во спроизво дятся в след ующем п орядк е: Примеч ания • Пап ка, не со дер ж ащая фа йлов MP 3, б у дет пропущен а. • До начала вос произведения ди с[…]
-
Страница 32
10 Начало работы Пере установка параметров устройства Перед пе рвым вклю чением устройст ва или пос ле заме ны авт омобильног о аккум улятора, а та кже посл е изменен ия схемы подклю чения след?[…]
-
Страница 33
11 Установка передней п анели Прикре пите част ь A пере дней пане ли к части B аппарата , как показа но на рисунке, и установит е левую с торону на место до щ елчка. Примеч ание Не ст авьте нич его н?[…]
-
Страница 34
12 Проигрыватель ко м п а к т — д и ск о в Воспроизведение диска 1 Откройте заслонк у . 2 Встав ьте диск стороно й с этикеткой вверх. Восп роизв едени е начн етс я автомати чески . 3 Закройте заслонк у[…]
-
Страница 35
13 Примеч ания • Не за крывай те за слонк у при у ст анов ке или извлече нии диска. Д иск мож ет застря ть и получить поврежд ения. • Если при открытии заслонки пр илага ть чрезме рные усилия, диск[…]
-
Страница 36
14 Примеч ания • Некотор ые символы могут не отобража ться. • Информ ация в ви де бегущ ей строки мож е т не отобража ться для некотор ых дисков с C D TEXT , содер ж ащих слишком м ного с имвол ов. • Д?[…]
-
Страница 37
15 Р адио приемник Данны й аппарат може т хран ить в памяти до 6 станц ий в каждо м диапазо не (FM1, FM2, FM3 *, AM1 и AM2 ). Предупреждение Для п редотвр ащения возник новения аварийн ых сит уаций при на стро[…]
-
Страница 38
16 Если каче ство приема стереос игнала в д иапазоне F M низ к о е — Монофонич еский реж им При прие ме радиопр ограммы нажима йте кноп ку (SENS) , пок а на дисплее не по явится индика ция “MONO-ON” . Кач?[…]
-
Страница 39
17 Посредств ом вращения регулятора Поверните и отпустите , чтобы: – проп устить к омпозици и. Чтобы выполни ть непре рывный пропус к компо зиций, повер ните рег улято р один раз, зате м не поздн […]
-
Страница 40
18 Смена напра вления вращени я Направ ление в ращени я регу лятора устан овлено на заводе-и згото вителе и показано ниже. Если нео бходимо смонтиров ать поворотн ый пер еключатель на правой ст?[…]
-
Страница 41
19 Р езк о е снижение уровня громк ости Нажмит е кнопку (ATT) . Посл е кратковр еменн ого отоб ражени я индика ции “ A TT -ON” на диспле е появл яетс я инд икаци я “ AT T ” . Для вос становл ения преды дущ?[…]
-
Страница 42
20 Переключение REAR/SUB * 1 Нажмит е кнопку (SEL) , затем нажмит е кнопку регу лировки уровня гро мк ости + (REAR) или – (SUB). Через 3 с екунды на дисплее по явится индикаци я обычног о режима воспроиз ведени[…]
-
Страница 43
21 Настройка кривой эквал айзера Можн о сохраня ть и выпол нять настро йки эквал айзера дл я различн ых диапаз онов частот . 1 Нажмит е кнопку (SOURCE) для выбор а источника (ра диоприемник или к омпа[…]
-
Страница 44
22 Чистка к онтактов Устрой ство может не работать надлеж ащим обр азом из-з а загряз нения контакто в, служ ащих для со едине ния передней панели с устройс твом. Во избежа ние этого отсоед ините[…]
-
Страница 45
23 Извлечение у стройства 1 Снимит е защитн ую ман жету . 1 Снимите пер еднюю панель (стр. 10). 2 Чтобы снять з ащитные манжеты, используйте ключи для демонт ажа. 3 Потяните на себя ключи для демонт аж[…]
-
Страница 46
24 Т ехничес кие характеристики Проигры ватель к омпакт-дис ков Отношение “ сигнал/шум” 120 дБ Диапазон во спроизводимых частот 10 – 20 0 0 0 Гц Низкоча стотная и высокочас тотная детона ция Ниже у?[…]
-
Страница 47
25 Устранение непо ладок Привод имый ниж е пров ерочный перечен ь поможе т устрани ть больш инство проблем, которые могут возн икнут ь с аппар атом. Пере д озна комл ением с нижеп риве денн ой та?[…]
-
Страница 48
26 Индика ция/сообщения об ош ибках Не работаю т кнопки управлени я. К омпакт-д иск не вытал кивается. Нажм ите к нопку RE SET . Из-за вибрации п роисх од ят провалы звука. • Апп арат уст ановлен под у[…]
-
Страница 49
27 Если в результате п редла гаемых д ействий непо ладка не бу дет ус тране на, обра титес ь за помощью к бл ижайше му ди леру S ony . Сообщения L.SEEK +/– Во время автоматиче ской наст ройки включе н ре?[…]
-
Страница 50
[…]
-
Страница 51
[…]
-
Страница 52
Sony Corporation Printed in Thaila nd • L ead-free solder i s used for solder ing cer tain p ar ts. • Ha logena ted flame r etardants are not u sed in th e cer tain pr inted wiring bo ards. • Ha logena ted flame r etardants are not u sed in cabi nets. • Paper i s used for the pa ckaging cushio ns.[…]
Раздел: Авто, мото оборудование и транспорт
Тип: Автомагнитола
Характеристики, спецификации
Формат дисплея:
текст./символьный
Воспроизведение CD/-R/-RW:
Да
Текстовые сообщения RDS:
Да
Фиксированные настройки тюнера:
18 FM/6 MW/6 LW
Макс. выходная мощность:
4 x 50 Вт
Размер установочного места:
1 DIN
Тип дистанционного управления:
ИК
Пульт дистанционного управления:
доп.опция
Инструкция к Автомагнитоле Sony CDX-R3300EE
3-263-513-11 (1)
FM
/
AM
Compact Disc Player
GB
Operating Instructions
RU
Инструкция по эксплуатации
For installation and connections, see the supplied installation/connections manual.
Перед установкой и подсоединениями прочитайте прилагаемую инструкцию по
установке и подсоединению.
CDX-R3300EE
© 2004 Sony Corporation
Welcome !
Thank you for purchasing this Sony Compact
Disc Player. You can enjoy its various features
even more with:
• MP3 file playback.
• CD-R/CD-RW which can have a session added
can be played (page 7).
• Discs recorded in Multi Session can be played,
depending on the recording method (page 7).
• CD TEXT information
1
(displayed when a CD TEXT disc*
is played).
2
•ID3 tag*
version 1.0, 1.1, 2.2, 2.3 or 2.4
information (displayed when an MP3 file is
played).
• Optional controller accessories
Card remote commander RM-X114
Rotary commander RM-X4S
*1 A CD TEXT disc is an audio CD that includes
information such as the disc name, artist name,
and track names. This information is recorded on
the disc.
*2 ID3 tag is an MP3 file that contains information
about album name, artist name, track name, etc.
This label is located on the bottom of the
chassis.
2

Table of Contents
Location of controls . . . . . . . . . . . . . . . . . . . 4
Other Functions
Precautions . . . . . . . . . . . . . . . . . . . . . . . . . . 6
Using the rotary commander. . . . . . . . . . . . 14
Notes on discs . . . . . . . . . . . . . . . . . . . . . . . . 6
Adjusting the sound characteristics . . . . . . 16
About MP3 files . . . . . . . . . . . . . . . . . . . . . . 7
Quickly attenuating the sound . . . . . . . . . . 16
Changing the sound and display settings
Getting Started
— Menu . . . . . . . . . . . . . . . . . . . . . . . . . 16
Resetting the unit. . . . . . . . . . . . . . . . . . . . . . 9
Setting the equalizer (EQ3). . . . . . . . . . . . . 17
Detaching the front panel . . . . . . . . . . . . . . . 9
Setting the clock . . . . . . . . . . . . . . . . . . . . . 10
Additional Information
Maintenance . . . . . . . . . . . . . . . . . . . . . . . . 18
CD Player
Removing the unit. . . . . . . . . . . . . . . . . . . . 19
Playing a disc. . . . . . . . . . . . . . . . . . . . . . . . 11
Specifications . . . . . . . . . . . . . . . . . . . . . . . 21
Display items. . . . . . . . . . . . . . . . . . . . . . . . 12
Troubleshooting . . . . . . . . . . . . . . . . . . . . . 22
Playing tracks repeatedly
Error displays/Messages. . . . . . . . . . . . . . . 23
— Repeat Play . . . . . . . . . . . . . . . . . . . . 12
Playing tracks in random order
— Shuffle Play . . . . . . . . . . . . . . . . . . . . 12
Radio
Storing stations automatically
— Best Tuning Memory (BTM). . . . . . . 13
Receiving the stored stations. . . . . . . . . . . . 13
Storing only the desired stations . . . . . . . . . 14
3
Location of controls
Refer to the pages listed for details.
ATT OFF
SEEK
DSPL
EQ3
–
ALBUM
+
REP
SHUF
SOURCE MODE
SEL
123456
SENS
BTMSCRL
CDX-R3300EE
a Volume +/– button
n Number buttons 17
b ATT (attenuate) button 16
Radio:
c DSPL (display mode change) button
To store the desired station on each number
10, 12
button.
d OPEN/EJECT shutter 11
MP3 files:
e Display window
(1): ALBUM – 11
f EQ3 button 17, 18
(2): ALBUM + 11
g OFF (Stop/Power off) button* 9, 11
CD:
h SEEK +/– button
(3): REP 12
Radio:
(4): SHUF 12
To tune in stations automatically/find a
o SENS button 13
station manually.
p SCRL (scroll) button 12
CD (MP3 files):
q BTM button 13
To skip tracks/fast-forward, reverse a track.
r Receptor for the card remote
i (front panel release) button 9
commander
j SOURCE (Power on/Radio/CD) button
To select the source.
* Warning when installing in a car without
k MODE button
an ACC (accessory) position on the
To change the operation.
ignition switch
l SEL (select) button
After turning off the ignition, be sure to press
To select items.
and hold (OFF) on the unit until the display
m RESET button (located on the front side of
disappears.
the unit, behind the front panel) 9
Otherwise, the display does not turn off and this
causes battery drain.
4
Selecting an album with the card
remote commander
Card remote commander RM-X114
Album can be skipped using the DISC
(optional)
(ALBUM) (+/–) buttons on the card remote
commander.
To Press
DSPL MODE
2
Skip albums*
+ or – [once for each album]
– Album selection
To continuously skip
PRESET
+
albums, press and hold
either button.
MENU
DISC
+
LIST
*2 Available only when an MP3 file is played.
SOURCE
SEEK
–
SEEK
+
Skipping tracks continuously
SOUND
DISC
–
ENTER
Press once (SEEK) (+) or (SEEK) (–) on the
PRESET –
card remote commander, then press again within
ATTOFF
+
1 second and hold.
VOL
–
The corresponding buttons of the card
remote commander control the same
functions as those on this unit.
a DSPL button
1
b MENU button*
c SOURCE button
d SEEK (–/+) buttons
e SOUND button
f OFF button
g VOL (+/–) buttons
h MODE button
1
i LIST button*
1
j DISC*
(ALBUM)/PRESET (+/–)
buttons
1
k ENTER button*
l ATT button
*1 Not available for this unit
Note
If the display disappears by pressing (OFF), it cannot
be operated with the card remote commander unless
(SOURCE) on the unit is pressed, or a disc is inserted
to activate the unit first.
Tip
For details on how to replace the battery, see
“Replacing the lithium battery” on page 19.
5
Precautions
Notes on discs
• If your car has been parked in direct sunlight,
• To keep a disc clean, do not touch its surface.
allow the unit to cool off before operating it.
Handle the disc by its edge.
• Power aerial will extend automatically while
• Keep your discs in their cases or disc
the unit is operating.
magazines when not in use.
• Do not subject discs to heat/high temperature.
If you have any questions or problems
Avoid leaving them in a parked car or on a
concerning your unit that are not covered in this
dashboard/rear tray.
manual, please consult your nearest Sony dealer.
Moisture condensation
On a rainy day or in a very damp area, moisture
condensation may occur inside the lenses and
display of the unit. Should this occur, the unit
will not operate properly. In such a case, remove
the disc and wait for about an hour until the
moisture has evaporated.
• Do not attach labels, or use discs with sticky
ink/residue. Such discs may stop spinning
To maintain high sound quality
when used, causing a malfunction, or may ruin
the disc.
Be careful not to splash juice or other soft drinks
onto the unit or discs.
• Do not use any discs with labels or stickers
attached.
The following malfunctions may result from
using such discs:
– Inability to eject a disc (due to a label or
sticker peeling off and jamming the eject
mechanism).
– Inability to read audio data correctly (e.g.,
playback skipping, or no playback) due to
heat shrinking of a sticker or label causing a
disc to warp.
• Discs with non-standard shapes (e.g., heart,
square, star) cannot be played on this unit.
Attempting to do so may damage the unit. Do
not use such discs.
• You cannot play 8 cm CDs.
6
• Before playing, clean the discs with a
commercially available cleaning cloth. Wipe
About MP3 files
each disc from the centre out. Do not use
solvents such as benzine, thinner, commercially
MP3 (MPEG 1 Audio Layer-3) is a standard
available cleaners, or antistatic spray intended
technology and format for compressing a sound
for analogue discs.
sequence. The file is compressed to about 1/10 of
its original size. Sounds outside the range of
human hearing are compressed while the sounds
we can hear are not compressed.
Notes on discs
You can play MP3 files recorded on CD-ROMs,
CD-Rs, and CD-RWs.
1
The disc must be in the ISO 9660*
level 1 or
level 2 format, or Joliet or Romeo in the
Music discs encoded with copyright
expansion format.
protection
2
You can use a disc recorded in Multi Session*
.
This product is designed to play back discs that
conform to the Compact Disc (CD) standard.
1
*
ISO 9660 Format
Recently, various music discs encoded with
The most common international standard for
copyright protection are marketed by some
the logical format of files and folders on a
record companies. Please be aware that among
CD-ROM.
those discs, there are some that do not conform to
There are several specification levels. In
the CD standard and may not be playable by this
Level 1, file names must be in the 8.3 format
product.
(no more than 8 characters in the name, no
more than 3 characters in the extension
Notes on CD-Rs (recordable CDs)/CD-
“.MP3”) and in capital letters. Folder names
can be no longer than 8 characters. There can
RWs (rewritable CDs)
be no more than 8 nested folder levels. Level
This unit can play the following discs:
2 specifications allow file names up to 31
Type of discs Label on the disc
characters long.
Each folder can have up to 8 trees.
For Joliet or Romeo in the expansion format,
make sure of the contents of the writing
Audio CD
software, etc.
2
*
Multi Session
This is a recording method that enables
adding of data using the Track-At-Once
method. Conventional CDs begin at a CD
control area called the Lead-in and end at an
MP3 files
area called Lead-out. A Multi Session CD is a
CD having multiple sessions, with each
segment from Lead-in to Lead-out regarded
as a single session.
CD-Extra: The format which records audio
(audio CD data) as tracks on session 1, and
• Some CD-Rs/CD-RWs (depending on the
records data as tracks on session 2.
equipment used for its recording or the
Mixed CD: In this format, data is recorded as
condition of the disc) may not play on this unit.
track 1, and audio (audio CD data) is recorded
• You cannot play a CD-R/CD-RW that is not
as track 2.
finalized*.
• You can play MP3 files recorded on CD-
continue to next page t
ROMs, CD-Rs, and CD-RWs.
• A CD-R/CD-RW to which a session can be
added can be played.
* A process necessary for a recorded CD-R/CD-RW
disc to be played on the audio CD player.
7
Notes
The playback order of the MP3 files
• With formats other than ISO 9660 level 1 and level 2,
The playback order of the folders and files is as
folder names or file names may not be displayed
follows:
correctly.
• When naming, be sure to add the file extension
“.MP3” to the file name.
Folder (album)
• If you put the extension “.MP3” to a file other than
1
MP3, the unit cannot recognize the file properly and
will generate random noise that could damage your
1
MP3 file (track)
speakers.
• The following discs take a longer time to start
playback.
2
– a disc recorded with complicated tree structure.
– a disc recorded in Multi Session.
2
– a disc to which data can be added.
Cautions when playing a disc that is recorded in
3
Multi Session
• When the first track of the first session is audio CD
3
data:
Only audio CD data of the first session is played
4
back.
Any data in subsequent sessions is skipped.
5
4
• When the first track of the first session is not audio
CD data:
5
– If an MP3 file is in the disc, only MP3 file(s) is
6
played back and other data is skipped. (Audio CD
data is not recognized.)
– If no MP3 file is in the disc, “NO MUSIC” is
6
displayed and nothing is played back. (Audio CD
data is not recognized.)
7
7
8
8
9
Tree 1
Tree 2
Tree 3
Tree 4
Tree 5
(root)
Notes
• A folder that does not include an MP3 file is skipped.
• When you insert a disc with many trees, it takes a
longer time to start playback. We recommend that
you make only one or two trees for each disc.
• Maximum folder number: 150 (including root folder
and empty folders)
• The maximum number of MP3 files and folders that
can be contained in a disc: 300
When a file/folder name contains many characters,
this number may become less than 300.
Tip
To specify a desired playback order, before the folder
or file name, input the order by number (e.g., “01,”
“02”), then record contents onto a disc. (The order
differs depending on the writing software.)
8
Detaching the front panel
Getting Started
You can detach the front panel of this unit to
protect the unit from being stolen.
Resetting the unit
Caution alarm
If you turn the ignition switch to the OFF
Before operating the unit for the first time, or
position without removing the front panel, the
after replacing the car battery or changing the
caution alarm will beep for a few seconds.
connections, you must reset the unit.
If you connect an optional amplifier and do not
Remove the front panel and press the RESET
use the built-in amplifier, the beep sound will be
button with a pointed object, such as a ballpoint
deactivated.
pen.
1 Press (OFF)*.
CD playback or radio reception stops (the key
illumination and display remain on).
* If your car has no ACC (accessory) position on
the ignition switch, be sure to turn the unit off by
pressing (OFF) until the display disappears to
RESET button
avoid car battery drain.
Note
2 Press , then pull it off towards you.
Pressing the RESET button will erase the clock setting
and some stored contents.
(OFF)
/
E
J
E
C
T
O
P
E
N
Notes
• If you detach the panel while the unit is still turned
on, the power will turn off automatically to prevent
the speakers from being damaged.
• Do not drop or put excessive pressure on the front
panel and its display window.
• Do not subject the front panel to heat/high
temperature or moisture. Avoid leaving it in a parked
car or on a dashboard/rear tray.
Tip
When carrying the front panel with you, use the
supplied front panel case.
continue to next page t
9
Attaching the front panel
Attach part A of the front panel to part B of the
Setting the clock
unit as illustrated and push the left side into
position until it clicks.
The clock uses a 24-hour digital indication.
Example: To set the clock to 10:08
/
E
J
E
C
T
1 Press (DSPL) for 2 seconds.
O
P
E
N
The hour indication flashes.
1Press the volume +/– button to set
the hour.
2Press (SEL).
The minute indication flashes.
3Press the volume +/– button to set
the minute.
Note
2 Press (DSPL).
Do not put anything on the inner surface of the front
panel.
The clock starts. After the clock setting is
completed, the display returns to normal play
mode.
10
To eject the disc
CD Player
1 Open the shutter.
Playing a disc
1 Open the shutter.
2 Push down the shutter.
2 Insert the disc labelled side up.
The disc is ejected.
Notes
• While ejecting or inserting a disc, do not close the
shutter. The disc may be caught and damaged.
• A disc may be ejected if you open the shutter
forcefully.
• Before playing a track, this unit reads all track and
Playback starts automatically.
album information on the disc. Depending on the
track structure, it may take more than a minute
3 Close the shutter.
before playback begins. During this time, “READ” is
displayed. Please wait for play to start automatically
when the reading is complete.
• Depending on the condition of the disc, it may not
play back (page 6, 7).
• While the first/last track on the disc is playing, if
(SEEK) (–) or (SEEK) (+) is pressed, playback skips
to the last/first track of the disc.
• When the last track on the disc is over, playback
restarts from the first track of the disc.
• If you play a high-bit rate MP3 file such as 320 kbps,
If a disc is already inserted, press (SOURCE)
sound may be intermittent.
repeatedly until “CD” appears to start playback.
Tip
A disc can be played with the shutter opened or
To Press
closed.
Stop playback (OFF)
Skip tracks
(SEEK) (–/+)
–Automatic
(./>)
Music Sensor
[once for each track]
Fast-forward/
(SEEK) (–/+)
reverse
(m/M)
–Manual Search
[hold to desired point]
Skip albums*
(1)(ALBUM–) or
–Albums selection
(2)(ALBUM+)
* Available only when an MP3 file is played.
To skip tracks continuously, press (SEEK) (+) or
(SEEK) (–), then press again within 1 second
and hold.
11
Display items
Playing tracks repeatedly
When the disc/album/track changes, any
— Repeat Play
1
prerecorded title*
of the new disc/album/track is
You can select:
automatically displayed (if A.SCRL (Auto
• REP-TRACK — to repeat the current track.
Scroll) is set to “ON,” names exceeding 8
• REP-ALBM* — to repeat the tracks in the
characters will be scrolled (page 16)).
current album.
Source
* Available only when an MP3 file is played.
During playback, press (3) (REP)
repeatedly until the desired setting
appears in the display.
Repeat Play starts.
Displayable items
• Track number/Elapsed playing time
1
2
To return to normal play mode, select
• Disc name*
/Artist name*
3
“REP—OFF.”
• Album (folder) name*
1
3
• Track (file) name*
*
3
•ID3 tag*
•Clock
Playing tracks in random
order
To Press
— Shuffle Play
Switch display item (DSPL )
You can select:
• SHUF-ALBM* — to play the tracks in the
Scroll display item (SCRL)
current album in random order.
• SHUF-DISC — to play the tracks in the disc in
*1 When pressing (DSPL), “NO NAME” indicates that
random order.
there is no prerecorded name to display.
*2 Only for CD TEXT discs with the artist name.
* Available only when an MP3 file is played.
*3 Only for MP3 files.
Only track name/artist name/album name in ID3
During playback, press (4) (SHUF)
tag is displayed.
repeatedly until the desired setting
When pressing (DSPL), “NO ID3” indicates that
appears in the display.
there is no ID3 tag to display.
Shuffle Play starts.
Notes
• Some characters cannot be displayed.
To return to normal play mode, select
• For some CD TEXT discs with very many
“SHUF-OFF.”
characters, information may not scroll.
• This unit cannot display the artist name for each
track of a CD TEXT disc.
Notes on MP3
• ID3 tag applies to version 1.0, 1.1, 2.2, 2.3 and 2.4.
• Some characters and signs cannot be displayed
(appear as “ *”). The maximum number of
displayable characters for an album (folder) name/
track (file) is 64 (Romeo) or 32 (Joliet); ID3 tag 30
characters (1.0, 1.1, 2.2 and 2.3) or 126 characters
(2.4).
• In the following cases, elapsed playing time may not
be displayed accurately.
– when an MP3 file of VBR (variable bit rate) is
played.
– during fast-forward/reverse.
Tips
• When A.SCRL (Auto Scroll) is set to “OFF” and the
disc/album/track is changed, the disc/album/track
name does not scroll.
• When an MP3 file is played and the album is
changed, the new album number is displayed.
12
Receiving the stored stations
Radio
1 Press (SOURCE) repeatedly to select
The unit can store up to 6 stations per band
the radio.
(FM1, FM2, FM3*, AM1 and AM2).
2 Press (MODE) repeatedly to select the
Caution
band.
When tuning in stations while driving, use Best
3 Press the number button ((1) to (6))
Tuning Memory to prevent accidents.
on which the desired station is stored.
* FM3 tuning range is 65 to 74 MHz (at 30kHz step).
If preset tuning does not work
— Automatic tuning/Local Seek Mode
Storing stations
Automatic tuning:
automatically
Press ( SEEK) (+) or (SEEK) (–) to
search for the station.
— Best Tuning Memory (BTM)
Scanning stops when the unit receives a
station. Repeat the operation until the desired
The unit selects the stations with the strongest
station is received.
signals within the selected band, and stores them
in the order of their frequency.
Local Seek Mode:
1 Press (SOURCE) repeatedly to select
If the automatic tuning stops too
the radio.
frequently, press (SENS) repeatedly
until “LOCAL-ON” appears in the
2 Press (MODE) repeatedly to select the
display.
band.
3 Press (BTM) for 2 seconds.
The unit stores stations in the order of their
frequencies on the number buttons.
A beep sounds when the setting is stored.
Only the stations with relatively strong
signals will be tuned in.
Notes
• If only a few stations can be received due to weak
signals, some number buttons will retain their former
To cancel the local seek mode, press (SENS)
settings.
twice when receiving FM.
• When a number is indicated in the display, the unit
Note
starts storing stations from the one currently
When receiving AM, to cancel the local seek mode,
displayed.
press (SENS) (“LOCAL-OFF” appears).
Tip
If you know the frequency of the station you want to
listen to, press and hold (SEEK) (+) or (SEEK) (–) to
locate the approximate frequency, then press
(SEEK) (+) or (SEEK) (–) repeatedly to fine adjust to
the desired frequency (manual tuning).
If FM stereo reception is poor
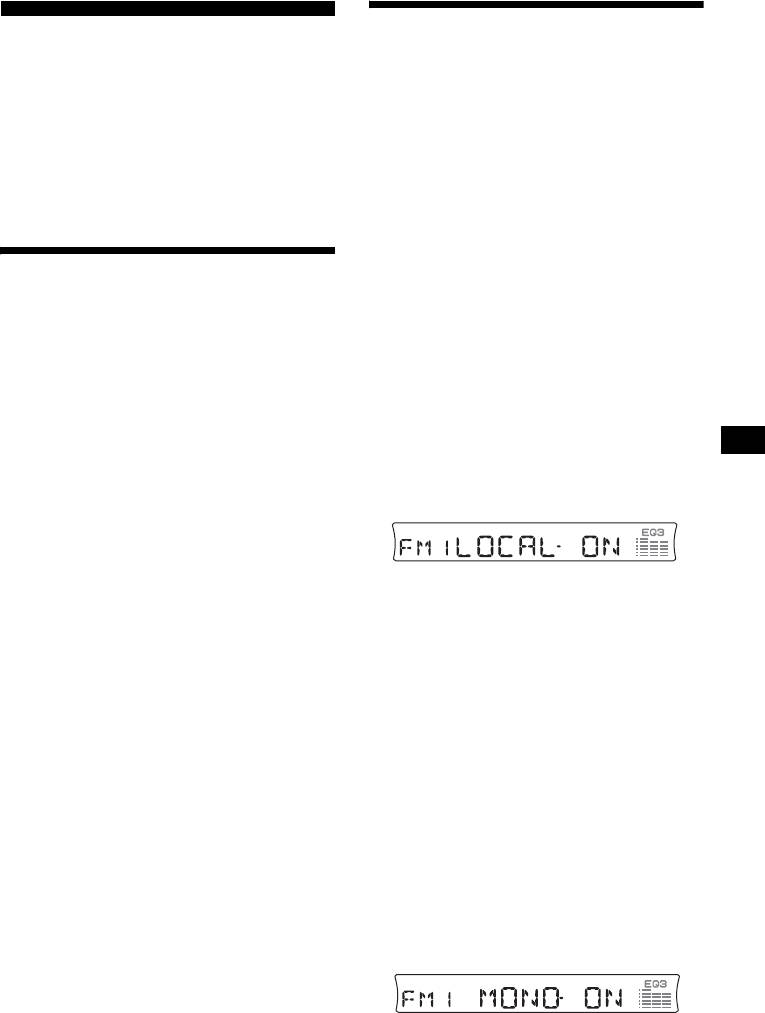
— Monaural Mode
During radio reception, press (SENS)
repeatedly until “MONO-ON” appears
in the display.
The sound improves, but becomes monaural
(“ST” disappears).
To return to normal radio reception mode, press
13
(SENS) (“MONO-OFF” appears).
Storing only the desired
Other Functions
stations
You can also control the unit with a rotary
You can manually preset the desired stations on
commander (optional).
any chosen number button.
1 Press (SOURCE) repeatedly to select
the radio.
Using the rotary commander
2 Press (MODE) repeatedly to select the
First, attach the appropriate label depending on
band.
how you want to mount the rotary commander.
3 Press (SEEK) (+) or ( SEEK) (–) to tune
The rotary commander works by pressing
in the station that you want to store.
buttons and/or rotating controls.
4 Press the desired number button ((1)
to (6)) for 2 seconds until “MEM”
appears.
The number button indication appears in the
display.
Note
DSPL
SEL
If you try to store another station on the same number
MODE
MODE
button, the previously stored station will be erased.
SEL
DSPL
By pressing buttons
(ATT)
(SEL)
(MODE)
(SOURCE)
OFF
(DSPL)
(OFF)
Rotate the VOL control
to adjust the volume.
Press To
(SOURCE) Change the source
(Radio/CD)/Power on
(MODE) Change radio band
(ATT) Attenuate the sound
1
(OFF)*
Stop playback or radio
reception/Power off
(SEL) Adjust and select
(DSPL) Change the display item
14
By rotating the control
Changing the operative direction
The operative direction of controls is factory-set
as shown below.
To increase
SEEK/AMS
control
To decrease
If you need to mount the rotary commander on
Rotate and release to:
the right hand side of the steering column, you
– Skip tracks.
can reverse the operative direction.
To continuously skip tracks, rotate once
and rotate again within 1 second and hold
the control.
– Tune in stations automatically.
Rotate, hold, and release to:
– Fast-forward/reverse a track.
– Find a station manually.
By pushing in and rotating the control
Press ( SEL ) for 2 seconds while
pushing the VOL control.
PRESET
control
Push in and rotate the control to:
– Receive preset stations.
2
– Change albums*
.
*1 If your car has no ACC (accessory) position on the
ignition key switch, after turning off the ignition, be
sure to press and hold (OFF) until the display
disappears.
*2 Available only when an MP3 file is played.
When an MP3 file is played, you can select an
album using the rotary commander.
To Do this
Skip albums
Push in and rotate [once for
–Album selection
each album] the control.
To continuously skip
albums, push in and rotate
(and hold) the control.
15

Adjusting the sound
Changing the sound and
characteristics
display settings
— Menu
You can adjust the balance, fader, low pass filter
and subwoofer volume.
The following items can be set:
1 Press (SEL) repeatedly until “BAL,”
Set up
“FAD,” “LPF” or “SUB” appears.
1
•REAR/SUB*
— to switch the audio output
Each time you press (SEL), the item changes
REAR or SUB.
as follows:
1
1
1
– Select “REAR” to output to a power
LOW*
t MID*
t HI*
t
amplifier.
BAL (left-right) t FAD (front-rear) t
2
3
– Select “SUB” to output to a subwoofer.
LPF (low pass filter)*
*
t
2
2
4
• A.SCRL (Auto Scroll)*
(page 12)
SUB (subwoofer volume)*
*
1
•DEMO*
— to turn the demonstration display
on or off.
*1 When EQ3 is activated (page 17).
*2 When “SUB” is selected (page 16).
– Select “ON” to activate the demonstration
*3 The cut off frequency is adjustable to 78 Hz,
display (The demonstration starts about 10
125 Hz or OFF.
seconds after the unit is turned off).
*4 The volume level is adjustable between –10
– Select “OFF” to deactivate the
and +10 steps. (Below –10, “ATT” is displayed.)
demonstration display.
• BEEP — to turn the beeps on or off.
2 Press the volume +/– button to adjust
• DIM — to change the brightness of the display.
the selected item.
– Select “ON” to dim the display.
Note
– Select “OFF” to deactivate the Dimmer.
Adjust within 3 seconds after selecting the item.
Quickly attenuating the
sound
Press (ATT).
After “ATT-ON” momentarily appears,
“ATT” appears in the display.
To restore the previous volume level, press
(ATT) again.
Tip
When the interface cable of a car telephone is
connected to the ATT lead, the unit decreases the
volume automatically when a telephone call comes in
(Telephone ATT function).
16
1
Switching the REAR/SUB*
Setting the equalizer (EQ3)
Press (SEL) and then press the
volume + (REAR) or – (SUB) button.
You can select an equalizer curve for 7 music
After 3 seconds, the display returns to normal
types (XPLOD, VOCAL, CLUB, JAZZ, NEW
play mode.
AGE, ROCK, CUSTOM and OFF (equalizer
OFF)).
You can store a different equalizer setting for
Selecting the desired item
each source.
Press (SEL) and the desired button
simultaneously.
Selecting the equalizer curve
2
(SEL) + (3): A.SCRL*
1
1 Press (SOURCE) to select a source
(SEL) + (4): DEMO*
(Radio or CD).
(SEL) + (6): BEEP
2 Press (EQ3) repeatedly until the
(SEL) + (D SPL): DIM
desired equalizer curve.
Each time you press (EQ3), the item
After the mode setting is completed, the display
changes.
returns to normal play mode.
To cancel the item, press (SEL) and the desired
button simultaneously again.
To cancel the equalizing effect, select “OFF.”
*1 When the unit is turned off.
*2 When no CD is playing, this item will not appear.
continue to next page t
17
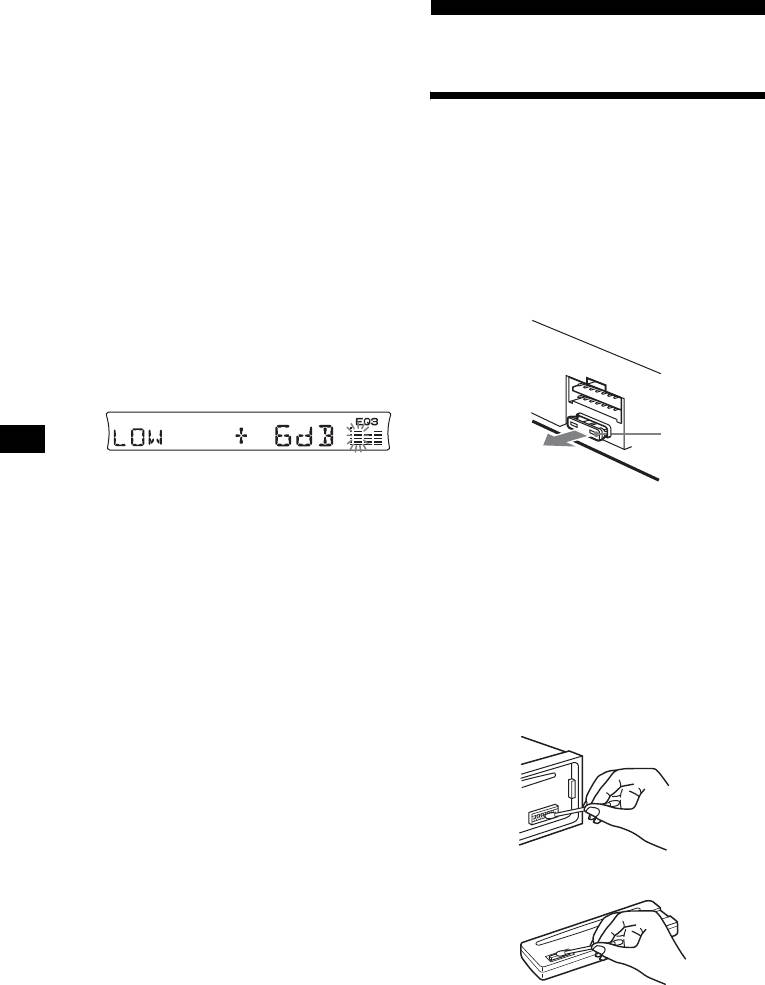
Adjusting the equalizer curve
You can store and adjust the equalizer settings
Additional Information
for different tone ranges.
1 Press (SOURCE) to select a source
(Radio or CD).
Maintenance
2 Press (EQ3) repeatedly to select the
desired equalizer curve.
3 Adjusting the equalizer curve.
Fuse replacement
When replacing the fuse, be sure to use one
1 Press (SEL) repeatedly to select the
matching the amperage rating stated on the
desired tone range.
original fuse. If the fuse blows, check the power
Each time you press (SEL), the tone range
connection and replace the fuse. If the fuse blows
changes.
again after replacement, there may be an internal
LOW t MID t HI (t BAL t FAD t
malfunction. In such a case, consult your nearest
LPF t SUB)
Sony dealer.
2 Press the volume +/– button
repeatedly to adjust to the desired
volume level.
The volume level is adjustable by 1 dB
steps from –10 dB to +10 dB.
Fuse (10 A)
3 Repeat step 1 and 2 to adjust the
Warning
equalizer curve.
Never use a fuse with an amperage rating
To restore the factory-set equalizer curve,
exceeding the one supplied with the unit as this
press (SEL) for 2 seconds.
could damage the unit.
Note
When EQ3 is set to “OFF,” you cannot adjust the
Cleaning the connectors
equalizer curve settings.
The unit may not function properly if the
connectors between the unit and the front panel
are not clean. In order to prevent this, detach the
front panel (page 9) and clean the connectors
with a cotton swab dipped in alcohol. Do not
apply too much force. Otherwise, the connectors
may be damaged.
Main unit
Back of the front panel
Notes
• For safety, turn off the ignition before cleaning the
connectors, and remove the key from the ignition
switch.
• Never touch the connectors directly with your fingers
18
or with any metal device.
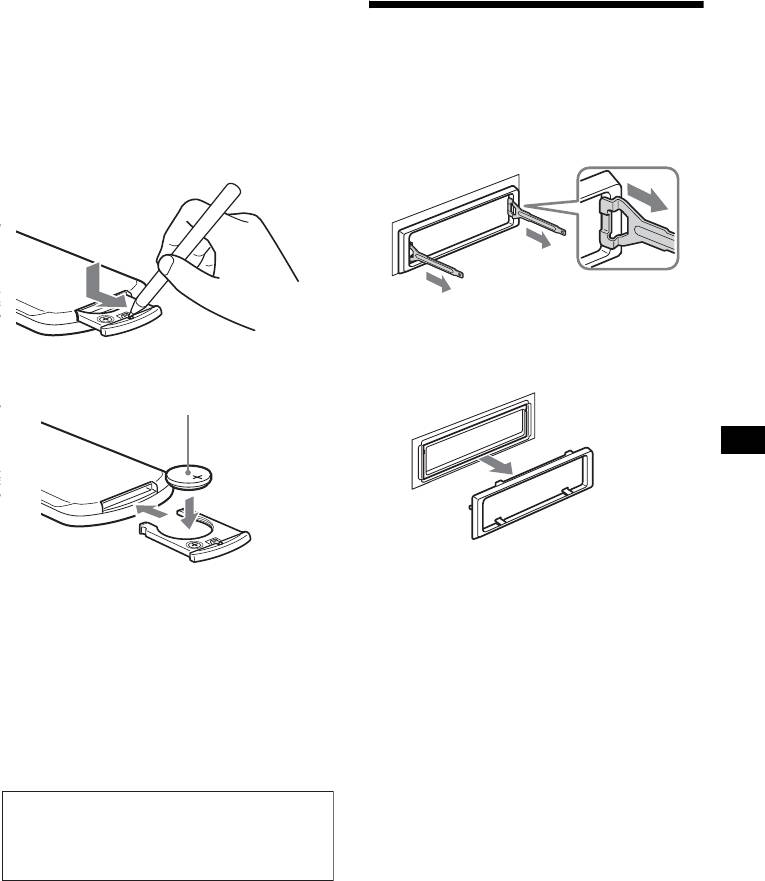
Replacing the lithium battery
Under normal conditions, battery will last
Removing the unit
approximately 1 year. (The service life may be
shorter, depending on the conditions of use.)
1 Remove the protection collar.
When the battery becomes weak, the range of the
card remote commander becomes shorter.
1 Detach the front panel (page 9).
Replace the battery with a new CR2025 lithium
2 Engage the release keys together
battery. Use of any other battery may present a
with the protection collar.
risk of fire or explosion.
Orient the release
key correctly.
3 Pull out the release keys to remove
the protection collar.
x
+ side up
continue to next page t
Notes on lithium battery
• Keep the lithium battery out of the reach of
children. Should the battery be swallowed,
immediately consult a doctor.
• Wipe the battery with a dry cloth to assure a
good contact.
• Be sure to observe the correct polarity when
installing the battery.
• Do not hold the battery with metallic tweezers,
otherwise a short-circuit may occur.
WARNING
Battery may explode if mistreated.
Do not recharge, disassemble, or dispose of
in fire.
19
2 Remove the unit.
1 Insert both release keys together
until they click.
Face the hook
inwards.
2 Pull the release keys to unseat the
unit.
3 Slide the unit out of the mounting.
20
Аннотации для Автомагнитолы Sony CDX-R3300EE в формате PDF
Топ 10 инструкций
Другие инструкции
Страницы и текст этой инструкции
Инструкция автомагнитолы Sony CDX-R3300EE
Информация отображена на картинке
Информация отображена на картинке
Информация отображена на картинке
Информация отображена на картинке
Как использовать наш сайт инструкций OnlineManuals.ru
Наша цель состоит в том, чтобы предоставить вам быстрый доступ к содержанию инструкции для автомагнитолы Sony CDX-R3300EE.
С помощью онлайн просмотра, Вы можете быстро просмотреть содержимое инструкции и найти решение проблемы с автомагнитолы Sony CDX-R3300EE.
Для Вашего удобства
Если листать руководство пользователя автомагнитолы Sony CDX-R3300EE прямо на сайте, не очень удобно для Вас, есть два возможных решения:
• Просмотр в полноэкранном режиме — легко просмотреть руководство пользователя (без загрузки его на свой компьютер), Вы можете использовать режим полноэкранного просмотра.
Для просмотра инструкции пользователя автомагнитолы Sony CDX-R3300EE на полном экране, используйте кнопку «Открыть в Pdf-viewer».
• Загрузка на компьютер — Вы можете также скачать Инструкция автомагнитолы Sony CDX-R3300EE на свой компьютер и сохранить его в файлах.
Многие люди предпочитают читать документы не на экране, а в печатной версии.
Возможность печати руководства пользователя также была предусмотрена на нашем сайте,
и вы можете использовать ее, нажав на иконку «печать» в Pdf-viewer.
Нет необходимости печатать все руководство автомагнитолы Sony CDX-R3300EE, можно выбрать только нужные страницы инструкции.