
Перейти к контенту
Автомагнитолы Pioneer
- Размер инструкции: 3.44 Мб
- Формат файла: pdf
Если вы потеряли инструкцию от автомагнитолы Pioneer MVH-150UI, можете скачать файл для просмотра на компьютере или печати.
Инструкция для автомагнитолы Pioneer MVH-150UI на русском языке. В руководстве описаны возможности и полезные функции, а также правила эксплуатации. Перед использованием внимательно ознакомьтесь с инструкцией.
Чтобы не читать всю инструкцию вы можете выполнить поиск по содержимому внутри инструкции и быстро найти необходимую информацию. Рекомендации по использованию помогут увеличить срок службы автомагнитолы Pioneer MVH-150UI. Если у вас появилась проблема, то найдите раздел с описанием неисправностей и способами их решения. В нем указаны типичные поломки и способы их решения.
Перейти к контенту
Русские электронные инструкции по эксплуатации
Постоянно обновляемый большой каталог документации по эксплуатации и использованию современных устройств и оборудования на русском языке. Бесплатное скачивание файлов.
Поиск:
Главная
♥ В закладки
Просмотр инструкции в pdf
Инструкция по эксплуатации автомагнитолы Pioneer MVH-150UI.
Скачать инструкцию к автомагнитоле Pioneer MVH-150UI (6,37 МБ)
Автомагнитолы
« Инструкция к GPS навигатору Explay GN-510
» Инструкция к автомагнитоле Pioneer MVH-280FD
Вам также может быть интересно

Инструкция к автомагнитоле Pioneer MVH-X460UI
Инструкция к наушникам Pioneer SE-M521

Инструкция к автомагнитоле Pioneer DMH-G220BT
Инструкция к наушникам Pioneer HDJ-X7-S

Инструкция к автомагнитоле Pioneer DEH-1500UBG

Инструкция к наушникам Pioneer SE-MJ503-G

Инструкция к автомагнитоле Pioneer DEH-1600UBA

Инструкция к автомагнитоле Pioneer MVH-29BT
Добавить комментарий
Имя *
Email *
Сайт
Комментарий
Сохранить моё имя, email и адрес сайта в этом браузере для последующих моих комментариев.
- Добавить инструкцию
- Заказать инструкцию
- Политика конфиденциальности

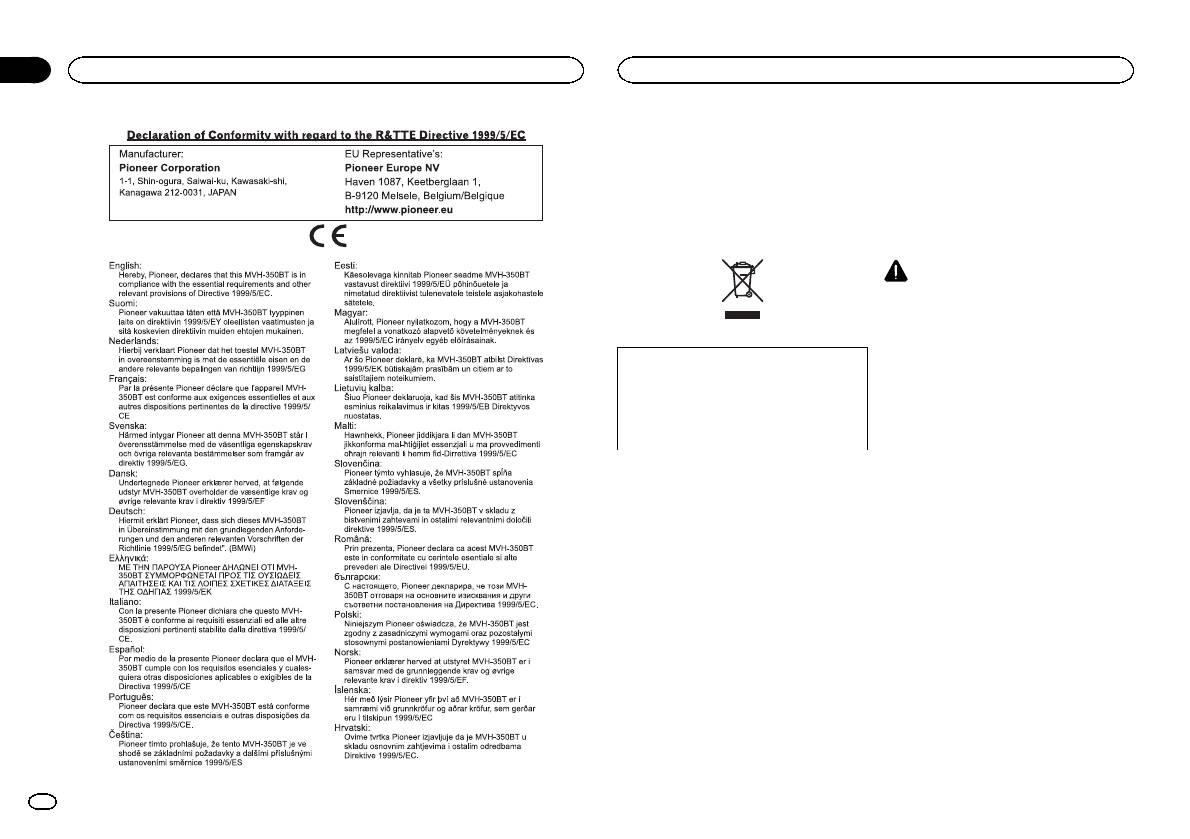
RDS MEDIA CENTER RECEIVER
AUTORADIO MULTIMEDIA RDS
RICEVITORE MULTIMEDIALE CON RDS
English NederlandsDeutschEspañolItalianoFrançais Русский
RECEPTOR Y CENTRO DE COMUNICACIONES RDS
RDS-MULTIMEDIA-EMPFÄNGER
RDS MEDIA CENTER ONTVANGER
ЦИФРОВОЙ МЕДИА—РЕСИВЕР
Owner’s Manual
Mode d’emploi
MVH-350BT
Manuale d’istruzioni
Manual de instrucciones
MVH-150UI
Bedienungsanleitung
Handleiding
Руководство пользователя
Section
01
Before you start
Before you start
Thank you for purchasing this PIONEER
About this unit
product
To ensure proper use, please read through this
The tuner frequencies on this unit are allocated
manual before using this product. It is especially
for use in Western Europe, Asia, the Middle
important that you read and observe WARN-
East, Africa and Oceania. Use in other areas
INGs and CAUTIONs in this manual. Please
may result in poor reception. The RDS (radio
keep the manual in a safe and accessible place for
data system) function only operates in areas
future reference.
with broadcasting RDS signals for FM stations.
CAUTION
! Do not allow this unit to come into contact
with liquids. Electrical shock could result.
Also, damage to this unit, smoke, and over-
heating could result from contact with
liquids.
If you want to dispose this product, do not
! The Pioneer CarStereo-Pass is for use only in
mix it with general household waste. There is
Germany.
a separate collection system for used elec-
! Always keep the volume low enough to hear
tronic products in accordance with legislation
outside sounds.
that requires proper treatment, recovery and
! Avoid exposure to moisture.
recycling.
! If the battery is disconnected or discharged,
any preset memory will be erased.
Private households in the member states of the
Note
EU, in Switzerland and Norway may return their
Function setting operations are completed even
used electronic products free of charge to desig-
if the menu is canceled before the operations
nated collection facilities or to a retailer (if you
are confirmed.
purchase a similar new one).
For countries not mentioned above, please con-
tact your local authorities for the correct method
About this manual
of disposal.
! In the following instructions, USB memories
By doing so you will ensure that your disposed
and USB audio players are collectively re-
product undergoes the necessary treatment, re-
ferred to as “USB storage device”.
covery and recycling and thus prevent potential
! In this manual, iPod and iPhone will be re-
negative effects on the environment and human
ferred to as “iPod”.
health.
In case of trouble
Should this unit fail to operate properly, please
contact your dealer or nearest authorized
PIONEER Service Station.
2
En
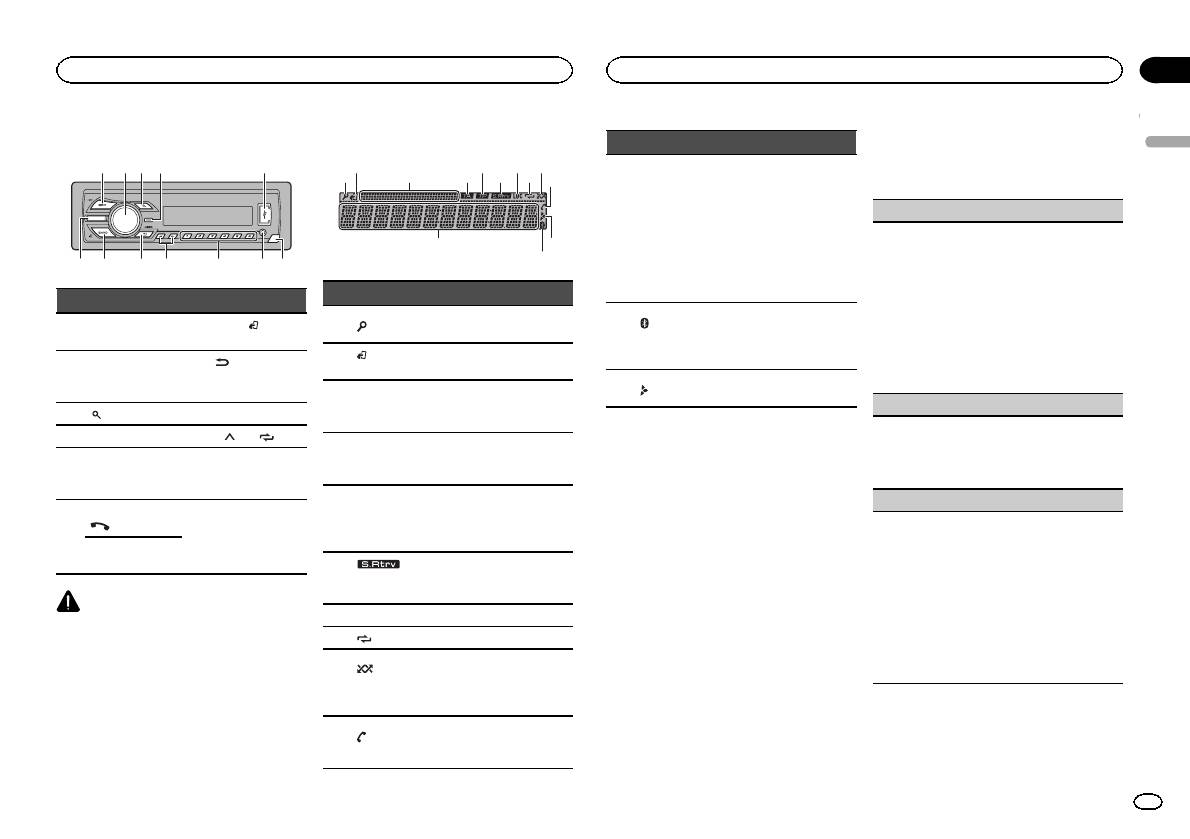
Head unit
a b
4
7
1 2 3 5
98c6
Display indication
2 5 7 9
31 4 86
a
db
Part Part
BAND/
(iPod
1 SRC/OFF 7
control)
(back)/
MULTI-CONTROL
2
8
DIMMER
(M.C.)
(dimmer)
3
(list) 9 c/d
4 DISP a 1/
to 6/
AUX input jack
5 USB port b
(3.5 mm stereo
jack)
MVH-350BT
(phone)
6
c Detach button
MVH-150UI
iPod
CAUTION
! Use an optional Pioneer USB cable (CD-
U50E) to connect the USB storage device as
any device connected directly to the unit will
protrude out from the unit, which could be
dangerous.
! Do not use unauthorized products.
c
Section
Operating this unit
Operating this unit
02
4 Perform the following procedures to set
Indicator State
the menu.
English
To proceed to the next menu option, you need to
! Tuner: band and fre-
confirm your selection.
quency
! RDS: program service
Main infor-
LANGUAGE (multi-language)
name, PTY information
b
mation sec-
and other literal informa-
This unit can display the text information from a
tion
tion
compressed audio file even for information em-
! USB storage device and
bedded in English or Russian.
iPod: elapsed playback
! If the embedded language and the selected
Indicator State
time and text information
language setting are not the same, text infor-
mation may not display properly.
The list function is being oper-
Only for MVH-350BT
1
(list)
! Some characters may not be displayed prop-
ated.
Connected to a Bluetooth de-
c
(Bluetooth
erly.
vice.
(iPod
This unit’s iPod function is op-
indicator)
1 Turn M.C. to select the desired setting.
2
The line is on hold.
control)
erated from your iPod.
ENG (English)—РУС (Russian)
Appears when a lower tier of
2 Press M.C. to confirm the selection.
Sub infor-
d
folder or menu exists.
3
mation sec-
Sub information is displayed.
CLOCK SET (setting the clock)
tion
1 Turn M.C. to adjust hour.
TA (traffic
Set up menu
2 Press M.C. to select minute.
4
announce-
TA function is on.
When you turn the ignition switch to ON after in-
3 Turn M.C. to adjust minute.
ments)
stallation, set up menu appears on the display.
4 Press M.C. to confirm the selection.
TP (traffic
You can set up the menu options below.
FM STEP (FM tuning step)
program
5
A TP station is tuned in.
identifica-
1 After installation of this unit, turn the
Normally, the FM tuning step employed by seek
tion)
ignition switch to ON.
tuning is 50 kHz. When AF or TA is on, the tuning
SET UP appears.
step automatically changes to 100 kHz. It may be
The sound retriever function
preferable to set the tuning step to 50 kHz when
6
(sound re-
is on.
2 Turn M.C. to switch to YES.
AF is on.
triever)
# If you do not operate for 30 seconds, the set up
! The tuning step remains at 50 kHz during man-
7 LOC Local seek tuning is on.
menu will not be displayed.
ual tuning.
# If you prefer not to set up at this time, turn M.C.
1 Turn M.C. to select the FM tuning step.
8
(repeat) Track or folder repeat is on.
to switch to NO. Press to select.
50 (50 kHz)—100 (100 kHz)
Random play is on.
If you select NO, you cannot set up in the set up
2 Press M.C. to confirm the selection.
(ran-
The iPod source is selected
menu.
QUIT appears.
9
dom/shuf-
and the shuffle or shuffle all
fle)
function is on.
3 Press M.C. to select.
5 To finish your settings, turn M.C. to select
Only for MVH-350BT
YES.
(auto an-
a
Shows when the automatic
# If you prefer to change your setting again, turn
swer)
answering function is on.
M.C. to switch to NO. Press to select.
En
3
Section
02
Operating this unit
Operating this unit
6 Press M.C. to select.
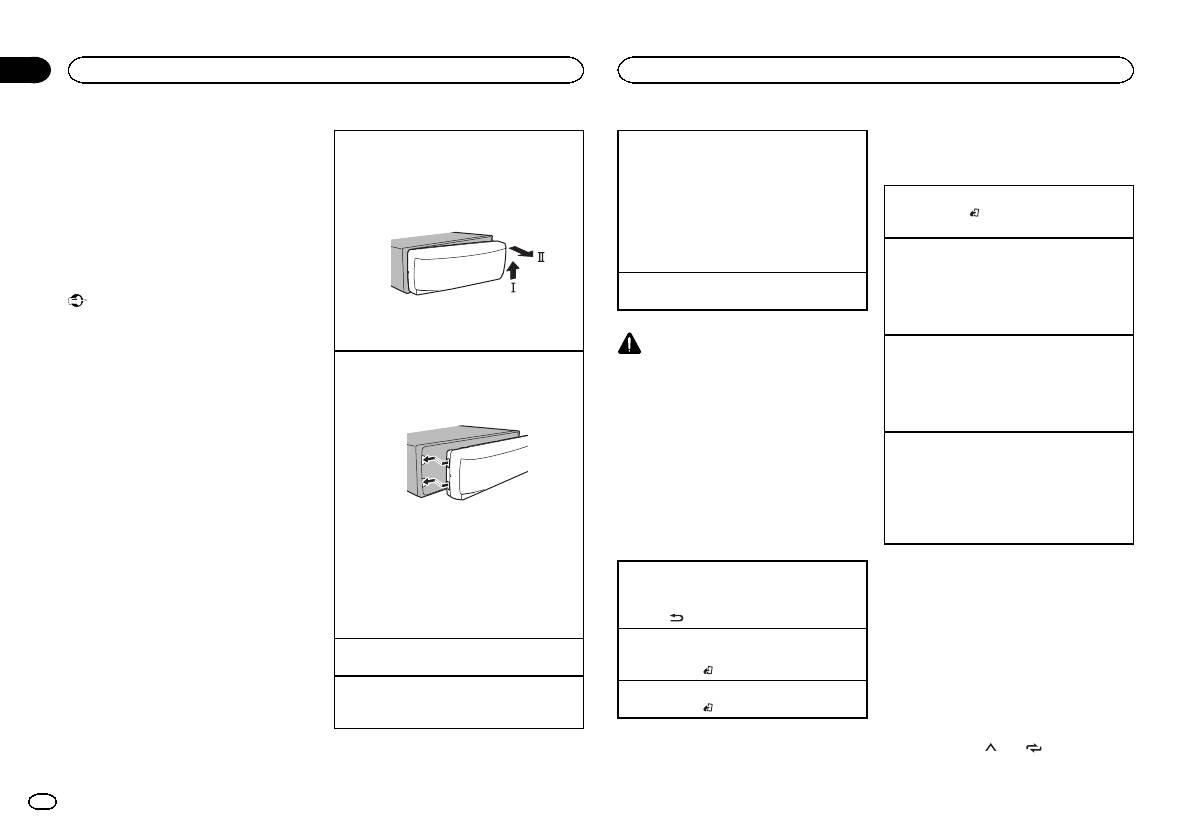
Removing the front panel to protect your unit from
Selecting a source
Tuner
Notes
theft
1 Press SRC/OFF to cycle between:
Basic operations
! You can set up the menu options from the
1 Press the detach button to release the front
TUNER (tuner)—USB (USB)/iPod (iPod)—
system menu. For details about the settings,
panel.
AUX (AUX)—BT AUDIO (Bluetooth audio)
refer to System menu on page 11.
2 Push the front panel upward (M) and then pull
! BT AUDIO is not available for MVH-150UI.
Selecting a band
1 Press BAND/
until the desired band (FM1,
! You can cancel set up menu by pressing
it toward (N) you.
! Only for MVH-150UI
FM2,FM3 for FM or MW/LW) is displayed.
SRC/OFF.
When there is an iPod connected and a source
other than iPod is selected, you can switch to
Switching preset stations
iPod by pressing iPod.
1 Press c or d.
Basic operations
Adjusting the volume
! Select PCH (preset channel) under SEEK to
Important
1 Turn M.C. to adjust the volume.
use this function. For details about the set-
tings, refer to SEEK (left/right key setting) on
! Handle gently when removing or attaching
3 Always keep the detached front panel in a pro-
the next page.
the front panel.
tection device such as a protection case.
! Avoid subjecting the front panel to excessive
CAUTION
Manual tuning (step by step)
shock.
Re-attaching the front panel
For safety reasons, park your vehicle when re-
1 Press c or d.
! Keep the front panel out of direct sunlight
1 Slide the front panel to the left.
moving the front panel.
! Select MAN (manual tuning) under SEEK to
and high temperatures.
Make sure to insert the tabs on the left side of
use this function. For details about the set-
! To avoid damaging the device or vehicle inte-
the head unit into the slots on the front panel.
Note
tings, refer to SEEK (left/right key setting) on
rior, remove any cables and devices attached
When this unit’s blue/white lead is connected to
the next page.
to the front panel before detaching it.
the vehicle’s auto-antenna relay control termi-
Seeking
nal, the vehicle’s antenna extends when this
1 Press and hold c or d, and then release.
unit’s source is turned on. To retract the anten-
You can cancel seek tuning by briefly pressing
na, turn the source off.
c or d.
While pressing and holding c or d, you can
2 Press the right side of the front panel until it is
Frequently used menu
skip stations. Seek tuning starts as soon as
firmly seated.
you release c or d.
operations
If you cannot attach the front panel to the
Note
head unit successfully, make sure that you are
Returning to the previous display
This unit’s AF (alternative frequencies search)
placing the front panel onto the head unit cor-
Returning to the previous list (the folder one level
function can be turned on and off. AF should be
rectly. Forcing the front panel into place may
higher)
off for normal tuning operation (refer to AF (al-
result in damage to the front panel or head
1 Press
/DIMMER.
ternative frequencies search) on the next page).
unit.
Returning to the ordinary display
Turning the unit on
Canceling the main menu
Storing and recalling stations
1 Press SRC/OFF to turn the unit on.
1 Press BAND/
.
for each band
Turning the unit off
Returning to the ordinary display from the list
Using preset tuning buttons
1 Press and hold SRC/OFF until the unit turns
1 Press BAND/
.
off.
1 When you find a station that you want
to store in memory, press one of the preset
tuning buttons (1/
to 6/ ) and hold until
the preset number stops flashing.
4
En
Section
Operating this unit
Operating this unit
02
2 Press one of the preset tuning buttons
Searching for an RDS station by PTY information
OTHERS (others)
Local seek tuning lets you tune in to only those
(1/
to 6/ ) to select the desired station.
English
You can search for general types of broadcasting
radio stations with sufficiently strong signals for
EDUCATE (Education), DRAMA (Drama), CUL-
programs, such as those listed in the following
good reception.
Switching the display
TURE (Culture), SCIENCE (Science), VARIED (Var-
section. Refer to this page.
1 Press M.C. to select the desired setting.
ied), CHILDREN (Children’s), SOCIAL (Social
1 Press
(list).
FM: OFF—LV1—LV2—LV3—LV4
Selecting the desired text information
affairs), RELIGION (Religion), PHONE IN (Phone
2 Turn M.C. to select a program type.
MW/LW: OFF—LV1 —LV2
1 Press DISP to cycle between the following:
in), TOURING (Travel), LEISURE (Leisure), DOCU-
NEWS/INFO—POPULAR—CLASSICS—
The highest level setting allows reception of
! FREQUENCY (program service name or
MENT (Documentaries)
OTHERS
only the strongest stations, while lower levels
frequency)
3 Press M.C. to begin the search.
allow the reception of weaker stations.
! BRDCST INFO (program service name/PTY
The unit searches for a station broadcasting
Function settings
information)
TA (traffic announcement standby)
that type of program. When a station is found,
! CLOCK (source name and clock)
its program service name is displayed.
1 Press M.C. to display the main menu.
1 Press M.C. to turn traffic announcement
! To cancel the search, press M.C. again.
Notes
standby on or off.
! The program of some stations may differ
2 Turn M.C. to change the menu option
! If the program service name cannot be ac-
from that indicated by the transmitted PTY.
and press to select FUNCTION.
AF (alternative frequencies search)
quired in FREQUENCY, the broadcast fre-
! If no station is broadcasting the type of
quency is displayed instead. If the program
program you searched for, NOT FOUND is
3 Turn M.C. to select the function.
1 Press M.C. to turn AF on or off.
service name is detected, the program serv-
displayed for about two seconds and then
Once selected, the following functions can be
ice name will be displayed.
NEWS (news program interruption)
the tuner returns to the original station.
adjusted.
! BRDCST INFO text information will change
# If MW/LW band is selected, only BSM, LOCAL
1 Press M.C. to turn the NEWS function on or
automatically.
and SEEK are available.
off.
! Depending on the band, text information can
PTY list
be changed.
BSM (best stations memory)
SEEK (left/right key setting)
! Text information items that can be changed
NEWS/INFO (news and information)
BSM (best stations memory) automatically stores
You can assign a function to the left and right keys
depend on the area.
NEWS (News), AFFAIRS (Current affairs), INFO
the six strongest stations in the order of their sig-
of the unit.
(Information), SPORT (Sports), WEATHER (Weath-
nal strength.
Select MAN (manual tuning) to tune up or down
Using PTY functions
er), FINANCE (Finance)
1 Press M.C. to turn BSM on.
manually or select PCH (preset channel) to switch
You can tune in to a station using PTY (program
To cancel, press M.C. again.
between preset channels.
type) information.
POPULAR (popular)
1 Press M.C. to select MAN or PCH.
REGION (regional)
POP MUS (Popular music), ROCK MUS (Rock
music), EASY MUS (Easy listening), OTH MUS
When AF is used, the regional function limits the
(Other music), JAZZ (Jazz), COUNTRY (Country
selection of stations to those broadcasting region-
music), NAT MUS (National music), OLDIES
al programs.
(Oldies music), FOLK MUS (Folk music)
1 Press M.C. to turn the regional function on or
off.
CLASSICS (classics)
LOCAL (local seek tuning)
L. CLASS (Light classical), CLASSIC (Classical)
En
5
Section
02
Operating this unit
Operating this unit
USB storage device
Switching the display
Operations using special buttons
iPod
Basic operations
Selecting the desired text information
Selecting a repeat play range
Basic operations
1 Press DISP to cycle between the following:
1 Press 6/
to cycle between the following:
Playing songs on a USB storage device
MP3/WMA/WAV
! ALL – Repeat all files
Playing songs on an iPod
1 Open the USB port cover.
! TRACK INFO (track title/artist name/album
! ONE – Repeat the current file
1 Open the USB port cover.
2 Plug in the USB storage device using a USB
title)
! FLD – Repeat the current folder
2 Connect an iPod to the USB cable using an
cable.
! FILE INFO (file name/folder name)
iPod Dock Connector.
Playing tracks in random order
Playback is performed automatically.
! ELAPSED TIME (track number and play-
Playback is performed automatically.
1 Press 5/
to turn random play on or off.
back time)
Stopping playback of files on a USB storage de-
Tracks in a selected repeat range are played in
Selecting a song (chapter)
! CLOCK (source name and clock)
vice
random order.
1 Press c or d.
! SPEANA (spectrum analyzer)
1 You may disconnect the USB storage device at
! To change songs during random play, press d
Selecting an album
any time.
Notes
to switch to the next track. Pressing c restarts
1 Press 1/
or 2/ .
The unit stops playback.
playback of the current track from the begin-
! TRACK INFO and FILE INFO text information
ning of the song.
Fast forwarding or reversing
Selecting a folder
will change automatically.
1 Press and hold c or d.
1 Press 1/
or 2/ .
! Depending on the version of iTunes used to
Pausing playback
write MP3 files to media file types, incompati-
1 Press 4/PAUSE to pause or resume.
Selecting a track
Notes
ble text stored within an audio file may be
1 Press c or d.
Enhancing compressed audio and restoring rich
! The iPod cannot be turned on or off when the
displayed incorrectly.
sound (sound retriever)
control mode is set to CONTROL AUDIO.
Fast forwarding or reversing
! Text information items that can be changed
1 Press 3/S.Rtrv to cycle between:
! Disconnect headphones from the iPod be-
1 Press and hold c or d.
depend on the media.
1—2—OFF (off)
fore connecting it to this unit.
! When playing compressed audio, there is no
1 is effective for low compression rates, and 2
! The iPod will turn off about two minutes after
sound during fast forward or reverse.
Selecting and playing files/
is effective for high compression rates.
the ignition switch is set to OFF.
Returning to root folder
tracks from the name list
1 Press and hold BAND/
.
Switching the display
1 Press
to switch to the file/track name
Function settings
Switching between playback memory devices
list mode.
You can switch between playback memory devices
1 Press M.C. to display the main menu.
Selecting the desired text information
on USB storage devices with more than one Mass
2 Use M.C. to select the desired file name
1 Press DISP to cycle between the following:
Storage Device-compatible memory device.
(or folder name).
2 Turn M.C. to change the menu option
CONTROL AUDIO/CONTROL iPod
! TRACK INFO (track title/artist name/album
1 Press BAND/
.
and press to select FUNCTION.
title)
! You can switch between up to 32 different
Selecting a file or folder
Once selected, the function below can be ad-
! ELAPSED TIME (track number and play-
memory devices.
1 Turn M.C.
justed.
back time)
Note
Playing
! CLOCK (source name and clock)
S.RTRV (sound retriever)
1 When a file or track is selected, press M.C.
Disconnect USB storage devices from the unit
! SPEANA (spectrum analyzer)
Automatically enhances compressed audio and
when not in use.
CONTROL APP
Viewing a list of the files (or folders) in the se-
restores rich sound.
! CONTROL APP (APP MODE is displayed)
lected folder
1 Press M.C. to select the desired setting.
! CLOCK (source name and clock)
1 When a folder is selected, press M.C.
For details, refer to Enhancing compressed
! SPEANA (spectrum analyzer)
Playing a song in the selected folder
audio and restoring rich sound (sound retriever)
1 When a folder is selected, press and hold M.C.
on this page.
6
En
Section
Operating this unit
Operating this unit
02
Note
Operations using special buttons
2 Turn M.C. to change the mode; press to
% Press BAND/
to switch the control
TRACK INFO text information will change auto-
select.
mode.
English
matically.
Selecting a repeat play range
! ARTIST – Plays an album of the artist cur-
! CONTROL iPod – This unit’s iPod function
1 Press 6/
to cycle between the following:
rently being played.
can be operated from the connected iPod.
Browsing for a song
! ONE – Repeat the current song
! ALBUM – Plays a song from the album cur-
! CONTROL APP – This unit’s iPod function
! ALL – Repeat all songs in the selected list
rently being played.
can be operated from the connected iPod.
1 Press
to switch to the top menu of list
! When the control mode is set to CONTROL
! GENRE – Plays an album from the genre cur-
The unit will play back the sound from your
search.
iPod/CONTROL APP, the repeat play range will
rently being played.
iPod applications.
be same as what is set for the connected iPod.
The selected song/album will be played after the
! CONTROL AUDIO – This unit ’s iPod function
2 Use M.C. to select a category/song.
currently playing song.
can be operated from this unit.
Selecting a random play range (shuffle)
Only for MVH-150UI
Changing the name of the song or category
1 Press 5/
to cycle between the following:
Notes
You can also switch the control mode by press-
1 Turn M.C.
! SNG – Play back songs in the selected list
! The selected song/album may be canceled if
ing iPod.
Playlists—artists—albums—songs—podcasts
in random order.
you operate functions other than link search
—genres—composers—audiobooks
! ALB – Play back songs from a randomly se-
(e.g. fast forward and reverse).
Notes
lected album in order.
! Depending on the song selected to play, the
! Switching the control mode to
Playing
! OFF – Not play back in random order.
end of the currently playing song and the be-
CONTROL iPod/CONTROL APP pauses song
1 When a song is selected, press M.C.
ginning of the selected song/album may be
playback. Operate the iPod to resume play-
Playing all songs in random order (shuffle all)
Viewing a list of songs in the selected category
cut off.
back.
1 Press and hold 5/
to turn shuffle all on.
1 When a category is selected, press M.C.
! The following operations are still accessible
! To turn off shuffle all, select OFF in shuffle. For
Operating this unit’s iPod
from the unit even if the control mode is set
Playing a song in the selected category
details, refer to Selecting a random play range
(shuffle) on this page.
function from your iPod
to CONTROL iPod/CONTROL APP.
1 When a category is selected, press and hold
— Pausing
M.C.
This unit’s iPod function can be operated from a
Pausing playback
— Fast forward/reverse
connected iPod.
Searching the list by alphabet
1 Press 4/PAUSE to pause or resume.
— Selecting a song (chapter)
If you switch to APP Mode, you can have the
1 When a list for the selected category is dis-
! The volume can only be adjusted from this
Enhancing compressed audio and restoring rich
sound from your iPod applications be output
played, press
to switch to alphabet search
unit.
sound (sound retriever)
from your car’s speakers.
mode.
1 Press 3/S.Rtrv to cycle between:
CONTROL iPod is not compatible with the fol-
! You also can switch to alphabet search
Function settings
1—2—OFF (off)
lowing iPod models.
mode by turning M.C. twice.
1 is effective for low compression rates, and 2
! iPod nano 1st generation
1 Press M.C. to display the main menu.
2 Turn M.C. to select a letter.
is effective for high compression rates.
! iPod with video
3 Press M.C. to display the alphabetical list.
CONTROL APP is compatible with the following
2 Turn M.C. to change the menu option
! To cancel searching, press
/DIMMER.
iPod models.
and press to select FUNCTION.
Playing songs related to the
! iPod touch 4th generation
Notes
currently playing song
! iPod touch 3rd generation
3 Turn M.C. to select the function.
! You can play playlists created with the PC ap-
You can play songs from the following lists.
! iPod touch 2nd generation
Once selected, the following functions can be
plication (MusicSphere). The application will
• Album list of the currently playing artist
! iPod touch 1st generation
adjusted.
be available on our website.
• Song list of the currently playing album
! iPhone 4S
! AUDIO BOOK is not available when
! Playlists that you created with the PC appli-
• Album list of the currently playing genre
! iPhone 4
CONTROL iPod/CONTROL APP is selected in
cation (MusicSphere) are displayed in abbre-
! iPhone 3GS
the control mode. For details, refer to Operat-
viated form.
1 Press and hold
to switch to link play
! iPhone 3G
ing this unit’s iPod function from your iPod on
mode.
! iPhone
this page.
En
7
Section
02
Operating this unit
Operating this unit
Setting up for hands-free phoning
Notes
Using voice recognition
AUDIO BOOK (audiobook speed)
Before you can use the hands-free phoning
! If private mode is selected on the cellular
This feature can be used on an iPod equipped
1 Press M.C. to display the setting mode.
function you must set up the unit for use with
phone, hands-free phoning may not be avail-
with voice recognition that is connected by
2 Turn M.C. to select your favorite setting.
your cellular phone.
able.
Bluetooth with the source set to iPod or
! FASTER – Playback at a speed faster than
! The estimated call time appears in the dis-
BT AUDIO.
normal
play (this may differ slightly from the actual
1 Connection
! NORMAL – Playback at normal speed
call time).
% Press and hold M.C. to switch to voice
Operate the Bluetooth telephone connection
! SLOWER – Playback at a speed slower
recognition mode.
menu. Refer to Connection menu operation on
than normal
Storing and recalling phone numbers
The commands available with this unit are listed
this page.
below.
S.RTRV (sound retriever)
2 Function settings
1 If you find a phone number that you
! Song playback
Operate the Bluetooth telephone function
Automatically enhances compressed audio and
want to store to memory, press and hold
! Making a phone call
menu. Refer to Phone menu operation on the
restores rich sound.
down one of the preset tuning buttons (1/
next page.
Note
1 Press M.C. to select the desired setting.
to 6/ ) to store it to the relevant preset
tuning button.
For details on voice recognition features, check
For details, refer to Enhancing compressed
the manual for the iPod you are using.
audio and restoring rich sound (sound retriever)
The functions below can be used to store phone
Basic operations
on the previous page.
numbers to the memory. For details, refer to
Phone menu operation on the next page.
Connection menu operation
Making a phone call
! MISSED (missed call history)
Important
1 Refer to Phone menu operation on the next
! DIALLED (dialed call history)
Using Bluetooth wireless
page.
! Be sure to park your vehicle in a safe place
! RECEIVED (received call histor y)
and apply the parking brake when perform-
technology
Answering an incoming call
! PHONE BOOK (phone book)
ing this operation.
Only for MVH-350BT
1 When a call is received, press
.
! Connected devices may not operate properly
2 Press one of the preset tuning buttons
Ending a call
if more than one Bluetooth device is con-
(1/
to 6/ ) to recall the desired phone
Using Bluetooth telephone
1 Press
.
nected at a time (e.g. a phone and a separate
number.
audio player are connected simultaneously).
Important
Rejecting an incoming call
! Since this unit is on standby to connect with
1 When a call is received, press and hold
.
3 Press M.C. to make a call.
1 Press and hold
to display the con-
your cellular phone via Bluetooth wireless
technology, using it without the engine run-
Answering a call waiting
nection menu.
ning can drain the battery power.
1 When a call is received, press
.
Switching the display
# You cannot operate this step during a call.
! Operations may vary depending on the kind
Switching between callers on hold
Selecting the desired text information
2 Turn M.C. to select the function.
of cellular phone.
1 Press M.C.
You can change the display during a call.
Once selected, the following functions can be
! Advanced operations that require attention
Canceling call waiting
1 Press DISP to cycle between the following:
adjusted.
such as dialing numbers on the monitor,
! Call time
using the phone book, etc., are prohibited
1 Press and hold
.
! Name of other party
while driving. Park your vehicle in a safe
Adjusting the other party’s listening volume
! Number of other party
place when using these advanced opera-
1 Press c or d while talking on the phone.
tions.
! When private mode is on, this function is not
! Be sure to park your vehicle in a safe place
available.
and apply the parking brake when perform-
ing this operation.
Turning private mode on or off
1 Press BAND/
while talking on the phone.
8
En
Section
Operating this unit
Operating this unit
02
DEVICELIST (connecting or disconnecting a de-
To connect your device to this unit via Bluetooth
PHONE BOOK (phone book)
1 Press M.C. to start searching.
English
vice from the device list)
wireless technology, you need to enter a PIN code
! To cancel, press M.C. while searching.
on your device to verify the connection. The default
! The phone book in your cellular phone will be
! If this unit fails to find any available cellular
! When no device is selected in the device list,
code is 0000, but you can change it with this func-
transferred automatically when the phone is
phones, NOT FOUND is displayed.
this function is not available.
tion.
connected to this unit.
2 Turn M.C. to select a device from the device
1 Press M.C. to display the setting mode.
1 Press M.C. to display the setting mode.
! Depending on the cellular phone, the phone
list.
2 Turn M.C. to select the name of a device you
2 Turn M.C. to select a number.
book may not be transferred automatically. In
! If the desired device is not displayed, select
want to connect/disconnect.
3 Press M.C. to move the cursor to the next posi-
this case, operate your cellular phone to trans-
RE-SEARCH.
! Press and hold M.C. to switch the
tion.
fer the phone book. The visibility of this unit
! Press and hold M.C. to switch the
Bluetooth device address and device
4 After inputting PIN code, press and hold M.C.
should be on. Refer to VISIBLE (setting the visi-
Bluetooth device address and device
name.
! After inputting, pressing M.C. returns you
bility of this unit) on this page.
name.
3 Press M.C. to connect/disconnect the selected
to the PIN code input display, and you can
1 Press M.C. to display SEARCH (alphabetical
3 Press M.C. to connect the selected device.
device.
change the PIN code.
list).
! To complete the connection, check the de-
If the connection is established, * is indicated
2 Turn M.C. to select the first letter of the name
vice name (Pioneer BT Unit) and enter the
DEV. INFO (Bluetooth device address display)
on the device name.
you are looking for.
PIN code on your device.
! Press and hold M.C. to select the desired
DEL DEVICE (deleting a device from the device
! PIN code is set to 0000 as the default. You
1 Press M.C. to display the setting mode.
character type.
list)
can change this code.
2 Turn M.C. to display the device information.
TOP (alphabet)–ΟΛΑ (Greek alphabet)–—
! 6-digit number appears on the display of
Device name—Bluetooth device address
ВСЕ (Cyrillic alphabet)
! When no device is selected in the device list,
this unit. Once the connection is estab-
3 Press M.C. to display a registered name list.
this function is not available.
lished, this number disappears.
1 Press M.C. to display the setting mode.
Phone menu operation
4 Turn M.C. to select the name you are looking
! If you are unable to complete the connec-
for.
2 Turn M.C. to select the name of a device you
tion using this unit, use the device to con-
Important
5 Press M.C. to display the phone number list.
want to delete.
nect to the unit.
Be sure to park your vehicle in a safe place and
6 Turn M.C. to select a phone number you want
! Press and hold M.C. to switch the
! If three devices are already paired, DEVICE-
apply the parking brake when performing this
to call.
Bluetooth device address and device
FULL is displayed and it is not possible to
operation.
7 Press M.C. to make a call.
name.
perform this operation. In this case, delete
3 Press M.C. to display DELETE YES.
a paired device first.
1 Press
to display the phone menu.
PRESET 1-6 (preset phone numbers)
4 Press M.C. to delete a device information from
# When PW SAVE is on, you cannot display the
A. CONN (connecting to a Bluetooth device auto-
the device list.
phone menu. For details about the settings, refer to
1 Press M.C. to display the setting mode.
matically)
! While this function is in use, do not turn off
PW SAVE (power saving) on page 12.
2 Turn M.C. to select the desired preset number.
the engine.
3 Press M.C. to make a call.
1 Press M.C. to turn automatic connection on or
! You can also use the preset number but-
ADD DEVICE (connecting a new device)
off.
2 Turn M.C. to select the function.
Once selected, the following functions can be
tons 1/
to 6/ to recall a preset phone
VISIBLE (setting the visibility of this unit)
adjusted.
number.
For more details about storing phone num-
To check the availability of this unit from other de-
vices, Bluetooth visibility of this unit can be turned
MISSED (missed call history)
bers, refer to Storing and recalling phone
on.
DIALLED (dialed call history)
numbers on the previous page.
1 Press M.C. to turn the visibility of this unit on
RECEIVED (received call histor y)
PHONE FUNC (phone function)
or off.
1 Press M.C. to display the phone number list.
You can set A. ANSR, R.TONE and PB INVT from
PIN CODE (PIN code input)
2 Turn M.C. to select a name or phone number.
this menu. For details, refer to Function and opera-
3 Press M.C. to make a call.
tion on the next page.
En
9
Section
02
Operating this unit
Operating this unit
Function and operation
! Since there are a number of Bluetooth audio
Basic operations
Pausing playback
players available on the market, available op-
1 Display PHONE FUNC.
1 Press 4/PAUSE to pause or resume.
erations will vary extensively. When operating
Fast forwarding or reversing
Refer to PHONE FUNC (phone function) on the
your player with this unit, refer to the instruc-
1 Press and hold c or d.
Enhancing compressed audio and restoring rich
previous page.
tion manual that came with your Bluetooth
sound (sound retriever)
Selecting a track
audio player as well as this manual.
1 Press 3/S.Rtrv to cycle between:
2 Press M.C. to display the function menu.
1 Press c or d.
! As the signal from your cellular phone may
1—2—OFF (off)
cause noise, avoid using it when you are lis-
Starting playback
1 is effective for low compression rates, and 2
3 Turn M.C. to select the function.
tening to songs on your Bluetooth audio
1 Press BAND/
.
is effective for high compression rates.
Once selected, the following functions can be
player.
adjusted.
! When a call is in progress on the cellular
phone connected to this unit via Bluetooth
Switching the display
Function settings
A. ANSR (automatic answering)
wireless technology, the sound of the
1 Press M.C. to display the main menu.
Bluetooth audio player connected to this unit
Selecting the desired text information
1 Press M.C. to turn automatic answering on or
is muted.
1 Press DISP to cycle between the following:
2 Turn M.C. to change the menu option
off.
! When the Bluetooth audio player is in use,
! DEVICE INFO (device name)
and press to select FUNCTION.
R.TONE (ring tone select)
you cannot connect to a Bluetooth telephone
! TRACK INFO (track title/artist name/album
automatically.
title)
3 Turn M.C. to select the function.
! Playback continues even if you switch from
! ELAPSED TIME (track number and play-
Once selected, the following functions can be
1 Press M.C. to turn the ring tone on or off.
adjusted.
your Bluetooth audio player to another
back time)
PB INVT (phone book name view)
source while listening to a song.
! CLOCK (source name and clock)
! Depending on the type of Bluetooth audio
! SPEANA (spectrum analyzer)
PLAY (play)
1 Press M.C. to invert the order of names in the
player you have connected to this unit, oper-
phone book.
Notes
1 Press M.C. to start playback.
ation and information display may not be
! TRACK INFO text information will change au-
available for some functions.
tomatically.
STOP (stop)
Bluetooth Audio
! Depending on the device, text information
1 Press M.C. to stop the playback.
Important
Setting up for Bluetooth audio
can be changed.
! Depending on the Bluetooth audio player
Before you can use the Bluetooth audio function
S.RTRV (sound retriever)
connected to this unit, the available opera-
you must set up the unit for use with your
Operations using special buttons
Automatically enhances compressed audio and
tions will be limited to the following two lev-
Bluetooth audio player. This entails establishing
restores rich sound.
els:
a Bluetooth wireless connection between this
Selecting a repeat play range
1 Press M.C. to select the desired setting.
— A2DP profile (Advanced Audio Distribution
unit and your Bluetooth audio player, and pair-
1 Press 6/
to select a repeat play range from
For details, refer to Enhancing compressed
Profile): You can only playback songs on your
ing your Bluetooth audio player with this unit.
one or all.
audio and restoring rich sound (sound retriever)
audio player.
! This function may not be available depend-
on this page.
You cannot use the A2DP connection when
ing on the type of Bluetooth audio player
1 Connection
iPod is selected as a source.
connected.
Operate the Bluetooth telephone connection
— AVRCP profile (Audio/Video Remote Control
! The repeat play range varies depending on
menu. Refer to Connection menu operation on
Audio adjustments
Profile): You can perform playback, pause
the Bluetooth audio player in use.
page 8.
playback, select songs, etc.
1 Press M.C. to display the main menu.
Playing tracks in random order
1 Press 5/
to turn random play on or off.
2 Turn M.C. to change the menu option
! The random play range varies depending
and press to select AUDIO.
on the Bluetooth audio player in use.
10
En
Section
Operating this unit
Operating this unit
02
3 Turn M.C. to select the audio function.
Only frequencies lower than those in the selected
SLA (source level adjustment)
Once selected, the following audio functions
1 Press M.C. to display the setting mode.
English
2 Turn M.C. to select the equalizer.
range are outputted from the subwoofer.
can be adjusted.
SLA (Source level adjustment) lets you adjust the
! FADER is not available when SUB.W/SUB.W
POWERFUL—NATURAL—VOCAL—CUS-
1 Press M.C. to display the setting mode.
volume level of each source to prevent radical
is selected in SP-P/O MODE. For details, refer
TOM1—CUSTOM2—FLAT—SUPER BASS
2 Press M.C. to cycle between the following:
changes in volume when switching between sour-
Cut-off frequency—Output level—Slope level
to SP-P/O MODE (rear output and preout set-
The equalizer band and equalizer level can be
customized when CUSTOM1 or CUSTOM2 is
Rates that can be adjusted will flash.
ces.
ting) on the next page.
selected.
3 Turn M.C. to select the desired setting.
! Settings are based on the FM volume level,
! SUB.W, SUB.W CTRL and HPF SETTING are
Cut-off frequency: 50HZ—63HZ—80HZ—
which remains unchanged.
not available when REAR/REAR is selected in
If selecting CUSTOM1 or CUSTOM2, complete
the procedures outlined below. If selecting
100HZ—125HZ—160HZ—200HZ
! The MW/LW volume level can also be adjusted
SP-P/O MODE. For details, refer to
Output level: –24 to +6
with this function.
SP-P/O MODE (rear output and preout set-
other options, press M.C. to return to the pre-
Slope level: –6— –12
! When selecting FM as the source, you cannot
ting) on the next page.
vious display.
switch to SLA.
! SUB.W CTRL and HPF SETTING are not avail-
! CUSTOM1 can be set separately for each
BASS BOOST (bass boost)
! USB and iPod are all set to the same setting
able when SUB.W is selected in OFF. For de-
source. However, USB and iPod are all set
automatically.
tails, refer to SUB.W (subwoofer on/off
to the same setting automatically.
1 Press M.C. to display the setting mode.
1 Press M.C. to display the setting mode.
setting) on this page.
! CUSTOM2 is a shared setting used in com-
2 Turn M.C. to select a desired level.
2 Turn M.C. to adjust the source volume.
mon for all sources.
0 to +6 is displayed as the level is increased or
Adjustment range: +4 to –4
FADER (fader adjustment)
3 Press M.C. to display the setting mode.
decreased.
4 Press M.C. to cycle between the following:
Equalizer band—Equalizer level
HPF SETTING (high pass filter adjustment)
1 Press M.C. to display the setting mode.
System menu
2 Turn M.C. to adjust the front/rear speaker bal-
5 Turn M.C. to select the desired setting.
When you do not want low sounds from the sub-
ance.
Equalizer band: 80HZ—250HZ—800HZ—
Important
woofer output frequency range to play from the
2.5KHZ—8KHZ
front or rear speakers, turn on the HPF (high pass
PW SAVE (power saving) is canceled if the ve-
BALANCE (balance adjustment)
Equalizer level: +6 to –6
filter). Only frequencies higher than those in the
hicle battery is disconnected and will need to be
1 Press M.C. to display the setting mode.
LOUDNESS (loudness)
selected range are output from the front or rear
turned back on once the battery is reconnected.
When PW SAVE (power saving) is off, depend-
2 Turn M.C. to adjust the left/right speaker bal-
speakers.
Loudness compensates for deficiencies in the low-
ing on connection methods, the unit may con-
ance.
1 Press M.C. to display the setting mode.
frequency and high-frequency ranges at low vol-
tinue to draw power from the battery if your
2 Press M.C. to cycle between the following:
EQ SETTING (equalizer recall)
ume.
vehicle’s ignition doesn’t have an ACC (acces-
Cut-off frequency—Slope level
1 Press M.C. to select the desired setting.
sory) position.
3 Turn M.C. to select the desired setting.
OFF (off)—LOW (low)—MID (mid)—HI (high)
Cut-off frequency: OFF—50HZ—63HZ—80HZ
1 Press M.C. to display the main menu.
SUB.W (subwoofer on/off setting)
—100HZ—125HZ—160HZ—200HZ
Slope level: –6— –12
2 Turn M.C. to change the menu option
This unit is equipped with a subwoofer output
and press to select SYSTEM.
which can be turned on or off.
1 Press M.C. to select the desired setting.
3 Turn M.C. to select the system menu
NOR (normal phase)—REV (reverse phase)—
function.
OFF (subwoofer off)
Once selected, the following system menu func-
SUB.W CTRL (subwoofer adjustment)
tions can be adjusted.
! MUTE MODE is not available for MVH-350BT.
! BT AUDIO, BT MEM CLEAR and
BT VERSION are not available for MVH-150UI.
En
11
Section
02
Operating this unit
Operating this unit
LANGUAGE (multi-language)
Sound from this system is automatically muted or
Bluetooth device data stored on this unit can be
Initial menu
attenuated when a signal from equipment with a
cleared. To protect personal information, we rec-
This unit can display the text information from a
1 Press and hold SRC/OFF until the unit
mute function is received.
ommend that you clear this data before transfer-
compressed audio file even for information em-
turns off.
1 Press M.C. to display the setting mode.
ring this unit to other persons. The following types
bedded in English or Russian.
2 Turn M.C. to select the desired setting.
of data on this unit will be cleared in such cases.
2 Press and hold SRC/OFF until the main
! If the embedded language and the selected
You can select any one of the options in the fol-
! Phone book
menu appears in the display.
language setting are not the same, text infor-
lowing list:
! Call history
mation may not display properly.
! MUTE – Muting
! Preset number
3 Turn M.C. to change the menu option
! Some characters may not be displayed prop-
! 20dB ATT – Attenuation (20dB ATT has a
! PIN code
and press to select INITIAL.
erly.
stronger effect than 10dB ATT)
! Registration assignment
1 Turn M.C. to select the desired setting.
! 10dB ATT – Attenuation
! Information of the connected Bluetooth tele-
4 Turn M.C. to select the initial menu func-
ENG (English)—РУС (Russian)
phone
tion.
BT AUDIO (Bluetooth audio activation)
CLOCK SET (setting the clock)
1 Press M.C. to show the confirmation display.
Once selected, the following initial menu func-
You need to activate the BT AUDIO source in order
YES is displayed. Clearing memory is now on
tions can be adjusted.
1 Press M.C. to display the setting mode.
to use a Bluetooth audio player.
standby.
! S/W UPDATE is not available for MVH-150UI.
2 Press M.C. to select the segment of the clock
1 Press M.C. to turn the BT AUDIO source on or
If you do not want to clear the Bluetooth device
display you wish to set.
off.
data stored on this unit, turn M.C. to display
FM STEP (FM tuning step)
Hour—Minute
CANCEL and press it again to select.
3 Turn M.C. to adjust the clock.
PW SAVE (power saving)
Normally, the FM tuning step employed by seek
2 Press M.C. to clear the memory.
tuning is 50 kHz. When AF or TA is on, the tuning
CLEARED is displayed and the Bluetooth de-
12H/24H (time notation)
Switching this function on enables you to reduce
step automatically changes to 100 kHz. It may be
the consumption of battery power.
vice data is cleared.
! While this function is in use, do not turn
preferable to set the tuning step to 50 kHz when
1 Press M.C. to select the desired setting.
! Turning on the source is the only operation al-
AF is on.
12H (12-hour clock)—24H (24-hour clock)
lowed when this function is on.
off the engine.
! The tuning step remains at 50 kHz during man-
1 Press M.C. to turn the power save on or off.
BT VERSION (Bluetooth version display)
AUTO PI (auto PI seek)
ual tuning.
BT MEM CLEAR (clearing the Bluetooth device
1 Press M.C. to select the FM tuning step.
You can display the system versions of this unit
The unit can automatically search for a different
data stored on this unit)
50 (50 kHz)—100 (100 kHz)
and of Bluetooth module.
station with the same programming, even during
1 Press M.C. to display the information.
SP-P/O MODE (rear output and preout setting)
preset recall.
1 Press M.C. to turn Auto PI seek on or off.
AUX (auxiliary input)
Switching the dimmer setting
Activate this setting when using an auxiliary de-
You can adjust the brightness of illumination.
vice connected to this unit.
1 Press M.C. to turn AUX on or off.
1 Press M.C. to display the main menu.
MUTE MODE (mute mode)
2 Turn M.C. to display ILLUMI and press to
select.
3 Press M.C. to select the desired setting.
OFF (off)—ON (on)
! You can also change the dimmer setting by
pressing and holding
/DIMMER.
12
En
3 Turn M.C. to change the menu option
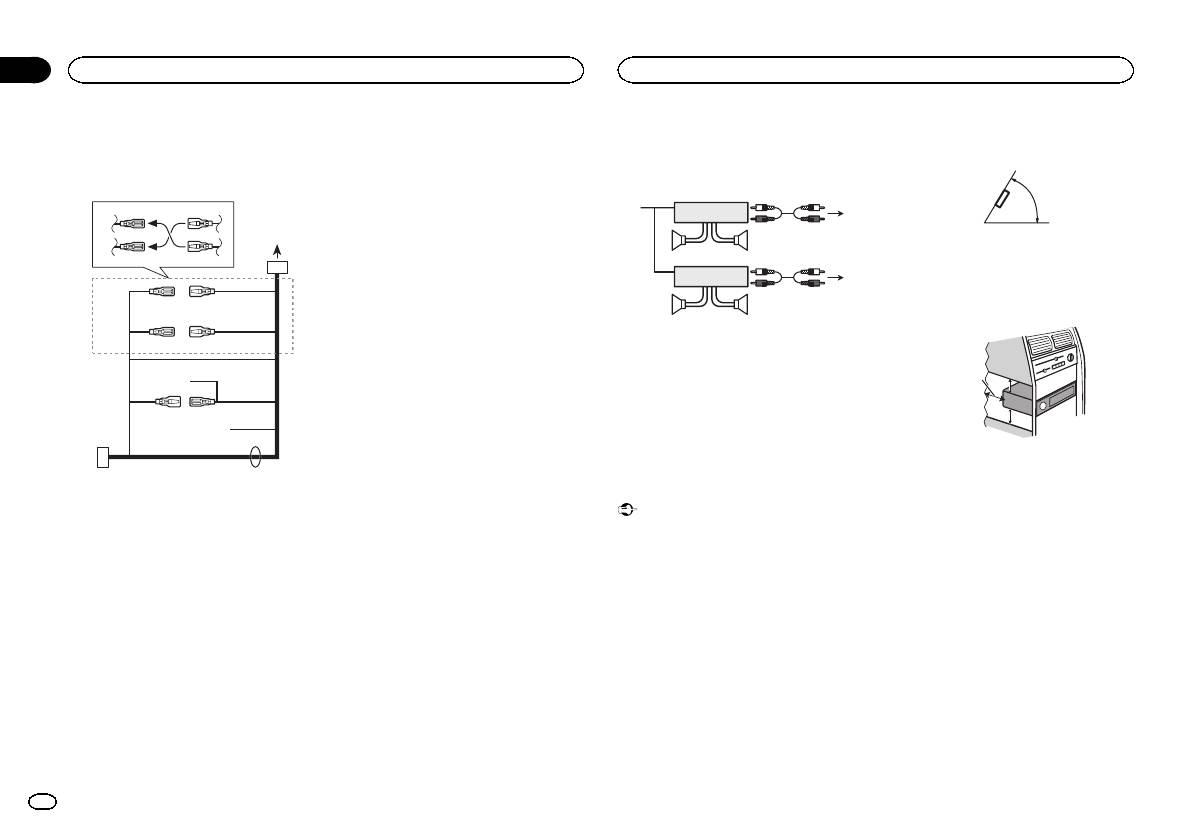
— Never wire the negative speaker cable directly
The rear speaker leads output and the RCA output
Connections
and press to select SYSTEM.
to ground.
of this unit can be used to connect a full-range
Important
— Never band together negative cables of multi-
speaker or subwoofer. Select a suitable option for
4 Turn M.C. to select the system menu
! When installing this unit in a vehicle without
ple speakers.
your connection.
function.
an ACC (accessory) position on the ignition
! When this unit is on, control signals are sent
1 Press M.C. to display the setting mode.
Once selected, the following system menu func-
switch, failure to connect the red cable to the
through the blue/white cable. Connect this
2 Turn M.C. to select the desired setting.
tions can be adjusted.
terminal that detects operation of the ignition
cable to the system remote control of an ex-
You can select any one of the options in the fol-
For details, refer to System menu on page 11.
key may result in battery drain.
ternal power amp or the vehicle’s auto-anten-
lowing list:
! REAR/SUB.W – Select when there is a full-
na relay control terminal (max. 300 mA
range speaker connected to the rear speak-
Using an AUX source
F
F
O
N
12 V DC). If the vehicle is equipped with a
O
er leads output and there is a subwoofer
T
S
R
A
glass antenna, connect it to the antenna
1 Insert the stereo mini plug into the AUX
T
connected to the RCA output.
booster power supply terminal.
input jack.
! SUB.W/SUB.W – Select when there is a
! Never connect the blue/white cable to the
ACC position No ACC position
subwoofer connected directly to the rear
2 Press SRC/OFF to select AUX as the
power terminal of an external power amp.
speaker leads output without any auxiliary
source.
! Use of this unit in conditions other than the
Also, never connect it to the power terminal
amp and there is a subwoofer connected
following could result in fire or malfunction.
of the auto antenna. Doing so may result in
Note
to the RCA output.
— Vehicles with a 12-volt battery and negative
battery drain or a malfunction.
! REAR/REAR – Select when there is a full-
AUX cannot be selected unless the auxiliary set-
grounding.
! The black cable is ground. Ground cables for
range speaker connected to the rear speak-
ting is turned on. For more details, refer to AUX
— Speakers with 50 W (output value) and 4 W to
this unit and other equipment (especially,
er leads output and the RCA output.
(auxiliary input) on the previous page.
8 W (impedance value).
high-current products such as power amps)
If there is a full-range speaker connected to
! To prevent a short-circuit, overheating or mal-
must be wired separately. If they are not, an
the rear speaker leads output and the RCA
Switching the display
function, be sure to follow the directions
accidental detachment may result in a fire or
output is not used, you may select either
below.
malfunction.
REAR/SUB.W or REAR/REAR.
Selecting the desired text information
— Disconnect the negative terminal of the bat-
S/W UPDATE (updating the software)
1 Press DISP to cycle between the following:
tery before installation.
This unit
! Source name
— Secure the wiring with cable clamps or adhe-
This function is used to update this unit with the
! Source name and clock
sive tape. Wrap adhesive tape around wiring
3
latest Bluetooth software. For about Bluetooth
that comes into contact with metal parts to
software and updating, refer to our website.
protect the wiring.
1
2
! Never turn the unit off while the Bluetooth soft-
If an unwanted display appears
— Place all cables away from moving parts,
ware is being updated.
Turn off the unwanted display using the proce-
such as the shift lever and seat rails.
1 Press M.C. to display the data transfer mode.
dures listed below.
— Place all cables away from hot places, such
Follow the on-screen instructions to finish up-
as near the heater outlet.
dating the Bluetooth software.
1 Press M.C. to display the main menu.
— Do not connect the yellow cable to the battery
by passing it through the hole to the engine
2 Turn M.C. to change the menu option
compartment.
System menu
and press to select SYSTEM.
— Cover any disconnected cable connectors
1 Press and hold SRC/OFF until the unit
3 Turn M.C. to display DEMO OFF and press
with insulating tape.
turns off.
to select.
— Do not shorten any cables.
— Never cut the insulation of the power cable of
2 Press and hold SRC/OFF until the main
4 Turn M.C. to switch to YES.
this unit in order to share the power with
menu appears in the display.
other devices. The current capacity of the
5 Press M.C. to select.
cable is limited.
— Use a fuse of the rating prescribed.
6 78
Section
Operating this unit
Installation
02
03
English
4
5
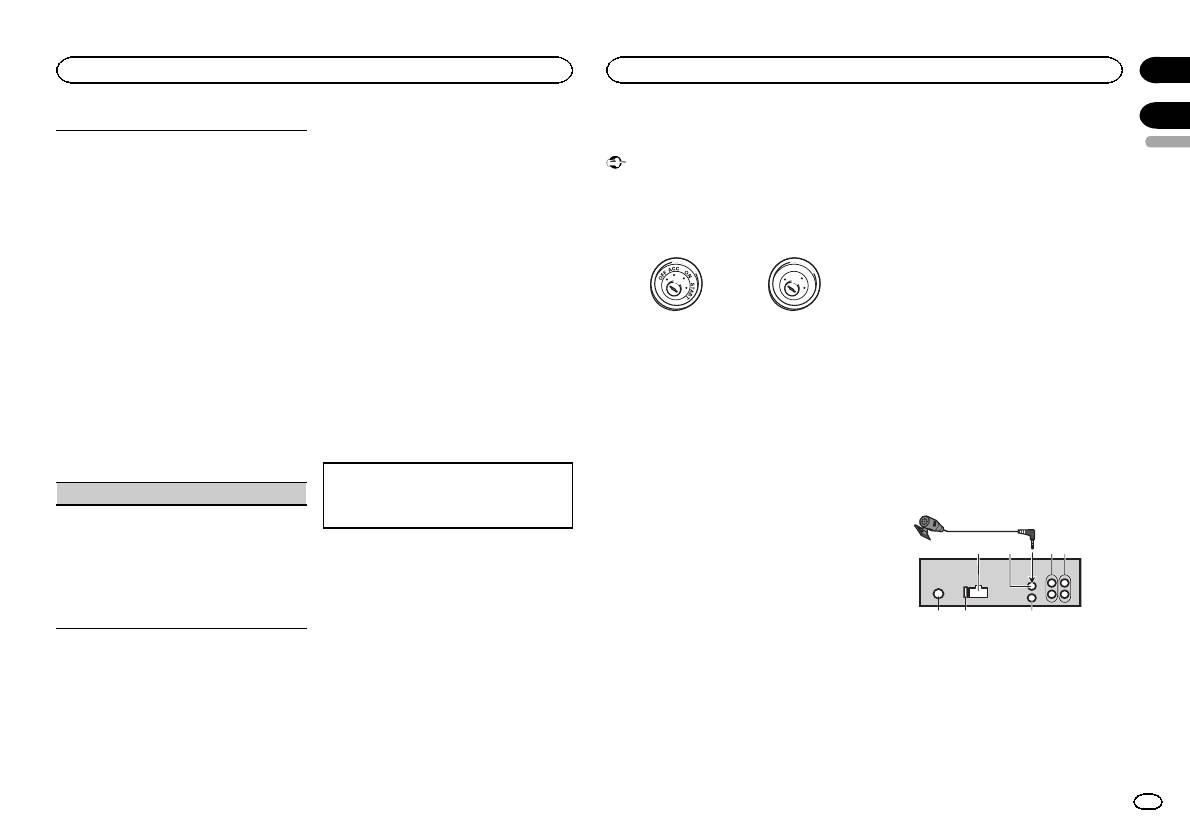
1 Power cord input
2 Microphone input (MVH-350BT only)
3 Microphone (MVH-350BT only)
4m
4 Rear output or subwoofer output
5 Front output
6 Antenna input
7 Fuse (10 A)
8 Wired remote input
En
13
Hard-wired remote control adapter can be
connected (sold separately).
Power cord
3
4
2
5
6
1
3
4
7
5
6
8
a
9
b
e
d
9 Blue/white
Power amp (sold separately)
! Optimum performance is obtained when the
The pin position of the ISO connector will dif-
unit is installed at an angle of less than 60°.
Perform these connections when using the op-
fer depending on the type of vehicle. Connect
tional amplifier.
9 and b when Pin 5 is an antenna control
60°
type. In another type of vehicle, never con-
1
3
nect 9 and b.
2
a Blue/white
4
Connect to system control terminal of the
55
! When installing, to ensure proper heat dis-
power amp (max. 300 mA 12 V DC).
3
persal when using this unit, make sure you
b Blue/white
1
2
leave ample space behind the rear panel and
Connect to auto-antenna relay control termi-
6
wrap any loose cables so they are not block-
nal (max. 300 mA 12 V DC).
77
ing the vents.
c Yellow/black (MVH-150UI only)
If you use an equipment with Mute function,
wire this lead to the Audio Mute lead on that
1 System remote control
equipment. If not, keep the Audio Mute lead
Connect to Blue/white cable.
free of any connections.
2 Power amp (sold separately)
d Speaker leads
3 Connect with RCA cables (sold separately)
White: Front left +
4 To Front output
White/black: Front left *
5 Front speaker
6 To Rear output or subwoofer output
c
Gray: Front right +
Gray/black: Front right *
7 Rear speaker or subwoofer
Green: Rear left + or subwoofer +
Green/black: Rear left * or subwoofer *
Installation
1 To power cord input
Violet: Rear right + or subwoofer +
2 Depending on the kind of vehicle, the func-
Violet/black: Rear right * or subwoofer *
Important
tion of 3 and 5 may be different. In this
e ISO connector
! Check all connections and systems before
case, be sure to connect 4 to 5 and 6 to
In some vehicles, the ISO connector may be
final installation.
3.
divided into two. In this case, be sure to con-
! Do not use unauthorized parts as this may
3 Yellow
nect to both connectors.
cause malfunctions.
Back-up (or accessory)
! Consult your dealer if installation requires
Notes
4 Yellow
drilling of holes or other modifications to the
Connect to the constant 12 V supply termi-
! Change the initial menu of this unit. Refer to
vehicle.
nal.
SP-P/O MODE (rear output and preout set-
! Do not install this unit where:
5 Red
ting) on page 12.
— it may interfere with operation of the vehicle.
Accessory (or back-up)
The subwoofer output of this unit is monau-
— it may cause injury to a passenger as a result
6 Red
ral.
of a sudden stop.
Connect to terminal controlled by ignition
! When using a subwoofer of 70 W (2 W), be
! The semiconductor laser will be damaged if
switch (12 V DC).
sure to connect the subwoofer to the violet
it overheats. Install this unit away from hot
7 Connect leads of the same color to each
and violet/black leads of this unit. Do not
places such as near the heater outlet.
other.
connect anything to the green and green/
8 Black (chassis ground)
black leads.
5cmcm
Section
03
Installation
Installation
Leave ample
space
5 cm
5 cm
DIN front/rear mount
This unit can be properly installed using either
front-mount or rear-mount installation.
Use commercially available parts when instal-
ling.
DIN Front-mount
1 Insert the mounting sleeve into the dash-
board.
For installation in shallow spaces, use the sup-
plied mounting sleeve. If there is enough space,
use the mounting sleeve that came with the ve-
hicle.
14
En
2 Secure the mounting sleeve by using a
Removing the unit
Installing the microphone
1
screwdriver to bend the metal tabs (90°) into
1 Remove the trim ring.
place.
Only for MVH-350BT
1
CAUTION
It is extremely dangerous to allow the micro-
phone lead to become wound around the steer-
ing column or shift lever. Be sure to install the
unit in such a way that it will not obstruct driv-
2
2
ing.
1 Trim ring
2 Notched tab
Note
1 Dashboard
! Releasing the front panel allows easier ac-
Install the microphone in a position and orienta-
2 Mounting sleeve
1 Microphone clip
cess to the trim ring.
tion that will enable it to pick up the voice of the
# Make sure that the unit is installed securely in
2 Clamp
! When reattaching the trim ring, point the
person operating the system.
place. An unstable installation may cause skipping
Use separately sold clamps to secure the
side with the notched tab down.
or other malfunctions.
lead where necessary inside the vehicle.
When installing the microphone
2 Insert the supplied extraction keys into
on the sun visor
When installing the microphone
DIN Rear-mount
both sides of the unit until they click into
place.
1 Install the microphone on the micro-
on the steering column
1 Determine the appropriate position
phone clip.
where the holes on the bracket and the side
1 Install the microphone on the micro-
3 Pull the unit out of the dashboard.
of the unit match.
1
phone clip.
2
2
2 Tighten two screws on each side.
1 Microphone
2 Microphone clip
Removing and re-attaching the front
panel
3
2 Install the microphone clip on the sun
1
You can remove the front panel to protect your
visor.
unit from theft.
With the sun visor up, install the microphone
Press the detach button and push the front
clip. (Lowering the sun visor reduces the voice
2
panel upward and pull it toward you.
recognition rate.)
For details, refer to Removing the front panel to
1 Tapping screw (5 mm × 8 mm)
protect your unit from theft and Re-attaching the
2 Mounting bracket
front panel on page 4.
3 Dashboard or console
4
Section
Installation
Installation
03
English
1
3
1 Microphone
2 Microphone base
3 Microphone clip
4 Fit the microphone lead into the groove.
# Microphone can be installed without using mi-
crophone clip. In this case, detach the microphone
base from the microphone clip. To detach the micro-
phone base from the microphone clip, slide the mi-
crophone base.
En
15
2 Install the microphone clip on the steer—
ing column.
2
Section
03
Installation
Additional information
Troubleshooting
Symptom Cause Action
The sound
There is a call in
The sound will be
1
Symptom Cause Action
from the
progress on a
played back when
The display
You did not per-
Perform operation
Bluetooth
Bluetooth con-
the call is termi-
automatically
form any opera-
again.
audio source
nected cellular
nated.
returns to the
tion within
is not played
phone.
ordinary dis-
about 30 sec-
back.
A Bluetooth
Do not operate
play.
onds.
connected cel-
the cellular phone
The repeat
Depending on
Select the repeat
lular phone is
at this time.
play range
the repeat play
play range again.
currently being
changes un-
range, the se-
operated.
expectedly.
lected range
A call was
Reconnect the
may change
made with a
Bluetooth con-
when another
Bluetooth con-
nection between
folder or track is
nected cellular
this unit and the
being selected
phone and then
cellular phone.
3
or during fast
immediately ter-
forwarding/re-
minated. As a
versing.
result, commu-
A subfolder is
Subfolders can-
Select another re-
nication be-
not played
not be played
peat play range.
tween this unit
1 Double-sided tape
back.
when FLD (fold-
and the cellular
2 Install the microphone clip on the rear side of
er repeat) is se-
phone was not
the steering column.
lected.
terminated
3 Clamp
properly.
NO XXXX ap-
There is no em-
Switch the display
Use separately sold clamps to secure the
pears when a
bedded text in-
or play another
lead where necessary inside the vehicle.
display is
formation.
track/file.
Error messages
changed (NO
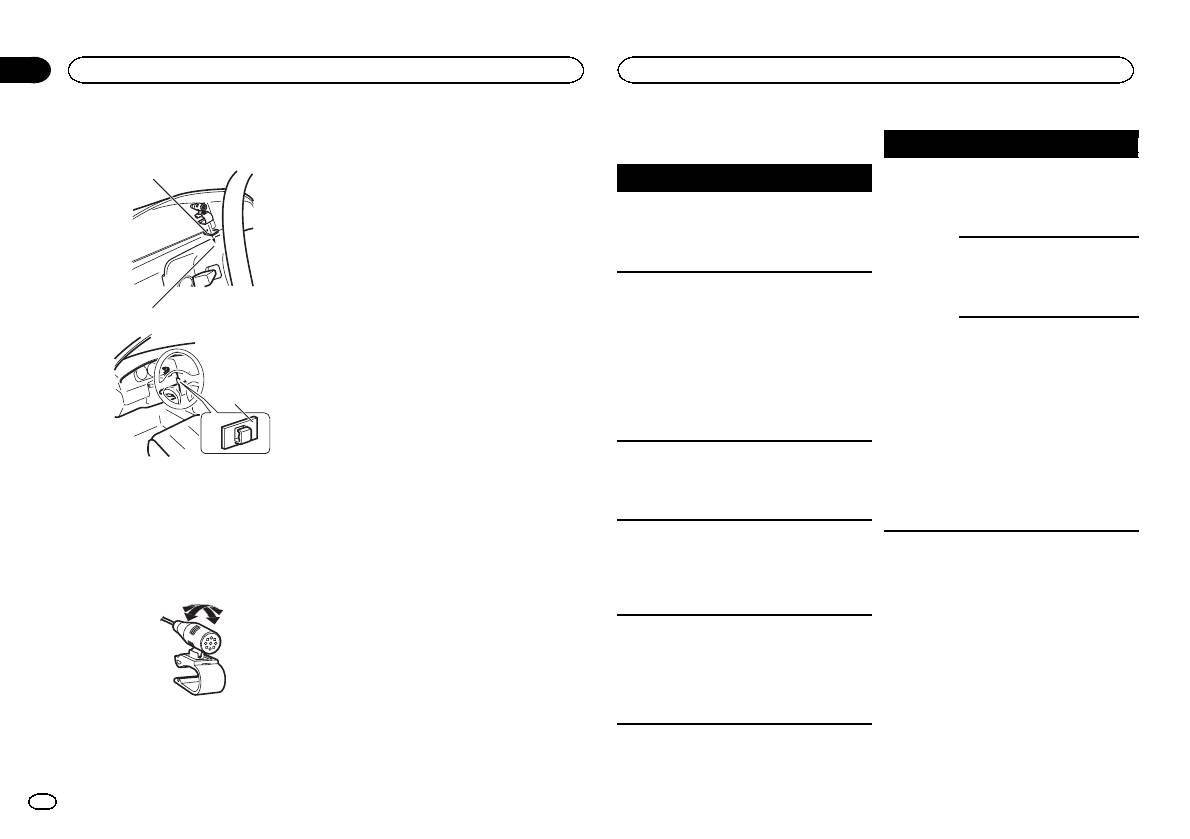
Adjusting the microphone angle
TITLE, for ex-
When you contact your dealer or your nearest
ample).
Pioneer Service Center, be sure to note the error
message.
The unit is
You are using a
Move electrical
malfunction-
device, such as
devices that may
ing.
a cellular
be causing the in-
There is inter-
phone, that
terference away
ference.
transmits elec-
from the unit.
tric waves near
The microphone angle can be adjusted.
the unit.
16
En

Appendix
Additional information
Additional information
Common
Message Cause Action
Message Cause Action
Message Cause Action
English
Message Cause Action
PROTECT All the files in
Transfer audio
CHECK USB The iPod oper-
Make sure the
ERROR-16 The iPod firm-
Update the iPod
AMP ERROR Unit fails to op-
Check the speak-
the USB storage
files not em-
ates correctly
connection cable
ware version is
version.
erate or speaker
er connection. If
device are em-
bedded with
but does not
for the iPod has
old.
connection is
the message fails
bedded with
Windows Media
charge.
not shorted out
iPod failure. Disconnect the
incorrect; pro-
to disappear even
Windows Media
DRM 9/10 to the
(e.g., not caught
cable from the
tective circuit is
after the engine is
DRM 9/10.
USB storage de-
in metal objects).
iPod. Once the
activated.
switched off/on,
vice and connect.
After checking,
iPod’s main
contact your deal-
N/A USB The USB device
! Connect a USB
turn the ignition
menu is dis-
er or an author-
connected to is
Mass Storage
switch OFF and
played, reconnect
ized Pioneer
not supported
Class compliant
back ON, or dis-
the iPod and reset
Service Station
by this unit.
device.
connect the iPod
it.
for assistance.
! Disconnect
and reconnect.
STOP There are no
Select a list that
your device and
ERROR-19 Communication
Perform one of
songs in the
contains songs.
replace it with a
failed.
the following op-
USB storage device/iPod
current list.
compatible USB
erations.
Message Cause Action
storage device.
–Turn the ignition
NOT FOUND No related
Transfer songs to
switch OFF and
songs.
the iPod.
FORMAT
Sometimes
Wait until the
CHECK USB The USB con-
Check that the
back ON.
READ
there is a delay
message disap-
nector or USB
USB connector or
–Disconnect the
between the
pears and you
cable has short-
USB cable is not
Bluetooth device
USB storage de-
start of playback
hear sound.
circuited.
caught in some-
vice.
and when you
thing or dam-
Message Cause Action
aged.
–Change to a dif-
start to hear any
ERROR-10 The power failed
Turn the ignition
ferent source.
sound.
CHECK USB The connected
Disconnect the
for the
switch OFF and
Then, return to
NO AUDIO There are no
Transfer the audio
USB storage de-
USB storage de-
Bluetooth mod-
then to ACC or
the USB source.
songs.
files to the USB
vice consumes
vice and do not
ule of this unit.
ON.
storage device
more than maxi-
use it. Turn the
iPod failure. Disconnect the
If the error mes-
and connect.
mum allowable
ignition switch to
cable from the
sage is still dis-
current.
OFF, then to ACC
iPod. Once the
played after
The connected
Follow the USB
or ON and then
iPod’s main
performing the
USB storage de-
storage device in-
connect only
menu is dis-
above action,
vice has secur-
structions to dis-
compliant USB
played, reconnect
please contact
ity enabled.
able the security.
storage devices.
the iPod and reset
your dealer or an
SKIPPED The connected
Play an audio file
it.
authorized
USB storage de-
not embedded
ERROR-23 USB storage de-
USB storage de-
Pioneer Service
vice contains
with Windows
vice was not for-
vice should be for-
Station.
files embedded
Media DRM 9/10.
matted with
matted with
with Windows
FAT12, FAT16 or
FAT12, FAT16 or
Mediaä DRM 9/
FAT32.
FAT32.
10.
En
17

Appendix
Additional information
Additional information
Handling guidelines
About iPod settings
M3u playlist: Not compatible
Playback of copyright-protected files: Not compati-
! When an iPod is connected, this unit changes
ble
USB storage device
MP3i (MP3 interactive), mp3 PRO: Not compatible
the EQ (equalizer) setting of the iPod to off in
Partitioned USB storage device: Only the first par-
order to optimize the acoustics. When you dis-
Address any questions you have about your USB
tition can be played.
connect the iPod, the EQ returns to the original
storage device to the manufacturer of the device.
WAV
setting.
There may be a slight delay when starting play-
Connections via USB hub are not supported.
! You cannot set Repeat to off on the iPod when
File extension: .wav
back of audio files on a USB storage device with
using this unit. Repeat is automatically
numerous folder hierarchies.
Do not connect anything other than a USB stor-
changed to All when the iPod is connected to
Quantization bits: 8 and 16 (LPCM), 4 (MS
age device.
this unit.
ADPCM)
Firmly secure the USB storage device when driv-
Incompatible text saved on the iPod will not be dis-
Sampling frequency: 16 kHz to 48 kHz (LPCM),
CAUTION
ing. Do not let the USB storage device fall onto the
played by the unit.
22.05 kHz and 44.1 kHz (MS ADPCM)
! Pioneer cannot guarantee compatibility with
floor, where it may become jammed under the
all USB mass storage devices and assumes
brake or accelerator pedal.
no responsibility for any loss of data on
Supplemental information
Depending on the USB storage device, the follow-
media players, smart phones, or other devi-
Compressed audio
ing problems may occur.
ces while using this product.
Only the first 32 characters can be displayed as a
! Operations may vary.
compatibility (USB)
! Do not leave a USB storage device in any
file name (including the file extension) or a folder
! The storage device may not be recognized.
place that is subject to high temperatures.
WMA
name.
! Files may not be played back properly.
! The device may generate noise in the radio.
Russian text to be displayed on this unit should be
File extension: .wma
iPod compatibility
encoded in one of the following character sets:
Bit rate: 48 kbps to 320 kbps (CBR), 48 kbps to
! Unicode (UTF-8, UTF-16)
This unit supports only the following iPod mod-
iPod
384 kbps (VBR)
! A character set other than Unicode that is
els. Supported iPod software versions are shown
used in a Windows environment and is set to
below. Older versions may not be supported.
Sampling frequency: 32 kHz, 44.1 kHz, 48 kHz
Do not leave the iPod in places with high tempera-
Russian in the multi-language setting
Made for
tures.
Windows Media Audio Professional, Lossless,
! iPod touch 4th generation (software version
This unit may not operate correctly depending on
Voice/DRM Stream/Stream with video: Not com-
To ensure proper operation, connect the dock con-
5.1.1)
the application used to encode WMA files.
patible
nector cable from the iPod directly to this unit.
! iPod touch 3rd generation (software version
There may be a slight delay at the start of playback
5.1.1)
Firmly secure the iPod when driving. Do not let the
of audio files embedded with image data or audio
! iPod touch 2nd generation (software version
iPod fall onto the floor, where it may become
MP3
files stored on a USB storage device that has nu-
4.2.1)
jammed under the brake or accelerator pedal.
merous folder hierarchies.
! iPod touch 1st generation (software version
File extension: .mp3
3.1.3)
Bit rate: 8 kbps to 320 kbps (CBR), VBR
! iPod classic 160GB (software version 2.0.4)
USB storage device
! iPod classic 120GB (software version 2.0.1)
Sampling frequency: 8 kHz to 48 kHz (32 kHz,
! iPod classic (software version 1.1.2)
44.1 kHz, 48 kHz for emphasis)
Playable folder hierarchy: up to eight tiers (A prac-
! iPod with video (software version 1.3.0)
tical hierarchy is less than two tiers.)
Compatible ID3 tag version: 1.0, 1.1, 2.2, 2.3, 2.4
! iPod nano 6th generation (software version
(ID3 tag Version 2.x is given priority over Version
Playable folders: up to 500
1.2)
1.x.)
! iPod nano 5th generation (software version
Playable files: up to 15 000
1.0.2)
! iPod nano 4th generation (software version
1.0.4)
18
En
Appendix
Additional information
Additional information
! iPod nano 3rd generation (software version
Example of a hierarchy
MP3
D: C D: C D: C D: C D: C
1.1.3)
01
Supply of this product only conveys a license for
English
! iPod nano 2nd generation (software version
02
: Ш,
: Х : Ц : Ч
: Ъ
private, non-commercial use and does not con-
1.1.3)
Щ
vey a license nor imply any right to use this prod-
! iPod nano 1st generation (software version
: Folder
: Ы : Ь : Э : Ю : Я
uct in any commercial (i.e. revenue-generating)
1.3.1)
03
: Compressed
real time broadcasting (terrestrial, satellite,
! iPhone 4S (software version 5.1.1)
04
audio file
cable and/or any other media), broadcasting/
D: Display C: Character
! iPhone 4 (software version 5.1.1)
01 to 05: Folder
streaming via internet, intranets and/or other
! iPhone 3GS (software version 5.1.1)
number
networks or in other electronic content distribu-
! iPhone 3G (software version 4.2.1)
05
1 to 6: Playback
Bluetooth profiles
tion systems, such as pay-audio or audio-on-de-
! iPhone (software version 3.1.2)
Level 1 Level 2 Level 3 Level 4
sequence
mand applications. An independent license for
In order to use Bluetooth wireless technology,
such use is required. For details, please visit
Depending on the generation or version of the
devices must be able to interpret certain pro-
http://www.mp3licensing.com.
USB storage device
iPod, some functions may not be available.
files. This unit is compatible with the following
Playback sequence is the same as recorded se-
profiles.
Operations may vary depending on the software
WMA
quence in the USB storage device.
! GAP (Generic Access Profile)
version of iPod.
Windows Media is either a registered trademark
To specify the playback sequence, the following
! OPP (Object Push Profile)
or trademark of Microsoft Corporation in the
method is recommended.
When using an iPod, an iPod Dock Connector to
! HFP (Hands Free Profile) 1.5
United States and/or other countries.
1 Create a file name that includes numbers
USB Cable is required.
! HSP (Head Set Profile)
This product includes technology owned by
that specify the playback sequence (e.g.,
! PBAP (Phone Book Access Profile)
A Pioneer CD-IU51 interface cable is also avail-
Microsoft Corporation and cannot be used or
001xxx.mp3 and 099yyy.mp3).
! A2DP (Advanced Audio Distribution Profile)
able. For details, consult your dealer.
distributed without a license from Microsoft
2 Put those files into a folder.
! AVRCP (Audio/Video Remote Control Profile)
Licensing, Inc.
3 Save the folder containing files on the USB
About the file/format compatibility, refer to the
1.3
storage device.
iPod manuals.
However, depending on the system environment,
iPod & iPhone
Audiobook, Podcast: Compatible
you may not be able to specify the playback se-
Copyright and trademark
iPhone, iPod, iPod classic, iPod nano, and iPod
quence.
touch are trademarks of Apple Inc., registered in
For USB portable audio players, the sequence is
Bluetooth
the U.S. and other countries.
â
different and depends on the player.
The Bluetooth
word mark and logos are regis-
“Made for iPod” and “Made for iPhone” mean
CAUTION
tered trademarks owned by Bluetooth SIG, Inc.
that an electronic accessory has been designed
Pioneer accepts no responsibility for data lost
and any use of such marks by PIONEER
to connect specifically to iPod or iPhone, respec-
on the iPod, even if that data is lost while this
Russian character chart
CORPORATION is under license. Other trade-
tively, and has been certified by the developer to
unit is used.
marks and trade names are those of their re-
meet Apple performance standards. Apple is
D: C D: C D: C D: C D: C
spective owners.
not responsible for the operation of this device
Sequence of audio files
or its compliance with safety and regulatory
: А : Б : В : Г : Д
iTunes
standards. Please note that the use of this ac-
The user cannot assign folder numbers and
: Е, Ё : Ж : З : И, Й : К
Apple and iTunes are trademarks of Apple Inc.,
cessory with iPod or iPhone may affect wireless
specify playback sequences with this unit.
registered in the U.S. and other countries.
performance.
: Л : М : Н : О : П
: Р : С : Т : У : Ф
En
19

Appendix
Additional information
Specifications
Maximum current supply
…………………………….. 1 A
General
USB Class ………………….. MSC (Mass Storage Class)
Power so urce ………………. 14.4 V DC (10.8 V to 15.1 V al-
File system ………………….. FAT12, FAT16, FAT32
lowable)
MP3 decoding format …… MPEG-1 & 2 Audio Layer 3
Grounding system ………… Negative type
WMA decoding format ….. Ver. 7, 7.1, 8, 9, 10, 11, 12 (2ch
Maximum current consumption
audio)
…………………………….. 10.0 A
(Windows Media Player)
Dimensions (W × H × D):
WAV signal format ……….. Linear PCM & MS ADPCM
DIN
(Non-compressed)
Chassis ………….. 178mm × 50mm ×
165 mm
FM tuner
Nose ……………… 188 mm × 58mm ×
Frequency range ………….. 87.5 MHz to 108.0 MHz
15 mm
Usable sensitivity …………. 9 dBf (0.8 µV/75 W, mono, S/N:
D
30 dB)
Chassis ………….. 178mm × 50mm ×
Signal-to-noise ratio ……… 72 dB (IEC-A network)
165 mm
Nose ……………… 170 mm × 46mm ×
15 mm
MW tuner
Weight ……………………….. 0.7 kg
Frequency range ………….. 531 kHz to 1602 kHz
Usable sensitivity …………. 25 µV (S/N: 20 dB)
Signal-to-noise ratio ……… 62 dB (IEC-A network)
Audio
Maximum power output ... 50 W × 4
70 W × 1/2 W (for subwoofer)
LW tuner
Continuous power output
Frequency range ………….. 153 kHz to 281 kHz
…………………………….. 22W × 4 (50 Hz to 15000Hz,
Usable sensitivity …………. 28 µV (S/N: 20 dB)
5 % THD, 4 W load, both chan-
Signal-to-noise ratio ……… 62 dB (IEC-A network)
nels driven)
Load impedance ………….. 4W (4 W to 8 W allowable)
Preout maximum output level
Bluetooth
…………………………….. 2.0V
Version ………………………. Bluetooth 3.0 certified
Loudness contour ………… +10dB (100 Hz), +6.5 dB
Output power ………………. +4dBm Maximum
(10 kHz) (volume: –30 dB)
(Power class 2)
Equalizer (5-Band Graphic Equalizer):
Frequency …………….. 80Hz/250 Hz/800 Hz/
Note
2.5 kHz/8 kHz
Specifications and the design are subject to
Equalization range …. ±12 dB (2 dB step)
modifications without notice.
Subwoofer (mono):
Frequency …………….. 50Hz/63 Hz/80 Hz/100 Hz/
125 Hz/160 Hz/200 Hz
Slope …………………… –6 dB/oct, –12 dB/oct
Gain ……………………. +6dB to –24 dB
Phase ………………….. Normal/Reverse
USB
USB standard specification
…………………………….. USB 2.0 full speed
20
En
-
Страница 1
Owner ’ s Manual Mode d ’ emploi Manuale d ’ istruzioni Manual de instrucciones Bedienungsanleitung Handleiding Руководств о пользова те ля RDS MEDIA CENTER RECEIVER A UT ORADIO MUL TIMEDIA RDS RICEVIT ORE MUL TIMEDIALE CON RDS RECEPT OR Y CENTRO DE COMUNICA CIONES RDS RDS-MUL TIMEDIA-EMPFÄNGER RDS MEDIA CENTER ONTV AN[…]
-
Страница 2
Thank you for purchasing this PIONEER product T o ensure proper use, please read through this manual before using this product. It is especially important that you read and obser ve WARN- ING s and CAUTION s in this manual. Please keep the manual in a safe and accessible place for future reference. If you want to dispose this product, do not mix it[…]
-
Страница 3
Head unit a b 4 7 1 2 3 5 9 8c 6 Part Part 1 SRC / OFF 7 BAND / (iPod control) 2 MUL TI-CONTROL ( M.C. ) 8 (back)/ DIMMER (dimmer) 3 (list) 9 c / d 4 DISP a 1 / to 6 / 5 USB port b AUX input jack (3.5 mm stereo jack) 6 MVH-350BT (phone) c Detach button MVH-150UI iPod CAUTION ! Use an optional Pioneer USB cable (CD- U50E) to connect the USB storage […]
-
Страница 4
6 Press M.C. to select. Notes ! Y ou can set up the menu options from the system menu. For details about the settings, refer to System menu on page 11. ! Y ou can cancel set up menu by pressing SRC / OFF . Basic operations Important ! Handle gently when removing or attaching the front panel. ! Avoid subjecting the front panel to excessive shock. ! […]
-
Страница 5
2 Press one of the preset tuning buttons (1/ to 6/ ) to select the desired station. Switching the display Selecting the desired text information 1 Press DISP to cycle between the following: ! FREQUENCY (program ser vice name or frequency) ! BRDCST INFO (program service name/PTY information) ! CLOCK (source name and clock) Notes ! If the program ser[…]
-
Страница 6
USB storage device Basic operations Playing songs on a USB storage device 1 Open the USB port cover . 2 Plug in the USB storage device using a USB cable. Playback is per formed automatically . Stopping playback of files on a USB storage de- vice 1 You may disconnect the USB storage device at any time. The unit stops playback. Selecting a folder 1 P[…]
-
Страница 7
Note TRACK INFO text information will change auto- matically . Browsing for a song 1 Press to switch to the top menu of list search. 2 Use M.C. to select a category/song. Changing the name of the song or category 1 Turn M.C. Playlists — artists — albums — songs — podcasts — genres — composers — audiobooks Playing 1 When a song is sele[…]
-
Страница 8
AUDIO BOOK (audiobook speed) 1 Press M.C. to display the setting mode. 2 Turn M.C. to select your favorite setting. ! FASTER – Playback at a speed faster than normal ! NORMAL – Playback at normal speed ! SLOWER – Playback at a speed slower than normal S.RTRV (sound retriever) Automatically enhances compressed audio and restores rich sound. 1 […]
-
Страница 9
DEVICELIST (connecting or disconnecting a de- vice from the device list) ! When no device is selected in the device list, this function is not available. 1 Press M.C. to display the setting mode. 2 Turn M.C. to select the name of a device you want to connect/disconnect. ! Press and hold M.C. to switch the Bluetooth device address and device name. 3[…]
-
Страница 10
Function and operation 1 Display PHONE FUNC. Refer to PHONE FUNC (phone function) on the previous page. 2 Press M.C. to display the function menu. 3 T ur n M.C. to select the function. Once selected, the following functions can be adjusted. A. ANSR (automatic answering) 1 Press M.C. to turn automatic answering on or off . R.TONE (ring tone select) […]
-
Страница 11
3 T ur n M.C. to select the audio function. Once selected, the following audio functions can be adjusted. ! FADER is not available when SUB.W/SUB.W is selected in SP-P/O MODE . For details, refer to SP-P/O MODE (rear output and preout set- ting) on the next page. ! SUB.W , SUB.W CTRL and HPF SETTING are not available when REAR/REAR is selected in S[…]
-
Страница 12
LANGUAGE (multi-language) This unit can display the text information from a compressed audio file even for information em- bedded in English or Russian. ! If the embedded language and the selected language setting are not the same, text infor- mation may not display properly . ! Some characters may not be displayed prop- erly. 1 Turn M.C. to select[…]
-
Страница 13
The rear speaker leads output and the RCA output of this unit can be used to connect a full-range speaker or subwoofer . Select a suitable option for your connection. 1 Press M.C. to display the setting mode. 2 Turn M.C. to select the desired setting. Y ou can select any one of the options in the fol- lowing list: ! REAR/SUB.W – Select when there[…]
-
Страница 14
Hard-wired remote control adapter can be connected (sold separately). Power cord 1 3 3 2 4 4 5 5 6 6 b 8 9 7 a e d c 1 T o power cord input 2 Depending on the kind of vehicle, the func- tion of 3 and 5 may be different. In this case, be sure to connect 4 to 5 and 6 to 3 . 3 Yellow Back-up (or accessor y) 4 Yellow Connect to the constant 12 V supply[…]
-
Страница 15
2 Secure the mounting sleeve by using a screwdriver to bend the metal tabs (90°) into place. 1 2 1 Dashboard 2 Mounting sleeve # Make sure that the unit is installed securely in place. An unstable installation may cause skipping or other malfunctions. DIN Rear -mount 1 Determine the appropriate position where the holes on the bracket and the side […]
-
Страница 16
2 Install the microphone clip on the steer — ing column. 2 1 3 1 Double-sided tape 2 Install the microphone clip on the rear side of the steering column. 3 Clamp Use separately sold clamps to secure the lead where necessary inside the vehicle. Adjusting the microphone angle The microphone angle can be adjusted. T roubleshooting Symptom Cause Action[…]
-
Страница 17
Common Message Cause Action AMP ERROR Unit fails to op- erate or speaker connection is incorrect; pro- tective circuit is activated. Check the speak- er connection. If the message fails to disappear even after the engine is switched off/on, contact your deal- er or an author- ized Pioneer Service Station for assistance. USB storage device/iPod Mess[…]
-
Страница 18
Handling guidelines USB storage device Address any questions you have about your USB storage device to the manufacturer of the device. Connections via USB hub are not supported. Do not connect anything other than a USB stor- age device. Firmly secure the USB storage device when driv- ing. Do not let the USB storage device fall onto the floor , wher[…]
-
Страница 19
! iPod nano 3rd generation (software version 1.1.3) ! iPod nano 2nd generation (software version 1.1.3) ! iPod nano 1st generation (software version 1.3.1) ! iPhone 4S (soft ware version 5.1.1) ! iPhone 4 (software version 5.1.1) ! iPhone 3GS (soft ware version 5.1.1) ! iPhone 3G (software version 4.2.1) ! iPhone (software version 3.1.2) Depending […]
-
Страница 20
Specifications General Power so urce ………………. 14.4 V DC (10.8 V to 15.1 V al- lowable) Grounding system ………… Negative type Maximum current consumption …………………………….. 10.0 A Dimensions (W × H × D): DIN Chassis ………….. 178 mm × 50 mm × 165 mm Nose ……………… 18 8 mm × 58 mm × 15 mm D Chassi[…]
-
Страница 21
English 21 En[…]
-
Страница 22
Nous vous remer cions d ’ avoir acheté cet ap- pareil PIONEER. P our garantir une utilisation correcte, lisez bien ce mode d ’ emploi avant d ’ utiliser cet appareil. Il est particulièrement important que vous lisiez et respectiez les indications A TTENTION et PRÉ- CAUTION de ce mode d ’ emploi. Conser vez-le dans un endroit sûr et faci[…]
-
Страница 23
Appareil central a b 4 7 1 2 3 5 9 8c 6 Partie Partie 1 SRC / OFF 7 BAND / (contrôle de l ’ iPod) 2 MUL TI-CONTROL ( M.C. ) 8 (retour)/ DIM- MER (atténuateur de luminosité) 3 (liste) 9 c / d 4 DISP a 1 / à 6 / 5 Port USB b Jack d ’ entrée AUX (jack stéréo 3,5 mm) 6 MVH-350BT (téléphone) c T ouche de retrait de la face avant MVH-150UI i[…]
-
Страница 24
FM STEP (incrément d ’ accord FM) Normalement, l ’ incrément d ’ accord FM employé par l ’ accord automatique est 50 kHz. Quand la fonction AF ou TA est en ser vice, l ’ incrément d ’ ac- cord passe automatiquement à 100 kHz. Il peut être préférable de régler l ’ incrément d ’ accord à 50 kHz quand la fonction AF est en s[…]
-
Страница 25
Accord manuel (pas à pas) 1 Appuyez sur c ou d . ! Sélectionnez MAN (accord manuel) sous SEEK pour utiliser cette fonction. Pour des dé- tails sur les réglages, reportez-vous à la page suivante, SEEK (réglage de la touche dro ite/gau- che) . Recherche 1 Appuyez de manière prolongée sur c ou d , puis relâchez. Vous pouvez annuler l ’ acco[…]
-
Страница 26
Quand la fonction AF est utilisée, la fonction de re- cherche des stations régionales limite la sélection aux stations qui diffusent des programmes régio- naux. 1 Appuyez sur M.C. pour mettre la fonction de recherche des stations régionales en ser vice ou hors service. LOCAL (accord automatique sur une station lo- cale) L ’ accord automatiqu[…]
-
Страница 27
Opérations à l ’ aide de touches spéciales Sélection d ’ une étendue de répétition de lecture 1 Appuyez sur 6 / pour parcourir les options disponibles : ! ALL – Répétition de tous les fichiers ! ONE – Répétition du fichier en cours de lecture ! FLD – Répétition du dossier en cours de lecture Lecture des plages dans un ordre a[…]
-
Страница 28
Opérations à l ’ aide de touches spéciales Sélection d ’ une étendue de répétition de lecture 1 Appuyez sur 6 / pour parcourir les options disponibles : ! ONE – Répétition de la plage musicale en cours de lecture ! ALL – Répétition de toutes les plages musi- cales de la liste sélectionnée ! Lorsque le mode de commande est défi[…]
-
Страница 29
AUDIO BOOK (vitesse du livre audio) 1 Appuyez sur M.C. pour afficher le mode de ré- glage. 2 T ournez M.C. pour choisir le réglage désiré. ! FASTER – Lecture plus rapide que la vi- tesse normale ! NORMAL – Lecture à la vitesse normale ! SLOWER – Lecture plus lente que la vitesse normale S.RTRV (sound retriever) Améliore automatiquement […]
-
Страница 30
1 Appuyez de façon prolongée sur pour afficher le menu de connexion. # Vous ne pouvez pas effectuer cette étape pen- dant un appel téléphonique. 2 T ournez M.C. pour sélectionner la fonc- tion. Une fois sélectionnées, les fonctions suivantes peuvent être ajustées. DEVICELIST (connexion ou déconnexion d ’ un péri- phérique de la liste[…]
-
Страница 31
2 T ournez M.C. pour sélectionner la fonc- tion. Une fois sélectionnées, les fonctions suivantes peuvent être ajustées. MISSED (historique des appels manqués) DIALLED (historique des appels effectués) RECEIVED (historique des appels reçus) 1 Appuyez sur M.C. pour afficher la liste des nu- méros de téléphone. 2 T ournez M.C. pour sélecti[…]
-
Страница 32
Changement de l ’ affichage Sélection des informations textuelles souhaitées 1 Appuyez sur DISP pour parcourir les options disponibles : ! DEVICE INFO (nom de l ’ appareil) ! TRACK INFO (titre de la plage/nom de l ’ in- terprète/nom de l ’ album) ! ELAPSED TIME (numéro de plage et temps de lecture) ! CLOCK (nom de la source et horloge) […]
-
Страница 33
LOUDNESS (correction physiologique) La correction physiologique a pour objet d ’ accen- tuer les hautes et les basses fréquences à bas ni- veaux d ’ écoute. 1 Appuyez sur M.C. pour sélectionner le réglage souhaité. OFF (hors service) — LOW (faible) — MID (moyen) — HI (élevé) SUB.W (réglage en ser vice/hors ser vice du haut- parle[…]
-
Страница 34
L ’ appareil peut rechercher automatiquement une autre station avec le même type de programme, y compris si l ’ accord a été obtenu par le rappel d ’ une fréquence en mémoire. 1 Appuyez sur M.C. pour mettre en ser vice ou hors ser vice la recherche automatique PI. AUX (entrée auxiliaire) Activez ce réglage lorsque vous utilisez un appa[…]
-
Страница 35
La sortie des bornes du haut-parleur arrière et la sortie RCA de cet appareil peuvent être utilisées pour connecter un haut-parleur pleine gamme ou un haut-parleur d ’ extrêmes graves. Sélectionnez l ’ option appropriée à votre connexion. 1 Appuyez sur M.C. pour afficher le mode de ré- glage. 2 T ournez M.C. pour sélectionner le régla[…]
-
Страница 36
Connexions Important ! Lors de l ’ installation de cet appareil dans un véhicule sans position ACC (accessoire) sur le contact d ’ allumage, ne pas connecter le câble rouge à la borne qui détecte l ’ utilisa- tion de la clé de contact peut entraîner le dé- chargement de la batterie. O N S T A R T O F F Avec position ACC Sans position A[…]
-
Страница 37
9 Bleu/blanc La position des broches du connecteur ISO est différente selon le type de véhicule. Connectez 9 et b lorsque la broche 5 est de type commande de l ’ antenne. Dans un type différent de véhicule, ne connectez jamais 9 et b . a Bleu/blanc Connectez à la borne de commande du sys- tème de l ’ amplificateur de puissance (max. 300 m[…]
-
Страница 38
2 Serrez deux vis de chaque côté. 1 2 3 1 Vis taraudeuse (5 mm × 8 mm) 2 Support de montage 3 Tableau de bord ou console Retrait de l ’ appareil 1 Retirez l ’ anneau de garniture. 1 Anneau de garniture 2 Encoche ! Retirer la face avant permet d ’ accéder plus facilement à l ’ anneau de garniture. ! Quand vous remontez l ’ anneau de g[…]
-
Страница 39
2 Installez le clip microphone sur la colonne de direction. 2 1 3 1 Bande double face 2 Installez le clip microphone sur la face arrière de la colonne de direction. 3 Serre-fils Utilisez des serre-fils vendus séparément pour fixer le fil là où c ’ est nécessaire dans le véhicule. Réglage de l ’ angle du microphone L ’ angle du microph[…]
-
Страница 40
Messages d ’ erreur Quand vous contactez votre distributeur ou le Service d ’ entretien agréé par Pioneer le plus proche, n ’ oubliez pas de noter le message d ’ er- reur . Commun Message Causes possi- bles Action correc- tive AMP ERROR Une anomalie de fonctionne- ment de l ’ appa- reil s ’ est produite ou la connexion des haut-parleu[…]
-
Страница 41
Message Causes possi- bles Action correc- tive ERROR-23 Le périphérique de stockage USB n ’ a pas été formaté avec FA T12, FA T16 ou FA T32. Le périphérique de stockage USB doit être formaté avec FA T12, FAT16 ou FA T32. ERROR-16 La version du firmware de l ’ iP od est an- cienne. Mettez à jour la version de l ’ iPod. P anne iPod . […]
-
Страница 42
Informations supplémentaires Seuls les 32 premiers caractères d ’ un nom de fi- chier (incluant l ’ extension de fichier) ou d ’ un nom de dossier peuvent être affichés. Les textes russes à afficher sur cet appareil doi- vent être codés avec un des jeux de caractères sui- vants : ! Unicode (UTF-8, UTF-16) ! Un jeu de caractères autre[…]
-
Страница 43
D: C D:C D:C D: C D: C : Х : Ц : Ч : Ш , Щ : Ъ : Ы : Ь : Э : Ю : Я D : Affichage C : Caractère Profils Bluetooth P our utiliser la technologie sans fil Bluetooth, les appareils doivent pouvoir interpréter certains profils. Cet appareil est compatible avec les pro- fils suivants. ! GAP (Generic Access Profile) ! OPP (Object Push Profile[…]
-
Страница 44
Grazie per aver acquistato questo prodotto PIONEER Leggere attentamente questo manuale prima di utilizzare il prodotto, per assicurarne il corretto utilizzo. È particolarmente importante leggere e osservare le precauzioni contrassegnate da AV- VERTENZA e A TTENZIONE contenute in questo manuale. Conser var e il manuale in un luogo sicuro e accessib[…]
-
Страница 45
Unità principale a b 4 7 1 2 3 5 9 8c 6 Componente Componente 1 SRC / OFF 7 BAND / (control- lo iPod) 2 MUL TI-CONTROL ( M.C. ) 8 (indietro)/ DIMMER (varialu- ce) 3 (lista) 9 c / d 4 DISP a Da 1 / a 6 / 5 Porta USB b Connettore di in- gresso ausiliario (AUX) (connettore stereo da 3,5 mm) 6 MVH-350BT (telefono) c T asto Rimozione MVH-150UI iPod A T[…]
-
Страница 46
FM STEP (passo di sintonizzazione FM) Normalmente il passo per la sintonizzazione in FM impiegato dalla ricerca di sintonia è 50 kHz. Se sono attivate le funzioni AF o TA il passo di sinto- nizzazione cambia automaticamente a 100 kHz. Se è attivata la funzione AF , è preferibile impostare il passo di sintonizzazione a 50 kHz. ! Il passo di sinto[…]
-
Страница 47
Sintonizzazione manuale (passo per passo) 1 Premere c o d . ! Selezionare MAN (sintonizzazione manuale) in SEEK per utilizzare questa funzione. Per in- formazioni dettagliate sulle impostazioni, vede- re SEEK (impostazione tasto sinistr o/destro) nella pagina seguente. Ricerca 1 Premere e tenere premuto c o d e poi rilascia- re. È possibile annull[…]
-
Страница 48
La ricerca di sintonia in modo locale consente di sintonizzare solo le stazioni radio con segnali radio sufficientemente potenti per una buona rice- zione. 1 Premere M.C. per selezionare l ’ impostazione desiderata. FM: OFF — LV 1 — LV 2 — LV 3 — LV 4 MW/L W : OFF — LV 1 — LV 2 L ’ impostazione di livello massimo consente la ricezio[…]
-
Страница 49
Impostazioni delle funzioni 1 Premere M.C. per visualizzare il menu principale. 2 Ruotare M.C. per modificare l ’ opzione di menu; premere per selezionare FUNCTION. Dopo aver effettuato la selezione, è possibile re- golare la funzione descritta di seguito. S.RTRV (Sound Retriever) Questa funzione migliora automaticamente l ’ au- dio compresso […]
-
Страница 50
Riproduzione di brani correlati al brano attualmente in riproduzione È possibile riprodurre i brani dalle liste seguenti. • Lista degli album dell ’ artista correntemente in riproduzione • Lista dei brani dell ’ album correntemente ripro- dotto • Lista degli album del genere correntemente in riproduzione 1 Premere e tenere premuto per pa[…]
-
Страница 51
Fine di una chiamata 1 Premere . Rifiuto di una chiamata in arrivo 1 Quando si riceve una chiamata, premere e te- nere premuto . Risposta a una chiamata in attesa 1 Quando si riceve una chiamata, premere . P assare da un chiamante in attesa all ’ altro 1 Premere M.C. Rifiuto delle chiamate in attesa 1 Premere e tenere premuto . Regolazione del vo[…]
-
Страница 52
1 Premere M.C. per avviare la ricerca. ! Per annullare, premere M.C. durante la ri- cerca. ! Se questa unità non riesce a rilevare nes- sun cellulare, viene visualizzata l ’ indicazio- ne NOT FOUND . 2 Ruotare M.C. per selezionare un dispositivo dall ’ elenco dei dispositivi. ! Se non viene visualizzato il dispositivo desi- derato, selezionare[…]
-
Страница 53
PHONE FUNC (funzione telefono) È possibile impostare A. ANSR , R.TONE e PB INVT da questo menu. Per dettagli, vedere Descri- zione delle funzioni e loro funzionamento in questa pagina. Descrizione delle funzioni e loro funzionamento 1 Visualizzare PHONE FUNC. Vedere PHONE FUNC (funzione telefono) in que- sta pagina. 2 Premere M.C. per visualizzare[…]
-
Страница 54
PLA Y (riproduzione) 1 Premere M.C. per avviare la riproduzione. STOP (arresto) 1 Premere M.C. per interrompere la riproduzio- ne. S.RTRV (Sound Retriever) Questa funzione migliora automaticamente l ’ au- dio compresso e ripristina il suono completo. 1 Premere M.C. per selezionare l ’ impostazione desiderata. Per ulteriori dettagli, vedere Migl[…]
-
Страница 55
Se si desidera che i suoni bassi provenienti dalla gamma di frequenza dell ’ uscita subwoofer non siano riprodotti dagli altoparlanti anteriori o poste- riori, attivare la funzione HPF (filtro passa alto). Solo le frequenze più alte di quelle comprese nel- l ’ intervallo selezionato vengono emesse dagli alto- parlanti anteriori o posteriori. 1[…]
-
Страница 56
È possibile cancellare i dati dei dispositivi Bluetooth memorizzati in questa unità. Per proteg- gere i dati personali, si consiglia di cancellare tali dati prima di cedere l ’ unità ad altre persone. In questo caso, verranno cancellati i seguenti tipi di dati da questa unità. ! Rubrica ! Registro chiamate ! Numero di preselezione ! Codice PI[…]
-
Страница 57
Se viene visualizzato un display indesiderato Per disattivare il display indesiderato, utilizzare la procedura descritta di seguito. 1 Premere M.C. per visualizzare il menu principale. 2 Ruotare M.C. per modificare l ’ opzione di menu; premere per selezionare SYSTEM. 3 Ruotare M.C. per visualizzare DEMO OFF, quindi premere per selezionare. 4 Ruot[…]
-
Страница 58
Questa unità 1 3 2 6 78 4 5 1 Ingresso cavo di alimentazione 2 Ingresso microfono (solo per il modello MVH-350BT) 3 Microfono (solo per il modello MVH-350BT) 4m 4 Uscita posteriore o del subwoofer 5 Uscita anteriore 6 Ingresso antenna 7 Fusibile (10 A) 8 Ingresso telecomando cablato È possibile collegare un adattatore per tele- comando cablato (v[…]
-
Страница 59
! Durante l ’ installazione, per assicurare la cor- retta dissipazione del calore quando si utiliz- za l ’ unità, accertarsi di lasciare ampio spazio dietro il pannello posteriore e avvolgere even- tuali cavi allentati in modo che non ostrui- scano le aperture. 5 cm cm Lasciare ampio spazio 5 cm 5 cm Montaggio DIN anteriore/posteriore Questa u[…]
-
Страница 60
1 2 1 Clip del microfono 2 Morsetto Utilizzare i morsetti venduti separatamente per assicurare il cavo, ove necessario, all ’ in- terno del veicolo. Installazione del microfono sul piantone dello sterzo 1 Installare il microfono sulla clip del micro- fono. 2 4 3 1 1 Microfono 2 Base del microfono 3 Clip del microfono 4 Inserire il cavo del microf[…]
-
Страница 61
Messaggi di errore Se si contatta il rivenditore o il Centro assistenza Pioneer più vicino, accertarsi di annotare il mes- saggio di errore. Problemi comuni Messaggio Causa Azione AMP ERROR L ’ unità non fun- ziona o l ’ alto- parlante non è collegato corret- tamente; è stato attivato il circui- to di protezione. Controllare il col- legamen[…]
-
Страница 62
Messaggio Causa Azione ERROR-16 La versione del firmware dell ’ iP od è obso- leta. Aggiornare la ver- sione dell ’ iPod . Errore dell ’ iPod . Scollegare il cavo dall ’ iP od. Quando viene visualizzato il menu principale dell ’ iP od, collega- re l ’ iPod e reimpo- starlo. STOP Nessun brano presente nella lista corrente. Selezionare u[…]
-
Страница 63
Dispositivo di memoria USB Gerarchia delle cartelle riproducibili: fino a otto li- velli (una gerarchia pratica non dovrebbe prevede- re più di due livelli.) Cartelle riproducibili: fino a 500 File riproducibili: fino a 15 000 Riproduzione dei file con protezione del copyright: non compatibile Dispositivo di memoria USB partizionato: verrà ri- pr[…]
-
Страница 64
Copyright e marchi registrati Bluetooth Il marchio nominale e il logo Bluetooth â sono marchi registrati di proprietà di Bluetooth SIG, Inc. e sono utilizzati in licenza da PIONEER CORPORA TION. T utti gli altri marchi registrati e marchi nominali sono marchi dei rispettivi pro- prietari. iT unes Apple ed iT unes sono marchi di fabbrica di Apple […]
-
Страница 65
Italiano 65 It[…]
-
Страница 66
Gracias por haber adquirido este producto PIONEER Lea con detenimiento este manual antes de utili- zar el producto por primera vez para que pueda darle el mejor uso posible. Es muy importante que lea y cumpla con la información que apare- ce bajo los mensajes de ADVERTENCIA y PRECAUCIÓN de este manual. Una vez leído, guarde el manual en un lugar[…]
-
Страница 67
Unidad principal a b 4 7 1 2 3 5 9 8c 6 Parte Parte 1 SRC / OFF 7 BAND / (control de iPod) 2 MUL TI-CONTROL ( M.C. ) 8 (parte poste- rior)/ DIMMER (re- ductor de luz) 3 (lista) 9 c / d 4 DISP a 1 / a 6 / 5 Puerto USB b Conector de en- trada AUX (co- nector estéreo de 3,5 mm) 6 MVH-350BT (teléfono) c Botón de soltar MVH-150UI iPod PRECAUCIÓN ! U[…]
-
Страница 68
FM STEP (paso de sintonía de FM) Normalmente, el paso de sintonía de FM emplea- do en la sintonización por búsqueda es de 50 kHz. Si la función AF o TA está activada, el paso de sin- tonía cambia automáticamente a 100 kHz. Puede que convenga ajustar el paso de sintonía a 50 kHz si la función AF está activada. ! El paso de sintonía se ma[…]
-
Страница 69
Almacenamiento y recuperación de emisoras para cada banda Uso de los botones de ajuste de presintonías 1 Cuando encuentre la emisora que desee almacenar en la memoria, pulse uno de los botones de ajuste de presintonías (1/ a6 / ) y manténgalo pulsado hasta que el nú- mero de presintonía deje de parpadear . 2 Pulse uno de los botones de ajuste[…]
-
Страница 70
Dispositivo de almacenamiento USB Funcionamiento básico Reproducción de canciones de un dispositivo de almacenamiento USB 1 Abra la tapa del puerto USB. 2 Conecte el dispositivo de almacenamiento USB mediante un cable USB. La reproducción se inicia automáticamente. Detención de la reproducción de archivos en un dispositivo de almacenamiento U[…]
-
Страница 71
Cambio de la visualización Selección de la información de texto deseada 1 Pulse DISP para desplazarse entre las siguien- tes opciones: CONTROL AUDIO / CONTROL iPod ! TRACK INFO (título de la pista/nombre del artista/título del álbum) ! ELAPSED TIME (número de pista y tiempo de reproducción) ! CLOCK (nombre de la fuente y reloj) ! SPEANA (an[…]
-
Страница 72
Si cambia a modo APP , podrá escuchar el soni- do de las aplicaciones del iP od a través de los al- tavoces del vehículo. CONTROL iPod no es compatible con los si- guientes modelos de iPod: ! iPod nano 1ª generación ! iPod con vídeo CONTROL APP es compatible con los siguientes modelos de iPod: ! iPod touch de 4ª generación ! iPod touch de 3[…]
-
Страница 73
Almacenamiento y llamada de un número de teléfono 1 Si encuentra un número de teléfono que desee guardar en la memoria, mantenga pul- sado uno de los botones de ajuste de presin- tonías (1/ a6 / ) para guardarlo en el botón de ajuste de presintonías deseado. Las funciones siguientes se pueden utilizar para guardar números de teléfono en la[…]
-
Страница 74
P ara conectar su dispositivo a esta unidad a través de tecnología inalámbrica Bluetooth, debe intro- ducir el código PIN en su dispositivo para verificar la conexión. El código predefinido es 0000 , aun- que puede cambiarlo siguiendo estos pasos: 1 Pulse M.C. para mostrar el modo de ajuste. 2 Gire M.C. para seleccionar un número. 3 Pulse M.[…]
-
Страница 75
! Según el tipo de reproductor de audio Bluetooth que haya conectado a esta unidad, es posible que la pantalla de funcionamiento e información no tenga disponibles algunas de las funciones. Ajuste de audio Bluetooth Antes de que pueda utilizar la función de audio Bluetooth deberá configurar la unidad para el uso con su reproductor de audio Blue[…]
-
Страница 76
1 Pulse M.C. para mostrar el modo de ajuste. 2 Gire M.C. para seleccionar el ecualizador . POWERFUL — NA TURAL — VOCAL — CUS- TOM1 — CUSTOM2 — FLA T — SUPER BASS La banda y el nivel de ecualización se pueden personalizar si se selecciona CUSTOM1 o CUSTOM2 . Si selecciona CUSTOM1 o CUSTOM2 , com- plete los pasos que se describen más ab[…]
-
Страница 77
El sonido proveniente de este sistema se silencia o atenúa automáticamente cuando se recibe una señal desde un equipo con función de silencia- miento. 1 Pulse M.C. para mostrar el modo de ajuste. 2 Gire M.C. para seleccionar el ajuste deseado. Se puede seleccionar cualquiera de las opcio — nes de la lista siguiente: ! MUTE – Silenciamiento ! […]
-
Страница 78
Menú del sistema 1 Mantenga pulsado SRC/OFF hasta que se apague la unidad. 2 Mantenga pulsado SRC/OFF hasta que aparezca el menú principal en la pantalla. 3 Gire M.C. para cambiar la opción de menú y pulse para seleccionar SYSTEM. 4 Gire M.C. para seleccionar la función del menú del sistema. Una vez seleccionado, se pueden ajustar las si- gui[…]
-
Страница 79
Esta unidad 1 3 2 6 78 4 5 1 Entrada del cable de alimentación 2 Entrada micrófono (sólo MVH-350BT) 3 Micrófono (solo MVH-350BT) 4m 4 Salida trasera o salida de subgraves 5 Salida delantera 6 Entrada de la antena 7 Fusible (10 A) 8 Entrada remota conectada Es posible conectar un adaptador de mando a distancia físicamente conectado (se vende po[…]
-
Страница 80
! Cuando instale, para asegurar la dispersión apropiada del calor durante el uso de esta unidad, asegúrese de dejar un amplio espa- cio por detrás del panel trasero y enrolle los cables sueltos de modo que no bloqueen las aberturas de ventilación. Deje un amplio espacio 5 cm 5 cm Montaje delantero/posterior de DIN Esta unidad puede instalarse c[…]
-
Страница 81
1 2 1 Pinza 2 Abrazadera Use las abrazaderas compradas por separado para fijar el cable en los lugares del interior del vehículo donde sea necesario. Instalación del micrófono en la columna de dirección 1 Instale el micrófono en la abrazadera del micrófono. 2 4 3 1 1 Micrófono 2 Base del micrófono 3 Pinza 4 Ajuste el cable del micrófono en[…]
-
Страница 82
Comunes Mensaje Causa Resolución AMP ERROR La unidad no funciona o la conexión de los altavoces es in- correcta; se ac- tiva el circuito de protección. Compruebe la co- nexión de los alta- voces. Si el mensaje no desa- parece aun des- pués de apagar y volver a encender el motor , contacte con su distribui- dor o con el Ser vi- cio técnico ofi[…]
-
Страница 83
Mensaje Causa Resolución ERROR-16 La versión de firmware del iP od es antigua. Actualice la ver- sión del iPod. F allo del iPod . Desconecte el cable del iPod. Una vez que apa- rezca el menú principal del iP od, vuelva a conectar el iPod y reinície- lo. STOP No hay cancio- nes en la lista actual. Seleccione una lista que conten- ga canciones. […]
-
Страница 84
Dispositivo de almacenamiento USB Jerarquía de carpetas reproducibles: hasta ocho niveles (una jerarquía práctica de carpetas tiene menos de dos niveles). Carpetas reproducibles: hasta 500 Archivos reproducibles: hasta 15 000 Reproducción de archivos protegidos por dere- chos de autor: no compatible Dispositivo de almacenamiento USB particionad[…]
-
Страница 85
Copyright y marcas registradas Bluetooth La marca literal y los logotipos Bluetooth â son marcas registradas propiedad de Bluetooth SIG, Inc., y cualquier uso de dichas marcas por PIONEER CORPORA TION se hace bajo licencia. Otras marcas y nombres comerciales son pro- piedad de sus respectivos propietarios. iT unes Apple e iT unes son marcas comerc[…]
-
Страница 86
Vielen Dank , dass Sie sich für dieses PIONEER-Produkt entschieden haben. Bitte lesen Sie diese Anleitung vor der Verwen- dung dieses Produkts zur Gewährleistung seiner ordnungsgemäßen Verwendung durch. Lesen und befolgen Sie dabei insbesondere die Hin- weise WARNUNG und VORSICHT . Bewahren Sie die Anleitung zur zukünftigen Bezugnahme si- cher[…]
-
Страница 87
Hauptgerät a b 4 7 1 2 3 5 9 8c 6 Bezeichnung Bezeichnung 1 SRC / OFF 7 BAND / (iPod- Steuerung) 2 MUL TI-CONTROL ( M.C. ) 8 (Zurück)/ DIM- MER (Dimmer) 3 (Liste) 9 c / d 4 DISP a 1 / bis 6 / 5 USB-Anschluss b AUX-Eingang (3,5-mm-Stereo- anschluss) 6 MVH-350BT (T elefon) c T aste zum Entrie- geln der F ront- platte MVH-150UI iPod VORSICHT ! Verwe[…]
-
Страница 88
1 Drehen Sie M.C. , um die Stunde einzustellen. 2 Drücken Sie auf M.C. , um die Minuten auszu- wählen. 3 Drehen Sie M.C. , um die Minuten einzustellen. 4 Drücken Sie M.C. , um die Auswahl zu bestäti- gen. FM STEP (UKW-Kanalraster) Bei der Suchlaufabstimmung wird normaler weise das 50-kHz-UKW-Kanalraster ver wendet. Wenn der Alternativfrequenzsu[…]
-
Страница 89
Häufig verwendete Menüschritte Zurückschalten zur vorherigen Anzeige Zum Zurückschalten zur vorherigen Liste (bzw. zum übergeordneten Ordner) 1 Drücken Sie / DIMMER . Zurückschalten zur normalen Anzeige Beenden des Hauptmenüs 1 Drücken Sie BAND / . Zurückschalten zur normalen Anzeige von der Liste 1 Drücken Sie BAND / . T uner Grundlegen[…]
-
Страница 90
L. CLASS (Leichte klassische Musik), CLASSIC (Klassische Musik) OTHERS (Sonstiges) EDUCA TE (Bildung), DRAMA (Drama), CUL TURE (Kultur), SCIENCE (Wissenschaft), V ARIED (Ge- mischtes), CHILDREN (Kinderprogramme), SO- CIAL (Soziales), RELIGION (Religion), PHONE IN (T elefongesprächsprogramme), TOURING (Rei- sen), LEISURE (F reizeit), DOCUMENT (Doku[…]
-
Страница 91
Anzeige einer Liste der Dateien (oder Ordner) im gewählten Ordner 1 Drücken Sie nach Auswahl eines Ordners auf M.C. Wiedergabe eines Musiktitels im gewählten Ord- ner 1 Drücken und halten Sie M.C. nach Auswahl des Ordners gedrückt. Bedienvorgänge mit speziellen T asten Wählen eines Wiederholbereichs 1 Drücken Sie 6 / , um zwischen den folge[…]
-
Страница 92
Wiedergabe eines Musiktitels der gewählten Kate- gorie 1 Drücken und halten Sie M.C. nach Auswahl der Kategorie gedrückt. Alphabetische Listensuche 1 Sobald die Liste der gewählten Kategorie an- gezeigt wird, drücken Sie die T aste ,u mi n den alphabetischen Suchmodus umzuschal- ten. ! Durch zweimaliges Drehen von M.C. kann in den alphabetisch[…]
-
Страница 93
! CONTROL APP – Die iPod-F unktionen dieses Geräts können über den angeschlossenen iP od bedient werden. Das Gerät wird den T on Ihrer iPod-Anwendungen ausgeben. ! CONTROL AUDIO – Die iPod-Funktionen die- ses Geräts können über das Gerät bedient werden. Nur für MVH-150UI Der Steuermodus kann auch durch Drücken auf iPod geändert werde[…]
-
Страница 94
Speichern und Abrufen von T elefonnummern 1 Wenn Sie eine T elefonnummer speichern möchten, drücken und halten Sie eine Stationstaste (1/ bis 6/ ) gedrückt, um Sie in der entsprechenden Stationstaste zu speichern. Die unten stehenden Funktionen können zur Speicherung von Telefonnummern im Speicher verwendet werden. Für detaillierte Information[…]
-
Страница 95
Um die V er fügbarkeit dieser Einheit von anderen Geräten aus zu überprüfen, kann die Bluetooth- Sichtbarkeit dieses Geräts eingeschaltet werden. 1 Drücken Sie M.C. , um die Sichtbarkeit dieses Geräts ein- oder auszuschalten. PIN CODE (PIN-Code-Eingabe) Wenn Sie Ihr Gerät über die Bluetooth-Wireless- T echnologie mit diesem Gerät verbinde[…]
-
Страница 96
— P rofil A2DP (Advanced Audio Distribution Profile): Sie können mit Ihrem Audio- Player nur Musiktitel wiedergeben. Sie können keine A2DP- Verbindung ver wen- den, wenn iPod als Programmquelle gewählt ist. — P rofil AVRCP (Audio/Video Remote Control Profile): Sie können die Wiedergabe starten, sie anhalten, Titel auswählen usw. ! Da sehr […]
-
Страница 97
! SUB.W , SUB.W CTRL und HPF SETTING ste- hen nicht zur Verfügung, wenn in SP-P/O MODE die Option REAR/REAR ge- wählt wurde. Für detaillierte Informationen hierzu siehe SP-P/O MODE (Heckausgang- und Preout-Einstellungen) auf Seite 99. ! SUB.W CTRL und HPF SETTING stehen nicht zur Verfügung, wenn in OFF die Option SUB.W gewählt wurde. Für deta[…]
-
Страница 98
Systemmenü Wichtig Die F unktion PW SAVE (Energiesparmodus) wird deaktiviert, wenn die Fahrzeugbatterie ab- geklemmt wird und muss neu aktiviert werden, sobald die Batterie wieder angeschlossen wird. W enn PW SAVE (Energiesparmodus) deaktiviert ist, kann das Gerät je nach Anschlussart Batte- rieleistung in Anspruch nehmen, sollte die Zün- dung d[…]
-
Страница 99
1 Drücken Sie auf M.C., um das Hauptmenü anzuzeigen. 2 Drehen Sie M.C., um die Option ILLUMI zur Anzeige zu bringen, und drücken Sie dann darauf, um Ihre Auswahl zu bestäti- gen. 3 Drücken Sie auf M.C., um die gewünschte Einstellung zu wählen. OFF (Aus) — ON (Ein) ! Sie können die Dimmer-Einstellung auch durch Drücken und Halten von / DI[…]
-
Страница 100
Hinweis AUX kann nur gewählt werden, wenn die AUX- Einstellung eingeschaltet wurde. Für weitere Einzelheiten siehe AUX (Zusatzeingang) auf Seite 98. Umschalten der Anzeige Wählen der gewünschten T extinformationen 1 Drücken Sie auf DISP , um zwischen den fol- genden Optionen umzuschalten: ! Programmquellenname ! Programmquellname und Uhr Bei A[…]
-
Страница 101
! Das schwarze Kabel gewährleistet die Er- dung. Dieses Kabel wie auch die Erdungska- bel anderer Produkte (insbesondere von Hochstromprodukten wie Leistungsverstär- ker) müssen separat verdrahtet werden. An- derenfalls kann es zu einem Brand oder einer Funktionsstörung kommen, wenn sich die Kabel versehentlich lösen. Dieses Gerät 1 3 2 6 78 […]
-
Страница 102
! Installieren Sie dieses Gerät keinesfalls an folgenden Orten: — Orte, an denen das Gerät die Steuerung des F ahrzeugs behindern könnte. — Orte, an denen das Gerät die Insassen des F ahrzeugs im Anschluss an eine Schnell- bremsung verletzen könnte. ! Der Halbleiterlaser kann durch Überhitzung beschädigt werden. Installieren Sie dieses G[…]
-
Страница 103
Installieren des Mikrofons Nur für MVH-350BT VORSICHT Eine Führung des Mikrofonkabels um die Lenk- säule oder den Schalthebel kann sich als über- aus gefährlich er weisen. Achten Sie bei der Installation des Geräts stets darauf, dass die Lenkung des Fahrzeugs in keiner Weise behin- dert wird. Hinweis Wählen Sie für die Anbringung des Mikrof[…]
-
Страница 104
Fehlerbehebung Symptom Ursache Abhilfemaßnah- me Das Display schaltet auto- matisch in die normale An- zeige um. Sie haben kei- nen Bedienvor- gang innerhalb von 30 Sekun- den durchge- führt. Wiederholen Sie den Vorgang. Der Wieder- holbereich ändert sich unerwartet. Ja nach Wieder- holbereich kann sich der ausge- wählte Bereich ändern, sobald[…]
-
Страница 105
Meldung Ursache Abhilfemaßnah- me N/A USB Das ange- schlossene USB-Gerät wird von diesem Gerät nicht un- terstützt. ! Schließen Sie ein dem Standard USB-Massenspei- cher-Klasse ent- sprechendes Gerät an. ! T rennen Sie das Gerät ab und schließen Sie ein kompatibles USB- Speichermedium an. CHECK USB Der USB-An- schluss oder das USB-Kabel wur[…]
-
Страница 106
Bluetooth-Gerät Meldung Ursache Abhilfemaßnah- me ERROR-10 Spannungsstö- rung des Bluetooth-Mo- duls dieses Ge- räts. Drehen Sie den Zündschlüssel in die Position OFF (Aus) und an- schließend in die P osition ACC oder ON (Ein). Wird nach diesem Vorgang dieselbe Fehlermeldung angezeigt, wen- den Sie sich an Ihren Händler oder eine Pioneer- K[…]
-
Страница 107
VORSICHT ! Pioneer kann nicht die Kompatibilität mit allen USB-Speichermedien gewährleisten und übernimmt keine Verantwortung für eventuelle Datenverluste auf Media-Playern, Smartphones oder anderen Geräten, die mit diesem Gerät ver wendet werden. ! Bewahren Sie ein USB -Speichermedium nicht an Orten mit hohen T emperaturen auf. iPod-Kompatib[…]
-
Страница 108
men, z. B. „ Pay-Audio ” — oder „ Audio- on-de- mand ” -Anwendungen. Für eine derartige Nut- zung ist eine separate Lizenz er forderlich. Detaillierte Informationen hierzu finden Sie unter http://www.mp3licensing.com. WMA Windows Media ist eine eingetragene Marke oder eine Marke der Microsoft Corporation in den USA und/oder anderen Länder[…]
-
Страница 109
Deutsch 109 De[…]
-
Страница 110
Hartelijk dank voor uw keuze voor dit Pioneer-product. Lees deze handleiding voordat u het product in gebruik neemt zodat u het goed leert gebruiken. Lees vooral de gedeelten die met WAARSCHU- WING en LET OP gemarkeerd zijn aandachtig. Bewaar deze handleiding na het lezen op een vei- lige, voor de hand liggende plaats zodat u hem in- dien nodig alt[…]
-
Страница 111
Hoofdtoestel a b 4 7 1 2 3 5 9 8c 6 Onderdeel Onderdeel 1 SRC / OFF 7 BAND / (iPod- bediening) 2 MUL TI-CONTROL ( M.C. ) 8 (terug)/ DIM- MER (dimmer) 3 (lijst) 9 c / d 4 DISP a 1 / tot 6 / 5 USB-poort b AUX-ingang (3,5 mm-stereo- plug) 6 MVH-350BT (telefoon) c Verwijderen MVH-150UI iPod LET OP ! Sluit een USB -opslagapparaat via een Pioneer USB-kab[…]
-
Страница 112
5 Draai aan M.C. en selecteer YES om de in- stelling te voltooien. # Als u de instelling wilt wijzigen, draait u M.C. naar NO . Druk in om te selecteren. 6 Druk op M.C. om uw keuze te bevesti- gen. Opmerkingen ! U kunt de menu-opties instellen in het sys- teemmenu. Raadpleeg Systeemmenu op bladzijde 120 voor meer informatie over de in- stellingen. […]
-
Страница 113
Zenders voor de verschillende frequentiebanden opslaan en oproepen De voorkeuzetoetsen gebruiken 1 Stem af op de zender die u in het geheu- gen wilt opslaan. Om hem op te slaan houdt u de gewenste voorkeuzetoets (1/ t/m 6/ ) ingedrukt tot het voorkeuzenummer stopt met knipperen. 2 Druk op de gewenste voorkeuzetoets (1/ t/m 6/ ) om de betreffende ze[…]
-
Страница 114
USB-opslagapparaat Basisbediening Songs op een USB-op slagapparaat afspelen 1 Open het deksel van de USB-poort. 2 Sluit het USB -opslagapparaat aan via een USB-kabel. Het afspelen begint automatisch. Stoppen met afspelen van songs op een USB-op- slagapparaat 1 U kunt een USB-opslagapparaat op elk ge- wenst moment ver wijderen. Het toestel stopt met[…]
-
Страница 115
Een ander display kiezen De gewenste informatie selecteren 1 Druk op DISP om over te schakelen tussen: CONTROL AUDIO / CONTROL iPod ! TRACK INFO (fragmenttitel/naam artiest/ albumtitel) ! ELAPSED TIME (fragmentnummer en weergavetijd) ! CLOCK (naam signaalbron en klok) ! SPEANA (spectrumanalyzer) CONTROL APP ! CONTROL APP ( APP MODE wordt weerge- ge[…]
-
Страница 116
! CONTROL AUDIO – De iP od-functie van dit toestel kan via dit toestel bediend worden. Alleen voor MVH-150UI U kunt ook op iPod drukken om de bedienings- modus te wijzigen. Opmerkingen ! Als u de bedieningsmodus overschakelt op CONTROL iPod / CONTROL APP , wordt het afspelen van songs onderbroken. Bedien de iPod om de weergave te her vatten. ! Oo[…]
-
Страница 117
Een ander display kiezen De gewenste informatie selecteren U kunt de schermweergave tijdens een gesprek wijzigen. 1 Druk op DISP om over te schakelen tussen: ! Gespreksduur ! Naam van gesprekspartner ! Nummer van gesprekspartner Spraakherkenning Deze functie kan worden gebruikt op een iP od met spraakherkenningsfunctie die is aangeslo- ten via Blue[…]
-
Страница 118
2 Draai aan M.C. om de gewenste functie te selecteren. U kunt de volgende functies aanpassen. MISSED (gemiste gesprekken) DIALLED (gekozen gesprekken) RECEIVED (ontvangen gesprekken) 1 Druk op M.C. om de lijst met telefoonnum- mers weer te geven. 2 Draai aan M.C. en selecteer een naam of tele- foonnummer . 3 Druk op M.C. om het nummer te bellen. PH[…]
-
Страница 119
Een ander display kiezen De gewenste informatie selecteren 1 Druk op DISP om over te schakelen tussen: ! DEVICE INFO (naam van het apparaat) ! TRACK INFO (fragmenttitel/naam artiest/ albumtitel) ! ELAPSED TIME (fragmentnummer en weergavetijd) ! CLOCK (naam signaalbron en klok) ! SPEANA (spectrumanalyzer) Opmerkingen ! De tekstinformatie onder TRACK[…]
-
Страница 120
SUB.W CTRL (subwoofer aanpassen) De subwoofer geeft alleen frequenties beneden de geselecteerde waarde weer . 1 Druk op M.C. om de instellingenmodus weer te geven. 2 Druk op M.C. om over te schakelen tussen: Drempelfrequentie — Uitgangsniveau — V er val- niveau Instelbare waarden knipperen. 3 Draai aan M.C. en selecteer de gewenste in- stelling[…]
-
Страница 121
Bluetooth-apparaatgegevens op dit toestel kunnen gewist worden. Om uw persoonlijke gegevens beter te beschermen, verdient het aanbeveling om zulke gegevens te wissen voordat u het toestel aan derden overdraagt. De volgende instellingen wor- den daarbij verwijderd. ! T elefoonboek ! Gespreksgeschiedenis ! Voorkeuzenummer ! Pincode ! Registratienumme[…]
-
Страница 122
Als een scherm verkeerd wordt weergegeven Zet het ongewenste scherm als volgt uit. 1 Druk op M.C. om het hoofdmenu weer te geven. 2 Draai aan M.C., selecteer de menuoptie SYSTEM en druk erop. 3 Draai aan M.C., geef DEMO OFF weer en druk erop. 4 Draai aan M.C. en selecteer YES. 5 Druk op M.C. om uw keuze te bevesti- gen. V erbindingen Belangrijk ! A[…]
-
Страница 123
3 Microfoon (alleen MVH-350BT) 4m 4 Achteruitgang of subwooferuitgang 5 Uitgang voor 6 Antenne-ingang 7 Zekering (10 A) 8 Ingang voor draadafstandsbediening Een bedrade afstandsbedieningsadapter kan aangesloten worden (los verkrijgbaar). Stroomkabel 1 3 3 2 4 4 5 5 6 6 b 8 9 7 a e d c 1 Naar ingang stroomkabel 2 De functie van 3 en 5 kan verschille[…]
-
Страница 124
DIN-voormontage 1 Schuif de montagebehuizing in het dash- board. Gebruik voor installatie in een ondiepe ruimte de meegeleverde montagebehuizing. Als er vol- doende ruimte is, gebruikt u de montagebehui- zing die met het voertuig geleverd werd. 2 Zet de montagebehuizing vast door met een schroevendraaier de metalen lipjes op hun plaats te buigen (9[…]
-
Страница 125
1 2 1 Microfoonklem 2 Klem Gebruik waar nodig los verkrijgbare klemmen om de kabel in het voertuig vast te zetten. Als u de microfoon op de stuurkolom installeert 1 Plaats de microfoon op de microfoon- klem. 2 4 3 1 1 Microfoon 2 Microfoonstatief 3 Microfoonklem 4 Zet de microfoonkabel vast in de groef. # De microfoon kan ook zonder microfoonklem g[…]
-
Страница 126
Foutmeldingen Schrijf een foutmelding altijd nauwkeurig op en houd die bij de hand als u contact opneemt met uw leverancier of Pioneer-servicecentrum. Algemeen Melding Oorzaak Actie AMP ERROR Het toestel werkt niet of er is een probleem met de luidspre- keraansluiting; het beveiligings- circuit is geacti- veerd. Controleer de luidsprekeraan- sluiti[…]
-
Страница 127
Melding Oorzaak Actie ERROR-16 De versie van de iP od-firmware is verouderd. W erk de versie van de iPod bij. iP od-fout. V erwijder de kabel uit de iPod . Sluit de kabel weer aan als het hoofdmenu van de iPod wordt weergegeven en stel de iPod op- nieuw in. STOP De huidige lijst bevat geen songs. Selecteer een lijst die wel songs bevat. NOT FOUND G[…]
-
Страница 128
Afspeelbare bestanden: maximaal 15 000 Afspelen van auteursrechtelijk beschermde be- standen: Niet compatibel Gepartitioneerd USB-op slagapparaat: Alleen de eerste partitie kan worden afgespeeld. Bij het starten van audiobestanden op een USB- opslagapparaat met een uitgebreide mappen- structuur kan enige vertraging optreden. LET OP ! Pioneer garand[…]
-
Страница 129
MP3 Dit product is uitsluitend bedoeld voor niet-com- mercieel privégebruik. Het mag niet in een com- merciële omgeving worden gebruikt voor realtime-uitzendingen (over land, via satelliet, kabel en/of andere media), voor uitzendingen/ streaming via internet, intranet en/of andere net- werken, of in andere elektronische distributie- systemen zoal[…]
-
Страница 130
Благодарим Вас за покупку этого изделия компании PIONEER. Для обеспе чения правильности эксплуата — ции внимате льно прочитайт е данное руко — водство перед началом использования изде лия . Особе[…]
-
Страница 131
Основное устройство a b 4 7 1 2 3 5 9 8c 6 Элемент Элемент 1 SRC / OFF 7 BAND / ( упра — вление iPod) 2 MUL TI-CONTROL ( M.C. ) 8 ( назад )/ DIM- MER ( регулятор освещенности ) 3 ( список ) 9 c / d 4 DISP a С 1 / по 6 / 5 USB порт b Вход AUX ( сте — реораз[…]
-
Страница 132
1 Поворачивайте M.C. , чтобы установить часы . 2 Нажимайте M.C. , чтобы выбрать установку минут . 3 Поворачивайте M.C. , чтобы установить ми — нуты . 4 Нажмите M.C. , чтобы подтвер дить выбор . FM STEP ( шаг настр[…]
-
Страница 133
Тюнер Основные операции Выбор диапазона 1 Нажимайте кнопку BAND / , пока на дис — плее не отобразится нужный диапазон ( FM1 , FM2 , FM3 для FM или MW/LW ). Переключение станций предварите льной на — стройки 1 Н[…]
-
Страница 134
BSM ( запоминание лучших станций ) Функция BSM ( запоминание лучших станций ) позволяе т автоматически сохранять в памяти устройства шесть станций с самым мощным сигналом в порядке убывания его м[…]
-
Страница 135
Функции с использованием специальных кнопок Выбор диапазона повторног о воспроизведе — ния 1 Нажимайте кнопку 6 / для выбора из сле — дующих функций : ! ALL – Повтор всех файлов ! ONE – Повтор текущ?[…]
-
Страница 136
Функции с использованием специальных кнопок Выбор диапазона повторног о воспроизведе — ния 1 Нажимайте кнопку 6 / для выбора из сле — дующих функций : ! ONE – повтор текущей композиции ! ALL – повто[…]
-
Страница 137
3 Для выбора функции поворачивайте M.C. Следующие выбранные функции можно на — страивать . ! Функция AUDIO BOOK недоступна , если в качестве режима воспроизведения выбра — но CONTROL iPod / CONTROL APP . Подроб — н?[…]
-
Страница 138
% Нажмите и удерживайте M.C. , чтобы переключиться в режим голо сового упра — вления . Команды , доступные на данном устройстве , перечислены ниже . ! Воспроизведение м узыки ! Выполнение вызовов Пр[…]
-
Страница 139
1 Нажмите , чтобы отобразить меню телефона . # В режиме PW SAVE меню телефона не выво — дится . Подробную информацию о настройках см . в разделе PW SAVE ( энергосбережение ) на стр . 142. 2 Для выбора функции […]
-
Страница 140
! Во время использования Bluetooth- ауди — оплеера невозможно автома тически под — ключиться к Bluetooth- телефону . ! Если воспроизводилась как ая — либо ком — позиция , воспроизведение продолжае тся даже[…]
-
Страница 141
FADER ( регулировка баланса ) 1 Для отображения установо чного меню на — жмите M.C. 2 Нажмите M.C. , чтобы отрегу лировать ба — ланс передних и задних громкоговорите — лей . BALANCE ( регулировка баланса ) 1 Дл[…]
-
Страница 142
Меню системы Важно PW SA VE ( режим энергосбере жения ) отклю — чается при отсоединении акк умуляторной ба тареи автомобиля ; при подсоединении ба — тареи его потреб уется включить снова . При выклю[…]
-
Страница 143
2 Поверните M.C. , чтобы отобразить ILLUMI , затем нажмите . 3 Нажмите M.C. для выбора нужной на — стройки . OFF ( выкл ) — ON ( вкл ) ! Вы также можете выбрать другую на — стройку регулятора освещенности , удер -[…]
-
Страница 144
Соединения Важно ! При установке данного устройства в авто — мобиле , в к отором отсутств ует положение ключа зажигания АСС , красный кабель должен быть подключен к клемме , кото — рая определяе […]
-
Страница 145
9 Синий / белый Распо ложение штекера разъема ISO на различных автомобилях может от личать — ся . Если штекер 5 предназна чен для управления антенной , подсоединит е 9 к b . На других автомобилях под[…]
-
Страница 146
2 Закрепите обойму , подогнув с по — мощью отвертки металлические язычки (90°). 1 2 1 Приборная панель 2 Мо нтажная обойма # Убе дитесь , что устройство надежно закрепле — но в гнез де . Неустойчивость[…]
-
Страница 147
2 У становите держатель микрофона на колонке рулево го управления . 2 1 3 1 Двусторонняя клейк ая лента 2 Установит е держате ль микрофона на внутренней стороне колонки рулевог о управления . 3 За?[…]
-
Страница 148
Сообщения об ошибках Прежде чем обратиться к торговому пред — ставите лю или в б лижайший сервисный центр Pioneer, обязате льно запомните сооб — щение об ошибке . Общие Сообщение Причина Действие A[…]
-
Страница 149
Сообщение Причина Действие ERROR-19 Сбой связи . Выполните сле — дующие дей — ствия . – У становите ключ зажигания в положение OFF , а затем – в положение ON. – Отключите за — поминающее ус — тройство USB.[…]
-
Страница 150
MP3 Расширение : .mp3 Скорость передачи данных : от 8 к бит / сд о 320 кбит / с ( постоянная ), переменная Частота дискретизации : от 8 кГц до 48 кГц (32 кГц , 44,1 кГц ,4 8 кГц пиковая ) Совместимая версия тегов ID3[…]
-
Страница 151
Пример иерархии 1 2 3 4 5 6 01 02 03 04 05 : Папка : Сжатый ауди — офайл от 01 до 05: Номер папки от 1 до 6 : После — довате льность воспроизведения Запоминающее устройство USB Файлы воспроизво дятся в той послед?[…]
-
Страница 152
Технические характеристики Общие Источник питания ……….. 14,4 В постоянного тока ( до — пустимый диапазон от 10,8 Вд о 15,1 В ) Система заземления ….. Заземление отрицате льно — го полюса Максимальны?[…]
-
Страница 153
Русский 153 Ru[…]
-
Страница 154
154 Ru[…]
-
Страница 155
Русский 155 Ru[…]
-
Страница 156
PIONEER CORPORA TION 1-1, Shin-ogura, Saiwai-ku, Kawasaki-shi, Kanagawa 212-0031, JAP AN Корпорация Пайонир 1-1, Син — Огура , Са йвай — ку , г . Кавасаки , префектура Канагава , 212-0031, Япония Импортер ООО “ ПИОНЕР РУС ” 125040, Россия , г . М ос?[…]
Страницы и текст этой инструкции
Инструкция автомагнитолы Pioneer MVH-150UI
Информация отображена на картинке
Информация отображена на картинке
Информация отображена на картинке
Информация отображена на картинке
Как использовать наш сайт инструкций OnlineManuals.ru
Наша цель состоит в том, чтобы предоставить вам быстрый доступ к содержанию инструкции для автомагнитолы Pioneer MVH-150UI.
С помощью онлайн просмотра, Вы можете быстро просмотреть содержимое инструкции и найти решение проблемы с автомагнитолы Pioneer MVH-150UI.
Для Вашего удобства
Если листать руководство пользователя автомагнитолы Pioneer MVH-150UI прямо на сайте, не очень удобно для Вас, есть два возможных решения:
• Просмотр в полноэкранном режиме — легко просмотреть руководство пользователя (без загрузки его на свой компьютер), Вы можете использовать режим полноэкранного просмотра.
Для просмотра инструкции пользователя автомагнитолы Pioneer MVH-150UI на полном экране, используйте кнопку «Открыть в Pdf-viewer».
• Загрузка на компьютер — Вы можете также скачать Инструкция автомагнитолы Pioneer MVH-150UI на свой компьютер и сохранить его в файлах.
Многие люди предпочитают читать документы не на экране, а в печатной версии.
Возможность печати руководства пользователя также была предусмотрена на нашем сайте,
и вы можете использовать ее, нажав на иконку «печать» в Pdf-viewer.
Нет необходимости печатать все руководство автомагнитолы Pioneer MVH-150UI, можно выбрать только нужные страницы инструкции.