

kkiiaa,, tthhee ccoommppaannyy
Congratulations! Your selection of a Kia was a wise investment. It
will give you years of driving pleasure. Now that you are the owner of
a Kia vehicle, you’ll probably be asked a lot of questions about your
vehicle and the company like “What is a Kia?”, “Who is Kia?”, “What
does ‘Kia’ mean?”.
Here are some answers. First, Kia is the oldest car company in Korea.
It is a company that has thousands of employees focused on building
high-quality vehicles at affordable prices.
The first syllable, Ki, in the word “Kia” means “to arise from to the
world” or “to come up out of to the world.” The second syllable, a,
means “Asia.” So, the word Kia, means “to arise from” or “to come
up out of Asia to the world.”
Drive safely and enjoy your Kia!

i
Thank you for choosing a Kia vehicle.
When you require service, remember that your KIA Dealer
knows your vehicle best. Your dealer has factory-trained technicians, recommended special tools, genuine Kia replacement
parts and is dedicated to your complete satisfaction.
Because subsequent owners require this important information
as well, this publication should remain with the vehicle if it is
sold.
This manual will familiarize you with operational, maintenance and safety information about your new vehicle. It is supplemented by a Warranty and Consumer Information manual
that provides important information on all warranties regarding
your vehicle. We urge you to read these publications carefully
and follow the recommendations to help assure enjoyable and
safe operation of your new vehicle.
Kia offers a great variety of options, components and features
for its various models.
Therefore, the equipment described in this manual, along with
the various illustrations, may not all be applicable to your particular vehicle.
The information and specifications provided in this manual
were accurate at the time of printing. Kia reserves the right to
discontinue or change specifications or design at any time
without notice and without incurring any obligation. If you
have questions, always check with your Kia Dealer.
We assure you of our continuing interest in your motoring
pleasure and satisfaction in your Kia vehicle.
© 2009 Kia Canada Inc.
All rights reserved. Reproduction by any means, electronic or
mechanical, including photocopying, recording, or by any
information storage and retrieval system or translation in
whole or part is not permitted without written authorization
from Kia Canada Inc..
Printed in Korea
Foreword
ii
1
2
3
4
5
6
7
8
Introduction
Your vehicle at a glance
Knowing your vehicle
Driving your vehicle
Driving tips
In case of an emergency
Maintenance
Specifications
Index
table of contents
9
1
How to use this manual / 1-2
Vehicle break-in process / 1-2
Introduction
Introduction
21
We want to help you get the greatest
possible driving pleasure from your vehicle.Your Owner’s Manual can assist you
in many ways. We strongly recommend
that you read the entire manual.
Especially, in order to minimize the
chance of death or injury, you must read
the WARNING and CAUTION sections
spread throughout the manual.
Illustrations complement the words in this
manual to best explain how to enjoy your
vehicle.By reading your manual, you will
learn about features, important safety
information, and driving tips under various road conditions.
The general layout of the manual is provided in the Table of Contents. A good
place to start is the index;it has an alphabetical listing of all information in your
manual.
Sections:This manual has eight sections
plus an index.Each section begins with a
brief list of contents so you can tell at a
glance if that section has the information
you want.
You’ll find various WARNING’s,
CAUTION’s, and NOTICE’s in this manual.These were prepared to enhance your
personal safety.You should carefully read
and follow ALL procedures and recommendations provided in these WARNINGS, CAUTIONS and NOTICES.
✽✽
NOTICE
A NOTICE indicates a situation in
which damage to your vehicle could
result if the notice is ignored.
No special break-in period is needed. By
following a few simple precautions for the
first 1,000 km (600 miles) you may add to
the performance, economy and life of
your vehicle.
• Do not race the engine.
• Do not maintain a single speed for long
periods of time, either fast or slow.
Varying engine speed is needed to
properly break-in the engine.
• Avoid hard stops, except in emergencies, to allow the brakes to seat properly.
• Avoid full-throttle starts.
HOW T O USE THIS MANUAL
WARNING
A WARNING indicates a situation in
which serious bodily injury or death
could result if the warning is ignored.
CAUTION
A CAUTION indicates a situation in
which personal injury, perhaps
severe, could result if the caution is
ignored.
VEHICLE BREAK-IN PROCESS
2
Interior overview / 2-2
Instrument panel overview / 2-3
Engine compartment / 2-4
Your vehicle at a glance
Your vehicle at a glance
22
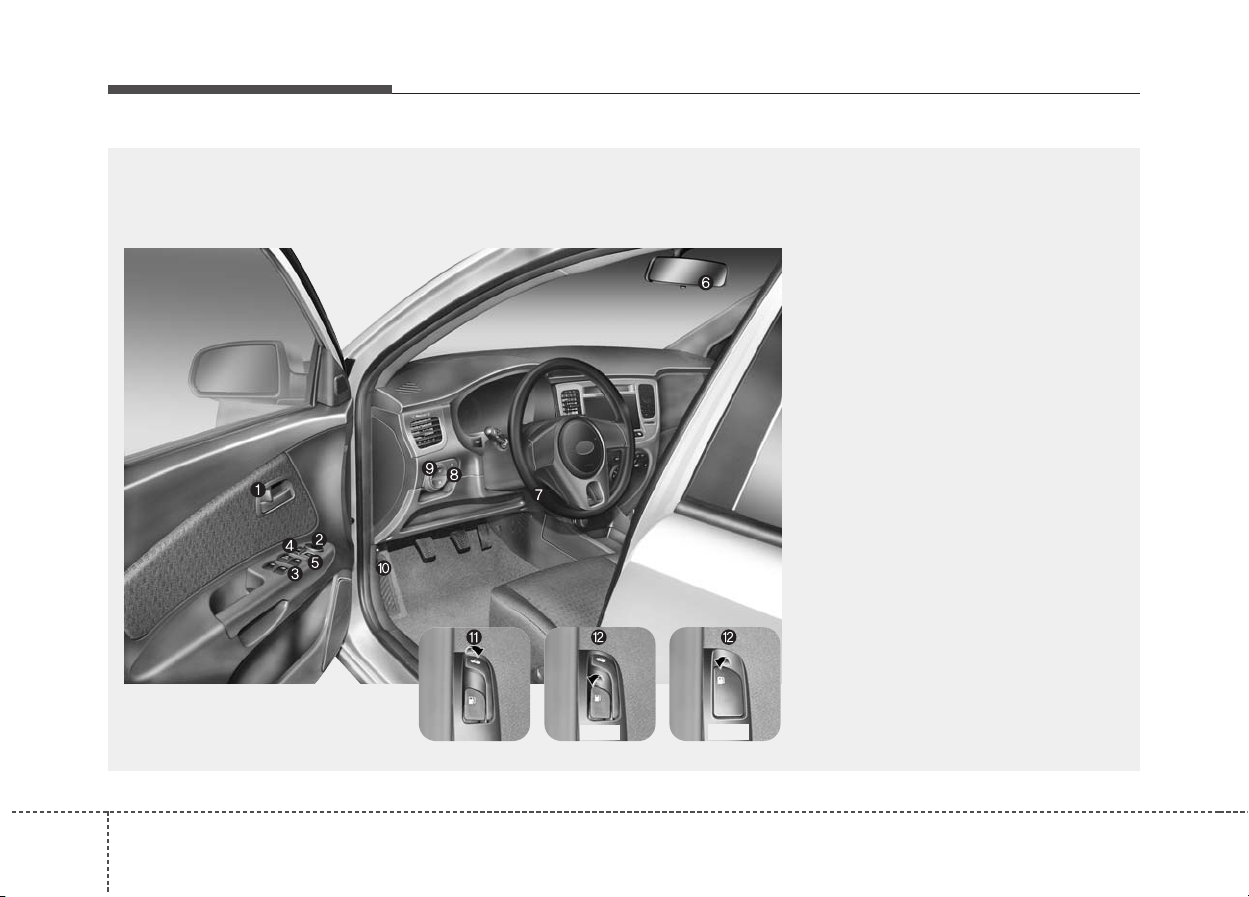
INTERIOR OVERVIEW
OJB00002/1JBA3077/1JBA3082/1JBA3207
4Door
5Door
1. Door lock/unlock button…………………3-10
2. Outside rearview mirror control
switch*………………………………………..3-71
3. Power window switches*……………….3-14
4. Master power door lock control*…….3- 9
5. Master power window control lock*…3-16
6. Inside rearview mirror…………………..3-72
7. Steering wheel…………………………….4-18
8. Instrument panel illumination* ……….4-25
9. Front fog light*……………………………..4-34
10. Hood release lever …………………….3-66
11.Trunk release lever* ……………………3-65
12. Fuel filler lid release lever*…………..3-67
* : if equipped
23
Your vehicle at a glance
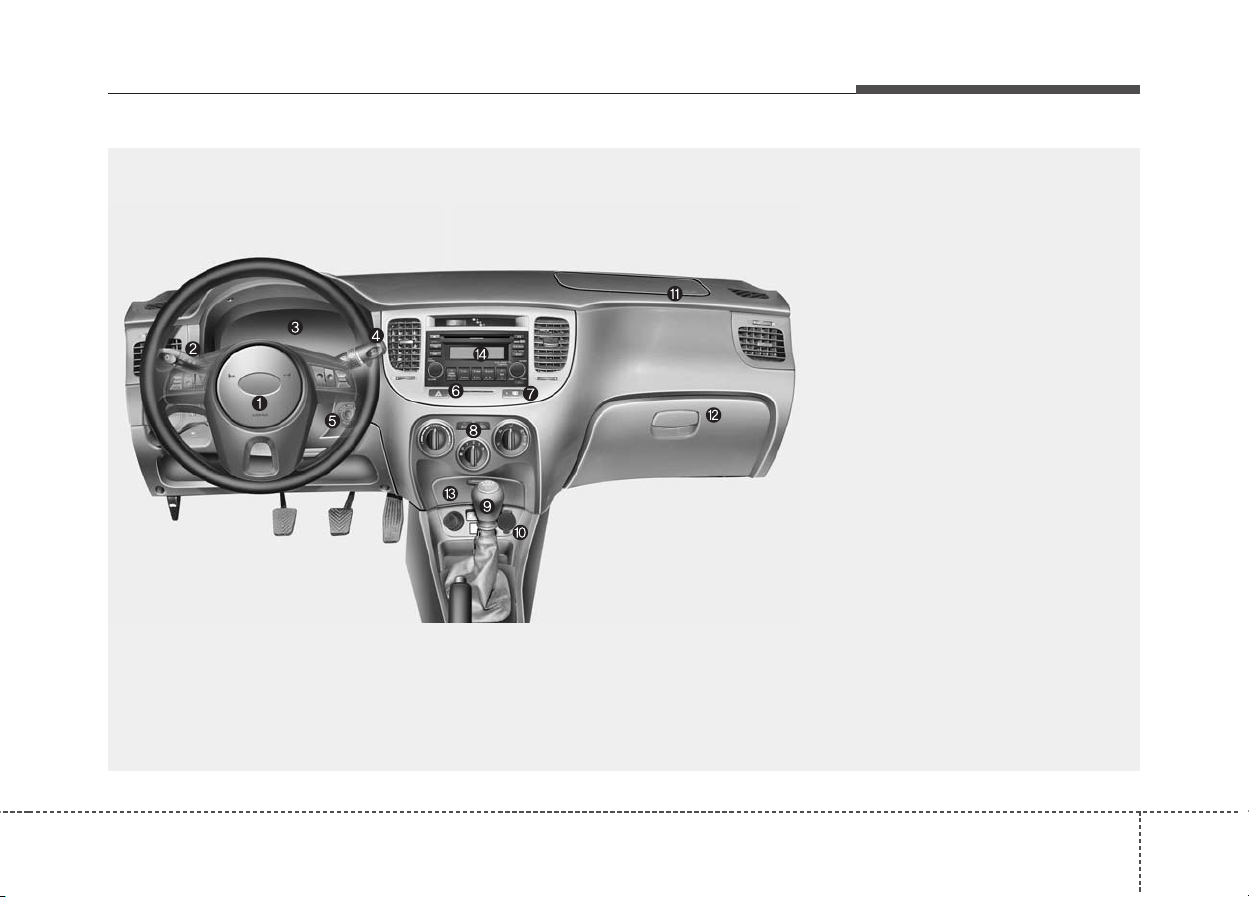
INSTRUMENT PANEL OVERVIEW
1. Driver’s air bag…………………………….3-51
2. Light control / Tur n signals …………….4-31
3. Instrument cluster ………………………..4-20
4.Wiper/Washer………………………………4-35
5. Ignition switch………………………………4- 2
6. Hazard………………………………………..4-38
7. Rear window defroster ………………….4-38
8. Climate control system………………….4-39
9. Shift lever……………………………………4- 4
10. Power socket……………………………..3-77
11. Passenger’s air bag ……………………3-52
12. Glove box………………………………….3-74
13. Multi box*………………………………….3-74
14. Audio controls*…………………………..3-84
* : if equipped
OJB00003
Your vehicle at a glance
42
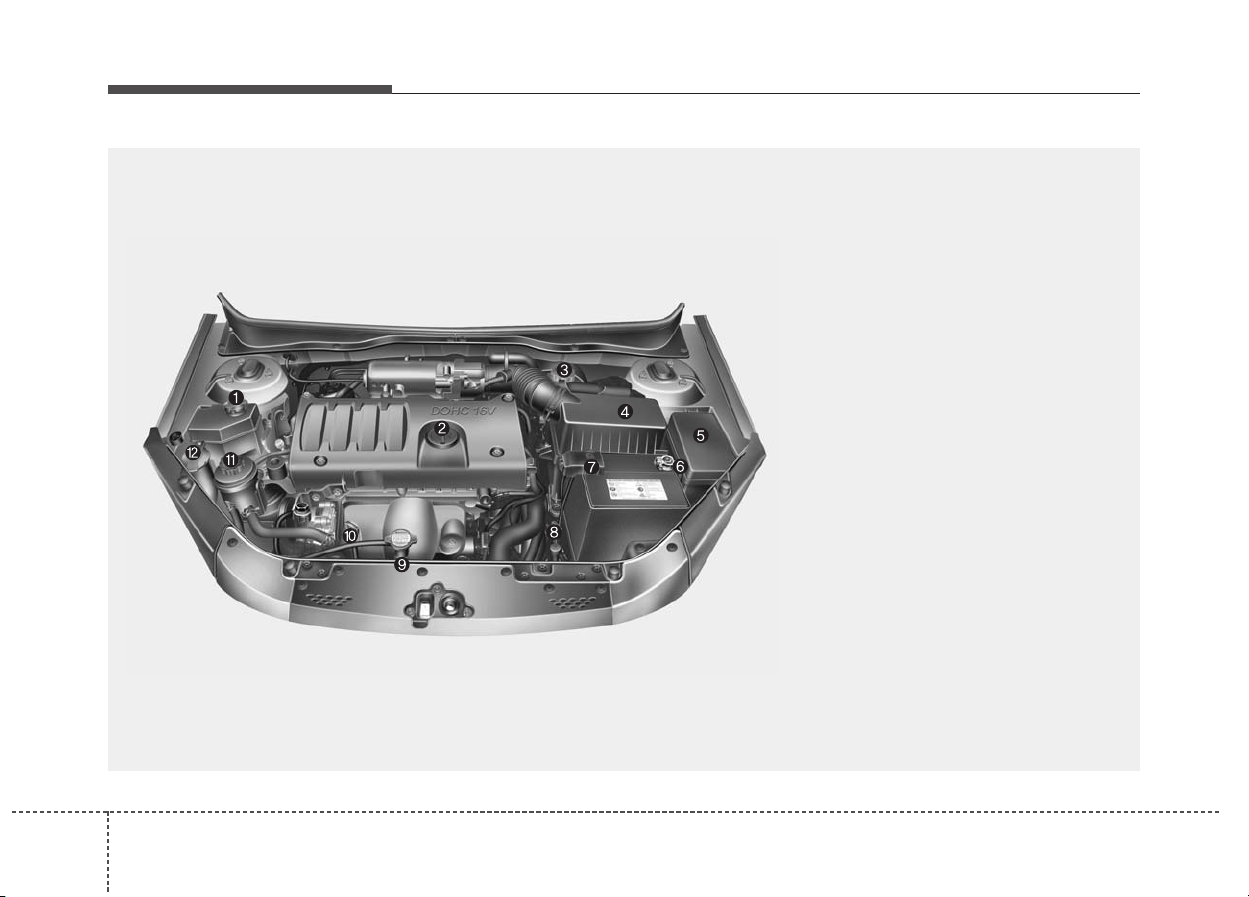
ENGINE COMPARTMENT
OJB050002
1. Engine coolant reservoir……………….7-12
2. Engine oil filler cap……………………….7-11
3. Brake fluid reservoir ……………………..7-14
4. Air cleaner…………………………………..7-18
5. Fuse box…………………………………….6- 6
6. Negative battery terminal ………..6-4/7-21
7. Positive battery terminal………….6-4/7-21
8. Auto transaxle oil dipstick*…………….7-16
9. Radiator cap………………………………..7-14
10. Engine oil dipstick………………………7-11
11. Power steering fluid reservoir*……..7-15
12.Windshield washer fluid reser voir …7-17
* : if equipped

3
Keys / 3-2
Remote keyless entry / 3-3
Theft-alarm system / 3-5
Immobilizer system / 3-7
Door locks / 3-9
Windows / 3-14
Seat / 3-17
Safety belts / 3-28
Air bags-supplemental restraint system / 3-49
Trunk / 3-64
Hood / 3-66
Fuel filler lid / 3-67
Mirrors / 3-70
Interior lights / 3-73
Storage compartment / 3-74
Interior features / 3-76
Sunroof / 3-79
Luggage net / 3-81
Antenna / 3-82
Audio remote control / 3-83
Audio system / 3-84
Knowing your vehicle
Knowing your vehicle
23
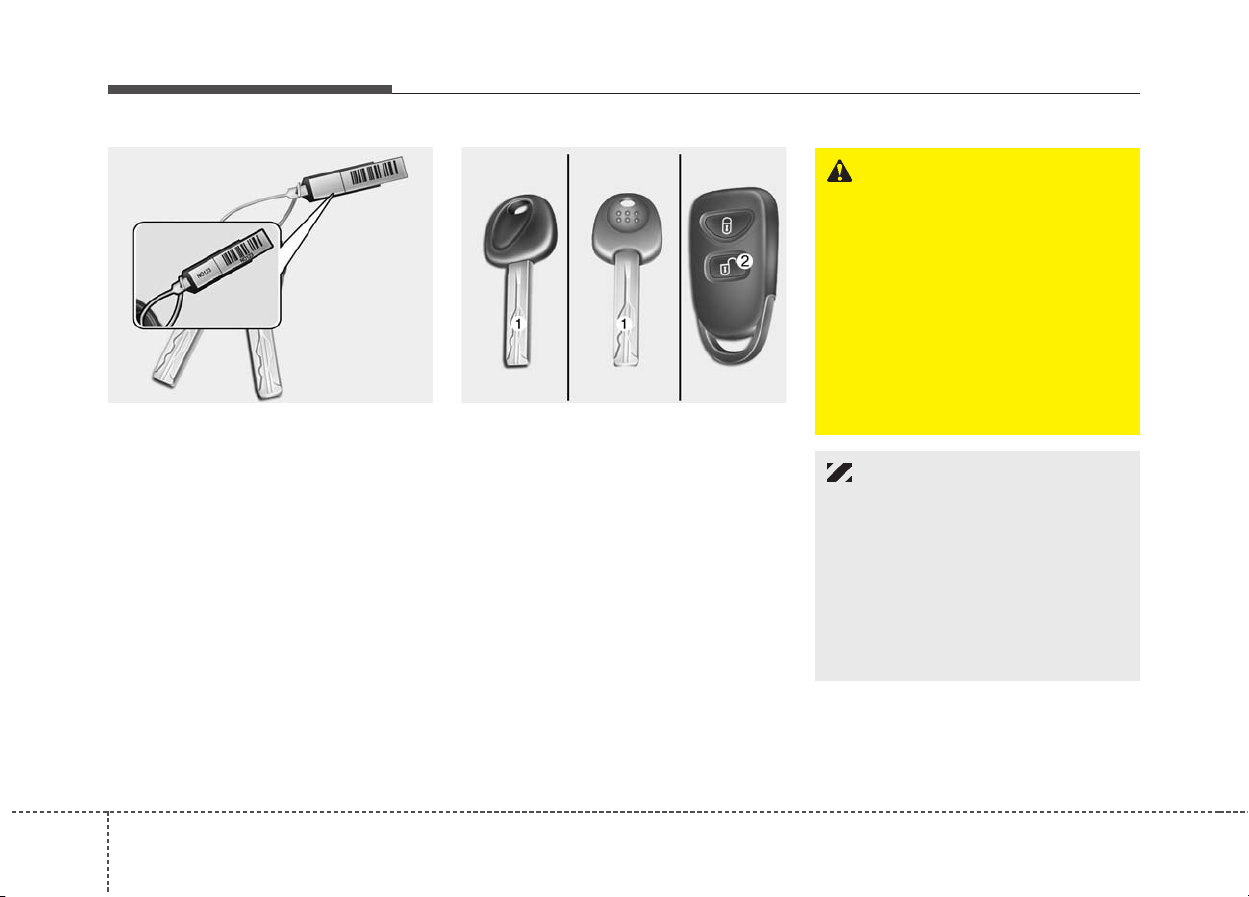
The key code number is stamped on the
plate attached to the key set.Should you
lose your keys, this number will enable
an authorized Kia dealer to duplicate the
keys easily. Remove the plate and store it
in a safe place. Also, record the code
number and keep it in a safe and handy
place, but not in the vehicle. Use only
Kia-approved key blanks.
Key operations
(1)Master key
Used to start the engine, lock and
unlock the doors, and open the trunk
(if equipped).
(2)Transmitter (if equipped)
Used to lock and unlock the doors.
KEYS
OJB040006
WARNING — Ignition key
Leaving children unattended in a
vehicle with the ignition key is dangerous even if the key is not in the
ignition. Children copy adults and
they could place the key in the ignition. The ignition key would enable
children to operate power windows
or other controls, or even make the
vehicle move, which could result in
serious bodily injury or even death.
Never leave the keys in your vehicle
with unsupervised children.
OJB040005N
CAUTION
Use only Kia original parts for the
ignition key in your vehicle. If an
aftermarket key is used, the ignition
switch may not return to ON after
START. If this happens, the starter
will continue to operate causing
damage to the starter motor and
possible fire due to excessive current in the wiring.
33
Knowing your vehicle
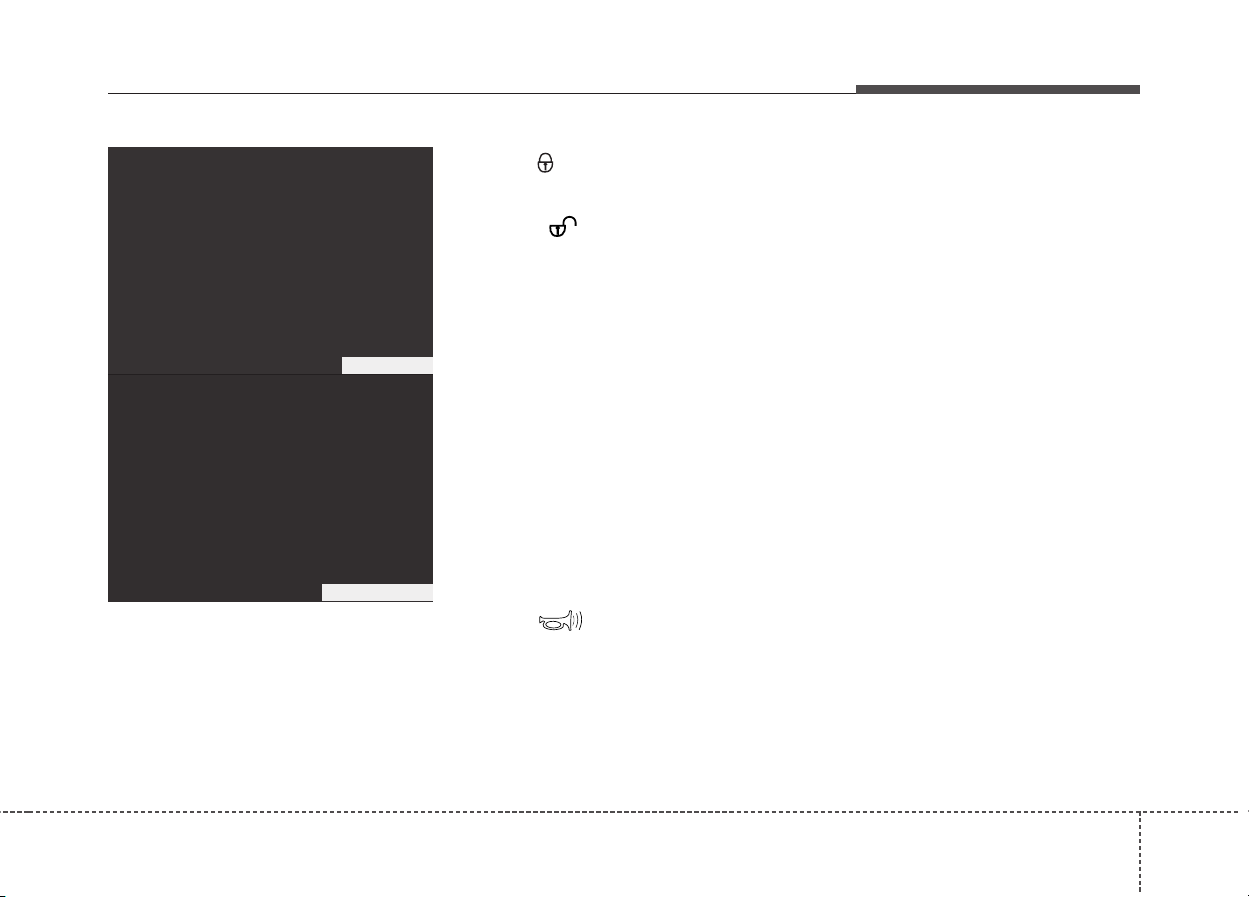
➀ Lock button
➁ Unlock button
➂ Panic button
➀ Lock ( )
All doors are locked if the lock button
is pressed.
➁ Unlock ( )
Two turn unlock mode
The driver’s door is unlocked if the
unlock button is pressed once. All
doors are unlocked if the unlock b utton
is pressed again within 4 seconds.
Central door unlock mode
All the doors are unlocked by pressing
the unlock button once.
Two turn unlock mode
↔↔
Central door unlock mode
The modes are changed alternately by
pressing the lock button and unlock
button at the same time for more than
4 seconds.
After pressing this button, the
doors will be locked automatically
unless you open them within 30
seconds.
➂
Panic ( )
The horn sounds and hazard warning
lights will flash for about 30 seconds if
this button is pressed. To stop the
horn and lights, press any button on
the transmitter.
✽✽
NOTICE
The transmitter will not work if any of
following occur:
• The ignition key is in ignition switch.
• You exceed the operating distance
limit (about 10 m [30 feet]).
• The battery in the transmitter is
weak.
• Other vehicles or objects may be
blocking the signal.
• The weather is extremely cold.
• The transmitter is close to a radio
transmitter such as a radio station or
an airport which can interfere with
normal operation of the transmitter.
When the transmitter does not work
correctly, open and close the door with
the ignition key. If you have a problem
with the transmitter, contact an authorized Kia Dealer.
✽✽
NOTICE
Keep the transmitter away from water
or any liquid. If the keyless entry system
is inoperative due to exposure to water
or liquids, it will not be covered by your
manufacturer vehicle warra
nty.
REMOTE KEYLESS ENTRY (IF EQUIPPED)
OJB040007N
OJB040008N
Knowing your vehicle
43
Operational distance may vary depending upon the area the transmitter is used
in. For example, if the vehicle is parked
near police stations, government and
public offices, broadcasting stations, military installations, airports, or transmitting towers, etc.
This device complies with Industry
canada standard RSS-210.
Operation is subject to the following two
conditions:
1.This device may not cause harmful
interference, and
2. This device must accept any interference received, including interference
that may cause undesired operation.
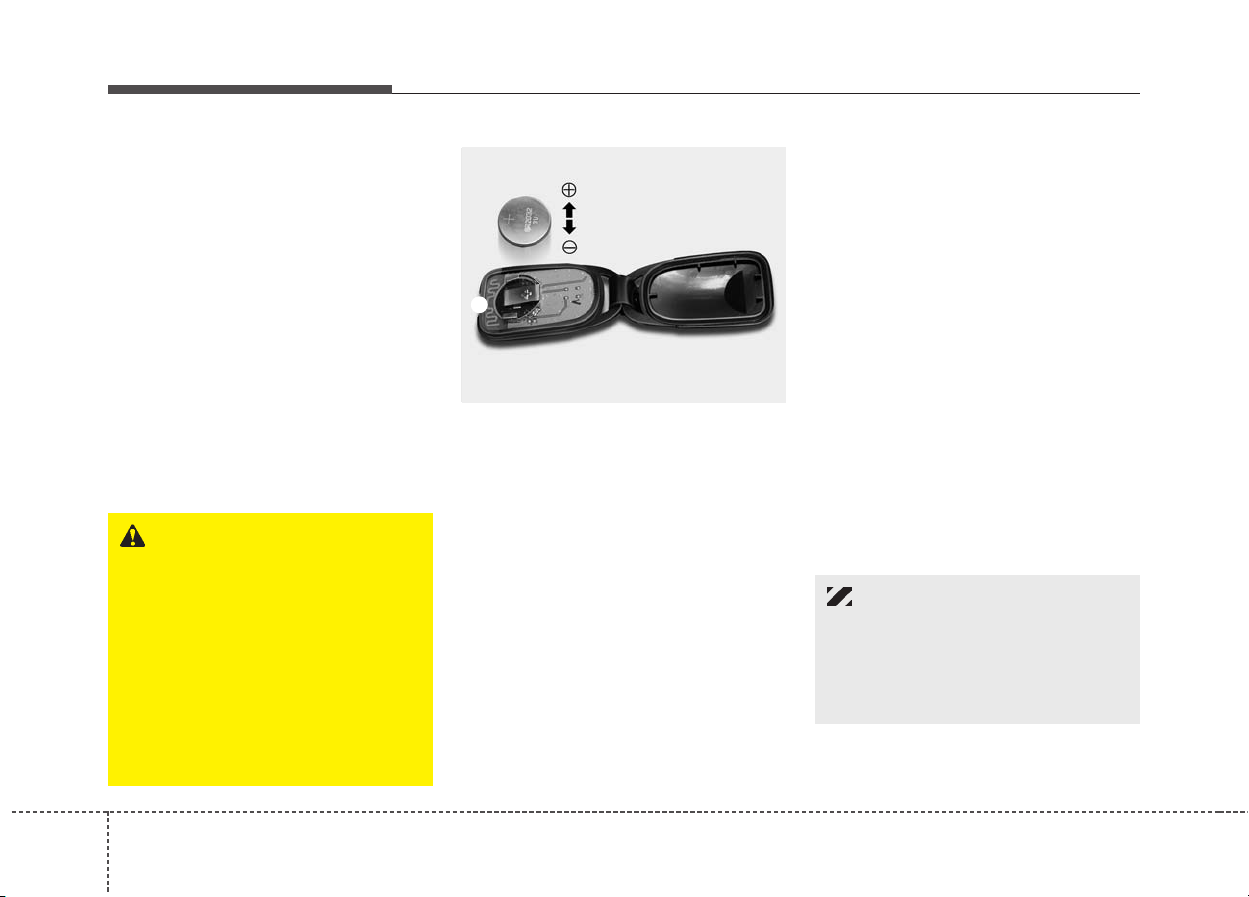
Battery replacement
Transmitter uses a 3 volt lithium battery
which will normally last for several years.
When replacement is necessary, use the
following procedure.
1. Insert a slim tool into the slot and gently pry open the transmitter center
cover (1).
2. Replace the battery with new one.
When replacing the battery, mak e sure
the battery positive “+” symbol faces
up as indicated in the illustration.
3. Install the battery in the reverse order
of removal.
✽✽
NOTICE
The keyless entry system transmitter is
designed to give you years of troublefree use, however it can malfunction if
exposed to moisture or static electricity.
If you are unsure how to use your transmitter or replace the battery, contact an
authorized Kia dealer.
For replacement transmitters, see an
Authorized Kia Dealer for reprogramming.
✽✽
NOTICE
• Using the wrong battery can cause the
transmitter to malfunction. Be sure to
use the correct battery.
• To avoid damaging the transmitter,
don’t drop it, get it wet, or expose it to
heat or sunlight.
1KMA2003
1
CAUTION
An inappropriately disposed battery can be harmful to the environment and human health. Dispose
the battery according to your local
law(s) or regulation.
WARNING
Changes or modifications not
expressly approved by the party
responsible for compliance could
void the user’s authority to operate
the equipment. If the keyless entry
system is inoperative due to
changes or modifications not
expressly approved by the party
responsible for compliance, it will
not be covered by your manufacture vehicle warranty.

35
Knowing your vehicle
Theft alarm system will not operate when
the ignition key is in the ignition switch.
If the lock button on the transmitter is
pressed when the key is not in the ignition and any vehicle door or the trunk (if
equipped) is open, then, the doors will
lock but the theft alarm system will not
activate.However , the theft alarm system
will automatically activate when the open
door(s) or trunk (if equipped) is closed
and locked.
Armed stage
When the ignition switch is in the “LOCK”
position, and key is not in the ignition, the
system will be armed and the hazard
lights will flash once when the following
conditions are met:
• The hood, trunk (if equipped) and
doors (including the rear hatch, if
equipped) are all closed and locked
with the transmitter.
• If a door or the trunk (if equipped) is
not opened within approximately 30
seconds after unlocking with the transmitter, all doors will be locked again
and theft alarm system armed.
✽✽
NOTICE
Do not arm the system until all passengers have left the vehicle. If the system is
armed while a passenger(s) remains in
the vehicle, the alarm may be activated
when the remaining passenger(s) leaves
the vehicle.
Alarm stage
The alarm will activate (horn will sound
and lights flash) when:
• Any door is opened without using the
transmitter or key.
• The engine hood is opened.
The alarm will sound ON for 27 seconds,
then OFF for 10 seconds. This ON/OFF
cycle will be repeated three times.During
this time, the engine will not start.
✽✽
NOTICE
The engine will not start immediately
while the theft-alarm system is armed or
activated. You must disarm the theftalarm system to start the engine.
THEFT-ALARM SYSTEM (IF EQUIPPED)
HMR.082
Knowing your vehicle
63
Opening the trunk with the alarm
armed (if equipped)
When the alarm is armed, the alar m will
not sound if the trunk lid is opened with
the key.
Also, if any of the doors or hood is
opened while the trunk lid is open and
the alarm armed, the alar m will sound.
Disarmed stage
The system will be disarmed when the
doors are unlocked by depressing the
unlock button on the transmitter. After
depressing unlock button, the hazard
flasher light will flash twice to indicate the
system is disarmed.
After depressing unlock button, if any
door is not opened within 30 seconds,
the system will be rearmed.
CAUTION
Only the transmitter can disarm the
armed stage. If the transmitter does
not disarm the system, it is necessary to take the following steps:
Without immobilizer system:
1. Unlock and open the door with
the key, which will cause the
alarm to be activated.
2. Insert the key in the ignition
switch and turn the ignition key
to «ON» position.
3.Wait for 30 seconds.
(Continued)
(Continued)
With immobilizer system:
1. Unlock and open the door with
the key, which will cause the
alarm to be activated.
2. Insert the key in the ignition
switch and turn the ignition key
to «START» position.
After completing the steps above,
the system will be disarmed.
CAUTION
Do not change, alter or adjust the
theft-alarm system because it could
cause the theft-alarm system to
malfunction and should only be
serviced by an authorized KIA dealer. Malfunctions caused by improper alterations, adjustments or modifications to the theft-alarm system
are not covered by your vehicle
manufacturer warranty.

37
Knowing your vehicle
Your vehicle is equipped with an electronic engine immobilizer system to
reduce the risk of unauthorized vehicle
use.
Your immobilizer system is comprised of
a small transponder in the ignition key,
and antenna coil in the key cylinder and
Immobilizer Control Unit (or Smartra
Unit).
With this system, whenever you insert
your ignition key into the ignition switch
and turn it to ON, the antenna coil in the
ignition switch receives a signal from the
transponder in the ignition key and then
sends the signal to the ECU (Engine
Control Unit).
The ECU checks the signal whether the
ignition key is valid.
If the key is determined to be valid, the
engine will start.
If the key is determined to be invalid, the
engine will not start.
To deactivate the immobilizer
system:
Insert the ignition key into the key cylinder and turn it to the ON position.
To activate the immobilizer system:
Turn the ignition key to the OFF position.
The immobilizer system activates automatically. Without a valid ignition key for
your vehicle, the engine will not start.
✽✽
NOTICE
When starting the engine, do not use the
key with other immobilizer keys around.
Otherwise the engine may not start or
may stop soon after it starts. Keep each
key separately not to have any malfunction after you receive your new vehicle.
Limp home (override) procedure
When you turn the ignition key to the ON
position, if the IMMO indicator goes off
after blinking 5 times, your transponder
equipped in the ignition key is out of order .
You cannot start the engine without the
lime home procedure.To start the engine,
you have to input your password by using
the ignition switch.
The following procedure is how to input
your password of “2345” as an example.
1.Turn the ignition key to the ON position.
The IMMO indicator ( ) will blink 5
times and go off indicating the beginning of the limp home procedure.
2.Turn the ignition key to the ACC position.
IMMOBILIZER SYSTEM (IF EQUIPPED)
CAUTION
Do not put metal accessories near
the key or ignition key.
The engine may not start for the
metal accessories may interrupt the
transponder signal from normally
transmitting.
WARNING
In order to prevent theft of your
vehicle, do not leave spare keys
anywhere in your vehicle. Your
Immobilizer password is a customer unique password and should
be kept confidential. Do not leave
this number anywhere in your vehicle.
Knowing your vehicle
83
3.To enter the first digit (in this example
“2”), turn the ignition key to the ON and
ACC position twice. Perfor m the same
procedure for the next digits between 3
seconds and 10 seconds (for example ,
for “3”, turn the ignition ON and ACC 3
times).
4. If all of the digits have been input successfully, you have to start the engine
within 30 seconds. If you attempt to
start the engine after 30 seconds, the
engine will not start and you will have
to input your password again.
After performing the limp home procedure, you have to see an authorized Kia
dealer immediately to inspect and repair
your ignition key or immobilizer system.
✽✽
NOTICE
If you cannot start your engine in spite
of limp home procedure, have your vehicle towed by an authorized Kia dealer
for inspection and necessary repairs.
✽✽
NOTICE
The transponder in your ignition key is
an important part of the immobilizer
system. It is designed to give years of
troublefree service, however you should
avoid exposure to moisture, static electricity and rough handling.
Immobilizer system malfunction could
occur.
✽✽
NOTICE
Do not change, alter or adjust the immobilizer system because it could cause the
immobilizer system to malfunction and
should only be serviced by an authorized Kia dealer.
Malfunctions caused by improper alterations, adjustments or modifications to
the immobilizer system are not covered
by your vehicle manufacturer warranty.
This device complies with Industry
Canada Standard RSS-210.
Operation is subject to the following two
conditions:
1.This device may not cause interference received, and
2. This device must accept any interference received, including interference
that may cause undesired operation.
WARNING
Changes or modifications not
expressly approved by the party
responsible for compliance could
void the user’s authority to operate
the equipment.
39
Knowing your vehicle
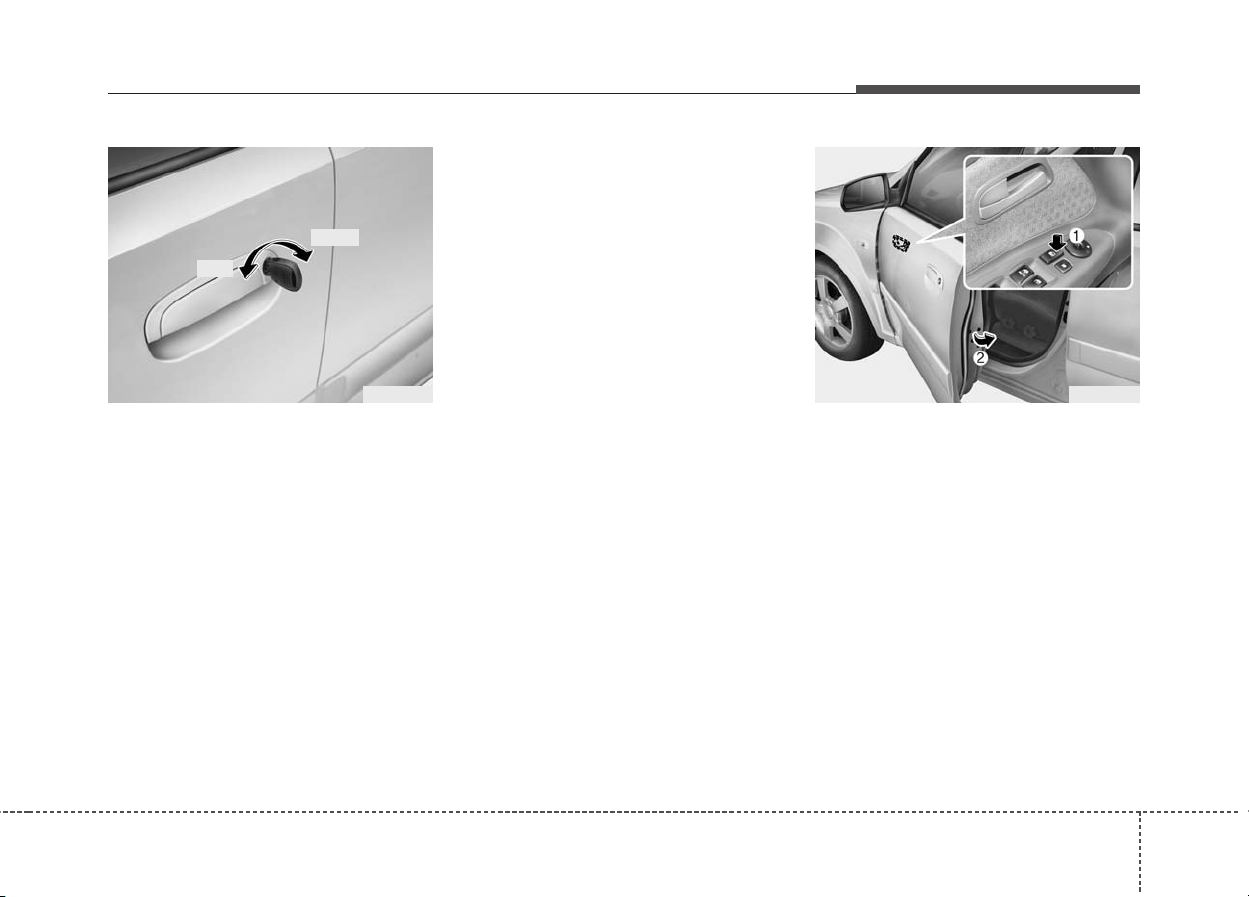
Operating door locks from outside the vehicle
• Turn the key toward rear of vehicle to
unlock and toward front of vehicle to
lock.
• If you lock the driver’s door with a key,
all vehicle doors will lock automatically
(if equipped).
• Turn the key to the right once to unlock
the driver’s door and to the right twice
within 4 seconds to unlock all doors.(if
equipped)
• If you lock the front passenger’s door
with a key, all vehicle doors will lock
automatically.
The door unlock operation mode using
the mechanical key will follow the operation mode of the transmitter.
• If your vehicle is equipped with a
remote keyless entry system, all vehicle doors will unlock automatically
when you unlock the front passenger’s
door with a key (if equipped).
• Doors can also be locked and
unlocked with the transmitter (if
equipped).
• Once the doors are unlocked, it may be
opened by pulling the door handle.
• When closing the door, push the door
firmly by the hand. Make sure that
doors are closed securely.
❈ If your vehicle is equipped with the
remote keyless entry system, there is
no key lock on the front passenger’s
door.
To lock a door without the key , push do wn
on the front portion of the inside door
lock switch (1, if equipped) to the “LOCK”
position and close the door (2).
✽✽
NOTICE
Always remove the ignition key, engage
the parking brake, close all windows
and lock all doors when leaving your
vehicle unattended.
✽✽
NOTICE
If the door is locked/unlocked multiple
times in rapid succession with either the
vehicle key or door lock switch, the system may stop operating temporarily in
order to protect the circuit and prevent
damage to system components.
DOOR LOCKS
1JBA3004
Lock
Unlock
1JBN3005
Knowing your vehicle
103
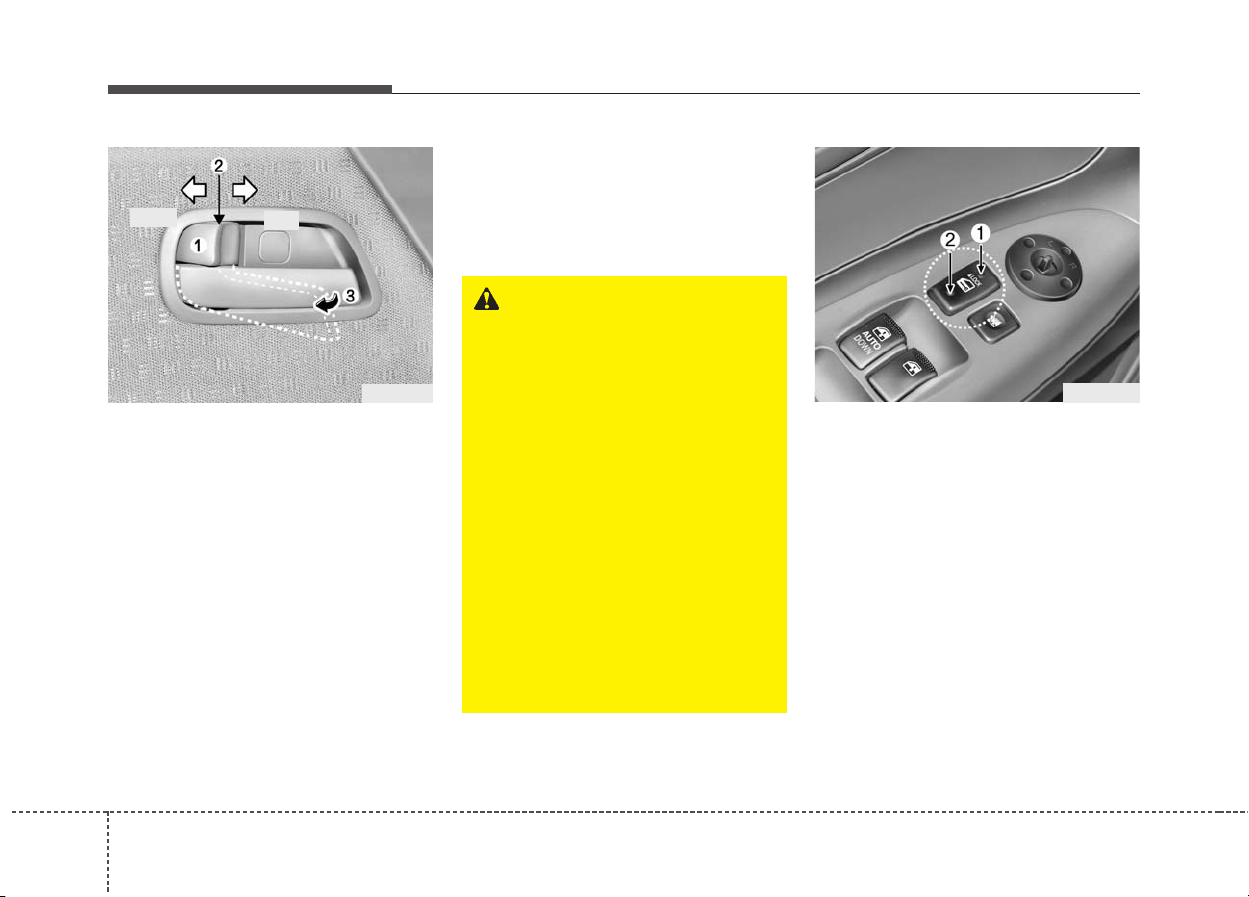
Operating door locks from inside
the vehicle
With the door lock button
• To unlock a door, push the door lock
button forward to the “Unlock” position
(red mark on button visible).
• To lock a door, push the door lock button (1) forward to the “Lock” position. If
the door is locked properly, the red
mark (2) on the door lock button (1) will
not be visible.
• To open a door, pull the door handle
(3) outward.
• If the inner door handle of driver’s side
door is pulled when the door lock button is in lock position, the button is
unlocked and door opens.(if equipped)
• Front doors cannot be locked if the
ignition key is in the ignition switch and
door is open.
• If you lock the front passenger’s door
with door lock button, all vehicle doors
will lock automatically.
With central door lock switch
(if equipped)
• When pushing down on the front portion (1) of the switch, all vehicle doors
will lock.
• When pushing down on the rear portion (2) of the switch, all vehicle doors
will unlock.
• However, if the key is in the ignition
switch and any front door is open, the
doors will not lock when the front portion of central door lock switch is
pressed.
1JBA3006
Lock
Unlock
WARNING — Door lock mal-
function
If a power door lock ever fails to
function while you are in the vehicle, try one or more of the following
techniques to exit:
• Operate the door unlock feature
repeatedly (both electronic and
manual) while simultaneously
pulling on the door handle.
• Operate the other door locks and
handles, front and rear.
• Lower a front window and use the
key to unlock the door from outside.
• Lower the rear seats (if
equipped), move to the cargo
area and open the trunk using the
emergency release handle (if
equipped).
OJB029007
311
Knowing your vehicle
Impact sensing door unlock system (if equipped)
All doors will be automatically unlocked
when the impact is delivered to impact
sensors while the ignition switch is in the
ON position.
Howev er, if the impact causes damage to
the vehicle electrical system or the
mechanical door lock mechanisms, the
impact sensing door unlock system may
not operate.
CAUTION — Doors
• The doors should always be fully
closed and locked while the vehicle is in motion to prevent accidental opening of the door.
Locked doors will also discourage potential intruders when the
vehicle stops or slows.
• Be careful when opening doors
and watch for vehicles, motorcycles, bicycles or pedestrians
approaching the vehicle in the
path of the door. Opening a door
when something is approaching
can cause damage or injury.
WARNING — Unlocked vehi-
cles
Leaving your vehicle unlocked can
invite theft or possible harm to you
or others from someone hiding in
your vehicle while you are gone.
Always remove the ignition key,
engage the parking brake, close all
windows and lock all doors when
leaving your vehicle unattended.
WARNING — Unattended
children
An enclosed vehicle can become
extremely hot, causing death or
severe injury to unattended children or animals who cannot escape
the vehicle. Furthermore , children
might operate features of the vehicle that could injure them, or they
could encounter other harm, possibly from someone gaining entry to
the vehicle. Never leave children or
animals unattended in your vehicle.
Knowing your vehicle
123
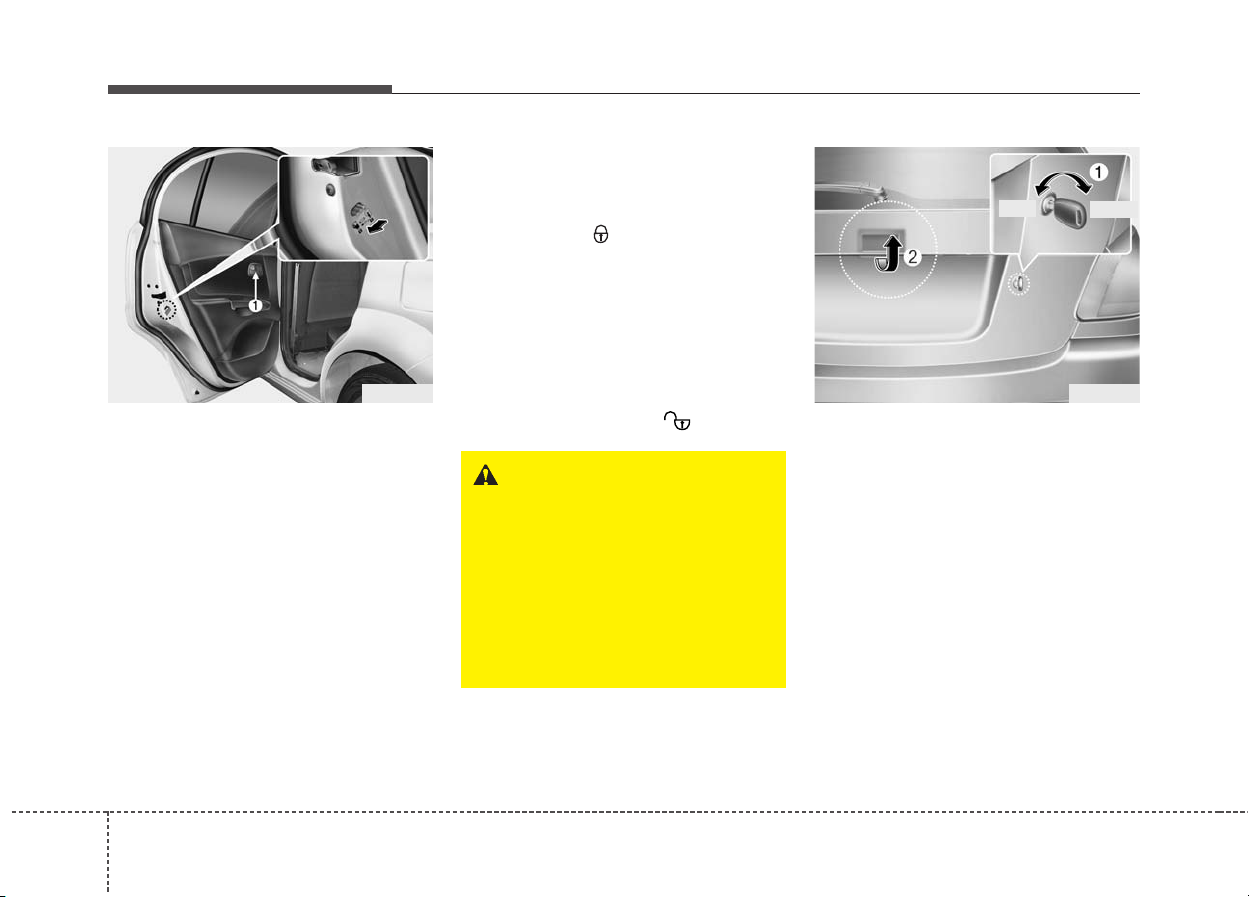
Rear door child safety lock
The child safety lock is provided to help
prevent children from accidentally opening the rear doors from inside the vehicle.
The rear door safety locks should be
used whenever children are in the vehicle.
1. Open the rear door.
2. Push the child safety lock located on
the rear edge of the door to the “lock”
position. When the child safety lock is
in the “lock ( )” position, rear door
will not open when the inner door handle is pulled inside the vehicle.
3. Close the rear door.
4.To open the rear door, pull the outside
door handle.
Even though the doors may be unloc ked,
the rear door will not open by pulling the
inner door handle (1) until rear door child
safety lock is unlocked ( ).
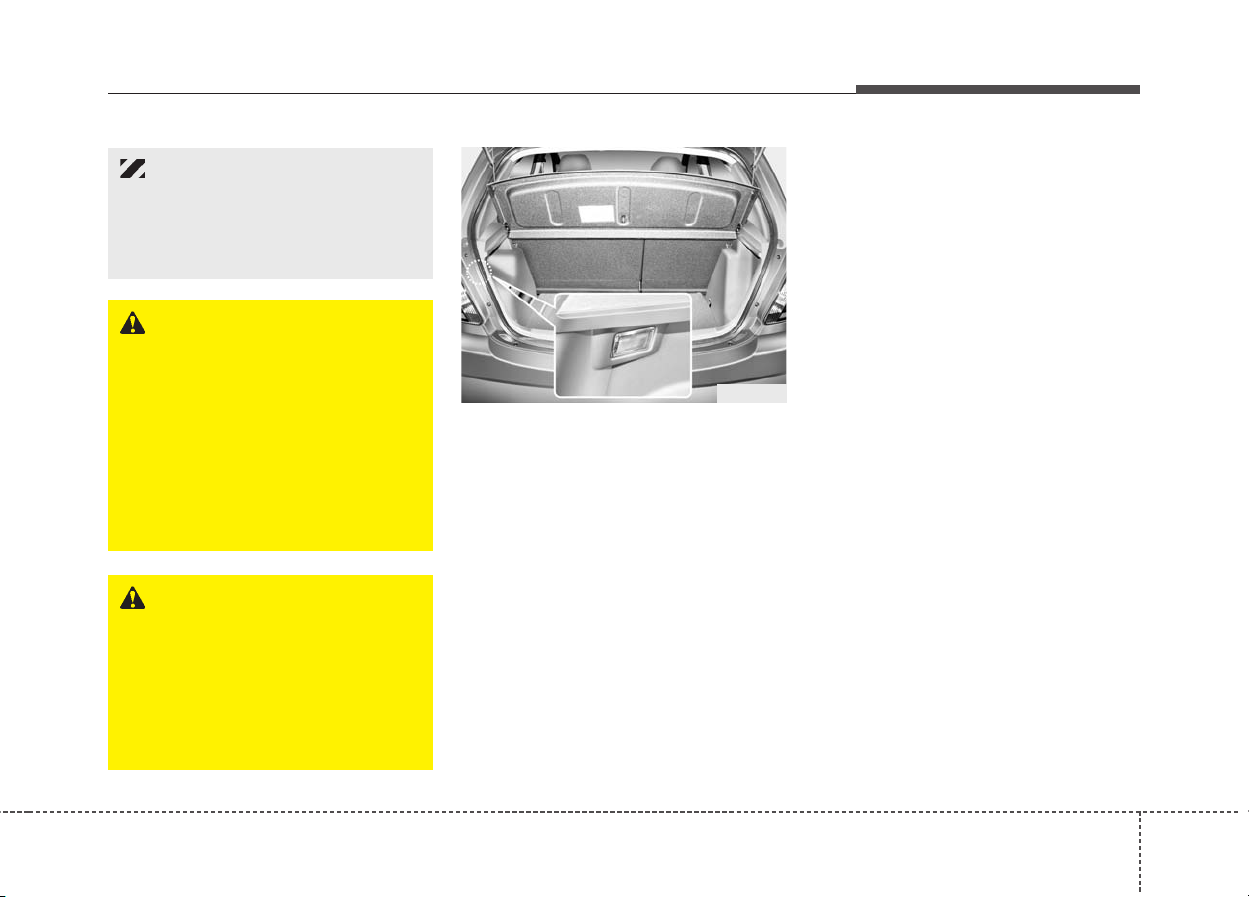
Rear hatch (if equipped)
Opening the rear hatch
• Rear hatch is locked or unlock ed with a
key .
• To open the rear hatch, inser t the key
into the lock, turn it to the unlock position (1) and pull up the rear hatch by
pressing the handle (2).
• You can also lock/unlock the latch (but
not release it) with the central door lock
system (if equipped).
• If unlocked, the rear hatch can be
opened by pressing the handle (2) and
pulling the hatch up.
1JBA3008
WARNING — Rear door
locks
If children accidentally open the
rear doors while the vehicle is in
motion, they could fall out and be
severely injured or killed.To prevent
children from opening the rear
doors from the inside, the rear door
safety locks should be used whenever children are in the vehicle.
1JBA3501
Lock
Unlock
313
Knowing your vehicle
Cargo area lamp (if equipped)
The cargo area lamp turns on when the
rear hatch is opened. It remains on until
the rear hatch is securely closed.
✽✽
NOTICE
Make sure to close the rear hatch
securely. If it remains open while engine
is not running, it may cause battery discharge because cargo area lamp
remains on.
CAUTION — Rear hatch
The rear hatch swings upward.
Make sure no objects or people are
near the rear of the vehicle when
opening the rear hatch.
WARNING — Exhaust
fumes
If you drive with the rear hatch
open, you will draw dangerous
exhaust fumes into your vehicle
which can cause serious injury or
death to vehicle occupants.
If you must drive with the rear hatch
open, keep the air vents and all windows open so that additional outside air comes into the vehicle.
WARNING — Rear cargo
area
Occupants should never ride in the
rear cargo area where no restraints
are available. To avoid injury in the
event of an accident or sudden
stops, occupants should always be
properly restrained.
1JBA3520
Knowing your vehicle
143
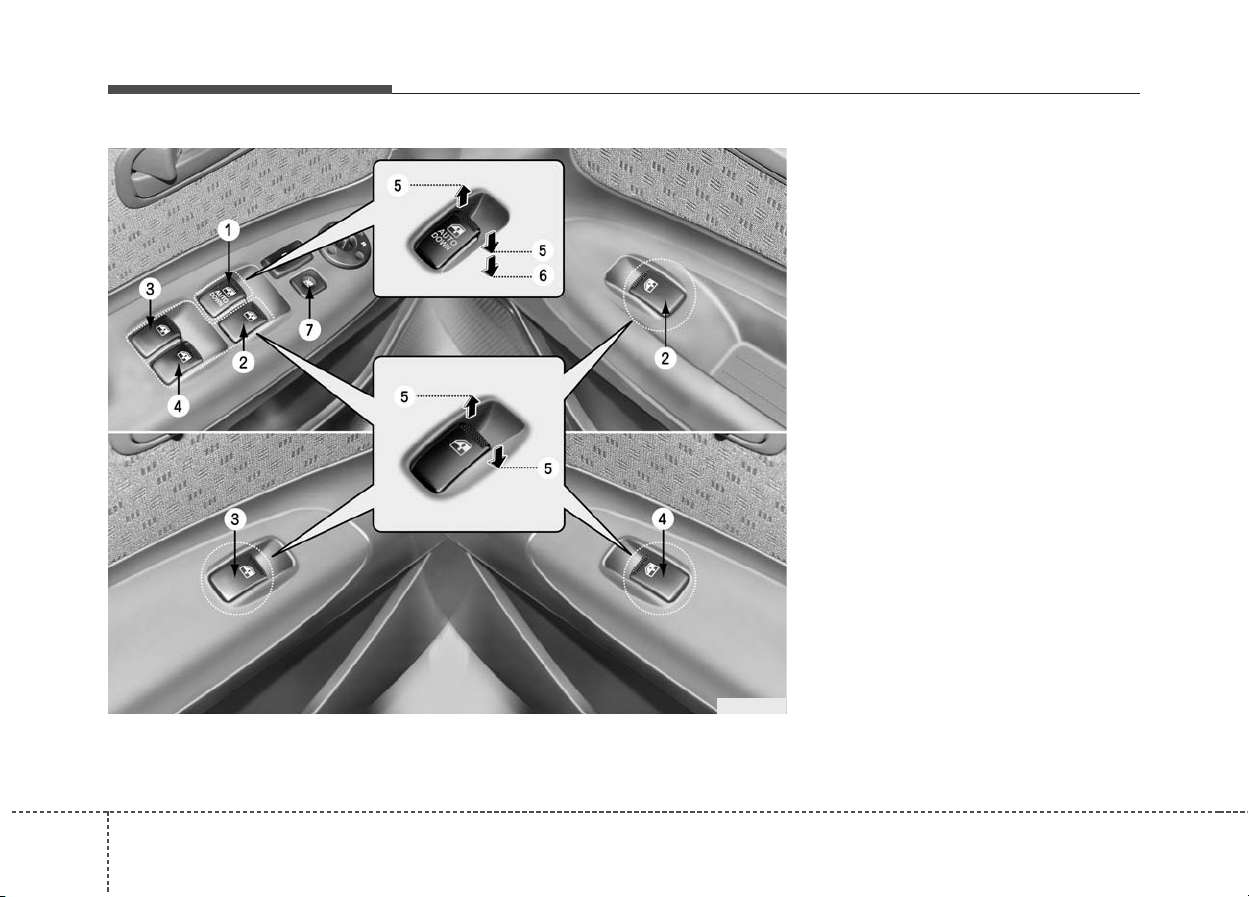
Power windows (if equipped)
(1) Driver’s door power window switch
(2) Front passenger’s door power win-
dow switch
(3) Rear door (left) power window
switch*
(4) Rear door (right) power window
switch*
(5) Window opening and closing
(6) Automatic power window down*
(Driver’s window)
(7) Power window lock switch*
• Power window timer*
The power windows can be operated
for approximately 30 seconds after the
ignition key is remov ed or turned to the
ACC or LOCK position.If the front door
is open, the window will not operate
unless the ignition key is in the ON
position.
* : if equipped
WINDOWS
1JBA3010
315
Knowing your vehicle
Power windows (if equipped)
The ignition switch must be in the ON
position for power windows to operate.
Each door has a power window switch
that controls that door’s window.
However, the driver has a power window
lock switch which can bloc k the oper ation
of passenger windows.
✽✽
NOTICE
While driving with the rear windows
down or with the sunroof (if equipped)
in an open(or partially open position),
your vehicle may demonstrate a wind
buffeting or pulsation noise. This noise
is a normal occurrence and can be
reduced or eliminated by taking the following actions. If the noise occurs with
one or both of the rear windows down,
partially lower both front windows
approximately one inch. If you experience the noise with the snroof open,
slightly reduce the size of the sunroof
opening.
✽✽
NOTICE
• To prevent the power window system
from the possibility of damage, do not
open or close two windows at the same
time. This will also ensure the longevity of the fuse.
(Continued)
(Continued)
• Never try to operate the main switch
on the driver’s door and the individual door window switch in opposing
directions at the same time. If this is
done, the window will stop and cannot
be opened or closed.
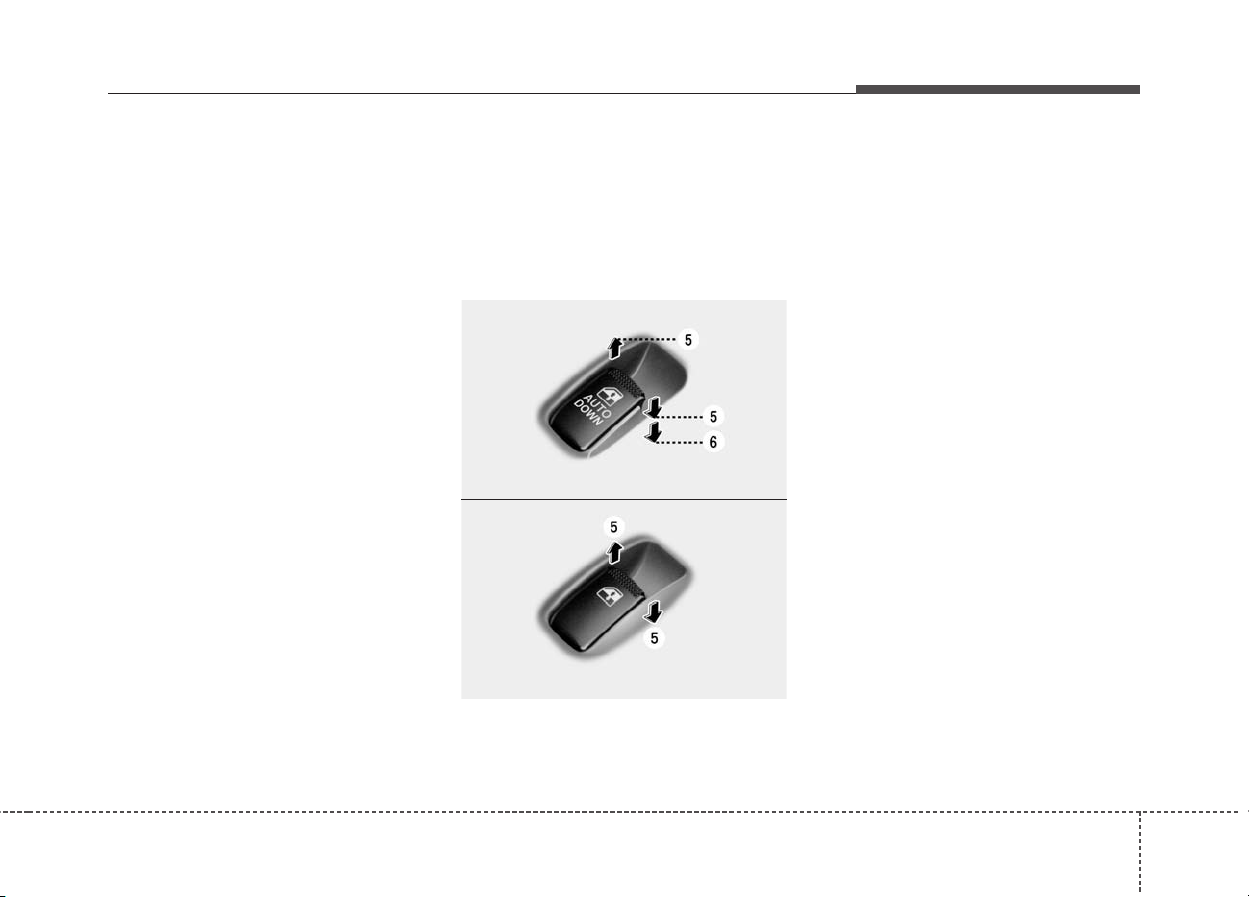
Window opening and closing
The driver’s door has a master power
window switch that controls all the windows in the vehicle. To open or close a
window, press down (5) or pull up (5) the
front portion of the corresponding switch.
Automatic power window down
(driver’s window, if equipped)
Depressing the power window switch
momentarily to the second detent position (6) completely lowers the driver’s
window even when the switch is
released. To stop the window at the
desired position while the window is in
operation, pull up the switch momentarily
to the opposite direction of the window
movement.
1JBH2013
1JBA3011
Knowing your vehicle
163
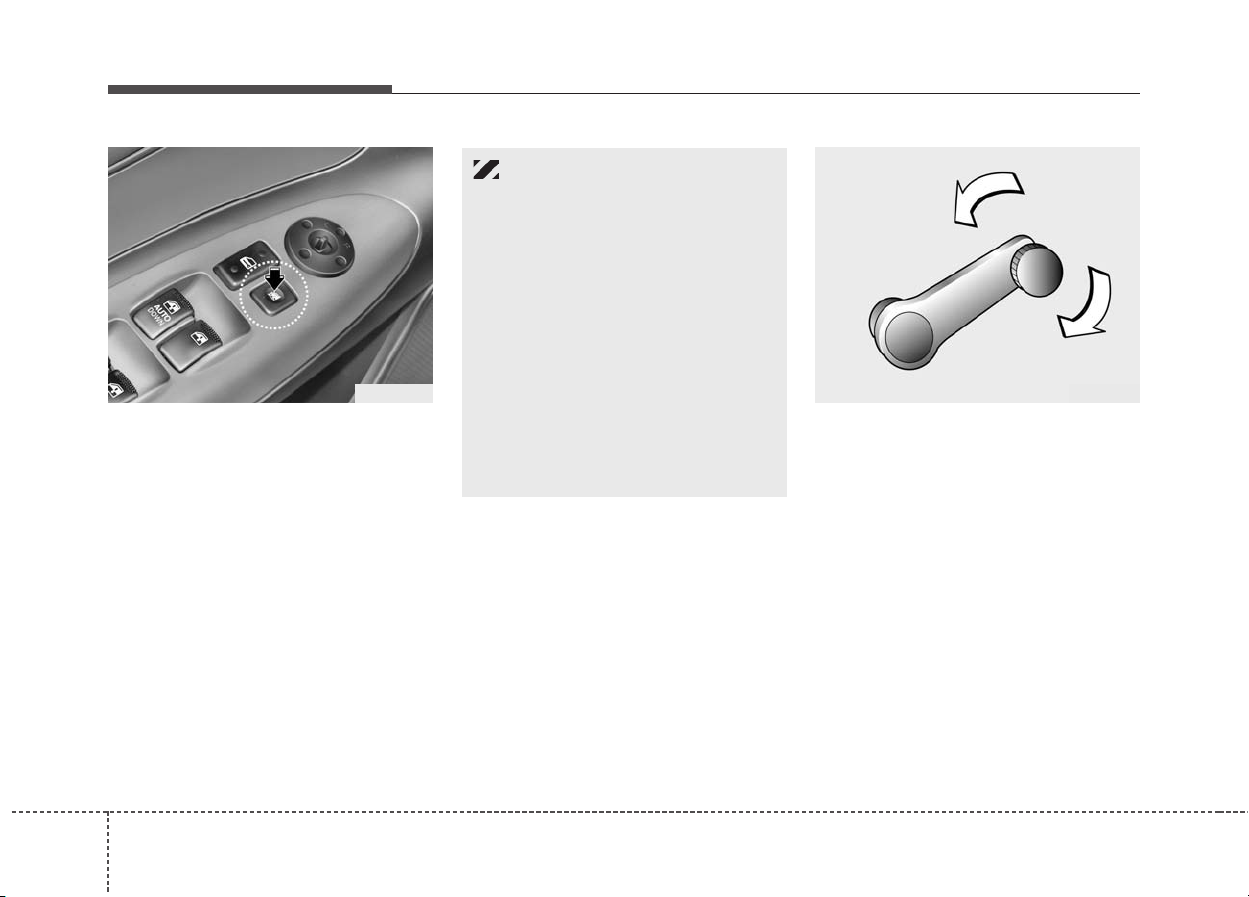
Power window lock switch
(if equipped)
• The driver can disable the power window switches on on all passenger
doors by depressing the power window
lock switch located on the driver’s door
to LOCK (pressed).
• When the power window lock switc h
is ON, the driver’s master control
cannot operate the passenger door
power windows either.
Manual windows (if equipped)
Use the window crank to open and close
each window.
CAUTION — Windows
• Always double-check to make
sure all arms, hands, heads and
other obstructions are safely out
of the way before closing a window. Serious injury could occur.
• Do not allow children to play with
the power windows. Keep the driver’s door power window lock
switch in the LOCK position
(depressed). Serious injury can
result from unintentional window
operation by a child.
• Never extend face or arms outside through the window opening
while driving.
3FDA2015
OJB028013

317
Knowing your vehicle
Driver’s seat
(1) Seat adjustment, forward / backward
(2) Seatback recliner
(3) Seat height adjustment
(4) Seat heater switch*
(5) Headrest adjustment
Front passenger seat
(6) Seat adjustment, forward / backward
(7) Seatback recliner
(8) Seat heater switch*
(9) Headrest adjustment
Rear seat
(10) Split folding rear seat*
(11) Armrest*
(12) Headrest adjustment*
* ; if equipped
SEAT
OJB03901N
Knowing your vehicle
183
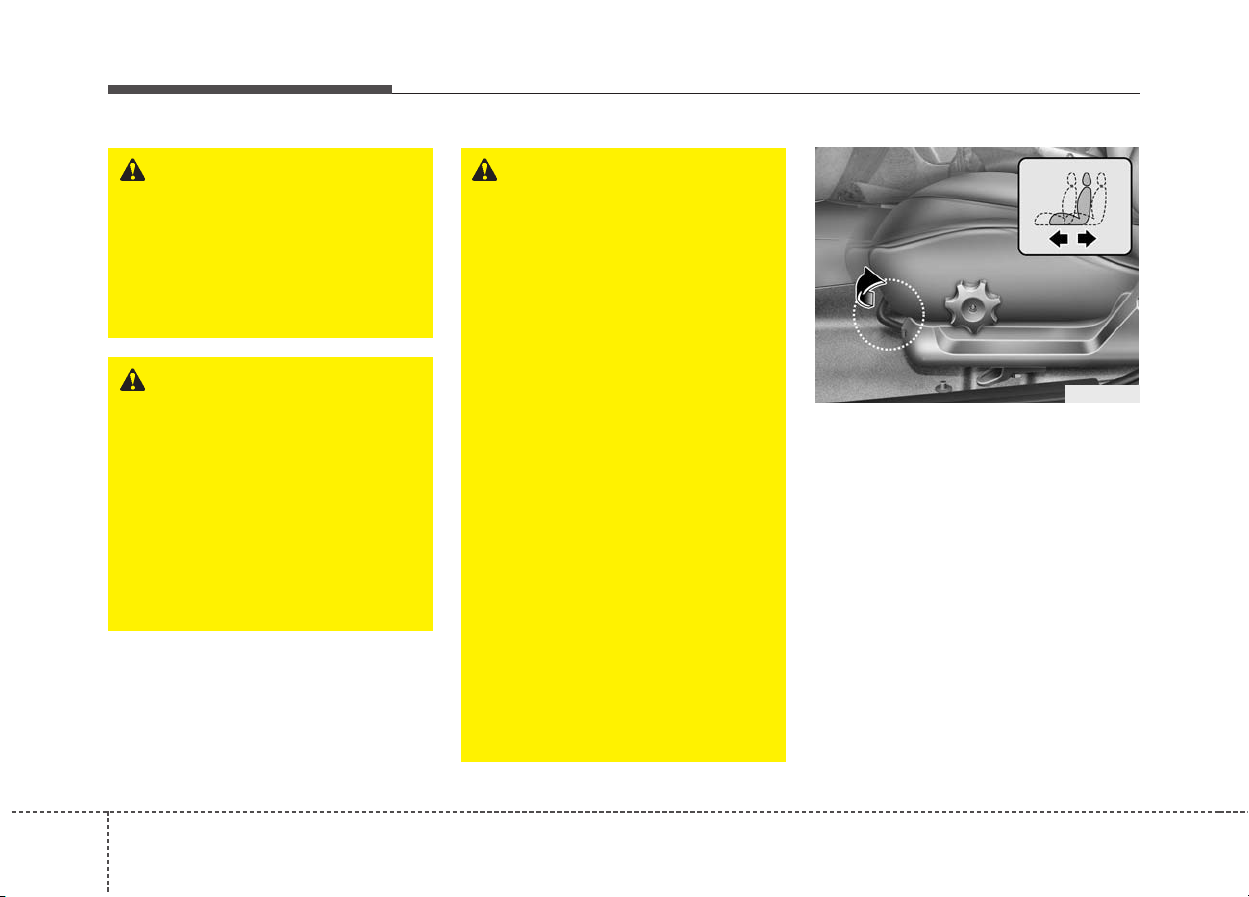
Front seat adjustment
Adjusting the seat forward and backward
To move the seat forward or backward:
1. Pull the seat slide adjustment lever
under the front edge of the seat cushion up and hold it.
2. Slide the seat to the desired position.
3. Release the lever and make sure the
seat is locked in place.
Adjust the seat before driving, and make
sure the seat is locked securely by trying
to move forward and backward without
using the control knob.If the seat moves,
it is not locked properly.
WARNING — Loose objects
Loose objects in the driver’s foot
area could interfere with the operation of the foot pedals, possibly
causing an accident. Loose objects
might interfere with the seat slide
mechanism. Do not place anything
under the front seats.
WARNING
• Children should never be left
unattended in the car.
• In order to avoid unnecessary air
bag injuries including the possibility of severe injury or death,
always sit as far back as possible
by moving the seat far back,while
still maintaining good vehicle
control. Serious injury or death
may be caused due to the deployment of the passenger’s air bag.
WARNING — Driver’s seat
• Never attempt to adjust seat while
the vehicle is moving. This could
result in loss of control, and an
accident causing death, serious
injury,or property damage.
• Do not allow anything to interfere
with the normal position of the
seatback. Storing items against a
seatback or in any other way
interfering with proper locking of
a seatback could result in serious
or fatal injury in a sudden stop or
collision.
• Always drive and ride with your
seatback upright and the lap portion of the safety belt, or lap belt,
snug and low across the hips.
This position puts your safety
belts in the best position to protect you in case of an accident.
• In order to avoid unnecessary air
bag injuries including the possibility of severe injury or death,
always sit as far back as possible
from the steering wheel so that
your chest is away at least 10
inches (250 mm) away from the
steering wheel.
OJB028016
319
Knowing your vehicle
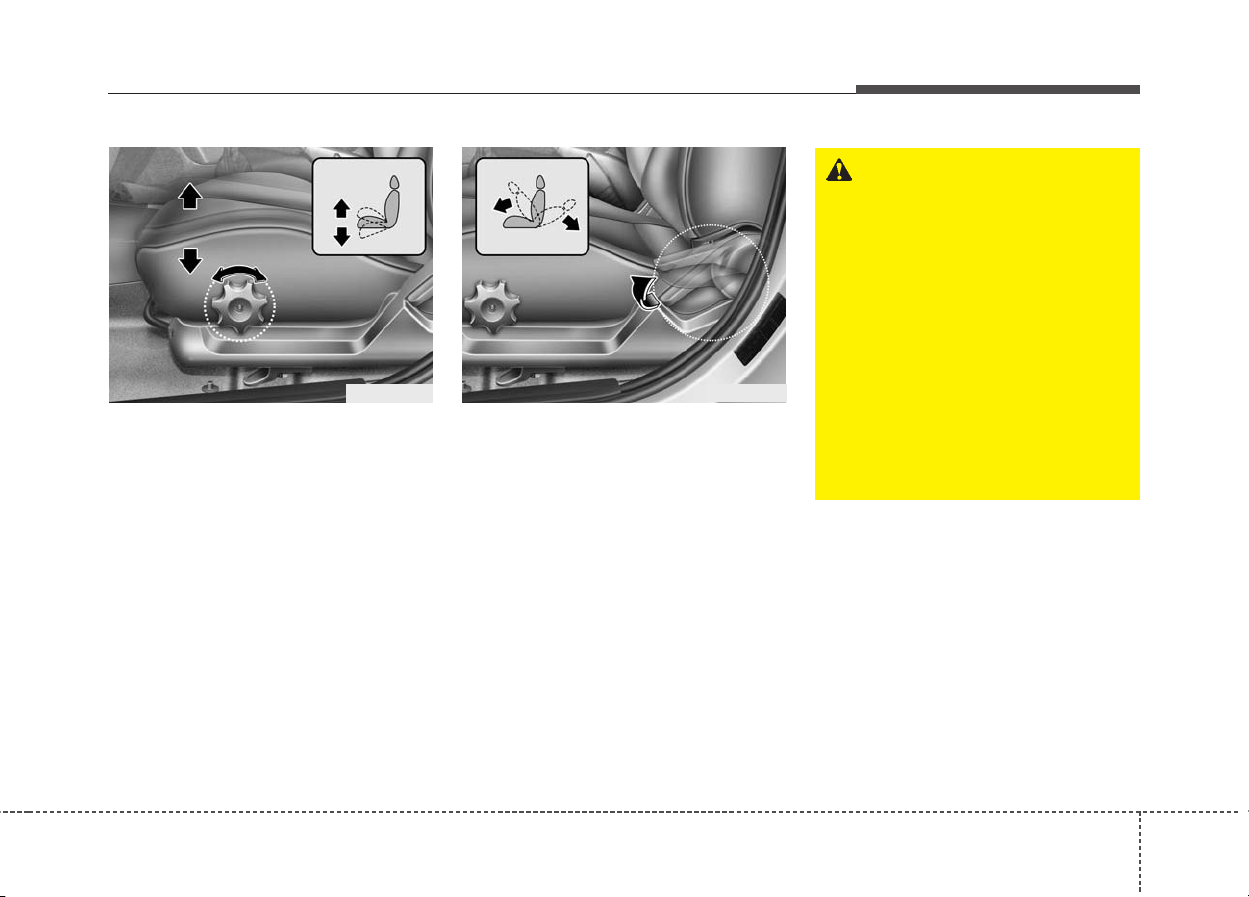
Adjusting height of the driver’s seat
cushion
To change the height of the seat cushion,
rotate the knob located on the outside of
the seat cushion.
Adjusting the seatback recliner
To recline the seatback:
1. Lean forward slightly and lift up on the
seatback recline lever located on the
outside of the seat, at the rear.
2. Carefully lean back on the seat and
adjust the seatback to the desired
position.
3. Release the lever and make sure the
seatback is locked in place. (The lever
MUST return to its original position for
the seatback to lock.)
WARNING — Driver respon-
sibility for front seat passenger
Driving or riding in a vehicle with a
front seatback reclined could lead
to serious or fatal injury in an accident. If a front seat is reclined during an accident, the occupant’ s hips
may slide under the lap portion of
the safety belt applying great force
to the unprotected abdomen or
neck. Serious or fatal internal
injuries could result. Keep the seatbacks in a comfortably upright
position whenever the vehicle is in
motion.
OJB028017A
OJB028018
Knowing your vehicle
203
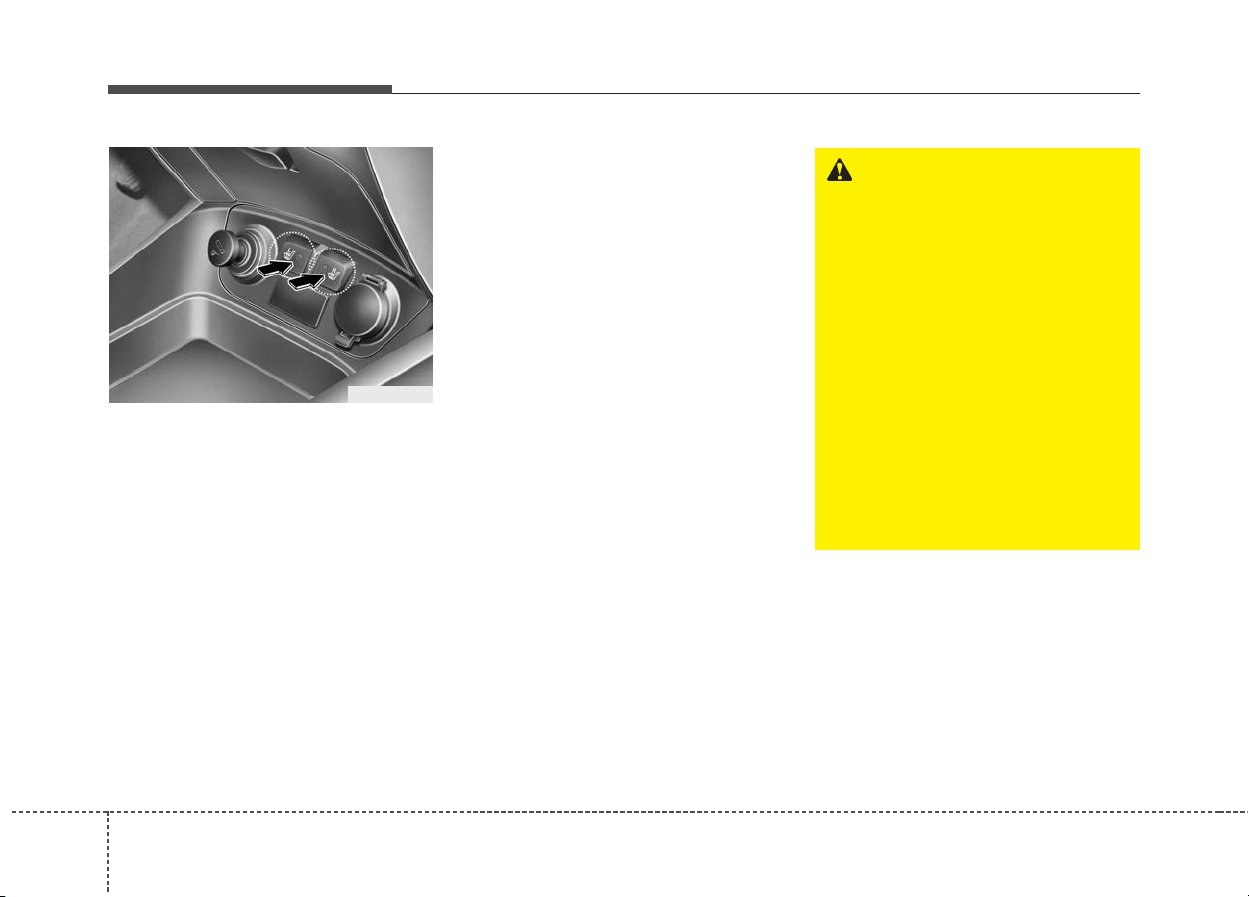
Warming the front seat (if equipped)
The front seats can be electrically heated
individually when the ignition switch is
ON.
When you depress the seat warmer
switch, a thermostat regulates seat temperature. To deactivate the heating system, depress the switch once again.
✽✽
NOTICE
• The seat warmer may not operate if
ambient temperature is warm enough.
• If the seat warmer doesn’t work when
the ambient temperature is below
24°C (75°F), have the system checked
by an authorized dealer.
• When cleaning the seats, do not use an
organic solvent such as thinner, benzene, alcohol and gasoline. Doing so
may damage the surface of the heater
or seats.
• To prevent overheating the seat
warmer, do not place blankets, cushions or seat covers on the seats while
the seat warmer is in operation.
• Do not place heavy or sharp objects
on seats equipped with seat warmers.
Damage to the seat warming components could occur.
OJB030019A
WARNING
Passengers should use extreme
caution when using seat warmers
due to the possibility of excess
heating or burns. In particular, the
following types of passengers
should exercise extreme care:
1. Infants, children, elderly or handicapped persons, or hospital outpatients
2. Persons with sensitive skin or
those that burn easily
3. Fatigued individuals
4. Intoxicated individuals
5. Individuals taking medication
that can cause drowsiness or
sleepiness (sleeping pills, cold
tablets, etc.)
321
Knowing your vehicle
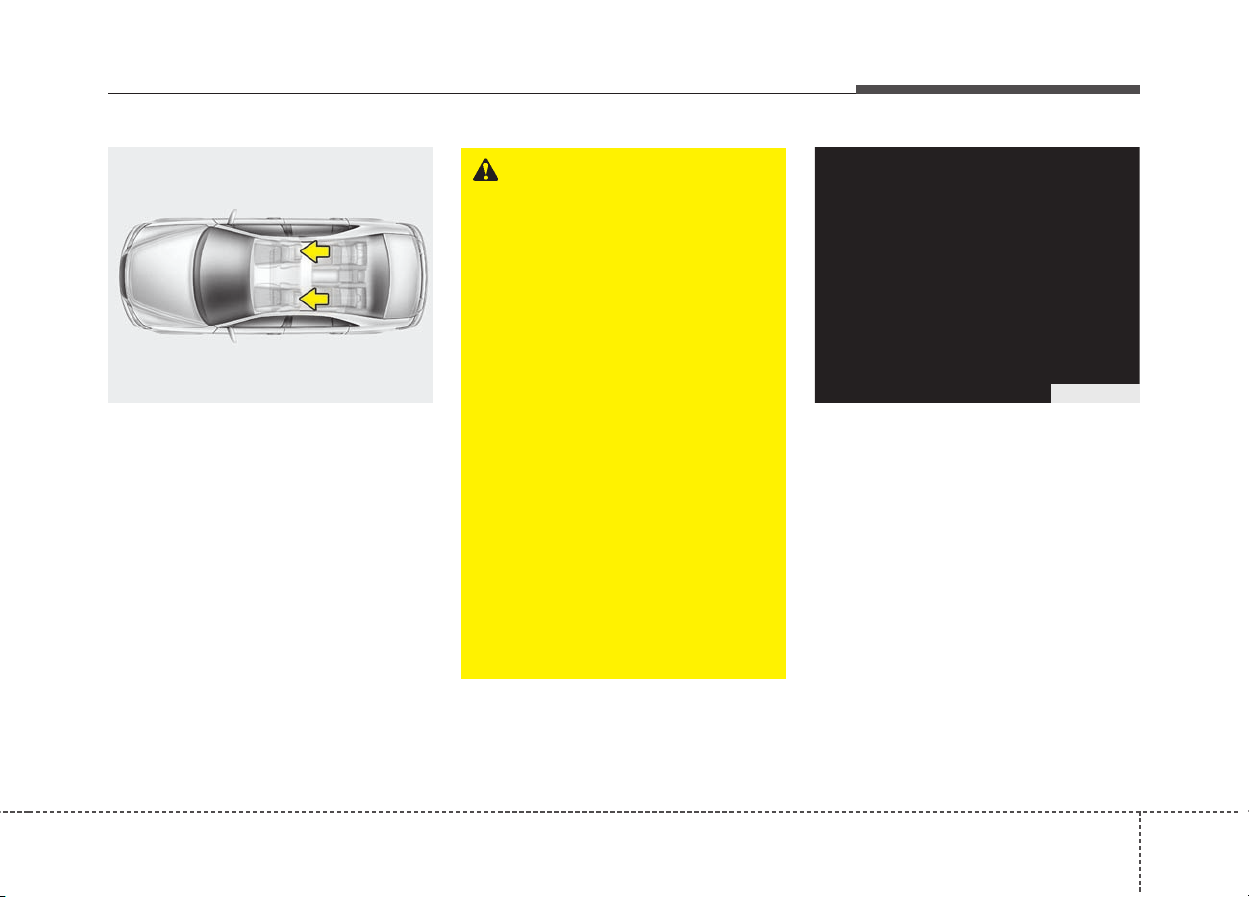
Headrest
The driver’s and front passenger’s seats
are equipped with a headrest for the
occupant’s safety and comfort.
The headrest not only provides comfort
for the driver and front passenger, but
also helps to protect the head and neck
in the event of a collision.
Adjusting the height up and down
To raise the headrest, pull it up to the
desired position (1). To lower the headrest, push and hold the release button (2)
on the headrest support and lower the
headrest to the desired position (3).
OBH038075L
WARNING
• For maximum effectiveness in
case of an accident, the headrest
should be adjusted so the middle
of the headrest is at the same
height of the center of gravity of
an occupant’s head. Generally,
the center of gravity of most people’s head is similar with the
height of the top of their eyes.
Also, adjust the headrest as close
to your head as possible. For this
reason, the use of a cushion that
holds the body away from the
seatback is not recommended.
• Do not operate the vehicle with
the headrests removed as severe
injury to the occupants may
occur in the event of an accident.
Headrests may provide pr otection
against neck injuries when properly adjusted.
• Do not adjust the headrest position of the driver’s seat while the
vehicle is in motion.
OOJB020020
Loading…
Инструкция (руководство) по эксплуатации Киа Рио
Инструкция Киа Рио 1 (BC)
года выпуска (2000, 2001, 2002, 2003, 2004, 2005)
Инструкция Киа Рио 2 (JB)
года выпуска (2006, 2007, 2008, 2009, 2010)
Инструкция Киа Рио 3 (QB)
года выпуска (2011, 2012, 2013, 2014, 2015, 2016, 2017)
Инструкция Киа Рио 4 (FB)
года выпуска (2017, 2018, 2019, 2020, 2021, 2022, 2023 +)
Инструкция Киа Рио 4 (FB) X Line
года выпуска (2017, 2018, 2019, 2020, 2021, 2022, 2023 +)
Идентификация автомобиля
Примечание: расположение идентификационных номеров автомобиля и агрегатов показано на рисунке «Расположение идентификационного номера автомобиля (VIN) и…
Технические характеристики двигателей
Примечание: приведенные значения мощности и крутящего момента являются ориентировочными и могут изменяться в зависимости от конкретной модификации и года выпуска, но в…
Сокращения и условные обозначения
Сокращения А/С — кондиционер воздуха ABS — антиблокировочная система тормозов CWT — система изменения фаз газораспределения DLC — диагностический разъем DOНС — два…
Общие инструкции по ремонту
1. Пользуйтесь чехлами на крылья, сиденья и напольными ковриками, чтобы предохранить автомобиль от загрязнения и повреждений. 2. При разборке укладывайте детали в…
Блокировка дверей
Внимание: при проведении работ в салоне автомобиля, оборудованного системой подушек безопасности и преднатяжителей ремней (система SRS), следует быть особенно…
Противоугонная система (модификации)
Примечание: противоугонная система предназначена для защиты от несанкционированного проникновения в автомобиль. 1. Активация режима охраны. Внимание: запуск двигателя…
Одометр и счетчики пробега
Примечание: ЖК-дисплей одометра работает, когда ключ в замке зажигания находится в положении «АСС» или ‘»ON». 1. Одометр показывает общий пробег автомобиля. 2. Счетчики…
Маршрутный компьютер (модификации)
Примечание: показания маршрутного компьютера отображаются на ЖК-дисплее одометра, когда ключ в замке зажигания находится в положении «АСС» или «ON». 1. Переключение…
Тахометр — общие сведения
Тахометр показывает частоту вращения (обороты) коленчатого вала двигателя в минуту (об/мин). Внимание: во время движения следите за показаниями тахометра. Его стрелка,…
Указатель количества топлива
1. Указатель показывает уровень топлива в топливном баке, когда ключ в замке зажигания находится в положении «ON» («F» — полный бак; «Е» — пустой). Метка (1) указывает…
Индикаторы комбинации приборов
Примечание: номер индикатора в таблице «Индикаторы комбинации приборов» соответствует номеру пункта. 1. Индикатор состояния стояночной тормозной системы и низкого уровня…
Часы — общие сведения
1. Часы расположены на центральной отделке панели приборов и работают, когда ключ в замке зажигания находится в положении «ON» или «АСС». 2. Настройка времени…
Стеклоподъемники — общие сведения
1. Стеклоподъемники работают, когда ключ в замке зажигания установлен в положение «ON» или в течение 30 секунд после выключения зажигания (ключ в положении «АСС» или…
Световая сигнализация на автомобиле
Примечание: С целью предотвращения разряда аккумуляторной батареи, наружное освещение будет выключено автоматически при открывании двери водителя, когда ключ зажигания…
Капот — общие сведения
1. Для открывания капота необходимо произвести следующие процедуры: а) Потяните рычаг привода замка капота на себя, как показано на рисунке. б) Слега приподнимите капот…
Задняя дверь (хэтчбек)
1. Чтобы отпереть заднюю дверь снаружи, необходимо вставить ключ в дверной замок и повернуть его по часовой стрелке. 2. Для открывания задней двери потяните на себя…
Крышка багажника (седан)
1. Чтобы открыть крышку багажника снаружи автомобиля, вставьте ключ в замок крышки багажника и поверните по часовой стрелке. Примечание: на моделях с центральным, замком…
Лючок заливной горловины топливного бака
1. Заглушите двигатель перед заправкой топливом. 2. Для открывания лючка заливной горловины потяните вверх рычаг, расположенный слева от сиденья водителя. Седан….
Регулировка положения рулевого колеса
Для регулировки расположения рулевого колеса потяните рычаг блокировки рулевой колонки вниз и, перемещая рулевое колесо по вертикали, установите его в нужное положение….
Управление зеркалами
Внимание: не удаляйте лед с зеркального элемента зеркала при помощи скребка, так как это может привести к повреждению зеркальной поверхности. Если лед мешает перемещению…
Обогреватель заднего стекла
Примечание: на моделях с подогревом боковых зеркал заднего вида при включении обогревателя заднего стекла одновременно включается подогрев боковых зеркал для удаления…
Сиденья — общие сведения
Внимание: Обязательно отрегулируйте сиденье перед поездкой. Отрегулируйте высоту подголовника так, чтобы его центр находился на уровне глаз. После регулировки убедитесь…
Обогреватель передних сидений
Обогреватель передних сидений может быть включен, когда ключ в замке зажигания находится в положении «ON». Для включения обогревателя сиденья нажмите на соответствующий…
Ремни безопасности
Общие сведения 1. Чтобы защитить Вас и Ваших пассажиров в случае дорожно-транспортного происшествия, рекомендуется всем людям, находящимся в автомобиле, пристегнуться…
Люк (модификации)
Управление люком возможно, когда ключ в замке зажигания установлен в положение «ON». Внимание: При закрытии и открытии люка или при регулировке наклона люка будьте…
Управление отопителем и кондиционером
Общие сведения 1. На моделях с автоматическим управлением кондиционером и отопителем не кладите вещи на датчик солнечного света. Кроме того, не закрывайте отверстия для…
Магнитола — основные моменты эксплуатации
Радио Качество приема радиосигнала может существенно изменяться во время движения автомобиля из-за особенностей рельефа местности, погодных условий и близости источников…
Прикуриватель — общие сведения
Прикуриватель работает, если ключ в замке зажигания находится в положении «ON» или «АСС». Для включения прикуривателя нажмите на него; когда прикуриватель накалится, то…
Стояночный тормоз
Чтобы включить стояночный тормоз при парковке автомобиля, нажмите на педаль тормоза и потяните рычаг стояночного тормоза на себя. Чтобы выключить стояночный тормоз,…
Управление автомобилем с АКПП
Положения селектора Для управления автоматической коробкой передач на напольной консоли, сбоку от водителя, установлен селектор, с помощью которого можно задавать…
Управление автомобилем с МКПП
Схема переключения передач показана на рисунке. Кроме того, схема изображена на ручке рычага. Прежде чем переключать передачу, всегда полностью выжимайте педаль…
Антиблокировочная тормозная система (ABS)
Внимание: используйте шины одинакового размера, конструкции и нагрузочной способности с исходными шинами автомобиля, поскольку использование шин другого типа может…
Советы по вождению в различных условиях
Общие рекомендации Внимание: Перед началом движения убедитесь, что стояночный тормоз полностью отпущен. Не держите ногу на педали тормоза во время движения. Это может…
Буксировка автомобиля
Для буксировки автомобиля обратитесь к технической службе по эвакуации автомобилей. Выполнение буксировки автомобиля неквалифицированными службами может привести к…
Запуск двигателя
Внимание: не допускайте длительной работы двигателя на повышенных оборотах и резких ускорений при непрогретом двигателе. Замок зажигания 1. Положение «LOCK». Двигатель…
Неисправности двигателя во время движения
Остановка двигателя во время движения 1. Постепенно снизьте скорость. Отведите автомобиль с дороги в безопасное место (например, на обочину). 2. Включите аварийную…
Запасное колесо, домкрат и инструменты
1. Домкрат хранится в специальном кронштейне крепления, который расположен в нише под накладкой пола багажника. Там же хранится запасное колесо (или докатка) и комплект…
Поддомкрачивание автомобиля
1. Установите автомобиль на ровной, горизонтальной твердой поверхности. 2. Заглушите двигатель, поверните ключ в замке зажигания в положение «LOCK» и включите аварийную…
Замена колеса
1. Если необходимо заменить колесо в дороге, то постепенно снизьте скорость и отведите автомобиль в безопасное место. 2. Отведите автомобиль на ровном месте с твердым…
Замена на «докатку»
1. «Докатка» (запасное колесо) используется в качестве экстренной замены. Она меньше диаметром, чем стандартное колесо. Внимание: При использовании «докатки»…
Рекомендации по выбору шин
1. При выборе шин обращайте внимание на маркировку. Геометрические размеры, грузоподъемность и максимальная скорость должны строго соответствовать рекомендациям…
Проверка давления и состояния шин
1. Регулярно проверяйте шины на отсутствие повреждений и утечки воздуха. Проверяйте давление в шинах через каждые две недели или, по меньшей мере, раз в месяц. Не…
Замена шин
1. Рекомендуется менять все шины или, по меньшей мере, обе передние или задние шины одновременно (см. «Рекомендации по выбору шин»). 2. После ремонта шины колесо должно…
Замена дисков колес
1. Замене дисков колес следует уделять должное внимание. Убедитесь, что устанавливаются диски с одинаковыми нагрузочной способностью, диаметром, шириной обода и вылетом….
Предохранители — общие сведения
Расположение 1. Для предотвращения повреждения электрической системы в результате короткого замыкания или перегрузки каждая отдельная электрическая цепь оснащена…
Замена ламп
Примечание: процедура замены и номинальное значение мощности ламп осветительных приборов автомобиля приведены в главе » Электрооборудование кузова «. При замене лампы…
Новостей компании Киа
Ссылка в разных форматах на этот раздел
TextHTMLBB Code
Где я могу найти номер VIN для моего KIA?
Положение номера VIN различается среди марок автомобилей и моделей. Он может быть отпечатан на кузове автомобиля или указан на табличке. Рекомендуется обратиться к руководству по эксплуатации KIA Rio / Rio Hatchback (2010) для точной информации о месте нахождения номера VIN.
Как проверить давление в шинах моего KIA Rio / Rio Hatchback (2010)?
Вы можете проверить давление в шинах вашего KIA Rio / Rio Hatchback (2010) с помощью манометра для измерения давления в шинах. Рекомендуемое давление в шинах обычно указано на наклейке внутри двери водителя или в руководстве владельца.
Какое масло нужно моему KIA Rio / Rio Hatchback?
Тип масла, необходимого вашему KIA Rio / Rio Hatchback, зависит от типа двигателя. Обратитесь к руководству владельца для рекомендуемой вязкости и спецификации масла.
Что такое номер VIN?
Номер VIN, также известный как идентификационный номер автомобиля, служит уникальным идентификатором для каждого автомобиля. Для точного местоположения номера VIN рекомендуется обратиться к руководству по эксплуатации KIA Rio / Rio Hatchback (2010).
Где я могу найти информацию о гарантийном покрытии моего KIA Rio / Rio Hatchback?
Информацию о гарантийном покрытии вашего KIA Rio / Rio Hatchback (2010) можно найти в гарантийном буклете, поставляемом с автомобилем. Обычно в нем содержится информация о сроке действия и охвате различных компонентов.
Когда мне следует запланировать техобслуживание для моего KIA Rio / Rio Hatchback?
Регулярное техническое обслуживание необходимо для оптимальной производительности автомобиля. Подробности о частоте техобслуживания и конкретных задачах можно найти в инструкциях по техническому обслуживанию. Обычно крупное техобслуживание должно производиться каждые два года или после пробега 30 000 километров.
Как сбросить индикатор технического обслуживания на панели приборов моего KIA Rio / Rio Hatchback?
Чтобы сбросить индикатор технического обслуживания на панели приборов вашего KIA Rio / Rio Hatchback (2010), следуйте инструкциям, описанным в руководстве по эксплуатации. Обычно это требует нажатия определенной комбинации кнопок в определенном режиме работы автомобиля.
С каким интервалом мне следует рассмотреть замену тормозной жидкости для моего KIA Rio / Rio Hatchback?
Рекомендуется заменять тормозную жидкость в вашем KIA Rio / Rio Hatchback (2010) каждые два года.
Что делать, если загорается лампа контроля двигателя моего KIA Rio / Rio Hatchback?
Если загорается лампа контроля двигателя вашего KIA Rio / Rio Hatchback (2010), это указывает на потенциальную проблему с автомобилем. Рекомендуется обратиться к квалифицированному механику для диагностики причины проблемы.
Как часто мне следует переключать шины на моем KIA Rio / Rio Hatchback?
Периодическая перестановка шин помогает обеспечить равномерный износ и продлить срок службы шин. Обычно рекомендуется переключать шины каждые 6 000-8 000 километров или по указаниям в руководстве владельца KIA Rio / Rio Hatchback (2010).
Что делать, если разряжается аккумулятор моего KIA?
Если разряжается аккумулятор вашего KIA Rio / Rio Hatchback, вы можете запустить автомобиль, используя провода для запуска двигателя и другой автомобиль с заряженным аккумулятором. В противном случае вы можете вызвать помощь на дороге.
Что делать, если одна или несколько дверей отказываются открываться изнутри?
Если у вас возникают проблемы с открыванием дверей изнутри, вероятно, включена детская защелка. Способ отключения детской защелки зависит от марки и модели автомобиля.
Как программировать новый ключ для моего KIA Rio / Rio Hatchback?
Для программирования нового ключа для вашего KIA Rio / Rio Hatchback обычно требуется следовать определенным инструкциям, описанным в руководстве пользователя, или обратиться за помощью в дилерский центр или к слесарю.
Какой рекомендуемый интервал для замены воздушного фильтра в моем KIA Rio / Rio Hatchback?
Рекомендуемый интервал для замены воздушного фильтра в вашем KIA Rio / Rio Hatchback (2010) зависит от условий езды. Обычно рекомендуется проверять воздушный фильтр каждые 12 000-15 000 километров и заменять его при необходимости.
Доступно ли руководство для KIA Rio / Rio Hatchback (2010) на русском языке?
Нет, руководство для KIA Rio / Rio Hatchback (2010) доступно на английском языке.