
Janome 7700QCP Horizon
Instruction Book
D1S
D2S
D3S
A
P
C
APC
AA
uu
tt
o
m
om
aa
t
i
c
tic PP
ll
a
t
at
e e
CC
oonn
vv
ee
rr
tt
e
rer
Memory Craft 7700 QCP
View the manual for the Janome 7700QCP Horizon here, for free. This manual comes under the category sewing machines and has been rated by 2 people with an average of a 7.6.
This manual is available in the following languages: English. Do you have a question about the Janome 7700QCP Horizon or do you need help?
Ask your question here
Product Images (1)
Janome 7700QCP Horizon specifications
Below you will find the product specifications and the manual specifications of the Janome 7700QCP Horizon.
The Janome 7700QCP Horizon is a sewing machine that offers a range of features to assist in various sewing projects. This machine is designed to be user-friendly and efficient, making it suitable for both beginners and experienced sewers.
The Janome 7700QCP Horizon is equipped with a large working area, providing ample space for larger quilting and sewing projects. It also features a high-resolution LCD screen, which allows users to easily navigate through the machine’s settings and select their desired stitch options.
This sewing machine offers a variety of stitch options, including a wide range of decorative stitches and alphabets. Users can choose from over 250 stitch patterns, allowing for creative and personalized sewing projects. The machine also includes an automatic thread cutter and a built-in needle threader, making it convenient and time-saving.
The Janome 7700QCP Horizon has a powerful motor, ensuring smooth and precise stitching. It also features an adjustable presser foot, allowing users to work with different fabric thicknesses. Additionally, this machine offers advanced features such as a knee lift lever, which allows for hands-free sewing, and a dual-feed system, ensuring even fabric feeding.
Constructed with durable materials, the Janome 7700QCP Horizon is designed to last and provide reliable performance over time. It also comes with a variety of accessory options, including different presser feet and extension tables, further enhancing its versatility.
Overall, the Janome 7700QCP Horizon is a high-quality sewing machine that offers a range of features and options to assist users in their sewing projects.
General
Frequently Asked Questions
Can’t find the answer to your question in the manual? You may find the answer to your question in the FAQs about the Janome 7700QCP Horizon below.
Why is the sewing machine not starting when I press the foot pedal?
Ensure that the power cord is securely plugged into the machine and the electrical outlet. Also, check if the machine’s power switch is turned on.
How do I adjust the thread tension on the sewing machine?
To adjust the thread tension, use the tension dial located on the front of the machine. Turn it to the right for tighter tension and to the left for looser tension, depending on your fabric and thread combination.
Why is the needle on my sewing machine not picking up the bobbin thread?
Check if the needle is inserted correctly and not bent. Make sure the bobbin is correctly threaded and the bobbin case is properly installed. Also, ensure that the machine is threaded correctly and the needle is at its highest position before attempting to pick up the bobbin thread.
How can I prevent fabric from bunching up or getting stuck while sewing?
Ensure that the presser foot is properly lowered before starting to sew. Additionally, use the appropriate needle size and type for your fabric, and make sure the fabric is positioned and guided smoothly through the machine as you sew.
Why is the sewing machine producing uneven stitches?
Check if the needle is securely tightened and not dull or bent. Ensure that the upper thread is threaded correctly, passing through all the required guides and tension discs. If the problem persists, adjust the thread tension dial slightly until you achieve even stitches.
What size needle should I use?
Which size of needle you can best use depends on the thickness of the fabric you use. With a thick fabric you should use a thick needle. The packaging of your needle states for which substances your needle is suitable.
Why does the needle break while sewing?
There can be several causes for needle breakage:
— Not using the right needle for the right fabric
— The needle is set too low
— The fabric is not properly guided
— The bobbin case is not inserted correctly
How long does a sewing needle last?
Generally, a sewing needle lasts about 7 to 9 hours.
Is the manual of the Janome 7700QCP Horizon available in English?
Yes, the manual of the Janome 7700QCP Horizon is available in English .
Is your question not listed? Ask your question here
Janome Horizon Memory craft 7700 QCP Sewing Machine PDF User Guides and Manuals for Free Download: Found (1) Manuals for Janome Horizon Memory craft 7700 QCP Device Model (Instruction Book)
Janome Horizon Memory craft 7700 QCP Instruction Book
Details:
- Manufacturer: Janome
- Product Name/ID: Janome Horizon Memory craft 7700 QCP / #479634
- Category: Sewing Machine
- File Path: janome/horizon-memory-craft-7700-qcp_479634.pdf
- Last Updated: 01 Apr 2025
- Description: This manual for Janome Horizon Memory craft 7700 QCP is your ultimate guide, offering clear instructions on setup, customization options, and routine maintenance to ensure your device operates efficiently.
- Document Type: User Manual
- Pages: 96
Download PDF
Read Online
The Janome Horizon Memory Craft 7700 QCP is a remarkable sewing machine that combines advanced technology with ease of use, making it a favorite among both novice and experienced sewers. This machine is designed to provide superior stitching capabilities and a plethora of features that elevate the sewing experience. With its sleek design and robust functionality, it stands out in the crowded market of sewing machines.
One of the most striking features of the Janome Horizon Memory Craft 7700 QCP is its large workspace. The extended arm allows for handling larger projects such as quilts and home decor items with relative ease. The 11 inches of throat space provides ample room to maneuver fabrics, making it suitable for a variety of sewing applications. This feature dramatically enhances the comfort and efficiency of sewing, particularly for quilters.
Another significant advantage of the Horizon Memory Craft 7700 QCP is its advanced sensor system, which ensures precise stitching. The machine automatically adjusts the tension and feed dog height based on the fabric type, reducing the need for manual adjustments. This is particularly beneficial for creating intricate designs, as it minimizes the risk of errors. Additionally, the seven-piece feed dog system allows for smooth fabric movement, ensuring consistent stitches regardless of the thickness or texture of the material.
Users will appreciate the expansive array of built-in stitches and features, including:
- Over 200 built-in stitches, including decorative, quilting, and utility stitches.
- Custom stitch capability, which allows for the creation of unique stitch patterns.
- Easy-to-use LCD touchscreen for selecting stitches and adjusting settings.
- Automatic one-step buttonhole function.
- Acufeed, which provides even feeding from the top and bottom of the fabric.
The Horizon Memory Craft 7700 QCP does not skimp on technology either. The built-in needle threader and automatic thread cutter make the sewing process quicker and more enjoyable. Unique time-saving features such as the memory function allow users to save and retrieve customized stitches, streamlining the workflow for repeated projects. These elements contribute to a superior sewing experience, allowing users to focus on their creativity without getting bogged down by tedious tasks.
While the machine boasts a multitude of features, it is important to address the learning curve that comes with a sophisticated piece of technology like the Janome Horizon Memory Craft 7700 QCP. Beginners may need to spend some time familiarizing themselves with all the built-in functionalities. However, Janome provides a wealth of online resources, including tutorials and manuals, to assist users in navigating through the machine’s features.
Overall, the Janome Horizon Memory Craft 7700 QCP is a stellar choice for anyone looking to invest in a high-quality sewing machine. Whether you’re a hobbyist or a professional, the machine’s advanced features, user-friendly design, and versatility make it an outstanding addition to your sewing room. With its focus on precision and creativity, this machine is truly designed for those who are passionate about sewing.
In conclusion, the Horizon Memory Craft 7700 QCP is not just a sewing machine; it’s a gateway to creativity and craftsmanship that empowers sewers of all skill levels to achieve their best work. If you’re in the market for a sewing machine that offers an exceptional combination of technology, power, and ease of use, look no further than the Janome Horizon Memory Craft 7700 QCP.

Instruction Book
D1S
D2S
D3S
A
P
C
APC
AA
uu
tt
o
m
om
aa
t
i
c
tic PP
ll
a
t
at
e e
CC
oonn
vv
ee
rr
tt
e
rer
Memory Cra ft 7700 QCP

IMPORTANT SAFETY INSTRUCTIONS
This appliance is not intended for use by persons (including children) with reduced physical, sensory or
mental capabilities, or lack of experience and knowledge, unless they have been given supervision or
instruction concerning use of the appliance by a person responsible for their safety.
Children should be supervised to ensure that they do not play with this sewing machine.
When using an electrical appliance, basic safety precautions should always be followed, including the
following:
This sewing machine is designed and manufactured for household use only.
Read all instructions before using this sewing machine.
DANGER— To reduce the risk of electric shock:
1. An appliance should never be left unattended when plugged in. Always unplug this sewing
machine from the electric outlet immediately after using and before cleaning.
WARNING— To reduce the risk of burns, fire, electric shock, or injury to persons:
1. Do not allow to be used as a toy. Close attention is necessary when this sewing machine is used
by or near children.
2. Use this appliance only for its intended use as described in this owner’s manual.
Use only attachments recommended by the manufacturer as contained in this owner’s manual.
3. Never operate this sewing machine if it has a damaged cord or plug, if it is not working properly, if
it has been dropped or damaged, or dropped into water.
Return this sewing machine to the nearest authorized dealer or service center for examination,
repair, electrical or mechanical adjustment.
4. Never operate the appliance with any air opening blocked. Keep ventilation openings of this
sewing machine and foot controller free from accumulation of lint, dust and loose cloth.
5. Never drop or insert any object into any opening.
6. Do not use outdoors.
7. Do not operate where aerosol (spray) products are being used or where oxygen is being
administered.
8. To disconnect, turn all controls to the off (“O”) position, then remove plug from outlet.
9. Do not unplug by pulling on cord. To unplug, grasp the plug, not the cord.
10. Keep fingers away from all moving parts. Special care is required around the sewing machine
needle and/or cutting blade.
11. Always use the proper needle plate. The wrong plate can cause the needle to break.
12. Do not use bent needles.
13. Do not pull or push fabric while stitching. It may deflect the needle causing it to break.
14. Switch this sewing machine off (“O”) when making any adjustment in the needle area, such as
threading the needle, changing the needle, threading the bobbin or changing the presser foot, and
the like.
15. Always unplug this sewing machine from the electrical outlet when removing covers, lubricating, or
when making any other adjustments mentioned in this owner’s manual.
SAVE THESE INSTRUCTIONS
The design and specifications are subject to change without a prior notice.
Please note that on disposal, this product must be safely recycled in accordance with relevant National
legislation relating to electrical/electronic products. If in doubt please contact your retailer for guidance.
(European Union only)

TABLE OF CONTENTS
GETTING READY TO SEW
Names of Parts ………………………………………………………………. 2
Standard Accessories ……………………………………………………… 3
Extension Table ………………………………………………………………. 4
Accessories Storage ……………………………………………………….. 4
Connecting the Power Supply …………………………………………… 5
Controlling Sewing Speed ………………………………………………… 6
Speed control slider ……………………………………………………… 6
Foot control …………………………………………………………………. 6
Machine Operating Buttons………………………………………………. 7
Start/stop button …………………………………………………………… 7
Reverse button …………………………………………………………….. 7
Auto-lock button……………………………………………………………. 7
Needle up/down position button ……………………………………… 8
Thread cutter button ……………………………………………………… 8
Jog dial ……………………………………………………………………….. 8
Confirm button ……………………………………………………………… 8
Raising and Lowering the Presser Foot ……………………………… 9
Knee Lifter ……………………………………………………………………… 9
Function Keys……………………………………………………………….. 10
Changing the Presser Foot …………………………………………….. 11
Removing and attaching the Foot Holder………………………….. 11
Setting for Dual Feed Sewing …………………………………………. 12
Attaching the dual feed foot …………………………………………. 12
Setting the dual feed device …………………………………………. 12
Disengaging the dual feed device …………………………………. 13
Removing the dual feed foot ………………………………………… 13
Setting the Spool of Thread ……………………………………………. 14
Extra spool pin …………………………………………………………… 14
Removing the Bobbin …………………………………………………….. 14
Winding the Bobbin ……………………………………………………….. 15
Inserting the Bobbin ………………………………………………………. 16
Threading the Machine ………………………………………………….. 17
Built-in needle threader ……………………………………………….. 18
Drawing up the Bobbin Thread ………………………………………… 19
Changing Needles ………………………………………………………… 20
Balancing Thread Tension ………………………………………………. 21
Balanced thread tension ……………………………………………… 21
Manual thread tension adjustment ………………………………… 21
Adjusting the Foot Pressure ……………………………………………. 22
Dropping the Feed Dog ………………………………………………….. 22
Selecting Patterns …………………………………………………………. 23
Help key ……………………………………………………………………. 24
Customizing Machine Settings ………………………………………… 25
Screen brightness ………………………………………………………. 25
Buzzer sound …………………………………………………………….. 25
Sub window display time ……………………………………………… 26
Resumption setting …………………………………………………….. 26
Favorite stitch adjustment…………………………………………….. 26
Touch panel calibration………………………………………………… 27
Language selection …………………………………………………….. 28
Deleting stored pattern combinations …………………………….. 28
Resetting all to default …………………………………………………. 28
UTILITY STITCHES
Straight Stitch ……………………………………………………………….. 29
Starting to sew …………………………………………………………… 29
Sewing from the edge of thick fabric ……………………………… 29
Changing sewing direction …………………………………………… 29
Securing seams …………………………………………………………. 30
Using the Seam Guides …………………………………………………. 30
Tu r ning a square corner ………………………………………………. 30
Assembling the Extra Wide Ta ble ……………………………………. 31
Using the Cloth Guide ……………………………………………………. 31
Adjusting the needle drop position ………………………………… 32
Adjusting the stitch length ……………………………………………. 32
Customizing preset values of stitch length and width……….. 33
Restoring the default settings ……………………………………….. 33
Automatic plate converter…………………………………………….. 34
Opening the automatic plate converter ………………………….. 35
Variety of straight stitches ……………………………………………. 36
Sewing with the Dual Feed Device …………………………………… 38
Basting ………………………………………………………………………… 39
Zigzag Stitch ………………………………………………………………… 40
Adjusting the stitch width ……………………………………………… 40
Adjusting the stitch length ……………………………………………. 40
Overcasting stitches ………………………………………………………. 41
Zipper Sewing ………………………………………………………………. 43
Rolled Hem ………………………………………………………………….. 46
Blind Hemming ……………………………………………………………… 47
Shell Tuck…………………………………………………………………….. 49
Buttonholes ………………………………………………………………….. 50
Square (Sensor) buttonhole …………………………………………. 51
Corded buttonhole ………………………………………………………. 54
Adjusting the buttonhole width ……………………………………… 55
Adjusting the buttonhole stitch density …………………………… 55
Memory buttonhole …………………………………………………….. 56
Round end and fine fabric buttonholes…………………………… 57
Keyhole buttonholes ……………………………………………………. 57
Stretch buttonholes …………………………………………………….. 58
Button Sewing ………………………………………………………………. 59
Darning ……………………………………………………………………….. 60
Ta cking ………………………………………………………………………… 62
Eyelet ………………………………………………………………………….. 63
PATCHWORK AND QUILTING
Patchwork Piecing…………………………………………………………. 64
Patchwork Stitches………………………………………………………… 64
Quilting ………………………………………………………………………… 65
Clasp Stitch ………………………………………………………………….. 65
Free-motion Quilting………………………………………………………. 66
DECORATIVE STITCHES
Applique ………………………………………………………………………. 67
Smocking …………………………………………………………………….. 67
Fagoting ………………………………………………………………………. 68
Scallop ………………………………………………………………………… 68
Cording (3-strand cording) ……………………………………………… 69
Cording (1-strand cording) ……………………………………………… 69
Satin Stitches ……………………………………………………………….. 70
Sewing Border Designs with the Border Guide Foot…………… 70
Sewing a Mirror Images of a Pattern………………………………… 71
Sewing a Single Unit of a Pattern ……………………………………. 71
Twin Needle Sewing ………………………………………………………. 72
PROGRAMMING A PATTERN COMBINATION
Pattern Combination ……………………………………………………… 74
Pattern Combination with a Mirror Image………………………….. 75
Programming Automatic Thread Cutting …………………………… 76
Checking Properties of a Pattern Combination ………………….. 76
Sewing the Pattern Combination from the Beginning …………. 77
Sewing the Current Pattern from the Beginning…………………. 77
Bridge Stitches ……………………………………………………………… 78
Programming French Knots ……………………………………………. 79
MONOGRAMMING
Selecting a Letter Style ………………………………………………….. 80
Selecting a Character…………………………………………………….. 80
Programming a Monogram …………………………………………….. 81
EDITING A PTTERN COMBINATION
Viewing a Long Combination ………………………………………….. 82
Deleting Patterns or Characters ………………………………………. 82
Inserting a Pattern …………………………………………………………. 83
Duplicating a Pattern ……………………………………………………… 83
Uniform Stitch Adjustment………………………………………………. 84
Unified needle drop position …………………………………………. 84
Programming Satin Stitches and Stretch Stitches ……………… 85
Individual Stitch Adjustment ……………………………………………. 85
STORING AND RECALLING A PATTERN COMBINATION
Storing a Pattern Combination ………………………………………… 86
Overwriting a Stored Combination …………………………………… 86
Recalling a Stored Combination ……………………………………… 87
Deleting a Stored Combination ……………………………………….. 87
CARE AND MAINTENANCE
Correcting Distorted Stitch Patterns …………………………………. 88
Cleaning the Hook Race, Feed Dog and Thread Cutter
Mechanism ………………………………………………………………… 89
Reattaching the Bobbin Holder and Needle Plate ……………… 89
Problems and Warning Signals ……………………………………….. 90
Troubleshooting …………………………………………………………….. 92
1

14
13
4
3
2
1
10
24
43
26
34
35
33
32
12
11
25
45
5
6
7
9
23
22
8
15
16
44
17
46
18
19
20
21
27
28
29
30
31
36
Names of Parts
1Take-up lever
2 Foot pressure dial
3 Reference chart
4Top cover
5 Foot storage compartment
6 Bobbin thread cutter
7 Bobbin winder stopper
8Bobbin winder spindle
9 Hole for extra spool pin
10 Spool holder
11 Spool pin
12 Thread tension dial
13 Thread cutter
14 Face plate
15 Speed control slider
16 LCD screen
17 Jog dial
18 Thread cutter button
19 Needle up/down position button
20 Auto-lock button
21 Knee lifter socket
22 Feed balancing dial
23 Reverse button
24 Start/stop button
25 Extension table (accessory storage)
26 Buttonhole lever
27 Needle clamp screw
28 Needle
29 Zigzag foot A
30 Hook cover release button
31 Hook cover plate
32 Needle plate
33 Foot holder
34 Built-in needle threader
35 Carrying handle
36 Presser foot lifter
37 Power switch
38 Foot control jack
39 Machine socket
40 Drop feed lever
41 Dual feed balancing dial
42 Hand wheel
43 Dual feed device
44 Touch panel
45 Automatic plate converter
46 Confirm button
GETTING READY TO SEW
42
41
40
37
38
39
2
123 4
5678
9
13 14
17
21
25
29
32
10 11 12
15
18 19 20
22 23
26
30
33
31
27
34
24
28
35
16
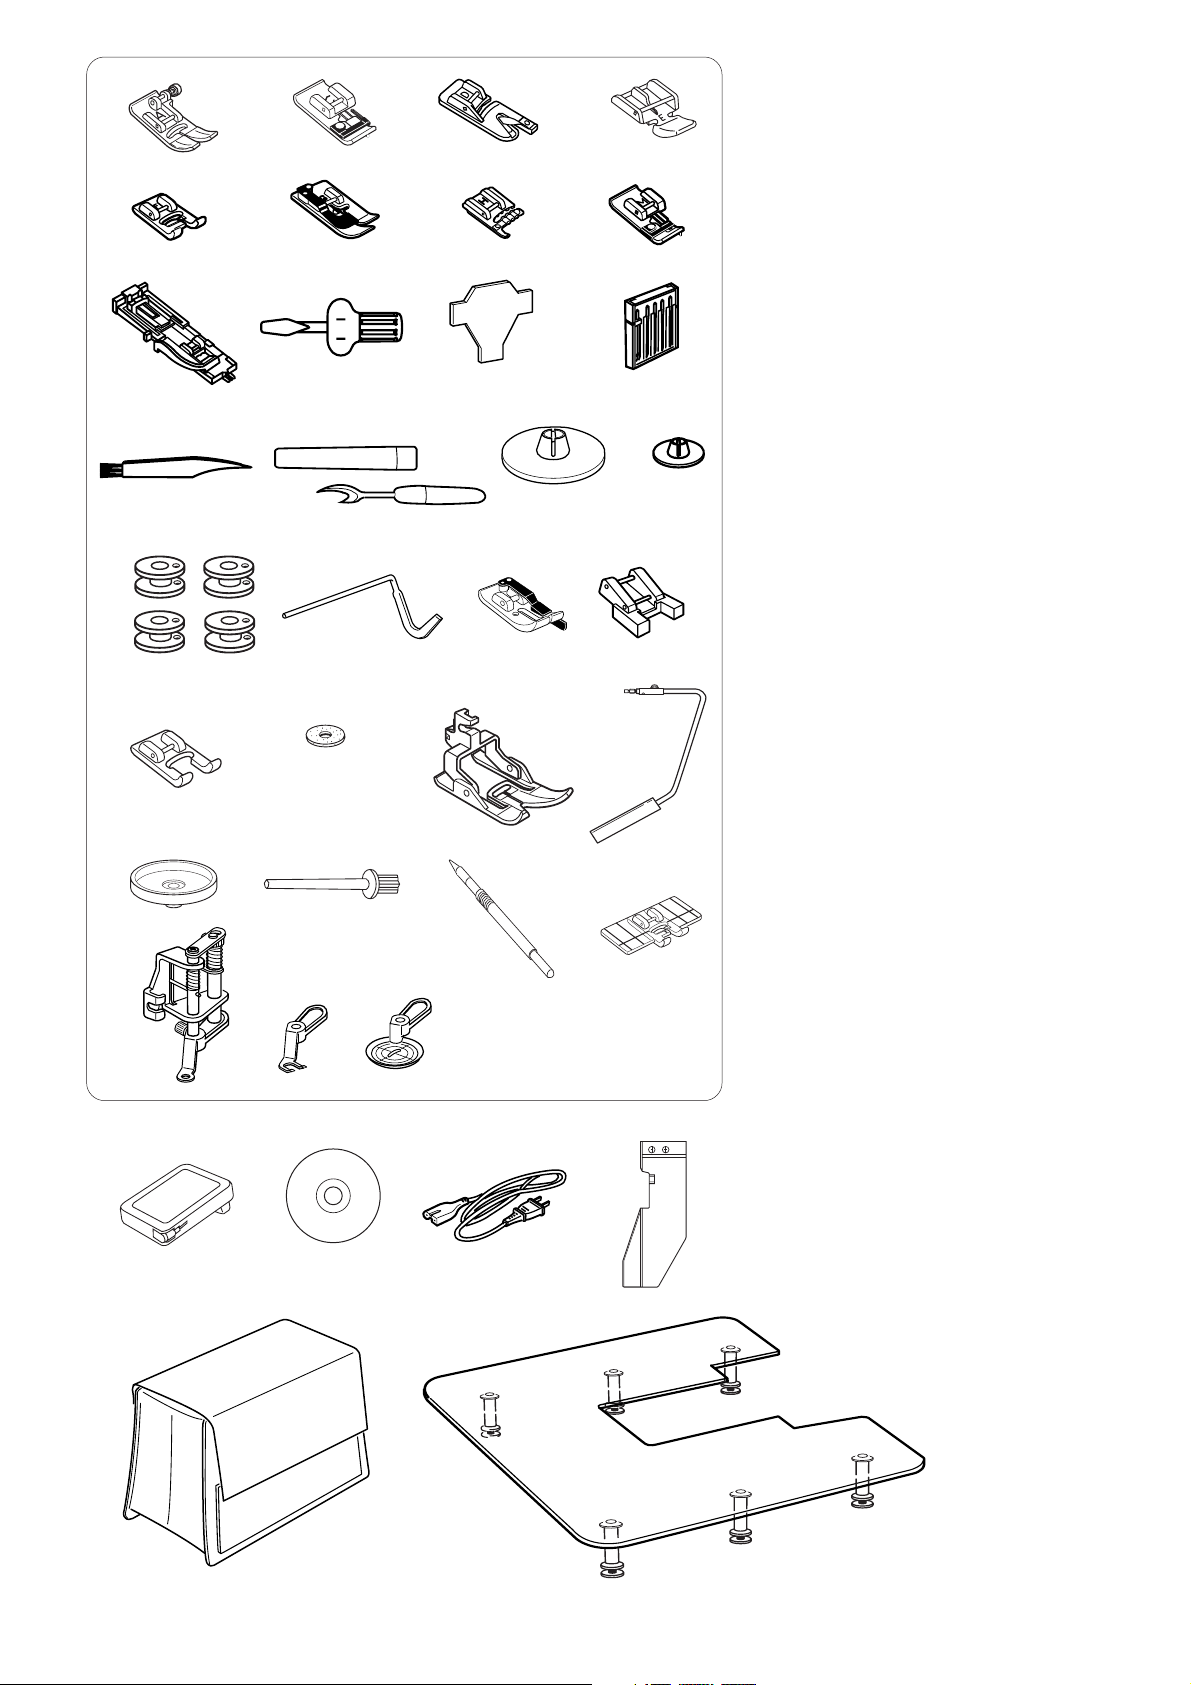
Standard Accessories
1 Zigzag foot A (set on the machine)
2 Overcasting foot C
3 Rolled hem foot D
4 Zipper foot E
5 Satin stitch foot F
6 Blind hemming foot G
7 Cording foot H
8 Overedge foot M
9 Automatic buttonhole foot R
10 Screwdriver
11 Screwdriver key
12 Set of needles
13 Lint brush
14 Seam ripper (Buttonhole opener)
15 Spool holder (large, set on the machine)
16 Spool holder (small)
17 Bobbins
18 Quilting guide bar
19 1/4” seam foot O
20 Button sewing foot T
21 Open toe satin stitch foot F2
22 Felt cushion
23 Dual feed foot AD
24 Knee lifter
25 Spool supporter
26 Extra spool pin
27 Touch panel stylus
28 Border guide foot
29 Convertible free motion
quilting foot QB- H
30 Open-toe foot
31 Clear view foot
32 Foot control
33 Instructional video DVD
34 Power cable
35 Cloth guide
36 Semi-hard fabric cover
37 Extra wide table
36
37
3

Extension Table
The extension table provides an extended sewing area
and can be removed for free arm sewing.
1 Extension table
To detach:
Draw the table out to the left.
1
4
3
2
1
9
7
8
To attach:
Slide the table on the base and push the table to the
right.
Free-arm sewing
Free-arm sewing is used for stitching sleeves, waist-
bands, pant legs or any other tubular garments.
It is also useful for darning socks or mending knees or
elbows.
Accessories Storage
The accessories can be conveniently stored in the foot
5
storage compartment under the top cover and in the
extension table.
6
Under the top cover
1 Zipper foot E
2 Overcasting foot C
3 Zigzag foot A
4 Clear view foot
5 Open-toe foot
6 Convertible free motion quilting foot QB-H
7 Satin stitch foot F
8 Blind hemming foot G
9Touch panel stylus
18
19
17
10
16
15
11
14
12
13
In the extension table
10 Rolled hem foot D
11 Overedge foot M
12 1/4” seam foot O
13 Button sewing foot T
14 Cording foot H
15 Bobbins
16 Screwdriver key
17 Dual feed foot AD
18 Automatic buttonhole foot R
19 Rear compartment
NOTE:
Other accessories can be stored in the rear
compartment.
4
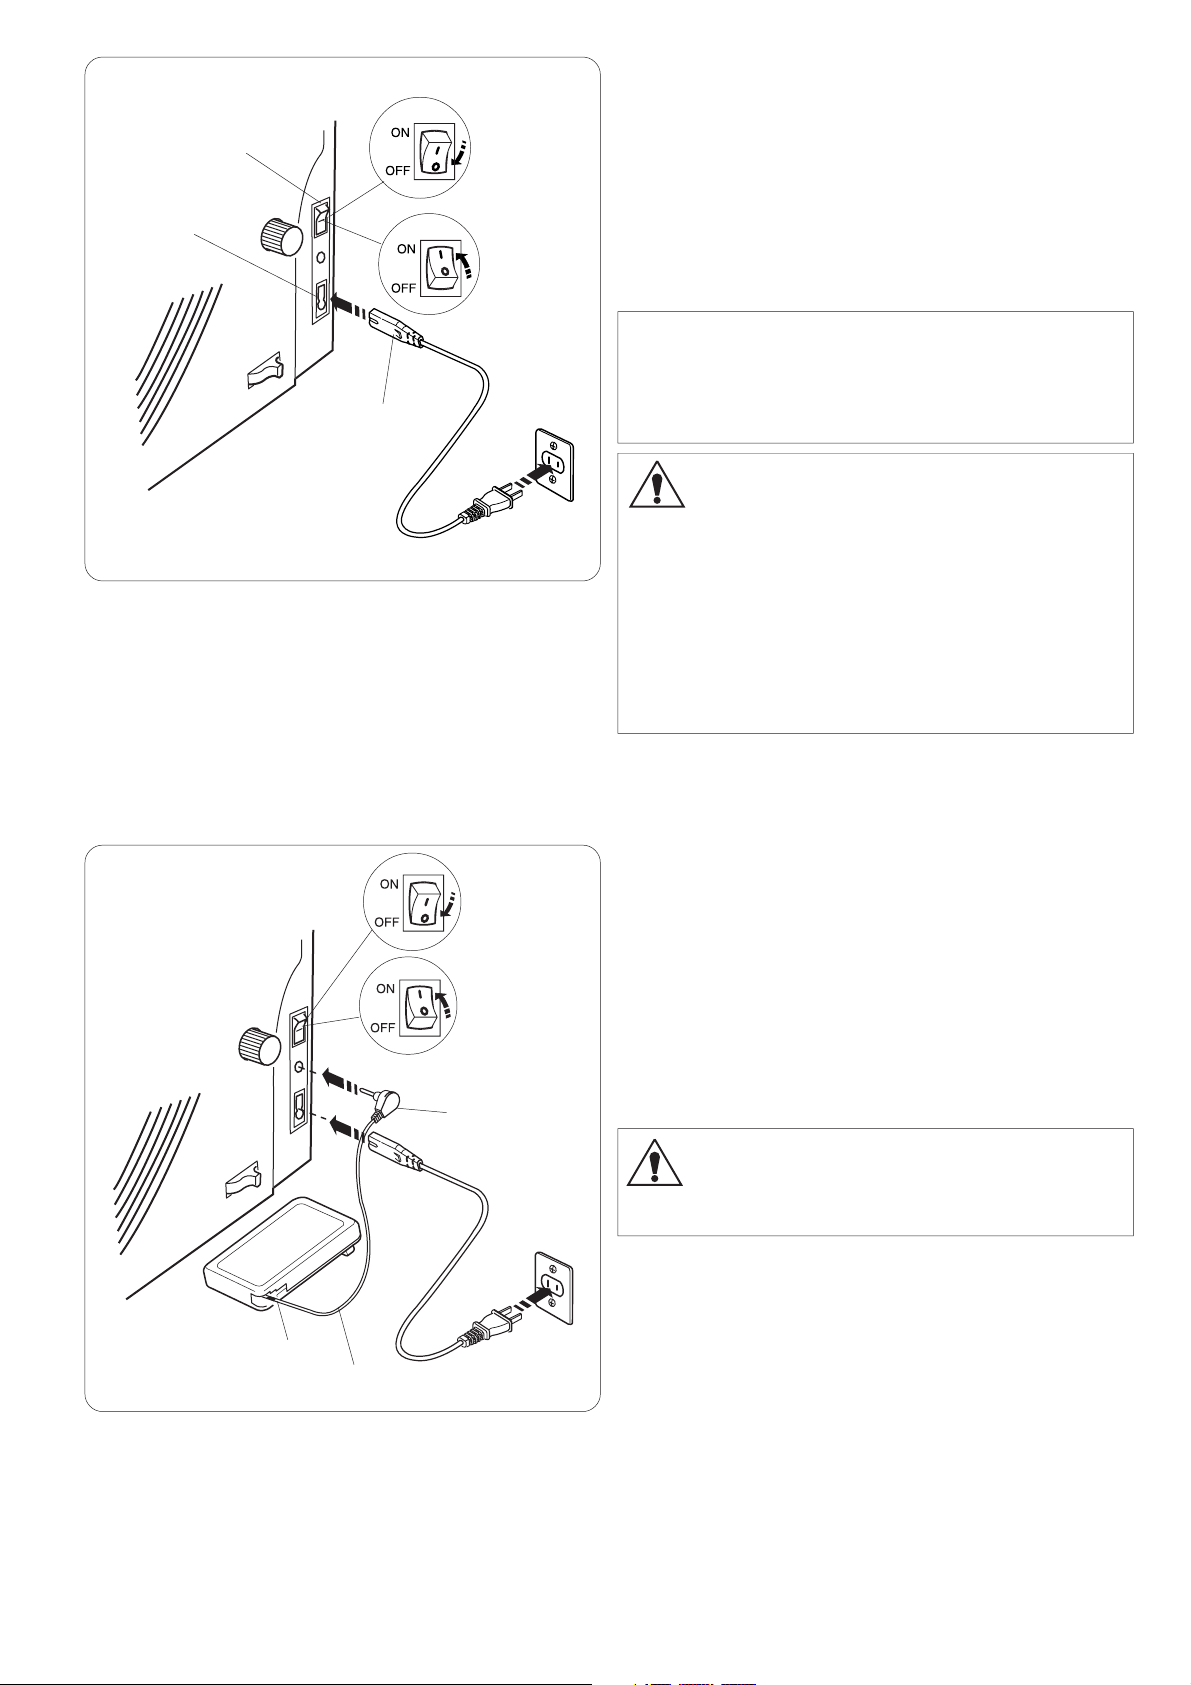
Connecting the Power Supply
First make sure the power switch is off.
1
3
2
Insert the machine plug of the power supply cord into the
machine socket.
Insert the power supply plug into the wall outlet, and turn
the power switch on.
1 Power switch
2 Machine plug
3 Machine socket
NOTES:
Make sure to use the power supply cord that came with
the machine.
If you turn off the power switch, wait for 5 seconds before
turning it on again.
WARNING:
While in operation, always keep your eyes on the sewing
area, and do not touch any moving parts such as the
thread take-up lever, handwheel or needle.
Always turn off the power switch and unplug the
machine from the power supply:
— when leaving the machine unattended.
— when attaching or removing parts.
— when cleaning the machine.
Do not place anything on the foot control.
If you wish to use the foot control, pull out the cord from
the foot control and insert the pin connector into the jack
on the machine.
1 Foot control cord
2 Pin connector
Insert the machine plug of the power supply cord into the
machine socket.
Insert the power supply plug into the wall outlet, and turn
2
the power switch on.
CAUTION:
Do not pull the foot control cord beyond the red mark.
3 Red mark
Operating Instructions:
The symbol “O” on a switch indicates the “off” position of
3
1
the switch.
For the U.S.A. and Canada only
Polarized plug (one blade wider than the other):
To reduce the risk of electric shock, this plug is intended
to fit in a polarized outlet only one way. If it does not fit
fully in the outlet, reverse the plug. If it still does not fit,
contact a qualified electrician to install the proper outlet.
Do not modify the plug in any way.
5

Controlling Sewing Speed
Speed control slider
You can limit the maximum sewing speed with the speed
control slider according to your sewing needs.
To increase the sewing speed, move the slider to the right.
To decrease the sewing speed, move the slider to the left.
Foot control
Pressing on the foot control can vary sewing speed.
The harder you press the foot control, the faster the
machine runs.
NOTE:
The machine runs at the maximum speed set by the
speed control slider when the foot control is fully
depressed.
Operating Instructions:
Foot control model 21371 is for use with this sewing
machine.
NOTE:
This machine is equipped with an automatic shutdown
safety feature to prevent overheating whenever the
machine is running overloaded. Follow the safety
instructions that appear on the LCD screen.
6

Machine Operating Buttons
1 Start/stop button
Press this button to start or stop the machine.
The machine starts running slowly for the first few
stitches, it then runs at the speed set by the speed
control slider. The machine runs slowly as long as this
button is pressed.
The button will turn red when the machine is running,
and green when it has been stopped.
(A)
(B)
3
2
1
Pressing and holding this button while sewing will slow
down the sewing speed and the machine will stop
when the button is released.
NOTE:
The start/stop button cannot be used when the foot
control is connected to the machine.
The machine will not start if the presser foot is up and
the LCD screen shows message (A) or (B).
Lower the presser foot and start the machine.
2 Reverse button
When sewing pattern number D1S, D1, D4, 9-11, 93 or
151-154 the machine will sew in reverse as long as the
reverse button is pressed.
If you press the reverse button when sewing any other
patterns, the machine will immediately sew locking
stitches and automatically stop.
When the foot control is not connected and pattern
D1S, D1, D4, 9-11, 93 or 151-154 is selected, the
machine will sew in reverse at the slowest speed as
long as the reverse button is pressed.
3 Auto-lock button
When sewing pattern number D1S, D1, D4, 9-11, 93 or
151-156, the machine will immediately sew locking
stitches and automatically stop when the auto-lock
button is pressed.
When sewing all other patterns, the machine will sew
to the end of the current pattern, sew locking stitches
and stop automatically.
7

LED signal
4 Needle up/down position button
Press this button to bring the needle bar up or down.
The machine will stop with the needle up or down
depending on the position set by this button.
The LED signal is turned on when the down position is
selected.
5
NOTE:
4
The machine will always stop with the needle up after
sewing buttonholes, darning and monograms.
If you press the up/down needle position button when the
presser foot is at the extra lifted position, the LCD screen
will advise you to lower the foot.
5 Thread cutter button
Press this button after finishing sewing and the machine
will trim the threads automatically.
The LED signal blinks while cutting threads.
NOTES:
Use the thread cutter on the face plate when cutting
specialized threads or threads #30 or thicker.
Clean the auto thread cutter mechanism regularly to
avoid malfunction due to built up lint.
Avoid using a paper-cored spools with the auto thread
cutter. When nearly empty, they may not unwind
smoothly and cause the thread to bunch up or slip when
using the auto thread cutter (refer to page 10).
Do not pull the fabric if auto thread cutting fails and the
thread tangles. Turn the power switch off and remove
the needle plate to remove the tangled threads (refer to
page 89).
6 Jog dial
The jog dial is used for selecting stitch patterns,
characters and certain settings.
Tu rn the jog dial clockwise or counterclockwise with your
fingertip to browse patterns or settings.
6
7 Confirm button
Press the confirm button to select the desired pattern or
settings.
7
8
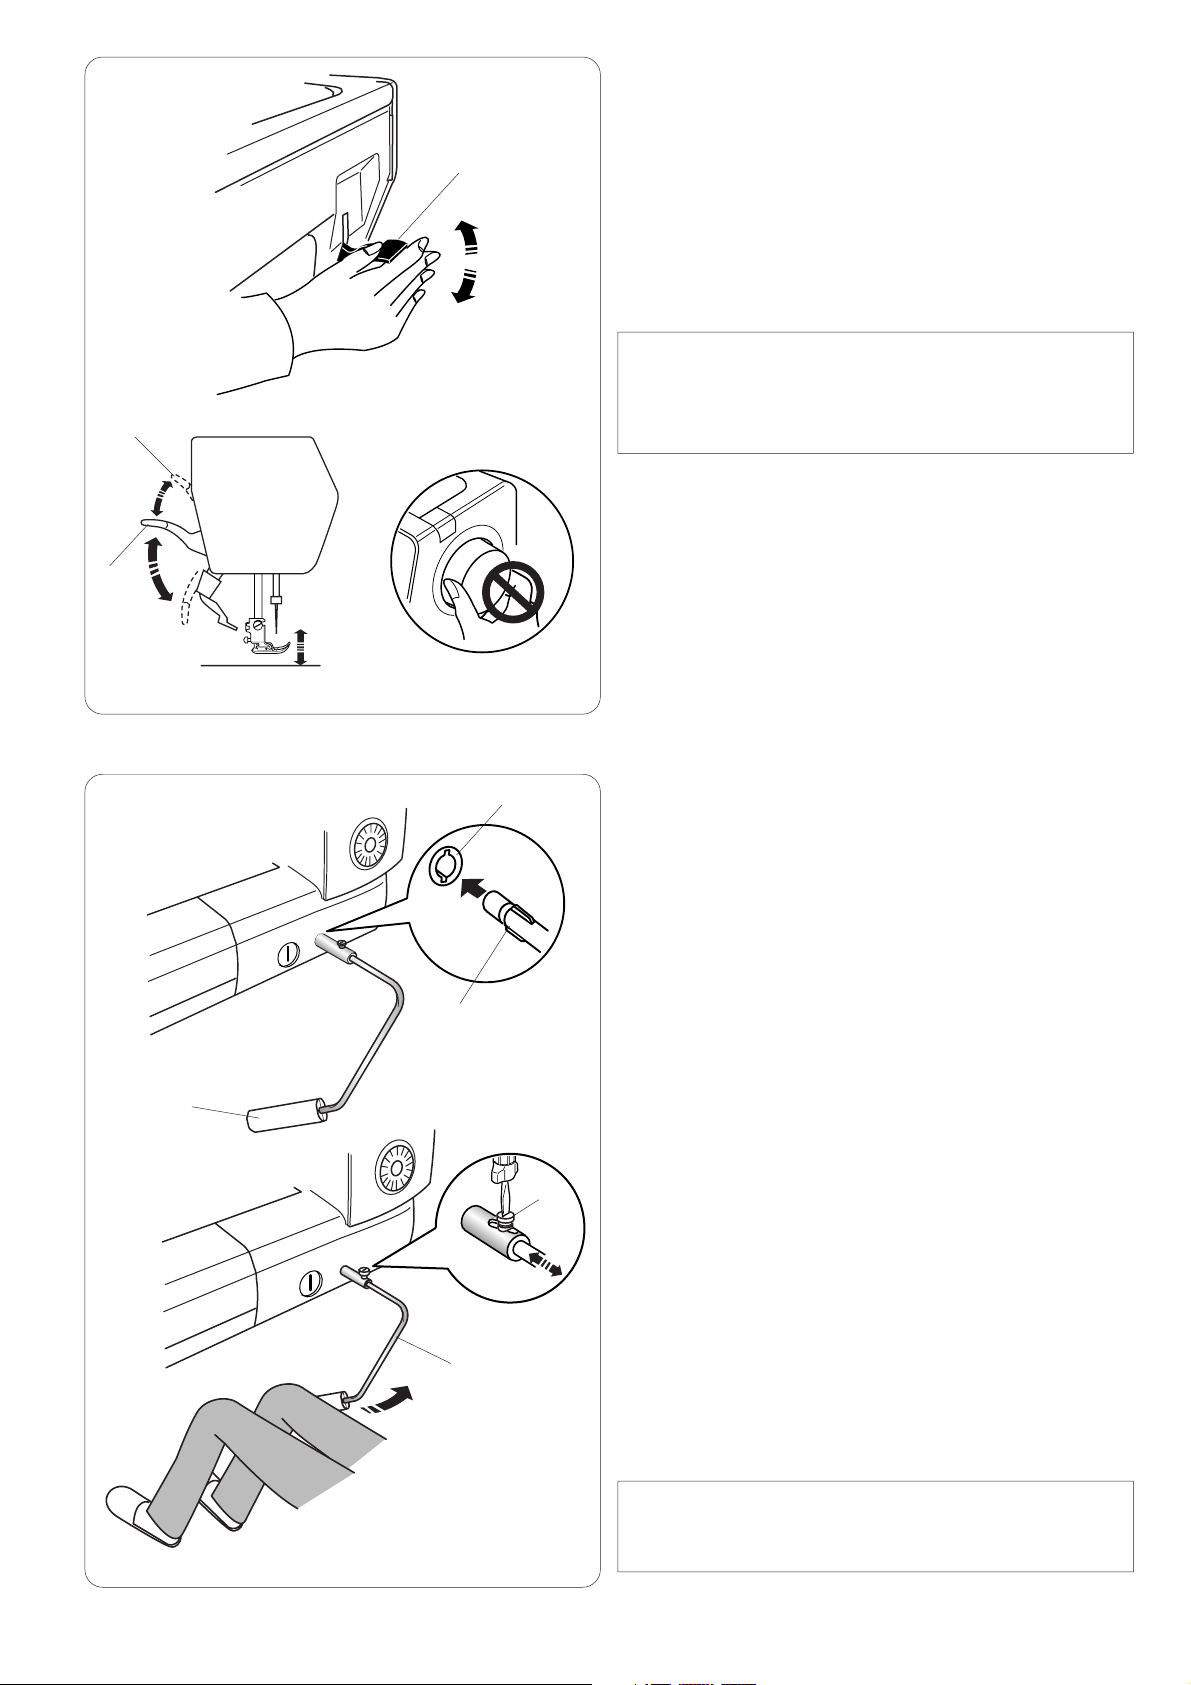
Raising and Lowering the Presser Foot
The presser foot lifter raises and lowers the presser foot.
1 Presser foot lifter
1
2
1
You can raise the presser foot higher than the normal up
position. This allows for setting the dual feed device,
attaching presser foot, and also helps you to place thick
layers of fabrics under the foot.
2 Extra lifted position
NOTE:
Do not turn the hand wheel of press the up/down needle
position button when the presser foot is in the extra lifted
position.
2
1
1
3
4
Knee Lifter
The knee lifter is extremely helpful when sewing
patchwork, quilting etc, since it allows you to handle the
fabric while your knee controls the presser foot.
Attaching the knee lifter
Match the ribs on the knee lifter with the notches in the
knee lifter socket and insert the knee lifter.
1 Knee lifter
2 Knee lifter socket
Adjusting the knee lifter
The angle of the knee lifter can be adjusted to fit you.
Loosen the setscrew and slide the angle bar in or out to
adjust the angle of the knee lifter.
Tighten the setscrew to secure the angle bar.
3 Setscrew
4 Angle bar
Using the knee lifter
Push the knee lifter with your knee to easily move the
presser foot up and down.
You can control how high the foot rises by the amount of
knee pressure you exert.
NOTE:
Do not touch the knee lifter while stitching, otherwise the
fabric will not be fed smoothly.
9

Function Keys
15
16
14
11
9
10
4
5
1
1 Mode key (refer to page 23)
Press this key to open the group selection window.
2 Monogram key (refer to page 80)
Press this key to select one of 3 letter styles available.
3Direct pattern selection keys (refer to page 34)
Press one of 3 keys to select a straight stitch pattern
using automatic plate converter.
2
12
13
6
8
7
3
8Set key (refer to page 25)
Press this key to open the machine setting window for
customizing the machine settings.
9Twin needle key (refer to page 72)
Press this key when sewing with a twin needle.
10 Elongation key (refer to page 70)
Press this key to elongate satin stitch patterns.
4 Memory recall key (refer to page 86)
Press this button to register or recall programmed pattern
combinations.
This button is also used to customize the default settings
of stitch length and width.
5Auto thread cutter key (refer to page 76)
Press this key before sewing, if you wish to cut the
threads automatically after finishing sewing with a locking
stitch.
When programming a pattern combination, press this key
after the last programmed pattern to cut the threads
automatically after finishing sewing.
The LED signal on the thread cutter button (refer to page
 will turn on when the auto thread cutter key is pressed.
6 Locking stitch key (refer to page 71)
Press this key after the last memorized pattern.
The machine will automatically lock the stitch off and then
stop when finishing sewing.
11 Mirror image key (refer to pages 71, 75)
Press this key to sew a mirror image of the selected
pattern.
12 Help key (refer to page 24)
Press this key to view information on the selected pattern.
13 Memory key (refer to pages 71, 75)
Press this key to memorize the selected pattern.
Up to 50 patterns can be memorized.
14 Stitch width adjusting key (refer to pages 32, 40, 55)
Press this key to alter the stitch width.
15 Stitch length adjusting key (refer to pages 32, 40, 55)
Press this key to alter the stitch length.
16 Edit key (refer to page 82)
Press this key to edit the programmed pattern combinations.
7 Clear key (refer to page 82)
Press this key to delete the last memorized pattern.
Press and hold this key until the buzzer sounds to delete
the whole pattern combination.
10
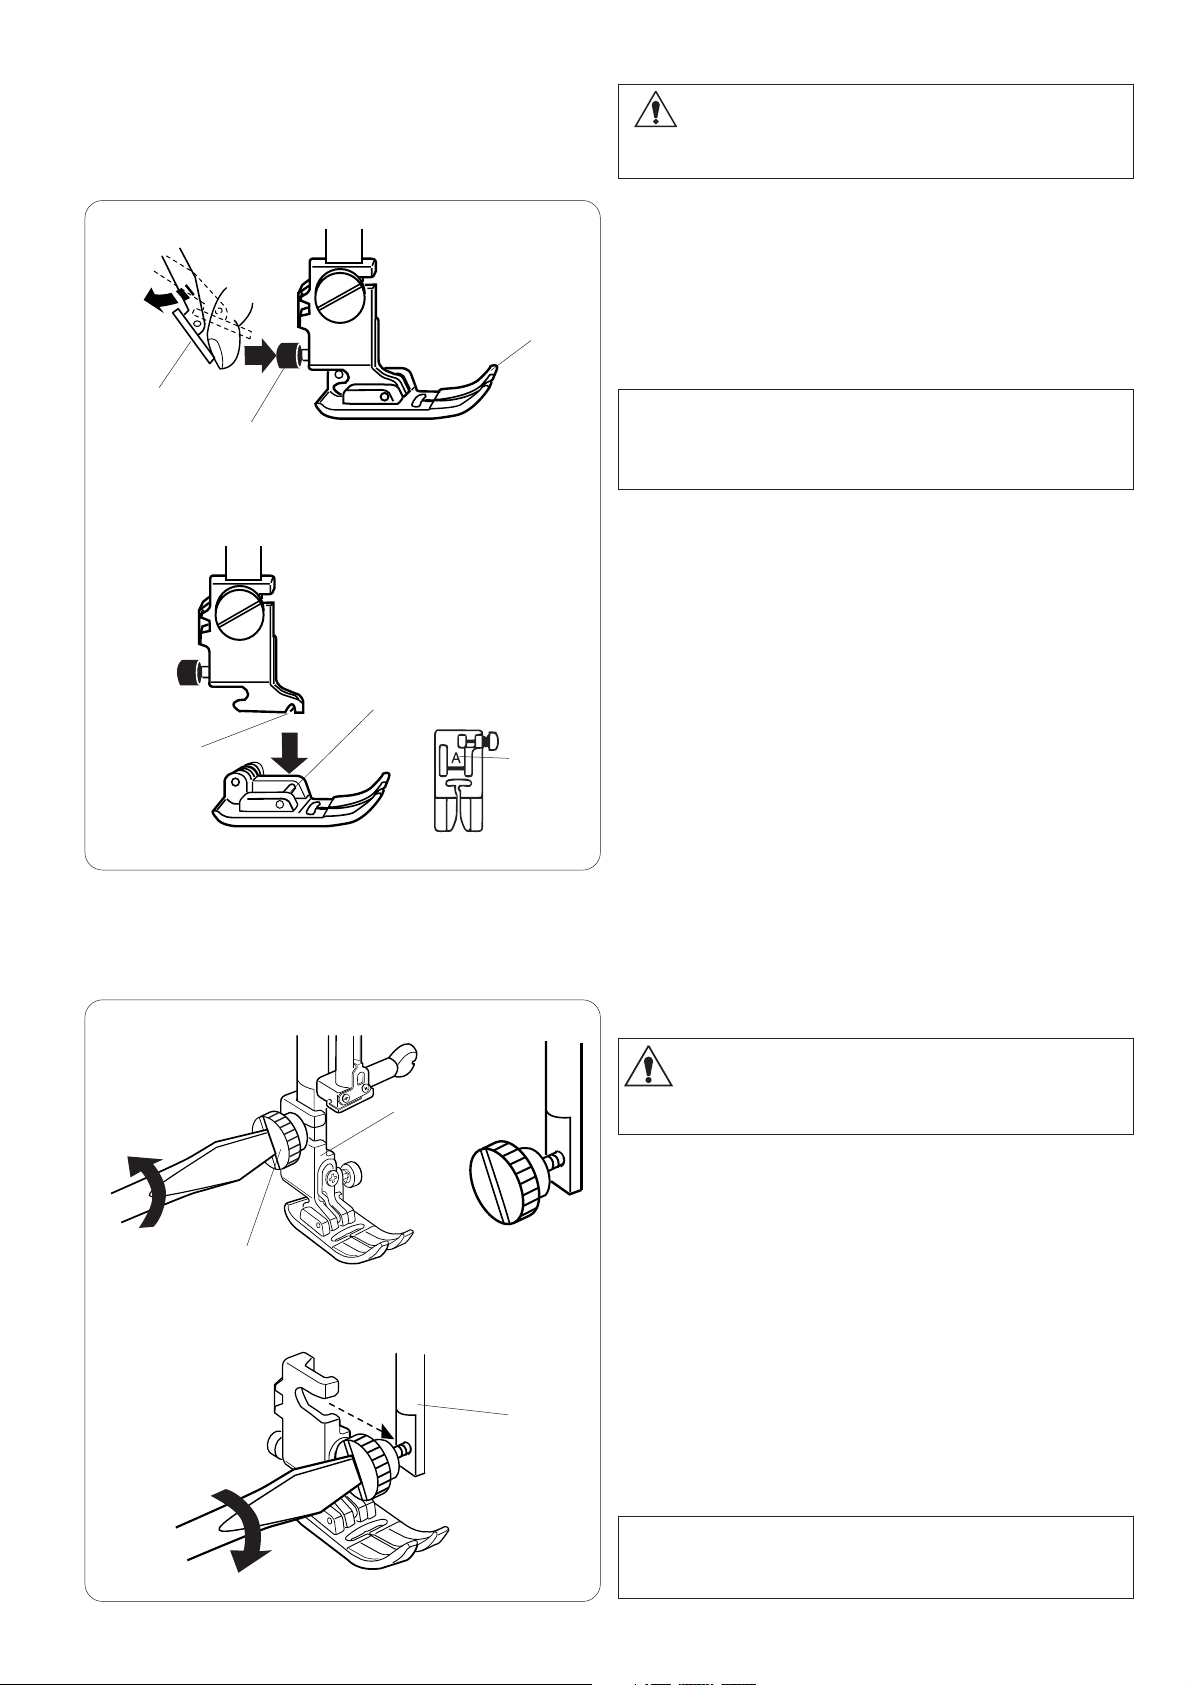
Changing the Presser Foot
WARNING:
Tu rn the power switch off before changing the presser
foot.
Removing the presser foot
Raise the needle to its highest position and raise the
presser foot lifter.
Press the red button on the back of the foot holder.
The presser foot will drop off.
2
1 Red button
2 Presser foot
3
1
5
4
6
NOTE:
If the dual feed device interferes when pressing the red
button, shift the dual feed device away.
3 Dual feed device
Attaching the presser foot
Place the presser foot so that the pin on the foot lies just
under the groove of the foot holder.
Lower the presser bar to lock the foot in place.
Each foot is marked with an identification letter.
4 Groove
5 Presser foot
6 Identification letter
Removing and Attaching the Foot Holder
WARNING:
2
1
3
Tu rn the power switch off before removing or attaching
the foot holder.
Remove the needle for easy operation.
Removing the foot holder
Raise the presser foot and loosen the thumbscrew.
Remove the foot holder.
1 Thumbscrew
2 Foot holder
Attaching the foot holder
Attach the foot holder to the presser bar from the rear.
Tighten the thumbscrew securely with the screwdriver.
3 Presser bar
Attach the needle after installation of the foot holder.
NOTE:
Lower the presser foot when loosening and tightening
the thumbscrew if it is hard to access.
11

Setting for Dual Feed Sewing
x
z
c
1
WARNING:
Tu rn the power switch off before changing the presser
foot.
Attach the dual feed foot when sewing with the dual feed
device.
Attaching the dual feed foot
2
z Remove the needle and loosen the thumbscrew with
the screwdriver.
1 Thumbscrew
x Raise the presser foot and loosen the thumbscrew to
remove the foot holder .
2 Foot holder
4
3
c Attach the dual feed foot to the presser bar and
tighten the thumbscrew lightly. Lower the presser
foot and tighten the thumbscrew securely with the
screwdriver.
3 Dual feed foot
4Presser bar
z
x
c
Setting the dual feed device
1
z Raise the presser foot lifter to the extra lifted position.
1 Extra lifted position
2
x Hold the dual feed device and lower it slowly.
2 Dual feed device
c Swing the dual feed device forward to the underside of
the dual feed foot until they engage.
12

z
Disengaging the dual feed device
z Raise the presser foot lifter to the extra lifted
1
position.
1 Extra lifted position
x
c
2
x Pull down the dual feed device to disengage it
from the dual feed foot. Swing the dual feed
device to the rear.
2 Dual feed device
c Swing up the dual feed device until it catches the
pins.
3Pin
3
x
z
c
Removing the dual feed foot
z Loosen the thumbscrew with the screwdriver.
1 Thumbscrew
1
x Raise the presser foot and loosen the thumbscrew
to remove the dual feed foot.
2 Dual feed foot
2
c Attach the foot holder to the presser bar and
4
3
tighten the thumbscrew lightly. Lower the presser
foot and tighten the thumbscrew securely with the
screwdriver.
3 Foot holder
4Presser bar
13

Setting the Spool of Thread
Lift up the spool pin. Place the spool of thread on the
spool pin with the thread coming off the spool as shown.
Attach the large spool holder, and press it firmly against
the spool of thread.
1 Large spool holder
1
NOTE:
Use the small spool holder to hold narrow or small spools
of thread.
2 Small spool holder
2
Extra spool pin
Use the extra spool pin when you need to wind a bobbin
without unthreading the machine while working on a
sewing project.
Insert the extra spool pin into the spool supporter and
then into the hole beside the horizontal spool pin.
6
3
4
Place the felt cushion on the spool pin and place a spool
of thread on it as shown.
3 Extra spool pin
4 Spool supporter
5 Hole for extra spool pin
6 Felt cushion
5
NOTE:
The extra spool pin is also used for twin needle sewing.
Removing the Bobbin
1
Slide the hook cover release button to the right, and
remove the hook cover plate.
1 Hook cover release button
2 Hook cover plate
2
3
Lift out the bobbin from the bobbin holder.
3 Bobbin
NOTE:
Use the Janome plastic bobbins for horizontal hook
(marked with “J”). Using other bobbins, such as
pre-wound paper bobbins, may cause stitching problems
and/ or damage to the bobbin holder.
14
z
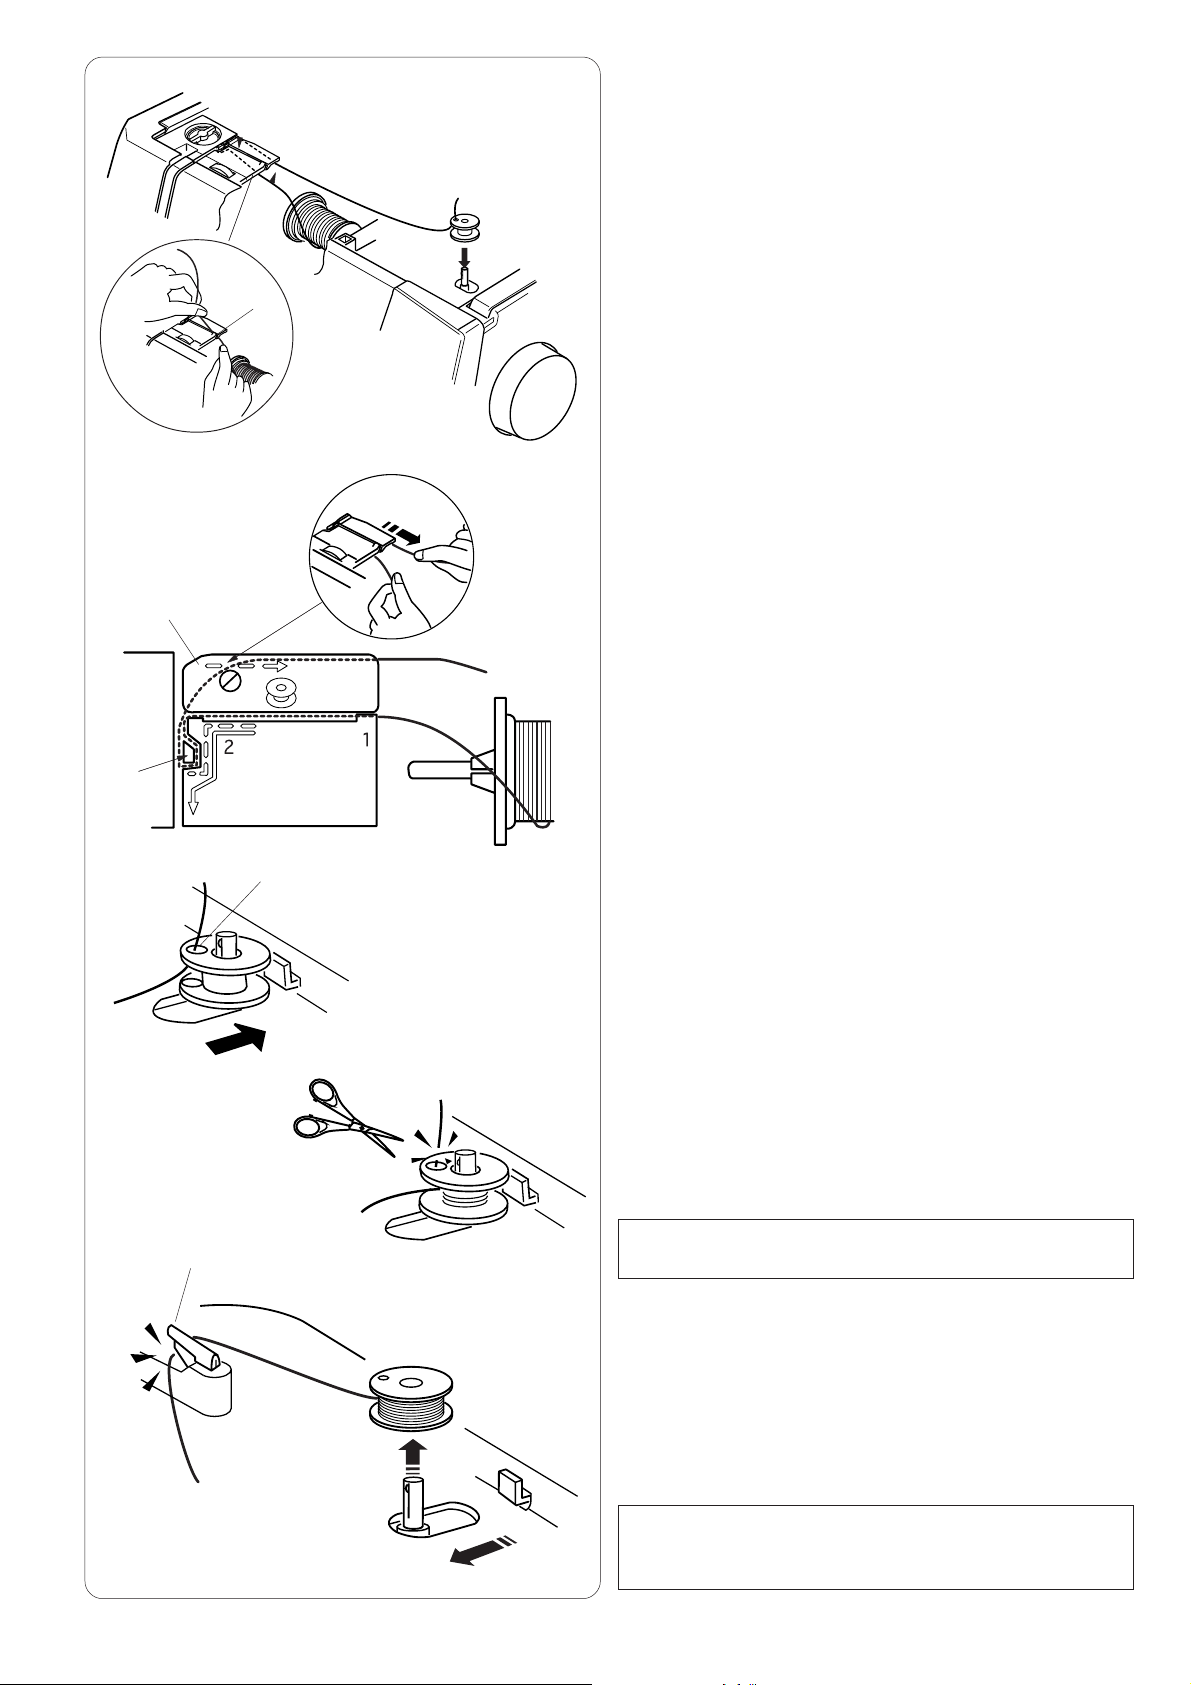
Winding the Bobbin
z Pull the thread from the spool.
Hold the thread with both hands and pass the thread
into the guide slot.
1 Guide slot
1
c
x
2
x Draw the thread to the left and forward around the
thread guide.
Draw the thread to the rear and to the right around
3
under the guide plate.
Firmly pull the thread to the right while holding it
with both hands.
2 Thread guide
3 Guide plate
4
c Pass the thread through the hole in the bobbin from
the inside to the outside.
Put the bobbin on the bobbin winder spindle.
Push the bobbin to the right.
4 Hole
v Hold the free end of the thread in your hand and
v
start the machine.
Stop the machine when the bobbin has wound
several layers, and cut the thread close to the hole
in the bobbin.
b
5
NOTE:
Set the speed control slider at the fastest position.
b Start the machine again.
Stop the machine when the bobbin is fully wound
and stops spinning.
Return the bobbin winder spindle to its original position.
Remove the bobbin and cut the thread with the thread
cutter.
5 Thread cutter
NOTE:
For safety purposes, the machine will automatically stop
2 minutes after starting bobbin winding.
15
z
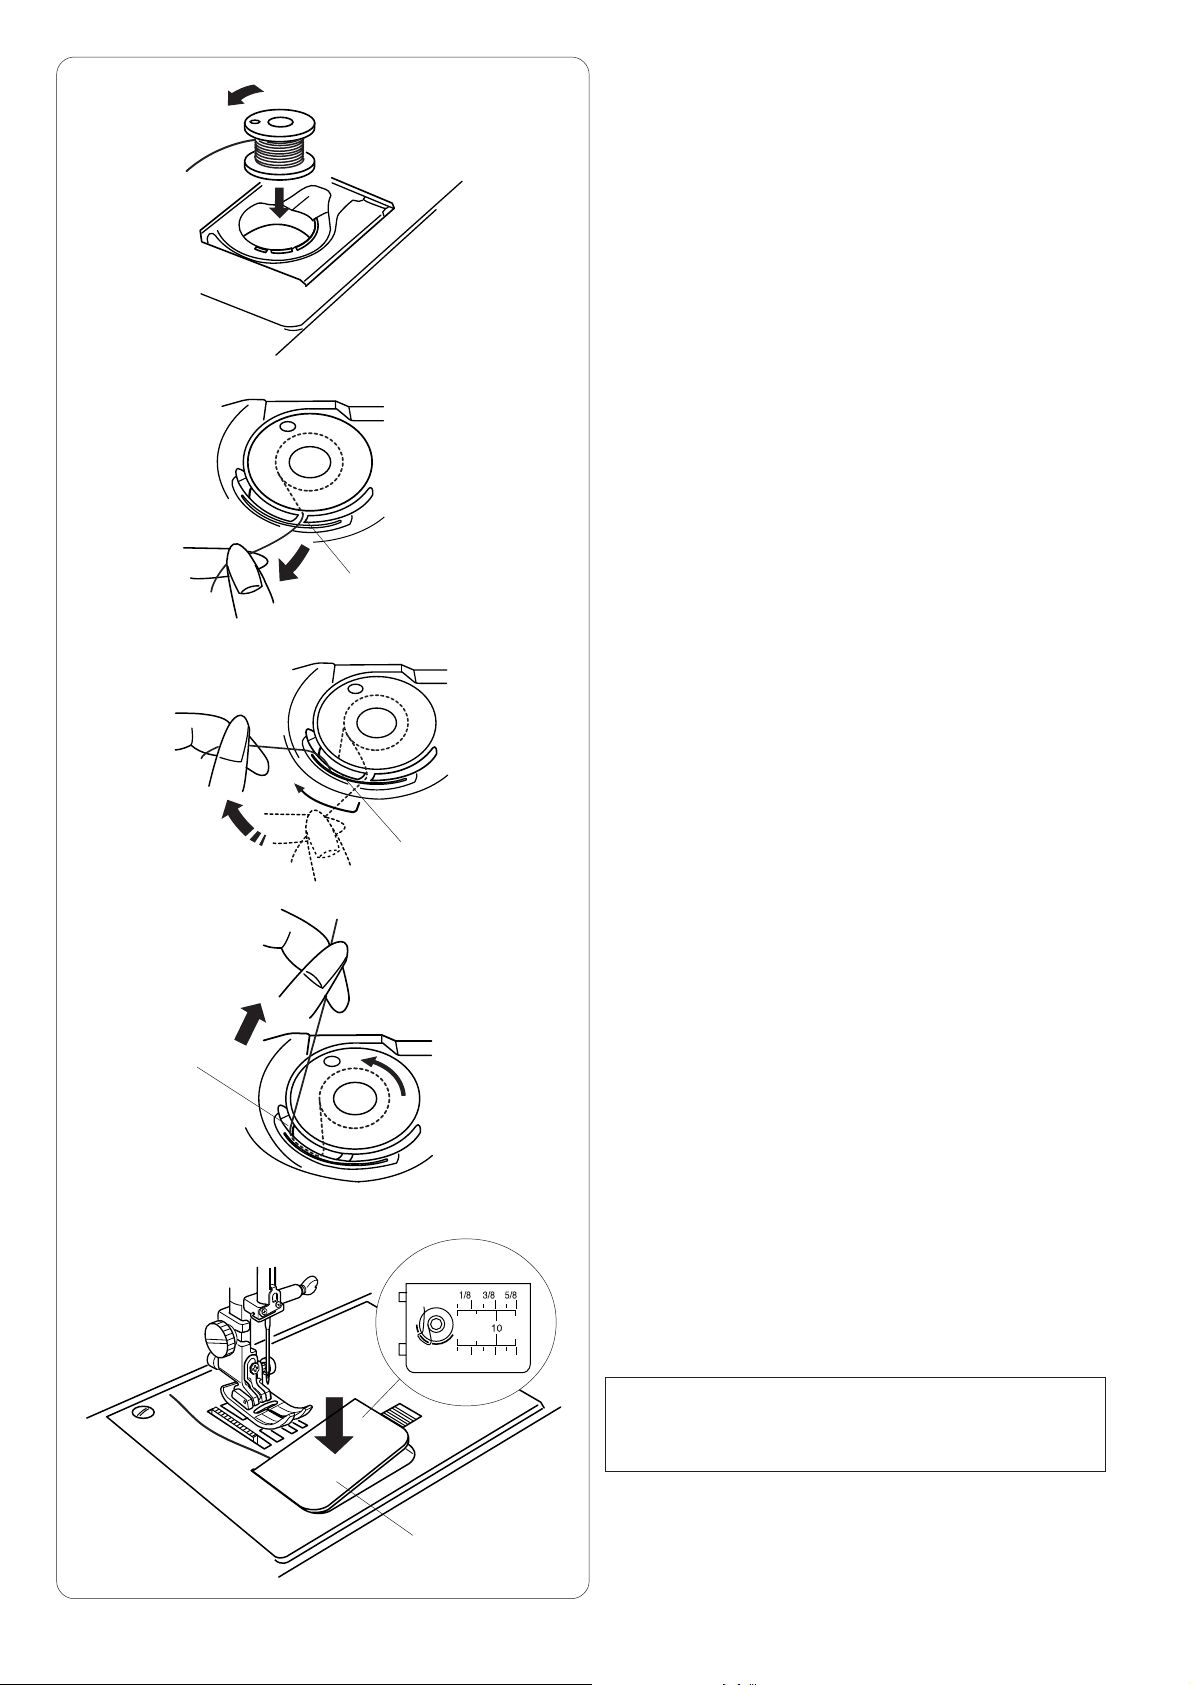
Inserting the Bobbin
z Place the bobbin in the bobbin holder with the
thread running off counterclockwise.
x
c
v
x Guide the thread into the front notch on the bobbin
holder.
1 Front notch
1
c Draw the thread to the left, sliding it between the
tension spring blades.
2Tension spring blades
2
v Continue to draw the thread lightly until the thread
slips into the side notch.
3 Side notch
b
3
b Pull out about 10 cm (4″) of thread to the rear.
Reattach the hook cover plate.
4 Hook cover plate
NOTE:
The threading chart is shown on the hook cover plate
for your reference.
4
16

v
3
zcx
2
n
m
x
b
c
Threading the Machine
z
1
Raise the presser foot. Press the needle up/down position
button twice to raise the needle.
Tu rn the power switch off.
Pass the thread in order from z to m.
z Hold the thread with both hands and pass the thread
into the guide slot.
1 Guide slot
x Draw the thread to the left and around the corner of
the guide toward you.
Pull the thread along the channel.
2 Corner of the guide
3 Channel
v
b
n
c Draw the thread down along the right channel and
around the bottom of the thread guide plate.
6
4
Pull the thread up along the left channel.
4 Right channel
5 Thread guide plate
6 Left channel
5
7
8
v While holding the thread at the spool, firmly draw the
thread up and to the back of the take-up lever. Draw
the thread forward to draw it into the eye of the take-up
lever.
7Eye of the take-up lever
b Then pull the thread down along the left channel
and through the lower thread guide.
8 Lower thread guide
n Slide the thread behind the needle bar thread guide
from the left.
9
17
9 Needle bar thread guide
m Thread the needle with the needle threader (refer to
the next page).

z
Built-in needle threader
NOTE:
The needle threader can be used with a #11 to #16
needle, or a #11 Blue needle.
Thread size 50 to 90 is recommended.
z Lower the presser foot. Raise the needle to its
highest position. Turn the power switch off.
Pull down the needle threader knob as far as it will go.
The threader hook comes out through the needle eye
from behind.
1
1 Knob
2 Threader hook
2
x
c
x Draw the thread from the left to the right, under the
4
left guide, threader hook and the right guide.
Draw the thread around the right guide toward you.
3 Left guide
4 Right guide
4
3
2
c Raise the threader slowly so a loop of the thread is
pulled up through the needle eye.
5 Thread loop
v
5
v Pull the thread end through the needle eye.
NOTE:
The needle threader cannot be used with the twin needle.
18
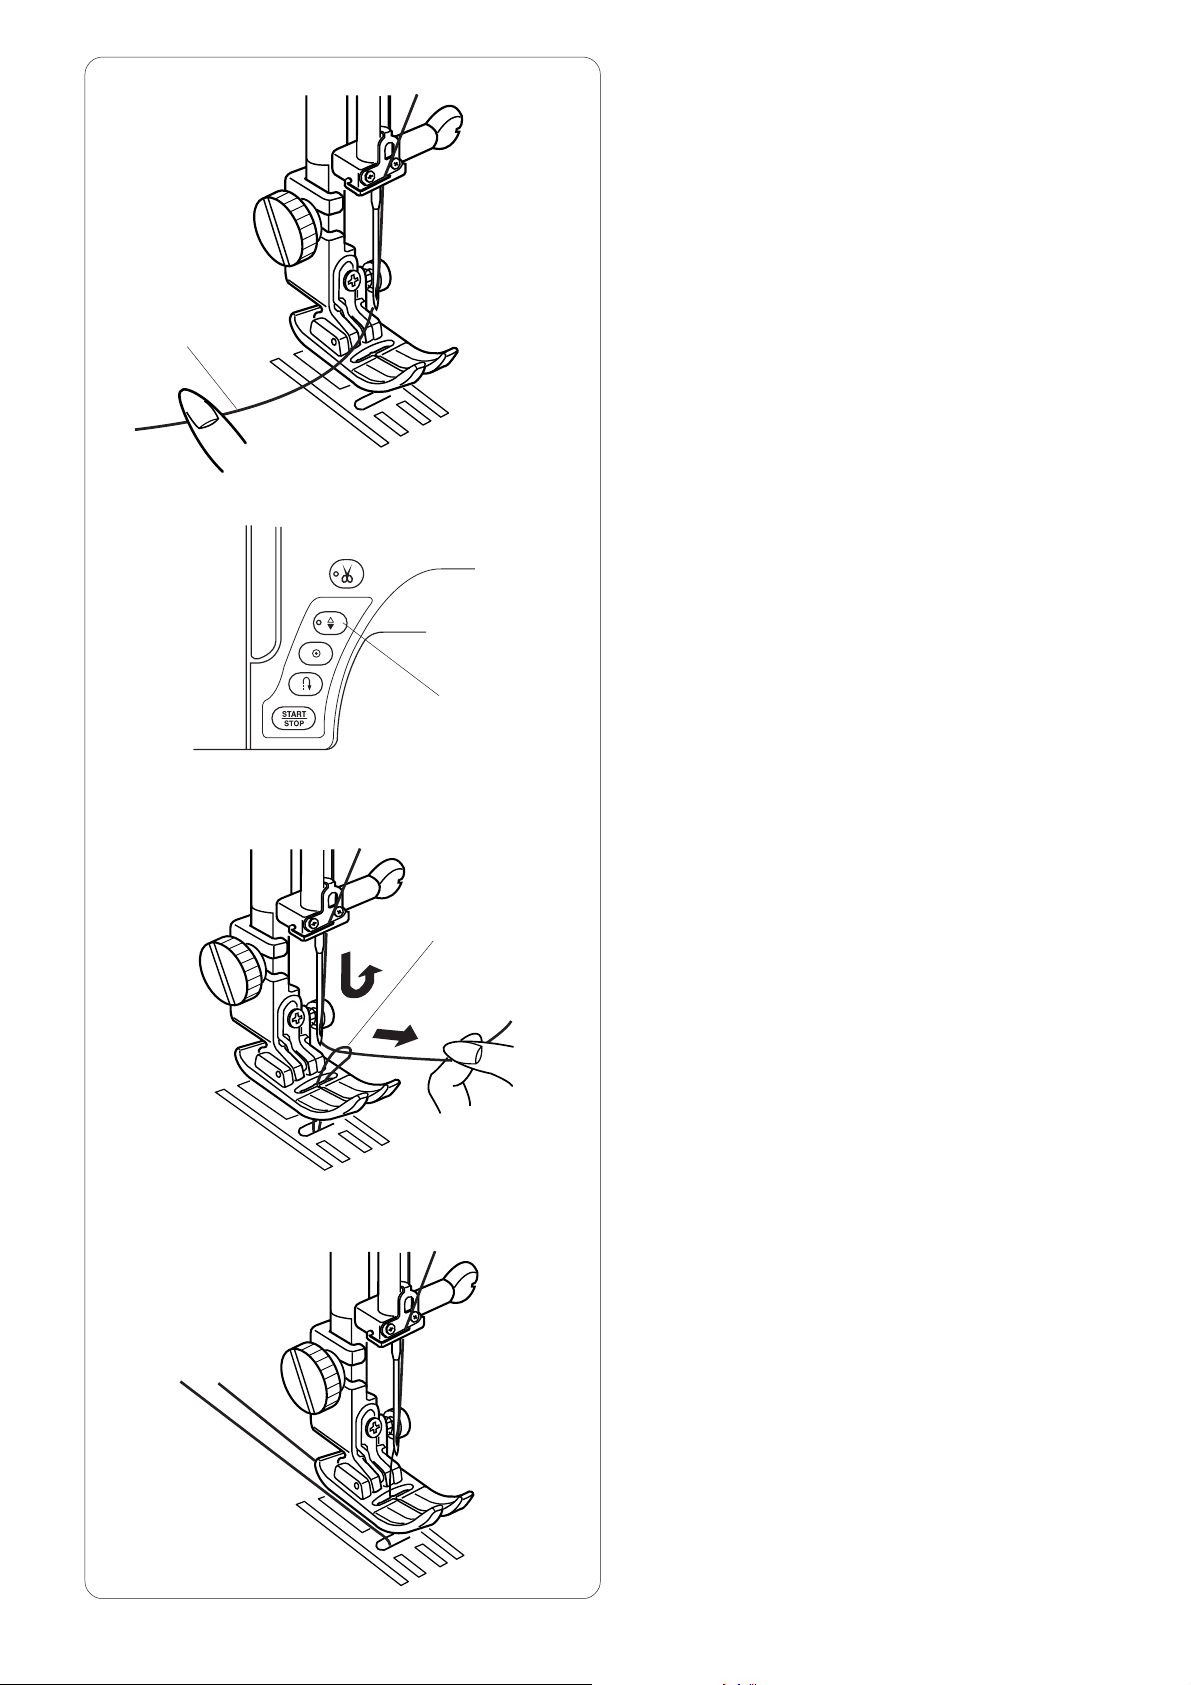
Drawing Up the Bobbin Thread
z
1
x
z Raise the presser foot lifter.
Hold the needle thread with your finger.
1 Needle thread
x Press the needle up/down position button twice to
draw up the bobbin thread.
2 Needle up/down position button
c
v
2
c Pull the needle thread to bring up the loop of bobbin
thread.
3 Loop of bobbin thread
3
v Pull both threads 10 cm (4″) and draw them to the rear
under the presser foot.
19
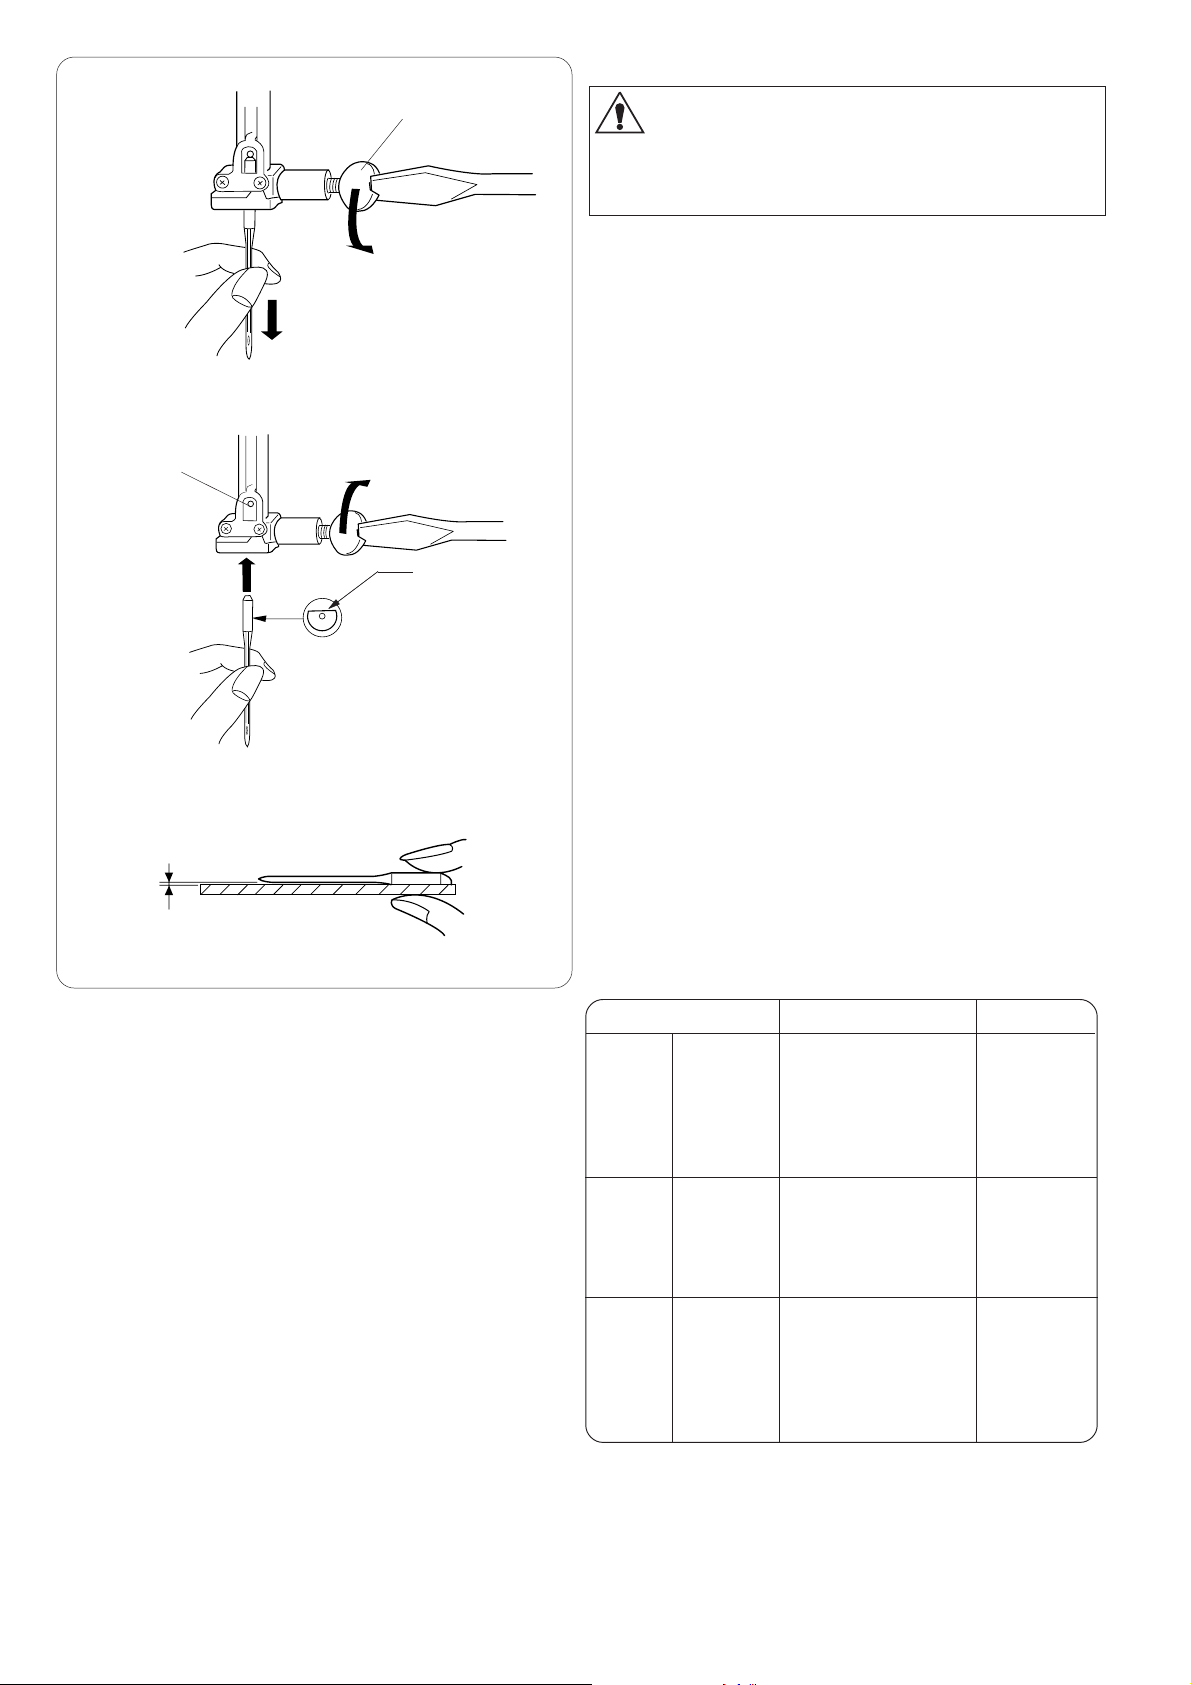
Changing Needles
1
CAUTION:
Always make sure to turn the power switch off and
disconnect the machine from the power supply before
changing the needle.
Raise the needle by pressing the needle up/down position
button and lower the presser foot.
Tu rn the power switch off.
Loosen the needle clamp screw and remove the needle
from the clamp.
1 Needle clamp screw
3
Insert a new needle into the needle clamp with the flat
side of the needle to the rear.
When inserting the needle into the needle clamp, push it
up against the stopper pin and tighten the needle clamp
2
screw firmly with a screwdriver.
2 Flat side
3 Stopper pin
To check needle straightness, place the flat side of the
needle onto something flat (a needle plate, glass etc.)
4
The gap between the needle and the flat surface should
be consistent.
Never use a blunt needle.
4 Gap
Thread
Needle
#9/65–11/75
#11/75–14/90
#14/90
#14/90–16/
100
#16/100
Light
Medium
Heavy
Fabric
Lawn
Georgette
Tr icot
Wool
Polyester
Cotton
Polyester
Fine jersey
Wool
Denim
Jersey
Coating
Quilting
Silk #80-100
Cotton #80-100
Synthetic #80-100
Silk #50
Cotton #60-80
Synthetic #50-80
Cotton #50
Silk #50
Cotton #40-50
Synthetic #40-50
Silk #30
Cotton #50
20
Balancing Thread Tension
1
Auto-thread tension
For general sewing, set the thread tension dial at AUTO,
which covers a wide range of sewing conditions.
Recommended tension setting for the selected pattern is
indicated on the LCD screen.
1 Thread tension dial
2 Recommended tension setting
2
Balanced thread tension
3
2
4
3
2
1
For straight stitch sewing, both needle and bobbin
threads will join at the middle of the fabric.
For zigzag stitch sewing, the needle thread will appear
slightly on the wrong side of the fabric.
1 Wrong side of fabric
1
2Right side of fabric
3 Needle thread
4 Bobbin thread
4
Manual thread tension adjustment
You should adjust the tension manually if the LCD screen
shows a tension setting other than AUTO.
You may also need to adjust tension manually depending
on the sewing conditions such as the type of fabric and
number of layers.
2
1
3
4
2
1
3
4
If the needle thread is too tight, the bobbin thread
appears on the right side of the fabric.
1 Wrong side of fabric
2Right side of fabric
3 Needle thread
4 Bobbin thread
Tu rn the thread tension dial to a lower number to
decrease the thread tension.
If the needle thread is too loose, the needle thread loops
on the underside of the fabric.
1 Wrong side of fabric
2Right side of fabric
3 Needle thread
4 Bobbin thread
Tu rn the thread tension dial to a higher number to
increase the thread tension.
21

5
6
4
Adjusting the Foot Pressure
The foot pressure can be adjusted with the foot pressure
7
3
2
1
2
dial located under the top cover.
The dial has 7 setting positions from 1 to 7.
For ordinary sewing, set “7” at the setting mark.
1 Foot pressure dial
1
2Setting mark
Reduce the pressure when sewing fine synthetics and
stretch fabrics.
To reduce the pressure, set the dial at a lower number.
The recommended dial setting for the selected pattern will
be show on the LCD screen.
For example, set the dial at 5 for heirloom stitch patterns
number 55 to 64. Set the dial at 4 for applique stitches.
3
3 Recommended setting
Dropping the Feed Dog
The feed dog can be lowered for basting, sewing on
buttons, free motion quilting etc.
Shift the drop feed lever toward you to lower the feed
dog.
1 Drop feed lever
Shift the drop feed lever away from you to raise the
feed dog, it will return to the up position when you start
the machine.
NOTE:
If you start the machine with the feed dog lowered, a
message will appear on the LCD screen.
1
The machine will not run with the feed dog lowered
when pattern number 23-33, 35-40 or monogram is
selected.
22
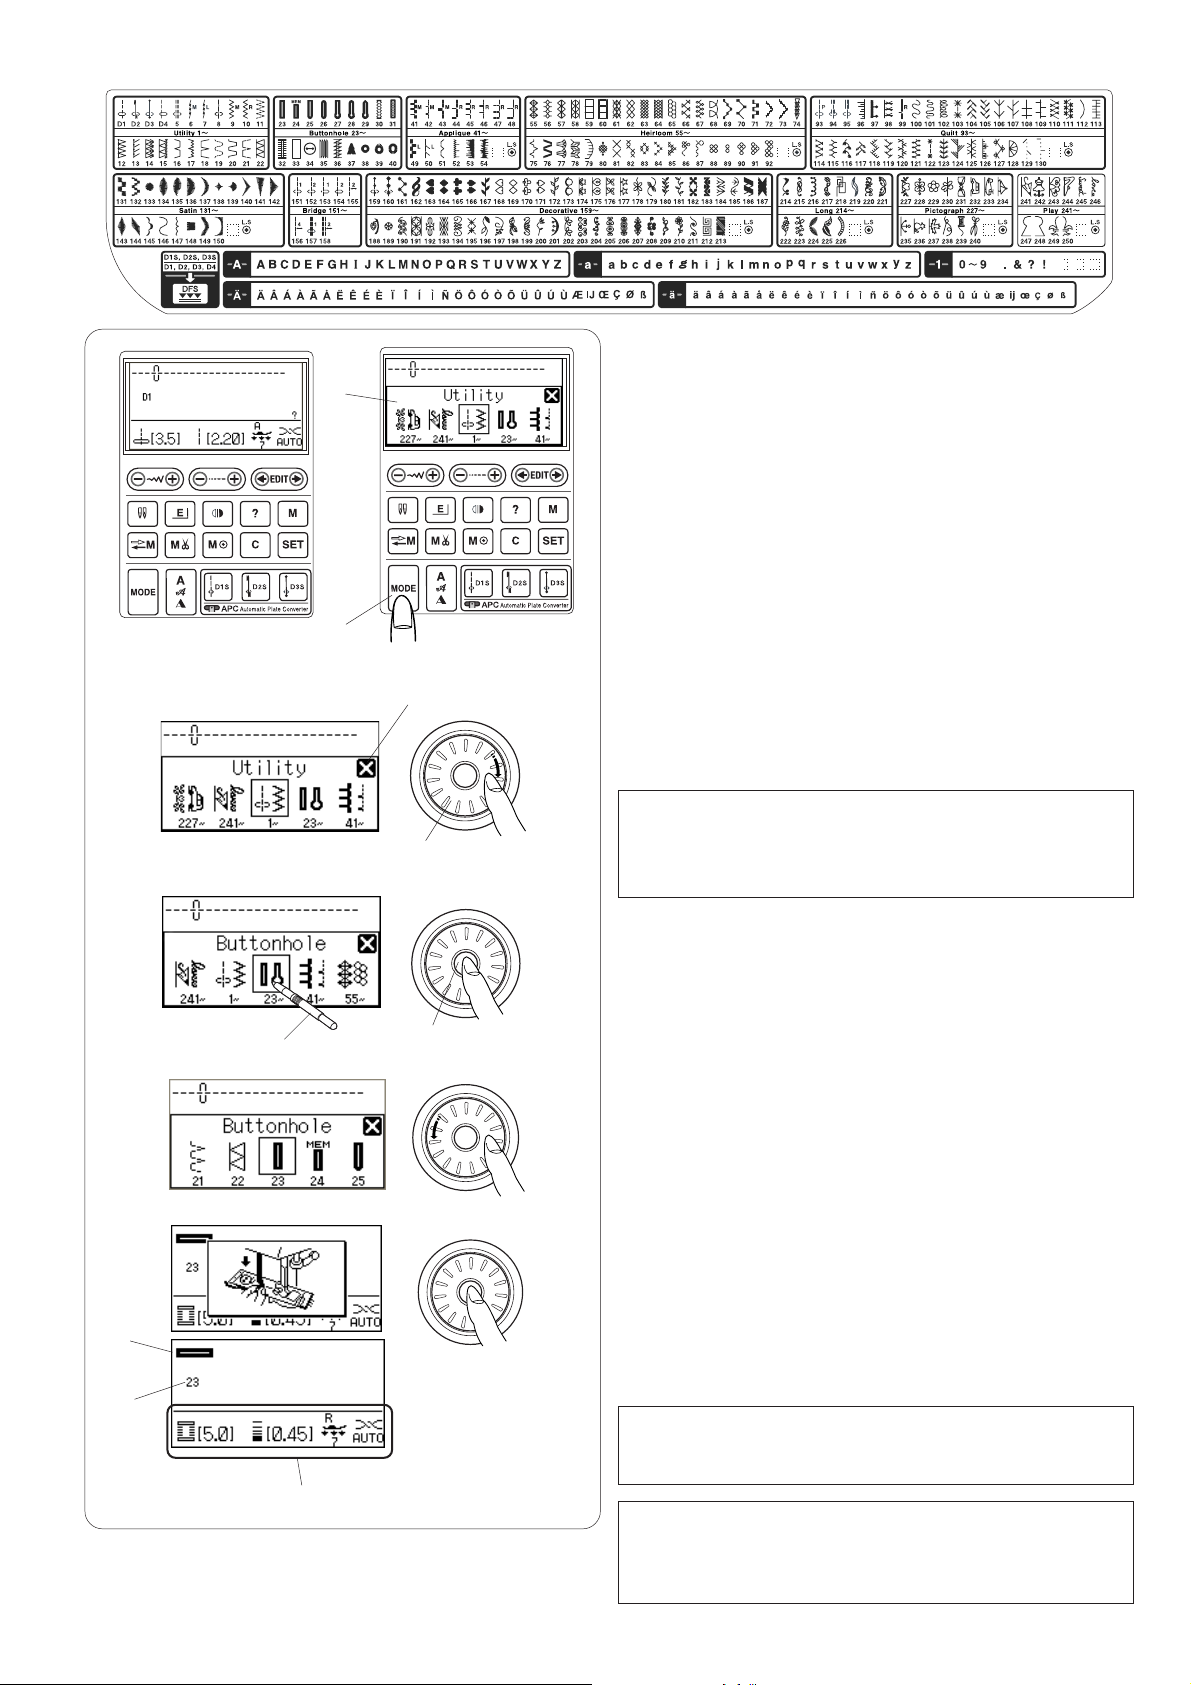
Selecting the Patterns
The stitch patterns are classified into 11 groups.
To select the desired stitch pattern, refer to the reference
2
chart inside the top cover to identify the stitch group and
pattern number.
When turning the power switch on, the LCD screen will
show the straight stitch D1 selected.
Press the mode key and the group selection window will
open.
1 Mode key
2 Group selection window
1
4
Tu rn the jog dial clockwise or counterclockwise to browse
through the groups.
3 Jog dial
NOTE:
3
6
5
7
To close the group selection window, press the cross
mark with the touch panel stylus.
4 Cross mark
Press the confirm button in the center of the jog dial to
select the group enclosed with a frame, or press the icon
of the desired group with the touch panel stylus.
5 Confirm button
6Touch panel stylus
The pattern selection window will open.
Tu rn the jog dial and press the confirm button, or press
the stitch icon to select the desired stitch pattern.
The LCD screen will display the pattern number and stitch
image, along with information such as stitch width and
length, recommended foot, foot pressure and tension
setting.
7Stitch image
8 Pattern number
9 Information
8
NOTE:
A message window will be displayed for briefly when
certain stitch pattern is selected.
9
CAUTION:
Do not press the surface of the LCD screen with hard or
sharp objects like pencils, screwdrivers or the like. Use
the touch panel stylus to press the LCD screen.
23

Help key
Pressing this key will show alternative applications and
2
useful information for the following stitch patterns:
1 Help key
1
3
3
When one of the above patterns is selected, the “?” mark
is displayed.
2 “?” mark
Example: Stitch pattern D1 is selected.
When you press the help key, the following will be displayed on the LCD screen.
The first page shows the zigzag foot A and quilting guide
bar for quilting.
The second page shows the rolled hem foot D for rolled
hemming applications.
NOTE:
Arrow marks indicate that there are previous and next
pages to be displayed.
3 Arrow marks
The third page shows the zipper foot E for zipper sewing
applications.
Pages A1 to A6 and D1 to D6 show step-by step
instructions on how to engage and disengage the dual
feed device.
NOTES:
Use the jog dial to scroll through the pages.
To close the help window, press the help key again or
press the clear key.
24

Customizing Machine Settings
You can customize the machine settings to your
preference.
1
3
2
Press the set key and the LCD screen will show the
machine setting window.
1 Set key
2 Machine setting window
To close the machine setting window, press the cross
mark.
3 Cross mark
Tu rn the jog dial to select the desired item to set and
press the confirm button
Screen brightness
The screen brightness can be adjusted from level 0 to 20.
The preset level is 10.
Tu rn the jog dial to adjust the screen brightness.
Press the confirm button to register the new setting.
Buzzer sound
The level of the buzzer sound can be adjusted and you
can mute the buzzer in normal operation.
Tu rn the jog dial to select the desired sound level; mute,
low normal or loud.
Press the confirm button to register the new setting.
You can select the desired level by also pressing a sound
level icon with the touch panel stylus.
NOTE:
Items and settings can also be selected by pressing the
relevant icon on the LCD screen
25

Sub window display time
A sub window will appear when selecting certain patterns
such as buttonholes.
The duration of the sub window display can be altered.
Tu rn the jog dial to select x0.5 (1 second), x1.0 (2 seconds)
or x1.5 (3 seconds).
The preset time is x1.0 (2 seconds).
Press the confirm button to register the new setting.
Resumption setting
The last pattern sewn before turning the power off can be
recalled when turning the power on again by setting the
resumption setting on.
Tu rn the jog dial to select the normal set or resumption set.
Press the confirm button to register the new setting.
Favorite stitch adjustment
If you wish to save the altered stitch length and width for
future use, turn on this option.
Tu rn the jog dial to select ON or OFF.
Press the confirm button to register the new setting.
26

Touch panel calibration
If the touch panel keys seem out of alignment, calibrate
the key position as follows.
z
x
c
z Press the center of the stitch width adjusting key with
the touch panel stylus.
x Press the center of the stitch length adjusting key with
the touch panel stylus.
c Press the center of the edit key with the touch panel
stylus.
v
b
v Press the “+” sign that appears on the LCD screen with
the touch panel stylus.
b Press the center of the D1S key with the touch panel
stylus.
b
n Press the “ ” sign that appears on the LCD screen
with the touch panel stylus.
The new settings are registered.
To start over the calibration again press the confirm
button.
27
Loading…
-
Page 1: Janome 7700QCP Horizon
Instruction Book D1S D2S D3S A P C APC A A u u t t o m om a a t i c tic P P l l a t at e e C C o o n n v v e e r r t t e r er Memor y Cra ft 7700 QCP[…]
-
Page 2: Janome 7700QCP Horizon
IMPORTANT SAFETY INSTRUCTIONS This appliance is not intended for use by persons (including children) with reduced physical, sensory or mental capabilities, or lack of experience and knowledge, unless they have been given supervision or instruction concerning use of the appliance by a person responsible for their safety. Children should be supervise[…]
-
Page 3: Janome 7700QCP Horizon
1 T ABLE OF CONTENTS GETTING READ Y TO SEW Names of P ar ts ………………………………………………………………. 2 Standard Accessories ……………………………………………………… 3 Extension T able ………………………………………………………………. 4 Accessories Storage …………..[…]
-
Page 4: Janome 7700QCP Horizon
2 GETTING READ Y T O SEW Names of Parts 1T ake-up le ver 2 Foot pressure dial 3 Reference chart 4T op cov er 5 Foot storage compartment 6 Bobbin thread cutter 7 Bobbin winder stopper 8B obbin winder spindle 9 Hole for extra spool pin 10 Spool holder 11 Spool pin 12 Thread tension dial 13 Thread cutter 14 Face plate 15 Speed control slider 16 LCD sc[…]
-
Page 5: Janome 7700QCP Horizon
3 Standard Accessories 1 Zigzag f oot A (set on the machine) 2 Overcasting foot C 3 Rolled hem foot D 4 Zipper foot E 5 Satin stitch foot F 6 Blind hemming foot G 7 Cording foot H 8 Overedge foot M 9 Automatic buttonhole foot R 10 Screwdriver 11 Screwdriver key 12 Set of needles 13 Lint brush 14 Seam ripper (Buttonhole opener) 15 Spool holder (larg[…]
-
Page 6: Janome 7700QCP Horizon
4 Extension T ab le The extension table provides an extended sewing area and can be removed for free arm sewing. 1 Extension table To detach: Draw the table out to the left. To attach: Slide the table on the base and push the table to the right. Free-arm sewing Free-arm sewing is used for stitching sleeves, waist- bands, pant legs or any other tubu[…]
-
Page 7: Janome 7700QCP Horizon
5 Connecting the Power Supply First make sure the po wer s witch is off. Inser t the machine plug of the pow er supply cord into the machine socket. Insert the power supply plug into the wall outlet, and turn the power switch on. 1 Power switch 2 Machine plug 3 Machine socket NOTES: Make sure to use the power supply cord that came with the machine.[…]
-
Page 8: Janome 7700QCP Horizon
6 Controlling Sewing Speed Speed control slider Y ou can limit the maximum sewing speed with the speed control slider according to your sewing needs. To increase the se wing speed, mov e the slider to the r ight. To decrease the se wing speed, move the slider to the left. Foot control Pressing on the foot control can vary sewing speed. The harder y[…]
-
Page 9: Janome 7700QCP Horizon
7 Machine Operating Buttons 1 Start/stop button Press this button to start or stop the machine. The machine starts running slowly for the first few stitches, it then runs at the speed set by the speed control slider . The machine runs slowly as long as this button is pressed. The button will turn red when the machine is running, and green when it h[…]
-
Page 10: Janome 7700QCP Horizon
8 4 Needle up/down position b utton Press this button to bring the needle bar up or down. The machine will stop with the needle up or down depending on the position set by this button. The LED signal is turned on when the down position is selected. NOTE: The machine will always stop with the needle up after sewing b uttonholes, dar ning and monogr […]
-
Page 11: Janome 7700QCP Horizon
9 Raising and Lowering the Presser Foot The presser foot lifter raises and lowers the presser foot. 1 Presser foot lifter Y ou can raise the presser foot higher than the normal up position. This allows f or setting the dual f eed de vice, attaching presser f oot, and also helps you to place thic k la yers of f abrics under the foot. 2 Extra lifted […]
-
Page 12: Janome 7700QCP Horizon
10 Function Keys 1 Mode key (refer to pa ge 23) Press this ke y to open the group selection window . 2 Monogram key (refer to page 80) Press this key to select one of 3 letter styles available. 3D irect pattern selection keys (refer to page 34) Press one of 3 keys to select a straight stitch pattern using automatic plate conv er ter . 4 Memory reca[…]
-
Page 13: Janome 7700QCP Horizon
11 Changing the Presser Foot W ARNING: Tu rn the po wer switch off bef ore changing the presser foot. Removing the presser foot Raise the needle to its highest position and raise the presser f oot lifter . Press the red button on the bac k of the f oot holder . The presser f oot will drop off . 1 Red button 2 Presser foot NOTE: If the dual f eed de[…]
-
Page 14: Janome 7700QCP Horizon
12 Setting for Dual Feed Sewing W ARNING: Tu rn the po wer switch off bef ore changing the presser foot. Attach the dual f eed f oot when sewing with the dual f eed device. Attaching the dual feed foot z Remove the needle and loosen the thumbscrew with the screwdriv er . 1 Thumbscrew x Raise the presser foot and loosen the thumbscrew to remove the […]
-
Page 15: Janome 7700QCP Horizon
13 Disengaging the dual feed device z Raise the presser foot lifter to the extra lifted position. 1 Extra lifted position x Pull down the dual feed device to disengage it from the dual feed foot. Swing the dual feed de vice to the rear . 2 Dual feed device c Swing up the dual feed device until it catches the pins. 3P i n Removing the dual feed foot[…]
-
Page 16: Janome 7700QCP Horizon
14 Setting the Spool of Thread Lift up the spool pin. Place the spool of thread on the spool pin with the thread coming off the spool as shown. Attach the large spool holder , and press it fir mly against the spool of thread. 1 Large spool holder NOTE: Use the small spool holder to hold narrow or small spools of thread. 2 Small spool holder Extra s[…]
-
Page 17: Janome 7700QCP Horizon
15 Winding the Bobbin z Pull the thread from the spool. Hold the thread with both hands and pass the thread into the guide slot. 1 Guide slot x Draw the thread to the left and f orward around the thread guide. Dra w the thread to the rear and to the right around under the guide plate. Firmly pull the thread to the r ight while holding it with both […]
-
Page 18: Janome 7700QCP Horizon
16 Inserting the Bobbin z Place the bobbin in the bobbin holder with the thread running off counterclockwise. x Guide the thread into the front notch on the bobbin holder . 1 Front notch c Draw the thread to the left, sliding it between the tension spring blades. 2T ension spring blades v Continue to draw the thread lightly until the thread slips i[…]
-
Page 19: Janome 7700QCP Horizon
17 Threading the Machine Raise the presser f oot. Press the needle up/down position b utton twice to raise the needle . Tu rn the power s witch off . Pass the thread in order from z to m . z Hold the thread with both hands and pass the thread into the guide slot. 1 Guide slot x Draw the thread to the left and around the corner of the guide tow ard […]
-
Page 20: Janome 7700QCP Horizon
18 Built-in needle threader NOTE: The needle threader can be used with a #11 to #16 needle, or a #11 Blue needle . Thread size 50 to 90 is recommended. z Lower the presser foot. Raise the needle to its highest position. T ur n the pow er s witch off . Pull down the needle threader knob as f ar as it will go. The threader hook comes out through the […]
-
Page 21: Janome 7700QCP Horizon
19 Drawing Up the Bobbin Thread z Raise the presser foot lifter . Hold the needle thread with your finger . 1 Needle thread x Press the needle up/down position button twice to dra w up the bobbin thread. 2 Needle up/down position b utton c Pull the needle thread to br ing up the loop of bobbin thread. 3 Loop of bobbin thread v Pull both threads 10 […]
-
Page 22: Janome 7700QCP Horizon
20 Changing Needles CAUTION: Alwa ys make sure to turn the power s witch off and disconnect the machine from the pow er supply before changing the needle. Raise the needle by pressing the needle up/do wn position b utton and lo wer the presser f oot. Tu rn the power s witch off . Loosen the needle clamp screw and remove the needle from the clamp. 1[…]
-
Page 23: Janome 7700QCP Horizon
21 Auto-thread tension F or gener al sewing, set the thread tension dial at A UTO , which covers a wide range of sewing conditions. Recommended tension setting for the selected pattern is indicated on the LCD screen. 1 Thread tension dial 2 Recommended tension setting Balanced thread tension For straight stitch sewing, both needle and bobbin thread[…]
-
Page 24: Janome 7700QCP Horizon
22 Adjusting the Foot Pressure The foot pressure can be adjusted with the foot pressure dial located under the top cov er . The dial has 7 setting positions from 1 to 7. For ordinary sewing, set “7” at the setting mark. 1 Foot pressure dial 2S etting mark Reduce the pressure when sewing fine synthetics and stretch f abrics. To reduce the pressu[…]
-
Page 25: Janome 7700QCP Horizon
23 The stitch patterns are classified into 11 groups. To select the desired stitch pattern, refer to the ref erence chart inside the top cover to identify the stitch group and pattern number . When turning the power switch on, the LCD screen will show the str aight stitch D1 selected. Press the mode key and the group selection window will open. 1 M[…]
-
Page 26: Janome 7700QCP Horizon
24 Help key Pressing this key will show alternative applications and useful inf ormation for the f ollowing stitch patter ns: 1 Help ke y When one of the abov e patter ns is selected, the “?” mark is displa yed. 2 “?” mark Example: Stitch patter n D1 is selected. When you press the help k ey , the follo wing will be dis- pla yed on the LCD […]
-
Page 27: Janome 7700QCP Horizon
25 Customizing Machine Settings Y ou can customize the machine settings to your preference. Press the set key and the LCD screen will show the machine setting window . 1 Set key 2 Machine setting window To close the machine setting window , press the cross mark. 3 Cross mark Tu rn the jog dial to select the desired item to set and press the confirm[…]
-
Page 28: Janome 7700QCP Horizon
26 Sub window display time A sub window will appear when selecting cer tain patterns such as buttonholes . The duration of the sub window displa y can be al tere d. Tu rn the jog dial to select x0.5 (1 second), x1.0 (2 seconds) or x1.5 (3 seconds). The preset time is x1.0 (2 seconds). Press the confirm button to register the new setting. Resumption[…]
-
Page 29: Janome 7700QCP Horizon
27 T ouch panel calibration If the touch panel keys seem out of alignment, calibrate the key position as follows. z Press the center of the stitch width adjusting key with the touch panel stylus. x Press the center of the stitch length adjusting key with the touch panel stylus. c Press the center of the edit ke y with the touch panel stylus. v Pres[…]
-
Page 30: Janome 7700QCP Horizon
28 Language selection Y ou can choose one of the follo wing languages f or screen displa y . 1 English 2 Spanish 3 Finnish 4 French 5 German 6 Italian 7 Dutch 8 Portuguese 9 Russian 10 Swedish 11 Polish Tu rn the jog dial to select the desired language. Press the confirm button to register the new setting. Deleting stored pattern combinations All t[…]
-
Page 31: Janome 7700QCP Horizon
29 UTILITY STITCHES Straight Stitch Machine settings Pattern: D1 (Utility) Thread tension: A UT O Presser foot: Zigzag f oot A or Dual f eed f oot AD Foot pressure: 7 Starting to sew Raise the presser foot and position the fabric next to a seam guide on the needle plate. Low er the needle at the point where you wish to start. Pull the needle and bo[…]
-
Page 32: Janome 7700QCP Horizon
30 Securing seam For fastening the ends of seams, press the reverse button and sew several reverse stitches. The machine sews in reverse as long as you press and hold in the reverse button. Press the reverse button once when sewing the Lock-a- Matic stitch (pattern D2/D2S) or locking stitch (pattern D3/D3S) so the machine will lock the stitch off a[…]
-
Page 33: Janome 7700QCP Horizon
31 Using the Cloth Guide Remove the extension table and attach the extra wide table. Attach the cloth guide to the free arm by pushing the cloth guide down to snap it in place . Slide the cloth guide to the desired position. Place the fabric with its edge against the cloth guide and sew . 1 Cloth guide 2 Free arm P eel off the backing paper from th[…]
-
Page 34: Janome 7700QCP Horizon
32 Adjusting the needle drop position The needle drop position of the straight stitches can be altered by pressing the stitch width adjusting k e y . NO TE: The v alue in brack ets indicates the preset setting. Press the “+” sign on the key to move the needle bar to the right. Press the “–” sign on the key to move the needle bar to the le[…]
-
Page 35: Janome 7700QCP Horizon
33 Example: T o change the preset v alue of the stitch length Select the stitch pattern you wish to change the preset value. The indication of stitch width and length are surrounded with a frame and will work as a custom setting ke y when the f av or ite stitch adjustment option is turned on. 1 Custom setting key Adjust the stitch length as you pre[…]
-
Page 36: Janome 7700QCP Horizon
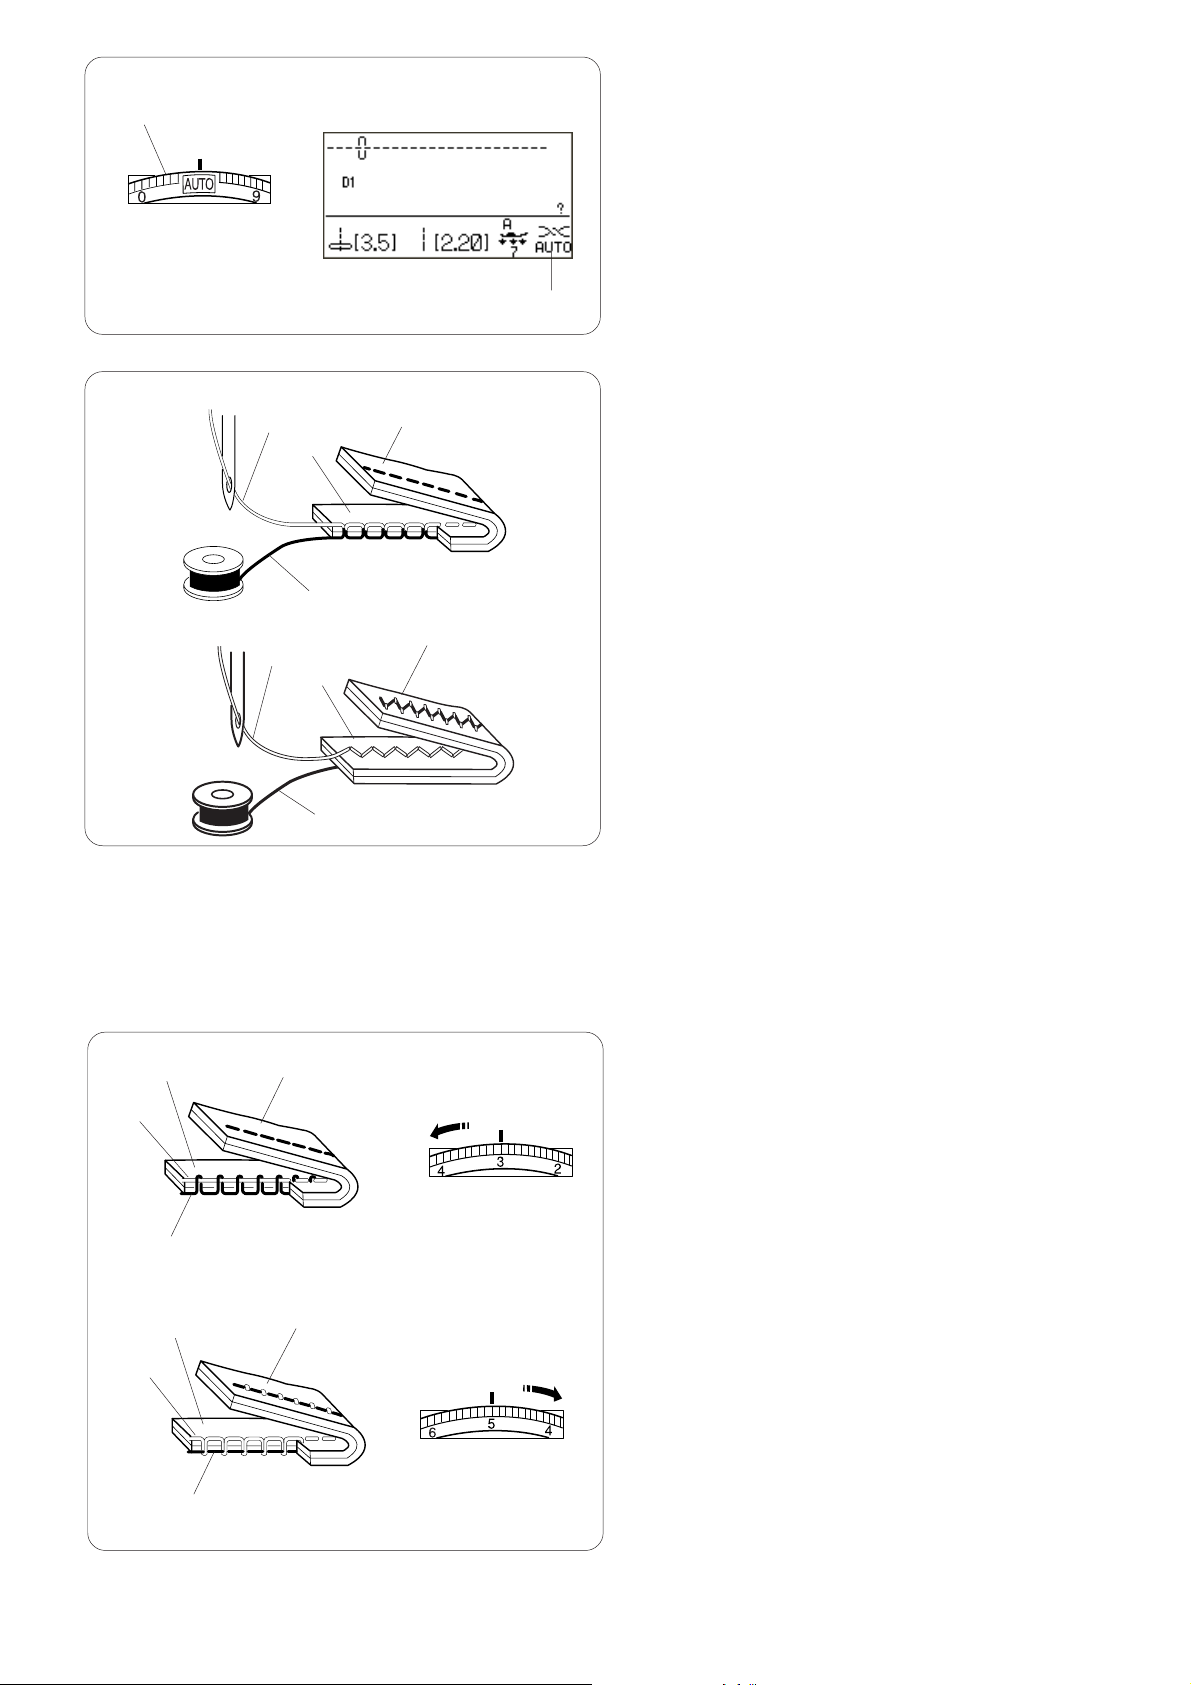
34 Automatic plate converter Setting for straight stitch When stitch pattern D1S, D2S or D3S is selected, the automatic plate converter will close to set up the needle plate hole for straight stitch. NOTE: Use the dual feed device and dual feed foot when sewing fine fabrics and stretch fabrics for the best sewing results. The zigzag foot can be use[…]
-
Page 37: Janome 7700QCP Horizon
35 Opening the automatic plate converter The automatic plate conv er ter should be open if any pattern other than D1S, D2S or D3S is selected. The APC setting window will open if a stitch pattern other than D1S, D2S or D3S is selected while the automatic plate conv er ter is closed. z If the bobbin thread is pulled out through the hole in the plate[…]
-
Page 38: Janome 7700QCP Horizon
36 V ariety of straight stitches Straight stitch with left needle position Machine settings Pattern: D4 (Utility) Thread tension: A U TO Presser foot: Zigzag f oot A, Dual feed f oot AD Foot pressure: 7 Use this stitch to seam the edge of fabrics. Locking stitch Machine settings Pattern: D3 (Utility) Thread tension: A U TO Presser foot: Zigzag f oo[…]
-
Page 39: Janome 7700QCP Horizon
37 T riple stretch stitch Machine settings Pattern: 5 (Utility) Thread tension: A U TO Presser foot: Zigzag f oot A Foot pressure: 7 This strong, durable stitch is recommended for areas where both elasticity and strength are needed to ensure comf or t and durability . Use it to reinf orce areas such as crotch and ar mhole seams . Also use it when c[…]
-
Page 40: Janome 7700QCP Horizon
38 2 (A) 3 1 1 2 (B) Sewing with the Dual Feed Device Machine settings P atter n: D1S Thread tension: A UT O Presser foot: Dual f eed f oot AD Foot pressure: 7 NOTE: Patterns number D1, D2, D3, D4 and D1S, D2S, D3S can be sewn with the dual feed device. The dual f eed de vice is e xtremely eff ectiv e f or se wing with hard to f eed material such a[…]
-
Page 41: Janome 7700QCP Horizon
39 Attaching the convertible free motion quilting foot Loosen the thumbscrew and remo v e the f oot holder . Attach the con v ertib le free motion quilting foot to th e presser bar and tighten the thumbscrew firmly with the screwdriv er . Adjust the height of the f oot by turning the round nut until bottom of the f oot barely touches top of the f a[…]
-
Page 42: Janome 7700QCP Horizon
40 2.0 7.0 1.0 5.0 Zigzag Stitch Machine Setting P atter n: 9 or 1 0 (Util ity) Thread tension: A U TO Presser foot: Zigzag f oot A Foot pressure: 7 Zigzag stitch is used for various sewing needs including overcasting. It can be used on most woven fabrics. A dense zigzag stitch can also be used for applique. Adjusting the stitch width Press the “[…]
-
Page 43: Janome 7700QCP Horizon
41 Overcasting Stitches Overcasting with zigzag stitch Machine settings Pattern: 9 or 10 (Utility) Thread tension: A U TO Presser foot: Overcasting foot C Foot pressure: 7 Place the fabric edge next to the guide of the foot and then sew . 1 Edge of f abric 2 Guide CAUTION: When you use the o vercasting f oot C , you m ust set the zigzag width at 4.[…]
-
Page 44: Janome 7700QCP Horizon
42 Knit stitch Machine settings Pattern: 13 (Utility) Thread tension: A U TO Presser foot: Zigzag f oot A Foot pressure: 7 This stitch is recommended for sewing such fabrics as synthetic knits and stretch velour as it provides the greatest amount of elasticity and strength. Sew along the fabric edge leaving an adequate seam allowance. After sewing,[…]
-
Page 45: Janome 7700QCP Horizon
43 Zipper Sewing Machine settings Pattern: D1 (Utility) Thread tension: A U TO Presser foot: Zipper foot E Foot pressure: 7 Attaching the zipper foot E Fit the pin on zipper foot E to the groove on the foot holder . 1G roove 2 Pin (A) :T o sew the left side of the zipper , attach zipper f oot with the pin on the right-hand side. (B) :T o sew the ri[…]
-
Page 46: Janome 7700QCP Horizon
44 Sewing z F old bac k the left seam allow ance. T ur n the r ight seam allowance under to form a 0.2 to 0.3 cm (1/8“) margin. Place the zipper teeth next to the fold and pin in place. Set the stitch length and thread tension back to the original setting. 1 0.2 to 0.3 cm (1/8”) margin 2 Zipper teeth 3 Fold 4 End of the zipper opening x Attach […]
-
Page 47: Janome 7700QCP Horizon
45 v Close the zipper and spread the fabric open flat with the right side facing up. Baste the opened f abric and zipper tape together . 1 Basting 2 Zipper tape b Re-attach the zipper foot E with the left pin. Backstitch across the end of the opening 0.7-1 cm (3/8“) and turn the fabric 90 degrees. 3 0.7-1 cm (3/8“) n Stitch through the garment […]
-
Page 48: Janome 7700QCP Horizon
46 Rolled Hem Machine settings Pattern: D1 (Utility) Thread tension: A U TO Presser foot: Rolled hem foot D Foot pressure: 7 Sewing Fold the edge of the fabric twice, 6 cm (2 — 3/8”) in length and 0.3 cm (1/8”) in width. 1 6 cm (2 — 3/8”) 2 0.3 cm (1/8”) Place the f abric aligning the edge of the hem with the guide on the f oot. Lower the f[…]
-
Page 49: Janome 7700QCP Horizon
47 Blind Hemming Machine settings Pattern: 16 or 17 (Utility) Thread tension: A U TO Presser foot: Blind hemming foot G Foot pressure: 7 Select pattern 16 for woven fabrics or pattern 17 for elastic fabrics. Folding the fabric Fold the fabric to make a hem as shown. 1 Heavy f abr ic 2 Fine to medium fabric 3 0.4 -0.7 cm (3/16”-1/4”) 4 Overcasti[…]
-
Page 50: Janome 7700QCP Horizon
48 Changing the needle drop position Press the stitch width adjusting ke y . The LCD screen shows the distance between the left needle position and the guide in millimeters. Press the “–“ sign to move the needle to the right. Press the “+” sign to move the needle to the left. 1 Left needle drop position 2 Right needle drop position 3 Guid[…]
-
Page 51: Janome 7700QCP Horizon
49 1 Shell T uck Machine settings Pattern: 18 (Utility) Thread tension: 6-8 Presser f oot: Satin stitch foot F Foot pressure: 7 Use a light weight fabric (tricot, for example). Fold the fabric as shown and stitch on the fold. Allow the needle to just clear the folded edge to create a shelled edge. Y ou may need to increase the needle thread tension[…]
-
Page 52: Janome 7700QCP Horizon
50 Buttonholes V ariety of buttonholes 23 Square (Sensor) buttonhole This square buttonhole is widely used on medium to heavy weight fabrics. The buttonhole size is automatically determined by placing a button in the foot. 24 Square (Memory) buttonhole This is also a square buttonhole similar to the sensor buttonhole, but you can manually set and m[…]
-
Page 53: Janome 7700QCP Horizon
51 Square (Sensor) buttonholes Machine settings Pattern: 23 (Buttonhole) Thread tension: A U TO Presser f oot: Automatic b uttonhole f oot R Foot pressure: 7 Sensor buttonhole Patterns number 23 and 25 to 33 are sensor buttonholes. The size of a buttonhole is automatically set by placing a button in the rear of automatic buttonhole foot R. The butt[…]
-
Page 54: Janome 7700QCP Horizon
52 c Pull the buttonhole le v er down as f ar as it will go . 1 Buttonhole lever NOTE: If you start sewing without pulling down the buttonhole le v er , the LCD screen will show a warning and the machine will stop after a f ew stitches . Pull the b uttonhole le v er down and star t se wing. v Insert the corner of the fabric under the foot. Press th[…]
-
Page 55: Janome 7700QCP Horizon
53 b Start the machine to sew the buttonhole. The machine will sew the left row first. n Then it goes to the end point with straight stitches. The machine will sew the back bartack and the right row . m Finally , the machine will se w the front bar tack and stop automatically . To sew another b uttonhole, press the thread cutter button and raise th[…]
-
Page 56: Janome 7700QCP Horizon
54 Corded buttonhole Machine settings Pattern 23 (Buttonhole) Thread tension: A U TO Presser f oot: Automatic b uttonhole f oot R Foot pressure: 7 With the automatic buttonhole foot R raised, hook the filler cord on the spur at the back of the buttonhole foot 1 Spur Bring the ends of the cord toward y ou under the b uttonhole f oot clear ing the fr[…]
-
Page 57: Janome 7700QCP Horizon
55 1 2 Adjusting the buttonhole width The buttonhole width can be adjusted by pressing the stitch width adjusting ke y . Press the “+“ sign on the stitch width adjusting key to increase the buttonhole width. Press the “–“ sign on the stitch width adjusting key to decrease the buttonhole width. 1 Stitch width adjusting key 2 Narrower butto[…]
-
Page 58: Janome 7700QCP Horizon
56 Memory buttonhole Machine settings Pattern: 24 (Buttonhole) Thread tension: A U TO Presser f oot: Automatic b uttonhole f oot R Foot pressure: 7 When selecting the memor y b uttonhole, the LCD screen will advise you to pull the b utton holder open. z Pull the button holder of the buttonhole foot all the way out. Place the fabric and lower the fo[…]
-
Page 59: Janome 7700QCP Horizon
57 Round end and fine fabric buttonholes Machine settings P atter n: 25 or 26 (Buttonhole) Thread tension: A U TO Presser f oot: Automatic b uttonhole f oot R Foot pressure: 7 The sewing procedure is the same as the square (sensor) buttonhole (ref er to pages 51-53). The machine will sew a b uttonhole in the order shown. NOTE: The buttonhole width […]
-
Page 60: Janome 7700QCP Horizon
58 Stretch b uttonholes Machine settings P atter n: 30 or 32 (Buttonhole) Thread tension: A U TO Presser f oot: Automatic b uttonhole f oot R Foot pressure: 7 The sewing procedure is the same as the square (sen- sor) buttonhole (ref er to pages 51-53). The machine will sew a b uttonhole in the order shown. NOTE: The b uttonhole width can be adjuste[…]
-
Page 61: Janome 7700QCP Horizon
59 Button Sewing Machine settings Pattern: 34 (Buttonhole) Thread tension: A U TO Presser f oot: Button sewing f oot T Foot pressure: 7 F eed dog: Low ered (ref er to page 22.) W ARNING: Tu rn the po wer s witch off before changing the presser foot. Attaching the button sewing foot T Insert the rear pin on the foot into the rear groove of the f oot[…]
-
Page 62: Janome 7700QCP Horizon
60 Darning Machine settings Pattern: 35 (Buttonhole) Thread tension: A U TO Presser f oot: Automatic b uttonhole f oot R Foot pressure: 7 When selecting the dar ning stitch, the LCD screen will advise you to pull the b utton holder open. Pull the button holder to the rear . Insert the corner of the fabric under the foot. Press the up/down needle po[…]
-
Page 63: Janome 7700QCP Horizon
61 Sewing a shorter darning To sew a darning shor ter than 2 cm (3/4”), first stop the machine after sewing the required length, then press the reverse button. The required length has been determined. Star t the machine again and continue se wing until the machine stops automatically . 1 Required length 2R ev erse button Sewing the same size darn[…]
-
Page 64: Janome 7700QCP Horizon
62 Ta c king Machine settings Pattern: 36 (Buttonhole) Thread tension: A U TO Presser f oot: Satin stitch foot F Foot pressure: 7 Ta c king is used to reinforce poc kets, crotch seams and belt carriers where extra strength is needed. Sewing Lower the needle at the starting point. Lower the foot and sew until the machine stops automatically . The ma[…]
-
Page 65: Janome 7700QCP Horizon
63 Eyelet Machine settings P atter n: 38-40 (Buttonhole) Thread tension: A U TO Presser f oot: Satin stitch foot F Foot pressure: 7 The eyelet is used for belt holes etc. Sewing Sew until the machine stops automatically . Open the eyelet with an eyelet puncher or pointed scissors. Adjusting the shape of an eyelet Correct the shape of the eyelet as […]
-
Page 66: Janome 7700QCP Horizon
64 90 60 45 120 PA TCHWORK AND QUIL TING Patchwork Piecing Machine settings Pattern: 93 (Quilt) Thread tension: Auto Presser foot: 1/4” seam foot O Foot pressure: 7 Place the patchwork pieces r ight sides together . Sew while guiding the edge of the fabric along the guide on the foot to keep a precise 1/4” seam allowance. 1 Guide 2 Right sides […]
-
Page 67: Janome 7700QCP Horizon
65 Quilting Machine settings Pattern: D1 (Utility) Thread tension: A U TO Presser f oot: Zigzag foot A or dual f eed foot AD Foot pressure: 7 Attaching the quilting bar Inser t the quilting guide bar into the opening and slide the quilting guide bar to the position according to the desired space between seams . 1 Opening on the f oot holder 2 Quilt[…]
-
Page 68: Janome 7700QCP Horizon
66 Free Motion Quilting Machine settings Pattern: D1S Thread tension: A U TO Presser foot: Convertible free motion quilting foot QB-H Foot pressure: 7 Feed dog: Lowered (See page 22) Attaching the convertible free motion quilting foot Attach the conv er tible free motion quilting f oot and make sure that the needle enters the center of the hole in […]
-
Page 69: Janome 7700QCP Horizon
67 Applique Machine settings P atter n: 41-50 (Applique) Thread tension: A UT O Presser f oot: Satin stitch foot F or open toe satin stitch f oot F2 F oot pressure: 4 Place an applique on the fabric and baste it in place or use a fusible web to secure the applique in place. Guide the applique f abric, so that the needle f alls off the edge of the a[…]
-
Page 70: Janome 7700QCP Horizon
68 Fagoting Machine settings Pattern: 66, 67, 75 (Heirloom) Thread tension: A UT O Presser f oot: Zigzag foot A Foot pressure: 5 Use this stitch to join two pieces of fabric to create an open work appearance and add design interest. Fold under each fabric edge 1.5 cm (5/8˝) and press. Pin the two edges to paper or tear away backing 0.3 cm (1/8˝) […]
-
Page 71: Janome 7700QCP Horizon
69 Cording (3-strand cor ding) Machine settings P atter n: 132 (Satin) Thread tension: A UT O Presser f oot: Cording f oot H F oot pressure: 7 Inser t 3 strands of cording under the spring of the f oot and dra w them under the f oot to the rear . 1 Spring Hold the three strands parallel f or ev en sewing and be sure to sew o v er the strands Stitch[…]
-
Page 72: Janome 7700QCP Horizon
70 Satin Stitches Machine settings Pattern: 131-150 (Satin) Thread tension: A U TO Presser f oot: Satin stitch foot F Foot pressure: 7 The stitches in this group can be elongated up to 5 times their original length while the stitch density remains the same. Example: Pattern number 134 Select pattern number 134. Press the elongation key to select th[…]
-
Page 73: Janome 7700QCP Horizon
71 Sewing a Single Unit of a P attern To sew only a single unit of a stitch pattern, press the locking stitch key after memorizing the desired pattern. z Select the desired pattern. x Press the memor y ke y . c Press the locking stitch k ey . NOTE: No further patterns can be memorized after pressing the locking stitch k ey . v Star t sewing. The ma[…]
-
Page 74: Janome 7700QCP Horizon
72 T win Needle Sewing CAUTION: Tu rn off the machine bef ore changing the needle and threading the machine. When sewing with the twin needle , press the twin needle key . NOTES: Use the zigzag f oot A or satin stitch f oot F . Use #60 or finer threads. T est the stitches bef ore you begin to se w . Threading the machine for twin needle Raise the n[…]
-
Page 75: Janome 7700QCP Horizon
73 Machine Setting Pattern: See below Thread tension: A U TO Presser f oot: Zigzag foot A or satin stitch f oot F Foot pressure: 7 Selecting the patterns Select the desired pattern suitable for twin needle sewing. Press the twin needle key . The LCD screen shows a twin needle icon and the maximum permissible stitch width is restricted to 3.0 mm. Th[…]
-
Page 76: Janome 7700QCP Horizon
74 PROGRAMMING A PA TTERN COMBINA TION Pattern Combination Example: Prog ramming patterns 134 and 138. NO TE: P atter ns in the diff erent groups, letters and n umbers can also be programmed. z Select patter n 134 (Satin). x Press the memor y ke y . c Select pattern 138 (Satin). v Press the memory key or confirm button. b Combination of patterns 13[…]
-
Page 77: Janome 7700QCP Horizon
75 Pattern Combination with a Mirror Image Example: Pattern 137 (Satin) and its mirror image z Select pattern 137 (Satin). x Press the memor y ke y . c Select pattern 137 (Satin) again. v Press the mirror image ke y to tur n o v er the pattern. b Press the memor y ke y . n The machine will sew the pattern combination repeatedly . NOTE: If you press[…]
-
Page 78: Janome 7700QCP Horizon
76 Programming A utomatic Thread Cutting To cut the threads automatically after sewing the pattern combination, press the automatic thread cutter key after programming the pattern combination. The cutter sign will be indicated on the LCD screen and the LED signal on the thread cutter button will turn on. 1 Cutter sign 2 LED signal The machine will […]
-
Page 79: Janome 7700QCP Horizon
77 Sewing the Pattern Combination from the Beginning If you ha ve to stop sewing in the middle of a pattern combination and wish to sew it o v er again, press the memor y k ey to se w the patter n combination from the beginning. 1 Programmed pattern combination 2 Sewing stopped. 3 Press the memor y k e y . 4 Sewing starts from the beginning of the […]
-
Page 80: Janome 7700QCP Horizon
78 Bridge Stitches Stitch patterns number 151 to 158 are bridge stitches, which are used to insert straight stitches after a stitch pattern. Example: Combination of pattern 77 (Heirloom) and pattern 155 (Bridge) z Select pattern 77 (Heirloom). x Press the memor y ke y . c Select pattern 155 (Bridge). v Press the memor y ke y . b Tw o counts of the […]
-
Page 81: Janome 7700QCP Horizon
79 Programming French Knots Example: Combination of French knot and bridge stitches z Select pattern 159 (Decorative). x Press the memor y ke y . c Select pattern 152 (Bridge). v Press the memor y ke y . b Tw o counts of straight stitch with center needle position will be added to the F rench knot. 1F rench knot 2 Bridge stitch z x c v b 1 2[…]
-
Page 82: Janome 7700QCP Horizon
80 MONOGRAMMING Selecting a Letter Style Press the monogram k ey to select the letter style. The monogram selection window will open. The f ollowing 3 styles are a v ailable . 1 Block 2 Script 3 Broadway Selecting a Character Tu rn the jog dial clockwise or countercloc kwise to select the desired character and press the confirm button. The LCD scre[…]
-
Page 83: Janome 7700QCP Horizon
81 Programming a Monogram Example: To prog ram “ R&B ” z Press the monogram ke y . x Select letter “ R ” (Block style). c Press the memor y ke y . v Select letter “ & ” (Block style). b Press the memor y ke y . n Select letter “ B ” (Block style). m Press the memor y ke y . , Press the auto thread cutter key . . The machine […]
-
Page 84: Janome 7700QCP Horizon
82 EDITING A P A TTERN COMBINA TION Viewing a Long Combination The LCD screen only shows 5 patterns or 9 characters at a time. If the entire combination is not displa yed, press the edit key to view the rest of the combination. Press the right arrow on the edit key to shift the cursor to the right. Press the left arrow on the edit key to shift the […]
-
Page 85: Janome 7700QCP Horizon
83 Inserting a Pattern Example: Inser ting a space. Press the edit ke y to shift the cursor under the pattern immediately after where you wish to insert a space. Select a space . Press the memor y k e y and a space will be inser ted bef ore pattern 133. Duplicating a P attern Press the edit ke y to shift the cursor under the patter n to be duplicat[…]
-
Page 86: Janome 7700QCP Horizon
84 Uniform Stitc h Adjustment The stitch width and length of the programmed patterns can be unif ormly adjusted. Example 1: Adjusting the stitch width of the programmed pattern 175 and its mirror image Shift the cursor to the right of the last programmed pattern. Press the stitch width adjusting ke y to adjust the stitch width. NO TE: Stitch length[…]
-
Page 87: Janome 7700QCP Horizon
85 Programming Satin Stitches and Stretch Stitches The stitch width of satin stitch and stretch stitch combinations can be unif or mly adjusted. Press the stitch width adjustment ke y . The stitch width will be applied to all programmed patterns. NOTE: How e v er unif orm adjustment of the stitch length is not av ailable . Adjust the stitch lengths[…]
-
Page 88: Janome 7700QCP Horizon
86 Overwriting a Stored Combination z Program a pattern combination. Press the memory recall key to select the desired address. x If a pattern combination has been already stored, the LCD screen will show the image of the stored pattern combination. c Press the memory key or memory key icon on the LCD screen. The stored combination will be replaced[…]
-
Page 89: Janome 7700QCP Horizon
87 Recalling a Stored Combination Press the memor y recall k ey to select the memory ad- dress where the desired patter n combination is stored. Press the confirm button or confirm button icon on the LCD screen to recall the stored combination. 1 Confirm button icon Deleting a Stored Combination Press the memor y recall k ey to select the memory ad[…]
-
Page 90: Janome 7700QCP Horizon
88 CARE AND MAINTENANCE Correcting Distorted Stitch Patterns The sewing results of the stitch patterns may vary depending upon sewing conditions , such as sewing speed, type of the fabric, number of layers etc. Always test sew on a scrap piece of the fabric that you wish to use. If stretch stitch patterns or the stretch buttonhole is distorted, cor[…]
-
Page 91: Janome 7700QCP Horizon
89 Cleaning the Hook Race, Feed Dog and Thread Cutter Mechanism W ARNING: Tu rn the po wer s witch off and unplug the machine before cleaning. CA UTION: Make sure to open the automatic needle con ver ter bef ore removing the needle plate . NO TE: Do not dismantle the machine in any w a y other than what is explained on this page. z Remove the needl[…]
-
Page 92: Janome 7700QCP Horizon
90 Prob lems and W arning Signals If a buzz er sounds and the LCD screen shows a warning sign, follow the guidance belo w . The machine will stop if the buttonhole is se wn without low ering the buttonhole le ver . The f oot control is disconnected while sewing. The machine is star ted without low ering the presser f oot. The machine will stop if t[…]
-
Page 93: Janome 7700QCP Horizon
91 The machine is star ted after halting due to ov erload. The feed dog is lowered while the machine is running. The presser foot is raised while the machine is running. The bobbin winder spindle is shifted to the left while winding a bobbin. Audible Signal The Buzzer sounds when: pip Normal operation The machine does not work properly due to a pro[…]
-
Page 94: Janome 7700QCP Horizon
92 Cause 1. The needle thread is not threaded properly . 2. The needle thread tension is too tight. 3. The needle is bent or blunt. 4. The needle is incorrectly inserted. 5. The needle thread and the bobbin thread are not set under the presser foot when start sewing. 6. The threads were not drawn to the rear after sewing. 7. The f abric is moved to[…]
-
Page 95: Janome 7700QCP Horizon
[…]
-
Page 96: Janome 7700QCP Horizon
858-800-001 (EN) Printed in T aiwan[…]