
Причины купить Avaya J139 (700513916) в интернет-магазине TEHPOS
- Гарантия низких цен и быстрая доставка
- Вы можете купить Avaya J139 (700513916) по выгодной цене с доставкой или оформить самовывоз с нашего склада
- Предпродажная подготовка б/у оборудования и гарантия на все товары от 3 до 24 месяцев
- Служба техподдержки для решения любых вопросов
- Нашли дешевле? Сообщите нам любым удобным способом и мы постараемся сделать более выгодное предложение!
Купить Avaya J139 (700513916) совсем несложно — добавьте его в корзину и оформите заказ в интернет-магазине TEHPOS или по телефону . В карточке товара посмотрите фото, отзывы покупателей и подробные характеристики, чтобы не промахнуться с выбором. Инструкцию на русском языке для Avaya J139 (700513916), руководство пользователя и программное обеспечение скачайте во вкладке «Загрузки».
В Бахчисарай, Джанкой, Евпатория, Керчь, Симферополь, Севастополь, Феодосия, Черноморское, Ялта и другие населенные пункты Республики Крым доставка занимает не более 5 дней! Доставка в Сочи не более 3 дней.
Для тех, кто хочет купить Avaya J139 (700513916) оптом, мы предлагаем выгодные условия — подробности уточняйте у менеджеров по телефону или отправьте запрос через форму обратной связи.
| Основные | |
|
Встроенная телефонная книга |
да |
|
Громкая связь |
да |
|
Количество линий |
4 |
|
Поддержка SIP |
да |
|
Поддержка Skype |
нет |
|
Подключение гарнитуры |
да |
| Дисплей | |
|
Дисплей |
цветной LCD 320×240 |
| Интерфейсы | |
|
Web-интерфейс |
да |
|
Интерфейсы |
Gigabit LAN |
| Передача данных | |
|
Wi-Fi |
нет |
| Электропитание | |
|
Поддержка PoE |
да |
Уважаемые покупатели! Пожалуйста, перед покупкой проверяйте описание товара на официальном сайте производителя. Внешний вид, комплектация и характеристики могут быть изменены производителем без предварительного уведомления.
Сообщить об ошибке в описании
Способы доставки
Курьерские службы
- СДЭК
- EMS Почта России
- DPD
- Курьер сервис экспресс
- Boxberry
Транспортные компании
- ПЭК
- Деловые линии
- Байкал-Сервис
- КИТ
- Энергия
Варианты оплаты
- Переводы с карты на карту
- Система быстрых платежей
- Оплата картой онлайн
- Оплата на расчетный счет
Остались вопросы?
Дополнительную информацию о доставке и оплате уточняйте по телефону горячей линии 8 (800) 550-90-96 (звонок по России бесплатный).

Using Avaya J139 SIP IP Phone in Open
SIP
Release 4.0.9
Issue 1
April 2021

©
2020-2021, Avaya Inc.
All Rights Reserved.
Note
Using a cell, mobile, or GSM phone, or a two-way radio in close
proximity to an Avaya IP telephone might cause interference.
Documentation disclaimer
“Documentation” means information published in varying mediums
which may include product information, operating instructions and
performance specifications that are generally made available to users
of products. Documentation does not include marketing materials.
Avaya shall not be responsible for any modifications, additions, or
deletions to the original published version of Documentation unless
such modifications, additions, or deletions were performed by or on
the express behalf of Avaya. End User agrees to indemnify and hold
harmless Avaya, Avaya’s agents, servants and employees against all
claims, lawsuits, demands and judgments arising out of, or in
connection with, subsequent modifications, additions or deletions to
this documentation, to the extent made by End User.
Link disclaimer
Avaya is not responsible for the contents or reliability of any linked
websites referenced within this site or Documentation provided by
Avaya. Avaya is not responsible for the accuracy of any information,
statement or content provided on these sites and does not
necessarily endorse the products, services, or information described
or offered within them. Avaya does not guarantee that these links will
work all the time and has no control over the availability of the linked
pages.
Warranty
Avaya provides a limited warranty on Avaya hardware and software.
Refer to your sales agreement to establish the terms of the limited
warranty. In addition, Avaya’s standard warranty language, as well as
information regarding support for this product while under warranty is
available to Avaya customers and other parties through the Avaya
Support website:
https://support.avaya.com/helpcenter/
getGenericDetails?detailId=C20091120112456651010 under the link
“Warranty & Product Lifecycle” or such successor site as designated
by Avaya. Please note that if You acquired the product(s) from an
authorized Avaya Channel Partner outside of the United States and
Canada, the warranty is provided to You by said Avaya Channel
Partner and not by Avaya.
“Hosted Service” means an Avaya hosted service subscription that
You acquire from either Avaya or an authorized Avaya Channel
Partner (as applicable) and which is described further in Hosted SAS
or other service description documentation regarding the applicable
hosted service. If You purchase a Hosted Service subscription, the
foregoing limited warranty may not apply but You may be entitled to
support services in connection with the Hosted Service as described
further in your service description documents for the applicable
Hosted Service. Contact Avaya or Avaya Channel Partner (as
applicable) for more information.
Hosted Service
THE FOLLOWING APPLIES ONLY IF YOU PURCHASE AN AVAYA
HOSTED SERVICE SUBSCRIPTION FROM AVAYA OR AN AVAYA
CHANNEL PARTNER (AS APPLICABLE), THE TERMS OF USE
FOR HOSTED SERVICES ARE AVAILABLE ON THE AVAYA
WEBSITE,
HTTPS://SUPPORT.AVAYA.COM/LICENSEINFO UNDER
THE LINK “Avaya Terms of Use for Hosted Services” OR SUCH
SUCCESSOR SITE AS DESIGNATED BY AVAYA, AND ARE
APPLICABLE TO ANYONE WHO ACCESSES OR USES THE
HOSTED SERVICE. BY ACCESSING OR USING THE HOSTED
SERVICE, OR AUTHORIZING OTHERS TO DO SO, YOU, ON
BEHALF OF YOURSELF AND THE ENTITY FOR WHOM YOU ARE
DOING SO (HEREINAFTER REFERRED TO INTERCHANGEABLY
AS “YOU” AND “END USER”), AGREE TO THE TERMS OF USE. IF
YOU ARE ACCEPTING THE TERMS OF USE ON BEHALF A
COMPANY OR OTHER LEGAL ENTITY, YOU REPRESENT THAT
YOU HAVE THE AUTHORITY TO BIND SUCH ENTITY TO THESE
TERMS OF USE. IF YOU DO NOT HAVE SUCH AUTHORITY, OR IF
YOU DO NOT WISH TO ACCEPT THESE TERMS OF USE, YOU
MUST NOT ACCESS OR USE THE HOSTED SERVICE OR
AUTHORIZE ANYONE TO ACCESS OR USE THE HOSTED
SERVICE.
Licenses
THE SOFTWARE LICENSE TERMS AVAILABLE ON THE AVAYA
WEBSITE, HTTPS://SUPPORT.AVAYA.COM/LICENSEINFO,
UNDER THE LINK “AVAYA SOFTWARE LICENSE TERMS (Avaya
Products)” OR SUCH SUCCESSOR SITE AS DESIGNATED BY
AVAYA, ARE APPLICABLE TO ANYONE WHO DOWNLOADS,
USES AND/OR INSTALLS AVAYA SOFTWARE, PURCHASED
FROM AVAYA INC., ANY AVAYA AFFILIATE, OR AN AVAYA
CHANNEL PARTNER (AS APPLICABLE) UNDER A COMMERCIAL
AGREEMENT WITH AVAYA OR AN AVAYA CHANNEL PARTNER.
UNLESS OTHERWISE AGREED TO BY AVAYA IN WRITING,
AVAYA DOES NOT EXTEND THIS LICENSE IF THE SOFTWARE
WAS OBTAINED FROM ANYONE OTHER THAN AVAYA, AN AVAYA
AFFILIATE OR AN AVAYA CHANNEL PARTNER; AVAYA
RESERVES THE RIGHT TO TAKE LEGAL ACTION AGAINST YOU
AND ANYONE ELSE USING OR SELLING THE SOFTWARE
WITHOUT A LICENSE. BY INSTALLING, DOWNLOADING OR
USING THE SOFTWARE, OR AUTHORIZING OTHERS TO DO SO,
YOU, ON BEHALF OF YOURSELF AND THE ENTITY FOR WHOM
YOU ARE INSTALLING, DOWNLOADING OR USING THE
SOFTWARE (HEREINAFTER REFERRED TO
INTERCHANGEABLY AS “YOU” AND “END USER”), AGREE TO
THESE TERMS AND CONDITIONS AND CREATE A BINDING
CONTRACT BETWEEN YOU AND AVAYA INC. OR THE
APPLICABLE AVAYA AFFILIATE (“AVAYA”).
Avaya grants You a license within the scope of the license types
described below, with the exception of Heritage Nortel Software, for
which the scope of the license is detailed below. Where the order
documentation does not expressly identify a license type, the
applicable license will be a Designated System License as set forth
below in the Designated System(s) License (DS) section as
applicable. The applicable number of licenses and units of capacity
for which the license is granted will be one (1), unless a different
number of licenses or units of capacity is specified in the
documentation or other materials available to You. “Software” means
computer programs in object code, provided by Avaya or an Avaya
Channel Partner, whether as stand-alone products, pre-installed on
hardware products, and any upgrades, updates, patches, bug fixes,
or modified versions thereto. “Designated Processor” means a single
stand-alone computing device. “Server” means a set of Designated
Processors that hosts (physically or virtually) a software application
to be accessed by multiple users. “Instance” means a single copy of
the Software executing at a particular time: (i) on one physical
machine; or (ii) on one deployed software virtual machine (“VM”) or
similar deployment.
License types
Designated System(s) License (DS). End User may install and use
each copy or an Instance of the Software only: 1) on a number of
Designated Processors up to the number indicated in the order; or 2)
up to the number of Instances of the Software as indicated in the
order, Documentation, or as authorized by Avaya in writing. Avaya
may require the Designated Processor(s) to be identified in the order
by type, serial number, feature key, Instance, location or other
specific designation, or to be provided by End User to Avaya through
electronic means established by Avaya specifically for this purpose.
Shrinkwrap License (SR). End User may install and use the Software
in accordance with the terms and conditions of the applicable license
agreements, such as “shrinkwrap” or “clickthrough” license
accompanying or applicable to the Software (“Shrinkwrap License”)
as indicated in the order, Documentation, or as authorized by Avaya
in writing.
Heritage Nortel Software
“Heritage Nortel Software” means the software that was acquired by
Avaya as part of its purchase of the Nortel Enterprise Solutions
Business in December 2009. The Heritage Nortel Software is the
software contained within the list of Heritage Nortel Products located
https://support.avaya.com/LicenseInfo under the link “Heritage
at
Nortel Products” or such successor site as designated by Avaya. For
Heritage Nortel Software, Avaya grants Customer a license to use
Heritage Nortel Software provided hereunder solely to the extent of
the authorized activation or authorized usage level, solely for the
purpose specified in the Documentation, and solely as embedded in,
for execution on, or for communication with Avaya equipment.
Charges for Heritage Nortel Software may be based on extent of
activation or use authorized as specified in an order or invoice.

Copyright
Except where expressly stated otherwise, no use should be made of
materials on this site, the Documentation, Software, Hosted Service,
or hardware provided by Avaya. All content on this site, the
documentation, Hosted Service, and the product provided by Avaya
including the selection, arrangement and design of the content is
owned either by Avaya or its licensors and is protected by copyright
and other intellectual property laws including the sui generis rights
relating to the protection of databases. You may not modify, copy,
reproduce, republish, upload, post, transmit or distribute in any way
any content, in whole or in part, including any code and software
unless expressly authorized by Avaya. Unauthorized reproduction,
transmission, dissemination, storage, and or use without the express
written consent of Avaya can be a criminal, as well as a civil offense
under the applicable law.
Virtualization
The following applies if the product is deployed on a virtual machine.
Each product has its own ordering code and license types. Unless
otherwise stated, each Instance of a product must be separately
licensed and ordered. For example, if the end user customer or
Avaya Channel Partner would like to install two Instances of the
same type of products, then two products of that type must be
ordered.
Third Party Components
“Third Party Components” mean certain software programs or
portions thereof included in the Software or Hosted Service may
contain software (including open source software) distributed under
third party agreements (“Third Party Components”), which contain
terms regarding the rights to use certain portions of the Software
(“Third Party Terms”). As required, information regarding distributed
Linux OS source code (for those products that have distributed Linux
OS source code) and identifying the copyright holders of the Third
Party Components and the Third Party Terms that apply is available
in the products, Documentation or on Avaya’s website at:
support.avaya.com/Copyright or such successor site as designated
by Avaya. The open source software license terms provided as Third
Party Terms are consistent with the license rights granted in these
Software License Terms, and may contain additional rights benefiting
You, such as modification and distribution of the open source
software. The Third Party Terms shall take precedence over these
Software License Terms, solely with respect to the applicable Third
Party Components to the extent that these Software License Terms
impose greater restrictions on You than the applicable Third Party
Terms.
The following applies only if the H.264 (AVC) codec is distributed with
the product. THIS PRODUCT IS LICENSED UNDER THE AVC
PATENT PORTFOLIO LICENSE FOR THE PERSONAL USE OF A
CONSUMER OR OTHER USES IN WHICH IT DOES NOT RECEIVE
REMUNERATION TO (i) ENCODE VIDEO IN COMPLIANCE WITH
THE AVC STANDARD (“AVC VIDEO”) AND/OR (ii) DECODE AVC
VIDEO THAT WAS ENCODED BY A CONSUMER ENGAGED IN A
PERSONAL ACTIVITY AND/OR WAS OBTAINED FROM A VIDEO
PROVIDER LICENSED TO PROVIDE AVC VIDEO. NO LICENSE IS
GRANTED OR SHALL BE IMPLIED FOR ANY OTHER USE.
ADDITIONAL INFORMATION MAY BE OBTAINED FROM MPEG LA,
L.L.C. SEE
Service Provider
THE FOLLOWING APPLIES TO AVAYA CHANNEL PARTNER’S
HOSTING OF AVAYA PRODUCTS OR SERVICES. THE PRODUCT
OR HOSTED SERVICE MAY USE THIRD PARTY COMPONENTS
SUBJECT TO THIRD PARTY TERMS AND REQUIRE A SERVICE
PROVIDER TO BE INDEPENDENTLY LICENSED DIRECTLY FROM
THE THIRD PARTY SUPPLIER. AN AVAYA CHANNEL PARTNER’S
HOSTING OF AVAYA PRODUCTS MUST BE AUTHORIZED IN
WRITING BY AVAYA AND IF THOSE HOSTED PRODUCTS USE
OR EMBED CERTAIN THIRD PARTY SOFTWARE, INCLUDING
BUT NOT LIMITED TO MICROSOFT SOFTWARE OR CODECS,
THE AVAYA CHANNEL PARTNER IS REQUIRED TO
INDEPENDENTLY OBTAIN ANY APPLICABLE LICENSE
AGREEMENTS, AT THE AVAYA CHANNEL PARTNER’S EXPENSE,
DIRECTLY FROM THE APPLICABLE THIRD PARTY SUPPLIER.
WITH RESPECT TO CODECS, IF THE AVAYA CHANNEL
PARTNER IS HOSTING ANY PRODUCTS THAT USE OR EMBED
THE H.264 CODEC OR H.265 CODEC, THE AVAYA CHANNEL
HTTP://WWW.MPEGLA.COM.
https://
PARTNER ACKNOWLEDGES AND AGREES THE AVAYA
CHANNEL PARTNER IS RESPONSIBLE FOR ANY AND ALL
RELATED FEES AND/OR ROYALTIES. THE H.264 (AVC) CODEC
IS LICENSED UNDER THE AVC PATENT PORTFOLIO LICENSE
FOR THE PERSONAL USE OF A CONSUMER OR OTHER USES
IN WHICH IT DOES NOT RECEIVE REMUNERATION TO: (I)
ENCODE VIDEO IN COMPLIANCE WITH THE AVC STANDARD
(“AVC VIDEO”) AND/OR (II) DECODE AVC VIDEO THAT WAS
ENCODED BY A CONSUMER ENGAGED IN A PERSONAL
ACTIVITY AND/OR WAS OBTAINED FROM A VIDEO PROVIDER
LICENSED TO PROVIDE AVC VIDEO. NO LICENSE IS GRANTED
OR SHALL BE IMPLIED FOR ANY OTHER USE. ADDITIONAL
INFORMATION FOR H.264 (AVC) AND H.265 (HEVC) CODECS
MAY BE OBTAINED FROM MPEG LA, L.L.C. SEE
WWW.MPEGLA.COM.
Compliance with Laws
You acknowledge and agree that it is Your responsibility for
complying with any applicable laws and regulations, including, but not
limited to laws and regulations related to call recording, data privacy,
intellectual property, trade secret, fraud, and music performance
rights, in the country or territory where the Avaya product is used.
Preventing Toll Fraud
“Toll Fraud” is the unauthorized use of your telecommunications
system by an unauthorized party (for example, a person who is not a
corporate employee, agent, subcontractor, or is not working on your
company’s behalf). Be aware that there can be a risk of Toll Fraud
associated with your system and that, if Toll Fraud occurs, it can
result in substantial additional charges for your telecommunications
services.
Avaya Toll Fraud intervention
If You suspect that You are being victimized by Toll Fraud and You
need technical assistance or support, call Technical Service Center
Toll Fraud Intervention Hotline at +1-800-643-2353 for the United
States and Canada. For additional support telephone numbers, see
the Avaya Support website:
successor site as designated by Avaya.
Security Vulnerabilities
Information about Avaya’s security support policies can be found in
the Security Policies and Support section of
support.avaya.com/security.
Suspected Avaya product security vulnerabilities are handled per the
Avaya Product Security Support Flow (https://
support.avaya.com/css/P8/documents/100161515).
Downloading Documentation
For the most current versions of Documentation, see the Avaya
Support website:
as designated by Avaya.
Contact Avaya Support
See the Avaya Support website:
product or Hosted Service notices and articles, or to report a problem
with your Avaya product or Hosted Service. For a list of support
telephone numbers and contact addresses, go to the Avaya Support
website:
designated by Avaya), scroll to the bottom of the page, and select
Contact Avaya Support.
Regulatory Statements
Australia Statements
Handset Magnets Statement:
Industry Canada (IC) Statements
RSS Standards Statement
https://support.avaya.com (or such successor site as
Danger:
The handset receiver contains magnetic devices that can
attract small metallic objects. Care should be taken to avoid
personal injury.
https://support.avaya.com, or such successor site
https://support.avaya.com or such
https://support.avaya.com for
HTTP://
https://

This device complies with Industry Canada licence-exempt RSS
standard(s). Operation is subject to the following two conditions:
1. This device may not cause interference, and
2. This device must accept any interference, including
interference that may cause undesired operation of the
device.
Le présent appareil est conforme aux CNR d’Industrie Canada
applicables aux appareils radio exempts de licence. L’exploitation est
autorisée aux deux conditions suivantes:
1. L’appareil ne doit pas produire de brouillage, et
2. L’utilisateur de l’appareil doit accepter tout brouillage
radioélectrique subi, même si le brouillage est susceptible
d’en compromettre le fonctionnement.
Radio Transmitter Statement
Under Industry Canada regulations, this radio transmitter may only
operate using an antenna of a type and maximum (or lesser) gain
approved for the transmitter by Industry Canada. To reduce potential
radio interference to other users, the antenna type and its gain
should be so chosen that the equivalent isotropically radiated power
(EIRP) is not more than that necessary for successful
communication.
Conformément à la réglementation d’Industrie Canada, le présent
émetteur radio peut fonctionner avec une antenne d’un type et d’un
gain maximal (ou inférieur) approuvé pour l’émetteur par Industrie
Canada. Dans le but de réduire les risques de brouillage
radioélectrique à l’intention des autres utilisateurs, il faut choisir le
type d’antenne et son gain de sorte que la puissance isotrope
rayonnée équivalente ne dépasse pas l’intensité nécessaire à
l’établissement d’une communication satisfaisante.
This Class B digital apparatus complies with Canadian ICES-003.
Cet appareil numérique de la classe B est conforme à la norme
NMB-003 du Canada.
Radiation Exposure Statement
This equipment complies with FCC & IC RSS102 radiation exposure
limits set forth for an uncontrolled environment. This equipment
should be installed and operated with minimum distance 20cm
between the radiator & your body. This transmitter must not be colocated or operating in conjunction with any other antenna or
transmitter.
Cet équipement est conforme aux limites d’exposition aux
rayonnements ISEDétablies pour un environnement non contrôlé.
Cet équipement doit être installé et utilisé avec un minimum de 20
cm de distance entre la source de rayonnement et votre corps.
This product meets the applicable Innovation, Science and Economic
Development Canada technical specifications.
Japan Statements
Class B Statement
This is a Class B product based on the standard of the VCCI Council.
If this is used near a radio or television receiver in a domestic
environment, it may cause radio interference. Install and use the
equipment according to the instruction manual.
Denan Power Cord Statement
Danger:
Please be careful of the following while installing the
equipment:
• Please only use the connecting cables, power cord, and
AC adapters shipped with the equipment or specified by
Avaya to be used with the equipment. If you use any
other equipment, it may cause failures, malfunctioning,
or fire.
• Power cords shipped with this equipment must not be
used with any other equipment. In case the above
guidelines are not followed, it may lead to death or
severe injury.
本製品を安全にご使用頂くため、以下のことにご注意ください。
• 接続ケーブル、電源コード、AC アダプタなどの部品は、必ず
製品に同梱されております添付品または指定品をご使用くだ
さい。添付品指定品以外の部品をご使用になると故障や動作
不良、火災の原因となることがあります。
• 同梱されております付属の電源コードを他の機器には使用し
ないでください。上記注意事項を守らないと、死亡や大怪我
など人身事故の原因となることがあります。
México Statement
The operation of this equipment is subject to the following two
conditions:
1. It is possible that this equipment or device may not cause
harmful interference, and
2. This equipment or device must accept any interference,
including interference that may cause undesired operation.
La operación de este equipo está sujeta a las siguientes dos
condiciones:
1. Es posible que este equipo o dispositivo no cause
interferencia perjudicial y
2. Este equipo o dispositivo debe aceptar cualquier
interferencia, incluyendo la que pueda causar su operación
no deseada.
Brazil Statement
Este equipamento não tem direito à proteção contra interferência
prejudicial e não pode causar interferência em sistemas devidamente
autorizados
Power over Ethernet (PoE) Statement
This equipment must be connected to PoE networks without routing
to the outside plant.
U.S. Federal Communications Commission (FCC) Statements
Compliance Statement
The changes or modifications not expressly approved by the party
responsible for compliance could void the user’s authority to operate
the equipment.
To comply with the FCC RF exposure compliance requirements, this
device and its antenna must not be co-located or operating to
conjunction with any other antenna or transmitter.
This device complies with part 15 of the FCC Rules. Operation is
subject to the following two conditions:
1. This device may not cause harmful interference, and
2. This device must accept any interference received,
including interferences that may cause undesired
operation.
This equipment has been tested and found to comply with the limits
for a Class B digital device, pursuant to Part 15 of the FCC Rules.
These limits are designated to provide reasonable protection against
harmful interferences in a residential installation. This equipment
generates, uses and can radiate radio frequency energy and, if not
installed and used in accordance with the instructions, may cause
harmful interference to radio communications. However, there is no
guarantee that interference will not occur in a particular installation. If
this equipment does cause harmful interferences to radio or
television reception, which can be determined by turning the

equipment off and on, the user is encouraged to try to correct the
interference by one or more of the following measures:
• Reorient or relocate the receiving antenna.
• Increase the separation between the equipment and receiver.
• Connect the equipment into an outlet on a circuit different from
that to which the receiver is connected.
• Consult the dealer or an experienced radio/TV technician for
help.
Radiation Exposure Statement
This equipment complies with FCC radiation exposure limits set forth
for an uncontrolled environment . This equipment should be installed
and operated with minimum distance of 8 in or 20 cm between the
radiator and your body. This transmitter must not be co-located or
operating in conjunction with any other antenna or transmitter.
ENERGY STAR® compliance statement
As an ENERGY STAR partner, Avaya Inc. has determined that this
product meets the ENERGY STAR guidelines for energy efficiency.
Information on the ENERGY STAR program can be found at
www.energystar.gov. ENERGY STAR and the ENERGY STAR mark
are registered trademarks owned by the U.S. Environmental
Protection Agency.
EU Countries
General Safety Warning
• Use only the Avaya approved Limited Power Source power
supplies specified for this product.
• Ensure that you:
— Do not operate the device near water.
— Do not use the device during a lightning storm.
— Do not report a gas leak while in the vicinity of the leak.
— For Accessory Power Supply in Avaya J100 Series IP
Phones– Use Only Limited Power Supply Phihong
Technology Co. Ltd. Model: PSAC12R-050, Output: 5VDC,
2.4A.
Trademarks
The trademarks, logos and service marks (“Marks”) displayed in this
site, the Documentation, Hosted Service(s), and product(s) provided
by Avaya are the registered or unregistered Marks of Avaya, its
affiliates, its licensors, its suppliers, or other third parties. Users are
not permitted to use such Marks without prior written consent from
Avaya or such third party which may own the Mark. Nothing
contained in this site, the Documentation, Hosted Service(s) and
product(s) should be construed as granting, by implication, estoppel,
or otherwise, any license or right in and to the Marks without the
express written permission of Avaya or the applicable third party.
Avaya is a registered trademark of Avaya Inc.
All non-Avaya trademarks are the property of their respective owners.
Device Usage Consent
By using the Avaya device you agree that Avaya, from time to time,
may collect network and device data from your device and may use
such data in order to validate your eligibility to use the device.

Contents
Chapter 1: Introduction……………………………………………………………………………………………. 12
Purpose……………………………………………………………………………………………………………….. 12
Chapter 2: Avaya J139 phones overview………………………………………………………………….. 13
Phone overview…………………………………………………………………………………………………….. 13
Physical layout of a J139 IP Phone……………………………………………………………………….. 15
Connection jacks for J139 IP Phone……………………………………………………………………… 17
Optional components…………………………………………………………………………………………. 19
Supported features……………………………………………………………………………………………. 19
Chapter 3: Getting started………………………………………………………………………………………… 21
Entering the provisioning details………………………………………………………………………………… 21
Identifying the device type during phone boot-up……………………………………………………………. 22
Logging in to your phone………………………………………………………………………………………….. 22
Logging out of your phone………………………………………………………………………………………… 23
Locking your phone………………………………………………………………………………………………… 23
Unlocking your phone …………………………………………………………………………………………….. 23
Chapter 4: Navigation………………………………………………………………………………………………. 25
Cursor navigation…………………………………………………………………………………………………… 25
Navigation cluster……………………………………………………………………………………………… 25
Text input……………………………………………………………………………………………………………… 26
Line keys……………………………………………………………………………………………………………… 27
Main menu……………………………………………………………………………………………………………. 27
General phone icons………………………………………………………………………………………………. 28
Chapter 5: Handling incoming calls………………………………………………………………………….. 30
Answering a call…………………………………………………………………………………………………….. 30
Answering a call when on another call…………………………………………………………………………. 30
Ignoring a call……………………………………………………………………………………………………….. 31
Declining a call………………………………………………………………………………………………………. 31
Chapter 6: Handling outgoing calls………………………………………………………………………….. 32
Making a call by using the manual dial mode………………………………………………………………… 32
Making a call by using the auto-dial mode……………………………………………………………………. 32
Redialing a number………………………………………………………………………………………………… 33
Making a call by using speed dial……………………………………………………………………………….. 33
Making a call from the local Сontacts list……………………………………………………………………… 34
Making a call from the corporate database Сontacts list………………………………………………….. 34
Making an international call………………………………………………………………………………………. 34
Emergency call……………………………………………………………………………………………………… 35
Making an emergency call…………………………………………………………………………………… 35
Chapter 7: Broadsoft Call recording indicator…………………………………………………………… 36
Chapter 8: Call related features………………………………………………………………………………… 37
April 2021 Using Avaya J139 SIP IP Phone in Open SIP 6
Comments on this document? infodev@avaya.com

Contents
Muting and unmuting a call……………………………………………………………………………………….. 37
Placing a call on hold and resuming the call…………………………………………………………………. 37
Chapter 9: Contacts…………………………………………………………………………………………………. 38
Directory………………………………………………………………………………………………………………. 38
Adding a new contact……………………………………………………………………………………………… 38
Adding a contact from the Recents list………………………………………………………………………… 39
Editing a contact…………………………………………………………………………………………………….. 39
Doing a quick search for a contact……………………………………………………………………………… 40
Viewing local contact details……………………………………………………………………………………… 40
Searching for a contact……………………………………………………………………………………………. 41
Combining contacts………………………………………………………………………………………………… 41
Deleting a contact…………………………………………………………………………………………………… 42
Creating a local Сontacts group…………………………………………………………………………………. 42
Adding a contact to the local group…………………………………………………………………………….. 43
Removing a contact from the local group……………………………………………………………………… 43
Assigning a ringtone to a contact……………………………………………………………………………….. 44
LDAP Directory……………………………………………………………………………………………………… 44
Setting LDAP Directory as the contact search source………………………………………………… 45
Searching LDAP contacts…………………………………………………………………………………… 45
Chapter 10: Recents………………………………………………………………………………………………… 47
Call log………………………………………………………………………………………………………………… 47
Making a call from Recents………………………………………………………………………………………. 47
Viewing the Recents details……………………………………………………………………………………… 47
Deleting a call record from Recents……………………………………………………………………………. 48
Clearing the Recents list………………………………………………………………………………………….. 49
Chapter 11: Conference calls……………………………………………………………………………………. 50
Adding a person to an active call……………………………………………………………………………….. 50
Adding a person on hold to a conference call………………………………………………………………… 50
Putting a conference call on hold and resuming a call……………………………………………………… 51
Chapter 12: Do not disturb and Call forward…………………………………………………………….. 52
Do not disturb……………………………………………………………………………………………………….. 52
Activating and deactivating Do not disturb………………………………………………………………. 52
Activating the ring reminder…………………………………………………………………………………. 53
Call forwarding………………………………………………………………………………………………………. 53
Call Forward icons…………………………………………………………………………………………….. 54
Forwarding a call to another extension…………………………………………………………………… 54
Forwarding call when busy………………………………………………………………………………….. 55
Forwarding unanswered calls………………………………………………………………………………. 55
Chapter 13: Advanced features………………………………………………………………………………… 57
Accessing the Features screen………………………………………………………………………………….. 57
Activating and deactivating Do not disturb……………………………………………………………………. 57
DND icons………………………………………………………………………………………………………. 58
Activating the screen saver………………………………………………………………………………………. 58
April 2021 Using Avaya J139 SIP IP Phone in Open SIP 7
Comments on this document? infodev@avaya.com

Contents
BroadWorks advance call control……………………………………………………………………………….. 59
Anonymous Call Block…………………………………………………………………………………………….. 59
Autodialing a pre-assigned number…………………………………………………………………………….. 60
BroadWorks Anywhere……………………………………………………………………………………………. 60
Enabling and disabling BroadWorks Anywhere………………………………………………………… 60
Configuring BroadWorks Anywhere locations…………………………………………………………… 61
Changing location details……………………………………………………………………………………. 62
Deleting locations……………………………………………………………………………………………… 62
Configuring BroadWorks Anywhere Alerting……………………………………………………………. 63
BroadWorks Mobility……………………………………………………………………………………………….. 63
Enabling and disabling BroadWorks Mobility alerting…………………………………………………. 64
Configuring BroadWorks Mobility………………………………………………………………………….. 64
Editing Mobile identity alerting……………………………………………………………………………… 65
BroadWorks Anywhere and Mobility icons……………………………………………………………………. 67
Calendar………………………………………………………………………………………………………………. 68
Accessing calendar…………………………………………………………………………………………… 68
Configuring the Microsoft® Exchange Server calendar……………………………………………….. 68
Reviewing your Calendar event……………………………………………………………………………. 69
Call Park………………………………………………………………………………………………………………. 70
Call Park icons…………………………………………………………………………………………………. 70
Call park notifications…………………………………………………………………………………………. 71
Customizing parked call notification………………………………………………………………………. 71
Parking a call…………………………………………………………………………………………………… 72
Parking a call to a call park group…………………………………………………………………………. 73
Unparking a call……………………………………………………………………………………………….. 73
Dynamic Park and Page………………………………………………………………………………………….. 74
Parking and paging an active call………………………………………………………………………….. 74
Retrieving a parked call……………………………………………………………………………………… 75
Call Retrieve…………………………………………………………………………………………………………. 75
Using Call Retrieve……………………………………………………………………………………………. 76
Call Transfer…………………………………………………………………………………………………………. 76
Making a consultative transfer……………………………………………………………………………… 76
Making a blind transfer……………………………………………………………………………………….. 77
Call Waiting………………………………………………………………………………………………………….. 77
Enabling and disabling the Call Waiting feature………………………………………………………… 78
Distinctive Ringing………………………………………………………………………………………………….. 78
Setting a distinctive ring tone……………………………………………………………………………….. 78
Enabling Auto Answer…………………………………………………………………………………………….. 79
Group Paging………………………………………………………………………………………………………… 80
Long-term acoustic exposure protection………………………………………………………………………. 80
Configuring Long term acoustic protection………………………………………………………………. 80
Multicast Paging…………………………………………………………………………………………………….. 81
Sending a multicast page……………………………………………………………………………………. 81
April 2021 Using Avaya J139 SIP IP Phone in Open SIP 8
Comments on this document? infodev@avaya.com

Contents
Pre-configuration of keys…………………………………………………………………………………………. 82
Push-To-Talk…………………………………………………………………………………………………………. 82
Retrieving a voice message……………………………………………………………………………………… 83
SLA Mon™ …………………………………………………………………………………………………………… 83
Using a Guest Login……………………………………………………………………………………………….. 83
Chapter 14: Busy Lamp Field…………………………………………………………………………………… 85
BLF icons and visual LED indication…………………………………………………………………………… 85
Adding a Broadsoft BLF user…………………………………………………………………………………….. 86
Customizing BLF incoming call indication…………………………………………………………………….. 87
Customizing Presence parked call indication………………………………………………………………… 88
Customizing the ring tone ………………………………………………………………………………………… 88
BLF call operations…………………………………………………………………………………………………. 89
Making a call to a monitored user…………………………………………………………………………. 89
Picking up an incoming call…………………………………………………………………………………. 89
Barging in on an active call………………………………………………………………………………….. 90
Unparking a call……………………………………………………………………………………………….. 90
Prioritizing incoming calls over a BLF call……………………………………………………………….. 90
Chapter 15: Shared call appearance…………………………………………………………………………. 92
SCA icons and visual LED indication…………………………………………………………………………… 93
Joining a call in a shared line…………………………………………………………………………………….. 94
Putting a call on private hold and resuming a call…………………………………………………………… 94
Customizing ringtones for the SCA extension……………………………………………………………….. 95
Customizing SCA lines……………………………………………………………………………………………. 96
Customizing incoming call alerts for shared lines…………………………………………………………… 96
Viewing SCA configuration……………………………………………………………………………………….. 97
Chapter 16: Simultaneous Ring Personal…………………………………………………………………. 99
Accessing Simultaneous Ring Personal from the phone menu………………………………………….. 99
Disabling Simultaneous Ring Personal during an active call……………………………………………. 100
Adding a Simultaneous Ring number………………………………………………………………………… 100
Editing Simultaneous Ring numbers…………………………………………………………………………. 101
Deleting a Simultaneous Ring number………………………………………………………………………. 101
Chapter 17: Customization…………………………………………………………………………………….. 102
Phone……………………………………………………………………………………………………………….. 102
Setting the dialing mode……………………………………………………………………………………. 102
Displaying сall timers……………………………………………………………………………………….. 102
Setting key repeat delay……………………………………………………………………………………. 103
Setting redial options……………………………………………………………………………………….. 103
Setting the Audio button……………………………………………………………………………………. 104
Assigning speed dial entries………………………………………………………………………………. 104
Setting Mute alert……………………………………………………………………………………………. 105
Visual alerting………………………………………………………………………………………………… 105
Customizing phone keys…………………………………………………………………………………… 106
Restoring customized keys to default…………………………………………………………………… 107
April 2021 Using Avaya J139 SIP IP Phone in Open SIP 9
Comments on this document? infodev@avaya.com

Contents
Applications………………………………………………………………………………………………………… 107
Enabling the Away timer…………………………………………………………………………………… 107
Enabling phone auto-lock………………………………………………………………………………….. 108
Turning call history on and off…………………………………………………………………………….. 108
Microsoft® Exchange account integration………………………………………………………………. 108
Entering Microsoft® Exchange credentials for basic authentication………………………………. 109
Entering Microsoft® Exchange credentials for OAuth authentication…………………………….. 110
Enabling and disabling Microsoft® Exchange contact integration…………………………………. 111
Calendar settings…………………………………………………………………………………………….. 111
Audio…………………………………………………………………………………………………………………. 114
Turning automatic gain control on or off………………………………………………………………… 114
Selecting audio path………………………………………………………………………………………… 114
Turning button clicks on and off…………………………………………………………………………… 115
Turning error tones on and off…………………………………………………………………………….. 115
Enabling wireless headset bidirectional signaling……………………………………………………. 116
Configuring hearing aid compatibility……………………………………………………………………. 116
Setting a headset profile……………………………………………………………………………………. 117
Setting headset mic level…………………………………………………………………………………… 118
Setting a personalized ringtone…………………………………………………………………………… 118
Display………………………………………………………………………………………………………………. 119
Changing the screen saver………………………………………………………………………………… 119
Setting the screen saver details………………………………………………………………………….. 119
Setting the backlight timer…………………………………………………………………………………. 120
Adjusting the brightness of a phone screen…………………………………………………………… 120
Setting the display language……………………………………………………………………………… 120
Adjusting phone screen width…………………………………………………………………………….. 121
Setting the date format……………………………………………………………………………………… 121
Setting the time format……………………………………………………………………………………… 122
Setting the time zone……………………………………………………………………………………….. 122
Setting the text size…………………………………………………………………………………………. 123
Backup and restore………………………………………………………………………………………………. 123
Backup and restore overview…………………………………………………………………………….. 123
Chapter 18: Phone update……………………………………………………………………………………… 125
Updating your phone…………………………………………………………………………………………….. 125
Checking your phone periodic automatic update………………………………………………………….. 125
Chapter 19: Troubleshooting………………………………………………………………………………….. 127
Recording audio parameters ………………………………………………………………………………….. 127
Limited access during failover…………………………………………………………………………………. 127
Viewing the Product ID………………………………………………………………………………………….. 128
Viewing the Device type…………………………………………………………………………………………. 129
Viewing the Server type…………………………………………………………………………………………. 129
Chapter 20: Resources…………………………………………………………………………………………… 130
Documentation…………………………………………………………………………………………………….. 130
April 2021 Using Avaya J139 SIP IP Phone in Open SIP 10
Comments on this document? infodev@avaya.com

Contents
Finding documents on the Avaya Support website………………………………………………….. 130
Avaya Documentation Center navigation………………………………………………………………. 130
Viewing Avaya Mentor videos………………………………………………………………………………….. 132
Support……………………………………………………………………………………………………………… 132
April 2021 Using Avaya J139 SIP IP Phone in Open SIP 11
Comments on this document? infodev@avaya.com

Chapter 1: Introduction
Purpose
This document describes how to use Avaya J139 IP Phone features in an Open SIP environment.
This document is intended for people who want to learn how to use Avaya J139 IP Phone features
and capabilities.
April 2021 Using Avaya J139 SIP IP Phone in Open SIP 12
Comments on this document? infodev@avaya.com

Chapter 2: Avaya J139 phones overview
Phone overview
Avaya J139 IP Phone is a phone for business communications.
The phone has a color display.
Physical specifications
• 4 buttons with red and green dual LEDs
• 320 x 240 pixel display
• Dual-position stand, optional wall mount stand
• Gigabit Ethernet (10/100/1000 Mbps) line interface
• Second Gigabit Ethernet (10/100/1000 Mbps) interface
• PoE Class 1, supports 802.3az, optional AC to 5V adapter
• Four call appearances
• Four soft keys
• Hard buttons for phone:
— Contacts
— Recents
— Navigation cluster
— Headset
— Speaker
— Volume
— Mute
— Main menu
— Phone key
• LED buttons for phone:
— Messages
— Recents
— Headset
— Speaker
April 2021 Using Avaya J139 SIP IP Phone in Open SIP 13
Comments on this document? infodev@avaya.com

Avaya J139 phones overview
— Mute
April 2021 Using Avaya J139 SIP IP Phone in Open SIP 14
Comments on this document? infodev@avaya.com
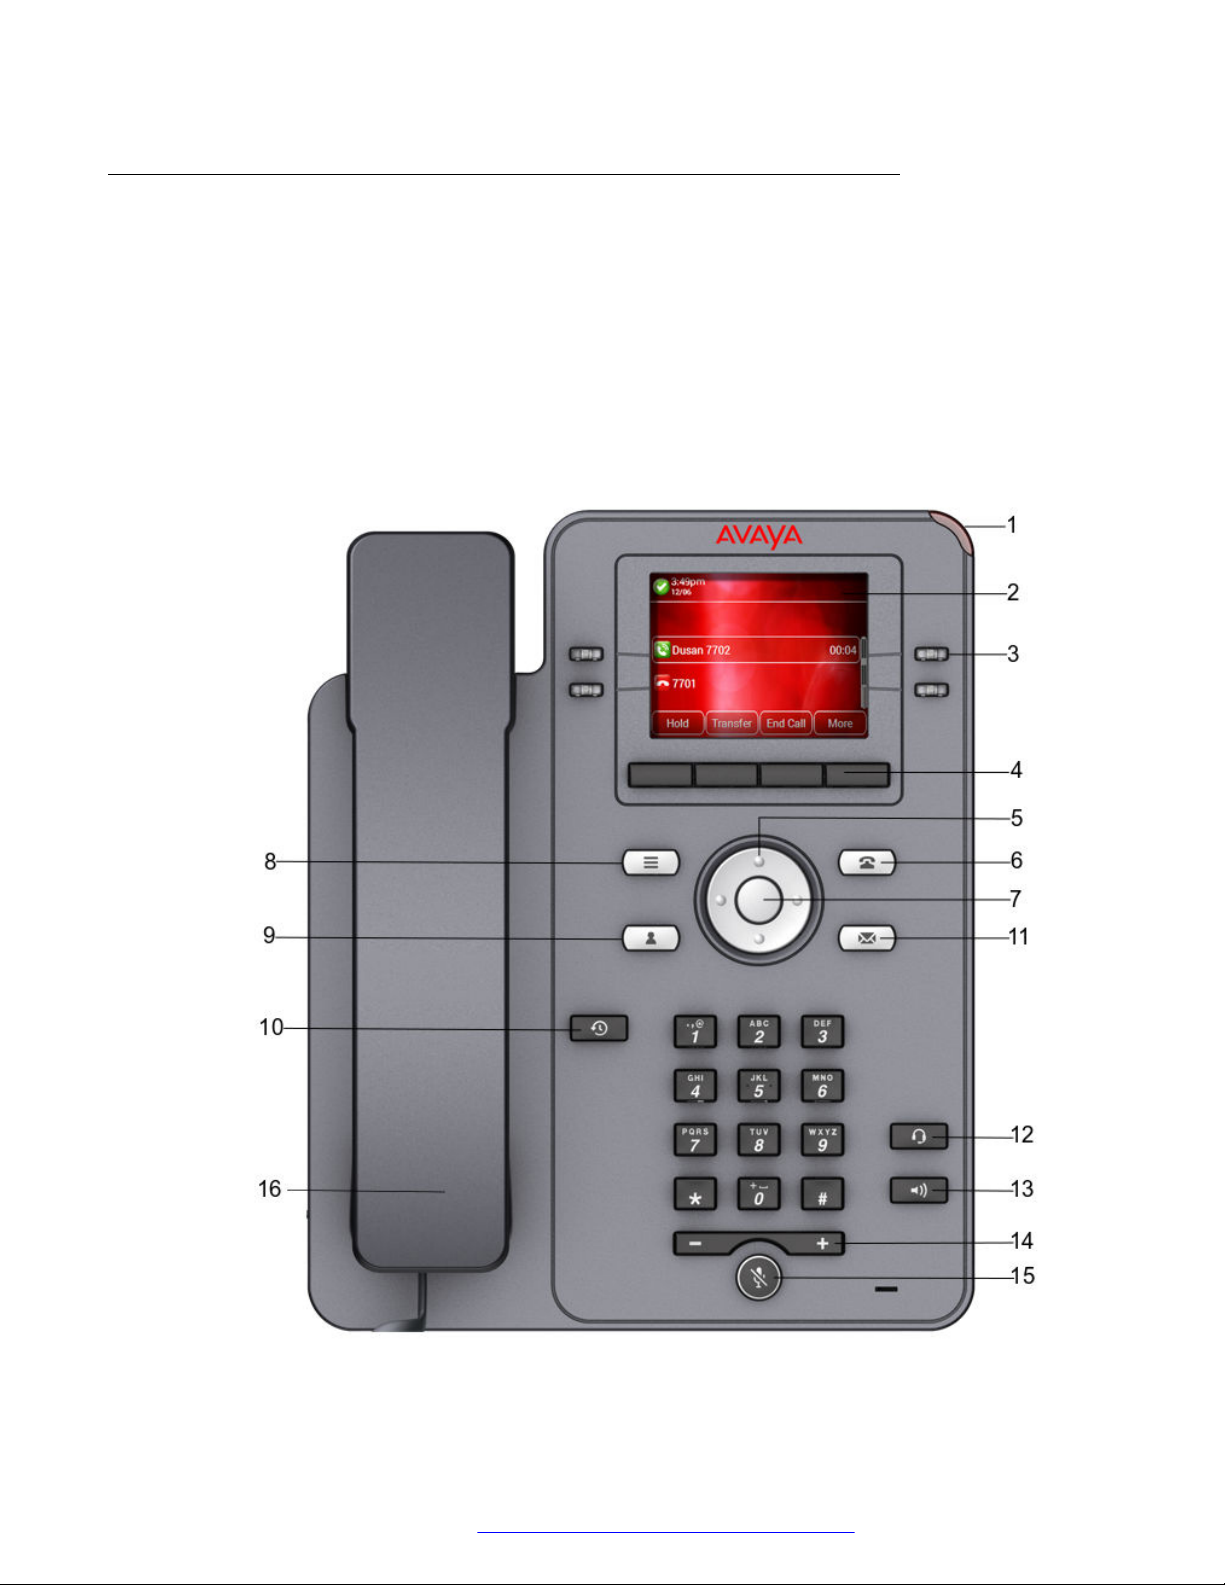
Physical layout of a J139 IP Phone
Phone overview
April 2021 Using Avaya J139 SIP IP Phone in Open SIP 15
Comments on this document? infodev@avaya.com

Avaya J139 phones overview
No. Name Description
1 Beacon LED Provides visual alerts for the following:
• Incoming call
• Voice mail
2 Phone display Displays two areas:
1. Top Bar: It is always visible, displays communication and device
status, and time and date.
2. Application area displays the following:
• Application header: It displays the context specific application
title, and one or more subtitles. Depending on the appearance
type and the call state, the header displays details of the call.
• Application content area: it displays menus, lists, pop-up
windows, images, or other application content.
• Softkey labels area: it displays labels with information about
the state of the Soft Key buttons.
3 Line Keys Used to select the corresponding rows. Each line key has a LED that
displays the following visual alerts:
• Red light: disabled features.
• Green light: incoming call and enabled features.
• Red and green light: phone is off-hook.
4 Softkeys Used to select the corresponding label of context-specific actions.
5, 7 Navigation cluster Used to navigate on the Phone screen.
• Up and Down arrow keys: to scroll up and down.
• Right and Left arrow keys: to move cursor in the text input field,
and to toggle values in the selection fields.
• OK button: to select the action assigned to the first soft key.
11 Voicemail Used to dial the configured voice mail number to receive a voice
message.
12 Headset Used to toggle your call from the speaker to headset.
13 Speaker Used to turn on the speaker.
14 Volume Used to adjust volume of a handset, a speaker, or a ringtone.
• (+): To increase the volume.
• (-): To decrease the volume.
15 Mute Button Used to mute and unmute the outgoing audio.
16 Handset Used to receive and make calls
Application keys provide direct access to the corresponding applications:
April 2021 Using Avaya J139 SIP IP Phone in Open SIP 16
Comments on this document? infodev@avaya.com

No. Application keys Description
6 Phone key Displays the Phone screen.
8 Main menu Displays the list of options, such as Features, Applications,
Settings, Network information, Administration, and About.
9 Contacts Displays the entries in your Contacts list.
10 Recents Displays call history list.
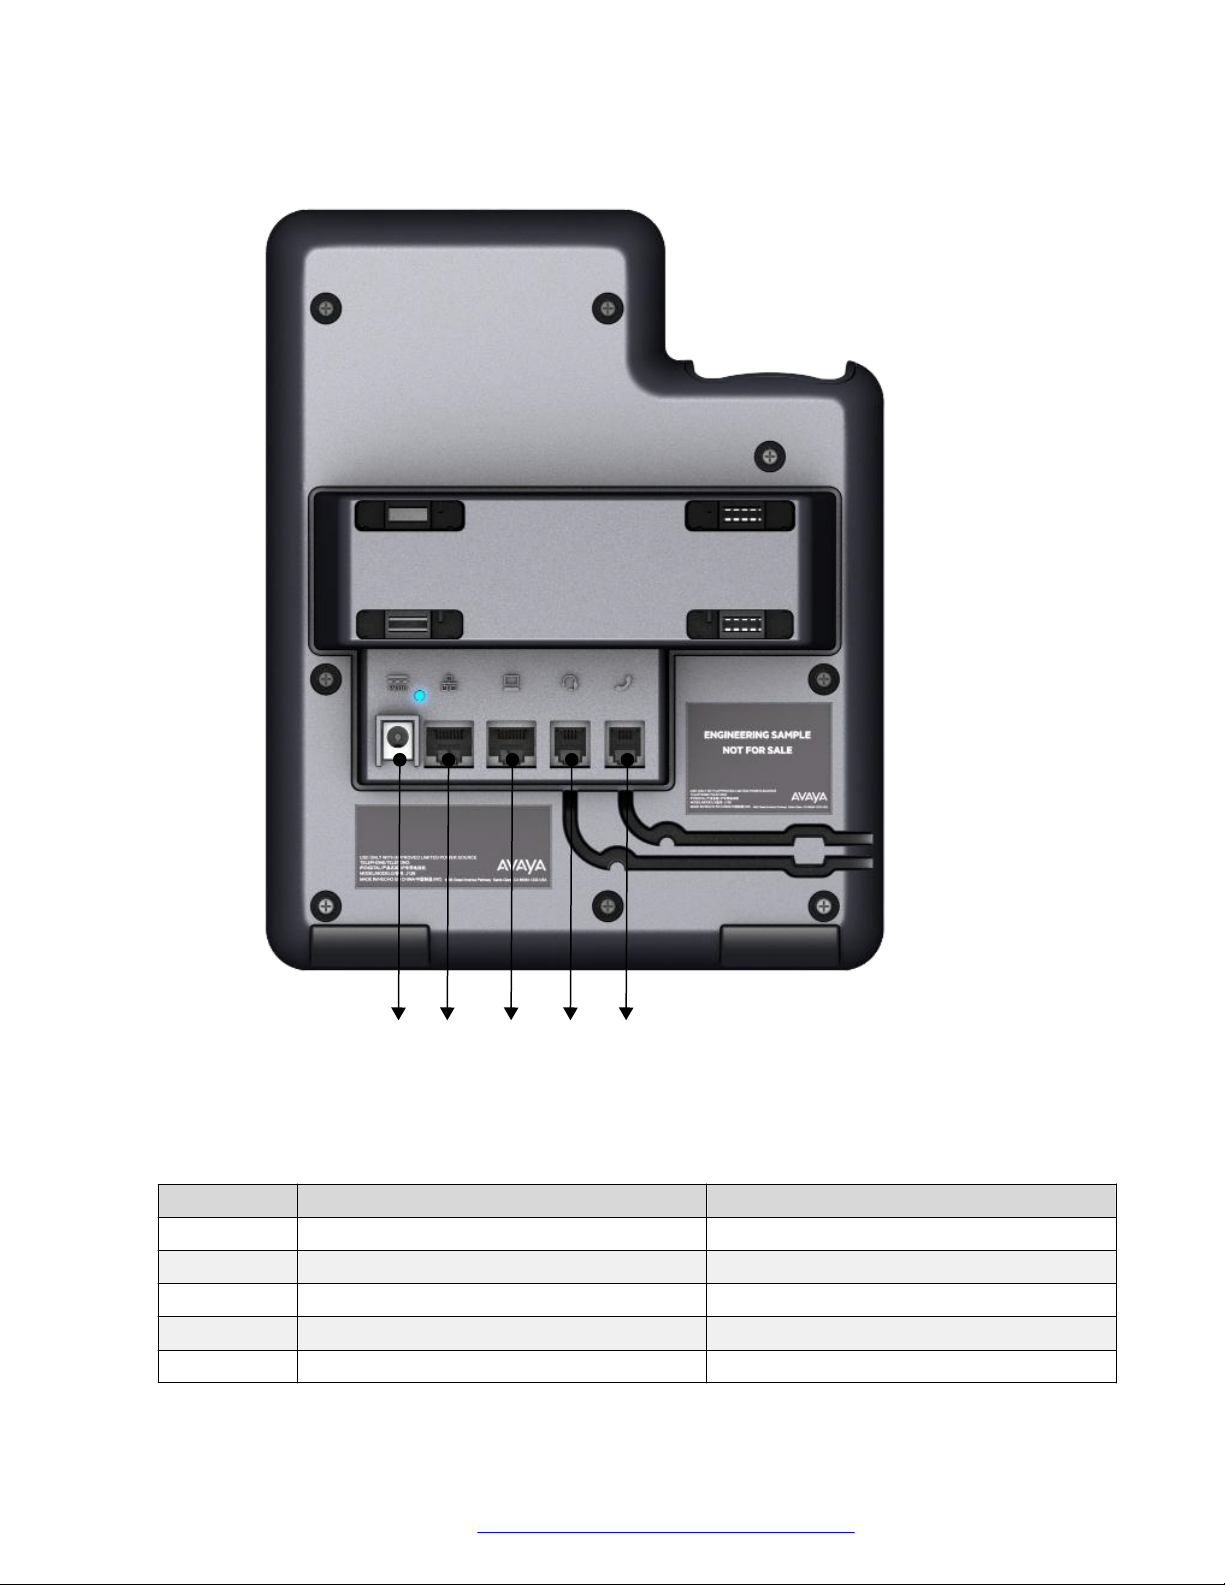
Connection jacks for J139 IP Phone
The following image illustrates the connection jacks that are present on the back panel of Avaya
J139 IP Phone.
The image schematically describes which device to connect to which jack.
Phone overview
April 2021 Using Avaya J139 SIP IP Phone in Open SIP 17
Comments on this document? infodev@avaya.com
Avaya J139 phones overview
No. Name Description
1 5V DC Jack To connect the power supply.
2 Network port To connect the Ethernet cable.
3 PC port To connect the computer.
4 Headset Jack To connect the headset.
5 Handset Jack To connect the handset.
April 2021 Using Avaya J139 SIP IP Phone in Open SIP 18
Comments on this document? infodev@avaya.com

Optional components
You can use the following components to your phone. These components are not a part of your
phone package and needs to ordered separately. You might need assistance of your system
administrator to install few of these items:
• PSAC12R–050 – 5V DC Power adapter
• PoE power supply
Supported features
The following table shows the features supported in Avaya J139 IP Phone:
Features Supported
Call Transfer Yes
Automatic Call Back No
Bridge Call Appearance No
Call Forward Yes
Call Park / Unpark Yes
Call Pickup Yes
Contact Center (CC Elite) No
Contacts Yes
Conference calls Yes
Conference List Roster No
Dial Intercom Yes
Dial mode Yes
Display Presence No
Do Not Disturb Yes
EC500 No
EHS (Headset Control) Yes
Enhanced Call Forward Yes
Exclusion Yes
Emergency dialing when user not logged in Yes
Guest Login Yes
Hunt Group Busy Yes
Malicious Call Trace (MCT) No
MLPP No
Phone overview
Table continues…
April 2021 Using Avaya J139 SIP IP Phone in Open SIP 19
Comments on this document? infodev@avaya.com

Avaya J139 phones overview
Features Supported
Multiple Device Access (MDA) No
LNCC Yes
Presence Yes
Call Priority Yes
Redial from list Yes
Shared Control Yes
Speed Dial Yes
Team Button Yes
Whisper Page Yes
April 2021 Using Avaya J139 SIP IP Phone in Open SIP 20
Comments on this document? infodev@avaya.com

Chapter 3: Getting started
Entering the provisioning details
About this task
Enter the provisioning server address if the phone prompts, for example, when you connect to the
network for the first time.
Before you begin
Obtain the provisioning server address from the system administrator.
Procedure
1. When you boot the phone for the first time, the Auto Provisioning screen displays Do you
want to activate Auto Provisioning now?, press one of the following:
• Yes: To connect to the Device Enrollment Services server to obtain the provisioning
server address and ignore the provisioning server address from the DHCP.
• No: To obtain the provisioning server address from the DHCP server.
In case of a time out, and the DHCP does not provide the provisioning server address, the
phone selects Yes.
If the connection to Device Enrollment Services is successful, and the phone receives the
provisioning server address, the phone continues to boot and not prompt you for the
provisioning server address.
If the connection to Device Enrollment Services is successful, and the phone does not
receive the provisioning server address from Device Enrollment Services, the phone
prompts you for a Numeric Enrollment code. Contact your administrator for a numeric
enrollment code. When you enter the valid numeric enrollment code, the phone continues
to boot and not prompt you for the provisioning server address.
If you do not have a numeric enrollment code, press Cancel. The phone continues to boot
using the DHCP.
The phone displays the Starting message. If the phone does not receive the
provisioning server address from the Device Enrollment Services or the DHCP server, the
phone displays the Enter provisioning details screen.
2. On Enter provisioning details screen, press one of the following:
• Config: To enter the provisioning server address.
April 2021 Using Avaya J139 SIP IP Phone in Open SIP 21
Comments on this document? infodev@avaya.com

Getting started
3. After you have pressed Config, enter the provisioning server address in the Address field.
4. (Optional) Enter the Group number.
5. Press Save.
• Never: To never prompt for the provisioning server address.
• Cancel: To cancel the prompt and display the Login screen.
The address is an alphanumeric URL like http://myfileserver.com/j100/.
Tip:
To enter the dot symbol (.) in the field, press the alphanumeric soft key to toggle to the
ABC mode.
To enter the forward slash symbol (/) in the field, press the / soft key.
Obtain the Group number from your system administrator. The value ranges from 0 to 999.
0 is the default value. If you do not enter any value in this field, the phone uses the default
value.
The phone continues to boot and connect to the provisioning server address for
provisioning configuration.
Identifying the device type during phone boot-up
About this task
Avaya J100 Series IP Phones screen displays the device type during the phone boot-up. This
feature is supported only in the phone software version 4.0.3 and later.
Procedure
1. Set up the phone hardware.
2. Plug the Ethernet cable to the phone.
The phone powers up and starts to initialize.
The phone primary screen displays one of the following as the backsplash screen:
• A screen with Avaya text for Avaya SIP phones
• A screen with Open SIP text for Open SIP phones
Logging in to your phone
Before you begin
Your extension and password are provided by your administrator.
April 2021 Using Avaya J139 SIP IP Phone in Open SIP 22
Comments on this document? infodev@avaya.com

Procedure
1. On the Login screen in the Username field, type your extension.
2. Press Enter.
3. In the Password field, type your password.
4. Press Enter.
5. To change the extension number or the password, press Backspac.
Logging out of your phone
About this task
Use this procedure to log out of your extension.
Procedure
1. Press the Main menu.
Logging out of your phone
2. Scroll to Applications and press Select.
3. Scroll to Log out, and press Select.
4. In the confirmation window, press Log out.
Locking your phone
About this task
You can lock your phone to prevent unauthorized use of the phone when you are away. Locking
your phone does not log you out, you can still receive all calls and make calls to emergency
numbers.
To lock the phone, press Main menu, and select Applications > Lock.
Unlocking your phone
About this task
You can unlock your phone using a PIN or a password. Depending on the configuration made by
your administrator, the phone screen displays the field for entering either a PIN or a password. A
PIN is a digit-only value whereas a password can be an alphanumeric value.
If you do not know or remember your PIN or password, contact your administrator.
April 2021 Using Avaya J139 SIP IP Phone in Open SIP 23
Comments on this document? infodev@avaya.com

Getting started
You cannot unlock the phone if you enter an incorrect PIN or password.
Your administrator sets a limit to the number of incorrect attempts. If you exceed the limit, the
phone temporarily blocks you from attempting to unlock the phone for a period that your
administrator specifies.
To unlock the phone, press Unlock and enter the PIN or password.
April 2021 Using Avaya J139 SIP IP Phone in Open SIP 24
Comments on this document? infodev@avaya.com

Chapter 4: Navigation
Cursor navigation
You can use the navigation cluster for cursor movement or selection of options on the Phone
screen or in other menus. The navigation cluster has the following keys on the phone:
• Left Arrow
• Right Arrow
• Up Arrow
• Down Arrow
• OK
Related links
Navigation cluster on page 25
Navigation cluster
The effect of pressing a navigation key depends on the current application and context.
Key name
Left Arrow and Right Arrow Use these keys in:
Up Arrow and Down Arrow Use these keys to scroll vertically in lists, menus, and pop-
Description
• Text input fields to move the cursor position.
• Selection fields to toggle field values and select options in
lists and menus.
• Half-width displays to move the selection left or right.
• Scrolling between pages when navigating the phone
screen, provided that page scrolling mode is switched on
by your administrator.
The directional keys are context-sensitive.
up windows.
Table continues…
April 2021 Using Avaya J139 SIP IP Phone in Open SIP 25
Comments on this document? infodev@avaya.com

Navigation
Key name Description
OK, center button of the navigation cluster. Unless otherwise specified, use this key for the first or left-
most soft key action.
If there are two or more pages of soft keys, the OK key is
active only when the phone screen displays the first page of
soft keys.
Related links
Cursor navigation on page 25
Text input
You can use the dial pad or the text input soft keys to edit and enter text in the text input fields of
the phone.
Input field
Depending on the application and context, a text input field is a text box with a label. The user
interface displays labels on the left side of the text box or in the line preceding the text box. An
input field can be blank or display a current value that can be modified. The user interface displays
input cursors on the right side of the current value or, if the input field is blank, on the left side of
the text box.
Hint text
Depending on the application and context, a text box contains hint text. The user interface
displays hint text on the left side of the text box in grey, italic font. The interface replaces the hint
text with the actual text that you enter. The interface displays the hint text again when you clear
the entered text. The interface does not display the hint text if the field contains a value.
Text truncation
When the space in the input area cannot display the full current value, the user interface truncates
the text. The interface truncates the text from the left side and displays a blank space with a cursor
on the right side of the input field for a new entry. When you enter a new character, the interface
truncates the existing character from the left side of the display.
Active language text direction
When the text direction of the active language is right-to-left, the text entry rules are reversed. The
user interface:
• Displays the hint text on the right side of the text box.
• Displays the input cursor on the left side of the current character or, if the input field is blank,
on the right side.
• Displays the new character on the left side of the current character.
• Deletes the character on the right side of the cursor when you press Backspace.
April 2021 Using Avaya J139 SIP IP Phone in Open SIP 26
Comments on this document? infodev@avaya.com
Line keys
The line keys are context-sensitive. When you press a line key:
• In full-width lists, the user interface selects the corresponding line or the object.
• In half-width lists, the interface selects the list item adjacent to the key.
• In page scroll mode and then scroll on to the next or previous page, the selected item
remains highlighted.
Input line
The following actions take place when you press the line key against the input lines.
• Selects the corresponding line for the line which accepts user input.
• Displays the cursor after the last character of the existing content if the line is an input line. If
an input line is selected, the interface performs no action even if the cursor is in the middle of
the line.
• Performs the action of the first soft key for the line which does not accept user input even if
the line is already selected.
For example, when you press a line key in Contacts, the interface initiates a call to the
contact because the first soft key represents the Call key.
Line keys
Main menu
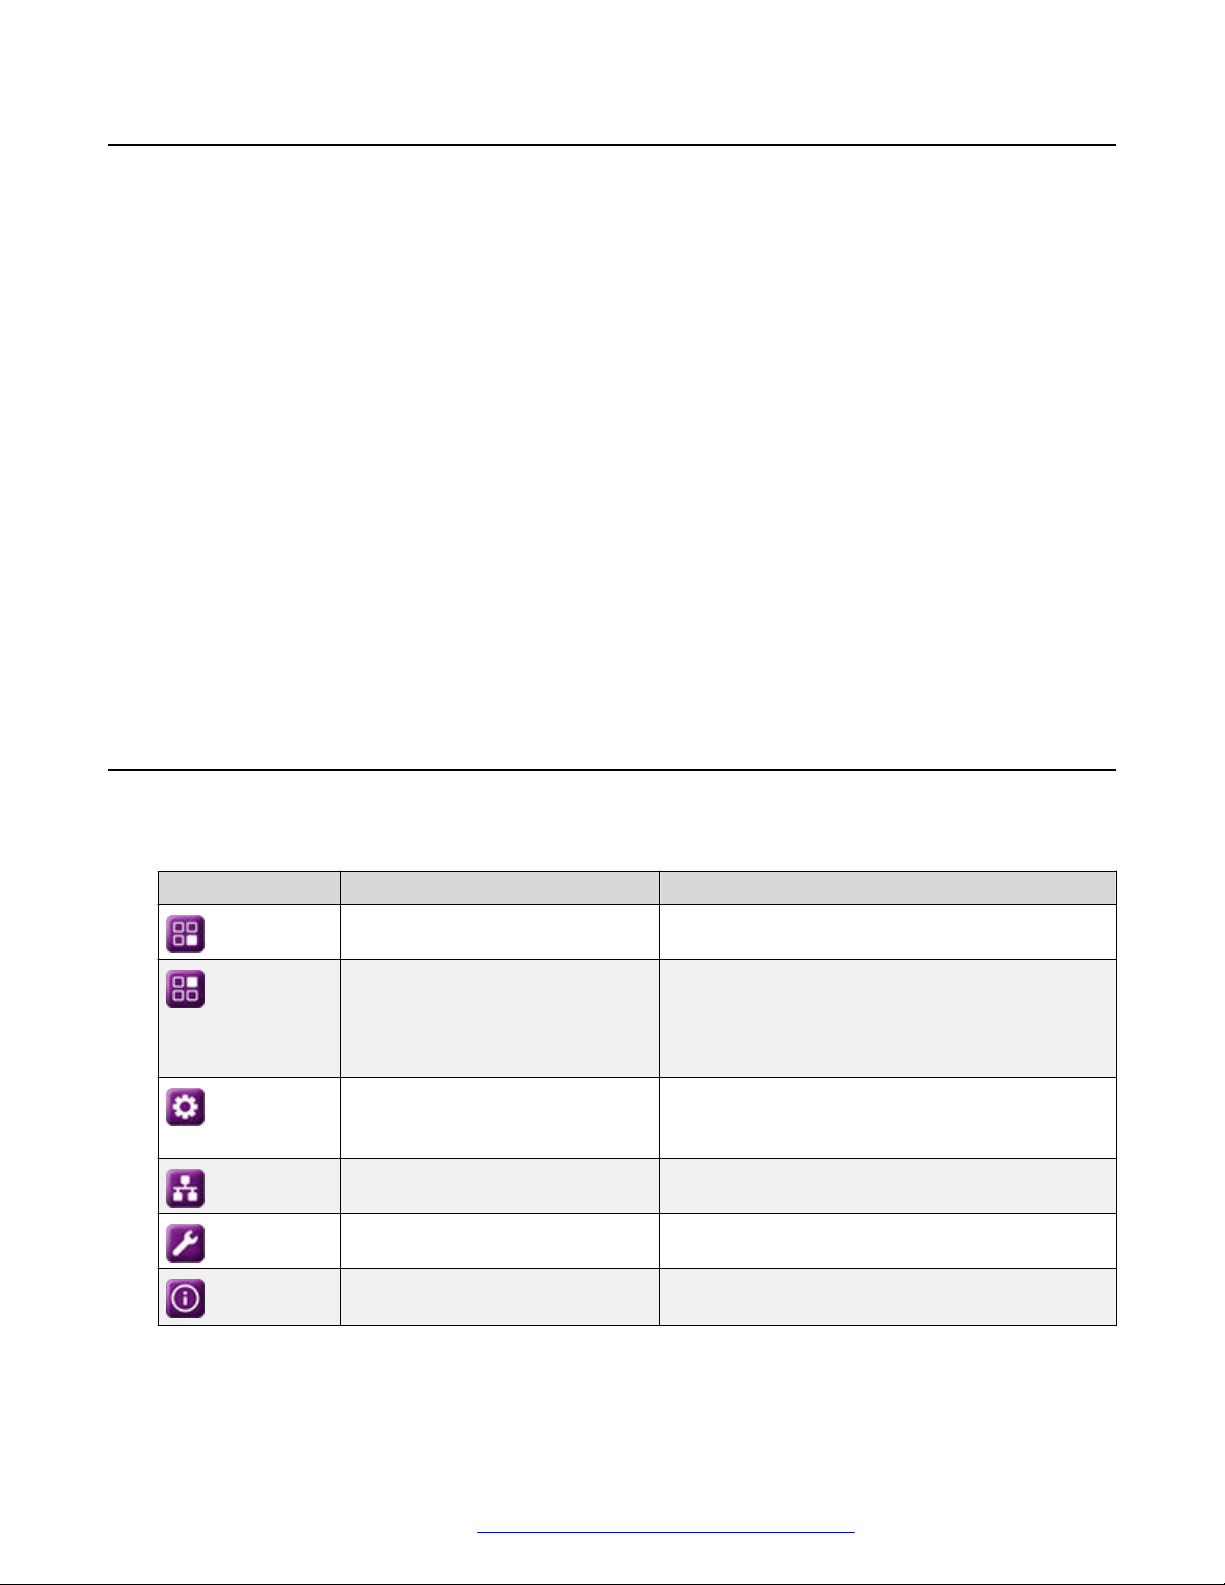
The following table lists the Main menu icons used in Avaya J139 IP Phone:
Icons
Name Description
Features To access administrator activated features.
Applications • To access phone applications such as
Contacts, Recents, and Activate screen saver.
• To log out of the phone extension to protect
your settings or let another user log in.
Settings To change your phone settings, customize button
labels, adjust brightness, audio settings, assign
speed dial entries, etc.
Network information To check network settings.
Administration To access administration settings.
About To view the phone model, software version,
default device type, and the default server type.
April 2021 Using Avaya J139 SIP IP Phone in Open SIP 27
Comments on this document? infodev@avaya.com
Navigation
General phone icons
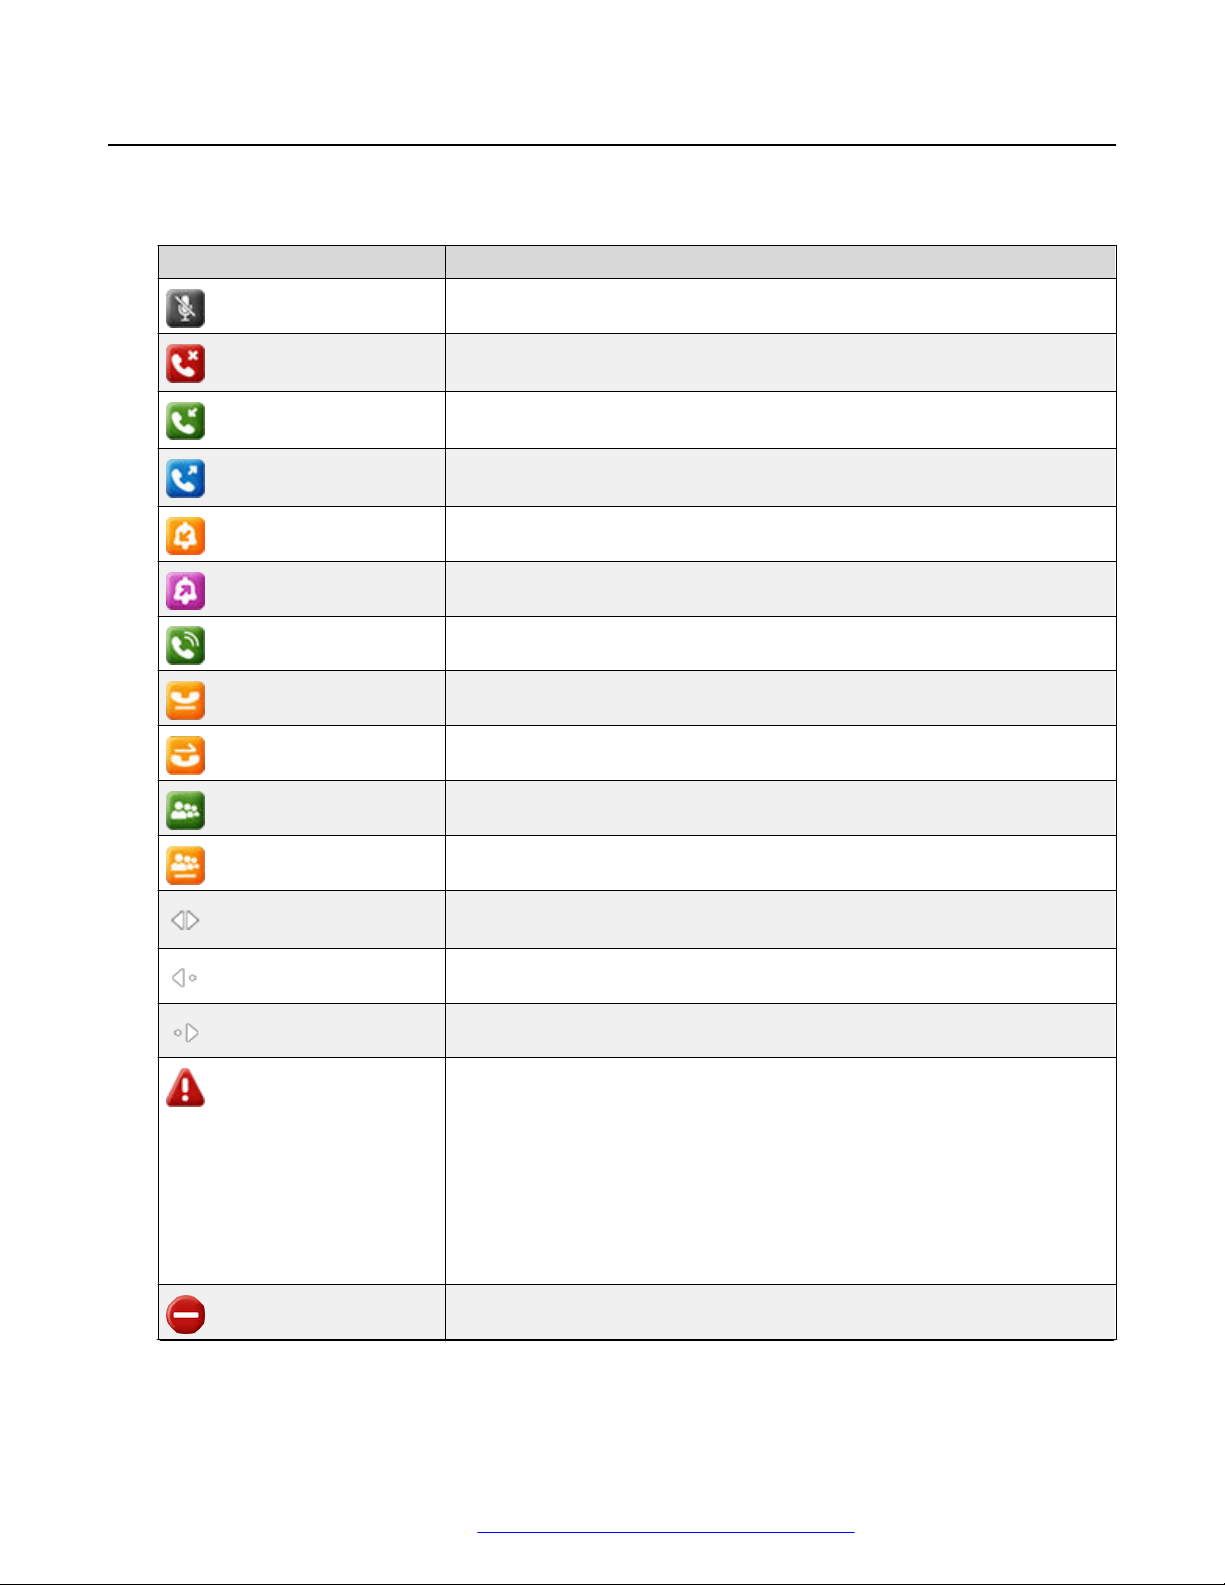
The following table lists the icons used in Avaya J139 IP Phone:
Icon Description
Microphone is muted.
Missed call on your phone. You can see this icon in the Recents
application.
Incoming call; indicates you have answered this call. You can see this
icon in the Recents application.
Outgoing call; indicates you have made this call. You can see this icon in
the Recents application.
Incoming call is alerting.
Outgoing call; indicates you have made this call.
Call is active.
Call is on hold.
Call is on hold during conference call setup.
Conference is active.
Conference is on hold.
Use the Right or Left navigation arrow to see more pages / screens /
options.
Scroll left for other options.
Scroll right for other options.
Indicates that the phone is not connected to the Session Manager and is
operating in Failover mode. Some features might not be available or work
incorrectly.
If the appearance line displays this icon, it indicates that the phone has
encountered a failure and has preserved the media session until the near
user hangs up.
This icon can also indicate that the phone is connected to the call server
but the features are not available.
The Do not disturb feature is on.
Table continues…
April 2021 Using Avaya J139 SIP IP Phone in Open SIP 28
Comments on this document? infodev@avaya.com
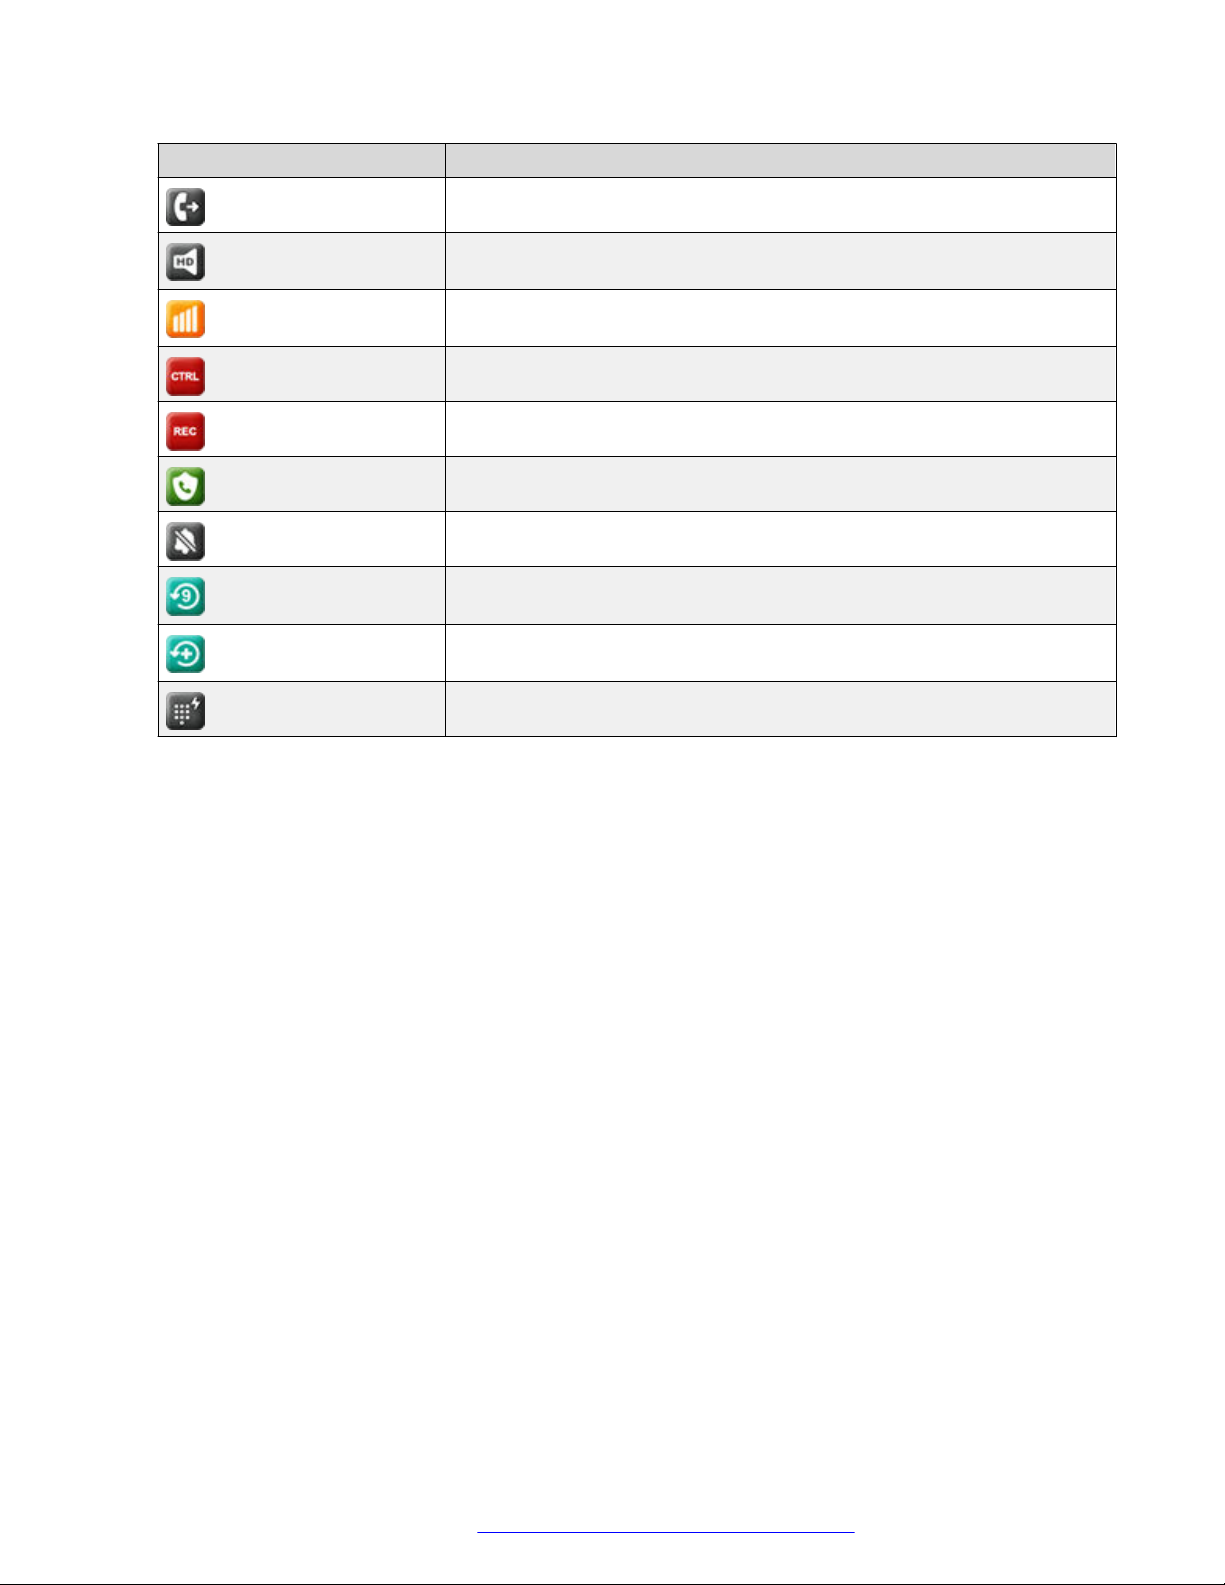
Icon Description
The Call forward feature is on.
Indicates that the call is using a wideband codec for excellent voice
quality.
Indicates a low network performance or presence of local network issues
that might result in lower call quality.
Indicates that the SLA Mon™ agent has taken control of the phone.
Indicates that the call is being recorded for SLA Mon™.
Indicates that the audio of this call is secure.
Indicates that the audio alert for incoming calls is off.
Indicates that you have missed a call. The number in the icon indicates
the number of missed calls.
Indicates that you have missed a call. The + in the icon indicates that the
number of missed calls are more than 9.
Autodialing feature
General phone icons
April 2021 Using Avaya J139 SIP IP Phone in Open SIP 29
Comments on this document? infodev@avaya.com

Chapter 5: Handling incoming calls
Answering a call
About this task
Use this procedure to answer a call. When you receive a call, the phone does the following:
• Generates audio-visual alerts.
• Displays the caller’s name or number.
Note:
When the Incoming call pop-up window is displayed, the only visual alert is the flashing
beacon LED. If you press Ignore, both the beacon LED and line key LED start flashing.
Procedure
Do one of the following:
• Lift the handset.
• Press Speaker.
• Press OK button.
• Press the Answer soft key.
• Press Headset.
Answering a call when on another call
About this task
You can receive a call on a secondary call appearance only if the call appearance is free.
Procedure
Press one of the following:
• The Answer soft key
• OK Button
The phone puts the first call on hold and moves to the second call.
April 2021 Using Avaya J139 SIP IP Phone in Open SIP 30
Comments on this document? infodev@avaya.com
Loading…
IP телефон Avaya J139 GLOBAL ENCRYPTION DISABLED (700515187)
Код: 700515187
Старая цена:16 900 руб.13 900 руб.
Avaya J139 шифрование отключено — Высокофункциональный SIP телефон начального уровня с дружественным пользовательским интерфейсом. Аппарат оборудован 2,8-дюймовым цветным дисплеем с возможностью персонализации, контекстно-зависимыми клавишами, на боковой стороне экрана есть дополнительные кнопки со световой индикацией.
Модель J139 подходит для абонентов, которым нужен стандартный набор функций голосовых вызовов с широкими возможностями для ежедневной эксплуатации. Телефон поддерживает 4 линии, современные решения коммуникаций и облачный офис AvayaOneCloud. Устройство отлично подходит для компаний любого размера и сферы деятельности.
Усовершенствованное качество звука обеспечивается широкополосным звуком. Телефон Avaya J139 имеет возможность подключения гарнитуры, для громкой связи есть встроенный динамик и микрофон.
IP-телефон Avaya J139 совместим с Avaya IP Office 11.0.1 и более поздними версиями, Avaya Aura 6.2 SP4 и более поздними версиями.
Характеристики
- Четыре линии/программируемые кнопки с двухцветной индикацией
- Цветной дисплей 2.8″, 320 x 240 пикселей
- Четыре программных клавиши
- Четыре контекстно-зависимых программных клавиши
- Командные кнопки: навигационный блок, гарнитура, история, отключение микрофона, регулировка громкости, динамик, сообщения, контакты, история вызовов, дом
- Широкополосный звук
- Спикерфон Full Duplex
- Оповещение о вызовах IC (360°)
- Трубка, совместимая со слуховым аппаратом
- Магнитный датчик телефонной трубки
- Поддержка акустической связи TTD
- Два сетевых порта RJ45 10/100/1000Mbit
- Питание PoE (IEEE 802.3af) Class 1
- Разъём для гарнитуры RJ9 с поддержкой Electronic Hook Switch (EHS)
- Конфигурирование через Web-интерфейс
- Безопасность: HTTPS, TLS и SRTP
- Персонализация интерфейса
- Журнал вызовов: до 100 вызовов
- Совместимость: RingCentral Office, Avaya CloudOffice, Avaya IP Office 11.0.1 и выше, Avaya Aura 6.2 FP4 и выше
- Регулируемая подставка с двумя углами наклона
- Требуется блок питания переменного тока до 5 вольт 700513357 или 700512602
- Дополнительные комплектующие: кабель питания Avaya C5 POWER CORD EUROPE/RUSSIA (700511978); патч-корд Avaya CAT 5E ETHERNET CABLE 9FT/3M (700383326)
Инструкция Avaya J139 предоставляется по запросу на mail@avaonly.ru.
-
Page 1
Using Avaya J139 IP Phone in an Open SIP environment Release 4.0.5 Issue 1 April 2020… -
Page 2
RESERVES THE RIGHT TO TAKE LEGAL ACTION AGAINST YOU the express behalf of Avaya. End User agrees to indemnify and hold AND ANYONE ELSE USING OR SELLING THE SOFTWARE harmless Avaya, Avaya’s agents, servants and employees against all WITHOUT A LICENSE. -
Page 3
MAY BE OBTAINED FROM MPEG LA, L.L.C. SEE HTTP:// written consent of Avaya can be a criminal, as well as a civil offense WWW.MPEGLA.COM. under the applicable law. Compliance with Laws… -
Page 4
1. This device may not cause interference, and AC adapters shipped with the equipment or specified by Avaya to be used with the equipment. If you use any 2. This device must accept any interference, including other equipment, it may cause failures, malfunctioning, interference that may cause undesired operation of the or fire. -
Page 5
Device Usage Consent operation. By using the Avaya device you agree that Avaya, from time to time, Class B Part 15 Statement may collect network and device data from your device and may use This equipment has been tested and found to comply with the limits such data in order to validate your eligibility to use the device. -
Page 6: Table Of Contents
Making a call from the local Сontacts list …………32 Making a call from the corporate database Сontacts list ………………..32 Making an international call ……………………32 Emergency call April 2020 Using Avaya J139 IP Phone in an Open SIP environment Comments on this document? infodev@avaya.com…
-
Page 7
………………52 Autodialing a pre-assigned number ………………….52 BroadWorks Anywhere …………..53 Enabling and disabling BroadWorks Anywhere …………..53 Configuring BroadWorks Anywhere locations April 2020 Using Avaya J139 IP Phone in an Open SIP environment Comments on this document? infodev@avaya.com… -
Page 8
…………………….. 77 Call Waiting …………..77 Enabling and disabling the Call Waiting feature ……………………. 78 Distinctive Ringing ……………….. 78 Setting a distinctive ring tone April 2020 Using Avaya J139 IP Phone in an Open SIP environment Comments on this document? infodev@avaya.com… -
Page 9
Turning call history on and off …………..99 Redirecting calls when Do Not Disturb is active ………………………. 99 Audio …………….99 Turning automatic gain control on or off April 2020 Using Avaya J139 IP Phone in an Open SIP environment Comments on this document? infodev@avaya.com… -
Page 10
…………114 Finding documents on the Avaya Support website …………….. 114 Avaya Documentation Center navigation ………………..116 Viewing Avaya Mentor videos ……………………..116 Support April 2020 Using Avaya J139 IP Phone in an Open SIP environment Comments on this document? infodev@avaya.com… -
Page 11: Chapter 1: Introduction
Chapter 1: Introduction Purpose This document describes how to use Avaya J139 IP Phone features in an Open SIP environment. This document is intended for people who want to learn how to use Avaya J139 IP Phone features and capabilities. April 2020 Using Avaya J139 IP Phone in an Open SIP environment Comments on this document? infodev@avaya.com…
-
Page 12: Chapter 2: Avaya J139 Phones Overview
Chapter 2: Avaya J139 phones overview Phone overview Avaya J139 IP Phone is a phone for business communications. Avaya J139 IP Phone has a color display. Physical specifications • Four call appearances • 320 x 240 pixels graphical LCD • Four soft keys •…
-
Page 13: Physical Layout Of A J139 Ip Phone
Phone overview Physical layout of a J139 IP Phone April 2020 Using Avaya J139 IP Phone in an Open SIP environment Comments on this document? infodev@avaya.com…
-
Page 14
Used to mute and unmute the outgoing audio. Handset Used to receive and make calls Application keys provide direct access to the corresponding applications: April 2020 Using Avaya J139 IP Phone in an Open SIP environment Comments on this document? infodev@avaya.com… -
Page 15: Connection Jacks For J139 Ip Phone
Displays call history list. Connection jacks for J139 IP Phone The following image illustrates the connection jacks that are present on the back panel of Avaya J139 IP Phone. The image schematically describes which device to connect to which jack.
-
Page 16
To connect the Ethernet cable. PC port To connect the computer. Headset Jack To connect the headset. Handset Jack To connect the handset. April 2020 Using Avaya J139 IP Phone in an Open SIP environment Comments on this document? infodev@avaya.com… -
Page 17: Optional Components
You can use the following optional components with the phone: • PSAC12R–050 – 5V DC Power adapter • GSPPoE — Avaya 48V PoE power inserter Supported features The following table shows the features supported in Avaya J139 IP Phone: Features Supported Call Transfer…
-
Page 18
Avaya J139 phones overview Features Supported Presence Call Priority Redial from list Shared Control Speed Dial Team Button Whisper Page April 2020 Using Avaya J139 IP Phone in an Open SIP environment Comments on this document? infodev@avaya.com… -
Page 19: Chapter 3: Getting Started
• Config: To enter the file server address. • Never: To never prompt for the file server address. • Cancel: To cancel the prompt and display the Login screen. April 2020 Using Avaya J139 IP Phone in an Open SIP environment Comments on this document? infodev@avaya.com…
-
Page 20: Identifying The Device Type During Phone Boot-Up
Identifying the device type during phone boot-up About this task Avaya J100 Series IP Phones screen displays the device type during the phone boot-up. This feature is supported only in the phone software version 4.0.3 and later. Procedure 1. Set up the phone hardware.
-
Page 21: Logging Out Of Your Phone
To unlock the phone, press Unlock and enter the PIN or password. April 2020 Using Avaya J139 IP Phone in an Open SIP environment Comments on this document? infodev@avaya.com…
-
Page 22: Chapter 4: Navigation
The directional keys are context-sensitive. Up Arrow and Down Arrow Use these keys to scroll vertically in lists, menus, and pop- up windows. Table continues… April 2020 Using Avaya J139 IP Phone in an Open SIP environment Comments on this document? infodev@avaya.com…
-
Page 23: Text Input
• Displays the new character on the left side of the current character. • Deletes the character on the right side of the cursor when you press Backspac. April 2020 Using Avaya J139 IP Phone in an Open SIP environment Comments on this document? infodev@avaya.com…
-
Page 24: Line Keys
For example, when you press a line key in Contacts, the interface initiates a call to the contact because the first soft key represents the Call key. Main menu The following table lists the Main menu icons used in Avaya J139 IP Phone: Icons Name…
-
Page 25: General Phone Icons
General phone icons General phone icons The following table lists the icons used in Avaya J139 IP Phone: Icon Description Microphone is muted. Missed call on your phone. Incoming call; indicates you have answered this call. Outgoing call; indicates you have made this call.
-
Page 26: Viewing The Product Id
Viewing the Device type About this task View your device type when your system administrator asks you to provide your device type information. The device type can be either Avaya SIP or Open SIP. Procedure 1. Press Main menu. 2. Scroll to Network information, and press Select.
-
Page 27
1. Press Main menu. 2. Scroll to Network information, and press Select. 3. Scroll to System, and press Select. 4. Scroll to Server type. April 2020 Using Avaya J139 IP Phone in an Open SIP environment Comments on this document? infodev@avaya.com… -
Page 28: Chapter 5: Handling Incoming Calls
Press one of the following: • The Answer soft key • OK The phone puts the first call on hold and moves to the second call. April 2020 Using Avaya J139 IP Phone in an Open SIP environment Comments on this document? infodev@avaya.com…
-
Page 29: Ignoring A Call
The call is declined. Depending on your Call decline policy, the caller receives one of the following alert: • An audio message alert • A busy tone alert April 2020 Using Avaya J139 IP Phone in an Open SIP environment Comments on this document? infodev@avaya.com…
-
Page 30: Chapter 6: Handling Outgoing Calls
• Press Speaker. • Press Headset. 2. Dial the number. Redialing a number About this task You can redial the most recently dialed number. April 2020 Using Avaya J139 IP Phone in an Open SIP environment Comments on this document? infodev@avaya.com…
-
Page 31: Making A Call By Using Speed Dial
3. (Optional) Press the digits on the dial pad that correspond to the letters of the name of the person you want to call. For example, press 76484 to search for someone whose name is Smith. 4. Press Call. April 2020 Using Avaya J139 IP Phone in an Open SIP environment Comments on this document? infodev@avaya.com…
-
Page 32: Making A Call From The Corporate Database Сontacts List
• Phone screen • Lock screen If your system administrator configures emergency calling for your phone, the Phone screen displays the Emerg soft key. April 2020 Using Avaya J139 IP Phone in an Open SIP environment Comments on this document? infodev@avaya.com…
-
Page 33: Making An Emergency Call
• On the Phone screen, press the Emerg soft key, and again press Emerg when the phone prompts you for confirmation. • Dial the emergency number by using the dial pad. April 2020 Using Avaya J139 IP Phone in an Open SIP environment Comments on this document? infodev@avaya.com…
-
Page 34: Chapter 7: Call Related Features
1. To put an active call on hold, press the Hold soft key. 2. To resume the held call, press the Resume soft key, or press the line key of the held call. April 2020 Using Avaya J139 IP Phone in an Open SIP environment Comments on this document? infodev@avaya.com…
-
Page 35: Chapter 8: Contacts
• To enter a symbol, press More > Symbol. Use the navigation arrows to highlight the symbol that you want to enter, and press Insert. • To delete the last character, press the Backspac softkey. April 2020 Using Avaya J139 IP Phone in an Open SIP environment Comments on this document? infodev@avaya.com…
-
Page 36: Adding A Contact From The Recents List
5. Scroll to the field to edit. 6. Use the dial pad and soft keys to change the contact information. 7. Press Save. April 2020 Using Avaya J139 IP Phone in an Open SIP environment Comments on this document? infodev@avaya.com…
-
Page 37: Doing A Quick Search For A Contact
• To call a contact, press Call. • To edit a contact, press Edit. • To delete a contact, press Delete. • To view more options, press More. April 2020 Using Avaya J139 IP Phone in an Open SIP environment Comments on this document? infodev@avaya.com…
-
Page 38: Searching For A Contact
Ensure the Contacts list is not empty. Procedure 1. Press Contacts. 2. (Optional) To navigate through Main menu, do the following: a. Scroll to Applications, and press Select. April 2020 Using Avaya J139 IP Phone in an Open SIP environment Comments on this document? infodev@avaya.com…
-
Page 39: Deleting A Contact
3. Press More. 4. Press Groups. 5. Press NewGroup. 6. In the Enter group name field, type your group name. 7. Press Save. April 2020 Using Avaya J139 IP Phone in an Open SIP environment Comments on this document? infodev@avaya.com…
-
Page 40: Adding A Contact To The Local Group
The phone displays the list of contacts in the group. 6. Select a contact, and press Remove. The contact will be removed from your Contacts list. April 2020 Using Avaya J139 IP Phone in an Open SIP environment Comments on this document? infodev@avaya.com…
-
Page 41: Assigning A Ringtone To A Contact
You can combine any found LDAP contact with an existing local contact with the help of the Combine soft key. In 3PCC environment, this feature is not available for CCMS mode. April 2020 Using Avaya J139 IP Phone in an Open SIP environment Comments on this document? infodev@avaya.com…
-
Page 42: Setting Ldap Directory As The Contact Search Source
Procedure 1. Press Contacts. 2. (Optional) To navigate through Main Menulist, do one of the following: • Scroll to Applications, and press Select. April 2020 Using Avaya J139 IP Phone in an Open SIP environment Comments on this document? infodev@avaya.com…
-
Page 43
8. (Optional) Press Combine from the Details view to select an existing local contact and merge it with the selected LDAP contact. April 2020 Using Avaya J139 IP Phone in an Open SIP environment Comments on this document? infodev@avaya.com… -
Page 44: Chapter 9: Recents
• Call time-stamp • Call duration Avaya J100 Series IP Phones software version 4.0.3 and later always encrypts the content of the call log file. If you downgrade the software of your phone to a version earlier than 4.0.3, you will lose the call log details.
-
Page 45: Deleting A Call Record From Recents
• Delete: To delete the entry. The phone deletes the number from the call history list. • Cancel: To cancel and return to the previous menu. April 2020 Using Avaya J139 IP Phone in an Open SIP environment Comments on this document? infodev@avaya.com…
-
Page 46: Clearing The Recents List
4. Select one of the following when the phone prompts for confirmation: • Delete: To delete all entries. • Cancel: To cancel and return to the previous menu. April 2020 Using Avaya J139 IP Phone in an Open SIP environment Comments on this document? infodev@avaya.com…
-
Page 47: Chapter 10: Conference Calls
3. Press Held call soft key to see a list of held calls. 4. Select the call on hold that you want to add to the conference. 5. Press one of the following: • Join April 2020 Using Avaya J139 IP Phone in an Open SIP environment Comments on this document? infodev@avaya.com…
-
Page 48: Putting A Conference Call On Hold And Resuming A Call
1. Press Hold soft key during a conference call. 2. Do one of the following: • Press Resume. • Select the call appearance to resume the conference call. April 2020 Using Avaya J139 IP Phone in an Open SIP environment Comments on this document? infodev@avaya.com…
-
Page 49: Chapter 11: Advanced Features
Additionally, you can configure a ring reminder to get a short ring burst when the incoming call is sent to the voice mail. April 2020 Using Avaya J139 IP Phone in an Open SIP environment Comments on this document? infodev@avaya.com…
-
Page 50: Activating The Ring Reminder
4. For the Ring reminder setting, press Toggle to activate the ring reminder. 5. Press Save. DND icons The following table displays the DND icons for the Avaya J100 Series IP Phones. April 2020 Using Avaya J139 IP Phone in an Open SIP environment…
-
Page 51: Activating The Screen Saver
If you are using the soft client for the remote call initiation, ensure that you do not have any active Call Forward—Always and DND local features of the phone. However, you can use BroadWorksCall Forward and DND features. April 2020 Using Avaya J139 IP Phone in an Open SIP environment Comments on this document? infodev@avaya.com…
-
Page 52: Anonymous Call Block
• Make calls from phones using your BroadWorks business phone number as the Calling Line • Move calls across phones. • Specify phones on which you can attend calls. April 2020 Using Avaya J139 IP Phone in an Open SIP environment Comments on this document? infodev@avaya.com…
-
Page 53: Enabling And Disabling Broadworks Anywhere
1. Press the Main menu. 2. Scroll to Settings, and press Select. 3. Scroll to Features, and press Select. 4. Scroll to BroadWorks Anywhere. April 2020 Using Avaya J139 IP Phone in an Open SIP environment Comments on this document? infodev@avaya.com…
-
Page 54: Changing Location Details
• Use diversion inhibitor: Press Toggle to enable or disable this field. • Answer confirmation required: Press Toggle to enable or disable this field. 8. Press Save. April 2020 Using Avaya J139 IP Phone in an Open SIP environment Comments on this document? infodev@avaya.com…
-
Page 55: Deleting Locations
• Include group paging: To set the alerting of the location for the group paging calls. 7. Press Save. Alerting is set to the location. April 2020 Using Avaya J139 IP Phone in an Open SIP environment Comments on this document? infodev@avaya.com…
-
Page 56: Broadworks Mobility
Use this procedure to configure the mobile device you want to use in conjunction with your office phone. Before you begin Ensure your administrator has enabled the BroadWorks Mobility feature for your extension. April 2020 Using Avaya J139 IP Phone in an Open SIP environment Comments on this document? infodev@avaya.com…
-
Page 57
Include shared call appearance Specifies that all SCA devices are alerted. Ensure to set Device to ring to either Fixed or Both. Table continues… April 2020 Using Avaya J139 IP Phone in an Open SIP environment Comments on this document? infodev@avaya.com… -
Page 58: Editing Mobile Identity Alerting
• BroadWorks call control • Use diversion inhibitor • Answer confirmation required • Device to ring • Include shared call appearance • Include BroadWorks Anywhere April 2020 Using Avaya J139 IP Phone in an Open SIP environment Comments on this document? infodev@avaya.com…
-
Page 59
Include shared call appearance Specifies that all SCA devices are alerted. Ensure to set Device to ring to either Fixed or Both. Table continues… April 2020 Using Avaya J139 IP Phone in an Open SIP environment Comments on this document? infodev@avaya.com… -
Page 60: Broadworks Anywhere And Mobility Icons
Ensure to set Device to ring to either Fixed or Both. Mobile identities alerted Specifies the list of mobile identities that are alerted. BroadWorks Anywhere and Mobility icons The following table displays the BroadWorks Anywhere Mobility icons for the Avaya J139 IP Phone. State Phone icons BroadWorks Anywhere…
-
Page 61: Blf Icons And Visual Led Indication
First soft key is the key on the bottom left corner of the phone screen. BLF icons and visual LED indication The following table displays the BLF state icons and LED indicators for the Avaya J100 Series IP Phones. State…
-
Page 62: Customizing Blf Incoming Call Indication
• Both: To set the BLF pick up indication to both audible and visual. April 2020 Using Avaya J139 IP Phone in an Open SIP environment Comments on this document? infodev@avaya.com…
-
Page 63: Customizing Blf Parked Call Indication
Ensure your administrator enables customizing the ring tone. Ensure BLF incoming call indication or BLF parked call indication is set to Audible or Both. April 2020 Using Avaya J139 IP Phone in an Open SIP environment Comments on this document? infodev@avaya.com…
-
Page 64: Blf Call Operations
Barging in on an active call About this task Use this procedure to barge in on an active call if the monitored user is busy April 2020 Using Avaya J139 IP Phone in an Open SIP environment Comments on this document? infodev@avaya.com…
-
Page 65: Calendar
Calendar information is updated whenever you log in to your phone, change calendar settings, or access the Calendar. April 2020 Using Avaya J139 IP Phone in an Open SIP environment Comments on this document? infodev@avaya.com…
-
Page 66: Accessing Calendar
• Exchange domain: Enter the domain name, for example, avaya.com. 6. (Optional) To enable or disable Name/Password Prompt, do one of the following: • Toggle: To enable or disable the prompt. April 2020 Using Avaya J139 IP Phone in an Open SIP environment Comments on this document? infodev@avaya.com…
-
Page 67: Reviewing Your Calendar Event
• Day: To view calendar event of the selected day. Call Forwarding With the Call Forwarding feature, you can divert incoming calls to another number. April 2020 Using Avaya J139 IP Phone in an Open SIP environment Comments on this document? infodev@avaya.com…
-
Page 68: Call Forward Icons
In this case, your phone will redirect that incoming call to the assigned call forwarding number. Call Forward icons The following table displays the Call forward icons for the Avaya J100 Series IP Phones. State Phone and button module icons…
-
Page 69: Forwarding Call When Busy
• Select • OK • The corresponding line key 3. Scroll to the Call forward-NA feature, and press one of the following: • Config April 2020 Using Avaya J139 IP Phone in an Open SIP environment Comments on this document? infodev@avaya.com…
-
Page 70: Call Park
• Group Call Park: To park a call to the first available extension in the group. Call Park icons The following table lists the Call Park feature icons for Avaya J139 IP Phone: The following table lists the Call Park feature icons for J139 phones:…
-
Page 71: Call Park Notifications
4. Scroll to Alerting on calls, and press one of the following: • Select • OK 5. Scroll to Call park, and press one of the following: • Select • OK April 2020 Using Avaya J139 IP Phone in an Open SIP environment Comments on this document? infodev@avaya.com…
-
Page 72: Parking A Call
5. In the Park Call screen, enter the parking extension. Entering hash (#) or leaving the parking extension empty will self-park the call. 6. Press Park. April 2020 Using Avaya J139 IP Phone in an Open SIP environment Comments on this document? infodev@avaya.com…
-
Page 73: Parking A Call To A Call Park Group
1. Press Main menu. 2. Scroll to Features, and press Select. 3. Scroll to Call unpark, and press one of the following: • Unpark April 2020 Using Avaya J139 IP Phone in an Open SIP environment Comments on this document? infodev@avaya.com…
-
Page 74: Dynamic Park And Page
• Dial the extension number of the user or page target group that you want to page, and press Page. • Press Contacts. Select the required user, and press Page. April 2020 Using Avaya J139 IP Phone in an Open SIP environment Comments on this document? infodev@avaya.com…
-
Page 75: Retrieving The Parked Call
To retrieve this call from its current location using the Call Retrieve feature, place the current call on hold and then press Call Retrieve. April 2020 Using Avaya J139 IP Phone in an Open SIP environment Comments on this document? infodev@avaya.com…
-
Page 76: Using Call Retrieve
2. Do one of the following: • Dial the number to transfer the call. • Search for the number in Contacts or Recents. April 2020 Using Avaya J139 IP Phone in an Open SIP environment Comments on this document? infodev@avaya.com…
-
Page 77: Making A Blind Transfer
The phone displays incoming call screen, plays incoming call ringtone, and the beacon LED flashes. Enabling and disabling the Call Waiting feature Procedure 1. Press Main menu. April 2020 Using Avaya J139 IP Phone in an Open SIP environment Comments on this document? infodev@avaya.com…
-
Page 78: Distinctive Ringing
• Alternate number 1: To select the different ringtone for the first alternate number of a contact. The default ringtone is Short Short Long. April 2020 Using Avaya J139 IP Phone in an Open SIP environment Comments on this document? infodev@avaya.com…
-
Page 79: Enabling Auto Answer
Group Paging is a group feature that allows unidirectional paging for a group of users by dialing a group paging directory number (DN) or an extension. The feature can be configured by a group administrator or higher. April 2020 Using Avaya J139 IP Phone in an Open SIP environment Comments on this document? infodev@avaya.com…
-
Page 80: Long-Term Acoustic Exposure Protection
Advanced features Long-term acoustic exposure protection Avaya J100 Series IP Phones have the long-term acoustic exposure protection to prevent the users from getting acoustic shocks. This feature reduces the loud volume of the conversations on the phone call to permissible acoustic limits. The user can set the permissible acoustic limit to dynamic or predefined static values.
-
Page 81: Multicast Paging
• Lift the handset. • Press Speaker. • Press Headset. 2. (Optional) If you use the handset, press End Call to cancel dialing. April 2020 Using Avaya J139 IP Phone in an Open SIP environment Comments on this document? infodev@avaya.com…
-
Page 82: Pre-Configuration Of Keys
• Ensure that the system administrator configures the voicemail for your extension. • Obtain the user ID and password of your voicemail from your system administrator. April 2020 Using Avaya J139 IP Phone in an Open SIP environment Comments on this document? infodev@avaya.com…
-
Page 83: Shared Call Appearance
Incoming calls to any shared extension alert all phones configured with this extension. Note: SCA is available only in Avaya J139 IP Phone, Avaya J169/J179 IP Phone and Avaya J159 IP Phone. To activate the feature, contact your system administrator or go to the BroadSoft web interface yourself to activate the feature.
-
Page 84: Joining A Call In A Shared Line
In-use icon Before you begin Ensure that you are assigned a shared extension. Procedure 1. Scroll to the shared line. 2. Press Barge in. April 2020 Using Avaya J139 IP Phone in an Open SIP environment Comments on this document? infodev@avaya.com…
-
Page 85: Putting A Call On Private Hold And Resuming A Call
Ensure that you are assigned a shared extension. Procedure 1. Press Main menu. 2. Scroll to Settings, and press one of the following: • Select • OK April 2020 Using Avaya J139 IP Phone in an Open SIP environment Comments on this document? infodev@avaya.com…
-
Page 86: Customizing Sca Lines
The label and location of each of these lines can be individually modified using the customization feature. April 2020 Using Avaya J139 IP Phone in an Open SIP environment Comments on this document? infodev@avaya.com…
-
Page 87: Viewing Sca Configuration
Simultaneous ring can be turned off when you are at your desk on a call. April 2020 Using Avaya J139 IP Phone in an Open SIP environment Comments on this document? infodev@avaya.com…
-
Page 88: Accessing Simultaneous Ring Personal From The Phone Menu
Use this procedure to add a number or a SIP-URI address for a simultaneous ring. Important: You can add maximum 10 numbers or SIP-URI addresses. April 2020 Using Avaya J139 IP Phone in an Open SIP environment Comments on this document? infodev@avaya.com…
-
Page 89: Editing Simultaneous Ring Numbers
Use this procedure to delete a number or a SIP-URI address for simultaneous ringing. Procedure 1. On the phone, go to Main menu > Features > Simultaneous ringing > Config. April 2020 Using Avaya J139 IP Phone in an Open SIP environment Comments on this document? infodev@avaya.com…
-
Page 90: Sla Mon
4. In the confirmation window, press Delete. ™ SLA Mon ™ SLA Mon technology is a patented Avaya technology embedded in Avaya products to facilitate ™ advanced diagnostics. The phones support SLA Mon agent which works with Avaya Diagnostic Server (ADS).
-
Page 91
5. Press one of the following to set the duration in hours: • Right arrow key: To increase the value. • Left arrow key: To decrease the value. 6. Press Enter. April 2020 Using Avaya J139 IP Phone in an Open SIP environment Comments on this document? infodev@avaya.com… -
Page 92: Chapter 12: Customization
Use this procedure to display the duration of calls. Procedure 1. Press Main menu. 2. Scroll to Settings, and press Select. 3. Scroll to Phone, and press Select. April 2020 Using Avaya J139 IP Phone in an Open SIP environment Comments on this document? infodev@avaya.com…
-
Page 93: Setting Key Repeat Delay
5. Press Toggle to one of the following: • One number: To see the last dialed number. • List: To see a list of the last eight numbers. April 2020 Using Avaya J139 IP Phone in an Open SIP environment Comments on this document? infodev@avaya.com…
-
Page 94: Setting The Audio Button
6. Press Contacts. The phone displays the Contacts list. 7. Scroll to a suitable contact, and press Select. The phone updates the speed dial entries. April 2020 Using Avaya J139 IP Phone in an Open SIP environment Comments on this document? infodev@avaya.com…
-
Page 95: Setting Mute Alert
• If the speaker is on during an active call and there are new voice mail messages, the beacon LED turns off every 15 seconds. Note: If the call is on hold, the beacon LED stops flashing. April 2020 Using Avaya J139 IP Phone in an Open SIP environment Comments on this document? infodev@avaya.com…
-
Page 96: Customizing Phone Keys
Press Move. b. Use the Navigation keys to move the selected line. c. (Optional) If the new location is empty, press Select. April 2020 Using Avaya J139 IP Phone in an Open SIP environment Comments on this document? infodev@avaya.com…
-
Page 97: Restoring Customized Keys To Default
4. Scroll down to Presence integration, and press Select. 5. Scroll down to Away timer. 6. Press Toggle to turn on the timer. April 2020 Using Avaya J139 IP Phone in an Open SIP environment Comments on this document? infodev@avaya.com…
-
Page 98: Enabling Phone Auto-Lock
• Toggle: To toggle call history on or off. 6. Scroll to Log calls, and press Toggle to toggle call history to on and off. 7. Press Save. April 2020 Using Avaya J139 IP Phone in an Open SIP environment Comments on this document? infodev@avaya.com…
-
Page 99: Redirecting Calls When Do Not Disturb Is Active
5. Select the handset, headset, or speaker for which you want to turn automatic gain control on or off. 6. Press Toggle to turn automatic gain control on or off. 7. Press Save. April 2020 Using Avaya J139 IP Phone in an Open SIP environment Comments on this document? infodev@avaya.com…
-
Page 100: Selecting Audio Path
2. Scroll to Settings, and press Select. 3. Scroll to Audio, and press Select. 4. Use the Down Arrow key to go to the Error tones screen. April 2020 Using Avaya J139 IP Phone in an Open SIP environment Comments on this document? infodev@avaya.com…
-
Page 101: Enabling Wireless Headset Bidirectional Signaling
Note: The amplified audio level will return to normal when the call is ended. April 2020 Using Avaya J139 IP Phone in an Open SIP environment Comments on this document? infodev@avaya.com…
-
Page 102: Setting A Headset Profile
Plantronics: ™ • CS500 Series: CS510, CS520, CS530, CS540 (APV-63) ® • Savi 700 Series: W710, W720, W730, W740, W745 (APV-63) Table continues… April 2020 Using Avaya J139 IP Phone in an Open SIP environment Comments on this document? infodev@avaya.com…
-
Page 103: Setting Headset Mic Level
SC 630/660 (CAVA-31) ™ ™ • VXI: CC Pro 4010V DC, CC Pro 4021V DC (OmniCord-V) Profile 5 Jabra: GN2000 (GN1216) Table continues… April 2020 Using Avaya J139 IP Phone in an Open SIP environment Comments on this document? infodev@avaya.com…
-
Page 104: Setting A Personalized Ringtone
• Call Pickup 6. Press Select. 7. Scroll to the ringtone, and press Select. 8. (Optional) To play the ringtone, press Play. 9. Press Save. April 2020 Using Avaya J139 IP Phone in an Open SIP environment Comments on this document? infodev@avaya.com…
-
Page 105: Display
You can enter any value from 0 to 999. 6. To enable clock on the screen saver, scroll to Clock, and press Toggle. 7. Press Save. April 2020 Using Avaya J139 IP Phone in an Open SIP environment Comments on this document? infodev@avaya.com…
-
Page 106: Setting The Backlight Timer
3. Scroll to Display, and press Select. 4. Scroll to Language, and press Select. 5. Scroll to the language that you want to use, and press Select. April 2020 Using Avaya J139 IP Phone in an Open SIP environment Comments on this document? infodev@avaya.com…
-
Page 107: Adjusting Phone Screen Width
4. Use the Down Arrow key to go to the Date format screen. The phone displays one of the following: • Default • mm/dd April 2020 Using Avaya J139 IP Phone in an Open SIP environment Comments on this document? infodev@avaya.com…
-
Page 108: Setting The Time Format
3. Scroll to Display, and press Select. 4. Scroll to Time zone, and press Select. The phone displays the following: • My time • Time zone April 2020 Using Avaya J139 IP Phone in an Open SIP environment Comments on this document? infodev@avaya.com…
-
Page 109: Setting The Text Size
• Language • Time zone and time format • Date format Backup process is initiated only after retrieval of user-specific data is successful. April 2020 Using Avaya J139 IP Phone in an Open SIP environment Comments on this document? infodev@avaya.com…
-
Page 110
• When Manual Backup is successful: Backup successful • When Manual Restore is not successful: Retrieval failed • When Manual Restore is successful: Retrieval successful April 2020 Using Avaya J139 IP Phone in an Open SIP environment Comments on this document? infodev@avaya.com… -
Page 111: Chapter 13: Troubleshooting
When your phone is back on the original server, normal functionality is restored. Failover and failback are automatic; you have no control over failure mode. April 2020 Using Avaya J139 IP Phone in an Open SIP environment Comments on this document? infodev@avaya.com…
-
Page 112: Viewing The Product Id
1. Press Main menu. 2. Scroll to Network information, and press Select. 3. Scroll to System, and press Select. 4. Scroll to Product ID. April 2020 Using Avaya J139 IP Phone in an Open SIP environment Comments on this document? infodev@avaya.com…
-
Page 113: Viewing The Device Type
Viewing the Device type About this task View your device type when your system administrator asks you to provide your device type information. The device type can be either Avaya SIP or Open SIP. Procedure 1. Press Main menu. 2. Scroll to Network information, and press Select.
-
Page 114: Chapter 14: Resources
7. Click Enter. Avaya Documentation Center navigation Customer documentation for some programs is now available on the Avaya Documentation Center website at https://documentation.avaya.com. April 2020 Using Avaya J139 IP Phone in an Open SIP environment…
-
Page 115
Documentation Important: For documents that are not available at Avaya Documentation Center, click More Sites > Support on the top menu to open https://support.avaya.com. Using the Avaya Documentation Center, you can: • Search for content in one of the following ways: — Type a keyword in Search, and click Filters to search for content by product, release. -
Page 116: Viewing Avaya Mentor Videos
Avaya Mentor videos provide technical content on how to install, configure, and troubleshoot Avaya products. About this task Videos are available on the Avaya Support website, listed under the video document type, and on the Avaya-run channel on YouTube. • To find videos on the Avaya Support website, go to https://support.avaya.com/…
-
Page 117
…………….69 barging in on an active call ……….. call history customizing the ring tone ……….63 viewing …………….44 icons and visual LEDs ……….calling April 2020 Using Avaya J139 IP Phone in an Open SIP environment Comments on this document? infodev@avaya.com… -
Page 118
…………..file server address …………enabling screen saver clock ……..connection jacks …………..language …………..106 contacts setting screen saver time ……….105 April 2020 Using Avaya J139 IP Phone in an Open SIP environment Comments on this document? infodev@avaya.com… -
Page 119
………..99 contacts ……………. parking a call …………..overview …………… field description Line keys …………….24 BroadWorks Mobility ………….57 local contacts Mobile identity alerting ……….59 April 2020 Using Avaya J139 IP Phone in an Open SIP environment Comments on this document? infodev@avaya.com… -
Page 120
……….Ring Splash …………….. phone boot-up …………….. phone lock icons …………….auto-lock …………… screen saver …………..manual lock …………..screen saver details April 2020 Using Avaya J139 IP Phone in an Open SIP environment Comments on this document? infodev@avaya.com… -
Page 121
……………17 text input enter, edit …………..23 time zone display settings …………settings …………… unlockPIN password …………..unparking a call …………..73 user data April 2020 Using Avaya J139 IP Phone in an Open SIP environment Comments on this document? infodev@avaya.com…
Эти клавиши имеют четыре роли
КЛАВИШИ ОТОБРАЖЕНИЯ ВЫЗОВА: позволяют обрабатывать несколько вызовов.
Используется для совершения или приема внутренних и внешних вызовов
ФУНКЦИОНАЛЬНЫЕ КЛАВИШИ: Доступ к функциям и меню осуществляется нажатием этих клавиш.
ПОИСК ГРУППОВЫХ КЛАВИШ: Звонки и/или мигание для «групповых» вызовов, т.е.: Ведомственные или основные номера
ПОЛЬЗОВАТЕЛЬСКИЕ КЛЮЧИ: Показать внешний вид расширений других пользователей и указать статус
Медленное мигание указывает на поступивший вызов
Быстрое мигание указывает на вызов. Непрерывный красный свет указывает на DND.
ТЕЛЕФОННЫЕ КЛАВИШИ И ФУНКЦИИ
- СООБЩЕНИЕ LAMP/ЗВОНОК ИНДИКАТОР: ВКЛ: Указывает на новые сообщения в вашем ящике голосовой почты, мигание указывает на поступивший вызов
- DISPLAY: показывает информацию о вызове, сведения о функциях системы и клавиши вызова
- ВЫЗОВ ИЛИ ФУНКЦИОНАЛЬНЫЕ КЛАВИШИ (24): Нажмите клавиши со стрелками влево/вправо, чтобы увидеть 2 дополнительных экрана.
Эти клавиши имеют четыре роли
КЛАВИШИ ОТОБРАЖЕНИЯ ВЫЗОВА: позволяют обрабатывать несколько вызовов.
Используется для совершения или приема внутренних и внешних вызовов
ФУНКЦИОНАЛЬНЫЕ КЛАВИШИ: Доступ к функциям и меню осуществляется нажатием этих клавиш.
ПОИСК ГРУППОВЫХ КЛАВИШ: Звонки и/или мигание для «групповых» вызовов, т.е.: Ведомственные или основные номера
ПОЛЬЗОВАТЕЛЬСКИЕ КЛЮЧИ: Показать внешний вид расширений других пользователей и указать статус
Медленное мигание указывает на поступивший вызов
Быстрое мигание указывает на вызов. Непрерывный красный свет указывает на DND.
| НАВИГАЦИОННЫЕ КЛАВИШИ: прокручивает внешний вид вызовов, функциональные клавиши, меню, журналы вызовов и списки быстрого набора. Используйте клавиши со стрелками вверх/вниз для прокрутки по одной клавише за раз или стрелки влево/вправо для прокрутки на один экран за раз. КЛАВИША OK: Подтверждает выбор меню. |
|
| ТЕЛЕФОННАЯ КЛАВИША: используется для выхода из любого меню или возврата к экрану телефона. | |
| СООБЩЕНИЕ: Доступ к системе голосовой почты, и загорается, когда у вас есть новые сообщения. | |
| КОНТАКТЫ: доступ к личным и общим каталогам. | |
| ГЛАВНОЕ МЕНЮ/ДОМАШНЯЯ СТРАНИЦА: Доступ к списку опций и настроек для индивидуальной настройки телефона. | |
| ПОСЛЕДНИЕ (ЖУРНАЛ ЗВОНКОВ/ИСТОРИЯ): отображает список последних отвеченных, пропущенных и исходящих вызовов. Загорается при наличии новых пропущенных вызовов. Если у вас есть новые пропущенные вызовы, количество пропущенных вызовов появится в верхней части экрана. |
|
| ГАРНИТУРА: переключение вызовов с трубки на гарнитуру. Клавиша подсвечивается, когда гарнитура активна. | |
| ДИНАМИК: Используется для совершения или ответа на любой вызов, не поднимая трубку. горит, когда динамик активен. | |
| ГРОМКОСТЬ: Управляет громкостью звонка, динамика и входящего голоса через трубку/гарнитуру. | |
| MUTE: выключает или включает микрофон, когда вы разговариваете по телефону. лamp горит во время использования, вызывающий абонент вас не слышит. | |
| НАЗВАНИЯ ПРОГРАММНЫХ КЛАВИШ: появляются на дисплее для обозначения функций, которые можно активировать, нажимая клавиши непосредственно под ними. ПРОГРАММНЫЕ КЛАВИШИ: Появляются под метками функциональных клавиш на дисплее и обеспечивают доступ к функциям, отображаемым на метке над ними. Эти функции меняются в зависимости от текущего состояния телефона. IE: в режиме ожидания, при звонке, при активном вызове и т.д. |
СОСТОЯНИЕ БЕЗОПАСНОСТИ: Следующие программные клавиши появляются, когда ваш телефон находится в режиме ожидания.
- ПОВТОРНЫЙ НАБОР: Отображает список исходящих номеров из вашего журнала вызовов, позволяя вам набирать номера из этого списка.
- ФУНКЦИИ: отображает прокручиваемый список доступных функций и пользовательских настроек.
СОСТОЯНИЕ ЗВОНКА: Следующие программные клавиши появляются, когда ваш телефон звонит.
- ОТВЕТ: Отвечает на входящие вызовы по громкой связи или переводит пейджинговый вызов в двусторонний разговор.
- TO VM: посылает сигнал вызова на вашу голосовую почту.
- ИГНОРИРОВАТЬ: Отключение звонка для текущего звонка. Вызов будет продолжать мигать до тех пор, пока ответ не будет переведен на голосовую почту.
- DROP: Когда ваш телефон звонит, DROP направит звонящего прямо на голосовую почту.
ВЫПОЛНЕНИЕ ДОПОЛНИТЕЛЬНОГО ВЫЗОВА: Следующие программные клавиши появляются, когда вы выполняете вызов на внутренний внутренний номер.
- CALLBACK: установите автоматический обратный вызов для абонентского аппарата, которому вы звонили. Когда они в следующий раз завершат вызов, телефонная система позвонит вам, а когда вы ответите, автоматически позвонит пользователю.
- DROP: Когда вы набираете номер, DROP отключит вас.
ПОДКЛЮЧЕН К ВЫЗОВУ: Следующие программные клавиши появляются, когда вы подключены к вызову.
- УДЕРЖАНИЕ: Поместите вызов на эксклюзивное удержание на своем телефоне.
- КОНФЕРЕНЦИЯ: перевод текущего вызова на удержание и подача гудка для добавления другого участника к конференции.
- ПЕРЕВОД: Помещает ваш текущий вызов на удержание и воспроизводит гудок, чтобы вы могли перевести вызов на другой добавочный номер.
- DROP: когда вы подключены к вызову, DROP отключит вас.
ПРИМЕЧАНИЕ: по мере завершения процесса ПЕРЕДАЧИ и КОНФЕРЕНЦИИ появляются дополнительные функциональные клавиши, а также когда вы находитесь в меню и списках на дисплее.
ОБРАБОТКА ЗВОНКОВ
ОТВЕТ И РАЗМЕЩЕНИЕ ЗВОНКОВ
ДЛЯ ОТВЕТА НА ВХОДЯЩИЙ ЗВОНОК: Телефон звонит — индикатор медленно мигает.
Поднимите трубку или нажмите кнопку SPEAKER или нажмите программную кнопку ANSWER.
ПРИМЕЧАНИЕ: Чтобы отключить звонящий вызов, нажмите функциональную клавишу IGNORE.
Для отправки звонка на голосовую почту нажмите функциональную клавишу TOVM.
ДЛЯ ОТВЕТА НА ВТОРОЙ ЗВОНОК: Нажмите клавишу отображения вызова нового вызова, первый вызов автоматически удерживается.
ЧТОБЫ СДЕЛАТЬ ЗВОНОК:
Поднимите трубку или нажмите кнопку SPEAKER.
Введите номер РАСШИРЕНИЯ.
Внешний: введите префикс набора (обычно 8 или 9), 1 код города и номер.
ЧТОБЫ СДЕЛАТЬ ВТОРОЙ ВЫЗОВ: Нажмите доступную клавишу внешнего вида, первый вызов автоматически удерживается.
Введите номер.
ДИНАМИК: Нажмите, чтобы сделать или ответить на любой вызов, не поднимая трубку.
ДЛЯ ПЕРЕКЛЮЧЕНИЯ НА ДИНАМИК С ГАРНИТУРЫ/ТРУБКИ: Нажмите клавишу SPEAKER. Замените трубку в подставке.
ДЛЯ ВОССТАНОВЛЕНИЯ КОНФИДЕНЦИАЛЬНОСТИ:
Поднимите трубку или нажмите кнопку HEADSET.
ЧТОБЫ ЗАВЕРШИТЬ ЗВОНОК ПО СПИКЕРФОНУ: Нажмите кнопку SPEAKER или программную кнопку DROP.
НЕМОЙ: Отключает микрофон (динамик, телефонную трубку и гарнитуру), чтобы вы могли говорить конфиденциально.
Звонящий не может слышать офисный шум/разговор.
ИСПОЛЬЗОВАТЬ:
Нажмите клавишу MUTE Клавиша загорается и говорите конфиденциально.
ДЛЯ ВОЗОБНОВЛЕНИЯ РАЗГОВОРА: Нажмите клавишу MUTE еще раз.
Удержание Ставит активный вызов на удержание. Это эксклюзивное удержание вашего телефона. Никто другой не может его восстановить.
ЧТОБЫ УДЕРЖАТЬ ВЫЗОВ: Нажмите функциональную клавишу HOLD. Индикатор лamp мигает быстро.
ЧТОБЫ ВОЗВРАТИТЬСЯ К ВЫЗЫВАЮЩЕМУ: Нажмите мигающую клавишу вызова.
АВТОМАТИЧЕСКОЕ УДЕРЖАНИЕ: Когда вы выбираете другую клавишу представления вызова или используете определенные функции, линия, по которой вы уже говорите, будет автоматически удерживаться без нажатия клавиши УДЕРЖАНИЕ.
ПЕРЕДАЧА: Позволяет связать ваш звонок с кем-то другим (при звонке онлайн)
Нажмите функциональную кнопку TRANSFER, и вызов будет автоматически удержан.
Введите номер РАСШИРЕНИЯ.
Передача вслепую: нажмите программную кнопку ЗАВЕРШИТЬ, соединение установлено.
Or
Объявлено: Подождите, пока сторона ответит (говорите конфиденциально), нажмите программную клавишу ЗАВЕРШИТЬ.
ЧТОБЫ ЗАВЕРШИТЬ ПЕРЕДАЧУ: Нажмите программную кнопку ЗАВЕРШИТЬ, соединение установлено, повесьте трубку.
ЧТОБЫ ВОЗВРАТИТЬСЯ К УДЕРЖАННОМУ ВЫЗОВУ: Нажмите функциональную клавишу ОТМЕНА, которая отключит вас от абонента и снова соединит вас с вызывающим абонентом.
ЧТОБЫ СБРОСИТЬ ВЫЗОВ: Нажмите функциональную клавишу DROP, чтобы разъединить вас с вызываемым абонентом, вызывающий абонент остается на удержании.
ДЛЯ ПРОВЕДЕНИЯ КОНФЕРЕНЦИИ ВСЕХ УЧАСТНИКОВ: Нажмите функциональную кнопку КОНФЕРЕНЦИЯ, все три стороны присоединятся к конференц-вызову.
ПРИМЕЧАНИЕ: Если вы не знаете добавочный номер после нажатия TRANSFER, вы можете выполнить поиск в справочнике.
ПЕРЕВОД НА ГОЛОСОВУЮ ПОЧТУ: перенаправляет вызывающего абонента непосредственно на голосовую почту, не звоня по телефону.
Нажмите функциональную кнопку TRANSFER, вызов автоматически удерживается.
Введите знак # и добавочный номер.
Немедленно нажмите функциональную клавишу COMPLETE.
СПЕЦИАЛЬНАЯ КОНФЕРЕНЦИЯ: Позволяет добавить несколько участников к вызову (при онлайн-вызове)
Нажмите программную кнопку КОНФЕРЕНЦИЯ, первый вызов будет автоматически удержан, и вы услышите гудок.
Введите второй номер (внутренний или внешний).
ВАЖНО: Дождитесь ответа и объявите конференцию.
Нажмите функциональную клавишу КОНФЕРЕНЦИЯ еще раз. Все стороны связаны.
- Чтобы добавить дополнительных участников, повторите описанную выше процедуру.
- Чтобы выйти из конференции, повесьте трубку.
- Чтобы исключить другого участника из конференции:
Нажмите программную кнопку ДЕТАЛИ, на дисплее отобразится информация об участнике.
Нажимайте клавиши со стрелками вверх/вниз для прокрутки списка участников.
Нажмите программную кнопку DROP, чтобы удалить нужного участника. - Чтобы отключить звук другого участника, нажмите программную кнопку MUTE.
- Чтобы отключить свой звук, нажмите фиксированную кнопку MUTE.
ЕСЛИ ВЫЗЫВАЕМАЯ СТОРОНА НЕ ОТВЕЧАЕТ/ЗАНЯТО: Чтобы вернуться к исходному вызову Нажмите
Функциональная клавиша ОТМЕНА или клавиша ВЫЗОВА на удерживаемой линии (быстро мигает зеленым цветом).
ПРИМЕЧАНИЕ: Количество внешних абонентов, которых вы можете подключить к этому типу конференции, зависит от типа услуги, предоставляемой вашим поставщиком гудков. Обратитесь к системному администратору.
ДОПОЛНИТЕЛЬНЫЕ ВОЗМОЖНОСТИ
ПРИМЕЧАНИЕ: Вам может потребоваться прокрутить, нажимая клавиши со стрелками вправо и влево, чтобы увидеть дополнительные функции.
ПАРКОВКА ВЫЗОВА: Это позволяет поставить вызов на удержание в системе и назначить его слоту парковки вызова.
Вызовы можно принимать с любого телефона в системе, нажав соответствующую клавишу слота парковки вызовов.
ПАРКОВАТЬСЯ: Когда вызывающий абонент находится в сети, нажмите кнопку «Доступная ПАРКОВКА ВЫЗОВА», кнопка загорится зеленым цветом на вашем телефоне, прочтите на других.
Сообщите человеку номер слота парковки вызова.
ДЛЯ ПОЛУЧЕНИЯ: Поднимите трубку или нажмите кнопку SPEAKER.
Нажмите соответствующую клавишу ПАРКОВКИ ВЫЗОВА. Отображается идентификатор вызывающего абонента удерживаемого вызова.
Нажмите функциональную клавишу ПОДКЛЮЧИТЬ. Вы подключены к вызову, начните говорить.
ЗАМЕТКИ: Если запаркованный вызов не будет получен в течение заданного количества секунд, вызов будет «обратно звонить» на телефон, с которого он был запаркован.
ПЕЙДЖИНГ: Доступ к телефону или потолочным динамикам для объявления.
ИСПОЛЬЗОВАТЬ: Поднимите трубку Нажмите
Нажмите клавишу PAGE или *631 и дождитесь звукового сигнала.
Сделать объявление. Нажмите клавишу DROP, повесьте трубку.
НЕ БЕСПОКОЙТЕ: Останавливает ВСЕ сигналы и звонки, позволяя вам работать без помех.
Входящие абоненты либо слышат сигнал «занято», либо переводятся на вашу голосовую почту.
ДЛЯ ПРОГРАММИРОВАНИЯ: Нажмите клавишу DND. Появится экранная клавиша STATUS, на дисплее появится N, загорится индикатор рядом с DND.
ЧТОБЫ ОТМЕНИТЬ: Нажмите кнопку «Не беспокоить». Кнопка STATUS исчезнет, N исчезнет, индикатор погаснет.
ПРИМЕЧАНИЕ: Когда активны определенные функции, такие как «Не беспокоить» и «Переадресация вызова», при поднятии трубки или нажатии громкой связи слышен «заикающийся» гудок. Это не влияет на исходящий вызов, это просто еще один признак того, что функция активирована.
ПОВТОРНЫЙ НАБОР: отображение последних 10 набранных номеров или повторный набор последнего набранного номера.
Функция повторного набора использует записи исходящих вызовов, хранящиеся в журнале вызовов.
ИСПОЛЬЗОВАТЬ: Нажмите
ПОВТОРНЫЙ НАБОР Программная клавиша.
На дисплее отображаются последние 10 набранных номеров.
Используйте клавиши со стрелками ВВЕРХ/ВНИЗ, чтобы выделить номер, который вы хотите набрать повторно.
Нажмите функциональную клавишу ВЫЗОВ.
К VIEW ИНФОРМАЦИЯ О ЗВОНКАХ: Отображается продолжительность звонка, количество звонков и время последнего звонка.
Нажмите функциональную клавишу ДЕТАЛИ.
Используйте клавиши со стрелками ВВЕРХ/ВНИЗ для просмотра сведений о вызове.
ПОЛЬЗОВАТЕЛЬСКОЕ ПРОГРАММИРОВАНИЕ
ПЕРЕДАЧА ЗВОНКА: Программирует ваш телефон так, чтобы он звонил на другой внутренний номер.
ДЛЯ ПРОГРАММИРОВАНИЯ: Нажмите кнопку CALL FWD.
Введите EXTENSION Number телефона, на который вы хотите переадресовывать вызовы.
Нажмите программную кнопку СОХРАНИТЬ. Клавиша CALL FWD горит, на дисплее появляется D.
ЧТОБЫ ОТМЕНИТЬ: Нажмите клавишу CALL FWD и услышите тональный сигнал. CALL FWD Индикатор клавиши гаснет, а буква D исчезает.
ПРИМЕЧАНИЕ: Пропущенный вызов вернется на вашу голосовую почту, поскольку изначально он предназначался вам.
ПЕРЕБОР ГРУППЫ: Это позволяет вам перехватить другой звонок, который вы слышите в своей группе. (Вы должны быть запрограммированы в группу системным администратором).
ИСПОЛЬЗОВАТЬ: Услышьте, как звонит другой телефон в вашей предварительно запрограммированной группе.
Нажмите клавишу ПОДЪЕМА. Начинайте говорить, вызов подключен.
НАПРАВЛЕННЫЙ ПОДБОР: Это позволяет вам подобрать «конкретный» добавочный номер, который вы слышите.
ИСПОЛЬЗОВАНИЕ: Услышьте звонок другого телефона, который не входит в вашу предварительно запрограммированную группу.
Нажмите клавишу НАПРАВЛЕННЫЙ ПОДЪЕМ.
Введите номер РАСШИРЕНИЯ, которое вы хотите получить.
ПРИМЕЧАНИЕ: Не все функции могут быть запрограммированы на ключи в зависимости от особых потребностей вашей компании. Такие функции, как переадресация вызова и перехват вызова, также можно активировать, нажав программную кнопку FEATURES.
КОНТАКТЫ: Содержит четыре предварительно запрограммированных каталога и один персональный каталог со 100 номерами, который вы программируете.
ТИПЫ СПРАВОЧНИКОВ:
- ВСЕ: все записи каталога (внешние, личные, пользователи и группы).
- ВНЕШНИЕ: записи, сохраненные системным администратором для использования всеми пользователями.
- ГРУППЫ: Имена и номера групп поиска в телефонной системе.
- ПОЛЬЗОВАТЕЛИ: Имена и номера всех пользователей телефонной системы.
- ЛИЧНЫЕ: Записи, сохраненные вами, для использования с вашего телефона.
ПРОГРАММИРОВАТЬ: Оставьте трубку на месте
Нажмите кнопку КОНТАКТЫ
Нажмите НОВУЮ функциональную клавишу
Введите имя и номер (включая префикс набора номера (обычно 8 или 9), 1 и код города, если требуется)
Нажмите программную кнопку СОХРАНИТЬ. Информация автоматически сохраняется в вашем личном каталоге.
Чтобы выйти без внесения изменений, нажмите программную кнопку ОТМЕНА.
ДЛЯ ИСПОЛЬЗОВАНИЯ: Нажмите кнопку КОНТАКТЫ
Начните писать имя на панели набора номера (вы можете искать по имени или фамилии).
Поднимите трубку или нажмите программную кнопку CALL, кнопку SPEAKER, кнопку HEADSET или кнопку OK, чтобы позвонить.
ПРОГРАММИРОВАТЬ: Оставьте трубку на месте Нажмите клавишу КОНТАКТЫ Нажмите программную клавишу НОВЫЙ
Введите имя и номер (включая префикс набора номера (обычно 8 или 9), 1 и код города, если требуется)
Нажмите программную кнопку СОХРАНИТЬ. Информация автоматически сохраняется в вашем личном каталоге.
Чтобы выйти без внесения изменений, нажмите программную кнопку ОТМЕНА.
ДЛЯ ИСПОЛЬЗОВАНИЯ: Нажмите кнопку КОНТАКТЫ
Начните писать имя на панели набора номера (вы можете искать по имени или фамилии).
Поднимите трубку или нажмите программную кнопку CALL, кнопку SPEAKER, кнопку HEADSET или кнопку OK, чтобы позвонить.
ПРИМЕЧАНИЕ: При поиске имени в контактах нажимайте клавишу только один раз для каждой буквы.
Exampль: при поиске Стивена — нажмите 783836 (не 7 четыре раза, чтобы указать S).
ИСТОРИЯ/ЖУРНАЛ ЗВОНКОВ: Доступ к списку ваших последних вызовов: последние 10 входящих, последние 10 пропущенных и последние 10 исходящих.
ДЛЯ ИСПОЛЬЗОВАНИЯ: Нажмите клавишу CALL LOG. Если у вас есть новые пропущенные вызовы, кнопка ЖУРНАЛ ВЫЗОВОВ будет подсвечена, и ЖУРНАЛ откроется для пропущенных вызовов.
Используйте клавиши со стрелками ВЛЕВО/ВПРАВО, чтобы просмотреть ПРОПУЩЕННЫЕ, ОТВЕЧЕННЫЕ, ИСХОДЯЩИЕ или ВСЕ
НАБОР: Нажмите функциональную клавишу CALL или OK, чтобы позвонить по номеру, отображаемому на дисплее.
ЧТОБЫ СОХРАНИТЬ НОМЕР В КОНТАКТЕ:
Нажмите кнопку ЖУРНАЛ ВЫЗОВОВ.
Используйте клавиши со стрелками ВЛЕВО/ВПРАВО для прокрутки ВСЕ/ПРОПУЩЕННЫЕ/ВХОДЯЩИЕ/ИСХОДЯЩИЕ.
Используйте клавиши со стрелками ВВЕРХ/ВНИЗ для прокрутки записей.
Нажмите программную кнопку ДЕТАЛИ.
Нажмите программную кнопку MORE, затем нажмите программную кнопку +CONTACT.
Используйте клавиши со стрелками ВВЕРХ/ВНИЗ для переключения и редактирования имени и номера, включая префикс набора (обычно 8 или 9), если это необходимо.
Нажмите программную кнопку СОХРАНИТЬ, для отмены без сохранения нажмите программную кнопку ОТМЕНА.
ПРИМЕЧАНИЕ: ИНДИКАЦИЯ ПРОПУЩЕННЫХ ВЫЗОВОВ в верхней левой части дисплея показывает количество пропущенных вызовов. то есть: 4 х.
ОЧИСТИТЬ: Удалите вызовы из журнала пропущенных вызовов, нажав клавишу CALL LOG.
Прокрутите до ПРОПУЩЕННЫЕ ВЫЗОВЫ.
Нажмите программную кнопку БОЛЬШЕ, затем нажмите программную кнопку УДАЛИТЬ ВСЕ.
ГОРЯЧИЙ СТОЛ: Это позволит вам подключиться к вашему внутреннему номеру на другом внутреннем телефонном аппарате.
Перемещает «функции» с вашего телефона на другой внутренний телефон, вы должны войти и выйти.
ДЛЯ ВЫХОДА: На телефоне вы переходите к Нажмите клавишу HOT DESK ИЛИ *36, чтобы выйти из текущего добавочного номера.
ЧТОБЫ ЗАЛОГИНИТЬСЯ: Нажмите функциональную клавишу ВХОД.
Введите EXTENSION Номер телефона, который вы хотите переместить.
ВВЕДИТЕ ПАРОЛЬ Это либо внутренний номер, либо номер, назначенный системным администратором.
Нажмите функциональную клавишу ГОТОВО.
ЗАМЕТКИ: Когда вы входите в систему на другом телефоне, вы выходите из своего телефона.
Когда вы выходите из телефона, на котором вы вошли в систему, оба телефона должны вернуться к своему исходному расширению.
При использовании Hot Desking в другом физическом здании при вызовах службы экстренной помощи будет отображаться адрес «домашнего» местоположения телефона.
ПРИМЕЧАНИЕ: Пункты меню могут немного отличаться и могут быть ограничены статусом системного администратора.
ПОЛЬЗОВАТЕЛЬСКИЕ ОПЦИИ И НАСТРОЙКИ
Настройки звонка
Display Call Timer (Отображение таймера вызова) Настройка отображения времени звонка/вызова для вызовов
Индикатор Visual Alerting Controls — при включении индикатор мигает при появлении новых входящих вызовов.
Звуковой тракт переключается между гарнитурой и динамиком
Параметры экрана и звука
Яркость Настройка яркости дисплея
Контраст Настройка контрастности дисплея
Персонализированный звонок Выбор другой мелодии звонка
Язык Выберите язык, используемый для меню телефона.
Щелчок кнопки Включение или отключение нажатия клавиши меню телефона
Звуки ошибок Включение и выключение сигналов ошибок меню телефона.
КОЛЬЦА И ИНДИКАТОРЫ
ВЫБЕРИТЕ ТИП ЗВОНКА Выберите одну из 8 различных мелодий звонка, чтобы отличить звонок вашего телефона от других.
Оставьте трубку на месте. Нажмите клавишу MENU/HOME. На дисплее отобразятся параметры и настройки.
Нажмите программную клавишу ВЫБОР. На дисплее отобразятся параметры экрана/звука, если нет, прокрутите до них.
Нажмите программную кнопку ВЫБОР
Используйте клавиши со стрелками ВВЕРХ/ВНИЗ, чтобы найти персонализированный звонок.
Нажмите программную кнопку ВЫБОР или ИЗМЕНИТЬ.
Используйте клавиши со стрелками ВВЕРХ/ВНИЗ для прослушивания различных вариантов.
Нажмите программную кнопку СОХРАНИТЬ, чтобы установить желаемый звонок.
Нажмите клавишу EXIT или PHONE, чтобы вернуться на главный экран.
Ваш телефон звонит по-разному для разных типов вызовов
ВНЕШНИЙ Два коротких повторяющихся звонка (новый внешний вызов или переадресованный внешний вызов)
ВНУТРЕННИЙ Одиночное кольцо Повторное
ОБРАТНЫЙ ЗВОНОК Одинарный звонок, за которым следуют два коротких звонка Повторный
ОТРЕГУЛИРОВАТЬ ГРОМКОСТЬ ЗВОНКА Оставьте трубку на месте
Вы можете регулировать громкость, когда телефон звонит или находится в режиме ожидания
Нажмите кнопку PLUS/MINUS VOLUME CONTROL, чтобы отрегулировать громкость.
| СИРАКУЗЫ Дупли Парк Драйв, 1, 5-й этаж Сиракузы, штат Нью-Йорк, 13204 Тел: 315-671-6200 Факс: 315-671-0080 |
ПАТЕНТ ГОЛЛАНДИИ 9560 Main Street Патент Голландии NY 13354 Тел: 315-624-2000 Факс: 315-624-0288 |
Документы / Ресурсы
Причины купить Avaya J139 (700513916) в интернет-магазине TEHPOS
- Гарантия низких цен и быстрая доставка
- Вы можете купить Avaya J139 (700513916) по выгодной цене с доставкой или оформить самовывоз с нашего склада
- Предпродажная подготовка б/у оборудования и гарантия на все товары от 3 до 24 месяцев
- Служба техподдержки для решения любых вопросов
- Нашли дешевле? Сообщите нам любым удобным способом и мы постараемся сделать более выгодное предложение!
Купить Avaya J139 (700513916) совсем несложно — добавьте его в корзину и оформите заказ в интернет-магазине TEHPOS или по телефону . В карточке товара посмотрите фото, отзывы покупателей и подробные характеристики, чтобы не промахнуться с выбором. Если нужны инструкция по применению или настройке для Avaya J139 (700513916), руководство пользователя или программное обеспечение — скачайте их во вкладке «Загрузки».
В Бахчисарай, Джанкой, Евпатория, Керчь, Симферополь, Севастополь, Феодосия, Черноморское, Ялта и другие населенные пункты Республики Крым доставка занимает не более 5 дней! Доставка в Сочи не более 3 дней.
Для тех, кто хочет купить Avaya J139 (700513916) оптом, мы предлагаем выгодные условия — подробности уточняйте у менеджеров по телефону или отправьте запрос через форму обратной связи.
| Основные | |
|
Встроенная телефонная книга |
да |
|
Громкая связь |
да |
|
Дисплей |
цветной LCD 320×240 |
|
Количество линий |
4 |
|
Поддержка SIP |
да |
|
Поддержка Skype |
нет |
|
Подключение гарнитуры |
да |
| Интерфейсы | |
|
Web-интерфейс |
да |
|
Wi-Fi |
нет |
|
Интерфейсы |
Gigabit LAN |
| Технология PoE | |
|
Поддержка PoE |
да |
Доставка
Для корректного расчета стоимости и сроков доставки, пожалуйста, выберите ваш город в верхней части сайта справа.
Способы доставки
Курьерские службы
- СДЭК
- EMS Почта России
- DPD
- Курьер сервис экспресс
- Boxberry
Транспортные компании
- ПЭК
- Деловые линии
- Байкал-Сервис
- КИТ
- Энергия
Варианты оплаты
- Переводы с карты на карту
- Система быстрых платежей
- Оплата картой онлайн
- Оплата на расчетный счет
Остались вопросы?
Дополнительную информацию о доставке и оплате уточняйте по телефону горячей линии 8 (800) 550-90-96 (звонок по России бесплатный).