
В настоящий момент товары недоступны для заказа на samsung.com/ru
В настоящий момент товары недоступны для заказа на samsung.com/ru
Выберите свое местоположение и язык.
Galaxy Watch4 Classic 46 мм
SM-R890
-
Настройка
Как узнать дату изготовления (производства) техники SamsungХотите узнать дату производства вашей техники Samsung? Ответ в этой статье.
-
Samsung Pay: как использовать, обзор, список банков, смартфонов, часовСамая свежая информация о сервисе Samsung Pay для РФ и РБ. Список банков, платежных систем, смартфонов и часов. Инструкции по регистрации и добавлению карт
-
Список банков, которые работают с Samsung Pay в БеларусиСписок банков для Беларуси в этой статье. Информация обновляется.
-
Как начать пользоваться Samsung Pay на носимых устройствахУзнайте подробнее о ‘Как начать пользоваться Samsung Pay на носимых устройствах’ с помощью службы поддержки Samsung. Часто задаваемые вопросы о Samsung Pay.
-
Bluetooth
Сопряжение Galaxy Buds+ с мобильным устройствомУзнайте подробнее о ‘Сопряжение Galaxy Buds+ с мобильным устройством’ с помощью службы поддержки Samsung. Часто задаваемые вопросы о мобильных устройствах Samsung Galaxy
-
Bluetooth
Что делать, если наушники Galaxy Buds+ не подключаются к смартфону Samsung GalaxyЧасто задаваемые вопросы о мобильных устройствах Samsung. Узнайте подробнее о ‘Что делать, если наушники Galaxy Buds+ не подключаются к смартфону Galaxy’ с помощью службы поддержки Samsung.
-
Питание / Зарядка
Samsung Galaxy Buds+ не заряжаютсяУзнайте подробнее о ‘Samsung Galaxy Buds+ не заряжаются’ с помощью службы поддержки Samsung. Часто задаваемые вопросы о мобильных устройствах Samsung Galaxy.
-
Звук / Динамик / Микрофон
Как управлять звонками на Samsung Galaxy Buds +Узнайте подробнее о ‘Как управлять звонками на Samsung Galaxy Buds +’ с помощью службы поддержки Samsung. Часто задаваемые вопросы о мобильных устройствах Samsung.
-
Использование
Какой уровень водонепроницаемости в Galaxy Buds Pro?Часто задаваемые вопросы о бытовой технике Samsung. Узнайте подробнее о ‘Какой уровень водонепроницаемости в Galaxy Buds Pro’ с помощью службы поддержки Samsung.
-
Использование
Как работает умное шумоподавление в наушниках Galaxy Buds Pro и Galaxy Buds2 ProУзнайте подробнее о ‘Как работает умное шумоподавление в наушниках Galaxy Buds Pro и Galaxy Buds2 Pro’ с помощью службы поддержки Samsung. Часто задаваемые вопросы о мобильных устройствах Samsung.
-
Обновление
Как обновить прошивку на носимых устройствах Samsung Galaxy (Watch, Buds, Fit)Часто задаваемые вопросы о технике Мобильные устройства Samsung. Узнайте подробнее о ‘Как обновить прошивку на носимых устройствах Samsung Galaxy (Watch, Buds, Fit)’ с помощью службы поддержки Samsung.
-
Использование
Как синхронизировать левый и правый наушники Samsung Galaxy между собойУзнайте подробнее о ‘Как синхронизировать левый и правый наушники Samsung Galaxy между собой’ с помощью службы поддержки Samsung. Часто задаваемые вопросы о мобильных устройствах Samsung.
-
Звук / Динамик / Микрофон
Что делать, если звук в одном наушнике Galaxy Buds тише, чем во второмУзнайте подробнее ‘Что делать, если звук в одном наушнике Galaxy Buds тише, чем во втором’ с помощью службы поддержки Samsung. Часто задаваемые вопросы о технике Мобильные устройства Samsung.
-
Использование
Как очистить наушники Galaxy BudsУзнайте подробнее о ‘Как прочистить наушники Galaxy Buds’ с помощью службы поддержки Samsung. Часто задаваемые вопросы о технике Мобильные устройства Samsung.
-
Настройка
Что делать, если перестали поступать уведомления на Samsung Galaxy Watch?Узнайте подробнее о ‘Что делать, если перестали поступать уведомления на Samsung Galaxy Watch?’ с помощью службы поддержки Samsung. Часто задаваемые вопросы о технике Samsung Galaxy Watch.
-
Использование
Как подключить и отключить беспроводную метку SmartTagЧасто задаваемые вопросы о технике Мобильные устройства Samsung. Узнайте подробнее о ‘Как подключить и отключить беспроводную метку SmartTag’ с помощью службы поддержки Samsung.
-
Использование
Что делать, если не работает один наушник Samsung Galaxy BudsУзнайте подробнее о ‘Что делать, если не работает один наушник Samsung Galaxy Buds’ с помощью службы поддержки Samsung. Часто задаваемые вопросы о технике Мобильные устройства Samsung.
-
Использование
Как установить соединение Galaxy Watch со смартфономУзнайте подробнее ‘Как установить соединение Galaxy Watch со смартфоном’ с помощью службы поддержки Samsung. Часто задаваемые вопросы о мобильных устройствах Samsung Galaxy
-
Использование
Как подключить Galaxy Buds к другим устройствамУзнайте, как выполнить сопряжение наушников Galaxy Buds с другими устройствами.
-
Использование
Как зарядить наушники Galaxy BudsЧасто задаваемые вопросы о Мобильных Устройствах. Узнайте больше о том, Как зарядить наушники Galaxy Buds, с помощью справочной системы Samsung Support.
-
Использование
Как изменить циферблат на Galaxy WatchЧасто задаваемые вопросы о мобильных устройствах Samsung. Узнайте подробнее о ‘Как изменить циферблат на Galaxy Watch’ с помощью службы поддержки Samsung.
-
Использование
Как пользоваться часами Galaxy WatchЧасто задаваемые вопросы о Мобильных Устройствах. Узнайте больше о том, Как пользоваться часами Galaxy Watch, с помощью справочной системы Samsung Support.
-
Использование
Как обновить программное обеспечение наушников Galaxy Buds, Galaxy Buds2, Galaxy Buds Live и Galaxy Buds ProЧасто задаваемые вопросы о Мобильных Устройствах. Узнайте больше о том, Как обновить программное обеспечение наушников Galaxy Buds, с помощью справочной системы Samsung Support.
-
Samsung Pay
Как совершить оплату с помощью Galaxy Watch?FAQ по использованию на мобильных устройствах. Узнайте подробнее, как совершить оплату с помощью Galaxy Watch, в Samsung Support.
-
Использование
Как найти Galaxy Watch и наушники Galaxy Buds с помощью SmartThings FindЧасто задаваемые вопросы о мобильных устройствах Samsung. Узнайте подробнее о ‘Как найти Galaxy Watch и наушники Galaxy Buds с помощью SmartThings Find’ с помощью службы поддержки Samsung.
-
Использование
Как управлять камерой смартфона Samsung Galaxy с носимых устройствЧасто задаваемые вопросы о мобильных устройствах Samsung. Узнайте подробнее о ‘Как управлять камерой смартфона Samsung Galaxy с носимых устройств’ с помощью службы поддержки Samsung.
-
Обновление
Обновление программного обеспечения на ваших смарт-часах SamsungЧасто задаваемые вопросы о мобильных устройствах Samsung. Из этого раздела вы узнаете, как обновить программное обеспечение на смарт-часах Samsung.
-
Батарея
Уменьшение времени работы смарт-часов Samsung от аккумулятораЧасто задаваемые вопросы о мобильных устройствах Samsung. Из этого раздела вы узнаете о причинах уменьшения времени работы смарт-часов Samsung от аккумулятора.
-
Использование
Управление уведомлениями на смарт-часах SamsungЧасто задаваемые вопросы о мобильных устройствах Samsung. Из этого раздела вы узнаете, как управлять уведомлениями на смарт-часах Samsung.
-
Батарея
Беспроводная зарядка для устройств GalaxyЧасто задаваемые вопросы о мобильных устройствах Samsung. Из этого раздела вы узнаете о беспроводной зарядке устройств Galaxy.
-
Использование
Как носить наушники SamsungЧасто задаваемые вопросы о мобильных устройствах Samsung. Из этого раздела вы узнаете, как носить наушники Samsung.
-
Использование
Что делать, если микрофон наушников Galaxy Buds не работаетЧасто задаваемые вопросы о мобильных устройствах Samsung Mobile. В этом разделе справки и поддержки Samsung вы узнаете, что делать, если на наушниках Galaxy Buds не работает микрофон.
-
Использование
Включение службы LTE на часах Samsung GalaxyЧасто задаваемые вопросы о мобильных устройствах Samsung. Из этого раздела вы узнаете, как включить службу LTE на часах Samsung Galaxy Watch.
-
Использование
Как подключить ваше устройство Galaxy к другим устройствам с помощью приложения Подключенные устройстваFAQ для мобильных устройств. Узнайте подробнее, Как подключить ваше устройство Galaxy к другим устройствам с помощью приложения Подключенные устройства, в Samsung Support.
-
Использование
Низкое или плохое качество звука в наушниках SamsungЧасто задаваемые вопросы о Samsung Mobile. В этом разделе справки и поддержки Samsung вы узнаете о причинах низкого уровня громкости или недостаточного качества звука в наушниках.
-
Использование
Как использовать сенсорную команду наушников Samsung Galaxy BudsУзнайте, как настраивать и использовать сенсорные команды на серии Samsung Galaxy Buds2.
-
Использование
Влагозащита Galaxy WatchFAQ для мобильных устройств. Узнайте подробнее о Влагозащита Galaxy Watch, в Samsung Support.
-
Использование
Как использовать виртуальную SIM-карту (eSIM) на часах Galaxy WatchУзнайте подробнее о ‘Как использовать виртуальную SIM-карту (eSIM) на часах Galaxy Watch’ с помощью службы поддержки Samsung. Часто задаваемые вопросы о мобильных устройствах Samsung.
-
Использование
Измерьте состав своего тела с помощью серии Galaxy WatchВы можете измерить состав своего тела с помощью датчика BIA на Galaxy Watch.
-
Использование
Как измерить ЭКГ с помощью Galaxy WatchИзмерение ЭКГ с помощью Galaxy Watch позволяет следить за состоянием вашего сердца.
-
Использование
Что делать, если Galaxy Watch не подключаются к смартфону SamsungУзнайте подробнее о ‘Что делать, если Galaxy Watch не подключаются к смартфону Samsung’ с помощью службы поддержки Samsung. Часто задаваемые вопросы о мобильных устройствах Samsung.
-
Использование
Что делать, если Bluetooth-гарнитура не подключается к Samsung GalaxyЧасто задаваемые вопросы о мобильных устройствах Samsung. Узнайте подробнее о ‘Что делать, если Bluetooth-гарнитура не подключается к Samsung Galaxy’ с помощью службы поддержки Samsung.
-
Samsung Apps
Используйте приложение Samsung Find, чтобы поделиться своим местоположением с друзьями, ребенком, семьей и другими контактамиУзнайте, как использовать приложение Samsung Find, чтобы делиться своим местоположением с друзьями, семьей и другими контактами.
-
Использование
Что делать, если время на Galaxy Watch отображается неправильноУзнайте подробнее о ‘Что делать, если время на Galaxy Watch отображается неправильно’ с помощью службы поддержки Samsung. Часто задаваемые вопросы о мобильных устройствах Samsung.
-
Батарея
Беспроводная и обратная беспроводная зарядка Galaxy Watch Ultra и Watch7Узнайте, как изменения в дизайне у Galaxy Watch Ultra и Watch7 влияют на возможность беспроводной зарядки устройства.
-
Использование
Как заменить амбушюры на Galaxy Buds3 ProУзнайте подробнее о ‘Как заменить амбушюры на Galaxy Buds3 Pro’ с помощью службы поддержки Samsung. Часто задаваемые вопросы о мобильных устройствах Samsung.
-
Использование
Чем отличаются Galaxy Bugs3/Buds3Pro и другие модели наушников SamsungУзнайте подробнее о ‘Чем отличаются Galaxy Bugs3/Buds3Pro и другие модели наушников Samsung’ с помощью службы поддержки Samsung. Часто задаваемые вопросы о мобильных устройствах Samsung.
-
Использование
Чем Galaxy Watch7 отличаются от предыдущих моделейУзнайте подробнее о ‘Чем Galaxy Watch7 отличаются от предыдущих моделей’ с помощью службы поддержки Samsung. Часто задаваемые вопросы о мобильных устройствах Samsung.
-
Использование
Используйте мониторинг сна Samsung Health на своих Samsung Galaxy Watch и FitУзнайте, как использовать функцию мониторинга сна в приложении Samsung Health и улучшить ночной сон.
-
Звук / Динамик / Микрофон
Что делать, если вы слышите статический шум при использовании наушников Samsung Galaxy BudsУзнайте, что делать, если в наушниках Galaxy Buds слышен статический шум.
-
Использование
Как использовать функцию обнаружения риска апноэ во сне на Samsung Galaxy WatchУзнайте, как включить и использовать функцию апноэ во сне на Galaxy Watch.
-
Использование
Что делать, если сенсорный экран Galaxy Watch не работаетВоспользуйтесь данным руководством, чтобы устранить неисправности сенсорного экрана, восстановить реагирование экрана или сбросить настройки часов Galaxy Watch.
-
Батарея
Как зарядить Samsung Galaxy Watch с зарядным устройством или без негоУзнайте о различных методах зарядки и функциях экономии заряда батареи, доступных на ваших часах Galaxy Watch.
-
Питание / Зарядка
Как использовать функцию беспрозодная обратная зарядка на вашем устройстве GalaxyУзнайте, как использовать функцию беспрозодная обратная зарядка для зарядки телефона Galaxy и других устройств.
-
Звук / Динамик / Микрофон
Galaxy Buds: можно ли использовать только один наушникМожно ли использовать только один наушник Galaxy Buds? Читайте рекомендации от производителя в этой статье.
-
Звук / Динамик / Микрофон
Galaxy Buds: какие улучшения у Galaxy Buds по сравнению с IconX 2018Узнайте подробнее ‘Galaxy Buds: какие улучшения у Galaxy Buds по сравнению с IconX 2018’ с помощью службы поддержки Samsung. Часто задаваемые вопросы о мобильных устройствах Samsung Galaxy
-
Что делать, если забыт PIN-код от Samsung Pay. Как восстановить?Забыли PIN-код от Samsung Pay? Информация от производителя в этой статье
-
Как добавить банковскую карту в Samsung PayУзнайте подробнее о ‘Как добавить банковскую карту в Samsung Pay’ с помощью службы поддержки Samsung. Часто задаваемые вопросы о Samsung Pay.
-
Приложения
Как обновить ПО и приложения на вашем Samsung Galaxy Watch Active2Часто задаваемые вопросы о мобильных устройствах Samsung. Узнайте подробнее о ‘Как обновить ПО и приложения на вашем Samsung Galaxy Watch Active2’ с помощью службы поддержки Samsung.
-
Bluetooth
Как подключить Bluetooth наушники к Galaxy Watch Active 2Узнайте подробнее ‘Как подключить Bluetooth наушники к Galaxy Watch Active 2’ с помощью службы поддержки Samsung. Часто задаваемые вопросы о мобильных устройствах Samsung Galaxy
-
Приложения
Как настроить приложения на вашем Samsung Galaxy Watch Active2Как настроить приложения на вашем Samsung Galaxy Watch Active2
-
Мультимедийный контент
Как слушать музыку на Galaxy BudsУзнайте подробнее о ‘Как слушать музыку на Galaxy Buds’ с помощью службы поддержки Samsung. Часто задаваемые вопросы о технике Мобильные устройства Samsung.
-
Спецификации / Функции
Что делать, если GPS не работает должным образом на Samsung Galaxy Watch Active2Узнайте подробнее ‘Что делать, если GPS не работает должным образом на Samsung Galaxy Watch Active2’ с помощью службы поддержки Samsung. Часто задаваемые вопросы о мобильных устройствах Samsung Galaxy
-
Звук / Динамик / Микрофон
Что делать, если при использовании наушников с Galaxy Watch Active 2 низкое качество звукаУзнайте подробнее ‘Что делать, если при использовании наушников с Galaxy Watch Active 2 низкое качество звука’ с помощью службы поддержки Samsung. Часто задаваемые вопросы о мобильных устройствах Samsung Galaxy
-
Звук / Динамик / Микрофон
Как избежать задержки звука на Galaxy Buds+Узнайте подробнее ‘Как избежать задержки звука на Galaxy Buds+’ с помощью службы поддержки Samsung. Часто задаваемые вопросы о мобильных устройствах Samsung Galaxy
-
Настройка
Функция 360 Audio на Galaxy Buds ProУзнайте подробнее о ‘Функция 360 Audio на Galaxy Buds Pro’ с помощью службы поддержки Samsung. Часто задаваемые вопросы о технике Мобильные устройства Samsung.
-
Использование
Что такое мобильная экосистема Samsung GalaxyЧасто задаваемые вопросы о Мобильных устройствах Samsung. Узнайте подробнее о ‘Что такое мобильная экосистема Samsung Galaxy’ с помощью службы поддержки Samsung.
-
Использование
Советы по использованию Galaxy Buds ProЧасто задаваемые вопросы о технике Мобильные устройства Samsung. Узнайте подробнее о ‘Советы по использованию Galaxy Buds Pro’ с помощью службы поддержки Samsung.
-
Использование
Как пользоваться виджетами для Samsung Galaxy Buds ProЧасто задаваемые вопросы о технике Мобильные устройства Samsung. Узнайте подробнее о ‘Как пользоваться виджетами для Samsung Galaxy Buds Pro’ с помощью службы поддержки Samsung.
-
Звук / Динамик / Микрофон
Что делать, если в наушниках Galaxy Buds Pro разная громкость?Часто задаваемые вопросы о технике Samsung Galaxy Watch. Узнайте подробнее о ‘Что делать, если в наушниках Galaxy Buds Pro разная громкость ?’ с помощью службы поддержки Samsung
-
Звук / Динамик / Микрофон
Советы по правильному ношению Samsung Galaxy Buds2Часто задаваемые вопросы о технике Мобильные устройства Samsung. Узнайте подробнее о ‘Советы по правильному ношению Samsung Galaxy Buds2’ с помощью службы поддержки Samsung.
-
Настройка
Как настроить быстрые ответы на Galaxy WatchЧасто задаваемые вопросы о технике Samsung Galaxy. Узнайте подробнее о ‘Как настроить быстрые ответы на Galaxy Watch?’ с помощью службы поддержки Samsung
-
Использование
Как измерить состав тела с Galaxy Watch4Узнайте подробнее о ‘Как измерить состав тела с Galaxy Watch4’ с помощью службы поддержки Samsung. Часто задаваемые вопросы о технике Мобильные устройства Samsung.
-
Использование
Что представляет собой функция Galaxy Buds «Аудио 360»?FAQ для мобильных устройств. Узнайте подробнее, Что представляет собой функция Galaxy Buds «Аудио 360», в разделе поддержки Samsung.
-
Использование
Как управлять виджетами и карточками на Galaxy WatchЧасто задаваемые вопросы о мобильных устройствах Samsung. Узнайте подробнее о ‘Как управлять виджетами и карточками на Galaxy Watch’ с помощью службы поддержки Samsung.
-
Использование
Как сделать снимок экрана на часах Galaxy Watch?Часто задаваемые вопросы о Мобильных Устройствах. Узнайте больше о том, Как сделать снимок экрана на часах Galaxy Watch, с помощью справочной системы Samsung Support.
-
Использование
Как изменить отображаемое имя наушников Galaxy Buds?Часто задаваемые вопросы о Мобильных Устройствах. Узнайте больше о том, Как изменить отображаемое имя наушников Galaxy Buds, с помощью справочной системы Samsung Support.
-
Использование
Чем отличаются Galaxy Buds2, Buds Live и Buds Pro?FAQ для мобильных устройств. Узнайте подробнее, чем отличаются Galaxy Buds2, Buds Live и Buds Pro, в Samsung Support.
-
Использование
Что делать, если возникла проблема со звуком на Galaxy WatchЧасто задаваемые вопросы о мобильных устройствах Samsung. Узнайте подробнее о ‘Что делать, если возникла проблема со звуком на Galaxy Watch’ с помощью службы поддержки Samsung.
-
Камера
Что делать, если не работает функция управления камерой телефона с часов Galaxy WatchУзнайте подробнее о ‘Что делать, если не работает функция управления камерой телефона с часов Galaxy Watch’ с помощью службы поддержки Samsung. Часто задаваемые вопросы о мобильной технике Samsung.
-
Использование
Техника безопасности при эксплуатации устройства GalaxyFAQ для мобильных устройств. Узнайте подробнее, как обеспечивается Техника безопасности при эксплуатации устройства Galaxy в Samsung Support.
-
Использование
GPS на смарт-часах Samsung работает неправильноЧасто задаваемые вопросы о мобильных устройствах Samsung. Из этого раздела вы узнаете, как решить проблему с неправильной работой GPS на смарт-часах Samsung.
-
Использование
Смарт-часы Samsung не воспроизводят звукиЧасто задаваемые вопросы о мобильных устройствах Samsung. Из этого раздела вы узнаете, что можно сделать, если смарт-часы Samsung не воспроизводят звуки.
-
Использование
Смарт-часы Samsung не вибрируютЧасто задаваемые вопросы о мобильных устройствах Samsung. Из этого раздела вы узнаете, что делать, если смарт-часы Samsung не вибрируют.
-
Обновление
Обновление программного обеспечения для наушников SamsungЧасто задаваемые вопросы о мобильных устройствах Samsung. Из этого раздела вы узнаете о том, как выполнять обновление программного обеспечения для наушников Samsung.
-
Использование
Что делать, если не удается подключить часы Samsung Galaxy Watch к Wi-FiЧасто задаваемые вопросы о Samsung Mobile. В этом разделе справки и поддержки Samsung вы узнаете, что делать, если не удается подключить часы Samsung Galaxy Watch к сети Wi-Fi.
-
Использование
Как пользоваться безелем Galaxy WatchЧасто задаваемые вопросы о Samsung Mobile. В этом разделе справки и поддержки Samsung вы узнаете, как пользоваться кольцом Galaxy Watch.
-
Использование
Как настроить клавишу «Домой» на часах Samsung Galaxy WatchЧасто задаваемые вопросы о Samsung Mobile. В этом разделе справки и поддержки Samsung вы узнаете, как настроить клавишу «Домой» на часах Samsung Galaxy Watch.
-
Использование
Самодиагностика портативных устройств GalaxyЧасто задаваемые вопросы по работе на мобильных устройствах. Узнайте больше о Самодиагностике портативных устройств Galaxy, в Samsung Support.
-
Спецификации / Функции
Советы и методы использования спортивного ремешка D-Buckle для серии Galaxy WatchРаскройте весь потенциал ремешка D-Buckle Sport серии Galaxy Watch с советами и рекомендациями экспертов. Узнайте, как регулировать, обслуживать и настраивать ремешок для часов, чтобы сделать его индивидуальным и стильным. Улучшите свои часы Galaxy Watch с помощью этого универсального аксессуара, который дополнит ваш образ и сделает вашу игру на умных часах еще лучше.
-
Использование
Как настроить порядок упражнений на Galaxy WatchУзнайте подробнее о ‘Как настроить порядок упражнений на Galaxy Watch’ с помощью службы поддержки Samsung. Часто задаваемые вопросы о мобильных устройствах Samsung.
-
Использование
Руководство пользователя приложения «Компас» для Galaxy WatchЗнание того, как использовать компас вашего Galaxy Watch, поможет вам добраться туда, куда вам нужно, когда вы не совсем уверены, куда повернуть.
-
Использование
Как сделать резервную копию данных на Samsung Galaxy WatchЧасто задаваемые вопросы о мобильных устройствах Samsung. Узнайте подробнее о ‘Как сделать резервную копию данных на Samsung Galaxy Watch’ с помощью службы поддержки Samsung.
-
Использование
Как включить режим «Сон» или «Театр» на Galaxy WatchУзнайте подробнее о ‘Как включить режим «Сон» или «Театре» на Galaxy Watch’ с помощью службы поддержки Samsung. Часто задаваемые вопросы о мобильных устройствах Samsung.
-
Использование
Как почистить ваше устройство Samsung GalaxyУчитывая, как грязь и микробы скапливаются на устройствах, которыми мы пользуемся каждый день, разумно научиться чистить устройство Samsung Galaxy.
-
Использование
Как правильно носить и ухаживать за Galaxy Watch/FitСледуя этому руководству по правильному ношению и обслуживанию устройства, убедитесь, что ваше устройство Galaxy Watch/Fit находится в хорошем состоянии.
-
Использование
Как поменять амбушюры у наушников GalaxyУзнайте, как легко заменить насадки для наушников Galaxy, с помощью нашего подробного руководства.
-
Samsung Apps
Используйте приложение Samsung Find, чтобы найти потерянное устройствоУзнайте, как использовать приложение Samsung Find для поиска утерянных устройств и отслеживания Samsung SmartTags.
-
Samsung Apps
Возможности приложения Samsung FindОткройте для себя различные функции приложения Samsung Find.
-
Настройка
Используйте беззвучные режимы на своих Samsung Galaxy WatchУзнайте, как использовать различные беззвучные режимы на часах Galaxy.
-
Samsung Apps
Просмотр количества шагов в Samsung HealthНаучитесь использовать устройства Galaxy для отслеживания количества шагов в приложении Samsung Health.
-
Обновление
Как обновить программное обеспечение и приложения на Samsung Galaxy WatchУзнайте, как обновить программное обеспечение и приложения ваших часов Samsung Galaxy.
-
Использование
Что делать, если приложение Samsung Galaxy Watch выходит из строя, зависает или не отвечаетУзнайте, что делать, если приложение на ваших часах Samsung Watch выходит из строя, зависает или не отвечает.
-
Использование
Как подключить часы Galaxy Watch к устройству Samsung GalaxyУзнайте, как подключить Galaxy Watch к устройству Samsung Galaxy, с помощью этого пошагового руководства.
-
Настройка
Как использовать телефон или часы Samsung Galaxy для управления уведомлениями на носимом устройствеУзнайте, как использовать телефон Galaxy и Galaxy Watch для включения и отключения уведомлений на носимом устройстве.
-
Питание / Зарядка
Что делать, если наушники Samsung Galaxy не включаются и не заряжаютсяУзнайте, что делать, если наушники Samsung Galaxy не включаются и не заряжаются.
-
Использование
Как установить или обновить приложение на устройстве с операционной системой Wear OSУзнай подробнее Как установить или обновить приложение на устройстве с операционной системой Wear OS с помощью службы поддержки Samsung. Часто задаваемые вопросы о мобильных устройствах Samsung Galaxy.
-
Обновление
Что делать, если на экране Galaxy Fit появляется восклицательный знак?Что делать, если на экране Galaxy Fit появляется восклицательный знак?
-
{{file.description}}
- Версия {{file.fileVersion}}
- {{file.fileSize}} MB
- {{file.fileModifiedDate}}
- {{file.osNames}}
Полезные ссылки
Другие программные инструменты и сервисы
Kies
Программа для создания резервных копий. Подойдет для всех смартфонов и планшетов Galaxy на Android от 2.3 до 4.3 и смартфонов Wave (Bada)
Читать дальше
Smart View
Приложение для просмотра мультимедийного контента с мобильного устройства или компьютера на телевизоре Samsung Smart TV
Читать дальше
Smart Switch
Программа для обновления прошивки и создания резервных копий. Подойдет для всех смартфонов и планшетов Galaxy на Android 4.3 и новее
Читать дальше
ДОПОЛНИТЕЛЬНАЯ ИНФОРМАЦИЯ
Информация о гарантии
Узнайте, что входит в гарантийные обязательства
Индивидуальная поддержка
Получите помощь от официальных центров поддержки
Новости и уведомления
Обьявления о важных продуктах и услугах
www.samsung.com
USER MANUAL
English. 08/2021. Rev.1.1
SM-R860
SM-R870
SM-R880
SM-R890
SM-R865F
SM-R875F
SM-R885F
SM-R895F

2
Table of Contents
Getting Started
5 About the Galaxy Watch4 Classic /
Galaxy Watch4
5 Read me first
11 Device layout
11 Package contents
12 Watch
15 Wireless charger
16 Charging the battery
16 Wireless charging
17 Charging the battery using Wireless
power sharing
19 Battery charging tips and
precautions
20 Wearing the Watch
20 Putting on the Watch
20 Band tips and precautions
21 Connecting the band
22 How to wear the Watch for accurate
measurements
24 Turning the Watch on and off
25 Connecting the Watch to a
smartphone
25 Installing the Galaxy Wearable app
25 Connecting the Watch to a
smartphone via Bluetooth
27 Remote connection
27 Controlling the screen
27 Bezel
28 Touchscreen
29 Screen composition
30 Turning the screen on and off
30 Switching the screen
31 Lock screen
32 Watch
32 Watch screen
32 Changing the watch face
33 Activating the Always On Display
feature
33 Activating watch only mode
34 Notifications
34 Notification panel
34 Viewing incoming notifications
35 Selecting apps for receiving
notifications
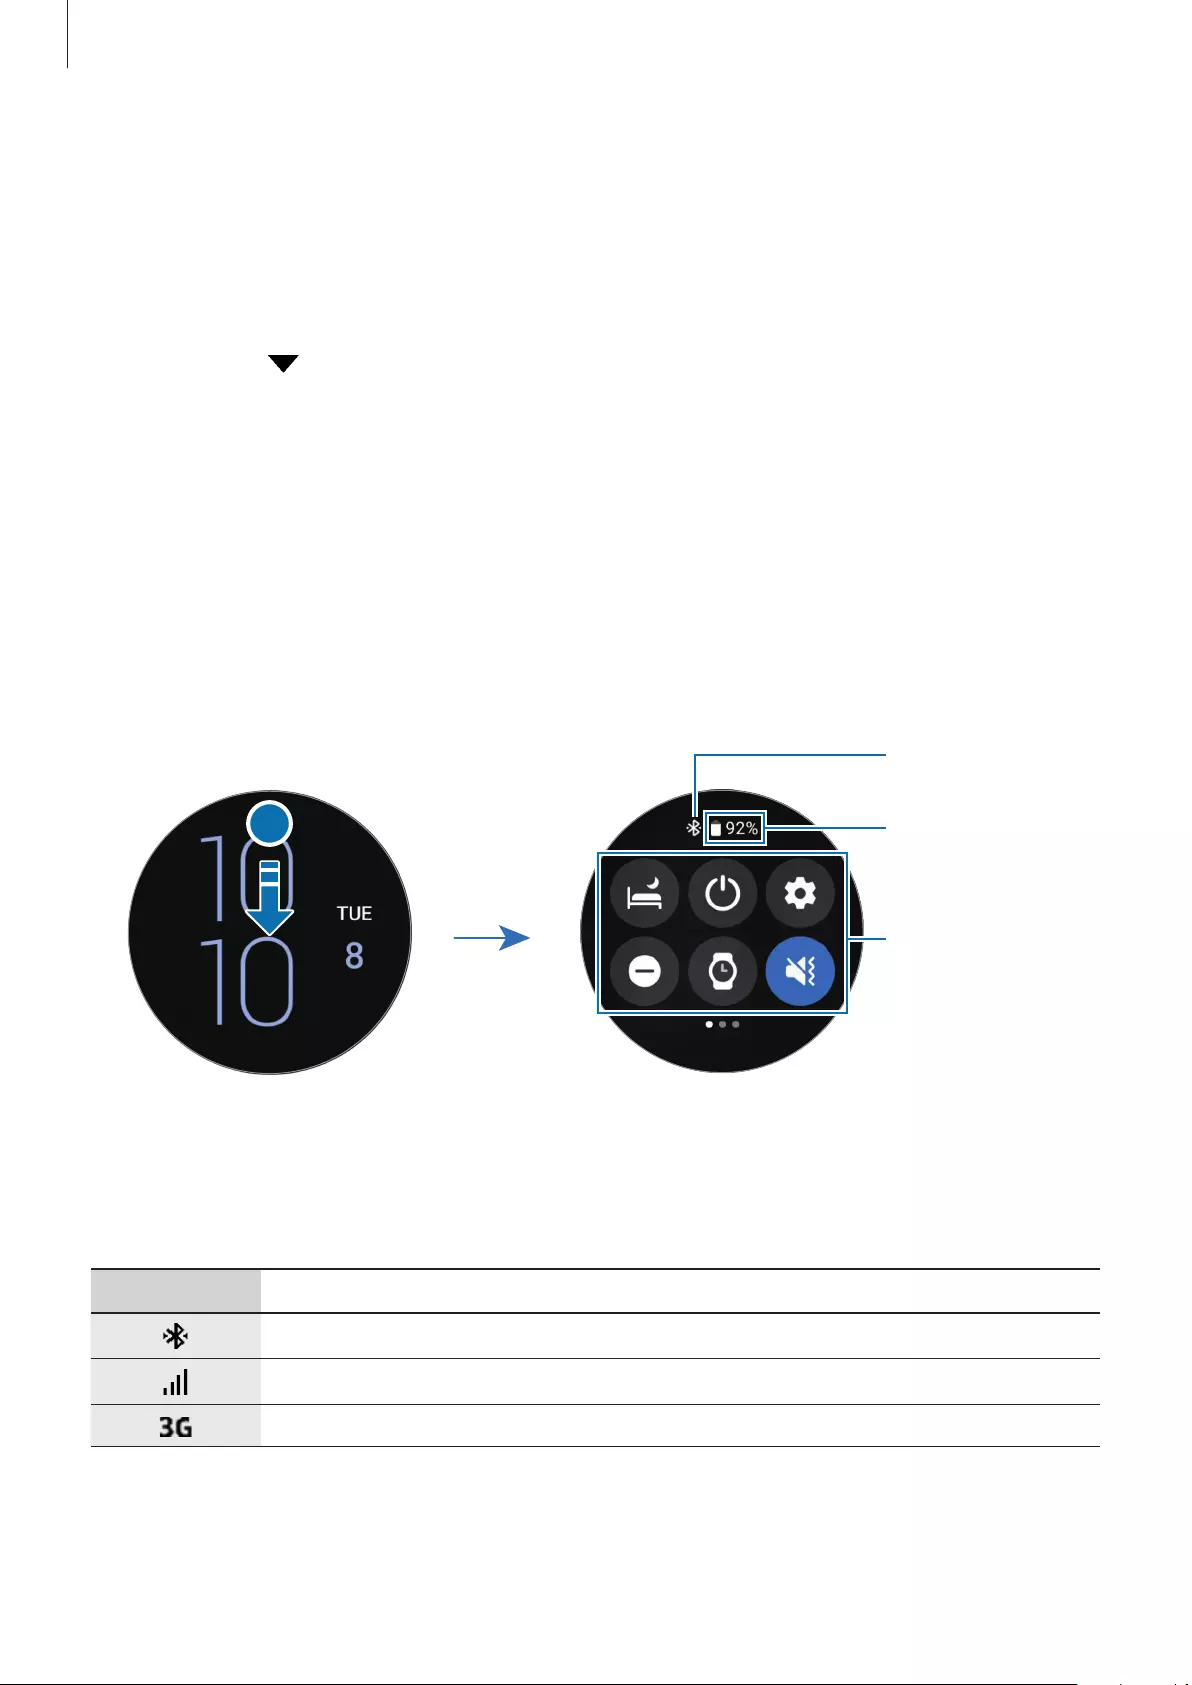
35 Quick panel
37 Entering text
37 Introduction
38 Entering text by voice
38 Entering with handwriting
39 Entering with the keyboard
39 Setting the input language

Table of Contents
3
79 Reminder
79 Calendar
80 Bixby
81 Weather
81 Alarm
82 World clock
82 Timer
83 Stopwatch
83 Gallery
83 Importing and exporting images
84 Viewing images
84 Deleting images
85 Find My Phone
85 Find My Watch
86 Sending an SOS
86 Introduction
86 Registering the emergency contacts
87 Requesting an SOS
87 Requesting an SOS when you are
hurt from a fall
88 Stopping SOS messages
89 Voice Recorder
90 Calculator
90 Compass
90 Buds Controller
91 Camera Controller
91 Samsung Global Goals
Apps and features
40 Installing and managing apps
41 Messages
43 Phone
45 Contacts
46 Samsung Pay
47 Samsung Health
47 Introduction
47 Daily activity
49 Steps
50 Exercise
55 Sleep
57 Heart rate
59 Stress
60 Blood oxygen
63 Body composition
66 Food
67 Water
67 Together
68 Women’s health
68 Settings
69 Samsung Health Monitor
69 Introduction
69 Precautions for measuring blood
pressure and ECG
72 Starting to measure the blood
pressure
74 Starting to measuring the ECG
76 GPS
77 Music
78 Media Controller
78 Introduction
78 Controlling the music player
78 Controlling the video player

Table of Contents
4
107 Battery
108 Manage content
108 Mobile plans (LTE models)
109 General
109 Accessibility
109 Account and backup
110 Watch software update
110 About watch
110 Find My Watch
111 Tips and user manual
111 Store
Appendix
112 Troubleshooting
116 Removing the battery
92 Settings
92 Introduction
92 Connections
95 Notifications
95 Sounds and vibration
96 Display
97 Samsung Health
97 Advanced features
98 Battery
98 Apps
98 General
100 Accessibility
100 Security
100 Privacy
101 Location
101 Account and backup
101 Software update
101 Tips and tutorials
102 About watch
Galaxy Wearable app
103 Introduction
104 Watch faces
105 Apps
105 Tiles
106 Quick panel
106 Watch settings
106 Introduction
106 Notifications
107 Sound and vibration
107 Display
107 Advanced features

5
Getting Started
About the Galaxy Watch4 Classic /
Galaxy Watch4
The Galaxy Watch4 Classic / Galaxy Watch4 (hereafter, Watch) is a smartwatch that can analyse
your exercise pattern, manage your health and allows you to use a variety of convenient apps
for making phone calls and playing music. You can easily browse the various features by using
the bezel or launch a feature by simply tapping the screen and also change the watch face to
match your taste.
You can use your Watch after connecting it to your smartphone.
Read me first
Please read this manual before using this device to ensure safe and proper use.
•
Descriptions are based on the device’s default settings.
•
Some content may differ from your device depending on the region, service provider,
model specifications, or device’s software.
•
The device may require a connection to a Wi-Fi or mobile network when using some apps
or features.
•
Content (high quality content) that requires high CPU and RAM usage will affect the
overall performance of the device. Apps related to the content may not work properly
depending on the device’s specifications and the environment that it is used in.
•
Samsung is not liable for performance issues caused by apps supplied by providers other
than Samsung.
•
Samsung is not liable for performance issues or incompatibilities caused by edited
registry settings or modified operating system software. Attempting to customise the
operating system may cause the device or apps to work improperly.

Getting Started
6
•
Software, sound sources, wallpapers, images, and other media provided with this device
are licensed for limited use. Extracting and using these materials for commercial or other
purposes is an infringement of copyright laws. Users are entirely responsible for illegal
use of media.
•
You may incur additional charges for data services, such as messaging, uploading and
downloading, auto-syncing, or using location services depending on your data plan. For
large data transfers, it is recommended to use the Wi-Fi feature.
•
Default apps that come with the device are subject to updates and may no longer be
supported without prior notice. If you have questions about an app provided with
the device, contact a Samsung Service Centre. For user-installed apps, contact service
providers.
•
This device’s operating system is different from the previous Galaxy Watch series, and you
cannot use previously purchased content due to the compatibility issues.
•
The model specifications and supported services may differ depending on the region.
•
Modifying the device’s operating system or installing software from unofficial sources
may result in device malfunctions and data corruption or loss. These actions are violations
of your Samsung licence agreement and will void your warranty.
•
Some functions may not work as described in this manual depending on the maker and
model of the smartphone you connect to your Watch.
•
Depending on the region or service provider, a screen protector is attached for protection
during production and distribution. Damage to the attached screen protector is not
covered by the warranty.
•
You can see the touchscreen clearly even in strong outdoor sunlight by automatically
adjusting the contrast range based on the surrounding environment. Due to the nature
of the product, displaying fixed graphics for extended periods may result in afterimages
(screen burn-in) or ghosting.
–
It is recommended not to use fixed graphics on part or all of the touchscreen for
extended periods and turn off the touchscreen when not using the device.
–
You can set the touchscreen to turn off automatically when you are not using it. On
the Watch’s Apps screen, tap (
Settings
)
→
Display
→
Screen timeout
and select
the length of time you want the device to wait before turning off the touchscreen.
–
To set the touchscreen to automatically adjust its brightness based on the
surrounding environment, on the Watch’s Apps screen, tap (
Settings
)
→
Display
and tap the
Auto brightness
switch to activate it.
Getting Started
7
•
Depending on the region or model, some devices are required to receive approval from
the Federal Communications Commission (FCC).
If your device is approved by the FCC, you can view the FCC ID of the Watch. To view the
FCC ID, on the Watch’s Apps screen, tap (
Settings
)
→
About watch
→
Device
. If your
device does not have an FCC ID, it means that the device has not been authorised for sale
in the U.S. or its territories and may only be brought to the U.S. for the owner’s personal
use.
•
The use of mobile devices on aeroplanes or ships may be subject to federal and local
guidelines and restrictions. Check with the appropriate authorities and always follow
crew instructions regarding when and how you may use your device.
•
Depending on the region, you can view the regulatory information on the device. To
view the information, on the Watch’s Apps screen, tap (
Settings
)
→
About watch
→
Regulatory info
.
•
Your device contains magnets. Keep a safe distance between your device and objects
that may be affected by magnets such as credit cards and implantable medical devices. If
you have an implantable medical device, consult your physician before use.
Maintaining water and dust resistance
Your device supports water- and dust-resistance. Follow these tips carefully to maintain the
water— and dust-resistance of your device. Failure to do so may result in damage to your
device.
•
Do not expose the device to water moving with force. Do not suddenly apply water
pressure to the device, such as when diving.
•
Do not use your device while diving into the water, playing water sports, or moving in
fast-flowing water. It is designed for regular use in normal swimming conditions, such as
for swimming pools or beaches.
•
If the device or your hands are wet, dry them thoroughly before handling the device.
•
If the device is exposed to fresh water, dry it thoroughly with a clean, soft cloth. If the
device is exposed to other liquids, such as salt water, swimming pool water, soapy water,
oil, perfume, sunscreen, hand cleaner, or chemical products such as cosmetics, rinse it
with fresh water and dry it thoroughly with a clean, soft cloth. If you do not follow these
instructions, the device’s performance and appearance may be affected.

Getting Started
8
•
Do not disassemble your device. The water- and dust-resistant features of the device can
be damaged.
•
Do not expose your device to a dramatic change in air temperature or water temperature.
•
Do not dry your device with a heating machine like a hair drier.
•
The water-resistant feature of the device can be damaged in the sauna.
•
If the device has been immersed in water or the microphone or speaker is wet, sound
may not be heard clearly during a call. After wiping the device with a dry cloth, dry it
thoroughly before using it.
•
The touchscreen and other features may not work properly if the device is used in water.
•
Your device has been tested in a controlled environment and certified to be water-
and dust-resistant in specific situations and conditions. (Meets the requirements of
the water-resistance in a 50 m deep water as described by the international standard
ISO 22810:2010 and your device can be used in shallow water. Meets the requirements
of the dust-resistance as described by classification IEC 60529 IP6X.)
Precautions for overheating
If you feel discomfort due to overheating while using the device, stop using it immediately
and remove it from your wrist.
To avoid problems, such as device malfunction, skin discomfort or damage, and battery
draining, a warning will appear on the device if it reaches a specific temperature. When the
initial warning appears, device functions will be disabled until the device cools down to a
specific temperature. However, the emergency call feature will be available on the LTE model.
If the device temperature continues to increase, a second warning will appear. At this time,
the device will shut down. Do not use the device until it cools down to a specific temperature.
However, when using the LTE model, the emergency call feature that has been previously
connected will remain active until you are finished, even though the second warning will
appear.

Getting Started
9
Cleaning and managing the Watch
Follow the points below to ensure your Watch functions correctly and maintains its
appearance. Failure to do so may damage the Watch and cause the skin irritation.
•
Turn off the Watch and remove the band before cleaning it.
•
Prevent the device from being exposed to dust, sweat, ink, oil, and chemical products
such as cosmetics, antibacterial spray, hand cleaner, detergent, and insecticides.
The Watch’s exterior and interior parts may be damaged or it could result in poor
performance. If your Watch is exposed to any of the previously mentioned substances,
use a lint-free, soft cloth to clean it.
•
Do not use soap, cleaning agents, abrasive materials and compressed air when cleaning
your Watch and do not clean it with the ultrasonic waves or the external heat sources.
Doing so may damage the Watch. Skin irritation may be caused by soap, detergents,
hand sanitizers, or cleaning agents left on the Watch.
•
When you remove sun block, lotion, or oil, use a soap-free detergent, then rinse and dry
your Watch thoroughly.
•
The hybrid band is not water-resistant. Do not swim or take a shower while using the
hybrid band.
•
The hybrid band may make squeaking sound where it connects with the Watch due to
the characteristics of the leather material. This is normal and you can address this issue by
applying leather care products to the band at the connection point.
•
Avoid exposing the Watch’s hybrid band to direct sunlight, hot or humid environments,
or water. The leather material’s colour and form may change if you do so. If it gets wet,
wipe it with a soft, lint-free cloth immediately and dry it in a well-ventilated and shaded
place.
•
When your hybrid band get stained, wipe it with a soft, lint-free cloth. If necessary, slightly
dampen a cloth with fresh water.
The supplied band may vary depending on the region or model. Be sure to properly
clean and maintain your band accordingly.
Getting Started
10
Use caution if you are allergic to any materials on the Watch
•
Samsung has tested the noxious materials found on the Watch through the internal and
external certificate authorities, including the test for all materials which contact with skin,
skin toxicity test, and the Watch-wearing test.
•
The Watch includes nickel. Take the necessary precautions if your skin is hypersensitive or
you have an allergy to any materials found on the Watch.
–
Nickel: The Watch contains a small amount of nickel, which is below its reference point
limited by the Europe REACH regulation. You will not be exposed to the nickel inside
the Watch and the Watch has passed the international certificated test. However, if you
are sensitive to nickel, be careful to use the Watch.
•
Only the materials observed the standards of the U.S Consumer Product Safety
Commission (CPSC), the regulations of the European countries, and other international
standards are used to make a Watch.
•
For more information about how Samsung manages chemicals, refer to the Samsung
website (https://www.samsung.com/uk/aboutsamsung/sustainability/environment/,
https://www.samsung.com/au/support/newsalert/119791/).
Instructional icons
Warning: situations that could cause injury to yourself or others
Caution: situations that could cause damage to your device or other equipment
Notice: notes, usage tips, or additional information

Getting Started
11
Device layout
Package contents
Refer to the quick start guide for package contents.
•
The items supplied with the Watch and any available accessories may vary
depending on the region or service provider.
•
The supplied items are designed only for this Watch and may not be compatible with
other devices.
•
Appearances and specifications are subject to change without prior notice.
•
You can purchase additional accessories from your local Samsung retailer. Make sure
they are compatible with the Watch before purchase.
•
Except for the Watch, some supplied items and accessories may not have the same
water— and dust-resistance certification.
•
Use only Samsung-approved accessories. Using unapproved accessories may cause
the performance problems and malfunctions that are not covered by the warranty.
•
Availability of all accessories is subject to change depending entirely on
manufacturing companies. For more information about available accessories, refer to
the Samsung website.
Getting Started
12
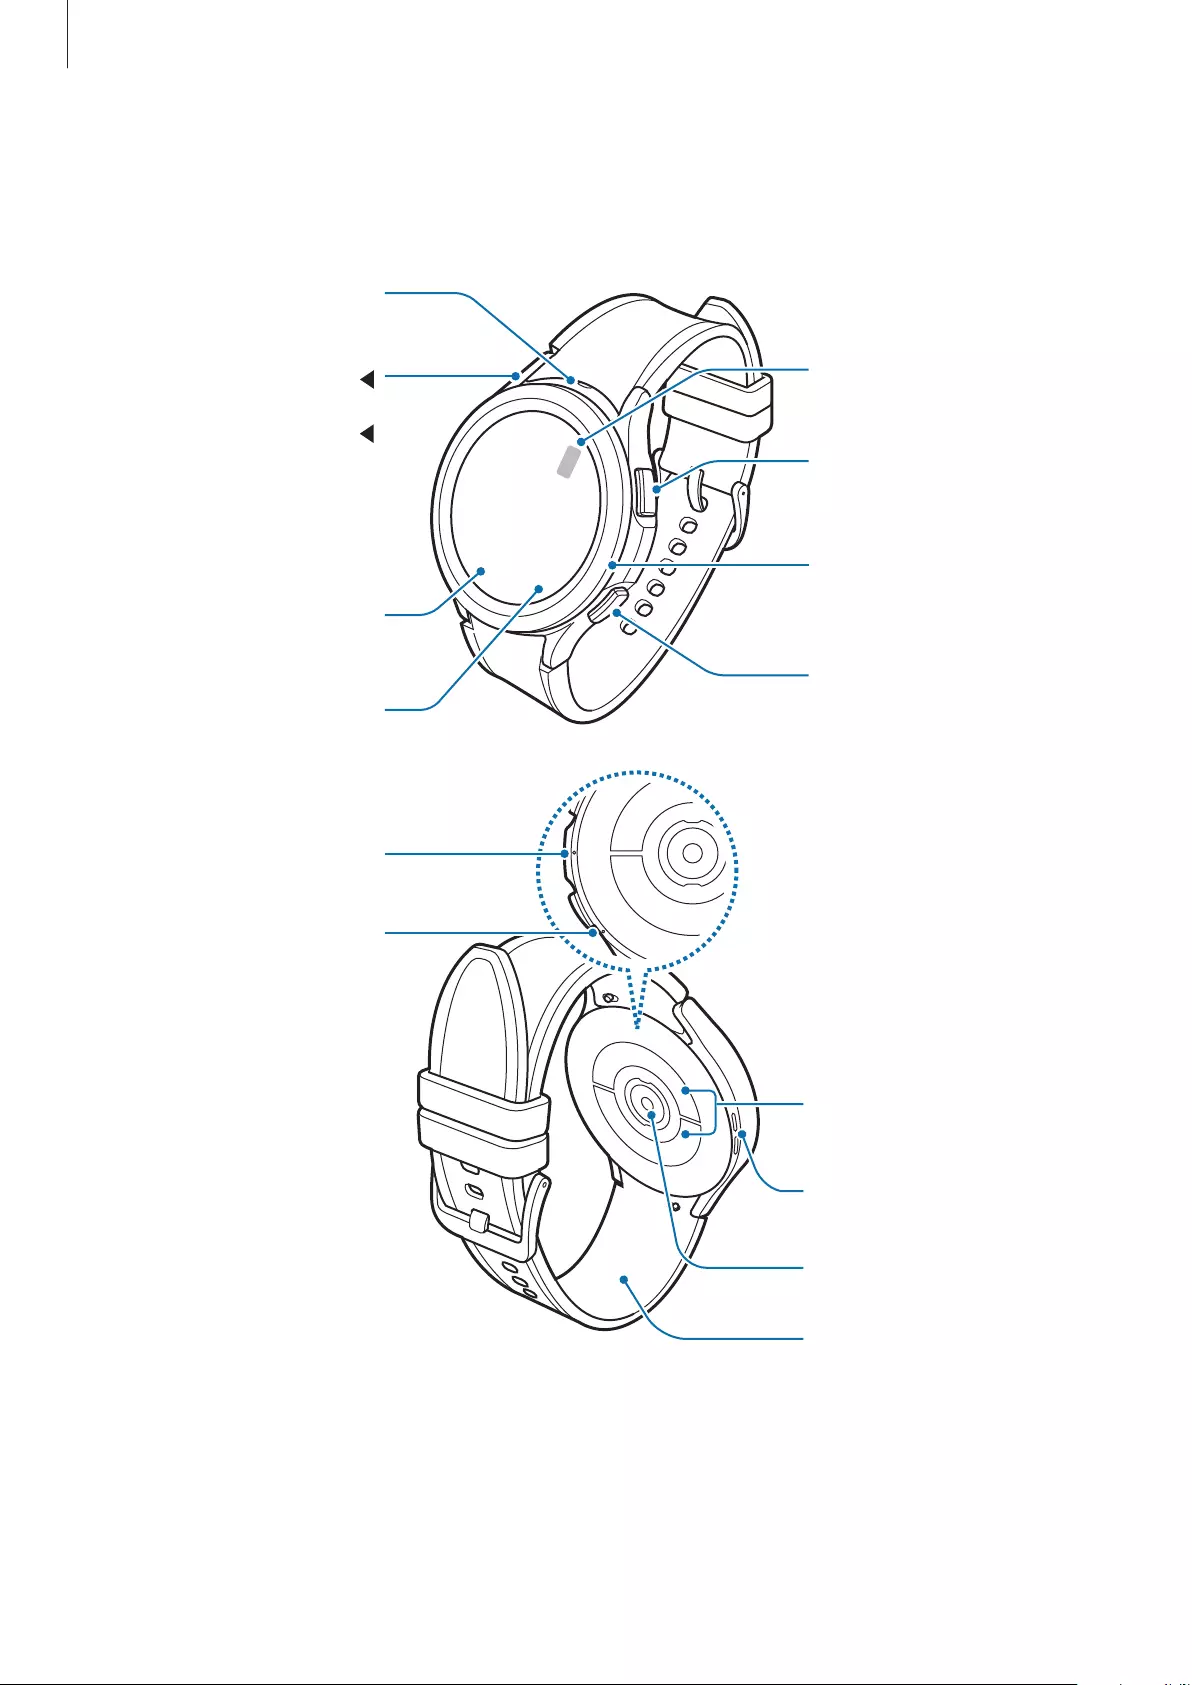
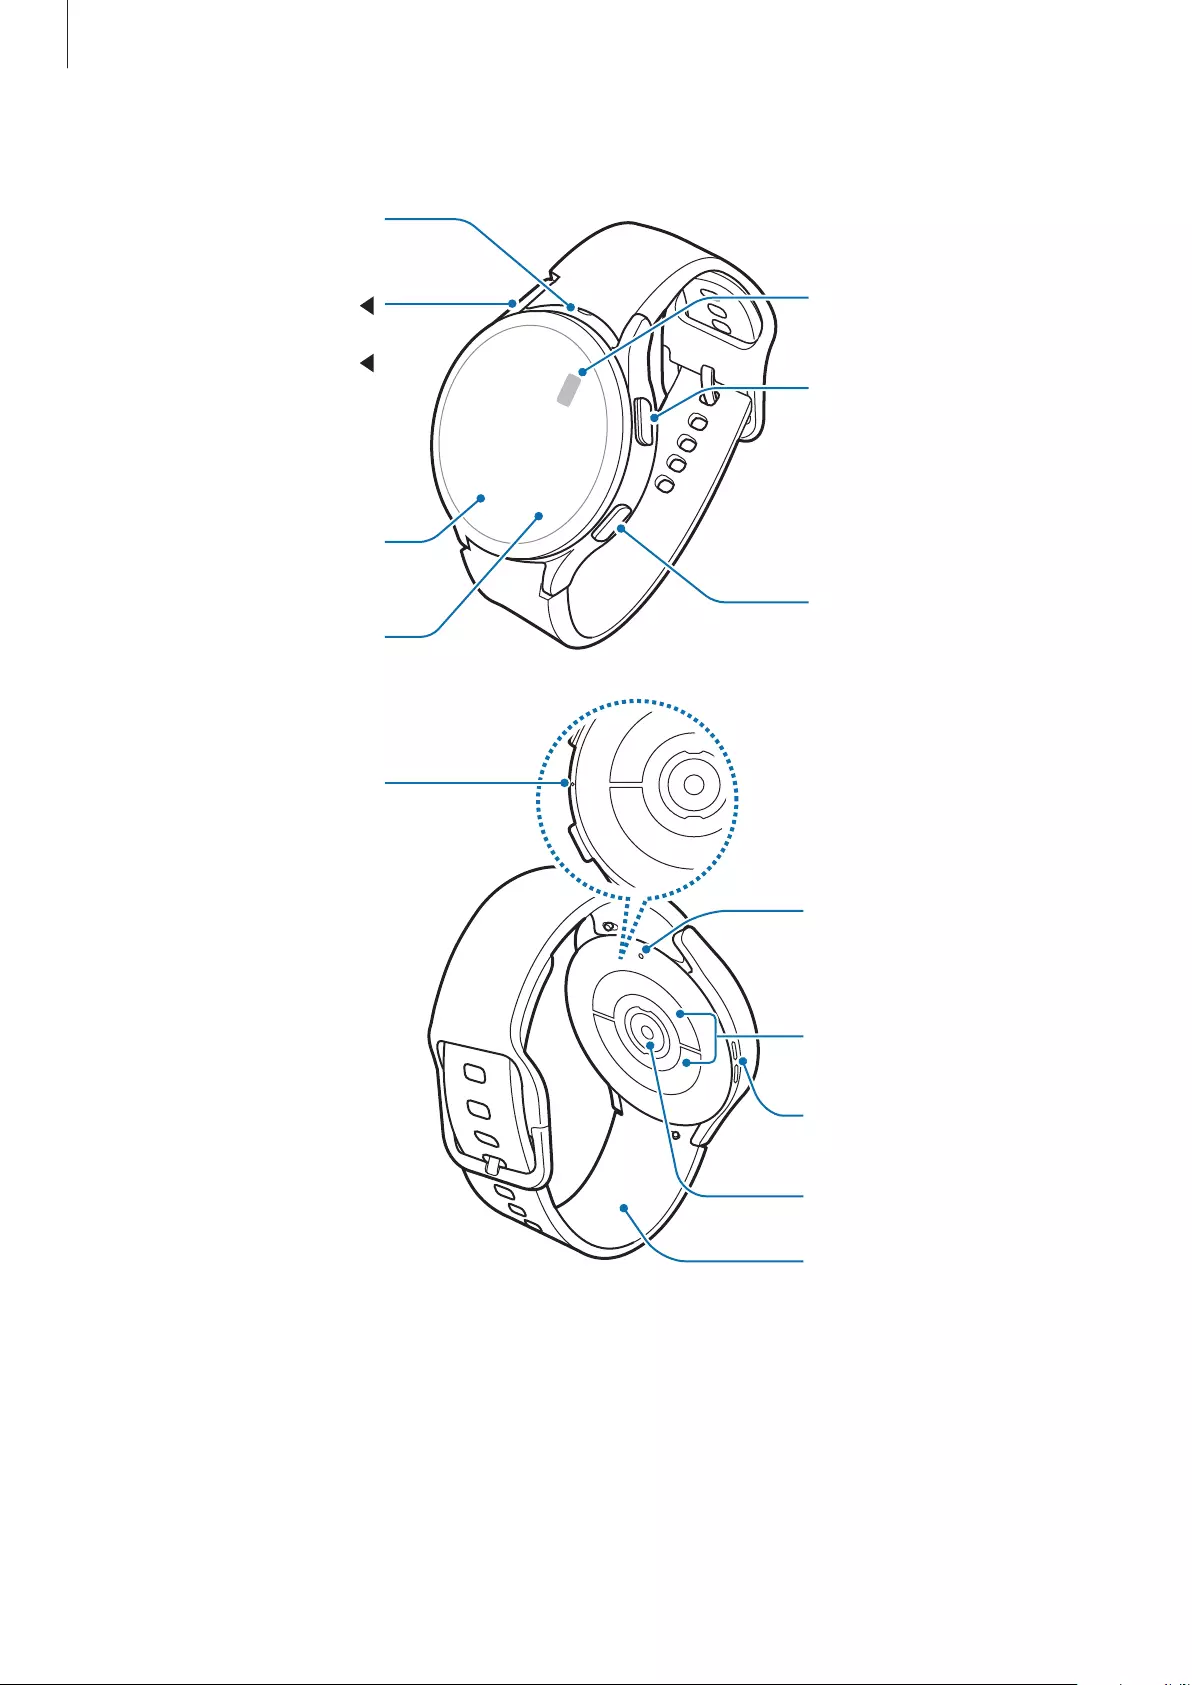
Watch
►
Galaxy Watch4 Classic:
Home key (Power key) /
Electrical biosensor
Back key /
Electrical biosensor
Bezel
Touchscreen
SM-R880, SM-R890:
GPS antenna
SM-R885F, SM-R895F:
LTE/GPS antenna
sensor
NFC antenna
Light sensor
Optical heart rate sensor
Speaker
Band
Pressure vent
Microphone
Electrical biosensors
Getting Started
13
►
Galaxy Watch4:
Home key (Power key) /
Electrical biosensor
Back key /
Electrical biosensor
Touchscreen
SM-R860, SM-R870:
GPS antenna
SM-R865F, SM-R875F:
LTE/GPS antenna
sensor
Light sensor
NFC antenna
Optical heart rate sensor
Speaker
Pressure vent
Microphone
Electrical biosensors
Getting Started
14
The device and some accessories (sold separately) contain magnets. The American
Heart Association (US) and the Medicines and Healthcare Products Regulatory Agency
(UK) both warn that magnets can affect the operation of implanted pacemakers,
cardioverters, defibrillators, insulin pumps or other electro medical devices (collectively,
“Medical Device”) within the range of 15 cm (6 inches). If you are a user of any of
these Medical Devices, DO NOT USE THIS DEVICE AND SOME ACCESSORIES (SOLD
SEPARATELY) UNLESS YOU HAVE CONSULTED WITH YOUR PHYSICIAN.
•
Do not store your device and some accessories (sold separately) near magnetic fields.
Magnetic stripe cards, including credit cards, phone cards, passbooks, and boarding
passes, may be damaged by magnetic fields.
•
When using the speakers, such as when playing media files, do not place the Watch
close to your ears.
•
Ensure that the band is kept clean. Contact with contaminants, such as dust and dye,
can cause stains on the band that may not be fully removed.
•
Do not insert sharp objects into the atmospheric pressure sensor, the pressure vent,
speaker, or the microphone. Inner components of the Watch may be damaged along
with the water-resistance feature.
•
If you use the Watch with its acrylic body broken, there may be a risk of injury. Use
the Watch only after it has been repaired at a Samsung Service Centre.
•
Connectivity problems and battery drain may occur in the following situations:
–
If you attach metallic stickers on the antenna area of the Watch
–
If you cover the Watch’s antenna area with your hands or other objects while
using certain features, such as calls or the mobile data connection (LTE models)
•
Do not cover the light sensor area with screen accessories, such as a screen protector
or stickers. Doing so may cause the sensor to malfunction.
•
Make sure the Watch’s microphone is not obstructed when you are speaking into it.
•
The pressure vent ensures that Watch’s inner parts and sensors work correctly when
you use the Watch in environment where the atmospheric pressure changes.
•
The leather on the hybrid band is made of natural leather with minimised processing.
The band’s irregular patterns, leather grains, pores, scars, as well as the natural colour
change, including metachromatic stains, which may occur during use, are a natural
phenomenon of the leather and not product defects.
•
The images in this manual are of a Galaxy Watch4 Classic.

Getting Started
15
Keys
Key Function
Home key
•
When the Watch is off, press and hold to turn it on.
•
When the screen is off, press to turn on the screen.
•
Press and hold to start a conversation with Bixby. Refer to
Using Bixby for more information.
•
Press twice or press and hold to launch the app or feature you
set. ( (
Settings
)
→
Advanced features
→
Customise keys
)
•
Press to open the Watch screen when you are on any other
screen.
Back key
•
When the screen is off, press to turn on the screen.
•
Press to launch the feature you set. ( (
Settings
)
→
Advanced features
→
Customise keys
)
Home key + Back key
•
Press simultaneously to capture a screenshot.
•
Press and hold simultaneously to turn off the Watch.
Wireless charger
Wireless charging
surface
Do not expose the wireless charger to water because the wireless charger does not
have same water- resistance certification as your Watch.
Getting Started
16
Charging the battery
Charge the battery before using it for the first time or when it has been unused for extended
periods.
Use only Samsung-approved charger and cable specifically designed for your Watch.
Incompatible charger and cable can cause serious injuries or damage to your device.
•
Use only wireless charger supplied with the device. The Watch cannot be charged
properly with a third-party wireless charger.
•
Connecting the charger improperly may cause serious damage to the device. Any
damage caused by misuse is not covered by the warranty.
•
To save energy, unplug the charger when not in use. The charger does not have a
power switch, so you must unplug the charger from the electric socket when not in
use to avoid wasting power. The charger should remain close to the electric socket
and easily accessible while charging.
•
The Watch has a built-in wireless charging coil. You can charge the battery by using
a wireless charging pad. The wireless charging pad is sold separately. For more
information about available wireless charging pads, refer to the Samsung website.
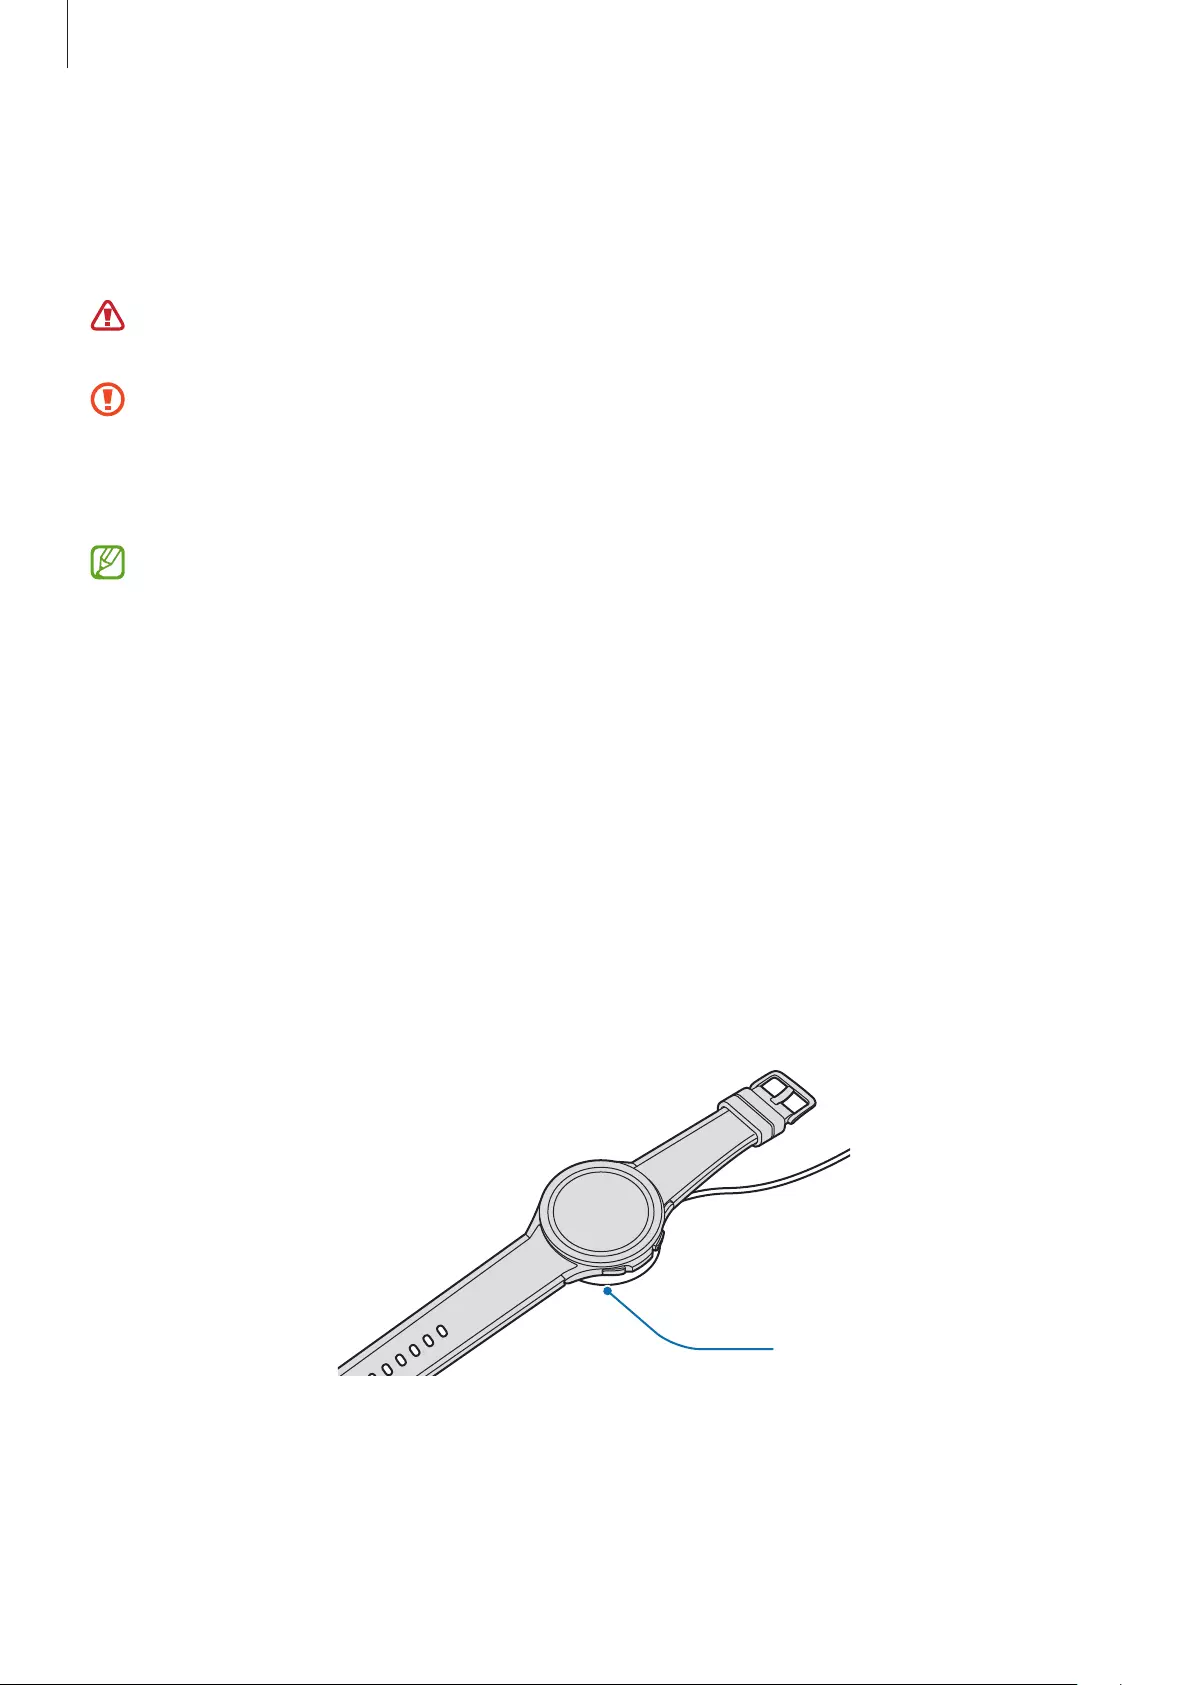
Wireless charging
1 Connect the wireless charger to the USB power adaptor.
2 Place the Watch on the wireless charger aligning the centre of your Watch’s back side with
the centre of the wireless charger.
Wireless charger
3 After fully charging, disconnect the Watch from the wireless charger.
Getting Started
17
Checking the charging status
You can check the charging status on the screen during wireless charging. If the charging
status does not appear on the screen, on the Apps screen, tap (
Settings
)
→
Display
and
tap the
Show charging info
switch to activate it.
If you charge the Watch when it is turned off, press any key to check the charging status on
the screen.
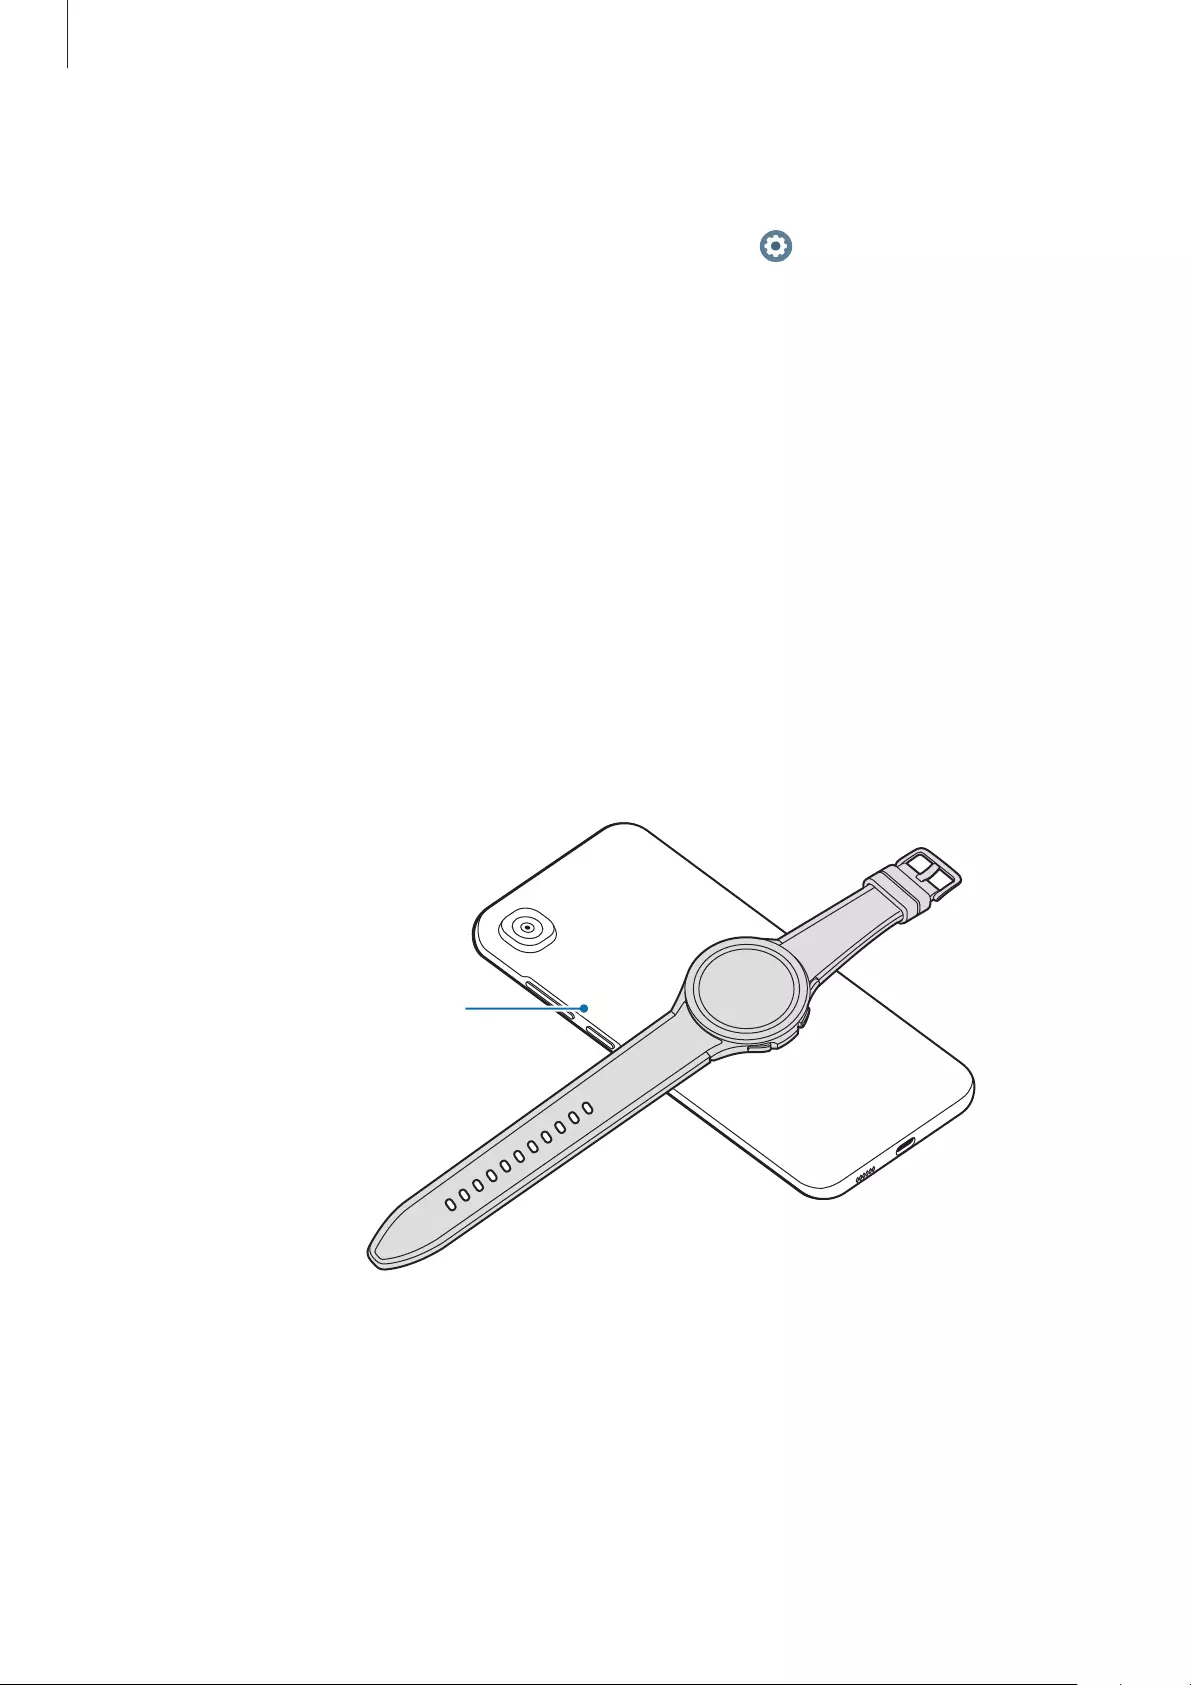
Charging the battery using Wireless power sharing
You can charge your Watch with the battery of the device that functions as a wireless
charging pad. You can still charge your Watch even while charging the device that functions
as a wireless charging pad. Depending on the type of cover being used, the Wireless power
sharing feature may not work properly. It is recommended to remove any cover being used
from the device that functions as a wireless charging pad before using this feature.
1 Turn on the Wireless power sharing feature on the device that functions as a wireless
charging pad and place the centre of the Watch’s back on the device that functions as a
wireless charging pad.
The device that functions
as a wireless charging pad

Getting Started
18
2 After fully charging, disconnect the Watch from the device that functions as a wireless
charging pad.
Do not use the earphones or Bluetooth headset while sharing power. Doing so may
affect nearby devices.
•
The location of the wireless charging coil may vary by device model. Adjust the
device or Watch to connect with each other properly.
•
Some features that work while wearing the Watch are not available while sharing
power.
•
To charge properly, do not move or use the device that functions as a wireless
charging pad or Watch while charging.
•
The power charged to your Watch may be less than the amount shared to it by the
device that functions as a wireless charging pad.
•
If you charge the Watch while charging the device that functions as a wireless
charging pad, the charging speed may decrease or the Watch may not charge
properly, depending on the charger type.
•
The charging speed or efficiency may vary depending on the condition of the device
that functions as a wireless charging pad or the surrounding environment.
•
If the remaining battery power of the device that functions as a wireless charging
pad drops below a certain level, power sharing will stop.

Getting Started
19
Battery charging tips and precautions
•
If there are obstructions between the Watch and the wireless charger, it may not charge
properly. Check if there is any sweat, liquid, or dust on them before charging.
•
If the battery is completely discharged, the Watch cannot be turned on immediately
when the wireless charger is connected. Allow a depleted battery to charge for a few
minutes before turning it on.
•
If you use multiple apps at once, network apps, or apps that need a connection to
another device, the battery will drain quickly. To avoid losing power during a data
transfer, always use these apps after fully charging the battery.
•
When connecting the wireless charger to another power source, such as a computer or
multi-charging hub, the Watch may not charge properly or it may charge more slowly
due to a lower electric current.
•
The Watch can be used while it is charging, but it may take longer to fully charge the
battery.
•
If the watch’s power supply is unstable while being used and charged at the same time,
the touchscreen may not function. If this happens, disconnect the Watch from the
wireless charger.
•
While charging, the Watch may heat up. This is normal and should not affect the Watch’s
lifespan or performance. Before wearing the Watch, allow it to cool down for a while
before using it. If the battery gets hotter than usual, the charger may stop charging.
•
If you charge the Watch while the wireless charger is wet, the Watch may be damaged.
Thoroughly dry the wireless charger before charging the Watch.
•
If the Watch is not charging properly, visit a Samsung Service Centre.
•
Avoid using a bent or damaged wireless charger cable. If the wireless charger cable is
damaged, stop using it.
Getting Started
20
Wearing the Watch
Putting on the Watch
Open the buckle and place your Watch around your wrist. Fit the band to your wrist, insert the
pin into an adjustment hole, and then secure the buckle to close it. If the band is too tight on
your wrist, use the hole one further out.
Do not bend the band excessively. Doing so may damage the Watch.
•
To measure your physical condition accurately, wear the Watch firmly around
your lower arm above the wrist. Refer to How to wear the Watch for accurate
measurements for more information.
•
When certain materials come into contact with the back of the Watch, your Watch
may recognise that you are wearing it on your wrist.
•
If the sensors on the back of your Watch do not come into contact with your wrist for
more than 10 minutes, your Watch may recognise that you are not wearing it on your
wrist.
Band tips and precautions
•
For accurate measurement, you have to wear the Watch so that it fits your wrist. After
measuring, loosen the band to allow air to reach your skin. It is recommended to wear
the Watch so that it is not too loose or tight, and that it feels comfortable in normal
circumstances.
•
When you wear the Watch for a long time or do a high-intensity exercise while wearing
it, skin irritation may occur due to certain factors, such as friction, pressure, or moisture. If
you have been wearing your Watch for a long time, remove it from your wrist for a while
to keep your skin healthy and allow your wrist to rest.
•
Skin irritation may occur due to an allergy, environment factors, other factors, or when
your skin is exposed to soap or sweat for long periods. In this case, stop using your Watch
immediately and wait 2 or 3 days for the symptoms to ease. If the symptoms persist or
worsen, call your doctor.
•
Make sure your skin is dry before wearing your Watch. If you wear a wet Watch for a long
time, your skin may be affected.
•
If you use your Watch in the water, remove foreign materials from your skin and Watch
and dry them thoroughly to prevent the skin irritation.
•
Do not use any accessories except the Watch in the water.

Getting Started
21
Connecting the band
Connect the band before using your Watch. You can detach the band from the Watch and
replace it with a new one. Remove the band in the reverse order of how you connected it.
Be careful not to hurt your fingernail when sliding the spring bar while connecting or
replacing bands.
•
The supplied band may vary depending on the region or model.
•
The supplied band’s size may vary depending on the model. Use the proper band
which fits your model’s size.
1 Insert one end of the band’s spring bar into the Watch’s lug.
2 Slide the spring bar inwards and connect the band.
2
Getting Started
22
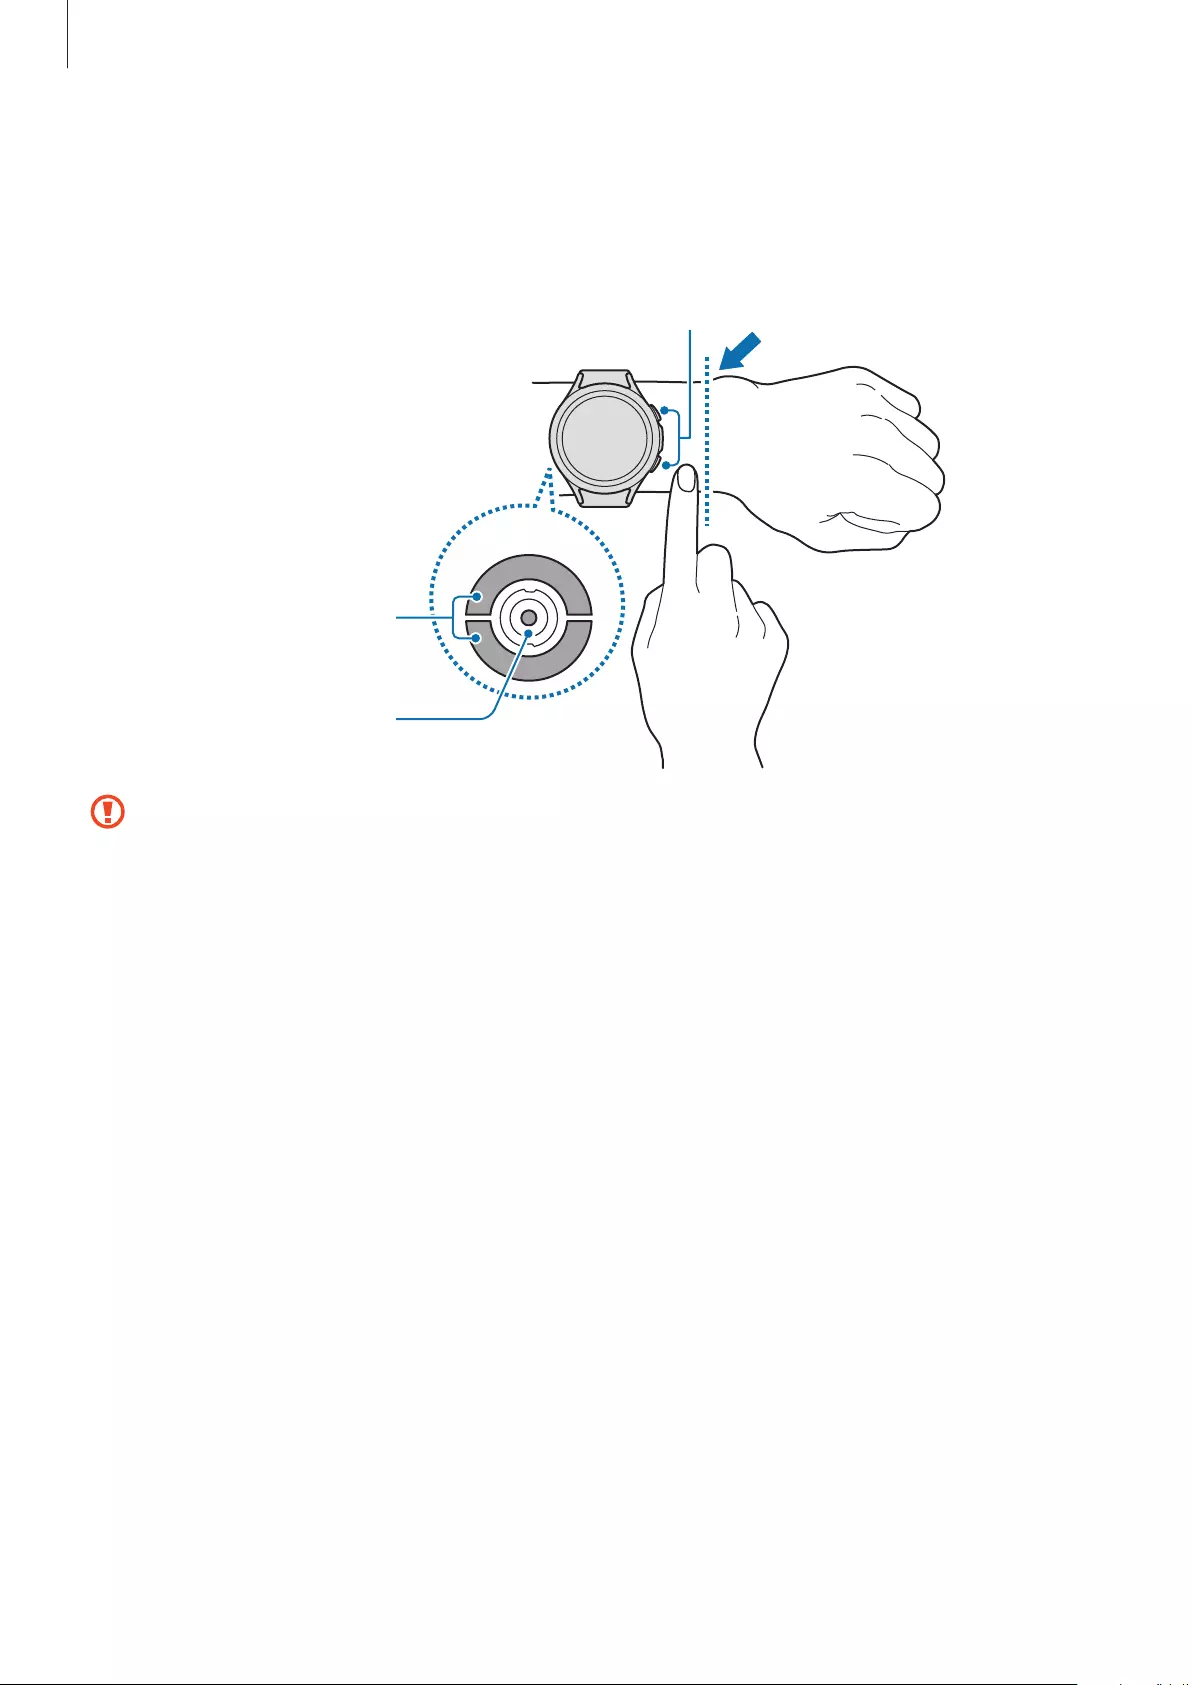
How to wear the Watch for accurate measurements
For accurate measurements, wear the Watch firmly around your lower arm above the wrist
while leaving a finger’s worth of space as shown in the figure below.
<Rear>
Optical heart rate
sensor
Electrical
biosensors
•
If you fasten the Watch too tightly, the skin irritation may occur and if you fasten it
too loosely, friction may occur.
•
Do not look directly at the optical heart rate sensor’s lights. Make sure children do not
look directly at the lights. Doing so may impair your vision.
•
If the Watch becomes hot to the touch, remove it until it cools. Exposing your skin to
a hot surface of the Watch for a long time may cause low-temperature burns.
•
Remove all water from your Watch and the band before measuring your body
composition and ECG.

Getting Started
23
•
Use the HR feature only for measuring your heart rate. The accuracy of the optical
heart rate sensor may be diminished depending on measurement conditions and
surroundings.
•
Cold ambient temperatures may affect your measurement; during winter or cold
weather, keep yourself warm when checking your heart rate.
•
Smoking or consuming alcohol before taking measurements may cause your heart
rate to be different from your normal heart rate.
•
Do not move, talk, yawn, or breathe deeply while taking heart rate measurements.
Doing so may cause your heart rate to be recorded inaccurately.
•
If your heart rate is extremely high or low, measurements may be inaccurate.
•
If measuring children’s heart rates, the measurement may not accurate.
•
Users with thin wrists may receive inaccurate heart rate measurements when the
device is loose, causing the light to be reflected unevenly. In this case, wear the
Watch around your lower arm above the wrist.
•
If heart rate measurement is not working properly, adjust the position of the device’s
optical heart rate sensor to the right, left, up, or down on your wrist, or wear the
device on your inner arm so that the sensor is in contact with your skin.
•
If the optical heart rate sensor and the electrical biosensors are dirty, wipe the
sensor and try again. If foreign materials prevent the light from reflecting evenly, the
measurement may not accurate.
•
The signal may be affected by your skin brightness, blood flow under your skin, and
the cleanliness of the sensor area.
•
For accurate measurements, use the Ridge sport band. The Ridge sport band may be
sold separately depending on the model.
Getting Started
24
Turning the Watch on and off
Follow all posted warnings and directions from authorised personnel in areas where the
use of wireless devices is restricted, such as aeroplanes and hospitals.
Turning the Watch on
Press and hold the Home key for a few seconds to turn on the Watch.
When you turn on the Watch for the first time or reset it, on-screen instructions will appear
to launch the Galaxy Wearable app on your smartphone. Refer to Connecting the Watch to a
smartphone for more information.
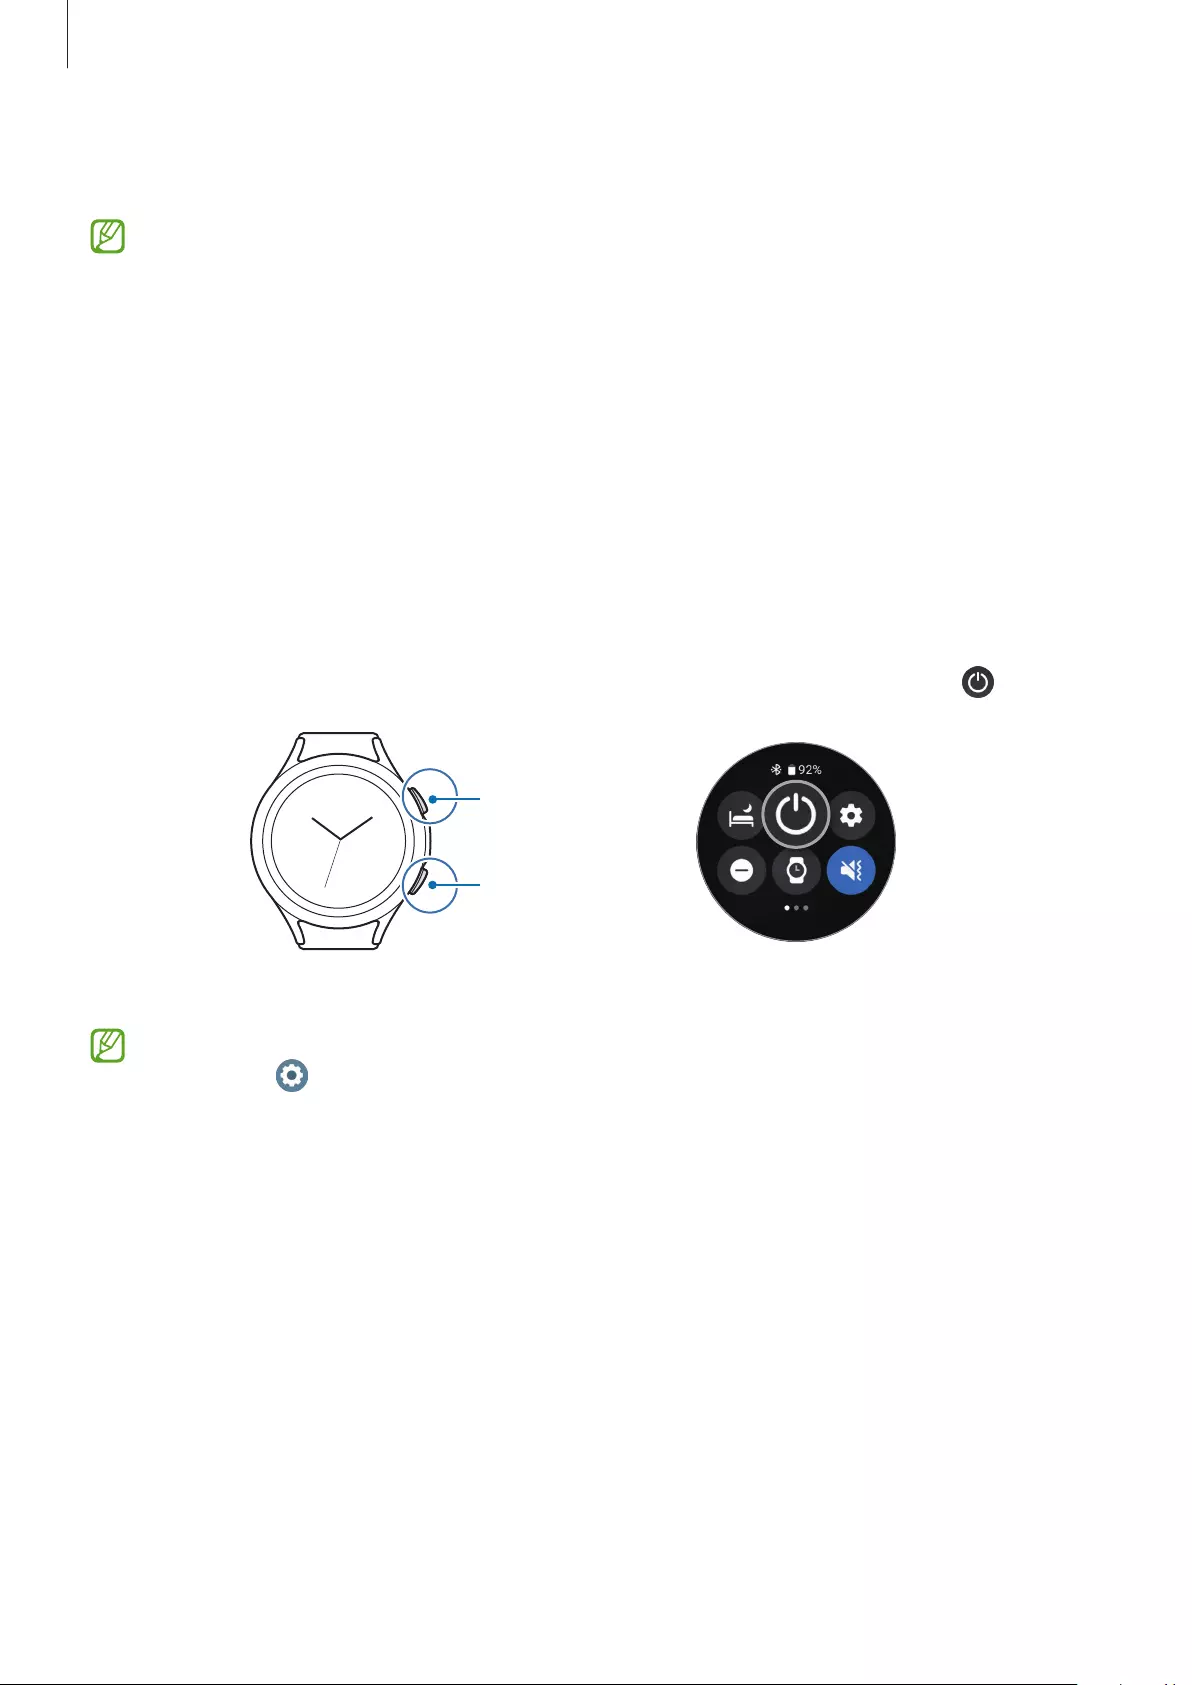
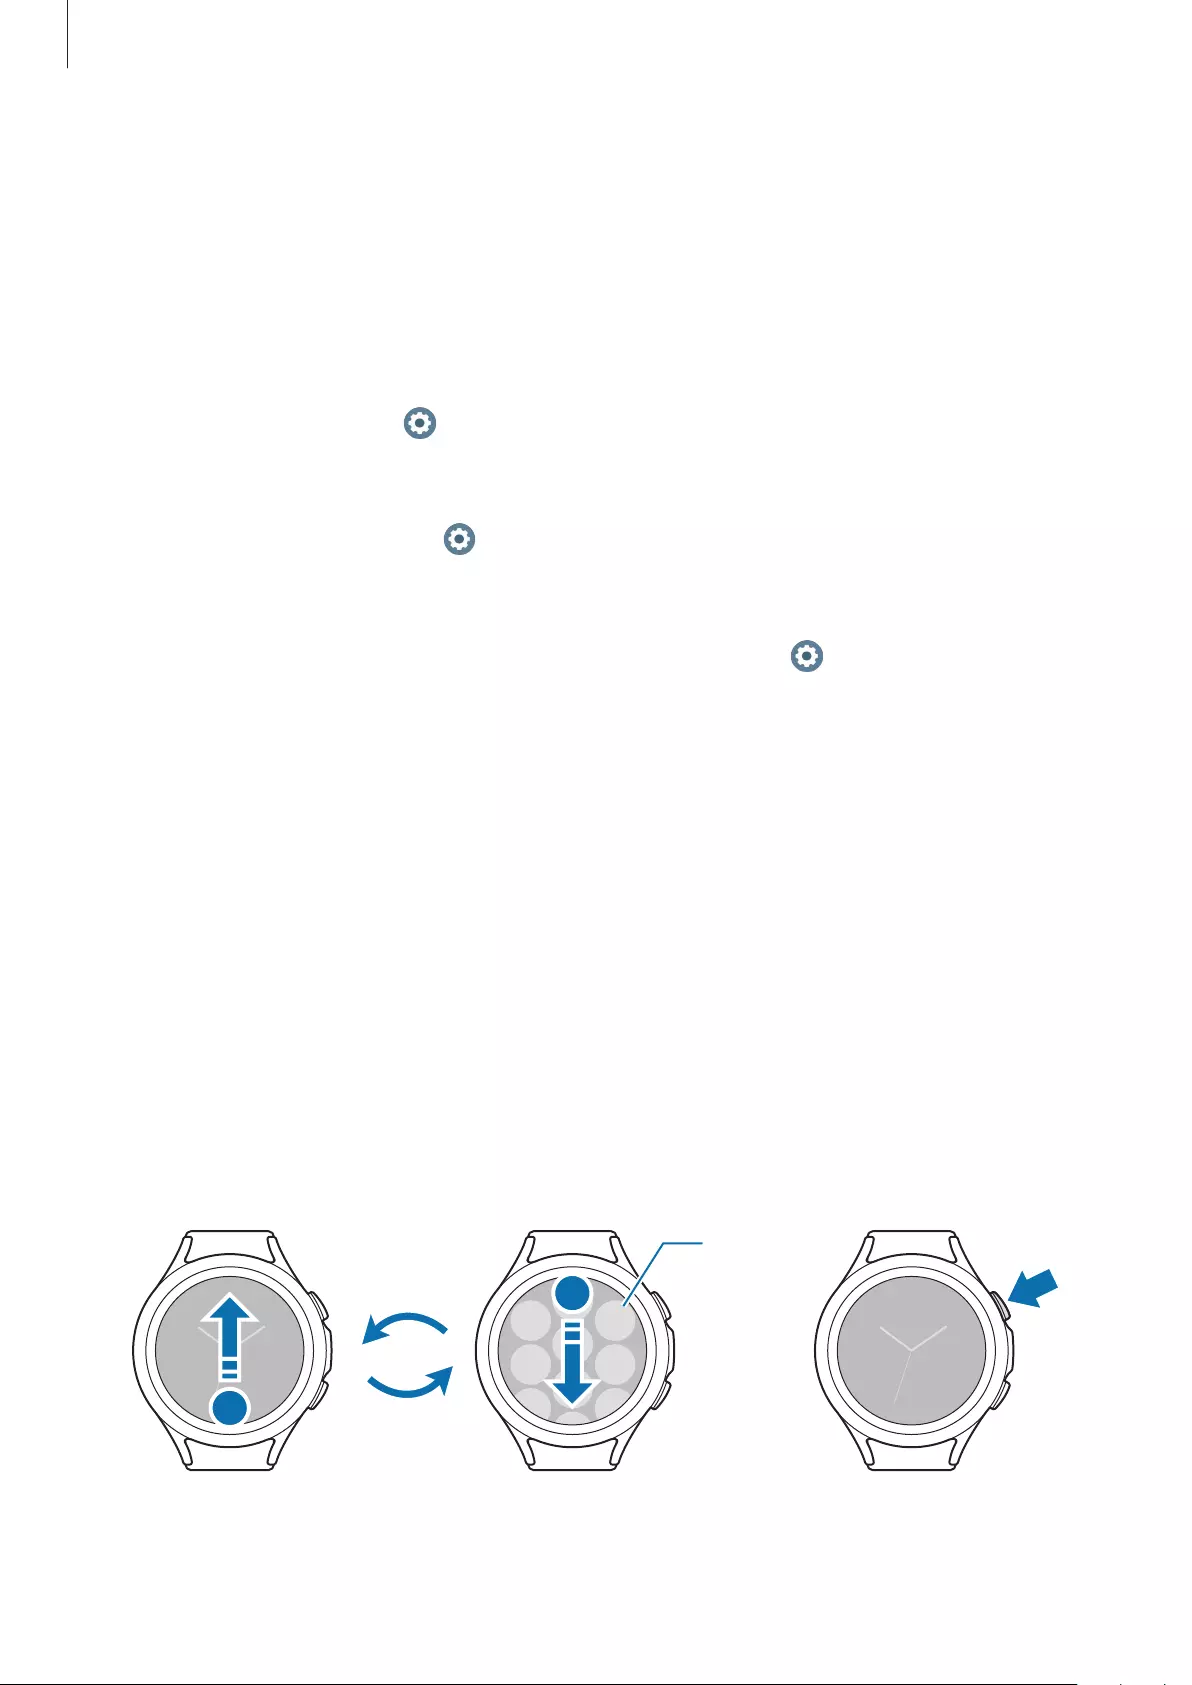
Turning the Watch off
1 Press and hold the Home key and the Back key simultaneously. Alternatively, open the
quick panel by dragging downwards from the top edge of the screen and tap .
Home key
Back key
2 Tap
Power off
.
You can set the Watch to turn off when you press and hold the Home key. On the Apps
screen, tap (
Settings
)
→
Advanced features
→
Customise keys
, tap
Press and
hold
under
Home key
, and then select
Power off menu
.
Forcing restart
If your Watch is frozen and unresponsive, press and hold the Home key and the Back key
simultaneously for more than 7 seconds to restart it.
Getting Started
25
Connecting the Watch to a smartphone
Installing the Galaxy Wearable app
To connect your Watch to a smartphone, install the Galaxy Wearable app on the smartphone.
Depending on your smartphone, you can download the Galaxy Wearable app from the
following places:
•
Samsung Android smartphones:
Galaxy Store
,
Play Store
•
Other Android smartphones:
Play Store
•
It is compatible with Android smartphones that support Google mobile services.
•
You cannot install the Galaxy Wearable app on the smartphones that do not support
Watch syncing. Ensure that your smartphone is compatible with a Watch.
•
The Watch cannot be connected to a tablet.
Connecting the Watch to a smartphone via Bluetooth
1 Turn on the Watch and swipe upwards from the bottom of the screen.
On-screen instructions for launching the Galaxy Wearable app will appear.
2 Tap
Language
to select a language to use and follow the on-screen instructions.
3 Launch the
Galaxy Wearable
app on your smartphone.
If necessary, update the Galaxy Wearable app to the latest version.
4 Tap
Start
.
5 Select your Watch on the screen.
If you cannot find your device, tap
Mine’s not here
.
6 Follow the on-screen instructions to complete the connection.
When completing the connection, tap
Start
and follow the on-screen instructions to learn
about the Watch’s basic controls.
Getting Started
26
•
The initial setup screen may differ depending on your region.
•
Connection methods may vary depending on your smartphone and software
version.
•
The Watch is smaller than normal smartphones so the network quality may be lower,
especially in areas with weak signals or poor reception. When a Bluetooth connection
is unavailable, your cellular network or Internet connection may be poor or become
disconnected.
•
When you connect your Watch to a smartphone for the first time after resetting it, the
Watch’s battery may drain more quickly while syncing data, such as contacts.
•
Supported smartphones and features may vary depending on your region, service
provider, or device manufacturer.
•
When you cannot establish a Bluetooth connection between your Watch and the
smartphone, the indicator icon will appear on the top of the Watch screen.
Connecting the Watch to a new smartphone
When you connect the Watch to a new smartphone, the Watch will reset all personal
information. When the prompt appears before connecting your Watch to a new smartphone,
tap
Back up data
to securely back up the stored data.
1 On the Apps screen, tap (
Settings
)
→
General
→
Connect to new phone
→
Continue
.
After a reset, it will automatically enter Bluetooth pairing mode.
2 On your new smartphone, launch the
Galaxy Wearable
app to connect to your Watch.
If the smartphone you want to connect to is already connected to another device,
launch the
Galaxy Wearable
app on your smartphone and tap
→
Add new device
to connect with a new device.
Getting Started
27
Remote connection
Your Watch and smartphone are connected via Bluetooth. You can sync your smartphone
to your Watch when both devices are remotely connected to each other, even though a
Bluetooth connection is not available. The Remote connection uses your mobile network or
Wi-Fi.
If this feature is not turned on, launch the
Galaxy Wearable
app on your smartphone, tap
Watch settings
→
Advanced features
→
Remote connection
, and then tap the switch to
activate it.
When your Watch and smartphone are remotely connected, the indicator icon will appear
on the top of the Watch screen.
Controlling the screen
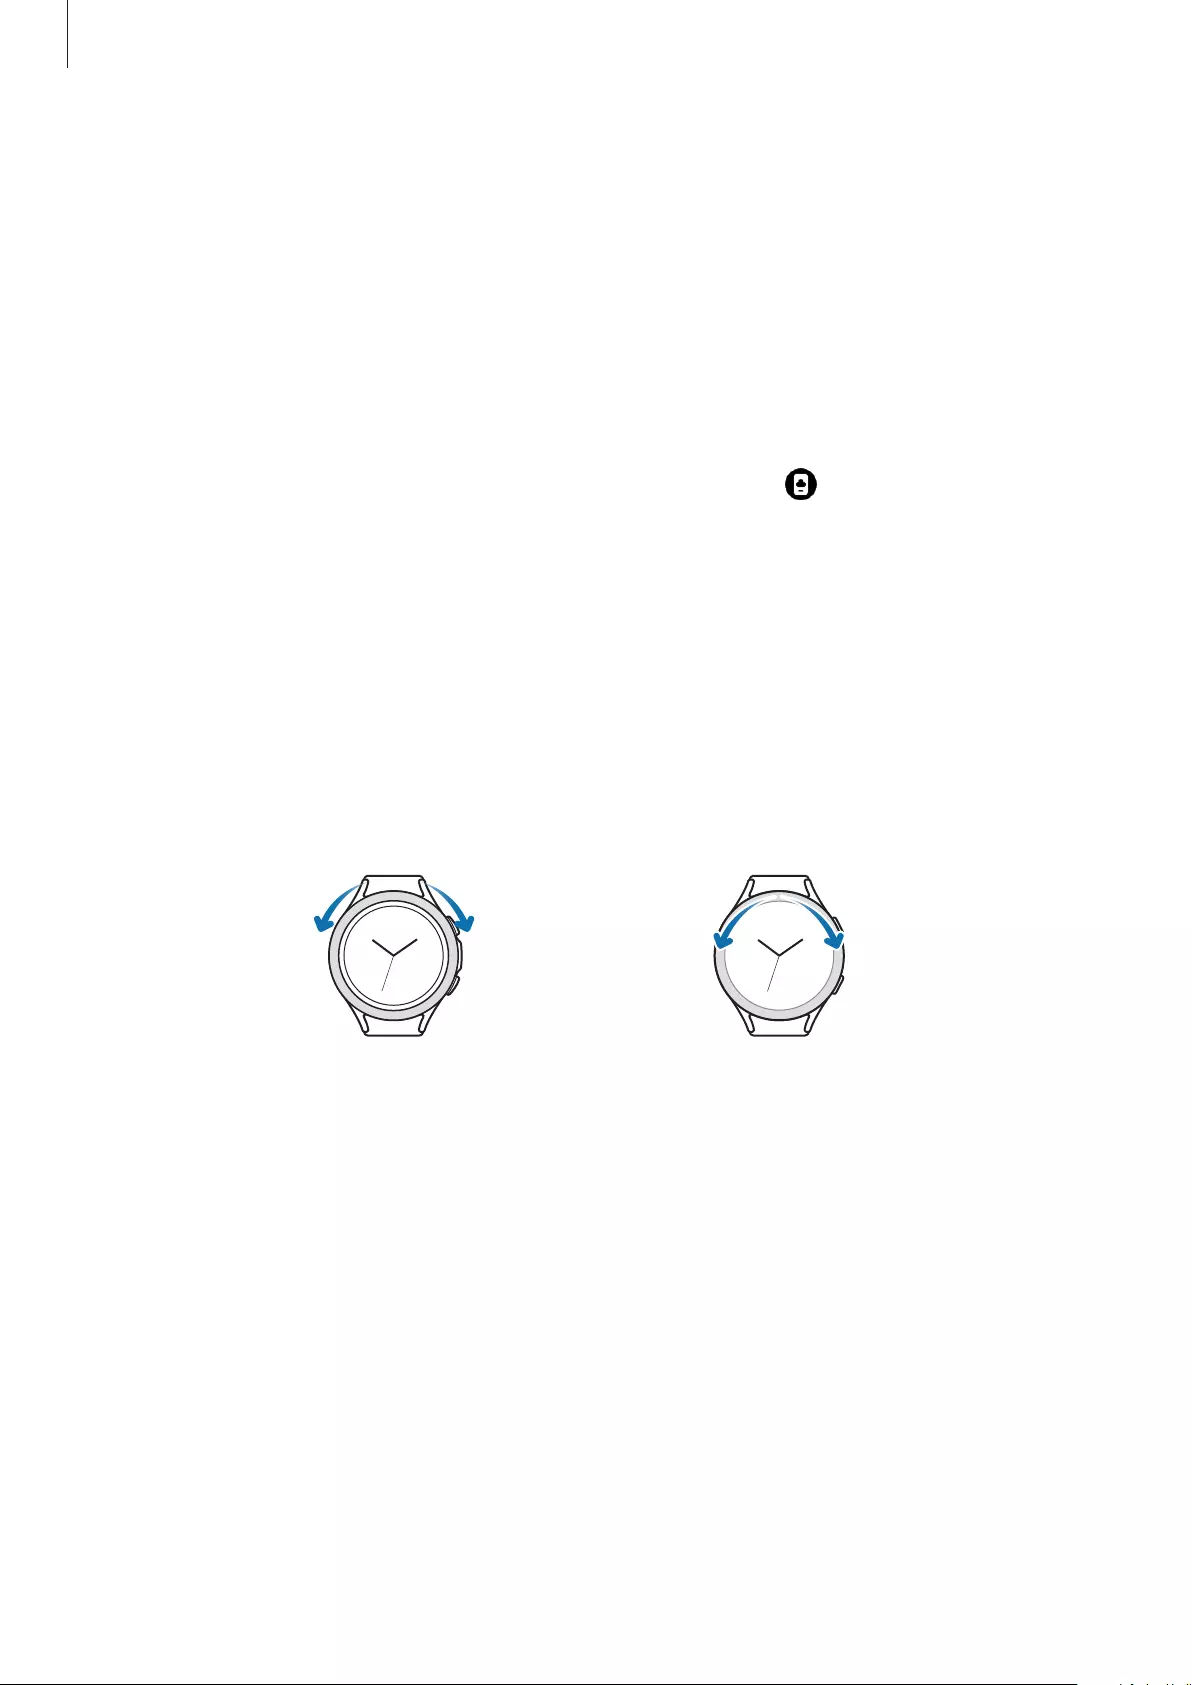
Bezel
Your Watch has a rotatable bezel or a touch bezel. Rotate or swipe the bezel clockwise or
anticlockwise to easily control various Watch functions.
Rotatable bezel
(Galaxy Watch4 Classic)
Touch bezel
(Galaxy Watch4)
•
Scrolling through screens: Rotate or swipe the bezel to view other screens.
•
Selecting an item: Rotate or swipe the bezel to move from item to item.
•
Adjusting the input value: Rotate or swipe the bezel to adjust the volume or brightness.
When adjusting the brightness, rotate or swipe the bezel clockwise to make the screen
brighter.
•
Using the phone or alarm feature: Rotate or swipe the bezel clockwise to receive an
incoming call or to dismiss an alarm. Rotate or swipe the bezel anticlockwise to reject an
incoming call or to activate the snooze feature for an alarm.
Getting Started
28
•
Make sure the rotatable bezel is free from the foreign materials like dust or sand.
•
Do not use the rotatable bezel near magnetic substances, such as magnets or
magnetic bracelets. The rotatable bezel may not work properly due to magnetic
interference.
If the bezel does not work, take it to a Samsung Service Centre without disassembling
the Watch.
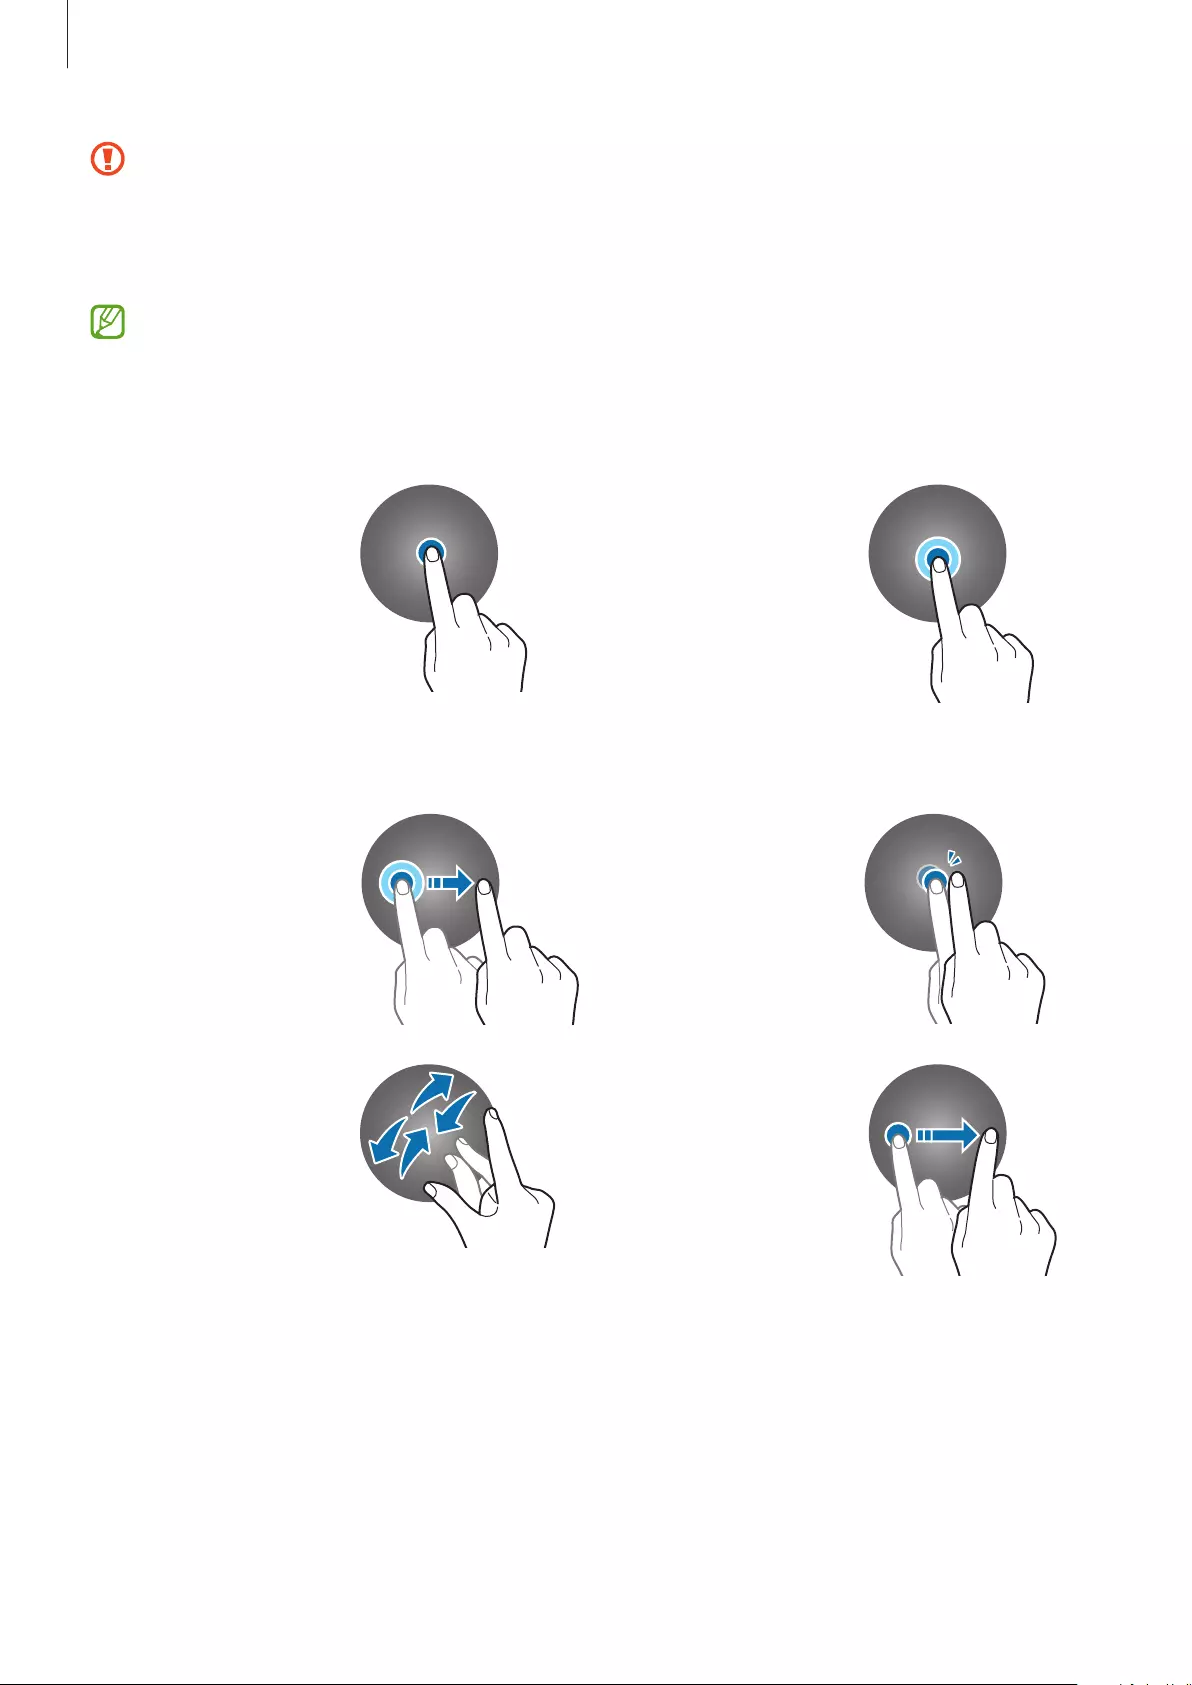
Touchscreen
Tapping
To open an app,
to select a menu
item, or to press
an on-screen
button, tap it with
your finger.
Tapping and
holding
Tap and hold the
screen for two or
more seconds to
access the edit
mode or to view
available options.
Dragging
Tap and hold an
item and drag
it to the target
position.
Double-tapping
Double-tap
quickly on an
image to zoom in
or out.
Spreading and
pinching
Spread two
fingers apart
or pinch on an
image to zoom in
or out.
Swiping
Swipe to the left
or right to view
other panels.
Getting Started
29
•
Do not allow the touchscreen to come into contact with other electrical devices.
Electrostatic discharges can cause the touchscreen to malfunction.
•
To avoid damaging the touchscreen, do not tap it with anything sharp or apply
excessive pressure to it with your fingertips.
•
It is recommended not to use fixed graphics on part or all of the touchscreen for
extended periods. Doing so may result in afterimages (screen burn-in) or ghosting.
•
The Watch may not recognise touch inputs close to the edges of the screen, which
are outside of the touch input area.
•
The touchscreen may not be available when water lock mode is activated.
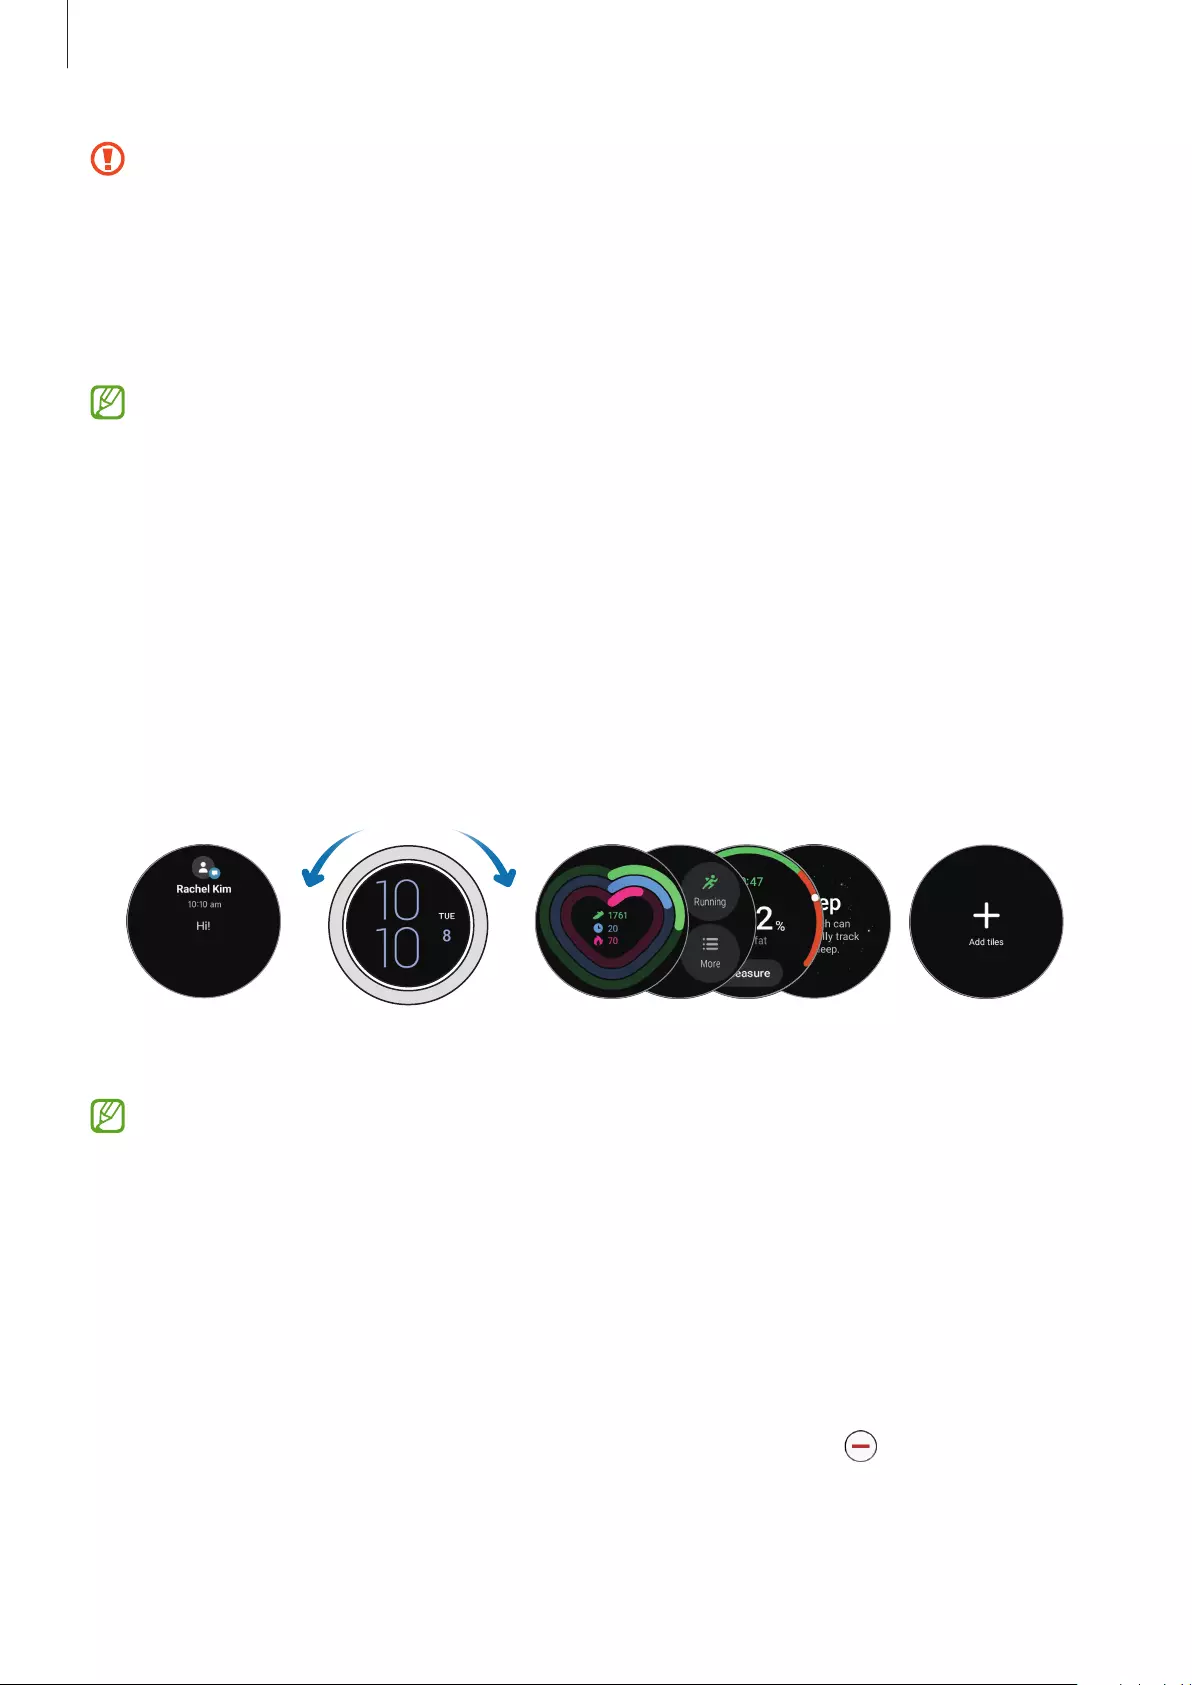
Screen composition
The Watch screen is the starting point of the Home screen, which is composed of several
pages.
You can view tiles or open the notification panel by swiping the screen to the left or right or
by using the bezel.
Notification
Tiles Add tiles.
The available panels, tiles, and their arrangement may vary depending on the software
version.
Using tiles
To add a tile, swipe left on the screen, tap
Add tiles
, and then select a tile.
When tapping and holding a tile, you can access the edit mode to change the tile’s
arrangement or remove the tiles.
•
Moving the tile: Tap and hold a tile and drag it to the desired location.
•
Removing the tile: Tap and hold a tile you want to delete and tap .
Getting Started
30
Turning the screen on and off
Turning the screen on
Use the following methods to turn the screen on.
•
Turn the screen on with the keys: Press the Home key or Back key.
•
Turn the screen on with the bezel: Rotate the bezel. If the screen does not turn on after
you rotate the bezel, tap (
Settings
) on the Apps screen, tap
Display
, and then tap the
Turn bezel to wake
switch under
Screen wake-up
to activate it (Galaxy Watch4 Classic).
•
Turn the screen on by tapping the screen: Tap the screen. If the screen does not turn on
after you tap the screen, tap (
Settings
) on the Apps screen, tap
Display
, and then tap
the
Touch screen to wake
switch under
Screen wake-up
to activate it.
•
Turn the screen on by raising your wrist: Raise your wrist where you wear the Watch. If
the screen does not turn on after you raise up your wrist, tap (
Settings
) on the Apps
screen, tap
Display
, and then tap the
Raise wrist to wake
switch under
Screen wake-up
to activate it.
Turning the screen off
To turn off the screen, cover it with your palm. Also, the screen will automatically turn off if the
Watch is not used for a specified period.
Switching the screen
Switching between the Watch and Apps screen
On the Watch screen, swipe upwards to open the Apps screen.
To return to the Watch screen, swipe downwards from the top of the Apps screen.
Alternatively, press the Home key.
Watch screen Apps screen
or
Getting Started
31
Apps screen
The Apps screen displays icons for all apps installed on the Watch.
The available apps may vary depending on the software version.
Opening apps
On the Apps screen, tap an app icon to launch the app.
To launch an app from the list of recent apps, on the Apps screen, tap (
Recent apps
).
Closing apps
1 On the Apps screen, tap (
Recent apps
).
2 Use the bezel or swipe left or right on the screen to move to the app to close.
3 Swipe upwards on the app to close it.
To close all running apps, tap
Close all
.
Returning to the previous screen
To return to the previous screen, swipe right on the screen or press the Back key.
Lock screen
Use the screen lock feature to protect your data, such as your personal information saved on
your Watch. After activating this feature, the Watch will require you to unlock it whenever you
use it. However, if you unlock it once while wearing the Watch, it will remain unlocked.
Setting the screen lock
On the Apps screen, tap (
Settings
)
→
Security
→
Lock
→
Type
and select the lock
method.
•
Pattern
: Draw a pattern with four or more dots to unlock the screen.
•
PIN
: Enter a PIN with numbers to unlock the screen.
Getting Started
32
Watch
Watch screen
You can check the current time or view other information. When you are not on the Watch
screen, press the Home key to return to the Watch screen.
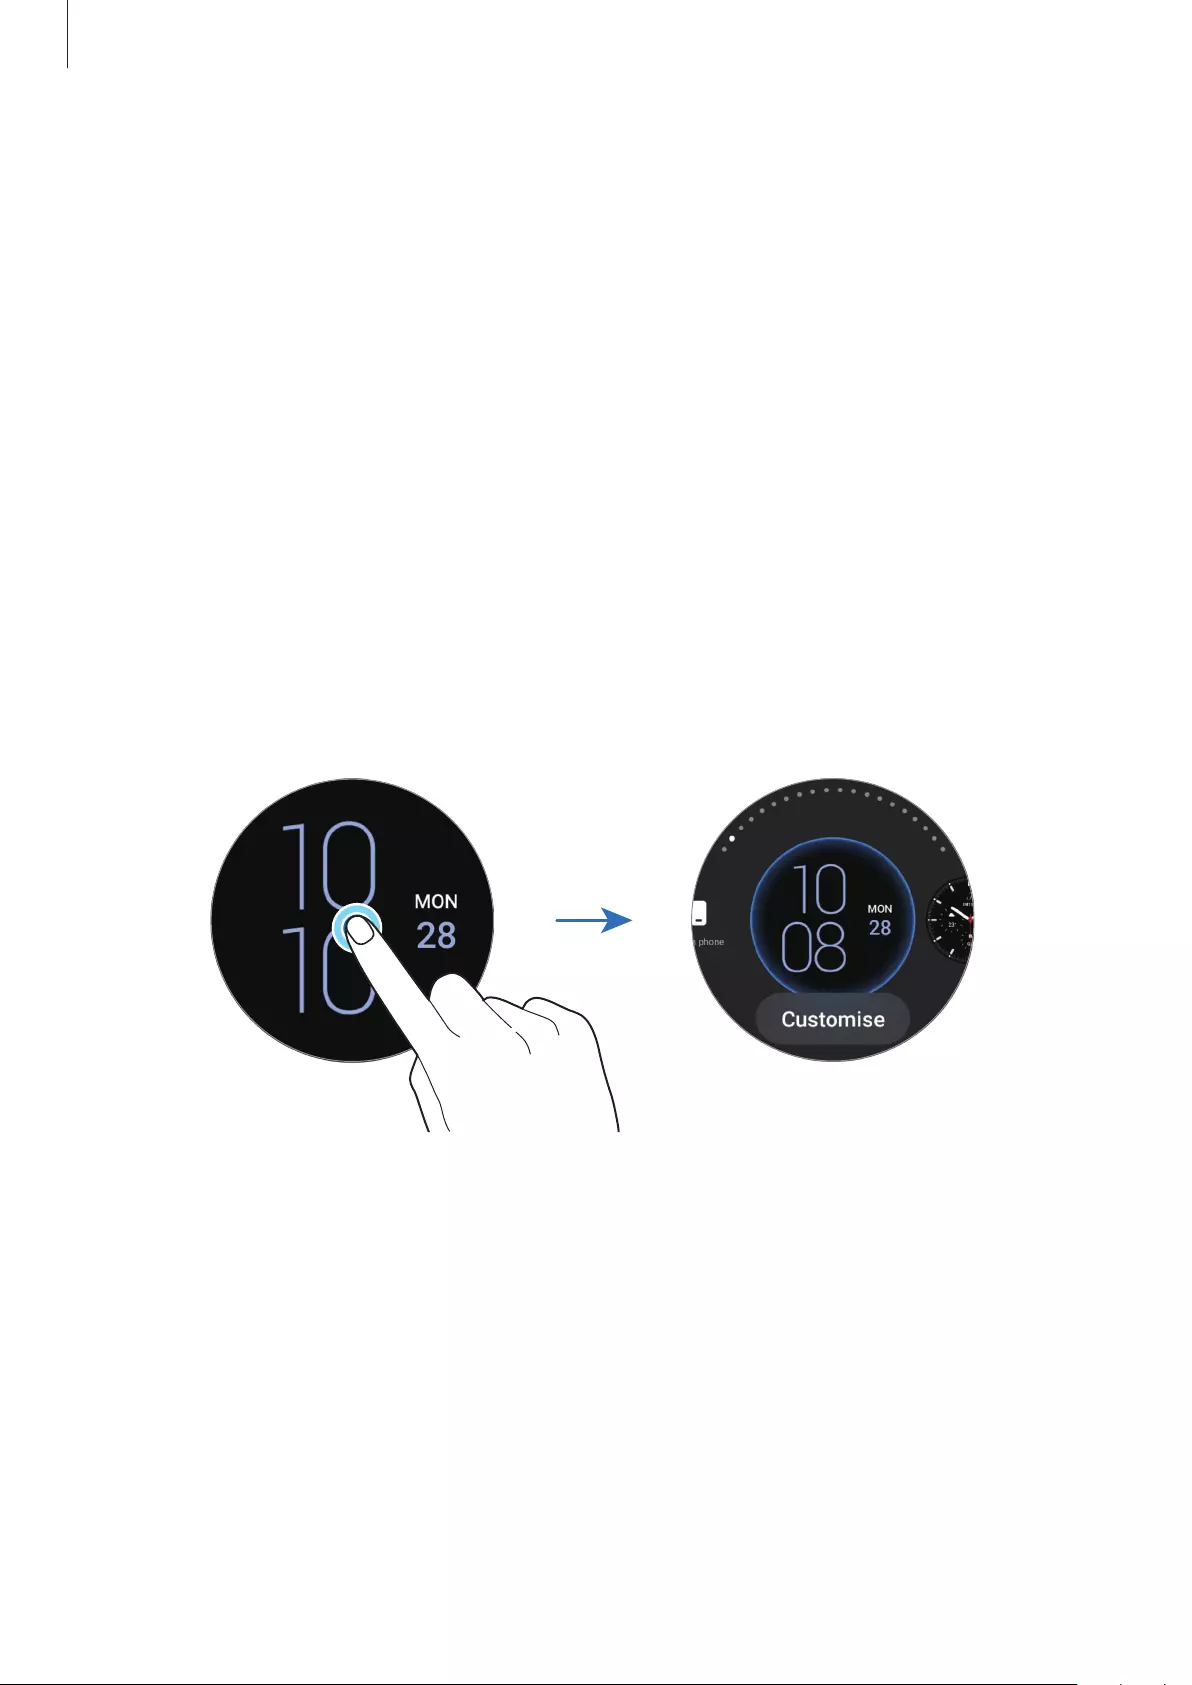
Changing the watch face
Tap and hold the Watch screen and use the bezel or swipe on the screen to the left or right,
and then select a watch face.
To customise the watch face, tap
Customise
, swipe the screen to the left or right to move to
option you want, and then select the desired colour and other options by using the bezel or
swiping upwards or downwards on the screen. To set the complications, tap each area you
want and then set them.
You can download more watch faces from the
Play Store
app.
You can also change the watch face and customise it from your smartphone. Launch the
Galaxy Wearable
app on your smartphone and tap
Watch faces
.
Getting Started
33
Customise a watch face with a picture
Apply a picture as your watch face after importing a picture from your smartphone. Refer
to Importing images from your smartphone for more information about importing pictures
from a smartphone.
1 Tap and hold the Watch screen and tap
Customise
on the
My Photo+
watch face by using
the bezel or swiping left or right on the screen.
2 Tap the screen and tap
Add photo
.
3 Select a picture to apply as a watch face and tap
OK
.
To zoom in or out on the picture, double-tap the image quickly, or spread two fingers
apart or pinch the picture. When the picture is zoomed in, swipe the screen to make a part
of the picture appear on the screen.
•
To select several pictures at the same time, tap and hold a picture, select pictures by
using the bezel or swiping left or right on the screen, and then tap .
•
To add extra pictures after selecting pictures, rotate or swipe the bezel clockwise.
Alternatively, swipe left on the screen and tap
Add photo
.
•
Up to twenty pictures can be added as the watch face. The pictures you add will
appear when you tap the screen.
4 Swipe the screen to change the background and other options and tap
OK
.
Activating the Always On Display feature
Set the Watch screen and some apps’ screens to always stay on while wearing your Watch.
However, the battery will drain more quickly than normal while using this feature.
Open the quick panel by dragging downwards from the top edge of the screen and tap
. Alternatively, on the Apps screen, tap (
Settings
)
→
Display
and tap the
Always On
Display
switch to activate it.
Activating watch only mode
In watch only mode, only the time will display and all other functions cannot be used.
On the Apps screen, tap (
Settings
)
→
Battery
→
Watch only
and tap
Turn on
.
To deactivate watch only mode, press and hold the Home key for more than three seconds.
Getting Started
34
Notifications
Notification panel
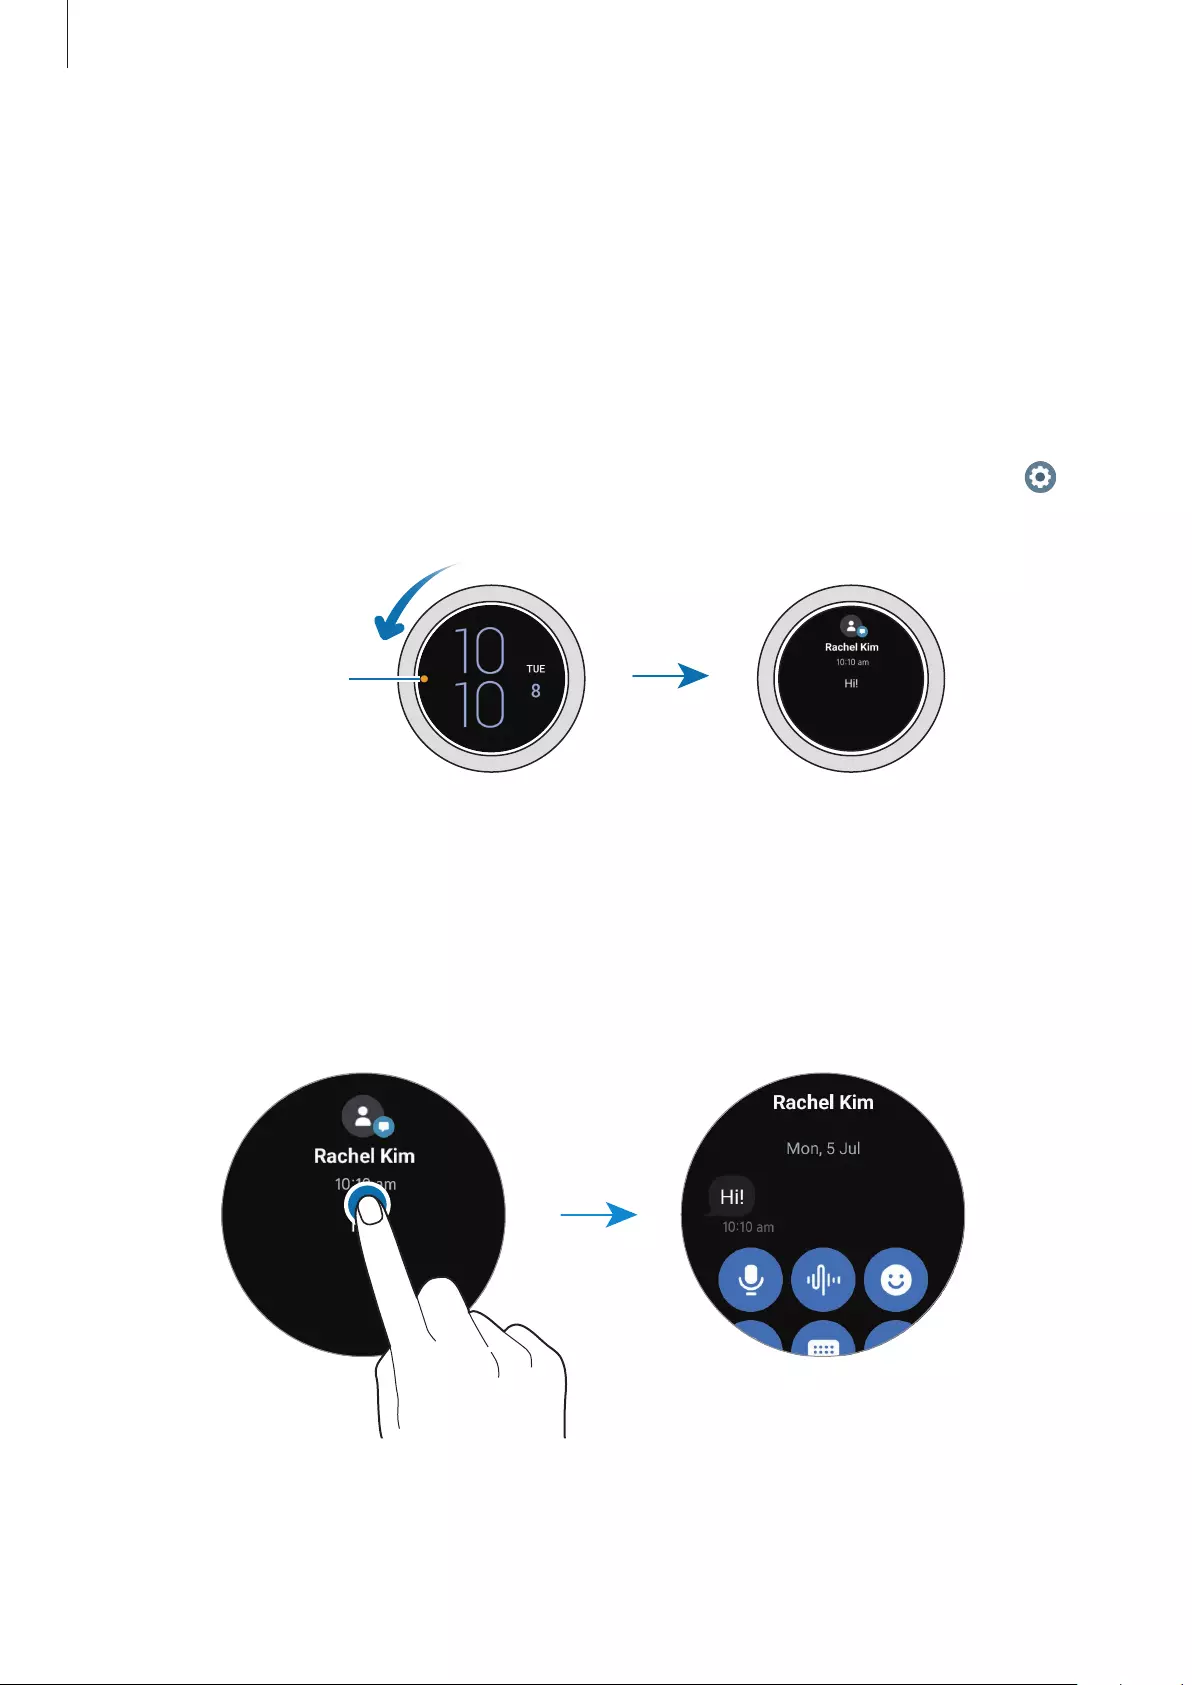
Check a notification such as a new message or a missed call on the notification panel. On the
Watch screen, rotate or swipe the bezel anticlockwise. Alternatively, swipe right on the screen
to open the notification panel.
When there are unchecked notifications, an orange notification indicator will be visible on
the Watch screen. If the notification indicator does not appear, on the Apps screen, tap
(
Settings
)
→
Notifications
and tap the
Notification indicator
switch to activate it.
Notification indicator
Viewing incoming notifications
When you receive a notification, information about the notification, such as its type or the
time you received it, will appear on the screen. If more than two notifications are received, use
the bezel or swipe left or right on the screen to view more notifications.
Tap the notification to view details.
Deleting notifications
Swipe upwards on the screen while viewing a notification.
Getting Started
35
Selecting apps for receiving notifications
Select an app from your smartphone or Watch to receive notifications on your Watch.
1 Launch the
Galaxy Wearable
app on your smartphone and tap
Watch settings
→
Notifications
.
2 Tap
More
→
→
All
and tap the switch next to apps to receive notifications from the
apps list.
Quick panel
This panel allows you to view the Watch’s current status and configure settings.
To open the quick panel, drag downwards from the top edge of the screen. To close the quick
panel, swipe upwards on the screen.
Use the bezel or swipe left or right on the screen to move to the next or previous quick panel.
Remaining battery
power and its
indicator icon
Quick setting
icons
Checking the indicator icons
Indicator icons appear at the top of the quick panel and let you know the Watch’s current
status. The icons listed in the table below are most common.
Icon Meaning
Bluetooth connected
Signal strength
3G network connected
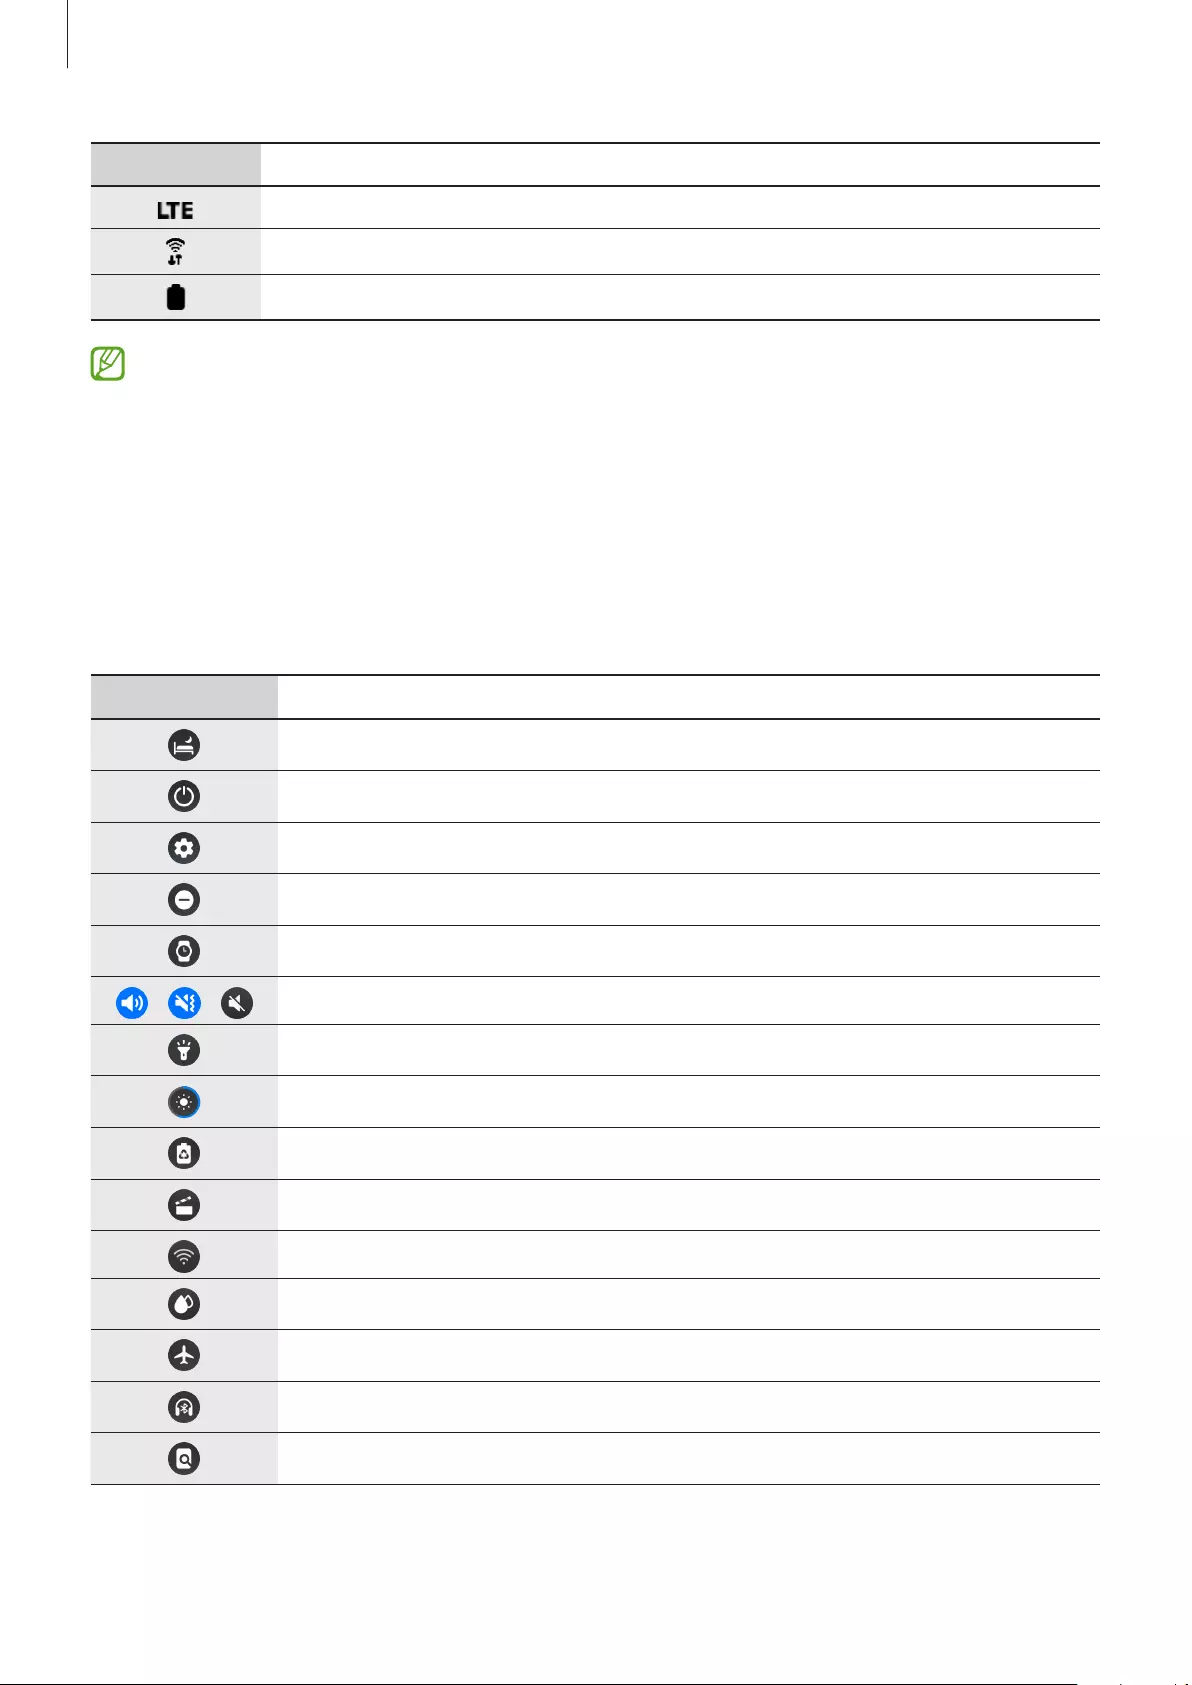
Getting Started
36
Icon Meaning
LTE network connected
Wi-Fi connected
Battery power level
The indicator icons may appear differently depending on the region, service provider, or
model.
Checking quick setting icons
Quick setting icons appear on the quick panel. Tap the icon to change the basic settings or
launch the function conveniently.
Refer to Adding or removing a quick setting icon for more information about adding the new
icons on the quick panel.
Icon Meaning
Activate bedtime mode
Access the power options
Launch the
Settings
app
Activate do not disturb mode
Activate the Always On Display feature
/ / Activate sound, vibrate, or silent mode
Activate the flash feature
Adjust the brightness
Activate power saving mode
Activate theatre mode
Connect the Wi-Fi network
Activate water lock mode
Activate flight mode
Connect the Bluetooth headset
Launch the
Find My Phone
app
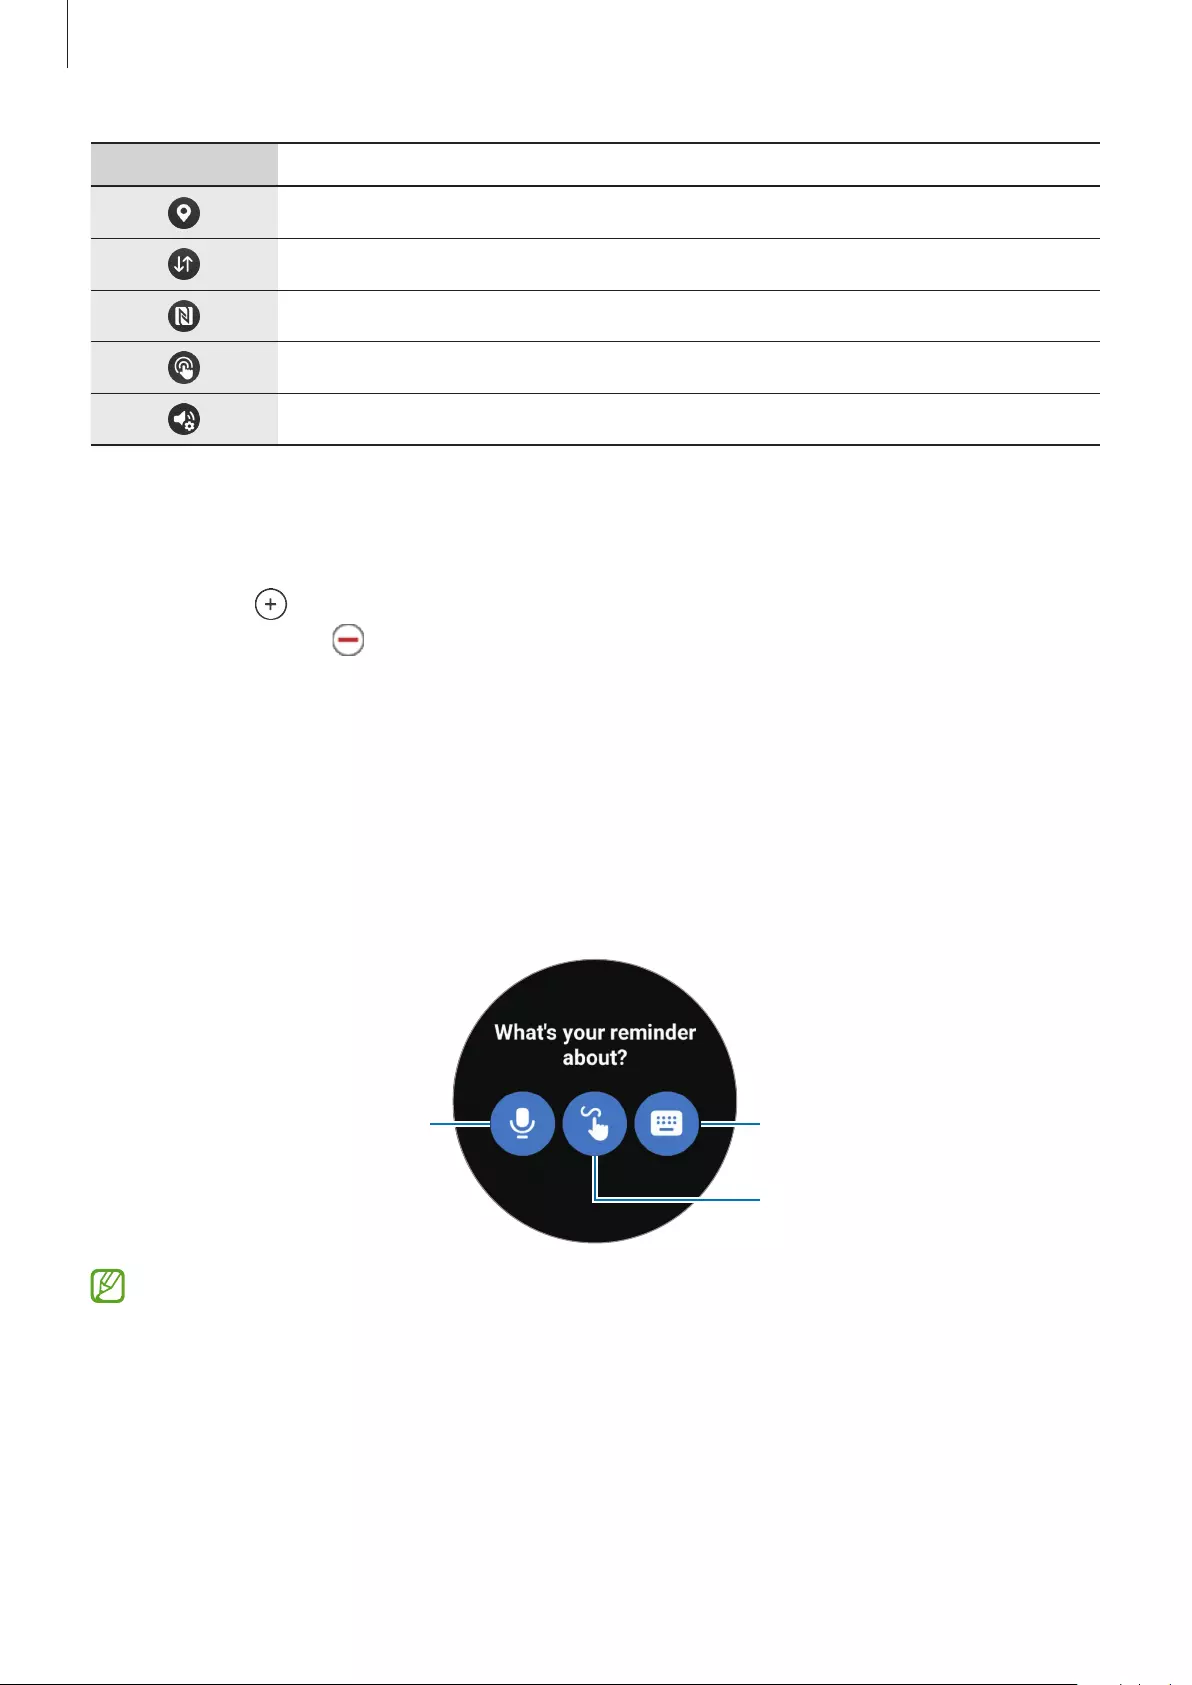
Getting Started
37
Icon Meaning
Activate the location information feature
Connect the mobile network (LTE models)
Activate the NFC feature
Activate the touch sensitivity feature
Open the volume menu
Adding or removing a quick setting icon
To add a quick setting icon, rotate or swipe the bezel clockwise. Alternatively, swipe left on
the screen, tap , and then select a feature to add. To remove a quick setting icon, tap and
hold any icon and tap on the feature you want to delete.
Entering text
Introduction
A text input screen will appear when you are able to enter text.
Enter text by voice.
Enter with handwriting.
Enter with the keyboard.
The text input screen may be different depending on the app you launch.
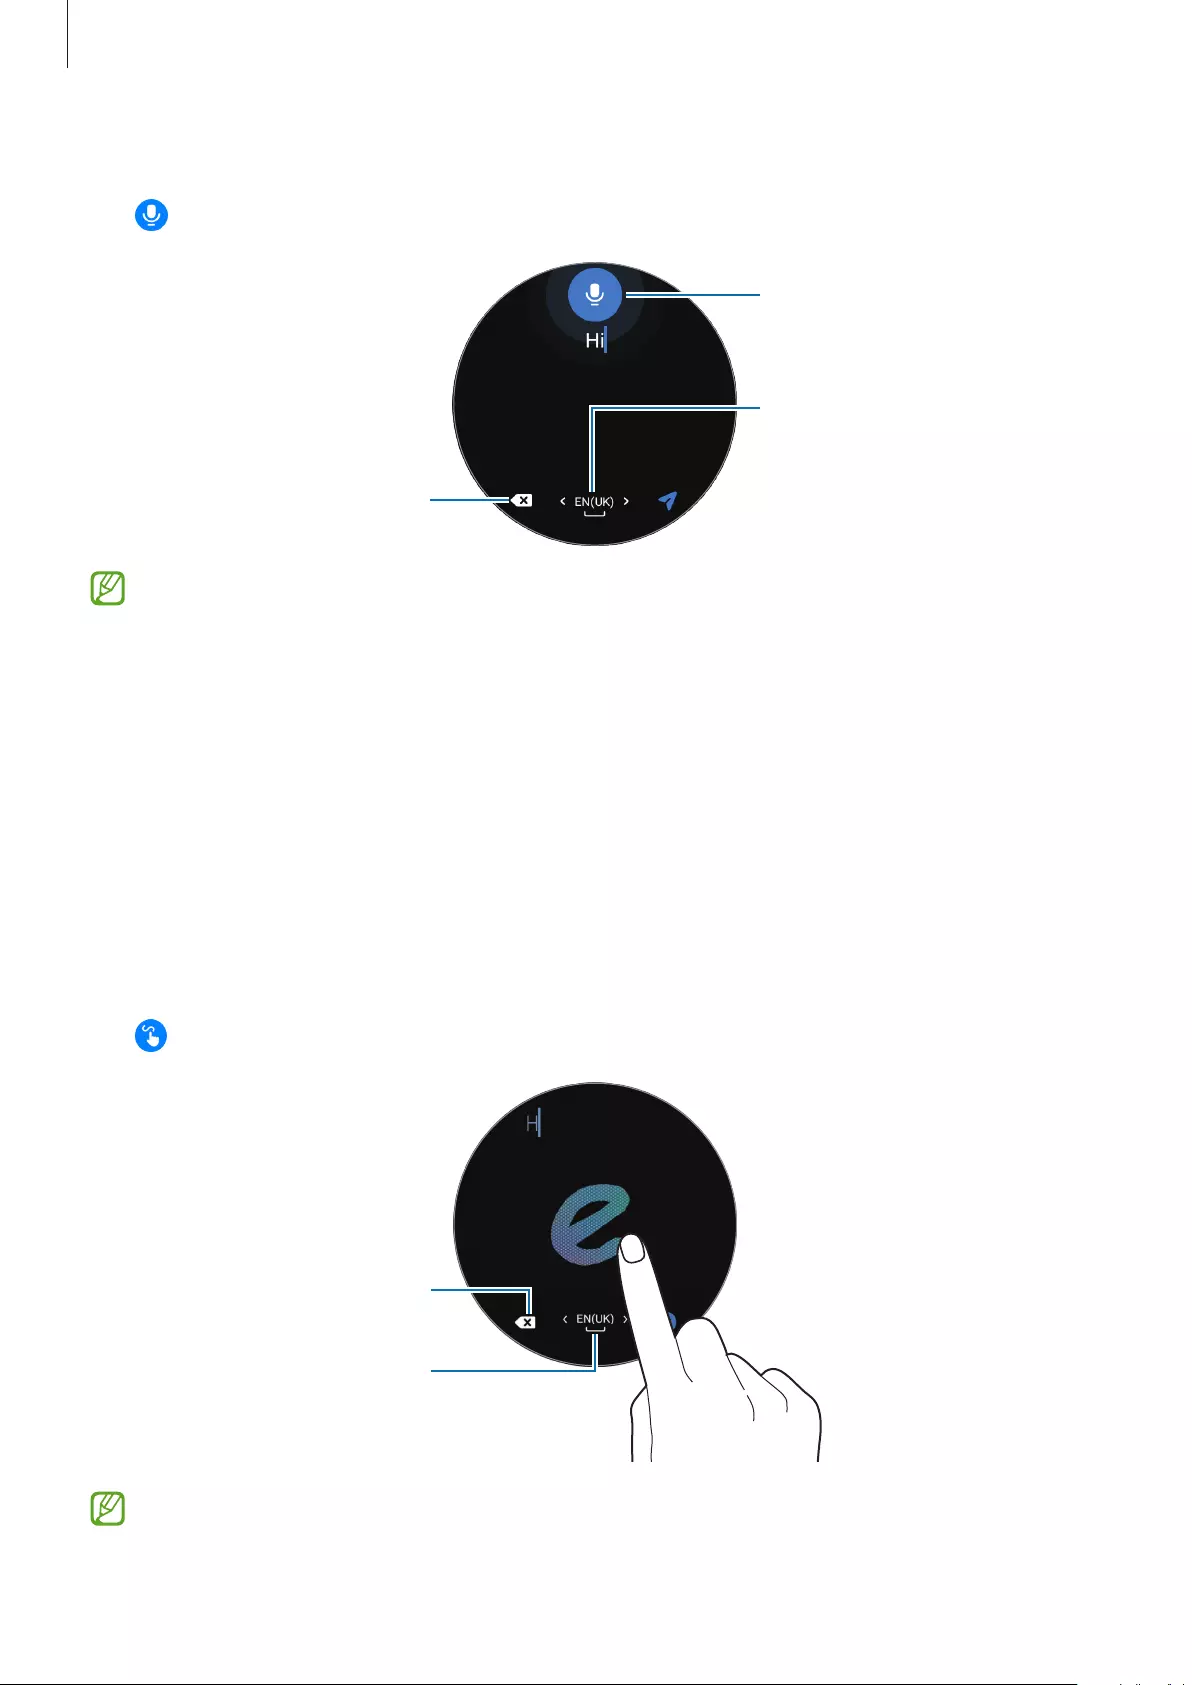
Getting Started
38
Entering text by voice
Tap and speak to enter your message.
Delete a preceding character.
Recognising voice input.
Enter a space. Or, drag it to the
left or right while tapping and
holding it to change the input
language.
•
This feature is not supported in some languages.
•
Tips for better voice recognition
–
Speak clearly.
–
Speak in quiet places.
–
Do not use offensive or slang words.
–
Avoid speaking in dialectal accents.
The Watch may not recognise your spoken message depending on your
surroundings or how you speak.
Entering with handwriting
Tap to open handwriting mode and write on the screen.
Enter a space. Or, drag it to the
left or right while tapping and
holding it to change the input
language.
Delete a preceding character.
This feature may not be available depending on the language.
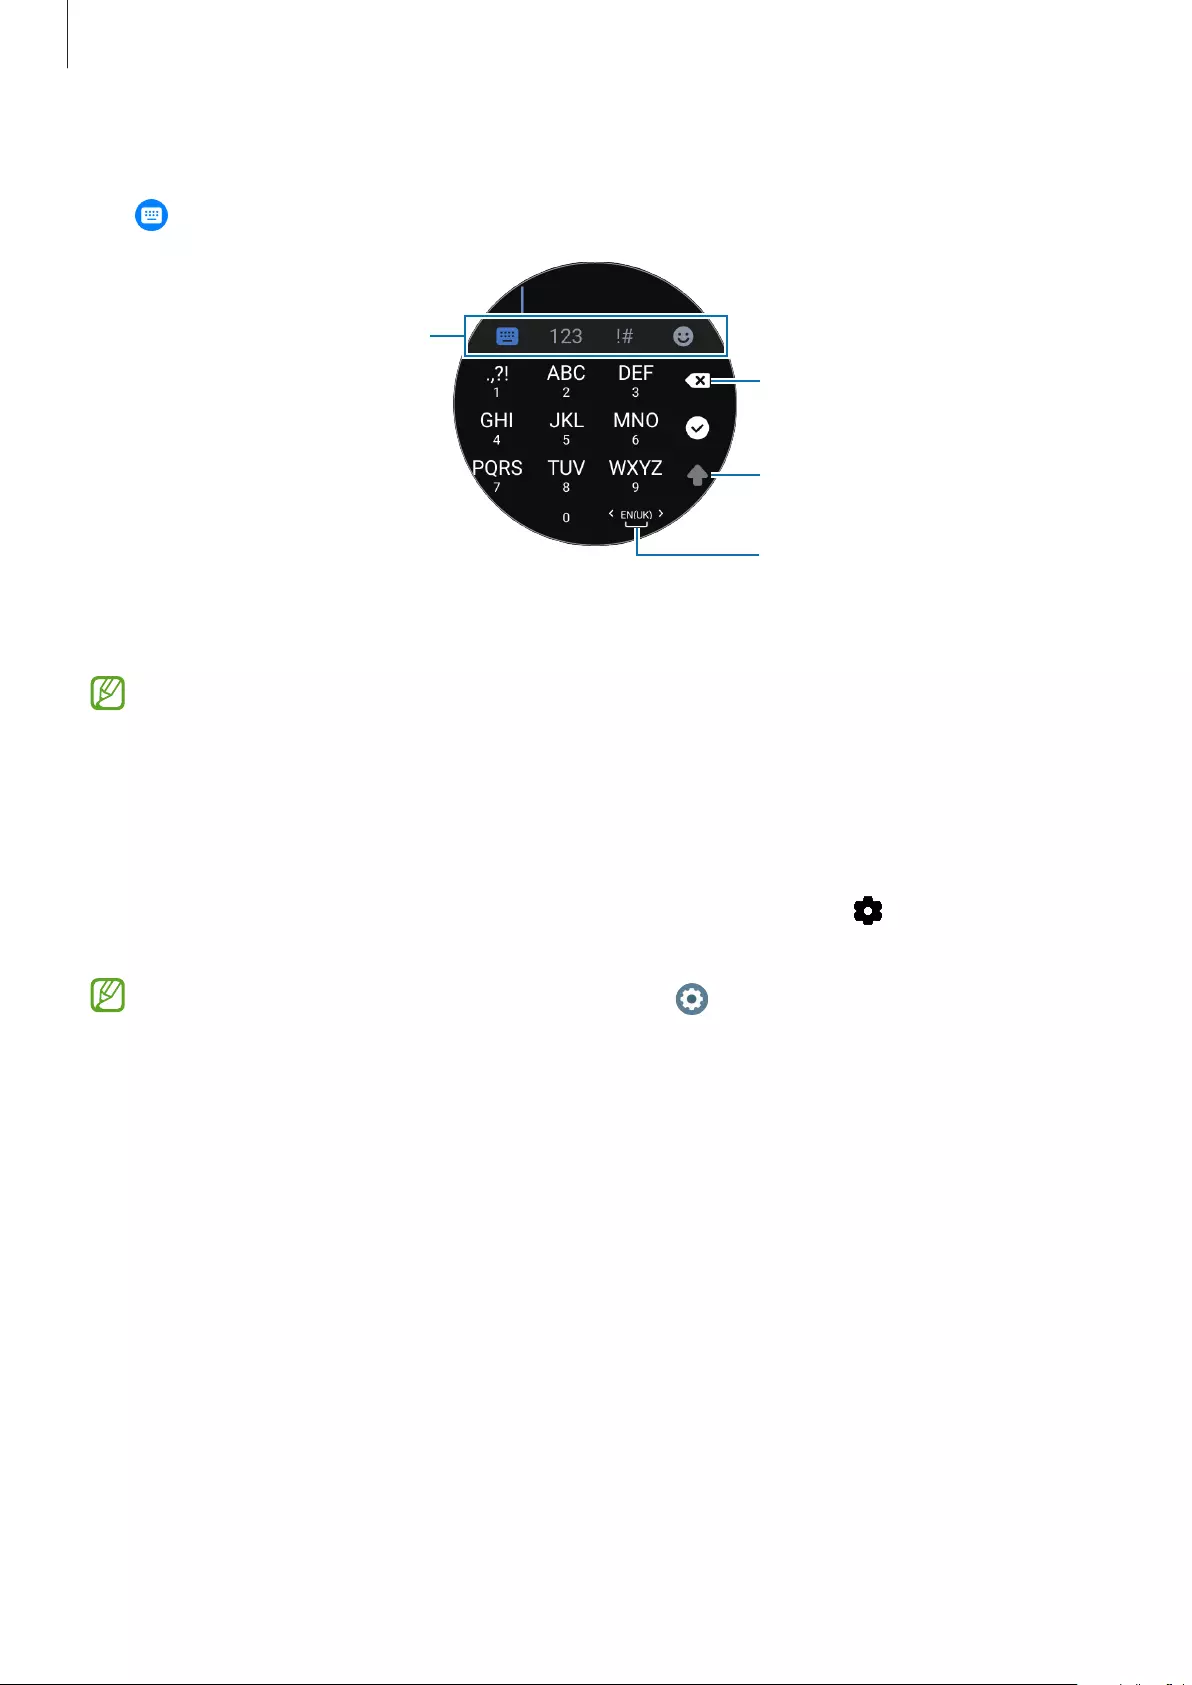
Getting Started
39
Entering with the keyboard
Tap and tap the input area to open the keyboard.
Delete a preceding character.
Enter uppercase. For all caps, tap
it twice.
Enter a space. Or, drag it to the
left or right while tapping and
holding it to change the input
language.
Change the input mode.
•
Text entry is not supported in some languages. To enter text, you must change the
input language to one of the supported languages.
•
The keyboard layout may differ depending on the region.
Setting the input language
Switch to number mode, punctuation mode, or emoji mode. Then, tap
→
Input
languages
→
Manage languages
and set a language. You can add up to two languages.
You can also set the input languages by tapping (
Settings
) on the Apps screen and
tapping
General
→
Input
→
Samsung Keyboard
→
Input languages
→
Manage
languages
.
40
Apps and features
Installing and managing apps
Play Store
Purchase and download apps.
Tap (
Play Store
) on the Apps screen. Browse apps by category or search for apps by
keyword.
•
Register the Google account on your Watch to use the Play Store app. Launch the
Galaxy Wearable
app on your smartphone, tap
Watch settings
→
Account and
backup
→
Google account
, and then follow the on-screen instructions to copy the
Google account from the smartphone to your Watch.
•
To change the auto update settings, tap
Settings
and tap the
Auto-update apps
switch to activate or deactivate it.
Setting app permissions
For some apps to operate properly, they may need permission to access or use information
on your Watch.
To view or change app permission settings by permission category, on the Apps screen, tap
(
Settings
)
→
Privacy
→
Permission manager
. Select an item and select an app.
If you do not grant permissions to apps, the basic features of the apps may not function
properly.
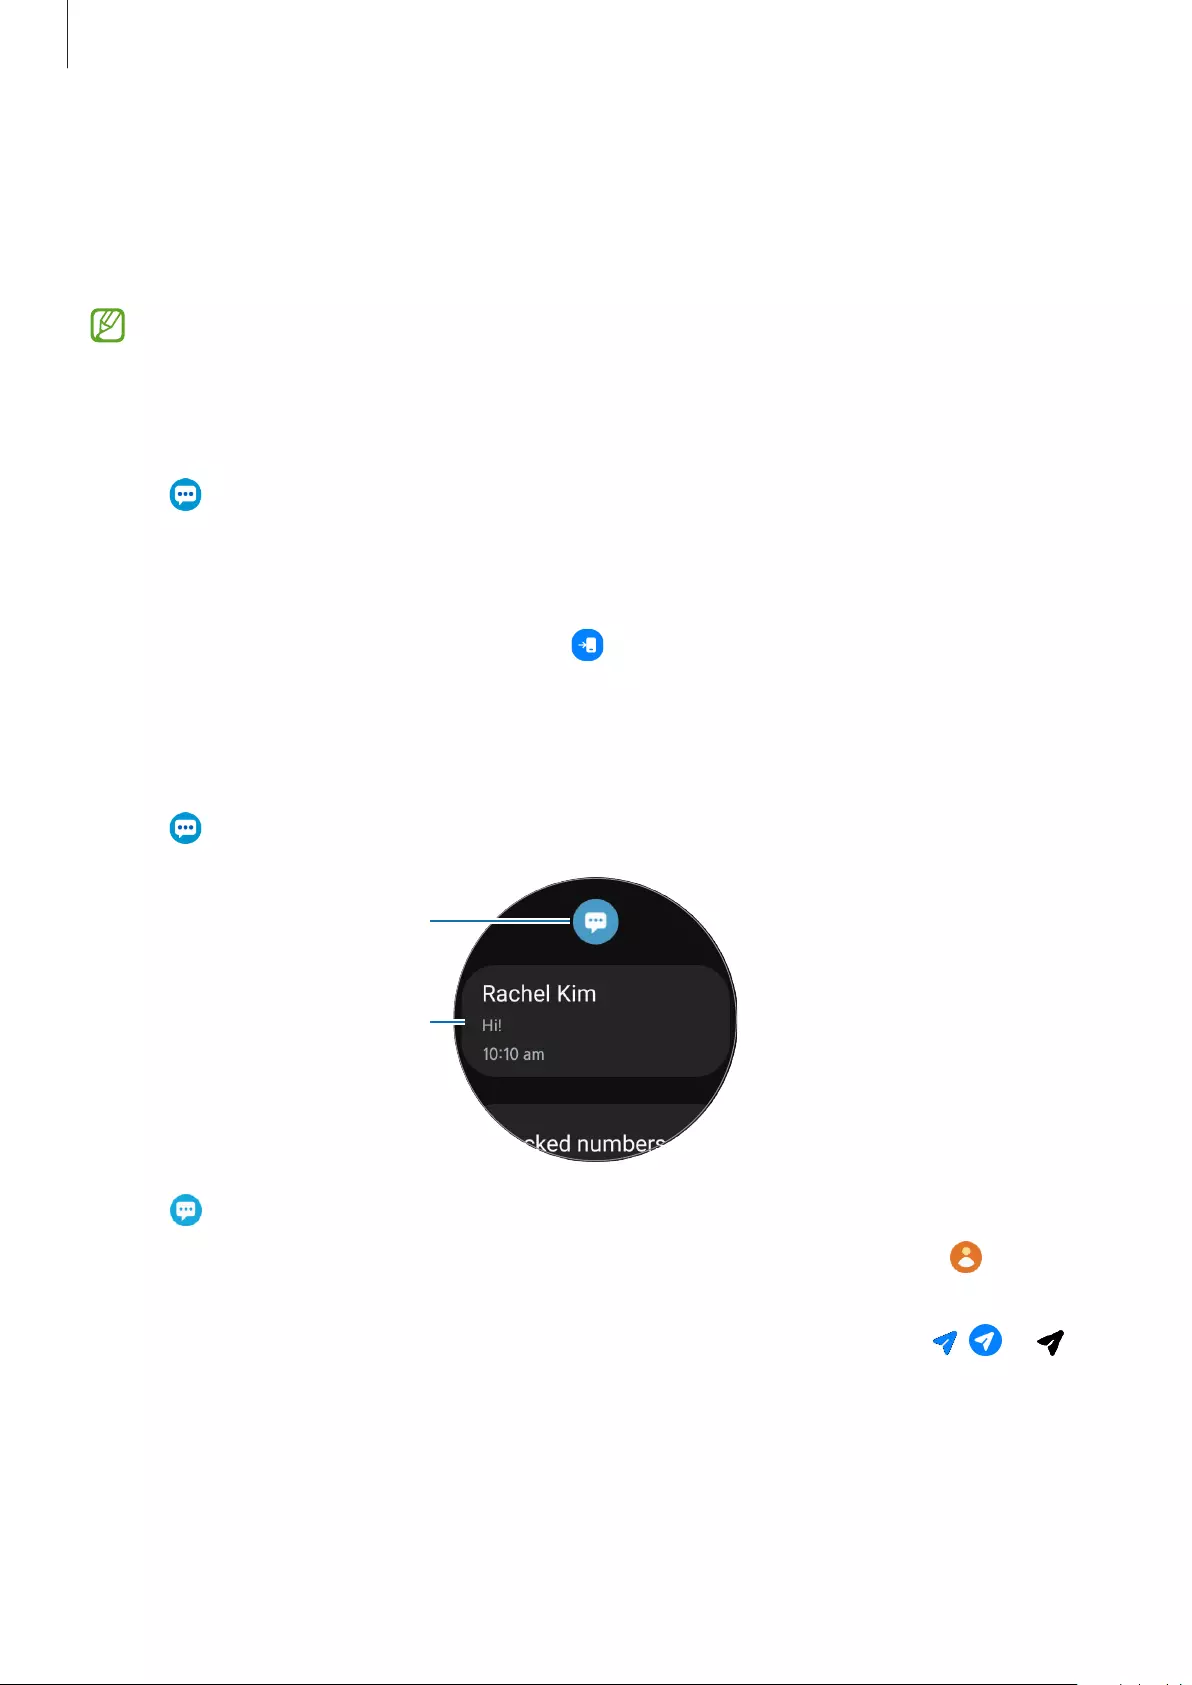
Apps and features
41
Messages
View messages and reply to using the Watch.
You may incur additional charges for sending or receiving messages when you are roaming.
The Android Messages app may be available depending on the region, and the settings
for the default messages app are synced with the connected smartphone.
Viewing messages
1 Tap (
Messages
) on the Apps screen.
Or, open the notification panel and view a new message.
2 Scroll through the message list, and then select a contact to view your conversations.
To view a message on your smartphone, tap .
To reply a message, select an input mode and enter your message.
Sending messages
1 Tap (
Messages
) on the Apps screen.
Create a new message.
Messages list
2 Tap .
3 Tap
Enter recipient
and enter a message recipient or phone number. Or, tap and select
a message recipient from the contacts list, and then tap
Next
.
4 Select a text template or an input mode, enter your message, and then tap , or .
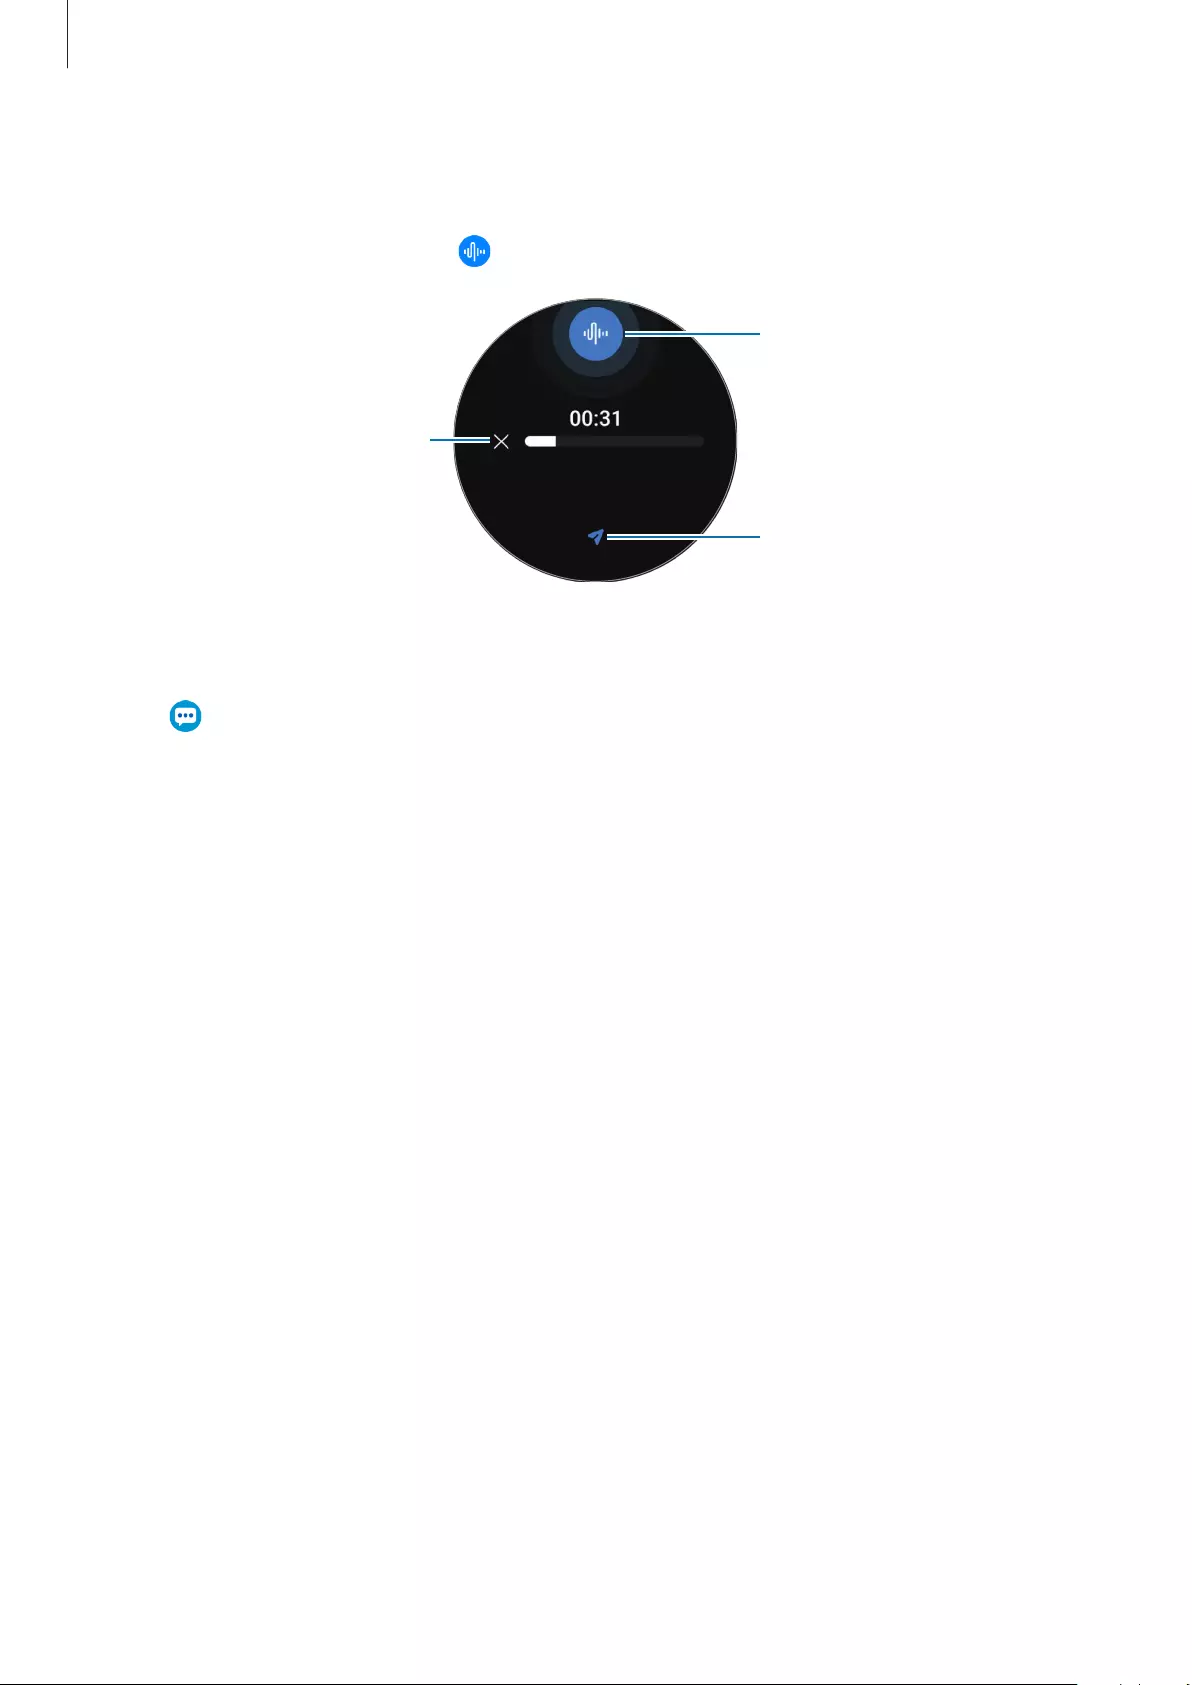
Apps and features
42
Recording and sending a voice message
You can send a voice file after recording what you want to say.
On the message input screen, tap and say what you want to be sent.
Recognising voice input
Stop recording voice.
Send a message.
Deleting messages
1 Tap (
Messages
) on the Apps screen.
2 Scroll through the message list, and then select a contact to view your conversations.
3 Tap and hold a message, then tap
Delete
.
To delete multiple messages, tap and hold a message, select messages you want to delete,
and then tap
Delete
.
The message will be deleted both from the Watch and the connected smartphone.
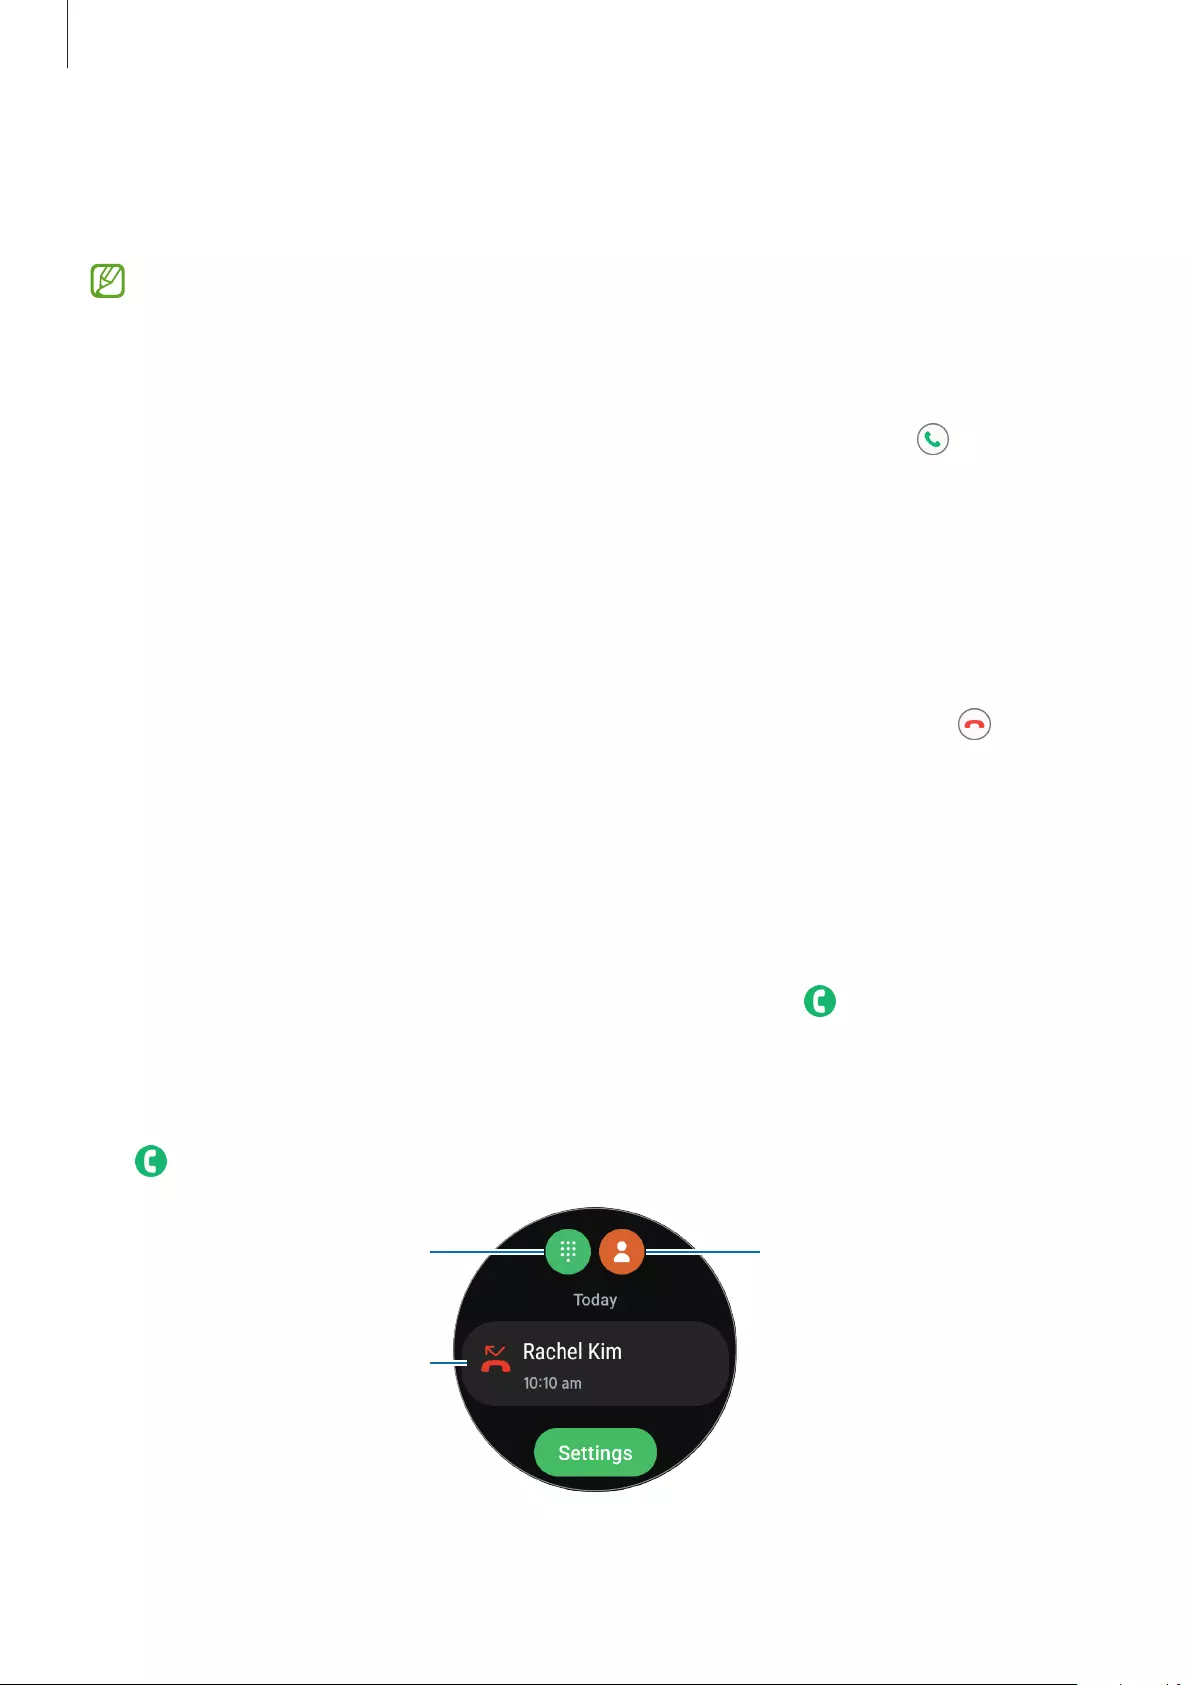
Apps and features
43
Phone
You can make calls and check incoming calls and receive them.
The sound may not be heard clearly during a call and only brief calls are available in
areas with weak signals.
Answering a call
When a call comes in, rotate or swipe the bezel clockwise. Alternatively, drag outside the
large circle.
You can have phone conversations via the Watch’s internal microphone, speaker, or a
connected Bluetooth headset.
Rejecting a call
You can reject incoming calls and send a rejection message to the caller.
When a call comes in, rotate or swipe the bezel anticlockwise. Alternatively, drag outside
the large circle.
To send a message when rejecting an incoming call, drag upwards from the bottom edge of
the screen and select the message you want.
Missed calls
If a call is missed, a missed call notification is displayed on the notification panel. On the
notification panel, view missed call notifications. Alternatively, tap (
Phone
) on the Apps
screen to view missed calls.
Making calls
Tap (
Phone
) on the Apps screen.
Keypad Contacts
Log list
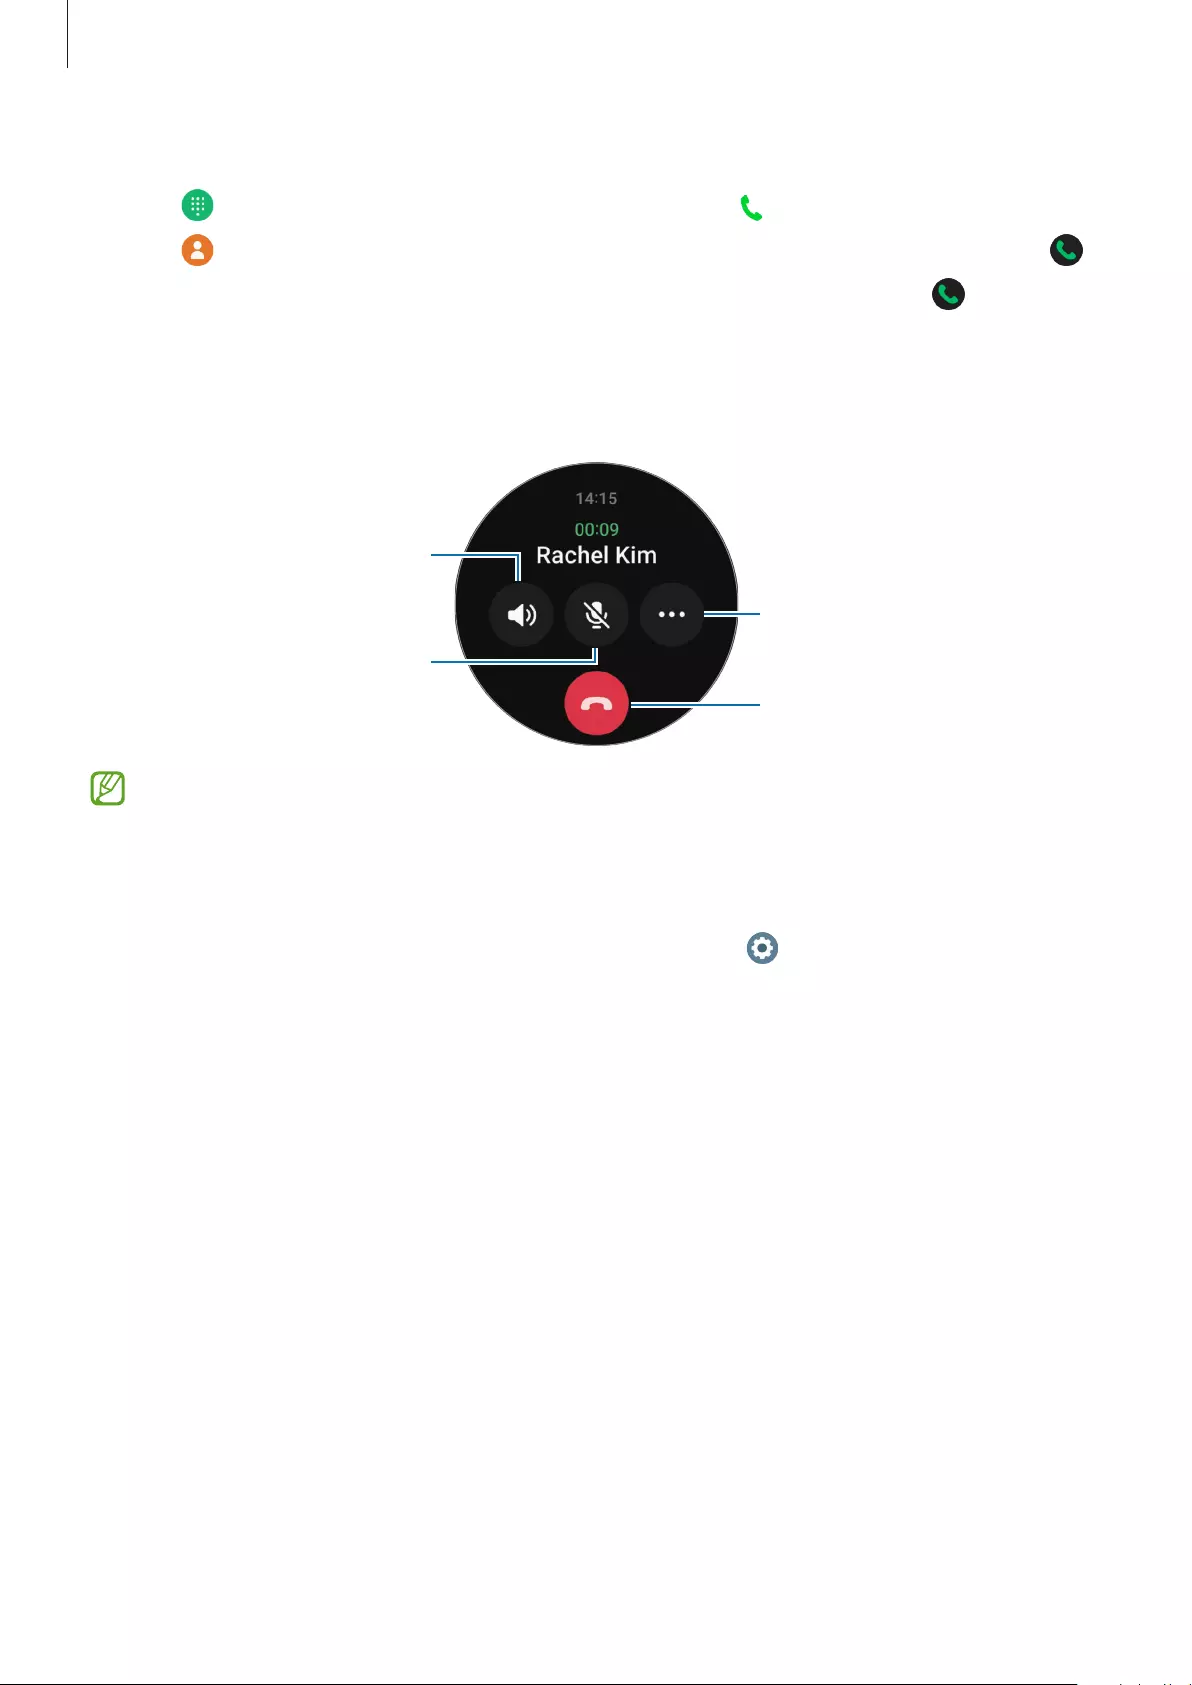
Apps and features
44
Use one of the following methods to make calls.
•
Tap , enter a number using the keypad, and then tap .
•
Tap , use the bezel or scroll through the contact list, select a contact, and then tap .
•
Use the bezel or scroll through the log list, select a log entry, and then tap .
Options during calls
The following actions are available:
Turn off the microphone so that
the other party cannot hear you.
Adjust the volume.
End the current call.
Access additional options.
The screen’s appearance may differ depending on the model.
Making a phone call with a Bluetooth headset
When a Bluetooth headset is connected, you can make phone calls with it. While the
Bluetooth headset is not connected, on the Apps screen, tap (
Settings
)
→
Connections
→
Bluetooth
. When the available Bluetooth devices list appears, select a Bluetooth headset
you want to use.
Apps and features
45
Contacts
You can make a call or send a message to a contact. The contacts saved on your connected
smartphone will be also saved to your Watch.
Tap (
Contacts
) on the Apps screen.
The favourites list contacts on the smartphone will display on the top of the contacts
list.
Use one of the following search methods:
•
Tap and enter the search criteria on the top of the contacts list.
•
Scroll through the contacts list.
•
Use the bezel. When you rotate or swipe the bezel quickly, the list scrolls by the alphabet
of the first letter.
Once a contact is selected, take one of the following actions:
•
: Make a voice call.
•
: Compose a message.
Selecting the frequently used contacts on the tile
Add the frequently used contacts from the
Contacts
tile to contact them directly via text
message or phone call. Tap
Add
→
and select contact.
•
To use this feature, you must add the
Contacts
tile. Refer to Using tiles for more
information.
•
Up to four contacts can be added on the tile.
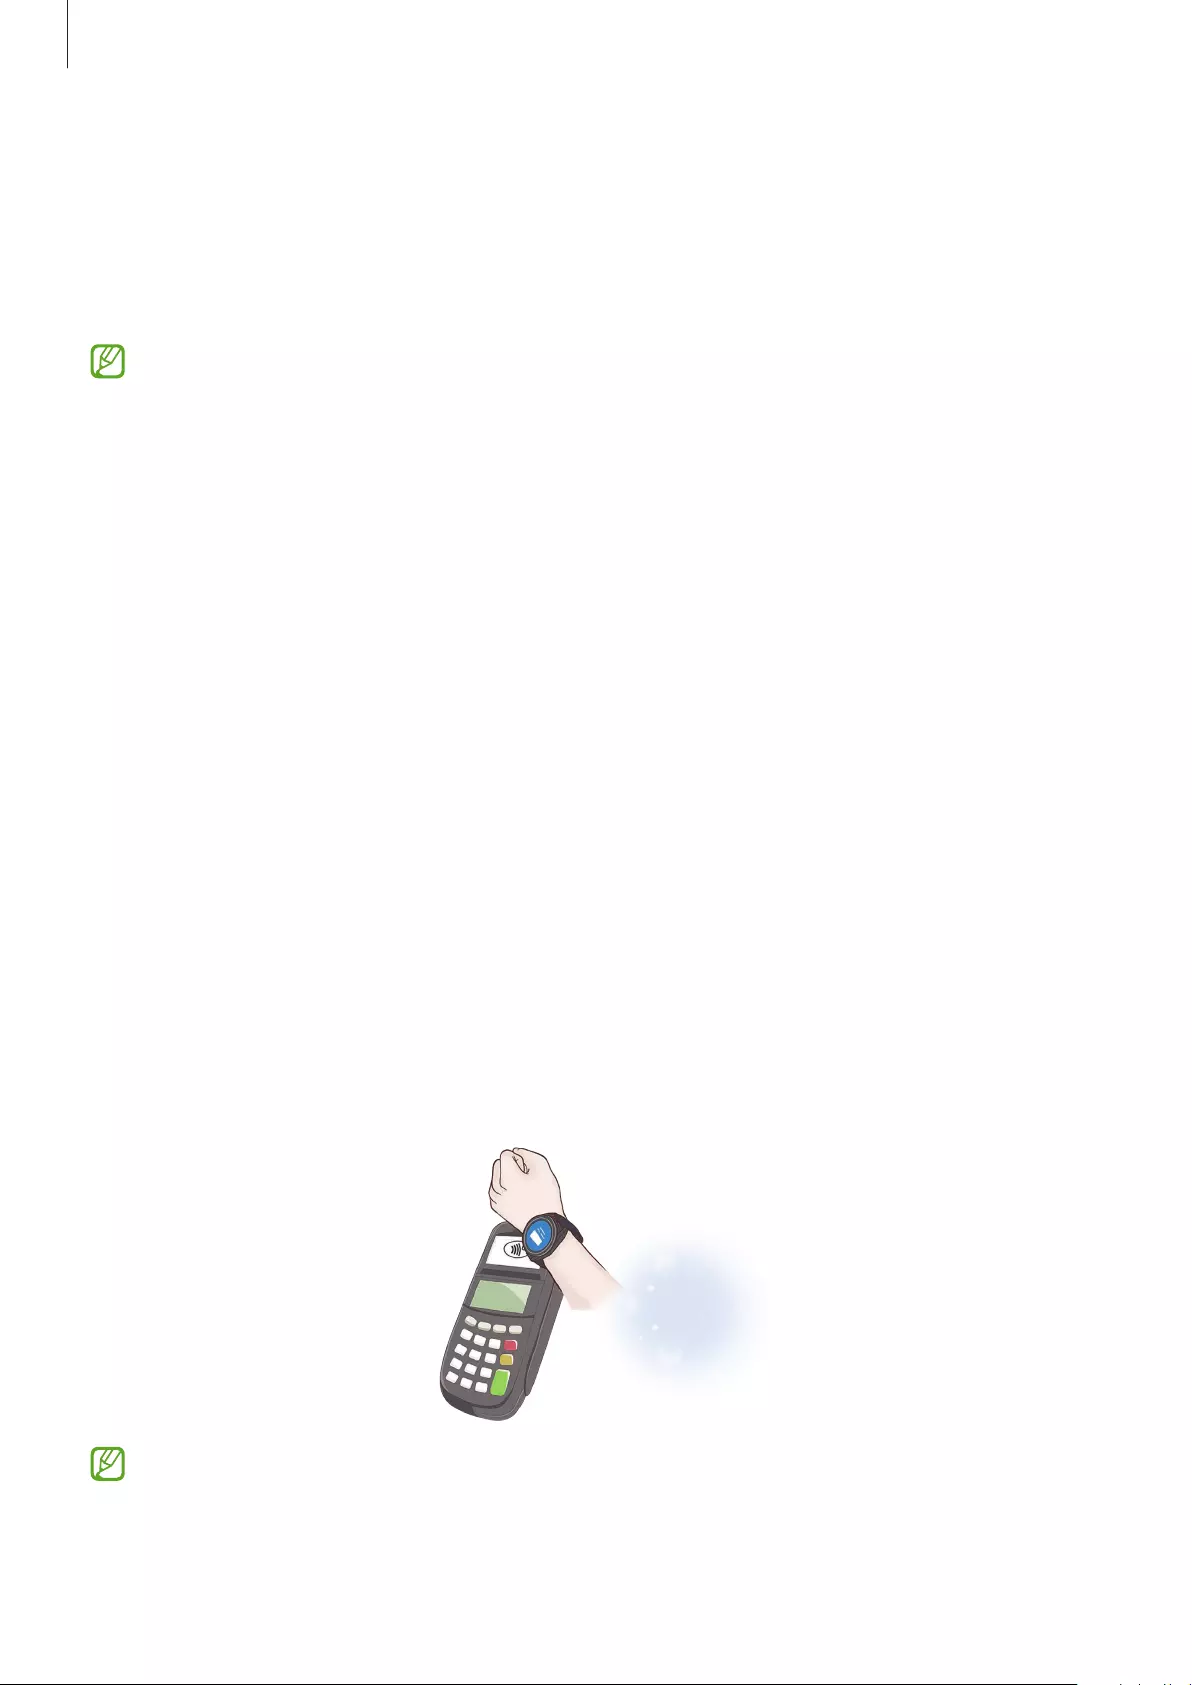
Apps and features
46
Samsung Pay
Register cards to Samsung Pay to make payments quickly and securely.
You can view more information, such as cards that support this feature at
www.samsung.com/samsung-pay.
•
To make payments with Samsung Pay, the device may be required a connection to a
Wi-Fi or mobile network depending on the region.
•
This feature may not be available depending on the service provider or model.
•
The procedures for the initial setup and card registration may vary depending on the
region or service provider.
Setting up Samsung Pay
1 On your smartphone, launch the
Galaxy Wearable
app.
2 Tap
Apps
→
App settings
→
Samsung Pay
and follow the on-screen instruction to
complete your card registration.
Making payments
1 To make a payment on your Watch, press and hold the Back key on the Watch screen or on
the Samsung Pay intro page.
2 Enter your PIN or draw the pattern you set.
3 Scroll through the cards list, select a card and tap
PAY
.
4 Place your Watch close to the card reader.
When the card reader recognises the card information, the payment will be processed.
•
Payments may not be processed depending on your network connection.
•
The verification method for payments may vary depending on the card readers.
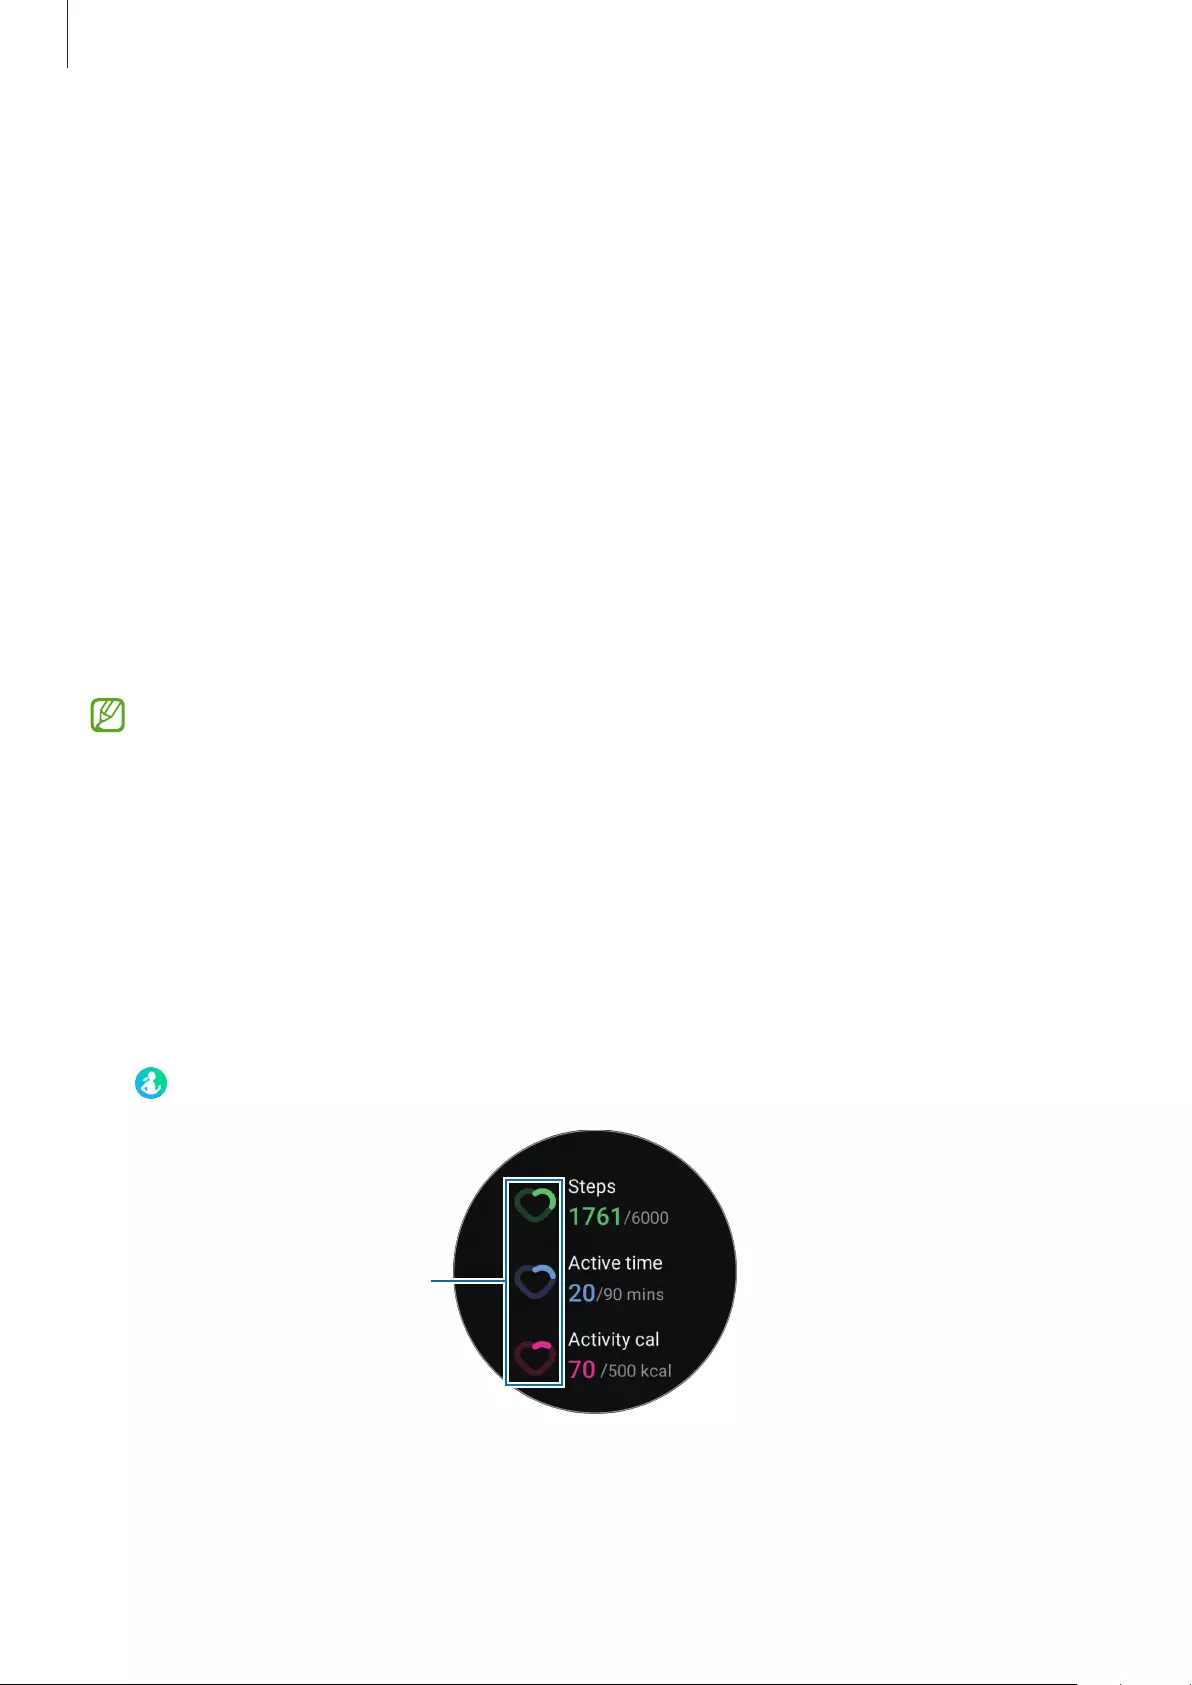
Apps and features
47
Samsung Health
Introduction
Samsung Health records and manages your 24-hour activity and sleep pattern to cultivate a
healthy habit. You can save and manage health-related data on the Samsung Health app of
the connected smartphone.
After exercising for more than 10 minutes (for running, 3 minutes) while wearing the Watch,
the automatic exercise recognition feature will be activated. Also the Watch will notify you
and show you some stretching motions to follow or it will show you a screen encouraging
you to engage in light activity when the Watch recognises inactivity for more than
50 minutes. When your Watch recognises that you are driving or sleeping, it may not notify
you and not display a stretching screen although you are physically inactive.
Visit www.samsung.com/samsung-health for more information.
Samsung Health features are intended only for leisure, well-being, and fitness purposes.
They are not intended for medical use. Before using these features, read the instructions
carefully.
Daily activity
Check your current daily status, such as steps, active times, activity calories, and their targets,
and related information.
Checking your daily activity
Tap (
Samsung Health
) on the Apps screen and tap
Daily activity
.
Target achievement graph

Apps and features
48
•
Steps
: Check the amount of steps you walk throughout the day. As you approach your
step target, the graph will increase.
•
Active time
: Check the total time you were physically active throughout the day. As you
approach your active time target by doing light activities, such as stretching, or walking,
the graph will increase.
•
Activity cal
: Check the total amount of calories you spent doing an activity throughout
the day. As you approach your activity calories target, the graph will increase.
To view additional information which is related to your daily activity, use the bezel or swipe
upwards or downwards on the screen.
Setting the daily activity target
1 Tap (
Samsung Health
) on the Apps screen.
2 Tap
Daily activity
and tap
Set targets
.
3 Select an activity option.
4 Use the bezel or swipe upwards or downwards on the screen to set the target.
5 Tap
Done
.
Setting up notifications
To receive a notification when reaching a target you’ve set, tap (
Samsung Health
) on
the Apps screen, select
Settings
→
Notification
, and then tap the
Daily activity
switch to
activate it.
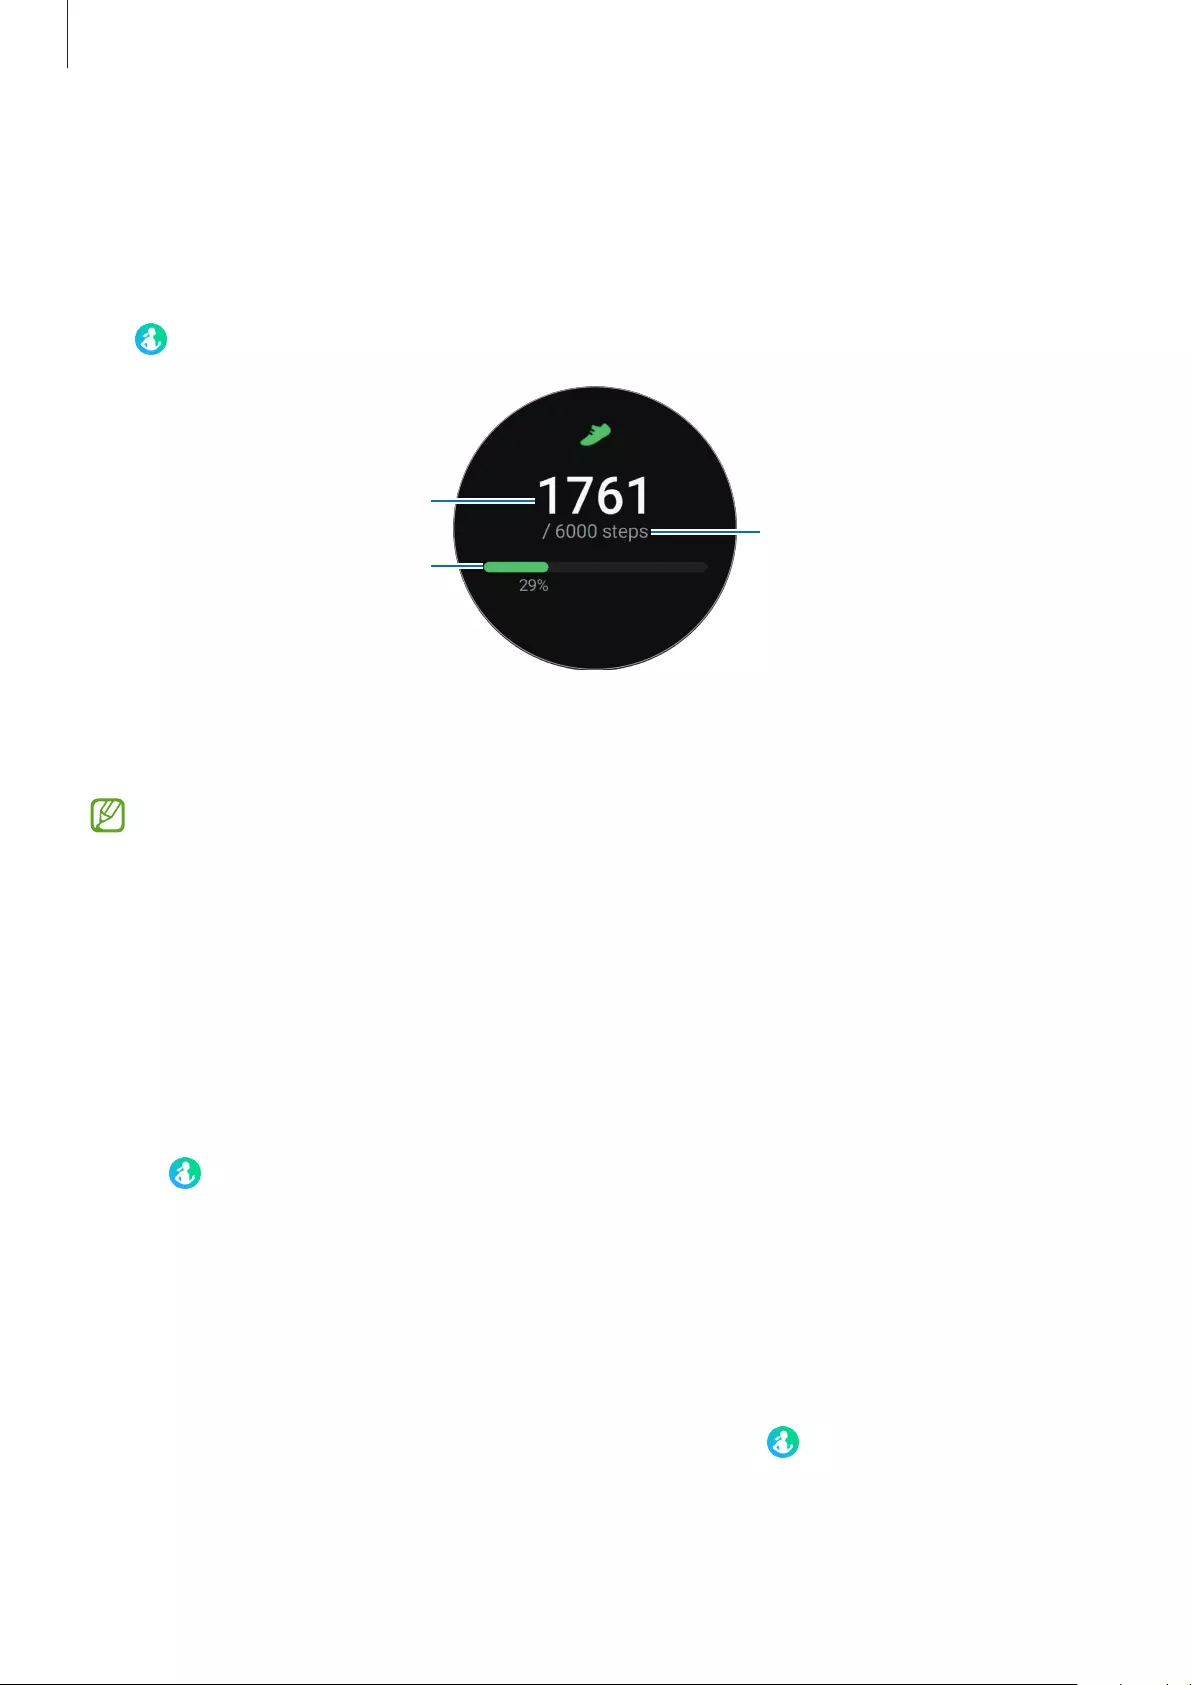
Apps and features
49
Steps
The Watch counts the number of steps you have taken.
Measuring your step count
Tap (
Samsung Health
) on the Apps screen and tap
Steps
.
Target
Target achievement graph
Current step total
To view additional information which is related to the steps, use the bezel or swipe upwards
or downwards on the screen.
•
When you start to measure your step, the step tracker monitors your steps and
displays your step count after a brief delay because your Watch accurately recognises
your movement after you walk for a while. Also, for an accurate step count, you may
experience a brief delay before the notification indicates that a certain goal has been
reached.
•
If you use the steps tracker while travelling by car or train, vibration may affect your
step count.
Setting the step target
1 Tap (
Samsung Health
) on the Apps screen.
2 Tap
Steps
and tap
Set target
.
3 Use the bezel or swipe upwards or downwards on the screen to set the target.
4 Tap
Done
.
Setting up notifications
To receive a notification when reaching a target you’ve set, tap (
Samsung Health
) on the
Apps screen, select
Settings
→
Notification
, and then tap the
Steps
switch to activate it.
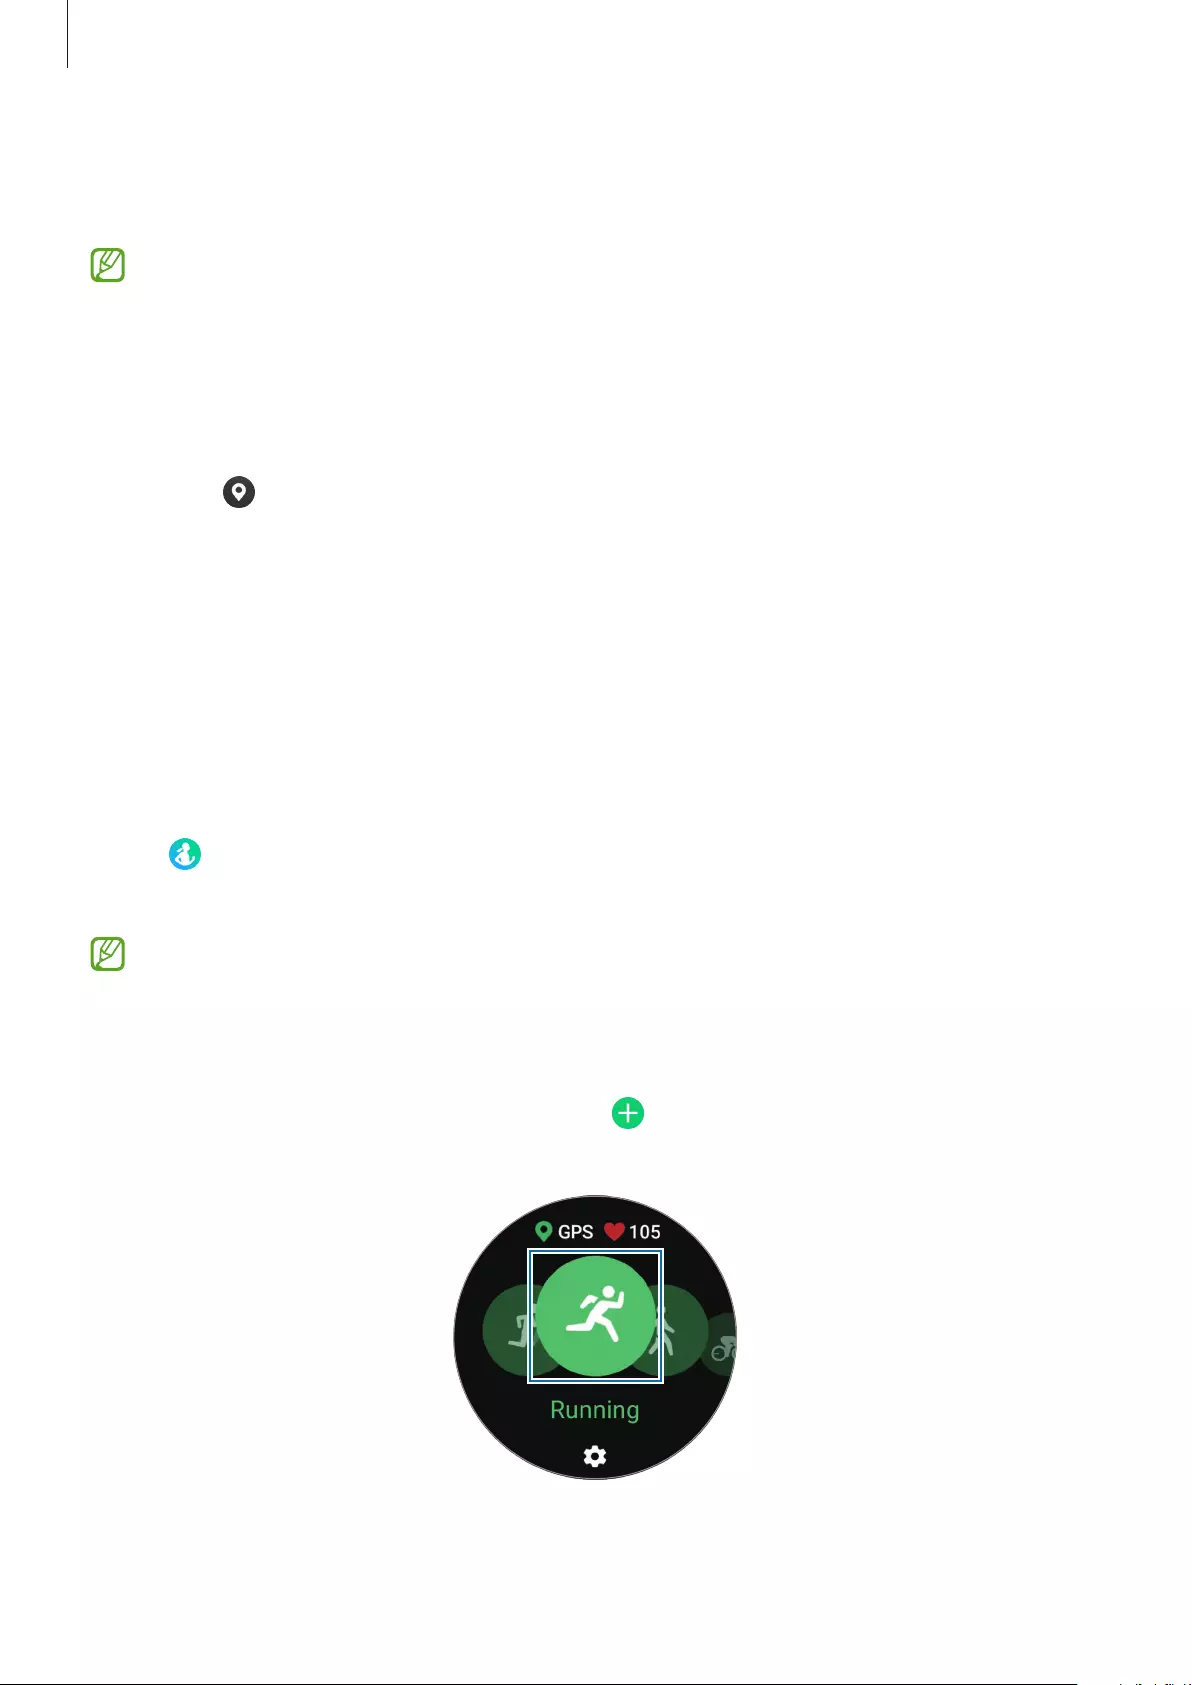
Apps and features
50
Exercise
Record your exercise information and check the results.
•
Before using this feature, pregnant women, the elderly, and young children, users
suffering from conditions, such as chronic heart disease or high blood pressure, are
recommended to seek the advice of a licenced medical professional.
•
If you feel dizzy, experience pain, or have difficulty breathing during exercise, stop
exercising immediately and seek the advice of a licenced medical professional.
•
Open the quick panel by dragging downwards from the top edge of the screen, and
tap to activate the location information feature when you use your Watch for the
first time after purchasing or resetting it.
Be aware of following conditions before exercising in cold weather conditions:
•
Avoid using the device in cold weather. If possible, use the device indoors.
•
If you use the device outside in cold weather, cover the Watch with your sleeves before
using it.
Starting exercises
1 Tap (
Samsung Health
) on the Apps screen.
2 Tap
Exercise
→
Choose workout
.
You can start exercising directly from the
Multi-workouts
tile after adding workouts to
it.
3 Use the bezel or swipe left or right on the screen to select an exercise type you want and
begin.
When there is no exercise type you want, tap , and then select an exercise type you
want.
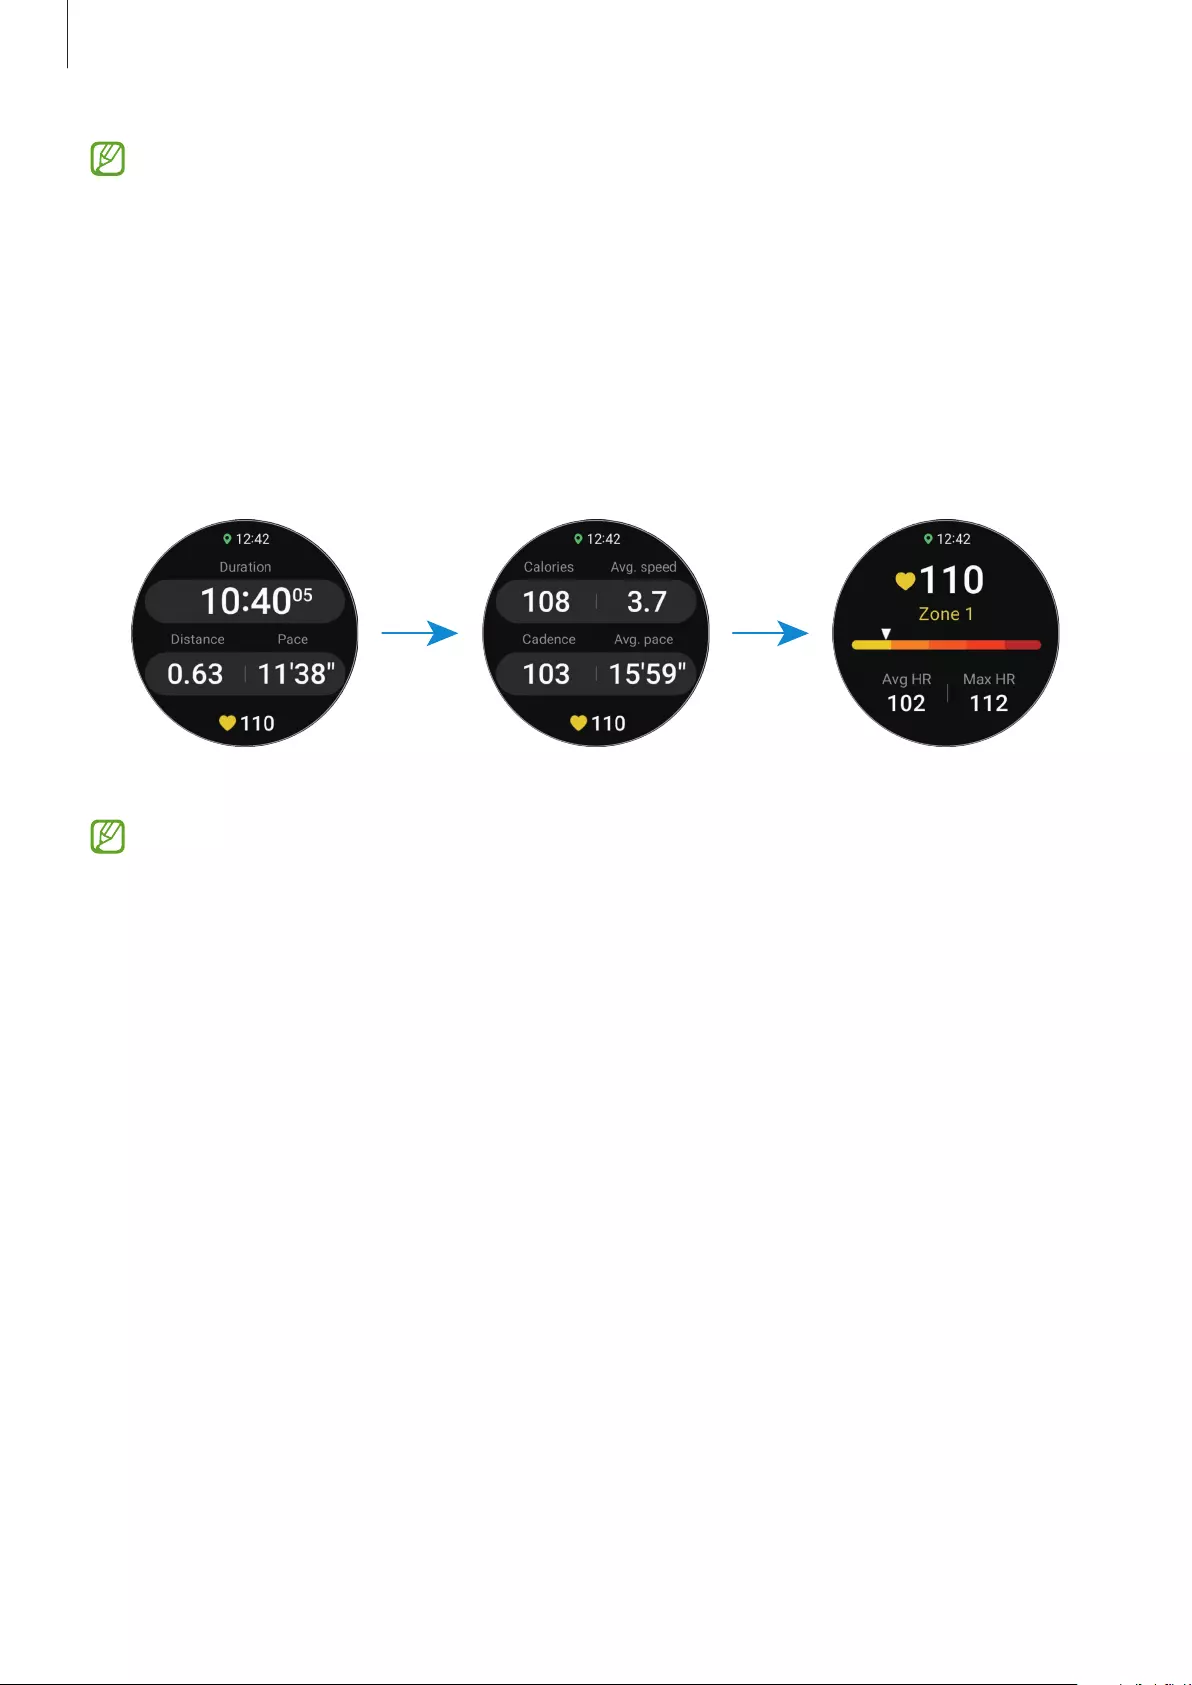
Apps and features
51
•
Your heart rate is measured when you start exercising. For accurate measurements,
wear the Watch firmly around your lower arm above the wrist. Refer to How to wear
the Watch for accurate measurements for more information.
•
Do not move until your heart rate displays on the screen so it can be measured more
accurately.
•
Your heart rate may not be visible temporarily due to various conditions such as the
environment, your physical state, or how the Watch is worn.
4 Use the bezel or swipe upwards or downwards on the screen to view exercise information,
such as your heart rate, distance, or time, on the workout screen.
You can play music by swiping left on the screen.
•
When you select
Swimming (pool)
or
Swimming (outdoor)
, water lock mode will be
automatically activated and the touchscreen will be disabled.
•
When you select
Swimming (pool)
or
Swimming (outdoor)
, the recorded value may
not be accurate in following cases:
–
If you stop swimming before reaching the completion point
–
If you change your swimming stroke midstream
–
If you stop moving your arms before reaching the completion point
–
If you kick with your legs on a kickboard or swim without moving your arms
–
If you swim with only one arm
–
If you swim under water
–
If you do not pause or restart the exercise, but finish the exercise while resting

Apps and features
52
5 Swipe right on the screen and tap
Finish
.
To pause or restart the exercise, swipe right on the screen and tap
Pause
or
Resume
.
Alternatively, press and hold the Back key.
•
To finish or pause swimming, first press and hold the Home key to deactivate water
lock mode, shake your Watch to completely remove any water from it to ensure that
the atmospheric pressure sensor will work properly, and then tap
OK
.
•
Music will continue to play even if you finish exercising. To stop playing music, stop
music before finishing exercising or launch the
Music
app or
Media Controller
app
to stop playing music.
6
Use the bezel or swipe upwards or downwards on the screen after finishing the exercise
and view your exercise results.
Doing multiple exercises
You can log various exercises and go straight through an entire routine by starting another
exercise right after finishing the current exercise.
Swipe right on the screen while working out, tap
New
, and then select the next exercise type
to begin.
To finish swimming, first press and hold the Home key to deactivate water lock
mode, shake your Watch to completely remove any water from it to ensure that the
atmospheric pressure sensor will work properly, and then tap
OK
.
Starting repetitive exercises
When you perform repetitive exercises such as squats or deadlifts, your Watch will count how
many times you repeat the motion with beeping.
1 Tap (
Samsung Health
) on the Apps screen.
2 Tap
Exercise
→
Choose workout
.
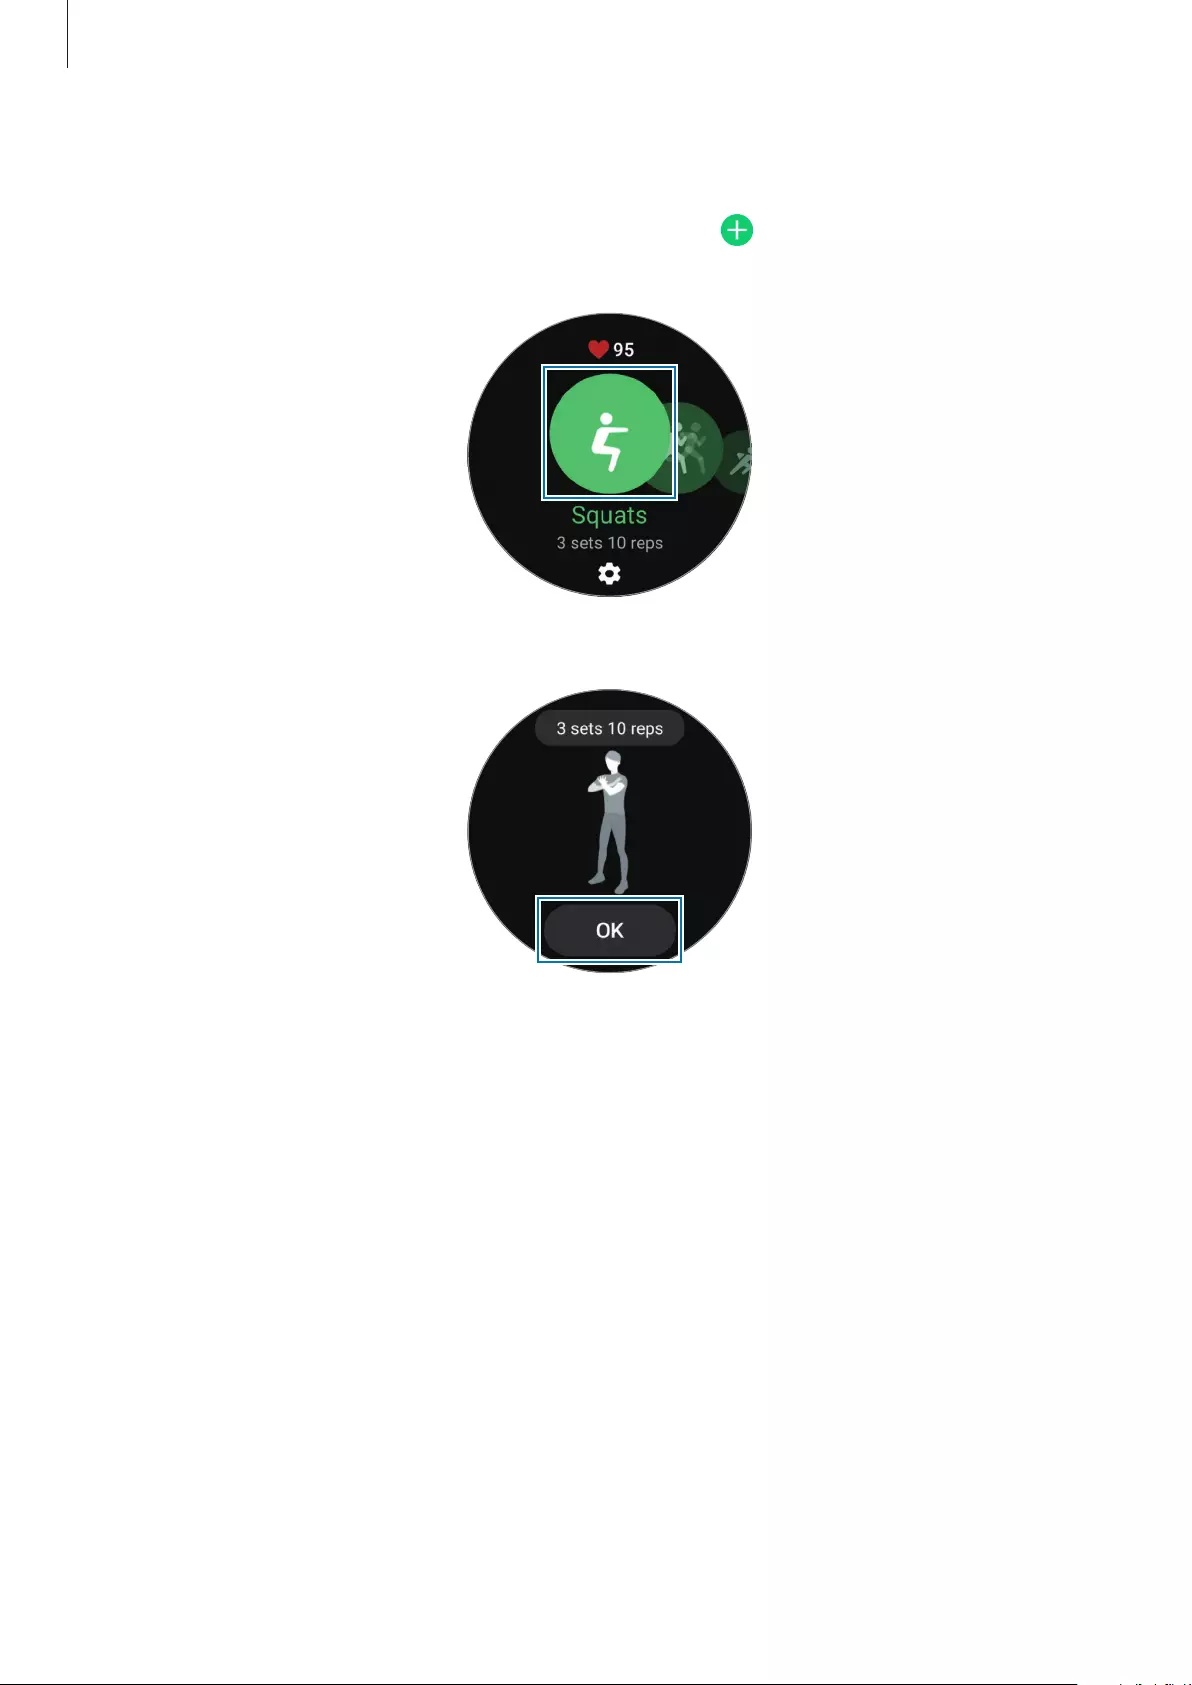
Apps and features
53
3 Use the bezel or swipe left or right on the screen to select a type of repetitive exercise you
want and begin.
When there is no repetitive exercise type you want, tap , and then select an exercise
type you want.
4 Tap
OK
and get into the proper position to start by following the pose on the screen.
5 Counting will begin with beeping.
Take a rest after completing a set. Or, tap
Skip
if you want to skip to the next set. The
exercise will begin after you get into the proper position to start it by following the pose
on the screen.
6 Swipe right on the screen and tap
Finish
.
To pause or restart the exercise, swipe right on the screen and tap
Pause
or
Resume
.
Alternatively, press and hold the Back key.
7
Use the bezel or swipe upwards or downwards on the screen after finishing the exercise
and view your exercise results.

Apps and features
54
Setting the exercise
1 Tap (
Samsung Health
) on the Apps screen.
2 Tap
Exercise
→
Choose workout
.
3 Tap under each exercise type and set the various exercise options.
•
Pool length
: Set the pool length.
•
Target
: Activate the exercise target feature and set it.
•
Workout screen
: Set the screens that appear while you are working out.
•
Coaching messages
: Set to receive coaching messages for proper pacing while
working out.
•
Guide frequency
: Set to receive guidance whenever you reach the distance, point, or
time you set.
•
Auto lap
: Set to record the lap time manually by tapping the screen twice quickly or
automatically at regular distances, times, or swimming laps while working out.
•
Auto pause
: Set the Watch’s exercise feature to pause automatically when you stop
working out.
•
Audio guide
: Turn the audio guide on or off.
•
Wrist worn on
: Select the wrist that you wear your Watch to improve the counting
accuracy.
You can also change certain settings while exercising. While working out, swipe right on
the screen and tap
Settings
.
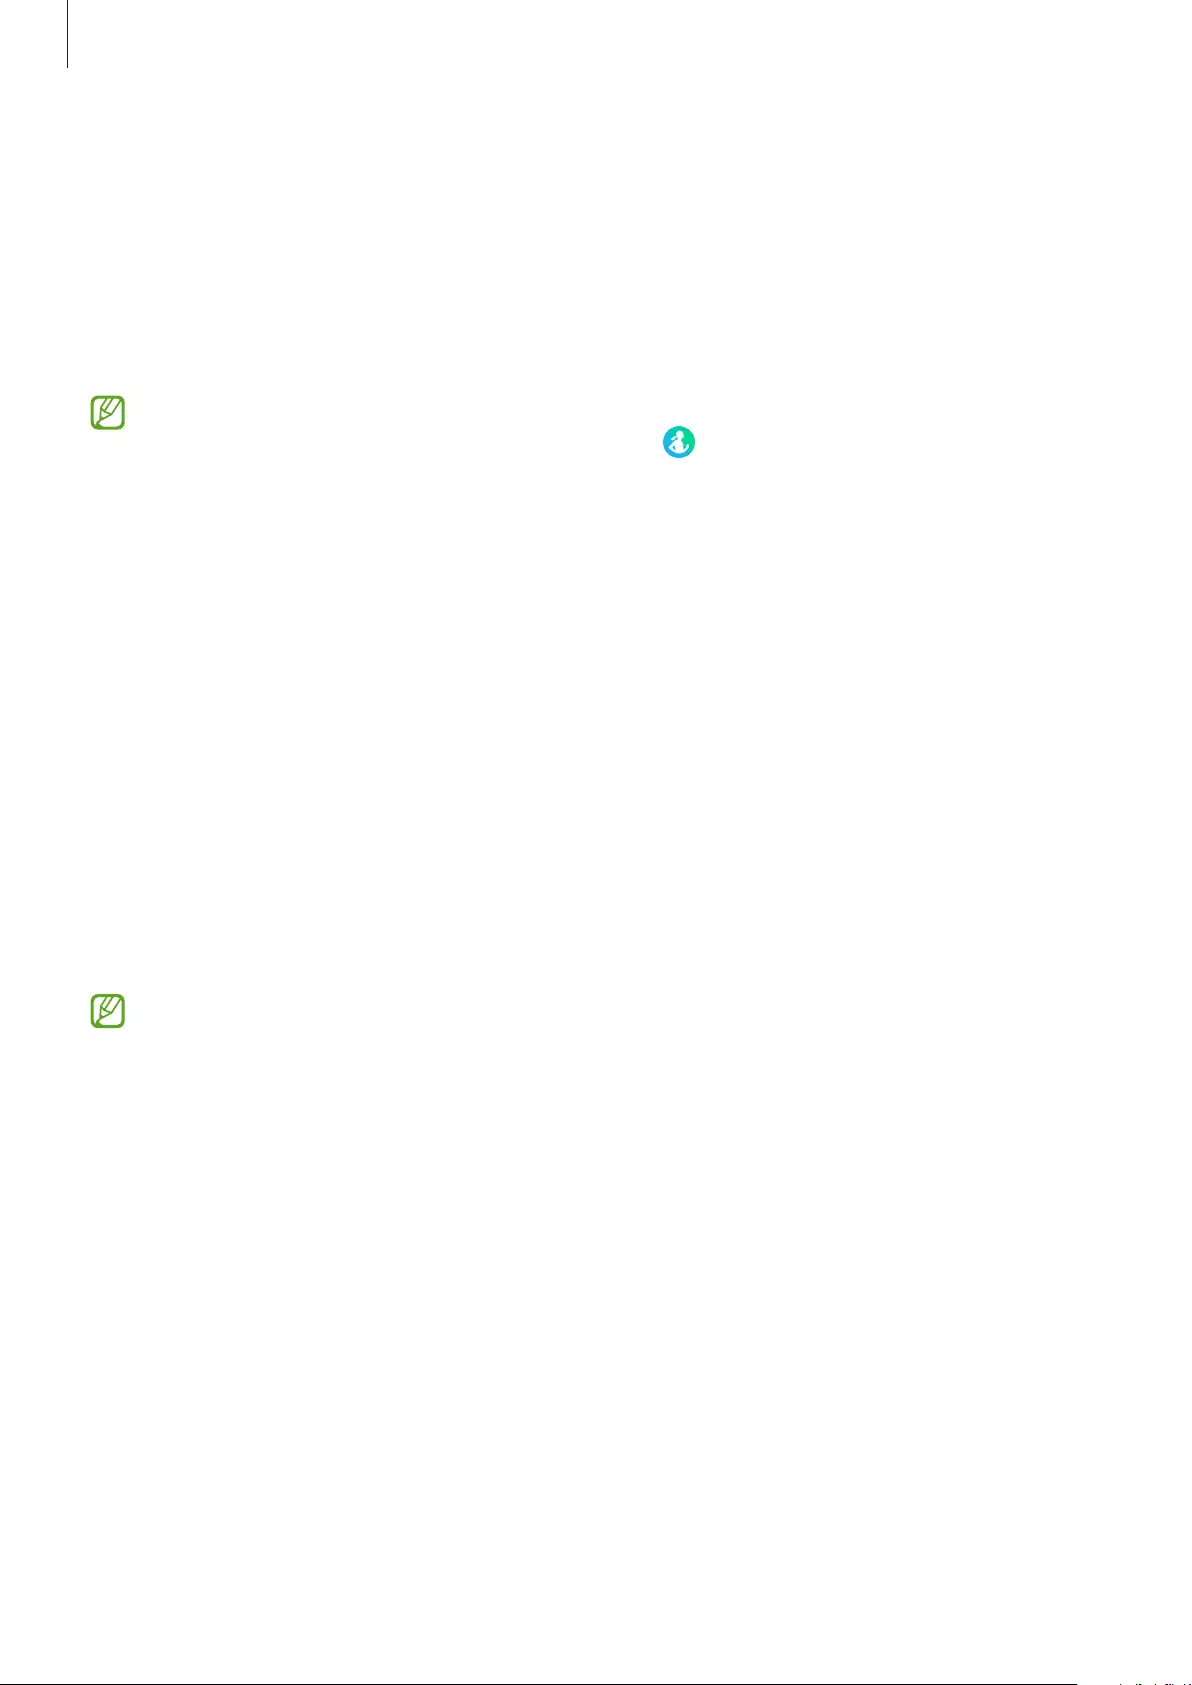
Apps and features
55
Automatic exercise recognition
Once you have engaged in an activity for more than 10 minutes (for running, 3 minutes) while
wearing the Watch, it automatically recognises that you are exercising and records exercise
information such as the exercise type, duration and calories burned.
When you stop doing some exercises for more than one minute, the Watch automatically
recognises that you have stopped exercising and recording will end.
•
You can check the list of exercises which are supported by the automatic exercise
recognition feature. On the Apps screen, tap (
Samsung Health
) and tap
Settings
→
Auto detect workouts
.
•
The automatic exercise recognition feature measures the time you spent exercising
and calories burnt using the acceleration sensor. The measurements may not be
accurate depending on your manner of walking, exercise routines, and lifestyle.
•
If you are walking or running, the Watch may provide the feature that allows you
to switch to manual exercise after they are automatically recognised. If you want to
record in detail, including the course you are working out, switch to manual exercise.
In this case, you must finish the Watch’s exercise feature manually when finishing the
exercise.
Sleep
Analyse your sleep and record it by measuring your heart rate and your movement while you
are sleeping.
•
The sleep pattern will have its four states (Awake, REM, Light, Deep) analysed by
using your movement and changes in your heart rate while you are sleeping. A graph
will be provided with recommended ranges for each measured sleep state.
•
If your heart rate is irregular or your Watch cannot recognise your heart rate properly,
the sleep pattern will be analysed into three states (Restless, Light, Motionless).
•
The snoring detection feature can be activated on the Samsung Health app (version
6.18 or higher) of the connected smartphone. Also, you must place the connected
smartphone’s microphone so it faces you.
•
You can check the detailed sleep analysis only when your Watch is connected to your
smartphone.
•
Before measuring, charge the Watch’s battery so it is more than 30%.
•
For accurate measurements, wear the Watch firmly around your lower arm above
the wrist. Refer to How to wear the Watch for accurate measurements for more
information.
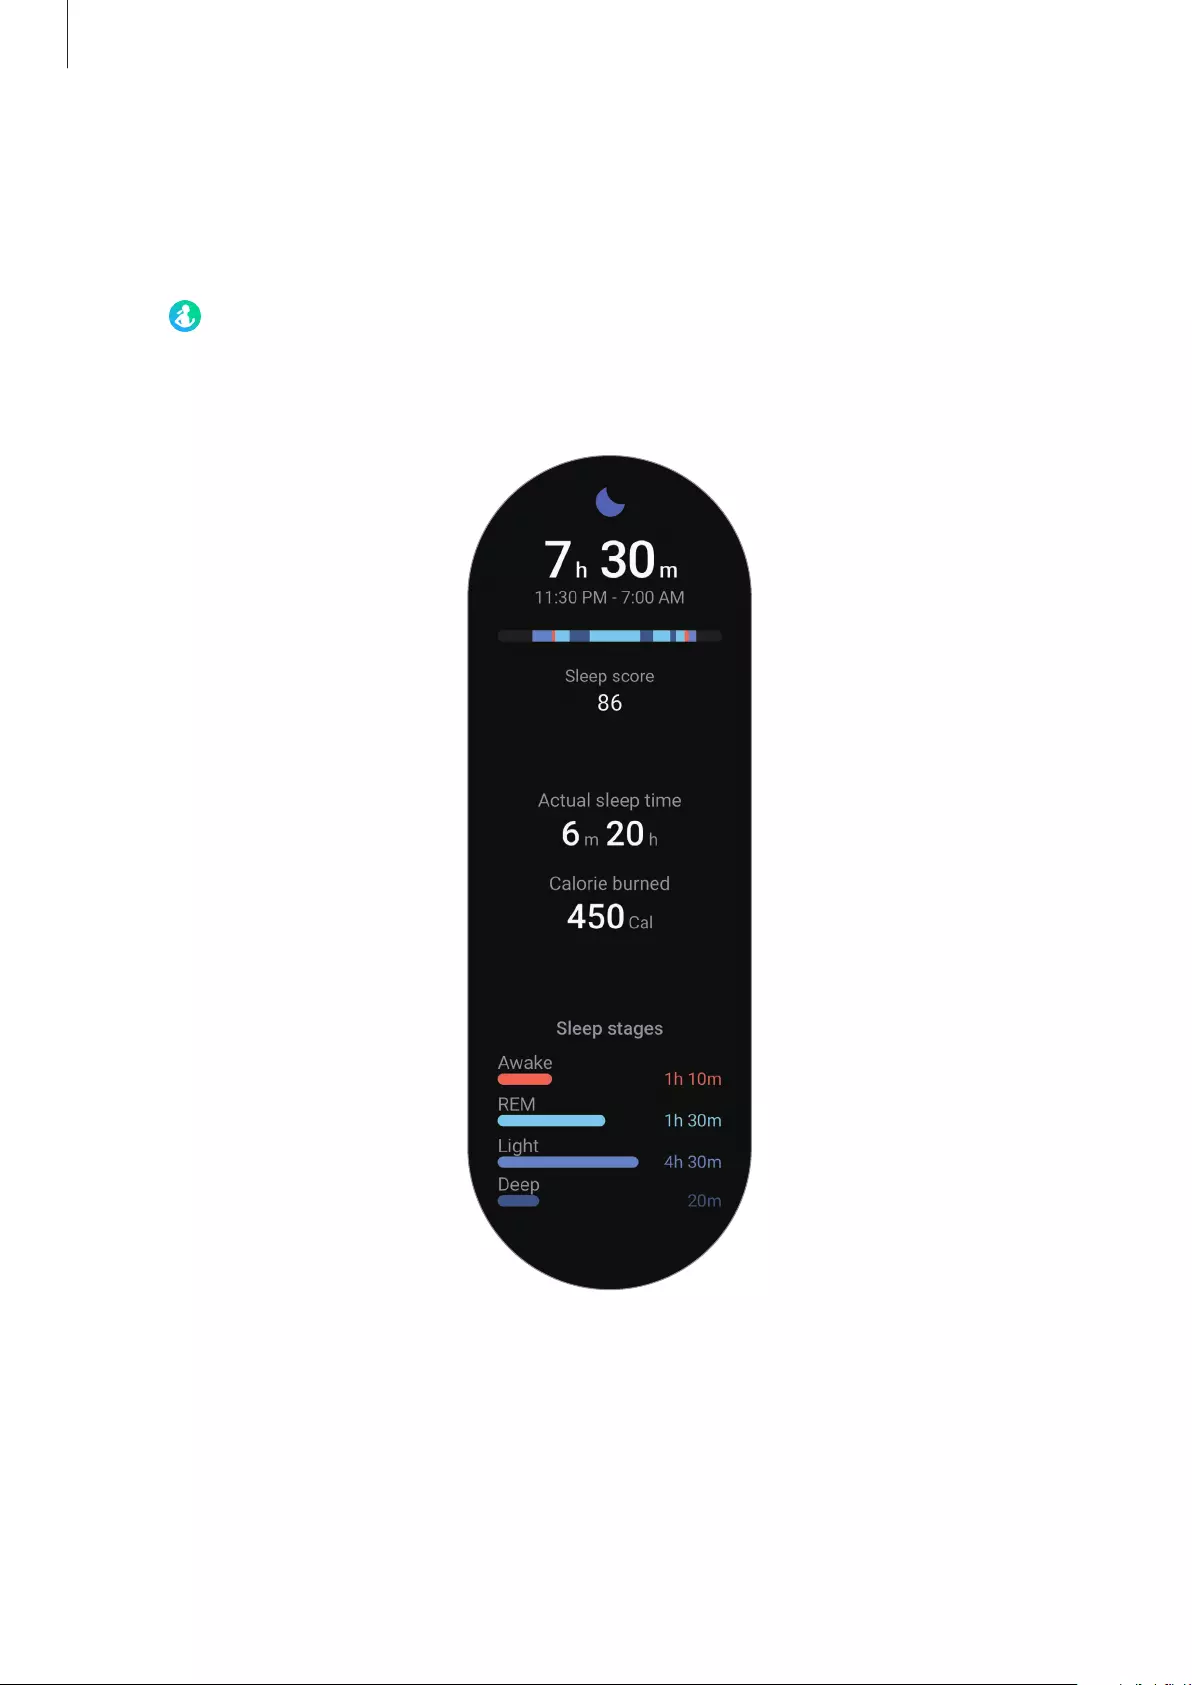
Apps and features
56
Measuring your sleep
1 Sleep while wearing the Watch.
The Watch will start to measure your sleep.
2 Tap (
Samsung Health
) on the Apps screen after you wake up.
3 Tap
Sleep
.
4 View all information related to your measured sleep.

Apps and features
57
Heart rate
Measure and record your heart rate.
The Watch’s heart rate tracker is intended for fitness and informational purposes only
and is not intended for use in the diagnosis of disease or other conditions, or in the
cure, mitigation, treatment, or prevention of disease.
For accurate measurements, wear the Watch firmly around your lower arm above the
wrist. Refer to How to wear the Watch for accurate measurements for more information.
Be aware of following conditions before measuring your heart rate:
•
Rest for 5 minutes before taking measurements.
•
If the measurement is very different from the expected heart rate, rest for 30 minutes and
then measure it again.
•
During winter or in cold weather, keep yourself warm when measuring your heart rate.
•
Smoking or consuming alcohol before taking measurements may cause your heart rate
to be different from your normal heart rate.
•
Do not talk, yawn, or breathe deeply while taking heart rate measurements. Doing so
may cause your heart rate to be recorded inaccurately.
•
Heart rate measurements may vary depending on the measurement method and the
environment they are taken in.
•
If the sensor is not working, check the Watch’s position on your wrist and make sure
nothing is obstructing the sensor. If the sensor continues to have the same problem, visit
a Samsung Service Centre.
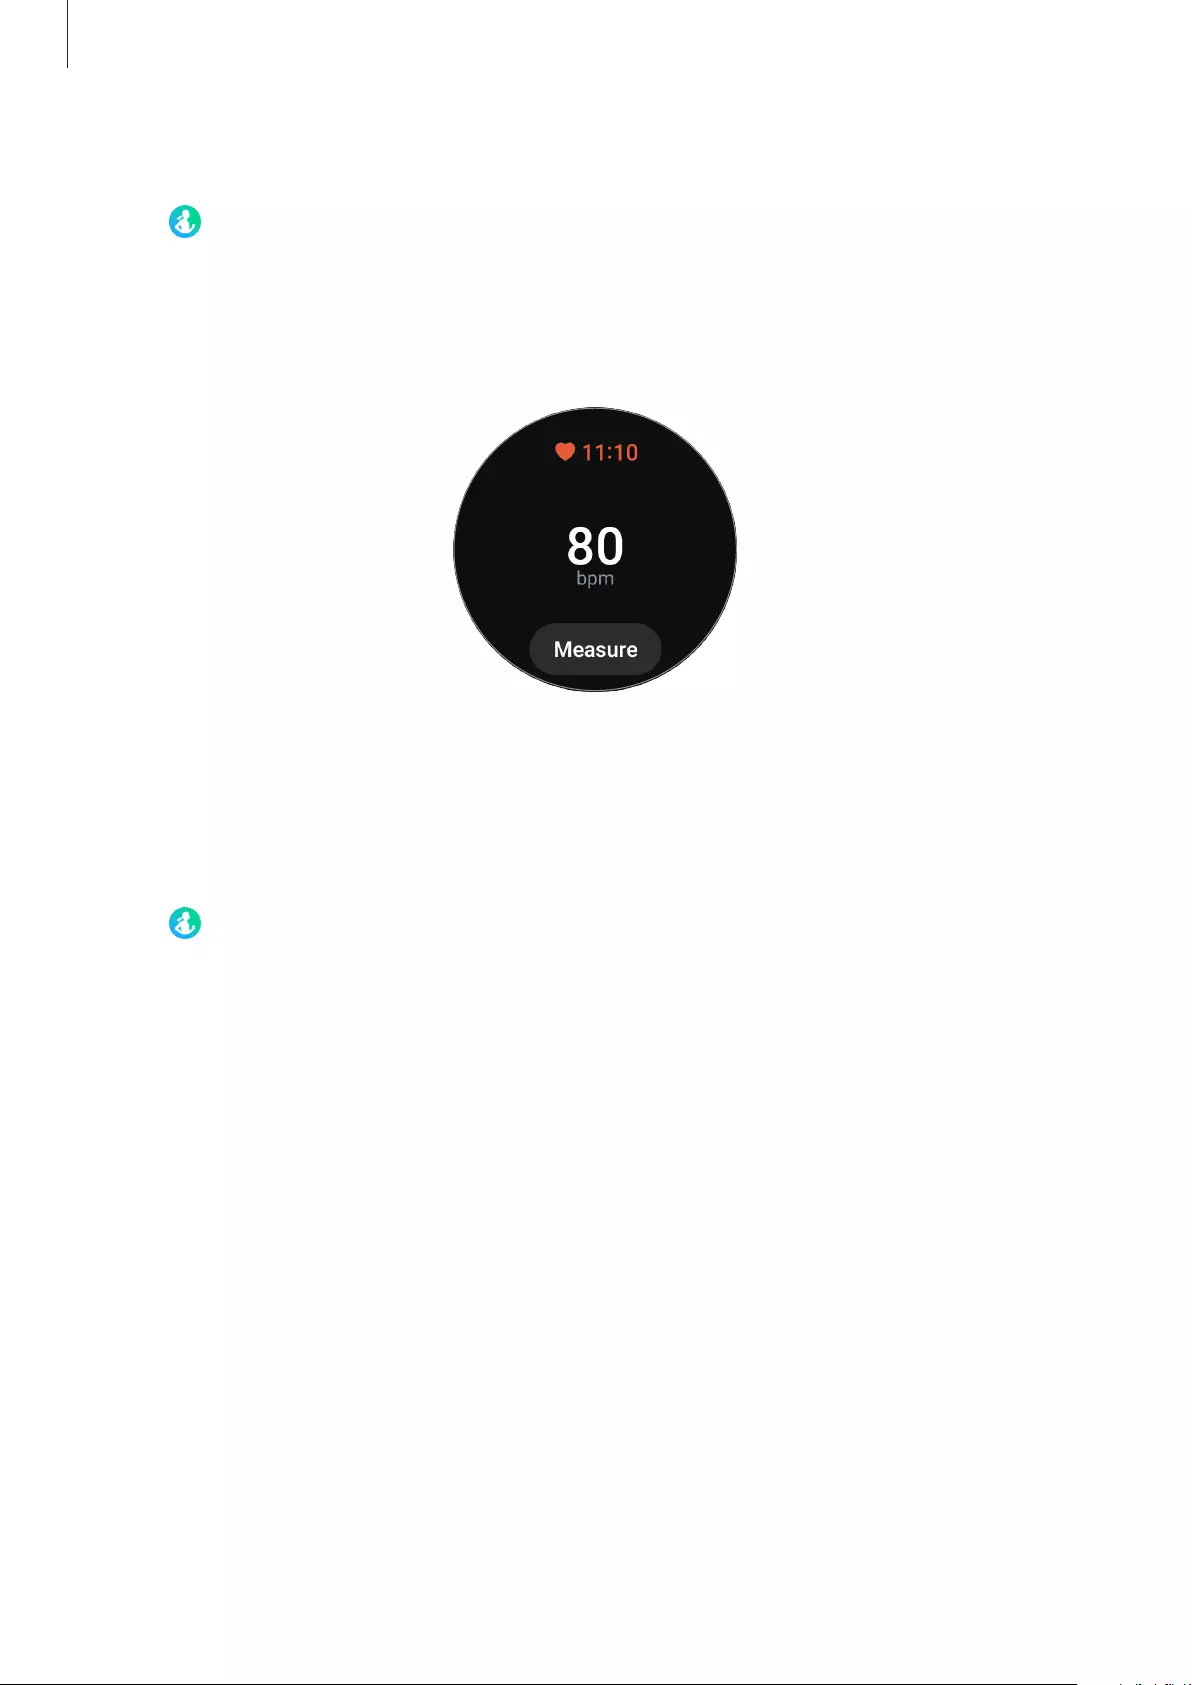
Apps and features
58
Measuring your heart rate manually
1 Tap (
Samsung Health
) on the Apps screen.
2 Tap
Heart rate
.
3 Tap
Measure
to begin measuring your heart rate.
Check the measured heart rate on the screen.
To view additional information which is related to the heart rate, use the bezel or swipe
upwards or downwards on the screen.
Changing the heart rate measurement settings
1 Tap (
Samsung Health
) on the Apps screen.
2 Tap
Settings
→
Measurement
.
3 Select the measurement setting under
Heart rate
.
•
Measure continuously
: Your heart rate will be measured continuously. In this case, you
can find additional information, such as your maximum heart rate, on the screen.
•
Every 10 mins while still
: Your heart rate will be measured every 10 minutes while
resting.
•
Manual only
: Your heart rate will be measured manually only when tapping
Measure
.
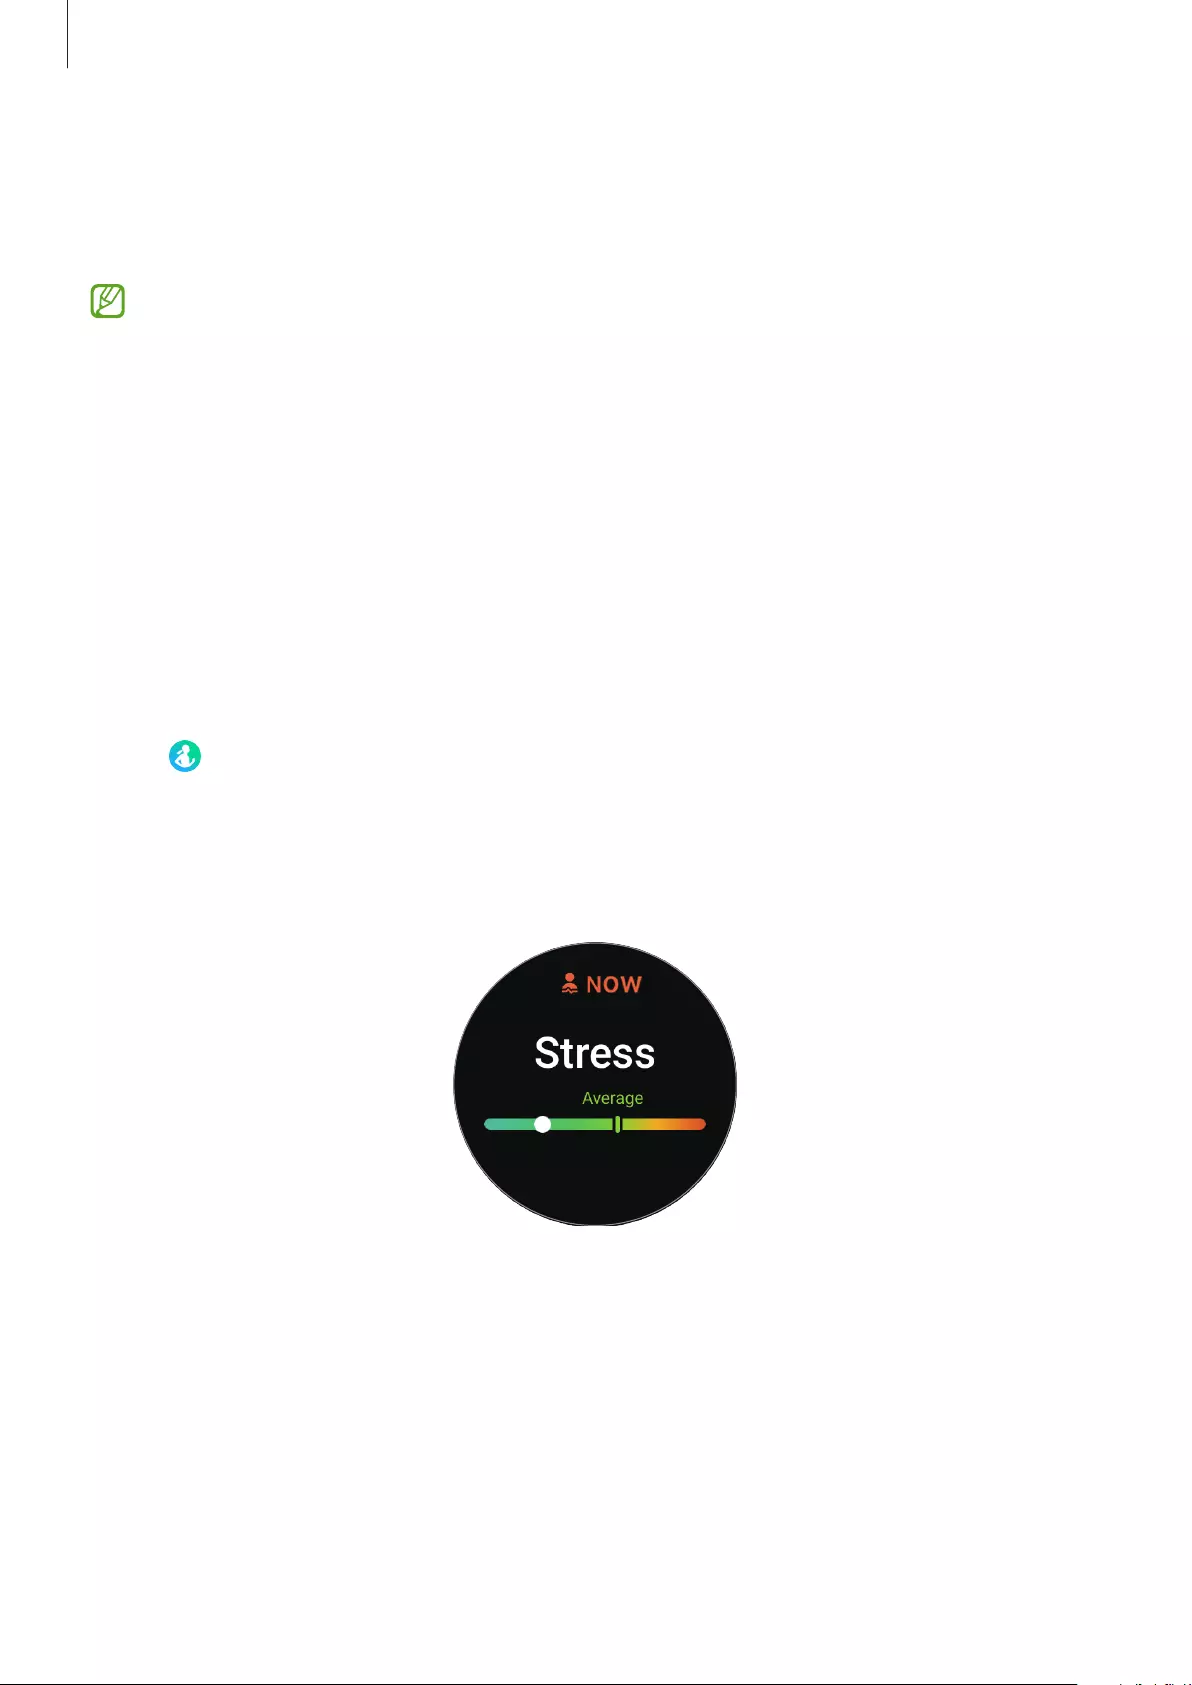
Apps and features
59
Stress
Check your stress level by using changes in your heart rate and reduce your stress by
following the breathing exercise that the Watch provides.
•
The more frequently you measure your stress level, the more accurate your results
will be due to the accumulated data.
•
Your measured stress level is not necessarily related to your emotional state.
•
Your stress level may not be measured, while you are sleeping, working out, moving
a lot, or immediately after you finish a workout.
•
For accurate measurements, wear the Watch firmly around your lower arm above
the wrist. Refer to How to wear the Watch for accurate measurements for more
information.
•
This feature may not be available depending on the region.
Measuring your stress level manually
1 Tap (
Samsung Health
) on the Apps screen.
2 Tap
Stress
.
3 Tap
Measure
to begin measuring your stress level.
Check the measured stress level on the screen.
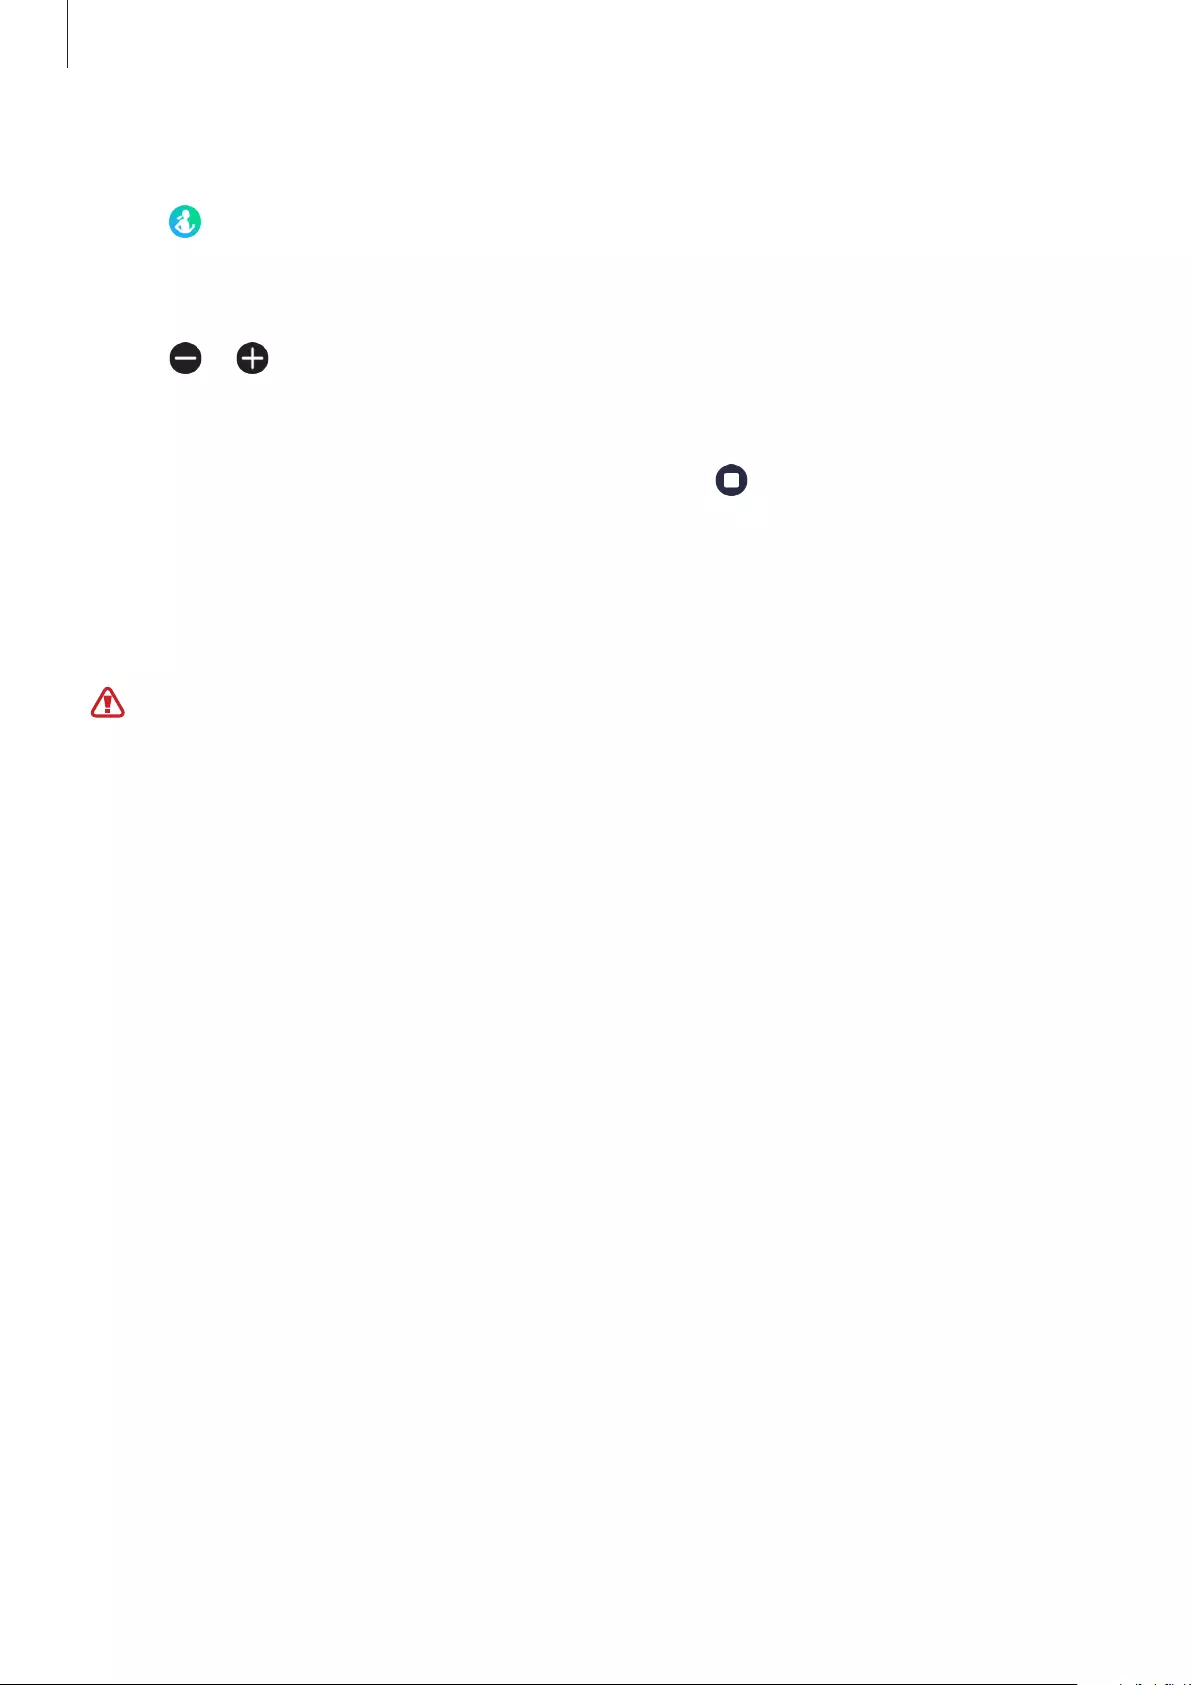
Apps and features
60
Alleviating stress with the breathing exercise
1 Tap (
Samsung Health
) on the Apps screen.
2 Tap
Stress
and move to the breathe screen by using the bezel or swiping upwards on the
screen.
3 Tap or to change the number to breathe. To change the breathe duration, tap
Breathe duration
.
4 Tap
Breathe
and start breathing.
To stop the breathe process, tap on the screen and tap .
Blood oxygen
Measure your blood’s oxygen level to check whether your blood is properly delivering oxygen
to the different parts of your body.
This feature is only for your general wellness and fitness. Therefore, do not use it for
medical purposes, such as diagnosing the symptoms, treatment, or prevention of
disease.
Be aware of following conditions before measuring your blood oxygen level:
•
Rest for 5 minutes before taking measurements.
•
During winter or in cold weather, keep yourself warm when measuring your blood
oxygen level.
•
Blood oxygen level measurements may vary depending on the measurement method
and the environment they are taken in.
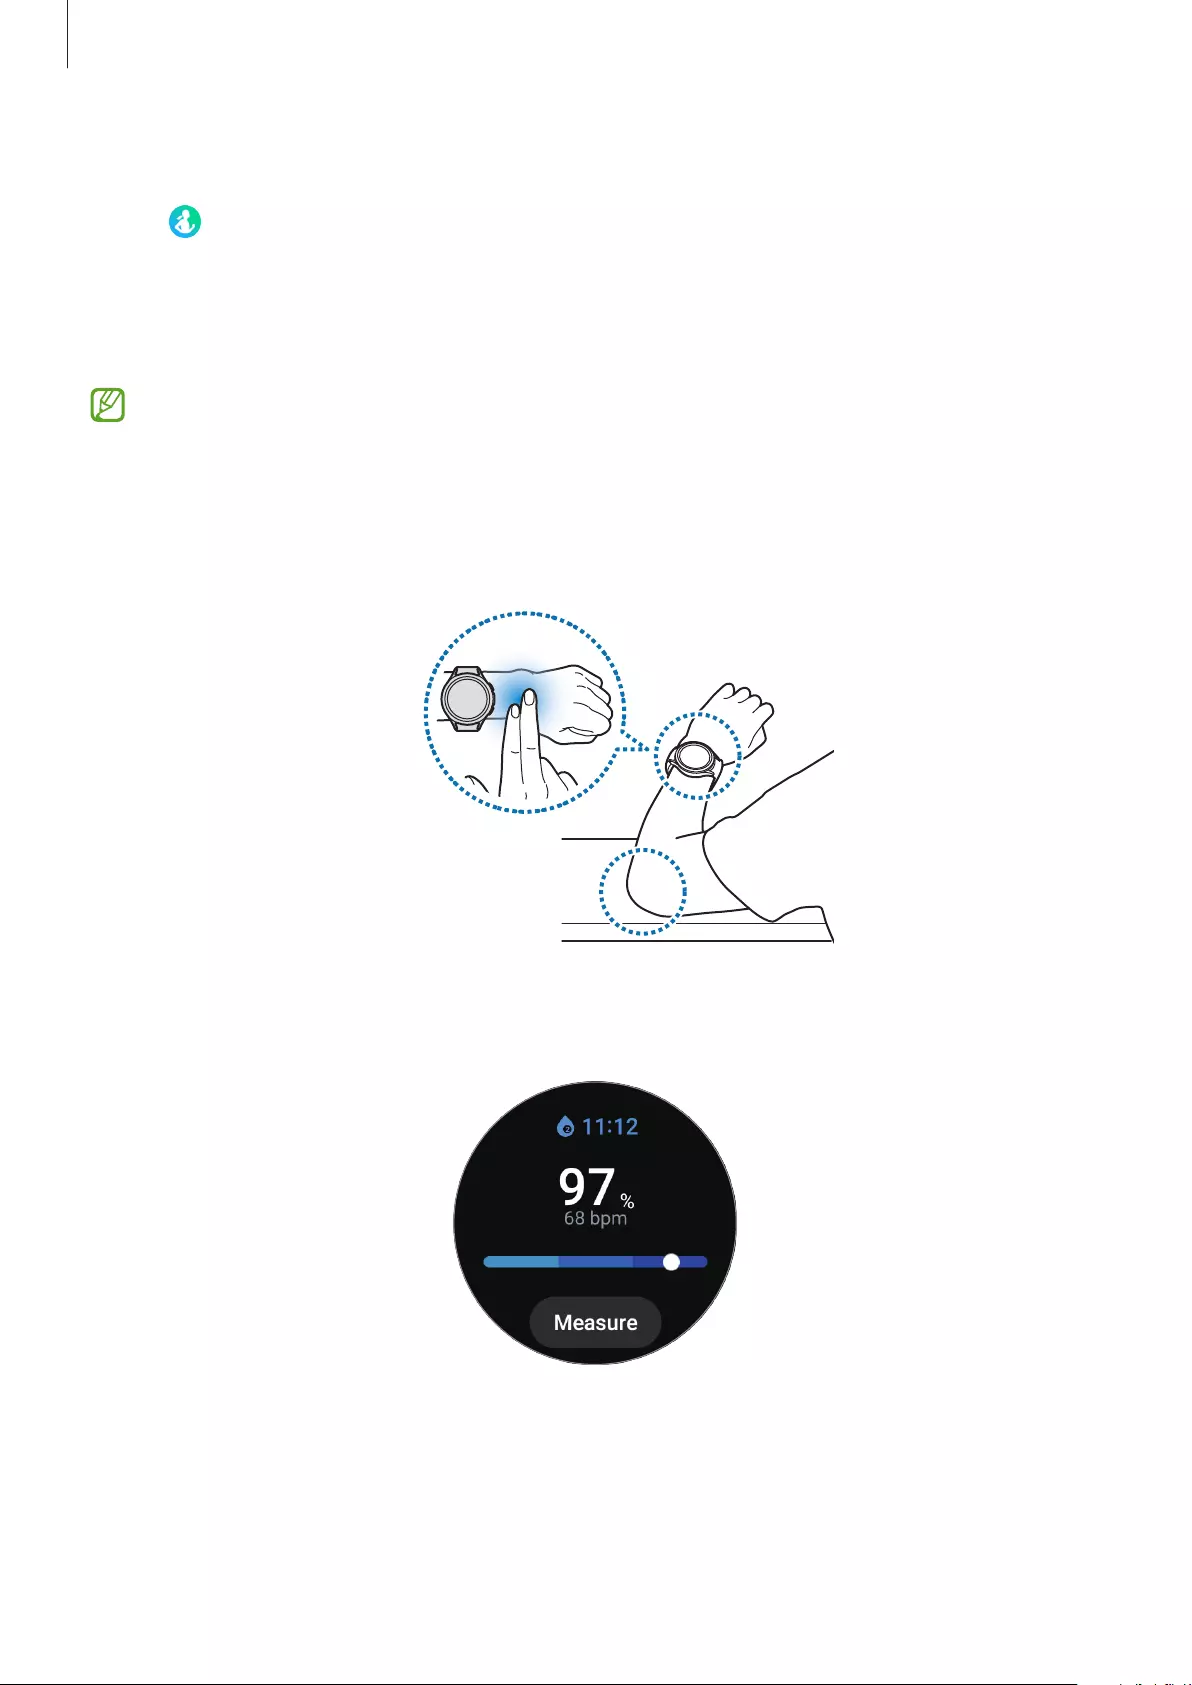
Apps and features
61
Measuring your blood oxygen level manually
1 Tap (
Samsung Health
) on the Apps screen.
2 Tap
Blood oxygen
.
3 Tap
Measure
, follow the on-screen instruction to assume a correct posture, and then tap
OK
to begin measuring your blood oxygen level.
Correct measurement posture
•
For accurate measurements, wear the Watch firmly around your lower arm above the
wrist while leaving two fingers’ worth of space as shown in the figure below. Also,
place your elbow on the table while positioning it close to your heart.
•
Do not move and stay in the correct posture until finishing measurement.
Check the measured blood oxygen level on the screen. If your resting blood oxygen level
is between 95% and 100%, it is assumed to be within the normal range.

Apps and features
62
Measuring your blood oxygen level while sleeping
Set to measure your blood oxygen level continuously while sleeping.
1 Tap (
Samsung Health
) on the Apps screen.
2 Tap
Settings
→
Measurement
.
3 Tap the switch under
Blood oxygen during sleep
to activate it.
Your sleeping blood oxygen level will measured along with your other sleep records when
you sleep while wearing the Watch.
•
If you set it to measure your blood oxygen level continuously while sleeping, the
battery will drain more quickly than normal.
•
You can see the light due to the flickering optical heart rate sensor while measuring
your blood oxygen level.
•
The Watch may measure your blood oxygen level even if you are not sleeping
because your Watch can recognise your sleep status even while reading books or
watching TV or movies.
•
Wear the Watch firmly, following the wearing guide on the screen, ensuring that you
are not making space between your wrist and the Watch due to turning over in your
sleep.
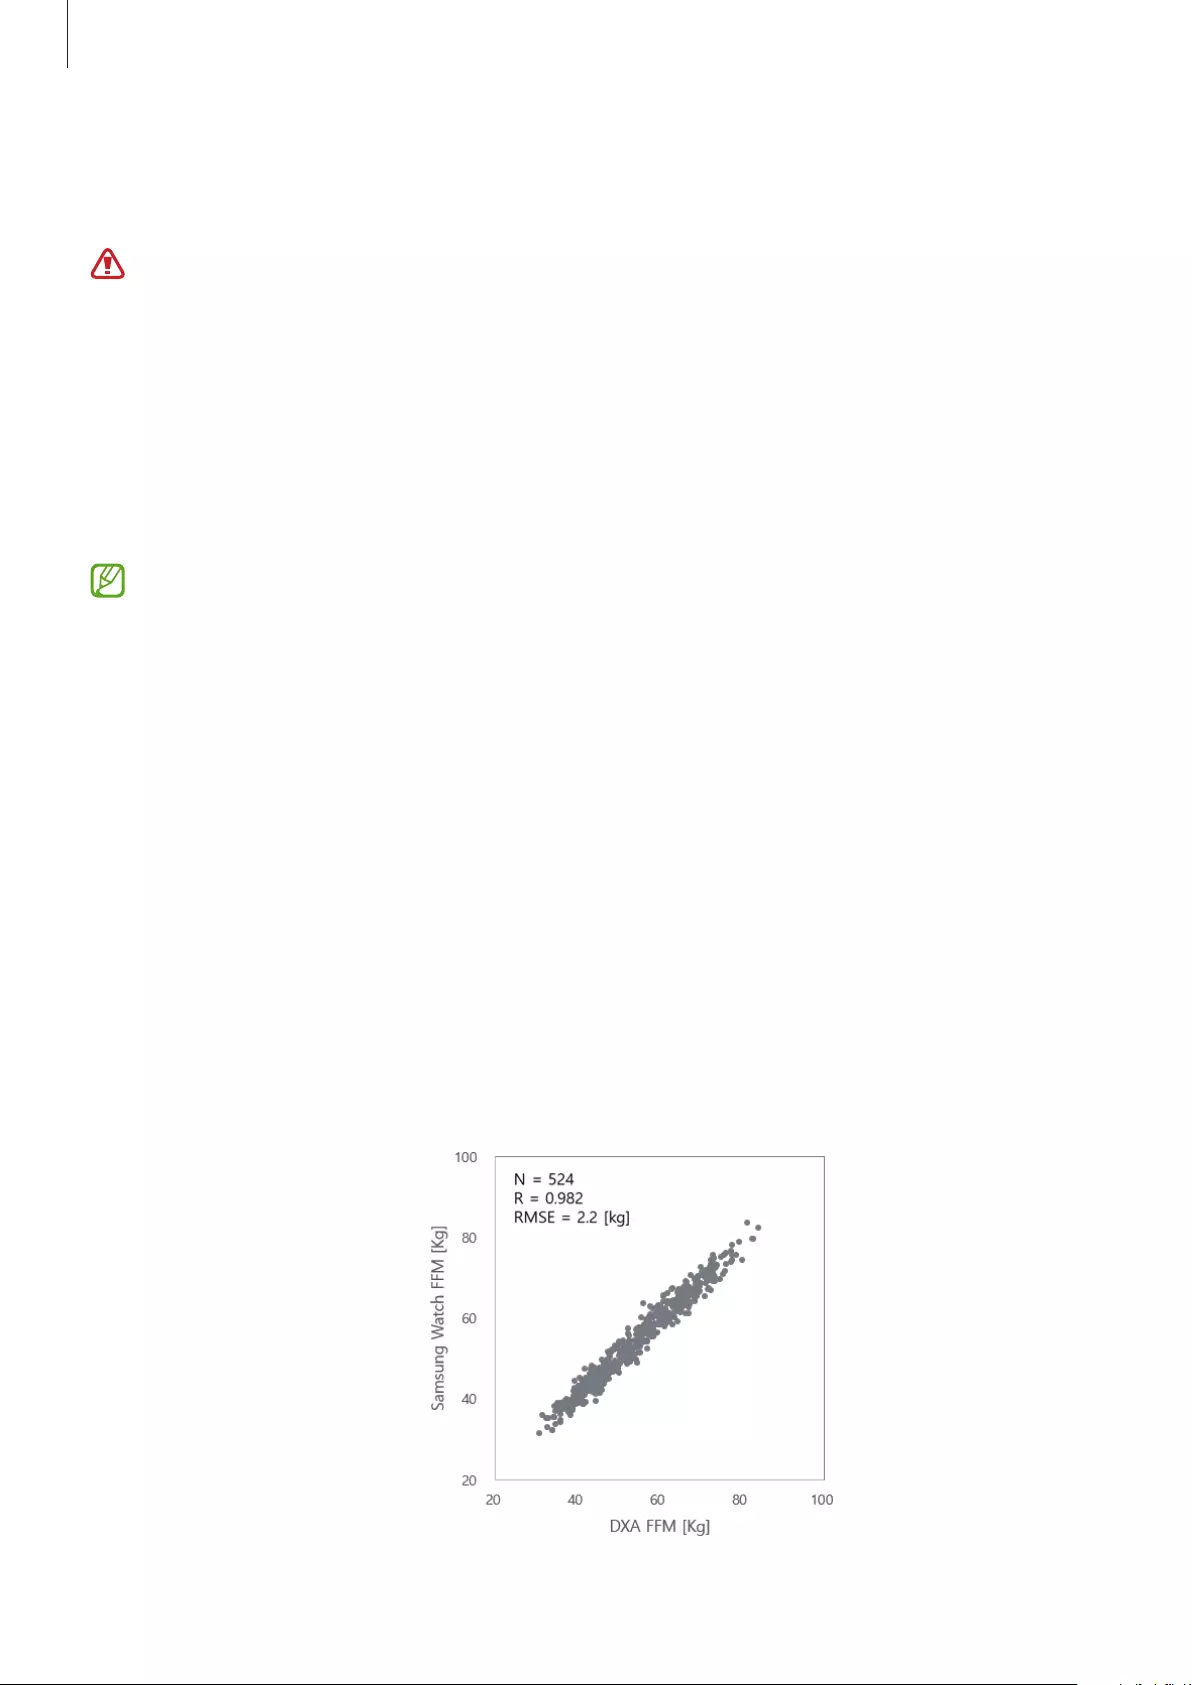
Apps and features
63
Body composition
Measure your body composition, such as your skeletal muscle mass or fat mass.
•
This feature is only for your general wellness and fitness. Therefore, do not use it for
medical purposes, such as diagnosing the symptoms, treatment, or prevention of
disease.
•
Do not measure your body composition if you have an implanted cardiac pacemaker,
defibrillator, or if any other electronic device is inside of your body.
•
A low electric current goes through your body when measuring your body
composition. Although it is harmless to humans, do not measure your body
composition if you are pregnant.
•
For accurate measurements, wear the Watch firmly around your lower arm above
the wrist. Refer to How to wear the Watch for accurate measurements for more
information.
•
If the measured body composition results are inaccurate, check your user profile in
the Samsung Health app on the smartphone and modify it.
•
Unlike professional body composition measuring instruments, the Watch, which
has to be worn your wrist, measures the upper body’s composition and estimates
your entire body’s composition to provide the results. Therefore the measured body
composition results may be inaccurate in the following cases: when your upper and
lower body’s composition is too unbalanced, when you are extremely obese, or when
you have a very large amount of muscles.
•
The Watch uses the Bioelectrical Impedance Analysis (BIA) method when measuring
body composition, which has more than 98% correlation compared to the
Dual-energy X-ray absorptiometry (DXA) method, which is regarded as the golden
standard.

Apps and features
64
Be aware of following conditions before measuring your body composition:
•
If you are an individual under the age of 20, the results may not be accurate when you
measure your body composition.
•
You can get more accurate body composition results if you follow the following
measurement conditions:
–
Measuring at the same time of the day (recommended to measure in the morning)
–
Measuring on an empty stomach
–
Measuring after going to the bathroom
–
Measuring when you are not having your menstrual period
–
Measuring before doing activities that cause your body temperature to rise, such as
exercising, taking showers, or going to the sauna.
–
Measuring after removing metal objects from your body, such as necklace
Measuring your body composition
1 Tap (
Samsung Health
) on the Apps screen.
2 Tap
Body composition
.
3 Tap
Measure
.
4 Enter your weight and tap
Confirm
.
For accurate body composition measurements, you must enter your actual height,
weight, and gender on your Samsung Health profile, and also enter your actual age on
your Samsung account. Also, you can view how to measure it in detail on the screen by
tapping
How to measure
.
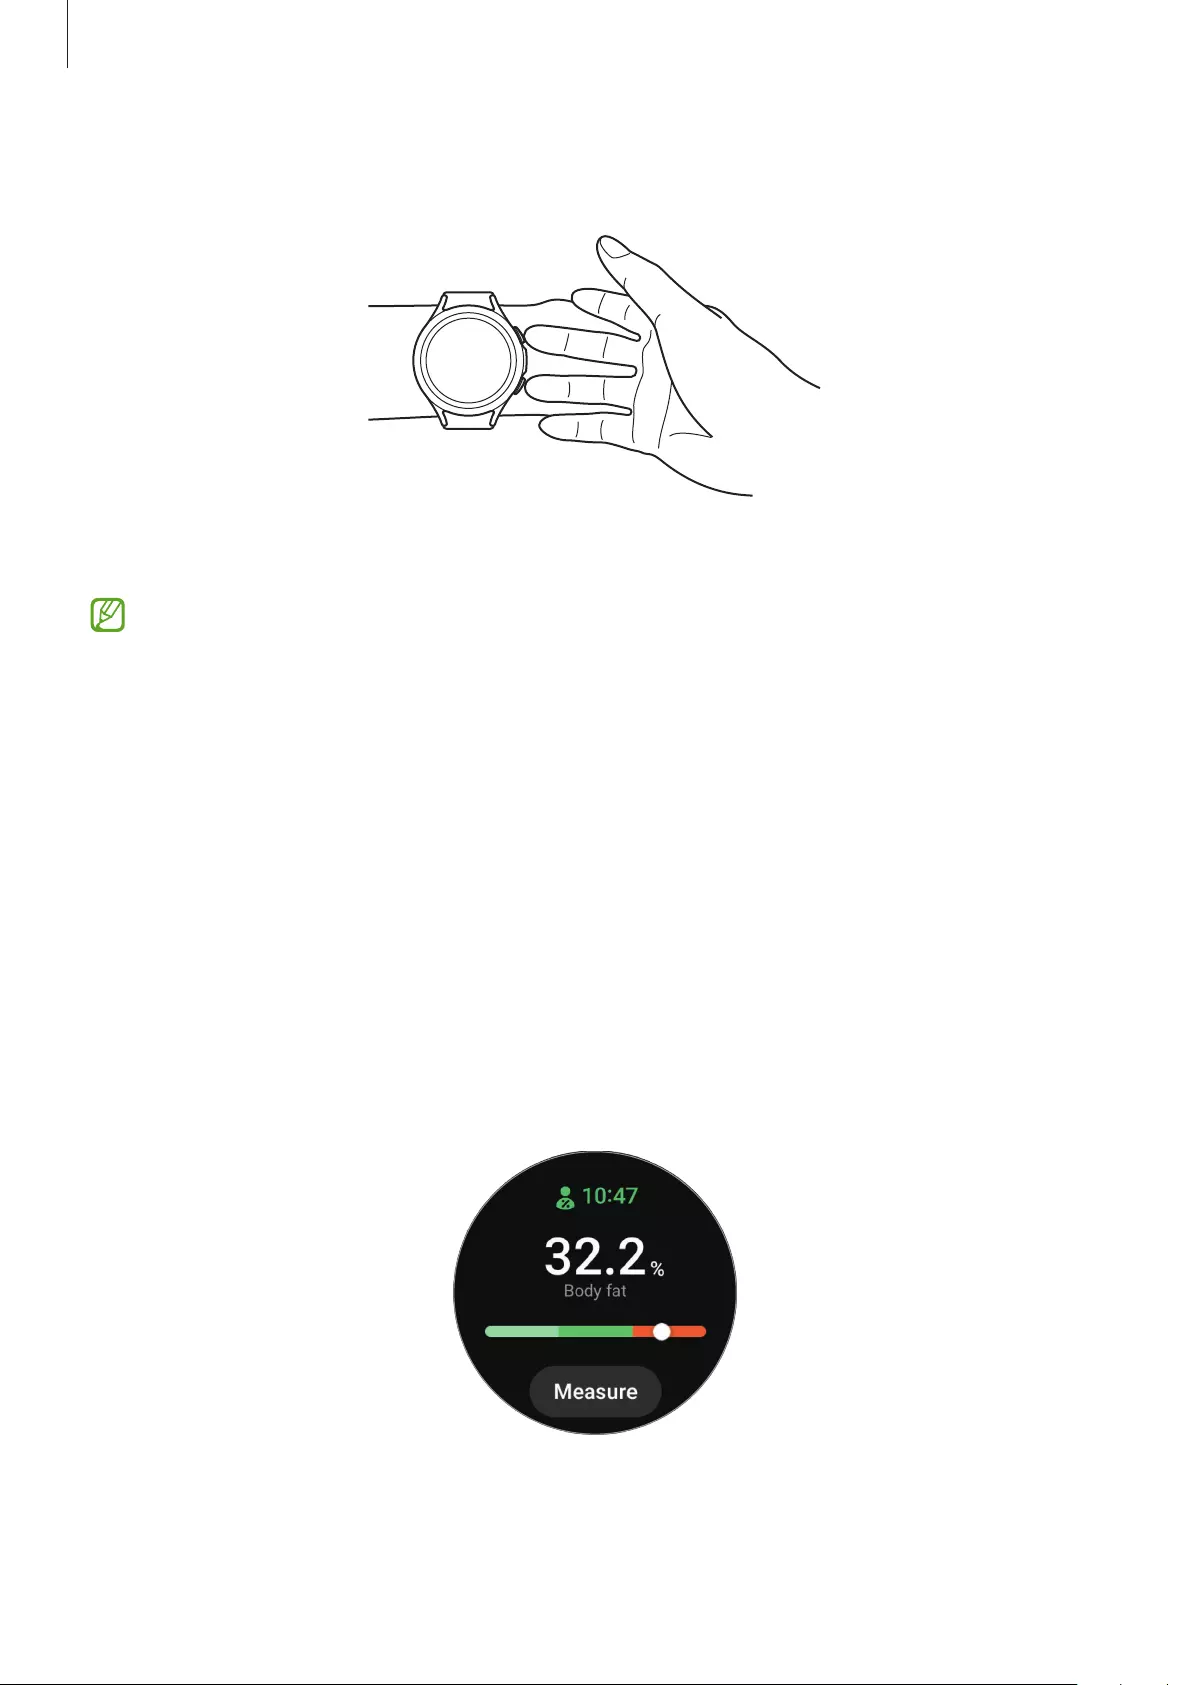
Apps and features
65
5 Place your two fingers on the Home and Back keys by following the on-screen instructions
to begin measuring your body composition.
Correct posture for measuring your body composition when
wearing the Watch on your left wrist
Correct measurement posture
•
Put both of your arms to chest level while not making contact with your body.
•
Do not allow the two fingers that are placed on the Home and Back keys to come
into contact with each other. Also do not touch the other part’s of your Watch with
your fingers except the keys.
•
Stay stable and do not move for accurate measurement results.
•
The signal may experience interruptions when your finger is dry. In this case, measure
your body composition after applying toner or lotion to make your finger’s skin
moist.
•
Measurement results may not be accurate due to the dryness of your skin or hair.
•
Wipe the back of the Watch clean before measuring for accurate measurement
results.
Check measured body composition results on the screen.
To view the additional information which is related to the body composition, use the bezel or
swipe upwards or downwards on the screen.

Apps and features
66
Food
Record the calories you eat in a day and compare with your target calories to get help to
manage your weight.
Recording the calories
1 Tap (
Samsung Health
) on the Apps screen.
2 Tap
Food
.
3 Tap
Add
, tap the meal type on the top of the screen, and then select an option.
4 Use the bezel or swipe upwards or downwards on the screen to set the caloric intake, and
then tap
Done
.
To view additional information which is related to the caloric intake, use the bezel or swipe
upwards or downwards on the screen.
Deleting logs
1 Tap (
Samsung Health
) on the Apps screen.
2 Tap
Food
and tap
Delete today’s log
.
3 Select data to delete and tap
Delete
.
Setting your caloric intake target
1 Tap (
Samsung Health
) on the Apps screen.
2 Tap
Food
and tap
Set target
.
3 Use the bezel or swipe upwards or downwards on the screen to set the target.
4 Tap
Done
.
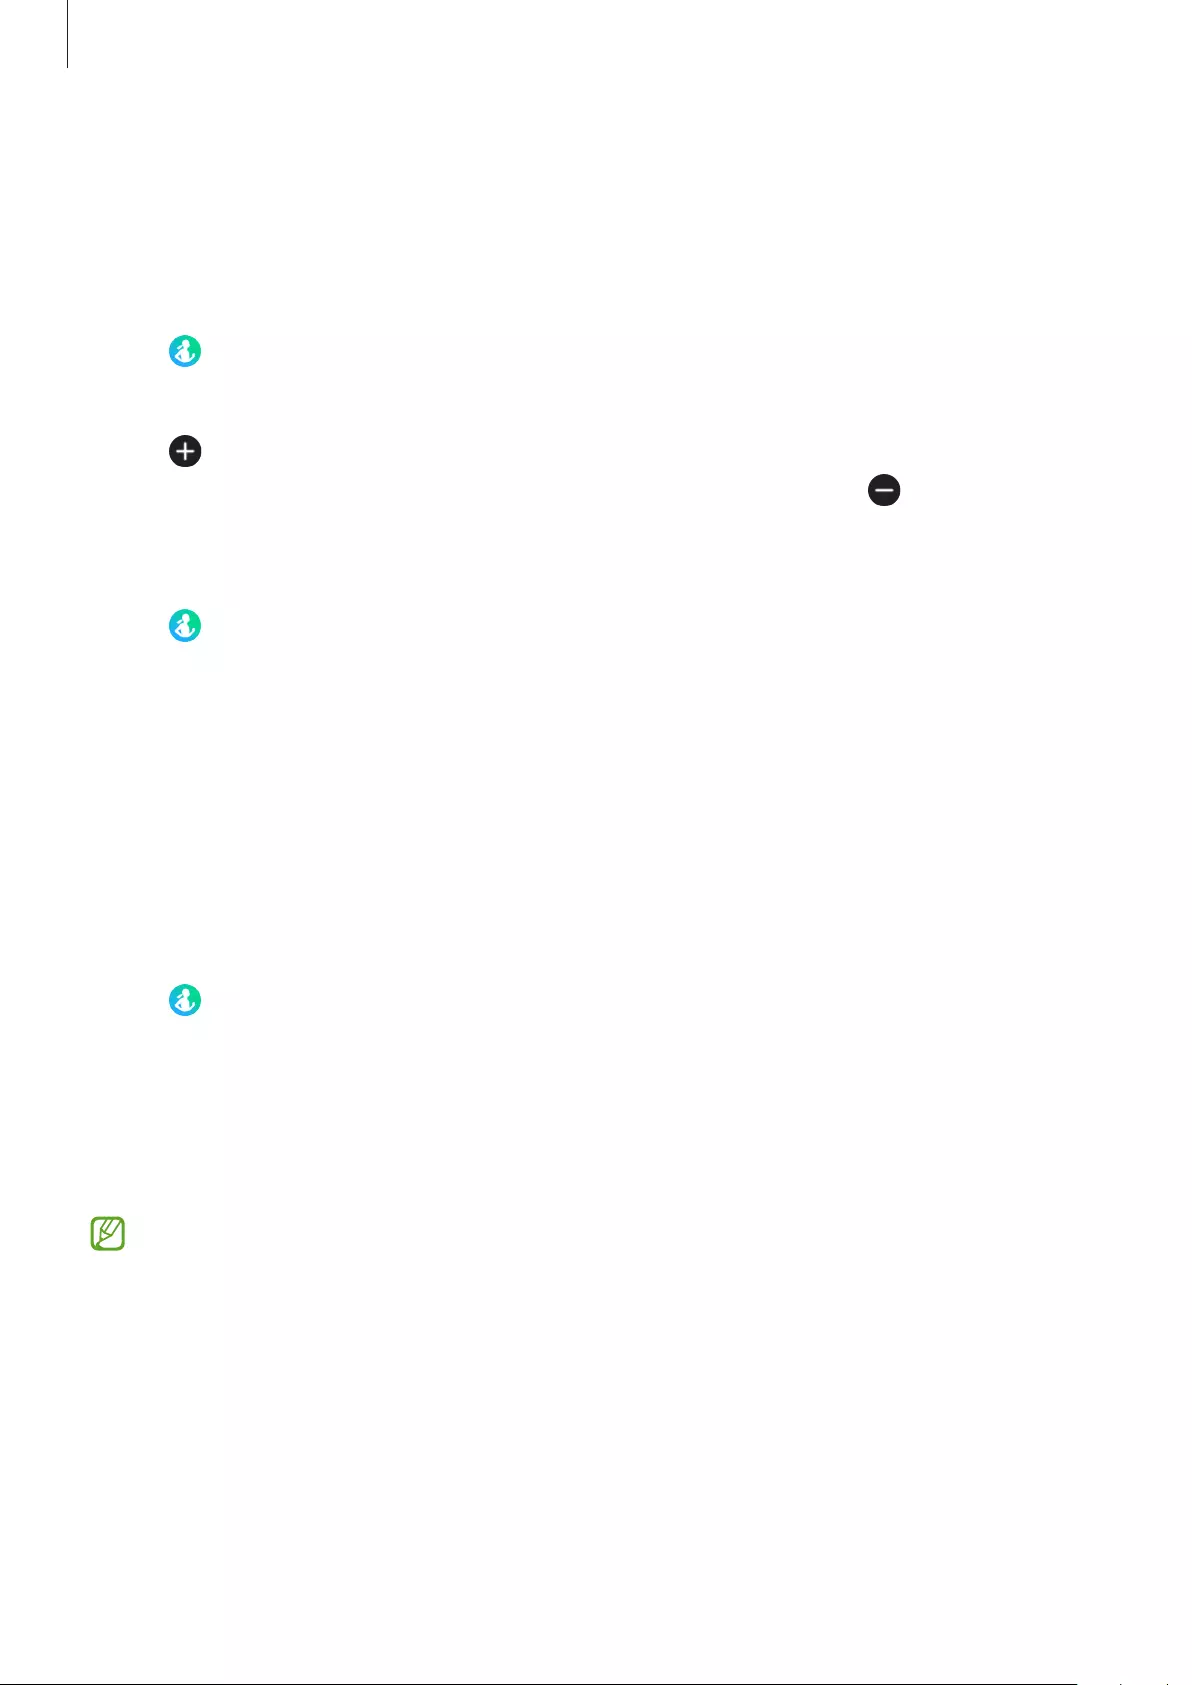
Apps and features
67
Water
Record and track how many glasses of water you drink.
Recording water consumption
1 Tap (
Samsung Health
) on the Apps screen.
2 Tap
Water
.
3 Tap when you drink a glass of water.
If you accidentally added an incorrect value, you can fix it by tapping .
Setting your target consumption
1 Tap (
Samsung Health
) on the Apps screen.
2 Tap
Water
and tap
Set target
.
3 Use the bezel or swipe upwards or downwards on the screen to set the daily target.
4 Tap
Done
.
Together
Compare your step count records with your friends who also use the Samsung Health. When
you start step challenges with your friends, you can view the challenge status on your Watch.
1 Tap (
Samsung Health
) on the Apps screen.
2 Tap
Together
.
Tap
Show on phone
to view detailed information such as your or your friends’ challenges
status or your or your friends’ step count ranking for the seven-day challenge on your
smartphone.
Activate the together feature in the Samsung Health app on your smartphone to check
information on your Watch.
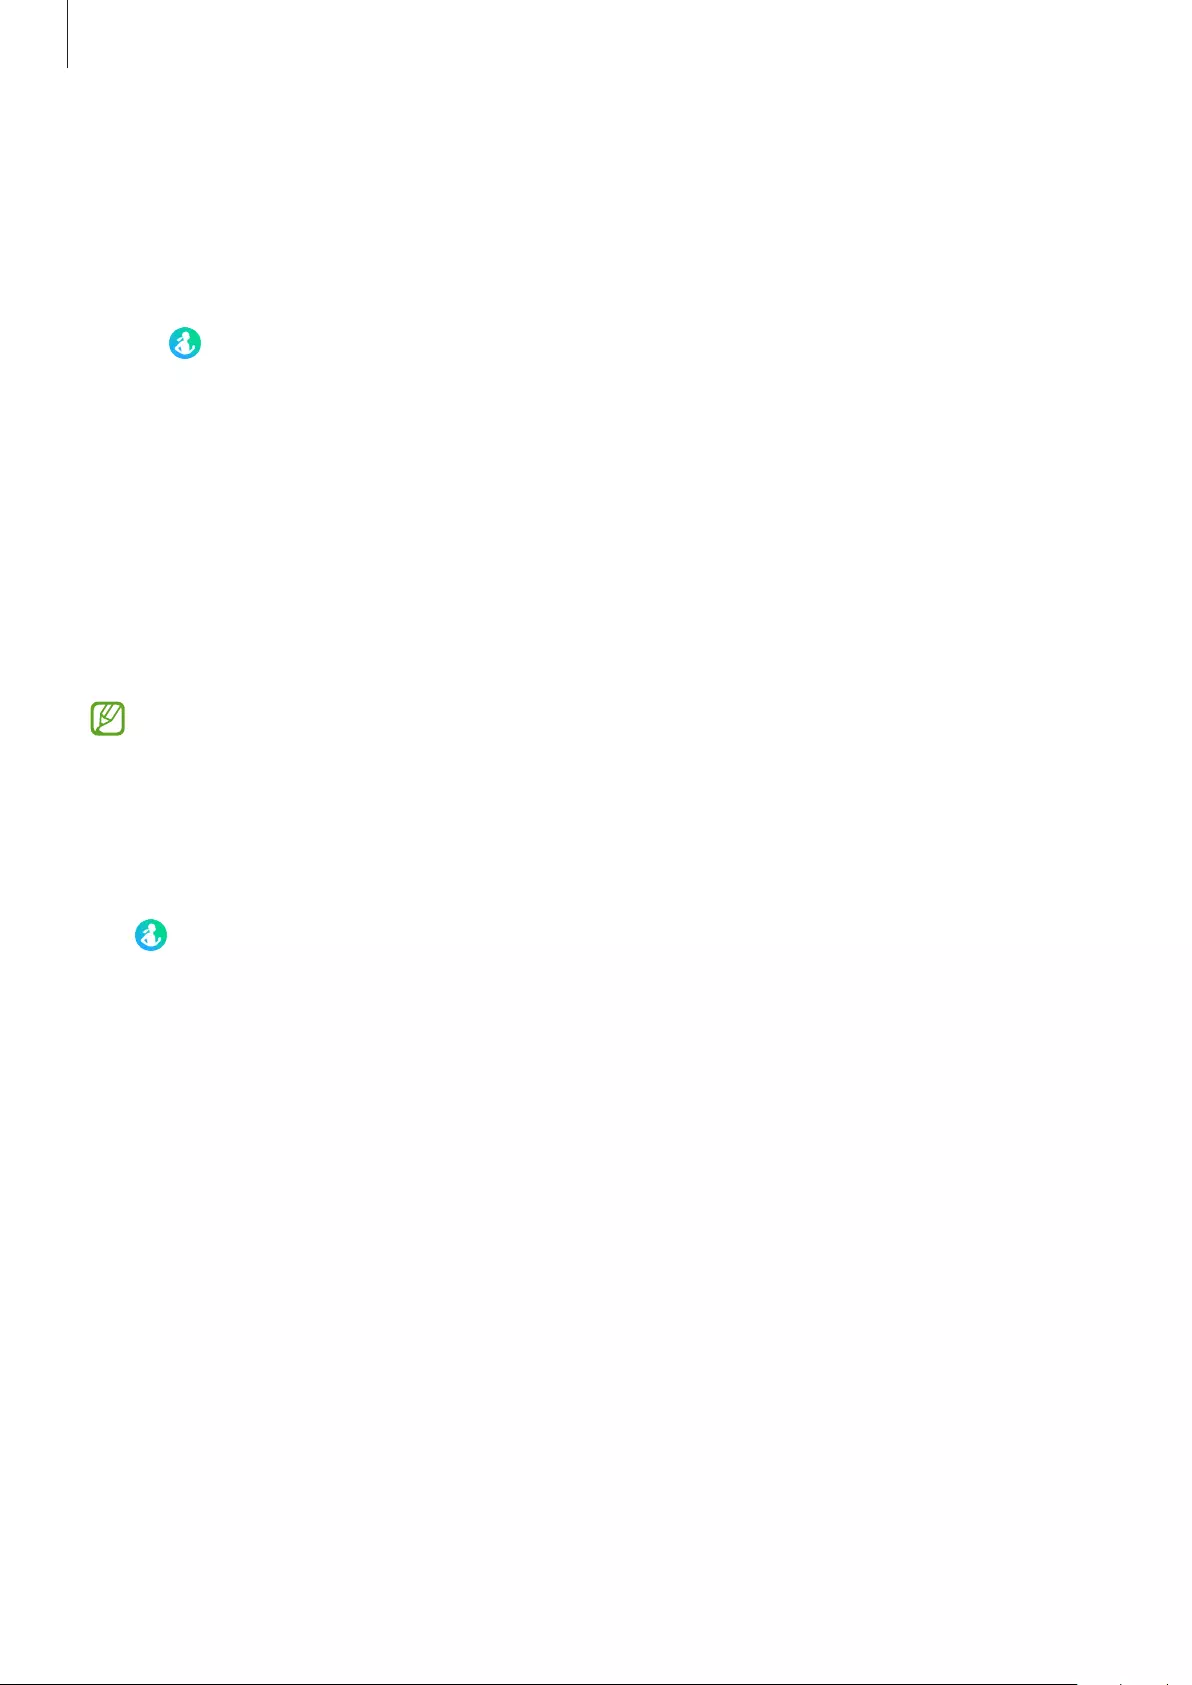
Apps and features
68
Women’s health
Enter your menstrual period to begin tracking your cycle. When you are managing and
tracking your menstrual cycle, you can predict date like your next period. Moreover, you can
help manage your health by recording your symptoms and moods.
1 Tap (
Samsung Health
) on the Apps screen.
2 Tap
Women’s health
.
3 Tap
Enter period
.
4 Tap the input field, use the bezel or swipe upwards or downwards on the screen to set
your period’s start date.
5 Tap
Save
.
Tap
Add log
and select additional information you wish to record, such as symptoms or
moods.
Activate the women’s health feature in the Samsung Health app on your smartphone to
use this feature on your Watch.
Settings
You can set the various setting options related to exercise and fitness.
Tap (
Samsung Health
) on the Apps screen and tap
Settings
.
•
Notification
: Set up the notifications for exercise and fitness.
•
Measurement
: Set how to measure your heart rate and stress, and turn the measure
blood oxygen during sleep or snore detection features on or off.
•
Auto detect workouts
: Set an exercise type that the Watch can recognise automatically
and also set Watch to record your approximate location information automatically when
walking or running.
•
Connected services
: Set to share information with other connected health platform
apps, exercise machines, and TVs.
Apps and features
69
Samsung Health Monitor
Introduction
You can measure your blood pressure or ECG whenever you want to check them with
the Samsung Health Monitor app of your Watch that includes both the optical heart rate
sensor and electrical biosensor. The measurement history is synced automatically with your
smartphone connected to the Watch. You can also view your measurement history on the
Samsung Health Monitor app of your smartphone.
Manage your health more systemically with your physician based on your measurement
results.
•
If you have not installed the Samsung Health Monitor app on your smartphone,
download it from the
Galaxy Store
.
•
The Samsung Health Monitor app is only supported on the Samsung smartphones.
•
Individuals under the age of 22 cannot use the Samsung Health Monitor app to
measure your blood pressure or take your ECG.
•
This feature may not be available depending on the region.
Precautions for measuring blood pressure and ECG
Common precautions
•
The Samsung Health Monitor app cannot be used for diagnosing hypertension,
cardiac disorders, and other heart conditions. Do not use this app for purpose of
replacing a physician’s medical judgment or treatment under any circumstances. In
case of an emergency, contact a nearby hospital immediately.
•
Do not change your medication, dosage, or usage without your physician’s advice.
•
The readings and results from the Samsung Health Monitor app are only for
reference. Do not use them for making medical decisions without your physician’s
opinion under any circumstances.
•
For accurate measurements, wear the Watch firmly around your lower arm above
the wrist. Refer to How to wear the Watch for accurate measurements for more
information.

Apps and features
70
•
Before measuring your blood pressure or ECG, prepare a comfortable chair and a
table to rest your arm and smartphone on.
•
Seat yourself in the comfortable chair you prepared with your back supported. Do
not sit with your legs crossed, and keep both of your feet on the ground.
•
Be sure to place your arm comfortably on a table when you are measuring your
blood pressure or taking an ECG.
•
Rest for at least five minutes in a comfortable position before measuring your blood
pressure or taking your ECG.
•
Measure your blood pressure or ECG in a quiet place indoors.
•
Do not measure your blood pressure or ECG while engaging in physical activity.
•
Stay still and do not speak once you start measuring your blood pressure or taking
your ECG, and do not move or speak until the measurement is complete.
•
Do not measure your blood pressure or take your ECG when you are in close vicinity
of machines that produce strong electronic fields, such as MRIs (Magnetic Resonance
Imaging), X-ray machines, electromagnetic anti-theft systems, or metal detectors.
•
Always connect your Watch to your smartphone at home or in a safe place via
Bluetooth for security reasons. It is not recommended to connect to a smartphone in
a public place.
•
Do not measure your blood pressure or take your ECG during medical treatments,
such as operations or defibrillation.
•
Measure your blood pressure or ECG in an environment where the temperature is
between 12 °C to 40 °C, and the relative humidity is between 30% to 90%.

Apps and features
71
Precautions for measuring the blood pressure
•
Avoid consuming alcohol, food that includes caffeine, smoking, exercising, and
taking a bath 30 minutes before measuring your blood pressure.
•
Make sure your wrist is dry when measuring your blood pressure and do not measure
it when you have applied lotion or are sweating excessively.
•
Do not take a deep breathe or breathe slowly on purpose, but breath as usual while
measuring your blood pressure.
•
If you are pregnant, your results may not be accurate when you measure your blood
pressure.
•
Do not measure your blood pressure with the Samsung Health Monitor app if you
have any of the following conditions:
–
Arrhythmia
–
Underlying heart disease or have suffered a heart attack
–
Circulatory or peripheral vascular disease
–
Valvular heart disease (Aortic valve disease)
–
Myocardiopathy
–
Other cardiovascular disease
–
End-stage renal disease (ESRD)
–
Diabetes
–
Neurotic disorders (e.g. shivering)
–
Hemostatic disorders or if you are taking a blood thinner
•
Do not use a wrist that has been tattooed when measuring your blood pressure.
•
The Samsung Health Monitor app calibrates and measures blood pressure based on
the readings from the arm that is wearing the blood pressure manometer. You must
consult your physician if there is a large difference between the blood pressure in
both of your arms (more than 10 mmHg).
•
Do not use a Watch which has been calibrated for other people for measuring your
blood pressure.
•
The measurable reading range of the Samsung Health Monitor app for blood
pressure is as follows: If it has been calibrated, the systolic blood pressure range is
80 mmHg to 170 mmHg, and the diastolic blood pressure is 50 mmHg to 110 mmHg.
In case of measurement, the systolic blood pressure range is 70 mmHg to 180 mmHg,
and the diastolic blood pressure is 40 mmHg to 120 mmHg.
•
The signal may be affected by the individual’s skin brightness, the amount of blood
under their skin, and the cleanliness of the sensor.
Apps and features
72
Precautions for measuring the ECG
•
Make sure your wrist is not too dry when measuring your ECG. You can get a more
accurate ECG signals when your skin that comes in contact with the sensor is moist
with a moderate amount of sweat, toner, or lotion.
•
Do not measure your ECG if you have an implanted cardiac pacemaker, defibrillator,
or if any other electronic device is inside of your body.
•
If you are pregnant, the results may not be accurate when you take your ECG.
•
Do not take your ECG with the Samsung Health Monitor app if you have arrhythmia,
unless it is because of atrial fibrillation.
•
The Samsung Health Monitor app cannot detect heart attacks. If you have any
suspicious symptoms, contact emergency services immediately.
Starting to measure the blood pressure
Presetting before measuring the blood pressure
Enter your profile on the Samsung Health Monitor app and calibrate your Watch before
measuring your blood pressure. If you do not enter a profile, you cannot measure your blood
pressure, and if you do not calibrate the Watch or have someone else calibrate it, the readings
will be invalid.
Be sure to calibrate the Watch with cuff-typed blood pressure manometer when
measuring your blood pressure for the first time after purchasing the Watch. Afterwards,
recalibrate it every 28 days. The cuff-typed blood pressure manometer is sold
separately.
1 Tap (
Samsung Health Monitor
) on the Apps screen.
2 Tap
Blood pressure
→
Open phone app
.
The Samsung Health Monitor app will be launched on your smartphone.
3 Tap
Accept
.
4 Enter your profile information, such as your name, gender, and birthday, and tap
Continue
.
5 Tap
Calibrate the watch
.
6 Wear the cuff of the blood pressure manometer on the upper part of the arm not wearing
the Watch. Refer to the blood pressure manometer’s user manual for more information
about correctly wearing the cuff.
7 Follow the on-screen instructions to complete the calibration.
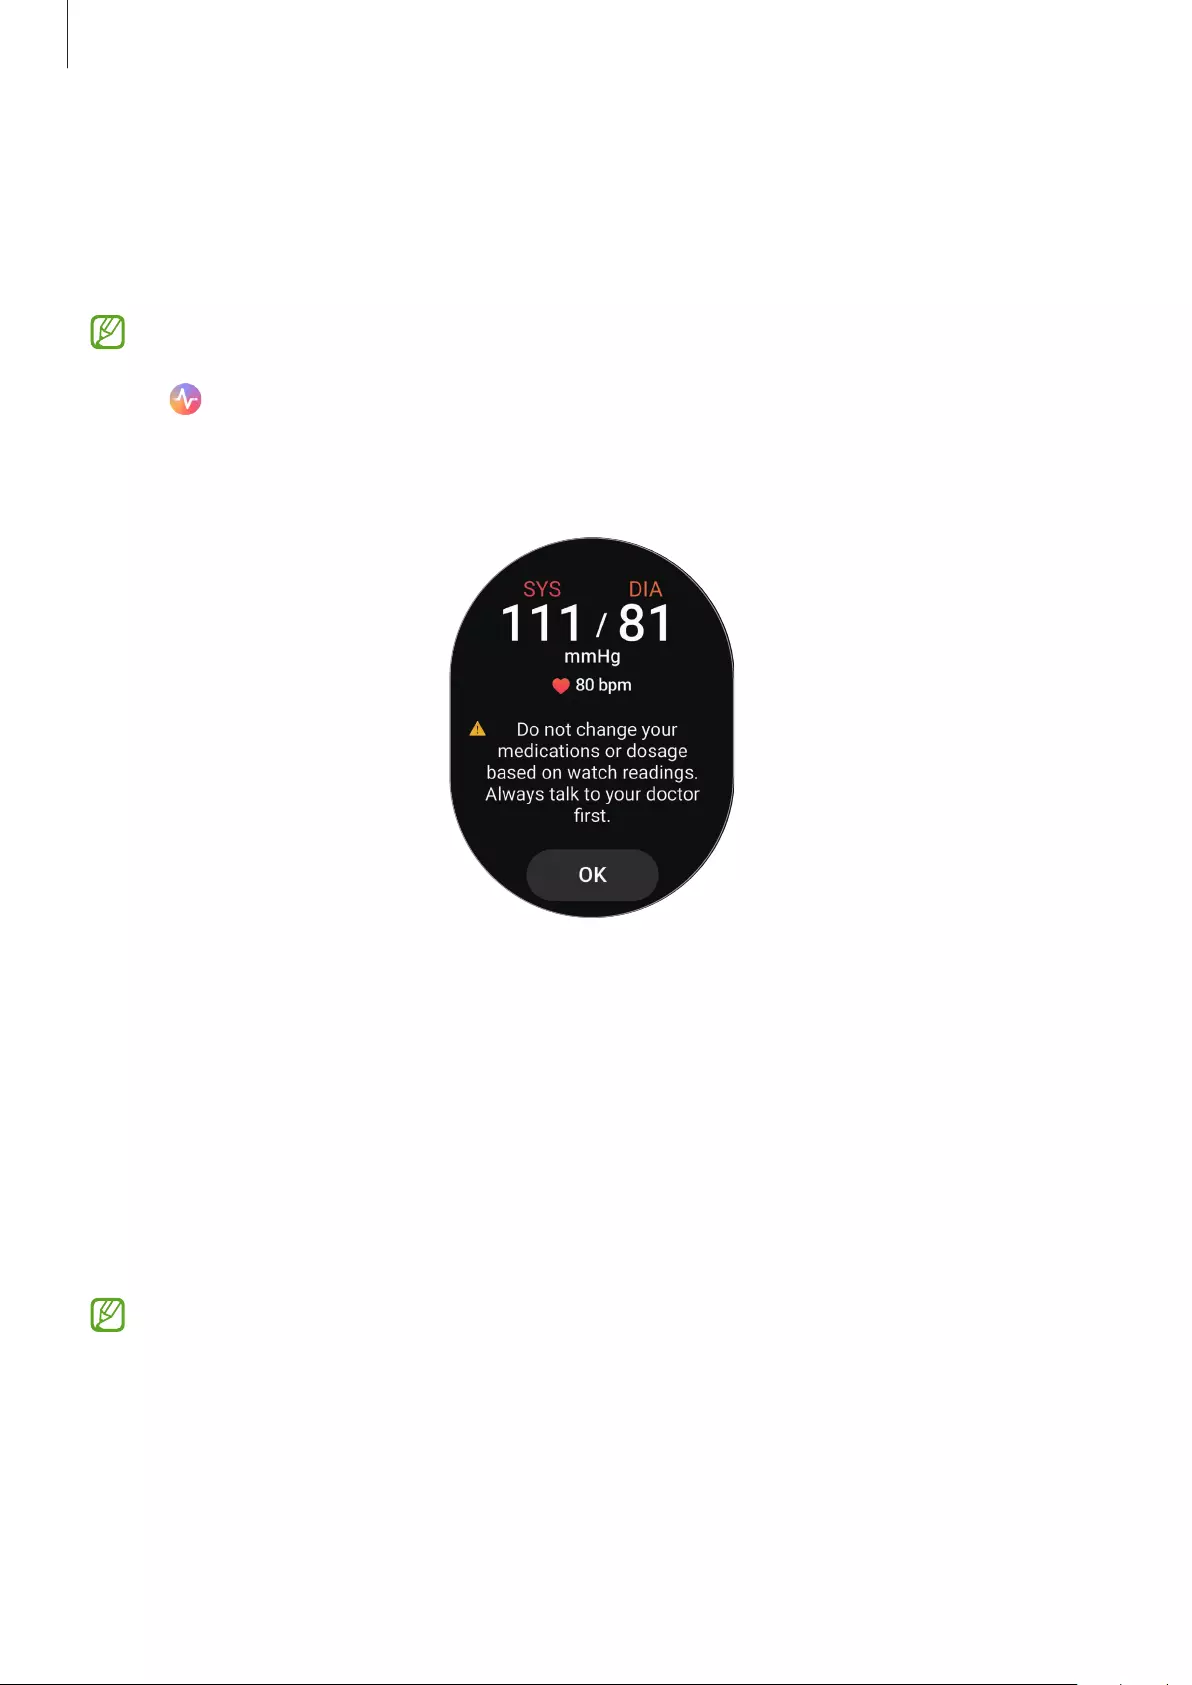
Apps and features
73
Measuring your blood pressure
You can measure your blood pressure by using your Watch’s optical heart rate sensor without
using any other medical devices, such as the cuff-typed blood pressure manometer, after
calibration.
You have to wear your Watch on your dominant arm for calibration.
1 Tap (
Samsung Health Monitor
) on the Apps screen.
2 Tap
Blood pressure
→
Measure
.
The measured systolic and diastolic blood pressure and pulse will appear on the screen.
Checking the readings
Check the readings on the Watch’s screen after measuring your blood pressure. You can view
the previous readings and information on the connected smartphone’s Samsung Health
Monitor app. Share, delete, and manage your results on the smartphone’s Samsung Health
Monitor app.
If your readings are abnormally high or low and feel some unusual physical symptoms,
contact a nearby hospital immediately for proper medical attention. Measure at least
2 more times again if you are judged not to be in an emergency situation.
Old results can be removed from the smartphone connected to your Watch depending
on its storage. The results will only be sent automatically if the connected smartphone
has at least 100 MB of storage.
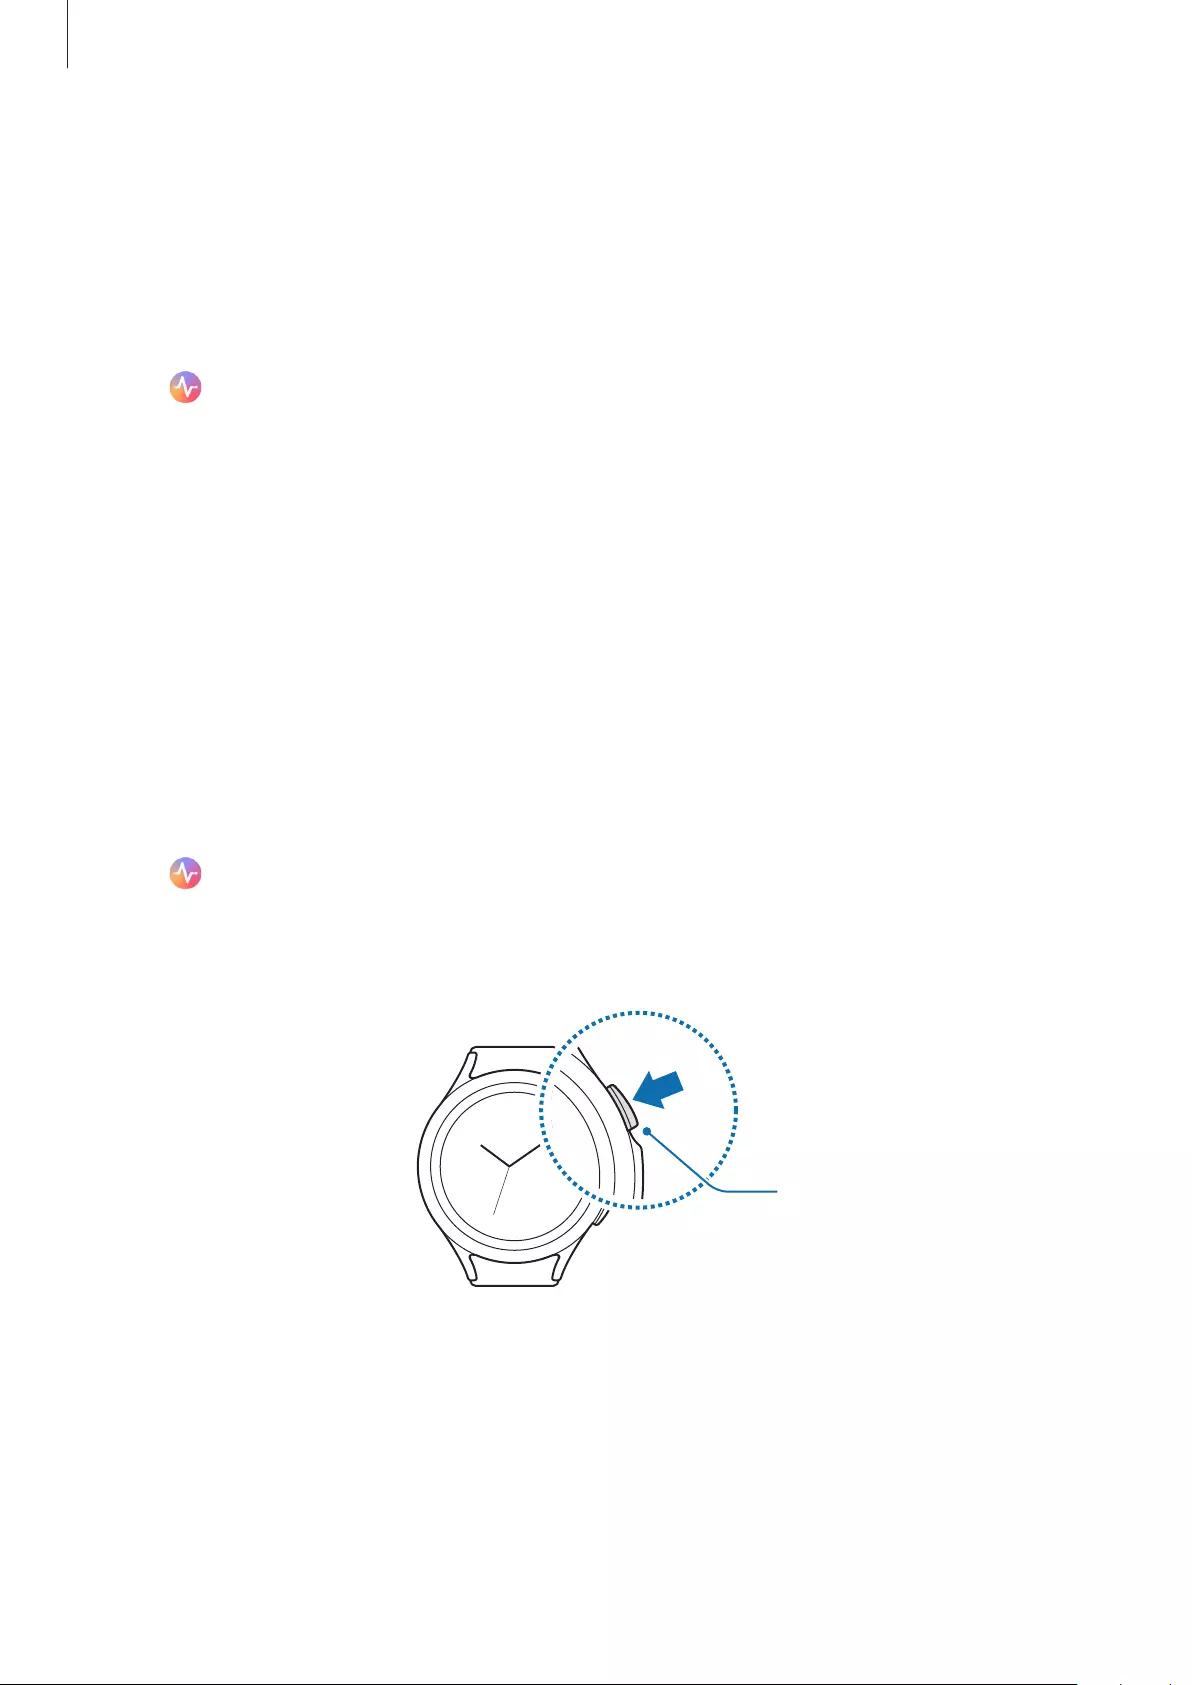
Apps and features
74
Starting to measuring the ECG
Presetting before measuring the ECG
Enter your profile on the Samsung Health Monitor app before measuring your ECG. If you do
not enter a profile, you cannot measure your ECG.
1 Tap (
Samsung Health Monitor
) on the Apps screen.
2 Tap
ECG
→
Open phone app
.
The Samsung Health Monitor app will be launched on your smartphone.
3 Tap
Accept
.
4 Enter your profile information, such as your name, gender, and birthday, and tap
Continue
.
5 Tap
Get started
and follow the on-screen instructions to begin measuring your ECG.
Measuring the ECG
Manage your health by checking your heart status conveniently in advance through the ECG
measurement results.
1 Tap (
Samsung Health Monitor
) on the Apps screen.
2 Tap
ECG
and place a finger lightly on the electrical biosensor. Do not leave any space
between your wrist and your Watch.
Electrical biosensor

Apps and features
75
The measurement will start and the ECG wave will appear on the screen.
3 Tap
Add
to enter additional physical symptoms that you have currently when
measurement is complete.
4 Tap
Done
.
Checking the results
Check the results and ECG wave on the Watch’s screen after taking your ECG. The ECG wave
shows heart rate rhythm and electric activities of your heart, and it is divided into several
parts. Share the ECG graph and results with your physician to get an accurate diagnosis
through a more thorough checkup when you find an abnormal results from your ECG wave
and readings.
You can view the previous results and information on the connected smartphone’s Samsung
Health Monitor app. Share, delete, and manage your results on the smartphone’s Samsung
Health Monitor app.
•
Sinus rhythm
: A normal heartbeat rhythm that is between 50 — 100 BPM.
•
Atrial fibrillation
: A type of arrhythmia where the heart beats irregularly. Consult your
physician.
•
Inconclusive
: The result is not a type of
Sinus rhythm
nor
Atrial fibrillation
and falls into
one of the following conditions:
–
When the heart rate is less than 50 or more than 100 BPM while recording the ECG
wave and there is also no
Atrial fibrillation
–
When the ECG wave is not sorted as
Sinus rhythm
nor
Atrial fibrillation
–
When the heart rate is more than 120 BPM and the ECG wave indicates
Atrial
fibrillation

Apps and features
76
•
Poor recording
: It appears when the signals used for analysing the ECG measurement
result is not measured properly. If this case, take the measurement again.
Contact to your physician or a nearby hospital if
Inconclusive
or
Poor recording
appears continuously and you feel some unusual physical symptoms.
•
If
Poor recording
appears continuously, wipe out the electrical biosensor and
measure your ECG again. The signal may be experiencing interruptions due to the
dryness of the skin on the sensor or hair on your wrist. In this case, measure your ECG
after applying toner or lotion to make your skin moist or after removing some hair
first.
•
If the ECG wave appears upside down, it may not be analysing properly. Wear your
Watch in the correct direction and measure your ECG again after checking the
settings on the wrist you wear it on.
•
Old results can be removed from the smartphone connected to your Watch
depending on its storage. The result will be automatically sent only if the connected
smartphone has at least 100 MB of storage.
GPS
The Watch has a GPS antenna so that you can check your real-time location information
without connecting to a smartphone.
On the Apps screen, tap (
Settings
)
→
Location
and tap the switch to activate it.
Tap the
Improve accuracy
switch to activate it for setting the Watch to use the Wi-Fi or
mobile network for increasing your location information’s accuracy, even when the networks
are deactivated.
•
When your Watch and smartphone are connected, this feature uses your
smartphone’s GPS. Activate the smartphone’s location feature to use the GPS sensor.
•
The GPS antenna in your Watch will be used when using the Samsung Health
feature and the health platform apps, even though your Watch is connected to your
smartphone.
•
GPS signal strength may decrease in locations where the signal is obstructed, such as
between buildings or in low-lying areas, or in poor weather conditions.
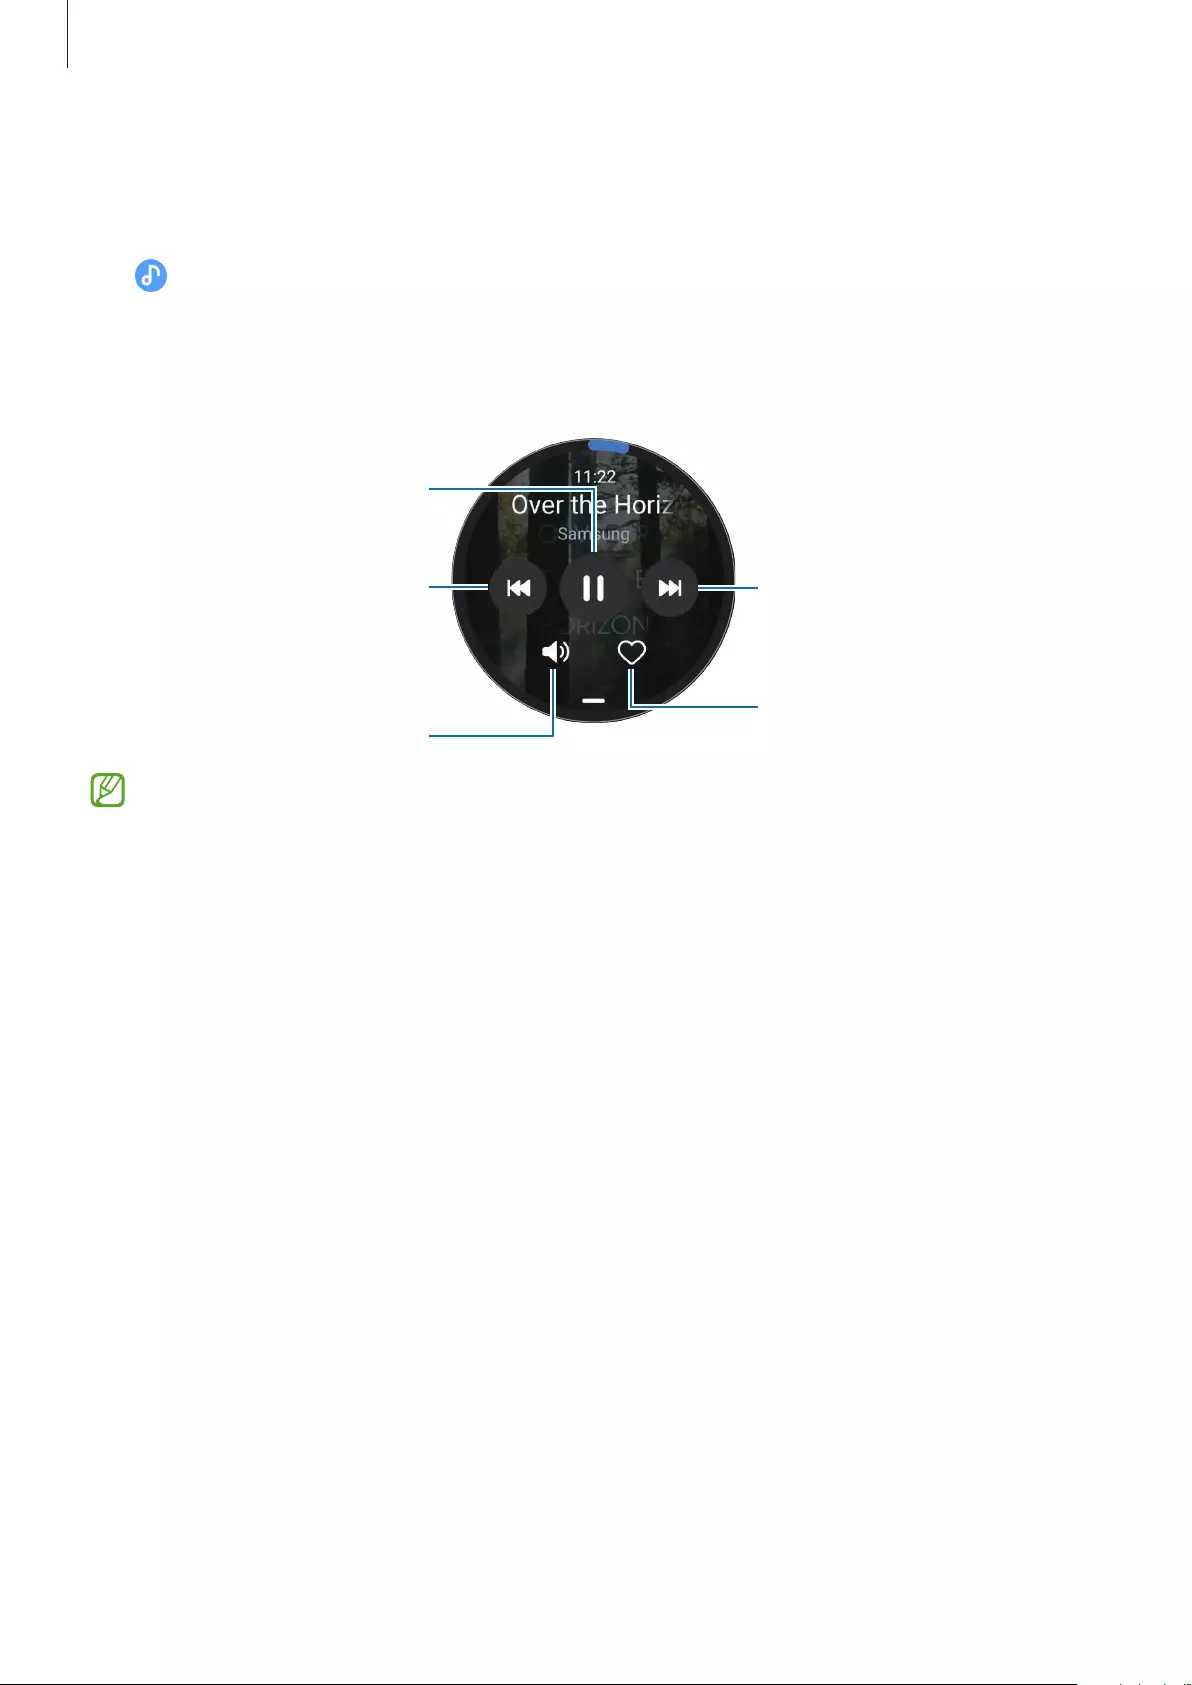
Apps and features
77
Music
Listen to music saved in your Watch.
Tap (
Music
) on the Apps screen.
When listening to music, drag upwards from the bottom edge of the screen and tap
Library
to open the Library screen. On the Library screen, you can view the playlist and arrange music
by tracks, albums, and artists.
Skip to the next file. Tap and
hold to move forwards quickly.
Add to favourites.
Pause and resume playback.
Restart the currently playing file
or skip to the previous file. Tap
and hold to move backwards
quickly.
To save music in your Watch, launch the
Galaxy Wearable
app on your smartphone, tap
Watch settings
→
Manage content
→
Add tracks
, select music you want to send to
the Watch from the connected smartphone, and then tap
Done
.

Apps and features
78
Media Controller
Introduction
Control the media app installed on your Watch or the connected smartphone to play or pause
music and video.
This app will be launched automatically from your Watch when you play music
or videos on the connected smartphone. If you do not want the app to launch
automatically, on the Apps screen, tap (
Settings
)
→
Display
and tap the
Show
media controls
switch to deactivate it.
Controlling the music player
1 Tap (
Media Controller
) on the Apps screen.
2 Select
Phone
or
Watch
.
When selecting
Phone
, the music will be played on the connected smartphone’s music
app and you can control the music player with your Watch.
When selecting
Watch
, the music will be played on your Watch’s music app, and you can
listen to music with your Watch’s speaker or a connected Bluetooth headset.
Skip to the next file.
Adjust the volume.
Pause and resume playback.
Skip to the previous file.
Controlling the video player
1 Play video on the connected smartphone.
2 Tap (
Media Controller
) on the Apps screen.
3 Tap
Phone
.
You can control the video player with your Watch.
Apps and features
79
Reminder
Register to—do items as reminders and receive notifications according to the condition you
set.
•
To receive reminder notifications in a specific place, you have to connect your Watch
to your smartphone via Bluetooth. However, the feature for setting you to receive
reminder notifications in a specific place is only available on your smartphone.
•
All reminders on your Watch will be synced with the connected smartphone
automatically so that you can receive alarms and check them from the smartphone.
1 Tap (
Reminder
) on the Apps screen and tap
Write
.
If you have a saved reminder, tap on the top of the reminders list.
2 Select the input mode you want and enter the reminder.
3 Tap
Set time
to set a notification.
4 Tap the input field, use the bezel, or swipe upwards or downwards on the screen to set the
time, and tap
Next
.
5 Set other notification options, such as selecting the date on which the notification will
repeat, and tap
Done
.
6 Tap
Save
.
The saved reminder is added to the reminders list and the reminder will display at the time
you set with an alarm.
Completing or deleting the reminder
When you have finished your task, you can set the reminder as completed or delete it.
To complete the reminder, select the reminder from the reminder list and tap
Complete
.
To delete the reminder, tap and hold the reminder on the reminder list, and then tap
Delete
.
To delete multiple reminders, tick the reminders you want to delete and tap
Delete
.
Calendar
You can check the 7-day schedules of events that you saved in your smartphone on your
Watch.
Tap (
Calendar
) on the Apps screen to check the schedules of events that you saved in
your smartphone.
To add your schedule, tap
Show on phone
and add it on the connected smartphone.
Apps and features
80
Bixby
Bixby is a user interface that helps you use your Watch more conveniently.
You can talk to Bixby. Bixby will launch a function you request or show the information you
want.
Visit www.samsung.com/bixby for more information.
•
Make sure the Watch’s microphone is not obstructed when you are speaking into it.
•
Bixby is only available in some languages, and certain features may not be available
depending on your region.
Starting Bixby
Press and hold the Home key to launch Bixby. The Bixby intro page will appear. After you sign
in to your Samsung account, select the language to use with Bixby, complete the setup by
following the on-screen instructions.
Using Bixby
While pressing and holding the Home key, say what you want to Bixby, and then release your
finger from the key. Alternatively, say “Hi, Bixby” after turning on the screen and say what you
want.
For example, while pressing and holding the Home key, say “How’s the weather today?” The
weather information will appear on the screen with voice feedback.
If you want to know the weather tomorrow, while pressing and holding the Home key, just
say “Tomorrow?”
If Bixby asks you a question during a conversation, while pressing and holding the Home key,
answer Bixby. Or, tap and answer Bixby.
If you cannot launch Bixby with the Home key, on the Apps screen, tap (
Settings
)
→
Advanced features
→
Customise keys
, tap
Press and hold
under
Home key
, and then select
Wake Bixby
.
Tips for better voice recognition
•
Speak clearly.
•
Speak in quiet places.
•
Do not use offensive or slang words.
•
Avoid speaking in dialectal accents.
The Watch may not recognise your commands or may perform unwanted commands
depending on your surroundings or how you speak.
Apps and features
81
Waking up Bixby using your voice
You can start a conversation with Bixby by saying “Hi, Bixby”.
1 Tap (
Bixby
) on the Apps screen.
2 Tap
Settings
→
Voice wake-up
.
3 Tap the
Voice wake-up
switch to activate it.
Weather
View weather information on the Watch for locations set on the connected smartphone.
Tap (
Weather
) on the Apps screen.
To view the weather information, such as the time-specific weather or weekly information,
use the bezel or swipe upwards or downwards on the screen.
To add another city’s weather information, tap your current location at the top of the screen,
tap
Manage on phone
, and then add the city from the connected smartphone.
Alarm
Set and manage the Watch’s alarms and the smartphone’s alarms individually.
When your Watch is connected to your smartphone via Bluetooth, you can check all
alarm lists on your smartphone from the Watch.
Setting alarms
1 Tap (
Alarm
) on the Apps screen.
2 Tap
Add on watch
to set alarms that only go off on your Watch.
You can also add an alarm from the connected smartphone by tapping
Add on phone
.
3 Tap the input field, use the bezel or swipe upwards or downwards on the screen to set the
alarm time, and tap
Next
.
4 Select the days for the alarm to repeat.
Apps and features
82
5 Rotate or swipe the bezel clockwise. Alternatively, swipe left on the screen, set the
additional options, and then tap
Save
.
The saved alarm is added to the alarms list.
To activate or deactivate alarms, tap the switch next to the alarm in the alarms list.
Stopping alarms
Drag outside the large circle to stop an alarm. Alternatively, rotate or swipe the bezel
clockwise.
If you want to use the snooze function, drag outside the large circle. Alternatively, rotate
or swipe the bezel anticlockwise.
Deleting alarms
In the alarms list, tap and hold an alarm, and then tap
Delete
.
World clock
Tap (
World clock
) on the Apps screen to view the world clocks added from the
smartphone.
To add a world clock, tap
Add on phone
. Or, if you have added world clocks, tap
Manage on
phone
, and then add or remove a world clock on the connected smartphone.
Timer
Setting a timer
1 Tap (
Timer
) on the Apps screen.
2 Tap .
3 Tap the input field, use the bezel or swipe upwards or downwards on the screen to set the
duration, and tap .
If you select a preset, the timer will start right away. You can also view more presets by
using the bezel or swiping upwards or downwards on the screen.
Apps and features
83
Dismissing a timer
Drag outside the large circle when your timer goes off. Alternatively, rotate or swipe the
bezel clockwise.
To restart the timer, drag outside the large circle. Alternatively, rotate or swipe the bezel
anticlockwise.
Stopwatch
1 Tap (
Stopwatch
) on the Apps screen.
2 Select the stopwatch style you want by using the bezel or swiping left or right on the
screen.
To change the stopwatch style, tap and hold the screen.
3 Tap
Start
to time an event.
To record lap times while timing an event, tap
Lap
or .
4 Tap
Stop
or to stop timing.
•
To restart the timing, tap
Resume
or .
•
To clear lap times, tap
Reset
or .
Gallery
Importing and exporting images
Importing images from your smartphone
1 Launch the
Galaxy Wearable
app on your smartphone.
2 Tap
Watch settings
→
Manage content
.
3 Tap
Add images
.
4 Select a category, select files, and then tap
Done
.
To sync images on your smartphone with your Watch, tap the
Auto sync
switch under
Gallery
to activate it. Then, tap
Albums to sync
, select albums to import to your Watch, and then tap
Done
. The selected albums will be automatically synced with your Watch when it has more
than 15 % of remaining battery power.
Apps and features
84
Exporting images to your smartphone
1 Tap (
Gallery
) on the Apps screen.
2 Tap and hold the image to export it.
3 Use the bezel or swipe left or right on the screen and select any images to export more.
To select all images, tap
All
.
4 Tap .
You can view the exported images in apps like Gallery on your smartphone.
Viewing images
View and manage the images saved on your Watch.
1 Tap (
Gallery
) on the Apps screen.
2 Use the bezel or swipe upwards or downwards on the screen to scroll through the image
list and select an image.
Zooming in or out
While viewing an image, double-tap the image quickly, spread your two fingers apart, or
pinch on an image to zoom in or out.
When an image is magnified, you can view the rest of the image by scrolling around the
screen.
Deleting images
1 Tap (
Gallery
) on the Apps screen.
2 Tap and hold the image to delete it.
3 Use the bezel or swipe left or right on the screen and select any images to delete more.
To select all images, tap
All
.
4 Tap .
Apps and features
85
Find My Phone
If you misplace the smartphone, the Watch can help you find it.
1 Tap (
Find My Phone
) on the Apps screen.
2 Tap
Start
.
The smartphone will make a sound and vibrate, and its screen will turn on.
To stop making sound and vibrating, tap and drag it on the smartphone, or tap
Stop
on the Watch.
Find My Watch
If you misplace your Watch, the Galaxy Wearable app on your connected smartphone or the
SmartThings Find feature of the SmartThings app installed on your connected smartphone
can help you find it.
The screen may be switched automatically to find your Watch with the SmartThings
Find feature if the connected smartphone supports the SmartThings Find feature.
Finding with the Galaxy Wearable app
1 Launch the
Galaxy Wearable
app on your smartphone and tap
Find My Watch
.
2 Tap
Start
.
The Watch will make a sound and vibrate, and its screen will turn on.
To stop making sound and vibrating, drag outside the large circle on the Watch.
Alternatively, rotate or swipe the bezel. You can also stop it by tapping
Stop
on the
smartphone.
Controlling the Watch remotely
When your Watch is lost or stolen, launch the
Galaxy Wearable
app on your smartphone, tap
Find My Watch
→
Set security
, and then control your Watch remotely.

Apps and features
86
Finding with the SmartThings Find feature of the SmartThings app
Launch the
Galaxy Wearable
app on your smartphone and tap
Find My Watch
.
The SmartThings Find screen of the SmartThings app will appear on the smartphone and you
can check your misplaced Watch’s location on the map. Also, you can find it by following the
beeping sound emitted from your Watch.
Sending an SOS
Introduction
In an emergency, you can send an SOS message that includes your location information
to previously registered contacts, or you can set it up your Watch to send an SOS message
automatically when you are hurt from a fall and your Watch recognises it. Also, you can set
the Watch to automatically make an emergency call to a previously registered contact.
•
If the GPS feature is not activated on your Watch when sending an SOS, the GPS
feature will be activated automatically to send the location information.
•
Your location information may not be sent depending on your region or situation.
Registering the emergency contacts
Register the emergency contact to send an SOS message and make an emergency call to in
an emergency.
1 Launch the
Galaxy Wearable
app on your smartphone and tap
Watch settings
→
Advanced features
→
SOS
.
2 Tap
Send messages to
.
3 Tap
Create contact
and enter new contact information or tap
Select from Contacts
to
add an existing contact as an emergency contact.
You can select a contact to make an emergency call to from the contacts you registered for
SOS messages. Launch the
Galaxy Wearable
app on your smartphone, tap
Watch settings
→
Advanced features
→
SOS
→
Make SOS call to
, and then select a contact.

Apps and features
87
Requesting an SOS
Setting the SOS request
1 Launch the
Galaxy Wearable
app on your smartphone and tap
Watch settings
→
Advanced features
→
SOS
.
2 Tap
When Home key pressed 3 times
and tap the switch to activate it.
To set a delay time for sending an SOS message that will give you time to cancel the
message after quickly pressing the Watch’s Home key three times, tap the
Count down
before sending
switch to activate it.
Sending an SOS request
In an emergency, quickly press the Watch’s Home key three times.
The SOS message will be sent and the emergency call will be made to the previously
registered contacts.
The icon will appear on the Watch screen while sending an SOS message and you can
check the SOS request result on the notification panel after the SOS message has been sent.
Requesting an SOS when you are hurt from a fall
Setting the SOS request when you are hurt from a fall
1 Launch the
Galaxy Wearable
app on your smartphone and tap
Watch settings
→
Advanced features
→
SOS
.
2 Tap
When hard fall detected
and tap the switch to activate it.
Apps and features
88
Sending an SOS request when you are hurt from a fall
When you fall a certain distance, the Watch will detect your status through your arm’s
movement and it will display the notification while vibrating and emitting sound.
If you do not respond within 60 seconds, a siren will sound for 30 seconds, and then an SOS
message will be sent out automatically. Then emergency call will be made to a previously
registered contact.
After the Watch detects your fall, cancel the alert not to send the SOS message whenever you
want or send an SOS message manually.
The Watch may believe that you have been hurt in a fall if you are doing a high impact
exercise. If it is so, cancel the alert not to send the SOS message.
Stopping SOS messages
When the icon appears on the Watch screen, check your location information sharing
status on the notification panel. To stop sharing your location information, tap the screen and
tap
Stop sharing
→
.
If you do not stop sending SOS messages, which include your location information,
additional messages will be continuously sent to the previously registered contacts
every 15 minutes for 24 hours after the first SOS message is sent. However, the message
will be sent only when your current location is away off more than 50 m from the
location where the last message is sent.
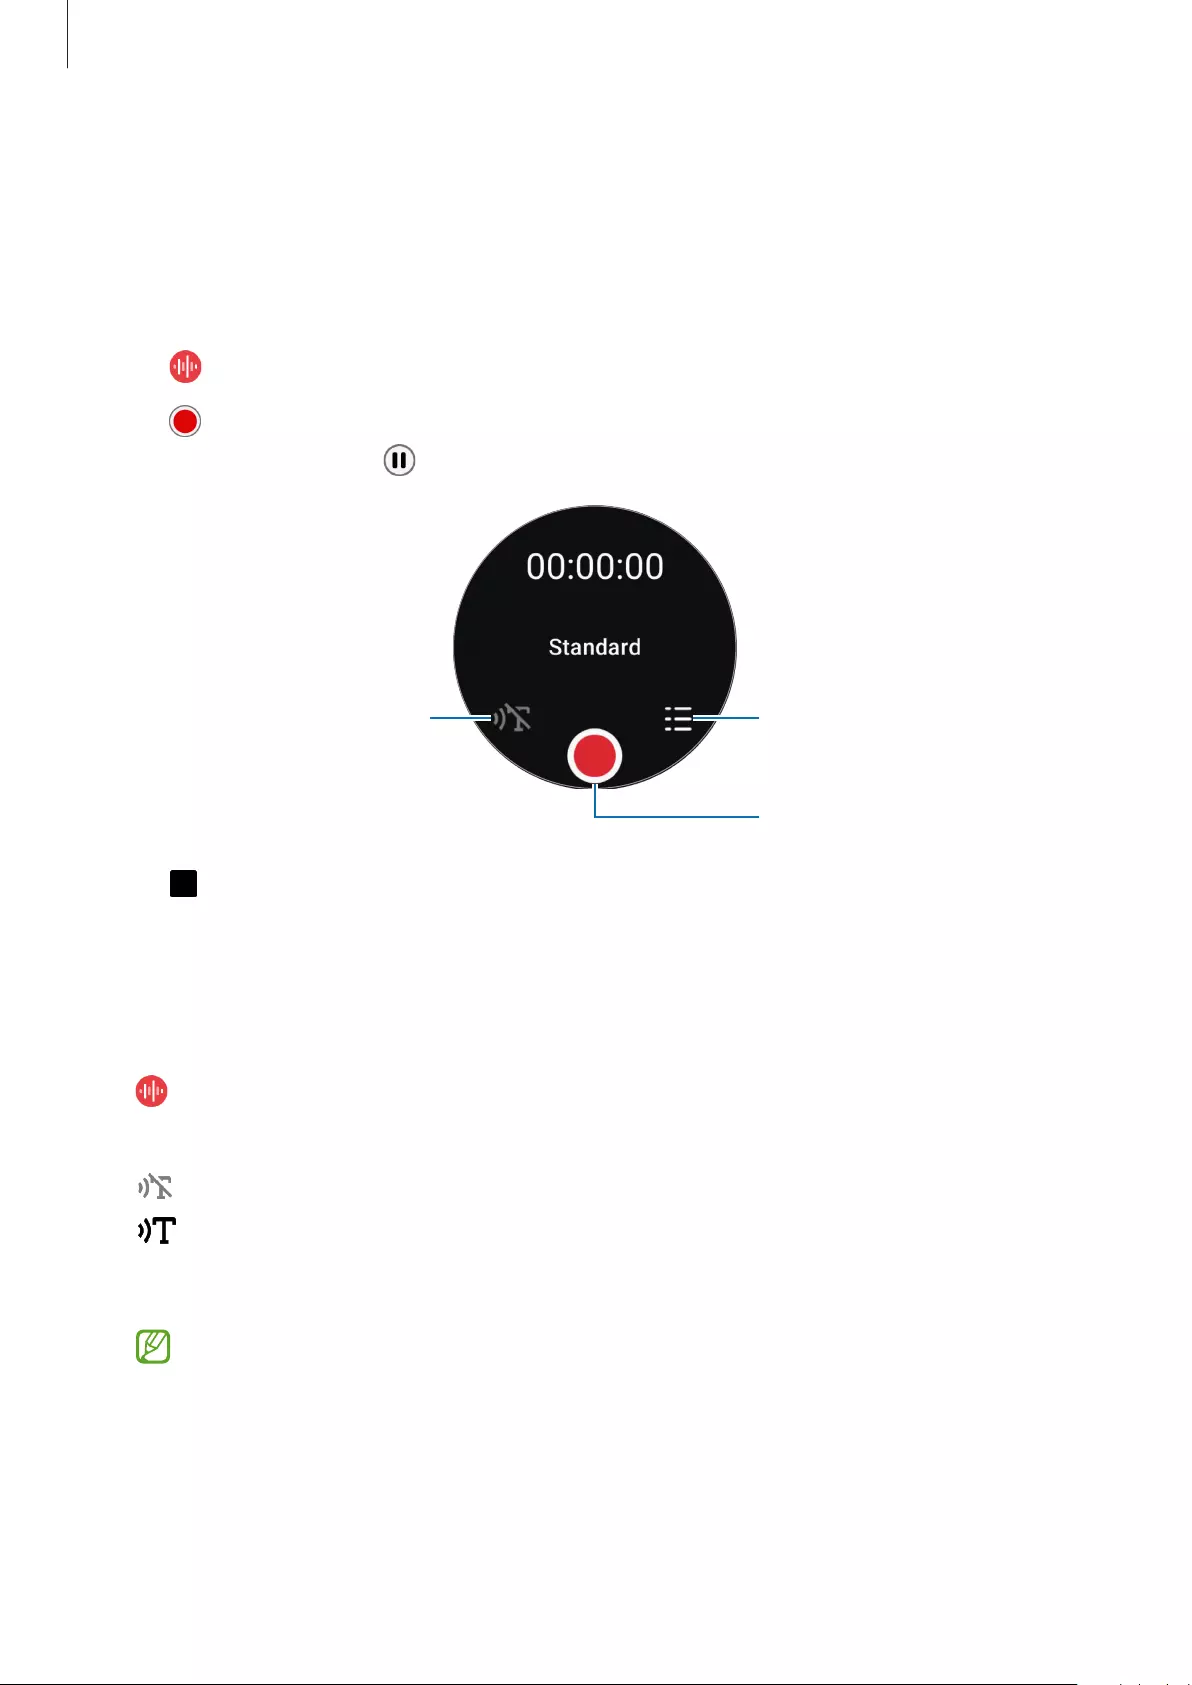
Apps and features
89
Voice Recorder
Record or play voice recordings.
Making voice recordings
1 Tap (
Voice Recorder
) on the Apps screen.
2 Tap to start recording. Speak into the Watch’s microphone.
To pause recording, tap .
Change the recording mode.
Start recording.
Check your saved recordings.
3 Tap to finish recording.
The recording will be saved automatically.
4 To listen to the recorded sound, select a recording file and tap
Play
.
Changing the recording mode
Tap (
Voice Recorder
) on the Apps screen.
Select a mode you want.
•
: This is the normal recording mode.
•
: The Watch records your voice for up to 10 minutes, converts it to text, and then
saves it. For best results, keep the Watch near your mouth and speak loudly and clearly in
a quiet place.
If the speech-to-text language does not match the language you are speaking, the
Watch will not recognise your voice. Before using this feature, tap
Speech-to-text
to set the speech-to-text language.

Apps and features
90
Calculator
You can perform simple calculations.
Tap (
Calculator
) on the Apps screen.
You can use this app when leaving a tip or splitting the bill by dragging upwards from the
bottom edge of the screen.
Compass
You can use your Watch as a compass.
Tap (
Compass
) on the Apps screen.
You can check additional information, such as the incline, altitude, and atmospheric pressure,
by dragging upwards from the bottom edge of the screen.
•
The presence of magnetic substances, such as the wireless charger, may affect to
your Watch’s internal compass sensor and lower its accuracy. Before using this app,
follow the on-screen instructions to calibrate the compass by swinging the wrist you
are wearing the Watch on.
•
Rotating the bezel may affect to the compass’s accuracy. You can improve the
compass’s accuracy by swinging your wrist that is wearing the Watch in a variety
directions.
Buds Controller
You can check the battery status of the Galaxy Buds connected to the Watch and change their
settings.
Tap (
Buds Controller
) on the Apps screen.
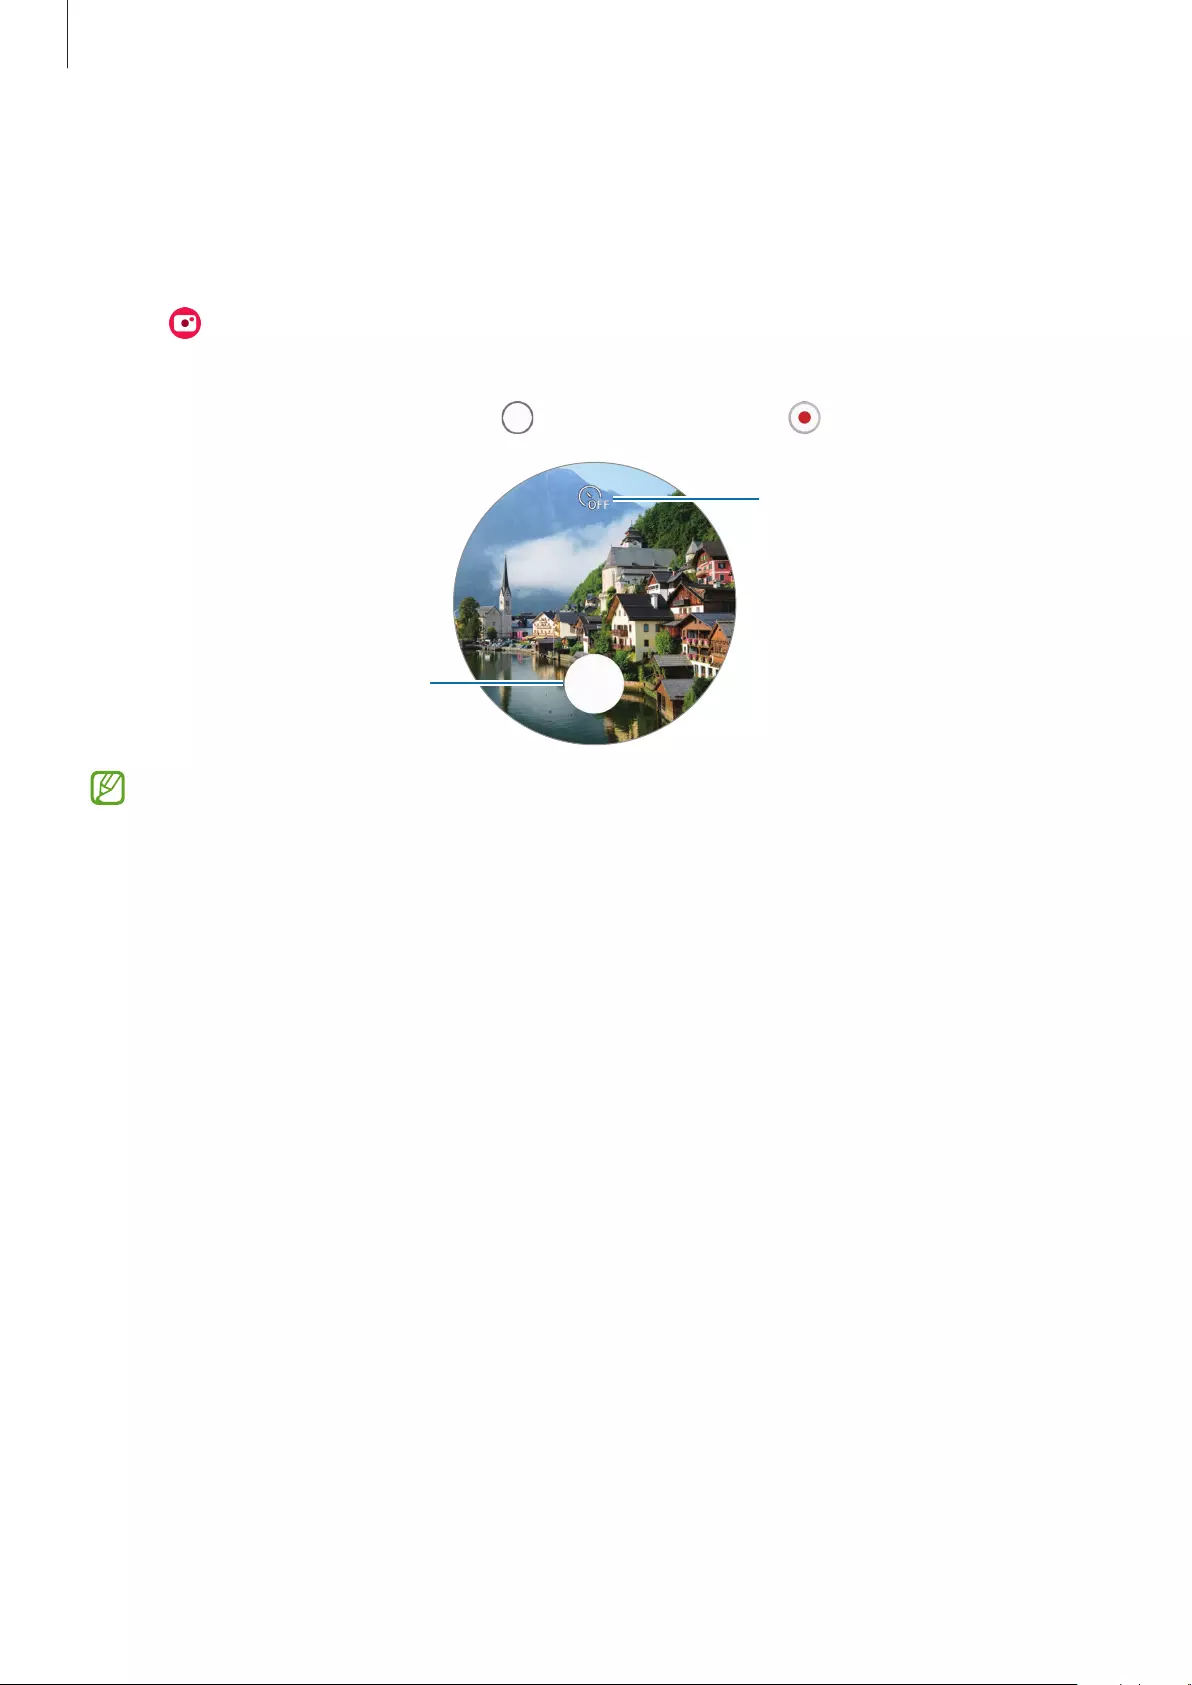
Apps and features
91
Camera Controller
You can remotely control the cameras of the smartphone connected to the Watch and take
pictures or record videos from a distance.
1 Tap (
Camera Controller
) on the Apps screen.
The Camera app will be launched on the connected smartphone.
2 Check the preview screen, and tap to take a picture or tap to record a video.
Take a picture.
Select the length of the delay
before the camera automatically
takes a picture.
This app may not be available depending on the connected smartphone.
Samsung Global Goals
The Global Goals, which were established by the United Nations General Assembly in 2015,
consist of goals that aim to create a sustainable society. These goals have the power to end
poverty, fight inequality, and stop climate change.
With Samsung Global Goals, learn more about the global goals and join the movement for a
better future.
Apps and features
92
Settings
Introduction
Customise settings for functions and apps. Set your Watch depending on your usage pattern
by configuring the various settings.
Tap (
Settings
) on the Apps screen.
Some features in Settings may not be available depending on the region, service
provider, or model.
Connections
Bluetooth
Connect to a smartphone via Bluetooth. You can also connect other Bluetooth-enabled
devices, such as a Bluetooth headset or computer.
On the Settings screen, tap
Connections
→
Bluetooth
.
•
Samsung is not responsible for the loss, interception, or misuse of data sent or
received via Bluetooth.
•
Always ensure that you share and receive data with devices that are trusted and
properly secured. If there are obstacles between the devices, the operating distance
may be reduced.
•
Some devices, especially those that are not tested or approved by the Bluetooth SIG,
may be incompatible with your device.
•
Do not use the Bluetooth feature for illegal purposes (for example, pirating copies of
files or illegally tapping communications for commercial purposes). Samsung is not
responsible for the repercussion of illegal use of the Bluetooth feature.
Wi—Fi
Activate the Wi-Fi feature to connect to a Wi-Fi network.
1 On the Settings screen, tap
Connections
→
Wi—Fi
, and tap the switch to activate it.
2 Select a network from the Wi-Fi network list under
Available networks
.
Networks that require a password appear with a lock icon.
3 Tap
Connect
.
If you cannot connect to a Wi-Fi network properly, restart your Watch’s Wi-Fi feature or
the wireless router.
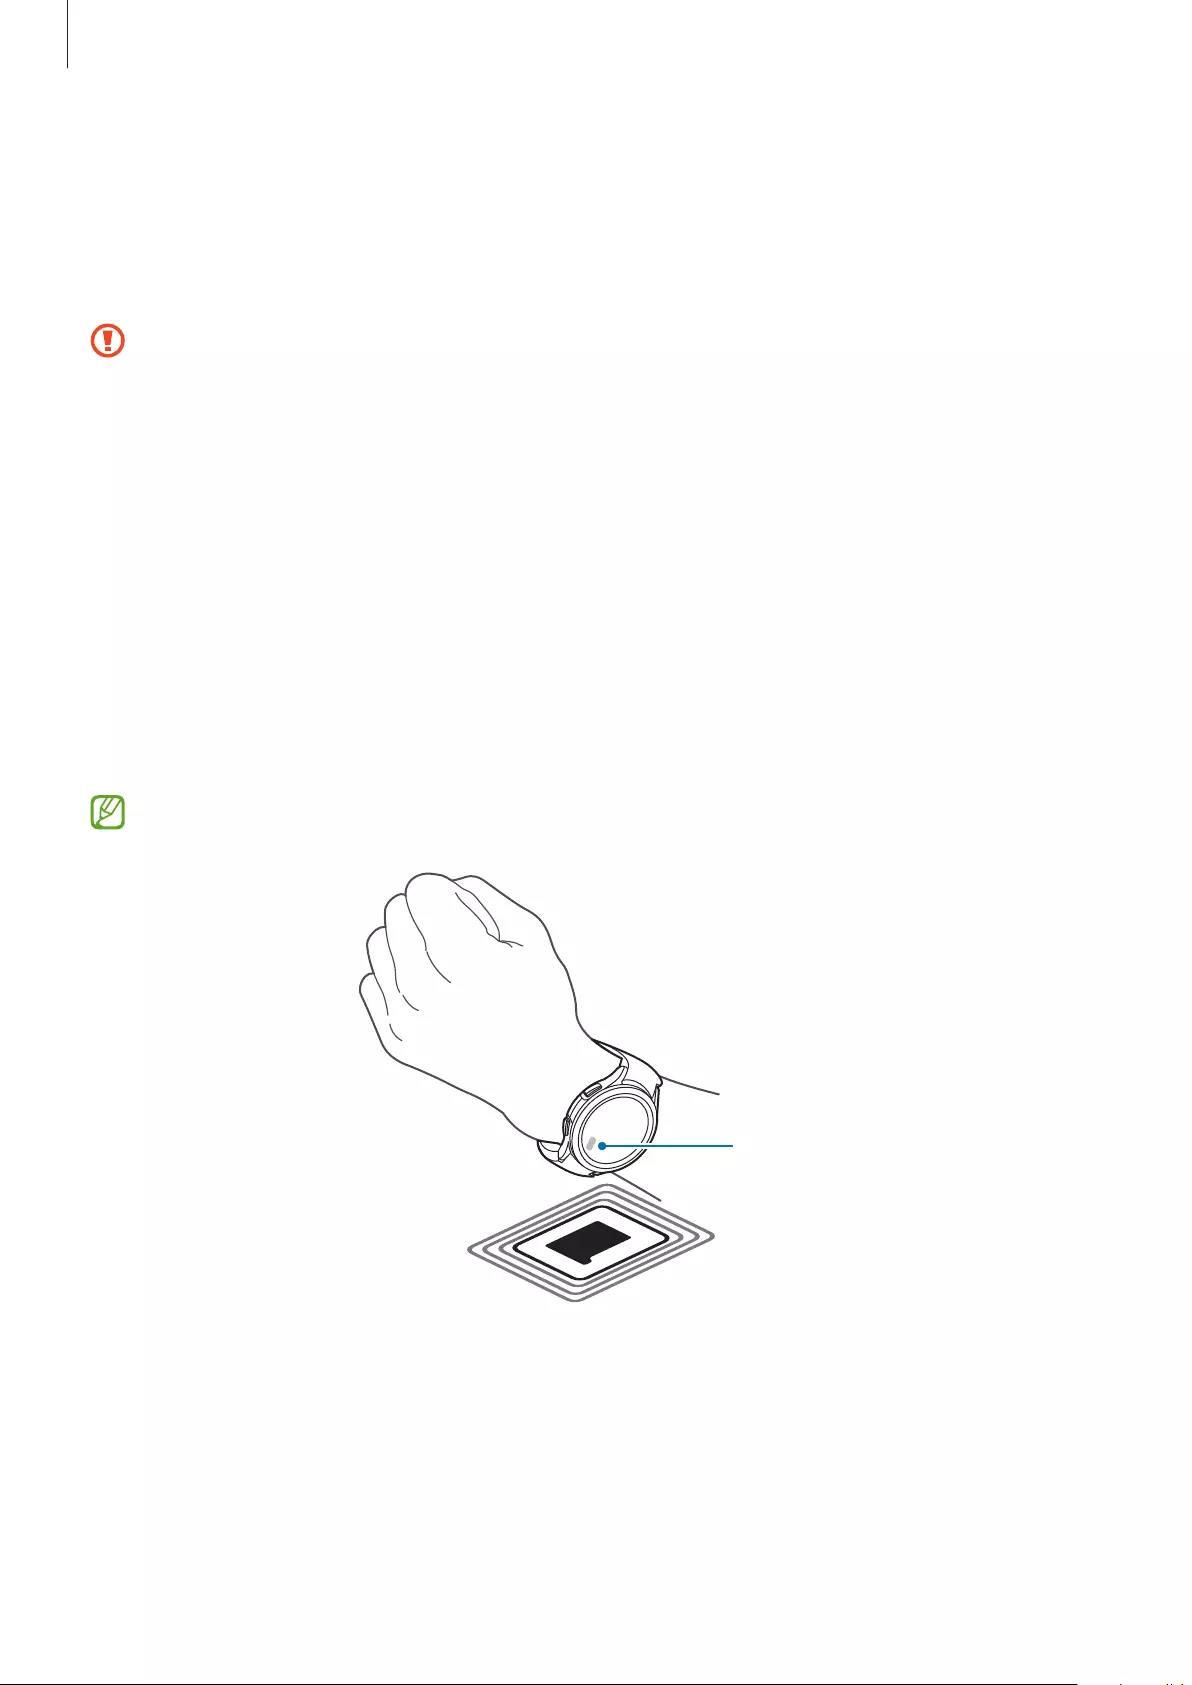
Apps and features
93
NFC
You can use this feature to make payments and buy tickets for transportation or events after
downloading the required apps.
On the Settings screen, tap
Connections
→
NFC
.
The Watch contains a built-in NFC antenna. Handle the Watch carefully to avoid
damaging the NFC antenna.
Making payments with the NFC feature
Before you can use the NFC feature to make payments, you must register for the mobile
payment service. To register or get more information about the service, contact your service
provider.
1 On the Settings screen, tap
Connections
→
NFC
and tap the switch to activate it.
2 Touch the NFC antenna area of the Watch to the NFC card reader.
To set the default app, on the Settings screen, tap
Connections
→
NFC
→
Payment
and
select an app.
The payment services list may not include all available payment apps.
NFC antenna
Disconnection alerts
Set to vibrate or make an alarm when the Bluetooth connection with your smartphone is
disconnected while you are wearing your Watch.
On the Settings screen, tap
Connections
→
Disconnection alerts
and select an alert option
you want.
Apps and features
94
Flight mode
This disables all wireless functions on your Watch. You can use only non-network services.
On the Settings screen, tap
Connections
and tap the
Flight mode
switch to activate it.
Follow the regulations provided by the airline and the instructions of aircraft personnel.
In cases where it is allowed to use the device, always use it in flight mode.
Mobile networks (LTE models)
Customise the settings to control mobile networks.
On the Settings screen, tap
Connections
→
Mobile networks
and select a mobile network
connection option.
•
Auto
: Set to automatically use the Watch’s mobile network when the Bluetooth
connection with your smartphone is disconnected.
•
When the Watch is connected to the smartphone via Bluetooth, the Watch’s
mobile network is turned off to save battery power. Then, you cannot receive
messages and calls made to the Watch’s phone number.
•
When the Bluetooth connection with your smartphone is disconnected, the
Watch’s mobile network will automatically connect. Then, you can receive
messages and calls made to the Watch’s phone number.
•
Always on
: Set to always use the Watch’s mobile network regardless of the connection
with the smartphone.
•
Always off
: Set not to use the Watch’s mobile network.
•
Mobile plans
: Subscribe to the service provider’s mobile plan or additional services.
Data usage (LTE models)
Keep track of your data usage amount and customise the limit settings. Set the Watch to
automatically disable the mobile data connection when you have reached your specified
mobile data limit.
On the Settings screen, tap
Connections
→
Data usage
.
•
Start billing cycle on
: Set the monthly start date of your plan’s data usage.
•
Set data limit
: Activate or deactivate the feature to automatically disable the mobile data
connection when you have reached your specified mobile data limit.
•
Data limit
: Set the mobile data limit.
Apps and features
95
Notifications
Change the notification settings.
On the Settings screen, tap
Notifications
.
•
Show phone notifications on watch
: Set the conditions for checking the smartphone’s
notification on your Watch while wearing it.
•
Mute notifications on phone
: Set to mute the smartphone when it receives notifications
while wearing your Watch.
•
Do not disturb
: Incoming calls will be muted and the screen will not turn on when
receiving incoming calls. Also, all notifications will be muted, except for alarms, and the
screen will not turn on when notifications are received.
•
Notification indicator
: Set the Watch to display a notification indicator on the Watch
screen to alert you to notifications that you have not checked.
•
Read notifications aloud
: Set the Watch to provide a verbal cue when you receive a
notification. However, you can listen to the audio only through the connected Bluetooth
headset.
•
Turn on screen
: Set the Watch to turn its screen on when it receives notifications.
•
Turn on for new apps
: Set the Watch to receive notifications from newly installed apps
automatically without any additional settings.
•
Wireless emergency alerts
: Change the emergency alert settings.
Some features may not be available depending on the region, service provider, or
model.
Sounds and vibration
Change the sound and vibration settings.
On the Settings screen, tap
Sounds and vibration
.
•
Sound mode
: Set to use sound mode, silent mode, or vibrate mode.
•
Vibrate while ringing
: Set the Watch to vibrate and play a ringtone for incoming calls.
•
Vibration
: Set the vibration duration and intensity.
•
Call vibration
: Select a vibration pattern for incoming calls.
•
Notification vibration
: Select a vibration pattern for notifications.
•
Volume
: Adjust the volume level.
•
Ringtone
: Change the ringtone.

Apps and features
96
•
Notification sound
: Change the notification sound.
•
System vibration
: Enable vibrations for certain actions.
•
System sounds
: Enable sounds for certain actions.
Some features may not be available depending on the region, service provider, or
model.
Display
Change the screen settings.
On the Settings screen, tap
Display
.
•
Brightness
: Adjust the brightness for the screen.
•
Auto brightness
: Set the Watch to automatically adjust the brightness depending on the
ambient light conditions.
•
Always On Display
: Set the screen to always stay on while wearing your Watch.
•
Raise wrist to wake
: Set to turn on the screen by raising your wrist while wearing the
Watch.
•
Touch screen to wake
: Set to turn on the screen by tapping it.
•
Turn bezel to wake
: Set to turn on the screen by rotating the bezel (Galaxy Watch4
Classic).
•
Show media controls
: Set to automatically launch the Media Controller app on your
Watch when music or video is played on the connected smartphone.
•
Screen timeout
: Set the length of time the Watch waits before turning off the screen’s
backlight.
•
Show last app
: Set the time to keep the last-used app on after the screen is turned off. If
you turn the screen on again within the time you set after it has been turned off, the app
screen you last used will appear instead of the Watch screen.
•
Font style
: Select the font style for the screen.
•
Font size
: Set the font size of text on the screen.
•
Touch sensitivity
: Set the Watch to allow use of the touchscreen with gloves on.
•
Show charging info
: Set the Watch to display the remaining battery when the screen is
off while charging.

Apps and features
97
Samsung Health
You can set the various setting options related to exercise and fitness.
On the Settings screen, tap
Samsung Health
.
•
Notification
: Set up the notifications for exercise and fitness.
•
Measurement
: Set how to measure your heart rate and stress, and turn the measure
blood oxygen during sleep or snore detection features on or off.
•
Auto detect workouts
: Set an exercise type that the Watch can recognise automatically
and also set Watch to record your approximate location information automatically when
walking or running.
•
Connected services
: Set to share information with other connected health platform
apps, exercise machines, and TVs.
Advanced features
Activate the advanced features.
On the Settings screen, tap
Advanced features
.
•
Water lock
: Activate water lock mode before entering the water. The touchscreen feature
will be deactivated.
•
Bedtime mode
: Incoming calls will be muted and the screen will not turn on when
receiving incoming calls. Also, all notifications will be muted, except for alarms, and
the screen will not turn on when notifications are received. Also, the raise wrist to wake
feature, Always On Display feature, and system sounds will be deactivated automatically.
•
Theatre mode
: Incoming calls will be muted and the screen will not turn on when
receiving incoming calls. Also, all notifications will be muted, including alarms and timers,
and the screen will not turn on when notifications are received or when there is an alarm.
Also, the raise wrist to wake feature, Always On Display feature, and system sounds will be
deactivated automatically.
•
SOS
: In an emergency, you can send an SOS message to previously registered contacts by
quickly pressing the Home key three times, or you can set it up to send an SOS message
automatically when you are hurt from a fall and your Watch recognises it. Refer to
Sending an SOS for more information.
•
Customise keys
: Select an app or feature to launch when you press the Watch’s Home
key twice or press and hold it. You can also select a feature to launch when you press the
Watch’s Back key.

Apps and features
98
•
Answer calls
: Set to answer calls by shaking twice the arm which you are wearing your
Watch on after bending at the elbow.
•
Dismiss alerts and calls
: Set to dismiss alerts and decline calls by rotating the wrist you
are wearing your Watch on twice.
Battery
Check the remaining battery. If the battery is low, activate power saving mode to reduce
battery consumption.
On the Settings screen, tap
Battery
.
•
Power saving
: Activate power saving mode in which some features are restricted to
reduce battery consumption.
•
Watch only
: Only the watch displays on the screen and all other features will be
deactivated to reduce the battery consumption. Press the Home key to view the watch.
Press and hold the Home key for three seconds to deactivate watch only mode.
•
The usage time left shows the time remaining before the battery power runs
out. Usage time left may vary depending on your Watch settings and operating
conditions.
•
You may not receive notifications from some apps that use power saving mode.
Apps
Configure the settings for the Watch’s app.
On the Settings screen, tap
Apps
.
•
Choose default apps
: Choose default apps for specific features.
•
Health Platform
: Select a default health management app.
•
Permissions
: View the permission list for all apps, including the system apps, and change
their permission settings.
•
Samsung app updates
: Check for updates for some preinstalled Samsung apps.

Apps and features
99
General
Touch bezel (Galaxy Watch4)
Change the touch bezel settings.
On the Settings screen, tap
General
→
Touch bezel
and tap the switch to activate it.
To feel vibrations while using the touch bezel, tap the
Vibration feedback
switch to activate
it.
Text—to-speech
Change the settings for text-to-speech features, such as languages, speed, and more.
On the Settings screen, tap
General
→
Text—to-speech
.
•
Preferred engine
: Select a default engine when using the text-to-speech feature.
•
TTS engine settings
: Set the TTS engine.
•
Language
: Select a language to use. The language that is used for text-to-speech feature
will be same as your Watch’s language.
•
Speech rate
: Set the reading speed.
Input
Change the text input settings.
On the Settings screen, tap
General
→
Input
.
•
Samsung Keyboard
: Configure the Samsung keyboard’s settings.
•
Keyboard list and default
: Select a keyboard to use by default and change the keyboard
settings.
•
Quick responses
: Turn the message suggestions feature, which can be used for sending
messages, on or off and set your own custom responses on the connected smartphone.

Apps and features
100
Date and time
You can set the date and time manually. Disconnect your Watch from the smartphone to use
the date and time features, since they are synced with the connected smartphone.
On the Settings screen, tap
General
→
Date and time
.
•
Automatic
: Set the time zone provided by network or GPS to be applied when travelling
to a different time zone.
•
Set date
: Set the date manually.
•
Set time
: Set the time manually.
•
Select time zone
: Select the time zone manually.
Connect to new phone
The Watch can connect to another new smartphone after performing a reset for all your
personal information.
On the Settings screen, tap
General
→
Connect to new phone
.
Reset
Delete all data on your Watch.
On the Settings screen, tap
General
→
Reset
.
Accessibility
Configure various settings to improve accessibility to the Watch.
On the Settings screen, tap
Accessibility
.
•
TalkBack
: Activate TalkBack, which provides voice feedback. To view help information to
learn how to use this feature, tap
Settings
→
Tutorial and help
.
•
Visibility enhancements
: Customise the settings to improve accessibility for visually
impaired users.
•
Hearing enhancements
: Customise the settings to improve accessibility for users with
hearing impairment.
•
Advanced settings
: Manage other advanced functions.
•
Installed services
: View accessibility services installed on the Watch.

Apps and features
101
Security
Configure your Watch’s security settings.
On the Settings screen, tap
Security
.
•
Lock
: Change the lock settings. When you use this feature, the screen may be locked
automatically when you do not move for a period of time. However, if you unlock it
once while wearing the Watch, it will remain unlocked. Refer to Lock screen for more
information.
Privacy
Change your privacy settings.
On the Settings screen, tap
Privacy
.
•
Permission manager
: View the list of features and apps that have permission to use
them. You can also edit the permission settings.
Location
Change settings for location information usage.
On the Settings screen, tap
Location
and tap the switch to activate it.
•
Improve accuracy
: Set the Watch to use the Wi-Fi or mobile network to increase your
location information’s accuracy, even when the networks are deactivated.
•
Permissions
: Set the permission of the feature to use location information.
Account and backup
You can use various features of the Watch after registering your Samsung or Google account
on your connected smartphone.
On the Settings screen, tap
Account and backup
.
•
Samsung account
: Check the Samsung account registered on your connected
smartphone.
•
Google account
: Check the Google account registered on your connected smartphone
and copy it to your Watch.

Apps and features
102
Software update
Update Watch to the latest software.
On the Settings screen, tap
Software update
.
Tips and tutorials
Learn the basic tips for using your Watch and view the user manual on the connected
smartphone.
On the Settings screen, tap
Tips and tutorials
.
•
Tutorial
: View the tutorial for learning the Watch’s basic usage tips.
•
View tips on phone
: View the detailed usage tips for your Watch on the connected
smartphone.
About watch
View the Watch’s additional information.
On the Settings screen, tap
About watch
.
•
Storage
: Check the status of the used and available memory.
•
Device
: View the information, such as the Wi-Fi MAC address, Bluetooth address, and
serial number.
•
Legal info
: View legal information related to the Watch. You can also send the Watch’s
diagnostic information to Samsung.
•
Software
: View the software version and security status.
•
Battery
: View the battery information.
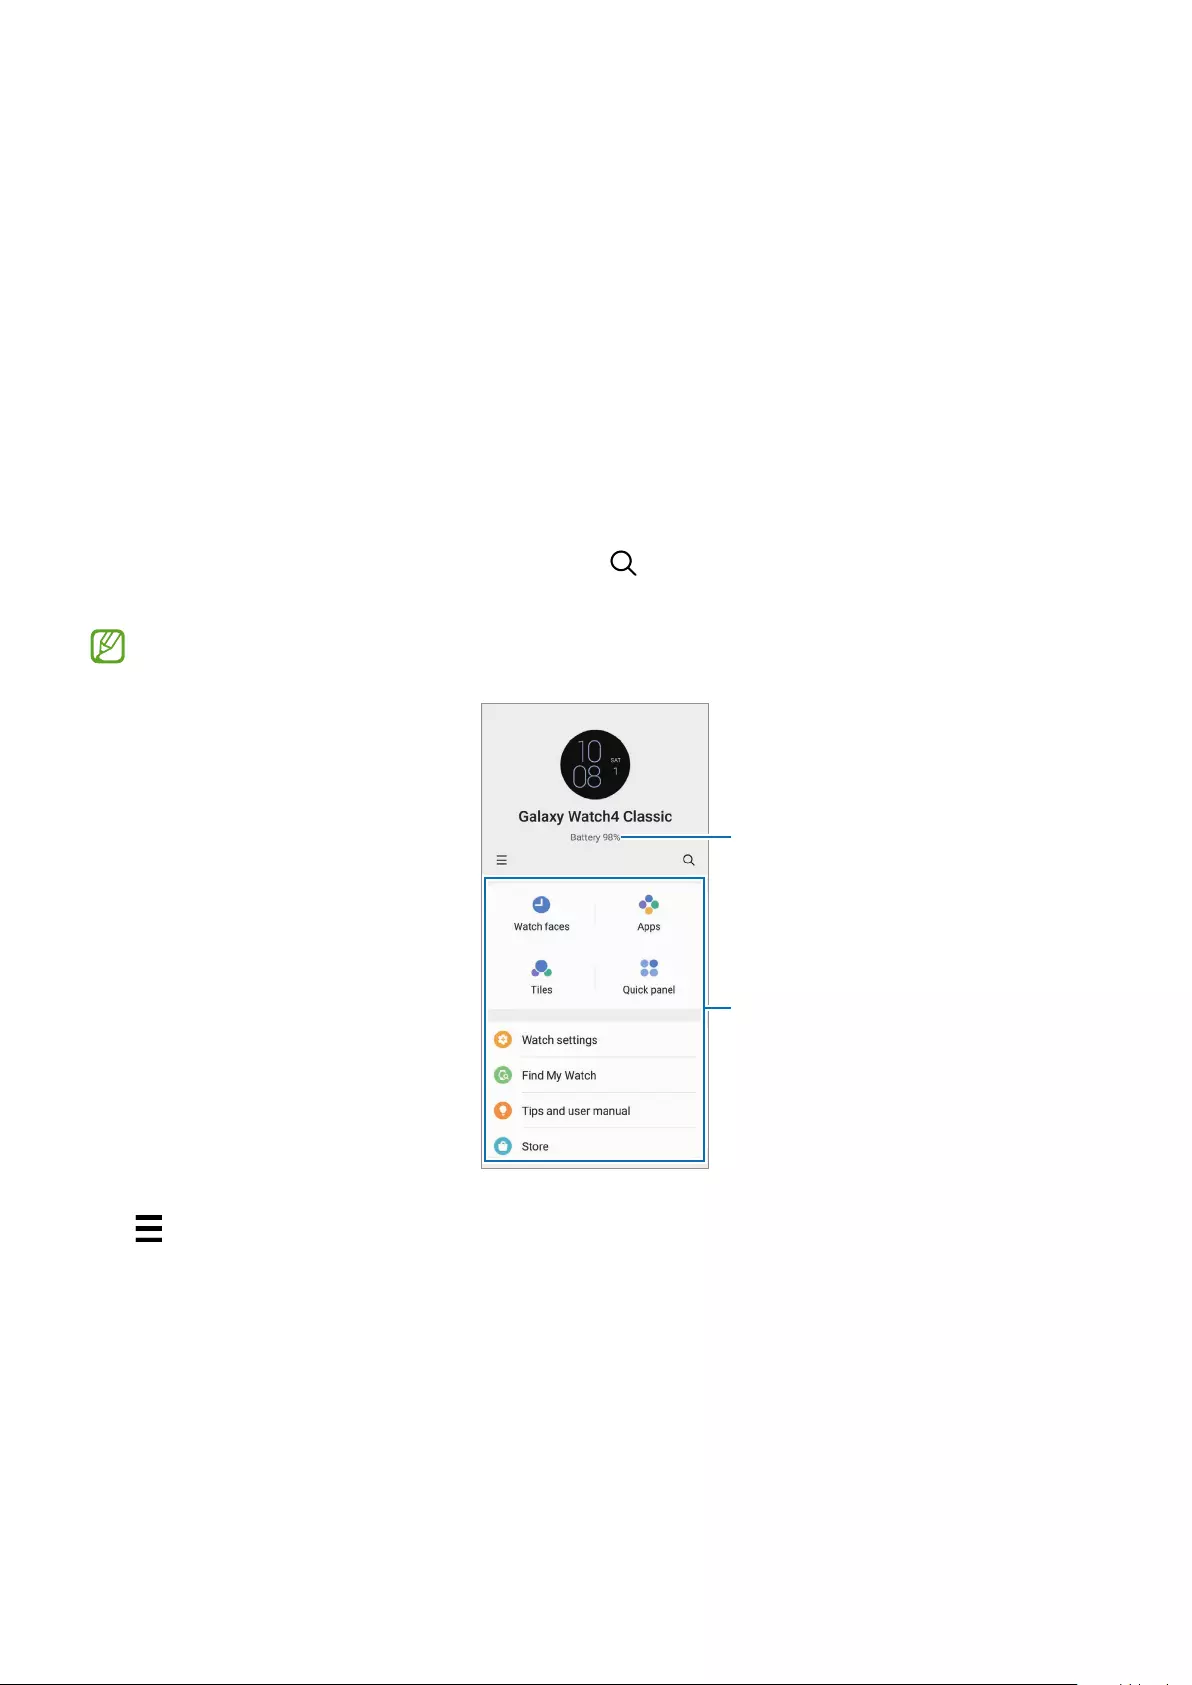
103
Galaxy Wearable app
Introduction
To connect your Watch to a smartphone, you must install the Galaxy Wearable app on your
smartphone. You can check the Watch’s remaining battery and configure the settings with the
Galaxy Wearable app.
Launch the
Galaxy Wearable
app on your smartphone.
To search for settings by entering keywords, tap . You can also search for settings by
selecting a tag under
Suggestions
.
Some features may not be available depending on the type of connected smartphone.
Watch’s remaining battery
Configure Watch settings and
launch features you want.
Tap to use the following additional options:
•
Add new device
: Disconnect your device from the currently connected smartphone and
connect a new device. Select your device on the screen or tap
Mine’s not here
if you
cannot find your device, and then follow the on-screen instructions to connect to the
new device.
Galaxy Wearable app
104
•
Auto switch
: The Watch will still automatically connect to your smartphone if you wear it
on your wrist.
This feature will be displayed only when more than two devices that support the
auto switch feature are paired to your smartphone.
•
Manage devices
: Manage connected devices when more than two devices are paired
with your smartphone. To disconnect a device from your smartphone, select a device and
tap
Remove
.
•
Contact us
:
Samsung Members
offers support services to customers, such as device
problem diagnosis, and lets users submit questions and error reports. You can also share
information with others in the Galaxy users’ community or view the latest news and tips.
Samsung Members
can help you solve any problems you might encounter while using
your device.
•
About Galaxy Wearable
: View version information of the Galaxy Wearable app.
Some features may not be available depending on the region, service provider, or
model.
Watch faces
You can change the type of watch to be displayed on the Watch screen.
On the Galaxy Wearable screen of the smartphone, tap
Watch faces
.
Select a watch face you want and tap
Customise
to change screen colours or components,
such as clock hands and dials, and even select items to display on the Watch screen.
Making My style watch faces
Change your Watch’s watch face into a pattern image that uses a colour combination
abstracted from the picture you took. You can match your Watch’s watch face with any
fashion you want.
This feature is only available on Samsung or Android smartphones.
1 On the Galaxy Wearable screen of the smartphone, tap
Watch faces
.
2 Select
My style
.
3 Tap
Customise
→
Camera
.
To select a picture saved on your smartphone, tap
Gallery
.
Galaxy Wearable app
105
4 Tap to take a picture and then tap
OK
.
5 Drag the picture to the collection of colours you want to use.
6 Select a pattern type and tap
Done
.
7 Tap
Save
.
The watch face of your Watch will be changed into the My style one.
Apps
Customise the Apps screen, configure the settings for certain apps, or view their information.
On the Galaxy Wearable screen of the smartphone, tap
Apps
.
Arranging apps
Tap
Reorder apps
, tap and hold an app to move, drag it to the desired position, and then tap
Save
.
Configuring app settings
Tap
App settings
and select an app installed on your Watch to change its settings.
Viewing app information
Tap
App info
and select an app installed on your Watch to check its information.
Tiles
Customise the tiles on the Watch. You can also rearrange tiles.
On the Galaxy Wearable screen of the smartphone, tap
Tiles
.
Adding or removing tiles
Tap on the tile to add under
Add tiles
or tap on the tiles you want to delete, and then
tap
Save
.
Reordering tiles
Tap and hold a tile you want to move, drag it to the desired position, and then tap
Save
.

Galaxy Wearable app
106
Quick panel
Select the quick settings icons displayed on the quick panel of your Watch. You can also
rearrange quick settings icons.
On the Galaxy Wearable screen of the smartphone, tap
Quick panel
.
Adding or removing quick setting icons
Tap and hold an icon you want to add under
Available buttons
and drag it to the last quick
panel, or tap on the icon to delete, and then tap
Save
.
Arranging quick setting icons
Tap and hold an icon to move, drag it to the desired position, and then tap
Save
.
Watch settings
Introduction
View your Watch’s status and customise your Watch settings.
On the Galaxy Wearable screen of the smartphone, tap
Watch settings
.
Notifications
Change the notification settings.
On the Galaxy Wearable screen of the smartphone, tap
Watch settings
→
Notifications
.
•
Show phone notifications on watch
: Set the conditions for checking the smartphone’s
notification on your Watch while wearing it.
•
Mute notifications on phone
: Set to mute the smartphone when it receives notifications
while wearing your Watch.
•
Most recent on phone or watch
: View the apps that received recent notifications and
change the notification settings. To customise notification settings for more apps, tap
More
→
→
All
and select an app from the apps list.
•
Sync Do not disturb with phone
: Set to sync the do not disturb settings of your Watch
and smartphone.
•
Advanced notification settings
: Configure advanced settings for notifications.

Galaxy Wearable app
107
Sound and vibration
Change the sound and vibration settings.
On the Galaxy Wearable screen of the smartphone, tap
Watch settings
→
Sound and
vibration
. Refer to Sounds and vibration in Apps and features for more information.
Display
Change the screen settings.
On the Galaxy Wearable screen of the smartphone, tap
Watch settings
→
Display
. Refer to
Display in Apps and features for more information.
Advanced features
Activate the advanced features.
On the Galaxy Wearable screen of the smartphone, tap
Watch settings
→
Advanced
features
. Refer to Advanced features in Apps and features for more information about other
features besides those listed below.
•
Remote connection
: Set the Watch to remotely connect to your smartphone with the
mobile network or Wi-Fi network when a Bluetooth connection between devices is
unavailable.
Battery
Check the remaining battery. If the battery is low, activate power saving mode to reduce
battery consumption.
On the Galaxy Wearable screen of the smartphone, tap
Watch settings
→
Battery
. Refer to
Battery in Apps and features for more information.

Galaxy Wearable app
108
Manage content
Transfer saved audio or image files from your smartphone to your Watch manually or
automatically.
On the Galaxy Wearable screen of the smartphone, tap
Watch settings
→
Manage content
.
•
Music
–
Add tracks
: Select audio files and manually send them from the smartphone to the
Watch.
–
Auto sync
: Set the smartphone to sync recently added audio files with the Watch
when it has more than 15 % of remaining battery power.
If the music files saved on the Watch take up more than 1 GB, it deletes files that
you have not set as your favourites in order from the music files you first added.
–
Playlists to sync
: Select a playlist to sync with the Watch automatically.
This feature may appear only when the Samsung Music app is installed on your
smartphone and when you turn on the
Auto sync
feature.
•
Gallery
–
Add images
: Select images and manually send them from the smartphone to the
Watch.
–
Auto sync
: Set the smartphone to sync images with the Watch when it has more than
15 % of remaining battery power.
–
Image limit
: Select the number of images to send to your Watch from a smartphone
at one time.
–
Albums to sync
: Select an image album to sync with the Watch automatically.
Image limit
and
Albums to sync
may appear when you turn on the
Auto sync
feature.
Mobile plans (LTE models)
Use various other services through the mobile network after activating it on the Watch.
On the Galaxy Wearable screen of the smartphone, tap
Watch settings
→
Mobile plans
.
Galaxy Wearable app
109
General
Customise the general settings.
On the Galaxy Wearable screen of the smartphone, tap
Watch settings
→
General
. Refer to
General in Apps and features for more information.
Accessibility
Configure various settings to improve accessibility to the Watch.
On the Galaxy Wearable screen of the smartphone, tap
Watch settings
→
Accessibility
. Refer
to Accessibility in Apps and features for more information.
Account and backup
Back up or restore your Watch’s data using Samsung Cloud. You can also check your Samsung
and Google accounts that were registered on the connected smartphone, and copy the
Google account to your Watch.
On the Galaxy Wearable screen of the smartphone, tap
Watch settings
→
Account and
backup
.
•
Regularly back up your data to a safe location, such as Samsung Cloud or a computer,
so that you can restore it if the data is corrupted or lost due to an unintended factory
data reset.
•
Music and images will not be backed up.
•
For the Samsung Health app, only records from the previous 28 days are saved in
your Watch. To view saved record older than 28 days, install the Samsung Health app
on the connected smartphone and back up data automatically.
•
Samsung account
: Add and check your Samsung account to use with your Watch.
•
Auto back up
: Keep the Watch’s data up-to-date and store them securely.
•
Back up data
: Safely back up the Watch’s data or settings to the cloud.
•
Restore data
: Restore the backed up data to the desired device.
•
Delete backups
: Delete the backed up data from the cloud.
•
Google account
: Check your Google account to use with your Watch and copy it to your
Watch.

Galaxy Wearable app
110
Watch software update
The Watch can be directly updated to the latest software by the firmware over-the-air (FOTA)
service.
On the Galaxy Wearable screen of the smartphone, tap
Watch settings
→
Watch software
update
.
About watch
View the Watch’s additional information.
On the Galaxy Wearable screen of the smartphone, tap
Watch settings
→
About watch
.
Refer to About watch in Apps and features for more information.
Find My Watch
Find your lost or misplaced Watch and remotely control it.
On the Galaxy Wearable screen of the smartphone, tap
Find My Watch
.
•
Start
: Check where your Watch is now. Refer to Find My Watch in Apps and features for
more information.
•
Set security
:
–
Lock watch
: Remotely lock the Watch to prevent unauthorised access. This feature can
be used when your smartphone is connected to your Watch via Bluetooth or a remote
connection. When your Watch is locked, unlock manually by entering a preset PIN, or
connect the Watch to your smartphone via Bluetooth to unlock it automatically.
–
Reset watch
: Remotely delete all personal information stored in the Watch. After the
Watch is reset, you cannot restore the information or use the Find My Watch feature,
so it is recommended to back up your data safely by tapping
Back up data
.

Galaxy Wearable app
111
Tips and user manual
View the Watch’s basic operations and user manual. You can also use various other services
through the mobile network after activating it on the Watch.
On the Galaxy Wearable screen of the smartphone, tap
Tips and user manual
.
Store
Download the apps and watch faces to be used on your Watch.
On the Galaxy Wearable screen of the smartphone, tap
Store
.

112
Appendix
Troubleshooting
Before contacting a Samsung Service Centre, please attempt the following solutions. Some
situations may not apply to your Watch.
The quick panel displays network or service error messages
•
When you are in areas with weak signals or poor reception, you may lose reception. Move
to another area and try again. While moving, error messages may appear repeatedly.
•
You cannot access some options without a subscription. For more information, contact
your service provider.
Your Watch does not turn on
When the battery is completely discharged, your Watch will not turn on. Fully charge the
battery before turning on the Watch.
The touchscreen responds slowly or improperly
•
If you attach a screen protector or optional accessories to the touchscreen, the
touchscreen may not function properly.
•
If you are wearing gloves, if your hands are not clean while touching the touchscreen,
or if you tap the screen with sharp objects or your fingertips, the touchscreen may
malfunction.
•
The touchscreen may malfunction in humid conditions or when exposed to water.
•
Restart your Watch to clear any temporary software bugs.
•
Ensure that your Watch software is updated to the latest version.
•
If the screen is scratched or damaged, visit a Samsung Service Centre.

Appendix
113
Your Watch freezes or has errors
Try the following solutions. If the problem is still not resolved, contact a Samsung Service
Centre.
Restarting the Watch
If your Watch freezes or hangs, you may need to close apps or turn off the Watch and turn it
on again.
Forcing restart
If your Watch is frozen and unresponsive, press and hold the Home key and the Back key
simultaneously for more than 7 seconds to restart it.
Resetting the Watch
If the methods above do not solve your problem, perform a factory data reset.
On the Apps screen, tap (
Settings
)
→
General
→
Reset
→
Reset
. Alternatively, launch
the
Galaxy Wearable
app on your smartphone and tap
Watch settings
→
General
→
Reset
→
Reset
. Before performing the factory data reset, remember to make backup copies of all
important data stored in the Watch.
Another Bluetooth device cannot locate your Watch
•
Ensure that the Bluetooth wireless feature is activated on your Watch.
•
Reset your Watch and try again.
•
Ensure that your Watch and the other Bluetooth device are within the Bluetooth
connection range (10 m). The distance may vary depending on the environment the
devices are used in.
If the tips above do not solve the problem, contact a Samsung Service Centre.

Appendix
114
A Bluetooth connection is not established or your Watch and the
smartphone are disconnected
•
Ensure that the Bluetooth feature on both devices is activated.
•
Ensure there are no obstacles, such as walls or electrical equipment, between the devices.
•
Ensure that the latest version of the Galaxy Wearable app is installed on the smartphone.
If necessary, update the Galaxy Wearable app to the latest version.
•
Ensure that your Watch and the other Bluetooth device are within the Bluetooth
connection range (10 m). The distance may vary depending on the environment the
devices are used in.
•
Restart both devices and launch the
Galaxy Wearable
app on the smartphone again.
Calls are not connected
•
Ensure that your Watch is connected to a smartphone via Bluetooth. If your Watch is
connected to your smartphone remotely, you cannot receive incoming calls.
•
Ensure that your smartphone and Watch have accessed the right cellular network.
•
Ensure that you have not set call barring for the phone number you are dialling on the
smartphone.
•
Ensure that you have not set call barring for the incoming phone number on the
smartphone.
•
Check if do not disturb mode, theatre mode, or bedtime mode is activated. If one of these
modes has been activated, incoming calls will be muted and the screen will not turn on
when receiving incoming calls. Use the bezel, tap the screen, or press the key to turn on
the screen and check the incoming call.
Others cannot hear you speaking on a call
•
Ensure that you are not covering the built-in microphone.
•
Ensure that the microphone is close to your mouth.
•
If using a Bluetooth headset, ensure that it is properly connected.

Appendix
115
Sound echoes during a call
Adjust the volume or move to another area.
A cellular network or the Internet is often disconnected or audio
quality is poor
•
Ensure that you are not blocking the Watch’s internal antenna.
•
When you are in areas with weak signals or poor reception, you may lose reception. You
may have connectivity problems due to issues with the service provider’s base station.
Move to another area and try again.
•
When using the device while moving, wireless network services may be disabled due to
issues with the service provider’s network.
The battery does not charge properly (For Samsung-approved
chargers)
•
Ensure that you connect the Watch to the wireless charger properly.
•
Visit a Samsung Service Centre and have the battery replaced.
The battery depletes faster than when first purchased
•
When you expose the Watch or the battery to very cold or very hot temperatures, the
useful charge may be reduced.
•
Battery consumption increases when you use some apps.
•
The battery is consumable and the useful charge will get shorter over time.
Your Watch is hot to the touch
When you use apps that require more power or use apps on your Watch for an extended
period of time, your Watch may feel hot to the touch. This is normal and should not affect
your Watch’s lifespan or performance.
If the Watch overheats or feels hot for a prolonged period, do not use it for a while. If the
Watch continues to overheat, contact a Samsung Service Centre.

Appendix
116
Your Watch cannot find your current location
The Watch uses your smartphone’s location information. GPS signals may be obstructed in
some locations, such as indoors. Set to use Wi-Fi or a mobile network to find your current
location.
Data stored in the Watch has been lost
Always make backup copies of all important data stored in the Watch. Otherwise, you cannot
restore data if it is corrupted or lost. Samsung is not responsible for the loss of data stored in
the Watch.
A small gap appears around the outside of the Watch case
•
This gap is a necessary manufacturing feature and some minor rocking or vibration of
parts may occur.
•
Over time, friction between parts may cause this gap to expand slightly.
There is not enough space in the Watch’s storage
Delete unused apps or files to free up storage space.
Removing the battery
•
To remove the battery, contact an authorised service centre. To obtain battery
removal instructions, please visit www.samsung.com/global/ecodesign_energy.
•
For your safety, you must not attempt to remove the battery. If the battery is not
properly removed, it may lead to damage to the battery and device, cause personal
injury, and/or result in the device being unsafe.
•
Samsung does not accept liability for any damage or loss (whether in contract or tort,
including negligence) which may arise from failure to precisely follow these warnings and
instructions, other than death or personal injury caused by Samsung’s negligence.

Copyright
Copyright © 2021 Samsung Electronics Co., Ltd.
This manual is protected under international copyright laws.
No part of this manual may be reproduced, distributed, translated, or transmitted in any form
or by any means, electronic or mechanical, including photocopying, recording, or storing in
any information storage and retrieval system.
Trademarks
•
SAMSUNG and the SAMSUNG logo are registered trademarks of Samsung Electronics Co.,
Ltd.
•
Bluetooth® is a registered trademark of Bluetooth SIG, Inc. worldwide.
•
Wi-Fi®, Wi-Fi Direct™, Wi-Fi CERTIFIED™, and the Wi-Fi logo are registered trademarks of
the Wi-Fi Alliance.
•
All other trademarks and copyrights are the property of their respective owners.
Руководство
пользователя
SM-R800
SM-R810
www.samsung.comRussian. 11/2018. Rev.1.2

Содержание
Начало работы
6 Об устройстве Galaxy Watch
7 Прочтите перед использованием
11 Внешний вид устройства
11 Комплект поставки
12 Носимое устройство Galaxy Watch
15 Док-станция для беспроводной
зарядки
15 Аккумулятор
15 Зарядка аккумулятора
17 Советы и меры предосторожности во
время зарядки аккумулятора
18 Режим энергосбережения
19 Ношение устройства Galaxy Watch
19 Надевание устройства Galaxy Watch
20 Советы и меры предосторожности
при использовании ремешка
20 Замена ремешка
27 Управление экраном
27 Структура экрана
28 Включение и выключение экрана
28 Переключение между экранами
30 Использование безеля
32 Сенсорный экран
35 Панель быстрого доступа
42 Экран блокировки
43 Часы
43 Экран часов
43 Изменение вида часов
44 Использование функции постоянного
отображения часов
45 Режим «Только часы»
45 Уведомления
45 Панель уведомлений
46 Просмотр входящих уведомлений
47 Выбор приложений, от которых
поступают уведомления
23 Включение и выключение
устройства Galaxy Watch
24 Подключение Galaxy Watch к
мобильному устройству
24 Установка приложения Galaxy
Wearable
24 Подключение Galaxy Watch к
мобильному устройству по Bluetooth
26 Удаленное подключение
47 Ввод текста
47 Введение
48 Использование функции голосового
ввода
49 Использование смайликов
49 Использование режима рукописного
ввода или клавиатуры
2

Содержание
Приложения и функции
51 Сообщения
53 Телефон
53 Введение
53 Входящие вызовы
55 Выполнение вызовов
55 Возможности во время вызовов
56 Контакты
57 Samsung Pay
58 Samsung Health
58 Введение
61 Калории
62 Шаги
63 Этажи
64 Упражнение
71 Сон
72 Пульс
74 Стресс
76 Пища
85 Музыка
85 Введение
85 Прослушивание музыки
85 Импорт музыкальных файлов
86 Воспроизведение музыки с помощью
устройства Galaxy Watch
86 Воспроизведение музыки с
мобильного устройства
87 Воспроизведение музыки без
подключения к мобильному
устройству
87 Напоминания
88 Календарь
89 Погода
89 Будильник
90 Мировое время
91 Галерея
91 Импорт и экспорт изображений
92 Просмотр изображений
92 Удаление изображений
78 Вода
79 Кофеин
80 Состязания
80 Настройки
81 Дополнительная информация
82 GPS
82 Баро-альтиметр
93 Краткие новости
94 Найти телефон
94 Найти часы
3

Содержание
95 Экстренные сообщения
97 Электронная почта
97 Управление PPT
97 Введение
97 Подключение устройства Galaxy Watch
к компьютеру по Bluetooth
99 Настройка функций сигнала
100 Samsung Flow
100 Введение
100 Подключение устройств через
Bluetooth
101 Разблокировка компьютера или
планшета
102 GALAXY Apps
102 Настройки
102 Введение
102 Циферблаты часов
103 Звук и вибрация
104 Экран
104 Дополнительные
106 Подключения
109 Приложения
110 Безопасность
111 Учетная запись
Приложение Galaxy
Wearable
114 Введение
115 ИНФОРМАЦИЯ
116 ЦИФЕРБЛАТЫ ЧАСОВ
117 НАСТРОЙКИ
117 Уведомления
118 Приложения
119 Виджеты
119 Звук и вибрация
120 Экран
120 Дополнительные
121 Добавление содержимого на часы
122 Отправка экстренных оповещений
122 Найти часы
123 Подключение часов
123 Galaxy Apps
123 Samsung Health
123 Samsung Pay
124 SmartThings
124 О часах
125 О Galaxy Wearable
111 Спец. возможн.
112 Общие
112 Аккумулятор
113 О часах
113 Подкл. к новому телефону
4

Содержание
Использование устройства
Galaxy Watch
126 Введение
126 Планировщик
126 Просмотр информации на текущий
день
128 Контроль повседневной жизни
130 Двойные часы за рубежом
131 Удобные напоминания
132 Персональный тренер для
поддержания здорового образа
жизни
132 Управление стрессом и
продолжительностью сна
133 Достижение цели потребления
калорий
134 Дополнительные физические
упражнения
135 Использование в качестве простого
устройства для разблокировки
135 Быстрая и простая разблокировка
компьютера
Приложение
136 Устранение неполадок
5
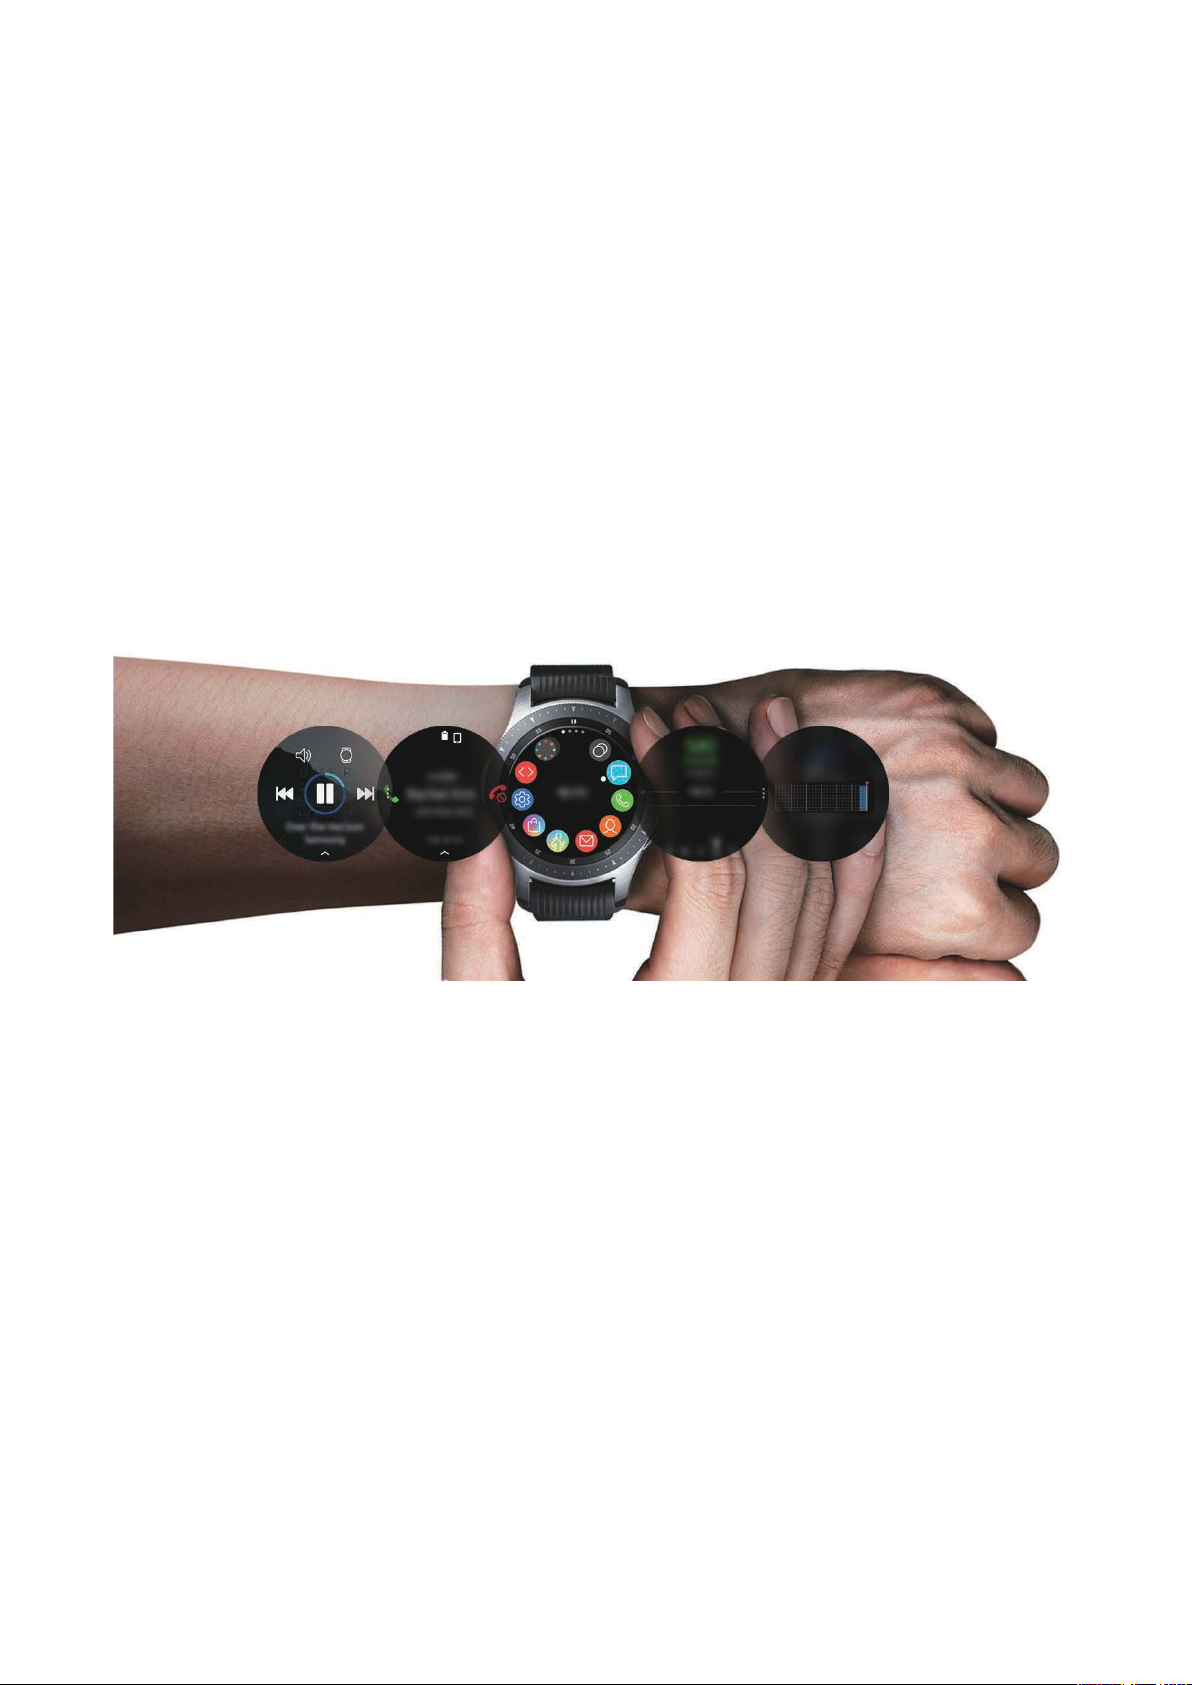
Начало работы
Об устройстве Galaxy Watch
Galaxy Watch— это носимое устройство, способное анализировать характер ваших тренировок,
позволяющее следить за здоровьем, а также использовать другие разнообразные приложения для
совершения телефонных вызовов и прослушивания музыки. Поворотом безеля можно быстро и
легко управлять удобными функциями. Кроме того, можно изменить дизайн часов в зависимости
от предпочтений.
Подключите устройство Galaxy Watch к мобильному устройству, чтобы расширить его
функциональные возможности.
6

Начало работы
Прочтите перед использованием
В целях правильного и безопасного использования устройства, прежде чем приступать к работе с
ним, изучите это руководство.
•
Приведенные ниже описания основаны на настройках устройства по умолчанию.
•
Приведенные сведения могут частично не соответствовать функциям данного устройства. Это
зависит от региона, характеристик устройства, программного обеспечения или поставщика
ус лу г.
•
Контент (высококачественный контент) с высоким потреблением ресурсов ЦП и ОЗУ влияет
на общую производительность устройства. Приложения, использующие такой контент, могут
работать некорректно в зависимости от характеристик устройства и среды, в которой оно
используется.
•
Компания Samsung не несет ответственности за нарушения производительности, вызванные
приложениями, выпущенными не компанией Samsung.
•
Компания Samsung не несет ответственности за нарушения производительности или
совместимости, возникшие вследствие редактирования настроек реестра или внесения
изменений в операционную систему. Попытки изменить настройки операционной системы
могут привести к неправильной работе устройства Galaxy Watch или установленных
приложений.
•
ПО, звуковые файлы, обои, изображения и прочее содержимое, предустановленное на этом
устройстве Galaxy Watch, лицензированы для ограниченного использования. Копирование
и использование этих материалов в коммерческих или иных целях является нарушением
авторского права. Пользователи несут полную ответственность за незаконное использование
мультимедийного содержимого.
•
Предустановленные на устройстве Galaxy Watch приложения подлежат обновлению. В
дальнейшем их поддержка может быть прекращена без предварительного уведомления.
В случае возникновения вопросов относительно предустановленных на устройство Galaxy
Watch приложений обратитесь в сервисный центр Samsung. По вопросам, касающимся
установленных вами приложений, обращайтесь к вашему поставщику услуг.
•
Изменение настроек операционной системы устройства Galaxy Watch и установка
приложений, полученных из неофициальных источников, может вызвать сбои в работе
устройства Galaxy Watch и повреждение или утерю данных. Такие действия являются
нарушением условий лицензионного соглашения Samsung и ведут к прекращению действия
гарантии.
•
Изображения в данном руководстве соответствуют модели SM-R800.
•
Некоторые функции могут не работать в соответствии с описанием в данном руководстве. Это
зависит от производителя и модели подключенного к Galaxy Watch мобильного устройства.
7

Начало работы
Влаго- и пылезащита
Устройство оснащено влаго- и пылезащитой. Следуйте советам ниже для обеспечения влаго- и
пылезащиты устройства. Их несоблюдение может привести к повреждению устройства.
•
Избегайте контакта устройства с водой под напором.
•
Не пользуйтесь устройством во время ныряния, плаванья под водой или занятия любыми
видами спорта в воде с быстрым течением.
•
Тщательно вытрите намокшее устройство или мокрые руки перед использованием
устройства.
•
После погружения устройства в пресную воду тщательно протрите его чистой мягкой
тканью. Если устройство подвергается воздействию других жидкостей, таких как соленая,
мыльная вода, вода из бассейна, масло, духи, солнцезащитный крем, очиститель для рук, или
воздействию химических веществ, таких как косметические средства, промойте его в пресной
воде и тщательно протрите чистой мягкой тканью. Несоблюдение этих инструкций может
повлиять на работу и внешний вид устройства.
•
Падения или другие воздействия на устройство могут сказаться на пыле- и
водонепроницаемости устройства.
•
Не разбирайте устройство. Водо- и пыленепроницаемые качества устройства могут быть
нарушены.
•
Не подвергайте устройство воздействию резких перепадов температуры воды или воздуха.
•
Не сушите устройство с помощью нагревательного прибора, такого как фен для волос.
•
Водонепроницаемость устройства может нарушиться в сауне.
•
Некоторые функции, такие как сенсорный экран, могут не работать должным образом, если
устройство используется в воде.
•
Устройство прошло испытания в контролируемой среде и признано устойчивым к
воздействию воды и пыли в определенных условиях и ситуациях. (Устройство признано
влагозащищенным, будучи погруженным в воду на глубину 50 м, в соответствии с
международным стандартом ISO 22810:2010, и может использоваться в мелкой воде.
Отвечает требованиям к пылезащищенности в соответствии с классификацией стандарта
IEC 60529 IP6X.)
8

Начало работы
Предостережения о перегреве
Если при использовании устройства вы ощущаете дискомфорт по причине перегрева, немедленно
прекратите им пользоваться и снимите его с запястья.
Во избежание таких проблем, как поломка устройства, дискомфорт или повреждение кожи, а
также преждевременная разрядка аккумулятора, при нагреве до определенной температуры
устройство выдает предупреждение. Как только появится первое предупреждение, все вызовы, за
исключением вызовов экстренных служб, и прочие функции устройства будут отключены до тех
пор, пока температура устройства не снизится до заданного уровня.
Если температура устройства продолжает повышаться, появляется второе предупреждение. На
этот раз устройство отключится. Не пользуйтесь устройством до тех пор, пока его температура
не снизится до заданного уровня. Однако, если в момент появления второго предупреждения
осуществляется экстренный вызов, такой вызов не будет прерван до его окончания.
Обозначения, используемые в данном руководстве
Предупреждение — ситуации, которые могут привести к получению травмы вами или
кем-либо из окружающих.
Внимание — ситуации, которые могут привести к повреждению устройства или другого
оборудования.
Примечание — примечания, советы или дополнительные сведения.
Очистка устройства Galaxy Watch и уход за ним
Следуйте приведенным ниже указаниям— их соблюдение гарантирует правильность работы
устройства Galaxy Watch и сохранение его внешнего вида. Несоблюдение этих указаний может
стать причиной повреждения устройства Galaxy Watch и появления раздражения кожи.
•
Оберегайте устройство от воздействия пыли, пота, чернил, жирных веществ и химических
продуктов, таких как косметика, антибактериальные спреи, антисептики для рук, моющие
средства и инсектициды. Это может привести к порче внешних или внутренних частей
устройства Galaxy Watch или ненадлежащей его работе. Если на устройство Galaxy Watch
попала любая из вышеупомянутых жидкостей, используйте для его очистки мягкую ткань без
ворсы.
9

Начало работы
•
Для очистки устройства Galaxy Watch не следует использовать мыло, чистящие вещества,
абразивные материалы и сжатый воздух, а также запрещается применять ультразвуковые
волны или внешние источники тепла. Это может повредить устройство Galaxy Watch. Остатки
мыла, моющих и дезинфицирующих средств или чистящих веществ на устройстве Galaxy
Watch могут вызвать раздражение кожи.
•
После тренировки или в случае появления пота помойте запястье и ремешок. Очистите
устройство Galaxy Watch пресной водой, протрите его небольшим количеством медицинского
спирта, после чего тщательно высушите.
•
Для удаления солнцезащитного крема, лосьона или масла используйте не содержащее мыло
моющее средство, после чего прополощите и тщательно высушите устройство Galaxy Watch.
•
Если на устройстве Galaxy Watch появились пятна или какие-либо вещества, очистите
устройство смоченной нежесткой зубной щеткой.
Предостережения касательно аллергии на материалы устройства Galaxy
Watch
•
Компания Samsung протестировала вредные материалы, содержащиеся в устройстве Galaxy
Watch, с привлечением внутренних и внешних организаций по сертификации, в том числе
были проведены тесты всех материалов, которые контактируют с кожей, тест на кожную
токсичность и тест на ношение устройства Galaxy Watch.
•
В устройстве Galaxy Watch присутствует никель. Соблюдайте надлежащие меры
предосторожности в случае гиперчувствительности кожи или при наличии аллергии на какиелибо материалы устройства Galaxy Watch.
–
Никель: в устройстве Galaxy Watch содержится никель, количество которого
незначительно и меньше порога, определенного регламентом Европейского союза REACH.
Пользователь не подвергается воздействию никеля, находящегося внутри устройства
Galaxy Watch, и устройство Galaxy Watch прошло международную сертификацию. Однако
следует проявлять осторожность при использовании устройства Galaxy Watch в случае
гиперчувствительности к никелю.
•
В производстве устройства Galaxy Watch применялись только материалы, отвечающие
требованиям стандартов Комиссии США по безопасности потребительских товаров (CPSC),
регламентов стран Европейского союза и других международных стандартов.
•
Дополнительную информацию о порядке обращения компании Samsung
с химическими веществами можно получить на веб-сайте Samsung
(https://www.samsung.com/uk/aboutsamsung/sustainability/environment/).
10

Начало работы
Внешний вид устройства
Комплект поставки
Комплект поставки описан в кратком руководстве.
•
Доступные ремешки зависят от модели. Используйте ремешки соответствующего
размера для каждой модели.
•
Комплект поставки устройства Galaxy Watch и набор доступных аксессуаров могут
различаться в разных регионах и определяются поставщиком услуг.
•
Поставляемые аксессуары предназначены исключительно для данного устройства
Galaxy Watch и могут быть несовместимы с другими устройствами.
•
Внешний вид изделий и технические характеристики могут быть изменены без
предварительного уведомления.
•
Дополнительные аксессуары можно приобрести у местных дилеров компании
Samsung. Перед покупкой убедитесь, что они совместимы с вашим устройством Galaxy
Watch.
•
В отличие от устройства Galaxy Watch некоторые аксессуары, например док-станции,
могут не обладать такой же водо- и пыленепроницаемостью.
•
Применяйте только аксессуары, рекомендованные компанией Samsung.
Использование нерекомендованных аксессуаров может привести к проблемам в
работе и сбоям, на которые не распространяется гарантия.
•
Доступность любых аксессуаров целиком и полностью зависит от производителя.
Дополнительные сведения о доступных аксессуарах см. на веб-сайте Samsung.
11
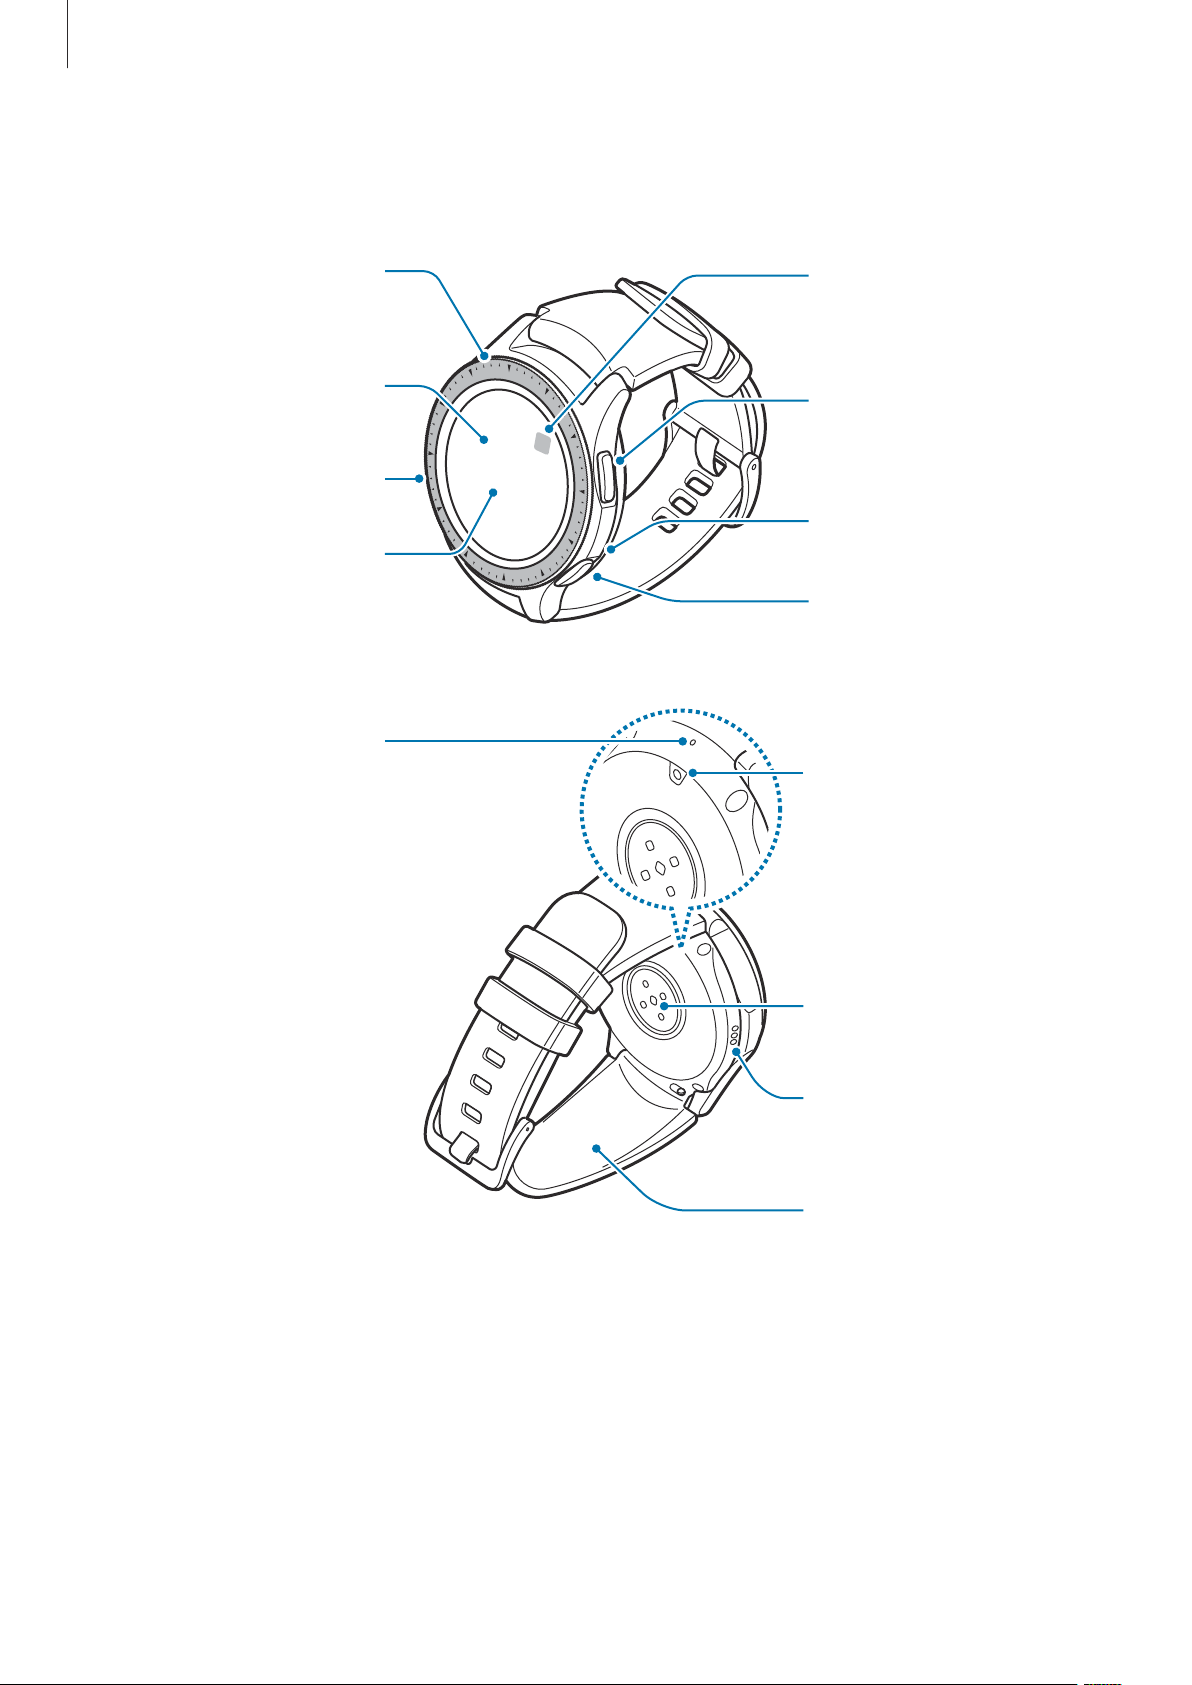
Начало работы
Носимое устройство Galaxy Watch
►
SM-R800
Антенна NFC
Сенсорный экран
Безель
Датчик
освещенности
Клапан сброса
давления
Клавиша «Назад»
Микрофон
Клавиша «Главный
экран» (клавиша
питания)
Датчик
атмосферного
давления
Датчик
пульсометра
Внешний динамик
Ремешок
12
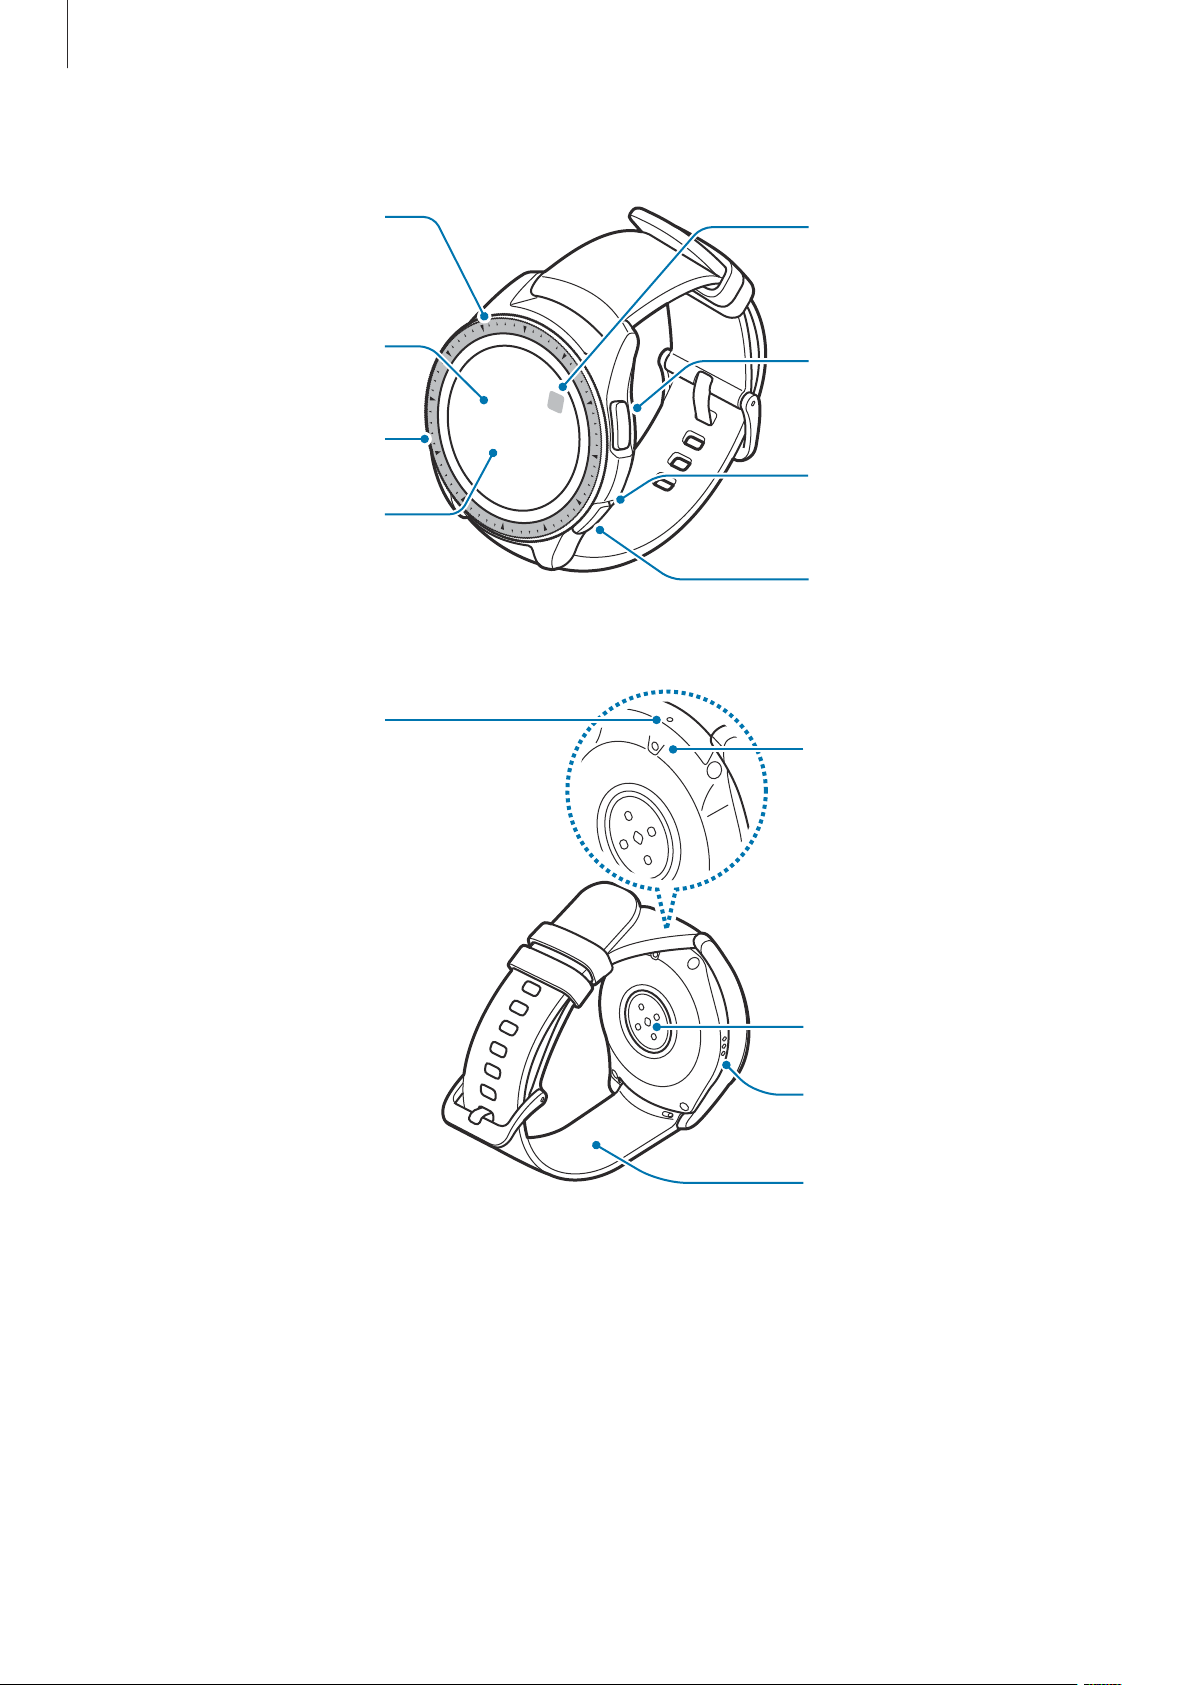
Начало работы
►
SM-R810
Антенна NFC
Сенсорный экран
Безель
Датчик
освещенности
Клапан сброса
давления
Клавиша «Назад»
Микрофон
Клавиша «Главный
экран» (клавиша
питания)
Датчик
атмосферного
давления
Датчик
пульсометра
Внешний динамик
Ремешок
13
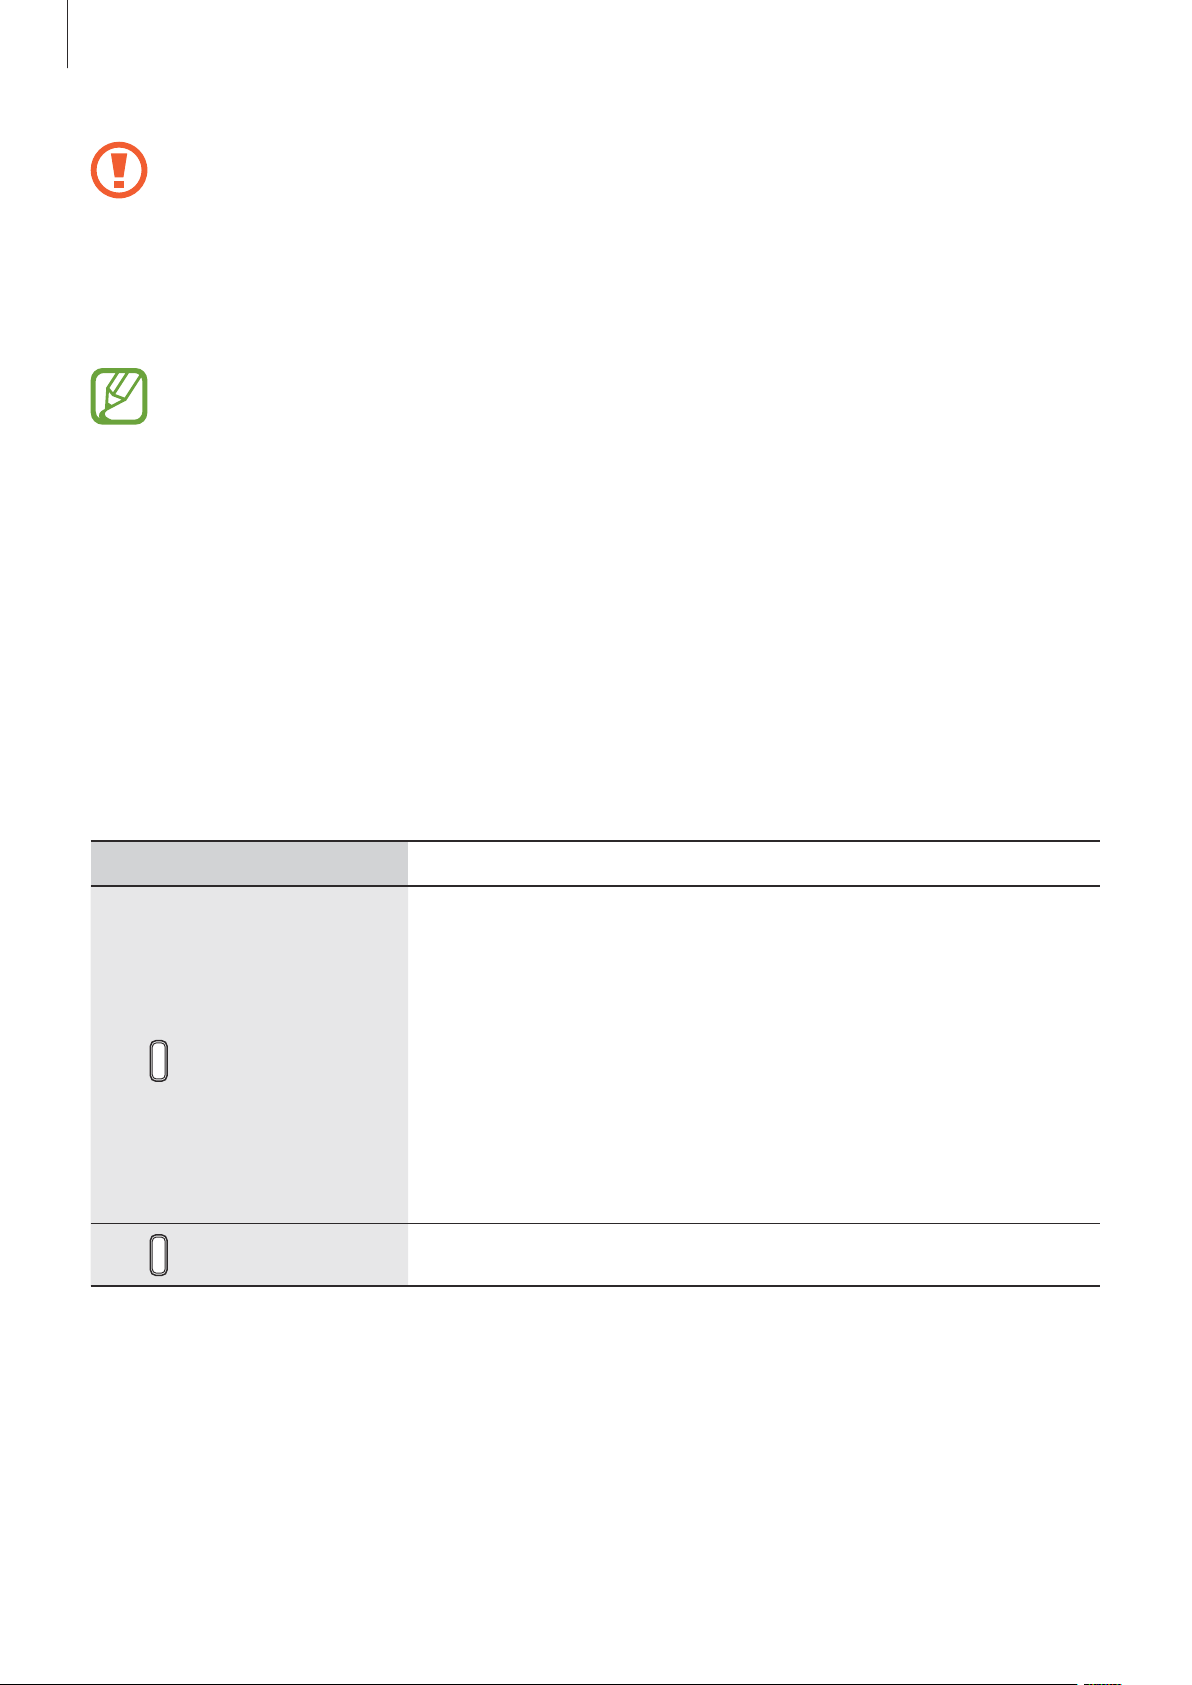
Начало работы
•
Убедитесь, что ремешок устройства чист. При контакте ремешка с загрязняющими
частицами, такими как пыль или краска, на нем могут появляться трудноудаляемые
пятна.
•
Запрещается вставлять острые предметы в датчик атмосферного давления, динамик,
клапан сброса давления или микрофон. Возможно повреждение внутренних
компонентов устройства Galaxy Watch и нарушение влагонепроницаемости.
•
Проблемы с подключением и разрядкой аккумулятора могут возникнуть в следующих
ситуациях:
–
–
•
Убедитесь, что во время разговора микрофон Galaxy Watch ничем не закрыт.
при установке металлических элементов в области антенны устройства Galaxy
Watch;
при накрытии области антенны устройства Galaxy Watch руками или предметами
во время использования определенных функций, например осуществления
вызовов или подключения к сети мобильной связи.
•
Клапан сброса давления обеспечивает правильность работы внутренних компонентов
и датчиков Galaxy Watch в случае изменения атмосферного давления.
Клавиши
Клавиша Функция
•
Нажмите и удерживайте, чтобы включить или выключить
устройство Galaxy Watch.
•
Нажмите, чтобы включить экран.
•
Главный
экран/питание
Назад
Нажмите и удерживайте в течение более 7 секунд, чтобы
перезагрузить Galaxy Watch.
•
Если открыт экран часов, нажмите, чтобы перейти на экран
приложений.
•
Если открыт какой-либо другой экран, нажмите, чтобы
перейти на экран часов.
•
Нажмите для возврата на предыдущий экран.
14
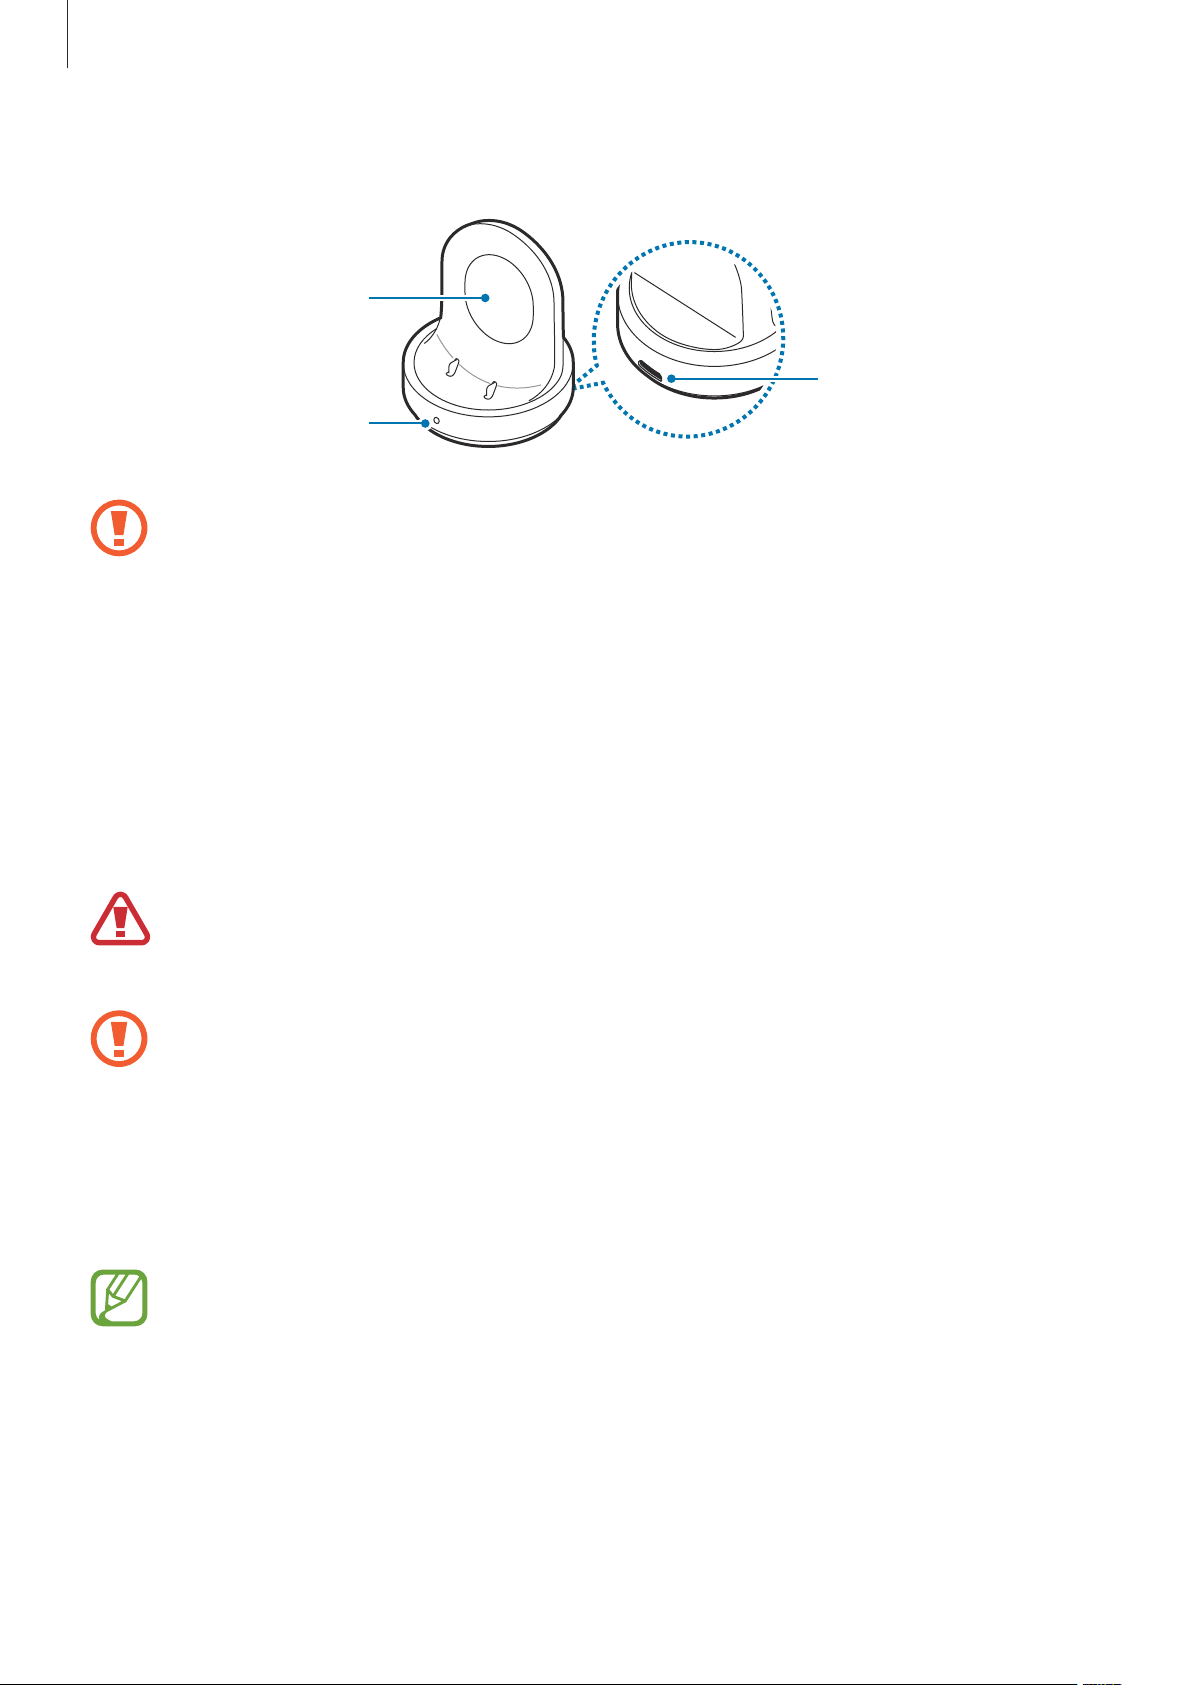
Начало работы
Док-станция для беспроводной зарядки
Поверхность для
беспроводной
зарядки
Индикатор
Не допускайте попадания воды на док-станцию для беспроводной зарядки, так как она не
обладает водо- и пыленепроницаемостью в отличие от устройства Galaxy Watch.
Разъем для
подключения
зарядного
устройства
Аккумулятор
Зарядка аккумулятора
Перед первым использованием устройства или после продолжительного периода, в течение
которого устройство не использовалось, необходимо зарядить аккумулятор.
Используйте только аккумуляторы, зарядные устройства и кабели, одобренные
компанией Samsung. Использование несовместимых зарядных устройств и кабелей может
привести к взрыву аккумулятора или повреждению устройства Galaxy Watch.
•
Используйте беспроводную док-станцию для зарядки и зарядное устройство
из комплекта поставки. В случае использования сторонних зарядных устройств
устройство Galaxy Watch может не заряжаться должным образом.
•
Неправильное подключение зарядного устройства может привести к серьезному
повреждению вашего устройства. Гарантия не распространяется на любые
повреждения, возникшие в результате неправильного использования устройства и
аксессуаров.
В целях экономии электроэнергии отключайте зарядное устройство, если оно не
используется. Зарядное устройство не оснащено переключателем питания, поэтому
его нужно отключать от электрической розетки, чтобы прервать процесс зарядки и
сэкономить электроэнергию. При использовании зарядное устройство должно плотно
прилегать к электрической розетке и быть легкодоступным.
15

Начало работы
Вставьте штекер зарядного устройства в разъем для подключения зарядного устройства
1
на беспроводной док-станции для зарядки, а затем подключите зарядное устройство к
электрической розетке.
Поместите устройство Galaxy Watch на док-станцию для беспроводной зарядки, совместив
2
центр задней стенки устройства Galaxy Watch с центром док-станции для беспроводной
зарядки.
В случае использования устройства Galaxy Watch с металлическим ремешком (продается
отдельно), надавите на нижнюю часть Galaxy Watch в направлении стрелки, показанной на
рисунке ниже, после размещения устройства на док-станции для беспроводной зарядки,
чтобы обеспечить надлежащее соединение. В случае отсутствия надлежащего контакта
между устройством Galaxy Watch и док-станцией для беспроводной зарядки, устройство
Galaxy Watch может не заряжаться должным образом.
16
Начало работы
Проверка состояния заряда аккумулятора
После подключения устройства Galaxy Watch к беспроводной док-станции для зарядки
имеющийся на ней светодиодный индикатор загорается разными цветами, указывая на состояние
зарядки.
Цвет Состояние зарядки
Красный Выполняется зарядка
Зеленый Аккумулятор полностью заряжен
Оранжевый Подключен адаптер с низким напряжением
В случае возникновения ошибки, связанной с беспроводной док-станцией для зарядки,
светодиодный индикатор мигает красным. Отсоедините устройство Galaxy Watch от
док-станции для беспроводной зарядки, подождите пока индикатор не перестанет
мигать и восстановите соединение между двумя устройствами. Если ошибка повторится,
обратитесь в сервисный центр Samsung для получения поддержки.
Советы и меры предосторожности во время зарядки
аккумулятора
•
При наличии посторонних предметов или веществ между устройством Galaxy Watch и
беспроводной док-станцией для зарядки устройство Galaxy Watch может не зарядиться
должным образом. Не допускайте попадания на устройство Galaxy Watch и беспроводную докстанцию для зарядки пота, жидкостей или пыли.
•
Когда заряд аккумулятора подходит к концу, появляется значок пустого аккумулятора.
•
При полной разрядке аккумулятора включить устройство Galaxy Watch сразу после
подключения к зарядному устройству невозможно. Чтобы включить устройство Galaxy Watch,
следует подождать несколько минут, пока аккумулятор немного зарядится.
•
При одновременном использовании нескольких приложений аккумулятор может быстро
разряжаться. Чтобы избежать разрядки аккумулятора во время передачи данных, эти
приложения следует всегда запускать при полностью заряженном аккумуляторе.
•
Если для зарядки используется не зарядное устройство, а, например, ПК, на зарядку
аккумулятора может потребоваться больше времени из-за меньшей силы электрического
тока.
•
Если устройство Galaxy Watch заряжается одновременно с другими устройствами с помощью
зарядного устройства для зарядки нескольких устройств, на полную зарядку может
потребоваться больше времени.
•
Во время зарядки аккумулятора можно пользоваться устройством Galaxy Watch, но в этом
случае на зарядку его аккумулятора потребуется больше времени.
17
Начало работы
•
Если устройство Galaxy Watch получает нестабильное питание во время зарядки, сенсорный
экран может не реагировать на прикосновения. В этом случае отключите устройство Galaxy
Watch от беспроводной док-станции для зарядки.
•
Во время зарядки устройство Galaxy Watch может нагреваться. Это нормальное явление, не
влияющее на производительность и срок службы устройства Galaxy Watch. Если аккумулятор
нагреется больше обычного, зарядное устройство может прекратить свою работу по
соображениям безопасности. Если это произойдет, уберите устройство Galaxy Watch с докстанции для беспроводной зарядки, дайте ему остыть, и только затем продолжите его зарядку.
•
Если устройство Galaxy Watch не заряжается должным образом, обратитесь с ним в сервисный
центр Samsung.
•
Не используйте изогнутый или поврежденный кабель USB. Если кабель USB поврежден, не
используйте его.
Режим энергосбережения
Для продления времени работы от аккумулятора включите режим энергосбережения.
•
Все цвета экрана отображаются в серой палитре.
•
Все функции отключаются и остаются доступными только уведомления от приложений,
которым не требуется подключение к сети Wi-Fi. При этом если устройство Galaxy Watch
подключено к мобильному устройству по Bluetooth, остаются доступными функции телефона,
сообщений и уведомлений.
•
Сеть Wi-Fi отключается.
•
Производительность процессора Galaxy Watch ограничивается.
На экране приложений нажмите кнопку
→
. Кроме того, чтобы включить режим энергосбережения, можно также нажать кнопку →
на панели быстрого доступа. Дополнительные сведения о способах открытия панели быстрого
доступа содержатся в разделе Панель быстрого доступа.
Для отключения этого режима выберите пункт
и коснитесь кнопки . Кроме того, чтобы отключить режим энергосбережения, можно также
нажать кнопку → на панели быстрого доступа.
(
Настройки
ВЫКЛ
) →
Аккумулятор
. внизу экрана режима энергосбережения
→
Экономия энергии
18
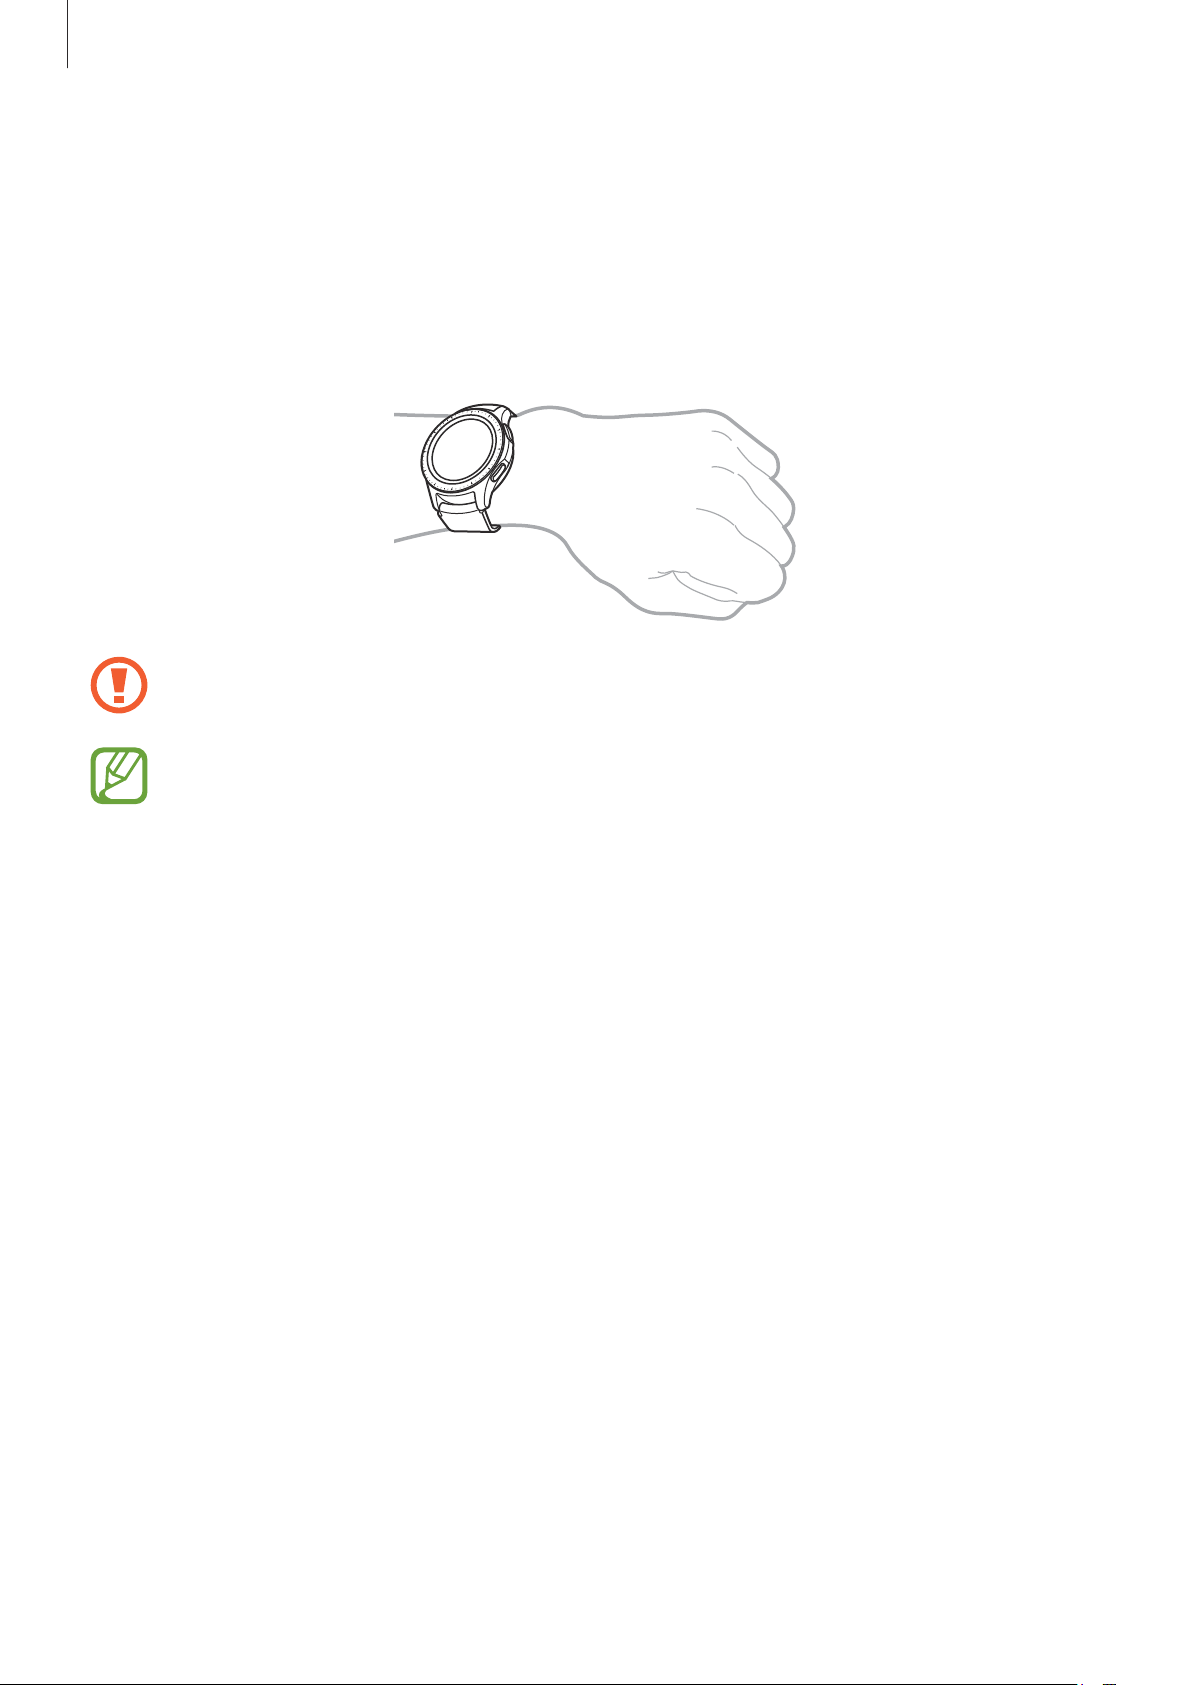
Начало работы
Ношение устройства Galaxy Watch
Надевание устройства Galaxy Watch
Откройте замок браслета и накиньте ремешок на запястье. Затяните ремешок, вставьте язычок в
нужное регулировочное отверстие и зафиксируйте замок браслета, чтобы закрыть его.
Не сгибайте ремешок слишком сильно. Это может повредить устройство Galaxy Watch.
•
Для более точного измерения пульса с помощью устройства Galaxy Watch носите его
так, чтобы оно плотно прилегало к нижней части руки над запястьем. Дополнительная
информация представлена в разделе Правильное ношение устройства Galaxy Watch.
•
В случае контакта определенных материалов с обратной стороной устройства Galaxy
Watch, устройство Galaxy Watch может распознавать ношение на запястье.
•
Если устройство Galaxy Watch не обнаруживает движение в течение 10 минут, может
оказаться, что оно не смогло определить ношение на запястье.
19
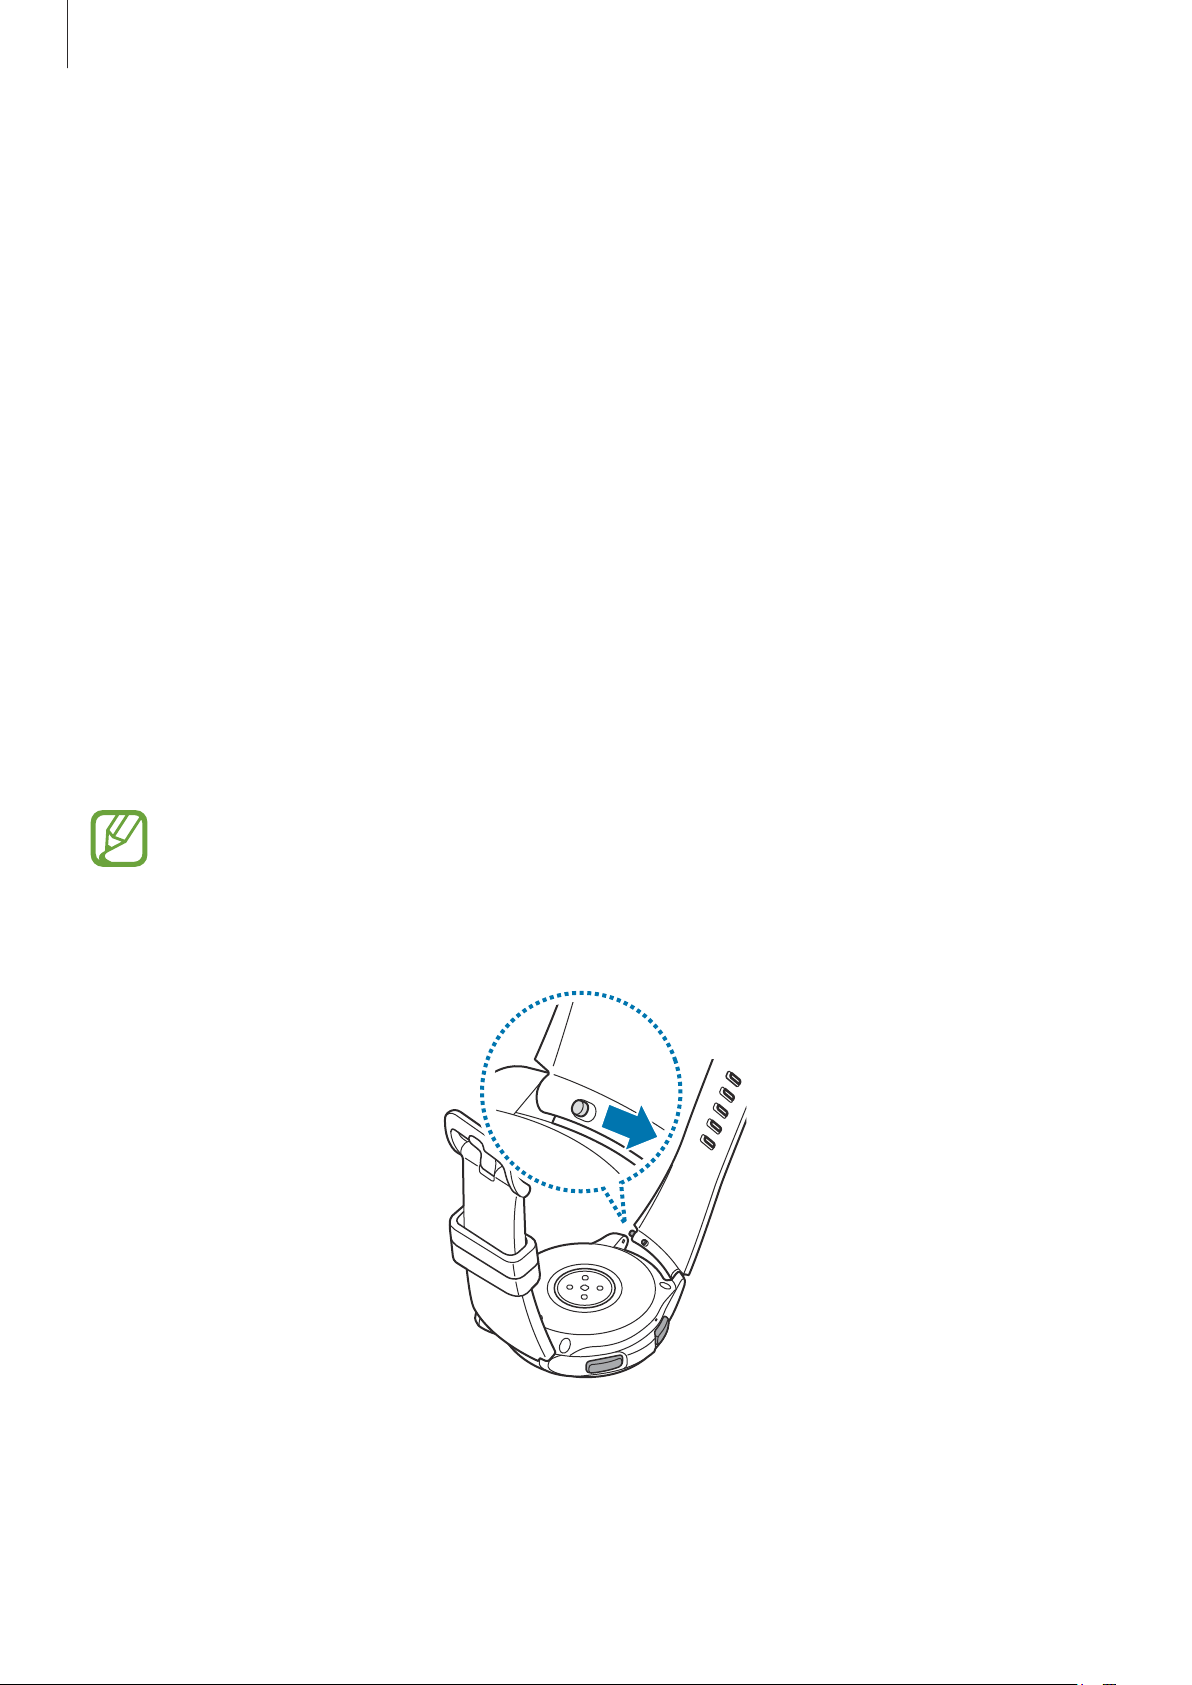
Начало работы
Советы и меры предосторожности при использовании ремешка
•
При продолжительном ношении или выполнении высокоинтенсивных упражнений во время
ношения Galaxy Watch возможно раздражение кожи по причине трения и давления. После
ношения устройства Galaxy Watch в течение продолжительного времени снимите его с
запястья и не надевайте в течение нескольких часов.
•
Раздражение кожи может возникать по причине аллергии, факторов внешней среды, прочих
факторов, а также при длительном контакте с мылом или потом. В этом случае прекратите
пользоваться устройством Galaxy Watch и подождите 2 или 3 дня до тех пор, пока симптомы не
ослабнут. Если симптомы не проходят или усугубляются, немедленно обратитесь к врачу.
•
Перед надеванием устройства Galaxy Watch кожа должна быть сухой. При длительном
ношении влажного устройства Galaxy Watch возможно воздействие на кожу.
•
Если устройство Galaxy Watch используется в воде, уберите посторонние материалы с кожи и
устройства Galaxy Watch и тщательно высушите их во избежание раздражения кожи.
•
Не используйте в воде никакие аксессуары помимо устройства Galaxy Watch.
Замена ремешка
Отсоедините ремешок от устройства Galaxy Watch для замены на новый.
Внешний вид ремешка может отличаться в зависимости от модели.
Задвиньте пружинный стержень ремешка внутрь.
1
20
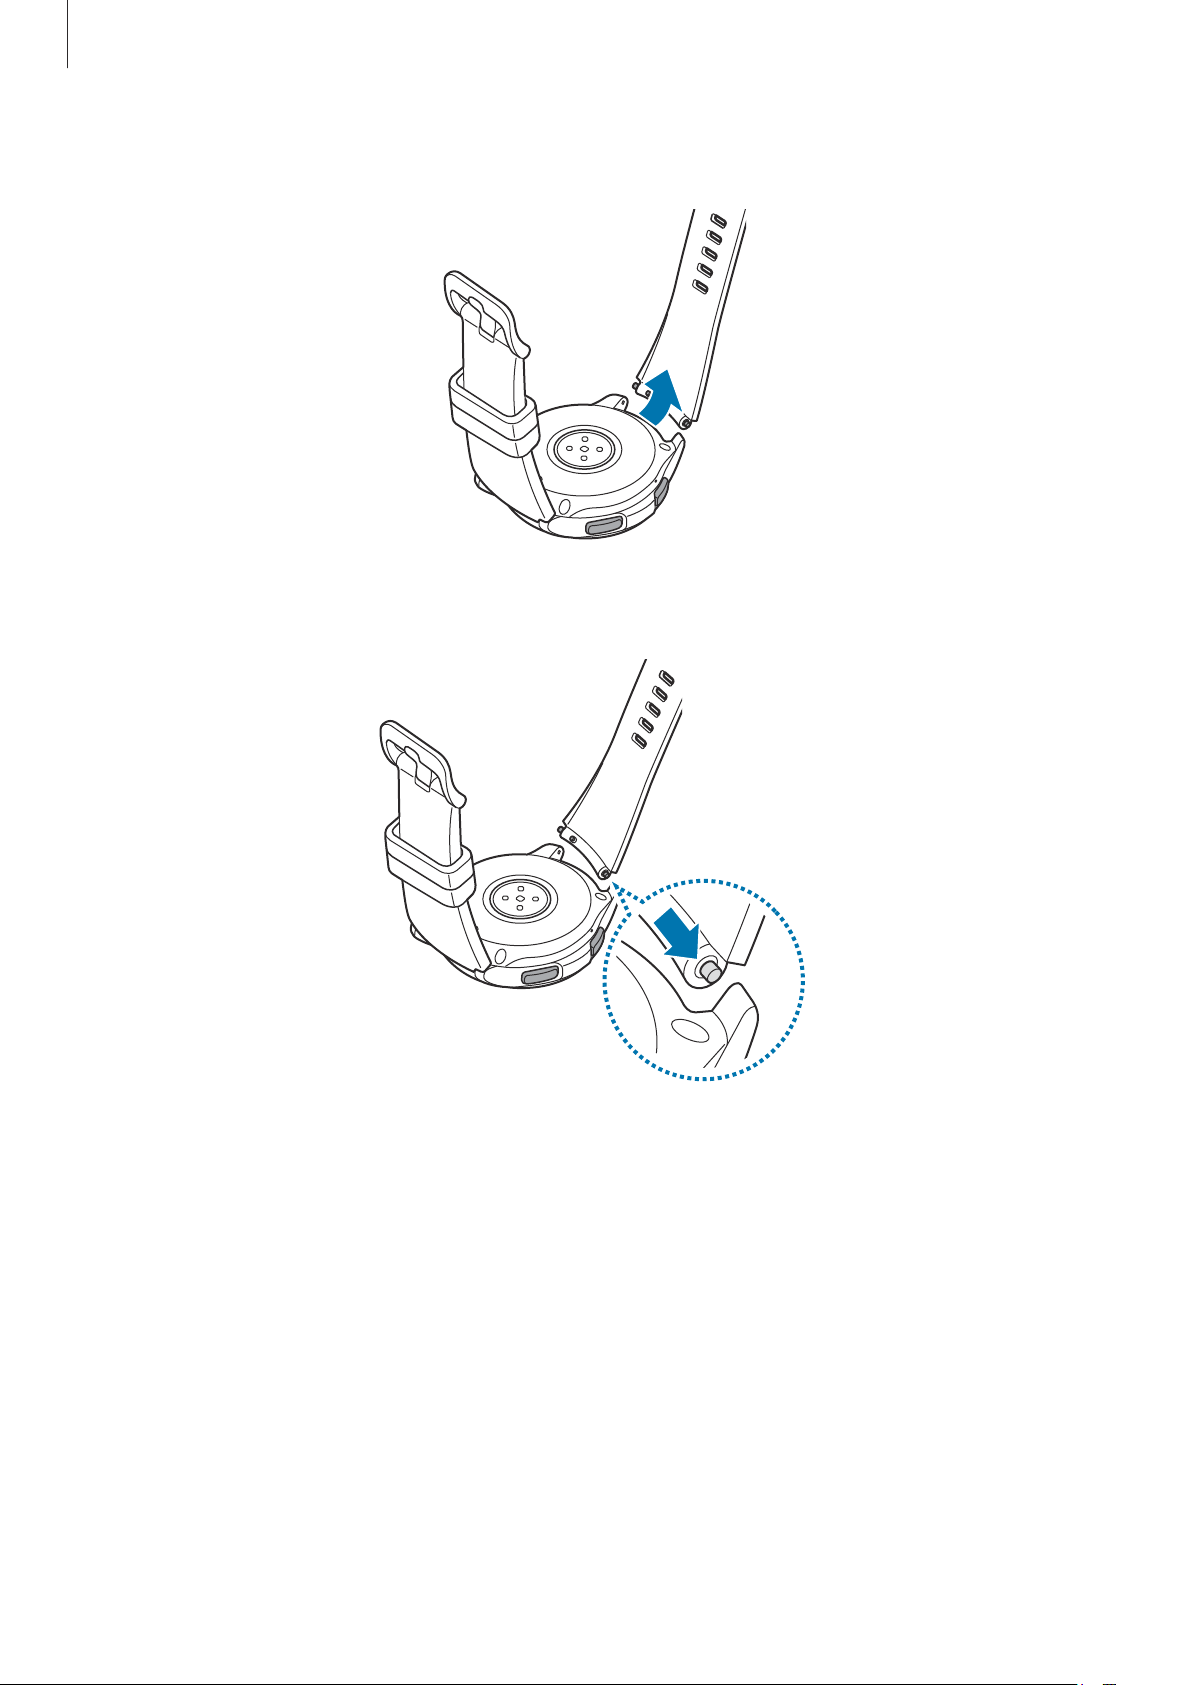
Начало работы
Отсоедините ремешок от корпуса устройства Galaxy Watch.
2
Вставьте один конец пружинного стержня в проушину устройства Galaxy Watch.
3
21
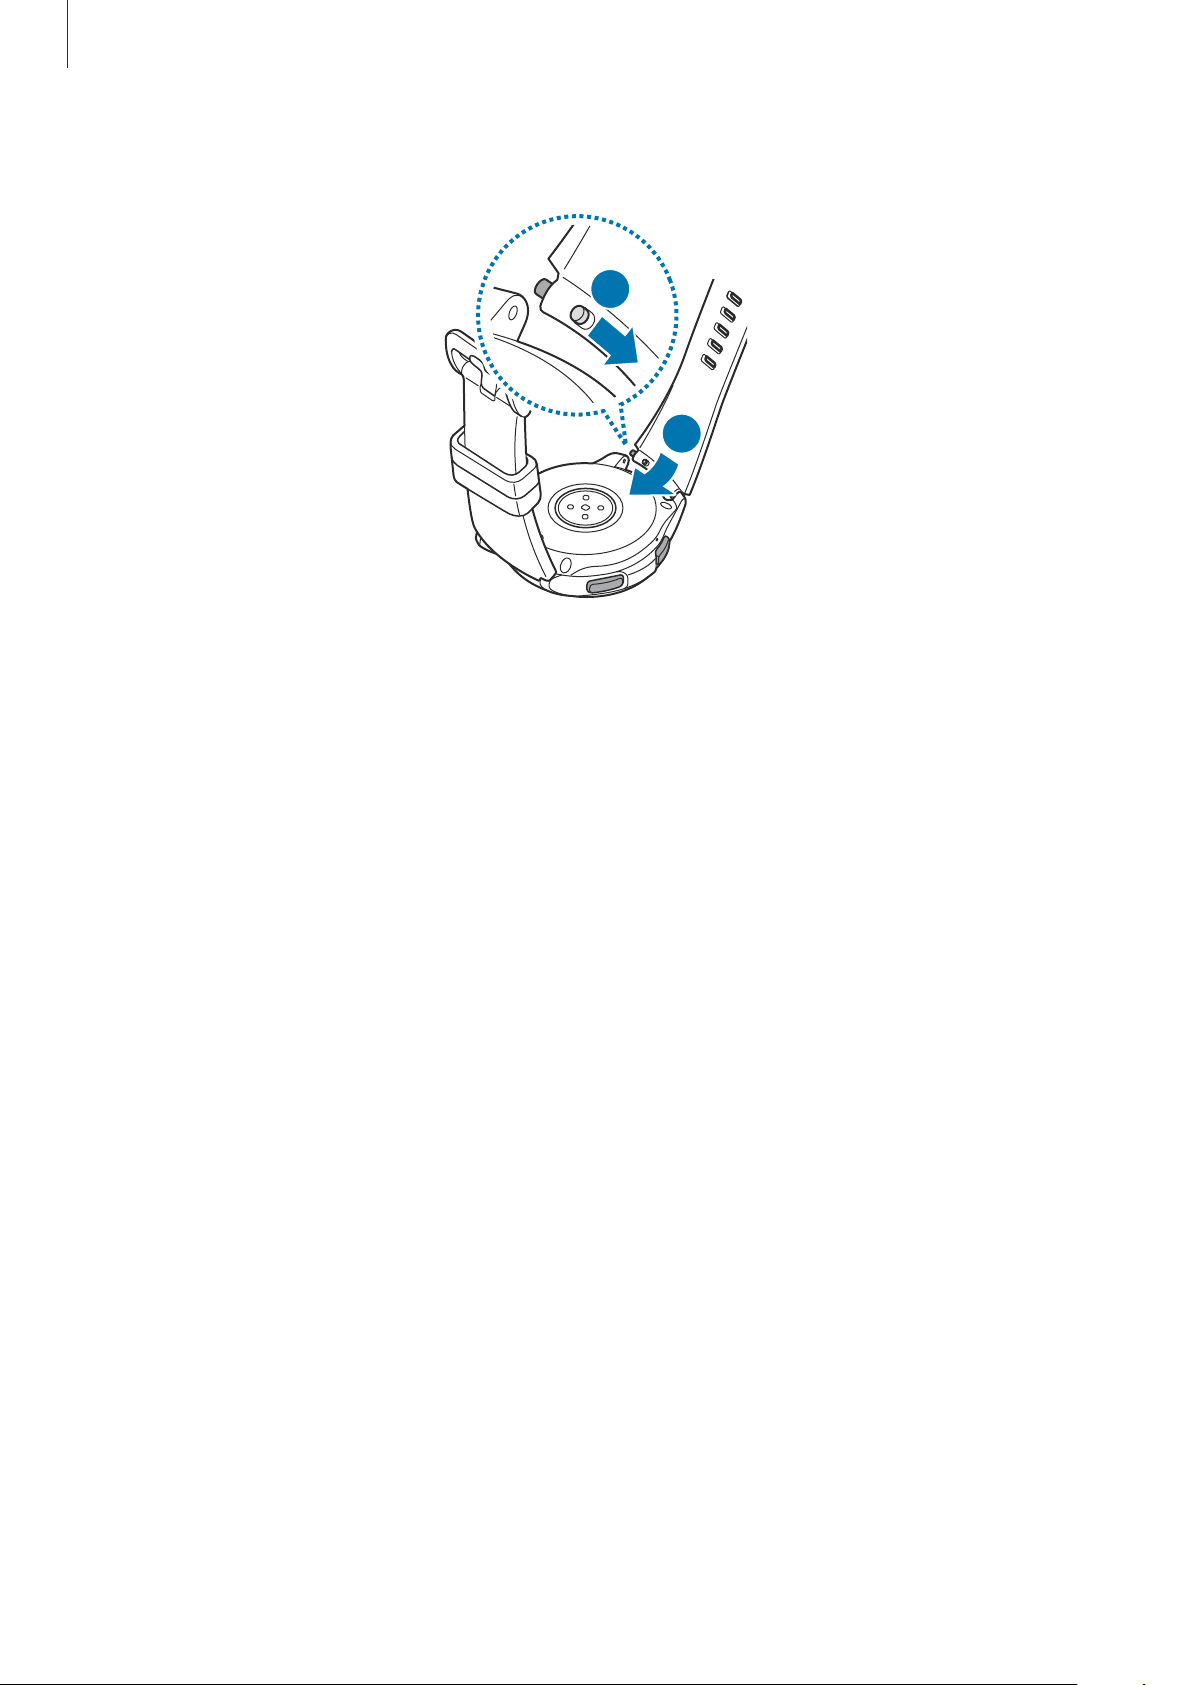
Начало работы
Задвиньте пружинный стержень внутрь и подсоедините ремешок.
4
1
2
22
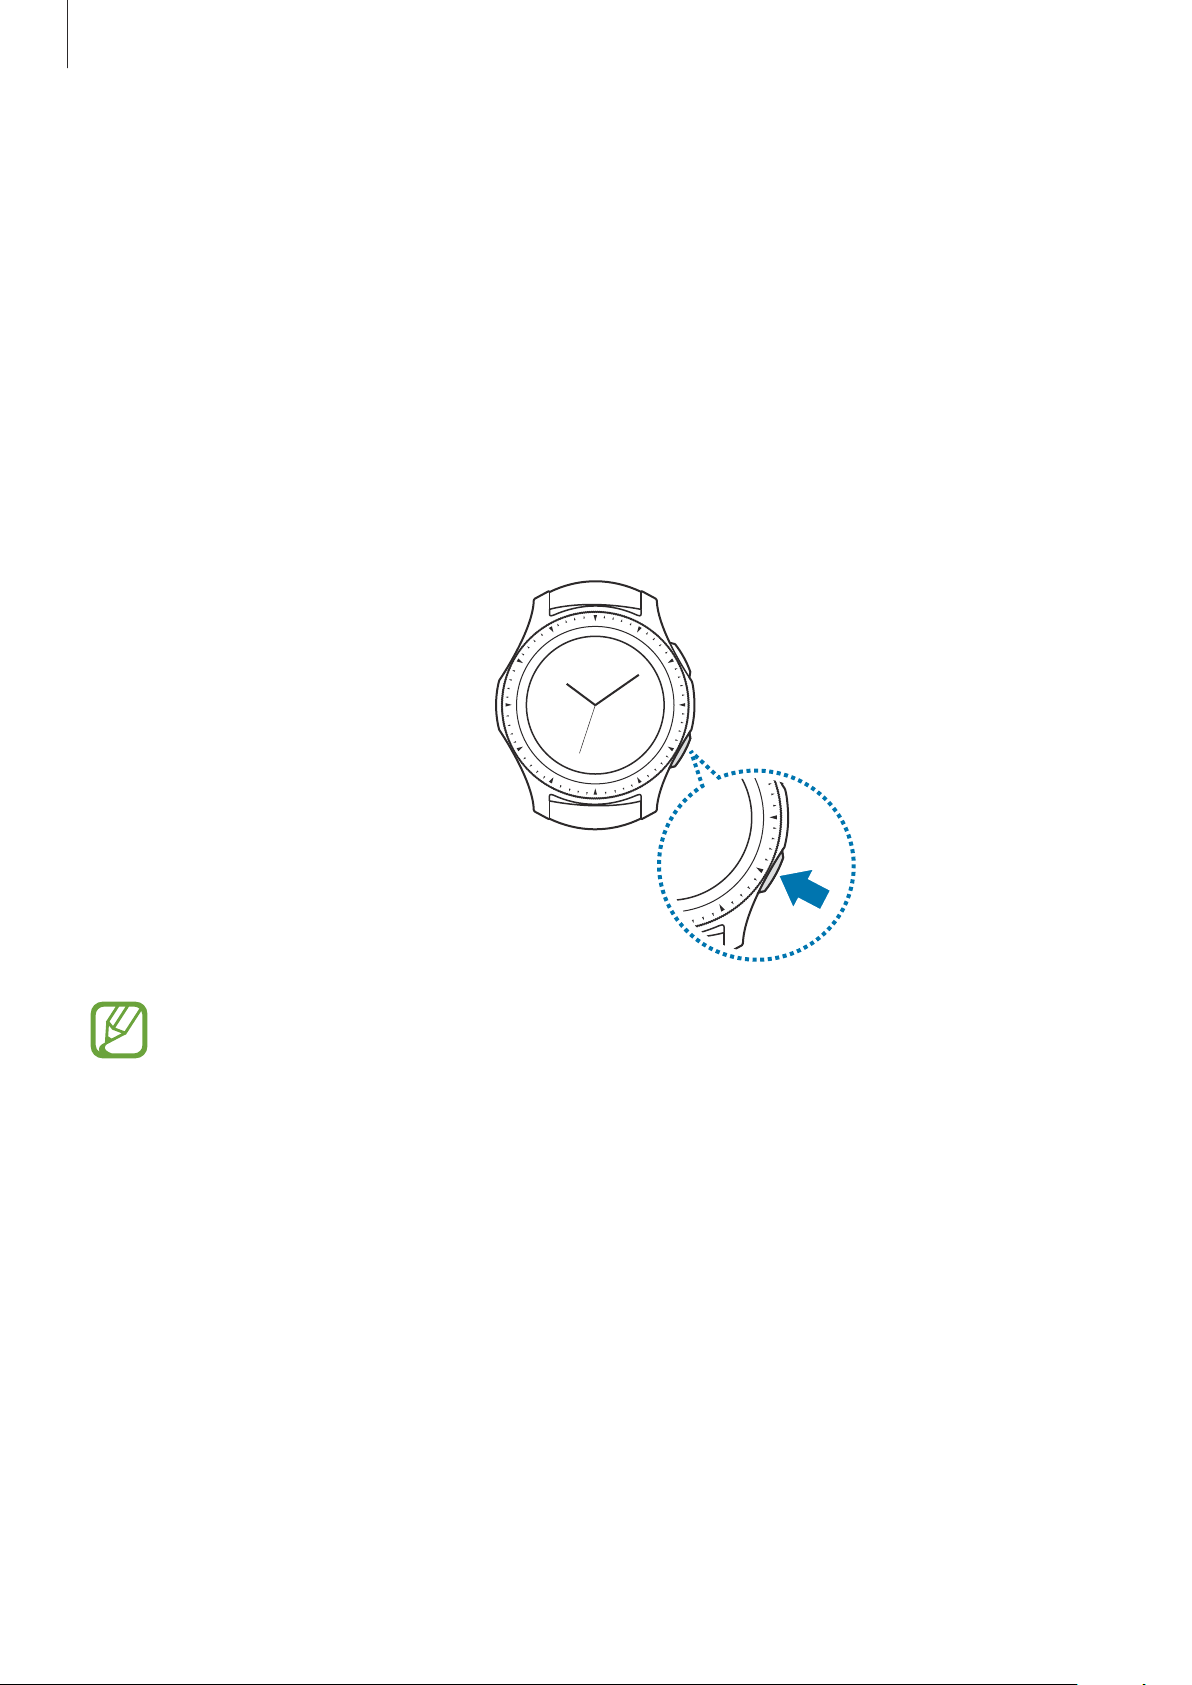
Начало работы
Включение и выключение устройства Galaxy
Watch
Чтобы включить устройство Galaxy Watch, нажмите и удерживайте клавишу «Главный экран»
(клавишу питания) в течение нескольких секунд.
При первом включении устройства Galaxy Watch или после его сброса на экране появляются
инструкции по загрузке и установке приложения Galaxy Wearable на мобильном устройстве.
Дополнительная информация представлена в разделе Подключение Galaxy Watch к мобильному
устройству.
Для выключения устройства Galaxy Watch нажмите и удерживайте клавишу «Главный экран»
(клавишу питания), а затем выберите пункт
Выключение
.
В местах, где использование беспроводных устройств запрещено, например в самолетах
или больницах, следуйте требованиям предупреждающих табличек и указаниям
персонала.
Перезапуск устройства Galaxy Watch
Если устройство Galaxy Watch не реагирует на выполняемые действия, для его перезагрузки
нажмите и удерживайте клавишу «Главный экран» (клавишу питания) в течение более 7 секунд.
23
Начало работы
Подключение Galaxy Watch к мобильному
устройству
Установка приложения Galaxy Wearable
После подключения устройства Galaxy Watch к мобильному устройству можно использовать
прочие различные функции. Чтобы подключить устройство Galaxy Watch к мобильному устройству,
установите на мобильном устройстве приложение Galaxy Wearable.
В зависимости от смартфона приложение Galaxy Wearable можно загрузить из следующих
источников:
•
Смартфоны Samsung:
•
Другие устройства Android:
Galaxy Apps, Play Маркет
Play Маркет
Приложение Galaxy Wearable невозможно установить на мобильные устройства, которые
не поддерживают синхронизацию с Galaxy Watch. Убедитесь, что ваше мобильное
устройство совместимо с устройством Galaxy Watch.
Подключение Galaxy Watch к мобильному устройству по
Bluetooth
Носимое устройство Galaxy Watch
Включите устройство Galaxy Watch.
1
Появится экран загрузки и установки приложения Galaxy Wearable.
Коснитесь значка и выберите нужный язык.
2
Смартфон
Запустите приложение
3
При необходимости обновите приложение Galaxy Wearable до последней версии.
Выберите пункт
4
НАЧАТЬ ЗНАКОМСТВО
Galaxy Wearable
.
.
24
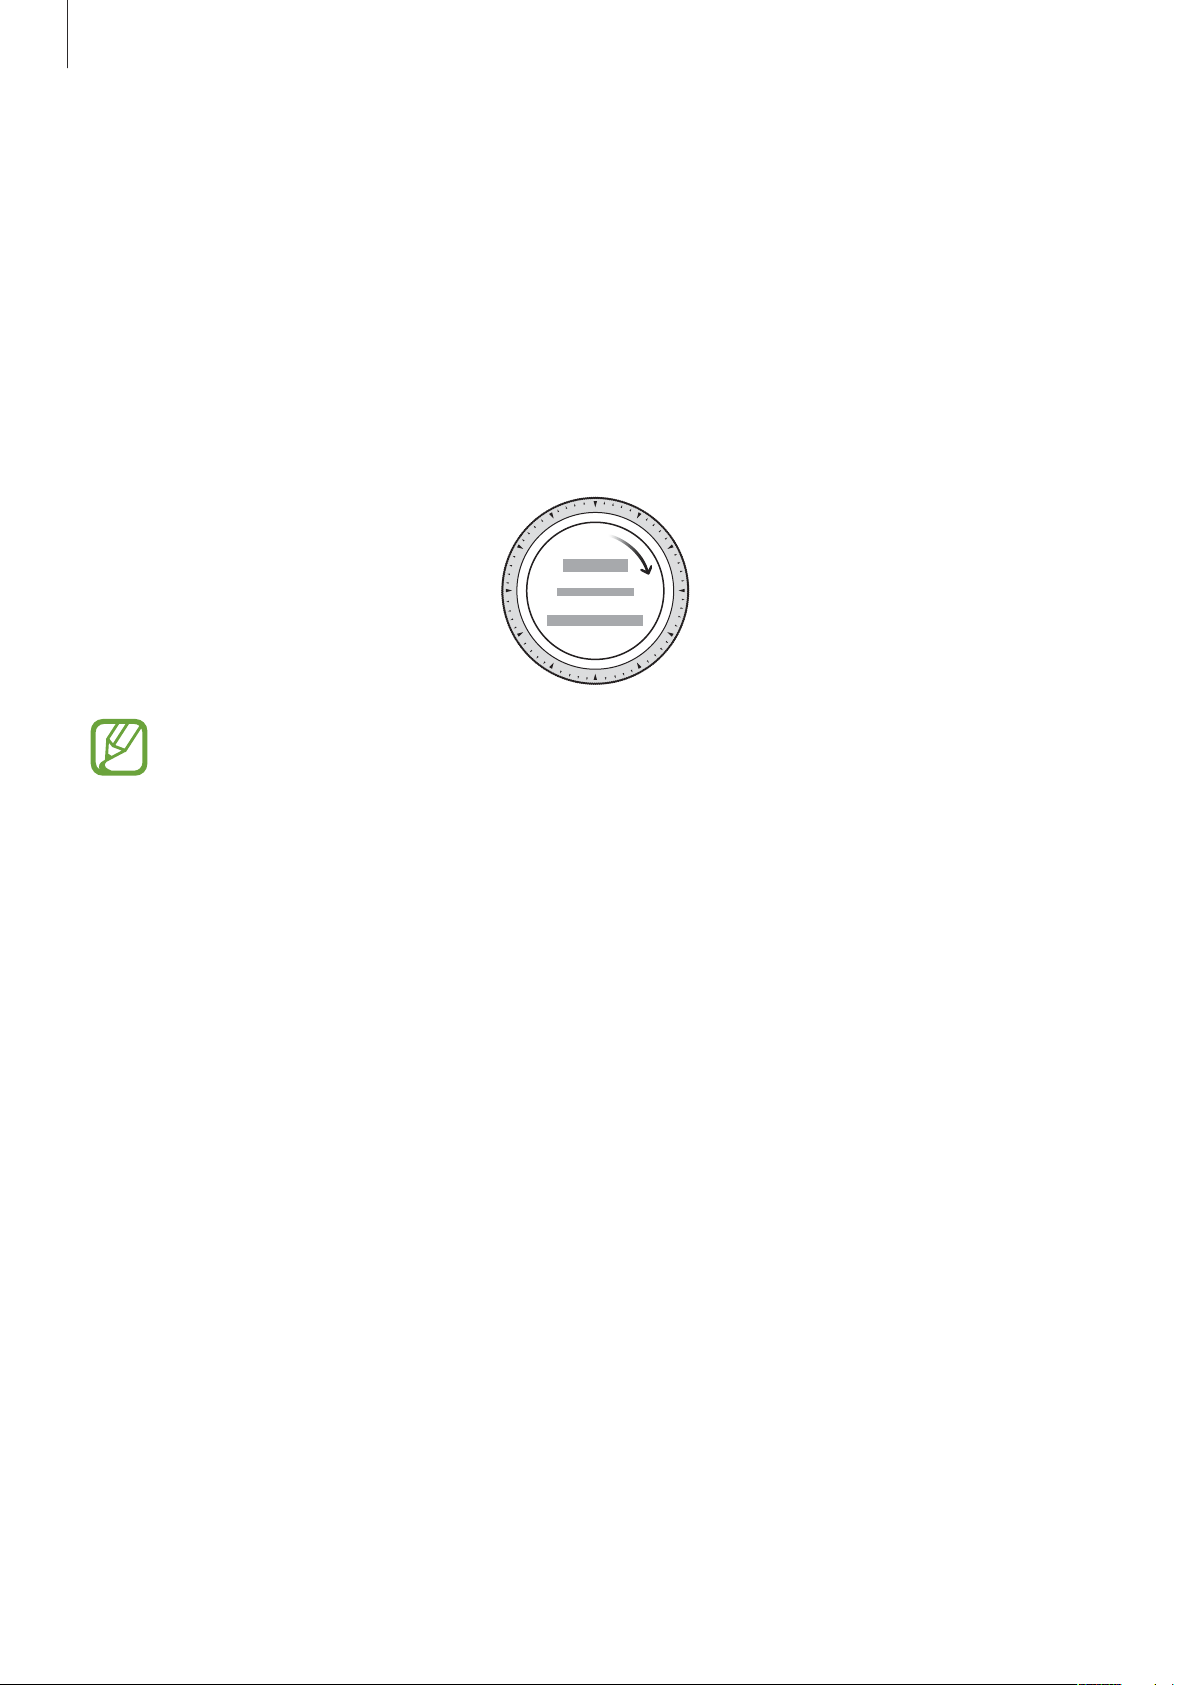
Начало работы
Выберите устройство на экране.
5
Если нужное устройство отсутствует, выберите пункт
Выберите пункт
6
Для установки подключения следуйте инструкциям на экране.
7
Во время установления подключения на экране Galaxy Watch и мобильного устройства
откроется экранное учебное руководство. Следуйте инструкциям на экране, чтобы
ознакомиться с базовыми функциями устройства Galaxy Watch.
•
Способы подключения и экран могут отличаться в зависимости от используемого
мобильного устройства и версии программного обеспечения.
ВКЛЮЧИТЬ
, когда появится окно с запросом на включение Bluetooth.
МОЕГО УСТРОЙСТВА НЕТ
.
•
При первом подключении устройства Galaxy Watch к мобильному устройству после
сброса заряд аккумулятора Galaxy Watch может расходоваться быстрее во время
синхронизации данных, например, контактов.
•
Поддерживаемые мобильные устройства и функции могут отличаться в зависимости от
страны, поставщика услуг и производителя устройства.
25
Начало работы
Подключение Galaxy Watch к новому мобильному устройству
При подключении устройства Galaxy Watch к новому мобильному устройству на экране появятся
инструкции по сбросу устройства Galaxy Watch. Перед подключением устройства Galaxy Watch
к новому мобильному устройству не забудьте создать резервные копии любых важных данных,
хранящихся на устройстве Galaxy Watch. Для получения дополнительной информации о
резервном копировании данных устройства Galaxy Watch см. раздел
восстановление данных.
Резервное копирование и
На экране приложений нажмите кнопку (
1
Устройство Galaxy Watch будет отключено от мобильного устройства. После этого оно
автоматически переключится в режим сопряжения по Bluetooth.
На новом мобильном устройстве запустите приложение
2
подключение к устройству Galaxy Watch.
Если нужное мобильное устройство уже подключено к другому устройству, запустите
приложение
Подключить новое устройство
Galaxy Wearable
на мобильном устройстве и коснитесь значка →
, чтобы выполнить подключеное к новому устройству.
Настройки
) →
Подкл. к новому телефону
Galaxy Wearable
, чтобы установить
→ .
Удаленное подключение
Мобильное устройство и устройство Galaxy Watch будут подключены с помощью функции
Bluetooth. Если подключение по Bluetooth недоступно, устройство Galaxy Watch можно удаленно
подключить к мобильному устройству с помощью учетной записи Samsung по Wi-Fi. Таким
образом, можно будет и далее получать уведомления от мобильного устройства.
Эта функция включается автоматически при первом подключении к мобильному устройству по
Bluetooth.
Если эта функция выключена, запустите приложение
выберите пункт
Удаленное подключение
НАСТРОЙКИ
.
→
Подключение часов
26
Galaxy Wearable
, а затем коснитесь переключателя
на мобильном устройстве,
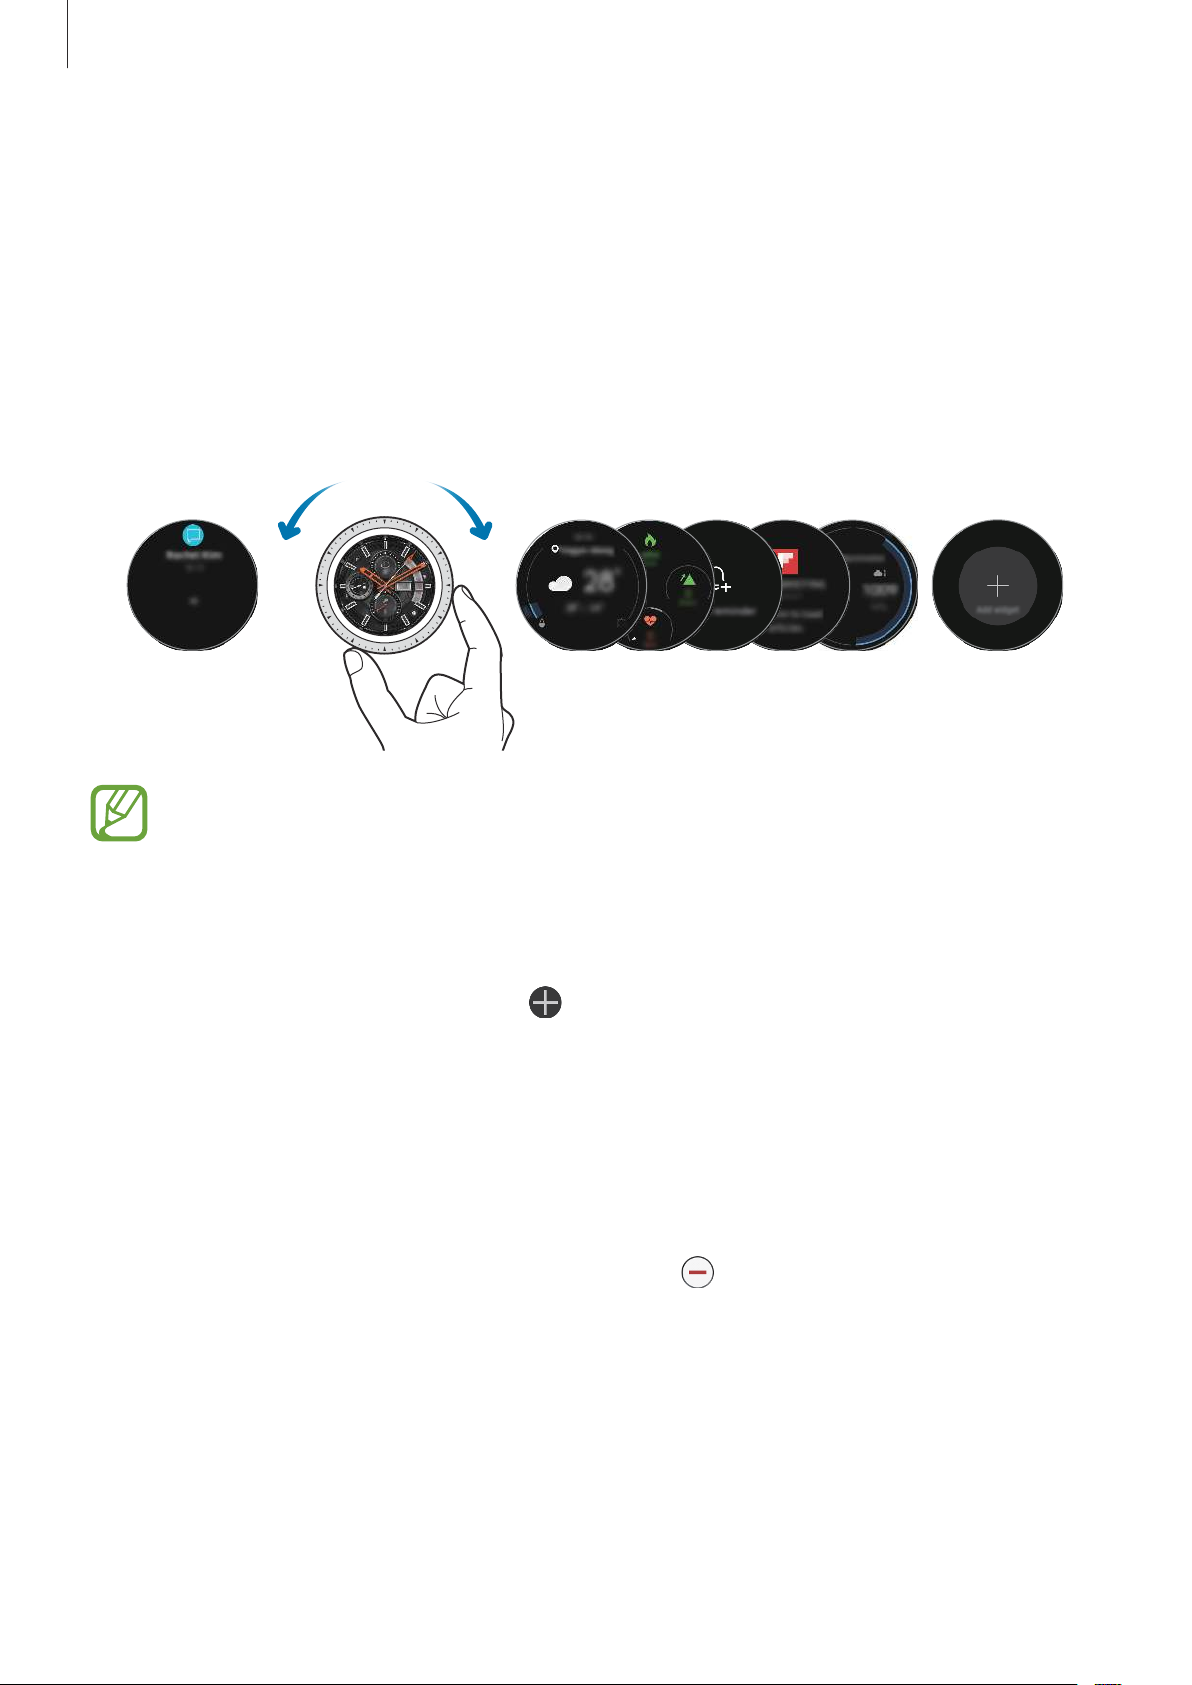
Начало работы
Управление экраном
Структура экрана
Экран Часы— это отправная точка для доступа к остальным экранам устройства Galaxy Watch.
Пользователю доступны другие экраны, к которым можно перейти с помощью нажатия клавиши,
поворота безеля или проведения пальцем по экрану.
Уведомления
Доступные виджеты, уведомления и порядок их расположения зависят от версии
программного обеспечения.
Виджеты Добавление
Добавление виджетов
На главный экран можно добавить дополнительные виджеты.
Прокрутите экран влево, коснитесь значка
появится на новой панели.
, а затем выберите виджет. Выбранный виджет
Перемещение виджетов
Нажмите и удерживайте виджет, а затем перетащите его в нужное место.
Удаление виджетов
виджетов
Нажмите и удерживайте виджет, а затем коснитесь значка .
27
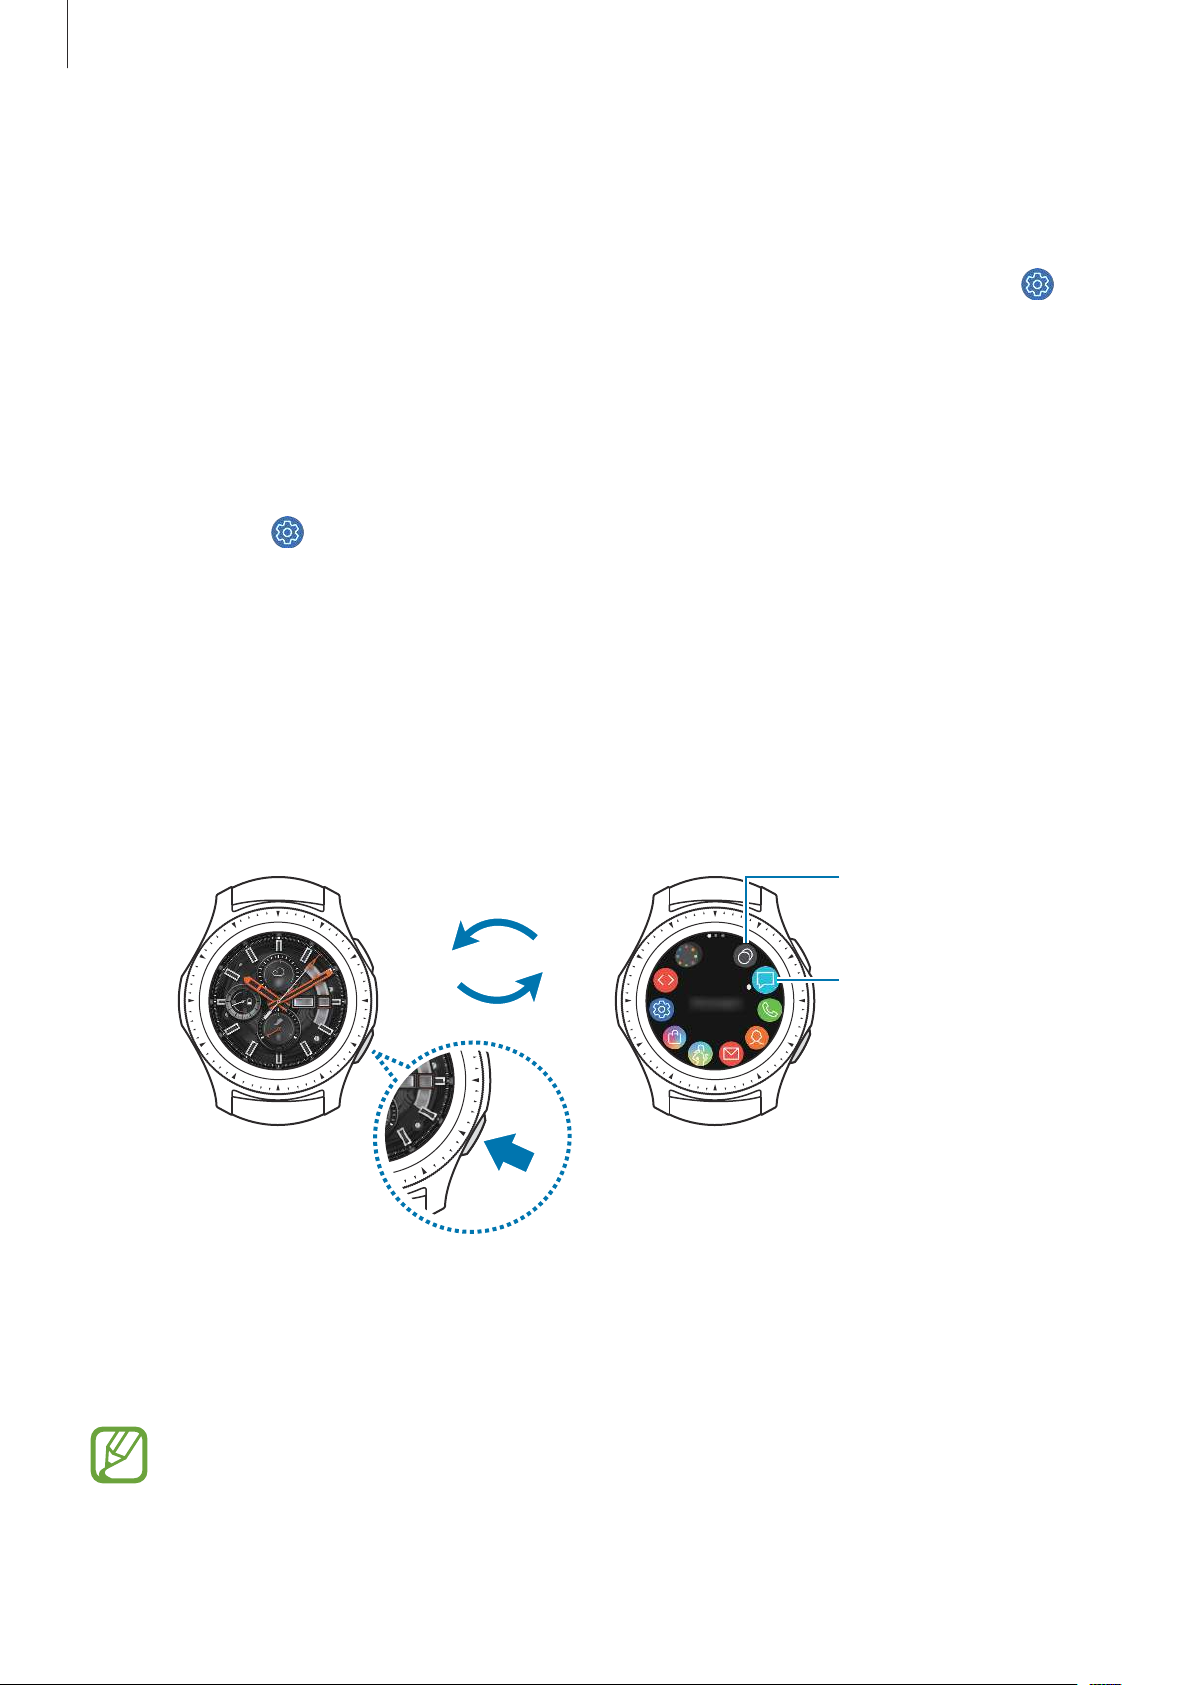
Начало работы
Включение и выключение экрана
Чтобы включить экран, поверните безель. Также можно нажать кнопку «Главный экран» или кнопку
«Назад».
Если после поворота безеля экран не включается, на экране приложений коснитесь значка
(
Настройки
коснитесь переключателя
функцию.
Чтобы выключить экран, накройте его ладонью. Кроме того, экран автоматически выключается,
если устройство Galaxy Watch не используется в течение определенного периода времени.
Для включения экрана также можно использовать жест пробуждения. На экране приложений
коснитесь значка
переключателя
) и выберите пункт
Пробуждение с помощью кольца
(
Настройки
Жест включения
Дополнительные
) →
Дополнительные
, чтобы включить соответствующую функцию.
→
Пробуждение с помощью кольца
, чтобы включить соответствующую
→
Жест включения
, а затем
и коснитесь
Переключение между экранами
Переход между экранами часов и приложений
Чтобы открыть экран приложений нажмите клавишу «Главный экран».
Для возврата на экран часов нажмите клавишу «Главный экран».
использованных
приложений
Приложение
Экран часов Экран приложений
Экран приложений
На экране приложений расположены значки всех установленных приложений.
Для просмотра других панелей поверните безель или проведите по экрану влево или вправо.
Доступные приложения зависят от версии программного обеспечения.
28
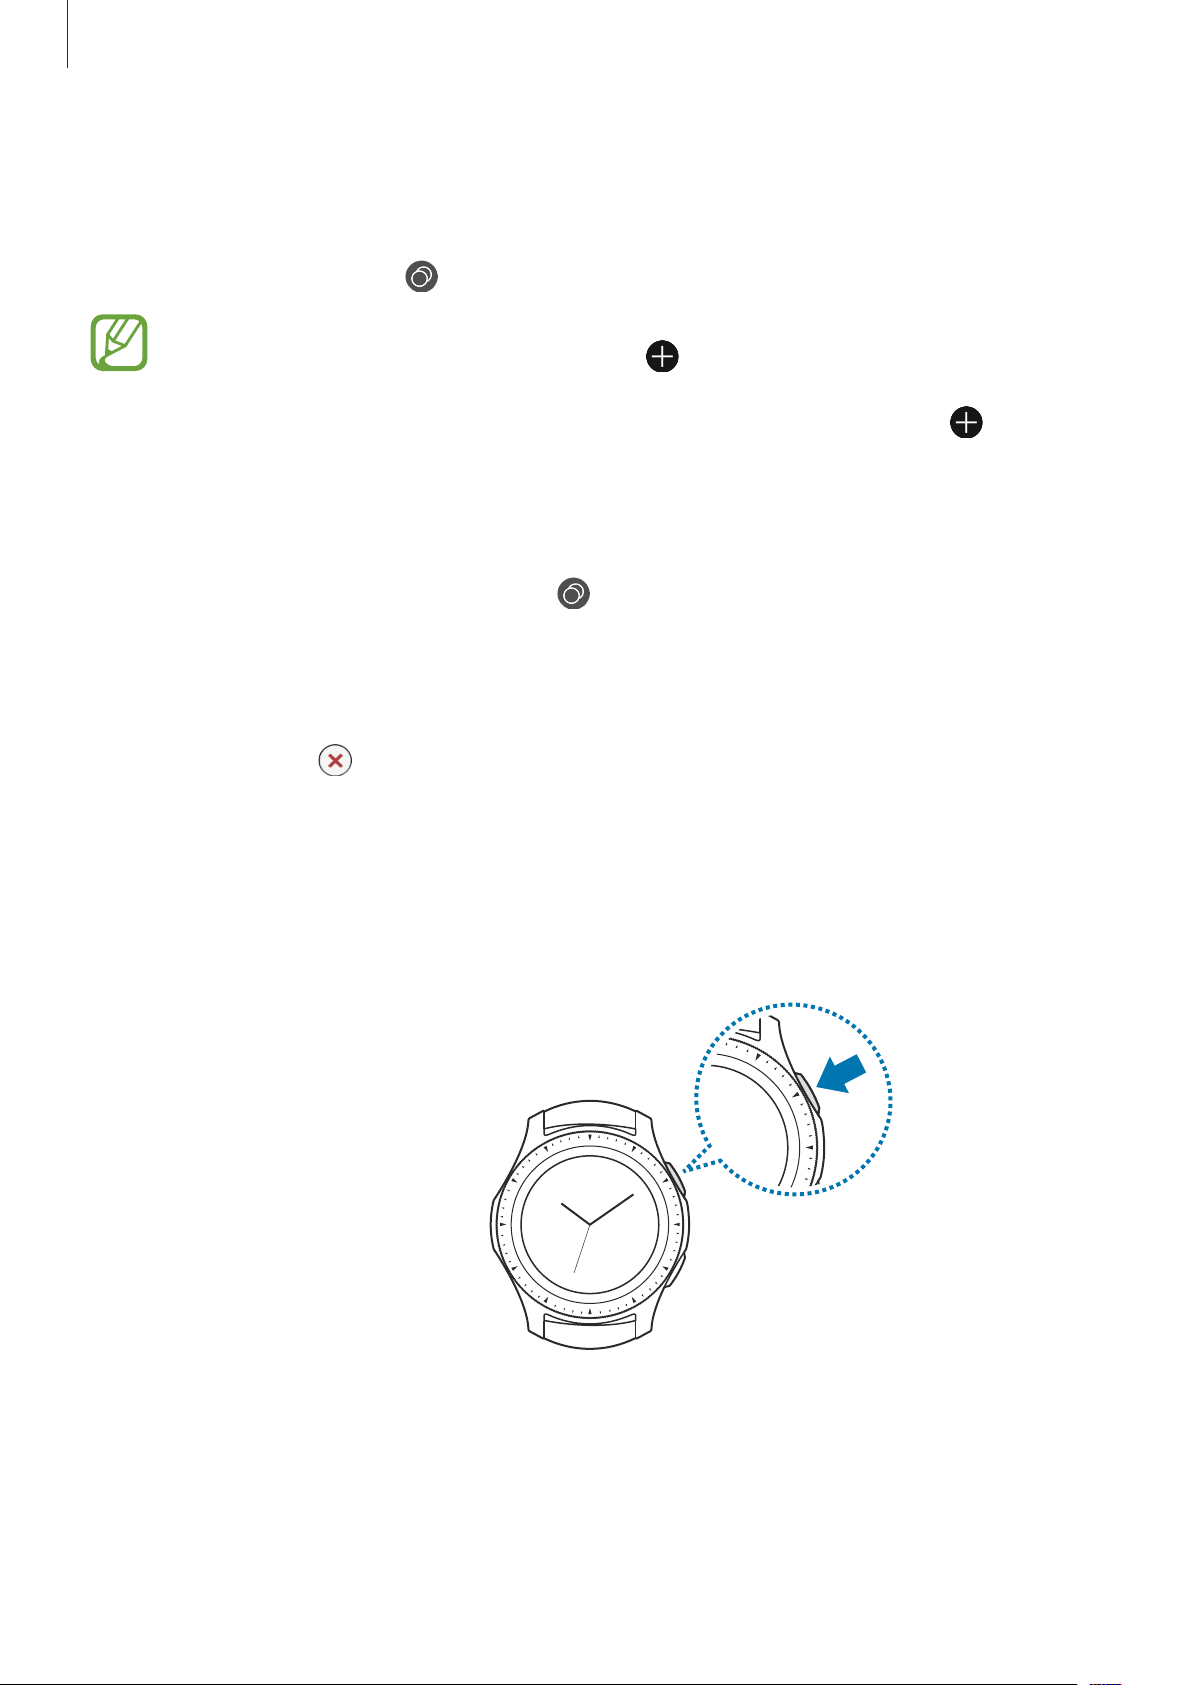
Начало работы
Запуск приложений
Чтобы открыть приложение, коснитесь его значка на экране приложений.
Чтобы открыть приложение из списка недавно использованных приложений, на экране
приложений коснитесь значка
Приложения можно быстро запускать, если добавить часто используемые приложения
на виджет
свободное место для добавления часто используемого приложения отсутствует, коснитесь
и удерживайте экран, выберите пункт
добавленном приложении, чтобы добавить другое приложение.
Закрытие приложений
Ярлыки прилож.
(
Последние прилож.
Коснитесь значка и добавьте нужное приложение. Если
ИЗМЕНИТЬ
).
, а затем коснитесь значка на ранее
На экране приложений коснитесь значка (
1
Чтобы выделить приложение, которое нужно закрыть, поверните безель или проведите по
2
экрану влево или вправо.
Коснитесь значка .
3
Чтобы закрыть все запущенные приложения, выберите пункт
Последние прилож.
ЗАКРЫТЬ ВСЕ
).
.
Возврат на предыдущий экран
Для возврата на предыдущий экран нажмите кнопку «Назад».
29
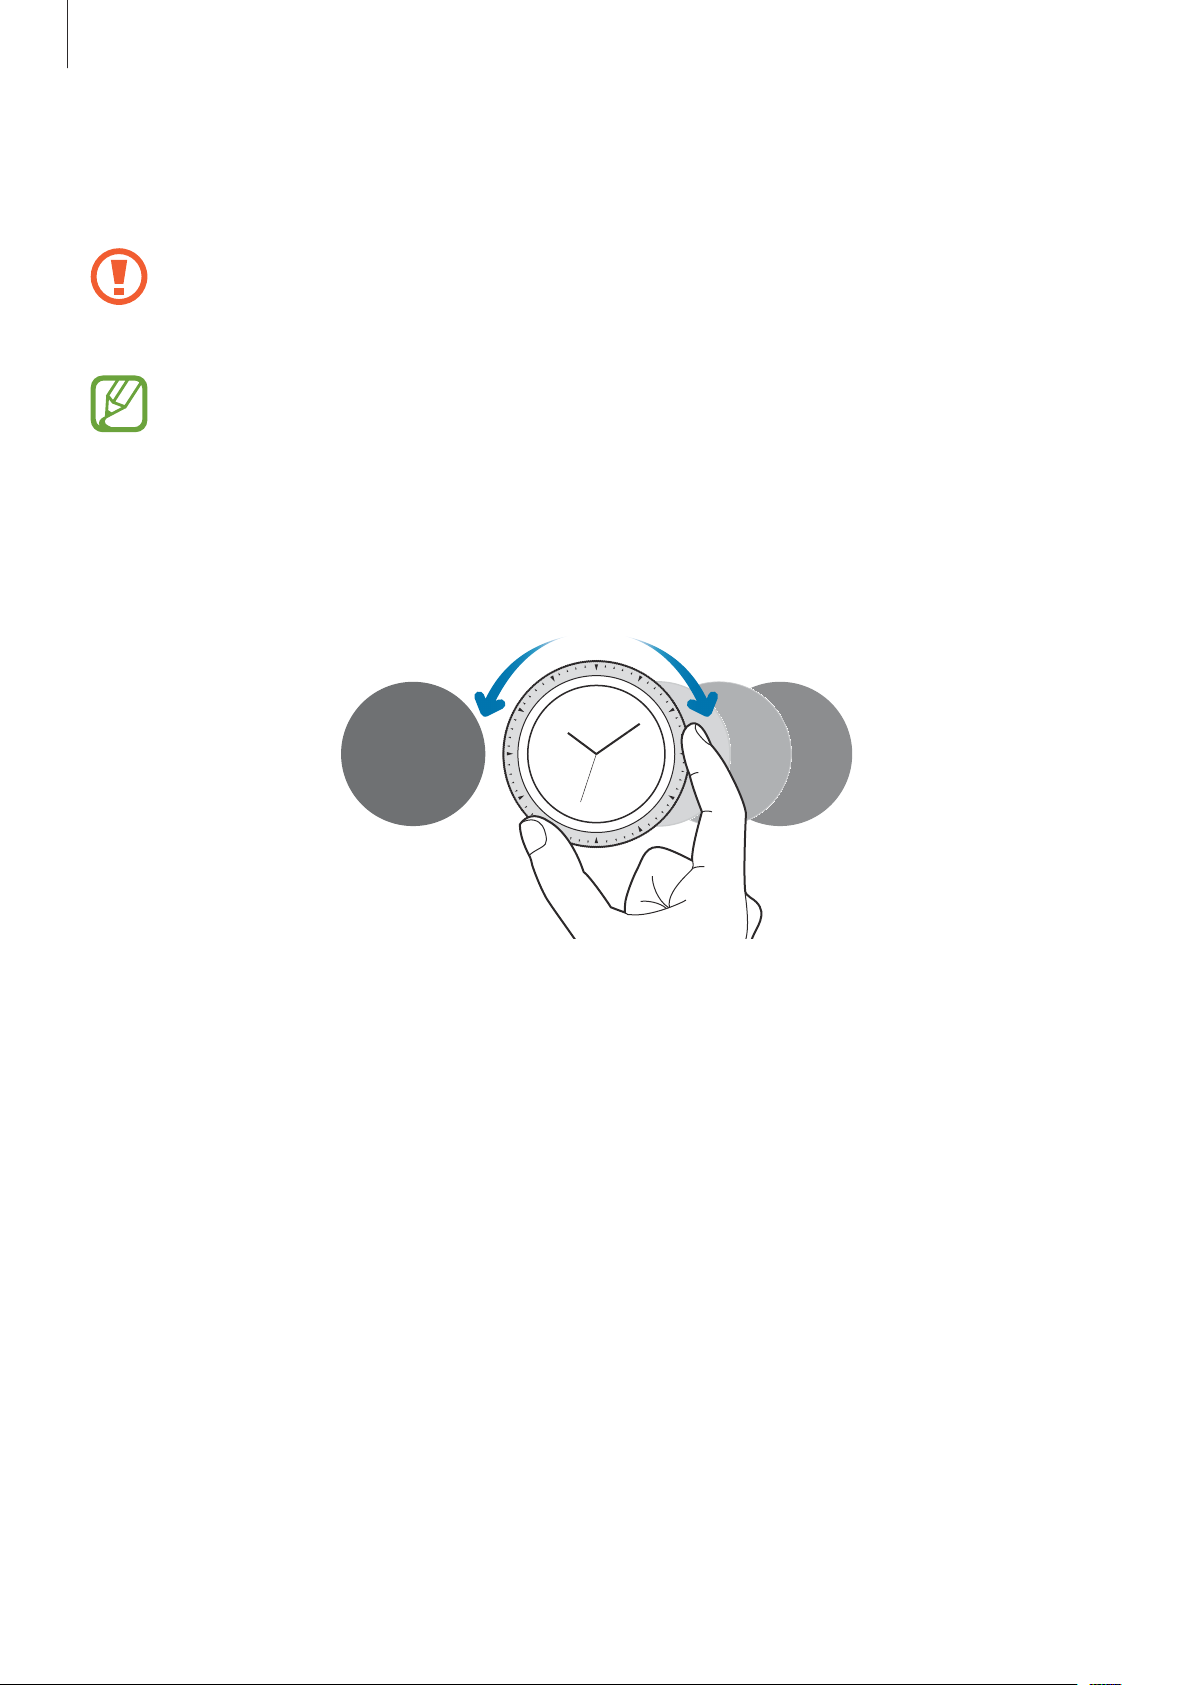
Начало работы
Использование безеля
Функциями устройства Galaxy Watch можно управлять, просто поворачивая безель.
•
Убедитесь, что в области безеля нет посторонних веществ, таких как пыль или песок.
•
Не используйте безель возле магнитных полей, так как они могут вносить помехи в
работу внутренних магнитов безеля и привести к их неисправности.
Если безель не поворачивается, обратитесь в сервисный центр Samsung, не пытаясь
разобрать устройство Galaxy Watch.
Перемещение между экранами
Поверните безель, чтобы просмотреть содержимое других экранов. При открытом экране часов
поверните безель против часовой стрелки, чтобы просмотреть уведомления.
30
Loading…
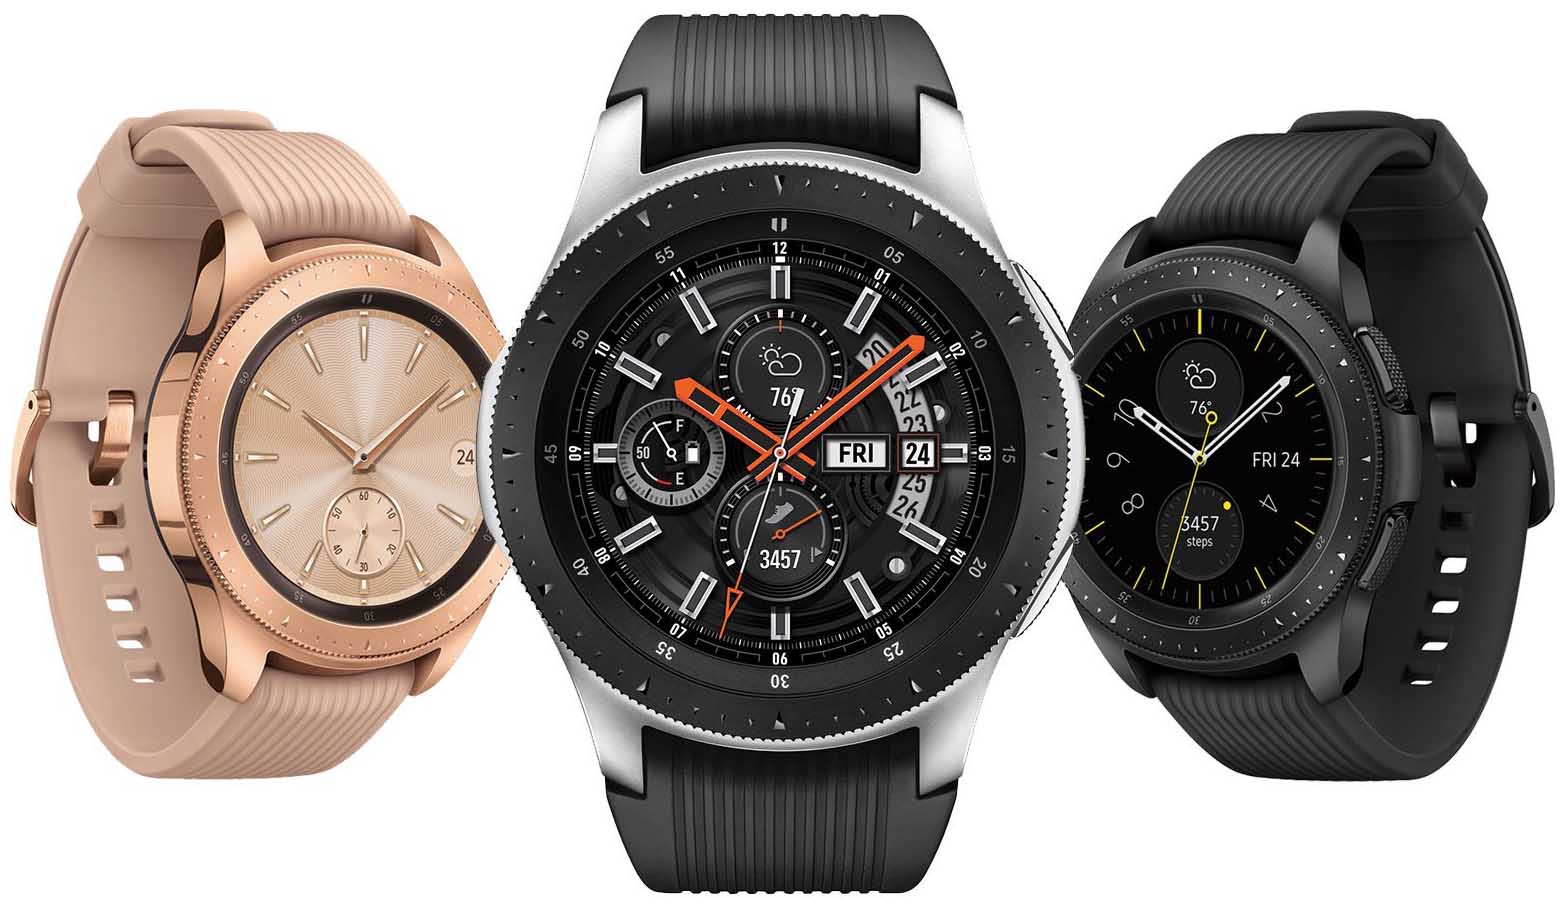
Использование умных часов Samsung Galaxy Watch может вызвать много вопросов, ответы на часть из которых мы разберем в этой статье. Мы рассмотрим основные элементы управления часами, способы их подключения к телефону и кратко разберем основные настройки.
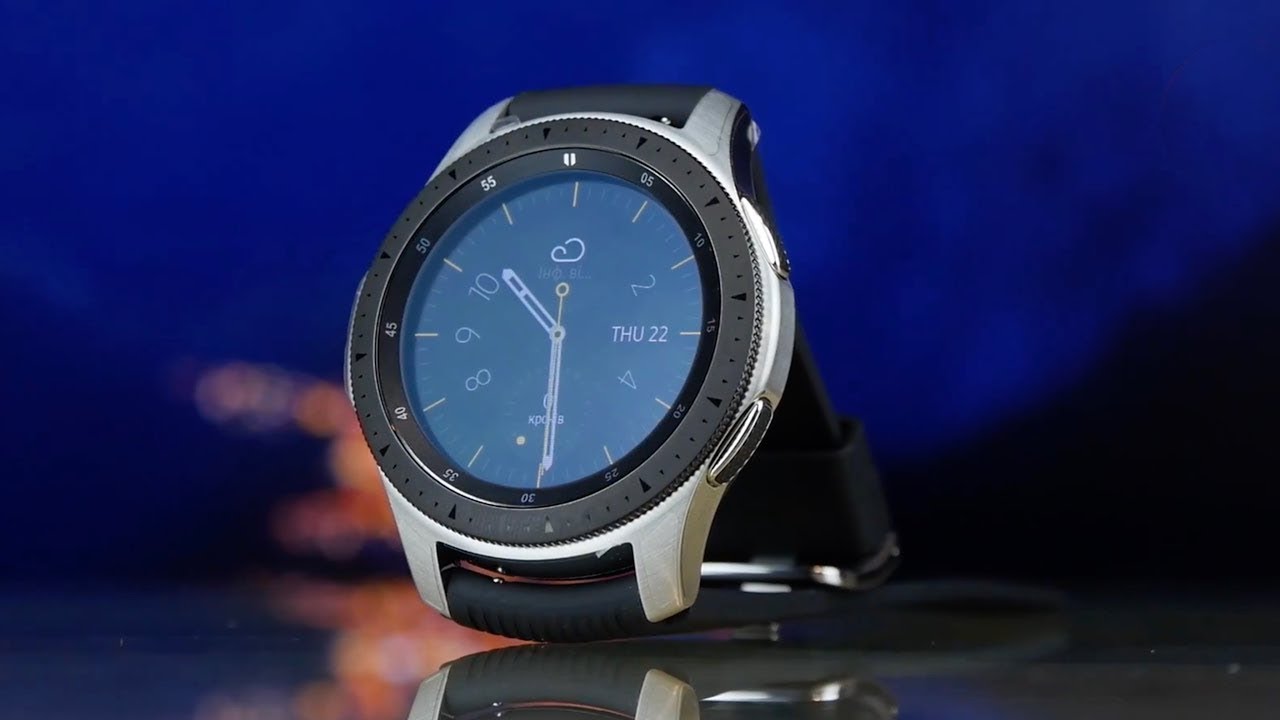
В комплекте с умными часами Samsung Galaxy Watch идет своя док-станция, поэтому их не получится зарядить через классический USB-провод от телефонной зарядки. Зато на док-станции часы восполняют энергию по принципу беспроводной зарядки, что избавляет от необходимости подключать их к проводу. Рассмотрим процесс зарядки подробнее.
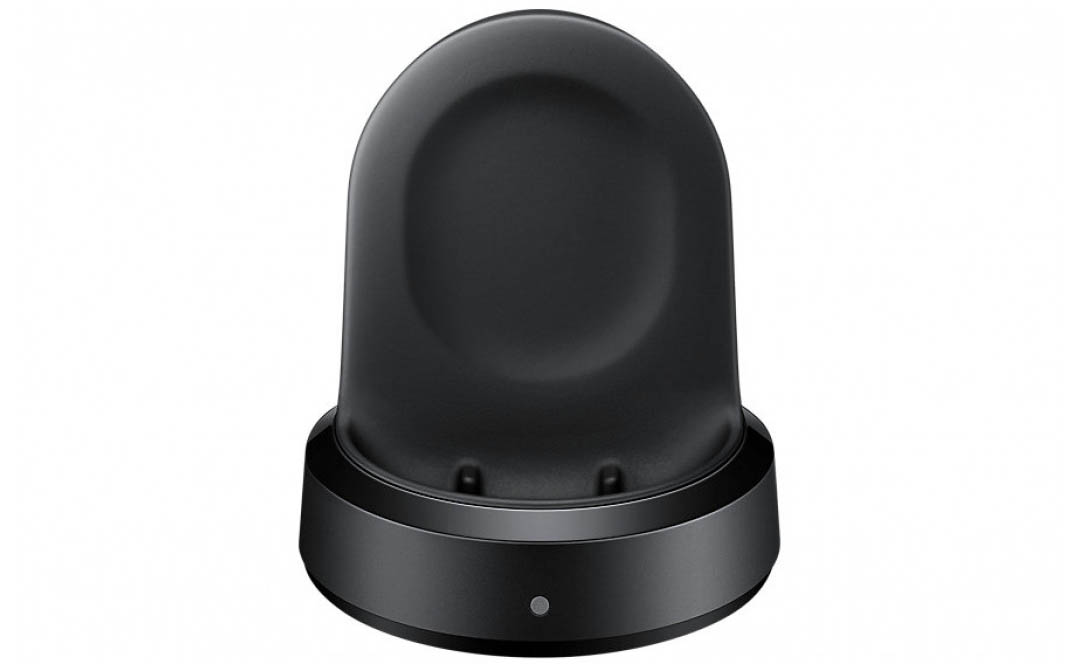
Сама док-станция получает энергию от обычной бытовой сети. В вертикальной площадке станции расположена индукционная катушка, которая при включении в розетку начинает генерировать электрическое поле. В смарт-часах тоже есть индукционная катушка. Если прижать часы к вертикальной площадке станции, то в их катушке под действием катушки станции вырабатывается электрический ток. По этой причине в часах нет зарядных контактов, которые нужно было бы совмещать с контактами док-станции. Однако для эффективности процесса зарядки расстояние между обеими индукционными катушками должно быть маленьким.
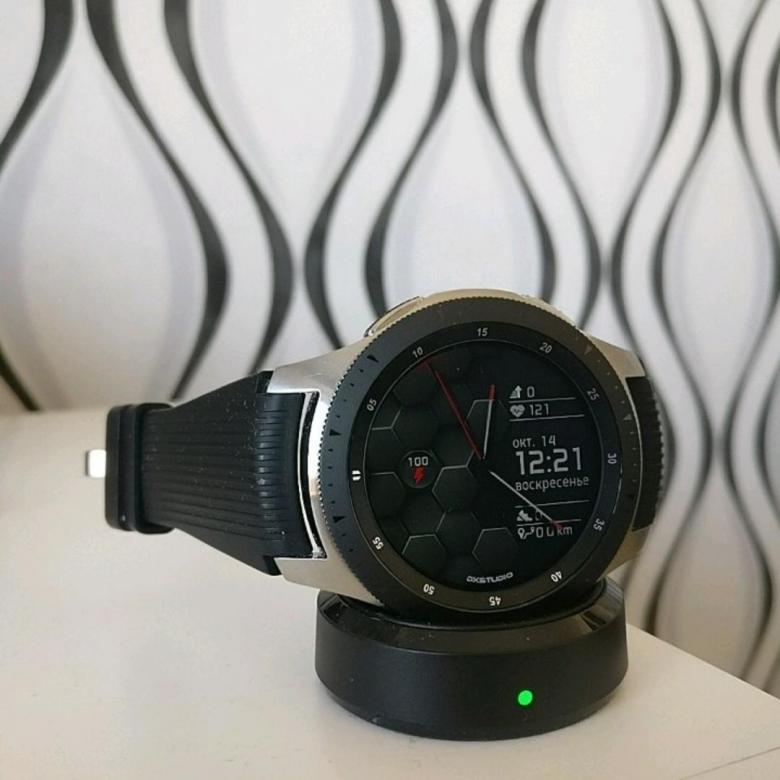
Чтобы зарядить ваши смарт-часы, вставьте в разъем док-станции зарядный кабель и подключите его к розетке. Поместите часы на станцию таким образом, чтобы центр вертикальной площадки станции совпал с центром задней стороны часов. В процессе зарядки на станции будет гореть красный индикатор, который сменится зеленым при полном восстановлении энергии. Если индикатор загорится оранжевым, значит, напряжение для зарядки слишком низкое, а мигающий красный говорит о неполадках с зарядкой. В последнем случае снимите часы с зарядки, дождитесь прекращения мигания индикатора и снова поставьте их на док-станцию. Если это не помогло, придется обратиться в сервисный центр.

Если на ваших часах стоит металлический ремешок, после их установки на док-станцию надавите на нижнюю часть часов так, как показано на рисунке. Это обеспечит более плотное прилегание к станции.
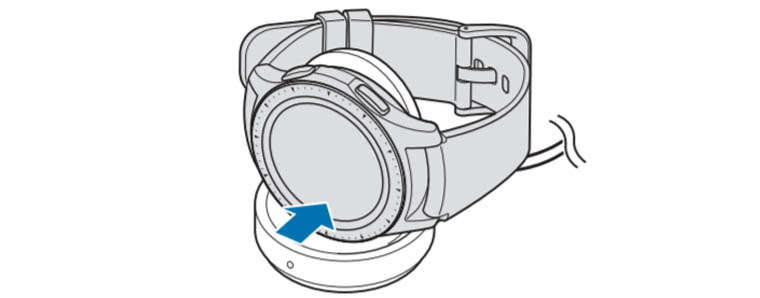
Обратите внимание, что при полном разряде часов вы не сможете включить их сразу даже при подключении к зарядному устройству. Часы включатся только через несколько минут пребывания на зарядке.
Может оказаться, что у вас нет под рукой зарядки, тогда продлить время работы часов поможет переход в режим энергосбережения. В нем вам не будут доступны сети Wi-Fi, процессор будет работать медленнее, с экрана исчезнут цвета, отключатся основные функции, но вы по-прежнему сможете получать уведомления от приложений по Bluetooth.
Устройство часов
На передней стороне корпуса смарт-часов Samsung Galaxy Watch расположен сенсорный экран, безель (вращающееся кольцо), датчик освещенности и две антенны. Одна антенна отвечает за прием сигнала GPS, а другая необходима для NFC-контакта. Сбоку часов расположены две управляющие кнопки, микрофон и внешний динамик. Сзади корпуса есть еще несколько датчиков и клапан сброса давления (см. рисунок ниже).

Ремешок у гаджета съемный и меняется одним движением. Чтобы снять ремешок, найдите на его обратной стороне пружинный стерженек и отодвиньте его в сторону, как показано на рисунке ниже. После этого можно вытащить ремешок из корпуса и при желании заменить его другим.
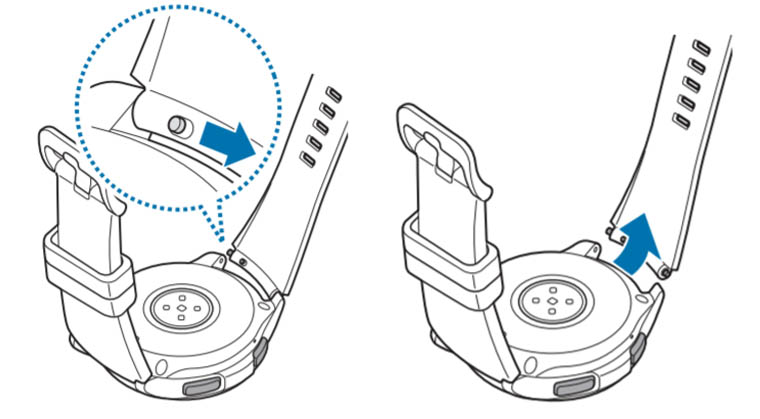
Управляющие элементы часов
Управление умными часами Samsung Galaxy Watch происходит при помощи сенсорного экрана, безеля, двух кнопок сбоку корпуса и жестов.
Управление экраном
Сенсорный экран реагирует на традиционные для сенсорных устройств свайпы (перелистывания) экрана вверх, вниз или в стороны. Нажатие на экран переведет вас внутрь раздела, выведет дополнительную информацию, а долгое нажатие выделит значок для его редактирования. Нажав и двигая значок, можно перенести его в другое место экрана. Быстрое двойное касание пальцем экрана поможет увеличить или уменьшить масштаб изображения. Экран может не реагировать на касания в том случае, если они слишком близко к его краю или если он заблокирован.
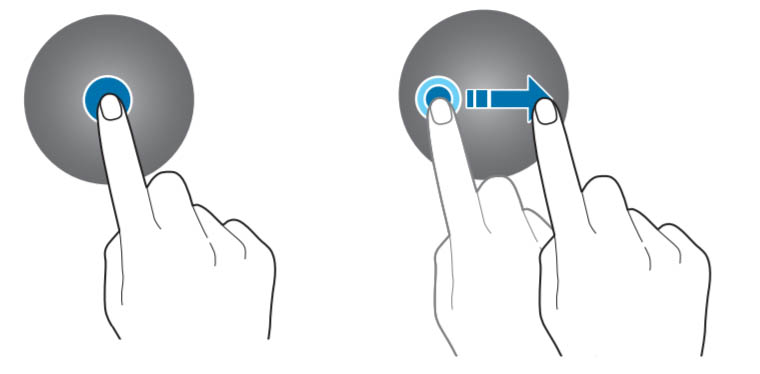
Управление безелем
Безель представляет собой кольцо по контуру часов, поворачивая которое, вы сможете перелистывать пункты меню, выбирать конкретные элементы или настраивать параметры. Рассмотрим примеры. Если вам звонят, на экране появится два значка: слева значок трубки, справа значок отмены звонка. Поворотом безеля в нужную сторону вы поднимете трубку или прервете звонок. Если вы настраиваете яркость, то при помощи безеля сможете прибавить или убавить ее поворотами вправо или влево соответственно. При нахождении в списке элементов просто поворачивайте безель до выделения нужного элемента, а затем кликните по этому элементу пальцем. Также безелем можно включать экран при условии настройки такой функции (включить переключатель в разделе часов Настройки / Дополнительные / Пробуждение с помощью кольца).
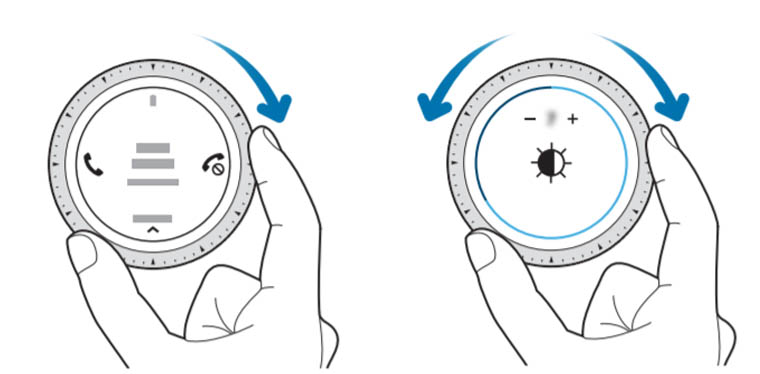
Управление кнопками
Основной является нижняя кнопка (кнопка питания), так как она отвечает за включение/выключение часов и ряд других функций. Поэтому у кнопки питания есть несколько способов нажатия. Чтобы включить или выключить смарт-часы, нажмите эту кнопку и удерживайте ее. Короткое нажатие поможет вам включить погашенный экран, перейти на главный экран (экран часов) с любого другого экрана или перейти с главного экрана в раздел приложений. Если часы ни на что не реагируют или работают некорректно, удерживайте кнопку питания дольше 7 секунд для перезагрузки. Верхняя кнопка (кнопка «Назад») нужна для возврата на предыдущий экран. У нее есть только короткое нажатие, но вы можете настроить и двойное нажатие в разделе часов Настройки (значок шестеренки) / Дополнительные. На двойное нажатие задается любое из представленных в часах действий: музыка, новости, последнее открытое приложение и другое.
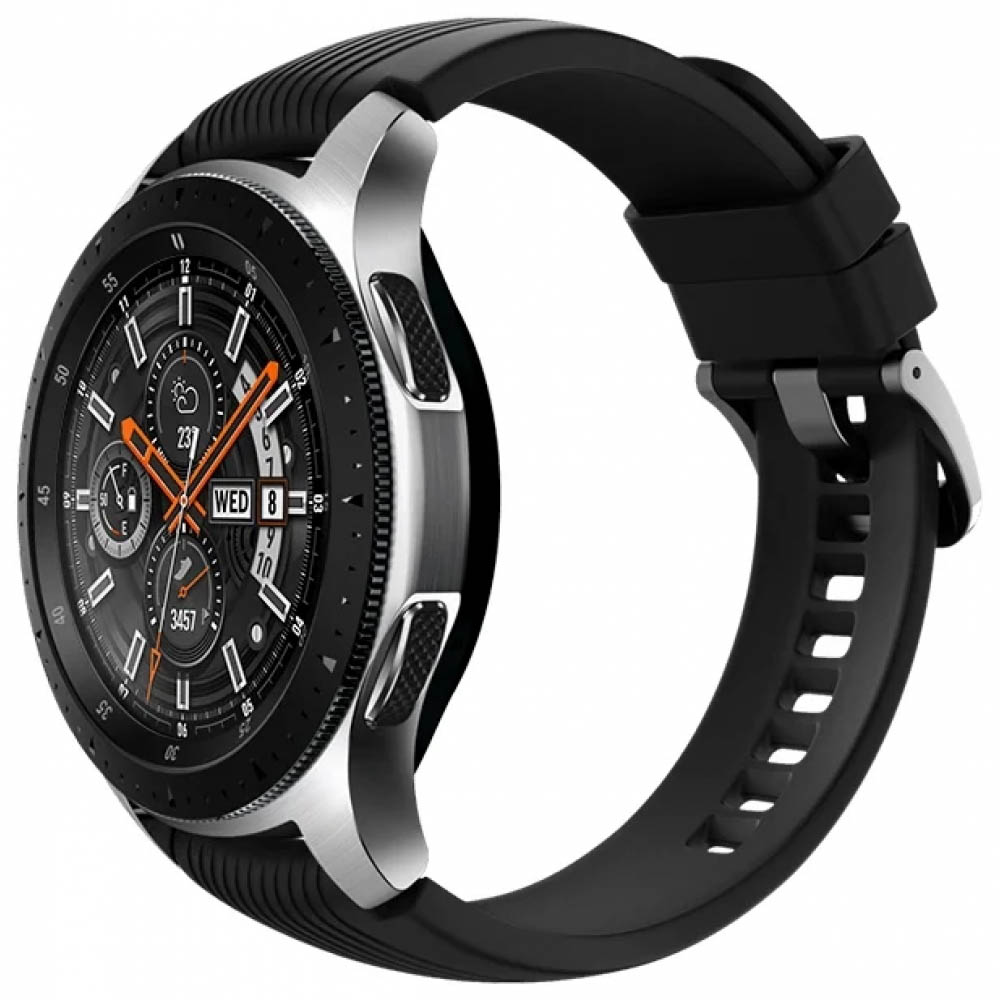
Управление жестами
Включать и выключать экран можно не только кнопками или безелем, но и специальными жестами. Для выключения экрана просто накройте его ладонью. При этом сработает расположенный на передней стороне часов датчик освещенности, и экран погаснет. То же самое произойдет при помещении часов в карман куртки или сумку. Для включения экрана предусмотрен жест включения — подъем и поворот запястья так, как будто вы хотите посмотреть время на часах. Но этот жест должен быть включен в разделе Настройки / Дополнительные / Жест включения.
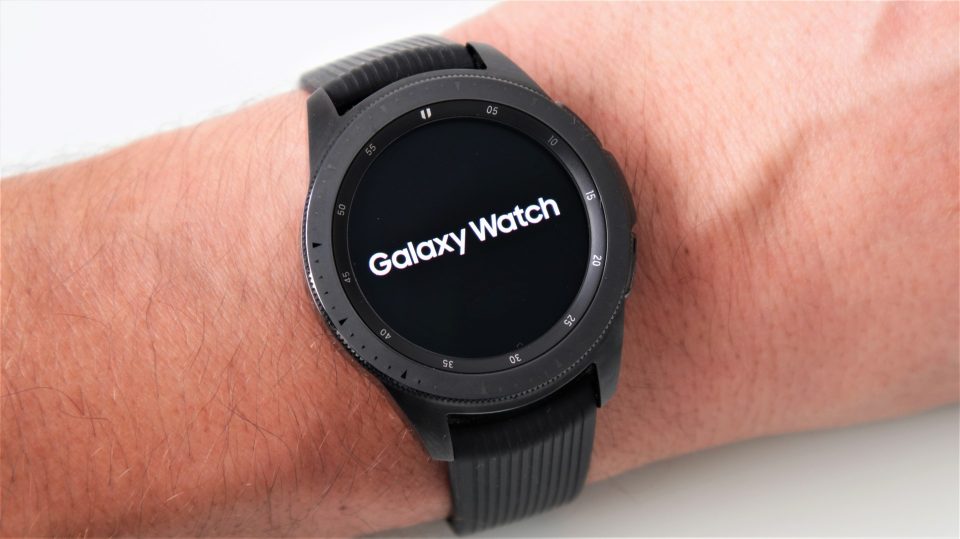
Как подключить часы Samsung Galaxy Watch к телефону
Для управления смарт-часами с мобильного телефона вам понадобится приложение Galaxy Wearable. Найдите его в «Play Маркет» или в Galaxy Apps: наберите в поисковой строке название приложения, кликните «Установить» и затем «Открыть». Если приложение начнет обновляться, дождитесь завершения этого процесса. Одновременно с этим включите ваши часы, коснитесь значка глобуса и при необходимости выберите нужный вам язык.
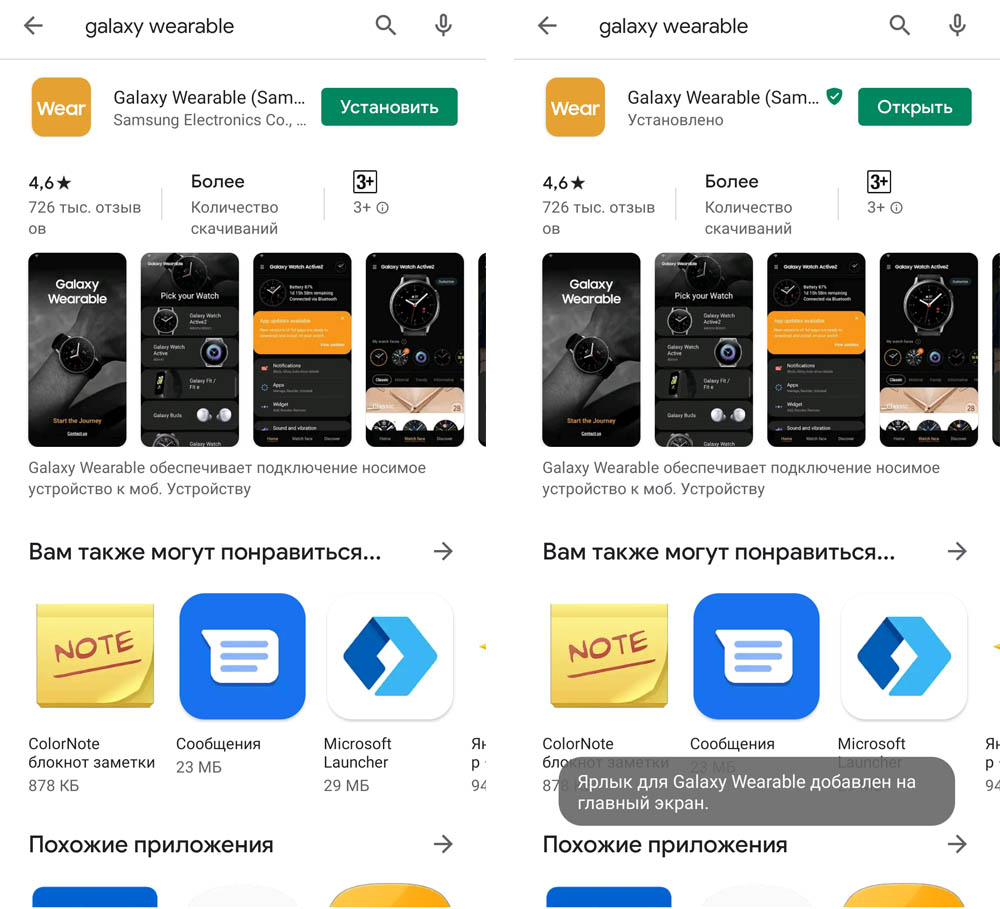
После запуска приложения нажмите кнопку «Начать» внизу экрана. Перед вами раскроется список из названий и картинок часов Samsung Galaxy. Кликните по строке с названием Galaxy Watch 46 mm/42 mm. Если такой строки в вашем списке нет, пролистайте его вниз и кликните по кнопке «Моего устройства нет».
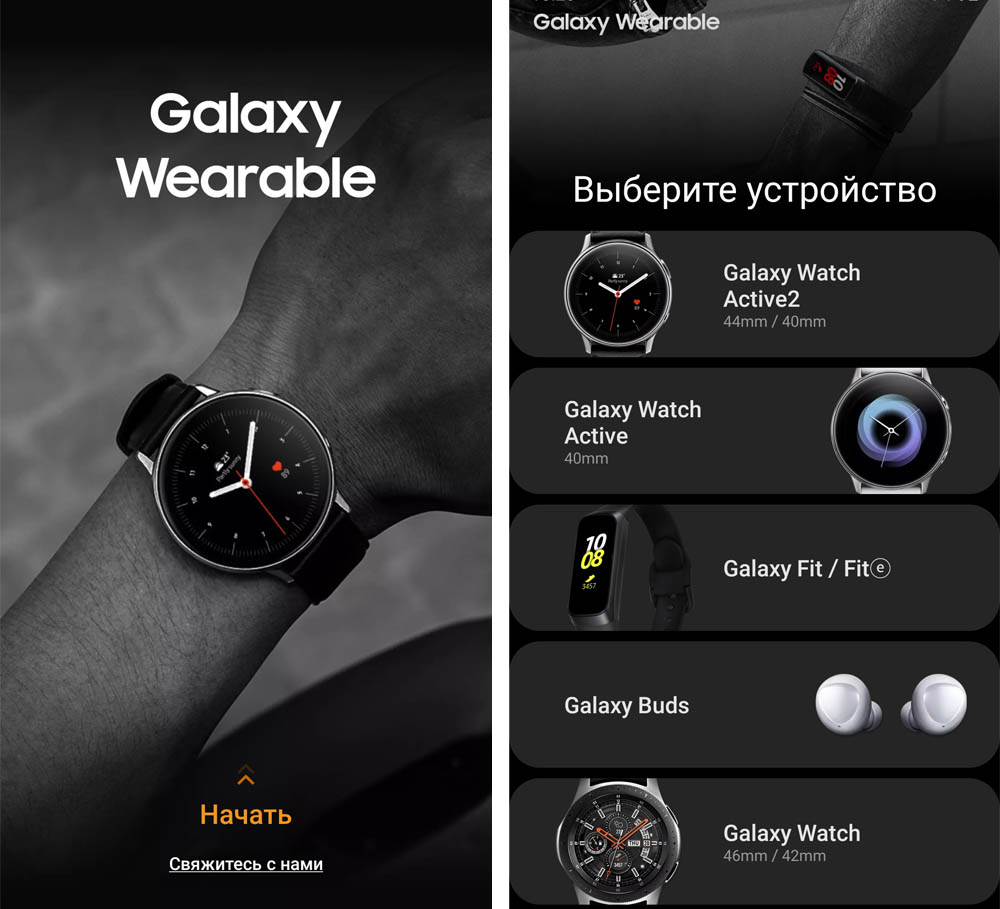
На следующем шаге приложение запросит разрешение на определение местоположения телефона, доступ к хранилищу, контактам и другое. Дайте все требуемые разрешения, и телефон начнет сопряжение с часами. Кликните по галочке на часах, при необходимости включите Bluetooth, подтвердите сопряжение на телефоне и сделайте базовые настройки, которые предложит телефон. У Samsung Galaxy Watch есть собственное учебное руководство, с которым вы можете ознакомиться на экране часов или телефона при первом подключении.
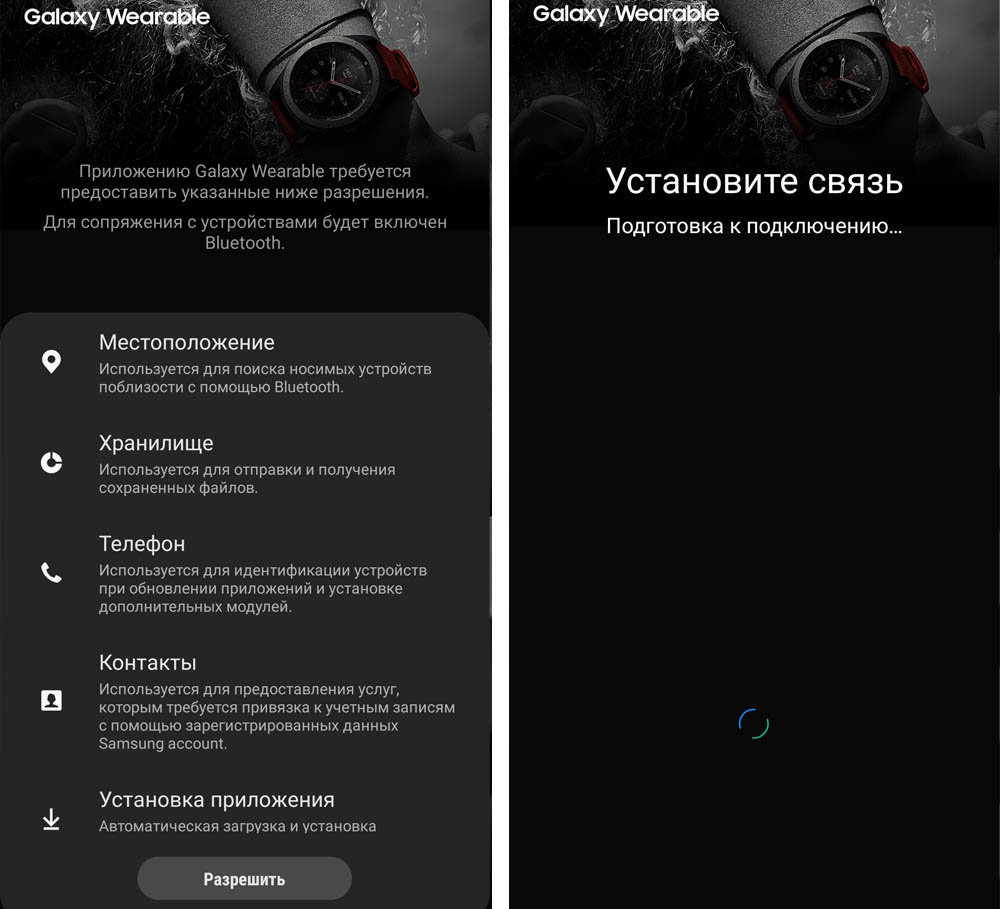
Если вы хотите подключить часы к другому смартфону, вам понадобится сделать сброс умных часов. Но перед этим обязательно сделайте резервное копирование хранящихся в часах данных. На экране приложений выберите пункт настроек (значок шестеренки) и строку «Подключение к новому телефону». Часы отключатся от прежнего смартфона и будут готовы к новому сопряжению. Дальнейшие шаги такие же, как описано выше. Если к новому смартфону привязаны другие умные часы, зайдите в приложение Galaxy Wearable, кликните по значку трех точек и выберите «Подключить новое устройство».
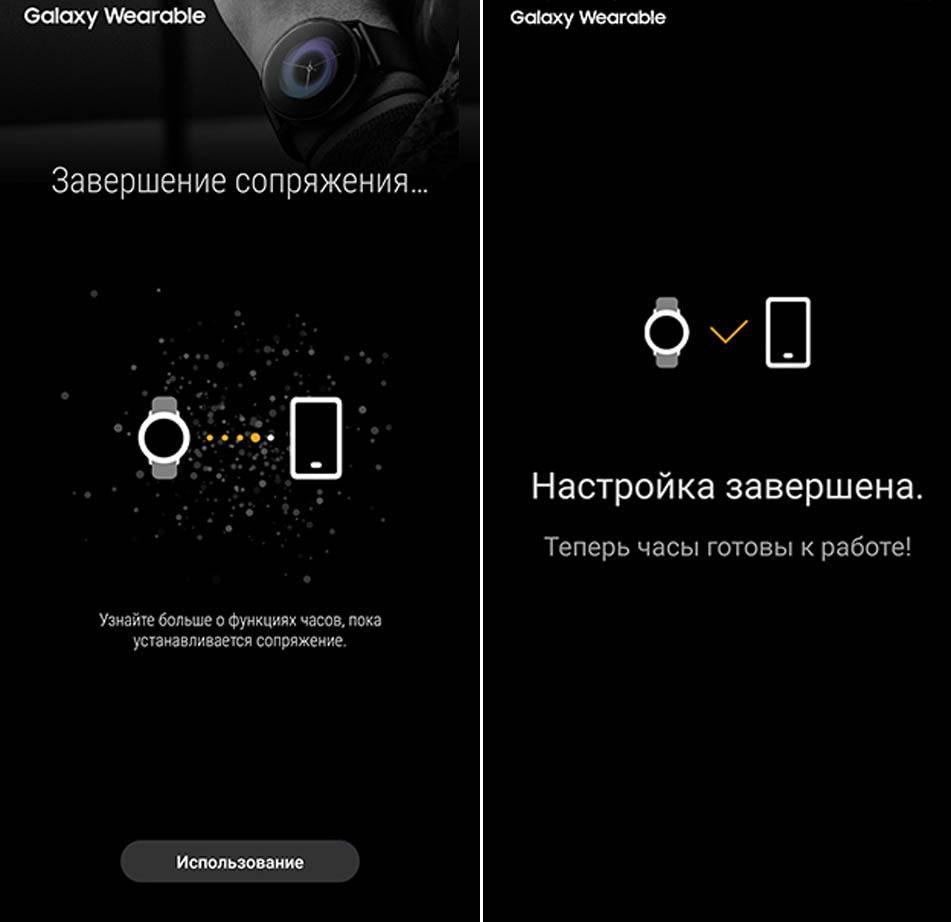
Работа по Wi-Fi
По умолчанию часы подключаются к телефону через Bluetooth. Но можно подключаться и по сетям Wi-Fi через учетную запись Samsung. Функция включается автоматически, но если она у вас не работает, зайдите в раздел Настройки / Подключение часов и включите переключатель в строке «Удаленное подключение». Часами можно пользоваться и без подключения к телефону, но в этом случае будут доступны не все функции.
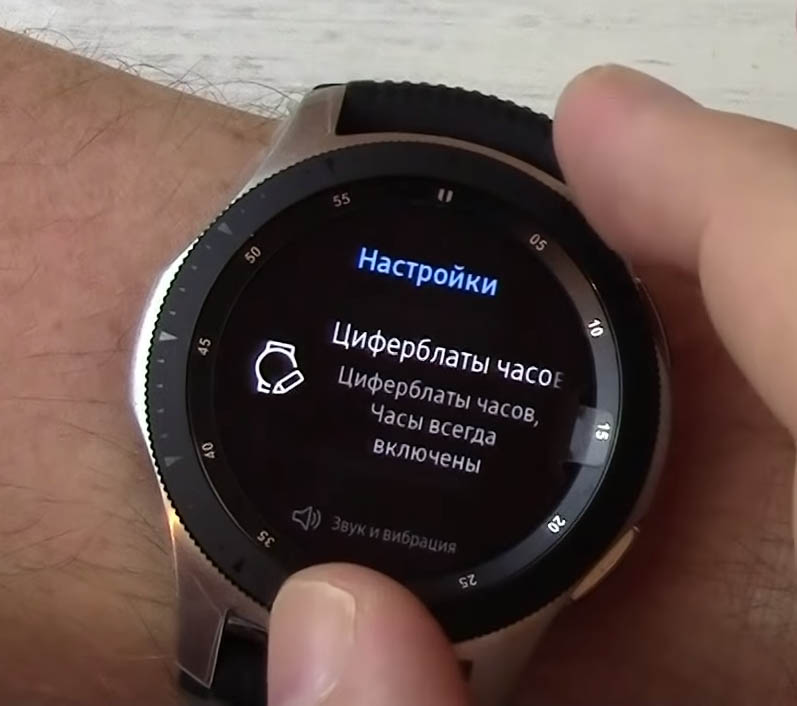
Как настроить часы Samsung Galaxy Watch
Как настроить или сменить циферблат
Циферблаты настраиваются на самих часах и в мобильном приложении. Для смены циферблата на часах кликните по экрану часов и удержите палец. При этом вы попадаете в раздел доступных циферблатов и можете перемещаться по нему при помощи безеля или свайпов в стороны. В этом же разделе есть пункт «Персонализация», в котором загружаются другие циферблаты из приложения GALAXY Apps или выбирается свое фото в роли типа часов. Для загрузки фото с телефона в приложении Galaxy Wearable зайдите в раздел «Настройки» (значок шестеренки), затем кликните по строке «Добавление содержимого на часы». Найдите пункт «Копирование изображений», выберите нужные файлы и нажмите «Готово».
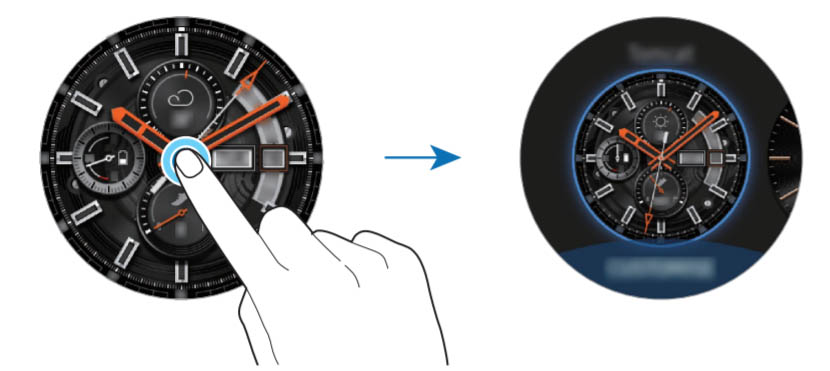
В приложении Galaxy Wearable настройка циферблатов ведется в одноименном разделе (Watch Faces). Для настройки нажимайте кнопку «Настроить» (Customize) и «Сохранить» (Save).

Как изменить расположение виджетов и приложений
На часах вы можете оставлять только те приложения, которые вам нужны. Для этого свайпом вниз по главному экрану вызовите панель быстрого запуска. Нажмите и удерживайте палец на экране и попадете в раздел редактирования. Теперь можно удалять ненужные значки и заменять тем, что вам нравится. В мобильном приложении перейдите в раздел настроек, найдите в нем раздел «Приложения», нажмите на значок трех точек и выберите «Изменить порядок». То же самое вы можете проделать для виджетов, зайдя в разделы Настройки / Виджеты.
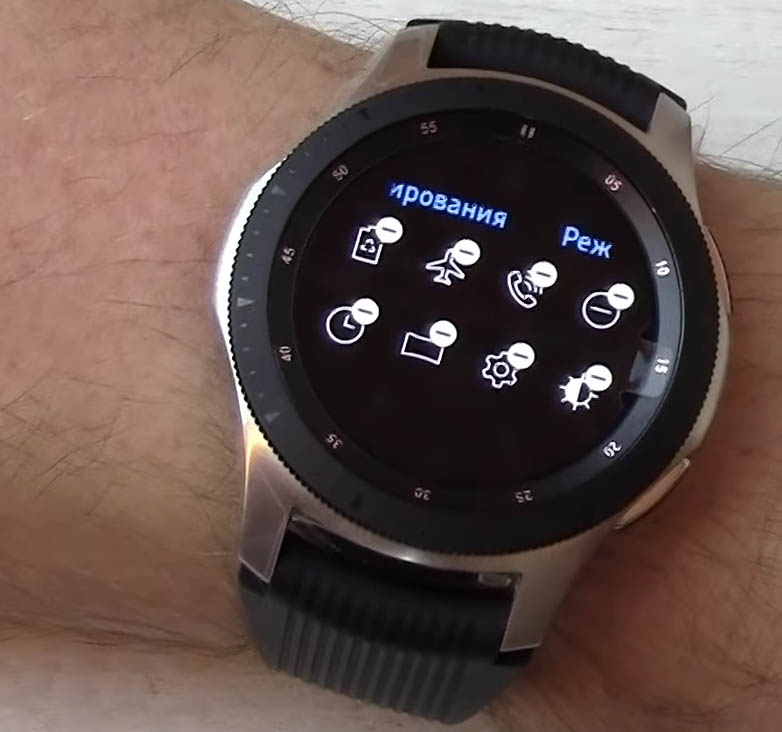
Другие настройки
В часах есть огромная группа настроек, расположенная все в том же разделе настроек (значок шестеренки). Помимо циферблатов и расположения элементов вы можете настраивать звуки часов, работу экрана, способы подключения к телефону, работу приложений, выбирать режим работы аккумулятора, синтез речи и многое другое.

Мы рассмотрели лишь базовые настройки часов Samsung Galaxy Watch. Как и любой сложный инструмент, умный гаджет требует детального изучения, запоминания кнопок и функций и освоения на практике.
Перейти к контенту
Русские электронные инструкции по эксплуатации
Постоянно обновляемый большой каталог документации по эксплуатации и использованию современных устройств и оборудования на русском языке. Бесплатное скачивание файлов.
Поиск:
Главная
♥ В закладки
Просмотр инструкции в pdf
Инструкция по эксплуатации умных часов Samsung Galaxy Watch4 Classic 46mm черный (SM-R890N).
Скачать инструкцию к умным часам Samsung Galaxy Watch4 Classic 46mm черный (SM-R890N) (3,56 МБ)
Инструкции по эксплуатации умных часов Samsung
« Инструкция к умным часам Samsung Galaxy Watch4 Classic 42mm черный (SM-R880N)
» Инструкция к автомобильной сигнализации Pharaon LC20
Вам также может быть интересно

Инструкция к телевизору Samsung UE65NU7470U

Инструкция к телевизору Samsung UE65NU8000U
%2032Gb%20Blue%20(SM-A105F).jpg)
Инструкция к смартфону Samsung Galaxy A10 (2019) 32Gb Blue (SM-A105F)
Инструкция к стиральной машине Samsung WW10N64PRBX
.jpg)
Инструкция к смартфону Samsung Galaxy Z Flip3 256GB Green (SM-F711B)

Инструкция к телевизору Samsung UE32J5200AK

Инструкция к роботу-пылесосу Samsung SR20M7070WD

Инструкция к телевизору Samsung QE65QN90AAU
Добавить комментарий
Имя *
Email *
Сайт
Комментарий
Сохранить моё имя, email и адрес сайта в этом браузере для последующих моих комментариев.
- Добавить инструкцию
- Заказать инструкцию
- Политика конфиденциальности