
OWNER’S MANUAL
Operation
Maintenance
Specifications
All information in this Owner’s Manual is current at the time of publication.
However, Hyundai reserves the right to make changes at any time so that
our policy of continual product improvement may be carried out.
This manual applies to all models of this vehicle and includes descriptions
and explanations of optional as well as standard equipment. As a result,
you may find material in this manual that does not apply to your specific
vehicle.
Please note that some models are equipped with Right-Hand Drive (RHD).
The explanations and illustrations for some operations in RHD models are
opposite of those written in this manual.

CAUTION: MODIFICATIONS TO YOUR HYUNDAI
Your Hyundai should not be modified in any way. Such modifications may adversely affect the performance, safety or durability of your Hyundai and may, in addition, violate conditions of the limited
warranties covering the vehicle. Certain modifications may also be in violation of regulations established by the Department of Transportation and other government agencies in your country.
TWO-WAY RADIO OR CELLULAR TELEPHONE INSTALLATION
Your vehicle is equipped with electronic fuel injection and other electronic components. It is possible
for an improperly installed/adjusted two-way radio or cellular telephone to adversely affect electronic
systems. For this reason, we recommend that you carefully follow the radio manufacturer’s instructions or consult your Hyundai dealer for precautionary measures or special instructions if you choose
to install one of these devices.
F2
SAFETY AND VEHICLE DAMAGE WARNING
This manual includes information titled as WARNING, CAUTION and NOTICE.
These titles indicate the following:
WARNING
This indicates that a condition may result in harm, serious injury or death to you or other
persons if the warning is not heeded. Follow the advice provided with the warning.
CAUTION
This indicates that a condition may result in damage to your vehicle or its equipment if the
caution is not heeded. Follow the advice provided with the caution.
✽
NOTICE
This indicates that interesting or helpful information is being provided.
F3

FOREWORD
Thank you for choosing Hyundai. We are pleased to welcome you to the growing number of discriminating people who drive
Hyundais. The advanced engineering and high-quality construction of each Hyundai we build is something of which we’re very
proud.
Your Owner’s Manual will introduce you to the features and operation of your new Hyundai. It is suggested that you read it carefully because the information it contains can contribute greatly to the satisfaction you receive from your new car.
The manufacturer also recommends that service and maintenance on your vehicle be performed by an authorized Hyundai dealer.
HYUNDAI MOTOR COMPANY
Note : Because future owners will also need the information included in this manual, if you sell this Hyundai, please leave the man-
ual in the vehicle for their use. Thank you.
CAUTION
Severe engine and transmission damage may result from the use of poor quality fuels and lubricants that do not meet
Hyundai specifications. You must always use high quality fuels and lubricants that meet the specifications listed on Page
9-4 in the Vehicle Specifications section of the Owner’s Manual.
Copyright 2014 Hyundai Motor Company. All rights reserved. No part of this publication may be reproduced, stored in any retrieval
system or transmitted in any form or by any means without the prior written permission of Hyundai Motor Company.
F4
Introduction
1
table of contents
Your vehicle at a glance
Safety features of your vehicle
Features of your vehicle
Driving your vehicle
What to do in an emergency
Maintenance
Consumer information
Specifications
Index
2
3
4
5
6
7
8
9
I
Introduction
1
How to use this manual / 1-2
Fuel requirements / 1-2
Vehicle handling instructions / 1-6
Vehicle break-in process / 1-6
Introduction
HOW TO USE THIS MANUAL
A010000AUN
We want to help you get the greatest
possible driving pleasure from your vehicle. Your Owner’s Manual can assist you
in many ways. We strongly recommend
that you read the entire manual. In order
to minimize the chance of death or injury,
you must read the WARNING and CAUTION sections in the manual.
Illustrations complement the words in this
manual to best explain how to enjoy your
vehicle. By reading your manual, you
learn about features, important safety
information, and driving tips under various road conditions.
The general layout of the manual is provided in the Table of Contents. A good
place to start is the index; it has an alphabetical listing of all information in your
manual.
Sections: This manual has nine sections
plus an index. Each section begins with a
brief list of contents so you can tell at a
glance if that section has the information
you want.
You will find various WARNINGs,
CAUTIONs, and NOTICEs in this manual. These WARNINGs were prepared to
enhance your personal safety.You should
carefully read and follow ALL procedures
and recommendations provided in these
WARNINGs, CAUTIONs and NOTICEs.
WARNING
A WARNING indicates a situation in
which harm, serious bodily injury or
death could result if the warning is
ignored.
CAUTION
A CAUTION indicates a situation in
which damage to your vehicle could
result if the caution is ignored.
✽
NOTICE
A NOTICE indicates interesting or helpful information is being provided.
FUEL REQUIREMENTS
Gasoline engine
A020101AEN
Unleaded
Your new HYUNDAI vehicle is designed
to use only unleaded fuel having an
Octane Rating of RON (Research
Octane Number) 91/AKI (Anti-Knock
Index) 87 or higher. (Do not use
methanol blended fuels.)
Your new vehicle is designed to obtain
maximum performance with UNLEADED
FUEL, as well as minimize exhaust emissions and spark plug fouling.
CAUTION
NEVER USE LEADED FUEL. The
use of leaded fuel is detrimental to
the catalytic converter and will
damage the engine control system’s oxygen sensor and affect
emission control.
Never add any fuel system cleaning
agents to the fuel tank other than
what has been specified. (We recommend that the system be consulted by an authorized HYUNDAI
dealer.
21

WARNING
• Do not «top off» after the nozzle
automatically shuts off when
refueling.
• Always check that the fuel cap is
installed securely to prevent fuel
spillage in the event of an accident.
A020102AEN
Leaded (if equipped)
For some countries, your vehicle is
designed to use leaded gasoline. When
you are going to use leaded gasoline, we
recommend that you ask an authorized
HYUNDAI dealer.
Octane Rating of leaded gasoline is
same with unleaded one.
A020103AUN
Gasoline containing alcohol and
methanol
Gasohol, a mixture of gasoline and
ethanol (also known as grain alcohol),
and gasoline or gasohol containing
methanol (also known as wood alcohol)
are being marketed along with or instead
of leaded or unleaded gasoline.
Do not use gasohol containing more than
10% ethanol, and do not use gasoline or
gasohol containing any methanol. Either
of these fuels may cause drivability problems and damage to the fuel system,
engine control system and emission control system.
Discontinue using gasohol of any kind if
drivability problems occur.
Vehicle damage or drivability problems
may not be covered by the manufacturer’s warranty if they result from the use
of:
1. Gasohol containing more than 10%
ethanol.
2. Gasoline or gasohol containing
methanol.
3. Leaded fuel or leaded gasohol.
Introduction
CAUTION
Never use gasohol which contains
methanol. Discontinue use of any
gasohol product which impairs drivability.
Other fuels
Using fuels such as;
— Silicone (Si) contained fuel,
— MMT (Manganese, Mn) contained fuel,
— Ferrocene (Fe) contained fuel, and
— Other metalic additives contained fuels,
may cause vehicle and engine damage
or cause plugging, misfiring, poor acceleration, engine stalling, catalyst melting,
abnormal corrosion, life cycle reduction,
etc.
Also, the Malfunction Indicator Lamp
(MIL) may illuminate.
✽
NOTICE
Damage to the fuel system or performance problem caused by the use of these
fuels may not be covered by your New
Vehicle Limited Warranty.
13
Introduction
A020104AEN
Use of MTBE
HYUNDAI recommends avoiding fuels
containing MTBE (Methyl Tertiary Butyl
Ether) over 15.0% vol. (Oxygen Content
2.7% weight) in your vehicle.
Fuel containing MTBE over 15.0% vol.
(Oxygen Content 2.7% weight) may
reduce vehicle performance and produce
vapor lock or hard starting.
CAUTION
Your New Vehicle Limited Warranty
may not cover damage to the fuel
system and any performance problems that are caused by the use of
fuels containing methanol or fuels
containing MTBE (Methyl Tertiary
Butyl Ether) over 15.0% vol.
(Oxygen Content 2.7% weight.)
A020105AUN
Do not use methanol
Fuels containing methanol (wood alcohol) should not be used in your vehicle.
This type of fuel can reduce vehicle performance and damage components of
the fuel system, engine control system
and emission control system.
Fuel Additives
HYUNDAI recommends that you use
unleaded gasoline which has an octane
rating of RON(Research
Octane Number) 95 / AKI (Anti Knock
Index) 91 or higher (for Europe) or
Octane Rating of RON (Research
Octane Number) 91 / AKI (Anti-Knock
Index) 87 or higher (except Europe).
For customers who do not use good
quality gasoline including fuel additives
regularly, and have problems starting or
the engine does not run smoothly, one
bottle of additives added to the fuel tank
at every 15,000km (for Europe)/5,000km
(except Europe). Additives are available
from your authorized HYUNDAI dealer
along with information on how to use
them.
A020107AUN
Operation in foreign countries
If you are going to drive your vehicle in
another country, be sure to:
• Observe all regulations regarding reg-
istration and insurance.
• Determine that acceptable fuel is avail-
able.
Diesel engine
A020201DUN
Diesel fuel
Diesel engine must be operated only on
commercially available diesel fuel that
complies with EN 590 or comparable
standard. (EN stands for «European
Norm»).
Do not use marine diesel fuel, heating
oils, or non-approved fuel additives, as
this will increase wear and cause damage to the engine and fuel system.
The use of non-approved fuels and/or
fuel additives will result in a limitation of
your warranty rights.
Diesel fuel of above cetane 51 is used in
your vehicle. If two types of diesel fuel
are available, use summer or winter fuel
properly according to the following temperature conditions.
• Above -5°C (23°F) … Summer type
diesel fuel.
• Below -5°C (23°F) … Winter type diesel
fuel.
Watch the fuel level in the tank very carefully : If the engine stops through fuel failure, the circuits must be completely
purged to permit restarting.
41
Introduction
CAUTION
Do not let any gasoline or water
enter the tank. This would make it
necessary to drain it out and to
bleed the lines to avoid jamming the
injection pump and damaging the
engine.
CAUTION — Diesel Fuel
(if equipped with DPF)
It is recommended to use the regulated automotive diesel fuel for
diesel vehicle equipped with the
DPF system.
If you use diesel fuel including high
sulfur (more than 50 ppm sulfur)
and unspecified additives, it can
cause the DPF system to be damaged and white smoke can be emitted.
A020202BUN
Biodiesel
Commercially supplied Diesel blends of no
more than 7% biodiesel, commonly known
as «B7 Diesel» may be used in your vehicle
if Biodiesel meets EN 14214 or equivalent
specifications. (EN stands for «European
Norm»). The use of biofuels exceeding 7%
made from rapeseed methyl ester (RME),
fatty acid methyl ester (FAME), vegetable
oil methyl ester (VME) etc. or mixing diesel
exceeding 7% with biodiesel will cause
increased wear or damage to the engine
and fuel system. Repair or replacement of
worn or damaged components due to the
use of non approved fuels will not be covered by the manufactures warranty.
A020202AUN
Biodiesel (for New Zealand)
Commercially supplied Diesel blends of
no more than 7% biodiesel, commonly
known as «B7 Diesel» may be used in
your vehicle if Biodiesel meets EN 14214
or equivalent specifications. (EN stands
for «European Norm»). The use of biofuels exceeding 7%, made from rapeseed
methyl ester (RME), vegetable oil methyl
ester (VME) etc. or mixing diesel exceeding 7% with biodiesel will cause
increased wear or damage to the engine
and fuel system. Repair or replacement
of worn or damaged components due to
the use of non approved fuels will not be
covered by the manufactures warranty.
CAUTION
• Never use any fuel, whether
diesel, B7 biodiesel or otherwise,
that fails to meet the latest petroleum industry specification.
• Never use any fuel additives or
treatments that are not recommended or approved by the vehicle manufacturer.
15

Introduction
INSTRUCTIONS
A090000AEN
As with other vehicles of this type, failure
to operate this vehicle correctly may
result in loss of control, an accident or
vehicle rollover.
Specific design characteristics (higher
ground clearance, track, etc.) give this
vehicle a higher center of gravity than
other types of vehicles. In other words
they are not designed for cornering at the
same speeds as conventional 2-wheel
drive vehicles. Avoid sharp turns or
abrupt maneuvers. Again, failure to operate this vehicle correctly may result in
loss of control, an accident or vehicle
rollover. Be sure to read the “Reducing
the risk of a rollover” driving guidelines, in section 5 of this manual.
VEHICLE BREAK-IN PROCESSVEHICLE HANDLING
A030000AUN
No special break-in period is needed. By
following a few simple precautions for the
first 1,000 km (600 miles) you may add to
the performance, economy and life of
your vehicle.
• Do not race the engine.
• While driving, keep your engine speed
(rpm, or revolutions per minute)
between 2,000 rpm and 4,000 rpm.
• Do not maintain a single speed for long
periods of time, either fast or slow.
Varying engine speed is needed to
properly break-in the engine.
• Avoid hard stops, except in emergencies, to allow the brakes to seat properly.
• Don’t tow a trailer during the first 2,000
km (1,200 miles) of operation.
16
Your vehicle at a glance
Interior overview / 2-2
Instrument panel overview / 2-4
Engine compartment / 2-6
2
Your vehicle at a glance
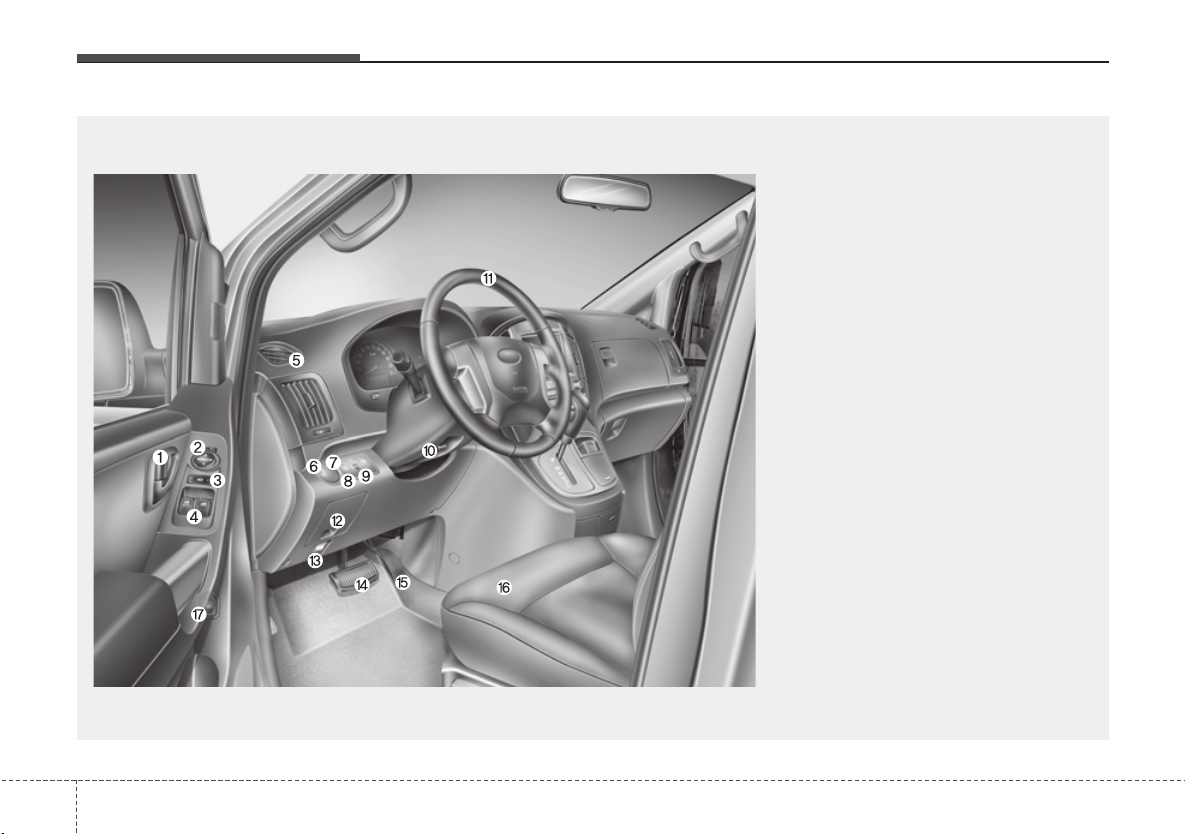
INTERIOR OVERVIEW
Left-Hand drive type
1. Door lock/unlock button* ……………….4-10
2. Outside rearview mirror control
switch*………………………………………..4-30
3. Central door lock switch* ………………4-11
4. Power window switches*……………….4-16
5. Air vent……………………………………….4-63
6. Front fog light switch*……………………4-53
7. Rear fog light switch* …………………..4-53
8. Head lamp leveling device*……………4-54
9. Instrument panel illumination control
knob*………………………………………….4-33
10. Steering wheel tilt control*…………..4-27
11. Steering wheel…………………………..4-26
12. Fuse box …………………………………..7-55
13. Hood release lever……………………..4-21
14. Brake pedal……………………………….5-19
15. Accelerator pedal…………………………5-6
16. Seat……………………………………………3-2
17. Fuel filler lid release button………….4-23
* : if equipped
B010000ATQ
22
OTQ027001G
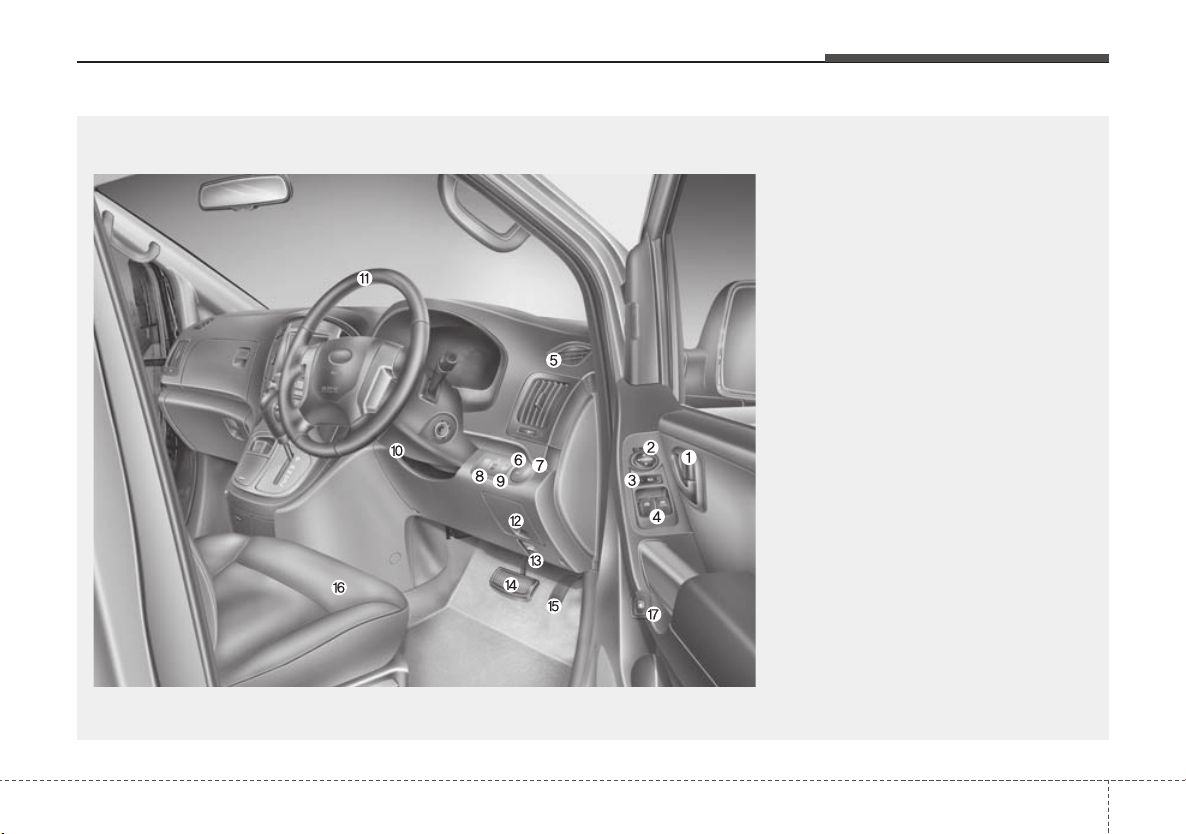
Right-Hand drive type
Your vehicle at a glance
1. Door lock/unlock button* ……………….4-10
2. Outside rearview mirror control
switch*………………………………………..4-30
3. Central door lock switch* ………………4-11
4. Power window switches*……………….4-16
5. Air vent……………………………………….4-63
6. Front fog light switch*……………………4-53
7. Rear fog light switch* …………………..4-53
8. Head lamp leveling device*……………4-54
9. Instrument panel illumination control
knob*………………………………………….4-33
10. Steering wheel tilt control*…………..4-27
11. Steering wheel…………………………..4-26
12. Fuse box …………………………………..7-55
13. Hood release lever……………………..4-21
14. Brake pedal……………………………….5-19
15. Accelerator pedal…………………………5-6
16. Seat……………………………………………3-2
17. Fuel filler lid release button………….4-23
* : if equipped
B010000ATQ-EA
OTQ027001R
23
Your vehicle at a glance
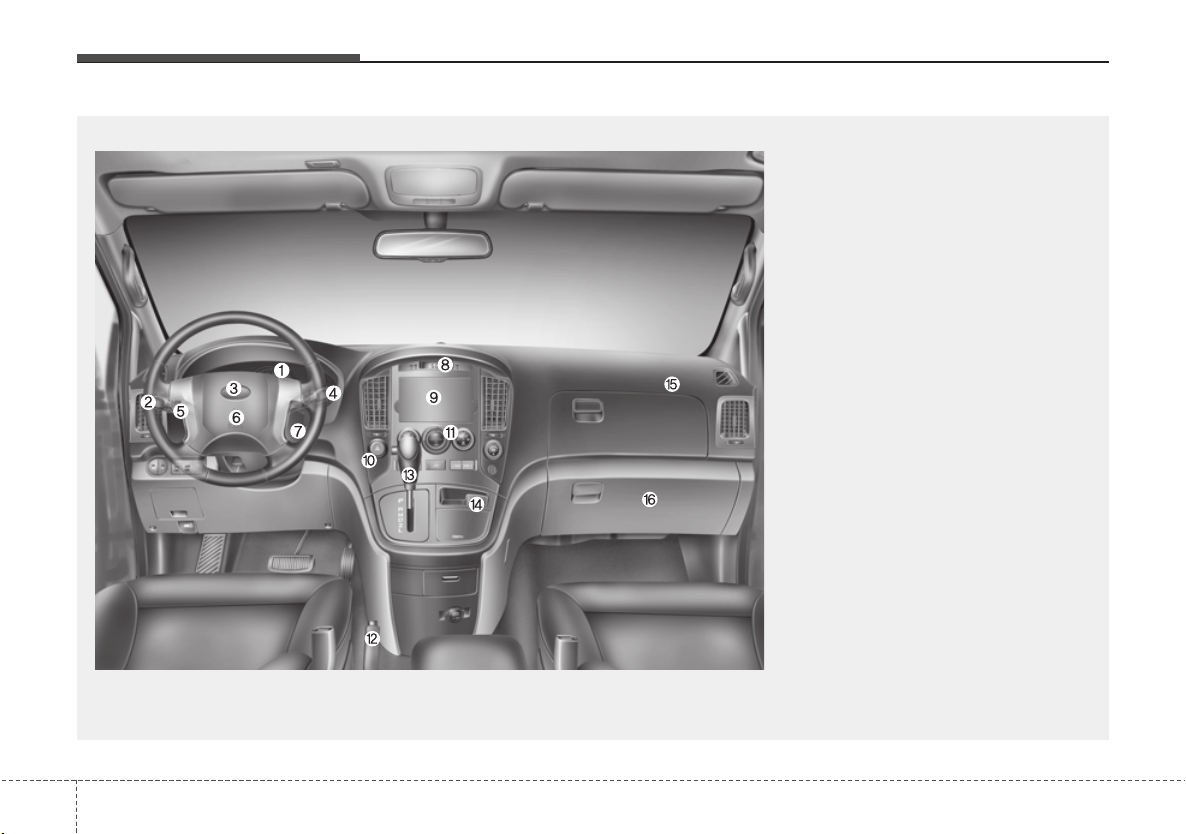
INSTRUMENT PANEL OVERVIEW
Left-Hand drive type
1. Instrument cluster………………………..4-32
2. Light control / Turn signals ……………4-50
3. Horn ………………………………………….4-27
4. Wiper/Washer……………………………..4-55
5. Steering wheel audio controls* ……..4-83
6. Driver’s front air bag* …………………..3-44
7. Ignition switch……………………………….5-4
8. Digital clock* ………………………………4-80
9. Audio*………………………………………..4-82
10. Hazard warning flasher
switch ………………………………..4-50, 6-2
11. Climate control system* ……………..4-61
12. Parking brake ……………………………5-20
13. Shift lever …………………………..5-12, 5-9
14. AUX, USB and iPod port* …………..4-84
15. Passenger’s front air bag*…………..3-44
16. Glove box …………………………………4-74
* : if equipped
B020000BTQ
42
OTQ027002G
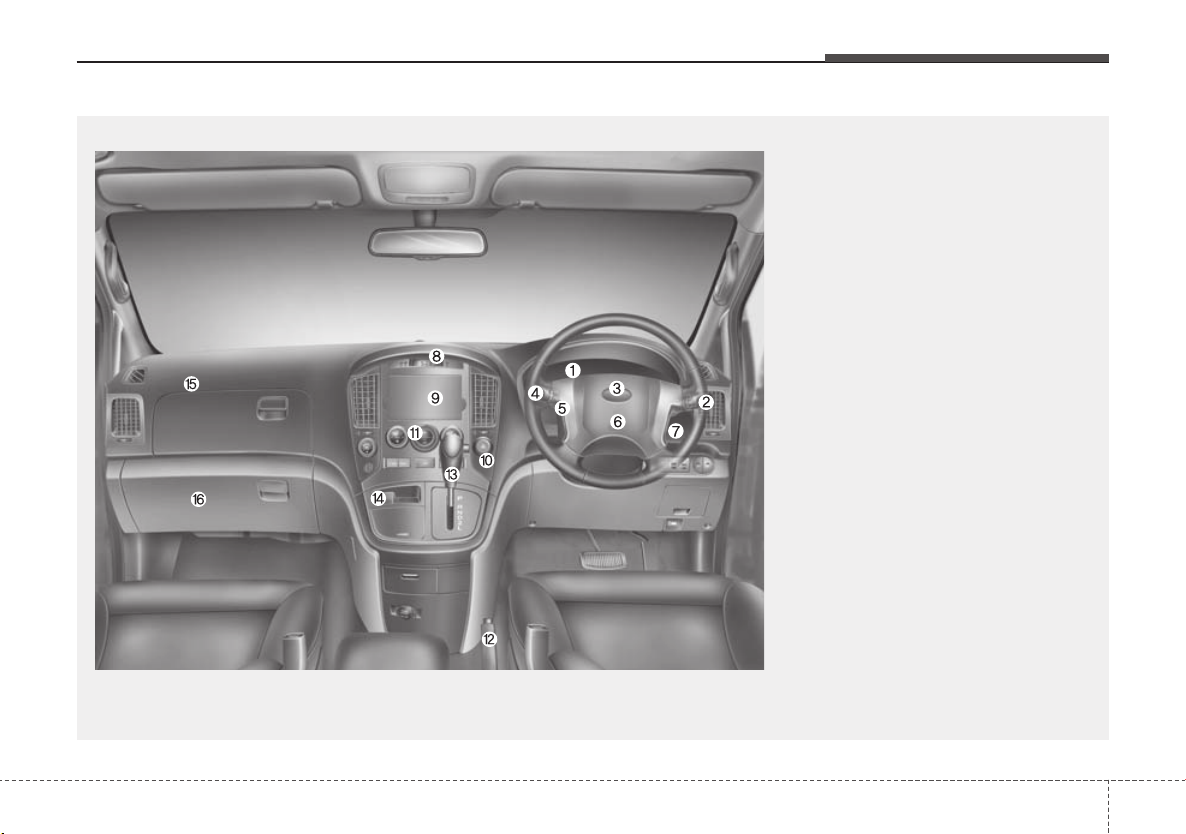
Right-Hand drive type
Your vehicle at a glance
1. Instrument cluster………………………..4-32
2. Light control / Turn signals ……………4-50
3. Horn ………………………………………….4-27
4. Wiper/Washer……………………………..4-55
5. Steering wheel audio controls* ……..4-83
6. Driver’s front air bag* …………………..3-44
7. Ignition switch……………………………….5-4
8. Digital clock* ………………………………4-80
9. Audio*………………………………………..4-82
10. Hazard warning flasher
switch ………………………………..4-50, 6-2
11. Climate control system* ……………..4-61
12. Parking brake ……………………………5-20
13. Shift lever …………………………..5-12, 5-9
14. AUX, USB and iPod port* …………..4-84
15. Passenger’s front air bag*…………..3-44
16. Glove box …………………………………4-74
* : if equipped
B020000BTQ
OTQ027002R
25
Your vehicle at a glance
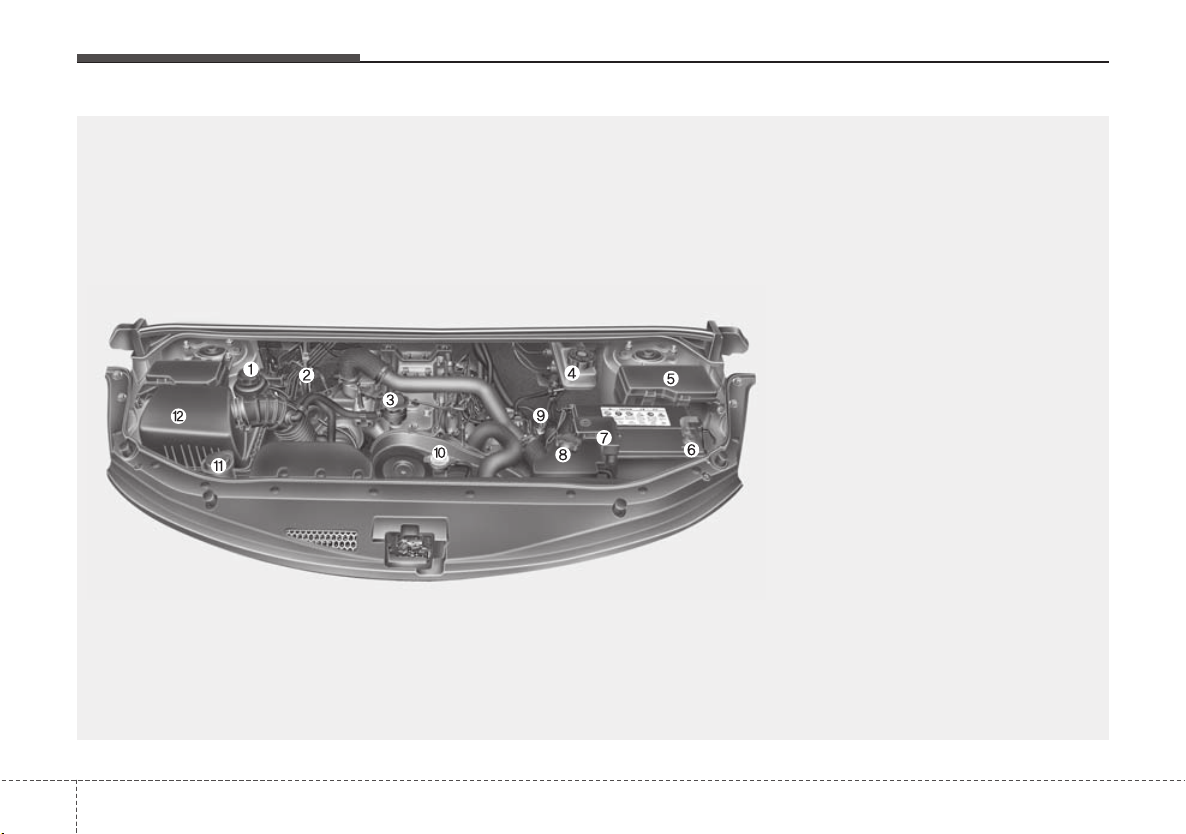
ENGINE COMPARTMENT
1. Power steering fluid reservoir ………..7-30
2. Automatic transmission fluid
dipstick*………………………………………7-31
3. Engine oil filler cap ………………………7-25
4. Brake fluid reservoir ……………………..7-29
5. Fuse box …………………………………….7-56
6. Negative battery terminal………………7-41
7. Positive battery terminal ……………….7-41
8. Engine coolant reservoir……………….7-27
9. Engine oil dipstick………………………..7-25
10. Radiator cap ……………………………..7-28
11. Windshield washer fluid reservoir …7-33
12. Air cleaner…………………………………7-35
* : if equipped
* The actual engine room in the vehicle may differ from the illustration.
B030000ATQ
62
OTQ077001
Seats / 3-2
Seat belts / 3-15
Child restraint system / 3-26
Air bag — supplemental restraint system / 3-38
Safety features of your vehicle
3
Safety features of your vehicle
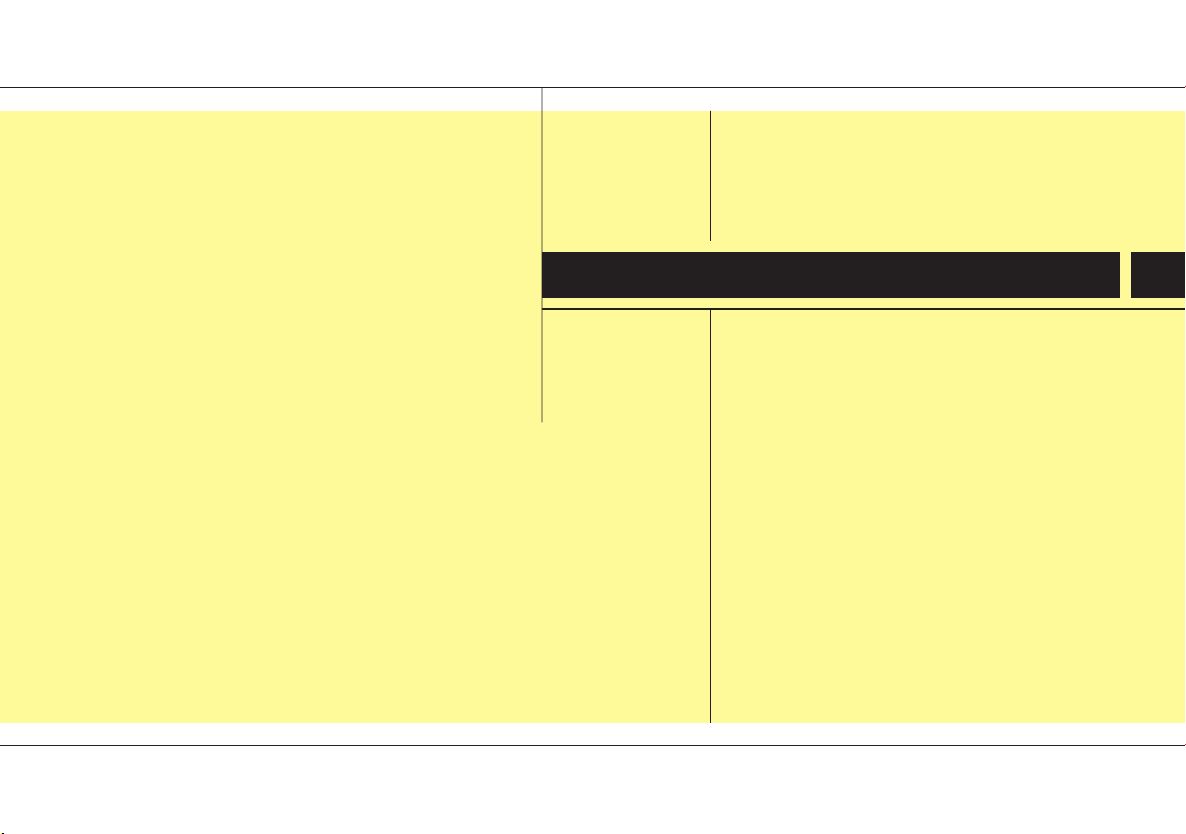
SEATS
Front seat
(1) Forward and backward
(2) Seatback angle
(3) Seat cushion height (Driver’s seat)*
(4) Seat warmer (Driver’s seat)*
(5) Headrest
2nd row seat* / 3rd row seat*
(6) Forward and backward/
Seat rotation (2nd row seat only)*
(7) Seatback angle
(8) Headrest
4th row seat*
(9) Forward and backward
(10) Seat cushion folding
(11) Headrest
*: if equipped
C010000BTQ
The actual seats in the vehicle may differ from the illustration.
23
OTQ037001E
Safety features of your vehicle
WARNING
Loose objects in the driver’s foot
area could interfere with the operation of the foot pedals, possibly
causing an accident. Do not place
anything under the front seats.
— Loose objects
WARNING — Uprighting
seat
When you return the seatback to its
upright position, hold the seatback
and return it slowly and be sure
there are no other occupants
around the seat. If the seatback is
returned without being held and
controlled, the back of the seat
could spring forward resulting in
accidental injury to a person struck
by the seatback.
WARNING
— Driver respon-
sibility for passengers
Riding in a vehicle with the seatback reclined could lead to serious
or fatal injury in an accident. If a
seat is reclined during an accident,
the occupant’s hips may slide
under the lap portion of the seat
belt applying great force to the
unprotected abdomen. Serious or
fatal internal injuries could result.
The driver must advise the front
passenger to keep the seatback in
an upright position whenever the
vehicle is in motion.
WARNING
Do not use a sitting cushion that
reduces friction between the seat
and passenger. The passenger’s
hips may slide under the lap portion of the seat belt during an accident or a sudden stop. Serious or
fatal internal injuries could result
because the seat belt can’t operate
normally.
WARNING
• Never attempt to adjust the seat
while the vehicle is moving. This
could result in loss of control,
and an accident causing death,
serious injury, or property damage.
• Do not allow anything to interfere
with the normal position of the
seatback. Storing items against a
seatback or in any other way
interfering with proper locking of
a seatback could result in serious
or fatal injury in a sudden stop or
collision.
• Always drive and ride with your
seatback upright and the lap portion of the seat belt snug and low
across the hips. This is the best
position to protect you in case of
an accident.
• In order to avoid unnecessary
and perhaps severe air bag
injuries, always sit as far back as
possible from the steering wheel
while maintaining comfortable
control of the vehicle. We recommend that your chest be at least
250 mm (10 inches) away from
the steering wheel.
— Driver’s seat
33
Safety features of your vehicle
WARNING
• The rear seatback must be
securely latched. If not, passengers and objects could be thrown
forward resulting in serious
injury or death in the event of a
sudden stop or collision.
• Luggage and other cargo should
be laid flat in the cargo area. If
objects are large, heavy, or must
be piled, they must be secured.
Under no circumstances should
cargo be piled higher than the
seatbacks. Failure to follow these
warnings could result in serious
injury or death in the event of a
sudden stop, collision or rollover.
• No passenger should ride in the
cargo area or sit or lie on folded
seatbacks while the vehicle is
moving. All passengers must be
properly seated in seats and
restrained properly while riding.
• When resetting the seatback to
the upright position, make sure it
is securely latched by pushing it
forward and backwards.
— Rear seatbacks
(Continued)
(Continued)
• To avoid the possibility of burns,
do not remove the carpet in the
cargo area. Emission control
devices beneath this floor generate high temperatures.
WARNING
After adjusting the seat, always
check that it is securely locked into
place by attempting to move the
seat forward or backward without
using the lock release lever.
Sudden or unexpected movement
of the driver’s seat could cause you
to lose control of the vehicle resulting in an accident.
WARNING
• Do not adjust the seat while wearing seat belts. Moving the seat
cushion forward may cause
strong pressure on the abdomen.
• Use extreme caution so that
hands or other objects are not
caught in the seat mechanisms
while the seat is moving.
• Do not put a cigarette lighter on
the floor or seat. When you operate the seat, gas may gush out of
the lighter and cause fire.
• If there are occupants in the rear
seats, be careful while adjusting
the front seat position.
• Use extreme caution when picking small objects trapped under
the seats or between the seat and
the center console. Your hands
might be cut or injured by the
sharp edges of the seat mechanism.
43
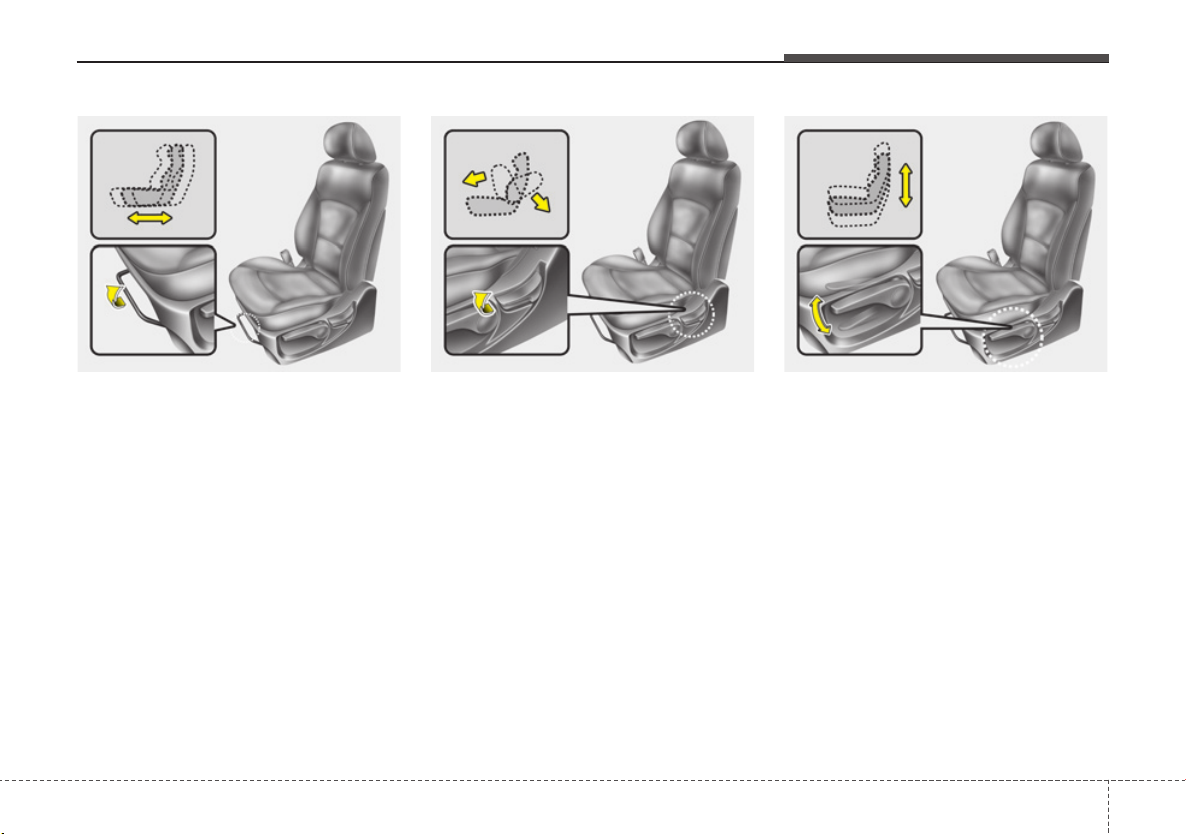
Front seat adjustment
C010101AUN
Forward and backward
To move the seat forward or backward:
1. Pull the seat slide adjustment lever
under the front edge of the seat cushion up and hold it.
2. Slide the seat to the position you
desire.
3. Release the lever and make sure the
seat is locked in place.
Adjust the seat before driving, and make
sure the seat is locked securely by trying
to move forward and backward without
using the lever. If the seat moves, it is not
locked properly.
C010102AUN
Seatback angle
To recline the seatback:
1. Lean forward slightly and lift up on the
seatback recline lever located on the
outside of the seat at the rear.
2. Carefully lean back on the seat and
adjust the seatback of the seat to the
position you desire.
3. Release the lever and make sure the
seatback is locked in place. (The lever
MUST return to its original position for
the seatback to lock.)
Safety features of your vehicle
OTQ037004OTQ037003OTQ037002
C010103AUN
Seat cushion height (for driver’s seat)
To change the height of the seat cushion,
push the lever that is located on the outside of the seat cushion upwards or
downwards.
• To lower the seat cushion, push the
lever down several times.
• To raise the seat cushion, pull the lever
up several times.
35
Safety features of your vehicle
OTQ037008E
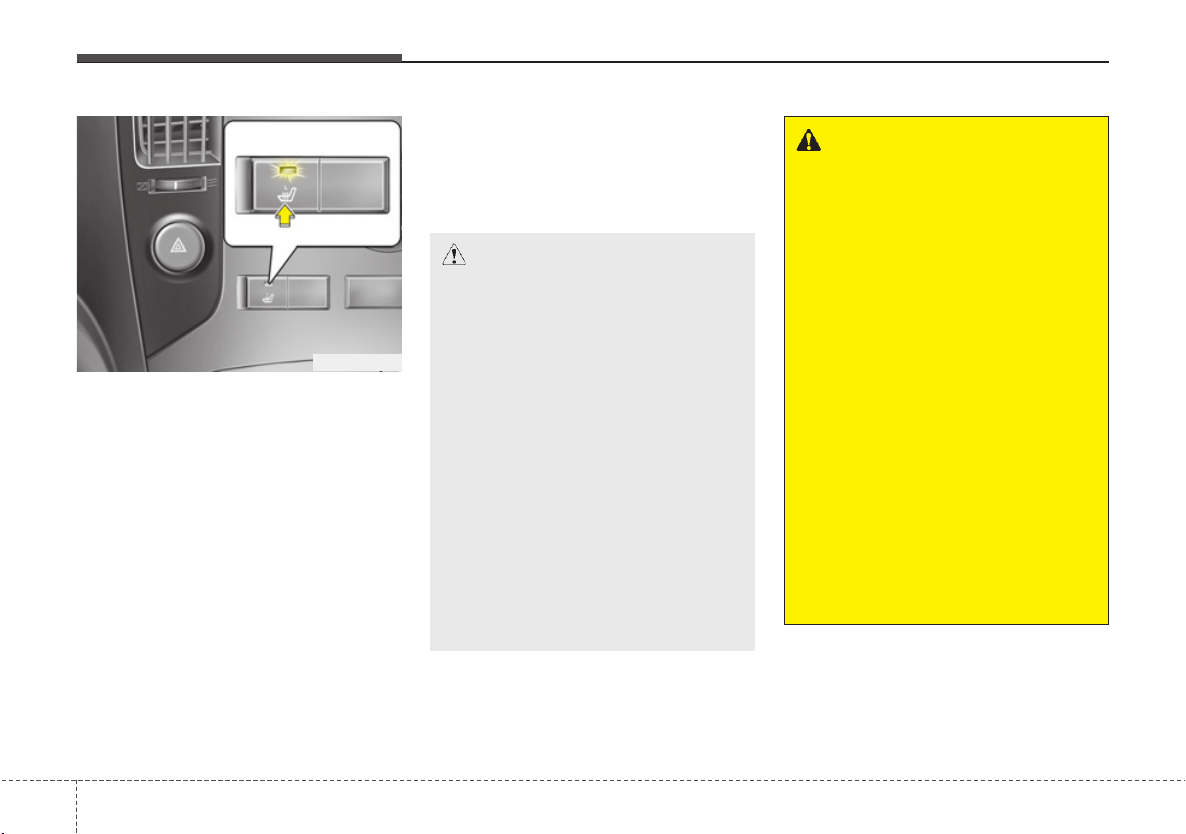
C010107CTQ
Seat warmer
(Driver’s seat, if equipped)
The seat warmer is provided to warm the
driver’s seat during cold weather. With
the ignition switch in the ON position,
push the switch to warm the driver’s seat.
During mild weather or under conditions
where the operation of the seat warmer
is not needed, keep the switch in the
«OFF» position.
• The seat warmer defaults to the OFF
position whenever the ignition switch is
turned on.
✽
NOTICE
With the seat warmer switch in ON
position, the heating system in the seat
turns off or on automatically depending
on the seat temperature.
CAUTION
• When cleaning the seats, do not
use an organic solvent such as
thinner, benzene, alcohol and
gasoline. Doing so may damage
the surface of the heater or seats.
• To prevent overheating the seat
warmer, do not place anything on
the seats that insulates against
heat, such as blankets, cushions
or seat covers while the seat
warmer is in operation.
• Do not place heavy or sharp
objects on seats equipped with
seat warmer. Damage to the seat
warming components could occur.
• Do not change the seat cover. It
may damage the seat warmer or
airventilation system.
WARNING
— Seat warmer
burns
Passengers should use extreme
caution when using seat warmers
due to the possibility of excess
heating or burns. The seat warmer
may cause burns even at low temperatures, especially if used for
long periods of time.
In particular, the driver must exercise extreme care for the following
types of passengers:
1. Infants, children, elderly or handicapped persons, or hospital outpatients
2. Persons with sensitive skin or
those that burn easily
3. Fatigued individuals
4. Intoxicated individuals
5. Individuals taking medication
that can cause drowsiness or
sleepiness (sleeping pills, cold
tablets, etc.)
63
OTQC031161E
C010104CTQ
Headrest
The driver’s and front passenger’s seats
are equipped with a headrest for the
occupant’s safety and comfort.
The headrest not only provides comfort
for the driver and front passenger, but
also helps to protect the head and neck
in the event of a collision.
WARNING
• For maximum effectiveness in
case of an accident, the headrest
should be adjusted so the middle
of the headrest is at the same
height of the center of gravity of
an occupant’s head. Generally,
the center of gravity of most people’s head is similar with the
height of the top of their eyes.
Also, adjust the headrest as close
to your head as possible. For this
reason, the use of a cushion that
holds the body away from the
seatback is not recommended.
• Do not operate the vehicle with
the headrests removed as severe
injury to the occupants may
occur in the event of an accident.
Headrests may provide protection against neck injuries when
properly adjusted.
• Do not adjust the headrest position of the driver’s seat while the
vehicle is in motion.
Safety features of your vehicle
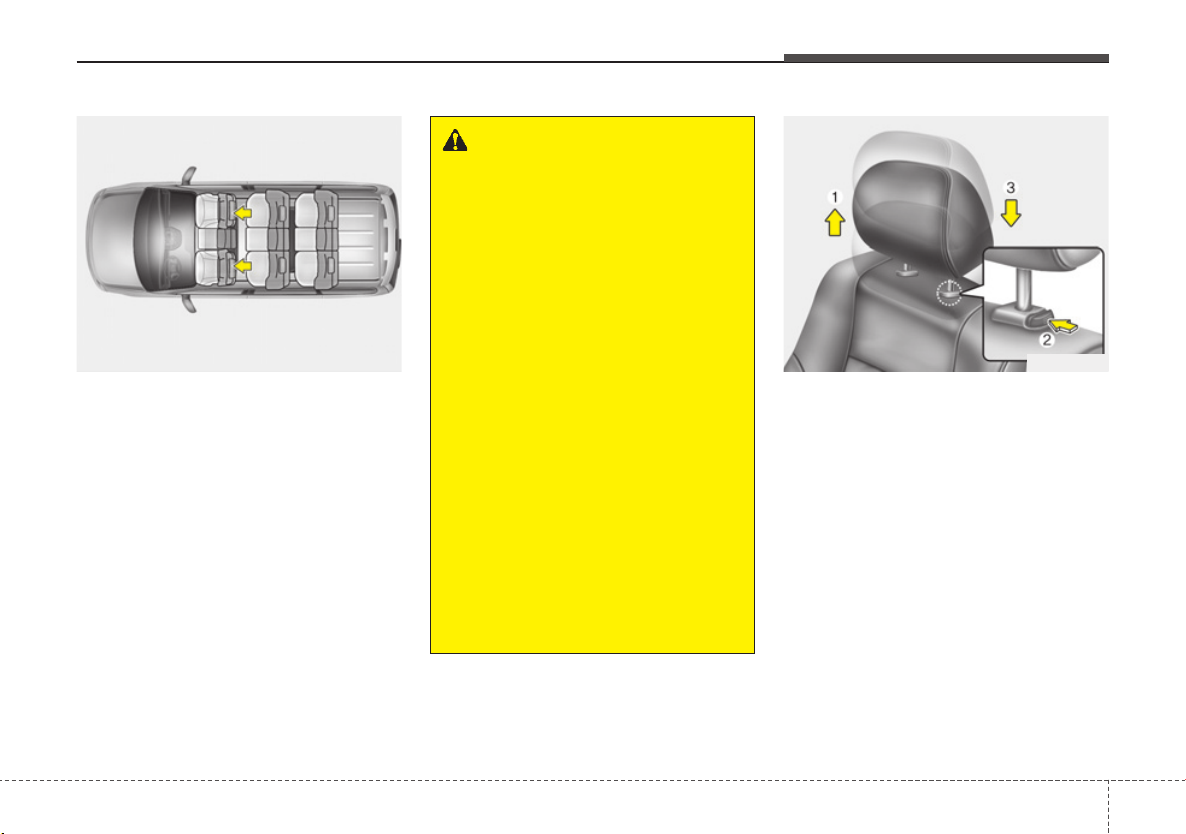
OFD037037
Adjusting the height up and down
To raise the headrest, pull it up to the
desired position (1). To lower the headrest, push and hold the release button (2)
on the headrest support and lower the
headrest to the desired position (3).
37

Safety features of your vehicle
CAUTION
If you recline the seatback towards
the front with the head restraint and
seat cushion raised, the head
restraint may come in contact with
the sunvisor or other parts of the
vehicle.
83
OTQ033200OYFH034205
Removal
To remove the headrest:
1. Recline the seatback (2) with the
recline lever (1).
2. Raise headrest as far as it can go.
3. Press the headrest release button (3)
while pulling the headrest up (4).
WARNING
NEVER allow anyone to ride in a
seat with the headrest removed.
OTQ033201
Reinstall
To reinstall the headrest :
1. Put the headrest poles (2) into the
holes while pressing the release button
(1).
2. Recline the seatback (4) with the
recline lever (3).
3. Adjust the headrest to the appropriate
height.
WARNING
Always make sure the headrest
locks into position after reinstalling
and adjusting it properly.
Safety features of your vehicle
OTQ037036
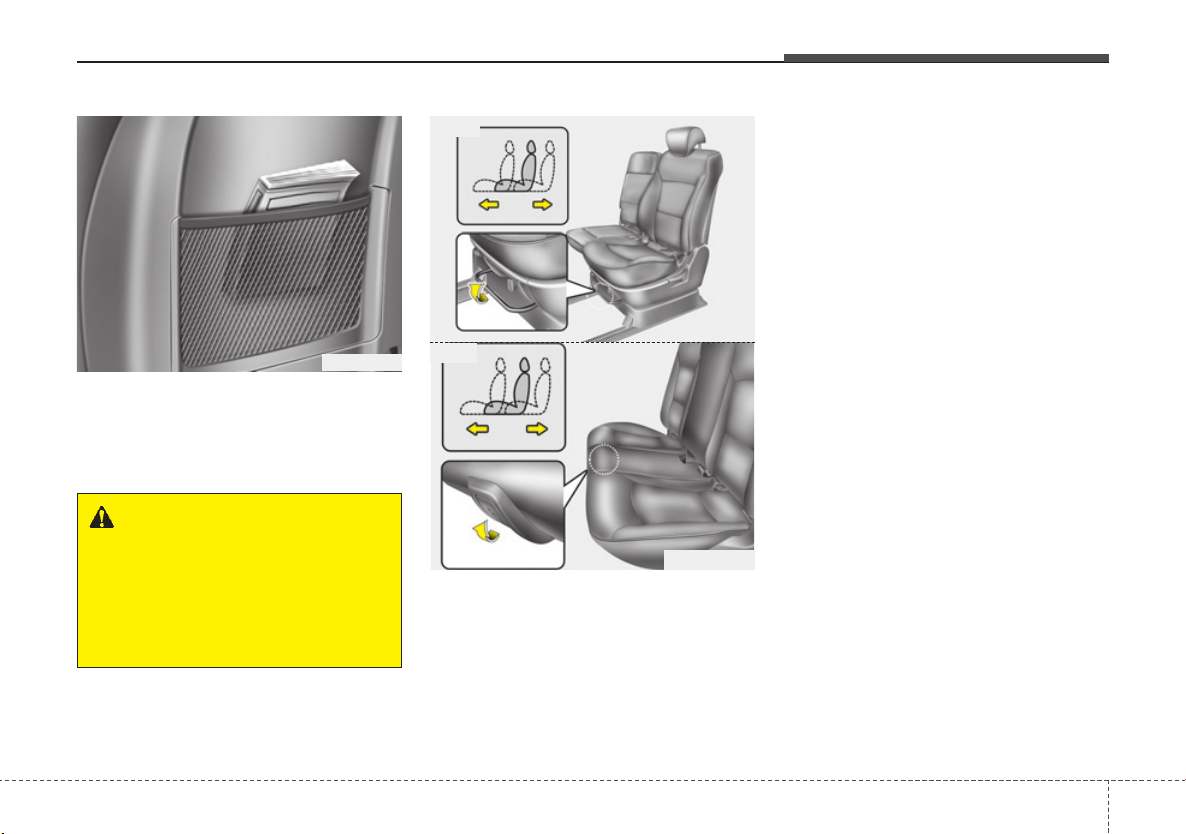
C010108AUN
Seatback pocket (if equipped)
The seatback pocket is provided on the
back of the front passenger’s and driver’s
seatbacks.
WARNING — Seatback
pockets
Do not put heavy or sharp objects
in the seatback pockets. In an accident they could come loose from
the pocket and injure vehicle occupants.
Type A
OTQ037011
Type B
OTQ037011G
Rear seat adjustment
C010301ATQ
Forward and backward (2nd and 3rd
row, if equipped)
To move the seat forward or backward:
1. Pull up the seat slide adjustment lever
under the front edge of the seat cushion and hold it.
2. Slide the seat to the position you
desire.
3. Release the lever and make sure the
seat is locked in place.
Adjust the seat before driving, and make
sure the seat is locked securely by trying
to move forward and backward without
using the lever. If the seat moves, it is not
locked properly.
39
Safety features of your vehicle
Type A
Type B
Type C
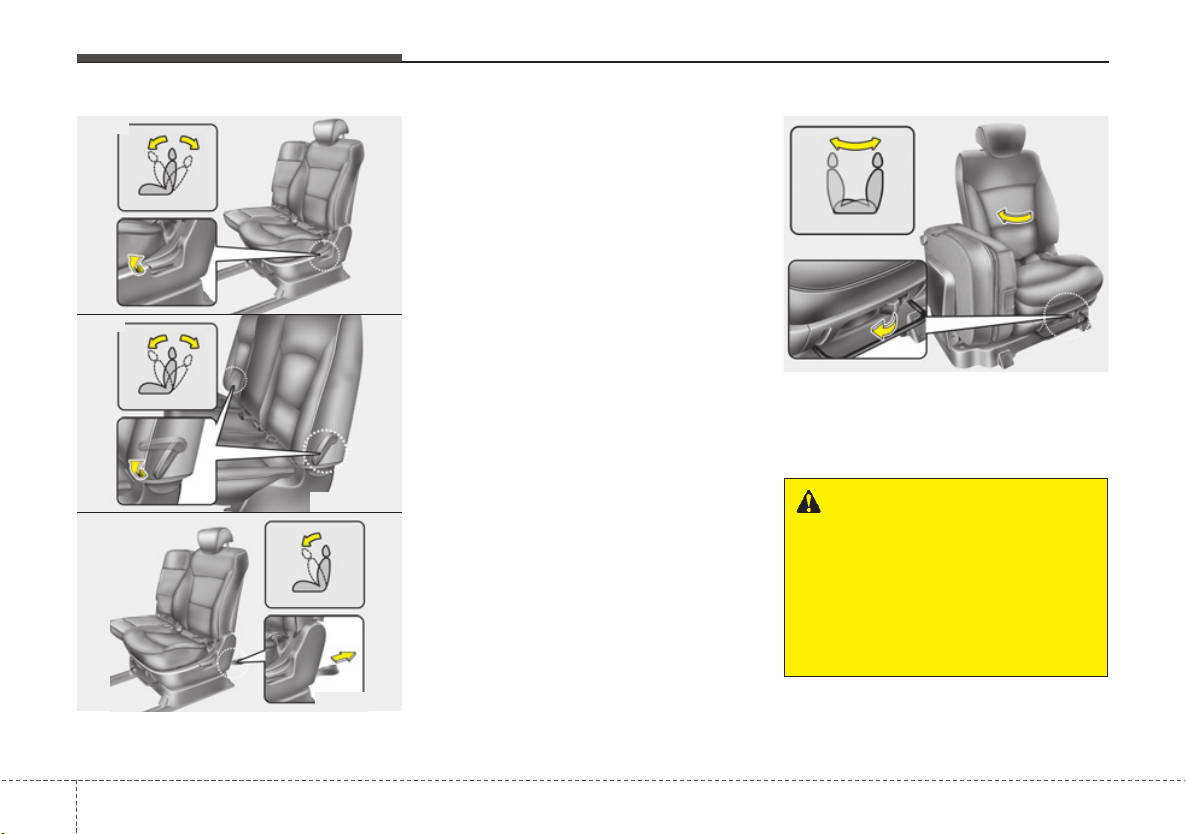
C010302ATQ
Seatback angle (if equipped)
OTQ037012
OTQ037012G
OTQ037015
To recline the seatback:
1. Pull or pull up the seatback recline
lever.
2. Carefully lean back the seat and adjust
the seatback to the position you
desire.
3. Release the lever and make sure the
seatback is locked in place. (The lever
MUST return to its original position for
the seatback to lock.)
OTQ037033
Seat rotation
(2nd row seat, if equipped)
Pull the lever and rotate the seat clockwise.
WARNING
• Never rotate the seat while the
vehicle is in motion.
• When the seat is rotated, be sure
that the seat is securely locked in
position. It not, it may result in
serious injury in the event of a
sudden stop.
103
OTQC031161F
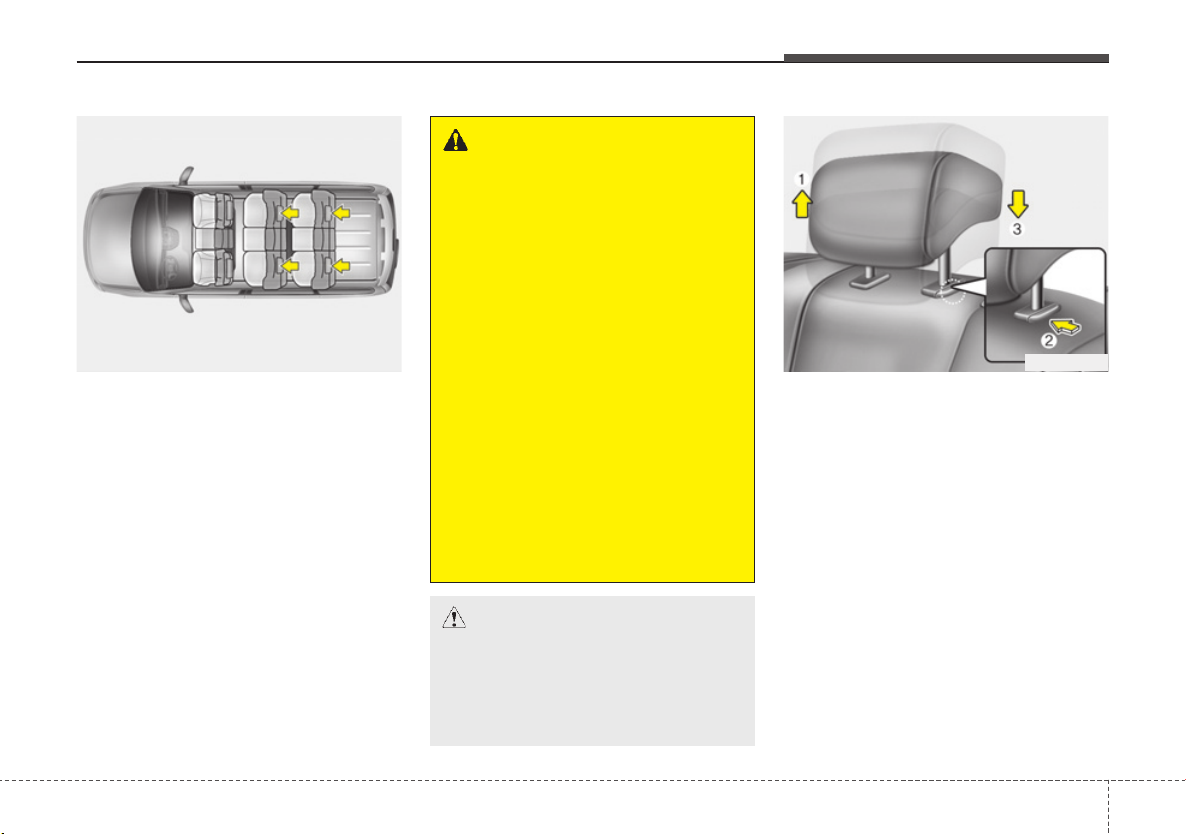
C010303CTQ
Headrest
The rear seats are equipped with headrests in the outboard seating positions
(except center seating position) for the
occupant’s safety and comfort.
The headrest not only provides comfort for
passengers, but also helps to protect the
head and neck in the event of a collision.
WARNING
• For maximum effectiveness in
case of an accident, the headrest
should be adjusted so the middle
of the headrest is at the same
height of the center of gravity of
an occupant’s head. Generally,
the center of gravity of most people’s head is similar with the
height of the top of their eyes.
Also, adjust the headrest as close
to your head as possible. The use
of a cushion that holds the body
away from the seatback is not
recommended.
• Do not operate the vehicle with
the headrests removed as severe
injury to an occupant may occur
in the event of an accident.
Headrests may provide protection against severe neck injuries
when properly adjusted.
CAUTION
When there is no occupant in the
rear seats, adjust the height of the
headrest to the lowest position. The
rear seat headrest can reduce the
visibility of the rear area.
Safety features of your vehicle
OHM038017
Adjusting the height up and down
To raise the headrest, pull it up to the
desired position (1). To lower the headrest, push and hold the release button (2)
on the headrest support and lower the
headrest to the desired position (3).
311
Safety features of your vehicle
CAUTION — Damaging rear
seat belt buckles
When you fold the rear (2nd and/or
3rd row) seatback, insert the buckle
in the pocket between the rear seatback and cushion. Doing so can
prevent the buckle from being damaged by the rear seatback.
OHM038018N
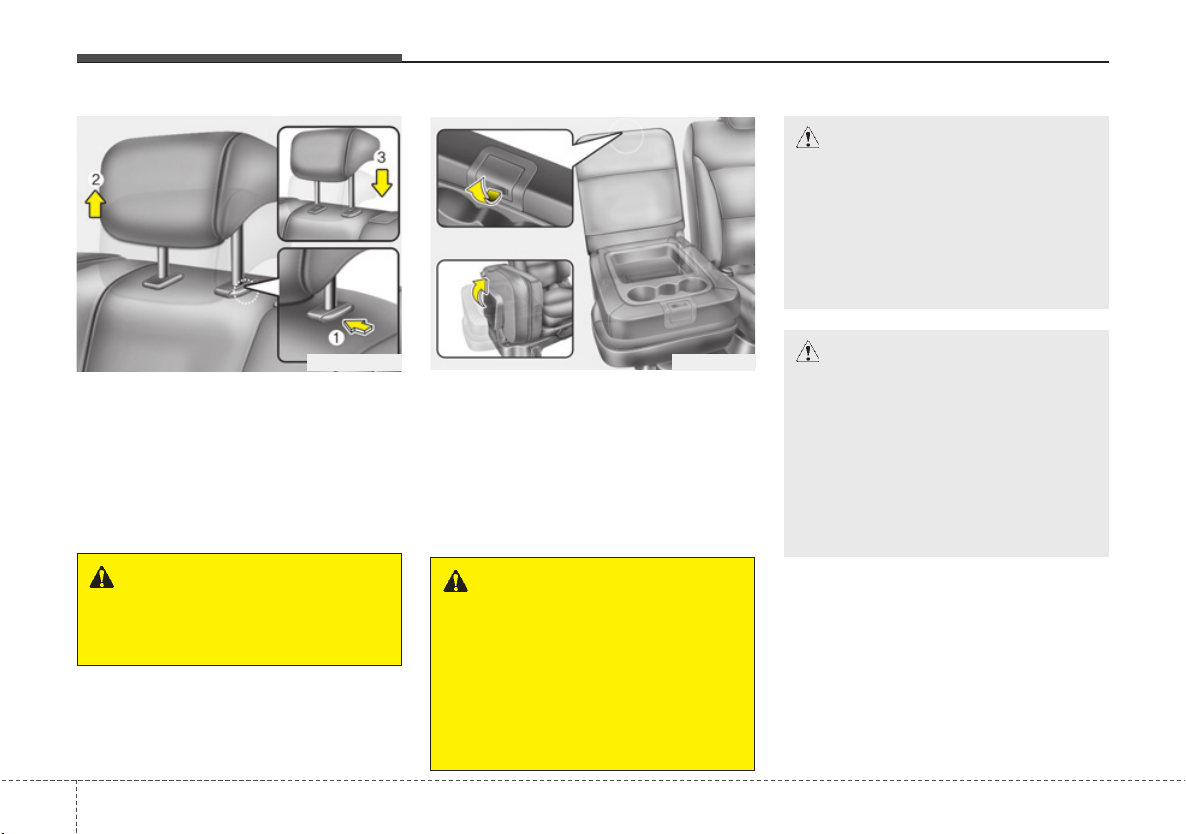
Removal
To remove the headrest, raise it as far as
it can go then press the release button
(1) while pulling upward (2).
To reinstall the headrest, put the headrest poles (3) into the holes while pressing the release button (1). Then adjust it
to the appropriate height.
WARNING
Make sure the headrest locks in
position after adjusting it to properly protect the occupants.
123
OTQ037031
C010304ATQ
Center seat folding (if equipped)
1. Stow the rear seat belt in the pocket to
prevent the seat belt from being damaged.
2. Pull the release knob and fold the
seatback forward.
3. Fold up the seat.
WARNING — Uprighting
seat
When you return the seatback to its
upright position, hold the seatback
and return it slowly. If the seatback
is returned without holding it, the
back of the seat could spring forward resulting in injury caused by
being struck by the seatback.
CAUTION — Rear seat belts
When returning the rear (2nd and/or
3rd row) seatbacks to the upright
position, remember to return the
rear shoulder belts to their proper
position. Routing the seat belt webbing through the rear seat belt
guides will help keep the belts from
being trapped behind or under the
seats.
Safety features of your vehicle
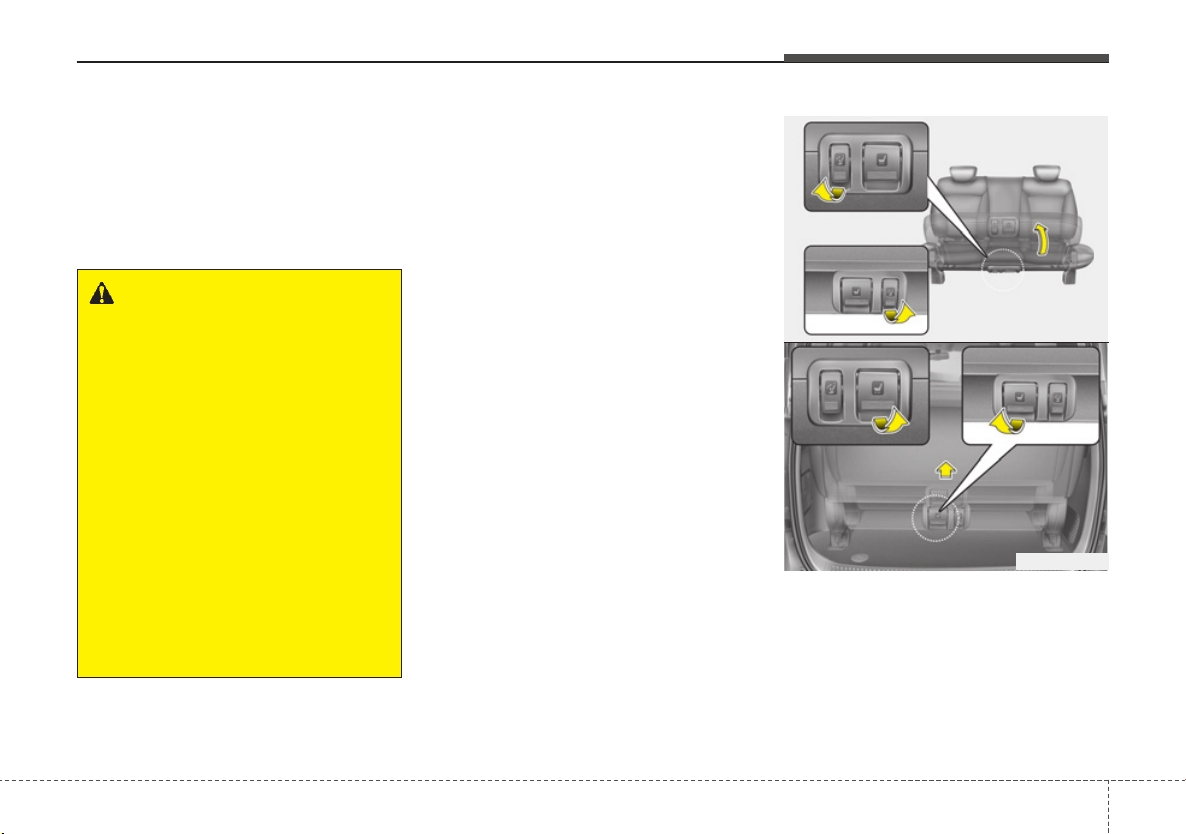
C010307ATQ
Folding the rear seat
(4th row seat, if equipped)
The rear seat cushion may be folded to
facilitate carrying long items or to
increase the luggage capacity of the
vehicle.
WARNING
The purpose of the fold rear seat is
to allow you to carry longer objects
that could not be accommodated in
the cargo area.
Never allow passengers to sit on a
improper position (ex : top of the
folded seat, floor etc.) while the car
is moving as this is not a proper
seating position and no seat belts
are available for use. This could
result in serious injury or death in
case of an accident or sudden stop.
Objects carried on the cargo area
should not extend higher than the
top of the front seatbacks. Doing
this could allow cargo to slide forward and cause injury or damage
during sudden stops.
To fold the rear seat:
1. Stow the rear seat belt in the pocket
to prevent the seat belt from being
damaged.
2. Set the 3rd row seatback to the upright
position and if necessary, slide the 3rd
row seat forward.
OTQ037016
OTQ037017
3.Pull on the seatcushion folding lever,
then fold the seat toward the rear of the
vehicle.
4. Increase the luggauge compartment
space by moving the rear seat using
the sliding lever.
313
Loading…
OWNER’S MANUAL
Operation
Maintenance
Specifications
All information in this Owner’s Manual is current at the time of publication.
However, Hyundai reserves the right to make changes at any time so that
our policy of continual product improvement may be carried out.
This manual applies to all models of this vehicle and includes descriptions
and explanations of optional as well as standard equipment. As a result,
you may find material in this manual that does not apply to your specific
vehicle.
Please note that some models are equipped with Right-Hand Drive (RHD).
The explanations and illustrations for some operations in RHD models are
opposite of those written in this manual.
Где я могу найти номер VIN для моего Hyundai?
Положение номера VIN различается среди марок автомобилей и моделей. Он может быть отпечатан на кузове автомобиля или указан на табличке. Рекомендуется обратиться к руководству по эксплуатации Hyundai H-1 (Grand Starex) (2007) для точной информации о месте нахождения номера VIN.
Как проверить давление в шинах моего Hyundai H-1 (Grand Starex) (2007)?
Вы можете проверить давление в шинах вашего Hyundai H-1 (Grand Starex) (2007) с помощью манометра для измерения давления в шинах. Рекомендуемое давление в шинах обычно указано на наклейке внутри двери водителя или в руководстве владельца.
Какое масло нужно моему Hyundai H-1 (Grand Starex)?
Тип масла, необходимого вашему Hyundai H-1 (Grand Starex), зависит от типа двигателя. Обратитесь к руководству владельца для рекомендуемой вязкости и спецификации масла.
Что такое номер VIN?
Номер VIN, также известный как идентификационный номер автомобиля, служит уникальным идентификатором для каждого автомобиля. Для точного местоположения номера VIN рекомендуется обратиться к руководству по эксплуатации Hyundai H-1 (Grand Starex) (2007).
Где я могу найти информацию о гарантийном покрытии моего Hyundai H-1 (Grand Starex)?
Информацию о гарантийном покрытии вашего Hyundai H-1 (Grand Starex) (2007) можно найти в гарантийном буклете, поставляемом с автомобилем. Обычно в нем содержится информация о сроке действия и охвате различных компонентов.
Когда мне следует запланировать техобслуживание для моего Hyundai H-1 (Grand Starex)?
Регулярное техническое обслуживание необходимо для оптимальной производительности автомобиля. Подробности о частоте техобслуживания и конкретных задачах можно найти в инструкциях по техническому обслуживанию. Обычно крупное техобслуживание должно производиться каждые два года или после пробега 30 000 километров.
Как сбросить индикатор технического обслуживания на панели приборов моего Hyundai H-1 (Grand Starex)?
Чтобы сбросить индикатор технического обслуживания на панели приборов вашего Hyundai H-1 (Grand Starex) (2007), следуйте инструкциям, описанным в руководстве по эксплуатации. Обычно это требует нажатия определенной комбинации кнопок в определенном режиме работы автомобиля.
С каким интервалом мне следует рассмотреть замену тормозной жидкости для моего Hyundai H-1 (Grand Starex)?
Рекомендуется заменять тормозную жидкость в вашем Hyundai H-1 (Grand Starex) (2007) каждые два года.
Что делать, если загорается лампа контроля двигателя моего Hyundai H-1 (Grand Starex)?
Если загорается лампа контроля двигателя вашего Hyundai H-1 (Grand Starex) (2007), это указывает на потенциальную проблему с автомобилем. Рекомендуется обратиться к квалифицированному механику для диагностики причины проблемы.
Как часто мне следует переключать шины на моем Hyundai H-1 (Grand Starex)?
Периодическая перестановка шин помогает обеспечить равномерный износ и продлить срок службы шин. Обычно рекомендуется переключать шины каждые 6 000-8 000 километров или по указаниям в руководстве владельца Hyundai H-1 (Grand Starex) (2007).
Что делать, если разряжается аккумулятор моего Hyundai?
Если разряжается аккумулятор вашего Hyundai H-1 (Grand Starex), вы можете запустить автомобиль, используя провода для запуска двигателя и другой автомобиль с заряженным аккумулятором. В противном случае вы можете вызвать помощь на дороге.
Что делать, если одна или несколько дверей отказываются открываться изнутри?
Если у вас возникают проблемы с открыванием дверей изнутри, вероятно, включена детская защелка. Способ отключения детской защелки зависит от марки и модели автомобиля.
Как программировать новый ключ для моего Hyundai H-1 (Grand Starex)?
Для программирования нового ключа для вашего Hyundai H-1 (Grand Starex) обычно требуется следовать определенным инструкциям, описанным в руководстве пользователя, или обратиться за помощью в дилерский центр или к слесарю.
Какой рекомендуемый интервал для замены воздушного фильтра в моем Hyundai H-1 (Grand Starex)?
Рекомендуемый интервал для замены воздушного фильтра в вашем Hyundai H-1 (Grand Starex) (2007) зависит от условий езды. Обычно рекомендуется проверять воздушный фильтр каждые 12 000-15 000 километров и заменять его при необходимости.
Доступно ли руководство для Hyundai H-1 (Grand Starex) (2007) на русском языке?
Нет, руководство для Hyundai H-1 (Grand Starex) (2007) доступно на английском языке.
Hyundai H-1 Grand Starex (2015)
OWNER’S MANUAL
Operation
Maintenance
Specifications
All information in this Owner’s Manual is current at the time of publication.
However, Hyundai reserves the right to make changes at any time so that
our policy of continual product improvement may be carried out.
This manual applies to all models of this vehicle and includes descriptions
and explanations of optional as well as standard equipment. As a result,
you may find material in this manual that does not apply to your specific
vehicle.
Please note that some models are equipped with Right-Hand Drive (RHD).
The explanations and illustrations for some operations in RHD models are
opposite of those written in this manual.
View the manual for the Hyundai H-1 Grand Starex (2015) here, for free. This user manual comes under the category cars and has been rated by 3 people with an average of a 9.2. This manual is available in the following languages: English. Do you have a question about the Hyundai H-1 Grand Starex (2015)?
Ask your question here
Index
- Table of contents
- 1] Introduction
- 2] Your vehicle at a glance
- 3] Safety features of your vehicle
- 4] Features of your vehicle
- 5] Driving your vehicle
- 6] What to do in an emergency
- 7] Maintenance
- 8] Consumer information
- 9] Specifications
Product Images (1)
Hyundai H-1 Grand Starex (2015) specifications
Below you will find the product specifications and the manual specifications of the Hyundai H-1 Grand Starex (2015).
General
| Brand | Hyundai |
| Model | H-1 Grand Starex (2015) |
| Product | car |
| Language | English |
| Filetype | User manual (PDF) |
Frequently asked questions
Can’t find the answer to your question in the manual? You may find the answer to your question in the FAQs about the Hyundai H-1 Grand Starex (2015) below.
When does my Hyundai need maintenance?
Regular maintenance is necessary for every car. How often the car needs maintenance and what exactly needs to be done can be found in the maintenance instructions.
For major periodic service, this should generally be done every 2 years or after 30,000 kilometres.
One or more doors won’t open from the inside. Now what?
The lock is most likely set to the child safety lock so it cannot be opened from the inside. How to unset the child safety lock differs per brand and type.
My car radio does not turn on, now what?
If your car radio does not turn on, it will not receive any power. Check that the red wire is connected to the contact power supply and the yellow wire to the constant power supply.
How do I convert miles into kilometres?
1 mile equals 1.609344 kilometers and 1 kilometer equals 0.62137119 miles.
Where can I find the VIN number of my Hyundai?
The location of the VIN number of the car differs per brand and type of car.
The code may be stamped on the frame of the car or mounted on a plate. It is best to consult the manual of the Hyundai H-1 Grand Starex (2015)for the exact location of the VIN number.
When should I change the brake fluid of my Hyundai?
It is recommended to change the brake fluid every two years.
What is the difference between E10 and E5 petrol?
E10 petrol consists of up to ten per cent ethanol while E5 petrol will contain less than five per cent ethanol. As a result, the percentage of E10 petrol is lower than that of E5 petrol, making it less bad for the environment.
What is a VIN number?
The VIN number of a car is an identification number unique to each car. The abbreviation VIN therefore stands for Vehicle Identification Number.
Is the manual of the Hyundai H-1 Grand Starex (2015) available in English?
Yes, the manual of the Hyundai H-1 Grand Starex (2015) is available in English .
Is your question not listed? Ask your question here