
Инструкция (руководство) по эксплуатации Хендай Соната
Инструкция Хендай Соната 4 (EF)
года выпуска (2001, 2002, 2003, 2004, 2005)
Инструкция Хендай Соната 5 (NF)
года выпуска (2005, 2006, 2007, 2008, 2009, 2010)
Инструкция Хендай Соната 6 (YF)
года выпуска (2010, 2011, 2012, 2013, 2014)
Инструкция Хендай Соната 7 (LF)
года выпуска (2014, 2015, 2016)
Инструкция Хендай Соната 7 (LF) FL
года выпуска (2018, 2019+)
Блокировка дверей
1. В комплект входят несколько ключей: основной (один или два) и запасной. В зависимости от комплектации автомобиля различают следующие комплекты основных ключей: для…
Блокировка замка боковой двери
1. Для отпирания/запирания замка водительской двери и двери переднего пассажира снаружи, необходимо вставить ключ в дверной замок и повернуть его вправо/влево. 2. Кроме…
Центральный замок
Примечание: если какая-либо дверь была открыта при срабатывании центральной блокировки замков дверей, то замок данной двери будет автоматически заблокирован после ее…
Штатная противоугонная система
Примечание: противоугонная система предназначена для защиты от несанкционированного проникновения в автомобиль. 1. Активация режима охраны. Внимание: запуск двигателя…
Маршрутный компьютер
1. При нажатии на кнопку переключения режимов работы ЖК дисплея, находящуюся слева от спидометра можно переключать показания маршрутного компьютера. Для сброса показаний…
Тахометр (частота вращения)
Тахометр показывает частоту вращения (обороты) коленчатого вала двигателя в минуту (об/мин). Внимание: во время движения следите за показаниями тахометра. Его стрелка,…
Указатель количества топлива
1. Указатель показывает уровень топлива в топливном баке, когда ключ в замке зажигания находится в положении «ON» («F» — полный бак; «Е» — пустой). Емкость топливного…
Указатель температуры охлаждающей жидкости
1. Указатель показывает температуру охлаждающей жидкости двигателя, когда ключ в замке зажигания находится в положении «ON». 2. Если при работающем двигателе стрелка…
Индикаторы комбинации приборов
Комбинация приборов (модели для Северной Америки) 1 — индикатор «проверь двигатель» (CHECK ENGINE), 2 — тахометр, 3 — индикатор указателей поворота, 4 — указатель…
Часы на приборной панели
1. Часы расположены на центральной отделки панели приборов и работают, когда ключ в замке зажигания находиться в положении «ON» или «АСС». 2. Настройка времени…
Стеклоподъёмники
Примечание: во избежание разряда аккумуляторной батареи, избегайте использования электрических стеклоподъемников при неработающем двигателе. 1. Электрические…
Световая сигнализация на автомобиле
1. Включение габаритов, фар, подсветки комбинации приборов и номерного знака. Примечание: переключатель наружных световых приборов работает независимо от положения ключа…
Система коррекции положения фар
Ручной корректор фар 1. Корректировка направления пучка света фар осуществляется вращением регулятора системы коррекции положения фар , как показано на рисунке. 2….
Освещение салона
Примечание: во избежание разряда аккумуляторной батареи не оставляйте освещение салона и багажного отделения включенными на длительный промежуток времени, когда…
Капот автомобиля
1. Для открывания капота необходимо произвести следующие процедуры: а) Потяните рычаг привода замка капота на себя, как показано на рисунке. б) Слега приподнимите капот…
Крышка багажника
Чтобы открыть крышку багажника из салона потяните за рычаг привода замка багажника, как показано на рисунке. Чтобы открыть крышку багажника снаружи автомобиля, вставьте…
Лючок топливно-заливной горловины
1. Заглушите двигатель перед заправкой топливом. 2. Для открывания лючка топливно-заливной нажмите на кнопку, как показано на рисунке. 3. Откройте крышку заливной…
Очиститель и омыватель лобового стекла
1. Очиститель и омыватель лобового стекла работают, если ключ в замке зажигания находится в положении «ON». 2. Для включения или остановки очистителя лобового стекла…
Регулировка положения рулевого колеса
1. Для регулировки высоты расположения рулевого колеса, придерживая рулевое колесо рукой, потяните рычаг-стопор на себя и, перемещая рулевое колесо, установите его на…
Управление зеркалами
Боковые зеркала заднего вида с электроприводом Внимание: не соскребайте лед со стекла зеркала, так как это может привести к повреждению зеркальной поверхности. Если лед…
Передние и задние сиденья автомобиля
Внимание: Обязательно отрегулируйте сиденье перед поездкой. Отрегулируйте высоту подголовника так, чтобы его центр находился на уровне глаз. После регулировки убедитесь…
Ремни безопасности
1. Чтобы защитить Вас и Ваших пассажиров в случае дорожно-транспортного происшествия, рекомендуется всем людям, находящимся в автомобиле, пристегнуться ремнями…
Люк — открытие и закрытие
Управление люком возможно, когда ключ в замке зажигания установлен в положение «ON». Внимание: При закрытии и открытии люка или при регулировке наклона люка будьте…
Система поддержания скорости
1. Система поддержания скорости автоматически поддерживает заданную скорость без нажатия на педаль акселератора. Данной системой рекомендуется пользоваться при…
Управление отопителем и кондиционером
Общие сведения 1. На моделях с ЖК дисплеем не кладите вещи на датчик солнечного света. Кроме того, не закрывайте отверстия для датчиков температуры воздуха. 1 — датчик…
Магнитола на приборной панели
Магнитола. Примечание: описание переключателей приведено в разделе «Магнитола и проигрыватель компакт-дисков». Основные моменты эксплуатации Примечание: расположение…
Работа прикуривателя
Прикуриватель работает, если ключ в замке зажигания находится в положении «ON» или «АСС». Для включения прикуривателя нажмите на него, когда прикуриватель накалится, то…
Управление автомобилем с АКПП
1. Для управления автоматической коробкой передач на центральной консоли, сбоку от водителя, установлен рычаг селектора, с помощью которого можно задавать диапазон…
Управление автомобилем с МКПП
1. Схема переключения передач показана на рисунке. Кроме того, схема изображена на ручке рычага. Прежде чем переключать передачу, всегда полностью выжимайте педаль…
Антиблокировочная система тормозов (ABS)
Внимание: используйте шины одинакового размера, конструкции и нагрузочной способности с исходными шинами автомобиля, поскольку использование шин другого типа может…
Противобуксовочная система (TCS)
Внимание: если используются шины различного размера, конструкции и нагрузочной способности (например, «докатка»), то убедитесь, что противобуксовочная система отключена…
Советы по вождению в различных условиях
Общие рекомендации Внимание: Перед началом движения убедитесь, что стояночный тормоз полностью отпущен. Не держите ногу на педали тормоза во время движения. Это может…
Буксировка автомобиля
Внимание: Буксировка автомобилей с АКПП разрешается при скорости не выше 50 км/час на расстояние не более чем 25 км. При необходимости буксировки на расстояние больше 25…
Буксировка прицепа
Общая информация 1. Несмотря на то, что буксировка прицепа будет оказывать негативное влияние на управление, эксплуатационные качества, торможение, долго-вечность и…
Запуск двигателя
Внимание: не допускайте длительной работы двигателя на повышенных оборотах и резких ускорений при непрогретом двигателе. Замок зажигания 1. Положение «LOCK». Двигатель…
Неисправности двигателя во время движения
Остановка двигателя во время движения 1. Постепенно снизьте скорость. Отведите автомобиль с дороги в безопасное место (например, на обочину). 2. Включите аварийную…
Запасное колесо, домкрат и инструменты
1. Домкрат хранится в специальном кронштейне крепления, который расположен в нише под накладкой пола багажника. Там же хранится запасное колесо (или докатка) и комплект…
Поддомкрачивание автомобиля
1. Установите автомобиль на ровной, горизонтальной твердой поверхности. 2. Заглушите двигатель, поверните ключ в замке зажигания в положение «LOCK» и включите аварийную…
Замена колеса
1. Если необходимо заменить колесо в дороге, то постепенно снизьте скорость и отведите автомобиль, в безопасное место. 2. Остановите автомобиль на ровном месте с твердым…
Рекомендации по выбору шин
1. При выборе шин обращайте внимание на маркировку. Геометрические размеры, грузоподъемность и максимальная скорость должны строго соответствовать рекомендациям…
Проверка давления и состояния шин
1. Регулярно проверяйте шины на отсутствие повреждений и утечки воздуха. Проверяйте давление в шинах через каждые две недели или, по меньшей мере, раз в месяц. Не…
Замена шин
1. Рекомендуется менять все четыре шины или, по меньшей мере, обе передние или задние шины одновременно (см. » Рекомендации по выбору шин «). 2. После ремонта шины…
Замена дисков колес
1. Замене дисков колес следует уделять должное внимание. Убедитесь, что устанавливаются диски с одинаковыми нагрузочной способностью, диаметром, шириной обода и вылетом….
Плавкие предохранители
Расположение 1. Для предотвращения повреждения электрической системы в результате короткого замыкания или перегрузки каждая отдельная электрическая цепь оснащена плавким…
Замена ламп
Перед заменой лампы убедитесь, что зажигание и все осветительные приборы выключены. Используйте только лампы с номинальной мощностью, приведенной в таблице. Внимание:…
Несколько новостей компании Хендай
Ссылка в разных форматах на этот раздел
TextHTMLBB Code

2005

A010A02A-AAT
WARRANTIES FOR YOUR HYUNDAI VEHICLE
o New Vehicle 60 Months/60,000 Miles Limited Warranty
o New Vehicle 120 Months/100,000 Miles Limited Powertrain Warranty (original owner only)
o Anti-Perforation Limited Warranty
o Emission Defect Warranty — Federal Vehicle
o California Emission Control System Warranty (if applicable)
o Emission Performance Warranty — Federal Vehicle
o Replacement Parts and Accessories Limited Warranty
NOTE:
Detailed warranty information is provided in your Hyundai Owner’s Handbook.
A020A01A-AAT
RESPONSIBILITY FOR MAINTENANCE
The maintenance requirements for your new Hyundai are found in Section 5. As the owner, it is your responsibility
to see that all maintenance operations specified by the manufacturer are carried out at the appropriate intervals.
When the vehicle is used in severe driving conditions, more frequent maintenance is required for some operations.
Maintenance requirements for severe operating conditions are also included in Section 5.
OWNER’S MANUAL
A030A01NF-AAT
Operation
Maintenance
Specifications
A030A01NF-A
All information in this Owner’s Manual is current at the time of publication. However, Hyundai reserves the right to make changes at any
time so that our policy of continual product improvement may be carried out.
This manual applies to all Hyundai models and includes descriptions and explanations of optional as well as standard
equipment. As a result, you may find material in this manual that does not apply to your specific vehicle.
A070A01A-AAT
Your Hyundai should not be modified in any way. Such modifications may adversely affect the performance, safety
or durability of your Hyundai and may, in addition, violate conditions of the limited warranties covering the vehicle.
Certain modifications may also be in violation of regulations established by the U.S. Department of Transportation
and other federal or state agencies.
CAUTION: MODIFICATIONS TO YOUR HYUNDAI
!
A080A01S-AAT
TWO-WAY RADIO OR CELLULAR TELEPHONE INSTALLATION
Your vehicle is equipped with electronic fuel injection and other electronic components. It is possible for an
improperly installed/adjusted two-way radio or cellular telephone to adversely affect electronic systems. For this
reason, we recommend that you carefully follow the radio manufacturer’s instructions or consult your Hyundai
dealer for precautionary measures or special instructions if you choose to install one of these devices.
A040A01A-AAT
FOREWORD
Thank you for choosing Hyundai. We are pleased to welcome you to the growing number of discriminating people who
drive Hyundais. The advanced engineering and high-quality construction of each Hyundai we build is something of which
we’re very proud.
Your Owner’s Manual will introduce you to the features and operation of your new Hyundai. It is suggested that you read
it carefully because the information it contains can contribute greatly to the satisfaction you receive from your new car.
The manufacturer also recommends that all service and maintenance on your car be performed by an authorized Hyundai
dealer. Hyundai dealers are prepared to provide high-quality service, maintenance and any other assistance that may
be required.
A050A04A-AAT
HYUNDAI MOTOR COMPANY
Note : Because future owners will also need the information included in this manual, if you sell this Hyundai, please leave
the manual in the vehicle for their use. Thank you.
!
Severe engine and transaxle damage may result from the use of poor quality fuels and lubricants that do not
meet Hyundai specifications. You must always use high quality fuels and lubricants that meet the specifications listed on Page 9-4 in the Vehicle Specifications section of the Owner’s Manual and which also appear
in the Service Station Information on the back cover of the Owner’s Manual.
Copyright 2005 Hyundai Motor Company. All rights reserved. No part of this publication may be reproduced, stored in
any retrieval system or transmitted in any form or by any means without the prior written permission of Hyundai Motor
Company.
CAUTION:
A090A01A-AAT
SAFETY AND VEHICLE DAMAGE WARNING
This manual includes information titled as WARNING, CAUTION and NOTE.
These titles indicate the following:
!
!
WARNING:
CAUTION:
This indicates that a condition may result in harm, serious injury or death to you or other persons if
the warning is not heeded. Follow the advice provided with the warning.
This indicates that a condition may result in damage to your vehicle or its equipment if the caution is
not heeded. Follow the advice provided with the caution.
NOTE:
This indicates that interesting or helpful information is being provided.

TABLE OF CONTENTS
SECTION
FEATURES OF YOUR HYUNDAI
DRIVING YOUR HYUNDAI
WHAT TO DO IN AN EMERGENCY
CORROSION PREVENTION & APPEARANCE CARE
VEHICLE MAINTENANCE REQUIREMENTS
DO-IT-YOURSELF MAINTENANCE
EMISSION CONTROL SYSTEMS
CONSUMER INFORMATION, REPORTING SAFETY DEFECTS &
BINDING ARBITRATION OF WARRANTY CLAIMS
VEHICLE SPECIFICATIONS
INDEX
1
2
3
4
5
6
7
8
9
10
B250A01NF-AAT
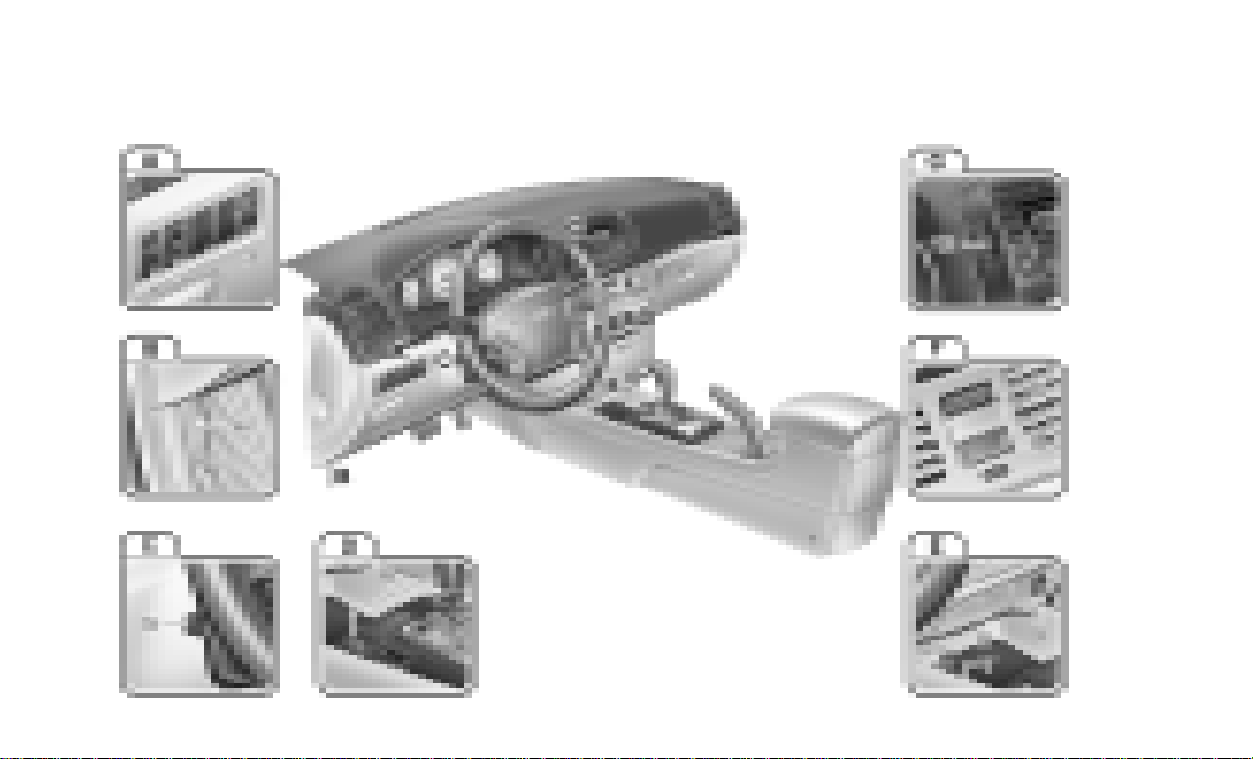
INSTRUMENTS AND CONTROLS (I)
B250A01NF-A
1. Electronic Stability Control (ESC) Switch
2. Power Adjustable Pedals Switch (If Installed)
3. Panel Brightness Control Knob (Rheostat Switch)
4. Hood Release Lever
5. Steering Wheel Tilt Lever (If Installed)
6. Front Seat Warmer (If Installed)
!
When installing a container of liquid air freshener inside the vehicle, do not place it near the instrument cluster nor
on the instrument panel surface. If there is any leakage from the air freshener onto these areas (Instrument cluster,
instrument panel or air ventilator), it may damage these parts. If the liquid from the air freshener does leak onto these
areas, wash them with water immediately.
CAUTION:
7. Power Outlet
8. Ashtray
9. Cigarette Lighter
10.Digital Clock
11.»PASSENGER AIR BAG OFF» Indicator
12.Hazard Warning Switch
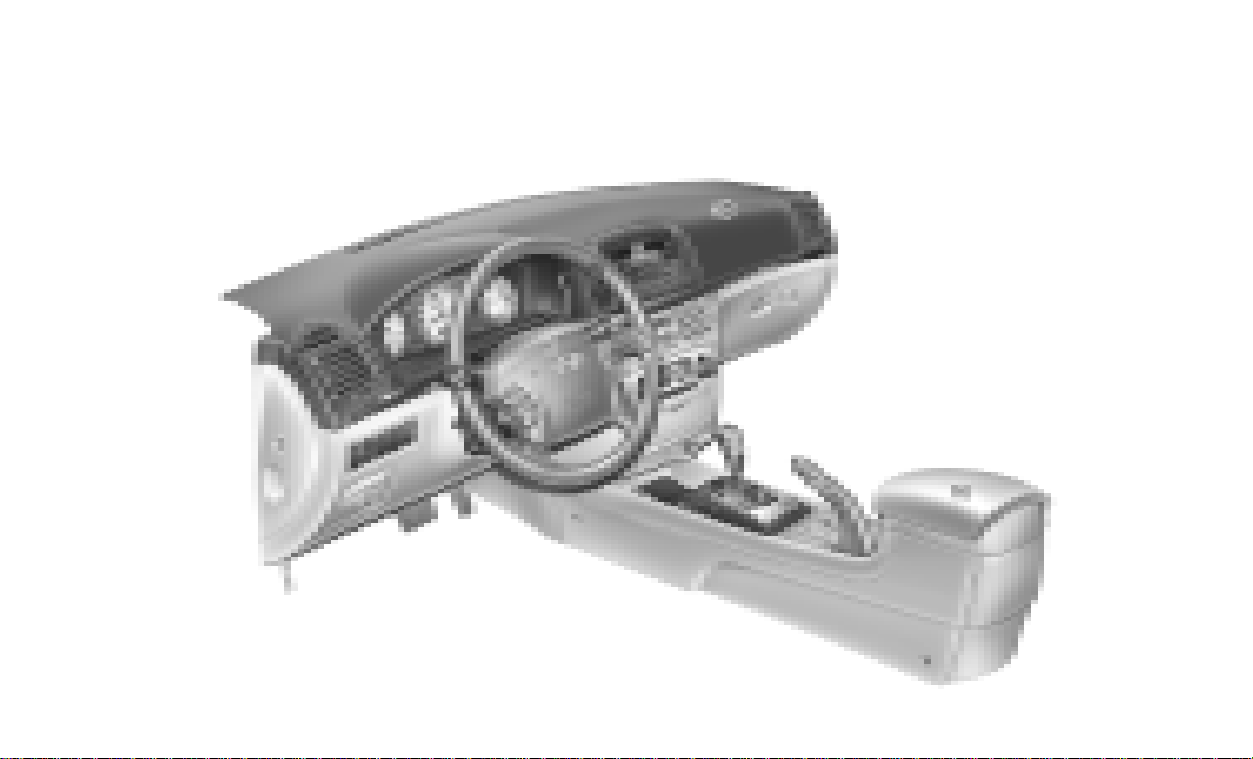
B250B01NF-AAT
INSTRUMENTS AND CONTROLS (II)
B250A02NF-A
1. Fuse Box
2. Multi Box
3. Instrument Cluster
4. Multi-Function Light/Front Fog Light Switch
5. Audio Remote Control Switch (If Installed)
6. Horn and Driver’s Airbag
7. Windshield Wiper/Washer Switch
8. Cruise Control Switch
!
When installing a container of liquid air freshener inside the vehicle, do not place it near the instrument cluster nor
on the instrument panel surface. If there is any leakage from the air freshener onto these areas (Instrument cluster,
instrument panel or air ventilator), it may damage these parts. If the liquid from the air freshener does leak onto these
areas, wash them with water immediately.
CAUTION:
9. Audio System (If Installed)
10. Passenger’s Airbag
11. Glove Box
12. Heating/Air Conditioning Control Panel
13. Shift Lever
14. Parking Brake Lever
15. Drink Holder
16. Center Console
B255A01NF-AAT
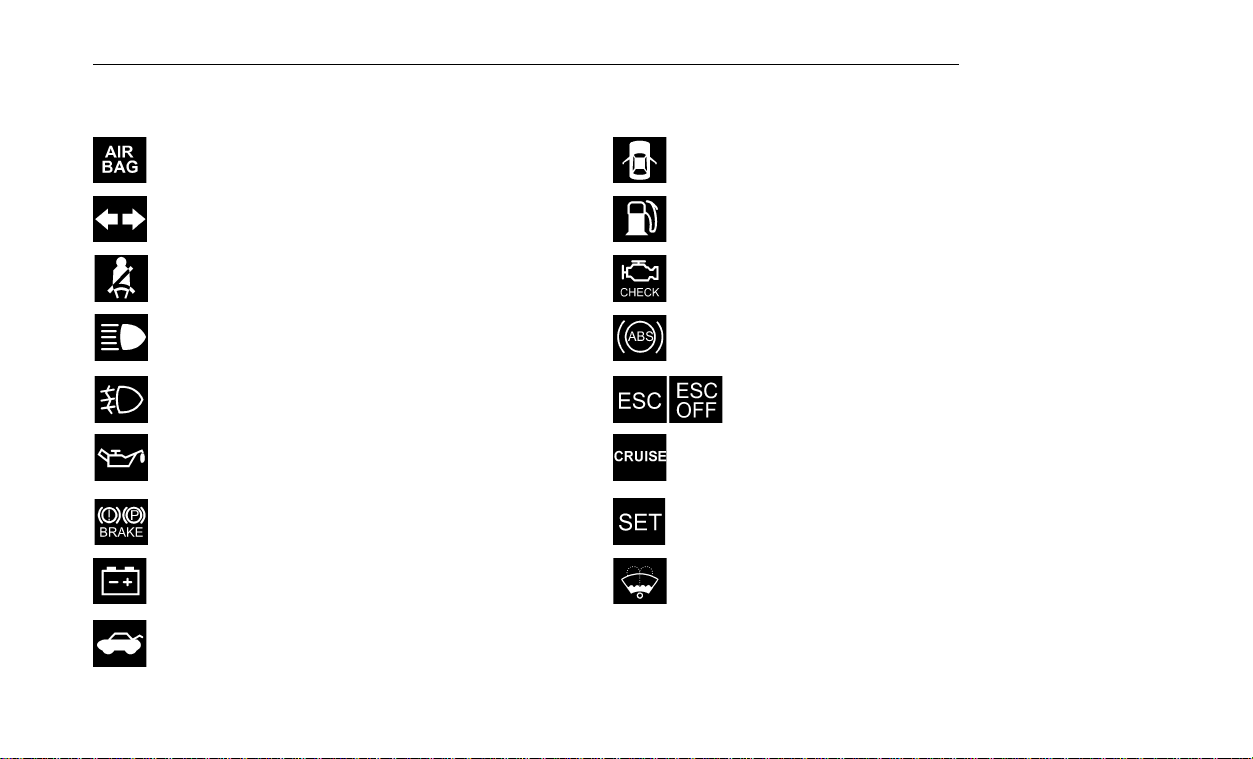
INDICATOR SYMBOLS ON THE INSTRUMENT CLUSTER
YOUR VEHICLE AT A GLANCE
SRS (Airbag) Warning Light
Turn Signal Indicator Lights
Seat Belt Reminder Light
High Beam Indicator Light
Front Fog Light Indicator Light
Low Oil Pressure Warning Light
Parking Brake/Low Brake Fluid Level
Warning Light
Charging System Warning Light
Trunk Lid Open Warning Light
* More detailed explanations of these items will be found beginning on page 1-52.
Door Ajar Warning Light
Low Fuel Level Warning Light
Check Engine — Malfunction Indicator Light (MIL)
ABS Service Reminder Indicator (If Installed)
Electronic Stability Control (ESC) Indicator
Lights (If Installed)
Cruise Indicator Light
Cruise SET Indicator Light
Low Windshield Washer Fluid Level Warning Light
A100A03A-AAT
Guide to Hyundai Genuine Parts
1. What are Hyundai Genuine Parts?
Hyundai Genuine Parts are the same parts
used by Hyundai Motor Company to manufacture vehicles. They are designed and
tested for the optimum safety, performance,
and reliability to our customers.
2. Why should you use genuine parts?
Hyundai Genuine Parts are engineered and
built to meet rigid manufacturing requirements. Using imitation, counterfeit or used
salvage parts is not covered under the
Hyundai New Vehicle Limited Warranty or
any other Hyundai warranty. In addition, any
damage to or failure of Hyundai Genuine
Parts caused by the installation or failure of
an imitation, counterfeit or used salvage part
is not covered by any Hyundai Warranty.
3. How can you tell if you are purchasing
Hyundai Genuine Parts?
Look for the Hyundai Genuine Parts Logo on
the package (see below).
Hyundai Genuine Parts exported to the United
States are packaged with labels written only
in English.
Hyundai Genuine Parts are only sold through
authorized Hyundai Dealerships.
To find the closest authorized dealer call
1-800-826-CARS
A100A03L
A100A01L A100A02L A100A04L

FEATURES OF YOUR HYUNDAI
Fuel Recommendations …………………………………………….1-2
Breaking in Your New Hyundai …………………………………..1-3
Keys ………………………………………………………………………..1-3
Door Locks ………………………………………………………………1-4
Theft-Alarm System ………………………………………………….1-8
Windows ……………………………………………………………….. 1-11
Seats …………………………………………………………………….. 1-14
Seat Belts ………………………………………………………………1-21
Child Restraint System …………………………………………….1-28
Advanced Supplemental Restraint (AIRBAG)
System (SRS) ……………………………………………………….1-36
Instrument Cluster and Indicator Lights …………………….1-50
Warning and Indicator Lights ……………………………………1-52
Trip Computer ………………………………………………………..1-58
Multi-Function Light Switch ………………………………………1-61
Windshield Wiper and Washer Switch ……………………….1-64
Sunroof ………………………………………………………………….1-70
Mirror …………………………………………………………………….1-77
Homelink Mirror ………………………………………………………1-79
Hood Release …………………………………………………………1-89
Cruise Control…………………………………………………………1-93
Heating and Cooling Control ……………………………………. 1-96
Stereo Sound System ………………………………………….. 1-113
Audio System………………………………………………………. 1-115
Antenna ……………………………………………………………… 1-130
1
1

FEATURES OF YOUR HYUNDAI
1
FUEL RECOMMENDATIONS
2
B010A01NF-AAT
Use Unleaded Gasoline
UNLEADED
FUEL ONLY
B010A01NF-A
Unleaded gasoline with a Pump Octane
Rating of 87 (Research Octane Number 91)
or higher must be used in your Hyundai.
!
o Do not «TOP-OFF» after the first nozzle
o The fuel cap must be tightened until cap
CAUTION:
shut off when refueling.
clicks, otherwise » » light will
illuminate.
B010B01A-AAT
What About Gasohol?
Gasohol (a mixture of 90% unleaded gasoline
and 10% ethanol or grain alcohol) may be used
in your Hyundai. However, if your engine develops driveability problems, the use of 100%
unleaded gasoline is recommended. Fuels with
unspecified quantities of alcohol, or alcohols
other than ethanol, should not be used.
B010C01A-AAT
Use of MTBE
Hyundai recommends that fuels containing
MTBE (Methyl Tertiary Butyl Ether) over 15.0%
vol. (Oxygen Content 2.7% weight) should not
be used in your Hyundai.
Fuel containing MTBE over 15.0% vol. (Oxygen
Content 2.7% weight) may reduce vehicle performance and produce vapor lock or hard
starting.
B010D01A-AAT
Do Not Use Methanol
Fuels containing methanol (wood alcohol) should
not be used in your Hyundai. This type of fuel
can reduce vehicle performance and damage
components of the fuel system.
!
Your Hyundai’s New Vehicle Limited Warranty may not cover damage to the fuel
system and any performance problems that
are caused by the use of fuels containing
methanol or fuels containing MTBE (Methyl
Tertiary Butyl Ether) over 15.0% vol. (Oxygen Content 2.7% weight.)
CAUTION:
FEATURES OF YOUR HYUNDAI
KEYSBREAKING IN YOUR NEW HYUNDAI
1
3
B010E01A-AAT
Gasolines for Cleaner Air
To help contribute to cleaner air, Hyundai recommends that you use gasolines treated with
detergent additives, which help prevent deposit
formation in the engine. These gasolines will
help the engine run cleaner and enhance performance of the Emission Control System.
B010F01A-AAT
Operation in Foreign Countries
If you are going to drive your Hyundai in another
country, be sure to:
o Observe all regulations regarding registra-
tion and insurance.
o Determine that acceptable fuel is available.
B020A01S-AAT
During the First 1,200 Miles (2,000 Km)
No formal «break-in» procedure is required with
your new Hyundai. However, you can contribute to the economical operation and durability of
your Hyundai by observing the following recommendations during the first 1,200 miles (2,000
km).
o Don’t drive faster than 55 MPH (88 km/h).
o While driving, keep your engine speed (rpm,
or revolutions per minute) between 2,000
rpm and 4,000 rpm.
o Use moderate acceleration. Don’t start
quickly or depress the accelerator pedal
fully.
o For the first 200 miles (300 km), try to avoid
hard stops.
o Don’t lug the engine (in other words, don’t
drive so slowly in too high a gear that the
engine «bucks»:shift to a lower gear).
o Whether going fast or slow, vary your speed
from time to time.
o Don’t let the engine idle longer than 3 minutes
at one time.
o Don’t tow a trailer during the first 1,200 miles
(2,000 km) of operation.
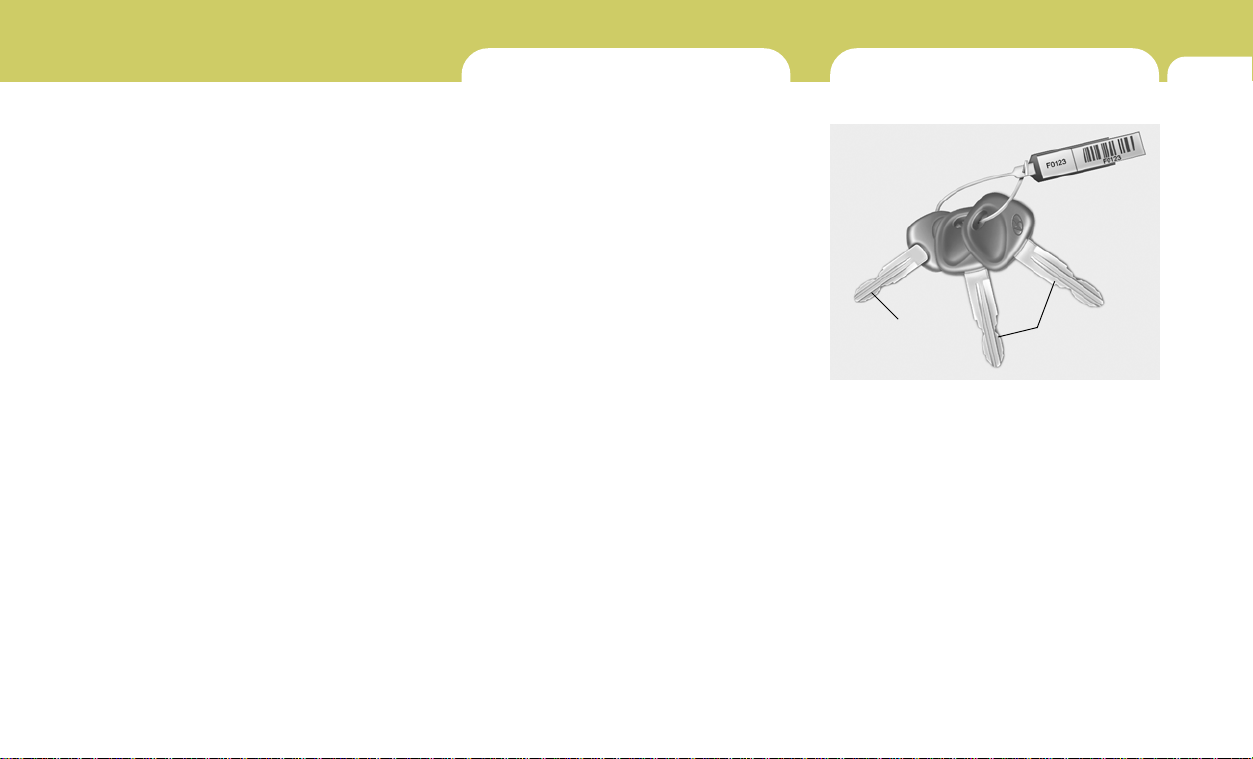
B030A01NF-GAT
Sub key
Master key
B030A01NF
For greater convenience, your Hyundai has
two master keys and a sub key. The master
keys will open all locks on your vehicle. The sub
key will only function in the ignition and the door
locks.
Leaving your sub key with a parking attendant
will ensure that your vehicle’s trunk, trunk lid
release, glove box compartment and rear trunk
access may not be unlocked in your absence.
NOTE:
Before leaving your sub key with a parking
attendant, make sure that the lock knobs of
the rear seatback lock and the trunk lid lock
are switched to the «LOCK» position.
FEATURES OF YOUR HYUNDAI
1
4
DOOR LOCKS
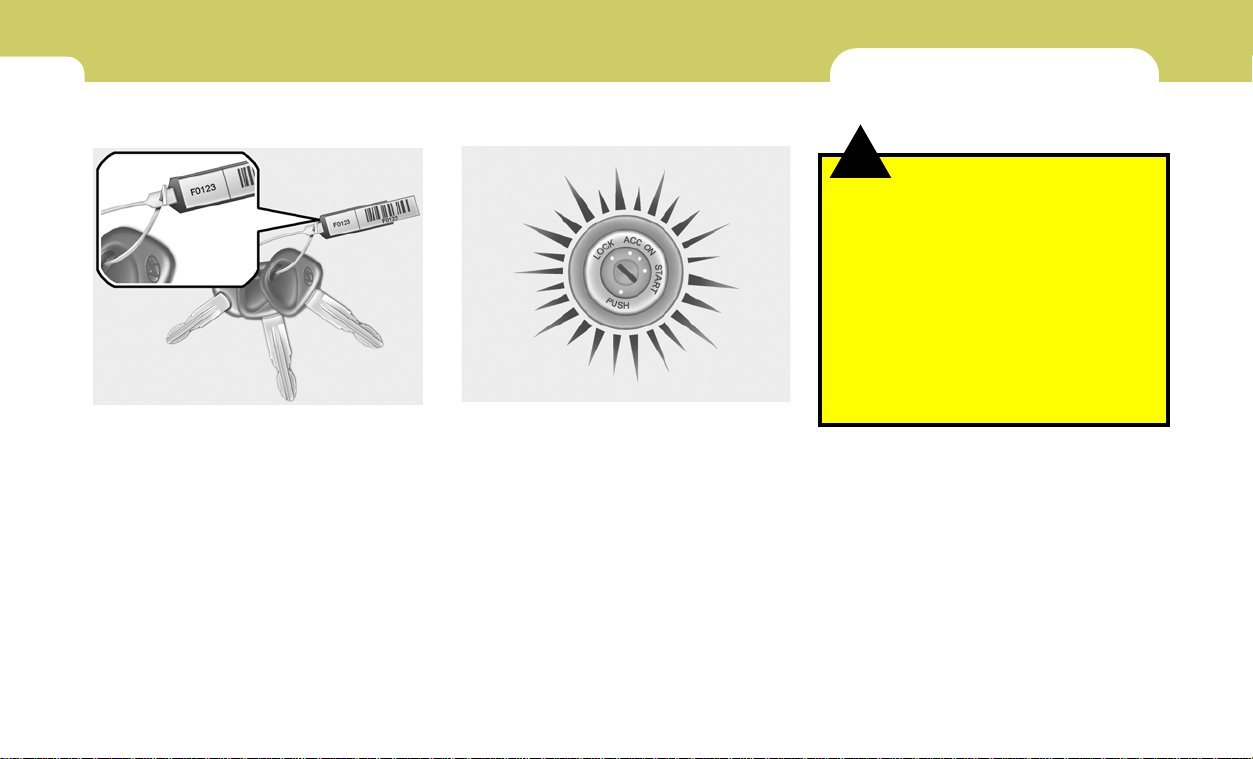
B030B01NF-GAT
Record Your Key Number
B030B01NF
A code number is attached on the number tag
that came with the keys to your Hyundai. This
key number tag should not be left with the keys
but kept in a safe place, not in the vehicle. The
key number should also be recorded in a place
where it can be found in an emergency.
If you need additional keys, or if you should lose
your keys, your authorized Hyundai dealer can
make new keys if you can supply the key
number.
ILLUMINATED IGNITION SWITCH
B030C01E
Whenever either front door is opened, the ignition switch will be illuminated for your convenience, provided the ignition switch is not in the
«ON» position.
The light will go off approximately 10 seconds
after closing the door or when the ignition switch
is turned on.
B040A01A-AATB030C01JM-AAT
!
o Unlocked doors can be dangerous. Be-
o Before opening the door, always look for
WARNING:
fore you drive away (especially if there
are children in the car), be sure that all the
doors are securely closed and locked so
that the doors cannot be opened from
the inside. This helps ensure that the
doors will not be opened accidentally.
Also, when combined with the proper
use of seat belts, locking the doors helps
keep occupants from being ejected from
the car in case of an accident.
and avoid oncoming traffic.
FEATURES OF YOUR HYUNDAI
1
5
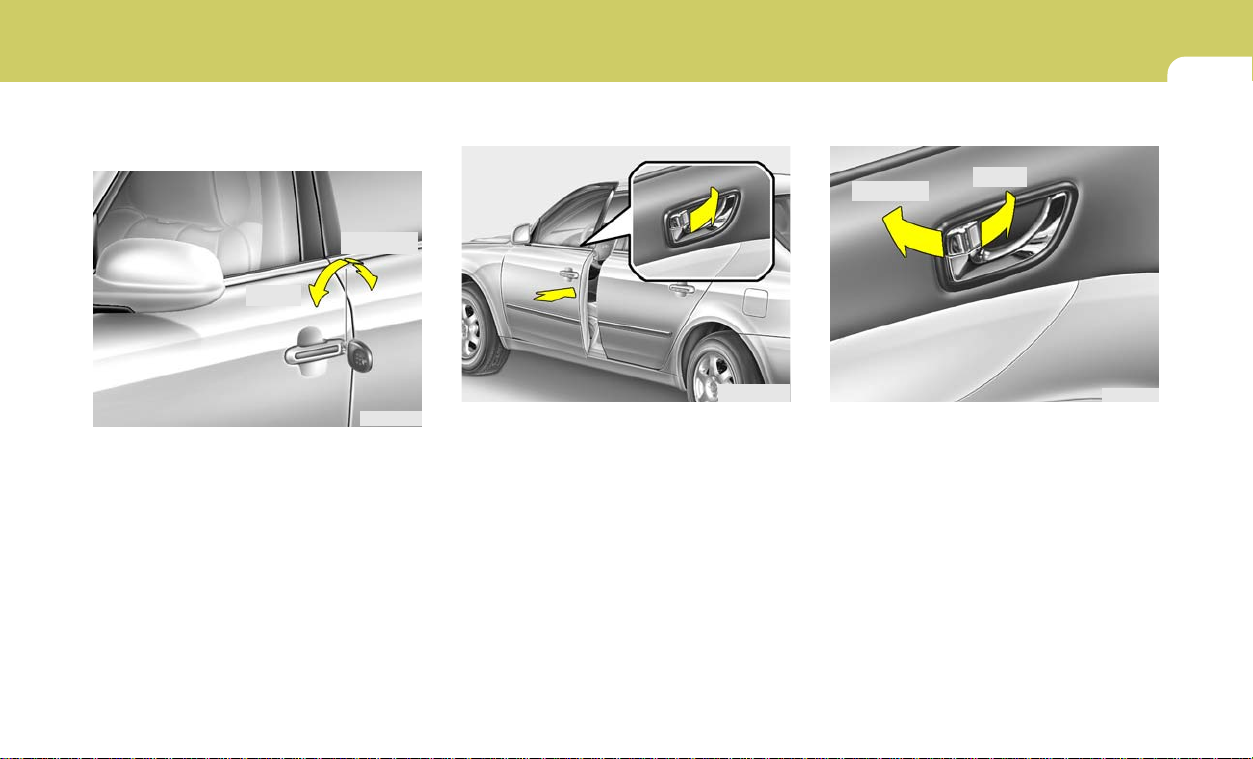
B040B01JM-AAT
Locking, unlocking front doors with a
key
UNLOCK
LOCK
HNF2007
o The door can be locked or unlocked with a
key.
o Lock the door by turning the key toward the
front of the vehicle and unlock it by turning the
key toward the rear.
NOTE:
The driver’s door can be unlocked by turning the key once toward the rear. If you wish
to unlock all doors, turn the key again
toward the rear within 4 seconds. The
passenger’s side will lock or unlock all
doors with just one rotation.
B040C02Y-AAT
Locking from the Outside
B040C01NF-A
The doors can be locked without a key. To lock
the doors from the outside, first push the inside
lock switch to the «LOCK» position, so that the
red mark on the switch is not visible, then close
the door.
The door will not lock if the key is left in the ignition
switch when the front doors are closed. This is
normal.
NOTE:
o When locking the door this way, be care-
ful not to lock the door with the key left
in the vehicle.
o To discourage theft, always remove the
ignition key, close all windows and lock
all doors when leaving your vehicle unattended.
B040D01NF-AAT
Locking from the Inside
UNLOCK
To lock the doors from the inside, simply close
the door and push the lock switch to the «LOCK»
position.
LOCK
HNF2008
NOTE:
o When the door is locked, the red mark on
the switch is not visible.
o The driver’s and front passenger’s doors
can be opened by pulling the inside door
handle even if the inside lock switch is
pushed to the «LOCK» position.
FEATURES OF YOUR HYUNDAI
1
6
!
WARNING:
Be careful not to pull the inside door handle
while driving. If you pull the inside door
handle, the door can be opened and you
may be ejected from the vehicle and can be
injured or killed.
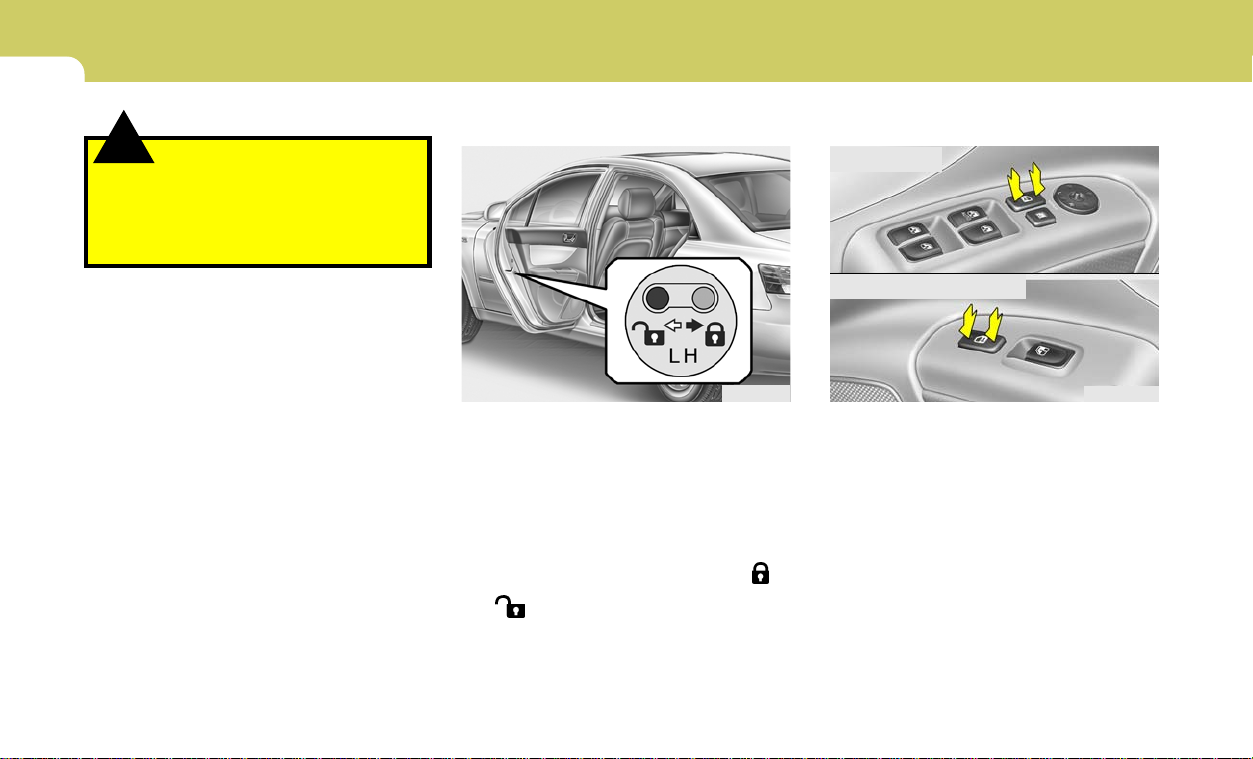
B040E04A-AAT
Child-Protector Rear Door Lock
HNF2011-1
Your Hyundai is equipped with left and right side
«child-protector» rear door locks. When the lock
mechanism is engaged, the rear door cannot be
opened from the inside. Its use is recommended
whenever there are small children in the rear
seat.
To engage the child-protector feature so that
the door cannot be opened from the inside,
move the child-protector lever to the » »
position and close the door. Move the lever to
the » » position when normal door operation
is desired.
To open the door from the outside, pull the
outside door handle.
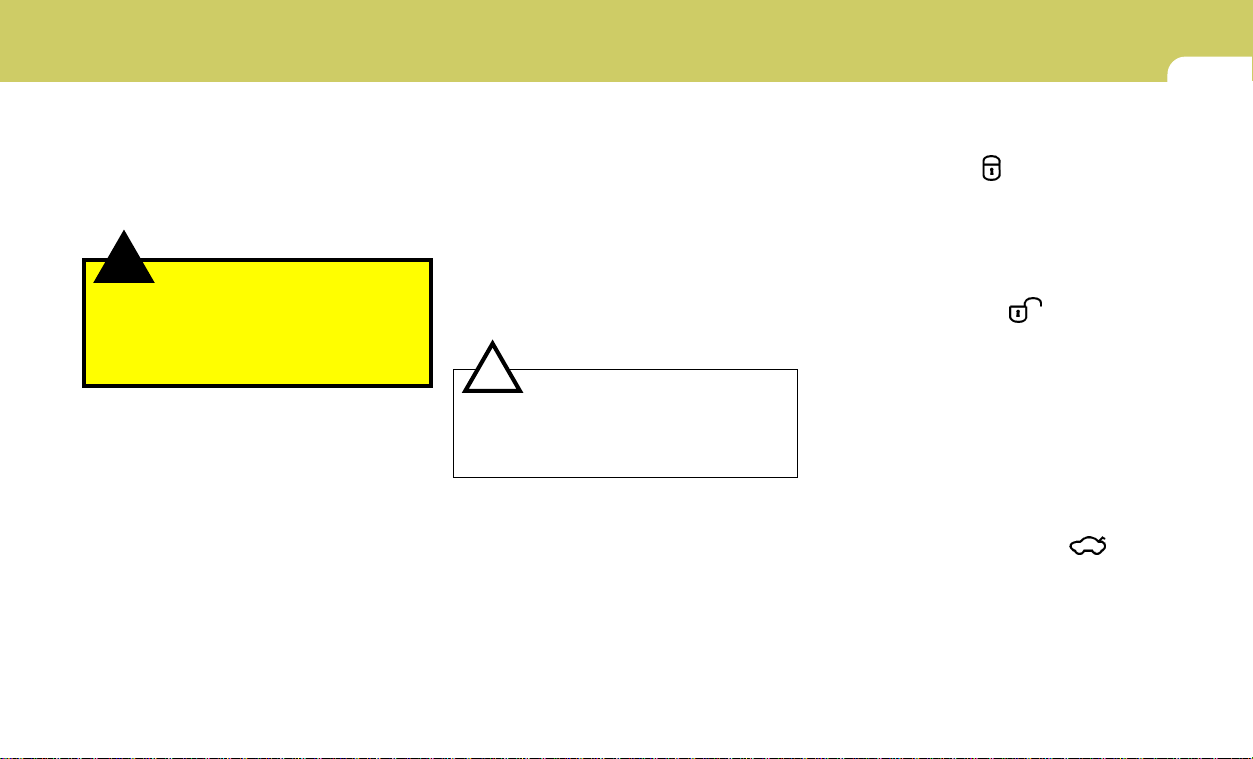
B040G01NF-AAT
Central Door Locks
Driver’s side
UNLOCK
Front passenger’s side
LOCK
The central door locking switch is located on the
driver’s and front passenger’s armrest. It is
operated by depressing the door lock switch. If
any door is open when the switch is depressed
to the «LOCK» position, the door will remain
locked when closed.
LOCK
UNLOCK
B040G01NF
NOTE:
o When depressing the front portion of
the driver’s or front passenger’s door
lock switch, all vehicle doors will lock.
o When depressing the rear portion of
these switches, all vehicle doors will
unlock.
FEATURES OF YOUR HYUNDAI
1
7
o The driver’s and front passenger’s doors
can be opened by pulling the inside door
handle even if the front portion of the
driver’s or front passenger’s central door
locking switch has been depressed to
lock the doors.
!
Be careful not to pull the inside door handle
while driving. If you pull the inside door
handle, the door can be opened and you
may be ejected from the vehicle and can be
injured or killed.
B040H02NF-GAT
WARNING:
Speed Sensing Auto Door Locking
(If Installed)
When the speed of the vehicle keeps above the
specific speed for 1 second, it will automatically
lock all doors for driver and passenger’s safety.
For further information, contact an authorized
Hyundai dealer.
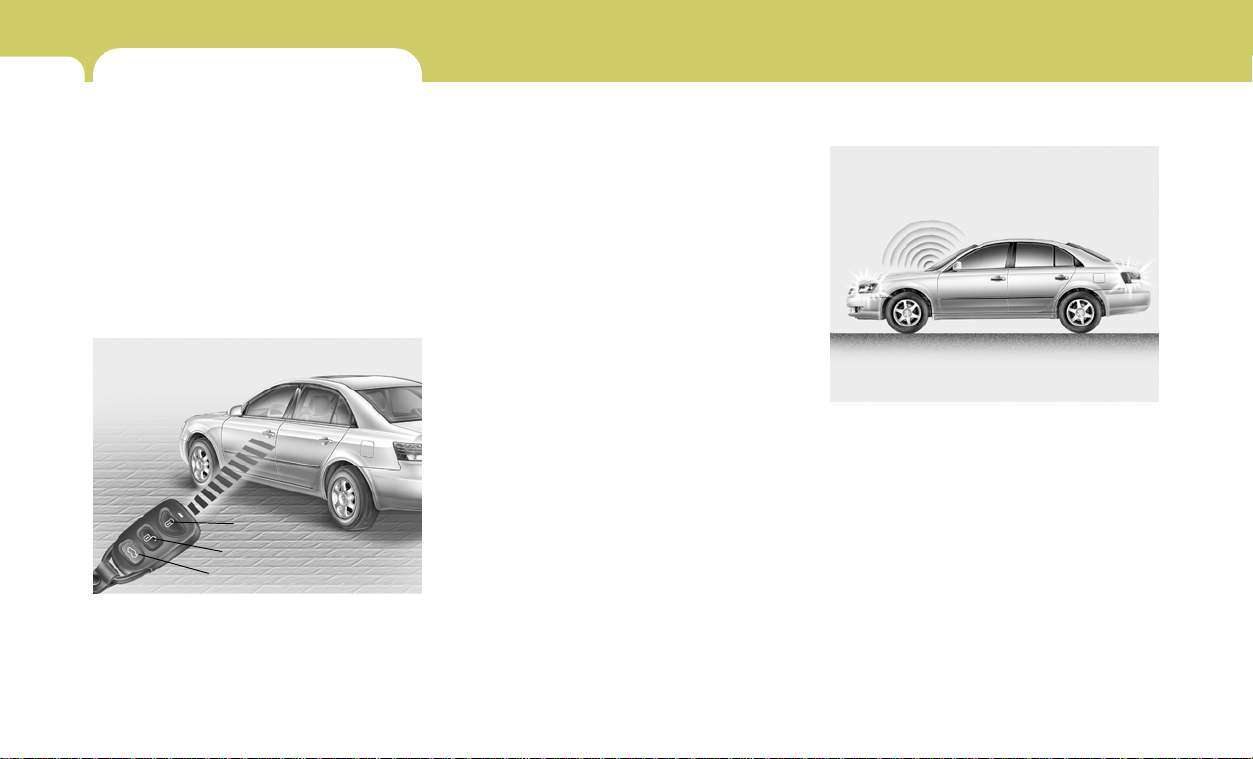
B070F01NF-AAT
KEYLESS ENTRY SYSTEM
NOTE:
This device complies with Part 15 of the
FCC rules. Operation is subject to the following two conditions:
(1) This device may not cause harmful interference, and (2) this device must accept
any interference received, including interference that may cause undesired operation.
!
Changes or modifications not expressly
approved by the party responsible for compliance could void the user’s authority to
operate the equipment.
CAUTION:
Locking doors
1. Close all doors.
2. Push the «LOCK ( )» button on the transmitter.
3. At the same time, all doors lock and the turn
signal lights will blink once to indicate that the
system is armed.
Unlocking doors
1. Push the «UNLOCK ( )» button on the
transmitter.
2. At the same time, the driver’s door unlocks
and the turn signal lights will blink twice to
indicate that the system is disarmed.
NOTE:
If you wish to unlock all the doors, press the
«UNLOCK» button on the transmitter again
within 4 seconds.
Releasing the trunk lid
Push the trunk lid release button ( ) on the
transmitter for longer than 1 second.
FEATURES OF YOUR HYUNDAI
1
THEFT-ALARM SYSTEM
8
B070A01A-AAT
This system is designed to provide protection
from unauthorized entry into the car. This system is operated in three stages : the first is the
«Armed» stage, the second is the «Alarm» stage
and the third is the «Disarmed» stage. If triggered, the system provides an audible alarm
with blinking of the turn signal lights.
B070B01NF-AAT
Armed Stage
Lock
Unlock
Trunk Unlock
Park the car and stop the engine. Arm the
system as described below.
1) Remove the ignition key from the ignition
switch.
B070B01NF-A
2) Make sure that the engine hood and trunk lid
are closed and latched.
3) Lock the doors using the transmitter of the
keyless entry system.
After completion of the steps above, the turn
signal lights will blink once to indicate that the
system is armed.
NOTE:
1) If any door, trunk lid or engine hood
remains open, the system will not be
armed.
2) If this happens, rearm the system as
previously described.
NOTE:
Do not arm the system until all passengers
have left the car. If the system is armed while
a passenger(s) remains in the car, the alarm
may be activated when the remaining
passenger(s) leaves the car.
B070C01NF-AAT
Alarm Stage
B070C01NF-A
The alarm will be activated if any of the following
occurs while the car is parked and the system
is armed.
1) A front or rear door is opened without using
the transmitter or the ignition key.
2) The trunk lid is opened without using the
transmitter or the ignition key.
3) The engine hood is opened.
The alarming horn will sound and the turn signal
lights will blink continuously for 27 seconds
(This will repeat 3 times). To turn off the system,
unlock the door or trunk lid with the transmitter
or the ignition key.
FEATURES OF YOUR HYUNDAI
1
9
!
Avoid trying to start the engine while the
system is armed.
B070D01NF-AAT
CAUTION:
Disarmed Stage
The system will be disarmed by using the
transmitter or the ignition key.
Only the driver’s door is unlocked by depressing once the «UNLOCK ( )» button on the
transmitter. If you wish to unlock all doors, press
the «UNLOCK ( )» button on the transmitter
again within 4 seconds.
Whenever the step above is completed, the turn
signal lights will blink twice to indicate that the
system is disarmed.
If any door, trunk lid or engine hood is not opened
or the ignition key is not inserted in the ignition
switch within 30 seconds, the system will be
rearmed.
NOTE:
When the system is disarmed while the
«DOOR» button of the interior light is depressed, the interior light will illuminate for
30 seconds.
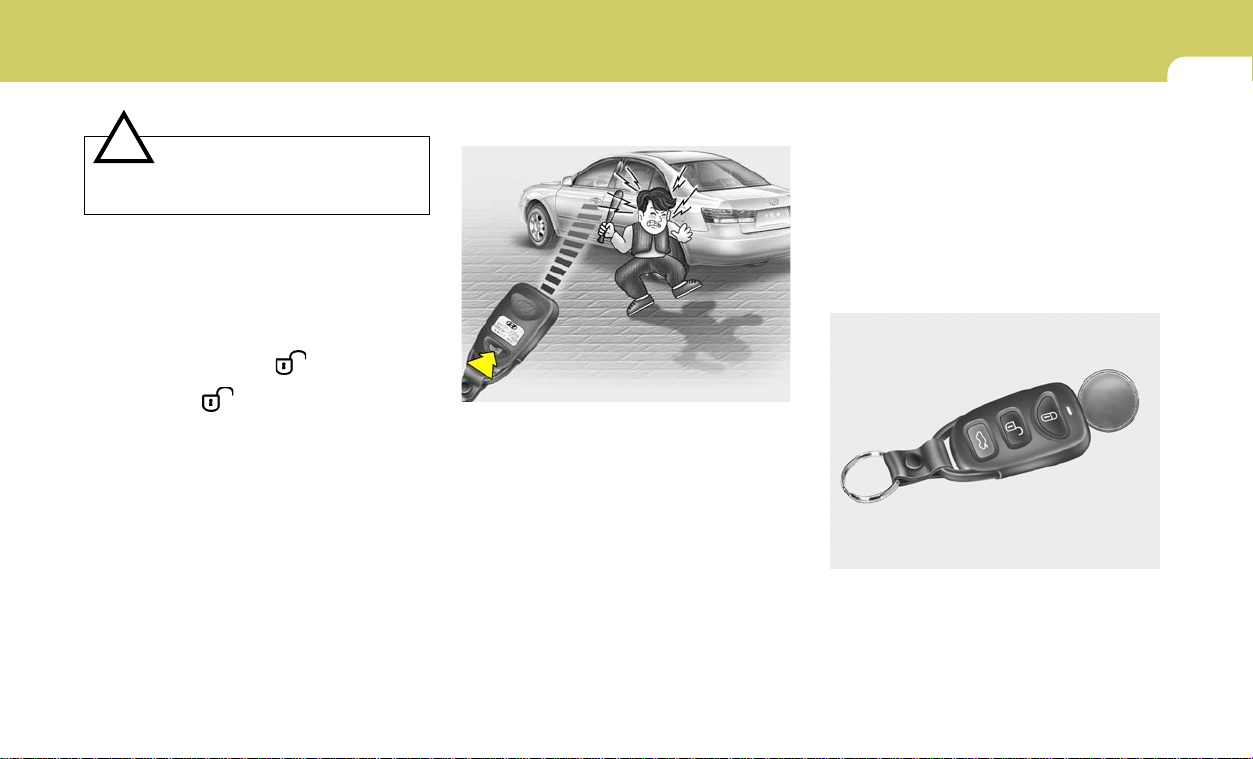
B070E01NF-AAT
Panic Warning
B070E02NF-A
1. Push the «PANIC» button on the backside of
the transmitter.
2. At the same time, the alarming horn will
sound and the turn signal lights will blink
continuously for 30 seconds.
3. To turn off the system, push the «PANIC»
button again on the backside of the transmitter.
B070E01NF-GAT
Replacing the battery
When the transmitter’s battery begins to get
weak, it may take several pushes on the button
to lock or unlock the doors, and the LED will not
light. Replace the battery as soon as possible.
Battery type : CR2032
Replacement instructions:
B070E01NF
1. Carefully separate the case with a coin as
shown in the illustration.

FEATURES OF YOUR HYUNDAI
1
10
Battery
2. Remove the old battery from the case and
note the polarity. Make sure the polarity of
the new battery is the same(+side facing up),
then insert it in the transmitter.
HNF2005
WINDOWS
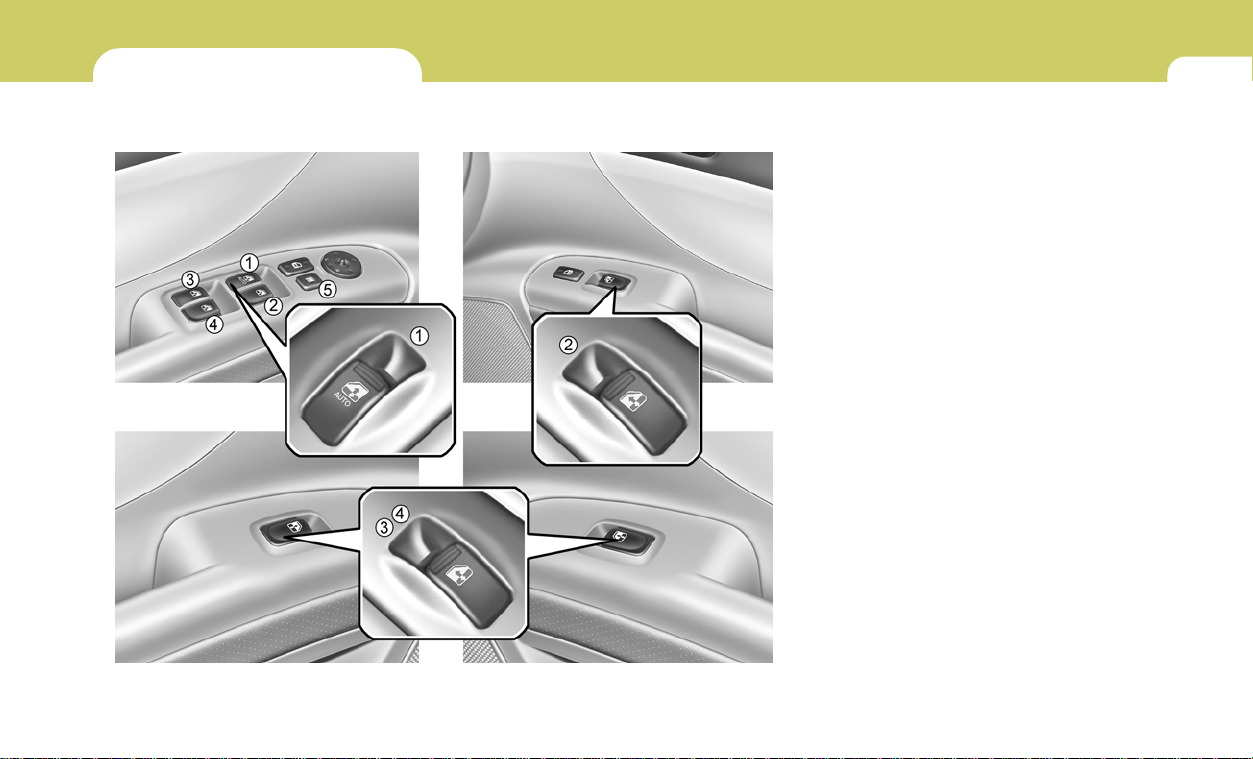
B060D01NF-GAT
FEATURES OF YOUR HYUNDAI
1. Driver’s door power window switch
2. Front passenger’s door power window switch
3. Rear passenger’s door power window switch
(left side)
4. Rear passenger’s door power window switch
(right side)
5. Window lock switch
1
11
HNF2017-1
FEATURES OF YOUR HYUNDAI
1
12
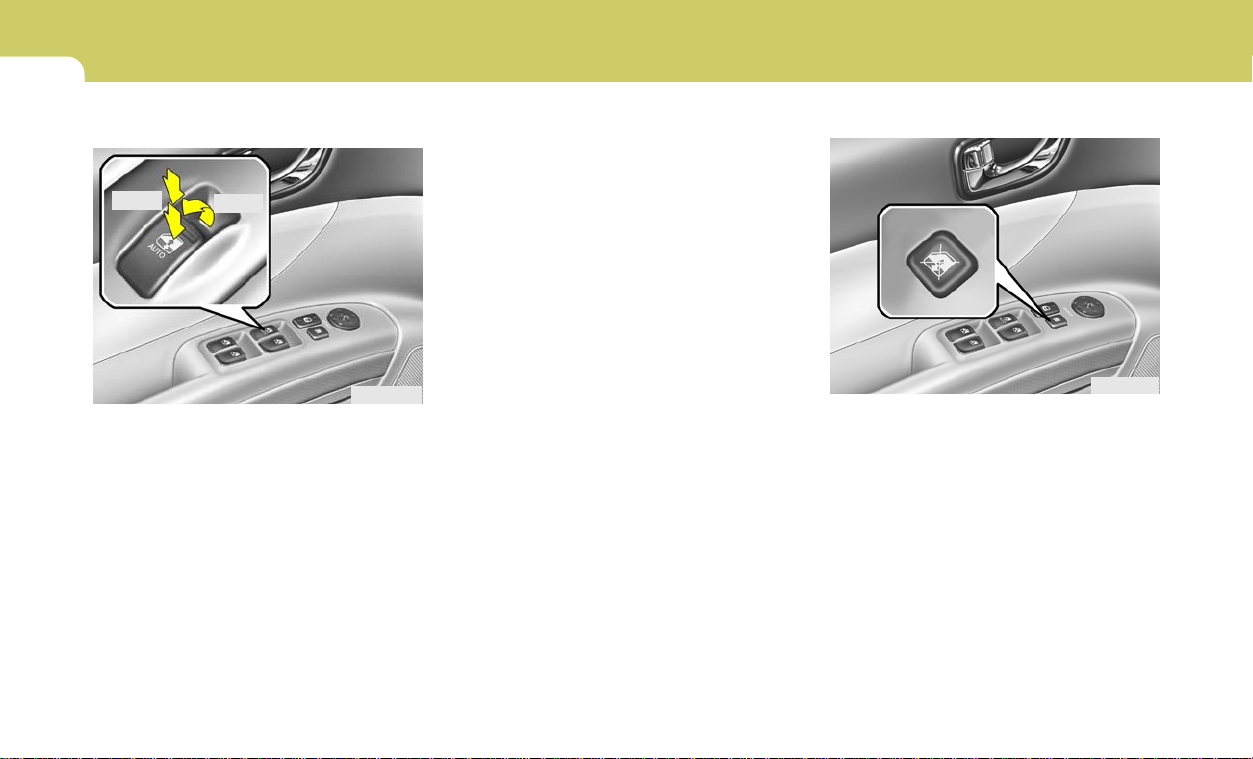
B060A01NF-GAT
POWER WINDOWS
Open
The power windows operate when the ignition
key is in the «ON» position. The main switches
are located on the driver’s armrest and control
the front and rear windows on both sides of the
vehicle. The windows may be opened by depressing the appropriate window switch and
closed by pulling up the switch. To open the
window on the driver’s side, press the switch
halfway down. The window moves as long as
the switch is operated.
Close
B060A01NF
Auto Up/Down Window
(Driver’s side)
The auto up/down window is controlled by the
main switch on the driver’s armrest.
To fully open the window automatically, press
the switch fully down. To fully close the window
automatically, pull the switch fully up. In automatic operation, the window will fully open or
close even if you let go of the switch. To stop the
window at the desired position while the window
is in operation, pull up or depress and release
the switch to the opposite direction of the movement.
NOTE:
If the battery has been recharged or disconnected, the auto up/down window system
must be reset as follows;
1. Turn the ignition key to «ON» position.
2. Pull up the driver’s window switch until
the window is fully closed and continue
pulling up the driver’s window switch
for at least 0.2 second.
If the auto up/down window is not reset, it
may not operate properly.
Window lock (Driver’s side)
HNF2019-A
In order to prevent operation of the passenger
front and rear windows, a window lock switch is
provided on the armrest of the driver’s door. To
disable the power windows, press the window
lock switch. To revert to normal operation,
press the window lock switch a second time.
FEATURES OF YOUR HYUNDAI
1
13
NOTE:
The power windows can be operated for 30
seconds after the ignition key is turned to
the «ACC» or «LOCK» positions, or removed
from the ignition switch.
If the front doors are opened during this 30
second period, the power windows can no
longer be operated without the ignition key
turned to the «ON» position.
Close
Open
HNF2018
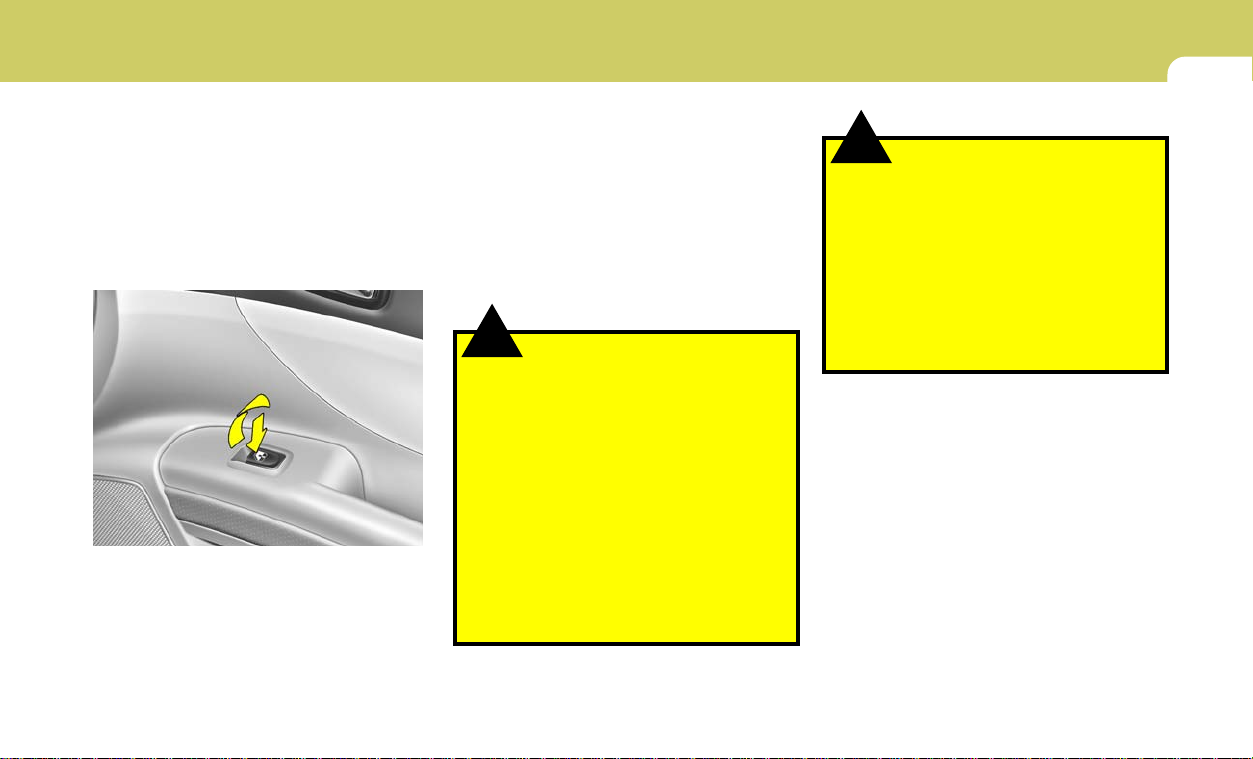
B060C01NF-AAT
Automatic Reverse Window
(Driver’s side)
If the upward movement of the window is blocked
by an object or part of the body, the window will
detect the resistance and will stop upward
movement. The window will then lower approximately 11.8 in.(30cm) to allow the object to be
cleared.
!
o The automatic reverse window will only
o If an object less than 0.16 in.(4 mm) in
WARNING:
operate when the automatic up window
operation feature is used. The automatic
reverse feature of the window will not
operate if the window is raised using the
halfway position on the power window
switch.
diameter is caught between the window
glass and the upper window channel,
the automatic reverse window may not
detect the resistance and will not stop
and reverse direction. Therefore, always
check for any obstructions before raising any window.
!
o Be careful that someone’s head, hands
o Never try to operate the main switch on
o Do not leave children alone in the car.
o Never leave the ignition key in the car.
WARNING:
and body are not trapped by a closing
window.
the driver’s door and the individual door
window switch in opposing directions
at the same time. If this is done, the
window will stop and cannot be opened
or closed.
FEATURES OF YOUR HYUNDAI
1
SEATS
14
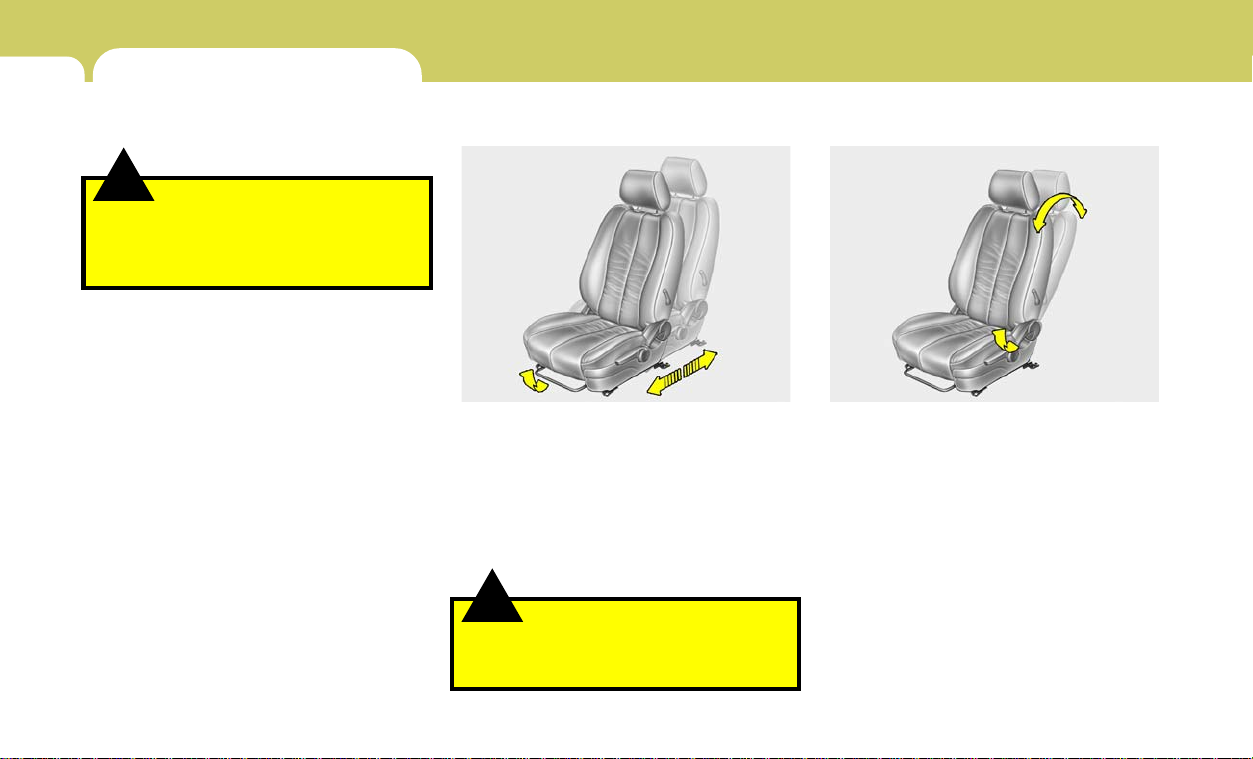
B080A01A-AAT
ADJUSTABLE FRONT SEATS
!
Never attempt to adjust the seat while the
vehicle is moving. This could result in loss
of control or an accident which may cause
death, serious injury, or property damage.
WARNING:
B080B02A-AAT
Adjusting Seat Forward and Rearward
HNF2032
To move the seat toward the front or rear, pull
the lock release lever upward. This will release
the seat on its track so you can move it forward
or rearward to the desired position. When you
find the position you want, release the lever and
slide the seat forward or rearward on its track
until it locks into the desired position and cannot
be moved further.
!
To ensure the seat is locked securely, attempt to move the seat forward or rearward
without using the lock release lever.
WARNING:
B080C01A-AAT
Adjusting Seatback Angle
HNF2033
To recline the seatback, lean forward to take
your weight off it, then pull up on the recliner
control lever at the outside edge of the seat. Now
lean back until the desired seatback angle is
achieved. To lock the seatback into position,
release the recliner control lever.
!
To minimize risk of severe injury in the
event of a collision or a sudden stop, both
the driver and passenger seatbacks should
always be in an upright position while the
vehicle is in motion. The protection provided by the seat belts and airbags may be
reduced significantly when the seatbacks
are reclined. There is greater risk that the
driver and passenger will slide under the
seat belt which may result in serious injury
if a crash occurs when the seatbacks are
reclined.
The seat belt cannot provide full protection
to an occupant if the seat back is reclined.
WARNING:
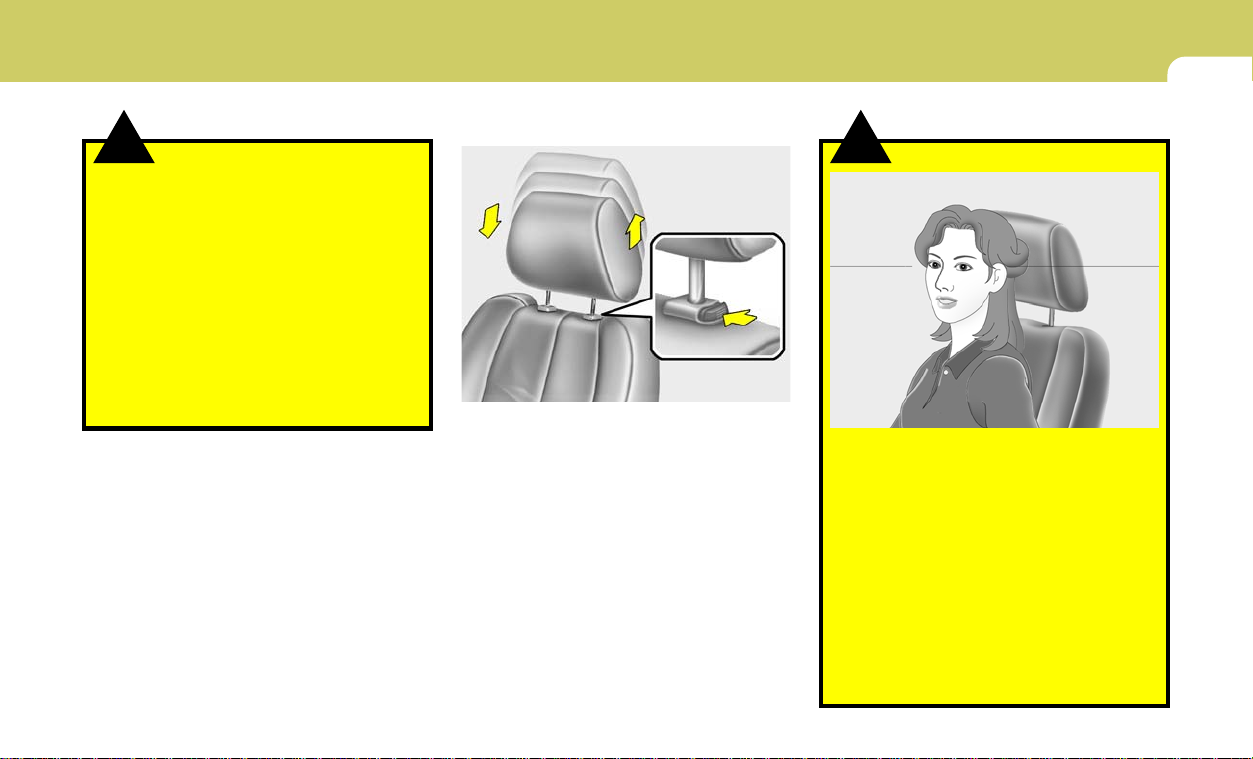
B080D02JM-AAT
Adjustable Headrests
Lock knob
B080D01NF
Headrests are designed to help reduce the risk
of neck injuries.
To raise the headrest, pull it up. To lower it, push
it down while pressing the lock knob. To remove
the headrest, raise it as far as it can go then
press the lock knob while pulling upward. This
should only be done when the seat is not
occupied.
FEATURES OF YOUR HYUNDAI
!
WARNING:
B080D01JM
o For maximum effectiveness in case of an
accident the headrest should be adjusted so the middle of the headrest is at
the same height as the top of the
occupant’s eyes. For this reason, the
use of a cushion that holds the body
away from the seatback is not recommended.
o Do not operate the vehicle with the head-
rests removed as injury to the occupants
may occur in the event of an accident.
Headrests may provide protection against
neck injuries when properly adjusted.
o Do not adjust the headrest height while
the vehicle is in motion.
1
15
FEATURES OF YOUR HYUNDAI
1
16
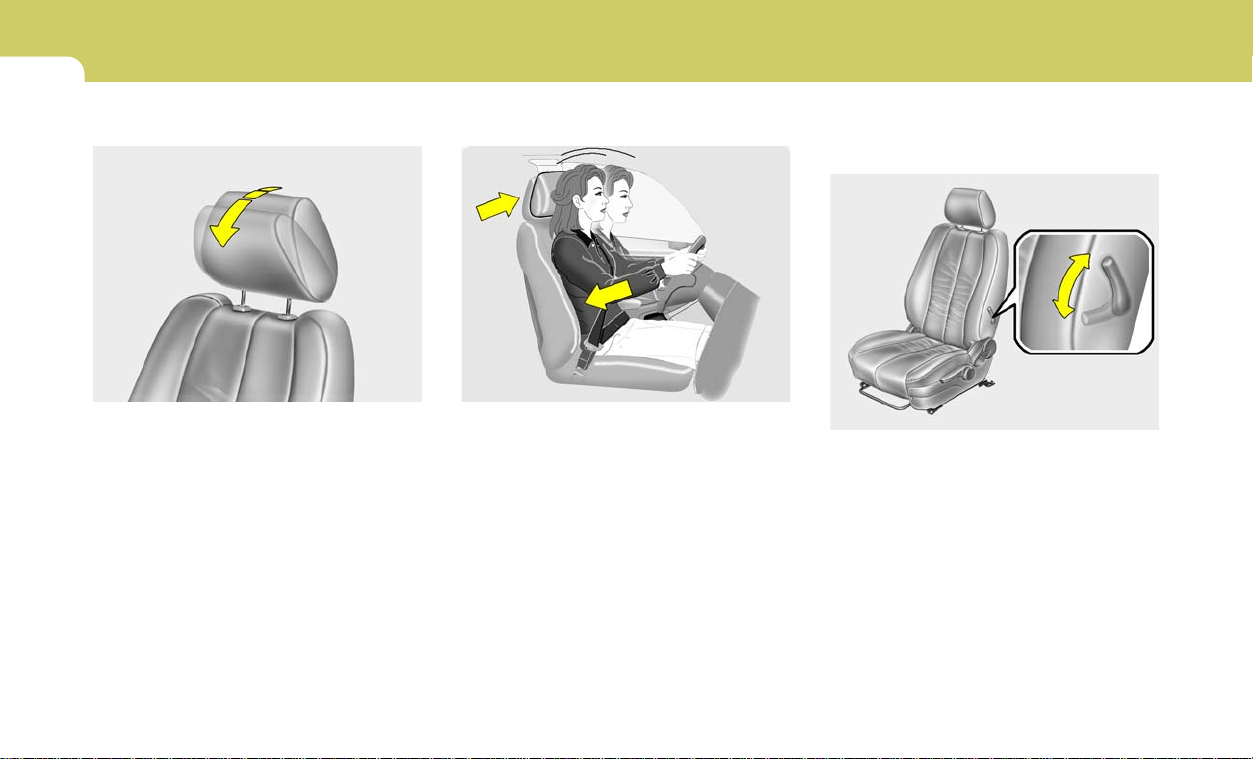
B081D01LZ-AAT
Tilting Headrest Forward and Rearward
B081D01NF
The headrest may be tilted forward to three
different positions by pulling the headrest forward. To adjust the headrest rearward, pull it
fully forward to the farthest position and release
it. Adjust the headrest so that it properly supports the head and neck.
B083D01NF-AAT
Active Headrests (If Installed)
HNF2041-1
The active headrest is designed to move forward and upward during a rear impact. This
helps to prevent the driver’s and front
passenger’s head from moving backward and
thus helps prevent neck injuries.
B080E01Y-AAT
Lumbar Support Control
(Driver’s Seat Only) (If Installed)
1
2
HNF2039
To adjust the lumbar support, turn the handle on
the outboard or left side of the seat. To increase
the amount of lumbar support, pull the lever
forward. To decrease it, push the lever toward
the rear.
1. Minimum support
2. Maximum support
FEATURES OF YOUR HYUNDAI
1
17
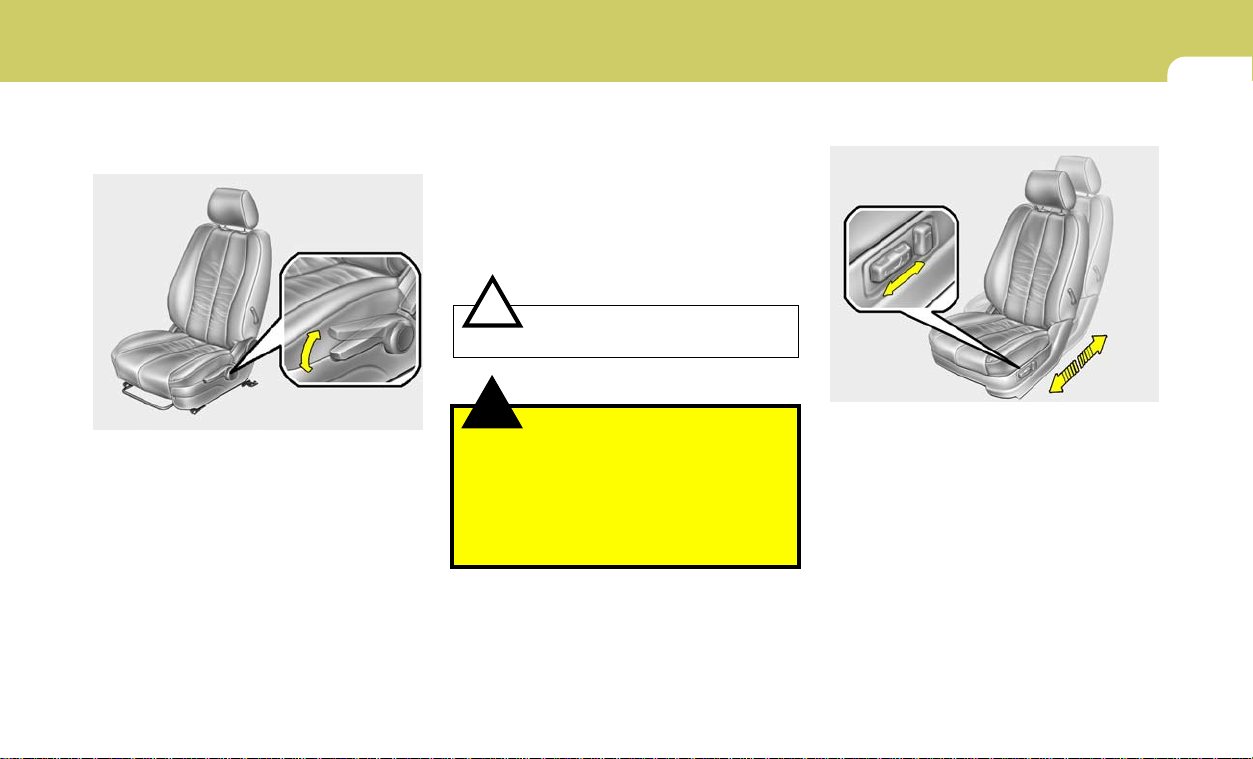
B080F01NF-GAT
Seat Height Adjustment
(Driver’s Seat Only)
HNF2034
To raise or lower the seat, raise or lower the
control lever to the desired seat height.
B090A01Y-AAT
POWER DRIVER’S SEAT (If Installed)
The driver’s seat can be adjusted by using the
control knobs on the left side of the seat. Before
driving, adjust the seat to the proper position so
as to easily control the steering wheel, pedals
and switches on the instrument panel.
!
Do not operate two knobs at the same time.
o Never attempt to adjust the seat while
o Do not sit or lean unnecessarily close to
CAUTION:
!
WARNING:
the vehicle is moving. This could result
in loss of control or an accident causing
death, serious injury, or property damage.
the airbag.
B090B01NF-GAT
Adjusting Seat Forward and Rearward
HNF2036
Pull the control knob forward or backward to
move the seat forward or backward to the
desired position. Release the control knob and
the seat will remain at that position.
Loading…
View the manual for the Hyundai Sonata (2005) here, for free. This manual comes under the category cars and has been rated by 4 people with an average of a 8.6. This manual is available in the following languages: English. Do you have a question about the Hyundai Sonata (2005) or do you need help?
Ask your question here
Frequently Asked Questions
Can’t find the answer to your question in the manual? You may find the answer to your question in the FAQs about the Hyundai Sonata (2005) below.
When does my Hyundai need maintenance?
Regular maintenance is necessary for every car. How often the car needs maintenance and what exactly needs to be done can be found in the maintenance instructions.
For major periodic service, this should generally be done every 2 years or after 30,000 kilometres.
One or more doors won’t open from the inside. Now what?
The lock is most likely set to the child safety lock so it cannot be opened from the inside. How to unset the child safety lock differs per brand and type.
My car radio does not turn on, now what?
If your car radio does not turn on, it will not receive any power. Check that the red wire is connected to the contact power supply and the yellow wire to the constant power supply.
How do I convert miles into kilometres?
1 mile equals 1.609344 kilometers and 1 kilometer equals 0.62137119 miles.
Where can I find the VIN number of my Hyundai?
The location of the VIN number of the car differs per brand and type of car.
The code may be stamped on the frame of the car or mounted on a plate. It is best to consult the manual of the Hyundai Sonata (2005)for the exact location of the VIN number.
When should I change the brake fluid of my Hyundai?
It is recommended to change the brake fluid every two years.
What is the difference between E10 and E5 petrol?
E10 petrol consists of up to ten per cent ethanol while E5 petrol will contain less than five per cent ethanol. As a result, the percentage of E10 petrol is lower than that of E5 petrol, making it less bad for the environment.
What is a VIN number?
The VIN number of a car is an identification number unique to each car. The abbreviation VIN therefore stands for Vehicle Identification Number.
Is the manual of the Hyundai Sonata (2005) available in English?
Yes, the manual of the Hyundai Sonata (2005) is available in English .
Is your question not listed? Ask your question here
Hyundai Sonata 2005 Quick Reference Guide
Quick Reference Guide
2 pages
en
271 pages
en
Hyundai Sonata 2005 Sedan Specification
The 2005 Hyundai Sonata Sedan is a mid-sized vehicle that combines style, performance, and affordability. It features a choice of two powertrains: a 2.4-liter inline-4 engine delivering 138 horsepower and an optional 2.7-liter V6 engine producing 170 horsepower. Both engines are paired with a 4-speed automatic transmission, with an option for a 5-speed manual transmission on the base model. The sedan’s fuel efficiency is commendable, with the inline-4 engine achieving approximately 22 mpg in the city and 30 mpg on the highway.
The exterior dimensions of the Hyundai Sonata 2005 include an overall length of 186.9 inches, a width of 71.7 inches, and a height of 56.3 inches, providing a spacious interior. The cabin offers ample legroom and headroom, with a total passenger volume of 105.3 cubic feet and a trunk capacity of 14.1 cubic feet. Standard interior features include air conditioning, power windows and locks, and an AM/FM stereo with a CD player. Higher trims offer additional amenities such as leather upholstery, a power sunroof, and an upgraded audio system.
Safety features in the 2005 Sonata include dual front airbags, front side-impact airbags, and anti-lock brakes (ABS). The vehicle’s construction integrates front and rear crumple zones and side-impact door beams to enhance occupant protection. The suspension system comprises an independent double-wishbone setup at the front and a multi-link configuration at the rear, providing a balanced ride and handling experience.
The Hyundai Sonata 2005 Sedan presents a compelling option for those seeking a reliable and well-equipped mid-sized sedan. Its combination of performance, comfort, and safety features, along with its competitive pricing, makes it a strong contender in its class.
Hyundai Sonata 2005 Sedan F.A.Q.
The recommended oil type for a 2005 Hyundai Sonata is 5W-20 or 5W-30. Always check the owner’s manual to confirm the specification.
To reset the check engine light, disconnect the battery for about 15 minutes. Reconnect it and start the car. If the light persists, it may indicate a deeper issue that needs diagnosing.
The recommended tire pressure for a 2005 Hyundai Sonata is typically 30-32 psi for both front and rear tires. Refer to the sticker on the driver’s side door jamb for precise specifications.
The timing belt should be replaced every 60,000 to 90,000 miles. It’s important to adhere to the maintenance schedule provided in the owner’s manual to avoid engine damage.
Overheating can be caused by low coolant levels, a faulty thermostat, a malfunctioning radiator fan, or a clogged radiator. Check these components and consult a mechanic if necessary.
A rough idle may be due to dirty fuel injectors, a clogged air filter, or faulty spark plugs. Cleaning or replacing these components can often resolve the issue.
To change the cabin air filter, locate the filter behind the glove box, remove the securing screws or tabs, and replace the old filter with a new one. Ensure it is seated correctly before reassembling.
Transmission slipping can be caused by low transmission fluid, worn clutch plates, or a faulty transmission control module. Check the fluid level and condition, and consult a professional for a thorough inspection.
Improving fuel efficiency can be achieved by maintaining proper tire pressure, performing regular engine tune-ups, using the recommended motor oil, and avoiding aggressive driving.
Symptoms of a failing alternator include dimming headlights, a dead battery, warning lights on the dashboard, and unusual noises. It is advisable to have the charging system tested if these occur.