

en
Operator’s Manual
bg
Инструкции за експлоатация
cs
Návod k obsluze
et
Kasutusjuhend
hr
Priruènik za operatora
hu
Kezelési útmutató
lt
Naudojimo instrukcija
lv
Operatora rokasgrāmata
pl
Instrukcja obs³ugi
ro
Manual de utilizare
ru
Руководство по эксплуатации
sl
Priroènik za uporabo
Model 120000
Vanguardt
RUN
Model 200000
Vanguardt
Briggs & Stratton is a registered trademark
of Briggs & Stratton Corporation
English
en
Български LietuviųMagyar Slovenšèina
bg cs hr slet hu
Èeština
eesti keel Hrvatski Latviešu Polski Русский
E 2008 Briggs & Stratton Corporation,
Milwaukee, WI, USA. All rights reserved.
lt lv pl ro ru
Form No. 277552EST A
Românã
1
I
RUN
D
E
M
J
K
H
C
F
C
B
H
A
L
H
G
N
2
A
C
4
5
AB
A
B
F
G
3
C
A
B
C
D
B
E
2
A
BRIGGSandSTRATTON.COM
D
6
RUN
A
7
B
A
A
8
10
A
B
A
9
D
B
C
E
F
D
D
E
11
A
A
D
B
C
F
G
12
E
D
A
B
C
A
B
13
14
C
B
RUN
B
A
3

General Information
For replacement parts or technical assistance, record below the engine model, type, and
code numbers along with the date of purchase. These numbers are located on your
engine (see the Features and Controls page).
WARNING
The engine exhaust from this product contains chemicals known to
the State of California to cause cancer, birth defects, or other
reproductive harm.
Date of purchase:
MM/DD/YYYY
Engine model:
Model: Code:Type:
Engine Power Rating Information
The gross power rating for individual gas engine models is labeled in accordance with
SAE (Society of Automotive Engineers) code J1940 (Small Engine Power & Torque
Rating Procedure), and rating performance has been obtained and corrected in
accordance with SAE J1995 (Revision 2002-05). Torque values are derived at 3060
RPM; horsepower values are derived at 3600 RPM. Actual gross engine power will be
lower and is affected by, among other things, ambient operating conditions and
engine-to-engine variability. Given both the wide array of products on which engines are
placed and the variety of environmental issues applicable to operating the equipment,
the gas engine will not develop the rated gross power when used in a given piece of
power equipment (actual “on-site” or net power). This difference is due to a variety of
factors including, but not limited to, accessories (air cleaner, exhaust, charging, cooling,
carburetor, fuel pump, etc.), application limitations, ambient operating conditions
(temperature, humidity, altitude), and engine-to-engine variability. Due to manufacturing
and capacity limitations, Briggs & Stratton may substitute an engine of higher rated
power for this Series engine.
Operator Safety
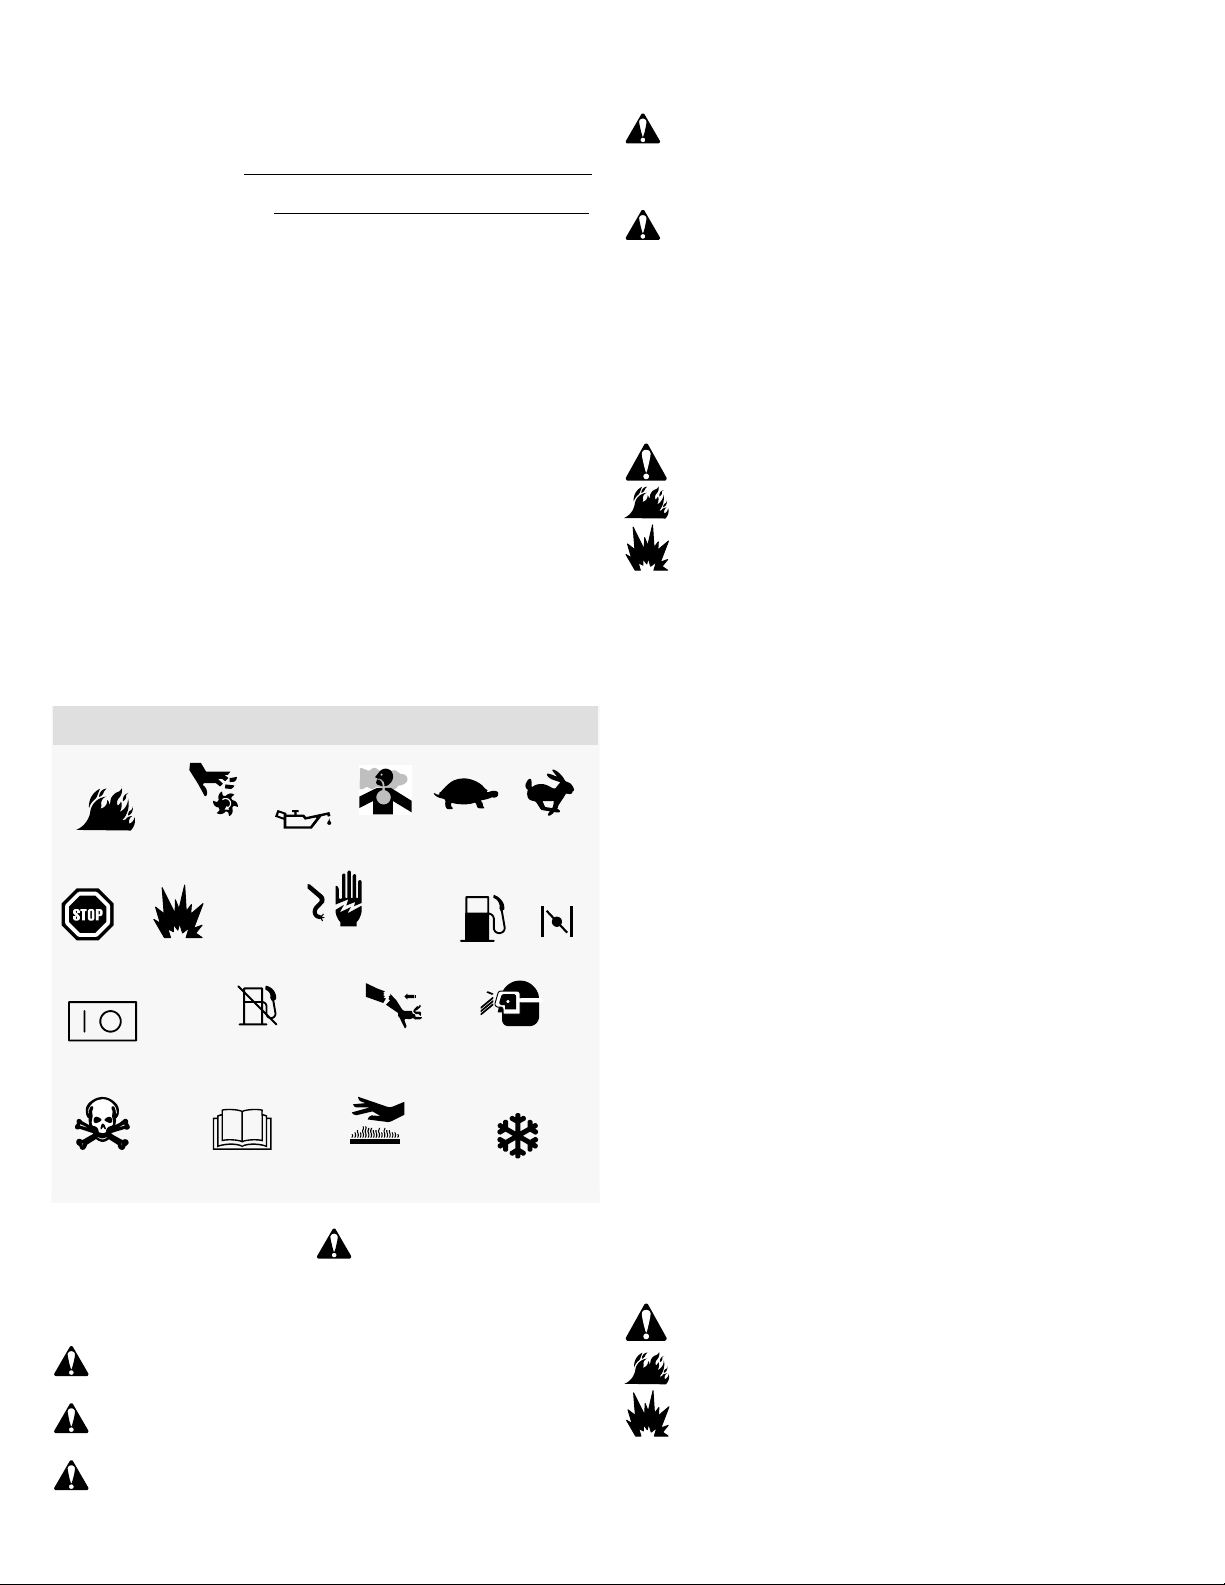
SAFETY AND CONTROL SYMBOLS
Fire
Fast
Choke
Hazardous
Chemical
Moving Parts
Stop
On Off
Read Manual
Oil
Explosion
Fuel Shutoff
Hot Surface
Toxic Fumes
Shock
Kickback
Frostbite
Slow
Fuel
Wear Eye
Protection
WARNING
Briggs & Stratton does not approve or authorize the use of these
engines on 3-wheel All Terrain Vehicles (ATVs), motor bikes,
fun/recreational go-karts, aircraft products, or vehicles intended for
use in competitive events. Use of these engines in such applications
could result in property damage, serious injury (including paralysis),
or even death.
CAUTION: This engine was shipped from Briggs & Stratton without oil. Before you start
the engine, make sure you add oil according to the instructions in this manual. If you
start the engine without oil, it will be damaged beyond repair and will not be covered
under warranty.
WARNING
Gasoline and its vapors are extremely flammable and explosive.
Fire or explosion can cause severe burns or death.
When Adding Fuel
• Turn engine off and let engine cool at least 2 minutes before removing the fuel cap.
• Fill fuel tank outdoors or in well-ventilated area.
• Do not overfill f uel tank. Fill tank to approximately 1.5 inches (38 mm) below top of
neck to allow for fuel expansion.
• Keep gasoline away from sparks, open flames, pilot lights, heat, and other ignition
sources.
• Check fuel lines, tank, cap, and fittings frequently for cracks or leaks. Replace if
necessary
• If fuel spills, wait until it evaporates before starting engine.
When Starting Engine
• Ensure that spark plug, muffler, fuel cap and air cleaner (if equipped) are in place
and secured.
• Do not crank engine with spark plug removed.
• If engine floods, set choke (if equipped) to OPEN/RUN position, move throttle (if
equipped) to FAST position and crank until engine starts.
When Operating Equipment
• Do not tip engine or equipment at angle which causes gasoline to spill.
• Do not choke the carburetor to stop engine.
• Never start or run the engine with the air cleaner assembly (if equipped) or the air
filter (if equipped) removed.
When Changing Oil
• If you drain the oil from the top oil fill tube, the fuel tank must be empty or fuel can
leak out and result in a fire or explosion.
When Transporting Equipment
• Transport with fuel tank EMPTY or with fuel shut-off valve OFF.
When Storing Gasoline Or Equipment With Fuel In Tank
• Store away from furnaces, stoves, water heaters or other appliances that have pilot
light or other ignition source because they can ignite gasoline vapors.
The safety alert symbol
result in personal injury. A signal word (DANGER, WARNING, or CAUTION) is used with the
alert symbol to indicate the likelihood and the potential severity of injury. In addition, a hazard
symbol may be used to represent the type of hazard.
DANGER indicates a hazard which, if not avoided, will result in death or
serious injury.
WARNING indicates a hazard which, if not avoided, could result in death or
serious injury.
CAUTION indicates a hazard which, if not avoided, might result in minor or
moderate injury.
CAUTION, when used without the alert symbol, indicates a situation that
could result in damage to the product.
is used to identify safety information about hazards that can
WARNING
Starting engine creates sparking.
Sparking can ignite nearby flammable gases.
Explosion and fire could result.
• If there is natural or LP gas leakage in area, do not start engine.
• Do not use pressurized starting fluids because vapors are flammable.
WARNING
Engines give off carbon monoxide, an odorless, colorless, poison gas.
Breathing carbon monoxide can cause nausea, fainting or death.
• Start and run engine outdoors.
• Do not start or run engine in enclosed area, even if doors or windows are open.
4 BRIGGSandSTRATTON.COM

WARNING
Rapid retraction of starter cord (kickback) will pull hand and arm toward
engine faster than you can let go.
Broken bones, fractures, bruises or sprains could result.
• When starting engine, pull the starter cord slowly until resistance is felt and then pull
rapidly to avoid kickback.
• Remove all external equipment/engine loads before starting engine.
• Direct-coupled equipment components such as, but not limited to, blades, impellers,
pulleys, sprockets, etc., must be securely attached.
WARNING
Rotating parts can contact or entangle hands, feet, hair, clothing, or
accessories.
Traumatic amputation or severe l aceration can result.
• Operate equipment with guards in place.
• Keep hands and feet away from rotating parts.
• Tie up long hair and remove jewelry.
• Do not wear loose-fitting clothing, dangling drawstrings or items that could become
caught.
WARNING
Running engines produce heat. Engine parts, especially muffler, become
extremely hot.
Severe thermal burns can occur on contact.
Combustible debris, such as leaves, grass, brush, etc. can catch fire.
• Allow muffler, engine cylinder and fins to cool before touching.
• Remove accumulated debris from muffler area and cylinder area.
• Install and maintain in working order a spark arrester before using equipment on
forest-covered, grass-covered, brush-covered unimproved land. The state of
California requires this (Section 4442 of the California Public Resources Code).
Other states may have similar laws. Federal laws apply on federal land.
WARNING
Unintentional sparking can result in fire or electric shock.
Unintentional start-up can result in entanglement, traumatic amputation,
or laceration.
Fire hazard
Before performing adjustments or repairs:
• Disconnect the spark plug wire and keep it away from the spark plug.
• Disconnect battery at negative terminal (only engines with electric start.)
• Use only correct tools.
• Do not tamper with governor spring, links or other parts to increase engine speed.
• Replacement parts must be the same and installed in the same position as the
original parts.
• Do not strike the flywheel with a hammer or hard object because the flywheel may
later shatter during operation.
When testing for spark:
• Use approved spark plug tester.
• Do not check for spark with spark plug removed.
en
5

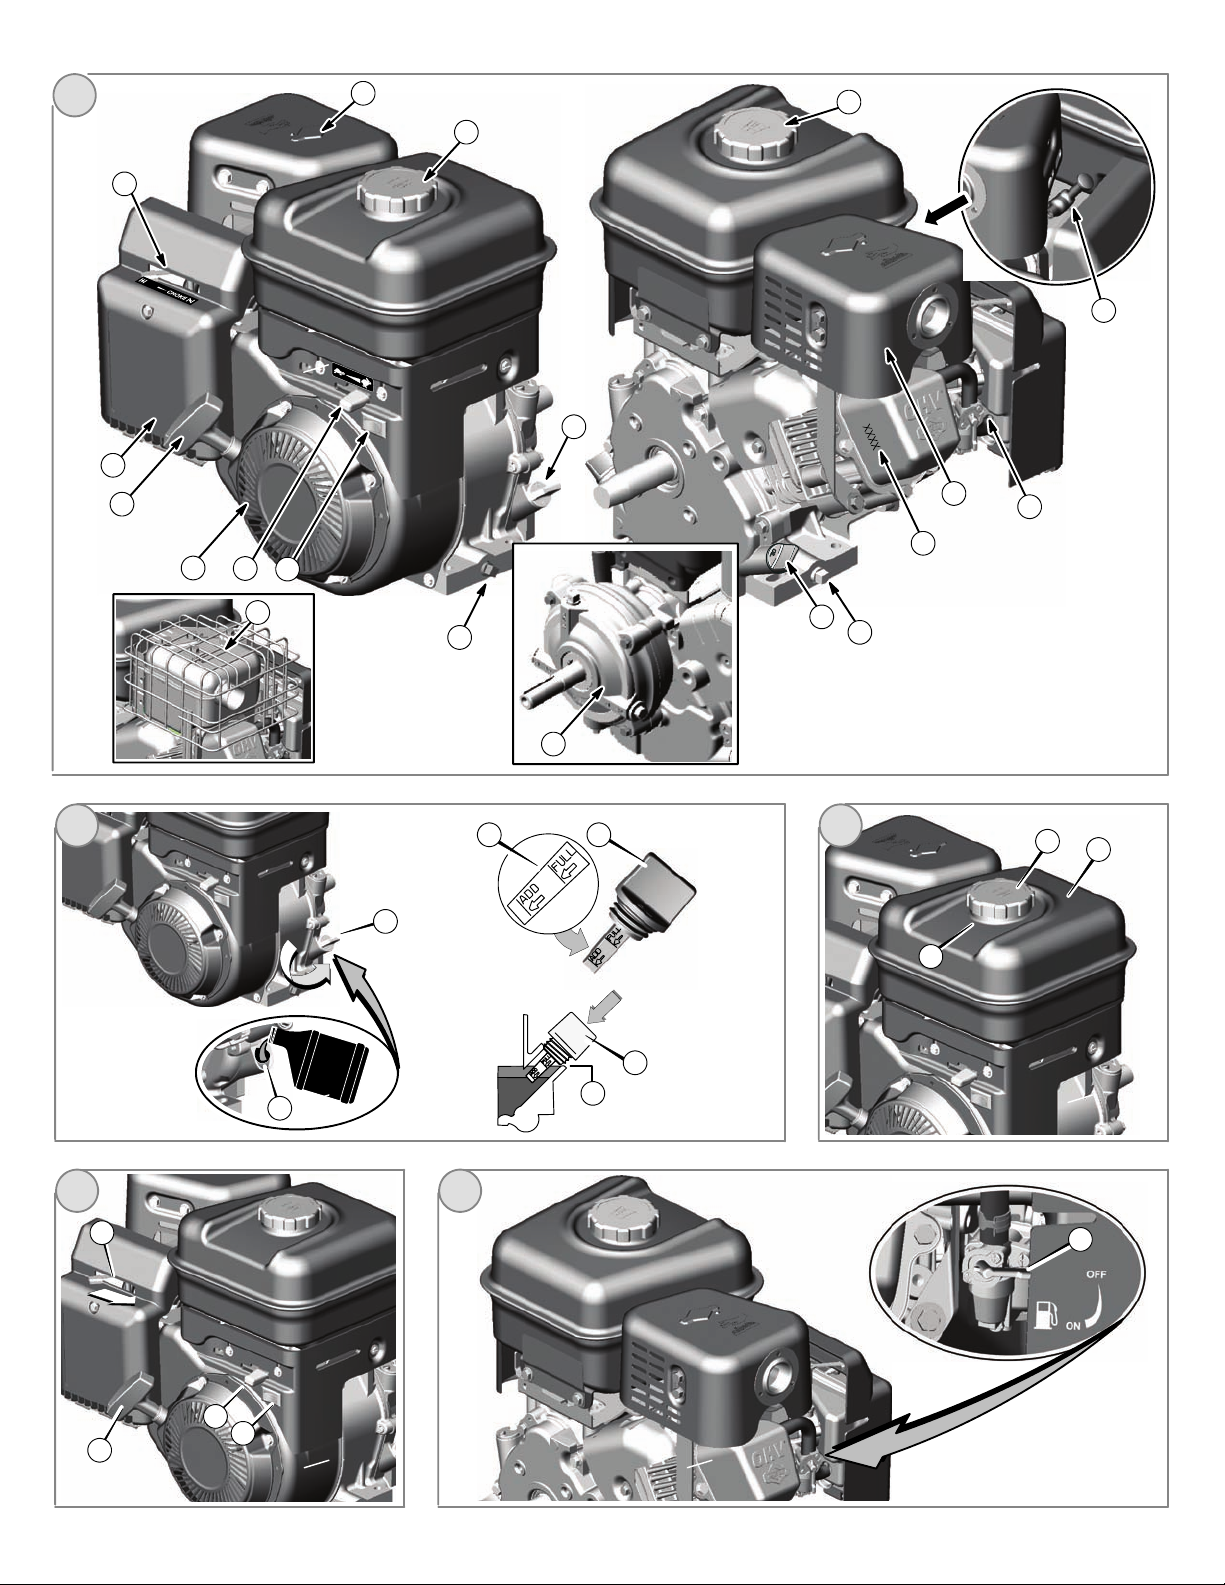
Features and Controls
Compare the illustration
various features and controls.
A. Engine Identification
Model Type Code
B. Spark Plug
C. Fuel Tank and Cap
D. Air Cleaner
E. Starter Cord Handle
F. Oil Fill and Dipstick
G. Oil Drain Plug
H. Muffler
Muffler Guard (optional)
Spark Arrester (optional)
I. Choke Control
J. Throttle Control (optional)
K. Stop Switch
L. Shut-off Valve (optional)
M. Finger Guard
N. Gear Reduction Unit (optional)
1
with your engine to familiarize yourself with the location of
Operation
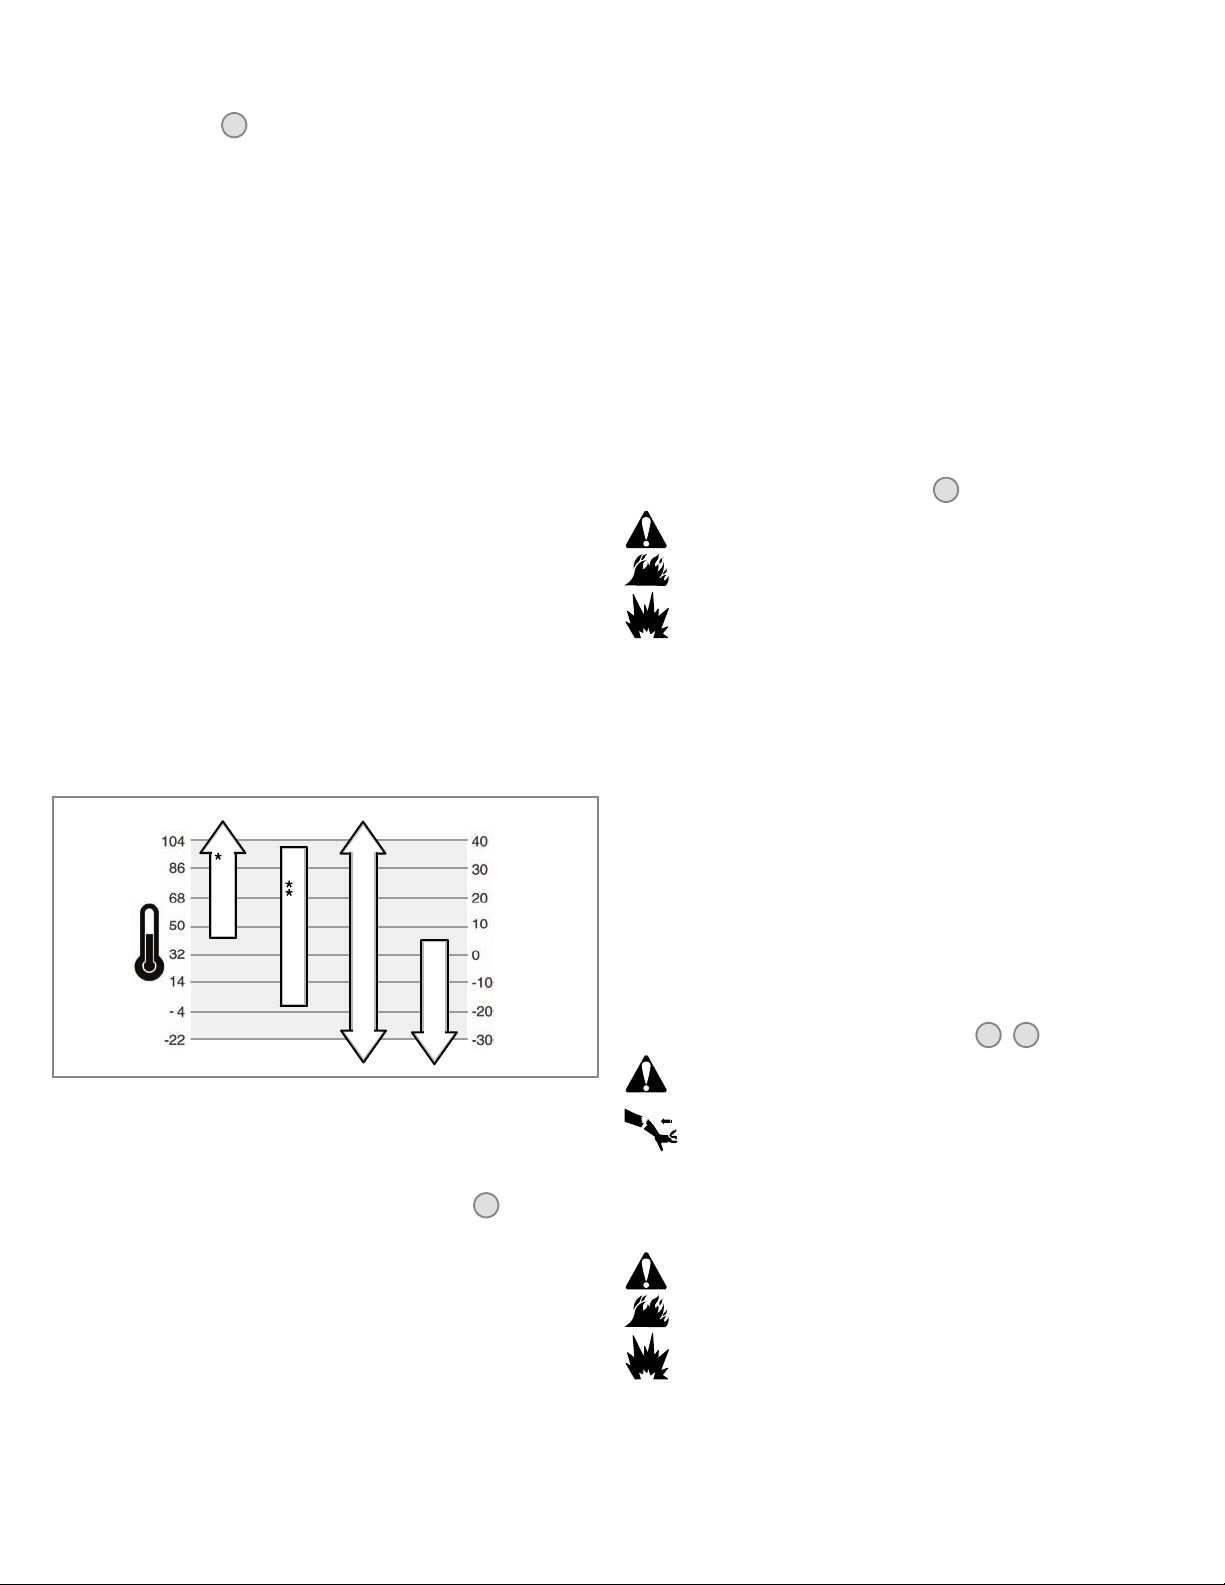
Oil capacity (see the Specifications section)
Oil Recommendations
We recommend the use of Briggs & Stratton Warranty Certified oils for best
performance. Other high-quality detergent oils are acceptable if classified for service SF,
SG, SH, SJ or higher. Do not use special additives.
Outdoor temperatures determine the proper oil viscosity for the engine. Use the chart to
select the best viscosity for the outdoor temperature range expected.
°F °C
providers or change brands. This engine is certified to operate on gasoline. The
emissions control system for this engine is EM (Engine Modifications).
High Altitude
At altitudes over 5,000 feet (1524 meters), a minimum 85 octane/85 AKI (89 RON)
gasoline is acceptable. To remain emissions compliant, high altitude adjustment is
required. Operation without this adjustment will cause decreased performance,
increased fuel consumption, and increased emissions. See a Briggs & Stratton
Authorized Dealer for high altitude adjustment information.
Operation of the engine at altitudes below 2,500 feet (762 meters) with t he high altitude
kit is not recommended.
How To Add Fuel — Figure
3
WARNING
Gasoline and its vapors are extremely flammable and explosive.
Fire or explosion can cause severe burns or death.
When Adding Fuel
• Turn engine off and let engine cool at least 2 minutes before removing the fuel cap.
• Fill fuel tank outdoors or in well-ventilated area.
• Do not overfill f uel tank. Fill tank to approximately 1.5 inches (38 mm) below top of
neck to allow for fuel expansion.
• Keep gasoline away from sparks, open flames, pilot lights, heat, and other ignition
sources.
• Check fuel lines, tank, cap, and fittings frequently for cracks or leaks. Replace if
necessary.
• If fuel spills, wait until it evaporates before starting engine.
1. Clean the fuel cap area of dirt and debris. Remove the fuel cap (A). See Figure 3.
2. Fill the fuel tank (B) with gasoline. To allow for expansion of the gasoline, do not fill
above the bottom of the fuel tank neck (C).
3. Reinstall the fuel cap.
How To Start The Engine — Figure
4 5
WARNING
Rapid retraction of starter cord (kickback) will pull hand and arm toward
SAE 30
10W-30
Synthetic 5W-30
* Below 40°F(4°C) the use of SAE 30 will result in hard starting.
** Above 80°F(27°C) the use of 10W-30 may cause increased oil consumption. Check
oil level more frequently.
How To Check/Add Oil — Figure
Before adding or checking the oil
• Place engine level.
• Clean the oil fill area of any debris.
1. Remove the dipstick (A) and wipe with a clean cloth.
2. Insert the dipstick but do not screw in. Oil level should be at the FULL mark (B)on
the dipstick.
3. To add oil, pour the oil slowly into the engine oil fill (C). Fill to point of overflowing.
4. Replace and tighten the dipstick.
2
5W-30
Fuel Recommendations
Fuel must meet these requirements:
• Clean, fresh, unleaded gasoline.
• A minimum of 87 octane/87 AKI (91 RON). High altitude use, see below.
• Gasoline with up to 10% ethanol (gasohol) or up to 15% MTBE (methyl tertiary
butyl ether) is acceptable.
CAUTION: Do not use unapproved gasolines, such as E85. Do not mix oil in gasoline or
modify the engine to run on alternate fuels. This will damage the engine components and
void the engine warranty.
To protect the fuel system from gum formation, mix a fuel stabilizer into the fuel. See
Storage. All fuel is not the same. If starting or performance problems occur, change fuel
engine faster than you can let go.
Broken bones, fractures, bruises or sprains could result.
• When starting engine, pull the starter cord slowly until resistance is felt and then pull
rapidly to avoid kickback.
WARNING
Gasoline and its vapors are extremely flammable and explosive.
Fire or explosion can cause severe burns or death.
When Starting Engine
• Ensure that spark plug, muffler, fuel cap and air cleaner are in place and secured.
• Do not crank engine with spark plug removed.
• If engine floods, set choke (if equipped) to open/run position, move throttle (if
equipped) to fast position and crank until engine starts.
WARNING
Engines give off carbon monoxide, an odorless, colorless, poison gas.
Breathing carbon monoxide can cause nausea, fainting or death.
• Start and run engine outdoors.
• Do not start or run engine in enclosed area, even if doors or windows are open.
CAUTION: This engine was shipped from Briggs & Stratton without oil. Before you start
the engine, make sure you add oil according to the instructions in this manual. If you
start the engine without oil, it will be damaged beyond repair and will not be covered
under warranty.
1. Check the oil level. See the How To Check/Add Oil section.
2. Make sure equipment drive controls, if equipped, are disengaged. See the equipment
manual for location and operation of these controls.
3. Push the stop switch (A) to the on position (Figure 4).
4. Move the throttle control (B), if equipped, to the fast
engine in the fast
5. Move the choke control (C) to the choke
position.
position.
position. Operate the
6 BRIGGSandSTRATTON.COM
Note: Choke is usually unnecessary when restarting a warm engine.
6. Turn the fuel shut -off valve (D), if equipped, to the on position (Figure 5).
7. Rewind Start: Firmly hold the starter cord handle (E). Pull the starter cord handle
slowly until resistance is felt, then pull rapidly (Figure 4).
Note: If the engine does not start after three attempts, go to
BRIGGSandSTRATTON.COM or call 1-800-233-3723 (in USA).
WARNING: Rapid retraction of the starter cord (kickback) will pull your
hand and arm toward the engine faster than you can let go. Broken bones,
fractures, bruises or sprains could result. When starting engine, pull the starter cord
slowly until resistance is felt and then pull rapidly to avoid kickback.
8. Electric Start: Turn the electric start switch to the on/start position. See the
equipment manual for the location and operation of the switch.
Note: If the engine does not start after three attempts, go to
BRIGGSandSTRATTON.COM or call 1-800-233-3723 (in USA).
CAUTION: To extend the life of the starter, use short starting cycles (five seconds
maximum). Wait one minute between starting cycles.
9. As the engine warms up, move the choke control (C)totherun
(Figure 4).
How To Stop The Engine — Figure
5 6
position
WARNING
Gasoline and its vapors are extremely flammable and explosive.
Fire or explosion can cause severe burns or death.
Maintenance Chart
First 5 Hours
• Change oil
Every8HoursorDaily
• Check engine oil level
• Clean area around muffler and controls
• Clean finger guard
Every 25 Hours or Annually
• Clean air filter *
• Clean pre-cleaner *
Every 100 Hours or Annually
• Change engine oil
• Check muffler and spark arrester
Every 100 Hours
• Change gear reduction oil (if equipped)
Annually
• Replace air filter
• Replace pre-cleaner
• Replace spark plug
• Clean/Replace fuel filter
• Clean air cooling system *
• Check valve clearance **
* In dusty conditions or when airborne debris is present, clean more often.
** Not required unless engine performance problems are noted.
• Do not choke the carburetor to stop engine.
1. Push the stop switch (A, Figure 6) to the off position
Electric Start: Turn the electric start switch to the off/stop position. See the
equipment manual for the location and operation of the switch.
2. After the engine stops, turn the fuel shut-off valve (D, Figure 5) to the closed position.
or
Maintenance
Use only original equipment replacement parts. Other parts may not perform as
well, may damage the unit, and may result in injury. In addition, use of other parts
may void your warranty.
We recommend that you see any Briggs & Stratton Authorized Dealer for all
maintenance and service of the engine and engine parts.
CAUTION: All t he components used to build this engine must remain in place for proper
operation.
Emissions Control
Maintenance, replacement, or repair of the emissions control devices and systems
may be performed by any non-road engine repair establishment or individual.
However, to obtain “no charge” emissions control service, the work must be performed
by a factory authorized dealer. See the Emissions Warranty.
WARNING
Unintentional sparking can result in fire or electric shock.
Unintentional start-up can result in entanglement, traumatic amputation,
or laceration.
Fire hazard
Carburetor Adjustment
Never make adjustments to the carburetor. The carburetor was set at the factory to
operate efficiently under most conditions. However, if adjustments are required, see any
Briggs & Stratton Authorized Dealer for service.
CAUTION: The manufacturer of the equipment on which this engine is installed specifies
the top speed at which the engine will be operated. Do not exceed this speed.
How To Check The Spark Plug — Figure
Check the gap (A, Figure  with a wire gauge (B). If necessary, reset the gap. Install
and tighten the spark plug to the recommended torque. For gap setting or torque, see the
Specifications section.
Note: In some areas, local law requires using a resistor spark plug to suppress ignition
signals. If this engine was originally equipped with a resistor spark plug, use the same
type for replacement.
Inspect Muffler And Spark Arrester — Figure
8
7
WARNING
Running engines produce heat. Engine parts, especially muffler, become
extremely hot.
Severe thermal burns can occur on contact.
Combustible debris, such as leaves, grass, brush, etc. can catch fire.
• Allow muffler, engine cylinder and fins to cool before touching.
• Remove accumulated debris from muffler area and cylinder area.
• Install and maintain in working order a spark arrester before using equipment on
forest-covered, grass-covered, brush-covered unimproved land. The state of
California requires this (Section 4442 of the California Public Resources Code).
Other states may have similar laws. Federal laws apply on federal land.
Inspect the muffler (A, Figure 7) for cracks, corrosion, or other damage. Remove the
spark arrester (B), if equipped, and inspect for damage or carbon blockage. If
replacement parts are required, make sure to use only original equipment replacement
parts.
Before performing adjustments or repairs:
• Disconnect the spark plug wire and keep it away from the spark plug.
• Use only correct tools.
• Do not tamper with governor spring, links or other parts to increase engine speed.
• Replacement parts must be the same and installed in the same position as the
original parts.
• Do not strike the flywheel with a hammer or hard object because the flywheel may
later shatter during operation.
en
WARNING: Replacement parts must be the same and installed in the same
position as the original parts or fire could result.
How To Change The Oil — Figure
CAUTION: Used oil is a hazardous waste product and must be disposed of properly. Do
not discard with household waste. Check with your local authorities, service center, or
dealer for safe disposal/recycling facilities.
9 10
Remove Oil
1. With engine off but still warm, disconnect the spark plug wire (A) and keep it away
from the spark plug (Figure 10).
7

2. Remove the oil drain plug (B, Figure 9). Drain the oil into an approved receptacle.
Note: Any of the oil drain plugs (C) shown may be installed in the engine.
3. After the oil has drained, install and tighten the oil drain plug.
Add oil
• Place engine level.
• Clean the oil fill area of any debris.
• See the Specifications section for oil capacity.
1. Remove the dipstick (D) and wipe with a clean cloth.
2. Pour the oil slowly into the engine oil fill (E). Fill to point of overflowing.
3. Install the dipstick but do not screw in. Remove and check the oil level. Oil level
should be at the FULL mark (F) on the dipstick.
4. Install and tighten the dipstick.
• Check fuel lines, tank, cap, and fittings frequently for cracks or leaks. Replace if
necessary.
• Before replacing the fuel filter, drain the fuel tank or close the fuel shut-off valve.
• Replacement parts must be the same and installed in the same position as the
original parts.
• If fuel spills, wait until it evaporates before starting engine.
1. Remove the fuel cap (A, Figure 13).
2. Remove the fuel filter (B).
3. If the fuel filter is dirty, clean or replace it. If you replace the fuel filter, make sure to
use an original equipment replacement filter.
How To Clean The Air Cooling System — Figure
14
How To Service The Air Filter — Figure
11
WARNING
Gasoline and its vapors are extremely flammable and explosive.
Fire or explosion can cause severe burns or death.
• Never start or run the engine with the air cleaner assembly or the air filter removed.
CAUTION: Do not use pressurized air or solvents to clean the filter. Pressurized air can
damage the filter and solvents will dissolve the filter.
The air cleaner system uses a pleated filter with an optional pre-cleaner. The pre-cleaner
can be washed and reused.
Flat Air Filter
1. Loosen the fastener (D) that holds the cover (A). See Figure 11.
2. Open the cover and remove the pre-cleaner (C) and the filter (B).
3. To loosen debris, gently tap the filter on a hard surface. If the filter is excessively
dirty, replace with a new filter.
4. Wash the pre-cleaner in liquid detergent and water. Then allow it to thoroughly air
dry. Do not oil the pre-cleaner.
5. Assemble the dry pre-cleaner to the filter with the lip (G) of the pre-cleaner on the
bottom of the filter pleats.
6. Install the filter.
7. Install the cover tabs (E) into the slots (F).
8. Close the cover and secure with the fastener.
How To Change The Gear Reduction Oil — Figure
If your engine is equipped with a gear reduction unit, service as follows.
1. Remove the oil fill plug (B) and the oil level plug (C).
2. Remove the oil drain plug (A, Figure 12) and drain the oil into an appropriate
receptacle.
3. Install and tighten the oil drain plug.
4. To refill, slowly pour gear lube into the oil fill hole (see Specifications section).
Continue to pour until the oil runs out of the oil level hole.
5. Install and tighten the oil level plug.
6. Install and tighten the oil fill plug.
Important: The oil fill plug has a vent hole (D) and must be installed on the top of the
gear case cover as shown.
How To Clean/Replace The Fuel Filter — Figure
12
13
WARNING
Gasoline and its vapors are extremely flammable and explosive.
Fire or explosion can cause severe burns or death.
WARNING
Running engines produce heat. Engine parts, especially muffler, become
extremely hot.
Severe thermal burns can occur on contact.
Combustible debris, such as leaves, grass, brush, etc. can catch fire.
• Allow muffler, engine cylinder and fins to cool before touching.
• Remove accumulated debris from muffler area and cylinder area.
CAUTION: Do not use water to clean the engine. Water could contaminate the fuel
system. Use a brush or dry cloth to clean the engine.
This is an air cooled engine. Dirt or debris can restrict air flow and cause the engine to
overheat, resulting in poor performance and reduced engine life.
Use a brush or dry cloth to remove debris from the finger guard (A). Keep linkage,
springs and controls (B) clean. Keep the area around and behind the muffler (C)freeof
any combustible debris (Figure 14).
After a period of time, debris can accumulate in the cylinder cooling fins and cause the
engine to overheat. This debris cannot be removed without partial disassembly of the
engine. Have a Briggs & Stratton Authorized Dealer inspect and clean the air cooling
system as recommended in the Maintenance Chart.
Storage
WARNING
Gasoline and its vapors are extremely flammable and explosive.
Fire or explosion can cause severe burns or death.
When Storing Gasoline Or Equipment With Fuel In Tank
• Store away from furnaces, stoves, water heaters or other appliances that have pilot
lights or other ignition sources because they can ignite gasoline vapors.
Fuel System
Fuel can become stale when stored over 30 days. Stale fuel causes acid and gum
deposits to form in the fuel system or on essential carburetor parts. To keep fuel fresh,
use Briggs & Stratton FRESH START
drip concentrate cartridge.
There is no need to drain gasoline from the engine if a fuel stabilizer is added according
to instructions. Run the engine for 2 minutes to circulate the stabilizer throughout the fuel
system. The engine and fuel can then be stored up to 24 months.
If gasoline in the engine has not been treated with a fuel stabilizer, it must be drained into
an approved container. Run the engine until it stops from lack of fuel. The use of a fuel
stabilizer in the storage container is recommended to maintain freshness.
Engine Oil
While the engine is still warm, change the engine oil.
®
fuel stabilizer, available as a liquid additive or a
• Keep gasoline away from sparks, open flames, pilot lights, heat, and other ignition
sources.
8
Troubleshooting
Need Assistance? Go to BRIGGSandSTRATT ON.COM or call 1-800-233-3723.
BRIGGSandSTRATTON.COM

Specifications
Engine Specifications
Model 120000
Displacement 12.48 ci (205 cc)
Bore 2.688 in (68.28 mm)
Stroke 2.200 in (55.88 mm)
Oil Capacity 18 — 20 oz (0.54 — 0.59 L)
Gear Reduction Oil 80W-90
Tune-up Specifications *
Model 120000
Spark Plug Gap 0.030 in (0.76 mm)
Spark Plug Torque 180 lb-in (20 Nm)
Armature Air Gap 0.010 — 0.014 in (0.25 — 0.36 mm)
Intake Valve Clearance 0.004 — 0.006 in (0.10 — 0.15 mm)
Exhaust Valve Clearance 0.009 — 0.011 in (0.23 — 0.28 mm)
* Engine power will decrease 3.5% for each 1,000 feet (300 meters) above sea level and 1% for each 10° F(5.6° C) above 77° F(25° C). The engine will operate satisfactorily at an
angle up to 15°. Refer to the equipment operator’s manual for safe allowable operating limits on slopes.
Engine Specifications
Model 200000
Displacement 18.63 ci (305 cc)
Bore 3.120 in (79.24 mm)
Stroke 2.438 in (61.93 mm)
Oil Capacity 26 — 28 oz (0.77 — 0.83 L)
Gear Reduction Oil SAE 30
Tune-up Specifications *
Model 200000
Spark Plug Gap 0.030 in (0.76 mm)
Spark Plug Torque 180 lb-in (20 Nm)
Armature Air Gap 0.008 — 0.012 in (0.20 — 0.30 mm)
Intake Valve Clearance 0.004 — 0.006 in (0.10 — 0.15 mm)
Exhaust Valve Clearance 0.009 — 0.011 in (0.22 — 0.28 mm)
Common Service Parts n
Service Part Part Number
Flat Air Filter 491588, 5043
Flat Air Filter Pre-cleaner 493537, 5064
Fuel Filter 792917
Fuel Additive 5041, 5058
n We recommend that you see any Briggs & Stratton Authorized Dealer for all maintenance and service of the engine and engine parts. Use only genuine Briggs & Stratton parts.
Service Part Part Number
Resistor Spark Plug 491055
Long Life Platinum Spark Plug 5066
Spark Plug Wrench 89838, 5023
Spark Tester 19368
en
9

BRIGGS & STRATTON ENGINE OWNER WARRANTY POLICY
May 2008
LIMITED WARRANTY
Briggs & Stratton Corporation will repair or replace, free of charge, any part(s) of the engine that is defective in material or workmanship or both. Transportation charges on
product submitted for repair or replacement under this warranty must be borne by purchaser. This warranty is effective for and is subject to the time periods and conditions
stated below. For warranty service, find the nearest Authorized Servic e Dealer in our dealer locator map at BRIGGSandSTRATTON.COM, or by calling
1-800-233-3723, or as listed in the ‘Yellow Pagest’.
There is no other expressed warranty. Implied warranties, including those of merchantability and fitness for a particular purpose, are limited to one year from
purchase, or to the extent permitted by law and all implied warranties are excluded. Liability for incidental or consequential damages are excluded to the extent
exclusion is permitted by law. Some states or countries do not allow limitations on how long an implied warranty lasts, and some states or countries do not allow the
exclusion or limitation of incidental or consequential damages, so the above limitation and exclusion may not apply to you. This warranty gives you specific legal rights and
you may also have other rights which vary from state to state and country to country.
STANDARD WARRANTY TERMS *
Brand/Product Type
Vanguardt
Extended Life Seriest, I/C®, Intekt I/C®, Intekt Pro
Snow Series MAXt with Du ra-Boret Cast Iron Sleeve
Consumer Use Commercial Use
2 years 2 years
2 years 1 year
2 years 1 year
Y
All Other Briggs & Stratton Engines 2 years 90 days
* These are our standard warranty terms, but occasionally there may be additional warranty coverage that was not determined at time of publication. For a listing of current
warranty terms for your engine, go to BRIGGSandSTRATTON.COM or contact your Authorized Briggs & Stratton Service Dealer.
Y
Engines used on Home Standby Generator applications are warranted under consumer use only. This warranty does not apply to engines on equipment used for prime
power in place of a utility. Engines used in competitive racing or on commercial or rental tracks are not warranted.
The warranty period begins on the date of purchase by the first retail consumer or commercial end user, and continues for the period of time stated in the table above. “Consumer
use” means personal residential household use by a retail consumer. “Commercial use” means all other uses, including use for commercial, income producing or rental purposes.
Once an engine has experienced commercial use, it shall thereafter be considered as a commercial use engine for purposes of this warranty.
No warranty registration is necessary to obtain warranty on Briggs & Stratton Products. Save your proof of purchase receipt. If you do not provide proof of the initial
purchase date at the time warranty service is requested, the manufacturing date of the product will be used to determine the warranty period.
About Your Warranty
Briggs & Stratton welcomes warranty repair and apologizes to you for being
inconvenienced. Any Authorized Service Dealer may perform warranty repairs. Most
warranty repairs are handled routinely, but sometimes requests for warranty service may
not be appropriate.
If a customer differs with the decision of the Service Dealer, an investigation will be made
to determine whether the warranty applies. Ask the Service Dealer to submit all
supporting facts to his Distributor or the Factory for review. If the Distributor or the
Factory decides that the claim is justified, the customer will be fully reimbursed for those
items that are defective. To avoid misunderstanding which might occur between the
customer and the Dealer, listed below are some of the causes of engine failure that the
warranty does not cover.
Normal wear: Engines, like all mechanical devices, need periodic parts service and
replacement to perform well. Warranty will not cover repair when normal use has
exhausted the life of a part or an engine. Warranty would not apply if engine damage
occurred because of misuse, lack of routine maintenance, shipping, handling,
warehousing or improper installation. Similarly, warranty is void if the serial number of the
engine has been removed or the engine has been altered or modified.
Improper maintenance: The life of an engine depends upon the conditions under which
it operates, and the care it receives. Some applications, such as tillers, pumps and rotary
mowers, are very often used in dusty or dirty conditions, which can cause what appears
to be premature wear. Such wear, when caused by dirt, dust, spark plug cleaning grit, or
other abrasive material that has entered the engine because of improper maintenance, is
not covered by warranty.
This warranty covers engine related defective material and/or workmanship only
and not replacement or refund of the equipment to which the engine may be
mounted. Nor does the warranty extend to repairs required because of:
1 Problems caused by parts that are not original Briggs & Stratton parts.
2 Equipment controls or installations that prevent starting, cause unsatisfactory engine
performance, or shorten engine life. (Contact equipment manufacturer.)
3 Leaking carburetors, clogged fuel pipes, sticking valves, or other damage, caused
by using contaminated or stale fuel.
4 Parts which are scored or broken because an engine was operated with insufficient
or contaminated lubricating oil, or an incorrect grade of lubricating oil (check and
refill when necessary, and change at recommended intervals). OIL GARD may not
shut down running engine. Engine damage may occur if oil level is not properly
maintained.
5 Repair or adjustment of associated parts or assemblies such as clutches,
transmissions, remote controls, etc., which are not manufactured by Briggs &
Stratton.
6 Damage or wear to parts caused by dirt, which entered the engine because of
improper air cleaner maintenance, re-assembly, or use of a non-original air cleaner
element or cartridge. At recommended intervals, clean and/or replace the filter as
stated in the Operator’s Manual.
7 Parts damaged by over-speeding, or overheating caused by grass, debris, or dirt,
which plugs or clogs the cooling fins, or flywheel area, or damage caused by
operating the engine in a confined area without sufficient ventilation. Clean engine
debris at recommended intervals as stated in the Operator’s Manual.
8 Engine or equipment parts broken by excessive vibration caused by a loose engine
mounting, loose cutter blades, unbalanced blades or loose or unbalanced impellers,
improper attachment of equipment to engine crankshaft, over-speeding or other
abuse in operation.
9 A bent or broken crankshaft, caused by striking a solid object with the cutter blade of
a rotary lawn mower, or excessive v-belt tightness.
10 Routine tune-up or adjustment of the engine.
,
11 Engine or engine component failure, i.e., combustion chamber, valves, valve seats,
valve guides, or burned starter motor windings, caused by the use of alternate fuels
such as, liquified petroleum, natural gas, altered gasolines, etc.
Warranty service is available only through authorized service dealers by Briggs &
Stratton Corporation. Locate your nearest Authorized Service Dealer in our dealer
locator map on BRIGGSandSTRATT ON .COM or by calling 1-800-233-3723, or as
listed in the ‘Yellow Pagest’.
10 BRIGGSandSTRATTON.COM

Emissions Control System Warranty Statement
Briggs & Stratton Corporation (B&S), the California Air Resources Board (CARB) and the United States Environmental Protection
Agency (U.S. EPA) Emissions Control System Warranty Statement (Owner’s Defect Warranty Rights and Obligations)
California, United States and Canada Emissions Control Defects
Warranty Statement
The California Air Resources Board (CARB), U.S. EPA and B&S are pleased to explain
the Emissions Control System Warranty on your small off-road engine (SORE). In
California, new small off-road engines model year 2006 and later must be designed, built
and equipped to meet the State’s stringent anti-smog standards. Elsewhere in the United
States, new non-road, spark-ignition engines certified for model year 1997 and later must
meet similar standards set forth by the U.S. EPA. B&S must warrant the emissions
control system on your engine for t he periods of time listed below, provided there has
been no abuse, neglect or improper maintenance of your small off-road engine.
Your emissions control system includes parts such as the carburetor, air cleaner, ignition
system, fuel line, muffler and catalytic converter. Also included may be connectors and
other emissions related assemblies.
Where a warrantable condition exists, B&S will repair your small off-road engine at no
cost to you including diagnosis, parts and labor.
Briggs & Stratton Emissions Control Defects Warranty Coverage
Small off-road engines are warranted relative to emissions control parts defects for a
period of two years, subject to provisions set forth below. If any covered part on your
engine is defective, the part will be repaired or replaced by B&S.
Owner’s Warranty Responsibilities
As the small off-road engine owner, you are responsible for the performance of the
required maintenance listed in your Operating and Maintenance Instructions. B&S
recommends that you retain all your receipts covering maintenance on your small
off-road engine, but B&S cannot deny warranty solely for the lack of receipts or for your
failure to ensure the performance of all scheduled maintenance.
As the small off-road engine owner, you should however be aware that B&S may deny
you warranty coverage if your small off-road engine or a part has failed due to abuse,
neglect, improper maintenance or unapproved modifications.
You are responsible for presenting your small off-road engine to an Authorized B&S
Service Dealer as soon as a problem exists. The undisputed warranty repairs should be
completed in a reasonable amount of time, not to exceed 30 days.
If you have any questions regarding your warranty rights and responsibilities, you should
contact a B&S Service Representative at (414) 259-5262.
The emissions warranty is a defects warranty. Defects are judged on normal engine
performance. The warranty is not related to an in-use emissions test.
Briggs & Stratton Emissions Control Defects Warranty Provisions
The following are specific provisions relative to your Emissions Control Defects Warranty Coverage. It is in addition to the B&S engine warranty f or non-regulated engines found in the
Operating and Maintenance Instructions.
1. Warranted Parts
Coverage under this warranty extends only to the parts listed below (the emissions
control systems parts) to the extent these parts were present on the engine
purchased.
a. Fuel Metering System
• Cold start enrichment system (soft choke)
• Carburetor and internal parts
• Fuel pump
• Fuel line, fuel line fittings, clamps
• Fuel tank, cap and tether
• Carbon canister
b. Air Induction System
• Air cleaner
• Intake manifold
• Purge and vent line
c. Ignition System
• Spark plug(s)
• Magneto ignition system
d. Catalyst System
• Catalytic converter
• Exhaust manifold
• Air injection system or pulse valve
e. Miscellaneous Items Used in Above Systems
• Vacuum, temperature, position, time sensitive valves and switches
• Connectors and assemblies
2. Length of Coverage
B&S warrants to the initial owner and each subsequent purchaser that the Warranted
Parts shall be free from defects in materials and workmanship which caused the
failure of the Warranted Parts for a period of two years from the date the engine is
delivered to a retail purchaser.
3. No Charge
Repair or replacement of any Warranted Part will be performed at no charge to the
owner, including diagnostic labor which leads to the determination that a Warranted
Part is defective, if the diagnostic work is performed at an Authorized B&S Service
Dealer. For emissions warranty service contact your nearest Authorized B&S
Service Dealer as listed in the “Yellow Pages” under “Engines, Gasoline,” “Gasoline
Engines,” “Lawn Mowers,” or similar category.
4. Claims and Coverage Exclusions
Warranty claims shall be filed in accordance with the provisions of the B&S Engine
Warranty Policy. Warranty coverage shall be excluded for failures of Warranted
Parts which are not original B&S parts or because of abuse, neglect or improper
maintenance as set forth in the B&S Engine Warranty Policy. B&S is not liable to
cover failures of Warranted Parts caused by the use of add-on, non-original, or
modified parts.
5. Maintenance
Any Warranted Part which is not scheduled for replacement as required
maintenance or which is scheduled only for regular inspection to the effect of “repair
or replace as necessary” shall be warranted as to defects for the warranty period.
Any Warranted Part which is scheduled for replacement as required maintenance
shall be warranted as to defects only for the period of time up to the first scheduled
replacement for that part. Any replacement part that is equivalent in performance
and durability may be used in the performance of any maintenance or repairs. The
owner is responsible for the performance of all required maintenance, as defined in
the B&S Operating and Maintenance Instructions.
6. Consequential Coverage
Coverage hereunder shall extend to the failure of any engine components caused
by the failure of any Warranted Part still under warranty.
Look For Relevant Emissions Durability Period and Air Index Information On Your Engine Emissions Label
Engines that are certified to meet the California Air Resources Board (CARB) Emissions
Standard must display information regarding the Emissions Durability Period and the Air
Index. Briggs & Stratton makes this information available to the consumer on our
emissions labels. The engine emissions label will indicate certification information.
The Emissions Durability Period describes the number of hours of actual running time
for which the engine is certified to be emissions compliant, assuming proper
maintenance in accordance with the Operating & Maintenance Instructions. The
following categories are used:
Moderate:
Engine is certified to be emissions compliant for 125 hours of actual engine running time.
Intermediate:
Engine is certified to be emissions compliant for 250 hours of actual engine running time.
en
Extended:
Engine is certified to be emissions compliant for 500 hours of actual engine running time.
For example, a typical walk-behind lawn mower is used 20 to 25 hours per year.
Therefore, the Emissions Durability Period of an engine with an intermediate rating
would equate to 10 to 12 years.
Briggs & Stratton engines are certified to meet the United States Environmental
Protection Agency (USEPA) Phase 2 emissions standards. For Phase 2 certified
engines, the Emissions Compliance Period referred to on the Emissions Compliance
label indicates the number of operating hours for which the engine has been shown to
meet Federal emissions requirements.
For engines less than 225 cc displacement.
Category C = 125 hours , Category B = 250 hours , Category A = 500 hours
For engines of 225 cc or more displacement.
Category C = 250 hours , Category B = 500 hours , Category A = 1000 hours
11
Общи сведения
За ˜езе˜вни …асти или техни…еска помощ запиμете по-долу номе˜ата на модела,
типа и кода на двигател ви, заедно с датата на купуването. ‚ези номе˜а се
нами˜ат въ˜ху двигател ви (ви¥те ст˜аницата Показатели и управления).
Дата на купуване:
MM/ÄÄ/øøøø
ВНИМАНИЕ, използвано áåç п˜едуп˜едителни символ, посо…ва
ситуаци,êîòî би могла да доведе до повреждане на продукта.
ПРЕДУПРЕЖДЕНИЕ
¤зго˜елите газове от този двигател съдъ˜¥ат хими…ески съединени,
известни на щата яалифо˜ни като п˜и…инители на ˜ак, ув˜е¥дани ï˜è
˜à¥äàíå, èëè ä˜óãè óâ˜å¥äàíè, свъ˜зани с ˜еп˜одуктивността.
Модел на двигателя:
flîäåë: ÿîä:‚èï:
Информация за номиналната мощност на двигателите
fiълната мощност въ˜ху отделните модели бензинови двигатели е отбелçàíà â
съответствие със създадени от SAE (Д˜у¥ество на ин¥ене˜ите от
автомобилната п˜омиμленост и т˜анспо˜та) fi˜авилник за техни…еска
експлоатаци J1940 (flетодика за оп˜еделне на номиналната мощност и
âú˜òùè момент на малки двигатели), а номиналната им мощност бе полу…ена и
ко˜иги˜ана в съответствие с ве˜сиòà íà fi˜авилника за техни…еска
експлоатаци J1995 на SAE (ˆедакци от 2002-05 г.). Стойностите на въ˜тùè
момент са изведени п˜и 3060 об/мин.; стойностите на мощността √ п˜и 3600
об/мин. Действителната пълна мощност на двигателите ще бъде по-ниска и се
влие, ме¥ду д˜угото, от околната с˜еда, в кото обо˜удването се експлоати˜а и
от ха˜акте˜истиките на всеки отделен двигател. fi˜è μè˜îêè íàáî˜ îò ìàμини,
въ˜ху които се поставт двигателите и п˜и ˜азнооб˜азието на екологи…ните
изисквани,âêîто обо˜удването ˜аботи, бензиновит двигател нма да ˜азвие
указаната от п˜оизводител пълна мощност, когато е монти˜ан на дадено
ене˜гийно обо˜удване (действителната мощност ∆на обекта∆ или ефективната
мощност). ‚ази ˜азлика се дъл¥и на голм б˜ой факто˜и, вкл˚…ително на
аксесоа˜ите към двигател (въздуμен филтъ˜, ауспух, система за за˜е¥дане,
система за охла¥дане, ка˜бу˜ато˜, го˜ивна помпа и т. н.), на ха˜акте˜ните
ог˜ани…ени за използването му, на условита в околната с˜еда, в кото
двигателт ˜аботи (темпе˜ату˜а, вла¥ност, надмо˜ска висо…ина), на ˜азли…и
във всеки отделен двигател. fiо˜ади технологи…ни и п˜оизводствени ог˜ани…ени
фи˜мата Briggs & Stratton мо¥е да замести даден двигател с по-висока
номинална мощност с двигател от тези се˜ии.
òà
Техника за безопасност на оператора
СИМВОЛИ ЗА БЕЗОПАСНОСТ И УПРАВЛЕНИЕ
Движещи
Огнеопасно
Ñòîï
Âêë. Èçêë.
Опасни
химикали
fi˜едуп˜едителнит символ за опасност
èíôî˜ìàöè за ˜искове, които могат да доведат до на˜анване на пе˜сонала.
Сигнализи˜аща дума (›fiæÑ‹›, fiˆÅćfiˆÅ≠ÄÅ‹¤Å èëè ◊‹¤fl拤Е) се постав
заедно с п˜едуп˜едителен символ, за да посо…и ве˜отността и потенциалната
се˜иозност на на˜анването. Допълнително, един символ за опасност мо¥е да
показва вида на опасността.
се части
Взривоопасно
Прекратяване
подаването на гориво
Прочетете
Ръководството
Масло
Опасност за поражения
от електрически ток
ОПАСНО посо…ва опасност, кото, ако не бъде избегната, ще доведе
до смърт или сериозно нараняване.
ПРЕДУПРЕЖДЕНИЕ посо…ва опасност, коòî, àêî íå áúäå
избегната, може да доведе до смърт или сериозно нараняване.
ВНИМАНИЕ посо…ва опасност, кото ако не бъде избегната, може да
доведе до малка или средна степен на нараняване.
Отровни
газове
Обратен
óäàð
Гореща
повърхност
îï˜åäåë п˜едох˜анителна
Бързи
обороти
Гориво
Да се носят
предпазни очила
измръзването
Бавни
обороти
Смукач
ПРЕДУПРЕЖДЕНИЕ
ÿî˜ïî˜àöè Briggs & Stratton íå îäîá˜ваинепозволва използването на
тези двигатели въ˜ху всъдеходи на 3 колела (ATVs), мотоциклети,
увеселителни коли…ки/за ка˜тинг, летателни апа˜ати или т˜анспо˜тни
с˜едства за у…астие в състезателни ме˜оп˜иòè. ¤зползването на тези
двигатели на такива маμини мо¥е да доведе до мате˜иални щети,
се˜иозни на˜анâàíè (âêë˚…ително па˜ализа) и до˜и до смъ˜т.
ВНИМАНИЕ: ‹àñòîùèт двигател се достав от Briggs & Stratton без масло.
fi˜еди да ста˜ти˜ате двигател се уве˜ете, …е сте налели масло спо˜ед
инст˜укциите в това ˜ъководство. жко го ста˜ти˜ате без масло, той ще се
пов˜еди, без да мо¥е да бъде поп˜авен и га˜анциòà íìà äà ãî ïîê˜èâà.
ПРЕДУПРЕЖДЕНИЕ
Бензинът и неговите пари са изключително огнеопасни и
избухливи.
Пожар или взрив могат да причинят сериозни обгаряния или смърт.
При доливане на гориво
• ¤çêë˚…ете двигател и го оставете да се охлади най-малко 2 минути, п˜еди
да свалите капа…ката на ˜езе˜воа˜а за го˜иво.
• fiълнете ˜езе˜воа˜а за го˜иво на отк˜ито или в доб˜е вентили˜ано
помещение.
• ‹е п˜епълвайте ˜езе˜воа˜а за го˜иво. fiълнете го п˜иблизително 1,5 ин…а
(38 mm) по-ниско от го˜ни ˜ъб на гъ˜ловината, за да позволите ˜азμи˜ение
на го˜ивото.
• Д˜ъ¥те бензина дале… от иск˜и, отк˜ити пламъци, сигнални лампи, топлина
и д˜уги запалителни изто…ници.
• fi˜îâå˜вайте …есто го˜ивоп˜оводите, ˜езе˜воа˜а, капа…ката и
съединенита за пукнатини и те…ове. Замен йте ги ако е необходимо.
• жко го˜ивото се ˜азлее, из…акайте докато то се изпа˜и, п˜еди да ста˜ти˜ате
двигател.
При стартиране на двигателя
• ‡ве˜ете се, …е запалителната свещ, μумозаглуμèòåë, êàïà…êàòà íà
˜езе˜воа˜а за го˜иво и въздуμíè филтъ˜ (ако има такъв) са на мстото си и
са обезопасени.
• ‹е ˜азвъ˜тайте двигател с извадена запалителна свещ.
• жко двигателт се задави, поставете смука…а (ако има такъв) на позици
OPEN/RUN, п˜еместете ˜ъ…ната газ (ако има такава) на позици FAST и
˜азвъ˜тайте, докато двигателò ñòà˜òè˜à.
При работеща машина
• ‹е накланйте двигател èëè ìàμината под ъгъл, който води до ˜азливане на
бензина.
• ‹å çàïóμвайте ка˜бу˜ато˜а, за да сп˜ете двигател.
• ‹икога не ста˜ти˜айте и не ˜аботете с двигател, на който въздуμíè
филтъ˜ен (ако има такъв) комплект е свален.
Когато сменявате маслото
жко изто…вате маслото п˜ез го˜ната т˜ъба за наливане, ˜езе˜воа˜ът за
•
го˜ивото т˜бва да бъде п˜азен, защото в п˜отивен слу…ай мо¥е да има те…
на го˜иво, водещ до по¥а˜ или експлози.
При транспортиране на машината
• ‚˜анспо˜ти˜айте с fiˆжЗЕ‹ ˜езе˜воа˜, или с к˜ан за подаване на го˜иво на
позици OFF.
Когато складирате бензин или оборудване с гориво в резервоара
• Склади˜айте дале… от пещи, пе…ки, водонаг˜еватели или д˜уги елект˜и…ески
п˜ибо˜и, които имат сигнална лампа или д˜уг запалителен изто…ник, защото
те могат да възпламент бензиновите па˜и.
ПРЕДУПРЕЖДЕНИЕ
Пускането на двигателя създава искрене.
Искренето може да възпламени намиращите се наоколо запалими
газове.
Това може да доведе до експлозия и пожар.
• жко има изти…ане на п˜и˜оден или вте…нен газ п˜опан в помещението, не
ста˜ти˜айте двигател.
• ‹е използвайте го˜ива за на…ално запалване под налгане, защото па˜ите им
са запалителни.
12 BRIGGSandSTRATTON.COM

ПРЕДУПРЕЖДЕНИЕ
Двигателите изпускат въглероден окис, който е отровен газ, без
мирис и цвят.
Вдишването на въглероден окис може да причини гадене,
припадък или смърт.
• Ста˜ти˜айте и ˜аботете с двигател навън.
• ‹е ста˜ти˜айте и не ˜аботете с двигател в затво˜ено помещение, до˜и и п˜и
îòâî˜åíè â˜àòè èëè ï˜îçî˜öè.
ПРЕДУПРЕЖДЕНИЕ
Бързото оттегляне на пусковото въже (обратен удар) ще придърпа
изцяло ръката ви към двигателя по-бързо, отколкото вие можете да
я отдръпнете.
Това може да причини счупени кости, фрактури, контузии и
навяхвания.
• яогато ста˜ти˜ате двигател, изтеглете бавно въ¥ето на ста˜те˜а, докато
усетите съп˜отивление, а после ˜зко д˜ъпнете, за да избегнете об˜атни
óäà˜.
• ¤çêë˚…åòå âñêî âúíμно обо˜удване/задви¥вано от двигател, ï˜åäè äà ãî
ñòà˜òè˜àòå.
• Ди˜ектно п˜ика…ените към двигател ìàμинни елементи като но¥ове, пе˜ки,
лебедки, зъбни колела, задви¥ващи ве˜иги и д˜уги, т˜бва да бъдат сигу˜но
п˜ик˜епени.
ПРЕДУПРЕЖДЕНИЕ
Въртящите се части могат да допрат или захванат ръце, крака,
коса, облекло или принадлежности.
Може да се достигне до травматична ампутация или сериозно
нараняване.
• ˆаботете с двигател п˜и поставени защитни капаци.
• Д˜ъ¥те ˜ъцете и к˜аката си дале… от въ˜тùè ñå …àñòè.
• fi˜ивъ˜звайте дългите коси и свалéòå óê˜àμåíèòà.
• ‹е носете по себе си μи˜око облекло, висùè μну˜ове или вещи, които могат
да бъдат захванати.
ПРЕДУПРЕЖДЕНИЕ
Работещите двигатели отделят топлина. Частите на двигателите,
особено шумозаглушителя, стават изключително горещи.
При допир може да получите сериозно изгаряне.
Горимите отпадъци, като листа, треви, храсталак и други, могат да
се запалят.
• ›ставете μумозаглуμèòåë, цилиндъ˜а на двигател è ˜åá˜àòà äà ñå
охладт, п˜еди да ги докосвате.
• ›тст˜анете нат˜упаните отломки около μумозаглуμèòåë и цилиндъ˜а.
• flонти˜айте и поддъ˜¥айте в ˜аботно състоние иск˜огасител, ï˜åäè äà
използвате двигател на залесени места, зат˜евени площи, площи с х˜асти и
необ˜аботени места. Ватът яалифо˜ни изисква това (в ˆаздел 4442 на
яалифо˜нийски п˜авилник за обществени ˜есу˜си). ◊ъзмо¥ноед˜угищати
да имат подобни закони. ·еде˜алните закони се п˜илагат на феде˜ална
те˜ито˜и.
ПРЕДУПРЕЖДЕНИЕ
Случайно искрене може да доведе до пожар или поразяване от
електрически ток.
Неволно стартиране може да доведе до захващане, травматична
ампутация или до раняване.
Опасност от пожар
Преди извършване на настройки и поправки:
• ›тка…ете кабела на запалителната свещ и го д˜ъ¥те дале… от не.
• ›тка…ете минус-клемата на акумулато˜а (само п˜и двигатели с елект˜и…ески
ñòà˜òå˜).
• ¤зползвайте само подходщи инст˜ументи.
• ‹е застопо˜вайте лостовите системи с ˜егули˜ащата п˜у¥ина, или с д˜уги
…àñòè, çà äà ïîâèμите обо˜отите на двигател.
• ˆезе˜вните …асти т˜бва да бъдат със същото ка…ество и да се монти˜ат в
същата позици, както о˜игиналните …асти.
• ‹å óä˜йте маховика с …ук или твъ˜д п˜едмет, защото той мо¥е да се ст˜оμè
по в˜еме на ˜абота.
При изпробване за искра:
• ¤зползвайте одоб˜ен тип тесте˜ за свещи.
• ‹е п˜авете п˜ове˜ка за иск˜а п˜и извадена запалителна свещ.
bg
13
Елементи и управления
С˜авнете ил˚ñò˜àöèòà1ñâàμи двигател, за да се запознаете с
˜азполо¥ението на ˜азли…ните елементи и уп˜авлени.
A. flа˜ки˜овка на двигател
Модел Тип Код
B. Запалителна свещ
C. ˆåçå˜âîà˜ çà ãî˜èâî è êàïà…êà
D. ◊úçäóμен филтъ˜
E. ˆъкохватка на въ¥ето за ˜ъ…ни ñòà˜òå˜
F. ›тво˜ за наливане на масло и нивопоказател
G. fi˜обка за изто…ване на маслото
H. Жумозаглуμèòåë
ÿî¥óõ íà μумозаглуμèòåë (ïî îïöè)
¤ск˜огасител (по опци)
I. ⁄ ост на смука…а
J. ˆú…íà ãàç (ïî îïöè)
K. Ñòîï êë˚…
L. я˜ан…е за подаване на го˜ивото (по опци)
M. fi˜едпазител за п˜ъстите
N. Зъбна ˜едукто˜на кути (ïî îïöè)
Работа
◊местимост за масло (нап˜авете сп˜авка в ˜аздел Технически данни).
Препоръки за маслото
За полу…аване на най-доб˜и техни…ески показатели п˜епо˜ъ…ваме използването
на маслата на Briggs & Stratton с га˜анци и се˜тификат за ка…ество. Д˜уги
високока…ествени масла с миещи п˜исадки са п˜иемливи, ако са класифици˜ани
за ˜аботни ˜е¥ими SF, SG, SH, SJ или по-високи. Да не се използват специални
добавки.
◊úíμните темпе˜ату˜и оп˜еделт п˜авилни вискозитет на маслото за
двигател. ¤зползвайте таблицата, за да избе˜ете най-доб˜и вискозитет за
о…аквани диапазон на вънμните темпе˜ату˜и.
°F °C
SAE 30.
10W-30
Синтетично 5W-30
5W-30
• Ÿензин със съдъ˜¥ание на не пове…е от 10% етанол (бензоспи˜т) или до
15% MTBE (т˜и-метил бутилов ете˜) е п˜иемлив.
ВНИМАНИЕ: ‹е използвайте неодоб˜ени бензини като E85. ‹е смесвайте
бензина с масло, не го модифици˜айте за ˜абота с алте˜нативни го˜ива. ‚ова ще
пов˜еди компонентите на двигател è ще анулира гаранцията му.
За да п˜едпазите го˜ивната система от об˜азуване на смоли, добавете
стабилизато˜ в го˜ивото. ‹ап˜авете сп˜авка в Складиране. шо˜ивата не са едни
същи. жко настъпи п˜облем със ста˜ти˜ането или техни…еските показатели,
сменете достав…иците или ма˜ките на го˜ивото. ‹астоùèтдвигателима
се˜тификат за ˜абота с бензин. Системата за бо˜ба с в˜едните емисии за този
двигател е EM (flодификации на двигателите)
Голяма надморска височина
fi˜и надмо˜ски висо…ини над 5000 фута (1524 мет˜а), бензин с минимално
октаново …исло 85/85 AKI (89 RON), е п˜иемлив. За да остане съвместим с
изискванита за нивото на емисиите, се налага наст˜ойка на двигател â
съответствие с голмата надмо˜ска висо…ина. ˆаботата без такава наст˜ойка ще
доведе до пони¥аване на техни…еските показатели, повиμаване на
консумацита на го˜иво и увели…ени в˜едни емисии. ‹ап˜авете сп˜авка п˜и
‡пълномощен п˜едставител на Briggs & Stratton за сведени относно наст˜ойката
за голма надмо˜ска висо…ина.
‹е се п˜епо˜ъ…ва ˜абота на двигател с ˜егули˜ащ комплект за голма
надмо˜ска висо…ина п˜и висо…ини под 2500 фута (762 мет˜а).
Как да наливаме гориво — Фигура
3
ПРЕДУПРЕЖДЕНИЕ
Бензинът и неговите пари са изключително огнеопасни и
избухливи.
Пожар или взрив могат да причинят сериозни обгаряния или смърт.
При доливане на гориво
• ¤çêë˚…ете двигател и го оставете да се охлади най-малко 2 минути, п˜еди
да свалите капа…ката на ˜езе˜воа˜а за го˜иво.
• fiълнете ˜езе˜воа˜а за го˜иво на отк˜ито или в доб˜е вентили˜ано
помещение.
• ‹е п˜епълвайте ˜езе˜воа˜а за го˜иво. fiълнете го п˜иблизително 1,5 ин…а
(38 mm) по-ниско от го˜ни ˜ъб на гъ˜ловината, за да позволите ˜азμи˜ение
на го˜ивото.
• Д˜ъ¥те бензина дале… от иск˜и, отк˜ити пламъци, сигнални лампи, топлина
и д˜уги запалителни изто…ници.
• fi˜îâå˜вайте …есто го˜ивоп˜оводите, ˜езе˜воа˜а, капа…ката и
съединенита за пукнатини и те…ове. Замен йте ги ако е необходимо.
• жко го˜ивото се ˜азлее, из…акайте докато то се изпа˜и, п˜еди да ста˜ти˜ате
двигател.
1. fiо…истете п˜ост˜анството около капа…ката на ˜езе˜воа˜а за го˜иво от
м˜ъсоти и наслоâàíè. Свалете капа…ката (A). ◊è¥òå ·èãó˜à 3.
2. ‹апълнете ˜езе˜воа˜а за го˜иво (B) с бензин. За да позволите ˜азμи˜ение на
бензина, не пълнете над долната основа на гъ˜ловината за наливане на
го˜иво (C).
3. fiоставете об˜атно капа…ката.
Как да стартирате двигателя — Фигура
4 5
* жко п˜и темпе˜ату˜и под 40°F(4°C) се използва масло SAE 30, това ще
доведе до т˜удно ста˜ти˜ане на двигател.
** fi˜и темпе˜ату˜и над 80°F(27°C) използването на масло 10 W-30 мо¥е да
ïîâèμи консумацита на масло. fi˜îâå˜вайте по …есто нивото му.
Как да проверявате/доливате масло — Фигура
Преди наливане или проверяване на маслото
• ˆазполо¥ете хо˜изонтално двигател.
• fiо…истете мстото около отво˜а за наливане на масло от наслоâàíè.
1. Свалете нивопоказател (A) è ãî èçáú˜μåòå ñ …èñò ïëàò.
2. fiоставете нивопоказател,íîíå ãî çàòгайте. нивото на маслото т˜бва да
бъде до ма˜ки˜овката FULL (B) на нивопокаазател.
3. fi˜и наливане на масло, отливайте внимателно п˜ез отво˜а за пълнене с
масло (C). ‹апълнете до то…ката на п˜епълване.
4. fiоставете отново нивопоказател и го затегнете.
2
Препоръки за горивото
Горивото трябва да отговаря на следните изисквания:
• ˝ист, п˜есен, безоловен бензин.
• flинимално октаново …исло от 87/87 AKI (91 RON). За голма надмо˜ска
âèñî…èíà, âè¥òå ïî-äîëó.
ПРЕДУПРЕЖДЕНИЕ
Бързото оттегляне на пусковото въже (обратен удар) ще придърпа
изцяло ръката ви към двигателя по-бързо, отколкото вие можете да
я отдръпнете.
Това може да причини счупени кости, фрактури, контузии и
навяхвания.
• яогато ста˜ти˜ате двигател, изтеглете бавно въ¥ето на ста˜те˜а, докато
усетите съп˜отивление, а после ˜зко д˜ъпнете, за да избегнете об˜атни
óäà˜.
ПРЕДУПРЕЖДЕНИЕ
Бензинът и неговите пари са изключително огнеопасни и
избухливи.
Пожар или взрив могат да причинят сериозни обгаряния или смърт.
При стартиране на двигателя
• ‡ве˜ете се, …е запалителната свещ, μумозаглуμèòåë, êàïà…êàòà íà
˜езе˜воа˜а за го˜иво и въздуμíè филтъ˜ са на мстото си и са обезопасени.
• ‹е ˜азвъ˜тайте двигател с извадена запалителна свещ.
• жко двигателт се задави, поставете смука…а (ако има такъв) на позици
∆open/run∆, п˜еместете ˜ъ…ната газ (ако има такава) на позици∆fast∆ è
˜азвъ˜тайте, докато двигателò ñòà˜òè˜à.
14 BRIGGSandSTRATTON.COM

ПРЕДУПРЕЖДЕНИЕ
Двигателите изпускат въглероден окис, който е отровен газ, без
мирис и цвят.
Вдишването на въглероден окис може да причини гадене,
припадък или смърт.
• Ста˜ти˜айте и ˜аботете с двигател навън.
• ‹е ста˜ти˜айте и не ˜аботете с двигател в затво˜ено помещение, до˜и и п˜и
îòâî˜åíè â˜àòè èëè ï˜îçî˜öè.
ВНИМАНИЕ: ‹àñòîùèт двигател се достав от Briggs & Stratton без масло.
fi˜еди да ста˜ти˜ате двигател се уве˜ете, …е сте налели масло в него спо˜ед
инст˜укциите в това ˜ъководство. жко го ста˜ти˜ате без масло, той ща се
пов˜еди без да бъде възмо¥но да се ˜емонти˜а и га˜анциòà íма да пок˜ива
щетата.
1. fi˜ове˜ете нивото на маслото. ‹ап˜авете сп˜авка в ˜аздела Êàê ñå
проверява/налива масло.
2. ‡ве˜ете се, …е уп˜авленита на съо˜ъ¥ението, ако има такива, са изкл˚…ени.
‹ап˜авете сп˜авка в ˜ъководството за ˜абота относно местата и ˜аботата с
тези уп˜авлени.
3. ‹атиснете стоп кл˚…à (A) до позициòà (·èãó˜à 4).
4. fi˜еместете ˜ъ…ната газ (B), ако има такава, на бъ˜зата
ˆаботете с двигател íà áú˜çàòà
позици.
позици.
Техническо обслужване
Използвайте единствено оригинални машинни резервни части. Части с друг
произход може да не пасват добре, може да повредят устройството и могат
да доведат до нараняване. ›свен това, използването на …асти с д˜уг п˜оизход
мо¥е да анули˜а ваμàòà ãà˜àíöè.
‹ие ви п˜епо˜ъ…ваме да посетите ›то˜изи˜ан се˜визен п˜едставител на Briggs &
Stratton за вси…ки опе˜ации по техни…еското и се˜визното обслу¥ване на
двигател и ˜езе˜вните …асти.
ВНИМАНИЕ: ◊си…ки компоненти, използвани п˜и п˜оизводството на този
двигател, т˜бва да бъдат на мстото си за п˜авилната му ˜абота.
Контрол на емисиите
Поддръжката, смяната или ремонтът на устройствата за контрол на
вредните емисии могат да бъдат извършвани от всеки ремонтен цех или
техник, ремонтиращи двигатели, които не се използват за транспортни цели.
◊ñå ïàê, çà äà ïîëó…èòå ∆безплатно∆ обслу¥ване на уст˜ойствата за конт˜ол на
в˜едните емисии, ˜аботата т˜áâà äà áúäå èçâú˜μена от упълномощен заводски
п˜едставител. ‹ап˜авете сп˜авка в ша˜анцита относно в˜едните мисли.
ПРЕДУПРЕЖДЕНИЕ
Случайно искрене може да доведе до пожар или поразяване от
електрически ток.
Неволно стартиране може да доведе до захващане, травматична
ампутация или до раняване.
Опасност от пожар
5. fi˜еместете лоста на смука…а (C) на д˜осели˜ана
Забележка: ›бикновено използването на смука… не е необходимо п˜и
повто˜но ста˜ти˜ане на топъл двигател.
6. Завъ˜тете к˜ан…ето за подаване на го˜иво (D), ако има такова, на позици
(·èãó˜à 5).
7. Ръчен стартер: Зд˜аво д˜ъ¥те ˜ъкохватката на въ¥ето на ста˜те˜а (E).
¤зтеглете бавно ˜ъкохватката на въ¥ето на ста˜те˜а, докато по…увствате
съп˜отивление, след което го д˜ъпнете ˜çêî (·èãó˜à 4).
Забележка: жко двигателт не ста˜ти˜а след т˜и опита, идете на ад˜ес
BRIGGSandSTRATTON.COM или се обадете на телефон 1-800-233-3723 (â
ÑæÂ).
ПРЕДУПРЕЖДЕНИЕ: Ÿъ˜зото оттеглíå íà âú¥åòî íà ñòà˜òå˜à
(об˜атен уда˜) ще п˜итегли цлата ви ˜ъка към двигател по-бъ˜зо,
отколкото вие мо¥ете да оттеглите. ‚ова би могло да доведе до с…упени
кости, ф˜акту˜и, навхвани и контузии. fi˜и ста˜ти˜ане на двигател
изтеглете бавно въ¥ето на ста˜те˜а, докато по…увствате съп˜отивление,
след което го д˜ъпнете ˜зко, за да избегнете об˜атни óäà˜.
8. Електрически стартер: Çàâú˜òåòå êë˚…а за елект˜и…ески ста˜те˜ на
позици on/start. ‹ап˜авете сп˜авка в ˜ъководството за ˜абота със
съо˜ъ¥ението относно ˜азполо¥ението и действието с кл˚…à.
Забележка: жко двигателт не ста˜ти˜а след т˜и опита, идете на ад˜ес
BRIGGSandSTRATTON.COM или се обадете на телефон 1-800-233-3723 (â
ÑæÂ).
ВНИМАНИЕ: За да п˜одъл¥ите ¥ивота на ста˜те˜а, използвайте к˜атки
ста˜тови цикли (пет секунди максимум). ¤з…аквайте една минута ме¥ду
отделните ста˜тови цикли.
9. Вом двигателт заг˜ее, поставете лоста на смука…а (C) на ˜аботна
позици (·èãó˜à 4).
Как да спрете двигателя — Фигура
5 6
позици.
ПРЕДУПРЕЖДЕНИЕ
Бензинът и неговите пари са изключително огнеопасни и
избухливи.
Пожар или взрив могат да причинят сериозни обгаряния или смърт.
• ‹å çàïóμвайте каме˜ата на ка˜бу˜ато˜а, за да сп˜ете двигател.
1. ‹атиснете стоп кл˚…à (A, ·игу˜а 6) до позици∆off∆
Електрически стартер: Çàâú˜òåòå êë˚…а за елект˜и…ески ñòà˜òå˜ íà
позици off/stop. ‹ап˜авете сп˜авка в ˜ъководството за ˜абота със
съо˜ъ¥ението относно ˜азполо¥ението и ˜аботата с кл˚…à.
2. След спи˜ане на двигател, завъ˜тете к˜ан…ето за подаване на го˜ивото (D,
·игу˜а 5) на затво˜ено поло¥ение.
èëè
bg
Преди извършване на регулировки и поправки:
• ›тка…ете кабела на запалителната свещ и го д˜ъ¥те дале… от не.
• ¤зползвайте само подходщи инст˜ументи.
• ‹е застопо˜вайте с ˜егули˜ащата п˜у¥ина, лостовите системи или с д˜уги
…àñòè, çà äà ïîâèμите обо˜отите на двигател.
• Replacement parts must be the same and installed in the same position as the
original parts.
• ‹å óä˜йте маховика с …ук или твъ˜д п˜едмет, защото той мо¥е да се ст˜оμè
по в˜еме на ˜абота.
При изпробване за искра:
• ¤зползвайте одоб˜ен тип тесте˜ за свещи.
• ‹е п˜авете п˜ове˜ка за иск˜а п˜и извадена запалителна свещ.
График за техническо обслужване
След първите 5 часа
• Äà ñå ñìåí маслотоl
На всеки 8 часа или ежедневно
• Äà ñå ï˜îâå˜ва нивото на маслото в двигател
• Да се по…истват повъ˜хностите около μумозаглуμèòåë è
уп˜авлениòà.
• Да се по…иства защитни капак за п˜ъстите
На всеки 25 часа или ежегодно
• Да се по…иства въздуμíè филтъ˜ *
• Да се по…иства п˜едфилтъ˜а *
На всеки 100 часа или ежегодно
• Äà ñå ñìåí маслото на двигател
• Äà ñå ï˜åãëå¥äàò μумозаглуμèòåë и иск˜огасител
На всеки 100 часа
• Äà ñå ñìåí маслото в зъбни ˜едукто˜ (ако има такъв)
Ежегодно
• Äà ñå ñìåí въздуμíè филтъ˜.
• Да се смени п˜едфилтъ˜а
• Да се смени запалителната свещ
• Да се по…исти/смени филтъ˜а за го˜ивото
• Да се по…исти въздуμната охладителна система *
• Äà ñå ï˜îâå˜т ме¥дината на клапаните **
* fi˜è íàëè…èå íà çàï˜àμеност или носещи се в околното п˜ост˜анство
отломки, да се по…иства по-…есто.
** ‹е се налага, освен ако не бъдат забелзани п˜облеми с техни…еските
показатели на двигател.
Регулиране на карбуратора
‹е п˜авете никога наст˜ойки на ка˜бу˜ато˜а. яа˜бу˜ато˜ът е ˜егули˜ан в завода
да ˜аботи ефективно п˜и пове…ето околни услови. ◊се пак, ако се налагат
наст˜ойки, се объ˜нете към ‡пълномощен се˜визен на Briggs & Stratton.
ВНИМАНИЕ: fi˜оизводителт на обо˜удването, на което този двигател ще бъде
монти˜ан, оп˜едел максималните обо˜оти, п˜и които ще ˜аботи двигателò. Íå
надвишавайте òåçè îáî˜îòè.
Как да се провери запалителната свещ — Фигура
fi˜îâå˜вайте ме¥дината ме¥ду елект˜одите и (A,·игу˜а8)спомощтана
калибъ˜ за тел (B). жко е необходимо, ˜егули˜айте ме¥дината. flîíòè˜àéòå è
8
15

затегнете свещта с п˜епо˜ъ…вани âú˜òщ момент. За ˜егули˜ане на ме¥дината
или относно въ˜тùè момент за затгане, нап˜авете сп˜авка в ˜аздел
Технически данни.
Забележка: ‹à íкои места, местнит закон изисква упот˜еба на ˜езисто˜на
свещ, за да се подтиснат ˜адиосмущенита. жко настоùèт двигател е
фаб˜и…но обо˜удван с ˜езисто˜на свещ, използвайте същи òèï ñâåù çà ñìíà.
Да се проверява внимателно шумозаглушителя и
искрогасителя — Фигура
7
ПРЕДУПРЕЖДЕНИЕ
Работещите двигатели отделят топлина. Частите на двигателите,
особено шумозаглушителя, стават изключително горещи.
При допир може да получите сериозно изгаряне.
Горимите отпадъци, като листа, треви, храсталак и други, могат да
се запалят.
• ›ставете μумозаглуμèòåë, цилиндъ˜а на двигател è ˜åá˜àòà äà ñå
охладт, п˜еди да ги докосвате.
• ›тст˜анете нат˜упаните отломки около μумозаглуμèòåë и цилиндъ˜а.
• flонти˜айте и поддъ˜¥айте в ˜аботно състоние иск˜огасител, ï˜åäè äà
използвате двигател на залесени места, зат˜евени площи, площи с х˜асти и
необ˜аботени места. Ватът яалифо˜ни изисква това (в ˆаздел 4442 на
яалифо˜нийски п˜авилник за обществени ˜есу˜си). ◊ъзмо¥ноед˜угищати
да имат подобни закони. ·еде˜алните закони се п˜илагат на феде˜ална
те˜ито˜и.
fi˜îâå˜åòå μумозаглуμèòåë (A, ·игу˜а 7) за пукнатини, ко˜ози èëè ä˜óã âèä
пов˜еда. Свалете иск˜огасител (B), ако има такъв, и го п˜ове˜ете за пов˜еда
èëè çàïóμване със са¥ди. жко се налага използването на ˜езе˜вни …асти се
убедете, …е ще бъдат монти˜ани единствено о˜игинални ˜езе˜вни маμèííè
…àñòè.
ПРЕДУПРЕЖДЕНИЕ: ˆезе˜вните …асти т˜бва да бъдат същите
êàòî ñìåíваните и да се монти˜ат в същата позици както о˜игиналните такива,
по˜ади опасност от възникване на по¥а˜.
Системата на въздуμíè филтъ˜ използва филтъ˜ от нагънат филтъ˜ен
мате˜иал с п˜едфилтъ˜ по опци. fi˜едфилтъ˜ът мо¥е да бъде п˜омиван и
ползван повто˜но.
Плосък въздушен филтър
1. ˆазхлабете скобата (D), êîто задъ˜¥а капака (A). ◊è¥òå ·èãó˜à 11.
2. ›тво˜ете капака и свалете п˜едфилтъ˜а (C)ифилтъ˜а(B).
3. За да по…истите наслоâàíèта, леко по…уквайте филтъ˜а въ˜ху твъ˜да
повъ˜хност. жко филтъ˜ът е п˜екоме˜но замъ˜сен, заменете го с нов.
4. fi˜омийте п˜едфилтъ˜а във воден ˜азтво˜ на по…истващ п˜епа˜ат. ›ставете
го доб˜е да се изсуμинавъздух.Íå смазвайте п˜едфилтъ˜а.
5. flîíòè˜àéòå ñóõè п˜едфилтъ˜ с опо˜ни ìó ˜úá (G) към долната ст˜ана на
гънките на филтъ˜а.
6. flонти˜айте филтъ˜а.
7. fiоставете зъб…етата на капака (E)âμлиците (F).
8. Затво˜ете капака и го зак˜епете със скобата.
Как да сменитемаслото в зъбния редуктор — Фигура
жко двигателт ви е обо˜удван със зъбен ˜едукто˜, обслу¥вайте го както
следва.
1. Свалете п˜обката за наливане на масло (B) и п˜обката за п˜ове˜ка на нивото
(C).
2. Свалете п˜обката за изто…ване на маслото (A, ·игу˜а 12) и го изто…ете в
подходщ за целта съд receptacle.
3. fiоставете и затегнете п˜обката за изто…ване на маслото
4. За да напълните отново с масло, внимателно налейте маслото за п˜едавки в
отво˜а за наливане (нап˜авете сп˜авка в ˜аздел Технически данни).
fi˜одъл¥авайте да наливате, докато маслото п˜оте…е извън отво˜а за
п˜ове˜ка на нивото му.
5. fiоставете и затегнете п˜обката за п˜ове˜ка на нивото на маслото.
6. fiоставете и затегнете п˜обката за наливане на масло.
Важно: fi˜обката за наливане на масло има вентилационен отво˜ (D)èò˜áâà
да бъде поставена отго˜е на капака на ˜едукто˜а, както е показано.
12
Как да почиствате/сменяте филтъра за
горивото — Фигура
13
Как да се сменя маслото — Фигура
ВНИМАНИЕ: ›т˜аботилото масло е опасен отпадъ…ен п˜одукт и т˜áâà äà ñå
склади˜а по подходщ на…ин. ‹е го изхвъ˜лйте с домакинските отпадъци.
fi˜ове˜ете съвместно с общинските власти, за обслу¥ващ центъ˜ или з а
п˜едставител на инсталации за безопасно депони˜ане/˜ецикли˜ане на
от˜аботилото масло.
9 10
Източете отработилото масло
1. fi˜è èçêë˚…ен, но все още топъл двигател, отка…ете кабела на запалителната
ñâåù (A) и го д˜ъ¥те на ˜азстоние от свещта (·игу˜а 10).
2. Свалете п˜обката за изто…ване на маслото (B, ·игу˜а 9). ¤зто…ете маслото в
подходщ за целта съд.
Забележка: ◊ñка от показаните п˜обки за изто…ване на маслото (C)ìî¥åäà
бъде монти˜ана на двигател.
3. След като маслото е изто…ено, поставете и затегнете п˜обката.
Наливане на масло
• ˆазполо¥ете хо˜изонтално двигател.
• fiо…истете мстото около отво˜а за наливане на масло от вси…ки отломки.
• ‹ап˜авете сп˜авка в ˜аздел Технически данни относно вместимостта за
маслото.
1. Свалете нивопокаазател (D) è ãî èçáú˜μåòå ñ …èñò ïëàò.
2. ‹алейте внимателно масло в двигател п˜ез отво˜а за наливане (E).
‹апълнете до то…ката на п˜еливане.
3. fiоставете нивопоказател,íîíå ãî çàòгайте. Свалете го и п˜ове˜ете
нивото на маслото. ‚о т˜бва да достига до ма˜ки˜овката FULL (F)на
нивопоказател.
4. flонти˜айте и затегнете нивопоказател.
Как да се обслужва въздушния филтър — Фигура
11
ПРЕДУПРЕЖДЕНИЕ
Бензинът и неговите пари са изключително огнеопасни и
избухливи.
Пожар или взрив могат да причинят сериозни обгаряния или смърт.
• ‹икога не ста˜ти˜айте и не ˜аботете с двигател п˜и свален филтъ˜ен
комплект или въздуμен филтъ˜.
ВНИМАНИЕ: ‹е използвайте сгъстен въздух или ˜азтво˜ители, за да по…иствате
филтъ˜а. Сгъстенит въздух мо¥е да пов˜еди филтъ˜а, а ˜азтво˜ителите го
˜азтва˜ò.
16
ПРЕДУПРЕЖДЕНИЕ
Бензинът и неговите пари са изключително огнеопасни и
избухливи.
Пожар или взрив могат да причинят сериозни обгаряния или смърт.
• Д˜ъ¥те бензина дале… от иск˜и, отк˜ити пламъци, сигнални лампи, топлина
и д˜уги запалителни изто…ници.
• fi˜îâå˜вайте …есто го˜ивоп˜оводите, ˜езе˜воа˜а, капа…ката и
съединенита за пукнатини и те…ове. Замен йте ги ако е необходимо.
• fi˜åäè ñìна на филтъ˜а за го˜иво, изто…ете ˜езе˜воа˜а за го˜иво или
затво˜ете к˜ан…ето за подаване на го˜иво.
• ˆезе˜вните …асти т˜бва да бъдат със същото ка…ество и да се монти˜ат в
същата позици, както о˜игиналните …асти.
• жко го˜ивото се ˜азлее, из…акайте докато то се изпа˜и, п˜еди да ста˜ти˜ате
двигател.
1. Свалете капа…ката на ˜езе˜во˜а за го˜иво (A, ·èãó˜à 13).
2. Свалете филтъ˜а за го˜ивото (B).
3. жко филтъ˜ът за го˜ивото е замъ˜сен, по…истете го или го сменете. жко го
смените, уве˜ете се …е поставте о˜игинален ˜езе˜вен филтъ˜ за го˜иво.
Какдасепочиствавъздушно-охладителната
система — Фигура
14
ПРЕДУПРЕЖДЕНИЕ
Работещите двигатели отделят топлина. Частите на двигателите,
особено шумозаглушителя, стават изключително горещи.
При допир може да получите сериозно изгаряне.
Горимите отпадъци, като листа, треви, храсталак и други, могат да
се запалят.
• ›ставете μумозаглуμèòåë, цилиндъ˜а на двигател è ˜åá˜àòà äà ñå
охладт, п˜еди да ги докосвате.
• ›тст˜анете нат˜упаните отломки около μумозаглуμèòåë и цилиндъ˜а.
ВНИМАНИЕ: ‹е използвайте вода, за да по…иствате двигател. ◊одата мо¥е да
замъ˜си го˜ивната система. ¤зползвайте …етка или сух плат, за да го по…истите.
‚ова е двигател с въздуμно охла¥дане. ‹е…истотиите и наслоâàíèта могат да
ог˜ани…ат въздуμíè поток и да п˜и…инò ï˜åã˜ването му, което води до
намалване на показателите и п˜одъл¥ителността на ¥ивота му.
¤зползвайте …етка или сух плат, за да отст˜аните наслоâàíèта от
п˜едпазител на п˜ъстите (A). Д˜ъ¥те …исти лостовата система, п˜у¥ините и
уп˜авлениòà (B). fiазете п˜ост˜анството около и зад μумозаглуμèòåë (C) …èñòî
îò âñкакви запалими наслоâàíè (·èãó˜à 14).
BRIGGSandSTRATTON.COM

Складиране
ПРЕДУПРЕЖДЕНИЕ
Бензинът и неговите пари са изключително огнеопасни и
избухливи.
Пожар или взрив могат да причинят сериозни обгаряния или
смърт.
Когато складирате бензин или оборудване с гориво в резервоара
• Склади˜айте дале… от пещи, пе…ки, водонаг˜еватели или д˜уги елект˜и…ески
п˜ибо˜и, които имат сигнални лампи или д˜уги запалителни изто…ници,
защото те могат да възпламент бензиновите па˜и.
Горивна система
шо˜ивото оста˜ва след склади˜ане за пове…е от 30 дни. ›ста˜лото го˜иво води
до об˜азуване на киселинни и смолести отло¥ени в го˜ивната система или по
основните …асти на ка˜бу˜ато˜а. За да запазите го˜ивото све¥о, използвайте
Технически данни
стабилизато˜а за го˜иво FRESH START
под фо˜мата те…на добавка или флакон за капково подаване.
жко се добав стабилизато˜а за го˜ивото съгласно инст˜укциите, нма ну¥да
бензинът да се изто…ва. ›ставете двигателт да ˜аботи около 2 минути, за да
ци˜кули˜а стабилизато˜ът в го˜ивната система. ‚огава двигателт и го˜ивото
могатдасесъх˜анват до 24 месеца.
жко бензинът в двигател не е бил об˜аботван със стабилизато˜, той т˜бва да
бъде изто…ен в подходщ за целта съд. ›ставете двигателт да ˜аботи, докато
сп˜е по˜ади из…е˜пване на го˜ивото. За да поддъ˜¥ате све¥естта на го˜ивото
п˜и склади˜ането му, п˜епо˜ъ…ваме използването на стабилизато˜.
Маслото на двигателя
Докато двигателт е все още топъл сменете маслото.
®
на Briggs & Stratton, който е достъпен
Откриване и отстраняване на неизправности
‹у¥даете ли се от помощ? fiосетете BRIGGSandSTRATTON.COM или се обадете
на 1-800-233-3723.
Спецификации за двигателя
flîäåë 120000
ˆаботен обем 12,48 èí…à3(205 cm3)
◊úò˜åμен диаметъ˜ на цилиндъ˜а 2,688 èí…à (68,28 mm)
ˆаботен ход на буталото 2,200 èí…à (55,88 mm)
◊местимост за масло 18 — 20 óíöè (0,54 — 0,59 L)
flасло за зъбни ˜едукто˜ 80W-90
Регулировъчни данни *
flîäåë 120000
¤ск˜ова ме¥дина на запалителната свещ 0,030 èí…à (0,76 mm)
◊ú˜òщ момент за затгане на
запалителната свещ
◊úçäóμна ме¥дина ме¥ду ˜ото˜а и
стато˜а
flе¥дина на смукателни клапан 0,004 — 0,006 èí…à (0,10 — 0,15 mm)
flе¥дина на изпускателни клапан 0,009 — 0,011 èí…à (0,23 — 0,28 mm)
* flощността на двигател намалва с 3,5% на всеки 1000 фута (300 мет˜а) над мо˜ското ниво и с 1% за всеки 10° F(5,6° C) íàä 77° F(25° C). Двигателт ще ˜аботи
задоволително п˜и наклон до 15°. ‹ап˜авете сп˜авка в ˆъководството за ˜абота с обо˜удването за безопасните г˜аници за ˜абота на наклони.
180 ëèá˜è.èí…à (20 Nm)
0,010 — 0,014 èí…à (0,25 — 0,36 mm)
Спецификации за двигателя
flîäåë 200000
ˆаботен обем 18,63 èí…à3(305 cm3)
◊úò˜åμен диаметъ˜ на цилиндъ˜а 3,120 èí…à (79,24 mm)
ˆаботен ход на буталото 2,438 èí…à (61,93 mm)
◊местимост за масло 26 — 28 унции (0,77 — 0,83 L)
flасло за зъбни ˜едукто˜ SAE 30
Регулировъчни данни *
flîäåë 200000
¤ск˜ова ме¥дина на запалителната свещ 0,030 èí…à (0,76 mm)
◊ú˜òщ момент за затгане на
запалителната свещ
◊úçäóμна ме¥дина ме¥ду ˜ото˜а и
стато˜а
flе¥дина на смукателни клапан 0,004 — 0,006 èí…à (0,10 — 0,15 mm)
flе¥дина на изпускателни клапан 0,009 — 0,011 èí…à (0,22 — 0,28 mm)
180 ëèá˜è.èí…à (20 Nm)
0,008 — 0,012 èí…à (0,20 — 0,30 mm)
Обикновени части за поддръжка n
Сервизна част Номер на частта
fiлосък въздуμен филтъ˜ 491588, 5043
fiлосък п˜едфилтъ˜ за въздуμíè филтъ˜ен комплект 493537, 5064
·èëòú˜ çà ãî˜èâî 792917
шо˜ивна добавка 5041, 5058
n ‹ие ви п˜епо˜ъ…ваме да посетите нкой от ‡пълномощените п˜едставители на Briggs & Stratton за вси…ки опе˜ации по техни…еското и се˜визното обслу¥ване на
двигател и ˜езе˜вните …асти. ¤зползвайте само о˜игинални …асти на Briggs & Stratton.
Сервизна част Номер на частта
ˆезисто˜на запалителна свещ 491055
Дългот˜айна платинена запалителна свещ 5066
ÿë˚… çà ñâåù 89838, 5023
¤ск˜ов тесте˜ 19368
bg
17

ГАРАНЦИОННА ПОЛИЦА НА СОБСТВЕНИКА НА ДВИГАТЕЛ BRIGGS & STRATTON
Màé 2008 ã.
ÿî˜ïî˜àöè Briggs & Stratton ще ˜емонти˜а или замени безплатно вска …аст (вси…ки …асти) на двигател, които са пов˜едени, по˜ади дефектен мате˜иал или
ОГРАНИЧЕНА ГАРАНЦИЯ
п˜оизводство, или по˜ади двете. ‚˜анспо˜тните ˜азходи на изп˜атените за ˜емонт или смíà …àñòè ïî òàçè ãà˜àíöè се поемат от купува…а. ‚ази га˜анци е
валидна за оп˜еделени с˜ок и е п˜едмет на условита, фикси˜ани по-долу. За обсл у¥ване по га˜анцита се объ˜нете към най-близки ‡пълномощен
се˜визен п˜едставител, който мо¥е да отк˜иете в наμè указател на ад˜ес BRIGGSandSTRATTON.com, или като се обадите на телефон
1-800-233-3723, или като е посо…ено в «≠ълтите ст˜анициt».
Няма друга специална гаранция. Подразбиращите се гаранции, включително тези за годността за продажба или за някаква специална цел, са
ограничени до една година от датата на купуване или до срока, разрешен по закон, а всички свързани гаранции се изключват. Отговорност за
случайни или последващи щети се изключва в степен, разрешена по закон. ‹кои щати или ст˜ани не позволâàò îã˜àíè…åíè за в˜емет˜аенето на
под˜азби˜ащата се га˜анци,àíкои щати или ст˜ани не позволват изкл˚…ването или ог˜ани…аването на слу…айни или последващи щети, така …е е
възмо¥но го˜ното ог˜ани…ение и изкл˚…åíèå äà íå âà¥è çà âàñ. ‚àçè ãà˜àíöè ви дава специфи…ни законови п˜ава, а вие мо¥ете да имате и д˜уги такива,
които се изменò â åäèí èëè ä˜óã ùàò, èëè â åäíà èëè ä˜óãà ñò˜àíà.
СТАНДАРТНИ ГАРАНЦИОННИ УСЛОВИЯ *
Марка/Вид продукт
Vanguardt 2 години 2 години
®
Се˜иисудъл¥ен¥ивотt, I/C
Се˜иизаснãMAXt с …угунена ˜иза Dura-Boret 2 години 1 година
◊си…ки д˜уги двигатели на Briggs & Stratton 2 години 90 äíè
* ‚åçè ñà íàμите станда˜тни га˜анционни услови, но е възмо¥но слу…айно да има допълнително га˜анционно пок˜итие, което не е било оп˜еделено към
момента на публикуването. За списъка с текущите га˜анционни услови çà âàμè двигател посетете ад˜еса ни в ¤нте˜нет BRIGGSandSTRATTON.COM или
се объ˜нете към ‡пълномощен се˜визен п˜едставител на Briggs & Stratton.
Y
Двигатели, монти˜ани на домаμен гене˜ато˜ за елект˜оене˜ги са га˜анти˜ани само по клаузата ∆За пот˜ебителско ползване∆. ‹àñòîùàòà ãà˜àíöè не е
валидна за двигатели, монти˜ани на обо˜удване, ползвано като пъ˜ви…на мощност, вместо цент˜алното зах˜анване. Двигатели, използвани за
състезания, за търговски цели или за отдаване под наем, не са покрити от гаранцията.
ша˜анционнит пе˜иод запо…ва от датата на купуване от пъ˜ви пот˜ебител на д˜ебно или от к˜айни пот˜ебител за п˜омиμлени ну¥ди и п˜одъл¥ава за пе˜иода,
посо…ен в таблицата го˜е. ∆За ползване за собствени ну¥ди∆ озна…ава ли…но използване в домакинство от пот˜ебител на д˜ебно. ∆За ползване за п˜омиμëåíè íó¥äè∆
îçíà…àâà âñè…êè ä˜óãè óïîò˜åáè, âêë˚…ително тъ˜говска упот˜еба, както и такава, фо˜ми˜аща доход или отдаване под наем. След като веднъ¥ двигателò å áèë
ползван за п˜омиμлени ну¥ди, по-нататък той ще бъде с…итан като двигател за п˜омиμлени ну¥ди за целите на тази га˜анци.
Не е необходима регистрация на гаранцията, за да се получи гаранционно обслужване за продуктите Briggs & Strstton. Пазете за доказателство квитанцията
от покупката. Ако не осигурите доказателство за началната дата на купуване, при поискване на гаранционно обслужване, датата на производство но
продукта ще бъде използвана за определяне на гаранционния период.
,IntektI/C®, IntektPro
За ползване за собствени нужди За ползване за промишлени нужди
2 години 1 година
Y
Относно вашата гаранция
Briggs & Stratton п˜иемат с готовност га˜анционни ˜емонт и се извинват за
п˜и…иненото ви неудобство. ◊секи ‡пълномощен се˜визен п˜едставител мо¥е да
извъ˜μва га˜анционни ˜емонти. fiове…ето га˜анционни ˜емонти се п˜ове¥дат
˜утинно, но понкога е възмо¥но исканита за га˜анционно обслу¥ване да не
бъдат съответстващи.
жкокупува…ътнеесъгласенс˜еμението на Се˜визни п˜едставител, ще се
нап˜ави п˜оу…ване, за да се установи дали га˜анцита се п˜изнава. ¤зисквайте
от Се˜визни п˜едставител да п˜едостави за п˜еглед вси…ки допълнителни
факти на сво дист˜ибуто˜ или на завода. жко дист˜ибуто˜ът или заводът ˜еμи,
…е това искане е оп˜авдано, купува…ът ще бъде напълно обезщетен за
дефектните …асти. За да се избегне недо˜азумението, което мо¥е да възникне
ме¥ду купува…а и п˜едставител, ïî-äîëó ñà èçá˜îåíè íкои от п˜и…ините за
пов˜еда в двигател, които га˜анциòà íå ïîê˜èâà.
Нормално износване: Двигателите, както вси…ки механи…ни уст˜ойства, се
ну¥даò îò ïå˜èîäè…íà çàìна на …асти и обслу¥ване, за да ˜аботò äîá˜å.
øà˜àíöèта не пок˜ива ˜емонта, когато п˜и но˜мално износване дадена …аст или
двигателт са из…е˜пали ¥ивота си. ша˜анцита не се п˜илага, ако в двигател се
слу…и пов˜еда, по˜ади неп˜авилно ползване или отсъствие на ˜утинна
подд˜ъ¥ка, т˜анспо˜ти˜ане, манипули˜ане, съх˜анване или неп˜авилен
монта¥. Също така, га˜анциòà ñå ãóáè, àêî ñå˜èéíèт номе˜ на двигател å
отст˜анен или по него са п˜авени п˜омени.
Неправилно поддържане: ≠ивотът на даден двигател зависи от условиòà, ï˜è
които ˜аботи и от г˜и¥ите, които полу…ава. ‹êîè ï˜èëî¥åíè, като
култивато˜и, помпи, и ˜отационни коса…ки, много …есто се използват в п˜аμна и
замъ˜сена с˜еда, което мо¥е да доведе до п˜едва˜ителното им износване.
‚акова износване не се пок˜ива от га˜анци
п˜ах, аб˜азив за по…истване на свещта или д˜уги аб˜азивни мате˜иали,
попаднали в двигател по˜ади нека…ествено поддъ˜¥ане.
Тази гаранция покрива само
и/или изработка, а не замяната или възстановяването на машината, към
която двигателят може да бъде монтиран. Гаранцията не покрива и
поискани ремонти поради:
1 Проблеми, причинени от части, които не са оригинални части на Briggs &
Stratton.
2 ‡ст˜ойства за уп˜авление на маμината или съо˜ъ¥ени, които п˜е…ат на
ста˜ти˜ането на двигател, âîäт до незадоволителната му ˜абота или
скъсват ¥ивота му. (яонсулти˜айте се с п˜оизводител на уст˜ойствата.)
3 ‚е…ащи ка˜бу˜ато˜и, зад˜ъстени го˜ивни т˜ъби, блоки˜ани клапани или
д˜уги пов˜еди, п˜и…инени от упот˜ебата на замъ˜сено или оста˜ëî ãî˜èâî.
употребен в двигателя дефектен материал
та, когато се дъл¥и на м˜ъсоти,
4 ˝асти, които са над˜ани или с…упени, защото двигателт е ˜аботил с
недостатъ…но или замъ˜сено масло, или с масло с неподходщо ка…ество
(п˜ове˜вайте и доливайте, когато е необходимо и го сменвайте на
п˜епо˜ъ…ваните инте˜вали от в˜еме.) жва˜ийното уст˜ойство OIL GARD
мо¥е да не сп˜е ˜аботещи двигател. жко нивото на маслото не се поддъ˜¥а
то…но, двигателò ìî¥å äà ñå ïîâ˜åäè.
5 ˆемонт или ˜егули˜ане на монти˜ани …асти или аг˜егати като съединители,
п˜едавателни механизми, дистанционни уп˜авлени ид˜.,коитонеса
п˜оизведени от Briggs & Stratton.
6 fiов˜еда или износване на …асти, п˜и…инени от не…истоти, попаднала в
двигател, по˜ади нека…ествено поддъ˜¥ане на въздуμíè филтъ˜,
нека…ествен повто˜ен монта¥ или от използване на нео˜игинални елементи
за филтъ˜а. ‹а п˜епо˜ъ…ваните инте˜вали от в˜еме по…иствайте и/или
сменвайте филтъ˜а, както е посо…ено в ˆъководството за ˜абота.
7 ˝асти, пов˜едени от п˜евиμåíà ñêî˜îñò èëè ï˜åã˜ване, п˜и…инени от т˜еви,
па˜…ета или м˜ъсоти,êîто запуμва или зад˜ъства охладителните ˜еб˜а и
каме˜ата на маховика, или пов˜еда по˜ади ˜абота на двигател в затво˜ено
п˜ост˜анство без достатъ…но п˜овет˜âàíå. fiо…иствайте двигател от
попаднали па˜…ета на п˜епо˜ъ…ваните инте˜вали от в˜еме, както е посо…ено
в ˆъководството за ˜абота.
8 ˝асти на двигател èëè ìàμ
дъл¥аща се на хлабав монта¥ на двигател, хлабави ˜е¥ещи но¥ове,
хлабави пластини и хлабави или зле баланси˜ани ˜аботни колела, на
недоб˜о купли˜ане на маμината към колен…ати вал на двигател,на
св˜ъхвисоки обо˜оти или д˜уга злоупот˜еба п˜и ˜абота.
9 ›гънат или с…упен колен…ат вал вследствие на уда˜ в твъ˜д п˜едмет на
˜å¥åùè но¥ на ˜отационната полева коса…ка или от п˜екоме˜но натгане
на т˜апецовидни ˜åìúê.
10 ˆутинна наст˜ойка и ˜егули˜овка на двигател.
11 fiов˜еда на двигател или на негов елемент, т.е. го˜ивна каме˜а, клапани,
клапанни легла, клапанни вода…и, или изго˜ели намотки на ста˜те˜а по˜ади
използването на алте˜нативни го˜ива като нафта, п˜и˜оден газ, бензини с
п˜оменени ка…ества и т.н.
Гаранционното обслужване е достъпно единствено чрез Упълномощените
сервизни представители на Корпорация Briggs & Stratton. Намерете
най-близкия Упълномощен сервизен представител в нашата указателна карта
за представителите на адрес BRIGGSandSTRATTON.com, или като се обадите
на тел. 1-800-233-3723, или както е посочено в ‘Жълтите странициt’.
ината, с…упени от п˜екоме˜на виб˜аци,
18 BRIGGSandSTRATTON.COM
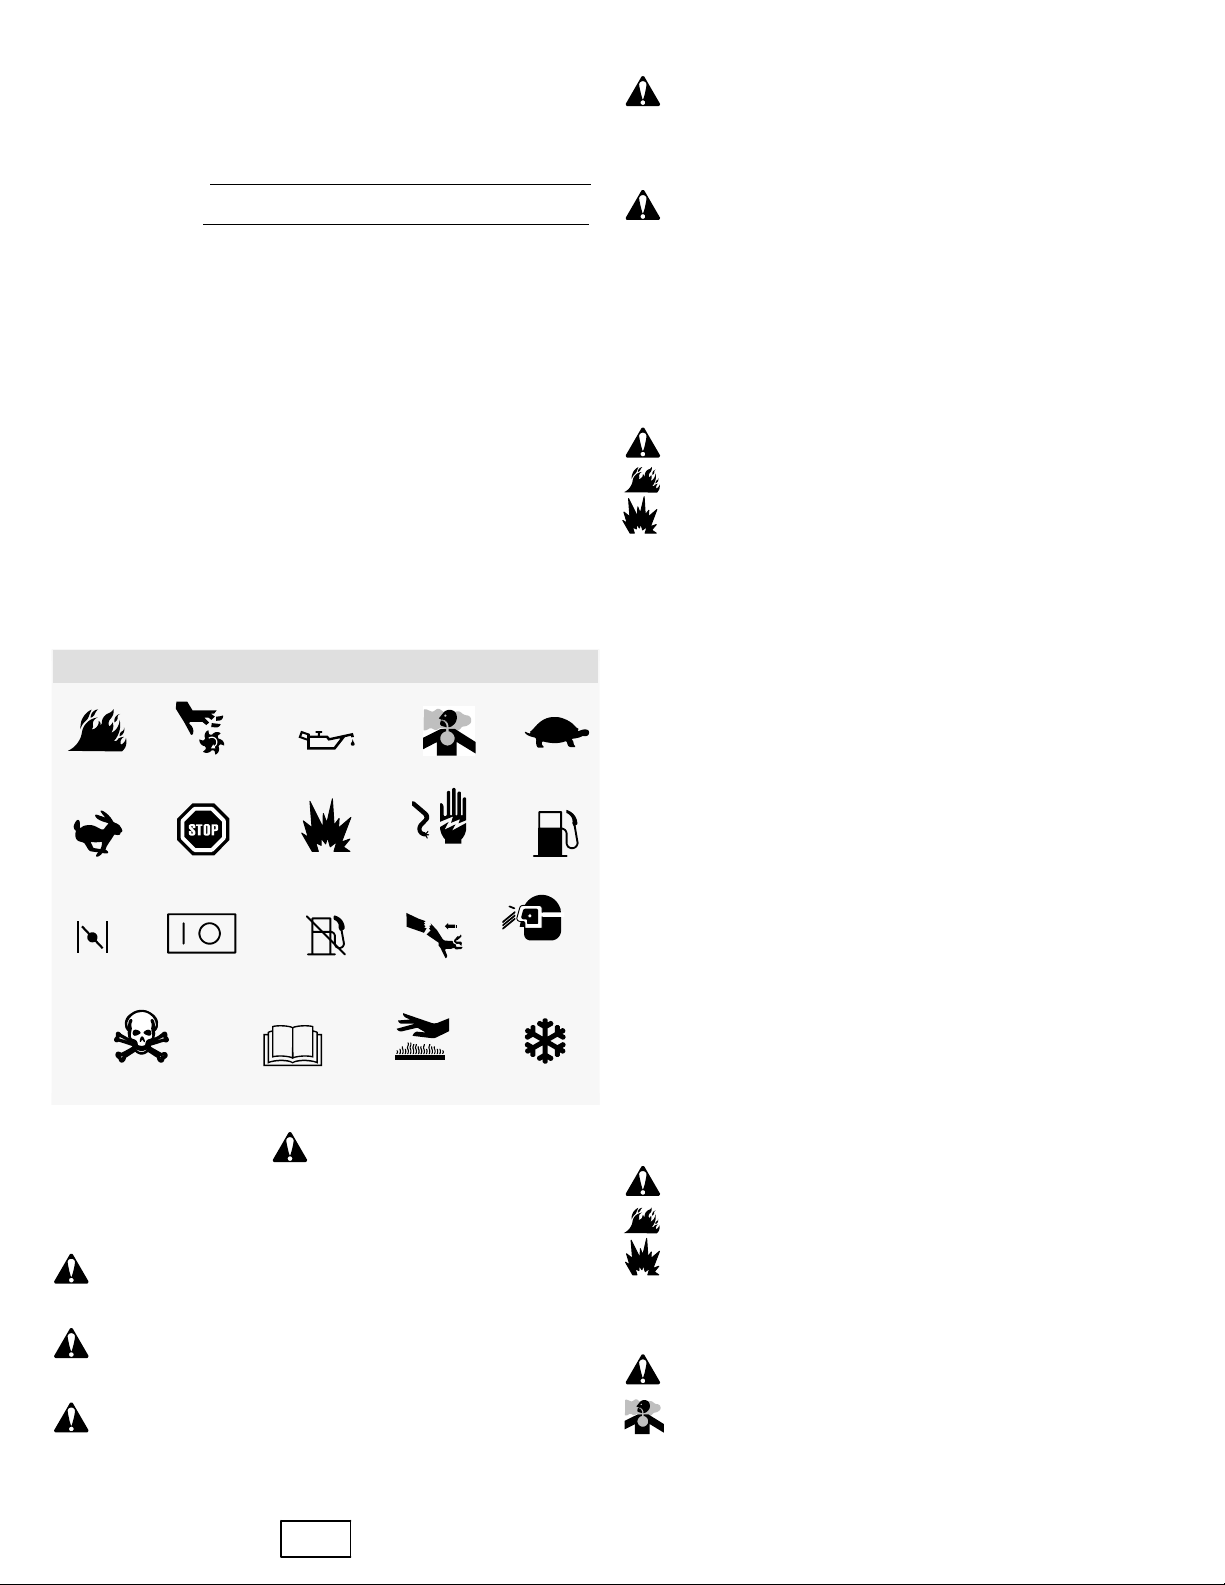
Všeobecné informace
Potøebujete-li náhradní díly nebo technickou pomoc, zapište dolù model motoru, typové a
kódové èíslo a datum nákupu. Tato naleznete na svém motoru (viz kapitola Funkce a
ovládací prvky).
Datum nákupu:
DD/MM/RRRR
Model motoru:
Model: Kód:Typ:
Informace o jmenovitém výkonu motoru
Hrubý výkon jednotlivých modelù benzínových motorù je uvádìn v souladu s normou
J1940 pro postup pøi stanovování výkonu a krouticího momentu u malých motorù (Small
Engine Power & Torque Rating Procedure) vydanou asociací SAE (Society of
Automotive Engineers) a výkon byl získán a pøepoèten v souladu s normou SAE J1995
(revize 2002-05). Hodnoty krouticího momentu byly získány pøi 3060 RPM (ot./min.) a
hodnoty výkonu v koních byly získány pøi 3600 RPM (ot./min.) Skuteèný hrubý výkon
motoru bude nižší, což je, mimo jiné, ovlivnìno provozními podmínkami prostøedí a
rozdíly mezi jednotlivými vyrobenými kusy motorù. Z dùvodu široké škály produktù, do
nichž se naše motory umísují, a rùzných ekologických faktorù vztahujících se k provozu
zaøízení, nemusí benzínový motor pøi použití v konkrétním druhu zaøízení dosahovat
nominálního hrubého výkonu (skuteèného výkonu „na místì instalace” nebo èistého
výkonu). Tento rozdíl je zpùsoben mnoha faktory, mezi nìž patøí použité pøíslušenství
(jako je napøíklad vzduchový filtr, výfuk, plnìní, chlazení, karburátor, palivové èerpadlo
atd.), omezení využití, provozní podmínky prostøedí (teplota, vlhkost, nadmoøská výška)
a rozdíly mezi jednotlivými vyrobenými kusy motoru. V dùsledku výrobních a kapacitních
omezení mùže spoleènost Briggs & Stratton nahradit motor této série motorem o vyšším
nominálním výkonu.
Bezpeènost obsluhy
BEZPEÈNOSTNÍ A KONTROLNÍ SYMBOLY
Požár
Rychle
Sytiè
Nebezpeèná chemikálie Omrzlina
Symbol bezpeènostního upozornìní
rizik, která mohou zpùsobit úraz. Signální slovo (NEBEZPEÈÍ, UPOZORNÌNÍ nebo
VÝSTRAHA) se používá spolu s varovným symbolem pro vyznaèení pravdìpodobnosti a
potenciální vážnosti úrazu. Mimo to mùže být pro oznaèení druhu nebezpeèí použit symbol
nebezpeèí.
Stop
Zapnuto/Vypnuto
Olej
Výbuch
Uzávìr paliva
Ètìte návod
oznaèuje bezpeènostní informace týkající se
NEBEZPEÈÍ oznaèuje ohrožení, které, není-li eliminováno, zpùsobí smrt
nebo vážný úraz.
Toxické výparyPohyblivé èásti
Úraz elektrickým
proudem
Zpìtný ráz
Horký povrch
Pomalu
Palivo
Používejte
ochranu zraku
VAROVÁNÍ
Výfukové plyny tohoto výrobku obsahují chemikálie, o nichž je ve státì
Kalifornie známo, že zpùsobují rakovinu, poškození plodu èi jiné poruchy
reprodukce.
VAROVÁNÍ
Briggs & Stratton neschvaluje ani nepovoluje použití tìchto motorù na
tøíkolových terénních vozidlech (ATV), motocyklech, zábavních/rekreaèních
motokárách, letadlech nebo vozidlech urèených pro sportovní soutìže. Takové
použití tìchto motorù by mohlo vést ke škodám na majetku, vážnému zranìní
(vèetnì ochrnutí) nebo i ke smrtelnému úrazu.
POZOR: Tento motor byl odeslán spoleèností Briggs & Stratton bez oleje. Než motor
nastartujete, ještì jednou zkontrolujte, zda jste doplnili olej podle pokynù uvedených v
této pøíruèce. Jestliže nastartujete motor bez oleje, znièí se tak, že už nepùjde opravit a
nebude kryt žádnou zárukou.
VAROVÁNÍ
Benzin a jeho páry jsou vysoce hoølavé a výbušné.
Požár nebo výbuch mùže zpùsobit vážné popáleniny nebo i smrt.
Když doplòujete palivo
• Vypnìte motor a pøed sejmutím uzávìru palivové nádrže jej n echte nejménì 2
minuty chladnout.
• Nádrž plòte venku nebo v dobøe vìtraném prostoru.
• Nepøeplòujte palivovou nádrž. Nádrž plòte zhruba 38mm (1,5 in) pod horní okraj
hrdla kvùli tepelné roztažnosti paliva.
• Benzín chraòte pøed jiskrami, otevøeným ohnìm, vìènými plamínky, horkem a
jinými zdroji vznícení.
• Kontrolujte palivové potrubí, nádrž a víèko a všechny spoje na tìsnost a
praskliny. V pøípadì potøeby proveïte výmìnu.
• Jestliže rozlijete palivo, poèkejte, až se odpaøí a teprve potom spuste motor.
Pøi spouštìní motoru
• Zkontrolujte, zda jsou na svém místì svíèky, tlumiè výfuku, víèko palivové nádrže a
vzduchový filtr (je-li k dispozici), a zda jsou dobøe zajištìny.
• Neotáèejte motorem pøi odstranìné svíèce.
• Pøi pøeplavení motoru nastavte sytiè (je-li k dispozici) do polohy OPEN/RUN (chod)
a škrtící klapku do polohy FAST (rychle) a protáèejte motor, dokud nenaskoèí.
Pøi obsluze zaøízení
• Nenaklánìjte motor ani zaøízení do polohy, která by zpùsobila únik benzínu.
• Motor se nesmí zastavovat zahlcením karburátoru.
• Nikdy nestartujte ani nenechte bìžet motor s demontovanou sestavou vzduchového
èistièe nebo filtru (je-li k dispozici).
Pøi výmìnì oleje
• když vypouštíte olej z horní plnící olejové trubky, musí být palivová nádrž prázdná,
protože jinak mùže palivo unikat z nádrže a zpùsobit požár nebo explozi.
Pøi pøepravì zaøízení
• Zaøízení pøepravujte s PRÁZDNOU palivovou nádrží nebo zavøeným palivovým
kohoutem.
Pøi skladování benzínu nebo zaøízení s palivem v nádrži
• Uchovávejte oddìlenì od pecí, kamen, ohøívaèù vody èi jiných zaøízení, která mají
vìèný plamínek nebo od jiných zdrojù zapálení. Mohou zažehnout benzinové páry.
VAROVÁNÍ
Spouštìní motoru je doprovázené jiskøením.
Jiskøení mùže zažehnout pøítomné hoølavé plyny.
Výsledkem mùže být požár nebo výbuch.
• Nespouštìjte motor, uniká-li v prostoru zemní plyn nebo propan-butan (LPG).
• Nepoužívejte stlaèené startovací kapaliny, jejich páry jsou hoølavé.
VAROVÁNÍ oznaèuje ohrožení, které, není-li eliminováno, mùže zpùsobit
smrt nebo vážný úraz.
POZOR oznaèuje ohrožení, které, není-li eliminováno, mùže zpùsobit lehký,
nebo støednì tìžký úraz.
POZOR, pokud se použije bez varovného symbolu, oznaèuje situaci, vnížby
mohlo dojít k poškození produktu.
cs
VAROVÁNÍ
Motory produkují oxid uhelnatý, což je bezbarvý jedovatý plyn bez
zápachu.
Vdechování oxidu uhelnatého mùže zpùsobit nevolnost, mdloby až smrt.
• Spouštìjte a provozujte motor venku.
• Nespouštìjte ani neprovozujte motor v uzavøeném prostoru, i když jsou otevøená
okna i dveøe.
19

VAROVÁNÍ
Rychlé zatažení (zpìtné ”kopnutí”) lanka spouštìèe pøitáhne ruku a paži k
motoru rychleji, než ho staèíte pustit.
Je tu nebezpeèí zlomeniny, odøení nebo natažení šlach.
• Pøi startování motoru táhnìte za lanko spouštìèe pomalu, dokud neucítíte odpor a
pak rychle zatáhnìte, abyste zabránili zpìtnému kopnutí.
• Pøed spuštìním motoru zbavte motor veškerého vnìjšího vybavení/zátìže.
• Pøímo spøažené souèásti zaøízení, napø. nože, obìžná kola, øemenice, ozubená kola
atd., musí být bezpeènì upevnìny.
VAROVÁNÍ
Otáèivé èásti se mohou dostat do styku nebo zachytit ruce, nohy, vlasy,
odìv èi výstroj.
Mùže dojít k tìžkým tržným ranám až amputacím konèetin.
• Provozujte zaøízení pouze s upevnìnými ochrannými kryty.
• Nepøibližujte ruce a nohy k rotujícím èástem.
• Sepnìte si dlouhé vlasy a sejmìte šperky.
• Nenoste volnì vlající odìv, volnì visící stahovací tkalouny a šòùry, jež mohou být
zachyceny.
VAROVÁNÍ
Provozem motorù se vytváøí teplo. Díly motoru, zejména tlumiè výfuku,
jsou za provozu extrémnì horké.
Ve styku s nimi mohou vzniknout vážné popáleniny.
Hoølavý materiál, jako je listí, tráva, roští atd., mùže vzplanout.
• Pøed manipulací nechejte tlumiè výfuku, válec a žebra motoru vychladnout.
• Odstraòujte hoølavé neèistoty, hromadící se v prostoru tlumièe a válce.
• Pøed použitím zaøízení na zalesnìném, travnatém nebo køovím porostlém
nekultivovaném pozemku namontujte a udržujte ve funkèním stavu lapaè jisker.
Vyžaduje to stát Kalifornie (paragraf 4442 Kalifornského zákona o v eøejných
zdrojích). Ostatní státy mají podobné zákony. Na federálních pozemcích platí
federální zákony.
VAROVÁNÍ
Neúmyslné jiskøení mùže zpùsobit požár nebo úraz elektrickým proudem.
Neúmyslné spuštìní motoru mùže zpùsobit zachycení, amputaci konèetiny
nebo tržné rány.
Riziko požáru
Pøed provádìním seøizování nebo oprav:
• Odpojte kabel od zapalovací svíèky a uložte jej dále od zapalovací svíèky.
• Odpojte kabel od záporného vývodu akumulátoru (jen pokud je motor vybaven
elektrickým spouštìèem).
• Používejte pouze správné nástroje.
• Otáèky motoru se nesmí zvyšovat úpravami pružin regulátoru, táhel a ostatních dílù.
• Náhradní díly tlumièe výfuku musí být stejné jako originály a namontované na
pùvodních místech.
• Na setrvaèník netluète kladivem nebo tvrdým pøedmìtem, protože hrozí rozpad
setrvaèníku pøi dalším provozu.
Pøi zkoušení svíèky:
• Použijte schválenou zkoušeèku zapalovacích svíèek
• Nezkoušejte jiskru zapalování pøi vyjmuté svíèce.
20 BRIGGSandSTRATTON.COM
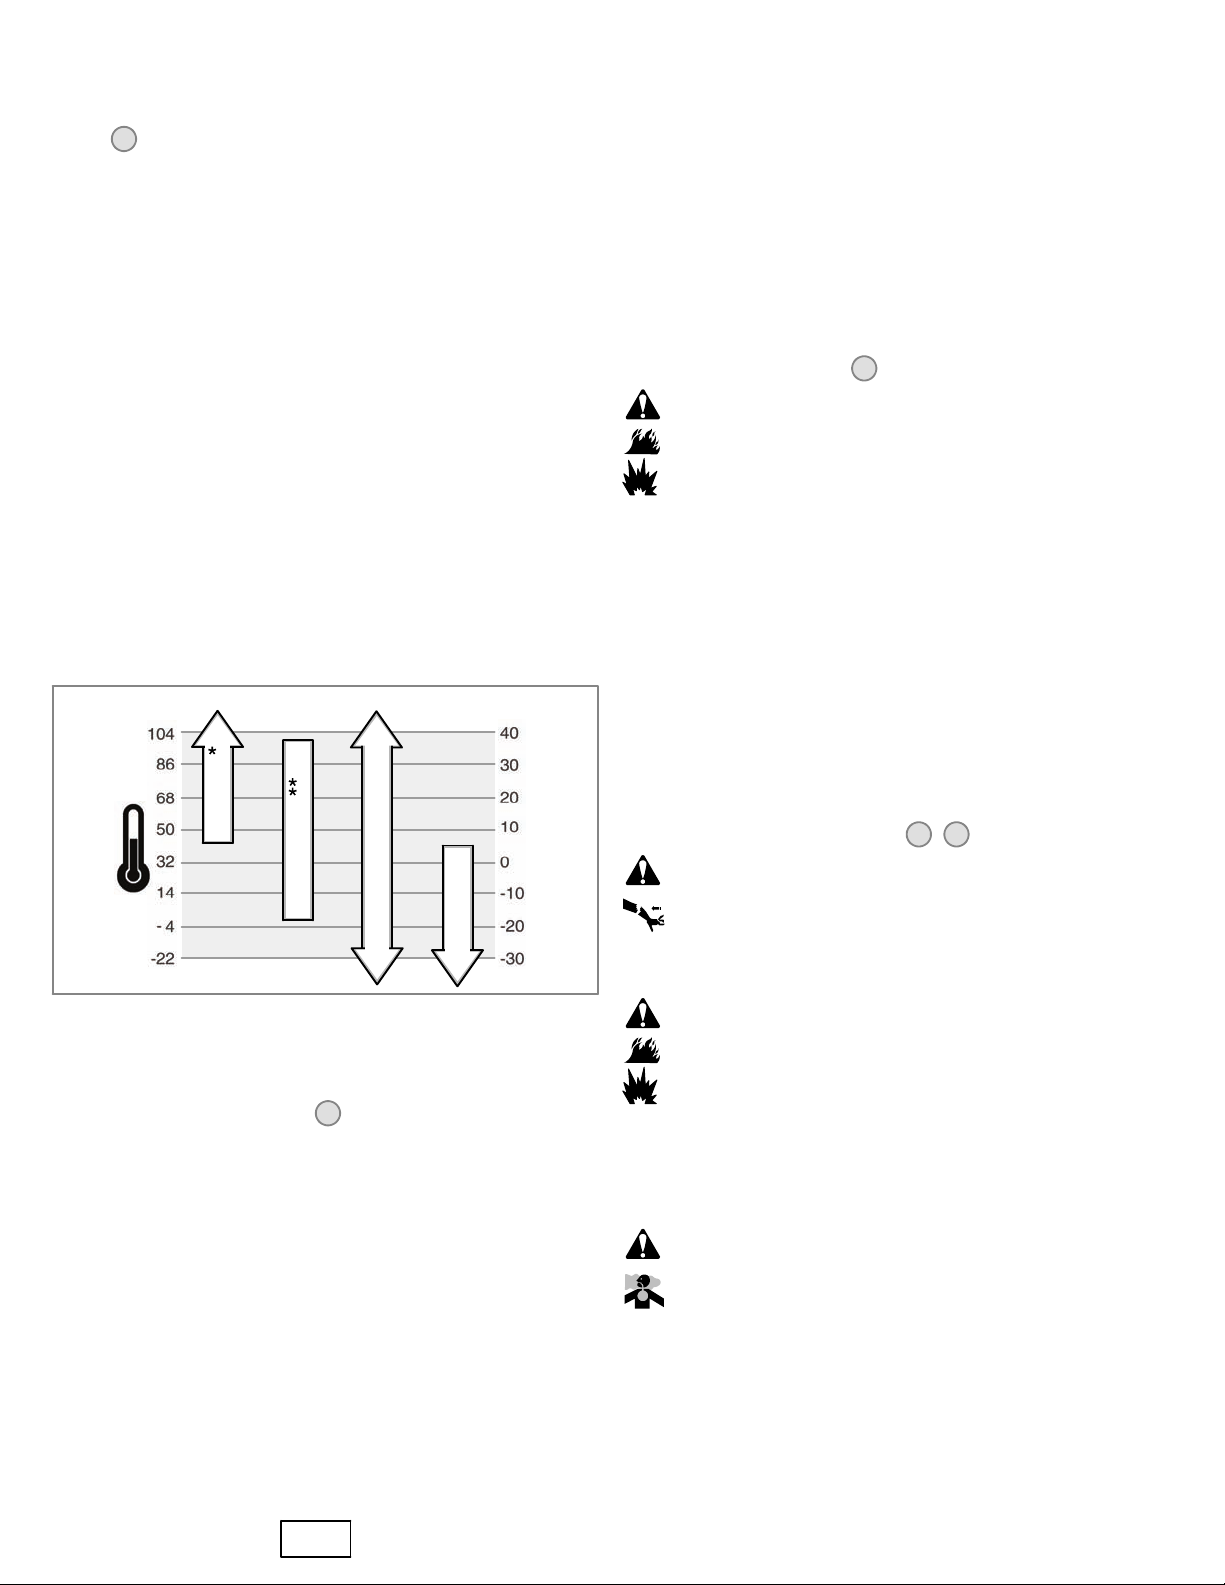
Funkce a ovládací prvky
Abyste se seznámili s umístìním rùzných funkcí a ovládacích prvkù, porovnávejte
ilustrace
A. Identifikace motoru
Model Typ Kód
B. Zapalovací svíèka
C. Palivová nádrž a víèko
D. Vzduchový filtr
E. Držadlo spouštìcího lanka
F. Plnicí otvor oleje s mìrkou
G. Vypouštìcí zátka oleje
H. Tlumiè výfuku
Kryt tlumièe výfuku (volitelné vybavení)
Lapaè jisker (volitelné vybavení)
I. Ovládání sytièe
J. Ovládání škrticí klapky (volitelné vybavení)
K. Vypínaè motoru
L. Uzavírací ventil (volitelné vybavení)
M. Chrániè prstù
N. Redukèní pøevod (volitelné vybavení)
s motorem.
1
Chcete-li ochránit palivový systém pøed tvorbou rosolovitých usazenin, pøimíchejte do
paliva stabilizátor paliva. Viz Skladování. Všechna paliva nejsou stejná. Pokud po
použití paliva zjistíte problémy se startováním nebo výkonem, zmìòte dodavatele paliva
nebo znaèku paliva. Schválené palivo pro tento motor je benzín. Systém kontroly
výfukových spalin: EM (upravené motory).
Vìtší nadmoøské výšky
V nadmoøských výškách nad 5 000 stop (1524 metrù) je pøijatelný benzín s oktanovým
èíslem nejménì 85/85 AKI (89 RON). Aby byla zachována platnost certifikátu shody s
emisními limity, je nezbytné seøízení motoru pro velké nadmoøské výšky. Pøi používání
motoru bez tohoto seøízení dochází ke snížení výkonu, zvýšení spotøeby paliva a
zvýšení emisí. Informace o seøízení pro velké nadmoøské výšky získáte od
autorizovaného dealera spoleènosti Briggs & Stratton.
Pøi provozu v nadmoøských výškách do 2 500 stop (762 metrù) se nedoporuèuje
používat soupravu pro vìtší nadmoøské výšky.
Doplnìní paliva — Obrázek
3
VAROVÁNÍ
Benzin a jeho páry jsou vysoce hoølavé a výbušné.
Požár nebo výbuch mùže zpùsobit vážné popáleniny nebo i smrt.
Fungování
Objem oleje (viz sekci Specifikace)
Doporuèené oleje
Pro optimální výkon doporuèujeme používat oleje Briggs & Stratton se záruèním
certifikátem. Jsou pøípustné i další vysoce kvalitní detergentní oleje s klasifikací pro
provoz SF, SG, SH, SJ nebo vyšší. Nepoužívejte speciální pøísady.
Správná viskozita oleje pro motor je závislá na venkovní teplotì. S pomocí tabulky zvolte
nejlepší viskozitu pro oèekávaný rozsah venkovních teplot.
°F °C
SAE 30
10W-30
Syntetický olej 5W-30
* Používání oleje SAE 30 pøi teplotách nižších než 40°F(4°C) bude mít za následek
obtížné startování.
** Pøi teplotách vyšších než 80°F(27°C) mùže zpùsobit použití oleje10W-30 zvýšení
spotøeby oleje. Kontrolujte hladinu oleje èastìji.
5W-30
Když doplòujete palivo
• Vypnìte motor a pøed sejmutím uzávìru p aliv ové nádrže jej nechte nejménì 2
minuty chladnout.
• Nádrž plòte venku nebo v dobøe vìtraném prostoru.
• Nepøeplòujte palivovou nádrž. Nádrž plòte zhruba 1.5 palce (38 mm) pod horní
okraj hrdla kvùli tepelné roztažnosti paliva.
• Benzín chraòte pøed jiskrami, otevøeným ohnìm, vìènými plamínky, horkem a
jinými zdroji vznícení.
• Zkontrolujte palivové potrubí, nádrž a uzávìr a všechny spoje na tìsnost a
praskliny. V pøípadì potøeby proveïte výmìnu.
• Jestliže rozlijete palivo, poèkejte, až se odpaøí a teprve potom spuste motor.
1. Odstraòte z oblasti kolem uzávìru palivové nádrže. Sejmìte uzávìr palivové nádrže
(A). Viz Obrázek 3.
2. Naplòte palivovou nádrž (B) benzínem. Kvùli tepelné roztažnosti benzínu dbejte na
to, aby pøi plnìní hladina nepøesáhla spodní èást hrdla palivové nádrže (C).
3. Znovu nasaïte uzávìr palivové nádrže.
Jak nastartovat motor — Obrázek
4 5
VAROVÁNÍ
Rychlé zatažení (zpìtné ”kopnutí”) lanka spouštìèe pøitáhne ruku a paži k
motoru rychleji, než ho staèíte pustit.
Je tu nebezpeèí zlomeniny, odøení nebo natažení šlach.
• Pøi startování motoru táhnìte za lanko spouštìèe pomalu, dokud neucítíte odpor a
pak rychle zatáhnìte, abyste zabránili zpìtnému kopnutí.
VAROVÁNÍ
Benzin a jeho páry jsou vysoce hoølavé a výbušné.
Požár nebo výbuch mùže zpùsobit vážné popáleniny nebo i smrt.
Kontrola/dolití oleje — Obrázek
Pøed doplnìním nebo kontrolou oleje
• Motor dejte do vodorovné polohy.
• Vyèistìte prostor pro doplòování oleje od neèistot.
1. Vyjmìte mìrku (A) a otøete ji èistým hadøíkem.
2. Vrate zpìt mìrku, ale nezašroubujte ji. Hladina oleje by mìla být na znaèce FULL
(B)namìrce.
3. Nalévejte olej pomalu do plnicího otvoru v motoru (C). Dolijte olej až po okraj, ale
nepøelijte jej.
4. Zasuòte mìrku zpìt a utáhnìte ji.
2
Doporuèení týkající se benzínu
Palivo musí splòovat následující požadavky:
• Používejte èistý, èerstvý bezolovnatý benzín.
• Minimálnì 87 oktanù/87 AKI (91 RON). V pøípadì, že používáte stroj ve vyšších
nadmoøských výškách, viz níže.
• Pøijatelný je benzín obsahující do 10 % ethanolu (smìsi benzínu s alkoholem)
nebo do 15 % MTBE (methyl-tercio-butyl-ether).
POZOR: Nepoužívejte neschválené druhy benzínu, jako napøíklad E85. Nepøidávejte do
benzínu olej ani neupravujte motor pro prov oz s alternativními palivy. Došlo by k
poškození souèástí motoru a ztrátì záruky na motor.
cs
Pøi spouštìní motoru
• Zkontrolujte, zda jsou na svém místì svíèky, tlumiè výfuku, víèko palivové nádrže a
vzduchový filtr, a zda jsou dobøe zajištìny.
• Neotáèejte motorem pøi odstranìné svíèce.
• Pøi pøeplavení motoru nastavte sytiè (je-li k dispozici) do polohy open/run (chod) a
škrtící klapku do polohy fast (rychle) a protáèejte motor, dokud nenaskoèí.
VAROVÁNÍ
Motory produkují oxid uhelnatý, což je bezbarvý jedovatý plyn bez
zápachu.
Vdechování oxidu uhelnatého mùže zpùsobit nevolnost, mdloby až smrt.
• Spouštìjte a provozujte motor venku.
• Nespouštìjte ani neprovozujte motor v uzavøeném prostoru, i když jsou otevøená
okna i dveøe.
POZOR: Tento motor je dodáván firmou Briggs & Stratton bez oleje. Pøed spuštìním
motoru zkontrolujte hladinu oleje. Pokud spustíte motor bez oleje, mùže dojít k jeho
neopravitelnému poškození, na které se nebude vztahovat záruka.
1. Zkontrolujte hladinu oleje. Viz pokyny v sekci Postup kontroly/pøidání oleje .
2. Zkontrolujte, zda jsou ovládací prvky zaøízení deaktivovány. Popis umístìní a funkce
tìchto ovládacích prvkù najdete v pøíruèce k zaøízení.
3. Zatlaète vypínaè (A) do polohy on (Obrázek 4).
21
4. Posuòte ovládání škrticí klapky (B), je-li jí motor vybaven, do polohy fast .
Zaøízení používejte v poloze fast
5. Posuòte ovládání sytièe (C) do polohy choke
Poznámka: Použití sytièe není obvykle potøeba pøi opakovaném startu teplého
motoru.
6. Pøepnìte palivový ventil (D), je-li jím motor vybaven, do polohy on (Obrázek 5).
7. Spouštìní pomocí lanka: Pevnì uchopte rukoje lanka spouštìèe (E). Táhnìte za
lanko spouštìèe pomalu, dokud neucítíte odpor. Pak zatáhnìte prudce (Obrázek 4).
Poznámka: Pokud motoro ani po tøech pokusech nenastartuje, navštivte stránku
BRIGGSandSTRATTON.COM nebo zavolejte na telefonní èíslo 1-800-233-3723 (v
USA).
.
.
VAROVÁNÍ: Rychlé zatažení (zpìtné ”kopnutí”) lanka spouštìèe pøitáhne
ruku a paži k motoru rychleji, než je staèíte pustit. Je tu nebezpeèí zlomeniny, odøení
nebo natažení šlach. Pøi spouštìní motoru táhnìte za lanko spouštìèe nejprve
pomalu, dokud neucítíte odpor. Pak zatáhnìte prudce.
Poznámka: Pokud motoro ani po tøech pokusech nenastartuje, navštivte stránku
BRIGGSandSTRATTON.COM nebo zavolejte na telefonní èíslo 1-800-233-3723 (v
USA).
8. Elektrické spouštìní: Pøepnìte vypínaè elektrického spouštìní do polohy on/start.
Popis umístìní a funkce tohoto spínaèe najdete v pøíruèce k zaøízení.
POZOR: Chcete-li prodloužit životnost spouštìèe, používejte krátké spouštìcí cykly
(maximálnì pìt sekund). Mezi spouštìcími cykly poèkejte jednu minutu.
9. Když se motor zahøeje, pøesuòte ovladaè sytièe (C) do polohy run
Jak zastavit motor — Obrázek
5 6
(Obrázek 4).
VAROVÁNÍ
Benzin a jeho páry jsou vysoce hoølavé a výbušné.
Požár nebo výbuch mùže zpùsobit vážné popáleniny nebo i smrt.
• Motor se nesmí zastavovat zahlcením karburátoru.
1. Zatlaète vypínaè (A, Obrázek 6) do polohy off
Elektrické spouštìní: Pøepnìte vypínaè elektrického spouštìní do polohy off/stop.
Popis umístìní a funkce tohoto spínaèe najdete v pøíruèce k zaøízení.
2. Po zastavení motoru pøepnìte palivový ventil (D, Obrázek 5) do polohy closed.
nebo
Pøi zkoušení svíèky:
• Použijte schválenou zkoušeèku zapalovacích svíèek
• Nezkoušejte jiskru zapalování pøi vyjmuté svíèce.
Tabulka údržby
Prvních 5 pracovních hodin
• Vymìòte olej
Každých 8 hodin provozu nebo dennì
• Zkontrolujte stav oleje v motoru.
• Vyèistìte prostor kolem tlumièe výfuku a ovládacích prvkù.
• Vyèistìte chrániè prstù.
Každých 25 hodin nebo jednou roènì
• Vyèistìte vzduchový filtr *
• Vyèistìte pøedfiltr *
Každých 100 hodin nebo jednou roènì
• Vymìòte olej v motoru.
• Vyèistìte tlumiè výfuku a lapaè jisker.
Každých 100 hodin
• Vymìòte olej v redukèním pøevodu (je-li jím motor vybaven).
Jednou roènì
• Vymìòte vzduchový filtr.
• Vymìòte pøedfiltr.
• Vymìòte zapalovací svíèku.
• Vyèistìte/vymìòte palivový filtr.
• Vyèistìte vzduchový chladicí systém *
• Pøekontrolujte vùli ventilù **
* V prašném prostøedí nebo tam, kde se ve vzduchu vyskytují neèistoty, provádìjte
èištìní èastìji.
** Není nutné, pokud se nevyskytnou problémy s výkonem motoru.
Seøízení karburátoru
Nikdy sami neseøizujte karburátor. Ten je již z výroby seøízen tak, aby efektivnì fungoval
ve vìtšinì pracovních podmínek. Pokud je pøece jen nutné seøízení provést, kontaktujte
držba
Používejte pouze originální náhradní díly zaøízení. Jiné díly nemusí stejnì dobøe
fungovat a mohou zpùsobit zranìní. Navíc by mohlo použití jiných dílù vést ke ztrátì
nároku na záruku.
Doporuèujeme svìøit veškerý servis a údržbu motorù a jejich dílù autorizovanému
servisu Briggs & Stratton. Používejte výhradnì originální díly Briggs & Stratton.
POZOR: Aby motor správnì fungoval, musí všechny jeho souèásti zùstat na svém
místì.
Omezení emisí
Údržba, výmìna nebo oprava zaøízení pro snižování emisí mohou být provedeny
kterýmkoliv servisem nebo jednotlivcem zabývajícím se opravou motorù pro
pracovní stroje používané v terénu. Pro bezplatnou opravu za podmínek a ustanovení
záruèní smlouvy spoleènosti Briggs & Stratton však musí být jakýkoliv zásah na zaøízení
pro snižování emisí nebo oprava èi výmìna dílu provedeny autorizovaným servisem. Viz
Záruka na splnìní emisních limitù.
VAROVÁNÍ
Neúmyslné jiskøení mùže zpùsobit požár nebo úraz elektrickým proudem.
Neúmyslné spuštìní motoru mùže zpùsobit zachycení, amputaci konèetiny
nebo tržné rány.
Riziko požáru
Pøed provádìním seøizování nebo oprav:
• Odpojte kabel od zapalovací svíèky a uložte jej dále od zapalovací svíèky.
• Používejte pouze správné nástroje.
• Otáèky motoru se nesmí zvyšovat úpravami pružin regulátoru, táhel a ostatních dílù.
• Náhradní díly tlumièe výfuku musí být stejné jako originály a namontované na
pùvodních místech.
• Na setrvaèník netluète kladivem nebo tvrdým pøedmìtem, protože hrozí rozpad
setrvaèníku pøi dalším provozu.
kteréhokoli autorizovaného dealera Briggs & Stratton.
POZOR: Výrobce zaøízení, do kterého je motor osazen, uvádí maximální otáèky motoru
vhodné pro provoz svého výrobku. Nepøekraèujte tuto hodnotu.
Postup kontroly zapalovací svíèky — Obrázek
Zkontrolujte vzduchovou mezeru (A, Obrázek pomocí drátové mìrky (B). Je-li to
nutné, mezeru znovu nastavte. Nainstalujte zapalovací svíèku a dotáhnìte ji na
doporuèený krouticí moment. Postup nastavení mezery nebo krouticí moment najdete v
sekci Specifikace .
Poznámka: V nìkterých oblastech vyžadují místní pøedpisy použití zapalovací svíèky s
odporem pro potlaèení rušení. Jestliže byl tento motor pùvodnì vybaven svíèkou s
odporem, používejte k výmìnì svíèek stejného typu.
Zkontrolujte tlumiè výfuku a lapaè jisker — Obrázek
VAROVÁNÍ
Provozem motorù se vytváøí teplo. Díly motoru, zejména tlumiè výfuku,
jsou za provozu extrémnì horké.
Ve styku s nimi mohou vzniknout vážné popáleniny.
Hoølavý materiál, jako je listí, tráva, roští atd., mùže vzplanout.
• Pøed manipulací nechejte tlumiè výfuku, válec a žebra motoru vychladnout.
• Odstraòujte hoølavé neèistoty, hromadící se v prostoru tlumièe a válce.
• Pøed použitím zaøízení na zalesnìném, travnatém nebo køovím porostlém
nekultivovaném pozemku namontujte a udržujte ve funkèním stavu lapaè jisker.
Vyžaduje to stát Kalifornie (odst. 4442 Kalifornského zákona o v eøejných zdrojích).
Ostatní státy mají podobné zákony. Na f ederálních pozemcích platí federální zákony.
Zkontrolujte, zda tlumiè výfuku (A, Obrázek 7) nevykazuje praskliny, korozi nebo jiné
opotøebení. Sejmìte lapaè jisker (B), je-li jím motor vybaven a zkontrolujte, zda není
poškozen nebo zanesen uhlíkovými usazeninami. Pokud je potøeba nìkteré díly vymìnit,
použijte pouze originální náhradní díly.
8
7
UPOZORNÌNÍ: Náhradní díly musí být stejné a musí být nainstalovány ve
stejné poloze jako pùvodní díly, jinak by mohlo dojít k požáru.
22 BRIGGSandSTRATTON.COM

Postup výmìny oleje — Obrázek
POZOR: Použitý olej je nebezpeèný odpad a je nutno jej správným zpùsobem
zlikvidovat. Použitý olej nepatøí do domovního odpadu. Ohlednì bezpeèné
likvidace/recyklace oleje se poraïte s místními úøady, servisním støediskem nebo
prodejcem.
9 10
Odstraòte olej
1. Vypnìte motor a dokud je ještì teplý, odpojte kabel zapalovací svíèky (A) a uložte jej
v bezpeèné vzdálenosti od svíèky (Obrázek 10).
2. Odšroubujte vypouštìcí uzávìr (B, Obrázek 9). Vypuste olej do schválené nádoby.
Poznámka: V motoru mohou být nainstalovány kterékoli z následujících
vyobrazených vypouštìcích uzávìrù (C).
3. Po vypuštìní oleje vrate zpìt vypouštìcí uzávìr a dotáhnìte jej.
Doplnìní oleje
• Motor dejte do vodorovné polohy.
• Vyèistìte prostor pro doplòování oleje od neèistot.
• Objem oleje najdete v sekci Specifikace.
1. Vyjmìte mìrku (D) a otøete ji èistým hadøíkem.
2. Nalévejte olej pomalu do plnicího otvoru v motoru (E). Dolijte olej až po okraj, ale
nepøelijte jej.
3. Vrate zpìt mìrku, ale nezašroubujte ji. Znovu ji vyjmìte a zkontrolujte hladinu
oleje. Hladina oleje by mìla být na znaèce FULL (F)namìrce.
4. Vrate zpìt mìrku a dotáhnìte ji.
Provádìní údržby vzduchového filtru — Obrázek
11
VAROVÁNÍ
Benzin a jeho páry jsou vysoce hoølavé a výbušné.
Požár nebo výbuch mùže zpùsobit vážné popáleniny nebo i smrt.
• Nespouštìjte ani neprovozujte motor s odmontovanou sestavou vzduchového filtru
nebo s vyjmutým vzduchovým filtrem.
POZOR: Nepoužívejte k èištìní filtru stlaèený vzduch nebo rozpouštìdla. Stlaèený
vzduch mùže filtr poškodit a rozpouštìdla jej rozpustí.
Systém vzduchového filtru používá skládaný filtr s volitelným pøedfiltrem. Pøedfiltr lze
vyprat a opìtovnì použít.
Postup èištìní/výmìny palivového filtru — Obrázek
13
VAROVÁNÍ
Benzin a jeho páry jsou vysoce hoølavé a výbušné.
Požár nebo výbuch mùže zpùsobit vážné popáleniny nebo i smrt.
• Benzín chraòte pøed jiskrami, otevøeným ohnìm, vìènými plamínky, horkem a
jinými zdroji vznícení.
• Kontrolujte palivové potrubí, nádrž a víèko a všechny spoje na tìsnost a
praskliny. V pøípadì potøeby proveïte výmìnu.
• Pøed výmìnou palivového filtru vypuste palivovou nádrž nebo zavøete palivový
kohout.
• Náhradní díly tlumièe výfuku musí být stejné jako originály a namontované na
pùvodních místech.
• Jestliže rozlijete palivo, poèkejte, až se odpaøí a teprve potom spuste motor.
1. Sejmìte palivový uzávìr (A, Obrázek 13).
2. Vyjmìte palivový filtr (B).
3. Je-li filtr zneèištìný, vyèistìte jej nebo jej vymìòte. Pøi výmìnì palivového filtru
používejte vždy originální náhradní filtr.
Postup èištìní vzduchového chladicího systému — Obrázek
VAROVÁNÍ
Provozem motorù se vytváøí teplo. Díly motoru, zejména tlumiè výfuku,
jsou za provozu extrémnì horké.
Ve styku s nimi mohou vzniknout vážné popáleniny.
Hoølavý materiál, jako je listí, tráva, roští atd., mùže vzplanout.
• Pøed manipulací nechejte tlumiè výfuku, válec a žebra motoru vychladnout.
• Odstraòujte hoølavé neèistoty, hromadící se v prostoru tlumièe a válce.
POZOR: Nepoužívejte k èištìní motoru vodu. Voda by mohla kontaminovat palivovou
soustavu. K èištìní motoru použijte kartáè nebo suchý hadøík.
Tento motor je chlazen vzduchem. Neèistoty nebo usazeniny mohou omezit proudìní
vzduchu a zpùsobit pøehøátí motoru, které má za následek snížení výkonu a životnosti
motoru.
Pomocí kartáèe nebo suchého hadøíku odstraòte neèistoty z chránièe prstù (A). Udržujte
táhla, pružiny a ovládací prvky (B) èisté. Odstraòujte z okolí tlumièe výfuku (C) hoølavé
neèistoty (Obrázek 14).
14
Skladování
Plochý vzduchový filtr
1. Povolte šroub (D), který drží víko (A). Viz Obrázek 11.
2. Otevøete víko a vyjmìte pøedfiltr (C)afiltr(B).
3. Zlehka oklepejte filtr o tvrdou podložku, aby se z nìj uvolnily neèistoty. Pokud je filtr
pøíliš zneèištìný, vymìòte jej za nový.
4. Vyperte pøedfiltr v tekutém odmašovacím prostøedku a vodì. Poté jej nechte na
vzduchu dùkladnì uschnout. Nemažte pøedfiltr olejem.
5. Spojte suchý pøedfiltr s filtrem tak, aby byl okraj (G) pøedfiltru u s podního konce
záhybù filtru.
6. Nainstalujte filtr.
7. Zacvaknìte jazýèky víka (E)doštìrbin(F).
8. Zavøete víko a zajistìte je šroubem.
Postup výmìny oleje v redukèním pøevodu — Obrázek
Je-li váš motor vybaven redukèním pøevodem, provádìjte servisní práce následovnì.
1. Vyjmìte plnicí olejovou zátku (B) a kontrolní olejovou zátku (C).
2. Odšroubujte vypouštìcí uzávìr (A, Obrázek 12) a vypuste olej do vhodné nádoby.
3. Našroubujte vypouštìcí uzávìr zpìt a utáhnìte jej.
4. Pomalu nalévejte mazivo pøevodù do otvoru pro plnìní oleje (viz sekci Specifikace).
Když olej zaène vytékat z kontrolního otvoru, s naléváním pøestaòte.
5. Vrate zpìt kontrolní zátku a dotáhnìte ji.
6. Vrate zpìt plnicí olejovou zátku a dotáhnìte ji.
Dùležité: Plnicí olejová zátka je opatøena odvzdušòovacím otvorem (D)amusíbýt
nasazena na horní stranu krytu pøevodovky.
12
VAROVÁNÍ
Benzin a jeho páry jsou vysoce hoølavé a výbušné.
Požár nebo výbuch mùže zpùsobit vážné popáleniny nebo i smrt.
Pøi skladování benzínu nebo zaøízení s palivem v nádrži
• Uložte oddìlenì od pecí, kamen, ohøívaèù vody èi jiných zaøízení, která mají vìèný
plamínek nebo od jiných zdrojù zapálení. Mohou zažehnout benzinové páry.
Palivová soustava
Palivo mùže pøi skladování delším než 30 dnù zvìtrat. Zvìtralé palivo zpùsobuje tvorbu
usazenin kyseliny a rosolovitých usazenin v palivové soustavì nebo na základních
dílech karburátoru. Chcete-li, aby palivo vydrželo déle èerstvé, používejte stabilizátor
paliva Briggs & Stratton FRESH START
nebo koncentrovaných kapek.
Pøidáváte-li stabilizátor paliva podle pokynù, není potøeba vypouštìt benzín z motoru.
Nechte motor bìžet 2 minuty, aby se stabilizátor rozptýlil po celém palivovém systému.
Motor s palivem lze poté skladovat až po dobu 24 mìsícù.
Pokud nebyl benzín v motoru ošetøen stabilizátorem paliva, je nutné jej vypustit do
schválené nádoby. Spuste motor a nechte jej, aby se sám zastavil v dùsledku
nedostatku paliva. Pro zachování èerstvosti paliva doporuèujeme pøidat stabilizátor
paliva do nádoby, v níž palivo skladujete.
Motorový olej
Olej vymìòujte, dokud je motor ještì teplý.
®
, který je dostupný v podobì kapalné pøísady
Vyhledávání a odstraòování závad
Potøebujete pomoc? Jdìte na stranu BRIGGSandSTRATTON.COM nebo zavolejte na
èíslo 1-800-233-3723 257 013 116.
cs
23

Specifikace
Specifikace motorù
Model 120000
Zdvihový objem 205 ccm
Vrtání 68,28 mm
Zdvih 55,88 mm
Objem oleje 0,54 — 0,59 l
Olej v redukèním pøevodu 80W-90
Specifikace seøízení *
Model 120000
Vzduchová mezera zapalovací svíèky 0,76 mm
Krouticí moment zapalovací svíèky 20 Nm
Vzduchová mezera zapalovací cívky 0,25 — 0,36 mm
Vùle sacího ventilu 0,10 — 0,15 mm
Vùle výfukového ventilu 0,23 — 0,28 mm
* Výkon motoru klesá o 3,5 % na každých 1 000 stop (300 metrù) nadmoøské výšky ao1%nakaždých10° F(5,6° C) nad 77° F(25° C). Motor funguje normálnì pøi náklonu do 15°.
Maximální dovolené provozní limity pro svahy najdete v návodu k obsluze zaøízení.
Specifikace motorù
Model 200000
Zdvihový objem 305 ccm
Vrtání 79,24 mm
Zdvih 61,93 mm
Objem oleje 0,77 — 0,83 l
Olej v redukèním pøevodu SAE 30
Specifikace seøízení *
Model 200000
Vzduchová mezera zapalovací svíèky 0,76 mm
Krouticí moment zapalovací svíèky 20 Nm
Vzduchová mezera zapalovací cívky 0,20 — 0,30 mm
Vùle sacího ventilu 0,10 — 0,15 mm
Vùle výfukového ventilu 0,22 — 0,28 mm
Bìžné servisní díly n
Servisní díl Èíslo dílu
Plochý vzduchový filtr 491588, 5043
Pøedfiltr plochého vzduchového filtru 493537, 5064
Palivový filtr 792917
Aditivum do benzínu 5041, 5058
n Doporuèujeme svìøit veškerý servis a údržbu motorù a jejich dílù nìkterému z autorizovaných servisù Briggs & Stratton. Používejte výhradnì originální díly Briggs & Stratton.
Servisní díl Èíslo dílu
Zapalovací svíèka s odrušením 491055
Platinová zapalovací svíèka s dlouhou životností 5066
Klíè na zapalovací svíèku 89838, 5023
Zkoušeèka zapalování 19368
24
BRIGGSandSTRATTON.COM

ZÁRUKA POSKYTOVANÁ MAJITELÙM MOTORÙ BRIGGS & STRATTON
Kvìten 2008
OMEZENÁ ZÁRUKA
Spoleènost Briggs & Stratton Corporation bezplatnì opraví nebo nahradí jakýkoli díl nebo díly produktu s vadou materiálu nebo dílenského zpracování, pøípadnì obojího.
Náklady na pøepravu produktu pøedaného k opravì nebo výmìnì na základì této záruky ponese zákazník. Tato záruka je platná pro stanovená èasová období a podléhá
níže uvedeným podmínkám. Záruèní opravy si objednejte u nejbližšího autorizovaného servisu, který naleznete na mapì vyhledavaèe autorizovaných servisù na
adrese BRIGGSandSTRATTON.COM nebo jej zjistíte, zavoláte-li na telefonní èíslo 1-800-233-3723, pøípadnì jej naleznete ve ‘Zlatých stránkácht’.
Neexistuje žádná další výslovná záruka. Pøedpokládané záruky, vèetnì napø. záruky prodejnosti a vhodnosti pro konkrétní úèel, jsou omezeny na dobu jednoho
roku od zakoupení, nebo na jinou dobu povolenou zákonem, a všechny pøedpokládané záruky jsou vylouèeny. Odpovìdnost za náhodné nebo následné škody
je vylouèena v maximálním rozsahu povoleném zákonem. Nìkteré státy nebo zemì nedovolují omezení délky pøedpokládané záruky a nìkteré státy nebo zemì
nedovolují vylouèení nebo omezení náhodných nebo následných škod, takže se vás výše uvedená vylouèení a omezení nemusí týkat. Tato záruka vám dává specifická
práva, a mùžete mít i jiná práva, která se liší v jednotlivých státech a zemích.
Y
Znaèka/Typ produktu
STANDARDNÍ ZÁRUÈNÍ PODMÍNKY *
Spotøebitelské použití Komerèní použití
Vanguardt 2 roky 2 roky
Extended Life Seriest, I/C®, IntektI/C®, IntektPro
2 roky 1 rok
Snow Series MAXt s litinovou vložkou Dura-Boret 2 roky 1 rok
Všechny ostatní motory Briggs & Stratton 2 roky 90 dní
* Toto jsou naše standardní podmínky záruky, ta však mùže být v nìkterých pøípadech rozšíøena, aniž by nám to bylo v dobì vydání tohoto dokumentu známo.
Informace o aktuálních záruèních podmínkách pro váš motor najdete na webu BRIGGSandSTRATTON.COM nebo kontaktujte autorizovaný servis Briggs & Stratton.
Y
Na motory používané v domácích záložních generátorech se vztahuje záruka pouze pro spotøebitelské používání. Tato záruka neplatí pro motory používané v
zaøízeních sloužících k napájení elektrorozvodné sítì. Na motory, používané pøi sportovních závodech nebo na komerèních èi nájemních dráhách, se žádná
záruka neposkytuje.
Záruèní lhùta zaèíná v den zakoupení prvním maloobchodním spotøebitelem nebo komerèním koncovým uživatelem a trvá po dobu, uvedenou v horní tabulce. ”Spotøebitelským
používáním” se rozumí osobní používání maloobchodním spotøebitelem v jeho domácnosti. ”Komerèním použitím” se rozumí všechny ostatní druhy použití, vèetnì použití
komerèního, výdìleèného a v pùjèovnách. Jakmile byl jednou motor použit pro komerèní úèely, musí být pro úèely této záruky nadále považován za motor pro komerèní použití.
K obdržení záruky na výrobky Briggs & Stratton není nutná registrace záruky. Uchovejte si úètenku jako dùkaz o zakoupení. Jestliže pøi žádosti o záruèní servis
nepøedložíte dùkaz o dni prvního zakoupení, pro urèení záruèní lhùty bude použito datum výroby výrobku.
O naší záruce
Spoleènost Briggs & Stratton ochotnì zajistí záruèní opravy a omlouvá se za zpùsobené
nepøíjemnosti. Záruèní opravy provádìjí všichni autorizovaní prodejci. Vìtšina záruèních
oprav je rutinní záležitostí, ale nìkdy mohou být požadavky na záruèní servis
nepøimìøené.
Pokud nebudete souhlasit s názorem autorizovaného prodejce, oprávnìnost vašich
záruèních nárokù prošetøíme. V tomto pøípadì jej požádejte, aby pøedal všechny
podklady svému distributorovi nebo výrobnímu závodu. Jestliže distributor nebo výrobce
rozhodne o oprávnìnosti nároku, dostanete za vadné souèástky úhradu v plné výši. Aby
se pøedešlo nedorozumìním mezi zákazníkem a prodejcem, uvádíme dále nejbìžnìjší
pøíèiny selhání motoru, na které se záruka nevztahuje.
Normální opotøebení: Motory, stejnì jako všechna mechanická zaøízení, potøebují ke
správné funkènosti pravidelnou výmìnu dílù a další údržbu. Tato záruka se nevztahuje
na opravy v dùsledku ukonèení životnosti konkrétního dílu nebo celého produktu pøi
normálním používání. Záruka se nevztahuje na závady zpùsobené neodborným
zacházením, nedostateènou bìžnou údržbou, pøepravou, manipulací, skladováním nebo
nesprávnou montáží. Záruku nelze uplatnit ani v pøípadì, kdy bylo z motoru odstranìno
výrobní èíslo nebo byl jakkoliv upravován èi mìnìn.
Nesprávná údržba: Životnost motoru závisí na podmínkách, v nichž se provozuje, a na
péèi, která se mu vìnuje. Nìkterá zaøízení (napøíklad kultivátory, èerpadla a rotaèní
sekaèky) jsou èasto provozována v prašném nebo zneèištìném prostøedí, což mùže
zpùsobit pøedèasné opotøebení. Pokud bylo toto opotøebení zpùsobeno vniknutím
prachu, neèistot, písku z èištìní svíèek nebo jiného abrazivního materiálu do motoru v
dùsledku nesprávné údržby, nevztahuje se na nìj záruka.
Tato záruka se vztahuje pouze
motoru. Nežádejte proto výmìnu nebo zaplacení zaøízení, na nìmž mùže být motor
namontován. Záruka se nevztahuje ani na opravy nutné v dùsledku:
1 Problémy zpùsobené použitím jiných než originálních dílù Briggs & Stratton.
2 Ovládací prvky nebo zaøízení, která brání spouštìní motoru, mají za následek
snížení výkonu motoru a zkracují jeho životnost (Spojte se s výrobcem zaøízení.)
3 Netìsné karburátory, ucpané palivové trubky, váznoucí ventily nebo jiná poškození,
zpùsobená používáním zneèištìného nebo starého paliva.
na vady materiálu a/nebo dílenského zpracování
4 Díly, které jsou vydøené nebo zlomené z toho dùvodu, že byl motor provozován s
nedostateèným množstvím oleje, zneèištìným olejem, nebo olejem nesprávné
jakosti (hladinu oleje kontrolujte a doplòujte dle potøeby a olej vymìòujte v
doporuèených intervalech). Zaøízení OIL GARD nemusí bìžící motor zastavit.
Nedodržuje-li se správná hladina oleje, motor se mùže poškodit.
5 Oprava nebo seøízení souvisejících souèástí nebo sestav, napø. spojky, pøevodù,
dálkového ovládání apod., které nebyly vyrobeny firmou Briggs & Stratton.
6 Poškození nebo opotøebení souèástí zpùsobené neèistotami, které se dostaly do
motoru z dùvodù nesprávné údržby èi zpìtnou montáží èistièe vzduchu, používáním
jiného než originálního èistièe, èi filtraèní vložky. V doporuèených intervalech èistìte
nebo mìòte filtraèní vložku, jak je uvedeno v Návodu k obsluze a údržbì.
7 Souèásti poškozené pøetoèením nebo pøehøátím, zpùsobeným zanesením èi
ucpáním chladících žeber nebo prostoru setrvaèníku trávou, úlomky a špínou, nebo
provozem motoru v uzavøeném nevìtraném prostoru. Motor èistìte v pøedepsaných
intervalech, jak je uvedeno v Návodu k obsluze a údržbì.
8 Poškození motoru nebo jeho souèásti nadmìrnými vibracemi zpùsobenými volným
pøipevnìním motoru, uvolnìnými noži sekaèky, uvolnìnými nebo nevyváženými
obìžnými koly, nesprávným upevnìním zaøízení k høídeli motoru, nadmìrnými
otáèkami nebo jiným nesprávným provozem.
9 Ohnutý nebo zlomený klikový høídel po nárazu nože rotaèní sekaèky na pevný
pøedmìt nebo pro nadmìrné napìtí klínových øemenù.
10 Bìžné vyladìní nebo seøízení motoru.
11 Poškození motoru nebo nìkteré jeho souèásti, napø. spalovací komory, ventilù,
ventilových sedel, vedení ventilù, nebo spálení vinutí startéru používáním
nesprávného paliva — zkapalnìného plynu, zemního plynu, upravovaného benzinu
apod.
Záruèní servis je dostupný pouze prostøednictvím autorizovaných dealerù
spoleènosti Briggs & Stratton. Nejbližší autorizované dealery spoleènosti Briggs &
Stratton najdete na naší mapì dealerù na webové stránce
www.BRIGGSandSTRATTON.com, na telefonu 257 013 117, nebo jsou také uvedeni
ve ’Zlatých stránkácht’.
cs
25
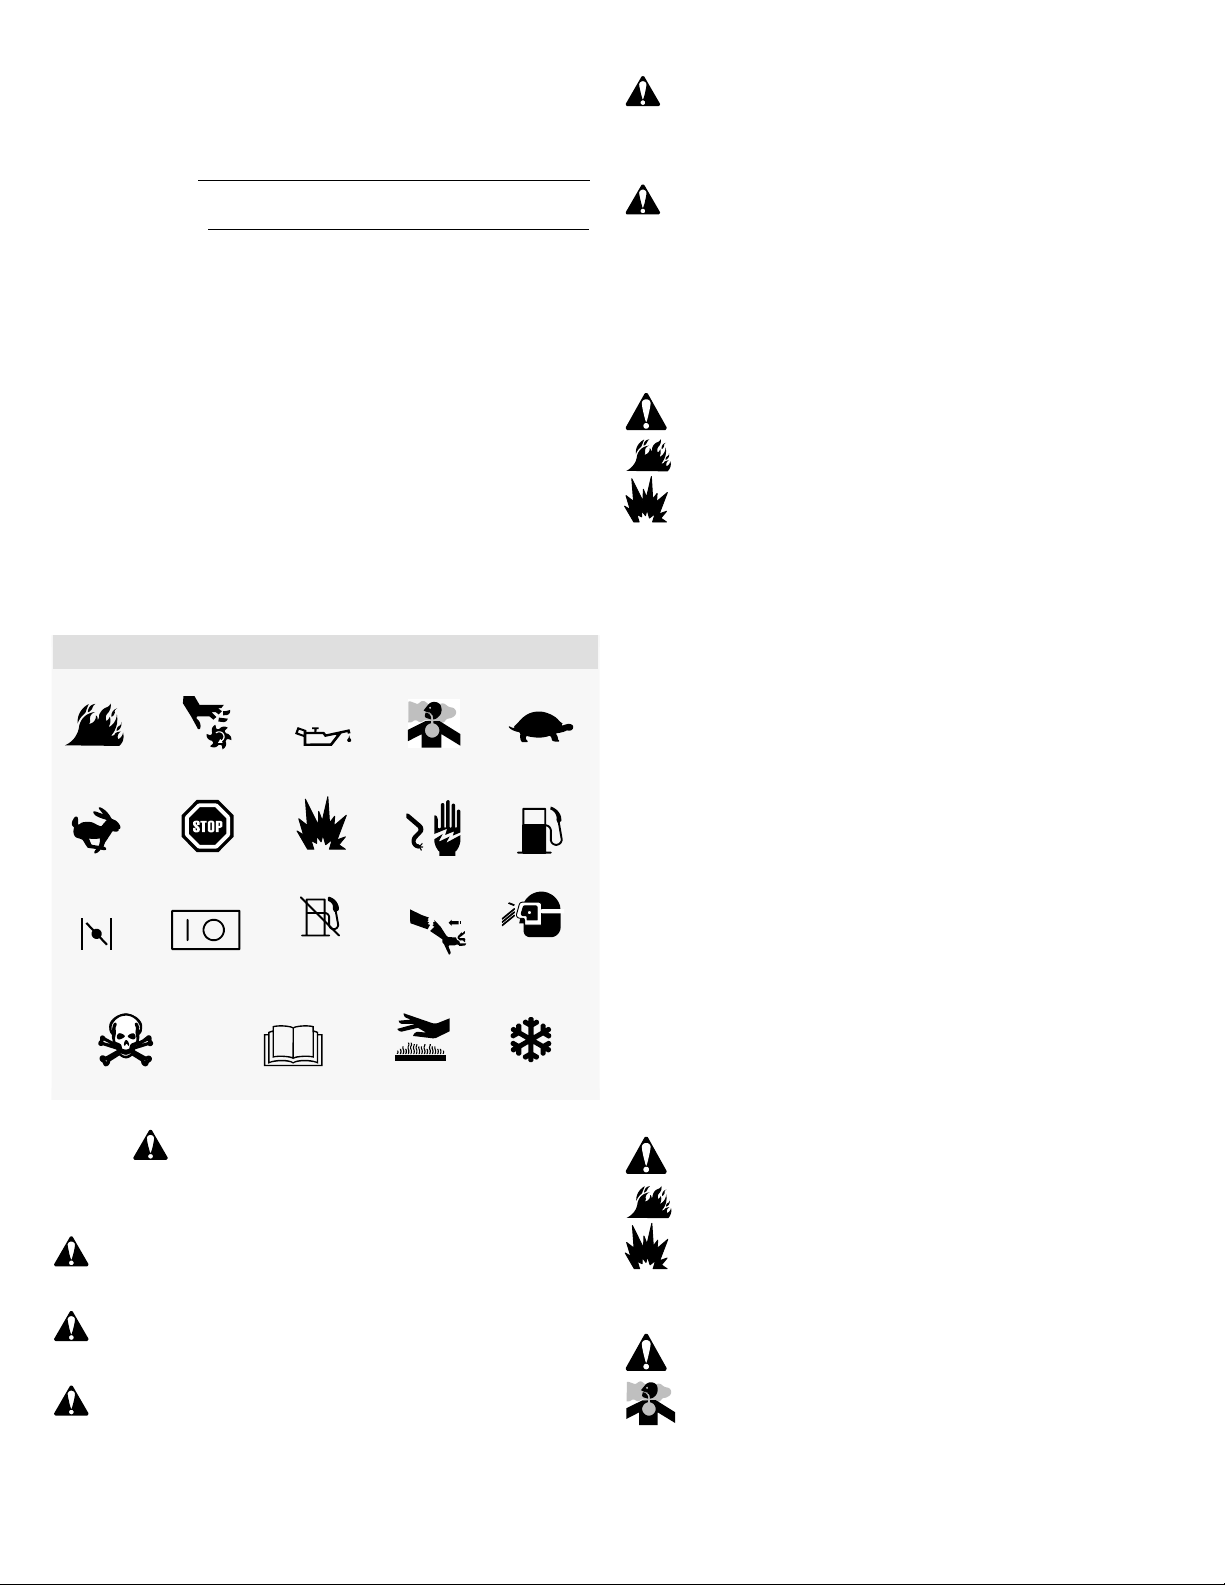
Üldinfo
Varuosade ja tehnilise abi saamiseks pange siia kirja mootori mudel, tüüp ja
koodnumbrid koos ostukuupäevaga. Need numbrid paiknevad Teie mootoril (vt
Omadused ja juhtseadised).
Ostukuupäev:
PP/KK/AAAA
Mootori mudel:
Mudel:
Mootori nimivõimsust puudutav teave
Bensiinimootorite erinevate mudelite kogunimivõimsuse sildid vastavad SAE
(Autoinseneride Ühenduse) eeskirjade J1940 (Väikemootorite võimsuse ja
pöördemomendi hindamise protseduur) nõuetele või ületavad neid ning hindamise
tulemuslikkus on saavutatud ja seda on korrigeeritud vastavalt SAE eeskirjadele J1995
(versioon 2002-05). Pöördemomendi väärtused on antud 3060 p/min juures; võimsuse
väärtused on antud 3600 p/min juures. Mootori tegelik koguvõimsus on madalam ning
seda mõjutavad muuhulgas ümbritsevad töötingimused ja mootorite vahelised
erinevused. Nii bensiinimootoreid kasutatavate toodete suure hulga kui ka seadmete
kasutamisega seotud keskkonnaküsimuste tõttu ei arenda bensiinimootor konkreetses
ajamis kasutamisel kogunimivõimsust (tegelik „kohapealne” või netovõimsus). See
erinevus johtub paljudest teguritest, k.a, kuid mitte ainult: seadme osadest (õhupuhasti,
väljalase, laadimine, jahutus, karburaator, kütusepump jne), rakenduspiirangutest,
kasutustingimustest (temperatuur, niiskus, kõrgus) ja mootorite erinevustest. Tootmis- ja
mahupiirangute tõttu võib Briggs & Stratton asendada selle seeria mootori kõrgema
nimivõimsusega mootoriga.
Tüüp:
Kood:
asutaja ohutus
OHUTUS- JA JUHTSÜMBOLID
Tuleoht
Kiire
Õhuklapp
Ohtlikud kemikaalid
Peatamine
Sisse Välja
Õli
Plahvatusoht
Kütusevool
u peatamine
Lugege kasutusjuhendit
Mürgised aurudLiikuvad osad
Elektrišoki oht
Tagasilöögi oht
Kuum pind
Aeglane
Kütus
Kandke
kaitseprille
Külmakahjustus
HOIATUS
Selle mootori heitgaasid sisaldavad keemilisi aineid, mis California osariigi
andmeil põhjustavad vähki, sünnidefekte või kahjustavad muul viisil
paljunemisvõimet.
HOIATUS
Briggs & Stratton ei kiida heaks nende mootorite paigaldamist ja k asutamist
3-rattalistel maastikusõidukitel (ATVd), mootorratastel, hobi/lõbusõidukartidel,
õhusõidukitel ega võistlussõidukitel. Mootorite kasutamine sellisteks
rakendusteks võib põhjustada varalist kahju, tõsiseid kehavigastusi (k.a
halvatus) või isegi surma.
HOIATUS: Briggs & Stratton on tarninud selle mootori ilma õlita. Lisage kindlasti enne
mootori käivitamist õli vastavalt selles kasutusjuhendis antud juhistele. Kui käivitate
mootori ilma õlita, kahjustub see lõplikult ega kuulu garantii alla.
HOIATUS
Bensiin ja bensiiniaurud on väga tule- ja plahvatusohtlikud.
Süttimine või plahvatus võib põhjustada raskeid põletushaavu või
surma.
Kütuse lisamisel
• Lülitage mootor välja ja laske sel enne kütusepaagi korgi eemaldamist vähemalt 2
minuti jooksul jahtuda.
• Täitke kütusepaaki õues või hästiventileeritud ruumides.
• Ärge täitke kütusepaaki üle. Jätke bensiini tase korgist 38 mm (1,5 tolli) allapoole, et
jätta kütusele paisumisruumi.
• Hoidke bensiin ja selle aurud eemal sädemetest, lahtisest t ulest, süüteleekidest,
kuumusest ja muudest süüteallikatest.
• Kontrollige kütusetorusid, paaki, korki ja liitmikke regulaarselt pragude ja lekete
suhtes. Vajadusel asendage.
• Kütuse mahavoolamise korral oodake enne mootori käivitamist kütuse
aurustumiseni.
Mootori käivitamisel
• Veenduge, et süüteküünal, summuti, kütusepaagi kork ja õhufilter (kui see on
olemas) on oma kohal ja kinnitatud.
• Ärge käitage eemaldatud süüteküünlaga mootorit.
• Kui mootor on bensiini täis, seadke õhuklapp (kui see on olemas) asendisse
OPEN/RUN, seguklapp (kui see on olemas) asendisse FAST ja käivitage, kuni
mootor tööle hakkab.
Seadme kasutamisel
• Ärge kallutage mootorit või seadet asendisse, mille juures kütus võib välja voolata.
• Ärge sulgege mootori seiskamiseks karburaatorit.
• Ärge kunagi käivitage mootorit ega laske sel töötada, kui õhupuhasti sõlm või
õhufilter (kui see on olemas) on eemaldatud.
Õli vahetamisel
• Kui lasete õli välja üleval asuva õlilisamistoru kaudu, peab kütusepaak olema tühi,
sest vastasel korral võib see välja voolata ja põhjustada plahvatuse.
Seadme transportimisel
• Transportige seadet TÜHJA kütusepaagiga või suletud asendis (OFF)
kütusekraaniga.
Kütuse või täidetud paagiga seadme hoidmine
• Ärge hoidke seadet kamina, ahju, veeboileri või muude süüteleegiga seadmete või
süttimisallikate läheduses, sest need võivad süüdata bensiiniaure.
Ohusümbolit
põhjustada inimestele vigastusi. Koos ohusümboliga kasutatakse hoiatussõna (OHTLIK,
HOIATUS või ETTEVAA TUST) vigastuse tõenäosuse ja potentsiaalse raskusastme
tähistamiseks. Lisaks võib ohusümbolit kasutada ohu tüübi kirjeldamiseks.
kasutatakse, et tähistada teavet nendest ohtude kohta, mis võivad
HOIATUS
Mootori käivitamisel tekivad sädemed.
Sädemed võivad põhjustada läheduses olevate tuleohtlike gaaside
süttimise.
Selle tulemuseks võib olla plahvatus või tulekahju.
OHTLIK tähistab ohtu, mis juhul, kui seda ei väldita, toob kaasa surma või
raske kehavigastuse.
• Kui ümbruskonnas on aset leidnud maa- või v edelgaasileke, ärge mootorit käivitage.
• Ärge kasutage surve all olevaid käivitusvedelikke, sest nende aurud on tuleohtlikud.
HOIATUS tähistab ohtu, mis juhul, kui seda ei väldita, võib kaasa tuua
surma või raske kehavigastuse.
ETTEVAATUST tähistab ohtu, mis juhul, kui seda ei väldita, võib kaasa
tuua kerge või keskmise kehavigastuse.
ETTEVAATUST, kui seda on kasutatud ilma ohumärgita, tähistab olukorda,
kus kahjustada võib saada seade.
HOIATUS
Mootoritest eraldub süsinikmonooksiidi, mis on lõhnatu, värvitu,
mürgine gaas.
Süsinikmonooksiidi sissehingamine võib põhjustada iiveldust,
minestamist või surma.
• Käivitage ja kasutage mootorit välitingimustes.
• Ärge käivitage ega kasutage mootorit suletud ruumis, isegi mitte siis, kui uksed või
aknad on avatud.
26 BRIGGSandSTRATTON.COM

HOIATUS
Käivitustrossi järsk sissetõmme (tagasilöök) võib tõmmata käe ja
käsivarre mootori poole nii kiiresti, et Te ei jõua lahti lasta.
Tagajärjeks võivad olla luumurrud, luumõrad, marrastused või
nikastused.
• Tõmmake mootori käivitamisel starteri trossi aeglaselt, kuni tunnete takistust, ning
seejärel kiiresti, et vältida tagasilööki.
• Enne mootori käivitamist eemaldage seadme/mootori välised koormused.
• Seadme külge kinnituvad osad, k.a, kuid mitte ainult: terad, tiivikud, rihmarattad,
ketirattad jms peavad olema kindlalt kinnitatud.
HOIATUS
Pöörlevad osad võivad puutuda või vahele tõmmata käsi, jalgu,
juukseid, rõivaid vm.
Tagajärjeks võib olla kehaosade küljestrebimine või vigastus.
• Kasutage ainult seadmeid, mille kaitsmed on oma kohal.
• Hoidke käed ja jalad pöörlevatest osadest eemal.
• Siduge pikad juuksed kinni ning eemaldage ehted.
• Ärge kandke avaraid rõivaid, rippuvaid kinnituspaelu ega muid esemeid, mis võivad
seadmesse takerduda.
HOIATUS
Töötavast mootorist eraldub soojust. Mootori osad, eelkõige summuti,
võivad olla väga kuumad.
Nende puudutamine võib kaasa tuua raskeid põletushaavu.
Põlevad jäägid, näiteks puulehed, rohulibled, kõrred jms võivad süttida.
• Laske summutil, mootorisilindril ja ribidel enne puudutamist jahtuda.
• Eemaldage summuti ja silindri piirkonnast sinna kogunenud praht.
• Enne seadme kasutamist metsa, kulu või hagudega kaetud hooldamata alal
paigaldage sädemepüüdja ja hoidke see töökorras. California osariigis on see
kohustuslik (California Public Resources Code, artikkel 4442). Sarnaseid seadusi
võib olla ka teistes osariikides. Föderaalaladel kehtivad föderaalseadused.
HOIATUS
Juhuslik säde võib põhjustada põlengu või elektrišoki.
Juhuslik käivitumine võib kaasa tuua jäsemete vahelejäämise,
küljestrebimise või vigastuse.
Tuleoht
Enne seadistamist või parandamist:
• Ühendage lahti süüteküünla juhe ja hoidke seda süüteküünlast eemal.
• Ühendage lahti aku miinusklemm (ainult elektrikäivitiga mootorite puhul).
• Kasutage ainult õigeid tööriistu.
• Ärge püüdke gaasihoova vedru, ühenduslüli või mõne muu detaili kallal
nokitsemisega suurendada mootori pöördeid.
• Varuosad peavad olema samasugused ja need tuleb paigaldada samasse asendisse
kui originaalosad.
• Ärge lööge hooratast haamri või muu kõva esemega, sest see võib põhjustada
hooratta hilisema purunemise töö käigus.
Sädeme kontrollimisel:
• Kasutage heakskiidetud süüteküünlatestrit.
• Ärge kontrollige sädet, kui süüteküünal on eemaldatud.
et
27
Loading…
- June 10, 2024
- BRIGGS STRATTON
Table of Contents
- General Information
- European Office Contact Information
- European Union (EU) Stage V (5): Carbon Dioxide (CO2) Values
- Recycling Information
- Operator Safety
- Hazard Symbols and Meanings
- Safety Messages
- Features and Controls
- Engine Control Symbols and Meanings
- Operation
- Check the Oil Level
- Low Oil Protection System (if installed)
- Fuel Recommendations
- Add Fuel
- Start the Engine
- Stop the Engine
- Maintenance
- Maintenance Schedule
- Electronic Fuel Management System
- Carburetor and Engine Speed
- Servicing the Spark Plug
- Servicing the Exhaust System
- Change Engine Oil
- Servicing the Air Filter
- Servicing the Fuel System
- Servicing the Cooling System
- Storage
- Troubleshooting
- Specifications
- Warranty
- Briggs & Stratton Emissions Warranty
- Briggs & Stratton Emissions Warranty
- References
- Read User Manual Online (PDF format)
- Download This Manual (PDF format)
BRIGGS STRATTON 290000 Vanguard Series Engine User Manual

General Information
This manual contains safety information so that you will know the hazards and
risks related to this engine and how to prevent them. It also contains
instructions for the correct use and maintenance of the engine. Because Briggs
& Stratton does not know what equipment this engine will power, it is
important that you read, understand, and obey these instructions. Save these
original instructions for future reference.
NOTE: The figures and illustrations in this manual are for reference only
and can be different from your model. If you need help, contact an Authorized
Service Dealer.
For replacement parts or technical help, record the date of purchase, engine
model, type, trim, and the engine serial number. These numbers are located on
your engine. Refer to the Features and Controls section.
Date of Purchase|
—|—
Engine Model – Type – Trim|
Engine Serial Number|
European Office Contact Information
For questions related to European emissions, contact our European office at:
Max-Born-Straße 2, 68519 Viernheim, Germany.
European Union (EU) Stage V (5): Carbon Dioxide (CO2) Values
Enter CO2 in the search window on BriggsandStratton.com to find carbon dioxide
values of Briggs & Stratton EU Type-Approval Certificate engines.
Recycling Information
| | Recycle all
cartons, boxes, used oil, and batteries as specified by government
regulations.
—|—|—
Operator Safety
Safety Alert Symbol and Signal Words
The safety alert symbol identifies safety information about hazards that could
result in personal injury. A signal word (DANGER, WARNING, or CAUTION) is used
to indicate the likelihood and the potential severity of injury. In addition,
a hazard symbol is used to represent the type of hazard.
DANGER indicates a hazard which, if not avoided, will result in death or
serious injury.
WARNING indicates a hazard which, if not avoided, could result in death
or serious injury.
CAUTION indicates a hazard which, if not avoided, could result in minor
or moderate injury.
NOTICE indicates information considered important but not hazard-related.
Hazard Symbols and Meanings
Safety information about hazards that can result in personal injury.| Read
and understand the Operator’s Manual before operating or servicing the unit.
—|—
Fire Hazard| Explosion Hazard
Shock Hazard| Toxic Fume Hazard
Hot Surface Hazard| Noise Hazard – Ear protection recommended for extended
use.
Thrown Object Hazard – Wear eye protection| Explosion Haza
Frostbite Hazard| Kickback Hazard
Amputation Hazard – Moving Parts| Chemical Hazard
Thermal Heat Hazard| Corrosive Hazard
Safety Messages
WARNING
Briggs & Stratton® Engines are not designed for and are not to be used to
power: fun-karts; go-karts; children’s, recreational, or sport all-terrain
vehicles (ATVs); motorbikes; hovercraft; aircraft products; or vehicles used
in competitive events not sanctioned by Briggs & Stratton. For information
about competitive racing products, see
www.briggsracing.com. For use with utility and
side-by-side ATVs, please contact Briggs & Stratton Power Application Center,
1-866-927-3349. Incorrect engine use
could result in serious injury or death.
WARNING
Fuel and its vapors are flammable and explosive. Fire or explosion could
result in burns or death. When you add fuel
- Stop the engine. Before you remove the fuel cap, wait a minimum of two (2) minutes to make sure that the engine is cool.
- Fill the fuel tank outdoors or in an area that has good airflow.
- Do not put too much fuel in the tank. For expansion of the fuel, do not fill above the bottom of the fuel tank neck.
- Keep fuel away from sparks, open flames, pilot lights, heat, and other ignition sources.
- Frequently examine the fuel lines, fuel tank, fuel cap, and connections for cracks or leaks. Replace damaged parts.
- If fuel spills, wait until it dries before you start the engine
When you start the engine
- Make sure that the spark plug, muffler, fuel cap and air cleaner (if equipped) are correctly installed.
- Do not crank the engine with the spark plug removed.
- If the engine is flooded, set the choke (if equipped) to the OPEN or RUN position. Move the throttle (if equipped) to the FAST position and crank until the engine starts.
- If there is natural or LP gas leakage in the area, do not start the engine.
- Because vapors are flammable, do not use pressurized starter fluids.
When you operate the equipment
- Do not tilt the engine or the equipment at an angle which causes fuel to spill.
- Do not choke the carburetor (if equipped) to stop the engine.
- Do not start or operate the engine with the air cleaner (if equipped) or the air filter (if equipped) removed.
When you do maintenance
- If you drain the oil from the top oil fill tube, the fuel tank must be empty. If it is not empty, fuel leakage can occur and could result a fire or an explosion.
- During maintenance if it is necessary to tilt the unit, make sure that the fuel tank, if mounted on the engine, is empty and that the spark plug side is up. If the fuel tank is not empty, leakage can occur and could result a fire or an explosion.
- Frequently examine the fuel lines, fuel tank, fuel cap, and connections for cracks or leaks. Replace damaged parts.
- Do not change the governor spring, links or other parts to increase engine speed.
- Do not hit the flywheel with a hammer or hard object. This could result in failure of the flywheel during operation.
- Replacement parts must be of the same design and installed in the same position as the original parts. Other parts could result in damage or an injury
When you move the location of equipment
- Make sure that the fuel tank is EMPTY or that the fuel shut-off valve is in the CLOSED position
When fuel or equipment is in storage with fuel in the fuel tank
- Because pilot lights or other ignition sources can cause explosions, keep fuel or equipment away from furnaces, stoves, water heaters or other appliances that have pilot lights.
WARNING
Fuel and its vapors are flammable and explosive. Fire or explosion could
result in burns or death. Engine start-up causes spark that could result in a
fire or explosion
- If there is natural or LP gas leakage in the area, do not start the engine.
- Because vapors are flammable, do not use pressurized starter fluids.
WARNING
POISONOUS GAS HAZARD. Engine exhaust contains carbon monoxide, a poisonous gas
that could kill you in minutes. Although you do not smell exhaust fumes, you
could still be exposed to dangerous carbon monoxide gas. If you feel sick,
dizzy, or weak while you use this product, get to fresh air RIGHT AWAY. See a
doctor. You may have carbon monoxide poisoning
- Carbon monoxide gas can collect in occupied spaces. To reduce the risk of carbon monoxide gas, ONLY operate this product outdoors and far away from windows, doors and vents.
- Install battery-operated carbon monoxide alarms or plug-in carbon monoxide alarms with battery back-up as specified by the manufacturer’s instructions. Smoke alarms cannot sense carbon monoxide gas.
- DO NOT operate this product in homes, garages, basements, crawlspaces, sheds, or other closed spaces, even if you use fans or open doors and windows for ventilation. After the operation of this product, carbon monoxide can quickly collect in these spaces and stay for hours.
- ALWAYS put this product downwind and point the engine exhaust away from occupied spaces
WARNING
Fast retraction of the starter cord (kickback) will pull your hand and arm to
the engine faster than you can let go. Broken bones, fractures, bruises or
sprains could result.
- To prevent kickback when you start the engine, pull the starter cord slowly until resistance is felt and then pull quickly.
- Before you start the engine, disconnect or remove all external equipment and engine loads.
- Make sure that direct-coupled equipment components, such as, but not limited to, blades, impellers, pulleys, and sprockets, are correctly attached
WARNING
Rotating parts can entangle hands, feet, hair, clothing, or accessories and
result in traumatic amputation or laceration.
- Operate equipment with the guards correctly installed.
- Keep hands and feet away from rotating parts.
- Remove jewelry and make sure that long hair is away from all rotating parts.
- Do not wear loose clothes or items that could become caught.
WARNING
During operation, the engine and muffler become hot. If you touch a hot
engine, thermal burns can occur. Combustible materials, such as leaves, grass
and brush, can catch fire.
- Before you touch the engine or muffler, stop the engine and wait two (2) minutes. Make sure that the engine and muffler are safe to touch.
- Remove debris from the muffler and engine.
It is a violation of California Public Resource Code, Section 4442, to use or
operate the engine on any forest-covered, brush-covered, or grass-covered land
unless the exhaust system is equipped with a spark arrester, as defined in
section 4442, maintained in effective working order. Other states or federal
jurisdictions may have similar laws; reference Federal Regulation 36 CFR Part
261.52. Contact the original equipment manufacturer, retailer, or dealer to
obtain a spark arrester designed for the exhaust system installed on this
engine.
WARNING
Accidental engine spark can cause an electric shock or fire and could result
in entanglement, traumatic amputation or laceration. Before you make
adjustments or repairs:
- Disconnect the spark plug wire and keep it away from the spark plug.
- Disconnect the battery wire from the negative battery terminal (only engines with electric start.)
- Use only the correct tools.
When you check for spark:
- Use an approved spark plug tester.
- Do not check for spark with the spark plug removed
WARNING
Fuel vapors are flammable and explosive. Fire or explosion could result in
burns or death. If you smell gas
- Do not start the engine.
- Do not switch on electrical switches.
- Do not use a phone in the vicinity.
- Evacuate the area.
- Contact the gas supplier or the fire department.
Features and Controls
Engine Controls
Compare the callout letters in Figures 1, 2, and 3 to the engine controls
in the list that follows:


- A. Engine Identification Numbers Model – Type – Code
- B. Spark Plug
- C. Air Cleaner
- D. Dipstick / Oil Fill
- E. Oil Drain Plug
- F. Oil Pressure Sensor
- G. Air Intake Grille
- H. Electric Starter
- I. Rewind Starter (if installed)
- J. Carburetor
- K. Exhaust Manifold
- L. Fuel Pump (if installed)
- M. Fuel Filter (if installed)
- N. Oil Filter (if installed)
- O. Oil Cooler (if installed)
- P. Muffler (if installed)
Engine Control Symbols and Meanings
| Engine Speed – FAST | Engine Speed – SLOW |
|---|
Engine Speed – STOP| ON – OFF
Engine Start Choke CLOSED| Engine Start Choke OPEN
Fuel Cap Fuel Shut-off OPEN|
Fuel Shut-off CLOSED
Fuel Level – Maximum Do Not Overfill|
Operation
Oil Recommendations
Oil Capacity: See the Specifications section.
NOTICE
This engine was shipped from Briggs & Stratton without oil. Equipment
manufacturers or dealers could have added oil to the engine. Before you start
the engine for the first time, make sure that the oil is at the correct level.
Add oil as specified by the instructions in this manual. If you start the
engine without oil, damage will occur and the engine will not be repaired
under warranty.
We recommend the use of Briggs & Stratton® Warranty Certified oils for best
performance. Other high-quality detergent oils are permitted if classified for
service SF, SG, SH, SJ or higher. Do not use special additives.
Use the chart to select the best viscosity for the outdoor temperature range
expected. Engines on most outdoor power equipment operate well with 5W-30
Synthetic oil. For equipment operated in hot temperatures, Vanguard® 15W-50
Synthetic oil gives the best protection.

| A | SAE 30 – Below 40 °F (4 °C) the use of SAE 30 will result in hard starting. |
|---|---|
| B | 10W-30 – Above 80 °F (27 °C) the use of 10W-30 may cause increased oil |
consumption. Check the oil level frequently.
C| 5W-30
D| Synthetic 5W-30
E| Vanguard® Synthetic 15W-50
Check the Oil Level
Before you check or add oil
- Make sure the engine is level.
- Clean the oil fill area of debris.
- Refer to the Specifications section for oil capacity
NOTICE
This engine was shipped from Briggs & Stratton without oil. Equipment
manufacturers or dealers could have added oil to the engine. Before you start
the engine for the first time, make sure that the oil is at the correct level.
Add oil as specified by the instructions in this manual. If you start the
engine without oil, damage will occur and the engine will not be repaired
under warranty.
- Remove the dipstick ( A, Figure 4 ) and clean with a cloth.
- Install and tighten the dipstick (A, Figure 4).
- Remove the dipstick and check the oil level. Make sure that the oil level is at the top of the full indicator (B, Figure 4) on the dipstick.
- If the oil level is low, slowly add oil into the engine oil fill (C, Figure 4). Do not add too much oil.
- Wait one minute and check the oil level again. Make sure that the oil level is correct.
- Install and tighten the dipstick ( A, Figure 4).


Low Oil Protection System (if installed)
A low oil sensor is installed on some engines. If the oil is low, the sensor
will show a warning light or stop the engine. Stop the engine and do the steps
that follow before you start the engine.
- Make sure that the engine is level.
- Do an oil check. Refer to the Check Oil Level section.
- If the oil level is low, add the correct amount of oil. Start the engine and make sure that the warning light (if installed) does not come on.
- If the oil level is not low, do not start the engine. Contact a Briggs & Stratton Authorized Service Dealer to correct the oil problem
Fuel Recommendations
Fuel must meet these requirements:
- Clean, fresh, unleaded gasoline.
- A minimum of 87 octane/87 AKI (91 RON). High altitude use, see below.
- Gasoline with up to 10% ethanol (gasohol) is permitte
NOTICE
Do not use unapproved gasoline, such as E15 and E85. Do not mix oil in
gasoline or change the engine to operate on alternate fuels. Use of unapproved
fuels could result in damage to engine components, which will not be repaired
under the warranty.
To protect the fuel system from gum formation, and corrosion, mix an alcohol-
free fuel stabilizer and ethanol treatment into the fuel. Refer to the Storage
section. All fuel is not the same. If start or performance problems occur,
change fuel providers or brands. This engine is certified to operate on
gasoline. The emissions control system for carbureted engines is EM (Engine
Modifications). The emissions control systems for engines with electronic fuel
injection are ECM (Engine Control Module), MPI (Multi Port Injection), and if
equipped an O2S (Oxygen Sensor).
High Altitude
At altitudes over 5,000 feet (1524 meters), a minimum 85 octane/85 AKI (89
RON) gasoline is permitted.
For carbureted engines, high altitude adjustment is required to maintain
performance. Operation without this adjustment will cause decreased
performance, increased fuel consumption, and increased emissions. Contact a
Briggs & Stratton Authorized Service Dealer for high altitude adjustment
information. Operation of the engine at altitudes below 2,500 feet (762
meters) with the high altitude adjustment is not recommended.
For Electronic Fuel Injection (EFI) engines, no high altitude adjustment is
necessary
Add Fuel
WARNING
Fuel and its vapors are flammable and explosive. Fire or explosion could
result in burns or death. When you add fuel
- Stop the engine. Before you remove the fuel cap, wait a minimum of two (2) minutes to make sure that the engine is cool.
- Fill the fuel tank outdoors or in an area that has good airflow.
- Do not put too much fuel in the tank. For expansion of the fuel, do not fill above the bottom of the fuel tank neck.
- Keep fuel away from sparks, open flames, pilot lights, heat, and other ignition sources.
- Frequently examine the fuel lines, fuel tank, fuel cap, and connections for cracks or leaks. Replace damaged parts.
- If fuel spills, wait until it dries before you start the engine.
-
Clean the fuel cap area of dirt and debris. Remove the fuel cap.
-
Fill the fuel tank ( A, Figure 5) with fuel. Because fuel will expand, do not fill above the bottom of the fuel tank neck (B).
-
Install the fuel cap

Start the Engine
WARNING
Fuel and its vapors are flammable and explosive. Fire or explosion could
result in burns or death. When you start the engine
- Make sure that the spark plug, muffler, fuel cap and air cleaner (if equipped) are correctly installed.
- Do not crank the engine with the spark plug removed.
- If the engine is flooded, set the choke (if equipped) to the OPEN or RUN position. Move the throttle (if equipped) to the FAST position and crank until the engine starts.
- If there is natural or LP gas leakage in the area, do not start the engine.
- Because vapors are flammable, do not use pressurized starter fluids.
WARNING
POISONOUS GAS HAZARD. Engine exhaust contains carbon monoxide, a poisonous gas
that could kill you in minutes. Although you do not smell exhaust fumes, you
could still be exposed to dangerous carbon monoxide gas. If you feel sick,
dizzy, or weak while you use this product, get to fresh air RIGHT AWAY. See a
doctor. You may have carbon monoxide poisoning
- Carbon monoxide gas can collect in occupied spaces. To reduce the risk of carbon monoxide gas, ONLY operate this product outdoors and far away from windows, doors and vents.
- Install battery-operated carbon monoxide alarms or plug-in carbon monoxide alarms with battery back-up as specified by the manufacturer’s instructions. Smoke alarms cannot sense carbon monoxide gas.
- DO NOT operate this product in homes, garages, basements, crawlspaces, sheds, or other closed spaces, even if you use fans or open doors and windows for ventilation. After the operation of this product, carbon monoxide can quickly collect in these spaces and stay for hours.
- ALWAYS put this product downwind and point the engine exhaust away from occupied spaces.
NOTICE
This engine was shipped from Briggs & Stratton without oil. Equipment
manufacturers or dealers could have added oil to the engine. Before you start
the engine for the first time, make sure that the oil is at the correct level.
Add oil as specified by the instructions in this manual. If you start the
engine without oil, damage will occur and the engine will not be repaired
under warranty.
Types of Start Systems
Before you start the engine, you must know the type of starting system on your
engine. Your engine will have one of these start systems
- Electronic Fuel Management System: An Electronic Fuel Management system has an Electronic Control Unit that monitors engine and temperature conditions. It does not have a manual choke or a primer.
- Choke System: This type of system has a choke to be used in cool temperatures. Some models will have a separate choke control while others will have a combination choke and throttle choke. It does not have a primer.
NOTE: Your equipment could have remote controls. Refer to the equipment
manual for location and operation of remote controls.
Electronic Fuel Management System
-
Check the engine oil. See Check and Add Oil section.
-
Make sure that the equipment drive controls, if installed, are disengaged.
-
Move the fuel shut-off ( A, Figure 6) , if installed, to the OPEN position.
-
Push the stop switch (F, Figure 6), if installed, to the ON position.
-
Move the throttle control (B, Figure 6), if installed, to the FAST position. Operate the engine in the FAST position.
-
Rewind Start, if installed: Turn the key switch (D, Figure 6) to the ON / START position.
-
Rewind Start, if installed: Tightly hold the starter cord handle ( E, Figure 6). Pull the starter cord handle slowly until resistance is felt, then pull quickly.
WARNING
Fast retraction of the starter cord (kickback) will pull your hand and arm
to the engine faster than you can let go. Broken bones, fractures, bruises or
sprains could result. To prevent kickback when you start the engine, pull the
starter cord slowly until resistance is felt and then pull quickly -
Turn the key switch (D , Figure 6 ) to the ON / START position.
NOTICE To extend the life of the starter, use short starting cycles (five
seconds maximum). Wait one minute between starting cycles.
NOTE: If the engine does not start after 2-3 attempts, contact your local
dealer or go to vanguardpower.com or call
1-800-999-9333 (in USA)

Choke System
-
Check the engine oil. See the Check and Add Oil Level section.
-
Make sure that the equipment drive controls, if installed, are disengaged.
-
Move the fuel shut-off ( A, Figure 7), if installed, to the OPEN position.
-
Push the stop switch (F, Figure 7), if installed, to the ON position.
-
Move the throttle control (B, Figure 7), if installed, to the FAST position. Operate the engine in the FAST position.
-
Move the choke control (C, Figure 7) or combination choke/throttle control (B, C, Figure 7) to the CLOSED position.
NOTE: The choke is usually not necessary when you start a warm eng -
Rewind Start, if installed with key switch: Turn the key switch (D, Figure 7) to the ON position.
-
Rewind Start, if installed: Tightly hold the starter cord handle (E, Figure 7). Pull the starter cord handle (E) slowly until resistance is felt, then pull it quickly
WARNING
Fast retraction of the starter cord (kickback) will pull your hand and arm to
the engine faster than you can let go. Broken bones, fractures, bruises or
sprains could result. To prevent kickback when you start the engine, pull the
starter cord slowly until resistance is felt and then pull quickly -
Electric Start, if installed:Turn the electric start switch to the ON or START position.
NOTICE
To extend the life of the starter, use short start cycles (five seconds
maximum). Wait one minute between start cycles. -
As the engine warms, move the choke control (C, Figure 7) to the OPEN position.
NOTE: If the engine does not start after 2-3 attempts, contact your local
dealer or go to vanguardpower.com or call
1-800-999-9333.

Stop the Engine
WARNING
Fuel and its vapors are flammable and explosive. Fire or explosion could
result in burns or death.
- Do not choke the carburetor (if equipped) to stop the engine.
- Stop Switch, if installed: Move the stop switch (D, Figure to the OFF position.
- Key Switch, if installed: Set the throttle control to the SLOW position. Turn the key switch (E, Figure to the OFF position. Remove the key and keep it in a safe location out of reach of children.
- After the engine stops, move the fuel shut-off (A , Figure 8 ), if installed, to the CLOSED position

Maintenance
Maintenance Information
WARNING
During maintenance if it is necessary to tilt the unit, make sure that the
fuel tank, if mounted on the engine, is empty and that the spark plug side is
up. If the fuel tank is not empty, leakage can occur and could result in a
fire or an explosion. If the engine is tilted in a different direction, it
will not easily start because of oil or fuel contamination of the air filter
or the spark plug.
We recommend that you see a Briggs & Stratton Authorized Service Dealer for
all maintenance and servicing of the engine and engine parts.
NOTICE
All the components used to build this engine must remain in place for correct
operation.
WARNING
Accidental engine spark can cause an electric shock or fire and could result
in entanglement, traumatic amputation or laceration. Before you make
adjustments or repairs:
- Disconnect the spark plug wire and keep it away from the spark plug.
- Disconnect the battery wire from the negative battery terminal (only engines with electric start.)
- Use only the correct tools.
When you check for spark:
- Use an approved spark plug tester.
- Do not check for spark with the spark plug removed.
Emissions Control Service$
For maintenance, replacement, or repair of emissions control devices and
systems, contact a qualified off-road engine repair establishment or service
technician. However, for “no charge” emissions control service, the work must
be done by a factory authorized dealer. Refer to the Emissions Control
Statements.
Maintenance Schedule
First 5 Hours
- Change the engine oil1
Intervals of 8 Hours or Daily
- Check the engine oil level.
- Clean the area around the muffler and controls.
Intervals of 25 Hours or Annually
- Clean the air filter2
Intervals of 50 Hours or Annually
- Change the engine oil3
- Replace the oil filter (if installed)3
- Service the exhaust system.
Intervals of 100 Hours or Annually
- Change the engine oil4
- Replace the oil filter (if installed)4 .
Annually Every 250 Hours
- Change the air filter.
Annually
- Replace the spark plug.
- Replace the air filter.
- Replace the pre-cleaner.
- Replace the fuel filter.
- Service the cooling system1
- Check the valve clearance 5
- Only engines without an oil filter.
- Clean more frequently in dusty conditions or when many particles are in the air..
- Engines without oil filter or with standard black oil filter. Refer to the Specifications section for the part number.
- Engines with high-efficiency yellow or orange oil filter. Refer to the Specifications section for the part number.
- Not necessary unless engine performance problems occur
Electronic Fuel Management System
The Electronic Fuel Management System monitors engine temperature, engine
speed, and battery voltage to adjust the choke during engine start-up and
warm-up. There are no adjustments on the system. If start-up or operation
problems occur, contact an Authorized Briggs & Stratton Dealer
NOTICE Make sure to obey and follow the steps that follow or the
Electronic Fuel Management System could be damaged.
- DO NOT start the engine if the battery cables are loose.
- Turn the key to the OFF position or remove the starter switch before you\ disconnect, remove, and / or install the battery.
- DO NOT use a battery charger to start the engine.
- DO NOT disconnect the battery cables during engine operation.
- When you disconnect the battery cables, first connect the positive (+) cable, and then connect the negative (-) cable to the battery.
- When you charge the battery, turn the ignition switch to the OFF position, and disconnect the negative (-) battery cable from the battery.
- DO NOT spray water directly on the Electronic Control Unit.
Carburetor and Engine Speed
Do not make adjustments to the carburetor or engine speed. The carburetor was
set at the factory to operate satisfactorily in most conditions. Do not change
the governor spring, linkages, or other parts to adjust the engine speed. If
adjustments are necessary, contact a Briggs & Stratton Authorized Service
Dealer for servicing.
NOTICE
The equipment manufacturer specifies the maximum speed for the engine as
installed on the equipment. Do not exceed this speed. If you are not sure what
the equipment maximum speed is, or what the engine speed is set to from the
factory, contact a Briggs & Stratton Authorized Service Dealer for assistance.
For safe and correct operation of the equipment, the engine speed should only
be adjusted by a qualified service technician.
Servicing the Spark Plug
Check the spark plug gap ( A, Figure 9) with a wire gauge (B). If
necessary, set the spark plug gap. Install and tighten the spark plug to the
correct torque. For gap and torque specifications, refer to the
Specifications section

NOTE: In some areas, it is mandatory by local law that you use a resistor
spark plug to decrease ignition signals. If a resistor spark plug was
installed by the equipment manufacturer, use the same type for replacement.
Servicing the Exhaust System
WARNING
During operation, the engine and muffler become hot. If you touch a hot
engine, thermal burns can occur. Combustible materials, such as leaves, grass
and brush, can catch fire
- Before you touch the engine or muffler, stop the engine and wait two (2) minutes. Make sure that the engine and muffler are safe to touch.
- Remove debris from the muffler and engine.
It is a violation of California Public Resource Code, Section 4442, to use or
operate the engine on any forest-covered, brush-covered, or grass-covered land
unless the exhaust system is equipped with a spark arrester, as defined in
section 4442, maintained in effective working order. Other states or federal
jurisdictions may have similar laws; reference Federal Regulation 36 CFR Part
261.52. Contact the original equipment manufacturer, retailer, or dealer to
obtain a spark arrester designed for the exhaust system installed on this
engine.
Remove debris from the muffler and cylinder area. Inspect the muffler for
cracks, corrosion, or other damage. Remove the deflector or the spark
arrester, if equipped, and inspect for damage or carbon blockage. If damage is
found, install the replacement parts before you operate the equipment.
WARNING
Replacement parts must be of the same design and installed in the same
position as the original parts. Other parts could result in damage or an
injury.
Change Engine Oil
WARNING
Fuel and its vapors are flammable and explosive. Fire or explosion could
result in burns or death. During operation, the engine and muffler become hot.
If you touch a hot engine, thermal burns can occur.
- If you drain the oil from the top oil fill tube, the fuel tank must be empty. If it is not empty, fuel leakage can occur and cause a fire or an explosion.
- Before you touch the engine or muffler, stop the engine and wait two (2) minutes. Make sure that the engine and muffler are safe to touch.
Used oil is a hazardous waste product and must be discarded of correctly. Do
not discard with household waste. Contact your local authorities, service
center, or dealer for safe disposal or recycling facilities.
Remove Oil
- With engine OFF but warm, disconnect the spark plug wire(s) (D, Figure 10), and keep it away from the spark plug(s)(E).
- Remove the dipstick (A , Figure 11).
- Remove the oil drain plug (F , Figure 12). Drain the oil into an approved container.
- Install and tighten the oil drain plug ( F, Figure 12 ).


Change the Oil Filter
-
Drain the oil from the engine. Refer to the Remove Oil section.
-
Remove the oil filter (H, Figure 13) and discard correctly.
-
Before you install the new oil filter, lightly lubricate the oil filter gasket with clean oil.
-
Install the oil filter by hand until the gasket touches the oil filter adapter, then tighten the oil filter 1/2 to 3/4 turns.
-
Add oil. Refer to the Add Oil section.
-
Start and operate the engine. When the engine is warm, do a check for oil leaks.
-
Stop the engine. Make sure that oil level is at the top of the full indicator on the dipstick. Refer to the Add Oil section.

Add Oil
- Make sure the engine is level.
- Clean the oil fill area of all debris.
- Refer to the Specifications section for oil capacity
-
Remove the dipstick (A, Figure 14). Remove oil from the dipstick with a clean cloth.
-
Slowly add oil into the engine oil fill (C, Figure 14). Do not put too much oil in the engine oil fill. Wait one minute and then check the oil level.
NOTE: Do not add oil at the quick oil drain, if equipped. -
Install and tighten the dipstick (A, Figure 14).
-
Remove the dipstick and check the oil level. The correct oil level is at the top of the full indicator (B, Figure 14) on the dipstick.
-
Install and tighten the dipstick (A, Figure 14).
-
Connect the spark plug wire(s) to the spark plug(s). See Remove Oil section
.

Servicing the Air Filter
WARNING
Fuel vapors are flammable and explosive. Fire or explosion could result in
burns or death.
- Do not start and operate the engine with the air cleaner assembly (if equipped) or the air filter (if equipped) removed.
NOTICE
Do not use pressurized air or solvents to clean the filter. Pressurized air
could result in damage to the filter and solvents will dissolve the filter.
See the Maintenance Schedule for service requirements.
Different models use either a foam or a paper filter. Some models can also
have an optional pre-cleaner that can be cleaned and used again. Compare the
illustrations in this manual with the type installed on your engine
- Open the fastener(s) ( A, Figure 15) and remove the cover (B).
- Remove the nut (C, Figure 15) and the retainer (D).
- To make sure debris does not enter the carburetor, remove the foam element from the air filter base.
- Remove the air filter (E, Figure 15).
- To loosen debris, lightly tap the filter on a hard surface. If the air filter is dirty, replace it with a new filter.
- Remove the pre-cleaner (F, Figure 15), if equipped, from the air filter (E).
- Clean the pre-cleaner (F, Figure 15), if equipped, in liquid detergent and water. Let the pre-cleaner fully air dry. DO NOT lubricate the pre-cleaner.
- Install the dry pre-cleaner (F, Figure 15), if equipped, to the air filter (E).
- Install the air filter (E, Figure 15) and attach with the retainer (D) and nut (C).
- Install the cover ( B, Figure 15) and attach with the fastener(s) (A

Servicing the Fuel System
WARNING
Fuel and its vapors are flammable and explosive. Fire or explosion could
result in burns or death.
- Keep fuel away from sparks, open flames, pilot lights, heat, and other ignition sources.
- Frequently examine the fuel lines, fuel tank, fuel cap, and connections for cracks or leaks. Replace damaged parts.
- Before you clean or replace the fuel filter, drain the fuel tank or close the fuel shut-off valve.
- If fuel spills, wait until it dries before you start the engine.
- Replacement parts must be of the same design and installed in the same position as the original parts. Other parts could result in damage or an injury.
Fuel Filter, if installed
- Before you clean or replace the fuel filter (A, Figure 16) , drain the fuel tank or close the fuel shut-off valve. If the fuel tank is not drained, fuel leakage could occur and cause a fire or explosion.
- Use pliers to squeeze tabs (B, Figure 16) on the clamps (C), then move the clamps away from the fuel filter (A). Twist and pull the fuel lines (D) off of the fuel filter.
- Examine the fuel lines (D, Figure 16) for cracks or leaks. Replace if necessary.
- Replace the fuel filter (A, Figure 16) with an original equipment replacement filter.
- Attach the fuel lines (D, Figure 16) with clamps (C).

Servicing the Cooling System
WARNING
During operation, the engine and muffler become hot. If you touch a hot
engine, thermal burns can occur. Combustible debris, such as leaves, grass,
and brush can catch fire.
- Before you touch the engine or muffler, stop the engine and wait two (2) minutes. Make sure that the engine and muffler are safe to touch.
- Remove debris from the muffler and engine
NOTICE
Do not use water to clean the engine. Water could cause contamination of the
fuel system. Use a brush or dry cloth to clean the engine.
This is an air cooled engine. Dirt or debris can prevent air flow and cause
the engine to become too hot and result in unsatisfactory performance and
decreased engine life.
- Use a brush or dry cloth to remove debris from the air intake grille.
- Keep linkage, springs, and controls clean.
- Keep the area around and behind the muffler, if equipped, free of combustible debris.
- Make sure the oil cooler fins, if equipped, are clean.
After a period of time, the cylinder cooling fins can collect debris and cause
the engine to overheat. This unwanted material cannot be removed without
partial disassembly of the engine. Have a Briggs & Stratton Authorized Service
Dealer inspect and clean the air cooling system as recommended in the
Maintenance Schedule.
Storage
Fuel System
Refer to Figure: 17.
WARNING
Fuel and its vapors are flammable and explosive. Fire or explosion could
result in burns or death. Fuel Storage
- Because pilot lights or other ignition sources can cause explosions, keep fuel or equipment away from furnaces, stoves, water heaters or other appliances that have pilot lights.
Keep the engine level at the correct operating position. Fill the fuel tank
(A, Figure 17 ) with fuel. For fuel expansion, do not fill above the fuel
tank neck (B).

Fuel can become stale when kept in a storage container for more than 30 days.
The use of an alcohol-free fuel stabilizer and ethanol treatment in the fuel
storage container is recommended. This keeps fuel fresh and decreases fuel-
related problems or contamination in the fuel system.
When you fill the container with fuel, add an alcohol-free fuel stabilizer as
specified by the manufacturer’s instructions. If gasoline in the engine has
not been treated with a fuel stabilizer, it must be drained into an approved
container. Operate the engine until it is out of fuel.
NOTE: DO NOT run the Electronic Fuel Injection engine out of fuel. Fuel
pump damage can occur. Make sure to add the correct amount of fuel stabilizer
to the fuel tank, and run the engine for 30 minutes.
Engine Oil
While the engine is still warm, change the engine oil. Refer to Change the
Engine Oil section.
Troubleshooting
Assistance
For assistance, contact your local dealer or go to BRIGGSandSTRATTON.COM or
call 1-800-444-7774 (in USA).
Specifications
Specifications and Service Parts
MODELS: 290000, 300000
Displacement| 29.23 ci (479 cc)
Bore| 2.677 in (68 mm)
Stroke| 2.598 in (66 mm)
Oil Capacity| 46 – 48 oz (1,36 – 1,42 L)
Spark Plug Gap| .030 in (,76 mm)
Spark Plug Torque| 180 lb-in (20 Nm)
MODELS: 290000, 300000
Armature Air Gaps| .008 – .012 in (,20 – ,30 mm)
Intake Valve Clearance| .004 – .006 in (,10 – ,15 mm)
Exhaust Valve Clearance| .004 – .006 in (,10 – ,15 mm)
MODEL: 350000
Displacement| 34.78 ci (570 cc)
Bore| 2.835 in (72 mm)
Stroke| 2.756 in (70 mm)
Oil Capacity| 46 – 48 oz (1,36 – 1,42 L)
Spark Plug Gap| .030 in (,76 mm)
Spark Plug Torque| 180 lb-in (20 Nm)
Armature Air Gap| .008 – .012 in (,20 – ,30 mm)
Intake Valve Clearance| .004 – .006 in (,10 – ,15 mm)
Exhaust Valve Clearance| .004 – .006 in (,10 – ,15 mm)
MODEL: 380000
Displacement| 38.26 ci (627 cc)
Bore| 2.972 in (75,5 mm)
Stroke| 2.756 in (70 mm)
Oil Capacity| 46 – 48 oz (1,36 – 1,42 L)
Spark Plug Gap| .030 in (,76 mm)
Spark Plug Torque| 180 lb-in (20 Nm)
Armature Air Gap| .008 – .012 in (,20 – ,30 mm)
Intake Valve Clearance| .004 – .006 in (,10 – ,15 mm)
Exhaust Valve Clearance| .004 – .006 in (,10 – ,15 mm)
Engine power will decrease 3.5% for each 1,000 feet (300 meters) above sea
level and 1% for each 10°F (5.6°C) above 77°F (25°C). The engine will operate
satisfactorily at an angle up to 15°. Refer to the equipment Operator’s Manual
for safe permitted operating limits on slopes
MODELS: 290000, 300000, 350000, 380000
Service Part| Part Number
Air Filter (except Models 358700, 380000)| 394018
Air Filter (Models 358700, 380000)| 692519
Air Filter, Pre-cleaner (except Models 358700, 380000)| 272492
Air Filter, Pre-cleaner (Models 358700, 380000)| 692520
Oil – SAE 30| 100028
Oil Filter| 842921
Fuel Filter – with fuel tank| 808116
Fuel Filter – with fuel pump| 84001895
Fuel Filter – without fuel pump| 298090
Resistor Spark Plug| 491055S
Long Life Platinum Spark Plug| 696202, 5066K
Spark Plug Wrench| 19576S
Spark Tester| 84003327
We recommend that you see a Briggs & Stratton Authorized Dealer for all
maintenance and servicing of the engine and engine parts.
Power Ratings
The gross power rating for individual gasoline engine models is labeled in
accordance with SAE (Society of Automotive Engineers) code J1940 Small Engine
Power & Torque Rating Procedure, and is rated in accordance with SAE J1995.
Torque values are derived at 2600 RPM for those engines with “rpm” called out
on the label and 3060 RPM for all others; horsepower values are derived at
3600 RPM. The gross power curves can be viewed at www.BRIGGSandSTRATTON.COM.
Net power values are taken with exhaust and air cleaner installed whereas
gross power values are collected without these attachments. Actual gross
engine power will be higher than net engine power and is affected by, among
other things, ambient operating conditions and engine-to-engine variability.
Given the wide array of products on which engines are placed, the gasoline
engine may not develop the rated gross power when used in a given piece of
power equipment. This difference is due to a variety of factors including, but
not limited to, the variety of engine components (air cleaner, exhaust,
charging, cooling, carburetor, fuel pump, etc.), application limitations,
ambient operating conditions (temperature, humidity, altitude), and engine-to-
engine variability. Due to manufacturing and capacity limitations, Briggs &
Stratton may substitute an engine of higher rated power for this engine.
Warranty
Briggs & Stratton® Engine Warranty
Effective August 2021
Limited Warranty
Briggs & Stratton warrants that, during the warranty period specified below,
it will repair or replace, free of charge, with a new, reconditioned or re-
manufactured part, at the sole discretion of Briggs & Stratton, any part that
is defective in material or workmanship or both. Transportation charges on
product submitted for repair or replacement under this warranty must be borne
by purchaser. This warranty is effective for and is subject to the time
periods and conditions stated below. For warranty service, find the nearest
Authorized Service Dealer in our dealer locator map at BRIGGSandSTRATTON.COM.
The purchaser must contact the Authorized Service Dealer, and then make the
product available to the Authorized Service Dealer for inspection and testing.
There is no other express warranty. Implied warranties, including those of
merchantability and fitness for a particular purpose, are limited to one year
from purchase, or to the extent permitted by law. All other implied warranties
are excluded. Liability for incidental or consequential damages are excluded
to the extent exclusion is permitted by law. Some states or countries do not
allow limitations on how long an implied warranty lasts, and some states or
countries do not allow the exclusion or limitation of incidental or
consequential damages, so the above limitation and exclusion may not apply to
you. This warranty gives you specific legal rights and you may also have other
rights which vary from state to state and country to country* .
Standard Warranty Terms 1, 2, 3
Vanguard®; Commercial Series 3
Consumer Use – 36 months
Commercial Use – 36 months
XR Series
Consumer Use – 24 months
Commercial Use – 24 months
All Other Engines Featuring Dura-Bore™ Cast Iron Sleeve
Consumer Use – 24 months
Commercial Use – 12 months
All Other Engines
Consumer Use – 24 months
Commercial Use – 3 months
- These are our standard warranty terms, but occasionally there may be additional warranty coverage that was not determined at time of publication. For a listing of current warranty terms for your engine, go to BRIGGSandSTRATTON.COM or contact your Briggs & Stratton Authorized Service Dealer.
- There is no warranty for engines on equipment used for prime power in place of a utility; standby generators used for commercial purposes, utility vehicles exceeding 25 MPH, or engines used in competitive racing or on commercial or rental tracks.
- Vanguard® installed on standby generators: 24 months consumer use, no warranty commercial use. Commercial Series with manufacturing date before July 2017: 24 months consumer use, 24 months commercial use.
In Australia – Our goods come with guarantees that cannot be excluded under
the\ Australian Consumer Law. You are entitled to a replacement or refund for
a major failure and for compensation for any other reasonably foreseeable loss
or damage. You are also entitled to have the goods repaired or replaced if the
goods fail to be of acceptable quality and the failure does not amount to a
major failure. For warranty service, find the nearest Authorized Service
Dealer in our dealer locator map at BRIGGSandSTRATTON.COM, or by calling 1300
274 447, or by emailing or writing to
salesenquiries@briggsandstratton.com.au,
Briggs & Stratton Australia Pty Ltd, 1 Moorebank Avenue, Moorebank, NSW,
Australia, 2170.
The warranty period begins on the date of purchase by the first retail
consumer or commercial end user, and continues for the period of time stated
in the table above. “Consumer use” means personal residential household use by
a retail consumer. “Commercial use” means all other uses, including use for
commercial, income producing or rental purposes. Once an engine has
experienced commercial use, it shall thereafter be considered as a commercial
use engine for purposes of this warranty.
No warranty registration is necessary to obtain warranty on Briggs & Stratton
products. Save your proof of purchase receipt. If you do not provide proof of
the initial purchase date at the time warranty service is requested, the
manufacturing date of the product will be used to determine the warranty
period.
About Your Warranty
This limited warranty covers engine-related material and/or workmanship issues
only, and not replacement or refund of the equipment to which the engine may
be mounted. Routine maintenance, tune-ups, adjustments, or normal wear and
tear are not covered under this warranty. Similarly, warranty is not
applicable if the engine has been altered or modified or if the engine serial
number has been defaced or removed. This warranty does not cover engine damage
or performance problems caused by:
- The use of parts that are not original Briggs & Stratton parts;
- Operating the engine with insufficient, contaminated, or an incorrect grade of lubricating oil;
- The use of contaminated or stale fuel, gasoline formulated with ethanol greater than 10%, or the use of alternative fuels such as liquefied petroleum or natural gas on engines not originally designed/manufactured by Briggs & Stratton to operate on such fuels;
- Dirt which entered the engine because of improper air cleaner maintenance or reassembly;
- Striking an object with the cutter blade of a rotary lawn mower, loose or improperly installed blade adapters, impellers, or other crankshaft coupled devices, or excessive v-belt tightness;
- Associated parts or assemblies such as clutches, transmissions, equipment controls, etc., which are not supplied by Briggs & Stratton;
- Overheating due to grass clippings, dirt and debris, or rodent nests which plug or clog the cooling fins or flywheel area, or by operating the engine without sufficient ventilation;
- Excessive vibration due to over-speeding, loose engine mounting, loose or unbalanced cutter blades or impellers, or improper coupling of equipment components to the crankshaft;
- Misuse, lack of routine maintenance, shipping, handling, or warehousing of equipment, or improper engine installation.
Warranty service is available only through Briggs & Stratton Authorized
Service Dealers. Locate your nearest Authorized Service Dealer in our dealer
locator map at BRIGGSandSTRATTON.COM or by calling
1-800-444-7774 (in USA).
80004537 (Revision G)
Briggs & Stratton Emissions Warranty
California, U.S. EPA, and Briggs & Stratton, LLC Emissions Control Warranty –
Your Warranty Rights and Obligations
For Briggs & Stratton Engine Models with “F” Trim Designation (Model-TypeTrim
Representation xxxxxx xxxx Fx)
The California Air Resources Board, U.S. EPA, and Briggs & Stratton (B&S) are
pleased to explain the exhaust and evaporative emissions (“emissions”) control
system warranty on your 2021-2023 engine. In California, new equipment that
use small offroad engines must be designed, built, and equipped to meet the
State’s stringent antismog standards. B&S must warrant the emissions control
system on your engine/ equipment for the periods of time listed below provided
there has been no abuse, neglect or improper maintenance of your small off-
road engine or equipment leading to the failure of the emissions control
system.
Your emissions control system may include parts such as the carburetor or
fuelinjection system, the ignition system, catalytic converter, fuel tanks,
fuel lines (for liquid fuel and fuel vapors), fuel caps, valves, canisters,
filters, clamps and other associated components. Also included may be hoses,
belts, connectors, and other emissionrelated assemblies.
Where a warrantable condition exists, B&S will repair your engine/equipment at
no cost to you including diagnosis, parts, and labor.
Manufacturer’s Warranty Coverage:
The exhaust and evaporative emissions control system on your engine/equipment
is warranted for two years. If any evaporative emission-related part on your
engine/ equipment is defective, the part will be repaired or replaced by B&S.
Owner’s Warranty Responsibilities:
- As the engine/equipment owner, you are responsible for the performance of the required maintenance listed in your owner’s manual. B&S recommends that you retain all receipts covering maintenance on your engine, but B&S cannot deny warranty coverage solely for the lack of receipts or for your failure to ensure the performance of all scheduled maintenance.
- As the engine/equipment owner, you should however be aware that B&S may deny you warranty coverage if your engine/equipment or a part has failed due to abuse, neglect, or improper maintenance or unapproved modifications.
- You are responsible for presenting your engine/equipment to a B&S distribution center or service center as soon as the problem exists. The warranty repairs shall be completed in a reasonable amount of time, not to exceed 30 days. If you have a question regarding your warranty right BRIGGSandSTRATTON.COM.
Briggs & Stratton Emissions Control Warranty Provisions
The following are specific provisions relative to your Emissions Control
Warranty Coverage. It is in addition to the B&S engine warranty for non-
regulated engines found in the Operator’s Manual.
Warranted Emissions Parts
Coverage under this warranty extends only to the parts listed below (the
emissions control systems parts) to the extent these parts were present on the
B&S engine and/or B&S supplied fuel system.
a. Fuel Metering System
- Cold start enrichment system (soft choke)
- Carburetor or fuel injection system
- Oxygen sensor
- Electronic control unit
- Fuel pump module
- Fuel line (for liquid fuel and fuel vapors), fuel line fittings, clamps
- Fuel tank, cap and tether
- Carbon canister and mounting bracket
- Pressure relief valves
- Liquid/Vapor separator
b. Air Induction System
- Air cleaner
- Intake manifold
- Purge and vent line
c. Ignition System
- Spark plug(s)
- Magneto ignition system
d. Catalyst System
- Catalytic converter
- Exhaust manifold
- Air injection system or pulse value
e. Miscellaneous Items Used in Above Systems
- Vacuum, temperature, position, time sensitive valves and switches
- Connectors and assemblies
- Electronic controls
Length of Coverage
Coverage is for a period of two years from the date of delivery to an ultimate
purchaser, or for the time period listed in the respective engine or product
warranty statement, whichever is greater. B&S warrants to the original
purchaser and each subsequent purchaser that the engine is designed, built,
and equipped so as to conform with all applicable regulations adopted by the
Air Resources Board; that it is free from defects in material and workmanship
that could cause the failure of a warranted part; and that it is identical in
all material respects to the engine described in the manufacturer’s
application for certification. The warranty period begins on the date the
engine or equipment is delivered to an ultimate purchaser.
The warranty on emissions-related parts is as follows:
- Any warranted part that is not scheduled for replacement as required maintenance in the Operator’s Manual supplied, is warranted for the warranty period stated above. If any such part fails during the period of warranty coverage, the part will be repaired or replaced by B&S at no charge to the owner. Any such part repaired or replaced under the warranty will be warranted for the remaining warranty period.
- Any warranted part that is scheduled only for regular inspection in the Operator’s Manual supplied, is warranted for the warranty period stated above. Any such part repaired or replaced under warranty will be warranted for the remaining warranty period.
- Any warranted part that is scheduled for replacement as required maintenance in the Operator’s Manual supplied, is warranted for the period of time prior to the first scheduled replacement point for that part. If the part fails prior to the first scheduled replacement, the part will be repaired or replaced by B&S at no charge to the owner. Any such part repaired or replaced under warranty will be warranted for the remainder of the period prior to the first scheduled replacement point for the part.
- Add-on or modified parts that are not exempted by the Air Resources Board may not be used. The use of any non-exempted add-on or modified parts by the owner will be grounds for disallowing a warranty claim. The manufacturer will not be liable to warrant failures of warranted parts caused by the use of a non-exempted add-on or modified part.
Consequential Coverage
Coverage shall extend to the failure of any engine components caused by the
failure of any warranted emissions parts.
Claims and Coverage Exclusions
Warranty claims shall be filed according to the provisions of the B&S engine
warranty policy. Warranty coverage does not apply to failures of emissions
parts that are not original equipment B&S parts or to parts that fail due to
abuse, neglect, or improper maintenance as set forth in the B&S engine
warranty policy. B&S is not liable for warranty coverage of failures of
emissions parts caused by the use of add-on or modified parts.
Look For Relevant Emissions Durability Period and Air Index Information
On
Your Small Off-Road Engine Emissions Label
Engines that are certified to meet the California Air Resources Board (CARB)
small offroad Emissions Standard must display information regarding the
Emissions Durability Period and the Air Index. Briggs & Stratton makes this
information available to the consumer on our emissions labels. The engine
emissions label will indicate certification information.
The Emissions Durability Period describes the number of hours of actual
running time for which the engine is certified to be emissions compliant,
assuming proper maintenance in accordance with the Operator’s Manual. The
following categories are used:
Moderate:
Engines at or less than 80 cc displacement are certified to be emissions
compliant for 50 hours of actual engine running time. Engines greater than 80
cc displacement are certified to be emissions compliant for 125 hours of
actual engine running time.
Intermediate:
Engines at or less than 80 cc displacement are certified to be emissions
compliant for 125 hours of actual engine running time. Engines greater than 80
cc displacement are certified to be emissions compliant for 250 hours of
actual engine running time.
Extended:
Engines at or less than 80 cc displacement are certified to be emissions
compliant for 300 hours of actual engine running time. Engines greater than 80
cc displacement are certified to be emissions compliant for 500 hours of
actual engine running time.
For example, a typical walk-behind lawn mower is used 20 to 25 hours per year.
Therefore, the Emissions Durability Period of an engine with an intermediate
rating would equate to 10 to 12 years
Briggs & Stratton engines are certified to meet the United States
Environmental Protection Agency (USEPA) Phase 2 or Phase 3 emissions
standards. The Emissions Compliance Period referred to on the Emissions
Compliance label indicates the number of operating hours for which the engine
has been shown to meet Federal emissions requirements
-
For engines at or less than 80 cc displacement:
Category C = 50 hours, Category B = 125 hours, Category A = 300 hours -
For engines greater than 80 cc displacement and less than 225 cc displacement:
Category C = 125 hours, Category B = 250 hours, Category A = 500 hours -
For engines of 225 cc or more displacement:
Category C = 250 hours, Category B = 500 hours, Category A = 1000 hours
80106346 (Revision A)
Briggs & Stratton Emissions Warranty
California, U.S. EPA, and Briggs & Stratton, LLC Emissions Control Warranty –
Your Warranty Rights and Obligations
For Briggs & Stratton Engine Models with “B” or “G” Trim Designation
(ModelType Trim Representation xxxxxx xxxx Bx or xxxxxx xxxx Gx)
The California Air Resources Board, U.S. EPA, and Briggs & Stratton (B&S) are
pleased to explain the exhaust emissions (“emissions”) control system warranty
on your 2021-2023 engine. In California, new small off-road engines and large
spark ignited engines less than or equal to 1.0 liter must be designed, built,
and equipped to meet the State’s stringent anti-smog standards. B&S must
warrant the emissions control system on your engine for the periods of time
listed below provided there has been no abuse, neglect or improper maintenance
of your small off-road engine or equipment leading to the failure of the
emissions control system.
Your emissions control system may include parts such as the carburetor or
fuelinjection system, the ignition system, catalytic converter, fuel tanks,
fuel lines (for liquid fuel and fuel vapors), fuel caps, valves, canisters,
filters, clamps and other associated components. Also included may be hoses,
belts, connectors, and other emissionrelated assemblies.
Where a warrantable condition exists, B&S will repair your engine at no cost
to you including diagnosis, parts, and labor.
Manufacturer’s Warranty Coverage:
The exhaust emissions control system on your engine is warranted for two
years. If any emissions-related part on your engine is defective, the part
will be repaired or replaced by B&S.
Owner’s Warranty Responsibilities:
- As the engine owner, you are responsible for the performance of the required maintenance listed in your owner’s manual. B&S recommends that you retain all receipts covering maintenance on your engine, but B&S cannot deny warranty coverage solely for the lack of receipts or for your failure to ensure the performance of all scheduled maintenance.
- As the engine owner, you should however be aware that B&S may deny you warranty coverage if your engine or a part has failed due to abuse, neglect, or improper maintenance or unapproved modifications.
- You are responsible for presenting your engine to a B&S distribution center or service center as soon as the problem exists. The warranty repairs shall be completed in a reasonable amount of time, not to exceed 30 days. If you have a question regarding your warranty rights and responsibilities, you should contact B&S at 1-800-444-7774 (in USA) or BRIGGSandSTRATTON.COM
Briggs & Stratton Emissions Control Warranty Provisions
The following are specific provisions relative to your Emissions Control
Warranty Coverage. It is in addition to the B&S engine warranty for non-
regulated engines found in the Operator’s Manua
Warranted Emissions Parts
Coverage under this warranty extends only to the parts listed below (the
emissions control systems parts) to the extent these parts were present on the
B&S engine
a. Fuel Metering System
- Cold start enrichment system (soft choke)
- Carburetor or fuel injection system
- Oxygen sensor
- Electronic control unit
- Fuel pump module
b. Air Induction System
- Air cleaner
- Intake manifold
c. Ignition System
- Spark plug(s)
- Magneto ignition system
d. Catalyst System
- Catalytic converter
- Exhaust manifold
- Air injection system or pulse value
e. Miscellaneous Items Used in Above Systems
- Vacuum, temperature, position, time sensitive valves and switches
- Connectors and assemblies
- Electronic controls
Length of Coverage
Coverage is for a period of two years from the date of delivery to an ultimate
purchaser, or for the time period listed in the respective engine or product
warranty statement, whichever is greater. B&S warrants to the original
purchaser and each subsequent purchaser that the engine is designed, built,
and equipped so as to conform with all applicable regulations adopted by the
Air Resources Board; that it is free from defects in material and workmanship
that could cause the failure of a warranted part; and that it is identical in
all material respects to the engine described in the manufacturer’s
application for certification. The warranty period begins on the date the
engine or equipment is delivered to an ultimate purchaser.
The warranty on emissions-related parts is as follows:
- Any warranted part that is not scheduled for replacement as required maintenance in the Operator’s Manual supplied, is warranted for the warranty period stated above. If any such part fails during the period of warranty coverage, the part will be repaired or replaced by B&S at no charge tothe owner. Any such part repaired or replaced under the warranty will be warranted for the remaining warranty period.
- Any warranted part that is scheduled only for regular inspection in the Operator’s Manual supplied, is warranted for the warranty period stated above. Any such part repaired or replaced under warranty will be warranted for the remaining warranty period.
- Any warranted part that is scheduled for replacement as required maintenance in the Operator’s Manual supplied, is warranted for the period of time prior to the first scheduled replacement point for that part. If the part fails prior to the first scheduled replacement, the part will be repaired or replaced by B&S at no charge to the owner. Any such part repaired or replaced under warranty will be warranted for the remainder of the period prior to the first scheduled replacement point for the part.
- Add-on or modified parts that are not exempted by the Air Resources Board may not be used. The use of any non-exempted add-on or modified parts by the owner will be grounds for disallowing a warranty claim. The manufacturer will not be liable to warrant failures of warranted parts caused by the use of a non-exempted add-on or modified part.
Consequential Coverage
Coverage shall extend to the failure of any engine components caused by the
failure of any warranted emissions parts
Claims and Coverage Exclusions
Warranty claims shall be filed according to the provisions of the B&S engine
warranty policy. Warranty coverage does not apply to failures of emissions
parts that are not original equipment B&S parts or to parts that fail due to
abuse, neglect, or improper maintenance as set forth in the B&S engine
warranty policy. B&S is not liable for warranty coverage of failures of
emissions parts caused by the use of add-on or modified parts.
Look For Relevant Emissions Durability Period and Air Index Information
On
Your Small Off-Road Engine Emissions Label
Engines that are certified to meet the California Air Resources Board (CARB)
small offroad Emissions Standard must display information regarding the
Emissions Durability Period and the Air Index. Briggs & Stratton makes this
information available to the consumer on our emissions labels. The engine
emissions label will indicate certification information.
The Emissions Durability Period describes the number of hours of actual
running time for which the engine is certified to be emissions compliant,
assuming proper maintenance in accordance with the Operator’s Manual. The
following categories are used:
Moderate:
Engines at or less than 80 cc displacement are certified to be emissions
compliant for 50 hours of actual engine running time. Engines greater than 80
cc displacement are certified to be emissions compliant for 125 hours of
actual engine running time.
Intermediate:
Engines at or less than 80 cc displacement are certified to be emissions
compliant for 125 hours of actual engine running time. Engines greater than 80
cc displacement are certified to be emissions compliant for 250 hours of
actual engine running time.
Extended:
Engines at or less than 80 cc displacement are certified to be emissions
compliant for 300 hours of actual engine running time. Engines greater than 80
cc displacement are certified to be emissions compliant for 500 hours of
actual engine running time.
For example, a typical walk-behind lawn mower is used 20 to 25 hours per year.
Therefore, the Emissions Durability Period of an engine with an intermediate
rating would equate to 10 to 12 years.
Briggs & Stratton engines are certified to meet the United States
Environmental Protection Agency (USEPA) Phase 2 or Phase 3 emissions
standards. The Emissions Compliance Period referred to on the Emissions
Compliance label indicates the number of operating hours for which the engine
has been shown to meet Federal emissions requirements.
-
For engines at or less than 80 cc displacement:
Category C = 50 hours, Category B = 125 hours, Category A = 300 hours -
For engines greater than 80 cc displacement and less than 225 cc displacement:
Category C = 125 hours, Category B = 250 hours, Category A = 500 hours -
For engines of 225 cc or more displacement:
Category C = 250 hours, Category B = 500 hours, Category A = 1000 hours
80106344 (Revision A

References
- Lawn Mower Engines | Outdoor Power Equipment | Backup Power Solutions | Briggs & Stratton
- Vanguard® Commercial Power | Vanguard® Commercial Engines & Battery Power
- Lawn Mower Engines | Outdoor Power Equipment | Backup Power Solutions | Briggs & Stratton
- Briggs Racing Engines — Kart Racing
Read User Manual Online (PDF format)
Read User Manual Online (PDF format) >>
Download This Manual (PDF format)
Download this manual >>
Briggs & Stratton 200000 Vanguard Engine PDF User Guides and Manuals for Free Download: Found (14) Manuals for Briggs & Stratton 200000 Vanguard Device Model (Operating And Maintenance Instructions Manual, Operator’s Manual)
The Briggs & Stratton 200000 Vanguard series is a remarkable engine that has garnered a significant reputation in the outdoor power equipment industry. This powerhouse is designed to perform optimally in demanding circumstances, catering to the needs of both professional landscapers and passionate DIY enthusiasts. With its robust features and reliable technology, the Vanguard 200000 offers an impressive blend of power and efficiency.
One of the key attributes of the Briggs & Stratton 200000 Vanguard engine is its exceptional durability. Built with commercial-grade components, this engine is engineered to withstand heavy workloads and rough treatment. The following features contribute to its longevity and reliability:
- High-Performance Design: The Vanguard 200000 features a unique engine design that maximizes power output while minimizing fuel consumption.
- Heavy-Duty Construction: Constructed with high-quality materials, the engine is built to last and resist wear and tear over extensive use.
- Advanced Air Filtration: The dual-element air filtration system enhances engine performance and extends the intervals between servicing, allowing users to focus on their tasks.
Furthermore, the Briggs & Stratton 200000 Vanguard series is renowned for its ease of use. Whether you are a seasoned professional or a novice operator, you will find that this engine is user-friendly. Features that enhance usability include:
- Simple Starting Mechanism: The engine is equipped with an easy-start system that reduces the effort needed to initiate operation.
- Intuitive Control Layout: Controls are clearly labeled and easily accessible, enabling quick adjustments without having to refer to the manual.
- Maintenance-Friendly Design: Components are designed for easy access, making routine maintenance both straightforward and efficient.
Performance-wise, the Briggs & Stratton 200000 Vanguard is nothing short of impressive. Users can expect powerful operation that tackles even the toughest jobs with ease. Key performance aspects include:
- Consistent Power Delivery: The engine delivers a steady stream of power, leading to effective operation across various applications.
- Fuel Efficiency: Thanks to advanced engineering, the Vanguard 200000 ensures that you get the most out of every drop of fuel, minimizing operational costs.
- Low Emission Technology: This engine meets stringent emission standards, making it an eco-friendly choice for users concerned about their environmental impact.
In terms of applications, the Briggs & Stratton 200000 Vanguard engine excels in various fields, including:
- Lawn Care Equipment: Ideal for commercial mowers and ride-on tractors.
- Generators: Provides reliable power for portable and standby generators.
- Construction Machinery: Suitable for heavy-duty jobs where maximum performance is key.
In conclusion, the Briggs & Stratton 200000 Vanguard engine is an outstanding choice for anyone in need of a reliable, powerful, and efficient engine. Its combination of durability, ease of use, and robust performance makes it a leading option in its category. Whether you’re looking to power lawn care equipment, generators, or construction machinery, the Vanguard 200000 will surely meet and exceed your expectations, transforming the way you approach your outdoor tasks.
Найти руководство оператора для вашего двигателя
Независимо от того, убираете ли вы ваше оборудование на сезонное хранение, или вам нужно заменить деталь, найдите руководство для вашего оборудования или двигателя, чтобы получить информацию именно для вашего изделия.
Следуйте приведенному ниже руководству, чтобы найти номер модели вашего изделия. Нужна помощь в поиске номера модели? Загрузите информационный бюллетень о системе нумерации либо воспользуйтесь инструментом для поиска номера модели.
Двигатель:
XXXXXX-XXXX (6 цифр модели)
0XXXXX-XXXX (5 цифр модели)*
*5-значный номер модели двигателя будет иметь 0 в начале.
Изделие:
XXXXXX-XX (все изделия)
0XXXX-X (изделия для морских условий)**
**В изделиях для морских условий используется более короткая последовательность моделей.
Введите номер модели-версии вашего продукта. Он должен быть в формате XXXXXX-XX.
Введите номер модели/типа вашего двигателя. Он должен быть в формате XXXXXX-XXXX. Если номер модели состоит всего из 5 цифр, введите 0 + 5 цифр и номер типа.
Каждый двигатель малого объема, изготовленный компанией Briggs & Stratton или содержащий ее логотип, подходит для многих видов оборудования. Самым популярным из них является двигатель для газонокосилки, который нуждается в ежегодном техническом обслуживании, а иногда и ремонте. Это касается и двигателей малого объема, установленных в наших снегоуборщиках, установках для мытья под давлением, переносных генераторах и резервных генераторах. Таким образом, либо выберите тип вашего изделия, чтобы ввести номер модели, либо используйте очень полезную функцию поиска номера модели вашего изделия, либо обратитесь к ближайшему дилеру Briggs & Stratton, чтобы узнать больше!