
INSTRUCTION BOOK

IMPORTANT SAFETY INSTRUCTIONS
This sewing machine is not a toy. Do not allow children to play with this machine.
The machine is not intended for use by children or mentally infirm persons without proper supervision.
This sewing machine is designed and manufactured for household use only.
Read all instructions before using this sewing machine.
DANGER— To reduce the risk of electric shock:
1. An appliance should never be left unattended when plugged in. Always unplug this sewing machine from the
electric outlet immediately after using and before cleaning.
2. Always unplug before replacing a sewing machine bulb. Replace bulb with same type rated 12 Volts 5 Watts.
WARNING— To reduce the risk of burns, fire, electric shock, or injury to persons:
1. Do not allow children to play with the machine. The machine is not intended for use by children or
infirmed persons without proper supervision.
Do not allow to be used as a toy. Close attention is necessary when this sewing machine is used by
or near children.
2. Use this appliance only for its intended use as described in this owner’s manual.
Use only attachments recommended by the manufacturer as contained in this owner’s manual.
3. Never operate this sewing machine if it has a damaged cord or plug, if it is not working properly, if it
has been dropped or damaged, or dropped into water.
Return this sewing machine to the nearest authorized dealer or service center for examination,
repair, electrical or mechanical adjustment.
4. Never operate the appliance with any air opening blocked. Keep ventilation openings of this sewing
machine and foot controller free from accumulation of lint, dust and loose cloth.
5. Never drop or insert any object into any opening.
6. Do not use outdoors.
7. Do not operate where aerosol (spray) products are being used or where oxygen is being
administered.
8. To disconnect, turn all controls to the off (“O”) position, then remove plug from outlet.
9. Do not unplug by pulling on cord. To unplug, grasp the plug, not the cord.
10. Keep fingers away from all moving parts. Special care is required around the sewing machine
needle.
11. Always use the proper needle plate. The wrong plate can cause the needle to break.
12. Do not use bent needles.
13. Do not pull or push fabric while stitching. It may deflect the needle causing it to break.
14. Switch this sewing machine off (“O”) when making any adjustment in the needle area, such as
threading the needle, changing the needle, threading the bobbin or changing the presser foot, and
the like.
15. Always unplug this sewing machine from the electrical outlet when removing covers, lubricating, or
when making any other adjustments mentioned in this owner’s manual.
SAVE THESE INSTRUCTIONS
The design and specifications are subject to change without a prior notice.
Please note that on disposal, this product must be safely recycled in accordance with relevant National
legislation relating to electrical/electronic products. If in doubt please contact your retailer for guidance.
(European Union only)

TABLE OF CONTENTS
NAME OF PARTS
Name of Parts ………………………………………………………….. 2
Standard Accessories ……………………………………………….. 3
Extension Table ………………………………………………………… 4
Stitch Chart ……………………………………………………………… 4
GETTING READY TO SEW
Connecting the Power Supply …………………………………….. 5
Controlling Sewing Speed ………………………………………….. 6
Speed control slider ………………………………………………….. 6
Foot control ……………………………………………………………… 6
Function Buttons ………………………………………………….. 7-11
Mode selection …………………………………………………………. 9
Pattern selection …………………………………………………….. 10
Help button …………………………………………………………….. 11
Customizing Machine Settings ……………………………… 12-14
Resumption setting …………………………………………………. 12
Sound setting …………………………………………………………. 12
Language setting…………………………………………………….. 13
Pop-up window duration time setting …………………………. 13
Customizing the preset value for the stitch length
and width ……………………………………………………………….. 14
Restoring the original settings …………………………………… 14
Presser Foot Lifter…………………………………………………… 15
Changing the Presser Foot ………………………………………. 15
Removing and Attaching the Foot Holder …………………… 15
Variety of Presser Feet and Their Uses ……………………… 16
Bobbin Winding ………………………………………………………. 17
Removing the bobbin ………………………………………………. 17
Setting the spool of thread ……………………………………….. 17
Extra spool pin ……………………………………………………….. 17
Bobbin winding ……………………………………………………….. 18
Inserting the bobbin…………………………………………………. 19
Threading the Machine ……………………………………………. 20
Built-in needle threader ……………………………………………. 21
Drawing Up Bobbin Thread ………………………………………. 22
Changing the Needle ………………………………………………. 23
Balancing Thread Tension………………………………………… 24
Pressure Adjusting Lever …………………………………………. 25
Dropping and Raising the Feed Dog ………………………….. 25
BASIC AND UTILITY STITCHES
Straight Stitches …………………………………………………. 26-30
Sewing on heavy fabric ……………………………………………. 26
Securing a seam …………………………………………………….. 27
Using the seam guides on the needle plate ………………… 27
Turning a square corner …………………………………………… 27
Using the quilting guide ……………………………………………. 27
Straight stitch in left needle position…………………………… 28
Adjusting the needle drop position …………………………….. 28
Adjusting the stitch length ………………………………………… 28
Variety of Straight Stitches …………………………………… 29-30
Zipper Sewing ……………………………………………………. 31-32
Basting ………………………………………………………………….. 33
Rolled Hem ……………………………………………………………. 34
Zigzag Stitch ………………………………………………………….. 35
Changing the stitch width …………………………………………. 35
Changing the stitch length………………………………………… 35
Overcasting ……………………………………………………………. 36
Tricot Stitch ……………………………………………………………. 36
Overedge Stitch ……………………………………………………… 36
Knit Stitch ………………………………………………………………. 37
Double Overedge Stitch …………………………………………… 37
Overlock Stitch ……………………………………………………….. 37
Blind Hem………………………………………………………………. 38
Button Sewing ………………………………………………………… 39
Buttonholes ……………………………………………………….. 40-47
Variety of buttonholes ………………………………………………. 40
Square buttonhole ………………………………………………. 41-44
Adjusting buttonhole width ……………………………………….. 44
Adjusting stitch density…………………………………………….. 44
Corded buttonhole…………………………………………………… 45
Round-end buttonhole……………………………………………… 46
Keyhole buttonhole …………………………………………………. 46
Knit buttonhole ……………………………………………………….. 47
Faux chain buttonhole ……………………………………………… 47
Eyelet ……………………………………………………………………. 48
Darning………………………………………………………………….. 49
Tacking ………………………………………………………………….. 51
QUILTING AND DECORATIVE STITCHES
Quilting ………………………………………………………………….. 52
Free motion quilting…………………………………………………. 52
Patchwork ……………………………………………………………… 52
Pintucking………………………………………………………………. 53
Applique ………………………………………………………………… 53
Shell Tuck………………………………………………………………. 54
Scallop ………………………………………………………………….. 54
Smocking ………………………………………………………………. 54
Fagoting ………………………………………………………………… 55
Cording………………………………………………………………….. 55
Satin Stitches …………………………………………………………. 56
Twin Needle Sewing………………………………………………… 57
PROGRAMMING PATTERNS AND LETTERS
Programming the Pattern Combination ………………………. 58
Programming the mirror image patterns …………………….. 59
Sewing a pattern combination from the beginning ……….. 61
Sewing the current pattern from the beginning ……………. 61
Programming French knots ………………………………………. 62
Extender Stitches ……………………………………………………. 63
Programming Letters……………………………………………….. 65
Selecting a letter style ……………………………………………… 65
Programming letters ………………………………………………… 66
Programming letters and decorative patterns ……………… 67
Viewing a long text ………………………………………………….. 67
Editing the Programmed Patterns …………………………. 68-70
Deleting a letter (pattern) …………………………………………. 68
Inserting a letter (pattern) …………………………………………. 68
Duplicating a pattern (letter) ……………………………………… 68
Stitch adjustment of programmed patterns …………………. 69
Unified needle drop position……………………………………… 70
Storing and Recalling the Pattern Combination …………… 71
Storing the pattern combinations ………………………………. 71
Overwriting a stored combination………………………………. 71
Recalling a stored combination …………………………………. 72
Deleting a stored combination…………………………………… 72
Correcting Distorted Stitch Patterns …………………………… 73
CARE AND MAINTENANCE
Cleaning the Hook Race and Feed Dog …………………….. 74
Inserting the bobbin holder……………………………………….. 74
Replacing the Light Bulb ………………………………………….. 75
Warning Messages …………………………………………….. 76-77
Troubleshooting ……………………………………………………… 78
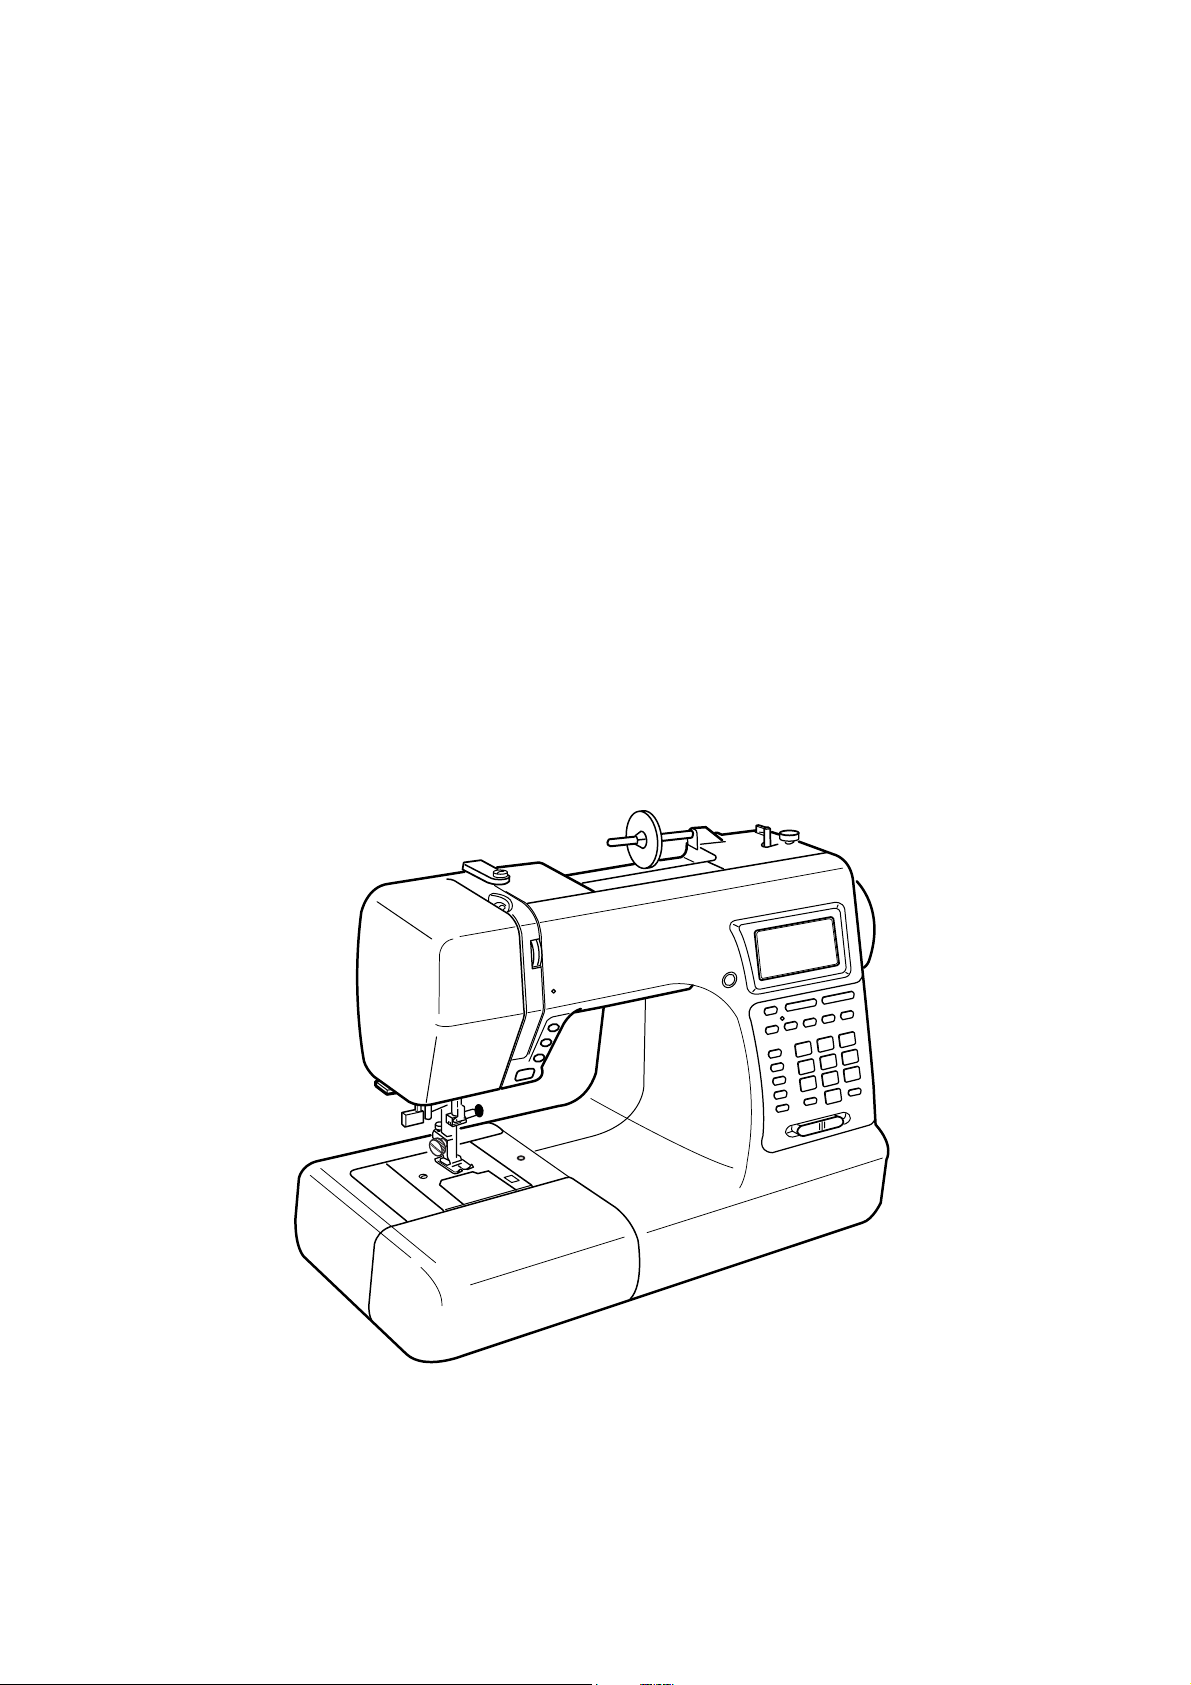
1
NAME OF PARTS
#3
!4
#2
@5
@6
!2
!3
!5
o
!0
!1
#1
i
#0
!6
@8
@9
@7
!7
!8
yu
!9
#9
#7
t
#6
@1
#8
r
@2
@3
w
e
@4
q
@0
Name of Parts
q Function buttons
w Liquid crystal display
e Screen sharpness adjustment dial
r Bobbin winder stopper
t Bobbin winder spindle
y Spool pin
u Large spool holder
i Thread guide
o Take-up lever
!0 Thread tension dial
!1 Face cover
!2 Thread cutter
!3 Needle threader
!4 Needle plate
!5 Extension table (Accessory box)
!6 Hook cover plate
!7 Hook cover release button
!8 Feed balancing dial
!9 Attachment hole
@0 Speed control slider
@1 Start/stop button
@2 Reverse stitch button
@3 Auto-lock button
@4 Up/down needle position button
@5 Presser foot holder
@6 Thumb screw
@7 Presser foot
@8 Needle
@9 Needle clamp screw
#0 Carrying handle
#1 Bobbin thread cutter
#2 Handwheel
#3 Power switch
#4 Machine sockets
#5 Drop feed dog lever
#6 Free-arm
Buttonhole lever
#7
#8 Presser foot lifter
#9 Hole for additional spool pin
#4
2
#5
NOTE:
The design and specifications are subject
to change without a prior notice.
qw
o
t
o
yu
!0
!2
!5
!9
!6
@0
er
i
!1
!3
!4
!7 !8
@1
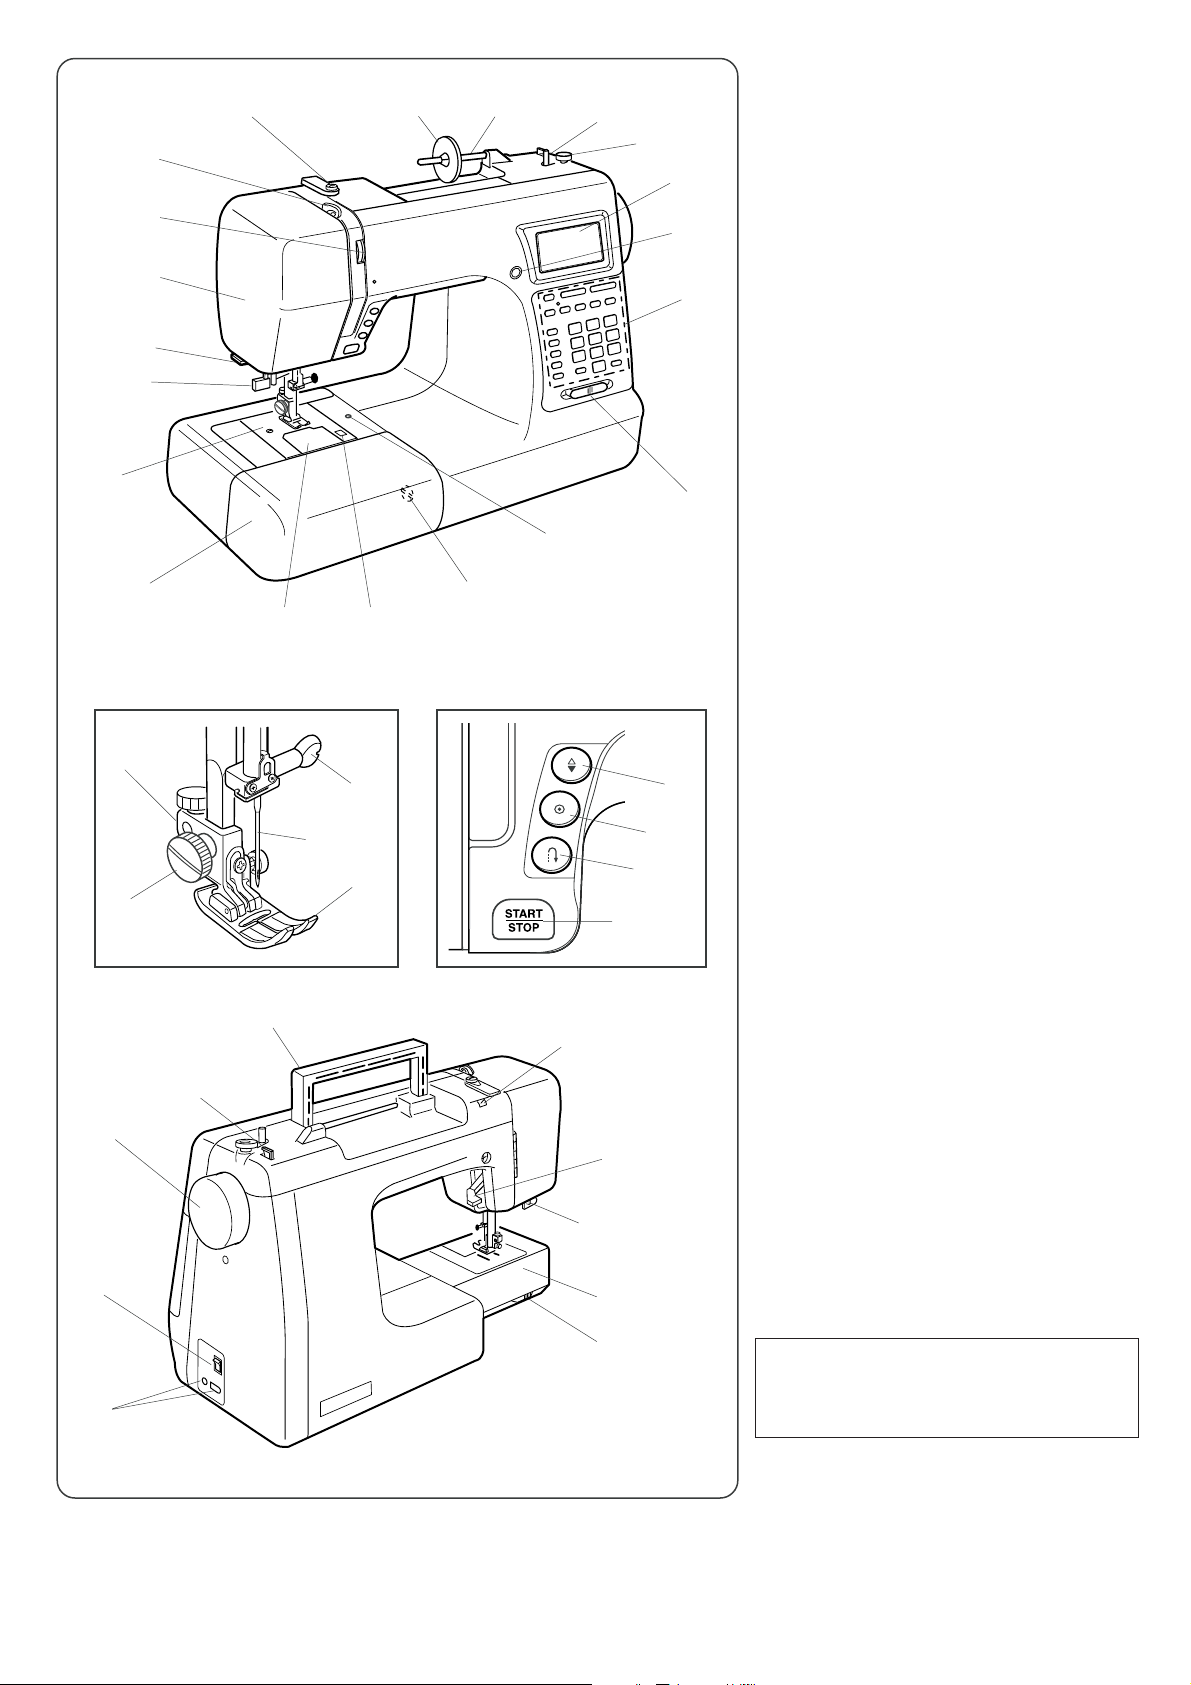
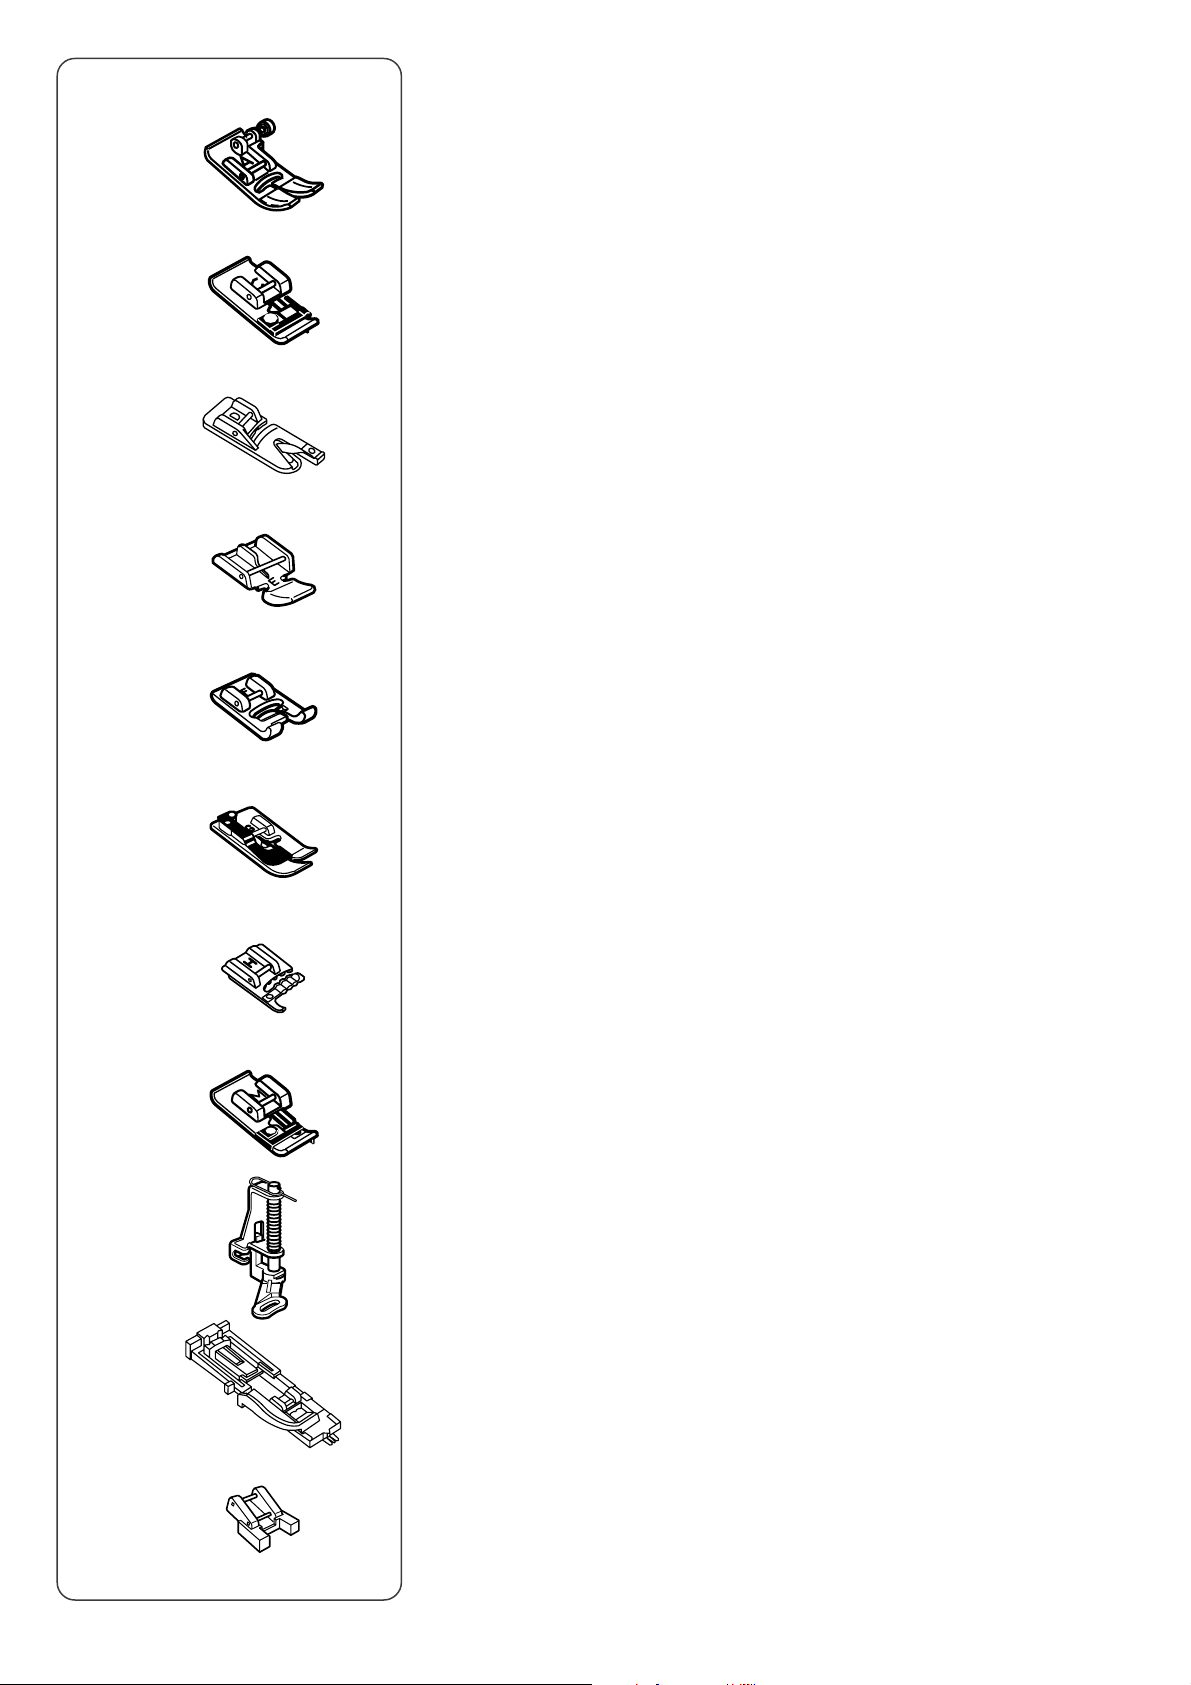
Standard Accessories
Zigzag foot A (set on the machine)
q
w Overedge foot C
e Rolled hem foot D
r Zipper foot E
t Satin stitch foot F
y Blind hem foot G
u Cording foot H
i Overcast foot M
o Automatic buttonhole foot R
!0 Darning foot P
!1 Button sewing foot T
!2 Bobbins
!3 Needle set
!4 Quilting bar
!5 Large spool holder (set on the machine)
!6 Small spool holder
!7 Extra spool pin
!8 Spool pin felt
!9 Spool stand
@0 Screwdriver
@1 Screwdriver
@2 Lint brush
@3 Seam ripper/Buttonhole opener
@4 Stitch chart
@5 Stitch chart holder
@6 Instruction book
@7 Power supply cable
@8 Foot control
@2
@4
@7
@5
@3
NOTE:
Accessories can be stored in the extension
table (see page 4).
@6
@8
3

q
w
Extension Table
The extension table provides an extra surface for sewing bulky
materials, and can be removed for free-arm sewing.
Detaching the table
Pull the table away from the machine as illustrated.
Free-arm sewing can be used for:
Stitching sleeves, waistbands, pant legs or any tubular garment
area, darning socks as well as mending knees, elbows or children’s
wear.
Attaching the table
Push the extension table until it snaps into the machine.
q Pin
w Hole
w
q
w
Accessory storage
Open the lid toward you.
The accessories can be conveniently stored in the foot
compartment and space under it.
q Lid
w Foot compartment
q
Stitch Chart
Insert the pin into the hole for additional spool pin.
Insert the stitch chart into the slot of chart holder.
q Stitch chart
w Slot
e Chart holder
r Pin
t Hole for additional spool pin
t
e
r
4
e
e
w
t
r
r
t
u
q
q
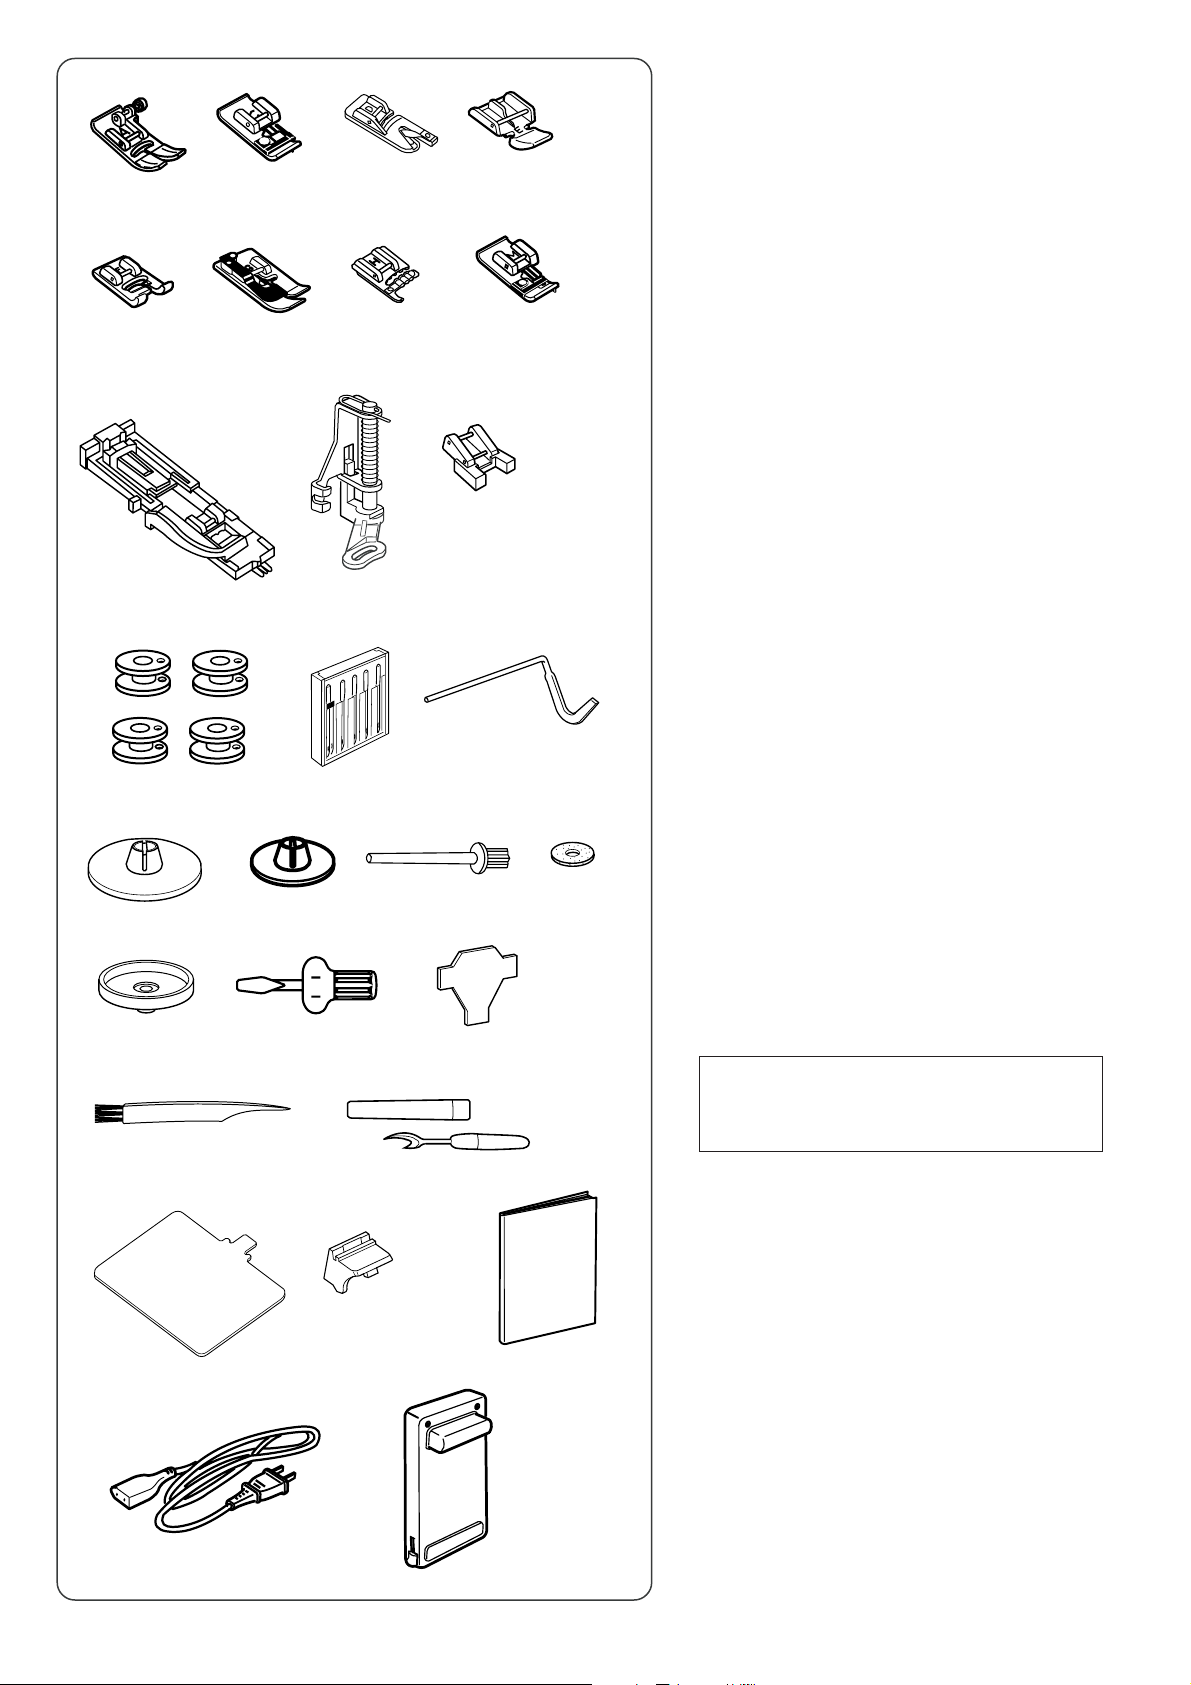
GETTING READY TO SEW
Connecting the Power Supply
CAUTION
Always turn the power switch off and unplug the sewing machine
from the electrical outlet when the machine is not in use.
To use start/stop button
Turn off the power switch.
Insert the machine plug into the machine.
Insert the power supply plug into the wall outlet.
Turn on the power switch.
q Power switch
w Machine plug
e Machine socket for power supply
r Power supply plug
t Wall outlet
To use foot control
Turn off the power switch.
Pull out the foot control cable gently.
Insert the foot control plug into the machine.
Insert the machine plug into the machine.
Insert the power supply plug into the wall outlet.
Turn on the power switch.
q Power switch
w Foot control plug cord
e Machine socket for foot control
r Machine plug
t Machine socket for power supply
y Power supply plug
u Wall outlet
i
w
CAUTION
Do not pull the foot control cable beyond the red mark to avoid
damage to the foot control.
i Red mark
y
NOTE:
The start/stop button cannot be used when the foot control is
connected to the machine.
CAUTION
When turning off the machine after straight stitch sewing, be sure
to open the needle plate hole to prevent the needle from hitting
the needle plate.
Press button to open the needle plate before turning the
machine off.
NOTE:
Do not turn the machine off while an hourglass is
indicated on the LCD screen.
5

Controlling Sewing Speed
Speed control slider
Sewing speed can be varied according to your sewing needs with
the speed control slider.
q To increase sewing speed, slide it to the right.
w To decrease sewing speed, slide it to the left.
qw
Foot control
Sewing speed is varied by the foot control.
The harder you press down on the foot control, the faster the
machine runs.
The machine runs at the maximum speed set by the speed
control slider when the foot control is fully depressed.
Operating Instructions:
The symbol “O” on a switch indicates the «off» position of a
switch.
For appliances with a polarized plug (one blade wider than the
other): To reduce the risk of electric shock, this plug is intended
to fit in a polarized outlet only one way. If it does not fit fully in the
outlet, reverse the plug. If it still does not fit, contact a qualified
electrician to install the proper outlet. Do not modify the plug in
any way (U.S.A.and Canada only).
* Foot control model 21371 is used with this sewing machine.
6
t
q
w
e
r
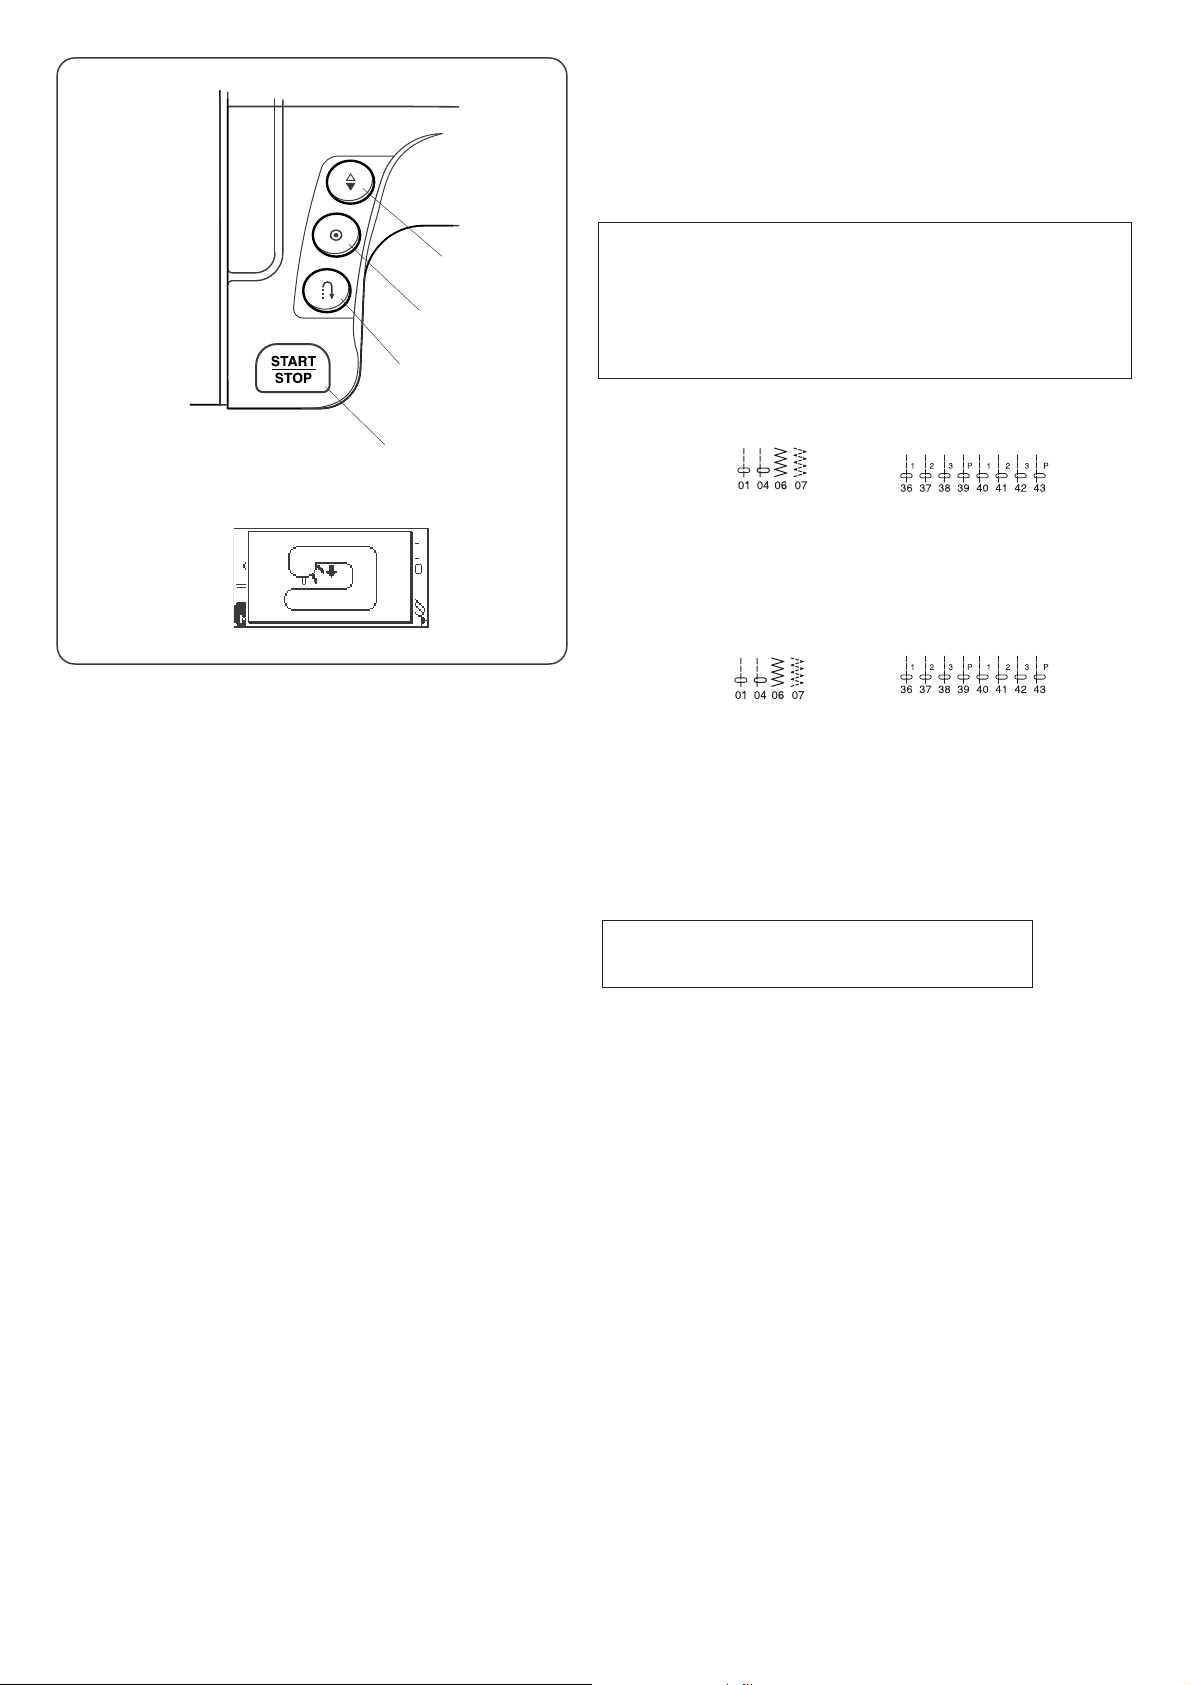
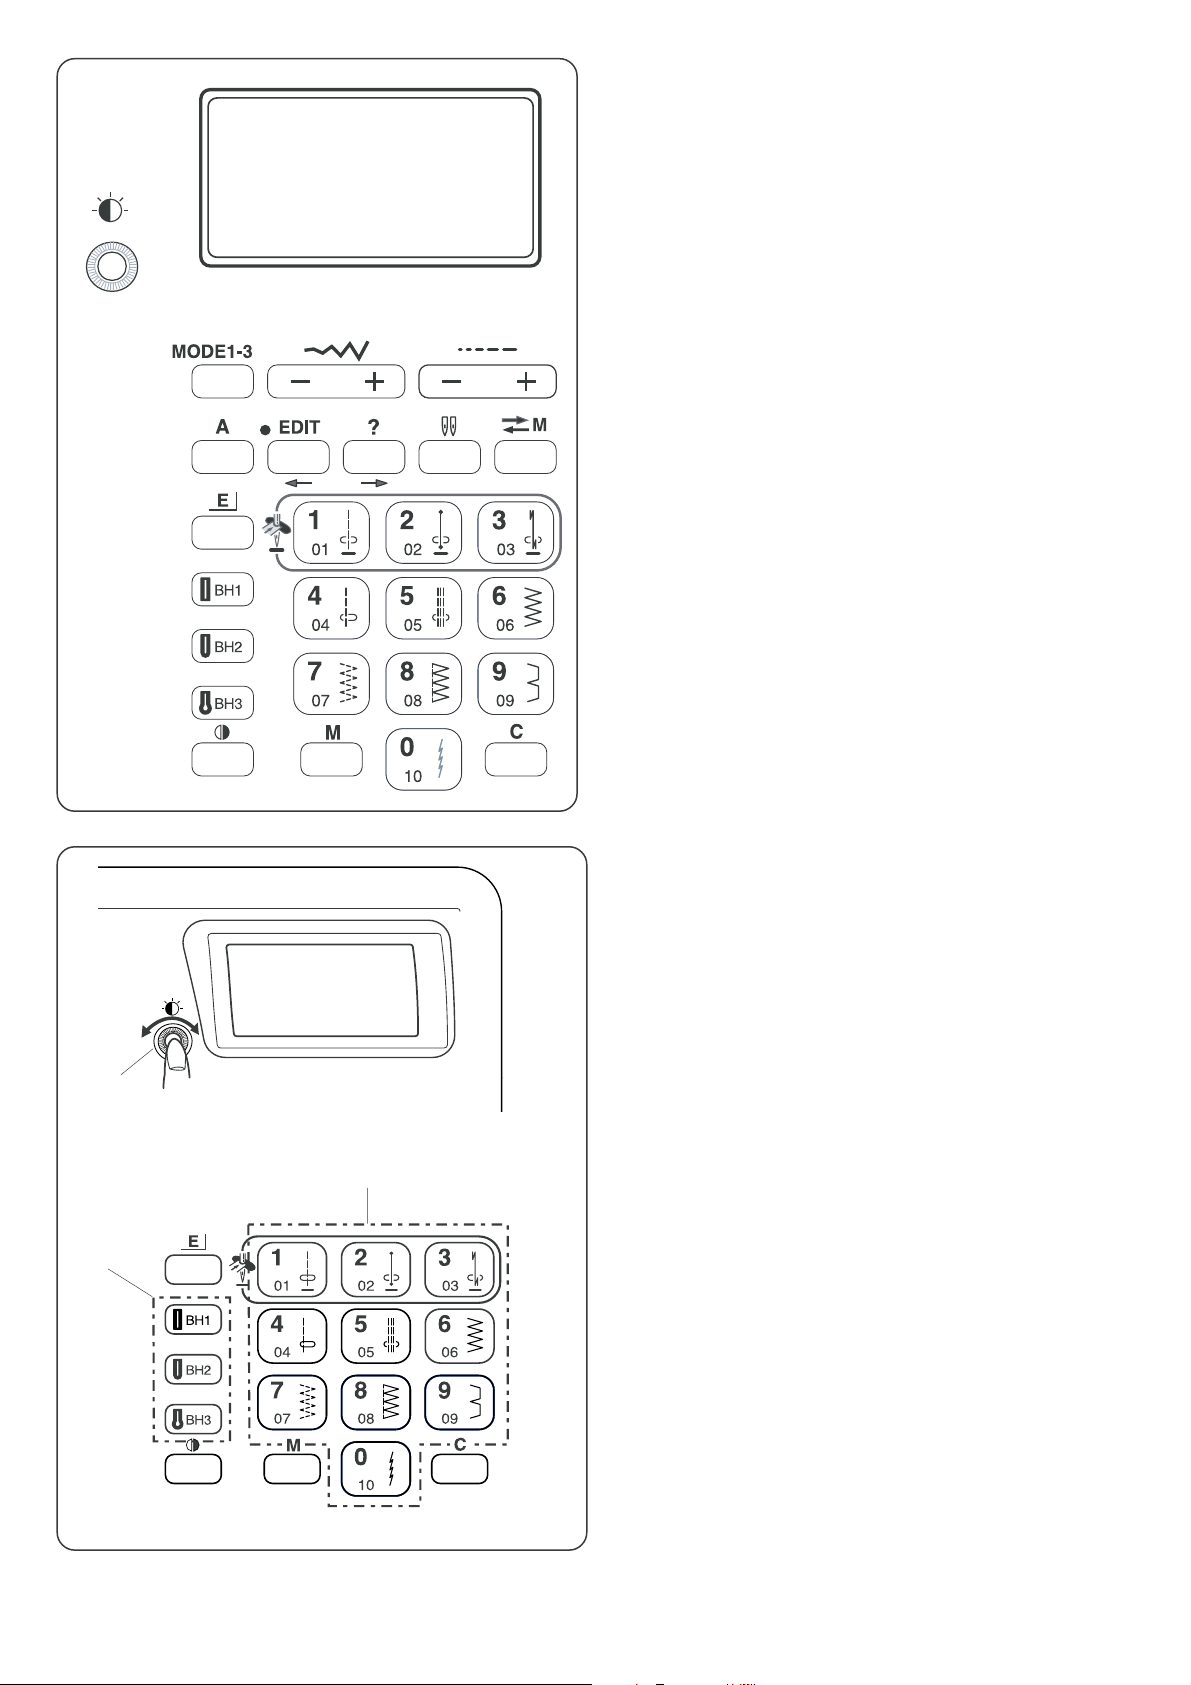
Function Buttons
q Start/stop button
Press this button to start or stop the machine. The machine starts
running slowly for the first few stitches, it then runs at the speed
set by the speed control slider.
NOTE:
• Start/stop button cannot be used when the foot control is
connected to the machine.
• If you start the machine with the presser foot up, a warning
message will appear to advise you to lower the foot.
Lower the foot and rstart the machine again.
t Warning message
ww
w Reverse stitch button
ww
When stitches (mode 1) (mode 2)
are selected, the machine will sew in reverse while the reverse
stitch button is pressed.
If you press the reverse stitch button when sewing any other
stitches, the machine will immediately sew locking stitches and
automatically stop.
ee
e Auto-lock button
ee
When stitches (mode 1) (mode 2)
are selected, the machine will immediately sew locking stitches
when the Auto-lock button is pressed, then automatically stop.
When sewing any other stitches, the machine will sew locking
stitches at the end of the current pattern and automatically stop.
rr
r Up/down needle position button
rr
Press this button to bring the needle up or down. The machine
will stop with the needle up or down depending on the needle
position determined by this button.
NOTE:
The needle will always stop in the up position after
sewing buttonholes, bartacks, eyelets and darning.
7
q
w
e
!0
r
yu
i
t
o
q Screen sharpness adjusting dial
Use this dial to adjust the brightness of the liquid crystal
display. If the screen is not clear, adjust the screen
brightness with this dial.
ww
w Mode button
ww
Press this button to change the mode.
Mode 1: Direct pattern selection
Mode 2, 3: Utility and decorative stitch pattern selection
ee
e Letter style button
ee
Press this button to select letter style for sewing letters.
rr
r Stitch width adjusting button
rr
Press “+” or “–” to change the stitch width.
tt
t Stitch length adjusting button
tt
Press “+” or “–” to change the stitch length.
yy
y Edit button (see pages 12, 13, 67-69)
yy
Press this button to enter the editing mode. In the editing
mode, this button is used to shift the cursor to the left.
uu
u Help button (see pages 11-13. 67)
uu
Press this button to view alternative applications of certain
stitches. In the editing mode, this button is used to shift the
cursor to the right.
!5
q
!2
!4
ii
i Twin needle button (see page 57)
ii
Press this button for twin needle sewing.
!3!1
oo
o Memory/call button (see pages 14, 71, 72)
oo
When you press this button after memorizing or editing
patterns, the pattern combination will be registered. You
can also recall registered patterns by pressing this button.
!0!0
!0 Elongation button (see page 56)
!0!0
Stitches #28 to #34 can be elongated up to five times of
their original size.
!1!1
!1 Mirror image button (see pages 59, 72)
!1!1
Press this button to turnover the selected pattern.
!2!2
!2 Memory button (see pages 12-14, 58-68)
!2!2
The memory button will memorize your pattern selection.
Press the memory button after you selected the stitch
pattern. (You can program up to 40 patterns.)
!3!3
!3 Clear button (see pages 68, 72)
!3!3
When this button is pressed, the pattern before or above
the cursor will be deleted.
Press and hold this button to clear the entire pattern
combination.
If this button is pressed after sewing a pattern combination,
the sequence will be deleted.
!4!4
!4 Pattern selection buttons (see page 10)
!4!4
You can select the stitch patterns directly (mode 1) or by
entering the 2-digit pattern number (mode 2).
!5!5
!5 Buttonhole selection buttons (see page 10)
!5!5
You can select buttonholes directly in any mode.
8
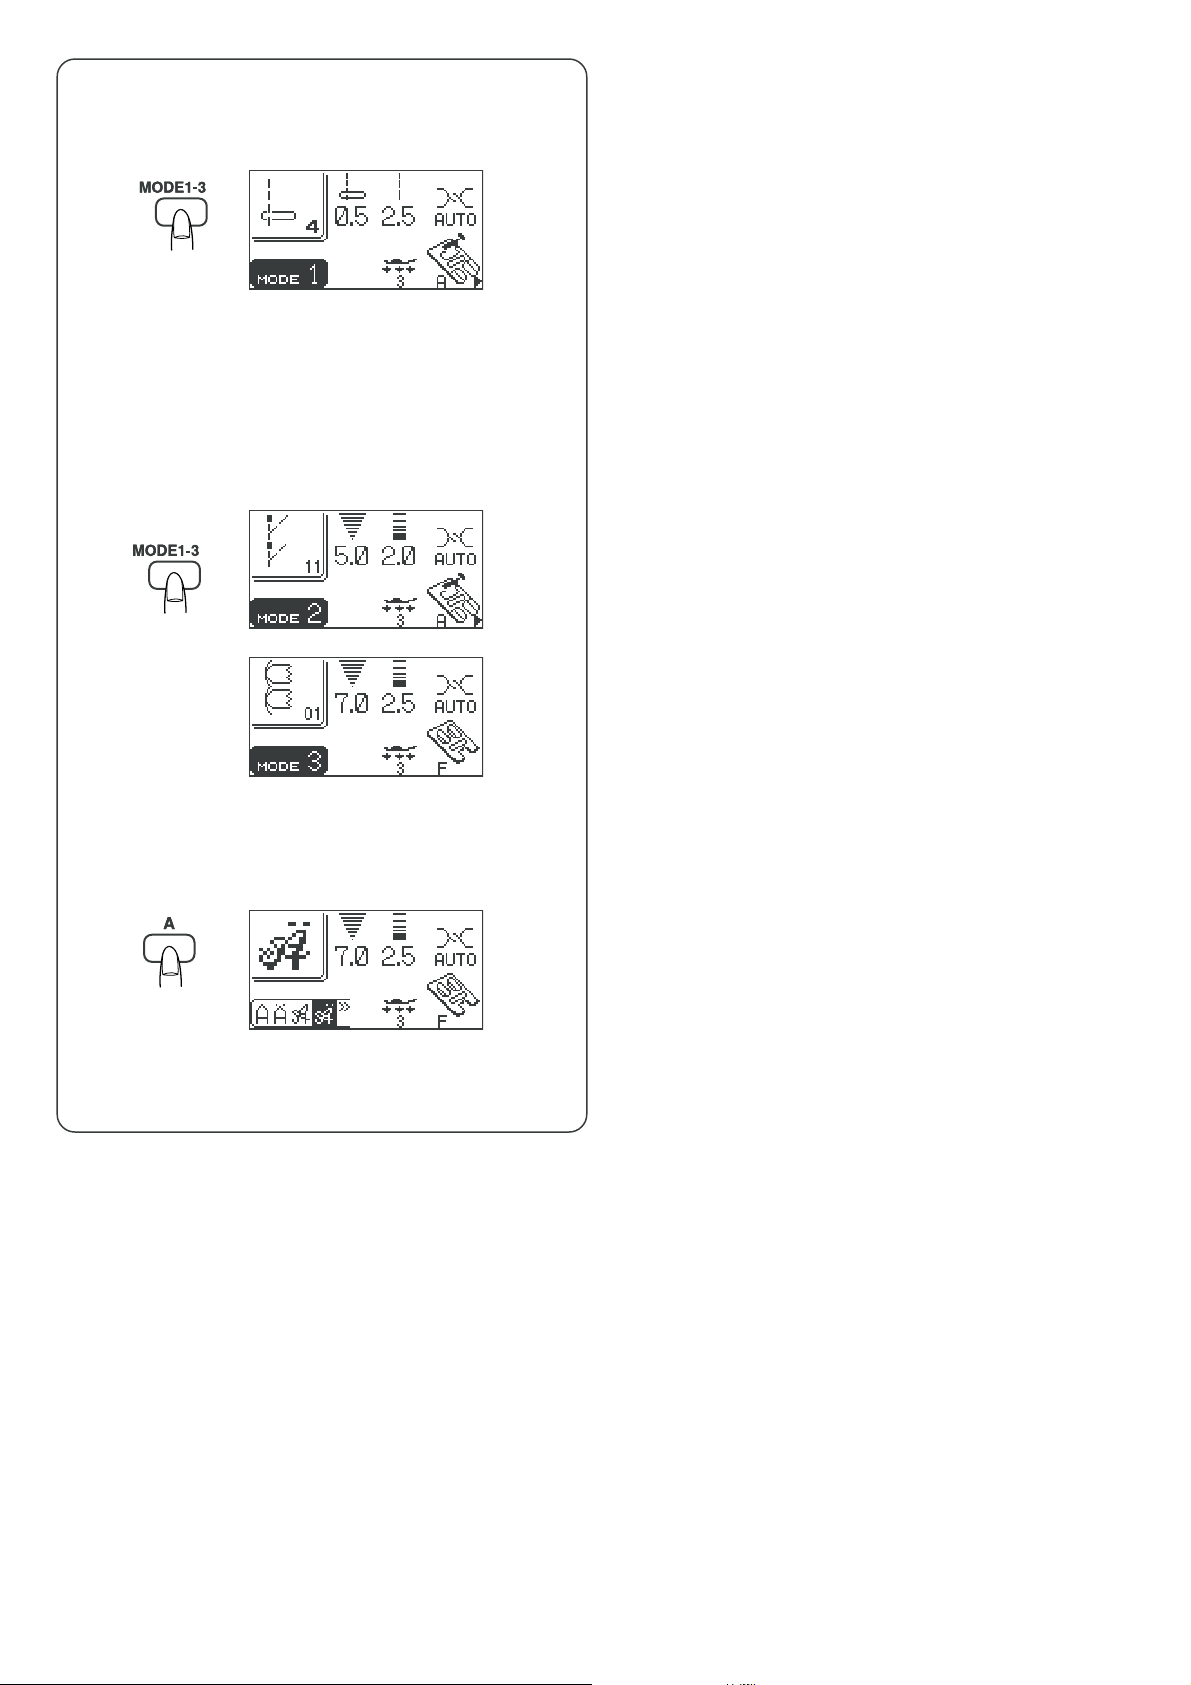
Mode selection
When you switch on the machine, the direct select mode
(mode 1) is activated. Press the mode button to change
the mode.
Mode 1
Screen indication
You can select 10 of the most commonly used patterns
directly by pressing the pattern selection buttons.
Mode 2 and 3
You can select stitch patterns from #01 to #99.
Patterns #01 to #10 in mode 2 are programmable patterns
equivalent to the patterns in mode 1.
Lettering mode
Press this button to enter the lettering mode and select one
of the following fonts or border patterns.
q Block style letters
w Block style European letters
e Script style letters
r Script style European letters
t Broadway style letters
y Broadway style European letters
u Border patterns
9
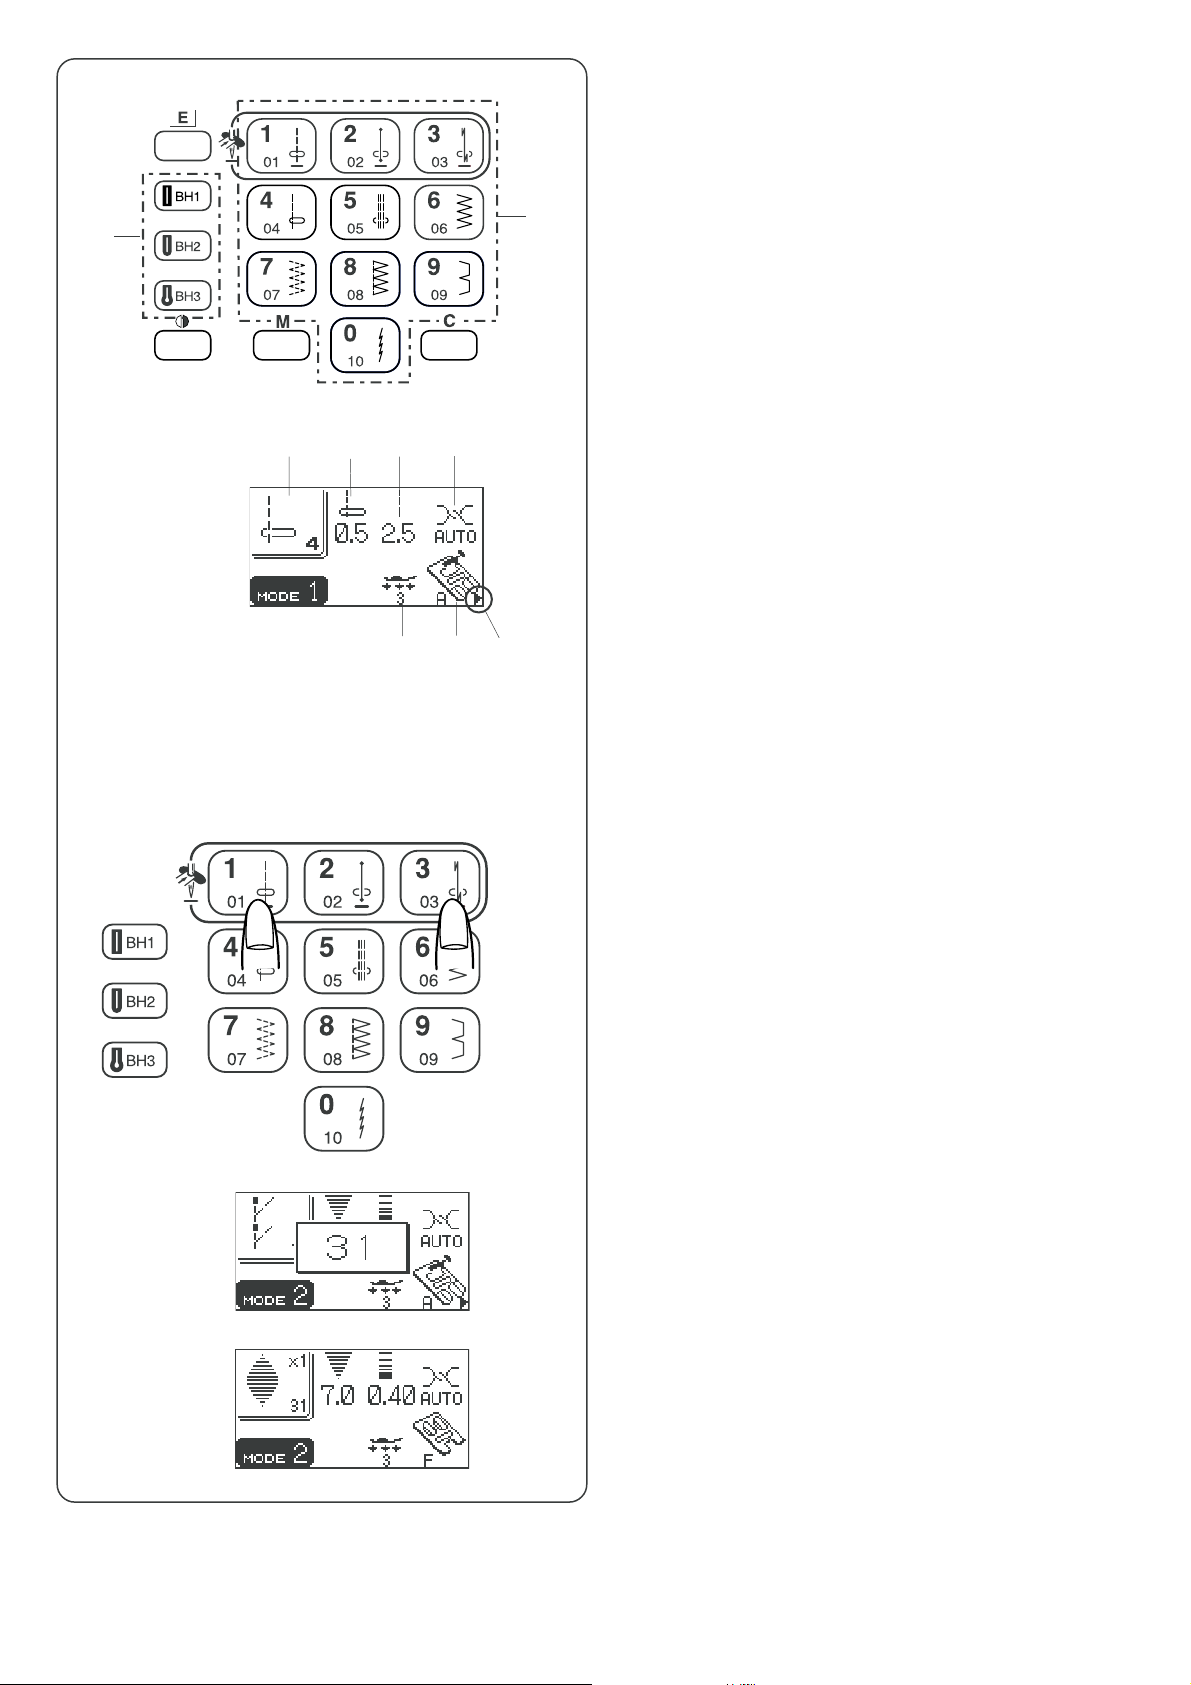
Pattern Selection
Mode 1
You can select the stitch patterns #01 to #10 directly by
pressing the pattern selection buttons.
q Patten selection buttons
w
er
t
u
y
i
o
q
The buttonholes BH1 to BH3 cab be directly selected by
pressing the buttonhole selection buttons in any mode.
w Buttonhole selection buttons
The LCD screen shows the standard settings for the
selected stitch pattern.
e Pattern number and image of the selected stitch
r Stitch width or needle drop position
t Stitch length
y Recommended setting for needle thread tension
u Recommended foot pressure
i Recommended presser foot
A triangle mark will appear when a certain utility stitch is
selected. This indicates that there are alternative settings
for the selected stitch (see page 11).
o Recommended presser foot
Mode 2, 3 and Lettering
To select a stitch pattern, enter the 2-digit number of the
desired stitch pattern by pressing the corresponding
number buttons.
Please refer to the stitch chart to find the pattern number of
the desired stitch.
Example: stitch pattern #31
Press the button number “3” and button number “1”.
The pattern number appears for a while.
The LCD screeen shows the selected stitch pattern and
setting information.
10
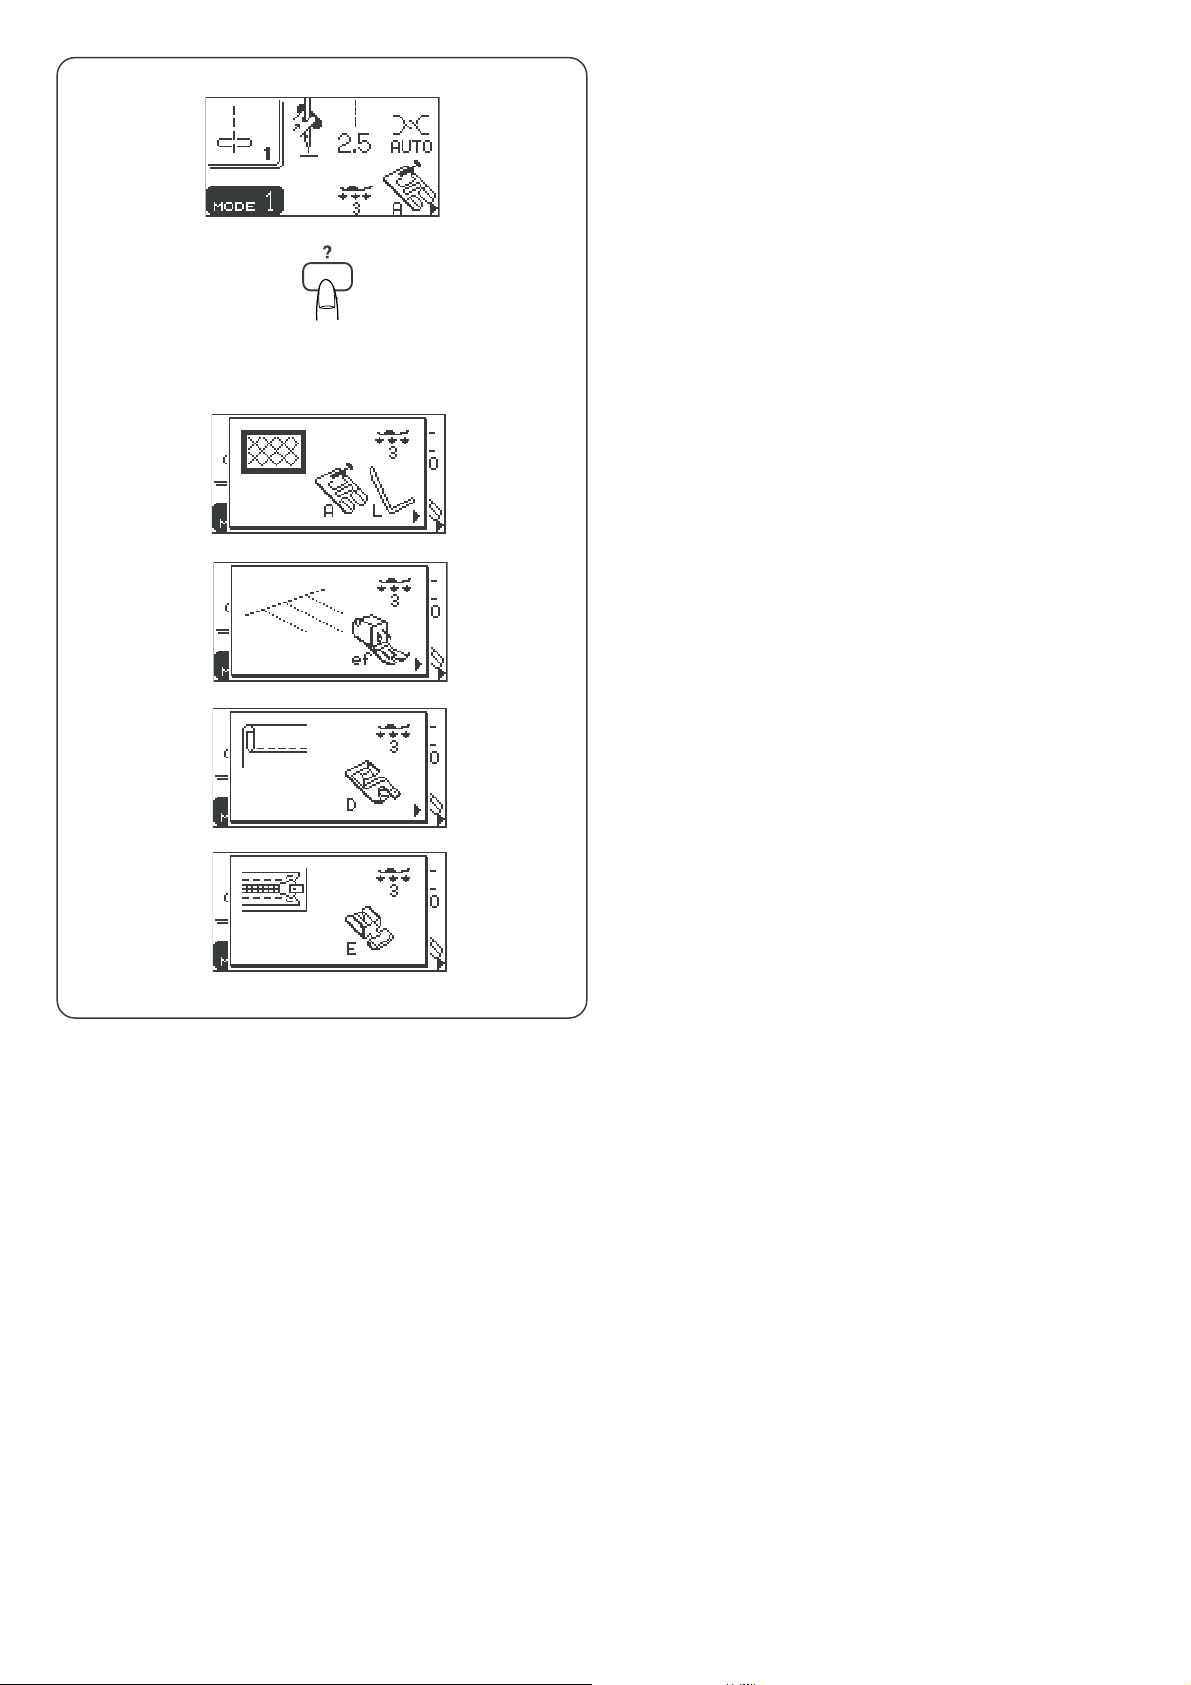
Help button
Pressing this button will show alternative applications of the
selected pattern when patterns #01, #04, #06, #08 (mode 1)
or #29 (mode 2) have been selected.
Example: When pattern #01, #04, #06, #08, #29 has been
selected.
Each time you press the help button, the LCD screen will
show as follows:
The zigzag foot and quilting bar for quilting will be shown.
The even foot (optional item) will be shown.
The rolled hem foot for a rolled hem will be shown.
The zipper foot for zipper sewing will be shown.
11
q
e
w
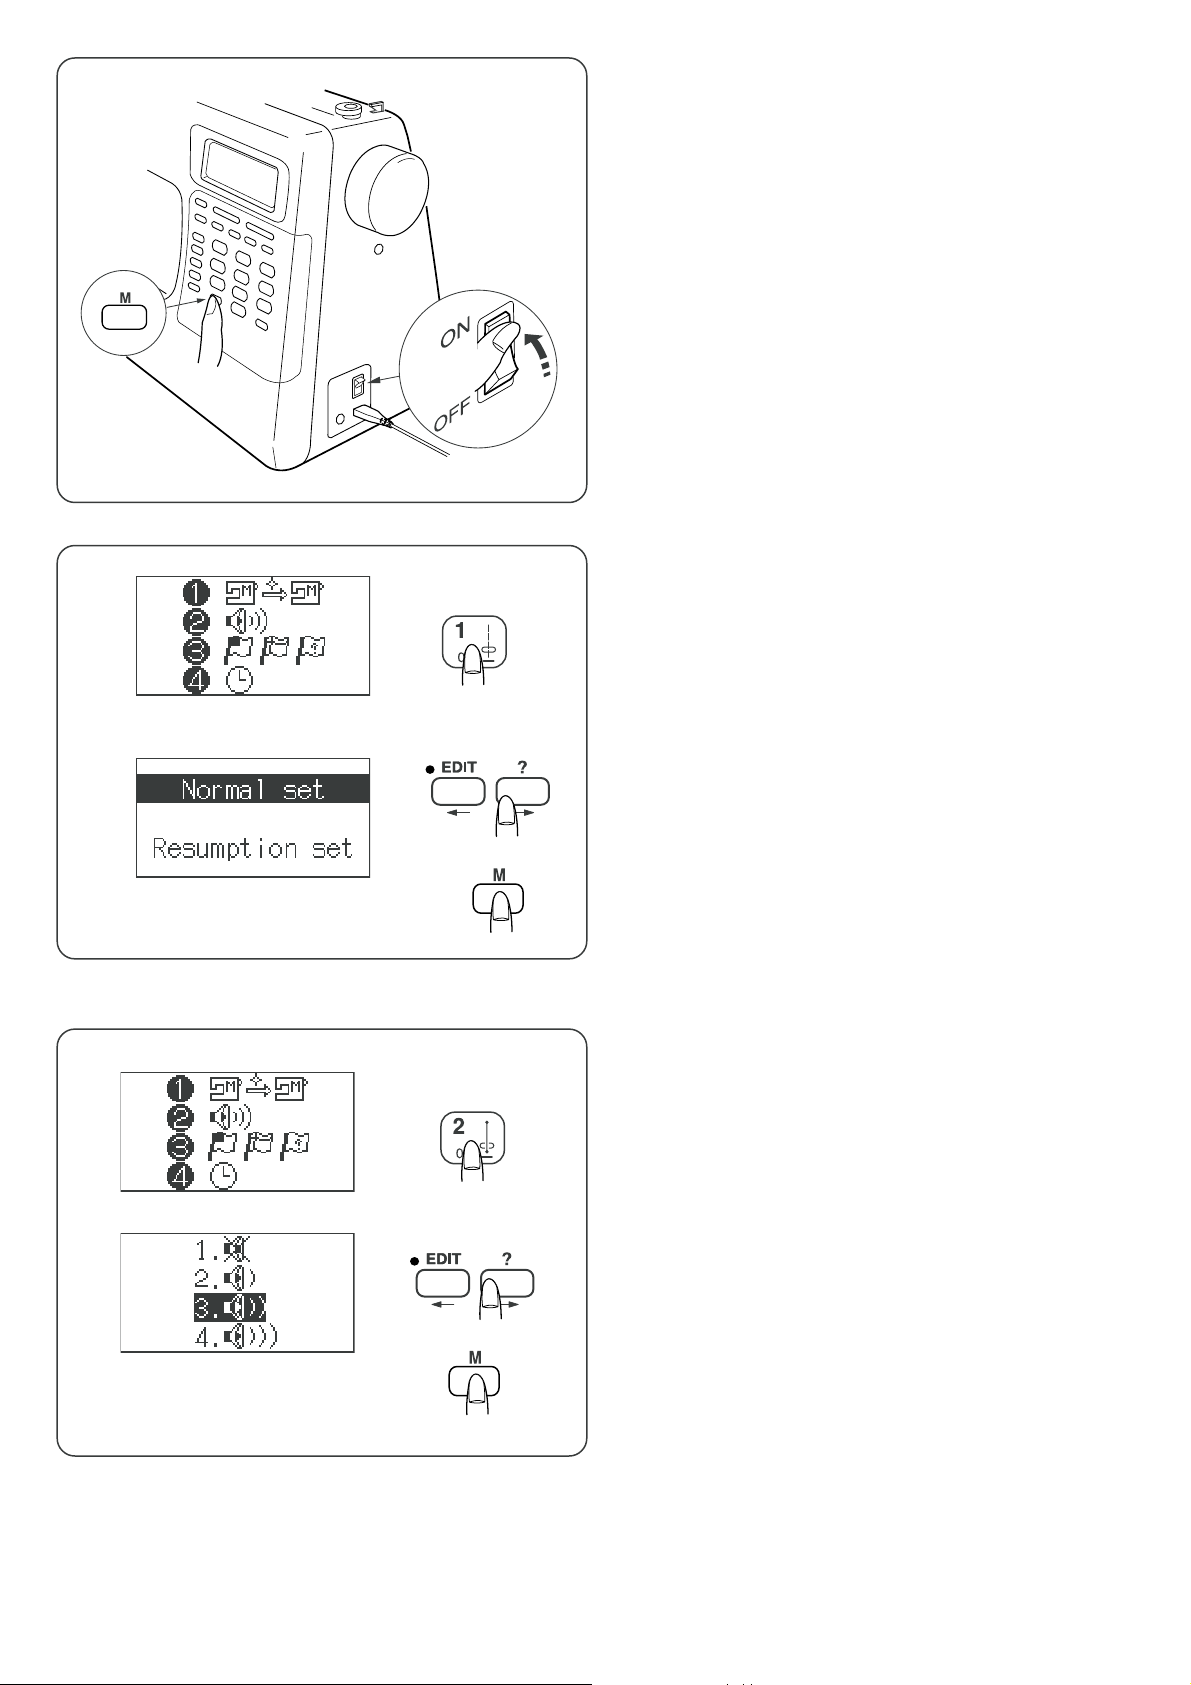
Customizing Machine Settings
You can customize the machine settings to your
preference.
Turn on the power switch while pressing the memory
button. The machine setting window will appear.
q Memory button
w Power switch
e Machine setting window
Resumption setting
Pattern number 4 will be automatically selected when
turning the power on.
However the last pattern sewn before turning the power off
can be recalled if the resumption setting is selected.
Press button number 1 to select Normal/Resumption
setting.
Press the edit or help button to select either Normal or
Resumption setting.
Press the memory button to enable the setting.
Sound setting
You can change the loudness of buzzer sound.
Press button number “2” to select sound setting. The LCD
screen shows the sound setting.
Press the edit or help button to select the sound level.
Press the memory button to enable the setting.
12
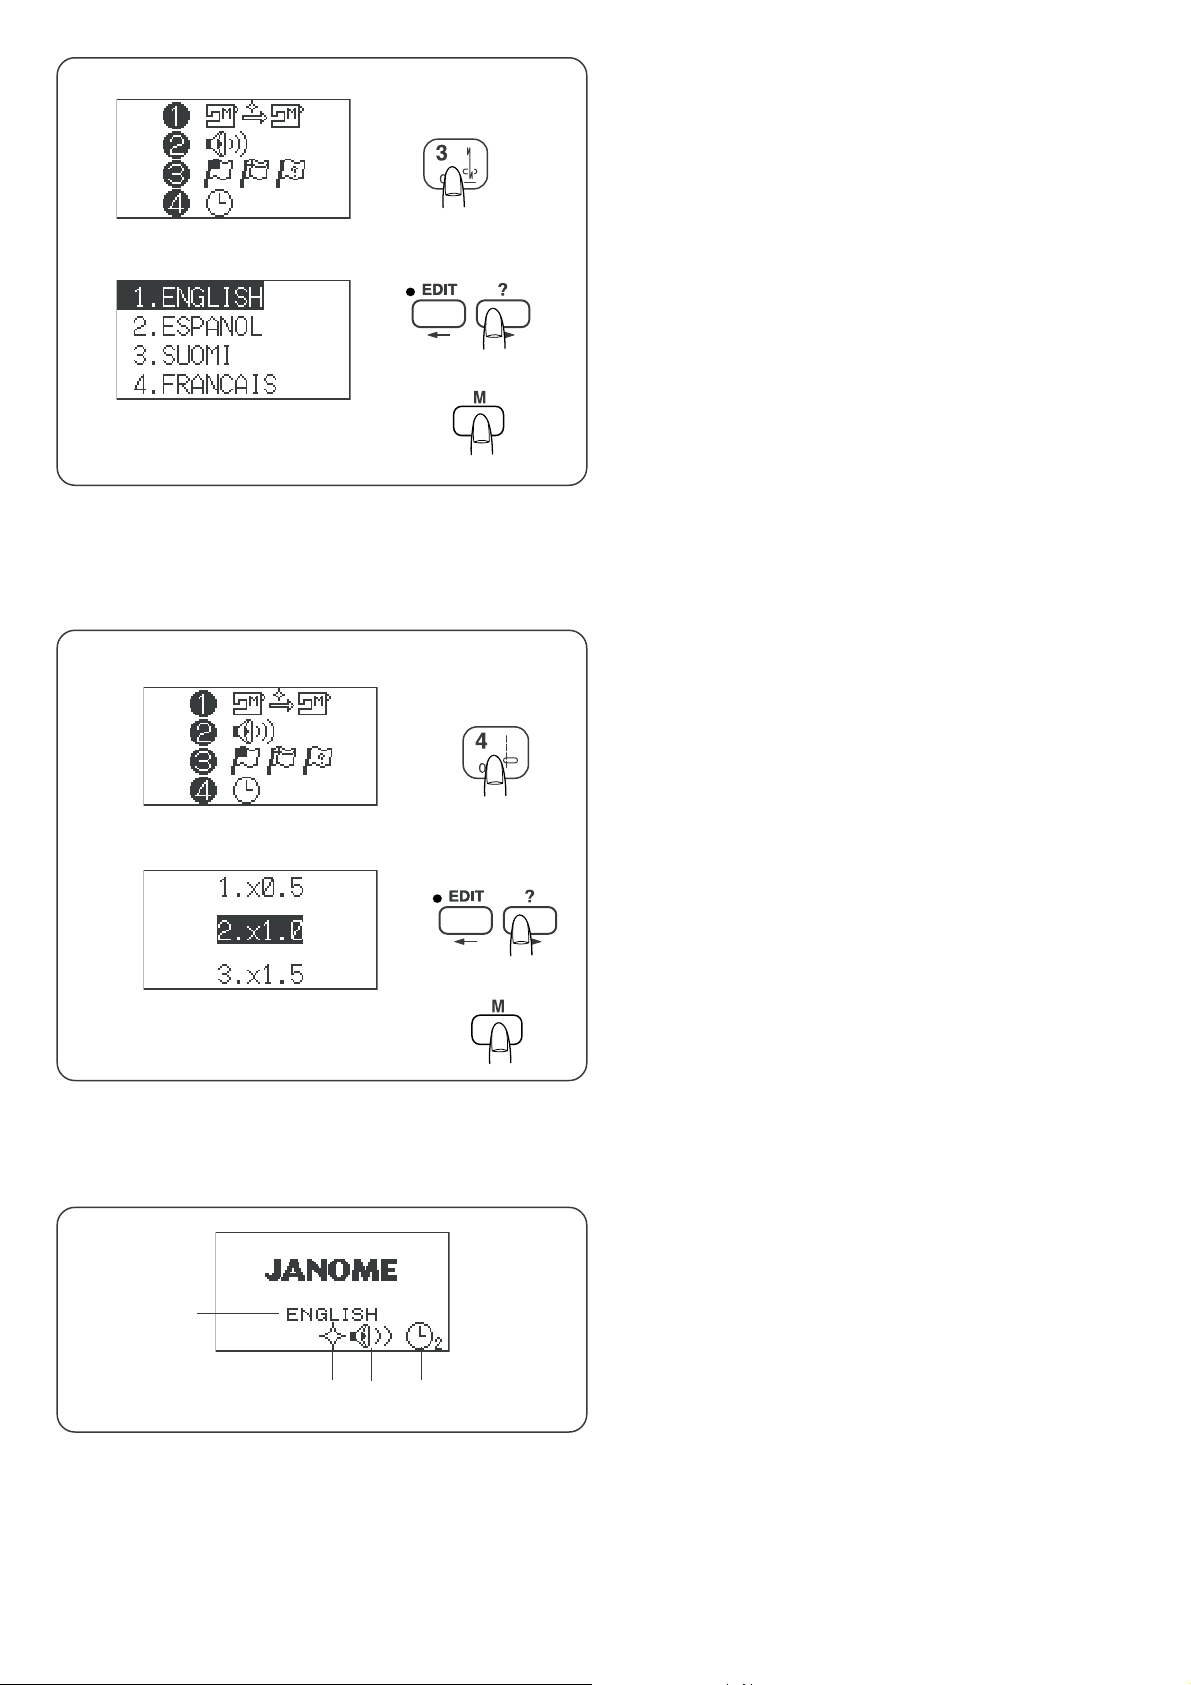
Language selection
You can choose one of 10 languages for the screen display.
1. English 2. Spanish 3. Finnish 4. French
5. German 6. Italian 7. Dutch 8. Portuguese
9. Russian 10. Swedish
Press the button number “3”.
The LCD screen shows language selection.
Press the edit or help button to select a language.
Press the memory button to set the language.
Pop-up window duration time setting
A pop-up window will appear for a while when selecting
patterns, altering stitch length or width.
The duration of the window displayed can be changed to
suit o your preference.
The default setting is 2 seconds (x1.0).
q
e
Press the button number “4”.
The LCD screen shows the pop-up window duration time
setting display.
Press the edit or help button to select the duration.
1.: x 0.5……..1 second
2.: x 1.0……..2 seconds
3.: x 1.5……..3 seconds
Press the memory button to enable the setting.
When turning the power on, the initial display shows the
customized settings that you have made.
Example:
q Language: English
w Resumption setting: ON
e Buzzer sound: Normal
r Pop-up window duration: 2 seconds
rw
13

q
Customizing the preset values for the stitch length and
width
The preset value of the stitch length and width are
optimized for each pattern.
You can modify the preset value of the patterns in mode 1
and save it so that you do not have to change the setting
each time you turn the power switch on.
Example: To change the preset value for the stitch
length
Select the stitch pattern you want to change the preset
value.
Press “–” or “+” to change the stitch length.
Press the memory/call button.
Press the memory button to save your personal setting.
A symbol “C” appears on LCD screen to indicate the stitch
has been altered from the factory default settings.
q Symbol “C”
Restoring the original settings
Select the pattern that you have changed its settings.
Press the memory/call button. The LCD screen will show
the current settings.
Press the “C” button. The symbol “C” disappears and the
preset values will return to the original settings (the same
settings when you have purchased the machine).
14
w
q
Presser Foot Lifter
The presser foot lifter raises and lowers the presser foot.
You can raise it about 1/4˝ (0.6 cm) higher than the normal
up position for easy removal of the presser foot, or to help
you place thick material under the foot.
q Presser foot lifter
w Higher position
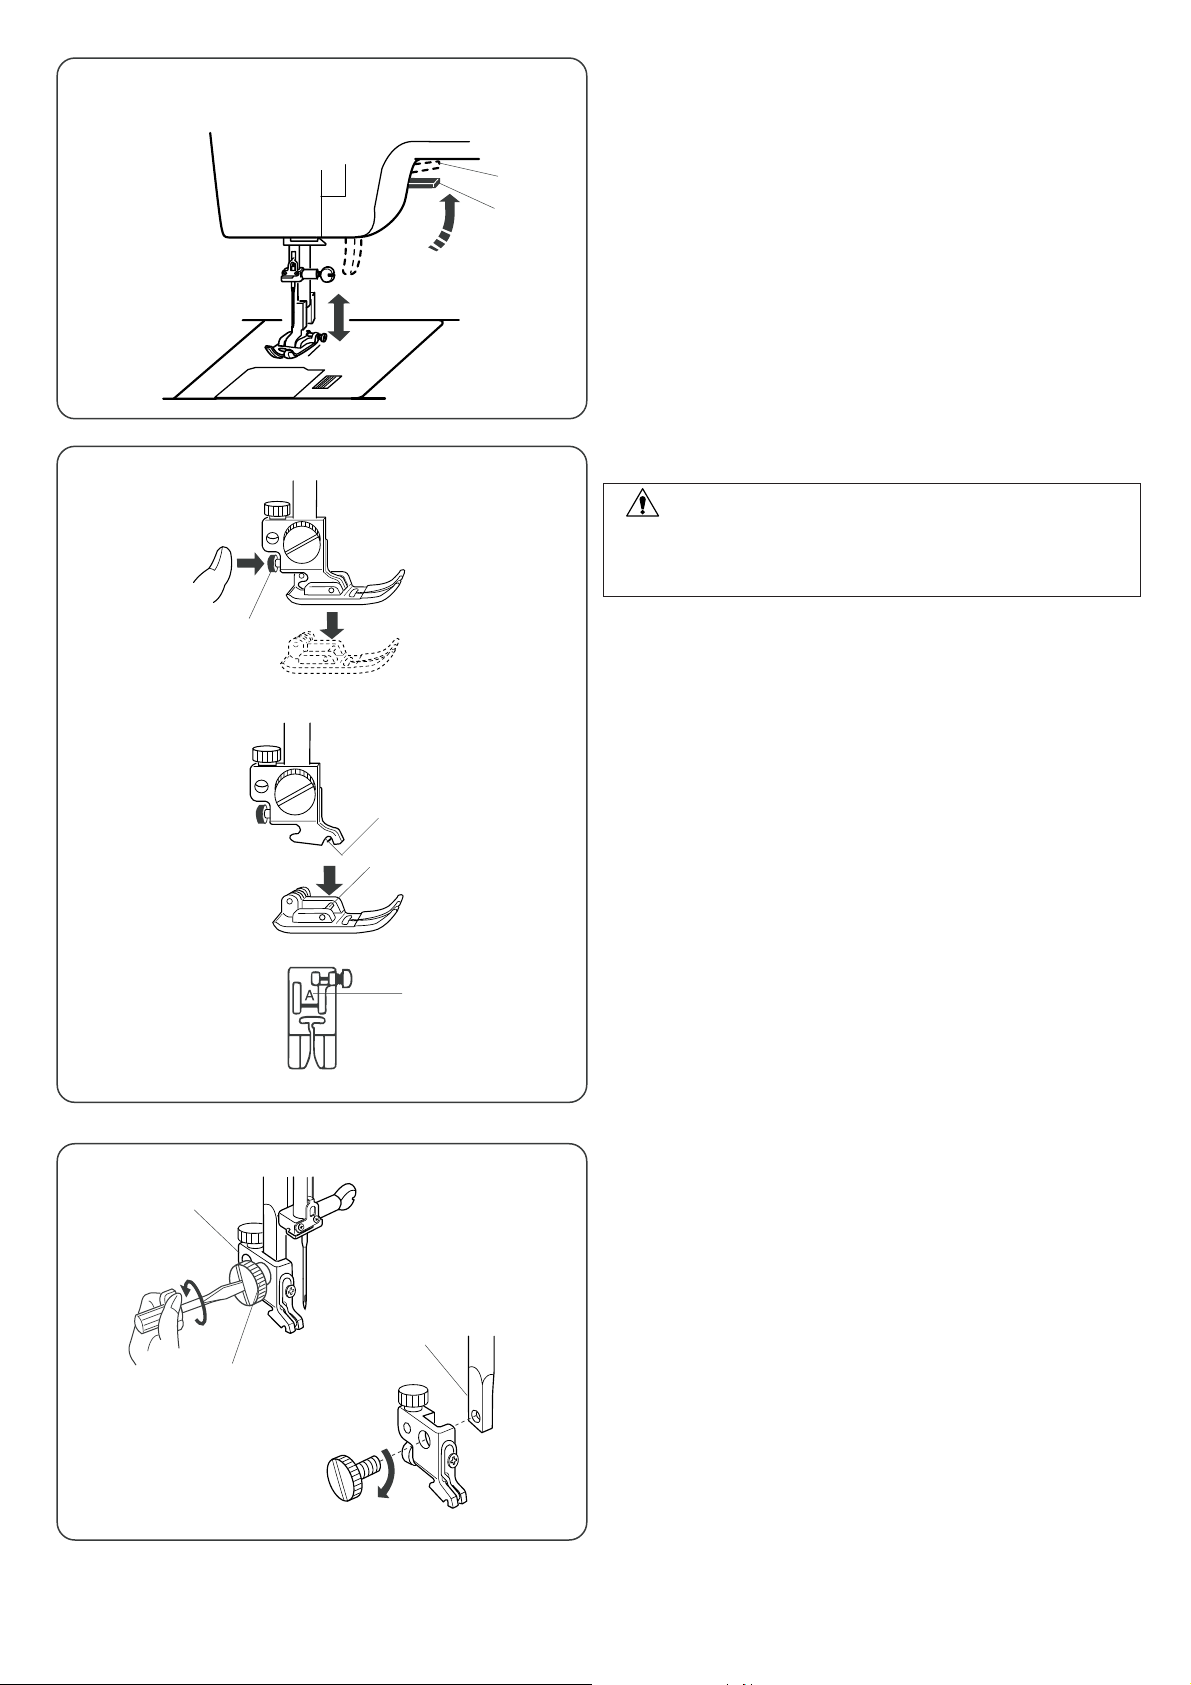
Changing the Presser Foot
CAUTION:
Turn off the power switch before changing the foot. Always
use the proper foot for the selected pattern. The wrong foot
can cause the needle to break.
w
q
w
e
r
• To remove
Raise the needle to its highest position by turning the hand
wheel counterclockwise.
Raise the presser foot, and press the red button on the
back of the foot holder.
• To attach
Place the selected presser foot so that the pin on the foot
lies just under the groove on the foot holder.
Lower the presser bar to lock the foot into place.
Each foot is marked with a letter for identification.
q Snap-on button (red button)
w Groove
e Pin
r Identification letter
Removing and Attaching the Foot Holder
• To remove
Raise the presser foot lifter and remove the thumb screw
by turning it counterclockwise with a screwdriver.
Remove the foot holder.
q
e
• To attach
Match the hole in the foot holder with the threaded hole in
the presser bar.
Fit the thumb screw into the hole.
Tighten the screw by turning it clockwise with
a screwdriver.
q Thumb screw
w Foot holder
e Presser bar
15
q
w
e
r
Variety of Presser Feet and Their Uses
q Zigzag foot A:
This is the most versatile foot. It can be used for various stitches including
straight stitches and zigzag stitches. It is designed to achieve firm and neat
seam results.
ww
w Overedge foot C:
ww
This foot is exclusively for overedging. The brush on the foot effectively
prevents skipped stitches on the raw edge of fabrics.
ee
e Rolled hem foot D:
ee
This special foot is for sewing a rolled hem. The curl of the foot helps to form a
hem at a constant width.
rr
r Zipper foot E:
rr
This foot is for sewing zippers. The zipper teeth are guided through the grooves
on the bottom of the foot.
t
y
u
i
o
tt
t Satin stitch foot F:
tt
This clear plastic foot is ideal for satin stitches and decorative stitches. The
center groove on the bottom of the foot ensures smooth feeding of dense
stitches.
yy
y Blind hem foot G:
yy
This foot is specially designed for blind hemming. The guide on the foot helps
feed the fabric and sew a straight and nearly invisible blind-hem.
uu
u Cording foot H:
uu
This foot is specially designed to hold one or three strands of cording to create
braiding.
ii
i Overcasting foot M:
ii
This foot is specially designed to simulate professional style overlocking. The
wires on the foot effectively prevent the fabric edge from puckering or rolling.
oo
o Darning foot P:
oo
This is a special foot for basting. It holds the fabric while taking a stitch,
synchronizing with the needle bar movement. This foot can also be used for
free motion embroidery or quilting.
!0
!1
!0!0
!0 Automatic buttonhole foot R:
!0!0
This foot is for buttonholes and for darning. Place a button in the button holder
on the rear of the foot. This automatically sets the buttonhole size.
!1!1
!1 Button sewing foot T:
!1!1
This foot is exclusively used fir attaching a button. It holds a button securely in
place and allows fine adjustment of button position.
16
q
Bobbin Winding
Removing the bobbin
Slide the hook cover plate release button to the right, and
remove the cover plate.
e
w
we
q
Lift out the bobbin from the bobbin holder.
q Hook cover plate release button
w Hook cover plate
e Bobbin
Setting the spool of thread
Lift up the spool pin.
Place a spool of thread on the spool pin with the thread
coming off the spool as shown.
Attach the large spool holder, and press it firmly against
the spool of thread.
q Spool pin
w Spool of thread
e Large spool holder
r
q
w
t
w
e
r
q
The small spool holder is used with narrow or small spools
of thread.
r Small spool holder
Extra spool pin
The extra spool pin is for bobbin winding, without
unthreading the machine, and for twin needle sewing.
Insert the extra spool pin into spool stand and the hole.
Place the felt and a spool on the pin as illustrated.
q Spool
w Extra spool pin
e Spool pin felt
r Spool stand
t Spool pin hole
17
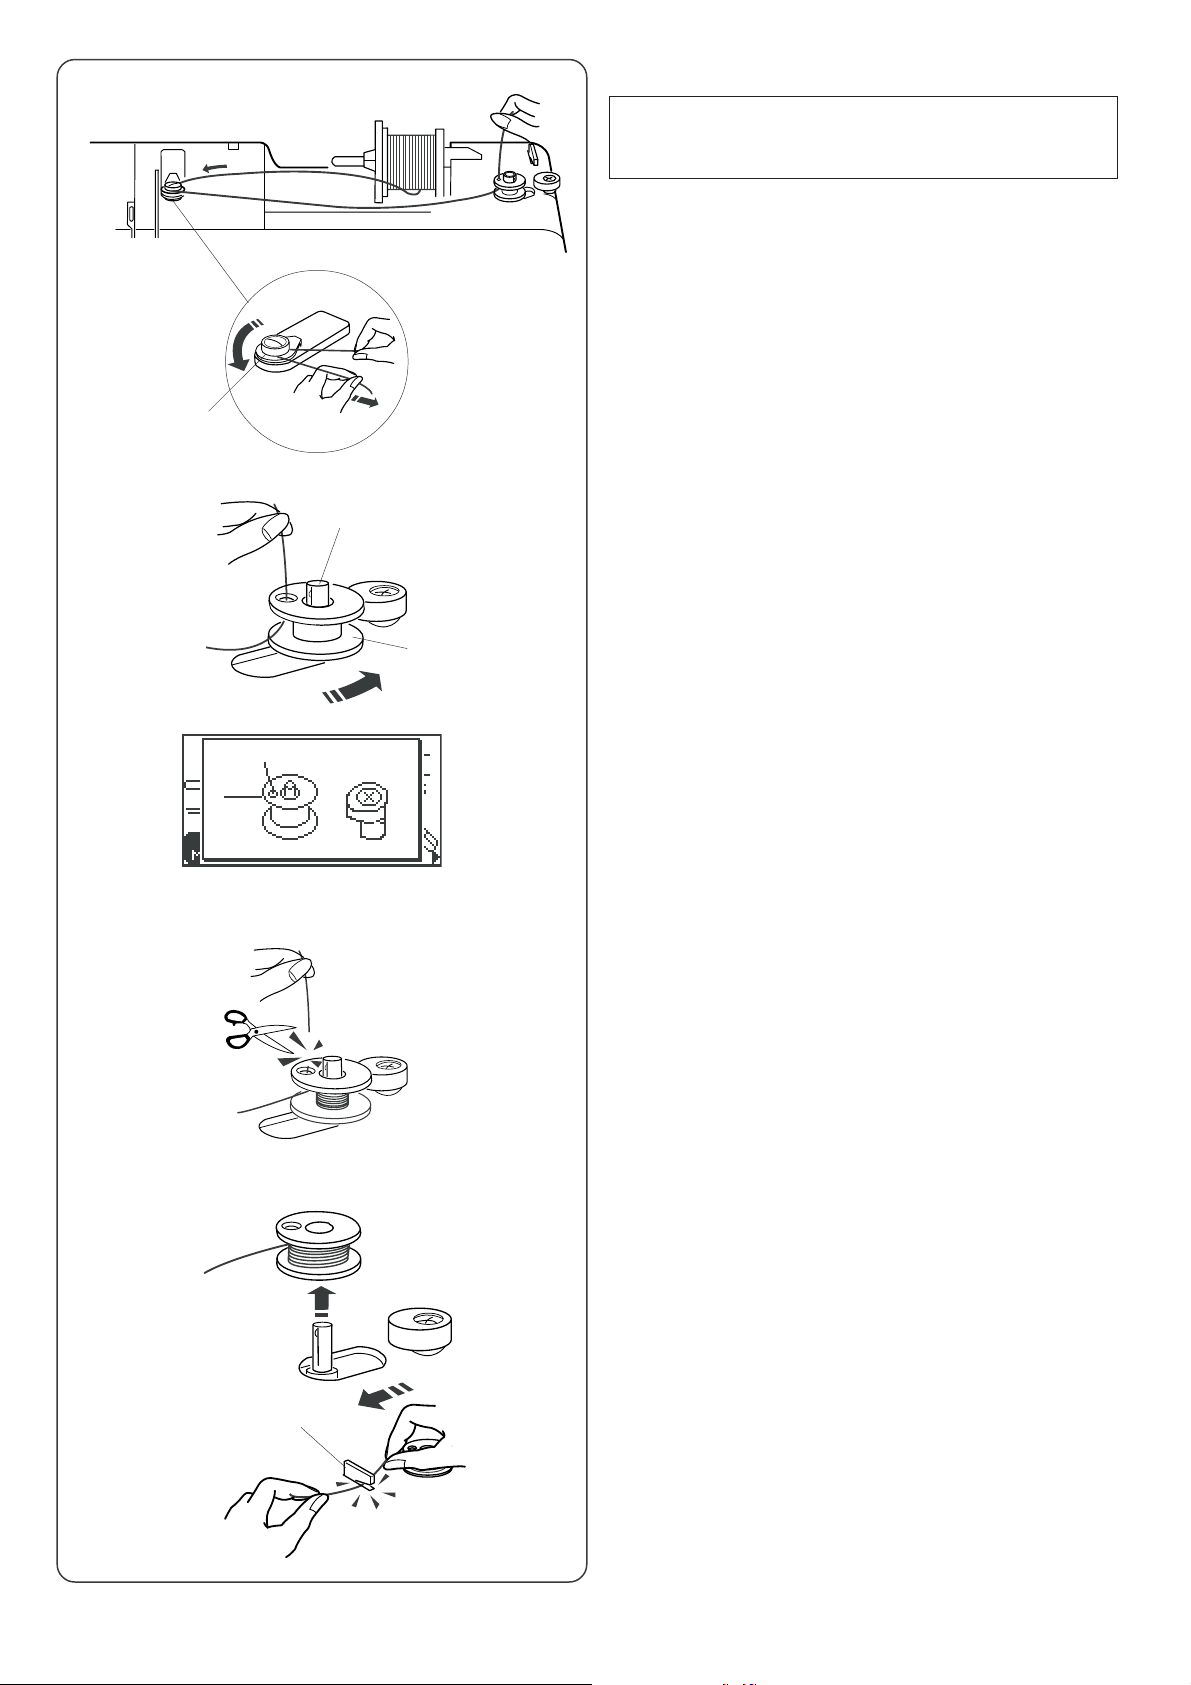
z
Bobbin Winding
NOTE:
Set the speed control slider at its fastest position for
bobbin winding.
z Draw the thread from the spool.
Guide the thread around the bobbin winding tension
disk.
Be sure to insert the thread between the tension disks.
q Bobbin winding tension disk
q
x
c
v
e
x Insert the thread through the hole in the bobbin,
threading from the inside to the outside.
Put the bobbin on the bobbin winder spindle.
w Bobbin
e Bobbin winder spindle
w
c Push the bobbin winder spindle to the right.
The LCD screen shows bobbing winding sign.
v With the free end of the thread held in your hand,
depress the foot control. Stop the machine when
the bobbin has wound a few layers, and cut the
thread close to the hole on the bobbin.
b
b Depress the foot control again. When the bobbin is
fully wound, it will stop automatically.
Return the bobbin to its original position by moving the
spindle to the left, and cut the thread as shown.
Cut the thread with the bobbin thread cutter.
r Bobbin thread cutter
r
18
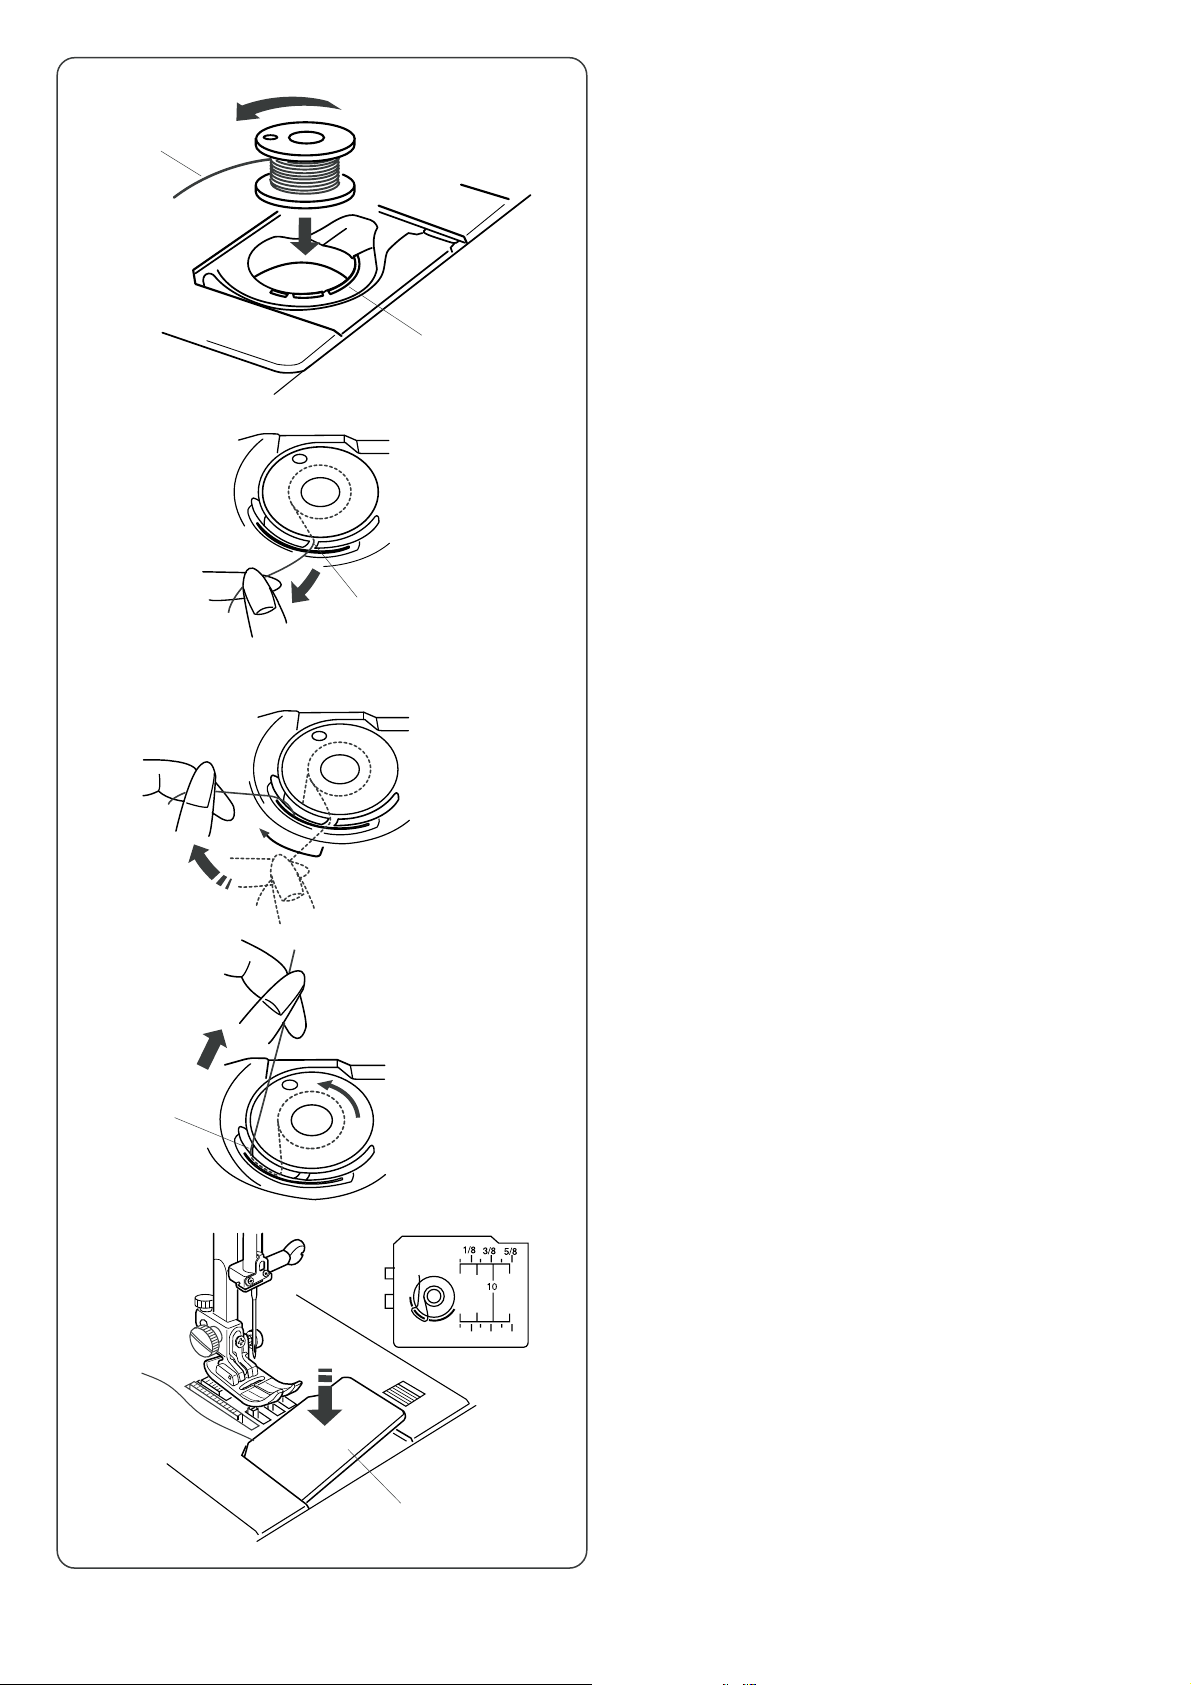
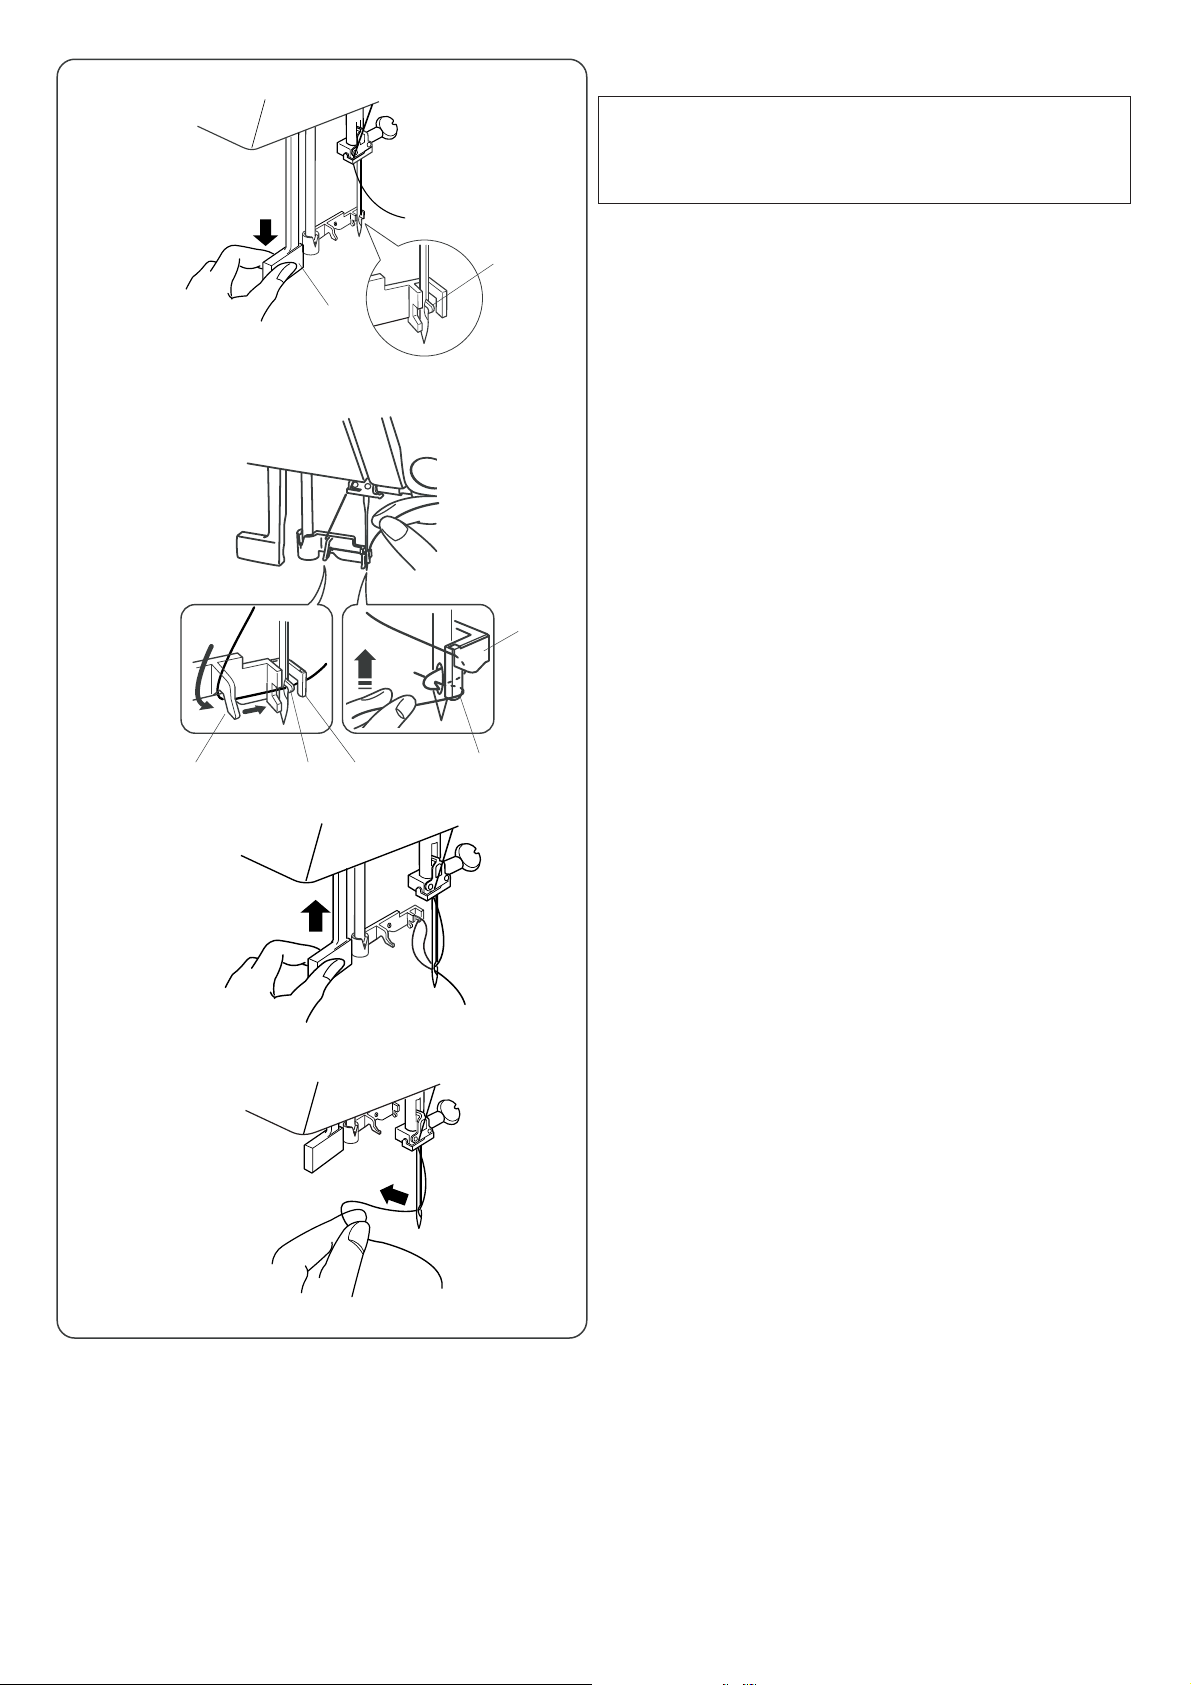
z
q
Inserting the bobbin
z Place the bobbin in the bobbin holder with the thread
running off counterclockwise.
q Thread
w Bobbin holder
w
x
c
v
x Guide the thread into the notch on the front of the bobbin
holder.
e Front notch
e
c Draw the thread to the left, sliding it between the tension
spring blades.
v Continue to draw the thread lightly until the thread slips
into side notch (B).
r Side notch
b
r
t
y
b Pull out about 10 cm (4˝) of thread to the rear.
Refer to the threading chart shown on the hook cover
plate. Attach the hook cover plate.
t Hook cover plate
y Threading chart
19
b
c
z
v
w
x
q
Threading the Machine
Raise the presser foot lifter.
Turn the power switch on.
Press the up/down needle position button twice to raise
the needle.
q Up/down needle position button
Turn the power switch off.
z
x
c
z Draw the thread around and under the upper thread
guide while holding the thread at the spool.
w Upper thread guide
x Draw the thread down along the right channel.
Then turn around the bottom of the guide plate.
e Guide plate
e
c Firmly draw the thread up to the take-up lever.
Slip the thread through the slit and into the eye of the
take-up lever.
r Slit
t Eye of take-up lever
v
b
r
y
t
v Then down through the lower thread guide.
y Lower thread guide
b Slide the thread behind the needle bar thread guide
on the left. Thread the needle from front to back or use
the needle threader.
u Needle bar thread guide.
u
Thread the needle using the needle threader (see the next
page).
20
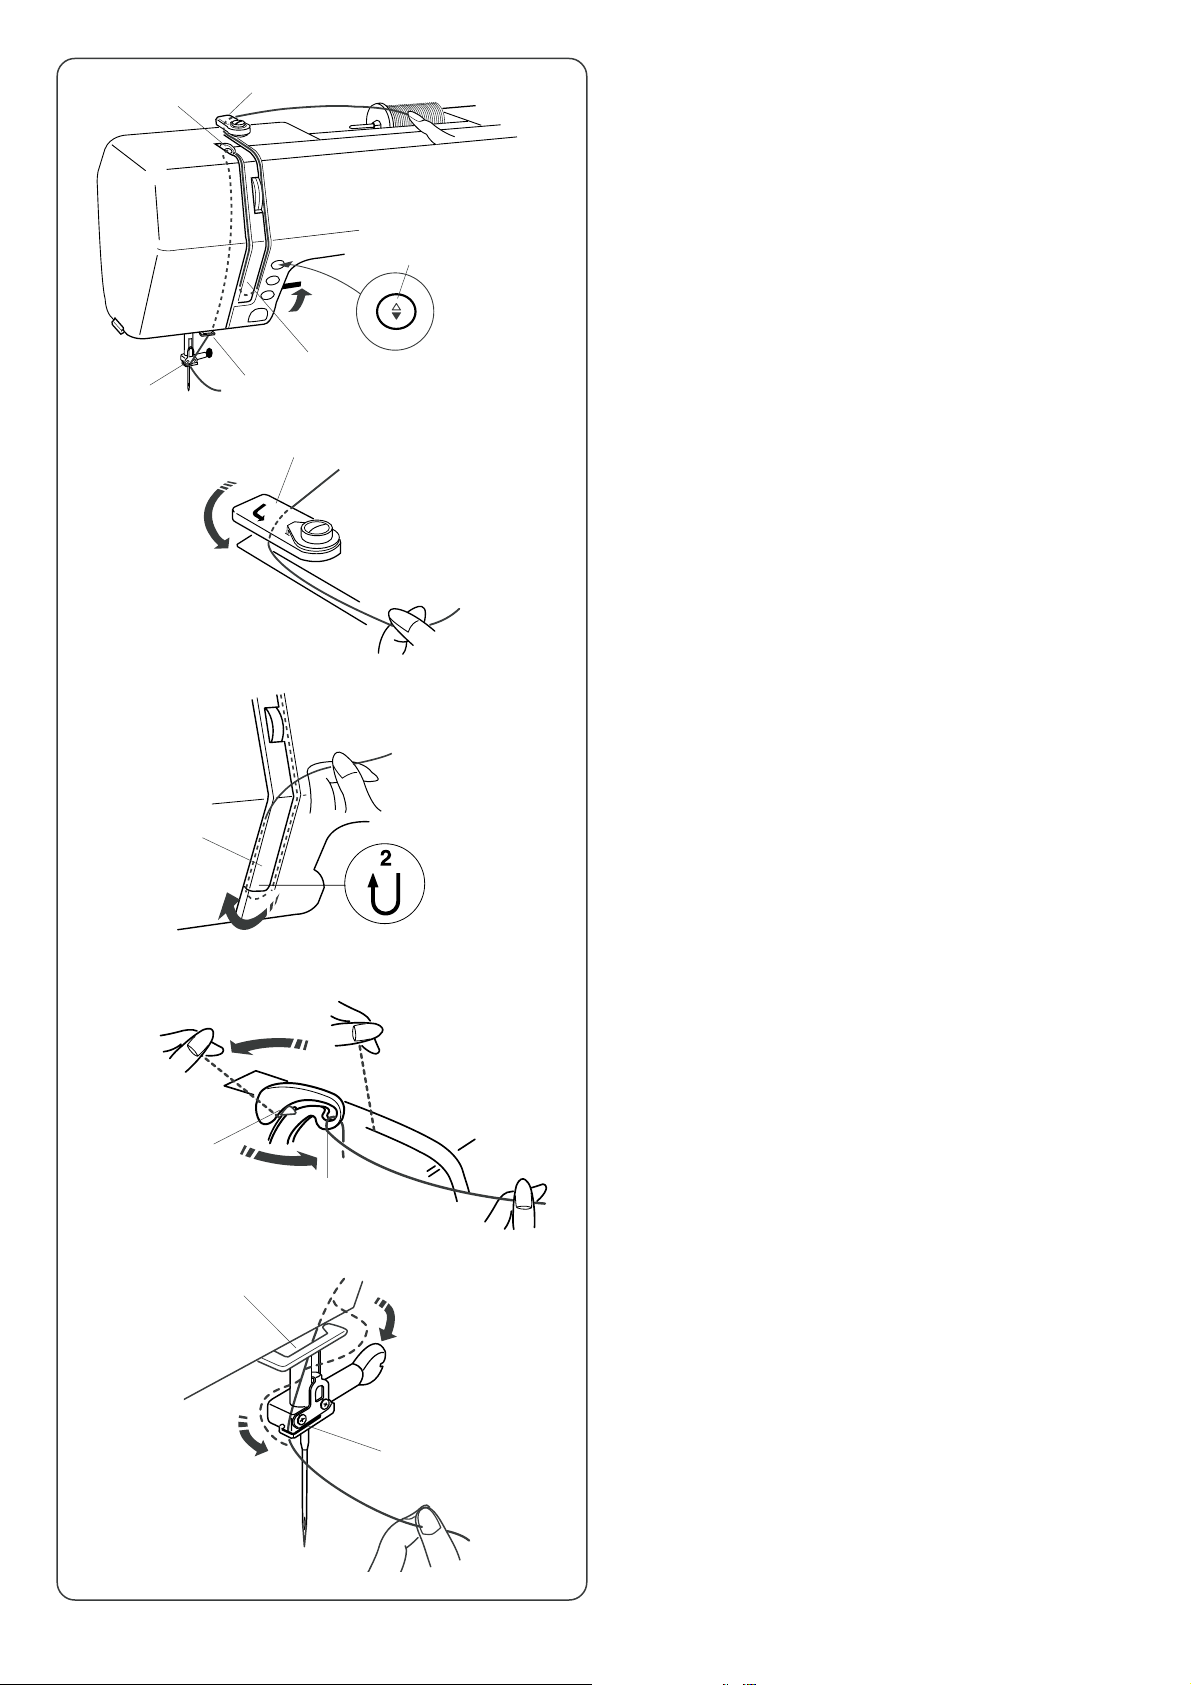
Built-in needle threader
z
w
q
NOTE:
The needle threader can be used with a #11 to #16
needle, or a #11 Blue needle.
Thread size 50 to 90 is recommended.
z Lower the presser foot. Raise the needle to its highest
position.
Push down the needle threader knob as far as it will go.
The hook comes out through the needle eye from
behind.
q Knob
w Hook
xc
t
x Draw the thread from the right to the left, under the
guide (A), threader hook and the guide (B).
e Guide (A)
er
w
r
w Hook
v
b
c Draw the thread up along the right side of the guide (B)
and slip the thread in between the guide (B) and holder
plate.
r Guide (B)
t Holder plate
v Release the knob slowly so a loop of the thread is
pulled up through the needle eye.
b Pull the thread end through the needle eye.
21
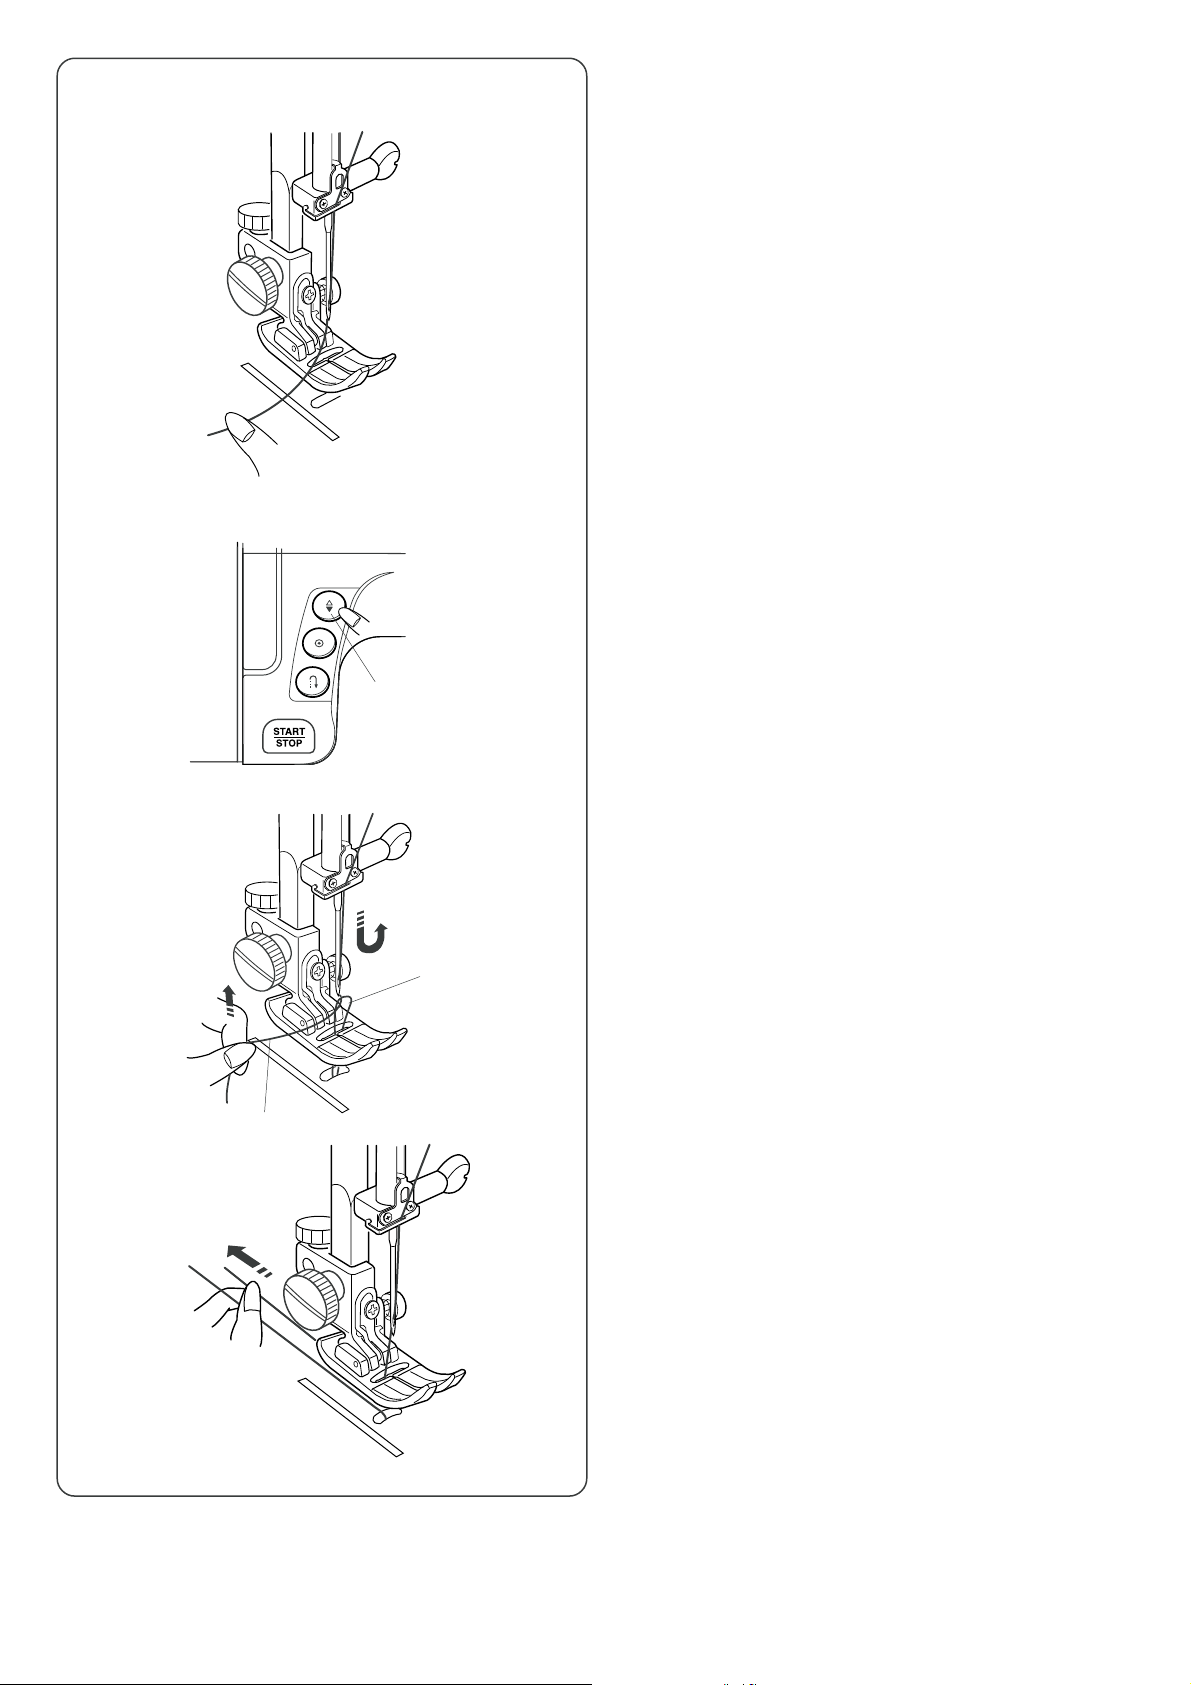
Drawing Up Bobbin Thread
z
x
z Raise the presser foot. Hold the needle thread lightly
with your left hand.
x Press the up/down needle position button twice to
lower and raise the needle.
q Up/down needle position button
q
c
v
c Pull the needle thread to pick up the bobbin thread.
w Needle thread
e Bobbin thread
e
w
v Pull both threads 4˝ to 6˝ (10 to 15 cm) under and
behind the presser foot.
22
Changing the Needle
w
q
e
CAUTION
Always make sure to turn the power switch off and
disconnect the machine from power supply before
changing the needle.
• Removing the needle
Turn the power switch off.
Raise the needle to its highest position by turning the
hand wheel. Lowering the presser foot.
Loosen the needle clamp screw by turning it
counterclockwise.
Remove the needle from the needle clamp.
q Needle clamp screw
w Needle clamp
• Attaching the needle
Insert a new needle into the needle clamp with the flat side
to the rear.
Push the needle up as far as it goes.
Tighten the needle clamp screw firmly by turning it
clockwise.
e Flat side
r
• Checking the needle
To see if the needle is good, place the flat side of the
needle onto something flat (needle plate, glass, etc.).
The gap between the needle and the flat surface should be
consistent. Never use a bent or blunt needle.
A damaged needle can cause permanent snags or runs in
knits, fine silks and silk-like fabrics.
r Gap
Needle and thread chart
Thread
Needle
#9/65–11/75
#11/75–14/90
#14/90
Light
Medium
Fabric
Lawn
Georgette
Tricot
Wool,
Polyester
Cotton,
Polyester
Fine jersey
Wool
Silk #80-100
Cotton #80-100
Synthetic #80-100
Silk #50
Cotton #60-80
Synthetic #50-80
Cotton #50
23
Heavy
Denim
Jersey
Coating
Quilting
Silk #50
Cotton #40-50
Synthetic #40-50
Silk #30
Cotton #50
#14/90–16/100
#16/100
Loading…
|
Код: 33468 Извините, товара сейчас нет в наличии
Бесплатная доставка Извините, товара сейчас нет в наличии Сравнить Новости интернет-магазина «Лаукар»:26.02.2025 17.02.2025 10.02.2025 Дополнительная информация в категории Швейная машина:Швейные машины — словарь терминов Таблица Авторизованных сервисных центров по брендам. Описание Инструкция Отзывы (0) В интернет-магазине бытовой техники «Лаукар» Вы можете скачать инструкцию к товару Швейная машина Janome MC 5200 HC Memory Craft совершенно бесплатно. Все инструкции, представленные на сайте интернет-магазина бытовой техники «Лаукар», предоставляются производителем товара. Для того чтобы скачать инструкцию, Вам необходимо нажать на ссылку «скачать инструкцию», расположенную ниже, а в случае, если ссылки нет, Скачать инструкцию Смотреть инструкцию 
Фирма-производитель оставляет за собой право на внесение изменений в конструкцию, дизайн и комплектацию товара: Швейная машина Janome MC 5200 HC Memory Craft . Пожалуйста, сверяйте информацию о товаре с информацией на |
View the manual for the Janome Memory Craft 5200 here, for free. This manual comes under the category sewing machines and has been rated by 2 people with an average of a 6.6.
This manual is available in the following languages: English. Do you have a question about the Janome Memory Craft 5200 or do you need help?
Ask your question here
Janome Memory Craft 5200 specifications
Below you will find the product specifications and the manual specifications of the Janome Memory Craft 5200.
The Janome Memory Craft 5200 is a sewing machine that is designed to provide reliable and durable performance. It is manufactured by Janome, a well-known brand in the sewing industry. This machine is equipped with various features and functions that allow users to complete their sewing projects with ease.
The Janome Memory Craft 5200 offers a wide range of stitch options, allowing users to create intricate designs and patterns. It has a built-in memory, which enables users to save their favorite stitch settings for future use. This machine also comes with a large LCD screen, which provides clear and easy-to-read information about the selected stitch settings.
The Janome Memory Craft 5200 is constructed with high-quality materials, ensuring its durability and longevity. It has a sturdy and stable build, which helps in reducing vibrations and noise during operation. This machine also has a strong and efficient motor, which provides smooth and consistent sewing results.
In addition to its stitching capabilities, the Janome Memory Craft 5200 also offers convenient features such as an automatic needle threader and a top-loading bobbin system. These features make it easier for users to set up the machine and start sewing quickly.
Overall, the Janome Memory Craft 5200 is a reliable and durable sewing machine that offers a wide range of stitching options and convenient features. It is suitable for both beginners and experienced sewers who are looking for a high-quality and robust machine to complete their sewing projects.
General
Frequently Asked Questions
Can’t find the answer to your question in the manual? You may find the answer to your question in the FAQs about the Janome Memory Craft 5200 below.
How do I thread the Janome Memory Craft 5200 sewing machine?
To thread the machine, begin by ensuring the presser foot is raised and the needle is set to its highest position. Follow the threading pathway indicated by the diagrams on the machine, ensuring the thread is properly guided through each designated area, including the tension discs, take-up lever, and needle.
Why is the needle breaking frequently while sewing?
Frequent needle breakage may occur due to several reasons. Firstly, ensure that you are using the correct needle type and size for your fabric. Secondly, check that the needle is properly inserted and tightened. Additionally, make sure there are no obstructions or bent parts within the needle area, such as a bent needle itself or a damaged needle plate. Stitching over heavy seams or using improper tension settings can also lead to needle breakage.
How can I adjust the tension on the Janome Memory Craft 5200?
To adjust the thread tension, locate the tension control dial usually positioned on the front of the machine. Turn the dial to increase or decrease the tension as needed. Remember to sew a test fabric to evaluate the tension adjustment. It may be necessary to fine-tune the tension for different fabrics or sewing techniques.
What should I do if the stitching appears uneven or skipped stitches occur?
Uneven or skipped stitches can be resolved by checking a few factors. Firstly, ensure the needle is suitable for the fabric type and that it is not dull or bent. Secondly, rethread the machine, following the correct threading pathway as outlined earlier. Make sure the thread is properly seated in the tension discs and take-up lever. Additionally, check the bobbin thread to ensure it is correctly wound and inserted into the bobbin case.
How do I clean the Janome Memory Craft 5200 sewing machine?
Regular cleaning is essential for optimal machine performance. Begin by unplugging the machine and removing the needle, presser foot, and bobbin case. Use a small brush, such as a cleaning brush or a soft paintbrush, to remove dust, lint, and loose threads from the machine, particularly around the feed dog area, bobbin case, and tension discs. Avoid using compressed air as it can push debris into sensitive components. Finally, wipe the exterior surfaces with a soft, lint-free cloth.
What size needle should I use?
Which size of needle you can best use depends on the thickness of the fabric you use. With a thick fabric you should use a thick needle. The packaging of your needle states for which substances your needle is suitable.
Why does the needle break while sewing?
There can be several causes for needle breakage:
— Not using the right needle for the right fabric
— The needle is set too low
— The fabric is not properly guided
— The bobbin case is not inserted correctly
How long does a sewing needle last?
Generally, a sewing needle lasts about 7 to 9 hours.
Is the manual of the Janome Memory Craft 5200 available in English?
Yes, the manual of the Janome Memory Craft 5200 is available in English .
Is your question not listed? Ask your question here
Janome Memory Craft 5200 Instruction Book
Janome Memory Craft 5200 Specification
The Janome Memory Craft 5200 is a computerized sewing machine designed for advanced sewing enthusiasts and professionals. It features a robust selection of 200 built-in stitches, including utility, decorative, and quilting options, catering to a wide range of sewing projects. The machine is equipped with a user-friendly LCD screen that provides clear stitch selection and settings adjustments, enhancing ease of use. It offers a maximum sewing speed of 820 stitches per minute, allowing for efficient project completion. The Memory Craft 5200 includes a superior feed system (SFS) that ensures consistent fabric feeding, resulting in precise and high-quality stitching. Its automatic thread tension and built-in needle threader streamline the setup process, saving time and reducing frustration. The machine is designed with a top-loading full rotary hook bobbin system, which simplifies bobbin changes and minimizes thread jams. An adjustable presser foot pressure feature provides the flexibility needed for handling various fabric types and thicknesses. Additionally, the machine includes a start/stop button that allows for sewing without a foot pedal, as well as a speed control slider to adjust the sewing speed to suit different skill levels or project requirements. The Janome Memory Craft 5200 is further enhanced by its capability to memorize stitch combinations and settings, facilitating repetitive sewing tasks. With its durable construction and wide range of features, the Janome Memory Craft 5200 stands out as a versatile and reliable tool for both creative and practical sewing applications.
To thread the Janome Memory Craft 5200, first raise the presser foot and turn off the machine. Place a spool of thread on the spool pin, then pull the thread through the guides and thread the needle using the built-in needle threader.
If the needle keeps breaking, ensure that you are using the correct needle type and size for your fabric. Check that the needle is properly installed and not bent, and verify that the thread is not tangled or incorrectly threaded.
Tension can be adjusted using the tension dial located on the top of the machine. For most fabrics, a setting between 3 and 5 is suitable. Test on a scrap piece of fabric to ensure proper stitch quality.
If fabric is not feeding, check that the feed dogs are raised. Ensure the presser foot is down and that the fabric is positioned correctly. Clean the feed dogs to remove any lint or debris.
Regular maintenance includes cleaning the bobbin area with a brush to remove lint and dust, and oiling the machine as per the manual. Use only sewing machine oil and avoid over-oiling.
Skipped stitches can be caused by a dull or bent needle, incorrect threading, or using the wrong needle for the fabric. Replace the needle and re-thread the machine, ensuring the bobbin is correctly placed.
Yes, you can sew heavy fabrics. Use a needle appropriate for heavy materials and adjust the presser foot pressure as needed. Test stitches on a fabric scrap before starting your project.
To access built-in stitches, use the stitch selection buttons to navigate through the available options. The LCD screen will display the selected stitch pattern and recommended settings.
To troubleshoot bobbin tension, first check that the bobbin is wound evenly and inserted correctly. Adjust the bobbin tension by turning the small screw on the bobbin case slightly, testing after each adjustment.
Unusual noises may indicate that the machine needs cleaning or oiling, or that there is a problem with the needle or threading. Turn off the machine and inspect for any trapped threads or debris.