
Урок №1 базовый уровень EQ5
Урок №1
1.Nine-Patch and Double Nine-Patch Block ( Создание блока 3х3 и двойного блока 3х3»)
В EQ5 есть 2 совершенно разных стиля рисования: EasyDraw и PatchDraw. Лоскутные блоки могут быть отрисованы обеими вариантами . Для блоков-аппликаций используется PatchDraw.
EasyDraw
EasyDraw можно сравнить с рисованием карандашом. Основное правило: любая линия должна быть соединена с краем блока или пересекать другие линии. Это позволяет затем окрашивать каждый лоскут отдельно. При несоблюдении этого правила линия исчезает, или программа будет окрашивать сразу несколько Ваших лоскутов.
Чтобы создать блок, Вам не надо отрисовывать каждый треугольник по отдельности (как в PatchDraw). Наоборот, одна линия, и EQ доделает все за Вас сама. Именно это мы и называем EasyDraw.
EasyDraw идеально подходит для создания простых блоков. В добавок к инструментам Line и Arc, у Вас будет инструмент Grid, который отрисовывает все линии в сетке за раз, и инструмент Edit, который создает несколько точек (узлов), а уже к ним привязывает линии. Меняя эти инструменты, Вы сможете нарисовать все, что угодно — от Nine Patches до Compasses, New York Beauties и многие другие.
Nine-Patch and Double Nine-Patch Block
Включите EQ5.В центре программы появляется окно Project Helper
При каждом новом открытии программы у вас будет появляться окно Project Helper и предлагать выбрать тот проект, с которым вы будете сейчас работать
Если EQ5 уже запущен, нажмите кнопку New. При открытии программы EQ5 предлагает нам создать или выбрать свой проект.
Т.к. урок №1 будет посвящён созданию блока, то и назовём этот проект «Урок №1» Нажмите OK. Название Проекта появится в верхнем левом углу title bar. Я бы попросила вас присвоить точно такое же название данному проекту. В дальнейшем нам будет удобно это в обсуждении
Приступим непосредственно к творчеству.
Т.к. любой классический квилт состоит из блоков, то на этом уроке мы научимся создавать простейший из них, и отработаем кнопочки на панелях инструментов до автоматизма.
После того, как вы дали название своему проекту, заходим в меню выбираем Work on Block
Открываем BLOCK > New Block > EasyDraw Block, чтобы начать работу над простым блоком
Нам нужно выставить размеры блока : Block > Drawing Board Setup
Настраиваем размеры блока и заодно разберём Drawing Board Setup
Block Size – Эти числа определяют размер блока.
Snap Points – Эти числа меняют количество узелков блока. Они будут равномерно распределятся по сторонам блока.
• Для блока 6″ на 6″ возможны значения:
6 (1 узел на дюйм, 6 x 1 = 6),
12 (каждые ½ дюйма, 6 x 2 = 12),
24 (каждые ¼ дюйм, 6 x 4 = 24),
48 (каждые ¹∕8 дюйм, 6 x 8 = 48), и т.д.
• Для блока 6″ на 10″ возможны значения:
6 x 10 (1 узел на дюйм, x 1),
12 x 20 (каждые ½ дюйм, x 2),
24 x 40 (каждые ¼ дюйм, x 4),
48 x 80 (каждые ¹∕8 дюйм, x 8 ), и т.д.
Я работаю в дюймах – мне так удобнее, но в Екушке есть возможность перехода на см (File >Preferences > Measurement)
Для начала нам нужен будет 6-ти дюймовый блок состоящий из 9-ти деталей. Каждая деталька будет равна 2х2”
Graph Paper – Чтобы включить сетку, нажмите Graph Paper Lines . Сетка поможет Вам правильно оценивать размеры блоков. Если вы выберите blanck, то сетка не будет видна.
Рассмотрим Инструменты EasyDraw.
В EQ5 рабочие панели раскиданы по разным сторонам рабочего стола.
Мне это показалось неудобно, поэтому я зацепив мышкой правую панельку перетащила влево
А потом решила, что на верхней панели им будет самое место:)
Работаем дальше:
Перечисляю слева-направо:
Select tool – Выделить и переместить сегменты/ группы, которые можно вращать, удалять и т.д.
Line tool — Нарисовать линию.
Arc tool — Нарисовать дугу.
Edit tool — Редактировать линии и кривые дуги; добавить новые узлы; найти пересечения; разделить сегмент и т.д.
Grid tool — Нарисовать все линии сетки координат одним кликом
Рисуя в EasyDraw™, помните — Вы рисуете линии швов блока. И каждый шов должен быть соединен с краем блока или пересекать другие швы. У Вас не должно быть “плавающих” деталей в блоке. Здесь линии служат для разделения деталей между собой.
Начинаем делить блок.
Нажимаем кнопку Line с её помощью рисуются прямые линии.
Поместите курсор в точку начала новой линии.
Зажмите и перетащите курсор до нужной точки. Линия будет “тянуться” за курсором. Перед тем, как отпустить курсор, убедитесь, что линия пересекает другие линии или оканчивается в узле контура и удерживая её левой кнопкой мышки . Рисуем сетку из 3х3 детали, т.е. проводим 2 горизонтальных и 2 вертикальных линии.
Чуть-чуть о Sketchbook:
У каждого EQ5 проекта есть свой Sketchbook. Там Вы сохраняете все эскизы, это папка для сбора всей информации по каждому проекту. Все, что Вы добавляете в Sketchbook, сохраняется там для дальнейшей работы.
Кнопка Save in Sketchbook доступна во всех рабочих окнах. Необязательно доделывать проект до конца, чтобы нажать Save in Sketchbook. Лучше будет делать это “в процессе”, так Вы сможете добиться оптимального результата.
-Добавив или изменив объект в рабочем окне, нажмите кнопку Save in Sketchbook.
-Если хотите, нажмите кнопку View Sketchbook, чтобы проверить изменение.
Сохраняем свои рисовалки нажатием на кнопку Save in Sketchbook и переходим на вкладку Color the Block она находится внизу окна
Как только Вы нарисовали или вставили блок в макет квилта, его можно раскрасить цветом или тканью.
Открыв закладку Color. Будет автоматически выбран инструмент Paintbrush
появятся палитры Prints и Solids. Откройте закладку Prints в палитре для выбора рисунка ткани или закладку Solids, чтобы выбрать чистые цвета. Используйте ползунок прокрутки снизу, чтобы просмотреть все образцы.Нажав на кисточку начинаем красить свой блок. При этом вы можете применить как ткани, так и просто краски. Я покрашу одну часть красками, другую — образцами тканей.
Чтобы перекрасить, выберите другую ткань или цвет из палитры и кликните по детальке заново.
и УРААААААААА!!!!!!!! Я сама создала «супер сложный блок»!
Считайте — что программа освоена!
И не забываем снова нажать на сохранение своих мучений – Скетчбук.
На базе этого блока создадим Double Nine-Patch Block (двойной блок из 9 частей)
Открываем BLOCK > New Block > EasyDraw Block > Drawing Board Setup И выставляем в параметрах блока 9”
с размером деталей 3х3”
И начинаем рисовать (или делить) внутри каждой детальки.
Для этого снова нажимаем на кнопочку Line и ручками прорисовываем линии в верхней левой детали. Две горизонтальные линии и две вертикальные линии
Или! Можно поступить намного проще
Выберите инструмент Grid
Чтобы открыть Grid Setup , можно:
• кликнуть по маленькому чёрному квадрату в углу кнопки Grid.
• или правой кнопкой мыши по рабочему окну >выйдет менюшка > Grid Setup.
• или из меню – кликните BLOCK > Grid Tool Setup.
Двойной клик по полю Columns или Rows, чтобы изменить количество ячеек. Также можете использовать стрелочки.
Сетка может заполнять весь блок или его часть. Чтобы сетка заполнила весь блок, начните с (или за) левого верхнего угла и отпустите в (или за) нижнем правом углу. Переместите курсор в любую часть блока, зажав, проведите диагональ чтобы создать сетку, затем отпустите курсор.….я для примера сначала поставила по 5 клеточек и
встав в верхний левый угол квадрата который нам нужно разделить удерживая левую кнопку мыши тяну сетку до нижнего правого угла
Но это был пример, на котором я показала что каждую часть блока вы можете разделить на любое количество внутренних деталей – это ваше личное желание..я же вернусь к 3-м. Не забываем сохранить свои рисовалки нажав на кнопку Save in Sketchbook и быыыстренько бежим на вкладку Color начинаем бегом раскрашивать своё творение
На мои высокохудожественные раскраски не смотрим, а от вас жду шедевры
На этом наш 1 урок окончен!!!!
Домашнее задание:
1.Сделать по 3- 5 примеров Nine-Patch и Double Nine-Patch Block. Количество деления внутри деталей блока – на ваше усмотрение.
2. На форуме в теме «Урок №1» выложить скрины блоков «скелеты» с вкладки EasyDraw, а также уже окрашенные блоки с вкладки Color под названием «Урок№1 блок 3*3».
Bookreader Item Preview
65
Previews
4
Favorites
DOWNLOAD OPTIONS
No suitable files to display here.
Uploaded by
station21.cebu
on
SIMILAR ITEMS (based on metadata)
EQ Mini
Print Article
Open a Project
In the previous lessons, we’ve started new projects and named them. In this lesson, we will open one of the projects and continue to use it.
- Start EQ Mini.
- When the Welcome to EQ Mini box displays, click Close.
- When the Tip of the Day appears, read as many tips as you like or just click Close.
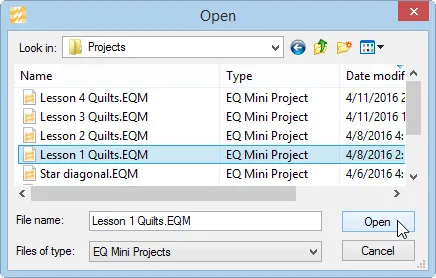
- Instead of starting a new quilt and naming a new project, let’s open an existing project. On the top toolbar click the Open button . The Open box will display.
- All your project files can be found in the Projects folder in Documents > My EQ Mini. Click Lesson 1 Quilts to select it.
- Click the Open button.

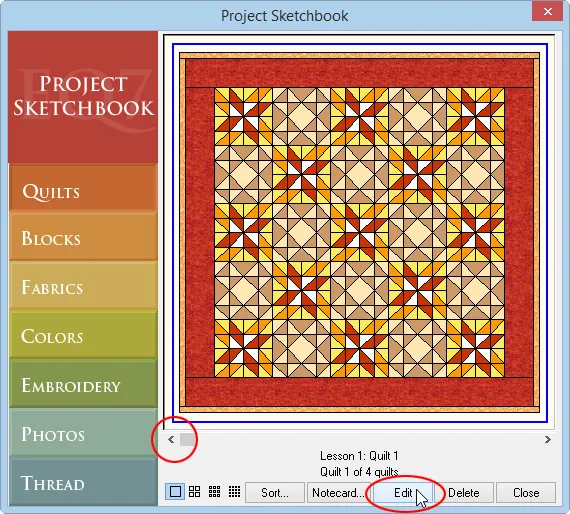
- The Project Sketchbook will display. Click Blocks to display the blocks in the project.
- Click Quilts to see the quilts in the project.
Edit Quilt
- Use the left scrollbar button to select quilt 1. Click the Edit button to place the quilt back on the Design Quilt tab.

Now that the project is fully open, you can see the title of the project at the top of the EQ Mini window. Since the project is already named, anything you design and add to the Sketchbook will automatically get saved in the project. You are ready to begin editing.
Whenever you edit a quilt from the Sketchbook, you’ll skip over the Adjust Layout and Edit Borders tabs, but you can always go back and use them.
- Click the Adjust Layout tab along the top.
- Change the number of blocks Horizontal and Vertical to 3. We won’t make any other changes.
Notice that the overall size of the quilt is 38 by 38 inches. - Click the Design Quilt tab along the top. Our quilt is still filled with blocks and color.
Let’s add this new quilt in the smaller size to the Sketchbook. Click Add to Sketchbook .
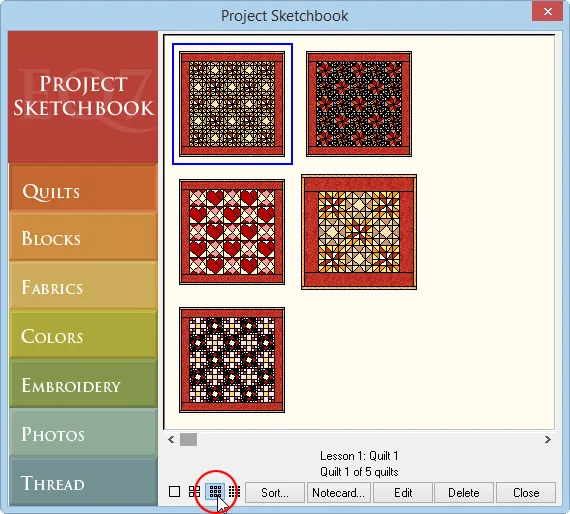
- Click the View Sketchbook button . The Sketchbook will appear. You should see your quilt when the Sketchbook displays. If you don’t, click the Quilts section along the left.
- To see multiple quilts at the same time, click the 3×3 button along the bottom of the Project Sketchbook box.
- Click Close. Let’s continue to edit this quilt.
Blocks Colorings
- Click the Spraycan tool . The Spraycan tool will spray all matching patches in the block with a new fabric in one click.
- Click on any fabric in the palette other than red and click on one of the red points of the star-like block on the quilt. All 8 patches with matching fabric will color with one click.
- Click on a different fabric from the palette. Click on another star in the quilt.
- Continue to place a different fabric in each star.
- Click Add to Sketchbook .
- Click the View Sketchbook button .
- Click the Quilts section to see your new quilt with multi-colored stars.
- Click the Blocks section.
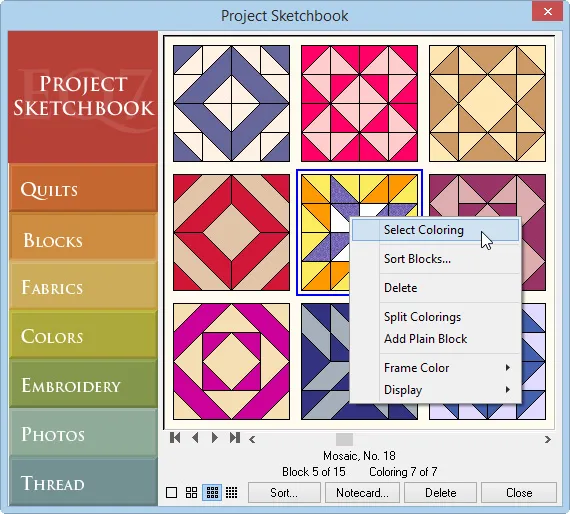
- Click on block 5, Mosaic, No. 18, and notice that it says that this block has 7 colorings.
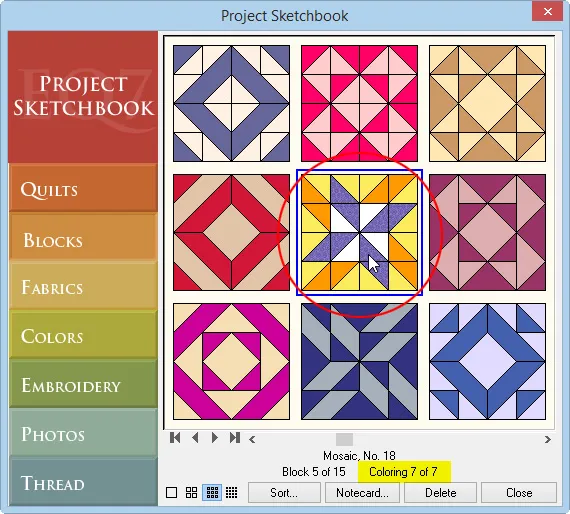
In EQ Mini, blocks can have more than one coloring. When you look at the Sketchbook or palette, you may not see the coloring that you expect. The coloring that you are looking for may be underneath the coloring you see. Block colorings stack on top of one another.
- Right-click to display the context menu. Click Select Coloring.
This will display all the block’s colorings. The first block will always be a line drawing with no coloring. The second block will be a grayscale version of the block. The third coloring is the one you see in the library. Any new colorings that you make during your designing get saved after that. You can click on any of these colorings to select it.
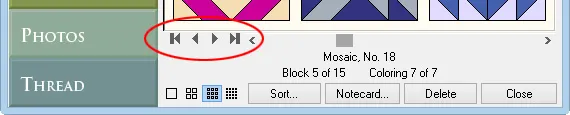
- Another option for changing the coloring is to use the arrow buttons in the Sketchbook. The middle two arrows change the coloring by one. The text that appears in the Sketchbook tells you which coloring you are looking at – Coloring 5 of 8 and so on. Click on the arrows several times to understand how this works.

- Click Close.
- Click the Set Block tool on the right to display the Sketchbook Blocks palette.
- Click on block 5, Mosaic, No. 18.
- Right-click to display the context menu. Click Select Coloring. This option is just like the Sketchbook. Click on any coloring to select it.
- Click the arrow buttons at the bottom of the palette. These arrows will change the block coloring displayed just like in the Sketchbook. Let’s continue to edit this quilt.
- Click Edit Borders along the top.
The first border, the wide one, is selected and showing in gray. We also know this because the top of the palette says Select border 1 of 2 borders.
- Let’s change the style of this border. Click the down arrow under Select a border style and click on Points Out. This style works nicely with 3 points. The 3 points on each side line up with the 3 blocks in the center of the quilt.
- Click the Design Quilt tab along the top.
Our quilt is still filled with blocks and color except for the first border. Since we totally changed that border, it has been erased and is ready to be filled with blocks and color.
Erasing Blocks and Quilts
- Click the Erase Block tool .
- Click on any block in the quilt to erase it.
- Erase another block or two.
- Right-click over the quilt.
- Click Erase Quilt.
- You’ll be prompted with a message asking if you want to save the current quilt. We don’t want to save the partially designed quilt. Click No. The entire quilt will be erased and ready to fill with blocks and colors.
- Click the Set Block tool .
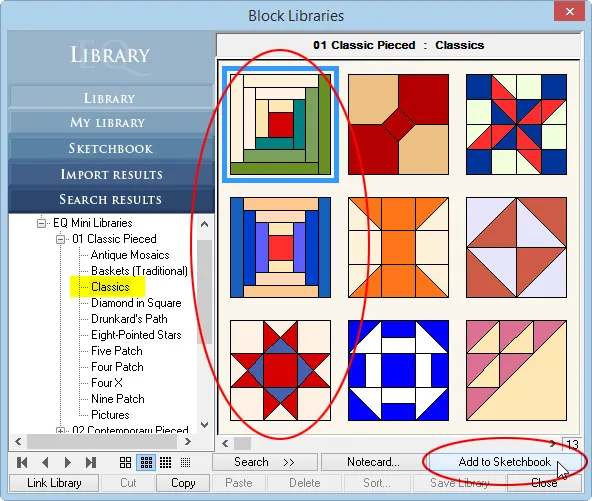
- Click Open the Library to get more blocks.
- Click Classics under 01 Classic Pieced.
- Add the first three blocks to the Sketchbook – Log Cabin, Log Cabin (2) and Ohio Star.

- Click Close. The blocks from the library will now appear in the palette. You may need to scroll to the end to see the newly added blocks.
- Click the Log Cabin block in the palette, and then click in each point of border 1 to set the blocks.
- Click the Rotate Block tool and rotate the blocks in the points that are showing green and cream so that they show only green.
The points on the top will need three clicks to rotate the blocks three turns. The points on the left will need two clicks and the bottom points will just need one click.
- Click the Set Block tool .
- The Log Cabin block should still be selected. Click on the four corners of the center of the quilt.
- Click the Rotate Block tool and rotate these blocks so the green strips align with the green in the border.
- Click the Set Block tool .
- Click the Log Cabin (2) block in the palette, and then click in the empty blocks in the center of the quilt, except for the center block.
- Click the Rotate Block tool .
- Click the center top and center bottom blocks to rotate one turn, or 90 degrees. This will create a blue frame around the center block.
- Click the Set Block tool .
- Click the Ohio Star block in the palette.
- Click to set the block in the center of the quilt.
- Click to set the block in each of the four corners of border 1.
Using the Eyedropper tool
- Click the Eyedropper tool .
- Click on one of the blue triangles in the Ohio Star block in the center of the quilt. This will find the blue from the palette for you.
- If your tool did not automatically switch to the Paintbrush tool, then click the Paintbrush tool to select it.
- Ctrl+click (Command+click for Mac users) on the outer border to set the blue on all sides of the outer border.
- Click the Eyedropper tool .
- Click on one of the cream color patches in the Ohio Star block in the center of the quilt. This will find the matching cream color from the palette for you.
- If your tool did not automatically switch to the Paintbrush tool, then click the Paintbrush tool to select it.
- Ctrl+click (Command+click) on the empty points in the outer border. Your quilt design is complete.
- Click Add to Sketchbook .
- Click the View Sketchbook button .
- Click the Quilts section. Our project has several quilts, especially if you did the homework at the end of Lesson 1. Only the first one is named. Use the Notecard button to name the quilts if you wish.
- Click Close.
Print Foundation Pattern
- Click the Select tool .
- Click on one of the pieced points along the top of border 1.

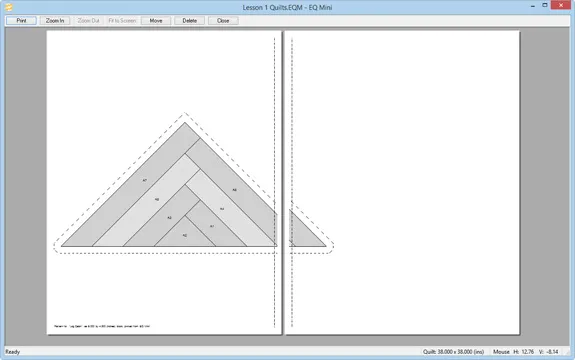
- Click the Print button in the top toolbar and choose Foundation Pattern.

EQ Mini will correctly clip a square block that is set into a triangle location.
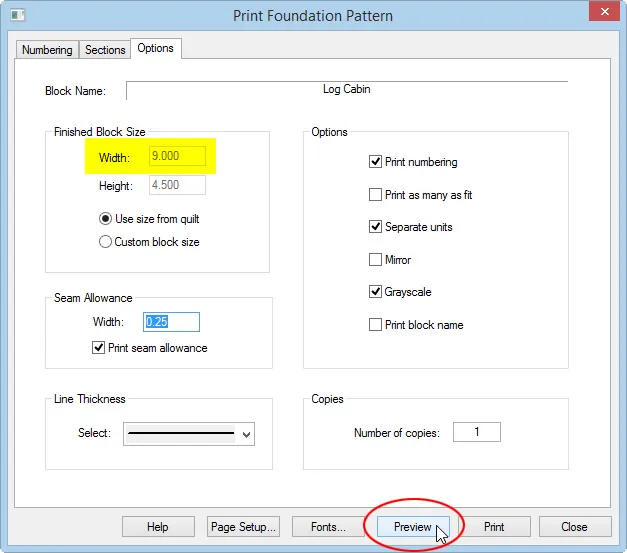
- Click the Options tab. We can see that the pattern will use the size from the quilt.

- Click the Preview button. Since the block is 9 inches wide, it tiles onto two pages.

- Click Close at the top of the preview.
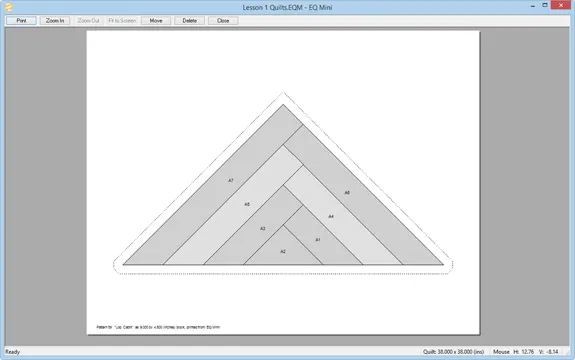
- Click Page Setup at the bottom of the Print box.

- Change the Page Orientation to Landscape.
- Click OK.
- Click Preview. Now our pattern fits nicely onto one page.
- Click Print.

Print, Move and Rotate Templates
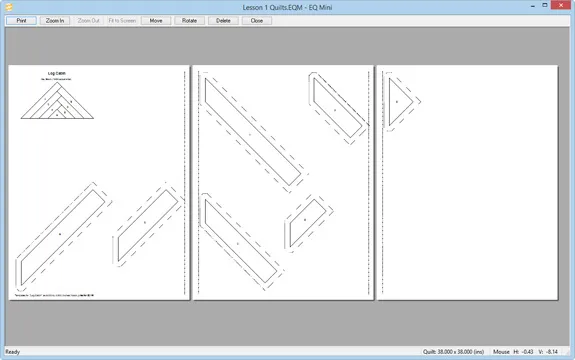
- With the same pieced point selected for printing, click the Print button in the top toolbar and choose Templates.
- Let’s change the Page Orientation back to Portrait. Click Page Setup.
- Change the Page Orientation to Portrait.
- Click OK.
- Click Preview.
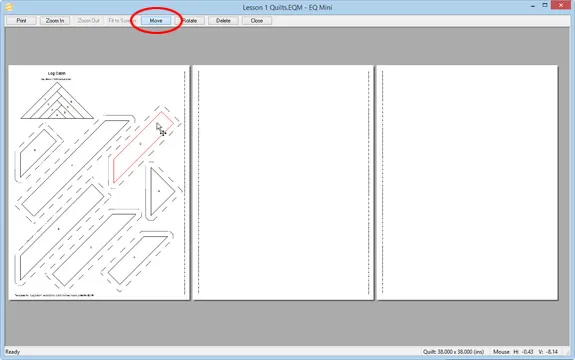
- This pattern shows template pieces spread over 3 pages.
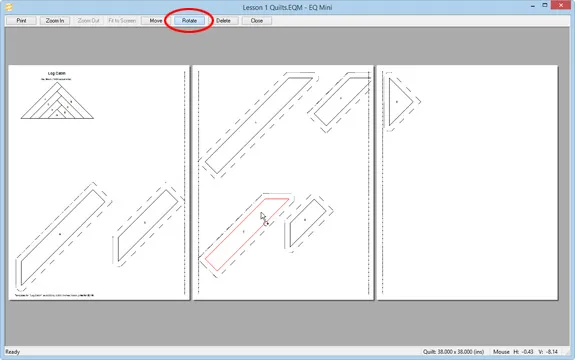
We can use less paper if we move the template pieces closer together. First let’s rotate the templates so they all face the same direction. Click Rotate on the top toolbar. The cursor will change to indicated rotate.
- Click on a template to rotate it 90 degrees. Continue to click on templates until they all face the same direction.
- Click Move on the top toolbar. The cursor will change to indicate move.
- Drag each template separately to the first page. All the pieces can fit on one page. Empty pages do not print.
- Click Print.
- Click File > Exit to close EQ Mini.
In this lesson we learned how to open an existing project to continue to work on it. We also learned more about the many printing options in EQ Mini and some new design tools.
This lesson was a bit longer so there’s no homework this time!
03.01.2017 13:54


Сделать веселый квилт из одного лоскута. Используя эти возможности Вы можете получать бесконечное количество вариаций своих работ.5. Скачать 133 Мб.5 содержит.
Документацию, включая полноценную схему расположения элементов. Программа. 5:. Лоскутное путешествие. Программа , ч.2. Утилитарное рукоделие. В наличии: Да.5. Хотите.
Более 8000 образцов тканей от известных производителей.5 Создавать пояса и рамки. А еще лучшесделать эскиз в цвете, с деталями. Распечатывать полную. Это профессиональная программа по.
Авг.2012 г. Обзор программы Электрик квилт для создания Одеяла пэчворк. В наличии: Да.5. Это профессиональная программа по созданию проекта лоскутного одеяла в. Распечатывать полную.
Инструкция по установке в картинках. Приветствую друзья. Как всегда нашел в интернете отличную программу для создания образцов в технике и лоскутного шитья. ПодписатьсяПодписка оформленаОтменить подписку. Опубликовано: 24.
Созданию проекта лоскутного одеяла в электронном виде 5. Программа. 5:. Лоскутное путешествие проходит в Москве новости: 2:31. Страницы: 1.
Вместе с Electric quilt 5 инструкция часто ищут
программа для пэчворка онлайн.
программа для пэчворка скачать бесплатно.
electric quilt 7 download
Читайте также:
Инструкция кондиционеры ballu
Гентомицин уколы инструкция по применению
Военкомат форма 6 инструкция по заполнению