

УКАЗАНИЯ ПО ТЕХНИКЕ БЕЗОПАСНОСТИ
Внимание.
ПРОЧТИТЕ ДАННЫЕ ИНСТРУКЦИИ.
СОХРАНИТЕ ДАННОЕ РУКОВОДСТВО.
ОБРАТИТЕ ВНИМАНИЕ НА ВСЕ ПРЕДУПРЕЖДЕНИЯ.
СЛЕДУЙТЕ ИНСТРУКЦИЯМ.
ИЗБЕГАЙТЕ ПОПАДАНИЯ ЖИДКОСТИ НА/В ПРИБОР.
ЧИСТКА ТОЛЬКО СУХОЙ ТКАНЬЮ.
Не перекрывайте вентиляционных отверстий. При
установке строго следуйте инструкциям производителя.
Не используйте прибор вблизи открытых источников
тепла, таких как радиаторы, обогреватели, камины и
другого оборудования, выделяющего при работе тепло.
При использовании прибора в электросетях с
поляризованными розетками, обратите внимание на их
конструкцию, Поляризованная вилка имеет два плоских
контакта, один из которых шире другого. Вилка с
заземлением имеет дополнительный третий контакт.
Если прилагаемая вилка не подходит к вашей розетке,
обратитесь к специалисту для её замены на
соответствующую.
Берегите кабель питания от повреждений. Не
наступайте на него. Следите за целостностью
соединений в районе штепсельной вилки и в месте
соединения с прибором.
Используйте только рекомендуемые производителем
аксессуары.
Используйте только рекомендованные
производителем, или входящие в
комплект поставки, тележки, штативы,
стойки. При перевозке на тележке
примите меры предосторожности от переворачивания.
Во время грозы, а также когда он не используется
долгое время, отключите прибор из электросети.
Ремонт и сервисное обслуживание прибора должно
осуществляться только квалифицированными
специалистами. В сервисный центр следует
обращаться в случаях обнаружения неисправностей в
работе прибора, различного рода повреждений,
попадания в устройство жидкостей или посторонних
предметов.
Пиктограмма “Молния в треугольнике” используется для
предупреждения о наличии опасного напряжения
внутри корпуса прибора, которое может представлять
потенциальную опасность для человека при нарушении
его целостности.
Пиктограмма “Восклицательный знак в треугольнике”
используется для предупреждения пользователя о
наличии важных инструкций по эксплуатации и
обслуживанию, прилагаемых к устройству.
Высокое напряжение опасное для жизни. Прибор не
содержит элементов для обслуживания пользователем.
Не вскрывайте прибор. Ремонт должен осуществляться
только квалифицированными специалистами.
Для подключения прибора к сети используйте адаптер
питания, поставляемый в комплекте, либо равноценный
аналог надлежащего качества.
К штепсельной вилке, используемой для подключения
прибора к сети, всегда должен быть обеспечен лёгкий
доступ.
Для снижения риска возникновения пожара или
поражения электрическим током устройство не должно
подвергаться попаданию на него жидкостей. Не
допускайте использование прибора в качестве
подставки для ёмкостей с жидкостями (стаканов,
бутылок и др.).
Не эксплуатируйте прибор в сильно ограниченном
пространстве.
Электромагнитная совместимость
Это устройство протестировано и соответствует
требованиям безопасности Европейской директивы
2006/95/EC и директиве по электромагнитной
совместимости 2004/108 /EC.
Примечание. Не утилизировать с бытовыми
отходами. Утилизация должна производится
в соответствии с местными законами об
утилизации электроприборов.

Обзор
Введение
Процессоры эффектов Element и Element XP являются компактными и недорогими приборами для
обработки гитарного звука. Но их не стоит недооценивать. Процессоры серии Element являются
мощными инструментами, предлагающими полный набор необходимых эффектов и функций, которые
помогут с каждым днём раскрывать ваш творческий потенциал, развивать технику игры и находить новые
способы использования различных гитарных эффектов. И всё это благодаря небольшому и удобному в
использовании устройству.
В модели Element на выбор предлагается 31 различный эффект и с возможностью использовать до 8
эффектов одновременно. В модели Element XP – 37 эффектов, с возможностью использовать до 9
эффектов одновременно. Модель Element XP дополнительно оснащена педалью экспрессии. Эта педаль
используется для управления такими эффектами как Wah или Whammy, либо одного из параметров
любого другого эффекта для управления им в реальном времени, изменяя угол наклона педали ногой.
Для того, чтобы вы могли сразу начать пользоваться процессором, в нём сохранены 100 заводских
пресетов (настроек звука), и 100 пользовательских, доступных для редактирования и сохранения своих
собственных настроек. Также, для вашего удобства, вы можете выбирать различные предустановленные
комбинации эффектов и настроек тембра, которые организованы в так называемые банки — Банк
Эффектов и Банк Тембров. Комбинируя их по вашему вкусу, можно изучать особенности работы
различных типов эффектов между собой, даже не изменяя настроек их параметров.
С встроенным в процессор эффектов тюнером вы в любой момент можете удостовериться в
правильности интонирования вашей гитары, а встроенная драм-машина и линейный вход позволят вам
заниматься под барабанные ритмы, метроном, или вместе с любимой музыкой. Так что теперь занятия на
гитаре будут ещё более увлекательными!
Неважно, являетесь вы начинающим музыкантом или опытным гитаристом, несомненно, вы получите
огромное удовольствие от изучения различных инструментов, формирующих гитарное звучание,
доступных в процессорах Element и Element XP. Спасибо, что выбрали DigiTech!

Основные особенности
37 эффектов (Element XP) / 31 эффект (Element)
12 моделей усилителей и 6 эффектов дисторшн
Встроенная драм-машина (45 различных ритмов, включая метроном)
Встроенный тюнер
Педаль экспрессии (только в модели Element XP)
200 пресетов (100 заводских / 100 пользовательских)
Использование до 9 эффектов одновременно (в модели Element XP) или 8 эффектов (в модели
Element)
20 банков эффектов (FX Bank) и 20 банков тембров (Tone Bank)
Моно / стерео выходы
Линейный вход (Aux in) для подключения внешних источников сигнала (mp3 плейера)
Разъём 1/8” для подключения наушников
Эмуляция гитарного кабинета
Надёжные металлические ножные переключатели
Адаптер питания в комплекте
Пользовательский интерфейс и разъёмы для подключения
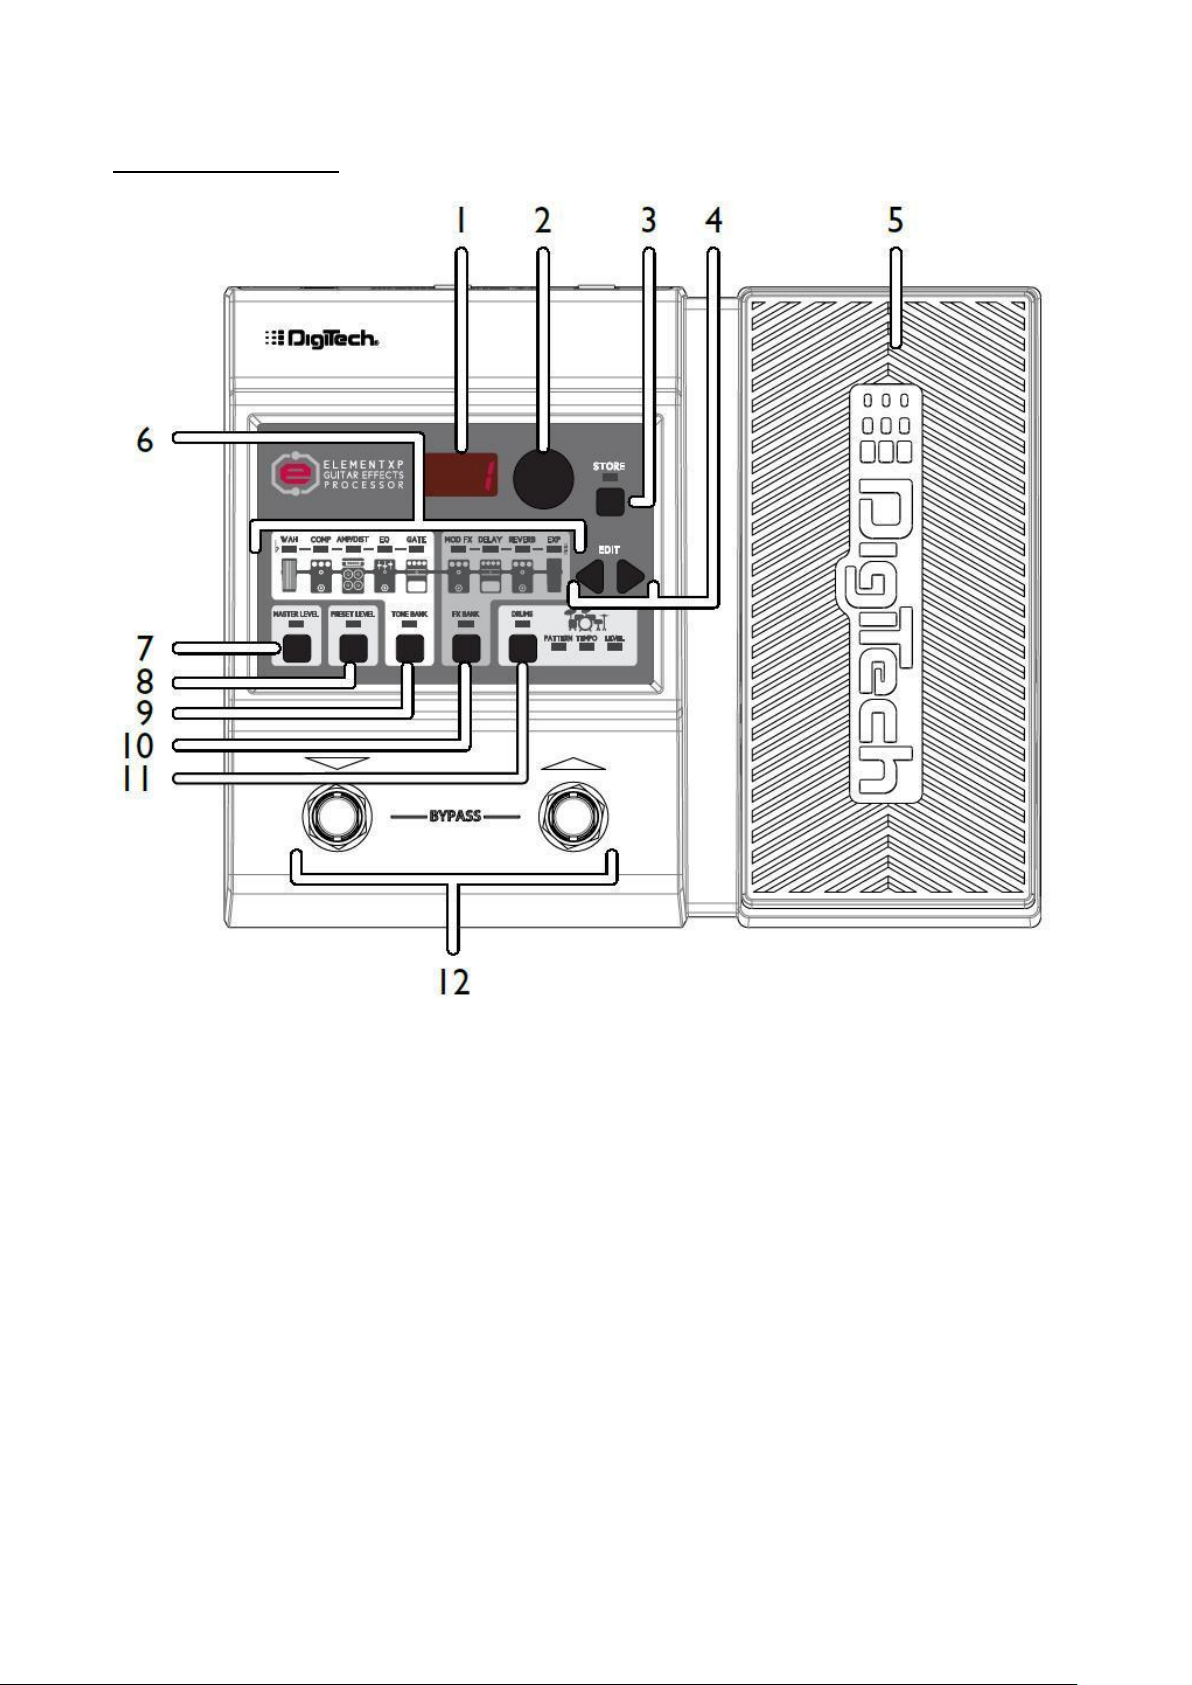
Лицевая панель
1. СВЕТОДИОДНЫЙ ДИСПЛЕЙ
На дисплее отображаются номера пресетов при их переключении (в режиме игры Play Mode) и
уровни параметров эффектов в режиме редактирования (Edit Mode)
2. РЕГУЛЯТОР SELECT
Этим переключателем осуществляется навигация между пресетами (в режиме игры Play Mode) и
редактирование параметров эффектов (в режиме редактирования Edit Mode).
3. КНОПКА STORE (СОХРАНИТЬ)
Эта кнопка используется для сохранения и копирования пресетов, для чего в памяти процессора
предусмотрено 100 ячеек памяти для хранения пользовательских пресетов. Индикатор STORE
начнёт светиться, если в используемом пресете были сделаны изменения. Это означает, что
сделанные настройки пока не сохранены и, при необходимости, это можно сделать.
4. КНОПКИ EDIT (РЕДАКТИРОВАТЬ)
Кнопки в виде стрелок “влево” и “вправо” используется для доступа к эффектам, переключения
между типами ритмов драм-машины и их редактирования.
5. ПЕДАЛЬ ЭКСПРЕССИИ (только в модели Element XP)
Педаль экспрессии используется для управления параметрами эффектов в реальном времени.
При помощи этой педали в каждом пресете может управляться только один эффект.

6. ПОСЛЕДОВАТЕЛЬНОСТЬ ЭФФЕКТОВ
Эти иконки являются графическим отображением последовательности эффектов, через которую
проходит гитарный сигнал в процессоре Element / Element XP. Сигнал идёт слева направо по
блокам эффектов: Wah (только в Element XP), компрессор (compressor), усилитель/дисторшн (Amp
/Distortion), эквалайзер (EQ), шумоподавление (Noise Gate), модуляционные эффекты (Mod FX),
задержка (Delay) и реверберация (Reverb). Встроенная педаль экспрессии (только в Element XP)
позволяет дополнительно управлять этими эффектами. Светодиодный индикатор над каждой
иконкой позволяет видеть, какие из эффектов включены или выключены в пресете, а также
отображает выбранный эффект при редактировании. Эти же индикаторы используются чтобы
помочь настроить вашу гитару в режиме тюнера (см. раздел “Использование тюнера”).
7. ОБЩАЯ ГРОМКОСТЬ (MASTER LEVEL)
Для изменения общей громкости процессора нажмите на кнопку Master Level, затем регулятором
Select установите нужный уровень громкости. Это окажет влияние на выходной уровень сигнала
со всех выходов процессора и все без исключения пресеты.
8. ГРОМКОСТЬ ПРЕСЕТА (PRESET LEVEL)
Для изменения громкости выбранного пресета нажмите на кнопку Preset Level, затем регулятором
Select установите нужный уровень громкости. Громкость пресета является программируемым
параметром и настраивается для каждого пресета индивидуально и позволяет легко
устанавливать баланс громкости между пресетами.
9. КНОПКА TONE BANK (БАНК ТЕМБРОВ)
При помощи этой кнопки осуществляется выбор настроек из 20 предустановленных типов
тембров, состоящих из различных комбинаций и настроек следующих блоков эффектов: Wah
(только в Element XP), компрессор (compressor), усилитель/дисторшн (Amp /Distortion), эквалайзер
(EQ) и шумоподавление (Noise Gate). Для выбора нажмите на эту кнопку, затем при помощи
регулятора Select осуществите переключение настроек по библиотеке тембров, предлагающих
широкую палитру тембров для различных музыкальных стилей – от блюза до метала и кантри.
Подробнее об этом в разделе “Выбор из банков тембров”.
10. КНОПКА FX BANK (БАНК ЭФФЕКТОВ)
При помощи этой кнопки осуществляется выбор настроек из 20 различных комбинаций и
настроек следующих блоков эффектов: модуляционные эффекты (Mod FX), задержка (Delay) и
реверберация (Reverb). Для выбора нажмите на эту кнопку, затем при помощи регулятора Select
осуществите переключение настроек по библиотеке эффектов для выбора последовательностей
эффектов, которые располагаются после усилителя (постобработки). Подробнее об этом в разделе
“Выбор из банков эффектов”.
11. КНОПКА DRUMS (УДАРНЫЕ)
При помощи этой кнопки включается и отключается встроенная в процессор драм-машина.
12. НОЖНЫЕ ПЕРЕКЛЮЧАТЕЛИ
При помощи этих переключателей осуществляется навигация между пресетами, отключения
эффектов (bypass) и включения тюнера.
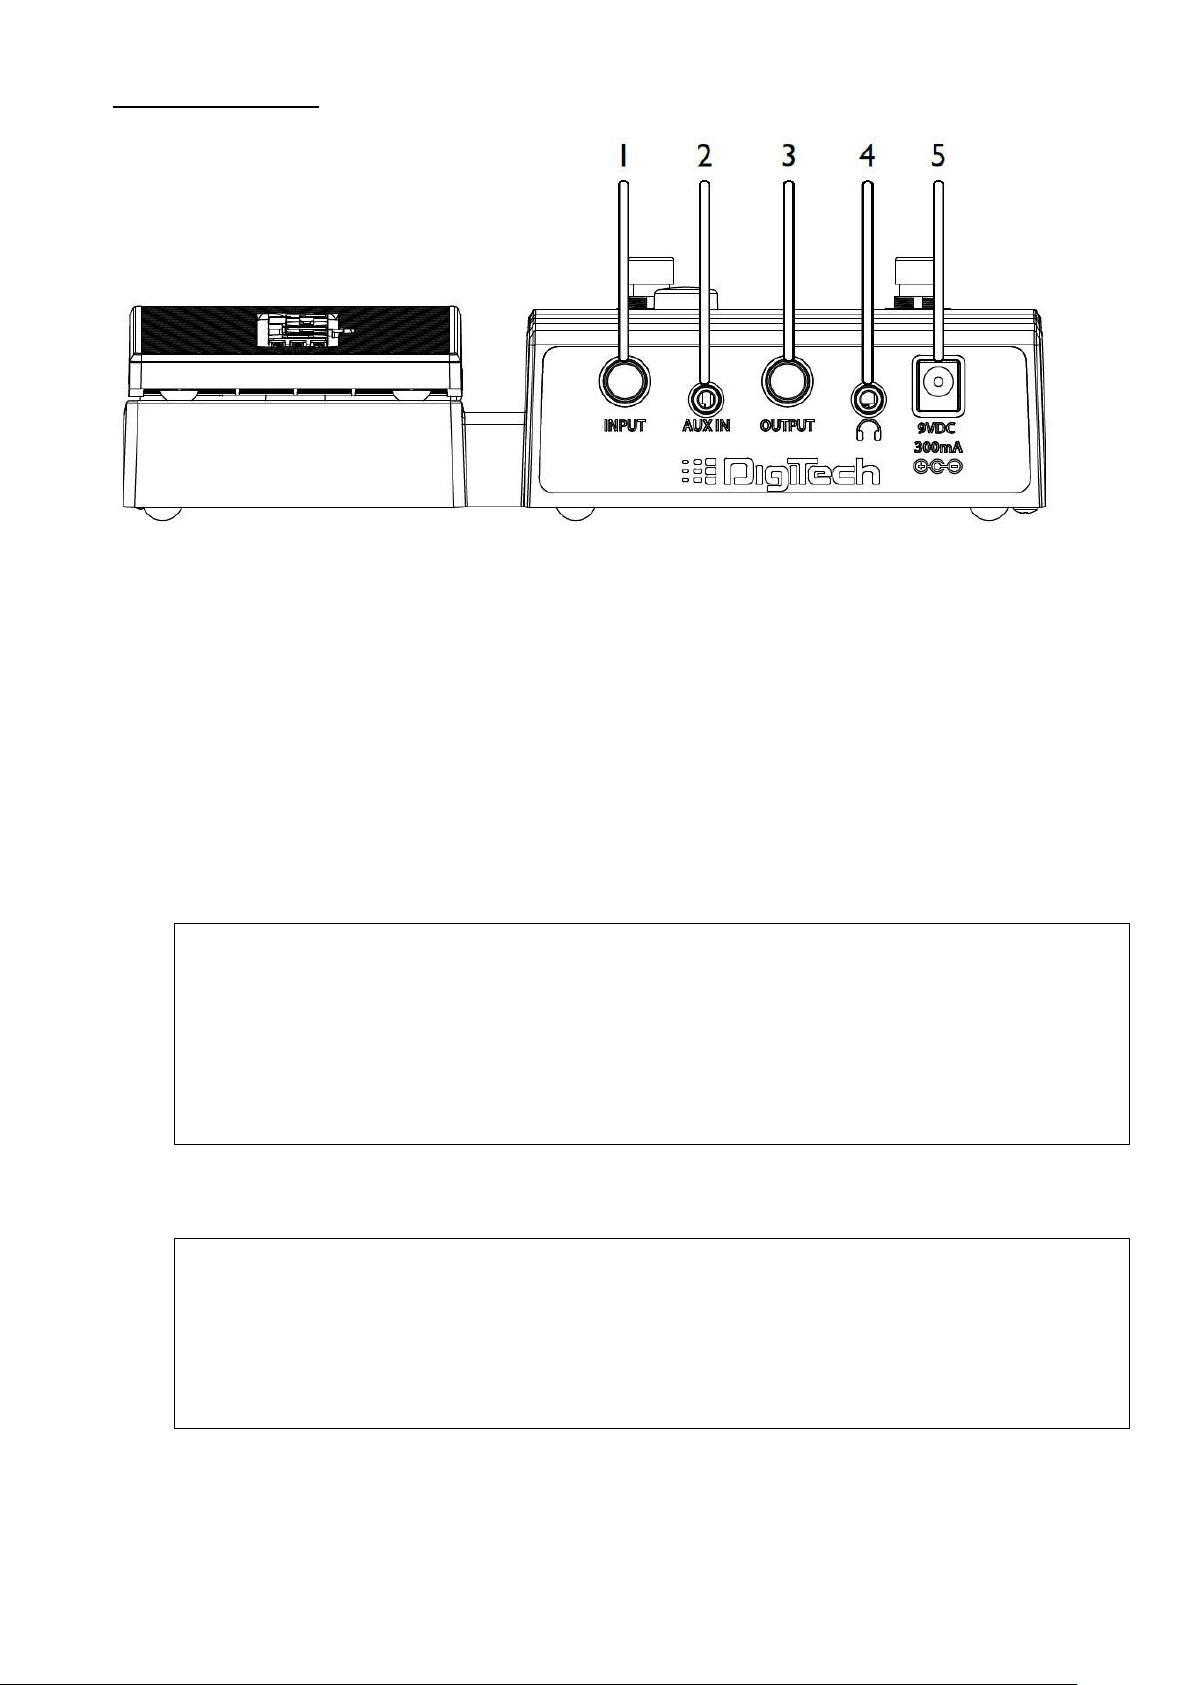
Задняя панель
1. ВХОДНОЙ РАЗЪЁМ (INPUT)
Подключите вашу гитару инструментальным кабелем с разъёмами 1/4” к этому разъёму.
2. ЛИНЕЙНЫЙ ВХОД (AUX IN)
Используя 1/8” кабель подключите выходной разъём вашего mp3-плейера (или другого
источника) к этому разъёму и играйте вместе с вашими любимыми исполнителями. Для
настройки баланса громкостей между записью и гитарой используйте регуляторы уровня на
вашем плейере и мастер громкости (Master Level) на процессоре.
3. ВЫХОДНОЙ РАЗЪЁМ (OUTPUT)
Данный 1/4″ TRS разъём поддерживает работу процессора как в моно, так и стерео режимах.
Подключите процессор к гитарному усилителю используя стандартный инструментальный кабель
(моно), или к стерео входу микшерного пульта или устройству звукозаписи через разветвитель
(кабель Yтипа).
Примечание. Режим работы процессора (моно или стерео) через выходы Output и выход для
наушников определяется типом подключенного в разъём Output коннектора. Если в разъём
подключен стандартный инструментальный кабель, то процессор работает в моно режиме для
подключения в гитарный усилитель. Если разъём не подключен, то система конфигурируется для
работы в стерео режиме через разъём для подключения наушников. Процессор также может
работать в стерео режиме через разъём Output. Для получения подробностей обратитесь к
разделам “Диаграммы подключения” и “Работа в стерео и моно режимах”.
4. РАЗЪЁМ ДЛЯ НАУШНИКОВ
Подключите ваши наушники коннектором 1/8” TRS этому разъёму. Этот выход оптимизирован для
работы с наушниками сопротивлением 60 Ом или меньше.
Примечание. Когда наушники подключены к этому разъёму, автоматически активируется
функция моделирования работы гитарного кабинета (SCC) для того, чтобы звучание в наушниках
создавало ощущение игры через усилитель. Эта функция не активна для этого выхода при
подключенном кабеле в 1/4″ разъёме Output и все выходы настроены для работы в моно
режиме. Для получения подробностей обратитесь к разделам “Моделирование гитарного
кабинета (SCC)” и “Работа в стерео и моно режимах”.
5. РАЗЪЁМ ПИТАНИЯ
Подключите к этому разъёму входящий в комплект поставки процессора адаптер питания
PS0913DC.
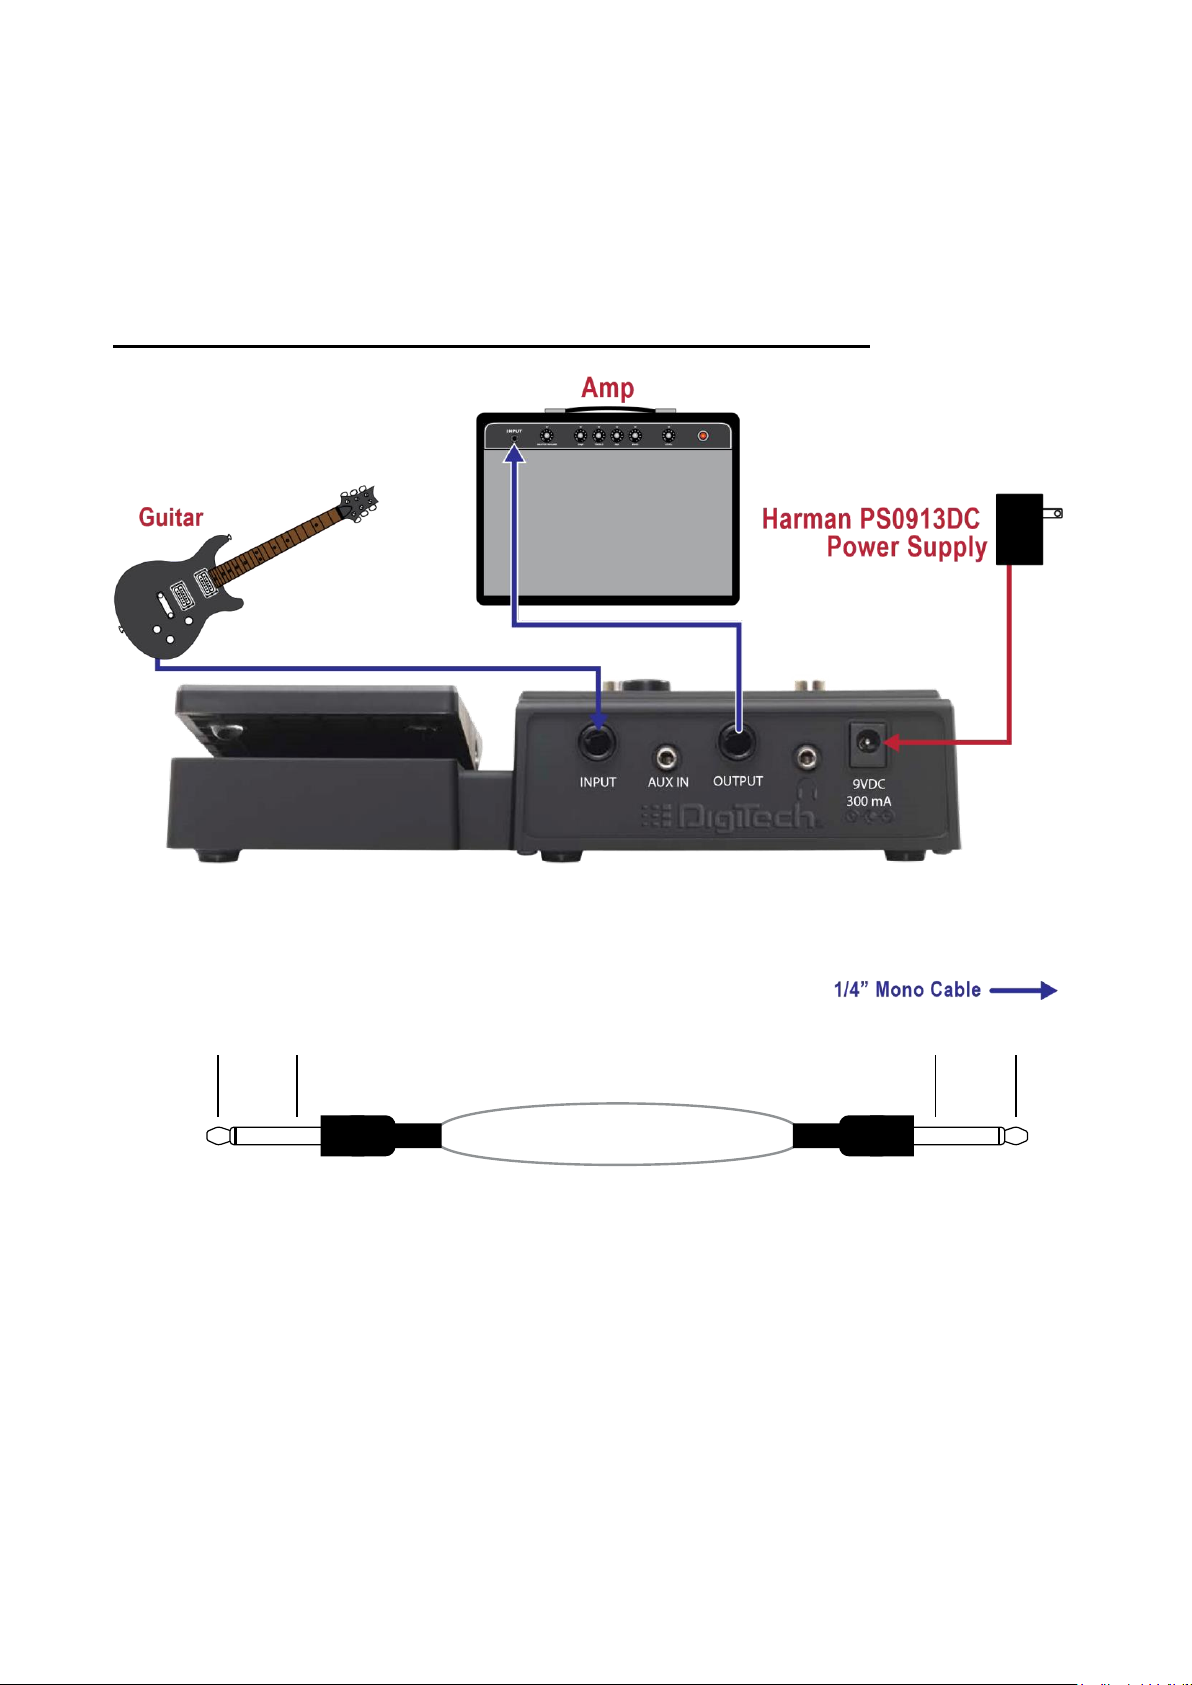
Диаграммы подключения
Прежде чем подключить процессор Element / Element XP к усилителю, рекомендуется убрать уровень
громкости усилителя до минимального значения. Убедитесь, что питание процессора и усилителя
отключено. Для включения/отключения процессора Element / Element XP, подсоедините/отсоедините
разъём адаптера питания к процессору. После того, как все разъёмы соединены, и питание подключено,
плавно увеличьте громкость усилителя до желаемого уровня.
Подключение к гитарному усилителю в моно режиме
Hot (+) Ground () 1/4” Mono Cable Ground () Hot (+)

Подключение к гитарному усилителю в стерео режиме
Примечание. Данная схема предполагает предварительную перенастройку выходного разъёма OUTPUT
для работы в стерео режиме. Подробности в разделе “Работа в стерео и моно режимах”.
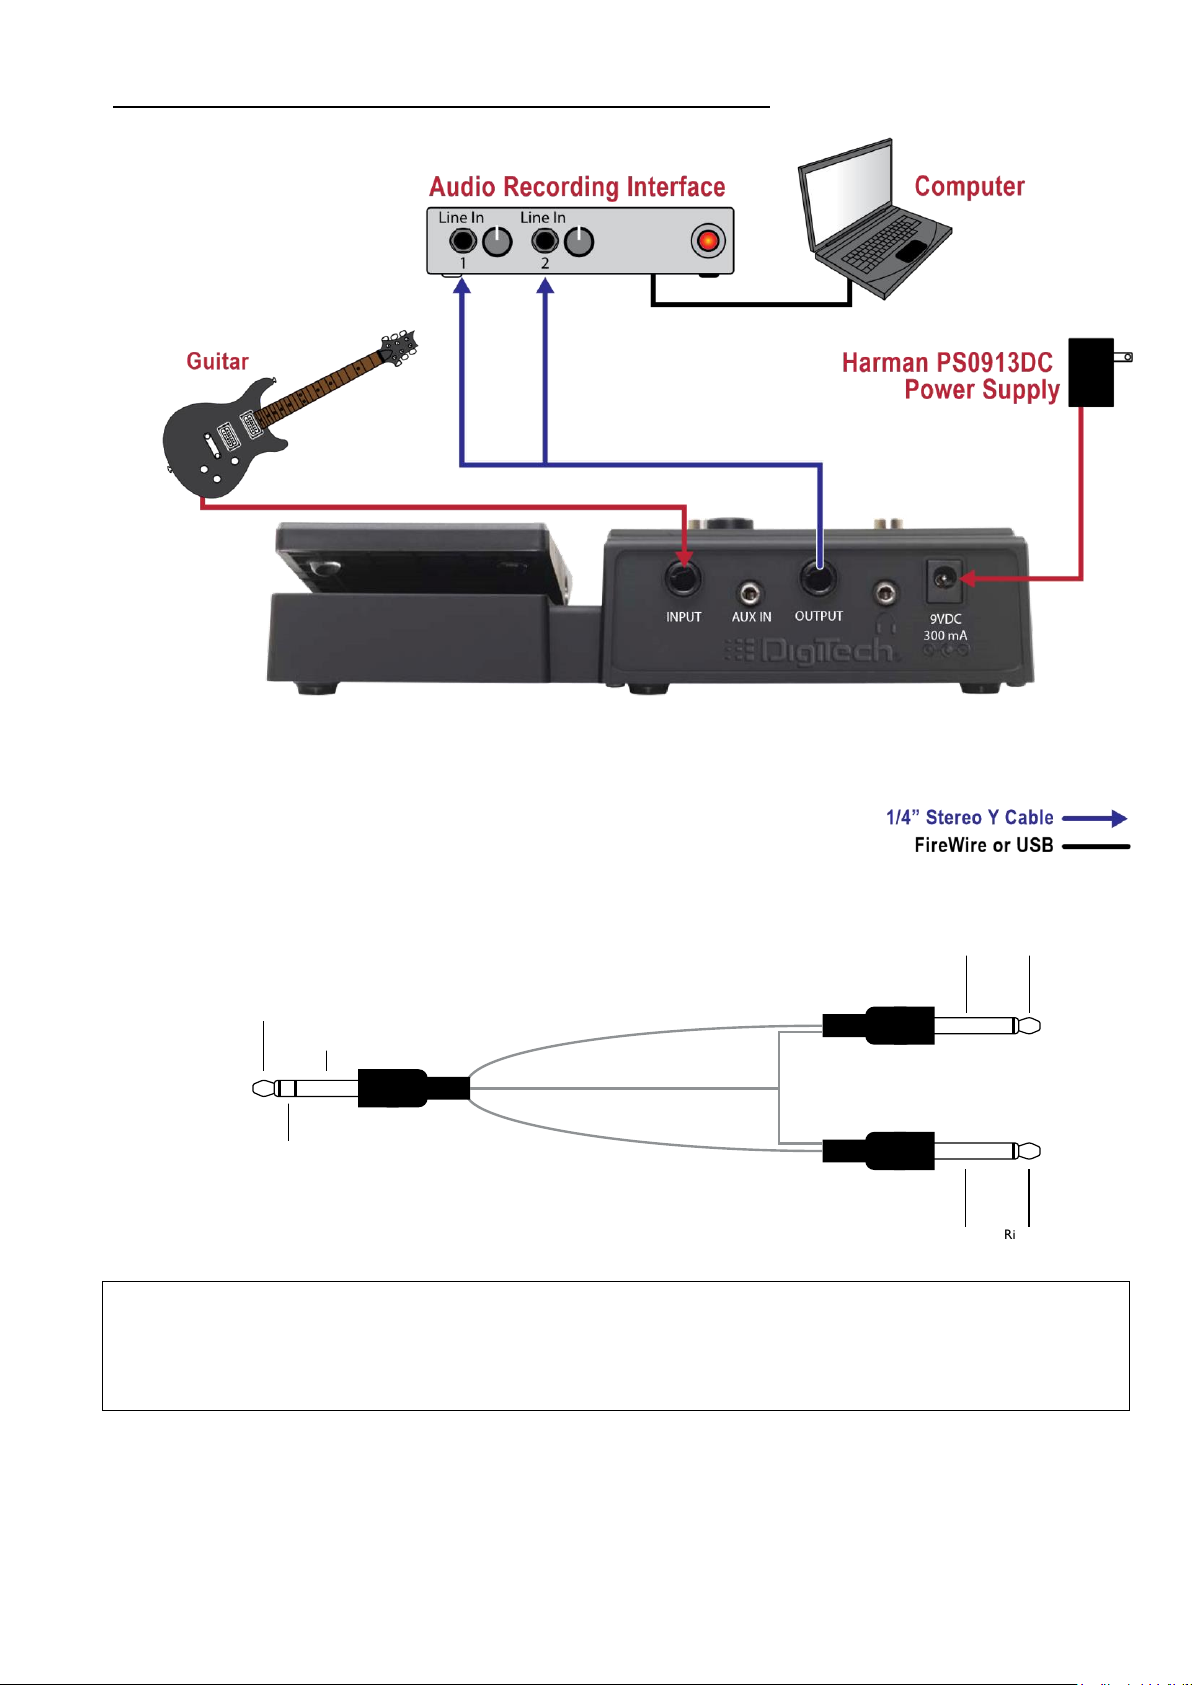
Подключение к устройству стерео звукозаписи
Примечание. Данная схема предполагает предварительную перенастройку выходного разъёма OUTPUT
для работы в стерео режиме. Подробности в разделе “Работа в стерео и моно режимах”. При
подключении к устройству звукозаписи через линейный вход необходимо использовать функцию
моделирования гитарного кабинета. Подробности в разделе “Эмуляция гитарного кабинета”.

Подключение наушников
Loading…
УКАЗАНИЯ ПО ТЕХНИКЕ БЕЗОПАСНОСТИ Внимание. ПРОЧТИТЕ ДАННЫЕ ИНСТРУКЦИИ. СОХРАНИТЕ ДАННОЕ РУКОВОДСТВО. ОБРАТИТЕ ВНИМАНИЕ НА ВСЕ ПРЕДУПРЕЖДЕНИЯ. СЛЕДУЙТЕ ИНСТРУКЦИЯМ. ИЗБЕГАЙТЕ ПОПАДАНИЯ ЖИДКОСТИ НА/В ПРИБОР. ЧИСТКА ТОЛЬКО СУХОЙ ТКАНЬЮ. Не перекрывайте вентиляционных отверстий. При установке строго
Обзор Введение Процессоры эффектов Element и Element XP являются компактными и недорогими приборами для обработки гитарного звука. Но их не стоит недооценивать. Процессоры серии Element являются мощными инструментами, предлагающими полный набор необходимых эффектов и функций, которые помогут с
Основные особенности 37 эффектов (Element XP) / 31 эффект (Element) 12 моделей усилителей и 6 эффектов дисторшн Встроенная драм-машина (45 различных ритмов, включая метроном) Встроенный тюнер Педаль экспрессии (только в модели Element XP) 200 пресетов (100 заводских /
Пользовательский интерфейс и разъёмы для подключения Лицевая панель 1. СВЕТОДИОДНЫЙ ДИСПЛЕЙ На дисплее отображаются номера пресетов при их переключении (в режиме игры Play Mode) и уровни параметров эффектов в режиме редактирования (Edit Mode) 2. РЕГУЛЯТОР SELECT Этим переключателем осуществляется
6. ПОСЛЕДОВАТЕЛЬНОСТЬ ЭФФЕКТОВ Эти иконки являются графическим отображением последовательности эффектов, через которую проходит гитарный сигнал в процессоре Element / Element XP. Сигнал идёт слева направо по блокам эффектов: Wah (только в Element XP), компрессор (compressor), усилитель/дисторшн
Задняя панель 1. ВХОДНОЙ РАЗЪЁМ (INPUT) Подключите вашу гитару инструментальным кабелем с разъёмами 1/4” к этому разъёму. 2. ЛИНЕЙНЫЙ ВХОД (AUX IN) Используя 1/8” кабель подключите выходной разъём вашего mp3-плейера (или другого источника) к этому разъёму и играйте вместе с вашими любимыми
Диаграммы подключения Прежде чем подключить процессор Element / Element XP к усилителю, рекомендуется убрать уровень громкости усилителя до минимального значения. Убедитесь, что питание процессора и усилителя отключено. Для включения/отключения процессора Element / Element XP,
Подключение к гитарному усилителю в стерео режиме 1 /4” Stereo Y Cable Ground (-) Left (+) Left Channel Left (+) Left (+) Ground (-) Ground (-) Right Channel Right (+) Right (+) Ground (-) Right (+) Примечание. Данная схема предполагает предварительную перенастройку выходного разъёма OUTPUT для
Подключение к устройству стерео звукозаписи 1 /4” Stereo Y Cable Left (+) Ground (-) Left (+) Left Channel Left (+) Ground (-) Ground (-) Right Channel Right (+) Right (+) Ground (-) Right (+) Примечание. Данная схема предполагает предварительную перенастройку выходного разъёма OUTPUT для работы в
Подключение наушников
Эксплуатация Описание режимов Режим игры (Play Mode) Включение процессора происходит в режиме игры (Play Mode). В этом режиме на лицевой панели процессора светодиодными индикаторами обозначены эффекты, используемые в пресете, и номер пресета. Этот режим является основным режимом работы процессора,
Переключение пресетов В процессоре Element / Element XP есть две группы пресетов – пользовательские и заводские. В новых процессорах эти группы содержат одинаковый набор пресетов. Например, пресет номер 45 в пользовательском банке будет идентичен 45-му пресету в заводском, и так далее.
Выбор из банка тембров В банке тембров содержится 20 настроек предустановленных типов тембров, предлагающих широкую палитру настроек чистых и перегруженных звучаний для различных музыкальных стилей – от блюза до метала и кантри, состоящих из различных комбинаций и настроек следующих блоков
Выбор из банка эффектов В банке эффектов содержится 20 предустановленных различных комбинаций и настроек следующих блоков эффектов: модуляционные эффекты (Mod FX), задержка (Delay) и реверберация (Reverb). Настройки всех эффектов в банке эффектов доступны для дальнейшего редактирования. Обратите
Редактирование эффектов Вероятно, что спустя какое-то время вы обнаружите, что банков готовых тембров/эффектов и заводских пресетов уже не хватает для создания нужного звучания. Самое время начать немного экспериментировать – редактировать эффекты. Как изменить настройки параметров эффекта: 1.
Сохранение / копирование пресетов Для сохранения всех сделанных изменений настроек эффектов используется кнопка Store. Если какойлибо параметр в пресете был изменён, то это будет отображено светящимся индикатором над кнопкой Store. Для возможности дальнейшего использования сделанных в режиме
Как скопировать пресет: 1. В режиме игры (Play Mode), при помощи ножных переключателей или регулятора Select выберите пресет, который хотите скопировать. 2. Нажмите кнопку Store один раз. Номер текущего пресета будет моргать на светодиодном дисплее. 3. Вращая регулятор Select, выберите номер
Список барабанных ритмов Порядковый номер 1 2 3 4 5 6 7 8 9 10 11 12 13 14 15 16 17 18 19 20 21 22 23 Название BEATS 1 BEATS 2 BEATS 3 BEATS 4 BEATS 5 BEATS 6 ROCK 1 ROCK 2 ROCK 3 ROCK 4 ROCK 5 ROCK 6 HARD ROCK 1 HARD ROCK 2 HARD ROCK 3 HARD ROCK 4 METAL 1 METAL 2 METAL 3 METAL 4 METAL 5 BLUES 1
Использование тюнера Встроенный тюнер позволяет в любой момент проверить правильность настройки вашей гитары и при необходимости подстроить её. Доступны 4 варианта альтернативного (пониженного) строя. В большинстве случаев вами будет использоваться стандартный строй (A=440 Гц). В процессорах
НАСТРОЙКА Работа в стерео и моно режимах Режим работы процессора, моно или стерео, для выходов Output и для наушников по умолчанию определяется автоматически, зависимо от того, подключен ли к выходу Output 1/4″ разъём. Если разъём подключен, то процессор автоматически настраивается на работу в моно
Калибровка педали экспрессии (только для модели Element XP) Прежде чем покинуть стены фабрики, процессоры серии Element проходят процедуру калибровки всех параметров. Однако, в процессе длительной эксплуатации педаль экспрессии может начать функционировать неточно. В этом случае необходимо
Назначение педали экспрессии (только для модели Element XP) Педаль экспрессии процессора Element XP может быть назначена для управления громкостью (Volume), эффектами Wah, Whammy, YaYa или параметрами других эффектов. Минимальное (носок вверх) и максимальное (носок вниз) значения управляемых
Как назначить управление эффекта на педаль экспрессии и установить минимальное и максимальное значение изменяемого диапазона: 1. Эффект, управление параметра которого вы хотите назначить на педаль экспрессии, должен быть включён (подробности в разделе «Включение и отключение эффектов»). 2. В режиме
Эффекты Модель Element XP имеет 37 эффектов и даёт возможность использовать до 9 эффектов одновременно. В модели Element 31 эффект с возможностью использования до 8 эффектов одновременно. Обе модели моделируют 12 моделей усилителей и кабинетов. В этом разделе изложено описание этих эффектов и
Модель усилителя / дисторшн В моделях Element и Element XP на выбор предлагается 6 моделей эффектов типа дисторшн и 12 моделей усилителей и кабинетов. Каждая модель обозначена двумя буквами (например, “td”) и имеет изменяемый параметр в интервале от 1 до 9, за исключения эмулятора акустической
Эквалайзер (EQ) 3-полосный эквалайзер – это дополнительный инструмент для настройки вашего звучания. Каждый частотный диапазон обозначен двумя буквами (например, “bA”) и имеет изменяемый параметр в интервале от 1 до 9. Значения параметра от 1 до 4 обозначают срез частот (1=-12 дБ, 2= -9 дБ, 3= -6
Модуляционные эффекты (Mod FX) Процессоры Element и Element XP оснащены множеством различных модуляционных эффектов и эффектов изменения высоты тона. Каждый эффект обозначен двумя буквами (например, “PH” для эффекта “фазер”) и имеет изменяемый параметр в интервале от 1 до 9. Изменение этого
Panner (паннер) Эффект Panner плавно изменяет громкость с равномерной скоростью, создавая эффект плавного перехода звука из левого канала в правый. Vibrato (вибрато) Эффект Vibrato модулирует высоту сигнала с равномерной скоростью. Rotary Speaker (вращающийся динамик) Этот эффект является
Эффект задержки (Delay) Этот эффект работает по принципу записи, а затем воспроизведения через короткий промежуток времени записанного сигнала. Записанный сигнал может повторятся как один, так и несколько раз, в зависимости от типа и настроек эффекта. Всего в процессорах Element и Element XP
Время задержки отображается на цифровом дисплее и изменяется в диапазонах от 10 до 990 мс (с шагом 10 мс), и от 1.0 до 5.0 с (с шагом 100 мс). Как уже ранее упоминалось, исключение составляют настройки для эффекта Analog Delay, для которого время задержки может изменяться до 350 мс. Доступные
Список пресетов в модели Element Польз. 1 2 3 4 5 6 7 8 9 10 11 12 13 14 15 16 17 18 19 20 21 22 23 24 25 26 27 28 29 30 31 32 33 34 Заводск. Название F1 F2 F3 F4 F5 F6 F7 F8 F9 F10 F11 F12 F13 F14 F15 F16 F17 F18 F19 F20 F21 F22 F23 F24 F25 F26 F27 F28 F29 F30 F31 F32 F33 F34 Rectified Tough Echo
Список пресетов в модели Element XP Польз. 1 2 3 4 5 6 7 8 9 10 11 12 13 14 15 16 17 18 19 20 21 22 23 24 25 26 27 28 29 30 31 32 33 34 Заводск. Название F1 F2 F3 F4 F5 F6 F7 F8 F9 F10 F11 F12 F13 F14 F15 F16 F17 F18 F19 F20 F21 F22 F23 F24 F25 F26 F27 F28 F29 F30 F31 F32 F33 F34 Rectified Tough
Техническая информация Восстановление заводских настроек (сброс) Процедура восстановления заводских настроек возвращает все настройки процессоров Element и Element XP к значениям по умолчанию. ВНИМАНИЕ! Сброс настроек к значениям по умолчанию приведёт к потере всех пользовательских пресетов.
Спецификация Основные характеристики А/Ц/А преобразователь Частота дискретизации DSP секция Кол-во одновременно работающих эффектов Количество пресетов Драм-машина Габаритные размеры Вес 24 бит 44,1 кГц AudioDNA2™ DSP Processor 8 (Element) 9 (Element XP) 100 пользовательских (1100) / 100 заводских
Element / Element XP Owners Manual
IMPORTANT SAFETY INSTRUCTIONS DECLARATION OF CONFORMITY
Manufacturers Name: DigiTech Manufacturers Address: 8760 S. Sandy Parkway Sandy, Utah 84070, USA
declares that the product:
Product name: ELEMENT and ELEMENT XP Product option: all (requires Class II power adapter that conforms to the requirements of EN60065, EN60742, or equivalent.)
conforms to the following Product Specifications:
Safety: IEC 60065 -01+Amd 1 EMC: EN 55022:2006 EN 55024:1998 FCC Part 15
Supplementary Information:
The product herewith complies with the requirements of the: Low Voltage Directive 2006/95/EC EMC Directive 2004/108/EC. RoHS Directive 2011/65/EC WEEE Directive 2002/96/EC EC Regulation 278/2009
With regard to Directive 2005/32/EC and EC Regulation 1275/2008 of 17 December 2008, this product is designed, produced, and classified as Professional Audio Equipment and thus is exempt from this Directive. Rex C. Reed Director, Engineering Signal Processing 8760 S. Sandy Parkway Sandy, Utah 84070, USA Date: July 9, 2013
European Contact: Your local DigiTech Sales and Service Office or
Harman Signal Processing 8760 South Sandy Parkway Sandy, Utah 84070 USA Ph: (801) 566-8800 Fax: (801) 568-7583
WARNING FOR YOUR PROTECTION READ THE FOLLOWING:
KEEP THESE INSTRUCTIONS
HEED ALL WARNINGS
FOLLOW ALL INSTRUCTIONS
The apparatus shall not be exposed to dripping or splashing liquid and no object filled with liquid, such as vases, shall be placed on the apparatus.
CLEAN ONLY WITH A DRY CLOTH.
FOR INDOOR USE ONLY.
DO NOT BLOCK ANY OF THE VENTILATION OPENINGS. INSTALL IN ACCOR- DANCE WITH THE MANUFACTURERS INSTRUCTIONS.
DO NOT INSTALL NEAR ANY HEAT SOURCES SUCH AS RADIATORS, HEAT REGISTERS, STOVES, OR OTHER APPARATUS (INCLUDING AMPLIFIERS) THAT PRODUCE HEAT.
ONLY USE ATTACHMENTS/ACCESSORIES SPECIFIED BY THE MANUFAC- TURER.
UNPLUG THIS APPARATUS DURING LIGHTNING STORMS OR WHEN UNUSED FOR LONG PERIODS OF TIME.
Do not defeat the safety purpose of the polarized or grounding-type plug. A polarized plug has two blades with one wider than the other. A grounding type plug has two blades and a third grounding prong. The wide blade or third prong are provided for your safety. If the provided plug does not fit your outlet, consult an electrician for replacement of the obsolete outlet.
Protect the power cord from being walked on or pinched particularly at plugs, convenience receptacles, and the point where they exit from the apparatus.
Use only with the cart stand, tripod bracket, or table speci- fied by the manufacture, or sold with the apparatus. When a cart is used, use caution when moving the cart/apparatus combination to avoid injury from tip-over.
Refer all servicing to qualified service personnel. Servicing is required when the apparatus has been damaged in any way, such as power-supply cord or plug is damaged, liquid has been spilled or objects have fallen into the apparatus, the apparatus has been exposed to rain or moisture, does not operate normally, or has been dropped.
POWER ON/OFF SWITCH: The Power switch used in this piece of equip- ment DOES NOT break the connection from the mains.
MAINS DISCONNECT: The plug shall remain readily operable. For rack- mount or installation where plug is not accessible, an all-pole mains switch with a contact separation of at least 3 mm in each pole shall be incorpo- rated into the electrical installation of the rack or building.
If connected to 240V supply, a suitable CSA/UL certified power cord shall be used for this supply.
WARNING: APPARATET M TILKOPLES JORDET STIKKONTAKT. APPARATEN SKALL ANSLUTAS TILL JORDAT UTTAG. LAITE ON LIITETTV SUOJAKOSKETTIMILLA VARUSTETTUUN PISTORASIAAN.
IMPORTANT SAFETY INSTRUCTIONS
If you want to dispose this product, do not mix it with general household waste. There is a separate collection system for used electronic products in accordance with legislation that requires proper treatment, recovery and recycling.
Private households in the 25 member states of the EU, in Switzerland and Norway may return their used electronic products free of charge to designated collection facilities or to a retailer (if you purchase a similar new one).
For Countries not mentioned above, please contact your local authorities for a correct method of disposal.
By doing so you will ensure that your disposed product undergoes the necessary treatment, recovery and recycling and thus prevent potential negative effects on the environment and human health.
ELECTROMAGNETIC COMPATIBILITY
This device complies with part 15 of the FCC Rules and the Product Specifications noted on the Declaration of Conformity. Operation is subject to the following two conditions:
this device may not cause harmful interference, and
this device must accept any interference received, including interference that may cause undesired operation.
Operation of this unit within significant electromagnetic fields should be avoided.
use only shielded interconnecting cables.
The symbols shown above are internationally accepted symbols that warn of potential hazards with electrical products. The lightning flash with arrowpoint in an equilateral triangle means that there are dangerous voltages present within the unit. The exclamation point in an equilateral triangle indicates that it is necessary for the user to refer to the owners manual.
These symbols warn that there are no user serviceable parts inside the unit. Do not open the unit. Do not attempt to service the unit yourself. Refer all servicing to qualified personnel. Opening the chassis for any reason will void the manufacturers warranty. Do not get the unit wet. If liquid is spilled on the unit, shut it off immediately and take it to a dealer for service. Disconnect the unit during storms to prevent damage.
The following is indicative of low altitude use; do not use this product above 2000m.
Warranty We at DigiTech are very proud of our products and back-up each one we sell with the following warranty:
1. Please register online at digitech.com within ten days of purchase to validate this warranty. This warranty is valid only in the United States.
2. DigiTech warrants this product, when purchased new from an authorized U.S. DigiTech dealer and used solely within the U.S., to be free from defects in materials and workmanship under normal use and service. This warranty is valid to the original purchaser only and is non-transferable.
3. DigiTech liability under this warranty is limited to repairing or replacing defective materials that show evidence of defect, provided the product is returned to DigiTech WITH RETURN AUTHORIZATION, where all parts and labor will be covered up to a period of one year. A Return Authorization number may be obtained by contacting DigiTech. The company shall not be liable for any consequential damage as a result of the products use in any circuit or assembly.
4. Proof-of-purchase is considered to be the responsibility of the consumer. A copy of the original purchase receipt must be provided for any warranty service.
5. DigiTech reserves the right to make changes in design, or make additions to, or improvements upon this product without incurring any obligation to install the same on products previously manufactured.
6. The consumer forfeits the benefits of this warranty if the products main assembly is opened and tampered with by anyone other than a certified DigiTech technician or, if the product is used with AC voltages outside of the range suggested by the manufacturer.
7. The foregoing is in lieu of all other warranties, expressed or implied, and DigiTech neither assumes nor authorizes any person to assume any obligation or liability in connection with the sale of this product. In no event shall DigiTech or its dealers be liable for special or consequential damages or from any delay in the performance of this warranty due to causes beyond their control.
NOTE: The information contained in this manual is subject to change at any time without notification. Some information contained in this manual may also be inaccurate due to undocumented changes in the product since this version of the manual was completed. The information contained in this version of the owners manual supersedes all previous versions.
Service Contact Info If you require technical support, contact DigiTech Technical Support. Be prepared to accurately describe the problem. Know the serial number of your devicethis is printed on a sticker attached to the chassis. If you have not already taken the time to register your product, please do so now at digitech.com.
Before you return a product to the factory for service, we recommend you refer to the manual. Make sure you have correctly followed installation steps and operating procedures. For further technical assistance or service, please visit our support page at digitech.com. If you need to return a product to the factory for service, you MUST first contact Technical Support to obtain a Return Authorization Number.
No returned products will be accepted at the factory without a Return Authorization Number.
Please refer to the Warranty information, which extends to the first end-user. After expiration of the warranty, a reasonable charge will be made for parts, labor, and packing if you choose to use the factory service facility. In all cases, you are responsible for transportation charges to the factory. DigiTech will pay return shipping if the unit is still under warranty.
Use the original packing material if it is available. Mark the package with the name of the shipper and with these words in red: DELICATE INSTRUMENT, FRAGILE! Insure the package properly. Ship prepaid, not collect. Do not ship parcel post.
1
Table of Contents
Overview 2 Introduction 2 Features 3
User Interface & Connectors 4 Top Panel 4 Rear Panel 6
Connection Diagrams 8 Mono Amp Configuration 8 Stereo Amp Configuration 9 Stereo Recording Configuration 10 Headphone/Practice Configuration 11
Operation 12 Modes Explained 12
Play Mode12 Edit Mode 12
Navigating Presets 13 Editing Presets 13
Selecting A Tone Bank 14 Selecting An FX Bank 15 Editing Effects 16 Turning Effects On & Off 16
Storing/Copying Presets 17 Bypassing All Effects 18 Using The Drum Machine 18 Using The Tuner 20
Setup 21 Mono/Stereo Operation 21 Speaker Cabinet Compensation (SCC) 21 Expression Pedal Calibration (Element XP Only) 22 Expression Pedal Assignment (Element XP Only) 23
The Effects 25 Wah (Element XP Only) 25 Compressor 25 Amp/Distortion Models 26 EQ 27 Noise Gate 27 Mod FX 28 Reverb 31
Element Preset List 32
Element XP Preset List 33
Technical Information 34 Factory Restore 34 Specifications 35
2
Overview Introduction The DigiTech Element and Element XP provide a compact and cost-effective guitar effects processing solution. But dont let that fool you. The Element Series processors offer a powerful effects processing platform and complete feature set, so you can tantalize your creativity, improve your chops, and explore the endless possibilities of guitar effects, all with one simple-to-use, compact device.
The Element has 31effects to choose from and allows you to run 8 effects simultaneously. The Element XP has 37 effects to choose from and allows you to run 9 effects simultaneously. The Element XP adds an Expression Pedal. Use it to control the Wah or Whammy effect or assign it to the effect you want to control for real-time effect changes with your foot.
100 included factory presets allow you to begin exploring immediately and 100 user presets allow you to store all your favorite sounds. Select between the 20 pre-configured FX Banks and Tone Banks to explore a multitude of tonal possibilities without even editing any effects!
The built in tuner ensures your guitar is in tune and the built-in drum machine and aux input jack allow you to play along with a drum loop, metronome, or your favorite music, so you can improve your skills fast and have fun doing it!
Whether you’re a budding artist, or an experienced guitar aficionado, youll have fun exploring the vast sound-shaping options available in the Element and Element XP. Thanks for choosing DigiTech.
3
Features 37 Effects (Element XP) / 31 Effects (Element)
12 Amp & 6 Distortion Models To Choose From
Built-In Drum Machine With 45 Drum Pattern Loops Including Metronome
Built-In Tuner
Built-In Expression Pedal (Element XP Only)
200 Presets (100 User Presets / 100 Factory Presets)
9 Simultaneous Effects (Element XP) / 8 Simultaneous Effects (Element)
20 FX Banks & 20 Tone Banks To Choose From
Mono / Stereo Output
Aux Input For Playing Along With Your Favorite Songs
1/8 Headphone Output
Speaker Cabinet Compensation
Heavy Duty Metal Footswitches
Power Supply Included
4
User Interface & Connectors Top Panel
1.
2 3 4 51
7
6
8 9
10 11
12 LED DISPLAY This display shows the preset numbers when navigating presets (in Play Mode) and effect settings when editing (in Edit Mode).
2. SELECT KNOB This knob serves as both a preset selector and editing control. In Preset Mode, turning this knob will change between presets. In Edit Mode, this knob will modify the currently selected effect or option.
3. STORE BUTTON This button is used to store and copy presets to the 100 user preset memory locations. The STORE LED will light whenever a presets stored effect settings are altered, indicating that the changes must be stored to a preset to be retained.
5
4. EDIT BUTTONS These left/right arrow buttons access effects and drum machine settings for editing.
5. EXPRESSION PEDAL (Element XP only) The Expression Pedal is used to control effects in real time. A single effect can be controlled by the expression pedal per preset.
6. EFFECTS CHAIN These icons provide a graphical representation of the internal effect signal chain used in the Element/Element XP. The signal flow is from left to right and offers effects like Wah (Element XP only), Compressor, Amp Modeling/Distortion, EQ, Noise Gate, Mod FX, Delay, and Reverb. The Element XP also has an option for setting up its built-in Expression Pedal to control a variety of these effects. The LED above each of the icons indicates whether each effect is on or off and which effect is selected when editing. These effect LEDs are also used to help you tune your guitar when using the built-in tuner (see «Using The Tuner» on page 20).
7. MASTER LEVEL BUTTON Press this button then turn the SELECT knob to adjust the Master Level. This will adjust the global output level for the Main and Headphone Outputs and will affect all presets.
8. PRESET LEVEL BUTTON Press this button then turn the SELECT knob to adjust the Preset Level. Preset Level is a programmable level that is stored with each preset and provides a quick way to balance volume between presets. Note that changes made to this parameter must be stored to the preset in order to be retained (see «Storing/Copying Presets» on page 17).
9. TONE BANK BUTTON This button is used to select from a preset library of 20 different clean and distorted tone configurations utilizing the Wah (Element only), Compressor, Amp/Distortion Modeling, EQ, and Noise Gate effect modules. Press this button then use the SELECT knob to select from a variety of genre-based amp tone defaults ranging from Blues to Metal to Country. See «Selecting A Tone Bank» on page 14 for more information on Tone Banks.
10. FX BANK BUTTON This button is used to select from a preset library of 20 different effect configurations utilizing the Mod FX, Delay, and Reverb effect modules. Press this button then turn the SELECT knob to select a variety of post-amplifier model effect chains (Chorus, Chorus + Delay, Delay + Reverb, etc.). See «Selecting An FX Bank» on page 15 for more information on Tone Banks.
11. DRUMS BUTTON Pressing this button toggles the internal drum machine on and off.
12. FOOTSWITCHES These footswitches are used for preset up/down navigation, bypass, and tuner activation.
6
Rear Panel 2 3 4 51
1. INPUT Connect your guitar to this high impedance 1/4 instrument input.
2. AUX IN Using a stereo 1/8 cable, connect the headphone output of a portable music or CD player to this 1/8 TRS jack to play along with all your favorite music. Adjust the output level of your playback device and the Element/Element XPs Master Level to achieve the proper mix balance.
3. MAIN OUTPUT This 1/4 TRS jack supports mono or stereo operation.Connect thisoutput jack to your guitar amplifier using a mono instrument cable or connect to stereo inputs of a mixer or recording device using a stereo Y cable (see «Connection Diagrams» on page 8 for further information). The Master Level controls the global level of this output.
NOTE: Mono/stereo operation for the Main and Headphone Output jacks is determined by whether a plug is connected to the Main Output jack. If a plug is connected to this output jack, all outputs are set to mono for amp use. If no plug is connected to this jack, all outputs default to stereo for headphone use. This 1/4 Main Output can be forced to operate as a stereo output for stereo setups, see «Connection Diagrams» on page 8 and «Mono/Stereo Operation» on page 21 for more information.
4. HEADPHONE OUTPUT Connect your headphones to this 1/8 mini TRS jack. This output is optimized for use with headphones having an impedance of 60 Ohms or less. The Master Level controls the global level of this output.
7
NOTE: When only the headphones are connected, Speaker Cabinet Compensation (SCC) will be enabled to make the audio sound like it is actually being played through an amplifier. When a plug is connected to the 1/4 Main Output, SCC is disabled in the Headphone Output and all outputs are set for mono operation. See «Speaker Cabinet Compensation (SCC)» on page 21 and «Mono/Stereo Operation» on page 21 for more information.
5. POWER JACK Connect the included PS0913DC power supply to this power input jack.
8
Connection Diagrams Before connecting the Element/Element XP processor to an amplifier, it is recommended that you turn down the amplifier’s master volume control and make sure that the power to your amplifier and the Element/Element XP are turned off. To turn the Element/Element XP on or off, connect or disconnect the included power supply from the POWER input jack. Once all is connected and powered on, you can then gradually increase your amplifier’s master volume control until the desired level is achieved.
Mono Amp Configuration
Amp
1/4 Mono Cable
Guitar HARMAN PS0913DC Power Supply
INPUT AUX IN OUTPUT 9VDC 300 mA
1/4 Mono Cable
1/4 Mono Cable
Ground (-)
Hot (+)
Ground (-) Hot (+)Ground (-)Hot (+)
9
Stereo Amp Configuration
Amp 2Amp 1
Guitar HARMAN PS0913DC Power Supply
1/4 Stereo Y Cable
INPUT AUX IN OUTPUT 9VDC 300 mA
1/4 Stereo Y Cable
1/4 Stereo Y Cable
Left (+)
Right (+)
Ground (-)
Ground (-)
Left (+)
Right (+)
Left Channel
Right Channel
Ground (-) Left (+)
Right (+)Ground (-)
NOTE: The 1/4″ Output must be configured for stereo operation for this type of setup. See «Mono/ Stereo Operation» on page 21 for more information.
10
Stereo Recording Configuration
Audio Recording Interface Computer
Guitar HARMAN PS0913DC Power Supply
1/4 Stereo Y Cable
Line In
1
Line In
2
FireWire or USB
INPUT AUX IN OUTPUT 9VDC 300 mA
1/4 Stereo Y Cable
1/4 Stereo Y Cable
Left (+)
Right (+)
Ground (-)
Ground (-)
Left (+)
Right (+)
Left Channel
Right Channel
Ground (-) Left (+)
Right (+)Ground (-)
NOTE: The 1/4″ Output must be configured for stereo operation for this type of setup. See «Mono/ Stereo Operation» on page 21 for more information. When connecting directly to a recording device, SCC must be enabled. See «Speaker Cabinet Compensation (SCC)» on page 21 for more information.
11
Headphone/Practice Configuration
Guitar HARMAN PS0913DC Power Supply
Portable Music Player Headphones
Optional
INPUT AUX IN OUTPUT 9VDC 300 mA
12
Operation Modes Explained There are two modes of operation in the Element/Element XP: Play Mode and Edit Mode.
Play Mode When the Element/Element XP is powered on, the unit will be in Play Mode. Play Mode is indicated by the effect LEDs being lit for the effects which are active in the currently loaded preset and the currently loaded preset number being displayed in the LED display. Play Mode is the normal operating mode and allows you to navigate presets using the SELECT knob or FOOTSWITCHES.
Preset Number
Lit LEDs Indicate Enabled Effects
In Preset
Edit Mode You enter Edit Mode whenever you press the MASTER LEVEL, PRESET LEVEL, TONE BANK, FX
BANK, DRUMS, or EDIT buttons. Edit Mode allows you to adjust the global Master Level, the Preset Level, select between the different Tone and FX Banks, edit effect and system settings, and edit the settings for the built-in drums. To exit Edit Mode and return to Play Mode, simply press either FOOTSWITCH. You can tell you are back in Play Mode when the effect LEDs are lit for the effects which are active in the currently loaded preset and the currently loaded preset number is displayed in the LED display.
NOTE: Effect settings changed in Edit Mode will need to be stored to a preset in order to be retained. The exceptions are the Master Level and drum machine settings, which are global settings and are not stored to presets. Whenever you change a stored presets effect settings, the STORE button LED will light, indicating the effect settings have been changed from the stored value in the preset. See «Storing/ Copying Presets» on page 17 for further information on storing presets.
13
Navigating Presets There are two banks of presets in the Element/Element XP: the user preset bank and the factory preset bank. From the factory, the user and factory preset banks will contain the same presets. Therefore, factory preset 45 will be the same as user preset 45 and so on. User presets appear in the LED display as 1-100 and factory presets appear as F1-F00. Preset banks will automatically round-robin when navigating. In other words, navigating one preset above user preset 100 will select factory preset F1 in the factory preset bank. Navigating one preset below user preset 1 will select factory preset F00 (factory preset 100) in the factory preset bank.
To navigate presets:
1. From Play Mode, press the UP FOOTSWITCH to navigate up through presets or the DOWN
FOOTSWITCH to navigate down through presets. You can also navigate presets by turning the SELECT knob.
Editing Presets The Element Series processors have been engineered to give you more options for shaping your sounds. Of course you can navigate presets to find sounds which will get you started, and then edit the effects from there to fine tune your soundsthis is standard operation when using effect processors. But there is another layer of options available in the Element processors… Banks. There are two Banks available: Tone Banks and FX Banks. Each of these Banks give you a library of 20 pre-set configurations, allowing you to quickly audition different «tones» without affecting your «effects» chain or vice versa. Using this «coarse» and «fine» editing environment, you can quickly experiment with many different sound-shaping options and go only as deep into editing as you feel comfortable with.
14
Selecting A Tone Bank Tone Banks allow you to select from a preset library of 20 different tones. These tones consist of clean, distortion, and amp tones. Select from a variety of genre-based amp tone defaults ranging from Blues to Metal to Country. Behind the scenes, the Wah (Element XP only), Compressor, Amp/Distortion, EQ, and Noise Gate are configured to create a specified tone. You can then further refine the sound by editing each effects settings. Note that changing between different Tone Banks does not change the Mod FX, Delay, or Reverb settings, as these processing modules belong to the FX Bank. Available Tone Banks Display Number Description
1 Overdrive
2 Rock 1
3 Blues 1
4 Metal 1
5 Country 1
6 Warm Drive
7 Crunch
8 Texas Tone
9 Rockabilly
10 Solo 1
Available Tone Banks Display Number Description
11 Fuzz
12 Chunky
13 Smooth
14 Heavy
15 Clean 1
16 British
17 Distortion
18 Scooped
19 Bright Clean
20 Acoustic
To select a Tone Bank:
1. Press the TONE BANK button. The display will read cu for custom.
2. Turn the SELECT knob to select from one of the 20 Tone Bank library defaults. The number of the selected Tone Bank will appear in the LED display as you turn the SELECT knob.
3. When done, press either FOOTSWITCH to exit Edit Mode. Note that you must store the changes if you wish to retain the settings. See «Storing/Copying Presets» on page 17 for further information on storing presets.
15
Selecting An FX Bank FX Banks allow you to select from a preset library of 20 different effect chains. Behind the scenes the Mod FX, Delay, and Reverb are configured to create a specified combination of effects. You can then further refine the sound by editing each effects settings. Note that changing between different FX Banks does not change the Wah (Element XP only), Compressor, Amp/Distortion, EQ, or Noise Gate settings, as these processing modules belong to the Tone Bank. Available FX Banks Display Number Description
1 Chorus
2 Flanger
3 Phaser
4 Pitch
5 Tremolo
6 Rotary
7 Envelope Filter
8 Digital Delay
9 Analog Delay
10 Tape Delay
Available FX Banks Display Number Description
11 Hall Reverb
12 Spring Reverb
13 Chorus + Digital Delay
14 Chorus + Delay + Reverb
15 Flanger + Analog Delay
16 Phaser + Tape Delay
17 Digital Delay + Hall Reverb
18 Analog Delay + Spring
19 Pitch + Room Reverb
20 Vibrato + Tape Delay
To select an FX Bank:
1. Press the FX BANK button. The display will read cu for custom.
2. Turn the SELECT knob to select from one of the 20 FX Bank library defaults. The number of the selected FX Bank will appear in the LED display as you turn the SELECT knob.
3. When done, press either FOOTSWITCH to exit Edit Mode. Note that you must store the changes if you wish to retain the settings. See «Storing/Copying Presets» on page 17 for further information on storing presets.
16
Editing Effects Selecting a preset and/or Tone/FX Bank is the fastest and easiest way to achieve the sound your after. However, if you just cant seem to quite get the sound you’re after its time to edit some effects.
To edit effects:
1. Press either of the EDIT buttons repeatedly until the LED for the effect you wish to edit is lit. For a list of effect settings, see «The Effects» on page 25.
2. Once you have selected the effect for editing, strum your guitar then turn the SELECT knob to change the effect settings. Repeat this auditioning process until you find the desired setting.
3. To exit Edit Mode, press either FOOTSWITCH.
NOTE: Effects changed in Edit Mode will need to be stored to a preset in order to be retained. The exceptions are the Master Level and drum machine settings, which are global settings and are not stored to memory. See «Storing/Copying Presets» on page 17 for further information on storing presets.
Turning Effects On & Off The procedure for turning effects on and off is essentially the same as for editing effects.
To turn an effect on or off:
1. Press either of the EDIT buttons repeatedly until the LED for the effect you wish to turn on or off is lit.
2. Turn the SELECT knob. If the effect is already turned off, turn the SELECT knob to the right to enable the effect and select between the available options. If the effect is already on and you wish to turn it off, keep turning the SELECT knob to the left until off is shown in the LED display.
3. When done, press either FOOTSWITCH to return to Play Mode, indicated by the currently loaded preset number being displayed in the LED display.
NOTE: Parameters changed in Edit Mode will need to be stored to a preset in order to be retained. The exceptions are the Master Level and drum machine parameters, which are global parameters and are not stored to memory. See «Storing/Copying Presets» on page 17 for further information on storing presets.
17
Storing/Copying Presets The STORE button is used to save modifications made to a presets settings. The STORE buttons LED will light whenever effect settings have been changed from their stored value, indicating the changes must be stored to memory to be retained. Preset setting changes must always be stored to a user preset memory location, since factory presets cannot be overwritten. The Element and Element XP have 100 user preset memory locations. Factory presets can be accessed at any time, used as a starting point, edited, then stored to a user preset location. You can also copy a user or factory preset to any of the available 100 user preset locations.
To quickly store a preset to its current memory location (quick update):
1. Make the desired edits to the presets effect settings. See «Editing Effects» on page 16.
2. Press the STORE button twice. Sd will be briefly displayed in the LED display, indicating the preset is being stored. This will store the newly changed effect settings to the currently loaded preset memory location.
NOTE: If you perform the above quick update procedure on a factory preset, the changes will be stored to the equivalent user preset memory location. For example, if you load factory preset 5 (f 5), make edits, and then press the STORE button twice, you will overwrite user preset 5 (5). Therefore, use caution when performing this procedure on factory presets to ensure you do not accidentally overwrite one of your existing user presets.
To store an edited preset to a different memory location:
1. Make the desired edits to the presets effects. See «Editing Effects» on page 16.
2. Press the STORE button once. The current preset number will begin flashing in the LED display.
3. Use the SELECT knob to select the user preset memory location at which you would like to store the user preset (indicated in the display).
4. Press the STORE button again to complete the store procedure. Sd will be briefly displayed in the LED display, indicating the preset is being stored.
NOTE: Pressing one of the FOOTSWITCHES or any button (other than the DRUMS button) during the above procedure will abort the store procedure.
18
To copy a preset:
1. From Play Mode, use the FOOTSWITCHES or SELECT knob to load the preset you wish to copy.
2. Press the STORE button once. The current preset number will begin flashing in the LED display.
3. Use the SELECT knob to select the user preset memory location at which you would like to copy the preset (indicated in the display).
4. Press the STORE button again to complete the copy procedure. Sd will be briefly displayed in the LED display, indicating the preset is being stored.
NOTE: Pressing one of the FOOTSWITCHES or any button (other than the DRUMS button) during the above procedure will abort the store procedure.
Bypassing All Effects The Element and Element XP offer a global preset bypass feature which bypasses all effects in the currently loaded preset and feeds only the dry/unprocessed signal to the outputs.
To bypass all effects:
1. Press both FOOTSWITCHES simultaneously. The LED display will read bYP, indicating the effects are bypassed.
2. Press either FOOTSWITCH to exit the preset bypass function.
Using The Drum Machine Playing along with the built-in drum machine is a great way to improve your timing skills. The Element and Element XP give you 45 drum and metronome patterns to choose from and allow you to adjust the tempo and level of the pattern playback.
Available Drum Machine Parameters LED Lit Option (Shown In Display) Description PATTERN 1-45 Selects from the various drum patterns
TEMPO 1-99 Adjusts the drum machine tempo
LEVEL 1-99 Adjusts the drum machine level
19
Available Drum Patterns Display Number Description
1 BEATS 1
2 BEATS 2
3 BEATS 3
4 BEATS 4
5 BEATS 5
6 BEATS 6
7 ROCK 1
8 ROCK 2
9 ROCK 3
10 ROCK 4
11 ROCK 5
12 ROCK 6
13 HARD ROCK 1
14 HARD ROCK 2
15 HARD ROCK 3
16 HARD ROCK 4
17 METAL 1
18 METAL 2
19 METAL 3
20 METAL 4
21 METAL 5
22 BLUES 1
23 BLUES 2
Available Drum Patterns Display Number Description
24 BLUES 3
25 BLUES 4
26 GROOVE 1
27 GROOVE 2
28 COUNTRY 1
29 COUNTRY 2
30 COUNTRY 3
31 JAZZ 1
32 JAZZ 2
33 JAZZ 3
34 JAZZ 4
35 HIPHOP 1
36 HIPHOP 2
37 HIPHOP 3
38 WORLD 1
39 WORLD 2
40 WORLD 3
41 METRONOME 4/4
42 METRONOME 3/4
43 METRONOME 5/8
44 METRONOME 7/8
45 METRONOME
To use the built-in drum machine:
1. Press the DRUMS button to turn the drum machine on.
2. Use the EDIT buttons to select the drum setting you want to edit (i.e., Pattern, Tempo or Level). The corresponding LED will light when a selection is made.
3. Turn the SELECT knob to edit the selected setting.
4. Repeat steps 2-3 to make edits to any of the other drum machine settings.
5. When not using the drum machine, press the DRUMS button to turn the drum machine off.
NOTE: Drum machine settings are global and are not stored to presets.
20
Using The Tuner The built-in tuner allows you to effortlessly tune your guitar and offers 4 different tuning references as shown in the table to the right. In most cases you will use the standard tuning reference, which is A440 (A=440Hz). This is the default tuning reference setting in the Element/Element XP.
Tuning Reference Options Option (Shown In Display) Reference
40 A=440Hz (Default, standard setting)
Ab A=A (A flat)
G A=G
Gb A=G (G flat)
The tuner can be accessed from either Play Mode or Edit Mode. As a note is played, the LED display will show the note. The most center effect LED (green) will light when the note is in tune. If an effect LED to the left of the green LED is lit, the note is flat, so you must tune the string up. If an LED to the right of the green LED is lit, the note is sharp, so you must tune the string down.
In Tune
Note
(Flat) Tune Up
(Sharp) Tune Down
To use the tuner:
1. Press and hold both FOOTSWITCHES simultaneously. The display will read bYP briefly then tu then —. The tuner is now active.
2. If you wish to change the tuning reference, turn the SELECT knob. The default tuning reference is A=440Hz (represented as 40 in the LED display), which is considered to be the standard tuning reference and will be used in most cases.
3. Tune your guitar.
4. Press either FOOTSWITCH to exit the tuner.
NOTE: If preset modifications had been made prior to entering the tuner, the changes will still be available and can be stored after exiting the tuner.
21
Setup Mono/Stereo Operation Mono/stereo operation, for both the Main Output and Headphone Output, is determined by whether or not a plug is connected to the 1/4″ Main Output jack. If a plug is connected to this jack, all outputs are automatically configured for mono operation, just plug in your amp and play. If no plug is connected to the 1/4″ Main Output jack, the outputs default to stereo operation for headphone use. The 1/4 Main Output can be forced to operate in stereo when you need to connect the Main Output to a stereo destination, such as a pair of amplifiers, a mixer, or a recording device.
To configure the 1/4″ Main Output for stereo operation:
1. Start with the power cable disconnected (unit powered down).
2. Press and hold the FX BANK button while connecting the power cable. Keep the FX BANK button held down until the display reads StErEo On, then release the button. The 1/4 Main Output is now configured for stereo (TRS) operation.
3. To configure the 1/4 Main Output back to mono operation, follow the same steps above and wait for the display to read StErEo oFf.
Speaker Cabinet Compensation (SCC) The Element Series processors are designed to allow you to play your guitar even if you don’t have an amplifier. The built-in Speaker Cabinet Compensation (SCC) feature is what makes this possible. If you’ve ever listened to a direct guitar signal (using no guitar amplifier) then you know how thin and unnatural it can sound. SCC emulates the frequency response of a guitar speaker cabinet, providing the much more pleasant tone which a guitar cabinet reproduces. Use SCC when connecting to headphones, directly to a mixer, or directly to a recording device.
SCC is automatically enabled when only headphones are connected to the Headphone Output (and no cable is connected to the 1/4″ Main Output). If a cable is connected to the Main Output, SCC is defeated, both in the Headphone Output and Main Output. You must enable the SCC feature on the Main Output manually if you wish to connect directly to a recording interface or mixer.
To enable Speaker Cabinet Compensation on the Main Output:
1. Disconnect the power cord from the Element/Element XP processor (unit powered off).
2. Press and hold the TONE BANK button while connecting the power cord. Keep the TONE
BANK button held down until the display reads CabInEt On, then release the button.
22
Speaker Cabinet Compensation is now enabled on all outputs.
NOTE: Once enabled, SCC will remain active only while the unit is powered on. After a power cycle, the SCC enabling procedure must be performed again if you want SCC to be enabled.
Expression Pedal Calibration (Element XP Only) The Expression Pedal on the Element XP comes pre-calibrated from the factory. However, in the event the Expression Pedal does not function properly, it can be re-calibrated using the below Pedal Calibration procedure.
To calibrate the Element XP Expression Pedal:
1. Press and hold both FOOTSWITCHES simultaneously until PC appears in the LED display. All effects and button LEDs will be turned off.
2. When tdn appears in the display, rock the EXPRESSION PEDAL forward (toe down) then press either FOOTSWITCH.
3. When tuP appears in the display, rock the EXPRESSION PEDAL back (toe up) then press either FOOTSWITCH.
4. If the calibration procedure is successful, the Element XP will return to Play Mode and will be ready for use. If the calibration procedure fails, Err will appear in the LED display followed by tdn. If this happens, repeat steps 2 and 3 until calibration is successful.
23
Expression Pedal Assignment (Element XP Only) The Expression Pedal on the Element XP can be assigned to control the Volume, Wah, Whammy, YaYa, or one of several other effects with your foot. You can also assign Minimum (pedal toe up) and Maximum (pedal toe down) values. These Min and Max values will set the range in which the Expression Pedal is allowed to control the assigned effect. The following table shows the effect controls available for Expression Pedal control.
Effects Assignable For Control (Element XP Only) Option (Shown In Display) Effect Controlled (LED Lit) Description
Off No assignment (Expression Pedal off)
PrE PRESET LEVEL Pre-Delay Output Level (level is adjusted before the Delay effectdelay levels will not be affected by level change and will decay naturally)
POS PRESET LEVEL Post-Delay Output Level (level is adjusted after the Delay effectdelay levels will be affected by level change)
AH WAH Expression Pedal acts as a Wah pedal
Gan AMP/DISTORTION Amp Gain
SPE MOD FX Chorus Speed
LEL MOD FX Chorus Level
SPE MOD FX Flanger Speed
LEL MOD FX Flanger Level
SPE MOD FX Phaser Speed
LEL MOD FX Phaser Level
SPE MOD FX Tremolo Speed
dEP MOD FX Tremolo Depth
SPE MOD FX Panner Speed
dEP MOD FX Panner Depth
SPE MOD FX Vibrato Speed
dEP MOD FX Vibrato Depth
SPE MOD FX Rotary Speed
dEP MOD FX Rotary Depth
PEd MOD FX Expression Pedal acts as a YaYa effect
SPE MOD FX AutoYa Speed
dEP MOD FX AutoYa Depth
EnS MOD FX Envelope Filter Sensitivity
LEL MOD FX Detune Level
LEL MOD FX Pitch Shift Level
AhY MOD FX Expression Pedal acts as a Whammy pedal
dEL DELAY Delay Level
dEF DELAY Delay Feedback
rEL REVERB Reverb Level
24
To assign an effect to the Expression Pedal for control and set the Min/Max values:
1. Any effect you wish to assign to the Expression Pedal must be turned on before it can be assigned. For information on turning an effect on, see «Turning Effects On & Off» on page 16.
2. From Play Mode, press the right arrow EDIT button repeatedly until the EXP (Expression) LED is lit. An effect LED will also light indicating which effect the Expression Pedal is currently assigned to and the LED display will show which effect control the Expression Pedal is currently assigned to.
3. Turn the SELECT knob to select the effect control you wish to control (see the table on the previous page for a list of effects selectable for control). As you turn the SELECT knob the effects LED associated with the effect control will light.
4. Once you’ve selected the effect you want to control, press the right arrow EDIT button once. You have now selected the Minimum (pedal toe up) control range. Turn the SELECT knob to set this to the value which you want the Expression Pedal’s full toe up position to represent (the lowest value selectable by the Expression Pedal).
5. Press the right arrow EDIT button once. You have now selected the Maximum (pedal toe down) control range. Turn the SELECT knob to set this to the value which you want the Expression Pedal’s full toe down position to represent (the highest value selectable by the Expression Pedal).
6. Store the changes to a preset for later recall. See «Storing/Copying Presets» on page 17 for further information.
DigiTech Element Music Pedal PDF User Guides and Manuals for Free Download: Found (2) Manuals for DigiTech Element Device Model (Quick Start Manual, Owner’s Manual)
The DigiTech Element is a versatile multi-effects pedal designed specifically for guitarists looking to expand their sound palette without breaking the bank. As a fan of engaging and innovative music gear, I was eager to explore this product and see how it holds up in comparison to standalone pedals and more expensive alternatives. After extensive testing, I am ready to share my experience with the DigiTech Element.
First and foremost, the layout of the DigiTech Element is intuitive and user-friendly. The pedal boasts a sleek design and features an array of knobs, LCD display, and footswitches that make it easy to navigate through its various functions. For musicians who are new to multi-effects pedals, the DigiTech Element is a great introduction. The pedal comes with a broad range of preset sounds, and users can dive into creating their unique tones with relative ease.
One of the standout features of the DigiTech Element is its extensive library of effects, which includes:
- Distortion and Overdrive
- Chorus and Flanger
- Delay and Reverb
- Modulation effects
- Equalization options
Each effect is professionally crafted, allowing musicians to experiment with different genres and styles. I particularly appreciated the analog simulations and how they responded dynamically to playing intensity. The quality of the effects is impressive, especially considering the price point of the DigiTech Element.
Another noteworthy aspect of this pedal is its ability to integrate seamlessly with other music gear. The DigiTech Element features both stereo and mono outputs, making it easy to connect to mixers, amplifiers, or audio interfaces. This flexibility allows for extensive live performance capabilities or studio sessions without the hassle of complicated setups.
However, it’s worth mentioning that the DigiTech Element has its limitations. Some users might find that it doesn’t completely replicate the warmth and character of high-end, boutique pedals. The effects can sometimes feel a bit processed and may not satisfy purists who seek vintage tones. That said, for most players, the DigiTech Element offers sufficient quality and versatility for practice, live shows, and even recording.
Another important feature is the built-in tuner, which is a convenient addition for musicians on the go. The tuner is straightforward and precise, allowing quick adjustments to the guitar’s pitch. Furthermore, the DigiTech Element offers USB connectivity, making it simple to update the pedal’s firmware and explore additional patches via the DigiTech website.
In summary, the DigiTech Element is an impressive and affordable multi-effects pedal that caters to guitarists seeking a balance between quality and value. Its robust library of effects, ease of use, and versatility make it an excellent choice for both beginners and experienced players alike. While it may not satisfy every niche requirement, it certainly excels in providing a broad array of sounds for those looking to experiment with their music. If you’re seeking to enhance your rig without investing a fortune, consider giving the DigiTech Element a try.