
s You can switch the time indication between the 12-hour system and the 24-hour system by pressing the
DISPLAY/MENU button while you are setting the hour or minute.
s You can change the order of the date indication by pressing the DISPLAY/MENU button while you are
setting the year, month, or day.(Example: June 14, 2006)
—
2
— —
4
—
5
—
4
Hold
Set the HOLD switch to the HOLD position.All operation buttons are disabled. This feature isuseful when the recorder has to be carried in ahandbag or pocket.Remember to reset the HOLD switch beforeattempting to use the recorder.Notess The alarm will sound at the scheduled time even ifthe recorder is set to HOLD. The recorder will thenbegin to play the file associated with the alarm onceyou press any button (Excluded VN-1100/VN-1100PC).s The recorder functions as follows with the HOLDswitch set to the HOLD position:– If the recorder is playing, the display goes darkwhen playback of the current file has completed.
–
If the recorder is recording, the display goes darkwhen the recorder stops recording automaticallyupon running out of free memory.E1-BZ8174-02AP0607Current folder
—
3
—
4
To Pause RecordingTo PausePress the REC button during recording.➥ “PAUSE” appears on the display and the record/play indicatorlight flashes.To Resume RecordingPress the REC button again.➥ Recording will resume at the point of interruption.Notes
s If “FULL” appears on the display, you cannot record in the selected folder. In such a case, erase
unnecessary files or download to PC (VN-1100PC/VN-2100PC/VN-3100PC).
s If the recorder is placed directly on a table when recording a meeting, it tends to pick up table vibrations.
Put a notebook or other item between the table and the recorder so that the vibration is not easilytransmitted for clearer recording.
s Even if you press the DISPLAY button, the display will not change to current recording time if the
remaining recording time is 5 minutes or less.
s When remaining recording time falls to 1 minute or less, the Record/play indicator light flashes red.
s The recorder will enter Stop mode if it has been left paused for 60 minutes or longer.
s In case of difficult acoustic conditions or low speaker’s voice, recording in XHQ or HQ is recommended.
Also, usage of an external microphone (sold separately) could improve the quality of recordings.
s The input level cannot be adjusted on this recorder. When you connect the recorder to an external
device, execute a test recording and adjust the output level of the external device.
1
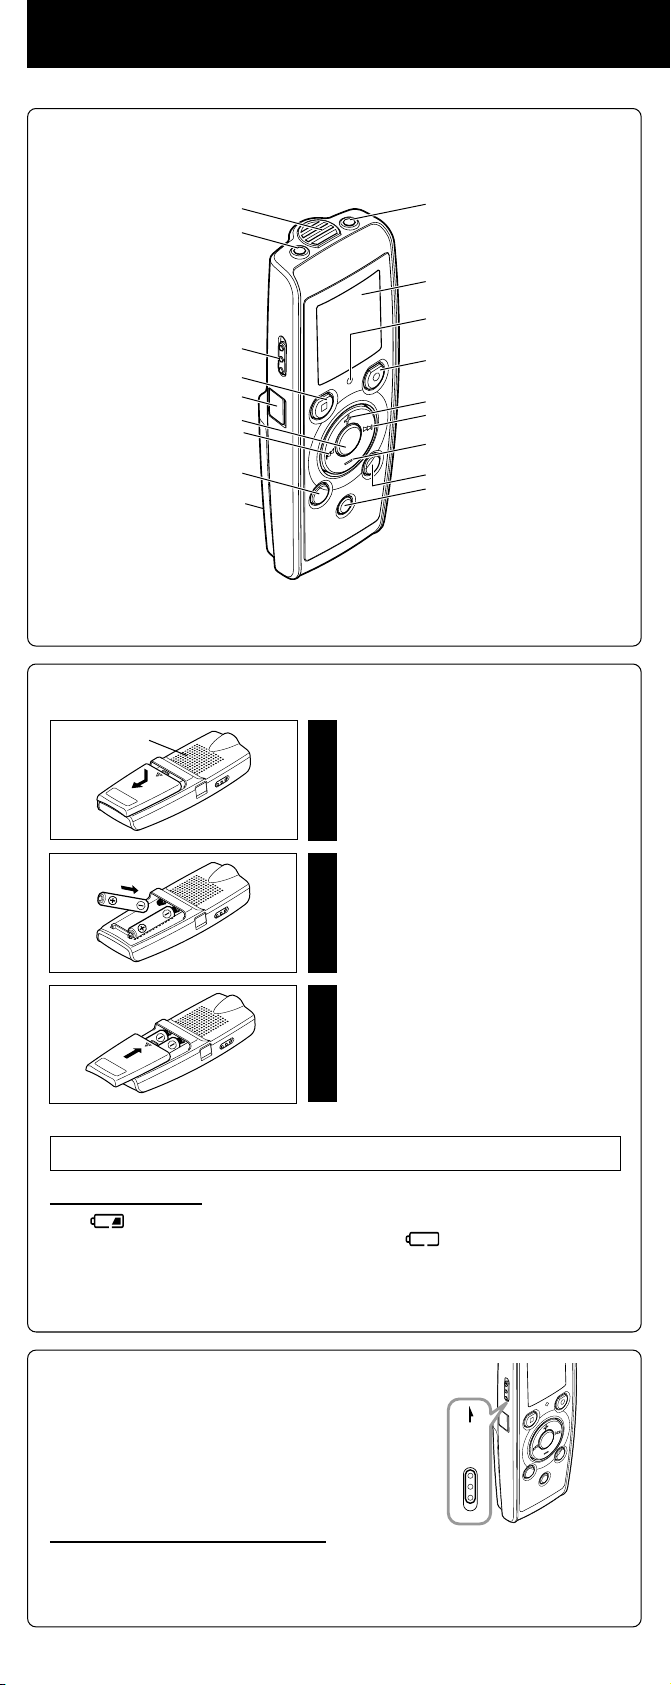
Lightly press down on thearrow and slide the batterycover open.
2
Insert two size-AAA alkalinebatteries, observing the correctpolarity.
3
Close the battery covercompletely.Time/Date screen appears. The hourindicator flashes, indicating the start of theTime/Date setup process. (See “SettingTime/Date (TIME)” for details)An optional Ni-MH Rechargeable Battery (BR401) from Olympus can be used for the recorder.Replacing Batteries
When appears on the display, replace the batteries as soon as possible. Size-AAA alkaline
batteries are recommended. When the batteries are depleted, appears on the display, and therecorder shuts off. It is recommended to set the HOLD switch to the HOLD position before you replacebatteries to maintain the current settings (Time/Date, etc.). For your convenience,the recorder alsologs the current settings in nonvolatile memory at hourly intervals.
4
Inserting Batteries
1
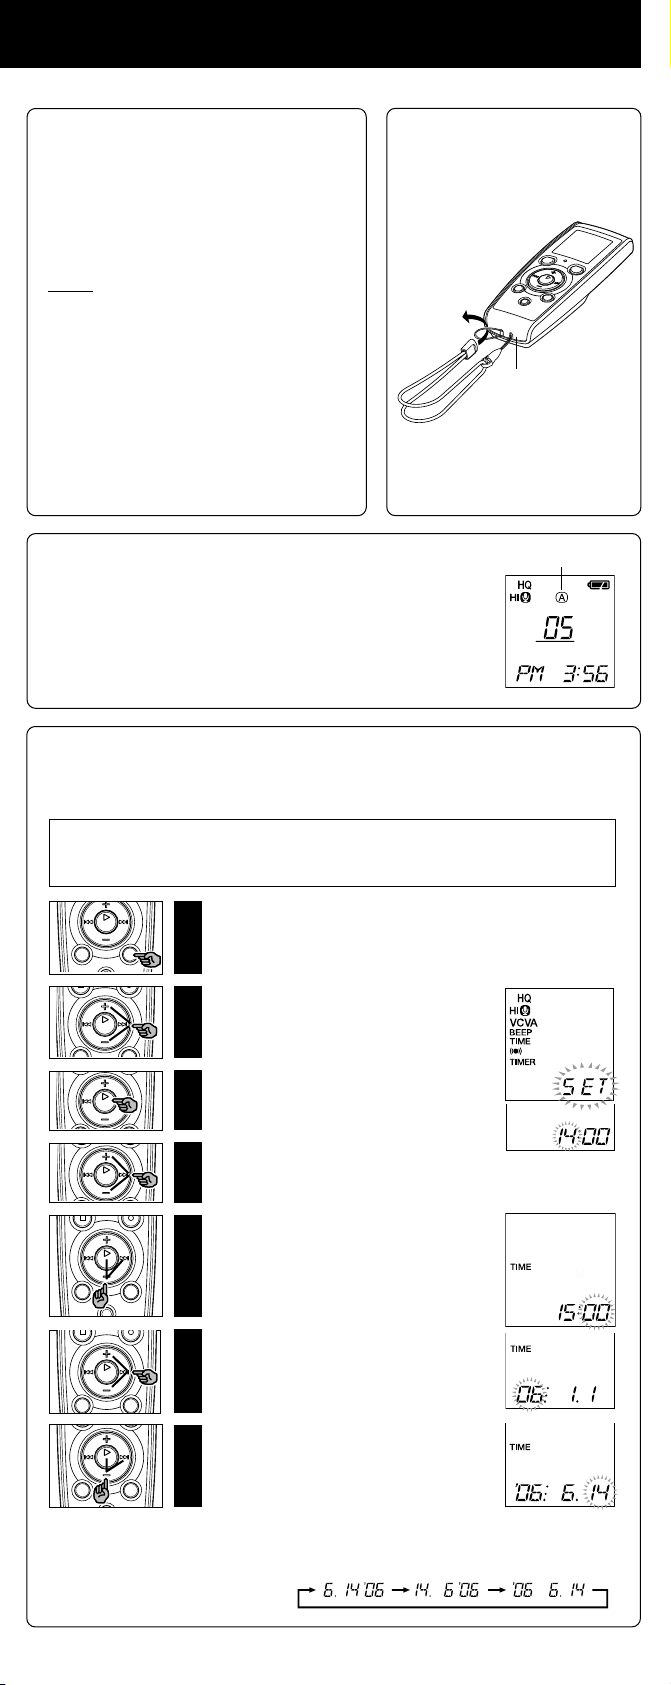
Press and hold the MENUbutton for 1 second or longer.
2
Press the + or – button until“TIME” flashes on thedisplay.
3
Press the PLAY button.The hour indicator flashes.
4
Press the + or – button to setthe hour.
5
Press the PLAY or 9button to accept the minute.The minute indicator flashes.
Pressing the 0 button enables the hour
setting again.
6
Press the + or – button to setthe minute.Repeat steps 5 and 6 to continue to setthe year, month and date in the same way.
7
After setting the date, pressthe PLAY or 9 button.This completes the time/date setupprocedure.
4
Setting Time/Date (TIME)If you have set the time and date, information as to when a sound file was recorded isstored automatically with that file.When you install batteries for the first time or each time you replace the batteries, thehour indication will flash. In such a case, be sure to set the time and date by followingsteps 4 through 7 described below.
4
Notes on the FoldersThe recorder provides four folders, A, B, C, and D (D is for VN-2100/VN-2100PC/VN-3100/VN-3100PC only).To change the folder selection, press the FOLDER button while therecorder is stopped. Each recorded file is stored in a folder. Using foldersto classify files makes it convenient to find files you want to accesslater. Up to a total of 100 files can be recorded in each folder.
4
Recording from External Microphone or Other DevicesThe external microphone and other devices can be connected andthe sound can be recorded.s When the external microphone is connected to the microphone jack of therecorder, the built-in microphone will not operate.s When using an external microphone, choose adequate microphone, such as aNoise-Cancellation microphone or Electret condenser microphone (optional).s When connecting an external equipment, use the connecting cord KA333 (optional).
—
1
—
4
How to Use the Strap
4
Power SupplyThe HOLD switch functions as a power button. When youdo not use the recorder, set the HOLD switch to the HOLDposition while the recorder is stopped. This will power offthe recorder and minimize the battery drain.Power on…Reset the HOLD switch.Power off…Set the HOLD switch to the HOLD position.Standby Mode and Display Shut OffIf the recorder is stopped or paused for 60 minutes or longer during recording or play back,it goes into Standby (power-save) mode, and the display shuts off. To exit Standby modeand turn on the display, press any button.Earphone jackMicrophone jackStrap hole
4
LCD Display Information
You can select an option for the display of the recorder. This help review and confirm different
recorder settings and file information.
RecordingGetting Started Playing Back
1
Press the FOLDER button toselect the desired folder.
2
Press the 9 or 0 button
to select the file to play back.
3
Press the PLAY button tostart playback.The Record/play indicator light turnsgreen, and the elapsed playing time isindicated on the display.
4
Press the + or – button to selectthe proper sound volume.The display shows the volume level. Youcan choose between 0 to 30.
1
Press the FOLDER button toselect the desired folder
2
Press the REC button to startrecording.The Record/play indicator light turns red,and recording starts.
3
To stop recording, press theSTOP button.New recordings are saved as the last filein the folder.
4 Identification of Parts
a Current folderb Current recording
mode
c Current file numberd Recording timee Remaining recording
time
b
c
A audio inputterminal ofother devicesb Current file numberc Playing time
DIGITAL VOICE RECORDER
VN-3100/VN-3100PC
VN-1100/VN-1100PC
INSTRUCTIONS
Thank you for purchasing an OlympusDigital Voice Recorder.Please read these instructions for informationabout using the product correctly and safely.Keep the instructions handy for future reference.To ensure successful recordings, we recommend thatyou test the record function and volume before use.Record/play indicator lightDisplay (LCD panel)DISPLAY/MENU buttonERASE buttonHold switchBuilt-in speakerBattery coverBuilt-in MicrophoneREC (Record) buttonSTOP buttonPLAY button9 (Fast Forward) button0 (Rewind) button+ button– button
4
Canceling PlaybackTo StopPress the STOP button.➥ The recorder stops in the middle of the file being played.To Resume PlaybackPress the PLAY button again.➥ Playback will resume at the point of interruption.
s
The end of the file is located by pressing and holding the 9 button during fast forwarding. The recorder will
pause at the end of the file. If you do not release the 9 button, the recorder will continue fast forward.
s
The beginning of the file is located by pressing and holding the 0 button during rewinding. The recorder will
pause at the beginning of the file. If you do not release the 0 button, the recorder will continue rewinding.
s When the index mark is shown in the middle of a file, it will stop temporarily in the position of the index mark.
4
Changing Playing SpeedYou can change the playing speed by pressing the PLAY button whilethe recorder is playing back.
s When the slow playback mode is selected, the “SLOW” appears and, for the fast playback mode,
“FAST” appears on the display while the recorder is playing back.
s The recorder stops playing when you press the STOP button while playing back in the slow/fast mode,
or when it reaches to the end of the file. If you once press the STOP button and start playback again,the recorder will play back files in normal speed as well.
4
Locating the Beginning of the File
While the recorder is playing back or playing back in slow/fast mode, pressing the 9 or 0
button forwards or rewinds to the beginning of the next file or the file being played respectively. If anindex mark is encountered midway, playback begins at that point. (See “Index Marks” for details)
4
Listening with EarphonesYou can listen to files by connecting earphones to the earphone jack.If an earphone is connected, the speaker doesn’t emit sound. Sound willbe played back monaurally.
s To avoid irritation to the ear, insert the earphone after turn down the volume level.
s When you listen with the earphone during playback, do not raise the volume toomuch. It may cause hearing impairment and decrease in hearing ability.
*Earphones are not supplied. You can use any standard 3.5mm monaural earphone or headphone.
4
Forwarding and RewindingFast ForwardPress and hold the 9 button while playing a file.
➥ When you release the 9 button, the recorder will resume
normal playback.RewindPress and hold the 0 button while playing a file.
➥ When you release the 0 button, the recorder will resume
normal playback.Normal speed Slow playback(-25%) Fast playback (+50%)* PC (USB) terminal….VN-1100PC/VN-2100PC/VN-3100PCState of therecorderWhile in stop
mode
While inrecord modeWhile in stopmode orplayback modeOperationPress and holdthe STOP buttonPress theDISPLAY buttonPress theDISPLAY buttonDisplayThe total number of files recorded in the folder andremaining recording time appears on the display.The display switches between current recording time andremaining recording time.Playing time → Remaining playing time → Recording date
of the file → Recording time of the file → Playing time . . .
USB terminal*For customers in North and South AmericaUSA RFIThis equipment has been tested and found to comply with the limits for a Class B digitaldevice, pursuant to part 15 of the FCC Rules. These limits are designed to provide reason-able protection against harmful interference in a residential installation. This equipment gen-erates, uses and can radiate radio frequency energy and, if not installed and used in accor-dance with the instructions, may cause harmful interference to radio communications. How-ever, there is no guarantee that interference will not occur in a particular installation. If thisequipment does cause harmful interference to radio or television reception, which can bedetermined by turning the equipment off and on, the user is encouraged to try to correct theinterference by one or more of the following measures:• Reorient or relocate the receiving antenna.• Increase the separation between the equipment and receiver.
• Connect the equipment into an outlet on a circuit different from that to which the receiver is
connected.• Consult the dealer or an experienced radio/TV technician for help.Canadian RFIThis digital apparatus does not exceed the Class B limits for radio noise emissions fromdigital apparatus as set out in the Radio Interference Regulations of the Canadian Depart-ment of Communications.Cet appareil numérique ne dépasse pas les limites de Catégorie B pour les émissions debruit radio émanant d’appareils numériques, tel que prévu dans les Règlements surl’Interférence Radio du Département Canadien des Communications.For customers in Europe“CE” mark indicates that this product complies with the Europeanrequirements for safety, health, environment and customer protection.This symbol [crossed-out wheeled bin WEEE Annex IV] indicates separate collectionof waste electrical and electronic equipment in the EU countries. Please do not throwthe equipment into the domestic refuse. Please use the return and collection systemsavailable in your country for the disposal of this product.Applicable Product : VN-3100/VN-3100PC/VN-2100/VN-2100PC/VN-1100/VN-1100PC
HOLD
*Strap is not supplied.Use the optional accessory.
c
d
a Current folderFOLDER/INDEX button
DIGITAL VOICE RECORDER
VN-3100/VN-3100PC
VN-2100/VN-2100PC
VN-1100/VN-1100PC
EN
INSTRUCTIONS
Thank you for purchasing an Olympus
Please read these instructions for information
about using the product correctly and safely.
Keep the instructions handy for future reference.
To ensure successful recordings, we recommend that
you test the record function and volume before use.
Digital Voice Recorder.
For customers in North and South America
USA RFI
This equipment has been tested and found to comply with the limits for a Class B digital
device, pursuant to part 15 of the FCC Rules. These limits are designed to provide reasonable protection against harmful interference in a residential installation. This equipment generates, uses and can radiate radio frequency energy and, if not installed and used in accordance with the instructions, may cause harmful interference to radio communications. However, there is no guarantee that interference will not occur in a particular installation. If this
equipment does cause harmful interference to radio or television reception, which can be
determined by turning the equipment off and on, the user is encouraged to try to correct the
interference by one or more of the following measures:
• Reorient or relocate the receiving antenna.
• Increase the separation between the equipment and receiver.
• Connect the equipment into an outlet on a circuit different from that to which the receiver is
connected.
• Consult the dealer or an experienced radio/TV technician for help.
Canadian RFI
This digital apparatus does not exceed the Class B limits for radio noise emissions from
digital apparatus as set out in the Radio Interference Regulations of the Canadian Department of Communications.
Cet appareil numérique ne dépasse pas les limites de Catégorie B pour les émissions de
bruit radio émanant d’appareils numériques, tel que prévu dans les Règlements sur
l’Interférence Radio du Département Canadien des Communications.
For customers in Europe
“CE” mark indicates that this product complies with the European
requirements for safety, health, environment and customer protection.
This symbol [crossed-out wheeled bin WEEE Annex IV] indicates separate collection
of waste electrical and electronic equipment in the EU countries. Please do not throw
the equipment into the domestic refuse. Please use the return and collection systems
available in your country for the disposal of this product.
Applicable Product : VN-3100/VN-3100PC/VN-2100/VN-2100PC/VN-1100/VN-1100PC
E1-BZ8174-02
AP0607
—
1
—
Getting Started
4 Identification of Parts
Built-in Microphone
Microphone jack
Hold switch
STOP button
USB terminal*
PLAY button
0 (Rewind) button
FOLDER/INDEX button
Battery cover
Inserting Batteries
4
Built-in speaker
Earphone jack
Display (LCD panel)
Record/play indicator light
REC (Record) button
+ button
9 (Fast Forward) button
– button
DISPLAY/MENU button
ERASE button
* PC (USB) terminal….
VN-1100PC/VN-2100PC/VN-3100PC
Lightly press down on the
arrow and slide the battery
1
cover open.
Insert two size-AAA alkaline
batteries, observing the correct
2
polarity.
Close the battery cover
completely.
3
Time/Date screen appears. The hour
indicator flashes, indicating the start of the
Time/Date setup process. (See “Setting
Time/Date (TIME)” for details)
An optional Ni-MH Rechargeable Battery (BR401) from Olympus can be used for the recorder.
Replacing Batteries
When appears on the display, replace the batteries as soon as possible. Size-AAA alkaline
batteries are recommended. When the batteries are depleted,
recorder shuts off. It is recommended to set the HOLD switch to the HOLD position before you replace
batteries to maintain the current settings (Time/Date, etc.). For your convenience,the recorder also
logs the current settings in nonvolatile memory at hourly intervals.
Power Supply
4
The HOLD switch functions as a power button. When you
do not use the recorder, set the HOLD switch to the HOLD
position while the recorder is stopped. This will power off
the recorder and minimize the battery drain.
Power on…Reset the HOLD switch.
Power off…Set the HOLD switch to the HOLD position.
Standby Mode and Display Shut Off
If the recorder is stopped or paused for 60 minutes or longer during recording or play back,
it goes into Standby (power-save) mode, and the display shuts off. To exit Standby mode
and turn on the display, press any button.
appears on the display, and the
HOLD
—
2
—
Hold
4
Set the HOLD switch to the HOLD position.
All operation buttons are disabled. This feature is
useful when the recorder has to be carried in a
handbag or pocket.
Remember to reset the HOLD switch before
attempting to use the recorder.
Notes
s The alarm will sound at the scheduled time even if
the recorder is set to HOLD. The recorder will then
begin to play the file associated with the alarm once
you press any button (Excluded VN-1100/VN1100PC).
s The recorder functions as follows with the HOLD
switch set to the HOLD position:
– If the recorder is playing, the display goes dark
when playback of the current file has completed.
If the recorder is recording, the display goes dark
–
when the recorder stops recording automatically
upon running out of free memory.
How to Use the
4
Strap
*Strap is not supplied.
Use the optional accessory.
Strap hole
Notes on the Folders
4
The recorder provides four folders, A, B, C, and D (D is for VN-2100/
VN-2100PC/VN-3100/VN-3100PC only).
To change the folder selection, press the FOLDER button while the
recorder is stopped. Each recorded file is stored in a folder. Using folders
to classify files makes it convenient to find files you want to access
later. Up to a total of 100 files can be recorded in each folder.
Setting Time/Date (TIME)
4
If you have set the time and date, information as to when a sound file was recorded is
stored automatically with that file.
When you install batteries for the first time or each time you replace the batteries, the
hour indication will flash. In such a case, be sure to set the time and date by following
steps 4 through 7 described below.
Press and hold the MENU
button for 1 second or longer.
1
Press the + or – button until
“TIME” flashes on the
2
display.
Press the PLAY button.
The hour indicator flashes.
3
Current folder
Press the + or – button to set
the hour.
4
Press the PLAY or 9
button to accept the minute.
5
The minute indicator flashes.
Pressing the 0 button enables the hour
setting again.
Press the + or – button to set
the minute.
6
Repeat steps 5 and 6 to continue to set
the year, month and date in the same way.
After setting the date, press
the PLAY or 9 button.
7
This completes the time/date setup
procedure.
s You can switch the time indication between the 12-hour system and the 24-hour system by pressing the
DISPLAY/MENU button while you are setting the hour or minute.
s You can change the order of the date indication by pressing the DISPLAY/MENU button while you are
setting the year, month, or day.
(Example: June 14, 2006)
—
3
—
Loading…
E1-BZ8174-03
AP0701
— 1 —
DIGITAL VOICE RECORDER
VN-4100/VN-4100PC
VN-3100/VN-3100PC
VN-2100/VN-2100PC
VN-1100/VN-1100PC
EN
INSTRUCTIONS
Thank you for purchasing an Olympus
Digital Voice Recorder.
Please read these instructions for information
about using the product correctly and safely.
Keep the instructions handy for future reference.
To ensure successful recordings, we recommend that
you test the record function and volume before use.
For customers in North and South America
USA RFI
This equipment has been tested and found to comply with the limits for a Class B digital
device, pursuant to part 15 of the FCC Rules. These limits are designed to provide reason-
able protection against harmful interference in a residential installation. This equipment gen-
erates, uses and can radiate radio frequency energy and, if not installed and used in accor-
dance with the instructions, may cause harmful interference to radio communications. How-
ever, there is no guarantee that interference will not occur in a particular installation. If this
equipment does cause harmful interference to radio or television reception, which can be
determined by turning the equipment off and on, the user is encouraged to try to correct the
interference by one or more of the following measures:
• Reorient or relocate the receiving antenna.
• Increase the separation between the equipment and receiver.
• Connect the equipment into an outlet on a circuit different from that to which the receiver is
connected.
• Consult the dealer or an experienced radio/TV technician for help.
Canadian RFI
This digital apparatus does not exceed the Class B limits for radio noise emissions from
digital apparatus as set out in the Radio Interference Regulations of the Canadian Depart-
ment of Communications.
Cet appareil numérique ne dépasse pas les limites de Catégorie B pour les émissions de
bruit radio émanant d’appareils numériques, tel que prévu dans les Règlements sur
l’Interférence Radio du Département Canadien des Communications.
For customers in Europe
“CE” mark indicates that this product complies with the European
requirements for safety, health, environment and customer protection.
This symbol [crossed-out wheeled bin WEEE Annex IV] indicates separate collection
of waste electrical and electronic equipment in the EU countries. Please do not throw
the equipment into the domestic refuse. Please use the return and collection systems
available in your country for the disposal of this product.
Applicable Product : VN-4100/VN-4100PC/VN-3100/VN-3100PC/VN-2100/VN-2100PC/
VN-1100/VN-1100PC
Перейти к контенту
Диктофоны Olympus
- Размер инструкции: 3.27 Мб
- Формат файла: pdf
Если вы потеряли инструкцию от диктофона Olympus VN-2100(PC), можете скачать файл для просмотра на компьютере или печати.
Инструкция для диктофона Olympus VN-2100(PC) на русском языке. В руководстве описаны возможности и полезные функции, а также правила эксплуатации. Перед использованием внимательно ознакомьтесь с инструкцией.
Чтобы не читать всю инструкцию вы можете выполнить поиск по содержимому внутри инструкции и быстро найти необходимую информацию. Рекомендации по использованию помогут увеличить срок службы диктофона Olympus VN-2100(PC). Если у вас появилась проблема, то найдите раздел с описанием неисправностей и способами их решения. В нем указаны типичные поломки и способы их решения.
Краткое содержание страницы № 1
DIGITAL VOICE RECORDER
VN-4100/VN-4100PC
VN-3100/VN-3100PC
VN-2100/VN-2100PC
VN-1100/VN-1100PC
EN
INSTRUCTIONS
Thank you for purchasing an Olympus
Digital Voice Recorder.
Please read these instructions for information
about using the product correctly and safely.
Keep the instructions handy for future reference.
To ensure successful recordings, we recommend that
you test the record function and volume before use.
For customers in North and South America
USA RFI
This equipment has been tested a
Краткое содержание страницы № 2
HOLD Getting Started 4 Identification of Parts Earphone jack Built-in Microphone Microphone jack Display (LCD panel) Record/play indicator light Hold switch REC (Record) button STOP button USB terminal* + button 9 (Fast Forward) button PLAY button 0 (Rewind) button – button FOLDER/INDEX button DISPLAY/MENU button ERASE button Battery cover * PC (USB) terminal…. VN-1100PC/VN-2100PC/VN-3100PC/VN-4100PC Inserting Batteries 4 Lightly press down on the Built-in speaker arrow and slide the battery 1
Краткое содержание страницы № 3
How to Use the Hold 4 4 Strap Set the HOLD switch to the HOLD position. All operation buttons are disabled. This feature is useful when the recorder has to be carried in a handbag or pocket. Remember to reset the HOLD switch before attempting to use the recorder. Notes s The alarm will sound at the scheduled time even if the recorder is set to HOLD. The recorder will then begin to play the file associated with the alarm once you press any button (Excluded VN-1100/VN- Strap hole 1100PC). s The r
Краткое содержание страницы № 4
Recording a Press the FOLDER button to select the desired folder 1 b Press the REC button to start recording. 2 The Record/play indicator light turns red, c and recording starts. d e To stop recording, press the a Current folder STOP button. 3 b Current recording New recordings are saved as the last file mode in the folder. c Current file number d Recording time e Remaining recording time To Pause Recording 4 To Pause Press the REC button during recording. ➥ “PAUSE” appears on the display and th
Краткое содержание страницы № 5
Playing Back a Press the FOLDER button to select the desired folder. 1 Press the 9 or 0 button to select the file to play back. 2 a Current folder Press the PLAY button to 3 start playback. b The Record/play indicator light turns green, and the elapsed playing time is indicated on the display. c b Current file number Press the + or – button to select c Playing time the proper sound volume. 4 The display shows the volume level. You can choose between 0 to 30. Canceling Playback 4 To Stop Press th
Краткое содержание страницы № 6
Erase Erasing 4 You can easily erase unnecessary files. Sequential file numbers are reassigned automatically. Erasing One File at a Time Press the FOLDER button to select folder. 1 Press the 9 or 0 button to select the file to 2 be erased. Press the ERASE button. 3 File to be erased Press the 9 or 0 button to select the “YES”. 4 Press the PLAY button. 5 Erase All Files from a Folder Press the FOLDER button to select folder. 1 Press the ERASE button twice. 2 Folder to be erased Press the 9 or 0 b
Краткое содержание страницы № 7
Menu Basic Operation of the Menu Mode 4 Using the menu function, you can change various settings according to your preference. Press and hold the MENU button for 1 second or longer 1 while the recorder is stopped. Press the + or – button to select what you would like to 2 set up. The selected menu item flashes. Use the 9 or 0 button to change the setting. 3 Press the PLAY button to confirm the setting. 4 Press the STOP button to close the menu. 5 Menu setting screen Move the selection one positi
Краткое содержание страницы № 8
Microphone Microphone Sensitivity (HI LOW) 4 sensitivity display Microphone sensitivity is adjustable to meet your recording needs. In Menu mode selection… HI, LOW HI: High-sensitivity mode that records sounds in all directions. LOW: Low-sensitivity mode suited for dictation. s To ensure successful recording, make a test recording to choose appropriate microphone sensitivity before recording. s If you choose “HI”, we recommend setting the recording mode to XHQ or HQ to best take advantage of
Краткое содержание страницы № 9
Other Functions Moving File Between Folders 4 (Excluded VN-1100/VN-1100PC) a You can move files recorded in folders A, B, C and D to other folders. The moved file is added at to the end of the destination folder. 1 Choose the file you want to transfer and press the PLAY button b to play it. 2 Press and hold the MENU button for 1 second or longer while the file is playing. a Destination folder b Destination 3 Press the 9 or 0 button to choose a destination folder. number of the file 4 Press
Краткое содержание страницы № 10
Batteries Warning • Batteries should never be exposed to flame, heated, short-circuited or disassembled. • Do not attempt to recharge alkaline, lithium or any other non-rechargeable batteries. • Never use any battery with a torn or cracked outer cover. • Keep batteries out of the reach of children. • If you notice anything unusual when using this product such as abnormal noise, heat, smoke, or a burning odor: 1 remove the batteries immediately while being careful not to burn yourself, and; 2 cal