

1. Before You Begin………………………………………………………………………………………………………………. 6
What is Included ………………………………………………………………………………………………………………………………. 6
Claims …………………………………………………………………………………………………………………………………………….. 6
Text Conventions………………………………………………………………………………………………………………………………. 6
Symbols ………………………………………………………………………………………………………………………………………….. 6
Disclaimer ……………………………………………………………………………………………………………………………………….. 6
Safety Notes …………………………………………………………………………………………………………………………………….. 7
2. Introduction ……………………………………………………………………………………………………………………… 7
Features ………………………………………………………………………………………………………………………………………….. 7
Product Description …………………………………………………………………………………………………………………………… 7
Programming Concept ……………………………………………………………………………………………………………………….. 8
Layout of the Board Channels …………………………………………………………………………………………………………… 8
Layout of the Scenes ………………………………………………………………………………………………………………………. 8
Product Overview ……………………………………………………………………………………………………………………………… 8
Control Descriptions ………………………………………………………………………………………………………………………….. 8
Product Overview (back panel) ……………………………………………………………………………………………………………. 9
Connections Descriptions …………………………………………………………………………………………………………………… 9
3. Setup ……………………………………………………………………………………………………………………………… 10
AC Power ………………………………………………………………………………………………………………………………………. 10
Mounting ………………………………………………………………………………………………………………………………………. 10
DMX Addressing ……………………………………………………………………………………………………………………………… 10
Signal Output ………………………………………………………………………………………………………………………………. 10
Physical Fader Assignment …………………………………………………………………………………………………………….. 10
Copying Physical Fader Assignment …………………………………………………………………………………………………. 11
Fader Reverse (0~255/255~0) …………………………………………………………………………………………………………. 11
Resetting the System …………………………………………………………………………………………………………………….. 11
4. Programming ………………………………………………………………………………………………………………….. 12
Entering Program Mode …………………………………………………………………………………………………………………… 12
Exiting Program Mode ……………………………………………………………………………………………………………………… 12
Creating a Scene ……………………………………………………………………………………………………………………………… 12
Create a Chase ……………………………………………………………………………………………………………………………….. 12
Chase Modifications ……………………………………………………………………………………………………………………… 13
Adding a Step to a Chase ……………………………………………………………………………………………………………………………..13
Delete a Scene/Step in a Chase……………………………………………………………………………………………………………………..13
Copy a Bank into a Chase …………………………………………………………………………………………………………………………….13
5. Programming Modifica tions ……………………………………………………………………………………………… 13
Delete One Scene ……………………………………………………………………………………………………………………………. 13
Delete All Scenes …………………………………………………………………………………………………………………………….. 13
Delete a Chase ……………………………………………………………………………………………………………………………….. 13
Delete All Chases …………………………………………………………………………………………………………………………….. 13
Delete a Bank of Scenes ……………………………………………………………………………………………………………………. 13
6. Playback …………………………………………………………………………………………………………………………. 14
Scene Playback ……………………………………………………………………………………………………………………………….. 14
Manual Scene Playback (Single) ………………………………………………………………………………………………………. 14
Auto Bank Playback ………………………………………………………………………………………………………………………. 14
Music Bank Playback …………………………………………………………………………………………………………………….. 14
Page 2 of 44 Obey™ 40 User Manual Rev. 5 ML

Chase Playback …………………………………………………………………………………………………………………………….. 14
Auto Chase Playback …………………………………………………………………………………………………………………….. 14
Music Chase Playback ……………………………………………………………………………………………………………………. 14
Playback Modifications …………………………………………………………………………………………………………………….. 14
MIDI Operation ……………………………………………………………………………………………………………………………. 14
Setting the MIDI Channel ……………………………………………………………………………………………………………….. 15
MIDI Configuration (Response) ………………………………………………………………………………………………………….. 15
Tap Sync ………………………………………………………………………………………………………………………………………… 15
Fog Control ……………………………………………………………………………………………………………………………………. 15
Strobe Control ………………………………………………………………………………………………………………………………… 15
7. Technical Information ………………………………………………………………………………………………………. 16
Maintenance ………………………………………………………………………………………………………………………………….. 16
Technical Specifications ……………………………………………………………………………………………………………………. 17
Returns …………………………………………………………………………………………………………………………………………. 18
1. Antes De Empezar …………………………………………………………………………………………………………… 19
Qué va Incluido ………………………………………………………………………………………………………………………………. 19
Reclamaciones ……………………………………………………………………………………………………………………………….. 19
Convenciones de Texto …………………………………………………………………………………………………………………….. 19
Símbolos ……………………………………………………………………………………………………………………………………….. 19
Exención de Responsabilidad …………………………………………………………………………………………………………….. 19
Notas de Seguridad …………………………………………………………………………………………………………………………. 20
2. Introducción ……………………………………………………………………………………………………………………. 20
Características ………………………………………………………………………………………………………………………………… 20
Descripción del Producto ………………………………………………………………………………………………………………….. 20
Concepto de Programación ………………………………………………………………………………………………………………. 21
Disposición de los Canales del Panel ………………………………………………………………………………………………… 21
Disposición de las Escenas ……………………………………………………………………………………………………………… 21
Visión General del Producto ……………………………………………………………………………………………………………… 21
Descripciones de Control ………………………………………………………………………………………………………………….. 21
Visión General del Producto (Panel Posterior) ………………………………………………………………………………………. 22
Descripción de las Conexiones …………………………………………………………………………………………………………… 22
3. Instalación………………………………………………………………………………………………………………………. 23
Corriente Alterna…………………………………………………………………………………………………………………………….. 23
Montaje ………………………………………………………………………………………………………………………………………… 23
Asignación de Direcciones DMX …………………………………………………………………………………………………………. 23
Salida de Señal …………………………………………………………………………………………………………………………….. 23
Asignación del Fader Físico …………………………………………………………………………………………………………….. 23
Copiar la Asignación del Fader Físico………………………………………………………………………………………………… 24
Fader Inverso (0~255/255~0) …………………………………………………………………………………………………………. 24
Reiniciar el Sistema ………………………………………………………………………………………………………………………. 24
4. Programación …………………………………………………………………………………………………………………. 24
Entrar en el Modo de Programa. ………………………………………………………………………………………………………… 24
Salir del Modo de Programa. …………………………………………………………………………………………………………….. 24
Crear una Escena …………………………………………………………………………………………………………………………….. 25
Crear una Secuencia ………………………………………………………………………………………………………………………… 25
Modificaciones de Secuencia ………………………………………………………………………………………………………….. 25
Añadir un Paso a una Secuencia ……………………………………………………………………………………………………………………25
Borrar una Escena/Paso en una Secuencia ………………………………………………………………………………………………………25
Copiar un Banco en una Secuencia ………………………………………………………………………………………………………………..25
Obey™ 40 User Manual Rev. 5 ML Page 3 of 44

5. Modificacion es De Programación ……………………………………………………………………………………… 26
Borrar una Escena …………………………………………………………………………………………………………………………… 26
Borrar Todas las Escenas ………………………………………………………………………………………………………………….. 26
Borrar una Secuenciae ……………………………………………………………………………………………………………………… 26
Borrar Todas las Secuencias ………………………………………………………………………………………………………………. 26
Borrar un Banco de Escenas ………………………………………………………………………………………………………………. 26
6. Reproducción …………………………………………………………………………………………………………………. 26
Reproducción de Escena …………………………………………………………………………………………………………………… 26
Reproducción manual de escena (única) …………………………………………………………………………………………… 26
Reproducción Automática de Banco ………………………………………………………………………………………………… 26
Reproducción de Banco de Música ………………………………………………………………………………………………….. 27
Reproducción de Secuencia ……………………………………………………………………………………………………………. 27
Reproducción de Secuencia Automática …………………………………………………………………………………………… 27
Reproducción de Secuencia Musical ………………………………………………………………………………………………… 27
Modificaciones de la Reproduccións …………………………………………………………………………………………………… 27
Funcionamiento MIDI ……………………………………………………………………………………………………………………. 27
Configurar el Canal MIDI ………………………………………………………………………………………………………………… 27
MIDI Configuration (Response) ………………………………………………………………………………………………………….. 28
Sincronización al Toque ……………………………………………………………………………………………………………………. 28
Control de Niebla ……………………………………………………………………………………………………………………………. 28
Control de Estroboscopio …………………………………………………………………………………………………………………. 28
7. Información Técnica ………………………………………………………………………………………………………… 29
Mantenimiento ………………………………………………………………………………………………………………………………. 29
Especificaciones Técnicas …………………………………………………………………………………………………………………. 29
Devoluciones ………………………………………………………………………………………………………………………………….. 30
1. Avant De Commencer ………………………………………………………………………………………………………. 31
Ce qui est Compris …………………………………………………………………………………………………………………………… 31
Réclamations ………………………………………………………………………………………………………………………………….. 31
Conventions de Texte ………………………………………………………………………………………………………………………. 31
Symboles……………………………………………………………………………………………………………………………………….. 31
Clause de non Responsabilité ……………………………………………………………………………………………………………. 31
Consignes de Sécurité ………………………………………………………………………………………………………………………. 32
2. Introduction ……………………………………………………………………………………………………………………. 33
Caractéristiques ……………………………………………………………………………………………………………………………… 33
Description de l’appareil …………………………………………………………………………………………………………………… 33
Concept de Programmation ………………………………………………………………………………………………………………. 33
Disposition de la Console d’éclairage ……………………………………………………………………………………………….. 33
Disposition des Scènes ………………………………………………………………………………………………………………….. 33
Vue d’Ensemble du Produit……………………………………………………………………………………………………………….. 34
Description du Tableau de Commandes ………………………………………………………………………………………………. 34
Vue d’ensemble de l’appareil (Panneau Arrière) …………………………………………………………………………………… 35
Descriptions des Connexions …………………………………………………………………………………………………………….. 35
3. Configuration ………………………………………………………………………………………………………………….. 36
Alimentation CA ……………………………………………………………………………………………………………………………… 36
Installation …………………………………………………………………………………………………………………………………….. 36
Configuration des Adresses DMX ……………………………………………………………………………………………………….. 36
Sortie de Signal ……………………………………………………………………………………………………………………………. 36
Attribution du Potentiomètre Physique ……………………………………………………………………………………………. 36
Attribution du Potentiomètre Physique ……………………………………………………………………………………………. 37
Page 4 of 44 Obey™ 40 User Manual Rev. 5 ML

Potentiomètre Inversé (0~255/255~0) ……………………………………………………………………………………………… 37
Réinitialisation du Système …………………………………………………………………………………………………………….. 37
4. Programmation ……………………………………………………………………………………………………………….. 38
Entrer dans le Mode Programmation ………………………………………………………………………………………………….. 38
Sortir du Mode Programmation …………………………………………………………………………………………………………. 38
Créer une Scène ……………………………………………………………………………………………………………………………… 38
Créer un Chenillard………………………………………………………………………………………………………………………….. 38
Modifications Apportées au Chenillard …………………………………………………………………………………………….. 39
Ajouter un pas à un Chenillard………………………………………………………………………………………………………………………39
Supprimer une Scène/un pas d’un Chenillard …………………………………………………………………………………………………..39
Copier une Banque dans un Chenillard …………………………………………………………………………………………………………..39
5. Modifications Apportees Aux Programmes ……………………………………………………………………….. 39
Supprimer une Scène ………………………………………………………………………………………………………………………. 39
Supprimer Toutes les Scènes …………………………………………………………………………………………………………….. 39
Supprimer un Chenillard …………………………………………………………………………………………………………………… 39
Supprimer Tous les Chenillards ………………………………………………………………………………………………………….. 39
Supprimer une Banque de Scènes ………………………………………………………………………………………………………. 39
6. Lecture …………………………………………………………………………………………………………………………… 40
Lecture de Scène …………………………………………………………………………………………………………………………….. 40
Lecture Manuelle de Scène (simple) ………………………………………………………………………………………………… 40
Lecture Automatique de Banque …………………………………………………………………………………………………….. 40
Lecture d’une Banque de Musique ………………………………………………………………………………………………….. 40
Lecture de Chenillards …………………………………………………………………………………………………………………… 40
Lecture Automatique de Chenillard …………………………………………………………………………………………………. 40
Lecture de Chenillards de Musique ………………………………………………………………………………………………….. 40
Modifications Apportées à la Lecture ………………………………………………………………………………………………….. 41
Fonctionnement MIDI …………………………………………………………………………………………………………………… 41
Configurer le Canal MIDI………………………………………………………………………………………………………………… 41
Configuration MIDI (réponse) ……………………………………………………………………………………………………………. 41
Tap Sync ………………………………………………………………………………………………………………………………………… 41
Commande du Brouillard ………………………………………………………………………………………………………………….. 42
Commande du Stroboscope………………………………………………………………………………………………………………. 42
7. Informations Techniques …………………………………………………………………………………………………. 43
Entretien ……………………………………………………………………………………………………………………………………….. 43
Spécificités Techniques …………………………………………………………………………………………………………………….. 43
Renvois …………………………………………………………………………………………………………………………………………. 44
Contact Us……………………………………………………………………………………………………………………………………… 44
Obey™ 40 User Manual Rev. 5 ML Page 5 of 44
1. Before You Beg i n
If the box or the contents appear damaged from shipping, or show signs of
mishandling, notify the carrier immediately, not CHAUVET®. Failure to do so in a
timely manner may invalidate your claim with the carrier. In addition, keep the
all the packing material for inspection. For other issues, such as
missing components or parts, damage not related to shipping, or concealed damage,
file a claim with CHAUVE T® within 7 days of delivery .
CHAUVET® manuals use the following conventions to differentiate certain types of
A DIP switch to be configured
A key to be pressed on the fixture’s control panel
A set of values of w hic h only one can be c hosen
A menu option not to be modified (for example, showing the operating
mode/current status)
A sequence of menu options to be followed
A key to be pressed on the product’s control panel
A value to be enter ed or s el ected
This manual uses the following symbols for information that requires special
attention.
Critical installation, configuration, or operation information. Failure to
user.
The information and specifications contained in this document are subject to change
without notice. CHAUVET® assumes no responsibility or liability for any errors or
omissions that may appear in this manual, and reserves the right to revise or
s manual at any time. Download the latest version from
Electronically published by CHAUVET® in the United States of America.
• 12 VDC, 500 mA External Power Supply
• Warranty Card
• User Manual
container and
information from the regular text.
Settings
compl y m a y make the product not work, damage it, or c ause harm to t h e
Important installation or configuration information. The product may not
functi on c orr ec tly if this informati on is not used.
Useful information.
recreate thi
www.chauvetlighting.com.
© Copyright 2012 CHAUVET®. All rights reserved.
Printed in P.R.C.
Page 6 of 44 Obey™ 40 User Manual Rev. 5 ML

• Please keep this Us er Manual for futur e consultat ion . I f you sell the unit to
2. Introduction
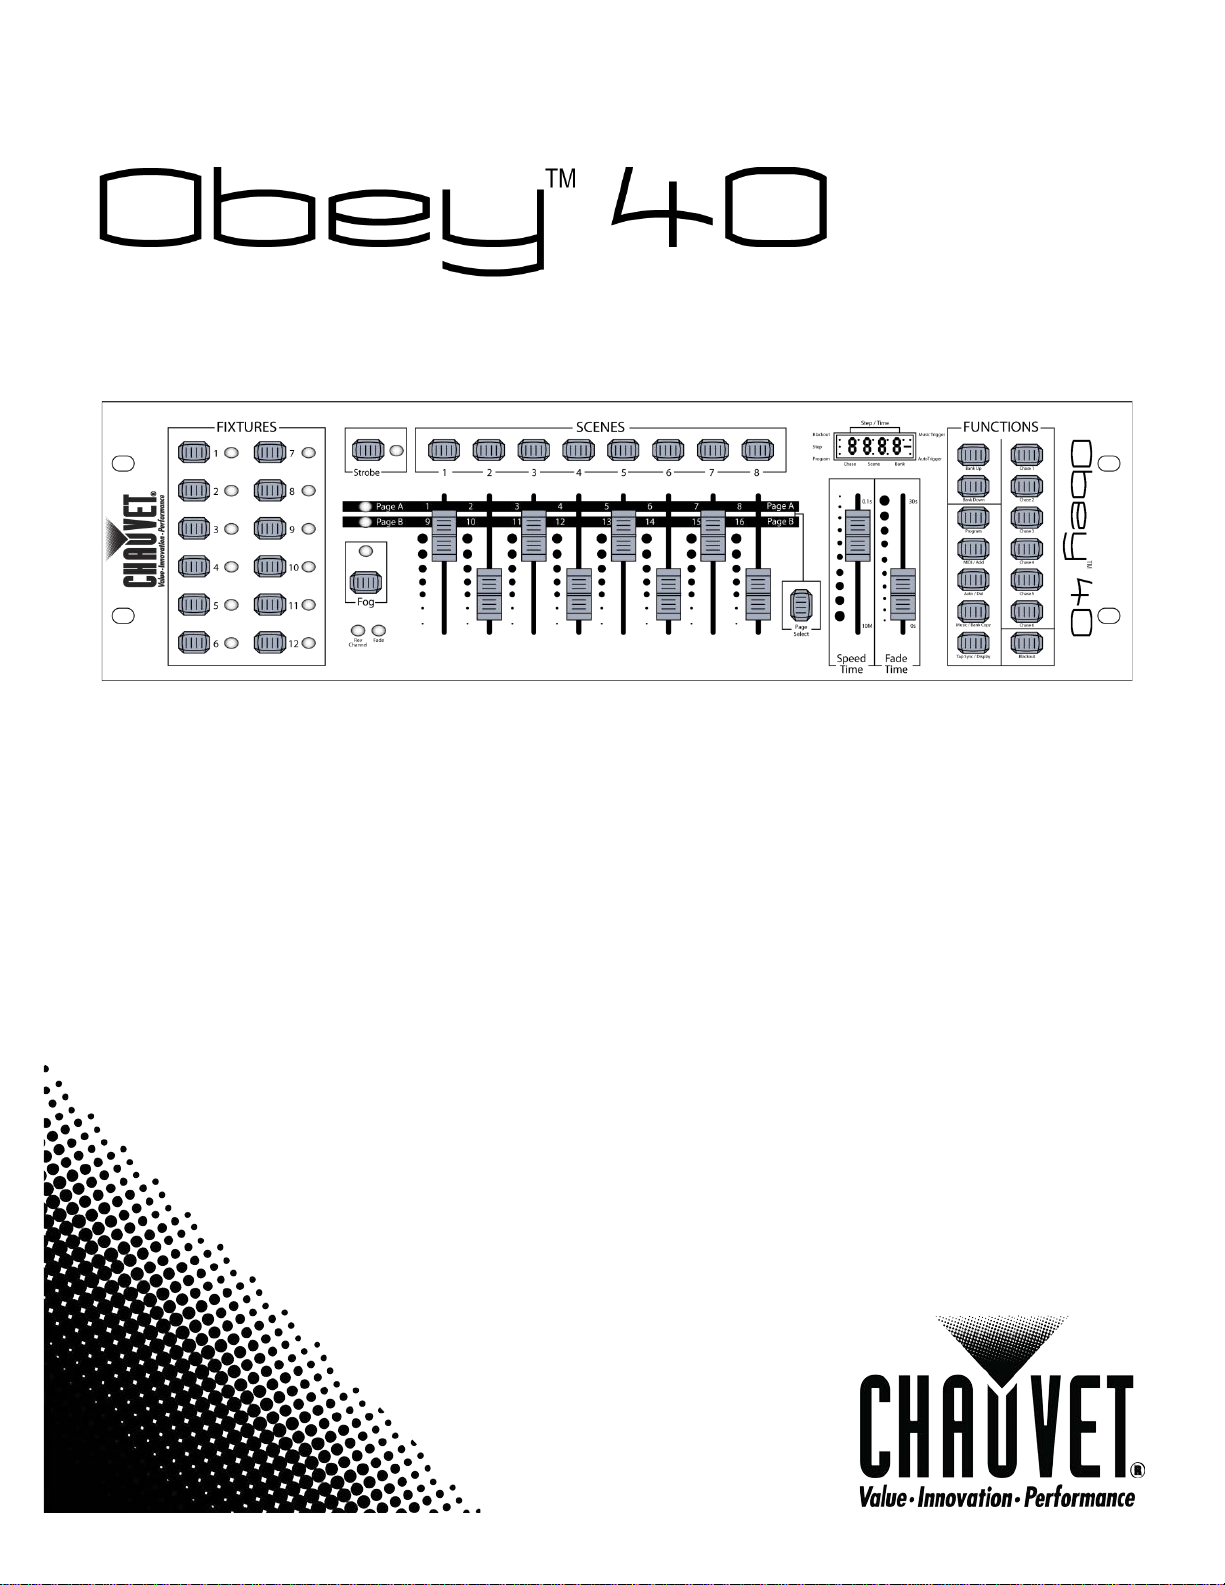
The Obey™40 is a universal intelligent lighting controller. It allows the control of 12
composed of 16 channels each and up to 240 programmable scenes. Six
can contain up to 240 steps composed of the saved scenes and in any order.
or manually. Channel
assignments can be reprogrammed for ease of controlling different fixtures. On the
d various programming tools such as 8 universal channel sliders,
quick access scanner and scene buttons, and an LED display indicator for easier
navigation of controls and menu functions.
Please read these instructions carefully. It includes important
of this product.
information about the installation, usage, and maintenance
ano ther user, be su re that they als o receive this manual.
• Alw ays make sure th at you a re connect ing the product to the proper voltage,
and that the li ne voltage you are connecting to is not higher than that stated on
the sticker or rear panel of the fixture.
• This product is int ended for indoor use only! To prevent risk of fire or shock, do
not expose fixture to ra in or m oisture.
• Make sur e ther e are n o f lamm able mater ials clos e t o the unit while operating.
• The unit must be installed in a location with adequate ventilation, at least 20″
cm) f rom adjac ent su r fac es. Be sure that no ventilation slots are bl ocked.
• Alw ays disconnect from power sou r ce bef ore servicing or rep l aci ng fus e and be
sure to replace with same fus e sour ce.
• Maximum ambient temper atur e (Ta) i s 104° F (40° C). Do not opera te fi xture at
tem pera tures higher than this.
• In t he event of a serious op erating p roblem, stop using the uni t imm ediately.
Nev er try to repair the unit by yourself. Repairs carried out by unskilled people
can lead to damage or malfunction. Please contact the nearest authorized
technical assistance center.
• Nev er connect t he device to a dimmer p ack.
• Make sure the power cord is never crimped or damaged.
• Never disconnect the power cord by pulli ng on the cord.
• Avo id direct eye exposure to t he li ght source while it is on.
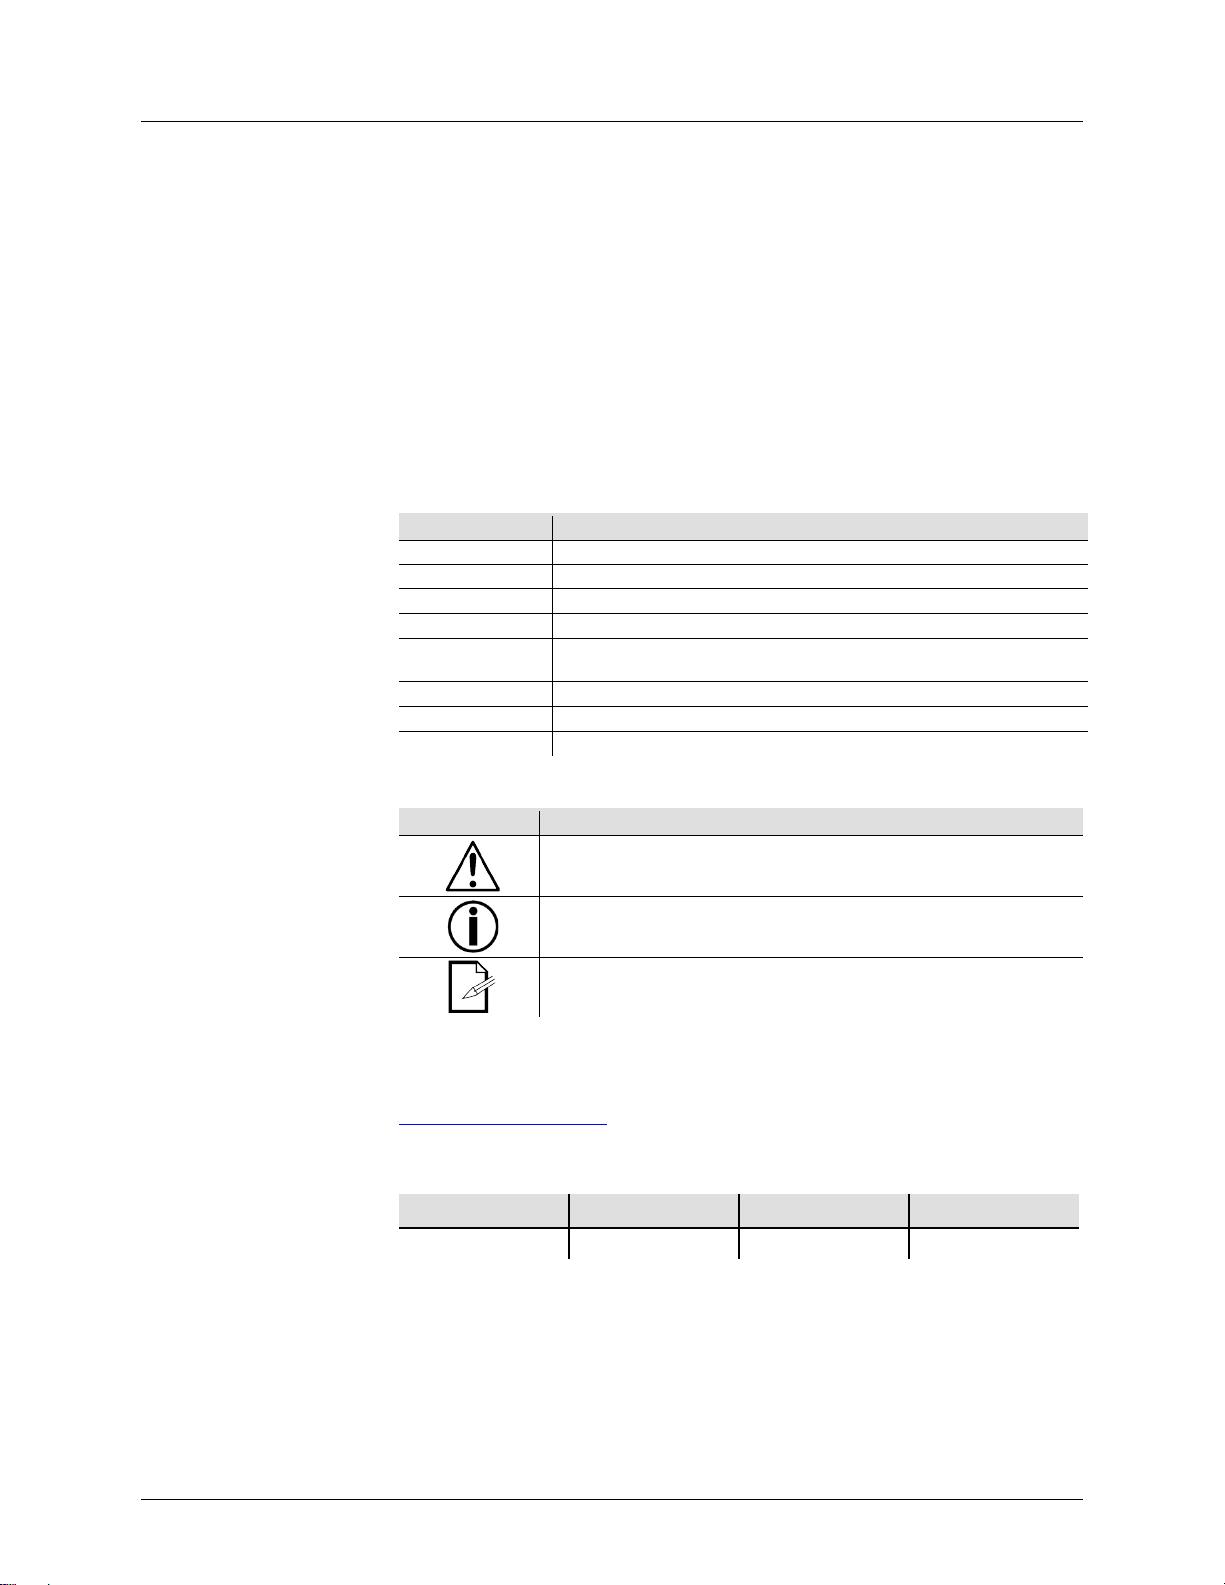
• Universal D M X-512 controller
• Controls up to 12 intelligent lights with up to 16 channels each
• 30 banks of 8 scenes, 240 scenes max
• 192 DMX channels of control
• 6 sets of chases containing 240 scenes
• Rev ersible s l iders
• Re-assignable channels
• Sequential linking of chases
• Fog & strobe control buttons
• Gr ab any fixtu re on the fly
• Beat activation, tap-sync and auto run
Description
• DMX p olarity selec tor
• 3-space (3U) rack mount
•
products
chases
Programs can be triggered by music, MIDI, automatically,
surface you will fin
Obey™ 40 User Manual Rev. 5 ML Page 7 of 44
This controller has several operation/playback modes. Multiple scenes may also be
The Obey™ 40 can control up to 192 channels. These channels are arranged into 12
predetermined DMX channels. These 16 channels are broken down into 2 groups, which
. This allows the 8 physical faders to control
between 1~8 and 9~16.
Up to 240 scenes m ay be saved in the internal memory of the Obey™ 40. These scenes
<BANK
DOWN>. Each bank contains 8 scenes.
Displays channel DMX/Percentage values, current operating mode, speed/fade time,
bank up/d ow n , an d any other ap pl icable setu p/ op eration inf or m ati on
Direct chase selection (1~6)
Scene Selectio n But ton s
Direct scene selection in relation to the current bank (1~30)
Fixture Select io n
Buttons
For adjusting DMX values, Ch 1~8 can be adjusted immediately after pressing the
respective fixture select button, Ch 9~16 after pressing the Page selection button
Switch between channels 1~8 and channels 9~16
Contains the following controls: MIDI/Add, Program, Auto/Del, Tap Sync/Display
Used to modify the speed time
Used to modify the fade time
Activate the external strobe light(s)
Activat es the exter n al f og mac hi ne(s)
Fixture selection buttons
Mode Modification
Blackout
programmed and arrang ed to playb ack in both banks and chases.
Board Channels
Scenes
groups, which are accessed using <FIXTURES>. Each fixture contains 16
are accessed using <PAGE SELECT>
are arranged into 30 groups, which are accessed using <BANK UP> and
LED Displ a y
Page 8 of 44 Obey™ 40 User Manual Rev. 5 ML
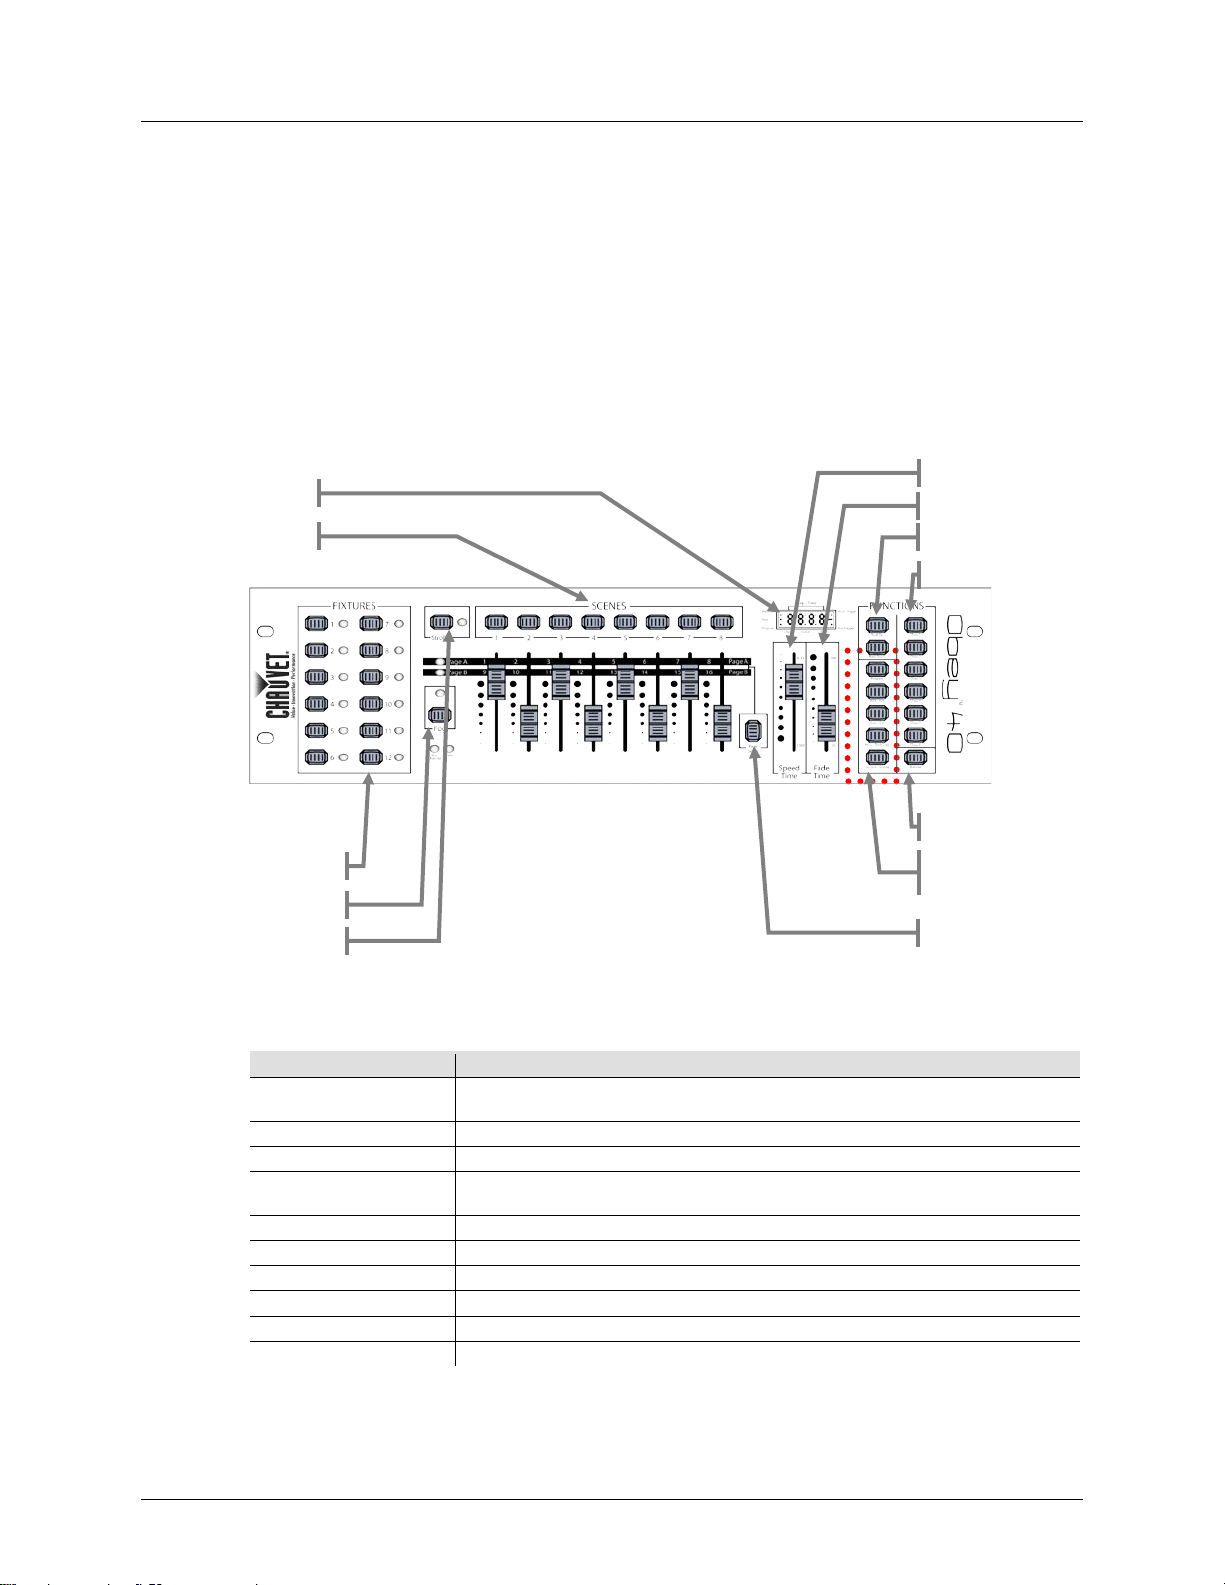
Product Overview
(back panel)
Connections Descript i on s
Sends DMX control out to fixture(s)
May be used to change DMX polarity (hardware)
Use a MIDI c ontroller f or external tri ggering of ban ks , scenes, ch as es, and
blackout
Mono ¼″ strob e control ler
Connections Description Sticker
Provides des cripti on of b ac k p anel contr ols
Turns the controller power On/Off
5-pin DIN fog controller (works with most CHAUVET® fog machines)
MIDI In
Obey™ 40 User Manual Rev. 5 ML Page 9 of 44
3. Setup
This product requires an external power supply, which is included. The included
power supply is rated for 100~240 VAC, 50/60 Hz, 500 mA max. Before powering on
the unit, make sure the line voltage to which you are connecting it is within the range
listed current rating indicates average current draw
under normal conditi ons.
Always connect the fixture to a grounded circuit. Never connect the fixture to a
rheostat (variable resistor) or dimmer circuit, even if the rheostat or dimmer
channel is used only as a 0 to 100% switch.
The Obey™ 40 may be mounted in any safe position.
The O bey™ 4 0 can control up to 12 s eparat e fixt ures. Each fi xtur e must be set t o
addresses of each of the 12 fixtures.
In order to use this co ntrol ler wi th mul tipl e fix tures , you must daisy chain from the
output of the Obey™ 40, using DM X cables to l ink from one fixt ure t o anot her.
Use t h i s fea t u r e t o c om bi n e or unify f i xt ur e c o nt r ol att r i b ut es fo r dif f er en t f i xt ur es . For
Reset the fader assignment back to the original, factory settings by performing
for detailed
instructions on this procedure.
When moving channels, you must relocate the previously addressed channel
hen moving channel 12 to channel 1, channel
1 must be relocated to a new channel.
of accepted voltages listed on the label affixed to the product
Technical Specifications. The
predetermined DMX addresses. Please see the chart below for the DMX starting
Product Address
Assignment
example; if you are controlling 4 moving mirrors and 4 movi ng yokes, the color, gobo,
and dimmer channels may not line up ideally on the physical
function to reassign these channels to faders 1, 2, and 3:
1. Press <PROGRAM> and <TAP SYNC/DISPLAY>. This will enter the physical fader
2. Select one of the fixtures: <FIXTURE 1~12>
3. Move th e <SPEED> fader to select the physical slider (control channel).
4. Move th e <FADE TIME> fader to select the DMX channel.
5. Press <MIDI/ADD> to save the setting.
6. Repeat steps 3~5 until all of the faders have been assigned for the fixture.
7. Press <PROGRAM> and <TAP SYNC/DISPLAY> two times to exit physical fader
a soft reset. Please see the section “Resetting the System”
to a new location. For example: w
assignment mode.
Product Address
Product Address
Page 10 of 44 Obey™ 40 User Manual Rev. 5 ML

This process wi ll copy the physical fader assignment from one fixture into another.
1. Press <PROGRAM> and <TAP SYNC/DISPLAY>. This will enter the physical fader
This function wi ll allow you to reverse the DMX output of t he physical fader(s).
Use this function to revert all settings and scenes back to the state they were in
4. All LEDs will blink to indic at e a suc c ess f ul reset.
Fader Assignment
(0~255/255~0)
System
assignment mode.
2. Press & hold the fixture button that contains the desired physical fader assignment.
3. While still holding the previous fixture button, press & hold the fixture that you want to copy
into.
4. While still holding the two fixture buttons above, press & hold <MIDI/ADD>.
5. While stil l holding all three buttons down, release the fixture selected in step # 2 above.
6. While s till holding down <MIDI/ADD>, release the fixture selected in step # 3 above.
7. Release <MIDI/ADD>.
8. All fixture LEDs will flash.
9. Press <PROGRAM> and <TAP SYNC/DISPLAY> two times to exit physical fader
This will not copy the fader-reverse setting(s).
1. Press <PROGRAM> and <TAP SYNC/DISPLAY> two times. This will enter the fader
revers e ass ig nment mod e.
2. Select one of the fixtures: <FIXTURE 1~12> (this will b e the fi xture that you w ant to m odify
the channels for).
3. Move th e <SPEED> fader to select the physical slider (control channel).
4. Move th e <FADE TIME> fader to activate/deactivate this function.
5. Press <MIDI/ADD> to save the setting.
6. Repeat steps 3~5 until all of the f aders have been ass i gn ed for the fixtu re.
7. Press <PROGRAM> and <TAP SYNC/DISPLAY> one time to exit fader reverse
when the product left the factory.
1. Turn off the unit.
2. Press and h old <BANK UP> and <AUTO/DEL>.
3. Turn on power to the unit (while still holding <BANK UP> and <AUTO/DEL>).
This will erase all scenes, chases, and other settings!
up to 30 seconds to complete.
Obey™ 40 User Manual Rev. 5 ML Page 11 of 44

4. Programming
No programming may be done on the Obey™ 40 without first entering program
mode. You will find references to thi s process in many other sections of this user
3. When the LE D dis play Prog r am LE D lights, you h ave enter ed pr ogram mod e.
Use this functi on to create a static look on stage.
You may select more than one fixt ure at a time. If you do so, you will not have
You may program multiple fixtures into the
same scene.
A ch ase is a s eries of sc enes. P rogram th e scenes before programmi ng the c hases.
10. Exit prog r am m od e.
Mode
manual. Press and hold PR OGRA M for three seconds to exit program mode.
1. Turn on the controller.
2. Press and h old <PROGRAM> for three seconds.
You w ill find r eferen ces t o this process in many other sect ions of thi s user m anual .
1. While currently in program mode, press and hold <PROGRAM> for three seconds.
2. When the LE D dis play Prog r am LE D t ur ns of f , you h ave e xited prog r am mod e.
1. Turn on the controller.
2. Enter program mode.
3. Select on e or mor e fixtures.
4. Using the 8 sliders, modify the value of the desired channel(s).
5. When the des ired look has been achie ved , press <MIDI/ADD>.
6. Use <BANK UP/DOWN> to select a desired bank (30 possibl e) to s ave th e scene to.
7. Once you ha ve n avigated to the desir ed b an k, press the <SCENE> (1~8) to save the
scene directly to.
8. All LEDs will flash to in dicate that th e scene has b een s av ed .
9. Repeat steps 3~8 until you are fin is h ed program m in g all sc en es.
separate control over each of them.
Use PAGE A/B to switch between the 2 pages for the selected fixture.
1. Enter program mode.
2. Select the chase that will be programmed (1~6).
3. Call up the first scene for the chase by pressing the appropriate <SCENE> button. You
may use <BANK UP/DOWN> to navigate through the different pages of the scenes.
4. Once the controller is outputting the correct scene to the lights, press <MIDI/ADD>.
5. All LEDs will flash when the scene is added to the chase.
6. Call up the second scene for the chase by pressing the appropriate <SCENE> button.
7. Once the controller is outputting the correct scene to the lights, press <MIDI/ADD>.
8. All LEDs will flash when the scene is added to the chase.
9. Continue through steps 6~8 until all of the scenes have been added to the chase.
Page 12 of 44 Obey™ 40 User Manual Rev. 5 ML

This function wi ll add a step after any step within a chase.
8. Press <MIDI/ADD>. All LEDs on the controller will flash.
6. All LEDs on th e c ont r oller will fl ash .
This fun ction copies an entire ba nk after any existing steps in a chase.
5. All LEDs on th e c ont r oller will fl ash .
5. Programming Modifications
Use t hi s function to delete one of the scenes in the controll er. Repeat this process for
3. Press and h old the <AUTO/DEL> button while pressing the SCENE you want to delete.
Use this f unction t o delete all of the scenes in t he controller.
4. When all LEDs blink, the function is successfully completed.
4. When all LEDs blink, the function is successfully completed.
3. While still holding the buttons down, turn the controller OFF.
4. When all LEDs blink, the function is successfully completed.
Chase
Chase
Chase
1. Enter program mode.
2. Activate the chase.
3. Using < BANK UP/DOWN>, scroll through the banks until you arrive at the bank that
contains the new scene.
4. Press <TAPSYNC/DISPLAY>. The display will change to step display mode.
5. Using < BANK UP/DOWN>, scroll to the step that will appear before the new step.
6. Press <MIDI/ADD>. The current step on the display will increase by one.
7. Press the new scene: <SCENE 1~8>.
2. Activate the chase.
3. Press <TAPSYNC/DISPLAY>. The display will change to step display mode.
4. Using < BANK UP/DOWN>, scroll to the step that you want t o d elet e.
5. Press <AUTO/DEL>.
1. Enter program mode.
2. Activate the desired chase.
3. Using < BANK UP/DOWN>, scroll through the banks until you arrive at the bank that you
want to copy into the chase.
4. Press <MUSIC/BANK COPY> and <MIDI/ADD> simultaneously.
each scene t hat you need to delete.
1. Enter program mode.
2. Use <BANK UP/DOWN> to navi g at e pr ogr am banks.
1. Turn off the unit.
2. Press and h old <BANK DOWN> and <PROGRAM>.
3. Turn on power to the unit (while still holding <BANK DOWN> and <PROGRAM>).
2. Activate the chase to be deleted: <C H A SE 1~ 6>.
3. Press <AUTO/DEL> and <CHAS E 1~ 6> simultaneously.
2. Press <AUTO/DEL> and <BANK DOWN> simultaneously.
2. Activate the BANK that you want to delet e.
Scenes
3. Press <AUTO/DEL> and the <MUSIC/BANK COPY> simultaneously.
Obey™ 40 User Manual Rev. 5 ML Page 13 of 44
6. Playback
This c ontro ller i s capable of playing back a single scene at a tim e. The <SPEED>
Please see the i nstructions
4. Activate another scene, if desired. This will disable any previously selected scene.
This controller is capable of playing back all 8 scenes on one of the 30 banks. These
3. Use the <SPEED> and <FADE TIME> faders to adjust the scene transition.
This controller is capable of playing back all 8 scenes on one of the 30 banks. These
from one scene to another
synchronized to the beat of the music. Please see the instructions below for
2. Using < BANK UP/DOWN>, navigate to the appropriate bank of scenes.
Empty scenes will be skipped during
There are three different modes of playback for the chases in the Obey™ 40. Please
see the sections below f or detailed in structions on t hese m odes.
You may control the playback of the chases in this controller by using the <SPEED>
between the individual scenes (steps).
You may synchronize the playback of the chases i n t hi s c ont r oll er to the beat of the
2. Press <MUSIC/BANK COPY>.
The controller will only respond to MIDI commands on the MIDI channel when it is
set to full stop. Perform all MIDI control using Note on commands. All other MIDI
instructions are ignored. To stop a chase, send the blackout on note.
mode. It is not necessary for the
Playback (Single)
Playback
and <F ADE TIME> faders will not functi on in this mode.
below for further explanation.
1. Set the controller in [MANUAL] playback mode. If [AUTO] or [MUSIC] is visible on the
displ ay, pr ess t h e appropriate button(s ) t o disable th e m od e(s). When these m od es are
disabled, the controller will be in manual scene playback mode.
2. Using < BANK UP/DOWN>, navigate to the appropriate bank of the desired scene.
3. Activate the appropriate scene by pressing <SCENE 1~8>.
scenes will play back in sequential order. The <SPEED> and <FADE TIM E>
are used to control the transition between the individual scenes.
instructions below for further explanation.
1. Press <AUTO/DEL> to set the controller in [AUTO] playback mode.
2. Using < BANK UP/DOWN>, navigate to the appropriate bank of scenes.
The scenes will play in sequential order within the bank.
scenes will play back. Empty scenes will be skipped during playback.
scenes will play back in sequential order. The triggering
will be
further explanation.
1. Press <MUSIC/BANK COPY> to set the controller in [MUSIC] playbac k m od e.
The scenes will play in sequential order within the bank.
Only programmed scenes will play back.
playback
You may activate multiple chases in this controller.
sequential order.
Playback
Playback
Page 14 of 44 Obey™ 40 User Manual Rev. 5 ML
and <FADE TIME> faders. Please see the instructions below for further explanation.
1. Activate the desired chase by pressing <CH A SE 1~6>.
2. Press <AUTO/DEL>.
3. Using the <SPEED> and <FADE TIME> faders, adjust the playback speed and transition
music. Please see the instructions below for further explanation.
1. Activate the desired chase by pressing <C HA SE 1~ 6>.
The controller is always in MIDI receive
display to read [MIDI] for the controller to respond to MIDI commands.
Loading…

Американская компания Chauvet выпустила целую серию портативных DMX контроллеров управления светом. Chauvet-DJ Obey — представляет собой линейку интеллектуальных пультов управления световыми приборами для малых и средних заведений и мероприятий. Серия Obey включает в себя следующий модельный ряд: Obey 3, Obey 4, Obey 6, Obey 10, Obey 40, Obey 50, Obey 70. Они прекрасно подходят для различных кафе, баров, ресторанов, дискоклубов, малых и средних концертных залов, свадеб, фото и видеосъемочных площадок, малых и средних концертов Open Air и так далее.
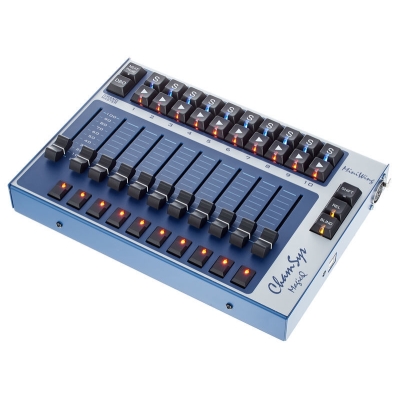
Obey 40 — представляет собой универсальный DMX контроллер управления интеллектуальным светом на 192 DMX канала. Данный контроллер позволяет независимо управлять 12 световыми приборами по 16 каналов на каждый. Он имеет 30 банков по 8 сцен в каждом, соответственно всего 240 сцен. Может работать как в ручном, так и автоматическом режиме. Плюс ко всему, данная модель имеет выход на стробоскоп, а так же выход на дымогенератор. Так же на задней панели имеется MIDI-вход. Очень удобным является цифровой дисплей, на котором отображается информация о текущем режиме работы контроллера. К тому же он имеет корпус рэкового исполнения размером в 19″ (дюймов) и 3U (юнита), что позволяет монтировать его в рэковую стойку.
Данная модель прибора может использоваться в самых различных заведениях и мероприятиях. Например это могут быть: кафе, бары, рестораны, караоке клубы, небольшие дискоклубы, фотостудии, видеосъемочные площадки и так далее.
Подробное описание
Схема подключения активных приборов к Chauvet Obey 40

Схема подключения пассивных приборов к Chauvet Obey 40

| Тип: | DMX контроллер |
| Каналов DMX: | 192 |
| Независимо управляемых источников: | 12 по 16 каналов в каждом |
| Наборов эффектов: | 30 банков по 8 сцен в каждом |
| Всего сцен: | 240 |
| Автоматический режим: | есть |
| Цифровой дисплей: | есть |
| Управление стробоскопом: | есть |
| Управление дымогенератором: | есть |
| MIDI вход: | 5 DIN |
| DMX выход: | 3-pin XLR |
| Выход на стробоскоп: | Jack |
| Выход на дымогенератор: | 5 DIN |
| Фейдеров: | 10 |
| Источник питания: | блок питания 9В, 500мА |
| Исполнение: | рэковое 19″ 3U |
| Вес: | 2.6 кг |
| Размеры: | 483х89х171 мм |
| Контроллер: | 1 шт. |
| Блок питания: | 1 шт. |
Дополнительно
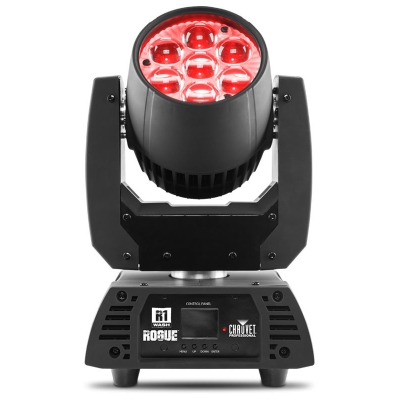
Wash, 7 светодиодов RGBW по 15 Вт/980 мА (50 000 часов работы), цветовая температура от 2800 до 10000 к, управление DMX, RDM, размеры 187 x 265 x 354 мм, вес 5,9 кг.
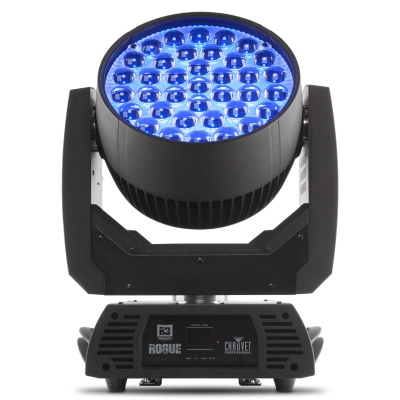
Wash, 37 светодиодов RGBW по 15 Вт/980 мА (50 000 часов работы), цветовая температура от 2800 до 10000 к, управление DMX, RDM, размеры 394 x 298 x 470 мм, вес 17,46 кг.

Spot, 1 светодиод 440 Вт/5.6 A (6808 K), 50000 часов работы, управление Art-Net, sACN, DMX, W-DMX, DMX (24 или 32 канал), размеры 385 х 250 х 671 мм, вес 28,5 кг.

Spot, 1 светодиод 60 Вт/2,3 A, 50000 часов работы, управление DMX (8 или 13 канал), Угол пучка 15°, Частота PWM 1200 Гц, Освещенность 10420 Лк при 2 м, Наклон / уклон 540 ° / 270 °, цвет корпуса черный, размеры 211 x 232 x 337 мм, вес 5,7 кг.

Spot, 1 светодиод 150 Вт/12,3 A, 50000 часов работы, управление DMX (9 или 15 канал), Угол маштабирования 10° до 23°, Частота PWM 1800 Гц, Освещенность 10°-38000 Лк при 2 м, Освещенность 23°-19850 Лк при 2 м, Наклон / уклон 540 ° / 270 °, цвет черный, размеры 220 x 322 x 466 мм, вес 12,4 кг.
Универсальный DMX-контроллер, поддержка платформ Mac OS X/Windows/Linux, работа на программном обеспечении MagicQ PC, управление световым и видеооборудованием, возможность сохранения шоу на USB накопители, подключение к компьютеру по USB, DMX-выход 5-pin XLR (без ограничений по патчу), поставляется в пластиковом кейсе, питание по шине USB.
Загрузка…
Характеристики
Вес, кг Световое оборудование и эффекты :2.6
Высота (мм) Световое оборудование и эффекты :171
Ширина (мм) Световое оборудование и эффекты :89
Длина (мм) Световое оборудование и эффекты :483
Тип прибора Световое оборудование и эффекты :контроллер
Количество фейдеров Световое оборудование и эффекты :10
Количество DMX-портов Световое оборудование и эффекты :1
Количество каналов Световое оборудование и эффекты :192
Маршрутизация Световое оборудование и эффекты :нет
DFI Световое оборудование и эффекты :нет
- компактный универсальный контроллер на 12 приборов по 16
каналов - 30 банков по 8 сцен (всего 240
сцен) - настраиваемые скорость и переход для каждого из сохраняемых
шагов - переназначение каналов
- перехват на ручное управление приборами
- автоматический и ритм-режим работы
- горячий доступ к строб- и
дым-эффектам - селектор полярности DMX
- MIDI-синхронизация
- установка в
рек 3U
Нашли ошибку в описании? Выделите текст с ошибкой и нажмите Ctrl+Enter или
напишите нам.
Вес, кг Световое оборудование и эффекты
2.6
Высота (мм) Световое оборудование и эффекты
171
Ширина (мм) Световое оборудование и эффекты
89
Длина (мм) Световое оборудование и эффекты
483
Тип прибора Световое оборудование и эффекты
контроллер
Количество фейдеров Световое оборудование и эффекты
10
Количество DMX-портов Световое оборудование и эффекты
1
Количество каналов Световое оборудование и эффекты
192
Маршрутизация Световое оборудование и эффекты
нет
DFI Световое оборудование и эффекты
нет
Видеоплеер Световое оборудование и эффекты
нет
Подключение к PC Световое оборудование и эффекты
нет
MIDI-синхронизация Световое оборудование и эффекты
да
Подключение к MAC Световое оборудование и эффекты
нет
Микрофон Световое оборудование и эффекты
да
Tuch-screen Световое оборудование и эффекты
нет
Аудиовход Световое оборудование и эффекты
да
Лампа подсветки Световое оборудование и эффекты
нет
Аудиоплеер Световое оборудование и эффекты
нет
RDM Световое оборудование и эффекты
нет
С этим товаром покупают
Рекомендательные технологии
Музторг — первая экосистема для музыкантов и сеть музыкальных магазинов в России.
Наши магазины предлагают лучшие музыкальные инструменты, созданные мировыми производителями, а также весь спектр профессионального звукового, светового и студийного оборудования.
Качество
Прямые поставки от производителя с полным контролем качества и гарантийным обслуживанием после покупки.
Сервис
Консультации квалифицированных менеджеров, доставка в удобное для вас время, сервис-центры по всей России и возможность возврата товара, если он вас не устроил.
Удобство оплаты
Вы можете выбрать подходящую вам схему оплаты (наличный, безналичный расчет, банковской картой, СБП), разделить оплату с сервисом Яндекс Сплит или покупку в рассрочку и кредит с выбором срока, процентной ставки и размера первого взноса.
Интернет-магазин
Выбирайте товар и совершайте покупки, не выходя из дома и получая дополнительные скидки и бонусы.
Доставка в регионы
Заберите товар в магазине или в пункте самовывоза. Даже если в вашем городе нет магазина «Музторг», мы оперативно доставим выбранный вами товар транспортной компанией в любой регион России (включая Крым), Беларуси и Казахстана.
Работа с юридическими лицами
Работая с юридическими лицами, мы предоставляем полный комплект документов. Также предлагаем выгодные условия сотрудничества для бюджетных организаций.
T
C
ABLE OF
BEFORE YOU BEGIN …………………………………………………………………………………………………………………… 3
……………………………………………………………………………………………………………………….. 3
………………………………………………………………………………………………………………….. 3
INTRODUCTION ………………………………………………………………………………………………………………………….. 4
………………………………………………………………………………………………………………………………….. 4
(
(
…………………………………………………………………………………………………………………………. 7
OPERATING INSTRUCTIONS ……………………………………………………………………………………………………….. 8
………………………………………………………………………………………………………………………………………. 8
Setting up the System …………………………………………………………………………………………………………. 8
RESETTING THE SYSTEM …………………………………………………………………………………………………. 8
Fixture Addressing ……………………………………………………………………………………………………………… 8
………………………………………………………………………………………………………………………….. 11
Entering program mode …………………………………………………………………………………………………….. 11
Create a scene …………………………………………………………………………………………………………………. 11
Edit a scene …………………………………………………………………………………………………………………….. 11
Scene copy ……………………………………………………………………………………………………………………… 12
Delete scene ……………………………………………………………………………………………………………………. 12
Delete all scenes ………………………………………………………………………………………………………………. 12
Bank copy ……………………………………………………………………………………………………………………….. 12
Bank delete ……………………………………………………………………………………………………………………… 12
………………………………………………………………………………………………………………… 13
Create a chase …………………………………………………………………………………………………………………. 13
Copy Bank Into Chase ………………………………………………………………………………………………………. 13
Adding a step to a chase ……………………………………………………………………………………………………. 14
Delete a scene/step in a Chase ………………………………………………………………………………………….. 14
Delete a Chase ………………………………………………………………………………………………………………… 14
Delete all Chase Programs ………………………………………………………………………………………………… 15
)…………………………………………………………………………………………………………………… 15
Manual run scene……………………………………………………………………………………………………………… 15
Running in Sound-Mode ……………………………………………………………………………………………………. 15
Running in Auto-Mode ………………………………………………………………………………………………………. 15
Blackout ………………………………………………………………………………………………………………………….. 15
) ………………………………………………………………………………………………………………….. 16
Manual run chases ……………………………………………………………………………………………………………. 16
Auto run chases ……………………………………………………………………………………………………………….. 16
Music run chases ……………………………………………………………………………………………………………… 16
Running Sequential chases ……………………………………………………………………………………………….. 16
………………………………………………………………………………………………………………………… 17
APPENDIX …………………………………………………………………………………………………………………………………. 18
……………………………………………………………………………………………………………………………. 18
Fixture Linking ………………………………………………………………………………………………………………….. 18
………………………………………………………………………………………………………………… 19
……………………………………………………………………………………………………………………………………. 19
……………………………………………………………………………………………………………………. 19
Obey™-40 User Manual
ONTENTS
…………………………………………………………………………………………………………….. 3
) ………………………………………………………………………………………………………… 5
) …………………………………………………………………………………………………. 6
……………………………………………………………………………………………………….. 21
…………………………………………………………………………………………………………. 22
2
Revised: 2008-06-13 15:54:24