

Refrigerator
Холодильник
морозильник
GNE V120 W
Please read this manual first!
Dear Customer,
We hope that your product, which has been produced in modern plants and
checked under the most meticulous quality control procedures, will provide you
an effective service.
For this, we recommend you to carefully read the entire manual of your product
before using it and keep it at hand for future references.
This manual
• Will help you use your appliance in a fast and safe way.
• Read the manual before installing and operating your product.
• Follow the instructions, especially those for safety.
• Keep the manual in an easily accessible place as you may need it later.
• Besides, read also the other documents provided with your product.
Please note that this manual may be valid for other models as well.
Symbols and their descriptions
This instruction manual contains the following symbols:
C Important information or useful usage tips.
A Warning against dangerous conditions for life and property.
B Warning against electric voltage.
This product is supplied with the selective sorting symbol for waste electrical
and electronic equipment (WEEE).
This means that this product must be handled pursuant to European Directive
2002/96/EC in order to be recycled or dismantled to minimise its impact on
the environment. For further information, please contact your local or regional
authorities.
Electronic products not included in the selective sorting process are potentially
dangerous for the environment and human health due to the presence of
hazardous substances.
www.beko.com
This product was manufactured using the latest technology in environmentally friendly conditions.
EN
1
CONTENTS
1 The refrigerator 3
2 Important Safety Warnings 4
Intended use …………………………………. 4
For products with a water dispenser; …. 6
Child safety …………………………………… 6
HCA Warning ………………………………… 6
Things to be done for energy saving ….. 7
Technical specifications of your
refrigerator ……………………………………. 7
Reccomendations for freshfood
compartment ………………………………… 8
3 Installation 9
Points to be considered when re-
transporting your refrigerator ……………. 9
Before operating your refrigerator ……… 9
Changing the illumination lamp ………… 9
Electric connection……………………….. 10
Disposing of the packaging ……………. 10
Disposing of your old refrigerator …….. 10
Placing and Installation ………………….. 10
Floor balance adjustment ………………. 11
Adjusting the gap between the upper
door ………………………………………….. 12
4 Preparation 14
5 Using your refrigerator 15
Indicator Panel …………………………….. 15
Setting the fridge compartment
temperature ………………………………… 16
Setting the freezer compartment
temperature ………………………………… 16
Fast Freeze function ……………………… 16
Quick cool function ………………………. 17
Egg tray ……………………………………… 17
Sliding Body Shelves …………………….. 17
Crisper humidity control sliders……….. 18
Ion: …………………………………………… 18
Recommendations for preservation of
frozen food …………………………………. 19
Defrosting …………………………………… 19
Replacing the Interior Light Bulb ……… 19
Chiller compartment ……………………… 21
Freezing fresh food ………………………. 22
Recommendations for preservation of
frozen food …………………………………. 22
Placing the food …………………………… 23
Deep-freeze information ………………… 23
6 Maintenance and cleaning 24
Protection of plastic surfaces ………… 24
7 Recommended solutions for
the problems 25
EN
2
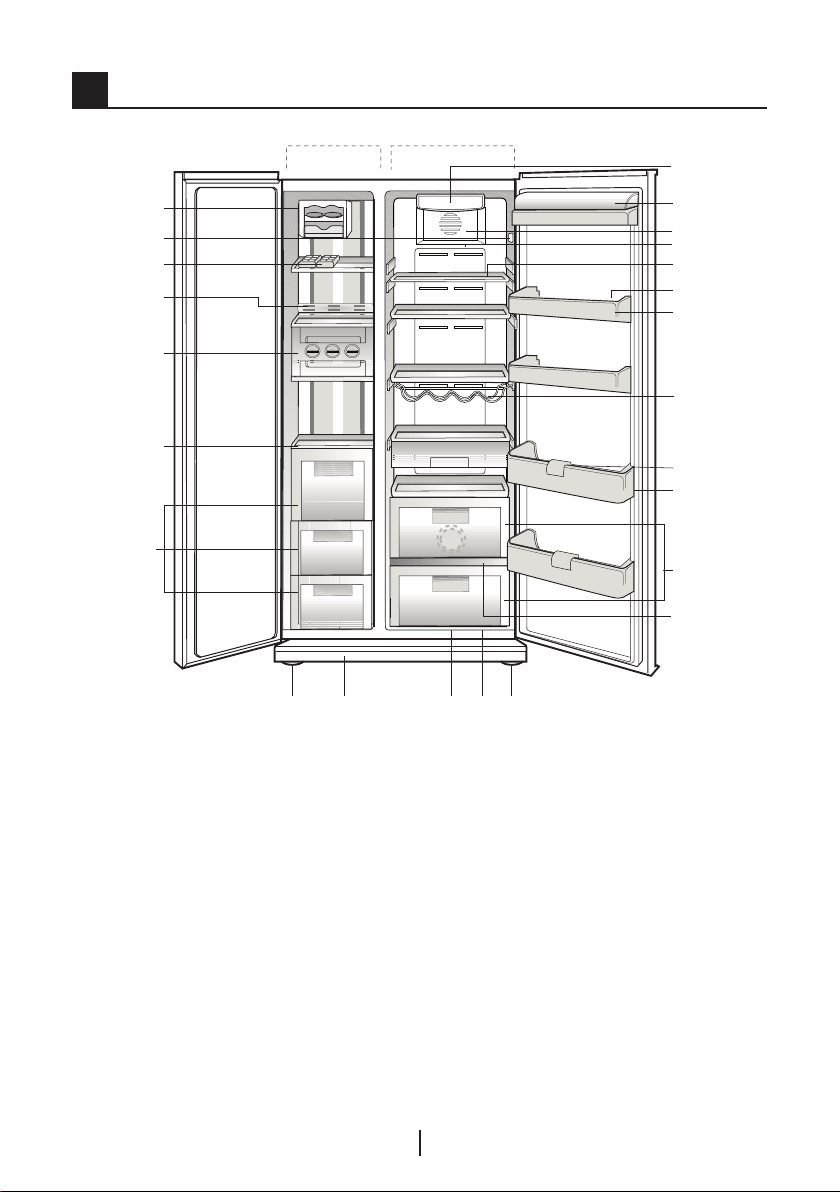
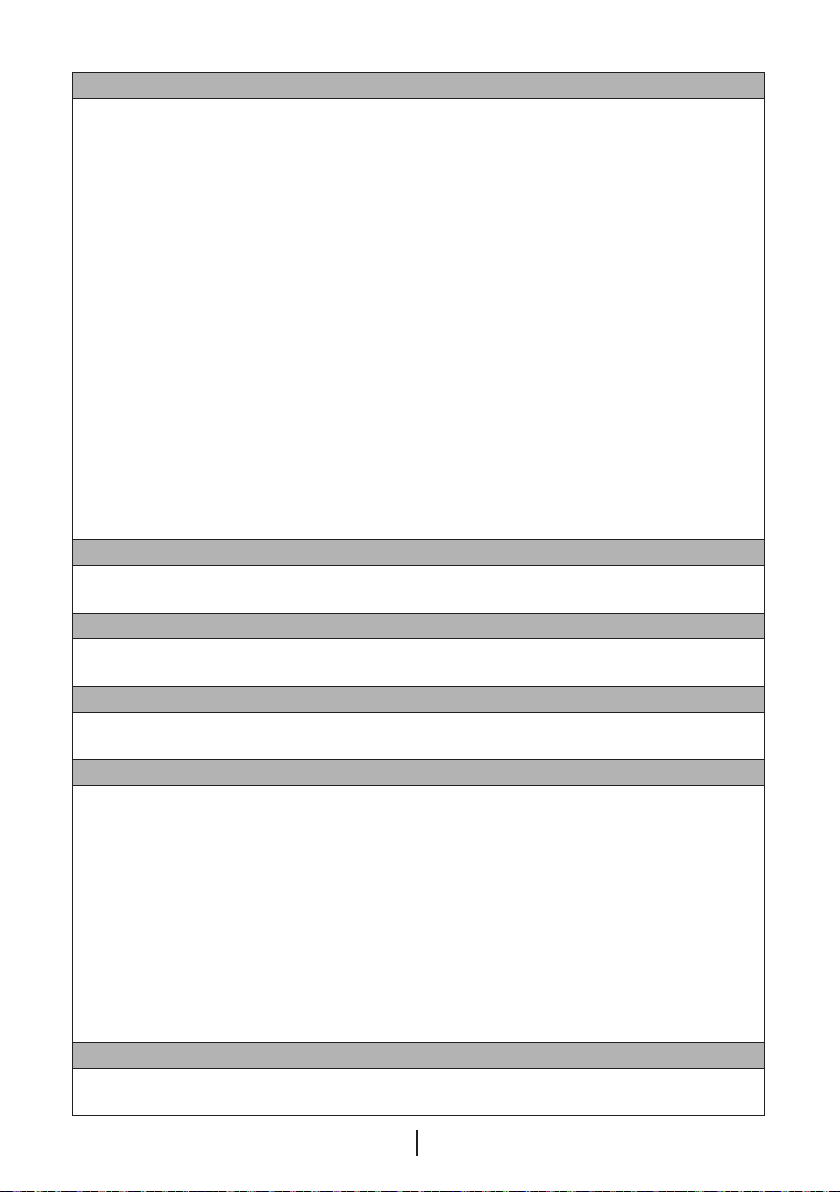
1 The refrigerator
1
2
3
*21
23
*21
22
*21
20
*19
18
15
1. Freezer compartment
2. Fridge compartment
3. Fridge compartment interior light
4. Butter and cheese lid
5. Fan
6. Ioniser
7. Fridge compartment glass shelves
8. Egg tray
9. Fridge compartment door racks
10. Wine cellar
11. Bottle shelves
*4
5
*6
7
8
9
*10
*11
12
13
14
*16 *17
15
12. Bottle holder
13. Crisper compartments
14. Crisper cover
15. Adjustable front legs
16.Snack tray
17. Ventilation lid
18. Freezer compartment drawers
19. Freezer Compartment glass shelves
20. Icematic
21. Freezer compartment interior light
* OPTIONAL
C Figures that take place in this instruction manual are schematic and may not
correspond exactly with your product. If the subject parts are not included in the
product you have purchased, then it is valid for other models.
EN
3

2 Important Safety Warnings
Please review the following
information. Failure to observe this
information may cause injuries or
material damage. Otherwise, all
warranty and reliability commitments
will become invalid.
The usage life of the unit you
purchased is 10 years. This is the
period for keeping the spare parts
required for the unit to operate as
described.
Intended use
This product is intended to be used
– indoors and in closed areas such as
homes;
– in closed working environments such
as stores and offices;
– in closed accommodation areas such
as farm houses, hotels, pensions.
• This product should not be used
outdoors.
General safety
• When you want to dispose/scrap
the product, we recommend you
to consult the authorized service in
order to learn the required information
and authorized bodies.
• Consult your authorized service for
all your questions and problems
related to the refrigerator. Do not
intervene or let someone intervene to
the refrigerator without notifying the
authorised services.
• For products with a freezer
compartment; Do not eat cone ice
cream and ice cubes immediately
after you take them out of the freezer
compartment! (This may cause
frostbite in your mouth.)
• For products with a freezer
compartment; Do not put bottled and
canned liquid beverages in the freezer
compartment. Otherwise, these may
burst.
• Do not touch frozen food by hand;
they may stick to your hand.
• Unplug your refrigerator before
cleaning or defrosting.
• Vapor and vaporized cleaning
materials should never be used in
cleaning and defrosting processes of
your refrigerator. In such cases, the
vapor may get in contact with the
electrical parts and cause short circuit
or electric shock.
• Never use the parts on your
refrigerator such as the door as a
means of support or step.
• Do not use electrical devices inside
the refrigerator.
• Do not damage the parts, where
the refrigerant is circulating, with
drilling or cutting tools. The refrigerant
that might blow out when the gas
channels of the evaporator, pipe
extensions or surface coatings are
punctured causes skin irritations and
eye injuries.
• Do not cover or block the ventilation
holes on your refrigerator with any
material.
• Electrical devices must be repaired
by only authorised persons. Repairs
performed by incompetent persons
create a risk for the user.
• In case of any failure or during
a maintenance or repair work,
disconnect your refrigerator’s mains
supply by either turning off the
relevant fuse or unplugging your
appliance.
EN
4
• Do not pull by the cable when pulling
off the plug.
• Place the beverage with higher proofs
tightly closed and vertically.
• Never store spray cans containing
flammable and explosive substances
in the refrigerator.
• Do not use mechanical devices
or other means to accelerate the
defrosting process, other than those
recommended by the manufacturer.
• This product is not intended to be
used by persons with physical,
sensory or mental disorders or
unlearned or inexperienced people
(including children) unless they are
attended by a person who will be
responsible for their safety or who will
instruct them accordingly for use of
the product
• Do not operate a damaged
refrigerator. Consult with the service
agent if you have any concerns.
• Electrical safety of your refrigerator
shall be guaranteed only if the earth
system in your house complies with
standards.
• Exposing the product to rain, snow,
sun and wind is dangerous with
respect to electrical safety.
• Contact authorized service when
there is a power cable damage to
avoid danger.
• Never plug the refrigerator into
the wall outlet during installation.
Otherwise, risk of death or serious
injury may arise.
• This refrigerator is intended for only
storing food items. It must not be
used for any other purpose.
• Label of technical specifications is
located on the left wall inside the
refrigerator.
• Never connect your refrigerator to
electricity-saving systems; they may
damage the refrigerator.
• If there is a blue light on the
refrigerator, do not look at the blue
light with optical tools.
• For manually controlled refrigerators,
wait for at least 5 minutes to start the
refrigerator after power failure.
• This operation manual should be
handed in to the new owner of the
product when it is given to others.
• Avoid causing damage on power
cable when transporting the
refrigerator. Bending cable may cause
fire. Never place heavy objects on
power cable. Do not touch the plug
with wet hands when plugging the
product.
• Do not plug the refrigerator if the wall
outlet is loose.
• Water should not be sprayed directly
on inner or outer parts of the product
for safety purposes.
• Do not spray substances containing
inflammable gases such as propane
gas near the refrigerator to avoid fire
and explosion risk.
• Never place containers filled with
water on top of the refrigerator,
otherwise this may cause electric
shock or fire.
• Do not overload your refrigerator
with excessive amounts of food. If
overloaded, the food items may fall
down and hurt you and damage
refrigerator when you open the door.
Never place objects on top of the
refrigerator; otherwise, these objects
may fall down when you open or
close the refrigerator’s door.
EN
5

• As they require a precise
temperature, vaccines, heat-sensitive
medicine and scientific materials
and etc. should not be kept in the
refrigerator.
• If not to be used for a long time,
refrigerator should be unplugged. A
possible problem in power cable may
cause fire.
• The plug’s tip should be regularly
cleaned; otherwise, it may cause fire.
• The plug’s tip should be cleaned
regularly with a dry cloth; otherwise, it
may cause fire.
• Refrigerator may move if adjustable
legs are not properly secured on the
floor. Properly securing adjustable
legs on the floor can prevent the
refrigerator to move.
• When carrying the refrigerator, do not
hold it from door handle. Otherwise, it
may be snapped.
• When you have to place your product
next to another refrigerator or freezer,
the distance between devices should
be at least 8cm. Otherwise, adjacent
side walls may be humidified.
For products with a water
dispenser;
Pressure of water mains should be
minimum 1 bar. Pressure of water
mains should be maximum 8 bars.
• Use only potable water.
Child safety
• If the door has a lock, the key should
be kept away from reach of children.
• Children must be supervised to
prevent them from tampering with the
product.
HCA Warning
If your product’s cooling system
contains R600a:
This gas is flammable. Therefore, pay
attention to not damaging the cooling
system and piping during usage and
transportation. In the event of damage,
keep your product away from potential
fire sources that can cause the
product catch a fire and ventilate the
room in which the unit is placed.
Ignore this warning if your
product’s cooling system contains
R134a.
Type of gas used in the product is
stated in the type plate which is on the
left wall inside the refrigerator.
Never throw the product in fire for
disposal.
EN
6

Things to be done for energy
saving
• Do not leave the doors of your
refrigerator open for a long time.
• Do not put hot food or drinks in your
refrigerator.
• Do not overload your refrigerator so
that the air circulation inside of it is not
prevented.
• Do not install your refrigerator
under direct sunlight or near heat
emitting appliances such as ovens,
dishwashers or radiators.
• Pay attention to keep your food in
closed containers.
• For products with a freezer
compartment; You can store
maximum amount of food items in
the freezer when you remove the
shelf or drawer of the freezer. Energy
consumption value stated for your
refrigerator has been determined
by removing freezer shelf or drawer
and under maximum load. There
is no harm to use a shelf or drawer
according to the shapes and size of
food to be frozen.
• Thawing frozen food in fridge
compartment will both provide energy
saving and preserve the food quality.
Technical specifications of your refrigerator
Energy efficiency class А
Protection class
1
2010-11-xx
Y Y Y Y — M M — D D
EN
7
Reccomendations for
temperature
sensor
food
MILK
juice
etc.
temperature
sensor
MILK
juice
etc.
temperature
sensor
freshfood compartment
* OPTIONAL
• Please do not let any foodstuff to
come to contact with the temperature
sensor in freshfood compartment.
In order to maintain freshfood
compartment at ideal storage
temperature, the sensor must not be
blocked by fodstuffs.
• Do not place hot foodstuff in your
appliance.
EN
8
3 Installation
C Please remember that the
manufacturer shall not be held liable if
the information given in the instruction
manual is not observed.
Points to be considered
when re-transporting your
refrigerator
1. Your refrigerator must be
emptied and cleaned prior to any
transportation.
2. Shelves, accessories, crisper and etc.
in your refrigerator must be fastened
securely by adhesive tape against any
jolt before repackaging.
3. Packaging must be tied with thick
tapes and strong ropes and the
rules of transportation printed on the
package must be followed.
C Always remember…
Every recycled material is an
indispensable source for the nature
and for our national resources.
If you wish to contribute to recycling
the packaging materials, you can
get further information from the
environmental bodies or local
authorities.
Changing the illumination
lamp
To change the lamp used for
illumination of your refrigerator, please
call your Authorized Service.
Before operating your
refrigerator
Before starting to use your refrigerator
check the following:
1. Is the interior of the refrigerator dry
and can the air circulate freely in the
rear of it?
2. Clean the interior of the refrigerator as
recommended in the “Maintenance
and cleaning” section.
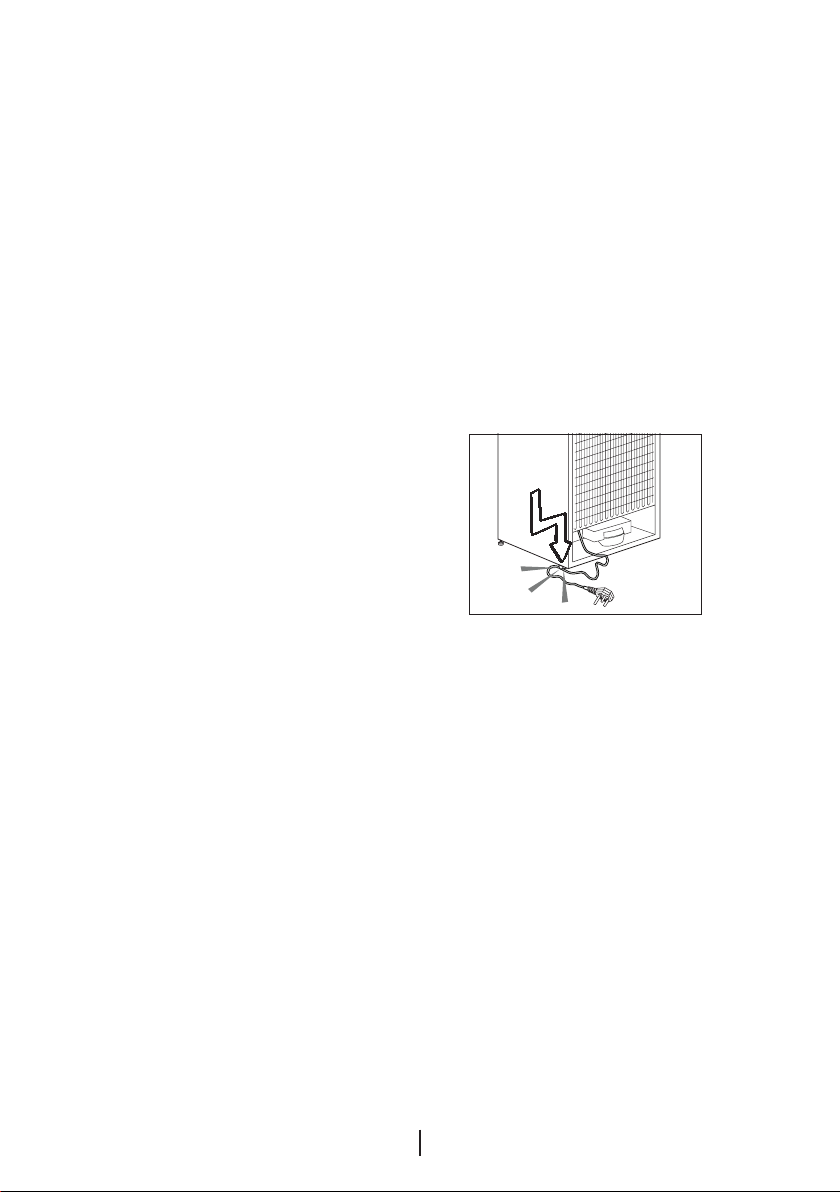
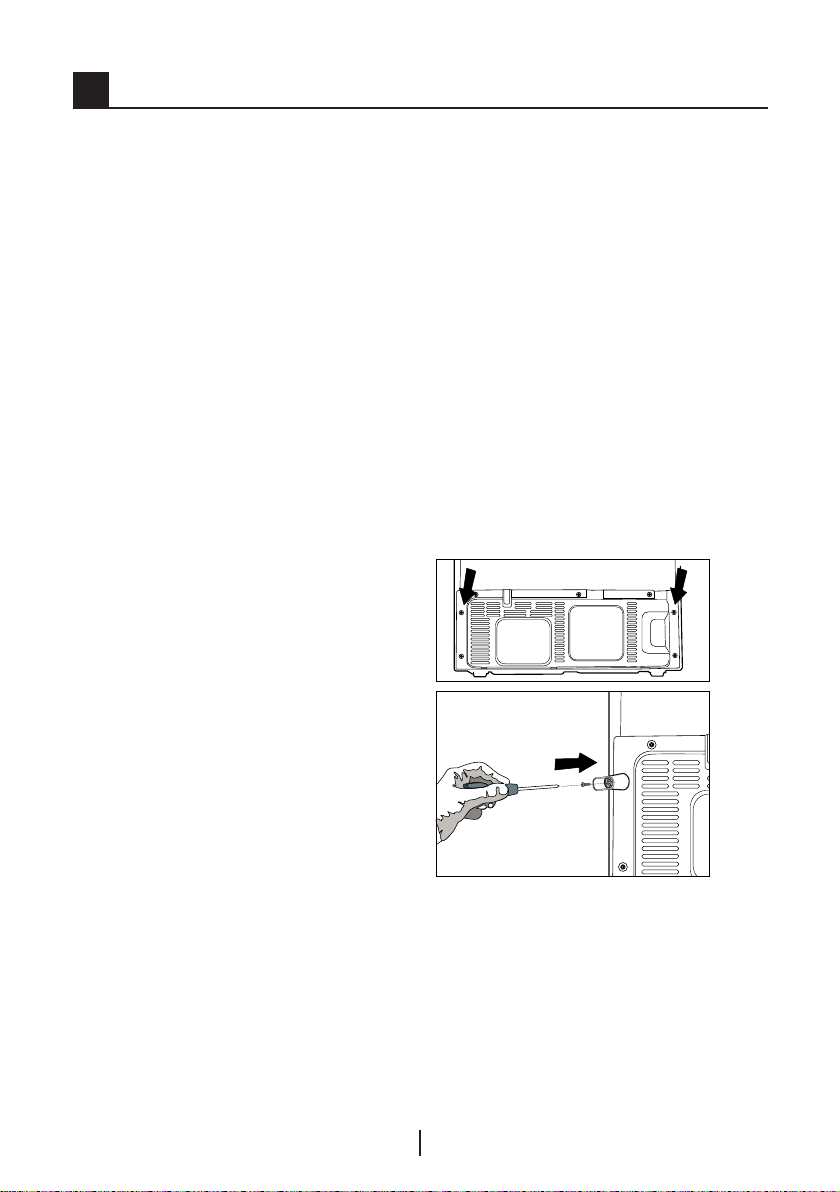
3. Insert the 2 plastic wedges onto the
rear ventilation as illustrated in the
following figure. Unscrew the existing
ones and use the screws given in the
same bag of wedges. Plastic wedges
will provide the required distance
between your refrigerator and the wall
in order to allow the air circulation.
EN
9

4. Plug the refrigerator into the wall
outlet. When the door is open the
respective interior light will come on.
5. You will hear a noise as the
compressor starts up. The liquid and
gases sealed within the refrigeration
system may also give rise to noise,
even if the compressor is not running
and this is quite normal.
6. Front edges of the refrigerator may
feel warm. This is normal. These
areas are designed to be warm to
avoid condensation.
Electric connection
Connect your refrigerator to a
grounded socket which is being
protected by a fuse with the
appropriate capacity.
Important:
B The connection must be in
compliance with national regulations.
B The power cable plug must be easily
accessible after installation.
B The specified voltage must be equal
to your mains voltage.
B Extension cables and multiway plugs
must not be used for connection.
B A damaged power cable must be
replaced by a qualified electrician.
B The appliance must not be operated
before it is repaired! There is danger
of electric shock!
Disposing of the packaging
AThe packing materials may be
dangerous for children. Keep the
packing materials out of the reach
of children or dispose them of by
classifying them in accordance
with the waste instructions. Do not
dispose them of along with the normal
household waste.
The packing of your refrigerator is
produced from recyclable materials.
Disposing of your old
refrigerator
Dispose of your old machine without
giving any harm to the environment.
A You may consult your authorized
dealer or waste collection center of
your municipality about the disposal
of your refrigerator.
A Before disposing of your refrigerator,
cut out the electric plug and, if there
are any locks on the door, make them
inoperable in order to protect children
against any danger.
Placing and Installation
B Caution: Never plug the refrigerator
into the wall outlet during installation.
Otherwise, risk of death or serious
injury may arise.
A If the entrance door of the room
where the refrigerator will be installed is
not wide enough for the refrigerator to
pass through, than call the authorised
service to have them remove the
doors of your refrigerator and pass it
sideways through the door.
1. Install your refrigerator to a place
that allows ease of use.
2. Keep your refrigerator away from
heat sources, humid places and direct
sunlight.
3. There must be appropriate air
ventilation around your refrigerator in
order to achieve an efficient operation.
If the refrigerator is to be placed in a
recess in the wall, there must be at
least 5 cm distance with the ceiling
and at least 5 cm with the wall.
If the floor is covered with a carpet,
your product must be elevated 2.5 cm
from the floor.
10
EN
4. Place your refrigerator on an even
floor surface to prevent jolts.
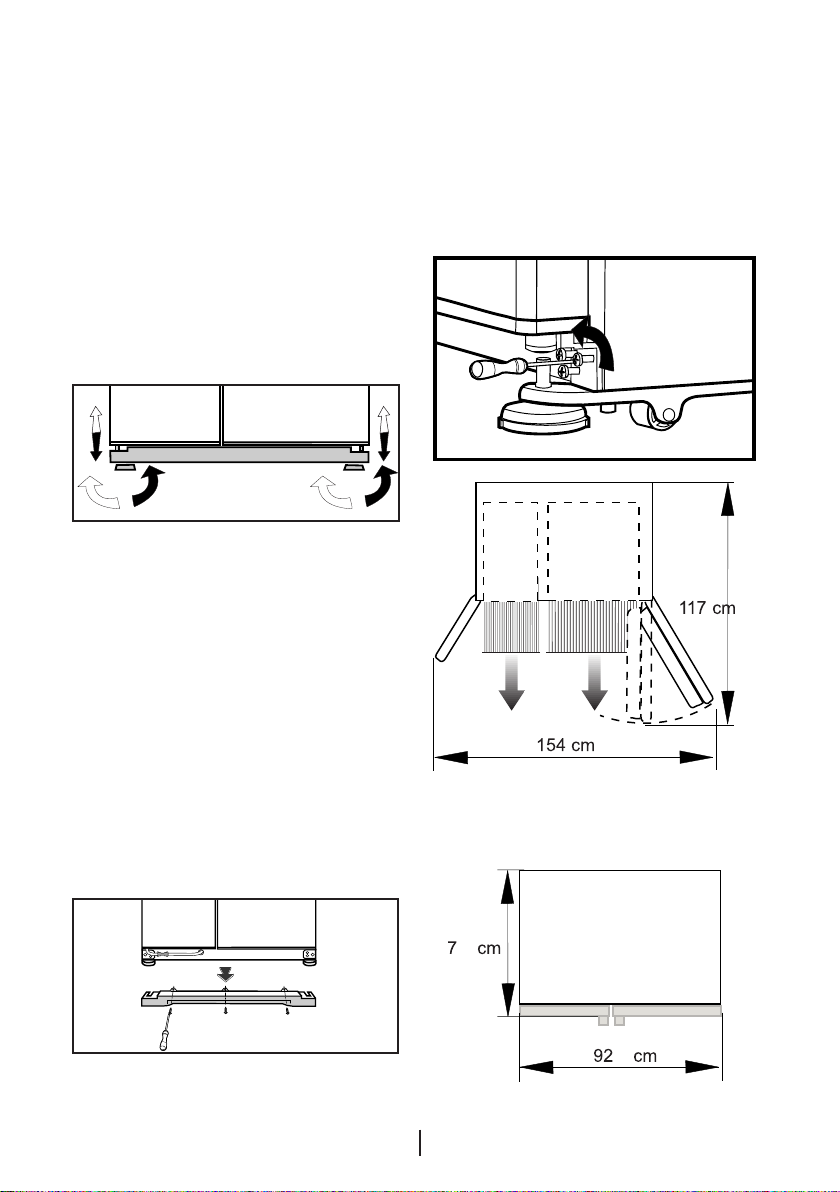
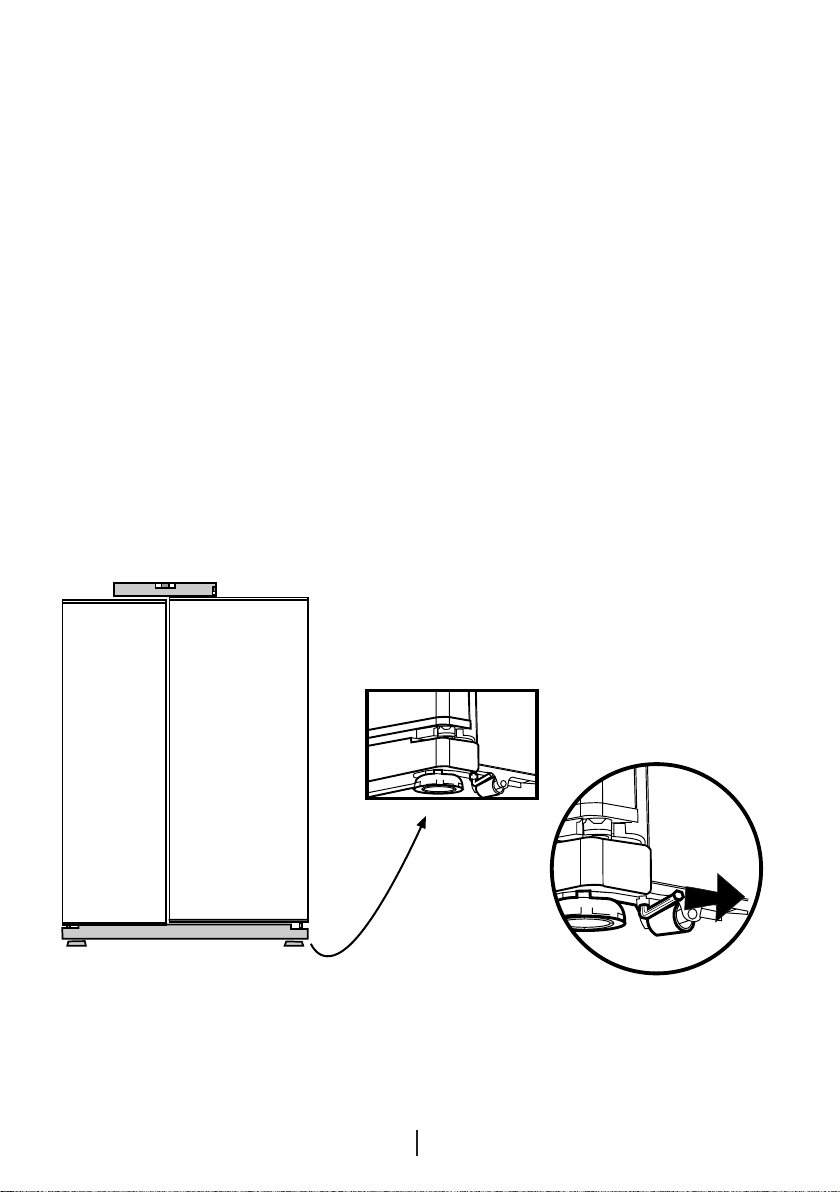
Floor balance adjustment
If your refrigerator is unbalanced;
You can balance your refrigerator by
turning the front legs of it as illustrated
in the figure. (See Figure A) The corner
where the leg exists is lowered when
you turn in the direction of black
arrow and raised when you turn in the
opposite direction. Taking help from
someone to slightly lift the refrigerator
will facilitate this process.
(A)
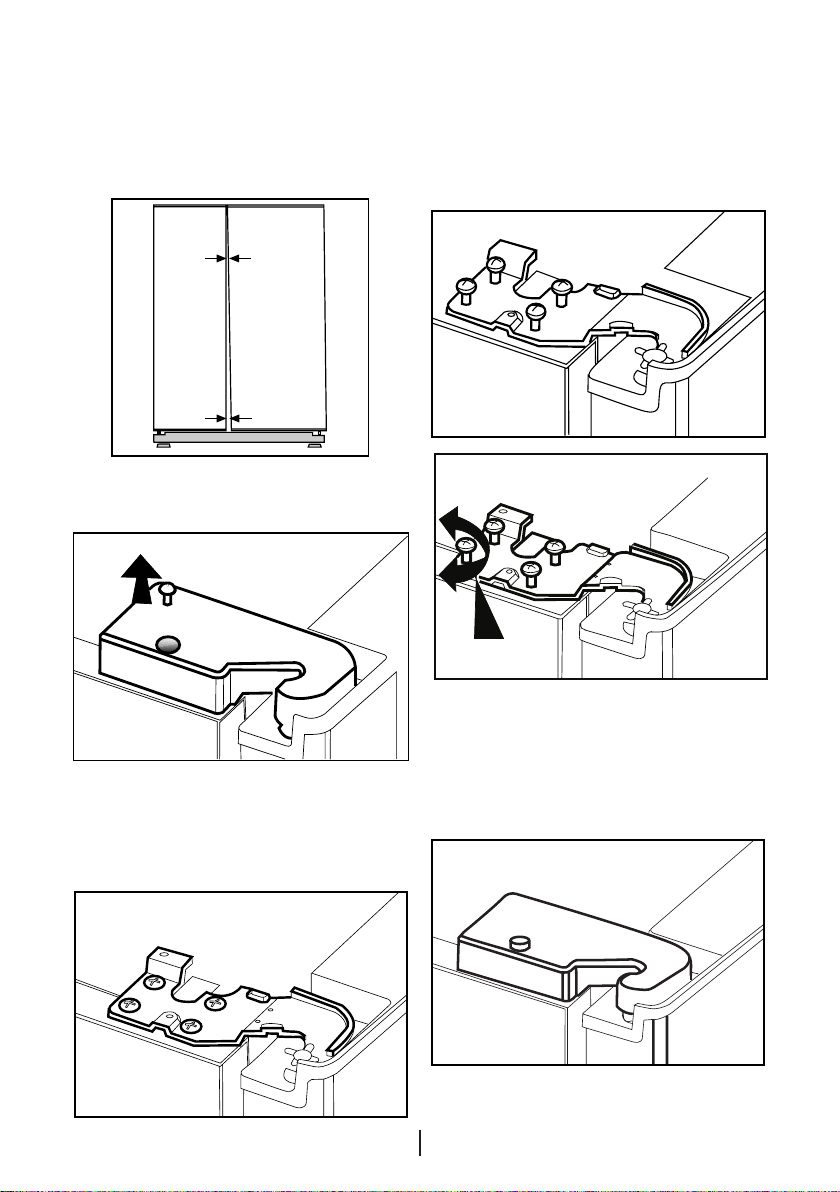
Door height adjustment
In case there is a problem with the
alignment of the doors with respect
to each other, they may be re-aligned
vertically in the order given below.
Ensure that door shelves are empty
when adjusting the door height.
1. Remove the lower ventilation cover
by unscrewing its screws as shown in
the figure below. (See Figure B)
2. Loosen the three screws of the
hinges of the lower door, which you
wish to escalate, with the help of a
screwdriver as shown in the figure
below. (Do not remove completely)
(See Figure C)
• If the freezer compartment door is
lower than the fridge compartment
door, bring them to the same level by
turning the turning the elevation screw
on the freezer compartment side in
the direction of arrow using a M6 Allen
wrench as illustrated in Figure D.
2
(C)
4
1 2 3
(B)
11
2
EN
• If the freezer compartment door is
higher than the fridge compartment
door, bring them to the same level
by turning the elevation screw on
the freezer compartment side in the
reverse direction of arrow using a M6
Allen wrench as illustrated in Figure D.
After bringing the doors to the same
level by elevating the front part with
the aid of the elevation screws,ensure
the doors of the refrigerator shall close
properly. If the doors do not close
properly, this might adversely affect the
efficiency of the refrigerator.
Adjusting the gap between
the upper door
C You can adjust the gap between
the fridge compartment doors as
illustrated in the figures.
Door shelves should be empty when
adjusting the door height.
12
(D)
EN
Because of being wires in the
hinge cover of the freezer door,
switch off the refrigerator power
before removing hinge covers and
this situation should be made to
take care.
C Using a screwdriver, remove the
screw of upper hinge cover of the door
you want to adjust.
C Fix the door you have adjusted by
tightening the screws without changing
the position of the door.
Center Screw
C Adjust the door appropriately as
you desire by loosing the screws.
C Replace the hinge cover and fix
with the screw.
EN
13

4 Preparation
C Your refrigerator should be installed at
least 30 cm away from heat sources
such as hobs, ovens, central heater
and stoves and at least 5 cm away
from electrical ovens and should not
be located under direct sunlight.
C The ambient temperature of
the room where you install your
refrigerator should at least be 10°C.
Operating your refrigerator under
cooler conditions than this is not
recommended with regard to its
efficiency.
C Please make sure that the interior
of your refrigerator is cleaned
thoroughly.
C If two refrigerators are to be installed
side by side, there should be at least
2 cm distance between them.
C When you operate your refrigerator
for the first time, please observe the
following instructions during the initial
six hours.
— The door should not be opened
frequently.
— It must be operated empty without
any food in it.
— Do not unplug your refrigerator. If
a power failure occurs out of your
control, please see the warnings in
the “Recommended solutions for
the problems” section.
C Original packaging and foam
materials should be kept for future
transportations or moving.
14
EN
5 Using your refrigerator
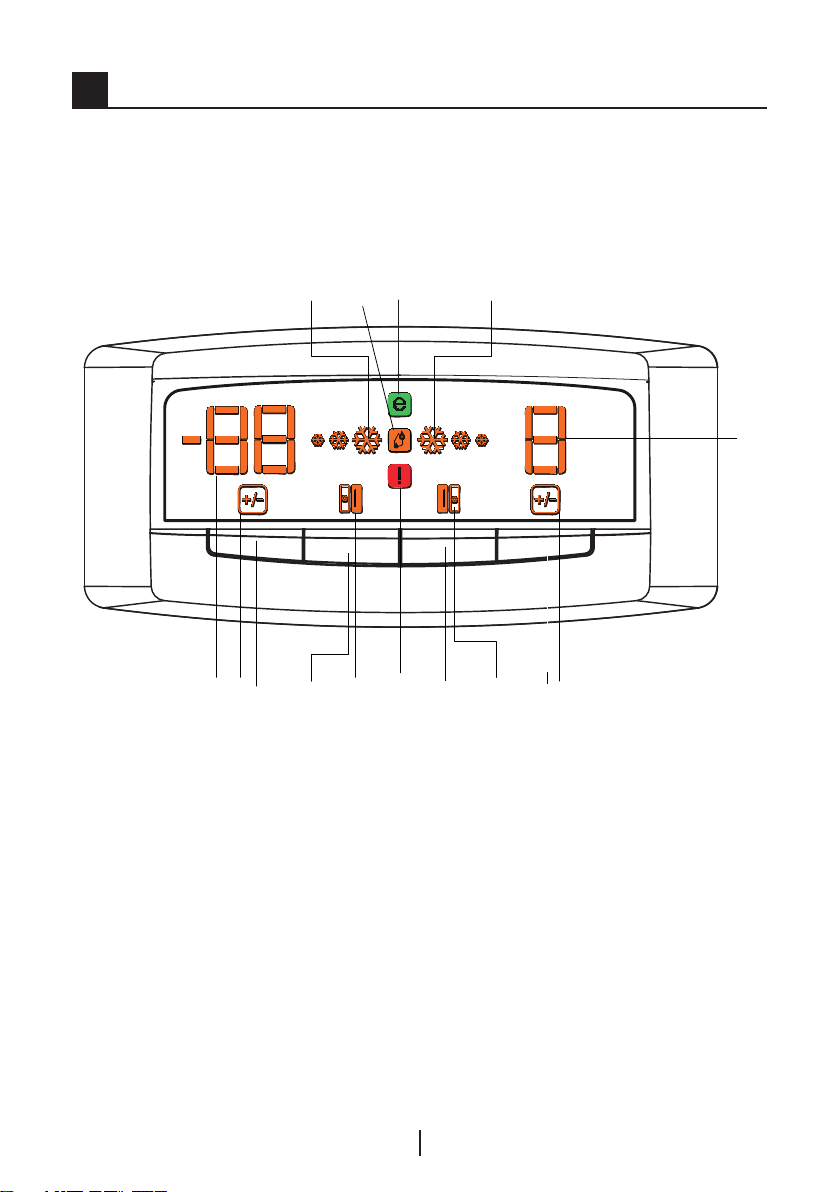
Indicator Panel
Indicator panel aids in using your refrigerator with its audio and visual functions.
This panel allows you to start and use all functions of your refrigerator without
opening its doors since the panel is located on the outer side of the freezer
compartment door.
3
215 41 5
1. Freezer Compartment Temperature
Setting indicator
2. Freezer compartment temperature
setting button
3. Fast Freeze indicator
4. Fast Freeze Button
5. Freezer door open indicator
6. Fridge compartment temperature
adjustment button
147
9 6
11
12 13
10
7. High humidity indicator
8. Fridge temperature setting indicator
9. Error Indicator
10. Fridge compartment temperature
change indicator
11. Quick cool indicator
12. Quick Cool Button
13. Fridge door open indicator
14. Economy mode
15. Freezer compartment temperature
change indicator
C Figures that take place in this instruction manual are schematic and may not
correspond exactly with your product. If the subject parts are not included in the
product you have purchased, then it is valid for other models.
8
15
EN

Setting the fridge
compartment temperature
When you want to change your
refrigerator’s temperature settings,
you need to press the “Fridge
compartment temperature
adjustment button” to make the
fridge compartment temperature
adjustment. The fridge compartment
temperature can be set to cooler
degrees every time you press on the
button (such as 8, 6, 4, 2, 8, …).
Setting the freezer
compartment temperature
When you want to change your
refrigerator’s temperature settings,
you need to press the “Freezer
compartment temperature
adjustment button” to make the
freezer compartment temperature
adjustment. The freezer compartment
temperature can be set to cooler
degrees every time you press on the
button (such as, -18, -20, -22, -24,
-18, …).
Freezer Compartment Temperature
Adjustment Indicator turns to -27°C.
While fast freeze function is activated,
this compartment reaches colder
degrees than the adjusted values
and all of the freezer compartment
temperature indicators may light
up. Fast Freeze function lasts for
maximum 24 hours. Your refrigerator
will automatically exit the fast freeze
mode once the fast freeze process is
completed, fast freeze indicator lamp
will go off and the refrigerator will
turn back to the previously adjusted
temperatures. Freezer compartment
temperature indicators will gradually go
off until the adjusted temperature value
is attained.
If you have unintentionally switched
your refrigerator to fast freeze mode or
if you want to cancel the process, just
press the “Fast Freeze” button again
to exit the fast freeze mode.
If you want to freeze large amounts of
fresh food, press the fast freeze button
24 hours before putting the food into
the freezer compartment.
Fast Freeze function
You can use this function of your
refrigerator to rapidly freeze the food
you put into the freezer compartment
for the first time or to obtain ice more
quickly. If you want to keep your food
frozen for a long period, first apply
the fast freeze function to them.
Fast freeze is the healthiest way of
keeping the food for a long time.
Temperature of your refrigerator’s
freezer compartment drops down
to -27°C during fast freeze process.
When you want to use the “Fast
Freeze” function, press on the fast
freeze button. Fast freeze indicator
lights up when you press the button.
16
EN
Quick cool function
This function can be used for food
placed in the fridge compartment and
desired to be cooled down rapidly.
Press quick cool button to activate the
function. During this process, the quick
cool indicator will light up and fridge
compartment temperature adjustment
indicator will turn into 1°C. While
quick cool function is activated, this
compartment reaches colder degrees
than the adjusted values. Meanwhile,
all of the temperature indicators of
the fridge compartment may light up.
Quick cool process will take about 2
hours and at the end of this period, the
quick cool indicator lamp will go off,
and the refrigerator will turn back to
the previously adjusted temperatures.
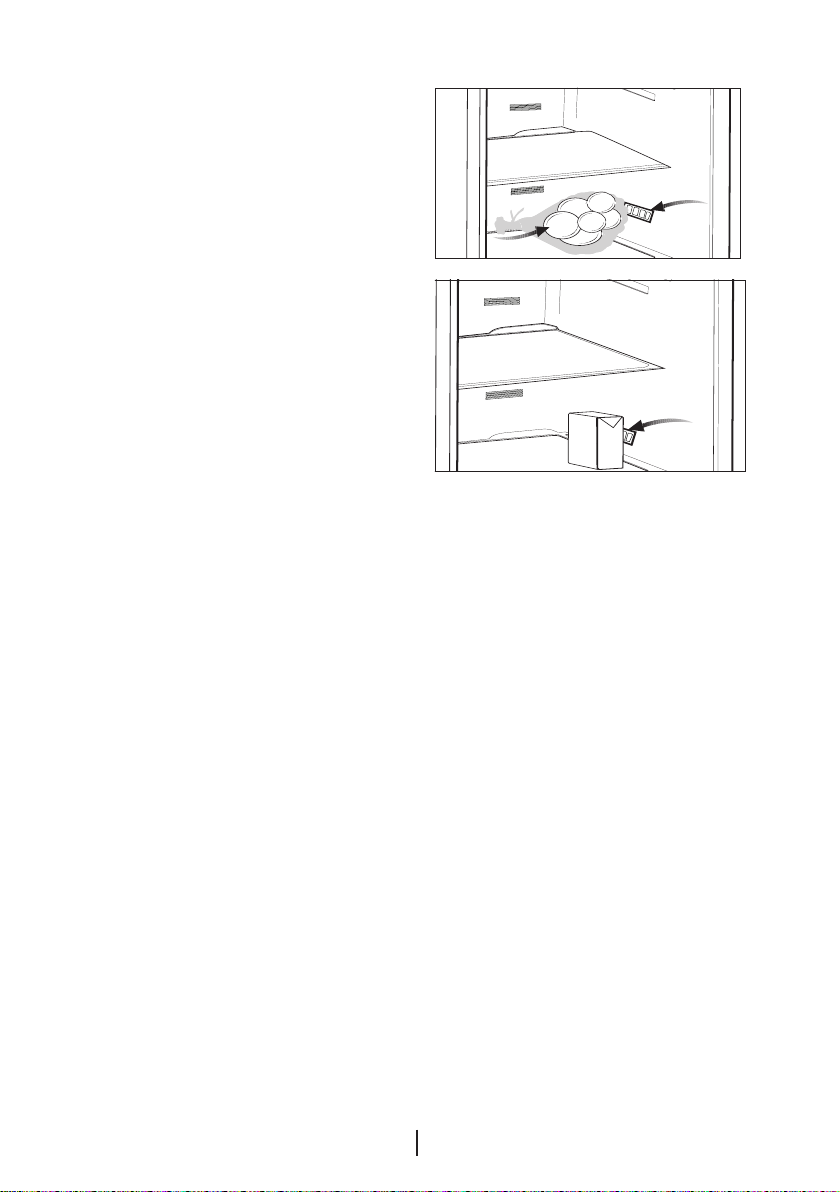
Egg tray
You can install the egg holder to the
desired door or body shelf.
Never store the egg holder in the
freezer compartment
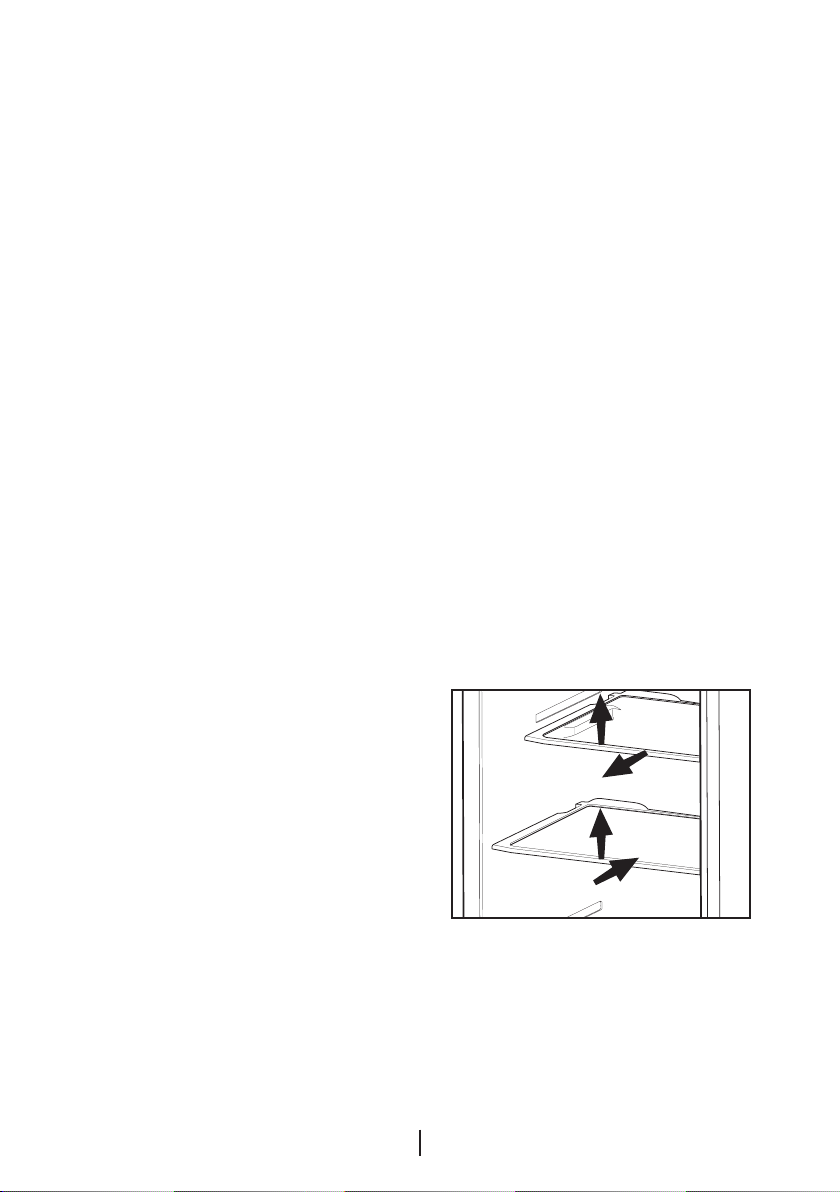
Sliding Body Shelves
Sliding body shelves can be pulled
by slightly lifting up from the front and
moved back and forth. They come to
a stop point when pulled towards front
to allow you reach the foods placed at
the back of the shelf; when it is pulled
after slightly lifted upwards at the
second stop point, the body shelf will
be released.
The shelf should be hold tightly from
the bottom as well in order to prevent
it from tipping over. The body shelf is
placed on the rails at the sides of the
refrigerator body by bringing it to one
lower or one upper level.
The body shelf should be pushed
backwards to seat it completely.
17
1
2
3
4
EN
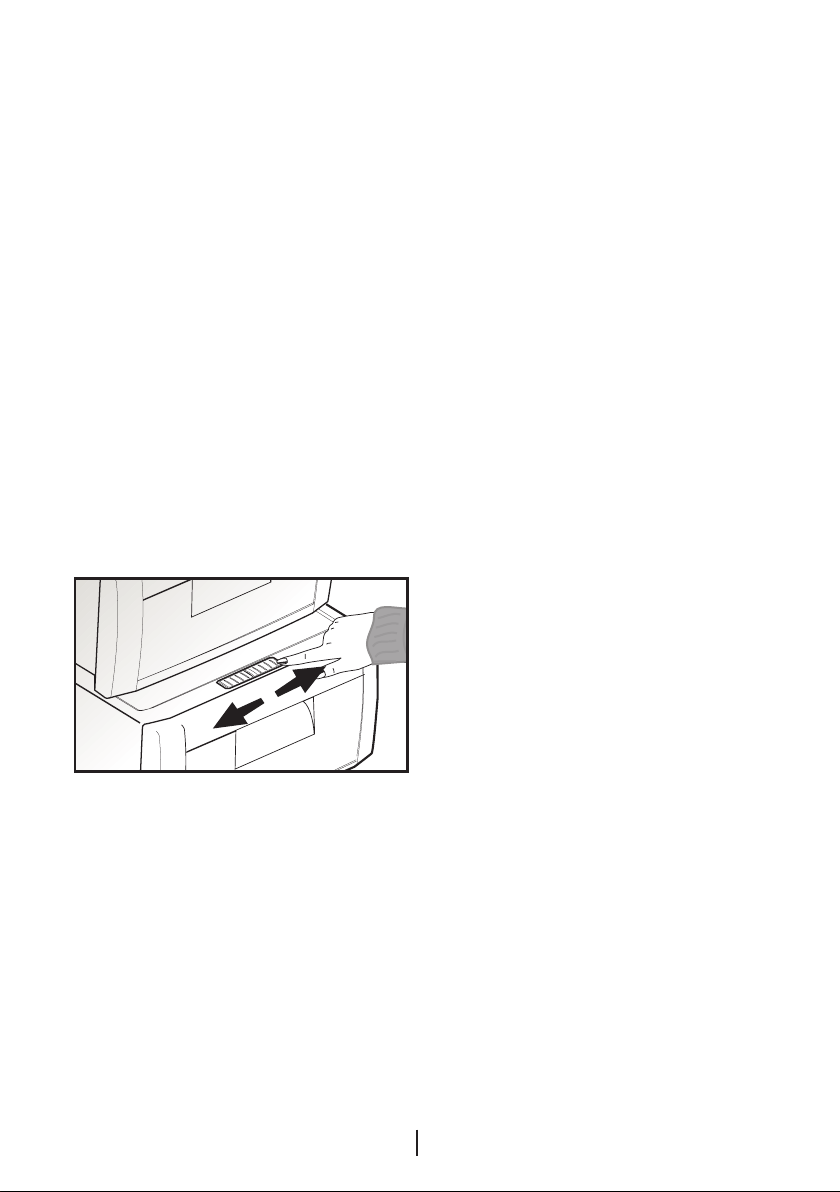
Crisper humidity control
sliders
Crisper of your refrigerator is
designed especially fresh to keep your
vegetables freshly without loosing their
humidity. Cold air circulates basically
around the crisper and the amount of
the cold air passing through the crisper
is controlled by the sliders on the front
side of the crisper cover.
You can adjust the humidity control
sliders to a suitable position according
to the humidity and cooling condition
of your food in the crisper.
If you want your food in the crisper
to cool more, open the holes of the
humidity control sliders and if you
want them to cool less and keep their
humidity for a longer time, close the
holes.
Ion:
Air is ionized by means of the ionizer
system in the fridge compartment air
duct. Thanks to this system, air-borne
bacteria and particles that cause
odour are removed.
18
EN

Recommendations for
preservation of frozen food
• Prepacked commercially frozen
food should be stored in accordance
with the frozen food manufacturer’s
instructions for a ( 4 star) frozen
food storage compartment.
• To ensure that the high quality
achieved by the frozen food
manufacturer and the food retailer is
maintained, the following should be
remembered:
1.Put packets in the freezer as quickly
as possible after purchase.
2.Ensure that contents are labelled
and dated.
3.Do not exceed «Use By», «Best
Before» dates on the packaging.
If there is a power failure do not
open the freezer door. Even if the
power failure lasts up to the time
specified on Type Label (inside left of
the refrigerator), frozen food will not
be affected. In case the failure lasts
longer, the food must be checked and
when necessary, must be consumed
immediately or must be frozen after
cooked.
Defrosting
The fridge and freezer compartments
defrost automatically.
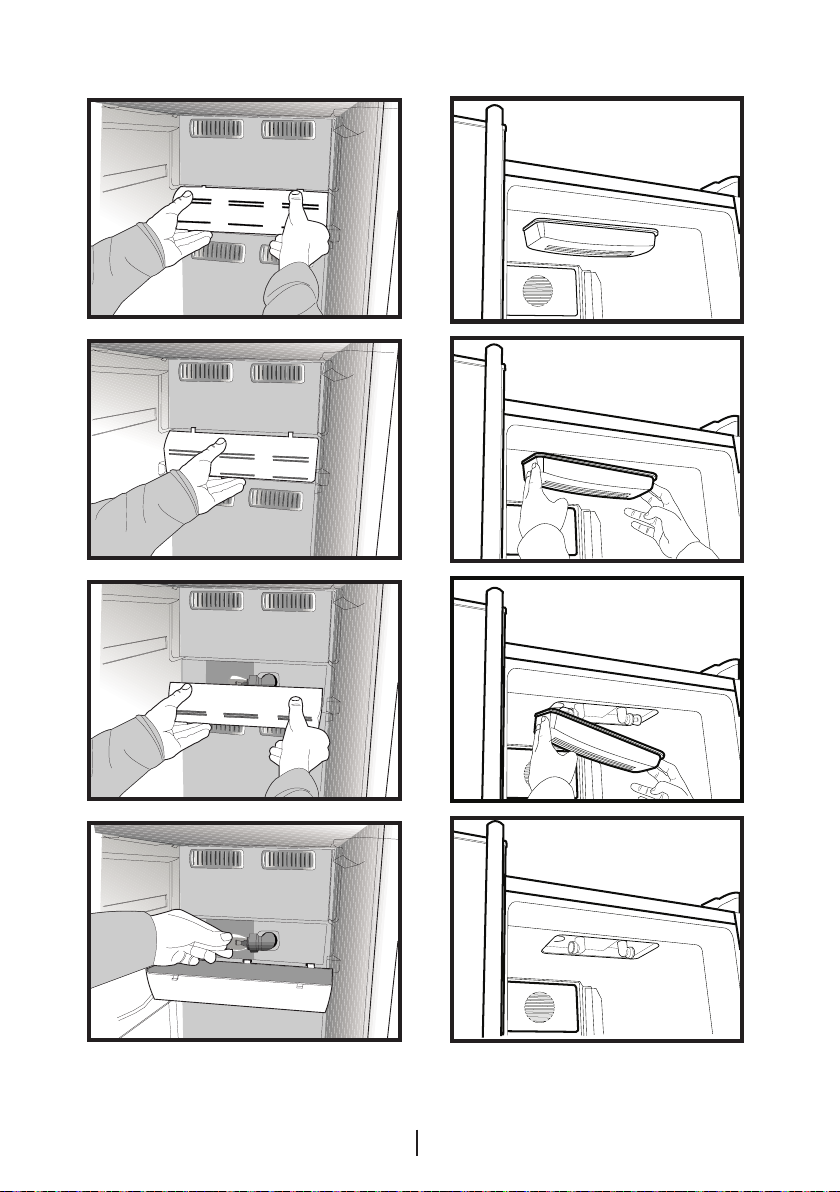
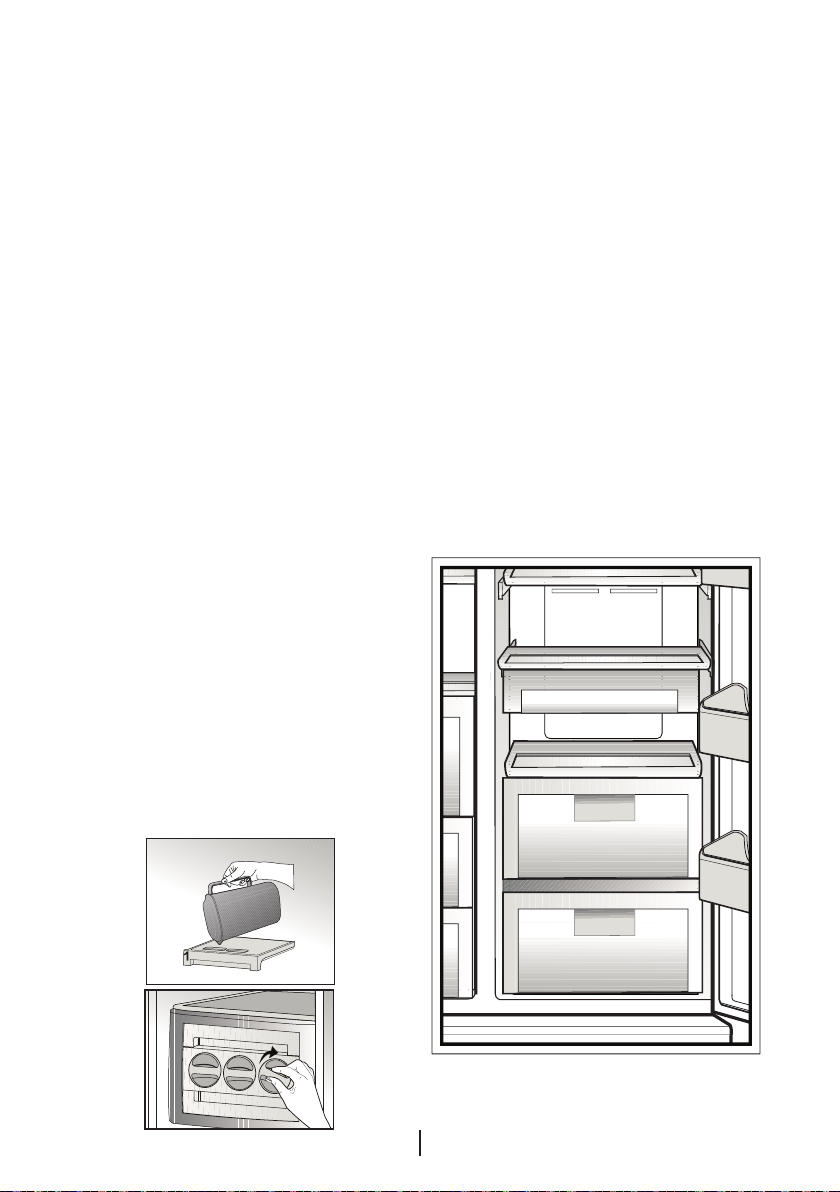
Replacing the Interior Light
Bulb
Should the light fail to work, proceed
as follows:
1. Switch off at the socket outlet and
pull out the mains plug.
Remove all shelves and drawers for
easy access.
2. Illumination cover in fridge section
is opened by pressing by hand; first
release one side and then the other by
pressing on the sides as shown in the
figures.
3. First check that the bulb has not
worked loose by ensuring that it
is screwed securely in the holder.
Reinsert the plug and switch on. If the
bulb works, reinstall the light cover by
inserting the rear lug and pushing up
to locate the front two lugs.
4.If the light still fails to work, switch
off at the socket outlet and pull out
the mains plug. Replace the bulb with
a new 15 watt (max) screw cap E14
(SES) bulb.
5.Carefully dispose of the burnt-out
light bulb immediately.
Replacement light bulb can easily be
obtained from a good local electrical or
DIY store.
19
EN
EN20EN
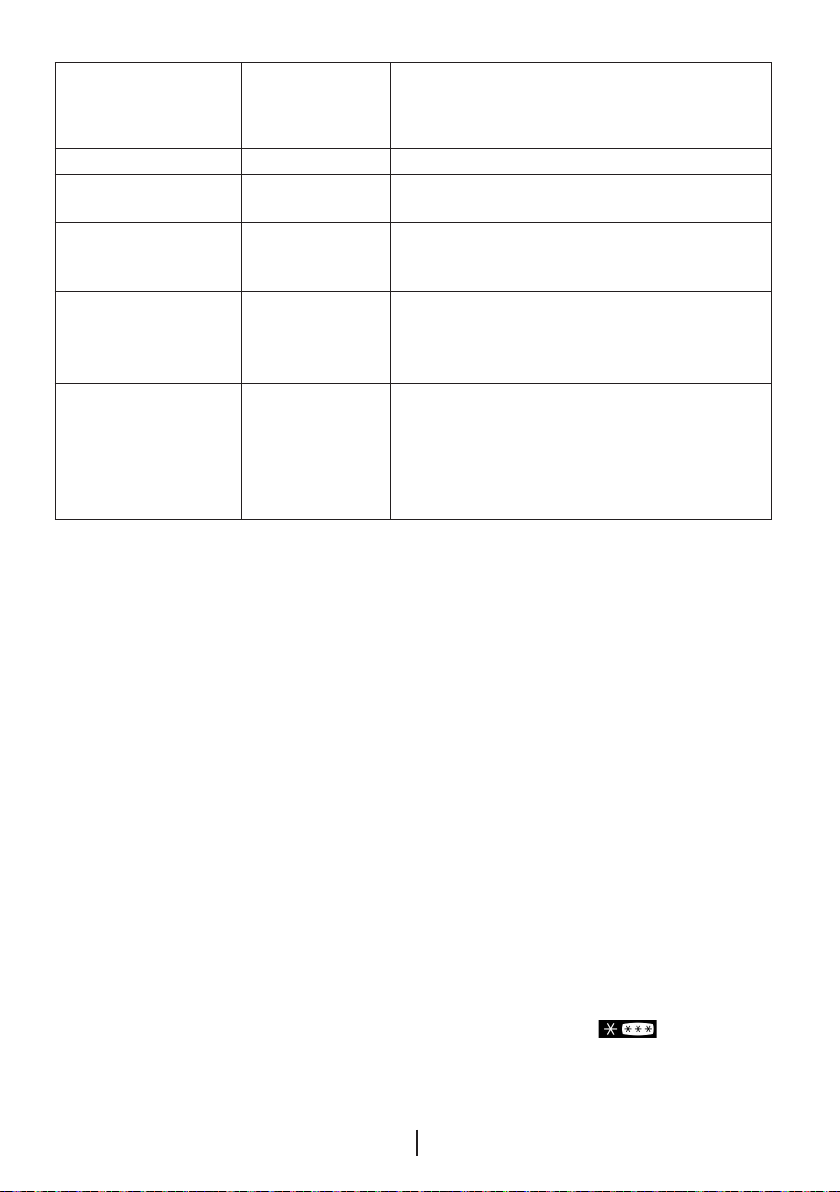
Icematic
* When the Icematic water supply
reservoir (1) is removed from its place
in order to fill it up, it must be replaced
within two minutes after it is filled with
water. The nozzle of the system will
open and the Icematic cells will be
filled with water automatically as soon
as the cartridge is seated in its place.
Your ice will be ready approximately in
two 2 hours.
• Do not remove the Icematic (2) from
its seating to take ice.
• Turn the knobs on it clockwise as
illustrated in the figure.
Ice cubes in the cells will fall down in to
the ice bank (3) below.
• You may take out the ice bank and
serve the ice cubes.
• If you wish, you may keep the ice
cubes in the ice bank.
The ice bank is just for
accumulating ice cubes. Do not
put water in it. Otherwise, it will
break.
About water supply reservoir
Remove the water supply reservoir and
fill it up with water. After filled up with
water, the reservoir must be pushed
forward into its seating until a “click”
sound is heard. If there is any ice in
the reservoir, wait until it melts. Water
supply reservoir has a capacity of
approximately 290 ml.
Chiller compartment
If you wish to use the storage
container under the shelf as the Chiller
compartment, the storage container
under the shelf should be placed as
shown in the picture.
Chiller compartments enable the
foods to be frozen become ready
for freezing. You can also use these
compartments to store your food at a
temperature a few degrees below the
fridge compartment.
You can increase the inner volume of
your refrigerator by removing any of
the chiller compartments. To do this,
pull the compartment towards yourself;
the compartment will lean against the
stopper and stop. This compartment
will be released when you lift it about 1
cm and pull it towards yourself.
2
3
21
Freezer
Compartment
Adjustment
-18°C 4°C This is the normal recommended setting.
-20,-22 or -24°C 4°C
Quick Freeze
-18°C or colder 2°C
-18°C or colder Quick Fridge
Freezing fresh food
• It must be preferred to wrap or cover
the food before placing them in the
refrigerator.
• Hot food must cool down to the
room temperature before putting
them in the refrigerator.
• The foodstuff that you want to freeze
must be fresh and in good quality.
• Foodstuff must be divided into
portions according to the family’s
daily or meal based consumption
needs.
• The foodstuff must be packaged in
an airtight manner to prevent them
from drying even if they are going to
be kept for a short time.
• Materials to be used for packaging
must be tear-proof and resistant to
cold, humidity, odor, oils and acids
and they must also be airtight.
Moreover, they must be well closed
and they must be made from easyto-use materials that are suitable for
deep freeze usage.
Fridge
Compartment
Adjustment
4°C
Explanations
These settings are recommended when
the ambient temperature exceeds 30°C.
Use when you wish to freeze your food in a
short time. Your refrigerator will return to its
previous mode when the process is over.
If you think that your fridge compartment
is not cold enough because of the hot
conditions or frequent opening and closing
of the door.
You can use it when your fridge
compartment is overloaded or if you
wish to cool down your food rapidly. It
is recommended that you activate quick
fridge function 4-8 hours before placing
the food.
• Frozen food must be used
immediately after they are thawed
and they should never be re-frozen.
• Please observe the following
instructions to obtain the best results.
1. Do not freeze too large quantities
of food at one time. The quality of
the food is best preserved when it
is frozen right through to the core as
quickly as possible.
2. Placing warm food into the freezer
compartment causes the cooling
system to operate continuously until
the food is frozen solid.
3. Take special care not to mix already
frozen food and fresh food.
Recommendations for
preservation of frozen food
• Prepacked commercially frozen
food should be stored in accordance
with the frozen food manufacturer’s
instructions for a ( 4 star)
frozen food storage compartment.
EN
22

• To ensure that the high quality
achieved by the frozen food
manufacturer and the food retailer is
maintained, the following should be
remembered:
1. Put packages in the freezer as quickly
as possible after purchase.
2. Ensure that contents are labeled and
dated.
3. Do not exceed «Use By», «Best
Before» dates on the packaging.
Defrosting
The freezer compartment defrosts
automatically.
Placing the food
Various frozen
Freezer
compartment
shelves
Egg tray Egg
Fridge
compartment
shelves
Fridge
compartment
door shelves
Crisper
Freshzone
compartment
food such as
meat, fish, ice
cream, vegetables
and etc.
Food in pans,
covered plates
and closed
containers
Small and
packaged food
or drinks (such as
milk, fruit juice and
beer)
Vegetables and
fruits
Delicatessen
products (cheese,
butter, salami and
etc.)
The TSE norm requires (according to
certain measurement conditions) the
refrigerator to freeze at least 4.5 kg of
foodstuff at 32°C ambient temperature
to -18°C or lower within 24 hours for
every 100-liters of freezer volume.
It is possible to keep the food for
a long time only at -18°C or lower
temperatures.
You can keep the freshness of food
for many months (at -18°C or lower
temperatures in the deep freeze).
WARNING! A
• Foodstuff must be divided into
portions according to the family’s daily
or meal based consumption needs.
• Foodstuff must be packaged in an
airtight manner to prevent them from
drying even if they are going to be kept
for a short time.
Materials necessary for packaging:
• Cold resistant adhesive tape
• Self adhesive label
• Rubber rings
• Pen
Materials to be used for packaging
the foodstuff must be tear-proof and
resistant to cold, humidity, odor, oils
and acids.
Foodstuff to be frozen should not be
allowed to come in contact with the
previously frozen items to prevent their
partial thawing.
Frozen food must be used immediately
after they are thawed and they should
never be re-frozen.
Deep-freeze information
Food must be frozen as rapidly as
possible when they are p
ut in a refrigerator in order to keep
them in good quality.
23
EN

6 Maintenance and cleaning
A Never use gasoline, benzene or
similar substances for cleaning
purposes.
B We recommend that you unplug the
appliance before cleaning.
B Never use any sharp abrasive
instrument, soap, household
cleaner, detergent and wax polish for
cleaning.
C Use lukewarm water to clean the
cabinet of your refrigerator and wipe it
dry.
C Use a damp cloth wrung out in
a solution of one teaspoon of
bicarbonate of soda to one pint of
water to clean the interior and wipe it
dry.
B Make sure that no water enters the
lamp housing and other electrical
items.
B If your refrigerator is not going to be
used for a long period of time, unplug
the power cable, remove all food,
clean it and leave the door ajar.
C Check door seals regularly to ensure
they are clean and free from food
particles.
A To remove door racks, remove all the
contents and then simply push the
door rack upwards from the base.
Protection of plastic
surfaces
C Do not put the liquid oils or oil-cooked
meals in your refrigerator in unsealed
containers as they damage the
plastic surfaces of your refrigerator. In
case of spilling or smearing oil on the
plastic surfaces, clean and rinse the
relevant part of the surface at once
with warm water.
24
EN

7 Recommended solutions for the problems
Please review this list before calling the service. It might save you time and
money. This list includes frequent complaints that are not arising from defective
workmanship or material usage. Some of the features described here may not
exist in your product.
The refrigerator does not operate.
• Is the refrigerator properly plugged in? Insert the plug to the wall socket.
• Is the fuse of the socket which your refrigerator is connected to or the main fuse
blown out? Check the fuse.
Condensation on the side wall of the fridge compartment (MULTIZONE, COOL
CONTROL and FLEXI ZONE).
• Very cold ambient conditions. Frequent opening and closing of the door. Highly
humid ambient conditions. Storage of food containing liquid in open containers.
Leaving the door ajar. Switching the thermostat to a colder degree.
• Decreasing the time the door left open or using it less frequently.
• Covering the food stored in open containers with a suitable material.
• Wipe the condensation using a dry cloth and check if it persists.
Compressor is not running
• Protective thermic of the compressor will blow out during sudden power
failures or plug-out plug-ins as the refrigerant pressure in the cooling system of
the refrigerator has not been balanced yet. Your refrigerator will start running
approximately after 6 minutes. Please call the service if the refrigerator does not
startup at the end of this period.
• The fridge is in defrost cycle. This is normal for a full-automatically defrosting
refrigerator. Defrosting cycle occurs periodically.
• Your refrigerator is not plugged into the socket. Make sure that the plug is
properly fit into the socket.
• Are the temperature adjustments correctly made?
• Power might be cut off.
25
EN
The fridge is running frequently or for a long time.
• Your new product may be wider than the previous one. This is quite normal.
Large refrigerators operate for a longer period of time.
• The ambient room temperature may be high. This is quite normal.
• The refrigerator might have been plugged in recently or might have been loaded
with food. Cooling down of the refrigerator completely may last for a couple of
hours longer.
• Large amounts of hot food might have been put in the refrigerator recently. Hot
food causes longer running of the refrigerator until they reach the safe storage
temperature.
• Doors might have been opened frequently or left ajar for a long time. The warm
air that has entered into the refrigerator causes the refrigerator to run for longer
periods. Open the doors less frequently.
• Freezer or fridge compartment door might have been left ajar. Check if the doors
are tightly closed.
• The refrigerator is adjusted to a very low temperature. Adjust the refrigerator
temperature to a warmer degree and wait until the temperature is achieved.
• Door seal of the fridge or freezer may be soiled, worn out, broken or not properly
seated. Clean or replace the seal. Damaged/broken seal causes the refrigerator
to run for a longer period of time in order to maintain the current temperature.
Freezer temperature is very low while the fridge temperature is sufficient.
• The freezer temperature is adjusted to a very low temperature. Adjust the freezer
temperature to a warmer degree and check.
Fridge temperature is very low while the freezer temperature is sufficient.
• The fridge temperature might have been adjusted to a very low temperature.
Adjust the fridge temperature to a warmer degree and check.
Food kept in the fridge compartment drawers are freezing.
• The fridge temperature might have been adjusted to a very low temperature.
Adjust the fridge temperature to a warmer degree and check.
Temperature in the fridge or freezer is very high.
• The fridge temperature might have been adjusted to a very high degree.
Fridge adjustment has an effect on the temperature of the freezer. Change
the temperature of the fridge or freezer until the fridge or freezer temperature
reaches to a sufficient level.
• Doors might have been opened frequently or left ajar for a long time; open them
less frequently.
• Door might have been left ajar; close the door completely.
• Large amount of hot food might have been put in the refrigerator recently. Wait
until the fridge or freezer reaches the desired temperature.
• The refrigerator might have been plugged in recently. Cooling down of the
refrigerator completely takes time.
The operation noise increases when the refrigerator is running.
• The operating performance of the refrigerator may change due to the changes in
the ambient temperature. It is normal and not a fault.
26
EN
Loading…
-
Инструкции по эксплуатации
1
BEKO GNEV120W инструкция по эксплуатации
(89 страниц)
- Языки:Русский
-
Тип:
PDF -
Размер:
3.41 MB -
Описание:
Холодильник
Просмотр
На NoDevice можно скачать инструкцию по эксплуатации для BEKO GNEV120W. Руководство пользователя необходимо для ознакомления с правилами установки и эксплуатации BEKO GNEV120W. Инструкции по использованию помогут правильно настроить BEKO GNEV120W, исправить ошибки и выявить неполадки.
-
Страница 1
GNE V120W GNE V122WG GNE V120S GNE V120P R e friger at or Kühlschr ank R é frigér at eur K oelkast Š aldytuvas Холодильники جيلثت نودب K oelkast Frigorif er o Frigorífic o Chladnička Hladilnik H ű t ő sz ekr ény[…]
-
Страница 2
Please read this manual first! Dear Customer , We hope that your pr oduct, which has been produced in modern plants and checked under the most meticulous quality control pr ocedures, will pr ovide you an effective service. For this, we recommend you to car efully read the entir e manual of your product before using it and keep it at hand for futur […]
-
Страница 3
EN 2 1 The refrigerator 3 2 Important Safety Warnings 4 Intended use …………………………………. 4 For products with a water dispenser; …. 6 Child safety …………………………………… 6 HCA W arning ………………………………… 7 Things to be done for energy saving ….. 7 3 Installation 8 Points to be conside[…]
-
Страница 4
EN 3 1 The refrigerator 2 1 8 9 *11 17 7 15 *18 *4 15 3 5 9 20 *19 *6 *10 13 14 *16 *22 *21 *21 12 1. Fr ee ze r c o m pa r tm e n t 2. Fr i d ge c om p ar t m en t 3. Fr i d ge c om p ar t m en t i n t er i or l ig h t 4. Bu t t er & C h ee s e s h el f 5. Fa n 6. Io n i se r 7. Fr i d ge c om p ar t m en t g l a ss sh e l ve s 8. Eg g tr a y […]
-
Страница 5
EN 4 2 Important Safety Warnings Please review the following information. Failure to observe this information may cause injuries or material damage. Otherwise, all warranty and reliability commitments will become invalid. The usage life of the unit you purchased is 10 years. This is the period for keeping the spare parts requir ed for the unit to o[…]
-
Страница 6
EN 5 pe rf or me d by i nc om p et en t pe rs on s cr ea te a r is k fo r t he u se r . • In c as e of a ny f ai l ur e or du ri ng a ma in te na nc e or r ep ai r wo rk , di sc on ne ct y ou r r ef ri ge ra t or ’ s ma in s su pp ly b y ei th er t u rni ng o f f th e r el ev an t fu se o r un pl ug gi n g yo ur ap pl ia nc e. • Do n ot p ul […]
-
Страница 7
EN 6 • Do n ot p lu g th e r ef ri ge r at or i f th e w al l ou tl et i s lo os e. • W a te r sh ou ld n o t be s pr ay ed di re ct ly on i nn er o r ou te r p ar ts o f th e p r od uc t fo r sa fe ty p ur po se s . • Do n ot s pr ay s ub st a nc es c on ta in i ng in fl am ma bl e ga se s s uc h as p r op an e ga s ne ar t he r ef ri ge ra […]
-
Страница 8
EN 7 HCA Warning If your product’s cooling system contains R600a: This gas is flammable. Therefor e, pay attention to not damaging the cooling system and piping during usage and transportation. In the event of damage, keep your product away fr om potential fire sour ces that can cause the product catch a fir e and ventilate the room in which t[…]
-
Страница 9
EN 8 3 Installation C Pl ea se r em em be r t ha t th e m an uf ac tu r er s ha ll n ot b e he ld l ia bl e i f th e in fo rm at io n gi v en i n th e in s tr uc ti on m an ua l is n ot o bs er ve d. Points to be considered when re-transporting your refrigerator 1. Y ou r r ef ri ge ra to r mu st b e em pt ie d an d cl ea ne d p ri or t o an y tr a[…]
-
Страница 10
EN 9 Electric connection Co nn ec t yo ur r ef ri ge ra to r to a g r ou nd ed so ck et w hi ch i s be i ng p r ot ec te d by a fu se w it h th e ap pr op ri at e ca pa ci ty . Important: B Th e co nn ec ti on m u st b e in c om p li an ce wi th n at io na l r eg ul at io ns . B Th e po we r ca bl e p lu g mu st b e e as il y ac ce ss ib le a ft er[…]
-
Страница 11
EN 10 5. Do not keep your refrigerator in ambient temperatures under 10°C. Floor balance adjustment If your refrigerator is unbalanced; Y ou can balance your refrigerator by turning the front legs of it as illustrated in the figure. (See Figur e A) The corner where the leg exists is lower ed when you turn in the direction of black arrow and raised[…]
-
Страница 12
EN 11 • If the freezer compartment door is lower than the fridge compartment door , bring them to the same level by turning the elevation screw on the freezer compartment side in the direction of arr ow using a M6 Allen wrench as illustrated in Figur e D. • If the freezer compartment door is higher than the fridge compartment door , bring them […]
-
Страница 13
EN 12 C Using a screwdriver , r emove the screw of upper hinge cover of the door you want to adjust. C Adjust the door appropriately as you desire by loosing the scr ews. C Fix the door without changing the position of the door you have adjusted by tightening the screws. C Replace the hinge cover and fix with the screw . Adjusting the gap between t[…]
-
Страница 14
EN 13 4 Preparation C Y ou r re fr ig er at or s ho ul d b e in st al le d a t le as t 30 c m aw ay f r om h ea t s ou r ce s su ch a s ho bs , ov en s , ce nt ra l he a te r an d st ov es a nd a t l ea st 5 c m aw a y fr om e le ct ri ca l o ve ns a nd s ho u ld n ot be l oc at ed u nd er d i r ec t su nl ig ht . C Th e am bi en t te mp er at ur e[…]
-
Страница 15
EN 14 5 Using your refrigerator 2 15 4 1 5 3 12 13 10 9 6 8 14 7 11 Indicator Panel 1. F r ee ze r c om pa rt me nt te mp er at ur e se tt in g in di ca to r 2. F r ee ze r c om pa rt me nt te mp er at ur e se tt in g bu tt on 3. F as t Fr ee ze i nd ic at or 4. F as t Fr ee ze B ut to n 5. F r ee ze r d oo r op en i n di ca to r 6. F ri dg e co mp[…]
-
Страница 16
EN 15 Setting the fridge compartment temperature When you want to change your refrigerator’ s temperature settings, you need to press the “Fridge compartment temperature adjustment button” to make the fridge compartment temperature adjustment. The fridge compartment temperature can be set to cooler degrees every time you pr ess on the button […]
-
Страница 17
EN 16 Quick cool function This function can be used for food placed in the fridge compartment and desired to be cooled down rapidly . Press quick cool button to activate the function. During this process, the quick cool indicator will light up and fridge compartment temperature adjustment indicator will turn into 1°C. While quick cool function is […]
-
Страница 18
EN 17 Blue light Foodstuff stor ed in the crispers that are enlightened with a blue light continue their photosynthesis by means of the wavelength effect of blue light and thus, preserve their fr eshness and increase their vitamin content. Crisper humidity control sliders Crisper of your refrigerator is designed specially to keep your vegetables fr[…]
-
Страница 19
EN 18 Recommendations for preservation of frozen food • Prepacked commer cially frozen food should be stored in accor dance with the frozen food manufactur er’s instructions for a ( 4 star) frozen food storage compartment. • T o ensure that the high quality supplied by the frozen food manufacturer and the food r etailer is maintained, foll[…]
-
Страница 20
EN 19[…]
-
Страница 21
EN 20 Icematic * When the Icematic water supply reservoir (1) is r emoved from its place in order to fill it up, it must be r eplaced within two minutes after it is filled with water . The nozzle of the system will open and the Icematic cells will be filled with water automatically as soon as the cartridge is seated in its place. Y our ice will be […]
-
Страница 22
EN 21 Using the Icematic • Fi ll t he I ce ma ti c w it h wa te r an d p la ce it i nt o it s se at . Y ou r ic e w il l be r e ad y ap pr ox im at el y i n tw o ho ur s . Do n ot r em ov e th e Ic em at ic f r om i ts s ea t in g to t ak e ic e. • T urn t he k no bs o n it c lo ck wi se b y 9 0 de gr ee s. I ce cu be s in t he ce ll s wi ll f […]
-
Страница 23
EN 22 6 Cleaning and care A Ne ve r us e ga so l in e, b en ze ne or si mi la r su bs ta nc es fo r cl ea ni ng pu rp os es . B We r ec om me nd t ha t yo u un pl ug t he ap pl ia nc e be fo r e cl ea ni ng . C Ne ve r us e an y s ha rp a br as i ve in st ru me nt , so ap , h ou se ho ld cl ea ne r , d et er ge nt an d wa x po li s h fo r cl ea ni […]
-
Страница 24
EN 23 7 Recommended solutions for the problems Please review this list befor e calling the service. It might save you time and money . This list includes frequent complaints that ar e not arising from defective workmanship or material usage. Some of the features described her e may not exist in your product. The refrigerator does not operate. • I[…]
-
Страница 25
EN 24 The fridge is running frequently or for a long time. • Y our new product may be wider than the pr evious one. This is quite normal. Large refrigerators operate for a longer period of time. • The ambient room temperatur e may be high. This is quite normal. • The refrigerator might have been plugged in r ecently or might have been loaded […]
-
Страница 26
EN 25 The operation noise increases when the r efrigerator is running. • The operating performance of the refrigerator may change due to the changes in the ambient temperature. It is normal and not a fault. Vibrations or noise. • The floor is not even or it is weak. The refrigerator r ocks when moved slowly . Make sure that the floor is str ong[…]
-
Страница 27
Veuillez d’abord lire la notice d’utilisation ! Chère cliente, cher client, Nous espérons que votr e produit, qui a été fabriqué dans des usines modernes et vérifié au terme des procédur es de contrôle de qualité les plus méticuleuses, vous aidera ef ficacement. Pour cette raison, nous vous conseillons de lire attentivement tout le m[…]
-
Страница 28
FR 2 TABLE DES MATIÈRES 1 Le réfrigérateur 3 2 Précautions importantes pour votre sécurité 4 Utilisation prévue …………………………………… 4 Pour les appareils dotés d’une fontaine à eau ; 6 Sécurité enfants ……………………………………. 6 Avertissement HCA ……………………………….. 6 Mesur[…]
-
Страница 29
FR 3 1 Le réfrigérateur 1. Co mpa rt im en t c ong él at eu r 2. Co mpa rt im en t r éf rig éra teu r 3. Éc lai ra ge i nté rie ur d u com par ti me nt r éf rig ér at eu r 4. Et agè re à Beu rr e e t F ro mag es 5. V ent ila teu r 6. Io nis eu r 7. Cl aye tt es e n v err e du com pa rt im ent de r éf rig ér at io n 8. Ca sie r à œu f[…]
-
Страница 30
FR 4 2 Précautions importantes pour votre sécurité V euillez examiner les informations suivantes : Le non respect de ces consignes peut entraîner des blessures ou dommages matériels. Sinon, tout engagement lié à la garantie et à la fiabilité du produit devient invalide. La durée de vie du pr oduit que vous avez acheté est de 10 ans. Il s[…]
-
Страница 31
FR 5 • En ca s de d ysf onc ti on ne men t o u lo rs d’ opé ra ti on s d ’en tr eti en ou d e ré pa rat io n, dé bra nc he z l’a lim en ta ti on éle ct ri qu e d u r éf rig ér at eu r s oit e n dé sac tiv an t le fu sib le co rr esp ond ant , so it en dé br an ch ant l’ app ar eil . • Ne ti re z p as su r le câ ble l or sq u[…]
-
Страница 32
FR 6 pr ès du r éfr igé rat eur p ou r évi ter t ou t ris que d’ inc en di e et d’e xp lo si on. • Ne pl ac ez j ama is de r éc ip ie nts p le in s d ‘ea u en ha ut d u ré fr igé ra te ur , il s pou rr ai en t c aus er de s c ho cs é lec tri qu es o u i nce nd ie . • Ne su rc har gez p as v otr e ré fr igé ra te ur av e[…]
-
Страница 33
FR 7 Mesures d’économie d’énergie • Ne la is se z pas le s po rt es du ré fri gér at eu r ou ver te s pe nda nt un e du ré e pr olo ngé e. • N’ int ro dui sez p as d e d enr ée s o u d e bo iss on s ch aud es da ns l e r éf rig éra teu r . • Ne su rc har gez p as l e r éf rig éra teu r po ur ne pa s ob st rue r p as l a cir c[…]
-
Страница 34
FR 8 3 Installation C V eu il lez n ot er qu e l e fa br ica nt ne p ou rra êt re te nu re spo nsa bl e si le s i nf or ma tio ns fo urn ies da ns ce tt e not ice d ’u ti lis ati on n e son t p as r es pec té es . Points à prendre en compte lorsque vous transportez à nouveau votre produit. 1. Le r éfr igé rat eu r do it êtr e vid é e t ne[…]
-
Страница 35
FR 9 Branchement électrique Br anc he z vo tr e ré fri gér ate ur à u ne pri se d e mis e à la te rr e pr ot ég ée par un f us ib le aya nt u ne ca pac it é ap pr op rié e. Important: B L e bra nc he me nt doi t êt r e con fo rm e aux no rme s en v igu eur s ur l e t err it oi r e nat ion al . B L a fic he d e câb le d’ al im ent ati o[…]
-
Страница 36
FR 10 5. N’exposez pas le réfrigérateur à des températures ambiantes inférieur es à 10°C. Réglage de la stabilité au sol Si le réfrigérateur n’est pas stable. V ous pouvez équilibrer le réfrigérateur en tournant les pieds avant, tel qu’illustré dans le schéma. V oir Schéma A) Le côté où se trouve le pied s’abaisse lor[…]
-
Страница 37
FR 11 • Si la porte du compartiment de congélation est plus basse que celle du compartiment de réfrigération, amenez-les à la même hauteur , en tournant la vis d’élévation située du côté du compartiment de congélation, dans le sens indiquée par la flèche, en utilisant une clé hexagonale M6, tel qu’illustré dans le schéma D. ?[…]
-
Страница 38
FR 12 C A l’aide d’un tournevis, retirez la vis du cache de la charnière supérieure de la porte que vous souhaitez régler . C Ajustez la porte de manière appr opriée à votre gr é en desserrant les vis. C Fixez la porte que vous avez réglée en serrant les vis sans modifier la position de la porte. C Replacez le cache de la charnière et[…]
-
Страница 39
FR 13 4 Préparation C V ot r e r éf ri gér at eu r doi t ê tr e i nst al lé à au mo ins 3 0 cm de s s ou r ce s de cha le ur t ell es qu e l es p la que s d e cu is son , l es f ou rs, ap par ei ls de ch au f fa ge ou cu is in ièr es , e t à au mo in s 5 cm des f ou rs él ect ri qu es . D e mê me, i l ne do it pa s êt re e xpo sé à l a[…]
-
Страница 40
FR 14 5 Utilisation du réfrigérateur Bandeau indicateur 1. In dic at eu r de ré gla ge de te mp ér atu re du co mpa rt im en t d e c on gé la tio n 2. Bo uto n de r ég la ge de t em pér atu re du co mpa rt im en t d e c on gé la tio n 3. In dic at eu r de con gé la ti on rap id e 4. Bo uto n de c ong éla ti on r api de 5. In dic at eu r d[…]
-
Страница 41
FR 15 Réglage de la température du compartiment réfrigérateur Lorsque vous souhaitez modifier les réglages de la température du r éfrigérateur , vous devez appuyez sur le « bouton de réglage de la température du compartiment de réfrigération » pour effectuer le r églage de cette température. La températur e du compartiment de réfr[…]
-
Страница 42
FR 16 Fonction de refroidissement rapide Cette fonction peut être utilisée pour les denrées placées dans le compartiment de réfrigération que l’on souhaite r efroidir rapidement. Appuyez sur le bouton QuickCool pour activer cette fonction. Au cours de ce processus, l’indicateur de refr oidissement rapide s’allumera et l’indicateur de […]
-
Страница 43
FR 17 Éclairage bleu Les denrées conservées dans les bacs à légumes sont éclairées par une lumièr e bleue qui, grâce aux effets de sa longueur d’onde, permet aux fruits et légumes de continuer la photosynthèse et ainsi de conserver leur fraîcheur et leur teneur en vitamines. Manettes de contrôle d’humidité du bac à légumes Le[…]
-
Страница 44
FR 18 Recommandations concernant la conservation des aliments congelés • Pour un compartiment des denrées congelées (4 étoiles), les aliments préemballés et surgelés, destinés à un usage commercial, doivent êtr e conservés conformément aux instructions du fabricant de produits congelés. • Afin de veiller à ce que la qualité supé[…]
-
Страница 45
FR 19[…]
-
Страница 46
FR 20 Distributeur de glaçons * Lorsque le réservoir d’alimentation en eau du distributeur de glaçon (1) est retir é pour être r empli, il doit être r emis en place dans les deux minutes qui suivent son remplissage. L ’embout du système s’ouvre et les cellules du distributeur de glaçons se remplissent d’eau automatiquement dès q[…]
-
Страница 47
FR 21 Utilisation du distributeur • Re mpl is se z le dis tr ib ut eur de g la ço ns ave c de l’ ea u et r em ett ez -l e à s a p la ce . V os gl aço ns s er on t pr êts da ns en vi r on de ux he ur es. Ne pa s r et ir er le di str ib ut eu r d e gl aço ns d e son lo ge me nt po ur pr end re de la gl ace . • T our ne z les b ou to ns […]
-
Страница 48
FR 22 6 Nettoyage et entretien A N ’u ti li sez ja mai s d’ es sen ce, d e be nzè ne ou de ma té ri au x s imi la ir es p ou r l e ne tt oya ge. B N ou s vo us re com man don s de d ébr anc he r l’ app ar eil av an t de pr oc éde r a u n et to ya ge. C N ’u til ise z j am ai s d’u ste ns il es tr anc ha nt s, sa von , pr od ui t de[…]
-
Страница 49
FR 23 7 Solutions recommandées aux problèmes V euillez vérifier la liste suivante avant d’appeler le service après-vente. Cela peut vous faire économiser du temps et de l’argent. Cette liste regr oupe les problèmes les plus fr équents ne provenant pas d’un défaut de fabrication ou d’utilisation du matériel. Il se peut que certai[…]
-
Страница 50
FR 24 Le réfrigérateur fonctionne fr équemment ou pendant de longue périodes. • V otre nouveau réfrigérateur est peut êtr e plus large que l’ancien. Ceci est tout à fait normal. Les grands réfrigérateurs fonctionnent pendant une période de temps plus longue. • La température ambiante de la salle peut êtr e élevée. Ceci est tout[…]
-
Страница 51
FR 25 Le niveau sonore augmente lorsque le r éfrigérateur est en marche. • Les caractéristiques de performance du réfrigérateur peuvent changer en raison des variations de la température ambiante. Cela est normal et n’est pas un défaut. Vibrations ou bruits • Le sol n’est pas plat ou n’est pas solide. Le réfrigérateur oscille […]
-
Страница 52
Bitte lesen Sie zuerst diese Anleitung! Lieber Kunde, Wir sind sicher , dass Ihnen dieses Produkt, das in modernsten Fertigungsstätten hergestellt und den strengsten Qualitätsprüfungen unterzogen wur de, lange Zeit gute Dienste leisten wird. Wir empfehlen Ihnen, vor Inbetriebnahme des Gerätes das gesamte Handbuch durchzulesen und es anschließe[…]
-
Страница 53
DE 2 INHALT 1 Der Kühlschrank 3 2 Wichtige Hinweise zu Ihrer Sicherheit 4 Bestimmungsgemäßer Gebrauch ……… 4 Bei Geräten mit W asserspender: ………. 6 Kinder – Sicherheit …………………………. 6 HCA-W arnung ………………………………. 6 Tipps zum Energiesparen ………………… 7 3 Installation 8 W as Sie bei […]
-
Страница 54
DE 3 1 Der Kühlschrank 1. Tie fk üh lbe re ic h 2. Kü hl be re ich 3. Kü hl be re ich -I nn enb el eu ch tu ng 4. Bu tt er — & K äs ef ach 5. Lü ft er 6. Io ni sa tor 7. Kü hl be re ich -G la sab la ge n 8. Ei er be häl te r 9. Kü hl be re ich -T ü rab la ge n 10 . W ei nk el ler 11 . F la sc hen ha lt er 12 . F la sc hen ab la gen 13[…]
-
Страница 55
DE 4 2 Wichtige Hinweise zu Ihrer Sicherheit Bitte lesen Sie die folgenden Hinweise aufmerksam durch. Bei Nichtbeachtung kann es zu V erletzungen und Sachschäden kommen. In diesem Fall erlöschen auch sämtliche Garantie- und sonstigen Ansprüche. Die regulär e Einsatzzeit des von Ihnen erworbenen Gerätes beträgt 10 Jahre. In diesem Zeitraum ha[…]
-
Страница 56
DE 5 au ft r et en , so t r en ne n Si e de n K üh ls chr an k vo n de r S tr om ve rso rg un g, i nd em Si e die en ts pr ec hen de S ich er un g ab sc hal te n od er d en Ne tz ste ck er z ie he n. • Zi eh en Si e ni em al s am N et zk abe l – fa ss en Si e st ets d en St ec ke r se lb st. • La ge rn Si e hoc hp r oz ent ig e alk oh ol isc[…]
-
Страница 57
DE 6 • St el le n S ie n iem al s mi t W as se r od er an de r en F lü ss ig ke ite n ge fül lt e Gef äß e au f de m Kü hls ch ra nk ab ; es b es teh t Br and — un d St ro msc hl ag gef ah r . • Ü be rla de n Si e de n K üh ls chr an k nic ht mi t üb erm äß ig vi el en L eb en smi tt el n. Be i Üb er la dun g kö nne n Le be ns mi tt[…]
-
Страница 58
DE 7 Tipps zum Energiesparen • Ha lt en Si e di e K üh ls ch ra nk tür en n ur mö gl ic hst k ur z g eö f fn et. • La ge rn Si e kei ne w arm en S pe is en od er Ge tr än ke im K ühl sc hr an k ei n. • Üb er la den S ie de n Kü hl sc hr ank n ic ht; d ie Lu ft m uss f r ei zi rk ul ier en k ön nen . • St el le n S ie d en Kü hl sc[…]
-
Страница 59
DE 8 3 Installation C Bi tt e bea ch te n S ie , das s de r H er st el le r ni ch t haf te t, we nn S ie s ic h n ic ht an d ie In fo rm ati on en un d An we is un gen d er Be di en ung sa nl eit un g ha lt en . Was Sie bei einem weiteren Transport Ihres Kühlschranks beachten müssen 1. De r Kü hls ch ra nk mu ss v or d em T ra ns po rt ge le er […]
-
Страница 60
DE 9 Elektrischer Anschluss Sc hl ie ßen S ie Ih re n Kü hl sc hr ank a n ein e ge er de te (S ch uk o-) S te ck do se an . Di ese St ec kd ose m us s m it e in er p ass en de n Si ch er ung a bg esi ch er t we r de n. Wichtig: B De r An sc hl us s mus s ge mäß l ok ale r V ors ch ri fte n er fol ge n. B De r Ne tz st ec ke r m us s nac h de r […]
-
Страница 61
DE 10 Gerade, ausbalancierte Aufstellung Wenn Ihr Kühlschrank nicht absolut gerade steht: Sie können den Kühlschrank – wie in der Abbildung gezeigt – durch Dr ehen der Frontfüße ausbalancier en. (Siehe Abbildung A.) Wenn Sie in Richtung des schwarzen Pfeils drehen, senkt sich die Ecke, an der sich der Fuß befindet. Beim Drehen in Gegenric[…]
-
Страница 62
DE 11 • Wenn die Tiefkühlbereichtür höher als die Kühlbereichtür ist, bringen Sie die T ür auf dieselbe Höhe, indem Sie die Höheneinstellschraube an der Tiefkühlbereichtür mit einem M6- Innensechskantschlüssel drehen; siehe Abbildung D. • Wenn die Tiefkühlbereichtür niedriger als die Kühlbereichtür ist, bringen Sie die T ür auf […]
-
Страница 63
DE 12 C Drehen Sie mit einem Schraubenzieher die Schraube am oberen T ürscharnier der einzustellenden T ür heraus. C Stellen Sie die T ür nach Lösen der Schrauben nach Wunsch ein. C Fixieren Sie die eingestellte T ür durch Anziehen der Schrauben; ändern Sie die T ürposition dabei nicht. C Setzen Sie die Scharnierabdeckung wieder auf, ziehen […]
-
Страница 64
DE 13 4 Vorbereitung C Ih r Kü hls ch ra nk so ll te mi nd est en s 30 cm v on Hi tz eq uel le n wi e Ko chs te ll en, Öf en , Hei zu ng en, H er de n un d ähn li ch en Ei nr ic htu ng en au fg es te ll t wer de n. Ha lt en Si e mi nde st en s 5 cm Ab st an d zu E le ktr oö fe n ein , ve rm ei de n S ie d ie Au fs te llu ng i m d ir ek te n So […]
-
Страница 65
DE 14 5 Nutzung des Kühlschranks Anzeigefeld 1. Tie fk üh lbe re ic ht emp er at ur ei ns te llu ng sa nze ig e 2. Tie fk üh lbe re ic ht emp er at ur -Ei ns te llk no pf 3. Sc hn el lge fr ie ran ze ig e 4. Sc hn el lge fr ie rta st e 5. Tie fk üh lbe re ic ht ür of fe n- An ze ig e 6. Kü hl be re ich te mp era tu rt as te 7. Ho he F euc ht […]
-
Страница 66
DE 15 Kühlbereichtemperatur einstellen Zum Ändern der T emperatureinstellungen des Kühlschranks drücken Sie die Kühlbereichtemperatur-Einstelltaste . Die T emperatur des Kühlbereichs kann schrittweise vermindert werden, indem Sie die T aste wiederholt drücken (8, 6, 4, 2, 8, …). Tiefkühlbereichtemperatur einstellen Zum Ändern der T emper[…]
-
Страница 67
DE 16 Schnellkühlfunktion Diese Funktion dient dazu, Lebensmittel, die im Kühlbereich aufbewahrt wer den, schnell herunterzukühlen. Sie starten diese Funktion mit einem Druck auf die Schnellkühltaste. Bei diesem V organg leuchtet die Schnellkühlanzeige auf, der Kühlbereich wir d besonders stark abgekühlt; die Kühlbereich- T emperaturanpassu[…]
-
Страница 68
DE 17 Blaues Licht Im Gemüsefach gelagertes Gemüse, wird mit blauem Licht beleuchtet. Dadurch wird die Photosynthese mit Hilfe des Wellenlängenef fekts des blauen Lichts fortgesetzt, Vitamine und Frische bleiben erhalten. Gemüsefach- Feuchtigkeitsschieber Im Gemüsefach Ihres Kühlgerätes bleibt Gemüse länger frisch und behält seine natürl[…]
-
Страница 69
DE 18 Empfehlungen zur Konservierung von gefrorenen Lebensmitteln • Handelsübliche, verpackte Tiefkühlkost sollte gemäß den Hinweisen des Herstellers zur Lagerung in Viersterne- Fächern ( ) gelagert werden. • Um besonders gute Ergebnisse zu erzielen und zu erhalten, sollten Sie Folgendes berücksichtigen: 1. Geben Sie Lebensmittel so schne[…]
-
Страница 70
DE 19[…]
-
Страница 71
DE 20 Eiswürfelmaschine * Wenn Sie den W asservorrat (1) der Eiswürfelmaschine aufstocken und dazu den V orratsbehälter herausnehmen, müssen Sie diesen innerhalb von zwei Minuten wieder einsetzen. Sobald Sie den Behälter wieder an seinen Platz setzen, öffnet sich das V entil, die Zellen der Eiswürfelmaschine werden automatisch mit W asser ge[…]
-
Страница 72
DE 21 Eisbereiter verwenden • Fü ll en Si e de n E is be r eit er m it W ass er , se tz en Si e ih n i n se in e Ha lte ru ng . I hr E is is t na ch et wa zw ei S tu nd en fe rt ig . Z um En tn eh men d es Ei se s ne hm en Si e de n Ei sb er ei ter n ic ht he ra us . • Dr eh en S ie di e Knö pf e da ra n um 90 ° im Uh rz ei ger si nn . D ie […]
-
Страница 73
DE 22 6 Reinigung und Pflege A V er wen de n Si e zu Re in ig ung sz we cke n ni em al s B en zi n o de r äh nl ic he Su bs ta nze n. B Wir e mpf eh le n, vo r de m Re ini ge n den Ne tz st eck er z u z ie he n. C V erw en de n S ie z ur Re in igu ng ni em al s s ch ar fe Ge ge ns tä nd e, Se if e, Ha us ha lts re in ig er , W as ch mit te l ode […]
-
Страница 74
DE 23 7 Empfehlungen zur Problemlösung Bitte arbeiten Sie diese Liste durch, bevor Sie den Kundendienst anrufen. Das kann Ihnen Zeit und Geld sparen. In der Liste finden Sie häufiger auftr etende Probleme, die nicht auf V erarbeitungs- oder Materialfehler zurückzuführen sind. Nicht alle hier beschriebenen Funktionen sind bei jedem Modell verfü[…]
-
Страница 75
DE 24 Der Kühlschrank arbeitet sehr intensiv oder über eine sehr lange Zeit. • Ihr neues Gerät ist vielleicht etwas breiter als sein V orgänger . Dies ist völlig normal. Große Kühlgeräte arbeiten oft länger e Zeit. • Die Umgebungstemperatur ist eventuell sehr hoch. Dies ist völlig normal. • Das Kühlgerät wurde möglicherweise erst[…]
-
Страница 76
DE 25 Das Betriebsgeräusch nimmt zu, wenn der Kühlschrank arbeitet. • Das Leistungsverhalten des Kühlgerätes kann sich je nach Umgebungstemperatur ändern. Dies ist völlig normal und keine Fehlfunktion. Vibrationen oder Betriebsgeräusche. • Der Boden ist nicht eben oder nicht fest. Der Kühlschrank wackelt, wenn er etwas bewegt wird. Acht[…]
-
Страница 77
Gelieve eerst deze gebruiksaanwijzing te lezen! Beste klant, We hopen dat uw pr oduct, dat in een moderne fabriek werd geproduceer d en onder de meest nauwkeurige procedur es voor kwaliteitscontrole wer d gecontroleer d, u doeltreffend van dienst zal zijn. Wij bevelen daarom aan dat u eerst zorgvuldig de volledige gebruiksaanwijzing van uw product […]
-
Страница 78
FL 2 INHOUD 1 De koelkast 3 2 Belangrijke veiligheidswaarschuwingen 4 Bedoeld gebruik…………………………….. 4 V oor producten met een waterdispenser; 6 Kinderbeveiliging ……………………………. 6 HCA-W aarschuwing ……………………….. 6 Aanwijzingen ter besparing van energie 7 3 Installatie 8 Aandachtspunten bij het[…]
-
Страница 79
FL 3 1 De koelkast 1. Di ep vr ies ge de elt e 2. Ko el ge dee lt e 3. Bi nn en lic ht k oel ge de el te 4. Bo te r — & k aa ss cha p 5. V ent il at or 6. Io ni sa tor 7. Gl as pl ate n ko elg ed ee lt e 8. Ei er r ek 9. De ur va kke n ko elg ed ee lt e 10 . Wi jn ke lde r 11 . F le ss enh ou de r 12 . F le ss enr ek ke n 13 . G ro en te vak ke[…]
-
Страница 80
FL 4 2 Belangrijke veiligheidswaarschuwingen Gelieve de volgende informatie goed te bestuderen. V erzuim deze informatie door te lezen kan letsel of materiële schade veroorzaken. In dat geval wor den alle garantie en betrouwbaarheidgaranties ongeldig. De levensduur van de unit die u heeft aangekocht is 10 jaar . Dit is de periode dat u benodigde r[…]
-
Страница 81
FL 5 • Pl aa ts al co ho lis ch e dr an ke n g oe d af ge sl ote n en ve rt ic aa l. • Be wa ar no oi t spu it bu ss en m et on tv la mba re e n exp lo si ev e su bst an ti es in de k oe lka st . • Ge br ui k g ee n and er e me ch an is che to es te lle n of an de r e mid de le n o m he t on td oo iin gp r oc es te v ers ne ll en da n di e to[…]
-
Страница 82
FL 6 be sc ha dig en . Pla at s no oi t voo rw er pen bo ve no p d e ko elk as t; d ez e voo rw er pen ku nn en bi j op eni ng o f sl ui tin g va n d e ko el ka std eu r naa r be ne de n val le n. • O md at va cc in s, h itt eg ev oel ig e med ic at ie, we te ns cha pp el ijk e ma te ri al en, e nz . e en na uw ke uri ge t emp er at uu r ve re is[…]
-
Страница 83
FL 7 Aanwijzingen ter besparing van energie • Ho ud d e d eu r en va n uw ko el ka st ni et la ng o pen . • Pl aa ts ge en w arm e vo ed in gs mid de le n o f dr an ke n i n de ko el ka st . • Ov er la ad de k oel ka st n ie t zod at lu ch tc ir cul at ie aa n de b in ne nzi jd e nie t ge bl ok kee rd w or dt . • Pl aa ts de k oe lka st n i[…]
-
Страница 84
FL 8 3 Installatie C De f ab rik an t kan n ie t a an sp rak el ij k wo rd en g est el d ind ie n de i nf orm at ie va n de ze g ebr ui ks aan wi jz in g ni et in a cht wo rd t ge nom en . Aandachtspunten bij het opnieuw transporteren van uw koelkast 1. V oor t ra nsp or t die nt d e k oe lk ast l ee g e n sc ho on te z ij n. 2. In v er ban d me t […]
-
Страница 85
FL 9 Elektrische aansluiting Sl ui t uw ko el kas t aa n in e en ge aa rd st op co nta ct , bes ch er md d oo r e en z eke ri ng , me t de ju is te ca pa ci te it . Belangrijk: B De a an sl ui ti ng mo et i n n al ev ing z ij n me t na ti on ale v oo rsc hr if te n. B De s te kk er v an de s tr oo mka be l moe t na in st al lat ie e env ou di g be […]
-
Страница 86
FL 10 5. Plaats uw koelkast niet in omgevingstemperaturen onder 10°C. Vloerafstelling W anneer uw koelkast niet waterpas staat; U kunt uw koelkast waterpas stellen door aan de stelvoetjes te draaien zoals getoond in de afbeelding. (Zie Afbeelding A) De hoek van het stelvoetje wordt verlaagd wanneer u in de richting van de zwarte pijl draait en ver[…]
-
Страница 87
FL 11 • W anneer de deur van het diepvriesgedeelte lager is dan de deur van het koelgedeelte: breng deze op hetzelfde niveau door de stelschroef aan de zijkant van het diepvriesgedeelte met een M6 inbussleutel in de richting van de pijl te draaien. Zie afbeelding D. • W anneer de deur van het diepvriesgedeelte hoger is dan de deur van het koelg[…]
-
Страница 88
FL 12 C V erwijder met een schroevendraaier de schroeven van het bovenste scharnierdeksel van de deur die u wilt aanpassen. C Pas de deur naar wens aan door de schroeven los te draaien. C Bevestig de deur die u hebt aangepast door de schroeven vast te draaien zonder de positie van de deur te wijzigen. C Plaats het scharnierdeksel terug en bevestig […]
-
Страница 89
FL 13 4 Voorbereiding C Uw k oe lka st m oet w or de n g eï ns ta ll ee rd op m in ste ns 3 0 c m af st an d van wa rm te br onn en z oal s ko ok pl at en, ce nt ra le ve rw arm in g en k ac hel s en op mi ns te ns 5 cm af st an d va n ele kt ri sch e ov en s. De k oe lka st m ag n ie t i n di re ct zo nl ic ht wo r de n g ep la ats t. C D e om ge[…]
-
Страница 90
FL 14 5 Gebruik van uw koelkast Indicatorpaneel 1. Di ep vr iez er — Aa nd ui di ng te mp er atu ur in ste ll in g 2. Di ep vr iez er — Kn op t em pe ra tuu ri ns tel li ng 3. Aa nd ui din g Fa st Fr ee ze 4. Kn op F ast F r ee ze 5. Aa nd ui din g Di epv ri ez er D eu r O pe n 6. Ko el ka st — te mpe ra tu ur kn op 7. Aa nd ui din g Ho ge vo ch ti[…]
-
Страница 91
FL 15 De temperatuur van het koelkastvak instellen W anneer u de temperatuurinstellingen van de koelkast wilt wijzigen, dient u de “Knop voor temperatuurafstelling koelgedeelte” in te drukken voor afstelling van de temperatuur van het koelgedeelte. De temperatuur van het koelgedeelte kan lager worden ingesteld, ieder e keer dat u de knop indruk[…]
-
Страница 92
FL 16 Quick Cool functie Deze functie kan worden gebruikt wanneer u levensmiddelen in het koelgedeelte plaatst en deze snel wilt laten afkoelen. Druk op de Quick Cool knop om de functie te starten. Tijdens dit proces, gaat de Quick Cool aanduiding branden en gaat de aanduiding temperatuurafstelling koelgedeelte naar 1°C. W anneer de Quick Cool fun[…]
-
Страница 93
FL 17 Blauw licht V oedingsmiddelen die worden bewaard in de groentelade en met een blauw licht worden verlicht, blijven doorgaan met hun fotosynthese door middel van het golflengte-effect van het blauwe licht. Zo behouden zij hun versheid en neemt hun vitaminegehalte toe. Vochtregeling van groenteladen De groentelade van uw koelkast is speciaal be[…]
-
Страница 94
FL 18 Aanbeveling voor het bewaren van diepvriesvoedsel • V oorverpakte commerciële diepvriesproducten dienen conform de instructies van de fabrikant te worden bewaard gedur ende (4 sterren) in het vak voor diepvriesproducten. • Om de kwaliteit van de fabrikant van de diepvriesproducten en voedingswinkel te behouden, dient u het volgende in ac[…]
-
Страница 95
FL 19[…]
-
Страница 96
FL 20 Icematic * W anneer het Icematic waterreservoir (1) wordt uitgehaald om bij te vullen, moet het binnen twee minuten na bijvullen worden teruggezet. De tuit van het systeem opent en de Icematic cellen worden automatisch met water gevuld zodra het patroon wor dt teruggezet. Het ijs is na ongeveer 2 uur klaar . • Haal de Icematic (2) niet van […]
-
Страница 97
FL 21 De Icematic gebruiken • V ul de I ce mat ic m et wa te r en p laa ts i n z ij n ho ud er . He t i js i s n a on gev ee r 2 u ur k laa r . Ha al d e I ce ma tic n ie t va n zij n pl aat s om ij s te p ak ken . • Dr aa i de kn op pen e r op 90 ° in wi jz er zin . De i js blo kj es in d e ce ll en zu ll en na ar be ne de n v al le n i n he […]
-
Страница 98
FL 22 6 Schoonmaak en onderhoud A Ge br uik n oo it b en zin e, b enz ee n of ge li jk soo rt ig e s ub st an ti es vo or h et r ein ig in gsw er k. B Wij b eve le n aan d at u d e ste kk er ui t he t to es te l t re kt v oor da t u me t re ini ge n beg in t. C Ge br ui k n oo it sc he rp e vo or wer pe n, ze ep , hu is ho udp ro du ct en, a fw as […]
-
Страница 99
FL 23 7 Aanbevolen oplossingen voor problemen Controleer de volgende punten voor dat u de onderhoudsdienst belt. Dit kan u tijd en geld besparen. Deze lijst omvat r egelmatige klachten die niet voortkomen uit defect vakmanschap of materiaalgebruik. Het is mogelijk dat bepaalde functies die hier beschreven zijn niet tot uw pr oduct behoren. De koelk[…]
-
Страница 100
FL 24 De koelkast werkt frequent of gedur ende lange tijd. • Uw nieuwe koelkast kan breder zijn dan de vorige. Dit is normaal. Gr ote koelkasten werken gedurende langer e tijd. • De omgevingstemperatuur kan hoog zijn. Dit is normaal. • De stekker van de koelkast kan onlangs ingestoken zijn of de koelkast kan zijn volgeladen met etenswaren. He[…]
-
Страница 101
FL 25 Het werkingsgeluid neemt toe wanneer de koelkast werkt. • De werkingskenmerken van de koelkast kunnen veranderen als gevolg van wijzigingen in de omgevingstemperatuur . Dit is normaal en geen defect. Vibratie of geluid. • De vloer is niet gelijk of is zwak. De koelkast kantelt een beetje wanneer langzaam wordt bewogen. Zorg dat de vloer v[…]
-
Страница 102
Pirmiausia įdėmiai perskaitykite šį vadovą! Gerbiamas pirkėjau, Mes tikimės, kad mūsų gaminys, kuris buvo sukurtas moderniose gamyklose ir kruopščiai patikrintas pagal griežtus kokybės kontrolės r eikalavimus, veiksmingai ir ilgai jums tarnaus. T odėl mes rekomenduojame jums prieš naudojimą atidžiai perskaityti visą šio gaminio […]
-
Страница 103
LT 2 TURINYS 1 Šaldytuvas 3 2 Svarbūs įspėjimai dėl saugos 4 Naudojimo paskirtis ……………………….. 4 Bendrieji saugos reikalavimai ……………. 4 Gaminiams su vandens dalytuvu; ……… 6 V aikų sauga ………………………………….. 6 HCA įspėjimas ………………………………. 6 Jeigu gaminyje įrengta au[…]
-
Страница 104
LT 3 1 Šaldytuvas 1. Ša ld ik lio s ky riu s 2. Ša ld yt uvo s ky riu s 3. Ša ld yt uvo s ky ria us v id au s apš vi et imo le mp ut ė 4. Le nt yn a s vi es tui i r sū ri ui 5. V ent il ia tor iu s 6. Jo ni za tor iu s 7. Ša ld yt uvo s ky ria us s ti kl in ės le nt yno s 8. Ki au ši nių d ėk las 9. Ša ld yt uvo s ky ria us d ur el ių[…]
-
Страница 105
LT 4 2 Svarbūs įspėjimai dėl saugos Prašome atidžiai perskaityti toliau pateiktą informaciją. Nepaisant šios informacijos, galima susižaloti arba padaryti žalos turtui. T uomet nebegalios jokia garantija ir gamintojo įsipareigojimai. Jūsų įsigytas prietaisas numatytas naudoti 10 metų. Šiuo laikotarpiu gamintojas įsipareigoja tiekt[…]
-
Страница 106
LT 5 as me ni ms, k ur ie tu ri n ep ak ank am ai pa ti rt ies i r žin ių n au do ti šį p ri eta is ą, ne be nt ju os t ink am ai pr iž iū r ėtų ( ar ba nu r od yt ų, ka ip n aud ot i šį bu it in į pr iet ai są ) u ž jų sa ug ą ats ak in gas a sm uo . • Ne na ud oki te s uge du si o ša ld ytu vo . Jei gu dė l ko no rs n eri ma […]
-
Страница 107
LT 6 • Ne šd am i š al dy tuv ą, n el ai ky kit e jo už d ur ų ra nk en os. K it aip j i ga li n ulū žt i. • Je ig u šį ga mi nį re ik ia s ta ty ti pr ie ki to ša ld yt uvo a rb a š al di kl io , tar p pr iet ai sų bū ti na pa li kt i b en t 8 cm t arp ą. K ita ip gr et im os šo ni nė s s ie ne lė s ga li pr ad ėti ra so ti […]
-
Страница 108
LT 7 3 Montavimas C Pr aš om at kr ei pt i d ėm es į, ka d ga mi nt oja s ne pr is iim a at sak om yb ės , je i n eb us va do va uja ma si ši oj e na ud oj imo in st ru kci jo je pa te ik ta i nf orm ac ij a. Į ką reikia atsižvelgti vežant šį šaldytuvą 1. Pr ie š šal dy tu vą tr an sp or tu oja nt , jį re ik ia iš tu št int i ir […]
-
Страница 109
LT 8 Elektros prijungimas Pr ij un kit e ša ldy tu vą p ri e įže mi nt o l iz do su ti nk am os ka te gor ij os s au gi kli u. Svarbu B El ekt ro s pr iju ng im ą bū ti na at li kti at si žv elg ia nt į sa vo š al ie s r eg la me ntu s. B At lik us e lek tr os i ns ta li aci ją , mai ti ni mo la id o ki št uk as tu ri bū ti l en gv ai p[…]
-
Страница 110
LT 9 Lygumo reguliavimas Jei šaldytuvas stovi nelygiai; jį galite išlyginti sukdami priekines kojeles, kaip pavaizduota toliau esančiame paveikslėlyje. (žr . A paveikslėlį) Kampas, kurioje yra kojelė, nuleidžiamas kojelę sukant juodos rodyklės kryptimi ir pakeliamas kojelę sukant priešinga kryptimi. Šį darbą atlikti bus lengviau, j[…]
-
Страница 111
LT 10 • Jei šaldiklio skyriaus durelės yra žemiau negu šaldytuvo skyriaus durelės, jas nustatykite į tą patį lygį: naudodami M6 universalųjį veržliaraktį rodyklės kryptimi sukite šaldiklio skyriaus šone esantį pakeliamąjį varžtą, kaip pavaizduota D paveikslėlyje. • Jei šaldiklio skyriaus durelės yra aukščiau negu šald[…]
-
Страница 112
LT 11 C Atsuktuvu išsukite durelių, kurias norite reguliuoti, viršutinio vyrio dangtelio varžtą. C Tinkamai pareguliuokite dureles, atsukdami varžtus. C Pritvirtinkite pareguliuotas dur eles, nekeisdami durelių padėties, priverždami varžtus. C Uždėkite vyrio dangtelį ir priveržkite jį varžtu. Tarpelio tarp viršutinių durelių regu[…]
-
Страница 113
LT 12 4 Paruošimas C Ša ld yt uvą r ei ki a į re ng ti ma ži au si ai 3 0 c m at st um u n uo š ilu mo s ša lt in ių, p av yzd ži ui , vi ry kl ės vi rš aus , or ka ič ių , c en tr ini o ši ldy mo ra di at ori ų be i v ir yk li ų, i r m až ia usi ai 5 cm a ts tum u nu o e le kt ri ni ų ork ai či ų; ne st at yki te j o t ie si og[…]
-
Страница 114
LT 13 5 Šaldytuvo eksploatavimas Valdymo skydelis 1. Ša ld ik lio s ky ri au s te mpe ra tū ro s nu sta ty mo in di ka tor iu s 2. Ša ld ik lio s ky ri au s te mpe ra tū ro s nu sta ty mo my gt uk as 3. Gr ei to š ald ym o šal di kl yj e fu nkc ij os in di ka tor iu s 4. Gr ei to u žša ld ym o š al di kl yj e fun kc ij os my gt uk as 5. ?[…]
-
Страница 115
LT 14 Šaldytuvo skyriaus temperatūros nustatymas Kai norite pakeisti šaldytuvo temperatūros nuostatas, turite paspausti “Šaldytuvo skyriaus temperatūros nustatymo mygtuką” , kad pareguliuotumėte šaldytuvo skyriaus temperatūrą. Kiekvieną kartą paspaudus šį mygtuką, šaldytuvo skyriuje temperatūra sumažėja (pavyzdžiui, 8, 6, 4[…]
-
Страница 116
LT 15 Greitojo vėsinimo funkcija Šią funkciją galima naudoti tada, kai į šaldytuvo skyrių įdedate produktų, kuriuos reikia gr eitai atvėsinti. Norėdami įjungti šią funkciją, paspauskite greitojo vėsinimo funkcijos mygtuką. Šio proceso metu užsidega greitojo vėsinimo indikatorius ir šaldiklio skyriaus temperatūros nustatymo ind[…]
-
Страница 117
LT 16 Mėlyno apšvietimo lemputė Maisto produktuose, laikomuose mėlyna šviesa apšviečiamose daržovių dėtuvėse, toliau vyksta fotosintezė, kurią skatina mėlynos šviesos bangų ilgio poveikis, todėl produktai išlieka švieži, juose padidėja vitaminų kiekis. Dėžės daržovėms drėgmės reguliavimo slankikliai Šio šaldytuvo dė?[…]
-
Страница 118
LT 17 Užšaldytų maisto produktų saugojimo rekomendacijos • Parduotuvėje įsigytus iš anksto supakuotus užšaldytus maisto produktus reikia laikyti paisant užšaldytų maisto produktų gamintojo instrukcijų, taikomų laikymui (4 žvaigždučių) užšaldytų maisto produktų laikymo skyriuje. • T am, kad būtų išsaugota užšaldytų m[…]
-
Страница 119
LT 18[…]
-
Страница 120
LT 19 Ledo gaminimo įtaisas «Icematic» * Nuėmus «Icematic» vandens tiekimo bakelį (1) , kad jį galima būtų pripildyti, jį privaloma vėl įdėti per dvi minutes nuo tada, kai jis pripilamas vandens. Įdėjus kasetę, atsidarys sistemos antgalis ir «Icematic» elementai bus automatiškai pripildyti vandens. Leduka[…]
-
Страница 121
LT 20 Ledukų dėklo naudojimas • Pr ip il kit e į led uk ų dė kl ą van de ns ir į dė kit e jį į š ald ik lį . L ed uk ai s uš als m až dau g pe r dv i va lan da s. No rė da mi i ši mt i l ed uk us, ne iš tr auk it e led uk ų dė kl o iš jo l izd o. • Pa su ki te an t jo es an či as r ank en ėl es 90 la ip sn ių ka mp u. Fo […]
-
Страница 122
LT 21 6 Valymas ir priežiūra A V al ymu i ni ek ad a nen au do kit e be nzi no , be nz ol o a rb a pan aš ių m ed ži agų . B Pr ie š v al ym ą re ko me ndu oj am a i šj un gti bu it in į p ri et ais ą iš m ai ti nim o ti nkl o. C V aly mu i nie ka da ne na ud oki te a štr ių ab ra zy vin ių į ran ki ų, m ui lo , b ui ti nio v al ik[…]
-
Страница 123
LT 22 7 Rekomenduojami problemų sprendimo būdai Prieš kreipdamiesi į aptarnavimo tarnybą, prašom peržiūrėti šį sąrašą. T aip sutaupysite laiko ir pinigų. Šiame sąraše pateikiamos dažniausiai pasitaikančios problemos, kurios nėra susijusios su pagaminimo arba naudojamų medžiagų broku. Kai kurių čia aprašytų funkcijų jūs[…]
-
Страница 124
LT 23 Šaldytuvas dažnai įsijungia arba ilgą laiką veikia. • Gali būti, kad jūsų naujas gaminys platesnis už ankstesnįjį. T ai visiškai normalu Dideli šaldytuvai veikia ilgesnį laiką. • Gali būti, kad patalpoje yra aukšta temperatūra. T ai visiškai normalu • Gali būti, kad šaldytuvas neseniai prijungtas arba į jį nesenia[…]
-
Страница 125
LT 24 Šaldytuvui pradėjus veikti, jis veikia triukšmingai. • Šio šaldytumo darbo našumo savybės gali kisti, priklausomai nuo aplinkos temperatūros pokyčių. T ai normalu ir nėra gedimas. Vibracija arba triuk šmas. • Nelygios arba silpnos grindys. Šaldytuvas lėtai judinamas linguoja. Grindys turi būti lygios ir pakankamai tvirtos, […]
-
Страница 126
По жалуйста, сначала прочтите данное рук оводство! Уважаемый покупа тель! Надеемся, что наше изделие, выпущенное на современных пре дприятиях, и проверенное с помощью самых тщательных проце д[…]
-
Страница 127
RU 2 СОДЕРЖАНИЕ 1 Хо лодильник 3 2 Важные указания по технике безопасно сти 4 Испо льзование по назначению ……………. 4 Для изделий с разда тчик ом о хлажденной во ды: ………………………………………………….[…]
-
Страница 128
RU 3 1 Хо лодильник 1 . М оро зил ьно е о тде ле ние 2. Хо ло ди ль но е о тде ле ние 3. Вн ут ре нне е о све ще ние х о ло ди льн ой ка мер ы 4. По лк а д ля мас ла и сыр а 5. Ве нт ил ято р 6. Ио ни за то р 7 . Ст екл ?[…]
-
Страница 129
RU 4 2 Важные указания по технике без опасности Обяза те льно ознакомь тесь со следующ ей информацией. Игнорирование данной информации може т привести к причинению травм или повреждению имущес[…]
-
Страница 130
RU 5 • Д ля у ско ре ния пр оц ес са р аз мо ра жив ани я не ис по ль зу йт е м ех ани чес кие у ст ро йст в а ил и д ру ги е ср ед ст ва , кр оме т е х, к о т ор ые ре ком ен до ва ны п рои зв о ди те лем . • Д ан […]
-
Страница 131
RU 6 • Н ео б хо ди мо р егу ля рн о о чи ща ть ко нц ы вил ки шну ра эл ект ро пи та ни я; не соб лю де ние э т ог о ус лов ия мо же т пр ив ес ти к пож ар у . • Н ео б хо ди мо р егу ля рн о о чи ща ть к он т ак ?[…]
-
Страница 132
RU 7 3 Установка C П ом нит е, ч то про изв о ди тел ь н е нес ет от вет ств ен нос ти в с лу чае не соб лю ден ия ук аза ний , при ве де нн ых в н аст оя щем р ук ово дс тв е . Что следует учитывать при транс?[…]
-
Страница 133
RU 8 По дключение к электросети По дс ое дин ите мо роз ил ьну ю к аме р у к пр ав ил ьно у ст ано вле нн ой заз емл ен ной ро зет к е , защ ище нн ой пре до хр ан ит ел ем с со отв етс тв ую щим но ми нал о?[…]
-
Страница 134
RU 9 5. Т емпера тура помещения, в к отором нах о дится хо лодильник, не до лжна быть меньше 1 0°C . Регулировка по ло жения на по лу Если х о ло дильник распо ло жен не устойчиво: Вы мо жете отрегулиро?[…]
-
Страница 135
RU 1 0 • Если дверь морозильной камеры ниж е, чем дверь х о ло дильной, выровнять их мо жно, регулируя с помощью торцовог о ключа M6 поворот винт а регулировки высоты, к оторый нах о дится со сторон?[…]
-
Страница 136
RU 1 1 C Испо льзуя отвертку , выньте винт из крышки верхней пет ли той двери, котор ую нужно отрегулировать. C Отрегулируйте дверь по своему усмотрению, немног о ослабляя винты. C Зафик сируйте отр[…]
-
Страница 137
RU 1 2 4 По дготовка C В аш х о ло ди льн ик сл е ду ет у ст ано ви ть, по кр ай не й м ер е, в 30 см от ис то чн ик ов те пла , т аки х как г аз ов ые к он фо рк и, пл иты , б а т ар еи це нтр ал ьн ог о от оп ле ния и[…]
-
Страница 138
RU 1 3 5 По льзование х о ло дильник ом Панель индикаторов 1 . Инд ик ат ор нас тр ойк и т емп ер а ту ры мо роз иль но г о отд ел ени я 2. Кн оп ка на стр ойк и тем пер а ту ры мо роз иль но г о отд ел ени я 3. […]
-
Страница 139
RU 1 4 Регулировка температуры х оло дильного отделения Если вы х отите изменить настройки темпера туры вашег о х о ло дильника, вы мо жете это сдела ть, нажимая на Кнопку настройки температуры х[…]
-
Страница 140
RU 1 5 Функция быстрого о хлаждения Эту ф ункцию можно испо льзовать в случае, к ог да про дукты, помещенные в морозильную камеру , треб уется быстро о хладить. Нажмите кнопку быстрог о о хлаждени?[…]
-
Страница 141
RU 1 6 Синий свет В про дуктах, хр анящихся в к онтейнерах для фруктов и овощей с синей по дсветк ой, про долж ается процесс фотосинтеза, благ о даря длине во лн синего свет а и, т аким образом, они с[…]
-
Страница 142
RU 1 7 Рек омендации по хранению заморо женных продуктов • Упакованные про дукты, пре дварительно заморо женные в промышленных у словиях, сле дует хранить в соответствии с инструкциями их прои?[…]
-
Страница 143
RU 1 8[…]
-
Страница 144
RU 1 9 Icematic (ледогенератор) * Если емк ость для во ды ледог енератор а Icematic (1) извлекается из своег о гнезда для напо лнения во дой, ее следу ет уст ановить обратно на место в течение двух минут посл[…]
-
Страница 145
RU 20 Испо льзование ледогенератора Icematic • На по лн ит е ле до г ен ер а то р Ice mat ic во до й и вст авь те ег о н а м ест о. Ле д б у дет г от ов пр иб лиз ит ель но чер ез дв а ч аса . Не вы ним айт е ле до г е?[…]
-
Страница 146
RU 21 6 Чистка и ух о д A Ни в к ое м сл уча е н е исп о ль зу йте бе нз ин, бе нзо л и ли по до бн ые ве щес тв а д ля чи стк и. B Пе ре д чи ст к ой р ек ом ен ду ем о тс ое ди нит ь из дел ие от эл ект рос ет и. C Н[…]
-
Страница 147
RU 22 7 Р ек омендации по устранению неисправностей Прежде чем обраща ться в сервисный центр, просмотрите этот перечень. Это мо жет помочь вам сэк ономить время и деньги. Ниже перечислены часто в[…]
-
Страница 148
RU 23 Хо ло дильник включается слишком часто или работ ает слишк ом долг о. • Ваш новый х о ло дильник мо жет быть бо льше, чем пре дыдущий. Это вполне нормально. Бо льшие х о ло дильники работ ают в[…]
-
Страница 149
RU 24 Уровень рабо чег о шума повышается во время работы х оло дильника. • Р абочие хар актеристики изделия могут изменяться в зависимости от изменений темпера туры окруж ающей сре ды. Это норма[…]
-
Страница 150
Бу дь ласка, спочатку прочитайте цю інструкцію! Шановний покупець! Спо діваємося, що цей товар, виготовлений на сучасних підприємствах і перевірений за допомог ою найприскіпливіших проце дур[…]
-
Страница 151
UK 2 ЗМІСТ 1 Хо лодильник 3 2 Важливі вказівки з техніки безпеки 4 Призначення …………………………………… 4 Для пристроїв із розпо дільником во ди: 6 Безпека дітей …………………………………. 6 Попере дження […]
-
Страница 152
UK 3 1 Хо лодильник 1 . Мо ро зи ль не від ді ле нн я 2. Хо ло дил ьне ві дд іл ен ня 3. Вн утр іш нє о сві т ле нн я х о ло ди ль но г о ві дді ле нн я 4. По ли ця д ля мас ла т а с ир у 5. Ве нти ля то р 6. Іо ніз а то[…]
-
Страница 153
UK 4 2 Важливі вказівки з техніки безпеки Ознайомтеся з наве деною нижче інформацією. Ігнорування цієї інформації може призвести до трав мування чи пошкодження пристрою. В такому разі гарантія[…]
-
Страница 154
UK 5 • Пр и в ід ‘є дн анн і в ід м ер еж і не тяг ніт ь за каб е ль – ті ль ки за шт еп се ль . • Мі цні н ап ої тр еб а з б ер іг а ти щіл ьно за кри ти ми у в ер ти каль ном у по лож ен ні . • Су во ро за бо[…]
-
Страница 155
UK 6 • Н е пе рев ан т аж уй те х ол о дил ьни к на дмі рн ою к іль кі ст ю про ду кті в. Як що х о ло ди ль ник пе ре ва нт аж ено , п ро ду кти мо жут ь ви па сти п ри в ідч ине нн і дв ер ця т і тр ав му в а ти […]
-
Страница 156
UK 7 • Сл ідк уй те з а т им, щ об про ду кти з б ер іг ал ися у з ак рит их кон те йн ер ах. • Дл я п ри ст ро їв із мо ро зи ль ни м ві дді ле нн ям : у м ор о зи ль не ві дд іл енн я х о ло ди ль ника м ож на за[…]
-
Страница 157
UK 8 3 Встановлення C Бу дь ла ск а, п ам’ ят ай те , щ о в ир об ни к не не ст им е від пов ід ал ьн іст ь, як що не до тр им ан о п ор ад, на ве ден их в ін стр ук ції з к о ри ст ува ння . Що слід врах овуват[…]
-
Страница 158
UK 9 Підключення до електромережі Пі дкл юч іт ь х о ло ди ль ни к д о за зе мле ної ро зет ки , за хищ ено ї пл ав ким за поб іж ни к ом в ідп ові дн ої п оту жно ст і. Важливо! B П ід клю че нн я має ві дп о[…]
-
Страница 159
UK 1 0 5. Т емператур а приміщення, в як ому знах о диться хо ло дильник, не має бути менше за 1 0°C . Регулювання по ло ження на підлозі Якщо х о ло дильник не збалансовано; Ви мо жете збалансува ти хо ?[…]
-
Страница 160
UK 1 1 • Якщо двері морозильної камери нижчі за двері х о ло дильної, їх можна вирівняти, регулюючи за допомог ою торцевог о ключа M6 поворот гвинт а регулювання висоти, який знах о диться з боку м?[…]
-
Страница 161
UK 1 2 C За допомог ою викрутки викр утіть гвинт з кришки верхньої завіси тих дверцят , які треба відрегулювати. C Відрегулюйте дверцят а на власний розсу д, трохи ослабивши гвинти. C Зафік суйте ві[…]
-
Страница 162
UK 1 3 4 Підг отовка C Хо ло д ил ьн ик слі д вс т ан ов ити на ві дст ан і що най ме нш е 30 см ві д дж ер ел те пла , т ак их я к в ари ль ні п ане лі, п ли ти , ба т ар еї цен тр аль ног о оп ал енн я й пе чі, а т а[…]
-
Страница 163
UK 1 4 5 Вик ористання х о лодильника Панель індикаторів 1 . Ін дик а то р нал ашт ув ан ня те мпе ра ту ри мо роз ил ьн ог о в ід ді ле ння 2. Кн опк а на ла шту ван ня т ем пер а тур и мо роз ил ьн ог о в ід ?[…]
-
Страница 164
UK 1 5 Налаштування температури х оло дильного відділення Аби змінити налаштування темпера тури х о ло дильника, натисніть «Кнопку регулювання температури х оло дильного відділення» , щоб нала[…]
-
Страница 165
UK 1 6 Функція швидк ого о х оло дження Цю ф ункцію можна вик ористовува ти, к о ли про дукти, покладені до х о ло дильного відділення, треба швидк о о х о ло дити. Натисніть кнопку швидк ог о о х о ло […]
-
Страница 166
UK 1 7 Синє світ ло У про дуктах, які зберіг аються в к онтейнерах із синім підсвічуванням, триває процес фотосинтезу завдяки довжині хвиль синьог о світ ла; таким чином вони зберіг ають свіжість[…]
-
Страница 167
UK 1 8 Рек омендації зі зберігання заморо жених продуктів Про дукти, заморож ені в промислових умовах, слід зберіг ати відповідно до інструкцій їхньог о виробника для (4-зірк овог о) відділення з?[…]
-
Страница 168
UK 1 9[…]
-
Страница 169
UK 20 Льодог енератор * Якщо резерву ар для во ди льо догенер атор а Icematic (1) вийняти з гнізда для наповнення во дою, його слід вст ановити на місце протяг ом дво х хвилин після наповнення. Впускний […]
-
Страница 170
UK 21 Вик ористання льо догенератора • На пов ні ть л ьо до г ене ра то р в о дою т а вс т ан ові ть у г ніз до. Л ід б у де г от ов ий пр иб ли зн о за дві г о ди ни. Не в ий ма йте ль о до г ен ер а то р і з й ?[…]
-
Страница 171
UK 22 6 Чищення та дог ляд A Н е ви к ор ис тов уй те б ен зин чи п о ді бн і ма те рі ал и для чи ще нн я. B П ер е д ви к он анн ям ч ищ енн я ре к ом енд ує мо в ід’ єдн а ти х о ло ди льн ик ві д е ле кт ро ме?[…]
-
Страница 172
UK 23 7 Р ек омендації з ус унення несправностей Пере д тим як зверта тися до авторизованої сервісної служби, ознайомтеся з наве деною інформацією. Це допомож е вам заощадити гроші й час. Наве ден[…]
-
Страница 173
UK 24 Хо ло дильник вмикається занадто часто або працює занадто довг о. • Ваш новий х оло дильник мо же б ути ширшим за попере дній. Це цілк ом нормально. Великі х о ло дильники працюють протяг ом ?[…]
-
Страница 174
UK 25 Рівень робочог о шуму підвищується під час роботи х о ло дильника. • Р обочі хар актеристики хо ло дильника мо жуть змінюватися у залежності від темпера тури навко лишнього сере довища. Це […]
-
Страница 175
Gelieve eerst deze gebruiksaanwijzing te lezen! Beste klant, We hopen dat uw pr oduct, dat in een moderne fabriek werd geproduceer d en onder de meest nauwkeurige procedur es voor kwaliteitscontrole wer d gecontroleer d, u doeltreffend van dienst zal zijn. Wij bevelen daarom aan dat u eerst zorgvuldig de volledige gebruiksaanwijzing van uw product […]
-
Страница 176
NL 2 INHOUD 1 De koelkast 3 2 Belangrijke Veiligheidswaarschuwingen 4 Bedoeld gebruik…………………………….. 4 V oor producten met een waterdispenser; 6 Kinderbeveiliging ……………………………. 6 HCA-waarschuwing ……………………….. 6 Aanwijzingen ter besparing van energie 7 3 Installatie 8 Aandachtspunten bij het […]
-
Страница 177
NL 3 1 De koelkast 1. Di ep vr ies ge de elt e 2. Ko el ge dee lt e 3. Bi nn en lic ht k oel ge de el te 4. Bo te r — e n ka as sch ap 5. V ent il at or 6. Io ni se er der 7. Gl as pl ate n ko elg ed ee lt e 8. Ei er r ek 9. De ur va kke n ko elg ed ee lt e 10 . Wi jn ke lde r 11 . F le ss enh ou de r 12 . F le ss enr ek ke n 13 . G ro en te vak ke[…]
-
Страница 178
NL 4 2 Belangrijke Veiligheidswaarschuwingen Gelieve de volgende informatie goed te bestuderen. Niet-inachtneming van deze informatie kan verwondingen of materiële schade veroorzaken. In dat geval worden alle garanties en betrouwbaarheidsengagementen ongeldig. De levensduur van de unit die u heeft aangekocht is 10 jaar . Dit is de periode dat u be[…]
-
Страница 179
NL 5 • Be wa ar no oi t spu it bu ss en m et ee n on tv la mba re o f exp lo si ev e in hou d in de ko el ka st. • Ge br ui k g ee n and er e me ch an is che ge re ed sc hap pe n of an de r e m id de len o m he t on tdo oi pr oc es te v er sn el len d an de ze aa ng er ade n do or de f ab ri ka nt. • Di t pr od uct i s nie t be st em d voo r […]
-
Страница 180
NL 6 • P r od uct en d ie ee n nau wk eu rig e te mp er atu ur r eg eli ng n odi g he bbe n (v ac ci ns, h it teg ev oe li ge m edi ca ti e, we te ns cha pp el ijk e ma te ri al en, e nz .) mo ge n nie t in ko el ka st b ew aar d wo r de n. • D e koe lk as t mo et wo rd en l osg ek op pel d in di en de ze l ang du ri g ni et wo rd t ge br ui kt[…]
-
Страница 181
NL 7 Aanwijzingen ter besparing van energie • Ho ud d e d eu r en va n uw ko el ka st ni et la ng o pen . • Pl aa ts ge en w arm e le ve ns mi dde le n of dr an ke n i n de ko el ka st . • Ov er la ad de k oel ka st n ie t zod at lu ch tc ir cul at ie aa n de b in ne nzi jd e nie t ge bl ok kee rd w or dt . • Pl aa ts de k oe lka st n ie t […]
-
Страница 182
NL 8 3 Installatie C De f ab rik an t kan n ie t a an sp rak el ij k wo rd en g est el d ind ie n de i nf orm at ie va n de ze g ebr ui ks aan wi jz in g ni et in a cht wo rd t ge nom en . Aandachtspunten bij het opnieuw transporteren van uw koelkast 1. V oor t ra nsp or t die nt d e k oe lk ast l ee g e n sc ho on te z ij n. 2. In v er ban d me t […]
-
Страница 183
NL 9 Elektrische aansluiting Sl ui t uw ko el kas t aa n in e en ge aa rd st op co nta ct , bes ch er md d oo r e en ze ke ri ng, m et de j ui st e ca pac it ei t. Belangrijk: B De a an sl ui ti ng mo et c onf or m de na ti on al e vo or sc hri ft en zi jn . B De s te kk er v an de s tr oo mka be l moe t na in st al lat ie e env ou di g be r ei kb […]
-
Страница 184
NL 10 5. Plaats uw koelkast niet in omgevingstemperaturen onder 10 °C. Vloerafstelling W anneer uw koelkast niet waterpas staat; U kunt uw koelkast waterpas stellen door aan de stelvoetjes te draaien zoals getoond in de afbeelding. (Zie Afbeelding A) De hoek van het stelvoetje wordt verlaagd wanneer u in de richting van de zwarte pijl draait en wo[…]
-
Страница 185
NL 11 • W anneer de deur van het diepvriesgedeelte lager is dan de deur van het koelgedeelte: breng deze op hetzelfde niveau door de stelschroef aan de zijkant van het diepvriesgedeelte met een M6- inbussleutel in de richting van de pijl te draaien. Zie Afbeelding D. • W anneer de deur van het diepvriesgedeelte hoger is dan de deur van het koel[…]
-
Страница 186
NL 12 C V erwijder met een schroevendraaier de schroef van het bovenste scharnierdeksel van de deur die u wilt aanpassen. C Pas de deur desgewenst correct aan door de schroeven los te draaien. C Maak de deur die u hebt aangepast vast door de schroeven aan te draaien zonder de positie van de deur te wijzigen. C Plaats het scharnierdeksel terug en ma[…]
-
Страница 187
NL 13 4 Voorbereiding C Uw k oe lka st m oet w or de n g eï ns ta ll ee rd op m in ste ns 3 0 c m af st an d van wa rm te br onn en z oal s ko ok pl at en, ce nt ra le ve rw arm in g en k ac hel s en op mi ns te ns 5 cm af st an d va n ele kt ri sch e ov en s. De k oe lka st m ag n ie t i n di re ct zo nl ic ht wo r de n g ep la ats t. D e om ge v[…]
-
Страница 188
NL 14 5 Gebruik van uw koelkast Display 1. Di ep vr iez er — in di ca to r te mp er atu ur in ste ll in g 2. T em pe ra tu ur re ge la ar di ep vri es ge de el te 3. Fa st F re eze -i nd ica to r 4. Fa st F re eze -k no p 5. Aa nd ui din g Di epv ri ez er d eu r o pe n 6. In di ca tor T em per at uu r ko el ged ee lt e 7. Aa nd ui din g Ho ge vo ch[…]
-
Страница 189
NL 15 Aanpassen van de temperatuur van het koelgedeelte W anneer u de temperatuurinstelling van uw koelkast wenst te wijzigen, drukt u op de «Knop temperatuurinstelling koelkast» om de instelling uit te voeren. De temperatuurinstelling voor het koelvak gaat telkens lager wanneer u op de knop drukt en vervolgens weer hoger (8, 6, 4, 2, 8, […]
-
Страница 190
NL 16 Functie Snel koelen Deze functie kan worden gebruikt wanneer u levensmiddelen in het koelgedeelte plaatst en deze snel wenst af te koelen. Druk op de knop Snel koelen om de functie te activeren. Tijdens dit proces licht de indicator Snel koelen op en zakt de temperatuurindicator van de koelkast tot 1 °C. Zolang de functie Snel koelen is inge[…]
-
Страница 191
NL 17 Blauw licht V oedingsmiddelen die worden bewaard in de groenteladen en met een blauw licht worden verlicht, blijven doorgaan met hun fotosynthese door middel van het golflengte-effect van het blauwe licht. Zo behouden zij hun versheid en neemt hun vitaminegehalte toe. Vochtregeling van groenteladen De groentelade van uw koelkast is speciaal b[…]
-
Страница 192
NL 18 Aanbeveling voor het bewaren van diepvriesvoedsel • V oorverpakte commerciële diepvriesproducten dienen conform de instructies van de fabrikant te worden bewaard gedur ende (4 ster) in het vak voor diepvriesproducten. • Om de kwaliteit van de fabrikant van de diepvriesproducten en voedingswinkels te behouden, dient u het volgende in acht[…]
-
Страница 193
NL 19[…]
-
Страница 194
NL 20 Icematic * W anneer het Icematice waterreservoir (1) uit de uitsparing is verwijderd om te wordenbijgevuld, moet het binnen de twee minuten, na te zijn gevuld met water , worden teruggeplaatst. De spuitmond van het systeem gaat open en de Icematic- cellen worden automatisch met water gevuld zodra het waterpatroon in de uitsparing wordt geplaa[…]
-
Страница 195
NL 21 De Icematic gebruiken • V ul de I ce mat ic m et wa te r en p laa ts i n z ij n ho ud er . He t i js i s n a on gev ee r 2 u ur k laa r . Ha al d e I ce ma tic n ie t va n zij n pl aat s om ij s te p ak ken . • Dr aa i de kn op pen e r op 90 ° in wi jz er zin . De i js blo kj es in d e ce ll en zu ll en na ar be ne de n v al le n i n he […]
-
Страница 196
NL 22 6 Schoonmaak en onderhoud A Ge br uik n oo it b en zin e, b enz ee n of ge li jk soo rt ig e s ub st an ti es vo or h et r ein ig in gsw er k. B Wij b eve le n aan d at u d e ste kk er ui t he t to es te l t re kt v oor da t u me t re ini ge n beg in t. C Ge br ui k n oo it sc he rp e vo or wer pe n, ze ep , hu is ho udp ro du ct en, a fw as […]
-
Страница 197
NL 23 7 Aanbevolen oplossingen voor problemen Controleer de volgende punten voor dat u de onderhoudsdienst belt. Dit kan u tijd en geld besparen. Deze lijst omvat r egelmatige klachten die niet voortkomen uit defect vakmanschap of materiaalgebruik. Het is mogelijk dat bepaalde functies die hier beschreven zijn niet tot uw pr oduct behoren. De koelk[…]
-
Страница 198
NL 24 De koelkast werkt frequent of gedur ende lange tijd. • Uw nieuwe product kan br eder zijn dan de vorige. Dit is normaal. Grote koelkasten werken gedurende langer e tijd. • De omgevingstemperatuur kan hoog zijn. Dit is normaal. • De stekker van de koelkast kan onlangs ingestoken zijn of de koelkast kan zijn volgeladen met etenswaren. Het[…]
-
Страница 199
NL 25 Het werkingsgeluid neemt toe wanneer de koelkast werkt. • De werking van de koelkast kan veranderen als gevolg van wijzigingen in de omgevingstemperatuur . Dit is normaal en geen defect. Vibratie of geluid. • De vloer is niet gelijk of is zwak. De koelkast kantelt een beetje wanneer langzaam wordt bewogen. Zorg dat de vloer vlak vlak en s[…]
-
Страница 200
[…]
-
Страница 201
AR 2 3 1 4 2 4 6 ?[…]
-
Страница 202
AR 3 1 1 2 3 4 5 […]
-
Страница 203
AR 4 2 […]
-
Страница 204
AR 5 ?[…]
-
Страница 205
AR 6 1 8 ?[…]
-
Страница 206
AR 7 3 C […]
-
Страница 207
AR 8 ?[…]
-
Страница 208
AR 9 A […]
-
Страница 209
AR 10 […]
-
Страница 210
AR 1 1 C […]
-
Страница 211
AR 12 4 30 C […]
-
Страница 212
AR 13 5 .1 .2 […]
-
Страница 213
AR 14 ?[…]
-
Страница 214
AR 15 ?[…]
-
Страница 215
AR 16 ?[…]
-
Страница 216
AR 17 […]
-
Страница 217
AR 18[…]
-
Страница 218
AR 19 )1( […]
-
Страница 219
AR 20 ?[…]
-
Страница 220
AR 21 6 A […]
-
Страница 221
AR 22 7 ?[…]
-
Страница 222
AR 23 ?[…]
-
Страница 223
AR 24 […]
-
Страница 224
Leggere innanzitutto il manuale di istruzioni. Gentile Cliente, ci auguriamo che l’articolo da Lei scelto, prodotto in moderni stabilimenti e sottoposto ai più severi controlli di qualità, risponda interamente alle Sue esigenze. A tal fine, La invitiamo a leggere attentamente il manuale di istruzioni del pr odotto prima di proceder e al suo […]
-
Страница 225
IT 2 1 Il frigorifero 3 2 Importanti avvertenze per la sicurezza 4 Uso previsto …………………………………. 4 Sicurezza generale …………………………. 4 Sicurezza bambini ………………………….. 6 Avvertenza HCA …………………………….. 6 Cose da fare per risparmiar e energia …. 6 3 Installazione 7 Punti[…]
-
Страница 226
IT 3 1 Il frigorifero 2 1 8 9 *11 17 7 15 *18 *4 15 3 5 9 20 *19 *6 *10 13 14 *16 *22 *21 *21 12 1. Sc om pa rto f r ee zer 2. Sc om pa rto f ri go 3. Lu ce i nte rna s co mp art o fr ee ze r 4. Sc om pa rto B ur ro e Fo rm ag gi o 5. V ent ol a 6. Io ni zz ato re 7. Me ns ol e i n ve tr o d el lo s co mp art o fr igo 8. Sc om pa rto p er le u ov a[…]
-
Страница 227
IT 4 2 Importanti avvertenze per la sicurezza Prender e in esame le seguenti informazioni. Se queste informazioni non vengono rispettate, possono verificarsi lesioni personali o danni materiali. Quindi tutte le garanzie e gli impegni sull’affidabilità diventerebber o privi di validità. La vita d’uso dell’unità acquistata è 10 anni. Questo[…]
-
Страница 228
IT 5 • No n ut ili zz ar e app ar ec ch ia tu r e me cc an ich e o alt ri m ez zi d ive rs i da qu el li co ns ig lia ti d al pr od ut to re , pe r a cc el era re i l pr oc es so di s br ina me nt o. • Qu es to ap pa r ec chi o no n d ev e ess er e us at o da pe rs one ( co mp re si b amb in i) co n ca pac it à fis ic he , se ns ori al i o m e[…]
-
Страница 229
IT 6 Un p r ob le ma n el l’ iso la me nto d el ca vo el et tr ico p ot re bbe p r ov oca re u n inc en di o. • La p un ta de ll a s pi na e le tt ric a de ve es se re r ego la rm ent e pu lit a al tr im en ti po tr eb be pr ov oc ar e un in ce nd io . • La p un ta de ll a s pi na d ev e ess er e pu lit a r ego la rm ent e co n u n pa nn o[…]
-
Страница 230
IT 7 3 Installazione C Ri co r da rs i che i l fa bb ri can te n on è r esp on sa bil e de lla m an ca ta o sse rv an za de ll e inf or ma zio ni f or ni te ne l man ua le di is tr uz ion i. Punti da tenere in considerazione quando si trasporta nuovamente il frigorifero 1. De ve e sse re s vu ota to p ri ma d i o gn i tr as po rto . 2. Sc af fa li[…]
-
Страница 231
IT 8 Collegamento elettrico Co ll eg ar e i l fr igo ri fe ro ad u na pr es a di me ss a a te rr a pr ote tt a da un f us ib il e d el la ca pa ci tà ap pr op ri ata . Importante: B Il c ol le ga me nt o d ev e ess er e co nfo rm e ai r ego la me nti n az ion al i. B Il c av o di a li men ta zi one d ev e e ss er e fa ci lm ent e ac ces si bi le d[…]
-
Страница 232
IT 9 5. Non tenere il frigorifer o in ambienti con temperature inferiori ai 10°C. Regolazione bilanciamento pavimento Se il frigorifero non è in equilibrio: è possibile bilanciare il frigorifer o ruotando i piedini anteriori come illustrato in figura. (V edere la Figura A) L ’angolo in cui i piedini sono più bassi quando girati in direzione d[…]
-
Страница 233
IT 10 • Se la porta dello scomparto del freezer è più bassa della porta dello scomparto del frigorifero, portarle allo stesso livello con la vite di sollevamento sullo scomparto al lato del freezer in dir ezione della freccia utilizzando una brugola Allen M6 come illustrato nella Figura D. • Se la porta dello scomparto del freezer è più alt[…]
-
Страница 234
IT 11 C Usando un cacciavite, rimuovere la vite della copertura del cardine superior e della porta che si desidera regolar e. C Regolare la porta in modo appr opriato, come desiderato, allentando le viti. C Fissare la porta che è stata r egolata stringendo le viti, senza modificare la posizione della porta stessa. C Riposizionare la copertura del […]
-
Страница 235
IT 12 4 Preparazione C Il f ri gor if er o dov rà e sse re i ns ta ll at o a d al me no 30 c m lon ta no d a fo nti d i cal or e, co me f orn i, ri sc al dam en to c en tr ale e s tuf e e ad a lme no 5 cm d a fo rni e le tt ric i e non de ve e sse re e sp ost o al la l uc e d ir et ta de l so le . C La t em per at ur a a mb ie nte d el la st an za[…]
-
Страница 236
IT 13 5 Utilizzo del frigorifero Pannello dei comandi 1. In di ca tor e im po sta zi on e te mp era tu ra sc om pa rto f r ee zer 2. T as to i mp os ta zi one t em per at ur a sc om pa rto f r ee zer 3. In di ca tor e di c ong el am en to r api do 4. T as to c on ge la me nto r ap ido 5. In di ca tor e Ap er tur a po rt a fr ee zer 6. T as to t em […]
-
Страница 237
IT 14 Impostazione della temperatura dello scomparto frigo Quando si desidera modificare le impostazioni di temperatura del frigorifero, è necessario premer e il “tasto di regolazione temperatura scomparto frigo” per effettuar e la regolazione della temperatura dello scomparto frigo. La temperatura dello scomparto frigo può essere impostata s[…]
-
Страница 238
IT 15 Funzione raffreddamento rapido Questa funzione può essere usata per alimenti posti nello scomparto del frigo e che necessitano di raffr eddare velocemente. Premer e il pulsante raffr eddamento rapido per attivare la funzione. Durante questo processo l’indicatore di raf freddamento rapido si illuminerà, e l’indicatore di r egolazione del[…]
-
Страница 239
IT 16 Spia blu I cibi immagazzinati nei cestelli che sono segnati da una spia blu continuano la loro fotosintesi grazie all’effetto delle onde della luce blu e quindi conservano la freschezza e aumentano il contenuto di vitamine. Cursori di controllo dell’umidità dello scomparto frutta e verdura Lo scomparto frutta e verdura del frigo è pr[…]
-
Страница 240
IT 17 Consigli per la conservazione di cibi congelati • Il cibo congelato commercialmente deve essere riposto secondo le istruzioni del fabbricante per un congelamento (4 stelle) del cibo nello scomparto apposito. • Per assicurare che sia conservata l’alta qualità del cibo congelato dal fabbricante e dal rivenditore, considerar e i seguenti […]
-
Страница 241
IT 18[…]
-
Страница 242
IT 19 Icematic * Quando il serbatoio di alimentazione acqua Icematic (1) viene rimosso dalla sua postazione per essere riempito, deve essere rimesso a posto entr o due minuti dal riempimento con acqua. L ’ugello del sistema si aprirà e le celle di Icematic verranno automaticamente riempite d’acqua non appena la cartuccia verrà rimessa a posto[…]
-
Страница 243
IT 20 Uso di Icematic • Ri em pi re Ic em at ic co n ac qu a e m et te rlo in s ed e. I l ghi ac ci o sa rà pr on to i n d ue o re ci rc a. N on ri mu ove re l ’I ce ma ti c d al la su a se de p er pr en de re i l gh iac ci o. • Ru ot ar e le ma no pol e in s en so or ar io pe r 90 g ra di. I cub et ti d i gh iac ci o cad on o ne l co nte ni[…]
-
Страница 244
IT 21 6 Pulizia e manutenzione A No n usa re m ai g as ol io, b en zen e o so st an ze si mi li pe r sc op i di pu li zia . B È co nsi gl ia to s co lle ga r e l’ ap pa re cc hi o pr im a del la p uli zi a. C No n ut ili zz ar e mai a tt r ezz i ap pun ti ti o so st an ze ab ra siv e, s ap on i, de te rg ent i pe r la c as a o c er e per l a pu […]
-
Страница 245
IT 22 7 Soluzioni consigliate per i problemi Prima di chiamare il servizio assistenza, riveder e la lista precedente. Si risparmierà tempo e denaro. Questa lista compr ende frequenti r eclami che non derivano da difetti di lavorazione o dai materiali utilizzati. Alcune delle funzioni descritte qui potrebber o non esistere nel pr oprio prodotto. Il[…]
-
Страница 246
IT 23 Il freezer funziona fr equentemente o per lunghi periodi. • Il nuovo frigorifero è più grande del pr ecedente. Ciò è abbastanza normale. I grandi frigoriferi lavorano per lunghi periodi di tempo. • La temperatura ambiente può essere alta. Ciò è abbastanza normale. • Il frigorifero è stato collegato alla pr esa di recente o è st[…]
-
Страница 247
IT 24 Il rumore aumenta quando il frigorifer o sta lavorando. • La performance operativa del frigorifero può cambiar e secondo i cambiamenti della temperatura ambiente. Si tratta di una cosa normale e non di un guasto. Vibrazioni o rumore. • Il pavimento non è orizzontale o è debole. Il frigorifero ondeggia quando si sposta lentamente. Accer[…]
-
Страница 248
Por favor, leia primeiro este manual! Caro cliente, Esperamos que o seu produto, que foi pr oduzido em modernas instalações e testado através de rigorosos contr olos de qualidade, ofereça-lhe um serviço efectivo. Para isso, recomendamos que leia cuidadosa e inteiramente o manual do seu pr oduto antes de utilizá-lo e guarde-o para futuras cons[…]
-
Страница 249
PT 2 1 O frigorífico 3 2 Avisos importantes de segurança 4 Uso pretendido ……………………………… 4 Para produtos com um dispensador de água; …………………………………………… 6 Segurança com crianças …………………. 6 Aviso HCA ……………………………………. 6 O que se pode fazer para economi[…]
-
Страница 250
PT 3 1 O frigorífico 2 1 8 9 *11 17 7 15 *18 *4 15 3 5 9 20 *19 *6 *10 13 14 *16 *22 *21 *21 12 1. Co mp ar tim en to do c on ge la do r 2. Co mp ar tim en to do r ef ri ge ra do r 3. Lu z in ter io r do co mp ar ti me nto d o r efr ig er ado r 4. Pr at el eir a de ma nt ei ga e q uei jo 5. V ent . 6. ‘I on is er’ ( Io niz ad or ) 7. Pr at el […]
-
Страница 251
PT 4 2 Avisos importantes de segurança Por favor , reveja as informações seguintes. A não-observância destas informações pode causar ferimentos ou danos ao material. Caso contrário, todas as garantias e compromissos de fiabilidade tornar -se-ão inválidos. A vida útil da unidade que adquiriu é de 10 anos. Este é o período para manter a[…]
-
Страница 252
PT 5 • Co lo qu e a s be bid as c om t eo r a lc oó lic o ma is e lev ad o bem f ec ha da s e n a ve rti ca l. • Nu nc a gua rd e la tas d e ae ro ss ol in fl am áve is e su bs tâ nc ia s exp lo si vas n o fr ig or ífi co . • Nã o ut ili ze d isp os it iv os m ecâ ni co s ou o ut ro s p ar a ace le ra r o pr oc ess o de d es con ge la ?[…]
-
Страница 253
PT 6 ma te ri ais c ie ntí fi co s, e tc ., nã o dev er ão se r gu ar da do s n o fr igo rí fi co . • S e não f or u ti li zad o po r u m lo ngo te mp o, o fr ig orí fi co d ev e ser d es lig ad o da t om ada . Qu alq ue r pr ob le ma po ss ív el no c ab o e lé ct ric o po de rá r es ult ar e m in cê nd io. • A ex tr em ida de d a f i[…]
-
Страница 254
PT 7 O que se pode fazer para economizar energia • Nã o de ixe a s por ta s do s eu fr ig or ífi co ab er ta s d ur an te mu it o te mp o. • Nã o co loq ue a lim en to s ou b ebi da s qu en te s n o se u f ri go rí fi co . • Nã o so br eca rr eg ue o s eu fr ig or ífi co p ara qu e a cir cu la çã o d o ar n o in ter io r não s ej a d[…]
-
Страница 255
PT 8 3 Instalação C Po r fa vor , lem br e- se de q ue o f ab ric an te nã o po de se r re spo ns ab il iz ad o s e nã o fo re m ob ser va da s a s in fo rm aç ões fo rne ci da s no ma nu al de i ns tr uç ões . Pontos a serem considerados ao transportar novamente o seu frigorífico 1. O se u fri go rí fic o de ve s er es va zi ado e li mp […]
-
Страница 256
PT 9 Ligação eléctrica Li gu e o s eu f rig or íf ic o a uma t om ada d e ter ra , qu e es tej a pr ot egi da p or u m fus ív el co m a ca pa ci dad e ap ro pri ad a. Importante: B A li ga çã o de ve es ta r em co nc or dân ci a co m os r egu la me nto s na ci on ai s. B A fi ch a do c ab o d e al ime nt aç ão de ve es ta r fac il me nte […]
-
Страница 257
PT 10 5. Não mantenha o seu frigorífico em temperaturas ambientes inferiores a 10ºC. Ajuste do nivelamento do pavimento Se o seu frigorífico estiver desnivelado; Pode equilibrar o seu frigorífico, rodando os seus pés frontais conforme ilustrado na figura. (V er figura A) O canto onde está o pé é baixado quando roda na dir ecção da seta p[…]
-
Страница 258
PT 11 • Se a porta do compartimento do congelador estiver mais baixa que a porta do compartimento do refrigerador , nivele- as rodando o parafuso de elevação ao lado do compartimento do congelador , na direcção da seta, utilizando uma chave- inglesa M6 Allen, conforme ilustrado na Figura D. • Se a porta do compartimento do congelador estive[…]
-
Страница 259
PT 12 C Com uma chave de fendas, remova o parafuso da cobertura da dobradiça superior que pretende ajustar . C Ajuste a porta adequadamente conforme pretendido, apertando os parafusos. C Fixe a porta sem alterar a posição que ajustou da mesma, apertando os parafusos. C V olte a colocar a cobertura da dobradiça e fixe com o parafuso. Ajustar o e[…]
-
Страница 260
PT 13 4 Preparação C O se u fri go rí fic o de ver á se r in st ala do a um a dis tâ nc ia mí ni ma d e 30 cm d e qu ai sq uer f on tes d e ca lo r , t ais c om o pl ac as , f orn os , aq uec im en to c en tra l e fo gõ es e de 5 cm d e fo rno s el éc tri co s e nã o de ver á fi car e xp os to d ir ect am en te à lu z so lar . C A te mp […]
-
Страница 261
PT 14 5 Utilizar o seu frigorífico Painel indicador 1. In di ca dor d e def in iç ão d a tem pe ra tur a do co mp ar tim en to do c on ge la do r 2. Bo tã o de de fi niç ão d a te mp era tu ra do co mp ar tim en to do c on ge la do r 3. In di ca dor d e ‘Fa st F r eez e’ 4. Bo tã o Fas t Fr ee ze 5. In di ca dor d e abe rt ur a da […]
-
Страница 262
PT 15 Definir a temperatura do compartimento do refrigerador Quando quiser alterar as definições de temperatura do seu frigorífico, deve pressionar o «botão de ajuste da temperatura do compartimento do refrigerador» para fazer o ajuste da temperatura do compartimento do refrigerador . A temperatura do compartimento do refrigerador pod[…]
-
Страница 263
PT 16 Função ‘Quick Cool’ (Arrefecimento rápido) Esta função pode ser usada para alimentos colocados no compartimento do refrigerador e que pr ecisem de arrefecer rapidamente. Pr essione o botão ‘quick cool’ para activar a função. Durante este processo, o indicador ‘quick cool’ acenderá e o indicador de ajuste da temperat[…]
-
Страница 264
PT 17 Luz azul Os alimentos guardados nas gavetas para frutas e legumes que são iluminados com uma luz azul, continuam a sua fotossíntese através do efeito de extensão de onda da luz azul e por isso, conservam a sua frescura e o seu conteúdo vitamínico é aumentado. Calhas deslizantes de controlo da humidade da gaveta de frutos e legumes A ga[…]
-
Страница 265
PT 18 Recomendação para a preservação de alimentos congelados • Os alimentos embalados pré-congelados devem ser armazenados de acordo com as instruções do fabricante do alimento, para um compartimento de armazenamento de alimentos ( 4 estrelas). • Para garantir que a alta qualidade fornecida pelo fabricante e revendedor de alimentos cong[…]
-
Страница 266
PT 19[…]
-
Страница 267
PT 20 Icematic * Quando o reservatório Icematic (1) de fornecimento de água é removido do seu lugar para ser abastecido, deve ser recolocado dentr o de dois minutos depois de ser enchido com água. O bocal do sistema abrirá e as células Icematic serão preenchidas com água automaticamente, logo que a recarga seja colocada no lugar . O seu gel[…]
-
Страница 268
PT 21 Usar o Icematic • En ch a o I ce ma tic c om á gu a e c ol oq ue- o no s eu lu ga r dev id o. O se u g el o fic ar á pr on to e m c er ca d e du as ho ra s. Nã o r emo va o Ic em at ic de po is q ue es ti ve r ac om od ado p ar a f az er g el o. • Ro de o bo tã o no se nt id o ho rár io em 9 0 gra us . Os cu bo s de g elo n os co mp […]
-
Страница 269
PT 22 6 Limpeza e cuidados A Nu nc a us e ga so lin a, b enz en o ou su bs tâ nci as s eme lh an te s pa ra a li mpe za . B Re co me nd am os q ue de sl igu e a fic ha do e qu ipa me nt o d a to ma da a nte s da li mp ez a. C Nu nc a uti li ze na l im pez a ob jec to s ab ra si vos o u pon ti ag ud os , sab õe s, pr od ut os de l im pez a do mé […]
-
Страница 270
PT 23 7 Soluções recomendadas para os problemas Por favor , reveja esta lista antes de telefonar para a assistência. Com isso, pode poupar tempo e dinheiro. Esta lista abrange as r eclamações frequentes r esultantes de defeitos de fabricação ou utilização do material. Algumas das funções descritas aqui podem não existir no seu produto. […]
-
Страница 271
PT 24 • O seu novo produto pode ser mais largo do que o anterior . Esta situação é perfeitamente normal. Os frigoríficos grandes operam por um período maior de tempo. • A temperatura ambiente pode estar muito elevada. Esta situação é perfeitamente normal. • O frigorífico foi ligado à tomada há pouco tempo ou carregado com alimentos[…]
-
Страница 272
PT 25 O ruído de funcionamento aumenta quando o frigorífico está a funcionar . • O desempenho de funcionamento do frigorífico pode variar devido às alterações na temperatura ambiente. Esta situação é normal e não é um problema. Vibrações ou ruído. • O piso não está nivelado ou não é resistente. O frigorífico balança quando […]
-
Страница 273
Prosím, prečítajte si najskôr túto príručku! V ážený zákazník, Dúfame, že váš produkt, ktorý bol vyr obený v moderných továr ňach a skontrolovaný v rámci prepracovaných postupov riadenia kvality , vám bude úspešne a efektívne slúžiť. Preto vám odporúčame, aby ste si pozorne prečítali celú túto príručku k vá?[…]
-
Страница 274
SK 2 1 Chladnička 3 2 Dôležité bezpečnostné výstrahy 4 Určené použitie ……………………………… 4 Pri výrobkoch s dávkovačom vody ……. 6 Bezpečnosť detí …………………………….. 6 Upozornenie HCA ………………………….. 6 V eci, ktoré treba ur obiť pre úsporu energie ……………………….[…]
-
Страница 275
SK 3 1 Chladnička 2 1 8 9 *11 17 7 15 *18 *4 15 3 5 9 20 *19 *6 *10 13 14 *16 *22 *21 *21 12 1. Pr ie či no k mr az ni čk y 2. Pr ie či no k ch la dn ič ky 3. Os ve tl en ie i nt er ié ru c hla dn ič ky 4. Po li čk a na m as lo a s yr 5. V en ti lá to r 6. Io ni zé r 7. Sk le né p ol ič ky p ri eč in ka ch la dn ič ky 8. Dr ži ak n a[…]
-
Страница 276
SK 4 2 Dôležité bezpečnostné výstrahy Prečítajte si nasledujúce informácie. Nedodržiavanie týchto informácií môže mať za následok zranenia alebo vecné škody . Všetky záručné záväzky tým strácajú platnosť. Doba životnosti vami zakúpeného zariadenia je 10 rokov . Je to obdobie, počas ktorého sú k dispozícii náhra[…]
-
Страница 277
SK 5 • V pr íp ad e zl yh an ia a le bo po ča s úd rž by al eb o op rá v od po jt e ch lad ni čk u od el ek tr ic ké ho r oz vo du b uď v yp nu tí m pr ís lu šn ej p oi st ky a le bo od po je ní m sp ot r ebi ča o d si et e. • Pr i od pá ja ní z ás uv ky n eťa ha jt e za k áb el , al e po ti ah ni te z ás uv ku . • Ná po j[…]
-
Страница 278
SK 6 • Z dô vo du r iz ik a po ži ar u a v ýb uc hu ne r oz str e ku jt e v b lí zk os ti c hl ad ni čk y ho rľ av é ma te ri ál y , a ko n ap rí kl ad pr o pá nov ý pl yn a p od . • Na c hl ad ni čk u ne um ie st ňuj te n ád ob y na pl ne né v od ou , pr et ož e mô žu sp ôs ob iť z ás ah e le kt ri cký m pr úd om al eb o[…]
-
Страница 279
SK 7 Veci, ktoré treba urobiť pre úsporu energie • Dv er e va še j ch la dn ič ky n en ec há va jte ot vo r ené d lh ý ča s. • Do c hl ad ni čk y ne vk la da jte h or úc e je dl á al eb o ná po je . • Ch la dn ič ku n ep re pĺ ňa jt e, a by s te ne bl ok ov al i pr úd en ie v zdu ch u v in te ri ér i. • V aš u ch la dn i?[…]
-
Страница 280
SK 8 3 Inštalácia C Za pa mä ta jt e si, ž e vý r obc a ne ne si e zo dp ov ed no sť v p rí pa de , ž e ne do dr ží te in fo rm ác ie u ve de né v n ávo de k ob sl uh e. Body, ktoré je potrebné zvažovať pri opakovanej preprave chladničky 1. V aš a ch la dn ič ka m usí b yť p r ed pr e su nom p rá zd na a o či st en á. 2. Po[…]
-
Страница 281
SK 9 Elektrické pripojenie Pr ip oj te c hl ad ni čk u k uze mn en ej z ás tr čk e, kt or á je c hr án en á po is tko u pr ís lu šn ej ka pa ci ty . Dôležité: B Pr ip oj en ie m us í by ť v zh od e s ná r od ným i pr e dp ism i. B El ek tr ic ká z ás uv ka m us í by ť p o in št al ác ii ľa hk o pr ís tu pn á. B Na pä ti e […]
-
Страница 282
SK 10 5. Chladničku neuchovávajte pri teplote prostr edia pod 10 °C. Nastavenie vyváženia podlahy Ak je vaša chladnička nestabilná; Chladničku môžete vyvážiť otáčaním predných nôh tak, ako je to znázornené na obrázku. (Pozrite si Obrázok A) Keď nohu otáčate v smere čiernej šípky , roh s príslušnou nohou sa znižuje; k[…]
-
Страница 283
SK 11 • Ak sú dvierka mraziaceho priečinka nižšie ako dvierka chladiaceho priečinka, otáčaním elevačnej skrutky na strane mraziaceho priečinka v smere šípky pomocou imbusového kľúča M6 ich dostaňte na rovnakú úr oveň (pozrite si znázornenie na Obrázku D). • Ak sú dvierka mraziaceho priečinka vyššie ako dvierka chladiac[…]
-
Страница 284
SK 12 C Pomocou skrutkovača vyberte skrutku krytu horného závesu dverí, ktoré chcete nastaviť. C Dvere podľa želania primerane nastavte uvoľnením skrutiek. C Upevnite dvere bez zmeny polohy dverí nastavených doťahovaním skrutiek. C Znovu nasaďte kryt závesu a dotiahnite ho skrutkou. Nastavenie medzery medzi hornými dverami C Medzer[…]
-
Страница 285
SK 13 4 Príprava C V aš a ch la dn ič ka by m al a by ť um ie st ne ná v n aj me ne j 30 cm vz di al en os ti o d zd ro jo v te pl a, a ko sú ho rá ky , rú ry n a pe če ni e, ra di át or y a ka ch le a n aj me ne j v 5 cm vz di al en os ti od e le kt ri ck ýc h rú r na pe če ni e a ne ma la by b yť u mi es tn en á na p ria mo m sl nk[…]
-
Страница 286
SK 14 5 Používanie chladničky Indikačný panel 1. I nd ik át or n as ta ve ni a t ep lo ty n a mr az ia co m pr ie či nk u 2. T la či dl o na st av en ia te pl ot y na m ra zi ac om pr ie či nk u 3. I nd ik át or r ýc hl eh o mra ze ni a 4. T la či dl o rý ch le ho m raz en ia 5. In di ká to r ot vo re ni a dv ie ro k mr az ni čk y 6.[…]
-
Страница 287
SK 15 Nastavenie teploty v chladiacom priečinku Keď chcete zmeniť nastavenia teploty v chladničke, je potrebné stlačiť „tlačidlo teploty v priečinku chladničky“ a nastaviť teplotu v chladiacom priečinku. T eplotu v chladiacom priečinku je možné nastaviť na nižšie stupne po každom stlačení tohto tlačidlo (napr . 8, 6, 4, 2,[…]
-
Страница 288
SK 16 Funkcia rýchleho chladenia T úto funkciu môžete použiť pre potraviny vložené v priečinku chladničky , ktoré je potrebné rýchlo schladiť. Pr e spustenie funkcie stlačte tlačidlo rýchleho chladenia. Počas tohto procesu sa rozsvieti indikátor rýchleho chladenia a indikátor nastavenia teploty v chladiacom priečinku sa zmení[…]
-
Страница 289
SK 17 Modré svetlo Potraviny uložené v špeciálnych priehradkách, ktoré sú osvetlené modrým svetlom, budú vďaka účinku vlnovej dĺžky modrého svetla pokračovať vo fotosyntéze a tak si uchovajú svoju čerstvosť a zvýšia obsah vitamínov . Posuvníky ovládania vlhkosti v priečinku na zeleninu a ovocie Priečinok na zeleninu a […]
-
Страница 290
SK 18 Odporúčania pre uchovávanie mrazeného jedla • Balené komerčne pr edávané mrazené jedlo by sa malo skladovať v súlade s pokynmi výrobcu pr e (4-hviezdičkový) priečinok na uchovávanie mrazeného jedla. • V záujme zachovania vysokej kvality dodávanej výrobcom a pr edajcom mrazeného jedla je potrebné dodržiavať nasledov[…]
-
Страница 291
SK 19[…]
-
Страница 292
SK 20 Icematic * Keď sa zásobník na vodu Icematic (1) odstráni zo svojho miesta za účelom naplnenia, do dvoch minút po naplnení vodou je potrebné ho vložiť späť. T ryska systému sa otvorí a bunky systému Icematic sa automaticky naplnia vodou ihneď po osadení kazety na svoje miesto. Ľad bude pripravený približne behom 2 hodín. […]
-
Страница 293
SK 21 Používanie Icematic-u • Na pl ňt e Ic em at ic v od ou a us aď te h o na mi es to . ľa d bu de p ri pr ave ný p ri bl iž ne be ho m dv oc h ho dí n. N ev ybe ra jt e Ic em at ic z j eh o mi es ta , p ok ia ľ ch ce te pr ip ra vi ť ľa d. • Po ot oč te z áp ad ka mi n a Ice ma ti c- u o 90 s tu pň ov v s me re h od in ov ýc h[…]
-
Страница 294
SK 22 6 Čistenie a údržba A Na č is te ni e ni kdy n ep ou ží va jt e pl yn , be nz ín a le bo o bd ob né p ro st ri ed ky . B Od po rú ča me v ám , a by s te z ar ia de ni e pr e d vyč is te ní m od po ji li o d si et e. C N a č is te ni e ni kd y ne po už íva jt e ži ad ne os tr é a dr sn é pr ed me ty , my dl o, do má ce č i[…]
-
Страница 295
SK 23 7 Odporúčané riešenia problémov Pred zavolaním servisu si pozrite tento zoznam. Môže vám to ušetriť čas aj peniaze. T ento zoznam obsahuje bežné sťažnosti, ktoré sa nevzťahujú na chybné spracovanie alebo využitie materiálu. Niektoré z tu popísaných funkcií nemusí váš pr odukt obsahovať. Chladnička nefunguje. •[…]
-
Страница 296
SK 24 Chladnička pracuje príliš často alebo príliš dlhý čas. • V áš nový produkt môže byť širší ako pr edchádzajúci. T o je úplne normálne. V eľké chladničky pracujú dlhší čas. • Okolitá teplota môže byť vysoká. T o je úplne normálne. • Chladnička mohla byť zapnutá len nedávno alebo mohlo byť do nej vlo[…]
-
Страница 297
SK 25 Prevádzkový hluk sa zvyšuje, keď chladnička pracuje. • Prevádzkový výkon chladničky sa môže meniť podľa zmeny teploty okolia. Je to úplne normálne a neznamená to poruchu. Otrasy alebo hluk. • Podlaha nie je rovná alebo nie je pevná. Chladnička sa trasie pri pomalom pohybe. Skontrolujte, či podlaha dokáže uniesť hmot[…]
-
Страница 298
Prosimo, da najprej preberete navodila za uporabo! Dragi kupec, upamo, da bo naprava, ki je bila izdelana v modernih obratih in preizkušena z natančnimi postopki kakovosti, zagotovila učinkovito delovanje. Zato priporočamo, da pr ed uporabo pazljivo preber ete celotna navodila za uporabo naprave in jih hranite v bližini, saj jih boste morda po[…]
-
Страница 299
SL 2 1 Hladilnik 3 2 Pomembna varnostna opozorila 4 Namen uporabe …………………………….. 4 Za naprave z dispenzerjem za vodo;….. 6 V ar nost otrok ………………………………… 6 Opozorilo HCA ………………………………. 6 V arčevanje z energijo ………………………. 7 3 Namestitev 8 Napotki, ki jih je tre[…]
-
Страница 300
SL 3 1 Hladilnik 2 1 8 9 *11 17 7 15 *18 *4 15 3 5 9 20 *19 *6 *10 13 14 *16 *22 *21 *21 12 1. Za mr zo va ln i de l 2. Hl ad il ni d el 3. No tr an ja l uč h la di l ne ga d el a 4. Po li ca z a ma sl o & s ir 5. V en ti la to r 6. Io ni za to r 7. St ek le ne p ol ic e hl a di ln eg a de la 8. Pl ad en j za j aj ca 9. V r at ne p ol ic e h l[…]
-
Страница 301
SL 4 2 Pomembna varnostna opozorila Prosimo, pr eglejte naslednje informacije. Če ne boste upoštevali teh informacij, lahko pride do telesnih poškodb ali poškodb materiala. V nasprotnem primeru garancija in zanesljivost nista veljavni. T ehnična življenjska doba naprave, ki ste jo kupili, je 10 let. Za ta čas hranite rezerve dele, ki so potr[…]
-
Страница 302
SL 5 • V pr im er u ka kr šn ek o li n ap ak e al i pr ed v zd rž ev al ni m i de li i n po p ra vi li ob ve zn o iz kl ju či te el ek tr ič no n a pa ja nj e hl ad il ni ka t ak o, d a i zk lj uč it e z ad ev no va r ov al ko a li i zt ak ne te v t ič n ap ra ve . • Ko i zk lo pi te v ti č, ne v le ci te z a k ab el . • Ko nc en tr ir[…]
-
Страница 303
SL 6 • V bl iž in i hl ad il ni k a ne p rš it e v ne tl ji vi h pl in ov , k ot j e pr op an , sa j ob st aj a ne va rno st p ož ar a al i ek sp l oz ij e. • Na h la di ln ik n ik ol i n e po st av lj a jt e po so d z vo do , sa j t o la hk o po vz r oč i el ek tr ič ni u da r al i p ož ar . • H la di ln ik a ne p r eo br em en ju jt e[…]
-
Страница 304
SL 7 Varčevanje z energijo • V r at h la di ln ik a n e pu šč aj te od pr ti h da lj ča sa . • V hl ad il ni ku n e sh r an ju jt e to pl i h ži vi l al i pi ja č. • Hl ad il ni ka n e na po l ni te p r eo bi ln o, s aj s te m pr ep r eč it e kr ož en je z ra ka . • Hl ad il ni ka n e po st a vl ja jt e na ne po sr ed no s o čn o s[…]
-
Страница 305
SL 8 3 Namestitev C Pr o iz va ja le c ne b o od go va rj al , č e ne bo st e up oš te va li i n fo rm ac ij v n a vo di li h za u po ra bo . Napotki, ki jih je treba upoštevati ob ponovnem prevozu hladilnika 1. H la di ln ik m or at e iz pr az ni ti i n o či st it i pr ed v sa ki m pr e vo zo m. 2. P ol ic e, p ri po mo čk e, p re da l e za s[…]
-
Страница 306
SL 9 Električna povezava Hl ad il ni k pr ik lj uč i te v o ze ml je n o vt ič ni co , ki j e za šč it en a z v ar ov al k o us tr e zn e zm og lj iv os ti . Pomembno: B Pr ik lj uč it ev m or a u st r e za ti n ac io na l ni m pr ed pi so m. B Vt ič n ap aj al ne ga ka bl a na j bo po na me st it vi l ah ko d o st op en . B Na pe to st i n […]
-
Страница 307
SL 10 5. T emperatura prostora, kjer je hladilnik, naj ne bo pod 10°C. Prilagoditev ravnotežja dna Če vaš hladilnik ni izravnan; Hladilnik lahko izravnate tako, da sprednje noge zavrtite, kot kaže slika. (Glejte sliko A) Kot, kjer je noga, je spuščen, če obrnete v smeri čr ne puščice in dvignjen, če obrnete v nasprotno smer . Olajšajte[…]
-
Страница 308
SL 11 • Če vrata zamrzovalnega dela stojijo nižje kot vrata hladilnega dela, jih nastavite na enako višino, tako da obrnete vijak za nastavitev na strani zamrzovalnega dela z imbus ključem M6 v smeri puščice kot je prikazano na sliki D. • Če vrata zamrzovalnega dela stojijo višje kot vrata hladilnega dela, jih nastavite na enako višino[…]
-
Страница 309
SL 12 C Z izvijačem odstranite vijak zgornjega pokrova tečaja vrat, ki jih želite prilagoditi. C Prilagodite vrata po želji, tako da zrahljate vijake. C Ko ste vrata prilagodili, jih pritrdite, tako da pričvrstite vijake, brez da bi spremenili položaj vrat. C Zamenjajte pokrov tečaja in ga pritrdite z vijakom. Prilagoditev odprtine med zgorn[…]
-
Страница 310
SL 13 4 Priprava C Hl ad il ni k mo ra te n am es t it i vs aj 3 0 cm o d vi ro v t op lo te k ot s o k uh al ne pl oš če , pe či ce , gl a vn i gr e lc i al i št ed il ni ki i n vs aj 5 cm o d el ek t ri čn ih pe či c, p ra v ta ko g a n e po st av lj a jt e po d ne po sr ed n o so nč no s ve t lo bo . C T em pe ra tu ra p ro st o ra k je r[…]
-
Страница 311
SL 14 5 Uporaba hladilnika Indikatorska tabla 1. K az al ec n as ta vi tv e te mp er at ur e za mr zo va ln eg a de la 2. G um b za n as ta vi te v te mp er at ur e za mr zo va ln eg a de la 3. K az al ec z a hi tr o za mr zo va nj e 4. G um b za h it r o za mr zo va nj e 5. K az al ec o dp rt ih v ra t za mr zo va ln i ka 6. G um b te mp er at ur […]
-
Страница 312
SL 15 Nastavitev temperature hladilnega dela Če želite spremeniti temperaturne nastavitve hladilnika, pritisnite “Gumb za nastavitev temperature hladilnega dela” , da nastavite temperaturo v hladilnem delu. Z vsakim pritiskom na gumb nastavite temperaturo hladilnega dela na hladnejšo stopnjo (kot je 8, 6, 4, 2, 8, …). Nastavitev temperatur[…]
-
Страница 313
SL 16 Funkcija hitrega hlajenja T a funkcija se uporablja za živila, ki jih postavite v hladilni del in želite, da se hitro ohladijo. Funkcijo vključite s pritiskom na gumb za hitro hlajenje. Medtem bo zasvetil kazalec za hitro hlajenje in kazalec za nastavitev temperature hladilnega dela se bo obrnil na 1 °C. Med delovanjem funkcije hitrega hl[…]
-
Страница 314
SL 17 Modra luč Živila, shranjena v predelih za sveža živila, ki so osvetljeni z modro lučjo, s pomočjo valovne dolžine modre luči nadaljujejo fotosintezo in tako ohranijo svežino in povečajo vsebnost vitaminov . Drsniki za upravljanje vlage v predalu za sveža živila Predal za sadje in zelenjavo v hladilniku je oblikovan posebej z namen[…]
-
Страница 315
SL 18 Priporočila za shranjevanje zamrznjenih živil • Vnaprej pakirana zamrznjena živila iz trgovine shranite po navodilih proizvajalca zamrznjenih živil za pr edel za shranjevanje zamrznjenih živil ( 4 zvezdice). • Da bi ohranili visoko kakovost proizvajalca zamrznjenih živil in prodajalca živil, upoštevajte naslednje točke; 1.Po naku[…]
-
Страница 316
SL 19[…]
-
Страница 317
SL 20 Ledomat * Ko odstranite vodni rezervoar (1) iz svojega mesta, da bi ga napolnili, ga morate v dveh minutah, potem ko ste ga napolnili z vodo, ponovno namestiti. Šoba na sistemu se bo odprla in ko namestite priključek na svoje mesto, se bodo celice ledomata samodejno napolnile z vodo. Led bo pripravljen približno v 2 urah. • Ledomata (2) […]
-
Страница 318
SL 21 Uporaba ledomata • Le do ma t na po ln it e z v od o in g a po st av it e na u st r ez no m es t o. L ed bo p ri pr av lj en p ri b li žn o v dv eh ur ah . Le do ma ta n e od st ra n ju jt e iz s vo j eg a m es ta , da b i vz el i le d. • Gu mb e na n je m za vr t it e v sm er i ur in eg a ka za lc a za 90 s to pi nj . K oc ke le du v c […]
-
Страница 319
SL 22 6 Čiščenje in vzdrževanje A Pr i či šč en ju n i ko li n e up or a bl ja jt e be nc in a, b en ze na a l i po do bn ih s n ov i. B Pr ip or oč a mo , da n ap ra v o pr ed či šč en je m iz kl ju či t e iz e le kt ri č ne ga om r ež ja . C Za č iš če nj e n e up or ab lj aj t e os tr ih ab ra zi vn ih p r ed me to v , mi la , g[…]
-
Страница 320
SL 23 7 Priporočljive rešitve za težave Prosimo, pr eglejte ta seznam preden pokličete servisno službo. Lahko V am prihrani čas in denar . Na seznamu so pogoste pritožbe, ki niso posledica pomanjkljive izdelave ali materiala. Nekatere izmed opisanih značilnosti, mor da ne veljajo za vašo napravo. Hladilnik ne deluje. • Ali je hladilnik p[…]
-
Страница 321
SL 24 Delovanje hladilnika je pogosto ali traja dalj časa. • Nova naprava je širša od prejšnje. T o je običajno. V eliki hladilniki delujejo dalj časa. • T emperatura prostora je visoka. T o je običajno. • Hladilnik je bil pred kratkim priključen ali pa je bil pr enapolnjen z živili. Popolno ohlajanje hladilnika lahko traja nekaj ur […]
-
Страница 322
SL 25 Med delovanjem hladilnika se hrup poveča. • Učinkovitost delovanja hladilnika se lahko spremenijo glede na spr emembe temperature pr ostora. T o je običajno in ni napaka. T resljaji ali hrup • Neravna ali slabotna tla. Hladilnik se med počasnim premikanjem tr ese. Prepričajte se, da so tla ravna in dovolj močna podpora za hladilnik.[…]
-
Страница 323
Kérjük, előbb olvassa el a használati útmutatót! Tisztelt V ásárló! Bízunk benne, hogy termékünk, mely egy modern gyárban készült, és a legaprólékosabb minőségirányítási eljárások alapján lett tesztelve, hatékony szolgáltatást fog biztosítani az Ön számára. Ehhez azt javasoljuk, hogy használat előtt alaposan olvas[…]
-
Страница 324
HU 2 1 A hűtő 3 2 Fontos biztonsági figyelmeztetések 4 Rendeltetésszerű használat ……………… 4 Általános tudnivalók ……………………….. 4 Gyermekbiztonság …………………………. 6 HCA Figyelmeztetés ……………………….. 7 Az energiatakarékosság jegyében teendő lépések ………………………[…]
-
Страница 325
HU 3 1 A hűtő 2 1 8 9 *11 17 7 15 *18 *4 15 3 5 9 20 *19 *6 *10 13 14 *16 *22 *21 *21 12 1. Fa gy as zt ór ek e sz 2. H űt ős ze kr én y r ek es z 3. H űt őr ek es z be ls ő vi lá gí tá s a 4. V aj — és s aj tt ár o ló p ol c 5. V en ti ll át or 6. Io ni zá ló 7. H űt őr ek es z üv eg po lc ai 8. T o já st ar tó 9. H űt őr […]
-
Страница 326
HU 4 2 Fontos biztonsági figyelmeztetések Kérjük, olvassa el az alábbi információkat. Amennyiben ezeket nem tartja be, személyi sérülés vagy anyagi kár keletkezhet. Ezenkívül valamennyi garancia érvényét veszti. A készülék élettartama 10 év . Ennyi ideig biztosítunk pótalkatrészeket a készülékhez, amennyiben azt rendelte[…]
-
Страница 327
HU 5 • Me gh ib ás od ás , il l. ka rb an ta rt ás i v ag y ja ví tá si m un ká la to k s or án v ál as s za le a h űt őt a z el ek t r om os h ál óz at r ól a m eg fe le lő b iz to sí té k ki ka pc so lá s áv al va gy a k és zü lé k ki h úz ás áv al . • A h űt őt a d ug ón ál f og va h úz za k i a ko nn ek to rb ó[…]
-
Страница 328
HU 6 • A h űt ős ze kr é ny t ne c sa tl ak oz ta ss a la za k on ne kt or ba . • B iz to ns ág i ok ok bó l ne ö nt sö n kö zv et le nü l vi ze t a h űt ős ze kr é ny be ls ő va gy k ül ső r és ze ir e . • Ne f új jo n ki g yú lé k on y an ya go ka t , pl . pr op án g á z, s tb . a hű t ős ze kr é ny kö ze lé be n, […]
-
Страница 329
HU 7 HCA Figyelmeztetés Ha terméke rendelkezik olyan hűtő rendszerrel, mely R600a-t tartalmaz: Ez a gáz gyúlékony . Ennek következtében figyeljen oda, hogy szállítás és használat közben ne tegyen kárt a hűtőrendszerben. Sérülés esetén tartsa távol a terméket a lehetséges tűzforrásoktól, melynek hatására a készülék b[…]
-
Страница 330
HU 8 3 Beüzemelés C Fe lh ív ju k rá f ig ye lm ét , h og y a gy ár t ó ne m vá ll al f el el ős s ég et a j el en út mu ta tó ba n fo gl al t i nf or má ci ók fi gy el me n kí vü l ha g yá sá ér t. A hűtő szállításakor figyelembe vevendő dolgok 1. S zá ll ít ás e lő tt ü rí ts e ki é s ti s zt ít sa k i a hű tő t[…]
-
Страница 331
HU 9 Elektromos összeköttetés A hű tő sz ek r én yt e gy o ly an fö ld el t al jz at ho z cs at la ko z ta ss a, m el y m eg fe le lő t el je sí tm én yű b iz to sí t ék ka l r en de lk ez ik . Fontos: B A cs at la ko zá sn ak me g ke ll f el e ln ie a z or sz ág os n or má kn ak . B Üg ye lj en r á, h og y a t áp ká be l kö nn[…]
-
Страница 332
HU 10 4. A rázkódások elkerülése érdekében a hűtőszekrényt egy egyenletes padlón helyezze el. 5. Ne tartsa a hűtőszekrényt 10 °C-nál alacsonyabb hőmérsékleten. A berendezés stabilizálása Ha a hűtő dülöngél: A hűtő stabilizálásához csavarja el az elülső lábakat az ábrán látható módon. (Lásd: A ábra) A láb a[…]
-
Страница 333
HU 11 • Ha a fagyasztórekesz ajtaja lejjebb van, mint a hűtőrekesz ajtaja, akkor a fagyasztórekesz felöli oldalon lévő beállítócsavar nyíllal jelzett irányba történő elcsavarásával állítsa azt be (lásd: D ábra). A művelethez használjon egy M6-os imbuszkulcsot. • Ha a fagyasztórekesz ajtaja feljebb van, mint a hűtőrekes[…]
-
Страница 334
HU 12 C Egy csavarhúzó segítségével távolítsa el a felső zsanér burkolatát annak az ajtónak, amelyiket be szeretné állítani. C Állítsa be megfelelően a kívánt ajtót a csavarok meglazításával. C Rögzítse a beállított ajtót a csavarok meghúzásával – ügyeljen rá azonban, hogy az ajtó közben ne állítódjon el! C T[…]
-
Страница 335
HU 13 4 Előkészületek C A hű tő t le ga lá bb 3 0 cm — r e ke ll el he ly ez ni m in de n h őf or rá st ól ( p l. ka nd al ló , sü tő , fő z ől ap ), é s le g al áb b 5 cm -r e az e l ek tr om o s sü tő kt ől . E ze nk ív ül ó vn i ke ll a k öz ve tl en na ps üt és tő l is . C A he ly is ég be n, a ho l a h űt őt e l k?[…]
-
Страница 336
HU 14 5 A hűtőszekrény használata 2 15 4 1 5 3 12 13 10 9 6 8 14 7 11 Kijelző panel 1. F ag ya sz tó r ek es z hő mé rs ék le tb eá ll ít ás je lz őj e 2. F ag ya sz tó r ek es z hő mé rs ék le tb eá ll ít ó go mb ja 3. G yo rs fa gy as zt ás j el ző 4. G yo rs fa gy as zt ás g om b 5. Ny it ot t fa gy as zt óa j tó j el z?[…]
-
Страница 337
HU 15 A hűtőrekesz hőmérsékletének beállítása Ha szeretné megváltoztatni a hűtő hőmérsékletbeállításait, akkor ehhez meg kell nyomnia a “Hűtőrekesz hőmérsékletbeállító gombját” . A hűtőrekesz hőmérsékletét a gomb többszöri megnyomásával lehet beállítani (8, 6, 4, 2, 8, …). A fagyasztórekesz hőmérsék[…]
-
Страница 338
HU 16 Gyorshűtés funkció Ez a funkció akkor hasznos, ha a hűtőbe tett ételt gyorsan le kell hűteni. A funkció aktiválásához nyomja meg a gyorshűtés gombot. A művelet során a gyorshűtés jelző kigyullad, és a hűtőrekesz hőmérsékletbeállítás jelzője 1 °C-ra vált. Amikor a gyorshűtés funkció aktív , a rekesz hőmérs?[…]
-
Страница 339
HU 17 Kék világítás A kék fénnyel megvilágított fiókban tárolt élelmiszer ek fotoszintézise beindul a kék fény hatására, így megőrzik frissességüket és nő a vitamintartalmuk. Fiók nedvesség-ellenőrző csúszkák A hűtőszekrény fiókjai speciálisan zöldségek tárolására lettek kialakítva, annak érdekében, hogy ne […]
-
Страница 340
HU 18 Tippek a fagyasztott ételek tárolásához • Az előrecsomagolt, mélyhűtött ételeket az ételek csomagolásán feltűntetett utasítások szerint kell tárolni (4-csillagos) fagyasztórekeszben. • A mélyhűtött ételek minőségének megőrzése érdekében tartsa be az alábbiakat: 1. A vásárlás után minél gyorsabban tegye be[…]
-
Страница 341
HU 19[…]
-
Страница 342
HU 20 Icematic * Amikor az Icematic víztartályát (1) kiveszi, hogy feltöltse azt, akkor azt a feltöltést követő 2 percen belül vissza kell helyezni. A rendszer fúvókája kinyílik, és az Icematic cellái automatikusan megtöltődnek vízzel, amint helyére került a kazetta. A jég kb. 2 óra alatt készül el. • A jég kivételéhez […]
-
Страница 343
HU 21 Az Icematic használata • T ö lt se f el v íz z el a z Ic em at i c- ot , ma jd te gy e a he ly ér e. A j ég k b. 2 ó ra a la tt ké sz ül e l. A j ég k i vé te lé he z ne ve gy e ki a z Ic em at ic -o t a h el yé r ől . • Fo r dí ts a el a g om bo ka t 90 fo kk al . A ce ll ák ba n lé vő j ég k oc ká k le hu ll n ak a z […]
-
Страница 344
HU 22 6 Tisztítás és ápolás A Tis zt ít ás ho z so se h as zn ál jo n b ez in zt va gy h as on ló s ze rt . B Tis zt ít ás e lő tt c él sz er ű ki hú z ni a be r en de zé st . C So ha n e ha sz n ál jo n él es , c si sz ol ó an ya go t, s za pp an t, há zt ar tá si t i sz tí tó t, ti sz tí tó sz er t va gy vi as zp ol it ú[…]
-
Страница 345
HU 23 7 A problémák javasolt megoldása Kérjük, mielőtt kihívná a szervizt, oldassa át a következő listát. Ezzel időt és pénzt takaríthat meg. Ez a lista azon gyakran előforduló panaszokat tartalmazza, melyek nem a hibás gyártásból vagy anyagokból erednek. Az itt ismertetett tulajdonságok közül nem mindegyik található meg[…]
-
Страница 346
HU 24 A hűtőszekrény gyakran vagy hosszú ideig működik. • Lehet, hogy az új hűtőszekrénye szélesebb, mint az előző. Ez teljesen normális jelenség. A nagyobb hűtőszekrények hosszabb ideig működnek. • Lehet, hogy túl magas a szobahőmérséklet. Ez teljesen normális jelenség. • előfordulhat, hogy a hűtőszekr ény nem r[…]
-
Страница 347
HU 25 A működés zaj a hűtő működése közben egyre hangosabb. • A hűtőszekrény működési teljesítménye a környezetei hőmérséklet változásának függvényében változik. Ez teljesen normális, nem utal hibára. Rezgés vagy zaj. • A padló nem egyenes vagy gyenge. A hűtő a lassú mozgás miatt ad ki hangot. Győződjön me[…]
-
Страница 348
4 8 85 67 0 00 3/ AE EN -F R- DE — FL -L İT -R U S- UK -N L- AR IT -P T -S K- SL -H U[…]
Beko GNEV120W Refrigerator PDF User Guides and Manuals for Free Download: Found (3) Manuals for Beko GNEV120W Device Model (Manual , Installation, Operation And Maintenance Instructions, Installation, Operation & Food Storage Instructions)
The Beko GNEV120W is a standout in the world of home refrigeration, offering a blend of modern design, functionality, and energy efficiency. As consumers continuously seek appliances that enhance their lifestyle and fit well with contemporary aesthetics, the GNEV120W delivers on all fronts. In this review, we will explore its features, performance, and overall value for money.
One of the most appealing aspects of the Beko GNEV120W is its sleek, white exterior. This appliance fits seamlessly into various kitchen decors, making it an attractive addition to your home. Whether you have a traditional or modern kitchen layout, its minimalist design ensures it won’t clash with existing furnishings. Additionally, it features a large capacity, perfect for families or those who love to entertain. With ample space for all your groceries and a well-organized layout, you can easily store everything from fresh produce to frozen goods.
When it comes to performance, the GNEV120W does not disappoint. Featuring an advanced cooling system, this appliance ensures that food stays fresher for longer. Its No Frost technology prevents ice build-up, eliminating the need for manual defrosting – a feature that saves time and hassle in the long run. Furthermore, the refrigerator maintains optimal temperatures, which helps preserve the quality and flavor of your food items.
The interior design of the Beko GNEV120W is equally impressive. It boasts:
- Adjustable shelves, allowing users to customize the space according to their needs.
- Multiple compartments, including dedicated vegetable drawers to keep produce crisp and fresh.
- Energy-efficient LED lighting that illuminates the entire fridge, making it easy to find what you need.
Another significant advantage of the Beko GNEV120W is its energy efficiency. With a high energy efficiency rating, this refrigerator helps reduce your electricity bills while being environmentally friendly. By choosing the GNEV120W, you can enjoy the benefits of a spacious fridge without the guilt of high energy consumption. This aspect is particularly appealing to today’s environmentally conscious consumers.
The Beko GNEV120W also comes with a range of convenient features that enhance its usability. From easy-to-use controls to a user-friendly interface, this appliance is designed with the user in mind. Here are some notable features:
- Quick Freeze function for rapidly freezing food items, ideal for preserving nutrients and flavor.
- Alarms that notify you if the door is left open, ensuring your food remains safe and fresh.
- Reversible door design, providing flexibility in installation and space management.
In terms of build quality, the Beko GNEV120W reflects exceptional craftsmanship. Its robust design promises durability, meaning you can rely on this appliance for years without compromising on performance. With a warranty to back up this commitment to quality, you can feel confident in your purchase.
Overall, the Beko GNEV120W is a remarkable appliance that combines style, functionality, and efficiency. It meets the demands of modern consumers and accommodates various lifestyles. Whether you are a busy family or a single professional, this unit caters to your needs effectively. The combination of advanced cooling technology and user-centric design truly sets this refrigerator apart from its competitors.
In conclusion, if you are in the market for a reliable, spacious, and stylish refrigerator, the Beko GNEV120W should definitely be on your list. Its innovative features and energy-saving capabilities make it a worthwhile investment for anyone looking to upgrade their kitchen.
Please read this manual first!
Dear Customer,
We hope that your product, which has been produced in modern plants and
checked under the most meticulous quality control procedures, will provide you
an effective service.
For this, we recommend you to carefully read the entire manual of your product
before using it and keep it at hand for future references.
This manual
• Will help you use your appliance in a fast and safe way.
• Read the manual before installing and operating your product.
• Follow the instructions, especially those for safety.
• Keep the manual in an easily accessible place as you may need it later.
• Besides, read also the other documents provided with your product.
Please note that this manual may be valid for other models as well.
Symbols and their descriptions
This instruction manual contains the following symbols:
C
Important information or useful usage tips.
A
Warning against dangerous conditions for life and property.
B
Warning against electric voltage.
This product is supplied with the selective sorting symbol for waste electrical
and electronic equipment (WEEE).
This means that this product must be handled pursuant to European Directive
2002/96/EC in order to be recycled or dismantled to minimise its impact on
the environment. For further information, please contact your local or regional
authorities.
Electronic products not included in the selective sorting process are potentially
dangerous for the environment and human health due to the presence of
hazardous substances.
Recycling