
Перейти к контенту
Хлебопечки Kenwood
- Размер инструкции: 1.02 Мб
- Формат файла: pdf
Если вы потеряли инструкцию от хлебопечки Kenwood BM260, можете скачать файл для просмотра на компьютере или печати.
Инструкция для хлебопечки Kenwood BM260 на русском языке. В руководстве описаны возможности и полезные функции, а также правила эксплуатации. Перед использованием внимательно ознакомьтесь с инструкцией.
Чтобы не читать всю инструкцию вы можете выполнить поиск по содержимому внутри инструкции и быстро найти необходимую информацию. Рекомендации по использованию помогут увеличить срок службы хлебопечки Kenwood BM260. Если у вас появилась проблема, то найдите раздел с описанием неисправностей и способами их решения. В нем указаны типичные поломки и способы их решения.
Раздел: Бытовая, кухонная техника, электроника и оборудование
Тип: Хлебопечка
Характеристики, спецификации
Максимальный вес выпечки:
1000 г
Регулировка веса выпечки:
есть
Поддержание температуры:
есть, до 1 ч
Количество программ выпечки:
11
Хлеб из муки грубого помола:
есть
Безглютеновая выпечка:
есть
Материал изготовления корпуса:
пластик
Функция «Защита от детей»:
нет
Габариты (ШxВxГ):
280x330x300 мм
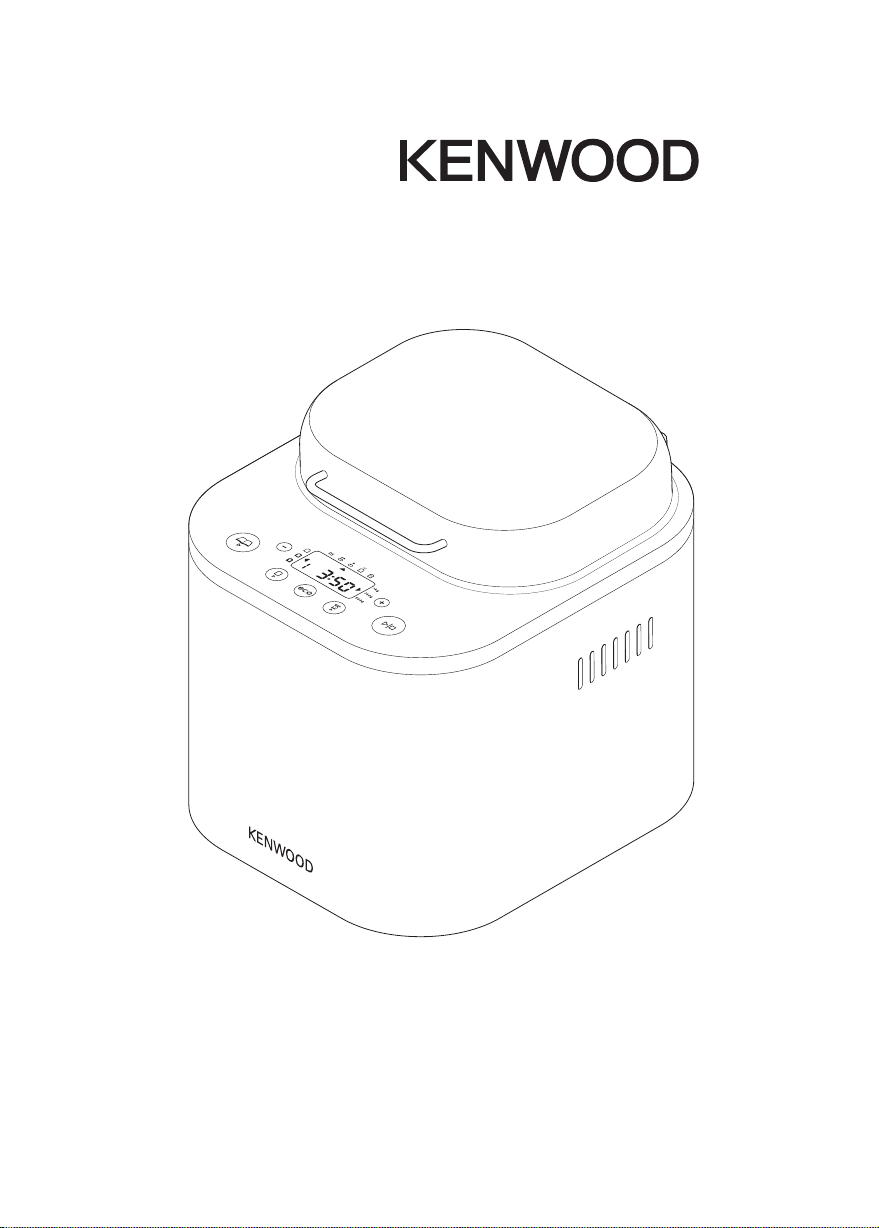
Инструкция к Хлебопечке Kenwood BM260
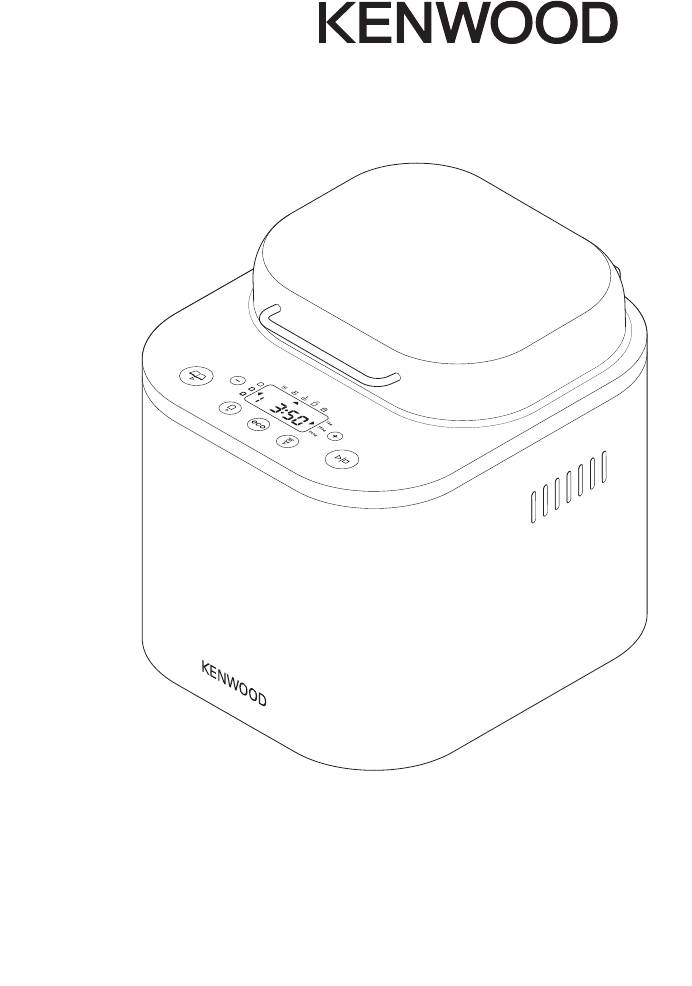
BM260

Ïesky 2 — 29
Magyar 30 — 55
Polski 56 — 84
Русский 85 — 114
Slovenčina 115 — 142
Українська 143 — 172
ml
45
0
400
35
0
300
250
200
150
100
50
1
2
3
4
5
6
7
br bs
btck
br
8 bk
9
bl
bm bo
bp bq
bn
1 2 3
7 8 9
13 14 15
19 20
4 5 6
10 11 12
1
10
500g 750g
1kg
16 17 18
Оглавление
Аннотации для Хлебопечки Kenwood BM260 в формате PDF
Топ 10 инструкций
Другие инструкции
BM260
5
0
1
0
0
1
5
0
2
0
0
2
5
0
3
0
0
3
5
0
4
0
0
4
5
0
m
l
1
2
3
4
5
8 bk
9
7
br bs
bl
btck
bm bobnbp bq
6
br
1 2 3
7 8 9
13 14 15
19 20
4 5 6
10 11 12
16 17 18
1
10
500g 750g
1kg

efore using your Kenwood appliance
b
●
Read these instructions carefully and retain for future
eference.
r
●
emove all packaging and any labels.
R
safety
●
Do not touch hot surfaces. Accessible surfaces are
liable to get hot during use. Always use oven gloves to
remove the hot bread pan.
●
To prevent spillages inside the oven chamber, always
remove the bread pan from the machine before adding
the ingredients. Ingredients that splash onto the heating
element can burn and cause smoke.
●
Do not use this appliance if there is any visible sign of
damage to the supply cord or if it has been accidentally
dropped.
●
Do not immerse this appliance, the supply cord or the
plug in water or any other liquid.
●
Always unplug this appliance after use, before
fitting or removing parts or before cleaning.
●
Do not let the electrical supply cord hang over the edge
of a work surface or allow it to touch hot surfaces such
as a gas or electric hob.
●
This appliance should only be used on a flat heat
resistant surface.
●
Do not place your hand inside the oven chamber after
the bread pan has been removed as it will be very hot.
●
Do not touch moving parts within the Bread Maker.
●
Do not exceed the maximum flour and raising agent
quantities specified in the recipes supplied.
●
Do not place the Bread Maker in direct sunlight, near
hot appliances or in a draught. All these things can
affect the internal temperature of the oven, which could
spoil the results.
●
Do not use this appliance outdoors.
●
Do not operate the Bread Maker when it is empty as
this could cause it serious damage.
●
Do not use the oven chamber for any type of storage.
●
Do not cover the vents on the sides and top of the
machine and ensure there is adequate ventilation
around the bread maker during operation.
●
This appliance is not intended to be operated by
means of an external timer or separate remote-control
system.
●
his appliance is not intended for use by persons
T
(including children) with reduced physical, sensory or
ental capabilities, or lack of experience and
m
nowledge, unless they have been given supervision or
k
instruction concerning use of the appliance by a person
responsible for their safety.
●
Children should be supervised to ensure that they do
not play with the appliance.
●
Only use the appliance for its intended domestic use.
Kenwood will not accept any liability if the appliance is
subject to improper use, or failure to comply with these
instructions.
before plugging in
●
Make sure your electricity supply is the same as the
one shown on the underside of your Bread Maker.
Important – UK only
●
The wires in the cord are coloured as follows:
Green and Yellow = Earth,
Blue = Neutral,
Brown = Live.
●
The appliance must be protected by a 13A approved
(BS1362) fuse.
●
WARNING: THIS APPLIANCE MUST BE
EARTHED.
●
For non-rewireable plugs the fuse cover MUST be
refitted when replacing the fuse. If the fuse cover is lost
then the plug must not be used until a replacement can
be obtained. The correct fuse cover is identified by
colour and a replacement may be obtained from your
Kenwood Authorised Repairer (see Service).
●
If a non-rewireable plug is cut off it must be
DESTROYED IMMEDIATELY. An electric shock hazard
may arise if an unwanted non-rewireable plug is
inadvertently inserted into a 13A socket outlet.
●
This appliance conforms to EC directive 2004/108/EC
on Electromagnetic Compatibility and EC regulation no.
1935/2004 of 27/10/2004 on materials intended for
contact with food.
before using your bread maker for the first
time
●
Wash all parts (see care and cleaning).
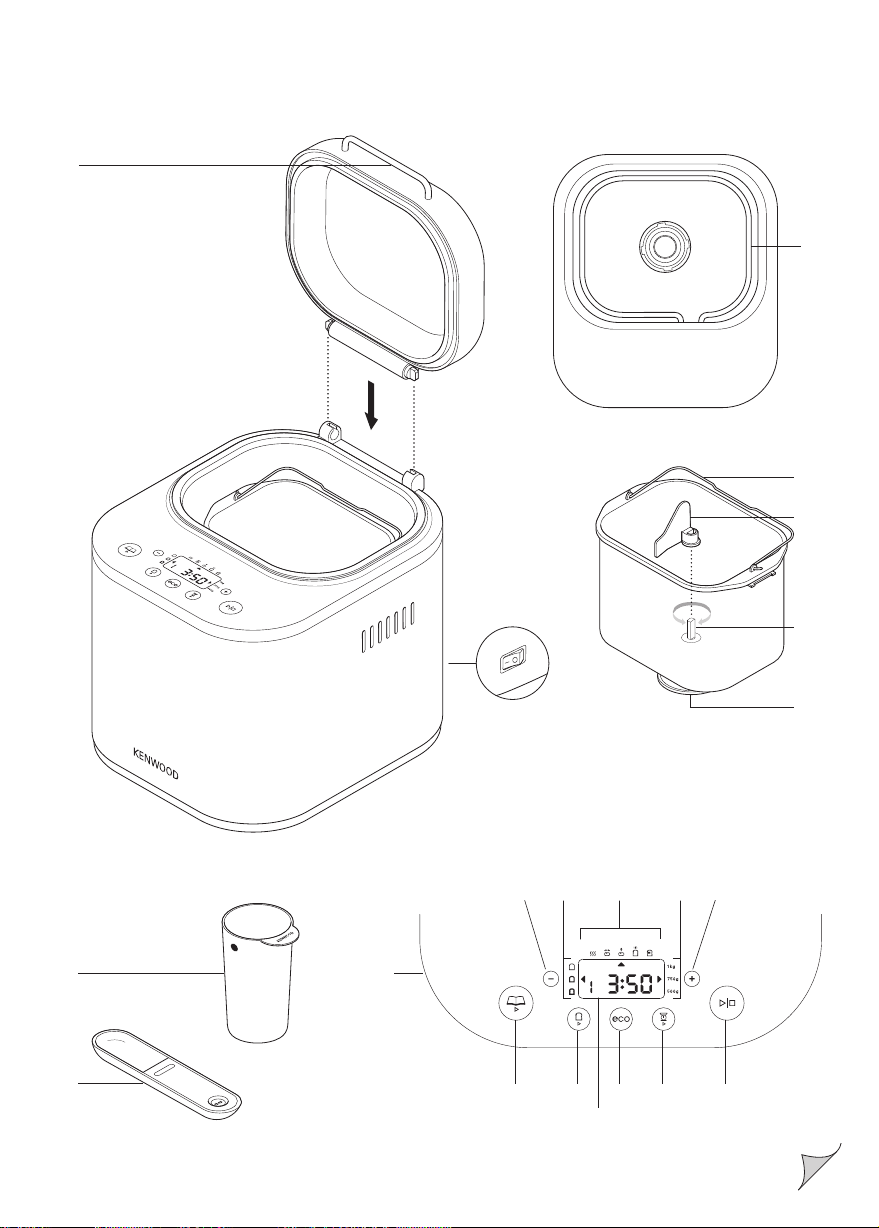
2

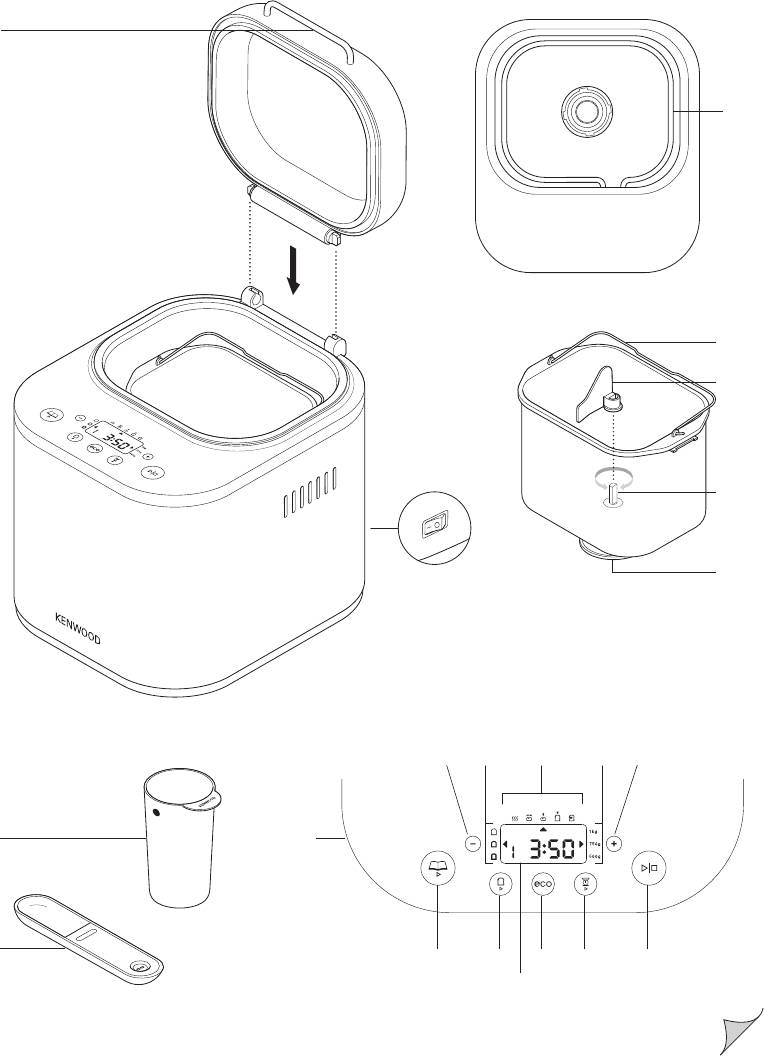
key
id handle
l
1
eating element
h
2
bread pan handle
3
kneader
4
drive shaft
5
drive coupling
6
on/off switch
7
measuring cup
8
dual measuring spoon 1tsp & 1tbsp
9
control panel
bk
menu button
bl
crust colour button
bm
display screen
bn
eco bake button
bo
loaf size button
bp
start/stop button
bq
delay timer buttons
br
loaf size indicators
bs
program status indicator
bt
crust colour indicators (light, medium, dark)
ck
how to measure ingredients (refer to
illustrations 3 to 7)
It is extremely important to use the exact measure of
ingredients for best results.
●
Always measure liquid ingredients in the see-through
measuring cup with graduated markings provided.
Liquid should just reach marking on cup at eye level,
not above or below (see 3).
●
Always use liquids at room temperature, 20ºC/68ºF,
unless making bread using the eco program. Follow
the instructions given in the recipe section.
●
Always use the measuring spoon provided to measure
smaller quantities of dry and liquid ingredients. Use the
slider to select between the following measure —
1
1 tsp,
⁄2 tbsp or 1 tbsp. Fill to the top and level off the
spoon (see 6).
1
⁄2 tsp,
on/off switch
7
our Kenwood bread maker is fitted with an ON/OFF
Y
switch and will not operate until switched on.
●
Plug in and press the ON/OFF switch7situated at the
back of the bread maker — the unit will beep and 1
(3:50) will appear in the display window.
●
Always switch off and unplug your bread maker after
use.
program status indicator
bt
The program status indicator is situated in the display
screen and the indicator arrow will point to the stage of
the cycle the bread maker has reached as follows: —
Pre-heat – The pre-heat feature operates at the
start of the Premium (14 minutes), French (20 minutes),
Wholewheat (25 minutes) and Gluten Free (10 minutes)
settings to warm the ingredients before the first
kneading stage begins. There is no kneader
action during this period.
Knead – The dough is either in the first or 2nd
kneading stage or being knocked back between the
rising cycles. During the last 20 minutes of the 2nd
Kneading cycle on setting (1), (2), (3), (4), (5) and (7) an
alert will sound to tell you to add any additional
ingredients manually.
Rise – the dough is in either the 1st, 2nd or 3rd
rising cycle.
Bake – The loaf is in the final baking cycle.
Keep Warm – The bread maker automatically goes
into the Keep warm mode at the end of the baking
cycle. It will stay on the keep warm mode for up to
1hour or until the machine is turned off, which ever is
soonest. Please note: the heating element will
switch on and off and will glow intermittently
during the keep warm cycle.
3

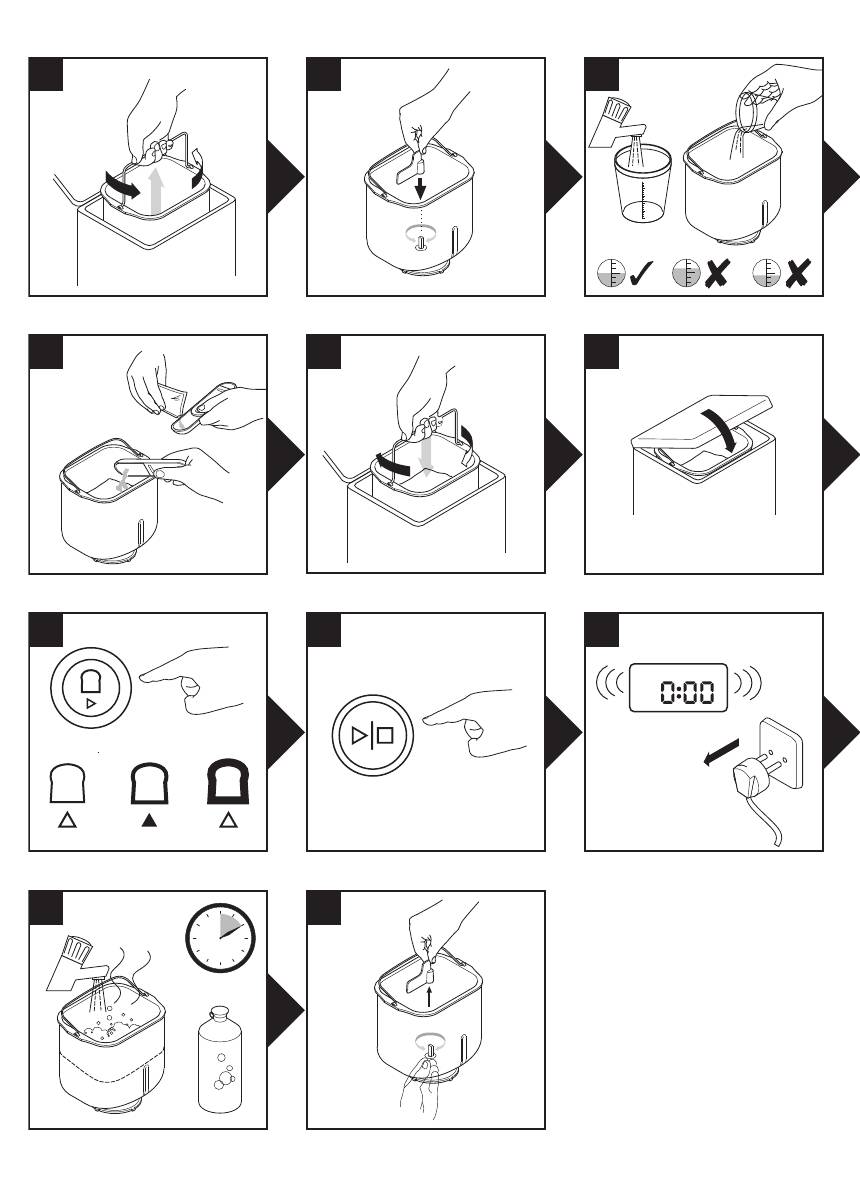
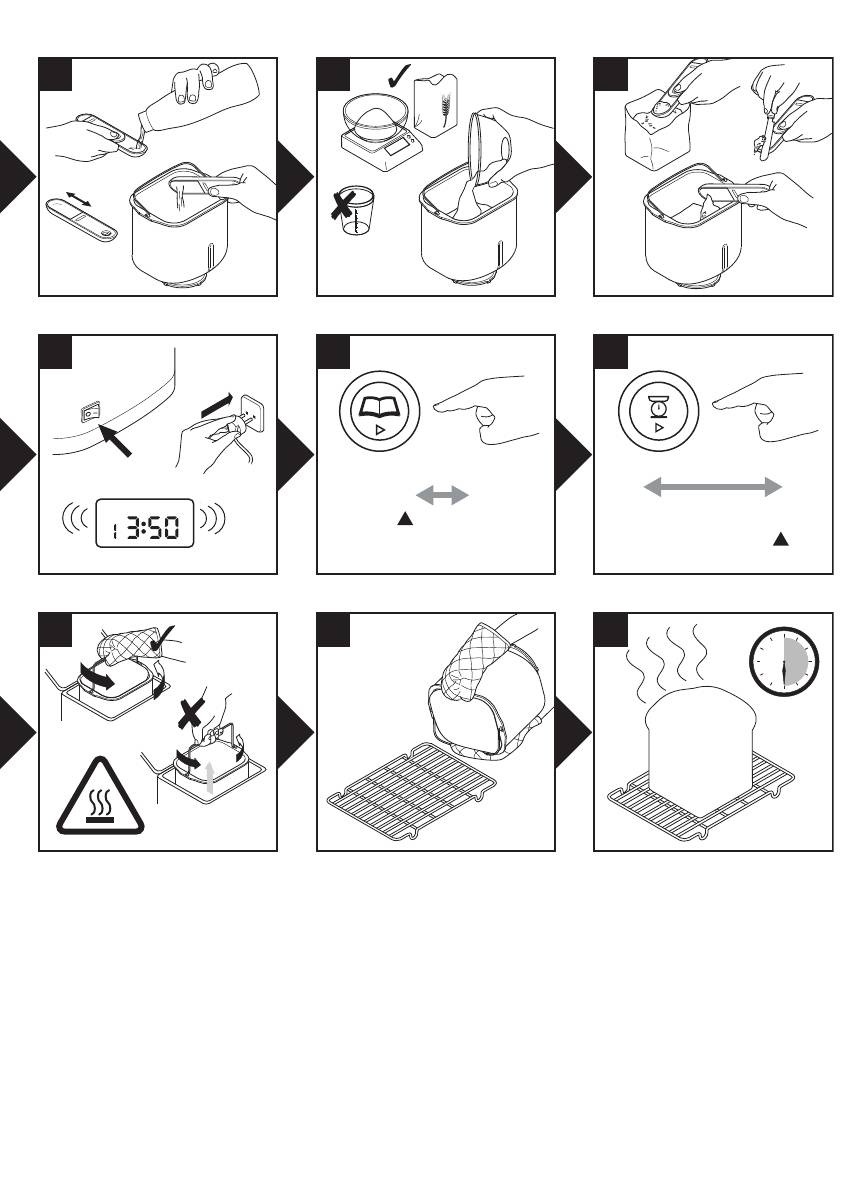
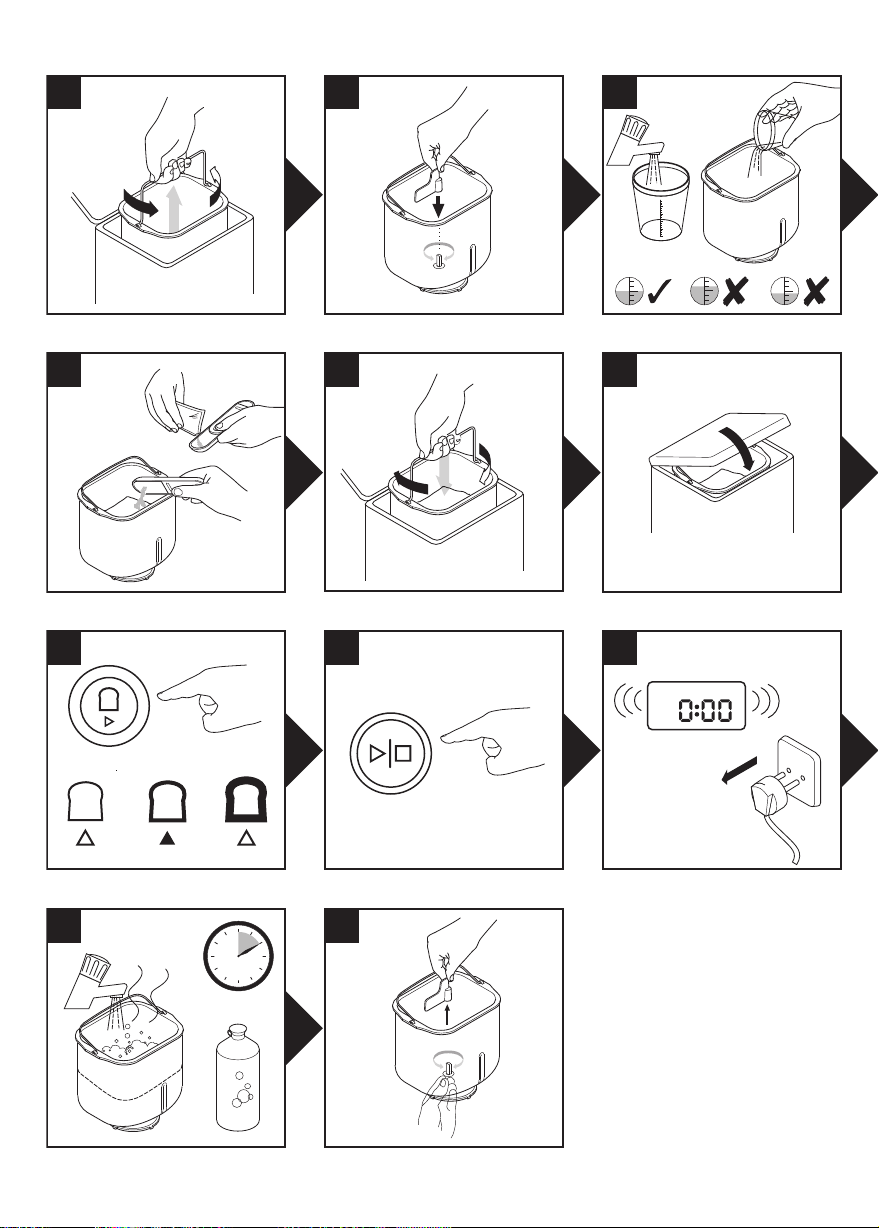
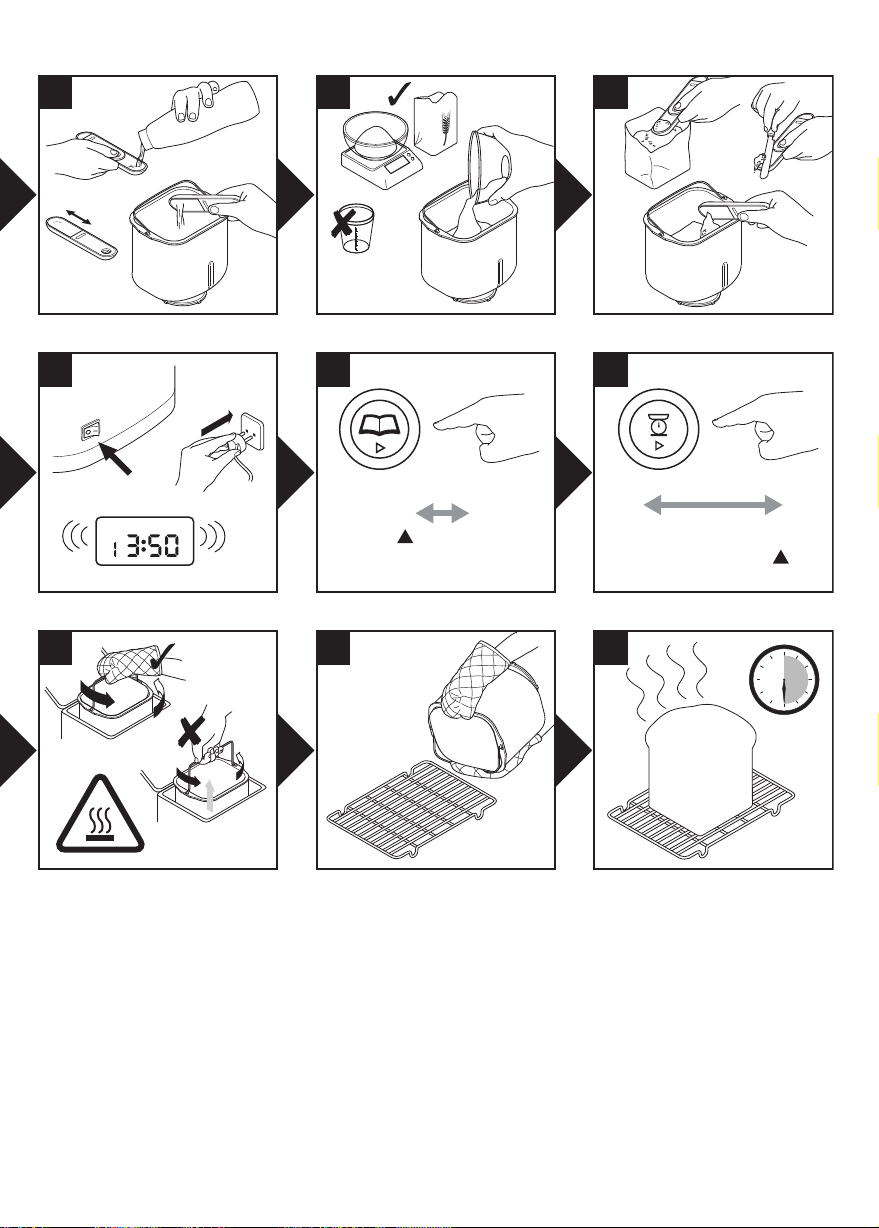
using your Bread Maker
(refer to illustration panel)
Remove the bread pan by holding the handle and
1
turning the pan to the back of the baking chamber.
2 Fit the kneader.
●
To prevent spillages inside the oven
chamber, always remove the bread pan from
the machine before adding the ingredients.
Ingredients that splash onto the heating
element can burn and cause smoke.
3 Pour the water into the bread pan.
4 Add the rest of the ingredients to the pan in the order
listed in the recipes.
Ensure that all the ingredients are weighed accurately
7 as incorrect measures will produce poor results.
8 Insert the bread pan into the oven chamber by
positioning the bread pan at an angle towards the
back of the unit. Then lock the pan by turning it
towards the front.
9 Lower the handle and close the lid.
10 Plug in and switch on — the unit will beep and default
to setting 1 (3:50).
11 Press the MENU button
is selected. The bread maker will default to 1Kg &
medium crust colour. Note: If using the “eco BAKE”,
just press the eco button
start automatically.
12 Select the loaf size by pressing the LOAF SIZE
button
loaf size.
13 Select the crust colour by pressing the CRUST button
bm
colour (light, medium or dark).
14 Press the START/STOP button
the program press the START/STOP button
hold down for 2 -3 seconds.
15 At the end of the baking cycle unplug the bread
maker.
16 Remove the bread pan by holding the handle and
turning the pan to the back of the baking chamber.
●
Always use oven gloves as the pan handle
will be hot.
17 Then turn out onto a wire rack to cool.
18 Leave the bread to cool for at least 30 minutes before
slicing, to allow the steam to escape. The bread will
be difficult to slice if hot.
19 Clean the bread pan and kneader immediately after
use (see care and cleaning).
until the indicatorbsmoves to the required
bp
until the indicatorckmoves to the required crust
until the required program
bl
and the program will
bo
. To stop or cancel
bq
bq
and
4
✬
Medium Crust Colour adding ingredients ✬✬
500g 750g 1Kg 500g 750g 1Kg
to loaves low in fat and sugar
recipes: 30 minute preheat
program Total Program Time Manual alert for Keep Warm
bread/dough program chart
1 premium White or Brown Bread Flour recipes 3:30 3:40 3:50 3:01 3:11 3:21 60
3 wholewheat Wholewheat or wholemeal flour 3:05 3:15 3:25 2:19 2:29 2:39 60
2 french Produces a crisper crust and suited 3:40 3:50 4:00 2:59 3:09 3:19 60
and gluten free mixes.
Max 500g flour
4 Brioche High sugar bread recipes 3:15 3:20 3:25 2:55 3:00 2:55 60
5 gluten free For use with gluten free flours 2:35 2:14 —
(sweeet)
baking in your own oven.
7 dough Dough for hand shaping and 1:30 1:14 —
6 cake Cake mixes — 500g mix 1:32 — —
8 pizza dough Pizza dough recipes 1:10 — —
9 jam For making jams 1:25 — —
already baked and cooled. Use
used to rewarm or crisp loaves
10 bake only Bake only feature. Can also be 0:10 — 1:30 — —
85 minutes. Loaves require warm
water, extra yeast and less salt.
timer buttons to change time required.
Suitable for use with packet mixes.
for up to 1hour or until the machine is turned off, which ever is soonest.
eco Produces loaves of white bread in 1:25 — —
✬✬ The Bread maker will automatically go in to the keep warm mode at the end of the baking cycle. It will stay in the keep warm mode
✬ An alert will sound before the end of the 2nd kneading cycle to add ingredients if the recipe recommends doing so.
5

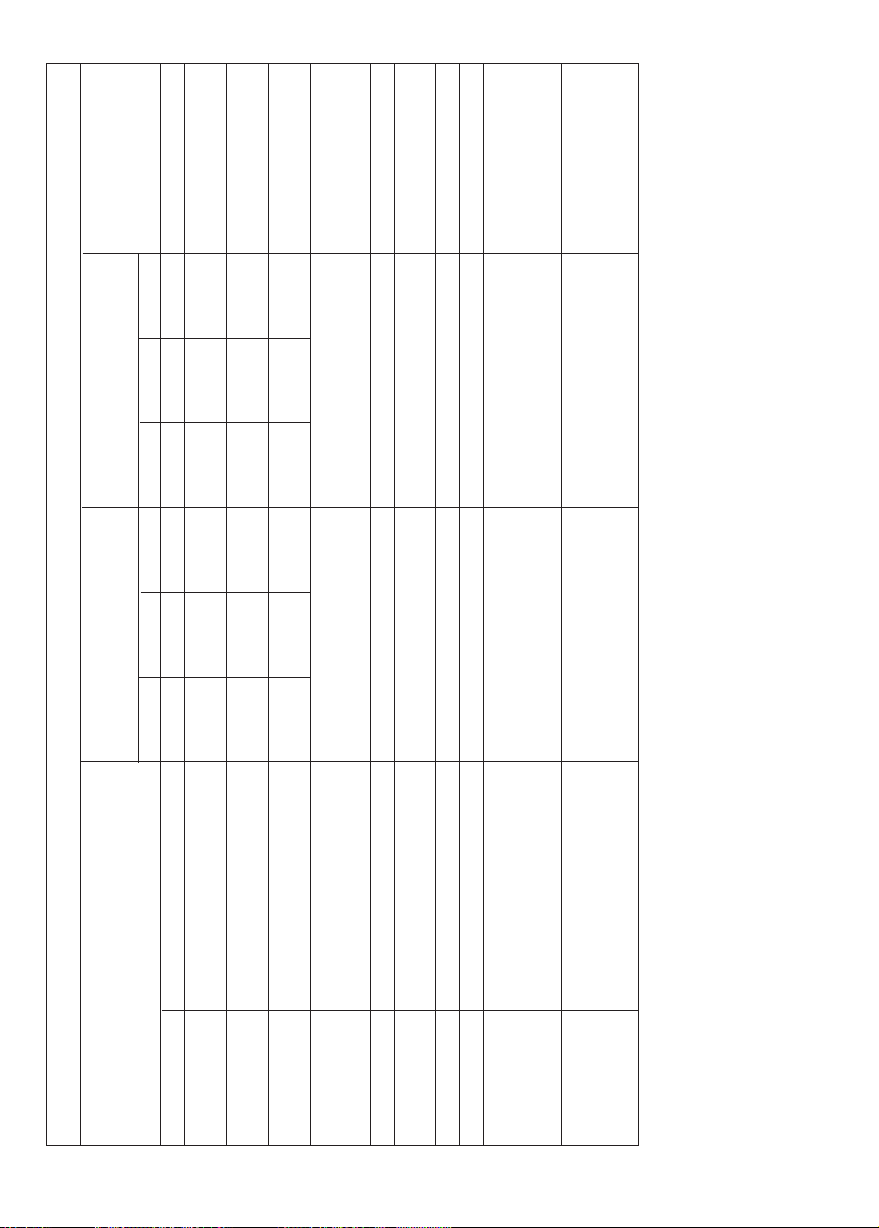
Premium 햲
Crust Colour Light Medium Dark
Weight 500g 750g 1Kg 500g 750g 1Kg 500g 750g 1Kg
Pre-heat 14 min 14 min 14 min 14 min 14 min 14 min 14 min 14 min 14 min
Knead 1 6 min 6 min 6 min 6 min 6 min 6 min 6 min 6 min 6 min
Rest 4 min 4 min 4 min 4 min 4 min 4 min 4 min 4 min 4 min
Knead 2 19 min 19 min 19 min 19 min 19 min 19 min 19 min 19 min 19 min
Rise 1 25 min 25 min 25 min 25 min 25 min 25 min 25 min 25 min 25 min
Knead 3 25 s 25 s 25 s 25 s 25 s 25 s 25 s 25 s 25 s
Rise 2 25 min 25 min 25 min 25 min 25 min 25 min 25 min 25 min 25 min
Knead 4 25 s 25 s 25 s 25 s 25 s 25 s 25 s 25 s 25 s
Rise 3 74 min 74 min 74 min 74 min 74 min 74 min 74 min 74 min 74 min
Bake 38 min 48 min 58 min 43 min 53 min 63 min 48 min 58 min 68 min
Total 3:25 3:35 3:45 3:30 3:40 3:50 3:35 3:45 3:55
Extras 2:56 3:06 3:16 3:01 3:11 3:21 3:06 3:16 3:26
Delay 15:00 15:00 15:00 15:00 15:00 15:00 15:00 15:00 15:00
Keep Warm 1 hour 1 hour 1 hour 1 hour 1 hour 1 hour 1 hour 1 hour 1 hour
6

French Style 햳
Crust Colour Light Medium Dark
Weight 500g 750g 1Kg 500g 750g 1Kg 500g 750g 1Kg
Pre-heat 20 min 20 min 20 min 20 min 20 min 20 min 20 min 20 min 20 min
Knead 1 6 min 6 min 6 min 6 min 6 min 6 min 6 min 6 min 6 min
Rest — — — — — — — — —
Knead 2 29 min 29 min 29 min 29 min 29 min 29 min 29 min 29 min 29 min
Rise 1 25 min 25 min 25 min 25 min 25 min 25 min 25 min 25 min 25 min
Knead 3 — — — — — — — — —
Rise 2 30 min 30 min 30 min 30 min 30 min 30 min 30 min 30 min 30 min
Knead 4 — — — — — — — — —
Rise 3 55 min 55 min 55 min 55 min 55 min 55 min 55 min 55 min 55 min
Bake 50 min 60 min 70 min 55 min 65 min 75 min 60 min 70 min 80 min
Total 3:35 3:45 3:55 3:40 3:50 4:00 3:45 3:55 4:05
Extras 2:54 3:04 3:14 2:59 3:09 3:19 3:04 3:14 3:24
Delay 15:00 15:00 15:00 15:00 15:00 15:00 15:00 15:00 15:00
Keep Warm 1 hour 1 hour 1 hour 1 hour 1 hour 1 hour 1 hour 1 hour 1 hour
7
Loading…
- Инструкции и руководства
- Бренды
- Kenwood
- BM 260
- Справочник Пользователя