

Please read the user manual carefully before using and keep the manual for future reference.
FIMI X8 SE User Manual

Contents
Services & Support
Product Instruction
Package List
Product Introduction
………………………………………………………………………………………………………………………………………………………………………
Drone
Assembly and Disassembly
Gimbal and Camera
Remote controller
…………………………………………………………………………………………………………………………………………………………………………
APP
Prepare to Fly
Maintenance and Calibration
Basic Specification
………………………………………………………………………………………………………………………………………………..
…………………………………………………………………………………………………………………………………………………..
……………………………………………………………………………………………………………………………………………………………
………………………………………………………………………………………………………………………………………………..
…………………………………………………………………………………………………………………………………….
………………………………………………………………………………………………………………………………………………..
……………………………………………………………………………………………………………………………………………………
………………………………………………………………………………………………………………………………………………………….
…………………………………………………………………………………………………………………………………..
…………………………………………………………………………………………………………………………………………………..
·1
·1
·2
·3
·5
·1 2
·1 4
·1 6
·2 0
·2 2
·2 5
·2 7

Services & Support
Product Instruction
FIMI provides X8 SE users with tutorial videos and the
following information:
1. FIMI X8 SE User Manua l
2. FIMI X8 SE Qui ck Start Manu al
3. FIMI X8 SE Disclaime r and Safety O peration Ins tructions
Users are advised to watch tutorial videos before using the product and read
FIMI X8 SE Disclaimer a nd Safety Op eration Inst ructions carefully and get to
know the proc ess of using by going through FIMI X8 SE Qui ck Start Manual.
For more detailed product information, please refer to FIMI X8 SE Use r Manual.
Please download the firmware and watch the tutorial videos on the link
https://ww w.fimi.com/fimi-x8-se.html
4. Please scan the the following QR-code to download Fimi Navi app
The FIMI X8 SE is an aerodynamic foldable drone equipped
with intelligent control, wireless communication and other
advanced technology which are necessary to realize
functions like long-distance remote control, intelligent flight,
precise landing, etc. The built-in 3-axis gimbal stabilizes
the camera which is able to shoot 4K video at 30 fps and
which performs HD real-time image transmission. The
APP enriches the remote controller with more features
and fast connection. The remote controller fits iPad Mini
at the maximum range. The sticks are detachable.
1

Package List
Drone x 1
Remote contro ller x 1
Batter y x 1
Positive pro peller x 3
Reverse prope llerx 3
Charger x 1
FIMI X8 SE 无人机快速入门指南
使用产品前请仔细阅读本快速入门指南,并妥善保管
Instruct ion x 2
AC cable x 1
2

Product Introduction
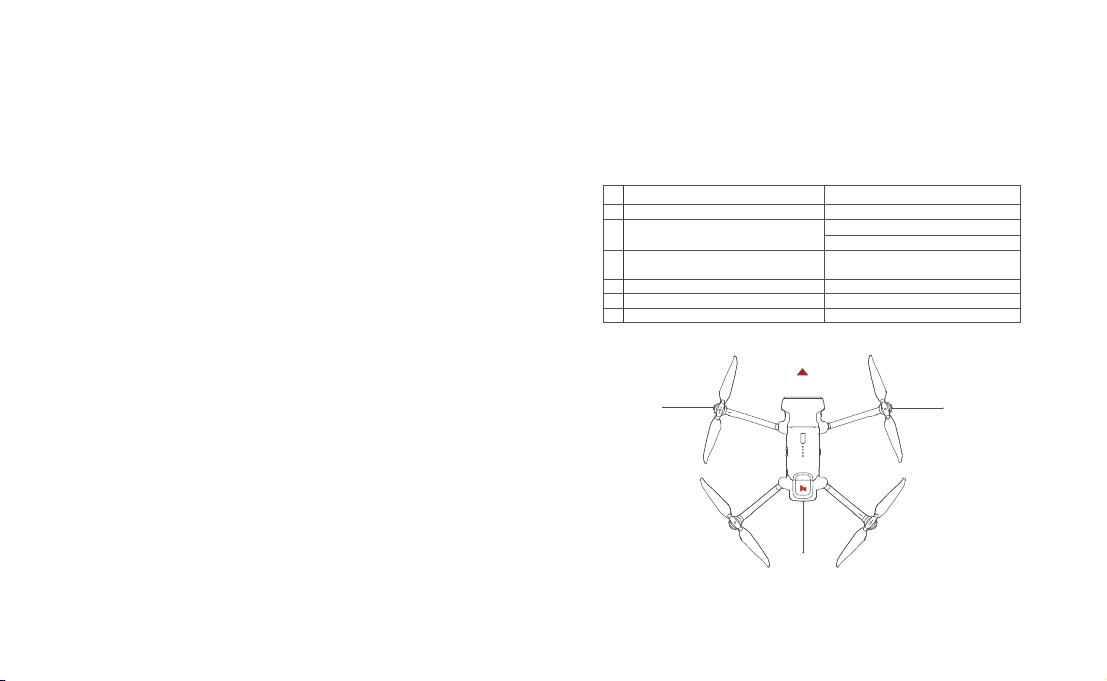
1 Drone
Power but ton
Integrate d gimbal camera
Batter y level lightsPositive propeller
Reverse propeller
Flight status lights
Landing gear Optical flow camera
Ultrasonic detect ing module
Motor
3
Drone tail lights
Batter y buckl e
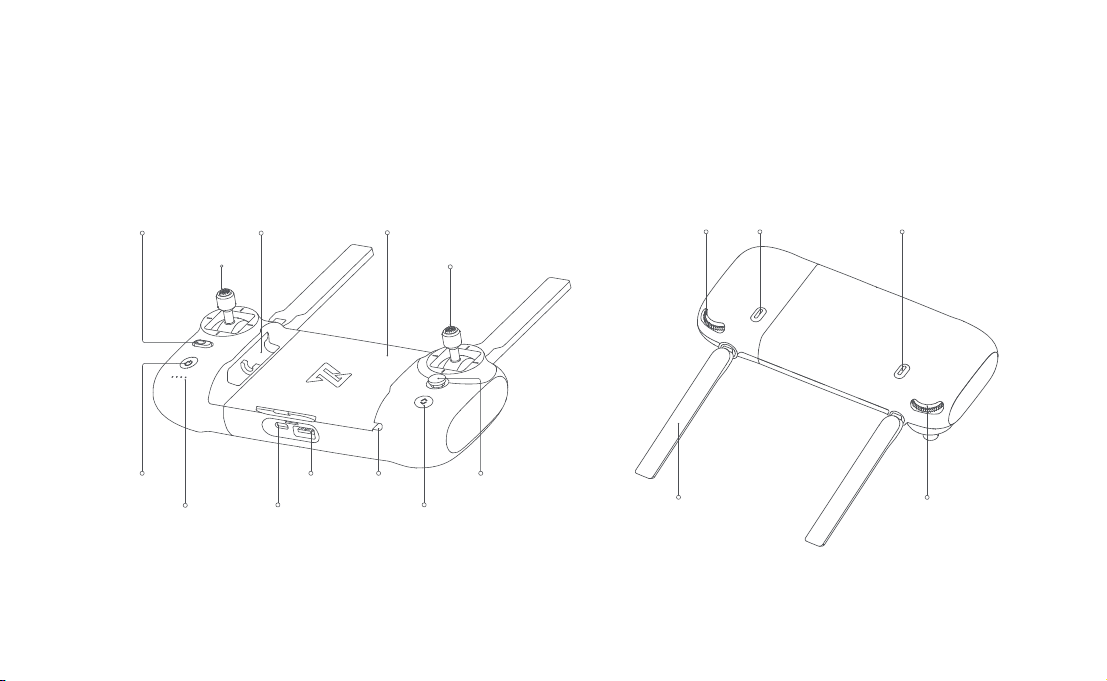
2 Remote controller
Flight mode/auto return
Power but ton
Batter y level lights
Left stick
Stick storage slot
Charging port
Mobile device holder
Right stick
Cable slotUSB por t
Five-directional button
Auto take-of f/land bu tton
Left dial
4
Record button Shoot button
Right dialAntenna
Drone
Flight Mode
GPS Mode
To achieve precise hovering, the drone is equipped with a GPS module.
The intelligent flight function works in GPS mode. Users c an enable Sport
Mode or Beginner Mode in the flight settings. When the Beginner Mode is
on, the flight speed, f light distance, flight altitude and RTH altitude will be
limited. In sport mode, the ma ximum flight speed is 18m/s(65 km /h), the
maximum ascending speed is 5m/s(18 km/h), and the maximum descending
speed is 4m/s(14 km/ h).
VPU Mode
An Optical Flow module is also built into the drone for precise hovering and
landing at the home point. In VPU mode, the Intelligent flight function is
not suppor ted. The maximum flight speed is 10m/s(36 km/h), the maximum
ascend speed is 3m/s(11 km/h), and the maximum descending speed is
2m/s (7 km/ h). When the drone is flying above a well-lit ground with a clear
texture and the GPS signal is poor, it will switch automatically to VPU mode.
ATTI Mode
When the GPS signal is poor or the compass has interference, the drone
enters in ATTI mode. In this mode, the drone can start drifting horizontally
and intelligent flight mode is not supported. Therefore, in case of any accidents,
we recommend flying in an open area with good GPS signal reception. Once
the drone enters in ATTI mode, please land in a safe place as soon as possible.
Note: Sport Mode will not be available when the drone is over 2400 meters above sea level.
5
Drone Lights
1
2
3
4
5
6
Drone lights
All lights ar e fading in and out
All lights are on
The red and green light s are on and the
yellow light is fla shing at regular intervals
All lights f lashing twice
All lights ar e flashing quickly
The yellow li ght is flashing
Very low battery aler t: land as soon as possible
Drone heading
red green
yellow
Drone status
Self-checking
Drone on the ground: self-che ck fails
Drone is f lying: internal error
Ready to fly / in f light
Low battery aler ts
The firmwar e of the drone is updating
Safety Protection
Failsafe Return
Failsafe return is only suppor ted in GPS mode. When the drone and
remote controller signal is interrupted for more than 2 seconds, the
flight control system built into the drone will take over the c ontrol of
your drone, planthe return path according to the original f light path,
then the drone will f ly back and land at the home point. This function
works precisely if there are enough GPS satellites are locked, the
compass has no interference and the home point has been recorded
correctly. If the wireless signal reconnects during the failsafe return, the
pilot can turn off App return hint or toggle Auto Return switch to the left
again to cancel, and the drone will hover at the cur rent position.
current alti tude≥return altitude
home point
current alt itude<return altitude
ascend fi rst
( the default alt itude is 30m)
home point
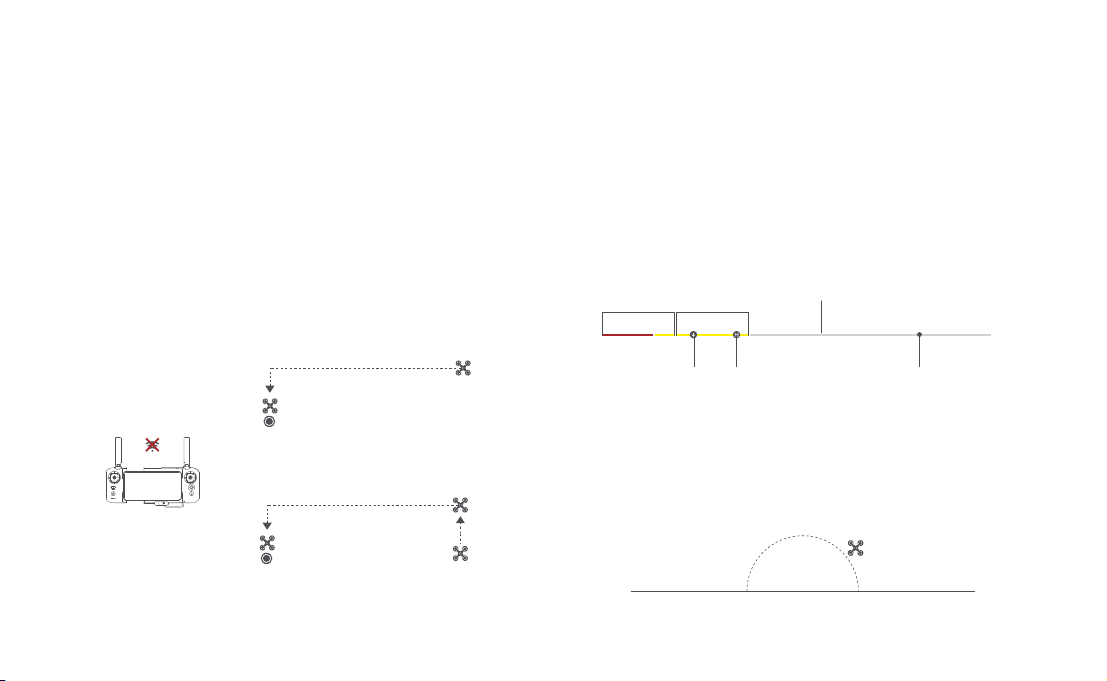
Low-power Protection
In flight, when the battery level is only enough for RTH, App advises users
to return, and the drone will return automatically after 10 seconds countdown.
When the bat tery level is only enough for landing, App advises users to land
as soon as possible, and the drone will land automatically after 10 seconds
countdown. When the battery level is at 10% usage left, the drone will be
forced to land.
critic al low battery
landing battery level
low battery
15%10%0% 30%
normal bat tery level
current battery levelRTH batter y level
Hovering on the Edge of No-fly-zone
The drone will automatically hover in the restricted flight area designated by
the state, such as the edge of airports, and the App will appear corresponding
hints. The user can use sticks to fly the drone from the edge of the no-fly-zone,
but the drone will not enter the no-fly-zone.
hover
No-fly-zone
6
100%
Intelligent Flight
Auto Take-off
When the conditions are right, press Auto Take-off/Landing button for 2
seconds to take off. In GPS mode, the drone will take off to an altitude of
4 meters and hover for sticks control. In VPU mode, the drone will take off
to an altitude of 1.2 meters and hover for sticks control.
4m
1.2m
GPS Mode VPU Mode
Auto Landing
When the conditions are right, press Auto Take-off/ Landing but ton for 2
seconds to land vertically.
Note: Users can short pre ss the auto take-off/land button to exit intelligent flight.
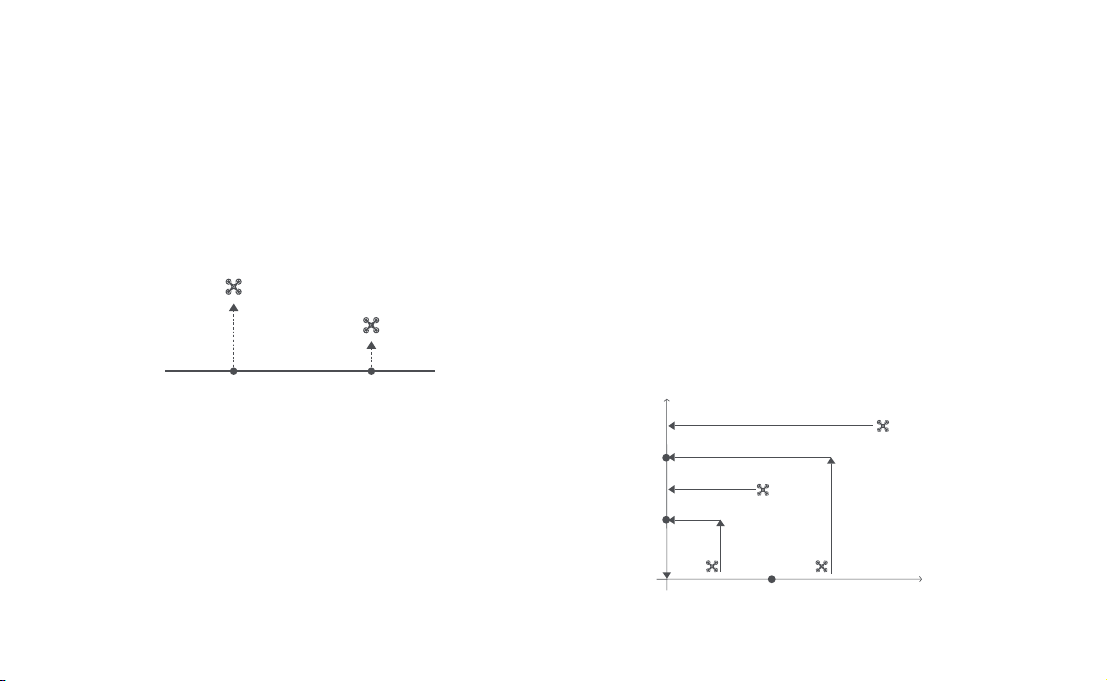
Auto Return
When the drone is in flight, the user c an toggle the auto return switch to
the right to return the drone. When the return distance is less than 10
meters and f light altitude is less than 3 meters, the drone will ascend to
3 meters first and return to the home point; if the flight altitude is greater
than or equal to 3 meters, the drone will directly return to the home point.
When the return distance of the drone is greater than or equal to 10 meters
and the flight altitude is less than 30 meters, the drone will ascend to 30
meters and return to the home point; if the flight altitude is 30 meters or
more, the drone will directly return to the home point . The user can toggle
the Auto Return Switch to the lef t to exit.
Altitude
altitude ≥30 m
distance≥10m
30m
altitude ≥3m
distance<10m
3m
altitude <3m
home point
7
distance<10m
10m
altitude ≤30 m
distance≥10m
Distance
Loading…
FIMI X8SE2022 Camera Drone

Specifications
- Model: FIMI X8 SE 2022
- Flight Modes: GPS Mode, Sport Mode, Beginner Mode
- Maximum Flight Speed: 18m/s (65 km/h)
- Maximum Ascending Speed: 5m/s (18 km/h)
- Maximum Descending Speed: 4m/s (14 km/h)
Product Usage Instructions
Drone
The drone is equipped with various features for optimal flight performance:
- GPS Mode for precise hovering
- Sport Mode for increased speed
- Beginner Mode for limited flight parameters
Remote Controller
The remote controller provides the following functionalities:
- Flight mode selection (auto return, auto take-off/land)
- Control sticks for directional movement and rotation
- Buttons for shooting, recording, and adjusting gimbal settings
Smart Battery
The smart battery powers the drone and can be monitored through the controller interface. It is essential to ensure the battery is fully charged before flight.
- Gimbal and Camera
The integrated gimbal camera provides stable footage during flight. Adjust the gimbal angle and camera settings as needed for optimal recording. - APP
- Download the Fimi Navi 2020 App by scanning the provided QR code. The app allows for additional control and customization options for your drone.
- Fly
Before taking off, ensure the drone is in a suitable location with enough space to maneuver. Follow the instructions for take-off, landing, and in-flight controls based on your preferred mode of operation. - Maintenance and Calibration
Regular maintenance and calibration of the drone are crucial for optimal performance. Follow the guidelines provided in the user manual for maintenance tasks and calibration procedures.
FAQ
- How do I switch between flight modes?
To switch between flight modes, use the dedicated buttons on the remote controller. Select from GPS Mode, Sport Mode, or Beginner Mode based on your desired flying experience. - How can I adjust the gimbal angle during flight?
Use the controls on the remote controller to adjust the pitch angle of the gimbal. Ensure smooth footage by making gradual adjustments to the gimbal angle as needed.
FIMI X8 SE 2022 User Manual
Please read the user manual carefully before using and keep the manual for future reference.
Services & Support
FIMI provides X8 SE 2022 users with tutorial videos and the following information:
- 1. FIMI X8 SE 2022 User Manual
- 2. FIMI X8 SE 2022 Quick Start Manual
- 3. FIMI X8 SE 2022 Disclaimer and Safety Operation Instructions Users are advised to watch tutorial videos before using the product and read FIMI X8 SE 2022 Disclaimer and Safety Operation Instructions carefully and get to know the process of using by going through FIMI X8 SE Quick Start Manual. For more detailed product information, please refer to FIMI X8 SE 2022User Manual. Please download the firmware and watch the tutorial videos on the link https://www.fimi.com/fimi-x8-se-2022.html
- 4. Please scan the the following QR-code to download Fimi Navi 2020 App
Product Instruction
- The FIMI X8 SE 2022 is an aerodynamic foldable drone equipped with intelligent control, wireless communication and other advanced technology which are necessary to realize functions like long distance remote control, intelligent flight, precise landing, etc. The built-in 3-axis gimbal stabilizes the camera which is able to shoot 4K video at 30 fps and which performs HD real-time image transmission. The APP enriches the remote controller with more features and fast connection. The remote controller fits iPad Mini at the maximum range. The sticks are detachable.
- Reading tips (Symbol description
- Operation prohibited
- Important notes
- Operation, Usage tips
- Glossary, Reference Information
Package List

Product Introduction
- Drone

- Remote controller


Function Introduction of RC
| Buttons | Function description | ||
| 1 | Left stick | Push stick upward, the drone goes up; pull stick downward, the drone goes down; toggle stick to left, the drone rotates counter- clockwise; toggle stick to right, the drone rotates clockwise | |
| 2 | Right stick | Push stick upward, the drone flies forward; pull stick downward, the drone flies backward; toggle stick to left, the drone flies to left; toggle stick to right, the drone flies to right | |
| 3 | Auto return | Toggle the button to the left, switching to normal flight Toggle the button to the right, switching to auto return | |
| 4 | Auto take-off/land button | long press 2 seconds to auto take off/landing | |
| 5 | Shoot button | short press to start / stop shooting | |
| 6 | Record button | Short press to start /stop recording | |
| 7 | Five directional button | Up | Default to switch between map / FPV |
| Down | Default to switch between gimbal center/down | ||
| Left | Default to turn on / off battery info interface | ||
| Right | Default to turn on / off self-checking interface | ||
| Center | Default to turn on/off media library | ||
| 8 | Left dial | Adjust the pitch angle of gimbal | |
| 9 | Right dial | Adjust the value of EV / ISO | |
| 10 | Power button |
|
- The other functions of the five-directional button can be set in the FIMI Navi 2020 App.
- The joystick function is the default mode, which can be set through the FIMI Navi 2020 App.


The stick mode can be set in FIMI Navi app (the default is American hand).
Drone
Flight Mode
- GPS Mode
To achieve precise hovering, the drone is equipped with a GPS module. The intelligent flight function works in GPS mode. Users can enable Sport Mode or Beginner Mode in the flight settings. When the Beginner Mode is on, the flight speed, flight distance, flight altitude and RTH altitude will be limited. In sport mode, the maximum flight speed is 18m/s(65 km/h), the maximum ascending speed is 5m/s(18 km/h), and the maximum descending speed is 4m/s(14 km/h). - VPU Mode
An Optical Flow module is also built into the drone for precise hovering and landing at the home point. In VPU mode, the Intelligent flight function is not supported. The maximum flight speed is 10m/s(36 km/h), the maximum ascend speed is 3m/s(11 km/h), and the maximum descending speed is 2m/s (7 km/h). When the drone is flying above a well-lit ground with a clear texture and the GPS signal is poor, it will switch automatically to VPU mode. - ATTI Mode
When the GPS signal is poor or the compass has interference, the drone enters in ATTI mode. In this mode, the drone can start drifting horizontally and intelligent flight mode is not supported. Therefore, in case of any accidents, we recommend flying in an open area with good GPS signal reception. Once the drone enters in ATTI mode, please land in a safe place as soon as possible.
Sport Mode will not be available when the drone is over 2400 meters above sea level.
Drone Lights
| Drone lights | Drone status | |
| 1 | All lights are fading in and out | Self-checking |
| 2 | All lights are on | Drone on the ground: self-check fails |
| Drone is flying: internal error | ||
| 3 | The yellow lights are on and the red and green light is flashing at regular intervals | Ready to fly / in flight |
| 4 | All lights flashing twice | Low battery alerts |
| 5 | All lights are flashing quickly | Very low battery alert: land as soon as possible |
| 6 | The red and green flashing quickly | The firmware of the drone is updating |
| 7 | Fill-in light | Automatically/manually opened |

Safety Protection
- Fail safe Return
Failsafe return is only supported in GPS mode. When the drone and remote controller signal is interrupted for more than 2 seconds, the flight control system built into the drone will take over the control of your drone, plan the return path according to the original flight path, then the drone will fly back and land at the home point. This function works precisely if there are enough GPS satellites are locked, the compass has no interference and the home point has been recorded correctly. If the wireless signal reconnects during the failsafe return, the pilot can turn off App return hint or toggle Auto Return switch to the left again to cancel, and the drone will hover at the current position.

Intelligent Flight
- Auto Take-off
When the conditions are right, press Auto Take-off/Landing button for 2 seconds to take off. In GPS mode, the drone will take off to an altitude of 4 meters and hover for sticks control. In VPU mode, the drone will take off to an altitude of 1.2 meters and hover for sticks control.
- Auto Landing
When the conditions are right, press Auto Take-off/Landing button for 2 seconds to land vertically. - Auto Return
When the drone is in flight, the user can toggle the auto return switch to the right to return the drone. When the return distance is less than 10 meters and flight altitude is less than 3 meters, the drone will ascend to 3 meters first and return to the home point; if the flight altitude is greater than or equal to 3 meters, the drone will directly return to the home point. When the return distance of the drone is greater than or equal to 10 meters and the flight altitude is less than 30 meters, the drone will ascend to 30 meters and return to the home point; if the flight altitude is 30 meters or more, the drone will directly return to the home point . The user can toggle the Auto Return Switch to the left to exit.
- Smart Track
Smart Track is supported only in GPS mode. The user can choose Trace, Profile, or Lock in the App menu. The drone will trace the subject chosen at the App interface at a distance.
In Trace mode, the heading will always lock at the target and trace it from the back at a distance.
- In Profile mode, the heading will always lock at the target and trace it from the side at a distance.

- In Lock mode, the drone will hover at a place if flight speed is 0, following the target 360°. The user can also adjust flight speed, and the drone will fly around the target at a certain distance.
flight speed =0m/s
- flight speed = 0m/s
- In Smart Trace, users should always make sure to avoid people, animals and obstacle’s in the tracking path to ensure the flight safety. Users should comply with local laws and regulations when using the function.


Orbit
- The user can select Orbit mode in the App. when a central point and a radius are set, the drone will fly around the central point at a default speed. If a point of interest is set, the camera will be locked at the POI.
- Fly to a central point to set the central point
- Fly away from the central point to set radius
- Set flight speed, move direction and heading. If the heading is free, the user can drag a rectangle around a POI

- If sticks are moved in flight, the flight altitude or radius will be changed. Taking Mode 2 as example:

- Tap-fly
The user can select Tap-fly in the App. Tap map to choose a destination and set flight speed, the drone will fly over there at a default speed in a straight line. If a point of interest is set, the camera will be locked at the POI- Tap map to choose a destination
- Switch to image interface to drag a rectangle around the POI
- Set flight altitude and speed
- Dronie
- The user can select Dronie, including Rocket and Invert, in the App. In Rocket mode, the drone flies upward with the camera pointing downward at the subject to shoot a video. In Invert mode, the drone flies backward and upward with the camera locking at the subject to shoot a video.
- Drag a rectangle around a POI
- Set flight speed and altitude, the flight control center will estimate flight time automatically
- The drone automatically adjusts its place
- 3 seconds count down to fly away to shoot a video once the drone completes adjustment

- Course Lock
The user can select Course Lock mode in the App. The drone saves current fly direction as heading. The user can control sticks to adjust direction of head and gimbal, but the forward direction remains unchanged. - Tripod Mode
The max speed of the drone is 1m/s, and the max rotation speed is 60°/s. In Tripod Mode, operation sensitivity is lowered simultaneously to shoot more stable and smooth video. - Aerial Mode
The brake distance is lengthened and the angular speed of rotation is limited to make sure the shooting videos are more stable and smooth
Note: Course Lock is enabled in Aerial Mode, Users can turn it on in the APP - Spiral Mode
The user can select Spiral Mode in the App. Set the central point and radius, the drone will spirally fly upward and shoot a video simultaneously, showing a sense of space.- Fly to a point to set as the central point
- Fly away the central point to set radius
- Set spiral direction and flight distance to start and shoot a video at the same time
- The mission interrupted if the user moves sticks
- SAR Mode
- The user can select SAR Mode in the APP. With real-time GPS coordinates, the drone could help user to search and rescue.
- Image interface: show real-time coordinate and time of the drone, support digital zoom, screen shots to share online
- Map interface: show real-time coordinate and time of the drone in ordinary map and satellite map, screen shots to share online


Waypoint
Choosing waypoint and drawing route both are available at map. The drone flies along waypoint route at a default speed. If a point of interest is set, the camera will be locked at the POI. The user can select a way to set waypoints, including choosing points in flight or on the map, historical routes.
Choosing points in flight:
- control the drone to a point to set as a waypoint
- using sticks to set flight altitude and heading direction, dials to set gimbal angle, and actions when reaching the waypoint
- when all waypoints ready, please set waypoints routes attribute, including flight speed, heading direction, action at the destination
- POI is enabled when executing waypoints
Choosing points on the map
- tap map to add waypoint
- set waypoint attribute, including flight altitude, action at the destination, rotate direction
- drag the POI icon to the map, and set its a;titude and relate waypoints
- when all waypoints ready, please set flight speed, failsafe action, and action at the destination
- POI is enabled when executing waypoints
Historical routes
- preview the waypoints and its attribute by entering Favorite list
- tap to start and show the real-time waypoints trace

Precise Landing
In the process of Return to Home, the optical flow sensor will match landing pad features above the home point. Once matched successfully, the drone will land on the landing pad precisely.

Please enable precise landing in the app before use it.
Fix-wing Mode
In Fix-wing Mode, the drone can only fly forward, not backward. The user can use sticks to control flight speed and course as showed below (America Mode).
|
Left stick |
push upward | up |
| push downward | down | |
| toggle left | turn left | |
| toggle right | turn right | |
|
Right stick |
push upward | accelerate |
| push downward | decelerate | |
| toggle left | turn left | |
| toggle right | turn right |
Assembly and Disassembly
Propellers
- Unfold the front and rear arms of the drone.
- Attach the gray marked propellers to the motor mounting base with gray marks on the arms.
- Ensure the propeller is pressed to the bottom of the mounting base.
- Rotate the propeller to the end of the lock direction until the propeller gets bounced and locked.
- Press the propeller forcefully and rotate the propeller along the unlock direction to remove the propeller.

- Take the installation of reverse propeller as example.
- If the propeller is damaged, please replace them to ensure flight safety and efficiency.
- Check if the propeller is properly installed and fastened before each flight. Stay away from the rotating propeller to avoid cutting.
Battery
- The intelligent battery of FIMI X8 SE 2022 has a capacity of 4500mAh, a voltage of 13.05V. This type of battery employs high energy cell, advanced battery management system, and charge and discharge functionality.
Assemble and disassemble
- Push hard the battery, after the battery is installed in place, there will be a «click» sound.
- To remove the battery, you need to press the battery buckle on both sides of the battery to pull out the battery.


Megaphone module
- Install the megaphone module as the indicated direction there will be a «click» sound.
- After the installation is successful, the corresponding icon will appear on the APP, click to set the relevant settings.
- Press the lock on the tail of the module and push out the module to remove it from the drone.


Drone Micro SD card
- When installing SD card to the drone, please unfold the arms of the drone first and open the protection cover
- Insert the SD card with the head side facing upward into the SD card slot
- When removing SD card, press the SD card to pop it out
Note: Support Micro SD ( U3 and above ) 8 ~ 256GB, recommend to use
- Sandisk Extreme Pro V30 32G
- Sandisk Extreme V30 32G
- Samsung Pro Endurance 32G
- Lexar Professional 1000X 32G
- Sandisk Extreme Pro V30 64G
- Sandisk Extreme V30 64G
- Toshiba Exceria Pro 64G
Charging
- Connect the battery, charger and AC cable as shown below, and plug the charger into a power outlet
- When the battery is in charge, the battery level lights are flashing
- When the battery is fully charged, the battery level lights go out
- It takes about 2 hours to fully charge the battery


Turning on and off
- Short press + long press power button 2 seconds to power on/off
- Short press to check battery level
- After the flight, the battery temperature is high, so wait for the battery to drop to room temperature or wait for the battery to stand still for 30 minutes before charging.
- The optimal charging temperature range of the smart battery is 25±3℃, and charging within this temperature range can prolong the battery life.
- Recharge and discharge every 3 months or so to ensure battery activity.
- The smart battery must be charged with the official Femto charger. FIMI will not take any responsibility for all consequences.
- For safety reasons, smart batteries need to be kept low (such as below 50%) during long-distance or long-term transportation
Gimbal and Camera
- Camera
The camera, equipped with 1/2.0 inch CMOS and wide-angle lens with 25mm equivalent focal distance, It also comes with various shooting modes, including single, burst, time lapse, panorama shot and slow motion, for different scenario.
Equip and remove the gimbal protector
Operating Mode
- Follow Mode:
The roll axis does not move with the drone and always keep the gimbal horizontally, which suits for shooting stable videos - FPV Mode:
The roll axis rotates with the drone to provide a first person view
Remote controller
With ergonomic design, it is easier and more precise to control. There is no complicated operation to connect App, just plug in and it works. The remote controller fully charged can work about 4.5 hours.
Turning on and off
- Short press + long press power button 2 seconds to power on/off
- Short press to check battery level
Charge
- Connect the remote controller to a power adapter as show below
- When the RC is in charge, the battery level lights are flashing
- when the RC is fully charged, the battery level lights go out
- It takes about 2.5 hours to fully charge the RC in the powered off condition

Assemble Device
- Tighten the mobile or pad on mobile device holder by extending the holder to the left.
- Open the interface protection cover on the RC bottom.
- Connect your phone and the RC with a USB cable.
- Connect the drone and update firmware according to instructions in Fimi Navi 2020 app.

Note: The cable slot is reserved on the right side of the RC.
Recording and Photo Shooting
- Press the shoot button to take a photo. A photo is taken when you hear 2 short sounds.
- Press the record button to record video. Recording starts when you hear 2 short sounds. Press again to stop recording with 4 short sounds.
- The pitch angle of the gimbal can be controlled by toggling the left dial up and down.
- The right dial can adjust EV/ISO.


Shortcut Buttons


- Toggle the auto return button to the right when the drone is in flight, the drone will return to the home point.
- In the process of auto return, toggle the auto return button to the left, the drone will hover at place and wait for sticks instructions.
- Push the five-directional button up default to access map or FPV
- Push the five-directional button down default to gimbal center or down
- Toggle the five-directional button left default to turn on/off battery info interface Toggle the five-directional button right default to turn on/off self-check interface Press the five-directional button center default to turn on/off media
- Right dial to adjust EV/ISO value
- Left dial to adjust pitch angle of gimbal
- When auto take-off/land button turns white, it can be pressed to take off or land When the drone meets auto take-off conditions, long press 2 seconds to take off When the drone meets auto land conditions, long press 2 seconds to land
- When the drone is executing intelligent flight, short press this button to exit
Sticks Control
Mode 1

Mode 3

Remote Controller Pairing
When a new remote controller or drone is replaced, please pair the remote controller and the drone again as shown below:
- Turn on the drone
- Turn on the RC, long press the power button 15 seconds until hearing constant beep sound and the power button red light flashes
- Short press the code pairing button on the drone , the yellow light on the drone goes out
- The code pairing succeeds when the power button on the RC turns white and the yellow light on the drone keeps on

This 5 pin port is only for updating firmware, but X8 SE Drone is auto equipped with auto update function. So there is no need to use this 5 pin port
Remote lights
| Remote lights | Remote status | |
| 1 | Power button’s red light are on | Weak signal |
| 2 | Power button’s red light flashes | Not connected to the drone |
| 3 | Power button’s red light flashes | RC Pairing or upgrading firmware |
| 4 | Power button’s white light is on | Normal signal |
| 5 | Power button’s white light flashes | Recording videos |
| 6 | Auto take-off/landing button’s red light is on | Auto take-off or landing not enabled |
| 7 | Auto take-off/landing button’s white light on | Ready for auto take-off |
APP
Download and install Fimi Navi 2020 app, register a FIMI user account before login, and select FIMI X8 SE 2020 to enter device
Image Interface

- Real-time Flight Parameters

- Drone Status
In flight: current flight status
GPS: current flight mode, including GPS,VPU,ATTI
: drone real-time power - Signal Status and General Settings


- Map Interface
: Displays the drone head orientation, tilt angle, remote control position and other information. Click to switch the map to display the aircraft in real time Location - Metering Mode tap any place in the image interface for metering, when appearing exposure lock button, click to lock the value.
- Gimbal and Image Parameters :Show the the current zoom multiple

- Camera Operation Area
3 : 26 :Video record length
- Intelligent Flight
Tap to enter intelligent flight interface
- Drone gear mode
- :Display the current aircraft gear mode, click to switch between“Sport” “Normal”“Cine”mode
- Sport: ax horizontal speed 18m/s, Max ascent speed 5m/s, Max descent speed 4m/s
- Normal: Max horizontal speed 10m/s, Max ascent speed 4m/s, Max descent speed 3m/s
- Cine: Max horizontal speed 6m/s, Max ascent speed 1.5m/s, Max descent speed 1.5m/s
- Shortcuts


Map Interface


Fly
Confirm the drone heading
- The direction of integrated gimbal camera is the drone heading.
- Once the drone is turned on, the heading can be told by navigation lights.
- The red light and the green light indicate the heading, and the yellow light is the tail.

Always keep the tail pointed at the user to avoid direction misjudging.
Pre-flight inspection
- Make sure the battery of the aircraft and the remote control are fully charged. Make sure that the propeller is installed correctly and that the propeller is not damaged or deteriorated.
- Make sure the camera lens is clean.
- Make sure the SD card is inserted.
- Make sure the front and rear propellers are extended in place
- Whether the camera and gimbal work normally after powering on
- Make sure the FIMI Navi 2020 is running normally
Manual take off

- Keep both sticks to the bottom inner still over 3 seconds, the propellers start spinning
- Release both sticks once propellers have been spinning, and firmly push the left stick upward to take off the drone
- During flight, release both sticks to hover
- At any time during controlled flight, release the sticks and the drone will hover automatically
Manual take landing

- Slowly move the left stick downward to land the drone
- Once the drone has landed, push and hold the left stick down over 5 seconds, the motors will stop
- Safety tips: The drone has no waterproof function. Please be careful of landing environment. Do not land on an inclined plane for safety.
Stop propellers in an emergency
When motors can’t properly turn off, please toggle the left stick to the bottom inner in maximum range, and press Auto take-off/landing button for 5 seconds simultaneously, the motors will stop.

Do not do the above operation during normal flight to avoid motors being stopped in the air.
Flying Condition Requirement
- The drone is suitable for people above 18 years who have full civil capacity.
- Make sure to keep some distance from people, animals, trees, vehicles and buildings while using the drone. Please be careful when someone approaches.
- Keep away from airports, railways, highways, high-rise buildings, utility poles and other dangerous environments when operating the drone.
- Keep away from the areas with complex electromagnetic signals such as communication base stations and high-power antennas when operating the drone.
- The flight altitude and distance of the drone corresponding to the take- off point will be limited based on relevant regulations and policies.
- Do not use this product at the place and time prohibited by regulations and policies.
- To protect the legitimate rights and interests of users, please follow the product safety instructions when using.
- Do not operate the drone in bad weather such as strong winds, rain, snow, or fog.
- Please operate the drone in a broad place with a good GPS signal.
- It is suggested that user should make the first flight under the guidance of an experienced pro.
Maintenance and Calibration
Remote Controller Calibration
Please try to calibrate the remote controller when you detect inconsistencies between stick control and drone flying.
- Select «RC Calibration» in the remote controller menu
- Tap» Start» to calibrate the center, do not move sticks
- Skip to sticks calibration once the center calibration succeed Skip to dial calibration once the sticks calibration succeed
- Please turn off the power of the drone before calibrating the remote controller. RC calibration is not available in flight
Compass Calibration
- If the magnetic field changes, the compass needs to be recalibrated to ensure flight safety. If the drone’s compass needs to be calibrated, the App will give corresponding hints and guidance. After entering the flight control menu, please select «compass calibration», and then calibrate based on prompts on the App.
- Please connect the drone before calibration. Compass calibration is not available in flight.
Gimbal Calibration
- Click «gimbal calibration» and enter the calibration page in the gimbal settings menu.
- After the drone is placed smoothly, click to start calibration.
- Do not move the drone during the calibration process.
- After the calibration is completed, the App interface shows «Calibration succeed».
- If the App interface shows «Calibration failed», please recalibrate.
- Gimbal calibration is not available in flight.
Propellers Maintenance
Propellers are wearing parts. When they’re damaged, replace them in time to ensure flight safety and efficiency.
- Battery Maintenance
Do not throw the battery into fire; Do not batter the battery; Lithium battery’s capacity reduces significantly in low temperature conditions. Do not use the battery when it is below 5 degrees. Do not place the battery under the burning sun. - Gimbal Maintenance
The gimbal of X8 SE 2020, integrated with the drone, does not need to disassemble. Please be careful not to scratch the camera when store the drone. Please keep the camera clean for better image quality. - Drone Self-check
The drone enters the self-check when the drone is powered on. If the self-check failed, App will pop up corresponding hints.
Firmware Upgrade
Please check the firmware version regularly, new version will be pushed by Fimi Navi 2020 App to prompt users to update. Please download new firmware when the App is connected with the drone and remote controller
Basic Specification
This device complies with Part 15 of the FCC Rules. Operation is subject to the following two conditions:
- This device may not cause harmful interference, and
- This device must accept any interference received, including interference that may cause undesired operation. FCC warning:
Any Changes or modifications not expressly approved by the party responsible for compliance could void the user’s authority to operate the equipment.
Note: This equipment has been tested and found to comply with the limits for a Class B digital device, pursuant to part 15 of the FCC Rules. These limits are designed to provide reasonable protection against harmful interference in a residential installation. This equipment generates uses and can radiate radio frequency energy and, if not installed and used in accordance with the instructions, may cause harmful interference to radio communications. However, there is no guarantee that interference will not occur in a particular installation.
- If this equipment does cause harmful interference to radio or television reception, which can be determined by turning the equipment off and on, the user is encouraged to try to correct the interference by one or more of the following measures:
- Reorient or relocate the receiving antenna.
- Increase the separation between the equipment and receiver.
- Connect the equipment into an outlet on a circuit different from that to which the receiver is connected.
- Consult the dealer or an experienced radio/TV technician for help.
The device has been evaluated
Documents / Resources
References
-
FIMI X8SE 2022 V2
tags: Camera Drone, drone, FIMI, X8SE2022 Camera Drone,
- June 15, 2024
- FIMI
Table of Contents
- X8SE 2022 Foldable 4K Camera Drone
- Services & Support
- Product Instruction
- Package List
- Product Introduction
- Function Introduction of RC
- Drone
- Safety Protection
- Assembly and Disassembly
- Gimbal and Camera
- Remote controller
- APP
- Fly
- Maintenance and Calibration
- Basic Specification
- Read User Manual Online (PDF format)
- Download This Manual (PDF format)
X8SE 2022 Foldable 4K Camera Drone
User Manual
X8SE 2022 Foldable 4K Camera Drone
Please read the user manual carefully before using and keep the manual for
future reference.
Services & Support
FIMI provides X8 SE 2022 users with tutorial videos and
the following information:
-
FIMI X8 SE 2022 User Manual
-
FIMI X8 SE 2022 Quick Start Manual
-
FIMI X8 SE 2022 Disclaimer and Safety Operation Instructions
Users are advised to watch tutorial videos before using the product and read
FIMI X8 SE 2022 Disclaimer and Safety Operation Instructions carefully and get
to know the process of using by going through FIMI X8 SE Quick Start Manual.
For more detailed product information, please refer to FIMI X8 SE 2022User
Manua Please download the firmware and watch the tutorial videos on the link
https://www.fimi.com/fimi-x8-se-2022.html -
Please scan the the following QR-code to download Femi Navi 2020 App
https://paas-oregon-static-
file.fimi.com/h5/x8h/down/down_app.html
Product Instruction
The FIMI X8 SE 2022 is an aerodynamic foldable drone equipped with intelligent
control, wireless communication and other advanced technology which are
necessary to realize functions like long-distance remote control, intelligent
flight, precise landing, etc. The built-in 3-axis gimbal stabilizes the camera
which is able to shoot 4K video at 30 fps and which performs HD real-time
image transmission. The APP enriches the remote controller with more features
and fast connection. The remote controller fits iPad Mini at the maximum
range. The sticks are detachable.
Reading tips Symbol description)
| Operation prohibited
—|—
****| Important notes
| Operation, Usage tips
| Glossary, Reference Information
Package List

Product Introduction
- Drone

- Remote controller


Function Introduction of RC
| Buttons| Function description
—|—|—
1| Left stick| Push stick upward, the drone goes up; pull stick downward, the
drone goes down; toggle stick to left, the drone rotates counter-
clockwise; toggle stick to right the drone rotates clockwise
2| Right stick| Push stick upward, the drone flies forward; pull stick
downward,
the drone flies backward; toggle stick to left, the drone flies to
left; toggle stick to right, the drone flies to right
3| Auto return| Toggle the button to the left, switching to normal flight
Toggle the button to the right, switching to auto return
4| Auto take-off/land button| long press 2 seconds to auto take off/landing
5| Shoot button| short press to start / stop shooting
6| Record button| Short press to start/stop recording
7| Five directional button| Up| Default to switch between map / FPV
Down| Default to switch between gimbal center/down
Left| Default to turn on /off battery info interface
Right| Default to turn on / off self-checking interface
Center| Default to turn on/off media library
8| Lef dial| Adjust the pitch angle of gimbal
9| Right dial| Adjust the value of EV / ISO
10| Power button| Short press to view the battery level
Short press+long press 2 seconds to power on / off
- The other functions of the five-directional button can be set in the FIMI Navi 2020 App.
- The joystick function is the default mode, which can be set through the FIMI Navi 2020 App.
The stick mode can be set in FIMI Navi app (the default is American hand).
Drone
Flight Mode
GPS Mode
To achieve precise hovering, the drone is equipped with a GPS module. The
intelligent flight function works in GPS mode. Users can enable Sport Mode or
Beginner Mode in the flight settings. When the Beginner Mode is on, the flight
speed, flight distance, flight altitude and RTH altitude will be limited. In
sport mode, the maximum flight speed is 18m/s(65 km/h), the maximum ascending
speed is 5m/s(18 km/h), and the maximum descending speed is 4m/s(14 km/h).
VPU Mode
An Optical Flow module is also built into the drone for precise hovering and
landing at the home point. In VPU mode, the Intelligent flight function is not
supported. The maximum flight speed is 10m/s(36 km/h), the maximum ascend
speed is 3m/s(11 km/h), and the maximum descending speed is 2m/s (7 km/h).
When the drone is flying above a well-lit ground with a clear texture and the
GPS signal is poor, it will switch automatically to VPU mode.
ATTI Mode
When the GPS signal is poor or the compass has interference, the drone enters
in ATTI mode. In this mode, the drone can start drifting horizontally and
intelligent flight mode is not supported. Therefore, in case of any accidents,
we recommend flying in an open area with good GPS signal reception. Once the
drone enters in ATTI mode, please land in a safe place as soon as possible.
Sport Mode will not be available when the drone is over 2400 meters above sea
level.
Drone Lights
| Drone lights| Drone status
—|—|—
1| All lights are fading in and out| Self-checking
2| All lights are on| Drone on the ground: self-check fails
Drone is flying: internal error
3| The yellow lights are on and the red and green light is flashing at regular
intervals| Ready to fly / in flight
4| All lights flashing twice| Low battery alerts
5| All lights are flashing quickly| Very low battery alert: land as soon as
possible
6| The red and green flashing quickly| The firmware of the drone is updating
7| Fill-in light| Automatically/manually opened
Safety Protection
Failsafe Return
Failsafe return is only supported in GPS mode. When the drone and remote
controller signal is interrupted for more than 2 seconds, the flight control
system built into the drone will take over the control of your drone, plan the
return path according to the original flight path, then the drone will fly
back and land at the home point. This function works precisely if there are
enough GPS satellites are locked, the compass has no interference and the home
point has been recorded correctly. If the wireless signal reconnects during
the failsafe return, the pilot can turn off App return hint or toggle Auto
Return switch to the left again to cancel, nd the drone will hover at the
current position.

Low-power Protection
In flight, when the battery level is only enough for RTH, App advises users to
return, and the drone will return automatically after 10 seconds countdown.
When the battery level is only enough for landing, App advises users to land
as soon as possible, and the drone will land automatically after 10 seconds
countdown. When the battery level is at 10% usage left, the drone will be
forced to land.

Hovering on the Edge of No-fly-
zone
The drone will automatically hover in the restricted flight area designated by
the state, such as the edge of airports, and the App will appear corresponding
hints. The user can use sticks to fly the drone from the edge of the no-fly-
zone, but the drone will not enter the no-fly-zone.
Intelligent Flight
Auto Take-off
When the conditions are right, press Auto Take-off/Landing button for 2
seconds to take off. In GPS mode, the drone will take off to an altitude of 4
meters and hover for sticks control. In VPU mode, the drone will take off to
an altitude of 1.2 meters and hover for sticks control. Auto Landing
When the conditions are right, press Auto Take-off/Landing button for 2
seconds to land vertically.
Users can short press the auto take-off/land button to exit intelligent
flight.
Auto Return
When the drone is in flight, the user can toggle the auto return switch to the
right to return the drone. When the return distance is less than 10 meters
and flight altitude is less than 3 meters, the drone will ascend to
3 meters first and return to the home point; if the flight altitude is greater
than or equal to 3 meters, the drone will directly return to the home point.
When the return distance of the drone is greater than or equal to 10 meters
and the flight altitude is less than 30 meters, the drone will ascend to 30
meters and return to the home point; if the flight altitude is 30 meters or
more, the drone will directly return to the home point . The user can toggle
the Auto Return Switch to the left to exit. Smart Track
Smart Track is supported only in GPS mode. The user can choose Trace, Profile,
or Lock in the App menu. The drone will trace the subject chosen at the App
interface at a distance.
In Trace mode, the heading will always lock at the target and trace it from
the back at a distance.

In Profile mode, the heading
will always lock at the target and trace it from the side at a distance. In
Lock mode, the drone will hover at a place if flight speed is 0, following the
target 360°. The user can also adjust flight speed, and the drone will fly
around the target at a certain distance.

In Smart Trace, users
should always make sure to avoid people, animals and bstacles in the tracking
path to ensure the flight safety. Users should comply with local laws and
regulations when using the function.
Orbit
The user can select Orbit mode in the App. when a central point and a radius
are set, the drone will fly around the central point at a default speed. If a
point of interest is set, the camera will be locked at the POI.
- Fly to a central point to set the central point
- Fly away from the central point to set radius
- Set flight speed, move direction and heading. If the heading is free, the user can drag a rectangle around a POI
If sticks are moved in flight, the flight altitude or radius will be changed.
Taking Mode 2 as example:

Tap-fly
The user can select Tap-fly in the App. Tap map to choose a destination and
set flight speed, the drone will fly over there at a default speed in a
straight line. If a point of interest is set, the camera will be locked at the
POI
Tap map to choose a destination
Switch to image interface to drag a rectangle around the POI Set flight
altitude and speed Dronie
The user can select Dronie,including Rocket and Invert,in the App. In Rocket
mode, the drone flies upward with the camera pointing downward at the subject
to shoot a video. In Invert mode, the drone flies backward and upward with the
camera locking at the subject to shoot a video.
- Drag a rectangle around a POI
- Set flight speed and altitude, the flight control center will estimate flight time automatically
- The drone automatically adjusts its place
- 3 seconds count down to fly away to shoot a video once the drone completes adjustment

Course Lock
The user can select Course Lock mode in the App. The drone saves current fly
direction as heading. The user can control sticks to adjust direction of head
and gimbal, but the forward direction remains unchanged.
Tripod Mode
The max speed of the drone is 1m/s, and the max rotation speed is 60°/s. In
Tripod Mode, operation sensitivity is lowered simultaneously to shoot more
stable and smooth video.5
Aerial Mode
The brake distance is lengthened and the angular speed of rotation is limited
to make sure the shooting videos are more stable and smooth Note: Course Lock
is enabled in Aerial Mode, Users can turn it on in the APP
Spiral Mode
The user can select Spiral Mode in the App. Set the central point and radius,
the drone will spirally fly upward and shoot a video simultaneously, showing a
sense of space.
- Fly to a point to set as the central point
- Fly away the central point to set radius
- Set spiral direction and flight distance to start and shoot a video at the same time
- The mission interrupted if the user moves sticks
SAR Mode
The user can select SAR Mode in the APP. With real-time GPS coordinates, the
drone could help user to search and rescue.
Image interface: show real-time coordinate and time of the drone, support
digital zoom, screen shots to share online
Map interface: show real-time coordinate and time of the drone in ordinary map
and satellite map, screen shots to share online
Waypoint
Choosing waypoint and drawing route both are available at map. The drone flies
along waypoint route at a default speed. If a point of interest is set, the
camera will be locked at the POI. The user can select a way to set waypoints,
including choosing points in flight or on the map, historical routes.
Choosing points in flight:
- control the drone to a point to set as a waypoint
- using sticks to set flight altitude and heading direction, dials to set gimbal angle, and actions when reaching the waypoint
- when all waypoints ready, please set waypoints routes attribute, including flight speed, heading direction, action at the destination
- POI is enabled when executing waypoints
Choosing points on the map
- tap map to add waypoint
- set waypoint attribute, including flight altitude, action at the destination, rotate direction
- drag the POI icon to the map, and set its a;titude and relate waypoints
- when all waypoints ready, please set flight speed, failsafe action, and action at the destination
- POI is enabled when executing waypoints
Historical routes
- preview the waypoints and its attribute by entering Favorite list
- tap to start and show the real-time waypoints trace

Precise Landing
In the process of Return to Home, the optical flow sensor will match landing
pad features above the home point. Once matched successfully, the drone will
land on the landing pad precisely. Please enable precise landing in the app
before use it.
Fix-wing Mode
In Fix-wing Mode, the drone can only fly forward, not backward. The user can
use sticks to control flight speed and course as showed below (America Mode).
| Left stick | push upward | up |
|---|---|---|
| push downward | down | |
| toggle left | turn left | |
| toggle right | turn right | |
| Right stick | push upward | accelerate |
| push downward | decelerate | |
| toggle left | turn left | |
| toggle right | turn right |
Assembly and Disassembly
Propellers
- Unfold the front and rear arms of the drone.
- Attach the gray marked propellers to the motor mounting base with gray marks on the arms.
- Ensure the propeller is pressed to the bottom of the mounting base.
- Rotate the propeller to the end of the lock direction until the propeller gets bounced and locked.
- Press the propeller forcefully and rotate the propeller along the unlock direction to remove the propeller.
Take the installation of reverse propeller as an example.
If the propeller is damaged, please replace them to ensure flight safety and
efficiency. Check if the propeller is properly installed and fastened before
each flight. Stay away from the rotating propeller to avoid cutting.
Battery
The intelligent battery of FIMI X8 SE 2022 has a capacity of 4500mAh, a
voltage of 13.05V. This type of battery employs high energy cell,
advanced battery management system, and charge and discharge functionality.
Assemble and disassemble
- Push hard the battery, after the battery is installed in place, there will be a “click” sound.
- To remove the battery, you need to press the battery buckle on both sides of the battery to pull out the battery.

Megaphone & Release-and-drop module
- Install the megaphone & Release-and-drop module as the indicated direction there will be a “click” sound.
- After the installation is successful, the corresponding icon will appear on the APP, click to set the relevant settings.
- Press the lock on the tail of the module and push out the module to remove it from the drone.

Drone Micro SD card
- When installing SD card to the drone, please unfold the arms of the drone first and open the protection cover
- Insert the SD card with the head side facing upward into the SD card slot
- When removing SD card, press the SD card to pop it out
Note:Support Micro SD ( U3 and above ) 8 ~ 256GB, recommend to use
| Sandisk Extreme Pro V30 32G | Sandisk Extreme Pro V30 64G |
|---|---|
| Sandisk Extreme V30 32G | Sandisk Extreme V30 64G |
| Samsung Pro Endurance 32G | Toshiba Exceria Pro 64G |
| Lexar Professional 1000X 32G |
Charging
Connect the battery, charger and AC cable as shown below, and plug the charger
into a power outlet
When the battery is in charge, the battery level lights are flashing
When the battery is fully charged, the battery level lights go out It takes
about 2 hours to fully charge the battery Turning on and off
- Short press+long press power button 2 seconds to power on/off
- Short press to check battery level
- After the flight, the battery temperature is high, so wait for the battery to drop to room temperature or wait for the battery to stand still for 30 minutes before charging.
- The optimal charging temperature range of the smart battery is 25±3℃, and charging within this temperature range can prolong the battery life.
- Recharge and discharge every 3 months or so to ensure battery activity.
- The smart battery must be charged with the official Femto charger.FIMI will not take any responsibility for all consequences.
For safety reasons, smart batteries need to be kept low (such as below 50%)
during long-distance or long-term transportation
Gimbal and Camera
Camera
The camera, equipped with 1/2.0 inch CMOS and wide-angle lens with 25mm
equivalent focal distance, It also comes with various shooting modes,
inculding single, burst, time lapse, panorama shot and slow motion, for
different scenario.
Equip and remove the gimbal protector
- Equip and remove the gimbal protector as shown

Gimbal
FIMI X8 SE 2022 combines a light weight 3-axis mechanical gimbal with the
latest professional control algorithms and ±0.005° control accuracy, which
provides a stable shooting platform for camera. The pitch axis, default to
tilt from 0°to -90°, can be adjusted by left dial of remote controller or App.
Operating Mode Follow Mode:
The roll axis does not move with the drone and always keep the gimbal
horizontally, which suits for shooting stable videos FPV Mode:
The roll axis rotates with the drone to provide a first person view
Remote controller
With ergonomic design, it is easier and more precise to control. There is no
complicated operation to connect App, just plug in and it works. The remote
controller fully charged can work about 4.5 hours.
Turning on and off
Short press+long press power button 2 seconds to power on/off Short press to
check battery level
Charge
- Connect the remote controller to a power adapter as show below
- When the RC is in charge, the battery level lights are flashing
- when the RC is fully charged, the battery level lights go out
- It takes about 2.5 hours to fully charge the RC in the powered off condition

Assemble Device
- Tighten the mobile or pad on mobile device holder by extending the holder to the left.
- Open the interface protection cover on the RC bottom.
- Connect your phone and the RC with a USB cable.
- Connect the drone and update firmware according to instructions in Fimi Navi 2020 app.

Note: The cable slot is
reserved on the right side of the RC.
Recording and Photo Shooting
- Press the shoot button to take a photo. A photo is taken when you hear 2 short sounds.
- Press the record button to record video. Recording starts when you hear 2 short sounds. Press again to stop recording with 4 short sounds.
- The pitch angle of the gimbal can be controlled by toggling the left dial up and down.
- The right dial can adjust EV/ISO.

Shortcut Buttons

- Toggle the auto return button to the right when the drone is in flight, the drone will return to the home point.
- In the process of auto return, toggle the auto return button to the left, the drone will hover at place and wait for sticks instructions.
- Push the five-directional button up default to access map or FPV
- Push the five-directional button down default to gimbal center or down
- Toggle the five-directional button left default to turn on/off battery info interface
- Toggle the five-directional button right default to turn on/off self-check interface
- Press the five-directional button center default to turn on/off media
- Right dial to adjust EV/ISO value
- Left dial to adjust pitch angle of gimbal
- When auto take-off/land button turns white, it can be pressed to take off or land
- When the drone meets auto take-off conditions, long press 2 seconds to take off
- When the drone meets auto land conditions,long press 2 seconds to land
- When the drone is executing intelligent flight, short press this button to exit
Sticks Control

Remote Controller Pairing
When a new remote controller or drone is replaced, please pair the remote
controller and the drone again as shown below:
Turn on the drone
Turn on the RC, long press the power button 15 seconds until hearing constant
beep sound and the power button red light flashes Short press the code pairing
button on the drone , the yellow light on the drone goes out The code pairing
succeeds when the power button on the RC turns white and the yellow light on
the drone keeps on This 5 pin port is only for updating firmware, but X8 SE
Drone is auto equipped with auto update function. So there is no need to use
this 5 pin port.
| Remote lights| Remote status
—|—|—
1| Power button’s red light are on| Weak signal
2| Power button’s red light flashes| Not connected to the drone
3| Power button’s red light flashes| RC Pairing or upgrading firmware
4| Power button’s white light is on| Normal signal
5| Power button’s white light flashes| Recording videos
6| Auto take-off/landing button’s red light is on| Auto take-off or landing
not enabled
7| Auto take-off/landing button’s white light on| Ready for auto take-off
APP
Download and install Fimi Navi 2020 app, register a FIMI user account before
login, and select FIMI X8 SE 2020 to enter device
Image Interface

-
Real-time Flight Parameters
:Tap to return to the home screen.
:28.8m: vertical flight altitude from the home point
:32.8m: horizontal distance from the home point
VS1.23m/s: vertical speed
HS1.80m/s: horizontal speed
: Estimated landing battery
: Estimated RTH battery -
Drone Status
In flight: current flight status
GPS: current flight mode, including GPS,VPU,ATTI
: drone real-time power -
Signal Status and General Settings
: show GPS signal status, 0-6 indicates poor with red; 7-12 indicates good
with yellow; 13 and above indicate excellent with white. Tap to enter flight
control settings
: show image transmission signal strength
: show the RC signal strength, tap to enter RC setting
: show real-time battery level, tap to enter battery settings
: tap to enter settings
: Real-time estimated flight time -
Map Interface
: Displays the drone head orientation, tilt angle, remote control position and
other information. Click to switch the map to display the aircraft in real
time Location -
Metering Mode
tap any place in the image interface for metering, when appearing exposure
lock button, click to lock the value. -
Gimbal and Image Parameters
:Show the the current zoom multiple
:Show the current gimbal angle
:Show the current EV value
:Camera parameter settings, tap to set EV,ISO,shutter,video or photo mode
resolution, video size, white balance, etc.
:Show the capacity of SD card and its residue
: Megaphone
: Dispenser -
Camera Operation Area
3:26 :Video record length
:Camera parameter settings, tap to set EV,ISO,shutter,video or photo mode
resolution, video size, white balance, etc.
:Tap to switch between photo and video record
:Tap to start/stop shooting photos or record videos
:Media library, tap to download or preview videos and photos saved in Micro SD
card -
Intelligent Flight
Tap to enter intelligent flight interface| :Auto Take-off
—|—
:Auto Landing
:Auto Return
| :Waypoints
—|—
:Smart Track, including Trace, Profile, Lock
:Orbit
| :Tap-fly
—|—
:Dronie, including Rocket and Invert
:Spiral Mode
| :SAR Mode
—|—
:Aerial Mode
:Tripod Mode
| :Course Lock
—|—
:Fix-wing Mode -
Drone gear mode
:Display the current aircraft gear mode, click to switch between “Sport”
“Normal”“Cine”mode
Sport Max horizontal speed 18m/s, Max ascent speed 5m/s, Max descent speed
4m/s
Normal:Max horizontal speed 10m/s, Max ascent speed 4m/s, Max descent speed
3m/s
Cinemax horizontal speed 6m/s, Max ascent speed 1.5m/s, Max descent speed
1.5m/s -
.Shortcuts****
| :Tap to auto takeoff.
—|—
:Tap to auto land the drone.
: Tap to return the drone.
Map Interface

| :Tap to center the drone.
—|—
:Display the location of the drone.
:Display the location of the Home.
:Display the location of the phone.
| :Tap to correct the direction.
—|—
:Switch the map.
:Home point.
Fly
Confirm the drone heading
- The direction of integrated gimbal camera is the drone heading.
- Once the drone is turned on, the heading can be told by navigation lights.
- The red light and the green light indicate the heading, and the yellow light is the tail.

Always keep the tail pointed at
the user to avoid direction misjudging.
Pre-flight inspection
- Make sure the battery of the aircraft and the remote control are fully charged.
- Make sure that the propeller is installed correctly and that the propeller is not damaged or deteriorated.
- Make sure the camera lens is clean.
- Make sure the SD card is inserted.
- Make sure the front and rear propellers are extended in place
- Whether the camera and gimbal work normally after powering on
- Make sure the FIMI Navi 2020 is running normally
Manual take off

- Keep both sticks to the bottom inner still over 3 seconds, the propellers start spinning
- Release both sticks once propellers have been spinning, and firmly push the left stick upward to take off the drone
- During flight, release both sticks to hover
- At any time during controlled flight, release the sticks and the drone will hover automatically
Manual take landing
- Slowly move the left stick downward to land the drone
- Once the drone has landed, push and hold the left stick down over 5 seconds, the motors will stop
Safety tips : The drone has no waterproof function. Please be careful of
landing environment.
Do not land on an inclined plane for safety.
Stop propellers in an emergency
When motors can’t properly turn off, please toggle the left stick to the
bottom inner in maximum range, and press Auto take-off/landing button for 5
seconds simultaneously, the motors will stop. Do not do the above operation
during normal flight to avoid motors being stopped in the air.
Flying Condition Requirement
- The drone is suitable for people above 18 years who have full civil capacity.
- Make sure to keep some distance from people, animals, trees, vehicles and buildings while using the drone. Please be careful when someone approaches.
- Keep away from airports, railways, highways, high-rise buildings, utility poles and other dangerous environments when operating the drone.
- Keep away from the areas with complex electromagnetic signals such as communication base stations and high-power antennas when operating the drone.
- The flight altitude and distance of the drone corresponding to the take off point will be limited based on relevant regulations and policies.
- Do not use this product at the place and time prohibited by regulations and policies.
- To protect the legitimate rights and interests of users, please follow the product safety instructions when using.
- Do not operate the drone in bad weather such as strong winds, rain, snow, or fog.
- Please operate the drone in a broad place with a good GPS signal.
- It is suggested that user should make the first flight under the guidance of an experienced pro.
Maintenance and Calibration
Remote Controller Calibration
- Please try to calibrate the remote controller when you detect inconsistencies between stick control and drone flying.
- Select “RC Calibration” in the remote controller menu
- Tap” Start” to calibrate the center, do not move sticks
- Skip to sticks calibration once the center calibration succeed
- Skip to dial calibration once the sticks calibration succeed
Please turn off the power of the drone before calibrating the remote
controller. RC calibration is not available in flight
Compass Calibration
If the magnetic field changes, the compass needs to be recalibrated to ensure
flight safety. If the drone’s compass needs to be calibrated, the App will
give corresponding hints and guidance. After entering the flight 5control
menu, please select “compass calibration”, and then calibrate based on prompts
on the App.
Please connect the drone before calibration. Compass calibration is not
available in flight.
Gimbal Calibration
- Click “gimbal calibration” and enter the calibration page in the gimbal settings menu.
- After the drone is placed smoothly, click to start calibration.
- Do not move the drone during the calibration process.
- After the calibration is completed, the App interface shows “Calibration succeed”.
- If the App interface shows “Calibration failed”, please recalibrate.
Gimbal calibration is not available in flight.
Propellers Maintenance
Propellers are wearing parts. When they’re damaged, replace them in time to
ensure flight safety and efficiency.
Battery Maintenance
Do not throw the battery into fire; Do not batter the battery; Lithium
battery’s capacity reduces significantly in low temperature conditions. Do not
use the battery when it is below 5 degrees. Do not place the battery under the
burning sun.
Gimbal Maintenance
The gimbal of X8 SE 2020, integrated with the drone, does not need to
disassemble. Please be careful not to scratch the camera when store the drone.
Please keep the camera clean for better image quality.
Drone Self-check
The drone enters the self-check when the drone is powered on. If the self-
check failed, App will pop up corresponding hints.
Firmware Upgrade
Please check the firmware version regularly, new version will be pushed by
Femi Navi 2020 App to prompt users to update.
Please download new firmware when the App is connected with the drone and
remote controller
Basic Specification
Drone
Product model:FMWRJ03A8
Dimensions:204×106×72.6mm
Diagonal size:372mm
Take off weight:About 779g
Take off weight:About 815g(Install the megaphone & dispenser module)
Flight time:About 35min
Flight time:About 31min(Install the megaphone & dispenser module)
Max ascending speed:5m/s
Max descending speed:4m/s
Max flight speed:18m/s
GNSS:GPS/GLONASS/CNSS
Hover accuracy: Vertical:±0.1m (Within the ultrasonic detecting range)
±0.5m (when GPS positioning is active) Horizontal: ±1.5m
Operating temperature:0°C ~ 40°C
Suitable altitude:≤5000m
Operating frequency:2.400-2.4835GHz
Data interface: 12-PIN data interface (female)
Charger
Rated input:100-240V~50/60Hz 1.5A
Rated output:13.05V 3A
Rated power:39.15W
Remote controller
Net weight:About 373g
Dimensions:203.8×91×46.6mm
Operating frequency:2.400-2.4835GHz
Type Rechargeable lithium battery
Capacity:3900mAh
Nominal voltage:3.7V
Input:5 V 2A
Max transmission distance About 10000m*
Operating temperature:0 ~ 40°C
Suitable altitude:≤5000m
Battery
Type Rechargeable lithium battery pack
Weight About 270g
Capacity:4500mAh
Voltage:11.4V
Limit voltage:13.05V
E n e r g y:5 1 . 3 W h
Charging ambient temperature:0°C ~ 40°C
Gimbal
Controllable rotation range:0°~ -90°(Pitch)
Angular vibration range:± 0.005°
Lens:FOV 79°
Camera aperture:f1.6
Camera focal distance:4.71mm
Equivalent focal distance:25mm
Sensor:1/2.0” SONY CMOS
ISO range:100 – 6400
Shutter speed:32 ~ 1/8000s
Max video resolution:3840 x 2160 | 30fps | 25fps | 24fps
Max birate: 100Mbps
File system:FAT32
Image format:JPG,JPG+DNG
Video format:MP4
Memory card type Micro SD ( U3 and above ) 8 ~ 256GB
Note:
The 35 minutes flight time refers to constant speed at 6-8m/s (no wind) with
fully charged and low cyclic battery. Remote control distance reach to 10km
(FCC) in open area and no interference . All above testing and
data come from FIMI laboratory, errors may occur in actual use for operating
and environmental changes.
This device complies with Part 15 of the FCC Rules. Operation is subject to
the following two conditions:
- this device may not cause harmful interference, and
- this device must accept any interference received, including interference that may cause undesired operation.
FCC warning:
Any Changes or modifications not expressly approved by the party responsible
for compliance could void the user’s authority to operate the equipment.
Note: This equipment has been tested and found to comply with the limits
for a Class B digital device, pursuant to part 15 of the FCC Rules. These
limits are designed to provide reasonable protection against harmful
interference in a residential installation. This equipment generates uses and
can radiate radio frequency energy and, if not installed and used in
accordance with the instructions, may cause harmful interference to radio
communications. However, there is no guarantee that interference will not
occur in a particular installation. If this equipment does cause harmful
interference to radio or television reception, which can be determined by
turning the equipment off and on, the user is encouraged to try to correct the
interference by one or more of the following measures:
- Reorient or relocate the receiving antenna.
- Increase the separation between the equipment and receiver.
- Connect the equipment into an outlet on a circuit different from that to which the receiver is connected.
- Consult the dealer or an experienced radio/TV technician for help.
The device has been evaluated
Read User Manual Online (PDF format)
Read User Manual Online (PDF format) >>
Download This Manual (PDF format)
Download this manual >>
Xiaomi FIMI X8 SE 2022 V2
FIMI X8 SE 2022V2 Benutzerhandbuch
Bitte lesen Sie das Benutzerhandbuch vor dem Gebrauch sorgfältig durch und
bewahren Sie es zum späteren Nachschlagen auf.
View the manual for the Xiaomi FIMI X8 SE 2022 V2 here, for free. This manual comes under the category drones and has been rated by 6 people with an average of a 8.8. This manual is available in the following languages: English. Do you have a question about the Xiaomi FIMI X8 SE 2022 V2 or do you need help?
Ask your question here
Product Images (2)

Xiaomi FIMI X8 SE 2022 V2 specifications
Below you will find the product specifications and the manual specifications of the Xiaomi FIMI X8 SE 2022 V2.
The Xiaomi FIMI X8 SE 2022 V2 drone is an advanced and highly capable aerial photography and videography tool. Equipped with a 4K camera, it can capture stunning high-resolution images and videos with excellent clarity and detail. The drone is lightweight and portable, making it easy to carry and maneuver in tight spaces. It features a range of intelligent flight modes, including follow-me, orbit, and waypoints, which allow for more precise and creative shots. The drone’s battery provides up to 35 minutes of flight time, and it can fly at speeds of up to 18 m/s. The FIMI X8 SE 2022 V2 drone is equipped with a 3-axis mechanical gimbal and EIS image stabilization technology, ensuring smooth and stable footage even in windy conditions. The drone’s control range extends up to 8 km, enabling it to fly long distances and capture shots from unique perspectives. It also features a range of safety features, including obstacle detection and avoidance, making it a reliable and safe device for aerial photography and videography enthusiasts. Overall, the Xiaomi FIMI X8 SE 2022 V2 drone is an excellent investment for anyone who wants to capture high-quality aerial footage easily and efficiently.
General
| Brand | Xiaomi |
| Model | FIMI X8 SE 2022 V2 |
| Product | drone |
| Language | English |
| Filetype | User manual (PDF) |
Questions & answers
Can’t find the answer to your question in the manual? You may find the answer to your question in the FAQs about the Xiaomi FIMI X8 SE 2022 V2 below.
Can the battery of my drone explode?
Make sure the batteries of your drone do not get too hot, in that case there is a very small chance that the battery will explode.
Can I fly a drone at nearby airports?
You should never fly your drone near airports.
Is the manual of the Xiaomi FIMI X8 SE 2022 V2 available in English?
Yes, the manual of the Xiaomi FIMI X8 SE 2022 V2 is available in English .
Is your question not listed? Ask your question here
FIMI X8SE2022 Дрон с камерой
Технические характеристики
- Модель: FIMI X8 SE 2022 г.
- Режимы полета: режим GPS, спортивный режим, режим для начинающих.
- Максимальная скорость полета: 18 м/с (65 км/ч)
- Максимальная скорость подъема: 5 м/с (18 км/ч)
- Максимальная скорость спуска: 4 м/с (14 км/ч)
Инструкции по применению продукта
Дрон
Дрон оснащен различными функциями для оптимальных летных характеристик:
- Режим GPS для точного зависания
- Спортивный режим для увеличения скорости.
- Режим новичка для ограниченных параметров полета
Пульт дистанционного управления
Пульт дистанционного управления обеспечивает следующие функции:
- Выбор режима полета (автовозврат, автоматический взлет/посадка)
- Ручки управления для направленного движения и вращения.
- Кнопки для съемки, записи и настройки стабилизатора.
Умная батарея
Интеллектуальная батарея питает дрон, и ее можно контролировать через интерфейс контроллера. Перед полетом важно убедиться, что аккумулятор полностью заряжен.
- Подвес и камера
Встроенная камера на подвесе обеспечивает стабильную съемку.tagе во время полета. Отрегулируйте угол подвеса и настройки камеры по мере необходимости для оптимальной записи. - ПРИЛОЖЕНИЕ
- Загрузите приложение Fimi Navi 2020, отсканировав предоставленный QR-код. Приложение предоставляет дополнительные возможности управления и настройки вашего дрона.
- Летать
Перед взлетом убедитесь, что дрон находится в подходящем месте и имеет достаточно места для маневра. Следуйте инструкциям по взлету, посадке и управлению полетом в зависимости от предпочитаемого вами режима работы. - Техническое обслуживание и калибровка
Регулярное обслуживание и калибровка дрона имеют решающее значение для оптимальной производительности. Следуйте инструкциям, приведенным в руководстве пользователя, при выполнении задач по техническому обслуживанию и процедурам калибровки.
Часто задаваемые вопросы
- Как переключаться между режимами полета?
Для переключения между режимами полета используйте специальные кнопки на пульте дистанционного управления. Выберите режим GPS, спортивный режим или режим для начинающих в зависимости от желаемого опыта полета. - Как отрегулировать угол подвеса во время полета?
Используйте элементы управления на пульте дистанционного управления для регулировки угла наклона стабилизатора. Обеспечить плавностьtage, постепенно регулируя угол наклона подвеса по мере необходимости.
FIMI X8 SE 2022 Руководство пользователя
Пожалуйста, внимательно прочтите руководство пользователя перед использованием и сохраните его для использования в будущем.
Услуги и поддержка
FIMI предоставляет пользователям X8 SE 2022 обучающие видеоролики и следующую информацию:
- 1. Руководство пользователя FIMI X8 SE 2022.
- 2. Краткое руководство по эксплуатации FIMI X8 SE 2022.
- 3. Отказ от ответственности и инструкции по безопасной эксплуатации FIMI X8 SE 2022. Перед использованием продукта пользователям рекомендуется просмотреть обучающие видеоролики, внимательно прочитать отказ от ответственности и инструкции по безопасной эксплуатации FIMI X8 SE 2022, а также ознакомиться с процессом использования, пройдя краткое руководство по быстрому запуску FIMI X8 SE. Руководство. Более подробную информацию о продукте см. в руководстве пользователя FIMI X8 SE 2022. Загрузите прошивку и посмотрите обучающие видеоролики по ссылке. https://www.fimi.com/fimi-x8-se-2022.html
- 4. Отсканируйте следующий QR-код, чтобы загрузить приложение Fimi Navi 2020.
Инструкция по применению продукта
- FIMI X8 SE 2022 — это аэродинамический складной дрон, оснащенный интеллектуальным управлением, беспроводной связью и другими передовыми технологиями, необходимыми для реализации таких функций, как дистанционное управление на большие расстояния, интеллектуальный полет, точная посадка и т. д. Встроенный 3-осевой подвес стабилизирует камера, способная снимать видео 4K со скоростью 30 кадров в секунду и обеспечивающая передачу изображения HD в реальном времени. Приложение обогащает пульт дистанционного управления дополнительными функциями и быстрым подключением. Пульт дистанционного управления подходит для iPad Mini на максимальном расстоянии. Палочки съемные.
- Советы по чтению (Описание символа
- Операция запрещена
- Важные примечания
- Эксплуатация, Советы по использованию
- Глоссарий, справочная информация
Список пакетов
Введение в продукт
- Дрон
- Пульт

Функция Введение RC
| Кнопки | Описание функции | ||
| 1 | Левый джойстик | Нажмите ручку вверх, дрон поднимется; потяните ручку вниз, дрон упадет; переключите стик влево, дрон вращается против часовой стрелки; переключите стик вправо, дрон вращается по часовой стрелке | |
| 2 | Правый джойстик | Нажмите стик вверх, дрон полетит вперед; потяните джойстик вниз, дрон полетит назад; переключите стик влево, дрон полетит влево; переключите стик вправо, дрон полетит вправо | |
| 3 | Автоматический возврат | Переключить кнопку влево, переключение в обычный полет Переключить кнопку вправо, переключение в автовозврат | |
| 4 | Кнопка автоматического взлета / посадки | Длительное нажатие и удерживание 2 секунды для автоматического взлета/посадки | |
| 5 | Кнопка стрельбы | короткое нажатие, чтобы начать/остановить съемку | |
| 6 | Кнопка записи | Короткое нажатие для начала/остановки записи | |
| 7 | Пятинаправленная кнопка | Up | По умолчанию для переключения между картой / FPV |
| Вниз | По умолчанию переключение между центральным/нижним стабилизатором | ||
| Левый | По умолчанию для включения / выключения интерфейса информации о батарее | ||
| Верно | По умолчанию для включения / выключения интерфейса самопроверки | ||
| Центр | По умолчанию для включения/выключения медиатеки | ||
| 8 | Левый циферблат | Отрегулируйте угол наклона подвеса | |
| 9 | Правый циферблат | Отрегулируйте значение EV/ISO | |
| 10 | Кнопка питания |
|
- Остальные функции пятипозиционной кнопки можно настроить в приложении FIMI Navi 2020.
- Функция джойстика является режимом по умолчанию, который можно настроить через приложение FIMI Navi 2020.
Режим джойстика можно установить в приложении FIMI Navi (по умолчанию — американская рука).
Дрон
Режим полета
- Режим GPS
Для точного зависания дрон оснащен модулем GPS. Функция интеллектуального полета работает в режиме GPS. Пользователи могут включить спортивный режим или режим для начинающих в настройках полета. Когда включен режим для начинающих, скорость полета, дальность полета, высота полета и высота возврата домой будут ограничены. В спортивном режиме максимальная скорость полета составляет 18 м / с (65 км / ч), максимальная скорость подъема составляет 5 м / с (18 км / ч), а максимальная скорость снижения составляет 4 м / с (14 км / ч). - Режим VPU
Модуль Optical Flow также встроен в дрон для точного зависания и приземления в домашней точке. В режиме VPU функция интеллектуального полета не поддерживается. Максимальная скорость полета составляет 10 м / с (36 км / ч), максимальная скорость подъема составляет 3 м / с (11 км / ч), а максимальная скорость снижения составляет 2 м / с (7 км / ч). Когда дрон летит над хорошо освещенной землей с четкой текстурой и плохой сигнал GPS, он автоматически переключается в режим VPU. - Режим ATTI
Когда сигнал GPS плохой или в компасе есть помехи, дрон переходит в режим ATTI. В этом режиме дрон может начать дрейфовать по горизонтали, а интеллектуальный режим полета не поддерживается. Поэтому в случае аварии мы рекомендуем летать на открытой местности с хорошим приемом GPS-сигнала. Как только дрон перейдет в режим ATTI, как можно скорее приземлитесь в безопасном месте.
Спортивный режим будет недоступен, если дрон находится на высоте более 2400 метров над уровнем моря.
Огни дрона
| Дрон фары | Статус дрона | |
| 1 | Все огни гаснут и гаснут | Самоконтроль |
| 2 | Все огни включены. | Дрон на земле: самопроверка не удалась |
| Дрон летит: внутренняя ошибка | ||
| 3 | Желтые индикаторы горят, а красный и зеленый индикаторы мигают через равные промежутки времени. | Готов к полету / в полете |
| 4 | Все индикаторы мигают дважды | Предупреждение о низком заряде батареи |
| 5 | Все индикаторы быстро мигают | Предупреждение об очень низком заряде батареи: приземлитесь как можно скорее |
| 6 | Красный и зеленый быстро мигают | Прошивка дрона обновляется |
| 7 | Заполняющий свет | Автоматически/ручное открытие |

Безопасность Защита
- Безопасный возврат
Безопасный возврат поддерживается только в режиме GPS. Когда сигнал дрона и пульта дистанционного управления прерывается более чем на 2 секунды, встроенная в дрон система управления полетом возьмет на себя управление вашим дроном, спланирует путь возврата в соответствии с исходной траекторией полета, затем дрон полетит обратно и приземлиться в домашней точке. Эта функция работает точно, если зафиксировано достаточное количество спутников GPS, компас не имеет помех и домашняя точка записана правильно. Если беспроводной сигнал повторно подключается во время безопасного возврата, пилот может отключить подсказку о возврате приложения или снова переключить переключатель автоматического возврата влево для отмены, и дрон зависнет в текущей позиции.
- Защита от низкого энергопотребления
В полете, когда уровень заряда батареи достаточен только для возврата домой, приложение советует пользователям вернуться, и дрон автоматически вернется через 10 секунд обратного отсчета. Когда уровня заряда батареи хватает только для приземления, приложение советует пользователям приземлиться как можно скорее, и дрон приземлится автоматически после 10-секундного обратного отсчета. Когда уровень заряда батареи останется на 10%, дрон будет вынужден приземлиться.
- Парение на краю бесполетной зоны
Дрон автоматически зависнет в зоне ограниченного полета, обозначенной государством, например на границе аэропортов, и в приложении появятся соответствующие подсказки. Пользователь может использовать палки, чтобы управлять дроном от края запретной для полетов зоны, но дрон не войдет в запретную для полетов зону.


Интеллектуальный полет
- Автоматический взлет
Когда условия будут подходящими, нажмите кнопку автоматического взлета / посадки и удерживайте ее в течение 2 секунд, чтобы взлететь. В режиме GPS дрон взлетит на высоту 4 метра и зависнет для управления стиками. В режиме VPU дрон будет взлетать на высоту 1.2 метра и зависать для управления стиками.
- Авто Посадка
Когда условия будут подходящими, нажмите кнопку автоматического взлета / посадки в течение 2 секунд, чтобы приземлиться вертикально. - Автоматическое возвращение
Когда дрон находится в полете, пользователь может переключить переключатель автоматического возврата вправо, чтобы вернуть дрон. Если расстояние возврата менее 10 метров и высота полета менее 3 метров, дрон сначала поднимется на высоту 3 метра и вернется в исходную точку; если высота полета превышает или равна 3 метрам, дрон сразу вернется в исходную точку. Когда расстояние возврата дрона больше или равно 10 метрам, а высота полета меньше 30 метров, дрон поднимется на высоту 30 метров и вернется в исходную точку; если высота полета составляет 30 метров и более, дрон сразу вернется в исходную точку. Пользователь может переключить переключатель автоматического возврата влево, чтобы выйти.
- Смарт Трек
Smart Track поддерживается только в режиме GPS. Пользователь может выбрать Trace, Profile, или Заблокировать в меню приложения. Дрон будет отслеживать объект, выбранный в интерфейсе приложения, на расстоянии.
В режиме отслеживания направление всегда будет фиксироваться на цели и отслеживать ее сзади на расстоянии.
- В Profile В этом режиме курс всегда будет захватывать цель и отслеживать ее сбоку на расстоянии.
- В режиме блокировки дрон будет зависать в месте, если скорость полета равна 0, следуя за целью на 360 °. Пользователь также может регулировать скорость полета, и дрон будет облетать цель на определенном расстоянии.
скорость полета = 0 м / с
- скорость полета = 0 м / с
- В Smart Trace пользователи всегда должны избегать людей, животных и препятствий на пути отслеживания, чтобы обеспечить безопасность полета. Пользователи должны соблюдать местные законы и правила при использовании этой функции.

Орбита
- Пользователь может выбрать режим орбиты в приложении. когда заданы центральная точка и радиус, дрон будет летать вокруг центральной точки со скоростью по умолчанию. Если точка интереса установлена, камера будет заблокирована в точке интереса.
- Летите к центральной точке, чтобы установить центральную точку.
- Улетайте от центральной точки, чтобы установить радиус.
- Установите скорость полета, направление движения и курс. Если заголовок свободен, пользователь может перетащить прямоугольник вокруг POI.
- Если джойстики перемещаются в полете, высота или радиус полета будут изменены. Принимая режим 2 как бывшийampль:
- Tap-fly
Пользователь может выбрать Tap-fly в приложении. Коснитесь карты, чтобы выбрать пункт назначения и установить скорость полета, дрон будет лететь туда со скоростью по умолчанию по прямой. Если точка интереса установлена, камера будет заблокирована в точке интереса.- Коснитесь карты, чтобы выбрать пункт назначения
- Переключитесь на интерфейс изображения, чтобы перетащить прямоугольник вокруг POI.
- Установите высоту и скорость полета
- Дрони
- Пользователь может выбрать Drone, включая Rocket и Invert, в приложении. В режиме «Ракета» дрон летит вверх, а камера направлена вниз на объект для съемки видео. В режиме инверсии дрон летит назад и вверх, а камера фиксируется на объекте для съемки видео.
- Перетащите прямоугольник вокруг POI
- Установите скорость и высоту полета, центр управления полетом автоматически рассчитает время полета.
- Дрон автоматически регулирует свое место
- Отсчет 3 секунд, чтобы улететь и снять видео, как только дрон завершит настройку.
- Блокировка курса
Пользователь может выбрать режим блокировки курса в приложении. Дрон сохраняет текущее направление полета как курс. Пользователь может управлять стиками для регулировки направления головы и подвеса, но направление вперед остается неизменным. - Режим штатива
Максимальная скорость дрона составляет 1 м / с, а максимальная скорость вращения — 60 ° / с. В режиме штатива одновременно снижается рабочая чувствительность, чтобы снимать более стабильное и плавное видео. - Воздушный режим
Увеличен тормозной путь и ограничена угловая скорость вращения, чтобы видео съемки были более стабильными и плавными.
Примечание: Блокировка курса включена в воздушном режиме. Пользователи могут включить ее в приложении. - Спиральный режим
Пользователь может выбрать спиральный режим в приложении. Установите центральную точку и радиус, дрон будет летать по спирали вверх и одновременно снимать видео, демонстрируя ощущение пространства.- Летите к точке, которую нужно установить в качестве центральной точки.
- Улетите от центральной точки, чтобы установить радиус.
- Установите направление спирали и расстояние полета, чтобы одновременно начать и снимать видео.
- Миссия прерывается, если пользователь перемещает палочки
- Режим SAR
- Пользователь может выбрать режим SAR в приложении. С координатами GPS в реальном времени дрон может помочь пользователю в поиске и спасении.
- Интерфейс изображения: отображение координат и времени дрона в реальном времени, поддержка цифрового зума, снимки экрана для публикации в Интернете
- Интерфейс карты: отображение координат и времени дрона в реальном времени на обычной карте и спутниковой карте, снимки экрана для публикации в Интернете

Точка маршрута
Выбор путевой точки и прорисовка маршрута доступны на карте. Дрон летит по маршруту маршрутной точки со скоростью по умолчанию. Если установлена точка интереса, камера будет заблокирована на POI. Пользователь может выбрать способ установки путевых точек, в том числе выбирать точки в полете или на карте, исторические маршруты.
Выбор точек в полете:
- Управляйте дроном до точки, которую нужно установить в качестве путевой точки
- использование джойстиков для установки высоты полета и направления, колесиков для установки угла подвеса и действий при достижении путевой точки
- Когда все путевые точки готовы, установите атрибуты маршрутов путевых точек, включая скорость полета, направление курса, действие в пункте назначения.
- POI включается при выполнении путевых точек
Выбор точек на карте
- коснитесь карты, чтобы добавить путевую точку
- установить атрибут путевой точки, включая высоту полета, действие в пункте назначения, направление поворота
- перетащите значок POI на карту, установите его название и сопоставьте путевые точки
- когда все путевые точки готовы, установите скорость полета, безопасное действие и действие в пункте назначения
- POI включается при выполнении путевых точек
Исторические маршруты
- предварительноview путевые точки и их атрибуты, введя список избранного
- нажмите, чтобы начать и отобразить трассировку путевых точек в реальном времени.

Точная посадка
В процессе возврата домой оптический датчик потока будет соответствовать характеристикам посадочной площадки над домашней точкой. После успешного подбора дрон точно приземлится на посадочную площадку.
Пожалуйста, включите точную посадку в приложении, прежде чем использовать его.
Режим неподвижного крыла
В режиме неподвижного крыла дрон может летать только вперед, а не назад. Пользователь может использовать джойстики для управления скоростью и курсом полета, как показано ниже (режим Америки).
|
Левый джойстик |
толкать вверх | up |
| толкать вниз | вниз | |
| переключить влево | Поверните налево | |
| переключить вправо | Поверните направо | |
|
Правый джойстик |
толкать вверх | ускорить |
| толкать вниз | Замедление | |
| переключить влево | Поверните налево | |
| переключить вправо | Поверните направо |
Сборка и разборка
Пропеллеры
- Разложите передние и задние рычаги дрона.
- Прикрепите пропеллеры с серой маркировкой к монтажной базе двигателя с серыми метками на рычагах.
- Убедитесь, что пропеллер прижат к нижней части монтажного основания.
- Поверните винт до конца направления замка, пока пропеллер не получает подпрыгнула и заблокированы.
- Сильно нажмите на гребной винт и поверните гребной винт в направлении разблокировки, чтобы снять гребной винт.
- Примите установку реверсивного винта как обычную.ampле.
- Если пропеллеры повреждены, замените их, чтобы обеспечить безопасность и эффективность полета.
- Перед каждым полетом проверяйте, правильно ли установлен и закреплен пропеллер. Держитесь подальше от вращающегося пропеллера, чтобы не порезаться.
Аккумулятор
- Интеллектуальная батарея FIMI X8 SE 2022 имеет емкость 4500 мАч, объемtagе от 13.05В. В этом типе батареи используются высокоэнергетические элементы, усовершенствованная система управления батареями, а также функции зарядки и разрядки.
Собрать и разобрать
- Сильно нажмите на аккумулятор, после того, как аккумулятор будет установлен на место, раздастся щелчок.
- Чтобы извлечь аккумулятор, вам нужно нажать на защелку аккумулятора с обеих сторон аккумулятора, чтобы вытащить аккумулятор.
Модуль Мегафон
- Установите модуль мегафона в указанном направлении, раздастся щелчок.
- После успешной установки в приложении появится соответствующий значок, нажмите, чтобы установить соответствующие настройки.
- Нажмите на фиксатор на хвостовой части модуля и вытолкните модуль, чтобы снять его с дрона.

Карта Micro SD для дрона
- При установке SD-карты в дрон сначала разверните дужки дрона и откройте защитную крышку.
- Вставьте SD-карту лицевой стороной вверх в слот для SD-карты.
- При извлечении SD-карты нажмите на SD-карту, чтобы вытащить ее.
Примечание: Поддержка Micro SD (U3 и выше) 8 ~ 256 ГБ, рекомендуется использовать
- Сандиск Экстрим Про V30 32G
- Сандиск Экстрим V30 32G
- Samsung Про Эндуранс 32G
- Лексар Профессионал 1000X 32G
- Сандиск Экстрим Про V30 64G
- Сандиск Экстрим V30 64G
- Тошиба Эксерия Про 64G
Зарядка
- Подключите аккумулятор, зарядное устройство и кабель переменного тока, как показано ниже, и подключите зарядное устройство к розетке.
- Когда аккумулятор заряжен, индикаторы уровня заряда мигают.
- Когда аккумулятор полностью заряжен, индикаторы уровня заряда аккумулятора гаснут.
- Полная зарядка аккумулятора занимает около 2 часов.

Включение и выключение
- Короткое нажатие + длительное нажатие кнопки питания в течение 2 секунд для включения/выключения питания.
- Короткое нажатие для проверки уровня заряда батареи
- После полета температура аккумулятора высокая, поэтому подождите, пока температура аккумулятора опустится до комнатной температуры, или подождите, пока аккумулятор постоит в течение 30 минут, прежде чем заряжать.
- Оптимальный диапазон температур зарядки интеллектуального аккумулятора составляет 25±3 ℃, и зарядка в этом диапазоне температур может продлить срок службы аккумулятора.
- Заряжайте и разряжайте примерно каждые 3 месяца, чтобы обеспечить работоспособность аккумулятора.
- Умную батарею необходимо заряжать с помощью официального зарядного устройства Femto. FIMI не несет никакой ответственности за все последствия.
- По соображениям безопасности уровень заряда «умных» батарей должен быть низким (например, ниже 50%) во время транспортировки на большие расстояния или при длительной транспортировке.
Подвес и камера
- Камера
Камера оснащена 1/2.0-дюймовой CMOS-матрицей и широкоугольным объективом с эквивалентным фокусным расстоянием 25 мм. Она также поддерживает различные режимы съемки, включая покадровую, серийную, замедленную съемку, панорамную съемку и замедленную съемку для различных сценариев.
Наденьте и снимите защиту стабилизатора
Режим работы
- Режим следования:
Ось крена не движется вместе с дроном и всегда удерживает подвес горизонтально, что подходит для съемки стабильных видео. - Режим FPV:
Ось крена вращается вместе с дроном, обеспечивая вид от первого лица. view
Пульт
Благодаря эргономичному дизайну управлять им проще и точнее. Для подключения приложения нет сложной операции, просто подключите его, и оно работает. Полностью заряженный пульт дистанционного управления может работать около 4.5 часов.
Включение и выключение
- Короткое нажатие + длительное нажатие кнопки питания в течение 2 секунд для включения/выключения питания.
- Короткое нажатие для проверки уровня заряда батареи
Заряжать
- Подключите пульт дистанционного управления к адаптеру питания, как показано ниже.
- Когда ПДУ заряжается, индикаторы уровня заряда батареи мигают.
- когда ПДУ полностью заряжен, индикаторы уровня заряда батареи гаснут
- Полная зарядка ПДУ в выключенном состоянии занимает около 2.5 часов.
Собрать устройство
- Затяните мобильный телефон или подушечку на держателе мобильного устройства, выдвинув держатель влево.
- Откройте защитную крышку интерфейса в нижней части пульта дистанционного управления.
- Соедините телефон и ПДУ кабелем USB.
- Подключите дрон и обновите прошивку согласно инструкциям в приложении Fimi Navi 2020.
Примечание: Разъем для кабеля зарезервирован на правой стороне пульта дистанционного управления.
Запись и фотосъемка
- Нажмите кнопку съемки, чтобы сделать снимок. Фотография будет сделана, когда вы услышите 2 коротких звука.
- Нажмите кнопку записи, чтобы записать видео. Запись начинается, когда вы слышите 2 коротких звука. Нажмите еще раз, чтобы остановить запись с 4 короткими звуками.
- Угол наклона стабилизатора можно регулировать, перемещая левый диск вверх и вниз.
- Правый диск может регулировать EV / ISO.
Кнопки быстрого доступа


- Переключите кнопку автоматического возврата вправо, когда дрон находится в полете, дрон вернется в исходную точку.
- В процессе автоматического возврата переключите кнопку автоматического возврата влево, дрон будет зависать на месте и ждать инструкций стиков.
- Нажмите пятинаправленную кнопку вверх по умолчанию, чтобы получить доступ к карте или FPV.
- Нажмите пятинаправленную кнопку вниз по умолчанию до центра подвеса или вниз.
- Переключение пятипозиционной кнопки влево по умолчанию для включения / выключения интерфейса информации о батарее Переключение пятипозиционной кнопки вправо по умолчанию для включения / выключения интерфейса самопроверки Нажмите пятинаправленную кнопку по умолчанию в центре, чтобы включить / выключить медиа
- Правый диск для настройки значения EV / ISO
- Левый диск для регулировки угла наклона стабилизатора
- Когда кнопка автоматического взлета/посадки станет белой, ее можно нажать для взлета или приземления. Когда дрон соответствует условиям автоматического взлета, нажмите и удерживайте 2 секунды, чтобы взлететь. Когда дрон соответствует условиям автоматической посадки, нажмите и удерживайте 2 секунды, чтобы земля
- Когда дрон выполняет интеллектуальный полет, коротко нажмите эту кнопку, чтобы выйти.
Палки управления
Режим 1

Режим 3

Сопряжение пульта дистанционного управления
При замене нового пульта ДУ или дрона снова выполните сопряжение пульта ДУ и дрона, как показано ниже :
- Включите дрон
- Включите пульт дистанционного управления, нажмите и удерживайте кнопку питания в течение 15 секунд, пока не услышите постоянный звуковой сигнал и не начнет мигать красный индикатор кнопки питания.
- Короткое нажатие кнопки сопряжения кода на дроне, желтый свет на дроне гаснет
- Сопряжение кода выполнено успешно, когда кнопка питания на ПДУ становится белой, а желтый индикатор на дроне продолжает гореть.
Этот 5-контактный порт предназначен только для обновления прошивки, но X8 SE Drone автоматически оснащен функцией автоматического обновления. Поэтому нет необходимости использовать этот 5-контактный порт.
Дистанционное освещение
| Дистанционное освещение | Удаленный статус | |
| 1 | Красный индикатор кнопки питания горит | Слабый сигнал |
| 2 | Красный индикатор кнопки питания мигает | Не подключен к дрону |
| 3 | Красный индикатор кнопки питания мигает | RC Сопряжение или обновление прошивки |
| 4 | Горит белый индикатор кнопки питания | Нормальный сигнал |
| 5 | Мигает белый индикатор кнопки питания | Запись видео |
| 6 | Горит красная лампочка кнопки автоматического взлета/посадки | Автоматический взлет или посадка не включены |
| 7 | Кнопка автоматического взлета/посадки горит белым светом | Готов к автоматическому взлету |
ПРИЛОЖЕНИЕ
Загрузите и установите приложение Fimi Navi 2020, зарегистрируйте учетную запись пользователя FIMI перед входом в систему и выберите FIMI X8 SE 2020 для входа в устройство.
Интерфейс изображения
- Параметры полета в реальном времени
- Статус дрона
В полете: текущий статус рейса
GPS: текущий режим полета, включая GPS, VPU, ATTI.
: мощность дрона в реальном времени - Состояние сигнала и общие настройки
- Интерфейс карты
: Отображает ориентацию головки дрона, угол наклона, положение пульта дистанционного управления и другую информацию. Нажмите, чтобы переключить карту для отображения самолета в режиме реального времени. - Режим замера экспозиции коснитесь любого места интерфейса изображения для замера экспозиции. При появлении кнопки блокировки экспозиции щелкните, чтобы заблокировать значение.
- Параметры стабилизатора и изображения: отображение текущего кратного увеличения.
- Область действия камеры
3 : 26 : продолжительность видеозаписи.
- Интеллектуальный полет
Нажмите, чтобы войти в интеллектуальный интерфейс полета
- Режим дрона
- : Отображение текущего режима передачи самолета, нажмите для переключения между режимами «Спорт», «Нормальный», «Кино».
- Спорт: горизонтальная скорость топора 18 м/с, максимальная скорость подъема 5 м/с, максимальная скорость спуска 4 м/с.
- Нормальный: максимальная горизонтальная скорость 10 м/с, максимальная скорость подъема 4 м/с, максимальная скорость спуска 3 м/с.
- Кино: максимальная горизонтальная скорость 6 м/с, максимальная скорость подъема 1.5 м/с, максимальная скорость спуска 1.5 м/с.
- Ярлыки


Интерфейс карты

Летать
Подтвердите направление дрона
- Направление встроенной карданной камеры — это курс дрона.
- Как только дрон включен, курс можно определить по навигационным огням.
- Красный свет и зеленый свет указывают курс, а желтый свет — хвост.
Всегда держите хвост направленным на пользователя, чтобы избежать неправильного определения направления.
Предполетный осмотр
- Убедитесь, что аккумулятор дрона и пульт дистанционного управления полностью заряжены. Убедитесь, что гребной винт установлен правильно и что гребной винт не поврежден и не изношен.
- Убедитесь, что объектив камеры чист.
- Убедитесь, что SD-карта вставлена.
- Убедитесь, что передние и задние гребные винты выдвинуты на месте.
- Работают ли камера и подвес нормально после включения
- Убедитесь, что FIMI Navi 2020 работает нормально.
Ручной взлет
- Держите обе ручки внизу внутри неподвижно более 3 секунд, пропеллеры начнут вращаться.
- Отпустите оба стика после того, как пропеллеры начнут вращаться, и сильно нажмите левый стик вверх, чтобы взлететь.
- Во время полета отпустите обе ручки, чтобы зависнуть
- В любой момент во время управляемого полета отпустите ручки, и дрон автоматически зависнет.
Ручная посадка

- Медленно переместите левый стик вниз, чтобы приземлиться.
- Как только дрон приземлится, нажмите и удерживайте левый стик в течение 5 секунд, моторы остановятся.
- Советы по безопасности: Дрон не имеет водонепроницаемой функции. Пожалуйста, будьте осторожны с условиями посадки. В целях безопасности не приземляйтесь на наклонную плоскость.
Остановите пропеллеры в аварийной ситуации
Когда моторы не могут должным образом выключиться, переведите левый джойстик в нижнее внутреннее положение в максимальном диапазоне и одновременно нажмите кнопку автоматического взлета / посадки в течение 5 секунд, моторы остановятся.

Не выполняйте вышеуказанную операцию во время обычного полета, чтобы избежать остановки двигателей в воздухе.
Требования к условиям полета
- Дрон подходит для людей старше 18 лет, имеющих полную гражданскую дееспособность.
- Убедитесь, что вы находитесь на некотором расстоянии от людей, животных, деревьев, транспортных средств и зданий при использовании дрона. Пожалуйста, будьте осторожны, когда кто-то приближается.
- Держитесь подальше от аэропортов, железных дорог, автомагистралей, высотных зданий, опор и других опасных сред при работе с дроном.
- При управлении дроном держитесь подальше от мест со сложными электромагнитными сигналами, таких как базовые станции связи и мощные антенны.
- Высота и расстояние полета дрона до точки взлета будут ограничены соответствующими правилами и политиками.
- Не используйте этот продукт в месте и во время, запрещенных правилами и политиками.
- Для защиты законных прав и интересов пользователей соблюдайте инструкции по безопасности при использовании продукта.
- Не используйте дрон в плохую погоду, например, при сильном ветре, дожде, снеге или тумане.
- Пожалуйста, управляйте дроном в широком месте с хорошим сигналом GPS.
- Рекомендуется, чтобы пользователь совершил первый полет под руководством опытного профессионала.
Техническое обслуживание и калибровка
Калибровка пульта дистанционного управления
Пожалуйста, попробуйте откалибровать пульт дистанционного управления, если вы обнаружите несоответствия между управлением ручкой и полетом дрона.
- Выберите «RC Calibration» в меню пульта дистанционного управления.
- Нажмите «Старт», чтобы откалибровать центр, не перемещайте джойстики.
- Переход к калибровке стержней после успешной калибровки центра Переход к калибровке шкалы после успешной калибровки стержней
- Пожалуйста, выключите питание дрона перед калибровкой пульта дистанционного управления. Калибровка RC недоступна в полете
Калибровка компаса
- При изменении магнитного поля компас необходимо откалибровать для обеспечения безопасности полета. Если компас дрона необходимо откалибровать, приложение даст соответствующие подсказки и рекомендации. После входа в меню управления полетом выберите «Калибровка компаса», а затем выполните калибровку в соответствии с подсказками в приложении.
- Пожалуйста, подключите дрон перед калибровкой. Калибровка компаса недоступна в полете.
Калибровка кардана
- Нажмите «Калибровка стабилизатора» и войдите на страницу калибровки в меню настроек стабилизатора.
- После плавного размещения дрона нажмите, чтобы начать калибровку.
- Не перемещайте дрон во время процесса калибровки.
- После завершения калибровки в интерфейсе приложения отображается сообщение «Калибровка выполнена успешно».
- Если в интерфейсе приложения отображается сообщение «Ошибка калибровки», выполните повторную калибровку.
- Калибровка стабилизатора недоступна в полете.
Обслуживание гребных винтов
Пропеллеры изнашиваются. Когда они повреждены, своевременно заменяйте их, чтобы обеспечить безопасность и эффективность полета.
- Техническое обслуживание аккумулятора
Не бросайте аккумулятор в огонь; Не бейте аккумулятор; Емкость литиевой батареи значительно снижается в условиях низких температур. Не используйте аккумулятор, если он ниже 5 градусов. Не оставляйте аккумулятор под палящим солнцем. - Обслуживание кардана
Подвес X8 SE 2020, интегрированный с дроном, не требует разборки. Будьте осторожны, чтобы не поцарапать камеру при хранении дрона. Пожалуйста, держите камеру в чистоте для лучшего качества изображения. - Самопроверка с помощью дрона
Дрон переходит в режим самопроверки при включении дрона. Если самопроверка не удалась, приложение отобразит соответствующие подсказки.
Обновление прошивки
Пожалуйста, регулярно проверяйте версию прошивки. Приложение Fimi Navi 2020 будет предлагать новую версию, чтобы предложить пользователям выполнить обновление. Загрузите новую прошивку, когда приложение подключено к дрону и пульту дистанционного управления.
Базовая спецификация
Это устройство соответствует Части 15 Правил FCC. Эксплуатация допускается при соблюдении следующих двух условий:
- Это устройство не может вызывать вредных помех и
- Это устройство должно принимать любые получаемые помехи, включая помехи, которые могут вызвать нежелательную работу. Предупреждение ФКС:
Любые изменения или модификации, не одобренные явно стороной, ответственной за соответствие, могут привести к аннулированию права пользователя на эксплуатацию оборудования.
Примечание: Это оборудование было протестировано и признано соответствующим ограничениям для цифровых устройств класса B в соответствии с частью 15 Правил FCC. Эти ограничения разработаны для обеспечения разумной защиты от вредных помех в жилых помещениях. Это оборудование генерирует, использует и может излучать радиочастотную энергию и, если оно установлено и используется не в соответствии с инструкциями, может вызывать вредные помехи для радиосвязи. Однако нет гарантии, что помехи не возникнут в конкретной установке.
- Если данное оборудование создает вредные помехи для приема радио- или телевизионных сигналов, что можно определить путем выключения и включения оборудования, пользователю рекомендуется попытаться устранить помехи одним или несколькими из следующих способов:
- Переориентируйте или переместите приемную антенну.
- Увеличьте расстояние между оборудованием и приемником.
- Подключите оборудование к розетке в цепи, отличной от той, к которой подключен приемник.
- Обратитесь за помощью к дилеру или опытному радио-/телевизионному технику.
Устройство прошло оценку
Документы/Ресурсы
Ссылки
- ФИМИ X8SE 2022 V2
- Руководство пользователя