
Первый запуск
Смотрите видеоинструкцию как собрать, зарядить и использовать новый беспроводной пылесос Dyson V12 Detect Slim™.
Обратите внимание, что расцветка вашего пылесоса может отличаться от той, что показана в видео, но процесс его использования будет таким же.
Как установить док-станцию для беспроводного пылесоса.
Док-станция позволяет удобно хранить и заряжать устройство между уборками. На ней также можно хранить две дополнительные насадки.
Полностью зарядите аккумулятор перед первым использованием.
Это важный шаг, который поможет системе управления батареей правильно рассчитать оставшееся время работы.
Советы по использованию вашего аккумулятора
Заряжайте между уборками — полная зарядка аккумулятора может занять до 4,5 часов. Когда отображается зеленая галочка, зарядка завершена.
Чередуйте — если у вас есть дополнительный аккумулятор, рекомендуется полностью зарядить его и регулярно чередовать использование аккумулятора.
Хранение аккумуляторов — если вы не используете аккумулятор, рекомендуется хранить их с зарядом около 30%.
Позвольте устройству остыть — не устанавливайте аккумулятор сразу на зарядку после продолжительной непрерывной уборки (в случае нагрева).
Устраивайте перерыв — разряжайте батарею полностью хотя бы раз в месяц, чтобы продлить срок ее службы.
Температура важна — рекомендуем хранить ваш пылесос где температура варьируется между 18 и 28°C, избегая солнечного света и отопительных приборов.
Оптимальный режим — постоянное использование режима высокой мощности ускоряет износ батареи, рекомендуем производить повседневную уборку в режиме «Авто» или «Эко».
Советы по эксплуатации вашего устройства
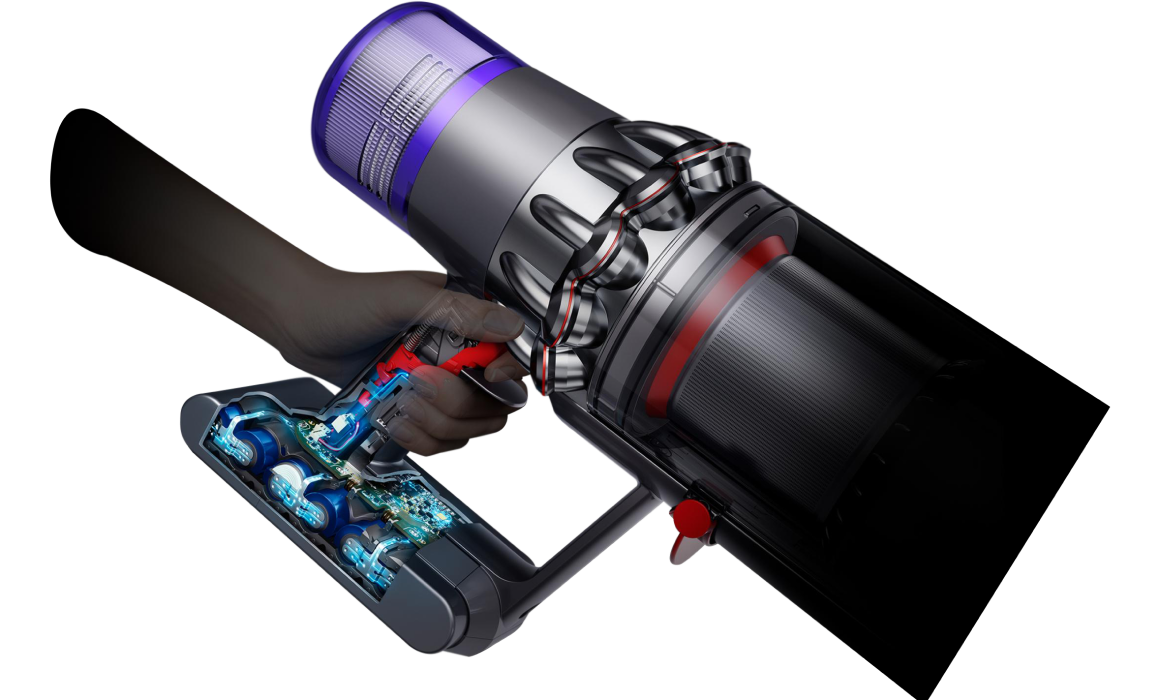
Чтобы работать наилучшим образом, ваш беспроводной пылесос Dyson V12 Detect Slim™ нуждается в простом регулярном обслуживании. В него входит очистка контейнера для пыли при достижении отметки Max, удаление мусора со щетки и ежемесячная промывка фильтра.
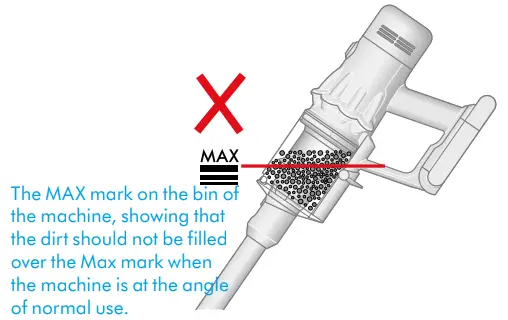
Следите за уровнем грязи в контейнере и опустошайте его, когда он достигает отметки MAX, не допуская переполнения.
Как помыть фильтр беспроводного пылесоса Dyson V12 Detect Slim™?
При нормальном использовании блок фильтра следует промывать не реже одного раза в месяц. Как это сделать, смотрите на данном видео.
Рекомендуем регулярно ухаживать за насадками пылесоса.
Чистые насадки не будут забирать дополнительной энергии вашего аккумулятора, тем самым Вы сможете использовать пылесос долго и без потери мощности.
Как почистить насадку с высоким крутящим моментом?
Универсальную насадку Digital Motorbar™ для пола и ковра можно протереть влажной тканью без ворса.
Устранение проблем
Устранение засоров
Если в воздушных путях вашей машины возникнет засор, на ЖК-экране появится предупреждение. На экране будет анимация, которая покажет, какие пути воздушного потока следует проверить.
Что делать, если на экране отображается сообщение «фильтр установлен не корректно»
Manual
View the manual for the Dyson V12 Detect Slim here, for free. This manual comes under the category vacuum cleaners and has been rated by 28 people with an average of a 8.1.
This manual is available in the following languages: English. Do you have a question about the Dyson V12 Detect Slim or do you need help?
Ask your question here
Dyson V12 Detect Slim specifications
Below you will find the product specifications and the manual specifications of the Dyson V12 Detect Slim.
The Dyson V12 Detect Slim is a dry cleaning type vacuum cleaner designed for use on both carpet and hard floor surfaces. It features a turbo function and offers three different cleaning settings. The vacuum utilizes cyclonic technology to separate dirt and debris, and it has a bagless dust container for easy disposal. The dry dirt capacity of the vacuum is 0.35 liters.
Powered by a battery, the Dyson V12 Detect Slim has a runtime of 60 minutes and requires approximately 4 hours to fully charge. The vacuum is available in a Sprayed Gloss Gold /Gloss Gold color.
One notable feature of the Dyson V12 Detect Slim is its washable filter, allowing for easy maintenance and extended use. Additionally, the vacuum is wall mountable, providing convenient storage options.
Overall, the Dyson V12 Detect Slim offers a versatile and efficient cleaning experience. With its ability to tackle various surfaces and its cyclonic dirt separation method, this vacuum provides reliable performance. Its compact and sleek design, along with the option to mount it on the wall, enhances its convenience and storage capabilities.
Please note that the provided information is a factual description of the Dyson V12 Detect Slim and does not offer subjective opinions or judgments.
Dust container type
Bagless
General
| Brand | Dyson |
| Model | V12 Detect Slim | 394461-01 |
| Product | vacuum cleaner |
| EAN | 5025155070505 |
| Language | English |
| Filetype | User manual (PDF) |
Performance
| Cleaning type | Dry |
| Cleaning surfaces | Carpet, Hard floor |
| Turbo | Yes |
| Number of settings | 3 |
| Vacuum air filtering | — |
| Dirt separating method | Cyclonic |
Design
| Dust container type | Bagless |
| Dirt capacity dry | 0.35 L |
| Product color | Gold |
| Color name | Sprayed Gloss Gold /Gloss Gold |
| Built-in display | Yes |
| Display type | LED |
Power
| Runtime | 60 min |
| Power source | Battery |
| Charging time | 4 h |
| Suction power | 150 AW |
| Battery voltage | — V |
Ergonomics
| Washable filter | Yes |
| Wall mountable | Yes |
| Removable filter | Yes |
| Easy to empty container | Yes |
Weight & dimensions
| Height | Blablabla mm |
| Width | 250 mm |
| Depth | 252 mm |
| Weight | 2400 g |
Packaging data
| Package height | 271 mm |
| Package width | 806 mm |
| Package depth | 154 mm |
| Package weight | 5580 g |
Packaging content
| Vacuum wand assembly | Yes |
| Batteries included | Yes |
| Charging base | Yes |
| Upholstery nozzle included | Yes |
| Vacuum brushes included | Motorized brush |
| Crevice tool | Yes |
show more
Frequently Asked Questions
Can’t find the answer to your question in the manual? You may find the answer to your question in the FAQs about the Dyson V12 Detect Slim below.
How do I empty the dustbin of the Dyson V12 Detect Slim?
To empty the dustbin of the Dyson V12 Detect Slim, press the release button located near the top of the bin. Hold the vacuum over a trash bin, and the bottom lid will open, allowing the debris to fall out. Close the lid securely after emptying.
How do I maintain the battery life of the Dyson V12 Detect Slim?
To maximize battery life, avoid leaving the vacuum on charge continuously. It is recommended to charge the vacuum fully before each use and unplug it once fully charged. If not in use for an extended period, store the vacuum in a cool, dry place with the battery at approximately 50% charge. Regularly checking and cleaning the battery contacts can also help maintain optimal performance.
How do I assemble the Dyson V12 Detect Slim vacuum cleaner?
To assemble the Dyson V12 Detect Slim, simply click the wand into the main body until it locks securely in place. Then attach the desired cleaning tool by aligning it with the accessory port and pushing firmly until it clicks.
How do I clean or replace the filters on the Dyson V12 Detect Slim?
To clean the filters, first, remove the bin from the vacuum and press the filter release button. Rinse the filter under cold water until the water runs clear, then squeeze out any excess water and let it air dry for at least 24 hours before reinserting. Replacement filters are available for purchase if necessary.
How long is the runtime of the Dyson V12 Detect Slim?
The Dyson V12 Detect Slim has a runtime of 60 minutes. This provides users with an extended cleaning period without the need to recharge frequently, giving them more efficiency and convenience.
How do I troubleshoot if the Dyson V12 Detect Slim loses suction power?
If you experience a loss of suction power, first ensure that the dustbin is empty and the filters are clean. Check for any clogs or blockages in the wand, cleaning tools, or hose. Make sure the brush bar is free from tangled hair or debris. If the issue persists, contact Dyson customer support for further assistance.
Does the Dyson V12 Detect Slim have a turbo feature?
Yes, the Dyson V12 Detect Slim has a turbo feature. This means it has a powerful suction ability that can effectively clean carpets and hard floors.
How many settings does the Dyson V12 Detect Slim have?
The Dyson V12 Detect Slim has 3 settings. This allows users to adjust the suction power based on their cleaning needs, providing versatility and customization.
Is the Dyson V12 Detect Slim a bagless vacuum cleaner?
Yes, the Dyson V12 Detect Slim is a bagless vacuum cleaner. This means it utilizes a dust container instead of a traditional bag, making it more convenient and cost-effective for users.
What is the dirt capacity of the Dyson V12 Detect Slim for dry cleaning?
The dirt capacity for dry cleaning of the Dyson V12 Detect Slim is 0.35 L. Although it is not the largest capacity, it is still sufficient for regular cleaning tasks and ensures easy emptying.
What is the weight of the Dyson V12 Detect Slim?
The Dyson V12 Detect Slim has a weight of 2400 g.
What is the height of the Dyson V12 Detect Slim?
The Dyson V12 Detect Slim has a height of Blablabla mm.
What is the width of the Dyson V12 Detect Slim?
The Dyson V12 Detect Slim has a width of 250 mm.
What is the depth of the Dyson V12 Detect Slim?
The Dyson V12 Detect Slim has a depth of 252 mm.
How often should I check the filter?
A clean filter is important to maintain the vacuum cleaner’s suction power. Therefore, check the filter regularly. When a filter is clogged, dust absorption decreases and energy consumption increases.
My Dyson vacuum is losing suction. Why is that?
Your Dyson vacuum cleaner losing suction power can be due to the following causes:
— The suction power is not set to maximum
— The dust container or dust bag is full
— The hose, brush or tube is clogged
What do I do with a smelly vacuum cleaner?
A commonly used method is to put a little washing powder in the dust container or the dust bag.
How often should I vacuum my house?
For allergy sufferers, vacuuming the house at least twice a week is recommended.
Is the manual of the Dyson V12 Detect Slim available in English?
Yes, the manual of the Dyson V12 Detect Slim is available in English .
Is your question not listed? Ask your question here
In the box
Your machine will come with one or more of these cleaner heads – not all will be included.
| Combination tool
Two tools in one – wide nozzle and brush, for quick switching between cleaning and dusting tasks around your home or car. |
|
| Crevice tool Engineered for precise cleaning around tricky edges and into hard-to-reach narrow spaces. |
|
| Hair screw tool
Anti-tangle conical brush bar spirals hair off and into the bin. Motor-driven cleaning for smaller spaces. |
|
| Soft dusting brush
Enclosed in a skirt of soft nylon bristles for gentle, vacuum-assisted |
|
| Stubborn dirt brush
Stiff nylon bristles dislodge ground-in dirt from coarse carpets, high traffic areas, and car interiors. |
|
| Wand clip |
Getting started

The screen, at the end of the main body, showing a graph of the sizing and counting of the dust particles.
Power modes
Your machine has three power modes for different tasks. Change power modes quickly using a single button.

Eco-mode
Maximum run time for longer cleans all-around your home.
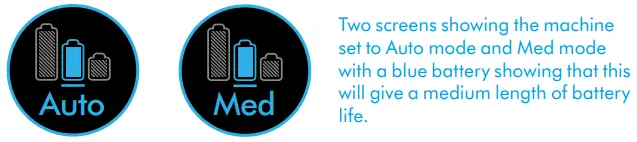
Auto and Med mode
The optimum balance of power and run time. Attach your cleaner head or Hair screw tool to activate the Auto mode. Suction power automatically adapts to dust levels.

Boost mode
Designed for intensive spot cleaning of ground-in dirt
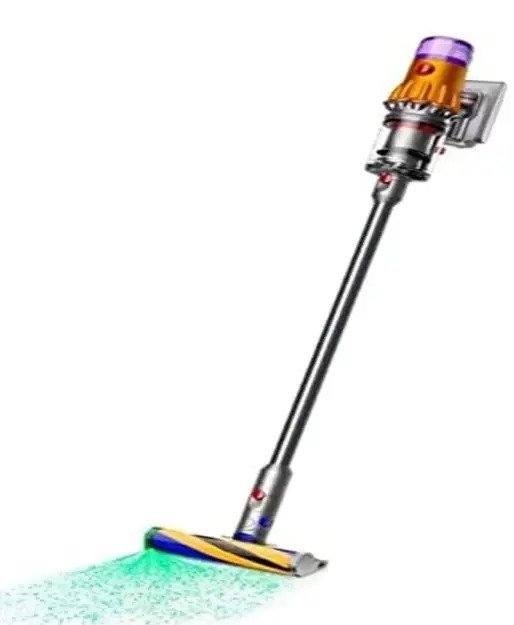
Turn your laser on and off Turn your laser on or off with the slider switch on your cleaner head.
Class 1 laser product – safe for pets and humans. Avoid looking directly into the beam.
Measures microscopic dust particles
A piezo sensor continuously sizes and counts dust particles at the inlet.
Attach your cleaner head or Hair screw tool and use in Auto mode to automatically increase suction power when needed. 1
1. Quantity and size of dust displayed on-screen vary depending on usage. Automatic suction adaptation only occurs in auto mode.
The LCD screen
The LCD screen shows your particle count information and performance, including the cleaning mode selected, remaining run time, filter maintenance, and blockage information.
Settings menu
Control the settings on your machine using the button.
To enter the settings menu, press and hold the button until the menu screen appears. Tap to scroll through the options available.
Particle count and graph
Select to turn the measuring and counting of particles on and off. Turn off the measuring and counting of particles to stop your machine from automatically adjusting suction power and turn off the graph.
Adjust reactive suction power sensitivity.
Use the selection button to change how sensitive the particle count is. This will change how your machine automatically reacts to the dust particles.
For more information and support for your machine
go online: www.dyson.com/support
Change language
To change the language on your screen, press the button and hold until the language list appears. Release the button.
Tap the button to scroll through the language list to your preferred language. Press and hold the button until the countdown ends.
A green tick will appear on the screen to show your language selection is complete.
To cancel your selection, release the button during the countdown.
Change alert settingsYou can turn the alert motor pulse off. Your motor will no longer pulse but run time alert information will continue to be displayed on the LCD screen when your machine needs your attention.Turning off alerts will not turn off the blockage alert pulsing. This is to ensure you clear any blockages, preventing damage to your machine.Tap to scroll through the settings menu. Select the ‘Alerts’ option.Scroll to select on or off. Hold the button until the countdown ends and a tick appears on the screen. To cancel your selection, release the button during the countdownRun time countdown
When the battery needs charging, your machine will pulse three times and a low run time icon will appear on the screen.When your battery is empty, a red warning icon will appear on the screenWhen the Particle count and graph are turned on, the low run time will be in amber and red when in Boost mode.Battery health
To get the best performance and life from your battery, use Eco or Auto/Med mode.Alerts
The alerts you might see are:
Filter – the filter isn’t fitted correctly or needs cleaning.
Blockage – your machine has a blockage that needs removing.
Exit settings menu
To exit the settings menu. Tap to scroll through the selection menu.
Select ‘Exit menu’.
Charging your machine
It’s important to fully charge your new machine before using it for the first time and after every clean. This is because the battery and monitoring system’s algorithm ‘learns’ over time, and fully charging your machine helps it to more accurately calculate and display the remaining run time.
Connect to the charger either directly or in the dock.
The blue LEDs on either side of the battery will flash during charging.
When the battery is fully charged, both LEDs will light for 5 seconds.
Your battery is fully charged when the display shows 100%.
Your machine won’t operate or charge if the ambient temperature is below 5°C(41°F). This is designed to protect both the motor and battery.
Changing your click-in battery
If you have additional click-in batteries, we recommend that you alternate the batteries to maintain even performance.
Removing your battery
Push the Battery release button on the handle and slide the battery off your machine.
Charge the battery.
Refitting your battery
Align your battery with the handle and slide it in. Push firmly until it clicks into place.
Caring for your floors
Check that the underside of the cleaner head or tool is clean and free from any objects that may cause damage.
Before vacuuming your flooring, rugs, and carpets, check the manufacturer’s recommended cleaning instructions.
The brush bar on your machine can damage certain carpet types and floors. Some carpets will fuzz if a rotating brush bar is used when vacuuming. If this happens, we recommend vacuuming without the motorized floor tool and consulting with your flooring manufacturer.
Emptying your bin
Empty as soon as the dirt reaches the MAX level – don’t overfill. Using your machine when the dirt is above the MAX line may affect the performance and require more frequent filter washing.
Overfilling your bin could result in inaccurate readings on the particle graph.
Remove your wand
Press the red wand release button, on the top of the wand, and pull the wand away from the bin.
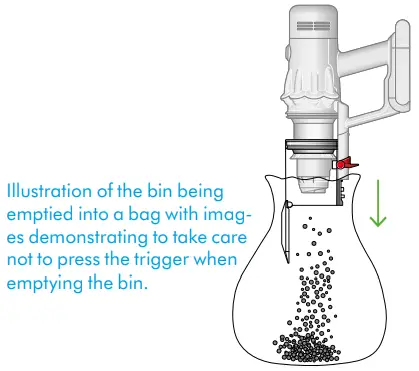
Release the dirt
Hold the machine over the bin, pointing downwards.
Firmly push the red bin release button. The bin will slide down, cleaning the shroud as it goes, and the bin base will open.
The bin base won’t open if the red bin release button isn’t pushed down all the way.
Minimize dust contact
Cover your bin tightly in a dust-proof bag while you empty. Remove the bin carefully seal the bag tightly and dispose of it.
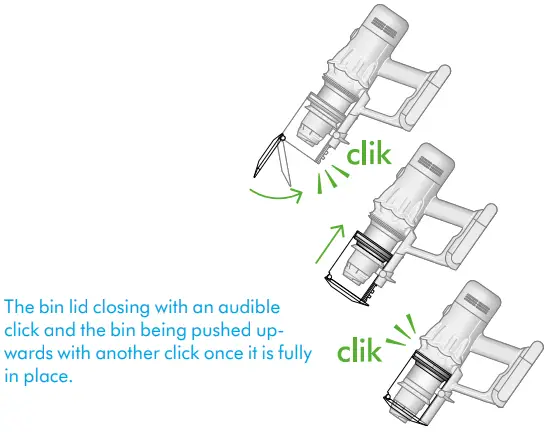
Close your bin
Push the bin base upwards until the bin and bin base click into place.
Cleaning your bin
Remove your bin
If it is necessary to clean your bin, empty it as shown in the ‘Emptying your bin’ section.
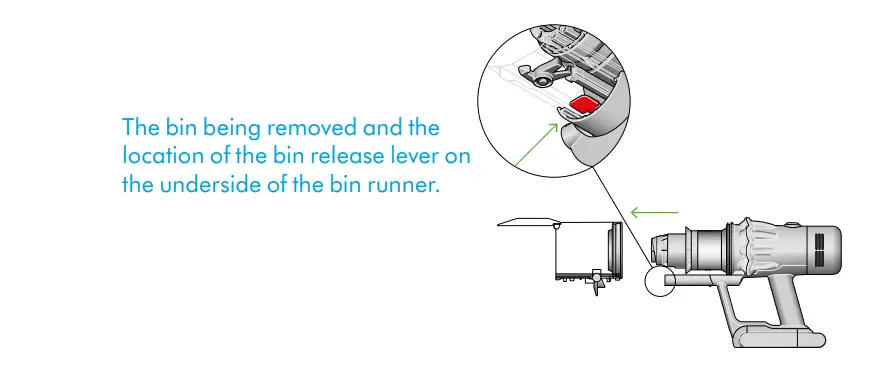
Press the red button located on the bin runner to release the bin and slide your bin off the runner.
Only clean your bin with a damp cloth.
Make sure that the bin and seals are completely dry before replacing.
Refit your bin
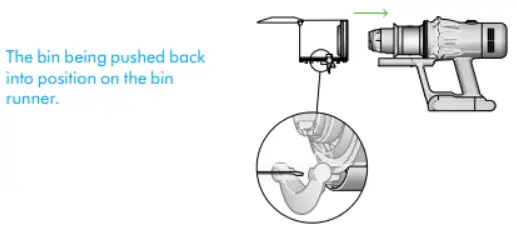
Insert the spine on to the bin runner.
Close your bin by pushing the bin base upwards until the bin and bin base click into place.
Your bin isn’t dishwasher safe and the use of detergents, polishes or air fresheners to clean your bin isn’t recommended, as it may damage your machine.
Clearing blockages
Disconnect your machine from the charger before looking for blockages.
Be careful not to touch the trigger and be aware of sharp objects.
Leave your machine to cool down before looking for blockages.
Don’t use your machine when looking for blockages as this could cause injury.
Remove the bin and check for blockages in the main body of your machine.
Make sure any blockages are completely cleared and all parts are fitted before using your machine.
If your machine detects a blockage, the motor will pulse and you won’t be able to use your machine until the blockage has been cleared.
If you try to use your machine when the motor is pulsing, it will automatically cut out.
To check for blockages in the main body of the machine, remove the bin following the instructions in the Cleaning your bin section and remove the blockage.
If you cannot clear an obstruction, you may need to remove the brush bars.
Refit all parts securely before using your machine.
Clearing blockages isn’t covered by your guarantee.
Wash your filter at least once a month to maintain optimum suction power.
For more information and support for your machine go online: www.dyson.com/support
Important: your filter must be completely dry before you put it back into the
machine. Your machine could be damaged if used with a damp filter.
Twist off your filter
Twist your filter anti-clockwise and pull it away from your machine.
Tap your filter
Before washing your filter, tap it gently over a bin to remove any loose dust and debris.

Wash your filter
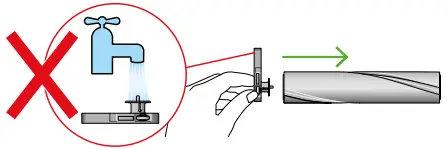
Wash with warm, running tap water – gently rubbing your filter with your fingto remove the dirt.
Fill and shake
Place your hand over one end of your filter.
Fill the filter with warm tap water.
Place your hand over the open end of the filter and shake it firmly to remove trapped dirt and debris.

Repeat these steps until the water runs clear.
Shake out the water
Empty the filter and shake firmly to remove excess water.
Shake with the filter in both an upward and downward position.
Keep shaking until there’s no water coming from the filter.
Dry your filter
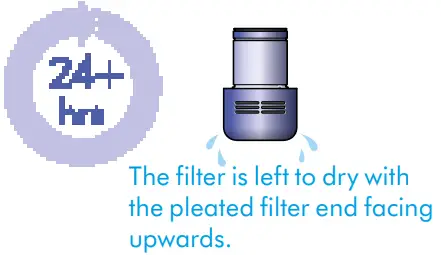
Leave your filter to dry for at least 24 hours in a well-ventilated, warm place.
Don’t dry your filter in a tumble dryer, microwave or near a naked flame.
Important: your filter must be completely dry before you put it back into the machine. Your machine could be damaged if used with a damp filter.
Washing your Laser Slim Fluffy™ brush bar
Your Laser Slim Fluffy™ cleaner head has a washable brush bar. To maintain optimum performance, check and wash your brush bar regularly.
Make sure your machine is disconnected from the charger and take care not to touch the trigger.
Remove your brush bar
Don’t put any part of your machine in a dishwasher or use detergents, polishes or air fresheners.
Press the cleaner head release button on the end of the wand. Place the cleaner head upside down.
Push the end cap up fully and pull the brush bar out of the cleaner head.
Wash and dry your brush bar
Hold your brush bar under running water and gently rub to remove any lint or dirt.
Stand your brush bar upright as shown. Leave to dry completely for at least 24 hours.
Replace your brush bar
Before replacing, check that your brush bar is completely dry.
Reattach the end cap to your brush bar.
Slide your brush bar into the cleaner head. Push the end cap back down to the closed position.
Cleaning your laser lens
To maintain optimum performance, keep your laser lens clean. Only clean
the lens when the cleaner head is not attached to your machine.
Use a soft, dry, lint-free cloth to wipe the lens.

Don’t put any part of your machine in a dishwasher or use detergents, polishes or air fresheners.
Wipe with a damp, lint-free cloth, without touching the connector end.
Make sure your tools are completely dry before using.
Clearing blockages from your
Your Hair screw tool doesn’t have a washable brush bar. To maintain optimum performance, check your brush bar regularly and clear any obstructions.
Make sure your machine is disconnected from the charger and take care not to touch the trigger.
Remove the cover and brush bar
Remove the Hair screw tool from the wand or machine.
Push the base plate open. Press the red lever down to release the cleaner headcover.
Pull the cleaner headcover off the main body of the tool.
Look for obstructions
Pull your brush bar firmly to remove it from the main body.
Check and remove any obstructions from all three parts of your Hair screw tool.
Your Hair screw tool isn’t washable. Wipe over with a damp lint-free cloth.
Don’t put any part of your machine in a dishwasher or use detergents, polishes, or air fresheners.
Reassemble Hair screw tool
Looking after your machine
To always get the best performance from your machine, it’s important to clean it regularly and check for blockages.
- Look after your machine
If your machine is dusty, wipe with a damp lint-free cloth.
Check for blockages in the cleaner head, tools, and main body of your machine.
Wash your filter regularly and leave it to dry completely.
Don’t use detergents or polishes to clean your machine. - Look after your battery
To get the best performance and life from your battery, use Eco or Auto/Med mode.
Your machine won’t operate or charge if the ambient temperature is below 5°C(41°F). - This is designed to protect both the motor and battery.
Your serial numbers
You can find your serial numbers on your machine, battery, and charger.
Use your serial number to register.
For more information and support for your machine go online: www.dyson.com/support
FAQS
How well can you vacuum under a bed?
We have platform beds and it’s a bit difficult to vacuum under. All in all though, I love this vacuum cleaner! It is super light and convenient to use.
Does Dyson V12 convert to handheld?
yes
Do you have to hold the on button while vacuuming the whole time??
No. One button press to turn it on then another to turn it off.
Do you have to hold the on button while vacuuming the whole time??
A hard floor, carpet and pet vac attachment as well as two small attachments on the base.
What exact attachments does this unit come with?
You can buy spare batteries. However, they don’t just pop out like battery power tools.
The battery in this is fixed and screwed in. You’d need to unscrew it every time you changed the battery.
Can you get a spare battery? Can the battery be swapped out like with battery powered tools?
It comes with many but not all of the Dyson attachments. Please consult the Amazon page for this model, as it will show you which ones it includes. It’s a great little machine!
Does it come with all the attachments that Dyson sells with the vaccum included??
Not certain of the actual weight but it’s very light in weight and yet very heavy duty for performance! I’d estimate the weight to be around 8-10 lbs.
What’s the body weight??
We have platform beds and it’s a bit difficult to vacuum under. All in all though, I love this vacuum cleaner! It is super light and convenient to use.
How well can you vacuum under a bed?
The unit will run at a consistent power level or variable power level if running by the dirt sense or as you decide by the power selection throughout the battery charge. It will maintain.
Does this have to be fully charged for maximum suction power?
No problem at all.
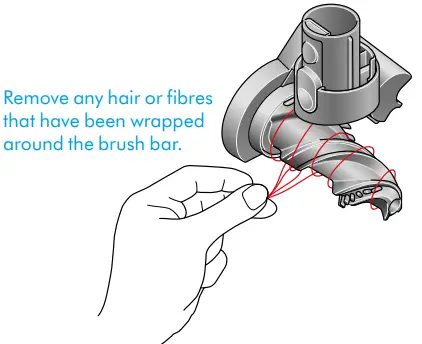
How hard is it to get hair out of the main roller?
yes so far
Do attachments from older models fit the ultra slim (e.g. dc44)?
You can have one battery charging while using another since the batteries are removable. One battery plugged the charging station or just plugged straight in (since you don’t have to use a charging station) while the other is in use. When one runs out, swap them.
Can you charge and change a second batterry?
Yes it does, you can mount the charger base to the wall or just use the charger by itself and plug it in
Table of Contents
- Dyson V12 Detect Slim Vacuum
- In the box
- Getting started
- The LCD screen
- Charging your machine
- Changing your click-in battery
- Caring for your floors
- Emptying your bin
- Cleaning your bin
- Clearing blockages
- Washing your filter
- Washing your Laser Slim Fluffy™ brush bar
- Cleaning your tools
- Clearing blockages from your Hair screw tool
- Looking after your machine
- References
- Read User Manual Online (PDF format)
- Download This Manual (PDF format)
Dyson V12 Detect Slim Vacuum

In the box
Your machine will come with one or more of these cleaner heads not all will be
included.


Some tools may not be included.
You can buy additional tools at
www.dysoncanada.ca


Getting started
Power modes
Your machine has three power modes for different tasks. Change power modes
quickly using a single button.
The screen showing the machine set to Eco mode with a full battery in green to
show that this will give the longest battery life of the three modes.
Eco mode
Maximum run time for longer cleans all around your home.

Two screens showing the machine set to Auto mode and Med mode with a blue
battery showing that this will give a medium length of battery life.
Auto and Med mode
The optimum balance of power and run time. Attach your cleaner head or Hair
screw tool to activate Auto mode. Suction power automatically adapts to dust
levels.
The screen showing the machine set to Boost mode with a red battery to show
that this will give the shortest battery life of the three modes.
Boost mode
Designed for intensive spot cleaning of ground–in dirt.
Turn your laser on and off
Turn your laser on or off with the slider switch on your cleaner head.
Class 1 laser product – safe for pets and humans. Avoid looking directly into
the beam.
- Location of the Selection button on the screen on the filter end of the machine.
- Diagram showing the connection of the wand onto the main body, with the wand release button aligned with the top of the main body.
- Arrow showing the end of the wand connecting to the cleaner head.
- The screen, on the end of the main body, showing a graph of the sizing and counting of the dust particles.
The LCD screen
The LCD screen shows your particle count information and performance,
including the cleaning mode selected, remaining run time, filter maintenance
and blockage information.The Selection button on the screen being pressed.
Settings menu
Control the settings on your machine using the button.
To enter the settings menu, press and hold the button until the menu screen
appears. Tap to scroll through the options available.
Particle count and graph
Select to turn the measuring and counting of particles on and off. Turn off
the measuring and counting of particles to stop your machine automatically
adjusting suction power and turn off the graph.
Adjust reactive suction power sensitivity
Use the selection button to change how sensitive the particle count is. This
will change how your machine automatically reacts to the dust particles.
For more information and support for your machine go online:
https://www.dysoncanada.ca/en/support
Change language
To change the language on your screen, press the button and hold until the
language list appears. Release the button.
Tap the button to scroll through the language list to your preferred language.
Press and hold the button until the countdown ends.
A green tick will appear on the screen to show your language selection is
complete.
To cancel your selection, release the button during the countdown.
Two screens, the first with the language list and then the tick screen to show
that the language has been successfully changed.
Change alert settings
You can turn the alert motor pulse off. Your motor will no longer pulse but
run time alert information will continue to be displayed on the LCD screen
when your machine needs your attention.
Turning off alerts will not turn off the blockage alert pulsing. This is to
ensure you clear any blockages, preventing damage to your machine.
Tap to scroll through the settings menu. Select the ‘Alerts’ option.
Scroll to select on or off. Hold the button until the countdown ends and a
tick appears on the screen. To cancel your selection, release the button
during the countdown.
The screen with an amber warning triangle to demonstrate an alert.
Run time countdown
When the battery needs charging, your machine will pulse three times and a low
run time icon will appear on the screen.
When your battery is empty, a red warning icon will appear on the screen.
- The screen with a battery time remaining shown as a number and as a half filled battery.
- A red screen with an icon with a plug being connected to the power supply. This demonstrates the battery is empty and needs charging.
When Particle count and graph is turned on, low run time will be in amber and
red when in Boost mode.
Battery health
To get the best performance and life from your battery, use Eco or Auto/Med
mode.
The battery health is shown on the batteries on the screen.
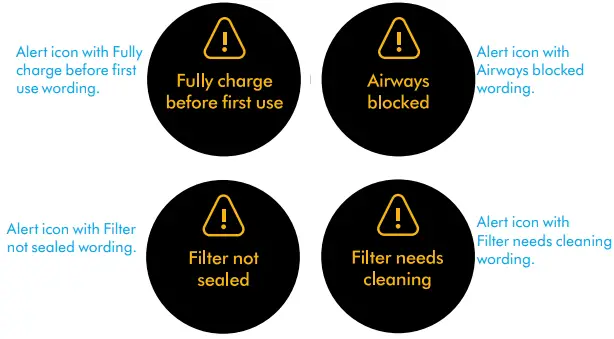
Alerts
The alerts you might see are:
-
Filter – the filter isn’t fitted correctly, or needs cleaning.
-
Blockage – your machine has a blockage that needs removing.
-
Alert icon with Fully charge before first use wording.
-
Alert icon with Filter not sealed wording.
-
Alert icon with Airways blocked wording.
-
Alert icon with Filter needs cleaning wording.
Exit settings menu
To exit the settings menu. Tap to scroll through the selection menu. Select
‘Exit menu’. Screen with Exit menu wording and return icon.
Charging your machine
It’s important to fully charge your new machine before using it for the first
time, and after every clean. This is because the battery and monitoring
system’s algorithm ‘learns’ over time, and fully charging your machine helps
it to more accurately calculate and display remaining run time.
- Connect to charger either directly or in the dock.
- The blue LEDs on either side of the battery will flash during charging.
- When the battery is fully charged, both LEDs will light for 5 seconds.
- Your battery is fully charged when the display shows 100%.
Your machine won’t operate or charge if the ambient temperature is below
5°C(41°F). This is designed to protect both the motor and battery.
- The charger connected from the power supply using the wall dock.
- The charger connected from the power supply directly into the front of the battery.
Changing your click-in battery
If you have additional click-in batteries, we recommend that you alternate the
batteries to maintain even performance.
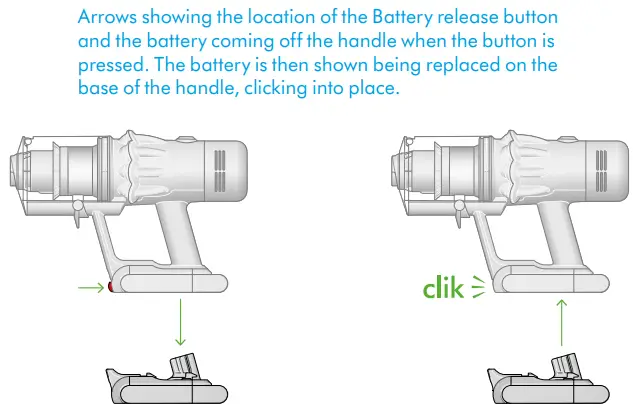
Arrows showing the location of the Battery release button and the battery
coming off the handle when the button is pressed. The battery is then shown
being replaced on the base of the handle, clicking into place.

Removing your battery
Push the Battery release button on the handle and slide the battery off your
machine.
Charge the battery.
Refitting your battery
Align your battery with the handle and slide it in. Push firmly until it
clicks into place.
Caring for your floors
Check that the underside of the cleaner head or tool is clean and free from
any objects that may cause damage.
Before vacuuming your flooring, rugs, and carpets, check the manufacturer’s
recommended cleaning instructions.
The brush bar on your machine can damage certain carpet types and floors. Some
carpets will fuzz if a rotating brush bar is used when vacuuming. If this
happens, we recommend vacuuming without the motorized floor tool and
consulting with your flooring manufacturer.
Emptying your bin
Empty as soon as the dirt reaches the MAX level – don’t overfill. Using your
machine when the dirt is above the MAX line may affect the performance
and require more frequent filter washing.
Overfilling your bin could result in inaccurate readings on the particle
graph.
Remove your wand
Press the red wand release button, on the top of the wand, and pull the wand
away from the bin.
Release the dirt
Hold the machine over the bin, pointing downwards.
Firmly push the red bin release button. The bin will slide down, cleaning the
shroud as it goes, and the bin base will open.
The bin base won’t open if the red bin release button isn’t pushed down all
the way.
Minimize dust contact
Cover your bin tightly in a dust proof bag while you empty. Remove the bin
carefully, seal the bag tightly and dispose.
Close your bin
Push the bin base upwards until the bin and bin base click into place.
The MAX mark on the bin of the machine, showing that the dirt should not be
filled over the Max mark when the machine is at the angle of normal use.
Illustration of the bin being emptied into a bag with images demonstrating to
take care not to press the trigger when emptying the bin.
The bin lid closing with an audible click and the bin being pushed upwards
with another click once it is fully in place.
Cleaning your bin
Remove your bin
If it is necessary to clean your bin, empty it as shown in the ‘Emptying your
bin’ section.
- Press the red button located on the bin runner to release the bin and slide your bin off the runner.
- Only clean your bin with a damp cloth.
- Make sure that the bin and seals are completely dry before replacing.
Refit your bin
Insert the spine on to the bin runner.
Close your bin by pushing the bin base upwards until the bin and bin base
click into place.
Your bin isn’t dishwasher safe and the use of detergents, polishes or air
fresheners to clean your bin isn’t recommended, as it may damage your machine.
The bin being removed and the location of the bin release lever on the
underside of the bin runner
The bin being pushed back into position on the bin runner.
Clearing blockages
Disconnect your machine from the charger before looking for blockages. Be
careful not to touch the trigger and be aware of sharp objects.
Leave your machine to cool down before looking for blockages.
Don‘t use your machine when looking for blockages as this could cause injury.
Remove the bin and check for blockages in the main body of your machine.
Make sure any blockages are completely cleared and all parts are fitted before
using your machine.
If your machine detects a blockage, the motor will pulse and you won’t be able
to use your machine until the blockage has been cleared.
If you try to use your machine when the motor is pulsing, it will
automatically cut out.
With the bin removed, check for blockages, paying particular attention to the
air inlet, located at on the right–hand side of the machine just below the
point where the bin joins the main body of the machine.
With the wand removed from the machine, check for blockages at both ends of
the wand.
Turn the cleaner head over to check for obstructions on the brush bar and air
inlet.
Washing your filter
Wash your filter at least once a month to maintain optimum suction power.
For more information and support for your machine go online:
https://www.dysoncanada.ca/en/support
Important: your filter must be completely dry before you put it back into
the machine. Your machine could be damaged if used with a damp.
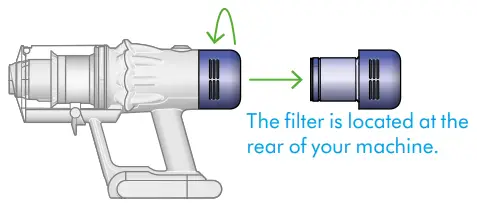
Twist off your filter
Twist your filter anti-clockwise and pull it away from your machine.
Tap your filter
Before washing your filter, tap it gently over a bin to remove any loose dust
and debris.
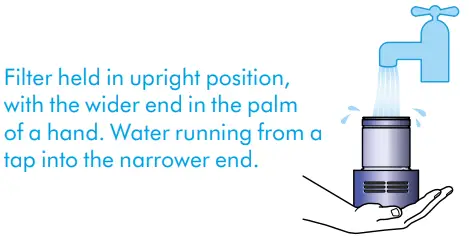
Wash your filter
Wash with warm, running tap water – gently rubbing your filter with your
fingers to remove the dirt.
Fill and shake
- Place your hand over one end of your filter.
- Fill the filter with warm tap water.
- Place your hand over the open end of the filter and shake it firmly to remove trapped dirt and debris.
- Repeat these steps until the water runs clear.
Shake out the water
- Empty the filter and shake firmly to remove excess water.
- Shake with the filter in both an upward and downward position.
- Keep shaking until there’s no water coming from the filter.
Dry your filter
- Leave your filter to dry for at least 24 hours in a well-ventilated, warm place.
- Don’t dry your filter in a tumble dryer, microwave or near a naked flame.
- Important: your filter must be completely dry before you put it back into the machine. Your machine could be damaged if used with a damp filter.
Holding the filter by the hard, plastic end, tap the other end over the bin.
Filter held in upright position, with the wider end in the palm of a hand.
Water running from a tap into the narrower end.
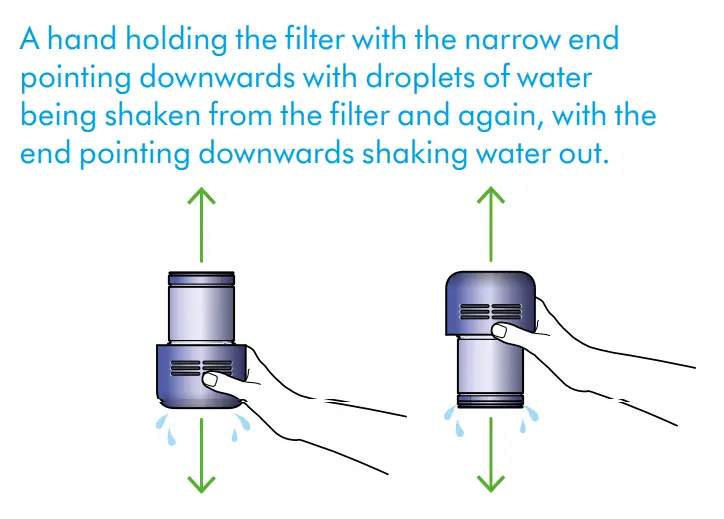
Filter with hand over the open end with arrows showing a shaking motion.
A hand holding the filter with the narrow end pointing downwards with droplets
of water being shaken from the filter and again, with the end pointing
downwards shaking water out.
The filter is left to dry with the pleated filter end facing upwards.
Washing your Laser Slim Fluffy™ brush bar
Your Laser Slim Fluffy™ cleaner head has a washable brush bar. To maintain
optimum performance, check and wash your brush bar regularly.
Make sure your machine is disconnected from the charger and take care not to
touch the trigger.
Remove your brush bar
Don’t put any part of your machine in a dishwasher or use detergents, polishes
or air fresheners.
Press the cleaner head release button on the end of the wand. Place the
cleaner head upside down.
Push the end cap up fully and pull the brush bar out of the cleaner head.
The end cap is located at the side of the cleaner head. Push this upwards to
unlock the brush bar. Don‘t wash the end cap.
The brush bar an open end and a closed end. Stand upright, with the closed end
facing upwards, to dry.
The end cap should be attached to the cleaner head at an angle less than 90°,
any angle greater than this will not allow the end cap to close.
Cleaning your tools
Don’t put any part of your machine in a dishwasher or use detergents, polishes
or air fresheners.
Wipe with a damp, lint-free cloth, without touching the connector end. Make
sure your tools are completely dry before using.


Clearing blockages from your Hair screw tool
Your Hair screw tool doesn‘t have a washable brush bar. To maintain optimum
performance, check your brush bar regularly and clear any obstructions.
Make sure your machine is disconnected from the charger and take care not to
touch the trigger.
Remove the cover and brush bar
- Remove the Hair screw tool from the wand or machine.
- Push the base plate open. Press the red lever down to release the cleaner head cover.
- Pull the cleaner head cover off the main body of the tool.
Look for obstructions
- Pull your brush bar firmly to remove it from the main body.
- Check and remove any obstructions from all three parts of your Hair screw tool.
- Your Hair screw tool isn‘t washable. Wipe over with a damp lint-free cloth.
- Don’t put any part of your machine in a dishwasher or use detergents, polishes or air fresheners.
Re–assemble Hair screw tool
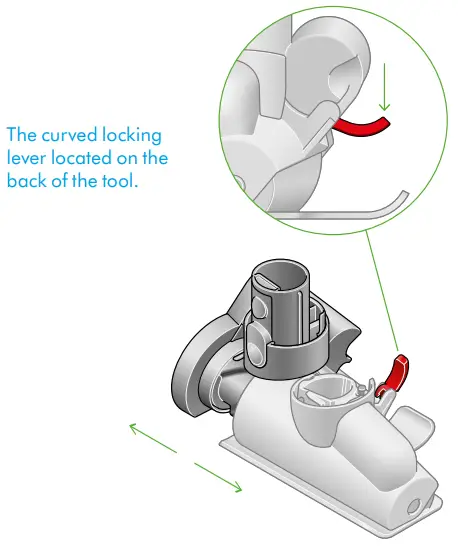
The curved locking lever located on the back of the tool.
Slide the housing back on to the brush bar and push the lever on the back of
the Hair screw tool upwards to lock.
Looking after your machine
To always get the best performance from your machine, it’s important to clean
it regularly and check for blockages.
Look after your machine
- If your machine is dusty, wipe with a damp lint-free cloth.
- Check for blockages in the cleaner head, tools and main body of your machine.
- Wash your filter regularly and leave to dry completely.
- Don’t use detergents or polishes to clean your machine.
Look after your battery
To get the best performance and life from your battery, use Eco or Auto/Med
mode.
Your machine won’t operate or charge if the ambient temperature is below
5°C(41°F). This is designed to protect both the motor and battery.
Your serial numbers
You can find your serial numbers on your machine, battery and charger.
Use your serial number to register.
For more information and support for your machine go online:
https://www.dysoncanada.ca/en/support
References
- Support | Customer Service | Contact Us | Dyson
Read User Manual Online (PDF format)
Read User Manual Online (PDF format) >>
Download This Manual (PDF format)
Download this manual >>
Your machine will come with one or more of these cleaner heads –
not all will be included.
Vacuum cleaner
Wand
Combination tool
Crevice tool
Two tools in one – wide
Engineered for precise
nozzle and brush,
cleaning around
for quick switching
tricky edges and into
between cleaning and
hard-to-reach narrow
dusting tasks around
spaces.
your home or car.
Laser Slim Fluffy™ cleaner head
A precisely-angled laser makes
invisible dust visible on hard
floors.
Hair screw tool
Anti-tangle conical
brush bar spirals hair
off and into the bin.
Motor-driven cleaning
for smaller spaces.
Direct drive cleaner head
Deep cleans carpets and
hard floors.
Charger
Charges your vacuum with
or without a dock.
Soft dusting brush
Stubborn dirt brush
Enclosed in a skirt
Stiff nylon bristles
of soft nylon bristles
dislodge ground-in dirt
for gentle, vacuum-
from coarse carpets,
assisted dusting of
high traffic areas and
delicate objects and
car interiors.
surfaces.
Wall dock
Charges your vacuum with
or without a dock.
Wand clip