

РУ
С
С
К
И
Й
Краткое руководство
по началу работы
Оглавление
Введение
12
Копирование
17
Печать с компьютера
19
Сканирование
20
Печать фотографий непосредственно с цифровой камеры
21
Обслуживание
22
Поиск и устранение неисправностей
25
-
Page 1: Canon MP190
series Quick S t art Guide QT5-1498-V01 XXXXXXXX © CANON INC. 2008 PRINTED IN VIETNAM The following FINE Cartridges are compatible with this product. For information on product specific ations, please visit our website at www .usa.canon.com Photo All-In-One[…]
-
Page 2: Canon MP190
Getting Help from Canon Help Us Help Y ou Better Before you cont act Canon, please record the following information. Serial Number (located on the inside of the product): _____________________________________ Model Number (located on the top of the produ ct): ____________________________________ ___ Setup CD-ROM number (located on the CD-ROM): ____[…]
-
Page 3: Canon MP190
Photo All-In-One Quick St art Guide series[…]
-
Page 4: Canon MP190
© CANON INC. 2008 All rights reserved. No part of this publication ma y be transmitted or copied in any form whatsoever without the express written permission. Disclaimer Canon U.S.A., Inc. has reviewed this manual thor oughly in order that it will be an easy- to-use guide to your Canon PIXMA MP190 series Photo All-In-O ne. All statements, technic[…]
-
Page 5: Canon MP190
T able of Content s 1 Introduction…………………. …………………………. 2 Safety Precautions ………………………………….. 3 Before Using the Machine ……………………….. 6 Included It ems …………….. ………………… ………. 6 Operation Panel…………………….. ……………….. 7 Turni[…]
-
Page 6: Canon MP190
2 Introduction Introduction This Quick S tart Guide uses the following symbol s to indicate important information. Always o bserve the instructions indicated by these symbols. Wa r n i ng Instructions that, if ignored, could result in deat h or serious personal injury caused by incorrect operation of the equipment. These must be observed for safe o[…]
-
Page 7: Canon MP190
3 Safety Precautions Safety Precautions Please read the safety warnings and cautions prov ided in this manual to ensure that you use the machine safely . Do not attempt to use the mach ine in any way not describe d in this manual. Wa r n i n g Y ou may cause a n electric sh ock, fire, or damage the mach ine if you i gnore any of th ese safety preca[…]
-
Page 8: Canon MP190
4 Safety Precautions Cleaning the machine Use a damp cloth to clean the machine. Never use flammable solvents such as alcohol, benzene or thinners. If flammable solvents come in contact with electrical components inside the machine, it could cause a fire or electric shock. Always unplug the machine from the power outlet before cleaning the machine […]
-
Page 9: Canon MP190
5 Safety Precautions Working around the machine Never put your hands or fingers in the machine while it is printing. When moving the machine, carry the machine at both ends. Do not hold the rear side of the machine. Do not place any object on the machine. Do not place metal objects (paper clip s, staples, etc.) or containers of flammable solvents ([…]
-
Page 10: Canon MP190
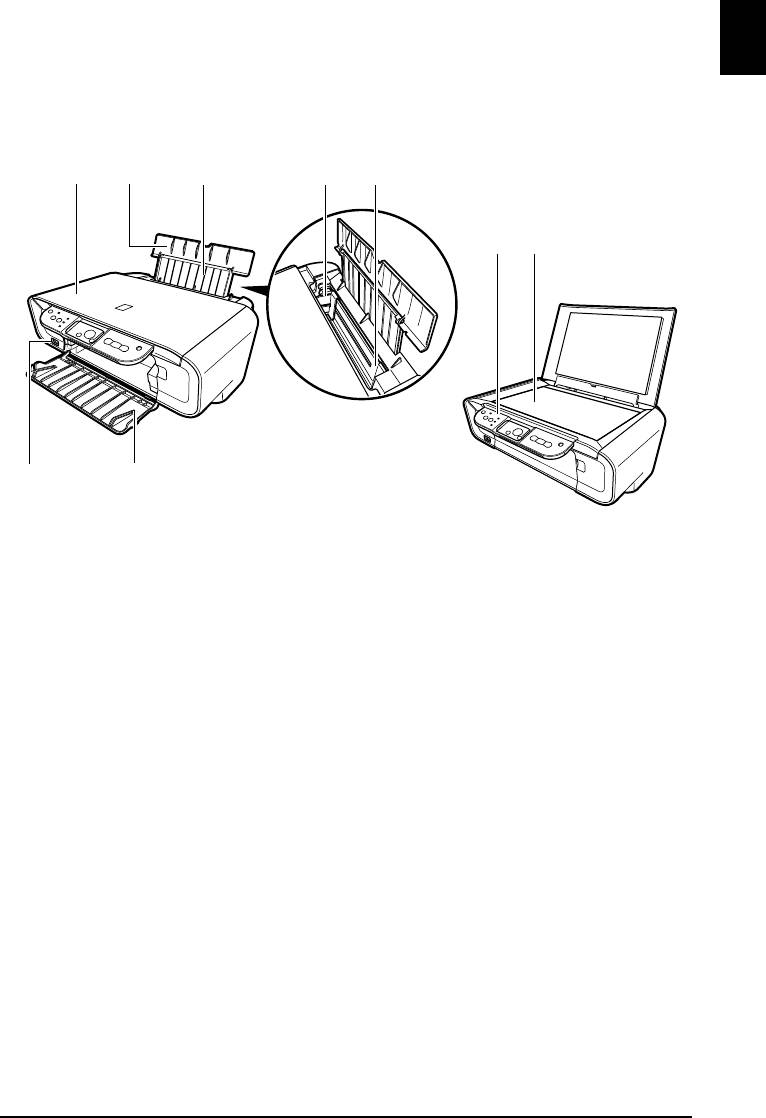
6 Before Using the Machine Before Using the Machine Included Items Check that all the following items are in the box . If anything is missing or damaged, contact your Canon Service representative. z Machine z Setup CD-ROM (Includes dr ivers, applications, and manuals) z Easy Setup Instructions (Setup Sheet) z Quick S tart Guide z Canon Black and Co[…]
-
Page 11: Canon MP190
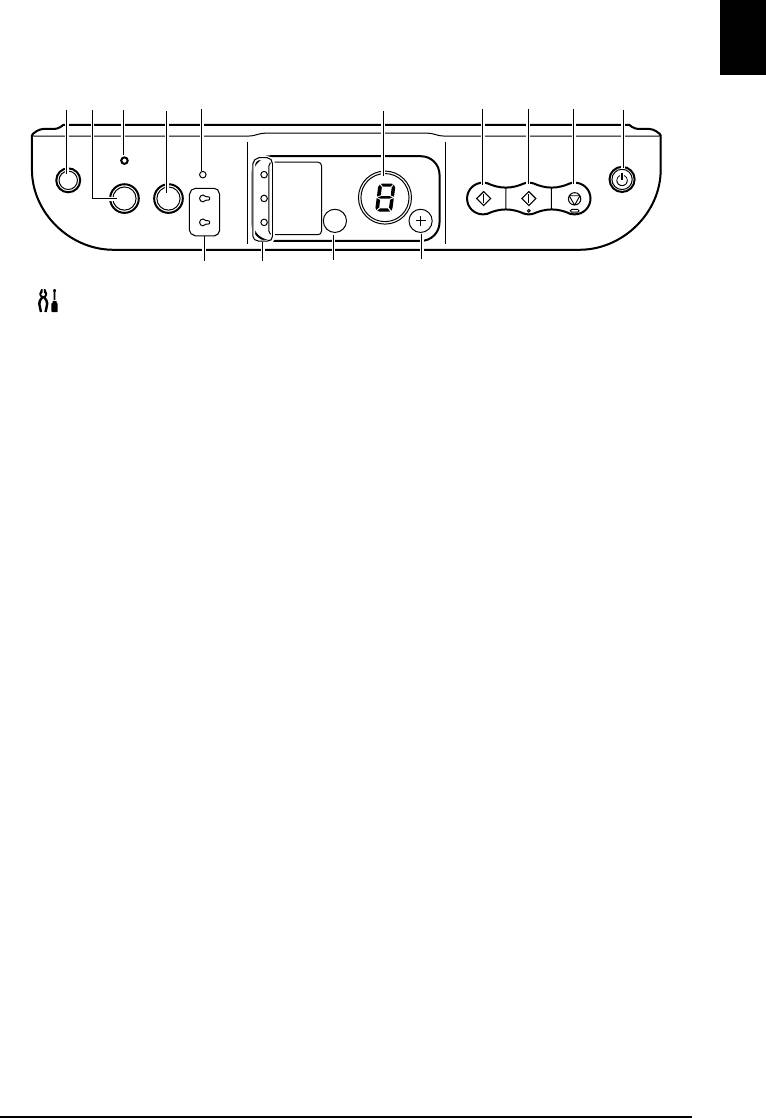
7 Before Using the Machine Operation Panel (1) ON button / Power lamp T urns the machine on and off. Lights or flashes green to indicate the power status. Before turning on the machine, make sure the Document Cover is closed. (2) LED (Light Emitting Diode) Displays the number of copies, Maintenance men u selections or the operational status. (3) [+[…]
-
Page 12: Canon MP190
8 Before Using the Machine (8) Color button* S tarts color copying. Also, finalizes your selection for the menu or setting item. (9) Black button* S tarts black & white copying. Also, finalizes your selection for the menu or setting item. (10) (Maintenance) button Accesses the Maintenance menu. (1 1) Fit to Page butto n / Fit-to-Page lamp Enabl[…]
-
Page 13: Canon MP190
9 Before Using the Machine T urning the Machine On and Off T urn on the machine before pr inting. T urning on the Machine 1 Press the ON button to turn on the machine. The Power lamp flashes and then remains lit green. 2 If you are using the machine connected to a computer , turn on your computer . T urning off the Mac hine 1 T o turn off t[…]
-
Page 14: Canon MP190
10 Before Using the Machine z Screen-saver M ode The LED goes out if the machine is not operated for about five minutes*. Perform a print operation to resto re the display . * Y ou cannot change the wait time before the LED goes out. Note When you wa nt to restore th e display , perform a print operation or press any bu tton except for th e ON butt[…]
-
Page 15: Canon MP190
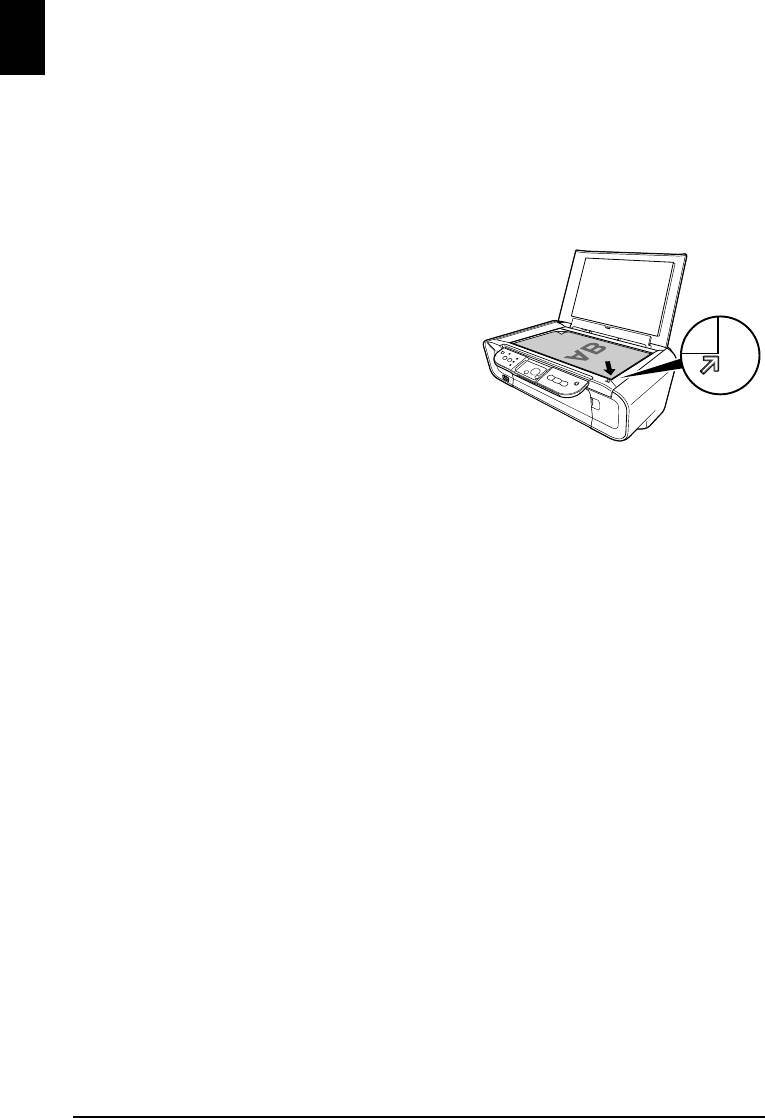
11 Before Using the Machine Handling the Original Document This section describes how to load t he or iginal document on the Platen Glass. Original Document Requirements The original documents you load on the Platen Gl ass for copying or scanning must meet these requirements: Loading Original Document s Load originals to copy or scan on the[…]
-
Page 16: Canon MP190
12 Before Using the Machine Loading Printing Paper This section describes how to load printing paper in the Rear Tray . Using S pecialty Media Canon recommends that you use Canon genuine media to ensure optimal print qua lity . z Photo Quality Media z Glossy Photo Paper z Matte Photo Paper z Photo Paper Plus Glossy z Photo Paper Plus Glossy II […]
-
Page 17: Canon MP190
13 Before Using the Machine Paper Handling z Recommended Paper and Requirements *1 Paper with a Mode l Number is Canon specialty media. R efer to the instruction manual supplied with the paper for detailed informat ion on the printable side and notes on handling paper . For information on the paper sizes available for each Canon genuine paper ,[…]
-
Page 18: Canon MP190
14 Before Using the Machine *6 We recommend that you remove the p revious ly printed sheet or envelope from the Paper Output T ray before continuously prin ting to avoid blur s and discoloration. z Media T ypes Y ou Cannot Use Do not use the following types of paper . Usi ng such paper will not only produce unsatisfactory results, but can also caus[…]
-
Page 19: Canon MP190
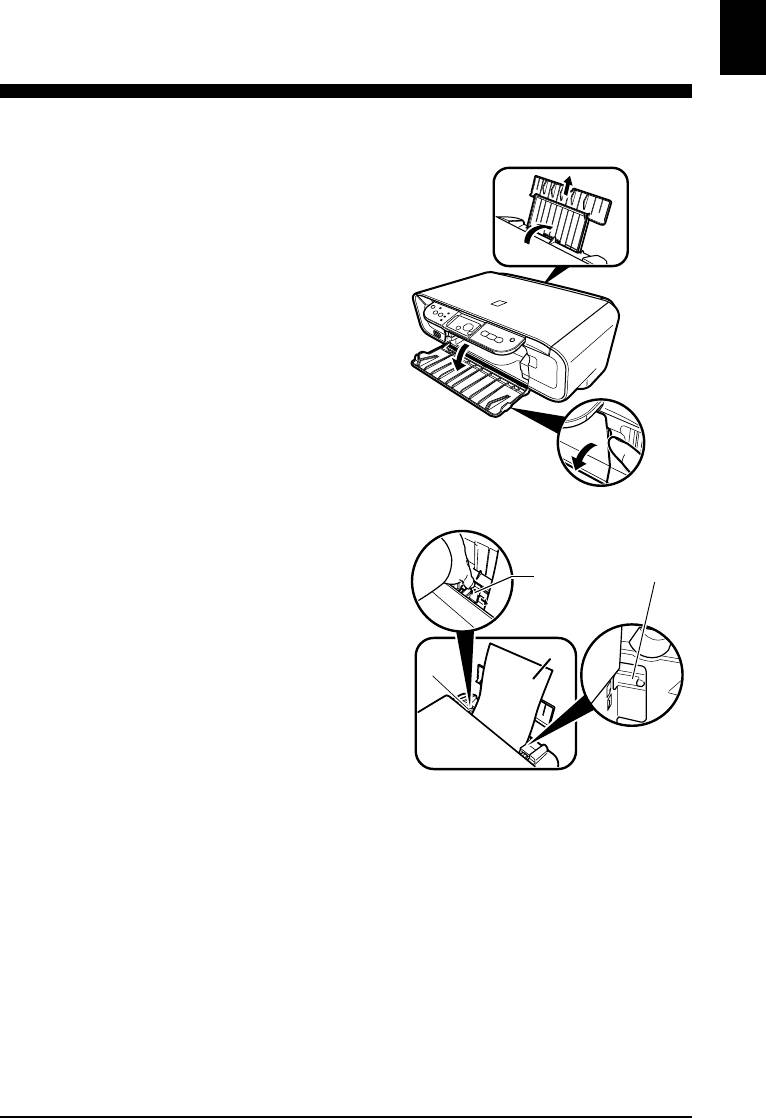
15 Before Using the Machine Loading Paper 1 Flatten the four corners of the paper before loading it. Import ant z Y ou cann ot print on post cards af fixed with phot os or stickers. z Always lo ad paper in p ortrait orientation (A). Loa ding paper in landsca pe orientati on (B) can cause the paper to be jammed. Note z We recommend using ge nuin[…]
-
Page 20: Canon MP190
16 Before Using the Machine 2 Prepare to load paper . (1) Open the Paper Support, then pull out the Paper Support Extension. (2) Open the Paper Output Tr ay fully . If it is not opened fully , an error may occur . (3) Open the Output Tray Extension. (4) Adjust the position of the Paper Thickness Lever . The Paper Thickness Lever switches the cleara[…]
-
Page 21: Canon MP190
17 Before Using the Machine Loading Envelopes Use either European DL or US Comm. Env . #10-sized e nvelope. With proper printer driver settings, the a ddress will be printed according to the dire ction of envelope. 1 Prepare the envelopes. z Press down on all four corners and edges of the envelop es to flatten them. z If the envelopes are curle[…]
-
Page 22: Canon MP190
18 Before Using the Machine 2 Load the envelop es. (1) Load the envelope against the right side of the Rear Tray . Load with the address side facing UP and the rear flaps DOWN on the left. Up to 10 envelopes can be loaded at once. (2) Pinch the Paper Guide and slide it against the left side of the envelope. Do not slide the Paper Guide too strong. […]
-
Page 23: Canon MP190
19 Before Using the Machine Loading Small-Sized Paper Y ou can use 4″ x 6″ / 10 x 15 cm and 5″ x 7″ / 13 x 18 cm- sized papers. 1 Load the paper . (1) Load the small-sized paper against the right side of the Rear Tray with the print side facing UP . (2) Pinch the Paper Guide and slide it against the left side of the paper st[…]
-
Page 24: Canon MP190
20 Copying Copying Making Copies This section describes the ba sic procedure to make copies. 1 T urn on the machine . See “T urning the Machine On and Off” on page 9. 2 Load paper . See “Loading Printing Paper” on page 12. 3 Load the original on the Platen Glass (A). See “Loading Original Documents” on page 1 1. 4 S pecify the copy sett[…]
-
Page 25: Canon MP190
21 Copying Changing the Copy Settings Setting The Default Page Size Y ou can switch the size of paper loaded in the Rear Tray between A4 and Letter . 1 Press the Maintenance button repeatedly until d appears. 2 Press the Black button to select A4, or the Color button to select Letter . Using Useful Copy Function For details, refer to “Fit-to-[…]
-
Page 26: Canon MP190
22 Printing from Your Computer Printing from Y our Computer This section describes procedure for basic printing. Printing with Windows 1 T urn on the machine and load the paper in the machine. See “T urning the Machine On and Off” on page 9 and “Loading Printing Pap er” on page 12. 2 Create a document or open a fi le to print using an appro[…]
-
Page 27: Canon MP190
23 Printing from Your Computer Printing with Macintosh 1 T urn on the machine and load the paper in the machine. See “T urning the Machine On and Off” on page 9 and “Loading Printing Paper” o n page 12. 2 Create a document or open a fi le to print using an approp riate application software. 3 Select Page Setup on the application software’[…]
-
Page 28: Canon MP190
24 Scanning Images Scanning Images Y ou can scan images from the machine to a com puter without printing the m and save them in popular image types such as JPEG , TIFF , bitmaps, or PDF . If you a re scanning printed text, you can use the OCR (Optical Character Recognition) software to convert it to text data. Scanning Methods Y ou can select from […]
-
Page 29: Canon MP190
25 Routine Main tenance Routine Maintenance List of Maintenance Codes T o perform maintenance of the machine, pre ss the Maintenance button repeatedly until the desired code is displayed on the LED, then press the B lack or Color button. Maintenance Code Operation See Prints the nozzle check pattern. “Printing the Nozzle Check Pattern” on page […]
-
Page 30: Canon MP190
26 Routine Maintenance When Printing Becomes Fain t or Colors Are Incorrect When printing becomes faint or colors are incorre ct, the print head nozzles on FINE Cartridges are probably clogged. Print the nozzle check pattern to confirm the co ndition of the nozzles and then perform Print Head Cleaning. If print results are not satisfactory , perfor[…]
-
Page 31: Canon MP190
27 Routine Main tenance Printing the Nozzle Check Pattern Print the nozzle check pattern to determine whether the ink ejects properly from the print head nozzles. 1 Make sure that the machine is turned on, then load a she et of A4 or Letter-si zed plain paper in the Rear Tray . 2 Open the Paper Output Tray , then open the Output Tray Extension. Set[…]
-
Page 32: Canon MP190
28 Routine Maintenance Examining the Nozzle Check Pattern Examine the nozzle check pattern, and perform cleaning if necessary . 1 Check the nozzle check pattern you printed. (1) If lines of this pattern are missing, the print head nozzles need cleaning. Example: When lines are missing (Black ink) (2) If these patterns have white streaks, the print […]
-
Page 33: Canon MP190
29 Routine Main tenance Print Head Cleaning Clean the Print Head if lines are missing or if white streaks appear in the printed nozzle check pattern. Cleaning unclogs the nozzle s and restores the print head condition. Note that cleaning the Print Head causes used ink to be absorbed in t he ink absor ber . Cleaning the Pr int Head consumes ink, so […]
-
Page 34: Canon MP190
30 Routine Maintenance Print Head Deep Cleaning If print quality does not impr ove by standard Print Head Cleaning, try Print Head Deep Cleaning, which is a more powerful process. Note that cl eaning the Print Head causes used ink to be absorbed in the ink absorber . Print Head Deep Cleaning consum es more ink than standard Print Head Cleaning, so […]
-
Page 35: Canon MP190
31 Routine Main tenance Aligning the Print Head If ruled lines are printed misaligned or print result s are otherwise unsatisfactory , adjust the print head position. 1 Make sure that the machine is turned on, then load a she et of A4 or Lette r-sized plain paper in the Rear Tray . 2 Open the Paper Output Tray , then open the Output Tray Extension.[…]
-
Page 36: Canon MP190
32 Routine Maintenance (2) Repeat the procedure until you finish selecting the pattern number for column L. (3) Place the Print Head Alignment Sheet face-down on the Platen Glass. When placing the Print Head Alignment Sheet, place the front side down and align the upper left corner of it with the alignment mark as shown in the figure below. (4) Mak[…]
-
Page 37: Canon MP190
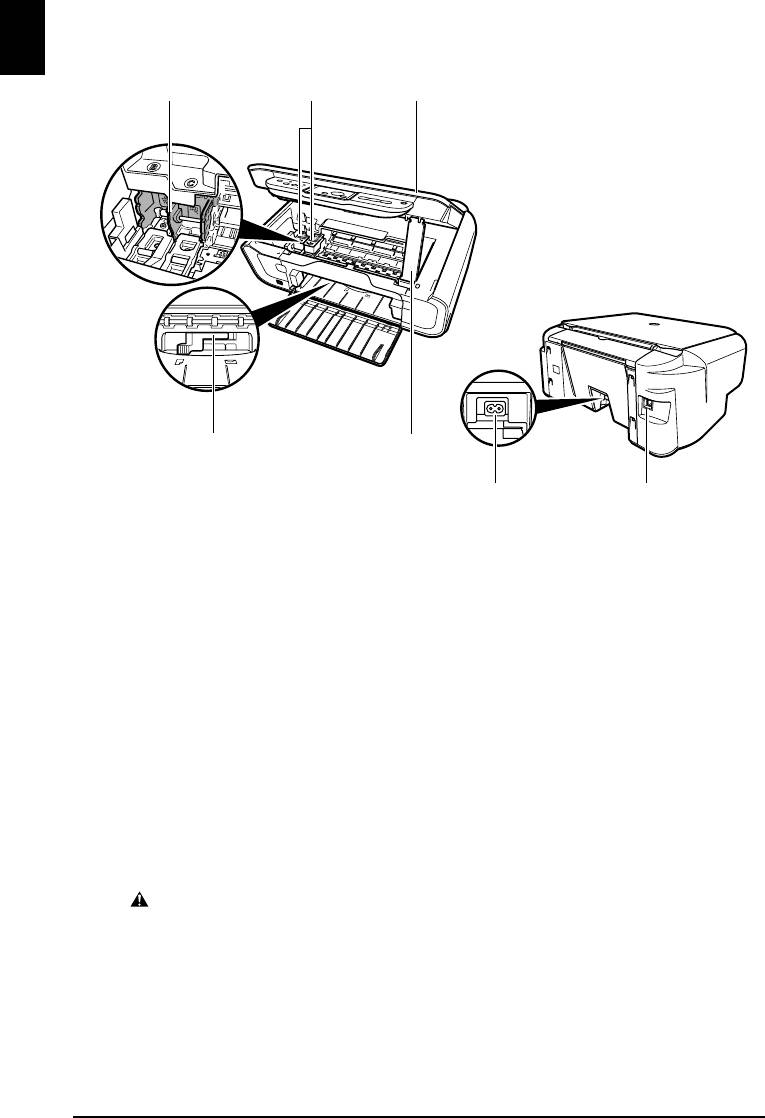
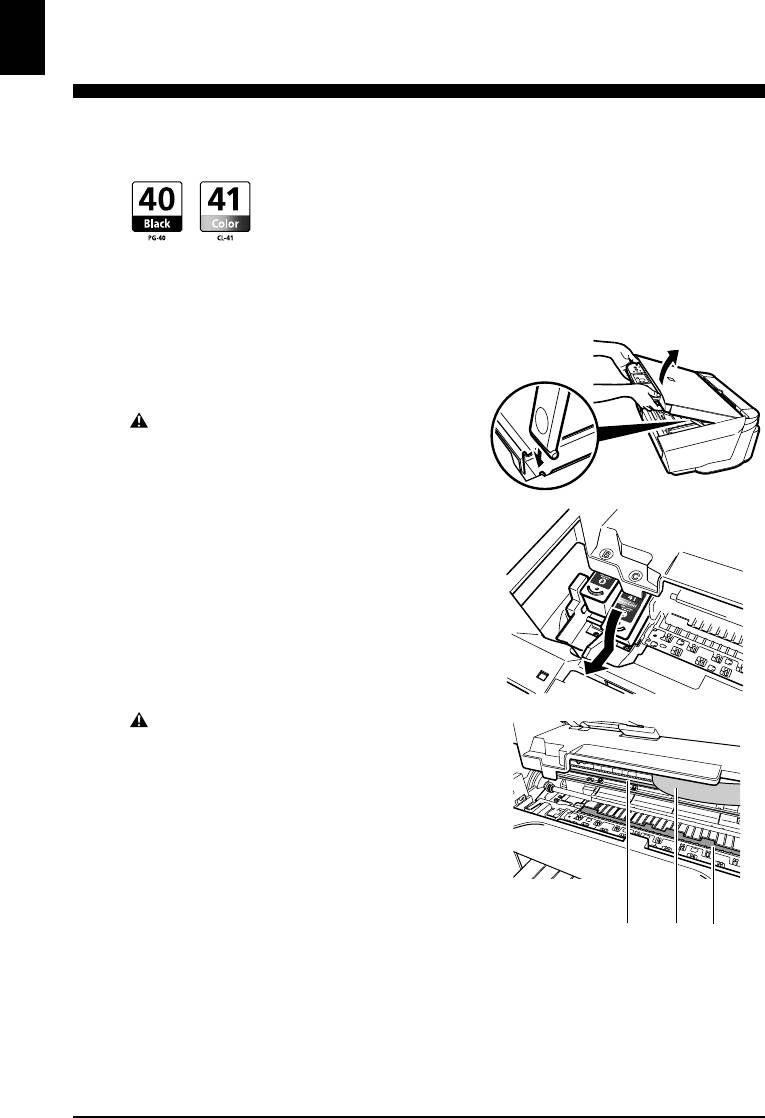
33 Routine Main tenance Replacing a FINE Cartridge This section explains the way to confirm the ink status and the procedure to replace FINE Cartridges. When ink runs out or other errors occur , an error code is displayed on the LED to inform you of the error . See “An Error Code Is Displayed on the LED” on page 44 and confirm how to handle it.[…]
-
Page 38: Canon MP190
34 Routine Maintenance z With the Computer Scr een Y ou can confirm the status of each FINE Cartri dge on the printer status monitor (Windows) and Canon IJ Printer Utility (Macintosh). (A) Confirm whether any sy mbols are displayed here. (C) The Ink lamp lights. Ink is low . Y ou can co ntinue printing for a while, but w e recommend you to have a n[…]
-
Page 39: Canon MP190
35 Routine Main tenance Follow the procedure below to open each of th e confirmation screens. 1 Open the printe r properties dialog box. Refer to “Opening the Printer Propert ies Dialog Box Directly f rom Control Panel” in “Opening the Printer Properties Dialog Box (Windows)” of the User ’s Guide on-screen manual. 2 Click Vi ew Printer S […]
-
Page 40: Canon MP190
36 Routine Maintenance Replacing FINE Ca rtridges When FINE Cartridges run out of ink, re place them using the followin g steps. Import ant Handling FINE Cartridges z Do not touch t he electric al contacts or Print He ad Nozzles on a FI NE Cartridge. The machine may not print out properl y if you touc h it. (A) Electrica l Contact s (B) Print H[…]
-
Page 41: Canon MP190
37 Routine Main tenance 1 Open the Paper Outpu t T ray . 2 Make sure tha t the machine is turne d on, lift the Scanning Unit (Cover), then pull the Scanning Unit Support (A) down into place. The FINE Cartridge Holder moves to the left. 3 Remove the empty FINE Cartridge. (1) Push down the FINE Cartridge. (2) Remove the FINE Cartridge. Caution z Do n[…]
-
Page 42: Canon MP190
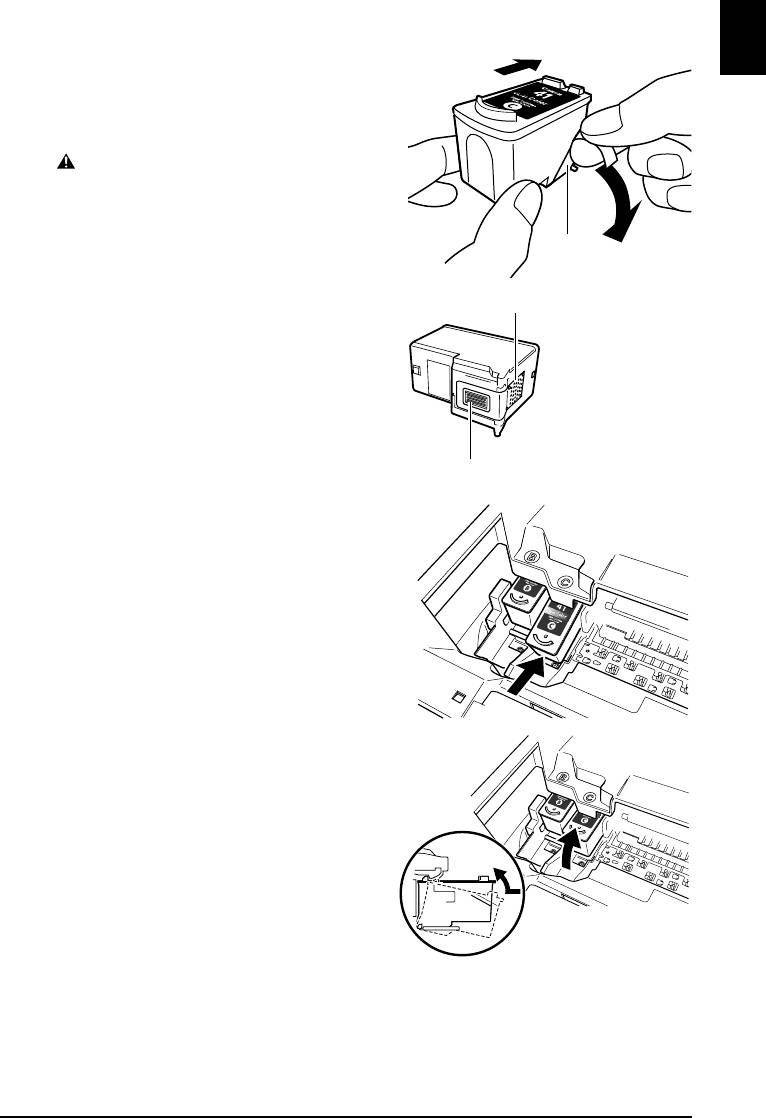
38 Routine Maintenance 4 Prepare the replacement FINE Cartridge. (1) Unpack a new FINE Cartridge and remove the orange protective tape (A) gently . 5 Install the FINE Cartridge. (1) Insert a new FINE Cartridge all the way into the appropriate slot. The Black FINE Cartridge should be installed into the left slot ( ) and the Color FINE Cartridge shou[…]
-
Page 43: Canon MP190
39 Routine Main tenance 6 Lift the Scanning Unit (Cover) slightly to set the Scanning Unit Support back to its original position, and then ge ntly close the Scanning Unit (Cover). Keeping the Best Printing Result s T o avoid drying of the Print Head and cl ogging of the no zzles, note the following. When Y ou T urn Off the Machi ne Follow the p[…]
-
Page 44: Canon MP190
40 Routine Maintenance Cleaning Y our Machine This section describes the cleaning procedure that is needed to maintain your machine. Wiping Off Dirt on th e Machine Be sure to use a soft cloth such as eyeglas ses cleaning cloth and wipe off dirt on the surface with it gently . Smooth out wrinkles on the cloth if necessary b efore cleaning. […]
-
Page 45: Canon MP190
41 Routine Main tenance Cleaning the Paper Feed Roller ( Roller Cleaning) Clean the paper feed roller if paper is not fed pr operly . Cleaning the paper feed roller will wear the roller , so perform this only when necessary . 1 Make sure that the machine is turne d on, and then remove any paper from the Rear T ray . 2 Open the Paper Output Tray[…]
-
Page 46: Canon MP190
42 Routine Maintenance 1 Make sure that the machine is turned on, and then remove an y paper from the Rear T ray . 2 Open the Paper Output Tray , then open the Output Tray Extension. 3 Fold a single sheet of A4 or Letter-sized plain paper in half widthwise, and then unfold the paper . 4 Load this and only this sheet of paper in the Rear Tray with t[…]
-
Page 47: Canon MP190
43 Troubleshooting T roubleshooting This section describes troubleshooting tips for problems you ma y encounter when using the machine. z “An Error Code Is Displayed on the LED” on page 44 z “LED Cannot Be Seen At All” on page 46 z “Cannot Install the MP Drivers” on page 47 z “Cannot Connect to Computer Properly” on page 48 z “Pri[…]
-
Page 48: Canon MP190
44 Troubleshooting An Error Code Is Displayed on the LED If an error code is displayed on the LED, take the corresponding a ction described below . Alarm Lamp Is Lit Orange When a printer error occurs, the Alarm lamp is lit orange. The number displayed on the LED indicates the type of error that has occurred. Check the error code displayed on t[…]
-
Page 49: Canon MP190
45 Troubleshooting E, 1, 3 Ink level cannot be detected. Ink may have run out. The function for detecting the remaining ink level will be disabled since the ink level cannot be correctly detected. If you want to continue printing without this function, press the Stop/Reset button for at least 5 seconds. Canon recommends to use new genuine Canon car[…]
-
Page 50: Canon MP190
46 Troubleshooting Power Lamp Flashes Green and Alarm Lamp Flashes Ora nge Alternately The Power and Alarm lamps flash alternately as shown below . Disconnect the USB cable from the machine, tu rn the machine off, then unplug the machine from the power supply . Plug the mach ine back in and turn the machine back on. If the problem is not resolv[…]
-
Page 51: Canon MP190
47 Troubleshooting Cannot Inst all the MP Drivers Cause Action Unable to proceed beyond the Printer Connection screen. If you were unable to proceed beyond the Printer Connection screen, f ollow the procedure below to reinstall the MP Drivers. Note In Windows Vista, “ The printer is not detected. Check the connection. ” may be displayed dependi[…]
-
Page 52: Canon MP190
48 Troubleshooting Cannot Connect to Computer Properly Printing or Scanning S peed Is Slow / Hi-S peed USB Connection Does Not Work “This device can perform fast er” Message Is Displayed Installation procedure not followed correctly . Follow the procedure described in your setup sheet for proper installation. If the MP Drivers were not […]
-
Page 53: Canon MP190
49 Troubleshooting Print Result s Not Satisfactory If the print result is not satisfactory such as white streaks, misalig ned lines, and uneven colors, confirm the paper and print quality settings first. z Check1: Do t he pag e size and media type s ettings match the size and type of the loaded paper? When these settings are incorrect, you cannot o[…]
-
Page 54: Canon MP190
50 Troubleshooting Printing Does Not S tart/Print ing Is Blurred/Colors Are Wrong/S traight Lines Are Misaligned White Str eaks Printed Paper Curls or Has Ink Blot s Cause Action The media is loaded with the wrong side facing upwards. When using paper with one printable surface, make sure the paper is loaded with the printable side faci[…]
-
Page 55: Canon MP190
51 Troubleshooting Printed Surface Is Scratched/Paper Is Smudge d Cause Action Printing on inappropriate type of paper . z Check to see if the paper you are printing on is not too thick or curled. See “Media T ypes Y ou Cannot Use” on page 14 to make sure that the paper you are using is suitable. If the paper is curled, see “Paper is curl[…]
-
Page 56: Canon MP190
52 Troubleshooting Colors Are Uneven or Str eaked Print Result s Not Satis factory When Copying If these do not resolve the problem, also see “Print Results Not Satisfactory” on page 49. Printing beyond the recommended printing area. If you are printing beyond the recommended printing area of your printing paper, the lower edge of the paper[…]
-
Page 57: Canon MP190
53 Troubleshooting Printing Does Not St art Paper Does Not Feed Properly Cause Action Unnecessary print jobs are left in queue. / Computer problems. Restarting your computer may solve the problem. If there are any unnecessary print jobs, follow the procedure below to delete them. (1) Open the printer properties dialog box. Refer to “Opening the P[…]
-
Page 58: Canon MP190
54 Troubleshooting T oo much paper loaded. Make sure that the paper stack does not exceed the paper support load limit. However , proper feeding of paper may not be possible at this maximum capacity depending on the type of paper or environmental conditions (either very high or low temperature and humidity). In such cases, reduce the sheets of pape[…]
-
Page 59: Canon MP190
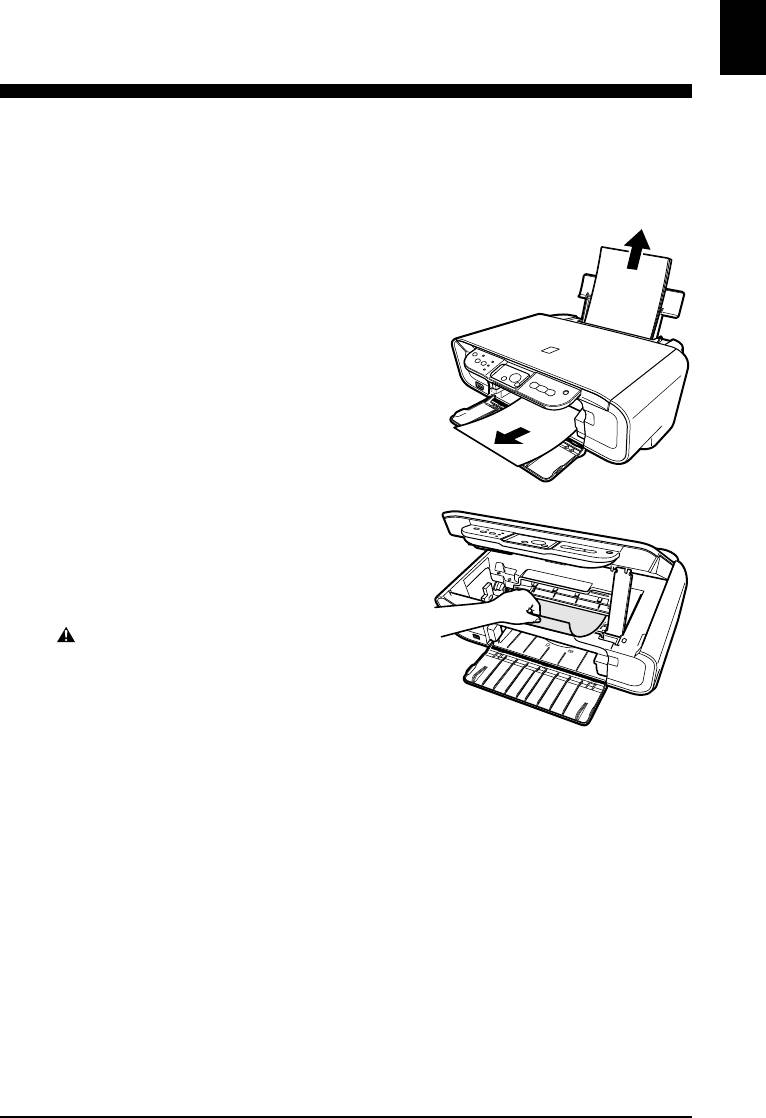
55 Troubleshooting Paper Jams Important When you turn off the mach ine to remove t he jammed paper, can cel the print jo b before tu rning off the machine. See “Printing f rom Y our Comput er” in the User ’s Guide on-scree n manual. Cause Action Paper jammed in the Paper Output Slot or the Rear Tray . Remove the paper following the procedure […]
-
Page 60: Canon MP190
56 Troubleshooting Message Appears on the Computer Screen Service Error 5 100 Is Displayed Writing Error/Output E rror/Communication Error Cause Action Movement of the FINE Cartridge Holder is blocked. Cancel printing from your computer, turn of f the machine. Then clear the paper jam or foreign object that is preventing the FINE Cartridge […]
-
Page 61: Canon MP190
57 Troubleshooting Error Number: 300 Is Displayed Error Number: 1700/171 0 Is Displayed Ink Info Number: 1688 Is Displayed Ink Info Number: 1686 Is Displayed Cause Action The machine is not ready . Confirm that the Power lamp is lit green. If the Power lamp is off, turn the machine on. While the Power lamp is flashing green, the mac[…]
-
Page 62: Canon MP190
58 Troubleshooting The Document Co ver Comes Off Scanning Problems ScanGear W on’t St art Other Scanning T roubles Refer to the Scanning Guide on-screen manual. Cause Action The Document Cover was opened too hard. If the Document Cover is opened too hard, it may come off. Reattach it according to the following procedure. (1) Insert the pr[…]
-
Page 63: Canon MP190
59 Appendix Appendix How to Use the Document ation Provided Printed Documentatio n Setup Sheet Be sure to read this sheet first. This sheet includes instructions for se tting up your machine and getting it ready for use. Quick St art Guide (This guide) Read this guide when starting to use the mach ine. After following instructions in your setup she[…]
-
Page 64: Canon MP190
60 Appendix Reading the On-screen Manuals For detailed instructions on installing the on-screen manuals, refer to your setup sheet. Y ou can view the on-screen manuals in the following way: T o view the on-scr een manual, double-click the XXX On-screen Manual shortcut icon on the desktop, or click Start > All Programs (or Programs ) > Canon X[…]
-
Page 65: Canon MP190
61 Appendix Solution Menu (Windows Only) This menu screen helps you to easily l aunch bundled applications or on-scr een manuals. Also, you can easily access us eful web sites to get tips on how to use your machine. Experience how easy it is to laun ch menu items by using the menu screen that appears automatically when your computer starts up. For […]
-
Page 66: Canon MP190
62 Appendix S pecifications General Specifications Printing resolution (dpi) 4800 (horizont al)* x 1200 (vertical) * Ink droplets can be placed with a pitch of 1/4800 inch at minimum. Interface Hi-S peed USB* * A computer that complies with Hi-Speed USB standard is required. Since the Hi- S peed USB interface has full backward compatibility with US[…]
-
Page 67: Canon MP190
63 Appendix z Some functions may not be available with Windows Media Center . z T o upgrade from Wind ows XP to Windows Vista, first uninstall software bundled with the Canon inkjet printer . S pecifications are subjec t to change without notice. Minimum System Requirements Note Conform to the ope rating syst em’s requirements when hi gher than t[…]
-
Page 68: Canon MP190
64 Appendix Legal Limit ations on Use of Y our Product and Use of Images It may be unlawful to make copies of, scan, print, or use reproductions of the following documents. The list provided is non-exhau stive. When in doub t, check with a legal repr esentative in your jurisdiction. z Paper money z Money orders z Certif icates of deposi t z Postage[…]
-
Page 69: Canon MP190
65 Appendix Users in the U.S.A. Regulatory Information FCC Notice (U.S.A. Only) For 120V , 60Hz model Model Number: K10320 This device complies with Part 15 of the FCC Ru les. Operation is subjec t to the following two conditions: (1) This device may not cause harmful in terference, and (2) this device must accept any interference received, inc[…]
-
Page 70: Canon MP190
66 Appendix This limited warranty shall only apply if the Pr oduct is used in conjun ction with compatible computers, peripheral equipment and software. Canon USA shall have no responsibility for such items except for compatible Canon brand peripheral equipment covered by a separate warranty (“Separate W arranty”). Repairs o f such Canon brand […]
-
Page 71: Canon MP190
67 Appendix PURCHASER OF THE PRODUCT OR THE PERSO N FOR WHOM IT W AS PURCHASED AS A GIFT , AND ST A TES YOUR EXCLUSIVE REMEDY . Canon USA offers a range of customer technical support* options: z Interactive troubleshooting, e-mail technical s upport, the latest driver downloads and a nswers to frequently asked questions ( www.canontechsupport.com )[…]
-
Page 72: Canon MP190
68 Appendix Canon U.S.A., Inc. One Canon Pla za Lake Success, NY 1 1042 USA ©2008 Canon U.S.A., Inc. Canon is a register ed trademark of Canon Inc. in the United St ates and may also be a registered trademark in other countries.[…]
-
Page 73: Canon MP190
69 Index Index A Appendix 59 B Before Using the Machine 6 C Canon U. S.A., INC. L IMITED WARRA NTY — U.S.A. only 65 Cleaning exterior 40 inside 41 platen glas s and document co ver 40 protrusion s inside the ma chine 42 roller 41 Copying 20 E Error Code 44 H Handling the Original Docu ment 11 L Legal Limit ations on Use of Your Product a nd Use of […]
-
Page 74: Canon MP190
70[…]
-
Page 75: Canon MP190
Getting Help from Canon Help Us Help Y ou Better Before you cont act Canon, please record the following information. Serial Number (located on the inside of the product): _____________________________________ Model Number (located on the top of the produ ct): ____________________________________ ___ Setup CD-ROM number (located on the CD-ROM): ____[…]
-
Page 76: Canon MP190
series Quick S t art Guide QT5-1498-V01 XXXXXXXX © CANON INC. 2008 PRINTED IN VIETNAM The following FINE Cartridges are compatible with this product. For information on product specific ations, please visit our website at www .usa.canon.com Photo All-In-One[…]
Раздел: Офисная Техника
Тип: Струйный Принтер
Характеристики, спецификации
Тип цветной печати:
4-х цветная
Макс. разреш. фотопечати:
1200×4800 т/д
Скорость печати текста до:
19 стр/мин
Полностраничная цв. печать до:
8 стр/мин
Скорость печати фото 10×15 до:
45 сек
Копирование без компьютера:
Да
Оптическое разреш. сканера:
600×1200 т/д
Лоток для подачи бумаги:
до 100 листов
Работа под Windows:
2000, XP, Vista
Работа под Mac OS:
X 10.3.9 и выше
Интерфейс связи с ПК:
USB 2.0
Программное обеспечение:
в комплекте
Потребляемая мощность:
13 Вт
Габаритные размеры (В*Ш*Г):
17*46*36 cм
Краткое описание:
струйный;1200×4800 т/д;USB 2.0;5.8кг
Вид гарантии:
гарантийный талон
Базовый цвет:
другие цвета
Инструкция к Струйному Принтеру Canon PIXMA MP 190
The following FINE Cartridges are compatible with this machine.
Les cartouches FINE suivantes sont compatibles avec cette machine.
Následující kazety FINE jsou kompatibilní s tímto přístrojem.
ENGLISH
Selle masinaga ühilduvad allpool märgitud FINE-kassetid.
Ar šo iekārtu ir savienojamas sekojošās FINE kasetnes.
Su šiuo aparatu suderintos spausdinimo kasetės „FINE“.
Az alábbi FINE patronok használhatók a készülékkel.
Urządzenie to obsługuje wymienione poniżej kasety FINE.
Данный аппарат совместим со следующими картриджами FINE.
Sledeče FINE kartuše so primerne za to napravo.
S týmto zariadením sú kompatibilné nasledovné kazety FINE (FINE Cartridge).
Aşağıdaki HASSAS Kartuşlar bu makine ile uyumludur.
Нижчезазначені картриджі FINE сумісні з цим апаратом.
The following FINE Cartridges (High Yield) are also compatible with this machine.
LATVIEŠUPOLSKI MAGYARTÜRKÇE РУССКИЙ ČESKYEESTI FRANÇAIS
Les cartouches FINE (haut rendement) suivantes sont compatibles avec cette machine.
Následující kazety FINE (vysoce výnosné) jsou také kompatibilní s tímto přístrojem.
Selle masinaga ühilduvad ka allpool märgitud FINE-kassetid (suure tootlikkusega).
Quick Start Guide
Ar šo iekārtu ir savienojamas sekojošās FINE kasetnes (ar augstu plūstamību).
IETUVIŠKAI
L
Toliau nurodytos „FINE“ (didelės išeigos) spausdinimo kasetės taip pat tinka šiam aparatui.
Guide de démarrage rapide
Az alábbi FINE patronok (High Yield) szintén használhatók a készülékkel.
Urządzenie to również obsługuje wymienione poniżej kasety FINE (wysokiej wydajności).
Quick Start Guide
Данный аппарат также совместим со следующими картриджами FINE (высокое качество).
Stručná příručka
Sledeče FINE kartuše (z veliko kapaciteto) so tudi primerne za to napravo.
S týmto zariadením sú kompatibilné nasledovné kazety FINE (FINE Cartridge) (vel’kokapacitné).
Kiirstardi juhend
Aşağıdaki HASSAS Kartuşlar da (Yüksek Verim) bu makine ile uyumludur.
Нижчезазначені картриджі FINE (високопродуктивні) також сумісні з цим апаратом.
Darba uzsākšanas rokasgrāmata
Greito parengimo instrukcija
Beüzemelési útmutató
For details on FINE Cartridge replacement, refer to “Replacing A FINE Cartridge” in this guide.
Szybkie wprowadzenie
Pour avoir des informations sur le remplacement de cartouches FINE, reportez—vous à « Remplacement d’une cartouche FINE » dans
ce manuel.
SLOVENŠČINA
Více informací o výměně kazet FINE viz část „Výměna kazet FINE“ v této příručce.
Краткое руководство по началу работы
FINE-kassettide asendamise kohta täpsema teabe saamiseks vt käesoleva juhendi osa „FINE-kasseti asendamine“.
Plašāku informāciju par FINE kasetņu nomaiņu meklējiet šīs pamācības nodaļā „FINE kasetnes nomaiņa“.
Kratka navodila za postavitev in uporabo
Išsamesnės informacijos apie spausdinimo kasečių „FINE“ keitimą ieškokite šios instrukcijos skyriuje „Spausdinimo kasetės „FINE“
keitimas“.
SLOVENSKY
A FINE patron cseréjével kapcsolatos részleteket lásd a „FINE patron cseréje” fejezetben.
Stručná příručka
Szczegółowe informacje na temat wymiany kaset FINE znajdują się w sekcji „Wymiana kasety FINE” w niniejszym podręczniku.
Для получения дополнительной информации о замене картриджа FINE см. раздел “Замена картриджа FINE” в настоящем
руководстве.
Hızlı Kurulum Kılavuzu
Za podrobnosti o zamenjavi FINIH KARTUŠ si preberite razdelek »Zamenjava FINE kartuše « v tem priročniku.
Podrobnejšie informácie o výmene kazety FINE (FINE Cartridge) nájdete v
č
asti Výmena kazety FINE (FINE Cartridge) v tejto príru
č
ke.
Коротка інструкція з користування
HASSAS Kartuşun değiştirilmesi hakkında ayrıntılar için, bu kılavuzdaki “Bir HASSAS Kartuşun Değiştirilmesi” kısmına bakın.
Для отримання інформації щодо заміни картриджів FINE перегляньте розділ „Заміна картриджа FINE“ цього довідника.
УКРАЇНСЬКА
QT5-0530-V01
E14
QT5-0530-V01 XXXXXXXX ©CANON INC.2006 PRINTED IN VIETNAM

Canon Europa N.V., Bovenkerkerweg 59-61, 1185 XB Amstelveen, The Netherlands

ENGLISH
Quick Start Guide
Table of Contents
Introduction 12
Copying 17
Printing From Your Computer 19
Scanning 20
Printing Photographs Directly From A Digital Camera 21
Maintenance 22
Troubleshooting 25
ENGLISH
X Preparing the machine
Unpack the machine
Please confirm bundled thing by the illustration printed on the flapped lid of the packing box.
IMPORTANT
• Do not connect the USB cable until after the software is installed.
• A printer cable is not included. You must purchase a USB cable (less than 10 ft. / 3 m) to connect your
machine to a computer.
1 Turn ON the machine.
2 Prepare the FINE Cartridges (ink cartridges).
• If the Scanning Unit (Printer Cover) is left open for more than 10 minutes, the FINE Cartridge Holder
moves to the right. Close and reopen the Scanning Unit (Printer Cover) to return the Holder to the center.
• Do not reattach the Protective Tape once you have removed it.
3 Install the FINE Cartridge.
• Ensure that all the FINE Cartridges are installed in the order directed by the label. The machine cannot
be used unless all the FINE Cartridges are installed.
• For safety reasons, store FINE Cartridges out of the reach of small children.
• Do not drop or shake FINE Cartridges as this may cause the ink to leak out and stain your clothes and
hands.
• The Alarm Lamp still lights orange if a FINE Cartridge is not installed properly. Open the Scanning Unit
(Printer Cover) and make sure that all the FINE Cartridges are installed in the correct order directed on
the label.
X European Union (and EEA) only.
This symbol indicates that this product is not to be disposed of with your
household waste, according to the WEEE Directive (2002/96/EC) and your
national law. This product should be handed over to a designated collection
point, e.g., on an authorized one-for-one basis when you buy a new similar
product or to an authorized collection site for recycling waste electrical and
electronic equipment (EEE). Improper handling of this type of waste could
have a possible negative impact on the environment and human health due
to potentially hazardous substances that are generally associated with EEE.
At the same time, your cooperation in the correct disposal of this product
will contribute to the effective usage of natural resources. For more
information about where you can drop off your waste equipment for
recycling, please contact your local city office, waste authority, approved
WEEE scheme or your household waste disposal service. For more
information regarding return and recycling of WEEE products, please visit
www.canon-europe.com/environment.
(EEA: Norway, Iceland and Liechtenstein)
X For Customers in Europe, Middle-East, Africa and Russia
only
For Canon Customer Support contacts, please see the back cover of the European
Warranty System (EWS) Booklet or visit www.canon-europe.com.
Printer Model: K10282 (MP160)
2
X Install the software
ENGLISH
Select Easy Install in order to install the application software, On-screen Manual and MP
drivers. Select Custom Install in order to choose the options you would like to install.
When the User Registration screen appears, if you click Register and computer is
connected to the internet, the on-screen instructions to register your product will appear.
Registration can also be performed from the icon on the desktop after installation is
completed.
IMPORTANT
• Temporarily disable any firewall software and close any open applications, including
anti-virus software. Computer security programs can be re-started after software
installation.
Installing the Printer Driver — Windows
• You must log on as an administrator or have administrative privileges in order to install
the software in Windows XP or Windows 2000.
• If the following screen appears, the USB cable is connected.
Perform the following steps.
1. Disconnect the USB cable.
2. Click [Cancel].
• Do not switch users during the installation process.
Installing the Printer Driver — Macintosh
• Do not connect the machine to Mac OS 9 or Mac OS X Classic environments since they
are not supported.
• Enter the name and password for an Administrator Account.
Perform the following to make sure the driver has been installed correctly:
1. Select [Utilities] from the [Go] menu.
2. Double-click the [Printer Setup Utility] ([Print Center] when using Mac OS X
v.10.2.  icon.
icon.
If the printer is displayed in the [Printer List], the printer driver is installed.
If the printer is not displayed in the [Printer List], click [Add] in the [Printer List] and
select [USB] from the pop-up menu. Select MP160 from the [Product] list and click
[Add].
When connecting from Mac OS X v.10.3.3 or earlier:
Restarting the computer while connected to the machine may cause the machine not to be
detected. To resolve this, either unplug the USB cable then plug it back in again, or turn
the machine OFF then back ON again.
3
ENGLISH
Disclaimer
Canon Inc. has reviewed this manual thoroughly in order that it will be an easy-to-use
guide to your Canon MP160. All statements, technical information and recommendations
in this manual and in any guides or related documents are believed reliable, but the
accuracy and completeness thereof are not guaranteed or warranted, and they are not
intended to be, nor should they be understood to be, representation or warranties
concerning the products described. Specifications are subject to change without notice.
As an ENERGY STAR® partner, Canon Inc. has determined that
this product meets the ENERGY STAR® guidelines for energy
efficiency.
This machine supports Exif 2.21 (also called “Exif Print”).
Exif Print is a standard for enhancing the communication
between digital cameras and printers. By connecting to an
Exif Print-compliant digital camera, the camera’s image data
at the time of shooting is used and optimized, yielding
extremely high quality prints.
About Consumables
Consumables (ink tanks / FINE Cartridges) are available for 5 years after production has
stopped.
Trademark Notices
• Windows is a registered trademark of Microsoft Corporation in the United States and
other countries.
• Macintosh and Mac are trademarks of Apple Computer, Inc., registered in the United
States and other countries.
Copyright ©2006 CANON INC.
All rights reserved. No part of this publication may be transmitted or copied in any form
whatsoever without expressed written permission from Canon Inc.
4

X How To Use The Documentation Provided
ENGLISH
Easy Setup Instructions (Printed documentation):
Be sure to read this sheet first.
This sheet includes instructions for setting up your machine and getting it ready for use.
Follow all steps in this sheet before using your machine.
Quick Start Guide (This guide):
Read this guide when starting to use the machine.
After following the instructions in the Easy Setup Instructions, we recommend that you
read this guide to familiarize yourself with the basic operation of all functions that can be
performed by your machine.
User’s Guide (On-screen manual):
This guide is available on the Setup CD-ROM.
This guide includes instructions on printing from your computer, direct photo printing
from a digital camera, and copying. Refer to this guide for in-depth instructions not
included in the Quick Start Guide, or if you want to learn more about advanced features.
Printer Driver Guide/Scanning Guide (On-screen manual):
These guides are available on the Setup CD-ROM.
Refer to these guides for full instructions on printing and scanning from your computer.
These guides describe the details of each function, as well as how to use the MP Drivers
and MP Navigator.
Photo Application Guide (On-screen manual):
This guide is available on the Setup CD-ROM.
This guide describes the utility software on the Setup CD-ROM, such as Easy-PhotoPrint
and Easy-WebPrint, including instructions on how to scan data, various printing methods,
and details of functions.
Users in Asia only:
The on-screen manuals may not be installed depending on the country of purchase. If not,
the on-screen manuals may be copied from the «Manual» folder in the Setup CD-ROM to
your computer’s hard disk.
5

ENGLISH
X Displaying On-screen Manual Stored On The Setup
CD-ROM
You can install the on-screen manuals using the Setup CD-ROM by either of the
following.
• Select «Easy Install» to install the on-screen manuals along with the printer driver and
applications.
• Select «On-screen Manual» from «Custom Install» to install the on-screen manuals. If
you have not installed or have deleted the on-screen manuals, use either method above
to install them.
• A start-up icon for the On-screen manual will be placed on the desktop after installing
the software with Easy Install.
• Double-click the icon, then from the pop-up menu, click the title of each manual you
want to open.
Various Web browsers are available for viewing HTML content, and therefore the same
text or image may appear different depending on which browser you use. The on-screen
manuals have been prepared on the assumption that they are displayed and read under the
following conditions:
For Windows:
• Browser: Windows HTML Help Viewer
• Note: Microsoft Internet Explorer 5.0 or later must be installed.
• The on-screen manuals may not be displayed properly depending on your operating
system or Internet Explorer version. We recommend that you keep your system up to
date with Windows Update.
For Macintosh:
• Browser: Help Viewer
• Note: The on-screen manuals may not be displayed properly depending on your
operating system. We recommend that you keep your system up to date.
6

X Reading The Document
ENGLISH
Symbols Used In This Guide
CAUTION Indicates a caution concerning operations that may lead to injury to persons or
damage to property if not performed correctly. In order to use the machine
safely, always pay attention to these cautions.
IMPORTANT Indicates operational warnings and restrictions. Be certain to read these items
to operate the machine correctly, and to avoid damage to the machine.
Indicates notes for operation or additional explanations. Reading these is
highly recommended.
Indicates the description of the machine when connected to a computer.
Read this when the machine is connected to a Windows system.
Read this when the machine is connected to a Macintosh system.
z(Operation branch title) Used for an operation that can be performed in branch procedures.
Buttons Used In This Guide
[button name] Text enclosed in these brackets indicates a button on the Operation Panel of the
machine or an item on the computer to be manipulated.
Example: [Color]
<letter> Text enclosed in these brackets indicates a letter in the alphabet or number which
appears on the LED (Light Emitting Diode).
Example: <P>, <3>
Terms Used In This Guide
machine General term used to represent the MP160.
default A setting that remains in effect unless you change it.
document The original sheets of paper, pages of a book, or photographs that you copy or
scan with the machine.
paper Paper on which you can print with the machine.
7

ENGLISH
X Safety Precautions
Please read the safety warnings and cautions provided in this guide to ensure that you use
your machine safely. Do not attempt to use the machine in any way not described in this
guide. For detailed safety information, refer to the User’s Guide.
WARNING
You may cause an electric shock/fire or damage the machine if you ignore any of
these safety precautions.
z Location
• Do not place the machine close to flammable solvents such as alcohol or thinners.
z Power supply
• Never attempt to plug or unplug the machine from the power supply when your hands
are wet.
• Always push the plug all the way into the power outlet.
• Never damage, modify, stretch or excessively bend or twist the power cord. Do not
place heavy objects on the power cord.
• Never plug the machine into a power socket that is shared with other equipment
(extension lead/cord, 2- or 3-way adapter, etc.).
• Never use the machine if the power cord is bundled or knotted.
• If you detect smoke, unusual smells or strange noises around the machine, immediately
unplug the machine at the power supply and contact your local authorized Canon dealer
or the Canon help line.
Using the machine in such conditions may result in fire or electrical shock.
• Periodically, unplug the machine and use a dry cloth to wipe off any dust or dirt
collected on the plug and the power outlet.
If the machine is placed at a location exposed to a lot of dust, smoke, or high humidity,
the dust collected on the plug absorbs moisture and may cause insulation failure and
fire.
8

z Maintenance
ENGLISH
• Use a damp cloth to clean the machine. Never use flammable solvents such as alcohol,
benzene or thinners. If flammable solvents come in contact with electrical components
inside the machine, it could cause a fire or electrical shock.
• Always turn OFF the power and unplug the machine from the power outlet before
cleaning the machine. If you leave ON or accidentally switch the machine ON while
cleaning it, it may result in injury or damage the machine.
z Handling
• Do not attempt to disassemble or modify the machine. There are no user serviceable
parts inside the machine.
The machine contains high-voltage components. Never attempt any maintenance
procedure not described in this guide. Incorrect maintenance procedures may damage
the machine, or cause a fire or electrical shock.
• Do not use flammable sprays near the machine.
This could cause a fire or electrical shock if the spray comes into contact with electrical
components inside the machine.
z Others
• When setting the machine near electric products with fluorescent lighting, separate the
machine at least 5.9 inches (15 cm) from electric products equipped with fluorescent
lighting. If you place it near to them, the machine may malfunction as a result of the
noise emitted by the fluorescent lighting.
• When turning OFF the power, be sure to press [ON/OFF] and confirm that the Alarm
Lamp has shut off. If you pull the power plug out of the wall outlet while the Alarm
Lamp is on, the FINE Cartridge is not protected, and you may not be able to print later.
9

ENGLISH
CAUTION
You may cause injury or damage the machine if you ignore any of these safety
precautions.
z Location
• Place the machine on a flat, stable, vibration-free surface that is strong enough to
support its weight.
• Do not install the machine in a location that is very humid or dusty, in direct sunlight,
outdoors, or close to a heating source. Installing in such a location may result in fire or
electrical shock. To avoid the risk of fire or electrical shocks, install the machine in a
location with an ambient temperature range of 41°F to 95°F (5°C to 35°C) and
humidity of 10% to 90% (condensation free).
• Do not place the machine on a thick rug or carpet. If fibers or dust come inside the
machine, it could cause a fire.
z Power supply
• Never remove the plug by pulling on the cord.
Pulling on the power cord may damage the cord and cause a fire or electrical shock.
• Do not use an extension cord as this may result in fire or electrical shock.
• Ensure that the area around the power outlet is kept clear at all times so you can easily
unplug the power cord if necessary. Otherwise you will be unable to disconnect the
power plug in case of an emergency.
• Never use a power supply source other than the one rated for the machine in the country
where you purchased the machine as it may result in fire or electrical shock.
The operating requirement of this machine is as follows:
100-240 V AC, 50/60 Hz (depending on local electrical requirements)
• The socket-outlet shall be installed near the equipment and shall be easily accessible.
10

z Handling
ENGLISH
• Close the Document Cover gently to avoid catching your hand. Failing to do so may
result in personal injury.
• Do not press down hard on the Document Cover when using the Platen Glass to scan
thick books. This may damage the Platen Glass and Document Cover, and/or result in
personal injury.
• When moving the machine, carry the machine at both ends.
• Do not insert your hands into the machine while it is printing. Parts inside the machine
are moving and this may result in injury.
• Do not turn the machine upside down. Ink may leak out and stain clothing or the
surrounding area.
z FINE Cartridges (Ink Cartridges)
• For safety reasons, store FINE Cartridges (Ink Cartridges) out of the reach of small
children. If a child ingests any ink, consult a doctor immediately.
• Do not shake FINE Cartridges (Ink Cartridges). Ink may leak out and stain clothing or
the surrounding area.
• Never touch the nozzle and the gold terminal.
X Legal Limitations On Use Of Your Product And Use Of
Images
It may be unlawful to make copies of, scan, print or use reproductions of the following
documents. The list provided is non-exhaustive. When in doubt, check with a legal
representative in your jurisdiction.
.
• Paper money
• Traveler’s checks
• Money orders
• Food stamps
• Certificates of deposit
• Passports
• Postage stamps (canceled or uncanceled)
• Immigration papers
• Identifying badges or insignias
• Internal revenue stamps (canceled or
• Selective service or draft papers
uncanceled)
• Checks or drafts issued by governmental
• Bonds or other certificates of indebtedness
agencies
• Stock certificates
• Motor vehicle licenses and certificates of title
• Copyrighted works/works of art without
permission of copyright owner
11

ENGLISH
1 Introduction
X Features Of Your Machine
Thank you for purchasing the Canon MP160. Your machine incorporates the following
functions in one simple-to-operate device:
Desktop photo printer Prints photo-quality images directly from a digital camera, without
using a computer.
Copier Makes color or black & white copies. Also, applies advanced copy
features to your copies.
Printer Prints photographs, vivid color and crisp black and white documents
from your computer.
Scanner Scans high-resolution images to your computer and processes them
easily using the utility software supplied.
You may select to use your machine as a stand-alone device for copying, and photo
printing. Alternatively, connect your machine to a computer and you will have a fully
integrated desktop printer/copier/scanner. The utility software supplied with your
machine enables you to perform a variety of tasks from your computer effortlessly and
efficiently.
12 Introduction Chapter 1
X Machine Parts And Their Functions
ENGLISH
Machine
z Exterior
(1) (2) (3) (4)
(5)
(9) (8)
(6)(7)
(1) Document Cover
Covers the Platen Glass. Open this cover when loading a document on the Platen Glass.
(2) Paper Support
Supports paper loaded in the Auto Sheet Feeder. Open it before loading paper.
(3) Paper Support Extension
Supports paper loaded in the Auto Sheet Feeder. Pull it out before loading paper.
(4) Paper Guide
When loading paper, ensure the left edge of the paper just touches this guide.
(5) Auto Sheet Feeder
Load paper here. Paper feeds automatically, one sheet at a time.
(6) Paper Output Tray
Printouts are output to this tray. Open the tray before you start copying or printing. When not being
used, keep it closed in the machine.
(7) Direct Print Port
Used to connect a PictBridge-compliant device to the machine when printing images directly from
the camera.
(8) Platen Glass
Used to load a document to be processed.
(9) Operation Panel
Displays the operational status of the machine. It is also used to change or check the settings of each
function. For details, see page 15.
Chapter 1 Introduction 13
ENGLISH
z Rear view and interior
(10)
(11) (12)
(14) (13)
(15) (16)
(10) FINE Cartridge Holder
Install the FINE Cartridges here.
(11) FINE Cartridges (Ink Cartridges)
Replaceable cartridges that comprise an integrated Print Head and ink tank.
(12) Scanning Unit
Used to scan a document.
(13) Scanning Unit Support
Used to hold the Scanning Unit being opened.
(14) Paper Thickness Lever
Used to adjust the gap between the FINE Cartridge and surface of the printing paper.
(15) Power Connector
Used to connect the power cord to the machine.
(16) USB Port
Used to connect a computer to the machine when printing from or scanning to the computer.
IMPORTANT
• While the machine is printing from or scanning images to the computer, or the computer is
in the sleep mode or standby mode, do not disconnect and connect the USB cable.
14 Introduction Chapter 1
Operation Panel
ENGLISH
(1) (2) (3) (4) (5) (6) (10)(7) (8) (9)
(11) (12) (13) (14)
(1) [ (Maintenance)] Button
Accesses the Maintenance menu.
(2) [Fit to Page] Button
Enables/disables the Fit-to-Page copying.
(3) Fit-to-Page Lamp
Lights when Fit-to—Page copying is enabled.
(4) [SCAN] Button
Opens the MP Navigator to scan a document to your computer according to the settings selected. To
use this button, the machine must be connected to a computer.
(5) Alarm Lamp
Lights if an error occurs, or when the paper or ink runs out.
(6) LED (Light Emitting Diode)
Displays the number of copies, Maintenance menu selections or the operational status.
(7) [Black] Button*
Starts black & white copying. Also, press this button to confirm settings or operations.
(8) [Color] Button*
Starts color copying. Also, press this button to confirm settings or operations.
(9) [Stop/Reset] Button
Cancels operations and returns the machine to standby mode.
(10) [ON/OFF] Button
Turns the machine ON and OFF. Before turning ON the machine, make sure the Document Cover is
closed.
* In the software applications or manuals, [Start] or [OK] is occasionally substituted for [Black] and/or
[Color] buttons.
Chapter 1 Introduction 15

ENGLISH
(11) Black/Color Ink Lamp
Lights when a Black/Color FINE Cartridge is empty.
(12) Paper Lamp
Displays the selected paper size and type for copying.
(13) [Paper] Button
Switches the paper size and type for copying.
(14) [+] Button
Increases the number of copies.
16 Introduction Chapter 1
ENGLISH
2 Copying
X Loading Paper
1 Open the Paper Support (1),
(1)
then pull out the Paper Support
Extension (2).
(2)
2 Place a stack of paper (print
side up) in the Auto Sheet
(B)
Feeder (1), pinch the Paper
(A)
Guide (A) and adjust it to the left
side of the stack (2).
• Make sure the stack does not exceed the
A4
(2)
Load Limit Mark (B).
• For details on loading paper, see the
(1)
User’s Guide.
X Recommended Paper
• Plain paper
• Super White Paper*
• Glossy Photo Paper*
• Matte Photo Paper*
• Photo Paper Pro*
• Photo Paper Plus Glossy*
• Photo Paper Plus Semi-Gloss*
*
Indicates Canon genuine media.
For details on the general paper guidelines, see the User’s Guide.
Chapter 2 Copying 17
ENGLISH
X Setting The Paper Size And Type
For copying or photo printing, on the Operation Panel, you need to set the size and type
of paper loaded in the Auto Sheet Feeder. (See page 17)
1 Press [Paper] repeatedly to select the paper size and type.
X Loading Documents
1 Lift the Document Cover.
2 Load your document.
• Place your document face down on the Platen
Glass.
• Align the upper left corner of your document
with the alignment mark on the lower right
corner of the Platen Glass.
3 Gently close the Document Cover.
X Making Copies
1 Press [+] repeatedly to select the number of copies (max. 20 copies).
2 Press [Color] for color copying, or [Black] for black & white copying.
• If you press and hold down the button for longer than 2 seconds, the LED flashes once. Then
release the button and the machine starts high speed (draft) copying (A4 or Letter plain paper
only).
X Advanced Copy Feature
Fit-to-Page copying Copies the images so that they fit the size of the paper.
For details on Fit-to-Page copying, see the User’s Guide.
18 Copying Chapter 2

ENGLISH
3 Printing From Your Computer
X Printing Documents
The print procedure varies slightly depending on the application software. The basic print
procedure is explained here.
1 Load paper in the Auto Sheet Feeder. (See page 17)
2 Create a document or open a file to print.
3 Select [Print] from the application software’s [File] menu.
• Make sure that your machine is selected as a printer.
4 Adjust the settings for your document as necessary, then click [OK].
5 Click [Print] or [OK].
1 Load paper in the Auto Sheet Feeder. (See page 17)
2 Create a document or open a file to print.
3 Select [Page Setup] from the application software’s [File] menu.
• Make sure that your machine is selected as a printer.
4 Select the desired paper size from [Paper Size], then click [OK].
5 Select [Print] from the application software’s [File] menu.
6 Adjust the settings for your document as necessary, then click [OK].
7 Click [Print].
Chapter 3 Printing From Your Computer 19

ENGLISH
4 Scanning
X Scanning Methods
Scanning using the MP Navigator
Using the MP Navigator, you can scan, process and save documents to your computer.
For details on using the MP Navigator, see the Scanning Guide.
On the Windows desktop, double-click [MP Navigator 3.0] icon to open the MP
Navigator.
On the [Go] menu, select [Applications], [Canon Utilities], then double-click the [MP
Navigator 3.0] icon to open the MP Navigator.
You can launch the following application software from the MP Navigator.
• Easy-PhotoPrint (Photo Printing)
• ArcSoft PhotoStudio (Photo image editing)
• ScanSoft OmniPage SE* (Converting scanned document to text)
*ScanSoft OmniPage SE does not support Windows 98 first edition.
If you performed the [Custom Install] and only installed the MP Driver and MP
Navigator, these application software were not installed and thus cannot be launched. To
launch any of the above application software from MP Navigator, perform the [Custom
Install] once again to install them.
Scanning with the operation panel of the machine
By pressing [SCAN] on the machine, the MP Navigator opens and you can change the
settings for the scanning operations. (See the Scanning Guide)
1 Load the document on the Platen Glass. (See page 18)
2 Press [SCAN].
• The MP Navigator opens.
• The subsequent procedure varies depending on your settings. For details, see the Scanning Guide.
Scanning from an application software
You can scan an image from a TWAIN— or WIA- (Windows XP only) compliant
application software and use the image in that application software. This procedure varies
depending on the application software.
For the detailed procedure, refer to the manual of the application software you are using.
20 Scanning Chapter 4

ENGLISH
5 Printing Photographs Directly From A
Digital Camera
X Connecting To A PictBridge-Compliant Device
Connecting a PictBridge-compliant device such as digital camera, camcorder or mobile
phone to the machine allows you to print recorded images directly without using a
computer.
1 Turn ON the machine.
2 Load paper in the Auto Sheet Feeder. (See page 17)
3 Connect the PictBridge-compliant device to the machine.
• Ensure that the device is turned off.
• Connect the device to the machine using the USB cable (for connection to a computer)
supplied with the device.
4 Turn ON and set up the device for direct printing.
Some types of PictBridge-compliant devices turn on automatically when connected to the
machine. For devices that do not turn on automatically, do so manually.
5 You are now ready to print images from the camera.
Chapter 5 Printing Photographs Directly From A Digital Camera 21
ENGLISH
6 Maintenance
X Replacing A FINE Cartridge
When replacing a FINE Cartridge, check the model number very carefully.
The FINE Cartridge PG-50 Black (High Yield) and CL-51 Color (High Yield) are also
compatible with this machine.
1 Make sure the power is turned ON.
2 Lift the Scanning Unit and pull the
Scanning Unit Support down into
place.
CAUTION
• Do not try to manually move or stop the FINE
Cartridge Holder.
• Do not touch any metal parts.
3 Push down the empty FINE Cartridge
on the tab to release it, then pull out the
FINE Cartridge.
CAUTION
• Do not touch the transparent film (A), film cable
(B), ink absorber (sponge part) (C), or any metal
parts.
(A) (B) (C)
22 Maintenance Chapter 6
4 Remove a new FINE Cartridge from
ENGLISH
its packaging. Then hold the FINE
Cartridge as shown and remove the
Protective Tape (A).
CAUTION
• Do not touch the gold terminals (B) or nozzles
(C).
• Do not shake or drop the FINE Cartridge as the
ink may leak and stain your clothes or hands.
(A)
• Do not attempt to reattach the Protective Tape
once you remove it.
• Do not place the nozzles in contact with any
(B)
other surface.
(C)
5 Insert the FINE Cartridge at a slight
angle into the empty slot.
6 Push up the FINE Cartridge until it
clicks into place.
Chapter 6 Maintenance 23

ENGLISH
7 If you need to replace another FINE Cartridge, repeat steps 3 to 6.
8 Lift the Scanning Unit and put the Scanning Unit Support and Scanning
Unit back to its original position.
X Cleaning The FINE Cartridge
If the printed nozzle check pattern is incomplete, omitted, or a specific color is not
printed, clean the FINE Cartridge.
1 Press [Maintenance] repeatedly to select <H> or <y> as necessary.
<H>: Performs normal FINE Cartridge cleaning.
<y>: Performs deep FINE Cartridge cleaning.
2 Press [Black] or [Color].
24 Maintenance Chapter 6
ENGLISH
7 Troubleshooting
X Removing Jammed Paper
If <E> and <3> are alternately appeared on the LED, follow the procedure below to clear
the paper jam.
Clearing Jams In The Paper Output Tray
1 Gently pull any jammed paper out of the
Paper Output Tray.
2 Press [Black] or [Color].
Clearing Jams From The Auto Sheet
Feeder
1 Gently pull out any jammed paper from
the Auto Sheet Feeder.
2 Press [Black] or [Color].
Clearing Jams From Inside The Machine
1 Open the Scanning Unit.
2 Gently pull out any jammed paper from
the rollers.
CAUTION
• Be careful not to touch the components inside the
machine at this time, otherwise, print quality may be
reduced.
3 Close the Scanning Unit.
4 Press [Black] or [Color].
X More Information
For details on other troubleshooting, see the User’s Guide.
Chapter 7 Troubleshooting 25

ENGLISH
26

ENGLISH
27

ENGLISH
28
Аннотации для Струйного Принтера Canon PIXMA MP 190 в формате PDF
Топ 10 инструкций
Другие инструкции
Просмотр
Доступно к просмотру 366 страниц. Рекомендуем вам скачать файл инструкции, поскольку онлайн просмотр документа может сильно отличаться от оригинала.
-
CESKY
EESTI
FRANCAIS
ENGLISH
Quick Start Guide  LIETUVISKAI LATVIESU  Guide de demarrage rapide  Strucna prirucka  MAGYAR  Kiirstardi juhend  POLSKI Darba uzsaksanas rokasgramata Greito parengimo instrukcija  РУССКИЙ Beuzemelesi utmutato Szybkie wprowadzenie  SLOVENSCINA Краткое руководство по началу работы Kratka navodila za postavitev in uporabo  SLOVENSKY  Strucna prirucka  TURKCE H?zl? Kurulum K?lavuzu Коротка інструкція з користування  УКРАЇНСЬКА  QT5-0530-V01  E14
Quick Start Guide
PRINTED IN VIETNAM
Podrobnejsie informacie o vymene kazety FINE (FINE Cartridge) najdete v casti Vymena kazety FINE (FINE Cartridge) v tejto prirucke.
Pour avoir des informations sur le remplacement de cartouches FINE, reportez-vous a « Remplacement d’une cartouche FINE » dans
Issamesnes informacijos apie spausdinimo kaseciu „FINE“ keitima ieskokite sios instrukcijos skyriuje „Spausdinimo kasetes „FINE“
Для получения дополнительной информации о замене картриджа FINE см. раздел “Замена картриджа FINE” в настоящем
Szczegolowe informacje na temat wymiany kaset FINE znajduja sie w sekcji „Wymiana kasety FINE” w niniejszym podreczniku.
Для отримання інформації щодо заміни картриджів FINE перегляньте розділ „Заміна картриджа FINE“ цього довідника.
HASSAS Kartusun degistirilmesi hakk?nda ayr?nt?lar icin, bu k?lavuzdaki “Bir HASSAS Kartusun Degistirilmesi” k?sm?na bak?n.
FINE-kassettide asendamise kohta tapsema teabe saamiseks vt kaesoleva juhendi osa „FINE-kasseti asendamine“.
Za podrobnosti o zamenjavi FINIH KARTUS si preberite razdelek »Zamenjava FINE kartuse « v tem prirocniku.
©CANON INC.2006
The following FINE Cartridges are compatible with this machine. Les cartouches FINE suivantes sont compatibles avec cette machine. Nasledujici kazety FINE jsou kompatibilni s timto pristrojem. Selle masinaga uhilduvad allpool margitud FINE-kassetid. Ar so iekartu ir savienojamas sekojosas FINE kasetnes. Su siuo aparatu suderintos spausdinimo kasetes „FINE“. Az alabbi FINE patronok hasznalhatok a keszulekkel. Urzadzenie to obsluguje wymienione ponizej kasety FINE. Данный аппарат совместим со следующими картриджами FINE. Sledece FINE kartuse so primerne za to napravo. S tymto zariadenim su kompatibilne nasledovne kazety FINE (FINE Cartr
-
Canon Europa N.V., Bovenkerkerweg 59-61, 1185 XB Amstelveen, The Netherlands
-
ENGLISH
Quick Start Guide
Table of Contents
Introduction                                  12
Copying                                       17
Printing From Your Computer                   19
Scanning                                      20
Printing Photographs Directly From A Digital Camera  21
Maintenance                                   22
Troubleshooting                               25
- 1
- 2
- 3
- 4
- 366
- Главная
-
Canon
-
МФУ
-
PIXMA MP190
-
Инструкция по эксплуатации
Вы можете бесплатно скачать Инструкция по эксплуатации для Canon PIXMA MP190.
Также вы сможете прочесть онлайн этот документ без скачивания.
Скачать Инструкция по эксплуатации для Canon PIXMA MP190
Тип файла
PDF
Размер
2.76 Mb
Кол-во страниц
76
Просмотров
43997
Вы не робот?
60
Скачать файл:
canon-pixma-mp190-user-s-manual.pdf
Читать онлайн Инструкция по эксплуатации для Canon PIXMA MP190 (Страница 1)

Next →
- 1
- 2
- 3
- 4
- 5
- 6
- 7
- 8
- 9
- 10
- 11
- 12
- 13
- 14
- 15
- 16
- 17
- 18
- 19
- 20
- 21
- 22
- 23
- 24
- 25
- 26
- 27
- 28
- 29
- 30
- 31
- 32
- 33
- 34
- 35
- 36
- 37
- 38
- 39
- 40
- 41
- 42
- 43
- 44
- 45
- 46
- 47
- 48
- 49
- 50
- 51
- 52
- 53
- 54
- 55
- 56
- 57
- 58
- 59
- 60
- 61
- 62
- 63
- 64
- 65
- 66
- 67
- 68
- 69
- 70
- 71
- 72
- 73
- 74
- 75
- 76
Другие МФУ Canon PIXMA MP190
Топ Canon МФУ
-
WirelessPhoto All-In-One Printer PIXMA MG6220 Руководства по эксплуатации
PDF файлов
1Просмотров
1652 -
2020i Инструкция по эксплуатации
PDF файлов
1Просмотров
3254 -
2022 Инструкция по эксплуатации
PDF файлов
1Просмотров
2659 -
3025 Объявления
PDF файлов
1Просмотров
12538 -
3035 Важное примечание
PDF файлов
1Просмотров
15215 -
3170 Series Инструкция по эксплуатации
PDF файлов
1Просмотров
11122
Ранее вы смотрели
Производители
AC International
Bauer
BeeWi
Compur
Creative Accents
EarthWay
Integration
Rosle
SimWatch
Vanguard Managed Solutions
Типы устройств
Эхолоты
Фотовспышки
Плиткорезы
Гаражные шкафчики для хранения инструмента
Аксессуары для освещения
Пайка
Грузовые ящики и стеллажи
ТВ-аксессуары
Спальня
Дополнения для триммера
Устройства
Carrier MPE62L-10R
Harbor Freight Tools 69462
Hunter Engineering HawkEye
IKEA KOMPLEMENT STORAGE TRAY ALL SIZES
Speco Technologies MCHH-100
SPX Cooling Technologies COFIMCO 03-11A
Tektronix 1480-SERIES
Viking 24″ W. Undercounter/Freestanding Refrigerated Beverage Center
freeuserguide.ru
About Us
Contacts
Disclamers
Privacy Policy
Эта страница полезна для вас? Поделитесь ссылкой: