
DIGITAL CAMERA
Camera User Guide
ENGLISH
Camera User Guide
Getting Started
Learning More
Components Guide
Basic Operations
Commonly Used Shooting Functions
Various Shooting Methods
Playback/Erasing
Print Settings/Transfer Settings
Connecting to a TV
Customizing the Camera
Troubleshooting
CDI-E366-010 XX07XXX © 2007 CANON INC. PRINTED IN JAPAN
List of Messages
Appendix
Ensure that you read the Safety Precautions (pp. 201–209).

Workflow and Reference Guides
The following guides are available. Refer to them as necessary according to the
flowchart below.
Check the package contents
Getting Started (p. 7)
Explains how to complete tasks ranging from charging
batteries and installing memory cards to setting the date and
time, shooting, playing and erasing images, and performing
simple printing tasks.
Learning More (p. 37)
Names camera components and provides more detailed
instructions for shooting and playback. Lists information for
more advanced use of your camera.
Connect the camera to
other devices
• Connecting to a printer
• Connecting to a TV set
• Connecting to a computer
Camera User Guide
(This guide)
Direct Print User
Guide
Software Starter
Guide
ZoomBrowser EX/
ImageBrowser
Software User Guide
• PDF manuals available
http://web.canon.jp/Imaging/information-e.html
on the Canon website.
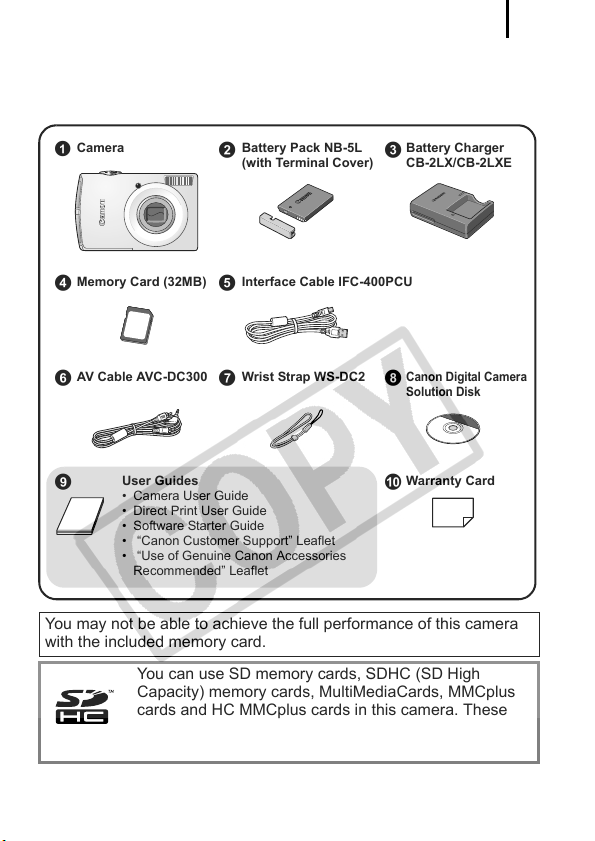
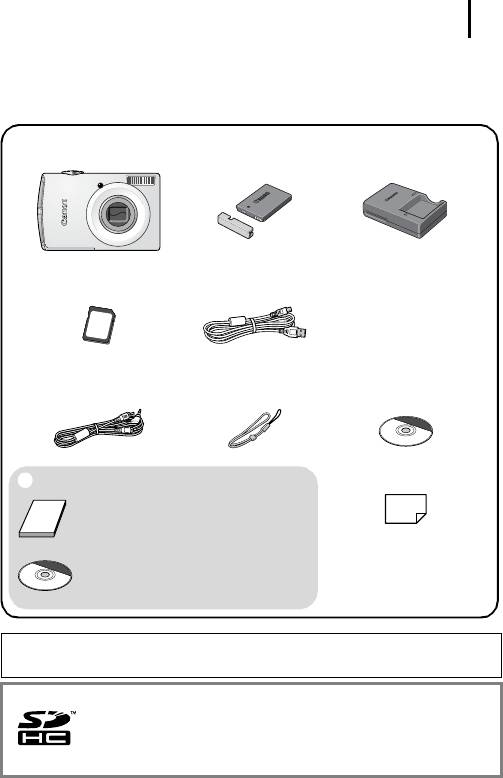
Checking the Package Contents
The following items are included in the package. If something is missing,
please contact the retail outlet at which you purchased the product.
1
Camera Battery Pack NB-5L
a
Memory Card (32MB) Interface Cable IFC-400PCU
de
AV Cable AVC-DC300 Wrist Strap WS-DC2
i
User Guides
• Camera User Guide
• Direct Print User Guide
• Software Starter Guide
• “Canon Customer Support” Leaflet
• “Use of Genuine Canon Accessories
Recommended” Leaflet
bc
(with Terminal Cover)
Battery Charger
CB-2LX/CB-2LXE
Canon Digital Camera
hfg
Solution Disk
Warranty Card
j
You may not be able to achieve the full performance of this camera
with the included memory card.
You can use SD memory cards, SDHC (SD High
Capacity) memory cards, MultiMediaCards, MMCplus
cards and HC MMCplus cards in this camera. These
cards are collectively referred to as memory cards in
this guide.
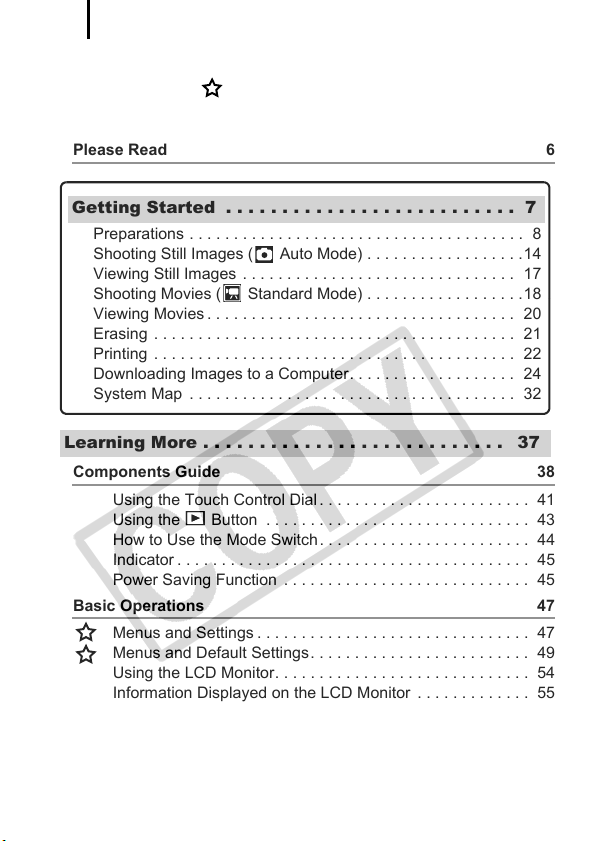
Table of Contents
2
Table of Contents
Items marked with a are lists or charts that summarize camera
functions or procedures.
Please Read 6
Getting Started . . . . . . . . . . . . . . . . . . . . . . . . . . 7
Preparations . . . . . . . . . . . . . . . . . . . . . . . . . . . . . . . . . . . . . . 8
Shooting Still Images ( Auto Mode) . . . . . . . . . . . . . . . . . .14
Viewing Still Images . . . . . . . . . . . . . . . . . . . . . . . . . . . . . . . 17
Shooting Movies ( Standard Mode) . . . . . . . . . . . . . . . . . .18
Viewing Movies . . . . . . . . . . . . . . . . . . . . . . . . . . . . . . . . . . . 20
Erasing . . . . . . . . . . . . . . . . . . . . . . . . . . . . . . . . . . . . . . . . . 21
Printing . . . . . . . . . . . . . . . . . . . . . . . . . . . . . . . . . . . . . . . . . 22
Downloading Images to a Computer. . . . . . . . . . . . . . . . . . . 24
System Map . . . . . . . . . . . . . . . . . . . . . . . . . . . . . . . . . . . . . 32
Learning More . . . . . . . . . . . . . . . . . . . . . . . . . . . 37
Components Guide 38
Using the Touch Control Dial . . . . . . . . . . . . . . . . . . . . . . . . 41
Using the Button . . . . . . . . . . . . . . . . . . . . . . . . . . . . . . 43
How to Use the Mode Switch. . . . . . . . . . . . . . . . . . . . . . . . 44
Indicator . . . . . . . . . . . . . . . . . . . . . . . . . . . . . . . . . . . . . . . . 45
Power Saving Function . . . . . . . . . . . . . . . . . . . . . . . . . . . . 45
Basic Operations 47
Menus and Settings . . . . . . . . . . . . . . . . . . . . . . . . . . . . . . . 47
Menus and Default Settings. . . . . . . . . . . . . . . . . . . . . . . . . 49
Using the LCD Monitor. . . . . . . . . . . . . . . . . . . . . . . . . . . . . 54
Information Displayed on the LCD Monitor . . . . . . . . . . . . . 55
Resetting Settings to Their Default Values . . . . . . . . . . . . . 64
Formatting Memory Cards . . . . . . . . . . . . . . . . . . . . . . . . . . 65

Table of Contents
Commonly Used Shooting Functions 66
Shooting with the Optical Zoom. . . . . . . . . . . . . . . . 66
Using the Digital Zoom/Digital Tele-Converter . . . . . . . . . . 67
Magnified Close-Up Shooting (Digital Macro) . . . . . . . . . . . 70
3
Using the Flash . . . . . . . . . . . . . . . . . . . . . . . . . . . . . . . . 71
Shooting Close—Ups/Infinity Shot . . . . . . . . . . . . . . . 72
Using the Self-Timer . . . . . . . . . . . . . . . . . . . . . . . . . . . 73
Changing the Recording Pixels/ Compression (Still Images) 75
Configuring the Postcard Mode . . . . . . . . . . . . . . . . . . . . . . 77
Embedding the Date in the Image Data. . . . . . . . . . . . . . . . 78
Setting the Image Stabilizer Function . . . . . . . . . . . . . . . . . 79
Various Shooting Methods 81
Shooting in Modes for Special Conditions . . . . . . . . . . . . . . 81
Shooting in Manual Mode . . . . . . . . . . . . . . . . . . . . . . . . . . 84
Continuous Shooting . . . . . . . . . . . . . . . . . . . . . . . . . . . 85
Setting the Red—Eye Reduction Function. . . . . . . . . . . . . . . 86
Setting the Slow Synchro Function . . . . . . . . . . . . . . . . . . . 87
Movie Shooting . . . . . . . . . . . . . . . . . . . . . . . . . . . . . . . 88
Shooting Panoramic Images (Stitch Assist). . . . . . . . . . . . . 93
Checking the Focus and Peoples’ Expressions
(Focus Check) . . . . . . . . . . . . . . . . . . . . . . . . . . . . . . . . . . . .95
Switching between Focusing Modes . . . . . . . . . . . . . . . . . . 97
Shooting Hard-to-Focus Subjects (Focus Lock, AF Lock) . 100
Locking the Exposure Setting (AE Lock) . . . . . . . . . . . . . . 102
Locking the Flash Exposure Setting (FE Lock) . . . . . . . . . 103
Adjusting the ISO Speed . . . . . . . . . . . . . . . . . . . . . . 104
Reducing the Effects of Camera Shake (Auto ISO Shift)
Adjusting the Exposure Compensation . . . . . . . . . . . . . . . 107
Switching between Metering Modes . . . . . . . . . . . . . . . . . 108
Setting the Shutter Speed (Long Shutter Mode) . . . . . . . . 109
Adjusting the Tone (White Balance) . . . . . . . . . . . . . . . . . 111
Shooting in a My Colors Mode. . . . . . . . . . . . . . . . . . . . . . 114
Changing Colors . . . . . . . . . . . . . . . . . . . . . . . . . . . . . . . . 116
Categorizing Images Automatically (Auto Category) . . . . . 121
Registering Settings to the Print/Share Button . . . . . 122
Setting the Display Overlays . . . . . . . . . . . . . . . . . . . . . . . 124
. . .105
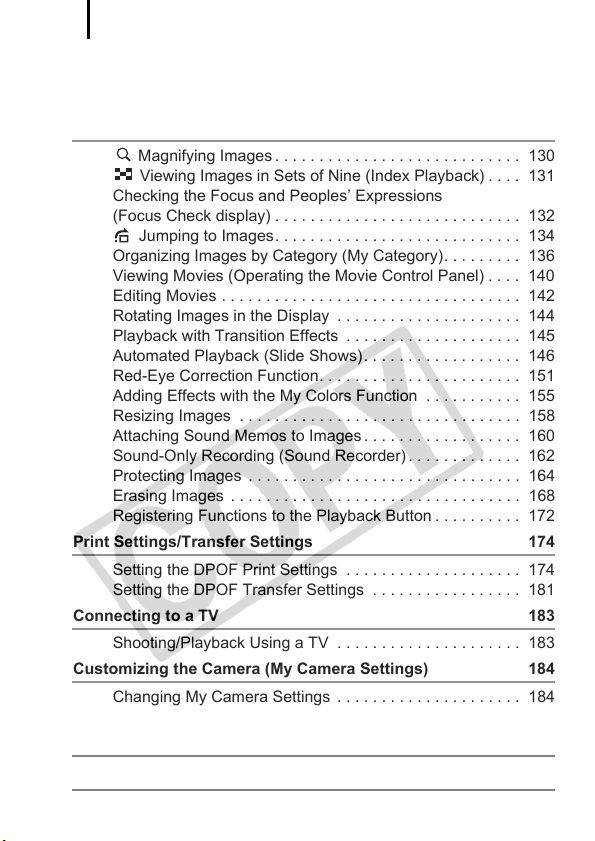
Table of Contents
4
Setting the Auto Rotate Function . . . . . . . . . . . . . . . . . . . . 125
Creating an Image Destination (Folder). . . . . . . . . . . . . . . 126
Resetting the File Number . . . . . . . . . . . . . . . . . . . . . . . . . 128
Playback/Erasing 130
Magnifying Images . . . . . . . . . . . . . . . . . . . . . . . . . . . . 130
Viewing Images in Sets of Nine (Index Playback) . . . . 131
Checking the Focus and Peoples’ Expressions
(Focus Check display) . . . . . . . . . . . . . . . . . . . . . . . . . . . . 132
Jumping to Images. . . . . . . . . . . . . . . . . . . . . . . . . . . . 134
Organizing Images by Category (My Category). . . . . . . . . 136
Viewing Movies (Operating the Movie Control Panel) . . . . 140
Editing Movies . . . . . . . . . . . . . . . . . . . . . . . . . . . . . . . . . . 142
Rotating Images in the Display . . . . . . . . . . . . . . . . . . . . . 144
Playback with Transition Effects . . . . . . . . . . . . . . . . . . . . 145
Automated Playback (Slide Shows). . . . . . . . . . . . . . . . . . 146
Red-Eye Correction Function. . . . . . . . . . . . . . . . . . . . . . . 151
Adding Effects with the My Colors Function . . . . . . . . . . . 155
Resizing Images . . . . . . . . . . . . . . . . . . . . . . . . . . . . . . . . 158
Attaching Sound Memos to Images . . . . . . . . . . . . . . . . . . 160
Sound-Only Recording (Sound Recorder) . . . . . . . . . . . . . 162
Protecting Images . . . . . . . . . . . . . . . . . . . . . . . . . . . . . . . 164
Erasing Images . . . . . . . . . . . . . . . . . . . . . . . . . . . . . . . . . 168
Registering Functions to the Playback Button . . . . . . . . . . 172
Print Settings/Transfer Settings 174
Setting the DPOF Print Settings . . . . . . . . . . . . . . . . . . . . 174
Setting the DPOF Transfer Settings . . . . . . . . . . . . . . . . . 181
Connecting to a TV 183
Shooting/Playback Using a TV . . . . . . . . . . . . . . . . . . . . . 183
Customizing the Camera (My Camera Settings) 184
Changing My Camera Settings . . . . . . . . . . . . . . . . . . . . . 184
Registering My Camera Settings . . . . . . . . . . . . . . . . . . . . 185
Troubleshooting 187
List of Messages 197
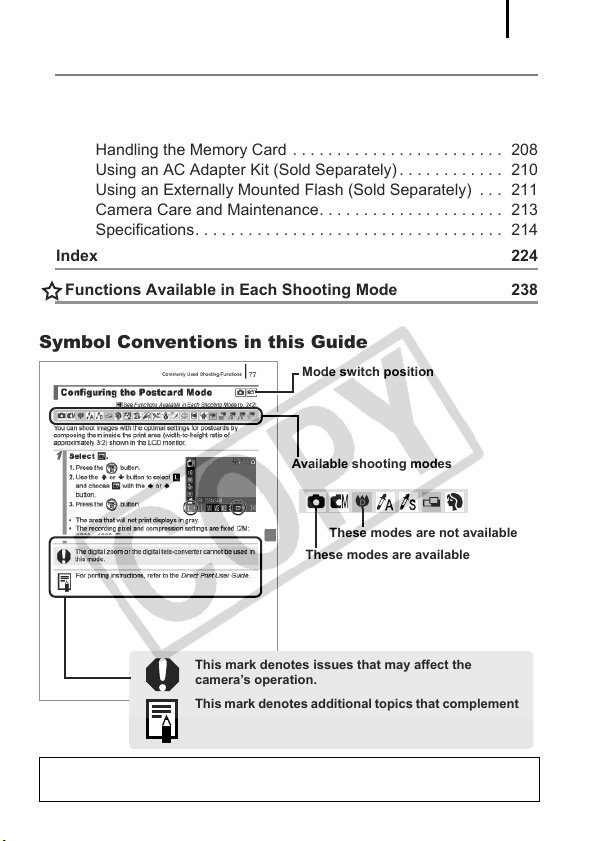
Table of Contents
Appendix 201
Safety Precautions. . . . . . . . . . . . . . . . . . . . . . . . . . . . . . . 201
Preventing Malfunctions . . . . . . . . . . . . . . . . . . . . . . . . . . 205
Battery Handling . . . . . . . . . . . . . . . . . . . . . . . . . . . . . . . . 206
Handling the Memory Card . . . . . . . . . . . . . . . . . . . . . . . . 208
Using an AC Adapter Kit (Sold Separately) . . . . . . . . . . . . 210
Using an Externally Mounted Flash (Sold Separately) . . . 211
Camera Care and Maintenance. . . . . . . . . . . . . . . . . . . . . 213
Specifications. . . . . . . . . . . . . . . . . . . . . . . . . . . . . . . . . . . 214
Index 224
Functions Available in Each Shooting Mode 238
Symbol Conventions in this Guide
Mode switch position
Available shooting modes
These modes are not available
These modes are available
5
This mark denotes issues that may affect the
camera’s operation.
This mark denotes additional topics that complement
the basic operating procedures.
Explanations in this guide are based on the camera’s default settings
at time of purchase.
6
Please Read
Tes t Shots
Before you try to photograph important subjects, we highly recommend that you
shoot several trial images to confirm that the camera is operating and being
operated correctly.
Please note that Canon Inc., its subsidiaries and affiliates, and its distributors are
not liable for any consequential damages arising from any malfunction of a
camera or accessory, including memory cards, that results in the failure of an
image to be recorded or to be recorded in a way that is machine readable.
Warning Against Copyright Infringement
Please note that Canon digital cameras are intended for personal use and should
never be used in a manner that infringes upon or contravenes international or
domestic copyright laws and regulations. Please be advised that in certain cases
the copying of images from performances, exhibitions, or commercial properties
by means of a camera or other device may contravene copyright or other legal
rights even if the image was shot for personal use.
Warranty Limitations
This camera’s warranty is only effective in the country of sale. If a problem arises
while the camera is in use abroad, please convey it back to the country of sale
before proceeding with a warranty claim to a Canon Customer Support Help
Desk.
For Canon Customer Support contacts, please see the customer support
list supplied with your camera.
Camera Body Temperature
If your camera is used for prolonged periods, the camera body may become
warm. Please be aware of this and take care when operating the camera for an
extended period.
About the LCD Monitor
The LCD monitor is produced with extremely high-precision manufacturing
techniques. More than 99.99% of the pixels operate to specification. Less than
0.01% of the pixels may occasionally misfire or appear as red or black dots.
This has no effect on the recorded image and does not constitute a malfunction.
Video Format
Please set the camera’s video signal format to the one used in your region before
using it with a TV monitor.
Language Setting
Please see Setting the Display Language (p. 13) to change the language setting.

Getting Started
z Preparations
z Shooting Still Images
z Viewing Still Images
z Shooting Movies
z Viewing Movies
z Erasing
z Printing
z Downloading Images to a Computer
z System Map
Preparations
8
Preparations
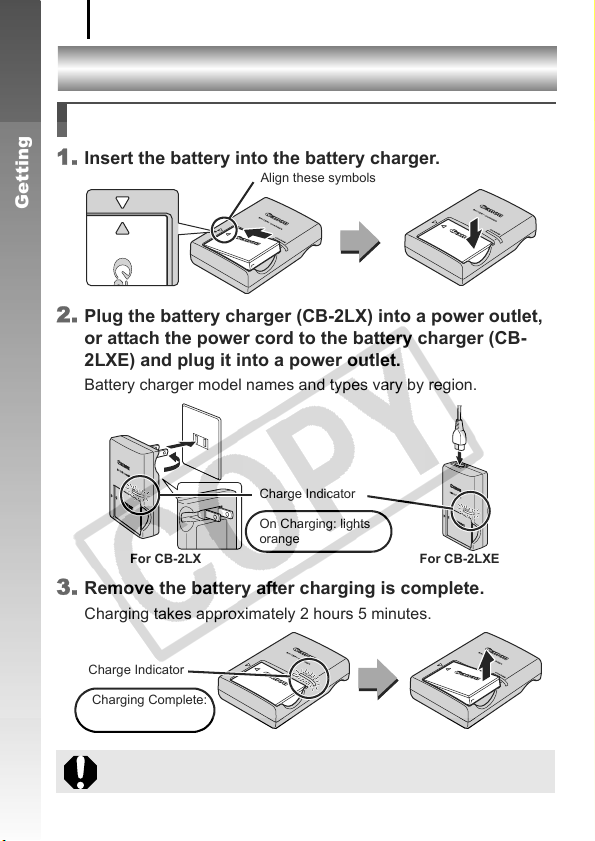
Charging the Battery
1. Insert the battery into the battery charger.
Align these symbols
Getting Started
2. Plug the battery charger (CB-2LX) into a power outlet,
or attach the power cord to the battery charger (CB—
2LXE) and plug it into a power outlet.
Battery charger model names and types vary by region.
Charge Indicator
On Charging: lights
orange
For CB-2LX For CB-2LXE
3. Remove the battery after charging is complete.
Charging takes approximately 2 hours 5 minutes.
Charge Indicator
Charging Complete:
lights green
To protect the battery and prolong its life, do not charge it for
longer than 24 hours continuously.
Preparations
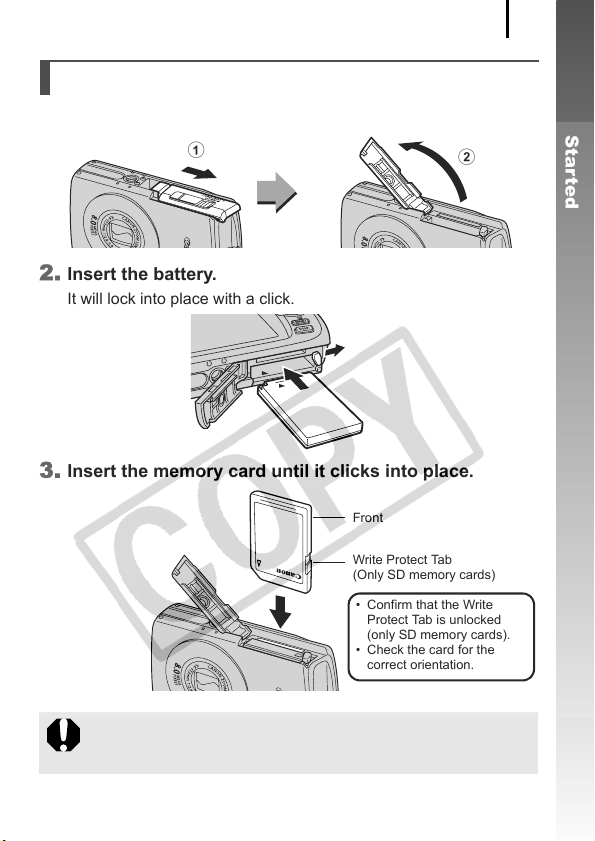
Installing the Battery and Memory Card
1. Slide the cover and open it out (a, b).
9
Getting Started
a
2. Insert the battery.
It will lock into place with a click.
3. Insert the memory card until it clicks into place.
Front
Write Protect Tab
(Only SD memory cards)
• Confirm that the Write
Protect Tab is unlocked
(only SD memory cards).
• Check the card for the
correct orientation.
Ensure that the memory card is correctly oriented before
inserting it in the camera. Inserting it backward may cause the
camera to fail to recognize the memory card or to malfunction.
b

Preparations
10
4. Close the cover (a, b).
a
Getting Started
b
To Remove the Battery
Press the battery lock in the direction of
the arrow (a) and pull the battery out (b).
b
To Remove the Memory Card
Push the memory card with your finger or the toggle on the wrist strap
until the memory card clicks and then release it.
a
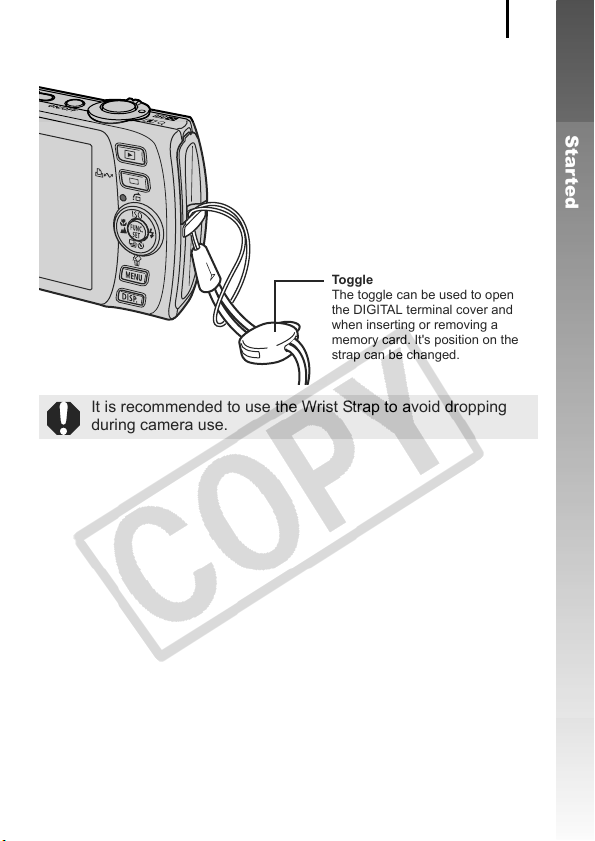
Attaching the Wrist Strap
Toggle
The toggle can be used to open
the DIGITAL terminal cover and
when inserting or removing a
memory card. It’s position on the
strap can be changed.
It is recommended to use the Wrist Strap to avoid dropping
during camera use.
Preparations
11
Getting Started
Preparations
12
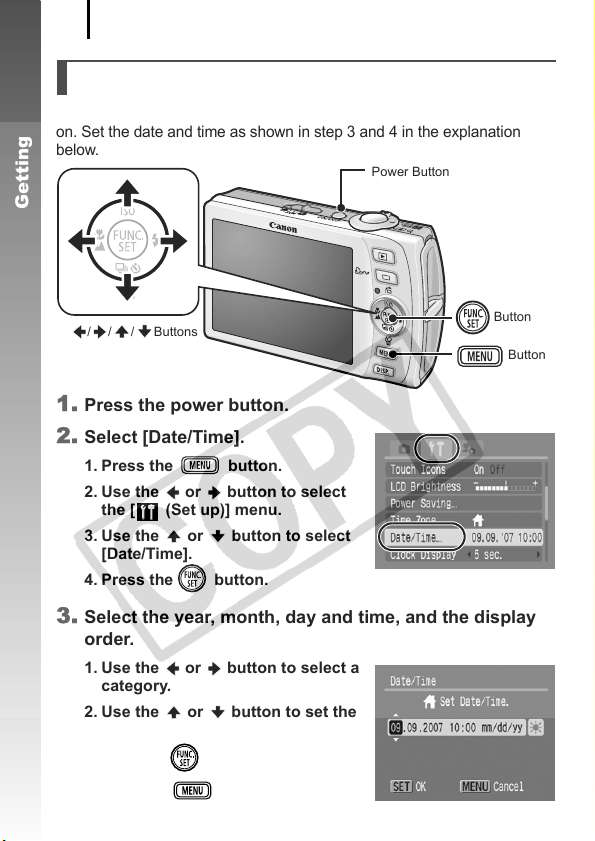
Setting the Date and Time
The Date/Time settings menu will appear the first time the power is turned
on. Set the date and time as shown in step 3 and 4 in the explanation
below.
Power Button
Getting Started
/ / / Buttons
Button
Button
1. Press the power button.
2. Select [Date/Time].
1. Press the button.
2. Use the or button to select
the [ (Set up)] menu.
3. Use the or button to select
[Date/Time].
4. Press the button.
3. Select the year, month, day and time, and the display
order.
1. Use the or button to select a
category.
2. Use the or button to set the
value.
4. Press the button.
5. Press the button.
Preparations
z A rechargeable lithium battery is built into the camera to
save such settings as the date/time. Insert a charged battery
into the camera. Or if you use the separately sold AC
Adapter Kit ACK-DC30, the battery will charge in about four
hours. It will charge even if the camera is turned off.
z The date/time settings may be lost after approximately three
weeks if you remove the main battery. Reset the date/time
settings if this occurs.
z You can imprint the date and time you have set onto images
(p. 78).
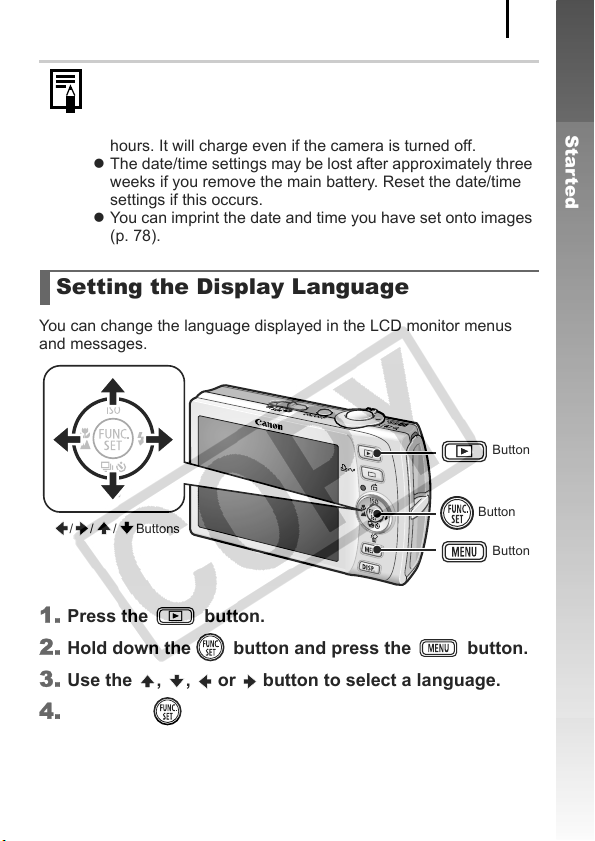
Setting the Display Language
You can change the language displayed in the LCD monitor menus
and messages.
Button
13
Getting Started
/ / / Buttons
Button
Button
1. Press the button.
2. Hold down the button and press the button.
3. Use the , , or button to select a language.
4. Press the button.
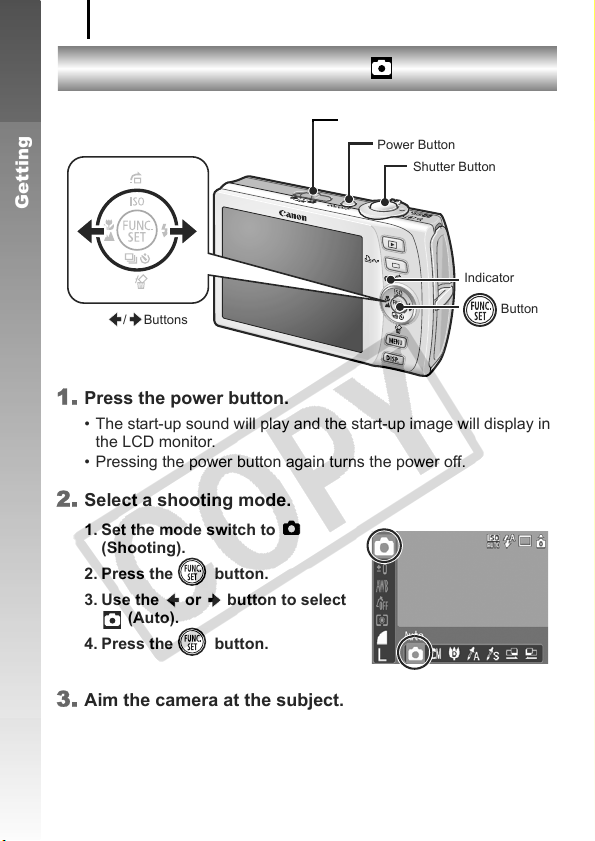
Shooting Still Images
14
Shooting Still Images
( Auto Mode)
Mode Switch
Power Button
Shutter Button
Getting Started
/ Buttons
1. Press the power button.
• The start-up sound will play and the start-up image will display in
the LCD monitor.
• Pressing the power button again turns the power off.
2. Select a shooting mode.
1. Set the mode switch to
(Shooting).
2. Press the button.
3. Use the or button to select
(Auto).
4. Press the button.
Indicator
Button
3. Aim the camera at the subject.
Shooting Still Images
4. Press the shutter button lightly (press halfway) to set
the focus.
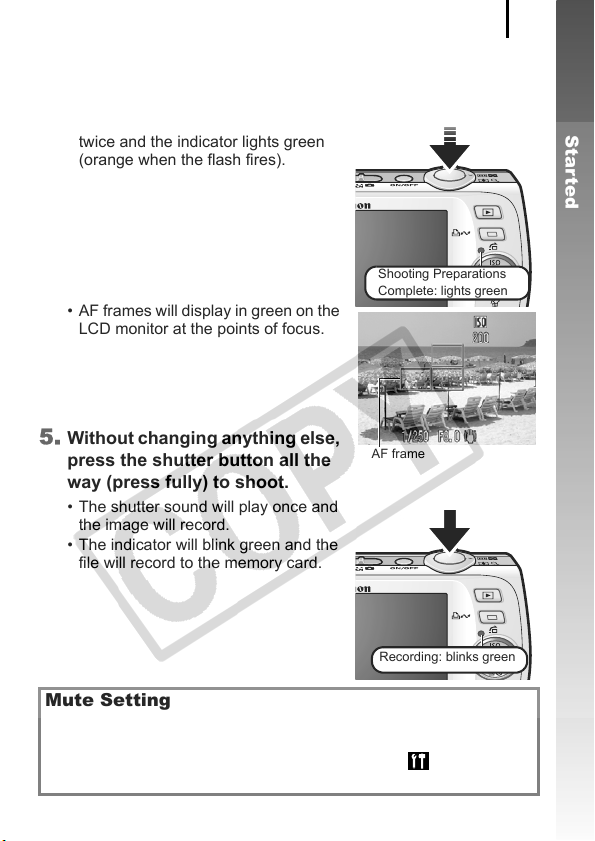
• When the camera focuses, it beeps
twice and the indicator lights green
(orange when the flash fires).
Shooting Preparations
Complete: lights green
• AF frames will display in green on the
LCD monitor at the points of focus.
15
Getting Started
5. Without changing anything else,
press the shutter button all the
AF frame
way (press fully) to shoot.
• The shutter sound will play once and
the image will record.
• The indicator will blink green and the
file will record to the memory card.
Recording: blinks green
Mute Setting
Pressing the DISP. button while switching on the camera power will
set the mute setting to [On] to silence all camera sounds except for
warning sounds. Setting can be changed from the [ (Set up)]
Menu [Mute] (p. 51).
Shooting Still Images
16
Reviewing an Image Right After
Shooting (Rec. Review)
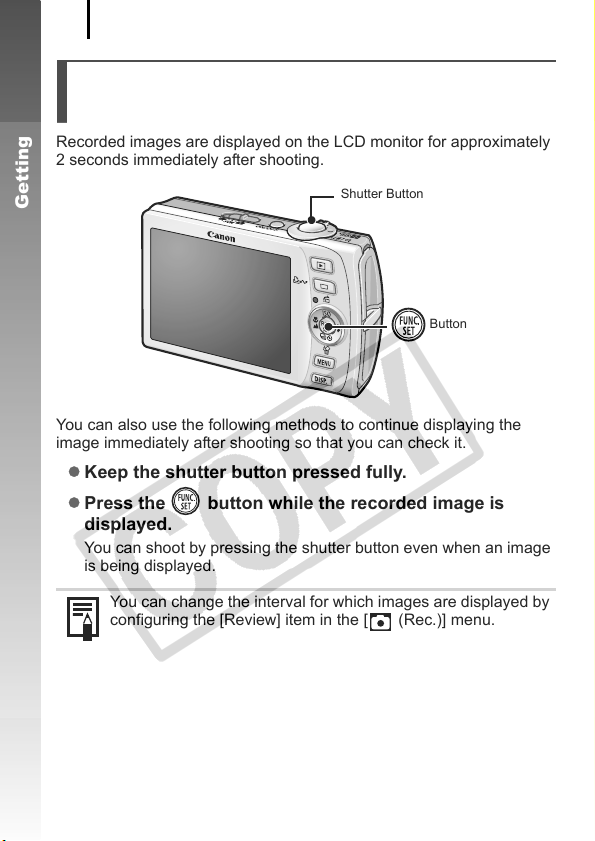
Recorded images are displayed on the LCD monitor for approximately
2 seconds immediately after shooting.
Getting Started
You can also use the following methods to continue displaying the
image immediately after shooting so that you can check it.
z Keep the shutter button pressed fully.
z Press the button while the recorded image is
displayed.
You can shoot by pressing the shutter button even when an image
is being displayed.
You can change the interval for which images are displayed by
configuring the [Review] item in the [ (Rec.)] menu.
Shutter Button
Button
Viewing Still Images
17
Viewing Still Images
Button
/ Buttons
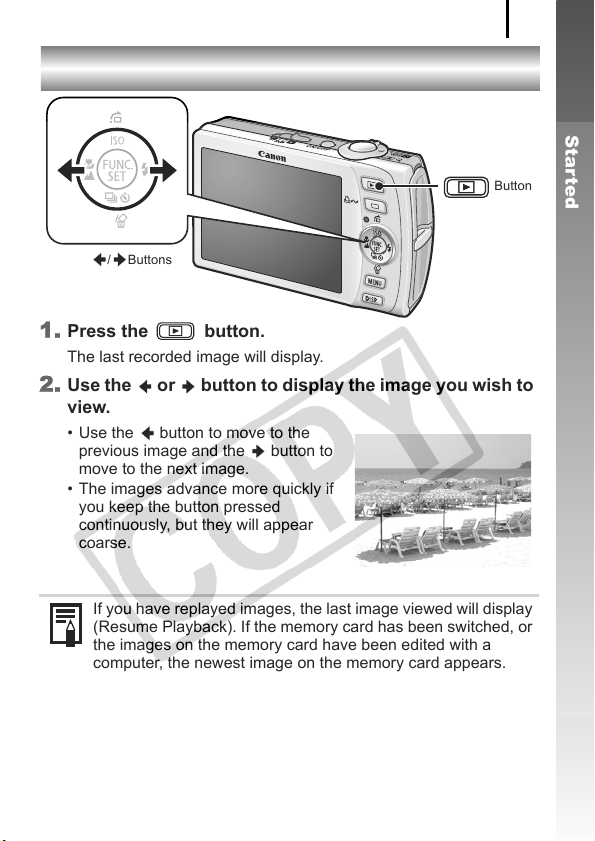
1. Press the button.
The last recorded image will display.
2. Use the or button to display the image you wish to
view.
• Use the button to move to the
previous image and the button to
move to the next image.
• The images advance more quickly if
you keep the button pressed
continuously, but they will appear
coarse.
Getting Started
If you have replayed images, the last image viewed will display
(Resume Playback). If the memory card has been switched, or
the images on the memory card have been edited with a
computer, the newest image on the memory card appears.
Shooting Movies
18
Shooting Movies
Getting Started
/ Buttons
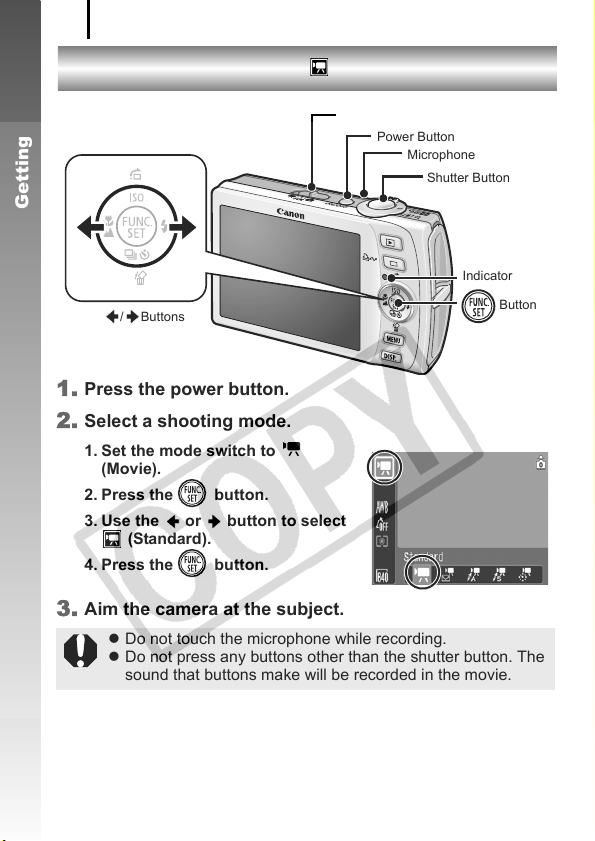
1. Press the power button.
2. Select a shooting mode.
1. Set the mode switch to
Movie).
(
2. Press the button.
3. Use the or button to select
(Standard).
4. Press the button.
3. Aim the camera at the subject.
z Do not touch the microphone while recording.
z Do not press any buttons other than the shutter button. The
sound that buttons make will be recorded in the movie.
( Standard Mode)
Mode Switch
Power Button
Microphone
Shutter Button
Indicator
Button
Shooting Movies
4. Press the shutter button lightly (press halfway) to set
the focus.
• An electronic beep will sound twice
and the indicator will light green when
the camera focuses.
• The exposure, focus and white
balance are automatically set when
you press the button halfway.
Shooting Preparations
Complete: lights green
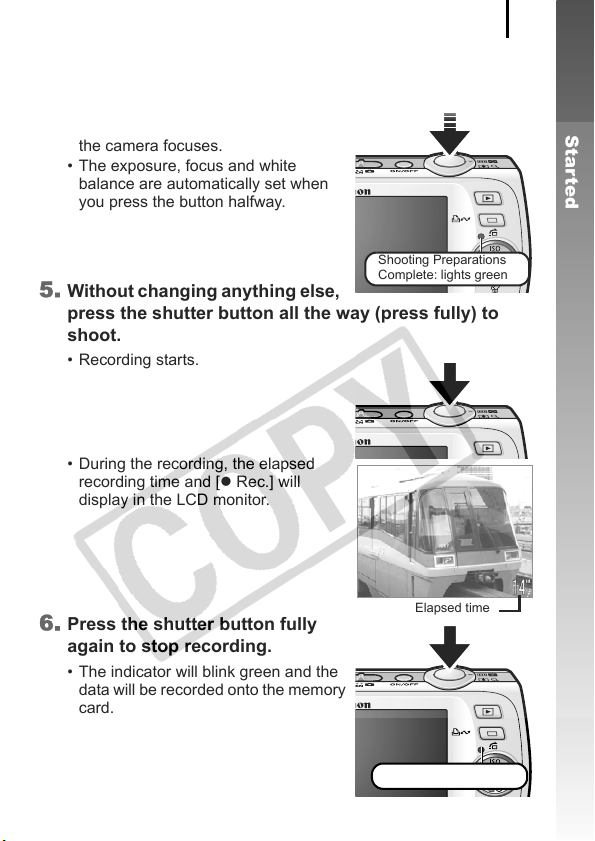
5. Without changing anything else,
press the shutter button all the way (press fully) to
shoot.
• Recording starts.
• During the recording, the elapsed
recording time and [z Rec.] will
display in the LCD monitor.
19
Getting Started
6. Press the shutter button fully
again to stop recording.
• The indicator will blink green and the
data will be recorded onto the memory
card.
• Recording will stop automatically
when the maximum recording time
elapses, or the built-in memory or
memory card become full.
Elapsed time
Recording: blinks green

Viewing Movies
20
Viewing Movies
Getting Started
/ / / Buttons
1. Press the button.
2. Use the or button to display a movie and press the
button.
Images with a icon are movies.
3. Use the or button to select
(Playback) and press the button.
• The movie will start playing.
• If you press the FUNC./SET button
during playback, you can pause and
restart the movie.
• You can adjust the playback volume
with the or button.
Button
Button
Erasing
Erasing
21
Getting Started
Button
/ Buttons
Button
Button
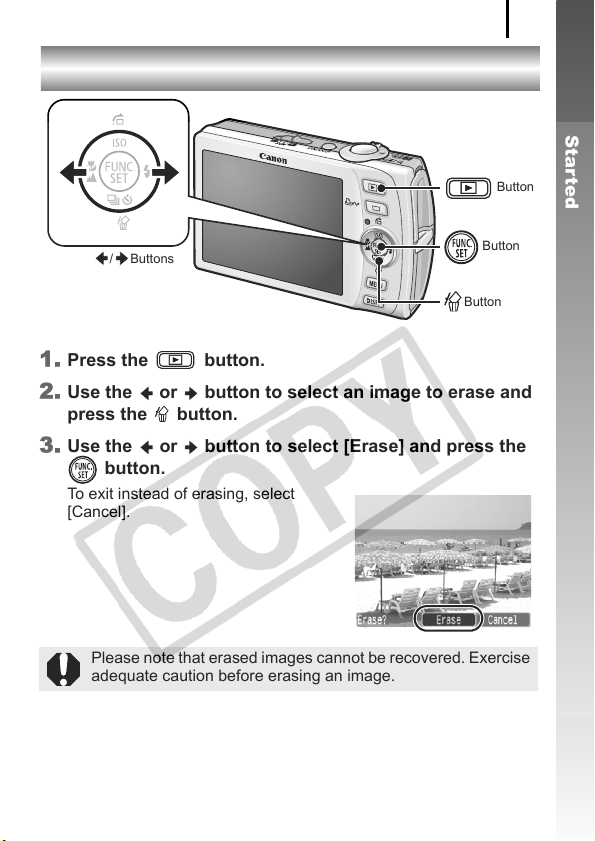
1. Press the button.
2. Use the or button to select an image to erase and
press the button.
3. Use the or button to select [Erase] and press the
button.
To exit instead of erasing, select
[Cancel].
Please note that erased images cannot be recovered. Exercise
adequate caution before erasing an image.
Printing
22
Printing
Getting Started
/ Buttons
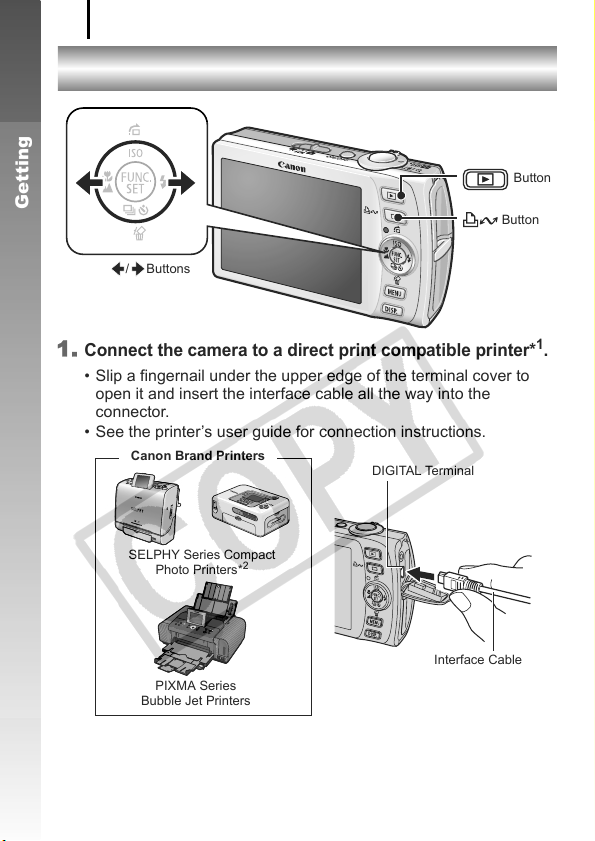
1.
Connect the camera to a direct print compatible printer*1.
• Slip a fingernail under the upper edge of the terminal cover to
open it and insert the interface cable all the way into the
connector.
• See the printer’s user guide for connection instructions.
Canon Brand Printers
DIGITAL Terminal
Button
Button
SELPHY Series Compact
Photo Printers*
PIXMA Series
Bubble Jet Printers
*1 Since this camera uses a standard protocol (PictBridge), you can use it with other
PictBridge-compliant printers in addition to Canon-brand printers.
*2 You can also use the CP-10/CP-100/CP-200/CP-300.
2
Interface Cable
Printing
23
2. Turn on the printer.
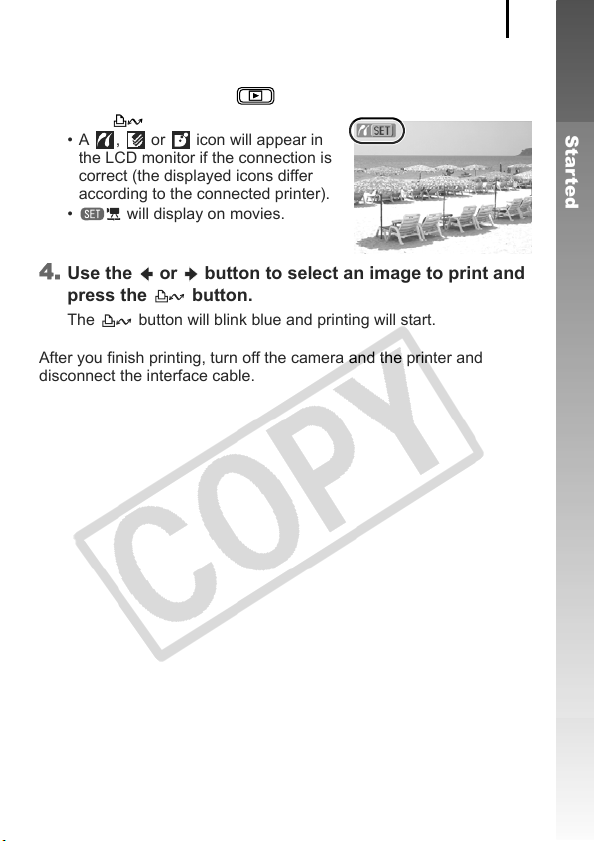
3. Press the camera’s button and turn on the power.
• The button will light blue.
• A , or icon will appear in
the LCD monitor if the connection is
correct (the displayed icons differ
according to the connected printer).
• will display on movies.
4. Use the or button to select an image to print and
press the button.
The button will blink blue and printing will start.
After you finish printing, turn off the camera and the printer and
disconnect the interface cable.
Getting Started
Downloading Images to a Computer
24
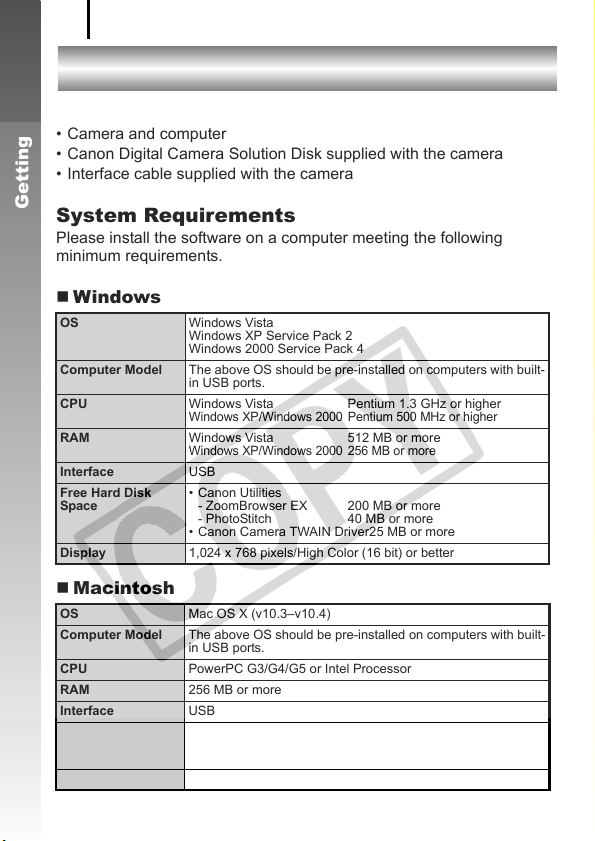
Downloading Images to a Computer
Items to Prepare
• Camera and computer
• Canon Digital Camera Solution Disk supplied with the camera
• Interface cable supplied with the camera
Getting Started
System Requirements
Please install the software on a computer meeting the following
minimum requirements.
Windows
OS Windows Vista
Computer Model The above OS should be pre-installed on computers with built-
CPU Windows Vista Pentium 1.3 GHz or higher
RAM Windows Vista 512 MB or more
Interface USB
Free Hard Disk
Space
Display 1,024 x 768 pixels/High Color (16 bit) or better
Macintosh
OS Mac OS X (v10.3–v10.4)
Computer Model The above OS should be pre-installed on computers with built-
CPU PowerPC G3/G4/G5 or Intel Processor
RAM 256 MB or more
Interface USB
Free Hard Disk
Space
Display 1,024 x 768 pixels/32,000 Colors or better
Windows XP Service Pack 2
Windows 2000 Service Pack 4
in USB ports.
Windows XP/Windows 2000 Pentium 500 MHz or higher
Windows XP/Windows 2000 256 MB or more
• Canon Utilities
— ZoomBrowser EX 200 MB or more
— PhotoStitch 40 MB or more
• Canon Camera TWAIN Driver25 MB or more
in USB ports.
• Canon Utilities
— ImageBrowser 300 MB or more
— PhotoStitch 50 MB or more
Downloading Images to a Computer
Preparing to Download Images
Ensure that you install the software first before connecting the
camera to the computer.
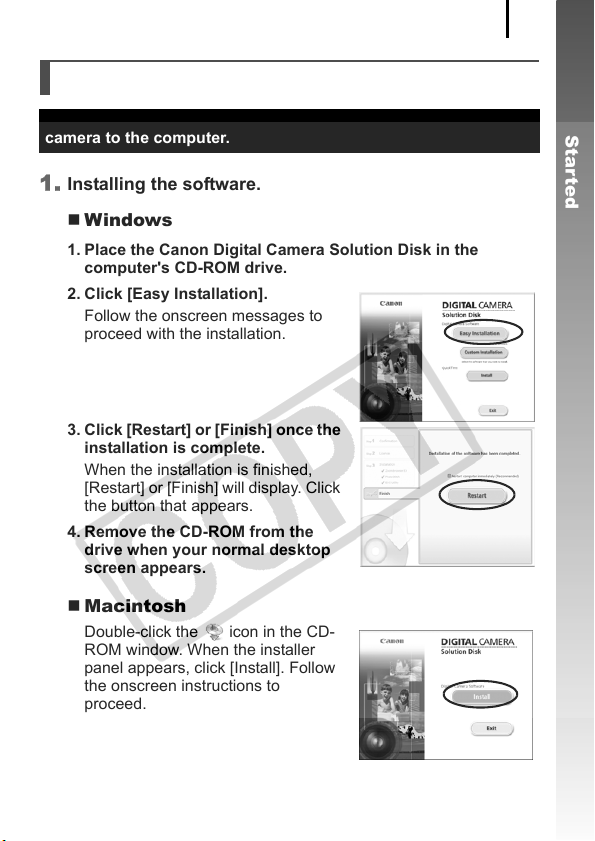
1. Installing the software.
Windows
1. Place the Canon Digital Camera Solution Disk in the
computer’s CD-ROM drive.
2. Click [Easy Installation].
Follow the onscreen messages to
proceed with the installation.
3. Click [Restart] or [Finish] once the
installation is complete.
When the installation is finished,
[Restart] or [Finish] will display. Click
the button that appears.
4. Remove the CD-ROM from the
drive when your normal desktop
screen appears.
25
Getting Started
Macintosh
Double-click the icon in the CD—
ROM window. When the installer
panel appears, click [Install]. Follow
the onscreen instructions to
proceed.
Downloading Images to a Computer
26
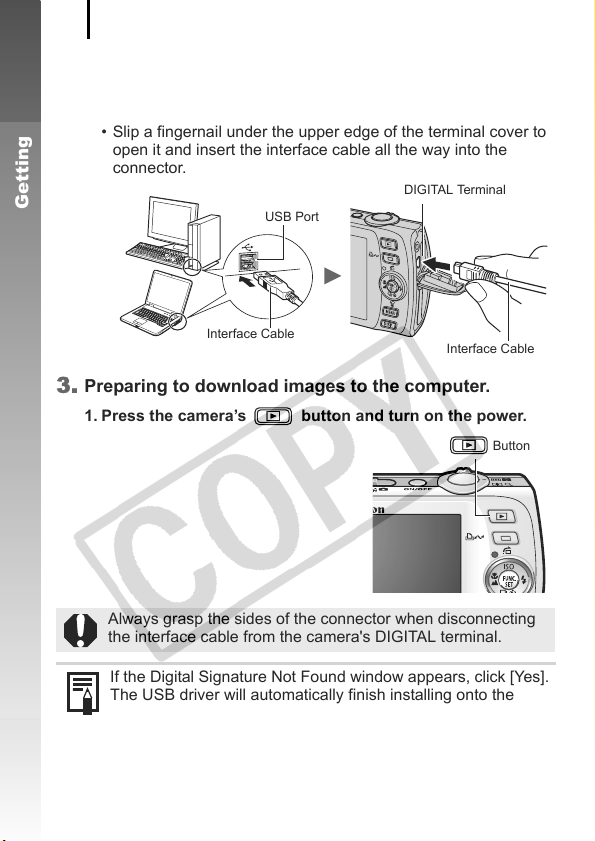
2. Connecting the camera to a computer.
1. Connect the supplied interface cable to the computer’s USB
port and to the camera’s DIGITAL terminal.
• Slip a fingernail under the upper edge of the terminal cover to
open it and insert the interface cable all the way into the
connector.
Getting Started
USB Port
DIGITAL Terminal
Interface Cable
Interface Cable
3. Preparing to download images to the computer.
1. Press the camera’s button and turn on the power.
Always grasp the sides of the connector when disconnecting
the interface cable from the camera’s DIGITAL terminal.
If the Digital Signature Not Found window appears, click [Yes].
The USB driver will automatically finish installing onto the
computer when you attach the camera and open a connection.
Button
Downloading Images to a Computer
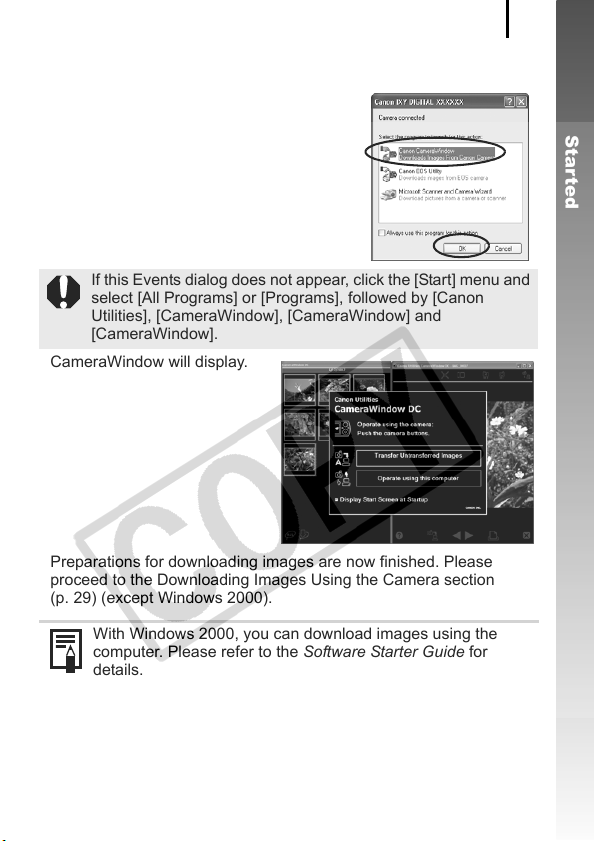
Windows
Select [CameraWindow] and click [OK].
If this Events dialog does not appear, click the [Start] menu and
select [All Programs] or [Programs], followed by [Canon
Utilities], [CameraWindow], [CameraWindow] and
[CameraWindow].
CameraWindow will display.
Preparations for downloading images are now finished. Please
proceed to the Downloading Images Using the Camera section
(p. 29) (except Windows 2000).
27
Getting Started
With Windows 2000, you can download images using the
computer. Please refer to the Software Starter Guide for
details.
Downloading Images to a Computer
28
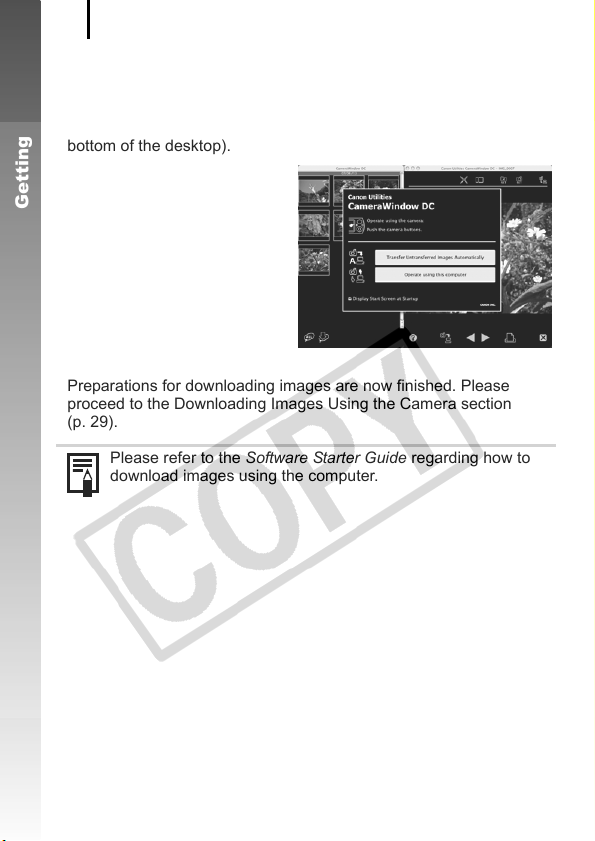
Macintosh
CameraWindow will appear when you establish a connection
between the camera and computer. If it fails to appear, click the
[CameraWindow] icon on the Dock (the bar which appears at the
bottom of the desktop).
Getting Started
Preparations for downloading images are now finished. Please
proceed to the Downloading Images Using the Camera section
(p. 29).
Please refer to the Software Starter Guide regarding how to
download images using the computer.
Loading…
View the manual for the Canon Digital IXUS 860 IS here, for free. This user manual comes under the category photo cameras and has been rated by 1 people with an average of a 8.9. This manual is available in the following languages: English. Do you have a question about the Canon Digital IXUS 860 IS?
Ask your question here
Canon Digital IXUS 860 IS specifications
Below you will find the product specifications and the manual specifications of the Canon Digital IXUS 860 IS.
ISO sensitivity
80,100,200,400,800,1600,AUTO
General
| Brand | Canon |
| Model | Digital IXUS 860 IS | 2341B009 |
| Product | photo camera |
| EAN | 8714574505756 |
| Language | English |
| Filetype | User manual (PDF) |
Picture quality
| Megapixel (approx.) | 8 MP |
| Maximum image resolution | 3264 x 2448 pixels |
| Image stabilizer | Yes |
| Sensor type | CCD |
| Image sensor size | 1/2.5 « |
Lens system
| Digital zoom | 4 x |
| Optical zoom | 3.8 x |
| Focal length range | 4.6 — 17.3 mm |
Other features
| Digital SLR | No |
| Video capability | Yes |
Focusing
| Auto Focus (AF) lock | Yes |
| Closest focusing distance | 0.03 m |
Exposure
| ISO sensitivity | 80,100,200,400,800,1600,AUTO |
Memory
| Internal memory | 32 MB |
| Compatible memory cards | mmc, sd |
Video
| Video formats supported | avi |
| Motion JPEG frame rate | 30 fps |
Display
| Display | LCD |
| Display diagonal | 3 « |
| Display resolution (numeric) | 230000 pixels |
Ports & interfaces
Design
Camera
| Custom colour | Yes |
| Photo effects | black&white, Neutral, Positive film, Sepia, Skin tones, Vivid |
| White balance | auto, Cloudy, custom modes, daylight, Fluorescent |
Battery
| Battery technology | Lithium-Ion (Li-Ion) |
System requirements
Weight & dimensions
| Weight | 155 g |
| Width | 92.6 mm |
| Height | 25.9 mm |
| Depth | 58.8 mm |
Operational conditions
| Operating relative humidity (H-H) | 10 — 90 % |
| Operating temperature (T-T) | 0 — 40 °C |
Flash
| Flash modes | auto, Flash off, manual, Red-eye reduction, Slow synchronization |
show more
Frequently asked questions
Can’t find the answer to your question in the manual? You may find the answer to your question in the FAQs about the Canon Digital IXUS 860 IS below.
What is the weight of the Canon Digital IXUS 860 IS?
The Canon Digital IXUS 860 IS has a weight of 155 g.
What is the height of the Canon Digital IXUS 860 IS?
The Canon Digital IXUS 860 IS has a height of 25.9 mm.
What is the width of the Canon Digital IXUS 860 IS?
The Canon Digital IXUS 860 IS has a width of 92.6 mm.
What is the depth of the Canon Digital IXUS 860 IS?
The Canon Digital IXUS 860 IS has a depth of 58.8 mm.
What is the screen size of the Canon Digital IXUS 860 IS?
The screen size of the Canon Digital IXUS 860 IS is 3 «.
Is the manual of the Canon Digital IXUS 860 IS available in English?
Yes, the manual of the Canon Digital IXUS 860 IS is available in English .
Is your question not listed? Ask your question here
Появились вопросы в использовании устройства? Эта страница посвящена инструкции к фотоаппарату Canon Digital IXUS 860 IS, так же известному как PowerShot SD870 IS (вариант для США), IXY DIGITAL 910 IS (вариант для Японии). Перед использованием устройства советуем внимательно ознакомиться с руководством пользователя. В нём вы найдете основные характеристики, описание функций фотоаппарата Digital IXUS 860 IS, меры предосторожности и условия эксплуатации. Мы надеемся, что после прочтения содержимого файла, вы сможете в полном объеме использовать фотоаппарат и узнайте как делать красивые фотографии на Canon Digital IXUS 860 IS. Год выпуска фотоаппарата 2007.
| Бренд: | Canon |
| Год выпуска: | 2007 |
| Тип сенсора фотоаппарата: | CCD |
| Размер сенсора: | 1/2.5″ (~ 5.75 x 4.32 мм) |
| Тип файла: |
На нашем сайте предусмотрен просмотр инструкции к Digital IXUS 860 IS в режиме ОНЛАЙН. Для того, что бы воспользоваться этим удобством, подтвердите что вы не робот, сделав отметку в форме ниже, и нажмите кнопку «Посмотреть». После этого наш сайт запустит режим поиска файла и представит его вам. Так же вы можете скачать инструкцию для фотоаппарата.
Manufacturer:Canon
Category:Computers & Peripherals
Device:Canon Digital IXUS 860 IS
Name:ImageBrowser EX / CameraWindow — Instruction Manual
Language:Latviešu
Version:2.00
Pages:89
Size:5.45 MB
Manufacturer:Canon
Category:Computers & Peripherals
Device:Canon Digital IXUS 860 IS
Name:ImageBrowser EX / CameraWindow — Instruction Manual
Language:Português
Version:2.00
Pages:92
Size:6.99 MB
Manufacturer:Canon
Category:Computers & Peripherals
Device:Canon Digital IXUS 860 IS
Name:ImageBrowser EX / CameraWindow — Instruction Manual
Version:2.00
Pages:89
Size:6.56 MB
Manufacturer:Canon
Category:Computers & Peripherals
Device:Canon Digital IXUS 860 IS
Name:ImageBrowser EX / CameraWindow — Instruction Manual
Language:Eesti
Version:2.00
Pages:89
Size:5.00 MB
Manufacturer:Canon
Category:Computers & Peripherals
Device:Canon Digital IXUS 860 IS
Name:ImageBrowser EX / CameraWindow — Instruction Manual
Language:Русский
Version:2.00
Pages:89
Size:5.61 MB
Manufacturer:Canon
Category:Computers & Peripherals
Device:Canon Digital IXUS 860 IS
Name:ImageBrowser EX / CameraWindow — Instruction Manual
Language:Україньска
Version:2.00
Pages:89
Size:5.53 MB
Manufacturer:Canon
Category:Computers & Peripherals
Device:Canon Digital IXUS 860 IS
Name:ImageBrowser EX / CameraWindow — Instruction Manual
Language:Čeština
Version:2.00
Pages:89
Size:6.58 MB
Manufacturer:Canon
Category:Computers & Peripherals
Device:Canon Digital IXUS 860 IS
Name:ImageBrowser EX / CameraWindow — Instruction Manual
Language:Lietuvių
Version:2.00
Pages:89
Size:5.55 MB
Manufacturer:Canon
Category:Computers & Peripherals
Device:Canon Digital IXUS 860 IS
Name:ImageBrowser EX / CameraWindow — Instruction Manual
Language:Ελληνικά
Version:2.00
Pages:89
Size:6.78 MB
Manufacturer:Canon
Category:Computers & Peripherals
Device:Canon Digital IXUS 860 IS
Name:ImageBrowser EX / CameraWindow — Instruction Manual
Language:Deutsch
Version:CA.2.00
Pages:89
Size:6.33 MB
Manufacturer:Canon
Category:Computers & Peripherals
Device:Canon Digital IXUS 860 IS
Name:ImageBrowser EX / CameraWindow — Instruction Manual
Language:Svenska
Version:CA.2.00
Pages:89
Size:6.61 MB
Manufacturer:Canon
Category:Computers & Peripherals
Device:Canon Digital IXUS 860 IS
Name:ImageBrowser EX / CameraWindow — Instruction Manual
Language:Italiano
Version:CA.2.00
Pages:89
Size:6.48 MB
Manufacturer:Canon
Category:Computers & Peripherals
Device:Canon Digital IXUS 860 IS
Name:ImageBrowser EX / CameraWindow — Instruction Manual
Language:Dansk
Version:CA.2.00
Pages:89
Size:6.80 MB
Manufacturer:Canon
Category:Computers & Peripherals
Device:Canon Digital IXUS 860 IS
Name:ImageBrowser EX / CameraWindow — Instruction Manual
Language:English
Version:CA.2.00
Pages:89
Size:6.91 MB
Manufacturer:Canon
Category:Computers & Peripherals
Device:Canon Digital IXUS 860 IS
Name:ImageBrowser EX / CameraWindow — Instruction Manual
Language:Español
Version:CA.2.00
Pages:91
Size:6.20 MB
Manufacturer:Canon
Category:Computers & Peripherals
Device:Canon Digital IXUS 860 IS
Name:ImageBrowser EX / CameraWindow — Instruction Manual
Language:Suomi
Version:CA.2.00
Pages:89
Size:6.62 MB
Manufacturer:Canon
Category:Computers & Peripherals
Device:Canon Digital IXUS 860 IS
Name:ImageBrowser EX / CameraWindow — Instruction Manual
Language:Nederlands
Version:CA.2.00
Pages:89
Size:6.64 MB
Manufacturer:Canon
Category:Computers & Peripherals
Device:Canon Digital IXUS 860 IS
Name:ImageBrowser EX / CameraWindow — Instruction Manual
Language:Français
Version:CA.2.00
Pages:91
Size:6.97 MB
Manufacturer:Canon
Category:Computers & Peripherals
Device:Canon Digital IXUS 860 IS
Name:ImageBrowser EX / CameraWindow — Instruction Manual
Language:Polski
Version:2.00
Pages:89
Size:6.80 MB
Manufacturer:Canon
Category:Computers & Peripherals
Device:Canon Digital IXUS 860 IS
Name:ImageBrowser EX / CameraWindow — Instruction Manual
Version:2.00
Pages:89
Size:5.09 MB
Manufacturer:Canon
Category:Computers & Peripherals
Device:Canon Digital IXUS 860 IS
Name:ImageBrowser EX / CameraWindow — Instruction Manual
Language:Magyar
Version:2.00
Pages:89
Size:6.76 MB
Manufacturer:Canon
Category:Computers & Peripherals
Device:Canon Digital IXUS 860 IS
Name:Camera User Guide
Language:Lietuvių
Version:1.0
Size:13.55 MB
DescriptionCanon Digital IXUS 860 IS Camera User Guide
Please use Acrobat Reader v5.0 or later to view these files. Quick
Starte Guide
Manufacturer:Canon
Category:Computers & Peripherals
Device:Canon Digital IXUS 860 IS
Name:Software Starter Guide
Language:Português
Version:31
Pages:91
Size:9.23 MB
Manufacturer:Canon
Category:Computers & Peripherals
Device:Canon Digital IXUS 860 IS
Name:Software Starter Guide
Language:Svenska
Version:31
Pages:91
Size:9.08 MB
Manufacturer:Canon
Category:Computers & Peripherals
Device:Canon Digital IXUS 860 IS
Name:Software Starter Guide
Language:English
Version:31
Pages:91
Size:8.98 MB
Manufacturer:Canon
Category:Computers & Peripherals
Device:Canon Digital IXUS 860 IS
Name:Software Starter Guide
Language:Dansk
Version:31
Pages:91
Size:9.02 MB
Manufacturer:Canon
Category:Computers & Peripherals
Device:Canon Digital IXUS 860 IS
Name:Software Starter Guide
Language:Deutsch
Version:31
Pages:91
Size:9.15 MB
Manufacturer:Canon
Category:Computers & Peripherals
Device:Canon Digital IXUS 860 IS
Name:Software Starter Guide
Language:Español
Version:31
Pages:91
Size:8.87 MB
Manufacturer:Canon
Category:Computers & Peripherals
Device:Canon Digital IXUS 860 IS
Name:Software Starter Guide
Language:Suomi
Version:31
Pages:91
Size:9.00 MB
Manufacturer:Canon
Category:Computers & Peripherals
Device:Canon Digital IXUS 860 IS
Name:Software Starter Guide
Language:Français
Version:31
Pages:91
Size:8.89 MB
Manufacturer:Canon
Category:Computers & Peripherals
Device:Canon Digital IXUS 860 IS
Name:Software Starter Guide
Language:Italiano
Version:31
Pages:91
Size:9.12 MB
Manufacturer:Canon
Category:Computers & Peripherals
Device:Canon Digital IXUS 860 IS
Name:Software Starter Guide
Language:Nederlands
Version:31
Pages:91
Size:9.21 MB
Manufacturer:Canon
Category:Computers & Peripherals
Device:Canon Digital IXUS 860 IS
Name:Camera User Guide
Language:Polski
Version:1.0
Pages:234
Size:15.28 MB
Manufacturer:Canon
Category:Computers & Peripherals
Device:Canon Digital IXUS 860 IS
Name:Camera User Guide
Language:Português
Version:1.0
Pages:234
Size:15.24 MB
Manufacturer:Canon
Category:Computers & Peripherals
Device:Canon Digital IXUS 860 IS
Name:Camera User Guide
Version:1.0
Pages:234
Size:14.44 MB
Manufacturer:Canon
Category:Computers & Peripherals
Device:Canon Digital IXUS 860 IS
Name:Camera User Guide
Language:Svenska
Version:1.0
Pages:234
Size:15.13 MB
Manufacturer:Canon
Category:Computers & Peripherals
Device:Canon Digital IXUS 860 IS
Name:Camera User Guide
Language:Español
Version:1.0
Pages:234
Size:12.81 MB
Manufacturer:Canon
Category:Computers & Peripherals
Device:Canon Digital IXUS 860 IS
Name:Camera User Guide
Language:English
Version:1.0
Pages:234
Size:14.00 MB
Manufacturer:Canon
Category:Computers & Peripherals
Device:Canon Digital IXUS 860 IS
Name:Camera User Guide
Language:Čeština
Version:1.0
Pages:234
Size:14.21 MB
Manufacturer:Canon
Category:Computers & Peripherals
Device:Canon Digital IXUS 860 IS
Name:Camera User Guide
Language:Dansk
Version:1.0
Size:13.33 MB
DescriptionCanon Digital IXUS 860 IS Camera User Guide
Please use Acrobat Reader v5.0 or later to view these files.
Manufacturer:Canon
Category:Computers & Peripherals
Device:Canon Digital IXUS 860 IS
Name:Camera User Guide
Language:Suomi
Version:1.0
Pages:234
Size:13.26 MB
Manufacturer:Canon
Category:Computers & Peripherals
Device:Canon Digital IXUS 860 IS
Name:Camera User Guide
Language:Nederlands
Version:1.0
Pages:236
Size:13.33 MB
Manufacturer:Canon
Category:Computers & Peripherals
Device:Canon Digital IXUS 860 IS
Name:Camera User Guide
Language:Français
Version:1.0
Pages:234
Size:12.96 MB
Manufacturer:Canon
Category:Computers & Peripherals
Device:Canon Digital IXUS 860 IS
Name:Camera User Guide
Language:Deutsch
Version:1.0
Pages:235
Size:13.57 MB
Manufacturer:Canon
Category:Computers & Peripherals
Device:Canon Digital IXUS 860 IS
Name:Camera User Guide
Language:Magyar
Version:1.0
Pages:234
Size:13.53 MB
Manufacturer:Canon
Category:Computers & Peripherals
Device:Canon Digital IXUS 860 IS
Name:Camera User Guide
Language:Italiano
Version:1.0
Pages:234
Size:13.53 MB
Характеристики, спецификации
Тип карты памяти:
SD, SDHC, MMC, MMC Plus, HCMMC
Разрешение ЖК дисплея:
230000 Пикс
Интерфейс связи с ПК:
USB 2.0
Зарядное устройство в комплекте:
Да
Работа под Windows:
2000, XP, Vista
Работа под Mac OS:
X 10.5 и выше
Материал изготовления корпуса:
металл/ пластик
Габаритные размеры (В*Ш*Г):
60*93*25 мм
Оптическое увеличение:
3.8x
Минимальная дистанция съемки:
от 3 см
Используемая оптика:
Canon Zoom Lens
Фокусное расстояние:
4.6 — 17.3 мм
Макс. разрешение:
3264×2448 Пикс
Автоматическая фокусировка:
Да
Диапазон выдержки:
15 — 1/1600 сек
Дальность действия вспышки:
4 м
Серийная съемка:
1.3 кадр/сек
Емкость аккумулятора:
1120 мАч
Наим. аккум. в комплекте:
NB-5L
РУССКИЙ
Руководство пользователя камеры
Начало работы
Дополнительные сведения
Элементы камеры и их назначение
Основные операции
Широко используемые функции съемки
Различные способы съемки
Воспроизведение/стирание
Параметры печати/передачи
Подключение к телевизору
Настройка камеры
Устранение неполадок
Список сообщений
Приложение
Обязательно ознакомьтесь с мерами предосторожности (стр. 201–209).

Порядок операций и справочные руководства
Предусмотрены следующие Руководства. Обращайтесь к ним по мере необходимости
в соответствии с приведенной ниже схемой.
: Содержится в этом Руководстве
Проверка комплекта поставки
Начало работы (стр. 7)
Рассматривается выполнение различных операций от зарядки аккуму—
ляторов и установки карт памяти до установки даты и времени, съемки,
воспроизведения и стирания изображений, а также простая печать.
Дополнительные сведения (стр. 37)
Приводятся названия компонентов камеры и более подробные инструкции
по съемке и воспроизведению. Содержится информация по более сложным
операциям с камерой.
Подключение камеры к другому
Руководство пользователя
камеры (настоящее
устройству
Руководство)
• Подключение к принтеру
• Подключение к телевизору
• Подключение к компьютеру
Руководство по прямой
печати
Вводное руководство
по программному
обеспечению
1
Проверка комплектности
Ниже показан комплект поставки. Если чего-либо не хватает, обращайтесь
в магазин, в котором была приобретена камера.
Камера Аккумулятор NB-5L
Зарядное устройство
a
bc
(с крышкой разъемов)
CB-2LX/CB-2LXE
Карта памяти
Интерфейсный кабель
de
(32 Мбайта)
IFC-400PCU
Аудио/видеокабель
Наручный ремень
Компакт-диск Canon Digital
hfg
AVC—DC300
WS-DC2
Camera Solution Disk
Руководства пользователя
Гарантийный талон
i
j
• Руководство пользователя камеры
• Брошюра «Рекомендуется использовать
оригинальные дополнительные принад-
лежности компании Canon».
• Компакт-диск Canon Digital Camera Manuals
Disk (с руководствами)
Карта памяти, входящая в комплект поставки камеры, может не обеспечивать
полное использование возможностей камеры.
С этой камерой можно использовать карты памяти SD, SDHC
(SD High Capacity – SD большой емкости), MultiMediaCards,
MMCplus и HC MMCplus. В настоящем Руководстве для этих карт
используется общий термин «карта памяти».