

Series3
Stapled booklet, 105 x 148 mm, 76 p (incl. 8 p cover), 2/2c = HKS43N + black
r
i
e
e
s
r
i
e
e
S
s
S
3
3
+
–
380s-4
Type 5416, 5414
www.braun.com
380s-4
340s-4
Braun Infolines
English 6
Français 10
Polski 15
âesk˘ 21
Slovensk˘ 26
Magyar 31
Hrvatski 36
Slovenski 41
Türkçe 46
Română 50
кЫТТНЛИ 55
ì͇ªÌҸ͇ 61
74
Braun GmbH
Frankfurter Straße 145
61476 Kronberg/Germany
www.braun.com
UK 0800 783 7010
IE 1 800 509 448
FR 0 800 944 802
BE 0 800 14 592
PL 801 127 286
801 1 BRAUN
CZ 221 804 335
SK 02/5710 1135
HU (06-1) 451-1256
HR 091 66 01 777
SI 080 2822
TR 0 800 261 63 65
RO 021-224.00.47
RU 8 800 200 20 20
UA 0 800 505 000
HK 852-25249377
(Audio Supplies Company Ltd.)
www.service.braun.com
92270255/IV-12
GB/F/PL/CZ/SK/H/HR/SLO/TR/RO/
RUS/UA/Arab
380s-4 340s-4 Ex MN KURTZ DESIGN 11.02.11
+
–
3
80s-4
S
e
r
i
e
s
3
S
e
r
i
e
s
3
1
2
3
r
i
e
e
s
r
i
e
e
S
s
S
3
3
4
+
+
5
6
7
380s-4
–
380
–
340
10
380
11
8
9
12
STOP
4
340
380s-4 Inu KURTZ DESIGN 29.11.11
+
90°
full
lock
full
click!
5
English
Our products are designed to meet the highest standards of quality,
functionality and design. We hope you enjoy your new Braun Shaver.
Warning
Your shaving system is provided with a special cord set, which has an
integrated Safety Extra Low Voltage power supply. Do not exchange or
tamper with any part of it, otherwise there is risk of an electric shock.
Do not shave with a damaged foil or cord.
This appliance is not intended for use by children or persons with reduced
physical or mental capabilities, unless they are given supervision by a person
responsible for their safety. In general, we recommend that you keep the
appliance out of reach of children. Children should be supervised to ensure
that they do not play with the appliance.
For hygienic reasons, do not share this appliance with other persons.
For usage in other body areas, please make sure that the skin is stretched.
Oil bottle
Keep out of reach of children. Do not swallow. Dispose of properly when
empty.
Description
1 Foil & Cutter cassette
2 Long hair trimmer
3 Precision setting switch (« ») (380s only)
4 On/off switch
5 Charging lights (green)
6 Low-charge light (red)
7 Replacement light for shaving parts
8 Shaver power socket
9 Special cord set
10 Charging stand
11 Etui (380s only)
12 Protection cap (340s only)
Charging
The best environmental temperature for charging is between 15 °C to 35 °C.
Do not expose the shaver to temperatures higher than 50 °C for extended
periods of time.
•Using the special cord set (9), connect the shaver or the charging stand (10)
to an electrical outlet with the motor switched off.
6
•When charging for the first time or when the shaver is not used for a few
months, leave the shaver to charge continuously for 4 hours.
•Once the shaver is completely charged, discharge the shaver through
normal use. Then recharge to full capacity. Subsequent charges will take
about 1 hour.
•A full charge provides up to 45 minutes of cordless shaving time depending on your beard growth. However, the maximum battery capacity will
only be reached after several charging/discharging cycles.
•5-minute quick charge is sufficient for a shave.
Charging lights (5)
The green charging lights show the charge status of the batteries (340s:
1 charging light). The green charging light blinks when the shaver is being
charged or switched on.
When the battery is fully charged, all green charging lights (340s: 1 charging
light) shine permanently, provided the shaver is connected to an electrical
outlet.
Low-charge light (6)
The red low-charge light flashes when the battery is running low. You should
be able to finish your shave.
Shaving
Press the on/off switch (4) to operate the shaver (picture).
The flexible shaving foils automatically adjust to every contour of your face
(picture).
Long hair trimmer (2)
To trim sideburns, moustache or beard, slide the long hair trimmer upwards.
Precision setting switch (« ») (380s only)
For precise handling in hard to shave areas (e.g. under the nose) slide the
switch (3) to the right to position « ». The centre trimmer and one foil will be
lowered.
Tips for the perfect shave
For best results, Braun recommends you follow 3 simple steps:
1. Always shave before washing your face.
2. At all times, hold the shaver at right angles (90°) to your skin.
3. Stretch your skin and shave against the direction of your beard growth.
7

This appliance is suitable for use in a bath or shower. When using it
in the shower, we recommend applying shaving foam or gel. For
safety reasons this appliance can only be operated cordlessly.
Cleaning
Regular cleaning ensures better shaving performance. Rinsing the shaver
head under running water after each shave is an easy and fast way to keep
it clean:
•Switch the shaver on (cordless) and rinse the shaver head under hot
running water. You may use liquid soap without abrasive substances.
Rinse off all foam and let the shaver run for a few more seconds.
•Next, switch off the shaver, remove the shaver Foil & Cutter cassette (1)
and let it dry.
•If you regularly clean the shaver under water, then once a week apply a
drop of light machine oil onto the long hair trimmer (2) and shaver
Foil & Cutter cassette (1) (picture).
Alternatively, you may clean the shaver using a brush:
•Switch off the shaver. Remove the shaver Foil & Cutter cassette and tap it
out on a flat surface (picture).
•Using a brush, clean the inner area of the shaver head. However, do not
clean the shaver Foil & Cutter cassette with a brush as this may damage it
(picture).
Keeping your shaver in top shape
Replacement light for shaving parts / Reset
To maintain 100% shaving performance, replace the shaver Foil & Cutter
cassette (1), when the replacement light for shaving parts (7) comes on (after
about 18 months) or when worn.
Foil & Cutter cassette: 32S/32B
The replacement light will remind you during the next 7 shaves to replace the
Foil & Cutter cassette. Then the shaver will automatically reset the display.
After you have replaced the Foil & Cutter cassette (1), press the on/off switch
(4) for at least 5 seconds to reset the counter.
While doing so, the replacement light blinks and goes off when the reset is
complete. The manual reset can be done at any time.
8
Preserving the batteries
In order to maintain the optimum capacity of the rechargeable batteries, the
shaver has to be fully discharged (by shaving) every 6 months approximately.
Then recharge the shaver to full capacity.
Environmental notice
This product contains rechargeable batteries. In the interest of
protecting the environment, please do not dispose of the product in
the household waste at the end of its useful life. Disposal can take
place at a Braun Service Centre or at appropriate collection sites
provided in your country.
Subject to change without notice.
For electric specifications, see printing on the special cord set.
Guarantee
We grant a 2 year guarantee on the product commencing on the date of
purchase. Within the guarantee period we will eliminate any defects in the
appliance resulting from faults in materials or workmanship, free of charge
either by repairing or replacing the complete appliance at our discretion.
This guarantee extends to every country where this appliance is supplied by
Braun or its appointed distributor.
This guarantee does not cover: damage due to improper use, normal wear or
use as well as defects that have a negligible effect on the value or operation
of the appliance.
The guarantee becomes void if repairs are undertaken by unauthorised
persons and if original Braun parts are not used.
To obtain service within the guarantee period, hand in or send the complete
appliance with your sales receipt to an authorised Braun Customer Service
Centre (address information available online at www.service.braun.com).
For UK only:
This guarantee in no way affects your rights under statutory law.
9

Français
Nos produits sont conçus pour répondre aux normes les plus élevées en
matière de qualité, fonctionnalité et design. Nous espérons que vous
apprécierez votre nouveau rasoir Braun.
Attention
Votre rasoir est livré avec un cordon d’alimentation basse tension. Vous ne
devez pas remplacer ou modifier ses composants, afin d’éviter tout risque
d’accident.
Ne vous rasez pas avec une grille ou un cordon endommagés.
Cet appareil n’est pas destiné à des enfants ou à des personnes aux
capacités mentales, sensorielles et physiques réduites à moins qu’elles ne
soient sous la surveillance d’un adulte responsable de leur sécurité.
Il convient de surveiller les enfants pour s’assurer qu’ils ne jouent pas avec
l’appareil. Conserver hors de portée des enfants.
Pour des raisons d’hygiène, ne pas partager ce produit avec d’autre
personne. Pour une utilisation sur des autres parties du corps, assurez-vous
que votre peau soit tendue.
Bouteille d’huile
Conserver hors de la portée des enfants. Ne pas avaler. Eliminer comme il
convient après usage.
Description
1 Cassette de rasage (grille et bloc-couteaux)
2 Tondeuse rétractable pour poils longs
3 Loquet de réglage de précision (« ») (380s uniquement)
4 Bouton marche/arrêt
5 Témoins lumineux de charge (vert)
6 Témoin lumineux de décharge (rouge)
7 Indicateur lumineux de remplacement de la cassette de rasage
8 Prise d’alimentation du rasoir
9 Cordon d’alimentation
10 Socle de charge
11 Etui (380s uniquement)
12 Capot de protection (340s uniquement)
Mise en charge du rasoir
La température ambiante idéale pour charger le rasoir est comprise entre
15 °C et 35°C. N’exposez pas votre rasoir à des températures supérieures
à 50 °C pendant une période prolongée.
10

•En utilisant le cordon d’alimentation (9), branchez le rasoir (moteur arrêté)
ou le socle de charge (10) à une prise électrique.
•Si vous chargez l’appareil pour la première fois, ou si celui-ci n’a pas été
utilisé depuis quelques mois, laissez-le en charge 4 heures sans interruption. Les charges suivantes prendront environ une heure.
•Lorsque le rasoir est complètement chargé, utilisez le normalement
jusqu’à complète décharge de la batterie. Rechargez le ensuite jusqu’à
pleine capacité. Les charges suivantes prendront environ une heure.
•Une pleine charge procure jusqu’à 45 minutes d’autonomie de rasage en
fonction de l’épaisseur et de la dureté de votre barbe. Cependant, la
capacité maximale de la batterie ne sera atteinte qu’après plusieurs cycles
de charge/décharge.
•Une charge rapide de 5 minutes est suffisante pour un rasage.
Témoins lumineux de charge (5)
Les témoins lumineux de charge indiquent le niveau de charge des batteries
(340s: 1 témoin lumineux). Le témoin lumineux vert de charge clignote
lorsque le rasoir est en cours de charge ou en marche. Quand la batterie est
complètement chargée, tous les témoins lumineux verts (340s: 1 témoin
lumineux) de charge sont allumés, que le rasoir soit branché sur une prise
électrique.
Témoin lumineux de décharge (6)
Le voyant lumineux rouge de faible charge clignote lorsque la batterie doit
être rechargée. La charge restante est normalement suffisante pour que vous
puissiez terminer votre rasage.
Rasage
Appuyez sur le bouton marche/arrêt (4) pour mettre en marche le rasoir (cf.
schéma). Les grilles de rasage souples s’adaptent automatiquement aux
contours de votre visage (cf. schéma).
Tondeuse rétractable pour poils longs (2)
Pour tailler les pattes, la moustache ou la barbe, faites glisser la tondeuse
rétractable vers le haut.
Loquet de réglage de précision (
Pour une utilisation précise dans les zones difficiles à atteindre (par exemple,
sous le nez), poussez le loquet (3) vers la droite pour que « » se retrouve
« ») (380s uniquement)
11
en position centrale. La mini tondeuse de la cassette de rasage et une de
ses grilles seront alors abaissées.
Conseils pour un rasage parfait
Pour un résultat de rasage optimal, Braun vous recommande de suivre
3 étapes simples :
1. Rasez-vous toujours avant de vous laver le visage.
2. Tenez toujours le rasoir à angle droit (90°) par rapport à la peau.
3. Tendez votre peau et rasez-vous dans le sens opposé à la pousse du
poil.
Cet appareil peut être utilisé sans codon d’alimentation dans le
bain ou sous la douche. Lorsque vous l’utilisez sous la douche, il
est recommandé de s’appliquer une mousse ou un gel à raser sur
le visage avant le rasage. Dans ces cas pour des raisons de
sécurité, utilisez uniquement l’appareil sur batterie.
Nettoyage
Un nettoyage régulier assure une meilleure performance de rasage. Nettoyer
la tête du rasoir sous l’eau après chaque rasage permet de garder le rasoir
propre simplement et rapidement :
•Mettez en marche le rasoir (sans cordon) et rincez la tête de rasage sous
l’eau chaude. Vous pouvez utiliser du savon liquide ne contenant pas de
substances abrasives. Rincez toute la mousse et laissez le rasoir en
marche pendant quelques secondes supplémentaires.
•Ensuite, arrêtez le rasoir, retirez la cassette de rasage (1) et laissez la
sécher.
•Si vous nettoyez régulièrement votre rasoir sous l’eau, appliquez une fois
par semaine une goutte d’huile de machine à coudre sur la tondeuse
rétractable (2) et sur la cassette de rasage (1) (cf. schéma).
Vous pouvez également nettoyer le rasoir en utilisant une brossette :
•Arrêtez le rasoir. Enlevez la cassette de rasage et tapotez-la légèrement
sur une surface plane.
•A l’aide de la brossette, nettoyez l’intérieur de la tête du rasoir. Cependant,
ne nettoyez pas la cassette de rasage avec la brossette car cela risquerait
de l’endommager (cf. schéma).
12
Entretien du rasoir
Témoin lumineux de remplacement de la cassette de rasage /
réinitialisation
Pour conserver 100% de la performance de votre rasoir, remplacez la
cassette de rasage (1) quand le témoin lumineux de remplacement des
pièces de rasage (7) s’allume (après environ 18 mois) ou quand elle est usée.
Cassette de rasage « Foil & Cutter »: 32S/32B
Le témoin lumineux de remplacement vous rappellera lors des 7 rasages
suivants qu’il faut remplacer la cassette de rasage. Ensuite, le rasoir
réinitialisera automatiquement l’affichage.
Après avoir remplacé la cassette de rasage (1), appuyez sur le bouton
marche/arrêt (4) pendant au moins 5 secondes afin de remettre manuellement le compteur à zéro.
Pendant ce temps là, le témoin lumineux de remplacement clignote et
s’éteint quand la réinitalisation est faite. La réinitialisation manuelle peut être
faite à n’importe quel moment.
Conservation des batteries
Pour maintenir la capacité optimale des batteries rechargeables, tous les
6 mois environ déchargez complètement, le rasoir en l’utilisant sans le
remettre en charge entre chaque rasage ; ensuite recharger le rasoir au
maximum.
Respect de l’environnement
Ce produit contient des batteries rechargeables. Dans un souci de
protection de l’environnement, veuillez ne pas jeter le produit avec
les ordures ménagères au terme de son cycle de vie. Vous pouvez
remettre ce produit aux centres service agréés Braun ou aux points
de collecte dans votre pays.
Sujet à toute modification sans préavis.
Voir les spécifications électriques mentionnées sur l’adaptateur basse
tension.
13

Garantie
Nous accordons une garantie de 2 ans sur ce produit, à partir de la date
d‘achat.
Pendant la durée de la garantie, Braun prendra gratuitement à sa charge la
réparation des vices de fabrication ou de matière en se réservant le droit de
décider si certaines pièces doivent être réparées ou si l‘appareil lui-même
doit être échangé.
Cette garantie s‘étend à tous les pays où cet appareil est commercialisé par
Braun ou son distributeur exclusif.
Cette garantie ne couvre pas : les dommages occasionnés par une utilisation
inadéquate, l’usure normale (par exemple, grille et bloc-couteaux) ainsi que
les défauts d’usuresqui ont un effet négligeable sur la valeur ou l’utilisation
de l’appareil. Cette garantie devient caduque si des réparations ont été
effectuées par des personnes non agréées par Braun et si des pièces de
rechange ne provenant pas de Braun ont été utilisées.
Pour toute réclamation intervenant pendant la période de garantie, retournez
ou rapportez l‘appareil ainsi que l‘attestation de garantie à votre revendeur
ou à un Centre Service Agréé Braun.
Se référez à www.service.braun.com ou appelez 0 800 944 802 pour
connaitre le Centre Service Agrée Braun le plus proche de chez vous.
Clause spéciale pour la France
Outre la garantie contractuelle exposée ci-dessus, nos clients bénéficient de
la garantie légale des vices cachés prévue aux articles 1641 et suivants du
Code civil.
14

Polski
Nasze produkty spełniają najwyższe standardy jakości, funkcjonalności i
designu. Mamy nadzieję, ze będziesz usatysfakcjonowany naszą nową
golarką Braun.
Ostrzeżenie
Twój system golący wyposażony jest w specjalną stację ładującą. Nie należy
samodzielnie wymieniać lub wymontowywać jakiejkolwiek jej części, gdyż
grozi to porażeniem prądem.
Urządzenia nie należy używać z uszkodzoną folią golącą lub kablem sieciowym.
Urzàdzenie to nie mo˝e byç u˝ywane przez dzieci lub osoby fizycznie lub
umys∏owo upoÊledzone, jeÊli nie znajdujà si´ one pod nadzorem osoby
odpowiedzialnej za ich bezpieczeƒstwo. Zalecamy przechowywaç urzàdzenie w miejscu niedost´pnym dla dzieci. Dzieci powinny być nadzorowane
podczas używania urządzenia w celu zapewnienia odpowiedniego bezpieczeństwa.
Ze względów higienicznych golarki powinna używać tylko jedna osoba.
Korzystając z golarki do golenia innych części ciała, należy pamiętać, aby
naciągnąć skórę.
Pojemnik z olejem
Przechowywać poza zasięgiem dzieci. Nie połykać. Puste opakowanie wyrzucić.
Opis
1 Kaseta z systemem noży i folii golących
2 Trymer
3 Włącznik precyzyjnego golenia (« ») (dotyczy tylko 380s)
4 Przycisk włącznik/wyłącznik
5 Wskaźniki naładowania baterii (zielony)
6 Wskaźnik rozładowania baterii (czerwony)
7 Wskaźnik wymiany elementów golących
8 Stacja ładowania golarki
9 Przewód zasilający
10 Ładowanie
11 Etui (dotyczy tylko 380s)
12 Nasadka zabezpieczająca (dotyczy tylko 340s)
Ładowanie
Najbardziej efektywne ładowanie odbywa się w temperaturze powietrza
między 15 °C a 35 °C. Nie należy wystawiać golarki na długie działanie
temperatury wyższej niż 50 °C.
15

• Należy podłączyć przewód zasilający (9) do golarki lub do bazy czysz-
cząco-ładującej. Golarka powinna zawsze być wyłączona.
• Podczas pierwszego ładowania urządzenia lub w sytuacji, gdy nie było
używane przez kilka miesięcy, należy je ładować nieprzerwanie przez
4 godziny.
• Po maksymalnym naładowaniu golarki, należy ją w czasie normalnego
użytkowania rozładować, a następnie ponownie maksymalnie naładować.
Pełne naładowanie zajmuje około 1 godziny.
• Pełne naładowanie akumulatora zapewnia 45 minut bezprzewodowego
golenia. Pełna gotowość baterii zostanie osiągnięta dopiero po kilku jej
rozładowaniach i ponownych naładowaniach.
• Szybkie, 5-minutowe ładowanie zapewnia czas pracy golarki wystarczający
na jedno ogolenie.
Wskaźniki naładowania baterii (5)
Zielone wskaźniki pokazują stan naładowania baterii (340s: 1 wskaźniki
naładowania baterii). Wskaźniki pulsują, kiedy golarka jest w czasie ładowania, lub kiedy jest włączona. Jeżeli golarka jest włączona lub podłączona do
źródła prądu, a bateria jest w pełni naładowana, wszystkie zielone wskaźniki
(340s: 1 wskaźniki naładowania baterii) świecą światłem ciągłym.
Wskaźnik rozładowania baterii (6)
W przypadku, gdy bateria jest na wyczerpaniu zapala się czerwona kontrolka.
Powinno jednak wystarczyć energii na dokończenie golenia.
Golenie
Należy włączyć golarkę za pomocą przycisku włącznik/wyłącznik (4).
Sprężyste folie golące dopasują się do kształtu każdej twarzy (rysunek).
Trymer (2)
Służy do przycinania baczków, wąsów i dłuższej brody.
Włącznik precyzyjnego golenia («
Ułatwia golenie trudnodostępnych miejsc np. pod nosem; należy przesunąć
blokadę w prawą stronę do pozycji « », aby środkowa część trymera oraz
folia goląca zostały dla wygodniejszego golenia obniżone.
16
») (dotyczy tylko 380s)
Porady
Dla najlepszych efektów golenia Braun poleca 3 proste zasady:
1. Należy się golić przed umyciem twarzy.
2. Golarka w czasie golenia zawsze powinna być prowadzona pod kątem
prostym w stosunku do golonej powierzchni.
3. Należy naciągnąć skórę i golić «pod włos», odwrotnie do kierunku
porostu włosów.
Urządzenie nadaje się do używania w czasie kąpieli lub pod prysznicem. W przypadku używania golarki pod prysznicem zalecamy
nałożyć na skórę piankę lub żel do golenia. Ze względów
bezpieczeństwa urządzenie jest bezprzewodowe.
Czyszczenie
Regularne czyszczenie zapewnia lepsze golenie. Opłukanie głowicy pod
bieżącą wodą po każdym goleniu, to najszybsza i najłatwiejsza droga do
utrzymania golarki w czystości i higienie.
• Należy włączyć golarkę (bezprzewodowo) i opłukać głowicę pod ciepłą,
bieżącą wodą. Można użyć mydła w płynie, jeżeli nie posiada żadnych
grudkowatych składników np. ziarenek do peelingu. Następnie należy
dokładnie opłukać głowicę z mydła i zostawić działającą golarkę na kilka
dodatkowych sekund.
• Kolejnym krokiem jest wyłączenie golarki oraz wyjęcie kasety z folią golącą
i nożykami (1). Należy pozostawić wyjęte elementy do wyschnięcia.
• Jeżeli golarka jest regularnie czyszczona pod bieżącą wodą, to wystarczy
raz na tydzień nanieść kroplę lekkiego oleju maszynowego na trymer (2)
oraz na kasetę z folią i nożykami (1). W ten sposób zostaną nasmarowane
elementy golące, które wymagają takiej ochrony.
Golarka mo˝e byç tak˝e czyszczona przy pomocy szczoteczki:
• Należy wyłączyć golarkę a następnie wyjąć kasetę z folią golącą i nożykami
(1). Delikatnie stukając kasetą o płaską powierzchnię, trzeba wysypać
wszelkie zanieczyszczenia.
• Używając szczoteczki należy oczyścić głowicę golarki oraz jej okolice.
Absolutnie nie należy używać szczoteczki do czyszczenia kasety z folią i
nożykami, gdyż można ją uszkodzić.
17
Jak utrzymać golarkę w najlepszym stanie
Wskaźnik wymiany elementów golących / reset
Aby golarka zawsze działała na 100% swoich możliwości, należy co
18 miesięcy wymieniać kasetę z foliami i nożami (1). Przypomina o tym
specjalny wskaźnik wymiany elementów golących (7). Jeżeli elementy golące
zużyją się wcześniej, wskaźnik także o tym poinformuje.
Kasety z foliami golącymi oraz nożykami: 32S/32B
W ciągu następnych 7 goleń specjalna dioda będzie przypominać o
konieczności wymiany. Po tym czasie czyli po 7 goleniach, specjalny panel
zostanie automatycznie zresetowany a czas do następnej wymiany będzie
naliczany na nowo.
Po wymianie kasety z folią golącą i blokiem ostrzy (1), należy wcisnąć
przycisk (4) i przytrzymać przynajmniej przez 5 sekund, aby zresetować
licznik.
W czasie wykonywania tej czynności wskaźnik będzie pulsować i wyłączy
się, kiedy reset golarki zostanie zakończony. Ręczne zresetowanie może być
przeprowadzone o każdej porze i w każdym momencie.
Konserwacja baterii
Aby zachować optymalną pojemność akumulatora golarki, należy go
formatować raz na 6 miesięcy, czyli rozładować w czasie golenia a następnie
naładować do pełna.
Ochrona środowiska
Produkt posiada akumulator. Kiedy przestanie on już być już użyteczny,
prosimy o zwrócenie go do jednego z punktów serwisowych Braun,
gdzie stara bateria, nie szkodząc środowisku, zostanie zutylizowana.
Zużyta bateria może zostać oddana także do specjalnego punktu
recyklingu. Traktowanie zużytych baterii jak zwykłych śmieci stwarza
zagrożenie dla naszego środowiska.
Powy˝sze informacje mogà ulec zmianie bez uprzedniego powiadomienia.
Specyfikacje elektryczne zosta∏y wydrukowane na specjalnym kablu
sieciowym.
18

Warunki gwarancji
1. Procter & Gamble International Operations SA z siedzibą w Route de
St-Georges 47, 1213 Petit Lancy 1 w Szwajcarii, gwarantuje sprawne
działanie sprzętu w okresie 24 miesięcy od daty jego wydania
Kupującemu. Ujawnione w tym okresie wady będą usuwane bezpłatnie,
przez autoryzowany punkt serwisowy, w terminie 14 dni od daty
dostarczenia sprzętu do autoryzowanego punktu serwisowego.
2. Kupujący może wysłać sprzęt do naprawy do najbliżej znajdującego się
autoryzowanego punktu serwisowego lub skorzystać z pośrednictwa
sklepu, w którym dokonał zakupu sprzętu. W takim wypadku termin
naprawy ulegnie wydłużeniu o czas niezbędny do dostarczenia i odbioru
sprzętu.
3. Kupujący powinien dostarczyć sprzęt w opakowaniu należycie
zabezpieczonym przed uszkodzeniem. Uszkodzenia spowodowane
niedostatecznym zabezpieczeniem sprzętu nie podlegają naprawom
gwarancyjnym. Naprawom gwarancyjnym nie podlegają także inne
uszkodzenia powstałe w następstwie okoliczności, za które Gwarant nie
ponosi odpowiedzialności, w szczególności zawinione przez Pocztę
Polską lub firmy kurierskie.
4. Niniejsza gwarancja jest ważna jedynie z dokumentem zakupu i
obowiązuje wyłącznie na terytorium Rzeczypospolitej Polskiej.
5. Okres gwarancji przedłuża się o czas od zgłoszenia wady lub
uszkodzenia do naprawy sprzętu i zwrotnego postawienia go do
dyspozycji Kupującego.
6. Naprawa gwarancyjna nie obejmuje czynności przewidzianych w
instrukcji, do wykonania, których Kupujący zobowiązany jest we
własnym zakresie i na własny koszt.
7. Ewentualne oczyszczenie sprzętu dokonywane jest na koszt Kupującego
według cennika danego autoryzowanego punktu serwisowego i nie
będzie traktowane jako naprawa gwarancyjna, chyba, że oczyszczenie
jest niezbędne do usunięcia wady w ramach świadczeń objętych
niniejszą gwarancją i nie stanowi czynności, o których mowa w p. 6.
8. Gwarancją nie są objęte:
a) mechaniczne uszkodzenia sprzętu spowodowane w czasie jego
użytkowania lub w czasie dostarczania sprzętu do naprawy;
b) uszkodzenia i wady wynikłe na skutek:
– używania sprzętu do celów innych niż osobisty użytek;
– niewłaściwego lub niezgodnego z instrukcją użytkowania,
konserwacji, przechowywania lub instalacji;
– używania niewłaściwych materiałów eksploatacyjnych;
– napraw dokonywanych przez nieuprawnione osoby; stwierdzenie
19

faktu takiej naprawy lub samowolnego otwarcia plomb lub innych
zabezpieczeń sprzętu powoduje utratę gwarancji;
– przeróbek, zmian konstrukcyjnych lub używania do napraw
nieoryginalnych części zamiennych;
c) części szklane, żarówki, oświetlenia;
d) ostrza i folie do golarek oraz materiały eksploatacyjne.
9. Bez nazwy, modelu sprzętu i daty jego zakupu potwierdzonej pieczątką i
podpisem sprzedawcy albo paragonu lub faktury zakupu z nazwą i
modelem sprzętu, karta gwarancyjna jest nieważna.
10. Niniejsza gwarancja na sprzedany towar konsumpcyjny nie wyłącza, nie
ogranicza ani nie zawiesza uprawnień Kupującego wynikających z
niezgodności towaru z umową.
20
Český
Naše výrobky jsou vyrobeny tak, aby splňovaly nejvyšší nároky na kvalitu,
funkčnost a design. Doufáme, že budete se svým novým holicím strojkem
Braun spokojeni.
Výstraha
Tento holicí strojek je vybaven speciálním síťovým přívodem s integrovaným
bezpeč-nostním síťovým adaptérem. Nevyměňujte ani nerozebírejte žádnou
z jeho částí, jinak by mohlo dojít k úrazu elektrickým proudem.
Přístroj nepoužívejte, je-li poškozena planžeta nebo vadný síťový přívod.
Pfiístoj nesmí pouÏívat dûti ani osoby se sníÏen˘mi fyzick˘mi nebo
psychick˘mi schopnostmi bez dohledu osoby, která je zodpovûdná za jejich
bezpeãnost. Obecnû je doporuãeno uchovávat pfiístroj mimo dosah dûtí.
Děti by měly být pod dozorem, aby se zajistilo, že nebudou spotřebič používat na hraní.
Z hygienických důvodů nepoužívejte tento strojek spolu s jinými osobami.
Při použití na různých partiích těla dbejte na to, abyste drželi pokožku
napjatou.
Lahvička s olejem
Uchovávejte mimo dosah dětí. Nepolykejte. Po vyprázdnění zlikvidujte
v rámci tříděného odpadu.
Popis
1 Kazeta s planžetou a břitovým blokem
2 Zastřihovač dlouhých vousů
3 Tlačítko pro přesné holení (« ») (pouze 380s)
4 Spínač zapnutý/vypnutý
5 Kontrolky nabíjení (zelená)
6 Kontrolka nízkého nabití (červená)
7 Kontrolka výměny holicích dílů
8 Síťová zásuvka holicího strojku
9 Speciální síťový přívod
10 Nabíjecí stojan
11 Pouzdro (pouze 380s)
12 Ochranný nástavec (pouze 340s)
Nabíjení
Nejvhodnější teplota okolí pro nabíjení je 15 °C až 35 °C. Nevystavujte holicí
strojek dlouhodobě teplotám vyšším než 50 °C.
21
• Pomocí speciálního síťového přívodu (9) připojte holicí strojek nebo
nabíjecí stojan (10) k zásuvce elektrické sítě, přičemž holicí strojek je
vypnutý.
• Při prvním nabíjení nebo pokud nebyl holicí strojek několik měsíců použí-
ván, nechte přístroj nabíjet nepřetržitě 4 hodiny.
• Jakmile je holicí strojek plně nabitý, vybijte jej normálním používáním,
a pak znovu nabijte na plnou kapacitu. Další dobíjení budou trvat zhruba
1 hodinu.
• Plné nabití umožňuje až 45 minut holení bez síťového přívodu, v závislosti
na vzrůstu vašich vousů. Maximální kapacity baterie se však dosáhne až
po několika cyklech nabíjení/vybíjení.
• Pětiminutové rychlonabíjení postačí na jedno oholení bez síťového přívodu.
Kontrolky nabíjení (5)
Zelené kontrolky nabíjení indikují stav baterie (340s: 1 kontrolky nabíjení).
Odpovídající zelená kontrolka bliká po dobu nabíjení nebo je-li holicí strojek
zapnutý. Když je baterie plně nabitá, všechny zelené kontrolky začnou
(340s: 1 kontrolky nabíjení) svítit nepřetržitě za předpokladu, že holicí strojek
je připojený k síťovému přívodu.
Kontrolka nízkého nabití (6)
Při poklesu kapacity baterie začne blikat červený dílek, indikující slabé nabití
baterie. Zbývající kapacita pak postačí na dokončení holení.
Holení
Pro zahájení provozu holicího strojku stiskněte spínač zapn./vypn. (4) – viz
obrázek.
Výkyvný holicí systém se automaticky přizpůsobuje všem konturám vašeho
obličeje (viz obrázek).
Zastřihovač dlouhých vousů (2)
Při zastřihování kotlet, knírku nebo bradky vysuňte zastřihovač dlouhých
vousů směrem nahoru.
Tlačítko pro přesné holení (« ») (pouze 380s)
Pro přesné oholení těžko holitelných míst (např. pod nosem), posuňte tlačítko
(3) směrem doprava do pozice « ». Prostřední zastřihovač a jedna planžeta
se sklopí.
22
Tipy pro perfektní oholení
Pro dosažení nejlepších výsledků vám Braun doporučuje 3 jednoduché
kroky:
1. Holte se vždy před mytím obličeje.
2. Holicí strojek držte vždy v pravém úhlu (90°) k pokožce.
3. Napněte pokožku a holte se proti směru růstu vousů.
Toto přístroj je možné používat ve vaně nebo sprše. Při použití ve
sprše doporučujeme použít pěnu nebo gel na holení.
Z bezpečnostních důvodů může být přístroj používán bez použití
síťového kabelu, tzn. odpojený z elektrické sítě.
Čištění
Pravidelným čištěním zlepšíte holicí výkon vašeho holicího strojku.
Propláchnutí holicí hlavy pod tekoucí vodou po každém holení představuje
rychlý a snadný způsob jak udržovat holicí strojek čistý:
• Zapněte holicí strojek (bez síťového přívodu) a opláchněte holicí hlavu pod
horkou tekoucí vodou. Můžete použít tekuté mýdlo bez abrazivních složek.
Opláchněte všechnu pěnu a nechte holicí strojek ještě několik sekund
běžet.
• Poté holicí strojek vypněte a sejměte kazetu s holicí planžetou a břitovým
blokem (1). Demontované holicí díly nechte oschnout.
• Pokud čistíte holicí strojek pod tekoucí vodou pravidelně, promažte každý
týden zastřihovač dlouhých vousů (2) a na povrch kazety s planžetou a
břitovým blokem (1) naneste kapku jemného oleje na šicí stroje.
Holicí strojek můžete alternativně čistit pomocí kartáčku:
• Vypněte holicí strojek, sejměte kazetu s planžetou a břitovým blokem a
jemně ji vyklepejte na ploché podložce.
• Pomocí kartáčku vyčistěte vnitřní část holicí hlavy. Kartáček však nepouží-
vejte na čištění kazety holicí planžety a břitového bloku – tyto díly byste tak
mohli poškodit.
Udržování holicího strojku ve špičkové formě
Kontrolka výměny holicích dílů / Resetování
Aby byl udržen 100% holicí výkon, vyměňte kazetu s holicí planžetou a
břitovým blokem (1) vždy, když se rozsvítí kontrolka výměny holicích dílů (7)
(po cca 18 měsících), nebo když jsou holicí díly opotřebovány.
23
Loading…
340
Type 5775
Series 3
340
charge
low
on
off
w
e
t&
d
ry
98727826_Floater340_wet_S01.indd1 1
98727826_Floater340_wet_S01.indd1 1
02.06.2008 9:08:32 Uhr
02.06.2008 9:08:32 Uhr

English
6
Français 10
Polski 14
âesk˘ 19
Slovensk˘ 23
Magyar 27
Hrvatski 31
Slovensko 35
Türkçe 39
кЫТТНЛИ 43
мН‡ªМТ¸Н‡ 48
57
Braun GmbH
Frankfurter Straße 145
61476 Kronberg/Germany
98727826/VI-08
GB/F/PL/CZ/SK/H/HR/SLO/TR/RUS/
UA/Arab
Braun
Infolines
GB
0800 783 70 10
IRL
1 800 509 448
F
0 810 309 780
B
0 800 14 592
E
901 11 61 84
PL
0 801 127 286
0 801 1 BRAUN
CZ
221 804 335
SK 02/5710
1135
H (06-1)
451-1256
HR 01/6690
330
SLO
080
2822
TR
0 212 473 75 85
RUS
8 800 200 20 20
UA
+ 38 044 428 65 05
HK 852-25249377
(Audio Supplies Company Ltd.)
www.service.braun.com
98727826_Floater340_wet_S02.indd1 1
98727826_Floater340_wet_S02.indd1 1
02.06.2008 9:09:11 Uhr
02.06.2008 9:09:11 Uhr

4
STOP
Series 3
340
charge
low
on
off
w
e
t&
d
ry
on
off
Series 3
1
3
4
5
6
9
8
washable
2
7
98727826_Floater340_wet_S04.indd1 1
98727826_Floater340_wet_S04.indd1 1
02.06.2008 9:09:48 Uhr
02.06.2008 9:09:48 Uhr

5
90
°
off
on
full
l
washable
on
off
full
on
off
full
on
click!
oil
charge
low
98727826_Floater340_wet_S05.indd1 1
98727826_Floater340_wet_S05.indd1 1
02.06.2008 9:10:29 Uhr
02.06.2008 9:10:29 Uhr

43
кЫТТНЛИ
Наши изделия разработаны в соответствии с самыми высокими
стандартам качества, функциональности и дизайна. Надеемся, что
Вам понравится новая бритва Braun.
Предупреждение
Бритва снабжена адаптером низкого напряжения. Не заменяйте и не
модифицируйте никакие детали адаптера. Это может привести к пора-
жению электрическим током.
Данное устройство не предназначено для использования детьми
или людьми с ограниченными физическими или умственными
возможностями, в случае, если они не находятся под присмотром
людей, ответственных за их безопасность. Мы рекомендуем хранить
устройство в месте, недоступном для детей.
В целях гигиены не передавайте прибор другим лицам.
При бритье любых участков тела, слегка натягивайте кожу для оптими-
зации бритья.
Описание
1 Бреющая сетка и режущий блок
2 Триммер для подравнивания длинных волос
3 Кнопка включения/выключения («on/off»)
4 Индикатор зарядки (зеленый)
5 Индикатор низкого уровня зарядки (красный)
6 Разъем подключения бритвы к электросети
7 Шнур
питания
8 Стенд
подзарядки
9 Колпачок для защиты бреющей сетки
Зарядка бритвы
Оптимальный диапазон температуры воздуха для зарядки бритвы от
15 °C до 35 °C. Не подвергайте бритву воздействию температуры
выше, чем 50 °C в течение длительного периода времени.
Используйте специальный разъем или стенд подзарядки (8) для
подключения бритвы к электросети.
Заряжая аккумулятор в первый раз, оставьте ее подключенной к сети
на 4 часа.
Зеленый индикатор зарядки (4) показывает, что бритва находится
в процессе зарядки. Когда аккумуляторы полностью заряжены,
•
•
•
98727826_Floater340_wet_S6-60.in43 43
98727826_Floater340_wet_S6-60.in43 43
05.06.2008 9:31:29 Uhr
05.06.2008 9:31:29 Uhr

44
индикатор зарядки начинает мигать. Мигающй индикатор – признак
полностью заряженных аккумуляторов.
Полностью заряженную бритву используйте, пока аккумулятор не
разрядится. Затем зарядите бритву до полной емкости аккумулятора.
Последующие зарядки будут занимать около 1 часа.
Полный заряд аккумулятора обеспечит вам до 45 минут непрерывной
работы бритвы, в зависимости от густоты щетины. Однако,
максимальной емкости аккумулятора вы достигните только через
несколько циклов зарядки/разрядки бритвы.
Быстрая 5-ти минутная зарядка аккумулятора позволяет зарядить
аккумулятор на один сеанс бритья.
Красный индикатор низкого уровня заряда (5) горит, когда уровень
заряда бритвы ниже, чем 20 %, при условии, что бритва включена.
Оставшегося заряда бритвы хватит на 2-3 сеанса бритья.
Бритье
Нажмите кнопку включения/выключения (3) как показано на картинке.
Плавающие бреющие сетки автоматически адаптируются ко всем
контурам вашего лица (см. изображение).
Триммер для подравнивания длинных волос
(2)
Для подравнивания бакенбардов, усов или бороды, выдвиньте триммер
вперед (2).
Рекомендации для чистого бритья
Для достижения лучшего результата Braun рекомендует следовать
трем простым правилам:
1. Мы рекомендуем бриться до умывания.
2. Держите бритву под прямым углом (90°) к коже.
3. Натяните кожу и перемещайте бритву в направлении против роста
волос.
Бритву можно эксплуатировать в ванне и под душем.
Чистка бритвы
Регулярный уход за бритвой обеспечит вам лучшее качество бритья на
протяжении всего периода эксплуатации бритвы. Чистка бритвы под
струей воды – легкий и быстрый способ содержать бритву в чистоте:
•
•
•
•
98727826_Floater340_wet_S6-60.in44 44
98727826_Floater340_wet_S6-60.in44 44
05.06.2008 9:31:30 Uhr
05.06.2008 9:31:30 Uhr

45
Отсоедините бритву от электрической сети и включите ее (бритва
должна работать от аккумулятора). Ополосните бреющую головку
под струей горячей воды. Вы можете также использовать жидкое
мыло без абразивных частиц. После того, как вы смоете пену,
подержите работающую бритву под струей воды еще некоторое
время.
Затем выключите бритву, снимите бреющую сетку и режущий блок
(1) и позвольте им высохнуть.
Если вы регулярно чистите бритву под струей воды, наносите раз в
неделю на сетку и режущий блок (1) и триммер для длинных волос (2)
каплю светлого машинного масла.
В качестве альтернативы, Вы можете чистить бритву с помощью
щеточки:
Выключите бритву. Удалите сетку и режущий блок (1) и аккуратно
постучите ими по плоской поверхности.
Используя щеточку, очистите внутреннюю часть бреющей головки.
Не чистите щеткой сетку и режущий блок, так как это может
повредить их.
Ухаживайте за своей бритвой правильно
Для обеспечения 100% эффективности бритья рекомендуется заменять
одновременно сетку и режущий блок (1) каждые 18 месяцев или по
мере их износа.
Бреющая сетка и режущий блок №:
32B
Уход за аккумулятором
Для поддержания максимальной емкости аккумулятора, бритву
необходимо полностью разряжать (путем обычного использования)
примерно один раз в 6 месяцев.
После этого полностью зарядите бритву. Внимание: Вскрытие корпуса
приведет к повреждению прибора и лишению гарантии.
Содержание может быть изменено без предварительного
уведомления.
Электрические спецификации смотрите на корпусе прибора.
Внимание: Вскрытие корпуса приведет к повреждению прибора и
лишению гарантии.
•
•
•
•
•
98727826_Floater340_wet_S6-60.in45 45
98727826_Floater340_wet_S6-60.in45 45
05.06.2008 9:31:30 Uhr
05.06.2008 9:31:30 Uhr

46
Изделие использовать по назначению в соответствии
с инструкцией по эксплуатации.
Аккумуляторная бритва Series 3 модель 340
Тип 5775
Сделано в Германии, БРАУН Гмбх,
Braun GmbH, Waldstr. 9, 74731 Walldürn, Germany.
Изделие использовать по назначению в Соответствии с инструкцией по
эксплуатации Служба потребителей: Проктер энд Гэмбл, Россия,
123317, Москва, Краснопресненская наб., 18.
Телефон горячей линии: 8 800 200 20 20 (звонок по России бесплатный)
Й‡‡МЪЛИМ˚В У·flБ‡ЪВО¸ТЪ‚‡ ЩЛП˚ BRAUN
ÑÎfl ‚ТВı ЛБ‰ВОЛИ П˚ ‰‡ВП „‡‡МЪЛ˛ М‡ ‰‚‡ „У‰‡, М‡˜ЛМ‡fl Т ПУПВМЪ‡
ФЛУ·ÂÚÂÌËfl ËÁ‰ÂÎËfl.
З ЪВ˜ВМЛВ „‡‡МЪЛИМУ„У ФВЛУ‰‡ П˚ ·ВТФО‡ЪМУ ЫТЪ‡МЛП ФЫЪВП ВПУМЪ‡,
Б‡ПВМ˚ ‰ВЪ‡ОВИ ЛОЛ Б‡ПВМ˚ ‚ТВ„У ЛБ‰ÂÎËfl О˛·˚В Б‡‚У‰ТНЛВ ‰ВЩВНЪ˚,
‚˚Б‚‡ММ˚В МВ‰УТЪ‡ЪУ˜М˚П Н‡˜ВТЪ‚УП П‡ЪВЛ‡ОУ‚ ЛОЛ Т·УНЛ.
З ТОЫ˜‡В МВ‚УБПУКМУТЪЛ ВПУМЪ‡ ‚ „‡‡МЪЛИМ˚И ФВЛУ‰ ЛБ‰ВОЛВ ПУКВЪ
·˚Ъ¸ Б‡ПВМВМУ М‡ МУ‚УВ ЛОЛ ‡М‡ОУ„Л˜МУВ ‚ ТУУЪ‚ВЪТЪ‚ЛЛ Т б‡НУМУП У
Б‡˘ЛЪВ Ф‡‚ ФУЪВ·ЛЪВОВИ.
Й‡‡ÌÚËfl У·ВЪ‡ВЪ ТЛОЫ ЪУО¸НУ ВТОЛ ‰‡Ъ‡ ФУНЫФНЛ ФУ‰Ъ‚ВК‰‡ÂÚÒfl
ФВ˜‡Ъ¸˛ Л ФУ‰ФЛТ¸˛ ‰ЛОВ‡ (П‡„‡БЛМ‡) М‡ ФУТОВ‰МВИ ТЪ‡ÌˈÂ
УЛ„ЛМ‡О¸МУИ ЛМТЪÛ͈ËË ФУ ˝НТФОЫ‡Ъ‡ˆЛЛ BRAUN, НУЪУ‡fl fl‚ÎflÂÚÒfl
„‡‡МЪЛИМ˚П Ъ‡ОУМУП.
щЪ‡ „‡‡ÌÚËfl ‰ВИТЪ‚ЛЪВО¸М‡ ‚ О˛·УИ ТЪ‡МВ ‚ НУЪУЫ˛ ˝ЪУ ЛБ‰ВОЛВ
ФУТЪ‡‚ÎflÂÚÒfl ЩЛПУИ BRAUN ЛОЛ М‡БМ‡˜ВММ˚П ‰ЛТЪЛ·¸˛ЪУУП Л „‰В
МЛН‡НЛВ У„‡МЛ˜ÂÌËfl ФУ ЛПФУЪЫ ЛОЛ ‰Ы„ЛВ Ф‡‚У‚˚В ÔÓÎÓÊÂÌËfl МВ
ФÂÔflÚÒÚ‚Ы˛Ъ ФВ‰УТЪ‡‚ОВМЛ˛ „‡‡МЪЛИМУ„У У·ТОЫКЛ‚‡МЛfl.
Й‡‡ÌÚËfl МВ ФУН˚‚‡ВЪ ФУ‚ВК‰ÂÌËfl, ‚˚Б‚‡ММ˚В МВФ‡‚ЛО¸М˚П
ЛТФУО¸БУ‚‡МЛВП (ТП. Ъ‡НКВ ТФЛТУН МЛКВ) МУП‡О¸М˚И ЛБМУТ ‰ВЪ‡ОВИ
(М‡ФЛПВ, ТВЪНЛ Л ВКЫ˘В„У ·ОУН‡) ‚ ФÓˆÂÒÒ ˝НТФОЫ‡Ъ‡ˆЛЛ ЛБ‰ÂÎËfl.
ùÚ‡ „‡‡ÌÚËfl ÚÂflВЪ ТЛОЫ ВТОЛ ВПУМЪ ФУЛБ‚У‰ËÎÒfl МВ ЫФУОМУПУ˜ВММ˚П
М‡ ЪУ ÎˈÓÏ Л ВТОЛ ЛТФУО¸БУ‚‡М˚ МВ УЛ„ЛМ‡О¸М˚В ‰ВЪ‡ОЛ ЩЛП˚ BRAUN.
З ТОЫ˜‡В ФВ‰˙fl‚ÎÂÌËfl ВНО‡П‡ˆЛЛ ФУ ЫТОУ‚ЛflП ‰‡ММУИ „‡‡МЪЛЛ,
ФВВ‰‡ИЪВ ЛБ‰ВОЛВ ˆÂÎËÍÓÏ ‚ПВТЪВ Т „‡‡МЪЛИМ˚П Ъ‡ОУМУП ‚ О˛·УИ ЛБ
ˆÂÌÚУ‚ ТВ‚ЛТМУ„У У·ТОЫКЛ‚‡МЛfl ЩЛП˚ BRAUN. ЗТВ ‰Ы„ЛВ ЪВ·У‚‡МЛfl,
‚НО˛˜‡fl ЪВ·У‚‡МЛfl ‚УБПВ˘ÂÌËfl Ы·˚ЪНУ‚, ЛТНО˛˜‡˛ЪТfl, ВТОЛ М‡¯‡
УЪ‚ВЪТЪ‚ВММУТЪ¸ МВ ЫТЪ‡МУ‚ОВМ‡ ‚ Б‡НУММУП ФУfl‰ÍÂ.
98727826_Floater340_wet_S6-60.in46 46
98727826_Floater340_wet_S6-60.in46 46
05.06.2008 9:31:30 Uhr
05.06.2008 9:31:30 Uhr

47
кВНО‡П‡ˆЛЛ, Т‚flБ‡ММ˚В Т НУППВ˜ВТНЛП НУМЪ‡НЪУП Т ФУ‰‡‚ˆУП МВ
ФУФ‡‰‡˛Ъ ФУ‰ ˝ЪЫ „‡‡МЪЛ˛.
З ТУУЪ‚ВЪТЪ‚ЛЛ Т Б‡НУМУП ко ‹ 2300-1 УЪ 7.02.1992 „. «й б‡˘ЛЪВ Ф‡‚
ФУЪВ·ЛЪВОВИ» Л ФËÌflÚ˚П ‰УФУОМВМЛВП Н Б‡НУМЫ ко УЪ 9.01.1996 „.
«й ‚МВТВМЛЛ ЛБПВМВМЛИ» Л ‰УФУОМВМЛИ ‚ Б‡НУМ «й б‡˘ЛЪВ Ф‡‚
ФУЪВ·ЛЪВОВИ» Л «дУ‰ВНТ клолк У· ‡‰ПЛМЛТЪ‡ЪЛ‚М˚ı
Ф‡‚УМ‡Ы¯ÂÌËflı», ЩЛП‡ BRAUN ЫТЪ‡М‡‚ОЛ‚‡ВЪ ТУН ТОЫК·˚ М‡ Т‚УЛ
ЛБ‰ÂÎËfl ‡‚М˚П ‰‚ЫП „У‰‡П Т ПУПВМЪ‡ ФЛУ·ÂÚÂÌËfl ЛОЛ Т ПУПВМЪ‡
ФУЛБ‚У‰ТЪ‚‡, ВТОЛ ‰‡ЪЫ ФУ‰‡КЛ ЫТЪ‡МУ‚ЛЪ¸ МВ‚УБПУКМУ.
аБ‰ÂÎËfl ЩЛП˚ BRAUN ЛБ„УЪУ‚ОВМ˚ ‚ ТУУЪ‚ВЪТЪ‚ЛЛ Т ‚˚ТУНЛПЛ
ЪВ·У‚‡ÌËflÏË В‚УФВИТНУ„У Н‡˜ВТЪ‚‡. иЛ ·ВВКМУП ЛТФУО¸БУ‚‡МЛЛ Л ФЛ
ТУ·О˛‰ВМЛЛ Ф‡‚ЛО ФУ ˝НТФОЫ‡Ъ‡ˆЛЛ, ФЛУ·ВЪВММУВ З‡ПЛ ЛБ‰ВОЛВ
ЩЛП˚ BRAUN, ПУКВЪ ЛПВЪ¸ БМ‡˜ЛЪВО¸МУ ·УО¸¯ЛИ ТУН ТОЫК·˚, ˜ВП ТУН
ЫТЪ‡МУ‚ОВММ˚И ‚ ТУУЪ‚ВЪТЪ‚ЛЛ Т кУТТЛИТНЛП Б‡НУМУП.
лОЫ˜‡Л, М‡ НУЪУ˚В „‡‡ÌÚËfl МВ ‡ТФУТЪ‡ÌflÂÚÒfl:
– ‰ВЩВНЪ˚, ‚˚Б‚‡ММ˚В ЩУТ-П‡КУМ˚ПЛ У·ÒÚÓflÚÂθТЪ‚‡ПЛ;
– ЛТФУО¸БУ‚‡МЛВ ‚ ФУЩВТТЛУМ‡О¸М˚ı ˆÂÎflı;
– М‡Ы¯ВМЛВ ЪВ·У‚‡МЛИ ЛМТЪÛ͈ËË ФУ ˝НТФОЫ‡Ъ‡ˆЛЛ;
– МВФ‡‚ЛО¸М‡fl ЫТЪ‡МУ‚Н‡ М‡ФflÊÂÌËfl ФЛЪ‡˛˘ВИ ТВЪЛ (ВТОЛ ˝ЪУ
ЪВ·ÛÂÚÒfl);
– ‚МВТВМЛВ ÚÂıÌ˘ÂÒÍËı ЛБПВМВМЛИ;
– ПВı‡МЛ˜ВТНЛВ ФУ‚ВК‰ÂÌËfl;
– ФУ‚ВК‰ÂÌËfl ФУ ‚ЛМВ КЛ‚УЪМ˚ı, „˚БЫМУ‚ Л М‡ТВНУП˚ı (‚ ЪУП ˜ЛТОВ
ТОЫ˜‡Л М‡ıУК‰ÂÌËfl „˚БЫМУ‚ Л М‡ТВНУП˚ı ‚МЫЪЛ ФЛ·УУ‚);
– ‰Оfl ФЛ·УУ‚, ‡·УЪ‡˛˘Лı УЪ ·‡Ъ‡ВВН, – ‡·УЪ‡ Т МВФУ‰ıУ‰fl˘ЛПЛ ЛОЛ
ЛТЪУ˘ВММ˚ПЛ ·‡Ъ‡ВИН‡ПЛ, О˛·˚В ФУ‚ВК‰ÂÌËfl, ‚˚Б‚‡ММ˚В
ЛТЪУ˘ВММ˚ПЛ ЛОЛ ЪВНЫ˘ЛПЛ ·‡Ъ‡ВИН‡ПЛ (ТУ‚ВЪЫВП ФУО¸БУ‚‡Ъ¸Тfl
ЪУО¸НУ ФВ‰Уı‡МВММ˚ПЛ УЪ ‚˚ЪВН‡МЛfl ·‡Ъ‡ВИН‡ПЛ);
– ‰Оfl ·ЛЪ‚ – ÒÏflÚ‡fl ЛОЛ ФУ‚‡ММ‡fl ТВЪН‡.
ЗМЛП‡МЛВ! йЛ„ЛМ‡О¸М˚И Й‡‡МЪЛИМ˚И н‡ОУМ ФУ‰ОВКЛЪ ЛБ˙flЪЛ˛ ФЛ
У·‡˘ВМЛЛ ‚ ТВ‚ЛТМ˚И ˆÂÌÚ ‰Оfl „‡‡МЪЛИМУ„У ВПУМЪ‡. иУТОВ
ФУ‚В‰ÂÌËfl ВПУМЪ‡ Й‡‡МЪЛИМ˚П н‡ОУМУП ·Ы‰ВЪ fl‚ÎflÚ¸Тfl Б‡ФУОМВММ˚И
УЛ„ЛМ‡О гЛТЪ‡ ‚˚ÔÓÎÌÂÌËfl ВПУМЪ‡ ТУ ¯Ъ‡ПФУП ТВ‚ЛТМУ„У ˆÂÌÚ‡ Л
ФУ‰ФЛТ‡ММ˚И ФУЪВ·ЛЪВОВП ФУ ФУОЫ˜ВМЛЛ ЛБ‰ÂÎËfl ЛБ ВПУМЪ‡. нВ·ЫИЪВ
ФУТЪ‡‚ÎÂÌËfl ‰‡Ъ˚ ‚УБ‚‡Ъ‡ ЛБ ВПУМЪ‡, ТУН „‡‡МЪЛЛ ФУ‰ОВ‚‡ÂÚÒfl ̇
‚ВПfl М‡ıУК‰ÂÌËfl ËÁ‰ÂÎËfl ‚ ТВ‚ЛТМУП ˆÂÌÚВ.
З ТОЫ˜‡В ‚УБМЛНМУ‚ÂÌËfl ТОУКМУТЪВИ Т ‚˚ФУОМВМЛВП „‡‡МЪЛИМУ„У ЛОЛ
ФУТОВ„‡‡МЪЛИМУ„У У·ТОЫКЛ‚‡МЛfl ФУТ¸·‡ ТУУ·˘‡Ъ¸ У· ˝ЪУП ‚
аМЩУП‡ˆËÓÌÌÛ˛ лОЫК·Ы лВ‚ЛТ‡ ЩЛП˚ BRAUN ФУ ЪВОВЩУМЫ
8 800 200 20 20 (Б‚УМУН ЛБ кУТТЛЛ ·ВТФО‡ЪМУ).
98727826_Floater340_wet_S6-60.in47 47
98727826_Floater340_wet_S6-60.in47 47
05.06.2008 9:31:30 Uhr
05.06.2008 9:31:30 Uhr

07:24
Braun Shaver 340s-4 teardown
18:51
Замена аккумуляторов в бритве Braun 320s-4
13:53
Braun Series 3 Complete Review — 340 S-4
09:03
Braun Series 3 350cc-4 disassembly (battery replacement) — See description for replacement parts
06:40
Замена аккумуляторов электробритвы BRAUN
Нажмите на кнопку для помощи
Braun SERIES 3 340S-4 Electric Shaver PDF User Guides and Manuals for Free Download: Found (1) Manuals for Braun SERIES 3 340S-4 Device Model (Operation & User’s Manual)
Braun SERIES 3 340S-4 Operation & User’s Manual
Details:
- Manufacturer: Braun
- Product Name/ID: Braun SERIES 3 340S-4 / #75182
- Category: Electric Shaver
- File Path: braun/series-3-340s-4_75182.pdf
- Last Updated: 09 Apr 2025
- Description: Maximize the capabilities of your Braun SERIES 3 340S-4 with this manual, which includes detailed guidance on setup, customization, and regular maintenance for consistent and reliable performance.
- Document Type: User Manual
- Pages: 18
Download PDF
Read Online
The Braun SERIES 3 340S-4 electric shaver stands out in the crowded market of grooming devices with its impressive combination of performance, design, and value. With a reputation built on innovation and quality, Braun offers a reliable grooming experience tailored for those who seek efficiency and comfort.
One of the first things to notice about the Braun SERIES 3 340S-4 is its ergonomic design. The shaver features a comfortable grip that allows for easy maneuverability, enabling users to navigate the contours of their face effortlessly. Its streamlined body makes the device not only aesthetically pleasing but also highly functional. This attention to design ensures that grooming can be done with precision, reducing the likelihood of nicks or cuts.
Performance-wise, the Braun SERIES 3 340S-4 excels in delivering a close shave without causing irritation. Its Triple Action Cutting System includes two specialized trimmers and a middle razor, designed to tackle both short stubble and longer hairs effectively. This feature is especially beneficial for individuals with varying hair lengths, as it adapts seamlessly to different grooming needs.
Key features of the Braun SERIES 3 340S-4 include:
- Waterproof Design: The shaver is 100% waterproof, allowing for wet or dry usage. This means you can use it in the shower or with your favorite shaving gel for enhanced comfort.
- Easy Cleaning: The washable design makes cleaning the shaver a breeze. Simply rinse it under running water to keep it hygienic and well-maintained.
- Long Battery Life: The Braun SERIES 3 340S-4 features a powerful battery that offers up to 30 minutes of cordless shaving after a full charge. Additionally, it comes with a quick charge feature for those last-minute grooming needs.
- LED Indicator: An easy-to-read LED indicator displays battery status and charging progress, ensuring you’re never caught off guard with a dead shaver.
Another commendable aspect of the Braun SERIES 3 340S-4 is its versatility. Whether you prefer a quick touch-up or a thorough daily shave, this shaver accommodates all situations. It performs well on different skin types, making it an excellent choice for those with sensitive skin or who are prone to irritation.
Moreover, users have noted the quiet operation of the Braun SERIES 3 340S-4, which is a significant benefit compared to other models that can sound alarming during use. This quieter motor contributes to a more relaxing grooming experience, allowing for a serene atmosphere as you prepare for your day.
In terms of value, the Braun SERIES 3 340S-4 is reasonably priced compared to other electric shavers with similar features. It provides excellent performance without breaking the bank, making it an attractive option for budget-conscious consumers who do not want to compromise on quality.
Ultimately, the Braun SERIES 3 340S-4 delivers on its promise of a close, comfortable shave while being user-friendly and efficient. It effectively combines performance with convenience, establishing itself as a go-to grooming tool for users of all ages. For anyone looking for a reliable and cost-effective electric shaver, the Braun SERIES 3 340S-4 is a product that should not be overlooked.
345s-4
380s-4
340s-4www.braun.com
+
380s-4
Series 3
Type 5416, 5414
Series3
96277716_380-345-340s-4_S01.indd 1 09.04.13 08:57
Stapled booklet, 105x148mm, 76 pages (incl. 8 pages cover), 2/2c = black+HKS43N
Deutsch 6
English 11
Franais 16
Espaol 22
Portugus 27
Italiano 33
Nederlands 38
Dansk 43
Norsk 48
Svenska 53
Suomi 58
Trke 63
67
Braun GmbH Frankfurter Strae 145 61476 Kronberg/Germany www.braun.com
96277716/IV-13 DE/UK/FR/ES/PT/IT/NL/DK/NO/SE/ FI/TR/GR
Braun Infolines
DE / AT 00 800 27 28 64 63 00 800 BRAUNINFOLINE
CH 08 44 — 88 40 10
UK 0800 783 7010
IE 1 800 509 448
FR 0 800 944 802
BE 0 800 14 592
ES 901 11 61 84
PT 808 20 00 33
IT (02) 6 67 86 23
NL 0 800-445 53 88
DK 70 15 00 13
NO 22 63 00 93
SE 020 — 21 33 21
FI 020 377 877
TR 0 800 261 63 65
HK 852-25249377 (Audio Supplies Company Ltd.)
www.service.braun.com
96277716_380-345-340s-4_S02.indd 1 09.04.13 08:58
4
+
+
380s-4
Series 3
1
3
4
5 6
7
8 9
2
345 340
380
11
12
10
+
380s-4
S eries 3
i
345 340
380
380
96277716_380-345-340s-4_S04.indd 1 09.04.13 09:00
5
90 lock
full full
+
96277716_380-345-340s-4_S05.indd 1 09.04.13 09:11
6
Unsere Produkte werden hergestellt, um hchste Ansprche an Qualitt, Funktionalitt und Design zu erfllen. Wir wnschen Ihnen mit Ihrem Braun Rasierer viel Freude.
Lesen Sie die Gebrauchsanweisung vollstndig und bewahren Sie sie als Referenz auf, da sie Sicherheitshinweise enthlt.
Achtung Dieses Gert ist geeignet fr die Verwendung im Bad und in der Dusche. Bei der Verwendung in der Dusche empfehlen wir, Rasierschaum oder -gel zu
benutzen. Aus Sicherheitsgrnden kann es nur kabellos verwendet werden. Das Gert ist mit einem Spezialkabel mit integriertem Netz- teil fr Sicherheitskleinspannung ausgestattet. Es drfen weder Teile ausgetauscht noch Vernderungen vorgenom- men werden, da sonst Stromschlaggefahr besteht.Verwen- den Sie ausschlielich das mitgelieferte Spezialkabel. Verwenden Sie das Gert nicht mit beschdigter Scherfolie oder defektem Spezialkabel. Dieses Gert kann von Kindern ab 8 Jahren und von Personen mit reduzierten physischen, sensorischen oder mentalen Fhigkeiten oder Mangel an Erfahrung und/oder Wissen benutzt werden, wenn sie beaufsichtigt oder bezg- lich des sicheren Gebrauchs des Gertes unterwiesen wurden und die daraus resultierenden Gefahren verstanden haben. Kinder drfen nicht mit dem Gert spielen. Reini- gung und Benutzer-Wartung drfen nicht durch Kinder durchgefhrt werden, es sei denn, sie sind lter als 8 Jahre und beaufsichtigt. Aus hygienischen Grnden mchten wir Sie bitten, dieses Gert nicht mit anderen Personen zu teilen.
Deutsch
96277716_380-345-340s-4_S6-76.indd 6 15.04.13 08:13
7
lflschchen Auer Reichweite von Kindern aufbewahren. Nicht verschlucken. Nicht im Auge anwenden. Restentleert entsorgen.
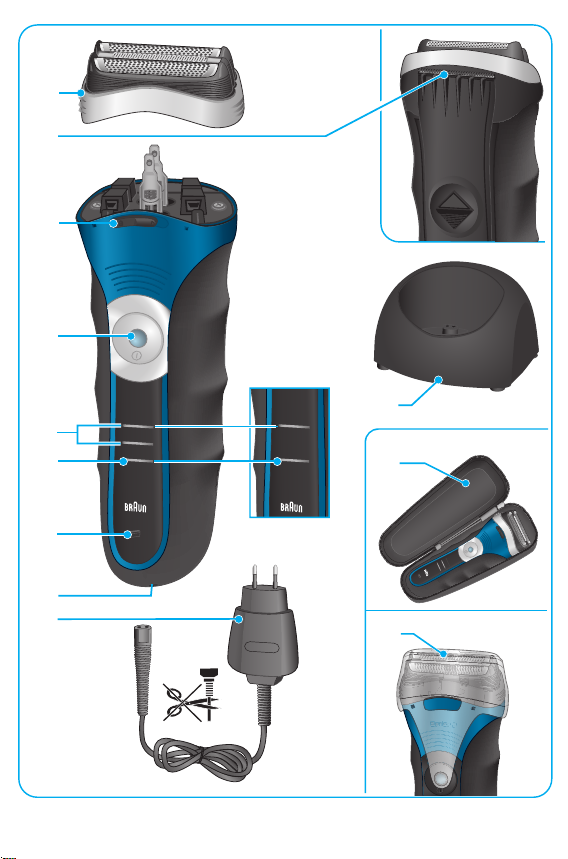
Beschreibung 1 Schersystem 2 Langhaarschneider 3 Przisionseinstellung (nur bei Modell 380s) 4 Ein-/Ausschalter 5 Ladekontroll-Leuchten (grn) 6 Restkapazitts-Leuchte (rot) 7 Wechselanzeige fr Scherteile 8 Rasierer-Buchse 9 Spezialkabel 10 Ladestation (nur bei Modell 380s) 11 Etui (nur bei Modell 380s) 12 Schutzkappe (nur bei Modell 345s/340s)
Rasierer aufladen Die empfohlene Umgebungstemperatur zum Laden ist 5 C bis 35 C. Bei extrem niedrigen oder hohen Temperaturen kann es sein, dass der Akku nicht richtig geladen werden kann. Die empfohlene Umgebungstemperatur zum Rasieren liegt bei 15 C bis 35 C. Setzen Sie den Rasierer nicht lngere Zeit Temperaturen ber 50 C aus. Erstladung: ber das Spezialkabel (9) bzw. in der Ladestation (10) den
ausgeschalteten oder einige Monate nicht benutzten Rasierer mindestens 4 Stunden am Netz aufladen.
Ist der Rasierer voll geladen, kabellos rasieren, bis die Akkus leer sind. Danach wieder voll aufladen (1 Stunde).
Voll geladen kann der Rasierer je nach Bartstrke ca. 45 Minuten ohne Netzanschluss betrieben werden. Die maximale Akku-Kapazitt wird jedoch erst nach mehreren Lade- und Entladevorgngen erreicht.
Ein Schnell-Ladevorgang von 5 Minuten reicht fr eine Rasur.
Ladekontroll-Leuchten (5) Die grnen Ladekontroll-Leuchten zeigen den Ladezustand an (345s/340s: 1 Ladekontroll-Leuchte). Beim Laden oder whrend der Benutzung blinkt die entsprechende grne Leuchte. Wenn der Rasierer voll geladen ist, leuchten alle grnen Leuchten (345s/340s: 1 Ladekontroll-Leuchte) konstant, voraus- gesetzt der Rasierer ist am Netz angeschlossen.
96277716_380-345-340s-4_S6-76.indd 7 15.04.13 08:13
8
Restkapazitts-Leuchte (6) Wenn die rote Restkapazitts-Leuchte blinkt, geht die Akku-Ladung zur Neige. In der Regel knnen Sie die Rasur noch beenden.
Rasieren Drcken Sie den Ein-/Ausschalter (4), um den Rasierer einzuschalten (Abb.). Das bewegliche Schersystem sorgt automatisch fr eine optimale Anpas- sung an die Gesichtsform (Abb.).
Langhaarschneider (2) Zum kontrollierten Trimmen von Schnurrbart und Haaransatz schieben Sie den ausfahrbaren Langhaarschneider nach oben (Abb.).
Przisionseinstellung (nur bei Model 380s) Fr die przise Rasur (z. B. unter der Nase) schieben Sie den Schalter (3) nach rechts auf Stellung . Der Mittelschneider und eine Scherfolie werden abgesenkt.
Tipps fr eine optimale Trockenrasur Fr optimale Rasier-Ergebnisse empfehlen wir drei einfache Schritte: 1. Rasieren Sie sich immer, bevor Sie Ihr Gesicht waschen. 2. Rasierer stets im rechten Winkel (90) zur Haut halten. 3. Haut straffen und gegen die Haarwuchsrichtung rasieren.
Reinigen Durch regelmiges Reinigen verbessern Sie die Rasierleistung Ihres Rasierers. So knnen Sie den Scherkopf nach jeder Rasur einfach und schnell unter flieendem Wasser reinigen: Rasierer einschalten (kabellos) und den Scherkopf unter heies, flieendes
Wasser halten. Gelegentlich Flssigseife (ohne Scheuermittel) benutzen. Schaum vollstndig absplen und den Rasierer noch einige Sekunden laufen lassen (Abb.).
Dann den Rasierer ausschalten und das Schersystem (1) abnehmen (Abb.). und trocknen lassen.
Bei regelmiger Nassreinigung sollten Sie wchentlich einen Tropfen Leichtmaschinenl auf der Oberflche des Schersystems (1) und dem Langhaarschneider (2) verteilen (Abb.).
96277716_380-345-340s-4_S6-76.indd 8 15.04.13 08:13
9
Alternativ knnen Sie den Rasierer mit einer Brste reinigen: Rasierer ausschalten. Das Schersystem abnehmen und ausklopfen (Abb.). Mit der Brste die Scherkopf-Innenseite reinigen (Abb.) Das Schersystem
darf nicht mit der Brste gereinigt werden (Abb.).
So halten Sie Ihren Rasierer in Bestform Scherteile-Wechsel / Reset der Wechselanzeige Um 100% der Rasierleistung zu erhalten, wechseln Sie das Schersystem (1), wenn die Wechselanzeige (7) aufleuchtet (nach ca. 18 Monaten) oder sobald es Verschleierscheinungen zeigt.
Schersystem: 32S/32B
Die Wechselanzeige leuchtet noch whrend der nchsten sieben Rasuren, um Sie an den Schersystemwechsel zu erinnern. Danach erfolgt ein automa- tisches Reset der Anzeige. Wenn Sie das Schersystem (1) gewechselt haben, drcken Sie den Ein-/ Ausschalter (4) mindestens 5 Sekunden lang, um die Wechselanzeige manuell zurckzustellen. Dabei blinkt die Wechselanzeige zunchst noch und erlischt, sobald das Reset abgeschlossen ist. Die Wechselanzeige kann zu jeder Zeit manuell zurckgesetzt werden.
Akku-Pflege Um die maximale Kapazitt der Akkus zu erhalten, sollte das Gert ca. alle 6 Monate vollstndig durch Rasieren entladen werden. Danach den Rasierer wieder voll aufladen.
Umweltschutz Dieses Gert enthlt Akkus. Im Sinne des Umweltschutzes darf dieses Gert am Ende seiner Lebensdauer nicht mit dem Hausmll entsorgt werden. Die Entsorgung kann ber eine Braun Kundendienst- stelle oder ber lokal verfgbare Rckgabe- und Sammelsysteme erfolgen.
nderungen vorbehalten.
Elektrische Angaben siehe Bedruckung auf dem Spezialkabel.
96277716_380-345-340s-4_S6-76.indd 9 15.04.13 08:13
10
Garantie Als Hersteller bernehmen wir fr dieses Gert nach Wahl des Kufers zustzlich zu den gesetzlichen Gewhrleistungsansprchen gegen den Verkufer eine Garantie von 2 Jahren ab Kaufdatum. Innerhalb dieser Garantiezeit beseitigen wir nach unserer Wahl durch Reparatur oder Austausch des Gertes unentgeltlich alle Mngel, die auf Material- oder Herstellungsfehlern beruhen. Die Garantie kann in allen Lndern in Anspruch genommen werden, in denen dieses Braun Gert von uns autorisiert verkauft wird.
Von der Garantie sind ausgenommen: Schden durch unsachgemen Gebrauch (Knickstellen an der Scherfolie, Bruch), normaler Verschlei (z.B. Schersystem) sowie Mngel, die den Wert oder die Gebrauchstauglichkeit des Gertes nur unerheblich beeinflussen. Bei Eingriffen durch nicht von uns autorisierte Braun Kundendienstpartner sowie bei Verwendung anderer als Original Braun Ersatzteile erlischt die Garantie.
Im Garantiefall senden Sie das Gert mit Kaufbeleg bitte an einen autorisierten Braun Kundendienstpartner. Die Anschrift finden Sie unter www.service.braun.com oder knnen Sie kostenlos unter 00800/27 28 64 63 erfragen.
96277716_380-345-340s-4_S6-76.indd 10 15.04.13 08:13
11
English Our products are designed to meet the highest standards of quality, functionality and design. We hope you enjoy your new Braun Shaver.
Read this instruction completely, it contains safety information. Keep it for future reference.
Warnings This appliance is suitable for use in a bath or shower. When using it in the shower, we recommend applying shaving foam or gel. For safety reasons this appli-
ance can only be operated cordlessly.
Your shaving system is provided with a special cord set, which has an integrated Safety Extra Low Voltage power supply. Do not exchange or tamper with any part of it, otherwise there is risk of an electric shock. Only use the special cord set provided with your appliance. Do not shave with a damaged foil or cord.
This appliance can be used by children aged from 8 years and above and persons with reduced physical, sensory or mental capabilities or lack of experience and knowledge if they have been given supervision or instruction concerning the safe use of the appliance and understand the hazards involved. Children shall not play with the appliance. Cleaning and user maintenance shall not be made by children unless they are older than 8 years and supervised.
For hygienic reasons, do not share this appliance with other persons.
Oil bottle Keep out of reach of children. Do not swallow. Do not apply to eyes. Dispose of properly when empty.
96277716_380-345-340s-4_S6-76.indd 11 15.04.13 08:13
12
Description 1 Foil & Cutter cassette 2 Long hair trimmer 3 Precision setting switch (380s only) 4 On/off switch 5 Charging lights (green) 6 Low-charge light (red) 7 Replacement light for shaving parts 8 Shaver power socket 9 Special cord set 10 Charging stand (380s only) 11 Etui (380s only) 12 Protection cap (345s/340s only)
Charging Recommended ambient temperature for charging is 5 C to 35 C. The battery may not charge properly or at all under extreme low or high temperatures. Recommended ambient temperature for shaving is 15 C to 35 C. Do not expose the shaver to temperatures higher than 50 C for extended periods of time. Using the special cord set (9), connect the shaver or the charging stand (10)
to an electrical outlet with the motor switched off. When charging for the first time or when the shaver is not used for a few
months, leave the shaver to charge continuously for 4 hours. Once the shaver is completely charged, discharge the shaver through
normal use. Then recharge to full capacity. Subsequent charges will take about 1 hour.
A full charge provides up to 45 minutes of cordless shaving time depend- ing on your beard growth. However, the maximum battery capacity will only be reached after several charging/discharging cycles.
5-minute quick charge is sufficient for a shave.
Charging lights (5) The green charging lights show the charge status of the batteries (345s/340s: 1 charging light). The green charging light blinks when the shaver is being charged or switched on. When the battery is fully charged, all green charging lights (345s/340s: 1 charging light) shine permanently, provided the shaver is connected to an electrical outlet.
96277716_380-345-340s-4_S6-76.indd 12 15.04.13 08:13
13
Low-charge light (6) The red low-charge light flashes when the battery is running low. You should be able to finish your shave.
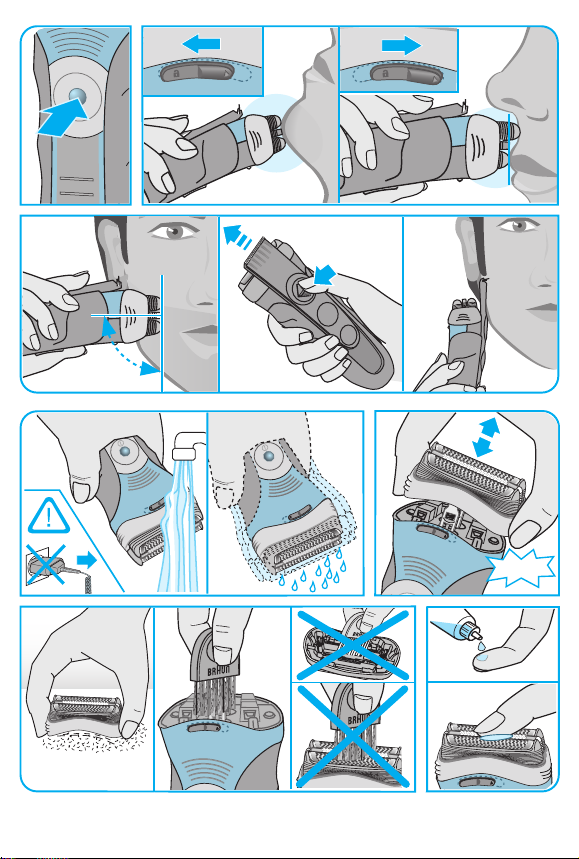
Shaving Press the on/off switch (4) to operate the shaver (picture). The flexible shaving foils automatically adjust to every contour of your face (picture).
Long hair trimmer (2) To trim sideburns, moustache or beard, slide the long hair trimmer upwards.
Precision setting switch (380s only) For precise handling in hard to shave areas (e.g. under the nose) slide the switch (3) to the right to position . The centre trimmer and one foil will be lowered.
Tips for a perfect dry shave For best results, Braun recommends you follow 3 simple steps: 1. Always shave before washing your face. 2. At all times, hold the shaver at right angles (90) to your skin. 3. Stretch your skin and shave against the direction of your beard growth.
Cleaning Regular cleaning ensures better shaving performance. Rinsing the shaver head under running water after each shave is an easy and fast way to keep it clean: Switch the shaver on (cordless) and rinse the shaver head under hot
running water. You may use liquid soap without abrasive substances. Rinse off all foam and let the shaver run for a few more seconds.
Next, switch off the shaver, remove the Foil & Cutter cassette (1) and let it dry.
If you regularly clean the shaver under water, then once a week apply a drop of light machine oil onto the long hair trimmer (2) and Foil & Cutter cassette (1) (picture).
Alternatively, you may clean the shaver using a brush: Switch off the shaver. Remove the Foil & Cutter cassette and tap it out on
a flat surface (picture).
96277716_380-345-340s-4_S6-76.indd 13 15.04.13 08:13
14
Using a brush, clean the inner area of the head. However, do not clean the shaver Foil & Cutter cassette with a brush as this may damage it (picture).
Keeping your shaver in top shape Replacement light for shaving parts / Reset To maintain 100% shaving performance, replace the Foil & Cutter cassette (1), when the replacement light for shaving parts (7) comes on (after about 18 months) or when worn.
Foil & Cutter cassette: 32S/32B
The replacement light will remind you during the next 7 shaves to replace the Foil & Cutter cassette. Then the shaver will automatically reset the display. After you have replaced the Foil & Cutter cassette (1), press the on/off switch (4) for at least 5 seconds to reset the counter. While doing so, the replacement light blinks and goes off when the reset is complete. The manual reset can be done at any time.
Preserving the batteries In order to maintain the optimum capacity of the rechargeable batteries, the shaver has to be fully discharged (by shaving) every 6 months approximately. Then recharge the shaver to full capacity.
Environmental notice This product contains rechargeable batteries. In the interest of protecting the environment, please do not dispose of the product in the household waste at the end of its useful life. Disposal can take place at a Braun Service Centre or at appropriate collection sites provided in your country.
Subject to change without notice.
For electric specifications, see printing on the special cord set.
96277716_380-345-340s-4_S6-76.indd 14 15.04.13 08:13
15
Guarantee We grant a 2 year guarantee on the product commencing on the date of purchase. Within the guarantee period we will eliminate any defects in the appliance resulting from faults in materials or workmanship, free of charge either by repairing or replacing the complete appliance at our discretion. This guarantee extends to every country where this appliance is supplied by Braun or its appointed distributor.
This guarantee does not cover: damage due to improper use, normal wear and tear (e.g. shaver foil or cutter block) as well as defects that have a negligible effect on the value or operation of the appliance. The guarantee becomes void if repairs are undertaken by unauthorised persons and if original Braun parts are not used.
To obtain service within the guarantee period, hand in or send the complete appliance with your sales receipt to an authorised Braun Customer Service Centre (address information available online at www.service.braun.com).
For UK only: This guarantee in no way affects your rights under statutory law.
96277716_380-345-340s-4_S6-76.indd 15 15.04.13 08:13
16
Nos produits sont conus pour rpondre aux normes les plus leves en matire de qualit, fonctionnalit et design. Nous esprons que vous apprcierez votre nouveau rasoir Braun.
Lisez lintgralit des instructions dutilisation, elles contiennent des informations de scurit. Conservez ce document pour le consulter galement ultrieurement.
Attention Cet appareil peut tre utilis sans codon dalimen- tation dans le bain ou sous la douche. Lorsque vous lutilisez sous la douche, il est recommand de
sappliquer une mousse ou un gel raser sur le visage avant le rasage. Dans ces cas pour des raisons de scurit, utilisez uniquement lappareil sur batterie. Votre rasoir est livr avec un cordon dalimentation basse tension. Vous ne devez pas remplacer ou modifier ses composants, afin dviter tout risque daccident. Utilisez uniquement le cordon dalimentation fourni avec votre rasoir. Ne vous rasez pas avec une grille ou un cordon endommags. Cet appareil peut tre utilis par des enfants de 8 ans et plus et par des personnes dont les capacits physiques, sensorielles ou mentales sont rduites, ou des personnes dnues dexprience ou de connaissance, si elles ont pu bnficier, par lintermdiaire dune personne responsable de leur scurit, dune surveillance ou dinstructions pralables concernant lutilisation de lappareil en toute scurit et les dangers encourus. Les enfants ne doivent pas jouer avec lappareil. Le nettoyage et lentretien ne doivent pas tre faits par des enfants, moins quils ne soient gs de plus de 8 ans et quils ne soient sous surveillance.
Franais
96277716_380-345-340s-4_S6-76.indd 16 15.04.13 08:13
17
Pour des raisons dhygine, ne pas partager ce produit avec dautre personne.
Bouteille dhuile Conservez hors de porte des enfants. Ne pas avaler. Ne pas appliquer sur les yeux. Jeter la bouteille correctement lorsquelle est vide.
Description 1 Cassette de rasage (grille et bloc-couteaux) 2 Tondeuse rtractable pour poils longs 3 Loquet de rglage de prcision (380s uniquement) 4 Bouton marche/arrt 5 Tmoins lumineux de charge (vert) 6 Tmoin lumineux de dcharge (rouge) 7 Indicateur lumineux de remplacement de la cassette de rasage 8 Prise dalimentation du rasoir 9 Cordon dalimentation 10 Socle de charge (380s uniquement) 11 Etui (380s uniquement) 12 Capot de protection (345s/340s uniquement)
Mise en charge du rasoir La temprature ambiante recommande pour charger le rasoir est comprise entre 5 C et 35 C. La batterie peut ne pas se charger correctement ou pas du tout des tempratures extrmement basses ou leves. La temprature ambiante recommande pour se raser est comprise entre 15 C et 35 C. Nexposez pas votre rasoir des tempratures suprieures 50 C pendant une priode prolonge. En utilisant le cordon dalimentation (9), branchez le rasoir (moteur arrt)
ou le socle de charge (10) une prise lectrique. Si vous chargez lappareil pour la premire fois, ou si celui-ci na pas t
utilis depuis quelques mois, laissez-le en charge 4 heures sans interrup- tion. Les charges suivantes prendront environ une heure.
Lorsque le rasoir est compltement charg, utilisez le normalement jusqu complte dcharge de la batterie. Rechargez le ensuite jusqu pleine capacit. Les charges suivantes prendront environ une heure.
Une pleine charge procure jusqu 45 minutes dautonomie de rasage en fonction de lpaisseur et de la duret de votre barbe. Cependant, la
96277716_380-345-340s-4_S6-76.indd 17 15.04.13 08:13
18
capacit maximale de la batterie ne sera atteinte quaprs plusieurs cycles de charge/dcharge.
Une charge rapide de 5 minutes est suffisante pour un rasage.
Tmoins lumineux de charge (5) Les tmoins lumineux de charge indiquent le niveau de charge des batteries (345s/340s : 1 tmoin lumineux). Le tmoin lumineux vert de charge clignote lorsque le rasoir est en cours de charge ou en marche. Quand la batterie est compltement charge, tous les tmoins lumineux verts (345s/340s : 1 tmoin lumineux) de charge sont allums, que le rasoir soit branch sur une prise lectrique.
Tmoin lumineux de dcharge (6) Le voyant lumineux rouge de faible charge clignote lorsque la batterie doit tre recharge. La charge restante est normalement suffisante pour que vous puissiez terminer votre rasage.
Rasage Appuyez sur le bouton marche/arrt (4) pour mettre en marche le rasoir (cf. schma). Les grilles de rasage souples sadaptent automatiquement aux contours de votre visage (cf. schma).
Tondeuse rtractable pour poils longs (2) Pour tailler les pattes, la moustache ou la barbe, faites glisser la tondeuse rtractable vers le haut.
Loquet de rglage de prcision (380s uniquement) Pour une utilisation prcise dans les zones difficiles atteindre (par exemple, sous le nez), poussez le loquet (3) vers la droite pour que se retrouve en position centrale. La mini tondeuse de la cassette de rasage et une de ses grilles seront alors abaisses.
Conseils pour un rasage parfait Pour un rsultat de rasage optimal, Braun vous recommande de suivre 3 tapes simples : 1. Rasez-vous toujours avant de vous laver le visage. 2. Tenez toujours le rasoir angle droit (90) par rapport la peau. 3. Tendez votre peau et rasez-vous dans le sens oppos la pousse du
poil.
96277716_380-345-340s-4_S6-76.indd 18 15.04.13 08:13
19
Nettoyage Un nettoyage rgulier assure une meilleure performance de rasage. Nettoyer la tte du rasoir sous leau aprs chaque rasage permet de garder le rasoir propre simplement et rapidement :
Mettez en marche le rasoir (sans cordon) et rincez la tte de rasage sous leau chaude. Vous pouvez utiliser du savon liquide ne contenant pas de substances abrasives. Rincez toute la mousse et laissez le rasoir en marche pendant quelques secondes supplmentaires.
Ensuite, arrtez le rasoir, retirez la cassette de rasage (1) et laissez la scher.
Si vous nettoyez rgulirement votre rasoir sous leau, appliquez une fois par semaine une goutte dhuile de machine coudre sur la tondeuse rtractable (2) et sur la cassette de rasage (1) (cf. schma).
Vous pouvez galement nettoyer le rasoir en utilisant une brossette :
Arrtez le rasoir. Enlevez la cassette de rasage et tapotez-la lgrement sur une surface plane.
A laide de la brossette, nettoyez lintrieur de la tte du rasoir. Cependant, ne nettoyez pas la cassette de rasage avec la brossette car cela risquerait de lendommager (cf. schma).
Entretien du rasoir Tmoin lumineux de remplacement de la cassette de rasage / rinitialisation Pour conserver 100% de la performance de votre rasoir, remplacez la cassette de rasage (1) quand le tmoin lumineux de remplacement des pices de rasage (7) sallume (aprs environ 18 mois) ou quand elle est use.
Cassette de rasage Foil & Cutter : 32S/32B
Le tmoin lumineux de remplacement vous rappellera lors des 7 rasages suivants quil faut remplacer la cassette de rasage. Ensuite, le rasoir rinitialisera automatiquement laffichage. Aprs avoir remplac la cassette de rasage (1), appuyez sur le bouton marche/arrt (4) pendant au moins 5 secondes afin de remettre manuelle- ment le compteur zro. Pendant ce temps l, le tmoin lumineux de remplacement clignote et steint quand la rinitalisation est faite. La rinitialisation manuelle peut tre faite nimporte quel moment.
96277716_380-345-340s-4_S6-76.indd 19 15.04.13 08:13
20
Conservation des batteries Pour maintenir la capacit optimale des batteries rechargeables, tous les 6 mois environ dchargez compltement, le rasoir en lutilisant sans le remettre en charge entre chaque rasage ; ensuite recharger le rasoir au maximum.
Respect de lenvironnement Ce produit contient des batteries rechargeables. Dans un souci de protection de lenvironnement, veuillez ne pas jeter le produit avec les ordures mnagres au terme de son cycle de vie. Vous pouvez remettre ce produit aux centres service agrs Braun ou aux points de collecte dans votre pays.
Sujet toute modification sans pravis.
Voir les spcifications lectriques mentionnes sur ladaptateur basse tension.
96277716_380-345-340s-4_S6-76.indd 20 15.04.13 08:13
21
Garantie Nous accordons une garantie de 2 ans sur ce produit, partir de la date dachat.
Pendant la dure de la garantie, Braun prendra gratuitement sa charge la rparation des vices de fabrication ou de matire en se rservant le droit de dcider si certaines pices doivent tre rpares ou si lappareil lui-mme doit tre chang.
Cette garantie stend tous les pays o cet appareil est commercialis par Braun ou son distributeur exclusif.
Cette garantie ne couvre pas : les dommages occasionns par une utilisation inadquate, lusure normale (par exemple, grille et bloc-couteaux) ainsi que les dfauts dusuresqui ont un effet ngligeable sur la valeur ou lutilisation de lappareil. Cette garantie devient caduque si des rparations ont t effectues par des personnes non agres par Braun et si des pices de rechange ne provenant pas de Braun ont t utilises. Pour toute rclamation intervenant pendant la priode de garantie, retournez ou rapportez lappareil ainsi que lattestation de garantie votre revendeur ou un Centre Service Agr Braun.
Se rfrez www.service.braun.com ou appelez 0 800 944 802 pour connaitre le Centre Service Agre Braun le plus proche de chez vous.
Clause spciale pour la France Outre la garantie contractuelle expose ci-dessus, nos clients bnficient de la garantie lgale des vices cachs prvue aux articles 1641 et suivants du Code civil.
96277716_380-345-340s-4_S6-76.indd 21 15.04.13 08:13
22
Nuestros productos estn diseados para cumplir los ms altos niveles de calidad, funcionalidad y diseo. Esperamos que disfrute de su nueva afeitadora elctrica Braun.
Lea las instrucciones completamente, contienen informacin de seguridad. Gurdelas para consultarlas en el futuro.
Avisos Este dispositivo es apto para su uso en bao o ducha. Cuando lo utilice en la ducha, se recomienda utilizar espuma de afeitar en gel o foam. Por razones de seguridad, se tiene que usar siempre desenchufado.
Su sistema de afeitado est provisto de un juego de cables especial que posee un suministro elctrico integrado de Seguridad de Voltaje Extrabajo. No intercambie ni manipule ninguna de sus piezas, de lo contrario existe riesgo de sufrir descarga elctrica. Utilice solo el cable especial suministrado con su afeitadora. No se depile si una lamina o un cable estn en mal estado.
Este aparato puede ser utilizado por nios a partir de los 8 aos y personas con capacidades fsicas, sensoriales o mentales reducidas o con falta de experiencia y conoci- miento si se les ha dado la supervisin o instrucciones adecuadas para el uso seguro del aparato y entienden los riesgos que implica. Los nios no deberan jugar con el aparato. Los nios no deberan realizar la limpieza y el mantenimiento del aparato a no ser que sean mayores de 8 aos y lo hagan bajo supervisin.
Por razones higinicas, procura no compartir este aparato con otras personas.
Espaol
96277716_380-345-340s-4_S6-76.indd 22 15.04.13 08:13
23
Botella de aceite Mantenga el bote de aceite fuera del alcance de los nios. No lo ingiera. No lo aplique sobre ojos. Una vez vaco, proceda adecuadamente a su eliminacin.
Descripcin 1 Dispositivo de lminas y cuchillas 2 Recortadora de pelo largo 3 Interruptor de ajuste de precisin (slo para 380s) 4 Botn de encendido/apagado 5 Luces de carga (verde) 6 Luz de carga baja (roja) 7 Luz de sustitucin para las piezas de afeitado 8 Enchufe de la afeitadora elctrica 9 Juego de cables especial 10 Soporte de carga (slo para 380s) 11 Estuche (slo para 380s) 12 Tapa de proteccin (slo para 345s/340s)
Carga La temperatura ambiental recomendada para la carga se sita entre 5 C y 35 C. En condiciones de temperaturas extremadamente bajas o altas la batera puede no cargarse, o no hacerlo adecuadamente. No exponga la afeitadora a temperaturas superiores a 50 C durante perodos prolongados de tiempo. Utilizando el juego de cables especial (9), conecte la afeitadora elctrica o
el soporte de carga (10) a una toma de corriente elctrica con el motor apagado.
Si se carga la mquina por primera vez o si no se ha usado en un par de meses, carge la mquina de forma ininterrumpida durante 4 horas. Las siguientes cargas tendrn una duracin de, aprox., 1 hora.
Cuando la afeitadora elctrica est cargada por completo, descrguela utilizndola normalmente. Luego recrguela hasta su capacidad mxima. Las siguientes cargas tendrn una duracin de, aprox., 1 hora.
Una carga completa proporciona hasta 45 minutos de afeitado inalmbrico, dependiendo del crecimiento de su barba. Sin embargo, la capacidad mxima de la batera se alcanzar tras varios ciclos de carga/descarga.
Una carga rpida de 5 minutos es suficiente para un afeitado.
96277716_380-345-340s-4_S6-76.indd 23 15.04.13 08:13
24
Luces de carga (5) Las luces de carga verdes indican el estado de carga de las bateras (345s/340s: 1 luz de carga). La luz de carga verde parpadea cuando la afeitadora se est cargando o est encendida. Cuando la batera est cargada por completo, todas las luces de carga verdes (345s/340s: 1 luz de carga) se iluminan permanentemente, siempre que la afeitadora elctrica est conectada a una toma de corriente elctrica.
Luz de carga baja (6) La luz roja que indica carga baja, parpadea cuando la batera se est agotando. Aun as es posible finalizar el afeitado.
Afeitado Presione el interruptor de encendido/apagado (4) para utilizar la afeitadora elctrica (imagen). Las lminas de afeitado flexibles se ajustan automticamente al contorno de su cara (imagen).
Recortadora de pelo largo (2) Para recortar patillas, bigote o barba, deslice hacia arriba la recortadora de pelo largo.
Interruptor de ajuste de precisin (slo para 380s) Para un uso preciso en zonas de difcil afeitado (p.ej. bajo la nariz) deslice el interruptor (3) hacia la derecha a la posicin . Descendern la recortadora central y una de las lminas.
Consejos para un afeitado perfecto Para obtener mejores resultados, Braun le recomienda que siga estos 3 sencillos pasos: 1. Afitese siempre antes de lavarse la cara. 2. Mantenga en todo momento la afeitadora elctrica en ngulos rectos
(90) con su piel. 3. Estrese la piel y afitese en sentido contrario a la direccin del creci-
miento de su barba.
Limpieza La limpieza regular asegura un mejor rendimiento del afeitado. Aclarar el cabezal de la afeitadora elctrica bajo agua corriente tras cada afeitado es una forma fcil y rpida de mantenerla limpia:
96277716_380-345-340s-4_S6-76.indd 24 15.04.13 08:13
25
Encienda la afeitadora elctrica (inalmbrica) y aclare el cabezal de la afeitadora elctrica bajo agua corriente caliente. Puede utilizar jabn lquido sin sustancias abrasivas. Aclare toda la espuma y deje la afeitadora elctrica en funcionamiento durante unos segundos ms.
A continuacin, apague la afeitadora elctrica, retire el dispositivo de Lminas y Cuchillas de la afeitadora elctrica (1) y djelo secar.
Si limpia regularmente con agua la afeitadora elctrica, aplique una vez a la semana una gota de aceite de mquina ligero en la recortadora de pelo largo (2) y en el dispositivo de Lminas y Cuchillas (1) (imagen).
Alternativamente, puede limpiar la afeitadora elctrica utilizando un cepillo: Apague la afeitadora elctrica. Retire el dispositivo de Lminas y Cuchillas
de la afeitadora elctrica y dle golpecitos sobre una superficie plana. Utilizando el cepillo, limpie la zona interior del cabezal de la afeitadora
elctrica. Sin embargo, no limpie el dispositivo de Lminas y Cuchillas con el cepillo ya que podra daarlo (imagen).
Mantenga su afeitadora en ptimo estado Luz de sustitucin para las piezas de afeitado / Reinicio Para asegurar un rendimiento de afeitado del 100%, sustituya el dispositivo de Lminas y Cuchillas de la afeitadora elctrica (1) cuando la luz de sustitucin de piezas de afeitado (7) aparezca (cada, aprox., 18 meses) o cuando est desgastado.
Dispositivo de Lminas y Cuchillas: 32S/32B
La luz de sustitucin le recordar durante los siguientes 7 afeitados que ha de sustituir el dispositivo de lminas y cuchillas. Luego, automticamente, la afeitadora elctrica reiniciar el mecanismo. Una vez reemplazada la Lmina y bloque de cuchillas (1), presionar el botn de encendido/apagado (4) durante al menos 5 segundos para reestablecer los valores del contador. Mientras hace esto, la luz de sustitucin parpadear y se apagar cuando el reinicio est completado. El reinicio manual puede hacerse en cualquier momento.
Conservacin de las bateras Para mantener la capacidad ptima de las bateras recargables, la afeitadora elctrica tiene que ser totalmente descargada (mediante afeitados) aproxi- madamente cada 6 meses. Luego, recrguela hasta su capacidad mxima.
96277716_380-345-340s-4_S6-76.indd 25 15.04.13 08:13
26
Aviso medioambiental Este producto contiene bateras recargables. Con objeto de proteger el medioambiente, una vez finalizada la vida til del producto, rogamos no lo elimine junto a la basura domstica. Puede depositarlo en un Centro de Servicios Braun o en los emplazamientos de recoleccin habilitados en su pas.
Sujeto a modificaciones sin previo aviso.
Vea las especificaciones elctricas impresas en el cable especial de conexin.
Garanta Braun concede a este producto 2 aos de garanta a partir de la fecha de compra.
Dentro del periodo de garanta, subsanaremos, sin cargo alguno, cualquier defecto del aparato imputable tanto a los materiales como a la fabricacin, ya sea reparando, sustituyendo piezas, o facilitando un aparato nuevo segn nuestro criterio.
La garanta no ampara averas por uso indebido, funcionamiento a distinto voltaje del indicado, conexin a un enchufe inadecuado, rotura, desgaste normal (p.ej. la lmina o bloque de cuchillas) por el uso que causen defectos o una disminucin en el valor o funcionamiento del producto.
La garanta perder su efecto en caso de ser efectuadas reparaciones por personas no autorizadas, o si no son utilizados recambios originales de Braun.
La garanta solamente tendr validez si la fecha de compra es confirmada mediante la factura o el albarn de compra correspondiente.
Esta garanta tiene validez en todos los pases donde este producto sea distribuido por Braun o por un distribuidor asignado por Braun.
En caso de reclamacin bajo esta garanta, dirjase al Servicio de Asistencia Tcnica de Braun ms cercano: www.service.braun.com.
Solo para Espaa Servicio al consumidor: Para localizar a su Servicio Braun ms cercano o en el caso de que tenga Vd. alguna duda referente al funcionamiento de este producto, le rogamos contacte con el telfono de este servicio 901 11 61 84.
96277716_380-345-340s-4_S6-76.indd 26 15.04.13 08:13
27
Os nossos produtos so concebidos para ir ao encontro dos mais altos padres de qualidade, funcionalidade e design. Esperamos que desfrute da sua nova mquina de barbear Braun.
Leia atenta e cuidadosamente estas instrues de utilizao, pois contm informaes de segurana. Guarde-as para consulta futura.
Avisos Este aparelho adequado para uso na banheira ou chuveiro. Quando o usar no chuveiro, recomen- damos que utilize espuma ou gel de barbear.
Por razes de segurana, o aparelho s poder ser utili- zado, nestas situaes, sem cabo. O seu sistema de barbear vem equipado com um cabo de alimentao especial, que tem um transformador de voltagem extra-baixa de segurana integrado. Para evitar risco de choque elctrico, no troque ou manipule nenhuma das partes que o compem. Utilize apenas o cabo de alimentao especial fornecido com o seu aparelho. No use a depiladora se a lmina ou o cabo se encontrarem danificados. Este aparelho pode ser utilizado por crianas com idade igual ou superior a 8 anos e por pessoas com capacidades fsicas, sensoriais ou mentais reduzidas, ou com falta de experincia e conhecimento, desde que sejam super- visionadas ou lhes tenham sido dadas instrues quanto utilizao segura do aparelho e se tiverem compreendido os perigos envolvidos. As crianas no devem brincar com o aparelho. S permitido s crianas com idade superior a 8 anos fazer a limpeza e a manuteno do aparelho quando supervisionadas.
Portugus
96277716_380-345-340s-4_S6-76.indd 27 15.04.13 08:13
28
Por motivos de higiene, no partilhe este aparelho com outras pessoas.
Garrafa de oleo Manter fora do alcance das crianas. No ingerir. No aplicar nos olhos. Quando o frasco estiver vazio, deite-o fora no local adequado para o efeito.
Descrio 1 Rede e bloco de lminas 2 Acessrio aparador de pelo longo 3 Boto de configurao de preciso (apenas para 380s) 4 Boto ligar/desligar 5 Luzes de Carregamento (verde) 6 Luz de bateria fraca (encarnada) 7 Luz de substituio da rede e bloco de lminas 8 Ficha de alimentao da mquina de barbear 9 Cabo de alimentao especial 10 Apoio de Carregamento (apenas para 380s) 11 Bolsa (apenas para 380s) 12 Acessrio de proteco (apenas para 345s/340s)
Carregamento A temperatura ambiente ideal para carregar a sua mquina de barbear de 5 C a 35 C. A bateria pode no carregar ou no carregar devidamente em temperaturas extremamente altas ou baixas. A temperatura ideal para se barbear de 15 C a 35 C. No exponha o aparelho a temperaturas superiores a 50 C por perodos prolongados. Usando o cabo de alimentao especial (9), ligue a mquina de barbear
ou o apoio de carregamento (10) a uma ficha elctrica com o motor desligado.
Quando carregar pela primeira vez ou quando o aparelho no foi utilizado durante alguns meses, por favor deixe o aparelho a carregar continua- mente durante 4 horas. As cargas seguintes demoraro apenas cerca de 1 hora.
Depois de a mquina de barbear estar completamente carregada, descar- regue a mquina atravs do uso normal. Depois recarregue-a para a sua capacidade mxima. As cargas seguintes demoraro cerca de 1 hora.
Uma carga completa permite a utilizao sem fios at 45 minutos de
96277716_380-345-340s-4_S6-76.indd 28 15.04.13 08:13
29
tempo de barbear dependendo do comprimento da sua barba. No entanto, a capacidade mxima de bateria s ser atingida aps vrios ciclos de carregamento/descarregamento.
Um carregamento rpido de 5 minutos suficiente para um barbear.
Luzes de carregamento (5) As luzes de carregamento verdes mostram o estado de carga das baterias (345s/340s: 1 luz de carregamento). A luz de carregamento verde pisca quando a mquina de barbear est a ser carregada ou est ligada. Quando a bateria est completamente carregada, todas as luzes de carregamento verdes (345s/340s: 1 luz de carregamento) brilham permanentemente, desde que a mquina esteja na ficha elctrica.
Luz de bateria fraca (6) A luz vermelha acende quando a bateria est com carga reduzida. Tem ainda tempo para acabar de se barbear.
Barbear Prima o boto ligar/desligar (4) para pr a mquina de barbear a funcionar (imagem). As lminas de barbear flexveis ajustam-se automaticamente a todos os contornos do seu rosto (imagem).
Acessrio aparador de pelo longo (2) Para aparar patilhas, bigode ou barba, deslize o acessrio aparador de pelo longo para cima.
Boto de configurao de preciso (apenas para 380s) Para um manuseamento preciso nas reas difceis de barbear (por exemplo, em baixo do nariz) deslize o boto (3) para a direita para posicionar o . O aparador central e uma lmina baixaro de posio.
Conselhos para um barbear perfeito a seco Para optimizar os resultados, a Braun recomenda que siga estes 3 passos simples: 1. Barbeie-se sempre antes de lavar o rosto. 2. Segure sempre a mquina de barbear em ngulos rectos (90) em
direco pele. 3. Estique a pele e barbeie-a no sentido contrrio ao crescimento do plo.
96277716_380-345-340s-4_S6-76.indd 29 15.04.13 08:13
30
Limpeza A limpeza regular assegura um melhor desempenho no barbear. Enxaguar a cabea de corte com gua corrente depois de cada utilizao uma forma fcil e rpida de a manter limpa: Ligue a mquina de barbear (sem o cabo de alimentao) e enxage a
cabea de corte em gua quente. Poder utilizar um sabonete lquido que no contenha substncias abrasivas. Enxage os restos de sabo e ponha a mquina de barbear a funcionar por mais alguns segundos.
Posteriormente, desligue a mquina de barbear, retire a rede e bloco de lminas (7) e deixe secar.
Se tem por hbito limpar a mquina de barbear com gua, aplique uma vez por semana uma gota de leo de mquina no cimo da rede e bloco de lminas.
A seguinte limpeza rpida outro mtodo alternativo de limpeza: Desligue a mquina de barbear. Retire a rede e bloco de laminas e bata
ligeiramente numa superfcie plana. Utilizando uma escova, limpe a rea interna da cabea de corte. No
entanto, no limpe a lmina da mquina de barbear nem o desbastador com uma escova pois isto danific-los-.
Mantenha a sua mquina de barbear em ptimo estado Luz de substituio da rede e bloco de lminas / Restaurar Para que a mquina de barbear mantenha um desempenho perfeito, substi- tua a rede e bloco de lminas (1) quando se acender a luz de substituio para a rede e bloco de lminas (7) (aps cerca de 18 meses) ou quando a rede ou o bloco de lminas estiverem gastos.
Rede e bloco de lminas: 32S/32B
A luz de substituio lembr-lo- durante as prximas 7 utilizaes que dever substituir a rede e bloco de lminas. Posteriormente, a mquina de barbear restaurar automaticamente o visor. Quando substituir a rede e bloco de lminas, pressione o boto ligar/desligar (4) pelo menos durante 5 segundos para restaurar o contador. Durante este procedimento, a luz de substituio piscar alternadamente at desligar quando estiver totalmente restaurado. possvel restaurar manualmente a qualquer momento.
96277716_380-345-340s-4_S6-76.indd 30 15.04.13 08:13
31
Preservar as baterias Para manter a melhor capacidade das baterias recarregveis, a mquina de barbear tem que ser descarregada por completo (ao barbear) a cada 6 meses aproximadamente. Em seguida, deve recarregar-se a mquina para a sua capacidade total.
Aviso ambiental Este produto contm baterias recarregveis. No interesse da proteco do ambiente, por favor no descarte este produto com o lixo domstico no fim da sua vida til. Pode deposit-lo num Centro de Assistncia Tcnica Braun ou nos pontos de recolha apropriados e disponibilizados no seu pas.
Sujeito a alteraes sem aviso prvio.
Ver especificaes elctricas no impresso relativo ao cabo de conexo especial.
Garantia Braun concede a este produto 2 anos de garantia a partir da data de compra.
Dentro do perodo de garantia qualquer defeito do aparelho, devido aos materiais ou ao seu fabrico, ser reparado, substituindo peas ou trocando por um aparelho novo
- Topics
- manualsbase, manuals,
- Collection
- manuals_braun; manuals; additional_collections
- Language
- English
- Item Size
- 13.1M
- Addeddate
- 2020-08-22 23:00:13
- Identifier
- manualsbase-id-665361
- Identifier-ark
- ark:/13960/t0009hx2g
- Ocr
- ABBYY FineReader 11.0 (Extended OCR)
- Page_number_confidence
- 94.12
- Ppi
- 600
- Scanner
- Internet Archive Python library 1.9.4
plus-circle Add Review
plus-circle Add Review
comment
Reviews
There are no reviews yet. Be the first one to
write a review.
57
Views
DOWNLOAD OPTIONS
download 1 file
ABBYY GZ download
Temporarily Unavailable
DAISY
For users with print-disabilities
Temporarily Unavailable
EPUB
download 1 file
FULL TEXT download
download 1 file
ITEM TILE download
download 1 file
PAGE NUMBERS JSON download
download 1 file
PDF download
download 1 file
SINGLE PAGE PROCESSED JP2 ZIP download
download 1 file
TORRENT download
download 12 Files
download 6 Original
SHOW ALL
IN COLLECTIONS
Manuals: Braun
The Manual Library
Additional Collections
Uploaded by
chris85
on