
Braun партнер программы
«Аэрофлот Бонус»!
Braun-russia стал партнером программы «Аэрофлот Бонус». Покупать в нашем интернет-магазине braun-russia.ru стало еще выгоднее!
Покупая любой товар на нашем сайте, Вы получаете мили в соответствии с правилами программы.
1 миля начисляется за каждые 60 рублей
Условия начисления миль:
- Мили начисляются на все товары, купленные в интернет-магазине braun-russia.ru, не включая стоимость доставки и premium service.
- Мили не начисляются на товары, при покупке которых был применен промокод или привилегии других программ лояльности.
- Начисление миль не производится за покупку подарочных сертификатов.
- Начисление миль не производится при покупке товаров юридическими лицами.
- При оформлении заказа необходимо указать номер карты участника программы «Аэрофлот Бонус».
- Мили начисляются в течение 45 дней после оплаты и доставки товара.
«Аэрофлот Бонус» – это программа лояльности авиакомпании Аэрофлот. Участие в программе позволяет участникам копить мили и использовать их на различные премии. Получить мили можно за перелеты, при совершении покупок по совместным картам банков-партнеров, за проживание в отелях, прокат автомобилей, при посещении кафе и ресторанов и при приобретении товаров партнеров программы, одним из которых являемся мы. Вы сможете использовать мили на авиабилеты, повышение класса обслуживания, а также услуги и товары многочисленных партнеров.
Если Вы еще не являетесь участником программы «Аэрофлот Бонус» вступить в программу сейчас!
Правила программы «Аэрофлот Бонус».
Гаранция
Нашите продукти са с гаранция 2 години,
считано от датата на покупката. В рамките на
гаранционния срок безплатно се отстраняват
дефектите в материалите и производството
чрез поправка, смяна на части или целия
уред, по преценка на сервизния център.
Тази гаранция се признава във всички страни,
където Braun и неговият изключителен
дистрибутор продават този уред и няма
ограничение за внос или официална
разпоредба не забранява да се извърши
предвиденото гаранционно обслужване.
Гаранцията не покрива: повреди от неправилна
употреба (работа при неподходящо
напрежение, включване в неподходящ източник
на електрически ток, счупване); износване
и незначителни дефекти, които не пречат
на нормалната работа на уреда. Гаранцията
не се признава при поправка на уреда от
неоторизирани лица или ако не са използвани
оригинални резервни части на Braun.
Гаранцията е валидна при правилно попълнени:
дата на покупката, печат и подпис в
гаранционната карта.
За всички рекламации, възникнали в
гаранционния срок, изпратете уреда както и
гаранционната му карта в най-близкия сервиз
на Braun. За справки 0800 11 003 – национален
телефон на БГ сервиз без увеличение на
телефонната услуга или www.bgs.bg.
Русский
Благодарим вас за выбор расчески Braun Satin
Hair с функцией ионизации IONTEC. В отличие
от обычных расчесок расческа Braun Satin Hair
Brush оснащена уникальной системой
ионизации, генерирующей поток ионов
непосредственно на ваши волосы. Функция
ионизации IONTEC мгновенно восстанавливает
блеск и сияние волос и эффективно укрощает
непослушные волосы, делая их гладкими и
мягкими на ощупь. Уникальная созданная
форма зубцов расчески Braun Satin Hair Brush
позволяет нежно расчесывать волосы, не
повреждая кутикулу*.
В результате уже после первого прикосновения
расчески Braun Satin Hair волосы выглядят
значительно более блестящими и более
здоровыми**.
Функция ионизации IONTEC эффективнее всего
действует на сухих волосах.
Не используйте расческу Satin Hair в качестве
щетки для укладки вместе с феном.
Перед использованием прибора внимательно
ознакомьтесь с инструкцией по применению.
Предупреждение
•  e?E·O? IA O?A‰I‡AI‡?AI ‰I? EOOOI?AO‚‡IE?
IE?‡IE (‚II??‡? ‰AUAE) O OOIEEAII?IE
UEAE?AOIEIE, ?U‚OU‚AII?IE EIE UIOU‚AI-
I?IE OOOOO·IOOU?IE EIE O?E OUOUUOU‚EE U IE?
OO?U‡ EIE AI‡IEE, AOIE OIE IA I‡?O‰?UO? OO‰
IOIU?OIAI EIE IA O?OEIOU?UIUE?O‚‡I? O·
EOOOI?AO‚‡IEE O?E·O?‡ IE?OI, OU‚AUOU‚AI-
I?I A‡ E? ·AAOO‡OIOOU?. NAUE ‰OIEI?
I‡?O‰EUO? OO‰ IOIU?OIAI ‰I? IA‰OOU?AIE?
E„?? O O?E·O?OI.
•  A‡U‡?AEIE IO„UU O?OUAI‡U?, AOIE OIE
?‡A??EAI? EIE IA EOOOI?AU?UO? ‰IEUAI?IOA
‚?AI?. NI? UO„O, ?UO·? A‡?EUEU? OA·? E
O?E·O?, OOE‡IUEOU‡, EA‚IAI‡EUA ·‡U‡?AEIE
‚?AI? OU ‚?AIAIE E EA·A„‡EUA IOIU‡IU‡
O IOEAE O?E EA‚IA?AIEE O?OUAI‡??E?
·‡U‡?AAI.
Описание
1 Источник ионов
2  Кнопка для снятия подушки с зубцами
3  Подушка с зубцами
4  Подсветка функции IONTEC
5 Переключатель вкл./выкл.
6  Индикатор заряда батареек
7  Отделение для батареек
Батарейки
Прибор работает от двух щелочных батареек
1,5 В (тип AAA/LR03/AM4), например Duracell).
Снимите крышку отделения для батареек (7),
установите батарейки соблюдая полярность
(+/–), и закройте крышку.
Заменять батарейки на новые необходимо
тогда, когда загорается индикатор заряда
батареек (6).
Использование
Передвиньте переключатель (5) для включения
функции ионизации IONTEC. В процессе работы
загорается подсветка функции IONTEC (4),
и ионы выпускаются из источника ионов (1).
i·A‰EUAO?, ?UO ‚? IA A‡I??‚‡AUA EOUO?IEI
EOIO‚ O‡I??‡IE EIE I‡‰OI??, O?AO?UOU‚U?
O‚O·O‰IOIU OOUOIU EOIO‚.
После использования всегда переводите
переключатель (5) в крайнюю нижнюю
позицию, что позволяет отключить функцию
ионизации IONTEC и защитить источник ионов
(1) от повреждений (например, в дамской
сумочке).
После 5 минут работы функция ионизации
IONTEC отключается автоматически. В этом
случае также переведите переключатель (5)
в крайнюю нижнюю позицию.
Чистка
Вы можете чистить расческу с помощью мягкой
ткани. Для более тщательной очистки можно
снять подушечку с зубцами (3). Нажмите кнопку
19
04.11.10   13:12
99734871_SB1_BR710.indd   19
99734871_SB1_BR710.indd   19                04.11.10   13:12
Satin Hair 7
Stapled booklet, 148 x 210 mm, 74 pages (incl. 6 pages cover), 1/1c = black
91163485/IX-16
Professional
HD 785
785
HD 780
78
Type 3532
pe 3532
www.braun.com
www.braun.
Braun Infolines
Deutsch 4
English 7
Français 9
Español 12
Português 15
Italiano 18
Nederlands 21
Dansk 24
Norsk 26
Svenska 28
Suomi 30
Polski 32
âesk˘ 35
Slovensk˘ 37
Hrvatski 40
Slovenski 43
Magyar 46
Türkçe 49
Română (RO/MD) 53
∂ППЛУИО¿ 56
Å˙΄‡ÒÍË 59
PЫТТНЛИ 62
ì͇ªÌҸ͇ 65
70
Braun GmbH
Frankfurter Straße 145
61476 Kronberg/Germany
www.braun.com
www.service.braun.com
DE / AT 00 800 27 28 64 63
00 800 BRAUNINFOLINE
CH 08 44 — 88 40 10
UK 0800 783 7010
IE 1 800 509 448
FR 0 800 944 802
(service & appel gratuits)
BE 0 800 14 592
ES 900 814 208
PT 808 20 00 33
IT 800 440 017
NL 0 800-445 53 88
DK 70 15 00 13
NO 22 63 00 93
SE 020 — 21 33 21
FI 020 377 877
PL 801 127 286
801 1 BRAUN
CZ 221 804 335
SK 02/5710 1135
HR 091 66 01 777
SI 080 2822
HU (06-1) 451-1256
TR 0 800 261 63 65
RO 021.224.30.35
GR 210-9478700
RU 8 800 200 20 20
UA 0 800 505 000
HK 2926 2300
(Jebsen Consumer Service Centre)
ZA 0860 112 188
(Sharecall charged at local rates)
DE/UK/FR/ES/PT/IT/NL/DK/NO/SE/FI/PL/CZ/SK/
HR/SL/HU/TR/RO/MD/GR/BG/RU/UA/Arab
Satin Hair 7
Professional
1
7
8
6
2a
5
2b
4
3
7
r
ai
H
n
Sati
A
7
r
Hai
n
ti
a
S
o
r
P
so
n
e
S
B
C
o
r
P
so
n
e
S
7
r
o
r
P
Hai
n
Sati
o
s
Sen
D
E
Deutsch
Unsere Produkte wurden entwickelt, um höchste
Ansprüche an Qualität, Funktionalität und Design zu
erfüllen. Wir wünschen Ihnen viel Freude mit Ihrem
neuen Braun Gerät.
Dieses Gerät ist nur für den Hausgebrauch bestimmt,
auch wenn es professionelle Leistung bietet.
Bitte lesen Sie die Gebrauchsanweisung vor Inbetriebnahme sorgfältig durch und bewahren Sie
sie auf.
Wichtig
•
Schließen Sie das Gerät nur an
Wechselspannung (~) an und prüfen
Sie, ob Ihre Netzspannung mit der
Spannungsangabe auf dem Gerät
übereinstimmt.
•
Dieses Gerät darf nicht in der
Nähe von mit Wasser gefüllten
Behältern (wie z.B. Badewanne,
Dusche, Waschbecken) verwendet
werden. Achten Sie darauf, dass das
Gerät nicht nass wird und Sie das Gerät
nicht mit nassen Händen anfassen.
•
Wenn der Haartrockner in einem
Badezimmer verwendet wird, ist nach
Gebrauch der Stecker zu ziehen. Auch
wenn der Haartrockner ausgeschaltet
ist, stellt die Nähe von Wasser eine
Gefahr dar.
•
Als zusätzlicher Schutz wird die Installation einer Fehlerstrom-Schutzeinrichtung (RCD) mit einem Bemessungsauslösestrom von nicht mehr als
30 mA im Badezimmer-Stromkreis
empfohlen. Fragen Sie Ihren Installateur um Rat.
•
Achten Sie darauf, dass die Luftansaug- bzw. Auslassöffnung während
des Gebrauchs nicht verdeckt oder
blockiert sind.
•
Der Haartrockner ist mit einem Überhitzungsschutz ausgestattet, der
das Gerät im Überhitzungsfall automatisch ausschaltet. Der Ventilator
läuft weiter. Nach einer Abkühlzeit
von wenigen Minuten schaltet sich
das Gerät automatisch wieder ein.
4
Achten Sie darauf, dass die Luftansaug- bzw. Auslassöffnung frei
sind.
•
Richten Sie den Luftstrom nicht in
Richtung Augen, Hände oder andere
Bereiche, die empfindlich auf Hitze
reagieren können.
•
Wickeln Sie das Netzkabel nicht um
das Gerät.
•
Überprüfen Sie das Netzkabel regelmäßig auf Schadstellen. Sollten Sie
Zweifel am einwandfreien Zustand
haben, lassen Sie das Gerät beim
Braun Kundendienst überprüfen bzw.
reparieren. Ein beschädigtes Netzkabel kann nur durch eine vom Hersteller benannte Reparaturwerkstatt
ersetzt werden, um Gefährdungen zu
vermeiden.
•
Dieses Gerät kann von Kindern ab
8 Jahren oder von Personen mit eingeschränkten physischen, sensorischen oder geistigen Fähigkeiten
oder Mangel an Erfahrung und/oder
Wissen benutzt werden, wenn sie
beaufsichtigt sind oder eine Unterweisung zur sicheren Anwendung
des Geräts erhalten haben und die
damit verbundenen Gefahren verstehen. Kinder dürfen nicht mit dem
Gerät spielen. Reinigung und Wartung dürfen nicht durch Kinder
durchgeführt werden, es sei denn,
sie sind älter als 8 Jahre und beaufsichtigt.
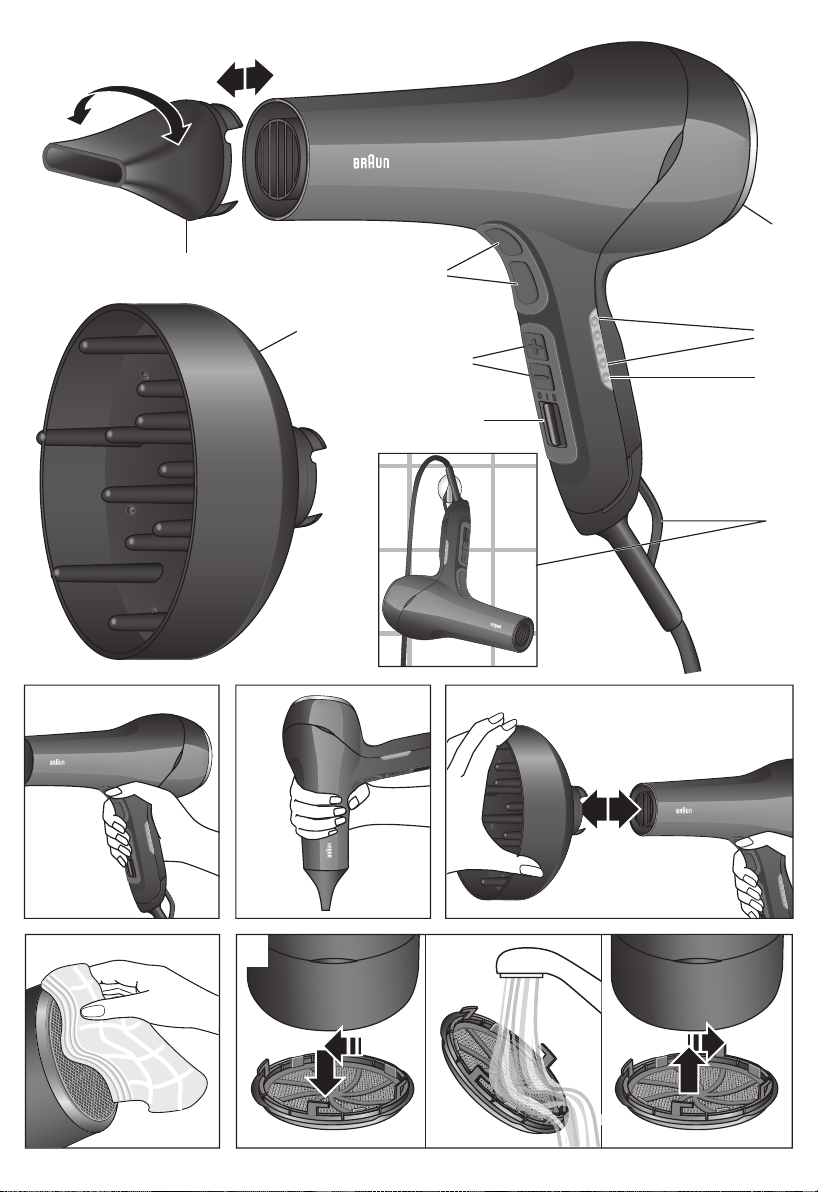
Beschreibung
1 Lufteinlassgitter mit Schutzfilter
2 Temperaturanzeige
a) rote LEDs für 4 Heizstufen
b) blaue LED für kalte Luft
3 Aufhängeöse
4 Ein-/Ausschalter
5 Temperaturschalter (+/–)
6 Kaltstufe-Tasten
7 Professionelle Styling-Düse
8 Professioneller Diffusor (nur bei Modell HD 785)
Bedienung
Dieser Haartrockner bietet zwei Griffpositionen:
Halten Sie ihn am Griff (A), um bequem alle Tasten
zu erreichen.
Sie können ihn auch direkt am Ausblasrohr (B)
halten, das durch die spezielle Luftkühlung kühl
bleibt.
Einschalten
Am Schalter (4) schalten Sie das Gerät ein und
wählen den Luftstrom:
O = aus
I = niedriger Luftstrom
II = starker Luftstrom
Temperaturanzeige (2)
Rote LEDs (2a) zeigen die Heizstufen von 1 (niedrig)
bis 4 (hoch).
Die blaue LED (2b) leuchtet auf, wenn Sie eine der
Kaltstufen-Tasten (6) drücken.
Einstellen der Temperatur
Beim Einschalten des Geräts wird die zuletzt
gewählte Temperatur eingestellt.
Drücken Sie die Temperatur-Tasten (5), um die
Temperatur zu verändern:
Mit der + Taste erhöhen Sie die Temperatur,
mit der – Taste verringern Sie sie.
Wählen Sie Ihre bevorzugte Temperatureinstellung
je nach persönlichem Wärmeempfinden auf der
Kopfhaut, Haartyp und Feuchtigkeitsgrad. Ein
integrierter Temperatursensor sorgt für maximale
Wärmekontrolle.
Kaltstufe
Die Kaltstufe-Tasten (6) ermöglichen ein sofortiges
Umschalten auf Kaltluftstrom, um einen Style zu
fixieren. Beide Tasten bieten die gleiche Funktion
und befinden sich in bequemer Reichweite, egal
welche Griffposition (A oder B) Sie bevorzugen.
Unabhängig von der Ausgangstemperatur erhalten
Sie sofort einen kühlen Luftstrom, und die blaue
LED leuchtet auf.
Wenn Sie wieder mit der zuvor eingestellten Temperatur (durch die roten LEDs angezeigt) weiter arbeiten wollen, drücken Sie erneut eine der KaltstufenTasten.
Ionen-Technologie (nur bei Modell HD 785)
Der Luftstrom wird mit Millionen von aktiven Ionen
angereichert, die jedes einzelne Haar umschließen
und dabei Frizz und statische Aufladung reduzieren.
Das Haar lässt sich leichter stylen und erhält dabei
seine Feuchtigkeit und natürlichen Glanz. Um den
maximalen Fluss von Ionen zu gewährleisten, verwenden Sie keinen der Aufsätze und beenden Sie
das Stylen ohne Aufsatz.
Anwendung der Stylingdüse
Um Ihr Haar zu stylen, drücken Sie die Stylingdüse (7) fest auf die Vorderseite des Geräts, bis sie
einrastet. Mit der Stylingdüse können Sie den
Luftstrom gezielt auf einzelne Haarpartien richten.
Bitte beachten Sie, dass die Stylingdüse im Gegensatz zum Ausblasrohr beim Betrieb heiß wird.
Anwendung des Diffusors (nur bei Modell HD 785)
Um Volumen oder Naturwellen zu stylen, bringen
Sie den Diffusor (8) an. Drücken Sie den Diffusor
fest auf den Luftauslass, bis er einrastet (C).
Kurze bis mittellange Haare:
Um Volumen zu erzeugen, fahren Sie sanft mit den
Diffusorfingern in kleinen kreisenden Bewegungen
über die Kopfhaut.
Lange Haare:
Trocknen Sie zuerst die Haarspitzen, indem Sie
sie locker auf die Diffusorplatte legen. Dann heben
Sie das Haar mit dem Diffusor bis an die Kopfhaut
heran und halten den Diffusor in dieser Position.
Zum Schluss fahren Sie mit den Diffusorfingern in
einer sanften, kreisförmigen Bewegung über die
Kopfhaut, um Volumen zu erzeugen.
Reinigung
Vor dem Reinigen den Netzstecker ziehen und das
Gerät abkühlen lassen.
Reinigen Sie das Gehäuse nur mit einem feuchten
Tuch. Unter keinen Umständen aggressive oder
scheuernde Reinigungsmittel verwenden.
Verwenden Sie niemals spitze Gegenstände
(z.B. die Spitze eines Kamms), um Staub oder
Fremdkörper aus dem Gerät zu entfernen. Es
besteht Stromschlaggefahr.
Reinigen Sie die Außenseite des Schutzfilters (1)
regelmäßig mit einem feuchten Tuch (D). Für eine
gründliche Reinigung können Sie den Schutzfilter
nach links drehen und abziehen (E). Reinigen Sie
den Schutzfilter unter fließendem Wasser und
lassen Sie ihn dann vollständig trocknen. Setzen Sie
den Schutzfilter wieder ein und verriegeln Sie ihn
durch Drehen nach rechts.
Aufbewahrung
Mit der Aufhängeöse (3) lässt sich der Haartrockner
praktisch und sicher aufbewahren.
Entsorgung
Dieses Gerät enthält wiederverwertbare
Elektrobauteile. Aus Umweltschutzgründen
darf das Gerät nicht über den Hausmüll
entsorgt werden. Bringen Sie es zu einer
kommunalen Sammelstelle.
Änderungen vorbehalten.
5

Garantie
Als Hersteller übernehmen wir für dieses Gerät –
nach Wahl des Käufers zusätzlich zu den gesetzlichen Gewährleistungsansprüchen gegen den
Verkäufer – eine Garantie von 2 Jahren ab Kaufdatum. Innerhalb dieser Garantiezeit beseitigen wir
nach unserer Wahl durch Reparatur oder Austausch
des Gerätes unentgeltlich alle Mängel, die auf
Material- oder Herstellungsfehlern beruhen.
Die Garantie kann in allen Ländern in Anspruch
genommen werden, in denen dieses Braun Gerät
von uns autorisiert verkauft wird.
Von der Garantie sind ausgenommen: Schäden
durch unsachgemäßen Gebrauch, normaler
Verschleiß und Verbrauch sowie Mängel, die den
Wert oder die Gebrauchstauglichkeit des Gerätes
nur unerheblich beeinflussen. Bei Eingriffen durch
nicht von uns autorisierte Braun Kundendienstpartner sowie bei Verwendung anderer als Original
Braun Ersatzteile erlischt die Garantie.
Im Garantiefall senden Sie das Gerät mit Kaufbeleg bitte an einen autorisierten Braun Kundendienstpartner. Die Anschrift finden Sie unter
www.service.braun.com oder können Sie kostenlos
unter 00800/27 28 64 63 erfragen.
6
English
Our products are engineered to meet the highest
standards of quality, functionality and design.
We hope you thoroughly enjoy your new Braun
appliance.
This appliance is designed for domestic use only,
although it offers professional performance.
Before use, carefully read the use instructions and
keep them for future reference.
Important
•
Plug your hairdryer into an alternating
current (~) outlet only and be sure that
your household voltage corresponds
to the voltage marked on the hairdryer.
•
This appliance must never be
used near water (e.g. a filled
wash basin, bathtub or shower). Do
not allow the appliance get wet, nor
operate it with wet hands.
•
When using the hairdryer in a bathroom, always unplug it after use and
before cleaning. Even a switched-off
hairdryer presents a hazard if not
unplugged.
•
For additional protection, it is advisable
to install a residual current device
(RCD) with a rated residual operating
current not exceeding 30 mA in the
electrical circuit of your bathroom.
Ask your installer for advice.
•
Care should be taken not to block the
inlet and outlet grille when the hairdryer is switched on.
•
The hair dryer is equipped with an
automatic overheating protection
system which switches off the heater
in the event of overheating. The fan
continues to run. After a short coolingoff period, the heater switches on
again. Make sure that the air inlet and
outlet openings are completely free.
•
Do not direct the air flow towards eyes,
hands or other areas sensitive to heat.
•
Do not wind the mains cord around the
appliance.
•
Regularly check the mains cord for
wear or damage. If you have any
doubt about its condition, take the
appliance to your nearest Braun
Service Centre for checking/repair.
The mains cord may only be replaced
by an authorised Braun Service Centre.
Unqualified repair work can lead to
extreme hazards for the user.
•
This appliance can be used by children
aged from 8 years and above and persons with reduced physical, sensory
or mental capabilities or lack of experience and knowledge if they have
been given supervision or instruction
concerning the safe use of the appliance and understand the hazards
involved. Children should not play with
the appliance. Cleaning and user
maintenance should not be made by
children unless they are older than
8 years and supervised.
Description
1 Air inlet grille with protective filter
2 Temperature display
a) red LEDs for 4 heat settings
b) blue LED for cold air
3 Hanging loop
4 On/off switch
5 Temperature buttons (+ / –)
6 Cold buttons
7 Professional styling nozzle
8 Professional diffusor (only with model HD 785)
Use
This hair dryer offers two grip positions:
Hold it by the handle (A) to comfortably reach all
buttons.
You may also hold it by the barrel (B). Thanks to the
special air cooling system the barrel remains cool.
Switching on
Use the switch (4) to switch on the appliance and
select the air flow:
O = off
I = low air flow
II = high air flow
Temperature display (2)
Red LEDs (2a) display heat settings in a range from
1 (low) to 4 (high).
7
A blue LED (2b) comes on when you press one of
the cold buttons (6).
Setting the temperature
When switching on the appliance, the last heat
setting selection is set.
Use the temperature buttons (5) to change the
temperature:
Push the + button to increase the temperature
setting.
Push the – button to reduce the temperature
setting.
Depending on your personal heat sensitivity, type
of hair and moisture level, you can select your
preferred temperature setting. An integrated
thermo sensor ensures maximum heat control.
Cleaning
Before cleaning, unplug the appliance and let it cool
down.
For cleaning the housing, only use a damp cloth.
Under no circumstances, use aggressive or abrasive
cleaners. Never use pointed objects (e.g. the tail
of a comb) to remove dust or foreign bodies from
inside the appliance. There is a risk of electric shock.
Regularly clean the outside of the protective filter
(1) with a damp cloth (D).
For a thorough cleaning, you may twist the protective filter to the left and pull it off (E). Clean the
protective filter under running water and allow it to
dry completely. Replace the protective filter and
lock it by turning to the right.
Cold shot
The cold buttons (6) permit instantly switching to
cold air flow in order to fix a style. Both buttons offer
the same function. Depending on your preferred
way to hold the appliance (A or B) you may press
the cold button that is within comfortable reach.
Regardless of the initial temperature you will instantly
get a cold air flow and the blue LED comes on.
Press one of the cold buttons again to continue
working at the previously set temperature as
displayed by the red LEDs.
Ion technology (only with model HD 785)
The air stream is enriched with millions of active
ions that hug every single hair, reduce frizz and
static charge. The hair can be styled more easily,
restores its moisture level and natural shine.
To ensure maximum flow of ions, use the hair dryer
without attachments or at least, finish styling
without attachments.
Using the styling nozzle
To style hair, push the styling nozzle (7) onto the
front of the appliance and press it firmly until it
snaps into place. The styling nozzle enables you to
direct the air flow towards individual sections of the
hair. Please note that unlike the barrel, the styling
nozzle is heated up by the hot air flow.
Using the diffusor (only with model HD 785)
To create root lift, volume or natural waves, attach
the diffusor (8). Push it firmly onto the air outlet until
it snaps into place (C).
Short to mid-length hair:
To add volume and root lift, gently guide the diffusor
fingers with small circular motions over your scalp.
Long hair:
First dry hair ends by placing them onto the finger
plate. Then carefully lift the hair with the diffusor to
your scalp and hold. Finish off the roots with a gentle
circular motion of the diffusor fingers on your scalp
to add some lift.
8
Storage
The hanging loop (3) provides a practical and safe
means of storing your hair dryer.
Disposal
The product contains recyclable electronic
waste. To protect the environment, do not
dispose of it in the household waste, but take
it to appropriate local collection points.
Subject to change without notice.
Guarantee
We grant a 2 year guarantee on the product
commencing on the date of purchase. Within the
guarantee period we will eliminate any defects in
the appliance resulting from faults in materials or
workmanship, free of charge either by repairing or
replacing the complete appliance at our discretion.
This guarantee extends to every country where this
appliance is supplied by Braun or its appointed
distributor.
This guarantee does not cover: damage due to
improper use, normal wear or use as well as defects
that have a negligible effect on the value or
operation of the appliance. The guarantee becomes
void if repairs are undertaken by unauthorised
persons and if original Braun parts are not used.
To obtain service within the guarantee period, hand
in or send the complete appliance with your sales
receipt to an authorised Braun Customer Service
Centre (address information available online at
www.service.braun.com).
For UK only:
This guarantee in no way affects your rights under
statutory law.

Français
Nos produits sont conçus pour satisfaire aux
standards de qualité, de fonctionnalité et de design
les plus élevés. Nous espérons que votre nouvel
appareil Braun vous apportera entière satisfaction.
Malgré ses performances professionnelles, cet
appareil est conçu pour un usage domestique
uniquement.
Merci de lire soigneusement le mode d’emploi
avant d’utiliser l’appareil et de le conserver pour
pouvoir le consulter ultérieurement.
Important
•
Branchez uniquement votre sèchecheveux sur une prise de courant
alternatif (~) et assurez vous que la
tension de votre maison corresponde
bien à celle indiquée sur votre sèchecheveux.
•
Cet appareil ne doit jamais être
utilisé à proximité de l’eau (par
ex. au dessus d’un lavabo ou d’une
baignoire remplis ou dans la douche).
Veillez à ce que l’appareil ne soit
jamais mouillé et ne l’utilisez jamais
avec les mains humides.
•
Lorsque vous utilisez le sèche-cheveux dans une salle de bain, débranchez-le toujours après l’avoir utilisé
et avant de le nettoyer. Même arrêté,
un sèche-cheveux branché présente
toujours un risque quand il est à proximité d’eau.
•
Pour une protection supplémentaire,
nous vous conseillons de faire installer
un disjoncteur différentiel n’excédant
pas 30 mA de courant de fuite maximum admissible dans le circuit électrique de votre salle de bain. Demandez conseil à votre installateur.
•
Veillez à ne pas obstruer les grilles
d’arrivée et de sortie d’air lorsque le
sèche-cheveux fonctionne.
•
Le sèche-cheveux est équipé d’une
protection contre la surchauffe qui
arrête automatiquement le système
de chauffage en cas de surchauffe.
Le ventilateur continue à tourner.
Après une courte période de refroidissement, le système de chauffage
redémarre. Veillez à ce que les ouvertures d’entrée et de sortie d’air soient
complètement dégagées.
•
Ne dirigez pas le flux d’air en direction des yeux, des mains ou d’autres
parties du corps sensibles à la chaleur.
•
N’enroulez pas le cordon d’alimentation autour de l’appareil.
•
Vérifiez régulièrement que le cordon
d’alimentation n’est ni usé, ni endommagé. Si vous avez un doute quelconque sur l’état de l’appareil, faitesle vérifier/réparer par un Centre
Service agréé Braun. Le cordon
d’alimentation ne peut être remplacé
que par un Centre Service agréé
Braun. Des travaux de réparations
effectués par des personnes non
qualifiées peuvent entraîner des
risques extrêmes pour l’utilisateur.
•
Cet appareil peut être utilisé par des
enfants de 8 ans et plus et par des
personnes dont les capacités physiques, sensorielles ou mentales sont
réduites, ou des personnes dénuées
d’expérience ou de connaissance, si
elles ont pu bénéficier, par l’intermédiaire d’une personne responsable
de leur sécurité, d’une surveillance
ou d’instructions préalables concernant l’utilisation de l’appareil en toute
sécurité et les dangers encourus.
Les enfants ne doivent pas jouer avec
l’appareil. Le nettoyage et l’entretien
ne doivent pas être faits par des
enfants, à moins qu’ils ne soient âgés
de plus de 8 ans et qu’ils ne soient
sous surveillance.
9
Descriptif
1 Grille d’arrivée d’air avec filtre de protection
2 Écran de contrôle de la température
a) LED rouges pour 4 réglages de la température
b) LED bleue pour l’air froid
3 Anneau de suspension
4 Bouton « marche/arrêt »
5 Boutons de réglage de la température (+ / –)
6 Boutons d’air froid
7 Embout de mise en forme professionnel
8 Diffuseur professionnel (uniquement avec le
modèle HD 785)
Utilisation
Ce sèche-cheveux peut être tenu de deux façons
différentes :
Tenez-le par la poignée (A) pour atteindre facilement tous les boutons.
Vous pouvez aussi le tenir par le cylindre (B). Grâce
au système spécial de refroidissement de l’air, le
cylindre reste froid.
Mise en marche
Mettez l’appareil en marche à l’aide du bouton
« marche/arrêt » (4) puis sélectionnez la puissance
du flux d’air :
O = arrêt
I = flux d’air faible
II = flux d’air fort
Écran de contrôle de la température (2)
Les LED rouges (2a) indiquent des réglages de
température allant de 1 (bas) à 4 (élevé).
Une LED bleue (2b) s’allume lorsque vous pressez
l’un des boutons d’air froid (6).
Réglage de la température
Lorsque vous allumez l’appareil, la dernière
température sélectionnée est réglée.
Utilisez les boutons de réglage de la température (5)
pour la modifier :
Appuyez sur le bouton + pour augmenter la température.
Appuyez sur le bouton – pour diminuer la température.
Choisissez le réglage de température en fonction
de votre sensibilité à la chaleur, de la nature de vos
cheveux et de leur taux d’hydratation. Un capteur
de température intégré assure une régulation optimale de la chaleur.
Air froid
Les boutons d’air froid (6) permettent de libérer
instantanément un flux d’air pour fixer votre
coiffure. Les deux boutons ont la même fonction.
Selon la façon dont vous préférez tenir l’appareil
(A ou B), utilisez le bouton d’air froid auquel vous
pouvez accéder le plus facilement.
10
Indépendamment de la température initiale, vous
obtiendrez instantanément un flux d’air froid et la
LED bleue s’allumera.
Pressez une deuxième fois le bouton d’air froid pour
revenir à la température réglée précédemment et
indiquée par les LED rouges.
Technologie ionique (uniquement sur le
modèle HD 785)
Le flux d’air contient des millions d’ions actifs qui
enveloppent chacun de vos cheveux pour réduire
les frisottis et la charge électrostatique. Ils vous
permettent de modeler plus facilement votre chevelure tout en restaurant son taux d’hydratation et
sa brillance naturelle. Afin d’assurer un flux d’ions
maximal, utilisez le sèche-cheveux sans embout ou
finissez au moins la mise en forme sans embout.
Utilisation de l’embout de mise en forme
Pour modeler votre chevelure, placez l’embout
de mise en forme (7) sur le nez de l’appareil et
appuyez jusqu’à ce qu’il se clipse. L’embout de
mise en forme vous permet de diriger le flux d’air de
manière ciblée sur des mèches précises. Attention,
contrairement au cylindre, l’embout de mise en
forme est chauffé par le flux d’air chaud.
Utilisation du diffuseur (uniquement avec le
modèle HD 785)
Pour donner du volume au niveau des racines ou de
l’ensemble de la chevelure, ou créer des ondulations naturelles, attachez le diffuseur (8). Placez-le
sur la sortie d’air et appuyez fermement dessus
jusqu’à ce qu’il se clipse (C).
Cheveux courts et mi-longs :
Afin d’ajouter du volume et ceci dès les racines,
guidez doucement les doigts du diffuseur en
effectuant de petits mouvements circulaires sur
votre cuir chevelu.
Cheveux longs :
Séchez tout d’abord les longueurs de vos cheveux
en les plaçant sur l’embout muni de doigts. Puis
soulevez doucement les cheveux avec le diffuseur
tout en les rapprochant de votre cuir chevelu et
maintenir. Finissez par les racines en effectuant des
mouvements circulaires avec les doigts du diffuseur
sur votre cuir chevelu pour ajouter du volume.
Nettoyage
Débranchez et laissez refroidir l’appareil avant de le
nettoyer.
N’utilisez qu’un chiffon humide pour nettoyer le
boîtier. N’utilisez jamais de nettoyants agressifs ou
abrasifs. N’utilisez jamais d’outils pointus (par ex.
l’extrémité d’un peigne) pour retirer de la poussière
ou des corps étrangers de l’intérieur de l’appareil.
Il existe un risque d’électrocution.
Nettoyez régulièrement l’extérieur du filtre de
protection (1) à l’aide d’un chiffon humide (D).
Pour un nettoyage plus approfondi, vous pouvez
tourner légèrement le filtre de protection vers la
gauche et le retirer (E). Nettoyez le filtre de protection sous le robinet d’eau puis laissez-le sécher
complètement. Remettez le filtre de protection en
place et enclenchez-le en le tournant vers la droite.
Rangement
L’anneau de suspension (3) est un moyen pratique
et sûr pour ranger votre sèche-cheveux.
Recyclage
L’appareil contient des déchets électroniques
recyclables. Pour préserver l’environnement,
ne le jetez pas avec les déchets ménagers,
déposez-le dans des sites de recuperation
appropriés conformément aux réglementations
locales ou nationales en vigueur.
Sujet à toute modification sans préavis.
– service & appel gratuits) pour connaître le Centre
Service Agréé Braun le plus proche de chez vous.
Clause spéciale pour la France
Outre la garantie contractuelle exposée ci-dessus,
nos clients bénéficient de la garantie légale des
vices cachés prévue aux articles 1641 et suivants
du Code civil.
Garantie
Nous accordons une garantie de 2 ans sur ce
produit, à partir de la date d’achat.
Pendant la durée de la garantie, Braun prendra
gratuitement à sa charge la réparation des vices de
fabrication ou de matière en se réservant le droit de
décider si certaines pièces doivent être réparées ou
si l’appareil lui-même doit être échangé.
Cette garantie s’étend à tous les pays où cet
appareil est commercialisé par Braun ou son
distributeur exclusif.
Cette garantie ne couvre pas : les dommages
occasionnés par une utilisation inadéquate et
l’usure normale. Cette garantie devient caduque
si des réparations ont été effectuées par des
personnes non agréées par Braun et si des pièces
de rechange ne provenant pas de Braun ont été
utilisées.
Pour toute réclamation intervenant pendant la
période de garantie, retournez ou rapportez
l’appareil ainsi que l’attestation de garantie à votre
revendeur ou à un Centre Service Agréé Braun.
Veuillez vous référer à www.service.braun.com ou
appeler le 0 800 944 802 (service consommateurs
11
Español
Nuestros productos están diseñados para satisfacer los más altos estándares de calidad,
funcionalidad y diseño. Esperamos que disfrute
de su nuevo electrodoméstico Braun.
Este aparato está diseñado solo para el uso doméstico, a pesar de que ofrece un rendimiento profesional.
Antes de su uso, lea atentamente las instrucciones
y consérvelas para futuras consultas.
Importante
•
Enchufe el secador a una toma de
corriente alterna (~) y asegúrese de
que el voltaje de su hogar corresponda con el indicado en el aparato.
•
Este aparato no debe utilizarse
cerca del agua (p. ej. un lavabo
lleno de agua, la bañera o la ducha).
Evite que el aparato se moje y no lo
utilice con las manos mojadas.
•
Cuando utilice el secador de pelo en
el baño, desenchúfelo siempre después de usarlo y antes de limpiarlo.
Incluso apagado, el secador representa un peligro si no se desenchufa.
•
Para una mayor protección, se recomienda instalar un interruptor diferencial (RCD), con una corriente de fuga
máxima de 30mA, en el circuito eléctrico de su cuarto de baño. Consulte
con su instalador.
•
Procure no bloquear la rejilla de
entrada o de salida de aire cuando el
secador esté en uso.
•
El secador de pelo está equipado con
un sistema automático de protección
contra el sobrecalentamiento, que
desconecta el aparato en caso de
sobrecalentamiento. El ventilador
seguirá funcionando. Después de un
corto período de enfriado, el secador
se enciende de nuevo. Asegúrese de
que las rejillas de entrada y salida de
aire no estén bloqueadas.
•
No dirija el flujo de aire a los ojos, las
manos u otras áreas sensibles al calor.
•
No enrolle el cable de red alrededor
del aparato.
12
•
Compruebe regularmente que el
cable no presente desgaste o daños.
Si usted tiene alguna duda sobre su
estado, lleve el aparato a su Centro
de Servicio Braun más cercano para
revisarlo / repararlo. Este cable sólo
puede ser reemplazado por un Centro
de Servicio Braun autorizado. Una
reparación defectuosa podría conllevar riesgos para el usuario.
•
Este aparato puede ser utilizado por
niños mayores de 8 años y por personas con capacidad física, sensorial o
mental reducida o que no tengan
experiencia o el conocimiento suficiente, siempre que sean supervisados o se les hayan dado las instrucciones relativas al uso seguro del
aparato y entiendan los peligros existentes. Los niños no deben jugar con
el aparato. Los niños no deben realizar
la limpieza ni el mantenimiento del
aparato, salvo que sean mayores de
8 años y lo hagan bajo supervisión.
Descripción
1 Rejilla de entrada de aire con filtro de protección
2 Pantalla de temperatura
a) LED rojos para 4 ajustes de temperatura
b) LED azul para golpe de aire frío
3 Colgador
4 Interruptor de encendido/apagado
5 Botones de temperatura (+ / –)
6 Botones de golpe de aire frío
7 Boquilla profesional concentradora de aire
8 Difusor profesional (solo con el modelo HD 785)
Uso
Este secador de pelo ofrece dos posiciones de
agarre:
Cójalo por el mango (A) para llegar cómodamente a
todos los botones.
También puede cogerlo por el tubo de aire (B).
Gracias al sistema especial de refrigeración de aire,
el tubo de aire se mantiene frío.
Encendido
Utilice el interruptor (4) para encender el aparato y
seleccione el flujo de aire:
O = apagado
I = flujo de aire flojo
II = flujo de aire fuerte
Pantalla de temperatura (2)
Los LED rojos (2a) muestran la temperatura
seleccionada de entre un rango de 1 (baja) a 4
(alta). El LED azul (2b) se ilumina cuando se pulsa
uno de los botones de golpe de aire frío (6).
Ajuste de la temperatura
Al encender el aparato, aparece por defecto el
último ajuste de temperatura.
Utilice los botones de temperatura (5) para cambiar
la temperatura:
Pulse el botón + para aumentar el ajuste de temperatura.
Pulse el botón – para reducir el ajuste de temperatura.
Seleccione la temperatura en función de su sensibilidad al calor, y del tipo y nivel de hidratación de
su cabello. Un sensor térmico integrado garantiza el
máximo control del calor.
Golpe de aire frío
Los botones de golpe de aire frío (6) permiten
cambiar al instante a un flujo de aire frío para fijar el
peinado. Ambos botones ofrecen la misma función.
Dependiendo de la forma que elija para sostener el
aparato (A o B), puede pulsar el botón de golpe de
aire frío más cercano.
Independientemente de la temperatura inicial,
conseguirá al instante un flujo de aire frío y el LED
azul se iluminará.
Pulse de nuevo uno de los botones de golpe de aire
frío para seguir trabajando a la temperatura que
muestran los LED rojos fijada previamente.
Tecnología iónica (solo con el modelo HD 785)
La corriente de aire se enriquece con millones de
iones activos que envuelven cada pelo, reduciendo
así el encrespamiento y la electricidad estática. El
pelo se moldea más fácilmente y se restaura el nivel
de hidratación y el brillo natural. Para conseguir el
máximo flujo de iones, use el secador de pelo sin
accesorios o, al menos, finalice el moldeado sin
accesorios.
Pelo corto o media melena:
Para aumentar el volumen y levantar las raíces,
pase suavemente los dedos del difusor por el cuero
cabelludo con pequeños movimientos circulares.
Pelo largo:
Primero seque las puntas colocándolas sobre la
placa del difusor. A continuación, levante el cabello
hacia el cuero cabelludo con el difusor. Para añadir
volumen a las raíces, pase suavemente los dedos
del difusor por el cuero cabelludo con pequeños
movimientos circulares.
Limpieza
Antes de limpiarlo, desenchufe el aparato y deje
que se enfríe.
Para limpiar la carcasa, utilice solo un paño
húmedo. No utilice nunca productos de limpieza
agresivos o abrasivos. No utilice nunca objetos
puntiagudos (p. ej., la púa de un peine) para
eliminar polvo o cuerpos extraños del interior del
aparato, ya que hay riesgo de descarga eléctrica.
Limpie periódicamente el exterior del filtro de protección (1) con un paño húmedo (D).
Para una limpieza a fondo, gire el filtro de protección hacia la izquierda y retírelo (E). Limpie el filtro
de protección con agua corriente y deje que se
seque por completo. Vuelva a colocar el filtro de
protección y fíjelo girando hacia la derecha.
Almacenamiento
El colgador (3) le permite almacenar el secador de
pelo de forma práctica y segura.
Eliminación
El producto contiene residuos electrónicos
reciclables. Para proteger el medio
ambiente, no lo tire a la basura doméstica.
Llévelo al punto de recogida local apropiado.
Uso de la boquilla concentradora de aire
Para dar estilo al cabello, coloque la boquilla concentradora de aire (7) en la parte frontal del aparato
y presione firmemente hasta que encaje en su lugar.
La boquilla concentradora de aire le permite dirigir
el flujo de aire a zonas concretas del cabello. Tenga
en cuenta que, a diferencia del tubo de aire, la
boquilla concentradora de aire se calienta por el
flujo de aire caliente.
Uso del difusor (solo con el modelo HD 785)
Para levantar las raíces, dar volumen o crear ondas
naturales, coloque el difusor (8). Presiónelo firmemente sobre la salida de aire, hasta que encaje en
su lugar (C).
Sujeto a modificaciones sin previo aviso.
13

Garantía
Braun concede a este producto 2 años de garantía
a partir de la fecha de compra.
Dentro del periodo de garantía, subsanaremos,
sin cargo alguno, cualquier defecto del aparato
imputable tanto a los materiales como a la
fabricación, ya sea reparando, sustituyendo
piezas, o facilitando un aparato nuevo según
nuestro criterio.
La garantía no ampara averías por uso indebido,
funcionamiento a distinto voltaje del indicado,
conexión a un enchufe inadecuado, rotura, uso o
desgaste normal, así como defectos que tengan un
efecto insignificante en el valor o funcionamiento
del producto.
La garantía perderá su efecto en caso de que se
hayan realizado reparaciones por parte de personas
no autorizadas, o no se hayan utilizado recambios
originales de Braun.
La garantía solamente tendrá validez si la fecha
de compra es confirmada mediante la factura o
el albarán de compra correspondiente.
Esta garantía tiene validez en todos los países
donde este producto sea distribuido por Braun
o por un distribuidor asignado por Braun.
En caso de reclamación bajo esta garantía, diríjase
al Servicio de Asistencia Técnica de Braun más
cercano: www.service.braun.com.
Solo para España
Servicio al consumidor: Para localizar su Servicio
Braun más cercano o en el caso de que tenga Vd.
alguna duda referente al funcionamiento de este
producto, le rogamos contacte con el teléfono de
atención al cliente: 900 814 208.
14
Português
Os nossos produtos são concebidos segundo os
mais elevados padrões de qualidade, funcionalidade e design. Esperamos que o nosso novo aparelho da Braun seja motivo de grande satisfação.
Este aparelho foi concebido apenas para o uso
doméstico, embora proporcione um desempenho
profissional.
Por favor, leia atenta e cuidadosamente as instruções de uso antes da utilização e conserve-as para
referência futura.
Importante
•
Ligue o aparelho a uma tomada de
corrente alterna (~) e assegure-se de
que a voltagem de sua casa corresponde à que esta marcado no aparelho.
•
Nunca utilizar este aparelho
próximo de água (por exemplo
um lavatório, uma banheira ou um
chuveiro com água). Não permita que
o aparelho se molhe, nem o utilize
com as mãos molhadas.
•
Ao utilizar o secador num quarto de
banho, desligue-o sempre da tomada
de corrente depois de o utilizar e
antes de o limpar. Mesmo quando
está desligado, o aparelho corre
riscos caso esteja perto de água.
•
Para proteção adicional, recomenda-
-se a instalação, no circuito elétrico da
casa de banho, de um aparelho
de corrente residual (RCD) com uma
corrente residual operativa que não
ultrapasse os 30 mA. Aconselhe-se
junto de um técnico.
•
Não deve bloquear a entrada ou saída
de ar do secador durante a sua utilização.
•
Este secador está equipado com um
sistema de proteção que desativa
automaticamente o calor em caso de
sobreaquecimento. A ventoinha continua a funcionar. O aquecimento é
ligado novamente após um curto
período de arrefecimento. Certifiquese de que as aberturas de entrada e
de saída de ar estão completamente
desobstruídas.
•
Não dirija o fluxo de ar para os olhos,
mãos ou outras áreas sensíveis ao
calor.
•
Não enrole o cabo de alimentação à
volta do aparelho.
•
Verifique com regularidade o estado
do cabo para identificar desgaste ou
danos. Se o estado do cabo suscitar
alguma dúvida, leve o aparelho ao
Serviço Técnico Braun mais próximo.
O cabo elétrico deve ser substituído
apenas por um Serviço Técnico Braun
autorizado.Uma reparação defeituosa
pode representar riscos para o utilizador.
•
Este aparelho pode ser utilizado por
crianças com idade igual ou superior
a 8 anos e por pessoas com capacidades físicas, sensoriais ou mentais
reduzidas, ou com falta de experiência
e conhecimento, desde que sejam
supervisionadas ou lhes tenham sido
dadas instruções quanto à utilização
segura do aparelho e se tiverem compreendido os perigos envolvidos.
As crianças não devem brincar com o
aparelho. Só é permitido às crianças
com idade superior a 8 anos fazer a
limpeza e a manutenção do aparelho
quando supervisionadas.
Descrição
1 Grelha de entrada de ar com filtro protetor
2 Visor de temperatura
a) LEDs vermelhos para 4 níveis de calor
b) LED azul para ar frio
3 Argola para pendurar
4 Interruptor para Ligar/Desligar
5 Botões da temperatura (+ / –)
6 Botões de frio
7 Concentrador de ar profissional
8 Difusor profissional (só com o modelo HD 785)
15
Utilização
Este secador de cabelo permite duas posições de
pega:
Pega pelo punho (A) para chegar confortavelmente
a todos os botões.
Pode também pegar diretamente pelo corpo do
secador (B). O corpo do secador permanece frio,
graças ao sistema de arrefecimento por ar.
Ligar
Use o interruptor (4) para ligar o aparelho e
selecionar o fluxo de ar:
O = desligado
I = fluxo de ar reduzido
II = fluxo de ar elevado
Visor de temperatura (2)
Os LEDs vermelhos (2a) indicam os níveis de calor
entre 1 (baixo) e 4 (alto).
O LED azul (2b) acende-se quando se prime um
dos botões de frio (6).
Regulação da temperatura
Quando o aparelho é ligado, é utilizada a última
regulação do calor que foi selecionada.
Use os botões da temperatura (5) para mudar a
temperatura:
Prima o botão + para aumentar a temperatura.
Prima o botão – para reduzir a temperatura.
Pode selecionar a sua temperatura preferida conforme a sua sensibilidade pessoal ao calor, tipo de
cabelo e nível de humidade. Um sensor térmico
incorporado assegura o máximo de controlo do
calor.
Fase fria
Os botões de frio (6) permitem alternar instantaneamente para o fluxo de ar frio, para fixar o penteado. Ambos os botões têm a mesma função.
Pode premir o botão que lhe for mais cómodo,
conforme a maneira como preferir pegar no aparelho (A ou B).
Independentemente da temperatura inicial, obterá
instantaneamente um fluxo de ar frio e o LED azul
acende-se.
Prima novamente um dos botões de frio para continuar a trabalhar à temperatura regulada previamente conforme indicado pelos LEDs vermelhos.
Tecnologia de iões (só com o modelo HD 785)
O fluxo de ar é enriquecido com milhões de iões
ativos, que aderem a cada cabelo e reduzem o
frisado e a carga estática. O cabelo pode ser
modelado mais facilmente e restitui o seu nível de
humidade e o brilho natural. Para assegurar um
fluxo máximo de iões, use o secador de cabelo sem
acessórios, ou pelo menos termine a modelação
sem acessórios.
16
Uso do concentrador de ar
Para estilizar o cabelo, empurre o concentrador de
ar (7) sobre a parte da frente do aparelho e carregue com firmeza até encaixar no lugar.
O concentrador de ar permite-lhe direcionar o fluxo
de ar para secções individuais do cabelo. Tenha em
atenção que, ao contrário do que sucede com o
corpo do secador, o concentrador de ar é aquecido
pelo fluxo de ar quente.
Uso do difusor (só com o modelo HD 785)
Para criar elevação do cabelo na raiz, volume ou
ondas naturais, coloque o difusor (8). Empurre-o
com firmeza contra a saída do ar até encaixar no
sítio (C).
Cabelo curto e médio:
Para criar volume e levantar o cabelo da raiz, gire
gentilmente os dedos do Difusor em pequenas
orbitas circulares sobre o couro cabeludo.
Cabelo comprido:
Primeiro seque as pontas do cabelo colocando-as
em cima do lado com os dedos. Depois levante o
cabelo cuidadosamente com o difusor virado para
o seu couro cabeludo e mantenha. Para finalizar,
seque as raízes do cabelo com um suave movimento circular dos dedos sobre o couro cabeludo,
criando volume.
Limpeza
Antes de limpar, desligue o aparelho da tomada de
corrente e deixe arrefecer.
Para limpar o secador use apenas um pano húmido.
Nunca utilize produtos de limpea agressivos ou
abrasivos. Nunca utilize objetos pontiagudos (p. ex.
a extremidade de um pente) para remover pó ou
corpos estranhos do interior do aparelho. Existe o
risco de choque elétrico.
Limpe regularmente o exterior do filtro protetor (1)
com um pano húmido (D).
Para uma limpeza aprofundada, pode torcer o filtro
protetor para a esquerda e puxá-lo para fora (E).
Limpe o filtro protetor sob água corrente e deixe
secar por completo. Reponha o filtro protetor e
fixe-o rodando-o para a direita.
Guardar
A argola para pendurar (3) é uma maneira prática e
segura de guardar o seu secador de cabelo.
Eliminação
O produto contém componentes eletrónicos
recicláveis. Para proteger o ambiente, não
deite o aparelho fora juntamente com o lixo
doméstico, leve-o para um ponto de recolha
local adequado.
Sujeito a alterações sem aviso prévio.

Garantia
Os nossos produtos dispõem de uma garantia de
2 anos a partir da data de compra. Qualquer defeito
do aparelho imputável, quer aos materiais, quer ao
fabrico, que torne necessário reparar, substituir
peças ou trocar de aparelho dentro de período de
garantia não terá custos adicionais.
A garantia não cobre avarias por utilização indevida,
funcionamento a voltagem diferente da indicada,
ligação a uma tomada de corrente elétrica
incorreta, rutura, desgaste normal por utilização
que causem defeitos ou diminuição da qualidade
de funcionamento do produto.
A garantia perderá o seu efeito no caso de
serem efetuadas reparações por pessoas não
autorizadas ou se não forem utilizados acessórios
originais Braun.
A garantia só é válida se a data de compra for
confirmada pela apresentação da fatura ou
documento de compra correspondente.
Esta garantia é válida para todos os países onde
este produto seja distribuído pela Braun ou por um
distribuidor Braun autorizado.
No caso de reclamação ao abrigo de garantia,
dirija-se ao Serviço de Assistência Técnica Oficial
Braun mais próximo: www.service.braun.com.
Só para Portugal
Apoio ao consumidor: para localizar o seu serviço
Braun mais próximo ou no caso de surgir alguma
dúvida relativamente ao funcionamento deste
produto, contacte-nos por favor pelo telefone
808 20 00 33.
17
Italiano
I nostri prodotti sono progettati in conformità ai più
rigorosi standard di qualità, funzionalità e design. Ci
auguriamo che il vostro nuovo apparecchio Braun
possa darvi molte soddisfazioni.
Questo apparecchio è ideato solo per uso domestico,
sebbene offra prestazioni professionali.
Leggere attentamente le istruzioni prima di utilizzare
l’apparecchio e conservarle per ogni ulteriore consultazione.
Importante
•
Collegare l’asciugacapelli solo a corrente alternata (~) e controllare che la
tensione di rete corrisponda a quella
indicata sull’asciugacapelli.
•
L’apparecchio non deve mai
essere utilizzato vicino all’acqua
(ad es. in prossimità di un lavandino
pieno, una vasca da bagno o una
doccia). Non bagnare l’apparecchio
né usarlo con le mani bagnate.
•
Se si utilizza l’apparecchio in una
stanza da bagno, spegnere sempre
l’asciugacapelli dopo l’uso e prima di
pulirlo. Anche l’asciugacapelli spento
presenta un rischio se non è scollegato dalla presa di corrente.
•
Per la massima protezione, vi raccomandiamo di far installare nel circuito
elettrico della stanza da bagno un
sistema salvavita che sopporti un
carico massimo di corrente elettrica
di 30 mA. Chiedere informazioni al
proprio installatore.
•
Fare attenzione a non bloccare le
griglie di entrata e uscita dell’aria se
l’asciugacapelli è in funzione.
•
L’asciugacapelli è dotato di un sistema
automatico di protezione dal surriscaldamento che spegne il riscaldatore in
caso di surriscaldamento. Il ventilatore
continua a girare. Dopo un breve
periodo di raffreddamento, il riscaldatore si riaccende. Assicurarsi che le
aperture di ingresso e uscita dell’aria
siano completamente libere.
•
Non rivolgere il flusso d’aria verso gli
18
occhi, le mani o altre zone sensibili al
calore.
•
Non avvolgere il cavo di alimentazione
attorno all’apparecchio.
•
Controllare regolarmente che il cavo
di alimentazione non presenti segni di
usura o danneggiamento. In caso di
dubbi sulle condizione dell’apparecchio, portarlo in un Centro di Assistenza autorizzato Braun per farlo
controllare/riparare. Il cavo di rete può
essere sostituito solo da un Centro di
Assistenza autorizzato Braun. Gli
interventi di riparazione non qualificati
possono causare gravi pericoli per l’utente.
•
L’apparecchio può essere utilizzato da
bambini di almeno 8 anni e persone
con ridotta capacità fisica, sensoriale
o mentale o mancanza di esperienza e
informazioni, se sono supervisionati
da una persona o se hanno ricevuto
istruzioni sull’utilizzo corretto dell’apparecchio e sono a conoscenza dei
rischi derivanti dall’utilizzo. I bambini
non dovrebbero giocare con l’apparecchio. La pulizia e la manutenzione
dell’apparecchio non dovrebbero
essere effettuate da bambini a meno
che non abbiano piu di 8 anni e siano
supervisionati.
Descrizione
1 Griglia di ingresso aria con filtro di protezione
2 Indicatore di temperatura
a) LED rossi per 4 regolazioni del calore
b) LED blu per l’aria fredda
3 Gancio per riporlo
4 Interruttore acceso/spento
5 Pulsanti temperatura (+ / –)
6 Tasti colpo d‘aria fredda
7 Beccuccio per styling professionale
8 Diffusore professionale (solo con modello
HD 785)
Uso
L’asciugacapelli offre due posizioni di presa:
Si può sostenere dall’impugnatura (A) per
raggiungere comodamente tutti i pulsanti.
Si può impugnare anche dal cilindro (B). Il cilindro
resta fresco grazie allo speciale sistema di raffreddamento ad aria.
Accensione
Usare l’interruttore(4) per accendere l’apparecchio
e selezionare il flusso d’aria:
O = spento
I = flusso d’aria basso
II = flusso d’aria elevato
Indicatore di temperatura (2)
I LED rossi (2a) indicano le regolazioni del calore,
da 1 (basso) a 4 (alto).
Quando si preme uno dei tasti colpo d’aria fredda
(6), si accende un LED blu (2b).
Regolazione della temperatura
All’accensione, l’apparecchio è regolato sul calore
impostato per ultimo.
Usare i pulsanti della temperatura (5) per cambiare
la temperatura:
Premere il pulsante + per aumentare la temperatura.
Premere il pulsante – per ridurre la temperatura.
È possibile selezionare la temperatura preferita in
funzione della propria personale sensibilità al calore,
del tipo di capello e del livello di idratazione.
Un sensore termico integrato assicura il massimo
controllo del calore.
Tasti colpo d’aria fredda
I tasti colpo d‘aria fredda (6) consentono di passare
immediatamente al flusso d’aria freddo per fissare
una piega. I due pulsanti offrono la stessa funzione.
A seconda del modo in cui si preferisce sostenere
l’apparecchio (A o B), si può premere il tasto colpo
d‘aria fredda più comodo da raggiungere.
Indipendentemente dalla temperatura iniziale, si
ottiene immediatamente un flusso d’aria fredda e il
LED blu si accende.
Premere di nuovo uno dei tasti colpo d‘aria fredda
per continuare a lavorare alla temperatura regolata
in precedenza e indicata dai LED rossi.
Tecnologia agli ioni (solo con modello HD 785)
Il getto d’aria è arricchito da milioni di ioni attivi
che avvolgono ogni singolo capello e riducono
visibilmente l’effetto crespo e la carica statica. Il
capello può essere acconciato più facilmente e
recupera il suo livello di idratazione e la sua
brillantezza naturale. Per assicurare il massimo
flusso di ioni, usare l’asciugacapelli senza accessori
o almeno concludere lo styling senza accessori.
Uso del beccuccio per styling
Per acconciare i capelli, spingere il beccuccio per
styling (7) sul lato anteriore dell’apparecchio e
premerlo con forza fino a quando scatta in posizione. Il beccuccio per styling consente di dirigere
il flusso d’aria verso singole parti della capigliatura.
Si tenga presente che, diversamente dal cilindro,
il beccuccio per styling viene riscaldato dal flusso
d’aria calda.
Uso del diffusore (solo con modello HD 785)
Per sollevare le radici e creare volume o onde
naturali, utilizzare il diffusore (8). Premerlo saldamente sull’uscita dell’aria finché scatta in posizione (C).
Capelli corti o medio-lunghi:
Per sollevare le radici e creare volume, guidare le
sporgenze del diffusore sul cuoio capelluto, con
piccoli movimenti circolari.
Capelli lunghi:
Asciugare prima le estremità dei capelli collocandole sulla superficie delle sporgenze. Quindi,
appoggiando il diffusore contro il cuoio capelluto,
sollevare i capelli e mantenere questa posizione.
Per dare maggior volume alle radici, terminare
l’operazione con movimenti circolari delle sporgenze del diffusore sul
cuoio capelluto.
Pulizia
Prima di pulire l’apparecchio, scollegarlo
dall’elettricità e farlo raffreddare.
Per pulire l’alloggiamento usare solo un panno
umido. Non utilizzare per nessun motivo detergenti
aggressivi o abrasivi. Non usare mai oggetti
appuntiti (ad es. la coda di un pettine) per
rimuovere la polvere o i corpi estranei dall’interno
dell’apparecchio. Vi è il rischio di scossa elettrica.
Pulire regolarmente l’esterno del filtro di protezione
(1) con un panno umido (D).
Per una pulizia approfondita, è possibile svitare il
filtro di protezione verso sinistra e tirarlo via (E).
Pulire il filtro di protezione sotto l’acqua corrente e
farlo asciugare completamente. Collocare nuovamente il filtro di protezione e bloccarlo girandolo
verso destra.
Conservazione
Il gancio per riporlo (3) fornisce un mezzo pratico e
sicuro per conservare l’asciugacapelli.
INFORMAZIONE AGLI UTILIZZATORI
Questo prodotto contiene batterie e/o rifiuti
elettrici riciclabili. Il simbolo del cassonetto
barrato riportato sull’apparecchiatura o sulla
sua confezione indica che il prodotto alla fine
della propria vita utile deve essere raccolto
separatamente dagli altri rifiuti. L’utente dovrà,
pertanto, conferire l’apparecchiatura giunta a fine
19

vita agli idonei centri comunali di raccolta
differenziata dei rifiuti elettrotecnici ed elettronici. In
alternativa alla gestione autonoma è possibile
consegnare l’apparecchiatura che si desidera
smaltire al rivenditore, al momento dell’acquisto di
una nuova apparecchiatura di tipo equivalente.
Presso i rivenditori di prodotti elettronici con
superficie di vendita di almeno 400 m
2
è inoltre
possibile consegnare gratuitamente, senza obbligo
di acquisto, i prodotti elettronici da smaltire con
dimensioni inferiori a 25 cm. L’adeguata raccolta
differenziata per l’avvio successivo
dell’apparecchiatura dismessa al riciclaggio, al
trattamento e allo smaltimento ambientalmente
compatibile contribuisce ad evitare possibili effetti
negativi sull’ambiente e sulla salute e favorisce il
reimpiego e/o riciclo dei materiali di cui è composta
l’apparecchiatura.
Soggetto a modifiche senza preavviso.
Garanzia
Braun fornisce una garanzia valevole per la durata di
2 anni dalla data di acquisto.
Nel periodo di garanzia verranno eliminati,
gratuitamente, i guasti dell’apparecchio
conseguenti a difetti di fabbrica o di materiali, sia
riparando il prodotto sia sostituendo, se necessario,
l’intero apparecchio.
Tale garanzia non copre: danni derivanti dall’uso
improprio del prodotto, la normale usura
conseguente al funzionamento dello stesso, i difetti
che hanno un effetto trascurabile sul valore o sul
funzionamento dell’apparecchio.
La garanzia decade se vengono effettuate
riparazioni da soggetti non autorizzati o con parti
non originali Braun.
Per accedere al servizio durante il periodo di
garanzia, è necessario consegnare o far pervenire il
prodotto integro, insieme allo scontrino di acquisto,
ad un Centro di Assistenza autorizzato Braun.
Contattare www.service.braun.com o il numero 800
440 017 per avere informazioni sul Centro di
Assistenza autorizzato Braun più vicino.
20
Nederlands
Onze producten zijn ontworpen om de hoogste
standaarden te behalen in kwaliteit, functionaliteit
en design. We hopen dat u grondig geniet van uw
nieuwe Braun apparaat.
Dit apparaat is enkel ontworpen voor huishoudelijk
gebruik, maar levert professionele resultaten.
Voordat u het apparaat voor het eerst gaat gebruiken, lees dan de gebruiksaanwijzing goed en aandachtig door en bewaar voor toekomstige
referentie.
Belangrijk
•
Uw haardroger alleen op wisselspanning (~) aansluiten. Controleer altijd
of de op het apparaat aangegeven
netspanning overeenkomt met die van
het lichtnet.
•
Gebruik het apparaat nooit in de
nabijheid van of vlak boven water
(bijv. boven gevulde wastafel, badkuip
of douche). Zorg dat het apparaat niet
nat wordt.
•
Wanneer u de haardroger in de badkamer gebruikt, trek dan altijd de stekker
na gebruik uit het stopcontact. Zelfs
uitgeschakelde apparaten kunnen
nog gevaar opleveren in een vochtige
omgeving, als de stekker niet uit het
stopcontact is.
•
Voor extra beveiliging is het aan te
raden de elektragroep in de badkamer
van een aardlekschakelaar te voorzien, (max. Stroom afname 30 mA).
Raadpleeg hiervoor uw installateur.
•
Het moet voorkomen worden dat het
luchtinlaatrooster en/of de blaasopening geheel of gedeeltelijk wordt
geblokkeerd wanneer het apparaat
aan staat.
•
Het apparaat is uitgerust met automatische bescherming tegen oververhitting en schakelt de heater uit bij oververhitting. De fan blijft draaien. Na
korte afkoelperiode, schakelt het de
heater vanzelf weer in. Zorg ervoor dat
luchtinlaatrooster en de blaasopening
compleet vrij en open zijn.
•
Richt de luchtstroom niet direct in
de ogen, naar de handen of andere
plekken die gevoelig zijn voor warmte.
•
Wind het snoer nooit rond het apparaat.
•
Controleer regelmatig het snoer op
beschadigingen of scheurtjes vooral
waar het snoer de haardroger binnen
gaat en bij de stekker. Als u twijfelt
over de conditie van het apparaat
breng dan het apparaat naar de
dichts
bijzijnde Braun service dealer
om het apparaat te controleren/repareren. Het snoer mag alleen door een
Braun erkende servicedienst worden
vervangen. Ondeskundig reparatiewerk kan gevaarlijk zijn voor de
gebruiker.
•
Dit apparaaat is geschikt voor gebruik
voor kinderen ouder dan 8 jaar en personen met een fysieke, sensorische of
mentale beperking indien zij het product gebruiken onder begeleiding of
instructies hebben gekregen over het
veilig gebruik van het apparaat en de
gevaren inzien. Laat kinderen niet met
het apparaat spelen. Laat het apparaat
niet schoon gemaakt of onderhouden
worden door kinderen, behalve onder
toezicht en als ze 8 jaar of ouder zijn .
Beschrijving
1 Luchtinstroom gril met beschermend filter
2 Temperatuur display
a) Rode LEDs voor 4 warmteinstellingen
b) Blauwe LED voor koude lucht
3 Ophangring
4 Aan/uit knop
5 Temperatuur knoppen (+ / –)
6 Koude knoppen
7 Professionele styling mondstuk
8 Professionele diffuser (alleen bij model HD 785)
Gebruik
Deze haardroger biedt 2 grijpmogelijkheden:
Bij de hendel (A) om comfortable bij alle knoppen te
komen.
21
Loading…
1
Привет!
Зарегистрируйся, чтобы:
🔥 отключить всю рекламу на сайте
💬 участвовать в дискуссиях и
💰 зарабатывать на отзывах
Пушатся и электризуются волосы? Есть решение! Расчёска Satin Hair 7 от Braun
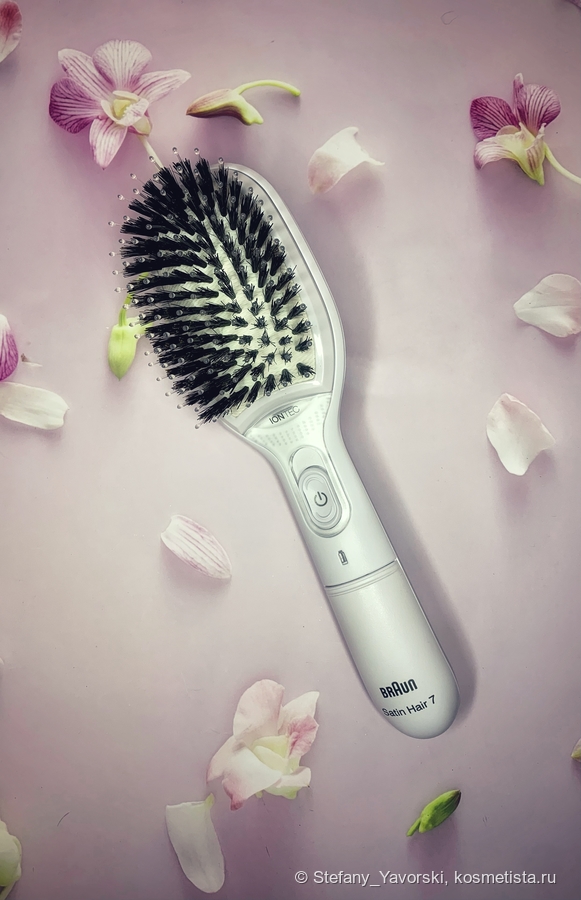
Мой сегодняшний пост будет посвящен одному бьюти-гаджету, без которого я уже не представляю свой уход за волосами. Знакомьтесь, расчёска Satin Hair 7 с функцией ионизации.
Мои волосы окрашенные, средней плотности. Кончики секутся, волосы постоянно пушатся, в «шапочное» время электризуются. После ковида стали выпадать как никогда раньше, плюс подпорчены горе-парикмахером. В связи с этим я отложила на дальнюю полочку утюжок, дабы не травмировать волосы ещё сильнее. Восстанавливаю шевелюру.
Но, я поняла, что без утюжка волосы выглядят ужасно с моей «пушистостью». Да ещё когда высокая влажность, на голове гнездо. Хоть на улицу не выходи. Одно время пробовала перейти на кудрявый метод, но либо у меня руки не из того места, либо он мне не подходит.
Однажды я наткнулась на отзыв от блоггера, которая рекомендовала данный девайс. Поизучав информацию, я пришла к выводу, что мне расческа Satin Hair 7 просто необходима.
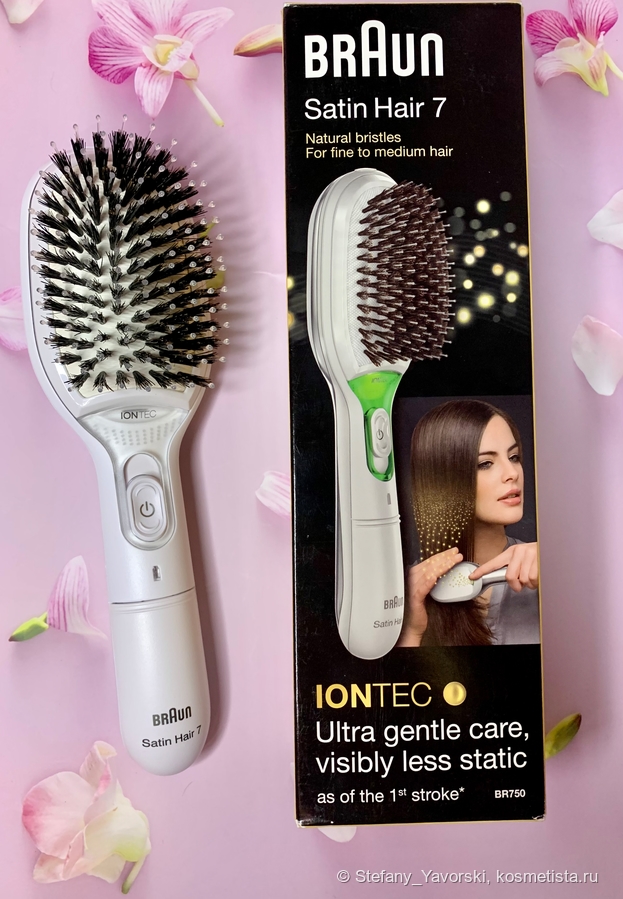
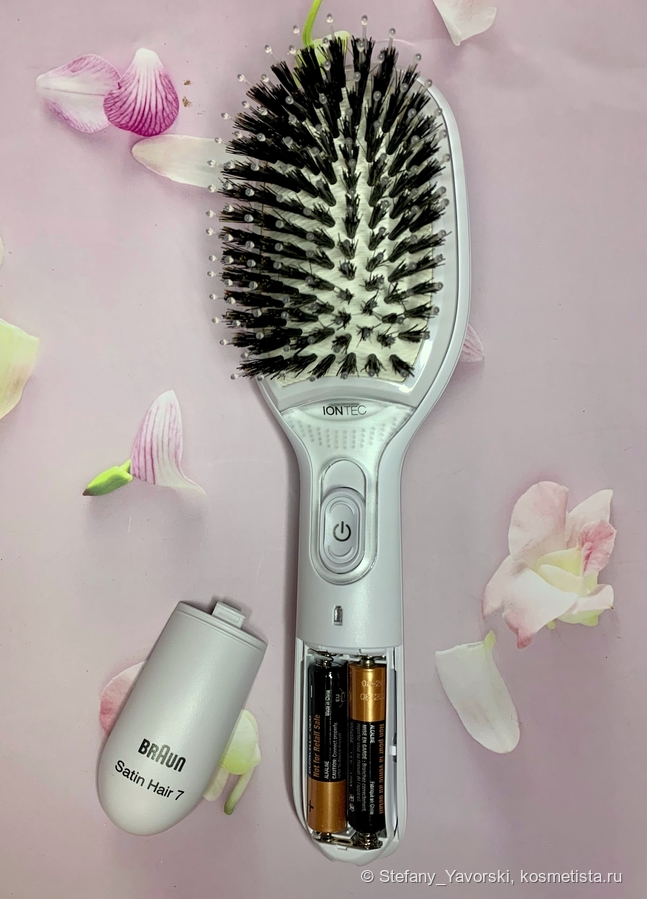
Расческа работает от батареек, которые находятся в комплекте. Также, в комплектацию входит инструкция.
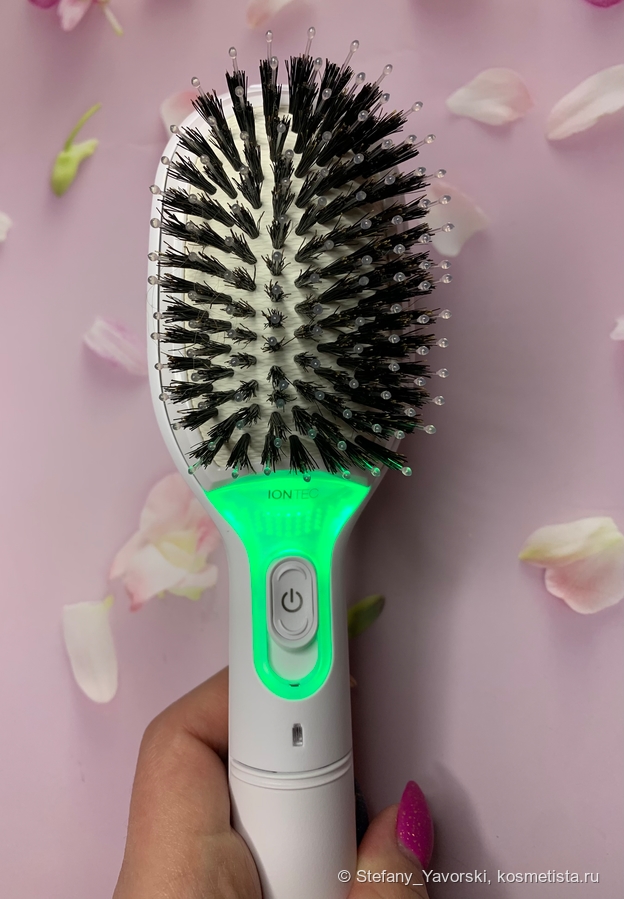
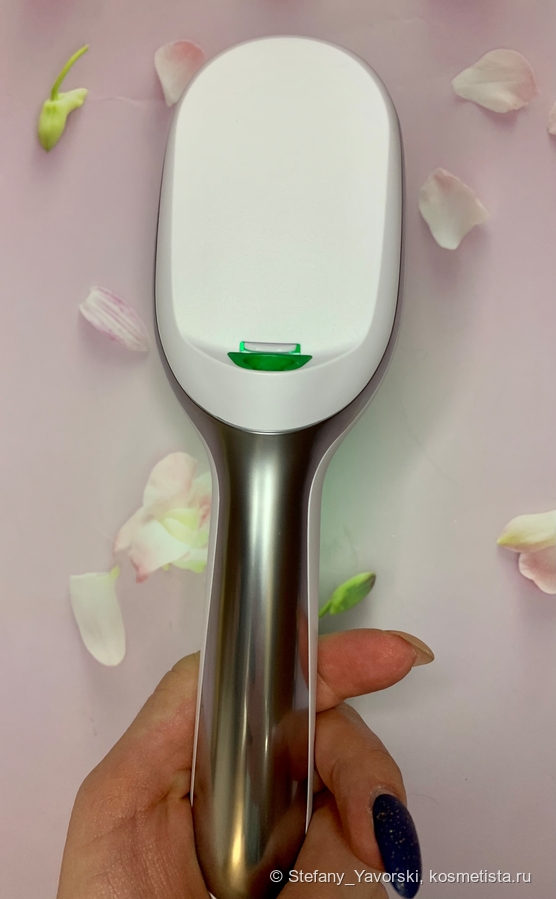
Сама расческа выглядит очень стильно, выполнена из белого, чуть шероховатого, качественного пластика с вставками из гладкого пластика под металл. В руку она ложится очень удобно, вес средний, при длительном расчесывании рука не устает.
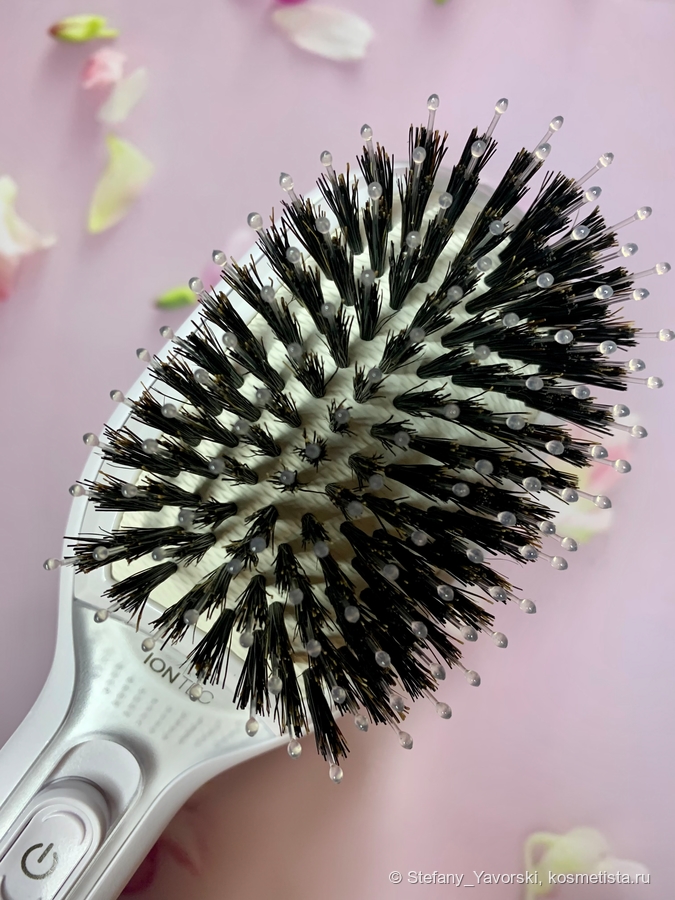
Сама расческа состоит из пластиковых, бесшовных зубцов и натуральной щетины. Зубцы высотой более сантиметра, при расчесывании не гнутся. Подушечка съемная, что позволяет качественно вымыть щетину и очистить от волосков.
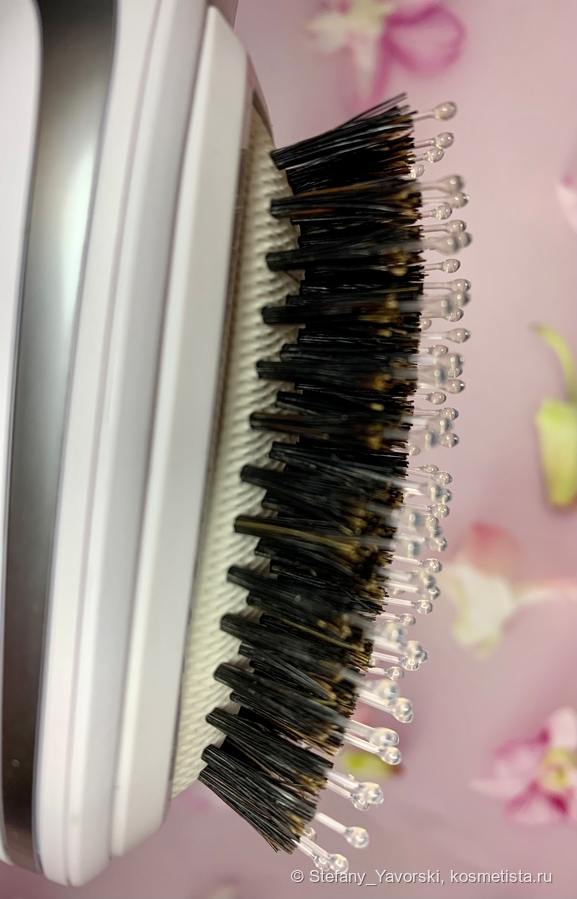
Для включения ионизации на корпусе есть кнопка, которую необходимо сдвинуть, после этого загорается зеленый свет и на задней стороне расчески открывается затвор, из которого виднеется лампочка-ионизатор.
При включении также слышен характерный шипящий звук и появляется легкий специфический запах, похож на запах от антибактериальных ламп, такие бывают в медицинских кабинетах.
В инструкции указано, что ионизатор отключается через 10 минут после включения.
Я, обычно, расчесываюсь несколько минут. Волосы расческа не выдирает и не травмирует, но для распутывания волос я предпочитаю использовать сначала Tangle Teezer, а потом расческу от Braun.
Безусловно, одна расческа не заменит полностью все средства по уходу за волосами, не превратит сухую солому в гладкий шелк, но придать финальный лоск этот бьюти-агрегат может.
Ниже я покажу результат работы расчески Satin Hair 7 на моих, окрашенных и посеченных волосах, а также на натуральных, неокрашенных волосах сестры.
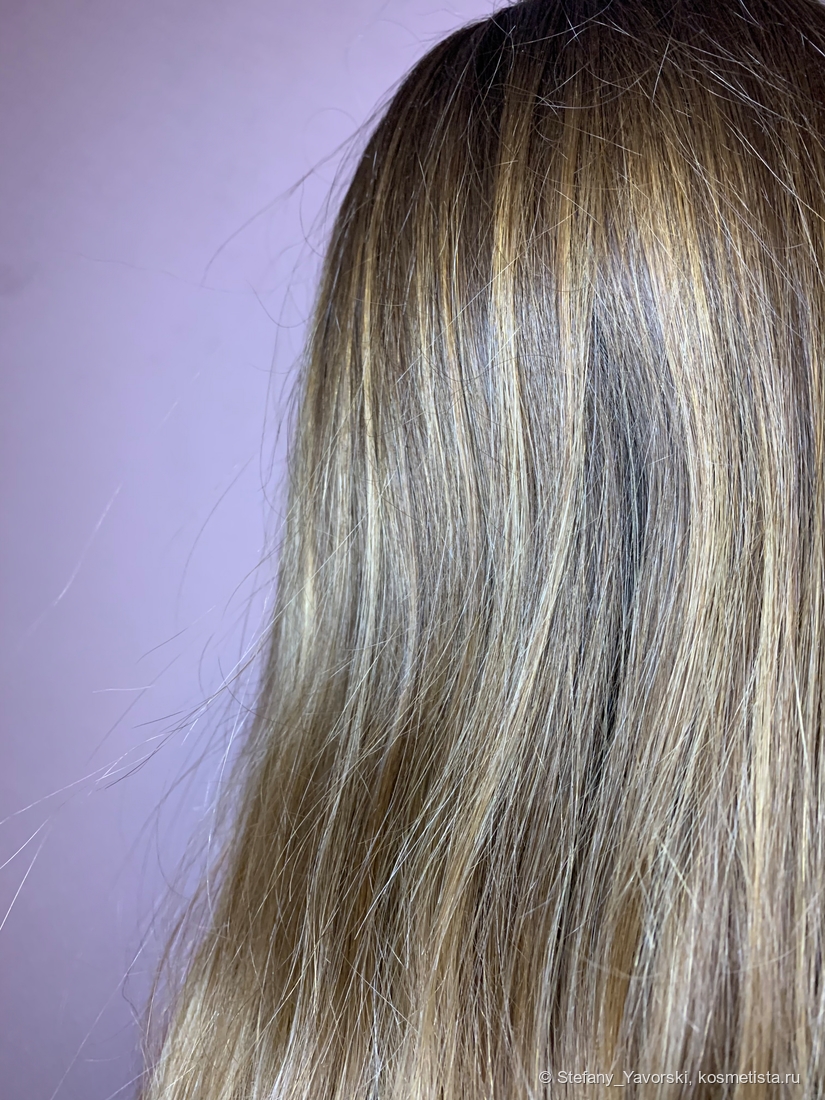
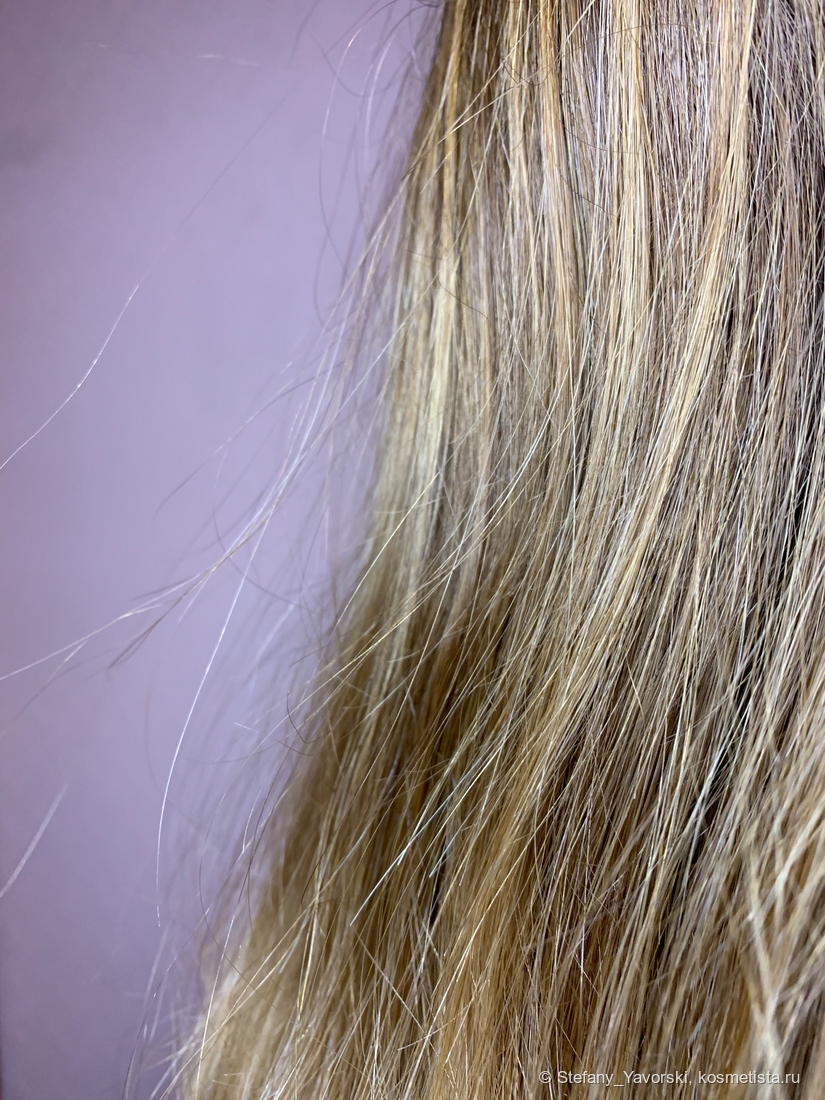
Мои волосы, расчесала, но видна статика, волосы наэлектризованы (постаралась максимально показать на фото).
Результат после использования Satin Hair 7.
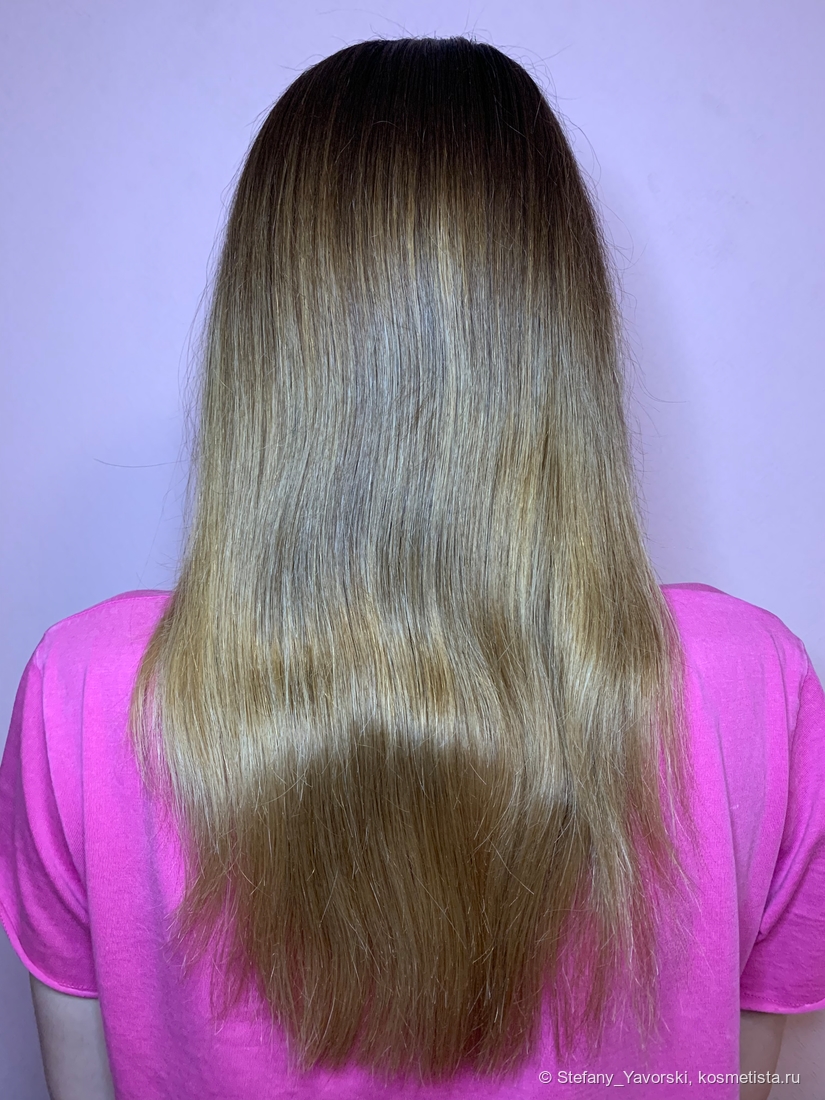
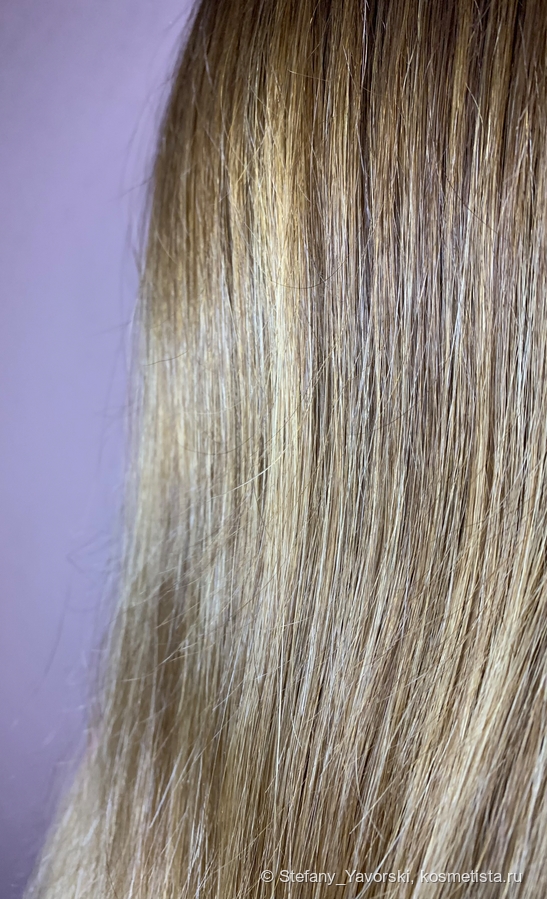
На последнем фото видно, что волосы не идеально ровные, но у меня по длине обломанные волоски ( парикмахер пережгла волосы, они стали обламываться с середины длины). Но, статика ушла и в целом вид гораздо лучше.
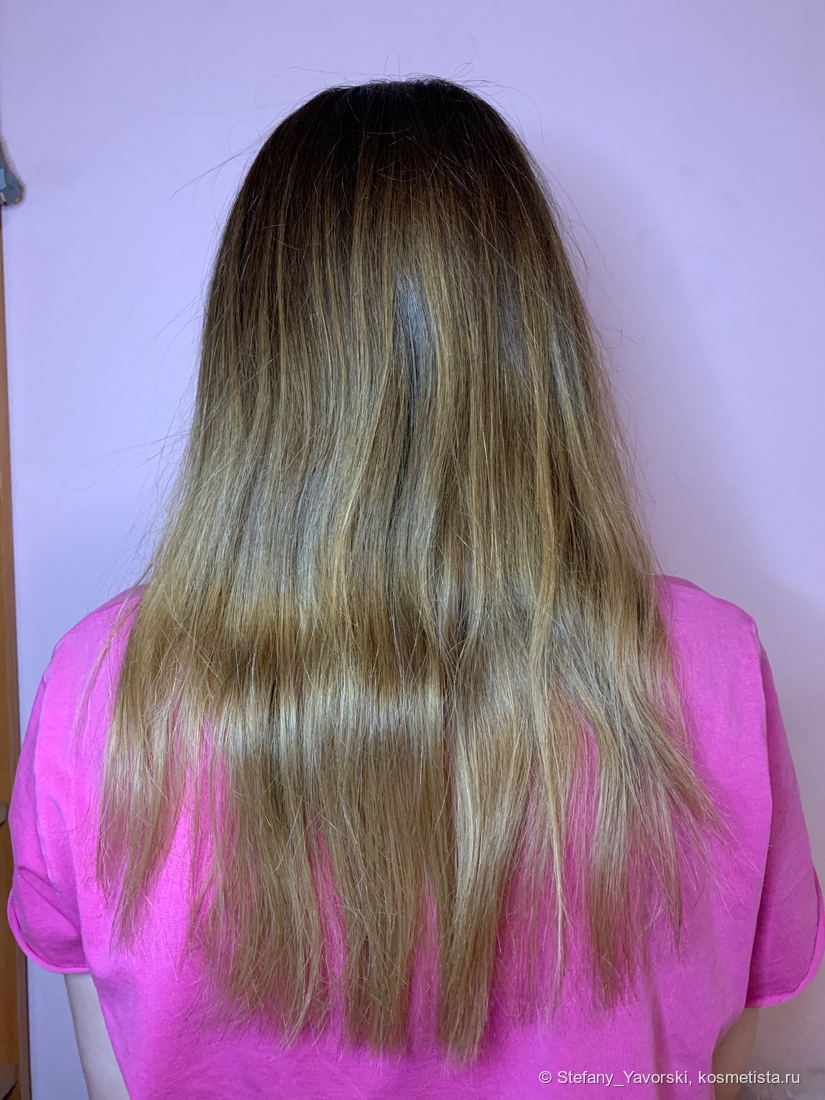
Далее покажу вам действие на волосах сестры. Они у неё, в целом, в хорошем состоянии, но при влажной погоде пушатся и спутываются. На фото после улицы (дождь со снегом).
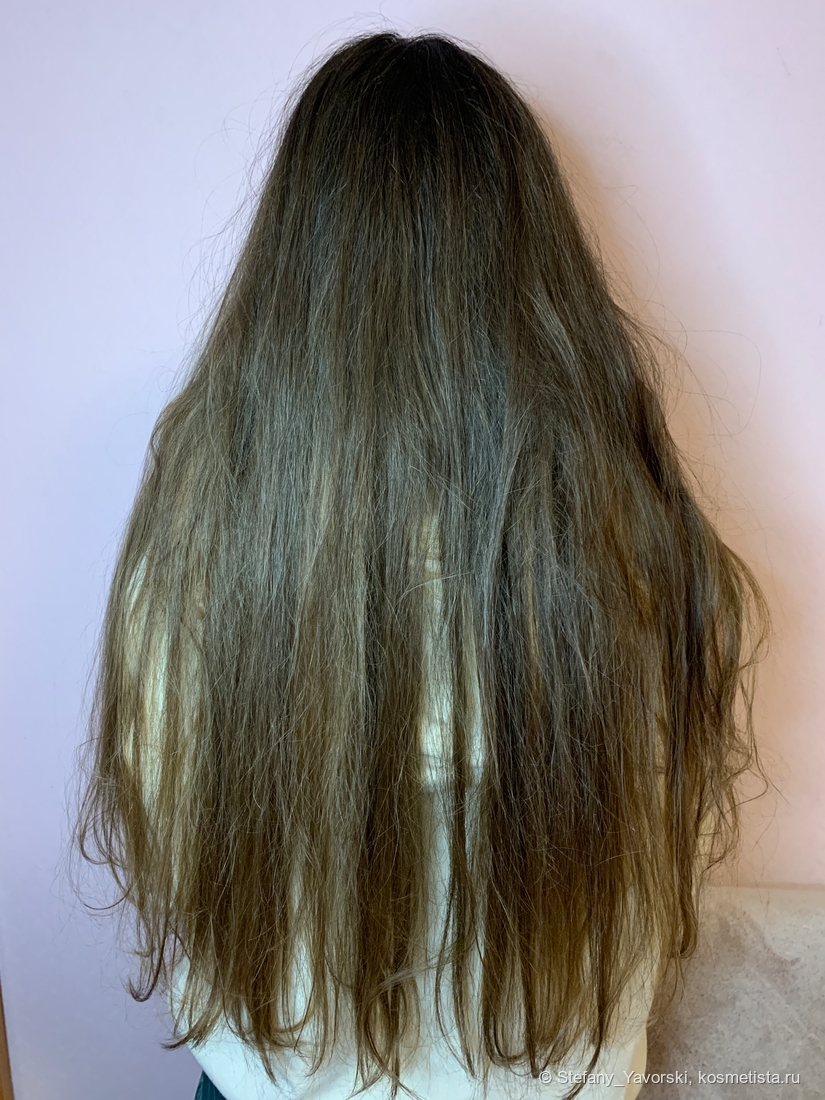
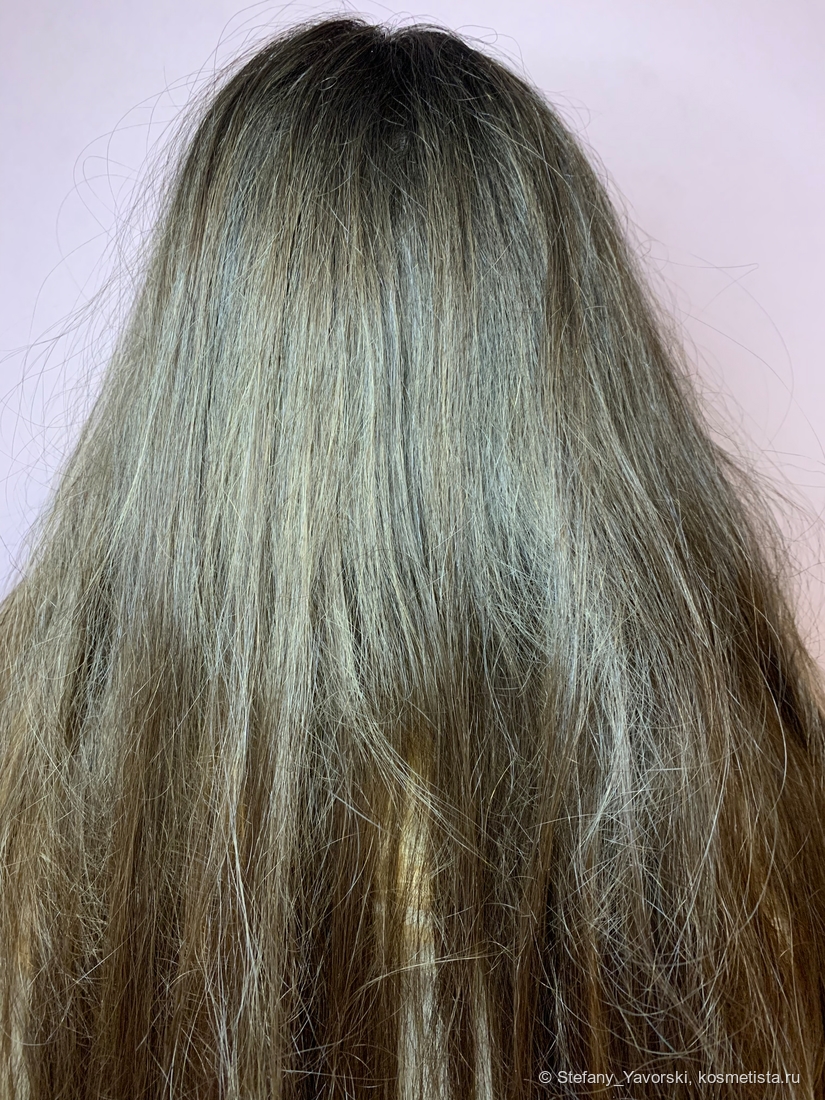
И после расчески
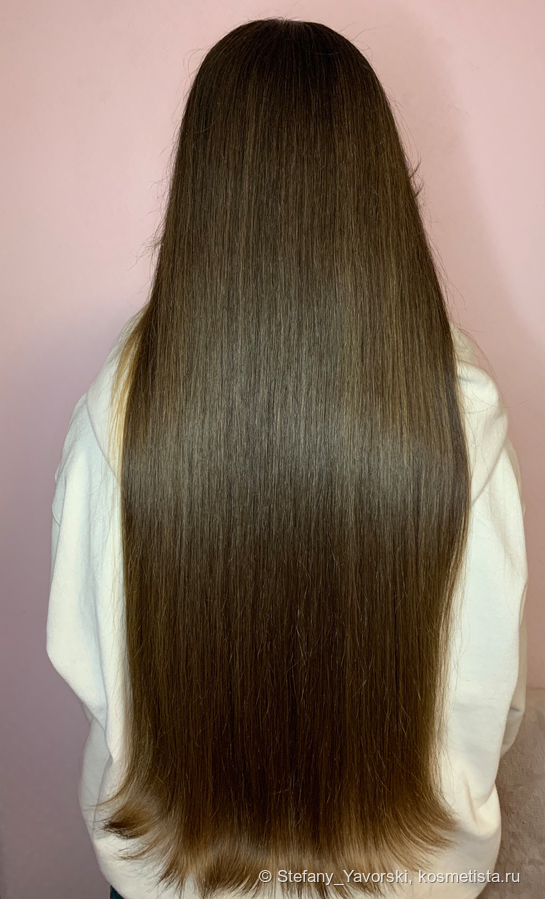

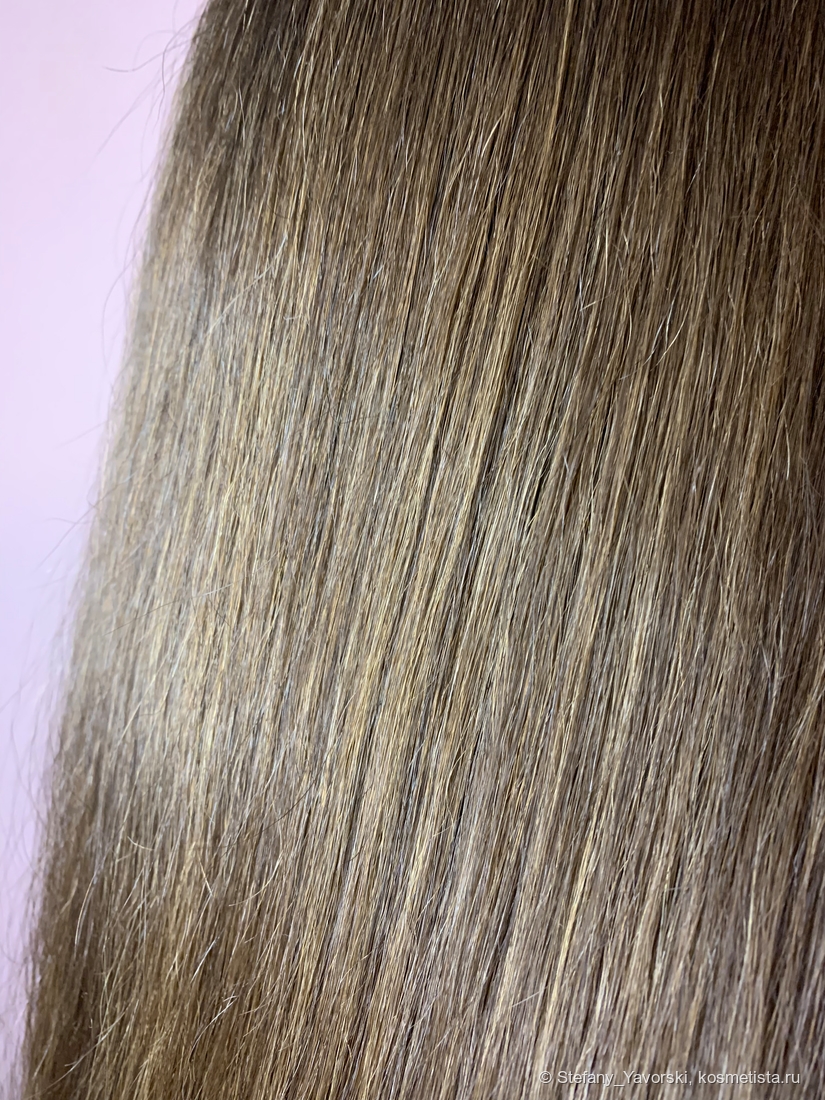
Подводя итоги, я хочу сказать, что если сравнивать с обычными расческами, то они все же не дают мне такой гладкости и усмирения пушащихся волос. Чаще всего, они ещё и прибавляют статики. Расческа с ионизацией помогает мне справиться с этой проблемой. Волосы не стоят дыбом до следующего выхода на улицу (либо ношения шапки).
Сама расческа очень компактная и достаточно лёгкая, ее можно носить с собой и расчесываться по мере необходимости.
Из минусов, могу отметить потерю объема. Но я не расчёсываю волосы у корней, только длину, поэтому для меня это не критично.
О покупке я не жалею, считаю, что этот девайс стоит своих денег. Конечно, это не волшебная палочка, волосы она не излечит и радикально не преобразит, тут нужен грамотный уход. Но для меня расческа с ионизацией стала прекрасной заменой утюжку, тем более в условиях восстановления травмированных волос.
Кстати, некоторые недобросовестные сайты в описании к расческе Braun Satin Hair указывают в свойствах «выпрямление волос». Волосы эта расческа не выпрямляет, и производитель тоже этого не обещает.
Оценка:10 из 10
Цена: 2 600
Срок использования: месяц, ежедневно
https://kosmetista.ru/uploads/images/12/91/00/2021/11/14/3705c3.jpg
https://kosmetista.ru/uploads/images/12/91/00/2021/11/14/3705c3_lbox.jpg
https://kosmetista.ru/uploads/images/12/91/00/2021/11/14/523d1f.jpg
https://kosmetista.ru/uploads/images/12/91/00/2021/11/14/523d1f.jpg
https://kosmetista.ru/uploads/images/12/91/00/2021/11/14/523d1f_lbox.jpg
https://kosmetista.ru/uploads/images/12/91/00/2021/11/14/5fac97.jpg
https://kosmetista.ru/uploads/images/12/91/00/2021/11/14/5fac97.jpg
https://kosmetista.ru/uploads/images/12/91/00/2021/11/14/5fac97_lbox.jpg
https://kosmetista.ru/uploads/images/12/91/00/2021/11/14/f91686.jpg
https://kosmetista.ru/uploads/images/12/91/00/2021/11/14/f91686.jpg
https://kosmetista.ru/uploads/images/12/91/00/2021/11/14/f91686_lbox.jpg
https://kosmetista.ru/uploads/images/12/91/00/2021/11/14/ada71a.jpg
https://kosmetista.ru/uploads/images/12/91/00/2021/11/14/ada71a.jpg
https://kosmetista.ru/uploads/images/12/91/00/2021/11/14/ada71a_lbox.jpg
https://kosmetista.ru/uploads/images/12/91/00/2021/11/14/b6c5b7.jpg
https://kosmetista.ru/uploads/images/12/91/00/2021/11/14/b6c5b7.jpg
https://kosmetista.ru/uploads/images/12/91/00/2021/11/14/b6c5b7_lbox.jpg
https://kosmetista.ru/uploads/images/12/91/00/2021/11/14/facf4d.jpg
https://kosmetista.ru/uploads/images/12/91/00/2021/11/14/facf4d.jpg
https://kosmetista.ru/uploads/images/12/91/00/2021/11/14/facf4d_lbox.jpg
https://kosmetista.ru/uploads/images/12/91/00/2021/11/14/7644f8.jpg
https://kosmetista.ru/uploads/images/12/91/00/2021/11/14/7644f8.jpg
https://kosmetista.ru/uploads/images/12/91/00/2021/11/14/7644f8_lbox.jpg
https://kosmetista.ru/uploads/images/12/91/00/2021/11/14/3537a0.jpg
https://kosmetista.ru/uploads/images/12/91/00/2021/11/14/3537a0.jpg
https://kosmetista.ru/uploads/images/12/91/00/2021/11/14/3537a0_lbox.jpg
https://kosmetista.ru/uploads/images/12/91/00/2021/11/14/9735f4.jpg
https://kosmetista.ru/uploads/images/12/91/00/2021/11/14/9735f4.jpg
https://kosmetista.ru/uploads/images/12/91/00/2021/11/14/9735f4_lbox.jpg
https://kosmetista.ru/uploads/images/12/91/00/2021/11/14/6165a7.jpg
https://kosmetista.ru/uploads/images/12/91/00/2021/11/14/6165a7.jpg
https://kosmetista.ru/uploads/images/12/91/00/2021/11/14/6165a7_lbox.jpg
https://kosmetista.ru/uploads/images/12/91/00/2021/11/14/58f091.jpg
https://kosmetista.ru/uploads/images/12/91/00/2021/11/14/58f091.jpg
https://kosmetista.ru/uploads/images/12/91/00/2021/11/14/58f091_lbox.jpg
https://kosmetista.ru/uploads/images/12/91/00/2021/11/14/ecc885.jpg
https://kosmetista.ru/uploads/images/12/91/00/2021/11/14/ecc885.jpg
https://kosmetista.ru/uploads/images/12/91/00/2021/11/14/ecc885_lbox.jpg
https://kosmetista.ru/uploads/images/12/91/00/2021/11/14/aaf1f5.jpg
https://kosmetista.ru/uploads/images/12/91/00/2021/11/14/aaf1f5.jpg
https://kosmetista.ru/uploads/images/12/91/00/2021/11/14/aaf1f5_lbox.jpg
https://kosmetista.ru/uploads/images/12/91/00/2021/11/14/6919c9.jpg
https://kosmetista.ru/uploads/images/12/91/00/2021/11/14/6919c9.jpg
https://kosmetista.ru/uploads/images/12/91/00/2021/11/14/6919c9_lbox.jpg
https://kosmetista.ru/uploads/images/12/91/00/2021/11/14/196dc4.jpg
https://kosmetista.ru/uploads/images/12/91/00/2021/11/14/196dc4.jpg
https://kosmetista.ru/uploads/images/12/91/00/2021/11/14/196dc4_lbox.jpg
https://kosmetista.ru/uploads/images/12/91/00/2021/11/14/6acb47.jpg
https://kosmetista.ru/uploads/images/12/91/00/2021/11/14/6acb47.jpg
https://kosmetista.ru/uploads/images/12/91/00/2021/11/14/6acb47_lbox.jpg
Лучшее за месяц
Вход
62
Русский
Руководство по эксплуатации
Наша продукция разрабатывается с учетом
высочайших стандартов качества, функциональ-
ности и дизайна. Мы надеемся, что вы остане-
тесь довольны новым продуктом Braun.
Фен предназначен для бытового использования,
хотя обладает профессиональными характери-
стиками.
Пожалуйста, внимательно прочитайте инструк-
цию перед использованием фена. Не выбрасы-
вайте инструкцию после прочтения.
Обратите внимание
• Перед тем как вставить вилку фена в розетку
переменного тока, убедитесь, что напряжение
вашей домашней электросети соответствует
напряжению, указанному на фене.
•
Запрещается использовать устройство
рядом с источником воды (напр.,
наполненной раковиной, ванной или
душем). Фен необходимо постоянно держать
сухим. Не берите фен мокрыми руками.
• Если вы пользуетесь феном в ванной, не
забудьте вынуть его вилку из розетки после
использования или перед чисткой. Даже
выключенный фен, подсоединенный к элек-
тросети, может представлять опасность.
• Для дополнительной защиты мы рекомендуем
установить в ванной устройство защитного
отключения (УЗО) с номинальным сопротив-
лением току срабатывания не выше 30 мА.
Подробную информацию можно получить у
техника, занимающегося установкой.
• Обратите внимание, что входная и выходная
распределительные решетки не должны
блокироваться после включения фена.
• Фен оборудован автоматической системой
защиты от перегревания. В случае перегрева
нагревающий элемент отключается, но сам
фен при этом продолжает работать. Через
некоторое время, после остывания фена,
нагревающий элемент повторно включается.
При этом входная и выходная распредели-
тельные решетки не должны блокироваться.
• Не направляйте фен на глаза, руки и другие
участки тела, чувствительные к высоким
температурам.
• Не оборачивайте шнур фена вокруг корпуса.
• Регулярно проверяйте шнур на отсутствие
износа или повреждений. Если у вас возни-
кают сомнения относительно состояния
устройства, обратитесь в ближайший
сервисный центр Braun для проверки и
ремонта. Провод устройства может быть
заменен только в авторизованном сервисном
центре Braun. Ремонт, выполненный неквали-
фицированными специалистами, может
привести к угрозе жизни и здоровью пользо-
вателя.
• Дети от 8 лет и лица с ограниченными физиче-
скими, сенсорными или умственными
способностями, а также с отсутствием
необходимых знаний и опыта могут использо-
вать фен только под наблюдением или после
получения инструкций по безопасному
использованию и возможным рискам. Не
использовать в детских играх. Не позволять
детям, даже если они старше 8 лет, без
наблюдения взрослых заниматься очисткой
или ремонтом фена.
Описание и комплектность
1 Входная распределительная решетка
с защитным фильтром
2 Датчик
температур
a) красные светодиоды – 4 режима нагрева
b) синий светодиод – холодный воздух
3 Петля
4 Выключатель
5 Кнопки регулирования температуры (+ / –)
6 Кнопки регулирования потока холодного
воздуха
7 Насадка для профессиональной укладки
8 Профессиональный диффузор (только для
модели HD 785)
Использование
Данную модель фена можно удерживать двумя
способами:
за ручку (А), что обеспечивает удобный доступ
ко всем кнопкам,
и за корпус (В). Благодаря специальной охлади-
тельной системе корпус фена не нагревается.
Включение
Используйте выключатель (4), чтобы включить
устройство и выбрать характер воздушного
потока:
O = выключено
I
= слабый воздушный поток
II = сильный воздушный поток
Датчик температур (2)
Красные светодиоды (2а) отображают настройки
теплового режима – от 1 (низкая температура)
до 4 (высокая температура).
Синий светодиод (2b) загорается, когда вы
нажимаете одну из кнопок регулирования потока
холодного воздуха (6).
Настройка температуры
При каждом включении фена используется та
настройка температуры, которая была устано-
влена последней.
Для изменения температуры используются
кнопки регулирования температуры (5).
91163485_HD785-780_MN_S4-74.indd 62
91163485_HD785-780_MN_S4-74.indd 62
28.10.16 12:21
28.10.16 12:21
CSS APPROVED Effective Date 3Nov2016 GMT — Printed 05Apr2017 Page 62 of 76